CS 1825 - Saw AL-KO - Free user manual and instructions
Find the device manual for free CS 1825 AL-KO in PDF.
User questions about CS 1825 AL-KO
0 question about this device. Answer the ones you know or ask your own.
Ask a new question about this device
Download the instructions for your Saw in PDF format for free! Find your manual CS 1825 - AL-KO and take your electronic device back in hand. On this page are published all the documents necessary for the use of your device. CS 1825 by AL-KO.
USER MANUAL CS 1825 AL-KO
AL-KO KOBER GROUP Kottz, Germany
This documentation or excerpts therefrom may not be reproduced or disclosed to third parties without the express permission of the AL-KO KOBER GROUP.

CS 1825
Refer to technical data section.
| B50 Li (PBA 18V 2.5Ah W-B) | B75 Li (PBA 18V 4.0Ah W-C) | B100 Li (PBA 18V 5.0Ah W-C) | B125 Li (PBA 18V 6.0Ah W-C) |
| 113893 113894 | 113895 113896 | ||
| 18 V | |||
| 2,5 Ah 4,0 Ah | 5,0 Ah 6,0 Ah | ||
| 45 Wh 72 Wh | 90 Wh 108 Wh | ||
| C50 Li: ≈ 60 min FC100 Li: ≈ 36 min | C50 Li: ≈ 95 min FC100 Li: ≈ 39 min | C50 Li: ≈ 105 min FC100 Li: ≈ 46 min | C50 Li: ≈ 130 min FC100 Li: ≈ 62 min |
| 0 °C – +45 °C | |||
| -20 °C – +50 °C | |||
| C50 Li (AL 1830 CV) | FC100 Li (AL 1880 CV) |
| 113897|113898 (UK) 113899|113900 (UK) | |
| 220 - 240 V AC, 50/60 Hz | |
| 14,4 V - 18 V DC | |
| 3 A 8 A | |
| 0 °C – +45 °C | |
| / II | |
1 About these operating instructions 31
1.1 Symbols on the title page 31
1.2 Legends and signal words 31
2 Product description 31
2.1 Designated use 31
2.2 Possible foreseeable misuse 32
2.3 Residual risks 32
2.4 Safety and protective devices 32
2.4.1 Switch-on protection 32
2.4.2 Chain brake/chain brake bracket. 32
2.4.3 Overload protection 32
2.4.4 Run-out brake 32
2.4.5 Chain interception bolt.. 32
2.5 Symbols on the appliance 32
2.5.1 Safety signs 32
2.5.2 Operating signs 33
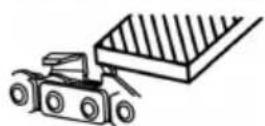
2.6 Product overview (01) 33
2.7 Scope of supply (02) 33
3 Safety instructions 33
3.1 General Power Tool SafetyWarnings 33
3.1.1 Work area safety 33
3.1.2 Electrical safety 34
3.1.3 Personal safety 34
3.1.4 Power tool use and care 34
3.1.5 Battery tool use and care.. 35
3.1.6 Service 35
3.2 Chain saw safety warnings 35
3.3 General safety warnings for chain saws 36
3.4 Causes and operator prevention of kickback 36
3.5 Vibration load 36
3.6 Noise pollution 37
3.7 Safety notes for rechargeable battery and charger 37
3.8 Safety information when working 37
3.8.1Operator 37
3.8.2 Operating times 37
3.8.3 Working with the chain saw 38
4 Installation 38
4.1 Installing the chain bar (03, 04) 38
4.2 Fitting the saw chain (04) 38
4.3 Tensioning the saw chain (03, 05).... 39
5 Start-up. 39
5.1 Charging the rechargeable battery .... 39
5.2 Fitting and removing the rechargeable battery (06) 39
5.3 Filling saw chain oil (07) 39
5.4 Checking the chain tension 40
5.5 Testing the function of the chain brake 40
5.5.1 Function test of the chain brake with the engine switched off (08). 40
5.5.2 Function test of the chain brake with the motor switched on (08) ... 40
6 Operation 41
6.1 Check the saw chain oil 41
6.2 Testing the chain brake 41
6.3 Switching the motor ON and OFF (09) 41
6.4 Checking the charge status of the rechargeable battery 41
7 Working behaviour and working technique 42
7.1 Felling trees (10, 11) 42
7.2 Delimbing (12) 43
7.3 Cross-cutting (13-16) 43
7.4 Cutting converted timber 43
8 Maintenance and care. 44
8.1 Sharpening the saw chain (17) 44
8.2 Cleaning the chain sprocket interior ... 44
8.3 Changing over the quick-tension chain wheel (18) 45
8.4 Checking, turning and greasing the chain bar (19, 20) 45
8.5 Chain maintenance table 45
9 Help in case of malfunction 46
10 Transport 47
11 Storage 47
11.1 Storing the appliance 47
11.2 Storing the rechargeable battery and charging unit 47
12 Disposal 48
13 Technical data 48
14 After-Sales/Service 50
15 Guarantee. 50
1 ABOUT THESE OPERATING INSTRUCTIONS
The German version is the original operating instructions. All additional language versions are translations of the original operating instructions.
Always safeguard these operating instructions so that they can be consulted if you need any information about the appliance.
Only pass on the appliance to other persons together with these operating instructions.
Comply with the safety and warning information in these operating instructions.
1.1 Symbols on the title page
Symbol Meaning

It is essential to read through these operating instructions carefully before start-up. This is essential for safe working and trouble-free handling.

Operating instructions

Handle Li-lon rechargeable batteries with care! In particular, observe the notes on transport, storage and disposal in these operating instructions!
1.2 Legends and signal words
DANGER! Denotes an imminently dangerous situation which will result in fatal or serious injury if not avoided.
WARNING! Denotes a potentially dangerous situation which can result in fatal or serious injury if not avoided.
CAUTION! Denotes a potentially dangerous situation which can result in minor or moderate injury if not avoided.
IMPORTANT! Denotes a situation which can result in material damage if not avoided.
NOTE Special instructions for ease of understanding and handling.
2 PRODUCT DESCRIPTION
These operating instructions describe a hand-held electric chain saw that is operated with a rechargeable battery.
The appliance may only be used together with the lithium-ion rechargeable batteries and chargers specified in the technical data. See the separate operating instructions for further information on rechargeable batteries and chargers:
- Operating instructions 443130: rechargeable batteries
Operating instructions 443131: chargers
IMPORTANT! Danger of damage to the appliance and battery. If the appliance is operated with unsuitable batteries, both the device and the batteries may be damaged.
Operate the appliance only with the specified rechargeable batteries.
2.1 Designated use
The chain saw is designed exclusively for domestic, DIY and gardening applications. In this sector, the chain saw can be used for light wood sawing work, e.g. for:
Cutting timber
Pruning hedges
Sawing firewood
Thanks to the electric drive, the cordless chain saw can be used not only on open ground, but also in closed rooms for sawing wood. Any other application not in accordance with the intended use described here shall be regarded as misuse.
This appliance is intended solely for use in non-commercial applications. Any other use as well as unauthorised conversions or modifications are regarded as contrary to the intended use and will result in voiding of the warranty as well as loss of conformity; the manufacturer will thus decline any
responsibility for damage and/or injury suffered by the user or third parties.
CAUTION! Danger of injury due to non-designated use! If wood or other substances embedded with foreign bodies are sawn with the chain saw, injury can result.
Only use the chain saw for light wood sawing work.
Before sawing wood, check for foreign bodies, e.g. nails, screws, fittings.
2.2 Possible foreseeable misuse
- Do not saw off any branches that are directly or at an acute angle above the user or other persons.
- Do not use old oil or mineral oil for lubrication of the saw chain.
- Do not use the tool in a potentially explosive atmosphere.
2.3 Residual risks
Even when using the appliance as intended, there is always a certain residual risk that cannot be excluded. The following hazards cannot be ruled out due to the nature and design of the appliance.
- Contact with the exposed teeth of the chain (risk of cutting)
Access to the moving chain (risk of cutting)
Sudden and unexpected movement of the bar (risk of cutting) - Detachment of parts of the chain (risk of cutting/injury)
- Detachment of parts of the wood being worked on
Impairment of hearing during work if ear defenders are not used
2.4 Safety and protective devices
WARNING! Danger of serious injury from manipulated safety and protective devices. As a result of manipulated safety and protective devices, serious injury can occur when working with the chain saw.
- Never deactivate safety and protective devices.
Only work with the chain saw if all safety and protective devices function correctly.
2.4.1 Switch-on protection
If the operator applies the throttle quickly several times in succession, the chain saw switches off
for a few seconds to protect the electronics and the saw chain. In this case, wait until the chain saw can be switched on again.
2.4.2 Chain brake/chain brake bracket
The chain saw has a manual chain brake that is triggered by the chain brake bracket, for example if kickback occurs. If the chain brake is tripped, saw chain and motor are stopped immediately.
2.4.3 Overload protection
The chain saw is equipped with an overload protection which switches off in case of overload.
After a cooling-down phase, the chain saw can be switched on again.
2.4.4 Run-out brake
The mechanical run-out brake is coupled to the chain brake and ensures rapid stopping of the saw chain when the chain saw is switched off.
The mechanical run-out brake prevents injuries that could be caused by the saw chain running on.
2.4.5 Chain interception bolt
If the saw chain breaks during sawing, the chain interception bolt arrests the flying chain end, thus preventing injuries to the operator's hand.
2.5 Symbols on the appliance
2.5.1 Safety signs
| Symbol Meaning | |
| ! | Pay special attention when handling this product. |
| Danger of kickback! | |
| Do not operate the chain saw with one hand! | |
| Do not use in the rain! Protect against moisture! | |
| Wear a protective helmet, ear defenders and eye protection! | |
Symbol Meaning

Wear protective gloves!

Wear sturdy shoes!

Read the operating instructions before starting operation.

Always operate the chain saw with both hands!
2.5.2 Operating signs
Symbol Meaning
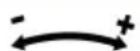
Slacken (-) and tension (+) the saw chain.
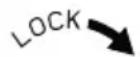
Tighten central lock.
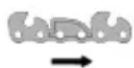
Saw chain running direction (under cover for chain sprocket)
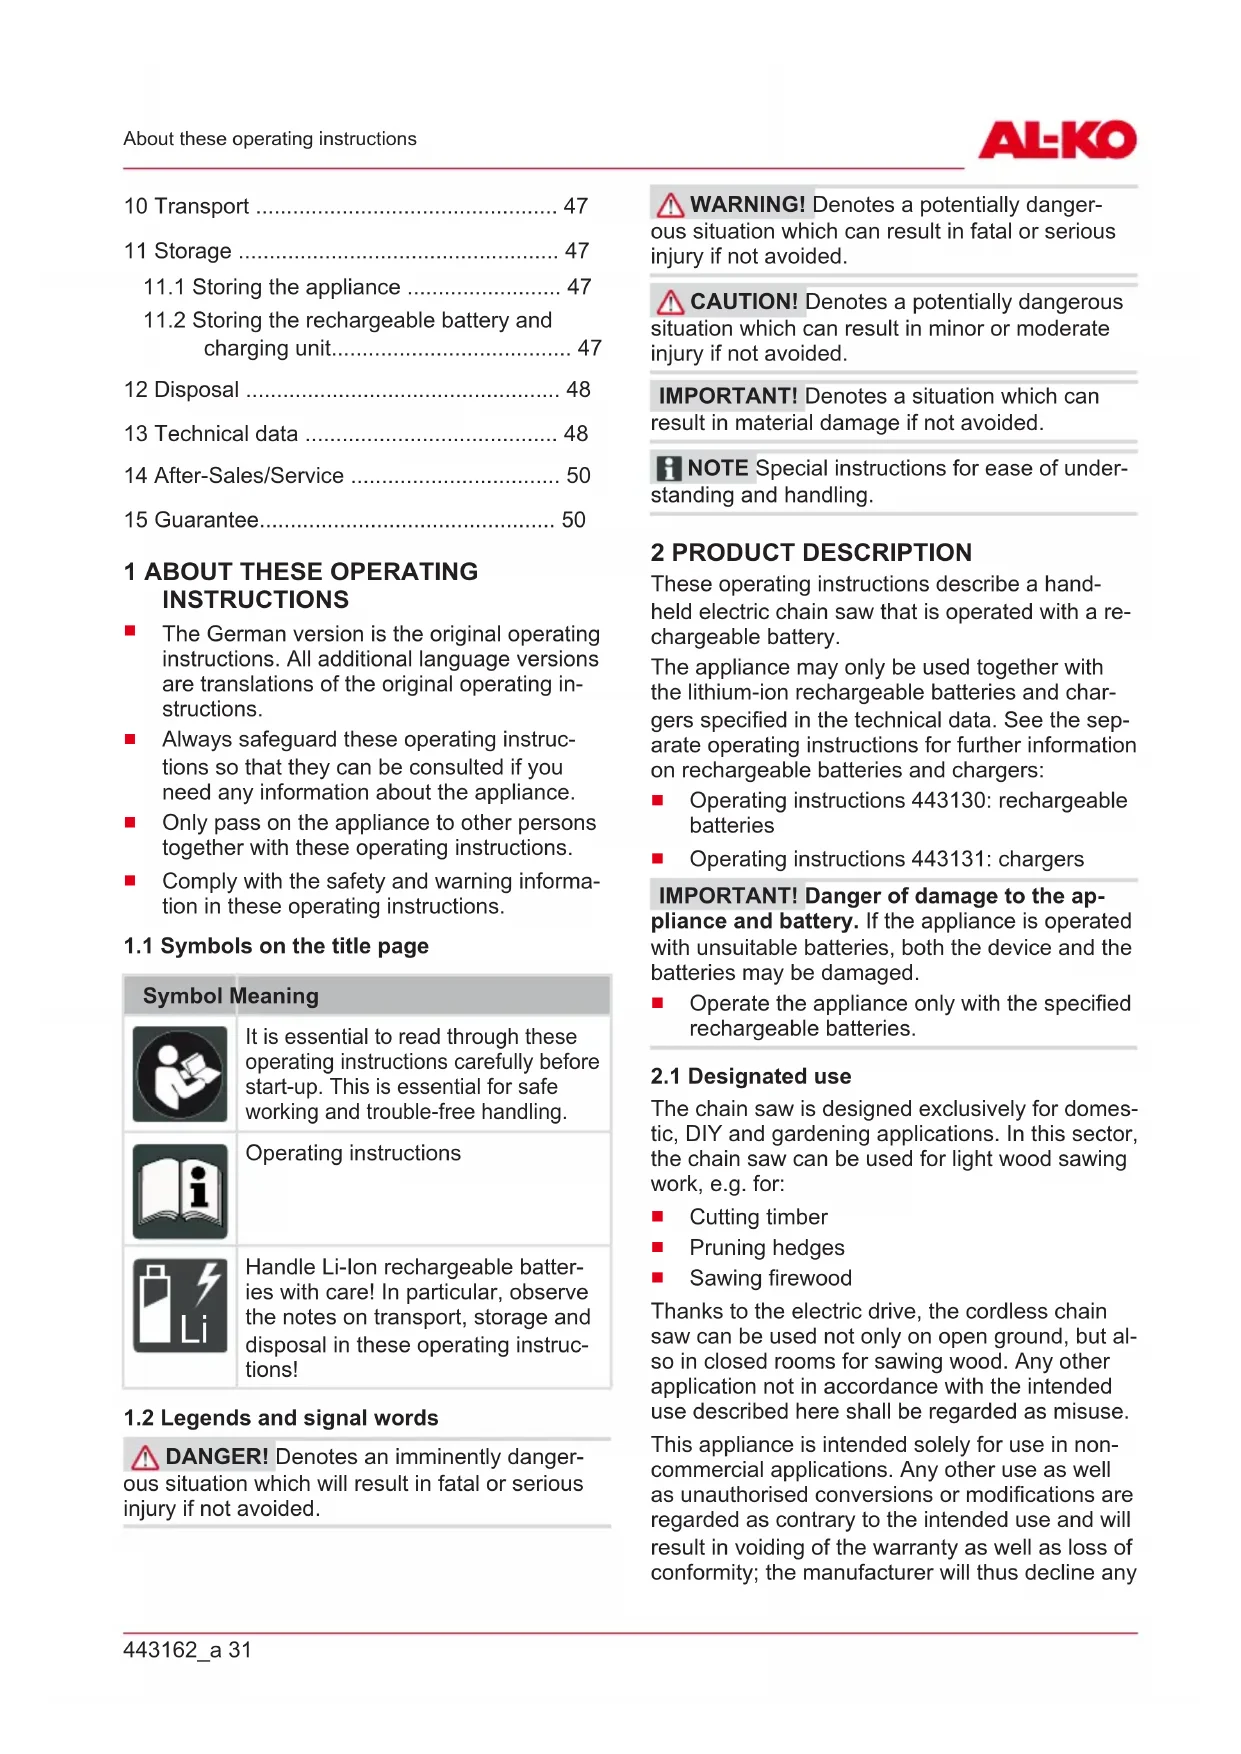
2.6 Product overview (01)
No. Component
1 Chain guard
2 Chain bar
3 Saw chain
4 Chain brake bracket (hand guard)
5 Handle
6 Viewing aperture of the chain oil tank
7 Cap of the chain oil tank
8 Charge status display
9 Locking button
10 Throttle lever
11 Rear handle
12 Engine
13 Cover for chain sprocket
No. Component
14 Quick-tension chain wheel with central lock and rotating ring
15 Bumper spike
16 Rechargeable battery
17 Charger
*Not included in the scope of supply, but can be purchased under the following article numbers: See Technical data.
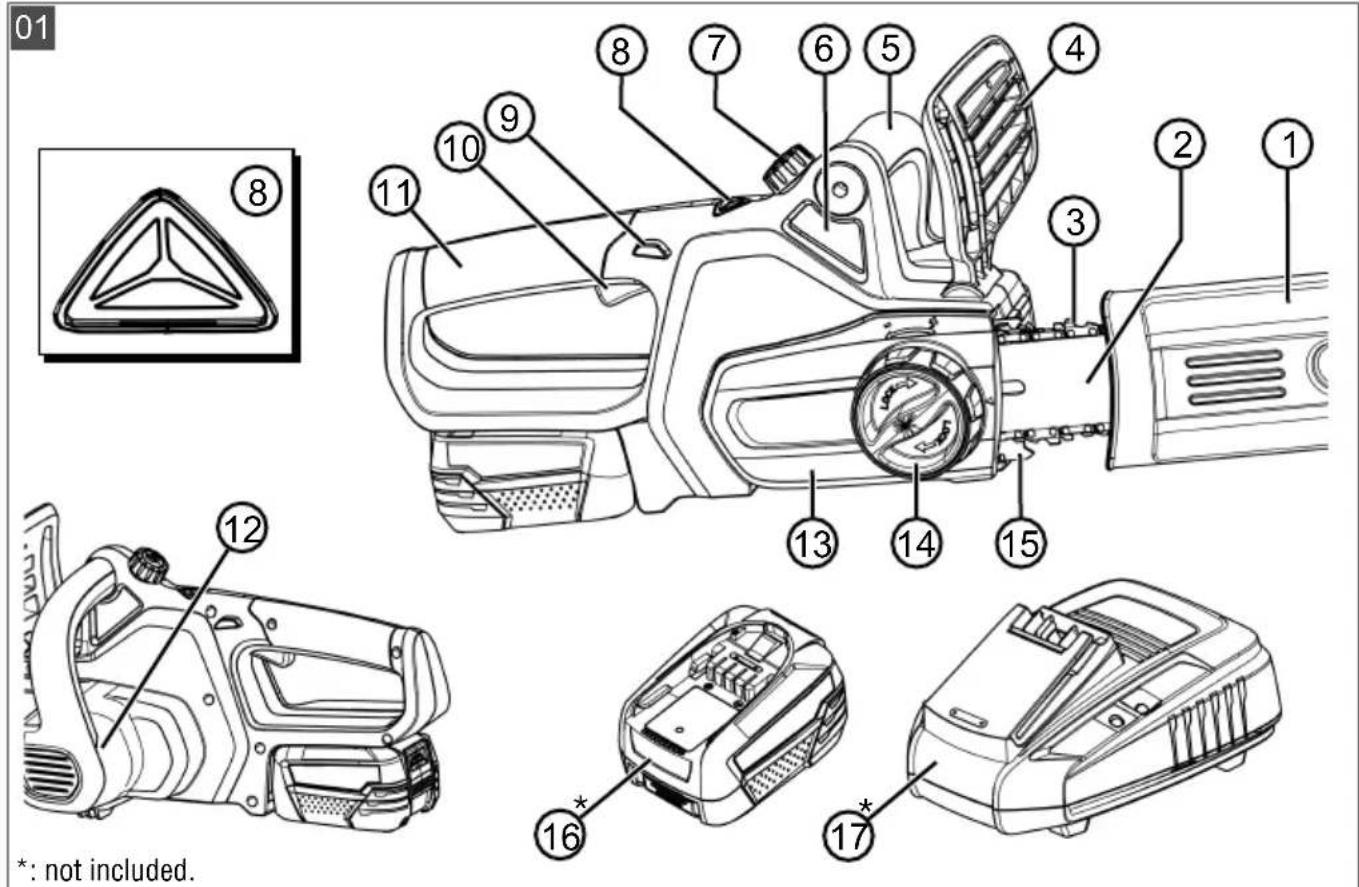
2.7 Scope of supply (02)
NOTE The rechargeable battery and charging unit are not included in the scope of delivery and must therefore be purchased separately.
The items listed here are included in the standard scope of supply. Check that all items are present:
No. Component
1 Battery chain saw
2 Chain bar
3 Saw chain
4 Chain guard
5 Operating instructions
3 SAFETY INSTRUCTIONS
3.1 General Power Tool SafetyWarnings
WARNING! Read all safety warnings, instructions, illustrations and specifications provided with this power tool. Failure to follow all instructions listed below may result in electric shock, fire and/or serious injury.
Save all warnings and instructions for future reference.
The term "power tool" in the warnings refers to your mains-operated (corded) power tool or battery-operated (cordless) power tool.
3.1.1 Work area safety
- Keep work area clean and well lit. Cluttered or dark areas invite accidents.
-
Do not operate power tools in explosive atmospheres, such as in the presence of flammable liquids, gases or dust. Power tools create sparks which may ignite the dust or fumes.
-
Keep children and bystanders away while operating a power tool. Distractions can cause you to lose control.
3.1.2 Electrical safety
Power tool plugs must match the outlet. Never modify the plug in any way. Do not use any adapter plugs with earthed (grounded) power tools. Unmodified plugs and matching outlets will reduce risk of electric shock.
- Avoid body contact with earthed or grounded surfaces, such as pipes, radiators, ranges and refrigerators. There is an increased risk of electric shock if your body is earthed or grounded.
- Do not expose power tools to rain or wet conditions. Water entering a power tool will increase the risk of electric shock.
- Do not abuse the cord. Never use the cord for carrying, pulling or unplugging the power tool. Keep cord away from heat, oil, sharp edges and moving parts. Damaged or entangled cords increase the risk of electric shock.
- When operating a power tool outdoors, use an extension cord suitable for outdoor use. Use of a cord suitable for outdoor use reduces the risk of electric shock.
If operating a power tool in a damp location is unavoidable, use a residual current device (RCD) protected supply. Use of an RCD reduces the risk of electric shock.
3.1.3 Personal safety
- Stay alert, watch what you are doing and use common sense when operating a power tool. Do not use a power tool while you are tired or under the influence of drugs, alcohol or medication. A moment of inattention while operating power tools may result in serious personal injury.
Use personal protective equipment. Always wear eye protection. Protective equipment such as a dust mask, non-skid safety shoes, hard hat, or hearing protection used for appropriate conditions will reduce personal injuries.
Prevent unintentional starting. Ensure the switch is in the off-position before connecting to power source and/or battery pack, picking up or carrying the tool. Carrying power tools with your finger on the
switch or energising power tools that have the switch on invites accidents.
- Remove any adjusting key or wrench before turning the power tool on. A wrench or a key left attached to a rotating part of the power tool may result in personal injury.
- Do not overreach. Keep proper footing and balance at all times. This enables better control of the power tool in unexpected situations.
- Dress properly. Do not wear loose clothing or jewellery. Keep your hair and clothing away from moving parts. Loose clothes, jewellery or long hair can be caught in moving parts.
If devices are provided for the connection of dust extraction and collection facilities, ensure these are connected and properly used. Use of dust collection can reduce dust-related hazards. - Do not let familiarity gained from frequent use of tools allow you to become complacent and ignore tool safety principles. A careless action can cause severe injury within a fraction of a second.
3.1.4 Power tool use and care
- Do not force the power tool. Use the correct power tool for your application. The correct power tool will do the job better and safer at the rate for which it was designed.
- Do not use the power tool if the switch does not turn it on and off. Any power tool that cannot be controlled with the switch is dangerous and must be repaired.
- Disconnect the plug from the power source and/or remove the battery pack, if detachable, from the power tool before making any adjustments, changing accessories, or storing power tools. Such preventive safety measures reduce the risk of starting the power tool accidentally.
Store idle power tools out of the reach of children and do not allow persons unfamiliar with the power tool or these instructions to operate the power tool. Power tools are dangerous in the hands of untrained users. - Maintain power tools and accessories. Check for misalignment or binding of moving parts, breakage of parts and any other condition that may affect the power tool's operation. If damaged, have the
power tool repaired before use. Many accidents are caused by poorly maintained power tools.
- Keep cutting tools sharp and clean. Properly maintained cutting tools with sharp cutting edges are less likely to bind and are easier to control.
Use the power tool, accessories and tool bits etc. in accordance with these instructions, taking into account the working conditions and the work to be performed.
Use of the power tool for operations different from those intended could result in a hazardous situation.
- Keep handles and grasping surfaces dry, clean and free from oil and grease. Slippery handles and grasping surfaces do not allow for safe handling and control of the tool in unexpected situations.
3.1.5 Battery tool use and care
- Recharge only with the charger specified by the manufacturer. A charger that is suitable for one type of battery pack may create a risk of fire when used with another battery pack.
Use power tools only with specifically designated battery packs. Use of any other battery packs may create a risk of injury and fire. - When battery pack is not in use, keep it away from other metal objects, like paper clips, coins, keys, nails, screws or other small metal objects, that can make a connection from one terminal to another.
Shorting the battery terminals together may cause burns or a fire.
Under abusive conditions, liquid may be ejected from the battery; avoid contact. If contact accidentally occurs, flush with water. If liquid contacts eyes, additionally seek medical help. Liquid ejected from the battery may cause irritation or burns.
- Do not use a battery pack or tool that is damaged or modified. Damaged or modified batteries may exhibit unpredictable behaviour resulting in fire, explosion or risk of injury.
- Do not expose a battery pack or tool to fire or excessive temperature. Exposure to fire or temperature above 130^ may cause explosion.
- Follow all charging instructions and do not charge the battery pack or tool outside the temperature range specified in the instructions. Charging improperly or at temperatures outside the specified range may damage the battery and increase the risk of fire.
3.1.6 Service
Have your power tool serviced by a qualified repair person using only identical replacement parts. This will ensure that the safety of the power tool is maintained.
- Never service damaged battery packs. Service of battery packs should only be performed by the manufacturer or authorized service providers.
3.2 Chain saw safety warnings
- Keep all parts of the body away from the saw chain when the chain saw is operating. Before you start the chain saw, make sure the saw chain is not contacting anything. A moment of inattention while operating a chain saw may cause entanglement of your clothing or body with the saw chain.
Always hold the chain saw with your right hand on the rear handle and your left hand on the front handle. Holding the chain saw with the hands reversed increases the risk of injury and should therefore be avoided.
Hold the chain saw only at the insulated handles as the saw chain may contact hidden wiring. Contact between the saw chain and a live cable can result in electrical current flowing through metal parts of the machine, leading to an electric shock.
Wear eye protection. Further protective equipment for ears, head, hands, legs and feet is recommended. Adequate protective clothing will reduce the risk of personal injury from flying debris or accidental contact with the saw chain. -
Do not operate the chain saw from a tree, ladder or roof or other unstable surface. Operation in this way poses a serious risk of injury.
Always keep proper footing and operate the chain saw only when standing on fixed, secure and level surface. Slippery or unstable surfaces may cause a loss of balance or control of the chain saw. -
When cutting a branch that is under tension, be alert for spring back. When the tension in the wood fibres is released, the branch may strike the operator and/or knock the chain saw out of control.
Use extreme caution when cutting brush and saplings. The slender material may catch up in the saw chain and be whipped toward you or pull you off balance. - Carry the chain saw by the front handle with the chain saw switched off and away from your body. When transporting or storing the chain saw always fit the guide bar cover. Proper handling of the chain saw will reduce the likelihood of accidental contact with the moving saw chain.
Follow the instructions for lubrication, chain tensioning and changing the chain bar and chain. Improperly tensioned or lubricated chain may either break or increase the chance for kickback.
Cut wood only. Do not use the chain saw for purposes for which it is not intended. For example: do not use the chain saw for cutting metal, plastic, masonry or nonwood building materials. Use of the chain saw for operations different than intended could result in a hazardous situation. - Do not try to fell a tree before you have a clear understanding of the inherent risks and their avoidance. The operator or other persons can be seriously injured by a falling tree.
3.3 General safety warnings for chain saws Follow all the instructions when removing accumulated material from the chain saw, when storing the chain saw or carrying out maintenance work. Ensure that the switch is turned off and the battery removed. Unexpected starting of the chain saw when removing accumulated material or during maintenance work can result in serious injuries.
3.4 Causes and operator prevention of kickback
Kickback may occur when the nose or tip of the chain bar touches an object, or when the wood closes in and pinches the saw chain in the cut.
Tip contact may in some cases cause a sudden reverse reaction, kicking the chain bar up and back towards the operator.
Pinching the saw chain along the top of the chain bar may push the chain bar rapidly back towards the operator.
Either of these reactions may cause you to lose control of the saw which could result in serious personal injury. Do not rely exclusively on the safety devices built into your saw. As a chain saw user, you should take several steps to keep your cutting work free from accident or injury.
Kickback is the result of chain saw misuse and/or incorrect operating procedures or conditions. and can be avoided by taking proper precautions as given below:
- Maintain a firm grip, with thumbs and fingers encircling the chain saw handles, with both hands on the saw. and position your body and arm to allow you to resist kickback forces. Kickback forces can be controlled by the operator if proper precautions are taken. Do not let go of the chain saw.
- Do not overreach and do not cut above shoulder height. This helps prevent unintended tip contact and enables better control of the chain saw in unexpected situations.
Only use replacement bars and chains specified by the manufacturer. Incorrect replacement bars and chains may cause chain breakage and/or kickback. - Follow the manufacturer's sharpening and maintenance instructions for the saw chain. Decreasing the depth gauge height can lead to increased kickback.
3.5 Vibration load
Danger due to vibration
The actual magnitude of the vibration emissions during the use of the appliance may deviate from that stated by the manufacturer. Observe the following influencing factors before or during use:
Is the appliance being used as intended?
Is the material being cut or processed in the proper manner?
Is the appliance in a proper condition of use?
Is the cutting tool properly sharpened or is the correct cutting tool installed?
Are the handle grips and any optional vibration grips mounted, and are they firmly attached to the appliance?
Only operate the tool at the motor speed required for the respective work. Avoid using the maximum speed in order to reduce noise and vibrations.
The noise and vibrations of the tool may increase due to improper use and maintenance. This leads to health damage. In this case, immediately switch off the tool and have it repaired by an authorised service workshop.
The degree of stress due to vibration depends on the work to be performed or on the use of the tool. Estimate the stress and plan appropriate work breaks. This considerably reduces stress due to vibration over the entire working time.
- Extensive use of the tool exposes the operator to vibrations, which can lead to circulatory issues ("white fingers"). To avoid this risk, wear gloves and keep your hands warm. If any symptoms of "white fingers" occur, immediately consult a physician. These symptoms include: Numbness, loss of feeling, tingling, itching, pain, reduced muscular strength, changes in the colour or condition of the skin. Normally these conditions affect the fingers, hands or pulse. The risk increases at low temperatures.
Take long breaks during your working day so you can recover from the noise and the vibrations. Plan your work in such a way that the use of appliances that generate strong vibrations is spread over several days.
If you notice an unpleasant sensation or discoloration of the skin on your hands when using the tool, stop work immediately. Take sufficient work breaks. Without sufficient breaks, a hand/arm vibration syndrome can occur.
- Minimise your risk of being exposed to vibrations. Maintain the tool according to the instructions in the operating instructions.
If the tool is used frequently, contact your dealer to purchase anti-vibration accessories (e.g. handles).
- Avoid working with the tool at temperatures below 10^ . Define how the vibration load can be limited in a work plan.
3.6 Noise pollution
A certain level of noise exposure from this appliance is inevitable. Carry out noisy work at approved and specified time periods. Observe rest periods as necessary and restrict the duration of
the work to a minimum. For your personal protection and protection of persons in the vicinity, appropriate hearing protection must be worn.
3.7 Safety notes for rechargeable battery and charger
Please observe the safety instructions for the rechargeable battery and the charger in the separate operating instructions.
See:
- Operating instructions 443130: rechargeable batteries
Operating instructions 443131: chargers
3.8 Safety information when working
Heed the country-specific safety regulations, e.g. from the relevant trade associations, social security systems, authorities for industrial safety.
Only work in sufficient daylight or artificial lighting.
- Keep the working area free from objects (e.g. off-cuts) - danger of stumbling.
The user is responsible for accidents involving other people and their property.
If you are working with a chain saw for the first time:
Have the salesperson or another expert explain the operation of the chain saw, or attend a course.
Prior to the first use, at the very least practice cutting round wood on a saw frame or stand.
3.8.1 Operator
- Young people under 16 years of age and people who do not know the operating instructions are not allowed to use the tool.
To operate the chain saw, you must be rested and in good physical and mental health. If you must not exert yourself for health reasons, ask your doctor whether it is possible to work with a chain saw.
3.8.2 Operating times
Heed the country-specific regulations for the operating times of chain saws. The operating times of chain saws can be limited by national and local regulations.
3.8.3 Working with the chain saw
WARNING! Danger of serious injury. If an incompletely mounted chain saw is used, serious injury can be caused.
Only use the chain saw when it has been fully mounted.
Before each use, perform a visual inspection in order to check that the chain saw is complete and does not contain damaged or worn components. Safety and protective devices must be intact.
WARNING! Risk of injury due to chain saw being started inadvertently. A chain saw that is started inadvertently can lead to serious injury. Therefore, remove the rechargeable battery during:
Testing, adjustment work and cleaning work
Work on the cutting equipment
Leaving the chain saw
Transport
Storage
Maintenance and repair work
Danger
Never work alone.
Always keep a first-aid kit to hand in case of accidents.
- Avoid touching metal objects in the ground or which are conductively connected to the ground.
The personal protective equipment comprises:
Protective helmet
Hearing protection (e.g. ear defenders, especially when working for than 2.5 hours a day)
Protective glasses or face visor incorporated in the protective helmet
Protective trousers with cut protection inlay
Sturdy working gloves
Safety boots with high-grip sole and steel toe caps
- Do not use the chain saw above shoulder height, since safe handling is no longer possible in this way.
-
When changing position, switch off the engine and put on the chain guard.
-
When chain saws are not in use, always put on the chain guard and remove the rechargeable battery.
- Switch the chain saw off before putting it down.
- Do not use the chain saw for levering or moving wood.
Only specialist personnel are allowed to saw trunks that are thicker than the length of the chain bar.
Only start the cut once the saw chain is running, never switch on the chain saw already in the kerf.
Make sure that no saw chain oil gets onto the ground.
Do not undertake sawing work in the rain, snow or stormy weather.
Never disable safety and protective devices.
4 INSTALLATION
WARNING! Danger of serious injury. If an incompletely mounted chain saw is used, serious injury can be caused.
Only use the chain saw when it has been fully mounted.
Before each use, perform a visual inspection in order to check that the chain saw is complete and does not contain damaged or worn components. Safety and protective devices must be intact.
CAUTION! Danger of laceration injuries.
The sharp edges of the saw chain can cause laceration injuries when assembling.
Before installation, remove the rechargeable battery.
Wear safety gloves when installing the saw chain and the guide rail.
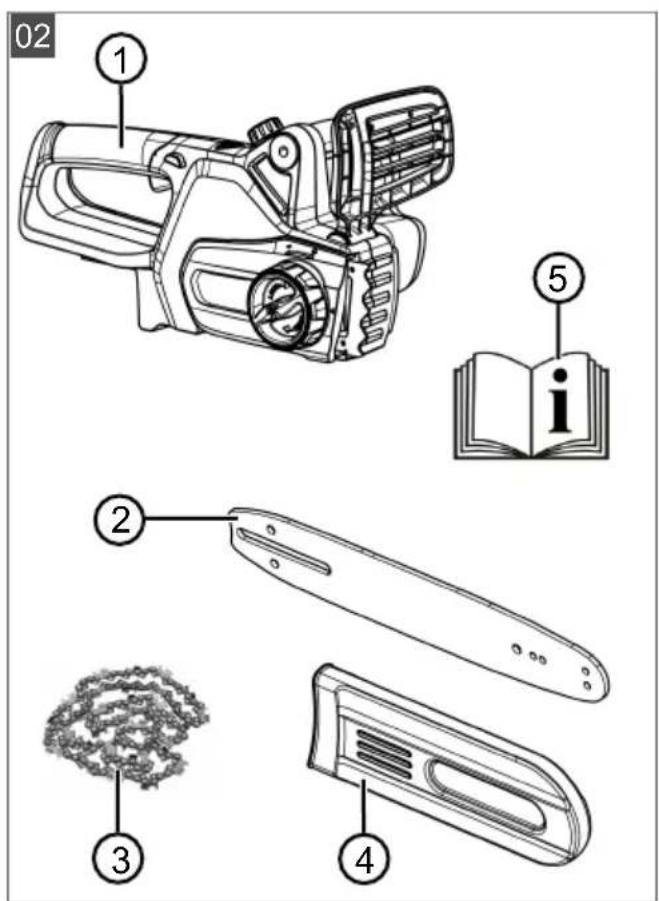
4.1 Installing the chain bar (03, 04)
- Pull hand guard (03/1) in the direction of the handle (03/a) in order to release the chain brake.
- Turn central lock (03/2) anti-clockwise and remove together with cover (03/3).
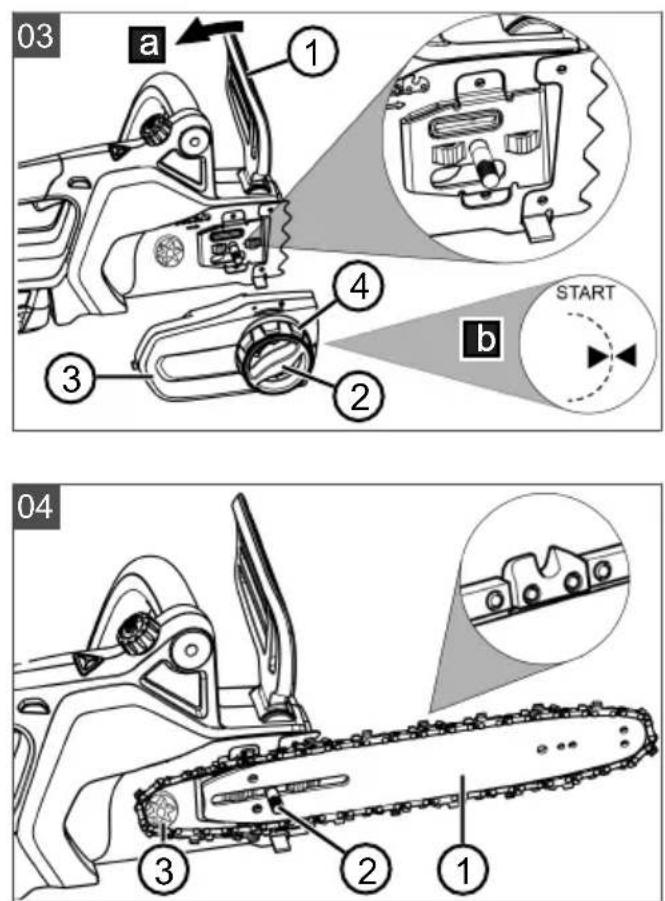
- Set chain bar (04/1) on guide pin (04/2) and push it back far enough that the saw chain can be fitted.
4.2 Fitting the saw chain (04)
-
Place the saw chain on chain sprocket (04/3) and in the groove of chain bar (04/1).
-
Guide the saw chain around the reversing sprocket of the chain bar. The saw chain must have a slight sag on the underside of the chain bar.
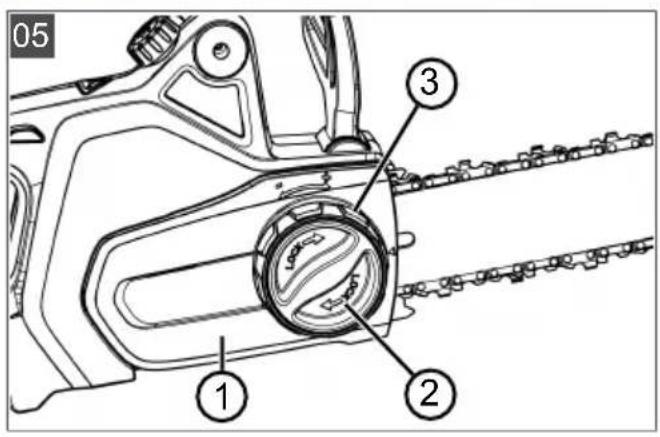
4.3 Tensioning the saw chain (03, 05)
NOTE The saw chain has been tensioned correctly when:
It is in contact with the underside of the guide rail and can be pulled through by hand.
It can be lifted by 3 - 4mm in the middle of the guide rail.
- Check the seat of the saw chain so that it sits correctly on the chain sprocket and in the chain bar.
- Fit cover (03/3) and tighten central lock (03/2) slightly.
- Turn the rotating ring (03/4) towards the cover (03/3) so that the two triangles are facing each other (03/b).
- Turn central lock (05/2) in clockwise direction. Do not tighten the central lock fully or turn back by one turn.
- Turn the rotating ring (05/3) clockwise until the saw chain has been tensioned correctly as described above.
- Turn the central lock (05/2) in clockwise direction until it is fixed in place.
5 START-UP
DANGER! Danger of fatal injury and danger of extremely severe injury. Lack of knowledge of the safety instructions and operating instructions can lead to extremely serious and even fatal injury.
Read and follow all safety instructions and instructions for use in these operating instructions as well the operating instructions which are referred to before you start using the chain saw.
WARNING! Danger of serious injury. Serious injury can be caused if there are damaged components on the chain saw.
Before each use, perform a visual inspection in order to check that the chain saw is complete and does not contain damaged or worn components. Safety and protective devices must be intact.
5.1 Charging the rechargeable battery
Observe the temperature range for charging, see technical data.
NOTE For detailed information, see the separate operating instructions for the rechargeable battery and the charger:
Operating manual 443130: Rechargeable batteries
Operating manual 443131: Chargers
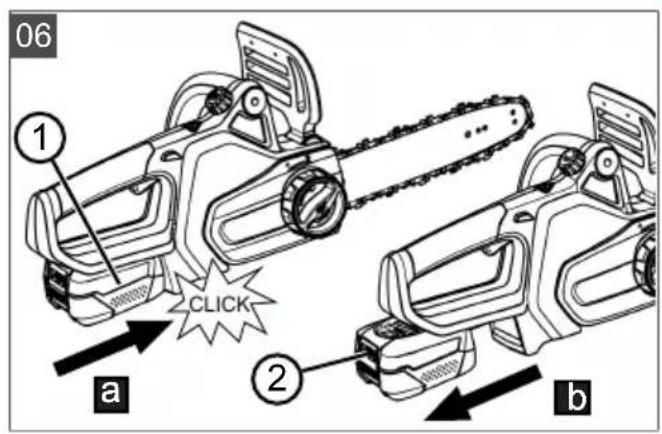
5.2 Fitting and removing the rechargeable battery (06)
IMPORTANT! Danger of damage to the rechargeable battery. If the rechargeable battery is left in the appliance after use, it may damage the rechargeable battery.
- Immediately after use, pull the rechargeable battery out of the appliance and store in a frost-protected area.
Only insert the rechargeable battery in the appliance immediately before starting work.
Inserting the rechargeable battery
- Push the rechargeable battery (06/1) into the chain saw from the rear until it engages (06/a).
Removing the rechargeable battery
- Press and hold the unlock button (06/2) on the rechargeable battery.
- Pulling out the rechargeable battery (06/b).
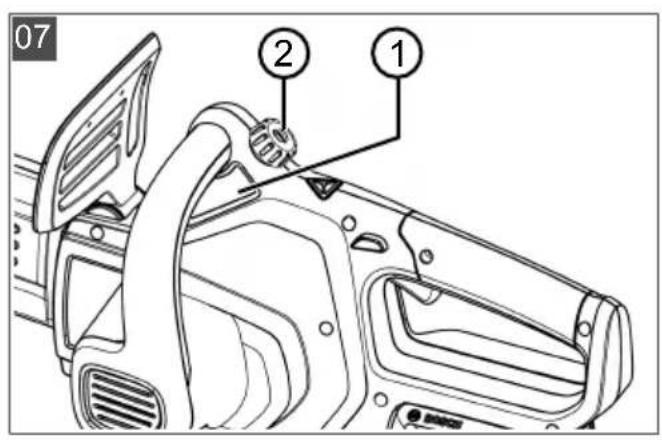
5.3 Filling saw chain oil (07)
IMPORTANT! Danger of damaging the chain saw. The chain saw will be severely damaged if there is too little or even no saw chain oil in the tank or if it has dried/is sticky. Dried/sticky saw chain oil can lead to damage to oil-channelling components and the oil pump. Damage also occurs if used oil is used. The use of used oil leads to environmental damage!
For start-up work, fill saw chain oil into the tank.
Do not use any used oil!
Each time before changing the rechargeable battery at the latest, fill the tank with saw chain oil again.
The saw chain and chain bar are continuously supplied with oil during operation by means of an automatic oiler system. The saw chain oil protects against corrosion and premature wear.
There must always be sufficient saw chain oil in the tank to lubricate the saw chain sufficiently.
Use only environmentally friendly, biodegradable, high-quality saw chain oil for lubrication of the saw chain and chain bar. This oil must be transported and stored in approved and appropriately labelled containers.
Each time before starting work or changing the rechargeable battery, check the oil level and replenish the saw chain oil if necessary:
- Check the oil level in the viewing aperture (07/1) of the oil tank. It must always be possible to see oil. The minimum and the maximum oil level must not be exceeded.
- Top up saw chain oil via filler neck (07/2).
5.4 Checking the chain tension
Frequently check the chain tension, because new saw chains stretch. At operating temperature, the saw chain stretches and hangs down. Tensioning the saw chain: see chapter 4.3 "Tensioning the saw chain (03, 05)", page 39.
NOTE The saw chain has been tensioned correctly when:
It is in contact with the underside of the guide rail and can be pulled through by hand.
It can be lifted by 3 - 4mm in the middle of the guide rail.
CAUTION! Danger of injury due to the saw chain jumping off! An insufficiently tensioned saw chain can jump off during operation and lead to injury.
Frequently check the chain tension. The chain tension is too low if the drive links come out of the groove on the underside of the chain bar.
Re-tension the saw chain properly if the chain tension is too low.
5.5 Testing the function of the chain brake
The chain saw has a manual chain brake that is triggered by the chain brake bracket, for example if kickback occurs.
If the chain brake is tripped, saw chain and motor are stopped immediately.
DANGER! Danger of fatal injury as a result of negligent handling! Extremely serious injury and even fatal injury can be caused as a result of careless and unexpected movements of the chain saw.
Pay attention to safety and work with a high level of concentration when using the chain saw.
- Do not press any switch when releasing the chain brake.
WARNING! Danger of fatal injury and danger of extremely severe injury due to a defective chain brake. If the chain brake does not function, the operator may be very seriously injured or even killed by the running saw chain, e.g. In the event of a kickback.
Check the chain brake each time before starting work.
- Do not switch the chain saw on if the chain brake is defective. In this case, have the chain saw checked in a customer service workshop.
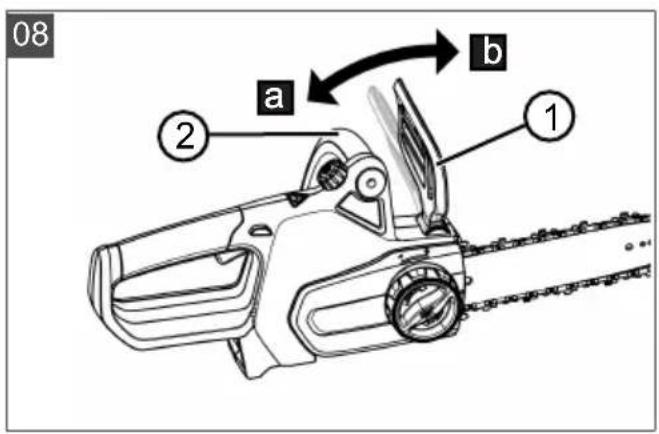
5.5.1 Function test of the chain brake with the engine switched off (08)
- Pull the battery out of the appliance: see chapter 5.2 "Fitting and removing the rechargeable battery (06)", page 39.
- To release the chain brake, pull chain brake bracket (08/1) in the direction of bow handle (08/2) (08/a). The saw chain can be pulled through by hand.
- Push chain brake bracket (08/1) forwards (08/B) to engage the chain brake. It must not be possible to pull the saw chain through.
5.5.2 Function test of the chain brake with the motor switched on (08)
NOTE Release the chain brake each time before switching on the chain saw.
- Hold the chain saw securely and firmly by the handle and hand grip.
- Release the chain brake.
- Switch on the motor.
- Push chain brake bracket (08/1) forwards (08/b). The saw chain and engine must stop immediately.
6 OPERATION
DANGER! Danger of fatal injury and danger of extremely severe injury. Lack of knowledge of the safety instructions and operating instructions can lead to extremely serious and even fatal injury.
Read and follow all safety instructions and instructions for use in these operating instructions as well the operating instructions which are referred to before you start using the chain saw.
WARNING! Danger of injury from faulty appliance. Operation of an faulty appliance can result in serious injury and damage to the appliance.
- Operate the appliance only when it is undamaged and has not defects, and when no parts are missing or loose.
Comply with working time regulations in force in your country.
Grip the rear handle firmly with your right hand and the bow handle with your left hand, and hold them tightly.
Do not release the handles as long as the motor is running.
Do not use the chain saw if you are:
Tired
Unwell
Under the influence of alcohol, medicines and drugs
6.1 Check the saw chain oil
Check that there is sufficient saw chain oil in the tank:
Before starting work
During work
At every battery change, at the latest
If the oil level is low, refill saw chain oil.
Procedure see chapter 5.3 "Filling saw chain oil (07)", page 39.
6.2 Testing the chain brake
Procedure: see chapter 5.5 "Testing the function of the chain brake", page 40.
WARNING! Danger of fatal injury and danger of extremely severe injury due to a defective chain brake. If the chain brake does not function, the operator may be very seriously injured or even killed by the running saw chain, e.g. In the event of a kickback.
Check the chain brake each time before starting work.
- Do not switch the chain saw on if the chain brake is defective. In this case, have the chain saw checked in a customer service workshop.
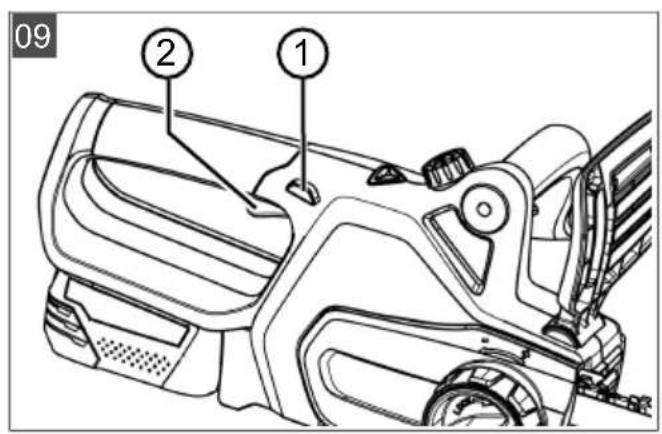
6.3 Switching the motor ON and OFF (09)
CAUTION! Danger of hearing impairment! The operation of the chain saw causes intense noise that can cause hearing impairment.
During work with the chain saw, wear ear defenders.
NOTE Release the chain brake each time before switching on the chain saw.
Switching on the motor:
- Release the chain brake.
- Press and hold locking button (09/1) with your thumb.
- Press and hold throttle lever (09/2).
- Release locking button (09/1). It is not necessary to keep the locking button pressed once the chain saw has started. The locking button is intended to prevent inadvertent starting of the chain saw.
Switching off the engine:
- Release throttle lever (09/2).
6.4 Checking the charge status of the rechargeable battery
The charge status indicator (01/8) is located on the top of the chain saw.
It has three segments. The segments light up or flash, depending on the battery charge status.
Segment Battery charge level
| 3 segments lit: | Rechargeable battery |
| fully charged. |
| 2 segments lit: | Rechargeable battery |
| 2/3 charged. |
| 1 segment lit: | Rechargeable battery |
| 1/3 charged. |
Segment Battery charge level
1 segment flashing: Rechargeable battery almost flat. The appliance will switch off shortly.
7 WORKING BEHAVIOUR AND WORKING TECHNIQUE
NOTE Courses in the use of chain saws and techniques for felling trees are regularly held by various forestry organisations.
DANGER! Danger of fatal injury due to inadequate technical knowledge! Inadequate technical knowledge can result in extremely serious up to fatal injury!
Only trained and experienced people are allowed to fell trees and lop branches.
DANGER! Danger of fatal injury from splintered wood! Wood chips caught up in the chain can cause extremely serious and even fatal injury!
- Remove loose chips and wood splinters from the part to be sawn.
7.1 Felling trees (10, 11)
Observe the following points before and during felling operations:
- When felling trees, care must be taken to ensure that other persons are not exposed to danger, that no supply lines are connected and that no damage to property is caused. If a tree comes into contact with a supply line, the utility company must be informed immediately.
Also pay attention to other people's property, animals or objects. These must not be in the danger zone. Immediately notify the owner in case of damage.
The safe distance from other workplaces or objects should be at least 212 tree lengths. - Judge the falling direction of the tree.
- Factors influencing the falling direction of the tree:
Natural lean of the tree
The position of larger branches
Height of the tree
Branches growing on one side
Level ground or slope
Asymmetrical growth, wood damage
Wind direction and wind speed
Snow load
When working on a slope, always work uphill of the tree to be felled.
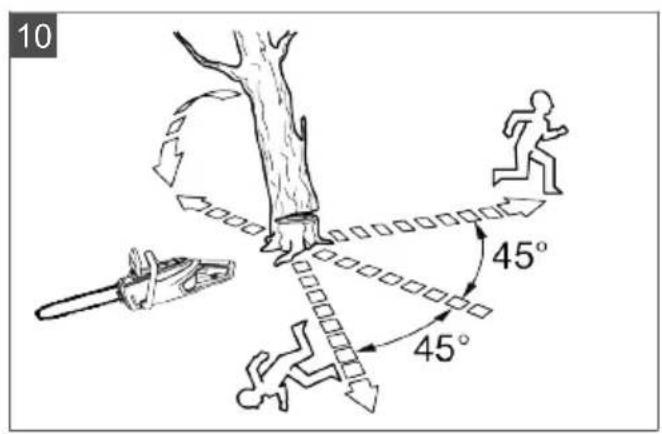
Establish your escape route in advance, and make sure that there are no obstacles in the way. The escape route should be at an angle of approx. 45^ backwards from the falling direction (10).
The trunk must be free from growth, branches and foreign bodies (e.g. dirt, stones, loose bark, nails, staples, wire, etc.).
Make two undercuts and one back cut in order to fell a tree.
- During back cuts and cross-cuts, place the bumper spike firmly against the wood to be cut.
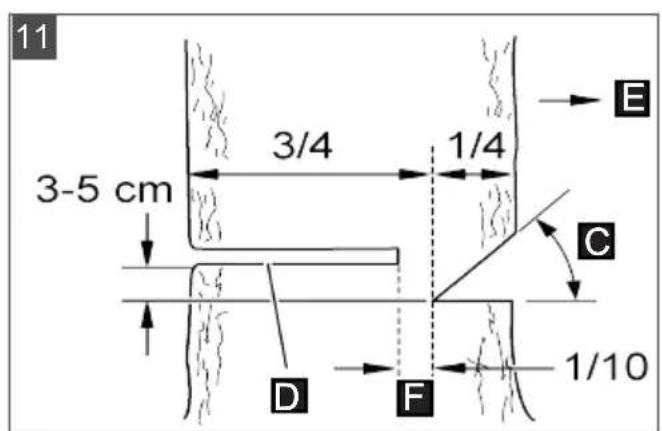
- Saw the first undercut (11/C) horizontally, then the second undercut at an angle of at least 45^ from above. This prevents the chain saw becoming trapped when you make the second undercut. The undercut must be as close as possible to the ground and in the required felling direction (11/E). The depth of the undercut should be about 1/4 of the diameter of the trunk.
- Cut the back cut (11/D) exactly horizontally opposite to the undercut. The back cut must be made 3-5 cm above the horizontal undercut.
- Saw in the back cut (11/D) sufficiently deep so that a bridge (11/F) of at least 1/10 the trunk diameter remains between the undercut (11/C) and the back cut (11/D). This bridge prevents the tree from twisting and falling in the wrong direction. The tree should start to fall when the back cut (11/D) approaches the bridge (11/F). Do not saw through the bridge! If the tree falls whilst you are sawing:
Interrupt the back cut if the tree does fall in the wrong direction or leans back and traps the chain saw. To open the cut and fell the tree, drive in wedges made of wood, plastic or aluminium in the direction of the required felling line.
- Immediately pull the chain saw from the cut, switch it off and put it down.
Walk away in the direction of the escape route.
Watch out for falling branches and twigs.
- If the tree remains standing, drive wedges into the back cut in order to cause it to fall in a controlled way.
Note: Use only wedges made of wood, plastic or aluminium.
- At the end of sawing work, immediately remove your ear defenders and listen out for signals or warning calls.
Only experienced or trained people should make plunge cuts, longitudinal cuts and boring cuts (11).
DANGER! Danger of fatal injury from a falling tree! Having no escape route when felling a tree represents a danger of serious and even fatal injury!
- Do not start the felling work until you are sure there is an unobstructed escape route away from the tree to be felled.
DANGER! Danger of fatal injury from an uncontrollably falling tree! Uncontrolled falling trees can lead to extremely serious and even fatal injury!
In order to guarantee controlled felling of a tree, leave a bridge between the undercut and the back cut. The length of this bridge should be approx. 1/10 of the trunk diameter.
Do not carry out any felling work in windy conditions.
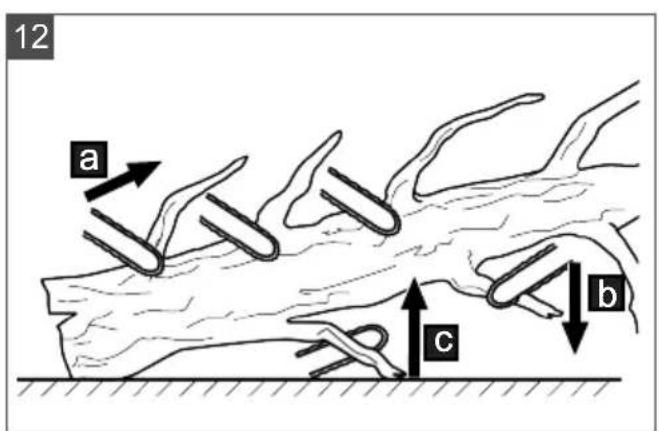
7.2 Delimbing (12)
Delimbing is the separation of branches from the felled tree. Observe the following points:
Support the chain saw against the tree trunk with the bumper spike during the work.
Leave larger, downward-pointing branches supporting the tree standing at first.
Cut off smaller branches with one cut.
Saw off branches systematically and sequentially from the tree (12/a). First, saw off any branches that might hinder you. Then cut off the branches that create tension. Finally saw off the main branch at the base.
Saw off free-hanging branches from above (12/b), but not from below.
Pay attention to branches under tension, and saw through these from underneath upwards (12/c) in order to avoid the chain saw becoming trapped.
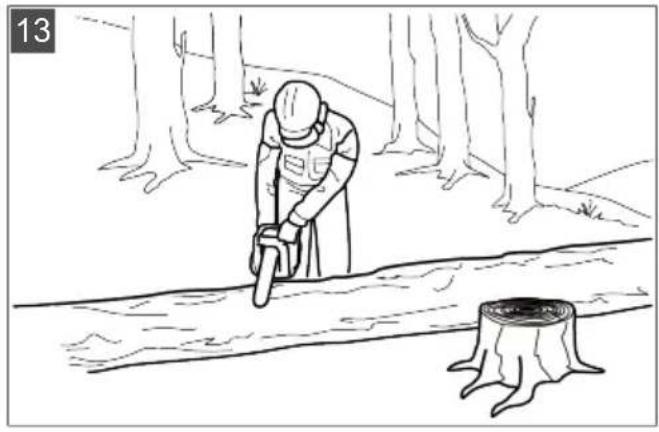
7.3 Cross-cutting (13 - 16)
Cutting to length means dividing the felled tree into sections. Observe the following points:
-
Ensure that your feet are stable and that your body weight is evenly distributed over both feet. If possible, the trunk should be backed and supported by branches, beams or wedges.
-
When working on a slope, always stand uphill from the tree trunk, because it could roll away (13).
Guide the chain saw so that there is no part of your body in the extended sweep arc of the saw chain.
Position the bumper spike directly adjacent to the cut edge and allow the chain saw to pivot about this point. Do not exert any pressure at the end of the cut.
In order to maintain full control of the chainsaw at the moment of sawing, reduce the contact pressure towards the end of the cut without releasing the tight hold on the chainsaw handles.
Make sure that the saw chain does not touch the ground.
At the end of the cut, wait for the saw chain to come to a halt before you remove the chain saw.
Always switch off the motor of the chain saw before you go to the next tree.
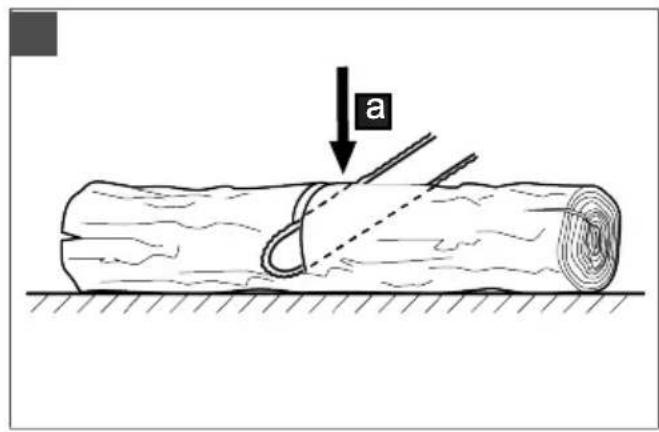
The entire length of the tree trunk is in contact with the ground:
Saw through the tree trunk from above (14/a), without cutting into the ground.
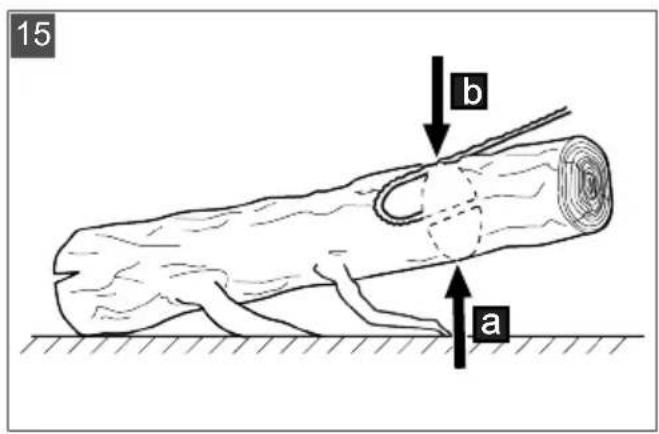
Tree trunk is lying raised at one end:
To prevent the chain saw becoming trapped and the wood splintering, first saw through 1/3 of the trunk diameter from below (15/a), then saw through the remainder from above, down as far as the cut made from underneath (15/b).
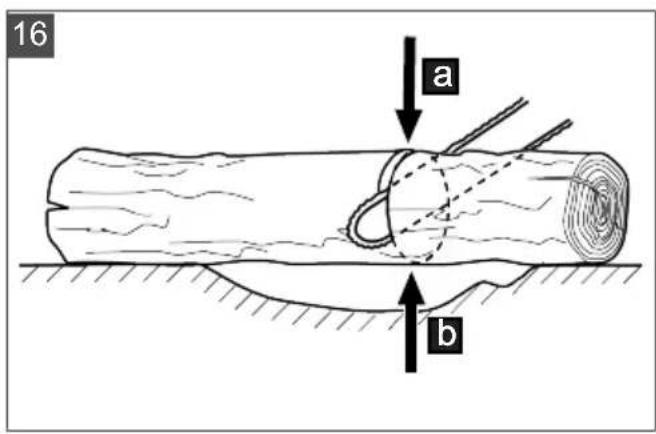
Tree trunk is lying raised at both ends:
To prevent the chain saw becoming trapped and the wood splintering, first saw through 1/3 of the trunk diameter from above (16/a), then saw through the remainder from underneath, up as far as the cut made from above (16/b).
DANGER! Danger of fatal injury due to kickback! The operator can be fatally injured by kickback of the appliance.
It is essential to comply with the measures in order to avoid any kickback.
7.4 Cutting converted timber
Heed the following points during this work:
Use a secure cutting surface (sawing trestle, wedges, beams).
Make sure you are standing securely and that your bodyweight is evenly distributed.
Secure logs to prevent them twisting.
Only start the cut once the saw chain is running. Never switch on the chain saw already in the kerf.
Do not secure the wood with your foot and do not get another person to hold it.
8 MAINTENANCE AND CARE
WARNING! Danger of cuts and lacerations. Danger of cuts and lacerations when reaching into sharp-edged, moving appliance parts and into cutting tools.
Before maintenance, care and cleaning work, always switch off the appliance. Remove the rechargeable battery.
Always wear protective gloves during maintenance, care and cleaning work.
The chain saw complies with all relevant safety standards. Repairs are only allowed to be performed by qualified specialists, and with the exclusive use of genuine spare parts.
After each use, check the chain saw for wear and renew any damaged components.
- Do not get the machine wet or expose it to moisture. Clean plastic parts with a cloth and do not use any cleaning agents or solvents.
Clean the cooling air slots if they are blocked.
- Do not spray the chain saw not with water and do not use a high-pressure cleaner.
Only use spare parts specified by the manufacturer.
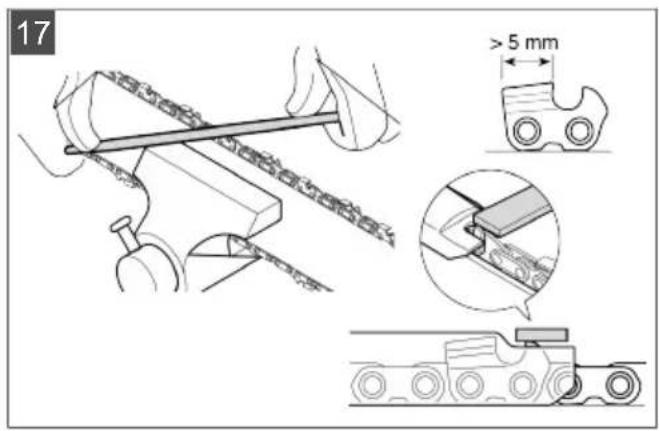
8.1 Sharpening the saw chain (17)
DANGER! Danger of fatal injury due to kickback! Improperly sharpened saw chain increases the danger of kickback and thus the danger of fatal injury.
Sharpen the saw chain properly to reduce the risk of kickback.
NOTE Inexperienced chain saw operators are recommended to have the saw chain sharpened by a specialist at the customer service.
The saw chain must always be well-sharpened for reasons of safety and efficiency.
Sharpening is required if:
The saw chips are like sawdust.
- Greater force is necessary for cutting.
The cut is not straight.
Vibration increases.
If you get trained customer service personnel to sharpen the chain for you, they will be able to do this with the appropriate tools for a minimum of material removal and uniform sharpening of all teeth.
You can sharpen the saw chain yourself using special round files whose diameters are adapted to the specific chain type (see chapter 8.5 "Chain maintenance table", page 45). A certain amount of skill and experience is necessary to avoid damage to the teeth.
To sharpen the saw chain:
- Switch off the chain saw and remove the rechargeable battery.
- Release the chain brake.
- Clamp the chain bar with fitted saw chain in a suitable vice, taking care that the saw chain can move freely.
- Tension the chain if it is slack.
- Place the file in the corresponding guide and then guide the file through the opening of the tooth making sure that you keep an even angle according to the tooth profile.
- Only perform a few strokes of the file and exclusively in the forwards direction, then repeat the working step on all teeth in the same orientation (right or left).
- Reverse the position of the chain bar in the vice and repeat the working step on the remaining teeth.
- Check that the limit tooth does not project beyond the checking tool, and file off any projection using a flat file, then round down the profile.
- After sharpening, clean away all filings and dust, then lubricate the saw chain in an oil bath.
The chain must be replaced if:
The length of the teeth is less than 5mm
Where applicable: The mark on the teeth of the cutting elements is exceeded;
The play on the links at the chain rivets is excessive.
8.2 Cleaning the chain sprocket interior
Thoroughly clean the chain saw after each use.
- Remove the rechargeable battery and place the chain saw on a stable base.
- Unbolt the cover of the chain sprocket.
-
Clean the inside with a suitable brush.
-
Remove the saw chain and take out the guide rail.
- Clean the groove in the rail and the oil inlet bore.
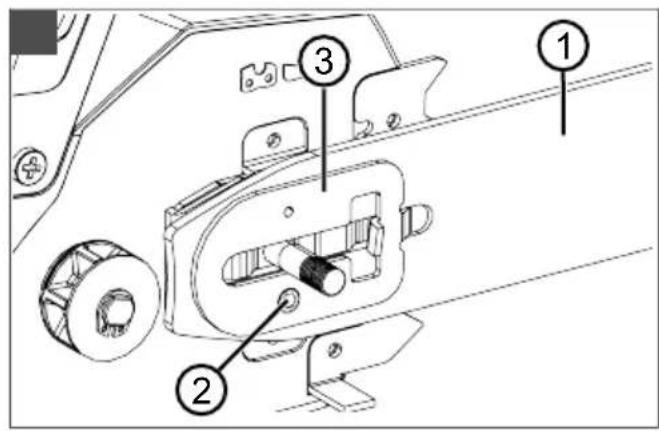
8.3 Changing over the quick-tension chain wheel (18)
- Removing chain bar (18/1): Remove screw (18/2) and release the adapter sheet metal from the chain bar with the tensioning hook (18/3).
- Turn the chain bar around the longitudinal axis.
- Attach the adapter sheet metal to the chain bar with the tensioning hook again and fix in place with the Phillips screw again.
- Install the chain bar again, (see chapter 4.1 "Installing the chain bar (03, 04)", page 38).
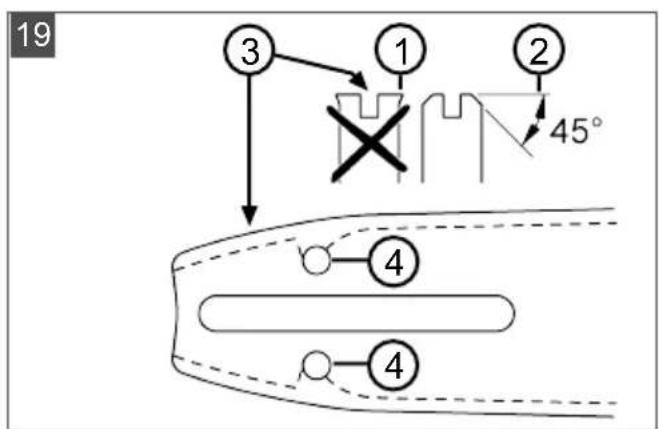
8.4 Checking, turning and greasing the chain bar (19, 20)
Checking the chain bar
Regularly check the chain bar for damage. If necessary, remove protruding burrs (19/1), i.e. file off at an angle of 45^ (19/2).
Turning the chain bar
The chain bar must be turned over after each chain sharpening and chain change in order to avoid one-sided wear.
- Change over the quick-tensioner on the chain bar (see chapter 8.3 "Changing over the quick-tension chain wheel (18)", page 45).
- Turn the chain bar.
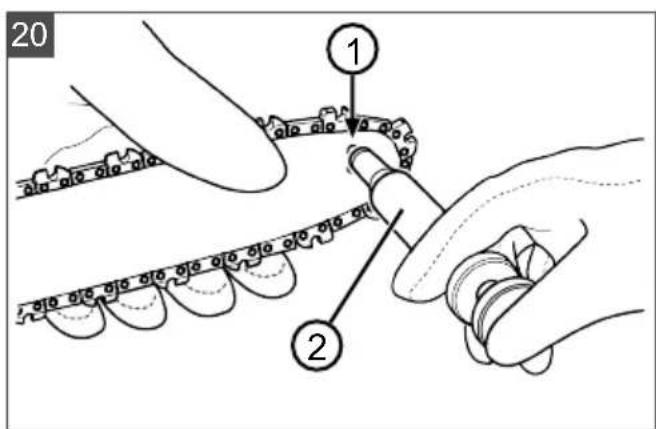
Greasing the chain bar
- Carefully clean groove in rail (19/3) and oil inlet bores (19/4).
- Carefully clean lubricating hole (20/1) from both sides.
- Use a grease gun (20/2) to pump in sufficient grease on both sides until the grease emerges evenly at the tips of the sprocket. Keep turning the sprocket when doing this.
8.5 Chain maintenance table
WARNING! Danger of serious injury. Use of an unapproved saw chain or guide rail on the chain saw can result in serious injuries.
Use only approved saw chains and guide rails.
Saw chain and chain bar as spare parts: see Technical data.
| Saw chain (chain bar) | File diameter Top plate an- gle | Down angle Head tilt angle (55°) | Depth gauge set- ting |
| Rotational an- gle of the tool | Inclination an- gle of the tool | Side plate angle | |
| 90PX040X (104MLEA041) | 4.5 mm 30° 0° 75° 0.025" |
Saw chain (chain bar)
File diameter Top plate angle
Down angle Head tilt angle (55°)
Depth gauge setting
Depth gauge setting File
9 HELP IN CASE OF MALFUNCTION
CAUTION! Risk of injury. Sharp-edged and moving appliance parts can lead to injury.
Always wear protective gloves during maintenance, care and cleaning work.
- Switch off the appliance and remove the rechargeable battery.
NOTE For malfunctions that are not listed in this table or that you cannot resolve yourself, please contact our customer service.
| Malfunction Cause Remedy | ||
| Engine does not start. No battery voltage present. Have the power supply checked by a qualified electrician. | ||
| Overload protection has switched off. | Wart until the overload protection re-establishes the power supply. | |
| Chain brake engaged. Release the chain brake. | ||
| The chain bar and saw chain become hot when running. Generation of smoke. | The saw chain is tensioned too tightly. | Reduce chain tension. |
| Oil tank is empty. Replenish | the saw chain oil. Check the oil tank for damage. | |
| The oil entry hole and/or groove of the chain bar are dirty. | Clean the oil entry hole and groove of the chain bar. | |
| Engine running, but the saw chain does not move. | The saw chain is tensioned too tightly. | Reduce chain tension. |
| Appliance errors Contact a service centre of the manufacturer. | ||
| Only sawdust is thrown out, rather than wood chips. The chain saw has to be pushed through the wood. | The saw chain is blunt. Sharpen | the saw chain or contact one of the manufacturer's service centres. |
| Appliance vibrates unusually. | Appliance errors Contact a service centre of the manufacturer. |
10 TRANSPORT
WARNING! Danger of fatal injury and danger of extremely severe injury. During transport, a running saw chain can lead to extremely serious and even fatal injury.
- Never carry and transport the chain saw with the saw chain running.
Before transporting, carry out the measures mentioned above.
Before transporting, carry out the following measures:
- Switch off the chain saw and remove the rechargeable battery.
- Fit the chain guard.
- Carry the chain saw only at the bow handle. Chain bar and saw chain should be facing to the rear.
- In vehicles: Secure the chain saw against tipping over, damage and leakage of chain oil.
Rechargeable battery "B125 Li" (Art. No. 113896)
NOTE The nominal energy of the rechargeable battery is more than 100 Wh. Therefore, observe the following transport instructions.
The li-ion rechargeable battery contained in the appliance is subject to the hazardous goods law, but can be transported under simplified conditions:
The rechargeable battery can be transported on public roads by the private user without further conditions provided it is packaged for retail sale and the transport serves personal purposes.
- Commercial users who carry out the transport in connection with their main activity (e.g. delivery from and to building sites, or demonstrations) can also take advantage of this simplification.
In both cases, it is essential to take the mandatory precautions mentioned above to prevent any leakage of the contents. In other cases, it is essential to comply with the regulations of the hazardous goods law. In the case of non-compliance, severe penalties can be imposed on the sender and possibly the transporter.
Additional notes on transport and shipment
Only transport or send the li-ion rechargeable battery in an undamaged condition.
For transporting the rechargeable battery, only use the original cardboard box or a suitable hazardous goods cardboard box (not required for rechargeable batteries with a nominal energy less than 100 Wh).
Tape off exposed rechargeable battery contacts to avoid a short circuit.
- Secure the rechargeable battery against shifting in the packaging to avoid damage to the rechargeable battery.
Ensure the correct marking and documentation of the shipment for transport or shipping (e.g. by parcel service or freight forwarding).
Check in advance that transport with the selected service provider is possible and indicate the shipment.
We recommend involving a hazardous goods specialist in preparation of the shipment. Also heed any further national regulations.
11 STORAGE
11.1 Storing the appliance
Remove the rechargeable battery from the appliance after every use.
Thoroughly clean the appliance and - if present - attach all covers.
Store the appliance in a dry, lockable place out of the reach of children.
Carry out the following jobs before intervals in work lasting for longer than 30 days:
Empty the oil tank for the saw chain oil.
- Remove the saw chain and chain bar, clean and spray with corrosion protection oil.
IMPORTANT! Danger of damage to the appliance. Dried/sticky saw chain oil can lead to damage to oil-channelling components or the oil pump after lengthy storage.
- Remove the saw chain oil from the chain saw before each extended period of storage.
11.2 Storing the rechargeable battery and charging unit
NOTE For detailed information, heed the separate operating instructions for the rechargeable battery and for the charging unit.
12 DISPOSAL
Information on the German Electrical and Electronic Equipment Act (ElectroG)

- Electrical and electronic appliances do not belong in household waste, but should be collected and disposed of separately.
Used batteries or rechargeable batteries that are not installed permanently in the old appliance must be removed before disposal. Their disposal is regulated by the battery law.
- Owners or users of electrical and electronic appliances are obliged by law to return them after use.
The end user bears personal responsibility for deleting his personal data from the old appliance to be disposed of.
The symbol of the crossed-through rubbish bin means that electrical and electronic appliances may not be disposed of in the household rubbish. Electrical and electronic appliances can be handed in at the following places at no charge:
Public service disposal or collection points (e.g. municipal building yards)
Points of sale of electrical appliances (stationary and online) provided traders are obliged to take them back or offer this voluntarily.
These statements only apply to appliances that are installed and sold in the countries of the European Union and are subject to European Directive 2012/19/EU. Different provisions may apply to the disposal of electrical and electronic appliances in countries outside the European Union.
Information on the German Battery Act (BattG)

Used batteries and rechargeable batteries do not belong in household waste, but should be collected and disposed of separately.
For safe removal of batteries or rechargeable batteries from the electrical appliance and for information on their type or chemical system, follow the further information within the operating or installation instructions.
- Owners or users of batteries and rechargeable batteries are obliged by law to return them after use. Return is limited to the handover of customary household quantities.
Used batteries can contain harmful substances or heavy metals that can cause damage to the environment and human health. Reuse of the used batteries and use of the resources contained therein contributes to the protection of these two essential commodities.
The symbol of the crossed-through rubbish bin means that batteries and rechargeable batteries may not be disposed of in household rubbish. In addition, if the symbol Hg, Cd or Pb appears under the rubbish bin, this stands for the following:
Hg: Battery contains more than 0.0005% mercury
Cd: Battery contains more than 0.002% cadmium
Pb: Battery contains more than 0.004% lead Rechargeable batteries and batteries can be handed in at the following places at no charge:
Public service disposal or collection points (e.g. municipal building yards)
Points of sale of batteries and rechargeable batteries
Disposal points of the common take-back system for the used batteries of appliances
Disposal point of the manufacturer (if not a member of the common take-back system)
These statements apply only to rechargeable batteries and batteries that are sold in the countries of the European Union and that are subject to European Directive 2006/66/EU. Different provisions can apply to the disposal of rechargeable batteries and batteries in countries outside the European Union.
13 TECHNICAL DATA
Chain saw CS 1825
Art. No. 113919
Dimensions (L × W × H) 610 x 215 x 217 mm
| Chain saw CS 1825 | |
| Weight without saw chain, chain bar, chain guard, oil and battery 2.4 kg | |
| Total weight (without battery) 3.4 kg | |
| Chain oil tank volume 110 ml | |
| Overload protection Yes | |
| Motor rating 350 W | |
| Motor speed 2200 - 2600 rpm | |
| Chain sprocket pitch 3/8" special | |
| Chain brake Yes (electrical, PCB and brake rod) | |
| Saw chain: | |
| ■ Working speed of the saw chain 4.67 m/s | |
| ■ Maximum braking time (EN 60745-2-13 - 19.107) EN 62841-4-1:2020-10 | 0,064 s |
| ■ Chain run-on time (EN 60745-2-13 - 19.113) EN 62841-4-1:2020-19.112 | 0,068 s |
| ■ Activation of the saw chain Twofold | |
| Sound power level LWA (DIN EN ISO 3744) 91.6 dB(A) | K = 2.3 dB(A) |
| Sound pressure level LpA | 81 dB(A) K = 3.0 dB(A) |
| Vibration value (DIN EN 28662-1)* 4.2 m/s | 2 K = 1.5 m/s² |
| Saw chain Oregon 90PX040X | |
| Drive link thickness 1.1 mm | |
| Spare part number | 127549 |
| Chain bar | Oregon 104MLEA041 |
| Length of the chain bar | 10" / 25 cm |
| Cutting length | 17 cm |
| Spare part number | 127550 |
- Notes:
The vibration emission value given has been measured according to a standardised test method and can be used to compare one power tool with another.
The vibration emission value can also be used for an initial assessment of the exposure (vibration exposure degree).
The vibration emission value may differ from the given value during actual use of the pow
er tool, depending on how the power tool is used.
Try to keep the vibration load as low as possible. Exemplary measures to reduce vibration are the wearing of gloves when using the tool and the limitation of working time. All parts of the operating cycle must be taken into account (e.g. times when the power tool is switched off and those in which it is switched on but runs without load).
14 AFTER-SALES/SERVICE
In the event of questions of warranty, repair or spare parts, please contact your nearest AL-
KO Service Centre. These can be found on the Internet at:
www.al-ko.com/service-contacts
15 GUARANTEE
We will resolve any material or manufacturing faults on the appliance during the legal warranty period for claims relating to faults, in accordance with our choice either to repair or replace. The legal warranty period is determined by the legislation of the country in which the appliance was purchased.
Our warranty promise applies only if:
These operating instructions are heeded
The appliance is handled correctly
Original spare parts have been used
The warranty becomes void in the case of:
Unauthorised repair attempts
Unauthorised technical modifications
Non-intended use
The guarantee excludes:
Paint damage that can be attributed to normal wear and tear
Wear parts that are marked with a frame xxxxx (x) on the spare parts card
The guarantee period commences with purchase by the first end user. The date on the proof of purchase is decisive. In the event of a guarantee claim, please take this guarantee declaration and the original proof of purchase, and contact your dealer or the nearest authorised customer service centre. This statement does not affect the purchaser's statutory claims for defects against the vendor.
VERTALING VAN DE ORIGINELE GEBRUIKERSHANDLEIDING
Inhoudsopgave
2 PRODUCTOMSCHRIJVING
2.4.3 Beveiling against overbelasting
www.al-ko.com/service-contacts
15 GARANTIE
www.al-ko.com/service-contacts
15 GARANZIA
www.al-ko.com/service-contacts
15 JAMSTVO
Možebitne greške u materijalu ili proizvodnji na urešaju uklonit Čemo tijekom zakonskoga roka zastare za jamstvo na nedostatke prema vlastitom izboru popravljanjem ili zamjenskom dostavom. Rok zastare odrešuje se prema pravu države u kooj je urešaj kuplejen.
2.4.2 KoyHnca IaHca/pyHnca KoHnce IaHca
IaHuaHa TecTepa IMa pyHy KoUHnUy IaHca, Koja ce Hnp. y cnuyajy nobpAthor ydapa (Kickback) akTbupa npeko pyuNce KoHnCe IaHca. Y cnuyajy akTbauNiJe KoUHnCe IaHca IaHauc TecTepe N MOTOp CE HaNo 3ayctabJbajy.
2.4.5 KInn 3a Kooye IaHua
Ako ce Ianauc TecTepe cIOMn TKOM ceYeHa, KInH 3a KoUeHe IaHua XBaTa yIapajyHn KpaJ IaHua n Ha Taj HauHn CnpueHa NobpeDe pyKe pyKOBaoCu.
2.5 Cm6oJn Ha ypehajy
2.5.1 Cnryphoche 03HaKe
3.5 Ontepehebe Bn6paunjom
OnachocT od Bn6paunja
CmbapHa epehocm bubpaouohx emucuja npunukom ynompebe ypejaja moke da odcmya od haeedehe epehocmu npou3e0jaua. Ppe oH. y ToKy KopuSheha obpatnte naJbY ha cneJe he faktope yTucaja:
Да пи ce ypeнaj kopuctn HameHcKn?
Да Ли се матершан сеve odn. obpa hyje Ha npabn haun?
Да Ли ще урегaj упорисом уnotpe6Hom стану?
JaIne je pe3Hn anat npOnucho HaoUtpen Odn. JaI ne je yrpaeho odroBapajyhi pe3Hn anat?
Да Ли су монтура themselves eBEBHTyaJIHOb ONUHOe Bn6paUHOpepyke,Иддлсу OHe YBpTo cnojeHecaypehajem?
Upehaj CME da paHn cAmo ca 6pojem oBpTaja MOTopa Notpe6Hm 3a OndroBapajyHn pad. N3berabajTe MaKcImaJIHn 6poj oBpTaja, KaKo 6nCTe cMaHbIIn 6ky n Bu6paunje.
UcneHnpaBnHOr KopuheBa n Odpkaaba,6ykaN Bn6paunje ypehaja ce Mory noBeHaTn.To BoDn Do 3npaBCTBeHX npo6nema.Y Tom cnyajy Omax NCKbYHTe ypehaj n daJte ra Ha nonpaBky oBnaShenhy cepBnchNy paAnOHnCy.
CTenenonTepeheHocTNB6paunjom3aBnCn od paJa koJN Tpe6a Da ce n3Bpwn ODN. YnoTpe6e ypehaja.Ipouenite ra Happante oDroBapajyhe na3e y Toky paJa. Ha taj hauHHce 3nauajHo cMaByje onTepeHeHocT B6paunjom y Toky ueKynHor padHor BpemeHa.
Dyjka ynoTpe6a ypehaja n3naKe pykoBaoza Bn6paunjama n MoKe Da npoy3pOkyje npo6Ie me ca uRkynaujom ("6en npct"). Da 6n ce cMaHbNO pN3NK, Hocnte pykabuce n OdpKabajTe pyke TOnlM. Ako ce npen03Ha CmNTOM "6enor npCTa", oDMax notpaxnte Iekapa. Y Te CmNTome cnadajy: rYbntak Ocehaja, rYbntak ceH3nBnHocTN, je3a, CBpa6, 6oJ, cnaBeHe teJece chare, npomeHa 6oJE nn CTaBa KOKe. ObuHo ce OBn CmNTOMn OndOce Ha npCTe, wake nIn Ha npnc. Kod Hncknx TemnepaTypa ce NoBeHaba onaCHOCT.
Y TOKy paHOR daHa npaBnte duXke nay3e, KaKo 6nCTe MoTn Da ce onopabNTe od 6yKe n Bn6paunja. Baw pad nCnPaHnpajTe Tako da ce ynoTpeba ypehaja KoJn CTbapajy jake Bn6paJe pacNoDenn Ha Bnwe daHa.
AkoHaBaWIM WAKaMa yTBPdNte HenpNJataH ocehaj nIIN npOMeHy 6oJe Koke y TOKy KopuShHeBa ypehaja, OImax npeknHITc ca paDom. HanpaBInTe DOBObHO dyre naye. Be3 DOBObHO dYrnx naY3a MoKe DoHnDo CnHDPOMa Bn6paCnje WaKe-pyKe.
MnHmN3yjTe cBoj pn3nk n3naRaHa bI6paunjama. Odpkabajte ypehaj y cknaNy ca INHCTpyKUnjama y ynyTCTBy 3a ynotpe6y.
Ako ce ypehaj yecto Kopnctn, KOHTaKtnpajTe BaWeI dnctpnyepa da 6nCTe HabBnna aHTN-Bn6paunohy onpemy (Hnp. pyKe).
I36erabajTe da paAnTe ca ypehajem Ha TemnepaTypama MaHbIM od 10^ .Y npaHy paDa dePhiHHuTte kako onTepeheBe Bn6paunjom MoKe Da ce orpaHnH.
3.6 OnTepeheHe 6yKoM
I3BecHO ONTepeHeJe yCne6yKe 360r OBorypehaja He MoKe Da ce n36BerHe. IpeBaunTe paOBe ca nHTeH3NBHom 6yKom Ha D03BOJbHe N 3a To npEdnHe BpemeHa. Po Notpe6n Ce npDpxKaBajTe BpemeHa oBaBe3He TnUnHe n OrpaHnUte TpajaBe paDa Ha OHO HajHyxHnje. PaDi BaWe LNue 3aUThTe n 3aUThTe oc6a KoJe ce HApAe y 6n3HN, Mopa Da ce Hocn ODroBapajhya 3aUThTa od 6yKe.
3.7 Be36eHocHe HAnomeHe 3a 6aTepnjy nnybaq
BoNTe paUHa o 6e36eHocHM HAnomeHaMa 3a akymyIaTOP n nyBauch noce6Hm ynyTCTBnMa 3a ynoTpe6y.
BnDn:
YnyTcTBo 3a ynoTpe6y 443130: AkymylaTopu
UnyTCTBO 3a ynoTpe6y 443131: Nhyaun
3.8 Be36eHocHe HAnomeHe 3a paI
Ipnipjxabajte ce 6e36eHocnHex nponica cneunuHnx 3a odpehEny dpjxaby, Hnp. npoepcnHOJIHnx ydpykeBa, pOHDoBa 3a counjaJHo OcHpyaBe, opraHa BnaCTN KoJN KOHTpOJIuSy 6e36eHocT paJa.
PaNTe cAmO npN DOBOJbHOM DHeBHOM INIIN BeHTaKOM CBETJy.
OuHCTIte paHIO MeCTO OJ npeMeta (Hnp. NceueHnx DeNoBa) - ONaCHOCT OJ CNOTUcaHa.
PykoBanaCCHOCh OndroBOpHoc3a He3roDe NOBe3aHe Ca DpyrM OC6aMa N HbNXOBOM NMOBINOM.
Ako npBn nyT KopncTe NaHcy TcTepy:
Heka npoDAbau nHn HeKn dpyrN cTpyhak oJacn kako ce KopnCTn IaHuaHa TecTepa nn noxAajTe Kypc o6yke.
Ipe Hero wTo ra npBn nyT ynoTppe6nte, 6apem Bex6ajTe ceuehe TpynaHa NaocToBy 3a TeCTepncAbe nn CTaNky.
3.8.1 RykoBanau
Ocobe mnahe od 16 roDnHa nn ocobe koje He no3hajy ynyTCTBO 3a ynoTpe6y, He cmejy Kopncnttuypehaj.
CbaKO Ko paN ca NaHuaHOM TeCTepom Mopa 6nTn Odmopan,3dpab uy do6poj fOpMn. Kome n3 3dpabCTBeHx pa3nora Hnje Do3BOJbeHO da ce HanpeXe, TpeBaNo 6n da NITa CBor Iekapa Da NN je MoXe Da paN ca NaHuaHOM TeCTepom.
3.8.2 PaHObBpeMe
NoTyjTe npOnnce cneuΦnue 3a npKaby 3a BpeMe paJa NaHuaHx TecTepa. BpeMe paJa NaHuaHe TecTepe MoKe 6HTN OrpaHnueHo HaNoHaHnM IN JOKaJIHm nPoPiNCMa.
3.8.3 Paɪ ca JɪaɪhʊaHOM TecTepeM
UPO3OPEHbE!OnachocT od TeuKnx NOBpea.Ako ce KopnCTn HENOTnyHO MOHTnpaHa JauHuaHa TecTepa, Mory ce npoy3pOKoBaTu TeuKe NoBpee.
IaHuaHy TecTepy KOpNCTnTe TeK KaJa je KOMPiTeHO MOHTnpaHa.
Ipe cBAkor KopuShHeBa cnpoBecTu Bn3yeHny npOBepy, da 6nCTe npOBepuN da nn je NaHuaHa TcTepa KomnIeTHa, n He caPkn OwTeHHe nN nCtpoWe HeJeNoBe. CnryphOCHn n 3aWHTn Yupehajn Mopajy da 6ydy nCnpabHn.
yN03OPEHbE! OnachocT od nobpeya cneI HeHaMePHor NOKpeTaHaJaHuaHe teCTepe. CnyajHo yKbUyNBaHe JaHuaHe teCTepe MoKe Da DoBeDe Do TeuKnx Nobpe3aTo cKnHnte akMyJnatop KOD:
paOBA nCnITnBaHa, noDeuBaHaN uHneHa
PadoBaHa rapHtypn 3a ceuehe
HanyuTaHaJaHuaHe TcTepe
TpaHcnOpTa
UyBaHbe
paOBa OndpKaBaHa n nonpaBKe
Onachoct
HnkaHa HemojTe da paAnTe camn.
YBeK DpXKeTe CnpMaH np6Op 3a npBy nomoh 3a Moryhe Hecpeh.
I36erabajTe DoOpnbAbe MeTaJIHnx npedMeTa KOJn Ce Hana3e y 3emJbN IIN KOJN cy eNEKtpnHNOBc3aHn ca 3Embom.
JIuHa 3aHTnTHa Onpema ce cactojn oJ:
3aWTnTHa Kaunra
3aHTnTa oD 6yKe (Hnp. aHTnΦoHn), nOce6Ho aKO paNTe Bnue oD 2,5 cata DHeBHO
3aHTnTHe Haoape nn BN3np 3aHTnTHe Kaunre
3aHTnTHe nHaTaNHOHe C yMeTKOM 3a 3aHTNTy OJ NOCEKOTnHa
UbpcTe paIHe pykaBnue
3aHTnTHe cHneJe ca npnaHajyHM hoHOM u HeNHyHom KaHcOm
HemojTe KopnCTHTIaHcy TeCTepy n3HaB BnCHe pameHa, jep 6e36eHNo pyKOBaHe TaDa BnSe HJMe Moryhe.
KaJa MeHbATE NOKaunjy, NCKJbUyInTe MOTOp n CTABNTe 1HTNTHNK NaHua.
YBeK npnUbPCTnTe 7TnTHNK NaHca Ha HeKOpuShHe NaHuaHe TcTepe N3BaIITe akymyIaTOP.
IaHnHaHy TeCTepy cnYcTnte cAmo KaJa je NCKJbUyeHa.
HemojTe KOpNCTnTn NaHuaHy TecTepy 3a npemeuTaBe dpBeTa NOlyrom nIIN NOMepaHe dpBeta.
Ie6no De6JIbe OJdUxKHe Maa cMe da ceue camo KBaIIINΦIKOBaHO OC6JIbe.
3a ceuehe Kopncnte camo potnpajyHn Ianau, HkaDa He yKbUyjTe IaHyaHy Tectepy ca npncnoBeHm IaHcem.
OcnrgypajTe da yIbe 3a IanaHau Tectepe He Docne y 3emby.
PadoBeceeHaHeH3BOIDHTNaKuN,npn CHerynnOnyjin.
HnkaJa HemoJTe DeaKTbBpaTn cnrgpHoche n 3aWTnThe ypehaje.
4 MOHTAXA
yN03OPEHbE! OnacHocT oD TeuKnx NOBpea. Ako ce KopnCTn HenoTnyHo MOHTnpaHa JlaHcHa Tectepa, Mory Ce npoy3pOKOBaTu TeUke NoBpee.
IaHuaHy TecTepy KOpNCTHTe TK KaJa je KOMnJIeTHO MOHTnpaHa.
Ipe cBAkor KopuShHeBa cnpoBecTu Bn3yeHny npOBepy, da 6nCTe npOBepuN da nn je NaHuaHa TeCTepa KOMnIeTHa, n He caApxN OoTeHene nnn nCtpoWe DeNoBe. CnryphOCHn n 3aunTHn ypehajn Mopajy da 6byu nCnpabHn.
ONPE3! OnachocT od noceKOTnHa.
Owtpre nBnue IaHua TeCTepe Mory npn MOHTaXn Da npoy3pOKyj noceKOTnHe.
Ipe MOHTaKe yKIOHnTe aKymyNaTOp.
IpnukomMOtaxe naHca TeCTepe IN BOHnue Hocnte cnypnoche pykabuie.
4.1 NocTabbahe wHe BOhue (03, 04)
- 3aHTy 3a pyke (03/1) nobvHn npema dpu npue (03/a), kao 6n ce KOUHua NaHca OTnyctnla.
-
ΚeHTpaHn 3aTbapau (03/2) okpehnte y cMepy cynpoTHOM oKa3aJbKe Ha caTu n cKnHnte 3ajeDHO ca NOKnoncem (03/3).
-
WInHy BoHnue (04/1) noctabnte Ha BoJeHn KInn (04/2) n rypHnTe ra TOnIko yHa3aD da ce IaHauc TeCTepe MoKe MOHTnpaTn.
4.2 NocTaBbAHe NaHua TeCTepe (04)
- CtabnTn IaHaT TecTepe Ha IaHuaHnK (04/3) n yMeTHyTu ray uHnHy BoHnue (04/1).
- LaHauc TecTepe BODITe OKo IaHuaHnka BODINIe. LaHauc TecTepe Mopa IaraHo da onyCTn Ha DOHbOJ CTPaHNiHe BOHnue.
4.3 3aTe3aHe IaHua Tectepe (03, 05)
HANOMEHA NaHaT TeCTepe je npabnIHO 3aTeRHyT, aKO:
HaIeKe Ha DObBy cTpaHy BoHnue n aKO MoKe Da ce npnterHe pykOM.
ce Ha cpeiHn BOHnCe MoKe nOuHn 3a 3-4 mm.
- Поверпесда пл пац ТстEpe Do6po HajiExe KaO 6и npabnHо HaJIerao Ho IaHuaHnK n y uINHy BOJnCe.
- CtabnTn noknona (03/3) mmaOp npTeHyTu ceHTpaHn 3atBapau (03/2).
- PotnajyH npcten (03/4) taKo okpeHytnpema noklonuy (03/3) da ce dBa TpoyrnaHaHy jedaH hacynpot dpyror (03/b).
- OkpeTaTu ΚeHTpaHn 3aTBapau (05/2) y cMepy Ka3aJbKe Ha caty. PnTOM HEmoJTe Do Kpaja npTe3aTu ΚeHTpaHn 3aTBapau HHTu Ra OKpeTaTu yHa3ad 3a jeDaH o6pt.
- Okpehnte potnpajyн npcten (05/3) y smepy ka3aJIbKe Ha caty DOK nHauc Tactepe He 6ynde npabunho 3aTeHnyT, kao wTo je rope onncaHo.
- Léntpânni 3aTbapay (05/2) okpeTaTu y cmepy ka3aJIke Ha caTy dOK He 6ynde ΦnKcnpaH.
5 NUTAbe Y NOHO
ONACHOCT! OnachocT no KINBOTn ONACHOCt od HajTeKnx NOBpeDa.
Heno3HaBaBe 6e36eHocnX HanomeHa n ynyTcTaBa 3a ynotpe6y MoKe da DoBeDe do HajTeKnx NOBpeDa, na n Do CmPTN.
Ipe ynoTpe6e IaHuaHe TecTepe npouHajTe n npiaPkaBajTe ce CBnx 6e36eHocnHex HApomeHa INcTpkyuja y OBom ynyTCTBy 3a ynoTpe6y kao n ynyTcTaBa 3a ynoTpe6y Ha Koja ce ynyHyje.
YNO3OPEHbE! OnacHocT oD TeuKnx NOBpeDa. O3bIbHe NobpeDe Mory HAcTaN aKO Ha NaHcHaOH J TcTePn NocToJe OwTeHEn DeNoBn.
Ipe cBaKe yNoTpBe 3BpUInTe BN3yeJHn npereNd da 6nCTe npOBepuN da Jn je IaHuaHa Tectepa KOMnIeTHa N da He caApxN OoTeHe Hn NcTpoWe He DeNoBe. Be36eHocn n 3aHTnTHn ypehajn Mopajy 6ntn nCnpabHn.
5.1 HanyHHTn akymyIaTOp
O6paTnte naKbhy Ha paCnoH TemnepaType 3apeKIM nyHeBa, BNDu TexHnUKe noTaTke.
HANOMEHA 3a DeTaBHe INHOpMaunJe nOrIeJaTe Noce6Ha yNyTCTBa 3a yNoTpe6y akMyIaTopa N:
YnyTcBo 3a ynoTpe6y 443130: AkymylaTopn
UnyTCTBO 3a ynoTpe6y 443131: Nhyaun
5.2 CtaBbaHe n Bahebe akymyNatopa (06)
PAXHbA! OnachocT od owteheba akymnatopa. Ako ce akymnatop nocne ynotpe6e octabn yypehajy,TO MOKe Da DOBeDe do owteheba akymnatopa.
HenocpeNo nocne ynoTpe6e n3Byn aKymyNatop n3 ypehaja n cKlaaNHTNTHa MeCTy 3aHTnEHom oD CMP3aBaHa.
CTaBHTn akymyIaTOp yypehaj TeK HENOCpeIHO npe noeTKa pada.
3aMeHa akymynaTopa
- AkymynaTop (06/1) otno3aДи rpyntu y IaHuaHy TeCTepy, dOK He halerHe (06/a).
Bahebe akymyntopa
1.ПиТиСнУТи TаСтЕр 3a ДeБлОКИра№ (06/2) Na AkуМуЛaTOPу И ДрЖaТи Гп рИТиСнЧуТиM.
2.Извадинakумларot (06/b).
5.3 Nybehe yba 3a naHauc TecTepe (07)
PAXHbA! OnachocT od owTeheBa JAnuane Tectepe. NaUcHa Tectepa he ce 036nJbHo OWTeTtN ako je y pe3epBoApy npemano yIba 3a NaHaC Tectepe nIa ko je pe3epBoap nCyuWeH/ cIenJIbeN.OcyuEHO/cIenJIbeHO yIbe 3a NaHaC Tectepe MOKe OWTeTtN KOMNoHETe 3a npOTOK yIba n Nymny 3a yIbe. OWTeHeBa HacTajy n KaJa ce KopncTn CTapo yIbe. KopnuHeBe CTapor yIba DOBOdN Do wTe Te NO XINBOTHy CpeDInHy!
3a nyuTaBe y noroH hanyHnTe pe3epBoap yJbem 3a Tectepe.
HemojTe KopuCTHTn CTapo ybe!
HanyHnte pe3epBoap yIbem 3a IaHnce HajkacHnje cBaKn nyT kaJa npomEnTe akymyIaTOP.
IaHauc TeCTepe n ⅢHa BOHnue ce TOKOM paJa HEnpeKnIDHO HaJajy yIbem NytEm ayTOMaTCKOR CnCTema 3a NpMa3nBaHe. YIbe 3a IaHauc TeCTepe WITNT Ond Kopo3nje I npEbpemHo Xa6aHa. Da 6n ce IaHauc TeCTepe npabuHNO IoMa3ao, y pe3epBoapy Mopa yBek 6HTN DOBOJbHO yIb a 3a IaHauc TeCTepe.
3a noDma3nBaHbe NaHcTa TceTepe N uHHe BOHnue, KAO n 3a TpaHCnOpT n CKNaDiuNtBe y Odo6peHm n O3HaueHm KOHTeJHePIMa KOpNCHTe cAmO ekOJIOWKn pInxBaTbNBO n 6nopa3rpaDnBO KBaIITeTHo yIbe 3a NaHnce 3a TceTepe.
Ipe noyeTka pada n CBAke 3aMeHe akymyIaTopa, npOBepTe HnBO yJb a I no notpe6n dOnjTe yJbe 3a Jnau TecTepe:
- KoHTpoJIuIe HnBO yBa Ha KOHTpOJHOM npo3OpHy (07/1) pe3epBoapa 3a yBe. YBe yBek Mopa da ce BnDn. MnHmApHn n MaKcImaJIHn HnBO yBa He Cmejy ce npEkoPaunTn.
- П配电инстаьka 3a pyибe (07/2)doиnte ybe 3a NaHaT TeTepe.
5.4 Kontrpona 3aterHytoctn naHua
YeCTO KOHTpOJIuIhTe HAneTOcT NaHca jep ce HOBn NaHcu TecTepe n3dyJyj. KoI paIHe TEMpeType NaHaC TECTepe Ce npOdyKabN BnCn. 3aTeHnTe NaHaC TECTepe. BNIN Po2JIaBBe 4.3 "3ame3aHbe NaHca mecmepe (03, 05),cmpaHa 193.
HANOMEHA LaHaT TeCTepe je npaBnIHO 3aTeRHyT, aKO:
Haleke Ha doHy cTpaHy Bohue n aKO MoKe Da ce npnterHe pykom.
ceHa cpeiHn BOHnue MoKe noDnHn 3a 3- 4mm.
ONPE3! Onacnoct od nobpeya ycneodcKaKaHa IaHua TecTepe! HeIOBOJbHO 3aTeHyT IaHaU TecTepe MoKe da OndCKOuY TOky paDa n Da IOBeDe Do nobpeda.
YecTo KOHTPOINCAITN 3aTeHHyTOCT IaHua. 3aTeHHyTOcT IaHua je npeBnue mala, aKo norOHcke Kapike N3aHy N3 XJle6a Ha doBoj cTpaHn BOHnCe.
IpaBnHIO DoTeHyTu NaHaT TecTepe, aKo je 3aTeHyTOcT LaHc npemaJa.
5.5 IcnnTnBaHe cyHKunje KOUHnue NaHua
IaanuHa TecTepa mMa pyHy KoUHnUy IaNua, Koja ce Hnp. y cnuyajy nobpaTHor ydapa (Kickback) akTbHnp npeKo puHnCe IaNua.
Ycnyajy aKTNBaunje KoCHnue NaHua JaHaTecTepe N MOTOP CE HArNo 3ayCTaBbajy.
ONACHOCT! OnachocT no XHBOT ycneHemapHor noctynaHa! HenaxJBnBO nHepeBnJeho KpeTaHe JaHuaHe Tectepe MoKeI3a3BaTN TeUke NOBpeJe NIn Yuak Cmpt.
PaHnTe ca nauHahom TecTepom ca CbeWhy o 6e36eHocTN u y3 BnCOky KOHcHTpaunjy.
ПиИКOM OTnyштая Кочнце Ланca hemoJte npTnCKaTNпpeKnidaч.
YNO3OPEHbE! OnachocT no XnBOT n OnachocT od HajTeKxN NOBpeDa 360r HencnpaBHe KoUHnce LaHca. Ako KOUHnca LaHca He fuyHKuONHse, potnpajyhn LaHaC TecTepe MoKe Da npoy3pOkye HajTeKe NOBpeDe, Na Yak N CmPT Hnp. y cIyuaJy NOBpaTHor Ydapa (Kickback).
Tecnpajte kouhny naHca npe cBAkor noyetka pada.
He yKbUyjTe IaHuaHy TecTepy ako je KouHnua IaHua HeucnPabHa. Y Tom cnyajy dajTe IaHuaHy TecTepy Ha npOBepy y cepBnc 3a KyIe.
5.5.1 IcnnTnBaHbe cyHKunje KoUHnue NaHca KaJa je MOTOp NCKbUyeH (08)
1.ИЗвачебеakymуларopaи3уpeнaja:Видп Позлаве5.2"Cmaьанe ueahebe akymyamopa(06),cmpaHa 193.
2. 3a otnytsahe koynue lahca nobynte (08/a) puynu koynue lahca (08/1) y cmepy dpwke puynce (08/2). Lahauc tectepe ce moxe npobvhyn pykom.
3. 3a yKbUyHbAHe KoUHnCe IaHua KopnCTnte pyuuy KoUHnCe IaHua (08/1) npTnCHnTe (08/b) npema Hanpei. He cme bTu MoYhe npOBnaueHe IaHua TeCTepe.
5.5.2 NcnnTnBaHbe cyHKnJe KoHnCe NaHca KaJa je MOTOp yKbUyen (08)
HANOMEHA OTnycntte KoUHnUy IaHua npe cBAkor yKbByuBaHaJaHuaHe TecTepe.
1.Cnpyno NyBpCTO dpKInTe NaHuaHy TeCTepy 3a DpWky pyuNue n pyuKy.
2. OTnyctnte KoUHnUy JauHa.
3. YukbyuTe MOTOp.
4. Puyu cy KoHnue Jana (08/1) npTncnTe (08/b) npema Hanpei. IaHaT TecTepe n MOTOP OdMax Mopajy da ce NotnyHO 3ayCTabe.
6 ONCJNYKUBAHe
ONACHOCT! OnachocT no KINBOTn onachocT od HajTeKHX NOBpeDa.
HEno3HaBaBe 6e36eHocnHex HAnomeHa n yNyTcTaBa 3a yNtpe6y MoKe Da DoBeDe Do HajTeKnx NOBpeDa, Na N Do CMPTN.
Ipe ynoTpe6IaHuaHe TecTepe npoHTajTe n npiaPxaBajTe ce CBnx 6e36eHocnHex HAnomeHa IINCTpyKcUja y OBOM yNyTCTBy 3a ynoTpe6y kao n ynyTCTaba 3a ynoTpe6y Ha koja ce ynyHyje.
UPO3OPEHbE! OnacnocT od nobpeya ycnei HenncnpaBHor ypehaja. Pa ca HncnpaBHM ypehajem MoKe n3a3BaTN TeIke noBpeIe N oWteHeBe ypehaja.
Ypehaj Kopuncte camo ako Hnje y KBapy nHnJe oWteHen nNn aKO hema HeocTajyHX nn OJaabBeHx DeNoBa.
IpndpjkaBajte ce odpe6n Be3aHnx 3a BpemeHa paJa koje cy cneuΦnue He 3a 3emby y Kojoj ce ypehaj Kopnstn.
3aHbI pyKU yBpCTO oByXBaTHTN I npKaTNI DECHOM pyKOM, a pyKU ca CTpeMeHOM NEBOM pyKOM.
He nyuTaTu pyUKe, DOK MOTOp paAn.
HekopnctntnnaHcyTecTepycnyajy:
ymopa
MMyHHHe
Ytuiaj ankoXoJa, neKOBa nDpora
AkymynaTop "B125 Li" (6p. apt. 113896)
HANOMEHA HaNBHN KanaqtET
akymyntopau n3nocnpeko 100 Wh! 36or tora BOnde payna o cnepehnm ynytCTBIma 3a TpaHcnpT!
CadpxaHn nHTnjym-joHcKn akymyIaTOp noJneKe 3akOHMa O onaChm MaTepnjama, aJI MOnKe da ce TpaHCnOpyte NOd NOjeHocTAbBeHIM ycNoBIma:
PnBAtHn KopuChnK 6e3 DoaTHnx 3axTeBa MoKe Da TpaHCnOpTyje HeoUteHe aKymyIaTOp DpyMOM, yKoNko je ypehaj CnaKOBaH Npema 3axTeBnMa 3a MaJOnpOdaJy n yKoNko TpaHCnOpT CnyxN PnBAtHOJ CBPCN.
Komepujann KOpncnui, KoJn Bpwe TpaHcnpT y KOMbHaunca HbNXOBom rnaBHom DeNaTHoWHy (Hnp. nCnpyke Ha rpaDnUHTa nn Ppe3eHTaunje n ca Hux), TaKOHe Mory da KopncTe OBO nojeHocTabbeHe.
Y oba rope nomeHyTa cnyuaja obaBe3Ho mopajy da ce npedy3My Mepe npedocptpoxhoctn da 6n ce cnpeynlo ocno6aHahe caipxaja. Y dpyrnm cnyuajebima ce obaBe3HO mopajy noTobatn odpe6e 3akoha O onacnM MaTepnjama! Y
Cnyajy HnpiDpKaBaHa, NoiRbaoUy I eBHTyaHNO npeBO3Hky npTe BnCOke Ka3He.
Octane hanoMeHe o npeb03y n cTaHy
TpaHcnpTOBaTu OdH. cNaTu JNTnjuym-jOHcke akymytaTope camo y HeoWteHeHom cTaHy!
3a TpaHcnpT akymyIaTopa KopnCTHTN NCKbUHyBO opRnHaHn KapToH nIi OndroBapajyHn KapToH 3a onaChe MaTepnje (Hnje noTppe6HO KOD akymyIaTopa ca Ha3NBHM kanaunTeTom MaHbIM od 100 Wh).
OblenitnoOTbOpene KOthaKTe akyMylaTopa TpaKOM, kako 6n ce cnpeHNo KpataK cnoj.
OcnypaTn akymyntop od KIn3aHa yHytap naKOBaHa, KaKo 6n ce cnpeuHa oWTeHeHa Ha akymyntopy.
Obe36eHTN hCnpaBHO 03HaabaBe n DOKyMeHTaunjy 3a cnaBe npnIKOM TpaHCnOpTa Odn. cnaBa (Hnp. ppeKo cepBnca 3a DoCTaBy naKeTa HnI nn IneDuuJe).
I IpnTeXoJHO ce INHΦopMncATn Da JIn je Moryh TpaHcnpT npeko n3a6paHOr npykaOua ycnyra N DeKnapCaTn NouMbky.
PpenopyjemyukbyuNbBaBe ctpyHaaka 3a onache MaTepeJe paN npnpeme nouJbKe. Pndpkabajte ce n eBentyaHnx DoaTHnx HaonohnHx npOnca.
11CKJIaIaIuIteHbE
11.1 CknaaunwTehe ypehaja
Hakon cBaKe yNoTpe6e n3BaAnTu akymyIaTOP u3 ypehaja.
TeMeJbHo OunchTuN ypehaj n no Notpe6n npuBpCTtu CBe 3aHTNTHe NOKNONCe.
Upehaj yBaTN Ha cyBOM MeCTy Koje je noi KByem BaH DomaJaja Deue.
Ppnnikom nay3a y paay, koje Tpajy dyke od 30 daHa, cnpoBecTu cneDehe paOBe:
Icnpa3HnTn pe3epBoap yba 3a IaHaTcTepe.
CkHyTN, ONUCTNTN yJbEM 3a 3aHTNY od phe HAnpCKaTN NaHaT TecTepe N IINHy BOHnue.
PAXHB! OnachocT od owTeheBa ypehaja.
Ocyuheo/clenbeto ybe 3a IanaTecTepe npn DyKem CKnaIWIteHy MOKe OWTENTN KOMNOHeHTe 3a npOTOK yba nIyMny 3a yBe.
Ipe cBAkor DyKer CKlaAniWTeHa n3 NaHuaHe Tectepe yKnOHTn yJbe 3a NaHauc Tectepe.
11.2 Cknaaunsttebe 6atepnje nnybaa
HANOMEHA 3a DeTaBHe INΦopMaunje norgéjaTe noce6ha ynyTCTBa 3a ynoTpeby akymyIaTopa I nyBaça.
12 OДЛАГАБЕ
Hanomehe y Be3n ca 3aKoHOM o eJekTpnuHm n eJektpoHcKn ypehajnma (ElektroG)

CTapn eNeKtpuHn n eNeKtpoHcKn ypehajn He Tpe6a da ce 6aauj ca kyHm cMehem, Beh Tpe6a da ce noDBprHy OdBajaHy n copTnpaBy oH. peuknpaBy!
CTape 6aTepejne nnakymyataOpn KoJn Hncy fKCHO yrgaehny cTapu ypehaj, npe npedaje Mopajy da ce n3BaJe! HbXOBO oIanahe Ha OTnaJ pe perylncaHo 3aKOHOM o 6aTeepjama.
BlnachNK Ond.KopncnK eJeKtpuHnx n eJeKtpoHcknx ypehaja cy no nCTeKy hnxOBor BeKa ynoTpe6e 3akOHcN o6aBe3Hn da nx BpaTe.
KpajbKn KopncnK CHOcN OndroBOpHoc3a 6picahe Cbojnx IunhNx IodaTaka n3 CTapor ypehaja KoJn Tpe6a Da ce OndoXn Ha OTnad! Cm60n PneuPTaHe KaHTe 3a OTnATke 3NaU n da CTapn eNeKtpuHn n eJeKTPoHcN ypehajn He Cmejy Da ce Ondaxy 3ajeHNo ca KyHNM Cmehem. CTapn eNeKTPuHn n eJeKTPoHcN ypehajn BeecnnaTHO Mory Da ce npedajy Ha cneedeHm MeCTnMa:
JaBHa MeCTa 3a OJNarAbe OTnada ODN. HBeROBO npKuIbAbe (Hnp. KOMyHaJIHa CTOBAPuTAt)
IpojajHa MeCTa 3a eJektpnue ypehaje (ctauHApHa n Ha nHTepHeTy),yKoJIko cy TpOBUu ObaBe3Hn Da npNXBaTe BpaHEn Ipon3BOd nIn aKO do6pOBoJbHo Hye TaKBy ycnyry.
Obe n3jaBe Baxe camo 3a ypehaje koju ce yrpahyj u npoajy y 3embama Ebpontcke yHnje nHa koje ce npimehbyje eBpontka dIupeKTHBa 2012/19/EY. Y 3embama n3BaH Ebpontcke yHnje Mory ce npimehBaTu HeKe dpyre oDpeD6e 3a Ondarahe cTapnx eJektpuHnX n eJekTpOHcknx ypehaja.
Hanomehe y Be3n ca 3aKoHOM o 6aTepnjama (BattG)

CTape 6aTepeju n akymylaTopn He Tpe6a da ce 6aucjy ca KyhHm Cmehem,BeH Tpe6a da ce nodBprHy ODBajaHy n copTnpaHy oH. peuKnnpaHy!
Y CBpxy 6e36eHnor BaHeBa 6aTepeNuja n akymlyaTopa n3 eIekTpUHOr ypehaja n paDN INHΦopMauJa O HbNXOBm TIny OdN. XEMNJCKOM CnCTemy, BODITe paCyHa o OCTaIM NOdaUma y yNyTCTBy 3a yNoTpe6y OdN. MOHTaKy.
Blachnok Ond. Kopncn6 batepnja n akymyntopa cy no nCTeKy hnxOBor Beka ynoTpe6 3aKoHcN oBaBe3n Da nx BpaTe. Bpahbe je orpaHueHo Ha npedajy kOJIuHa yObUaJehnx 3a DomaHnCTBO.
CTape 6aTepeJe Mory Da caApXe WTeTHe MaTepeJe Nn TeUke MeTane, KOJn 6n MoTn Da HaWKoDe XnBOTHOJ CpeINH Nn 3dpaBBy. Ipepa Da CTapnx 6aTepeJa n KopuShene y HbMa caPxAHNx Pecypca DoOpnHocn 3aHTtN OBa DBA dparOueHa pecypca.
Cm60n pneuPtaHe KaHTe 3a OTNaTke 3Haun da 6atepnje n akymyIaNTopn He Cmej y Da ce Ondaxy 3ajeHc KaYHnM CMeHem.
Ako ce ocim Tora nCnoj KaHTe 3a cMehe Hana3e O3HaKe Hg, Cd nn Pb, OHda To O3Haayaba cnedehe:
Hg: BaTepnja caPkn BnIe od 0,0005 % XnBe
Cd:Баэрпа саджи виши od 0,002 % KaДMuJyMa
Pb: BaTepeNiJa caApKu BnIe oD 0,004 % OJIOBa
AkymynaTopu n 6aTepejne 6ecnnaTHo Mory da ce npedajy Ha cIeDeHIM MeCTMa:
JaBHa MeCTa 3a OJNaraHbe OTnada OJH. HberOBO npKuPbAhe (Hnp. KOMyHaJIHa CTOBAPuTAt)
IpoaJaHa MeCTa 3a 6aTepe n i akymylaTope
Mecta 3a Bpahahe 6atepuja n akymylaTopa
MecToBpHaHaKaKoIpnO3BoHajya(aKO HneJUaH 3ajeHNuKOr CnCTema BpaHaHa)
OBe n3jaBe Baxke caMo 3a akymylaTope N
6aTepeNiJe KoJn ce npoJaJy y 3eMlbama EBponcke
yHnje H a KoJe ce npimebByje eBpONcKa
DnpeKTHBa 2006/66/E3. Y 3emlbama n3BaH
EBponcke yHnje Mory ce npimebNAtN HeKe
dpyre OndPeIbe 3a OndpaHe akymlyaTopa N
6aTepeNiJa.
13 TEXHnUKNIPODAUN
| ЛанчANA Теста CS 1825 | |
| Бр. apr. 113919 | |
| Димензиje (Д x Ш x В) 610 x 215 x 217 mm | |
| Текина бeз панца теста,шине boйице,шитника за паназ, улььи akумлatableа | 2,4 kg |
| Укuppna Текина (бeз akумлatableа) 3,4 kg | |
| Задренина рezерboaра за улье 110 ml | |
| Заштоа od п两点песеньке Дa | |
| Снага мотopa 350 W | |
| Б Proj образая мотopa 2200 - 2600 min | -1 |
| Порега панчанika 3/8" спецьални | |
| Кочница панца Дa (елькtripино, пцьи | Кочиона пипka) |
| Па nause Теста: | |
| Панчана Тостера CS 1825 | |
| Радна брзINA панца{Tостере 4,67 m/s} | |
| Мakсимално Врахе Кочьа (EN 60745-2-13 - 19.107) EN 62841-4-1:2020-10 | 0,064 sek. |
| Врахе нанадог okpeтыва панца (EN 60745-2-13 - 19.113) EN 62841-4-1:2020-19.112 | 0,068 sek. |
| Актуралье панца{Tостере Двоструко} | |
| НИВО 3ВУЧЕ снаге LwA (DIN EN ISO 3744) 91,6 dB(A) | K = 2,3 dB(A) |
| НИВО 3ВУЧОг рпитисka pA | 81 dB(A) K = 3,0 dB(A) |
| Вразност Вибрациje (DIN EN 28662-1)* 4,2 m/s | 2 K = 1,5 m/s² |
| Па nause{Tостере Oregon 90PX040X} | |
| Дебъни поюнске karпke 1,1 mm | |
| Браоj pezeревор дela 127549 | |
| Вошица Oregon 104MLEA041 | |
| Духина вodnilице 10" / 25 cm | |
| Духина сениа 17 cm | |
| Браоj pezeевор дela 127550 |
*Ppumede:
Habe de ha epehocm emucuje bubpauja u3mepeha je npema cmahandapdu3oahom nocmynky ucnumueba u moxe ce kopucmu 3a nopehejeedho2 eIekmpuHoo anama ca dpyzum.
HaseedeHa epehocm emucuje u6pauja MoKe ce Kopucmu u 3a npelumuHapHy npouehy u3noxehocmu (cmeneu u3noxehocmu u6paqjama).
Bpehoc emucuje bupauja mokom cmbaphe ynompebe eekmpuho anama moke ce pa3nukoamu od hasehe epehocmu y 3auechocmu od haunha kaju ce eekmpuhu anam Kopucmu.
I Pokwajme da u3na2aHe b6pauijama 6yde wmo je mozyne Hxke. Pumephe Mepe 3a cMaHeBe u3noXeHocMu b6pauijama cy HOweBe pykabuca npulukom ynompebe anama u ospanu4aabe padHOs epemeHa. Mopajy ce y3emu y ob3up cbu denobu padHOz uKnyca (Ha npumep epemeHa kada je eJekmpuHu anam uckbYueH u epemeHa kada je anam ykbYueH, anu padu 6e3 onmepeheba).
14 CJNYKBA 3A KOPNCHNIKE/CEPBNC
KoI nIaBa y Be3n ca rapaHunjom, nonpaBkOM nn pe3epBnIM DeIOBnMa ce o6paTne BaWem Haj6nnxem AL-KO cepBnCy. Hera heTe hahn Ha INHTepHeTy noD cIeDehom aDpecom:
www.al-ko.com/service-contacts
15 TAPAHUNJA
EBeHTyaIHe rpeuke y MaTePnJaNy IINI POnI3BOIDbN Ha ypehajy nonpaBnHemO 3a BpeMe 3aKOHcKor poka 3acTape npaba Ha rapaHunjy 3a HeIOCTaTKe IpeMa cONCTBeHOM n36Opy nonpaBbAbem IINI 3aMeHOM. Pok 3acTape odpehye ce npema npaby dpxkabe y Kojoj ye ypehaj KynIbeH.
Haça rapaHTha n3jaba Baxn camo y cnlyajy:
www.al-ko.com/service-contacts
15 ZÁRUKA
Segment Stav nabitia
www.al-ko.com/service-contacts
15 ZÁRUKA
- A gázkart (09/2) engedje el.
www.al-ko.com/service-contacts
15 GARANTI
10 fore transport 330
11 Forvaring. 330
Skru sentrallåsen fast.

7 ARBEIDSFREMTREDEN OG ARBEIDSTEKNIKK
8 VEDLIKEHOLD OG PLEIE
www.al-ko.com/service-contacts
15 GARANTI
www.al-ko.com/service-contacts
15 TAKUU JA TUOTEVASTUU
www.al-ko.com/service-contacts
15 GARANTIJA
www.al-ko.com/service-contacts
15 GARANTIJA
lespejamos materiala vai razoanas brakus iekarta mes noversisim atbilsto likumanaoteiktajam noilguma terminam attieibaz uz garantijas prasibam, paturot tiesibas izvelties remontu vai jaunas preces piegadi. Noilguma termns tiek noteikts, vadoties pec tas valsts speka esosas likumdoanas, kur a erice tika nopirkta.
PykoBoIDCTBO NO 3KcNpyaTuIN
OcToPOxHO o6paaTecb c JNTnHNoHHbIMn aKKyMnyTOpAMn! B qactHoCTn, co6JIOdaIte yKa3aHnno TpaHCnOpTnpOBKe, xpaHeHnIO uYtIN3aCmN B DaHHOM pyKoBODCTBe nO kcnPnyataCmN!
1.2 YcNoBHbIe 06o3HaueHn I CnHaJIbHbIe cNoBa
ONACHOCTb! Yka3bIbaeT Ha onaChyIO CNTyaCIO, KOtOpA, ecn ee He n36ExKaTb, npNBO-DNT K CMEptN INN cepBe3HbIM TpaBMam.
PENyPExEHE!Yka3bBaetHa noTeHuaJIbHO ONaCHyO CNTyaUIO,KOTOpa,ecJIe He H36exKaTb,MOKeT PnBcTeN K CMePTu INCepBe3HbIM TpaBMam.
OCTOPOXHO! Yka3bIbaeT Ha NoteHuaJIb-HO ONaCHyIO CNTyaUIO, KOTopA, ecJn ee He n3-6exaTb, MoKET npVBecTI TpaBMam JeKoN i CpeDHe TjXkectN.
BHHMAHNE! Yka3bIbAErHa CNTyaCnIO, KOTOpa, ecn ee He n36eKaTb, MoKET npNBecTn K mUyecTBeHHOMy yuep6y.
IINPIMEYAHNE CneuaJIbHbIe yka3aHnI
IJa OBeIeHnI NOHMAnI N 3KcNpyatauN.
2 OINCAHNE IPOdykTA
B 3TOM pyKOBOdCTBe NO 3KcNlYaTaUIN OINcaHa pyHaa cENHaa 3JIeKTPoPnIla, KOtopa NOLyuaET PNTAHne OT aKKMyJrTopa.
YcTpoIcTBo pa3peWaeTcra NcONb3OBaTb TOnbKO BMeCTe C INTn-NOHbIMN aKKyMnyTOpAMN 3aPpAHyIMN yCTpoIcTBaMn, Yka3aHHbIMN B TEXHueCKNX XapakTepcntkax. DOnONHHTeNbHbIe CBe
DeHnO6 akKymyIaTopax n 3apJNbIx yCTpOINCTBAX CM. B OTJeJIbHbIX INHCTpyKUINX:
pykoBOCTBO no 3KcnpnyatauN 443130:akkyMnyTOpbl
pyKOBODTBO NO 3KcPnyatau4 443131: a-paHbIe ycTpoiCTBa
BHIMAHHE! OnacnocTb NOBpeXdHn y-ctpoiCTBa n aKKymJyTopa. EcIyycTpoiCTBO pa6oTaET C HEnOxDxOJaUmN aKKymJyTopaM, TO yCTpoiCTBO n aKKymJyTopbl MOryt 6bITb NOBpeXdHbl.
UcTpoIcTBo pa60Taet TOnbKO c npeHa3Ha-ueHHbIMN dIa 3TOrO aKKMyJlTopaMn.
2.1 NcnoJb3ObaHne no Ha3NaYeHnIO
LcHnHa nHa paccuTaHa NckHouHTeBHo Ha npImeHeHne B DOMaUHem N npHycaDe6Hom XO3yIcTBe. B 3Toi ObNactn cHnHa nHa noDxO-DIT dIpaCnIOBKn JERKo IpeBecnHbI, HapnMep, dIa:
pacnINOBKN INNOMATEpeNaIOB,
Pe3kn n3ropoed
PacnIOBKn npOB
Blaqoapra 3neKtpueckomy npnBOy aKKymyTTOpHyu cenHyu Nnly MOxHO nCNoIb3OBaTb dIpaCnIIOBKn DpeBecnHbI He ToIbKO Ha OTKpbITOM BO3dyxe, HO IN B 3akpbItbIX NOMeUeHnx. IcNIOb3OBaHHe, KOTOpoe IpOTnBopeuyNT ONncaHHOMy B HAcToJsem DokyMeHTe, CHTaETcY nCNObl-3OBaHEm He No HA3NaYeHIO.
3TO yCTPOINCTBO IpeHa3HauheO IJIaYacTHORIO NCNoIb3OBaHnI. IIO6OE dpyroE nCNOJb3OBaHne, a TaKKe HecaHKUHOHPOBaHHbIe MOINΦNkAciu INII DOnONHeHnI paccMaTpNBaIOr cKa KHeHaJIeXaUee IcNoIb3OBaHne I npVBODrK Pnp3HaHnIO HeDeiCTBNTeHbOH rapaHTnI, a TaKKe K NToTepe COOTBeTCTBnI OTKa3y OT IIO6oI OTBeTCTBeHHocTN 3a yUeep6 NOb3OBaTeHIO INI TpeTbIM NlIcAm CO CTOpOHb IpnO3BODInTEJI.
OCTOPOXHO! OnacHocTb TpaBMnpoBaHHa npi nCNoJIb30BaHH He no Ha3NaueHnIO!
PacnnoBka ceHNoI nnOJ dpeBeCInbI nIN dpyRnx MaTePnaIOB, KOToBle coDepkat noCTOpOHHe npEdMeTbI, MoKeT pNpBeCTN K TpaBMe.
IcnoIb3yIte cenHyIO nIy TOnbKO IJRA paCnnIOBKn IerKo IpeBeCInHbl.
OcmoTpnte dpeBecnHy neped pacnIOBkoHnHa HJIInuHne NocToPOHHx npeDMeTOB,HaNpIMep, rBO3dei, wypynOB, pHTINHOB.
2.2 PpIMepbI HnpeBaNJIbHOro npImeHeHHa
He obpe3aTb BeTKn, KOtOpbIe pacnoJIOXeHbI npraMo nIIN NOd OCTpbIM yIOM HaI NOJIb3O-BaTeIeM IIN dpyrIMN IucaAM.
He nCnoB3yIe OTPa6oTaHHoe MacNo IIN MInHepaJIbHOe MacNo DJIa CMa3KN INJbHOJ UeN.
He pa3peuaaetcnaonb3oBaTb yctpoiCTBO BO B3pbIOONaCHOpeJe.
2.3 OctaToHbIe pNCKn
Дахе пи Incnoьзовани устpoиства NO Ha3ha-уеню сухесыET OCTaTOUHbI риck, KOtOpьИ HeBO3MOKHO NCKJIQUHTb. KoHCTpykцЯ устpoиства He NO3BOJЯET NCKJIQUHTb CJIeDyUOUIne O-nacHOCTN.
KoHTaKT C OTKpbITbIMN 3y6bYMNI cENI (onacHOCTb Iope3OB).
IocTyK BpaaHoueJcYeN (OaHocTb nope3OB).
Bhe3aHoe HneppeBnDHeHoe nepemeuneHne nIbHOJ uINbI (OnaCHOCTb Iope3OB).
UdaneHne YacTei cenn (onachoctb nope3OB/ TpaBmbl).
UdaJIeHne yacteN o6pa6oTaHHoN dpeBecnHbl.
HapyuheHe cnyxa BO Bpempa6oTbI,ecn He nCNOJIb3OBaTb 6epyu.
2.4 PpeoXpaHntbHbIe n 3aunTHbIe yCTpOcTba
PNEpyPExJEHNE!OnachocTb ce- pBe3HbIX TpaBM,Bbl3BaHHbIX MaHnPyInpOBAHNEM PpeOxpaHnteBHBIMN 3aUNTHbIMN ycTpoiCTBaMn.13-3a MaHnPyInpOBAHnA PpeOxpaHnteBHBIMN 3aUNTHbIMN yCTPOINCTBaMn npna6ote C cENHOI NIOJ MOrY BO3HNKHyTb cepbe3HbIe TpaBMbl.
HnB Koem cnyuae He BbIBOIndTe n3 cTpor npedeoxpaHntbHbIe N 3aunTHbIe ycTPOINCTBa!
Pa6oTaIe c ceHNoI pIIOJ, TOnbKO ecNn BCE npEdoXpaHnteJIbHbIe n 3aUHTbIe y-CTpoiCTBa pa6oTaiOT npaBnIbHO.
2.4.1 3aunTa oT BkIoueHn
Ecn onepaTop Bbinyckaet ra3 HeckoJbKO pa3 noDpyd, cenHnA nnA OTKnIOyaeTcH Ha HeckOJbKO cekyHd dIg 3aunTbI eKeKToHnKn I NnJbHOJ cenn. B 3tOM cnyae DoXdntecb NOBTOpHOrO BKIOUeHnI cENHOI nINbl.
2.4.2 Topmo3 zenn / pbiur Topmo3a zenn
LcHnHa nIa nMeet pyHOn TOpMo3 cEN, KOTopbI aKTHBnpyeTc C NOMOu bIO pBuHa rA TOpMo3a cEN, HApnmep, B cnUae OTdau. Pn CpabaTbIBAHm TOpMo3a cEN n cENHa n I DnraTeNB MrHOBeHH OCTaHaBJIINBAIoTcR.
2.4.3 3aunta ot neperpy3kn
CenHnna oHauneHa 3aunToI OT neperpy3K, KOtopa ee BbIKIOuae T Cnyae neperpy3Kn. Nocne KopoTkof pa3bl OxnaJdeHnra cENHyo nNy MOxHO CHOBA BKIIouHTb.
2.4.4 HnteHaTKeTJIb
MexaHnueckn HInTeHaTjXnTeJIb CoeINHeH C TopMO3OM ZEN N Bbl3bIbAeT PnB BbIKIOUeHNu CEHNHO NIIbI 6bICTpoe TOpMOxHne NINbHOJ ZEN.
MexaHueckn HnteHaTjKNTeIb npedotBpaaet nobpekdeHna, Bbl3BaHHbIe DnXKeHem cenn.
2.4.5 BontbHaDbB3Kn
EcnB BO BpempaCnIOBKn Cenb pa3OpBETc, 60ntbHaADB3KN 3axBaTAY KOHeu pa3beINHeH Hoi cEN, TEM CaMbIM npedOTbpaaJra TpaBMbl pyk onepatopa.
2.5 CnMBOJIbHa yCTpOINCTBe
2.5.1 Metkn 6e3onacchoTn
CnMBoJ 3HaueHne

CneNyet co6nOdaTb oc6yO octoPoxHOCTb npn nCNOB3OBAHn y-ctpoNCTBa!
Onachoctb otdaun!
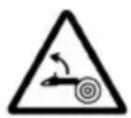
Pn pa6oTe c zenHOn nnoH He depKaTb INcTpymeHT OHO npKo!
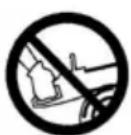
He nCnoJIb3OBAb BO BpEma DoxJa! Bepey ot Bo3deIcTBnBnAri!

Hocnte 3aunTHbIe KACKy,6epuun N ouKn!
CnmboJ 3HaueHne

Hocnte 3aunThbIe nepuatkn!

IcnoJIb3yIte npOuHyIO 6yBb!

IpeB BBOOM B 3KcNpyaTauHIO npOHTe pyKOBoCTBO NO 3KcNpyaTaun!
PnpapBoTe CzepHOn NnNoi HCTpyMeHT Bcerda CneDyEt DepxKaTb DByma pykam!
IOBaHbI npOn3BOAnTeJeM. Ecnn 3apAHOe yCTpOuCTBO, KOToPoe NOxOHT IaONpeEJIeHHoro BnDa aKKyMnyTOpOB, NcNoJb3yET-CdpyrIMn AKKyMnyTOpAMn, CyueCTByeT ONaCHOCTb NoXapa.
IcnoJb3ynteB3JeKtpoHCTpyMeHTax TOJIbKO npedycmOTpeHHbIe dIa 3TOrO aK KyMnyTOpbl. IcnoJb3OBAHne dpyrux akkyMnyTOpOB MOKeT pUBeCTN K TpaBMam N O-nachOCTn NoKapa.
ДерхиTe HeNcNoIb3YeMbIe aKKyMyJrTOpbl NOaJIbWe OT cKpeNOK, MoHET, KJIIO-yei, rBO3Dei, BnHTOB u DpyRnx MeJKNXMeTaNJIuYeCKNX npeMToB, KOToPbIe MOrTy Bbl3bIBaTb 3aMbIkaHne KOHTaKTOB. KoPOTKOe 3aMbIkaHne MeJdy aKKyMyJrTOpHbIMNI KOHTaKTamN MoKET Bbl3BaTb BO3rOpAHnIJIIN Noxap.
Ipn He npabnblbHom nCnoJb3ObaHnn n3 aKKymyIaTopa MoKet BbITeKaTb XNIDKOCTb. N36eraTe KOHTaTc HnMn. Ipn CnyaHOM KOHTaKTc CMoTte ee BODoE CnN XNIOKCTb nonana B rna3a, o6paNTecb 3a MeDnUHcKoN NOMouB. BbITEk-7aayakmyJIaTOpHaay XNIOKCTb MOXET Bbl3BaTb pa3dpaxKeHne KOKn nn OXOrn.
He nCnoJb3yIte NOBpeXdeHHbI NJI MOnOuΦnUncPOBaHHbI aKKymJrTOp. NOBpeKJDeHHbI NJI MOnUΦnUncPOBaHHbI aKKymJrTOp MOrY T BECTN Ce6H eHpeDcKa3yEmo N Bbl3bBA Tb IOxap, B3pbIB NJI ONaCHOCTb TpaBMnPOBaHnI.
- Depxhte aKKymyIaTOP BdIaN OT ORHn IIN BbICOKNX TemnepaTyp. OToHb NJIIN TEMnepaTpa BblIe 130 ^ C MOryt Bbl3BaTb B3pbIB.
CneyuTe HNcTpkykqnM No 3apKe n Hn B KOem Cnyue He 3apKaIte aKKymyIaTOp IIN aKKymyIaTOPbI INHCTpyMeHT BHe dnaNa3OHa TeMnepaTyp, yka3aHHoro B pyKOBODCTBe NO 3KcNpyaTuu. HenpaBnIbHa 3apJa Ka IIN 3apJa Ka BHe yTBepKdEHHoro Dnana3OHa TeMnpaTy pMOrT npINBcTN K pa3pySeHnIO aKKymyIaTopa I NOBblWeHIO NOXapOOnaCHOCTn.
3.1.6 CepBnC
PemOHnPOBaTb 3JIeKTPoHnHCTpyMeHT OJXKeH TOIbKO KBaJIuΦnUPOBaHHbI CneuaJIncT, IcNoJIb3yA OpuHaJIbHbIe 3aIyactn. TAKIM o6pa3OM o6ecNeuBaETcR COxpaHeHne HaJeXHoCTN 3JIeKTPoHnHCTpyMeHTa.
HnBkoemcnyaeHeBbINOJIHnTeO6cnyXINBaHne pa3pyuWeHHbIXaKKymyIaTOPOB.
O6cIyKINBaHHe aKKymYJrTOPOB dONJXHO Ocy- 1eCTBnTbCToJIbKO pOn3BOUHTeMeM IIn erO cepBnCHo cIyXboi.
3.2 Yka3aHnno TExHnke 6e3oNaChOCTn npn o6paueHn c ceHNo nIIO
ДерхиTe BCEЧаTN TeNa NOДаьшOTВрашaHOошсЯцEN.ПepeTtemКAKBKNIOUaTb NIIy, cIeDyET y6eDnTbCBA TOM,чTOцEN He KOHTaKTHpyet C KaKIMNJIb6OпрdmTaMn.KpaTKOBpemeHHa He-BHNMaTeJIbHocTb пri paBoTe c ZeHNoI NIOJMOKeT pnpBeCTN K NOJaAHIO ODeJdbI NIIu ChAteT TEa B DBNXyUcSЯцNTb.
PpavBpyKoepxHteeHNy0nny3a 3aHIO pykcy, a neBoi -3a npeHIO. PnpdepxBaITeCb IMeHHO 3TOI cxEMbl: B npOTNBOM Clyuae pNCK NOLyEHHra TpaBMbl yBeJIINuBAeTcra.
ДерхиTe ceHny nIpy 3a nIOnIpOBaHHyIO qacTb pyuKN, TaK KaK nIIbHa r cenb MoKxet KacaTbcr CkpbITbIX 3JIeKTpUneCKNXnHn. KoHTaKT cENHO nnblc KaBeIemNoI HaPraJxHeHEm MOKeT pINBecTn K TOMy,TO MeTaIINueCKNe qACTn INCTpyMeHTa TAKXe 6yDyT NOd HapJxHeHEm,a 3TO MoKetCTaTB pInuHoi NOPaxHeHr 3JIeKTpUneCKM TOKOM.
CneyuET Hocntb 3aunTHbIe OUYK. Kpome TOrO, peKOMeHdyetc NcNoJb3OBaTb CpeCTBa dJa 3aunTbI OpraHOB cnyxa, roJIOBbl, pyK, hor n CTynHei. HadnexkaaJ 3aunTHa Odejda ChnKaeT pNCK TpaBMnpoBAHn B pe3yNbTaTe nonaDaHn C tpykKn IJI N CnyauHoro COnpNKOCHOBEHn C NNlbHOJ Uenbo.
3anpezaetcpa6oTaTb c cenHoi nIIO, cT0r Ha depeBe, IecTHNue, KpbIe nn HeycTouHBOn NOBepxHocTN. Ppi pa6ote TaKIM o6pa3OM cyueCTByeT pNCK noIyehnra TpaBMbl.
O6ra3aTeNbHO 3aHMaIte yCToUHBOe noJIOXeHne HcNoJIb3yIte cENHyO NnIy TOIbKO Ha TBepDo,HaDeXHoN paBHO IOBepxHocTN. Ha cKoJIb3KO INn HeCTa-6nJIbHO ONOpHO NOBepxHocTN MOxHO JERKO NOTepaTb paBHOBeCne INn KOHTpONb HaD cENHO nnIOI.
IOMHHTe, YTO HAnpJxEHHa BeTKa npn OTNINIBAHm MOKeT OTnpyXHnHTb. NocLe CHrTnHaPjxHeHn B DpeBeChbIX BO
JOKHAX BeTka MoKTe yIapNTb NOJIb3OBaTeJIy IIN BbIbNTb n3 erO pyK cIeNHyIO NnIy.
Pn Cpe3aHn NoJnecka n MoOdbix DepeBbeB c6bIouaute oc6byo octopoxHoCTb.ToHKne BETKN MOryT 3anyTaTbcB UcENi uJaPTb Bac NIN BbIEcTn Bac N3 paBHOBecn.
I I nepeHockn ceHNOI NbI BbIKNoHTe ee n depKnte 3a nepeHIOpyky, noBepHyB NlbHOI cEnbIO ot Tena. TpaHcNopTnpOBaTB n XpaHNTb cENHyIO Nny CJeDyET TObKO B 3aunTHOM qexJe. ByTe KpaHHe OCTOpOJHbI npI o6paueHIn C ceHNOI NIOI, YTObI CHN3ITb BEPOrTHoCTb HnpeHaMepeHHoro COpNKoCHOBeHnA C BpaauoueiCra cEnbIO.
CobIIOdaIte HNCTpyKcHn NO CMa3bIBaHnIO,HaTaeHHeUcEN N 3aMeHe HAnpaBIAKoIe WInHbI U cEN. HenpaBnIbHO HaTayHTa IIN CMA3aHHa YcEnb MoKeT IOnHyTb. TaKke Bo3pactaet pNCK OTdauN.
Pa3pewaeTc nnNTb TOnbKO dpeBecnHy. He nCnoNb3yIe nnIy dIa BblOnHeHn HenpeDycMOrpeHHbIX pa60.TpImep: Ira pa3pe3aHnMaTeAIIuYeCKnx NnactMaccOBbIX n3deJI, KnpNCHoK KJaKn IIN CTponTeJIbHbIX MaTePnaIOB (Kpome DepeBAAHIX).NCNoIb3OBAHne cENHOI nnJIbI He NO Ha3NaueHIO MoKeT pInBeCTN K BO3HNKHOBEHIO ONaCHbIX CITyaU.
He nbItaTecb BaNITb DepeBO, ecn y Bac Het YetKoro npedcTaBneHnO pnckax nX n36erAHn. Nolb3OBaTeNb nn INhIe Nua MoYr NOJyHTb cepbe3HbIe TpaBMbl B pe3yIbTaTe naHnAdepeBa.
3.3 O6uHne yka3aHnNo ToTexHKe 6e3onachocTuJnIeNHBix nII
Co6nOdaTe Bce yka3aHn npu OunchTke cenHOn nIbI OT cKoJIeHn MaTePnAJa, BO BpeM xpaHeHn IIN BbINOJHeHn pa6OT no TeXo6cnykBaHnIO. Y6eInTeCb, YTO BbIKNoaTeBb OKIoueh, a akKymyIaTOP ydaJeH. HeoXHaHHa 3KcNpyataun CEHN OH nIbI npu ydaJIeHn cKoJIeHn MaTePnAJa IIN BO BpeM BblONHeHn peMOHTbIX pa6OT moKeT npNBecTu K cepBe3HbIM TpaBMam.
3.4 Pnuchnbl OTdaun MepbI JJIe ee npedotBpaueHn
O6paTHa OToDAu BO3HnKaeT, KOrDa KoHeu Ha- npabJIOUeI uINbI HataKnBaETcHa KaKoI IIn6o pEaMeT nN KOrDa dpeBecnHa cr6aetcN IN NIIbHra cENb 3aXnMaetc B IpOnJIe.
KoHTaKT KOHcA HApBaJIHOUeI UINbI C KaKIMn60 npEiMeTOM B HeKOTOpbIX CnyaX MoKeT npNBecTI K O6paTHOH OTBeTHOH peAKuN, npKOTOpO HApBaJIHOUaI WInHa CMeUaETcB BBePx B HApBaJIeHN IOnb3OBaTeJI.
3aueemnne HINbHOn ceHn Ha BepxHei KpOMKe HnpaBnIOe HINbI peNbCa MoKet npNBecTN Kpe3KOMy CMeUeHIO WInbI B HnpaBJeHN N0lb3OBaTeJI.
IIO6aI3 3Tnx peakun MOKeT npNBecTu K NOTepe KOHTpOJIHaNnIOU N, KaK CNeDCTBVE, K TAgXeJIbIM TpaBMam. He CneDuYeT NoJaraTbcr NcKINuHTeJIbHO Ha BCTpoEHHbIe 3aUNTHbIe Y-CTPOINCTBa cENHO nnbl. POnlb3OBaTeNb cENHO nnblI DOJXeH nPnHbTb Pd Mep DnI pPeDoTbpaUeHnra TpaBMn HecuaCThblx CInyaeB.
OTdaua YBnETC CNeDCTBnEM HnPaBnBHorO nHn HerpamOTHO NOb3OBaHnue cENHO nnNo. 4To6bl He DonyCTnTbe, co6nOdaIte cneDyUo- uie Mepb npedocTopoXHoCTn.
Ipoquho depxnte eenyu ny o6enmnyaku, comkhyb naibcbl BOKpyr puek.Pacnojaratb TeNo npykn cyeet taKIMobpa3OM, yTo6bl MoXHO 6blIO npOTNBOdeHCTBOBaTb O6pAHO tDAue. EcnBCE Heo6xOdmbie Mepbl npedoctopoxHoCTn 6blIIN PpeiPnHrtbI B COOTBeTCTBn C yka3aHNMyn IO TexHnke 6e3OnaCHOCTn, NOpb3OBaTeJIb CNpaBHTbcra C O6pAHO tDAue.Hn BV KOem cnUyae He OTnyckaIte eenyu niny.
N36eraIte Heydo6Horo noJoxHenra TeJa Hne NnIITe Bblse ypOBHn Pnue. 3To nO- 3BOJIaET IyUHe KOHTPOINPOBaTb CEHNHyIO NnIy B HeoXnDaHHbIX CNTyaCnIax Nn36eratb COpnKOCHOBEHn KOnCa IInHbIC DpyrIMn npedmetamn.
IcnoJIb3yIe ToJIbKO npEaHncaHHbIe npOn3BOJnteJIem 3aNaChbIe uINHbI nIIbHbIe cEN. B npOTnBHom cIyuae BO3-MoKeH pa3pbIB cEN, KOTOpBI npNBedeT K o6paTHOJ OTaUe.
Co6IIOdaIte npedocTaBneHbIe npo3-BoNDTeJIem HNCTpyKcII N0 3aToUcKe I TeXOBcnyXnBaHNIO NINbHOJ cEN. CnUKOM Hn3KNI ORpaHNUHTeJI bIy6bHIb Bpe3a-HNIA NOBbIaET BepoTHOCTb O6paTHOJ OTda-UN.
3.5 Bn6paunOHna Harpy3ka
Onachoctb Bn6paun
Фakmueckoe 3NaueHue 6bpaauoHou 3-Muccuu npu uCnOlb306aHu ycmpoUcmea MoKem omnuaMbce om 3a8NeHHO2o npoU3BODumEm 3NaueHua. H6nOdaIte cne
DyUOuIeΦaKTopbBO3dEInCTBnI Do IIN BO BpEmNcNoJIb3OBaHnI:
IcnoJb3yeTcJn yCTpoNCTBO no Ha3Ha-ueHIO?
MATEPnApa3pe3aHnn06pa6oTaH npaBnBHO?
HaxoNTcraIyCTpOuCTBO BXopoWem pa6ooyem coctoHN?
IpaBnIbHO JIN 3aocTpEn HJN yCTaHOJIeH pexyun INHCTpyMeHT?
YcTaHOBHeHbI JIN KPOHHTeHbI N,ecnTpe6yeTcA,DOJONHHTeHBHbIE Bn6paUNOHbIMNpyKIN,INIOTHO JIN OHN COeHNHeHbICyCTPOICTBOM?
3KcnpaHpyte yctpoCtBO TOnbKO c aCTOTOB BpaueHn ABnraTeJn, Heo6xOanMoI DnO TDeJIbHO pa60TbI. N36eraTe MaKcMaIbHOuactOTbI BpaueHn, YTO6bl CHN3NTb UPOBeHb Wyma n BN6paun.
H3-3a HnnpabunbHoro nCNoJb3OBAHnI TexHHueckoro 06cnykuaHnI Wym I Bn6pauny UcTPOINCTBa MOrY TIOBbICNTbcr. 3TO HaHOCNTBpeI 3dOpOBbU qHeNObEka.B TaKnx CUYaXHEMeDJIeHNO BbIKIQUaHTe yCTPOINCTBO I O6pATInTECb 3a eRo pEMoHTOM B aBTOpN3OBAHNBI CepBnCHbI ueHTp.
CTeNEHb Bn6paCIOHNOHOro HAnpJxEHHaBNCNT OT BbIOnHReMoN pa6Otbl NnN NCNoJIb30BaHNy UcTPOiCTBa. OueHnte N yctAHOBnTe COOTBeTCTByUOuNe nepepbIBb IB pa6ote. Bpe3yIbTaTe Bn6paCIOHNaHarpy3ka B TeueHne BCero pa6Ouyero BpemEn 6yDet 3HaunTeJIbHO CHNXeHa.
ДиnteьнэЗкплуаця устpoиCTba noB-Bepraet onepatopa Bn6paunu N MoKet Bbl3BaTb np6JIemblc KpoBOO6paueHneM (CmNTOM «6eIoro nalbuca»).UTo6bl yMeHbUnTB 3OT pNCK, Hocnte nepaATkn I depXknte pyKn B TENNE. B cnyae obhapyxeHna CmNTOMA «6eIoro nalbuca» HeMeJleHNO o6paNTecb K Bpauy. 3TN CmNTOMbl BKIOUohT B ce6r: OHeMeHne, Notepu UyBCTBnTeNbHOCTN, NOKaJIbIBaHne, 3yd, 60lb, cna6oCTb, N3MeHne UBeTa nncoCToHnRA KOxN. O6bIuHO 3TN CmNTOMbl BnIraIOT Ha nablcuI, pyKn IIN nyIbc. Ppr Hn3Knx TempepaTypax pNCK Bo3pactaET.
ДелаиTe BO Bpempa6oeryDnHДЛnteJb-HbIe nepepbIbI,уTObI OTdoxHyTb OT Wyma N Bn6paun.ПланИрУte cBoIO pa6Ory TAKIM o6pa3OM,yTObI pa3dJIHTb EKnIpyaTauny y-CTpoiCTB,KOTOpbIE CO3daIOT CInbHbIe BN6paun,Ha HeckoJIbKO dHei.
EcnBbI NOyBCTByeTe DnCKOMΦopT INN DnCXPOMIO KOJN PnIN NCNOJIb3OBAHNN y- cTpoiCTBa B pykax, HemeIeHHo IpeKpaITe pa6Oy. YcTaHOBtne DOCTaTOUHbIe NepepbI BB Pa6Ote. Pa6Ota 6e3 DoCTaTOUHbIX nepepbIOB MoKeT pInBeCTN K MeCTHOB Bu6pa- CIOHOH OBJe3HN.
MHHHm3npyTe pNCK BO3dEeCTBnB N6pa- cun. BbIOnHnTe 06cnyKnbAne np6opa B COOTBeTCTBnC INHCTpyKcnMaMn B pykoBOdCTBe NO 3KcNPyataun.
Ecnn obopydoBaHne nCnoNb3yeTcra qacto, o6paNTecb K dInepy, yTo6bl npNo6peCTn aHTNBn6baCuioHHbIe akceccyapbl (HaNPmEp, pyKn).
I36eraTe pa6oTbIC np6bopom npi Tempepatye Hxke 10^ .B npaHe pa6oTb onpeJeNTe, KaK MOxHO orpaHnHTb Bn6paunOHHyIO Harpy3Ky.
3.6 Akyctnecekna Harpy3ka
HeKOTopa akyCTnuecka Harpy3ka, BbI3BaHHa 3Tm yCTpOInCTBOM, Hen36exHa. BbIOJHnTe 7ymhble paobt b YcTaHOBnEHhbe n OnpeJeHHbc CpOKn. Ppi Heo6xOIMOCTH cNe dyET y-HTbIBaT b Yka3AHN OTHOCNTeNbHO «TnxX YaCOB» I ORpaHNuHBaT b IpODoJXnTEbHOCTb pa-60t b Han6OJIee Heo6xOIMMbIM. IЯ obecneueHn JINHOn 3aUHTb I N3aUHTb I NII, HaxOJauxxCr NOBn3OCTn, Heo6xOIMMO Hocntb 6epuSi.
3.7 Yka3aHnno TeXnKe 6e3OnacHOCTnДЯakKymJrTopa n 3apJdHorOyctpoiCtBa
CobnndaTe yka3aHnna no Texnke 6e3oNaChocTn,coepKaunecB OTdEJIbHbIX pyKOBoIDCTBAX NO 3KcNpyTaun K aKKMyJrTOpy N 3apJHOMy yCTPOINCTBy.
CM.
pykoBOcTBo no 3KcnnyaTaun 443130:akkyMynrTOpbl
pykoBOcTBo no 3Kcnnyatau443131:3apnHbIe ycTpoNCTBa
3.8 Yka3aHnI NO TexHnke 6e3OnachOCTN BO BpeMpa6oTbI
Co6IIOdaIte yka3aHnno Texnke 6e3oNaCHoCTN B KOHKpeTHbIX CTpaHax, HAnpIMep, yKa3aHnno Texnke 6e3oNaChocTn npOpeCcNoHaNbHbIX accouau, fOHDOB couaNb-Horo oBeceueHnra, OpraHOB 3dpaBOOxApeHnra.
IcnoB3yIte yCTpoiCTBO TOIbKO npN DOCTA-TOUHOM DHeBHOM IIN NCKYCCTBEHHOM OCBe-
Pa6o7a 30Ha, Cb6o7H8 OToNocTOpOHnX npEmdTeOB (HaNPmEp, 6pe3KOB) - onacHOCTb CNOTbIKAHJ.
OnepaTop nIN noB3OBaTeIb OTBeuAOT 3a KIN3HB IN NIMyUeCTBO dpynx IIN.
EcnBbIpa6oTaTe c zenHoi nnoi BnepBbIe:
I Nonpocnte npodabua nnn dpyroro cneuaJIncTa o6bJcHnTb, kak o6paatab-cra c 6eH30nNoi, nII npOuDnte KypcbI.
Ipepe nepBbIM npimHeHem nonpaKTnKyTecb, no KpaHHe Mpe, B pacnIOBKe 6peBeH Ha KO3Jax IIN NOCTaBKe.
3.8.1 OnepaTopbI
YCTPOIcTBO 3aPepaetcNcNoIb3OBaTb DeTAM B BO3pacte Do 16 Nt NnUam, He O3HaKOMJIeHHbIM C pyKOBoDCTBOM NO 3KcPiyaTa-
IIO6O ueNoBek, pa6oTaUcHm C cenHoi nIIOH,doJxeh 6bITb OTDOXHyBWM,3DOpOBbIMn HaxoINTbcra B xopoWe fOpme. Ecn IocToaHNO 3dopOBbYyTomJeHne 3anpeua-etCra, Heo6xoImO cnpocntb y BpaCa, MoKHO nn pa6oTaTb C cENHOIIOH.
3.8.2 Bpempa6oTbI
CobnoDaIte B OTHoWeHn B BpeMeH np60tbl ceHHbIX nIN KOHKpeTHOcTpaHb.IBpeM pa60tbl cENbIX nIN MOxET ORpaHNUBaTBcR HaUHOHaJIb-HbIMN MeCTHBIMn PpaBnJaM.
3.8.3 Pa6ota c zenHoi nHoi
PNEpyPExEHNHe! OnacHocTb ce- pbe3hblx TpaBM. B cnyae nCnoJb3ObaHn He NOINHOCTbIO CO6paHHoI cENHOI NIIbI cyueCTBy- et PnCK noJIyHeHn cepBe3HbIX TpaBM.
He nCnoJIb3yIte cIeNHyIO nIy, noka OHa He 6yJeT nONHOCTbIO CO6paHa.
BbINOJIHnTe Bn3yAlhBHy OCMOTpeKKaXdbIM NcNoIb3OBAHNEm, YTO6bl y6eIITbcB TOM, YTO cENHa NIIa NOJHOCTbO CO6paHa H He CoDEpXHT NobpeXDeHHbIX INN IN3HOWeHHbIX DeTanei. BCE npedoxpaHnTeJIbHbIe IN 3aUHTbIe yCTpoIcTBa DOJXHbI NCpabHo FyHKUOHPOBaTb.
PNEpyPExJEHNE!OnacHocTb TpaBMbI n3-3a HnpeDHaMepeHHoro BKJIIOueHnueHNHOIIbl. HenpeDHaMepeHHoe BkJIIOueHne CEHNHOIMoKeT npNBecTN K cepBe3HbIM TpaBMam. PoToMMy n3BleKaIte aKKymyIaTOp B CNe dyUOx CNyAax:
TexHnueckOM OcMoTpe,peryIinpoBke n O- uNCTKe;
pa60Ta c npHaIeXHOCCTaMn;
OCTaBHeHne cenHoi nINbI 6e3 npncMoTpa;
TpaHcnpTnPOBka;
pa3MeIeHN Ha xpaHeHne;
TexHnueckOM 6cIyKbAHn n peMOHTe;
B clyuae onaCHOCTN.
Hikorda He pa6oTaTe B OndHouky.
Bcerda depknte hartoBe anTeky Ha cnyu- yau paHeHn.
I36eTaTe KOHTaKTa C MeTaJIINueCKIMN IpeDMeTAMHAXODAUNMNCB 3eMJe IJN 3JIeKTPuYeCKn COeDInHeHHbIMN C Hei.
CpeIcTbA ININBnDyajbHOJ 3aUHTbI BKJIHO- yauT:
3aunTHa Kaca;
cpeic7Ba 3auntbI cnyxa (hanpimep,6e-pu),oco6eHNO,koIpa6Ouyn DeHb coCTabJraT 60lee 2,5 yacOB;
3aUHTbIe OUYN INIIN UNTOK 3aUHTHOJ KACKN;
3auntbIe UTaHbIC BCTaBKOJ DJIaTNTbl OT NOpe3OB;
Kpenkne pa6oue nepaTkn;
6e3onacHna 06yBb c HeckoJb3aJeN NO-DOWBOn HCTaJIbHbIM HOCKOM.
He nCnoJIb3yIte ueHny nIy Bblwe ypoBnI neu, 6e3Opacna pa6Ota B 3TOM IIOJKeHN He BO3MOxHa.
Ipn CmeHe MeCTa BbIKNoHTe DBNrATeJn HaJeHbTe cENHyU 3aunTy.
Ecnu cenna Hne nCnoB3yeTc, yCTaHOBnTe cenHyIO 3aunTy Nn3BnKeNte aKKMyJnTOp.
KnaIte cenHyTOIy TOJIbKO B BBIKIOueH-HOM COCTOHN.
He nCnoB3yIte cenHyIO nnly B kaueCTBe MexaHnueckoro pbIurara IINn dIra nepemeuneHnra DpeBecnbl.
BpeBHa,ToIuHnKaKOTOpbIX npeBblIaet dIHy NIIbHOI WInHb,IoJXHbI paCNIINBaTbcr ToIbKO KBaJIINΦUncIpOBaHHbIM nepcoHaIOM.
IpnctabJnTe nny K o6pa6aTbBaemomy MaTePnAny TOnbKO C pa6oTaUoSeNnBHOu cEpbH, H N B KOe CNyuae He NpOKnIOuAte pa6oTaUOyU cENHyU nny K nNlbHO u cenn.
Cneinte 3a Tem, yTo6bl MacNo Jnla Cma3Kn NnIbHOu cENHe nonaDaNO B 3emNIO.
He niiTe BO Bpemrdox, cherona da nnu TOpMa.
HnB KOem cnyuae He BbIOJnte n3 cTpor npedeoxpaHNTbHbIe n 3aunTHbIe yCTpOi-CTBa.
4 MOHTAX
I PENEYIPPEXJEHNE! Onacnoctbc
pbe3HbIX TpaBM. B cnyae nCnoJb3OBaHnA He NOnHOCTbIO CO6paHHo CEHNHO INIbI CyUeCTByEET PnCK NOJyHeHn cepBe3HbIX TpaBM.
He nCnoB3yIte cenHyIO nIy, noka oHa He 6ydet nonHocTbIO co6pAna.
BbINOJIHnTe Bn3yaJIbHbI OCMOT npeKaKdblIM NcNoJIb3OBAHNem, YTO6bl y6eINtbcB T TOM, YTO cENHa NIIa NOHOCtBu CO6paHa N He CoDEpKNT NOBpeXKeHHbIX INN IN3HOWeHHbIX DeTanei. Bce npedoxpaHnteJbHbIe N 3aUNTHbIe yCTpoIcTBa DOJXHbI NCpRaBHO cyHKUOHPOBaTb.
OCTOPOXHO! OnachocTb pe3aHbIX paH.
B npocece c6opkn octpbIe kpa nIbHoi ceNMOrT CTaTb npuHOn pe3aHbIX paH.
Ipeen Hauanom c6opKn CJeNyET BbHyTb akKymyJrTOP.
PnBbINOJIHeHn pa6oT no yCTaHOBe NINb-HOI cENI HAnpaBIAUe IINHb CNe dyET NOJb3OBaTBcAaUNTHbIMN nepuATkAMN.
4.1 YcTaHOBka HappaBnaIOUeN uHHbI (03, 04)
- Перемechтente зашиту рук (03/1) К дурову ручke (03/a), утосы пазблкововать Торmoц лени.
2.ПовернITE ueHTpaJIbHbI 3amok (03/2) npoTnB YacOBOc CTpeKN I CHmMtE erO BMeCTe c KpbIshKoN (03/3). - YctaHOBnte HnnpabJIIOU OUIHy (04/1) Ha HnnpabJIIOU 6oT (04/2) n nepemecHTe ee Ha3aI HaCTOJbKO, UTO6bl MOxHOb bIIO y-CTaHOBNTb NIIbHyIO ueNb.
4.2 MoHTaX NJIbHoN cenn (04)
- YIIOXINTe NIIbHyIO cENb Ha 3Be3DOUky cENN (04/3) IN KaHaBky HAnpaBJIooJe IINHbI (04/1).
2.ObepHnTe NnIbHyU cenb BOKpyr BeDOMoN 3Be3doUKN HnPaBnJIOUeN uINhbl. NnIbHaN cENb DOJXHa CNeRka npOBnCaTb C HxKHeN CTOpOHbI HnPaBnJIOUe NINhbl.
4.3 HatakeHne nnIbHOJ cenn (03, 05)
I PIMMEUHNE NJIbHa YeNb IpaBnJbHO HaTaNyTa,ecNI OHa:
PnInneraetK HxHHe CTopoHe HanpaBlaIO- 1IeN HINbI N npOBopaUBAeTc pyKoI.
PnHnHaMaTcBcepeHHe HnPaBJIoo- 3-4 MM.
- Пюверьтей поадку пльbosи сени, чтоы о-на павиьно сидана на 3Be3doчke и направляюшине.
- YctaHOBnTe KpbIuKy (03/3) n cIeRka 3aTaN-Te ceHTpaJIbHbI 3amok (03/2).
- Повернente наразхhoe кольculo (03/4) К крblшke (03/3) Так, чтобы Два Тpeуглбнka 6ыпиобрашени друг К друг (03/b).
- NOBEPHNTe CEHTpaIbHbI 3aMOK (05/2) no yacobon cTpeIke. He cIeIyET nonHOCTbIO 3aTARIBaTB CEHTpaIbHbI 3aMOK IIN NOBOPaYIBaTB eO Ha3aI Ha ODN HxOJ.
- BpaaaTe HaTae KOnb0 (05/3) no yacobOy CTpeJIke Do Tex NOp, Noka NnIbHaayeNb He 6yDeT npabNtBHO HATaHTa, KaK OINcaHO Bblwe.
- BpaaaTe ceHtpaBbHb 3amok (05/2) no cacoBoi cTpeJIke do ueJyka.
5 BBOI B 3KcPJIYATAUHO
ONACHOCTb! OnachocTb ДяжИЗн И onachocTb TЯкелых ТравМ. He3нане уka3a-ни NO Textиke 6e3OnachOCTn INHCTpyKци NO 3КСПлУаТAUng MОжET npINBeCTN K Cepbe3HbIM TpaBMam NДаЖЕСмерТи.
IpoHTaTe n co6JIIOdaTe BCE yka3AHn no texHnke 6e3ONaCHocTN n HnCTpyKuIN NO 3KcPnyatauIN DaHHORo pyKOBoDCTBa, a TAKKe pyKOBOdCTBa nO 3KcNPyTaUIN, O KOTOpbIX nDeT peYb, DnNCNoB3OBAHnue cENHO nnbl!
PNEyPExEHNc!OnacHocTb cepe3hIX TpaBM. NOBpeKdHne Detanei cenHOI MIOKeT PnVBecTN K cepbe3HbIM TpaB-MaM.
BbINOJIHnTe Bn3yaIbHbI OCMOT npeKaKdbIM NcNoIb3OBAHHeM, YTO6bl y6eIITbcB TOM, YTO cENHa NIIa NOnHocTbIO CObpaHn HE CoDEpXHT NOBpeXdEHHbIX IIN IN3HOWeHHbIX DeTanei. BCE npedoxpaHnTeNbHbIeN 3aUHTbIe yCTpoIcTBa DOJXHbI NCpABHo yHKcNOHIpOBaTb.
5.1 3apka akkymnyTopa
ОьразпгБИнманеHaДиANA3OH Temперatype ДдяЗардкN,сM.TexHnueckne daHHbIe.
IINPIMEYAHNE Iopno6HyIO INHOpMaunIO cm. B OTdeJIbHbIX INCTpyKcIyX NO 3KcNpyaTaunn aKKymyIaTopa n 3apAHO yCTpoiCTBa:
pykoBocToNo 3KcNnyatauN 443130:akkMyJrTOpbl
pykoBODCTBO NO 3KcPnyatau4 443131:3a-praHbIe yCTpOInCTBa
5.2 BcTaBka n n3BJeHne aKKyMyJrTopa (06)
BHIMAHHE! Onacnoctb nobpekdeHnaakymyIaTopa. Ecnn nocne nCNoJIb3OBAHn y-CTpOcTb OCTaBnTb akKMyIaTOp BHyTpN, 3TO MoKeT npINBeCTn K NOBpeKdeHnO akKMyIaTota.
Cpa3y nocne 3aBepweHnra pa60tbl cneJyET n3Bnueb aKKymyIaTOp n3 yCTpOiCTBa nNoMeCTNTb Ha xpaHeHne B yTePJIeHHoe MeCTo.
BCTabnTb aKKymyIaTOP B yCTpoIcTBO cneDyeT HENOCpeIcTBeHNO nepeI pa6oToI.
BctabkaakkymyIaTopa
- BctaBte aKkymyIaTOp (06/1) cBepxv B cenHyo nny do ynopa (06/a).
N3BneueHne akKymyIaTopa
- Haxmte u ydepxmbaite KhoNky fNKcaun (06/2) ha akymytope.
2.ИЗВЕКИТe(06/b)akKуМЛЯТOP.
5.3 3anpaBka macna dIy cMa3Kn nnIbHOJ cenn (07)
BHIMAHNE! Onachoctb nobpejdeHnue cenHOBINbI.EcINB6ake CNIUKOM MaIO INHn HET Macna DNRA CMA3KN NINbHOU CEEN INN ECIN OHO BbICyUSeHO/CKJIeEHO, 3TO MOKeT PnVBecTN K cepBe3HBIM NOBpeJDeHNm CEHNOH INbI. BbICyINBaHHe/CKJEnBaHHe Macna DIA CMA3KN INNBHOU CEEN MOKeT PnVBecTN K NOBpeJDeHNo MACnoHECuXx DeTaJe INN MaCnAHorO Hacoca. IOBpeJDeHne TaKke npOnCxOuNT npn IcNoB3OBaHn OTpa6oTaHHoro Macna. IVcNoB3OBaHne OTpa6oTaHHORo Macna pInBODHT K BpeDHOMy BO3dEChBnO Ha OKpyKaHOU cydy!
3aene Te Macno Dnma3Kn NnIbHOu cenB 6ak nepeD BBOOM B 3KcNpyatauHIO.
He nCnoJIb3yIte Otpa6OtaHHOe MacNo!
3aNoHnIe 6ak HObIM MaclOM IJIa CMa3KN IIbHOI cENI camoe IO3dHee npi KaKdoI 3aMeHe aKKyMylTopa.
ABTOMaTnuecka CMa3OuHa cNCTema HnpepepbIBHO Cha6XaET MacIOM NIIbHyU cenb HaInpabJIauO uH uHHy BO Bpempa60tbl. MacIO DnA CMA3Kn NIIbHO UeIN 3auuuaet OT Koppo3nn I npexDeBpemeHHoro n3HocA. Jn Heo6xO-DIMOTO CMA3bIBAHN IINbHO UeIN B bake BCerDa DOJNXHO HaxODHTBCA DOCTaTOHoe KOJNUeCTBO MaCJa DnA CMA3Kn NIIbHO UeIN.
Дя СмаьВИнг ПИьНОУЕПИ И HalpaBЛHо-
шey WINHbI NcNoB3yIte TOJbKO KaueCTBeHHOe
ЗКОЛOruHoe,бIOLOrUYeCKn pa3JaRaIOUeECa
MaCNo DЯ СмAZKII PnIbHOB UeN, TpaHCNoPTHpyIte I XpaHInTe MacNo TOJbKO B pa3peWENHbIX
N COOTBETCTBEHNO MapKnPOBaHHbIX EMKOCTx.
IpeD KaxDbIM NcNoJIb3OBAHNEM I npN KaXdoN
3aMeHe aKKymJYTopa CJeDyET NpOBepTb yPoBHeMACNa I DOJIbBaTb MacNo DЯ CmAZKII
PnIbHOB UeN B CJIyuae Heo6XoDnMOCTN:
- Поберпь уровень macna uepe3 smotpoBoe okho(07/1) macnaHoro 6aka. B smotpoBOM OKHe Bcerda doJnxHo 6bTb BnHNO macNo. He donyckaetc npebblueHne MInHMaJIbHoro n MaKcmaJIbHoro ypOBHЯ macna.
2.Доелte MacNo ДЯ СмЗи ZeHn Yepe3 3a- nHBhIe rOpNoBnHbI (07/2).
5.4 NpOBepka HataKeHna cenn
Yepe3 KopoTKe INHTepBaIbI npOBepaTe HaTaJxHHe 1eN, NocKoJIbky HOBbIe 1eNn pAcTyrNaIbTc. B nPoUecce 3KcPlyatau nn np HArpeBaHnn PnIbHa a 1eNbYdINHReTcN nPobNucaet. YBeInuHTb HATXeHne NINbHOu 1eN: cm. 2na6a
4.3 "Hamjxehue nunbHou cenu (03, 05)", Cmp. 427.
IINPIMEYAHNE INIbHnAeNb npaBnJIbHO HATyTa,ecnOHa:
πpɪnɪŋerae T K HɪxHη C T O pOHe H aɪnpaBЯI O- UeɪnHbɪ n I pɒBopɑuNbAeTc pyKoɪ.
PnHnOHaMaetcBcepeDInHe HnpaBJIIO- 1IeNHHbHa3-4MM.
OCTOPOXHO! OnachocTb TpaBMnpOBaHnI np CXoJe NIIbHoi ceni! HeIOCTaTOUHO3aJATAI NIIbHaI cEnb MOKeT COITN BO BpeMraBoToB I npNBecTI K TpaBMe.
Yacto npOBepaTe HaTaeKeHne cenn. HataKHeHne cenn CnIuKOM Hn3Koe, KOrda DnKyU- 3BeHbBA BICTyNaOT n3 Na3a B HnXHeN YaCTn HapBaBnaUoSei uHHbl.
Ecnn Hataxehne cenn cnukom Hn3Koe, 3aTnHTe ee COOTBETCTBYUUM o6pa3OM.
5.5 Поберка пботocnocoboctnTopmo3a ци
Cenna nmeT pyHOn TOPMO3 cenn, KOTOpBn AKTNBnpyETc NOMObIO pbIaRa TOPMO3a cenn, HAnpImep, B Cnyae OTdauN.
Pn Cpa6aTbIbAHm TOpMo3a Zenu ZenHaa NJIa n DBNfATEJb MTHOBeHHO OCTaHaBJIbBAOTcra.
ONACHOCTb! OnachocTb dЯЖи3Hn n3-3a He6peXho 06paueHn! He6peXHOe HnpeBnDEHHoe DnBXKeHn YenHOI NnblMOrYT npNBecTN K CaMbIM cepBe3HbIM TpaBMam Nn da-Jke Cmeptn.
Ipnpa6ote c ceHnoi nnOu pyKOBOdCTByntecb coo6paXeHnMn 6e3OnaCHOCTn HTepeYTe KOHcHTpaCNU.
Pn De6JIOKINOBAHN TOPMO3a CEHN He HAnMaIe HN Ha KaKo BbIKIOUOAteJIb.
I PENEYPPEXJEHNE! OnacHocTb dJn Xn3HN n pNCK TjXeJIbIX TpaBM n3-3a HeNCnpaBHoro TopMo3a Zenn. Ecnn TropMo3 Zenn He pa6oTaET, HapnIMep, B cIyuae OTdaun pa6oTaIOUe ZENHOI NINbl, 3TO MOKeT pINBeCTN K CaMbIM cepbe3HbIM TpaBMam I daJe CMEptN.
IpoBepaTe TOpMo3 ceni nepeK KaKdbIM Hauanom pa60tbl.
He BKIouaIte cenHyIO nIy, ecNI TopMo3 cENn HeNCnpaBeH. B 3Tom cnyuae o6paNTecb 3a npOBepKo IeHNo NNblB CneUNaJIIN3NPOBaHHyIO MaCTepCKyIO.
5.5.1 Поверка pa6otoocno6hoctn Topmo3a ueN npB bIKIOueHHOM DBnraTeNe(08)
1.ИЗВЕКЛТЕаKKуMЛЯТОПи3уСТРОИСТВА:СМ.;
2лава5.2"Всma经ka uuzeJIeueHueаKKуMЛЯmopa(06)”,Cmp.427.
2. TTo6bI pa36IOKIpOBaTb TopMo3 cenN, nepeMeCTnTe (08/a) pbUar TopMo3a cenN (08/1) B HAnpaBHeHn DyroBoi pyuKn (08/2). PInbHa- r YeB MoKeT npOBopauHbTaBcR pykoN.
3. UTo6bI BkIIOuHTb TOPMo3 cENn, NOBepHInTe (08/b) pbUar TopMo3a cENn (08/1) BnepeJ. NIIbHa YcEnb He DoJxHa npOBopaunBaTbcra.
5.5.2 Пюверka pa6OTocnOC6HocTn TopMo3a ZeEN npN BKNIOueHHOM DBnRaTeNe (08)
I PIMMEUHNE IpeD BKNIOUeHNEM cENHOI p36JOKpyTe TOpMO3 cENI.
- Kpenko Depeknte cenHyu nIy 3a DyrOByu n 3aHIO pUky.
- Pa36lOkpyIe TopMo3 cenn.
- BkIIOUHTe DnBraTeJIb.
4.ПеремechITE(08/b)pbyarTopMo3aцenv (08/1)ВпepeД.ПиьнаяцenvиDbИгател bOJIЖнblHemeДпЕНО OCTaHOВNTbCra.
6 YIINPABJIENHE
ONACHOCTb! OnachoctbДЯЖИЗнOnachoctb TЯкелых ТравМ. He3HaHne yka3a-HnNo TeXnKe 6e3oNaChOCTn INHCTpyKcIyNo 3KcPnyatauN MoKTe npNBecTn K cepBe3HbIM TpaBMam NДажс Cmeptn.
IpnouHTaTe n co6JIoDAaTe BCE yka3aHnna ITO texHnke 6e3ONaChOCTn INHcTpkyuNn IO kCnnyaTaun DaHHoro pyKOBODCTBa, a TaKKe pyKOBODCTBa NO 3kCNyatauN, O KOTOpbIX NDeT peYb, Do nCNoB3OBAHnna UenHoi nnbl!
NPEyPExEHNcOpBHO yCTPOcTBa.3KcIpyatauHcnpaBHO yCTPOcTBa MoKeT npBecn K cepbe3HbIM TpaBMam N NobpeXdeHHO yCTPOcTBa.
3Kcnpnyatpyte yctpoiCTBO TOnbKO B nCnnpaBHOM HEnOBpeJdeHHOM COCTOHNn PnIN CnnpaBHbIX N Xopo0o 3akpenJIeHHbIX DeTaJIAX.
CobIouaTe HaunohBbHbIe NIOXeHn, perIaMeHTnpUoUne DoynctUmoe BpeM pa60Tbl.
O6xbaTnte 3aHIOIO pyky npaBOi, a DyROByIO pyky IeBOI pyKO, n ydepxnBaIte y-CTpOietBO.
He otnyckaai Te pyuKn, noka pa6oTaET DnurataTeJIb.
He nCnoJIb3yIte cENHyIO pNlNy:
Pn yctanoctn,
PnIIOXOMcMOyBCTBUN,
IIOJ BO3JeNCTBnEM aJIKOrOJIa, MeiKa-MeHTOB HApKOTIKOB.
6.1 PpOBepka Macna IJRA CMA3KN NJIbHOJ cenn
Y6eIntecb, yTO B 6ake IOCTaTOUHoe KOINue-CTBO MacJa IINCA3KN INJbHOJ CEHN:
peepKaKdbIM Haayanom pa6oTbI
BOBpeMa pa60TbI
He No3Ke KaKDo 3aMeHbI aKKyMylTopa
Ecn npoBHeMaCna Inra Cma3Kn NnIbHoN 1eHN Hn3Kn, 3aNoJIHnTe cenHyIO nIpy.
Iopraok deiCTBn cm. 2naBa 5.3 "3anpaKa Macna dna Cma3ku nulbHOu cenu (07), Cmp.428.
BbIKJIouHHe DnIraTeJIA:
- OTnycntTe pbIar ra3a (09/2).
Cma3Ka HnpaBJIooeI uHbI
- TuaTeNbHO OuNCTnTE na3 uHHbI (19/3) n MacNoBnyCKHbE OTBePcTna (19/4).
- TuaTeNbHO ouHCTnTE cMa3OuHoe OTBepCTne (20/1) c obex CTopOH.
- C nOMOuBcMa3OuHOro u npua (20/2) nooopeepHO 3aIpaBbTe c o6eHX cToPcKo CMA3KN, yTO6bI OHa paBHomepHo Bblna Ha
KOHuaX 3Be3doUKn. Pn 3TOM NOCTOARHNO pOKpyuBaIte 3Be3doUky.
8.5 NapameTpbl cenn n dnaMeTp HannbHnka
PPEyPExEHHe!OnachocTb ce- pbe3HbIX TpaBM.Испьзоване Ha пип He- caHKUHOHPOBAHHО ПЛьНО спп Илп HanpaB- JIAIOUII SHINE MOKETnpINBecTN K cepbe3HbIM TpaBMam.
IcnoNb3ynte TOnbko caHKUHOHPOBaHHbIE NnIbHbIe cENN HAppaBraIOUne WInHbI.
3anachbte yacmu nunbho uenu u HanpaenioueuHb: cm mexHuueckue xapakmepucmuku.
AkkymyIaTopbI 6aTapeKIMoXHO 6ecnlaTHO CdaTb B CneDyUOuNX MeCTax:
TocydapctBehna cny6a no ytnn3aunn nn nyHKT cbopa (HaNPmep, MyHnunnabhbie CKnadbl)
Mara3nHbI 6aTaapeek n aKKyMnyTopoB
IpyHKtbI npHema o6uei cnCTembI BO3BpaTa IcNoJIb3OBAHHbIX 6aTapeek yctpoiCTB
IpyHKtI npnema n3rOToBnteJIa (ecn OH He ABJAreTc qJeHOM OBeDuHeHHo CnCTembl BO3Bpata)
3TN 3aBHeHn DeIcTBtBbHbT OJbKO DnA aK KyMnyrTOPOB N 6aTapeN, KOToPbIE npOaIOCTcB C TpaHax Ebponeckoro Co103a N COOTBeTCTByOT DnpeKTnBe 2006/66/EC. B cTpaHax 3a npeJaMa M Ebponeckoro Co103a MOyT DeIeCTBOBaTb DpyrIne npabnla, kacaUouneC8 yTnIn3aunn 6aTapeN n AKKymyIrTOPOB.
13 TEXHnueCKNE XAPAKTEPNCIKN
www.al-ko.com/service-contacts
15 TAPAHTIN
Mbl yctpaHReEM BO3MOXHbIe DepeKtbl MaTePnaIOB nII npOn3BOIDCTBa B TeueHne Cpoka daBHocTn, yCTaHOBJIeHHoro 3aKOHOM B OTHOSeHn peKNaMaucn NO KaYeCTBy, nyTeM pEmOHTa nII 3aMeHbI n3DeJn. Cpok daBHocTn ONpeJeTcra 3aKoHOdaTeNbCTBOM cTpaHbI, B KOTopoN 6blno npNo6peTeHo y-CTpoiCTBO.
Hahe rapaHTnHoe o6aTeNbCTBO DeIcTbnteJIb- rapaHTn aHHynpyetc npi:
HO TOJIbKO npN:
CobIIOdaIte daHHoe pyKOBOcTBO no 3Kcnnyatau
Haadnejkaeem Obaaehn;
NcNoJIb3OBAHnOpuHaJIbHbIX 3aNaChbIX Ya-CTeI.
cAmOCTeTJIbHbIX NOnbITKaX pEmoHTa;
cAmOCTeTbHbIXTexHnueCKNXn3MeHeHHx;
ICNPOJIb3OBAHnHE NO Ha3HaueHnIO.
TapaHTnHa He paCnpocTpAneTcRaHa:
IOBpeKdEHHaKOKpaCooHOro NOKpbITn, Bbl3BaHHbIe HOpMaJIbHbIM n3HOCOM;
N3HaINBaIOUeC8 YAcTn, O6O3HaueHHbIe B BeDOMoCTN 3aNaChbIX YAcTei paMKoX XXXXX (X).
TapaHTnHbI CpOK NaHnHaTe TocJne NOKyNk NepBbIM KOHeuHbIM NOJb3ObaTeJIeM. OnpedeJIouUIm
ΦaKTopOM cIyKNT dAta Ha DoKymHe, NODTBepXdaUoUeM NOKynKy. ObpaaatcB c HactOaUM
CEPTNOKATOM IN DOKyMeHToM, NODTBepXdaUoUm NOKynKy, K CBOeMy DNJIepy IIN B 6JInxAaHb
TOPn3OBaHHbI CepBnCHbI CEHTP. HAcToaUeN CEPtnOfHKaT He KacaETcR rapaHTnpyEmbIX 3aKOHOM
IpaB Ha npTeH3nn NOKyNaTeJI K npOdaBuY.
IPEKJIAD OPINIHJY NOCIBHnKA 3 EKCIIyATAUII
3mict
1 Inopmaia npo noci6nK i3 ekcnnyatauii 441
1.1 CmboJn Ha TtTybHi cToPiHci 441
1.2 YMOBHI no3HaueHHra cnHahbHi cNoBa 441
2 Onic npictpoio 441
2.1 BnKOpncTaHHa npu3HaueHHaM 442
2.2Пиклади He npabunbHoro 3acTocyBaHHa 442
2.3 3aIIuKoBi pIzIKu 442
2.4 3anobixhi Ta 3axnchi eIemehtn 442
2.4.1 KoHTaKTop yBIMKHeHHra 442
2.4.2 RaIbMo IaHcIora /BaXJIb raIb- Ma IaHcIora 442
2.4.3 3axnt Bi nepeBaHTaKeHHra... 443
2.4.4 TanaBmo Bn6iry NaHcIora 443
2.4.5 BoNTn nepexonneHnnaHcIora... 443
2.5 YMOBHI no3HaeHHa npicTpoi... 443
2.5.1MiTkn6e3neKn 443
2.5.2 CnmboJn ekcnnyataci.. 443
2.6 Bi3yaIbHn orJyD BpuO6y (01).....443
2.7 Komnnekt noctaehn (02) 444
3ПравидаTeXнicken6e3nekn 444
3.1 3aŋbhi pekomehdaui 3 6e3nekn e- neKTpoinHCTpymEnTy. 444
3.1.1 Be3neka Ha po6oOmy micui..... 444
3.1.2 EneKtpnHa 6e3neKa 444
3.1.3 Be3neKa IIOeI 445
3.1.4 KopncTyBaHn eIeKtponNkoIO i NOBOJKeHH 3 Heo.. 445
3.1.5 KopncTyBaHHa kMyJITOpHn m npnaDom i NOBxKeHH 3 Hm... 446
3.1.6 Cepbic. 446
3.2ПравILAТexhIKIбe3neKINiДчacpo6OTn 3ЯнцюROBIMNIIJAMN.....446
3.3 3araJIbHi peKOMeHdaUciI 3 6e3neKn Ira NaHcuroBoi nn..447
3.4ПичиниЗВОРТьоВiДачI Ta 3a-CTepeжehнЯ ДЯ onepaTopa... 447
3.5 Bi6pauiHe HabaHTaXeHHn 448
3.6 AkyctunHe HaBaHTaKeHHra... 448
3.7 Правидахнік 6e3neкn Дпя akу- myлгетора и зapадно рпсстpoю.....449
3.8ПравILAТexhikn6e3neknpiДчасpo6oTи 449
3.8.1 OnepaTopu 449
3.8.2 Yac po6oTu 449
3.8.3 Po6oTa 3 eJekTponnkoH..449
4 CknaaHnna 450
4.1 MoNTaX HAnpMaMHOi 03,04)....450
4.2 YkndaHnIy IJIbHoro IaHcIora (04) 450
4.3HaTgRaHHnIyIbHoro IaHcIora (03,05) 450
5 BBeDenHb Eeknlyaataciio. 451
5.1 3apnditb akymyIaTOp.. .451
5.2 BCTaHOBHeHH Ta BnMaHH aKMy- JIaTopa (06) 451
5.3 3aJIINBaHHI NaHcIHOBOrMOactnla (07) .451
5.4 NpeBipka Hatary IaHcIora... .451
5.5 Npebipka cnpaBHOCTI ranbMa naH- 452
5.5.1 Ipebipka npaue3daTHocTi ranbMa IanuIra 3 BUMKHeHIM DBNy-Hom (08) .452
5.5.2переверка пацетдатноcti raь- Ma laHOra 3 yBIMKHeHm DBN- ryHom (08) .452
6 Eknyatauia 452
6.1 IpepeBipTe IaHIOroBe MaCTnIO....453
6.2 IpeBipka raIbMa IaHcIora. 453
6.3YBIMKHeHHBIMKHeHHnBuRyHa(09)453
6.4 Npebipka pibn 3apny akymynto- pa... .453
7 Po6oça noBéɪnka Ta cnocić po6oTn......453
7.1 3BaJIIOBaHHaDepeBa(10,11).454
7.2 O6pi3aHHr rINOK (12) 455
7.3Попeчнepo3nIIOBaHЯdepeBa (13-16) 455
7.4 Ponepeuhe po3nnIOBaHHn nnIOMaTepiAnB 455
8 Texhiue He 06cnyrobyBaHH Ta dOrn4 .... 456
8.1 HataraHn nnIaIbHoro IaHcIora (17) 456
8.2 OuHueHHBHyTpHbOro npocTopy 3ipooukN 457
8.3IpeecTaHOBka WbNdko3aTnckHoro npncToPO (18). 457
8.4 IpeBipka, noBepTaHnTa 3MaUyBaHHa HnprMHOi uHH (19,20).... 457
8.5 Ta6nucyobvbaHnaHua 457
9 YcyHeHH HeCnpaBHOtei 458
10 TpahcnopTyBaHHra 459
11 36epiraHHra 459
11.1 36epiraHn npucTroo 459
11.2 36epirahnny akymyIaTopa Ta 3apd-Horo npncTroo... 460
12 Ytuniana 460
13TexHiHxapaKTepcntn 461
14 CepBicHe 6cnyroByBaHH 462
15Garantia 462
1 IHΦOPMALIJI IPO NOCIEHNIK I3 EKCPIYATAUII
Himeczka Bercia Micntb opurihalhni no ci6nki 3 ekcnnyatauii. Bci iHsi MOBHi Bepcii -e nepeknadi opurihalhoro noci6nka 3 ekcnnyatauii.
3aBxDn TpMaIte uei nocibnk i3 ekcnnyataui niD pykoIO, 0o6 npouHTaNrOro, kIo BAM 3HaOnobTbcra iHopmaia npo npncTpi.
IpeedabaTe npntpiinHmOc6am Tinb- kn pa3om 3n m nocihkom i3 ekcnnyatauii.
IpouHTaTe Ta DOpTmUyTEc8 Bka3IBOK 3 texHikn 6e3neKn Ta nonepedKeH, 0o MicTAYbC8 B Ucbomy Noci6NHy 3 ekcnnyataui.
1.1 CnmboHa THTyJIbHi cTOpIHci
yMOBHe n03Ha- yehn
3haueHH

O6OB'3KOBO npouHTaIte uei noC6HnK i3 ekcnnyatau i nepeB BBeDeHHaM B eKcnnyatauio. Lc e He06xIDHOYMOBOIO 6e3neuHOi Ta 6e3BiDMOBHOI pObToN.

Noci6HnK 3 ekcnnyataaii
Obepexno NOBObTeC3 NiTi-iOHnHm akyMnyTopamn! 3Okpema,doTpmuYTeC iHCTpyKci 3 TpaHcnpTyBaHH, 36epiraHH Ta yTuNi3aii B cboMy Noci6Hky 3 ekcnlyaTaui!
1.2 YMOBHnNo3HaueHH Ta CnHaJIbHi CIOBa
HE6E3NEKA! Bka3yE Ha He6e3neuHy cnTy-aizio, yka, kIoo II He yHnKHyTn, npN3BODnTb Do Cmepti a6o cepno3Hnx TpaBM.
NONEPEDXEHH!Bka3yeHa notehuiHo He6e3neuHy cHTyaIIO,yKa,kIIO II He yHNKHyTN, MOKe npn3BeCTn Do CmepTi a6o cepNo3Hx TpaM.
OBEPEXHO! Bka3ye Ha noTeHciHo He-6e3neuHy cnTuayiIO,ЯKa,ЯKIo II He yHnKHyTN,MOKe npN3BecTn TpaBMvBaHHaJeKoi Ta cepeHbOI TjXKOCTI.
YBAFA! Bka3ye Ha cnTyauciIO,ЯKa,ЯKIo II He yHnKHyTn,MOKe npN3BecTn Do MaHOBOrO 3bNTKy.
I IINIMITKA CneuaJIbHi Bka3iBKn dIg Kpa- ⅡOro po3yMiHH Ta nonerweHH po60Tu.
2 OINC INPNCPOHO
U cybomy noci6nky onncAo eNeKtpnHy naHcIoroBny nny 3 KNBneHHM BiD akymyIaTopa.
PnCTpii cnid BnKOpNCTOByBaTn TiBKn pa3om 3 NiTi-iOHHMn akymyIaTOpaMn i 3apArdHMn npNCTPOAMN, 3a3HaueHMMn B TexHiHNx XapaKTePnCTNKax. DoataKobi BiIDOMocTi npo akymyIaTOp i 3apAHDn pnCTpii DnB. B OKpeMnx IHCTpykiax:
Посибник користува 443130: akymларотрп
Ioci6HnK KopncTyBaHa 443131: zapnHi npn-ctpoi
YBAG! He6e3neka nooKoJKeHH npncTpo- 10 Ta akymyIaTopa. Jkso npicTpri npaue 3 He npabNbHmN aKymyIaTopam, TO ce MOxE npn3BeCTn Do nooKoJKeHH npncTpoTo Ta akymyIaTopiB.
Ipnctpi npaioe TINbkn 3 npn3HaueHIMN Dnra cboRo akymyTOpamn.
2.1 BnKOpncTaHn 3a npn3HaueHHm
IaHIOROBa nIIa po3paxObaHa BnKIOUHO dIa BnKOpNCTAHNA B DOMaUHbOMy Ta npicaDn6Homy roCnoapCTBi. Y ciI oBnaCTi 3hAxoNTbcra NaHIOROBa nIIa, kY MoXHa BnKOpNCTaTn dJIa IerKnx po6IT i3 po3nnIOBaHHa DepeBHH, HApni-KnaI:
po3nIIOBaHHnnlOMaTepiainB;
Bnpi3aHHKINBOJNTiB;
po3nIIOBaHHaDpOB.
3aBn eKtpnHMy npNBOy aKymJrOpHy
HaNcIIOBOy Nny MoXHa BnKOpNCTOByBaTn DnA
P03nJIIOBAHHa DepeBHN He TIlbKn Ha BiDkPNTOMy NobITpi, ane i BnpmiueHHi. Byd-Ke iHwe
3aCTOCyBaHHa OKpIM ONnCAHO, BBaxaETbcR BnKOpNCtAHHM He 3a npn3HaueHHam.
Ley npnctpi npn3naeH O nI npnbathoro BnKOpncTaan. ByIb-ye IwE BnKOpncTaanHa a6o HecaHKIOHOBAHI 3mHN Ta DOnOBHeHHa KOHCTpyKcII BBaxaOTbc BnKOpncTaanHM He 3a npn3naeH Hm i npn3BOJrB DO aHyIbOaHHra paaHTi, a TAKOX BTPaN BiNObIHOCTI Ta BiIMOBu BiD 6yDbKaoi BiINOBdaJIbHOCTI Bnpo6nka 3a WKOdy, 3aBdAnhy KOpNCTyBaueBi a6o TpeTi CTOPOHi.
OBEPEXHO! He6e3neka TpaBMyBaHHy pa3i BnKOpncTaHHa He 3a npu3HaueHHaM!
P03nHOBAHNe eNEKtpoNtkoH yXkopiDnX TIN, 1O npoxoTb chepe3 DepeBHy a6o iHsi MaTepi- aNN, MOKe npu3BeCTn DO OTPMaHHa TpaBMn.
BukopncToByte eNeKtpoNnky BnKnIOuHO dny Ierknx po6it i3 po3nnIbAHn depeBnHn.
Ipeed po3nHIOBaHHaM BuaJaTe 3 depeBHNuJxKopiHi npEdMeTn, HapnKnaD, CBy-XN, TBnHTN, fITnHn.
4.1 MoHTax HAnpMHOI uHHN (03, 04)
- NotarytB (03/a) pyuHn 3axnCT (03/1) 3a DuroBy puKy, uo6 po36JokyBaTn raIbmo NaHcIora.
2.Поверніть центральный Amok (03/2) npotruOHHNKOBoi CTpiIKn i 3HIMiTb pa3om i3 KoJxvOM (03/3). - BctaHObITb HapmHy uHy (04/1) Ha ha-npMHi 6oTn (04/2) i nepemictiB hazad TaK, UO6 MOxHa 6yNo BCTaHOBHTn NINJbHni NaHcIg.
4.2 YknaaHn nnJbHoro naHcIora (04)
- YknaiItb nIJIbHn IaHcIg Ha 3ipoQky IaHcIgra (04/3) i B kaHaBky HaprMHOI shHH (04/1).
2.ObepHItb nIJIbHN IaHcIg HABKOJIO BeDeHOI 3ipoQKn HAprrMHOI uHH.NIJIbHN IaHcIg NOBHeH 3IeRkA npOBncATn 3 HxHbO'CTOpOHn HAprrMHOI uHH.
4.3 HataraHn nnIaIbHoro IaHcIora (03, 05)
H NIPMITKA IIJIaJIbHn IaHcIg npaBnIbHO HATrHyTNI, RAIO BIN:
PnIyrae Do HxHbOi CTOpOHn HAnpMaHOI uHHn i npoBeptaetbcra pyko,
πiДиMaεTbcBcepeHnHnHa nprmHoiIuHnHa 3-4 MM.
- IpekehainTeC8 B TOMy, 00 nIJIbHn JAnHcIg npabInbHO BCTaHOBJeHO Ha 3ipoUci Ta HapmHiuHni.
- BctaHObitb Ha Micce KoKyx (03/3) i 3nerka 3aTARHITb CEHTpaJIbHN 3AMOK (03/2).
- Поверніт b obepTObe kINbue (03/4) B ha- npЯМКу KOKyxa (03/3)ТаK, uO6 dBa TpNKyT- Hnka 6yIn 3BepHeHi OdH Do OdHOrO (03/b).
- Поветаит eHTpaJIbHn 3amok (05/2) 3a roДИннКOBОЮ CTPIKIO. 3aTЯгпТь ceHTpaJIbHn 3AMOK He Do KiHcA a6O NOBepHiTb Ha OДИN OБePt Ha3aI.
- Повертуйе обертое кинце (05/3) за рождуннокoboюстриково, дOKи пляльни ланцior He 6уde натыгHyTo npabnIbHo, як описано виcke.
6.Повернitsь центальни замok (05/2)за ro-DHHNKOBIOО CTPIKIOO Do Knaцаня.
5 BBEENHBA EKCNIYATAUIO
HEBE3NEKA! Pn3nk cmepti a6o TjKkNx TpaBM. He3HaHHn npaBnI TexhIKn 6e3neKn Ta ekCnPyataci MoKe npu3BeCTn Do cepNo3Hnx TpaBM i HabiTb Cmepti.
IpouHTaTe i Bci npabuna Texhikn 6e3neKn Ta ekCnnyataui, 0oMiCTaTbcB Ucbomy NociHky, a TAKOX IHCTpykui 3 ekCnnyataui, nepei BnKOpNCtAHNm eJeKTpOnnIKn, a TAKOX DToPmUyTEcraix!
NONEPEDJXEHH!Pn3NK OTPMaHH cepno3Hx TpaBM.JaKoHa eJeKtpoNlci BCTaHOBHeNO IOsKOJxHcI DeTani,Ce MoKe pni- 3BeCTn DO OTPMaHH cepno3Hx TpaBM.
Ipeid KOxHIM BnKOpNCtAHHm BnKOhyTe Bi3yaJIbHNI KOHTPOJIb, 0o6 nepekoHaTncB TOMy, 0o eJNeKTpONIIky NOBHiCTIO 3MOHTOBaHO i 0o BOHa He MiCTNb 6yDb-IAkN X NooKOJXeHI a6O 3HOseHNX DeTanei. Bci 3aNo6ixHi Ta 3axChi npNCtpoI NOBHHI cnpabHo fYHKUioHyBaTI.
5.1 3apädiTb akymyTOp
3BepHb yBarHa diana3oH TemnepaTpy 3apraJkaHHa kymyIaTopa, nB. TexhiHi daHI.
8 NPMITKA BiIbI W DoKlaIHy iHΦopMaciIO nIB. B OkpeMnx IHCTpyKcIyx NO eKcnIyatau akyMyJrTopa Ta 3apIHorO npIcTpoI:
Ioci6HnK KopncTyBaHa 443130: akymyJrTo- np
Ioci6HnK KopncTyBa4 443131: 3apAHi npn-ctpoi
5.2 BCTaHOBJIeHH Ta BnMaHHa kymyITopa (06)
YBAI! He6e3neka noxokdxehnay akymyIaTopa.Якpo nicna BnKOpncTaHHa akymyIaTOp 3aNnHTB npucTrooi, ue MOKe npu3BecTu DO noXkOdkxeHHa akymyIaTopa.
Odpa3y nicra BnKOpncTaHHa kymyIaTOp cnId BnHrTu 3 npncPoTo Ta 36epirAtu B 3aXnueHOMy BiD BnNBy Hn3bKnx TempepaTyp micti.
AkymyIaTOp cIiD BCtABJrN B npucpiB 6e3- nOcepeHbO nepeB BNKOpNCaHHM.
BctaHOBJIeHHn akymyJrTopa
- BCTaBTe akymyIaTOp (06/1) 33aNy B IaHcIIO-ROBy NnIy Do KnaCaHHra (06/a).
BnMaHHaKymyIaTopa
- Hatnchytn Ta yTpmyBaTu HaTnchTyToIO KHO npky po36bNoKyBaHHa 06/2)Ha akymnyTopi.
- BnMItb akymyjTOp (06/b).
5.3 3aHbAHHaHcIOrOBoro MaCTnla (07)
YBAGA! He6e3neka nowkoJxehnnaHIOROI nII. 3aHaTo MaIa KJIbKicTb abo BiDcyTHiCt b IaHIOROBO rO MaCTnla B 6aKy IaHIOROBI nII, a6o NOro BnCnxAHN/CKNeIOBaHHr MoKe np3BeCTn Do cepNo3HNX NowKOJxHeB IIJIbHoro IaHIOra. BncxAHN/CKNeIOBaHHr NaIOROBO rO MaCTnla MoKe np3BeCTn Do NowKOJxEHnMaclONpOBiHNx DeTalei MacJHoro Hacoca. PoIKoJxEHn TaKox BiIDbYBaCTbcra B pa3i BnKOpNCtAHN BIdnpaCbObaHO rMCTnla. BnKOpNCtAHN BIdnpaCbObaHO rMaCTnla np3BODntb Do 3a6pydHeHHr DOBkInl'
Ipeed BBeHnM Beknnyataio 3anOB-Hitb 6ak IaHcIOROBIM MactNJOM.
He BnKOpncToBvIe BiDnpaCboBaHe MaCTnNo!
3anOBHIOHe 6ak IaHcIgOBIM MaCTINOM Haini3Hiue nID yac 3amHn akymyIaTopa.
A B T M A T N U H A M a C T N L B H C N C T E M a 6 e 3 n e p e p b H O N o c t a y a e M a C T N I O Y N I N J A L B H N I N A H U O R I H A N P R M H Y S U H Y N I D Y A C P O B O T N. I N A H U O R O B E M a C T N I O 3 a x i u a e B i d K O P O 3 I T a N e p e d y a c h O R O 3 H O W Y B A H N Y. I N A H O B X I D H O R O 3 M a U Y B A H N Y I N I N J A L B H O R O I N A H U Z I R A B 6 a k y 3 a B K D M A E 6 y T N D O C T A T H R K I N B K I C T B I N A H U Z I R O B O R O M a C T N I A.
Дя 3maуванн пляь Horo NaHOra i Ha-npMHOI uHHn BnKOpNCTOBuTe TiNbKn RaKHe e-KoIorH MaCTInO, lo BioIorHpo Po3KnadAetbC,ДЯ nIIaBnHex NaHcTOrIB, TpaHcnpTyNei 36epiraTe MaCTInO TiNbKn B Do3BOJeHx i BiNIOBIDHO MapKOBaHN X EMHOCTaX.
IpepeKoXHIM BnKOpNCtAHHm i nD qac KoxHOi 3amHn akymyJrTopa cnid nepeBiprtn pBeHb MaCTnJa Ta DOJIINBAITM MaCTnIO 3a Notpe6n:
- IpepeBipuPi PiBeH MaCna Upee3 OrIyObe BIKHO (07/1) MacJHoro 6aKa. BOrJIOBOMy BIKHI 3aBXKnMaE 6yTu BNHO MaCTnNo. MiIMaJIbHm i MaKcMAmJIbHm PiBeH MaCTnJa He NOBHHi 6yTu NpeBnUeHi.
2.Доиnte NaHcIOrObe MaCTnIO Yepe3 3aINBHy roPNObHy (07/2).
5.4 Npebipka Hatay IaHoura
Yepe3 Kopotki iHTepBaHn nepeBipraTe HaTAR naHOra, ockIbKn HOBI naHcUorn po3rpyOTbcR. B npoceci ekcnnyatau npn HarpibaHni nnilab
HnI NaHOr NOOBKyEcTa npOBncae.36inb- 4.3 "HamraHHnIaNbHoO NaHoua (03, 05), cmopihka 450.
H NPNMITKA NIIJIbHNI JAnIcIg npaBnJIbHO HATrHyTNI,AKUO BII:
npiyrae do Hxhboi ctopohn HanpmaHoi i npoBeptaeTbca pyko,
πiДиMaεTbcR BcepeHHi HapPmHOI ΜHHHa 3-4 MM.
OBEPEXHO! He6e3neKa TpaBMyBaHn npn cxoDi nIJIaIbHoro IaHcOra! Cna6ko HaTARHyTuI NaHcIg MoKe 3iCKouHTu NiD Yac po6OTTa npn3BeCTn Do TpaBMn.
IocinHO KOHTPOHOnTe HaTg NaHOra. HataR NaHOra 3acna6Kn, KOnpObooyi NaHKn BnCTyNaIOb 3 KaHaBKn Ha HxKHi CTOpOHHa- nPamHOI uHHN.
HaTayIte IaHcIg, KOJI NaTAR IaHcIgra 3a-cna6Kn.
5.5 IpepeBipka cnpabHocti ralbMa laHciora
IaHcIOrBa nIIa Mae pyHe raIbMo IaHcIora,
Ke aKTHByETbcra 3a DOnOMoTO BaxKeIraIbMa
IaHcIora, HapnKnad, y BnnaDky BiDaqi.
Y pa3i cnpaocboByBaHHraIbMa IaHcIgra IaHcIO-ROBa NIIa i DnRyH MNTTeBO 3yNINHJOTbcra.
HE6E3NEKA! He6e3neka dny xHTTyepe3 He6aane NOBODKeHH! He6ani Ta Henepe6aueHi pyxu eJIeKTPoNlKN MOxTy cnpnHHTN cepNo3Hi TpaBMn a60 HabiTb CmepTb.
BukopncToByte eJekTpOnnIky, 03HaHOMNBunc b Texhiko6e3neKn Ta JnWe B CkOH-CTHTPOBAHOMy cTaHi.
IiD yac De6IokyBaHHraJbMa IaHcUra He HATnCKaIte He Ha JxOJHn BmMkau.
NONEPEDJXEHH! Pn3nk cmepti a60 cepno3hNx TpaBM Ype3 HecnpaBHe raIbMo IaHOra. JaKIO ralbmo IaHOra He npaioe, ce MOKe npu3BeCTn Do cepNo3Hnx TpaBM i HabiTb cMepti onepaTopa, HanpNKlaD, y pa3i BiDaqi npaioUoyo NIIJIbHOrO NaHOra.
IpebeipraIte raIbMo IaHcIora nepeI, noaTkom po60Tu.
He BMnkaIte eIeKtpoNnKy, kIIO raIbMo IaHcIora HecnpaBHe. B cIbOMy BInaIky BiI npaBTe NIIJIbHNI JAnIcIg Ha NepeBipKy B MaIcTePHIO 3 ObcIpyroByBaHnKJIeHTiB.
5.5.1 NpeBipka npaue3daTHocTi raIbMa IaHcIora 3 BmKHeHm DnRyHOM (08)
3a6oHHeBOBnKOpNCToBvBaTnJaHcIroBv nnJy:
KONI BTOMNeHi,
y pa3i noraHoro camonoyTTR,
KIO 3HAXOINTEcb NiBnNBOM aNKORIO, MeDnKaMeHTiB a6o HApKOTNkIB.
6.1 IpepeBipTe JauHcIorOBe MaCTnIO
IpekoHyTEcB TOMy,IO B 6aKy E doCTaTHbO IaHIOROBOrMaCTnla:
IpepeKoXHM BnKOpNCaHHaM
piid yac po60tn
πid Yac KOxHOI 3aMIHN aKMyJYTopa
Y pa3i Hn3bko r piBna MaCTnla 3anOBHItb NaHcIROBE MaCTnIO.
Iopraok di: nB. po3di 5.3 "3aunueaHnaHnuc02o02o macmuna (07)", cmopiHa 451.
6.2 IpeBipka rJIbMa JAnIcIora
Iopraok dH: nB. po3di 5.5 "Pepeepka cnpaehocmi zalbma naHouza", cmopiHa 452.
NONEPEJXEHH! Pn3nk cmepti a60 cepno3Hx TpaBM Ype3 HecnpaBHe raIbMo IaHOra. RaKIO rALbMO IaHOra He npaioe, ce MOKe Iprn3BeCTn Do cepNo3Hx TpaBM i HabITb CMEpTi OepaTopa, HapnKJa, y pa3i BiDaqi IpaQIOUOro NIIJIbHOrO IaHOra.
IpeBipraIte raIbMo IaHcIora nepeI noaT- kOM po60tN.
He BMnkaIte eIeKTpOuNkU, JaIIO raIbMo IaHcIora HecnpaBHe. B cIbOMy BInpaKy BiI npaBTe NIIaIbHn IaHcIg Ha nepeBipKy B MaIcTepHIO 3 O6cIpyoBvBaHnKaIeHTiB.
6.3 YbIMKHeHHBumKHeHHaBnryHa (09)
OBEPEXHO! He6e3neka nouKoJxehnna opraHb cnyx!Piuc po60tn eJeKtponnka CTBOPcE rUHHn UWM, kN MoKe npVBecTn Do noukoDxehnroprAHIB cnyx.
KopncTyIeC8 3acobamn 3axncTy cnyx npiaocpo60tn 3 eNeKtpoNIIKOIO.
R NPPIMITKA Ipeed BkIIOueHnram LaHcIO-ROBOI NNIN De6NOKyTe raIbMo NaHcIora.
YbIMKHeHHaBnHyHa:
- BidnyctiB ralbmo naHcHora.
- BeJIHKIM najbIeM HaTNCiTb i yTpIMyIte KHOKNy 6JOKyBaHHa (09/1).
-
HatncihItb i ytpmmyTe BaxkInb ra3y (09/2).
-
BiDnycTiB Khonky 6nokyBaHHa (09/1). Nicna 3anycky naHucIroBOi nnn yTpmyBaTN KHO- kny 6nokyBaHHa He notpi6Ho. KhoNka 6nokyBaHHa CnyKuTb dJa 3anO6irAHHaHeHaBMnC-Horo 3anycky NaHucIroBOi nnn.
BmMkaHHaBnryHa:
- Bidiynctitb baxinb ra3y (09/2).
6.4 Npebeipka pibna 3apny akymyIaTopa
IhdkatoppiBn3apy01/8po3aobahni 3BepxynanlroBOi nnn.
Bih ckaaTbca 3 Tpbox cerMeHTiB. CerMeHTn 3aropraTbca abo 6IIMaHb B 3aJeKHOcti BiD pIBHa 3apAdy.
| Серм ent Piвен b зару akу- у мелаятора | |
| 3агоряоть са 3 сe- MeHTи: | akymулajTop NOBністю заряджени. |
| 3агоряоть са 2 сe- MeHTи: | akymулajTop зарядже- ни на 2/3. |
| 3агоряоть са 1 сe- MeNT: | akymулajTop зарядже- ни на 1/3. |
| Блимас 1 сerment: НИЗБКIN рiВeH b зар- у батаpei. Ппinctрий НебабapOM ВIMKHeТь- ся. | |
7 POBOOVA NOBEIHKA TA CNOCI6POBOTN
8 NPMITKA CinbcboKorocnoapcbki raIy3eBi ctpaxoBI 6'edHaHnpeYJrphO npOnHyOtB KypcN no po60ti 3 IaHucIOBmN nJaAMi i Bnpy6kn licy.
HE6E3NEKA! He6e3neka Дя ХИТЯЧЕрз HeDocTaHicTb npopeciHnx 3HaHb! HeIOCTaTHi npopeciHi 3HaHHaMOkyTb npu3BecTudo BaxkNt TpaBM i HABiTb CmepTi!
Bupy6ky nicy ny o6pi3ky rinoK moXHa dOpyaTn tiIbKn 06i3HaHm i DocbiDyeHm IIOJAM.
HE6E3NEKA! He6e3neka Дя кИТЯ чьpe3 po3цeплесня DepeBHH! TpICKN MOKyTb npn3BecTIdo cepno3Hx TpaBM i HabiTb CmepTi!
Budanitb trickni ockolkn 3 deTani, zo po3nnHoeTbcra.
7.1 3BaJIIOBAAHHIepeBa (10,11)
CnocTepiraIte 3a HabeDeHIMN HIXKYe paKaTOpAMM BnNBy do a6o niD yac 3BaJIIOBaHHa DepeBa:
IiD yac 3BaIIOBaan Hepeb cnid no6aTn npo Te, uo6 iHsi ocobn He hapaxanca Ha 6ydb-ky Hebe3neky, uo6 He 6ylo KOHTaTy 3 liHiaMn NoCTaHaHH I He 6yNo HaneHo MaTepiAIBHX 3bntkiv. Raio DepeBo BcTynae B KOHTaKt i3 LiHicIO NoCTaHaHH, HeraHNOBIOMTe KOMHaJIbHy cny6by.
Takox 3a6e3neute 3axnct yxkoBnacnocti, TBapin a6o npedmetib.BoH He noBHHI 3haoDNTnca B He6e3neuHi 3oHi. Y pa3i no- shKOJKeHHa HeraiHo NobIDomTe npo ce BnaChnky.
Be3neuHa BiDcTaHb MIX iHsIMn PO6OUMN Miczamn a6o npedMeTamn Mae cTahOBHTn He MeHwe 2 1/2 DOBXHH DepeBa.
OuiHb HnprMOK naIHHe DepeBa. BpiIaJIbHe 3NaueHHy dJa HnprMky naIH-HaDepeBa MaIOMb:
PnpOaHn Haxnl DepeBa;
po3TaUyBaHHBENKnxrIOK;
BnCota DpeBa;
3poCTaHHr rIOK 3 Ondoro 60ky;
po3TaUyBaHHHa pIBHnHi a6o cxnI;
acnmetpnuhe 3poCTaHHn, NOIkoJKeHHn DepeBHHn;
Hanpamoki WbNkictb BiTy;
CHIROBE HabaHTaXeHHr.
Upa3i po3TaUyBaHHHa cxuI npauHToTe Bn- 1e 3BaJIHOBaHOrO DepeBa.
IpekoHaTeCyaBn6paHni 30Hi BiXOy HemaepeukoJ.30Ha BiXoOy Mae po3Ta- WOByBaTcN prn6n3HO nKytom 45^ 3a DiarOHaJIIO B HanpMky, npOTnHexHOMy Ha-npMky BaNK (10).
CTOB6yp MaC 6byTn OuHneH N BiD YarapHnKIB, rIOK i CTOpOHHIX NpeMTeB (HaNPKnad,6pydy, KameHb, KopN, 0o BiDwapOByETbcra, CbXib, cko6, dpoTy too).
Uo6 3BaIHTn DepeBO, Heo6XiIDHO BIKOHaTn Dba niDnna i ODNH BaONuHn npOnn.
1.ПдчасВиубваннЯТаpo3пиюванняHa-ДИноЗатисHTь 3у6чатупд<|rotate_down|>у DepeBO,шо рo3пиюTOb.
2. CnooyaTy BnKoHaIe NiDnI (11/C) rOpHOTaJIbHo,NotIM HABCKOcN 3Bepxu NiD KyTOM He MeHwe 45^ .LcDe O3BOJNTb yHNKHTn 3aTnC KaHHa NaHcUroBOoi NINi NiD Yac BnKoHaHHa Dpyroro NiDnIy. NiDnIIIOBaHHa MaE 6ytN
YKOMORA 6JINXQHM Do 3emNi Ta 3HaxOHTNcB Heo6xIDHomy HAnpami 3BaJIIOBaHHa (11/E).Ii6nHa NiDIIJIIOBAHHa Mae CTAHOBUN npi-6n3Ho 1/4 iAmEtpa CTOB6ypa.
- 3po6itb BaOnHn npOnn (11/D) HabnpOt n iDnny toUHO roPn3oHTaIbHo. BAnOuyi npOnn Heo6xIDHO pObTuHa 3-5 cm BuIe roPn3oHTaIbHoro niDnny.
- Глибина валочого пponиу (11/D) NOBHHa 6byTu TakoIO, 7o6 mix NiДпнOM (11/C) iВалочим пponиюваням (11/D) 3aJIuWnBcra HeDOnI (11/F) He MeHwe 1/10 diametpa cTob6ypa. LcE HeDOnIg 3anO6irae obepTaHIO i naDiHHIO DepeBa B HEnpabNtBHomy Ha-npamky.ПID yac Na6nJxKeHHa BAlOnHOro nponny (11/D) Do HeDOnIg (11/F) DepeBoMaE nochatn Naatn. Y XODHomy pa3i He po3- nIIIOte NiDNIg nonepek!
JaKuo depeBo naaec niac po3nnIOBaHHa
JaKuo DepeBO NaadaB HenpaBnIbHomy HAnpymky uN BiXnJIeTbcra Ha3aJ i 3aTNCKae IaHcIIOBOy Nny, npuINHITb nIyT. Dnay po3tncKaHH npOnNy i nepeneCenHry DepeBa B Notpi6Hni HapramOK B6nIte B Heo6xIDHy LiHiO naiHnY DepeB'HN, pnaCTmacOBn a60 aIOMHieBn KInH.
HeraHb BnBeiItb NaHcIyOBy nIy 3 npOnNy, BmKHiTb i BiKnaIdb II.
BidiiniiTy 3OHy BiDxOy.
CTeKTe 3a nadaouHMn Ijnkamn.
5.Якuto DepeBo npoObKxye cTOrTu, B6nBUn KInHn B BaOnuHn npOnu, 3po6iTb KOHTpoJIbOBAHe 3BaJIIOBaHHa.
Ipumimka: Oo360nembcBukopucmo8ya mu nuwe KluHu 3 depeea, nacmAcu abo aniomHIO.
6.ПсЯЗаВЕРш�ня po3nHIOBaIbHnxpo6IT HeraHNo 3HIMiTb 3axNCHi HabyuHnKi i CTeXTe 3a CnHAnAMn a6o nonepdKyBaIbHnMn ro- IocOBUMKOMaHdAMn.
Bpi3aHHn, no3doBxHn npOnn i npOnn 3a cxeMoIO «cepue» Do3BOJeHO BnKoHyBaTN TiNbKn DocBIDueHm i obi3HaHm IIOJAM (11).
HE6E3NEKA! He6e3nekaДЯжTTЯчep3 naHnHa DepeBa! RaKUO BiXiD HEMOXNIBuYepe3 NaIHnA DepeBa, ue MoKe npn3BecTn DoBaxkx TpaBM i HabIt cMeptI!
Почиайтевирать,Tыкякюс можниВICTьбзпесшкового BiДхову BiД 3ВаюВанoro DepeBa.
HE6E3NEKA! He6e3neka Дя кИТТЯpe3 HeKoHTpoJIbOBAHe naIHHa DepeBa! HeKOHTpoJIbOBAHe naIHHa DepeB MOKe npI3BeCTNdo BaxkInx TpaM i HabiTb CmeptI!
Uo6 rapaHTyBaTn KOHTpOJIbOBAHe naIHHa DepeBa, Mix NiIINOM I BaIOuHIM npONIOM 3aIIuIte HeIoNl, IO MaE DOpIBHOBaTn npIbIIm3Ho 1/10 diametpa cToB6ypa.
He npoBObTe Bpy6ky niD qac BiTy.
7.2 06pi3aHHr rIOK (12)
O6pi3aHHrINOK nepe6bauae BiDIneHHrINOK BID DepeBa, 0o BnANo. 3BepHItb yBary Ha TaKe:
Piudacpo6otnBnpitbnaHcIoroBynnyB cTob6yp 3a donomoro1o 3y6uatoi niOpn.
Belenki, cnpmaBoHi Bn3 rilKn, Ha kci cnnapa-ctbca DepeBO, nOK 3aJIuIte.
Dpi6Hi rIKN BiIDnJIyTe 3a OIN pa3.
3pi3aIte (12/a) rIKN BiД DepeBa cncTeMaTnHOb,В рД. Cnepu 3pi3aIte rIKN,ЯК BAM 3abaxkaOTb.ПicJIЯ zuBOrO 3pi3aIte Ha-npyKeHi rIKN.HapeuTi,3pi3aIte ochOBHI rIKN 3i CTOBbypa.
3pi3aIte rIKN (12/b), 0o BiNbHO BnCraTb, 3Bepxy, a He 3Hn3y.
CTeXTe 3a HnpyKeHmN rIrkamn i po3nIJIouTe (12/c) ix 3n3y Bropy, uo6 3anobirTu 3aTnCKaHHIO NaHcIroBOoi nnn.
7.3 Ponepeyuhe po3nnIIOBaHHaDepeBa (13 - 16)
Ponepeyne po3nuiobanna neped6aaye po3iIneHHa depeBa, 0Bnano, Ha aactnH. 3BepHytb yBary Ha Take:
CniD Bn6patn CTiKe noJoxeHHa Ta pIBHOMipHo po3nojInTu Bary Tina Ha o6ox Horax. KaIO MOKJIbO, BnpiTb CTOB6yp rIKaMn, BaIkAmn a6o KInHaMn.
Ppno po3TaUyBaHnHa cxnIi 3aBXKn npa- pOnTe Bnue CTOB6ypa DepeBa, OckIbKn BiH MOKe CKOTNTNCBHN3 (13).
BedeHbIaHcIyNnnyTak,06ynoOB-KeHOMy dian3oHi nobOpTy nIbHoro IaHcIgHe 3haxOuINsc yactnH Tna.
BctaHOiB 3y6uAty nInpOy 6e3nocepEnhbo npra i3 KpOMKOIO 3apy6ka i nobepTaIte IaHIOROBy NnNy BiHocHO ciEi TouKn. HaPnKiHci po3nnny He doknaaiTe 6araTo 3yCINb.
Uo636epertn NOBHN KOHTpOJIb HAD NaHIO-ROBOIO NINOIO B MOMENT PO3NIIHOBaHHA,
3MeHtB TnCK npNTnCKy B KInCi po3pi3y, MiHo TpMaHOuPyKn NaHcIgROBOI nIKN.
CTeXTe 3a Tm, 06 nIJIbHn IaHIOr He TopKAbcra 3emni.
Picna 3aBepueHnpo3nnny doyeKaTeecyNHNKINJnIbHOro IaHOra, nepu Hix 3HiMaTN NaHOrOBy Nnly.
3aBxDn BmKaiTe DBNyH NaHOrOBoi NIN, nepu Hix nepexoNTn Do HactynHOrepeBa.
3araIbHa DOBXnHa CTOBbypa DepeBa cnpaCTb- cya pIBHomipHO:
Po3nHIOHe (14/a) cTob6yp 3BepxI i He Bpi3aHTecr B 3eMIO.
CTOB6yppeBa cnpaecbca OHNMI KIHcEM:
Uo6 yHnKHyTN 3aTnCKaHHN JaHnIOTOBOoi Nn i po3uennpeHHn DepeBa, cnoay Kny nIiNnIy- Te (15/a) cTOB6yp 3Hn3y Ha 1/3 diameTp a cTOB6ypa, noTIM nIiNnIyTe (15/b) 3Bepxv Do HnXHBOrO nIDnnNy.
CTOB6yp DepeBa cnnpaetbca 06oma kiHcramn: Uo6 yHnKHytn 3atncKaHHraanpuroBoi nIi npo3uepenHnHa depeBa, cnoaTky niDnIyTe (16/a) CTOB6yp 3BepxHa 1/3 diameTp a CTOB6py, notim niDnIyTe (16/b) 3Hn3y do BepxHbO rPi nnIy.
HE6E3NEKA! He6e3nekaДЯЖИТЯЧЕпзВIDДСУ! BiДача npистю може пиЗБЕCTNdo cepи03нх Травм onepaTopa.
O6OB'3KOBO DOTpMMyTeCn HabeDeHx 3aXoDiB, 06b yNkHyTn BiDaqi!
7.4 PonepeuHpeo3nHOBaHHnnomatepiJIB
IiD qac uix po6it Heo6xIDHO dOTpIMyBaTN TaNX nyHKTIB:
BnKOpncToByte 6e3neuHy ta cTiky onopy Dnla po3nnIIOBaHHa (Ko3nn,KnHn,6pyn).
CTeXTe 3a CTiIKM NOJoxeHHaI i pIBHomipHnM po3nojIOM macn Tina.
Kpyrni nnilomatepiia3akpiniTb, 06 yHnKHyTu npokpyuBaHHa.
PnuctabJnTe NnIky Do o6pO6JIbHO rMaTepiany TlBKn 3 npaIIOUHM nIyIbHm IaHiorom. Y KODHomy pa3i He BMkaIte IaHIOROBy NnIy 3 yKe npictabJeHIM Do MaTepiany NaHIOrOM.
He ytpmyte nnilomatepian horoio he npocitb notpmaTn Ioro iHuyIIOHNHy.
8 TEXHlUHE OBCJlyROBYBAHHRA TAOIJIaD
A NONEPEDJXEHH! He6e3neka nopizib!
He6e3neKa OTpMaHnPa3aHnx paH niD yac KOHTaKTy 3 roCTpMn pyXOMm DeTaIaMn npNCtpoHO i pIXyUm IHCTpyMeHToM.
3aBXd BmkaTe npncpti neped TexHcHm i cepBicHM o6cnyroByBaHHaM Ta ouH-ueHHaM. BnMiTb akymyIaTOP.
3aBxHn Hocitb 3axnchi pykabuCi Niac TexHiHOrO o6cnyroByBaHHa, DORJy Ta OUn-
IaHIOROBa nIIa BiINoBIaC BCIM cneuaJIbHM CTaHdApTAM 6e3NeK. PEmOHTHi poBOTn MaOTb npOBODNTUCr TiJIbKN KBaJIiFikOBaHmN faxIBzM NBUKNIOHO i3 BNUKOpNCtAHHm OpUHaJIbHNX 3aNaCHNX YacTHN.
Iicna KoxnHO BnKOpncTahnnepeBipTe IaHIOROBy Nny Ha 3Hoc Ta y pa3i Heo6xIDHOCTI 3amHItb NowKOJKeHi Detani.
CniD 6epeTn npicptiB iD BnNBy BOAn a6o BOJOrn.OuIaIte nIaCTNKOBi deTanI TkaHNo HO Ta He BVkOpNCToByIe MNUOci 3ac06n a- 6o po3HHKIn.
OuHuaTe BeHTnJIaIHi JkaJIHO3i, JAKUO BOHN 3acMueHi.
He po3nIIOHTe BODy Ha nIIaJIbHn I aHcIOr i He BnKOpNCTOBByIte OUYBaU BnCOKOTo TnCKy.
BukopncToByTe TINbKn 3a3NaueHi Bnpo6HnKOM 3anachi YactuHn.
8.1 HaTaraHn nnIaIbHoro naHcHora (17)
HE6E3NEKA! He6e3neka dny jnTType3 BiDau! HnpabNlBHO 3aToyeHNIJIbHnI NaHcUor 36IbWye pN3NK BiDaui i, TAKM YHOM, pN3NK CmeTeJbHnx TpaBM.
IpaBnIbHO 3aTouyTe nIIaJIbHNI naHIOr, 0o6 3MeHUnTI pn3NK BiJaqi.
H NPPIMTKA HeDocBIDueHnM KOpNCTyBaayam NaHIOROBHX NINOK peKOMeHnyEMO BiDaTn NIIaIbHN IaHIOr dIra 3aToUyBaHHa Y cepBicHy cnyx6y.
3 MipkyBaHb 6e3neKn Ta eΦeKTHBHOCTi PO6OTn DyXe BaxKnBO, ΜO6 ΜNJIaHbH NlaHcIg 6yB Do-6pe 3aToUeHn.
Heo6xioBnKohyBaTu 3aToeHHKoN:
BnD TnpCn HaraDye NJI;
Дя плянгnotpi6Hо дoknaatn 3haHi 3yCnll;
NIIJIHHHHeIpyMe;
36inbwyecbcbiopaia.
KUO BIKOHNAH3aTOyBaHHDOpyAcTbcnCneuiiIOBAHOMy ceHTpy, NOro BIKOHHObHa CneuihOMy 6nlaHaHHI, 03a6e3NeHTb MiHimaBHi 3pi MaTepiany i pIBHomipHe 3aToueHN HBCix pi3aJIbHnx KpOMok.
CamoctiHOn 3aToCHn nIJIbHn IaHcHOr MoKHa 3a DOnOMoTO CneuaJIbHoro KpyrHOro HAnIIKa, dIaMeTp koro niIDbnpaIOt b i3 ypaxyBaHHaMnapametpiB IaHcOra (INB. po3di 8.5 "Ta6luza"obCnyooyBaHHa NaHcUO2a", cmopiHa 457).L063aToHTn IaHcIg 6e3 NOwKOdJKeHHa 3y6ciB, NOTPi6Ha HABhICTb NEBHOrO DocBiDy Ta HABNuOK.
ДяЗATOUeHHNINJIbHOrOlaHciIora:
- BumkHiTb IaHciIorOby nIy Ta BnMItb aKyMyIaTOp;
- BiDnyctiB ralbmo IaHcIora.
- HadiiHo 3aΦikCyIe HanpMHy 3i BCTaHOBJIeHIM NIIJIbHIM NaHcIOM y BiNIOBIDHNX Neuatax, NepeKoHaBwncb, 100 NIIJIbHIN JIAHcIg MOKe BInbHO nepemiuatnca.
- HatairHItb nIJIbHn IaHcIor, JkUo BIn ocna6JeHn.
- BctaHOBiB HAnuNOK Ha CneuiabHy HAnpymHy,notim BCTaBTe HAnuNOK B 3anaDnHy 3y6-4,niTpmyOuH NoCTiHn HaxnJ 3a npoFiIem pKyuO' KpOMKn.
- Ппкладиь habилok кльka pa3iB Bnknioho cnepeу i nobTopiB zuio diio Ha BCix pi3aIb-Hnx KpOMkax y TOMy x Hanpamky (npabi a6o nibi).
7.ПомиЯнTe po3TaUyBaHHa HanpmaHoi uHHn B 3aTnCKHOMy npncTOcyBaHHi Ha npOTnJIeKHe i NOBTopiTb IIO DiHO ha iINHX pI3aJIbHnx KpOMkax. - IpepeipTe, 3y6eCb-ObMexyBaH He BnCTynae 3a KpaI npilaNy, 3o BnKOpNCTOBvETbcraDJa IpepeBipKn, 6pO6iTb MoKlnBn BnCTyn PNOCKIM HAnlKOM, 3akpyrInBUn npOphiInb.
9.ПиязаTOUeHЯВUdAniTbBci cniIuO6po6- KI I NJI HANJIKOMI 3MaCTiTb NIIJIbHNI NaHcIgY MaCTINbHi BAHHI.
Cni3amHHTNaHcIg, KOIN:
I OboKHa pixyoi KpOMKn 3HnJyETbcra Do 5 MM a6o MeHwe;
3a HaBHOCTi: He nepeBnUyTe no3HaKy Ha 3y6qx piaIbHnx IaHok;
3a3op JaHOK Ha 3aKJenKax 3aBeNkN.
8.2 OuHueHH BHyTpipHbOro npocTopy 3ipoQKn
PeteNbHO ouHuaTe IaHcIorOBy nHy nicJ Kox-Horo BnKOpuctaHHa.
-
BnMItb akymyIaTOp i nocTaBte naHcIorOby NnJy Ha cTiKy NOBepxHIO.
-
BnKpyTITb Koxkx 3ipOuKn.
-
3a donomoroio nixoiaoroeh3nka oucncttb BHytpiun hi npoctip.
-
3HIMITb NINJIbHN IaHcIHor, a NOTIM HAprrMHy UHHy.
-
OuNCTiB na3 uHHn i MaCTNUOBUNyCKHn OTBip.
8.3пектоановkaшвдко3aTиCKHOro npictpo10 (18)
1.3HHTTHaNPaMHOI uHHn (18/1):BiKpyTiB rHNT (18/2)iocna6Te nactHy aanTepa 3 HATJXHMn rakamn (18/3) HaNPaMHOI uHHn.
2. NobepHiTb HanpMHy uHHy HABKONo no3- doBxHboi oci.
3. 3HOBy npnKpiniTb nIaCTnHy aIaNTepa 3 HaTJXHMn rakAMn Ha HAprrMHy uHy i 3aΦiKCyuTe ix 3HOBy rBnHTOM i3 XpectOBmUJIICOM.
4. BctaHObitb Ha Micue HnnpMHy uHy, DnB. po3di 4.1 "MoHmax HnnpMHOI uHu (03, 04) , cmopiHa 450.
8.4 IpeBipka, NOBepTaHHa Ta 3MaUyBaHnHa HapymHOi uHH (19,20)
IpepeBipTe HappMHy shHy
PeryIpaHNo nepeBipraTe HnpanMHy hnHy Ha no- shkoJKeHHa. BuaJIb 3aInpKn (19/1) nIaCKm Hannikom Ni d Kytom 45^ (19/2).
IpepeBepTaHHHaHpA MHOI uHH
Uo6 yHnKHyTN OJHOCTOpOHbOro 3HOCy, cIi pepeBepTaTn HAnpMaMHy uHy nCJIa KOKHOrO 3aTouCyBaHH i 3amHn NaHcIora.
- NpeBCTaHOItb WbNko3aTnCKHn npucTpI Ha HaprMHi uHI, DnB. po3di 8.3 "PeecmaHO6ka wEudko3amuckHo2o npucmpoO (18),cmopIHka 457.
- NpepeBepHiTb HappMHy uHHy.
3mactitb HanpymHy uHy
- PeTeJIbHo OuHcTiTb Na3 UHH (19/3) i MaCTnIIOBUNyCKHi OTBOpN (19/4).
- PeTeJIbHO OUHCTiTb MaCTnIbHn OTBip (20/1) 3 o6ox cToPiH.
- 3a donomoro IO mactnIbHoro Inpuca no cep3i (20/2) 3anpaBte 3 o6ox 6okib cTilbkn mactnla, 06 BOHO pIBHomipHO BmUNo Ha kInx 3ipoQKn. Pn CbOMy nocTiHo npokpyu Te 3ipOky.
8.5 Ta6npu o6cnyroByBaHH naHciura
9 YCYHEHHRA HECINPABHOCTEIN
OBEPEXKHO! He6e3neka TpaBMyBaHHa.
Pyxomi Detani Ta Detani 3 roctpmm KpaMn MoKytb npn3BecTN Do TpaBM.
IiD yac TexhiyHoro 06cnyroByBaHHa, DOrnA- dy Ta OunuEHHa3BxDn CJIiD BdraTn 3axNCHi pykabni!
BumKHyTn npncpti Ta BnHnTa akymyIaTOP!
H NPMITKA y pa3i BUNHKHeHH NOsKO- DKeHb, kI He 3a3HaueHi B cII Ta6nci, a6o no- SKoDKeHb, 3 KIMN KOpNCyBauch He MOxE BnopaTncs Cam, cnId 3BepHyTnCnDo HaWoI CnyX6n NiIDTPmKn.
www.al-ko.com/service-contacts
15「APAHTI
До 3akihueHЯ CTPOky DabHocTi peKnaMaui, yctaHOBneHoro 3a 3akOHom, Bnpo6nK yCyBaE MOKnBi DeΦeKtn MaTepiAny Yu Bnpo6HnHm 6paK IJnxOM pEmOHTy a60 3amHn (Ha cBii Bn6ip). CToPK daBHOCTi Bu3NaHaeTbCRA 3aKOHOdABCTBOM KpaIHn, y kI npInaD 6yNo KynHeNo.
Tapaantia 36epiraetbca nIwe 3a TaKnx yMOB:
Dotpmyteca 100 noci6nka 3 ekcnnyatauii
BnKOpncTaHH npuay 3a npn3NaeHHaM
BnKOpncTaHH opurHaIbHnx 3aunactNH
TapaHTia anHyIOeTbCra 3a TaKnx yMOB:
Camobibn pemOHr
Camobibha 3MiHa TexhiHnx XapaKtepunctuk
BVKOPINCTaHHHe 3a npn3HaeHHaM
TapaHrHe NouHpOeTbCnHa:
I OwkoDxKeHH naKoap6OBOrO nOKpTTTc, cpiuHHe 3BnuaHm 3HOsyBaHHM
YactHnH, 3HOyTOBcI, No3HaueHi y BiIDOMocTI 3aNaChnx YactHn paMKoIO; XXXXX (X)
Bidnik rapaHTiHoro TepmiHy po3noUHaetbcra 3 daTn npudbaHHBnpo6y nepuHM KInueBM CNOXHBaYem. Data npudbaHH Bka3aHa B yeky. Y pa3i BnHKHeHHra paaHTiHoro BnnaDky 3BepHiTbcra 3 cieIO 3aBOIO Ta opurHAMK BnTaHcII, 0 niTBePdkyE NOKynk, Do CBORO dIlepa afo B haNbHexy ABTOpN3OBaHy cepbichy cnj6y. Lc rapaHTiHre 3o6OB'3aHHr He 3MiHOC BCTAHOBneHi 3aKOHOM IpTeH3I INokpucdo npodabca.