
WS 50 - Humidifier Kärcher - Free user manual and instructions
Find the device manual for free WS 50 Kärcher in PDF.
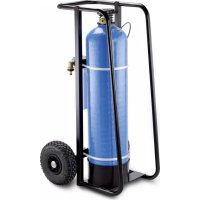


| Brand | Kärcher |
| Model | WS 50 |
| Category | Humidifier (water softener) |
| Product type | Ion exchange water softener |
| Transport weight | 35 kg |
| Resin capacity | 12.5 liters |
| Inlet water pressure | 2 to 6 bar |
| Inlet water temperature | 5°C to 30°C |
| Production capacity (depending on hardness) | Up to 10 m³ (at 5 °dH) |
| Display | Dial volumetric meter, CR2032 battery |
| Power supply | None (mechanical), battery for meter |
| Functions | Water softening, regeneration by resin or WS regenerator |
| Maintenance | Daily check, wheel lubrication every 3 months, resin replacement |
| Safety | Frost protection, depressurization before maintenance, safety goggles |
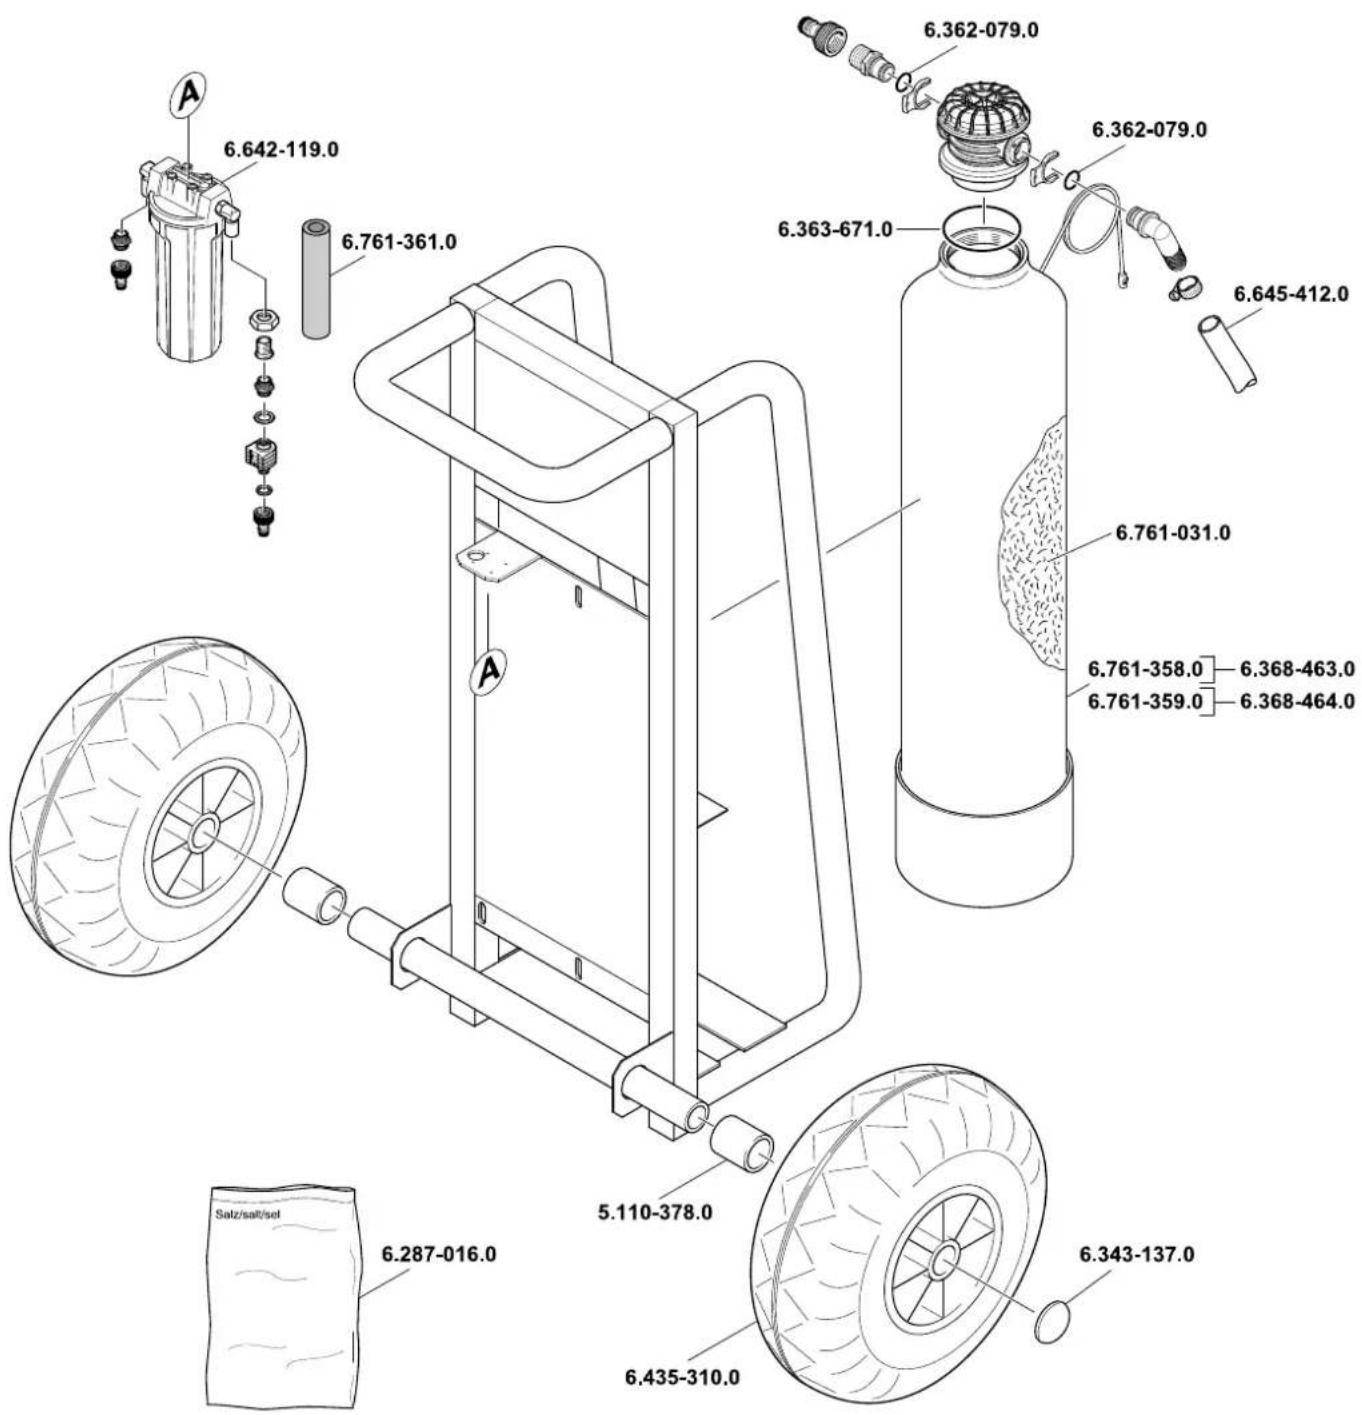
| Spare parts | Resin (6.761-031.0), filter cartridge (6.761-361.0), seal, tensioner |
| Intended use | Mains water or comparable quality, not for drinking water |
Frequently Asked Questions - WS 50 Kärcher
User questions about WS 50 Kärcher
0 question about this device. Answer the ones you know or ask your own.
Ask a new question about this device
Download the instructions for your Humidifier in PDF format for free! Find your manual WS 50 - Kärcher and take your electronic device back in hand. On this page are published all the documents necessary for the use of your device. WS 50 by Kärcher.
USER MANUAL WS 50 Kärcher
Safety instructions EN 1
Description of the Appliance EN 2
Preparation EN 2
Operation EN 2
Maintenance and care EN 3
Troubleshooting EN 3
Proper use
- The water softening plants WS 50 and WS100 must exclusively be used for softening water.
The water may only be used for technical purposes.
The plant is suitable for town water or water of similar quality.
The plant works on the principle of ion exchanger process in neutral exchange.
The plant must not be used for the production of drinking water (possible damage to health!)
Prerequisites for operation
- The feed water (raw water) must be free of iron, manganese, heavy metals, oil as well as larger quantities of organic substances. Drinking water meets these requirements.
- If the inlet pressure of the feed water (max. 6 bar) could be exceeded, a protective device against overpressure must be installed in the supply line to the water softening plant.
| Water temperature of the feed water (raw water) | min: 5°C max: 30°C |
| Ambient temperature Always in operation | >0°C max: 40°C |
| Inlet pressure of the feed water (raw water | min: 2 bar max: 6 bar free of water impact |
General information
Terminology
Raw water
Untreated water, mostly drinking water, town water or well water.
Soft water
Water treated with the softening plant does not contain hardening minerals such as calcium and magnesium.
Exchanger
Also called filter container or filter tank. It contains the ion exchanger resin with which the water is softened.
Ion exchanger resin
Filter material in the exchanger container that is used to soften the water.
Regeneration
The regeneration of the ion exchanger resin takes place by means of rinsing it with a saline solution. For this purpose the WS regenerator is required.
Rising pipe
The rising pipe stands centrally in the exchanger container and leads the water from the bottom back to the connecting adapter.
Filter nozzle
At the lower end of the rising pipe there is a filter nozzle that keeps the resin in the container but lets the water pass through.
Environmental protection

The packaging material can be recycled. Please do not place the packaging into the ordinary refuse for disposal, but arrange for the proper recycling.

Old appliances contain valuable materials that can be recycled. Please arrange for the proper recycling of old appliances. Please dispose your old appliances using appropriate collection systems.
Notes about the ingredients (REACH)
You will find current information about the ingredients at:
www.kaercher.com/REACH
Warranty
The warranty terms published by the relevant sales company are applicable in each country. We will repair potential failures of your appliance within the warranty period free of charge, provided that such failure is caused by faulty material or defects in manufacturing. In the event of a warranty claim please contact your dealer or the nearest authorized Customer Service centre. Please submit the proof of purchase.
Spare parts
Use only original KARCHER spare parts. You will find a list of spare parts at the end of these operating instructions.
Symbols in the operating instructions
Danger
Warns about immediate danger which can lead to severe injuries or death.
Warning
Warns about possible danger which could lead to severe injuries or death.
Caution
Points out a possibly dangerous situation which can lead to light injuries or property damage.
Safety instructions
- Persons that are concerned with the installation, maintenance and operation of the plant must be correspondingly qualified and know and comply with the relevant regulations and operating instructions.
- Modifications and changes that are not authorised by the manufacturer are prohibited for safety reasons.
Application
- The machine with working equipment must be checked to ensure that it is in proper working order and is operating safely prior to use. Otherwise, the appliance must not be used.
- The manufacturer is not responsible for any damages that may occur on account of improper use or wrong operations.
Operations
- This appliance is not intended for use by persons with reduced physical, sensory or mental capabilities. The appliance must not be operated by children or persons who have not been instructed accordingly. Children should be supervised to prevent them from playing with the appliance.
- The appliance may only be used by instructed personnel that is expressly commissioned with the use.
- Park the appliance on a level surface and secure it against rolling away (e.g. by means of wheel chocks underneath the wheels).
- Do not move the appliance in unsuitable terrain.
Danger
Risk of injury!
Always wear protective goggles when operating, maintaining and cleaning the appliance.
The plug connections are under pressure, depressurise the plant prior to detaching the plug connections.
Description of the Appliance
In the event of missing accessories or any transport damage, please contact your dealer.
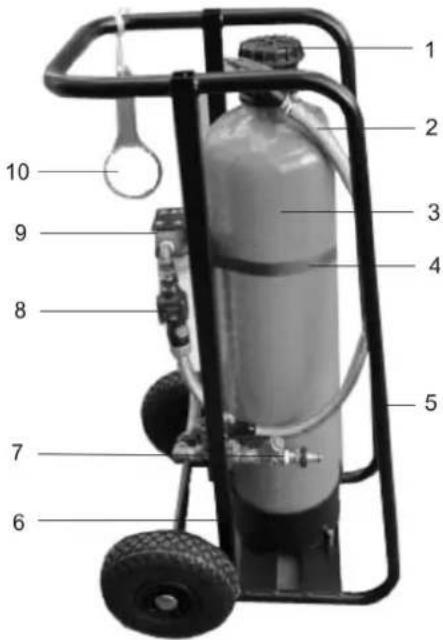
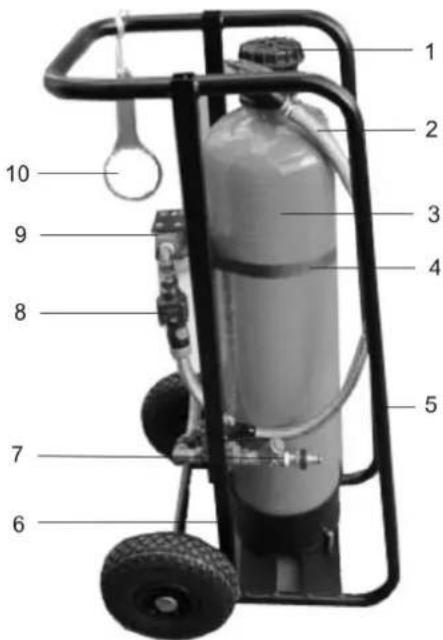
1 Tank adapter/connecting adapter 2 Connection hose filter/tank 3 Tank (exchanger) 4 Tie down strap 5 Transport rails 6 Frame, navigable 7 Dirt separator with dirt trap 8 Dial gauge 9 Filter 10 Key for pre-filter
Preparation
Transporting the device
Caution
Risk of injury! When moving the plant, ensure that the personal strength is not exceeded.
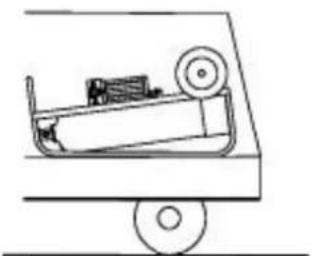
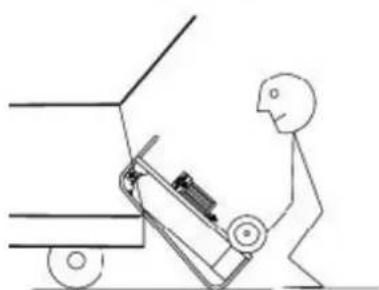
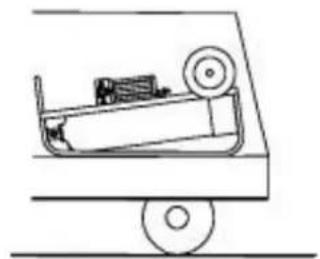
When transporting the appliance in a vehicle, transport it upright or lying on the transport rails and secure it appropriately.
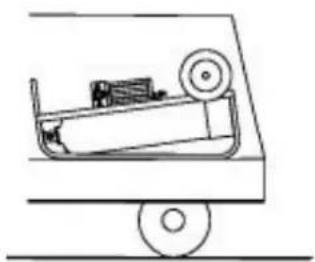
Unloading
Danger
Risk of injury, risk of damage! Observe the weight of the appliance when you load it!
Transport weight (WS 50) 35 kg (WS 100) 40 kg
Unloading the plant:
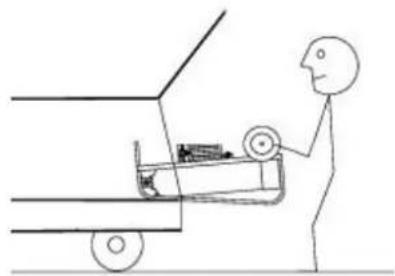
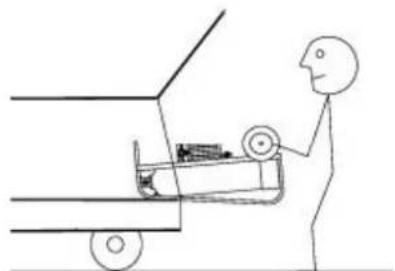
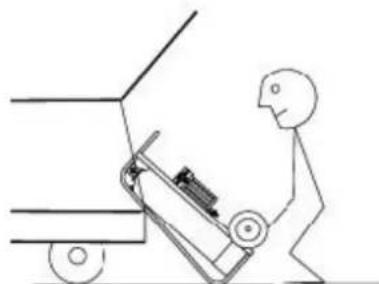
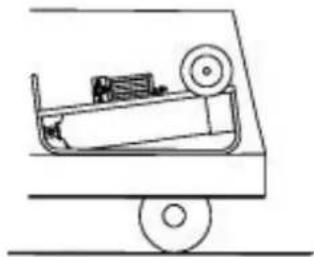
Pull the plant out of the vehicle holding the axle of the wheels and place it on the ground via the sill. Use the handle to completely raise it.
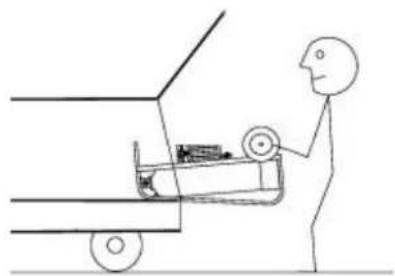
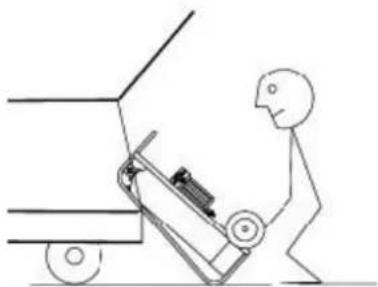
Loading the plant:
Load in reverse order.
Drive the machine
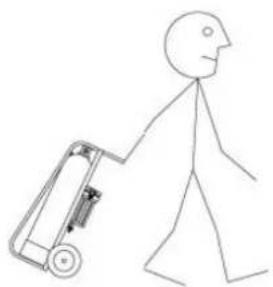
Hold the plant on the handle, tilt it backwards and push or pull. After moving, place the plant securely on an even surface.
Operation
Daily checks prior to operation
- Check plant for leaks.
- Check battery status (battery status indicator in the display dial gauge), replace if necessary. Battery type CR2032.
- Check tie down strap, replace as necessary.
- Check the soiling of the candle, replace as necessary (order no. 6.761-361.0).
Connecting the appliance
Danger
Risk of tipping! Route the connection hoses in a way that the plant cannot tip over due to pulling on the hoses.
Tripping hazard! Route the hoses in a way that they do not cause injuries (e.g. by tripping).
Caution
During use the plant must be set up at a frost-free location. The necessary connections to the water supply and the soft water consumer must be considered.
When connecting the unit, the relevant applicable standards and the regulations of the providers must be observed.
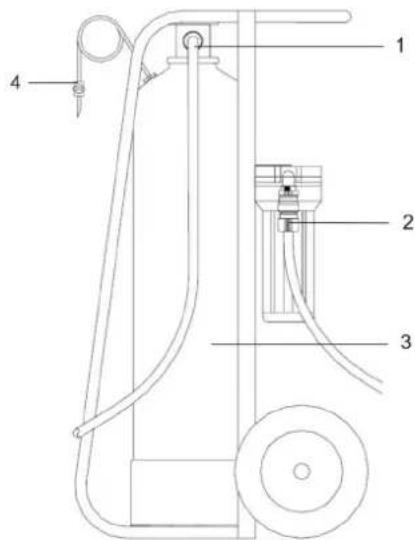
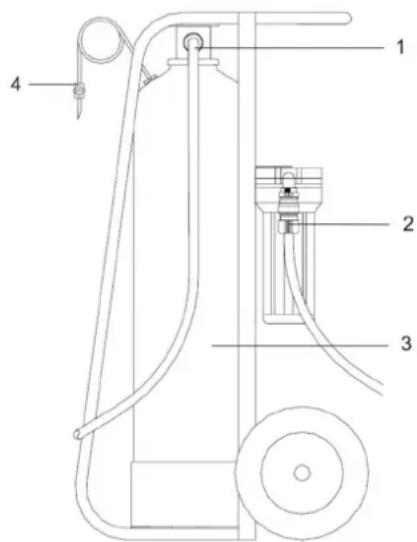
1 Outlet soft water 2 Inlet raw water 3 Tank (exchanger) 4 Drain/bleed valve
Connect raw water inlet (town water). Connect consumer to the soft water connection outlet.
Producing soft water
→ Open the water supply and have the tank (exchanger) filled. → Bleed the system, in order to do so, open the bleed valve until no more air escapes.
Determining the soft water capacity
→ Determine the water hardness of the raw water using a hardness measuring device (order no. 6.768-003.0) or ask your provider. Read soft water capacity in the following table.
The output can be shown via the dial gauge.
Dial gauge
The dial gauge automatically switches on as soon as water flows.
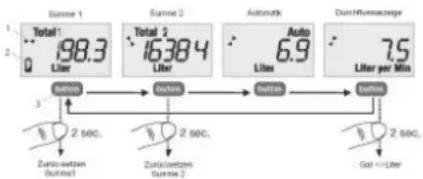
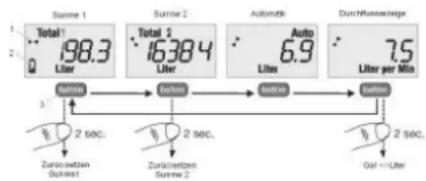
By shortly pushing the button you can switch between the different displays.
The following can be shown on the display of the dial gauge:
-Volume counter 1 shows the generated quantity of soft water in litres
Note: The volume counter is reset by pushing the button for at least 2 seconds.
Volume counter 2
Note: Both volume counters can individually be reset.
Automatic - Flow volume
shows the current flow rate in litres/min.
Note: The display switches between litres/min and gal/min when pushing the button for at least 2 seconds.
Regeneration
There are 2 ways to determine the depletion of the soft water:
- via the indicator of the volume counter on the display of the dial gauge. by measuring the water hardness at the soft water outlet by means of the hardness measuring device for soft water (order no. 6.768-004.0).
Regenerating depleted plant
There are 2 ways to regenerate the plant. - If a WS regenerator is available: Connect the plant to the WS regenerator. See operating instructions of the WS regenerator for description.
- Replace resin filling in the tank (exchanger).
Replacing the resin filling in the tank (exchanger).
→ Fill in new resin (order no. 6.761-031.0 -25 kg).
Depressurize the system. Remove the hose from the soft water connection. Remove the connection hose filter/tank. Release the tie down strap and remove unit from the frame. Loosen and screw out the tank adapter using the key. Pull the rising pipe out of the tank. Turn the tank around and collect the resin in a suitable container. Flush tank with water.
Note: Use a funnel for filling, flush resin in with water.
WS 50 - 12.5 litres
WS 100 - 25 litres
After the resin has been filled in, fill the tank completely with water. Insert the rising pipe in the tank (do not use tools), fill with water and simultaneously push it down carefully until it reaches the bottom.
Note: Ensure that the rising pipe is in the centre of the tank.
Reassemble the plant in reverse order.
Maintenance and care
General notes
Danger
Risk of injury!
Always wear protective goggles when operating, maintaining and cleaning the appliance.
The plug connections are under pressure, depressurise the plant prior to detaching the plug connections.
Risk of frost
Caution
Risk of damage! Drain the tank if there is a risk of frost.
Draining the tank if there is a risk of frost
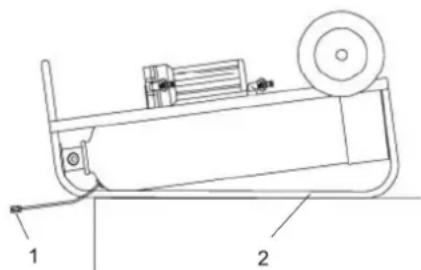
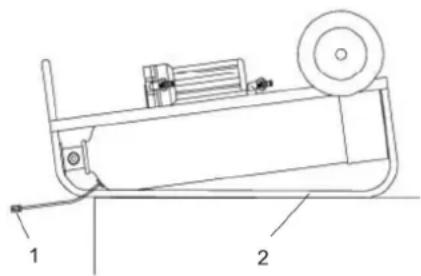
1 Drain valve 2 Transport rails
Remove the hose between the filter and the tank and let it drain. Open and drain the filter. Remove the hose from the soft water connection. Tip the unit onto the transport rails.
Open the drain valve on the hose.
Note: Bring the valve as far as possible below the tank, this facilitates the draining of the water in the tank.
If the water is drained, the plant is safe to be exposed to frost.
Maintenance Works
Daily checks prior to operation
- Check plant for leaks.
- Check battery status (battery status indicator in the display dial gauge), replace if necessary. Battery type CR2032.
- Check tie down strap, replace as necessary.
- Check the soiling of the candle, replace as necessary (order no. 6.761-361.0).
Maintenance every 3 months
Lubricate wheel bearing. - Check hoses and couplings for damage.
Troubleshooting
No soft water
Plant depleted
If a WS regenerator is available: Connect the plant to the WS regenerator and regenerate it. Otherwise, replace the resin filling in the tank (exchanger).
Resin leakage
Lower nozzle on the rising pipe defective
Replace the nozzle.
Leakage
Connecting adapter not properly tightened
Tighten adapter using key. Seal defective – check and replace.
www.kaercher.com/REACH
Warranty
Replace the liquid in the tank
1 Drain valve 2 Transport rails
www.kaercher.com/REACH
Warranty
www.kaercher.com/REACH
Warranty
www.kaercher.com/REACH
Warranty
www.kaercher.com/REACH
Warranty
www.kaercher.com/REACH
Warranty
www.kaercher.com/REACH
Takuu
www.kaercher.com/REACH
Eyyunon
www.kaercher.com/REACH
Garanti
It is forbidden to use the device for the production of drinking water (possible health hazards!).
Operating conditions
The supplied water (raw water) must not contain iron, manganese, heavy metals, or large amounts of organic substances. Drinking water meets these conditions. - If the pressure of the supplied water at the inlet (max. 6 bar) is exceeded, a pressure reducing device can be installed in the supply line upstream of the softening system.
Thanks to the softening system, the treated water does not contain hardness salts such as calcium and magnesium.
Heat exchanger
Also called "filter reservoir". It contains an ion exchange resin which is used for water softening.
Ion exchange resin
www.kaercher.com/REACH
Warranty
In each country, the warranty conditions issued by the authorized sales organization apply. Possible malfunctions of the device during the warranty period are eliminated free of charge if the cause is due to material defects or manufacturing errors. In the event of a complaint during the warranty period, please contact the sales organization that sold you the device or the nearest authorized customer service center, presenting the purchase receipt.
Use only original spare parts from KÄRCHER. The description of spare parts is at the end of this instruction manual.
Symbols in the operating instructions
Danger
Warning about an immediate danger that can lead to severe injuries or death.
Warning
Warning about a potentially dangerous situation that can lead to severe injuries or death.
Caution!
Indication regarding a potentially dangerous situation that can lead to minor injuries or damage to property.
Safety instructions
Persons who are involved in the installation, electrical connection, repair, and maintenance of the unit must have the corresponding qualification, know and comply with the corresponding rules and instructions for operation. Retrofitting and making changes that are not approved by the manufacturer are prohibited for safety reasons.
Use
- Before starting the device and work equipment, check them for their proper condition and their compliance with safety requirements. If the condition of the device is not flawless, it must not be used.
- The manufacturer is not liable for possible damages that arise from use not in accordance with the intended purpose or as a result of incorrect operation.
Operation
The device is intended for use by people with limited physical, sensory or mental abilities. Operation of the device by children or persons who have not been instructed is prohibited. It is necessary to supervise children to prevent them from playing with the device. The device may only be used by persons who have been trained in its handling and have been given the necessary powers for its use. - Install the device on a stable surface and take measures against accidental tipping (for example, install folding wedges under the wheels). Do not use improvised means for this.
Danger
Risk of injury!
During operation, maintenance and cleaning of the device, safety goggles must be worn.
The connections are under pressure; before disconnecting them, the pressure must be released from the system.
Description of the device
In case of damage or defects caused during transport, the dealer must be notified immediately.
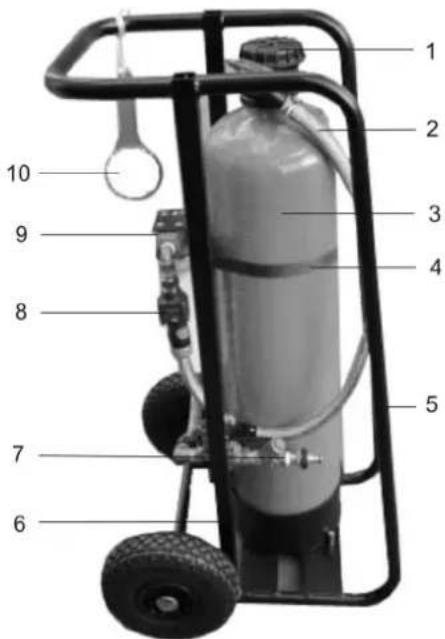
1 Pressure reducer/pressure gauge 2 Connection hose/filter/reservoir 3 Reservoir (heat exchanger) 4 Pressure gauge 5 Guide rails 6 Frame, base 7 Dirt separator with dirt trap 8 Sight glass 9 Filter 10 Key for pre-filter
Preparation
Transport of the device
Attention!
Risk of injury! When moving the device, do not exceed the individual physical load limit.
→ When transporting in a vehicle, the device must be placed in a vertical position, and when transporting on guide rails - in a horizontal position, and also secured accordingly.
Unpacking the device
Danger
Onachocmbdna3doopobb, onachocmb noepexdeHua!
Ipu noepyke cneedyem obpamumb eHMaHue Ha eec ycmpoucmea.
TpaHcnpTHbI Bec (WS 50)35 Kr (WS100)40Kr
→ BbIpy3ka yctaHOBKn:
BbIaHbYb yctaHObky n3 aBTOMo6nna 3a KOnechyIO oc b nepeHeCTn Ha non uepe3 norpy3OHyIO CTOpOHy nHaTΦopMb. B3a Tb 3a pyKy nONHOCTbIO yCTaHOBtB HA NOI.
→Iorpy3ka yctahOBKn:
Tporpy3ntb B o6paTHoN nocneDobaTeNbHOCTn.
IpepeBnKHeHe annapaTe
→ PnpdepknBaayctaHOky 3a pyky, onpOKHyTb ee Ha3ad n TOnkAtb nn TAnhyt. Nocne nepemeeHnnoctaBnTb yCTaHOky Ha yCTOHNBO, POBHO NOBepXHOCTN.

3Kcnpnyatauia
EkeHHeBhIe npOBepKn nped Hauanom pa6oTbI
- PpOBepntb repMeTnHOCt bycTaHOBKn.
- PpOBepnTb ypoBeHb 3apJa aKKymJITopa (HnDnKaTOp COCTOHNr 3apJKn aKKymJITopa Ha DnCnIee CcETnKa), npn Heo6xOAnMoCTn 3ameHnTb. Tn n aKKymJITopa CR2032.
- IpoBepntb HataxHNoI peMeHb, npH He06xOAnMoCTn 3aMeHHTb. IpoBepntb 3aqr3HHeNc CBeHOro HnTpa, npH Heo6xOJIMocTn 3aMeHHTb (No nra 3aka3a 6.761-361.0).
IopKIOUeHHe ycTpoiCTBa
Danger of tipping! The lines must be laid in such a way that the system cannot tip over when moving through the lines.
Danger of collision! Lay the lines in such a way as to prevent the possibility of damage (for example, due to collision).
Attention!
During installation and use, the device should be installed in places protected from frost. Appropriate connections for water supply and consumer connections must be provided.
When connecting the device, the applicable standards and installation rules must be observed.
1 Softened water outlet 2 Pressure reducer 3 Reservoir (exchanger) 4 Drain/vent valve
Close the raw water tap (water supply). → Connect the consumer connections to the softened water outlet.
Softened water production
Open the raw water tap and fill the reservoir (exchanger). → Remove air from the system by opening the vent valve and keep it open until air stops coming out.
Determining the volume of softened water
Determine the hardness of the raw water using a water hardness test kit (per standard 6.768-003.0), or obtain it from the supplier. Determine the volume of softened water using the following table.
| Жecetectь ВОДы ° dH | WS 50 ПразИЗБоДи- ТельноCTь M³ | WS 100 ПразИЗБоДи- ТельноCTь M³ |
| 5 10,0 20,0 | ||
| 10 5,0 10,0 | ||
| 12 4,2 8,3 | ||
| 14 3,6 7,1 | ||
| 16 3,1 6,3 | ||
| 18 2,8 5,6 | ||
| 20 2,5 5,0 | ||
| 22 2,3 4,5 |
→ The production volume may be displayed on the meter.
Meter
The meter is activated automatically as soon as water starts to flow.
By pressing the button, you can switch between different types of notifications. The following notifications may be displayed on the display:
-Volume counter 1
Shows the amount of water consumed in liters.
Note: The volume counter resets when the button is pressed for at least 2 seconds.
-Volume counter 2
Note: The volume counter readings can be reset independently of each other.
- Automatic
- flow rate
Shows the actual flow rate in l/min.
Note: Pressing the button for 2 seconds allows you to select between l/min and gal/min on the display.
Regeneration
There are 2 variants of regeneration of treated water:
- The volume counter readings are shown on the display of the counter. - By measuring the water hardness at the outlet of the softener using a water hardness test kit (order no. 6.768-004.0).
Regeneration of the system
There are 2 variants of system regeneration.
- Fill the installation with water to the WS regenerator. Description see in the operating manual for the WS regenerator.
- Replacing the resin in the tank (exchanger).
Replacing the resin in the tank
→ Depressurize the installation. → Remove the plugs for the connections. Remove the connections for the filter/tank. Leave the tension belt, remove the device from the frame. Loosen the tank clamp with a wrench and turn it. → Remove the pressure pipe from the tank. → Turn the tank and collect the resin in a suitable container. → Rinse the tank with water. Fill in new resin (for order no. 6.761-031.0-25 kg).
Note: Use a funnel for filling, rinse the resin with water. WS50-12.5 NITrOB WS100-25 NITrOB
→ After the resin has been completely filled, the tank must be filled with water. Insert the pressure pipe into the tank (without using tools), fill with water and simultaneously gently press the pipe down until the desired level is reached.
Note: Make sure that the pressure pipe is located in the center of the tank. → Reassemble the installation in the reverse order.
Care and maintenance
General instructions

Danger
Danger of injury! During operation, maintenance, and cleaning of the device, protective goggles must be worn.
The screw connections are under pressure; before loosening them, the pressure in the installation must be released.
Danger of freezing
Attention!
Danger of damage! If there is a risk of freezing, the tank must be emptied.
Draining the reservoir in case of freezing danger
1 Drain valve 2 Guide rails
→ Remove the hose connecting the filter and the reservoir, and drain. →Open and drain the filter. Rinse the filter with clean water. →Tilt the device onto the guide rails. Open the drain valve
Note: Placing the valve as far as possible from the reservoir facilitates the water draining process.
If water does not drain, the unit may tip over due to freezing.
Maintenance work
Daily checks before starting work
- Check the tightness of the installation.
- Check the battery charge level (battery charge indicator on the device display), replace if necessary. Battery type CR2032. Check the pressure gauge, replace if necessary.
- Check the contamination of the spark plug filter, replace if necessary (order no. 6.761-361.0).
Maintenance every 3 months
Lubricate the wheel bearing. - Check the hose connections for damage.
Troubleshooting
Reduced water flow
Device service life
→ Connect the device to the WS regenerator and perform regeneration. Replace the resin in the reservoir (exchanger).
Resin leakage
The internal nozzle in the pressure pipeline is faulty
Replace the nozzle.
Tightness
The shut-off valve is not properly tightened
Tighten the valve with a wrench.
Damaged gasket
→ Check and replace.
www.kaercher.com/REACH
www.kaercher.com/REACH
www.kaercher.com/REACH
Warranty
www.kaercher.com/REACH
Warranty
www.kaercher.com/REACH
Warranty
www.kaercher.com/REACH
Warranty
In every country, the warranty conditions issued by our responsible distribution organization apply. We will rectify any faults on the machine free of charge during the warranty period, provided that the cause is a material or manufacturing defect. In the event of a warranty claim, please contact your dealer or the nearest authorized service center, presenting your proof of purchase.
Spare parts
www.kaercher.com/REACH
Warranty
In every country, the warranty conditions issued by our responsible distribution organization apply. We will rectify any faults on the device free of charge during the warranty period, provided that the cause is a material or manufacturing defect. In the event of a warranty claim, please contact your dealer or the nearest authorized service center with your proof of purchase.
Spare parts
Use only original spare parts from KARCHER. You will find an overview of spare parts at the end of these operating instructions.
Symbols in the operating instructions
Danger
Indicates an imminent threat that leads to serious bodily injury or death.
△Warning
Indicates a potentially dangerous situation that could lead to serious bodily injury or death.
Caution
Indicates a potentially dangerous situation that could lead to minor bodily injury or cause material damage.
Safety notes
- Persons involved in installation, commissioning, and operation of the system must have appropriate qualifications and must know and observe the relevant regulations and operating instructions.
- For safety reasons, modifications and changes not approved by the manufacturer are prohibited.
Application
- Before use, check that the device and its working components are in proper condition and safe to operate. If the condition is not perfect, it must not be used. -The manufacturer assumes no responsibility for any damage caused by improper use or incorrect operation of the device.
Operation
Environmental protection

Packaging materials can be recycled. Please dispose of packaging materials separately, and return secondary raw materials for reuse.

Old devices contain materials that can be recycled and should be reused. Please dispose of old devices properly, using the appropriate collection system for waste.
Information on ingredients (REACH)
Current information on ingredients can be found at:
www.kaercher.com/REACH
Warranty
The warranty conditions published by our authorized distributor apply in each country. We will repair potential defects in your appliance free of charge within the warranty period, provided that such defects are caused by faulty material or production defects. In the event of a warranty claim, please contact your distributor or the nearest authorized customer service center, presenting the proof of purchase.
Spare parts
Only use original spare parts from KÄRCHER. You will find a list of spare parts at the end of these operating instructions.
Symbols in the operating instructions
Danger
Immediate danger that can lead to severe injuries or even death.
Warning
Possible dangerous situation that could lead to severe injuries or even death.
Caution
Possible dangerous situation that could lead to minor injuries or damage to property.
Safety instructions
Operators, who will be engaged in installation, technical maintenance and servicing of the device, must be appropriately qualified, must know and follow the relevant work safety regulations. For safety reasons, devices and their modifications not approved by the manufacturer are prohibited.
Use
- Before using the device with the attachment for work, it must be checked for perfect condition and operational safety. If the device is not in perfect condition, its use is prohibited. The manufacturer does not provide a guarantee for damages caused by use not intended for the purpose or incorrect servicing.
Maintenance
This device is not intended for use by persons with limited physical, sensory or mental capabilities. The device must not be used by children, infants or unauthorized persons. Children must be supervised to ensure they do not play with the device. Use of the device is allowed only by persons who have been trained in handling it and are familiar with its use. Place the device on a flat surface and secure it against accidental movement (e.g., with wedges under the wheels). Do not move the device unnecessarily.
Danger
Danger of electric shock! Maintenance, repairs and cleaning of the device should only be carried out with protective equipment. The electrical connections are under voltage; before working on the electrical connections, disconnect the device from the power supply.
Description of the device
The accessories are included in the delivery and are packed separately.
1 Filter for system/attachment 2 Connection for pump/hose 3 Pump (heat exchanger) 4 Cover 5 Transport wheels 6 Frame, movable 7 Separator with filter for dirt 8 Indicator with arrow 9 Filter 10 Key for pre-filter
Preparation
Transport device
Attention
Danger of electric shock! When moving the device, be careful not to damage the power cord.
For transport, move the device to the transport position on the transport wheels.
Danger! Danger of overloading! When talking, keep the device away from your face!
Weight when transporting (WS 50) 35 kg (WS 100) 40 kg
→ Talking on the device:
Remove the device from the end of the vehicle and place the items on the floor. Hold the handle and position it comfortably.
Loading the device:
Load in reverse order.
Unloading the device
Hold the device by the handle, tilt it slightly and pull it. After pulling, place the device firmly on a flat surface.
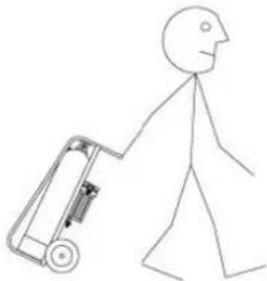
Operation
Daily checks before operation
- Check the tightness of the device.
- Check the condition of the batteries (the battery status indicator on the display with the arrow) is lit. Replace it. The battery is CR2032. Check the general condition, it is lit. Replace it.
- Check the clogging of the filter, it is lit. Replace it (order number 6.761-361.0).
Connection to the mains
Danger
Danger of electric shock! Route the connecting cables so that they cannot be damaged when the cables are pulled.
Danger of injury! Route the cables so that no one can trip over them (e.g., cable routing).
Attention
During use, the device must be placed on a surface protected from splashing water. The necessary connections for supplying water to the consumer of the softened water must be made.
When connecting, the relevant standards and the regulations of the local water supply company must be observed.
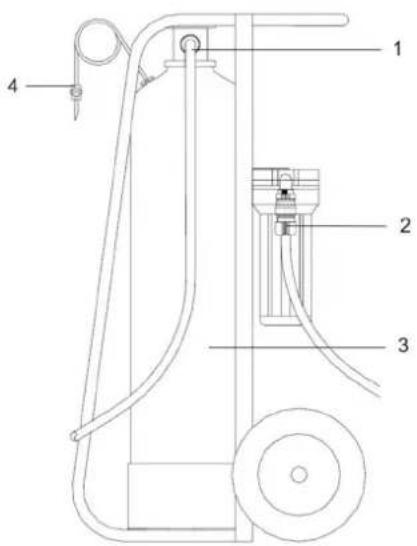
1 Softened water outlet 2 Raw water inlet 3 Reservoir (heat exchanger) 4 Ventilation/degassing valve → Connect the raw water inlet (water from the public water supply). → Connect the consumer outlet for softened water.
Commissioning of the softened water system
Open the water supply and let the reservoir (heat exchanger) fill. → Degas the system, for this open the degassing valve until no more air escapes.
Setting the quality of the softened water
Measure the hardness of the raw water with a hardness test kit (order no. 6.768-003.0), or ask the water supply company. Read the setting for the softened water from the table on the left.
www.kaercher.com/REACH
Warranty
www.kaercher.com/REACH
Warranty
www.kaercher.com/REACH
Warranty
Read the operating instructions carefully before using the device, follow them strictly, and keep them for future reference.
Contents
Intended use. UK . .1
Table of contents UK .1
Safety rules UK .1
Device description UK...2
Preparation UK 2
Operation UK.3
Maintenance and technical service UK.4
The system must not be used for purposes other than those intended by the manufacturer (possible health hazard!).
Operating conditions
Hard water (CNPA hard water), 10 noDaaetbC, He nobHHa MicTn3aIi3o, MapraHeu, BaxkMeTaN, HapTu i BeJNKy KJIbKicTB opraHInx peOBN. NtHa Boa BiNobiJae cIM m yMObam. JKIO TNCB ODN, IO NOaTbCRA, H BxOdi (MaKc.6bap) nepeBnueHn,TO B Tpy6oPBOiD BOONOM'kWByBaIbHOY cTaHOBKn,IO NiDBOnTb,MOXHa BCTAHOBITn pncTpi Jn 3anobirHHa HaIIINIKOBOMY TCKy.
| Tempepatya BODi (cnooi BODi), Μιο ποδaεΤbση | mɪn.: 5°C mʌkcs.: 30°C |
| Tempepatya HavkoIIshNbo cepeIoBvIa 3aBxJd В рoboti | > 0°C mʌkcs.: 40°C |
| Tnck BODi, Μιο πoδaεΤbση, на Вхodī (cnooi BODi) | mɪn.: 2 δap mʌkcs.: 6 δap 6e3 riɪdpaɪblɪchŋo уdapy |
General instructions
Intended use:
Hard water
Untreated water, mainly tap water, municipal water, or well water.
Soft water
Due to the water softening unit, the water does not contain hardness salts, such as calcium and magnesium salts.
Brine tank
Also called "brine reservoir". It contains a saline solution used for softening.
Saline solution
The material that softens in the brine tank reservoir, thanks to which water softening occurs.
Regeneration
Regeneration of the saline solution is carried out by rinsing with a solution of table salt. For this, a regenerator is needed.
Brine line
The brine line is located in the center of the brine tank reservoir and is directed vertically downwards to the bottom of the tank.
ΦiNbTpByBaJIbHaΦopcyHka
Ha HxhHbomy KINi HanipHoro TpyboPoBdy po3TaOoBaHa fIbtpyBaNbHa fOpcyHka, Bpe3epByapi koi 3hAxODntbcr cMOJa, aane Ype3 kky MOKe npoxoNTn BOda.
3axnCT HABKoNusHboro cepeoBnuca

MaTepiAnu ynakOBKn nIaHbTcB nepepo6ci dna nobTOphORO BnKOpNCtAHN. ByNb JaCKa, He BnKdaiTe nakyBaJIbHi MaTepiAn pa3OM i3 DomaUHIM CMITTM, BiDaaiTe ix nIy NOBTOphORO BnKOpNCtAHN.

CTapi npntpoit MICTaHTb cHHi MaTepiAIN, 10 MOxTyB BIKOPNCTOByBaTNCI NOBOTPOH.
Tomy, 6yNb Iacka, yTnI3yIe cIapipnpctpo 3a DOnomorOcneiaIbHnx CnCTem 360py cmITra.
IHCtpykuii 3aTocybaHHKOMnOHeHTIB (REACH)
AkyaIbHi BiDOMOcTI npo KOMnHOHeNTn HabeJeHI Ha Be6-By3ni 3a aDpecoH:
www.kaercher.com/REACH
Tapahtria
YKoKHi KpaIHi DiIObYMOBn rapaHTii, HadaHOI BiINOBiHIOO fipMOH npOabueM. HenoJaKn Bpo6ti npICrpoM M yCyBaEM 6e3PiHaTHo npOTaROM TepMHy DII rapaHTii, Akuo BOHN BnKlnKaHI 6pakOM MaTePiaJy uN NOMIKAMN BnROTOBHeHH. Y BnNaDky UHHOCTI rapaHTI 3BeptITbcrdo npOabua CH B NaB6nKuH ABTopn3OBAHn cepBicHn CEHTP 3 DOKyMeHTaJIbHM NiTBepeXeHHm NOKyn.
3anachi yactnH
BnKOpncTobyIe TbIbKn opnIbHaIbHbI 3anacHi qactnH fipm KARCHER. Onnc 3anachnx YacTHN HapnKiHci daHoI IHcTpkyi3 ekcnnyataui.
3HaKn y noci6Hnky
△ObepeXHo!
Warning: To prevent injury, the device must be used directly in accordance with the instructions.
△Warning
Warning about a potentially dangerous situation that could lead to serious injury or death.
Danger!
Indicates a potentially dangerous situation that could lead to serious injury or property damage.
Safety Rules
Persons who have access to the device, for installation, maintenance, and servicing of the equipment, must have the appropriate qualifications, knowledge, and comply with the relevant rules and operating instructions. Unauthorized modifications by the user are prohibited for safety reasons.
Application
- Before use, check the condition and safety of the device and equipment. If the equipment is in an unsafe condition, it must not be used. The manufacturer is not responsible for damage caused by improper or incorrect use of the device.
Operation
The device is not intended for use by persons with limited physical, sensory, or mental capabilities. Operation of the device by unqualified persons is prohibited. It is necessary to supervise children to ensure they do not play with the device. The device may be used by persons who have been instructed in its safe use and understand the hazards involved. Install the device on a flat surface and take precautions against tipping (for example, place it on a stable base). Do not move the device in an unsuitable manner.
△Caution!
Danger of injury! During operation, technical maintenance, and cleaning of the device, protective gloves must be used.
Electrical connections are under voltage; before connecting, the voltage must be disconnected and the equipment installed.
Device Description
Before starting the device, read the instructions received upon delivery, or contact the trade organization that sold the device.
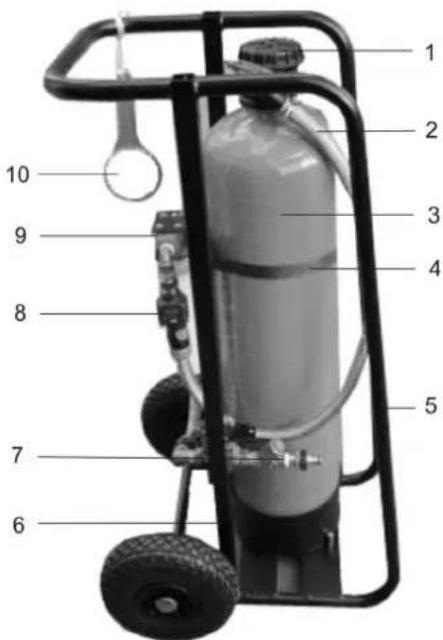
1 Tank cap / tank cap 2 Drain plug 3 Filter / tank 4 Tank (expansion tank) 5 Pump instructions 6 Guide rail 7 Frame, handle 8 Dirt trap with dirt collector
8 Hose 9 Filter 10 Clamp for preliminary cleaning
Preparation
Transport of the device
Device!
Safety instructions! When moving the installation, do not allow the device to be tilted or shaken.
→ For transport by car, place the installation in a vertical position, and when transporting on guide rails - in a horizontal position, and also secure it with appropriate straps.
Loading the device
Safety
Safety and health protection!
When loading, pay attention to the device's center of gravity.
Transport weight (WS 50) 35 kg (WS 100) 40 kg
→ Loading the installation:
Remove the installation from the vehicle by the wheels and carry it to the platform through the loading side. Grasp the handles and lift the installation onto the platform.

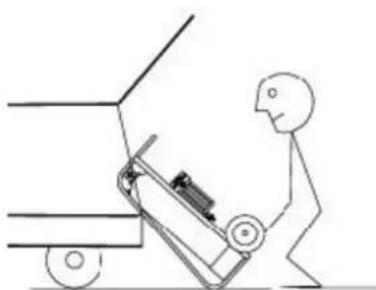
Installation: install in reverse order.
Commissioning
Grasp the device by the handle, turn it over and push or pull. Place the device on a flat, level surface.

Operation
Checks before starting work
- Check the tightness of the device.
- Check the battery charge (the charge indicator lamp on the battery), charge if necessary. Battery type CR2032.
- Check the belt, replace if necessary.
- Check the filter for contamination, replace if necessary (spare part 6.761-361.0).
Device operation
△Caution!
Danger of tipping! Lay the hoses so that the system cannot tip over when moving without a hose.
Danger of stumbling! Lay the hoses so as to prevent the risk of tripping (for example, due to stumbling).
Note!
Do not use the device in areas protected from frost. It is necessary to preheat the device and the connected hoses.
Connect the device to the mains using standard, and follow the manufacturer's instructions.
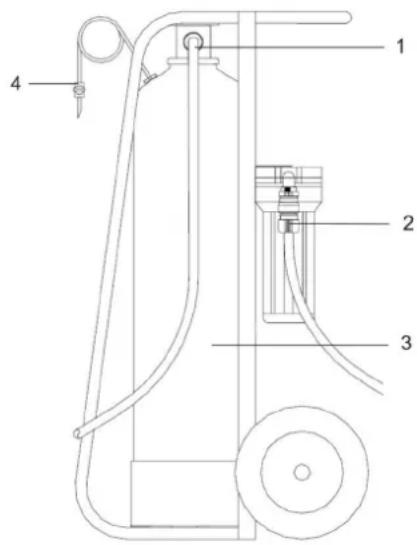
1 Water inlet 2 Drain valve 3 Reservoir (tank) 4 Ventilation valve
→ Close the water inlet (water supply). → Disconnect the water inlet hose from the water supply.
Testing the treated water
Open the water inlet and fill the reservoir (tank). → Vent the system by opening the vent valve and keeping it open until air stops entering.
Determining the hardness of the treated water
→ Determine the hardness of the source water using a water hardness test kit (per manufacturer's instructions), or obtain it from the supplier. Determine the volume of treated water in the following table.
Regeneration of the unit
There are 2 regeneration options for the unit.
- WS regenerator bypass: Connect the unit to the WS regenerator. See the WS regenerator operating instructions.
- Replacing the resin in the reservoir (tank).
Replacing the resin in the reservoir
→ Depressurize the unit. → Disconnect the hose from the treated water connection. Remove the drain hose from the filter/tank. Loosen the clamp and pull the fittings out of the frame. Loosen the tank clamp and remove it. Remove the pressure pipe from the tank. Turn the tank over and remove the resin according to its type. → Rinse the tank with water. Pour in new resin (per manufacturer's instructions, 25 kg). Note: Use a funnel for filling, rinse the resin with water. WS50-12.5 L, WS100-25 L → After the resin is completely filled, fill the tank with water. Insert the pressure pipe into the tank (without using tools), pour water and gently press the pipe down until it reaches the bottom.
Note: It is recommended that the pressure pipes
are located in the center of the tank.
Install the device in reverse order.
Maintenance
General instructions

Warning!
Danger of freezing! During operation, maintenance, and cleaning of the device, it is necessary to use protective clothing. The filters must be under pressure; before disconnecting them, it is necessary to drain the pressure in the established manner.
Danger of freezing
Attention!
Danger of damage! In case of danger of freezing, empty the reservoir.
Emptying the reservoir in case of danger of freezing
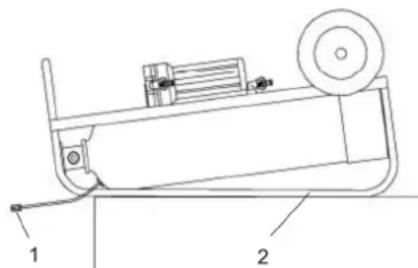
1 Drain valve 2 Guide rail
→ Remove the filter and reservoir, empty it. Open and empty the filter. → Remove the filter with the help of the supplied water. Tilt the device onto the guide rail. Open the drain valve of the filter.
Note: Diluting the valve of the reservoir accelerates the process of draining water.
If water leaks, the device may be damaged by freezing.
Preventive maintenance
Checks before starting work
- Check the installation tightness.
- Check the battery charge (battery charge indicator on the display), replace if necessary. Battery type CR2032. Check the settings, replace if necessary.
- Check for clogging of the filter, replace if necessary (part number 6.761-361.0).
Maintenance every 3 months
Wheel bearing. Check play and adjust height if necessary.
Moisture in the air
Installation resource before repair
→ When the generator is worn out: shut down the installation to the generator and perform regeneration. Replace the resin in the reservoir (tank).
Resin separation
The nozzle on the pressure pipeline is faulty
Replace the nozzle.
Tightness
Tighten the filter correctly
→ Tighten the filter with a wrench. Damaged gasket → check and replace.



- PROPER USE
- PREREQUISITES FOR OPERATION
- GENERAL INFORMATION
- TERMINOLOGY
- RAW WATER
- SOFT WATER
- EXCHANGER
- ION EXCHANGER RESIN
- REGENERATION
- RISING PIPE
- FILTER NOZZLE
- ENVIRONMENTAL PROTECTION
- NOTES ABOUT THE INGREDIENTS (REACH)
- WARRANTY
- SPARE PARTS
- SYMBOLS IN THE OPERATING INSTRUCTIONS
- DANGER
- WARNING
- CAUTION
- SAFETY INSTRUCTIONS
- APPLICATION
- OPERATIONS
- DESCRIPTION OF THE APPLIANCE
- PREPARATION
- TRANSPORTING THE DEVICE
- UNLOADING
- UNLOADING THE PLANT
- LOADING THE PLANT
- DRIVE THE MACHINE
- OPERATION
- DAILY CHECKS PRIOR TO OPERATION
- CONNECTING THE APPLIANCE
- PRODUCING SOFT WATER
- DETERMINING THE SOFT WATER CAPACITY
- DIAL GAUGE
- REGENERATING DEPLETED PLANT
- REPLACING THE RESIN FILLING IN THE TANK (EXCHANGER)
- MAINTENANCE AND CARE
- GENERAL NOTES
- RISK OF FROST
- DRAINING THE TANK IF THERE IS A RISK OF FROST
- MAINTENANCE WORKS
- MAINTENANCE EVERY 3 MONTHS
- TROUBLESHOOTING
- NO SOFT WATER
- PLANT DEPLETED
- RESIN LEAKAGE
- LOWER NOZZLE ON THE RISING PIPE DEFECTIVE
- LEAKAGE
- REPLACE THE LIQUID IN THE TANK
- WWW.KAERCHER.COM/REACH
- TAKUU
- EYYUNON
- GARANTI
- OPERATING CONDITIONS
- HEAT EXCHANGER
- ION EXCHANGE RESIN
- USE
- DESCRIPTION OF THE DEVICE
- TRANSPORT OF THE DEVICE
- ATTENTION
- UNPACKING THE DEVICE
- → BBIPY3KA YCTAHOBKN
- →IORPY3KA YCTAHOBKN
- IPEPEBNKHEHE ANNAPATE
- KCNPNYATAUIA
- EKEHHEBHIE NPOBEPKN NPED HAUANOM PA6OTBI
- IOPKIOUEHHE YCTPOICTBA
- SOFTENED WATER PRODUCTION
- DETERMINING THE VOLUME OF SOFTENED WATER
- METER
- REGENERATION OF THE SYSTEM
- REPLACING THE RESIN IN THE TANK
- CARE AND MAINTENANCE
- GENERAL INSTRUCTIONS
- DANGER OF FREEZING
- DRAINING THE RESERVOIR IN CASE OF FREEZING DANGER
- MAINTENANCE WORK
- DAILY CHECKS BEFORE STARTING WORK
- REDUCED WATER FLOW
- DEVICE SERVICE LIFE
- THE INTERNAL NOZZLE IN THE PRESSURE PIPELINE IS FAULTY
- TIGHTNESS
- THE SHUT-OFF VALVE IS NOT PROPERLY TIGHTENED
- DAMAGED GASKET
- △WARNING
- SAFETY NOTES
- INFORMATION ON INGREDIENTS (REACH)
- MAINTENANCE
- TRANSPORT DEVICE
- → TALKING ON THE DEVICE
- LOADING THE DEVICE
- UNLOADING THE DEVICE
- DAILY CHECKS BEFORE OPERATION
- CONNECTION TO THE MAINS
- COMMISSIONING OF THE SOFTENED WATER SYSTEM
- SETTING THE QUALITY OF THE SOFTENED WATER
- CONTENTS
- INTENDED USE
- HARD WATER
- BRINE TANK
- SALINE SOLUTION
- BRINE LINE
- ΦINBTPBYBAJIBHAΦOPCYHKA
- AXNCT HABKONUSHBORO CEPEOBNUCA
- IHCTPYKUII 3ATOCYBAHHKOMNOHEHTIB (REACH)
- TAPAHTRIA
- ANACHI YACTNH
- HAKN Y NOCI6HNKY
- △OBEPEXHO
- SAFETY RULES
- △CAUTION
- DEVICE DESCRIPTION
- DEVICE
- SAFETY
- → LOADING THE INSTALLATION
- COMMISSIONING
- CHECKS BEFORE STARTING WORK
- DEVICE OPERATION
- NOTE
- TESTING THE TREATED WATER
- DETERMINING THE HARDNESS OF THE TREATED WATER
- REGENERATION OF THE UNIT
- REPLACING THE RESIN IN THE RESERVOIR
- PREVENTIVE MAINTENANCE
- MOISTURE IN THE AIR
- INSTALLATION RESOURCE BEFORE REPAIR
- RESIN SEPARATION
- THE NOZZLE ON THE PRESSURE PIPELINE IS FAULTY
- TIGHTEN THE FILTER CORRECTLY
Brand : Kärcher
Model : WS 50
Category : Humidifier