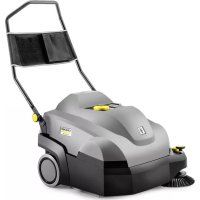
KM 130300 R Bp - Sweeper Kärcher - Free user manual and instructions
Find the device manual for free KM 130300 R Bp Kärcher in PDF.

| Product Type | Industrial Sweeper |
| Brand | Kärcher |
| Model | KM 130300 R Bp |
| Dimensions (L x W x H) | 2040 x 1330 x 1430 mm |
| Weight (without battery) | 840 kg |
| Weight (with battery) | 1300 kg |
| Power Supply | Battery 36 V, 360 Ah (Battery pack optional) |
| Sweeping width (with side brush) | 1300 mm |
| Sweeping width (without side brush) | 1000 mm |
| Sweeping capacity | Up to 9100 m²/h (with side brush) |
| Dust hopper volume | 300 L |
| Maximum gradient (forward direction) | 14 % |
| Travel speed (forward and reverse) | 7 km/h |
| Hydraulic oil type | HV 46 |
| Hydraulic oil quantity (tank) | 20.5 L |
| Dust filter surface area | 5.2 m² |
| Sound pressure level (LpA) | 75 dB(A) |
| Guaranteed sound power level | 93 dB(A) |
| Main functions | Sweeping with rotating brush and side brush, suction, hydraulic hopper emptying |
| Safety | Seat contact, parking brake, protective roof optional, automatic stop |
| Maintenance | Daily filter cleaning, weekly maintenance, brush replacement based on wear |
| Spare parts and repairability | Filter, brushes, batteries, seals, fuses available via Kärcher after-sales service |
Frequently Asked Questions - KM 130300 R Bp Kärcher
User questions about KM 130300 R Bp Kärcher
0 question about this device. Answer the ones you know or ask your own.
Ask a new question about this device
Download the instructions for your Sweeper in PDF format for free! Find your manual KM 130300 R Bp - Kärcher and take your electronic device back in hand. On this page are published all the documents necessary for the use of your device. KM 130300 R Bp by Kärcher.
USER MANUAL KM 130300 R Bp Kärcher
Chairman of the Board of Management Director Regulatory Affairs & Certification
71364 Winnenden (Germany)
Tel.: +49 7195 14-0
Fax: +49 7195 14-2212
Winnenden, 2018/09/01
General notes EN 1
Environmental protection EN 1
Warranty EN 1
Accessories and Spare
Parts. EN 1
Symbols in the operating in
instructions EN 1
Symbols on the machine EN 1
Proper use. EN 2
Foreseeable misuse. . . EN 2
Suitable surfaces . EN 2
Safety instructions EN 2
Safety instructions concerning the operation . . . . . EN 2
Safety information concerning the driving operation. EN 2
Safety instructions for battery-operated devices . . EN 2
Appliances with high emptying system EN 3
Devices with overhead
guard EN3
Safety information concerning the transport of the appliance. EN 3
Safety information concerning maintenance and care EN 3
Function. EN 3
Unloading tips EN 3
Operating and Functional Ele
ments. EN 4
Illustration of sweeper.. EN 4
Operating field EN 4
Function keys. EN 4
Indicator lamps and display EN 5
Before Startup . EN 5
Fold up the cab EN 5
Lock/ release parking brake EN 5
Moving sweeper without engaging self-propulsion . . EN 5
Moving sweeper by engaging self-propulsion . . . . EN 5
Start up EN 5
General notes EN 5
Inspection and maintenance work. EN 5
Before Startup EN 5
Safety notes regarding the
batteries EN 5
Charge the batteries . . . EN 6
Operation. EN 6
Adjusting driver's seat.. EN 6
Programme selection.. EN 6
Starting the machine . . . EN 6
Drive the machine . . . . EN 6
Sweeping mode EN 6
Emptying waste container EN 7
Turn off the appliance . . EN 7
Transport EN7
Storage EN 7
Shutdown. EN 7
Care and maintenance . EN 7
General notes EN 7
Cleaning. EN 7
Maintenance intervals.. EN 7
Maintenance Works . . . EN 7
Troubleshooting. EN
Technical specifications. . . . . EN
EU Declaration of Conformity . EN

Please read and comply with
these original instructions prior
to the initial operation of your appliance and store them for later use or subsequent owners.
General notes
Your sales outlet should be informed about any transit damage noted when unpacking the product.
-
Warning and information plates on the machine provide important directions for safe operation.
-
In addition to the information contained in the operating instructions, all statutory safety and accident prevention regulations must be observed.
Environmental protection

The packaging material can be recycled. Please do not throw the packaging material into household waste; please send it for recycling.
Old appliances contain valuable materials that can be recycled. Please arrange for the proper recycling of old appliances. Please dispose your old appliances using appropriate collection systems.
Batteries, oil, fuels and similar substances must not be released into the environment. Please dispose of these substances via suitable collection systems.
Notes about the ingredients (REACH)
You will find current information about the ingredients at:
www.kaercher.com/REACH
Warranty
The warranty terms published by the relevant sales company are applicable in each country. We will repair potential failures of your appliance within the warranty period free of charge, provided that such failure is caused by faulty material or defects in manufacturing. In the event of a warranty claim please contact your dealer or the nearest authorized Customer Service centre.
Please submit the proof of purchase.
Accessories and Spare Parts
DANGER
To avoid risks, all repairs and replacement of spare parts may only be carried out by authorized customer service personnel.
-
Only use accessories and spare parts which have been approved by the manufacturer. The exclusive use of original accessories and original spare parts ensures that the appliance can be operated safely and trouble free.
-
For additional information about spare parts, please go to the Service section at www.kaercher.com.
Symbols in the operating
instructions
DANGER
Warns about immediate danger which can lead to severe injuries or death.
WARNING
Warns about possible danger which could lead to severe injuries or death.
CAUTION
Points out a possibly dangerous situation which can lead to light injuries or property damage.
ATTENTION
Pointer to a possibly dangerous situation, which can lead to property damage.
Symbols on the machine
| Risk of burns on account of hot surfaces! Allow the exhaust to cool down sufficiently before starting work on the machine. | |
| Always use appropriate gloves while working on the device. | |
| Risk of getting squeezed on account of getting jammed between vehicle parts. | |
| Risk of injury on account of moving parts. Do not reach in. | |
| Risk of fire. Do not vacuum up any burning or glowing objects. | |
| Chain pick-up / crane point | |
| Intake points for the jack | |
| Maximum decline of ground when driving with the waste container raised. | |
| The gradient in the direction of travel should not exceed 14 %. | |
| Caution! Rotating brush (watch for rotation direction). | |
| Beware of dangerous electrical current! | |
| Pay attention to the in-struction. | |
| Steer slowly! | |
| Please read the operating instructions and act ac-cordingly! | |
| Risk of damage! Do not rinse out the dust filter. |
Proper use
The sweeper is intended for cleaning floor surfaces for commercial use and e.g. for the following fields of application:
Car parks
Production facilities
Logistics areas
Hotel
Retail industry
Storage areas
Walkways
-
This sweeper has been designed to sweep dirt and debris from indoor as well as outdoor surfaces.
-
The machine with working equipment must be checked to ensure that it is in proper working order and is operating safely prior to use. Otherwise, the appliance must not be used.
- Use this sweeper only as directed in these operating instructions.
- The machine may not be modified.
- The machine is only suitable for use on the types of surfaces specified in the operating instructions.
- The machine may only be operated on the surfaces approved by the company or its authorised representatives.
- The following applies in general: Keep highly-flammable substances away from the appliance (danger of explosion/fire).
Foreseeable misuse
Never vacuum up explosive liquids, combustible gases or undiluted acids and solvents. This includes petrol, paint thinner or heating oil which can generate explosive fumes or mixtures upon contact with the suction air. Acetone, undiluted acids and solvents must also be avoided as they can harm the materials on the machine.
Never sweep/vacuum up reactive metal dusts (e.g. aluminium, magnesium, zinc), as they form explosive gases when they come in contact with highly alkaline or acidic detergents.
Do not sweep/vacuum up any burning or glowing objects.
The appliance is not suitable for sweeping off hazardous substances.
The machine may not be used or stored in hazardous areas. It is not allowed to use the appliance in hazardous locations.
It is strictly prohibited to take co-passengers.
Pushing/pulling or transporting objects by means of this appliance is prohibited.
Suitable surfaces
Asphalt
- Industrial floor
- Screed
Concrete
Paving stones
Safety instructions
Safety instructions concerning the operation
In order to maintain clearance and creepage distances, the device may not be operated over 2000 metres above sea level.
(Applicable for Finland only) The device may not be used at low ambient temperatures (below 0^ ) if it is equipped with a PVC hose line. Contact Kärcher if should have questions regarding your device.
The machine with working equipment must be checked to ensure that it is in proper working order and is operating safely prior to use. Otherwise, the appliance must not be used.
If the appliance is used in hazardous areas (e.g. filling stations) the corresponding safety provisions must be observed. It is not allowed to use the appliance in hazardous locations.
△DANGER
Risk of injury:
Do not use the appliance without an overhead guard in areas where the operator might get hit by falling objects.
The operator must use the appliance properly. The person must consider the local conditions and must pay attention to third parties, in particular children, when working with the appliance.
It is important to follow all safety instructions, rules and regulations applicable for driving motor vehicles.
Prior to starting work, the operator must ensure that all protective devices are properly installed and function correctly.
The operator of the appliance is liable for accidents with other individuals or their property.
Ensure that the operator wears tight-fitting clothes. Wear sturdy shoes and avoid wearing loose-fitting clothes.
Check the immediate vicinity prior to starting (e.g. children). Ensure sufficient visibility!
Never leave the machine unattended so long as the engine is running. The operator may leave the appliance only when the engine has come to a standstill, the appliance has been protected against accidental movement, and the key has been removed.
Please remove the key, when not in use, to avoid unauthorised use of the appliance.
The appliance may only be used by persons who have been instructed in handling the appliance or have proven qualification and expertise in operating the appliance or have been explicitly assigned the task of handling the appliance.
This appliance is not intended for use by persons (including children) with limited physical, sensoric or mental capacities or lack of experience and/or skills, unless such persons are accompanied and supervised by a person in charge of their safety or if they received precise instructions on the use of this appliance.
Children should be supervised to prevent them from playing with the appliance.
CAUTION
Risk of damage! Do not sweep up straps, strings or wires as these may wrap around the brush roller.
Safety information concerning the driving operation
△DANGER
Risk of injury! Verify the stability of the ground prior to driving on it.
DANGER
Risk of accident, risk of injury!
Danger of tipping if gradient is too high.
The gradient in the direction of travel should not exceed 14% .
Danger of tipping over when taking bends at high speed (particularly left-hand bends).
- Drive slowly when cornering.
Danger of tipping on unstable ground
- Only use the machine on sound surfaces.
Danger of tipping with excessive sideways tilt.
The gradient perpendicular to the direction of travel should not exceed 10% .
Safety instructions for battery-operated devices
Note: Warranty claims will be entertained only if you use batteries and chargers recommended by Kärcher.
- Always follow the instructions of the battery manufacturer and the charger manufacturer. Please follow the statutory requirements for handling and disposing batteries.
- Never leave the batteries in a dis-charged state; recharge them as soon as possible.
- Always keep the batteries clean and dry to avoid creep currents. Protect the batteries and avoid contact with impurities such as metal dust.
- Do not place tools or similar items on the battery. Risk of short-circuit and explosion.
- Do not work with open flames, generate sparks or smoke in the vicinity of a battery or a battery charging room. Danger of explosion.
- Do not touch hot parts of the machine such as the drive motor (risk of burns).
- Be careful while handling battery acid. Follow the respective safety instructions!
- Used batteries are to be disposed according to the EC guideline 91/ 157 EWG in an environment-friendly manner.
Appliances with high emptying system
DANGER
Risk of injury!
When working on the high emptying system, completely lift and secure the waste container.
Perform the safeguarding only from outside the hazard zone.
Devices with overhead guard
NOTICE
The overhead guard (optional) protects the driver against larger falling objects. However, it does not provide rollover protection!
Check the overhead guard for damage daily.
If the overhead guard, as well as individual elements, should be damaged, replace the entire overhead guard.
Any modification of the overhead guard and installation of elements, components and assemblies other than those approved by Karcher is not permitted and may limit the function of the overhead guard.
Safety information concerning the transport of the appliance
Observe the net weight (transport weight) of the device during transport on trailers or vehicles.
To transport the device, unplug the battery plug and securely fasten the device.
Safety information concerning maintenance and care
First switch off the appliance and remove the key before performing any cleaning or maintenance tasks on the appliance, replacing parts or switching over to another function.
When performing any service and maintenance work on devices with a traction battery, the battery must be disconnected from the electrical system of
the device via the battery isolation point (battery plug).
Always disconnect the battery when working on the electrics.
To do this, first disconnect the negative terminal and then the positive terminal. Reconnection is performed in reverse sequence. Connect the positive terminal first, then connect the negative terminal.
Do not clean the appliance with a water hose or high-pressure water jet (danger of short circuits or other damage).
Maintenance work may only be carried out by approved customer service outlets or experts in this field who are familiar with the respective safety regulations.
Please observe the local safety regulations regarding portable commercially used appliances.
Always use appropriate gloves while working on the device.
The sweeper operates using the sweepshovel principle.
- The rotating roller brush moves the dirt directly into the waste container.
- The side brush cleans the corners and edges of the surface and moves dirt and debris into the path of the roller brush.
- The fine dust is sucked in via the dust filter through the suction blower.
Danger
Risk of injury, risk of damage!
Observe the weight of the appliance when you load it!
Weight (without batteries) 840kg^*
Weight (with batteries) 1300kg^*
- If upgrade kits are installed, the weight is respectively higher.
Do not use a forklift.
Use a suitable ramp or a crane to load the appliance!
Observe when using a ramp: Ground clearance 70~mm
If the machine is delivered on a pallet, you must create an unloading ramp using the boards provided.
You will find the instructions for this procedure on page 2 (inside of cover).
Important instruction: every board must be attached with at least 2 screws
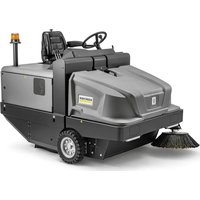
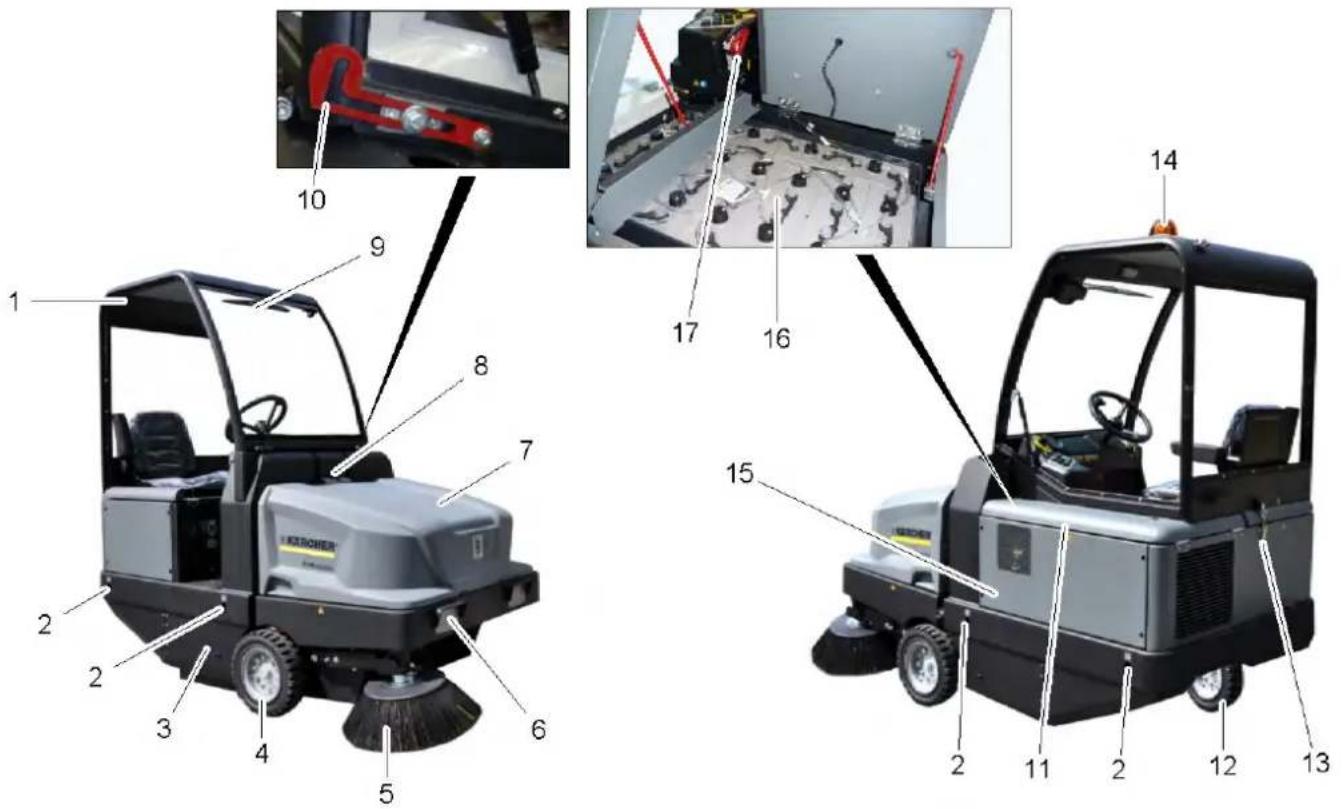
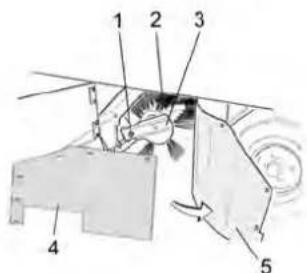
Illustration of sweeper Operating field Function keys
1 Driver cabin (optional)
2 Lashing point (4x)
3 Roller brush access
4 Front wheel
5 Side brushes
6 Lighting system (optional)
7 Waste container
8 Lock of appliance hood
9 Windshield wiper (option)
10 Lock lever of cab
11 Engine cover
12 Rear wheel
13 Cab lock
14 Beacon lamp
15 Brush roller adjustment (not pictured)
16 Battery set (only included with the scope of delivery for the KM 130/300 R Bp Pack)
17 Battery socket
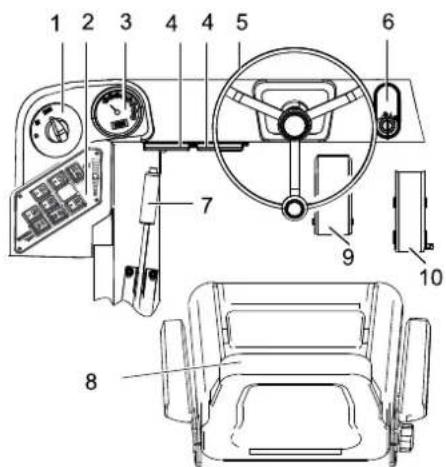
1 Programme switch
2 Function keys
3 Multifunction display
4 Fuse box - work station
5 Steering wheel
6 Ignition lock Position 0: Switch off engine Position 1: Ignition on Position 2: Start the engine
7 Parking brake
8 Seat (with seat contact switch)
9 Brake pedal
10 Drive pedal
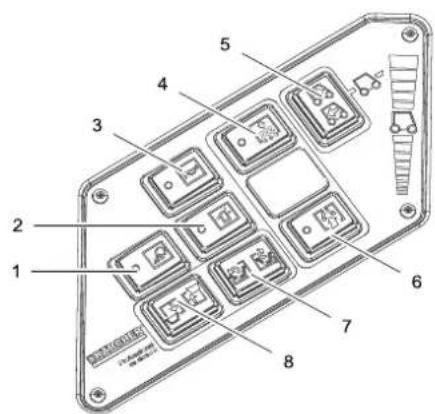
1 Work lights on/off (option)
2 Beacon lamp on/off
3 Horn
4 Filter deducting
5 Selector for the direction of travel
6 Blower
7 Open/close container lid
8 Raise/ lower waste container
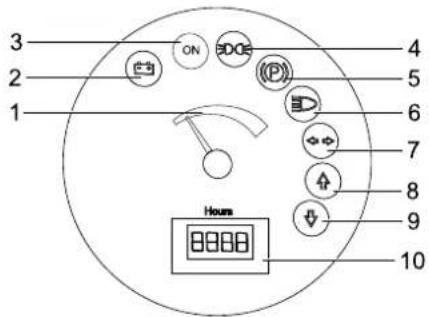
Indicator lamps and display

1 Battery capacity
2 Battery control lamp
3 Control lamp operating state
4 Indicator lamp for position lights
5 Indicator lamp (not connected)
6 Indicator lamp for dipper
7 Indicator lamp (not connected)
8 Indicator lamp - forward driving direction
9 Indicator lamp - reverse driving direction
10 Operating hour counter
Before Startup
Fold up the cab
In order to perform different tasks, you may have to fold up the cab (optional) first.
Note: The cab must only be tilted while the vehicle is on even ground (± 5 °).
Open the cab lock.
Tilt the cab up until the lock lever clicks into place.
Unlock the lock lever prior to lowering the cab.
Lock/releaseparkingbrake
Loosen parking brake; press brake pedal at the same time.
Activate the parking brake; press brake pedal at the same time.
Moving sweeper without engaging self-propulsion
Open engine cover.
Turn the freewheel lever of the hydraulic pump by 90^ down on the side.

CAUTION
Do not move the machine for long distances without engaging self-propulsion; a speed of 10km / h should not be exceeded.
After moving, fold the freewheel lever up again.
Moving sweeper by engaging selfpropulsion
After moving, fold the freewheel lever up again.
Start up
General notes
Park the sweeper on an even surface.
Remove ignition key.
Lockparking brake.
Inspection and maintenance work
Daily before starting operations
Check battery charging status; charge batteries it if required (see Chapter "Charging the batteries").
Check the sweeping roller and the side brush for wear and wrapped belts.
Check the wheels for tied up belts.
Check function of all operator control elements.
Check appliance for damages.
Clean the dust filter with the filter cleaning button.
Note: For description, see section on Care and maintenance.
Before Startup
Safety notes regarding the batteries
Please observe the following warning notes when handling batteries:
| Observe the directions on the battery, in the instructions for use and in the vehicle operat-ing instructions! |
| Wear an eye shield! |
| Keep away children from acid and batteries! |
| Risk of explosion! |
| Fire, sparks, open light, and smoking not allowed! |
| Danger of causticization! |
| First aid! |
| Warning note! |
| Disposal! |
| Do not throw the battery in the dustbin! |
| Beware of dangerous electrical current! |
△Danger
Risk of explosion! Do not put tools or similar on the battery, i.e. on the terminal poles and cell connectors.
Danger
Risk of injury! Ensure that wounds never come into contact with lead. Always clean your hands after having worked with batteries.
Danger
Risk of fire and explosion!
Smoking and naked flames are strictly prohibited.
- Rooms where batteries are charged must have good ventilation because highly explosive gas is emitted during charging.
Danger
Danger of causticization!
Rinse thoroughly with lots of clear water if acid gets into the eye or comes in contact with the skin.
- Then consult a doctor immediately.
- Wash off the acid If it comes in contact with the clothes.
Charge the batteries
CAUTION
Charge the batteries before commissioning the machine.
DANGER
Risk of injury! Comply with safety regulations on the handling of batteries. Observe the directions provided by the manufacturer of the charger.
Please read and follow the included operating instructions by the battery manufacturer and follow them.
Charge the battery only with an appropriate charger.
Rooms where batteries are charged must have good ventilation because highly explosive gas is emitted during charging.
Danger
Danger of chemical burns. Adding water to the battery in its discharged state can cause the acid to leak! Use safety glasses while handling battery acid and follow the safety instructions to avoid personal injury or damage to clothes. Should the acid spray on to the skin or clothes, rinse immediately with lots of water.
CAUTION
Risk of damage. Use only distilled or desalinated water (VDE 0510) for filling the battery. Do not add any substances (so-called performance improving agents), else warranty claims will not be entertained.
Recommended batteries, chargers
| Order number | |
| Battery pack 36 V, 360 Ah, (in the trough, low maintenance) * | 6.654-282.0 |
| Charger 36 V, 50 A 6.654-283.0 | |
| * Appliance requires 1 battery pack | |
The use of other batteries and chargers is not recommended and should be discussed with Karcher customer service.
Pull the battery plug from the machine and connect it to the plug of the charger.
Connect the plug of the charger to a proper socket of 16 A, the charger will charge automatically.
Always keep both motor covers open during the charging process.
Note: When the batteries are charged, first remove the charger from the mains and then disconnect it from the batteries.
Check fluid level in the battery and adjust if required
CAUTION
Be sure to observe the battery manufacturer's instructions and then act accordingly.
Check charging status of battery
Display of the battery capacity in the green range: Battery is charged.
- Display of the battery capacity in the yellow range: Battery is halfway discharged.
- Display of the battery capacity in the red range:
Battery is almost discharged. The sweeping mode will be shortly switched off automatically.
- Indicator lamp glows red Battery is discharged. The sweeping mode will be terminated automatically (the sweeping aggregates cannot be taken into operation until the battery is charged).
Drive the machine directly to the charging station; avoid any steep gradients in the process.
Charge battery.
Operation
Adjusting driver's seat
Pull seat adjustment lever outwards.
Slide seat, release lever and lock in place.
Check that the seat is properly locked in position by attempting to move it backwards and forwards.
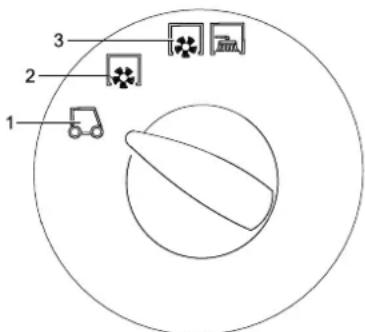
Programme selection
1 Transport drive
2 Sweeping with sweep roller
3 Sweeping using roller brush and side brushes
Starting the machine
Note: The machine is equipped with a seat contact switch If the driver's seat is vacated, the machine is switched off.
Sit on the driver's seat.
Bring the direction selector switch into the middle position.
Lockparkingbrake.
Insert the ignition key into the ignition switch.
Turn the ignition key to position "l". The appliance is now ready for operation.
Turn the ignition key to position "ll". The appliance can now be driven. Note: The display of the battery capacity will show the actual charge status after about 10 seconds.
Drive the machine
Set programme selection switch to "Transport drive".
Press brake pedal and keep it depressed.
Releaseparkingbrake.
Drive forward
Set the travel direction switch to "forward".
Press accelerator pedal down slowly.
Reverse drive
Danger
Risk of injury! While reversing, ensure that there is nobody in the way, ask them to move if somebody is around.
CAUTION
Risk of damage! Only use the direction switch when the machine is standing still.
Set the travel direction switch to "backwards".
Press accelerator pedal down slowly.
Driving method
- The accelerator pedal can be used to vary the driving speed infinitely.
- Avoid pressing the pedal suddenly as this may damage the hydraulic system.
Brakes
Release the accelerator pedal, the machine brakes automatically and stops.
Note: The braking effect can be supported by pressing the brake pedal.
Driving over obstacles
Driving over fixed obstacles which are 70 mm high or less:
Drive forwards slowly and carefully. Driving over fixed obstacles which are more than 70~mm high:
Only drive over these obstacles using a suitable ramp.
Sweeping mode
CAUTION
Do not sweep up packing strips, wire or similar objects as this may damage the sweeping mechanism.
Note: To achieve an optimum cleaning result, the driving speed should be adjusted to take specific situations into account.
Note: During operation, the dust filter should be shaken off and cleaned at regular intervals.
Sweeping dry floors
Switch on the blower.

Set the programme switch to sweep with sweeping brush when cleaning surfaces.
Set the programme switch to sweep with sweeping brush and side brush when cleaning edges.
Sweeping damp or wet floors
Switch off the blower.
Set the programme switch to sweep with sweeping brush when cleaning surfaces.
Set the programme switch to sweep with sweeping brush and side brush when cleaning edges.
Emptying waste container
Danger
Risk of injury! When emptying the waste container, care should be taken to ensure that no persons or animals are within its swivelling range.
Danger
Danger of crushing. Never reach into the rod assembly for the drainage mechanism. Stay away from the area under the raised container.
Danger
Danger of tipping. Place the machine on an even surface during emptying.

Set programme selection switch to "Transport drive".
Raise waste container.
Slowly drive towards the collection container.
Lockparkingbrake.
Open the container door: Press the left side of the switch and empty the waste container.
Close the container door: Press the right side of the switch (approximately 2 seconds), until the unit is tilted to the end position.
Release parking brake.
Drive away the collection container slowly.
Lower the waste container up to the end-position.
Turn off the appliance
Press brake pedal and keep it depressed.
Lockparkingbrake.
Turn ignition key to "0" and remove it.
Transport
DANGER
Risk of injury and damage! Observe the weight of the appliance when you transport it.
Turn ignition key to "0" and remove it.
Lockparkingbrake.
Secure the appliance at the lashing points (4x) using tension belts, ropes or chains.
Secure the wheels of the machine with wheel chocks.
When transporting in vehicles, secure the appliance according to the guidelines from slipping and tipping over.
Storage
DANGER
Risk of injury and damage! Note the weight of the appliance in case of storage.
Shutdown
If the sweeper is going to be out of service for a longer time period, observe the following points:
Park the sweeper on an even surface.
Set programme selection switch to "Transport drive".
Turn ignition key to "0" and remove it.
Lock the sweeper to ensure that it does not roll off.
Clean the inside and outside of the sweeper.
Park the machine in a safe and dry place.
Remove the battery plug from machine.
Charge battery and recharge it approx. every 2 months.
Care and maintenance
General notes
CAUTION
Risk of damage!
Do not rinse out the dust filter.
First switch off the appliance, remove the key and remove the battery plug or disconnect the battery before performing any cleaning or maintenance tasks on the appliance, replacing parts or switching over to another function.
- Maintenance work may only be carried out by approved customer service outlets or experts in this field who are familiar with the respective safety regulations.
- Mobile appliances used for commercial purposes are subject to safety inspections according to VDE 0701.
Park the sweeper on an even surface.
Turn ignition key to "0" and remove it.
Lockparkingbrake.
Cleaning
CAUTION
Risk of damage! Do not clean the appliance with a water hose or high-pressure water jet (danger of short circuits or other damage).
Cleaning the inside of the machine △Danger
Risk of injury! Wear dust mask and protective goggles.
Clean machine with a cloth.
Blow through machine with compressed air.
External cleaning of the appliance
Clean the machine with a damp cloth which has been soaked in mild detergent.
Note: Do not use aggressive cleaning agents.
Maintenance intervals
Note: The elapsed-time counter shows the timing of the maintenance intervals.
Maintenance by the customer
Note: Where maintenance is carried out by the customer, all service and maintenance work must be undertaken by a qualified specialist. If required, a specialised Kärcher dealer may be contacted at any time.
Daily maintenance:
Check the sweeping roller and the side brush for wear and wrapped belts.
Check function of all operator control elements.
Check appliance for damages.
Weekly maintenance:
Clean the hydraulic oil cooler.
Check hydraulic unit.
Check the hydraulic oil level.
Check brake fluid status.
Check the pad for wear, replace if required.
Check the container lid and lubricate it. Maintenance following wear:
Replace sealing strips.
Readjust the side seals or replace them.
Replace roller brush.
Replace side brush.
Note: For description, see section on Maintenance work.
Maintenance by Customer Service
Maintenance to be carried out after 50 operating hours:
Have the first inspection done according to the service manual.
Maintenance to be carried out after 250 operating hours:
Have the inspection done according to the service manual.
Note: In order to safeguard warranty claims, all service and maintenance work during the warranty period must be carried out by the authorised Kärcher Customer Service in accordance with the maintenance booklet.
Maintenance Works
Preparation:
Park the sweeper on an even surface.
Turn ignition key to "0" and remove it.
Lockparkingbrake.
General notes on safety
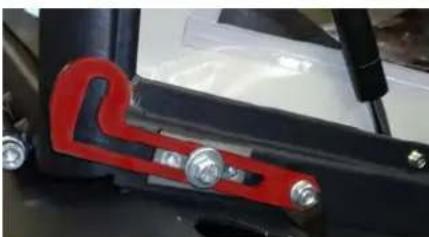
DANGER
Risk of injury! Always apply the safety bar when the waste container is raised.
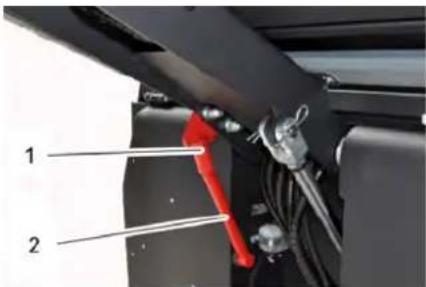
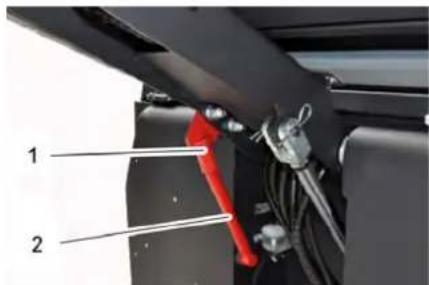
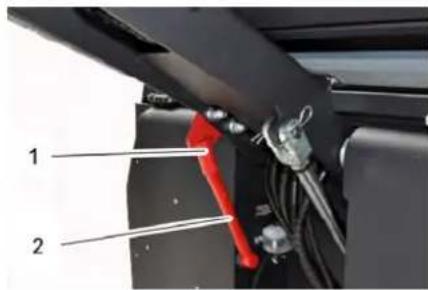
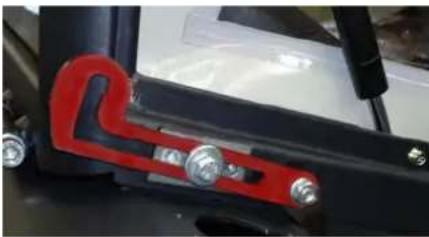
1 Holder of safety rod
2 Safety rod
Fold the safety rod for the high emptying up and insert it into the holder (se-cured).
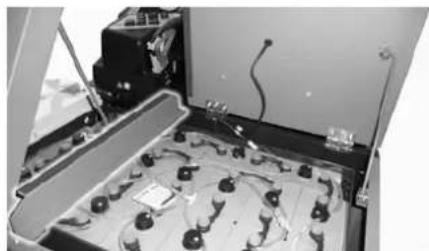
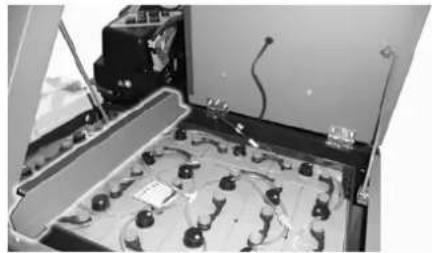
Replace batteries
The batteries can only be exchanged as a set. The exchange has to be performed by trained personnel.
Due to the heavy weight (450kg) ,the batteries must be exchanged using a crane.
Note: The cross strut must be unscrewed prior to replacing the battery.
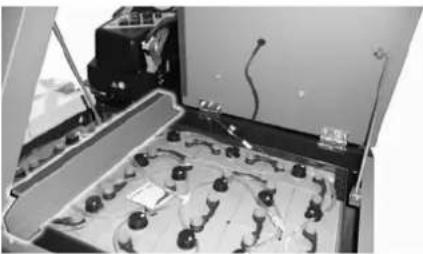
When removing the battery, disconnect the negative terminal wire first.
Fasten the crane chains in the four eyelets of the battery set and carefully lift out the batteries.
Check hydraulic oil level and refill hydraulic oil
NOTICE
The waste container must not be raised.
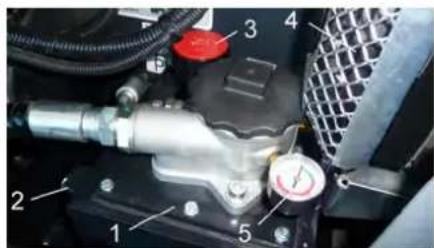
Open engine cover.
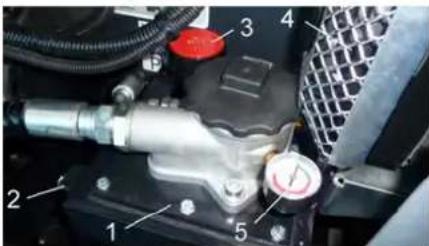
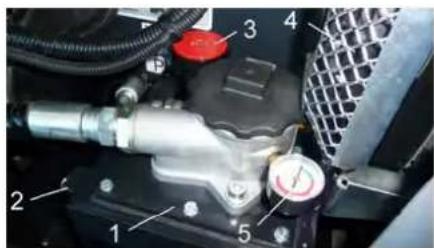
1 Hydraulic oil tank
2 Looking glass
3 Screw cap, oil fill opening
4 Hydraulic oil cooler
5 Manometer
Check hydraulic oil level in the looking glass.
-
The oil level must lie between "MIN" and "MAX" marking.
-
Add hydraulic oil if the oil level is below the "MIN" marking.
Loosen the closing cap of the oil filling opening.
Clean the filling area.
Refill hydraulic oil.
Oil grade: see Technical Data
Replace and tighten the closing cap of the oil filling opening.
NOTICE
If the pressure gauge shows an increased hydraulic oil pressure, the hydraulic oil filter must be replaced by Karcher customer service.
Check hydraulic unit
Lockparkingbrake.
Start the motor.
Only Kärcher Customer Service is authorised to carry out maintenance tasks on the hydraulic unit.
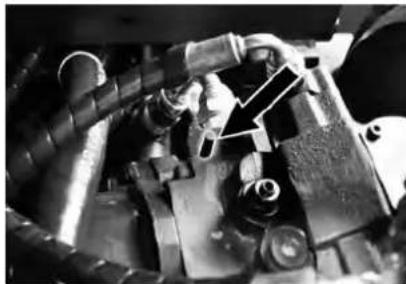
Check all hydraulic hoses and connections and ensure that they are leak-proof.
Checking roller brush
Turn the ignition key to position "l".
Raise the waste container up to the end-position.
Turn the ignition key to 0 position.
Lockparkingbrake.
Use the safety bar for emptying from a height.
Remove belts or cords from roller brush.
Remove the safety bar.
Insert the ignition key into the ignition switch.
Turn the ignition key to position "I".
Lower the waste container up to the end-position.
Turn ignition key to "0" and remove it.
Replacing roller brush

1 Fastening screws of the roller brush intake
2 Roller brush
3 Roller brush intake
4 Holding plate for side seal
5 Side seal
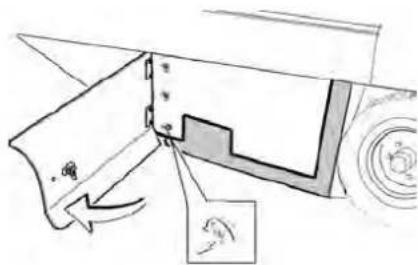
Open the side covers using a key.
Unscrew the wingnuts from the holding plate side seals and remove the holding plate.
Flip the side seal out.
Uncscrew the retaining screw of the roller brush intake, and swing the intake to the outside.
Pull out roller brush.
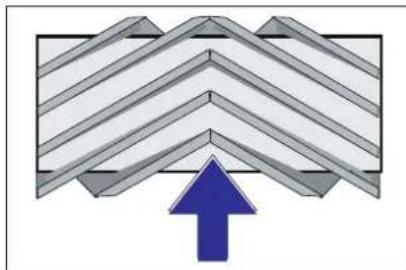
Installation position of roller brush in direction of travel (top view)
Note: When installing the new roller brush, ensure correct positioning of the bristle assembly.
Install new roller brush. The nuts of the roller brush must be inserted on the notches of the opposite crank.
Note: Once the new roller brush has been installed, the sweeping track must readjusted.
Check and adjust roller brush sweeping track
Note: The sweeping track is factory-set to 80mm ; it is steplessly adjustable if the brush roller wears down.
Check tyre pressure.
Switch off suction blower.
Drive sweeper on to a smooth, even surface covered with a visible layer of dust or chalk.
Set the programme switch to sweep with roller brush.
Set programme selection switch to "Transport drive".
Drive machine backwards.
Check sweeping mirror.
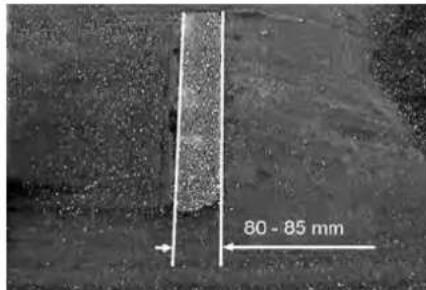
The sweeping track should have an even rectangular shape which is 80 - 85mm wide
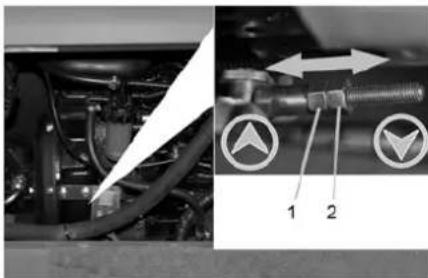
1 Rating nut
2 Counter-nut
Open the side engine panel.
Loosen counter-nut.
Adjust sweeping track
Tighten counter nut.
Check the sweeping track of the sweeping roller.
Check and adjust sweeping track of the side-brush
The side-brushes lift up.
Drive sweeper on to a smooth, even surface covered with a visible layer of dust or chalk.
Set the programme switch to sweep with roller brush and side brush.
The side-brushes lift up.
Set programme selection to "Drive".
Drive machine backwards.
Check sweeping mirror.
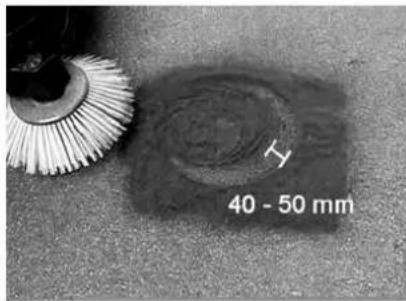
The width of the sweeping track should lie between 40-50 mm.
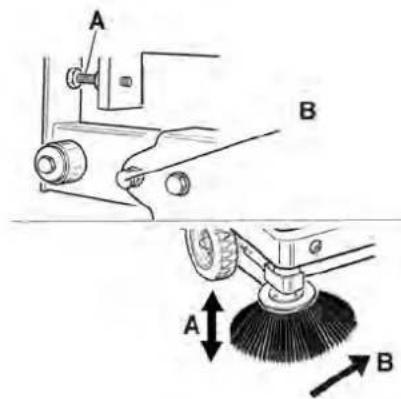
Set the sweeping track using the two adjusting screws.
Check sweeping mirror.
Adjust the side seals
Drive the waste container up and secure it with the safety rod.
△DANGER
Risk of injury! Always apply the safety bar when the waste container is raised.
Fold the safety rod for the high emptying up and insert it into the holder (se-cured).

1 Holder of safety rod
2 Safety rod
Open the side cover as described in Chapter "Replace brush roller".
Release the 6 wing nuts on the side holding plate.
Loosen 3 nuts (SW 13) on the front holding plate.
Press the side seal down (elongated hole) until it is about 1 to 3mm to the floor.
Screw in the holding plates.
Repeat the procedure on the other side of the appliance.
Manually clean the dust filter
Clean the dust filter with the filter cleaning button.
Replacing dust filter
WARNING
Empty waste container before replacing dust filter. Wear a dust mask when working around the dust filter. Observe safety regulations on the handling of fine particulate material.
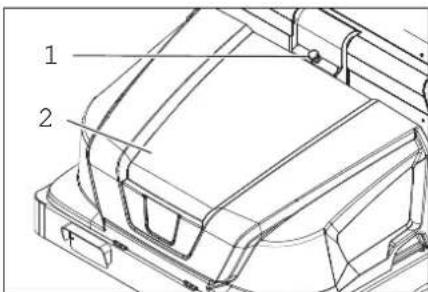
1 Lock of appliance hood
2 Cover
Open the lock, remove the star grip screw to do this.
Fold cover forwards.

Open filter cap.
Fold the filter vibrator forward.
Replace the dust filter.
Close the filter cover.
Changing the headlight bulb (option)
Unscrew the head lamps.
Take out the head lamps and pull out the plug.
Note: Note the positions of the plugs.
Dismantle the head lamps.
Dismantle the head lamp casing and hold it horizontally because the lamp unit is not fastened.
Unlock the bracked and take out the bulb.
Insert new bulb.
Reinstall in reverse sequence.
Changing the blinker bulb (option)
Note: Remove the glass of the direction-indicator lamp from its casing to replace the bulb.
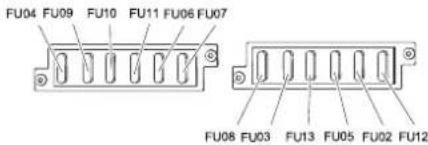
Replacing fuses
Open the fuse holder.
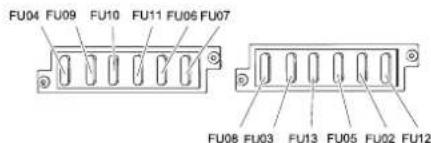
Check the fuses.
Replace defective fuses.
Note: The fuse FU 01 (main fuse) is located on the electronics casing.
The fuses FU 14, FU 15 and FU 16 are located in the electronics casing. Attention: Opening of electronics casing and replacing of fuses only by customer service.

1 FuseFU01(main fuse)
2 Electronics casing
| FU 01 Main fuse 220 A | |
| FU 02 Seat contact switch 3 A | |
| FU 03 Driver cabin (optional) 10 A | |
| FU 04 Driving direction switch | 5 A |
| FU 05 Multifunction display 3 A | |
| FU 06 Hydraulic oil cooler 25 A | |
| FU 07 Program selection switch | 15 A |
| FU 08 Horn 10 A | |
| FU 09 Left lighting 7,5 A | |
| FU 10 Right lighting 7,5 A | |
| FU 11 Working light 10 A | |
| FU 12 Beacon lamp 5 A |
| FU 13 Vibrator system 10 A | |
| FU 14 Motor 3 A | |
| FU 15 Voltage converter 20 A | |
| FU 16 Key switch 3 A |
Note: Only use fuses with identical safety ratings.
Troubleshooting
| Fault Remedy | |
| Device does not drive or drives only slowly | Sit on the driver seat, the seat contact switch gets activated. |
| Switch on the triggered fuse FU 01 (on the electronic casing) | |
| Charging or replacing battery | |
| Release parking brake | |
| Check for trapped ribbons and strings. | |
| Inform Kärcher Customer Service. | |
| Whistling sound in the hydraulic system | Refill hydraulic fluid |
| Inform Kärcher Customer Service. | |
| Brushes are rotating slowly or not at all | Check for trapped ribbons and strings. |
| Inform Kärcher Customer Service. | |
| Too little or no suction power in the brush area | Clean filter |
| Inform Kärcher Customer Service. | |
| Dust gathers in the machine Adjust | the side seals |
| Switch on blower | |
| Clean dust filter | |
| Replace filter washers | |
| Inform Kärcher Customer Service. | |
| Sweeping unit does not pick up waste | Empty waste container |
| Clean dust filter | |
| Replacing roller brush | |
| Adjust sweeping track | |
| Replace sealing strips of the waste container | |
| Remove the blocking of the brush roller | |
| Inform Kärcher Customer Service. | |
| Waste container does not raise or lower | Check the fuses. |
| Inform Kärcher Customer Service. | |
| Waste container is rotating slowly or not at all | Inform Kärcher Customer Service. |
| Operation problems with hydraulic movement parts | Inform Kärcher Customer Service. |
Technical specifications
| KM 130/300 R Bp KM 130/300 R Bp Pack | |||
| Machine data | |||
| Drive speed, forward km/h 7 7 | |||
| Drive speed, reverse km/h 7 7 | |||
| Climbing capability (max.) -- 14 % 14 % | |||
| Surface cleaning performance without side brushes m | 2/h 7000 | 7000 | |
| Surface cleaning performance with 1 side brushes m | 2/h 9100 | 9100 | |
| Working width without side brushes mm 1000 1000 | |||
| Working width with 1 side brushes mm 1300 1300 | |||
| Protection type, drip-proof -- IPX 3 IPX 3 | |||
| Usage duration with battery fully charged | h | 2 2 | |
| Electrical system | |||
| Battery capacity | V, Ah | -- | 36, 360 |
| Battery set | kg | -- | 460 |
| Hydraulic system | |||
| Oil quantity in the entire hydraulic system | I | 25 | 25 |
| Oil quantity in hydraulic tank | I | 20,5 | 20,5 |
| Hydraulic oil type | -- HV 46 | HV 46 | |
| Waste container | |||
| Max. unloading height | mm 1400 | 1400 | |
| Volume of waste container | I | 300 | 300 |
| Roller brush | |||
| Roller brush diameter | mm 300 | 300 | |
| Roller brush width | mm 1000 | 1000 | |
| Speed | 1/min | 325 | 325 |
| Sweeping track | mm 80 | 80 | |
| Side brushes | |||
| Side brush diameter | mm 600 | 600 | |
| Speed (continuous) | 1/min | 61 | 61 |
| Solid rubber tyres | |||
| Size, front | -- 15-4,5 x 8 | 15-4,5 x 8 | |
| Size, rear | -- 15-4,5 x 8 | 15-4,5 x 8 | |
| Brake | |||
| Front wheels | -- mechanical | mechanical | |
| Rear wheel | -- hydrostatic | hydrostatic | |
| Filter and vacuum system | |||
| Type | -- Flat fold filter | Flat fold filter | |
| Speed | 1/min | 2800 2800 | |
| Filter surface area, fine dust filter | m² | 5,2 | 5,2 |
| Nominal vacuum, suction system | mbar | 15,5 | 15,5 |
| Nominal volume flow, suction system | m³/h 800 | 800 | |
| Vibrator system | -- Electric motor | Electric motor | |
| Working conditions | |||
| Temperature | °C | -5 and +40 | -5 and +40 |
| Air humidity, non-condensing | % | 0 - 90 | 0 - 90 |
| Values determined as per EN 60335-2-72 | |||
| Noise emission | |||
| Sound pressure level LpA | dB(A) | 75 | 75 |
| Uncertainty KpA | dB(A) | 3 3 | |
| KM 130/300 R Bp | KM 130/300 R Bp Pack | ||
| Sound power level Lwa + Uncertainty Kwa | dB(A) 93 | 93 | |
| Machine vibrations | |||
| Hand-arm vibration value m/s | 2 | < 2,5 < 2,5 | |
| Seat m/s | 2 | < 2,5 < 2,5 | |
| Uncertainty Km/s | 2 | 0,1 0,1 | |
| Dimensions and weights | |||
| Length x width x height mm 2040x1330x1430 2040x1330x1430 | |||
| Right turning radius mm 1400 1400 | |||
| Left turning radius mm 1400 1400 | |||
| Unladen weight (with/ without battery) kg 840/1300 | 840/1300 | ||
| Permissible overall weight | kg 1789 1 | 789 | |
| Permissible front axle load | kg 897 | 897 | |
| Permissible rear axle load | kg 892 | 892 | |
| Subject to technical modifications! | |||
EU Declaration of Conformity
We hereby declare that the machine described below complies with the relevant basic safety and health requirements of the EU Directives, both in its basic design and construction as well as in the version put into circulation by us. This declaration shall cease to be valid if the machine is modified without our prior approval.
Product: Sweeper
Type: 1.186-xxx
Relevant EU Directives
2006/42/EC (+2009/127/EC)
2014/30/EU
2000/14/EC
Applied harmonized standards
EN 60335-1
EN 60335-2-72
EN 55012: 2007 + A1: 2009
EN 61000-6-2: 2005
EN 62233: 2008
Applied conformity evaluation method
2000/14/EC: Appendix V
Sound power level dB(A)
Measured: 90
Guaranteed: 93
The signatories act on behalf of and with the authority of the company management.

Chairman of the Board of Management

Director Regulatory Affairs & Certification
Documentation supervisor:
S. Reiser
Alfred Karcher SE & Co. KG
71364 Winnenden (Germany)
Tel.: +49 7195 14-0
Fax: +49 7195 14-2212
Winnenden, 2018/09/01
Consignes generales. FR 1
www.kaercher.com/REACH
Garantie
2006/42/CE (+2009/127/CE)
2014/30/UE
2000/14/CE
Chairman of the Board of Management

S. Reiser
Director Regulatory Affairs & Certification
Responsible de la documentation :
S. Reiser
Alfred Karcher SE & Co. KG
Alfred-Karcher-StraBe 28-40
71364 Winnenden (Germany)
Tel.: +49 7195 14-0
Fax: +49 7195 14-2212
Winnenden, 2018/09/01
www.kaercher.com/REACH
Garanzia
2006/42/CE (+2009/127/CE)
2014/30/UE
2000/14/CE
Chairman of the Board of Management

S. Reiser
Director Regulatory Affairs & Certification
71364 Winnenden (Germany)
Tel.: +49 7195 14-0
Fax: +49 7195 14-2212
Winnenden, 2018/09/01
www.kaercher.com/REACH
Garantie
5
Product: Veegmachine
Type: 1.186-xxx
Chairman of the Board of Management
S. Reiser
Director Regulatory Affairs & Certification
71364 Winnenden (Germany)
Tel.: +49 7195 14-0
Fax: +49 7195 14-2212
Winnenden, 2018/09/01
www.kaercher.com/REACH
Garantia
2006/42/CE (+2009/127/CE)
2014/30/UE
2000/14/CE
Chairman of the Board of Management
S. Reiser
Director Regulatory Affairs & Certification
Responsible de documentacion:
S. Reiser
Alfred Kärcher SE & Co. KG
Alfred-Karcher-StraBe 28-40
71364 Winnenden (Germany)
Tel.: +49 7195 14-0
Fax: +49 7195 14-2212
Winnenden, 2018/09/01
Carregar as baterias . . . PT 6
Funciomento .PT6
Ajustar o assento do conductor PT 6
Seleccionar os programas
Arrancar o aparelho . . . PT 6
www.kaercher.com/REACH
Garantia
Carregar as baterias
CUIDADO
Ajustar o assento do conductor
Substitur as baterias
2006/42/CE (+2009/127/CE)
2014/30/UE
2000/14/CE
Chairman of the Board of Management

S. Reiser
Director Regulatory Affairs & Certification
71364 Winnenden (Germany)
Tel.: +49 7195 14-0
Fax: +49 7195 14-2212
Winnenden, 2018/09/01
GenerelleHenisninger.DA1
www.kaercher.com/REACH
Garanti
2006/42/EF(+2009/127/EF)
2014/30/EU
2000/14/EF
Chairman of the Board of Management

S. Reiser
Director Regulatory Affairs & Certification
71364 Winnenden (Germany)
Tel.: +49 7195 14-0
Fax: +49 7195 14-2212
Winnenden, 2018/09/01
Generelle merknader.. NO 1
Miljøvern .NO 1
Garanti . NO 1
www.kaercher.com/REACH
Garanti
Anvising for avlossing
△Fare
Fare for personskade, fare for materiell skade!
Rengjore stovfilter manuelt
Apne sikringsholder.
Kontroller sikringer.
Skift ut defekte sikringer.
2006/42/EF(+2009/127/EF)
2014/30/EU
2000/14/EF
Chairman of the Board of Management

Director Regulatory Affairs & Certification
71364 Winnenden (Germany)
Tel.: +49 7195 14-0
Fax: +49 7195 14-2212
Winnenden, 2018/09/01
Allmanna hänvisningar .SV 1
Miljöskydd . SV 1
Garanti . SV 1
www.kaercher.com/REACH
Garanti
Chairman of the Board of Management

S. Beiser
Director Regulatory Affairs & Certification
Dokumentationsbefullmaktigad:
S. Reiser
Alfred Kärcher SE & Co. KG
71364 Winnenden (Germany)
Tel.: +49 7195 14-0
Fax: +49 7195 14-2212
Winnenden, 2018/09/01
Yleisä ohjeita FI 1
www.kaercher.com/REACH
Takuu
Chairman of the Board of Management

S. Reiser
Director Regulatory Affairs & Certification
www.kaercher.com/REACH
Eyyunon
E Kαθε χωρα IOXuov OI opoi Eyyunong TIOEKOθnKAV aTNO TIV apoδia εTaipia μaTPOwθnOgπWλnaewv. Avalaβavouμe TNOwpeav aTOKATAOaON OTIOAODNTOTE BαβncσTN OaKEUn aC, Eφoov OΦεiετai σaTOXIA UIKOU N KATAOKEUOTIKO αPáλμa, EVTOg TNS TPOθΕOμiα TIOU opiεtai OTNV Eyyunon. Σ TEPITIWON TIO ETTHμeite VA KAVETEXPHON TSG Eyyunong, TAPAKAOμe ANTEUθUVθeITE μe TIV aTIOEEN yopac σTO KAATOnμa ATI TO OTIOI TPOUNθEUTNATE TNOuKEUn n OTNV Iλnai
EOTepn EGOIOOBDtnev UTnpoeia TeXVIKns EUGNTNPeTNOCTeAATWV MaC.
Egptnmuata kai aVtAAkTiká
KINAYNOZ
Tia nV aTOnOpuyn EVDexoEvwKivDuvw,oi EtiDiopthetaic KAI NTOnOteiOn avTAAKTIKWThaPTeiVAkTEAouvtai Movov aTo TIV ESouioBtoEvn Utnpeia EUnnpetnoNc PAtv.
KivouoctpauanouELeyTe nVavToXnTOUeapouc npiv to pnoaAoeTE.
KINADYNOE
Kivouos atuxmuos, kivouos tpaunoiou!
Kivouoc avatponns,otav n Kian tou eoqous eiva tonu avoikn.
MetaTn meTakivnon aveBaoTe gava to loxAo aTOOuPTAeNs.
Evapxn 1eitoupyia
EvikéusuOBeiEIG
Evikcs UToBeiEis aopaaeias KINADYNO
Kivuvoc tpaumopou!TOnoTeite navta tn paoaepiaic,otavokadoatopipmuov evai avaonkwevoc.
1 Tnpiya paBou aopalians 2 PaBoc aopaians
AvoIeTn paBdo aopaiianc EKKevw- anC e uioa Tpoa ta Tavw kai totoThe TIOE TIV OTO npiypa (oopaiaouevn).
AvtikataoTowmuTapiov OI mTatapiec mTopoov va avtikataoTa-oouv ovo wovAo. Havtikataoan mTopei va yivei movo aTo EIOKEeUevo nE-KtpoAoYo.
Aoyoueayouapouc(450kg),n avikataoan npetie va yivei e xpn- on yepavou.
YIOB6Ig: EBIOWOT TNYEYKApOIA 0KO TPIV TNY AVTKATAOtaON TNC MTA- TAPIaC.
→Kata nV aTouovapoloyon TnS pTAPiAc TPeTE va TPOOEXE WOTe VA VETai TpWt aTTOOUVoEOn Tou aywyouaovntIKOU.
→ ΣTEPEWOTa OKOIVIa Tou Yepavou aTOUc 4 OTc Tou cTtapiaKai avaONKWOT TPOEKTiKa TITATpIeC.
EAEYTE Tn Otaun Aaiou Tou Ubaaikou ouotmuatcKai OuaanpwoTc Aabi YNOAEIH
O kāðoc antoppμátwv δev πρεπει va εivai avuωμévoç.
AvoiEToKaAuaμaTou KivnTnpa.
1△εαeνuopaaukoλaioU 2Yaalodikns
3 KaTaki aospalion, avoiyua Tnpwoan
4 UyEio uOpaUAIKou Aaio
5 Mavóμετρo
Chairman of the Board of Management

Director Regulatory Affairs & Certification
Genel bilgiler TR 1
Cevre koruma TR 1
Garanti TR 1
www.kaercher.com/REACH
Garanti
Calismaya baslamadan once her gun
Chairman of the Board of Management

S. Reiser
Director Regulatory Affairs & Certification
71364 Winnenden (Germany)
Tel.: +49 7195 14-0
Fax: +49 7195 14-2212
Winnenden, 2018/09/01
O6uye yka3aHnra. .RU 1 3aunTa OKpykaUouei CpeDbl RU 1 TapaHTna. .RU 1 PnHaJdJIeXHoCTN i 3aNaChbIe DeTANI. .RU 1 CmMBOnbl B pyKOBoDCTBe no 3KcPnyatauIN .RU 2 CmMBOnbl Ha npnbope..RU 2
IcnoB3OBAHnE noHa3HaueHnIO RU 2 YMbIJIeHHoe HnpeBaJIbHOe npImeHHe. .RU 2 IoXoJaune NOBepxHocTn RU 2
Yka3aHnno TneTexnke 6e3oNaCHoCTN. RU2 Yka3aHnno 6e3oNaChOCTnpn EKnPnyatau..RU2 Yka3aHnno 6e3oNaChOCTNBpeKIMe DnKHeHnRAU3 Yka3aHnno 6e3oNaChOCTnDnA YcTPOIcTB,pa6ToAounxOT aKKMyJrTopHOB 6aTapen RU 3 YcTPOIcTBa C NObEMNHkOM KOHTeHepa.RU3 YcTPOIcTBo C 3aUnTHbIM HaBeCOM BOITeRy.RU3 Yka3aHnno 6e3oNaChOCTnpn TpAnCnOpTnpOBKe MaunHbl. RU3 Yka3aHnno 6e3oNaChOCTnpn YXOJe H TeXHHueCKOM 6cLyKbAHnn. RU 3
Ha3naHne. RU4
Yka3aHn npa3rpy3ke. RU 4
OncanHe 3JemEntOB ynpabNe-
Hn pa6oynx y3NoB. RU5
I3o6paKeHne nOpMaTeaIbHoN MaunHbI. RU5
PaHEny ynpaBHeHn. RU5
FyHKUHOHaJIbHbIe KHOKn RU 5
KoHTPOJIbHbIe INDnKaTOpbl NDCnE. RU6
IpeepHaayamopapobtBu. .RU6 OTKINHyTB KBepxky Ka6nHy BO-DNTeJy. .RU 6 3aФNKCnPOBaTb/OTNcyCTnTb CTOHOuHbTOpMo3....RU 6 IpeEdBHXKeHne NOdMeTaHO- UeMAMHNbIb6e3co6cTBen-Horo npBODa. .RU 6 IpeEdBHXKeHne NOdMeTaHO- UeMAMHNbIC NOMoUbco6-CTBeHHORO npBODa. .RU 6
Haayao paobtbl. .RU 6 O6uye kazahnra. .RU 6 Paobtbpovepke nTexnueckomy o6cnyKbAHnIO .RU 6
Ipeed Haayamop pa60tbl. .RU 6 Yka3aHnno TExHnke 6e3ona-CHOCTn nO oBaPaeHHIO C aKKyMyJrTOpAMn. .RU 6 3apAdka aKKyMnyTOpOB RU7
3KcnpnyatauRAU7 Hactpontb noIoxKeHne cnde- Hbja BODHTeJRAU7 Bby6op nporpaMMbl .RU 7 3anyck npnbopa.RU7 IpeDVBxKeHne Ha annapate RU7 POnMeTaHne .RU8 OnopoxHNb pe3epByap dna C6opa Mycopa .RU 8 BbIKNochHe np6opa.RU8
TpaHcnpOpTnpoBka RU 8
XpahHeHne RU8
BbIOu n3 EKnIyatauui RU 8
YxOu n TexHnueckoe o6cnykBa-
Hne RU 8
06uue yKa3aHnra RU 8
UncKa RU 9
IepnoDnHyocTb TexHnueckoo
ro o6cnykBaHnra RU 9
Pa6oTb I IO TexHnueckomy o6-
cNyKBaHnIO RU 9
Помоць в сиуае неюладok RU 2
1
Texнческій даньie. .RU 3
1
3aЯВленье o COOTBETCTBn EU RU 4
Ipeed nepBbIM npimHeHnEm BaWero np60pa npouHTaTe 3Ty opHHaNbHyIO INCTpyKUIO NO 3KcNlyatauIN, noCNE 3TOO DeiCTByTE COOTBeTCTBEHNO I COxPAHTE ee dIra DaIbHeIeRo Nolb3OBAHn INI DN PAeDyUoero BlaJeNBca.
06üne yka3aHnIy
Ppi ObHapyKeHN BO BpeMa pacnakOBbIBaHHa annapaTa NOBpeKDeHNI, NOnyuHenHbIX B pe3yNbTaTe TpaHCnOpTnPOBKN, CNeDyET HMeEJIeHNO ObpaNTbcraB TopROByIO opraHn3aCNU, IpoDaBswUo Bam DaHHoe n3dneN.
-
PpeynpeIteIbHble n yka3aTeIbHble TaIuKn, npKpenIeHbIe K np6Opy, coepKaT BaKHyIO INΦopMaUIO, He- 06xOIMyIO IIN 6e3onacHO EKcNllyaTaUIN pnp6opa.
-
Hapny cyka3aHnmaN IO TexHnke 6e3OanachOCTN, CoedePkaUIMMnC B pykoBODCTBe NO 3KcPiyaTaun, Heo6xOIMMo TAKKe CO6bIaDt b O6uJe N0LoKeHnra 3aKOHOdaTeNbCTBa N0 TexHnke6e3OnacHOCTN IN PpeDTbpaueHnIO HeChAcTHbIX CnyuaEB.
3aunTaOkpykaIouee cpebl

YnakoOuHbIe MaTePnaJIbI npRoDnbl IaB TOpUHoi Nepepa6OtKn. PoXaIyNCTa, He BbIbpaCbBaIte yNaKOBky BMeCe C bItOBbIMN OTXdAMn, a cdaJte eeB ODNH N3 NyHKTOB PnPema BToPnuHOro CbIpbra.
CTapbIe yctpOcTBa cOepKaT
ZehHbIe nepepa6aTbIbAembIe
MaTePnAbI,IOJNeXaUne nepe-
Daue BnykTbI pniEMKn BTOpNuHoro cbIpB. N03tOMy yTuIN3n-pynte nX cheE3 COOTBeTcByo
Une CnCTEmbl PniEMKn OTxODoB.
BaTapeN, MaCNo, TOnJIbNO nIoo6HbIe MaTePnAbl He DoJXHbI IonoJaTaB B OkpyKaHOuyo Cpey. 3TN MaTePnAbl Heo6XOIMO yTINuIN3npOBaT YpeE3 COOTBeTCTByIOUne CNCTeMbI c6OpHbIX NyHKTOB.
Hnctpykunno npmmeHHIO KOMnoHeHTOB (REACH)
AkybHbIe CBeEHnO KOMnoHeHTax npBHeHbHa Be6-y3ne no CNeDyUoEmy aDpecy:
www.kaercher.com/REACH
Fapantna
B kajdoi ctpahe DeiCTbYOT COOTBETCTBENHO rapaHTnHbIe ycNOBIA, n3daHHbIe ynoHMOUeHHo opraHn3aCne i6bIta Hauwe npOdyKuIN B daHHoI cTpaHe. Bo3-MoXhIbe HncnpaBHoCTn np6Opa B TeueHne rapaHTnHOrO cPoka Mbl yctpAraHem 6ecnnaTHO, ecIn npuHa 3akNIOuaTecB DdeEKTax MaepnAIOB INN OUn6kax npn IN3rOToBLeHN. B Cnyae BO3NKnHOBeHnN ppeH3N B TeueHne rapaHTnHOrO cPoka npoc6Ba Obpaatbc, IMer npn Ce6e Yek O NOKyIke, B TopROByO praHn3aCIO, npDaBsyIO Bam np6Op INB 6bnxKaIHyO yNoHMOUeHHy ClyKy6 By cepBnCHOrO 0CbNyKBaHn.
Data Bbinycka OTo6paxaetcHa 3aBODCKO TabnHKe B 3aKoNPOBAHOM BnIe. PnTOM OTDeIbHbIe CnΦpbl IMeIOT CneJeIOooee 3NaueHHe:
Приимер: 30190
3 roD BbInycka
0 CTOnTeBbInycka
1 DecraTnIeTne BbInycka
9 BTOPAUcpa Mecaa BbInycka
0 nepBaIuΦpa MeCraa BbInycka
Takm 06pa3OM, B daHHom npnmepe KOD 30190 03Haayet DaTy BbInycka 09/(2)013.
PnHaIeXHocTHn 3aIacHbIe DeTaJIH
ONACHOCTb
Bo u36eXaHue onachocmu, pemohm u ycmahoeky 3anaChbix demaneu donxhbl ebInolnHm bmonkO aemopuzupoaaHHble cepeuchhe ue hmpbl.
-Pa3peuaeTcN CnNoIb3OBAb T NCKIQUH-TeNbHO Te npHaNDeXHOCHTN 3anaChble DeTaJI, NcNoIb3OBAHne KOTOpbIX 6blNO OIObpeHo N3rTOBHTeMe. NcNoIb3OBAHne OpurnHaJIbHbIX npHaNDeXHOCTeN OPurnHaJIbHbIX 3anaChbIX DeTaJe rapaHTnpyET Bam HAdExKHyO pa60Ty np6opa.
-Даьншую Инфорmaцию 03ancaCTrx Bbl HauDeTe Ha caTte www.kaercher.comВ pa3dene Service.
CmBbIBypykoBoDCTBe no 3Kcnnyatau
ONACHOCTb
Ppeynpexkaem o apo3aue onacHo cmu, komopar moxem npueecmu K mxeIbIM yeebym UUNK Cmepmu.
△PENDYNPEXDEHNE
Ppeynpekdoem o eo3moKho nomeHuaIbHO onachou cumyaquu, Komopar moKem npueecmu K mxeBIM yeeyam unu K cmepmu.
OCTOPOXHO
Yka3aHue omHocumelbHO 603MOxHou NoMeHuaJIbHO onaCHO cumyaUU, KOMopaAR MoXem npueecmu KLe2KUM mpaMmUuNoBleBy MamepuanbHbI yuep6.
BHIMAHHE
Yka3aHue omHocumelbHo 603MoXHOI noMeHuzaJIbHO onaCHOcmyauu, KOMopaM MoXem no6JIeYb MaMEpuJIbHi yuepe6.
CnmbolbHa npbope
DAHHOM pyKOBOCTBE NO 3KcNpyaTau.
-Пибор может поедвогаьс толькпО NO NOBepxHOCTЯ,ДONушЕньIM pyKOBOdCTBOM npeДрпгТИМ ИИ NpEД-CTaBITeIeM ДЯ ИСПОЛБОВАИЗ NOД-MeTeJIbHbIX MaUINH.
-BkaueCTBe oOJIeIIOJKeHnI DeiCTByET CNeIyUoIeepaBnIO:HeOnyCKaTb COpNIKOCHOBHnI pN6opaC IeKOBOCIIaMeHnIouImmICBWeIeCTBaMn (ONaCHOCTb B3pbIb/NoXapa).
YMbIWeHHOe HenpaBnIbHoe npImeHeHne
→ HNKOrIa He BbInOnHnIe NoMTeHaHn BCaCbIBaHnI pIn6Opom B3pbIBOOna- CHbIX XnIDKOcTei, rOpiOHx Ra3OB,a TaKke KOHcEHTpnpoBaHHbIX KNCJOT n pactBopntenei!
3aIpeaaetcya60ka/BCacbBaHne pe aKTHBHO MeTaNnuecko Nblnn (HaNPIMep, aJIOMHHN MaHn, cIHKA) B COeINHeHN CnJbHbIMN UeIOUHbIMN NNI KNCOTbIMM MOOUMM CpeCTBaM. 3TO MOKeT PnIBecTN K BO3HNKHOBEHIO B3pbBOONaCHbIX rA3OB.
He donyckaTb noDMetaHn/BCacBa-Hn np6opom ropaux nIIN Tneuux npedmetOB.
→ Pnp6op He npncnoc6neH nIcMeTa HnOaChbIX nIg 3DOpOBBy BeuectB.
3anpeueho HaxoDntbC B ONaCHOH 3c He.3Kcnnyataun np6opa BO B3pbl-BOONACHbIX 30HAX 3anpeuaetca.
He pa3pewaaetc6paTb cco6o co-npOBOXdaIOxN Nt.
3anpeaetcraBnraTb/TaunTbnn TpaHcnpotpoBaT npEIMTeBC NOMO- Ⅲbdo daHHoro yctpOCTBa.
PoaOaIe noBepxHocTn
-AcdaBbT
- PpmbuIeHHbIe noJIbI
- Cnnoohn(HaHbHO)noJ
-BeToH
-Бусчатka
Yka3aHnno NO TEXHnke 6e3OnachOCTn
Yka3aHnno 6e3oNaChoctn npn EKcnnyatauN
→Длгсobнiodеняnapamempoe 803dya unymeu ymeku ycmpoucmeo 3a-npeueho 3knnyamupoabmbHa ebico me bie 2000 mepoe had ypoehem Mopra.
(DuecmumenbHO mJbKO dNnHnHduu) Ecnu ycmpoucmeo ochaueho uHa2om u3 PBX, e7e 3anpeueHo ucNoIb3O6amb npu Hux mepeamypax okpykaiouecpebl (Huke 0^) .B cnyuoeo3HKHOeBu oBpocob omHocumEnb ycmpoucmea obpaambc8 kOMNaHUo Karcher.
→Ipeed hauanom pa6ombi annapam u pa6oue npucnoc6nue cnedyem npoeepumb Ha ux hadjekauee co-cmOHNue u ux coomeemcmeue mpe6o- aHuaM be3onacnocmu. Ecnu ccmor
Hue npubopa He ennemc6 bezynpeuHbIM, uCnoIb3oBam b e2o He pa3pewa-emca.
→PpuucnoIb3oBaHuUycmpoucmea 6 onacbix 30hax (Hanpumep,Ha aemO- 3anpaoeuHbX cmaunx) cneyem co6nodamb coomeemcmeyuoue npau mexnku 6e3onacnocmu.3KcnIya-maua ycmpoucmea eo3pbieoona- ChbIX 30hax 3anpeuaemca.
ONACHOCTb
Onachocmb noIyueHua mpaM!
He uonb30aamb ycmpoucmeo 6e3 3auumho2o Haeeca e Mecmax, 2e cyuecmeyem onachocmb naedeHua nped Memoe Ha onepamopa.
06cnykueaiooe nuo oba3ao u cnoIb3oebam npubop e coomeemcmBuu cHa3naeHueM.Obcnykueaiooe nuo doJxHn yuumbiam MecmHbIe ocobehnocmu u npu paBome c npubopom cneDumb 3a mpembuMu nuamau, Haxoduaumucn o6nu3ocmu, ocobehHO dembuM.
TaKKe cneDyem coBnIOdAmb 6ce npeduNucAHua, npaBUNa U HopMbI e omHo-ueHuu mpaHcnpmHbIX cpeOme.
→ Pēpeh hauanom paobmbl onepamop dojxhen ybeumbc8 momb, ymo ece npedoxpanemelbHbIe ycmpoucmea haxodarmcHa Mecmu u paobomam oJnKbIM 6pa30M.
Onepamop ycmpoicmea Hecem om- bemcmeHHocmb 3a e03HukHOeHue HeCyaacmblx cnyae C yuaem Dpyux IIOdeu Unu Umyuecmea.
→ Cneodum 3a mem, ymo6bl onepamop Hocun nnonho npunezaoukyo odek- dy. Hocum npouhyo obyeu u 36be- zamb howeHua c60bdoHou odek@bl.
→ Npeod hauanom dbuxkenu npoeepumb Mepmeyo 3ohy (hanpumep, Ha Hauuue demeu). Obecneumb docmouHbui o63op!
3aIpeuemcOcmaBnMb63 npu cMompapu6bOp cpaobamaUum deu ameEM.Obcykuaouemy nepcoHany pa3peuamcnokuadmb npubop moIbKO nocmeo, kak deuzameb 6ydem ocmaHOEN, npubop 6ydem 3auuueH om cnuyauHo2 nepeMeueH u KIOU cydem bHym.
Bo u36ekaHue HecaHKuOHpuOeaHHO 20 UcNoB3oEaHua npubopa cneoyem 6bIHumMb KIOU.
→ Pa6omamb c npubopom pa3pewaemca ucknouchmtebno luam, Komopbie npouu unhcmpykmax no 3knnyama-uu unu noodeepduu c8o1 Keauku Kaunio no o6cnykuaHuo u Ha komopbix eo3noKeHO uCnOB3oeaHue npubopa.
→Даннbl npup60 he npedha3naeH dna UcnoIb3o8aHua IIObMu (eknOyaa deMeu) c oapauHueyHbIMU du3uyeckuMu, ceHCOPbIMU unu yMcmEHHbIMU cnocobHocmMaMU u cmycymcBueM onbima u/Unu omCymcBueM 3HaHui, 3a uckNooyeuem Cnyaee, Kozda 3a HUMU cneDum oEmcmeehHoe 3a 6e3onacHocmb luuo unu ONU nOlya
om om Hezo yka3aHua no npumHeHu npubopa.
Heo6xodumO cneodmb 3a dembmu, ymo6bOnu He uapanu c npubopom.
OCTOPOXHO
Onachocmb nopekdeHura!He donyckamb nonadahure ycmpoucmeo nehm, eepeok uI npOBOJOKU, nCKoJIky OHU Mozym HaMOMaMbcaHa NoDMeMaHOuEaI.
Yka3aHnno6e3oNaCHOCTN B peXnme DnXKeHn
ONACHOCTb
Onachocmb nonyueHnurmpaM!Ppoepumb Hecyuuyo cnocobocmb apyHma nepeed e3doU.
ONACHOCTb
Onachocmb HechacmHbix clyuae, onachocmb noyuehn mpaem!
Onachocmb onpokudibaHua npubopa Ha cnluuKOM KpybIX CKNHOx.
B HanpaenHuu dbuxehua donyckaem-cra e3da no cknoham do 14 %.
Onachocmb onpokubibaunha noobopomax npu deuxeenu Ha ebicokou ckopocmu (ocobehno ha nobopomax enebo).
Ha noeopomax cneoyem 3amepnmbckopocmb deuxkhen.
Onachocmb onpokubhaHua Ha Heema6unbHom apyHme.
- Pa3pewaemcnaepemewamb npubop molbko no npouhomy ochoahuio.
Onachocmb onpokuobieaunna npubopa npu 6oIbUOM bokOBm yKnOHe.
B HanpaJIeHuaX, nonepuHbIX K HanpaJIeHko deUxKeHua, donyckaemcnapeDeuxKeHue annapama monbko noCKNoHaMoMaKc. 10%
Yka3aHnno 6e3oNaChoctn dnn yctpoiCTB,pa6oTaHOxuOT aKKymyIaTOPHoI 6atapen
Yka3aHHe: IpaBO Ha rapaHTnHoe 06cnyKINBAHHe COxPAHReTc TOJIbKO B CNYaeNCNtB3OBAHnpeKOMeHNyEmbIXΦnPMoKarcher akMyIrTopOB n 3apAnhix yCTpoiCTB.
-CneNyET 683aTeNbHO Co5NIOaTb IN-CTpyKUIO NO 3KcNPyatauIN npOn3BO-DNTeNAKKyMnIaTOPa N3apJHOrO yCTpoNCTBa.C6NIOaTe Yka3AHN 3aKHOaTeJIbCTBa No ObaPaeHHo C aKKMyIaTOpAMN.
- HNKoRda He ocTabIaTe pa3pIeHHbI aKKyMlyrTOp, n KaK MoJHo CkOpee CHOBa 3apJrTe erO.
-NoIePjNBAaTe aKkymyTOpbBceI Da B uNCTOM N cyXOM BnDE BO H36ekaHne yTeKN TOKa. 3aunuatb OT nonaDaHnra rpa3n, HanpImep, MeTaJIInueCKOINIIIN.
-He KnaCTb HnCTpyMeHTb Nn Nno6HbI IpeMeTb Ha aKKyMnyTOp. OnaCHOCTb KOPOTKOrO 3aMbKaHnN B3pblBa.
-HnB KOem cnyuae He obaaatabca C or-HEM, NCKPNTb NIN KypNTb B6N3n aKKyMyJrTopa INN B aKKyMylAToHPO. OnacHocTb B3pbIbA.
-He npnKacaTbca KtopaHm y3Jam,Ha-npImep,K npBOHOMy DBNrAteJIIO (onachoctb oXORA).
- OctopoxHoe obpaueHne c akKymyTTopHbIM 3JNEKTPOINTOm. Co6IIOaIte COOTBeTCTBHyIOUHe npabUNa TEXHNKn 6e3ONaCHOCTn!
-IVcnoIb3OBAHHbeakKMyJITOpbl CJIeDyeT yTNIN3NPOBaT, cornaCHO DnpeKeTInBe EC 91/157 EWG,6e3 yuepe6aDnra OkpykaUoce ncpbl.
YcTpoiCTBa C NOIDbEMHnKOM KOHTeHepa
ONACHOCTb
Onachocmb noIyueHua mpaem!
→Ppu paobomax Ha noDBeMHuke KOHmeuHepa cneoyem nonHocmbIO noDnHmB u 3aФukcupoabMb KOHmEHep dna Mycopa.
3aumy 6bionnmb molko 3a npe- de lamu onachou 3OHbl.
YcTPOIcTBOC3aUNTHbIMHaBecOM BOINTEJIA
YBELOMJIENHE
3aumhui Haeec bodumen (onu) oecneueaem 3auymy om nadehur kpynhix npedmemoe. Odnako on He obecneueuaem 3auymy npu onpokudibaahu!
EkeoHeHo npoeepmb 3auumHbI Haeec Ha omcymcmue noepexdeHu.
→ B cnyuae noepexkdeHua 3auumho2o Habeca, e mom yucne omdeIbHbIX 3JeMeHMoe, HeobxOoMo 3aMeHUMb 8ecb 3auumHbI HaBc.
→IIO6aMoUΦukaua 3auumH0zo Ha-eca u ycmaHOeKa 3neMeHMo8, dema-neu u y3no8, omnuHbIX om pa3peweHbIX KOMnHauei Karcher, He donycka-tomcra u Mozym o2paHuYabmbfynKcuio 3auumH0zo Habeca.
Yka3aHnno 6e3onacHOCTn npn TpaHCnOpTnpOBKe MaunHbI
→ Cnedeum 3a co6cmEHHbIM eecOM (mpaHcnpmHbIeec) ycmpoicmea npu mpaHcnpmupoeke Ha noodeece unu aemomobunx.
→ Ppu mpaHcnopmuOe ycmpoUcmea u3eney wmekep akkyMynmopa u HadeXHo 3akpenumb ycmpoUcmeo.
Yka3aHnno 6e3oNaChocTn npnyxoJe n TexHnueckom06cnyKuBaHn
→Ipeed ouucmkoU npoedeHuemex HueckoO 06cnykuaaun npubopa, 3amehbl demaneu unu hacmpouku Ha dpyuee fyHKuu npubop cedeyem bkiKIOuymb, u ebHymb KIOU.
Bycmpoicmbax c mraobim akkymynnapom npu npoeedeenu niobx pa6om no mexHuueckomy ocbnykuaHuO u pemohmy akkymnymop Heobxodumo omcoedunhm om 3neKmpu-yeckou cucmembl ycmpoicmba uepe3 moky pa3beDuHenura akkymnymopa (umekep akkymnymopa).
→ Ppu npoebeenu paobc 3neekmupeckou ycmaHOeKoHeo6xOduMo omcoedunmb akkymnyamopHyu 6bamapeo. Dnra 3mozo chayana omcoedunmb ompuamehblbui nonoc, a 3aem noIoxkumehblb. IooknueHue bInonHemc8 oBpAmHom nopRoke. Chayana nodcoedunmb noIoxkumehblbui nonoc, a 3aem ompuamehblb.
He pa3pewaemca yucmum npubop u3 60d8HOO uHaHa2 uu cmpyeE 60dbI nod ebICOKUM daeJeHuEM (Onachocmb KOpomKo2o 3aMbikaHua u dpyzux no-6peXKeHue).
→ PpoeeedeHueem peMoHmHbix pa6om pa3pewaemc 3aHumambcr moIbko aemopu3o8aHHbIM cepEChbIM ueHmpam, uU cneuaJucMaMu 8moU cfepe, kOmOpBie OHaKaOMJIeHbIC oOmeemcmeyoumu npednucHmau npabun mexHuKBe3oNacHocMu.
Yyumbibamb npoepky Ha npedMem 6e3onacnocmu e coomeemcmbuu c deucmyouum MecmhbuMu npednucanmu dna npedeBuxHbix npubopoe, UcNoIb3yeMbix nPombiunEnHoCmU.
→Pabomambc ycmpoucmeom cneoyem 6ceeda monbko e coomeemcmeyuux 3auumhblpxykaaux.
Ha3haYeHne
IOnMeTaIOUaMaUHa pa6OtaeT No npHnny COBa.
-BpaaiouinscnoMaTaooB aHa npabJnT Mycop Hapmyo B pe3epBy- ap nIc6opa mycopa.
-5okobayuetaoMDetaeYrIbIKpaanOmdetaemOnOBepxHOCTNIOCTabnEe MycOpB30Hy pa60tbn OndMeTaHouero Bana.
-Menka nIb BCacbBaetc BcacbibaIOUIM BEHTNIrTopOM uepe3 fJIbTp DnI Ibl.
Yka3aHnI npn pa3rpy3ke
Onachocmb
Onachocmb dna 3doopo6b, onachocmb noepexkdeHua!
Ppu noapy3ke cneyem obpammb HmuHae Ha 8ec ycmpoucm8a.
| Bec (6e3 aKKyMnyTophbx 6a- tapei) | 840 kg* |
| Bec (c aKKyMnyTophblm 6batapeymi) | 1300 kg* |
| * C yCTaHOBJIeHHblIM MOHTaJHbIM KOM-PIIeKToM BEc yCTpOJCTBa, COOTBeTCTBeH-HO, CTaHOBITcR eIe 6OJIee 3HaUHTeJIb-HblM. | |
He nCnoJb3OBAb BnIOuHbI No- rpy3uK.
→ Pn norpuy3ke yctpoiCTBa nCNoIb3oBaTb COOTBeTCTByIOUne CXOHN INN KpaH.
→ПиИСПОЛБ3OBAHMH CXOДЕнь Heo6xO-ДИМо OБразТь BHMaHHe Ha CneIyO-шee:ДорoxHbI npocBET 70 MM.
Ecnn yctpoiCTBO NOCTabIeTcRa HnOdoHe, Heo6xOIMo COOpyIITb n3 npINOKeHHbIX DOCOK paMny IJIa Cbe-3da.
HCTpyKmM MoXHO HaHTn Ha Ctp.2 (Ha BHYTeHHHe CTOpOHe KpbIuKN).
BaxHoe yka3aHHe:KaJdaIocka DOJIKHHa 6bITb 3aKpeIIeHa C NOMOu2 BHTOB.
H3o6paXeHne NOmTeaIbHOJ MaunHb!
1 KaibaHa BODHTeY (onu)
2 YctOnuBoe MeTo KpeIeHnA (4 Wt.)
3BxoDHOeOTBepCTneIOMDetaUoero Bana
4 PpeeJHee KOleco
5 BoKobBa 电Tka
6 OcBETeJIbHoe yCTpoNCTBO (Onu)
7 Pe3epByap nIa c6opa Mycopa
8Блokровka Кршки усторctBa
9 CTeKNoOoHcTntTeNb (onu)
10 PpeoXpaHnTeIbHbI pbHar B ka6nHe BOINTEJIa
11KoKyxDbIrataTeTn
12 3aDHee kOleco
13БлokировkaKa6nHbBoDHTeTJI
14 PpO6JIeCKOBbMaHqOK
15 PerynpoBka noDMeTaIOUeBO Bana (He OTo6paKaaeTc)
16 KomnJIeKt aKKyMnyTOpOB (ToIbKO B KOMnJIeKeTe nocTaBKn KM 130/300 R Bp Pack)
17 WTeKep aKcyMnyTopa
PanaHb ynpaBneHHaYHKnOHaJIbHbIe KHOKN
1IpeeklouateIb nporpaMM
2ФункционаньныеКондИ
3 MHorofoyHKnOHaNbHaN INDkaCa
4БLOK npedeoxpaHnteJeHa pa6oem MecTe
5 PyJIeBoe KOleco
6 3amok 3aikraHn
IonoXeHne 0: DbrarTeB BbIKIOueH
IonoXeHne 1:BkIOuHTb 3aXirraHne
IonoXeHne 2:3anyCTntb DbrarTeB,
7 CToHouHbI TOpMo3
8 CnDeHbe (c KOHTaKTHbIM npeKJIouaTeIeM cnDeHb)
9 PeJaJIb TopMo3a
10 XoDobar neDanb
1 BkI./BbIKI. pa6oHero ocBeueHnra (on-
2 Bk./BbIK. npo6neckOBoro MaYka
3 3BykoBoCirHan
4 Ynctka qnilbtpa
5 NpeeknquateB HnpabneHnA DnHexeHn
6 BeHTnIaTOp
7 OtkpbIb/3aKpbITb KpbIkwpe3epByapa
8Пбьem/onycakHnepe3epByapa nIc6opaMycopa
KoHTpoBbIe HndkaTOpbl N DnCnNei
1 EMKoCTb aKKymyIaTopa
2 INHdkaTOp 3apyaakymyIaTopa
3 INHnkaToppekImpa6oTbI
4 INHdkaTopra6apuTOB
5KoHTpOblbHbIMnHdNkAToP(HeNoDkNIO-HeH)
6 INHdkatop 6nKHeo CBeta
7 KOnTpOnlbHbI INHdNkAToP (He NoDkNIO-ueH)
8 KOHTPOJIbHbI INHdNkaTOp HAnpaBHe- HnA DnKeHn "BnepeD"
9 KOHTPOJbHbI INHdNkaTOp HAnpaBHeHHaDbWKeHn "Ha3aD"
10 Cuetynik paoboux yacob
IpeaHaanpa6oTbI
OTKNHyTB KBepxky Ka6nHy BoNDTeIa
Дя BынОннEHЯ pa3NHybIX pa6OT moKET NOTpe6OBaTcR pEdbapnteHbO OTKHyTB KBepxY KaBHy BoNTeR (ONU).Yka3aHHe: Ka6Ha MoKET 6bITb OTKHyTaTOJbKO Ha POBHyO NOBepxHOCTb (± 5^)
OTKpbTb 6IIOKNPOBky Ka6HbI BOINTe-
OnpOKHyTb Ka6Hy BoNTeY BBepx DoΦKcau npedoxpaHrTeNbHoro pbYuara.
→ Ppeo onyckaHnem Ka6nHb BOHTePa36JoknpoBaT npedoxpaHNTeHbHb pyhar.
3aФнсрOBaTb/OTnycTnTb CTORHCHbI TopMO3
OTnyctntb cTOrHOHybH TopMO3, HaxnMaJ npn 3ToM Ha neJaB TopMO3a.
3aФИКСИРОВАТБ CTORHOUHbI TOpM03, HAXIMAR pRn 3TOM Ha NeДaNb TOpM03a.
IpepeBnXeHne noMeTaHOuSei MaunHbI 6e3 co6CTBeHHoro npNBOda
OTKpbItbKOxyDnIraTeNa.
→ Pbyar cbo6oHoro xOda rnpabnueckoro hacoca OKHyTB B CTOPHY Ha90°.
OCTOPOXHO
He donyckaemc nepebdusamb nodmemaiouyu maunhy ha 6oIbue paccmoHua 6bicmpee, yem 10 km/4.
→ Nocne nepemeueHn CHOBa OTKHyTb KBepxpybUar cB6oDHorO xOJa.
PpeBnKHeNoDMeTaIOSeMaHnHbIC NOMOu bOco6CTBeHHOro npNbOa
Pocne nepemeeHn CHOBa OTKHyTb KBepypbuar CBO6oHoro xOda.
Hauano pa6oTbI
06nue yka3aHna
→ NocTABNTb NOdMeTaIOuIy MaUNHy HApOBHn IOBepxHOCTn.
→ BbITaHTyTb KIOH 3aXnHaHna.
3aФнксypуTe cTOrHouHbI TOpM03.
Pa60tbl npOBepke nTexHnueckomy 06cnyKnBaHHO
ExeHHeBHO nepaHaJOM pa60TbI
→ PpOBepntb COCTOaHnE 3apJa aKKMyJIaTOpa, npH Heo6xOdMocTn 3apJITb aKKMyJIaTOpB (CM. INaBy, 3apJa KaKMyJIaTOpob").
PPOBepntb MeTyuIN BaJIn K 6OKOBbie UETKn Ha H3HOC N HAJIyHe HAMOTaB- XNXCJ JEHT.
PpOBepntb KOeCa Ha HAIuYHe HAOMTABWIMXcJNEHT.
PPOBepntb NcnpaBHOE COCTOHNBCex 3NEMeHToB ynpabJeHn.
→Поверпь пибор на пpeдmet NOВржден.
→ BbINOJIHHTb YNCTKy QINbTpA DnI NbNN C NOMOJIbHO KHONK ONUCTKn QINbTpA.
Yka3aHHe: OnncaHHe cm. B rIabe "YxoI nTexHnueckoe o6cnyKuBaHHe".
Ipeed hauanom pa6oTbI
Yka3aHnno TExHnke 6e3oNaChocTn no o6paueHnIO c aKKymyIaTOpamN
PnO6paueHnCakKymyIaTOpamn Cne dyet co6JIOaTb cNeDyUoune npEynpe- dnteHbHe yka3AHN:
BbIBoI n3 3KcNJIyatauIN
Ecni noJMeTaIOUaMaUNHa He IcNoJIb- 3yETcB TeueHne IInTeIbHO BpeMeHN, CneNyET CO6NIODaTb CneNyOUIe NyKtbl:
→ NocTaBnTb NOmTaKoUyMoAunHy Ha pOBHOn NOBepxHOCTN.
→ NpeBectn npeKIOUaTeIb npOpaMM B noJoxHeN "TpaHcnpTupOBka"
Kniou 3aXnraHnnoBepHyb B no3n- uo "0" n BbTaunTb ero n3 amka.
→ПинЯть Меры пopotин БирпьBOЛHOrO KaeHnI NOmTaIOUeN MaINHbI.
OuNTb IOMeTaIOUHO MaHHy CHAPyKn BVHTn.
NocTabuBb aannapat B 3aunueHHOM n cyXOM MecTe.
→ N3Bnepb wTeKepe akKMyTTopa n3 Ma- WnHbl.
→ AkkymnyarTop cneIyET 3apAHTb, a 3aTeM 3apJkaTb np6JI. KaKdble DBa MeCya.
YxOД n TeXHnueeCKoe 06cIyXnBaHne
06une yka3aHnA
OCTOPOXHO
Onachocmb noepekdeHua!
Ibineoou pfunbp He hynkno npombiamb.
→ Ppeo ouncKoH npOBeeHNemTexHnueckoro 06cnykBaHnna npbopa,3aMeHbI DeTaneu HnHaCTpOKn HaDpyrHe cyHKnnpBOp cneDyET BblKNIOHTb,BbHyTb KIOU 3axKraHnN
N3BLeyb aKKMyJrTOpHbI uTeKepe NnOTCOEHNHTb.
-Проведенем ремонтных pa60ра3peшаetca3aHIMMaTbCra TOnbKO aBTopn30BaHHbIM cepBnChbIM ueHTpam,ИЛСпeциAJNCTAMN B 3ToI cfepe, KOTOpbIe O3HaKOMJIeHbIC COOTBETCTBYUmMN npedncaHnMn npabIN TeXhkn6e3onacHOCTN.
-Передынгьныеnpombyшениныепиборы похогглпpoверку 6e3oNachoCTN cornaCHO VDE 0701.
→ NocTABNTb NOmTaIOUyIO MaUNHy HApOBHOn NOBepxHOCTN.
→ KIIOU 3aKIRAHIN NOBEPHyb B N03N UIO "O" IN BBITaUNTB eO IN 3aMka.
3aФнксypyTe cTOrHouHbI TOpM03.
UncTka
OCTOPOXHO
Onachocmb nopekdehura! He pa3pewa emc yucmmb npubop u3 bdoHOZO wlanha unu cmpye bdoi nod blicOKUM daJIeHueM (onachocmbkopomko2o 3aMbkaHua u dpyzux nopekdeHu).
Hnctka annapapa n3Hytpn
Onachocmb
Onachocmb nolyehua mpaem! Hocumb 3aumHyu Macky npomue nbiu u 3a- umHbIe ouku.
→ Ptopeptb annapat TpknKo.
O6nytbannapatCkataBIMBO3dyxOM.
Hnctka annapapa chapykn
OuNCTb annapaT,ncnOB3yA DnA 3TORO BnaXHyTO TpRkny, npOnNTaHHyIO MRAKIM UeNoCHbIM pACTBOPOM.
Yka3aHne:IcnoJb3ObaHne arpeCcnBbIX MOIOU CpeCDTB He DONYCAeTcra.
PepnoDnHocbTexHueckoro 06cnyKuBaHHa
Yka3aHHe: CyeTnK pa6OuHX yacOB COo6- ⅢaET O MOMeHTe npOBeHnro 06cnykBa-HnR.
Texnueckoe 6cnykBaHne, ocyuectBnraemoe KnneHTOM
Yka3aHHe: Bce pa6oTbI no Texnueckomy 06cIyKuBaHnIO CO cTOpOHb KIneHTa DOJIHXbI IPOBOIDITcBc KBaIIINPcUPOBaH HbIM CneuaNACtOM. B cNyae Heo6xoND MoCTN B JIO6OIM MOMENT MOXHO O6paNTb C3a NOMOuBIO CNEuaN3pOBAHHyTO TropOByO prAun3aUnO fnpMbI Karcher.
ExeIHeBHOeTexHnueckoe 06cnyKnBaHne:
→ PpOBepntb MeTyuBn BaJIn K 6OkoBbIe UeTKN Ha N3HOC N HAJUyHe HAMOTAB-UXCXr JENT.
PPOBepntbNCpapBHOe COCTOHNBEcx 3JEMENTOB ynpabNeHn.
→Поверпь пибор на пpeДмТ NOВЕ-жден.
ExeHeIbHoeTexHnueckoe 6cnyKnBaHne:
OuNTb rnpaBnueckm MacnHbip aatop.
→PpOBepnTb rnpaBnueckyU yCTaHOB-ky.
PpOBepnTb ypoBeHb Macna B rnpab- nHecko CnCTeMe.
→ PpOBepntb ypoBeHb TOPMo3HOJ KIOCTN.
→ PIOBepntb n3HOC yNtHTnTeIbHbIX HAKnAdoK, pN Heo6xOmoCTn 3aMeHNTb
→Поверпьисma3аькршkype3epByapa.
TexHueckoe 06cnyxBaHne H3HaUNBAIOUXCRACTeI:
3aMeHb yNIOHTHeBHeIe nHaKn.
OTperpynpoBaTbnn3aMeHHTb60KOBBIEyNIOTHHeHIA.
3aMeHHTbIOMDTaHOUBAI.
3aMeHHTb 6okOBbIeTkn.
Yka3aHne: OncaHne cm. B rnaBe "Pa60TbI NO TEXHnueckOMy 06cnyKuBaHnO".
Texnueckoe 06cnykBaHne, ocyuectBnmeoe cepBncHoi cnykboi
06cnyxnbHne yepe3 50 yacob pa60-Tbl:
→ PpOBecTn nepByIO nHcneKcIIO nocTeTexHueCKOrO 06CnyKmbAHn.
Texnueckoe o6cnykubHne yepe3 250 yacob pa6oTbI:
→ PIOBecTN HCNTEKUNIO NOCNE TEXHnueCKORO 06cnykBAHNA.
Yka3aHne: IIN coxpaHEnHa npBa Ha rapaHTnHOE 06cnyXnBAHne BCE pa6oTbI no TexNHueCKOMy INpOPhiNtAeCKOMy 06cnyXnBAHIO IN B TeUeHne rapaHTnHoro CPOKa DOJIKNbI pOBoDITbcra YNOHOMOeHHoCepBnCHoCnyKboΦnpMbI Karcher B COOTBeTCTBmC 6poWIOPONo TexNHueCKOMy 06cnyXnBAHIO.
Pa60tblnoTexHnueckomy 06cnykBaHHIO
NoToBka:
→ NocTabntb NOmTaIOuIyMaunHy Ha pOBHn NOBepxHOCTN.
→ KIIOU 3aXnraHn NOBepHyb B No3nLNO "0" N BbITauNTb eO n3 3AmKa.
3aФнксypyTe CTOHOrHbI TopMo3.
06uue cBeDeHnnoTexnke
6e30nachoctn
ONACHOCTb
Onachocmb nonyuhenmuB! Bce2a npu nohrampeepeyape dncbopa Mycopa ycmahaeneambnpedoxpanenbHble omahue.

1 DepeKaeIb npedeoxpaHHTbHOH 7tAHn
2IpeoXpaHHTeJbHaa 7TaHa
OTKINHyTb HABePx npEdoXpaHntB-HyIO uTaHry IaI ONOPOXHeHnI NOHrTOpe3epByapa N BCTaBHTbeB DepKaTeNb (npEdoXpaHntBh)
3aMeHnTb aKKMyJrTOpHbIe 6aTape NOnyckAeTc3aMeHa TOJIbKO NOIHoro KOM nNeKTA aKKMyJrTOpOB.3aMeHy pa3peWaeTcOcUeCTBnRbT ToJIbKO KBaINΦnIPOBaHHOMy nepCOHany.
→ 3a 60bwoBeca (450 Kr) 3ameHy cneIyET npOn3BOIDtB C npIMHeHnEM KpaHa.
Yka3aHHe: Npeed 3ameHoN aKKMyJTopa CneDyET ydaJIITb nonepeHyo nlaHky.
→ PnBbHMaHnAkkymyIaTopa BHaHae CneJeYtO63aTeJbHOOTcoeHNHTb OTPuataJIbHbN NIOIoc (-).
→ПикpenNTbКpaHOBbIeKaHaTbIK4neJIM KOMIIeKTAaKKyMyJIrTOpHbIX6batapeNOCToPoxHOIN3BNeYb aKKyMnIrTOpbl.
PpOBepntb ypoBeHb IdoNTb Macno Dnra rnpaBnuyecknx CnCTeM YBEOMJIEHNE
Pe3epeyap dny c6opa mycopa He doJxeh 6bimb npunoohm.
OTKpbItb Koxkx Dniratena.
1 BaKДЯгдярвл用电скero Macna
2 CMOTPOBOE CTEKNO
3 KpbIka, OTBepCTne ⅡAJIINBKn MaCna
-EcInypoBeHbMacJHaHnKeOTMeTKN MIN",DOnITb MacNo.
OTKpyTntb 3anOpHyo KpbIuKy OTBepCTNr dIra 3aINBkMacna.
OuHCTnTb 06NaCTb 3aJIINBKn.
3aINMbMacNoDnIgdpabNuecknx CNTEM.
Bud macna:cm."TexHnueckne daHbIe".
3akpyTntb 3anopHyIO KpbIuKy OTBepCTNДЛЯ 3aJIbKIMacJa.
YBELOMNEHNE
Ecnu MaHomemp yka3bIaem Ha noBbiweHue daBneHuaDpaenueckozo Macna,Heo6xodumo o6pamumbc8 cepuchyocnykby Karcher no bnpocy 3amehblfunbmpa dra uopaenueckozo Macna.
IpoBepntb rnpaBnueckyO yctaHOky
3aФнксуTe CTOrHouHbI TopMo3.
3anyctntb DBBnraTeIb.
Pemont rnpabnuecko yctahOBKn npoBOnTb TOnbKO C npNBleHEnm cepBnCHO cnjkbf nmpk Barcher.
→ PpOBepuTb repMeTuHocTb Bcex 6e3 NCKJIIOUeHnra TnIpaBnuecknx IuaHROB n COeINHeHn.
IpoBepka noDMetaoero Bana
→ NObepHyb KIOU3aKUNAHnB NOJIOKeHHe J.
→ POnHnTb Do ynpa pe3epByap dna c6o-pa Mycopa.
→ NObepHyTb KInOu 3aKnraHnB nNoJoxeHne O.
3aФИКСИРУТЕ CTORHOUHbI TopMO3.
YctaHOBtB npedoxpaHnteHbIe WtaHn dIg ONOPXHeHn NOdHrTOpe3epByapa.
YdaNTb c noMteAIOUeBO Bana HAMOTABUNECRAIHTb IN BEPEKN.
BbHyt npedoxpahnteHbIe WtAHn.
BCTaBnTb KInOu B3aMOK 3aXnIraHna.
→ NOBepHyTb KInOu 3aXnIraHnB nNoJoxeHHe J.
Onyctntb pe3epByap dna c6opa mycopa B HauajbHoe noJoxeHne.
→ KIIOU 3aXnraHn NOBepHyb B No3uNo "0" IN BBItauNTb eO n3 aMka.
3aMeHa nOdmTaIooero BaIa
1 Kpenexhbl BnHT depkaTeI naMeTaIOUeBOBaIa
2 MeTyusn Bn
3 DepekateIb noMetaiooero Bana
4ПпockасторнayaшайббokoboroyntnotheHn
5 BoKoboe yIIOThHeHne

OTKpbIb 6OKOByIO nHaHJIb C NOMOJIbIO KIIIOHA.
OTBnHTnTb 6apaKOBbIe raIKn, pacno-IOXeHHbIe Ha IIOCKO CTOnOpHoi WaiBe,OT 6OKOBOrO yNtOHeHn CHaTb NIOCKyIO CTOnOpHyIO Wai6y.
OTKINHyTb HApKy 60KOBoe yNIOTheHHe.
→ BbINHTnTB KpEnexKbI BNTH DepeKaTeJI NIOmTaHouero Bana n NOBepHyTb HApJyKy npEmHOe yCTpoNCTBO.
BbHyTb noDMeTaHouu Bn.
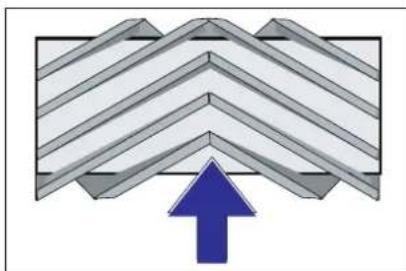
PacnoIoxKeHne IoMMeTaIOUeBO Bana npu yctaHOBKe NO HAnpaBNeHIO DnIXeHn (BvD CBepy)
Yka3aHHe: Pn yCTaHOBKe HOBOr NOmTeAIOUeO Bala CneINb 3a NOnOXKeHNEM UETINHb.
YcTaHOBHTb HOBbI NOmTeaHoun BAN. Na3bI NOmTeaHooero Bana DoJHK HbI COBNaCTb C BbICTyNam6BaJAHcnpa. Yka3aHHe: Nocne yCTaHOBKn HOBOr NOmTeaHooero BaJa Heo6XoHMo CHOBA OTpeRyInPOBaT PNOCKOCTb NOmTeaHna.
IpoBepka n KoppeKTnpOBKa IIOCKOCTn NOmTaHnI dIy NOmTaIoUoero Bana Yka3aHHe:Ha 3abOde yctaHaBnBaetc BAICOTA IIOCKOCTN NOmTaHnI,paBHnA 80 MM.Ee 3NaueHne MoXHO PnABHO peryI npOBaTb C NOMOcIbIO IITabaHOero KpeIIeHnI NOmTaHOero Bana.
PpOBePntb DaBHeHne B uHHax.
→ BbIKIOHTb BCaCbIBaIOUIN BEHTUNIA-Top
→ NocTABNTb NOIMetaUOyMoMaUNHy HaPOBbI rJaDKn NOn, NOKpbITbI BNDMbIM CNOEM nbIN INN MeNa.
YcTaHOBnTb nepeKnHouaTeNb npo- rpaMM Ha NOmTaHHe C nCnOJb3OBA-HnEM NOmTaUoIeBO Bana.
→ NpeBecn nepeKnOuateIb nporpaMM B noJoxHeN "TpaHcnpTnpOBka".
→ TaTb annpaTy 3aHnXoJ.
PpOBepuTb nIOCKoCTb NOmTaHnA.
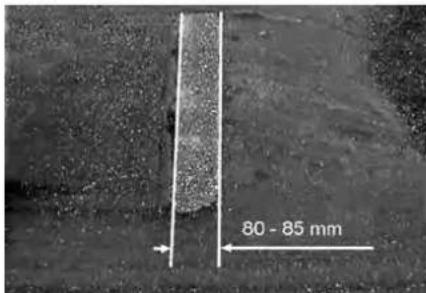
Прфиь ПОметаня ДОЛжень ИМБТВИп равHomeрHOrO пЯmoуrolьнka 施PиHо80-85 MM.
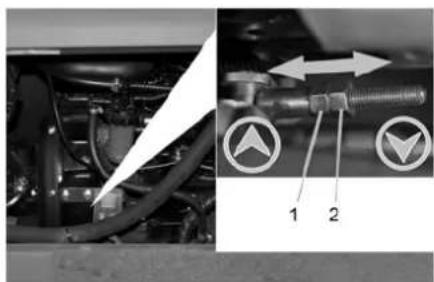
1 PerynipoBouHa raKa 2 KOnTpraKa
→ CHaTb 60KoByO 6BnBky DnBaTeJna.
OTnyctntb KOHTprayky.
PerynpobkA npoФnIy noMeTaHn
PPOUHO 3aBHTnTB KOHTpraKy.
PObepntb nobopothoe 3epkaio.
PpOBeRka N KoppeKTHnpOBKa npOphiNIA NOMeTaHnI DnI 6OKOBbIX ΜeTOK
→ PnnoHb6okOBbe uETK.
→ NocTaBnTb NOMeTaIOUyMoMaUNHy Ha pOBHbI rJaDkn NOn, NOKpbITbN BUNMbIM CNOEM NblIN NIN MeHa.
YcTaHOBnTb nepeKlnOuTeNb npo- rpaMM Ha NpDMetaHne C nCNoIb3OBAHNEM NpDMetaIOeBOBaN b6OKOBU 8ETKN.
→ PnnoHb6okOBbe 1eTKN.
YcTaHOBnTb nepeKIOuATEnb npo- rpaMM B NOIOXeHne «DbuKeHne»
→ TaB aannapaty 3aHnXoA.
PPOBepntb nIOCKOCTb NOmTaHnA.

HnHa npoOpnna noDmTaHn DaonKa H coCTaBnTb ot 40 do 50 MM.
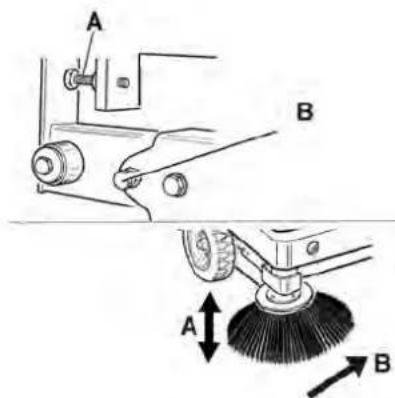
→ OtperynipoBaT noNoxKeHne nNoocKoCTN NOmTaHnC NOMOuBIO DByX yCTaHOBOUHbIX BnHTOB.
PPOBepntb NIOCKOCTb NOmTaHnA.
YcTaHOBt6oKOBbIe yNIOTHEHn
Chairman of the Board of Management
S. Reiser
Director Regulatory Affairs & Certification
YnOJIHOMOeHHbCOTpyDNHK NO BeDeHNIO
DOKyMEnToo6oPoTa:
S. Reiser
Alfred Karcher SE & Co. KG
71364 Winnenden (Germany)
Tel.: +49 7195 14-0
Fax: +49 7195 14-2212
Winnenden, 2018/09/01
www.kaercher.com/REACH
Garancia
Chairman of the Board of Management
S. Reiser
Director Regulatory Affairs & Certification
71364 Winnenden (Germany)
Tel.: +49 7195 14-0
Fax: +49 7195 14-2212
Winnenden, 2018/09/01
www.kaercher.com/REACH
Záruka
2006/42/ES (+2009/127/ES)
2014/30/EU
2000/14/ES
2000/14/ES: Prijloha V
Chairman of the Board of Management
S. Reiser
Director Regulatory Affairs & Certification
71364 Winnenden (Germany)
Tel.: +49 7195 14-0
Fax: +49 7195 14-2212
Winnenden, 2018/09/01
Splośna navodila. SL 1
Varstvo okolja..SL 1
Garancija.. SL 1
Pribor in nadomestni deli SL 1
Simboli v navodilu za obratova-nje .SL 1
Simboli na napravi .SL 1
Namenska uporaba..SL 2
www.kaercher.com/REACH
Garancija
Zadevne directives EU:
2006/42/ES (+2009/127/ES)
2014/30/EU
2000/14/ES
Chairman of the Board of Management

S. Reiser
Director Regulatory Affairs & Certification
71364 Winnenden (Germany)
Tel.: +49 7195 14-0
Fax: +49 7195 14-2212
Winnenden, 2018/09/01
www.kaercher.com/REACH
Gwarancja
2006/42/WE (+2009/127/WE)
2014/30/UE
2000/14/WE
Chairman of the Board of Management
S. Reiser
Director Regulatory Affairs & Certification
Administrator dokumentaci:
S. Reiser
Alfred Kärcher SE & Co. KG
71364 Winnenden (Germany)
Tel.: +49 7195 14-0
Fax: +49 7195 14-2212
Winnenden, 2018/09/01
www.kaercher.com/REACH
Garantie
Directive UE respectate:
2006/42/CE (+2009/127/CE)
2014/30/UE
2000/14/CE
Norme armonizate utilizezate:
EN 60335-1
EN 60335-2-72
EN 55012: 2007 + A1: 2009
EN 61000-6-2: 2005
EN 62233: 2008
Chairman of the Board of Management

S. Reiser
Director Regulatory Affairs & Certification
71364 Winnenden (Germany)
Tel.: +49 7195 14-0
Fax: +49 7195 14-2212
Winnenden, 2018/09/01
VseobecnePokyny SK1
Ovladaci panel. SK 4
www.kaercher.com/REACH
Záruka
2000/14/ES: Priloha V
Chairman of the Board of Management

S. Reiser
Director Regulatory Affairs & Certification
71364 Winnenden (Germany)
Tel.: +49 7195 14-0
Fax: +49 7195 14-2212
Winnenden, 2018/09/01
Opé napomene . HR 1
Zastita okolisa .HR 1
Jamstvo .HR 1
www.kaercher.com/REACH
Jamstvo
U svakoj zemplji vaze jamstveni uvjeti koje je izdala naša nadležna organizacija za distribuciju. Eventualne smetnje na stroju za vrijeme trajanja jamstva uklanjamo besplatno ukoliko je uzrok greška u materijalu ili proizvodnji. U slučaju koji podliježe garanciji obratite se, uz prilaganje potvrde o kupnjni, Vašem prodavaču ili njablžoj ovlaštenoj servisnoj službi.
2006/42/EZ (+2009/127/EZ)
2014/30/EU
2000/14/EZ
Primijenjene uskladene norme:
EN 60335-1
EN 60335-2-72
EN 55012: 2007 + A1: 2009
EN 61000-6-2: 2005
EN 62233: 2008
Chairman of the Board of Management

S. Reiser
Director Regulatory Affairs & Certification
71364 Winnenden (Germany)
Tel.: +49 7195 14-0
Fax: +49 7195 14-2212
Winnenden, 2018/09/01
Opste napomene. .SR 1
Zastita zivotne sredine. SR 1
Garancija .SR 1
Pribor i rezervni delovi . . SR 1
Simboli u uputstvu za rad SR 1
Simboli na aparatu. . . . SR 1
Namensko korišćenje . . . . . . SR 2
Predvidiva pogresna
upotreba. SR 2
Prikladne podloge . . . . SR 2
Sigurnosne napomene .SR 2
Sigurnosne napomene
vezane za rukovanje...SR 2
Sigurnosne napomene
vezane za voznju . . . . SR 2
Sigurnosne napomene za
uredaje koji se pogone uz
pomoć akumulatora . . . SR 3
Ure'daji sa visinskim
pražnjenjem .SR 3
Ureadi sa zaistim krovom
vozačevekabine .SR3
Sigurnosne napomene
vezane za transport uredaja SR 3
Sigurnosne napomene
Voznja ureda... SR 6
Metenje SR 6
www.kaercher.com/REACH
Garancija
U svakoj zemlji vaze garantni uslovi koje je izdala naša nadležna distributivna organizacija. Eventualne smetnje na uredaju za vreme trajanja garancije uklanjamo besplatno, ukolko je uzrok greška u materijalu ili proizvodnji. U slučaju koji podleže garanciji obratite se sa potvrdom o kupovini Vašem prodavcu ili najblžoj ovlašćenoj servisnoj službi.
Pribor i rezervni delovi
△OPASNOST
U cilju sprečavanja opasnosti, popravke i ugradnju rezervnih delova sme izvoditi samo ovlascena servisna služba.
-Sme se koristiti samo onaj pribor i oni rezervni delovi koje dozvoljava proizvodač. Originalan pribor i originalni rezervni delovi garantuju za to da uredaj moze raditi sigurno i bez smetnji.
- Dodatne informacije o rezervnim delovima dobicete pod www.kaercher.com u delu Serv (Service).
Simboli u uputstvu za rad
OPASNOST
Ukazuje na neposredno pretecu opasnost koja dovodi do teskih telesnih povreda ili smrti.
UPOZORENJE
Ukazuje na eventualno opasnu situaciju koja moze dovesti do teških telesnih povreda ili smrti.
△OPREZ
Ukazuje na eventualno opasnu situaciju koja moze dovesti do laksih telesnih povreda ili izazvati materijalnu stetu.
PAZNJA
Napomena koja ukazuje na eventualno opasnu situaciju koja moze izazvati materijalne stete.
Simboli na aparatu
| Opasnost od opekotina na vrelim povrsinama! Pre obavljanja radova na urežaju treba sačekati da se izduvni sklop dovoljno ohladi. |

2006/42/EZ (+2009/127/EZ)
2014/30/EU
2000/14/EZ
Primenjene uskladene norme:
EN 60335-1
EN 60335-2-72
EN 55012: 2007 + A1: 2009
EN 61000-6-2: 2005
EN 62233: 2008
Chairman of the Board of Management
S. Reiser
Director Regulatory Affairs & Certification
71364 Winnenden (Germany)
Tel.: +49 7195 14-0
Fax: +49 7195 14-2212
Winnenden, 2018/09/01
O6uynkaaHnB.G1
Ona3BaHe Ha OKoJHaTa cpe
da. BG1
TapaunB .BG1
PpHnAdJeKHOCTN n pe3epBHNuactN. BG 1
CIMBOJN Ha YnTBAHETO 3a
ynoTe6a BG1
CIMBOJI Na ypea .BG1
YnoTpe6a no npedHa3nueHne BG 2
PpeBnDIma rpeuHa ynoTpe6a . BG 2
IopDxOJaHn HactnKn .BG2
Yka3aHn 3a 6e3oNaChoc. .BG2
Yka3aHn 3a 6e3oNaChocT npn o6cnyXBaHe . . . BG 2
Yka3aHn 3a 6e3oNaChocT nppeKIM DnIXKeHne..BG3
Yka3aHn 3a 6e3oNaCHOCT 3a ypeiN 3aBnKBaHn O T BaTePn . BG 3
Upei C BncoKo n3npa3BaHeBG 3
YpeDn CbC 3aUHTeH NOKPnB 3a BODaHa. BG 3
Yka3aHn 3a 6e30nacHOCT 3a TpaHCnOpTnpaHe Ha ype-da. BG 3
yka3aHnna 3a 6e3oNaChocT 3a NOdPbXkna NTexHuecko 0cbnyKbaHe. . . . . . . BG:
ФУнкця BG3
Yka3aHn 3a pa3TOBapBaHe...BG3
O6cIyKbAsuNΦyHKUHOHaJIHN eJeMeHTn. BG 4
N3o6paXeHne Ha MaunHaTa 3a MeTeHe .BG4
O6cnyxbauo none .BG4
Функционн 6уToHn . BG4 KOnTpOHH nAmn nДиСпл徳... BG5
Ppei n yckane B ekcnnoataunBG 5
TobuHaHe Ha KaibaHaTa Ha BodaHa Harope... BG 5
BLOKIPAHE/OBCO6XJaBaHeHa3actONopRAaTaCnnpaKa... BG5
3aBnBxaHe Ha MeTaHata MaunHa 6e3 cO6CTBeHo 3aBnBxaHe .BG5
3aBnKBaHe Ha MetaHata MaunHa cbc co6CTbeH xoBG 5
Iyckahe B eKcnnoataa..BG5
O6uynka3aHnB..BG5 KOHTPOHNn NOIDbpxauN DeiHOCTN BG 5
Ipei n yckane B ekcnloaatauBG 5
Yka3aHnna 3a 6e3oNaChocT
akymyIaTopu BG5
3apeKdAnHe Ha akymyIaToPnte BG6
Eknoataua BG6
Ia ce Hactpon CeanKaTa Ha BOdaqa BG6
TIOMOU npHn3npaBHOCTN. BG
Texnueckn daHHN .BG 2
EC DeKnapaun 3a CbOTBeT-CTBue BG 3
Ipei npbpOTo n3no3BaHe Ha Bauny ypeI npoyeTe ToBa OpurnaJIHO HnCTpyKuy 3a paBoTa, DeNCTbaIte CnpoeH Hero I rO 3ana3e 3a NO-KbCHO n3no3BaHe nn 3a CneDbaUny npTeXaTeJ.
06u yka3aHnA
Ako np pa3oNaKOBaHe ycTaHOBnTe TpaHCnopTHa NOBpeHa, yBeDoMeTe MaRa3nHa, OT KOITcE 3aKynnnypeHa.
-Ппдунрсдгелнгteиуka3atelnhte Ta6eJKNHa ypeDa daBaT BaKHN HAnbTCTBn 3a 6e3onacha pa6ota.
-OCBEN yka3aHnraTa B pBkoBOOCTBOTO 3a ekCnIooatauN Tp6Ba Da ce Cna3- Bat N O6UHTe HOpMaTHNBn NpeDnicaHn 3a 6e3oNaCHOCT N PpeDnA3BaHe OT 3JONOlyKn.
Ona3BaHe Ha OKoHaTa CpeDa

OnaKOBbUHnTe MaTePnAJI MoRat Da ce peuKnIpaT. MoJr He XbPJIte ONaKOBKIne npi DoMaunHe OTnAbu, a rN ppeDaIte Ha BToPnHn CypOBuHn c CeI NoBtOpHa yNoTpe6a.
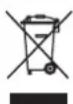
CTapnte ypeNi cbIbPkaT ceHn MaTePnAni, NoIeXaUHa peKuKnipaHe, KOITo MoRat da 6b- dAT yNtpe6EH NOBtOPHo. PpaN TOBa MOJ OTcPaHraBaIte CTapnte ypeNi, N3NoJI3BaIKn NOnxOJaUN 3a CEENTa CnCTeMn 3a cb6npaHe.
AkyMylatopn, MacNo, rOpNb u NIOobHn Ha Tx He 6bNa Da nOJaT B OKJHaTa cpea. MoJIy, n3XbPnIe Te3N MaTepuaJIn Upe3 NODxoJauu CnCTemn 3a Cb6paHe.
Yka3aHn 3a CbCTaBKnTe (REACH)
AkyaHa HnΦopMaun 3a CbCTaBKTe Ue HamepuTe Ha:
www.kaercher.com/REACH
TapaHcH
Bb BcKa cTpaHa BaxaT rapaHcIOHNHTe yCIOBn, Ny6IkyBaHH OT OTOp3NpaHata OT Hac DNCTPb6yTopcKa fnpMa. EBeHTy- aHn NOpeHn Ha BaHsny UpeJ ue OTcPaHm B pAMKInTe Ha rapaHcIOHHn CpOK 6e3IIaTHo, Ako ce Kacae 3a DeEkeKT B MaTePnaJIte Nn npn npOn3BOdCTBO. B rapaHcIOHOH cNYaH CE o6bPhETe KbM DNCTPb6yTopa Nn Hau-6JIIN3KNr OTOp3NpaH cepBn3, KaTo npeDCTabNTe KACOBATA 6eJexkka.
PpHaJaIeKHoCTn np3epBHN
actn
ONACHOCT
3a da ce u36e2ham ycnoxHeneu, peMOhmume u MOhmaxa Ha pe3epHu yacMu Ha ypeDa da ce u36bpuueam cAmo om omopu3upaHua cepu3.
-Morat da ce n3non3BaT caMo npinaJnLeXHOCTN IN pe3epBHN YacTN, KOnTO caNo3BOJeH NOT pOIN3BOIDNTeJI. OpurnHaHNHTe PnHaADNeXHOCTN IN opurnHaHN Pe3epBHN YactN rapaHTnpaT cnpyhata N 6e3npo6nemHa pa60Ta Ha ypeDa.
-ДугИ Информаши OТносю pe3eрВНITEЧАCTN MOKeTe Да ПОЛчИТЕ Ha www.kaercher.comВоблacrCecPbN3.
CIMBOJHa YnbTbaHTo 3a
ynoTpe6a
ONACHOCT
Ipeynpekda3a Henoepdmeho apo3uopaacHcM, kmo eOdo mexKu meenechu noepdu unu do cmbpm.
△PENDUNPEXDEHNE
Ipeynpekdoaba 3a 6b3MOxHa onacha cu Myauua, kOmo bu Moana da dooeede do meKku meJechu noepdu unu cmbpm.
△PENPA3NBOCT
Yka3aHue 3a eb3MOxHa onacha cumya uua, KOaMo 6u MoZna da doBede do neku meNeCHU noBpeDu unu MamepuanHu ueMu.
BHIMAHNE
Yka3aHue 3a eb3MOxHa onacha cumya- u, KOaMo MoKe da doBeDo Mamepu- aHnU uemu.
CnmboHa ypea
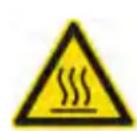
Onachocm om u3zapnne npadu zoepu noBpxHocmu! Ppeu paobama no ypeda, ypebama Ha aycnyxa da ce ocmaBu da ce oxnaDu docmabHyo.

I3eBpuueaime paobomama no ypeda c noxdoxrau npbkaeu.
Onachocm om npuunpeane npadu 3akleueaHe mekdy noobuxhu acmu Ha npeo3Homo cpecm80.
Onapocm om hapahea-he npadu noobuxhu acmu. He sbpkaume eb-mpe.

Onachocm om noxap. He 3acmykaume zoepu unu mnee npedmemu.
| 3akpenbahe Na vepuza-ma / moyka 3a okuveane Ha Kpan | |
| Tochu 3a 3axbaanzahe Na aemomobunnua Kpuk | |
| Maksumalen hakuon Ha ochobama npu prudexk-eanhe c noeduzham pe-zepeoap 3a u3memeho-mo. | |
| Ito nocoka Ha deuxkenue-mo npemuhaabaume camo no hakuonu do 14 %. | |
| Bhumanue bprmaiza ce yemka (cna3eaume noco-kama Ha bpmene). | |
| Pdeynpejxdenue 3a onacno enekmpuecko hapxejne! | |
| Cbplodabaume yka3a-huemo! | |
| Unpabnjaume 6abho! | |
| Molnypouememe ynbm-eanemo 3a pa6oma u deucmeaume cnoped ne-azo! | |
| Opanchosc om noepeda! He muimefunmbpa 3a npax. |
YnoTpe6a no npdeHa3HaueHne
MaunHaTa 3a MeTeHe e npEbnHeHa 3a NouchBaHe Ha NIOBn NOBbpxHocTn 3a npOMuIeHa yNtpe6a, HAp. 3a CneHnTe oBnaHn HpInloKeHne:
napKnHn
PON3BODCTBEHN CNTEMN
JONCTUHN3OHN
XoTeJIN
TbproBnA
CKJaIOBNI3OHNI
TpoToapn
-TaM MeTaHa MaSiHa e npedHa3Ha-yeHa 3a MeTeHe Ha 3AmbpcEHn NobbpxHOCTN BbTpE HABbH.
- YpeBbT c npncnoc6bnHeNra 3a pa60-Ta npeHn3noJ3BaHe da ce npoBepu
3a 6e3ynpeHc bctOAHne n EKCNIO-atauONHa cnypHOCT. Ako ypeBt He e B OTNIHc bCTOAHne, N3NON3BaHeTo My e 3a6paHeHo.
-3n0JI3BaIe Ta3n MeTauHa MaUHACAMOBcBcOTBeCTBHe CbC 3aJaHTe BHACTOJTOYNbTBaHe 3a EKcnPiOaTaLNA.
-No ypeHa He Tp86Ba Da ce npednpne-MaT npomeHn.
- YpeBbTe nOxOJaIc Camo 3a OncaHITe B YnbTbaHeTo 3a ekCnNoatauia noKpTuI.
-Morat da ce MnHaba cAmo no nobbpx-HOCTn, N03BOJEnH OT npednpneMaayu HNHEROBHTe yNbJHOMOSeHN Nua 3a H3NOJ3BaHe Ha MaunHInTe.
-По пиинл вадк: Лесноалмпite MaTePmaI Na ce IbpxaT danehe otypeда (Опасноct ot ekcnno3na/ noxap).
PpeBnDmMa rpeHa ynoTpe6a
Hkora He n3mTaIe/3acMyKBaIte EKcNIO3BHN TeHOCTH, Bb3nJaMeHrE Mn Ra3OBe, KaTOn H He pa3peDeH NKeCENHn Pa3TBOpNTEn! KbM Tx npHaNdxKAT 6eH3IN, pa3peDntEn 3a 60 nn Ma3yT, KOnTO npn 3aBnxPhe C Bb3dyxa 3a BCMyKBAHe MORat Da o6pa3yBAT EKcNIO3BHN napu nn Cmecn, OCBeh TOBa aUeToH, He pa3peDeH NKeCENHn Pa3TBOpNTEn, Tb' KATO Te aTakyBat n3NoJ3BaHnte 3a ypeDa MaTePnaJIn.
→ HNKORA He MeTeTe/He 3acMyKbaIte peakTNBn MeTaJIHn npaxOBe (Hanp. anyMNHI, MarHe3N, cHK) BbB Bpb3ka CbC CNJHO AKTNBn N KcEJI N ONUCTBaUN npenapATn 6pa3yBaT EKcNIO-3NBn rA3OBe.
He n3mntaTe/3acMyKbAte ropaun nn Tneeu npedmetn.
YpeBt He e noDxoJa3a H3MnTaHe Ha onaCHN 3a 3dpaBeTo BeueCTBa.
3a6paHbBa ce npeToB onaChn 0bJa-CTN.3a6paHeHa e pa6oTaTbBvB3pNBOONaCHN NOMEeHn.
B3mHaTeO cbc Ce6e cn Ha npDpykaBaunn nua He ce Donycka.
→ CTo3n ypeI He e IIO3BOJIeHO N36yTBAHe/TerJIeHcN TpaHCnOpTnpaHcHa npEpmTeN.
Iopxoadn Hactnkn
-Acpaant
-Индустрпаини подове
-UMMeHTOBNIOOBe
-BeTOH
- NaBeta
YkaaHna 3a6e3oNaCHOCT
Yka3aHn 3a 6e3onacHocT npn o6cnyKbaHe
→ 3a nodobpxkane Ha b3dyxa u nbmu-amaHa ymeuen mok ypebtm Hemp6ea da ce u3no13ea Ha bucouHa 2000 Mempa had mopckomo paehuie.
(Baxu cmo 3a uHaHouA) Ako ype- _bm e o6opybaH c 2eKae mpb6o
npo6o om PVC, He mpr6ba da ce u3non3ea npu hucu memnepamypu Ha 3ao6ukanuaama cpea (noo 0^ ).Ppu bynpocu omnocho Bauu yped, mojra, c6bpxeme ce c Karcher.
Ypebmcnpucnocoblenhura3a pa-6oma npdeu u3non3ahe da ce npoeepu 3a 6e3ynpeuHc bcmOHue u eknnoamauONHa cueypHocm.Ako ype-0bme He e omnuHc bcmOHue, u3non3eaHem My e 3abpaHeno.
Da ce cna3aam yka3aHura ma 3a 6e3o-nachocm npu pa6oma c ypeda e onacHu 30Hu (Hanpumep Ha 6eH3uHocmaHuu). 3a6paHaHa p6omama 6be 63puoeonacHu nOmeueHua.
ONACHOCT
Onachocm om HapaHaehe!
He u3no13baumyepea6e3zauumen nokpu npomue naadu npedmemu 6 obnacmu,kbdemo cbueecmbyea 6b3- moxhocmm,obcnykeauam nepco Han da 6bde 3aceaHam om naadu npedmemu.
Ocbnykbaaomo nuce mpy6ba da u3- non3ea ypeda cnopepd npednucanura. Ito epeMe Ha pa6oma mo mpy6ba da ce cbo6pa38a C OKoHume npedMemu u da eHmaea 3a mpemu nua u ocobeno 3a deua.
Tpy6ba da ce cnaeam och8ho Mep Kume Ha npednucnura, npabunama u npabunhuune, koumo ca bauo3u 3a MOMOPHu npee03Hu cpeocmea.
→Ppeu hauanomo ha paoba ocbnyk eauomo nuue mpr6ea da ce yeepu, ye ecuku 3auumHu npucnooHeHua nocmaeHu npabunHo u fynKuoHupam.
06cnykeaumo nue ha ypeda e om-2080pno 3a 3nnonyuku c dpyaunu unu cmaxhomo umyuecemo.
Ocbnykaaomo nuce mpa6ea da e c nblmno npunenHano o6neKnO. Hoceme 3dpaeu obyeku uuz6raabaume c8o-6odhomo o6neKnO.
→ПоьерьаUME npedu habnuzane (Ha- np.deua).Noapxeme ce 3a docma-mbynaEuDumocm!
Ypeobm Hukoza He mpr6ba da ce oc-ma8a 6e3 had3op,dokamo Momopb m pa6om.Obcnykauomo nuce moke da Hanycka ypeda edea mo2aaba,koama Momopbme yazachan,ypeobme ocayen npomue HnpeDhamepeHu obxekHua KIOUoyMe u3eadeH.
3a da ce u36e3e HeKOMnemehmHa ynppe6a Ha ype0a, da ce u3ea0u KIno4a.
Ypeobmmp6ea da ce u3non3ea camo om xopa, koumo ca obyuenu 3a ekc- nnoamauyma My u koumo ca dokaa-nu cnocobncmune cu 3a paBoma C Hezo, u ca Hamoeapenu u3puHc u3- non3eaHemO My.
To3u ypeD He e npedHa3haen 3a mo- 8a,da 6bde u3non3eah om luca (eknouumEnho deua) c opaHueHu fu3uuecku, ceHOpHu uyMcmeHu cnocobnocmu u lunca Ha onum U/Unu lunca Ha no3HaHua, oceeH akO me ca
nohada3opaHa om2o8aprao 3a mXnHama bezonacnocm luue unu ca noIyUnu om Hezo uHcmpkyu, KaK da u3non3bam ypeda.
→ Deuama mpa6ea da 6bdam noD ha3Op, 3a da ce aapaHmupa, ye Hma da uapam cypeda.
PNEI3NBOCT
Onachocm om yepexdahe! He uzmumaume lehmu, uhyoee unu men, 3aomome mozam da ce 3aueum okono memuaea
Yka3aHn 3a 6e30nacHocT npn peXMM DnXKeHne
ONACHOCT
Onachocm om HapaHaahe! Ipoeepem moeapohocumocmma ha ochoeama, npedu da npemuHeme no He.
ONACHOCT
Onachocm om 3Jnononyka, onachocm om hapaHraeane!
Onachocm om ppeobpbuahe npu mbpde 20JEMU HAKIOH.
- No nocoka ha dbuxkenu npemuha baume camo no haknohu do 14 %.
Onachocm om npoeobpuane npu 6bp30 deuxeHue Ha 3aou (ocobho npu 3aou hanaeo).
Ha 3aoume da ce kappa 6aBHO.
Onachocm om npeobpbuahe npu hecma-bunha ochoa. - Ypeobm da ce deuxcu camo Ha ykpeneHa ochoea.
Onachocm om npeo6pbuane npu mebpde 20JEM cmpaHueH hKJIOH. - HanpeuHo ha nocokama ha deuxkHeue da ce npemuHaam cmo hakIoHu do MakcumaHIO 10%
Yka3aHn 3a 6e3oNaChoc3a ypeN 3aDbXBAHNOT 6aTePnn
Yka3aHHe: TapaHIOHn IpTeHcIM MoRat Da CbIeCTByBaT CaMO, aKO I3NOI3BaTe npenOpbuaHnte O T Karcher akymyNatopu n 3apAHN yCtpoiCTBa.
-He npemehno da ce cna3BaT yka3aHnra Ta 3a ekcnloatauHa npOn3BODnteHa akyMylatopa Ha 3apAHOTo ycTrooCTBO.Cna3BaIte npenopbKnTe Ha 3akOHdaTeJI npi 6opabeHe c akymyIaTOPU.
-Hnkora He octabnTe akymynatopnte Bpa3peDeHO CbCToHne, a r3apeTe OTHOBO Bb3MOxHO Hau-CKOPO.
-3a n36rahe Ha 6nykaeun TOKOBe NOdIbpxKaIte AkyMylatOpnte BnHaHn YnCTn cyxN. Pa3eTe OT 3ambpcaBaHn, HnP.OT Metanen npax.
-He nocTabraIte HnctpyMeHTN Bbpxy akymylatopute.KbcO CbeDnHeHne n onachOCT OEKCNIO3N.
-B HnKaBcIyauHe Ce 3aHnMaBaIte B OTKPNT NnAmbK, He Cb3DaBaIte NCKPn I He NyuTe B 6JN3OCT Do aKyMyIaTOp NIN B NOMeUeHne 3a 3apeXda-He Ha akymyIaTOp. OnacHOCT OT eKcIIIO3nI.
-Да He ce DoKocBAt RopeuTe YacTn, HApP. 3aDbNkBaU, MOTOp (OnaCHOCT OT n3rapAHe).
-BHIMMaHHe npn 6opabHe c KInCeJIHH 3a akymyIaTopu. Cna3BaIte cbOTBeH NTe npaBnIa No TexHnka Ha 6e3onacHOCT!
-3pa3xoDBaHnTe akyMnyTOpn Da ceOTCTpaHBAt ONa3BaNk OKoHaTa cpeJa 3a OTnaBcN CbINaCHO NpeKTNBeTe Ha EO 91/157 ENO.
UpeNi C BnCOKo n3npa3BaHe
ONACHOCT
Onachocm om HapaheaHe!
→ Ppu pa6oma nO bu6okomo u3npa38aHe no8du2aume dokpa pe3ep6oapa 3a u3Memehomo u zo ndcuayp8aume.
→ N3eBpuEaume oBe3oNaCeaHemo Ha Onachama 30Ha cAmOmebH.
Ypei n c6c 3aunTeH nokpmb 3a BOda4a
YKA3AHHE
3aumnua m nokpu 3a 8oda a (onu) npednaa 3auma npomue no-eppu nada uacmu. Ypedume obaue He npednaaam 3auma npomue npoeobpuane!
EkeDHeBHO npoepeaume 3aumHua nokpue 3a nopeda.
Ppu noepeda Ha 3aumnna nokpu, cbuo u Ha omdeenu enememu om Heo,mpraea da ce cmehu eenuam 3a- uumeh nokpu.
He ce pa3pewasa KaKeamo u da e MoDudukauua Ha 3aUumHnue NOKpu6, KaKmo U nocmaeaHemo Ha pa3nHu om pa3peuHume om Karcher enemeHmu, KomnoHemu u Modynu, u moBa npu onpeDeJenuo bcmoernCmea opaanuHa yHKuaMaHa 3aUumHna NOKpu6.
Yka3aHnna 3a 6e3oNaCHoc 3a TpaHcnpOpTnpaHe Ha ypeDa
B3ememe nod eHumaHue meanomo 6e3 moepap (meano npu mpaHcnopm)Ha ypea npu mpaHcnopmupahe c pemaKema unu camonemu.
3a mpaHcnpupaHe Ha ypeDa, u3- 8aXdaume uencena Ha akymynamopa u 3akpeneaume ypeDa hadekdo.
yka3aHnna 3a 6e3oNaChocT 3a noDpIbXkA nTexHnuecko obcnykBaHe
→ Ppeu noucmehe u noopbka Ha ypea, cmaHa ha qacmu un npemuHaBaHe KbM dpy2a fynkuua da ce u3knOyu ypea u da ce u3eaDu knoya.
Ppu ypeu c mpaKuoHeN akyMynamop npu eKaKeu pa6omu no nodpBka u peMoHm u akyMynamopbmpra6ba da ce u3KnUoea om eJeKmuYeckama cucMeMa Ha ypea om Mcmomo Ha u3KnUoBahe Ha akyMynamopa (ueencen Ha akyMynamopa).
Ppu pa6oma no eeneKmpuueckama ype6ba mpa6ea da ce omkau akymy-namopb.m.
3a cenma nppeo paKaYe me ompuamennu, ced moa noJoxumnHua nonloc.
Pnozmopnmo c8bP3eane ce u38bpuwa e o6pamna nocneobamehncm. Pboe c8bpxeme nooKumeHnura, cned moea ompuameneHnra noHoc.
He mprbaea da noucmeame ypeda c Mapkyu unu c 0oHa cmpyra nod hnae (onacHocm om Kbco cbeDuheue unu om dpyu noepdu).
Pemohmu mprbaa da ce u3ebpuwam camo om omopuzupaH cepu3u unu om cneuauncmu 6 ma3u obnac, Koumo ca 3ano3ham cuukpnpednucahura 3a cuzypnocm.
Da ce cna3ea npoeepkama e6e epb3ka cbc cuayphocmma ecbomeemcmue c eaunudume mecmhu paanopebu 3a CMeHau MuCmomo cu npomuunenHu ypeu.
→ N3eBpweaume paBomama no ypea c nodxodrau pu pkaauu.
Фунн
MaunHaTa 3a MeTeHe pa6oTu no npHUnHa Ha IOnaTata 3a MeTeHe.
-Bbptraunr Ce metraBnIpaaMpbcOTnTa DnpeKTHo B peepBoapa3a N3MeTeHOTO.
-CTpaHnUHaTa MeTna NOChCTBa bJInTe N KaHTOBeTe Ha NOBbPxHOCTTa 3a MeTeHE N H3npaUa MPbCOTnRA Tb UyIe HaMeTraUNBaNk.
-ФИНЯТ npax ce 3acMyKbI npesФИн-Тьра 3a npax c nOMOuTa Ha CMyKaTeJI-NHЯ yNoBInTeJ.
Yka3aHnna 3pa3TOBapBaHe
Onachocm
Onachocm om hapaHBeane, onachocm om yepekdahe!
Ipu pa3moBapaeane umaime nped bud meanomo ha ypeda!
O6uynka3aHnna 3a cnpypnoct ONACHOCT
Onachocm om HapaHae! PpeDna3Ha- ma uhaa da ce nocmae euhaue npu noeduaH am pe3epoap 3a u3MemeHomo.
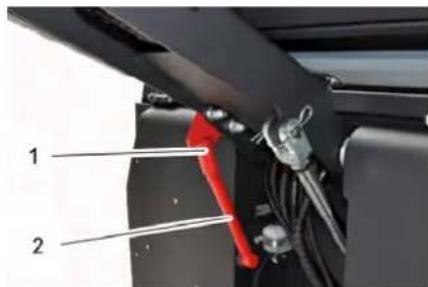
1Hocau npedna3Ha 4 Hnepna3Ha
3aBbptete npedna3HaTa 3a nbIHO n3npa3BaHe HArpe nNoctabete B Hocaya (noDCnrypeHa).
CmHa Ha akymyIaTOPn
AkyMylatopnte Moar da 6bDat CmehHn cAmo B KOMNKeT. I03BOnHe a CmHa cAmo OT CTpHa Ha KBaInΦuPah CneuaJIInCT.
→ Iopadn rojamoto terno (450 kg) cmaHata Tp6ba Da ce n3BbpuBa c KpaH. Yka3aHHe: HanpeuHata pa3nopKa Tp6ba Da 6bde pa3BnHTeHa npedn CmHa Ha 6aTePnnte.
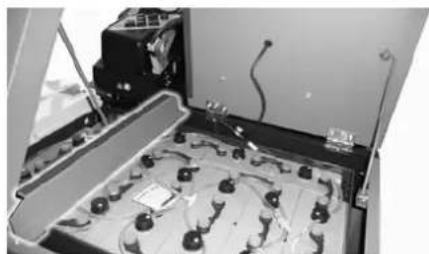
→Пи demoHTax Ha akMyIaTopa Da ce BHMABA 3a TOBa, nbpBO da ce pa3kaNu Ka6eJa Ha MNHycOBn Ka6eJ.
3akpenete BbkeTata Ha kpaHa Ha 4 xanka HA KOMNKeTA akyMylaTop n
BHNMaTeJHO N3BaIeTe aKyMyIaTOPn-TE.
PpOBepka HnBOTO Ha XnDpaBnHOTOMacno NdoNtBAHe Ha XnDpaBnHOMacnO
YKA3AHHE
Pe3epeoapb m 3a u3MeHomo He 6uea da 6bde no8duham.
OTbopete kanaka Ha dBuratena.
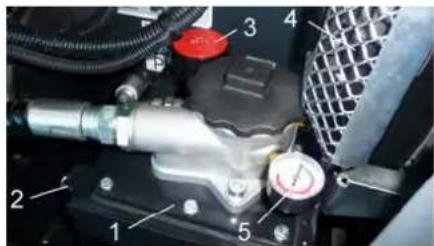
1 PeεepBoaap 3a XπdpaBnHNo MaCnO
2Ha6JIIOIaTeJIHcTBKIO
3 3aTbapu Kaak, OTBop 3a nBHe He MaCIO
4 OxnaIteJHa XnIpaBnHOTo MaCIO
5 MaHometbp
→ PpOBepTe HnBTo Ha XnDpaBnVHOT MacNo BHa6JIOdaTeJHOTO CTbKNO.
-HNBOTo Ha MaCnOTo TpR6Ba Da 6bDe MeKdMy MapKnOpBka, MNH" - n, MAKC".
-AKO HNBOTo Ha MaCnOTo e NoI MapKn- poBkata ,MnH", da ce DonbInxnpa BnHNO MacNo.
Pa3BnIte 3aTbapraunKaanKaHa OTBo pa 3a nblHe He Ha Macno.
→ NouncTeTe Dnana30Ha Ha nbJIHeHe.
→ DonbHHeTe XnDpaBnHNo MaCNo.
BvI MacNo: TexHnueckn daHHN
3aBnTe 3aTbapraNnaK Ha OTBOP 3a NbNHeHcHa MacNo.
YKA3AHHE
Ako MaHOMembpm Noka3a NouweHo Hanraane Ha xuopaenuHomo Macno, fummbpm 3a xuopaenuHo Macno mpa6ba da bde Cmehen om cepue3a Ha Karcher.
PpOBePkHa XmDpaBnHnHaTa ype6a
Da ce 6nokupa 3actonopbaaata cnpaqka.
→ CtraptnpaHe Ha MoTopa. IopnbkKa Ha xnpabNnHaTa ype6a camo OT cepBn3a Ha Karcher.
BcunxHpaBnHm Mapkyu nI3BO DN da ce npoBepr 3a XepMeTnuHOCT.
PpOBepKaHaMeTuaBnBaIaK
3aBbptTe KIOU 3aNaJIbaHe B NOJOKHne "I".
→ПОВДИНЕТе pe3ePBOapa 3a n3MeTeHTOДО КРайНоТО ПОJOKEHNE.
3abptete KIOU 3anaIbaHe B noIOKe Hne O.
a ce 6nokpa 3actonopbaata cn paKa.
Ae noCTaBn npedna3HaTa aaHra 3a BnCOKO n3npa3BaHe.
OTCTpaHETeJIeHTteUHHypOBeteOT METAUNBAJK.
→ 3BaTe npedna3HaTa 1aHa.
NocTabete KIIOUa Ha 3anaIbAHeto B 3anaIITeHATA KIOUaJIka.
3aBbptete KIOU 3aIaIbAHe B NOIOKeHne "I".
CnyckaIte pe3epBoapa 3a n3MeTeHOTo DO KpaHOTOnNoJoxHeH.
→ KInou 3anaJIbaHe da ce 3aBbptn Ha "0" n Da CE N3BaDN KInOua.
Da ce CmEH MTeaun BaJAK
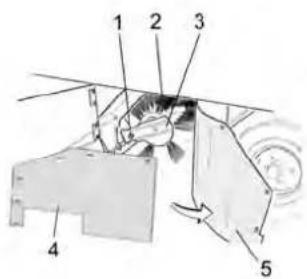
1 BoNT 3a 3akpenBaHe Ha MeTnBaa
2MeTuaBnK
33aKpeBaHe Ha MeTuaBnBaJAK
4 CtpaHnH0 yNtBTHHeHne Ha 3aDbpxka- uata JnamapuHa
5 CtpaHnHo ynnbTHHeHne
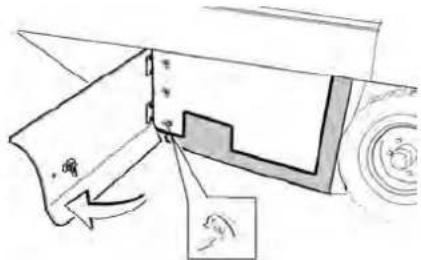
OTBOpTe cTpaHnUHATA 06NIOBka C KIIOU.
Pa3BnHTeTe KpNlUaTne raKn OT 3aDbpxkauTa lamapHa Ha CTpaHnHoTO yPiBTHHeHne n CBAIeTe 3aDbpxkaLsata lamapHa.
OsbpHte ctpaHnHTo ynJIbTHHeHHe HABbH.
Pa3BnTe 3aKpenBaunu BnHT Ha 3aKpenBaHTo Ha MeTuaN GaJrK nHa-KNOHeTe 3aKpenBaHTo HABh.
Cbaene metraa BanaK.
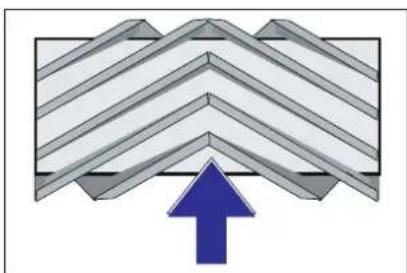
MOHTAXHNO NOLOXKeHHe Ha MeTzUHa BANK No Nocoka Ha DvIXKeHneTo (nOrIeOtrope)
Yka3aHHe: Pn MOHTaKa Ha HOBn MTeU BaaK BHMaBaIte 3a NIOJKeHneTo Ha KOMJIeKTA YeTKu C YeTuHa.
MOnTnpaTe HOBnMa METaBaNJaK.ΓNb-6oBeTe Ha MetaunBaNJaK TpaBbDa ce NoCTaBt B ONOpHTe Ha MetaunBaJAK Ha CpeuynOIOxHnB 6anaHCnp.
Yka3aHHe: Cne MoTtKaHa HOBnMe TnBaNk OTHOBo Tp8Ba Da ce HAcTpOn peFNeKTopb3a MeTeHe.
PpOBepKa HacTpoKa Ha peFJIeKToPa 3a MeTeHe Ha MeTuaBJIaK.
Yka3aHHe: PedjKeTOpbT 3a MeTeHe e Ha-CTpoEH f6pnuHO Ha 80 MM, TOI MOKe da ce perynpa 6e3eTeHNO npu H3HocBaHe HA METAUNBANK.
PpOBepeTe HAnraHEnTo Ha rymnte.
→ N3KJIIOUBaHe Ha CMyKaTeJIHHa yIIOBn-TeI.
→MetaHaTa MaunHa Da ce 3akapa Ha paBHO I rnaKO MRCTO, KOeTo e NOKpI-TO C npax nIte6eHnP Taka, Ye da ce BIXkda.
→ NocTabete nporpamnnpekcbaHa MeTeHe C metraBaanK.
→ NocTabete nporpamnnpekcbaHa TpaHCnOPTHOBTVBaHe.
KapaiTe ypeHa ha 3aDen xoI.
PpOBepeTe peDnEeKTopa 3a MeTeHe.

ΦopMaTa Ha peFJIeKTopa 3a MeTeHe TpIbBa Da o6pa3yBa IpaBnIeH npaBoIbJIHnIC WnpHa O T 80-85 MM.
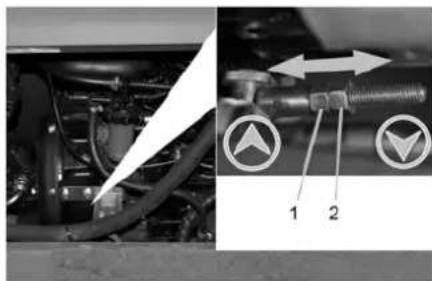
1 Taima 3a perylnpane
2KoHTparaKa
OTBOpTe CtpaHnHnO6TeKaTeHa DnurTaTeN.
Pa3BnTe KOHTparaiKaTa.
HactpoTe peΦnEeTopa 3a MeTeHe
3aterHete KOHTparaiKaTa.
PpOBepepepepeKTopa3aMeTeHa METAUNBAJK.
PpOBepKa HacTpoKa Ha peFNeKToPa 3a MeTeHe Ha CtpaHnHaTa MeTJa
→ПовдаганHa CTpaHnHTe MeTIN.
→ MaunHa Da ce 3akapa Ha paBHO INIaKO MRCTO, KOET e NOKPnTO C npax nTteBseu np TaKa, ye da ce BIXkda.
→ NocTabete nporpamHn npekbcBau Ha MeTeHe C metu BaanK n cTpaHnHn METIN.
→ NobDnraHe Ha CtpaHnHTe MeTJI.
→ NocTabete nporpaHnI npekbcBauHa PnDnKBaHe.
KapaiTe ypeHa ha 3aDen xoI.
PpOBepePeepJKeKTopa 3a MeTeHe.
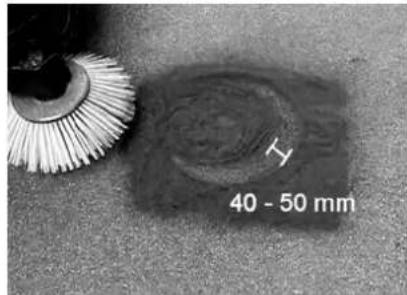
UHPOUNHaTa Ha peΦnEKTopa 3a MeTeHe Tp6Ba Da 6bJe MEXy 40-50 MM.

KopunpaTe peΦJIeKTopa 3a MeTeHe Dbata 60TtA 3a HAcTpOJa.
PpOBepeTe peFJneKTopa 3a MeTeHe.
Hactponka Ha ctpaHnHTe
yNtBTHEHn
→ N3HeCeTe HArOpE pe3epBoapa 3a n3-MeTeHOTo I rO noDCnHypeTe C npEdna3HaTa UaHra.
ONACHOCT
Onachocm om hapaHaehe!PpeDnazHa ma uhaea da ce nocmae buhaue npu noeduaham pe3epeoap 3a u3Memehomo.
3aBbptete npedna3HaTa 3a nIbIHO nIpa3BaHe HArpe I NaocTaBeTe B Hocay (NoCnrypeHa).

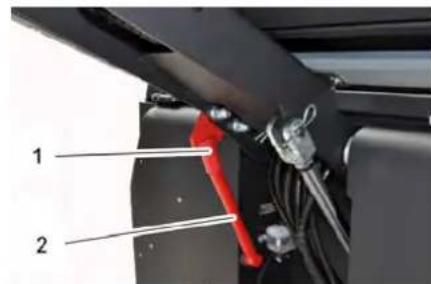
1 Hocay npedna3Ha anHa
2 PpeIa3Ha 1aHa
OTBOPETe cTpaHnUHATA 0bIuOBA KaKTo e ONaHO B rnaBa ,CMHa Ha METaUNA BaJAK.
PaBnTe 6-Te KpUHTaT raKHa CTpaHnHata 3aDbpKaaIaMapHa.
PaBnTe 3-Te raKn (SW 13) Ha nped Hata 3aDbPkaa JIamapuHa.
→ PnITnCHeTe CTPaHnUHnTE yINbTHeHn DToTOLKOBa HADOny (HaNbXeH OTBOp), Ye da ce NOnyu pa3cTOrHne ot 1- 3 MM Do nOda.
3aterheTe 3aBpkaunTe lamapnH.
→ NOBTOPeTe ONEpaunraHa Dpyrata CtpaHa Ha ypeJa.
PbUHO nouCTBaHe Ha qnIITbpa 3a npax
→ NOnCTeTeΦnITbpa 3a npax C6yToHa 3a NoNTBaHe HaΦnITbpa.
CmHa Ha qnItpa 3a npax △NPEDYNPEXKDEHNE
Ppeu Hauanomo Ha cmaHa Ha fummbpa 3a npax u3npa3heme pe3ep6oapa 3a u3 Memehomo. Ppu pa6oma no cucmemama Ha fummbpa Hoceme npaxo-3aumha macka.Cna3baume MEPkume 3a 6e3onac-Hocm npu pa6oma c pfun npax.
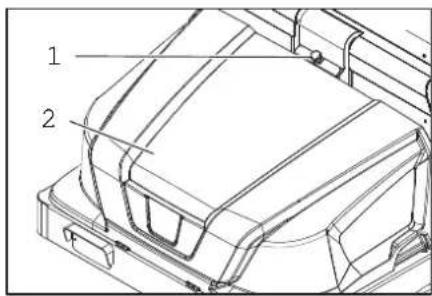
1БлokировkaHaKaIaKaHa ypeDa
2 Kanak Ha ypeda
OTBopete 6JIOKINPOBkAta,3a ceNTa pa3BnTE 60NTa CbC 3Be3DOO6pa3Ha dpjkk.
O6bpHete kanaka Ha ypeHa Hanpei.
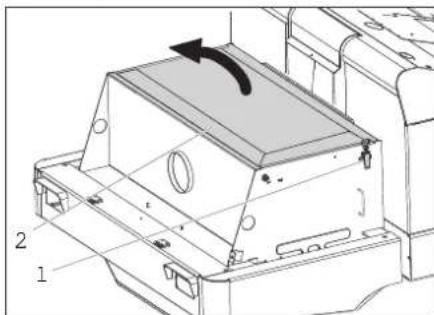
OTBopeTe kanaKaHa qntbpa.
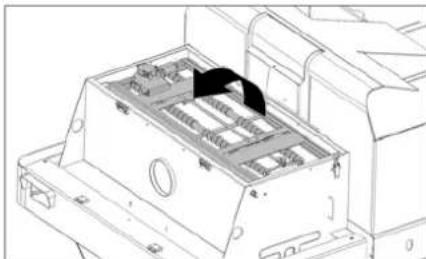
O6bpeTe TpbckaHa HaΦnTbpa Happei.

CmeheTe pntbpa 3a npax.
3aTBOpTe OTHOBOKanakaHaΦnITb-pa.
CmHa Ha KpyuKa Ha fapa (Onu)
Pa3BnTe daPobete.
→ CbaTeΦapOBete n ɪn3BaTe Σeke-pnte.
Yka3aHHe: Cna3BaIte No3nIInTe Ha IeKepeIte.
Pa3rno6eTe cepoBeTe.
Pa3rno6eTe fapOBeTe n npu TOBa rN dpbXTE XOpIN3OHTaIHO, TbN KaTO 3BeHO NaMn He e 3aKpeNeHO.
→ДeбнокираиTe 3akorчавацаТа ckoba n CBaIeTe KpyuKaTa.
MOnTnpaTe HOBA KpyuKa.
Da ce MOHTnpa B O6paTHa NOcneNoBaTeHHOCT.
CmHaHa Mmrau (onzna)
Yka3aHne: 3a cMaHa Ha KpyUkata Ha Mmraya OTCpaHeTe CTbKnTo Ha Mmraya OT Kopnyca Ha Mmraya.
CmHa Ha npdeNa3nteH
OTBopeTe HocayHa npednaTEna.
FU04FU09FU10FU11FU06FU07
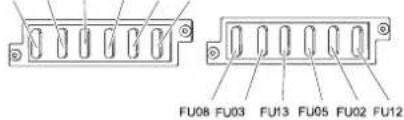
PpOBepeTe npEpaNa3uTeJIte.
→ CmHeTe DeΦeKTHnTe npEpa3nTea.
Yka3aHHe: PpeNa3ntTeT FU 01 (rnaBeH npEpaHa eKtpoHHn KOpNyc.
PpeNaTeNFU 14, FU 15 n FU 16 ce HAMnpaB OTDeJIeHHeTo Ha eJIeKtpOnHHa KOpNyc. BHMaHne: OTBapRHe Ha Kopnyca N CMHaTt Ha IpeNa3TeNTe Ca No3BOJLeHN CaMO BOTOpN3UnpAn cepBN3.
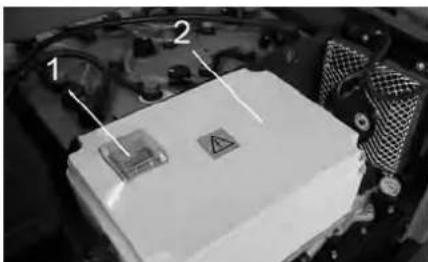
1 PpeNa3nTeF U 1 (rnaBEN nppeNa3nTe)
2 EneKtpoHEn KOpnyc
| FU 01 Га | авен пedingалten 220 | A |
| FU 02 Пуpeксывача седам- ката | 3 A | |
| FU 03 Кааына на ворача (оция) | 10 A | |
| FU 04 Пуревлочваши по- сokedа на движени | 5 A | |
| FU 05 Мултынфункционална иndидаця | 3 A | |
| FU 06 Охладитей на xидра- Влично Т масло | 25 A | |
| FU 07 Пурексывача за Избор на погама | 15 A | |
| FU 08 Кпakson 10 A |
| FU 09 Oobetlenne otTЯВо 7,5 A | |
| FU 10 Oobetlenne otДяСHO 7,5 A | |
| FU 11 PaobToHо ocBETlenne 10 A | |
| FU 12 AbaРина пamna 3a CBTeHe NaOkОLo | 5 A |
| FU 13 BbБрпраanza сисема 10 A | |
| FU 14 MoТор 3 A | |
| FU 15 ПpeOБразовател на Наразжени.To | 20 A |
| FU 16 КлЧов пекьсвач 3 A |
Yka3aHHe: IV3noJ3BaIte cAmo npedna3nTEEN CbC cbUata npedna3Ha CTOHOCT.
POMOu npn HEn3npaBHOCTN
| Hem3npabnocst OtrctpnaBvane | |
| Уретът He вьрви пл вьрвс са mбавно | Сededhe Na седалкata Na BODaça, KOntaktnЯгпpeкьсвач Na седалкata ce aktnВира |
| Вклочанe Na 3adeiCtВаняп р dedпа3ntel FU 1 (Вьрху eilektrponnry koprnyc) | |
| Заржданe пл smянa Na akymулatopa | |
| Освобождаданe Na зactonopявшata cnilpaika | |
| Провете за habити лeNTи и shypовe. | |
| Уberdomete cepВиза Na Kärcher | |
| С蜱ецшmВ xидравликata Дог | Блнete xидравличн Teuhoct |
| Уberdomete cepВиза Na Kärcher | |
| Четкite SE bьртЯ саMo sabHo nII Nьобше He se BьртЯ | Провете за habити лeNTи и shypовe. |
| Уberdomete cepВиза Na Kärcher | |
| Малко пллсваца сида Na ИЗ-cм央Ванe В Зоната Na ChETКITE | Почuctванe Na Фильbra |
| Уberdomete cepВиза Na Kärcher | |
| Уретът з苹рашава Habстpoиka Na | Сtrpanichnite ул'tchenia |
| Вклочete вentilnatopa | |
| Почuctete Фильbra 3a npax | |
| Сmedete Фильbethе ул'tchenia | |
| Уberdomete cepВиза Na Kärcher | |
| Метачно 3вевно He поема BCN-КITE OTпдьц | Да se ИЗразни розервоара 3a ИЗmeteHOTO |
| Почuctete Фильbra 3a npax | |
| Сmedete MeTЯшяваляк | |
| Настойе рефlektорa 3a MeTeHe | |
| Сmedete ул'tнител网te Л Lentи Na pezeрвоарa 3a ИЗmeteHOTO | |
| Отстане Блokиранeto Na MeTЯшяваляк | |
| Уberdomete cepВиза Na Kärcher | |
| Рezервоара 3a ИЗmeteHOTO He seповдига плп He se спуха | Провете р�除пазittelпe |
| Уberdomete cepВиза Na Kärcher | |
| Рezервоарът 3a ИЗmeteHOTO Se Bьрти Тьррide Бавно пльв�пс He se Bьрти | Уberdomete cepВиза Na Kärcher |
| ПюзвodстveNi CBMшени C xI-дравлино 3aДвиньани части | Уberdomete cepВиза Na Kärcher |
TexHnueckn daHHN
| KM 130/300 R Bp KM 130/300 R Bp Pack | |||
| Данни за урEDA | |||
| Скорост на движени, наразд. км/h 7 7 | |||
| Скорost на движени, наразд. кm/h 7 7 | |||
| Слобност за изоча ване (мак.) -- 14 % 14 % | |||
| Повьхноста мошност 6е 3старочи метл m | 2/h 7000 | 7000 | |
| Повьхноста мошност c 1 старочи метл m | 2/h 9100 | 9100 | |
| РавOTашиочина 6e3старочи метл mmm 1000 1000 | |||
| РавOTашиочина c 1 старочи метл mmm 1300 1300 | |||
| Вид зашITA зашITO потов калец вoda -- IPX 3 | IPX 3 | ||
| Пробъksi'tелност на Изочьвае рпс нально зареген akуу-латор | h | 2 | 2 |
| Еетричесka уреды | |||
| КацитET на akumylatopa | V, Ah | -- | 36, 360 |
| Компleckт akumylatop | kg | -- | 460 |
| Хidравлича уреды | |||
| КолочьTO на маслоTo в цялataх xидровлича уреды | I | 25 | 25 |
| КолочьTO на маслоTo в xидравличий розервоар | I | 20,5 | 20,5 |
| Тил xидравлично масlo | -- HV 46 | HV 46 | |
| Розервоар за изmetehOTO | |||
| Мakc. Височина на разржданe | mm 1400 | 1400 | |
| Обem на розервоара за изmetehOTO | I | 300 | 300 |
| Метяц валяk | |||
| Даматьр метяц валяк | mm 300 | 300 | |
| Широчина на метяць валяк | mm 1000 | 1000 | |
| Оворotи | 1/min | 325 | 325 |
| Рezфektor 3a метенe | mm 80 | 80 | |
| Стравочи четли | |||
| Даматьр стравочи метл | mm 600 | 600 | |
| Оворotи (бeзстени) | 1/min | 61 | 61 |
| ГуMi OT пьт haMa | |||
| Гуемион OTп徳 | -- 15-4,5 x 8 | 15-4,5 x 8 | |
| Гуемион OTзад | -- 15-4,5 x 8 | 15-4,5 x 8 | |
| Спирачka | |||
| Пробду Калега | -- мexанду | mexанду | mexанду |
| Задно Калего | -- xindrocstataчно | xindrocstataчно | |
| Филььрha и смужателя систema | |||
| Конструksя | -- Плоськ | Плоськ | Плоськ |
| Оворotи | 1/min | 2800 2800 | |
| Плочь на р�ыр римпрax | m? | 5,2 | 5,2 |
| Номинален вакуUM смужателя систema | mbar | 15,5 | 15,5 |
| Номинален об悔ен тok смужателя систema | m?/h 800 | 800 | |
| Вибрирашca систema | --Енекtrodвагател | Енекtrodвагател | |
| Оковни усlogья | |||
| Temperapatuya | °C | -5 до +40 -5 до +40 | |
| Влажност на вьздуха, не ороча | % | 0 - 90 | 0 - 90 |
| Устовени ссточи сьгласно EN 60335-2-72 | |||
| Шуши emиси | |||
| Нibо на звуka LpA | dB(A) | 75 | 75 |
| Heystошивостс KpA | dB(A) | 3 3 | |
| KM 130/300 R Bp | KM 130/300 R Bp Pack | ||
| НИВО на звекова мошноct LWA + несточи вост KWA | dB(A) 93 | 93 | |
| Вибрацни на урEDA | |||
| Стойноct на вибрацни в облacrпа на д��anta - ръката m/s | 2 | < 2,5 < 2,5 | |
| Сedlyка m/s | 2 | < 2,5 < 2,5 | |
| Несугирост KM/s | 2 | 0,1 0,1 | |
| Мерки и Тergla | |||
| Дылжина xшиroyina x височиа mm 2040x1330x1430 2040x13 | 30x1430 | ||
| Радиuc на обрьшане надясано mm 1400 1400 | |||
| Радиuc на обрьшане налаяво mm 1400 1400 | |||
| Тerglio бeз товар (c/be3 akumулatable) kg 840/1300 840/1300 | |||
| Долустимо obшо тerglio | kg 1789 1 | 789 | |
| Долустимо наковаране на осітіе отпрев кg 897 | 897 | ||
| Долустимо наковаране на осітіе отзад | kg 892 | 892 | |
| Залазаме сu правомо на мexнчесku uzmenеня! | |||
EC DeKnapaun3a cBoTBeTCTBnE
C HactoIto DeKnapnpame, Ye uTnupHaTa NO-DOy MaunHa CbOTBeCTBa NOKueuN KoHcTpkyu, KaKTo I No HaunHa npOn3BOdCTBO, PpInarAH OT Hac, Ha CbOTBeTHnte OCHOBn N3NCKBaHHa 3a TexHuecka 6e3onacHOCT N 6e3BpeDHOCT Ha DnpeKtBuTe Ha EC. Ppi npomeHn HaMaunHata, KOnTO He ca CbTlacyBaHN C Hac, HactoUaTa DeKnapaqra rybn BaJIiNDHOCT.
IpoodyKT: MeTaHa MaSiHa
Tun: 1.186-xxx
Hamnpaun npnloxKeHne DpukeTbNHa
EC:
2006/42/EO (+2009/127/EO)
2014/30/EC
2000/14/EO
Hamepnn npnnoxKeHne xapmoHn3npa
HnCTaHdaptn:
EN 60335-1
EN 60335-2-72
EN 55012: 2007 + A1: 2009
EN 61000-6-2: 2005
EN 62233: 2008
Ppnoxhen MeToD 3a OceHka Ha CboT-
BETCTBNETO:
2000/14/EO:Прилloxжени V
HnBOHa shym dB(A)
U3MepeHo: 90
TapaHTnpa- 93
HO:
IopnncBaunTe Jnca DeeCTBaT OT Nmeto n KaTO PbJHOMOuHnU Ha ynpaBtEnnOpraH.


71364 Winnenden (Germany)
Tel.: +49 7195 14-0
Fax: +49 7195 14-2212
Winnenden, 2018/09/01
Uldmarkusi. ET 1
Ohutusalased markused. ET 2
Akude ohutusnouded. ET 5
Akude laadimine . . . . . ET 6
Kaitamine. ET 6
Juhiistme reguleerimine. ET 6
Programmi valimine .ET 6
Käivitage masin . . . . . . ET 6
Masinaga soitmine. . . . ET 6
www.kaercher.com/REACH
Garantii
www.kaercher.com/REACH
Garantija
Chairman of the Board of Management
Director Regulatory Affairs & Certification
Pilvarotais sagatavot dokumentaciju: S. Reiser
Alfred Kärcher SE & Co. KG
71364 Winnenden (Germany)
Tel.: +49 7195 14-0
Fax: +49 7195 14-2212
Winnenden, 2018/09/01
Bendrieji nurodymai. LT 1
www.kaercher.com/REACH
Garantija

Chairman of the Board of Management

Director Regulatory Affairs & Certification
71364 Winnenden (Germany)
Tel.: +49 7195 14-0
Fax: +49 7195 14-2212
Winnenden, 2018/09/01
3araJIbHi Bka3iBKN. UK 1
3axnCT HABKOIMHbOro cepe
Dobuua UK 1
Tapaantia. UK 1
ObnaHaHH Ta 3aNaChi YacTNH. UK 1
3NaKy noci6nky .UK 1
CnmbonHa npncptoi..UK1
Ppabnblhe 3actocybaHHa. UK 2
Ymnche HnnpaBnblbHe 3aCTocy-
BaHHa UK 2
PiiXoJnji noBepxHi. .. UK 2
PapBnla 6e3neKn UK 2
Bka3iBkn 36e3neKn iD vac ekCnnyatauii UK 2
Bka3iBKn 3 6e3neKn B peXnmi pyxy UK
Bka3iBkn 3 6e3neKn dny npnctpoB, 10 npaioHbId akyMynlAToHoi 6atapei...UK 3
MaunHn 3 NiDnOMHnKOM KOH-TeHepa UK 3
Ppncptpi i3 3axnchm daxom BoiJ .UK 3
Bkaibk 36e3neKn iD Yac TpaHcnpTyBaHH MaHH UK 3
Bka3iBkn 3 6e3neKn iui cac doTnIy Ta texhiHoro o6cnyroByBaHHa UK 3
Pn3NaueHna. UK 3
Bka3iBKn npn po3BaHTaKeHHi .UK 3
ElenmEnTuynpaBInHHiayHKio
HaJIbHi By3JN.. UK 4
36paXeHHn iDmitaIbHOi MaunHn UK 4
PanaJIb ynpabJIHHa. UK 4
Функюньи Кони..UK4
KoHTpOJIbHI IINkAToPn Ta DNcNne UK 5
Ipeed noaTkom pobToN. .UK 5 BiKInHyTN HabePx ka6iHy B0diUK 5
3aφikcyBaTH/BiDnyCTHTN CTO- RHKOBe ralbmo. . . . UK 5
IpecyBaHH niDmitaJIbHOI MaUHNH 6e3 Bnachoro npBODa UK 5
IpecyBaHHn iDmitaBHOI Ma- uHn3 Bnachm npuBOOM UK 5
BbeHeHH B eKcnnyatauio .UK 5
3araJIbHi Bka3iBKn .UK 5
Ipebeipka i TexhiHne 6cnyroByBaHHa UK 5
Ipeep noaKom po6oTu. .UK 5
Bka3iBkn 3Texhikn 6e3neKn
IooAo akymnyarTopiB .UK 5
3apndtnaakymnyarTopi. UK 6
Ekcnnyataia. UK 6
HaCTpoTT noIOXeHHcNdiHHB Ooi UK 6
Bnbpatnporpamy .UK 6
3aynctnnpncptpi. .UK 6
IpecyBaHHHa npnlaadi UK 6
PiiMItaHHa. UK 7
CnopoxHHTnpe3epByap dna
CMITRA. UK7
Bumkhny npncptpiuUK 7
TpaHcnpOpTyBaHHa UK 7
36epiraHHK 7
36epiraHHa UK 7
Dorra Ta texhiye o6cyrobyBaH
HRA. UK 7
3araIbHI BkA3iBKn .UK 7
U8
PepioHnHcTbTexHnHoro 06-
CnyrobyBaHHa UK 8
PpOJIaKTHuHi po6ToN. UK 8
Donomora y Bunaiky Henonaok UK 1
TexhiXapaKTepeNCTnKU
3aBa npn BiinobiHicb Ebope ncbko r cnbTobapcTba. UK

Ipeepnepm3aocybaHHMaBaawornpnctpo npountaTe
IO opirihalbHy IHCTpyKUIO 3 EKcnnyatauii, nicra zuo DIIte BiINOBiHO Hei Ta 36epeXitb II IIN NOaIbWoro KOpNCTyBaHn A60 dna HAcTyNHO Bnachka.
3araabhi Bka3iBkn
Ku npo pO3nakyBaHHi 6yn BnBnBneHi N0sKOJKeHHN BiTpaHcnpTyBaHH, HeaHcnoBicITb Ipo ce Mara3nH, De BN Kynnn npnna.
-HaHeceHi Ha npncptpi nonepekyBaalbHI 3nakn Ta Ta6nukn DaHOb BaxNbi BkazIBKn Dny 6e3neuHoi ekcnnyataui npncptpo.
-Pa3OM i3 Bkazibkamn Buii iHCTpykuii Dnaekcnnyataucl cnid BpaxoByBaTu 3araIbHI npabuna texhikn 6e3neKn Ta HOpMN dIy NonepeJxehn HeuaChnx BNnAdkIB 3akoHOdaBvNx opraHIB.
3axnCT HABKONHboro cepeOBUuca

MaTepiAIn ynaKOBn NiIaIOBcra nepepO6ci IIN NOBTOHORBnKOpNCtAHN. Byb naCkA, HeBnKnJaTe nakyBaNbHi MaTepiAIn pa3OM i3 DomauHIM CMITTM, BiDaJIte ix nHa nepepO6ky.
CTapi npncTroMicTb ciHHi MaTepiAIn, kki MoKyTB nepepoBnTnca Ta nIinraTb nepedau Bi NyHKTI npHOMy BTOPHHOI CNPOBHN. Tomy, 6ydb nacka, yTNl3yIte CTapi npncTroi 3a DonomoroHO CneuaJIbHnx CnCTem 3bOpY CMITTA.
Baatae, MaCTnIO, nAhbHe Ta cxOxI MaTepiAn He NobHHI NOTpanNTu HABKOJIuHc cepedobuue. Li MaTepiAn noTpi6HO yTuNl3yBAtu Ypee3 BiDnOBiHi 36papJIbHI NyKHTN.
IHCpykii i3 3acTocyBaHHK KOMnoHeH TIB (REACH)
AkyaIbHi BiOmoCTI npo KOMnoHEnTn HaBeDeHI Ha Be6-By3ni 3a aDpecoHO:
www.kaercher.com/REACH
RapaHria
YKOxHII KpaiHII DIOb yMOBn rapaHTi,Ha-daHOI BiINOBiHDHO φipMOH-IPoDAuCEM.
Henonaikn B poboti npictpoMo MN ycybaeMo 6e3kOwTOBHO npotrorm TepmiHy iii rapaHTi, kAUO BOHN BVKNIkaHI 6paKOM MaTepiany NIN NOMIKAMN BNGOTOBNeHn. YBnAky HnHOI rapaHTi 3BeptITbcydo npodabucaYn B haNbIcxuyn ABTopn30Ba
HIN cepBICHN CEHTP 3 DOKymeHaNbHM niTBepeJKeHHn MOKyKn.
06naHnHa Ta 3anacHi acTHnH
HEBE3NEKA
Uo6 yHukhmu He63neku, pmoHm i ycmaHO6ky 3anachux demaneu noBuHHi ekoHy6amu minbku aeMOpuzoeaHi cepsiChi ueHmpu.
-MoXHa BnKOpNCToBbATn NIIe Te 0bnadHnn Ta 3anacHi YactHH, IIO Oo3BOJIeHI DnBnKOpNCtAHN BnpObHnikOM. OpiirHaJIbHe 0bnADHNN Ta opirihJIbHI 3anacHi YactHH E rapaHTIeTO TORI, IO npncTpii Bye npauOBaTN 6e3neuHO Ta cnpabHo.
-Погальша inhфорmaця no 3anauchim YactnHAM e Ha caTl
www.kaercher.com B po3diJi CepBic.
3HaKn y noci6Hnky
HEBE3NEKA
3anobiaac npo He6e3neky,ka 6e3nocepehbo 3a2poxyc ma npu3bodum do mxxmpaem qu cmepi.
△NONEPENXEHN
3anobiae npo nomenuHO moxnuey He- 6e3neuhy cumyauiio, uO MOKe npu3becmu do mkkux mpaem y cmepi.
△OBEPEXHO
Bka3ieke eidhocno nomenuho moKnueoi He63neuHoi cumyaui, 0o MOKe npu3e-cmu do nekux mpaem qu cnpuunum Mamepiabhi 3bumku.
YBATA
Bka3ieKa 0do MoKnueo! nomeHuiHo He6e3neHiu cumyaui, zo moKe cnpuuHu mu MamepiAnbHi 36umku.
CnMBOJN Ha npncTpoi
| Hebe3neka oniky od a- pЯч поBERPCHIO!! Пера почамков обслуов- ьань пунаду сiod даму вuxлonsнii мрбі oxолodumucb. |

Po6omu i3 npucmpoem cnid 3a8kdu npoeodum u minbku y eiodnoeiHux 3axuchux pykauex.
Hebe3neka 3amuckaHH pyxnlubmu demanmu aemomobina
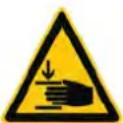
Hebe3neka odepkaHnmpaBMu bD pyxIueux cacmun. He mopkamucr.


Hebe3neka nokeki. He donyckamu ecmokmyeHn Hn panaoux abo mnioux npedmemie.
| 3amuckдя lanujoa / moyka pozmaushyehna kpahy |
| Tochu piidoumyдя do-Mkpama |
| Makcimalbnuh haxun noeepxhi npu pyci 3 pi-d-hamum bynkepom. |
| Y haprymky puxy dony-ckaembcya i3da no cxunax do 14 %. |
| Y6aza, obepmoa uizka (dompumyamucn haipr-my obepmanha). |
| 3anobizanhny pro no hebe3-neky nopazku enekmpuy-hum cmpymom! |
| Dompumyamusc b kazie-ku! |
| Poeepmamu noeilbho! |
| Ipochumaime nocibnuk 3 ekcnnyamaui ma diume 3ziodo 3 u020 nojoxen-HaMu. |
| Hebe3neka nowkodjeen!Пиоеву φільmp ngomu-eamu He nompibno. |
PpabunbHe 3aCTOCyBaHH
PIMITaIbHy MaunHy npn3haueHO nIpyopeciHoro BnKOpNCtAHN HpiuBipapHH NOBepXOHB, HanpNKnaD, B TaNX rany3x 3actocyBaHH:
CTOHHK
Bnpo6nHi cnpopyi
Tepuntopi IorictuHnx Cnyx6
Toreji
Po3dp6Ha Tropribn
TepuTopiCklaIcbKx npMiuEhb
TpoTyapn
-4cmtte3bnpaJIbHaMaunHa npn3HaueHa nI ndiMiTaHn 3abpydHeHx NOBepxoHb y npimieHHi Ha Bynui.
-NepeBnKOpNCtaHHaNnepeBipTeHaJIeXHnCTaH Ta 6e3NeKy npicTpOuTa 0bnaHaHHa. KaO 6bIaHaHHa3Ha
XOINbCry He6e3DorAHHomy Ctahi, IORo HE MoXHa BnKOpNCTOBYBaTn.
BnKOpncToByNe TIO nIMiTaNbHy MaHINHy TiNbKn 3rIHO 3 iHCTpyKciEIO NO EKCnNyatauii.
-3a6oPohrctbCBAHOCHTN3MiHNB npnIaI.
-Ппстpi npи3нayeн Tiькн дя po-6otn Ha nobepxHx, 3a3haueyx y da-Homy nocibnky 3 ekcnnyatauii.
-Пилад може посуватя TINьк no NOBepxHx,Дonyшени ДЯВКОпCTAHнпдмитальнх Maunн КерИHnTbOM nIDnpemcTba a60 iXHIM PpeDCTaBHnKOM.
-Якагалби npabnno diнacTynHe: He Donyckatn 3iTkHenn npnaNy 3 Jerko3aMnCTmnppeOBNAmn (He6e3neKa B6xv/NoKexKi).
YmncHe HenpaBnblbHe 3actocyBaHH
3a6bopohraTbc niD6bpaHHB/BCMOKtyBaHH Bn6yXoHe6e3neuHnx piINH,ROpHX ra3iB,a TAKOX HEP03BeDeHNKNCIOT Ta po3unHHNKIB! Lc CTOCyeTBc6EHNHy,pO3piJxYBaUHΦapBuTaMa3Ty,aki MOxyTB CTBOPHOBAtu Bn6yXoHe6e3neuHi ra3n a6o cymiu,3MIuyOncb 3i BCMOKHTyaBHUM NOBITPAM,a TAKOxAUETOHY,Hep03BeDeHNKNCIOT TaPO3UnHHKIB,OckIbKn BOH NOWKOJxOITb MaTePiAn npucTpO.
3a6bopohraetbcnpnbpupaHHBcMOKryBaHHpeakTNBHORMeTaeBoroNny(Hanpknad,anlomiHIO,MarHIO,uHKy)B3'EDHaHHI 3CNJbHMn JyKHMn a60KNCJLOTHMn 3acobamn DnayuueHHA.
He donyckaTn nIMiTaHn/BCMOKtYBaHn nanaIOuNX a6o TNIIOUx npedMeTIB.
Cen npncpii He npn3naeHo dnia 36paHH He6e3neuHX dna 3doob'peOBOH.
3abopohraetbcrno36epirahnnyhe6e3neuHnxmicx.3abopoheno BnKOpncTOByBaTHnpCTpiyBn6yxoHe6e3neuHnx npimiuehhax.
He do3B0nAeTbc8bpaTu i3 co6oO cynpobiHnx oci6.
He Do3B0JAEbC JTOBxATN/TaHTyTn a6o TpaHcnpTyBaTN npEaMeTn 3a DOnOMrOIO daHOrO npuCTpOIO.
PiiXoJaui noBepxhi
-AcpaJIbT
- Ppomncnoi nndorn
-CyuiNbHa(HannBHa)nIiNora
-BeToH
-Буцатka
Ppabnna 6e3neKn
→PiCnI npemiuHHe H3HOBy BiKHyTu HabePx BaxiB BinbHorO xOdy.
BVeDeHnBeknJyataziK
3araJIbHi Bka3iBKN
BcTaHOBnMaHHy,IO NiIMiTae,HapibHI NOBepxHi.
→ Bntrhytn knIOU 3anaIIOBaHH.
3aΦikcyTe CTOHouHy rAInbMiBHy cnCTeMy.
IpebeBipka i TexhiuHe 06cnyroByBaHHa
UoJeHNo nepei noaTkom eknnyatauii
Ipebipntu cTah 3apany akymyIaTopa, npn Heo6xIDHOCTi 3apanytna kMyIaTOpN (INB. rnaBy ,3apJdxHHeAkyMylarTopiB").
→ Npebipntn Ba, 0o niDmitae i 6iHi uTkn Ha 3HOuYBaHHa HArBHiCTb CTpiHOK, 0o HAOTaJIcR.
→ IpeBipuTN KOJeca Ha HABHicb CTPIYOK, IO HAOTAJINCRA.
→ Ipebipntu CTAH BCIX eHemHTIB ynpabJIHH.
→ IpeBipTN npnaad Ha npedmet noi-KoJKeHb.
→ BnKoHaTn YIeHnHn FInbTpY dnnny 3a DOnOMorO KHOJKn YIeHHn FInb- Tpy.
BkaibKa: Doknadhiwe nB. po3in "Dorra Ta texHnihe o6cnyrobyBaHHa
Ipeed noatakom po6oTn
Bka3iBkn 3 Texhikn 6e3neKn 1oDo akymyIaTOpIB
Ppi poboti 3 akymyIaTopam cnid doTpmyBaTHcH aCTynHnx nonepdxyBaIbHx Bka3IBOK:
| i | Домрumsуамся заимок на akumлamорi, e Incmpукуз kopucmsуаннma уnosibnky з ekspлуамочи пух场比赛! |
| Hocumu zaxucm ду оуe! | |
| He donyckamu dimeу do enek- mponimу ma akumлamopie! | |
| Hebezeпека вubуxy! | |
| Зборонься роз市教育ни eikpumozо boanu, ickpinna, смворенье dividpumux дxe- pen ceimna ma палінna! | |
| Hebezeпека ximichux onikie! | |
| Перша долюма! | |
| Порегджевалье маркуан- н! | |
| Уmunizаia! | |
| Pb | He bukuadamu akumлamopу konmeиер ду смимя! |
| Запбизанно по неSpec�у popa3ku elekmpuquhum smpy- mom! |
06epexkno!
He6e3neKa eubxy! He knacmu hcmpymenu 10o nodhi npedmemu ha akymyarnop, moMo Ha buoDu nonocie, iHa 3cDhyeanbhi enememu.
06epeXho!
He6e3neKa mpaemyeaHn! HikOnu He mopkamucdo cbuHueux enEmehmie. NcIra po6im 3akymyamopom Heo6xioNoMumu pyku.
06epeKHO!
He6e3neka 3a2opHH u eUbxy! 3abOpHnembcn naiHH u po3eDeH H eikpumoo eoHIO.
IpumiuHnY, yKOMy 3apraJaiombcs akymynmopu, noBuHne do6pe npo- bimpoBamucr, momy uO npu 3apadui buDjIeMbcraa3, uO neko buSyxa.
06epeKHo!
He6e3neka ximiuhux onikie!
Ipu enyueHHbpu3Kie enekmponimy oOi a6o Ha ukipy npommu benukoio Kibkicmo yucmoi eodu.
- Picna ubozo HeaauHo 3eephymucdo nikapra.
- EpydHu oOra 3anpamu.
3apnntakymyIaTOPn
OBEPEXHO
3apdumukaymylarnophi damapei neped eedeHHm npucmpoio Eeknyamauio. HE6E3NEKA
Hebe3neka mpaemyeaHn!Ipu pobomi 3 akymyamopamu cnid dompumyeamucr npaeun mexniku be3neku. Dompumyeamucr iHcmpkyuii 3 ekcnnyamaui bupo6nka 3apdno0 npucmpoio.
Heo6xio h o dompumyeamuc 8ka3ieok npuknaeHii icmpykuii 3 ekcnnyamaui, haoho bupo6hukom akymnnapoe, i dimu biOnoeHO.
3apxamu akymyarnopu luwe 3 donomozoio biOnoeiHOzo 3apdHOzo npucmpo.
Ppumuenny, y komy3apdkaombca akymnyamopu, noounhe do6pe npoeimpoeamucr, momy u npu 3apdui eudinembcraa, uo neko bubyac.
△O6epeKHo!
Hebe3neka ximichux onikie. DOnueaHn eodu 6 po3prxdxhenu akymyamop moKe npusbecmu do buuneahna enekmponimy! Ppu noobdoxeHHi 3 akymyarnophum enekmpionim cno hocumu 3axuchi okynpa ma dompumyeamu npunucanha dny 3ano6iahna mpaem i nowkoedxnboday. Bpu3ku enekmponimy, oio nompannu Ha wkpipy abo odra, cnid hezauiho 3mumu eeIukoio kibkicmo bodu.
OSEPEXHO
Hebe3neka yukokxehn.ДЯЗлuebaHH nE akymyamop bukopucmoeyamu nuue duumboahy abo 3heconeHy body (cmandapm CoO3y HimeuKux IHKeHepie VDE 0510). He bukopucmooyamu doaeku (maK 3aHni "noniuuyoi 3ac6oU), e npomunexhomy eunadky empauaembcra npaeo Ha zapaanmihe obcnyo8ybaHH.
PekomeHDoBaHi akymyIaTOpHi 6aTapei, 3apnI npntpoi
| Homer 3amOB- lennay | |
| Бл_OK akумларов 36 B, 360 A/roD (y Bi- cíky, He обсCityobYe- cY)* | 6.654-282.0 |
| Зарадни рисчий 36 B, 50 A | 6.654-283.0 |
| *对于我们 pботи пистою NeobxIDNo 1 SFOK akумларов | |
3acocybaHHnIHnXnAkyMnyTOpIB Ta 3apndnnpncptpoB He pekOMeHdyetbcra
BniipuybctiNbknnicjkoHcynbTaucii 3 npedctabnKamn cepbcchoro ceHTpy KARCHER.
→ BntaHytn akymyIaTOpHn uTekep 3 MaunHn Ta 3'EdHATn 3i uTekepom 3apRdHOro npucTroIO.
→Πικηουητι Μιτεκερ 3αργιHOrO πριστρού ΣΟ ΒΙδιΝΟιδΗΟι po3εΤΚι Ḁ 16 A, 3αργιHΠ πριστριμι σαμοχιHΟ πούνη επρούες 3αργιχΕΝΗ.
→Пид уас поцусу зарджени Тримати obdi Bi Кшкн ДИгуна BiKpntMuN.
Bka3iBa: IicnI 3apIaKn akyMny-TopiB BiIeDHyBaTn 3apIaHm npncTpIcNoaTkY BiIe MepeXi, NotIM BiIa AkyMy-lyrTopiB.
Ipebeipka KoperyBaHHp iBnpiHn B akymnytoPI OBEPEXHO
Obo8'3ko8o dompumyamucr ekazieok bupobnka akymynmopie i dimu biidnoeioHO do Hux.
Ipebeipu npiBeHb 3apAkn akymyTopa
- INДИКАТОР EMKOCTI aKуМЛЯТОРа B 3e-NeHoI oBnaCTi:
AkymnyaTOp 3apxKeHn.
-ⅠHДИКaTOp EMKOCtI aKymyJIaTOpaB KOBToI ObJAcTI: AkyMnyTOp 3apJxKeHn HanoIOBHy. - INdkaTop EMKocTi akymyIaTopa B cepBOHOI oBlaCTi: AkymyIaTOp MaJKe po3pIxKeHn. IiIMiTahHra aBTOMaTHuHo npINHHcTbCra He3a6apom.
-KoHTpOJIbHa JAmNoUka Ropntb UepBOHIM KOJIbOpOM AkymyIaTOp pO3PjaKeHH. IiMItAHn HArABTomAtuHNO npINHReTbc (PpoDObXeHHra PO6To NOBOPoTHoro arperaTy MoKJIbBO TiJbKn NiCnA 3apJKn AkyMlyTopa).
→ Ipeemictnt npnnaed 63nocepeHbO do ctaHii 3apdKn, npu bomy yHkaTnPiJOMIB.
3apyndtnaakymyIaTOp.
Ekcnnyatauia
Hactpoitn noJoxeHHcuiHH BODi
→ Notarynty6ik Baixinb perynhoBaHHn cndiHHn.
→ ΠepeCyHyTn cnDiHHra, BiDnyCTnTuBa- kjIb i DaTu Nomy 3aΦikCyBaTncr.
→ IpepeiueHHnCnHnBnpeD/Ha3aI nepebipTu Noro fikcaio.
Bn6paTn nporpamy
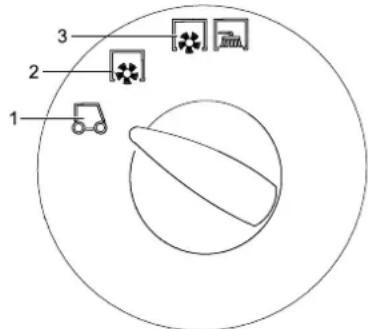
1 TpaHcnopTyBaHH
2ПiДмITAнг NiIMTaIOUHm BaIOM
3Пидмитаннь 3 Викорпостанням Bana, lo niiDmita i 6iHnX uitok
3anyctntnpncptpi
Bka3ibKa:Ppnaad OchaueHn KOHTaKTHOIO HactNIkoCnDInH. Pnp BCTabaHHi 3CnDInHr BOID npNCptpi BiKnHOaetbcra.
3aHHTMicHeHa cnDHHI onepaTopa.
→ IpepeBecTn IpepEMKaH HAnpMy pyxv B cepeHNc NOIOKeHHJ.
3aφikcynte cTOrHOHy rAJIbMiBHy cnCTemy.
BCTaBnTKnIOU B3AMOK 3aNaJIeHHra.
→ NObepHyTN KJIIOU 3aIaIIOBAHHB NOJIOXeHH,1". I. PnCTpiI roTOBm Do pO6OTn.
IpeBecTn KInOu 3anaIeHHa B noIooXeHHa II".IpnCTpiI roTOBm Do nepeMeiueHHa.
BkaibKa: IHnKaTOp EMKocTI aKyMyIaTopa BiO6paXyE paKTHNcTaN 3apA dy 3atpMkoB 10 ckyHd.
IpecesyBaHnHa npuNadi
→ NpebeCTn nepeMnKa nporpaB noNoKeHHN "TpaHcnpOpTyBaHHN"
→ HaTnCHyTN Ta yTpmyBaTu neaIb raJIbMa.
Bidnyctnte cToHkoBe raIbMo
Ixatn Bnepe
→перемканнрamy pyxy 3haxoДиТьсв полжени"Впeрд".
→ПлавноHaTиСHTиHa neДаь akcepe-paTopa.
IxatHa3a
△O6epexHo!
He6e3neka mpaemyeaHna!Ppu pyci ha3ad He6e3neka He 3aapoxyecmpemim oc6am, kuo bye nompeba, npoihcmpykmyea um ix.
OBEPEXHO
He6e3neKa yukOkeHH! NepemuKaHnpy My pyx dy038oJemcbakmueyeamu nue nncnyunku npucmpoio.
→Перемкauнрamy pyxy 3haxoДиТь-сяВ полжени "Ha3aД".
→Плавно haTиСHTи Ha neДаь akcepe- paTopa.
XapakTepepyx
-3 donomoroo neaani akcepeataopa MoKJINBO 6e3ctyniHacte perynIOBaHN HsBnDKoCTi pyx
-BapTo yHnKaTn pi3KOro HaTnCKaHHa HneDani, TOMy 0u ycbomy BnnaKy
rɪdpaBliuHa cnCTema MoTe 6yTu NOUKOJKeHa.
TalmyBaHHa
→ PnB iDnyckaHNI neaI xOy, npncpti camocTInHO raIbMyE i3ynHaeTbcra.
Bka3ibKa:JIO rAJIbMa MOXHa NiDCUNNTN, HAITCKYc Ha HOXHe rAJIbMO.
IoponanHn nepeWkoA
IoponanHn HepyXOMnx nepeuKoD BncoTTOIO 50 MM:
→ ΠepeuKoDN cnI npoxOuNTn o6epeKHo,pyxaUChb BnepeHa nobInbHiin WbNdkOCTi.
IIOIOJIaHHa HepyXOMNX NpeuKOJ BnCOTO 6INbue 70 MM:
→Подбипегшкогслд npoxoHTn TINbK3 BnKOpNCTaHHM nIXOJauoi paMn.
PiiMItaHH
OBEPEXHO
He donyckamu bnyeHHa MauuHy nkyeaBbHexcmpiok,dpomy u make iHwe.,momy 0o ue moKe npueecmu do yukodkeHHMexAH3My, 0o niDmimac.
BkaizbKa:ДЯ IOCAHHeHNAONTUMaNbHOro pe3yNbTaTy po6ToN Heo6xIDHO po3MiprTu WBnKicTh pyx 3 MlCueBmU yMOBaMn.
BkaizbKa:Piicpobotn cijpeyjraH Onuatn pibtp nny.
PiimTaHH cyxo iinor
→ YbIMKHyTuHaHHTaU.
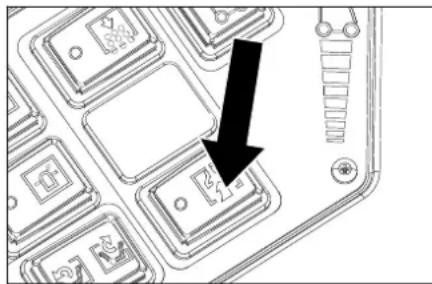
→Пи niДмITAHHIOBepxoHb nepeBecTu nporpaMHn BUMHKaU B peKIM niMiTaHH3 BVKOPNCaHHaM BaNy, lo NiДмITAe.
→ Pn YnueHni KpaIb NpeBecTn nporpaMHN BIMNKaU B pexHM NiIMiTahH3 BNKOpNCtAHm BaNy, 0o NiIMiTae, Ta6iHnx uitok.
Пдмитаннь Волoroi abo Mokpoi nIdnon
BumkhHyn HargHra.
→Пи niДмITAHHIOBepxoHb nepeBecTu nporpaMHn BmHKaay B peKIM niMiTaHH3 BkOpNCtAHHM BaNy, lo NiДмTAe.
→ Pn YnueHni KpaIb NpeBecTn nporpaHHN BmNKaU B pexKIM NiIMiTahH3 BNKOpNCtAHNR BaNy, 0PiNiIMiTae, Ta6iHuNX uitOK.
CnopoXHHTPe3epByap dna CMITTA
He6e3neuHo
He6e3neka mpaemyeaHn! NiD yac buOpoxKeHH e 30Hi eueahmaxKeHH pe3ep8yapy dnn cmimma3abopohmcbnpepe6yeaHH nOdeu ma meapun.
△He6e3neuHo
Hebe3neka 3daabnoabHH!Hikoln He mop- kamucra cumin mraon MexaHiHOi cumin eunopXhen. He cmou nio harnmu pe3epayom.
He6e3ne4Ho
Hebe3neka nepekuadnHa!Piid yac eunopoxkHeHHc mabum npunaHa pibHioeepxHi.
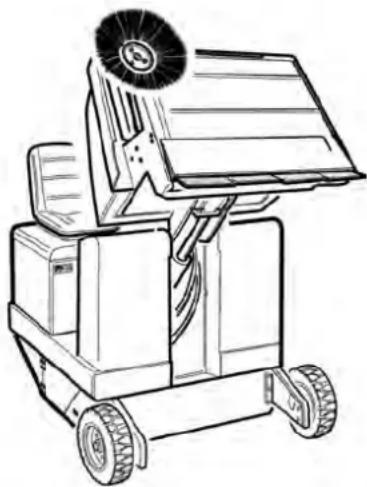
→ IpebeCTn nepeMnka nporpam B noIIOKeHH "TpaHcnpOpTyBaHH"
→Пингпpe3epByapдя360pycmTTA.
→ NobiNbHO niDi'ixaTu Do pe3epByapy nna 360py nny.
3aφikcynte cTOrHOHy rAJIbMiBHy cnCTemy.
→ BiKpnTu KpNkUy pe3epByapy: HATnCHyTN nepEMnKaU BJIBO Ta BNnopoxHnTn pe3epByap dIra 36OpY cmITT.
3akpnTu KpniuKy pe3epByapy:HaTnCHyTu nepemukay ynpaBO (ytpmyBatn npotrorm np6n.2cekyH) do pfikcaii B KInuebomy nOIOKeHHI.
Bidnyctnte cToHkoBe raIbmo
→Повьнб BiDixaBn BiD pe3epByapy nIЯ 360py nIny.
→ BiDnyctnTn pe3epByap dna 36opy cmit- TBA NOUATKOBENIOJXeHH.
BmKHyT npCtpi
→HaTnCHyTu Ta yTpmyBaTu neaJIb raJIbMa.
3aφikcyte CToHouHy ralbmiBHy cnCTemy.
→ KnHou 3anaJIIOBaHH NOBepHyTN B No3N- liio "0" i BNTaIHyTN NOrO 3 aMka.
TpaHcnoptyBaHHa
HEBE3NEKA
He6e3neKa ompumahnma ywKo0keh!Ppu mpaHcnopmyeaHHi cnid 3eepHymu yeazy Ha eazy npucmpoio.
KnHou 3anaJIIOBaHH NOBepHyTN B No3N zuo "0" i BuTARHyTN NOrO 3aMka.
3aφikcyte cTOrHOHy rAnbMiBHy cnCTeMy.
→ PnKpInTu npucpiu Do CTiKnx MicCb KpinneHn (4 wT) 3a Donomoro HoTARKHnx peMeHIB, TPOCIB aOHaNOrIb.
3aφikcyBatn anapat, niKnaBn niJ NOrO KOneca KInHn.
→ Pn nepebe3eHHi anapaty B TpaHcnp-THnx 3ac06ax cniB bpaxOByBatn Mic-ueBi diouyi depkabHi HOpMn, Hanpab-HeHi Ha 3axnCT BiKoB3aHHra nepeKndaHHa.
36epirannn
HEBE3NEKA
He6e3neka ompumannma yuKo0keh!Ipu 36epizanhi 3eepHymu yeazy Ha eaay npucmpo.
36epiraHHa
Kaio MaunHa, 10 NiIMTaHe BkOpncToBByTcBnptArom TpBaIoro Yacy, CnIDDOTpMByBaTnC HAcTyNHx BkAzIBOK:
BcTaHOBHTMaHInHy,IO NiIMiTae,Ha pIBHi NOBepxHi.
→ IpepeBecTu nepeMnKa nporpaB noIooKeHH "TpaHcnpOpTyBaHH"
Knou 3anaIIOBaHH NOBepHyT B No3uio "0" i BuTARHyT NOrO 3aMka.
Bxntn 3axoib npoT MmOJBbHoro CKoyBaHH MaunH, oPi dmitac.
→ ΜΟΥΝΤΗ ΜΑΜΙΝΗ, ζΟ πιδΜΙΤαε 3cepeπηνική 3OBHI.
→ IocTabnI npnaI y 3axuHOMy i cyxomY micui.
→ BntraHryTuI TeKepe aKymyTota 3 Ma-
→ AkymyIaTOp BApTo 3apAHTn, a NOTOM cnIa 3apAIXaTn np6n. KoxHi Dba MiCraui.
DorjraTaTexHiYe 06cnyroByBaHHa
3araanbHi Bka3iBKn
OBEPEXHO
He6e3neKa nowKoJKeHHa!
Punobu phiIbmp npomueamu He nompiHO.
→Ipeed ouHueHHm i npoBeeHHm TexHicHoro o6cnyroBvBaHH npnCTPOIO,3amHOO DeTanei a6o HacTpOuBAHH Ha iHsi yHKui, pncTpi cnID BKNJIOHTN, KINOH BnHATN, Ta BNITaN aKymyIaTOpHNI WTeKeP a6o BiD'EdHaTN aKymyJIaTOp.
-PemOHTHi pO60Tu MoKytb npoBouNTnCra NlWe ABTopu3OBaHmN cepBicHMn Cnyx6amn a6o cneuaianCTamyui Cpepi, kki O3HaNoMJIeHi 3 ycima BaxKnBIMn npabnAmn TexHkN 6e3NeKn.
-ПисТpoi,ио ВИКОПСТОВИТСКOMМерцIHo y BiINOBIDHOCI до MlCeBnxBIMOR,пДЯгOTьnpOBeDEHHIOpeBIPKn 3TexHik6e3neKn 3riHNO VDE0701.
BctaHOBHTMaunHy,uo nIdmitae,Ha pibHn nobepxhi.
Knou 3anaIOBaaHn NOBepHyT B No3uio "0" i BNITaHyT NOrO 3 aMka.
3aφikcynte cTOrHOHy rAJIbMIBHy CNTEmy.
HnueHH
OBEPEXHO
Hebe3neka yukokkeHH! He do360 Jnemcbyucmum npucmpi 3 60raho 7naHa2a abo cmpymeh bdu nid buKum muckom (Hebe3neka Kopomko2o 3aMukaHMa IHux NowkOKeHb).
YnueHH anapata 3cepeHn H06epxHo!
Hebe3neka mpaemyeaHna! Odaaume 3axuchy macky npomu nuny i 3axucHi okynpu.
→ PpoTeTpAnapat raHypkoIO.
O6nytn anapat noBITPm nID TnCKOM.
YnueHHnaanapata3OBhi
OuHCTHTn anapaT, BIKOPNCOTBOYUOHn Dnla 2b0rO BOIORY raHcy, IpocOeHy Cna6kIM NyKHM PO3HOM.
Bka3iBka: 3a6bOpOHReTbcra BnKOpuctaHH arpeCNBHx MnHnx 3ac06iB.
PepioDnHicTb TexHiHoro 06cnyroByBaHHa
Bka3iBka:JIiyuNbHnKpo6OxroIN nobiDOMJNE pO MOMENT npoBeeHHN 06cny-ROByBaHH.
TexnHHe 06cnyroByBaHHa, 3dIChIOeTbCkNlEHTOM
Bka3ibKa:Bci pO60n 3TexHrHoro 6cnyroByBaHHra 360ky KIneHTa NOBHHI npBOOdtncKBAJIΦIKOBAHM φaxiueM. B pa3i notpe6n B 6yNb-4KN MOMENT MOXHa 3BepHyTnCnnoDOMry B CneuianiOBAhy TopROBeNbHy opraiauio fipmN Karcher.
LQoENHeTexHieHe 0cnyroByBaHHa:
→ Npebipntn Ban, 0o nIdmitae i6uHi UITKN Ha 3HOswyBaHHa HArBHiCTb CTpiHOK, 0o HAOTanCra.
→ Ipebipntu CTaH BCix enemHTiB ynpabnHH.
→ ΠepeBipuTn npuaH ha npEaMeT noi-KoJxKeHb.
LToNkHeBTEXHcYeOcnyroByBaHHa:
OuHCTnTn riDpaBNIyHm MacJHn paiaTOp.
→IpepeipntriipabliHyycTaHOBky.
→ PpebpntPiBHeRiDpaBnHOroMa-CTnJa.
→IpebeipuTpiBeHraIbMIBHOiPiHNH.
→ ΠepeBipu yuihboaBnHn nHa 3HOseHCT Ta npn Notpe6i 3amHInT.
→ ΠepebipuTN i 3MaCTNTN KpUkky pe3epByapy.
TexHHe 06cIyroByBaHHaCTnH, 3HOuyOTbcR:
3amHItb yuinbHIOBaNbHi nnaHKn.
BidpernyIOBATn a6o 3amHHTn 6iHi yinbHeHH.
3amHItb BaJ, 0o NiDmitaE.
3amihItb 6iHi 1tKN.
Bka3IBKa: DOKnadHnne nIb. po3dn "TexHiue 06cnyrobyBaHHa".
TexHHe 06cnyroByBaHHa 3diHcHcTbCnK6oO 06cNryroByBaHHcNoXnBaivB
O6cnyroByBaHHaYepe3 50 roHn po6oTn:
→ 菲斯元门 npoBecn 3riDHO 3 cepBICHO KHIROIO.
O6cnyroByBaHHyYepe3 250 roHn po-60Tu:
PpOBeCTn IHCNEKIO nicraTexHiHoro 06cnyroByBaHHa
Bka3iBaK: IJIa 36epeKeHH npaba Ha rapaHTiHne 0bCnyoBvBAHn Bci pOboTn 3 texHIOHO npOphiAaTKHoro 0cCnyoBvBAHn npOtaRm rapaHTiHO nepioy noBHHI npOBOuNTnCBAOBHObaKeHO cepBicHO CnykBoo fipMn Karcher BiNobIDHO do 6pOuypn NO texHIOHOMy 0cCnyoBvBAHHO
PnpoiaktnHi po6oTu
Плг罗вka:
BcTaHOBHTMaHHy,IO NiIMiTae,HapibHn NOBepxHi.
→ KnHou 3anaJIIOBaHH NOBepHyTN B No3Iuio "0" i BuTARHyTN NOrO 3 aMka.
3aφikcyTe cTOrHOHy rAJIbMiBHy cnCTeMy.
3araJIbHI Bka3iBKN 0do 6e3neKn HE6E3NEKA
He6e3neKa mpaBmyeaHn? 3aekdu npu nidHmomy pe3epeyapi dna 3bopy cimmra ecmaoeJIOEAMU 3ano6ixhi umahzu.
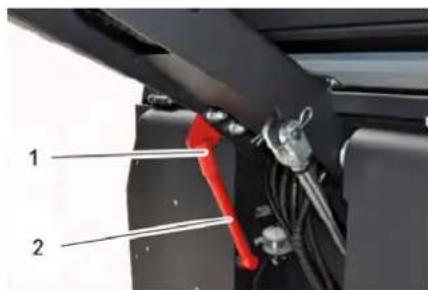
1 Tpmaa 3ana6jXhoTsaHn
23anobixha shaHa
→ BiDkHyTu HabePx 3anobixky TaHry DnA CnpoxKHeHH NIDHrTOpe3epBy- apy i BCTaBtu II y TpMaay (3anobixkHn)
3amihntn akymyIaTOPn
Donyckaetcb 3aimaTinbKn nobHoro KOMnneKty akmyJrTopiB. 3aimiHy dozBoJrEeTbc 3diNCHOBaTN TinbKn KBaniqikobahomy nepcohany.
Upe3 BEnKy Bary (450 kr) 3aminy cni3diHOBaTI 3acTOcYBaHHM KpaHy. BkaIBKa: Pepe3 aMIHO akyMyITo-opa cniD BuDAJIITN nonepeHu INaHKy.

→Пи ВИМанні akумлтopa сочатky obOB'якobo Tpe6a Bi'd'EDHaTn HeraTbHn NOJIOC (-).
→ PnKpInTu KaHaTu KpaHa Do 4 nTeJI KOMnNeKtY aKymyIaTOpHnx 6aTapei o6epeXHO BnTTHyTu aKymyIaTOpN.
IpebeipntpiBHeRiDpaBniHoro MaCTnTaTdoNTnNoRO IOBIOMJEHH
Pe3epeyap dna 3bopy cmmn He ma e 6ymu nHmmu.
BIDKpuTn Koxkx DmryHa.
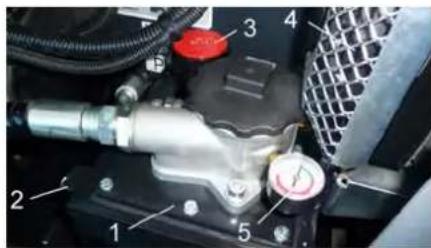
1 BaK dIy rIdpabNiyHOrO MaCTnla
2OrnaDBeCKNo
3Kpnka,OTBipJn3aJIbKnMaCTtna
4 Padiatop oxoJxBHHr iipabniHoro Macna
5 MaHometp
→ IpepeBipuPiBHeMaTnA B rIpaB-nHni CntemBI ORJIOBOMy BIKHi.
-PiBeHb MaCTnna NOBHeH nepe6yBaTu mIK BiDMiTkAmu "MIN" i "MAX".
-JaKIO pIBeHb MaCTnHa HIXKYe BiIMiTKn "MIN",DOnITn MaCTnNO.
→ BiKpyTnTu KpnuKy OTbOpy 3aJIne KIMactnla.
OuHCTnO6NaTb3aNBKN.
→ DOnHTn rIpaBniHc MaTIno.
BnI macna: nVB. TexhiHy daHi
→HARBHTNTKNKPNIKkyOTBOPYdIy3aJINBKNMactnla.
IIOBIDOMJIEHH
Kaio MaHomemp 6ka3yHa nideuueHH mucky iDpaBnHIO macmuna, Heo6xioHO 3eephmuc8 cepicHy cny6y Karcher 3 numaHra zamiHu pInbmpy dna iDpaBnHIO macmuna.
IpebipntripaBniCy yctaHObky
3aφikcyTe cTOrHOHy rAJIbMiBHy CNCTeMy.
3anyctnTn DBNrHy.
Texhihe 0cbnyrobybaHHraipabniHoi yctaHOKNMa3diinCHIOBAtnNne cepBiCHa cnyk6a.
→ Ipebipntn ripabniHhi JhaHn Ta 3'EDHaHHHa repMeTnHiCTb.
Ipebeipntu Baj, 0n iimitac
→ NObepHyTN KInou 3anaIIOBaHHB NoJIOXeHHaI.
→Пингп pe3epByap Дя 36opy cmTTB NOHTKOBE NOJIOKeHH.
→ NObepHyTKnIOu3aIaIOBaHHB no- IOXeHHo 0.
3aφikcyTe CTOHouHy rAInbMiBHy cnCTeMy.
BctaHOBHTn 3ano6iXHi uTaHn DnI crOpoxHeHH nIDHrTO pe3epByapy.
→ Buaanntn 3 Ba, uo nmiTae, cTpiKu N MOTy3KN, UO HAMOTaJNC.
BnHrTa3anO6jXHi TtAHrN.
BCTABNTN KNIUH B 3aMOK 3aNaJIeHHA.
NoBepHyTKnIOu 3aIaIbAHH B noIIOXeHHn
→ BiDnyctnTpe3epByap Ia 360py CmIT Ta B NOaTKOBe NNOXKeHH.
→ KInou 3anaJIIOBaHH NOBepHyTN B No3nIuio "0" i BNITaHyTN NOrO 3 aMka.

3amiha bana, 0n iinitac
1 KpinnbHn TBnHT TpMaaya Bany, 0o nDmitae
2Ban, nO nIDmitae.
3 TpmaBany, 0n iDmitae
4ПлockасторнашайббИногушьненя
5 BiyuyeuijibheHHa

BiiKpTuN 6iHy nHaHb 3a DonOMorOIO KIIOHa.
BidiBnHTn CMyKoBi raiKn, po3Ta- wObaHi Ha nlocki cTOnOpHni wa6i, BiD 6iHoro yuJIbHeHHa Ta 3Hrtn nlocky cTOnOpHy wa6y.
BiknHytn Ha3OBH6iHne yuJIbHeHHa
BnBHTNTN KpINHbHrBHT TpMa-ya Bany, 0o nIMtae, Ta oBepyTu Ha30BHi npMnBHN pncpti.
BnTnHTnBaI, nO niDmitae.

Po3TaUyBaHnB Bala, 0o NiIMtAe npu yCTaHOBcI NO HApPmky pyxg (Bnrrn3bepxy)
Bka3iBaKa: Pnp yctaHOBu HOBOro Bana, 0n iNIMiTae, 3BepHyTu Ybary Ha NOJIOKeHHaETINH
YCTAHOBHTHOBNBAJ,IOIπIMTae. Na3n BAJy,IOIπIMTae,NOBHHi 36irTNC3BNUCTynam6baaHcapa.
Bka3iBka: NcIy yctahOBKn HOBO rNIMtAnbHOro Bany Heo6xIDHO 3aHO BO BipeRyIbOAtn NIOuHny NiMItaHH.
Ipebeipka KopekTyBaHHn NIOUHN NIIMiTAHN DnB a, 0o NiIMiTae
Bka3ibKa:Ha 3aOdi BCTaHOBJIIOEbCBA Ncota nIOCKoCTi NiIMtAHHn, pIBHa 80 MM. IT 3haeHHa MOXHa INaBHO peryIObATn 3a DOnOMorHO INaBaOHOro KpInNeHHa NiIMiTaNbHOro Bany.
→ IpeBipuTN TnCK y uHax.
BUMKHYTN BCMOKTYBaJIbHn BEHTNJTTOp.
→ IocTabnMaunHy, 10 NiimTaie, HapibHy rnaKy nDnory, NOKpTu BnuMm wapom nnny a6o meJa.
→ IpeBecTn nporpaHm BmKau B peKHM NiIMiTahH3 BkOpuctaHHaM BaNy, 0o NiIMiTae.
→ NpeBecTu nepeMnKa nporpaB noIIOKeHH "TpaHcnpTyBaHH".
→ DaTn npncptpo 3aHi xi.
→ IpepeBipuHnIIOUHy NiIMiTahHa.
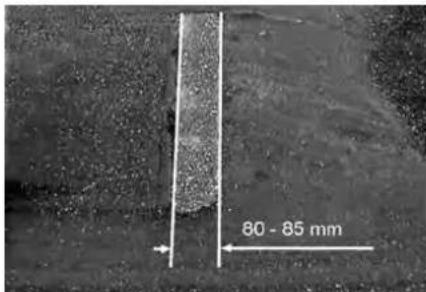
PpOJIb nIDMITAHN NOBHeH MaTN BnI rIa pIBHomipHO npMOKyTHnKa WnpHIO 80-85 MM.

1 PeryIIOBaJIbHa raIka
2KoHTpraKa
3Hrtn6iHy 06BnBky DnBnyHa.
Bikpyntn KOHTprayky
MoHTyBaHH npophiinIO iIMiTahHr
MiHcHO 3aRbHHTnKoHTprayKy
→ IpeBipuTn nIOUHy NiIMiTAHHBA-na, 0o NiIMiTae.
Ipebeipka Ta KopektyBaHH npophiJIO nIDmitaHH DnB a, oio nditae
PiHaTn 6iHi uItKn.
NocTaBnMaunHy, 10 NiIMiTae, Ha pIBHy rnaKy niDny, nOKpyu BnuM Mm wapom nIy a6o meJa.
→ IpepeBecTN nporpaHm BmNkau B pE KIM nIMiTaHH 3 BkOpNCtAHM BaNy, 0n iDmita, Ta 6iHoJ uTkn.
→PiHaTn 6iHi uItKn.
YCTAHOBHTI nepeMnKaH nporpam y no JIOXeHHa "Pyx".
→ DAtn npncptpo 3aHi xi.
→ IpepeBipuTn nnounHy niMItaHH.
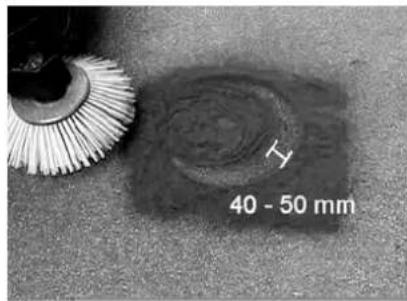
HINHA npophiinno niDmitaHHNOBHHA CTAHOBHTBID40do50MM.

→ BiDperyIOBAtn noLoXeHn nnocKoCTi nIMtaHHa 3a DonomoroO DBOX peryIOBaIbHX TBHTIB.
→ IpeBipuTn nlounHy ndMaHHa.
BctaHOBTN 6iHi yuinbHeHHA
→Пингпаверхpe3epByapДЯЗБОусмTTa 3aФikCyBaTN 3aДONOMORO3an06ixHoi UTaHn.
HEBE3NEKA
Hebe3neka mpaBmyaHnHa 3a6kdu npu niohymomy pe3epeyapi dny 3b0py cmimma csmahosniobamu 3anobixhi wmaheu.
BiiKHyTu HabePx 3ano6ixHy TuHaHy DnA CnpoXKeHHN iDnHrTO pe3epBy apy i BCTaBHTi y TpMaU (3ano6ixHn)


1 Tpmau 3ano6jxhoi tahn
23anobixkha wTaHa
BikpnT6iHy naHeIb, kO nicaHO B rnaBi 3amHa bany, uo niDmitae" Buie.
Ocna6nT6cmykoBnxraokHa6iHnnocki ctonophi shai6i.
Ocnabntn 3 raKn (SW 13) Ha nepeHni nnocki ctonophi wai6i.
→ HatnckyBaTu 6iHHe yuINbHeHHBn3 (noobxhi OTbip), noKn noTo KpaH He BnBnTbcra Ha BiCTaHi 1-3 MM BiD niD-nOrn.
→ PnRbHTnTn NIOCKy CTONOPHy Wai6y.
→ NIOBtopuTN nocniIDOBHicTB dna iHWOI CTOPOHn pncTPOK.
OuichiHnHnΦiNbTpynnny npuyHy
→ BnKoHaTn NnueHn HnIbTpY dnn nny 3a DOnOMorO KhoNKn NnueHn HnIb- Tpy.
3aHa nIOBOro fIbTpTa △NONEPEDKEHH
Dno noyamky 3amiu nuo020 foIbmpa eudanmu emic im3 peepeyapa dny 360py cmmma Ppu pobomi 3 fInbmpyealbhoyo ycmahoeko Hocumu macky dny 3axumy eid npny. Dompumyime npunucnb no mexhiui bezneku biho obiy i3 dpibHUM nunom.
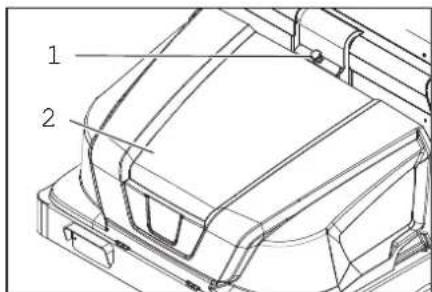
1 BnokyBaHHKpnuKn npntpoH
2 KpnuKa npncTroko
Bikpn6nokyBaHH.ДЯцBoRo He-06xIHOBiKpyTHTBnHT3roJIbKOOY BnJrI3ipOuKn.
BiknHyTu KpnuKy npncTroO BnepeI.
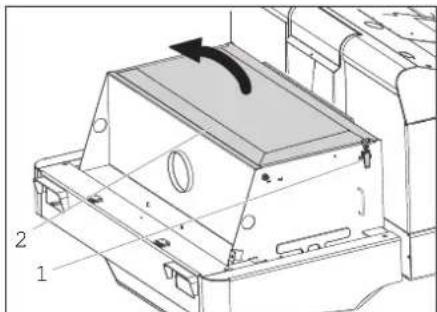
Bikpnkpiukyipnbpa.

BiknHyTu nItpuWyBauchinbtpy Bnepe.
3aMiHa nIOBOrO fIbTpa.
3HOBy 3aKnTu Kpuuky pIbTpY.
3aɪna nʌmnn po3xkapIOBaHHЯ φapn (onzi)
Bidkpyntndpy.
→ BnHrTn qapy Ta BnTyrHytn WTeKepeHn po3'IM.
Bka3iBa: 3anaMaTatTu NonoKeHHa WTekephoro po3'Emy.
Bikpyntn fapn OndHy BiD oNHOi.
BidkpyTnKopnyc capn, npu bomy TPIMATN KOPNYC ROpHOTaNbHO, OCKINK6IOK NAMn He 3aKpInneHm.
P03TnCKaTN cKo6y IBuHrTn IaMny po3XapIOBaHH.
BCTaHOBTN HOBy JAmny po3KapIOBaH-H.
3HOBy 36epiTy 3BOPOTnIOBHOCTI.
3amHa lamn po3xkapoBaHH noKaxka noBopoTy (onci)
Bka3iBka:ДЯЗAMINNAMMn NOKAKHKA NOBOPOTY BInHrTn CkNo 3 KOpNcY NOKAKNa.
3amihntn 3ano6jHnKu
BikpnTn TpMaay 3anO6xHnka.
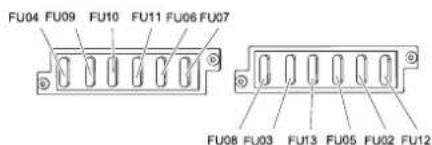
→IpepeBipTu 3anO6iKHNK.
HecnpabHi 3aNo6jHKn 3aMiHHTN.
Bka3iBk: BcTaHOBnTu 3anO6jHK FU 01 (rONOBHn 3ano6jHK) B Kopnyc eNeK- TPOHHORIO pNCTPOIO.
3anobxHKnFU14,FU 15 Ta FU 16 3haXoJbC8ycepeDnHi KopnyCy eJeKtpOHOr npncTpo. YBara:BikpBAtn Kopnyc i npOBOnr3amHy 3anobxHKnIB Do3BOJnEeTbCra TInbKn yNoBHObaKeHm qaxiBzM cepBicHO ceHTpy.
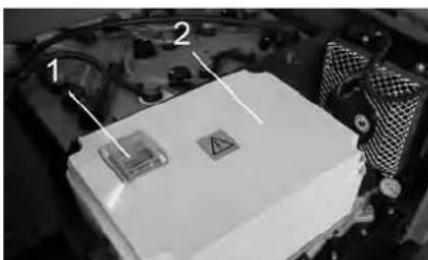
1 3anobiknK FU 1 (roJIOBnHn 3anobixnK)
2 Kopnyc eJektpoHHoro npucTpoH
FU 01 TogOBHn 3anO6jxHNK 22Q A
Chairman of the Board of Management

S. Reiser
Director Regulatory Affairs & Certification
YnoBHOBXeHn CnIBpo6iTHNK NO BeDeHHO DOKyMeHToo6iry:
S. Reiser
Alfred Karcher SE & Co. KG
Alfred-Karcher-StraBe 28-40
71364 Winnenden (Germany)
Tel.: +49 7195 14-0
Fax: +49 7195 14-2212
Winnenden, 2018/09/01
g 2j1 j00
<
jll
a j1 j00
aola// 1jg a y/1y0 y/2y j 1
clj/ y o/2y 9y Jac/ a/1y>1u
clxjolc/oLoo y/2y>1 j/2y/0 aIg3y Ei
acl// aJy/1 go Jole// aO// ao
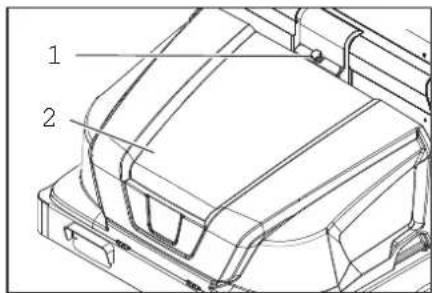
-
q
-
c
9
aai jiaai
.
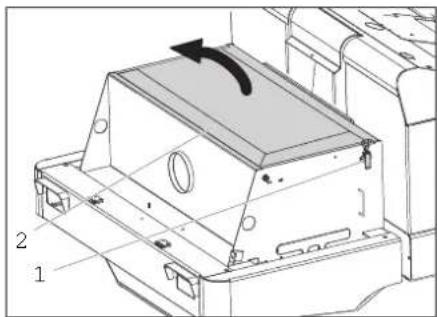
<.

<.pU
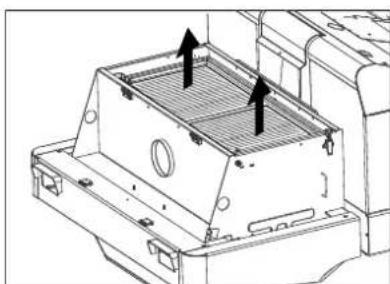
<.
<.S,
(aJlsl) JlssU oclyI Lj
<
<.w
yIgall golgo oIe IyI yIabgsxo 1uSll dssy p<
a> xoc >I uI eIg lusll aLc
aao n c aauu Jb jk
ooIyI aJg kaiu
oallgogoljolla
aJl jLj
a0g a>

y
50940
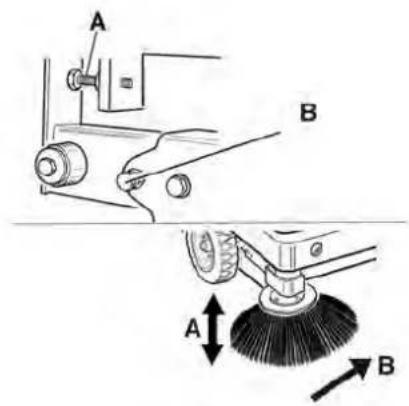
J50001olw0g29gauu
b. all Slauno
a>g a<
auii piK>iy jolic bwo
aaiplwluawg aolaluljgsj
4a = 3
oolll pssolsswls aolpsa loyjbs
Lolao/11
a + b = 3
Jaaa aag Jaaa aag
aJg aGua aJ 1Lc uSJI aJ
aalgljuljgogolaaag
aJgJ
JaiIgog JcQolJglio
wS|olj, a>g a>
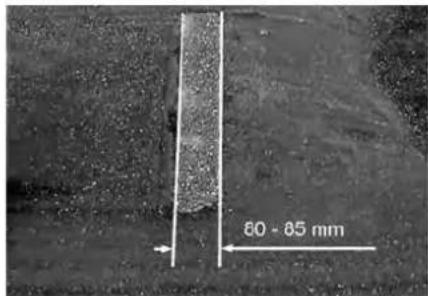
Jsw 1
85-80a0s gdu abio Jabiwo
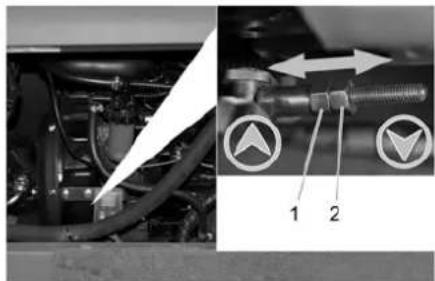
1aioljgo1 1
jll algo 2
JUaWJIgssJQ
.
aJl oawg a>gl
jglalgoaipso>1
aaiiiaolgaij:uiy
←
Jew
SxS xS xS xS yS yS yS yS yS yS yS yS yS yS yS yS yS yS
g>9j
J 1
1
←
←
←
中
.
Jssll oJy no bgyjgl abjyl gjjl
.
<.jIbIyI eIgIgIgIgIgIgIgIgIgIgIgIgIgIg
jllgogll aolalll jjly
"0 gioiI, 15 2022 2022
Jgall Jg no aagw
<olwjw jgog xo zoljll 1
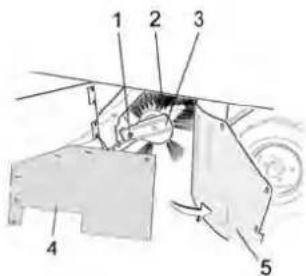
aJgJl oJgJgJgJgJ J 1
a 2
3
a|y|p|y|a|y|c|y
ai + 1 = 12( ai + b_i)
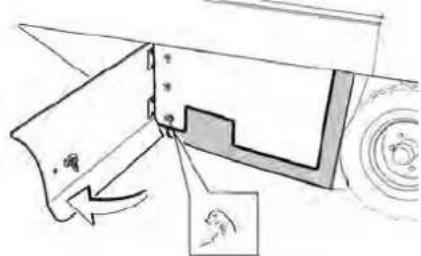
2.1aao plauwlu ayalJgwsJg
2g:0g>gall aixial jolgal all da, p<
2g 10
.
2.15W aI>1 pL>YI aA>
jg gogolal jlaa
←.oJgAaHJLgRPAeJyBnag g 1000
a,b = 1
all aaiSall oIw, g. bao,
aJg aGua aJ 1Lc uSul aJoo
aalalgluljllgogolao
aaiJll aaiSollg oJgss
.aaJJIaAsKJgJl
←olwjwssgogcglclla
a aaa
S = S
oioiio 1000000000000000000000000000000000000000000000
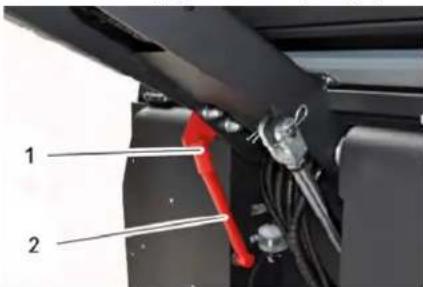
1
2
gogj aaxall nolll 29 b
Jolal aldsg Jcysg jll (ofo)
aJll
jy y. 1e Js Ulll llaaun s L
Jnag no gnoo ng y Jllu wll aalp
Ugll uag nog dauwlu p u (450) jll
Juuuul qaaolall f c y abgalo
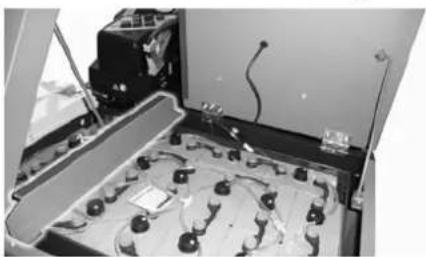
aall Jla JgJg aJbll 1ie
JwJ
aJlalal j aJrJl Jb 09
jllg jrln lalal pab ogs all
.
eJlssuIgSglgrrllcJllsagaaJra SglgrllCJJ
Jew
Lgaoa/1jgsy
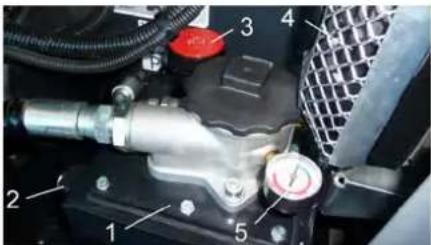
1
a>2j|awd2j 2
jll joa z3 3
sJgjgl jll 4
jogilo 5
00sglggl 100000000000000000000000000000000000000000
a a 1
jai jia jia jia jia jia jia jia jia jia jia jia jia jia jia jia jia jia jia jia jia jia jia jia jia jia jia jia jia jia jia jia jia jia jia jia jia jia
aogaoag allo wai aai g po suiw lgljll aai jieo Jue Jglo
aIgscabu slgo aiposu y:abgalo
aalalalalalal
aI J I J 111111111111111111111111111
Jaaal Jooa>laai
gag aillalwgl aolll Jlacg gaa:abg2o 1000000000000000000000000000000000000000000000000000000000
wS 15g 20
:aaal aal
aalall jgagaaal alac a
aai jiaai all gga> jlc abg2al:abgdo aai Jlacl a15 elj> jiaai all oj Jlgb duc
J 5u aai all j 6 10 w L 8g aaiall g
aIJl
:Jll
"0"gogll Jc jzjall oJz1i 2
jglJl Jai
ab 全
jglll 1g 1y jll jol yloylbs alai pall
"0" giool l jzol ojla zdo 1 .gaiI Jd Jo aWg
(4X) cullblw jgluulc oJr< Jg|
aalll 1y yj j
#
ab = a
alg ojai jglj 1a
aIg b oJl wSJI aC pIaIWI pIaJI J aJIJI IblJI OclJr
Jllgog JcJolalglao Jdol 0"gog JcUjolal OJdJlglao Jd Uaall Jq no a
Jill 1000
jllg jlll no wll a cubip
a> s3g 0jLs o jLj
aJall aJlll wJw
1g 2a aioj
a|a|g a|i|J
aolc
4
1111111111
jijujiy
gl alj aai jw g jglll aai j J gla y siaag jll bawll J 9 no oall oal ciao wg jgll J aJbll Jg i Jblal g e jg sall aos jy y
aia 100g 2 aall 100
aall aolll alai
lab qolll gajg aigla slo1
wo ao jle wJ agaag aag
wagd wal aagaae aogol
.VDE 0701 JALI
<.Jolj0g 1c Jzall oJdlaqdo 1. gaoa2wlg
#
4g
jglzlll jklj y!jlll j
jbs) biaial/11c 10slo jw g1 pgs 1p12uwl .(s)/11wog1 ailg5 cXie9
JusdUoJgUcua
2x - = 0
aLgUeOcljIc0>1laoyJb2 8g
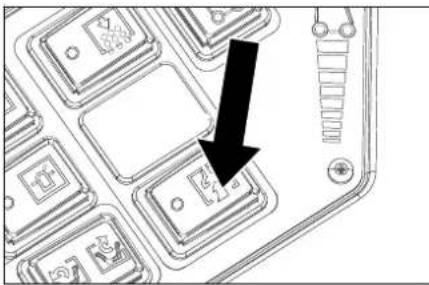
Jc JcJI cIoo bIaol bIaI aIbui ic .OJgUll oIe Ie
4g 212e0 jaiy y. jaiy jaiy jaiy jaiy jaiy jaiy jaiy jaiy jaiy jaiy jaiy jaiy jaiy jaiy jaiy jaiy jaiy jaiy jaiy jaiy jaiy jaiy jaiy jaiy jaiy jaiy jaiy jaiy jaiy jaiy jaiy
gog jc mllolol 2x 2x 2100 bwl
cBaaaggllaw|gslcbaol
oalai
0s>ill 5a gJllll J2a - aWu wul acw
aSgjgl o>gl jll gll l 1
la 1c lgsio Jb2g aulal ojog jLgJ gol Jbgo
Jolalawg
glglj
70 11 gbs jy aai yai ggljzj 1 gals 11 jzjx 1 xg jy 11 10 10 10 10 10 10 10 10 10 10 10 10 10
.
#
4glo9/SLwV/g aaovU/abwU/uxp,aeYyuyuoybgyolvullalueoLg0,aLW
aaiia aaiia aaiia Jgaaal:abgdo
aJyJI 100 aI aI aI aI aI aI aI aI aI
aJzJzJzJzJz
a0gjll jzoo
gagall jwll ojg>lg jll
pLW as > Ns > 0 aal c s<
#
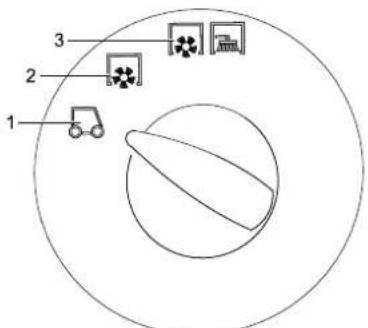
Jaiil pl 1
Ssll oRyabawg yssll 2
Ogll sll aowyabawg yssll 3
auii iaiisaij
| la i zi a b > l o | |
| la i zi a u a l l l a g a l l l o w a t i l l | |
| la i zi a u a l l l a g a l l l e l l l o w a t i l l .a l a a l l | Pb |
| la i zi w i l l l a g a l l l o w a t i l l |
Jas A
a/aw log/ g/ sac ay/gi y/ jzaiy/ jz
logog a/ ba// ouac/ lc si/ a/ ba// lc
Lx21
Jas A
auofo po c /c la/s oj>1/ay/la/
lc Jlac /y plal/ 2g jy/ plao//
du caab /c la/s oj>1/ b/ ba//
Jas A
Jzaiy/ g/ a/21
Jzaiy/
. Gwco /g/ wj/g /s//
Slou /a// a// so /d// d//
Jc g/Sj /jbi, a/b// zw /g p//
Zw// a/ ac / Ljci// u/a//
1cglsyl 25
aagaa, aunllnunl gljnucl
Jau// Jau jia// cl/
. g// nue// lc
g// l c u// Lc o>1 d3
.ql/ iuua// uLla// nucl
山
aag
jgl/ jauu u/la/
jz
Jz
aoLl oclj 11 loy
Jz
oLj 1. 1001 / go Jolil
z
Jzl jai/ a/ ag/
Jzl jai/
Jzl jai/
Jzl jai/
Jzl jai/
Jzl jai/
Jzl jai/
Jzl jai/
Jzl jai/
Jzl jai/
Jzl jai/
Jzl jai/
Jzl jai/
Jzl jai/
Jzl jai/
Jzl jai/
Jzl jai/
Jzl jai/
Jxl jai/
Jzl jai/
Jzl jai/
Jzl jai/
Jzl jai/
Jzl jai/
Jzl jai/
Jzl jai/
Jzl jai/
Jzl jai/
Jzl jai/
Jzl jai/
Jzl jai/
Jzl jai/
Jzl jai/
Jzl jai/
Jzl jai/
a 10 10
yj 1
J
aolc
aagssaaJc aJyae JyAe JyAe JyAe JyAe JyAe JyAe JyAe JyAe JyAe
ailllll Jlae
J 1 J 1 J 1 J 1 J 1 J 1 J 1 J 1 J 1 J 1 J 1 J 1 J 1 J 1 J 1 J 1 J 1 J 1 J 1 J 1 J 1 J 1 J 1 J 1 J 1 J 1 J 1 J 1 J 1 J 1 J 1 J 1 J 1 J 1 J
a9galo abj g> g> no x> a9l
.
Jolic a9sJ abgll sJy a> Jp 9
.JlaaWJ
JgJy cJtai g> g pC no sJ
aabij c1io oJdswU aRjll jdG aBj 9
jalll
aJIeIJI Jf jblcJbI Jc EJbJU abglo
JaaJd
Jolal l aai jai Jolal iia Jolal jai
jIul1a1a>aaawogjol0jg>yl
Jew
jla>1/(sla>1)gilw/la>aa
j0 a1g/ j0y y/a//y/.ab0aIw//o.5//c|j>
1y
aiojoo gaoi//logyla//zaw 229/
109
JliW/1iic u89,aoe j> jae 15
JolSIL aIa21 Ieew
g/la211 caw JcJcJcJcJcJcJcJcJc
s/s/aaSjUcIgaxoogcl>gl/molic
aJoo 1000aal lIeKarc
a/la//c/aw/1g//c/5y/
gjbl jz jdlc
jglll jai aolll aoalll
(jai/ijg)jla/ijg/olcJr>1
g1jglkaa/llc jull c/ jq
l_S = · m
jki jie 1
aIg aieiely aolal aoxlwl
jglia/wwg jge//jsew 1
g/a[g]g/
a/aa29//
iic aai > a/kuw oogjla/0g>
Jaua 12uol ailo Jauo
JLjQJGLIgS1pIaJIc aJIaJI
(a)/(2//)
Jac/1c>Jic a//la// Jaa
a|g|/110
p. g / / Jl / / Ja / / Ja / li, p.lu9
= 90^
a.1g23/0i0 uSe, Jwogill oIcI/ a
//lu// 1a//2g//2a//Jagy
jglgbspJzwiJg2//cbjjg
g/aaill j/gj(g)jbs)baia//llo
()
ooj510o oV/2xOy/1oc/1zj
a a a jll a jll b a h h h h h a>g o g
aui jil
jglj
aalljolallgallajy jglslx
jaiy jbs a blio jg21
clwyl jabol 2gawu u c
clwyl jaj g w gia>jl 2gawu u c
jglll p
a aai
-
acll a0jV
a. 2| | a.o.o.o.
a|wj
00j
aJlJr
pLxwyl aolw |slj|
Jaxi/0jg a> 1. aIy/ Jax
ocl/ jla/ 1c ola/1c yaiy jbs
jgljlll cleeajllgco ymuu//
iic aol) acw 1bceyI ic yaiy Ibs .Iuw oabeial
aia/0c bdu ola/1xoc 1- aii/1u c uoyjy/1xoc ola/1xoc xoyjy/2x2 auii auyjy/1xoc yjgz/1xuyjy
joo sjj2io oolai / ioc xaiy jbs
yio a> y j/ /leai/ yc y- y//olzyl ayu/ y c %10y
aJwai ojg>yy aol aayw w dLw J 1y
1> 1Jn JnJnJnJnJnJnJnJnJnJnJnJnJnJnJnJnJnJnJnJnJnJnJnJnJnJnJnJnJnJnJnJnJnJnJnJnJnJnJnJnJnJnJnJnJn
J 1 J 1 J 1 J 1 J 1 J 1 J 1 J 1 J 1 J 1 J 1 J 1 J 1 J 1 J 1 J 1 J 1 J 1 J 1 J 1 J 1 J 1 J 1 J 1 J 1 J 1 J 1 J 1 J 1 J 1 J 1 J 1 J 1 J 1 J
pSgl aaiw alg l 1c jlll y - SLo gwi lgaoa ocly aabi cjlall xlc bol > wllj y qiai
jlaa> Lc o>1.ogll Lc aLg>
jLg y aJy g aJy g aJy Jy 100000000000000000000000000000000000000000000000000000000000000000000000000
jao>goJaleill xic oJy jy - aollll caiLcio Jyoc Jy Jy
aL 5xauuuaa uuuu uuuu - .EEC 157 /91 aaggaaagaaagaaal
Jllgail pIbai 02gjoll jg>
m : x = 1 或 3x + 4y + 1 = 0
S OBC = S COD + S_ BOC
j 1 j/ l/ j 1 j 1 j 1 j 1 j 1 j 1 j 1 j 1 j 1 j 1 j 1 j 1 j 1 j 1 j 1 j 1 j 1 j 1 j 1 j 1 j 1 j 1 j 1 j 1 j 1 j 1 j 1 j 1 j 1 j 1 j 1 j 1 j 1 j 1
aebio 215 y/ uol/1s,paY
aay 12j// a9luog cag// xc blae> jio 2000c y elaj/ jc jz// jn
jz/19j 10i lo 1/1u16 1c b9 Jlu
pUziw gauw sAsiw y pOb sAUG
aoull abzall oJyI I jz/
Karcher asuJyI ayIy (oQyJ)
jz aol aiwi /sJ cIs
a#iua//jz//go jz//z9 #y a#o sio> go dlig p#xw/ j 1/2//Si, p/1s. J#uill aoLw gJ2//
jgl//puiu y/laLc aaiy jio) ojbs gblio jgl//puiw/sic
a0u//1c/gy, pJyV/12ggy//1b20 9jge// Jauu uji jz. aUa//1s 1jaz/1jz/aioa//Sloy
Jaa 1a/0yI Jaa
j//kblia//.d//jg,k20u//j
abjlu// jc/JeJieJua// 1a Jg jz// Jaau// Jia// xc oLc/a Ls.022a//sc/gxU
1/20180g0g0a1/2018g21/ abaw/gj4>1/201wUJla/cj>1/a1b> Jlab// aol> g
cglg/9 lalxell ocljoo awlwlaeg 1LsAL/ Lc ayluw2gUg
= 0
y/1//s2y/s//jz//jz
gai jie 1
11111111111111111111111111
gall lll 9/4
a
5j 19 SJIg Jai2al/ al2x// qgall / / aii
aioo/1//g/akw
a
sii 15
afoj
jgljllxlc03jgljjgogjll
J2.0 0AB1sLgAe, gAeAeY
2 AR aalil
2 AR
2 AR 1
2 AR 0aJlAeLaLwJrJ...
0jg2ylaol aosw oslw
2 AR
gjai pui bi ojoai jgj
2 AR
aLa> cddw:02gjalloog>vl
3 AR
Jai aolal aoLwll 1
3 AR
aaijll aolal aoolll
3 AR aIaJIg...
3 AR aa,bgJ
3 AR
4 AR abgJolilgl JaiyJolic
4 AR glll a rj o j
( AR) P S I 且 a > 0
4 AR aagabg vlaa ...
5 AR jjai aawg Jgssll
5 AR
5 AR 1
5 AR ggljol jgrj
0g
5 AR
Egwhw wss a r c
5 AR
5 AR
5 AR aolea
5 AR aIaIg a2al JlaI ...
5 AR
jLai Lao aolll 1
5 AR
5 AR
6 AR
6 AR
6 AR
-yljglgAsRcLaxyo aIpoxuillgduu
6 AR jll oJl
6 AR
6 AR aolall jgj
-Logall ABjoll Jg2al jgale...
7 AR jgJl Jai
A
7 AR aLgob jglal
7 AR
7 AR aole
7 AR
7 AR
7 AR aJalJlal...
10 AR Jbclg>ie cclal
11 AR aill
Register your product and benefit from many advantages.
www.kaercher.com/welcome ★★★★★
Rate your product and tell us your opinion.
www.kaercher.com/dealersearch
Alfred Kärcher SE & Co. KG
Alfred-Karcher-Str. 28-40
71364 Winnenden (Germany)
Tel.: +49 7195 14-0
Fax: +49 7195 14-2212