
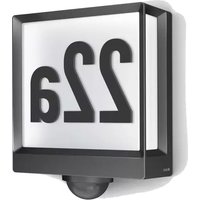
L 605 S - Lighting STEINEL - Free user manual and instructions
Find the device manual for free L 605 S STEINEL in PDF.

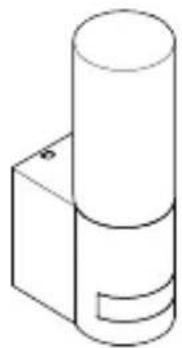
| Product type | LED wall light with passive infrared motion detector |
| Brand | Steinel |
| Model | L 605 S |
| Use | Indoor and outdoor, wall mounting |
| Supply voltage | 220-240 V, 50/60 Hz |
| Power consumption (P_on) | 11.3 W |
| Standby power (P_sb) | 0.50 W |
| Luminous flux | 729 lm |
| Luminous efficacy | 64.5 lm/W |
| Color temperature | 3000 K (warm white) |
| Color rendering index (Ra) | 82 |
| Energy efficiency class of the light source | E |
| Average lifetime (L70B50 at 25°C) | 36,000 hours |
| Detection angle | 180° |
| Detector range (tangential) | 10 m |
| Recommended installation height | 2 m |
| Trigger threshold adjustment | 10 - 2000 lx (adjustable) |
| Time setting | 5 s - 15 min (adjustable) |
| Orientation light (night standby) | 10 % of power |
| Programs | 4 programs: Standard, Comfort economy, Permanent orientation light, Manual |
| Protection rating | IP44 |
| Protection class | II |
| Ambient temperature | -10 °C to +40 °C |
| Mounting | Wall mounting, with bracket supplied |
| Electrical connection | 3 conductors: L, N, earth |
| Replaceable light source | No (replace entire light) |
| Manufacturer's warranty | 3 years |
| Delivery contents | LED light, wall bracket, connector block, screws, wall plugs |
| Dimensions (approx.) | Approx. 200 x 150 x 100 mm (W x D x H) |
| Weight (approx.) | 0.5 kg |
Frequently Asked Questions - L 605 S STEINEL
User questions about L 605 S STEINEL
0 question about this device. Answer the ones you know or ask your own.
Ask a new question about this device
Download the instructions for your Lighting in PDF format for free! Find your manual L 605 S - STEINEL and take your electronic device back in hand. On this page are published all the documents necessary for the use of your device. L 605 S by STEINEL.
USER MANUAL L 605 S STEINEL
natural_image
3D rendered metallic cylindrical object with layered structure (no text or symbols)
natural_image
Two gray gradient cylinders against a white background (no text or symbols)L 605 S
L 605

DE .... 6 Textteil beachten!
GB . . . 12 Follow written instructions!
natural_image
Technical line drawing of a mechanical component with multiple screw and pin assembly (no text or symbols)3.2 L 605
natural_image
Technical line drawing of a cylindrical component with a separate view of multiple screw fasteners and a pin (no text or symbols)3.3 L 605 S
natural_image
Pure geometric diagram of stacked rectangles with a dimension label (131) at the base, no text or symbols present.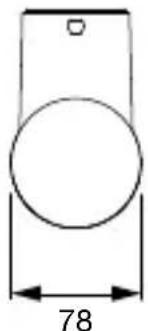
natural_image
Simple line drawing of a rectangular object with a circular hole and dimension label (78) at the bottom, no text or symbols present.3.5 L 605 S

3.4 L 605
natural_image
Simple geometric diagram of three stacked rectangles with a dimension label '131' at the base (no text or symbols within the shapes)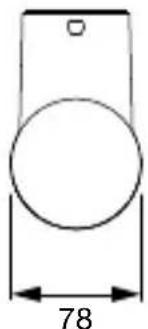
natural_image
Simple line drawing of a rectangular object with a circular hole and a dimension label '78' (no text or symbols beyond the number)3.6 L 605
3.7
radar
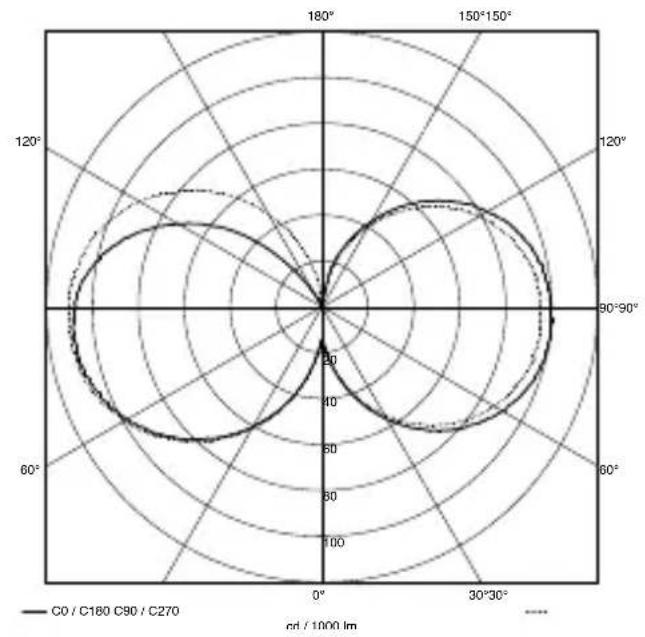
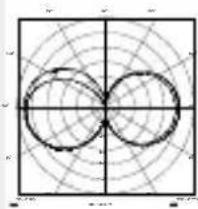
| Angle | C0 / C180 C90 / C270 (rad / 1000 lm) | C270 (rad / 1000 lm) | |-------|--------------------------------------|----------------------| | 0° | ~45 | ~45 | | 30° | ~65 | ~65 | | 60° | ~85 | ~85 | | 90° | ~100 | ~100 | | 120° | ~85 | ~85 | | 150° | ~65 | ~65 | | 180° | ~45 | ~45 |4.1 L 605 S
3.8
natural_image
Simple line drawing of a cylindrical object mounted on a rectangular base (no text or symbols)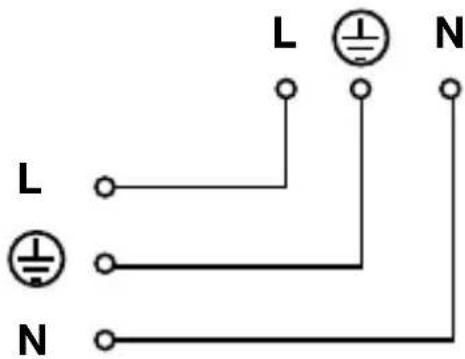
4.2 L 605 S

4.3 L 605 S
4.4
4.6
4.5
natural_image
Technical line drawing of an electronic device with a cable, connector, and housing (no text or symbols)4.7
4.8
5.1 L 605 S
4.9
5.2 L 605 S

5.3 L 605 S
natural_image
Simple line drawing of a cylindrical object mounted on a rectangular base with an arrow indicating rotation (no text or symbols)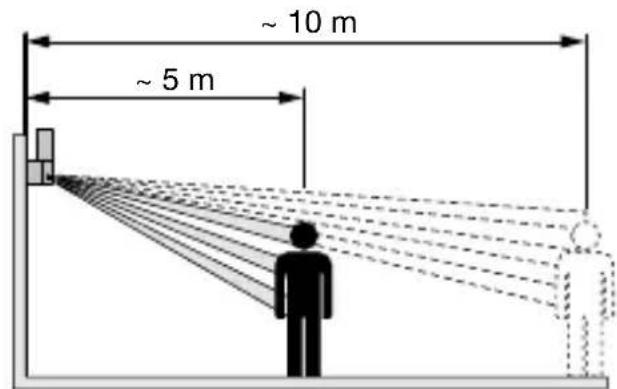
5.4 L 605 S

natural_image
Line drawing of a pair of scissors cutting into plastic sheets (no text or symbols)5.5 L 605 S
natural_image
Simple line drawing of a cylindrical object mounted on a rectangular base with an arrow indicating rotation (no text or symbols)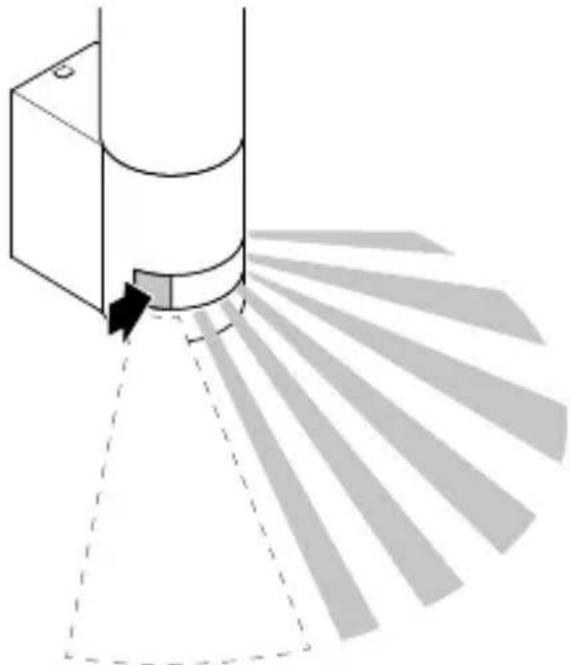
natural_image
Diagram of a cylindrical device emitting a fan-like structure with radial lines, no text or symbols present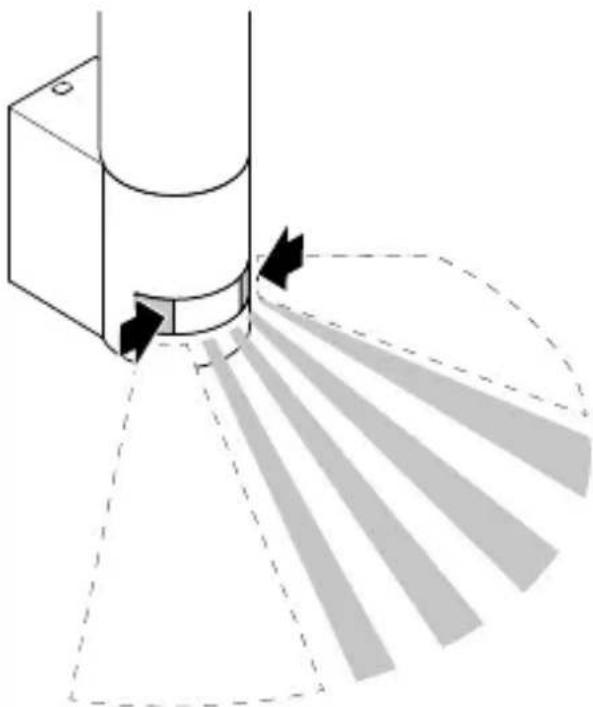
natural_image
Diagram of a cylindrical object with directional arrows indicating flow or movement, no text or symbols presentDE
natural_image
Pure geometric diagram with concentric circles and radial lines, no text or symbols present- Sensortechnik:
—Under copyright. Reproduction either in whole or in part only with our consent.
-Subject to change in the interest of technical progress.
2. General safety precautions

Failure to observe these operating instructions presents hazards!
These instructions contain important information on the safe use of this product. Particular attention is drawn to potential hazards. Failure to observe this information may lead to death or serious injuries.
- Read instructions carefully.
- Follow safety advice.
- Keep instructions within easy reach.
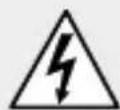
- Working with electrical current may produce hazardous situations. Touching live parts can result in electrical shock, burns or death.
-Work on mains voltage must only be performed by qualified, skilled personnel.
-National wiring regulations and electrical operating conditions must be observed (e.g. DE: VDE 0100, AT: ÖVE-ÖNORM E8001-1, CH: SEV 1000).
-Only use genuine replacement parts.
-Repairs must be made by specialist workshops.
3. L 605 S, L 605
Proper use
-LED sensor-switched light for indoor and outdoor wall mounting.
–The sensor variants (S variants) additionally contain an infrared sensor for motion detection.
Non-intended use
–The sensor LED spotlight is not dimmable.

Not dimmable
Operating principle motion detection
–The integrated infrared sensor detects the heat radiated from moving objects (e.g. people, animals).
- The heat detected in this way is converted electronically into a signal that switches the LED light ON automatically.
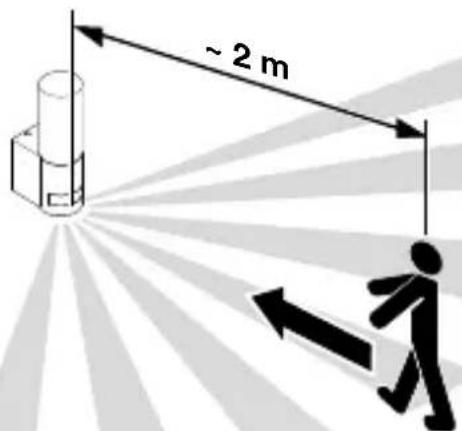
- The most reliable way of detecting motion is to install the light with the sensor aimed across the direction in which a person would walk.
-Reach is restricted when the sensor is approached head on.
-Obstacles (e.g. trees, walls etc.) interrupt the line of sensor vision.
- Heat radiation is not detected through obstacles (e.g. walls or panes of glass), the sensor is not triggered.
–Sudden fluctuations in the temperature due to changes in weather are not distinguished sources of heat.
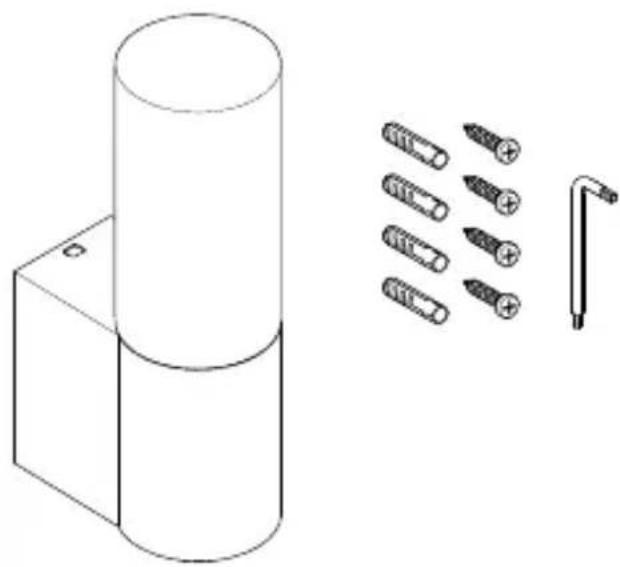
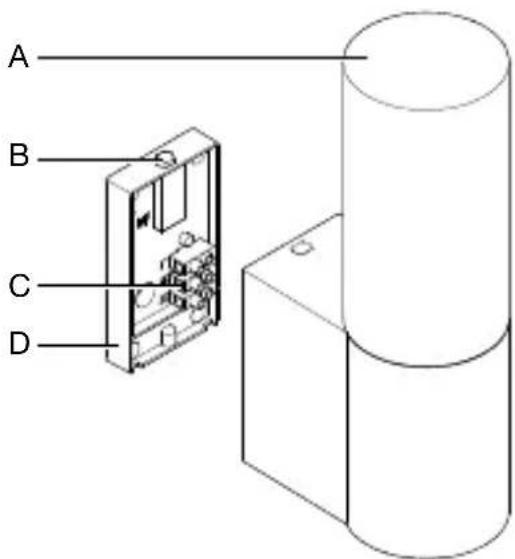
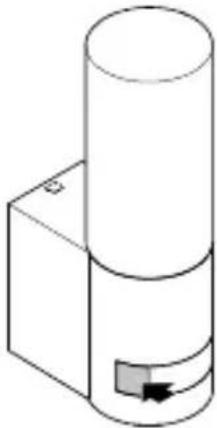
Package contents (Fig. 3.1, 3.2)
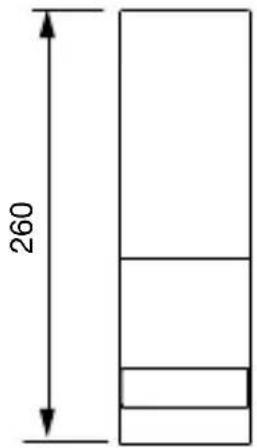
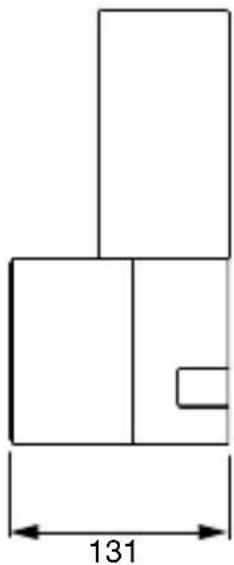
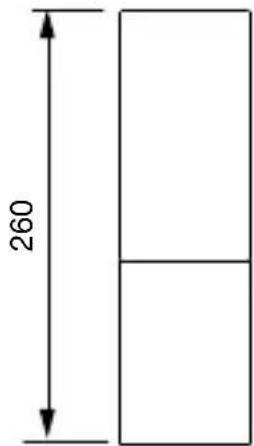
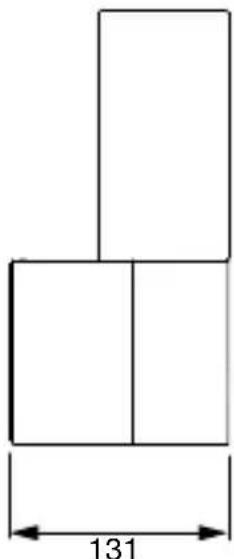
Product dimensions (Fig. 3.3, 3.4)
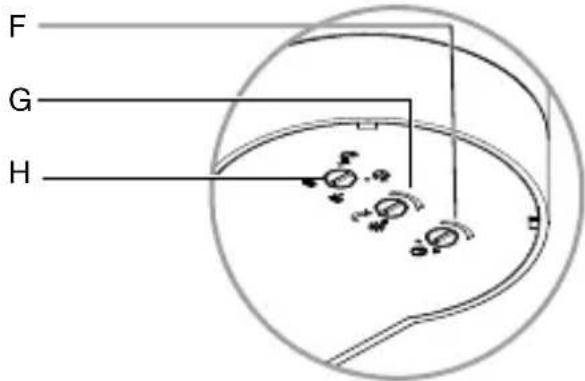
Product parts (Fig. 3.5, 3.6)
A LED light
B Clip
C Connecting terminal
D Wall mount
E Sensor unit (only S)
F Time setting (only S)
G Twilight setting (only S)
H Programme setting (only S)
Luminous intensity distribution (Fig. 3.7)
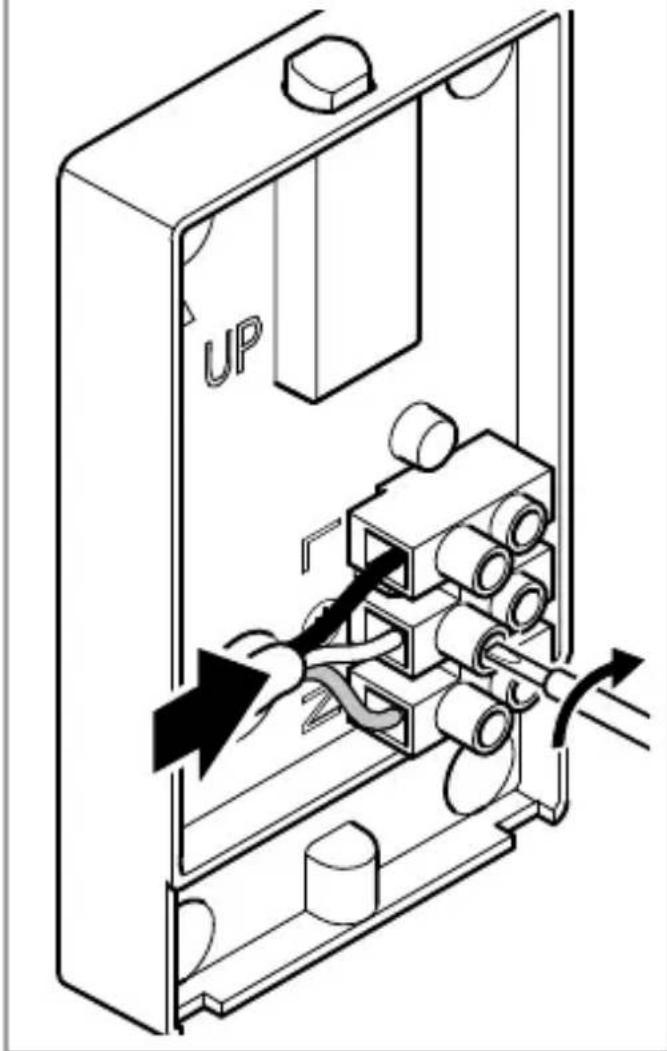
Wiring diagram (Fig. 3.8)
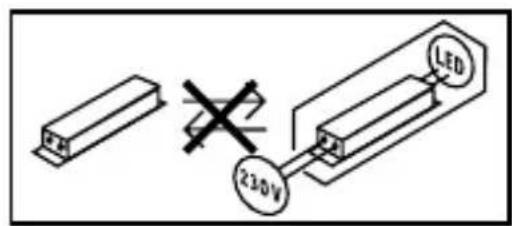
The supply lead is a three-core cable:
L = phase conductor (usually black, brown or grey)
N = neutral conductor (usually blue)
=protective-earthconductor (green/yellow)
A mains switch for switching the product ON and OFF may be installed in the mains supply lead.
Important: The light source of this luminaire is not replaceable; if the light source needs to be replaced (e.g. at the end of its life), replace the complete luminaire.
Technical specifications
-Dimensions (H × W × D):
$$ 2 6 0 \times 7 8 \times 1 3 1 m m $$
- Power supply: 220 - 240 V, 50/60 Hz
-Power consumption ( P_on ): 11.3 W
-Standby (P _sb ) (Sensor):
L605 S: 0.50 W
- Luminous flux: 729 lm
- Efficiency: 64.5 lm/W
-Light temperature:
$$ 3, 0 0 0 \mathrm{K} (\text { warm white }) $$
- Colour-rendering index: R_a=82
-Rated average lifetime:
$$ L 7 0 B 5 0 \text { at } 2 5 ^ {\circ} \mathrm{C}: 3 6, 0 0 0 \text { hrs } $$
-Colour consistency SDCM:
$$ \text { Initial value: } 6 $$
-Luminous intensity distribution:
natural_image
Pure geometric diagram with concentric circles and radial lines, no text or symbols present-Sensor technology:
$$ L 6 0 5 S: \text { passive infrared } $$
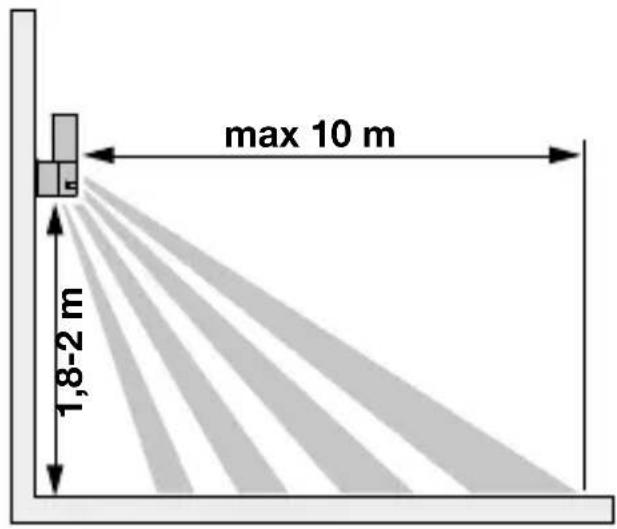
-Angle of coverage: L605 S: 180°
-Detection reach:
$$ L 6 0 5 S: 1 0 m \text { tangential } $$
- Mounting height: 2 m
-Twilight setting:
$$ L 6 0 5 S: 1 0 - 2, 0 0 0 \text { lux } $$
- Night light: L605 S: 10%
-Time setting: L605 S: 5 sec - 15 min
- Ambient temperature: -10°C to +40°C
- IP rating: IP44
- Protection class:
–Energy efficiency class:
This product contains a light source of energy efficiency class „E“.
4. Installation
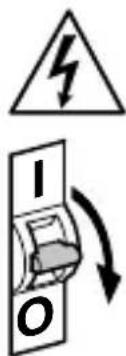
Hazard from electrical power.
Touching live parts can result in electrical shock, burns or death.
- Switch OFF power and interrupt power supply.
- Using a voltage, check to make sure the light is disconnected from the power supply.
- Make sure power supply remains interrupted.
Risk of damage to property!
Mixing up connection leads may produce a short circuit.
- Identify connection leads.
- Re-connect connection leads.
Preparing for installation
- Check all components for damage. Do not use the product if it is damaged.
- Select an appropriate site to install the product.
-Take reach into consideration. (Fig. 4.1)
-Take reach and motion detection into consideration. (Fig. 4.2/4.3)
-Vibration-free.
-No obstacles in detection zone.
-Not in explosive atmospheres.
-Not on normally flammable surfaces.
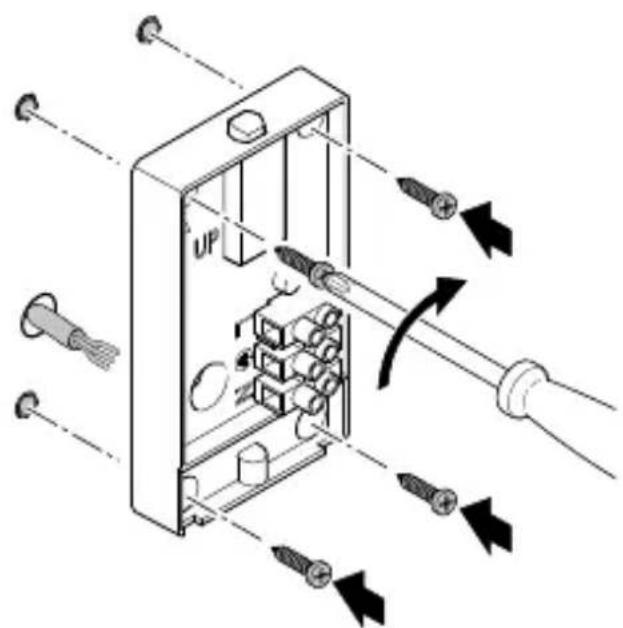
Mounting procedure
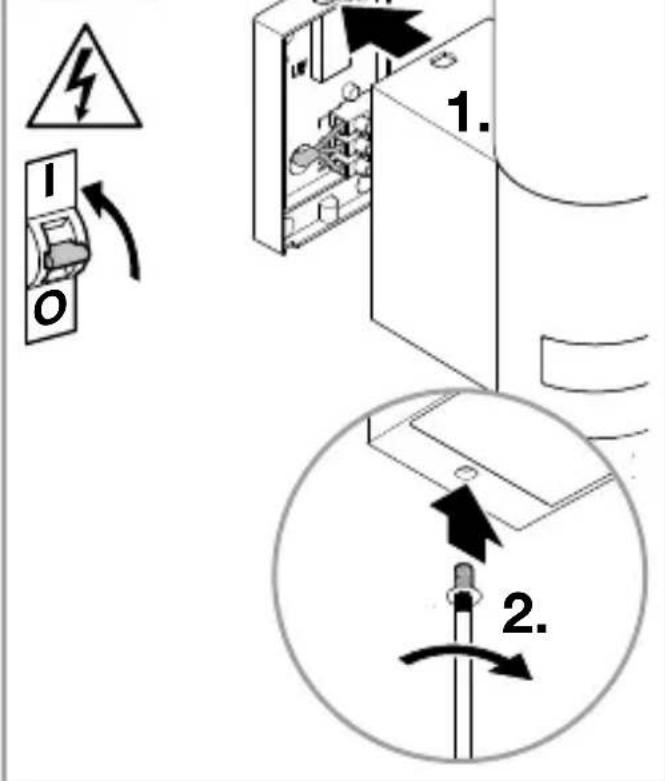
- Check to make sure the power supply is switched OFF. (Fig. 3.8)
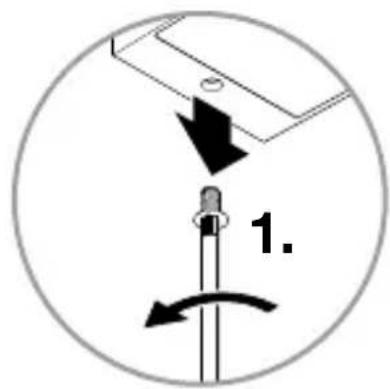
- Unscrew locking screw. (Fig. 4.4)
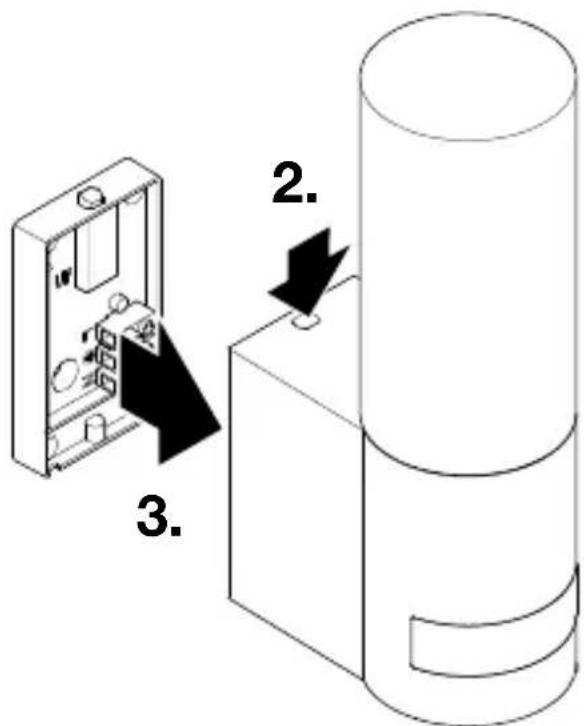
- Disconnect light from the wall mount by pressing the clip. (Fig. 4.4)
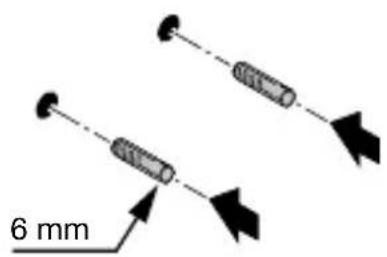
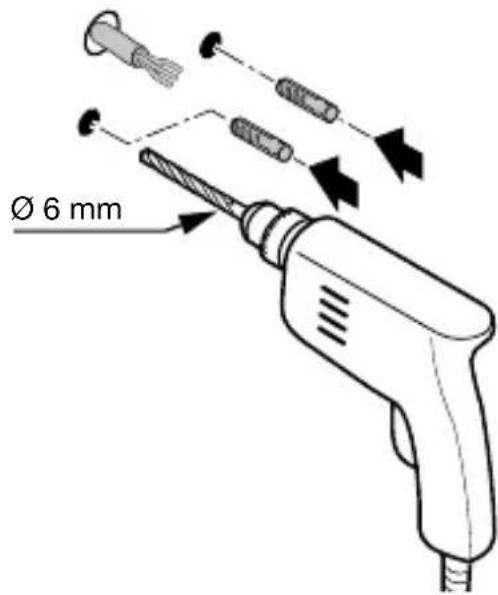
• Mark drill holes. (Fig. 4.5) - Drill holes (∅ 6 mm) and fit wall plugs. (Fig. 4.6)
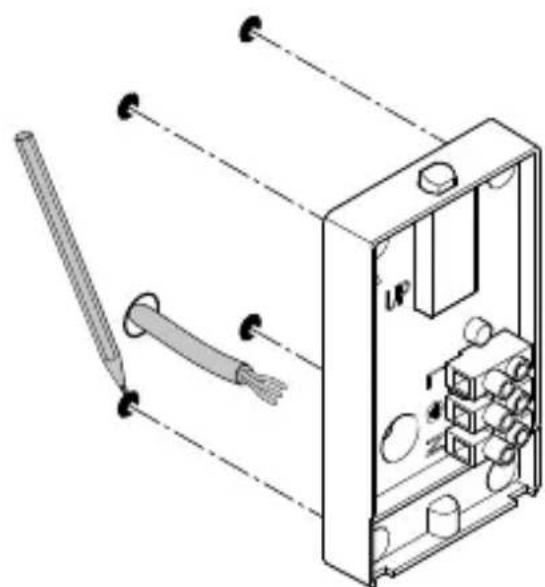
- Firmly screw wall mount into place. (Fig. 4.7)
- Connect conductors as shown in the wiring diagram. (Fig. 4.8/3.8)
- Fit light on the wall mount. (Fig. 4.9)
- Tighten locking screw. (Fig. 4.9)
- Switch ON power supply. (Fig. 4.9)
5. Use L 605 S
Factory settings
-Time setting: 5 seconds
–Twilight setting: daylight mode
-Programme setting: Programme 1
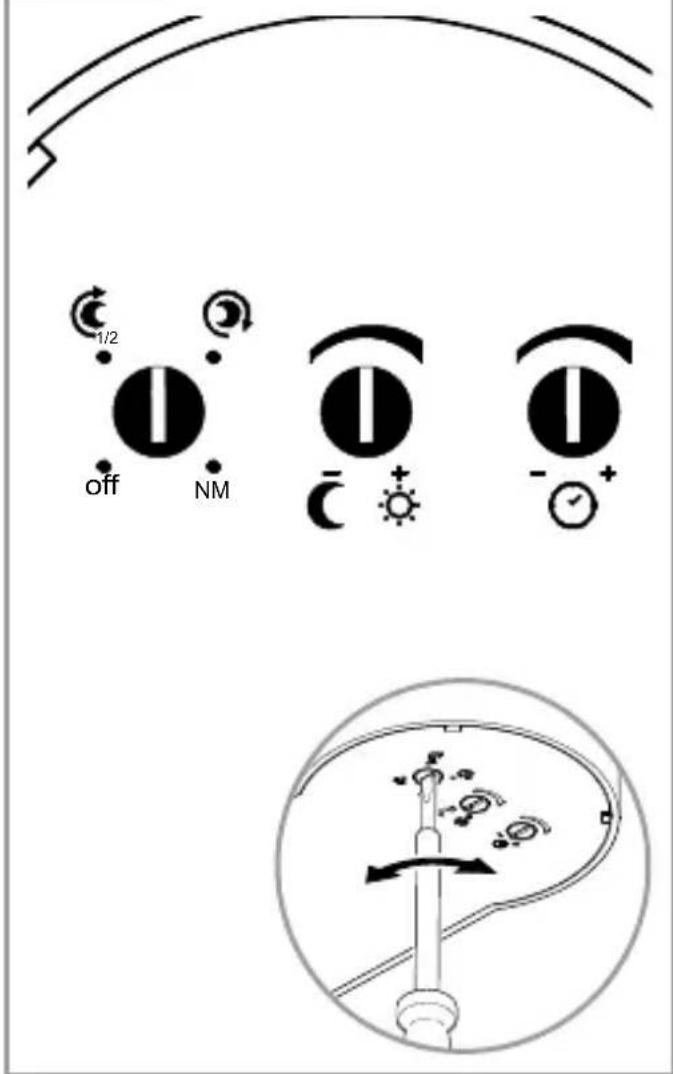
Time setting (Fig. 5.1)
The time (stay-ON time) can be set to any period from approx. 5 seconds to a maximum of 15 minutes. Every movement detected re-activates the light.
Twilight setting (Fig. 5.1)
The brightness response threshold (twilight) can be infinitely varied from approx. 10 to 2000 lux.
- daylight mode (depending on ambient light level)
- € night-time operation (approx. 10 lux)
Programme setting (programme 1-4) (Fig. 5.1)
- With soft light start, light output is slowly increased to 100% when the light is switched ON, slowly reduced when the light is switched OFF.
-Night light is continuous night-time illumination at approx. 10% light output. Light is switched to 100% output when movement is identified in the detection zone. The light then switches back to night light.

Programme 1 Standard programme
-Soft light start.
-No night light.

Programme 2 User-friendly economy programme
-Soft light start.
—Night light ON as from a selected brightness response threshold until the middle of the night.
The light contains no integrated clock. The middle of the night is determined by the length of the dark phases. The power supply must not be interrupted during the calibration phase.
—During the first night, the night light remains activated throughout the night. The values are saved even in the event of a mains power failure.
-The values are determined over several nights.

Programme 3 User-friendly programme:
-Soft light start.
—Night light, ON all night as from a selected brightness response threshold.
Programme 4 NM Nightmatic programme
-Soft light start.
-No night light.
-No movement evaluation
Light is switched to 100% output when ambient light level falls below brightness response threshold.
Manual override (Fig. 5.2)
In manual override mode, the light stays ON for 4 hours. Then it returns to sensor mode. Manual override mode is activated at the mains power switch (pressing within 0.2 to 1.0 second).
- Activate: 2 × OFF and 2 × ON.
- Deactivate: 1 × OFF and 1 × ON.
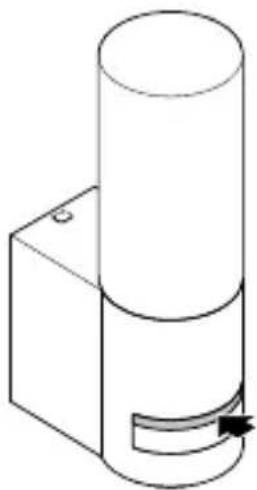
Adjusting the detection zone
To rule out inadvertent triggering or target specific danger spots, the detection zone can be limited with film shrouds. The film shroud is stuck onto the sensor unit.
-Limit the detection zone's max. reach with the top film shroud. (Fig. 5.3) -Limit the horizontal detection zone with film-shroud segments cut to size. (Fig. 5.4/5.5)
6. Cleaning and Maintenance
Hazard from electrical power.
Contact between water and live parts can result in electrical shock, burns or death.
• Light must not be wet-cleaned.
Risk of damage to property!
Using the wrong detergent can damage the light.
- Make sure detergent does not harm the surface.
- Clean light with a soft cloth and mild detergent.
Important: The control gear is not interchangeable.
7. Troubleshooting
Light does not switch ON.
-Fuse not switched ON or faulty.
- Switch ON fuse.
- Change faulty fuse.
-Break in wiring.
- Check wiring with voltage tester.
-Short circuit in mains power supply lead.
- Check connections.
-Mains switch OFF.
- Switch ON mains switch.
–Wrong twilight setting selected.
- Re-set brightness response threshold
–Light source faulty.
- The light source cannot be changed. Completely replace light.
Light does not switch OFF.
-Continued movement within the detection zone.
- Check detection zone.
- If necessary, limit detection zone.
-Night light selected.
- Select programme without night light.
Light switches ON without any identifiable movement.
-Install light at a non-vibrating site.
- Securely mount enclosure.
–Movement occurring, but is not identified by the observer (e.g. movement behind wall, movement of a small object in immediate light vicinity.)
- Check detection zone.
8. Disposal
Electrical and electronic equipment, accessories and packaging must be recycled in an environmentally compatible manner.
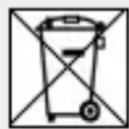
Do not dispose of electrical and electronic equipment as domestic waste.
EU countries only:
Under the current European Directive on Waste Electrical and Electronic Equipment and its implementation in national law, electrical and electronic equipment no longer suitable for use must be collected separately and recycled in an environmentally compatible manner.
9. Manufacturer's Warranty
This Steinel product has been manufactured with utmost care, tested for proper operation and safety and then subjected to random sample inspection. Steinel guarantees that it is in perfect condition and proper working order. The warranty period is 36 months and starts on he date of sale to the consumer. We will remedy defects caused by material flaws or manufacturing faults. The warranty will be met by repair or replacement of defective parts at our own discretion. The warranty shall not cover damage to wear parts, damage or defects caused by improper treatment or maintenance. Further consequential damage to other objects shall be excluded.
Claims under the warranty will only be accepted if the unit is sent fully assembled and well-packed with a brief description of the fault, a receipt or invoice (date
of purchase and dealer's stamp) to the appropriate Service Centre.
Repair service:
If defects occur outside the warranty period or are not covered by the warranty, ask your nearest service station for the possibility of repair.

FR
-Dimensions (H × I × P) :
$$ 2 6 0 \times 7 8 \times 1 3 1 m m $$
natural_image
Pure geometric diagram with concentric circles and grid lines, no text or symbols presentProgramme 3 programme confort
Programme 4 programme Nightmatic
= aarde (groen/geel)
natural_image
Symmetrical geometric pattern with intersecting circles on a grid background (no text or symbols)-Sensortechniek:
(programma 1-4) (afb. 5.1)
natural_image
Pure geometric diagram with intersecting circles and grid lines, no text or symbols presentnatural_image
Geometric diagram with two overlapping circles on a grid background (no text or symbols)natural_image
Pure geometric diagram with intersecting circles and grid lines, no text or symbols present● Programa 4 NM Programa Nightmatic
natural_image
Geometric diagram with two overlapping circles centered on a grid, no text or symbols present-Sensorteknik: L605 S: passiv-infraröd
natural_image
Pure geometric diagram with intersecting circles and grid lines, no text or symbols present- Sensorteknik: L605 S: Passiv infrarød
natural_image
Pure geometric diagram with intersecting circles and grid lines, no text or symbols presentnatural_image
Geometric diagram with two overlapping circles on a Cartesian coordinate grid (no text or labels)-Sensorteknologi:
L605 S: Passiv-infrarød
Programinnstilling (program 1-4) (ill. 5.1)
-Med softstart reguleres lyset sakte opp 100 % lyseffekt når lampen slås på, og reguleres langsomt ned når lampen slås av.
-Nattlys er konstant belysning om natten med ca. 10 % lyseffekt. Ved bevegelse i dekningsområdet kobles lyset inn med 100 % lyseffekt. Deretter kobles enheten om til nattlys igjen.

Program 1 Standardprogram
-Softstart.
-Ikke nattlys.
Program 2 Komfort-spareprogram
Permanent lys (ill. 5.2)
natural_image
Pure geometric diagram with intersecting circles and grid lines, no text or symbols presentProgram 4 Nightmatic program
-Méretek (Ma × Sz × Mé):
$$ 2 6 0 \times 7 8 \times 1 3 1 m m $$
natural_image
Geometric diagram with intersecting circles and grid lines, no text or symbols present-Érzékeléstechnika:
Program 1 Alapprogram
-Lágy bekapcsolás.
natural_image
Pure geometric diagram with intersecting circles and grid lines, no text or symbols presentProgram 4 Program Nightmatic
natural_image
Pure geometric diagram with intersecting circles and grid lines, no text or symbols present-Senzorová technológia:
Program 4 Program Nightmatic
-Wymiary (W × S × G):
$$ 2 6 0 \times 7 8 \times 1 3 1 m m $$
natural_image
Pure geometric diagram with intersecting circles and grid lines, no text or symbols presentProgram 4 program Nightmatic
Date tehnice
-Dimensiuni (h × I × A):
-Alimentare de la retea: 220 - 240 V, 50/60 Hz
-Consum de putere (P on ): 11,3 W
-Standby ( Psb ) (senzor):
L605 S: 0,50 W
$$ 2 6 0 \times 7 8 \times 1 3 1 m m $$
- Flux luminos: 729 lm
natural_image
Pure geometric diagram with intersecting circles and grid lines, no text or symbols present-Tehnologie cu senzori: L605 S: infrarosu pasiv
Program 1 Program standard
Program 3 Program confort
Program 4 Program Nightmatic
natural_image
Pure geometric diagram with intersecting circles and grid lines, no text or symbols present-Senzorska tehnika:
natural_image
Pure geometric diagram with intersecting circles and grid lines, no text or symbols present-Senzorska tehnika:
L605 S: pasivna infracrvena
- Kut detekcije: L605 S: 180°
-Domet detekcije:
L605 S: 10 m tangencijalno
– Visina montaže: L605 S: 2 m
Program 4 program Nightmatic
natural_image
Pure geometric diagram with intersecting circles and grid lines, no text or symbols present-Anduritehnika:
L605 S: passiivne infrapuna
- Tuvastusnurk: L605 S: 180°
-Tuvastusraadius:
L605 S: 10 m, tangentsiaalne
Techniniai duomenys
-Matmenys (A x P x G)
$$ 2 6 0 \times 7 8 \times 1 3 1 m m $$
-Tinklo jungtis: 220–240 V, 50/60 Hz
-Vartojama galia (P _on ): 11,3 W
natural_image
Pure geometric diagram with intersecting circles and grid lines, no text or symbols presentnatural_image
Geometric diagram with two overlapping circles centered on a grid, no text or symbols present-Sensortechnika:
L605 S: Pasīvs-infrasarkans
- Uztveršanas lenkis: L605 S: 180°
natural_image
Pure geometric diagram with intersecting circles and grid lines, no text or symbols presentnatural_image
Pure geometric diagram with intersecting circles and grid lines, no text or symbols present-Сензор:
L605 S: пасивен инфрачервен сензор
natural_image
Geometric diagram showing two overlapping circles on a grid background (no text or symbols)natural_image
World map silhouette in grayscale, showing continents and oceans without any text or labelsContact
www.steinel.de/contact


- DE
- General safety precautions
- Failure to observe these operating instructions presents hazards!
- L 605 S, L 605
- Proper use
- Non-intended use
- Not dimmable
- Operating principle motion detection
- Package contents (Fig. 3.1, 3.2)
- Product dimensions (Fig. 3.3, 3.4)
- Product parts (Fig. 3.5, 3.6)
- Luminous intensity distribution (Fig. 3.7)
- Wiring diagram (Fig. 3.8)
- Technical specifications
- Installation
- Hazard from electrical power.
- Risk of damage to property!
- Preparing for installation
- Mounting procedure
- Use L 605 S
- Factory settings
- Time setting (Fig. 5.1)
- Twilight setting (Fig. 5.1)
- Programme setting (programme 1-4) (Fig. 5.1)
- Programme 1 Standard programme
- Programme 2 User-friendly economy programme
- Programme 3 User-friendly programme:
- Programme 4 NM Nightmatic programme
- Manual override (Fig. 5.2)
- Adjusting the detection zone
- Cleaning and Maintenance
- Troubleshooting
- Light does not switch ON.
- Light does not switch OFF.
- Light switches ON without any identifiable movement.
- Disposal
- EU countries only:
- Manufacturer's Warranty
- Repair service:
- FR
- Programme 3 programme confort
- Programme 4 programme Nightmatic
- (programma 1-4) (afb. 5.1)
- ● Programa 4 NM Programa Nightmatic
- Programinnstilling (program 1-4) (ill. 5.1)
- Program 1 Standardprogram
- Program 2 Komfort-spareprogram
- Permanent lys (ill. 5.2)
- Program 4 Nightmatic program
- Program 1 Alapprogram
- Program 4 Program Nightmatic
- Date tehnice
- Program 1 Program standard
- Program 3 Program confort
- Techniniai duomenys
- Contact
Brand : STEINEL
Model : L 605 S
Category : Lighting