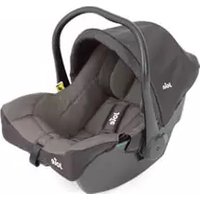
iSpin Safe - Car seat Joie - Free user manual and instructions
Find the device manual for free iSpin Safe Joie in PDF.
User questions about iSpin Safe Joie
0 question about this device. Answer the ones you know or ask your own.
Ask a new question about this device
Download the instructions for your Car seat in PDF format for free! Find your manual iSpin Safe - Joie and take your electronic device back in hand. On this page are published all the documents necessary for the use of your device. iSpin Safe by Joie.
USER MANUAL iSpin Safe Joie
enhanced child restraint
GB Instruction Manual
PT Manual de instruções
es Manual de instrucciones
FR Mode d'emploi
NL Handleiding
Manuale di istruzioni
Bedienungsanleitung
SV Bruksanvisning
EL Eyyepipio oyniw xponc
PL Instrukcja obstugi
sk Návod na použitie
Cz Návod k obsslze
Talimat Kilavuzu
RU RykoBoDcTBO no 3Kcnnyatau
DA Brugervejledning
AR
ET Kasutusjuhend
Fi Kayttoopaes
Lietošanas
rokasgramata
LT Naudiojimo instrukcija
SL Navodila za uporabo


ECE R129/03: ISO/R2
ECE R129/03: i-Size
GB
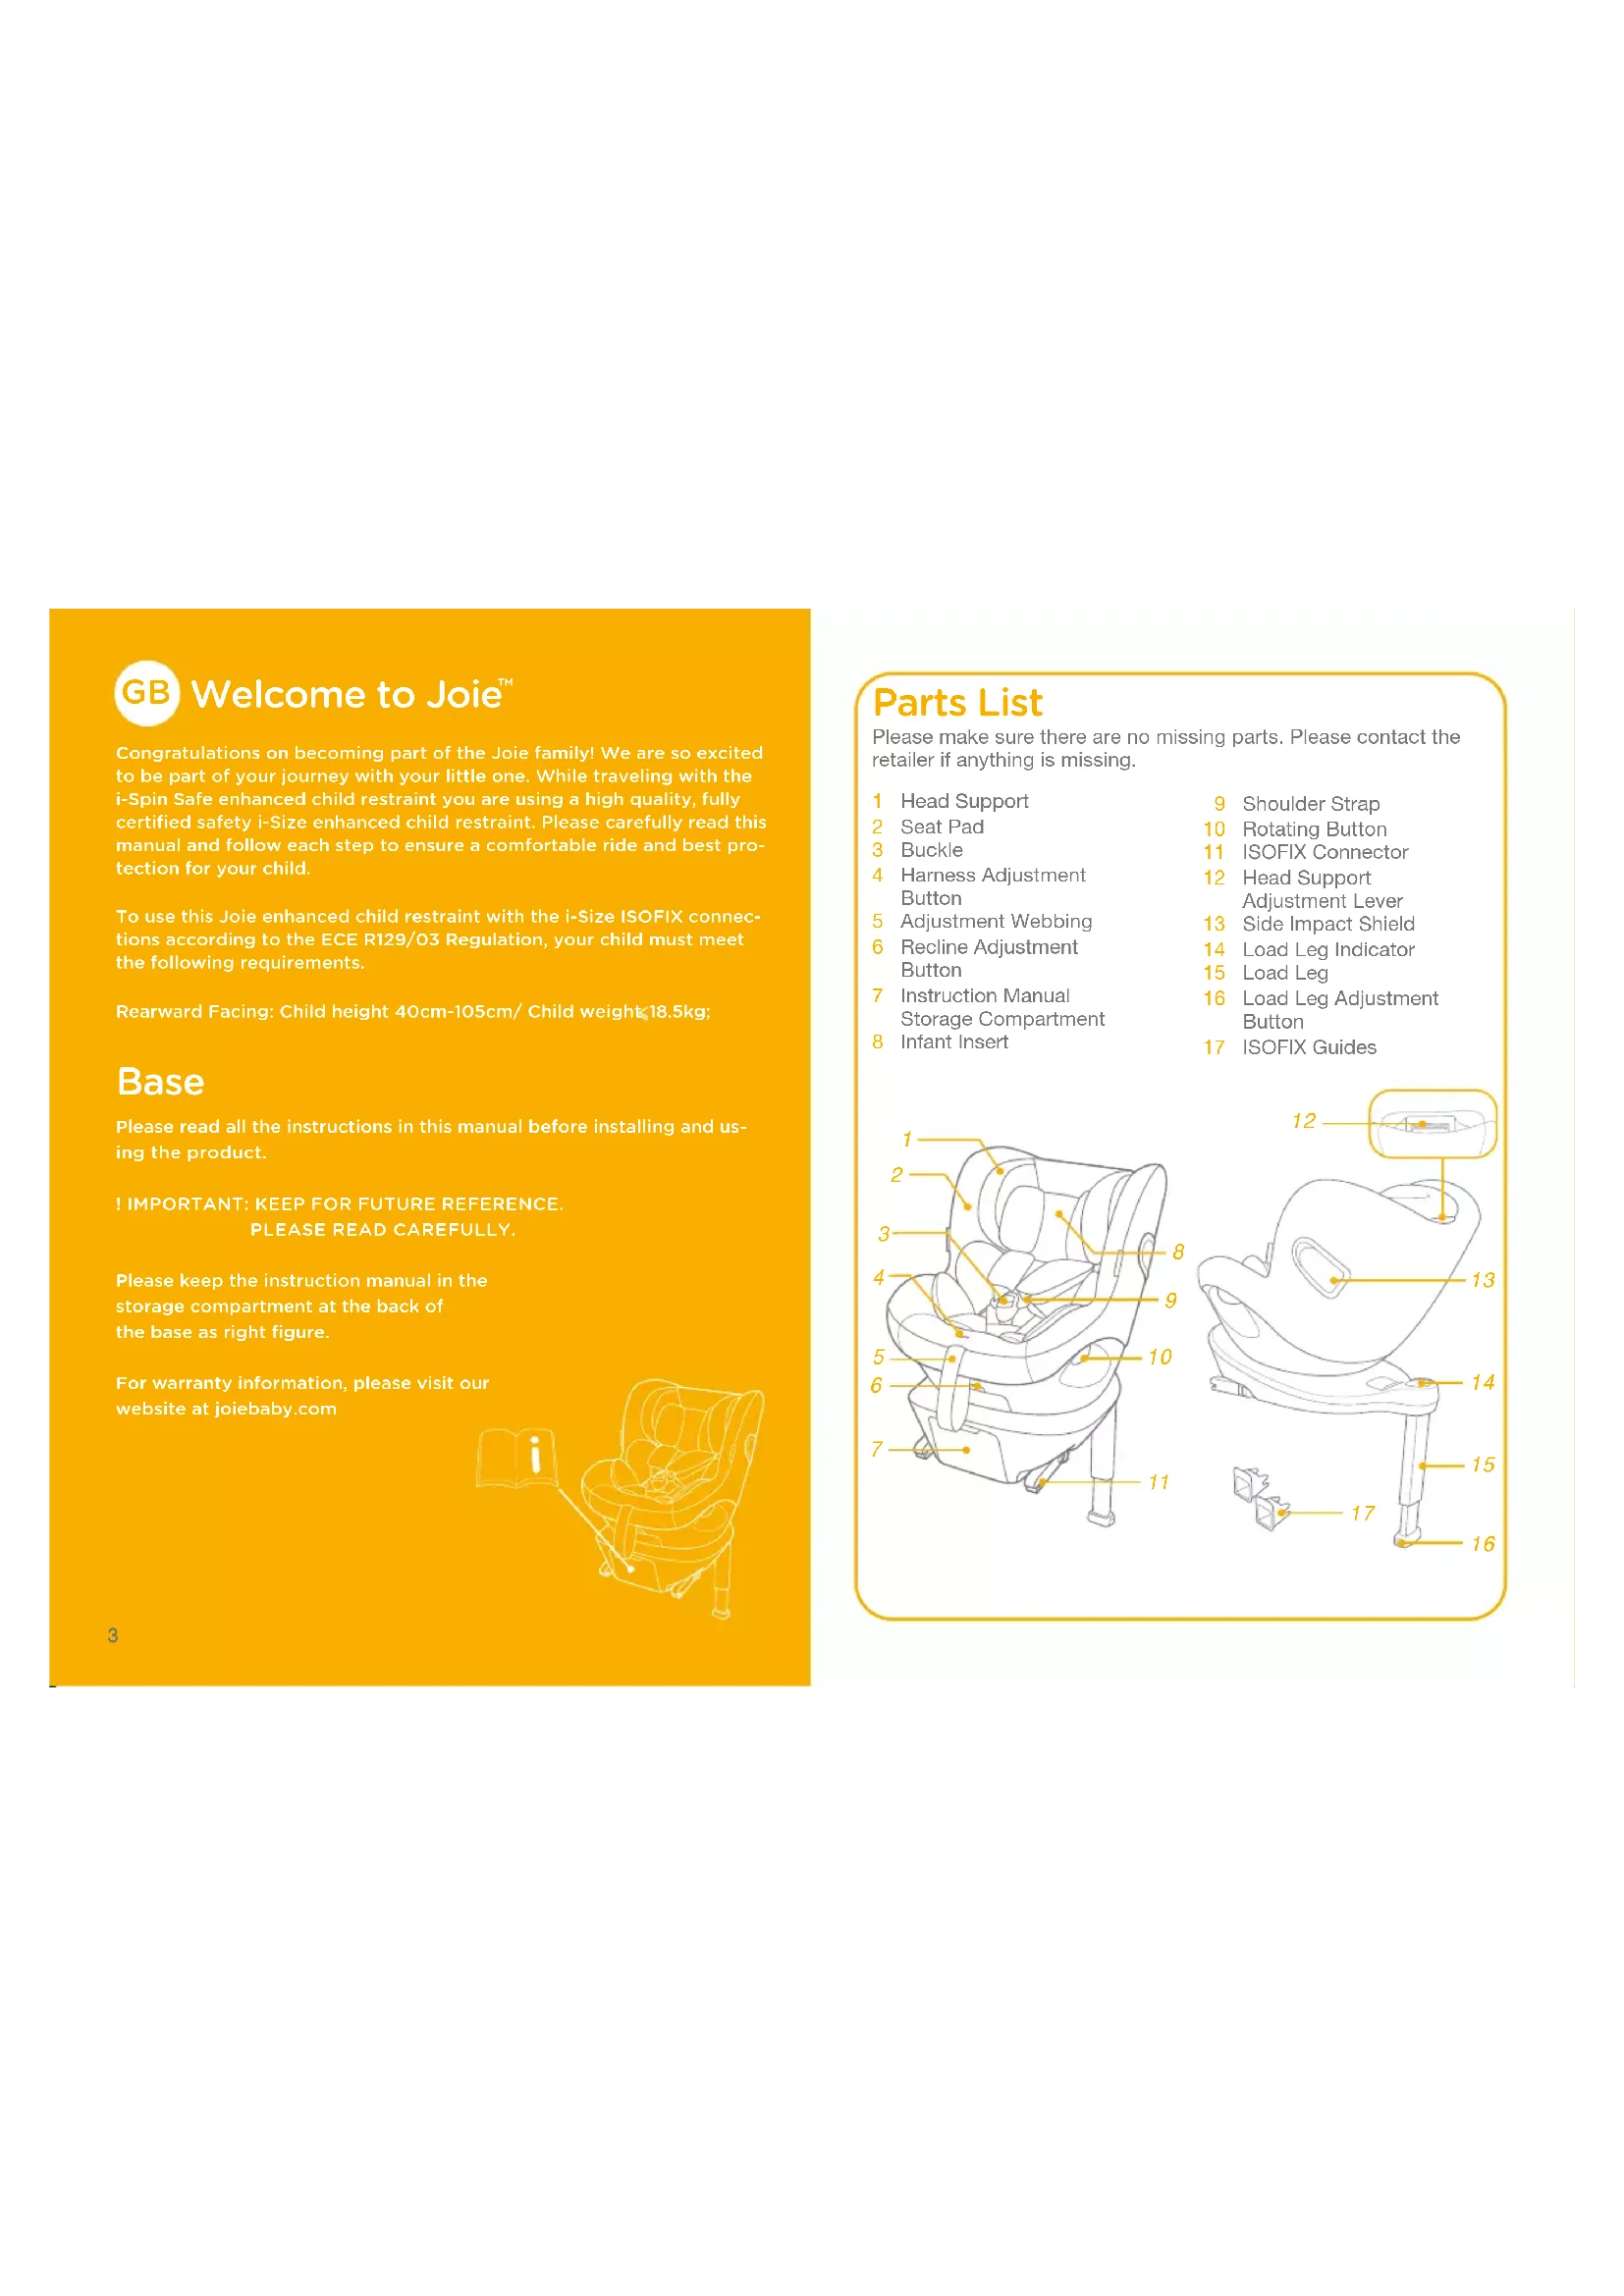
Welcome to Joie
Congratulations on becoming part of the Joie family! We are so excited to be part of your journey with your little one. While traveling with the i-Spin Safe enhanced child restraint you are using a high quality, fully certified safety I-Size enhanced child restraint. Please carefully read this manual and follow each step to ensure a comfortable ride and best protection for your child.
To use this Joie enhanced child restraint with the i-Size ISOFIX connections according to the ECE R129/O3 Regulation, your child must meet the following requirements.
Rearward Facing: Child height 40cm-105cm/ Child weight ≤ 18.5 kg ;
Base
Please read all the instructions in this manual before installing and using the product.
!IMPORTANT: KEEP FOR FUTURE REFERENCE. PLEASE READ CAREFULLY.
Please keep the instruction manual in the storage compartment at the back of the base as right figure.
For warranty information, please visit our website at joiebaby.com

Parts List
Please make sure there are no missing parts. Please contact the retailer if anything is missing.
1 Head Support
2 Seat Pad
3 Buckle
4 Harness Adjustment Button
5 Adjustment Webbing
6 Recline Adjustment Button
7 Instruction Manual Storage Compartment
8 Infant Insert
9 Shoulder Strap
10 Rotating Button
11 ISOFIX Connector
12 Head Support Adjustment Lc
13 Side Impact Shield
14 Load Leg Indicator
15 Load Leg
16 Load Leg Adjustment Button
17 ISOFIX Guides

WARNING
Do take care so that the rigid items and plastic parts of a enhanced child restraint shall be so located and installed that they are not liable to become trapped by a moveable seat or in a door of the vehicle.
DO NOT use the rearward facing enhanced child restraint systems in seating positions where there is an active frontal airbag installed. Death or serious injury may occur.
! To use this enhanced child restraint with the ISOFIX connections according to the ECE R129/03 Regulation, your child must meet the following requirements. Rearward Facing: Child height 40cm-105cm/ Child weight ≤slant 18.5kg
Any support-leg should be in contact with the vehicle floor and any straps restraining the child should be adjusted to the child's body. The straps should not be twisted.
! After your child is placed in this enhanced child restraint, the safety belt must be used correctly, and ensure that any lap strap is worn low down, so that the pelvis is firmly engaged, shall be stressed.
This enhanced child restraint should be replaced when it has been subject to violent stresses in an accident. An accident can cause damage to them that you cannot see.
WARNING
! Concern the danger of making any alterations or additions to the device without the approval of the competent authority, and a danger of not following closely the installation instructions provided by the enhanced child restraint manufacturer.
Please keep this enhanced child restraint away from sunlight, otherwise it may be too hot for child's skin. Always touch the enhanced child restraint before placing child in it.
Child is not left in the enhanced child restraint system unattended.
! Any luggage or other objects liable to cause injuries in the event of a collision shall be properly secured.
! The enhanced child restraint shall not be used without the soft goods.
The soft goods should not be replaced with any other than the one recommended by the manufacturer, because the soft goods constitutes an integral part of the restraint performance.
DO NOT use any load bearing contact points other than those described in the instructions and marked on the enhanced child restraint.
Please check before you purchase this enhanced child restraint to make sure it can be installed properly in your vehicle.
WARNING
NO enhanced child restraint can guarantee full protection from injury in an accident. However, proper use of this enhanced child restraint will reduce the risk of serious injury or death to your child.
DO NOT install this enhanced child restraint without following the instructions in this manual or you may put your child at serious risk of injury or death.
DO NOT use this enhanced child restraint if it has damaged or missing parts.
DO NOT have your child in large/oversized clothes because this may prevent your child from being properly and securely fastened by the shoulder harness straps and the crotch strap between the legs.
DO NOT leave this enhanced child restraint or other items unbelted or unsecured in your vehicle because an unsecured enhanced child restraint can be thrown around and may injure occupants in a sharp turn, sudden stop, or collision.
NEVER use a second-hand enhanced child restraint or an enhanced child restraint whose history you do not know because it may have structural damage that compromises your child's safety.
NEVER use ropes or any other substitutes to secure enhanced child restraint in vehicle or to secure child into enhanced child restraint.
WARNING
! Be sure that the enhanced child restraint is installed in such a way that no part of it interferes with movable seats or in the operation of vehicle doors.
Consult the distributor for issues concerning maintenance, repair and part replacement.
! Remove this enhanced child restraint from the vehicle seat when it is not in use for a long period of time.
! The parts of this enhanced child restraint should not be lubricated in any way.
! Always secure child in enhanced child restraint, even on short trips, as this is when most accidents occur.
! Frequently check the ISOFIX guides for dirt and clean them if necessary. Reliability can be effected by ingress of dirt, dust, food particles etc.
DO NOT put anything other than the recommended inner cushions in this enhanced child restraint.
! The child restraint may not fit in all approved vehicles when used in one of these positions.
Emergency
In case of emergency or accidents, it is most important to have your child taken care of with first aid and medical treatment immediately.
Product Information
"i-Size" (Integral Universal ISOFIX Enhanced Child Restraint Systems) is a category of Enhanced Child Restraint System for use in all i-Size seating position of a vehicle.
- According to the ECE R129/03 Regulation, the product is a Universal ISOFIX Class ISO/R2 enhanced child restraint and should be fitted using the ISOFIX connections.
- This is an "i-Size" Enhanced Child Restraint System. It is approved according to Regulation No.129, for use in, i-Size compatible vehicle seating positions as indicated by vehicle manufacturers in the vehicle users' manual.
- If in doubt, consult either the Enhanced Child Restraint System manufacturer or the retailer.
Materials Plastics, metal, fabrics
Patent No. Patents pending
Concerns on Installation
see images 1 - 2


3

2
Installation Mode

Installing the Base
see images 9-12
! After placing the base on the vehicle seat, pull the load leg downward to floor.

! Insert ISOFIX guides to assist with installation.
There are multiple adjustable positions for ISOFIX. Whilst depressing the ISOFIX adjuster button -1, pull out the ISOFIX connectors.
Make sure that both ISOFIX connectors are securely attached to their ISOFIX anchor points. The colors of the indicators on both ISOFIX connectors should be completely green.
! After successfully installing the ISOFIX connectors, press the ISOFIX adjustment buttons again while pushing the seat back until it comes in contact with the vehicle seat back.


! After attaching the ISOFIX, pull the load leg downward to floor. When the load leg indicator shows green, the load leg is installed correctly.
! Always make sure the support load leg has direct contact with the floor and is in locked position even when the child is not in it.
! Squeeze the load leg releasing button, then adjust the load leg length.
The load leg has multiple positions. When the load leg indicator shows red this means the load leg is in the wrong position.
Make sure the load leg is in full contact with the vehicle floor pan. Red means it is installed incorrectly.
! Check to make sure the base is securely installed by pulling on both ISOFIX connectors.
The ISOFIX connectors must be attached and locked onto the ISOFIX anchor points.
The load leg must be installed correctly with green indicator. 9-2


Removing the base
To remove from the vehicle press the ISOFIX adjuster button -1 and pull the base back from the seat. 10-2
Then press and release the connectors from the vehicle's ISOFIX.
To prevent damage during transit, press the ISOFIX adjuster button 13-1 and fold the connector completely. 13-2


Use Side Impact Shield
see images 16 - 16
! Ensure the side impact protection shield is locked in the open position for maximum side impact safety.
1. Side impact shields are automatically activated when the harness buckle is moved back into position and the harness is tightened, both sides will be opened automatically. 13-1&13-2
IMPORTANT: Please note that unfolding the side impact protection elements does NOT mean that the child is already restrained tight enough.
2. The side impact shield opposite the vehicle door can be closed to allow more seating space, if needed. The side closest to the vehicle exterior should always be in the open position. 10-1&16-2
3. The side impact can be manually opened as shown on 15


Recline Adjustment
see images 1-1
Squeeze the recline adjustment button to adjust the enhanced child restraint to the proper position. The recline angles are shown as

Please recheck the load leg position after reclining. There are 6 recline positions for rear facing mode.

Height Adjustment
for Head Support and Shoulder Harnesses
see images 18 - 20
-
Please adjust the head support and check if the shoulder harnesses are at the correct height according to 18
When used rear facing, the shoulder harness height must be even with or below the top of child's shoulders. -
Squeeze the head support adjustment lever, meanwhile pull up or push down on the head support until it snaps into one of the 6 positions. The head support positions are shown as


Using in the Rear Facing Mode
Child height 40cm-105cm/Child weight ≤slant 18.5kg / infant - 4 years old
see images 2 - 6
Please install the enhanced child restraint on the rear vehicle seat, and then put the child in the enhanced child restraint.
1. Press the ISOFIX adjuster button -1 and pull the base back from the vehicle seat. -2
2. Press the rotating button to rotate for easier side loading/unloading of the child, then rotate the seat to the rear facing position. 28
Press the rotating button on either side to rotate the enhanced child restraint.
Always make sure the seat is in locked position even when the child is not in it.


- After successfully installing the ISOFIX connectors, press the ISOFIX adjustment buttons again while pushing the seat back until it comes in contact with the vehicle seat back. -18-2
The ISOFIX connectors must be attached and locked onto the ISOFIX anchor points.
The load leg must be installed correctly with green indicator.


Securing Child
- Press the webbing adjustment button, while pulling out the shoulder harnesses to the desired (Pull from below the fixed shoulder pads to lengthen) length.
- Unlock the buckle of the harnesses by pressing the red button.
- Fix the buckles on the both sides of the seat shown as which located on the both sides of seat to make placing the child in rear facing mode more convenient.
- Please make sure the infant insert has the wedge assembled before using it for infant.


We recommend using the full infant insert while the baby is under 60cm and can be used until they outgrow the insert. The infant insert increases side impact protection.
- Place the child into the enhanced child restraint and pass both arms through the harnesses.
! After the child is seated, recheck whether the shoulder harnesses are at the proper height. - Engage the buckle. Please refer to
30


7.Pull down the adjustment webbing and adjust it to the proper length to make sure your child is properly secured.
Always keep child secured in harness and properly tightened by removing any slack.

Detach Soft Goods
see images -
Press the red button to disengage the buckle.
Follow steps to detach soft goods.
To re-attach the soft goods please repeat the above steps in the reverse step.


Care and Maintenance
! After removing the wedge from the insert, please store it somewhere that the child cannot access it.
Please wash the seat cover and inner padding with cold water under 30^
Do not iron the soft goods.
Do not bleach or dry clean the soft goods.
! Do not use undiluted detergents, gasoline or other organic solvent to wash the enhanced child restraint or base. It may cause damage to the enhanced child restraint.
Do not wring out the seat cover and inner padding to dry. It may leave the seat cover and inner padding with wrinkles.
Please hang dry the seat cover and inner padding in the shade.
Please remove the enhanced child restraint and base from the vehicle seat if not in use for a long period of time. Put the enhanced child restraint in a cool, dry place where your child cannot access it.
Do not tamper with the harness connectors during cleaning.


Bem-vindo à Joie
Bakatvand: Barnets langd 40cm-105cm/barnets vikt 18,5kg;
Bas
Upe3BbIaHbIe cHTyaIIN
B cnyuae ype3bvyahno npocseCTBn nn abapnHOn cnTuacnn cJeNyET He3aMeDInTeNbHO Oka3aTb pe6eHky nepByIO nOmoU b n o6paTntbc K Bpauy.
HΦopMaçn o6 n3denn

i-Size (ynyuHHeHHBe Detckne yapedKbHaOuue cncTeMbI Integral Universal ISOFIX) -30 kaTepnry ynyuWeHHbIX Detcknx ydepKbAoux CnCTEm, npEHa3HaueHHbIX dNra NcNoJIb3OBaHn BO BCex nONoxeHHx ABTOmBnBbIX cnDeHn Ttna i-Size.
- Cornacno noIoxeHnM npaBn ECE R129/03 daHHoe n3deJnne YnraTcra yHBepcaNbHbIM yNyuWeHHbIM dTeKm yDePknBaOuM ycPoIcTBOM C KpeJIeHem ISOFIX Knacca ISO/R2, KoTopoe ycTaHaBnBaETc npi nomoun KpeJIeHn ISOFIX.
2.3To ynyuHHeOe DetCKoe yedeKINbaHOoee yctpoCTBO Tnna i-Size.OHOYTBepXdeHO PpaBnIOM No 129 dIyraHOBKn Ha aBTOMOBnHBbIX CnDEhBX, COBmecTmBbIX CO CTaHApTOM "i-Size", corlacho INHΦopMaUIN PpOn3BODHTeNeA bTOMoBnEe, KOTOPaR cOdepXNTcB BYPOKOCTBE K ABTOMOBnIaM.
3.Bcnyae noBHeHnO comHeHn oBaauTebc K npOn3BOuNTeJIO nnnpoabuy ynyuueHHoro Detckoro ydepKBAUoero yctpoaCTBa.
I3eae TcKoe aTOKpeCno
Mоděн b C1801Z/ C1801W (i-Spin Safe)
IpeHa3NaYeHO dna deten poCTOMOT 40 cm do 105cm, MaKcImaJIbHO donyctmam Hapy3ka Ha n3dennne 18,5 kT
MaTePnAJIbI INaCTNK, MetaJI, TKAHb
Homep nateHTa NateHTb oOoPmraTc
-
China Bambino Prezioso Co., Ltd
-
China Wonderland Nursinggoods Co.,LTD
*CM.N3rTOBUNTeHnHa 3TNKETKe N3denn
**Ha Kopo6ke Bo3Moxkha MapKupOBka Allison Baby (eBponeckoe
noDpa3deneHne KOMNaHHN)
294 295
Oco6eHHoCTn yctaHOBKn
CM.pucyHKn 1-2


Cnocob yctaHOBKn

YCTaHOBka OCHOBaHnA
CM.pncyHKn

!IocTaBbTe OCHOBAHHe Ha ABTOMO6nIbHOe CnDEHBe, BblBnHbTe ONOpHyO HOxKy BHN3 Do NOHa.

!BCTaBtE HnPaBnIouHue ISOFIX, KOToPbIe NOMOry BAm BblIOJIHNHTb yctaHOkY.4-1
!DocTyHNO HeckoNbKO NoJIOKeHnpeynipobKn ISOFIX.HaKImaHaKhONkyISOFIX-1,n3BNeKeTeΦkcatopblISOFIX.8-2
!y6eINTeB TOM,TO 06a
ΦKCaTopa ISOFIX HAdexHo
3aKpeNneHbI B TOkax KpeNneHn
ISOFIX.UBet INdikatopOB 6oONX
ΦKCaTopoB ISOFIXdoJKeH 6bITb
3eJIeHbIM.
3aBepuB yctAHOBky KpennenH hISOFIX, HAKMTe Ha KHONK peryTApOBo ISOFIX nobTopHO npKMITE cndHeBe K CnHKe Kpecna aBTOMo6nI.


!PnKpENBΦKcTopbISOFIX, onyctnte onopHyIO HOKKy Do nOJa. Ecnm HndkatOp onopHoHoxKn 3eIeHbI,3TO 3HaHT,4TO ONOPHaHOKKa yCTaHOBJeHa npaBnblHo.
063aTeNbHO npOBepnTe, TTo6bI onOpHn HOxKa BcERda ynpanacB B nOaBTOMoBnna HbJa 3aΦKcnpoBaHa, He3aBnCmO OT HaxOXdEHHB ynyuHem DetCKOM abTOKpecne peBeHka.
I CoKMMTe KHOKNyФHCKaToppa OOnOPHO HOKKN IO TpepynpyTe DINHY HOKKN.
BOnopHoh HOKKe IMeTcR HeckoIbKO nOIOKeHH. Ecnn HdNkATOp ONOpHO HOKKn KpaCHbI, 3TO 3HaHT, YTO ONOpHaHOXKa HAXODITCB HEnpabunbHOM IIOJOKeHH.
Y6eHntecb, YTO onopnHa HOKKa
NtIOHOCTbO yIINpaETcB NtO
ABTOMo6nIa. KpaChbI cBET
O3Haayet He npabInbHyIO yCTaHOBky.
!PpOeBpTeHaIeXHocTbYcTaHOBKn OCHOBaHH,NOTAHyVB3a06a 1KCaTopaISOFIX.
!ΦKCaTOpbI ISOFIX Heo6xOJIM03aKpeNTb B ToqKax KpeNJIeHINISOFIX.9-1
298 267an3eHbIM. 9-2


CHaTne OCHOBaHHa
YTO6bI N3BnEChN3 ABTOMo6nHn, HAKMITE Ha KHOKNy peYnTOpa ISOFIX-1 nNOTAHNTe OCHOBAHne OT CINHKn CnDEhBn ABTOMO6nHn.
10-2
3aTeMaHxMnteNbICBO6OndteФKcTOpblnCnCTeMbI KpENJIENIAISOFIXABTOMO6NJ
Bo n36eKaHne NOBpeXdEHN BO BpEma DnKHeHna HaxMnte Ha KhoNkpy peryIaTopa ISOFIX-1n nonHocTbIO cNoXnTe fKncatop.2


IcnoJb3ObaHne 6OKOBoro 3aunTHoro 3KpaHa
CM.pncyHKn


!yIOCTOBepeBtcebYTO3aunTHbIuTOKaФKcnpOBaH BpackpblOMNOJoxEHn,TO6bIobecneHTbMAKcHMabHyUo3aunTypeEHaOT 60koBbIXyapOB.
1.50KOBbIe 3aUHTbIe 3kpaHbI ABTomATnueckn aKTHBpyIOCTc npn NpeMeueHN nprjXKn peMHeB INCXOHOe NOJKeHne HHaTJKeHnnpemHe, npn 3OM ABtomATnuEcknpackpbBaIOTC oBe cToPOhbl-1
BAXKHAR INHOPMALUNCneJyET yHTbBatb,TOpacknlaDbBAHNE 60KOBbIX3aunTHbIX 3nEmeHTOBHE03haayet,TOpe6EHOKyke3aФнсрOBAHDOCTAOHNO
2.БOKOB3aUNTHbI ΜιTOK Ha npOTIBONIOJHOH O TDBepn ABTOMO6JIY CTOPOHE MOXHO 3aKpbl, YTO6bOCBO6OJNTb DOnONHHTENbHO IpocTpaHCTBO DnpeBcHa.1UOKyHKnC TOPOHb ABTOMO6JIY BcERda DOnJKe HbITb packpbl.1-1
3. BOKOBO 3aunTHbI uHTOKpackpbBaetcBpyHyKAKnoka3aHO Ha pnc.


PerynpoBka haknoHa
Cm.pncyHKn 19-17
COxMnTe KhONky peryIINpOBKn HAKNoHa 16, n yCTaHOBnTe 1yNyuWeHHe OEETCKoe aBTOKpeCNO B HxHKe OIOJKeHne. Yrbl HaKNoHa NOKa3aHb HpaPc.7
Iocne Hacptpoyn yrna HaknoHa npOBepbTe NONOKeHne ONOPHO HOKKN.
BNoIOJKeHmIINOMnoXOyD BnIXeHnIpeDyCMOTpeHO6 No3NnHaKNOHa.


PerynpoBka BbICOTbl
NODRONOBHnKa n NpeeBbIX pemHei
CM.pncyHKN

1.OTperpynyTe noIroIobHnK npOBepbTe npaBnBHoCTb BbICotbl npeBbIX pemHeNo Pnc.18
BpeKIMeJIuOM npOTNB HnPaBHeHnI DnXKeHn NneYeBBIEpeMHn DOJXhbl paCnOlaTbCnHa yPOBHe nnHxke nnepe6eHka.16
2.HaKMTHe Ha pbYar dIpyrNIOBKN NOrONoBHnKa 19I np3TOM NOTAHNE NOrONoBHnK BBepx INN BHn3 TAK, YTO6bl OH 3aueJIKNyNCB OOnHOM n36 NoJoxEHNI. IOnoKeHHa NOrONoBHnKA NOKa3aHb HpNC.


YcTaHOBKa BpeXmE IInCtOM npOTNB HnPaBJIeHnI DnIXKeHnI
(PocTepeBcHa:40-105cm/BecpeBcHa:≤18,5Kr/c MnaJeHcTbAdo4NET)
CM.pncyHKn 1
YcTaHOBInTe yIyUeHHoe DeTCKoe aTOKpeCnO Ha 3aDHee CnDEHbe aTOMObnI. 3aTeM nocAnTe peBeHka B yIyUeHHoe DeTCKoe aTOKpeCnO.
1.HaKMITE Ha KhoNky perynIaTopa ISOFIX-1nNotHHTe OCHOBaHHe OT CINHKn CuDeHbA bTOMO6nla.2
2.HaKMHTe Ha KhoNky NOBOPota, 706bl NOBepHyTB aBTOKpeCNO Dny yO6cTBa NoCAk/N BbICaN pe6EHa c60ky,a 3aTEM NOBepHnTe aBTOKpeCNo B NIOJKeHHe IINOM POTNB HAnpaBHeHr ABXKeHr ABTOMoBnIy.2 n
Hakmte Ha KhoNky nobopoTa c nObo CTOpObHy, 4TO6bI NOBepHyTb yNyUWeHHoe DetCKoe ABtOKpecNo.
063aTeIbHO npOBepaIte, YTO6bl yIyUeHHoe DeTcKoe aBToKpeCNO BcERda 6bIIO 3aOpNKpOBAHO B, He3aBnCmO OT HAXOXdHnB HEm pe6eHka.


- 3aBepuB yctahOBky KpennenHn ISOFIX,HaKMTte Ha KhoNKn peryIaTOpOB ISOFIX noBtOHO npKMMTe CnDHe B KcINHKe Kpecna aBTOMo6nJa-1n24-2
1ΦHKCaTOpbI ISOFIX Heo6xOaHMo3aKpENITb B ToKax KpENNeHINISOFIX.25-1
!PpabnblHo yctaHabnBaIte onOpHyHOHXKcy,HTO6bl INDnKaTOp CTan 3eJeHbIM.2


Фикcaцяpeбeнka
1.HaKmTe Ha KhoNkypeynpovBkpeMHn N BbTiHnTe nIeYeBbpeMHn HA HxKyHIO DNHy(DnyyBeHnHnDnHbIOCTaHbTeCHN3y NOIJIeHuKn)
2. HaxmTe Ha KpaChyIO KHONky IpacTeHnTe npJxKy peMHei
3.3aФнсуTe cOeHx CTOpOH CnDEhpaJxK,paCNoJoxEHHbIe C OeHX CTOpOH CnDEHbI,Ka KnKa3aHO HaPc.,YTObI yDo6He yCaADtB pe6eHa B INoJoxEHIN JInOM IpOTNB HAnpaBJIeHn DBNKeHn.
4.ПepeIcnoIb3OBaHHeM aTOKpeCnaДЯпepeBO3Kn HOBOPOXDeHHOrO y6eIITecb,ЧTO B HEm yCTaHOBNeH KJIIN BKJaIbIiAДЯ HOBOPOXdEHbIX. 2


Pekomehydtca Hcnon3oBaBt BceB bnakldn nnnmndaehpoctomdo60cmnHdoTexnp, noka pebEOHK he nepepactet 3OT bnakldn. BknaDnI dnnmndaeHyeyyuatae3aunrty or yyapdo.
- Nocadne pe6eHb B ynyuHHe eTCKoe ABTOKpeCno n omeCTne 06e pyKn noD peMHn.
!PocainBpe6eHkaB KpeCNO, npOBepbTe npaBnIbHOCTb BblOpa BBICOTb IJIeueBbX pemHei.
6.3acteHTHe npjkky.CM.pnc.

30


7.ПOTЯнITE BHN3peryIpnoBouHbI peMeHbHaHyKHyIOДИNHy,YTO6bI XOPOwO 3aФиксinpoBaTpe6eHka.
063aTeIbHo npIcTeIuBaIte pe6eHka pEmHMy.PemHn DOJXHbI 6bITb XopoIo HAraHyTbI, 6e3 npOBucaHna.
ChyTne TkaHeBbIX DeTaIeN
CM.pucyHKn
HaKMMTe Ha KpachHyIO KHONky,HTO6bl pacCTeRHTb pIpyKKy.
BbnoHnTe Warr, yTo6bl ChrTb TkaHeBbI DeTani.
YtobcbOHaHadeTbTKaHeBbIe DeTaIN,BInONHHTepnBEeHHBe BbIe WArN B OpaTHOMnpAKe.


O6cnyxnbHne n yxo3a n3deJnem
KnH,INBLeueHHb INB KNaIbIa Ia Ia MNaIeHcE B, CneIyET XpaHHTB MecTe, HeIOCTYNHOM Ira DeTei.
!CTnpaTteYexoCnDcHbN BHyTpEHHIOO6NBky BXoJHOB Boe npTeMnepaType He Bblwe 30^
3anpeaaetcraaNTbTKaHHeBbIeTeTann.
3anpeaaetc on6eHnBaTbTKaHeBle DeTaJI N NOBepraTbNX XIMYNUCTKe.
3anpeaaetcnaocnoIb3oBaTbHepa36abNHeHbIeMoOuine cpeCTBa,6EH3HHnDpyrneopraHnuecknepactBOpntEnn dtn CnPKyUnyUheHHoroDeTCKORoABTOKpeCnaNNOnOCHOBAHNA.3To MOKeT npNBecTe N NOBpeXJdeHHO yUnyUHeHHOr DeTCKORo ABTOKpeCna.
He BbIXMaIte YexOn HByTpeHHIO O6NBky CnDEHbY npu cyUke. OT 3TOrHa YexNe HByTpeHHe O6NBKe CnDEHbMyOTBNTbcrCKnaJKN.
BbIeWuBaIte yexon cndeHbI IN BHyTpEHIOO 06NBky Inpocywn B TeHN.
Ecn ynyuHHe DetCKoe aBTOKpeCNo He nCnOJIb3yeTcB TeueHne dntteBHO BpemeHn, CHMaIte ero C cnDEHBaBtOMOBnJI BMeCTe C OCHOBaHNEM. IomeCTte ynyuHHeOE DetCKoe aBTOKpeCNo B npoxlaHoe cyXoe MeCTo, HeNOctyHoe DnA DetTe.
He hapyaate 1eIOCTHOCTb KpennneHn peHHe BO Bpem OYNCTK.


Velkommen til Joie
aagll aal g jgll lalgl 1225 yplall jbln qll
aagll jno aadell Ls Jull calele glil pae jbln g aaiiall
jgalll abll as > npi plll aaiiall
Jus Jus Jus Jus Jus Jus Jus Jus Jus Jus Jus Jus Jus Jus Jus Jus Jus Jus Jus Jus Jus Jus Jus Jus Jus Jus Jus Jus Jus Jus Jus Jus Jus Jus Jus Jus Jus Jus Jus Jus Jus
j 1234567890123456789012345678901234567890123456789012345678901234567890123456789012345678901234567890123456789
1
!
jia jia jia liai iai jia jia jia jia jia
a aaa aaasaaaaaaaaaaaa
Jai jia jiasill jj jj
Jusill Jus Jso
elal 15g. jusill glil sio china,
jie gao yao 1y jiu quan li qiu jia
- 1
Jaa Jaa Jaa Jaa Jaa Jaa Jaa Jaa
Jn Jnnn nn nnnn nnnn nnnn nnnn nnnn nnnn nnnn nnnn nnnn nnnn nnnn nnnn nnnn nnnn nnnn nnnn nnnn nnnn nnnn nnnn nnnn nnnn nnnn nnnn nnnn nnnn nnnn nnnn nnnn nnnn nnnn nnnn nnnn nnnn nn
-

aalnnae aen aeae
aal lal aal y alal e 100000000000000000000000000000000000000000000000000
ydi 2j jAlba x yj:adla 1
jaii jgiyA iJaii jaii

y

2000 1
111 111 111 111 111 111 111 111 111 111 111
eai jui bua iaaa
1


-1
Materiali Plastmasa, metals, audums
Patenta numurs Gaida patentu
Allison Baby UK Ltd,
Venture Point, Towers Business Park
Rugeley, Staffordshire, WS15 1UZ
NUNA International B.V.
Van der Valk Bourmanweg 178 C, 2352 JD Leiderdorp, The Netherlands