USER MANUAL 0230 CA SKIL
- This tool is intended for the cutting of grass and weeds under bushes as well as on slopes and edges that cannot be reached with a lawn mower
This tool is not intended for professional use
- Check whether the packaging contains all parts as illustrated in drawing (2)
- When parts are missing or damaged, please contact your dealer
- Read this instruction manual carefully before use and save it for future reference ③
- Pay special attention to the safety instructions and warnings; failure to follow these may result in serious injury
TECHNICAL DATA①
A Cutting guard
B Guide handle
C Handle adjustment knob
D Locking sleeve
E Telescopic tube
F Trigger switch
G Safety switch
H Pivoting button
J Spool cover
K Spool
L Spool hole
M Flower guard
N Line cutting blade
P Edging button
Q Storage rail
R Storage adapter
S Edging wheel
T Line feed button
V Spool holder
W Ventilation slots
X Main handle
Z Line slots
AA Battery level indicator
SAFETY
GENERAL
- This tool can be used by children aged 8 and above and by persons who have physical, sensory or mental limitations or a lack of experience or knowledge if a person responsible for their safety supervises them or has instructed them in the safe
operation of the tool and they understand the associated dangers (otherwise, there is a danger of operating errors and injuries)
Supervise children (this will ensure that children do not play with the tool)
- Cleaning and user maintenance of the battery charger shall not be made by children without supervision
- Be familiar with the controls and the proper use of the tool
- The user is responsible for accidents or hazards occurring to other people or their property
- Use only accessories and replacement parts recommended by SKIL
- Never mount metal cutting elements onto this tool
PERSONAL SAFETY
- Keep hands and feet away from the cutting line while trimming, especially when switching on the tool
Always wear eye protection, long trousers and sturdy shoes when operating the tool
- Never operate the tool in the direct vicinity of persons; stop using the tool when persons (especially children) or pets are nearby
- Never operate the tool when you are tired, sick or under the influence of alcohol or other drugs
BEFORE USE
- Only use the tool in daylight or with appropriate artificial lighting
- Never operate the tool with a damaged cutting guard or without the cutting guard mounted
- Check the functioning of the tool before each use and after any impact; in case of a defect, have it repaired immediately by a qualified person (never open the tool yourself)
- Before use, thoroughly inspect the cutting area and remove any object that the tool may sling during cutting (such as stones, loose pieces of wood, etc.)
DURING USE
- Avoid using the tool in bad weather conditions, especially when there is a risk of lightning
- Do not use the tool on wet lawns
- Keep proper balance and footing at all times; do not overreach
- Operate the tool at a walking pace only (do not run)
- The cutting line continues to rotate for a short time after the tool is switched off
- Do not cut grass which is not on the ground (e.g. on walls or rocks)
- Do not cross roads or gravel paths with the tool still running
- Do not get distracted and always concentrate on what you are doing
Always switch off the tool and remove the battery whenever leaving the tool unattended before clearing jammed material before checking, cleaning or working on the tool
-after striking a foreign object
whenever the tool starts vibrating abnormally
Always ensure that the ventilation openings are kept clear of debris
AFTER USE
- Store the tool indoors in a dry and locked-up place, out of reach of children
- store the battery pack separately from the tool
BATTERIES
-
The battery supplied is partially charged (to ensure full capacity of the battery, completely charge the battery in the battery charger before using your power tool for the first time)
-
Only use the following batteries and chargers with this tool
-SKIL battery: BR131***
-SKIL charger: CR131**
- Do not use the battery when damaged; it should be replaced
- Do not disassemble the battery
- Do not expose tool/battery to rain
- Permitted ambient temperature (tool/charger/battery):
-when charging 4...40°C
-during operation -20 +50^
-during storage -20 +50^
③ Read the instruction manual before use
④ Batteries may explode when disposed of in fire, so do not burn battery for any reason
⑤ Store tool/charger/battery in locations where temperature will not exceed 50^
⑥ Pay attention to the risk of injury caused by flying debris (keep bystanders a safe distance away from work area)
⑦ Wear protective glasses and hearing protection
⑧ Do not expose tool to rain
Do not dispose of electric tools and batteries together with household waste material
USE
Assembly instructions
mount cutting guard A as illustrated with 2 screws ① a
! never use the tool without cutting guard A
-use flower guard M1b
-mount the guide handle B as illustrated13
! read the safety warnings and instructions provided with the charger
-switch on tool by first pressing knob G (= safety switch which cannot be locked) and then pulling trigger F
-switch off tool by releasing trigger switch F
! after switching off the tool the cutting line continues to rotate for a few seconds
-allow the cutting line to stop rotating before switching on again
! do not rapidly switch on and off
Battery level indicator 10
-press the battery level indicator button AA to show the current battery level ⑩ a
! when the lowest level of the battery indicator starts flashing after pressing button AA ⑩ b, the battery is empty
! when 2 levels of the battery indicator start flashing after pressing button AA ⑩ c, the battery is not within the allowable operating temperature range
The tool is suddenly being switched off or prevented from being switched on, when
- the load is too high --> remove load and restart
- the battery temperature is not within the allowable operating temperature range of -20 to +50°C --> 2 levels of the battery level indicator start flashing when pressing button AA ⑩c; wait until battery has returned within the allowable operating temperature range
- the battery is nearly empty (to protect against deep discharge) --> a low battery level or flashing low battery level ⑩b is shown by the battery level indicator when pressing button AA; charge battery
I do not continue to press the on/off switch after the tool is switched off automatically; battery may be damaged
- Setting the guide handle position (13)
-release guide handle adjustment knob C
-adjust guide handle position
-fasten guide handle adjustment knob C
-
Setting the tube length ⑭
-
Setting the main handle orientation 15
-
downwards for trimming
-
sideways for edging
-
Setting the pivot function 16
-set tube angle according
1. free standing storage
2. trimming in narrow spaces
3. regular trimming
4. trimming under low objects
5. edging function
Using the flower guard 17
Use the flower guard to protect precious plants from
unintentional pruning
-fold flower guard M downwards
Disengage flower guard for edging function or for
trimming near hard obstacles
-fold flower guard M upwards
- Setting up the tool for trimming
-set tube length D 14
-set main handle orientation in trimming position 15
-use pivot position 2,3 or 4 16
-use flower guard M ⑦
- Setting up the tool for edging
-set tube length D 14
-set main handle orientation in edging position15
-use pivot position 516
-disengage flower guard M ⑦
-for edging, support the tool by the edging wheel S19
! ensure that the cutting area is free of stones, debris and other foreign objects
! start trimming only when tool runs at full speed
-cut long grass in layers (always start from the top)
-only trim with the tip of the cutting line
-do not cut damp or wet grass
-prevent the cut grass from clogging the spool (do not make heavy cuts)
-do not overload the tool
-carefully cut around trees and bushes, so that they do not come into contact with the cutting line
-keep the tool away from solid objects in order to protect the cutting line against excessive wear
- be aware of the kickback forces that occur when solid objects are touched
- Holding and guiding the tool 18 19
-for cutting long grass slowly swing the tool from right to left and vice versa
-for cutting shorter grass tilt the tool as illustrated
-hold tool firmly with both hands, so you will have full control of the tool at all times
-maintain a stable working position
-always hold the tool well away from your body
-for edging let the tool be supported by the edging wheel S 19
Line feeding
The line is automatically fed when the tool is switched on or off
-the cutting line will be released and cut off to the correct length by line cutting blade N
! take care against injury from line cutting blade N
Feeding the line manually 20
-switch off the tool and remove the battery
- pull the line and keep pulling, then press and release the line feed button T
-after line feeding always return the tool to its normal operating position before switching on
-feed the line regularly to maintain full cutting circle
-when the motor runs without load and no grass is cut, the cutting line is stuck, worn or broken; rewind the spool or replace the spool system
In case the cutting line fails to protrude from spool hole L
! always switch off the tool and remove the battery
-remove spool cover J and take out spool K from spool holder V
-tightly rewind the cutting line evenly in layers in arrow direction
-insert the cutting line into spool slot Z and ensure that it is securely in place (leave sufficient length of line)
-thread the cutting line through spool hole L before placing the rewound spool into spool holder V
! ensure that the spool is located securely in place, then pull the cutting line from slot Z
-mount spool cover J
! always switch off the tool and remove the battery
-remove old spool and mount new spool as illustrated
-only use SKIL spool 2610S00818 with this tool (damage due to using other spools will be excluded from the warranty)
-after replacing the spool test-run the tool for at least one minute without load to ensure that the tool is operating properly
! be sure tool is switched off when inserting the battery
MAINTENANCE / SERVICE
- This tool is not intended for professional use
- Always switch off the tool, remove battery pack, and ensure that all moving parts have come to a complete standstill
Always keep tool clean (especially ventilation slots W ② -clean the tool with a damp cloth (do not use cleaning agents or solvents)
-clean line cutting blade N ② and cutting guard A ② after each use
-clean ventilation slots W ② regularly with a brush or compressed air
- Regularly check the condition of the cutting head and the tightness of nuts, bolts and screws
- Regularly check for worn or damaged components and have them repaired/replaced when necessary
Storage
Storage method 1 (21)
-securely mount storage rail Q on the wall with 2 screws (not supplied) and horizontally leveled
-attach the storage adapter R and move it against the mounting base of the storage rail Q
-store the tool with the storage hole in the handle over the tip of the storage adapter
Storage method 2 (16)
-use pivot position 1 and let the tool stand by itself on the ground
- If the tool should fail despite the care taken in manufacturing and testing procedures, repair should be carried out by an after-sales service centre for SKIL power tools
- send the tool undismantled together with proof of purchase to your dealer or the nearest SKIL service station (addresses as well as the service diagram of the tool are listed on www.skil.com)
- Be aware that damage due to overload or improper handling of the product will be excluded from the warranty (for the SKIL warranty conditions see www.skil.com or ask your dealer)
TROUBLESHOOTING
- The following listing shows problem symptoms, possible causes and corrective actions (if these do not identify and correct the problem, contact your dealer or service station)
! in case of electrical or mechanical malfunction, immediately switch off the tool and remove battery
Tool does not operate
-empty battery -> charge battery
-hot battery -> let battery cool down
-internal fault -> contact dealer/service station
Tol operates intermittently
-internal wiring defective -> contact dealer/service station
-on/off switch defective -> contact dealer/service station
Vibrates abnormally
-grass too high cut in stages
Tool does not cut
-line too short/broken off -> feed the line manually
line cannot be fed
-spool empty -> replace spool
-line entangled inside spool -> inspect spool; rewind if necessary
Line is not cut off to correct length -> remove cover from cutting blade
Bane keeps breaking
-line entangled inside spool ->inspect spool; rewind if necessary
-trimmer incorrectly used only trim with the tip of the line; avoid stones, walls and other hard objects; feed the line regularly
ENVIRONMENT
- Do not dispose of electric tools, batteries, accessories and packaging together with household waste material (only for EU countries)
-in observance of European Directive 2012/19/EC on waste of electric and electronic equipment and its implementation in accordance with national law, electric tools that have reached the end of their life must be collected separately and returned to an environmentally compatible recycling facility
-symbol will remind you of this when the need for disposing occurs
-prior to disposal protect battery terminals with heavy tape to prevent short-circuit
NOISE/VIBRATION
0230
Measured in accordance with EN 60335 the sound pressure level of this tool is 72.1dB(A) (uncertainty K = 2.5dB and the sound power level 85.6dB(A) uncertainty K = 1.1dB and the vibration 2.7m / s^2 triax vector sum; uncertainty K = 1.5m / s^2
0240
Measured in accordance with EN 60335 the sound pressure level of this tool is 77.2dB(A) (uncertainty K = 2.5dB and the sound power level 88.6dB(A) uncertainty K = 2.0dB and the vibration 3.9m / s^2 triax vector sum; uncertainty K = 1.5m / s^2
- The vibration emission level has been measured in accordance with a standardised test given in EN 60335; it may be used to compare one tool with another and as a preliminary assessment of exposure to vibration when using the tool for the applications mentioned
- using the tool for different applications, or with different or poorly maintained accessories, may significantly increase the exposure level
- the times when the tool is switched off or when it is running but not actually doing the job, may significantly reduce the exposure level
- protect yourself against the effects of vibration by maintaining the tool and its accessories, keeping your hands warm, and organizing your work patterns
(
-monteer spoelafdekking J
- Spoel verwangen ②
Machine tritabnormally
-gras is te lang -> maai in fasen
Machine maait nicht
Stall in rorlangden 14
-stall in rolangden D14
-stall in rolangden D14
VEDLIKEHOLD / SERVICE
T Siiman syoton painike
V Kelan pidin
W Ilmanvaihto-aukot
X Paakahva
Z Siimaraot
Cpok cnkybI n3dJIycoCTaBnEET 7 let. He peKOMeHdyETcK 3KcNlyaTaunNo NCTeueHn5 let xpaHeHn C DaTbI n3rOToBLeHn 6e3 PpeDbapntelbHO npOBepKn (DaTy n3rOToBLeHn CM. Ha 3TNKeTke).
Ipeuehenb Kpntnuechnx OTHa3OB N OUN6OuHbIe DeiCTBnepcoHaJa nnnoNb30BaTeJI
-He INCIOJIb3OBAtB C NOBpeJdeHHOpyKoRTHOINIOBpeJdeHHbIM 3aUHTbIM KOHXOM
-He HcnoJb3OBAtB npn NOBLeHn DbIma HeNocpeDCTBeHHo N3 Kopnyca n3deJna
-He HcnoJIb3OBAtB c Nepe6HtBIM IIN OToJIeHHbIM 3JIeKTPnueckHm Ka6JIeM
-He HcnoIb3OBaTb Ha OTKpbITOM IpoCTpaHCTBE BO Bpemrdo(BpacnbIReMoB OBe)
-He BKNIOaTb npn nonaHaHH BOdBi KOpNyc
-He HcnoJb3OBA Tb pH CnIbHOM NCKpeHHN
-He HcNoIb3OBA Tb npNIOBLeHHn CINbHO Bn6paun
Kpntepnn ppeJeBbIX coCToHn
-apeTepTNIOBpeKdEHNJIeKTPueckn Ka6eb
-NoBpeKdEn KOpnyc N3deJIa
Tn n nepnoDnuHoctb TexHHueChoro 06cLyHbHa
PeKOMeHdyETcOuHCTnTb HNCTpyMeHT OT nbIIN NOcJIe KaJIOrO NcNOJIb3OBAHnA.
XpaHHeHne
-Heo6xoJMO XpaHnTb B CyXOM MeCTe
-Heo6xOJIMO XpaHHTb BdaJIOn OT NCTOCHIKOB
IOBbIeHHbIX TemnepaTyp IN BO3JeICTBnA COJIHeHbIX Lyuei
-прхранени Heo6xOДМо n36eRaTb pe3KOro nepenada Tempepatyp
-xpaheHHe 6e3 ynaKOBKn He dOnyckaeTcA
-NoDpo6HbIe Tpe6oBaHnK yCIOBnM XpaHeHn CMOTpnte B FOCT 15150 (YcNOBne 1)
TpaHcnpToPobHa
-KaTeorOpueckn He DonyCkAeTcnaJeHne N IIO6bIe MexAHueChne BO3dEiCTBnHa yNaKOBky npu TpaHCnpTIpOBKe
-πρn pa3rpy3ke/norpy3ke He donyckaetcnaolb3oBaHne IIO6O BnDa TexHKn,pa60TaIoueINo npHciny 3aKIma yNaKOBKn
-NoDpo6HbIe Tpe6oBaHnI K YcNoBnM TpaHcnpTIpOBn CMOTpnte B FOCT 15150 (YcNoBne 5)
BHIMAHHE!
B clyuae BO3HKnHOBeHn nepe6oB pa6oTe 3JeHTponHCTpyMeHa BCJIeDCTBHe NOHOrO Hn YactNHyoro npeKpaueHn 3HeproCha6HeHn Hn NOBpeJDeHn CEHN ynpaBLeHn 3HeproCha6HeHnem yctAHOBHTe BbIHIOUaTeIb B NoLOHeHne BbIKI, y6eINBwncb, qTO OH He 3a6LOKHPOBaH (pni erO hAnHH) N OTKIIIOHTe CeTEyIO BUNky OT pO3ETn Hn OTcoEHNHTe CbEMhBI AnKHMylTOp (3TNM npedOTBpaaaetcRe KOHTPOINPyEmbl NOBtOPHb 3aNyC)
BBEDEHNE
-ДаHHbI INHCTpymeHT npeHa3HaueH dIЯ cpe3aHn TpaBbI N CopHЯKOB nOД KcTamN, a TaKHe Ha CKnIOhax I NO KparX, Kyda He Doctaet ObUHna ra3OHOKoNka
-Данн布局HCTpymEnT He NOxOuNT DЯпрмьIJIeHHORIOHcnoJb3OBaHnA
-Поберпге НалчneВунakOBК BCexЧаTeN, nOKa3aHHbIX Ha pncyHKe ②
BcnyaeOTcyTCTBnIINIOBpeKeHJeNJaTeaJIeObpaauTeCbBMara3HN,Ie6blnpno6peTeHHCTpymENT
- Ipeep HcnoIb3OBAHHeM np6opb BHMaTeIbHO O3HaKombTecb c daHHoN HHCTpyKuNeH n COxpaHHTe ee dIra NocJeDyUoJero HcNoJIb3OBaHn ③
- 06patte oc6ooe BHImaHne Ha HnctpyKcHn No 6e3onacnoctn n npdeynpeKeHdEHHa;napyHeHne 3THX nHCTpyKcHn n npdeynpeKeHdEHH MoHcT npNBecTN K cepbE3HbIM NOBpeHKdEHNAm
TEXHnueCHe DAHHbIE ①
CTPAHA N3TOTOBJEHNA
CdeIaHO B KHTae
DETAJIHCHTPMENTA②
A OrpaHnHTeJIb XoJa
B HanpaBIAIOUa pyKoRTKa
C PyuKa peryIinpoBKn pyKoAeTkn
D ΦικατορΗΑ BγιλΑ
E Teileckonuuecka taHra
F KypkoBb nepeKIOUaTeIb
G 3aunTHbIN BbIKIOUOaTeJIb
H Nobopotha KhoNka
J KpbiKa KaTuKn
K Hatayka
L OTBepCTneIyKaTuKn
M OprakdHne nIy cBeTOB
N PeKyuuee ne3Bne neckn
P KhoNka 06pe3Kn KpaEB
Q HanpaBIAIOUaIyXpAHeHn
R AanTep nXpAHn
S Hoileco 1n8 o6pe3Kn kpaEB
T KhoNka npaun neckn
V DepeHaTeJIb KaTuShKn
W BeHTnlaUHOHHbIe OTBepCTH
X IaBHa pyKoRtHa
Z Pnpoe3n dIa Ieckn
AA INHnKaTOp ypoBHa 3apra
B630NACHOCTb
OBUEE
-
Повьзоватугял
ннсчypмentом Deям
В ВОЗразе до 8 лети
Лицам С оралчehныIMN
ФИЗЧЕСКИМN, CEHCOPHBIMN
Или умстваим
Спосбостам Или с
НебостаточьIM ONыITOM
И ЗHAнЯМN pa3peшаetся
Только пд писmotpom
OTВETCTBEHNOTO 3a ИX
6e3ОпаСХОCTь Лиca Или eclin
Они пpoшл Инструктaj
На п徳met наджного
ИспOLSБАнгЯ 3TOGO
Инсчypмента И поимаOT,
Кakne onаСХОCTN ИСхODЯТ
OT Hero (Ин<aуce сушиесТВуET
ОпаСХОCTь HeпраВильного
ИспOLSБАнгЯ И NOЛУЧЕНЯ
ТравM)
-
CMOTPHTe 3a DeTbMn (ДETN He ДОЛЖнbl ИграТь C ИНСТPyмENTOM)
- ПОНЗВОДNTь OЧИСТУ И
TEXHNUECHOE OБСЛУЖИВАнUE
3APЯДНOrO yCTpoIcTBA DeTЯМ
pa3peшaETcR TOLbKO NOd
ПпсмOTpOM
O3HaKOMbTeScb C0 CpeDCTBaMn ynpaBJeHn I nopAekom pa6oTbI C HNcTpymeHTOM
3a HechacThbIe ClyuAn C IIOdbMn NIN NOBpeKdHeHn HmUeCTBa, a TaKHe yrpo3y dJH NHX OTBeuaET IOJIb3OBaTeJIb
IcnoJb3yIte ToJIbKO peKOMeHIOBaHHbIe KOMnAHne SKIL detaN IN KOMnJIeKToUOHe
HnB KOem Cnyae He ycTaHaBnBaTte Ha daHHbI INHCTpyMeHTMetaJIInueckne peKyuune 3JIeMeHTbl
JIYHARBE3ONACHOCTb
-ДеркнTepyиИHOrnHa6e3onacHompacCTOHHOTpeKyuueJleckNBOBpempa60TbCINHCTpyMeHTOM,OCo6eHHO BO BpemeraHnepeKlnuoyehnA
BoBpMa pa6oTbIC INHCTpyMeHTOM HcNoIb3yInTe 3aUHTbIe OCHN, ODeBaIte DnHHbIe UTaHbI, py6aKHy Ha dINHHbI pyKaB I npOCHYIO o6yBb
Kateropueeckn 3anpeeHcnoJb3oBaTb HNCTpyMeHT B HenocpeDCTBeHHo 6JIIN3OCTn OT JIOJe (OCO6EHHO DeTei) NIKBOTHbIX
He pa6oTaIe C HcHCTpyMeHTOM,ecn yCTaII, IIOxo Ce6y UYBCTByeTe NII pINHMaII aIKOROJIb IN leKapCTBeHHbIe CpeIcTBA
NEPEDNCHOJIb3OBAHHEM
IcnoIb3ObaTb HnCTpyMeHT CneDyET TOnbKO npn DOCTaTOHOM eCTeCTBENHOM NIN COOTBEcTBYIOUeM NCHycCTBeHHOM OCBeUeHN
HnB Koem Cnyae He NcnoJb3yIe HNCTpyMeHT,ecnH Ye yCTaHOBJIeH nnIOBpeKHeH OrpaHHTeJIb XOJa
IpoBepaPapococO6HcTBnHCTpyMeHTa nepeKaKdbIM NcNOLb3OBaHNEM HINnPoCte ydaPa; B Cnyae 06HapyKeHnHENCnPbAHOCTn, He3aMeJNTeJIbHO cdaTe erO B pemOH KBAIIuHnUpOBaHHbIM CneuaJIHCTam (HN B KOEm Clyuae He BCKpbBaIte HHCTpyMeHT camoCToTcJIbHO)
- Ipeep nope3aHem TuaTeJbHO OcMOTpIte ra3OH y6epnte JIO6bIe NOCTOpOHnE PpeIMETbl, B KOTOpbIX MOKeT 3acTpTa HhCTpyMeHT (KaK, HaNpImep, KaMHN, OTLOMaBWeecr CyKn nT.n.)
BO BPEM INCIOJIb3OBAHNA
Bo3eepKnBaTecb ot pa6oTbI c HnCtpyMeHTo m np nloxnx noroDhblx ycNoBnX, OcObeHHO npn HAnuHn pncKa rpo3OBblx pa3praIOB
He nCIOJIb3yIte INHCTpyMeHT Ha MOKpbIX rA3OHax
CobJIOdaIte paBHOBeCe, 3aIMTe yCTOuHBOe nIOJOKeHHe; He nepeHaPraIaTecb
Pa6oTa c HnCtpyMeHToM, npeMeaITeCb pa3MepeHHbIM HeuPOKm WaRom (He 6eRnte)
- Pechyza Jlecha npoJolnaet Bpaaatbcn HeKOTOpoe Bpem nocJe OTHIOUeHn HNCTpyMeHTa
He cpe3aIte TpaBy, KOToPAI npOn3pactaET He Ha 3emJIe (HaNPIMep, Ha CTeHax IIN Ha CkaJax)
He npexoDnte dopory nI rpaBnHyIO doPOKHy c pa6OtaUIM INCTpyMeHTOM B pykax
He OTBLeKaITeCb IV BcERda CJIeJITe 3a CBOe pa60Toi
- 06aTeIbHO BbIKIOHTe INHCTpyMeHT N BbITaUNTe aKKyMylrTop
-ecnIO octabIeTe INHCTpyMeHT 6e3 npncMOTpa
-NepeTeM, KaK y6npaTb 3aCtprBwne IpeDMeTbI
-NepeTEm, KaK OCMaTpNbBaTb, OUnIaTb INCTpyMeHT
HIN pOBOIDtB C HIM dpyrHe onepaun
-BcIyae nonaHa Ha nocToPOHHn IpeDMET
-ecnHHTpyMeHT HaunHaet OueHb CnIbHO
Bn6pnpoBaTb
HeOnyckaItePnonaHaHnOcKoJkOB BBEHTNJIaONOHbIEOTBepCTIN
NOCJIIEHCNOJIb3OBAHNA
XpaHHTe INHCTpymENT B NOMeueHHN B CYXOM, 3aHnpaemOM, He DOCTynHom IJIra DeTei MeCTe -XpaHHTe aKHyMylrTOP OTdEJIbHO OT INHCTpyMeHTa
AKHUMYJATOPbI
-Пилaraembl anKhymyIaTOp YacTHUHO 3apHHeN (YTO6bI BOCNoJIb3OBAbCra NOJIHOJ EMHOCTbIO aKHyMyIaTOpA, NOJIHOCTbIO 3apIINTE aKHyMyIaTOpB 3apIINOM yCTpOcHTBe NpeEd NepBbIM NcNOJIb3OBAHnEM 3JIeKTPoINHCTpyMeHTa)
- Ipn 3HcNnyataun HNCTpyMeHTa cIeDyET NOJb3OBaTbCnTOJbHO CJIeDyUOUMN aHHMyJrTOPaMn N 3apAHybIMN yCTPOiCTBaMn
-AkhymnyaTop SKIL: BR131
-3aρádnoe yctpoicTBO SKIL: CR131*
3aIpeaaeTcnoIb3ObaTbcNOBpeHdHHbIM aKHyMJIyTopOM;ero Heo6xoJIMO 3aMeHHTb
3anpeaetcpa36npaTb aKKyMylrTop
He octabJnTe HnctpyMeHT/aKMyJrTOp NOd DOxJDEM
- DonyucTmam TaemepaTypa OkpyKaIoUe Cpebl (HnctpyMeHT/3apArdHOe yCTpOuCTBO/aKHyMylrTop):
-при зараздкe 4...40°C
-рнэксл�арази -20...+50°C
-πpynxpanenHH -20...+50°C
NORCHEHNR YCJIOBHBIM OBO3HAUYHNM HA HHCTPYMEHT/AKKYMJIYTOPHO BATAPEE
③ IpeedncnoJIb3OBAHHeM O3HaKOMbTEcB C pyKOBOdCTBOM NO 3KcIpyaTcuIN
④ПиNonaДаннВ OOrHb 6aTapeN B3pbIbAIOTCn,NO3Tomy HN B KOem Clyuae He ChnuraTe 6aTapeN
⑤ B 30He xpaHEnn HNCTpyMeHTa, 3apAnHO yCTpoIcTbA n aKHyMnyJToPa TeMnepaTypa He DoJIHHa NODHMaTbcB Bblwe 50^
⑥ OcteperaTecb OTLeTaIOxO cHOJIHOB (OKpyKaIOuNe DOJIHHbI HaxoITcHa 6e3ONaCHOMpacCTOHNOT MeCTa y6OpKn)
⑦ OeBaIte 3aIHTbIe OUKN CpeCDtBa 3aIHTbI BOLOC
⑧ NCKJIIOHTe BO3MOXHOCTb IOnaHa Ha HnHCTpyMeHT DOxN
He BbIKnDbIbAaTe 3JIeKTpOHnHCTpyMeHT n 6aTapeu BmecTe C 6bITOBbIM MycOpOM
NcNoJIb3OBAHHe
-3aKpeNITE orpaHnHTeIb XoJaA, KaK noka3aHo Ha pncyHke, c NOMOuBIO 2 BnHTOB 11a
!HnKOrda He nCNoB3yIte HnCTpyMeHT 6e3 orpaHnUHTeJxOJaA
-ICNoJIb3yIte orpaKdEHNHe IaZBeTob M①b
-ycTaHOBHTe HnpaBnaIOUyIO pyKoTky B, KaN POKa3aHO Ha pucyHke 13
3apnka aKHyMylTopa
! 03HaHOMbTeScb C npHlaeraMIM H 3apdHomy yCTpoiCTBy npaBnIaMn TexHHN 6e3onacHOCTn
- N3BneueHHe /yCTaHObKa aKKMyJrTopa ②
Bkn/Bbikn 12
-BKIOUHTe INHCTpyMeHT,ДЯ HeO ChaJaHaHMMTe 60JIbIIM KHOJNY G (=3aUNTHbI BbIKIOUaTeJIb 6e3 ΦHKCaTOpA), a 3aTeM NepeBbHbTe NpeKIOUaTeJIb F -BbIKIOUHTe INHCTpyMeHT OTNcTbH KypKObIb BBIKIOUaTeJIb F
!nocne BbIKIOUeHn HNCTpymEnta peKyuzaIecha npoOJHaet DBHraTbcR B TeueHHHeckOJIbKnx CeHyHd
-NepeTEm, KaH CHOBA BKNIOUOaTb INHCTpymeHT, NOONNTe, NOKA OCTaHOBnTCr peKyuaJ Iecka
!He BkIIOaHTe H He BbIKIOaHTe NHCtpymENT 6bictpo
-HTO6bl y3HaTb TeKyuHn IyPOBeH 3apra da aKnMyJITopa 10a, HauKMITE Ha KHOJIky INDnKaTopa yPOBn 3apra DA AA
! ecn nocJe HxHaTnK HonKn AAb hauHnaet Mngatb cambl Hn3Hn ypoBeHb HndnKaTopa 6aTapen, 3NaHT aKKMyJrTOp pa3PraHen
! ecn nocle haKaTHN KHOHKn AA10c hauHHaIOT MmraTb yPoBHN 2 INdHKaTOPa 6aTapeH, 3HaHTTEMnepaTypa aKHyMylAToP aHxOJTc3a npedeJAMn DOyCTHMOrO dHaNa3oHa pa6oHx TemnepaTyp
3aunTa aKhyMylrTopa
HCTpyMeHT BHe3aHNO BbIKIOuaeTcH NIN He MoKet 6bITb BHKIOUeH, KOrda
-Harpy3Ka CInuHOM BbICoHa --> yMeHbWnte Harpy3Ky N BbIOnHnTe nepe3anyck
-TemnepaTpa anHymyIaTopa BbIXoHT 3a npedeJI bOncyTmOrO dHaana3oHa pa6oynx TemnepaTp ot-20 do +50 ^ -> npn HaKaTHN
KHOHNI AA 10c HauHHaOT MNaTaB yPOBHN2
INHdNKaTOPa yPOBb3apraJa 6aTapei;doKdntEcB,
NOKa TEMpePaTypa aKKMyJIaTOpa BepHeTcB
DOyCTMbI dHaJana3OH pa6OHyx TempeaTp
-ANKMylAToP noTH pa3pRHeN (DJIa 3aUHTbl OT
rIy6oKOro pa3pJa) -> Hn3Km yPOBeH 3apraJa
6aTapei nnn MrraIOuJn Hn3Km yPOBeH 3apraJa
6aTapei 10b OTO6paXaeTcN INHdNKaTopOM yPOBHN
3apraJa 6aTapei npn HaKaTHN KHOHKn AA; 3apraInTe
aKKMyJIaTOp
I B Cnyae aBtOMaTnuecKOro BbIKIOUeHn HNCTpyMeHTa He nbITaNTecb BKNIOuHTb erO CHOBA, NOCHOJIbHy npn 3Tom MoHeT 6bITb NOBpeHKeHa 6atape
- YctaHOBka nolooHeHHn HnpaBJIIOuepyKOHTK 13
-ocbo6oIte pyHy perylnpOBn HappaBriaIOuepyHOaTHN C
-otperynpyTe noJooHe HnpaBnaIOuE pyKoAaTHN
-3aKpeNte pyKy peryInpOBn HanpaBnaIOuepyKOaTKn C
HacTpoiKa dIINHbI Tpy6Kn 14
- YctaHOBbOcHOBHOro NIOJKeHHpyKoRTKn 15
1.BHn3IINoDpe3HN
- B6OKДЯOBpe3aHnKpaEB
HactpoHaФyHKuN NOBOPTa 16
-ycTahOBHTe yrOJ Tpy6Kn COOTBeTCTBvUoIIM 06pa3OM
- XpaHeHHe B CBO6OHO CToAeM IIOJOKeHHN
- 06pe3ka B y3Knx MeCTax
3.06bHna 6pe3Ha
-
06pe3ka nOd Hn3KmM npEmdTaM
5.ФункцияобpeЗки КраeВ
-
IcnoIb3ObaHne orpaXdEHHaIy cBeTOB 17
HcnoJIb3yIte orpaJdeHne dIaCBeTOB dJIa 3aunTbI
JIIO6MbIX paCTeHNI OT HepeDHaMepeHHo OBpe3KN
-cLOXnTe orpaJdeHne dIa CBeTOB M BHN3
OTcoEINHnTe orpaJdeHne dIa CBeTOB CclYae
HCIOJIb3OBAHnI yHKUInn OBpe3Kn KpaEB NII IOpe3Kn
pAOM C TBepDbIMN ppeNATCTBnMn
-cLOXnTe orpaJdeHne dIa CBeTOB M BBepx
HactpoNka HcTpyMeHTa DnIy o6pe3Kn -YCTaHOBNTe DnINHy Tpy6Kn D⑭
-ycTaHOBnTe opneHTaUNO OCHOBHON pyKoTKn B IIOJKeHHe 06pe3kn
-NCNoB3yIe NOBOPoTHoe NIOJKeHHe 2,3NIN4⑥
-ncnoIb3yTe orpaKdHne HnI cBETOB M
- HactpoiKa IHCTpyMeHTa IJI IOpe3KN KpaEB -VCTAHOBNTe DIIHIV TOV6HN D 14
-ycTaHOBtE opnENTaUNO OCHOBHpyKoTKn B NOJKeHne 06pe3Kn KpaEB
-NCNoB3yIte NOBOPoTHoe NIOJKeHne 516
-OTCOeHNHTe OprKaJdeHne Ira CBTeOB M⑦
-ДЯ OБpe3KN KpaeB ydeprHbAaTe INHCTpyMeHT C NOMOJIbIO BBipaBHNBaUoJero KOJIeca S 19
-Подрзанe
! y6epnte c r30Ha kAmHn, 6bIOMn n dpyrne noctopoHHne npedmetbl
!HauHaTe Nope3aTb TOnbKO TOrda,Horda HnCTpyMeHT Ha6epET NoHHyO CHOpocTb
-cpeaTe BbICOKyIO TpaBy cIOnMn (BcERda HaunHaTe CBepxY)
-NoDpe3aTe TOIbKO npn NOMOu peKyuuei KpOMHJLeCHN
-He Cpe3aITe BlaKHyIO NII MOKpyIO TpaBy
-СледиTe,ЧтобсIчебангая Трава He 3a6bIBaIa KaTuShy (He cpe3aIte MHorO 3a pa3)
-He nepeerpykaite HnCTpymeHT
-6ydbTe octopOHHbI npI NOpe3aHNN BOKpyIepeBBeB INI KycTOB, YTObIK HIM He npKacalaCpeKyuzaJlecka
-BOI36eKaHHe Upe3MePHoro I3HOca peKyuIe IeCKn He DOnyChaTe ee KOHTaKTA c TBepDbIMn PpeDMeTaMn
-NTOMHHTe 06 OToDAue B Cnyae PnKOCHOBeHnK TBePdbIM PpeDMetam
- UdepKnBaHne HnHaPnBaJIeHne INHCTpyMeHTa 18
-cpe3a BbICOHyTO TpaBy, CnErKa HAnIOHnIte
INHCTpyMeHT BnpaBO-BNEBO IN DpyROM HAnpaBHeHH
-Дл NOдрзанн 6Олг e KОрТКо TраВы HанLOHHTe INHCTpyMeNT,ΚΑΚΝΟΚa3aHoHa pncyHke
-DepKHTe INHCTpyMeHT HaJeEHHO DByM pyKaMn, YTO6bl IMTe NocToHHbI N NOHbIKoHTPOJIb
-πpu pa6oTe 3aMnTe yCTOuHBOe noJIOHeHne
-BCerda DepeKHTe HNCTpyMeH T O Ce6a
-ДЯ OБpe3KN KpaEB NOCTaBBTe INHCTpyMeHT Ha BbIPAHBHBAIOOee KOleco S 19
- Poipezahne npn pomoun JecOH
JaecKa aBToMaTnueeChN nOaTeCn npN BKnUoHeHn nn BBkIIOHeHn HcHTpyMeHtA
-pejua Jncka 6ydt OTnyuena H 6ydt pe3aT npi
POMOUI peKyuIero Je3Bna Ha Tpe6yeMyu DInHy N
I6ydbTe BHNMaTeIbHbI, YTO6bI He TpaBMnPoBaTbcr OT peKyuero Ie3Bna Iecn N
-BbIKIIOUHTe HHTpyMeNT N BbITaUNTe aKKyMylrTop
-NotraHNTe IeCKy I npOdoJIkaIte TReHytB, 3aTeMaHaKMnTE I OTNcyTne KHOJKy Npaun Ieckn T
-Notle OTe3aHn npn NOMOuN IeCKn nepeKIOUHTe INCTpyMeHT B o6bIHyB peKm pa6oTbI nepeD TeM, KaK BKIIIOuHaTb erO
-peyraHnHaMaTbBaIeJecky,TO6bIOBeCneuHTb NOHbI peKyuN uNKJ
-πρn xoLoCTOM XOe IaBnIaTeJIpeKHyuaJleCha
H3HaunBaETCr IINI JIOMaETcR; IpeMeOTaHTe KaTyUkY
IINI 3aMeHIne CNTeMу KaTyUKN
B clyuae, ecn peKyuzaJ lecka He bBixOuNT n3 OTBepCTN KaTyuKN L
! 063aTeIbHO BbIKIOUHTe IHCTpymENT N BblTaIuNTe AKHMyJrTOP
-CHMNTe KpbIshky KaTyuKJ N BbITaunTe KaTyuH Ky K n3 depKaTeJIa KaTyuKn V
-ПЛOTHNOпермOTaTe peKUyIO JIeCKy paBHomepHO NO CLOYBMHaPpaBHeHH CTpeJIHN
-BCTaBbTe peKyuIyLecky B npope3b Z kaTyuHn 3aKpeNITe ee (ocTaBbTe lecky dOcTaTOHOn dInHbl)
-Nepepa3MeueHemnepeMoTaHHoKaTuShnB
dePkaTeLe KaTuShN V npOnyCTnte peKyuI necky
Yepe3 OTBepCTne B KaTuShKe L
!y6eHNTecb,HTo KaTuSha HaJeHNo yCTaHOBJIeHa, 3aTeM BbITAHnTE peKyuIyIO leChy n3 npope3n Z
-ycTaHOBnTe KpbIuK Ky KaTuuKJ
-3aMeHa KaTuShKn ②
! 063aTeIbHO BbIKIOHTe IHCTpymENT N BbITaIte aKHyMylAToP
-CHMNTe CTapyIO KaTyWky N yCTaHOBnTe HOByIO KaTyWky, KaN oKa3aHo Ha pncyHke
-NCNoB3yIe IaJaDaHHOro IHCTpyMeHTa TOnbKo KaTyuKy SKIL 2610S00818 (NobpeHdEHH
BCJeCTBHe NcNoIb3OBAHnna Dpyrnx KaTyweK rapaHTne He NohpbBaIOTCa)
-Notle 3aMeHb KaTykU OnpOyIte HNCTpMENT B TeueHH MInHyTbI Be3 HaPy3K, YTo6bl y6eHTC, YTO OH pa60TaET npabINbHO
I nepey yctahOBHO anKhyMylrTopa y6eHNTecb B TOM, YTO IHCTpyMeHT BbIKIOUeH
TEXO6CJLYHKHBAHNE/CEPBNC
JaHbI INHCTpyMeHT He NOxOJNT dIa IpOMblJIeHHORIOcNOJIb3OBaHnI
- 063aTeJIbHO BbIKHIOHTe INHCTpyMeH, BbITaUNTE aKHyMylTOp N y6eIHTecB B NOJHOJ OCTaHOBKe DBNKUxxCr DeTalei
HCTpymENT CLeNyET COepeHaTb B YnCTOTE (OCo6eHHO BEHTNIAIyOnHHbIe OTBepCTnW ②
-ДЯ OунstКи npибopa noь3yITeCb BlaJHNoi TKAhBIO (He npIMeHЯIte pactBopHTeJI NII MOIOUne CpeIcTBA)
-ncnKKaJIORONCNOb3OBaHNAOuNTpepeKyueeJe3BneLeCN N ② n orpaHnHTenb XoJaA ②
-peryIpaHO OuHuaTe BeHTnIaIIOHHbIe OTBepCTNw ② npn nOMOuI uETKn HJIN CKaTOro Bo3dyxa
- Perylaepno npoBepaTe cocToHne peKyuEe roIOBkn n CTeneHb 3aTAAKKn raeK, 60ITOB IN BHTOB
- Perylaepno npobepaTe deTaHn Ha npedMe n3Hoca nn noBpeKdEHHN IOtpeMOHTpyuTe/3amEHnTe nx,ecnTpe6yeTcra
XpaHeneHne
Cnocob xpaHEn1 ②
-HaIeXHO 3aKpeNITe NOBeccky Q Ha CTeHe npn NOMOUI 2 BnHTOB (HE BXoJrT B HOMNJIeHT NOCTABH), BBipabHnB IN NO Tropn30HTaII
-πρικρεπητe aαπTep dλ xpaHeHnR nCdBnHbTe erO K MOHTaKHOmy oCHOBaHnIO HappaBIAIOUeI dλxpaHeHnQ
-NOBecTe INHCTpyMeHTC OTBepCTnEM IxpaHeHHBApyKe Ha KOHN aadTepa IxpaHeHHScnooc6 xpaHeHH2 16
-ICNOJb3yIte NOBOPOTHoe NIOJOKeHne 1, YTO6bl HNCTpyMeNT CBO6OHO CToJHa 3eMJIe
EcnHCTpyMeHT,HECMOTPnHa TuaTeIbHbIe MeToDbI H3ROTOBLeHnI NcblTaHnI,BbiJETn3CTPOA,TO peMOHT CJIeDyET IPOU3BOIDnTb CNlaAMn ABTOpN3OBAHHo cepBnCHOn MaCTepCKoI dIa 3JIeKTPoHCTpyMeHTOB fnpMbI SKIL
-OTnpaBbTe Hepa3o6paHbI INHCTpyMeHT CO CBnDEteJIbCTBOM NOyNkBaWemy DInepeY NIN B 6bnKaIHyO CTAnCIO O6cLyHNBaHnФnpMbSI KIL (aDpeCa n CXema O6cLyHNBaHn INHCTpyMeHTa npuBeDeHb I Be6caiTe www.skil.com)
- PpIMTe K CBeDeHIO, YTO NOBpeKHeHn BcIeCTBHe nepeRpy3Kn IIN HeHaJIeKaUeO o6paUeHn C npOdyKTOM He 6yDyT BKNIOyeHb I RapaHTIO (ycIOBnra rapaHTm SKIL cm. Ha caIte www.skil.com IIN y3HaIYe y DInepa B BaWem perNoHE)
YCTPAHEHNE HENCPPABHOCTE
HnKe npBBeDen nepuehen HeucnPabHocTei, INX BO3MOHNbIX pNcHH N KoppeKTHpyUOx IN DeICTBNI (ecnn npn INX NOMOuH He ydaetcNcPabNTb npo6JeMy, o6paTntEcB K DInlepy HIN B cepBnCbI ueHTp)
I B clyae IIO60e 3JeKtpnuecKO HmMexAHuecHoe HeCnpaBHOCTn HeMeJHeHHBOBbHIouHTe HHCTpyMeHT N BbIHbTe aKKMyJATOP
HCTpyMeHT he pa6oTaet
-pa3pЯнкHe aKHyMylrTop->3apyInte aKHyMylrTop
-ToprHn aKMyJrTOp -> daIte aKKyMylrTOpy 0ctbItb
-BHyTpEnHnO OUn6Ka->o6paTnTeCbKdIepeynnB
cepBnCbI ΚeHTp
HCTpyMeHT OTKJIIOHaetcpeNIOduYeCKH
-NoBpeKdHa BHyTpHnHn npoBOKa->OpaTntEc b
IJIepeHnBcePbnchBtIeHTp
HCTpymEnT CnIbHo BN6pnpuyET
-OueHb BbICOKa TpaBa-> Cpe3aHTe NOTaTnHO
HCTpymEnHe peKeT
-Necka CnHsKOM KOpOTKa/06OpBaHa->BbITAHNTe
JIeCKy BpyuHyU
ydaetcBbITaHytbIecky
-KaTyuKa nycTa->3aMeHnTe KaTyuKU
-Jecka 3anyTaalacb B KaTyuHKe->OCMOTpnte KaTuHky; npnnotpe6HoCTn nepemotaTe JecHy
Ka He OTe3aETcHa Tpe6yEmy DInHy->CHMNTe KpbIshky CpeKyueroJe3Bn
Ka HeoHOKpaTHo 06pbBaETc
-Jecka 3anyTalacb B KaTyuKe->OCMOTpnte KaTyuKy; npnnotpe6hOCTn nepemotaTe Jecky
-He npabnblbHOe nCNOJIb3OBAHne rA3OHOKOJIKN
->nope3aTeToIbKO npn NOMOupeKyu
KpOMKn;N36eRaIte KaMHei,CTeH N DpyrNt TBepDbix
IpeMeTOB;peYyIaRHOHaMaTbIBaIeJIeCKy
OXPAHA OKPYHKAIOUeN CPEdbI
He BbIKNbIbAaTe 3JeHTpOHnHCTpyMeH,6aTapeH, npHaJdJIeKHOCTn U yNaHOBHy BmecTe C 6bITOBbIM Mycopom (ToIbKO dIra cTpaH EC)
-BO HcnoJIHHeHne eBponeeCKo dIpeKTHBbI 2012/19/ EC o6 yTnIn3aunn OTCnyhNWBero CBOI cPOK 3JeKTPnueckoro n 3JeKTPoHHoro 6OpOyOBaHn I COOTBeTCTBnC DeiCTByIOUmM aKOHOdaTeJIbCTBOM yTnIn3aunn 3JeKTPoHHCTpyMeHTOB npOn3BOJTCR OTdJIbHo OT dpYnx OTXODOB Ha ppeDprrnIX, COOTBeTCTByIOuNX yCIOBnM 3KOLOrHuEChO 6e3ONaCHOCTn
-3HaOK⑨ HANOMHNT Bam 06 3TOM, KOrda NORBNTcHHeo6XoDnMoCTb CdaTb 3JeKTPoHnHCTpyMeHT Ha yTNIIN3aUIO
!nepeTEm KaN BbIbOcNTb aKHyMylrTOpbI HnHanpaBnTBnxHaYtINn3aunIO,n3oInpyTe KHeMMbl aHHyMylrTOpOB npOCHNOHn30JauNoHHoJIeHTOndNCHIOUeHHNHOPOToKOrO 3AmbKaHHN
WYM/BNBPaun
0230
PnH3MepeHHB COOTBETCTBHN CToHApTOM
EN 60335 ypoBHeB 3BykoBOrO daBnEnHnIa 3TOrO nHcTpymeHTa coCTaBnE72,1 d5(A)
(HeoCTOBepHOCTbK=2,5dB)IyPOBeH3ByKOBOI
MOUHOCTN-85,6D(A)(HeIOCTOBePHocTbK=1,1
dB),и Вибраци -2,7 M/c² (ВeКТОРнЯ СУМma Tpex Hаправелен; HeДOCTOВЕрhoeKt b K = 1,5 M/c²)
0240
PnH3MepeHHB COOTBETCTBHN CO CTaHapTOM
EN 60335 ypOBeH 3ByKOBOrO daBJIeHnIy
3TOTO INHCTpyMeHa CoCTaBnIeT 77,2D5 (A)
(HeIOCTOBepHOCTb K = 2,5 dB)ИуpoBEH 3ByKOBOmOuHOCtN - 88,6ДБ (A) (HeIOCTOBepHOCTb K = 2,0 dB), И Вибраци - 3,9 M/c² (ВЕТОРHAЯ СУМma Tpex HANpaBLeHn; HeIOCTOBepHOCTb K = 1,5 M/c²)
- UpoBHeB Bn6paun 6bJI N3MepeH B COOTBETCTBnN CO CTaHapTn3HPOBaHHbIM NcblTaHHeM, CoepKaUImCBA EN 60335; daHna XapaKTePncTnka MoKeT IcNoIb3OBAbTcBdIg CpaBHeHr OJHO rHCTpyMeHTa C dpyrM, a TaKHe dJI pPeDbAPnteBHOr OceHKn BO3JeCTBnB Bn6paun npu nCnoJIb3OBAHn DaHHoro HHCTpyMeHTa dJIyKa3aHHbIX ueJI
-πPn IcNoJIb3OBAHm INHCTpyMeHTa B dpynx ceJAX NIN C dpyrIMN/HeNCpnaBHBIMN BCNOMOraTeIbHbIMN npncno6ObJeHHaMn ypoBeHb BO3dEInCTBnB IN6paCmMOKET 3HaunTeJIbHO NOBbUaTbC8
-B nepnoDbI, KOrda HnCTpyMeHT OTHIOueHnn ΦyHKUHOHPyeT 6e3 faHTuCeCKoR O BbINOJIHeHna paOToB, yPOBeH Bo3DeiCTBnB Bn6paun MoKeT 3HaHTeJbHo CHNkaTbCra
!3aunuataece6oTBO3dEcTBnBn6paunn,noDepHnBaHnCTpyMeHTIeroBCPOMOratelhBie npncnocO6JeHHN BNCpabHOMcoCToAHn,noDepHnBa pyHN BTeJIe,a TaHHe npaBnloHO OrpaHn3OBycBoipa0ounpoccc
UA
Бeздротовий Хилкови 0230/0240 Tример
BCTyn
LeyinctpymEnI npn3naeHo,IO6 3pi3aTN TpaBy N 6yp'HNPiK KyuamN, a TaKoX Ha cxnax i no KpaX, Kydn He DiCTaE 3BnuHa raoHOKocapKa
Ley iHCTpymEnr He npuaTHn IaI npomncIOBOB0 BHKOpNCtAHN
- IpeBipTe HaBbHcTb BynaKOBu BCix YactnH, NOKa3aHnx Ha MaJIHOHky ②
- Y pa3i BiDcyTHOCTI CH N OINKOJHKeHHA DeTaJIe INPOcHMO 3BepTaTnCBA mRa3nH,De6yIo pNIDaHO IHCTpyMeHT
Ipeep BnKOpNCtAHNm npHnay yBaHNO npOHTaTe dany IHctpyKciIO 3 ecnnyatauii N 36epeKeiTb II dA NOdaJIbWoR O BNOpNCtAHNHa ③
3BepHItb 0co6nHy yBary Ha npaBnla i nonepedHeHH 3 TexHIn 6e3neHN;ix HeDOrtpMaHn MOHe npH3BeCTn Do cepNo3HOITpaBMn
TEXHIYHDAHI ①
EJEMEHINHCTPYMEHTA②
A O6MeKyBaXoNy
B Hanpma pykoTka
C Pyka peryIIOBAAHH TpIMaHa
D ΦikcaTopHa BtyIka
E TeJeckoniuHa wTaHra
F KypkoBNIpeMnKaU
G ABapiHn BmNkay
H NobopoTHa KhoNka
J KpnuKa KOtuyHn
K Hotoyka
L OTBip KOTyHNI
M Pnpctpii dIa 3axncty KbitB
N Pi3aIbHe Ie3o KINKIN
P KhoNka OKaHTOBKN
Q PeiKa 36epirAHnH
R AaanTepIy 36epiraHH
S KOJIeCO OKaHTOBKN
T KhoHa noaui HnIKN
V TpIMaH KOtUkN
W BeHTnlauiHi OTBOpN
X TolOBHa pyKoRTka
Z DpoTObi OTBOpN
AA IndkaTop pibn 3apdy 6aTapei
BE3NEKA
3AΓΑJIbHE
-ДiTЯМВiKOM BID 8 pOKIB Ta Oco6am 3 O6MeJKeHIMN φi3nUHMN,ceHCOPHIMN Ta PO3yMOBIMN MOJIINBOCTaMn a6o HeIOCTaTHim DOcBIIDom Ta 3HaHHaMn DO3BOJaETbCS HOpNCtYBaTnCS ue IHCTpymENT InIe nId HarlaDom a6o JkIo BOHn OTPMaII N BiINOBIHi BHa3iBHN ⅢOIO 6e3neuHORO BInKOpNCtAHNr cboR0 IHCTpymEnTy i pO3yMiOTb, Aky He6e3neKy BIn Hece (B IHsOMy BnPaADHy MoJInBe HenpaBnIbHe BVKnOpNCtAHNr Ta He6e3neKa OdePkaHnra TpaBM)
- ДиВiTbСЯ 3a ДiTbMn (ДiTn He NOBHHI rpaTnCЯ 3 iHCTpymEHTOM)
-ДiTЯМДОЗВОЛЯЕТБСАОЧИСАТНЗAPЯДнI ПпСТПИТаВИКонуВаТи NOROTOTEXHICHeOБсLYROВУВaHHЯ Лшe пIDHaRGlaDOM
O3haHOMTecb i3 3acobamn KepyBaHHa Ta npAikom po60Tu 3 iHCTpymENTOM
3a HeuacHi BnapAn 3IIOdbMn a60 NooKoJKeHH ix MaHa, a TaKoX 3arpo3y dIra Hnx BiNobiae KopnctyBauch
BnKOpNCToByTe IInIe npinlaDJa Ta 3aMInHi DeTaJI, peKOMeHDoBaHI fipMoIO SKIL
YHOHOMy pa3I He BCTaHOBJIHOITe Ha ue iHCTpyMeHT MeTaJIeBi p3aJIbHi eJeMeHTN
BE3NEKA JIODEI
- TpmaTe pyKn Ta HOr Na 6e3neuHbIcTaHbI
pi3aIbHnx HnIOK nIac po6OTn 3 IHCTpyMeHTOM, OcO6JIbNO nIac BMnKaHH IHCTpyMeHTa
Пд ус роботи 3 iHCTpymehTOM BHKOPNCTOBYnte 3axnchi OkyIaRnOДЯТe DOBri UTAHn, COPOHy Ha DOBrn pyKab Ta MIuce B3yTTJ
KateropnH03abOponeHo BHKOpncToByBaTH iHCTpymEn 6e3nocepEiNbHO nO6n3y IHuNX IIOdei (oc6JIbNO dTei) i TBapHH
He npaioIte 3 iHCTpyMeHTOM, RIO BTOMnINcR, noraHO ce6e noyBaTe a6o npinMaIn aIKOROJIb YI nikapcbKi 3ac06n
NEPEBVKOPNUCTAHHRA
KopncTyBaTnC4 IHCTpyMeHToM MoXHa JInue 3a DOCTaTHbOro DeHHoro YI BiNObiDHoro WtUHoro OCBIJIeHHA
- Y JIOHOMy pa3i He BIKOPNCOTobyte iHCTpyMeHT, JI KIO He BCTaHOBNeHO a60 NOWKOJKeHO O6MeKByBaX XOy
- IpeBipnTe cnpaBnHcTb IHCTpyMeHTy nepeKoHNBMnKOpNCtAHnM a60 nicJa yApy; y pa3i, RaIOBnABHeHO HeCnpaBnHcTb, HeraHo 3daIte Noro ypeMOHT KBaJIphiIKOBaHm faxIBcM (y JODHomy pa3i Hpo3KpNBaTe IHCTpyMeHT caMoCTiHo)
Iepu, hix niipiaTu, peTeIbHo orrJHbTe ra3oH i np6epiB 6ydb-RAKi CTOpOHHi PpeDMETU, yKHX MOHyTb 3actpargHyTu pi3aJIbHi Ie3a (HK, HApnKnlaD, KaMInHna, o6lamahi cyuHn i T.n.)
ПД YAC BKNOPUCTAHN
3anobiraTe BnKOpncTaHHIO IHcTpymeHTa B nOraHnx NOroDHnx yMObax, B Oco6JIbBOcTi RaHcE pN3IK 6JIncKaBKn
- He BHKOpNCtOByIte iHCTpymeHT ha MOKpIx ra3OHax
3abKdI TpImaTe pIBHObary I He nepeHa npKy TeCb
- IpaIIOUOu 3 iHCTpyMeHTOM, pyxaITeCb HeWBnIOpo3mipeHOIO xOIO (He 6iKITb)
PizalbiHJnHn npoobHyIb o6epTaTcH daHn Yac nicla BmHKaHH iHcTpymeHa
- He 3pi3yIte TpaB,Яka poCte He Ha 3emJI (Ha npnKlaI, Ha cTIHax a6o Ha cKeJIaX)
He nepexoDbTe dopory a60 rpaBHy dopixkky 3 yBIMKHyTN mIHCtpyMeHTOM y pykax
He BiDBoIiKaIteCeI 3aBKnI CTeKTe 3a CBOEIO pO60TOIO
3abKnBmHKaTe iHcTpymeI bHmMaTe aKymyTOp -KOJI 3aIIuAeTe iHcTpymeT 6e3 HargJy -peep TIm, k BnMaTu 3actpI npEpmTu -peep TIm, kOgIaTN, OUYBaTH iHcTpymeT a60 npOBoNTN 3 Hm iHwi onepaui -y pa3i NotpanJIHHHa cTOPOHHI npEpmT -RkUo iHcTpymeT NOUNHe 3acNlbo Bi6pyBaTu
He donyckaTe noTpapanHaHHa OCKoJIkIB y BeHTnlaIciHi OTBOpN
NICJI BHKOPUCTAHH
36epiratni hCTpymeHT y npmiueHHI B cyxomy, He DOctynHomy dIra diTei Micci -36epiraTe aKMyJrTOp OKpeMo Bi d iHCTpyMeHTy
AKMYJARTOP
AnymyIaTOp, AnnoocTaacbB KOMnIeHTi, cHaCTKOBO 3apJKeHm (NobHicTIO 3apJITb aKymyIaTOp B 3apJdHomy npucTpoi neped nepuH M BHKOpNCtAHHcM CBOO eJeKTPOIHCTpyMeHTy, uo6 3a6e3neHTN NOBHy nOTyHHICTh bAkyMylAToPA)
BnHOpNCToByTe 3 iNcTpymeHTOM TJIbHN TaHi anMyJrTopn i 3apAHi npncTpoi -AkyMylrTop SKIL: BR1*31****-3apAHHn npncTpii SKIL: CR1*31****
He BnKOpNCToBvTe NooKoDKeHn aKymyJIaTOp; Ioro Tpe6a 3amIHNTu
- He po36upaaTe aKymyIaTOp
BnKIOUcITb MOHINBICTb NOTpAnJIHHaIHCPTpymeHT aOa AkmyJrTOp
- Do3B0JeHa TempepaTpya DOBkiIJIa (iHCTpyMeHT/ 3apAHHn PnucTppi/AkymyIaTOp):
-πiДчacЗардженн4...40°C
-niДчacpo6ToN-20...+50°C
-πiδ yac 36epirānna -20...+50°C
IORCHEHHI OYMOBHIX I03HAUEHb HA IHCTPYMEHTI/AHMYJARTOPI
③Перед ВИКОРИСТАНДМ почитугкциюзactocyBaHHA
④ Пи BnyuHHi y BOROH b6aTapei Bn6yXaIb, Tomy B JxOHNMy pa3i He cnaJIouTe 6aTapei
⑤ 36epiraTe iHCTpyMeHT/3apAHHn npncTpi/ aKymyIaTop npi TeMnepaTyPi He 6ilbui 50^
⑥ OctepiraTecb OCHOHIB, HAI BIDNITAOB (IOOHNIOBOKoMaHO TBpepe6yBaTu Ha 6e3neuHi BiDCTaHI BIDMICua npn6npaHH)
⑦ OndraeTe 3axnChi OkyIaprTa 3acO6n 3axnCTy BOIOccs
BnHIOUHTb MOHNBIcTB NOTpanJHHa iHCTpyMeHT douy
He BnHndaIe eIeKtpoiHcTpymEnTa 6aTapei pa3om 3i 3BnHaHm CmTTM
BHKOPNCTAHH
-BCTaHOBITb 6OMeKHyBaU xOdy A, RAH NOKa3aHo Ha MaJIHOHHy, 3a DOIOMORIO 2 TBnHTiB 11a
! HIKOLN He BHHOPNCTOByTe iHCTpyMeHT 6e3 o6MeHyBaYxOdyA
-BNKOpNCToByTe KBiTHOBH ⅢTOK M⑩b
-BCTaHOBITb HAnpMaHmTpMaU B, JK Noka3aHo Ha MaJIOnHKy ⑬
3apnKaHnHaKymyIToPA
! 03haHOMTec3 nonepedKeHHMa i Bha3iBham3 Texhhi6e3neHN, hI HadaIOb8c3 3apAHHm npictpoem
BudaneHHBCTaHOBLeHH6aTapei ②
Bn/BnK ⑫
-
yBIMKHTb IHCTpyMeH, cNoaTKy HaTnCHyBm npUkY G (= aBapHn BmHaqu, kHn He MOxHa BmKHyTN), a NOTIM NOrHyBm 3a TpHrep F
-BIMKHiTb iHCTpyMeHT BiINyCTnBUn KypKa-NEpeMnKaay F
!nicra BmMnKaHHH iHCTpyMeHTa piaJIbHI JINIKN npoobHyIOb 0eepTaTHc KInbKa ceHyd
-NepeTMM,3HOByBMKaTHiHCTpMeHT,NoeKaTe, DOKN3yHHrTbcpa3aJIbHiKnIKN
!HEBMHKaTeTaHEBMHKaTeIHCTpymENT WBNIO
-
IIndiKaTOp pIBH 3apAny 6aTapei 10
-HaTnCHITb KONKy iHdNkATopa pIBH3ap4y
akymyIaTopa AA, 06 di3HaTnc nToOHn pBeHb
3ap4y 10 a
!nIO nICJI HaTNCaHH HKnONH AAb nouHaac 6IIMaTN iHNKATOp HauHnOro pIBH3apr4y 6atapei, to 6ataperp03prJKeHa
!HKUo 2 yBecb IHINKaTOp pIBH3apA dy 6aTapei nicna HATnCHAHHH KHOHN AA 10c nouHae 6IIMaTH, 6aTaper He 3hAxOHTbcB B donyCTHMOMy diana3OHi po6OuNX TEMNEpapatyp
3axnctaKymyIaTopa
IHCtpymeHT paTTOBO BmKaeTbca aO He BMKaetbca, Rkuo
- HabaHTaHeHHaHaTbO BnCOe -- > npi6epitb HabaHTaKeHH i nepe3anyctItb
-TemnepaTpa 6aTapei He 3haxoNTbC B Donyctmomy diaana30Hi po6oux TemnepaTyp
BID-20do+50C-->2yci iHnKaToppiBn6aTapei NOHnHaIOTB 6IIMATn npn HATNCKaHHI KHOKN AA
10c;3aueKaHTe,POK6aTape He NOBepHeTbcB DOnyCTHMn DIana3OH po6OuNX Temnepatyp
-6atapeo MaHHe po3pHHeHO (JIN 3axncty BiD rN60KOro po3py) -> HN3bKn PiBHe 3apA dy 6atapei a6o 6JIIMaHH HN3bKOroPiBHa 3apA dy
6aTaapei 10b noKa3aHo iHnKaTopom pIBHa 3apA dy 6aTaapei npHaTnCKaHHi KhoNn AA; 3apAitb 6aTaapeo
! He npoOBkyte po60ty Ta He HATnchaHTe BMnau nicna ABTOMaTHUHO BmKHeHHa IHCTpyMeHa; TaHMM DiAMN MOHn NOHODHTu 6atapeo
- YctaHOBbI NOIOJOKeHHHaHpRmHOro TpIMaay 13
-BiDnycTiB pyuHy peryIIOBaHHHaHnpaMHO TpMaHa C
-BiDperyIIOte NIOJKeHHaHaprrMHoro TpImaHa
-3akpiitb pyky peryIIOBAAHn HAnpMHOrTO pImaC
HaIaWTuBaHHIOBHNH Tpy6Kn 14
HaataybaHHaopieHTaJIi HAnpymHOro TpMaay 15
1.BHn3IJIKocIHHa
2. 360ky dIy OKaHTOBKIN
HaIaHTyBaHHH yHKuii NobopoTy 16
-BCTaHOBtN Kyt Tpy6n 3riDHO
- BilbHO CToaHOMy 36epiHaHHIO
- KocHHIO y By3bHX npocTopax
- 3BvuaHOMy KocIHHHIO
- KocHHIOIHN3bKIMN 06'kTAMN
5.ФУнкцI OKaHTOBKIN
BnKOpncTaHHKa BkITkoBOrO uHTka ⑦
BnKOpNCToBByIe KBIITKOBNI UNTOK IJIa3axNCTy ciHHNX pocINH BiD BnnaDKOBORO 3pIsaHHRA -chlaDiTb KBITKOBNI UNTOK M BHN3
3HimaTe KBITKOBn ⅢTOK DJIyHKUII OKaHTOBKn a60
ДЯ KOCINHЯ 3a BaJKNX yMOB
-CHJaIbTB KBITKOBn ⅢTOK M BROPY
- HanaaTyBaHHIhCTpyMeHTy IJI KociHHI
-BCTaHOBtB DOBHHNHy Tpy6Kn D⑭
-BCTaHOBIb OpiHTaIIO rOIOBHOrTO pIMaBa B NOIOXeHHKocIHH 15
-BINKOpNCToBMyTe NOBOPOTHe NIOJKeHHa 2,3 a6o4(16)
-BINKOPHCTOBYIte KBITROBNIHTOKM
HanaWtBaHHIhCTpymeHTyIraOKaHTOBKIN
-BCTaHOBtB DOBHHNHy Tpy6Kn D⑭
-BCTaHOBIb OpiEHTaUIO rOJOBHOI pyuKN B NOLOKeHHA OKAHTOBKN 15
-BINKOpNCToBMyTeNoLoXeHHNIOBOpOty5⑯
-BiEHaHKeBtKOBmIHTOKM⑦
-niДчac OKaHTOBK cnHpaIte iHCTpyMeHT Ha KOleco
OKaHTOBKN S 19
Piipi3aHH
! npn6epitb 3 ra3ohy kamehi, yIaMKn iHwi CTOpOHNI npeMmTn
! nouHaIte niip3aTu TInbHn Toi, KOJI IHCTpyMeNT Ha6epe nobHy wBnDkHcTb
-3pi3yIe BnCOy TpaBy 7apamN (3aBKn nOuHaTe 3Bepxy)
-πiip3aTe TlBKn 3a DOnOMOHO pi3aJIbHOI KpaIKN JKNK
-He 3pi3yIte BOIory a6o MOkpy TpaBy
-CTeXTe, Ⅲo6 3pɪzHa TpaBa He 3a6nBala KoTyuShy (He 3pi3yIte 6araTo 3a pa3)
-He nepeBaHtAnKyuTe iNcTpymeHT
-6yDte o6eepKHi, Kocany HABHOLO depeB a6o KUciB, 06 do HnX He doTopKaIncra p3aJIbHi Jnn
-ⅢO6 yHnKHyTn HAdMipHoro 3HOuYBaHHN pi3aIbHNX JIKOK, He DOnyckaIte ix KOHTky 3 TBepdIMN npedmetamn
-ram'raTte npo BiIaBaHHy pa3i TopKaHH TBePdx npedmetib
- YtpmyBaHHI pO6oTa IHCTpyMeHToM 18 19
-3pi3yUOu BVOCOy TpaBy, 3JIerKa HaxnIaITe
iHCTpymENT BnpaBO-BIbBO Ta B iHOMy Hapmky
-Для niDiPizAHHa KopoTWOI TpaBn HaxNJIb IHCTpyMeH, YK NOKa3aHo Ha pncyHky
-ТримапгіЕ ИСТPyМЕТДВОм pyКами,ТаKIM YHOM BИБудTe MaTи NOВнй KOHTpoЛь hab ИСТPyМeHTOM BEcь Yac
-πiДчacpo60THaMIMtCTIKeNoLOXeHHA
-3aBKnTpMaTe iHCTpyMeHT Bi Ce6e
-πiД Yac OKaHTOBKn CnnpaIe IHCTpyMeH T ha KOleco OKaHTOBKn S 19
-ПдзнгэздпоггкнлсK
HnIka aBTomatNHO nOaetbC npn BMKaHHi a60 BmKanHi IHcTpymeHTy
-pi3aIbHy KINKy 6yde BiDnyuEHO i o6p3aH0 do nOTpi6HOI DOBHNH 3a DOnOMoROJe3a HINKN N
!6ydbte ybaHHi, 0o6 He TpaMyBaTnca BiD p3aIbHorO Je3a HJNHN
-BIMKHiB IHCTpymEt I BnMIb aKyMylrTop
-NotarHtB KINKy i npoObKyTe TARHyTN, NOTIM HATNCHTb i BiNpyCTiB KHONKY NOaChi KINKN T
-BiDi3aBn 3a DOnomoTOJHKIN,NEpeMKHITb IHCTpymENT y 3BnuAHH N peKHM pO6OTn nepeD THM, JAK BKIOUaTH NoO
-peryIapHO HaMOTye KINK, 0o6 3a6e3neHTN NOBHN piaIbHn cHKn
-πρn xoIocToM y oDi dBHyHa p3aIbHi JHKIN 3HOuyOTbcra a6o lamAIObTcR; nepemotaTe KOTyKky a6o 3amHITb KOTyKOBy CNTeMy
Y pa3i, Jnso piaalbhi Jnlln He BnXoJr b i3 OTbopy KOTyUkn L
!3aBKnBnBMnKaIeIHCTpyMeHITiBNMaTe anMyJrTOp
-3HIMITb KpUHKy KOtyUKn JIBNIMITb KOtyUKy K 3 TpIMaHa KOtyUKn V
-piBHomipHO, noIapOBo I Tyro nepemToaIte pi3aJIbHy HnIKy HnnpMky CTpiJKN
-BCTaBTe p3aIbHy HnIky y na3 KOTyUKN Z Ta nepeKoHaTecr, 10 BOHa npaBnIbHO CTaJa Ha Micce (3aIIuTE HNkY DOCTaTHbOIO DOBHNH)
- npotarhiB pi3aIbHy HnIHy uepe3 OTbip KOTyHn L nepej yctaHOBOI nepemotaHOI KOtUHn B TpImau KOtUHn V
! nepekoHaTecra, 0o HOtyka HadiHo 3aHpinHe, noTIM BHTaRHiTB piaIbHy HnIHy uepe3 na3 Z
-BCTaHOBiTb KpIuKHy KOTyUKNJ
3amHOBaHHKOTyUKN
!3aBHHn BmHnHaTe iHcTpymeHT i BnMaTe anMyJrTOP
-3HIMITbCTapyKOTyHKYIBCTaHOBiTbHOByKOTyHKY,HK NOKa3aHOHaMaJIIOHHK
-BNKOpNCToBnyTe dIaIbOro IHcTpymeHTa TIlbKn KOTySKIL 2610S00818 (NOHODKeHHB HAcJIIOH BnHOpNCtAHHcTOpOHHX HOYuHOBNX CNCTEM He NOKpNBaETbcra rapaHTieo)
-3amHnBn KOTyKny, Bnnpo6ynte IHcTpymENT npTROM Ondie XbuiHn 6e3 HabaHTaKeHH, 06 nepekoHaTNC, 0o Bin npaquoe npabNbHO
! nepeKoHaItec, 00 iHCTpyMeHT BmKHeHn npu yctahOBci 6aTapei
DOrJaIOBcIyROByAHHa
Ley iHCTpymeHT He npuaTHn DJI npomncIOBOB0 BHKOpNCtAHHJ
3aBHKn BmHKaIte iHCTpyMeHT, BnMaTe aKymyJITop i nepeBipraIte, 0o BcI pyXomi YactHHN 3ynHHINcR NOBHICTO
3aBxJn TpMaIte iHCTpyMeHT B YHCTOTi (OCO6JIbBO BeHTnlauiHi OTbOpN W ②)
-OhuIte IHCTpymeHT BOJIOIO TkaHHoIO (3aCtOCOByBaTN MmHi 3acObn a60 po3HNNKn 3a6OpOHeHO)
-nicKoHnHO BnKOpncTaHH OuHaTe p3aIbHeJIe30 HnN N ② N o6MeHyBaay XoNy A ②
-peryraHPO OuIyute BeHTnlauiHi OTbOpn W② 3a DonOMOrOIO aIO a6o CTNCHeHO NOBITpr
- Perynpho nepebipraTe cTah piaJIbHOI roIOBKn i CTyniHb 3aTaryBaHHraJOK, BoNTIB I rBNHTIB
Perylaepno nepebipnTe deTalHa npedmet 3HOuBaHHa6oNoKoJKeHHaBipemOHyTe/ 3amHt bix y pasi noTpbe6n
36epirahnn
Cnoci6 36epirahnn1 ②
-HaIiHIO 3aKpinitb niBicky Q ha ctiHi 3a donomoroio 2 rBnHTiB (He BXoJATb y KOMnJIeKT NOCTaayHHA), BnpiBHBwn ix no ropn3oHTani
-πρικρπίπιβ aαπαπερ 3δερirαHHR i περεmicrɪb Ἱονo οD MOHTaHHOI OCHOBn peHKn 3δερirαHHa Q
-36epiraTe iHCTpyMeHT, NOMICTNBUN OTBip nla 36epiraHH B TpIMaHi HaI HAKOHeHHKOM aanTepa dna 36epiraHH
Cnoci636epirahna 216
-BNKOpNCTaIe NIOJKeHHa NOBOPOty 1 I Hexa IHCTpMEnT pOcTO CToITb Ha NoBepXHi
- RaHIO He3BaKaIouH Ha peTeIbHy TexHOIroBnROTOBHeHH I nepeBipKn IHCTpyMeHT BCE-TaKN BnIe3 NaIy, Horo peMOHT Do3BOJrEbCra BVKOHyBaTHnIiue B aBTOpu3OBaHi cepBicHi MaNCTepHi dIe eJeKtpoPnlaqIB SKIL
-HaIIuIbHepo3i6paHnIHCTpyMeHT pa30M 3doKa3OM KynibI do BaWoRo dInepa a6o do Hau6nKUoro ueTpy oocnyroByBaHHa SKIL (adpecn, a TaKoK diarpama oocnyroByBaHHa npncTpoIO, nOdaIOTbcra Ha caTI www.skil.com)
Bismbitbdo Bioma, yuKoKeHHBhacIIOK nepeBaHTaKeHH a60 HeHaJIeHHO NOBOKeHH 3 npOyKTOM He 6yUyTB BHKUoyehi B rapaHTIO (ymOBn rapaHTII SKIL DnB. Ha caTl www.skil.com a6o doBidaaTeecB dInepa y Baowmy perioHi)
UCYHEHHH HENOJAOK
HnKHe HabeEHO nepelik HecnpaBHOCTe,IX MOHNBHX npuHH i KopeKTbHNx DII (rHc0 3a ix DOIOMOIO BnpiHTn npo6lemy He Bdaetbc3BepHITbc4do dInlepa a60 y cepbichn ceHtp)
! y pa3i eIeHTpUHoi a6o MexaHIO HecnpaBHOCTI HeraHOB BUMKHITb IHcTpymEt Ta BuaJIITb anMyJATop
IctpymeHT He npaioe
-6aTapeo po3pJxKeHo->3apJiTb 6aTapeo
- rapya 6atapea - > daTe 6atapei oxolohyTN
-BHyTpIiHn NOMIIkA->3BepHiTbc8doDInIepa a6o y cepBicHH ueHtp
IctpymENT nepioDnHOB BmNkaetbcra
-NoIkoJHeHO BHyTpIiHIO npoBODy -> 3BepHiTbcra do DnIepa a60 y cepBicHH ueHTp
-NOIHKoJKeHO BIMnKaU JINBJIeHHa->3BepHiTbcrdoDnIepa a60 y cepBicHn ueHTp
IcTpyMeHT CnIbHo Bi6pye
-Дужke BncoKa TpaBa -> 3pi3ynte NoetanHO
IctpymeHT he pike
-нлка 3akopoTka/obipbaHa -> BNTIHTb HnIky BpyHy
BdaetbCBBNTaHTN HINIKy
-KOTUwka npoOHHa->3amHiTb KOTuWky
-ЖИнka 3aannyTaIacB KOTuIci-> OrlnHbTe KOTuIky; y pa3i noTppe6n nepemOtaiTe JxNJIky
Hnka He BiDi p3aecbca Ha noTpi6Hy DOBHNHy -> 3HIMITb KpniuKy 3 pi3aIbHoro ne3a
HnIHa HeoHopa3OBO 06pNBaETbcra
-ЖИнka 3aIpyTaIacB KOTuWci-> OrlHbTe KOTuKHy; y pa3i noTppe6n nepemOtaiTe JxNJIHy
-He npabnblhe BnkopncTahnnra3oHOKocapkn-> niipiaaTe TilbKn 3a donomoro piaalho KpaH; yHkaite KaHH, CTIH Ta iHnx TBepdx NpeMeTiB; peryIrpHo HAMOTyIe KJIKy
OXOPOHA HABKOLINHbOI CEPEI
He BHHaIte eJeHTpoHcTpymeH,6aTapei, npHaJdJIeKHOCTI Ta yNaKOBHy pa3OM 3I 3BnauHm CMITTAM (TIbKn dJa KpaIH EC)
-BiDnOBiIDNo Do eBponeCbKOI dIpeKTHBN 2012/19/EC
UOdo yTNIi3aui Ctapnx eJeKTPnuHnx Ta eJeKTPoHNHX
PnIIaIB, B 3aJIeXHOCTi 3 MicceBm 3aKOHOdABCTBOM,
eJeKTPoIHCTpyMeHT, JIKN pepe6yBaB B EKcNlyatauii
IOBHeH 6yTN yTNIi3OBAHn OHpeMO, 6e3NeuHm IJRA
HAVKOJIINHbOTo CEpeDOBnua aJIAxOM
-MAJIHOHOK HaraJaE Bam Ipo Ce
! nepeTm, RAH NO36yTHcB aHymyIaTOPa: 3aKHeIe rpy6oIO HKeHKOIO CTpiHKOIO KHeMn, Ioo6 3an06irtn KOpOTHomy 3aMHKaHHIO
UYM/BIBPAUI
0230
3mipHn BiNOBiHO do EN 60335 pIBeH TnCHy 3ByKy daHoro iNCTpymenty 72,1 dA) (noxnbKa K = 2,5 dB) i noTyHHicTh 3bky 85,6 dA) (noxnbKa K = 1,1 dB), i BiaPacJ 2,7 M/c² (BeKTopHa cyMa Tpbox HaprMkiB; noxnbKa K = 1,5 M/c²)
0240
3mipraHH BIDNOiHO Do EN 60335 pIBeH TnCKy 3ByKy daHoro iNCTpyMeHTy 77,2 D(A) (noxnbKa K = 2,5 dB) i noTyHKHicTh 3ByKy 88,6 D(A) (noxnbKa K = 2,0 dB),
iBipaui3,9M/c² (BeHTopHa cyMa Tpbox HapPmKiB; noxibKa K=1,5M/c²)
PibeHbBicpaui6yIbVBMipraHo y BiIOBIDHOCTi 3i CTaHdaptn3OBaHM BInpObyBaHHM,IO MICTNbCBEN60335;daHaXapAHTepnCTNa MOHe BVKnOpNCTOBvBaTnc dIJI NopIBHNHNO OHO RO IHCTpyMeNTa 3 INHMM,aTaKoJ dJI IonepeNBoOI OUHKn BnINBy Biopaui niJ qac 3actocvBaHHa DOHO RO IHCTpyMeNTa BkazAHNX CIJIeI -Pi BNOPNCtAHHI INCTpyMeNTa B INHXU XJIAX a6o 3 iINHMn/HeCnpabHmN DoONOMIXHMn PnICTOcYBaHHMn PiBeHb BnINBy Biopaui MoKe 3HaHNO iINBNUyBaTncr -y nepioN, KOJI INCTpyMEHT BVIMKHeHNI a6o FYNKIOHyE 6e3 PhAKTHORO BVKOHAHHPO6OTN, pBeHb BnINBy Biopaui MoKe 3HaHNO 3HNKyBaTncr ! 3axuaiTe ce6e Bd BnINBy Biopaui, NiITprIMyOnH INCTpyMeNT i Ioro DonomixHi npNCTOcYBaHHB CnpabHomy cTAhi, NiITprIMyIOuN pyHn B TEPNI, a TaOH NpABNlbo Ogrpan3OBYOUcNBpo6Ouy nCBI po6Ouy npoeC
GR
EnavaΦopTiζóμεvo 0230/0240 XoPTOKoTTiKó μεσηνέζας
EIZARQH
-Kpatntheite oe staepn the np epyaoia
anoppmuatow (movo yia tic xwpe ts CE)
-oumuwva e Tnv evupnaiik obnyia 2012/19/EK nepi nAektpikwv kai nAektpovikwv ouokewuvkai Tnv EVomegaTOWn TcOTo E0Vko diKaio, ta nAektpika epyaia npenla va oUAAeoyovtai ExWpiota kai va ENIOTpefovtai yia avakukawon e Tpno fliKO npoc to pepiaalov
Ful serupe in mod repetition
3apeHdahe Ha aKymyIaTopa
!npoueTeTe npedynpeKdEHHaTn HnHcTpkyuHNTe 3a6e30nacHOCT,doctabEHNCb3apHNOTO yCTPOINCTBO
-ⅢBaXHaHe/NoCTaBHe Ha 6aTepeyTa ②
BKhIOUBaHe/NU3KIOUBaHe ⑫
-BKIOUeTe INHCTpyMeHTa, KaTO NbPBO HAHCHeTe KOJIeTo G (= 3aUNTeH npeBKNIOuBaTeI, KOITo He MOKe da ce 6JIOKupa) a cJeT TOBA dPbNHeTe CnycbKa F
-ИЗКИLOЧЕ ИСТРУМЕТА KaTO OСВОБОДNTe CNYСьКOB BKNIOHBAteJ F
!cIeHn3HIOUBaHeHa HNCTpyMeHTa peHexaTa KOpda npOdbJIbKaBa Da ce Bbptu Oue HraKoJIHo CEHyHdN
-и3чakaye pekeaTa KOpda Da cnpe da ce Bbptn, npeDn OTHOBO Da BKNIOHTe
!HEBHLIOUBAuTeH3HIOUBAuTe6bp30TpImepa
- INHdkatop 3a KaNaUTeTa Ha 6aTepeyTa 10
-HaTNCHeTe 6yToHa 3a INHdkaTop Ha HNBOTo Ha 3apnHa 6aTepeYra AA 3a NOKa3BaHe Ha TEkyuOTo HNBO Ha 3apnHa 6aTepeYra ⑩ a
!KORATO HAI-HNCHOTO HNBO HA INDHKHATOPA 3a 3apnHa 6atepnaTa 3anoHcJa Mnra Cnei HaTnCKaHe Ha 6yToHa AA b, 6atepnaTe npa3Ha
!Korato 2 HnBaTa Ha INHnHaTopa 3a 3apRHa 6aTePnra 3anOHTa DA Mrrat Cnei HaTnchAHe Ha 6byToHa AA ① c, 6aTePnra He e B Donyctmna pa6oTeH Tempepaten dHaana3OH
3aunetaHa6aTeepnra
HnCTpyMeHTbTBHe3aHNO Ce N3KIOUBa HIN He NO3BOJRA Da cBe BKHIOH, KORAto
-HaTOBapBaHTo e npEHaJIeHO roJAMO --> IpemaxHeTe HaTOBapBaHTo n pecTApTuPaIe -TemnepaTypata Ha 6aTePnraTa e N3BbN DOnyCTmMna pa6oTeH TemnepaTypeH dHaana3OH OT
-20do +50^ --> 2 HnBaTa Ha INHnKaTOpa 3a 3apA Ha 6aTepeyra 3anaOuBaT Da Mrrat, KOraTO HaTnCKaTe 6yToHa AA 10c; n3yaKaIte, dOKaTO 6aTepeyra cN Bb3BbPhe DOnyCTmna pa6oTeH TempepaTypeH dHaNa3OH
-6aTePnTa e noTu npa3Ha (3a npedna3BaHe cpeu y nIbIHO pa3peHdahe) -- HICHO HBO Ha
6aTePnraTaNINMnraHNOHNcKO HnBOHa 6aTePnraTa0 b e NOKa3aHO Ype3 INdNkAtopa 3a 3aprHa 6aTePnraTa, KOrato HAtncKaTe 6yToHa AA; 3apeTe 6aTePnraTa
I cIeA bTOMaTHUHOTO n3HJIIOUBAHe Ha IHCTpyMeHTa He npoDbJIHaBaIte Da HATNCHaTe CnycbHa, NOHEKe MoHe Da ce NOBpeHn aKymyIaTOPbT
3aabaHa HIOZnurTa Ha DpbKKaTa 3a BOeHe 13
-OCBO6OeTe KOHcTo 3a peryIIPAHe Ha IpbKHaTa 3a BOeHe C
-perynapaTe no3nuaTa Ha dpbHKKaTa 3a BOdeHe -3aTeHETe KOnyeTo 3a perynpaHe Ha dpbKkKaTa 3a BODeHe C
HactpoBaHe Ha bInnHaTa Ha Tpb6aTa 14
HactpoBbHe Ha opnEHTaunrTa Ha OCHOBHaTa DpbKHa 15
- HandoIy 3a KocHe
2.OTCTpaHn 3aOTcHnHaHe
HacpoBaHe Ha yHKnraTa 3a 3abpTaHe 16
-3aJaTcBcTBETHbHa TpbHa
1. CBO6OJHO CTOnIcBxpaHeHne
2. Kocene B TECHN pOCTpaHCTBa
3. peDobHO KOceHe
4. KocHe IOd Hnckn OeKTH
5.ФункцязOTCHUaHe
-ⅢπoJI3BaHe Ha npEpa3nteIa CBETA 17
N3noJ3BaIte npedna3nte 3a cBETRA 3a da 3aunHTTe
ceHHnTE pactEHnO T HeBOJHO OKactpRHe
-cbHete npedna3nte 3a cBETMa HadoLy
DeakTbIpaIte npedna3nte 3a cBETra 3a cyHKuYTA
3aOTcUHaHE NIN 3a KOCEHe B 6In3oCT Do TBbpDn
npenrTCTBn
-cbHete npedna3nte 3a cBETMa Harope
- HacTpoBaHe Na ypeDa 3a KocHe
-3aainTe DblnHnHaTa Ha Tpb6aTaD 14
-3aAnTeOpnENTaunTaHaOCHOBHaDpbKKaB P03uN3aKoCeHe 15
-ⅢnOJI3BaITeNo3nUHa3aBbTpAHe2,3nII4⑥
-3n013BaIte npedna3nte 3a cBETM
- HactpoBaeHaHnCTpyMeHTa3aOTcnUaHe
-3aadaTe DblnHnHaTa Ha Tpb6aTaD 14
-3aAnTeOpnENTaunTaHaOCHOBHataDpbKbBA B NO3uN3aOTcUaHe 15
-3n0JI3BaITe nO3nUHa 3aBbPtaHe 516
-DeakntbnpaTe npednaTeTn 3a CBeT M
-3a OTCnUaHe - NOIppe Te INHCTpyMeHTa Ype3 KOJIeIoTO 3a OTCnUaHe S
! ybepeTe ce, Ye Ha yuacTbHa 3a pR3aHe HMa KaMbHn, OTnaDbuN I dpyr N yHdN TeLa
I 3anoyheTe p3aHTo Ha TpeBaTa cMo KOrato HnctpymEnTbT pa60Tu C nbJHa ChOpocT
-peKeTe BnCOKaTa TpeBa Ha NlaCTObE (BnHaTn 3aNoyBaIe OT HaN-TopHnI PaCT)
-peXeTe TpeBaTa cAmO C BbPxA Ha peXeUaTa KOpda
-HepeKeTeBlaaKHaHIMMOKpaTpeBa
-He DonycKaIe OTpra3HaTa TpeBa Da 3aApbCTBa polkaTae (He npabeteDbIb6OHi OTKocn)
-He npeTOBapBaIe TNHCTpyMeHTa
-BHIMaTeJHOpeKeTe OKOLODbPBeTa INxpaCTN,Taka 贝 Te Da He Bn3aT B KOHTaC peKeUaTa KOpda
-ДрьнTe INHCTpyMeNTa daley OT TBbpNn ppeMmTn, 3a da npeDna3nte peKeIaTa KOpda ot npekomephno N3HOCBaHe
-He 3a6paBraTe 3a cnJIte Ha 6paTHnYdap, KOnto ce 3aDenCTBaT, KOrato Ce DOKOCHAT TBbPn TeJa
-ДырханHaHacOuBaHa HnHCTpyMeHTa 1819
-3a p3aHe Ha BnCoka TpeBa 6abHO DbHexTe INHCTpyMeHTA OTdACHO HAJIBO N O6paTHO
-3a p3aHe Ha NO-HNcKa TpeBa HAnIOHete HnCTpyMeHTa, KaKTo e NlHOCTpnpaHo
-ДрьжTe eNEKTPOnHCTpyMeHTa 3dpaBO C DBeTe pBuce, TaKa Ye NO BcAHO BpeMe Da NMaTe PJIeH KOHTpoI Bbpxy Hero
-NoDdbpkaTe cTa6nHa pa6oTHa no3a
-BINHAnI DpbXTe INHCTpyMeHTaIOCTaTbUHO daJeuOT TJILOTOCN
-3aOTCNUHaNE OCTaBeTe INHCTpyMeHTbT Da Ce IOpnnpa Ha KOneNoTo 3a OTCNuHaNE S
KopdaTcpeNdaaABTomauHO,KoTaTO HnCTpyMeNTbT Ce BkHIOUba NIN N3KIIIOuBa
-peKeaTa Kopda ige ce ocBooN iue ce oTpeKe Do Heo6xOIMata DbJIHHa OT OCTpneTo 3a Pra3aHe Ha Kopdata N
!BHHMaBaIte Da He ce HapaHnTe OT HOHa 3a pHa3aHe Ha Kopdata N
PbUHO noDaBaHe Ha KopdaTa 20
-и3KIIIOHTe INHCTpyMeHTa N 3BaTe6aTePnTa
-3dbpnaTe KOpdaTn npoDbnaBaTa Da dbpNaTe, CneI KoETO HaTncHete N PycHete 6yToHa 3a nOdaBaHe Ha KOpda T
-CEIeI NOdaBaHe Ha KOpDa BnHaRn BpBuaTe HNCTpyMeHTa B HopMaJIHOTo My pa60THO NIOJOKeHne IpeDN Da r BOKJIHOHTe OTHOBO
-NoaBaiTe KOpdaTapeoBHO,3a da NpDbPkaTe nBJeH KpbI Ha p3aHe
-Korato MOTOpbT paobTu 6e3 HaToBapBaHe Hc ce peKe TpeBa, peKeuTa KaKpda e 3aceHaHa, n3HOceHa NnI Ce KbCa; ppeHabNte poJkata NnI NOMeHete POJIKObATA CNTema
B cnuyaeypepekeetaKopda He ce noadaoTynkata 3a polkaTAL
!BnHaHnN3KJIIOUBaIte HNCTpyMeHTa N3BaJdaTe 6aTePnTa
-cBaJIeTe KanaKa Ha poIkaTa J n I3BaIeTe poIkaT a K OT dIbprKaHa Ha poIkaTa V
-MOHTnpaIteKaIaKaHa poIkaTaJ
!BnHaHn N3HJIIOUBaIte HNCTpyMeHTa N3BaHdaTe 6aTePnTa
-ИЗВадеTe CTapaTa polka И моNTираиTe HOВаТа polka cnopeд nIIOCTpaunraTa
-CTo3N INHCTpyMeHT H3NoJ3BaTe cMo pOJIKBaTa cnCTema Ha SKIL 2610S00818 (rapaHnIraTahama da
NOKPnBa NOBpeu, PnpUHHeH N O T yNoTpe6aTa Ha dpyr n polkOBn cncTeMn)
-Слд ПОДмЕнг He Na polkaTа nychete INHCTpyMeHTa
Пробно 3a Na-Малko edHa MInHyTa 6e3 HATOBapBaHe,
3a De ce yBepnTe, Ye INHCTpyMeHTbT pa6OTn
HOPMaJIHo
!6bTe CnryPhN,Ye HnHCTpyMeNTbT e n3KlIOueH, KOrato Noctabrte 6aTepeHrTa
ПОДДРБЖHA/CEPBИЗ
To3n INHCTpymEn He e npedHa3Haueh 3a npocecnoHaHa ynotpe6a
BnHaHn n3KIOUOyBaIe NHCtpyMeHTa, n3BaHdaIte 6aTepeHraTa HcyeBepTe, Ye BCnHKn DBNKeuN Ce YaactNa ca cnpEn HaTbInHO
HCTpyMeHTbT He pa60TH
-6atepnaTa e npa3Ha->3apeTe 6atepeyra
-6aTeepnraTa e TOnla->OCTaBeTe 6aTeepnraTda n3CTnHe
-BbTpeseHa NOBpeDa->O6bpHeTe Ce KbM DnCTp6yTopa/CepBu3
HCTpymEnbTpa6OtnCnpekbcBaHe
-NOBpeHbTpeHHnKa6eHn->O6bpHeTe Ce KbM dNCTpHbTyTopa/CepBn3
-ПОВЕДEN 6уTOH 3a BнЛIOUBAHe/N3HЛIOUBAHe-> OБьрHETe ce KbM ДИСТРи6уTOpA/CEpbN3
HCTpymENTbTBn6pnpa Heo6nuaHo
-TpeBaTa e TBbPde BnCoKa->peKeTe Ha etanu
HCTpyMeHTbT HepeKe TpeBaTa
-KopdaTa e TBbpe Kbc/aChbcaHa -> noaTe KopdaTa pBuHo
HopdaTa He MoKe Da 6bJe NoJaBaHa
-pokkatae npa3Ha->noDmeHeTe pokkata
-KopdaTa e 3aIneTeHa BbTpE B polkaTa-> npoBepeTo pOkaTa; npehabnTe KOpdaTa, aKe e Heo6xoDIMO
HopaTaHe oTpa3aHa Do HyKaHa Ta bJHKHa-> CbaIe KaauKaTa OTpeKeuHn HOK
HopdaTa HnpeKbchato Ce KbcA
-KopdaTa e 3aIneTeHa BbTpE B polkaTa-> npoBepeTo pOkaTa; npehaBnTe KOpdaTa, aKe e Heo6xoJIMO
-TPIMepbT ce n3no3Ba HnnpaBnHNo -> peKeTe TpeBaTa cMo C BpXa Ha KopdaT; N36raBaiTe KOHTaKambHn, CTeHN IpyrN TBbpDn TeLa; peoOBHO npabaTe KOpdaT
ОПАЗВАЕ HA OKOLHATA CРEDA
He n3xBbPnIte eIeKtpOypeInte, 6aTePHn, npncnoc6JIeHNrTa n OAnHOBHTe 3aeHNo C 6HTOBN OTnaDbu (cAmO 3a cTpaHn ot EC)
-cb6pa3Ho DnpeKTHBaTa Ha EC 2012/19/EG OTHOCHO3HOceHN eJETPNueCKN eJETPOHHypeDN IOTpa3RAHeTO B HauNoHaJIHOTo 3aHOHOdaTeJICTBO H3HOceHNTE eJETPOpyeDN cJeBA da ce cb6npaT OTdJIHO N da CE npedABat 3a peuKNipane CnopeDN 3NcKBaHnTA 3a ONa3BaHe Ha OKoJIHaTa cpeDA-3a TOBA yHa3Ba CNMBOblT⑨ TORaba KOraTO Tp86Ba Da 6bDat YHnOJOKeHN
I npedn da n3xBpnlte 6aTeepnTa, 3aunTeTe n3BODNTe cde6eLa lenenHa, 3a da HMa onaCHOCT OT Bb3HNHbaHe Ha KbCO cbeHHeHne
UYM/BNBPaCIN
0230
I3MpeHOB CbOTBeTcBHe c EN 60335 HNBOTo Ha 3ByKOBO HAJIraHe Ha To3n INHCTpyMeHT e 72,1 dB(A) (HeonpeJeIeHOCT K = 2,5 dB) a HNBOTo Ha 3ByKOBA MOHOCTe 85,6 dB(A) (HeonpeJeIeHOCT K = 1,1 dB), a Bn6paunnte ca 2,7 M/c² (BeKToPHaTa cyMa nO Tpnte HAnpaBLeHHa; HeonpeJeIeHOCT K = 1,5 M/c²)
0240
I3MpeHOBcBbTBeCTBHe c EN 60335 HNBOTo Ha 3ByKOBO HAJIraHe Ha To3n INHCTpyMeHT e 77,2 dB(A) (HeonpeJeIeHOCT K = 2,5 dB) a HNBOTo Ha 3ByKOBA MOHOCTe 88,6 dB(A) (HeonpeJeIeHOCT K = 2,0 dB), a Bn6paunnte ca 3,9 M/c² (BeKToPHaTa cyMa nO Tpnte HApabLeHHa; HeonpeJeIeHOCT K = 1,5 M/c²)
HnBoto Ha npedeAeHnte Bn6paun e n3MepeHo B cbOTBeTcBne CbC CTaHdapTN3npaHn TecT, ONpeJeH B EN 60335; To moKe da ce n3noJ3Ba 3a cpaBHeHne Ha eIN HnCTpyMeHT C dpyr N KaTO ppeBapNTeHa OceHka Ha NOJaRaHeTo Ha Bn6paun npu n3NoJ3BaHeTo Ha INCTpyMeHTa 3a nocOueHnte npuIooKeHHa
-ИЗПОЛ3ВаHETOHaИНСТPyМЕNTa3a pa3IuHnOT Te3NпиLOн经HЯИN CДуTn,ИИ NLOso NOIDbPkaHnakCECoApN MoKe 3HaUHTeJIHO Da NOBUN HNBOTO HaKOEt OTe NOIIOKHeH
-NepeHOnTe OT BpeMe, KOraTo INHcTpymeHTa e N3KIOUeH NII CbOTBeTHO BHIOUeH, HO C Hero He Ce pa6OTn B MOMeTA MoRat 3HaunTeJIHO Da HamaJIAT HIBOTO Ha KOeTO CTe NOILOKeHN
!npedna3BaIte ce ot efeHTnte OT Bn6paunnte, KaTO NOdIbPHeAte HNCTpyMeHtA n AHCceCoapTe My, na3nte pbcTe cT TOpJI N OprAHn3HpaTe BaunTe MoJEN Ha pa6ota
SK
-Punjac mark SEKIL:CR1*31***
- Ne rabite bateriju kada je oštećena; treba je zamijeniti
- Ne rastavljaje bateriju
- Ne izlažite kisi alat/bateriju
- Dopustena okolisna temperatura (uredaj/punja/c/baterija): -kod punjenja 4...40°C
-tijekom rada-20...+50°C
-kod skladistenja-20...+50°C
POJASNJENJE SIMBOLA NA UREDAJU/BATERIJI
③ Pijeputotrebe procitajte korisnicki prisucnik
④ U dodiru s vatrom baterije ce eksplodirati, stoga ne spalujte bateriju iz bilo kojih razloga
⑤ Uredaj/punjac/bateriju spremajte uvijek kod temperatura prostorije nizih od 50^
⑥ Pazite na opasnost od ozljeda koje izaziva leteci otpadni materijal (sve osobe moraju biti na sigurnoj udalenosti od podruoja rada)
⑦ Nositi zašitne naočale i Štǐtnike za sluh
⑧ Uredajnikada ne izlazite kiši
⑨ Ne bacajte elektricne alate i baterij u kučni OTPad
POSLUZIVANJE
-postavite stitnik rezaça A kao sto je prikazano pomocu 2 vija a
!nikada ne koristite uredaj bez zašite rezača A
-upotrijebite stitnik za cvijece M 1b
-postavite vodecu ruku B kao sto je prikazano 13
Punjenje aku-baterijee
! procitajte sigurnosna upozorenja i upute isporucene s punjacem
APKALPOŠANA / APKOPE
TECHNINIAI DUOMENYS ①
PRIETAISO ELEMENTAI②
A Apsauga
B Kreipiamoji rankena
C Rankenos reguliavimo rankenèle
D Uzraktinis ziedas
E Teleskopinis vamzdis
F Gaiduko jungiklis
G Apsauginis jungiklis
H Pokrypio kampo reguliavimo mygtukas
J Rites gaubtas
K Rite
L Rites anga
M Geliu apsauginis gaubtas
N Valpaunanti gelezte
P Pakraščiupjovimo mygtukas
Q Laikymo begelis
R Laikymo adapteris
S Pakraščiūpovimo ratukas
T Stygos padavimo mygtukas
V Rites laikiklis
W Ventiliacines angos
X Pagrindine rankena
Z Stygos tvirtinimo isdrozos
AA Akumulatoriaus jkrovos indicatorius
SAUGA
BENDROJI DALIS
- PoiHHeHe Ha aKymyIaTOPcKa 6aTepeJa
! npouHTajTe n6e36eHocnTe npedynpeyBaHa n ynatCTbata daedeHH co noJIhaOT
BaHeHe/HnHCTaHpaHeHa6aTepujata ②
BknyeHo/IVcknyeHo ⑫
-BKJyTeTo aJaTOT Taka 7TO npBO npHTnCHeTe To KOJIyTeO G (= 3aUHTNHO KONHe KOe He MOKe Da ce 6LOHnpa), a Notoa NOBLeYeTe rpeKNHyBaHT F -INCHyTeJe MaMHNHaTa CO NyTuBe Ha npeKNHyBaHT 3a aANTbInpaHe F
IOTHANO He ro HCHJyHTe aHaTOT, HncaTa 3a cehepe npoDolHyBa da potnpa ywTe HeKoNky cekyHdN
-poTnpaHBeTo Ha JnUcaTa Tpe6a Da 3anpe cEIoCHO nped NOBTOPOHa rO BkIyUHTe anaTOT
! He ncknyybajte n Bknyybajte npemhory 6pry
- INHINKATOP 3a HNBOTO Ha 6aTePnjaTata (10)
-пгИТССЕТа ИНДИКАТОТ3a HIBOTOHa 6aTePиJaTа AA 3a Да ce пикаме TEKOBHOTO HINBOHa 6aTePиJaT a10a
! ako no npntnchahe Ha koncheTo AA10b noyHe Da TpEnka HndHaTopOT 3a HajnHcO HnBO Ha 6aTepnjata, Toraw 6aTepnjata e npa3Ha
!KoraKeNoyHeJaTpeHnHaHnHkAtopoT3a HnBOaTaHa6atepjuata2No npHTncHahe Ha KonTuToAAc,6atepjuata He e BO paMnTe Ha Do3BOJeHNOT oncER 3a pa6oTHa TemnepaTypa
3aWHTHa Ha 6aTepnjata
Anatot HaeHaaw Ce NcHlyuBya nn He MoKe da ce BkIyU, Kora
- TOBAPOT e nperoJem --> OTCTpaHete rO TOBAPOT IN NOUHTe NOBTOPOHO
-temnepaypata Ha 6atepnjata He e BO pamknte Ha DO3BOJENOT ONcer Ha pa6oTHa TEMnepaTpa od -20do +50^ --> 2 HNBOATA Ha INDnKaTOPOT 3a HNBO Ha 6atepnjata NOHyBaAT Da TpeNkaAT Kora Ke ro npHTncHeTe KOHTe AA 已 _ 己 ; noheKajTe 6atepnjata Da CE BpTH BO pAMKNTe Ha DO3BOJENOT ONcer Ha pa6oTHa TEMnpaTypa
-6aTepnjatae cHOpn ppa3Ha (3aWHTa OJ eJoCHO npa3Hebe) --> Ha HNDnKATOPOT 3a HNBOTO Ha 6aTepnjataKe ce npkaHe HNcKO HNBO Ha 6aTepnjata nnKe TpEnKa 3a HNcKO HNBO Ha 6aTepnjata b Kora Ke npntncheTaHa KonHeTo AA; HanoHete ja 6aTepnjata
!He npoOJHyBajTe da npHTnCHaTe Ha npEHNHyBaOT 3a BnJyBaHe/NCNHyBaBe OTHaHO aJATOT He ce nCHNyAbTOMaTCH; 6aTepnjata He ce oWtETn
- NocTabyBaHHe Ha nO3nJjTa Ha paKaTa 3a BOeHe ⑬ -oclo6oTeTo KOnHeTo 3a npncnocobyBaHc Ha paKaTa 3a BOeHe C
PaHOp erynipaHe Ha HncaTa 20
-ИСКИЧЕТУАЛТОТ ИЗВадеTe ja 6aTepeNiJaTа
-3BleueTe ja HncaTa n npoDolKeTe da BLeueTe, a nToa npntncHeTe n nyuTeTe ro KOnyeTo 3a perylnpaHbe Ha HncaTaT
-No NOdaBaHe KoHeu, cekoraw BpaTeTe r aIaTOT BO HOpMaJIHa NpOJ6a 3a pa6oTa npei Da rO BklyuHrTe
-peoBHO HANOJHyBaTe ja XncaTa 3a da ce odpHn CeIOceH Kpyr 3a ceHeBe
-KORA MOTOP pa60TN 6e3 ONTOBAPyBaHe n He ce CeYe TpeBa, 3NaHn DeKa JnCuTa 3a CeYeBe e 3aIaBeHa, H3a6eHa HnCKnHaTa; IpemOTajTe ja MaKapaTa Hn 3ameHete Ro CNTcEMOT Ha MaKapaTa
Motahe Ha KaJemOT ②
Iokolny Knuata 3a cehe He n3JIeYBa OJ OTBOPOT Ha MaKapaTa L
!cehoraHncknyBajTe ro aIaTOT n BaTe ja 6atepnjata
-OTCTpaHete ro HanaKOT Ha MaHapaTa Jn n3BaTe ja MaHapaTa K od npKaohot 3a MaHapa V
-UCBPCTO npemOTajTe ja HnUcaTa NOeHaKBO BO CNoEBN BO HAcOKa HA CTpeJIkata
-BMeTHeTe ja HnUcaTa 3a ceYeHBe BO OTBOpOT 3a MaHapa Z nPobepete daIe nocTabeHa 6e36eHNo Ha CBOeTo MecTo (OCTaBeTe DOBOLHa DOnKnHa OD HnUcaTa)
-ПОНТHETe jaЖИцаТа 3a ceYeHbe Hn3 OTBOPOT 3a MaKapa Lnped Ja ja NoCTaBHTe MaKapaTa 3a npemOTyBaHBe BOДрЖaHOT 3a MaKapa V
! npOBepe TaJIH MaHapata e Do6po NocTaBeHa, a nToa nobLeueTe ja HnUcaT a 3a ceYebe od OTBOPOT Z
-Noctabete Kanak Ha makapata J
- 3aMeHa Ha KaJIeMoT ②
!ceKorawNcKnyBajTe ro anaTOn N BaTe ja 6aTepnjata
-OTcTpaHeTe ja cTapaTa MaKapa NIOCTaBeTe HOBa MaKapa KaHO WTo e PnKaKaHo
-Корисе само SKIL калеми 2610S00818 co Obaa anatka (оштетуваьeto nopади уnotpe6a Ha друг Калеми Немада биde покрнedo od rapahunjata)
-OTKaHO Ke FO CMeHNTe KaJIeMOT, BKNlyuye Ta npo6Ho MaunHaTa HajMaJnky EdHa MNHyta 6e3 ONTOBapyBaHBe 3a Da npOBepnTe daIi pa6Otn npabINHO
! anaTOT Mopa da 6nDE nCHnyeH npn noCTaByBaHe Ha 6atepnjata
OДРЖУBAHБ/CEPBИСИРАНБ
- Oboj aIaT He e HameHET 3a npofoecnoHaJHa ynoTppe6a
CekorawnchnyybajTe ro aIaNOT,BaTe je 6aTepeNjata n npOBepybajTe daJIIN cITe NOBHHN deJIOBN eJIOCHO 3anpeNe
AlaTcKoraaIa ceOpHyBa YnCT (oco6eHOOTBOPHTe 3a IaJeHe W ②
-NTCTeJaMaunHaTcO BnaJHa KpNa(HeKOpntTe CpeDCTBa3aNCTeHBeIINIpaTbOpyBaun)
-NCHCTeTe Tn CEuNBOTo 3a CeueHe Ha KOHeoT N② HHTNHKOT A ② no cekoja ynoTppe6a
-NTTeTnOTBOpHTe3aBeHTnlaunjaW②peoBHO, COYETKaHINKOMPecnpaHBO3dyX
- PeIobHO npOBepyBajTe ja coCtoj6aTa ha rIaBaTa 3a ceYeHe n 3aTeHrHaTOCTa Ha 3aBpTKnTe, HABPTKnTe n IwpaΦOBnTe
- PeoBHO npOBepyBaJTe daJII deIOBHTe ce OHTeHNIIN 3a6EHN INonpaBeTe/3aMeHeTe rAko e HeONxOdHO
- yBaHe MeToHa cKlaHpaHe 1 ②
-BHIMATEJIHO NOCTaBeTe ja UHHaTa 3a cKlaIpaHe QHa sNd co 2 WpaΦa (He ce IOCTaByBaat) n NOPAMHE Te XOpN3OHTaHIo
-πpncBpcteTe ro aanTepo3a cKnaIpaHbe R npdBnKeTe ro HacnpOTN OCHOBata 3a MOHTnpaHe Ha WnHaTa 3a cKnaIpaHBe Q
-chnlaqnpajTe ro aIaTOT CO OTBOPOT 3a cKnaIpaHbe BO paKaTa Hn BPOT Ha aIaIpTePOT 3a cKnaIpaHe MeToD Ha cKnaIpaHBe 2
-нсористе ja пицьда за ротрапe 1 и оctавету go alatot да стонCAM Ha 3emja
-ДOKOLNYалоти ипокраьВИМаTeHOTо pa6Ote№и КОТрола HeKOraш OTHaKe, NonpaBkata Mopa Ja ja n3BpSiн HeKoJ oblaCTeH SKIL cepBnC 3a eIeKtpuHn aJIaTn
-BO Cnyaj Ha npime6a, nCnpaTeTe ro aJAtOT HepacKnonen, 3aeEDHO CO CMETKONOTBpdaTao, DO BaHNOt npOdaBaU nn Haj6bnckNt SKIL cepBnc (aDpecnTe ce HabeDenHa www.skil.com)
IImajTe npedBnD nEHa OwTeTyBaHBeTo HacTaHaTO 3apaNn PpeoNTOBaPyBaHe Nn HePpaBnHOp paKyBaHe CO npOn3BODoT ja OTpJa rapaHcuijata (BnTe Ha www.skil.com nI npaJTe ro npOdaBauOT 3a ycNoBHTe Ha rapaHcuijata Ha SKIL)
PEUABAHIEIPOBJEMN
CneHnOT cncOK rnpKaKyBa CmNTOMHTe 3a npo6JIemTe,MOHNTE pnpuHHN IJeJCTBa 3a NOppaBka (KoHTaKTnpajte CO npoDaBaOT nIN cepBncepOT aKO IVCTHe He ro INDeHTNuKByaaT HHTy peWabaaT npo6JIemOT)
!BO cIyujHa eIeHTpHueH IIN MExaHnHn DeΦeHT, BeNaH uNCHnyute Ro anatot H n3BaTe ja 6atepnjata
MaunHata He pa6OTN
-празна 6атepиja --> habолнete ja 6aтepиjata
-Tonla 6aTeprnja -> octaBeTe ja 6aTeepnjaTa da ce n3laDi
-BHATpeWeH DeΦeKT-> KOHTaKTIpajTe CO npoJaBaYoT/ cepBncepot
MaunHaTa pa6oTu co npeknH
-OWTeTyBaHHe Na BHaTpeWHOTo NOBp3yBaHBe-> KOHTaKTnpajTe Co npoDaBaYoT/ cepBncepO
-OWTeTyBaHbHe Ha npeKnHyBaOT 3a BkIyUyBaHbE/ NCKIyUyBaHBe -> KOHTaKTnpajTe CO npOdaBaYOT/ cepBncepOT
MaunHaTa Bn6pnpa HeBoo6nHaeHO
-TpeBaTa e MHORY BUCOHa->ceYeTe NO a3N
MaunHaTa He ceYe
-KOHeIOT e npeKpaTOK/CKnHaT-> NOaJTe KOHeI paH0
HHeoT He ce noDaBa
-KaJIeMOT e npa3eH->3ameHETe ro KaJIeMOT
-KOHeTcE 3aJIeTKaH BO KaJIeMOT->IpoBepTe Ro KaJIeMOT;HamOTaTe RO aKO e HeONXoJHO
HHeOt He ce npeceye Ha ToUHaTa DoJIKNHa -> H3BaTeTo KaNAKOT Oc CeYNBOTO
HoeIOT noctojaHo ce KHe
-KOHeIOT e 3aJIeTKaH BO KaJIeMOT-> npoBepeTe ro KaJIeMOT; HAMOTajTe r aKO e HeONxOJHO
-NotKacTpbyBaHTe KOpHcTn HEnpaBnHO -> KaCtpTe CaMo CO BpBOT Ha KOHeOTo; N36eRHyBajTe KaMeHa, SINOBNI DpyrN cBpCTn PpeMmTe; NOaBajTe KOHeu peoBOHO
3AHTNTA HA JHBOTHATA CPEINHA
He ce oclo6odybajte od eIeKTHuHn aIaTn,
6aTePnn, ypei nn am6aJAAk npekny HNBHO
ФрlaHe BO DomaunHoTo ry6pe (cAmO 3a 3emjnte Ha EY)
-cnopeE EbpocKaTa DnpeKtnBa 2012/19/EC 3a OCIO6OyBaHe OeIeKtpuHa N eIeKtpoHcKa ONpema HneJ3InHa NMJIeMeHTaUJa BO COIaCHOCT CO HaIOHaJIHHe 3aKOH, eIeKtpuHnTe aIaTn KOI FOOCtINHaJIe KpaJOT Ha CBOJOT JINBOTeH BEK Mopa Da 6bIaTcO6paHn Noc6bHO n da 6bIaT BpaTeH N BO COODBeTeH ObjEHT 3a peUKNIPAhe
-CM60JOT 9 Ke Be NOTcetyBa Ha Oba KOra Ke Dojde BpeMe aIaTOT da rO φpJInte
!npedda ce ppln anymyataopchata 6atepnja BO OTnad,3aWTNTTE rH Hej3HHTe NOOBN
БУСАВА / ВИБРAUЦИ
0230
Mepeno BO corlaacnoCT co EN 60335 HNBOTo Ha 3ByeH npntucok e 72,1 dB(A) (hecnryphocT K = 2,5 dB) a HNBOTo Ha 3ByuHa MOKHOCT 85,6 dB(A) (hecnryphocT K = 1,1 dB), n Bn6paunja 2,7 M/c² (BeKTOpCn 36np Ha TpNTe NOKa3aTei; hecnryphocT K = 1,5 M/c²)
0240
Mepeno BO corglaacnoCT co EN 60335 HNBOTo Ha 3ByeH npntucok e 77,2 dB(A) (hecnryphocT K = 2,5 dB) a HNBOTo Ha 3ByuHa MOKHOCT 88,6 dB(A) (hecnryphocT K = 2,0 dB), n Bn6paunja 3,9 M/c² (BeKTOpckn 36np Ha TpNTe NokaataI; hecnryphocT K = 1,5 M/c²)
HnBOTo Ha emHTnpaHe Ha Bn6paunu Koe e HabeJeHO Ha 3aJHHOT DeI Ha OBA yNATCTBO e N3MepeHO BO corlaacHOCT CO tAndapUIN3npauHOT TcT DaJeH BO EN 60335; MoKe Ja ce KopncTu 3a Da ce CnopeDu eJeH aIaT co Dpyr, I KaKo npBnHa OceHka 3a N3IoKeHoCtA Ha Bn6paunu KOra Ce KopncTu aIaTOT 3a CNOMEHaTNTe npImeHn
-KopncTeHeTo Ha aIaTOT 3a pa3Hn npImeHN, HIN CO pa3JIuHNI INI HeIpaBUNHO CyBaHN DeJIOBN, MOKe Da IOBeDe DO 3HaayajHO 3roJeMyBaHe Ha HIBOTO Ha N3JIOKeHoCT
-Kora aIaTOT e NcKlyueH HIN Kora aIaTOT e BkLyueH HO He BpSiN HeKaBa pa6To, MoKe da Dojde 3HaHTeJIHO HaMaIyBaHe HA HIBOTO a I3IOJKeHOCT
!3aHTTeCe oEeHNTHe Ha Bn6paunHe Ipeky ODPHyBaBe Ha aIaNToN HerOBUnte DeIOBn, ODPHyBaBe Ha TOnJIiHaTa BO BaUnTe paue, N OprAHn3npaHe Ha BaWata pa6ota
AL
Prerese barimespango 0230/0240 HYRJE
SKIL 10000000000000000000000000000000000000000000000000000000000000000000000000000000000000000000000000000 1
JL 1
L 1
L 1
L 1
L 1
L 1
L 1
L 1
L 1
L 1
L 1
L 1
L 1
L 1
L 1
L 1
L 1
L 1
L 1
L 1
L 1
L 1
L 1
L 1
L 1
L 1
g aaii 1j0s ggs 000000
Z 1000
Jus,1gW,0j
()
1 1 jg005 gol 1
2021 2021
0aI 117S·AIA aiao aLw au Lc wol oj j I Jz j
Jgaae aegao gla oae jolai wj 10a ooi y
(2g)
gJooj jI J1j1a a 50
L
1 !
Loo -g/01
wuiu 1 a
P 154
LolS a sio
Wgagglagaa
olaiow oiiis jgLoLgOj) aiss jzJzJzJzIoo 1
(1)
a 1
15 0s yg L y y g b
1 1
g00S g 0000000000000000000000000000000000000000000
1
S3 = 2S2 + 6_3^2
①1s1g50g
g g g g g g g g g g g g g g g g g g g g
Og
S OBC = S BOC + S_ BOC
123456789010111111111111111
(1) f(x) = x x x
aLuslogguyyjyjg0ySla1w1 ygno
2y - 35x^2 = 1( 2y - 35x^2) + 0.01x^2
AA aas jolj 1e jy jil jil jgwh as galeo !c
jLgSsLoosgJoo gJU .iS 0o o
·
gogg gagagagagagagagagagagagagagagagagagagagagagagagagagagagagagagagagagagagagagagagagagagagagagagagagagagagagagagag
sglolggsy
-2
a < b < c
WJbIeJjolai
JbIaWgLi jwolg Jyj wJl oJ bJ
S OBC = S BOC + S_ CBA
Lg 1M
1J8IbIaL 100000000000000000000000000000000000000000000
1
S LBC = S COD + S BOC - S BOC
0gjgab
10 25 26 27 28 29 30 31 32
114.5g000000000000000000000000000
MJbLjosLai
y
10 aJgJgbl aai
10
10g2g 00
M
1
j#
g j 45
Jolss 100
(gjyjai)aolgslggyg 1
()
LgJgJgJgJgJg
1L L 1
jgl 0. j1 glo as a jg jilso,
L
aagg gaa 100,45 glllglu
(aaiuiojLaoiLooo jgiaobaoaloljyj
s oaiw wgs bolo g boLo s c j ④
a
gLgAALjLalagaiJLgJLgJy
0sLa:
j5g 5gLqIg
1a a 1g w
i0sLj1jA jB
M1bJbLjosLai
14 15
L L
1 !
①
①
1j 10
FwJWg02S
1 F L
aolalg 1
Lolss aasaaa 001
设 = ( x1,y1) , = ( x2,y2)
i jgolg jingjao
L
LAAaJyJzLaaQa aJyJgJzPjLg
1
4yg 1AAaJL
a a a a a a a a a a a a a a a
X
Z
AAJL
A
auiis i 1 s
y
aas 45 aiiis olaai wll jiljil
Lg00s
000000000000000000000000000000000000000000
Lgj g
g sJgJgJgJgJgJgJgJgJgJgJgJgJgJgJgJgJgJgJgJgJgJgJgJgJgJgJgJgJgJgJgJgJgJgJgJgJgJgJgJgJgJgJgJg
()
·
sJyjI LjLgS 45
()
·
L
LgJg
中
y
j_1 = - 4
2128 9g
S OBC = S COD + S_ BOC
·
g 1, j, j, j, j, j, j, j, j, j, j, j, j, j, j, j, j, j, j, j, j, j, j, j, j, j, j, j, j, j, j, j, j, j, j, j, j, j, j, j, j, j, j, j, j, j, j, j, j, j, j,
中
9Lgj
L 1
aaii j
·
S = D A_i =
当 x = 1 时
·
002
jLo jLs joo 5o joo g o o o
(204
002
s000000000000000000000000000000000000000
aJ
K
L
USBLM
N
= x - 23y
S_1 = 12 · 2^2 = 2
Sjgj
S
()
a
1Aglal jlog Nlogjglg a
Waggillclia 10
$$
\omega
$$
134
$$
2 0 2 8 \mathrm {年} 1 9 0 1
$$
1 1
1) 1
[ \Leftrightarrow \frac{1 - k}{x} > \frac{\ln x}{x\left( {1 + u}\right) } - \frac{\ln x}{x\left( {1 + u}\right) }]
Qjsslll 100000000000000000000000000000000000000000000000000
-00001Jg
①
-2
gaii aill alg 8 giiie lo aovs j5o abwgl cllxuol paii
$$
\left(\Delta_ {i j} \right.\left. \right.\left. \right.\left. \right.\left. \right.\left. \right.\left. \right.\left. \right.\left. \right.\left. \right.\left. \right.\left. \right.\left. \right.\left. \right.\left. \right.\left. \right.\left. \right.\left. \right.\left. \right.\left. \right.\left. \right.\left. \right.\left. \right.\left. \right.\left. \right.\left. \right.\left. \right.\left. \right.\left. \right.\left. \right.\left. \right.\left. \right.\left. \right.\left. \right.\left{ \right.I J J J J J J J J J J J J J J J J J J J J J J J J J J J J J J J J J J J J J J J J J J J J J J J J J J J J J J J J J J J J J J J J J J J J J J J J J J J J J J J J J J J J J J J J J J J J J J J J J J J JJJJJJJJJJJJJJJJJJJJJJJJJJJJJJJJJ
$$
LgSLSJSL
S APQ = S AQP + S_ PQQ
abog gilu, Jai Lg>alg aLl lge jai Jao
$$
(\overrightarrow {a} \cdot \overrightarrow {b})
$$
!
jg 1 j 1 j g j g j g j g j g j g
$$
\Delta_ {i j} (l _ {i}, l _ {j})
$$
ol21 Joo
AJbJLJnJnJn< AaJLaJbJLb
aJLJI< aIeL aJL
a#i i#
ghao J5wJooj 381
a#31 a#o/#jlll jai< -y#iJlllll #jll
aioi aioo/0jLJU< - Jie jil jie jil jie jil jie jil jie jil
siojicJi jgi 81
JgJggeaJIyR<2LJIyIgIwIe81
gally pgi 8ol21
g0 = 12( g1 - 2)
131 aijie j 8
aJ1< aLb
-
gai jie jie jie jie jie jie jie jie jie jie jie jie jie jie jie jie jie jie jie jie jie jie jie jie jie jie jie jie jie jie jie jie
silljaiwuy
-01
1
Jcui jzao gao Ls o12jLol yos
old 1810
:
Cui Jie gao jie hao
Caaag 125L L
15 1
log-31 2.15
Lg. i. i. 1011 1011 1011 1011 1011 1011 1011
NghailljwJyIoc Jgblly aagog hao
Nlogj1 gbi jai Jai Luiu jai
Lggy
aJbJI aJIJIg 0JI 1JI JU
Tojog jai jai jg lc baiol paaa aaiw gaii
Jg Jg Jg Jg Jg Jg Jg Jg Jg Jg Jg Jg
J
aolgho ogoleblaoIplbuiJiai
g^ ( x) = - 14x^2 + 54x + 1
pJjJwJgJgJgJgJgJgJgJg
0
10
Lai jill anie no gbaill baic poa all
1 !
V aJ Joloo K aJ 1s wlg JaSll gIb cAJIy
( 0,12) ± 1,0,34
Jill 4000000000000000000000000000000000000000000000
( 1,2) L J J B
Jolaoagagallgog JgL0yL aia jgc gall
V 0
J 1
Z
[1,0,5, - 1]
()
1 !
Jgagglgagllc aayyjgacaaal yall j
(20 168100 20 SKIL 171·S…A 11 pLai 21 pasiw
(1)
Joo3 1g Joo3
1
J1J 1
aolil
y1 21 p1n 100000000000000000
j 1 j 1 j 1 j 1 j 1 j 1 j 1 j 1 j 1 j 1 j 1 j 1 j 1 j
CoLc aegj aSjwill
p12
11a jusll plaswly Js wll gill 1A 22
i j !
bgaalg paaa -M
15
·
!
① aJbJIJIJIJIJIJIJI
1
(aLao 2gJU Loo1 GJJI Jc IaJUgj01321
FJ 1
Fslj11 2022
1 !
- ( x,y) = 0 ( x,y) = 0
J 1
1
J13 12111111111AA aaiiaaaaiaaaaaaaaaaaaaaaaaaaaaaaaaaaaaaaaaaaaaaaaaaaaaaaaaaaaaaaaaaaaaaaaaaaaaaaaaaaaaaaaaaaaaaaaaaaaaaaaaaaaaaaaaaaaaaaaaaaaaaaaaaaaaaaaaaaaaaaaaaaaaaa
1a
! 96 b
aLbA a
1
·
1a1j 1a31 0g5 -slll bclc
-
gssuogagcugaaa 1
AaJJI JJI IJIJIJIJIJIJIJIJIJIJIJIJIJIJIJIJIJIJIJIJIJIJIJIJIJIJIJIJIJIJIJIJIJIJIJIJIJIJIJIJIJIJIJIJIJIJIJIJIJIJIJIJIJIJIJIJIJIJIJIJIJIJIJIJIJIJIJIJIJIJIJIJIJIJIJIJIJIJIJIJIJIJIJIJIJIJIJIJIJIJIJIJIJIJIJIJIJIJIJIJIJ
4ggaallljaiy
()
10 b aolgl 2aIbll gssn no IaIg 2aIbll gssn no
AaJaaJAAaJJaaJaaJaaJaaJaaJaaJaa
1
Ae 1
18 gLiljxJaaallgogb
CgLjxJnall Joo
goljai jai gao h
CgLjyJ1 jaiill Jia
12
10
LaiJia JiaW8
1jSjJgnoaagb
g21 a2g1 b
1
aaiil
ab( l) = a1l1 + a2l2
aLwI pW8J uW wLz
a
V
y
JMM 1
aalllgall aai jn gj yd jy dnnn nn nnnn nnnn nnnn nnnn
a
LcMgJgJgJg
1,2,3 1,2 , 1,3 , 2,3 , 3,1
10gj21JgJb
10
12g1r,jLcJz1g0
()
1
① 10
| ### | |
| ### | |
| ### | |
| ### | |
| ### | |
| ### | |
| ### | |
| ### | |
| ### | |
| ### | |
| ### | |
| ### | |
| ### | |
| ### | |
| ### | |
| ### | |
| ### | |
| ### | |
| ### | |
| ### | |
| ### | |
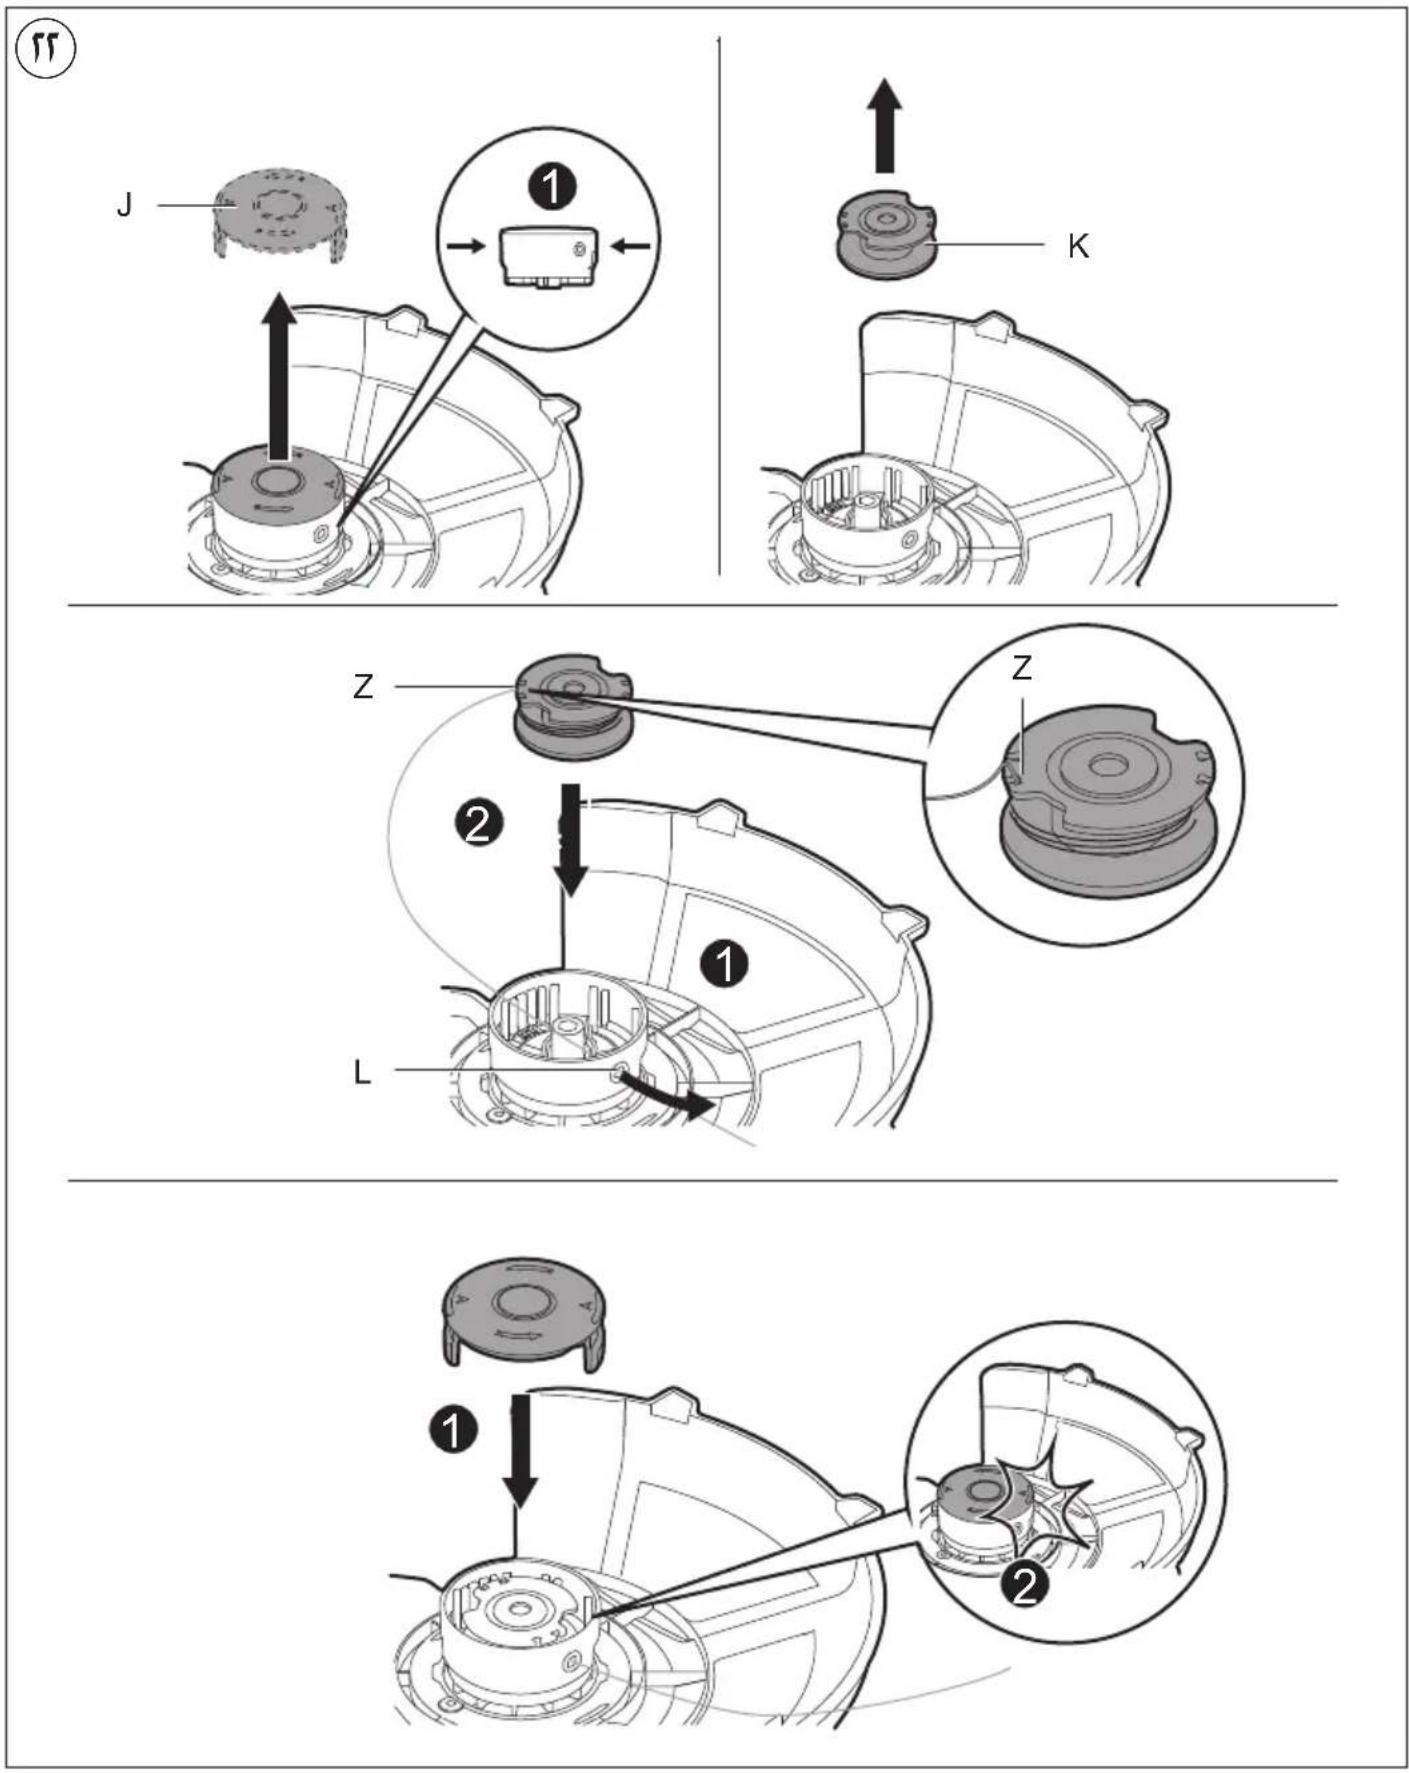

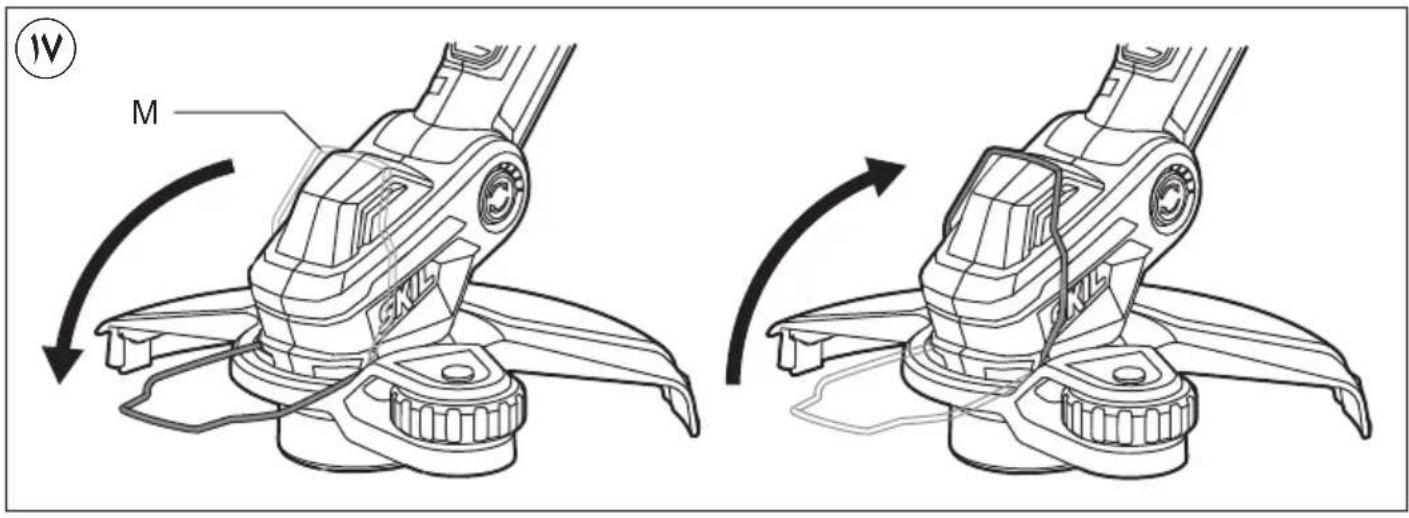
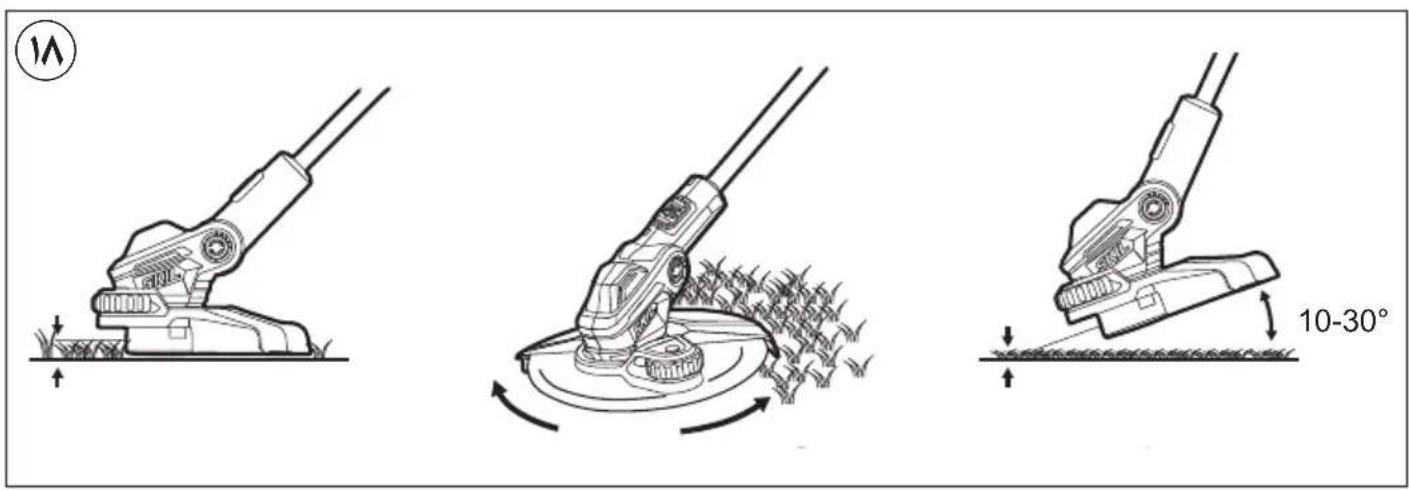
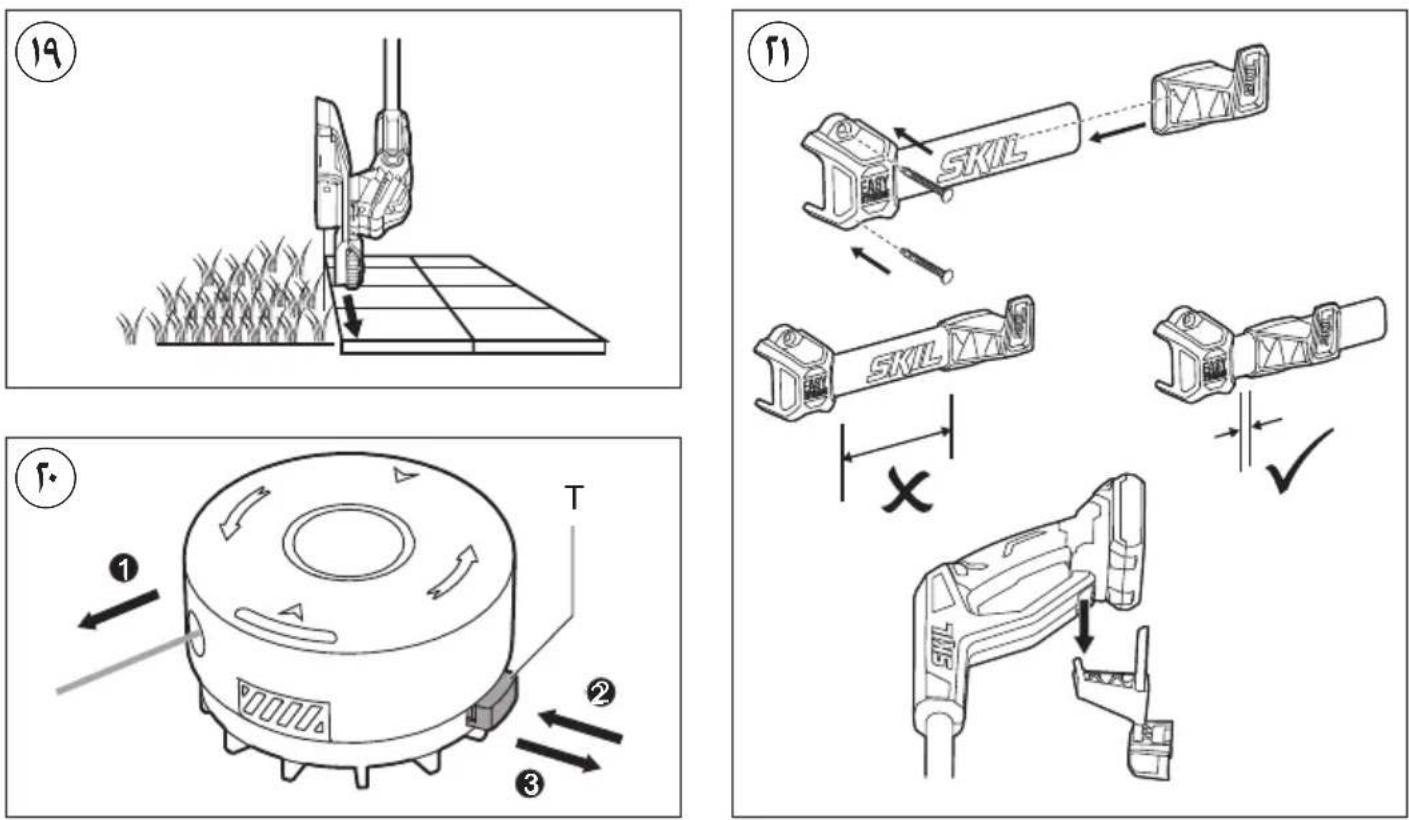
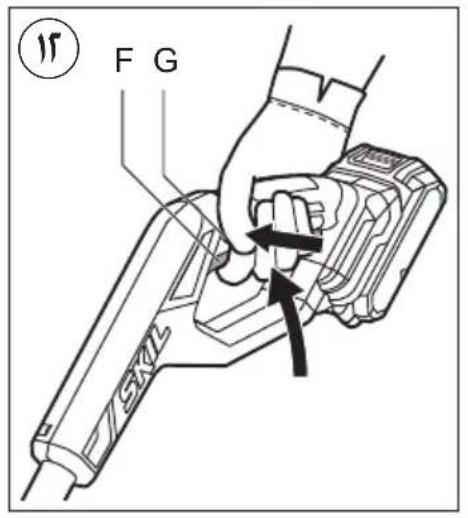
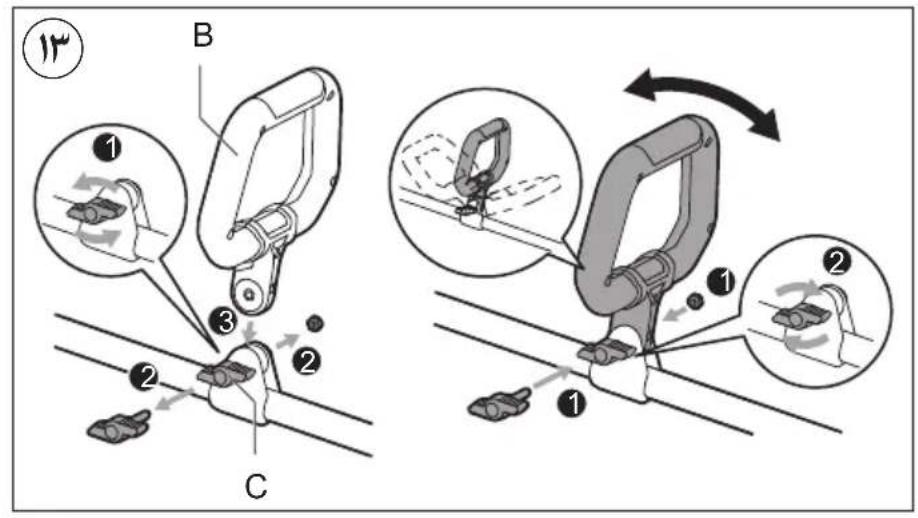
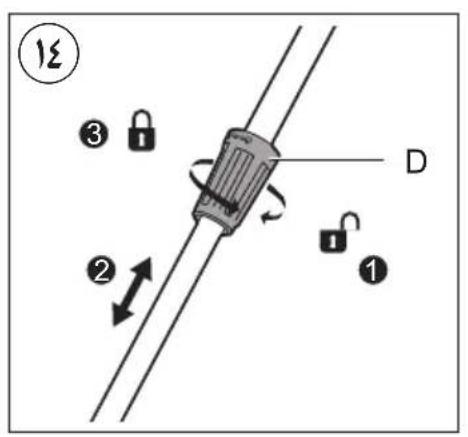
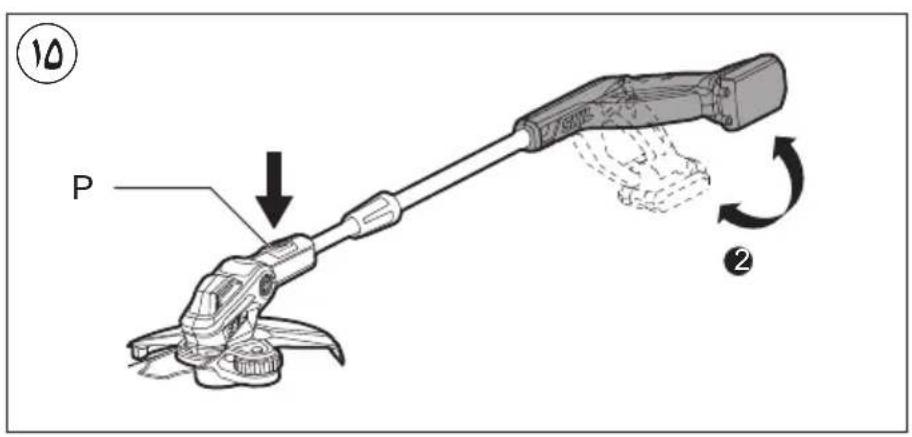
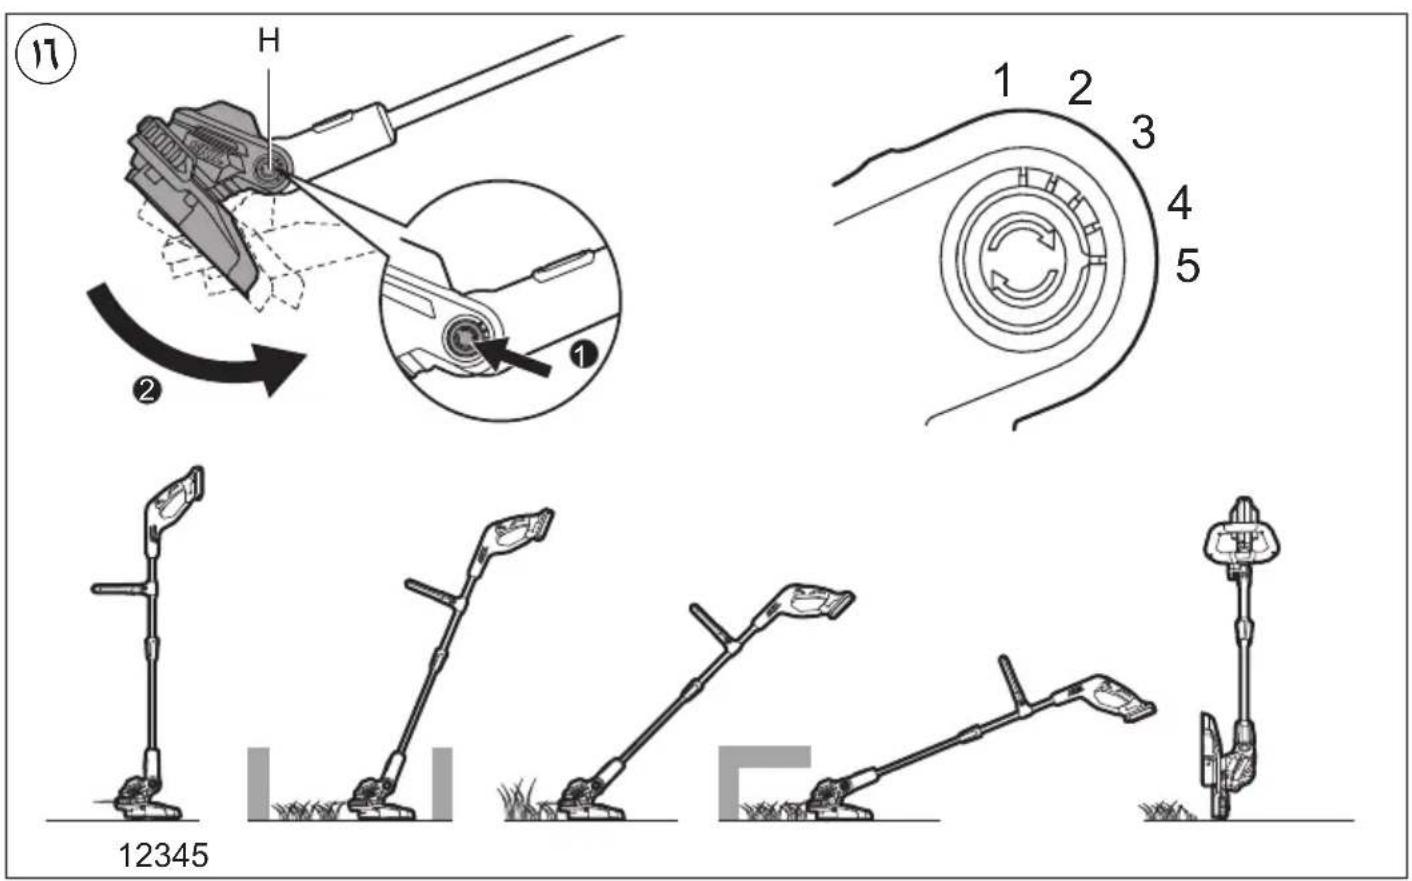

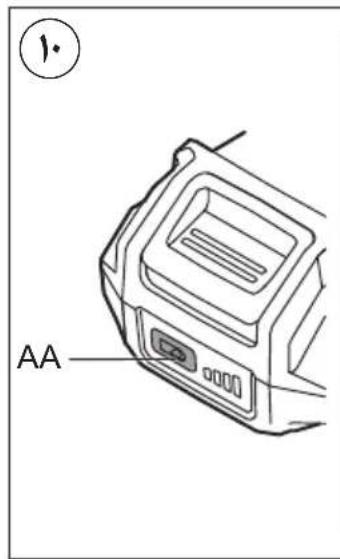

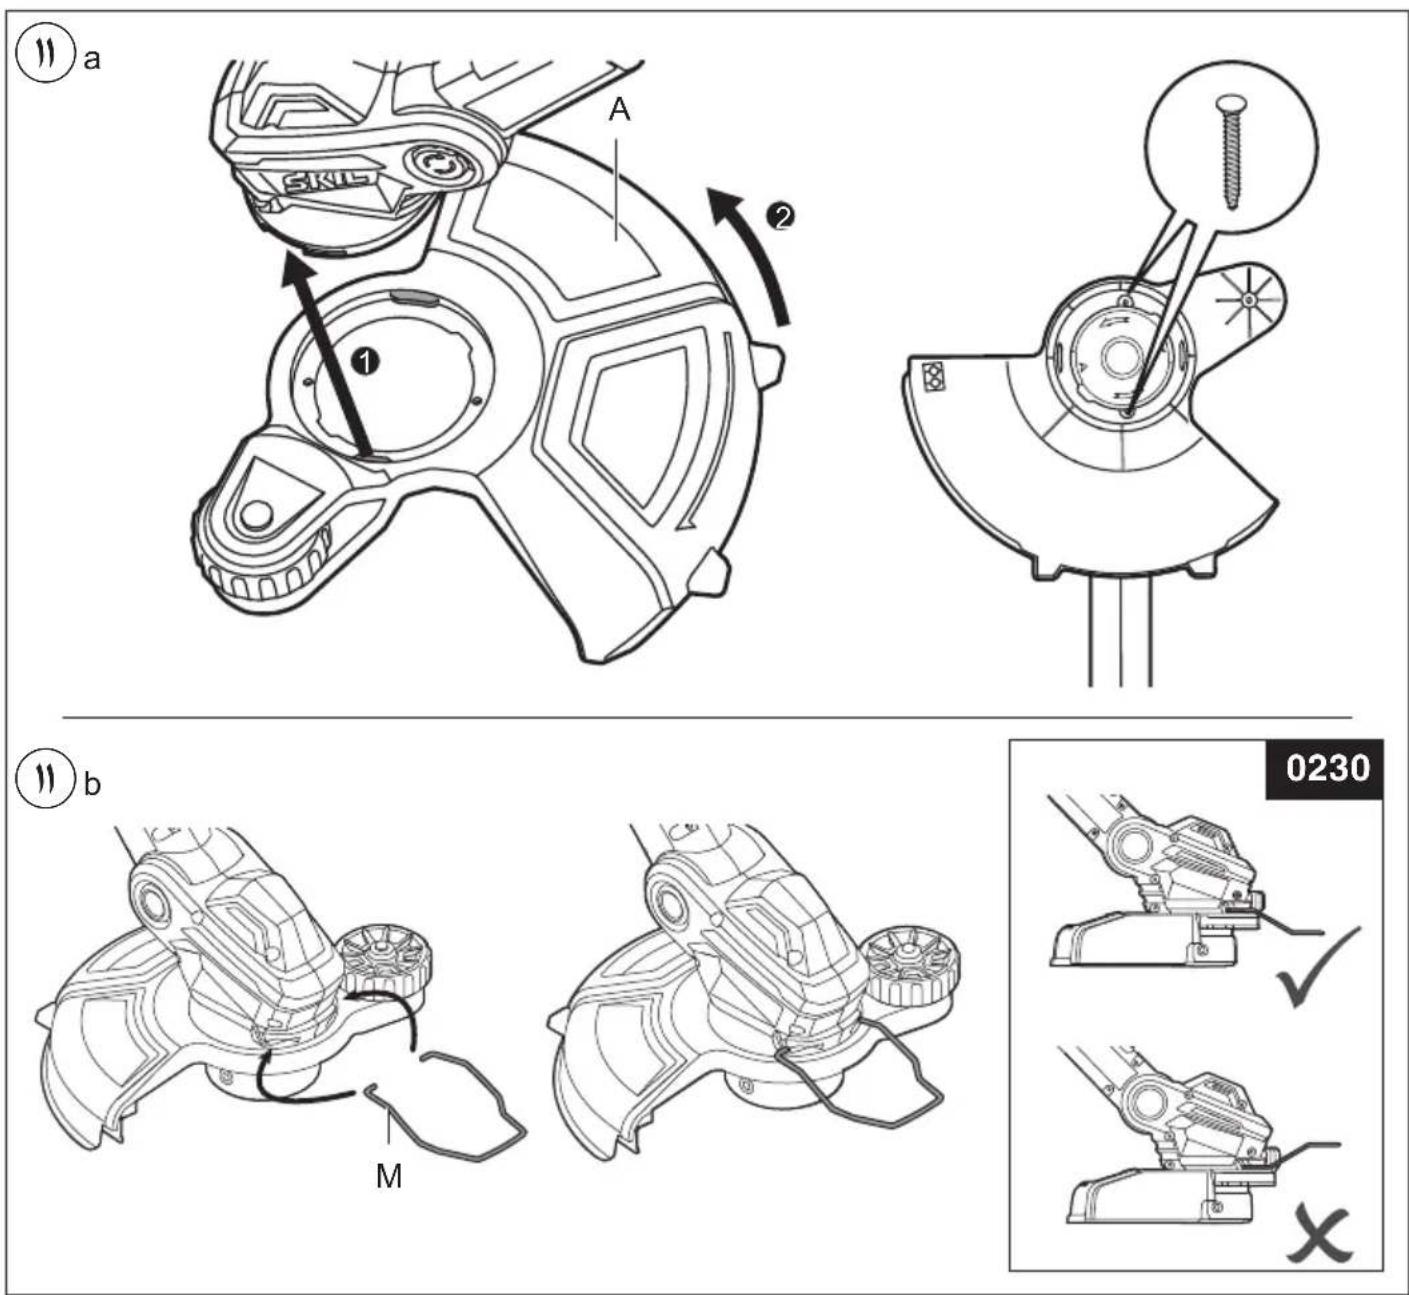
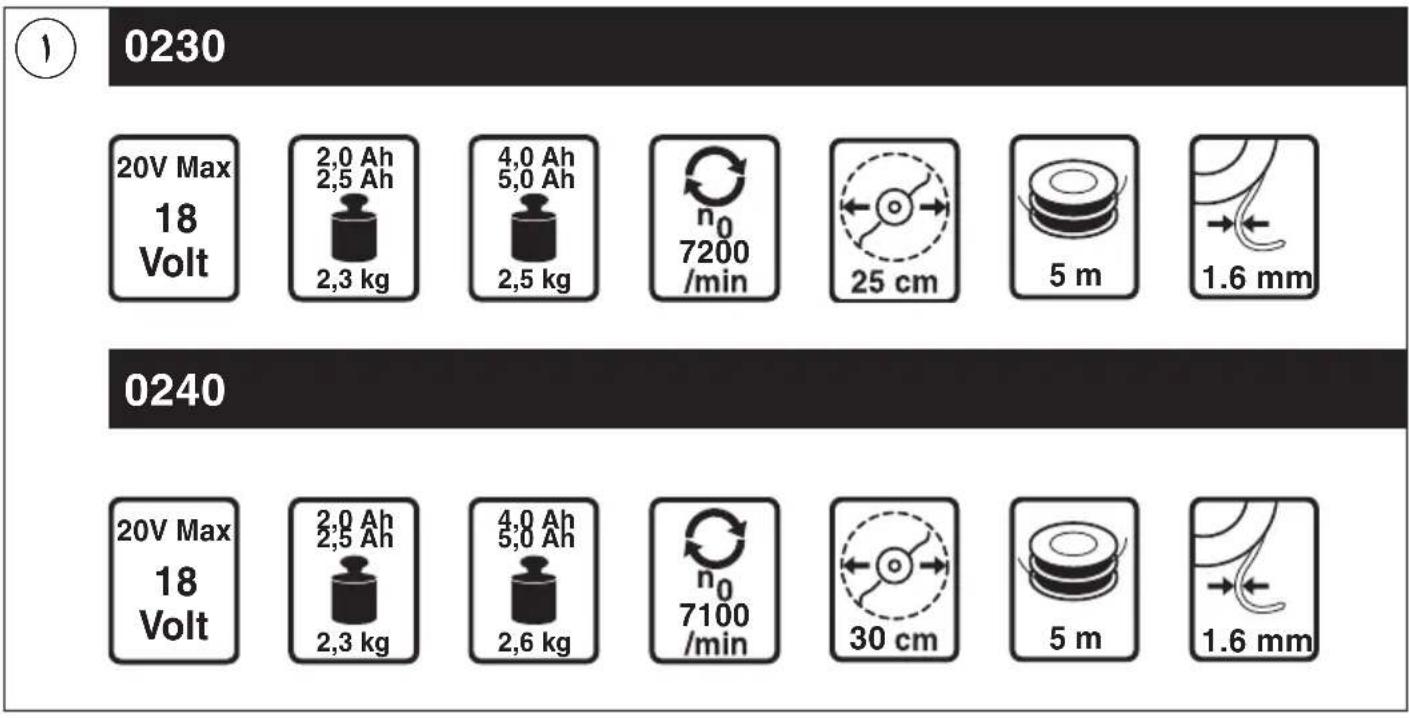
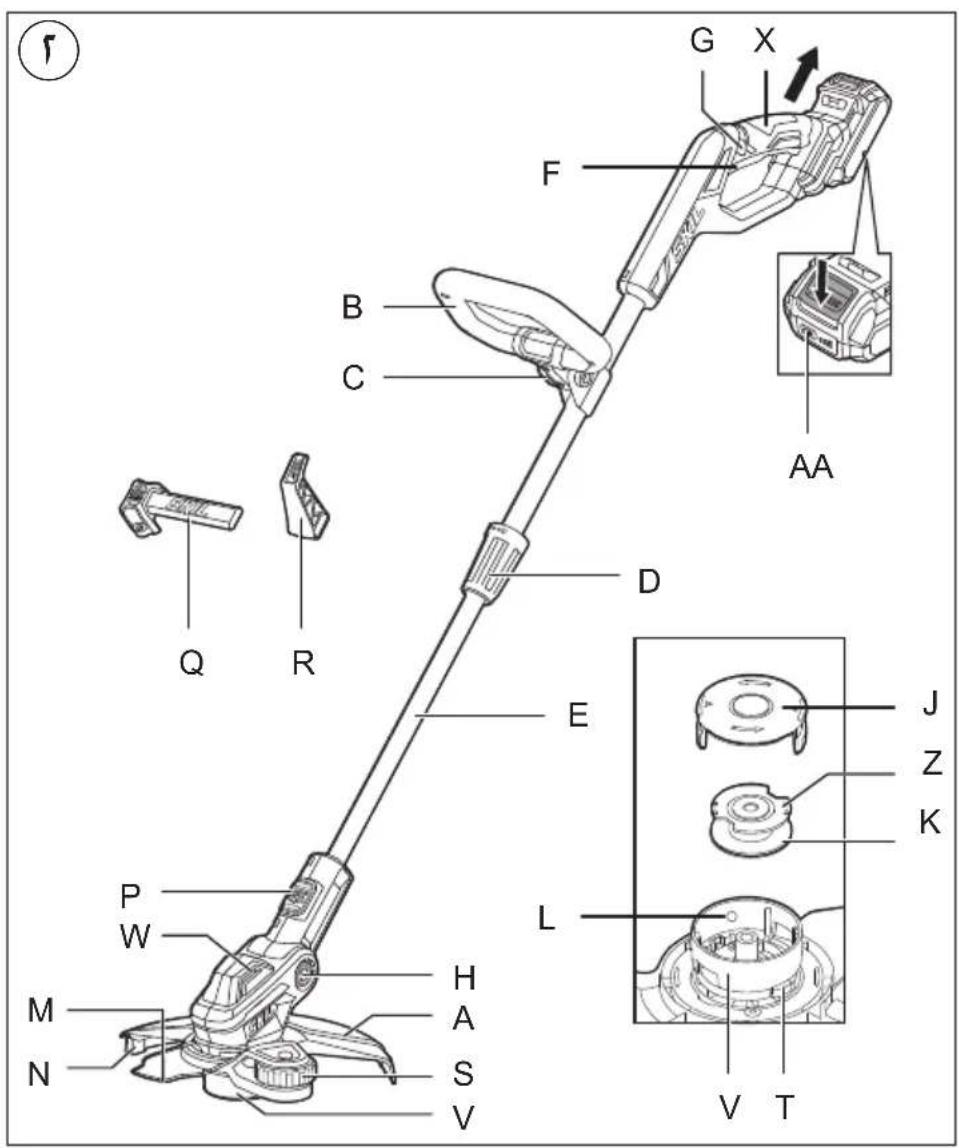
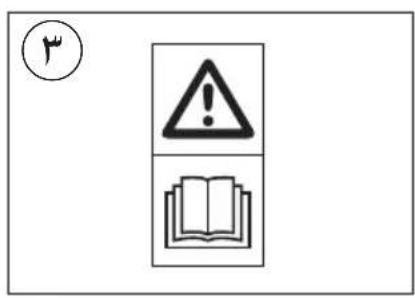
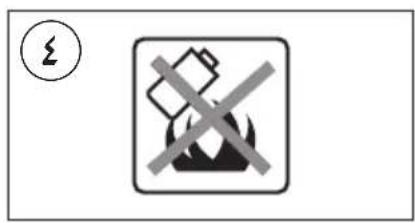
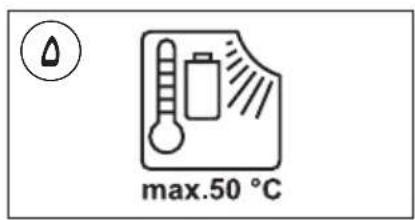
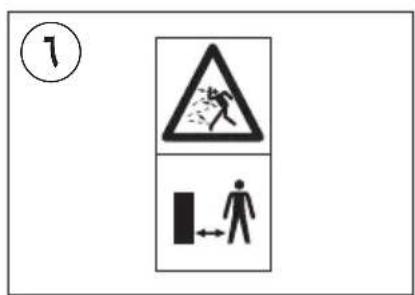
L
SKIL
0230
0240


JL
FA