RS65R5411B4 - Freezer SAMSUNG - Free user manual and instructions
Find the device manual for free RS65R5411B4 SAMSUNG in PDF.
| Product type | Freezer |
| Brand | Samsung |
| Model | RS65R5411B4 |
| Cooling technology | Metal Cooling |
| Defrost type | Manual defrost |
| Net capacity (L) | 300 |
| Climate class | SN-T (subtemperate to tropical) |
| Noise level (dB(A)) | 39 |
| Annual energy consumption (kWh) | 280 |
| Dimensions (H x W x D) (mm) | 1780 x 700 x 700 |
| Net weight (kg) | 75 |
| Power supply | 220-240 V, 50 Hz |
| Refrigerant gas type | R-600a |
| Number of drawers | 3 |
| Quick freeze function | Yes |
| Open door alarm | Yes |
| Interior lighting | LED |
| Door gasket | Removable and replaceable |
| Hinges | Reversible (top, middle, bottom) |
| Spare parts available | Handles, gaskets, drawers, hinges (on Samsung website) |
| User repairability | Handles, gaskets, drawers, hinges |
| Warranty | 2 years (parts and labor) |
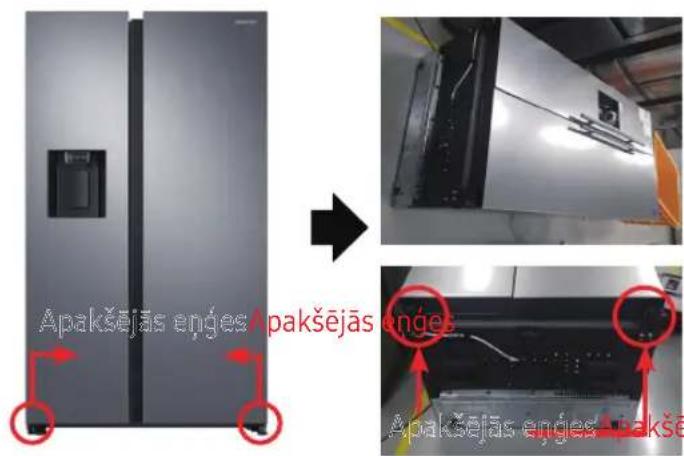
| Model code on label | Bottom left of the appliance |
Frequently Asked Questions - RS65R5411B4 SAMSUNG
User questions about RS65R5411B4 SAMSUNG
0 question about this device. Answer the ones you know or ask your own.
Ask a new question about this device
Download the instructions for your Freezer in PDF format for free! Find your manual RS65R5411B4 - SAMSUNG and take your electronic device back in hand. On this page are published all the documents necessary for the use of your device. RS65R5411B4 by SAMSUNG.
USER MANUAL RS65R5411B4 SAMSUNG
French - Français ......10
German - Deutsch ......19
Dutch - Nederlands......28
Italian - Italiano 37
Hungarian - Magyar 64
Polish - Polski....73
Czech - Čeština....82
Slovakian - Slovenčina......91
Serbian - Srpski......109
Greek - ελληνικά......118
Croation - Hrvatski......136
Albanian-Shqip 145
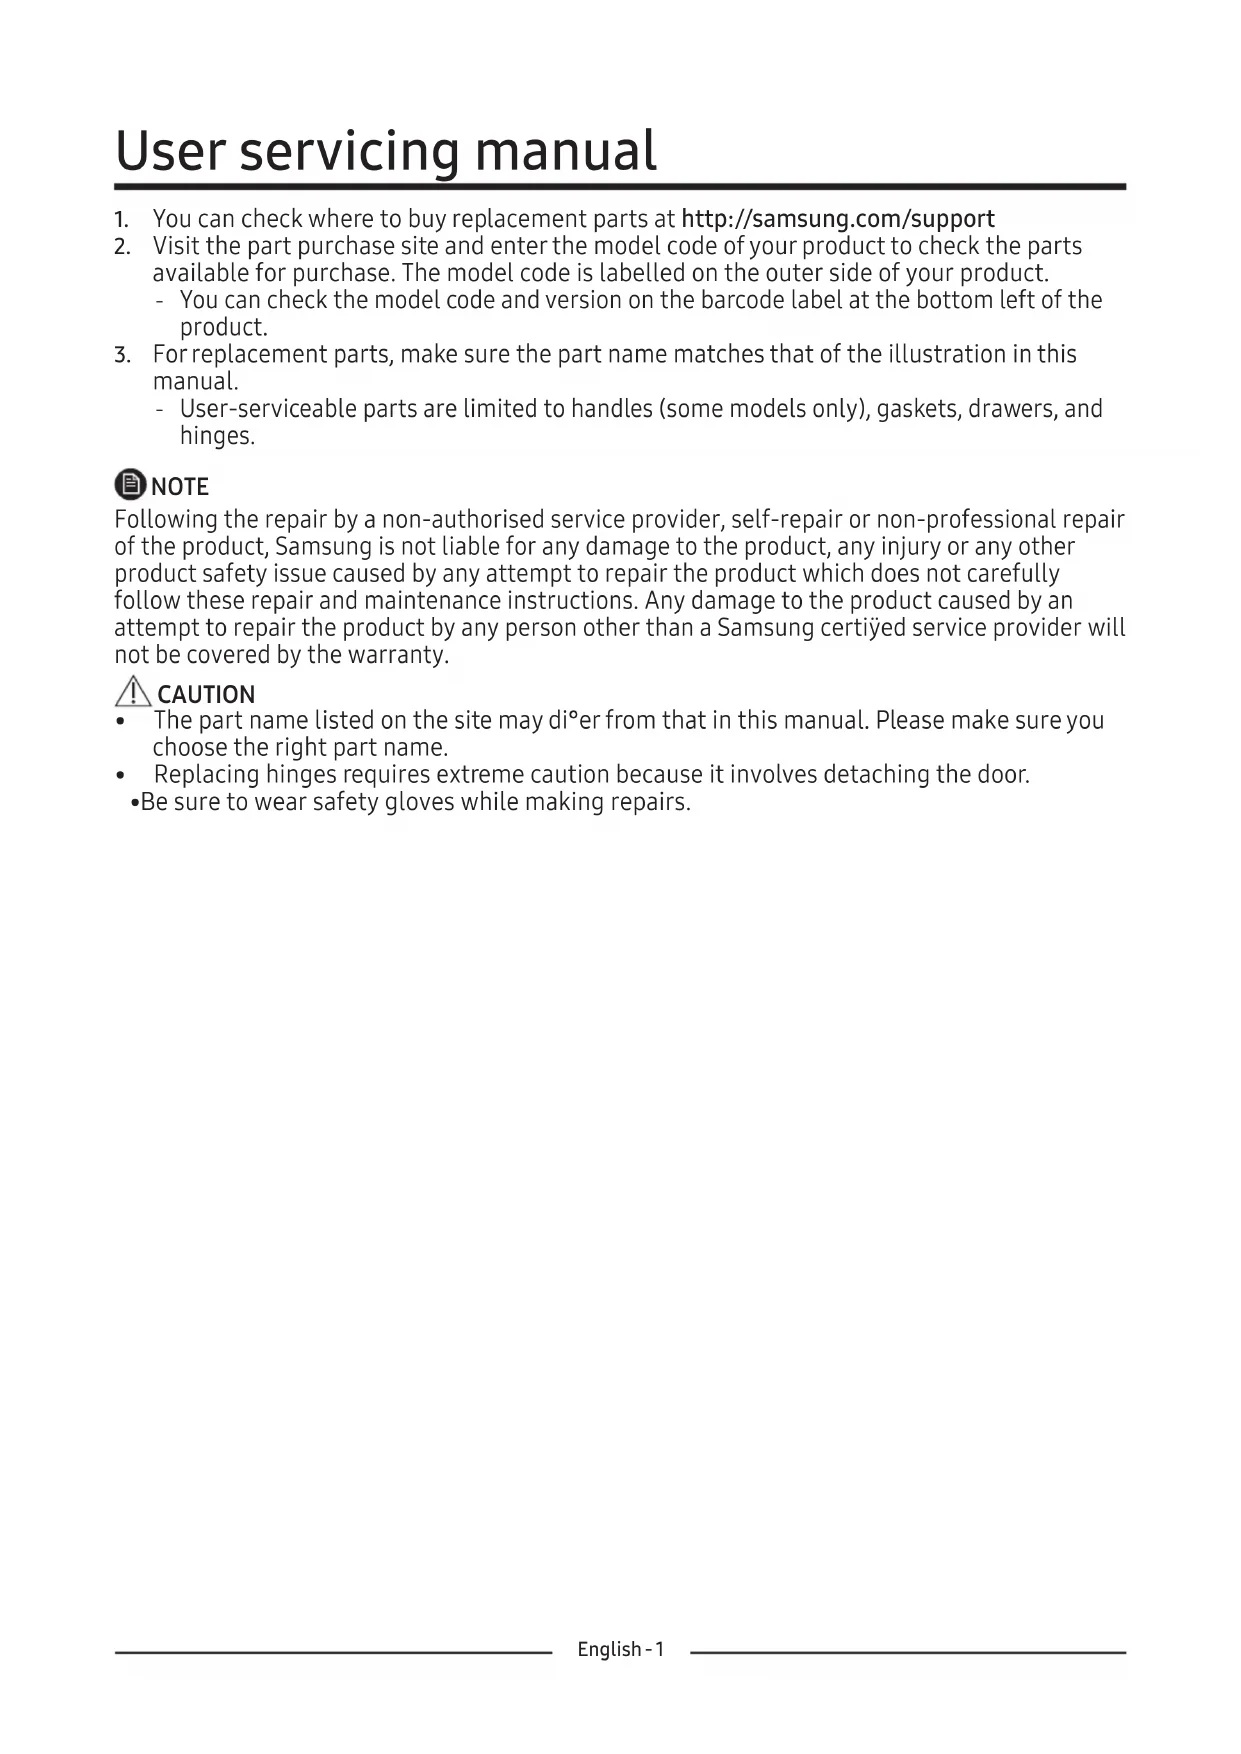
User servicing manual
- You can check where to buy replacement parts at http://samsung.com/support
- Visit the part purchase site and enter the model code of your product to check the parts available for purchase. The model code is labelled on the outer side of your product.
- You can check the model code and version on the barcode label at the bottom left of the product.
- For replacement parts, make sure the part name matches that of the illustration in this manual.
- User-serviceable parts are limited to handles (some models only), gaskets, drawers, and hinges.

NOTE
Following the repair by a non-authorised service provider, self-repair or non-professional repair of the product, Samsung is not liable for any damage to the product, any injury or any other product safety issue caused by any attempt to repair the product which does not carefully follow these repair and maintenance instructions. Any damage to the product caused by an attempt to repair the product by any person other than a Samsung certified service provider will not be covered by the warranty.

CAUTION
- The part name listed on the site may di°er from that in this manual. Please make sure you choose the right part name.
- Replacing hinges requires extreme caution because it involves detaching the door.
- Be sure to wear safety gloves while making repairs.
The actual image and provided parts of the refrigerator may differ, depending on the model and the country.
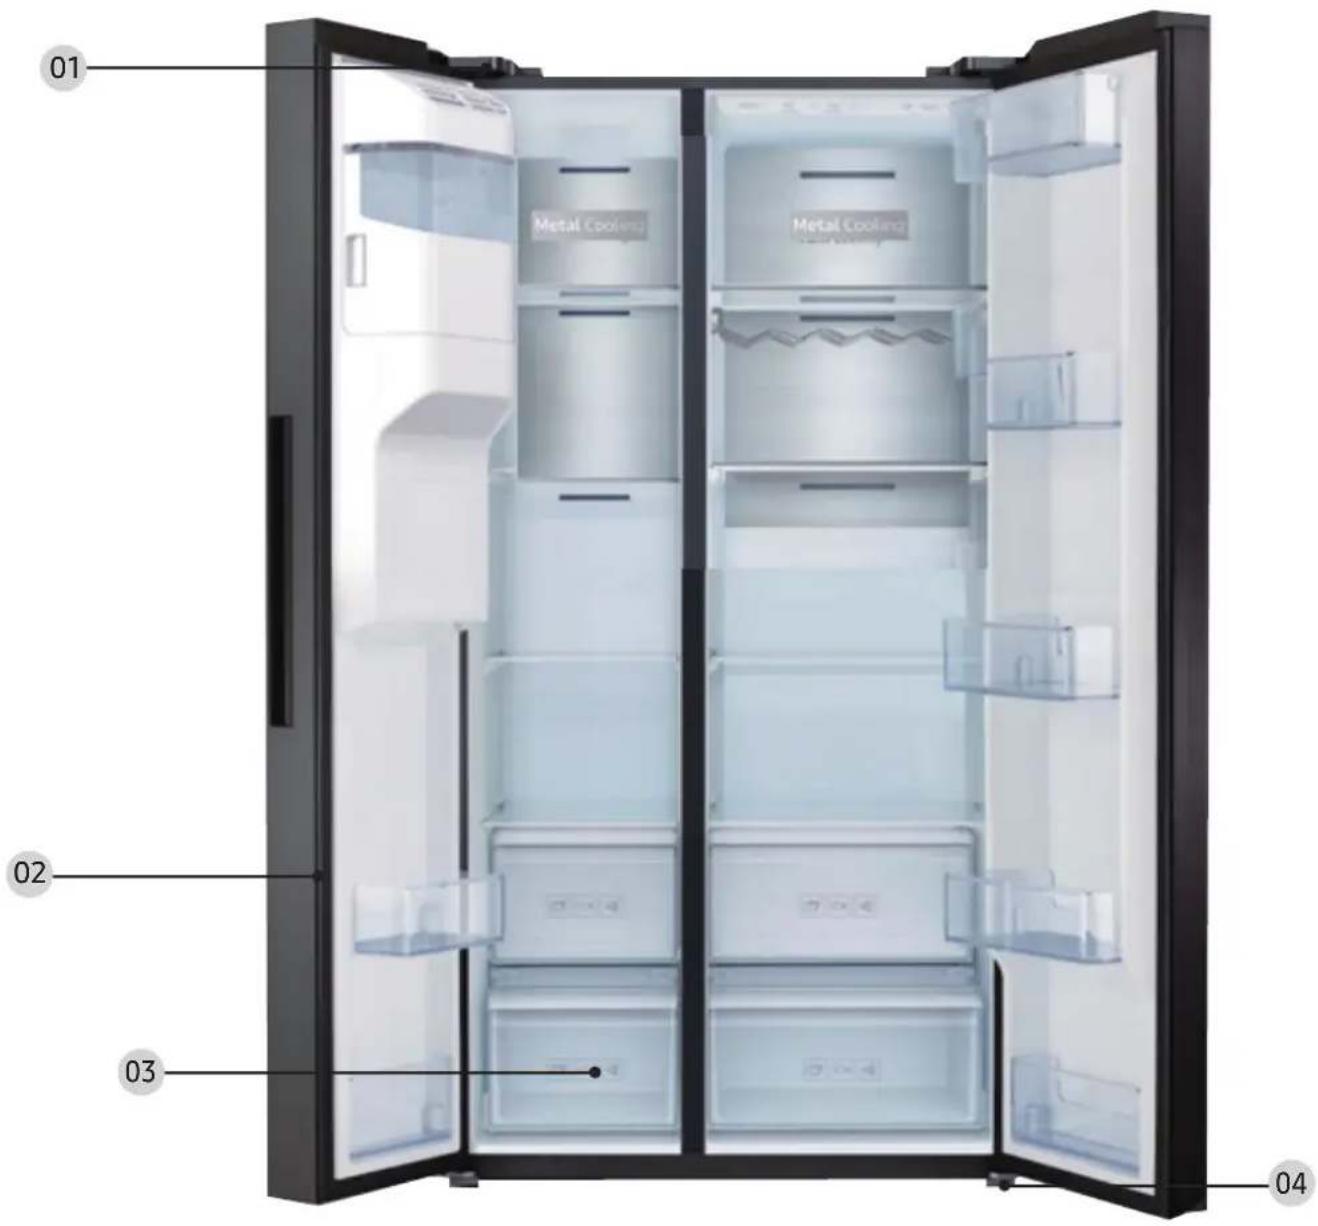
text_image
01 Metal Cooling 02 03 0401 Top hinge (Left and Right) 02 Gasket (Ref and Fre Door)
03 Drawer (Tray and Basket)
04 Bottom hinge (Left and Right)
CAUTION
Make sure you firmly attach the gasket. Otherwise, cold air from the refrigerator may leak.
To remove the gasket

text_image
Pull the corner of Gasket →Open the door and remove the gasket from the door.
[Disassembly]
- Pull the 4 corners of gasket.
- Pull the center of gasket.
To replace the gasket
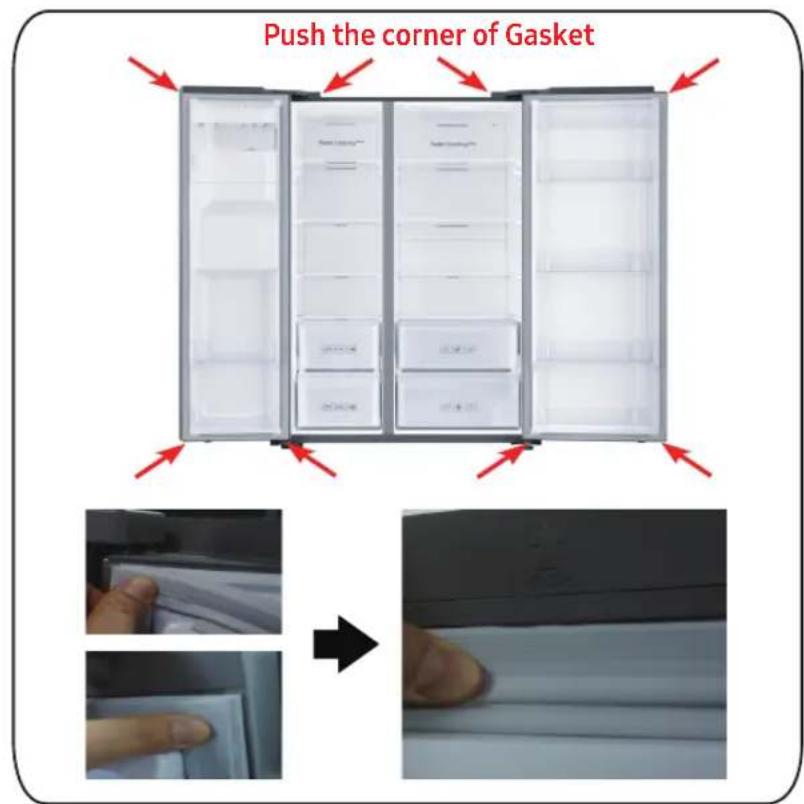
text_image
Push the corner of Gasket →Attach a new gasket to the refrigerator door.
Make sure there is no gap between the new gasket and the door.
[Assembly]
- Push the 4 corners of gasket.
- Push the center of gasket.
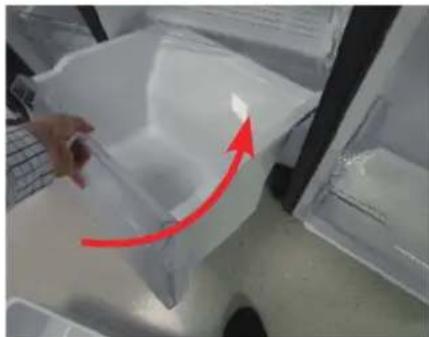
Drawer replacement
CAUTION
Check that the drawer is inserted properly into the rail during assembly.
To remove the gasket
natural_image
Person opening a white plastic refrigerator with a red arrow indicating the handle (no text or symbols visible)
natural_image
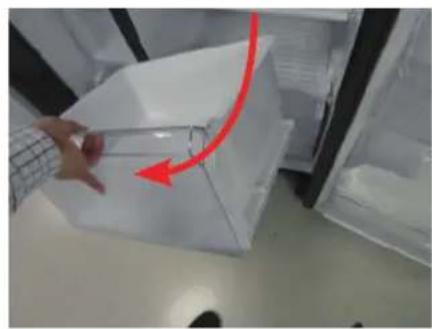
Hand holding a plastic container with a red arrow indicating rotation (no text or symbols visible)Gently lift up the front of the drawer and slide it out.
To reattach the drawers
Reattaching the drawers follows the reverse order of their respective removal steps.

natural_image
Close-up of a hand holding a transparent plastic bag with a red arrow pointing upward, next to a laptop keyboard (no text or symbols visible)
natural_image
Person handling a transparent plastic container with a red upward arrow, placed inside a refrigerator (no visible text or symbols)Reattaching the drawers follows the reverse order of their respective removal steps.
Hinge replacement
To replace the hinges, you must remove the doors .
CAUTION
- When removing the doors, take extreme caution because the doors are heavy.
- Before replacing the hinges, put a soft pad such as cardboard on the oor to prevent scratches on the door when you place the doors down.
- As the hinges must be handled carefully and replaced by two or more persons, we recommend you to call for professional technical service.
• If you remove the hinge without holding the door, the door may fall and cause injury. - Ensure that the shaft is rmly tightened on the hinge.
- Check that the hinge is rmly attached to the cabinet.
- Make sure the wire connectors are connected properly.
- Be careful not to damage the wires when fastening the top cover.
WARNING
- Tilting/laying the refrigerator requires a minimum of 2 people.
- Disconnect the power cord before reversing the doors.
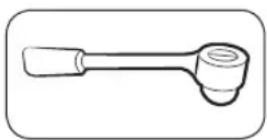
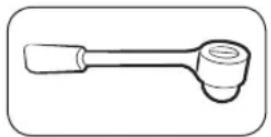
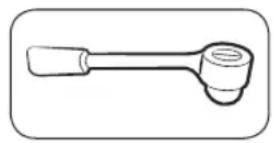
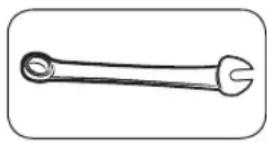
Tools required (not provided)

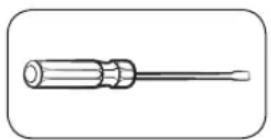

Philips screwdriver Flat-head screwdriver 11 mm spanner
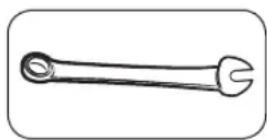
10 mm socket wrench 8 mm socket wrench 10 mm spanner
Top Hinge
natural_image
Close-up of a mechanical component with a red circular hole and internal structure (no visible text or symbols)
natural_image
Hand pressing a button on a computer monitor with a red arrow indicating rotation (no text or symbols visible)
natural_image
Close-up of a hand holding a yellow and white 3D connector with wires, next to a black electronic device (no visible text or symbols)
natural_image
Close-up of a mechanical or electronic component with three red-circled holes and yellow connectors (no visible text or symbols)
natural_image
Close-up of a mechanical device with wires and connectors, no visible text or symbols
natural_image
Close-up of a hand holding a black robotic arm with yellow and blue wires, no visible text or symbols- Disconnect the power cord, and remove 1 cover screws using a Phillips screwdriver.
Then open the Freezer door and pull the hooks on the sides to loosen the cover.
Lift up the cover towards you to detach it.
-
Disconnect the two top housings.
-
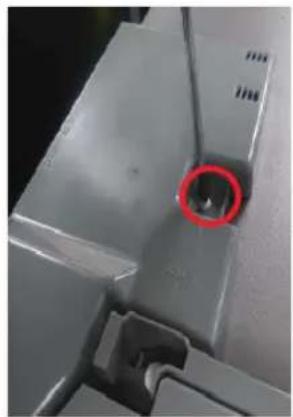
Remove the three bolts holding the hinge.
-
Disassemble the top hinge from the front of the door.
Hinge replacement
Model name looks like this: RS64R55**, RS64R56**, RS65R55**, RS65R56**, RS74R55**, RS75R56**, RS63R55**, RS63R56**
Mid Hinge (Only For 3-Door)

natural_image
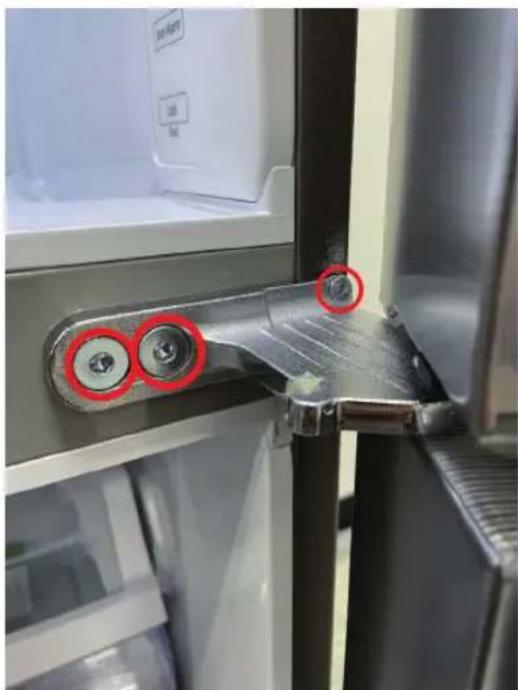
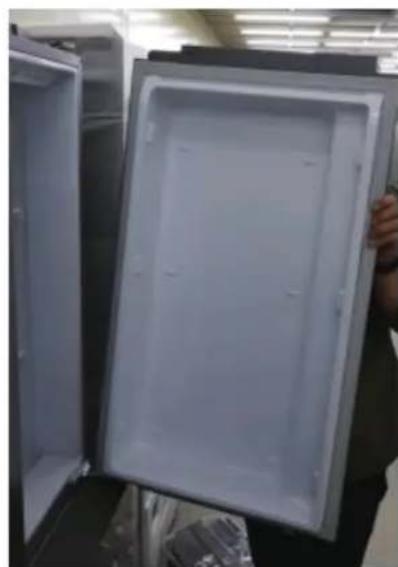
Open refrigerator with lid open, showing interior compartments (no visible text or symbols)- After disassemble the top hingerihgt, disassemble the Fridge door up.
natural_image
Close-up of a refrigerator interior showing a metallic handle and screw mechanism, with red circles highlighting specific points (no text or symbols visible)- Remove the three bolts holding the hinge, disassemble the Hinge-Mid
Bottom Hinge

text_image
Hinge low hinge low Hinge low hinge low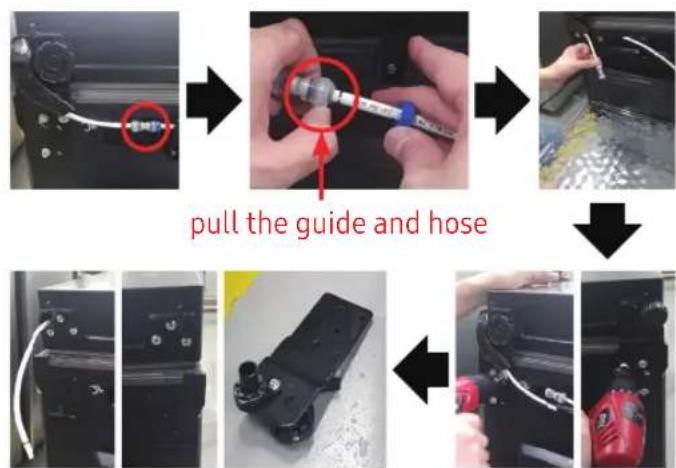
flowchart
graph TD
    A["Start: Screen with cable"] --> B["Step 1: Pull the guide and hose"]
    B --> C["Step 2: Screen being inserted into part"]
    C --> D["Step 3: Process with cable and hose"]
    D --> E["Step 4: Assembly of mechanical parts with cable"]
    E --> F["End: Close-up assembly with red rubber bottle"]
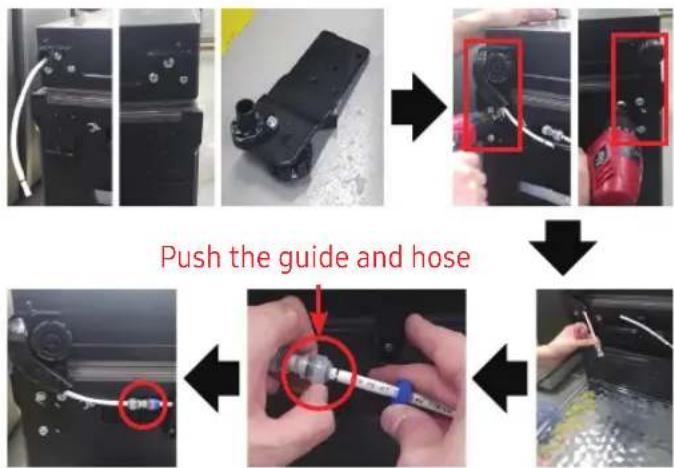
text_image
Push the guide and hose[Disassembly]
- Disconnect the Power Cord.
- Lay down the set.
CAUTION
- Must working more than 2 people.
- Be sure to unplug the power cord beforeperforming the operation above.
[Disassembly]
- DisconnectHose. (Only Hinge Low Left)
- Exhaust water in Hose. (Only Hinge Low Left)
- RemoveBolt(3ea). (Using spanner or 10mm Box wrench)
- Remove Hinge Low R/L.
[Assembly]
- Assemble hinge low on bottom. (Using spanner or 10mm Box wrench)
- Connect Hose (Only Hinge Low Left)
- Assemble water in Hose. (Only Hinge Low Left)
CAUTION
- Be sure to unplug the power cord before performing the operation above.
Bottom Hinge
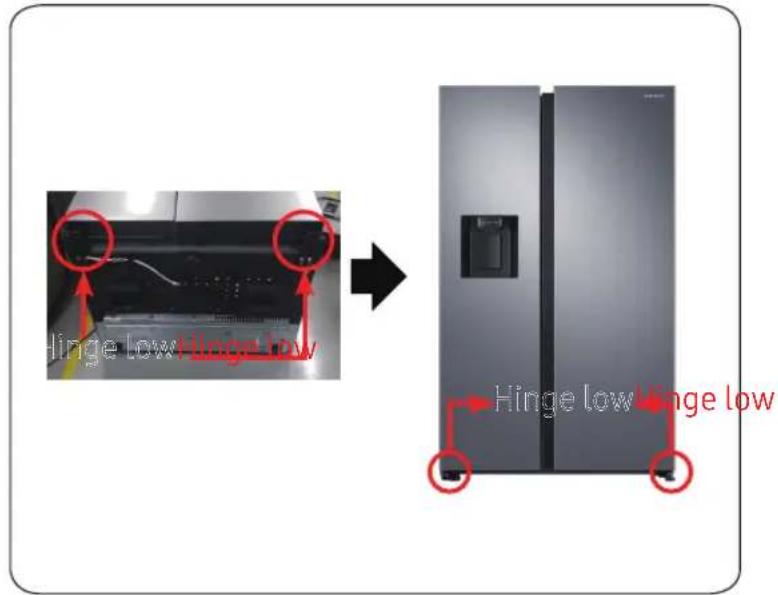
text_image
Hinge low-linger low Hinge low-linger low[Assembly]
- Assemble Hinge low R/L.
- Put up the set.
CAUTION
- Must working more than 2 people.
- Be sure to unplug the power cord before performing the operation above.
Pour retirer le joint
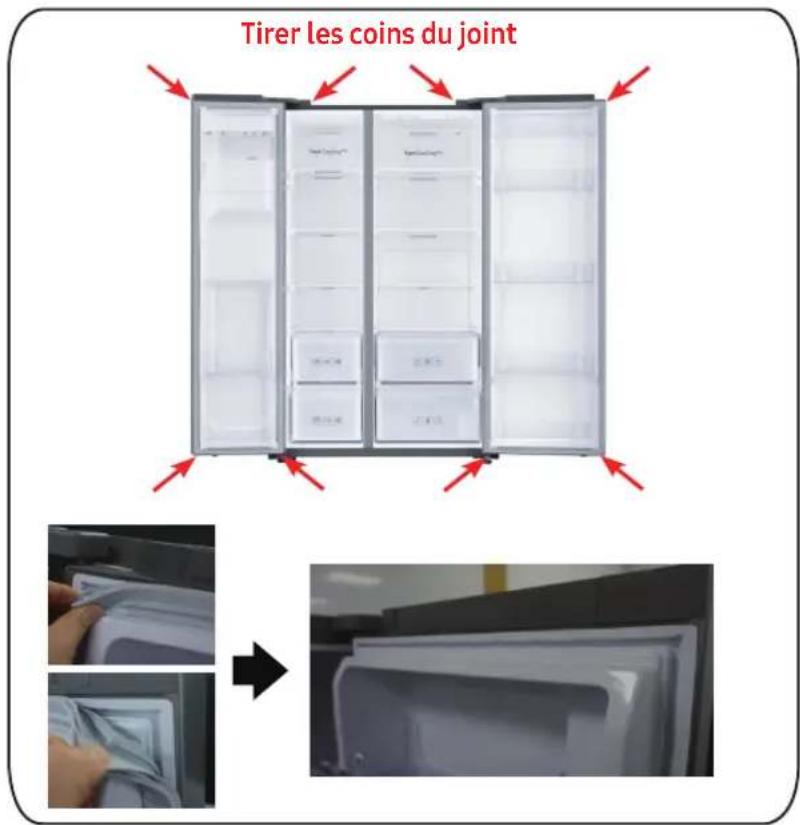
text_image
Tirer les coins du jointnatural_image
Person opening a white plastic refrigerator with a red arrow indicating the handle (no text or symbols visible)
natural_image
Hand holding a plastic container with a red arrow indicating rotation (no text or symbols visible)natural_image
Close-up of a hand holding a transparent plastic bag with a red arrow pointing upward, next to a white refrigerator (no visible text or symbols)
natural_image
Person handling a transparent plastic container with a red upward arrow, placed inside a refrigerator (no visible text or symbols)natural_image
Simple line drawing of a screwdriver (no text or symbols)
natural_image
Line drawing of a screwdriver with a cylindrical head and threaded shaft (no text or symbols)
natural_image
Close-up of a mechanical component with a red circular hole and a hand pressing a button (no text or symbols visible)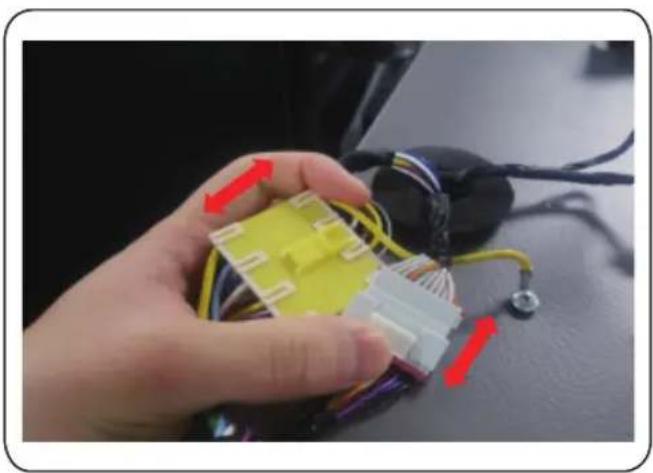
natural_image
Hand holding a yellow and white plastic connector with wires, next to a black electronic device (no visible text or symbols)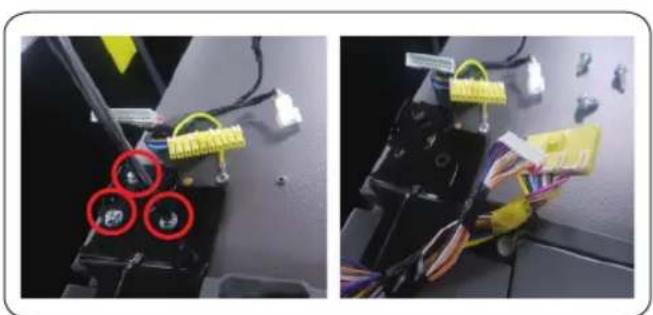
natural_image
Two-panel photo showing wiring harnesses and a device with three red circular components (no visible text or symbols)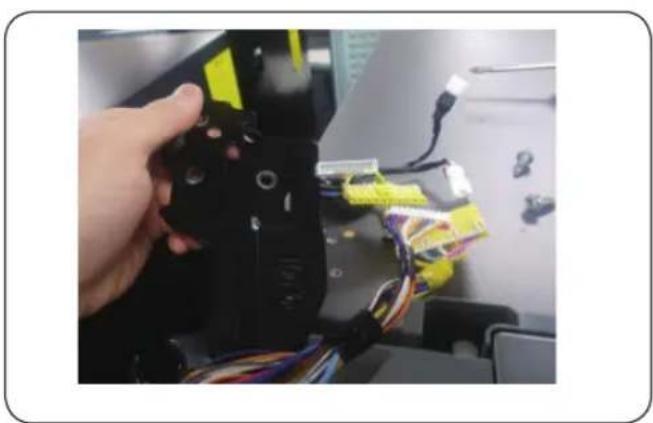
natural_image
Hand holding a black 3D printer with yellow connectors and multicolored wires, no visible text or symbolsnatural_image
Open refrigerator with lid open, showing interior compartments (no visible text or symbols)natural_image
Close-up of a refrigerator interior showing a metallic handle and screw mechanism, with red circles highlighting specific points (no text or symbols visible)flowchart
graph TD
    A["Initial Screen"] --> B["Turner Guide"]
    B --> C["Close-up of Tire"]
    C --> D["Assembly of Flexible Component"]
    D --> E["Final Assembly with Red Copper"]
[Démontage]
natural_image
Person opening a white plastic refrigerator with a red arrow pointing to the lid (no visible text or symbols)![SAMSUNG RS65R5411B4 - [Démontage] - 1](/content/2026/03/479042/images/f8312a05823de9708518170490f66c5df78800f7f9b5d4f9b1fb5c74cd919719.jpg)
natural_image
Hand placing a plastic bag with a red arrow indicating rotation (no text or symbols visible)natural_image
Close-up of a hand holding a transparent plastic container with a red arrow indicating rotation (no text or symbols visible)![SAMSUNG RS65R5411B4 - [Démontage] - 2](/content/2026/03/479042/images/89d257ad53cbd7135d0857394b9c83b2c84aebb2ceff20a39966b919e325b478.jpg)
natural_image
Close-up of a hand opening a transparent plastic container with a red upward arrow indicating motion (no text or symbols visible)natural_image
Close-up of a mechanical component with a red circular hole and internal structure (no visible text or symbols)![SAMSUNG RS65R5411B4 - [Démontage] - 3](/content/2026/03/479042/images/3318bf4d1016e27c69aedb8b2a3bb5a3b8745238fed36399eab08e1f3796ecdb.jpg)
natural_image
Hand pressing a button on a computer monitor with a red arrow indicating rotation (no text or symbols visible)![SAMSUNG RS65R5411B4 - [Démontage] - 4](/content/2026/03/479042/images/ac37958f28887252b965510fc6edf3150aa9c61f73874fdeeb7673ee1b5da839.jpg)
natural_image
Close-up of a hand holding a yellow and white 3D connector with wires, next to a black electronic device (no visible text or symbols)![SAMSUNG RS65R5411B4 - [Démontage] - 5](/content/2026/03/479042/images/8029c6c77b98960aea5db25f279db868e95ec8ef32952ace4d940435c30eac5f.jpg)
natural_image
Close-up of a mechanical component with three red-circled holes and yellow wiring (no visible text or symbols)![SAMSUNG RS65R5411B4 - [Démontage] - 6](/content/2026/03/479042/images/70c69b45bcc304026fb07f78ea811ae4b1e510db2394b9c3a247fd1205b27134.jpg)
natural_image
Close-up of a mechanical device with wires and connectors, no visible text or symbols![SAMSUNG RS65R5411B4 - [Démontage] - 7](/content/2026/03/479042/images/75f7e356709839f4611b2b5d16d94ee7b3b10f4a352d8764342603aaa6bac8c0.jpg)
natural_image
Close-up of a hand holding a black robotic arm with yellow and blue wires, no visible text or symbolsnatural_image
Interior view of a refrigerator with open door, showing front panel and side panels (no text or symbols visible)natural_image
Close-up of a refrigerator interior showing a metallic handle and screw mechanism, with red circles highlighting specific points (no text or symbols visible)natural_image
Close-up of a hand placing a transparent plastic container into a refrigerator (no visible text or symbols)![SAMSUNG RS65R5411B4 - [Démontage] - 8](/content/2026/03/479042/images/948286b8574186d1aa2ac7319255c8e4c420f778984fb7fc69c9c553f27e44c1.jpg)
natural_image
Hand placing a plastic bag with a red arrow indicating rotation (no text or symbols visible)natural_image
Close-up of a hand holding a plastic bag with a red arrow pointing upward, next to a transparent container (no text or symbols visible)![SAMSUNG RS65R5411B4 - [Démontage] - 9](/content/2026/03/479042/images/f272cdbcf33f3d3380b999bffdbe8235870c59efe9966ed7678ef63d3b281dfb.jpg)
natural_image
Close-up of a hand holding a transparent plastic box with a red upward arrow, placed inside an open refrigerator (no visible text or symbols)natural_image
Simple line drawing of a screwdriver (no text or symbols)![SAMSUNG RS65R5411B4 - [Démontage] - 10](/content/2026/03/479042/images/a80e6c8a1b379cea9f93aafed39c79d28d958b9dfee2fbc5aa22a0c8f999d1e5.jpg)
natural_image
Line drawing of a screwdriver with a cylindrical head and shaft (no text or symbols)![SAMSUNG RS65R5411B4 - [Démontage] - 11](/content/2026/03/479042/images/11ea6070fe648eda68ab69f6539b0c9c329d28f68dd80e5b7a87e6daf52785dd.jpg)
natural_image
Close-up of a mechanical component with a red circular hole and ventilation slots (no visible text or symbols)![SAMSUNG RS65R5411B4 - [Démontage] - 12](/content/2026/03/479042/images/47d3015c72349c2a2d06f0e8e1f97dc604ab740af1685b1299c381af8b45f6d8.jpg)
natural_image
Hand pressing a button on a computer mouse, with a red arrow indicating the motion (no text or symbols visible)![SAMSUNG RS65R5411B4 - [Démontage] - 13](/content/2026/03/479042/images/6fb87944c2ba695788a2610177d185098fbf833a290783dbfdc564e8cceb9a3b.jpg)
natural_image
Close-up of a hand holding a yellow and white 3D-printed connector with wires, next to a black electronic device (no visible text or symbols)![SAMSUNG RS65R5411B4 - [Démontage] - 14](/content/2026/03/479042/images/6064b72c4a89072530d747701c98f6b098636d8ccd395dee981abd0fc3fe5f2e.jpg)
natural_image
Close-up of a mechanical component with three red-circled holes and yellow wiring (no visible text or symbols)![SAMSUNG RS65R5411B4 - [Démontage] - 15](/content/2026/03/479042/images/7f8301553ee0fbac2fe9db9b64835b2f828cb25df74bdbdd7ac800aa0113fe2b.jpg)
natural_image
Close-up of a mechanical device with wires and connectors, no visible text or symbols![SAMSUNG RS65R5411B4 - [Démontage] - 16](/content/2026/03/479042/images/3b2f8420094e8c1302755ee9442a78a96c26c71549c23f01eea14ed21fef9f6b.jpg)
natural_image
Close-up of a hand holding a black mechanical device with yellow connectors and multicolored wires, next to a computer monitor (no visible text or symbols)natural_image
Interior view of a refrigerator with open door, showing front panel and side panels (no text or symbols visible)natural_image
Close-up of a refrigerator interior showing a metallic handle and screw mechanism, with red circles highlighting specific points (no text or symbols visible)natural_image
Person opening a white plastic refrigerator with a red arrow indicating the handle (no text or symbols visible)![SAMSUNG RS65R5411B4 - [Démontage] - 17](/content/2026/03/479042/images/a3a103dc57de7448c8bd4d30084e0f86544f35ad26431174ef1ec3eb0084e348.jpg)
natural_image
Hand holding a plastic container with a red arrow indicating rotation (no text or symbols visible)natural_image
Close-up of a hand holding a transparent plastic bag with a red arrow pointing upward, next to a laptop keyboard (no text or symbols visible)![SAMSUNG RS65R5411B4 - [Démontage] - 18](/content/2026/03/479042/images/d6b0d85d0c02754f8df4725918b6d063964231b2b488c76f77d0883eaf7faf6b.jpg)
natural_image
Person opening a transparent plastic box with a red upward arrow indicating motion (no text or symbols visible)natural_image
Close-up of a mechanical component with a red circular hole and internal structure (no visible text or symbols)![SAMSUNG RS65R5411B4 - [Démontage] - 19](/content/2026/03/479042/images/7b5ecf693024d4faadbb3cc19313c3681eb56a6de1d023ffbe0420cea70e0382.jpg)
natural_image
Hand pressing a button on a computer monitor with a red arrow indicating rotation (no text or symbols visible)![SAMSUNG RS65R5411B4 - [Démontage] - 20](/content/2026/03/479042/images/9285ff80ef0e6625bf99465d65c25d034c3794120d08d411dcac56e07698de19.jpg)
natural_image
Close-up of a hand holding a yellow and white 3D connector with wires, next to a black electronic device (no visible text or symbols)![SAMSUNG RS65R5411B4 - [Démontage] - 21](/content/2026/03/479042/images/be3c6358a18f17c65965c87cc45a64dd000c61ffda12c7e3d52e26b3361383fd.jpg)
natural_image
Close-up of a mechanical component with three red-circled holes and yellow wiring (no visible text or symbols)![SAMSUNG RS65R5411B4 - [Démontage] - 22](/content/2026/03/479042/images/40f819925732a504fb20b2cd3a3660887e6e3460754d9147a340ff86a40a3be4.jpg)
natural_image
Close-up of a mechanical device with wires and connectors, no visible text or symbols![SAMSUNG RS65R5411B4 - [Démontage] - 23](/content/2026/03/479042/images/48240647e2f0a25aca447cb8198da1f351c94f25701cc7caea11af5684fde301.jpg)
natural_image
Close-up of a hand holding a black robotic arm with yellow and blue wires, no visible text or symbolsnatural_image
Interior view of a refrigerator with open door, showing front panel and side panels (no text or symbols visible)natural_image
Close-up of a refrigerator interior showing a metallic handle and screw mechanism, with red circles highlighting specific points (no text or symbols visible)natural_image
Person opening a white plastic refrigerator with a red arrow pointing to the lid (no visible text or symbols)![SAMSUNG RS65R5411B4 - [Démontage] - 24](/content/2026/03/479042/images/223035658531521b083bc42fddb33c2c93dd4c4937fd9bd59d89c936ffc0e324.jpg)
natural_image
Hand placing a plastic bag with a red arrow indicating rotation (no text or symbols visible)Para voltar a colocar as gavetas
natural_image
Close-up of a hand holding a plastic container with a red arrow indicating rotation or movement (no text or symbols visible)
natural_image
Hand placing a transparent plastic crate with a red upward arrow, next to an open refrigerator (no text or symbols visible)natural_image
Simple line drawing of a screwdriver (no text or symbols)

natural_image
Line drawing of a wrench with a flared handle and pointed tip (no text or symbols)Chave Phillips Chave de fenda Chave de porca 11 mm
Chave de caixa 10 mm Chave de caixa 8 mm Chave de porca 10 mm
Dobradiça superior

natural_image
Close-up of a mechanical component with a red circular hole and internal structure (no visible text or symbols)
natural_image
Hand pressing a button on a computer monitor with a red arrow indicating rotation (no text or symbols visible)
natural_image
Close-up of a hand holding a yellow and white 3D connector with wires, next to a black electronic device (no visible text or symbols)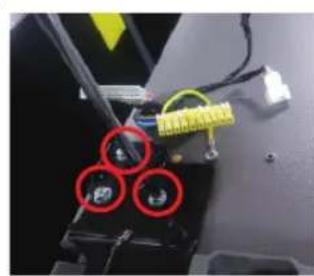
natural_image
Close-up of a mechanical component with three red-circled holes and yellow connectors (no visible text or symbols)
natural_image
Close-up of a mechanical device with wires and connectors, no visible text or symbols
natural_image
Close-up of a hand holding a black robotic arm with yellow and blue wires, no visible text or symbolsnatural_image
Interior view of a refrigerator with open door, showing front panel and side panels (no text or symbols visible)natural_image
Close-up of a refrigerator interior showing a metallic handle and screw mechanism, with red circles highlighting specific points (no text or symbols visible)natural_image
Person opening a white plastic refrigerator with a red arrow indicating the handle (no text or symbols visible)
natural_image
Hand holding a plastic bag with a red arrow pointing to it, placed inside a transparent container (no text or symbols visible)natural_image
Close-up of a hand holding a transparent plastic bag with a red arrow pointing upward, next to a laptop keyboard (no text or symbols visible)
natural_image
Person handling a transparent plastic container with a red upward arrow, placed inside a refrigerator (no visible text or symbols)natural_image
Close-up of a mechanical component with a red circular hole and ventilation slots (no visible text or symbols)
natural_image
Hand pressing a button on a computer mouse, with a red arrow indicating the motion (no text or symbols visible)
natural_image
Close-up of a hand holding a yellow and white 3D-printed connector with wires, next to a black electronic device (no visible text or symbols)
natural_image
Close-up of a mechanical component with three red-circled holes and yellow wiring (no visible text or symbols)
natural_image
Close-up of a mechanical device with wires and connectors, no visible text or symbols
natural_image
Close-up of a hand holding a black mechanical device with yellow connectors and multicolored wires, next to a computer monitor (no visible text or symbols)natural_image
Interior view of a refrigerator with open door, showing front panel and side panels (no text or symbols visible)natural_image
Close-up of a refrigerator interior showing a metallic handle and screw mechanism, with red circles highlighting specific points (no text or symbols visible)natural_image
Person opening a white plastic refrigerator with a red arrow indicating the handle (no text or symbols visible)
natural_image
Hand holding a plastic container with a red arrow indicating rotation (no text or symbols visible)natural_image
Close-up of a hand holding a transparent plastic bag with a red arrow pointing upward, next to a laptop keyboard (no text or symbols visible)
natural_image
Person handling a transparent plastic container with a red upward arrow, placed inside a refrigerator (no visible text or symbols)natural_image
Close-up of a mechanical component with a red circular hole and internal structure (no visible text or symbols)
natural_image
Hand pressing a button on a computer monitor with a red arrow indicating rotation (no text or symbols visible)
natural_image
Close-up of a hand holding a yellow and white 3D connector with wires, next to a black electronic device (no visible text or symbols)
natural_image
Close-up of a mechanical component with three red-circled holes and yellow wiring (no visible text or symbols)
natural_image
Close-up of a mechanical device with wires and connectors, no visible text or symbols
natural_image
Close-up of a hand holding a black robotic arm with yellow and blue wires, no visible text or symbolsnatural_image
Open refrigerator with lid open, showing interior compartments and door frame (no visible text or symbols)natural_image
Close-up of a refrigerator interior showing a metallic handle and screw mechanism, with red circles highlighting specific points (no text or symbols visible)natural_image
Person opening a white plastic refrigerator with a red arrow indicating the handle (no text or symbols visible)
natural_image
Hand holding a plastic container with a red arrow indicating rotation (no text or symbols visible)natural_image
Close-up of a hand holding a transparent plastic bag with a red arrow pointing upward, next to a laptop keyboard (no visible text or symbols)
natural_image
Person handling a transparent plastic container with a red upward arrow, placed inside a refrigerator (no visible text or symbols)natural_image
Close-up of a mechanical component with a red circular hole and internal structure (no visible text or symbols)
natural_image
Hand pressing a button on a computer monitor with a red arrow indicating rotation (no text or symbols visible)
natural_image
Close-up of a hand holding a yellow and white 3D connector with wires, next to a black electronic device (no visible text or symbols)
natural_image
Close-up of a mechanical component with three red-circled holes and yellow wiring (no visible text or symbols)
natural_image
Close-up of a mechanical device with wires and connectors, no visible text or symbols
natural_image
Close-up of a hand holding a black robotic arm with yellow and blue wires, no visible text or symbolsnatural_image
Interior view of a refrigerator with open door, showing front panel and side panels (no text or symbols visible)natural_image
Close-up of a refrigerator interior showing a metallic handle and screw mechanism, with red circles highlighting specific points (no text or symbols visible)natural_image
Person opening a white plastic refrigerator with a red arrow indicating the handle (no text or symbols visible)
natural_image
Hand holding a plastic container with a red arrow indicating rotation (no text or symbols visible)natural_image
Close-up of a hand holding a transparent plastic bag with a red arrow pointing upward, next to a laptop keyboard (no text or symbols visible)
natural_image
Person handling a transparent plastic container with a red upward arrow, placed inside a refrigerator (no visible text or symbols)natural_image
Close-up of a mechanical component with a red circular hole and internal structure (no visible text or symbols)
natural_image
Hand pressing a button on a computer monitor with a red arrow indicating rotation (no text or symbols visible)
natural_image
Close-up of a hand holding a yellow and white 3D connector with wires, next to a black electronic device (no visible text or symbols)
natural_image
Close-up of a mechanical component with three red-circled holes and yellow connectors (no visible text or symbols)
natural_image
Close-up of a mechanical device with wires and connectors, no visible text or symbols
natural_image
Close-up of a hand holding a black robotic arm with yellow and blue wires, no visible text or symbolsnatural_image
Open refrigerator with lid open, showing interior compartments (no visible text or symbols)natural_image
Close-up of a refrigerator interior showing a metal hinge with two red circular annotations highlighting features (no readable text or symbols)natural_image
Close-up of a hand placing a transparent plastic container into a refrigerator (no visible text or symbols)
natural_image
Hand placing a plastic bag with a red arrow indicating rotation (no text or symbols visible)natural_image
Close-up of a hand holding a plastic bag with a red arrow pointing upward, next to a transparent container (no visible text or symbols)
natural_image
Close-up of a hand holding a transparent plastic box with a red upward arrow, placed inside an open refrigerator (no visible text or symbols)natural_image
Close-up of a mechanical component with a red circular hole and internal structure (no visible text or symbols)
natural_image
Hand pressing a button on a computer monitor with a red arrow indicating rotation (no text or symbols visible)
natural_image
Close-up of a hand holding a yellow and white 3D connector with wires, next to a black electronic device (no visible text or symbols)
natural_image
Close-up of a mechanical component with three red-circled holes and yellow connectors (no visible text or symbols)
natural_image
Close-up of a mechanical device with wires and connectors, no visible text or symbols
natural_image
Close-up of a hand holding a black robotic arm with yellow and blue wires, no visible text or symbolsnatural_image
Interior view of a refrigerator with open door, showing front panel and side panels (no text or symbols visible)natural_image
Close-up of a refrigerator interior showing a metallic handle and screw mechanism, with red circles highlighting specific points (no text or symbols visible)- Odstráňte tri skrutky držiace pánt, demontujte stredový pánt
Spodný pánt
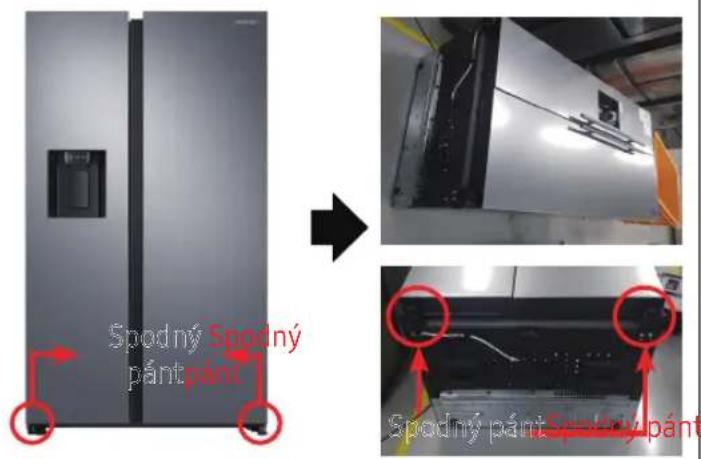
natural_image
Person opening a white plastic refrigerator with a red arrow indicating the handle (no text or symbols visible)
natural_image
Hand holding a plastic container with a red arrow indicating rotation (no text or symbols visible)natural_image
Close-up of a hand holding a transparent plastic bag with a red arrow pointing upward, next to a laptop keyboard (no text or symbols visible)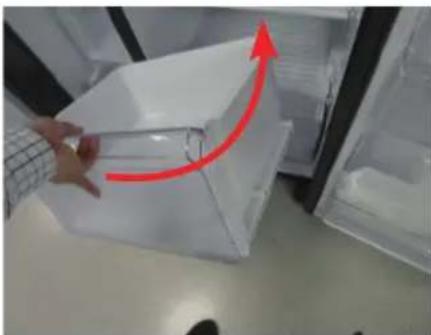
natural_image
Person handling a transparent plastic container with a red upward arrow, placed inside a refrigerator (no visible text or symbols)natural_image
Simple line drawing of a screwdriver (no text or symbols)
natural_image
Line drawing of a screwdriver with a cylindrical head and threaded shaft (no text or symbols)
natural_image
Close-up of a mechanical component with a red circular hole and internal structure (no visible text or symbols)
natural_image
Hand pressing a button on a computer monitor with a red arrow indicating rotation (no text or symbols visible)
natural_image
Close-up of a hand holding a yellow and white 3D connector with wires, next to a black electronic device (no visible text or symbols)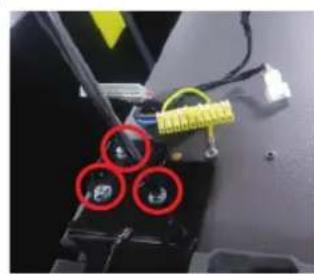
natural_image
Close-up of a mechanical component with three red-circled holes and yellow wiring (no visible text or symbols)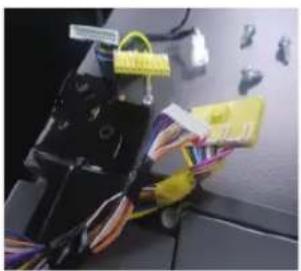
natural_image
Close-up of a mechanical device with wires and connectors, no visible text or symbols
natural_image
Close-up of a hand holding a black robotic device with yellow and blue wires, no visible text or symbolsnatural_image
Open refrigerator with lid open, showing interior compartments and door frame (no visible text or symbols)natural_image
Close-up of a refrigerator interior showing a metal hinge with two red circular annotations highlighting features (no readable text or symbols)natural_image
Person opening a white plastic refrigerator with a red arrow indicating the handle (no text or symbols visible)
natural_image
Hand holding a plastic bag with a red arrow pointing to it, placed inside a transparent container (no text or symbols visible)Lagano podignite naviše prednju stranu fioke i izvucite je.
Da ponovo pričvrstite fioke
Ponovno postavljanje fioka sledi obrnutom redosledu koraka za njihovo uklanjanje.
natural_image
Close-up of a hand holding a transparent plastic bag with a red arrow pointing upward, next to a laptop keyboard (no text or symbols visible)
natural_image
Person handling a transparent plastic container with a red upward arrow, placed inside a refrigerator (no visible text or symbols)Ponovno postavljanje fioka sledi obrnutom redosledu koraka za njihovo uklanjanje.
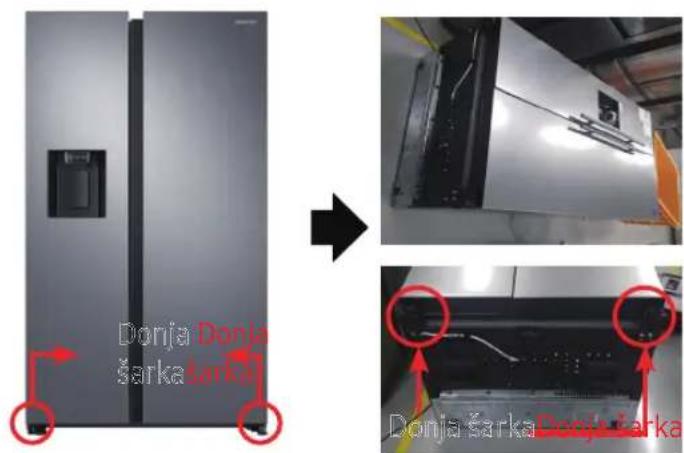
Da biste zamenili šarke, prvo morate skinuti vrata.
! OPREZ
- Prilikom uklanjanja vrata budite izuzetno oprezni jer su vrata teška.
- Pre nego što zamenite šarke, stavite na pod mekanu podlogu, kao što je karton, kako biste sprečili ogrebotine na vratima kada vrata skinete.
- Budući da sa šarkama treba pažljivo rukovati i da u njihovoj zameni treba da učestvuju dve ili više osoba, preporučujemo vam da pozovete stručnu tehničku službu.
- Ako uklonite šarku bez držanja vrata, vrata mogu pasti i prouzrokovati povrede.
- Uverite se da je osovina čvrsto zategnuta na šarki.
•Proverite da li je šarka čvrsto pričvršćena za kućište. - Uverite se da su žičani priključci pravilno povezani.
- Pazite da ne oštetite žice prilikom pričvršćivanja gornjeg poklopca.
⚠️ UPOZORENJE
- Naginjanje / postavljanje frižidera treba da rade najmanje 2 osobe.
- Isključite kabl za napajanje pre nego što započnete preokretanje vrata.
natural_image
Close-up of a mechanical component with a red circular hole and internal structure (no visible text or symbols)
natural_image
Hand pressing a button on a computer monitor with a red arrow indicating rotation (no text or symbols visible)
natural_image
Close-up of a hand holding a yellow and white 3D connector with wires, next to a black electronic device (no visible text or symbols)
natural_image
Close-up of a mechanical component with three red-circled holes and yellow connectors (no visible text or symbols)
natural_image
Close-up of a mechanical device with wires and connectors, no visible text or symbols
natural_image
Close-up of a hand holding a black robotic arm with yellow and blue wires, no visible text or symbols-
Isključite kabal za napajanje i uklonite 1 zavrtanj poklopca pomoću Phillips odvijača. Zatim otvorite vrata zamrzivača i povucite kuke sa strane da biste olabavili poklopac. Podignite poklopac prema sebi da biste ga odvojili.
-
Odvojte dva gornja kućišta.
-
Uklonite tri vijka koji drže šarku.
-
Rastavite gornju šarku sa prednje strane vrata.
Zamena šarke
Naziv modela izgleda ovako: RS64R55**, RS64R56**, RS65R55**, RS65R56**, RS74R55**, RS75R56**, RS63R55**, RS63R56**
natural_image
Interior view of a refrigerator with open door, showing front panel and side panels (no text or symbols visible)- Nakon rastavljanja gornje šarke udesno, odvojte vrata frižidera prema gore.

natural_image
Close-up of a refrigerator interior showing a metallic handle and screw mechanism, with red circles highlighting specific points (no text or symbols visible)- Uklonite tri vijka koji drže šarku, rastavite srednju šarku.
Donja šarka
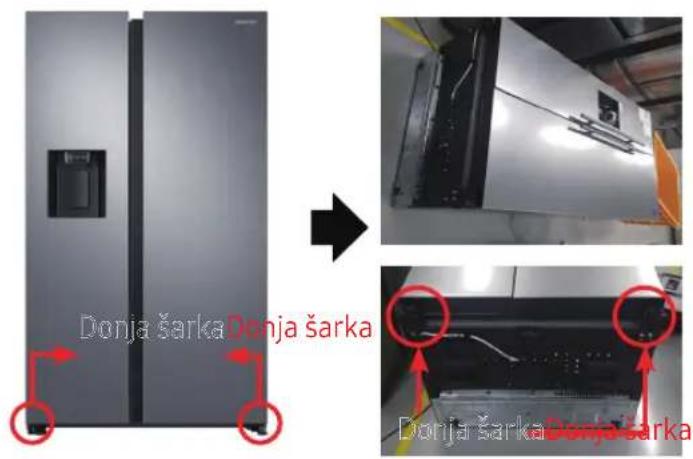
text_image
Donja šarka Donja šarka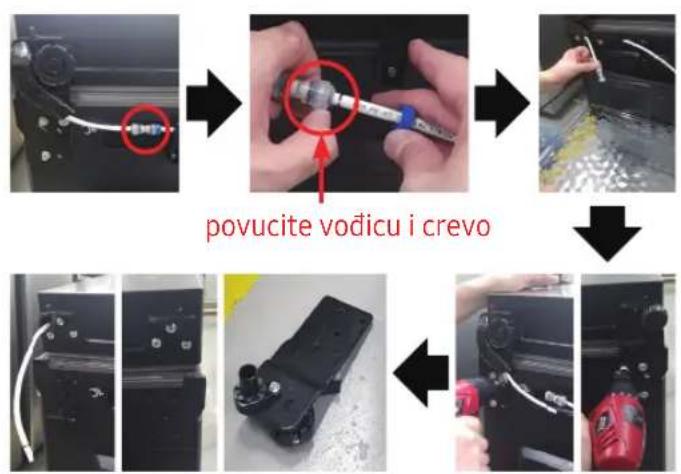
flowchart
graph TD
    A["Device with red circle"] --> B["Tool with red circle"]
    B --> C["Close-up of tool"]
    C --> D["Close-up of tool"]
    D --> E["Final Product with red tool"]
flowchart
graph TD
    A["Initial inspection of vodicu"] --> B["Assembly of components"]
    B --> C["Reassembly of vodicu into the engine"]
    C --> D["Final assembly with a red tool and blue screwdriver"]
    D --> E["Final assembly with a red tool and blue screwdriver"]
[Rastavljanje]
- Isključite kabal za napajanje.
- Položite set.
! OPREZ
•To moraju da rade više od 2 osobe.
- Obavezno iskopčajte kabal za napajanje pre nego što započnete gore navedenu operaciju.
[Rastavljanje]
- Odvojitecrevo.
(Samo šarka dole levo) - Iscrpite vodu u crevu.
(Samo šarka dole levo) - Uklonitevijak(3ea).
(Korišćenje ključa za matice ili ključa sa kutijom od 10 mm) - Uklonite donju šarku D / L.
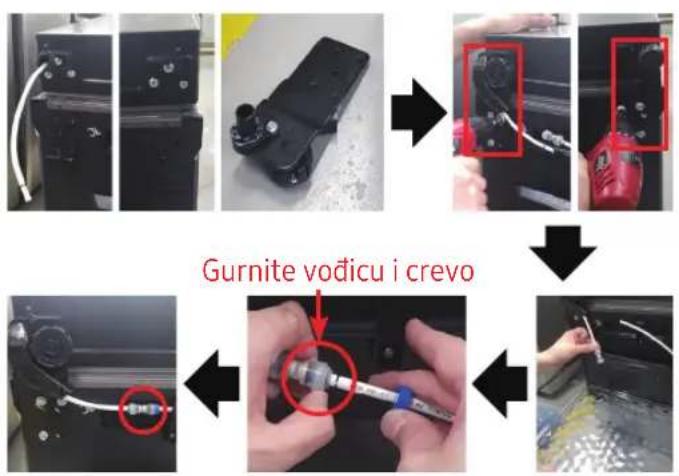
[Sastavljanje]
- Montirajte šarku nisko na dnu.
(Korišćenje ključa za matice ili ključa sa kutijom od 10 mm) - Priključite crevo (samo šarka dole levo)
- Priključite vodu u crevo.
(Samo šarka dole levo)
! OPREZ
- Obavezno iskopčajte kabal za napajanje pre nego što započnete gore navedenu operaciju.
Donja šarka
text_image
Donja šarka Donja šarka Donja šarka Donja šarka Donja šarka[Sastavljanje]
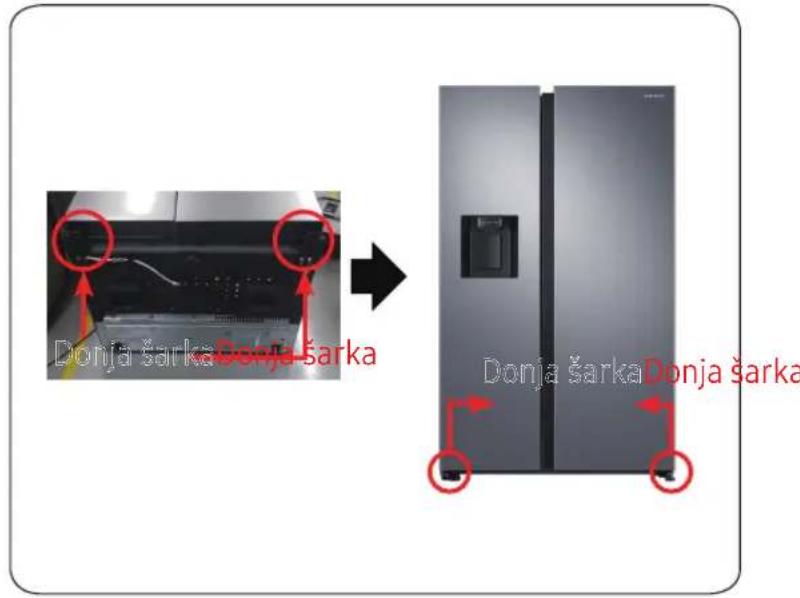
- Sastavite donju šarku D / L.
- Stavite set.
! OPREZ
•To moraju da rade više od 2 osobe.
- Obavezno iskopčajte kabal za napajanje pre nego što započnete gore navedenu operaciju.
natural_image
Person opening a white plastic refrigerator with a red arrow pointing to the lid (no visible text or symbols)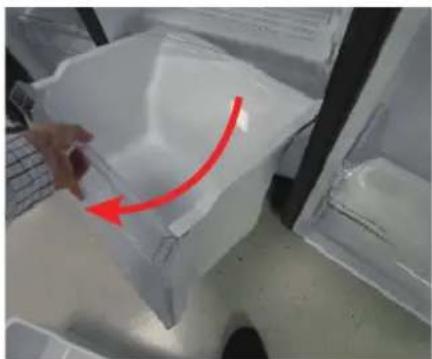
natural_image
Hand placing a plastic bag with a red arrow indicating rotation (no text or symbols visible)natural_image
Close-up of a hand holding a plastic container with a red arrow indicating rotation (no text or symbols visible)
natural_image
Hand placing a transparent plastic crate with a red upward arrow, next to an open refrigerator (no text or symbols visible)natural_image
Close-up of a mechanical component with a red circular hole and ventilation slots (no visible text or symbols)
natural_image
Hand pressing a button on a computer mouse, with a red arrow indicating the motion (no text or symbols visible)
natural_image
Close-up of a hand holding a yellow and white 3D-printed connector with wires, next to a black electronic device (no visible text or symbols)
natural_image
Close-up of a mechanical component with three red-circled holes and yellow wiring (no visible text or symbols)
natural_image
Close-up of a mechanical device with wires and connectors, no visible text or symbols
natural_image
Close-up of a hand holding a black mechanical device with yellow connectors and multicolored wires, next to a computer monitor (no visible text or symbols)natural_image
Interior view of a refrigerator with open door, showing front panel and side panels (no text or symbols visible)natural_image
Close-up of a refrigerator interior showing a metallic handle and screw mechanism, with red circles highlighting specific points (no text or symbols visible)natural_image
Person opening a white plastic refrigerator with a red arrow pointing to the lid (no text or symbols visible)
natural_image
Hand placing a plastic bag with a red arrow indicating rotation (no text or symbols visible)natural_image
Close-up of a hand holding a transparent plastic container with a red arrow indicating rotation (no text or symbols visible)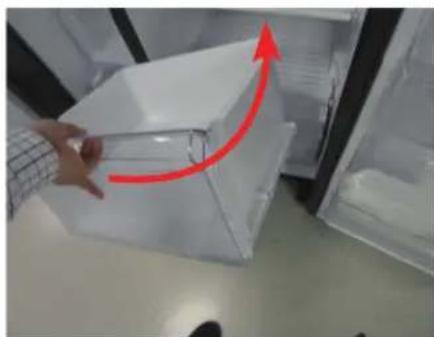
natural_image
Hand placing a transparent plastic container into an open refrigerator with a red upward arrow indicating motion (no text or symbols visible)natural_image
Simple line drawing of a screwdriver with no text or symbols

natural_image
Close-up of a mechanical component with a red circular hole and internal structure (no visible text or symbols)
natural_image
Hand pressing a button on a computer monitor with a red arrow indicating rotation (no text or symbols visible)
natural_image
Close-up of a hand holding a yellow and white 3D connector with wires, next to a black electronic device (no visible text or symbols)
natural_image
Close-up of a mechanical component with three red-circled holes and yellow connectors (no visible text or symbols)
natural_image
Close-up of a mechanical device with wires and connectors, no visible text or symbols
natural_image
Close-up of a hand holding a black robotic arm with yellow connectors and multicolored wires, no visible text or symbols.natural_image
Open refrigerator with lid open, showing interior compartments and door frame (no visible text or symbols)natural_image
Close-up of a refrigerator interior showing a metal hinge with two red-circled buttons and a small screw, no visible text or symbols.natural_image
Close-up of a hand placing a transparent plastic container into a refrigerator (no visible text or symbols)
natural_image
Hand placing a plastic bag with a red arrow indicating rotation (no text or symbols visible)Pažljivo podignite prednji dio ladice i izvucite je.
Da ponovno postavite ladice
natural_image
Close-up of a hand holding a plastic bag with a red arrow pointing upward, next to a transparent container (no visible text or symbols)
natural_image
Person handling a transparent plastic box with a red upward arrow, placed inside an open refrigerator (no visible text or symbols)natural_image
Simple line drawing of a screwdriver (no text or symbols)
natural_image
Line drawing of a screwdriver with a cylindrical head and threaded shaft (no text or symbols)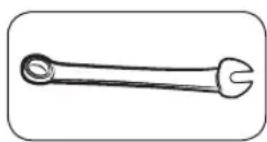
natural_image
Close-up of a mechanical component with a red circular hole and internal structure (no visible text or symbols)
natural_image
Hand pressing a button on a computer monitor with a red arrow indicating rotation (no text or symbols visible)
natural_image
Close-up of a hand holding a yellow and white plastic connector with wires, next to a black electronic device (no visible text or symbols)
natural_image
Close-up of a mechanical component with three red-circled features and yellow connectors (no visible text or symbols)
natural_image
Close-up of a mechanical device with wires and connectors, no visible text or symbols
natural_image
Close-up of a hand holding a black robotic arm with yellow connectors and wires, no visible text or symbols-
Isključite kabel za napajanje i uklonite 1 pokrovni vijak pomoću Phillips odvijača. Zatim otvorite vrata zamrzivača i povucite kuke sa strane kako biste olabavili poklopac. Podignite poklopac prema sebi da biste ga odvojili.
-
Odvojite dva gornja kućišta.
-
Uklonite tri vijka koji drže šarku.
-
Rastavite gornju šarku s prednje strane vrata.
Zamjena šarke
Naziv modela izgleda ovako: RS64R55**, RS64R56**, RS65R55**, RS65R56**, RS74R55**, RS75R56**, RS63R55**, RS63R56**
Srednja šarka (samo za 3 vrata)
natural_image
Interior view of a refrigerator with open door, showing front panel and side panels (no text or symbols visible)natural_image
Close-up of a refrigerator interior showing a metallic handle and screw mechanism, with red circles highlighting specific points (no text or symbols visible)- Uklonite tri vijka koji drže šarku, rastavite sredinu šarke
Donja šarka
text_image
Donja Donja šarka Donja Donja šarka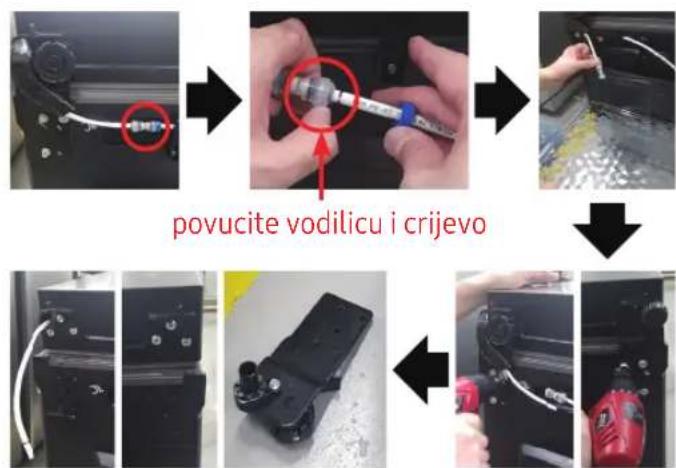
text_image
povucite vodilicu i crijevo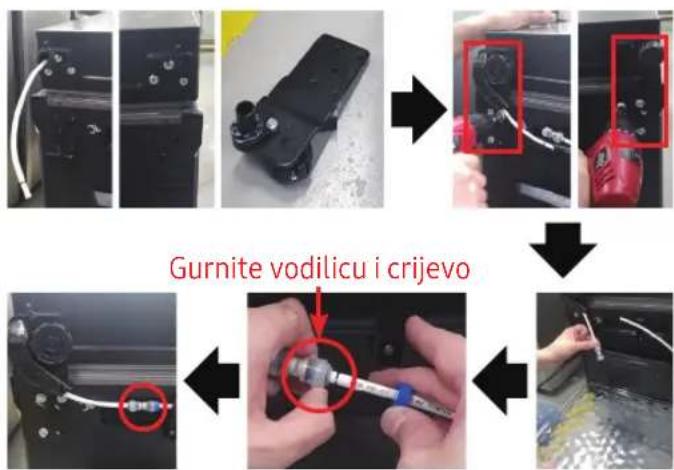
text_image
Gurnite vodilicu i crijevo[Rastavljanje]
- Odspojite kabel napajanja.
- Položite set.
! OPREZ
•To moraju raditi više od 2 osobe.
- Obavezno izvucite kabel za napajanje prije nego što izvršite gore navedenu radnju.
[Rastavljanje]
natural_image
Person opening a white plastic refrigerator with a red arrow indicating the handle (no text or symbols visible)![SAMSUNG RS65R5411B4 - [Rastavljanje] - 1](/content/2026/03/479042/images/2e7044345e2b7088238f1e45c789594c837e8c02ebcd3c4f4dd659bc4cdf8ada.jpg)
natural_image
Hand holding a plastic bag with a red arrow pointing to it, placed inside a transparent container (no text or symbols visible)natural_image
Close-up of a hand holding a transparent plastic bag with a red arrow pointing upward, next to a laptop keyboard (no text or symbols visible)![SAMSUNG RS65R5411B4 - [Rastavljanje] - 2](/content/2026/03/479042/images/6cff1417bacf22a442fdbbaaf7bc2d0bd5e0cf31239ba776354eebe2601ccc3a.jpg)
natural_image
Person opening a transparent plastic box with a red upward arrow indicating motion (no text or symbols visible)natural_image
Close-up of a mechanical component with a red circular hole and internal structure (no visible text or symbols)![SAMSUNG RS65R5411B4 - [Rastavljanje] - 3](/content/2026/03/479042/images/454acaefa09a185532de772ba3f74525060bc94a00b3e7df3b0ef9107f6007bf.jpg)
natural_image
Hand pressing a button on a computer monitor with a red arrow indicating rotation (no text or symbols visible)![SAMSUNG RS65R5411B4 - [Rastavljanje] - 4](/content/2026/03/479042/images/55b4c40f42116ba520f80244aab4786a0607146e30b46e5d60ab221f33d70258.jpg)
natural_image
Close-up of a hand holding a yellow and white 3D connector with wires, next to a black electronic device (no visible text or symbols)![SAMSUNG RS65R5411B4 - [Rastavljanje] - 5](/content/2026/03/479042/images/79058eabe6991a16bb37cfb7e246c7b98a3eef7dac7ca781cd3067f39d4e8340.jpg)
natural_image
Close-up of a mechanical component with three red-circled holes and yellow wiring (no visible text or symbols)![SAMSUNG RS65R5411B4 - [Rastavljanje] - 6](/content/2026/03/479042/images/30c750437b10118dfc8925f129cc3cf373444edf3fc1852552dabf8dadb42eba.jpg)
natural_image
Close-up of a mechanical device with wires and connectors, no visible text or symbols![SAMSUNG RS65R5411B4 - [Rastavljanje] - 7](/content/2026/03/479042/images/9688b3dfc530afe18f6b27a884de38b2fd9a21f3ca63ebc4857d006e28830f2a.jpg)
natural_image
Close-up of a hand holding a black robotic arm with yellow connectors and multicolored wires, no visible text or symbols.natural_image
Open refrigerator with lid open, showing interior compartments and door frame (no visible text or symbols)natural_image
Close-up of a refrigerator interior showing a metallic handle and screw mechanism, with red circles highlighting specific points (no text or symbols visible)flowchart
graph TD
    A["Device Insert"] --> B["Close-up with a red circle"]
    B --> C["Close-up with a blue tool"]
    C --> D["Close-up with a white tool"]
    D --> E["Close-up with a red component"]
    E --> F["Final Packaging with red device"]
[Çmontimi]
flowchart
graph TD
    A["Device Setup"] --> B["Assembly"]
    B --> C["Close-up of component with red dots"]
    C --> D["Close-up of component with red dots"]
    D --> E["Repairing"]
    E --> F["Final Repair"]
    G["Tërhiqni drejtuesin dhe tubin"] --> H["Close-up of component with red dots"]
    H --> I["Close-up of component with red dots"]
[Montimi]
natural_image
Person opening a white plastic refrigerator with a red arrow pointing to the lid (no visible text or symbols)![SAMSUNG RS65R5411B4 - [Montimi] - 1](/content/2026/03/479042/images/988460ca37119ce3a9539ae552b62b8d3acff489ffcfd602c4cb757a66679c31.jpg)
natural_image
Hand placing a plastic bag with a red arrow indicating rotation (no text or symbols visible)natural_image
Close-up of a hand holding a transparent plastic container with a red arrow indicating rotation (no text or symbols visible)![SAMSUNG RS65R5411B4 - [Montimi] - 2](/content/2026/03/479042/images/71e83bf2c80e0f8456f1563c23aa8eb4a9091fa3b6b711e2524fbf3dab5f7774.jpg)
natural_image
Hand placing a transparent plastic container into an open refrigerator with a red upward arrow indicating motion (no text or symbols visible)natural_image
Close-up of a mechanical component with a red circular hole and internal structure (no visible text or symbols)![SAMSUNG RS65R5411B4 - [Montimi] - 3](/content/2026/03/479042/images/5144b25c43e9ce940e3616d45d21318f67912f57780a288d7a00699617744f23.jpg)
natural_image
Hand pressing a button on a computer monitor with a red arrow indicating rotation (no text or symbols visible)![SAMSUNG RS65R5411B4 - [Montimi] - 4](/content/2026/03/479042/images/67be9eb8b5255e21c2fdb87686b288dbdb40d05de652a0ea4b456ed7cc15276d.jpg)
natural_image
Close-up of a hand holding a yellow and white 3D connector with wires, next to a black electronic device (no visible text or symbols)![SAMSUNG RS65R5411B4 - [Montimi] - 5](/content/2026/03/479042/images/9ef0edc04f9e6319f779f4c85cd6db5f551d6af280157bd9f04e3e67904ac122.jpg)
natural_image
Close-up of a mechanical component with three red-circled features and yellow connectors (no visible text or symbols)![SAMSUNG RS65R5411B4 - [Montimi] - 6](/content/2026/03/479042/images/f58350333b2eeff7643c6a9ed5291d25247466c47919864a889011a809270ab5.jpg)
natural_image
Close-up of a mechanical device with wires and connectors, no visible text or symbols![SAMSUNG RS65R5411B4 - [Montimi] - 7](/content/2026/03/479042/images/518f65b0f910d638b503719a59ecbca0a19809eece0a9bd496cd45d13fbe1c8d.jpg)
natural_image
Close-up of a hand holding a black robotic arm with yellow connectors and multicolored wires, no visible text or symbols.natural_image
Interior view of a refrigerator with open door, showing front panel and side panels (no text or symbols visible)natural_image
Close-up of a refrigerator interior showing a metallic handle and screw mechanism, with red circles highlighting specific points (no text or symbols visible)natural_image
Person opening a white plastic refrigerator with a red arrow indicating the handle (no text or symbols visible)![SAMSUNG RS65R5411B4 - [Montimi] - 8](/content/2026/03/479042/images/2212a10860cf87dbb39ee90e4198dc26094d2c2eea9c31f8f288ad9b9d8ab330.jpg)
natural_image
Hand holding a plastic bag with a red arrow pointing to it, placed inside a transparent container (no text or symbols visible)natural_image
Close-up of a hand holding a transparent plastic bag with a red arrow pointing upward, next to a laptop keyboard (no text or symbols visible)![SAMSUNG RS65R5411B4 - [Montimi] - 9](/content/2026/03/479042/images/5f09426eeb5acdc597172e0f14997aae89bbd9ed23095b59e3a77241c8c711a1.jpg)
natural_image
Person opening a transparent plastic box with a red upward arrow indicating motion (no text or symbols visible)natural_image
Close-up of a mechanical component with a red circular hole and internal structure (no visible text or symbols)![SAMSUNG RS65R5411B4 - [Montimi] - 10](/content/2026/03/479042/images/6ef9de85f81b7c324f973a827d2a732e44ef9dc9bde5585e8001752ef6053a17.jpg)
natural_image
Hand pressing a button on a computer monitor with a red arrow indicating rotation (no text or symbols visible)![SAMSUNG RS65R5411B4 - [Montimi] - 11](/content/2026/03/479042/images/46273d2fd5e861172ac61bf982137fe39d955d0bcdf1eb77c536db4d7e3f2012.jpg)
natural_image
Close-up of a hand holding a yellow and white 3D connector with wires, next to a black electronic device (no visible text or symbols)![SAMSUNG RS65R5411B4 - [Montimi] - 12](/content/2026/03/479042/images/2889fef185490662d539fe31ee4d60125c7daaf1d3354125cb4af892e0c22460.jpg)
natural_image
Close-up of a mechanical component with three red-circled features and yellow connectors (no visible text or symbols)![SAMSUNG RS65R5411B4 - [Montimi] - 13](/content/2026/03/479042/images/5919da713dfea53dbf15078840d36fe36a4d949c8472e53ff0a4ac73862a3fe0.jpg)
natural_image
Close-up of a mechanical device with wires and connectors, no visible text or symbols![SAMSUNG RS65R5411B4 - [Montimi] - 14](/content/2026/03/479042/images/25958b20409af9df9ee4d3094d8369169a32fbcca7f69c842c36f9a310fd8789.jpg)
natural_image
Close-up of a hand holding a black robotic arm with yellow and blue wires, no visible text or symbolsnatural_image
Interior view of a refrigerator with open door, showing front panel and side panels (no text or symbols visible)natural_image
Close-up of a refrigerator interior showing a metallic handle and screw mechanism, with red circles highlighting specific points (no text or symbols visible)- Iznemiet tris skrūves, kas tur eṅgi, izjauciet eṅges vidusdâlu
Apakšējā eṅge
natural_image
Person opening a white plastic refrigerator with a red arrow indicating the handle (no text or symbols visible)
natural_image
Hand holding a plastic bag with a red arrow pointing to it, placed inside a transparent container (no text or symbols visible)natural_image
Close-up of a hand holding a transparent plastic bag with a red arrow pointing upward, next to a laptop keyboard (no text or symbols visible)
natural_image
Person opening a transparent plastic box with a red upward arrow indicating motion (no text or symbols visible)natural_image
Close-up of a mechanical component with a red circular hole and internal structure (no visible text or symbols)
natural_image
Hand pressing a button on a computer monitor with a red arrow indicating rotation (no text or symbols visible)
natural_image
Close-up of a hand holding a yellow and white 3D connector with wires, next to a black electronic device (no visible text or symbols)
natural_image
Close-up of a mechanical component with three red-circled holes and yellow wiring (no visible text or symbols)
natural_image
Close-up of a mechanical device with wires and connectors, no visible text or symbols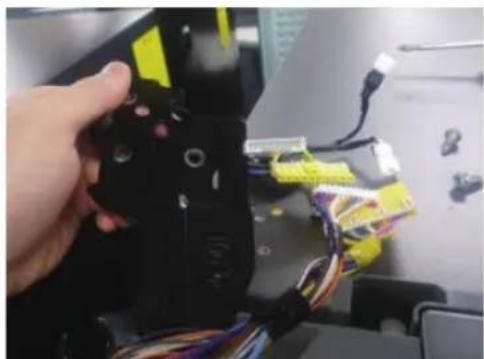
natural_image
Close-up of a hand holding a black robotic arm with yellow connectors and multicolored wires, no visible text or symbols.natural_image
Interior view of a refrigerator with open door, showing front panel and side panels (no text or symbols visible)natural_image
Close-up of a refrigerator interior showing a metallic handle and screw mechanism, with red circles highlighting specific points (no text or symbols visible)text_image
Alumine Alunine hing hing Alumine hing Alunine hing[Lahti võtmine]
text_image
Alumine hing Alumine hing Alumine Alumine hinging[Kokkupanek]
-
Paigaldage P/V alumine hing.
-
Pange komplekt valmis.
![SAMSUNG RS65R5411B4 - [Kokkupanek] - 1](/content/2026/03/479042/images/3498d4532330964e372f376fe9891d84e315a1af63f2452e80ff922ae6c8a45c.jpg)
ETTEVAATUST
natural_image
Close-up of a hand placing a transparent plastic container into a refrigerator (no visible text or symbols)
natural_image
Hand placing a plastic bag with a red arrow indicating rotation (no text or symbols visible)natural_image
Close-up of a hand holding a plastic bag with a red arrow pointing upward, next to a transparent container (no text or symbols visible)
natural_image
Person handling a transparent plastic box with a red upward arrow, placed inside an open refrigerator (no visible text or symbols)natural_image
Simple line drawing of a screwdriver (no text or symbols)
natural_image
Line drawing of a screwdriver with a flat blade (no text or symbols)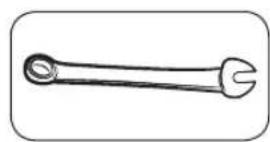
natural_image
Simple line drawing of a wrench (no text or symbols)natural_image
Close-up of a mechanical component with a red circular hole and internal structure (no visible text or symbols)
natural_image
Hand pressing a button on a computer monitor with a red arrow indicating rotation (no text or symbols visible)
natural_image
Close-up of a hand holding a yellow and white 3D connector with wires, next to a black electronic device (no visible text or symbols)
natural_image
Close-up of a mechanical component with three red-circled holes and yellow wiring (no visible text or symbols)
natural_image
Close-up of a mechanical device with wires and connectors, no visible text or symbols
natural_image
Close-up of a hand holding a black robotic arm with yellow and blue wires, no visible text or symbolsnatural_image
Interior view of a refrigerator with open door, showing front panel and side panels (no text or symbols visible)natural_image
Close-up of a refrigerator interior showing a metallic handle and screw mechanism, with red circles highlighting specific points (no text or symbols visible)natural_image
Person opening a white plastic refrigerator with a red arrow indicating the handle (no text or symbols visible)
natural_image
Hand holding a plastic bag with a red arrow pointing to it, placed inside a transparent container (no text or symbols visible)natural_image
Close-up of a hand holding a transparent plastic bag with a red arrow pointing upward, next to a laptop keyboard (no text or symbols visible)
natural_image
Person opening a transparent plastic box with a red upward arrow, no visible text or symbolsnatural_image
Close-up of a mechanical component with a red circular hole and internal structure (no visible text or symbols)
natural_image
Hand pressing a button on a computer monitor with a red arrow indicating rotation (no text or symbols visible)
natural_image
Close-up of a hand holding a yellow and white 3D connector with wires, next to a black electronic device (no visible text or symbols)
natural_image
Close-up of a mechanical component with three red-circled holes and yellow connectors (no visible text or symbols)
natural_image
Close-up of a mechanical device with wires and connectors, no visible text or symbols
natural_image
Close-up of a hand holding a black robotic arm with yellow connectors and multicolored wires, no visible text or symbols.natural_image
Open refrigerator with lid open, showing interior compartments and door frame (no visible text or symbols)natural_image
Close-up of a refrigerator interior showing a metallic handle and screw mechanism, with red circles highlighting specific points (no text or symbols visible)flowchart
graph TD
    A["Device inspection"] --> B["Close-up of mechanical part"]
    B --> C["Close-up of internal components"]
    C --> D["Disassembly with red ring and blue tool"]
    D --> E["Final disassembly with red circle and arrow"]
    style A fill:#f9f,stroke:#333
    style E fill:#bbf,stroke:#333
[Adskillelse]
natural_image
Person opening a white plastic refrigerator with a red arrow indicating the handle (no text or symbols visible)![SAMSUNG RS65R5411B4 - [Adskillelse] - 1](/content/2026/03/479042/images/0b8757073a17d96cdcf3e83baf42419a07b49cafd7ac81a8036abe642210e516.jpg)
natural_image
Hand holding a plastic bag with a red arrow pointing to it, placed inside a transparent container (no text or symbols visible)natural_image
Close-up of a hand holding a transparent plastic bag with a red arrow pointing upward, next to a laptop keyboard (no text or symbols visible)![SAMSUNG RS65R5411B4 - [Adskillelse] - 2](/content/2026/03/479042/images/197b92c465ce81d376d6047108a6dc2432c3af7a67992ee32c03d22c2c74da57.jpg)
natural_image
Person opening a transparent plastic box with a red upward arrow indicating motion (no text or symbols visible)natural_image
Close-up of a mechanical component with a red circular hole and internal structure (no visible text or symbols)![SAMSUNG RS65R5411B4 - [Adskillelse] - 3](/content/2026/03/479042/images/d9c23de3ff8d477157c14f4ea045d9528c41c8c300e5490cc86909caa6d8be59.jpg)
natural_image
Hand pressing a button on a computer monitor with a red arrow indicating rotation (no text or symbols visible)![SAMSUNG RS65R5411B4 - [Adskillelse] - 4](/content/2026/03/479042/images/1590922387332f3c3e98fad027ec9cab1abcef71f5ff36801d144b4c51b14103.jpg)
natural_image
Close-up of a hand holding a yellow and white 3D connector with wires, next to a black electronic device (no visible text or symbols)![SAMSUNG RS65R5411B4 - [Adskillelse] - 5](/content/2026/03/479042/images/02b18e388e80658e616a4bd5238705ed4e553eab128c68d21d4d1d370bebaba1.jpg)
natural_image
Close-up of a mechanical or electronic component with three red-circled holes and yellow wires (no visible text or symbols)![SAMSUNG RS65R5411B4 - [Adskillelse] - 6](/content/2026/03/479042/images/ba152af9322b897fcaa8558cf8b3c883b6e5f74e70fea1fee4463ffc4b757c5a.jpg)
natural_image
Close-up of a mechanical device with wires and connectors, no visible text or symbols![SAMSUNG RS65R5411B4 - [Adskillelse] - 7](/content/2026/03/479042/images/12c5c84f487cb59301390bb05837d528495458cbf374a68d6fb4ef65e632f3ac.jpg)
natural_image
Close-up of a hand holding a black robotic arm with yellow and blue wires, no visible text or symbolsnatural_image
Open refrigerator with lid open, showing interior compartments (no visible text or symbols)natural_image
Close-up of a refrigerator interior showing a metallic handle and screw mechanism, with red circles highlighting specific points (no text or symbols visible)flowchart
graph TD
    A["reklining device"] --> B["Close-up assembly"]
    B --> C["Close-up assembly with tool"]
    C --> D["Disassembly with cable"]
    D --> E["Final assembly with red clamp"]
![SAMSUNG RS65R5411B4 - [Adskillelse] - 8](/content/2026/03/479042/images/e9a6972af28ca930d81dfb556bc01cb666043f56480522c2ba6d4c165adc37b2.jpg)
natural_image
Person opening a white plastic refrigerator with a red arrow indicating the handle (no text or symbols visible)![SAMSUNG RS65R5411B4 - [Adskillelse] - 9](/content/2026/03/479042/images/0dd216fa34b138f6c5d091ba1f8395b2fd08f326fc73cd963659927a0ca64677.jpg)
natural_image
Hand holding a plastic bag with a red arrow pointing to it, placed inside a transparent container (no text or symbols visible)natural_image
Close-up of a hand holding a transparent plastic bag with a red arrow pointing upward, next to a laptop keyboard (no text or symbols visible)![SAMSUNG RS65R5411B4 - [Adskillelse] - 10](/content/2026/03/479042/images/383c9959fefcfffe8033f52ce692f17a72d0413048d2d9b08db9390ea31e8009.jpg)
natural_image
Person opening a transparent plastic box with a red upward arrow indicating motion (no text or symbols visible)natural_image
Simple line drawing of a screwdriver (no text or symbols)![SAMSUNG RS65R5411B4 - [Adskillelse] - 11](/content/2026/03/479042/images/cd7cc425181f0c8dfd9d2619d4bcca25bfb217d4e9460489a12348f847586250.jpg)
natural_image
Line drawing of a screwdriver with a flat blade (no text or symbols)![SAMSUNG RS65R5411B4 - [Adskillelse] - 12](/content/2026/03/479042/images/5d3b86fb37ffcf42418416942863cf4b0aab3813701483ab49d9584c0fe6fee8.jpg)
natural_image
Line drawing of a wrench with a flared end and pointed tip (no text or symbols)natural_image
Close-up of a mechanical component with a red circular hole and internal structure (no visible text or symbols)![SAMSUNG RS65R5411B4 - [Adskillelse] - 13](/content/2026/03/479042/images/809fa96a812b1a2ffca7104a837c07a4c4aa7688f52b77868fe6675b7cfd5a1e.jpg)
natural_image
Hand pressing a button on a computer monitor with a red arrow indicating rotation (no text or symbols visible)![SAMSUNG RS65R5411B4 - [Adskillelse] - 14](/content/2026/03/479042/images/58d2da1536bbe8fba754abae7a612f268caaf1e8856bb51201666f54a7b5f72e.jpg)
natural_image
Close-up of a hand holding a yellow and white 3D connector with wires, next to a black electronic device (no visible text or symbols)![SAMSUNG RS65R5411B4 - [Adskillelse] - 15](/content/2026/03/479042/images/33028b3e2ad566906ff47053e789a272b5f963d02e4c80e0b0bff2ca8d131931.jpg)
natural_image
Close-up of a mechanical component with three red-circled holes and yellow wiring (no visible text or symbols)![SAMSUNG RS65R5411B4 - [Adskillelse] - 16](/content/2026/03/479042/images/e2d66a95f4ff784d59c42f3c159cdb391d08cc036a99ffdcd91fd707d6f47854.jpg)
natural_image
Close-up of a mechanical device with wires and connectors, no visible text or symbols![SAMSUNG RS65R5411B4 - [Adskillelse] - 17](/content/2026/03/479042/images/0c513a5c870662f10495dd9b29533eaf98696959e9e519cd7bdb602da4562ba4.jpg)
natural_image
Close-up of a hand holding a black robotic arm with yellow and blue wires, no visible text or symbolsnatural_image
Open refrigerator with lid open, showing interior compartments (no visible text or symbols)natural_image
Close-up of a refrigerator interior showing a metal hinge with two red circular annotations highlighting the mounting points (no text or symbols present)natural_image
Close-up of a hand placing a transparent plastic container into a refrigerator (no visible text or symbols)![SAMSUNG RS65R5411B4 - [Adskillelse] - 18](/content/2026/03/479042/images/ec2565c7baf88736df805b353508bf4c4230bc8d808d07f9fa4f9a2d2d972500.jpg)
natural_image
Hand placing a plastic bag with a red arrow indicating rotation (no text or symbols visible)natural_image
Close-up of a hand holding a plastic bag with a red arrow pointing upward, next to a transparent container (no visible text or symbols)![SAMSUNG RS65R5411B4 - [Adskillelse] - 19](/content/2026/03/479042/images/4f9a1d04a31bae628b7d64389dca89c719dea6014253a66c3344e46ad7ba25e0.jpg)
natural_image
Person handling a transparent plastic box with a red upward arrow, placed inside a refrigerator (no visible text or symbols)natural_image
Close-up of a mechanical component with a red circular hole and internal structure (no visible text or symbols)![SAMSUNG RS65R5411B4 - [Adskillelse] - 20](/content/2026/03/479042/images/d87de9a4b18bcb9f6e935b9c2fc942465ce3ed5da27e6eb3b0ae55b13373951e.jpg)
natural_image
Hand pressing a button on a computer monitor with a red arrow indicating rotation (no text or symbols visible)![SAMSUNG RS65R5411B4 - [Adskillelse] - 21](/content/2026/03/479042/images/2e4eab635fba77a13660377cdf891f501cb8dbc7c61ec5b1027d98620e9a9d4d.jpg)
natural_image
Close-up of a hand holding a yellow and white 3D connector with wires, next to a black electronic device (no visible text or symbols)![SAMSUNG RS65R5411B4 - [Adskillelse] - 22](/content/2026/03/479042/images/99f344003814c126b31504a539f8d87ebe5c90c6c6cd07f8e86b90b8a5606ba6.jpg)
natural_image
Close-up of a mechanical component with three red-circled features and yellow connectors (no visible text or symbols)![SAMSUNG RS65R5411B4 - [Adskillelse] - 23](/content/2026/03/479042/images/15dd557539abce6b62b67110603bb65ad10b94e52ac6c0e07716c578fd5e4131.jpg)
natural_image
Close-up of a mechanical device with wires and connectors, no visible text or symbols![SAMSUNG RS65R5411B4 - [Adskillelse] - 24](/content/2026/03/479042/images/6d696be061b9895848c3f714d98bd25437dee62fe8f7b529206c1a9e16bf36df.jpg)
natural_image
Close-up of a hand holding a black robotic arm with yellow and blue wires, no visible text or symbolsnatural_image
Open refrigerator with lid open, showing interior compartments (no visible text or symbols)natural_image
Close-up of a refrigerator interior showing a metallic handle and screw mechanism, with red circles highlighting specific points (no text or symbols visible)natural_image
Close-up of a hand placing a transparent plastic container into a refrigerator (no visible text or symbols)![SAMSUNG RS65R5411B4 - [Adskillelse] - 25](/content/2026/03/479042/images/0b59a0b0dbd8b8c58753df9ba69739f1a1e5804a3ffa55e6989dc9234892db4b.jpg)
natural_image
Hand placing a plastic bag with a red arrow indicating rotation (no text or symbols visible)Previdno dvignite sprednji del predala in ga izvlecite.
Če želite namestiti predale
natural_image
Close-up of a hand holding a plastic bag with a red arrow pointing upward, next to a transparent container (no visible text or symbols)
natural_image
Person handling a transparent plastic container with a red upward arrow, placed inside an open refrigerator (no visible text or symbols)natural_image
Close-up of a mechanical component with a red circular hole and internal structure (no visible text or symbols)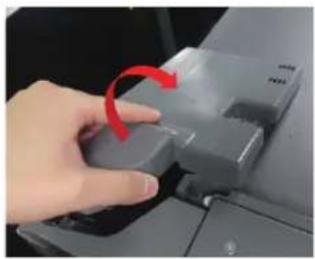
natural_image
Hand pressing a button on a computer monitor with a red arrow indicating rotation (no text or symbols visible)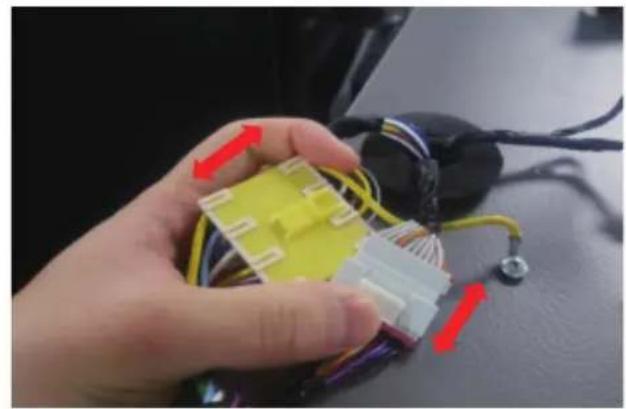
natural_image
Close-up of a hand holding a yellow and white 3D connector with wires, next to a black electronic device (no visible text or symbols)
natural_image
Close-up of a mechanical component with three red-circled holes and yellow wiring (no visible text or symbols)
natural_image
Close-up of a mechanical device with wires and connectors, no visible text or symbols
natural_image
Close-up of a hand holding a black robotic arm with yellow connectors and wires, no visible text or symbolsnatural_image
Interior view of a refrigerator with open door, showing front panel and side panels (no text or symbols visible)- Ko demontirate zgornji tečaj desno, razstavite vrata hladilnika navzgor.

natural_image
Close-up of a refrigerator interior showing a metallic handle and screw mechanism, with red circles highlighting specific points (no text or symbols visible)- Odstranite tri vijake, ki držijo tečaj ter razstavite srednji tečaj
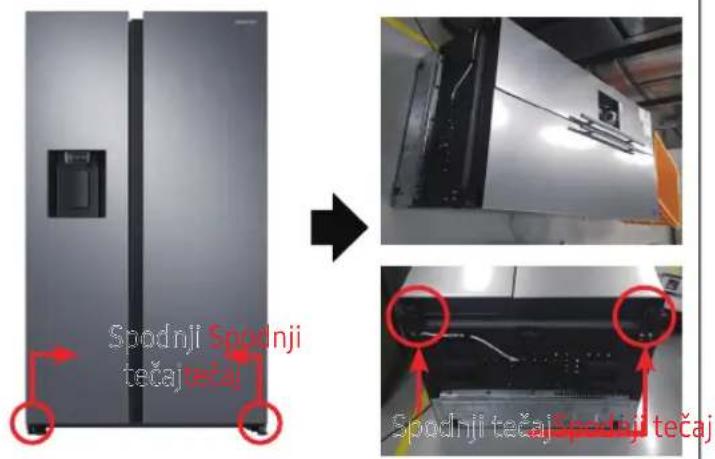
Spodnji tečaj