
CS 30SB - Saw HiKOKI - Free user manual and instructions
Find the device manual for free CS 30SB HiKOKI in PDF.
| Product Type | Electric Chain Saw |
| Brand | HiKOKI |
| Model | CS 30SB |
| Guide Bar Length | 300 mm |
| Power | 1900 W |
| Supply Voltage | 220-240 V ~ |
| Chain Speed at No Load | 14.5 m/s |
| Chain Type | 91PX-45 (Oregon) |
| Chain Pitch / Gauge | 9.53 mm (3/8") / 1.27 mm (0.05") |
| Sprocket | Number of teeth: 6 |
| Oil Pump | Automatic, adjustable flow |
| Oil Tank Capacity | 200 ml |
| Chain Brake | Manual activation |
| Weight | 4.7 kg |
| A-Weighted Sound Power Level | 108 dB(A) |
| A-Weighted Sound Pressure Level | 95 dB(A) |
| Vibrations (total value) | 4.0 m/s² (uncertainty K=1.5 m/s²) |
| Overload Protection | Electrical |
| Main Functions | Wood cutting, felling, pruning, cross-cutting |
| Maintenance and Cleaning | Regularly clean the side cover, oil nozzle, and guide bar groove; sharpen the chain with a round file |
| Safety | Chain brake, lock button, chain catcher, chain cover |
| Spare Parts and Reparability | Only use HiKOKI spare parts; have repairs carried out by an authorized service center |
| Standard Accessories | Guide bar, chain, chain cover, plug attachment, chain oil (100 ml) |
| Warranty | Complies with national regulations; does not cover normal wear or improper use |
Frequently Asked Questions - CS 30SB HiKOKI
User questions about CS 30SB HiKOKI
0 question about this device. Answer the ones you know or ask your own.
Ask a new question about this device
Download the instructions for your Saw in PDF format for free! Find your manual CS 30SB - HiKOKI and take your electronic device back in hand. On this page are published all the documents necessary for the use of your device. CS 30SB by HiKOKI.
USER MANUAL CS 30SB HiKOKI
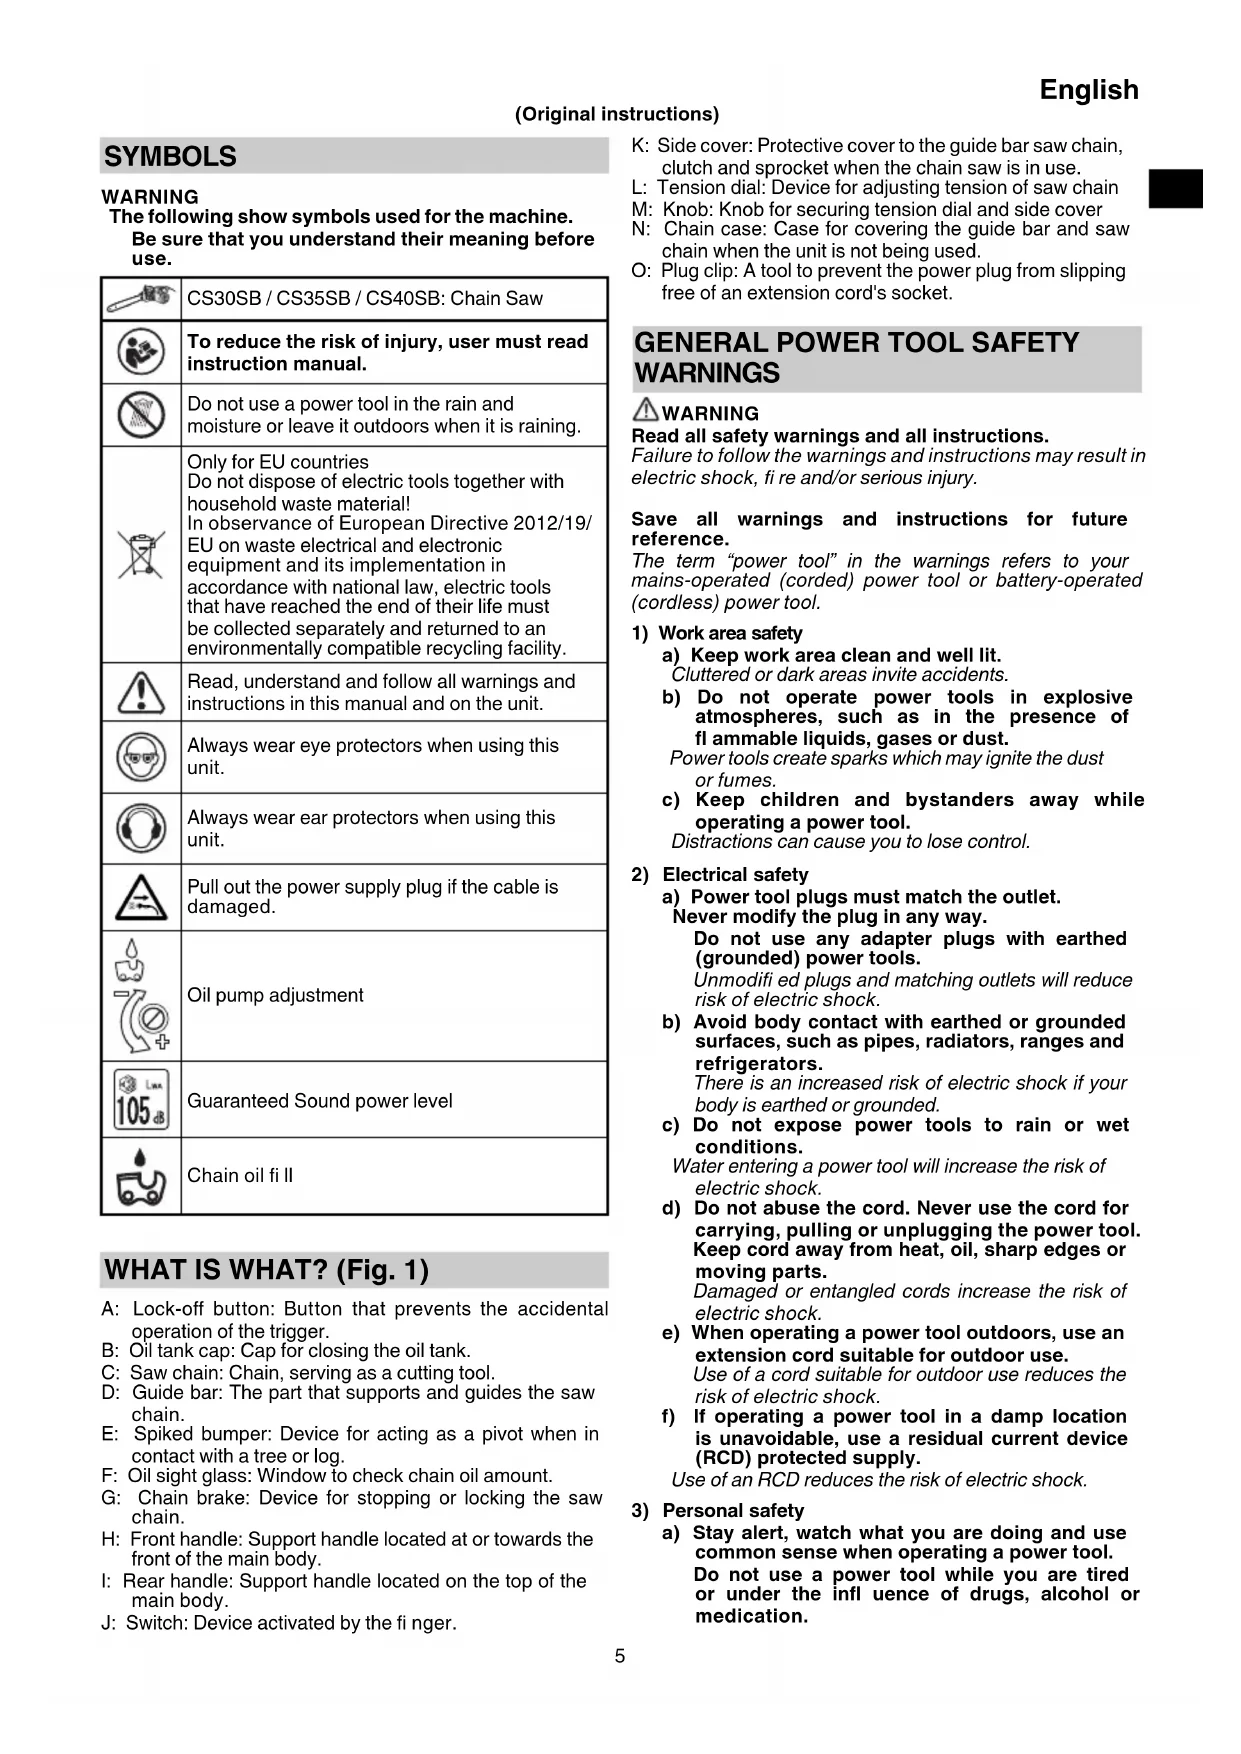
CS 30SB·CS 35SB·CS 40SB
CS35SB

enHandling instructions
Bedienungsanleitung
fr Mode d'emploi
It Istruzioni per l'uso
Gebruiksaanwijzing
esInstrucciones de manejo
@Instruções de uso
Bruksanvisning
Brugsanvisning
Bruksanvisning
Kayttoohjeet
O8nyiec xepioou
@Instrukcja obslugi
Kezelésiutasítás
csNavod k obsluze
Kullanim talimatlari
Instrukturi de utiliser
Navodila za rokovanje
SK Pokyny na manipuláiu
HCTpyKzna 3a ekCnloataza
Upstvo za rukovanje
Upute za rukovanje
UHCTpyKciI 0OoIO NOBOJKeHHa 3 npNCtpoem
HCTpyKuaI NO 3KcNlyaTaau
1
2
3
4
5
6
7
8
9
10 11 12 13
14151617

(Original instructions)
SYMBOLS
WARNING
The following show symbols used for the machine. Be sure that you understand their meaning before use.
| CS30SB / CS35SB / CS40SB: Chain Saw | |
| To reduce the risk of injury, user must read instruction manual. | |
| Do not use a power tool in the rain and moisture or leave it outdoors when it is raining. | |
| Only for EU countries Do not dispose of electric tools together with household waste material! In observance of European Directive 2012/19/EU on waste electrical and electronic equipment and its implementation in accordance with national law, electric tools that have reached the end of their life must be collected separately and returned to an environmentally compatible recycling facility. | |
| Read, understand and follow all warnings and instructions in this manual and on the unit. | |
| Always wear eye protectors when using this unit. | |
| Always wear ear protectors when using this unit. | |
| Pull out the power supply plug if the cable is damaged. | |
| Oil pump adjustment | |
| Guaranteed Sound power level | |
| Chain oil fi II |
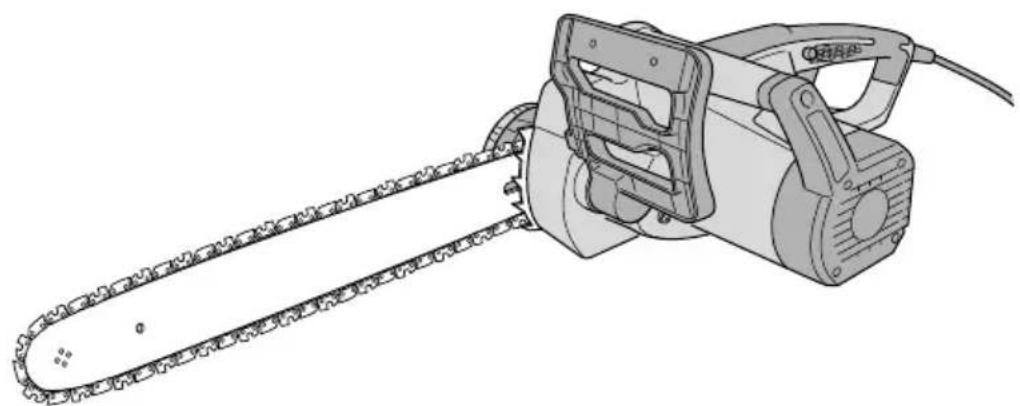
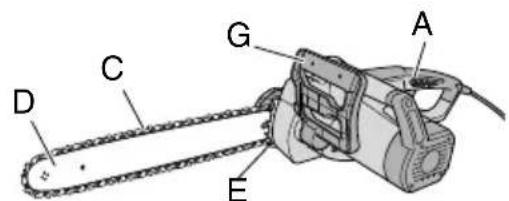
WHAT IS WHAT? (Fig. 1)
A: Lock-off button: Button that prevents the accidental operation of the trigger.
B: Oil tank cap: Cap for closing the oil tank.
C: Saw chain: Chain, serving as a cutting tool.
D: Guide bar: The part that supports and guides the saw chain.
E: Spiked bumper: Device for acting as a pivot when in contact with a tree or log.
F: Oil sight glass: Window to check chain oil amount.
G: Chain brake: Device for stopping or locking the saw chain.
H: Front handle: Support handle located at or towards the front of the main body.
I: Rear handle: Support handle located on the top of the main body.
J: Switch: Device activated by the fi nger.
K: Side cover: Protective cover to the guide bar saw chain, clutch and sprocket when the chain saw is in use.
L: Tension dial: Device for adjusting tension of saw chain
M: Knob: Knob for securing tension dial and side cover
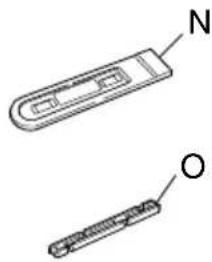
N: Chain case: Case for covering the guide bar and saw chain when the unit is not being used.
O: Plug clip: A tool to prevent the power plug from slipping free of an extension cord's socket.
GENERAL POWER TOOL SAFETY WARNINGS
WARNING
Read all safety warnings and all instructions.
Failure to follow the warnings and instructions may result in electric shock, fire and/or serious injury.
Save all warnings and instructions for future reference.
The term "power tool" in the warnings refers to your mains-operated (corded) power tool or battery-operated (cordless) power tool.
1) Work area safety
a) Keep work area clean and well lit.
Cluttered or dark areas invite accidents.
b) Do not operate power tools in explosive atmospheres, such as in the presence of flammable liquids, gases or dust.
Power tools create sparks which may ignite the dust or fumes.
c) Keep children and bystanders away while operating a power tool.
Distractions can cause you to lose control.
2) Electrical safety
a) Power tool plugs must match the outlet.
Never modify the plug in any way.
Do not use any adapter plugs with earthed (grounded) power tools.
Unmodified plugs and matching outlets will reduce risk of electric shock.
b) Avoid body contact with earthed or grounded surfaces, such as pipes, radiators, ranges and refrigerators.
There is an increased risk of electric shock if your body is earthed or grounded.
c) Do not expose power tools to rain or wet conditions.
Water entering a power tool will increase the risk of electric shock.
d) Do not abuse the cord. Never use the cord for carrying, pulling or unplugging the power tool. Keep cord away from heat, oil, sharp edges or moving parts.
Damaged or entangled cords increase the risk of electric shock.
e) When operating a power tool outdoors, use an extension cord suitable for outdoor use.
Use of a cord suitable for outdoor use reduces the risk of electric shock.
f) If operating a power tool in a damp location is unavoidable, use a residual current device (RCD) protected supply.
Use of an RCD reduces the risk of electric shock.
3) Personal safety
a) Stay alert, watch what you are doing and use common sense when operating a power tool.
Do not use a power tool while you are tired or under the influence of drugs, alcohol or medication.
A moment of inattention while operating power tools may result in serious personal injury.
b) Use personal protective equipment. Always wear eye protection.
Protective equipment such as dust mask, non-skid safety shoes, hard hat, or hearing protection used for appropriate conditions will reduce personal injuries.
c) Prevent unintentional starting. Ensure the switch is in the off position before connecting to power source and/or battery pack, picking up or carrying the tool.
Carrying power tools with your finger on the switch or energising power tools that have the switch on invites accidents.
d) Remove any adjusting key or wrench before turning the power tool on.
A wrench or a key left attached to a rotating part of the power tool may result in personal injury.
e) Do not overreach. Keep proper footing and balance at all times.
This enables better control of the power tool in unexpected situations.
f) Dress properly. Do not wear loose clothing or jewellery. Keep your hair, clothing and gloves away from moving parts.
Loose clothes, jewellery or long hair can be caught in moving parts.
g) If devices are provided for the connection of dust extraction and collection facilities, ensure these are connected and properly used.
Use of dust collection can reduce dust-related hazards.
4) Power tool use and care
a) Do not force the power tool. Use the correct power tool for your application.
The correct power tool will do the job better and safer at the rate for which it was designed.
b) Do not use the power tool if the switch does not turn it on and off.
Any power tool that cannot be controlled with the switch is dangerous and must be repaired.
c) Disconnect the plug from the power source and/or the battery pack from the power tool before making any adjustments, changing accessories, or storing power tools.
Such preventive safety measures reduce the risk of starting the power tool accidentally.
d) Store idle power tools out of the reach of children and do not allow persons unfamiliar with the power tool or these instructions to operate the power tool.
Power tools are dangerous in the hands of untrained users.
e) Maintain power tools. Check for misalignment or binding of moving parts, breakage of p and any other condition that may affect the power tool's operation.
If damaged, have the power tool repaired before use.
Many accidents are caused by poorly maintained power tools.
f) Keep cutting tools sharp and clean.
Properly maintained cutting tools with sharp cutting edges are less likely to bind and are easier to control.
g) Use the power tool, accessories and tool bits etc. in accordance with these instructions, taking into account the working conditions and the work to be performed.
Use of the power tool for operations different from those intended could result in a hazardous situation.
5) Service
a) Have your power tool serviced by a qualified repair person using only identical replacement parts.
This will ensure that the safety of the power tool is maintained.
PRECAUTION
Keep children and infirm persons away.
When not in use, tools should be stored out of reach of children and infirm persons.
CHAIN SAW SAFETY WARNINGS
- Keep all parts of the body away from the saw chain when the chain saw is operating. Before you start the chain saw, make sure the saw chain is not contacting anything. A moment of inattention while operating chain saws may cause entanglement of your clothing or body with the saw chain.
- Always hold the chain saw with your right hand on the rear handle and your left hand on the front handle. Holding the chain saw with a reversed hand configuration increases the risk of personal injury and should never be done.
- Hold the power tool by insulated gripping surfaces only, because the saw chain may contact hidden wiring or its own cord. Saw chains contacting a "live" wire may make exposed metal parts of the power tool "live" and could give the operator an electric shock.
- Wear safety glasses and hearing protection. Further protective equipment for head, hands, legs and feet is recommended. Adequate protective clothing will reduce personal injury by flying debris or accidental contact with the saw chain.
- Do not operate a chain saw in a tree. Operation of a chain saw while up in a tree may result in personal injury.
- Always keep proper footing and operate the chain saw only when standing on fixed, secure and level surface. Slippery or unstable surfaces such as ladders may cause a loss of balance or control of the chain saw.
- When cutting a limb that is under tension be alert for spring back. When the tension in the wood fibres is released the spring loaded limb may strike the operator and/or throw the chain saw out of control.
- Use extreme caution when cutting brush and saplings. The slender material may catch the saw chain and be whipped toward you or pull you off balance.
- Carry the chain saw by the front handle with the chain saw switched off and away from your body. When transporting or storing the chain saw always fit the guide bar cover. Proper handling of the chain saw will reduce the likelihood of accidental contact with the moving saw chain.
- Follow instructions for lubricating, chain tensioning and changing accessories. Improperly tensioned or lubricated chain may either break or increase the chance for kickback.
- Keep handles dry, clean, and free from oil and grease. Greasy, oily handles are slippery causing loss of control.
- Cut wood only. Do not use chain saw for purposes not intended. For example: do not use chain saw for cutting plastic, masonry or non-wood building materials. Use of the chain saw for operations different than intended could result in a hazardous situation.
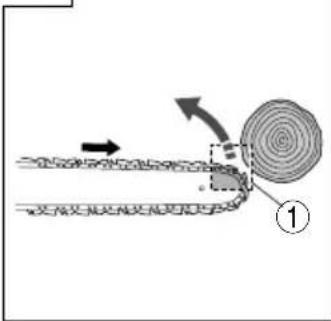
Causes and operator prevention of kickback: (Fig. 2)
Kickback may occur when the nose or tip of the guide bar touches an object, or when the wood closes in and pinches the saw chain in the cut.
Tip contact in some cases may cause a sudden reverse reaction, kicking the guide bar up and back towards the operator.
Pinching the saw chain along the top of the guide bar may push the guide bar rapidly back towards the operator.
Either of these reactions may cause you to lose control of the saw which could result in serious personal injury. Do not rely exclusively upon the safety devices built into your saw. As a chain saw user, you should take several steps to keep your cutting jobs free from accident or injury.
Kickback is the result of tool misuse and/or i operating procedures or conditions and can be avoided by taking proper precautions as given below:
- Maintain a firm grip, with thumbs and fingers encircling the chain saw handles, with both hands on the saw and position your body and arm to allow you to resist kickback forces. Kickback forces can be controlled by the operator, if proper precautions are taken. Do not let go of the chain saw.
- Do not overreach and do not cut above shoulder height. This helps prevent unintended tip contact and enables better control of the chain saw in unexpected situations.
- Only use replacement bars and chains specified by the manufacturer. Incorrect replacement bars and chains may cause chain breakage and/or kickback.
Follow the manufacturer's sharpening and maintenance instructions for the saw chain. Decreasing the depth gauge height can lead to increased kickback.
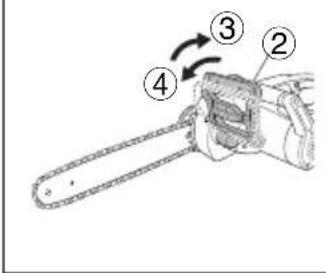
Chain brake operation:
If a chain saw hits a solid object at a high speed it reacts violently and kicks back. This is difficult to control and could be dangerous, especially with lightweight tools that tend to be used in all kind of positions. The chain brake immediately stops the chain from rotating if there is an unexpected kickback. The chain brake can be activated by pressing your hand against the handguard or automatically by the kickback itself.
The chain brake can only be reset after the motor has stopped completely. Reset the handle to the rear position (Fig. 3). Check the function of the chain brake every day.
ADDITIONAL SAFETY WARNINGS
- Use the electrical voltage listed on the name plate for the power source.
The use of a voltage that exceeds this may result in injury.
- Work without pressure. In addition, always keep your body warm.
- Before commencing work, reflect fully on the work procedures involved and work to avoid accidents, otherwise injury may occur.
- Do not use in the event of bad weather, such as strong wind, rain, snow, fog, or in areas prone to rockfall or avalanches.
In bad weather, judgment may be impaired and the vibration may result in disaster.
- When visibility is poor, such as during bad weather or night, do not use the unit. In addition, do not use it in rain or in a location exposed to rain.
Unstable foothold or loss of balance may result accident. - Check the guide bar and saw chain before starting the unit.
- If the guide bar or saw chain is cracked, or the product is scratched or bent, do not use the unit.
Check if the guide bar and saw chain are securely installed. If the guide bar or saw chain is broken or dislodged, this may result in an accident. - Before starting work, check to ensure the switch does not engage unless the lock-off button is pressed.
If the unit does not working properly, immediately stop using and request repair from your HiKOKI Authorized Service Center.
- Install the saw chain properly, in accordance with the instruction manual. If installed incorrectly, the saw chain will come off the guide bar and injury may occur.
- Never remove any of the safety devices equipped on the chain saw (brake lever, lock-off button, chain or launcher etc.).
In addition, do not alter or immobilize them. Injury may occur.
- In the following cases, switch the unit off and ensure the saw chain is no longer moving:
- When not in use or being repaired.
When shifting to a new work location. - When inspecting, adjusting or replacing the saw chain, guide bar, chain case and any other part.
When refilling the chain oil. - When removing dust etc. from the body.
- When removing obstacles, trash or sawdust generated from work from the work area.
- When you take off the unit, or when you get away from the unit.
-
Otherwise, if you sense danger or anticipate risk.
If the saw chain is still moving, an accident may occur. -
Work should generally be performed individually. When multiple individuals are involved, ensure sufficient spacing between them. In particular, when felling standing trees or working on a slope, if you anticipate trees falling, rolling or sliding, ensure there is no danger to other workers.
-
Remain more than 15m away from other people. In addition, when working with multiple persons, remain 15m or more apart.
There is a risk of impact with scatters and other accidents.
Prepare a whistle alert etc. and determine appropriate contact method for other workers beforehand. - Before felling standing trees, ensure the following:
Determine a safe evacuation location prior to felling.
Remove obstacles (e.g., branches, shrubs) in advance.
Based on a comprehensive evaluation of the state of the tree to be felled (e.g., trunk bend, tension of branches) and the surrounding situation (e.g., state of adjacent trees, presence of obstacles, terrain, wind), decide on the direction in which the standing tree will fall and then plan the felling procedure.
Careless felling may result in injury. - When felling standing trees, ensure the following:
During work, be very careful of the direction in which trees fall. - When working on a slope, ensuring the tree will not roll, always work from the uphill side of the terrain.
- When the tree starts falling, switch the unit off, alert the surroundings, and immediately retreat to a safe location.
During work, if the saw chain or guide bar become entangled in the tree, switch off and use a wedge. - During use, if the unit performance deteriorates, or you notice any abnormal sound or vibration, immediately switch off and discontinue use, and return to your HiKOKI Authorized Service Center for inspection or repair.
If you continue using, injury may occur.
- If the unit is accidentally dropped or exposed to impact, inspect carefully for damage or cracks and ensure there is no deformation.
If the unit is damaged, cracked or deformed, injury may occur. - When transporting the unit by car, secure the unit to prevent it moving.
There is a risk of accident.
English
- Do not switch the unit on while the chain case is attached.
Injury may occur.
- Ensure there are no nails and other foreign objects in the material.
If the saw chain impact on the nail etc., injury may occur.
- To avoid the guide bar becoming entangled with the material when chopping on a verge or when subject to the weight of material while cutting, install a supporting platform close to the cutting position.
If the guide bar becomes entangled, injury may occur.
- If the unit is to be transported or stored after use, either remove the saw chain, or attach the chain cover.
If the saw chain comes into contact with your body, injury may occur.
- Adequately care for the unit.
To ensure work can be performed safely and efficiently, care for the saw chain to ensure it provides optimal cutting performance.
-
When replacing the saw chain or guide bar, maintaining the body, fi lling oil etc., follow the instruction manual.
-
Ask the shop to repair the unit.
-
Do not modify this product, since it already complies with the applicable safety standards.
Always refer to your HiKOKI Authorized Service Center for all repairs.
Attempting to repair the unit yourself may result in an accident or injury.
-
When not using the unit, ensure it is properly stored. Drain off the chain oil, and keep in a dry place out of reach of children or a locked location.
-
If the warning label is no longer visible, peels off or is otherwise unclear, apply a new warning label. For the warning label, refer to your HiKOKI Authorized Service Center.
-
When working, if local rules or regulations apply, comply with the same.
-
Recommendation for the use of a residual current device with a tripping current of 30mA or less
-
Statement to position the cord of so that it will not be caught on branches and the like, during cutting
-
Recommendation that the first-time user should, as a minimum practice, cutting logs on a saw-horse or cradle
DESCRIPTION OF NUMBERED ITEMS (Fig. 2 - Fig. 38)
| ① | Kickback zone | ⑫ | Blade direction | ⑬ | Oil sight glass | ⑭ | 1/5 of diameter of fi le |
| ② | Chain brake | ⑬ | Chain tensioner hole | ⑭ | Oil pump adjuster | ⑮ | Depth gage jointer |
| ③ | Free | ⑭ | Chain tensioner boss | ⑮ | Lock-off button | ⑯ | Flat fi le |
| ④ | Lock | ⑮ | Increase the tension | ⑱ | Switch | ⑰ | Protruding depth gage head |
| ⑤ | Knob | ⑯ | Decrease the tension | ⑰ | Plug clip | ⑱ | Round off |
| ⑥ | Tension dial | ⑰ | Drive link | ⑱ | Plug | ⑲ | Brake band chamber |
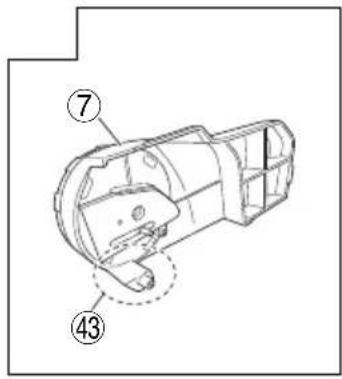
| ⑦ | Side cover | ⑱ | Fasten | ⑲ | Extension cord | ⑳ | Chain oil spout |
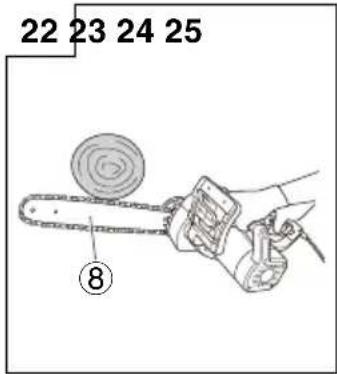
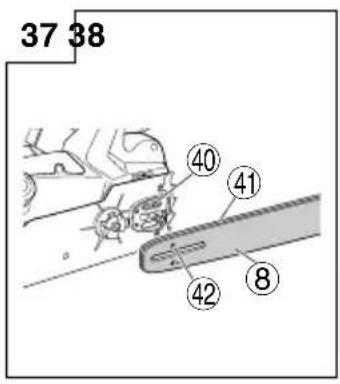
| ⑧ | Guide bar | ⑲ | Pull | ⑳ | Spiked bumper | ⑴ | Groove |
| ⑨ | Saw chain | ⑳ | Actuation | ⑴ | Front handle | ⑵ | Oil hole |
| ⑩ | Guide bar tip | ⑴ | Release | ⑵ | Rear handle | ⑶ | Chain catcher |
| ⑪ | Sprocket | ⑵ | Chain oil | ⑷ | Round fi le |
SPECIFICATIONS
| Model | CS30SB | CS35SB | CS40SB |
| Guide bar length (Max. cutting length) | 300 mm | 350 mm | 400 mm |
| Guide bar Type | P012-50CR | P014-50CR | P016-50CR |
| Voltage (by areas)*1 | (220 V, 230 V, 240 V) ~ | ||
| Power Input*1 | 1900 W | ||
| No-load chain speed | 14.5 m/s | ||
| Type of chain | 91PX-45 (Oregon) | 91PX-52 (Oregon) | 91PX-57 (Oregon) |
| Chain pitch / Gauge | 9.53 mm (3/8") / 1.27 mm (0.05") | ||
| Sprocket | Number of teeth: 6 | ||
| Oil pump | Automatic | ||
| Chain oil tank capacity | 200 ml | ||
| Overload protection | Electrical | ||
| Chain brake | Manually actuated | ||
| Weight*2 | 4.7 kg | 4.8 kg | 4.9 kg |
1 Be sure to check the nameplate on product as it is subject to change by areas.
2 Weight: According to EPTA-Procedure 01/2003
STANDARD ACCESSORIES
Chain case 1
Guide bar 1
Chain
Plug clip* 1
Chain Saw Oil (100 ml) 1
- Not supplied in certain sales areas.
Standard accessories are subject to change without notice.
OPTIONAL ACCESSORIES (SOLD SEPARATELY)
Chain Saw Oil
Round File
Depth Gauge Jointer
Round File and Depth Gauge Jointer are to be used for sharpening of chain blades. As to its application, please refer to the item titled "Sharpening of the Chain Blade".
Chain Case
Always keep the chain cover on the chain while carrying the chain saw or while storing it.
Optional accessories are subject to change without notice.
APPLICATIONS
General wood cutting.
INSTALLING (REPLACING) SAW CHAIN
WARNING
To prevent accidents, always switch the unit off, and disconnect the plug from the receptacle.
- Don't use the saw chain or the guide bar other than those specified in "SPECIFICATIONS".
CAUTION
Wear gloves and be careful to avoid injury with the saw chain.
NOTE
- When removing the saw chain, remove sawdust from the oil spout, oil hole, and guide bar groove.
If sawdust accumulates, this may cause the unit to fail. - Use the correct type of saw chain in accordance with the specific cations.
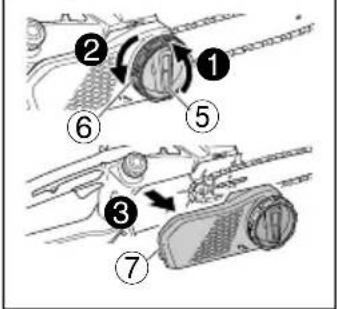
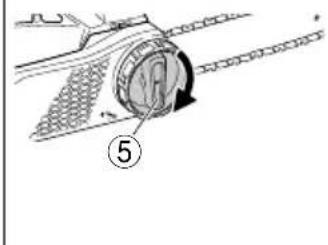
If you install the wrong type of guide bar, the saw chain may come off and injury may occur. - Removing the side cover (Fig. 4)
① Rotate the knob once to loosen it.
(2) Rotate the tension dial half a turn to loosen it.
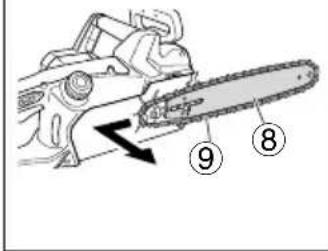
③ Turn the knob and remove the side cover. - Removing the saw chain and guide bar (Fig. 5) Remove the saw chain and guide bar in the direction indicated by the arrow.
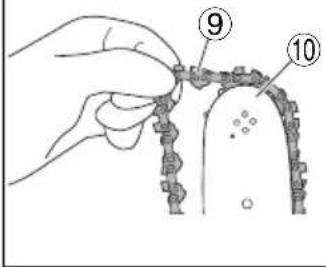
- Engaging the new saw chain in the sprocket (Figs. 6, 7)
Engage the saw chain at the guide bar tip with attention to the direction of the saw chain, and then properly engage the saw chain with the sprocket. -
Installing the side cover
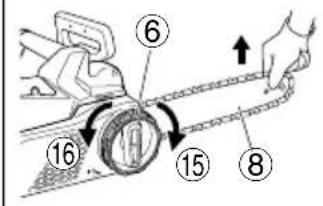
① Adjust the tension dial of the side cover so that the chain tensioner boss is inserted into the guide bar chain tensioner hole, and attach the side cover. (Fig. 8)
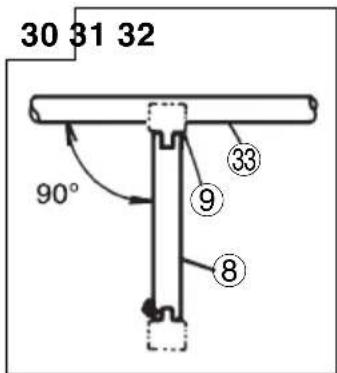
② Rotate the knob once to temporarily fix it. (Fig. 9) -
Adjusting the saw chain tension (Fig. 10)
While lifting the guide bar tip, turn the tension dial to adjust the saw chain tension.
Turn the tension dial to the right to increase the saw chain tension, and to the left to decrease it.
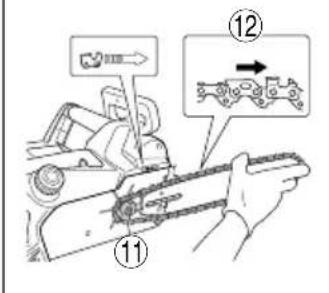
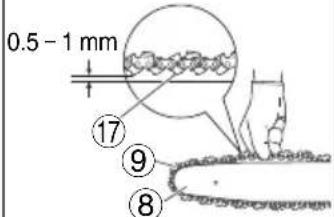
- Checking the saw chain tension (Fig. 11)
Adjust the saw chain tension so that the gap between the saw chain drive link and the guide bar is 0.5 to 1mm when you lift the saw chain slightly near the center of the guide bar.
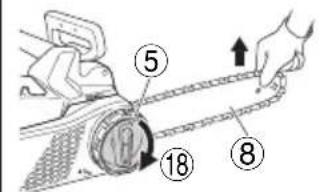
- Securing the knob (Fig. 12)
① When adjustment is complete, lift up the guide bar, and fully tighten the knob.
② Make sure the bolt is firmly tightened.
WARNING
After adjusting the saw chain tension, ensure the knob is fully tightened.
If it is loose, injury may occur.
INSPECTION AND PREPARATION PRIOR TO USE
Prior to use, make the following inspection and preparation. WARNING
Ensure that the power source to be utilized conforms to the power requirements specified on the product nameplate.
To prevent accidents, always perform steps 1 to 5 ensuring the plug is disconnected from the receptacle.
- Do not secure the lock-off button while it is pressed. If the switch is accidentally engaged, the unit may unexpectedly start and injury may occur.
- Ensuring the switch is off
Ensure that the power switch is in the OFF position. If the plug is connected to a receptacle while the power switch is in the ON position, the power tool will start operating immediately, which could cause a serious accident.
- When the switch is engaged while pressing the lock-off button, the unit switches on, and when the switch is released, the unit switches off.
- Checking the extension cord
When the work area is remote from the power source, use an extension cord of sufficient thickness and rated capacity. The extension cord should be kept as short as practicable.
- Checking the saw chain tension
If the saw chain tension is incorrect, there is a risk of damage to the saw chain or guide bar and malfunction. Referring to steps 5 to 7 "Installing (replacing) saw chain," ensure an appropriate tension is set.
While the saw chain is still new, it is particularly stretchy, so periodically check the tension and adjust as required.
Also check the knob is securely tightened.
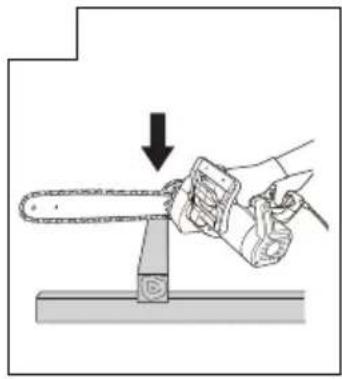
- Checking operation of chain brake (Fig. 13) WARNING
Although the chain brake is an emergency stop device, this is not completely reliable. Operate carefully to avoid the risk of kickback.
The chain brake is intended for use in emergencies and when starting up. Do not use it indiscriminately.
To avoid impaired movement of the chain brake due to buildup of sawdust etc., clean regularly.
The chain brake is an important component to ensure safe use.
If you have any concern regarding the brake operation, request repair from your HiKOKI Authorized Center.
English
The chain brake is an emergency stop device that stops the saw chain when the unit is subject to kickback etc., to reduce risk.
(Refer to "Causes and operator prevention of kickback.") When activating the chain brake by pushing the brake lever forward, the saw chain stops moving.
If you pull the brake lever toward you, the brake is released. When confirming the operation of the chain brake, always switch the unit off, disconnect the plug form the receptacle, activate the brake lever and pull the saw chain by hand. If the saw chain does not move, this means the chain brake is activated.
NOTE
Always wear thick gloves for this task. Since the saw chain blade is very sharp, pulling it hard risks injuring your fingers.
5. Checking the chain oil
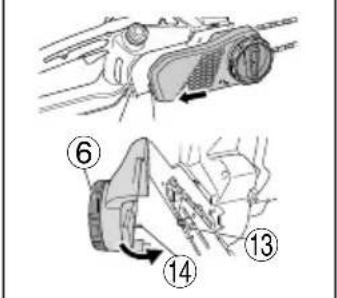
This unit is delivered without chain oil inside. Ensure the oil tank is filled with the chain oil provided before use. (Fig. 14)
Periodically check the oil sight glass during work and replenish oil as required.
- If the chain oil supplied runs out, use HiKOKI chain oil sold separately or equivalent chain oil on the market.
The chain oil lubricates automatically.
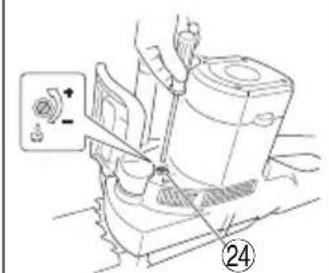
The discharge rate for auto lubrication is factory preset to the maximum.
To reduce the discharge rate, turn the oil pump adjuster on the rear of the body clockwise. (Fig. 15)
NOTE
- The oil tank capacity is about 200 ml. Even if overfilled, excess oil will escape from the overfl ow spout.
We recommend that you stock up with chain oil.
If you continue working without chain oil, the saw chain may burn through, or the motor may fail.
Be careful to avoid dust or other foreign matter from entering the oil tank.
If dust and other foreign matter enter the oil tank, the unit may fail.
- Chain oil left in the tank may leak due to the structure of this unit. Although this does not indicate a malfunction, it may soil the storage location, so be careful.
When storing, empty the oil from the oil tank, and place an item under the main body which can absorb any leaks.
6. Connecting the plug to the receptacle
7. Checking brake is engaged
- When the switch is engaged while pressing the lock-off button, the unit switches on, and when the switch is released, the unit switches off.
In addition, at the same time as releasing the switch, the unit applies a brake to stop the rotation of the saw chain.
Before using, check to ensure brake is engaged.
CAUTION
Be careful of the repulsive force when the brake is engaged.
If you drop the unit, injury may occur.
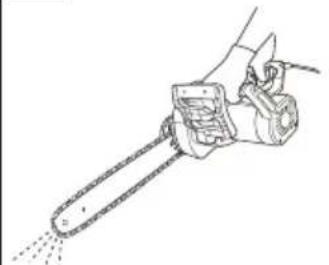
8. Checking chain oil discharge (Figs. 15, 16)
- When switching the unit on, chain oil automatically lubricates the saw chain and guide bar.
If oil does not seem to emerge 2 to 3 minutes after the unit starts, check if any sawdust has accumulated around the oil spout.
(Refer to "Cleaning the chain oil spout.")
(Refer to "Checking the chain oil.")
- It is recommended to use an earth-leakage circuit breaker or a residual current device.
Switch operation
When the switch is engaged while pressing the lock-off button, the saw chain rotates. (Fig. 17) Unless the lock-off button is pressed, the switch cannot be engaged.
After the switch is engaged, the saw chain continues rotating as long as it is pressed down.
When the switch is released, a brake is applied to stop the saw chain rotation.
WARNING
Do not secure the lock-off button while it is pressed. If the switch is accidentally engaged, t unexpectedly start and injury may occur.
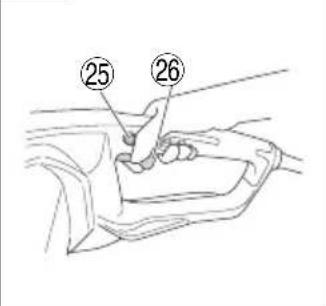
Using the plug clip
The cord leading from the power plug is prevented from being pulled out by the plug clip. (Fig. 18)
CUTTING PROCEDURES
WARNING
O Prior to operation, ensure that chain brake works.
During use, grip the handle securely with both hands.
- When cutting timber from the bottom, ensure the saw chain does not impact with the timber.
If the unit is pushed back, injury may occur.
During work breaks or after work, always switch the unit off, and disconnect the plug from the receptacle.
Always monitor the workplace and surrounding area, ensure there are no objects which could cause injuries, accidents or failure, and if any are present, remove them in advance.
In particular, when establishing a foothold for working, ensure there is no instability or any object which could be tripped over.
When felling standing trees, always pay careful attention to the direction in which the tree will fall or roll, and determine a safe evacuation area and escape route for yourself in advance.
① Ensuring the unit is switched off
If the plug is connected to a receptacle while the switch is unknowingly engaged, the unit may unexpectedly start, which may result in an accident.
② Engaging the switch
Ensuring the saw chain is not in contact with the timber, engage the switch, and start cutting when the saw chain speed has increased.
CAUTION
- When switching the unit on, ensure the saw chain does not contact with material or anything else.
During use, be careful to ensure the saw chain does not contact with other material or object. In particular, when you have finished cutting, be careful to ensure it does not touch the ground.
NOTE
Refill the oil tank early to prevent the unit running out of oil.
1. General cutting procedures
(1) Switch ON the power while keeping the saw slightly away from the wood to be cut. Start sawing only after the unit has reached full speed.
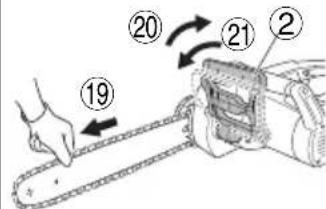
(2) When sawing a slender piece of wood, press the base section of the guide bar against the wood and saw downward as shown in Fig. 19.
(3) When sawing a thick piece of wood, press the spike on the front section of the unit against the wood and cut it with a lever action while using the spike as a fulcrum as shown in Fig. 20.
(4) When cutting wood horizontally, turn the unit body to the right so that the guide bar is below and hold the upper side of the front handle with your left hand. Hold the guide bar horizontally and place the spike that is on the front of the unit body on the lumbar. Using the spike as a fulcrum, cut into the wood by turning the rear handle to the right. (Fig. 21)
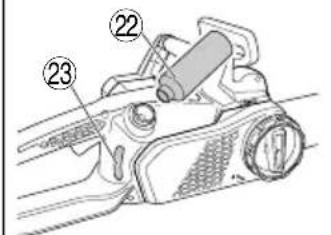
(5) When cutting into wood from the bottom, touch the upper part of the guide bar to the wood lightly. (Fig. 22)
(6) As well as carefully studying the handling instructions, ensure practical instruction in the operation of the chain saw prior to use, or at least practice working with the chain saw by cutting lengths of round timber on a sawing trestle.
(7) When cutting logs or timbers which are not supported, support them properly by immobilizing them during cutting using a sawing trestle or other proper method.
CAUTION
- When cutting wood from the bottom, there is a danger that the unit body may be pushed back toward the user if the chain strongly impacts with the wood.
Do not cut all the way thorough the wood by starting from the bottom since there is the danger of the guide bar flying up out of control when the cut is finished.
Always prevent the operating chain saw from touching the ground or wire fences.
2. Branch cutting
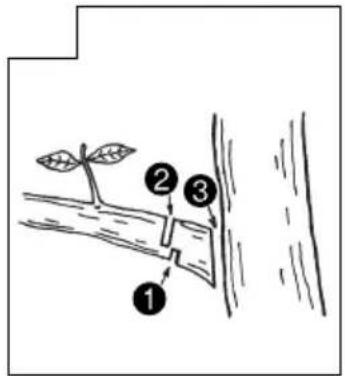
(1) Cutting branches from a standing tree: A thick branch should initially be cut off at a point away from the trunk of the tree.
First cut in about one third of the way from below, and then cut off the branch from above. Finally, cut off the remaining portion of the branch even with the trunk of the tree. (Fig. 23)
CAUTION
Always be careful to avoid falling branches.
Always be alert for chain saw recoil.
(2) Cutting branches from fallen trees: First cut off branches that do not touch the ground, then cut off those which touch the ground. When cutting thick branches that touch the ground, first cut in about half of the way from above, then cut the branch off from below. (Fig. 24)
CAUTION
- When cutting off branches which touch the ground, be careful that the guide bar does not become bound by pressure.
During the final cutting stage, beware of the log suddenly rolling.
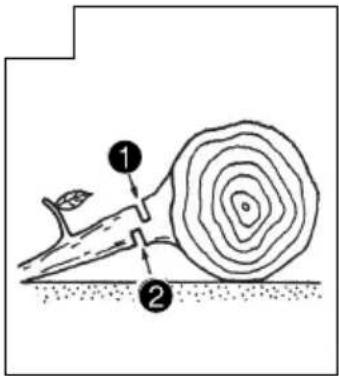
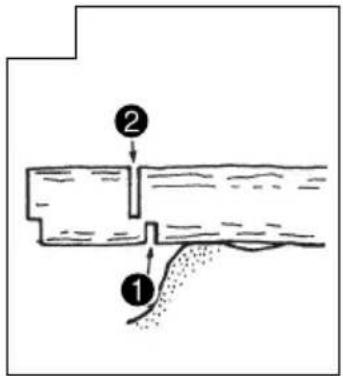
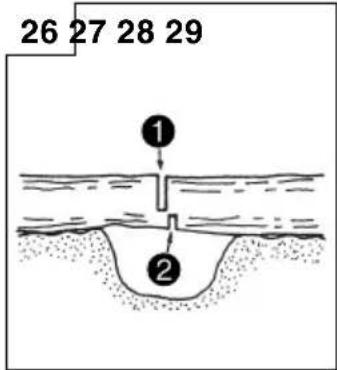
3. Log cutting
When cutting a log positioned as shown in Fig. 25, first cut in about one third of the way from below, then cut down all the way from above. When cutting a log that straddles a hollow as shown in Fig. 26, first cut in about two thirds of the way from above, then cut upward from below.
CAUTION
Ensure the guide bar does not become bound in the log by pressure.
- When working on inclined ground, be sure to stand on the uphill side of the log. If you stand on the downhill side, the cut-off log may roll toward you.
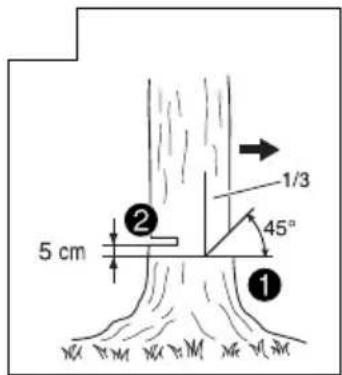
4. Felling trees
(1) Undercut 1 as shown in Fig.27): Make undercut facing the direction in which you want the tree to fall. The depth of the undercut should be 1 / 3 of the tree's diameter. Never fell trees without proper undercut.
(2) Back cut (2 as shown in Fig. 27): Make a backcut about 5cm above and parallel to the horizontal undercut. If the chain becomes entangled during cutting, stop the saw and use wedges to free it. Do not cut thorough the tree.
CAUTION
Trees should not be felled in a manner that would endanger any person, strike any utility line or cause any property damage.
- Be sure to stand on the uphill side of the terrain as the tree is likely to roll or slide downhill after it is felled.
Precaution for cutting work
Gripping/pushing force of chain saw
Always grip the chain saw securely. In addition, do not force the chain saw more than necessary. When cutting, additional force exerted on the chain saw will not accelerate the cutting speed. This will strain the motor, impair the performance, and damage or cause malfunction of the motor or guide bar. Use the unit in the range where the saw chain is at a reasonable speed. In particular, when the saw chain stops (becomes jammed) due to the excessive force, it may cause an injury or failure of the unit.
Chain catcher
The chain catcher is located on the power head just below the chain to further prevent the possibility of a broken chain striking the chain saw user.
- When the saw chain is cut, replace it with a new one referring to "Installing (replacing) saw chain".
SHARPENING OF THE CHAIN BLADE
WARNING
To prevent accidents, always turn off the switch and disconnect the plug from the receptacle. In addition, when using saw chains, always wear thick gloves.
NOTE
Sharpen the saw chain and adjust the depth gage at the central position on the guide bar, with the saw chain attached to the main body.
When the sharpness of saw chains deteriorates, the motor and each part of the body are burdened and the efficiency declines.
For optimal performance of the unit, frequent maintenance is necessary to keep the saw chain sharp.
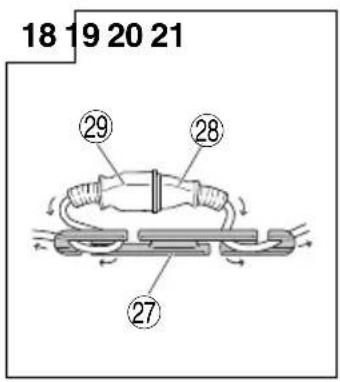
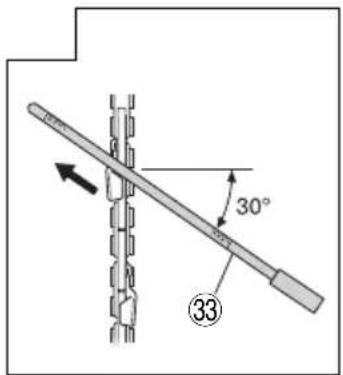
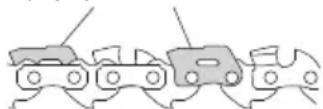
1. Blade sharpening
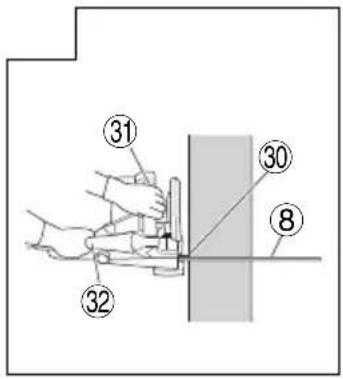
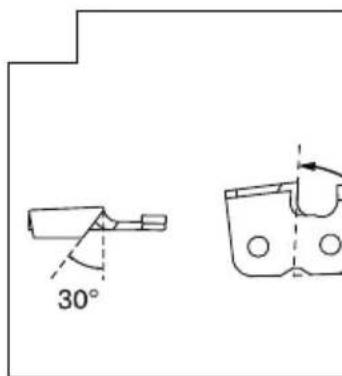
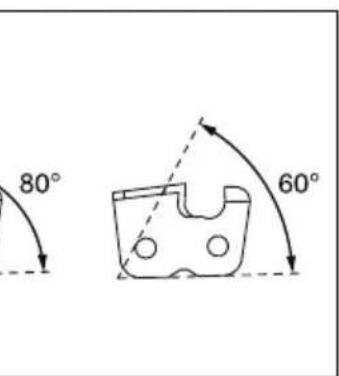
The accessory round file should be held against the chain blade so that one-fi th of its diameter extends above the top of the blade, as shown in Fig. 28. Sharpen the blades by keeping the round fi le at a 30^ angle in relation to the guide bar, as shown in Fig. 29, ensuring that the round file is held straight, as shown in Fig. 30. Ensure that all saw blades are filed at the same angle, or the cutting efficiency of the tool will be impaired. Appropriate angles for sharpening the blades correctly are shown in Fig. 31.
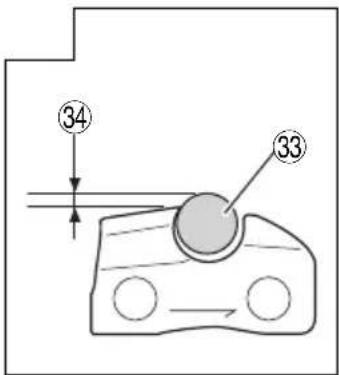
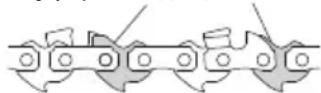
2. Adjustment of depth gage
WARNING
- Do not sand the top part of the bumper tie strap and guard drive link, nor cause the shape of said parts to deform.
Adjustment of depth gages must be in line with predetermined dimensions and shapes, otherwise the risk of kickback may increase, causing an injury.

English
Depth gages shall be all lined up in the same manner because they are used to adjust depth at the position where the cutter inlays into the wood.
When sharpening the saw chain, be sure to check the depth gage every two or three times.
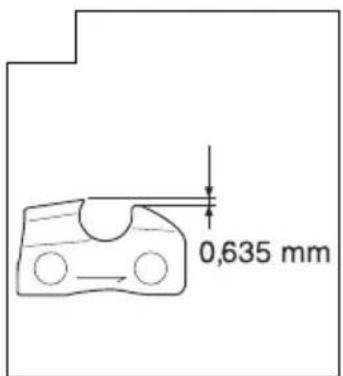
Place a depth gage jointer on the saw chain, leave the gage visible at the groove, and use a flat file to bevel the portion out of the depth gage jointer. (Fig. 33) (Depth gage jointer and flat file are sold separately.) After filing away the depth gage, round off the front side of the depth gage as it was. (Fig. 34)
After sharpening the saw chain, place it into chain oil to wash off the filings.
If filings are not cleaned off, the saw chain and guide bar will quickly wear while in use.
MAINTENANCE AND INSPECTION
After operation, perform inspection and maintenance of each part when storing the unit.
WARNING
During maintenance and inspection, always switch off the unit and disconnect the plug from the receptacle.
1. Inspection of saw chains
Occasionally inspect the saw chain. In the event of any abnormality, replace it with a new one referring to "Installing (replacing) saw chain".
Inspect the chain tension and check If it is correctly tightened.
- Stop using the unit when the saw chain becomes blunt and sharpen it referring to "Sharpening of the chain blade".
After use, carefully lubricate the saw chain and guide bars with oil for rust-proofing.
CAUTION
Wear gloves to avoid injury while using a saw chain.
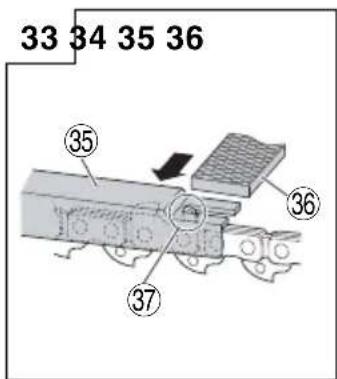
2. Cleaning the side cover (Fig. 35)
Clean and remove any sawdust left inside the parts.
NOTE
When cleaning the side cover, brake band chain oil spout, and side bar, see the procedure "Installing (replacing) saw chain" and remove the saw chain.
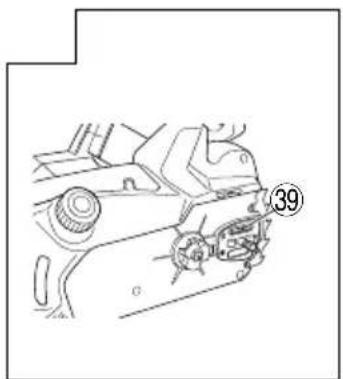
3. Cleaning the chain oil spout (Fig. 36)
Before cleaning the chain oil spout, remove the side cover and guide bar.
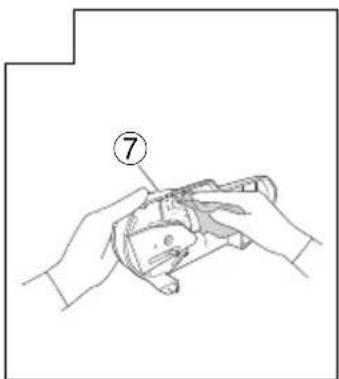
4. Cleaning the guide bar (Figs. 7, 37)
When sawdust and similar become clogged in the groove of the guide bar or oil spout, the oil may not flow, which may result in the unit failing.
Remove the guide bar and clean any sawdust clogged in the groove after use and when replacing the saw chain. (Refer to "Installing (replacing) saw chain.")
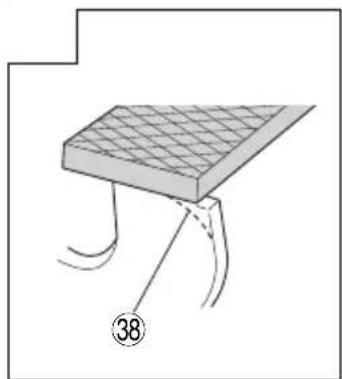
5. Inspect the chain catcher (Fig. 38)
The chain catcher is for preventing the saw chain from striking the operator as much as possible should the chain come loose or break.
The chain catcher and side cover are combined into a single structure.
Inspect the chain catcher to make sure that there are no damages.
6. Inspecting the mounting screws
Regularly inspect all mounting screws and ensure that they are properly tightened. Should any of the screws be loose, retighten them immediately. Failure to do so could result in serious hazard.
7. Maintenance of the motor
The motor unit winding is the very "heart" of the power tool. Exercise due care to ensure the winding does not become damaged and/or wet with oil or water.
8. Replacing the carbon brushes
For your continued safety and electrical shock protection, carbon brush inspection and replacement on this tool should ONLY be performed by a HiKOKI AUTHORIZED SERVICE CENTER.
9. Cleaning of the outside
When the chain saw is stained, wipe with a soft dry cloth or a cloth moistened with soapy water. Do not use chloric solvents, gasoline or paint thinner, for they melt plastics.
10. Storage
When storing the unit, perform cleaning and maintenance of each part and mount the chain case to the guide bar.
Store the chain saw in a place where the temperature is less than 40^ and out of reach of children.
CAUTION
In the operation and maintenance of power tools, the safety regulations and standards prescribed in each country must be observed.
SELECTING ACCESSORIES
The accessories of this machine are listed on page 235.
GUARANTEE
We guarantee HiKOKI Power Tools in accordance with statutory/country specific regulation. This guarantee does not cover defects or damage due to misuse, abuse, or normal wear and tear. In case of complaint, please send the Power Tool, undismantled, with the GUARANTEE CERTIFICATE found at the end of this Handling instruction, to a HiKOKI Authorized Service Center.
IMPORTANT
Correct connection of the plug
The wires of the main lead are coloured in accordance with the following code:
Blue: -- Neutral
Brown: -- Live
As the colours of the wires in the main lead of this tool may not correspond with the coloured markings identifying the terminals in your plug proceed as follows:
The wire coloured blue must be connected to the terminal marked with the letter N or coloured black.
The wire coloured brown must be connected to the terminal marked with the letter L or coloured red.
Neither core must be connected to the earth terminal.
NOTE
This requirement is provided according to BRITISH STANDARD 2769:1984.
Therefore, the letter code and colour code may not be applicable to other markets except The United Kingdom.
Information concerning airborne noise and vibration
The measured values were determined according to EN60745 and declared in accordance with ISO 4871.
Measured A-weighted sound power level: 108 dB (A)
Measured A-weighted sound pressure level: 95 dB (A) Uncertainty K:2 dB (A).
Wear hearing protection.
Vibration total values (triax vector sum) determined according to EN60745.
ah=4.0m/s2
Uncertainty K = 1.5m / s^2
The declared vibration total value has been measured in accordance with a standard test method and may be used for comparing one tool with another.
It may also be used in a preliminary assessment of exposure.
WARNING
The vibration emission during actual use of the power tool can differ from the declared total value depending on the ways in which the tool is used.
- Identify safety measures to protect the operator that are based on an estimation of exposure in the actual conditions of use (taking account of all parts of the operating cycle such as the times when the tool is switched off and when it is running idle in addition to the trigger time).
NOTE
Due to HiKOKI's continuing program of research and development, the specific cations herein are subject to change without prior notice.
Youousyousexposezisonaun accident.
VEILIGHEIDSWAARSCHUWINGEN VOOR DE KETTINGZAAGMACHINE
HVAD ER HVAD? (Fig. 1)
ENIOE'QPHsH KAI NPOETOIMAIA IPIN ANO TH XP'HsH
Piv ano Tn xhon, kavte tic enouevec eTioeepnoic Kai nponapaokvuaotkec epyaioes.
PPOEIODOIHEN
O BeBaIomegaTe otI n nnyn pEuMaToc nov npoketia va xpnoiOnoiThei evai evapoviaevn e Tc anaiTneic oE pUa nov avaepovta tnv nivakidaou epyaaleiou.
O Ia Tny anoouyn atuynmuatwv, va EKTLEite navtoTe ra 3nmuata 1 EWC 5 PovtiCovTAC to fic va Eiva anoouvdeltaevno Tny unodoxn.
Mny aopaiZeTe to koupi anaoaiaonc evoaw auto eivai natnuevo.
Av o diakontnc evai kata laooc deoueuvoc, n ouokeun mnpoei anpooevva va ekivnoei va aeitoupyeikai va npokanthepaumoioc.
- Bεβαιωθειτε οτι o διακόπτης είναι anενεργοποιημένος
O Beiaowte oti o diaokntnc peumuotc bioketai otn the ONFF.Av to biopa eivai otn npipca kaohoc diaokntnc peumuatc bioketai oTO ON, to epyaieo Oa apxioe va aeitoupyei aoeoc, me thavotnta npokanoc oobapou atuxnatoc.
O Av o iakontnc eival evoaw to kouuni anofoeunc eival n ouokevn evpyonoietal, kal otav o diakontnc anelevepwoei, n ouokevn anevepyonoietai. - Eλεγxος της επέκτασης καλωδιου
Av o xwpoc epyaiaac pbioketai maikpia ano tnv nnyn tpofoosoiac, xpnoumonoiote eva kaawdo 0eKtaanc enapkouc npxouc kau npakouc ovuaotiknc xwpntikotntac.To kaawdo 0eKtaonc 0a npeneva npapvei kovto, ooo auto eival 0fkiTo.
Mohlo by DOJIT K URAZU.
7. Checking brake is engaged
DODATNA VARNOSTNA OPOZORILA
OBsI MEPH3A B63OJACHOCT IPN PABOTA C EJEKTPUYeCHN HHCTPYMEHTN
PNEyNPEHDEHNE
PpoyeTe BCnKn HnCtpyKcH N npedynpckdHna 3a 6e3onachocT.
HecnasaBaHTo Ha nHCTpyKunTe n npdeynpeKeHnraTAMoKe Da IOBeDe Do eNeKTpueeCKn ydap, Nokap Hnnncepno3n HapaHaBaHna.
3ana3eTe H cBxpaHbAaIte HnCtpyKcHnTe 3a nocleDbauu cnpaBn npHIOKeHne.
TepMHbT ,eHtprueeCN HCTpyMeHT B npdynppeKHeHnTa ce OTHacr DO Baun eEKeTpueeCN (KaBeneH) nn akymyIaTopeH (6e3KnueH) HCTpyMeHT.
1) Bezonachoct Ha pa6oTHOT MRCTO
a) PoiBpHaIe pa6oTHOTo MRCTo NOpeHOn I do6pe OCBeteHO. Pa3xBpIHN Hn Cna6o OCBTeHn pa6oTHN MeCTa Ca npednoCTaBAka 3a INHCnDEHTN.
b) He n3noJ3BaIte eJeHTpuecHn HHCtpymeHT BbB B3pHBOONacHa CpeDa, npn HaJIyHe Ha 3aNaIMN TeuHOCTn, ra3 nn npax. EJeKTPnuEChnte HNCtpymeHTn npoIN3BeJdaT NCKPn, KOHTo MORaT Da DOBeJaT Da Bb3JIaMeHraBaHe.
c) He no3B0JBaIe DoCtbn Ha CtpaHnHn Iuca n Deua npn pa6oTa c eJeKTPnuechn HnCTpyMeHTn. HeBnMaHne No Bpeme Ha pa6oTa moKe da doBeede do 3aY6a Ha KOHTpol Bbpxy Ipoueca.
HnHora He npaBeTe KaHBnTo n Da 6nIoo npomeHn no eNceHte.
He n3no3BaIte npexoHN qencenC bC 3a3eMeHn eJeHTpHuEcHn HnCTpyMeHTn.
LJenCeH, KOHT He ca MoDnΦnUpaHn H CbOTBETCTBaT Ha KOHTaKTHe HAmJIaBaT pNcHa OT eNEKTPnueckn ydap.
b) H36RaBaiTe HOHTaKT C TAnoto npn pa6ota c eIeKTPnuecHn HNCTpyMeHTn No 3a3eMeHN NOBbpxHOCTn, KaTO Tpb6n, paHaTOpn XnaadnHn.
CbueCTByBa NOBnWeH pNCH OT eNEKtpnueChn yDap, aHO TAnTo Bu cTaHe qAcT OT 3a3eMntenHnKoHTyp.
c) He n3laarate eIeKtpnuechnte HNCTpyMeHTNa dBkN Bnara.
InonadaHeTo Ha Bnara B eJekTpuecknTe INHCTpyMeHTN NOBnWaba pNcKa OT eJekTpueckn ydap.
d) He hapuyaaBaTe ueoCTTa Ha Ka6eHnTe. HnKora He Hocete N He DbPnaTte eJeHTpnueChn HnCTpyMeHTn 3a Ka6eHa; npu n3KIOUvBaHe ot KOHTaTdaBpNaTte uenceJa, He Ka6eHa. Pa3ete Ka6eHnTe OT n3ToCHNu Ha TOnLIHa, OT CMA3OuHN MaTePNaHn, OCTPN p6oBe n NOdBnHHN KOMNoHEnTH. HapaheHn nn npenIeTeHn Ka6eHn NobuBaAT PnCKa OT eJeHTpnueeCN ydpap.
e) Horato pa60tnte c eIeKtpnuechn HNCTpymEnT Ha OTHPHTO, N3NoI3BaHTe YdbJIHNTeI, NOxOJa 3a pa60Ta Ha OTHPHTO. I3NoI3BaHTe Ka6en, NoXoJa 3a BbHJHi yCIOBna, KOITo HamaJIra Ba Pncha OT eJeKtpnuechn ydap.
f) Ako e HaIOxHTeJIHO 3nOJ3BaHeTo Ha eIeHTpUyeCn HNCTpyMeHT BbB BnaHH yCIOBn, n3oJ3BaHTe ypeu C dInepeHuaHa 3aunrta (RCD) cpeuy yteuHa. I3noJ3BaHeTO Ha yCTPOIcTBO 3a DnIepeHuaHa 3aunrta (RCD) hAmalra pncs oT eIeHTpueechn ydap.
3)Лична6e3oNaCHOCT
a)БbTe 6dTeHnBHMaBaTe B DeCTBnTa cn n H3noJ3BaTe pa3ymHO eIeHTpueeCKnte HHcTpymENTn. He n3noJ3BaTe eJIeHTpueeCHn HHcTpymENT, HORato CTe n3MOpeHN, HNI NOd BnHHeTO Ha JeHapCTBeHN cpeDCTBA, aIIHOXOJ HNI ONHaTH. BcAko HeBHmAHne npu pa6ota c eJIeHTpueeCHn HHcTpymENTn MOKe da DObeDe Do cepNo3HN HapaHraBaHn.
b) H3noJ3BaIte JnUHn npedna3HN cpeCTBa. BHHarH Hocete 3aunTHN OUnHa Nm MacHa. 3aunTHHe cpeCTBa, KaTO npOTNBOpaxOBA MaCKa, 3aunTHN OByBn C yToHnBa Ha NlB3raHe NOdMeTKa, KACKa nn aHTFOHn, CNOpeYcIOBnTa Ha pa6ota, HamaJIbaTOnaCHOCTTA OT HapaHBAHe.
c) PpeDToBpaTBAHe Ha CnyaHb BnHIOUBaHe. YBepTe Ce, Ye 6yToHbT 3a CTapT Ha ypeDa e B H3KlIOUeHO NIOIOHeHne, PpeN Da CBbpHeTe eJeHTpueChn HnCTpyMeHT KbM N3TOuHN Ha 3axpaHbAHe n/nn 6aTePn, KaHTo n PpeN da ro B3emTe nn npenacrte.
IpehaHTo Ha HhCTpyMeHTn C npbCT Ha CTapT 6yToHa, HnHa npBkIIuOvBaTeJHa 3axpaHbHeTo, Hocn OnaCHOCT OT HNcUdENTn.
d) Otcpahe BCnHn raeHH n npyH KIOObe, npedn da BHIOUHTe ypeHa. faeyen KIOU HIN HNCTpyMeHT, 3a6paBEN B potaiooHHN KOMTOHEHTn Ha eJektpuYeCKn HNCTpyMeHT, MoKe Da IOBeDe Do HapaHBAHe.
e) He ce npecaraTe. Ppe3 uJIoTO BpeMe TpA6Ba Da HMaTe Cta6HJa Onopa N da NoDbPHaTe 6aIaHC Ha TJIoto.
Toba OCHyprBa NO-IO6bP KOHTpOI Bbpxy ENEKTPnuecknte INHCTpyMeHTn Pn IN3BbHpeDHN CNTyaun.
f) Hocete noxdoxo 06leHIO. He hocete npekaIeHO shpOKn dpexn nn6NHyta. Na3eTe hocata,dpexnte n pBkABnCtne cN OT NOdBHNK NOMNOHEHTN.
UInpOKHTe Dpexn, BnKHyTa n IbIra Koca MOraT da 6bDat 3axBaHaTH OIOBnHHNTE KOMNOHEHTN.
g) Ako ca ocHrypeHn ycTpoHCTBa 3a cBbP3BaHe c npaxoyNoBHTeHH HHcTaJauuH, yBepTe ce, ye Te ca Cbbp3aHn H ce H3noJ3BAT npabNlHO.
N3noJ3BaHTo Ha npaxOyIOBnTeJI N uKNoH MoHe Ja HamaJIu Cbbp3aHHTe Cbc 3aMbpCBAHTo pNCKOBe.
4) EhcnpaatauHa n npdpbHHa Ha eJeHTpuechn HhCTpyMeHTn
a) He hacnBaIte eIeHTpueeCHnte HhCTpyMeHTN. 3noJ3BaIte NOxOJa eIeHTpueeCHn HhCTpyMeHT 3a CbOTBeTHnte cJIH. IooXoJauT eIeHTpueeCHn HhCTpyMeHT OcHryPraBa No-IO6pa N IO-CHyPHa pa60ta npn PpeDbHeHTe HOMHaJIHN napaMeTpN.
b) He n3no3BaIte eIeKtpnuecknT nHcTpymeHT, aHO He MoHe Da 6bDe BKNIOUeH NIN N3KIOUeH OT CbOTBETHNCTAPr6yTOH NIN pEBKIOUBATeJ. BceKn eIeKtpnueckn INHcTpymeHT, KOHTo He MOHe Da ce KOnHpOJIpa oT cnYCbHa, e ONaCeH nNoJIeHN Ha peMOHT.
c) N3KIOUeTe 8eCeJa Ha HNCTpyMeHTa OT N3TOOHnHa Ha 3axpaHbAne H/INr O6aTePnra, npei Da N3BbPbBaTe HAcTpoHN, npn CmHa HA npNCtABKn Hn npn CbXpaHeHne. Te3n PpeINa3Hn MePKn HAMJIaRaT pNcKa OT ClyuahHO HEnKeJHaOBKIIIOvBaHe Ha eNEKTPnueeckn HNCTpyMeHT.
d) CbXpaHbAite Heu3nO3BaHHTe eEHTpueckn HhCTpyMeHTn DaIeY OT DOCTbN Ha Deua N He No3BOJBAite Ha Iuca, He3aNo3HaTHc HauHbHa pa6oTa c HhCTpyMeHTnte, n C Te3n HhCTpyKcHn, da pa6oTAT C Tax. ELeKtpueckHte HhCTpyMeHTn PpeDcTaBnBaT onaCHOCT B pTuTe Ha HEONHTHn Iuca.
e) NpOdbpKaHte eJEnTpPueChnte HNcTpymeHTn. PpOBepaBHe TceHtpOBhata n 3aKpeNBaHeto Ha NpOBbHNHe TaCTn, npOBepaBaTe 3a NOBpeHn Yactn n Dpyr n CbctoRnHa, KOHTo MOrat Da ce Otpa3r Ha pa6oTata Ha eJenTpPueChnte HNcTpymeHTn. Ako yCTaHOBnte NobpeDn,OTcTaHete rN npEdu Na H3NoI3BaTe eJEnTpPueChnte HNcTpymeHTn. MHoro 3IIOJIoYNuCe dblKaT Ha loWa NpOdpbHKHa Ha eJenTpPueChnte HNcTpymeHTn.
f) PndbpaHaepeKeuHte HctpymeHTn HaTOOeHN uHCTN.
PpaBnHNO NOIbPkaHHTpeKeu INHCTpyMeHTN, C HatoyeHN peKeuIN eJeMeHTN, CE ynpabJIraBaT N KOHTPOIpaT No-JeCHO.
g) N3noI3BaIe eIeHTpHueeCN HHCtpymeHTN, npIcTAbHN n aHcecoapn, n T.H., cblnaCHO Te3n HHCtpyHKuH, KaTO B3EmTe ppeBnD pa60THnte ycIOBn H BnDa pa60TN, KOHTO ige ce N3BbPbBAT.
H3no3BaHeTo Ha eEeKtpnueechn HnCTpyMeHTn He NO npEaHa3HaueHne MOKe Da DoBede Do NOBuWeH PNCK H ONaCHN CNTyaUH.
5) 06cIyHbAHe
a) 06cIyHbHeTo Ha eIeKtpnuecknte HHCTpymeHTn Tpr6Ba Da ce N3BbpwBa cMo OT KBAJIHΦNtpanH cepBN3HN pa6OTnU, npn H3NOJ3BaHe Ha opuHnHaHH pe3epBHN qAcTn. ToBa Ie rapaHTnpa 6e3oNaChocTTa npu pa6Ota C eIeKTPnueckHTe HHCTpymeHTn.
BHIMAHNE
He donychaTe B 30HaTa Ha pa6ota deua N Bb3pacTHn Xopa.
Horato He n3noI3BaTe eIeKtpnuecHnte HnCtpymENTn, cbxpaHraBaiTe rHa daJeu OTO DocTbN Ha deua N Bb3pactHN Xopa.
БЕЗПАСНСТ ПИР PAБOTA CBEPИЖЕНТПОH
- PanaTe BCnUKN YactN OT TAnIOTO CN OT BepnHnHn TpnoH, KOrato ToN pa60TN. IpeDn Da BkInouHTe BepnKnHn TpnoH, ce yBepTe, Ye BepnraTa He Ce Donnpa HnKbJe. EINH MIR HeBnMaHne No Bpeme Ha pa60Ta C BepnKeH TpnoH MoKe Da DoBeNe Do 3aKaHaHe Ha BepnRaTa B DpexNTe NIN TAnIOTo BN.
- BnHa n dpbHTe BePnHHn TpnoH c JAcHata pKa 3a 3aHaTa pkoXbaTn Hc JBaTa pKa 3a npedHaTa pkoXBtka. Hkora He pa3MeHnTe No3uHnTe Ha pBte, Tb KaTo TOBa yBeIyAba Pncka ot HapaHBAhe.
3.ДрьктЕеКТрЧecнИHCTpyMeHT cMo 3a 30JlnpaHaTApbKoXBaTKa,ТБи KaTO HOKOBnT BaI MoHe Da 3aKaChn CkpNTn ПpoBOdNci NIn Kabela cn.Ako peKeHsTa Bepra BNe3e B KOHTc C npOBoDnH NOd HAnpeHEnHe,OTKpNTte MeTaJIH NaCTn Ha eJeKTHpUeCkNr INHCTpyMeHT MOrat Da CTaHaT ToKOpBOdMn N Da nPnCHnT TOKOB yIap Ha onepaTopa. - Hocete npedna3Hn OuHn a n CnyxOba 3aunTa. IpenopbUba ce DOnbInHTeHa 3aunTHa eKnnpOBKa 3a rIabata, pBcTe, KpaKaTaNCTbnaIATA. IoXODAOTO 3aunTHO 06leKIO ue HaMaJIH hapaHbAHnra OT JeTAAu NapYeTa NIN OT CnyuaeH KOHTAKCpeKeEuaTa Bepira.
- He pa6oTeTe C BepnKeH TpNoH Na DbPBo. Pa6oTaTc BepnKeH TpNoH DOHaTO CTe KaueHn Ha DbPBOTo MOKe Da DoBeDe Do HapaHraBaHe.
- BnHa n noDttbpkai Te npaBnHa no3nua Ha KpaKaTa n pa6oTe C bepnKnnr TpnoH CTbnnu Ha Cta6nHa, cnpyHa n paBHa NOBbpxHOCT. Xb3raBn nn HeCTa6nHn NOBbpxHOCTn, KaTO HApnpMeP cTbI6n, MORAT da npedn3BnKat 3ary6a Ha 6aIaHc N HA KOHTpoN Bbpxy BepnKHHr TpnoH.
- Korato peKte KIOH, KOIto e noD HanpeKeHne, BHIMABaIte 3a o6pAteh yIap. Korato HanpeKeHneTO B DbPBOTo CE OCBO6OuN, KIOHbT MOKe Da OTCHOU N Da BN yIapn W/INn Da n3BaAnn BepnKHHr TpNOH OT KOHTpOJ.
8.БbTe H3HIOUHTeJIHO BHIMATEJIHN, KORATOpeKeTe Xpactn NΦuaHKn.TbHKNTe MaTePnaIIMoHe Da ce 3aKaayat BbB BepHHN TpnoH n da Cb3daDat Kamuueh Eyap uIN da Hapyuat BaJahca BN. - Hocete BepnKnHn TpnoH B n3KnIOueHO CbCTOHaHne, 3a npedHaT a pbKoXBAtKa n Ha pa3CToHnE OT TaIOTo cN. Horato TpaHCnOpTpate nn np6npuTe BepnKnHn TpnoH, BNarN NOCTaBnTE KaIbFa Ha BOeUaTa UHa. PpaBnHoto 6opabeHe C BepnKnHn TpnoH ige Haamai N BepoTHOCTTa 3a ClyuaeH KOHTc C DBNKeUaTa Ce Bepira.
10.Cna3BaIte HNCTpyKUInTe 3a Cma3BaHe,OBTRAHe Ha BepnraTaNcMaHa Ha akcecoapnte.Bepna, KOrTo He e npabINHO ONbHaTa Nm Cma3aHa,MOKe Da ce ChbCa NN da yBeInuPnCKa OT ObpaTeH yAp. - PpKaIe pbKoXBaTKte CyxN uNCTn OT MacNo, Ipcn 3aMbpcBaHnAHO pbKoXBaTHne ca omacJIeHN, Ue 6bDat XJb3raBn Ue 3aRy6nte KOHTPOJ.
- PeXeTe cAmO dIbPBO.He n3NoI3BaIte BepnHHnT prnoH 3a HnpeDbIeHN cIeHN.HanpImep: He n3NoI3BaIte BepnHHn TprNOH 3a pR3aHe Ha nlaCTMaCa, 3ndapnHa HnHEdIbPBeHn CToPntEJIH MaTePnAII. N3NoI3BaHeTO Ha BepnHHn TprNOH He no IpeDHa3HaueHne MoKe da DOBede NOBNIeH pNCK N OaCHN CITyaUIN.
Pnunnnn HauHH 3a npedotbpaTbaHe Ha o6paTeH yap:(Φnr.2)
O6paTeH yIap MoKe Da ce noJyH, KOraTo HocbT, IIN BbPxbT, Ha BOeUaTa WInHa DOKoCHE npeMMeT, IIN KOraTO dIbPbTO Ce HAKIoHn 3aUnne BepnraT a B cpe3a.
B HAKON Cnyu an DoNIPAHeTo Ha Bbpxa MoHe Da npuHHn Bhe3aneH ObpaTeH yap, pni KOnTO uHaTa da 6bDe OTbchata Harope n KbM onepaTopa.
PnTnckKaHeTo Ha Bepnata PnBbpxa Ha Boeauata WnHa MoKe Da OTTlache WnHaTa 6bp3o Ha3aJ KbM OepaTopa.
BbB BCEKN OT Te3N CUYaH MoKe Da 3aRy6bnte KOHTpOJ NaTpnoHa N Da NocTpaDte CepNo3Ho. He pa3uNTaTe cAmo Ha BrpaDeHnTE B TpNOHa 3aUHTnY yCTpoiCTBa. Bne, KaTO ONEpatop Ha BepnKeH TpNOH, Tp6Ba Da npEepnpeMeTe HRAKOJIko CTbKn 3a IpeDoTBpaTBAHe Ha INUndeHTN.
O6paTHnT ynap e pe3yIITaT oT HEnpaBnHOn n3noJ3BaHe Ha ypeDa N/INn HEnpaBnHn Haunn INnn yCIOBnHa pa6ota n MoKe da Ce n36erHe npn Cna3BaHe Ha cIeHNTe ppeNa3Hm MepKn:
O DpBkTe BepnHHn TprHO, C DBe pBcpe, OXBaaauKn PbKOxBaTKaTc NaLeu N npCTN cpeUPOLOHNO, KaTO TANOTO H pBcTe BN Ca pa3noJIOHeH NOODXoAHT HaunH 3a npoTINBOeICTBne Ha cnlaTt Ha o6paTHn ydap. CnlaTt Ha o6paTHn ydap MoHe Da ce KOHTpOInp aOTonepApota, Ako Ce Cn3BaT npedna3HnTe MEPn. He nyckaIte BepnHHn TprHO.
He ce npotrae HnepeKte HaBncoOnHaTaHa pameheTe cn.ToBa ige nomorhe da ce n36erHe cnyaeh KOHTaKT Ha Bbpxa Hno3BOJRA BaNo-dO6bp KOHTpOHa BEPNHHN TpNOH B HeoayKaBHn CNTyaun.
O H3noJ3BaIte cAmo NocOeHn OT npOn3BODntTeIpe3epBHN u BepuN. H3noJ3BaHeTo Ha HeNoJxOJaUN pe3epBHN u BepuN MoKe Da DOBeDe Do CkbcBaHe Ha Bepurata N/wn ObpaTeH yap.
CnataBaIte HNCTpyKunTe Ha npOn3BODInTeIa OTHOCO 3aTOUbaHTo I NOdApbXkata Ha peKeIaTa Bepira. HamaJraBaHTo HA BnCOuHnAHa Ha orpaHnHTeJIteHa NoDABaHTo MoKe Da yBeIINn CnyaAnTe Ha o6pateH ynap.
Pa60aHa BepnKaTa CnpaHa:
Ako BepnKeH TpnoH yapn TBbpN npedMeT C BncoKa ckopocT, peaHnpa 6bpyHo n OTcKaHa. ToBa ce KOHTpoJInpa TpyHO mOka Da e ONaCHO,OCo6eHO C IeKN HnCTpyMeHTN, KOnTO Ce N3No13BaT BbB BCaKbN IO3nUHN. BepHHata cnpaYka He3a6abHO cnpa BbPTeHTo Ha Beprata aKO CE NOJyH NeOuyKaBAH OTkAT. BepnHata cnpaYka MoKe da 6bDe AKTINBIPAHa Ype3 HAtnC pKa Bbpxy npedna3nteJIa 3a pbue nn ABTomAtuH No nOTkAT.
BepnKaTa CnnpaKa MoKe Da ce DeaHTNbPa cAmO CLeI NbJIHOTo CnnpaHe Ha DBNrAteJIA. BbpHete pBkoXBaTKaTa B 3aJaHa No3uJy (Phr. 3). PpOBepraBaTe pa6oTata Ha BepnKaTa CnnpaKa eKeDHeBHO.
ДОПБЛНТЕЛН
PPEyPENKDEHNA 3A
BE3ONACHOCT
1.Излбайт eелктуческотнанржени,
уnomе haTo Bbpxu ИфорmaцноНаТа Таба 3a
иЗTOUHnka Ha 3axpaHBAHe.
H3noJ3BaHeTo Ha No-BuCko HAnpeKeHne MoKe Da npNHN HapaHbAe.
2. Pa6oTeTe 6e3 HappeKeHne. BuHaRn noDbPkaIte TJILOTO CN TOJIIO.
3.ПредиДаЗалочete pa60Ta,nomicJIeTe KaKBO BKNIOUcBaTЯ n CnAsBaIte МepKITe 3a 6e3ONaCHOCT,3a Da N36erHeTe INHUNDEHTN HapAHRAHINr.
4. He paBoTeTe npn loIoB Bpeme (CIneH BAtbP, IByK,I CHaR, MbyIa) INI INPn ONaCHOCT OT NaDaIaN KAmbH NIN CBNaUHa.
Pn looBpeMe npeehkata BN MoKe da 6bJe HapuSha n Bn6paunTe MOra T da npuHrT HeaacteH cnuya.
- He n3no3BaIte ypea npn cIa6a BnIMoCT (npn looBpeMe nn HoIeM). CbTO taka He n3no3BaTe ypea no BpeMe nn CTe dJbXd. HecTa6nHaT a Onopa nn 3ary6ata Ha paBHOBecne MORat Da DOBeaT Do INUIndHT.
- Поберете ВODEца ТИнна И ВЕргета, пedingда вкlioчпу畴да.
AHO uHaTa HnBeprata ca npOnyKaHn, nIaHO mHa N3dpacKBaHe IIN N3KpNBBAHe, He N3NoJ3BaTe ypeDa.
O Ybepete ce, ye uHaTa n Beprata ca HaedHIO MOHTnpaHn. AHO npu uHaTa nn Beprata mAm CuyBaHe nn pa3MeCTBaHe, e Bb3MOKeH HnIeHT. - Ппдд дд дд дд дд дд дд дд дд дд дд дд дд дд дд дд дд дд дд дд дд дд дд дд дд дд дд дд дд дд дд дд дд дд дд дд дд дд дд дд дд дд дд дд дд дд дд дд дд дд дд dng He He HATNCHaT.
Aho ypeTHe pa60Tu npabuHNO, He3a6abHO cnpeTe Da ro n3noJ3BaTe Hro daTe Ha peMOHT B OTOpN3npaH cepBn3eH ceHTbp Ha HiKOKI. - MoHTnpaIte Bepurata npabNlHO, KaTO cna3BaTe HnCTpyKUInTE B pBKOBOcTBOTo 3a eKcnloatauJr. Pn HnpepaJIeH MOtJX Bepurata ue ce n3BaJN OT BOeUaTa UINHa N e Bb3MOkHO HapaHBAHe.
- HnKora He cBaIyIte HnKoe OT 3aunTHHTE yCTpOcTBA Ha BepnHHn Tpnoh (Cnpaeh IocT, OTKIOUBAu, 6yToH, BepuoyIOBHTeI n dp.). He npaBeTe N3MeHeHnNoTAXn He rHHeYtpaJI3npaIte. Bb3MOKHO e HapaHraBaHe.
- B cIeHNHTe cIyau nI3KIOUHeTe ypeDa n ce yBepTe, Ye BepnraTa e cnpraJa da ce BbptN:
O Horato He ce n3noJ3Ba nn Ce peMOHTnpa.
O Horato CmehrTe MCTOTo Ha pa60Ta.
O Korato npOBepBaTe, peryInpate nn CMeHrTe BepnRata, BOeUaTa 1Ha, KaIbFa 3a BepnRaTaNn Dpyra Yact.
O KoraTo DoJIbAte BepnKHo MaCNo.
O Horato otctpaHbate npax n dp.OT TAnoto.
O Horato npemaxbate npenrTcBn, OTnaIbun nn IpbBeceH npax OT pa60Thata 30Ha.
O Korato octabryte ypea nHc ce otdaJeBaTe ot Hero.
Ako yceTHTe HnI npeBnHdaTe onaCHOCT. Ako Bepurata npoDbJHn Da ce DnHn, e Bb3MOHe HnHnDEHT. - По пинци Суда ce paBOTи CamoCTOЯТно.Horato B paBOTa YuactBaT NOBEe Xopa, MeHДу TЯx TpIbBa Да ИмdoCTaTbYHO pa3CTOЯHne.
Oco6eHn npn nobajHe Ha IbpbBeta nI npa6oTa ha NaHIOH ce norpHHete naDaunTe nI IN TbpKaJIaUNTE ce IbPBeta Da He Cb3daT onaCHOCT 3a dpyrnte pa60THNI. - CToIe Ha noBue ot 15 m ot npyrn xopa. OcBeH TOBa BCnUKN paOTHNtnpa Da 6bDaT Ha noBue ot 15 m eIN h OTpYr.
O CbIeCTByBa pIck ot yIap ot napYeHa n dpyrHnHcndHTn.
O IpeBapnteHNO yTOUHeTe HauHnHa 3a npedynpexkdaBaHe Ha dpyrnte pa6OTnCi (cbc CBnPKa n dp.). - Ппени повалино Дьрета наразовете следно:
O OnpedeJeTe Kbde ue ce OTdpbHHeTe npdnoBaJIaHETo.
O MaxheTe npenTCTBnraTa (HaNP. KIOHn, xpaCTn) npedBaPHTeJIHO.
O HanpaBete NbHa OueHka Ha CbCToHneTo Ha DbPBoTO 3a NOBaJIaHe (Hanp. HauKIOH Ha CTBOla, HappeKeHne B KIOHnTe) n OKOIHOCTTtA (Hanp. CbCToHne Ha CbCeHNte DpbBeta, HauNHy He NaIpeYrCTBn, TepeH, BByTbp) n Ha Ta3n 6a3a onpeJeTe nocOKaTa Ha naDaHe Ha DbPBOTo n PIAHnpaiTe paBOTata No NobaJIaHETo My.
B3OTROBOPHOTo NOBaJIHe Ha DbPBeTa MoKe Da DOBeDe Do HapaHRAHe.
14. По Врeme Ha noBaJIaHHe Ha IbPBeTa HappaBeTe CJIeIHOTo:
O IIO Bpeme Ha pa6oTa BHIMabaTe MHOro B KaKBa Nocoka ige naHHe IbpbOTO.
O Korato pa60THe Ha HauKIOH n CTe B3eJIIM MepKn DbPBoTo Da He Ce N3TbPkAIA, BNHaI IN CTOITe OT RopHata CTpHa.
O Korato dbpbBTo 3anoyHe da naHa, n3KIOUeTe ypeDa, CnHaNIm3npaIte Ha OKoJIHnTe Xopa N He3a6abHO ce OTdpbHHeTe Ha 6e30nacHO MRCTO.
O IIO BpeMe Ha pa6oTa, aHO BepnraTa HINI shHnHaTa ce 3aKInHrT B DbPBOTo, IN3KIOUcTe ypeDa n IN3NoI3BaIte KInH.
15.Ako no Bpeme Ha ynoTpe6a paobotaHa ypeda ce BLOUH NIN 3a6eJeHNTE HeoBuaeH Wym NIN Bn6paun, He3a6abHO N3KIOUeTe ypeDa, cnpTe Da ro N3PON3BaTe I RO 3aHeceTe 3a npOBepKa INI pEmOH T OTOPIHAPAN cepBUN3EH ZENTbP Ha HiKOKI. Ako PNOJbJIHNTe Da Ro N3PON3BaTe, IMa ONaCHOCT OT HapaHBAHe.
16.Ako ypeBbT 6bIe n3nycHa Tnnn 3nloKeH Ha ydap, npOBepTe BHNMaTeJIHO 3a NOBpeDn nn NyKHATnHn I ce yBepTe,Ye Hma DeOpMaun. Ako ypeBbTe noBpeDeH, npOpyKaH nn DeOpMnpaH, HMa OnaCHOCT OT HapaHBAHe.
17. Horato TpaHcnpOpTnape ypea c Kona, Tp6Ba da ro 3akpennte HeNoDBNHO. Ima onachOCT OT INUdENT.
18. He BKNIOUBAIte ypeDa, DOKaTO BEpNraTa e c KaJIbΦ. Bb3MOKHO e HapaHRAHe.
19.YBepete Ce,Ye B DbPBeHn MaTepHaJI HMa NIpOHN IpyrN YuXdI TeJa. Ako Bepurata Ydapn NipoH n dp.,e Bb3MOKeH HHcndeHT.
20.3a da n36erHete 3aKlnHbAHe Ha BOeUaTa 1nHa B MaTePnAla, KOrato peKeTe KbM Kpaar nn KOraTO CTe H3IOxeh Ha TeXeCTTa Ha MaTePnAla, INHCTaInpaTne IoDbpKaa aPiataOpMa 6JIn3O Do MRCTO Ha P3aHe. AKO BOeUaTa 1nHa ce 3aKlnHn, e Bb3MOxHO HapaHbAhe.
21.AHO Ue TpaHcnpTnpe HIN npnbnpate ypea cneJynotpe6a, INN MAXHEte BepnraTa, INN N CLOXHeKaIbphi.
Pn KOHTaKT Ha BepnraTa C TAnoto HMa OnaCHOCT OT HapaHBAhe.
22.Грнжerte ce doбe 3a уpeda.
O 3a da cn ocHypnTe 6e3onacHa n eFHKachHa pa6oTa, ce rpnKeTe Do6pe 3a peKeuata Bepnra, TaKa Ye TJa pa60Tu ONTImaJIHo.
O Pn CmHa Ha Beprata HIn BOeaaTa uHa, npn pndpbkHa Ha TJIOTO, PbJIHeHe Ha MaCIO n dp. cna3BaIte INCTpyKunTe B pkoBOcTBOTo 3a ekcnloatauia.
23. Hocete ypeHa hcepbn3.
O He moiHnHnUpaIte npOdykTa, TbN KaTO ToB Beue OTROBaPaHa npINIOHmMtE CTaHdApTn 3a 6e3OnaCHOCT.
3a BCnHn peMOHTn pa60Tu ce obpbuaTe KbM OTOpn3npaH cepBn3eH ueHTbp Ha HiKOKI. OINTTE da peMOHTnPate ypeDa cam MoKe Da DOBeDaT Do INCnDEHT Nn HapaHaBaHe.
24.CbXpaHbAaTe HaJIeJHo ypea, KOraTo He ro n3nol3BaTe. H3TOyTe BepHHoMaCNo Iro npnbepe (3aKIOUcTe)Ha cyxo MRCTo,HeOCTbNHO 3a Deua.
25.Ako npdeynpeinteHnrt ctnkepe ce e n3tpn, o6ennn noBpeuN NO dpy HauHH, cNoKeTe HOB. 3a npdeynpeinteHn ctnkepe ce o6bPHeTe KbM otOpunpan cepBu3eH ueTbp Ha HiKOKI.
26. IIO BpeMe Ha pa6oTa cna3BaIe npuIoHXmHTe MeCTHn npaBnla nn pa3nope6n.
Былгарский
27.Пpenopbkn 3a ynotpe6aTa Ha yctpoiCTBOTO 3a octaTbueH TOK C TOK Ha n3KJIIOUbaHe OT 30 mA nIIN noMaJIko
28.ПоЗиционираитЕ Кабела ТаKa,Че Д He ce 3axBaHe OТ KIOHи IpyrnoNoD6Hn NO BpeMe Ha pr3aHe
29. IpenopbUba ce,Horato ce n3noI3Ba 3a IIbpBn IIbT, IOTpe6nteIa da npakTKyBa, peKeHKn CTBOJIOBE Bbpxu cToiKa 3a TpNOH NIN ,Marape
ONICAHNE HA HOMEPIPAHITE ELEMHTN (Фиг.2-Фиг.38)
O PeIOBHO NOUCTBaIte BepnKHaTa CnnpaHa, 3a Da He ce HapuHn HeHOTo DnHexHe NopaHn HaTpynBaHc HdbpBeCeH npax n dp.
O BepnKHaTa CnpaKa e BaKeH eJeMeHT Ha 6e3oNaChocCTTa.
AkoImaTe onaceHn OTHoCHO pa6OtaTa Ha cnnpaKaTa, Ta Tp6Ba Da ce pemOHtnpa B OTOpN3npaH cepBn3eH ueHTbp Ha HiKOKl.
BepnHaTa CnpaKa e yctpoCTBO 3a aBapuHc npaHe, KOeTo Cnpa BepnRaTa B clyaHa o6paTeH ydp n dp., C ceI HamaJIbAbe Ha pNcKa.
(BnKTe ,PpHnHn HauHn 3a npedotbpaTbaHe Ha o6paTeH yap".)
Korato 3aDenCTBaTe BepnKaHaTa CnpaHa, HATNcKaHn CnpaHnna loCT Hanpei, BepnraTa Cnpa da ce DbHN.
Ako DpBnHeTe CnpaHnI JocT KbM ce6e cn, CnpaKaTa ce ocbo6oKdaba.
Korato npOBepBaTe pa6oTaHa BepnKaHa Ta cnnpaKa, 3aBbJIHNTeHNO n3KnUOte YepeA, n3BaJeTe eNceLa OT KOHTaT, 3aDeIcTBaIe CnpaHn Ioc T n DpBnHeTe Bepurata Cpka.
AkoBepurataHe NompbDba,TOBa O3Haaba,Ye BepnKHaTa cnnpaKa e 3aJeCTBaHa.
3A6EJIENKHA
BnHaHn HocTe De6eI npKaBnI 3a Ta3n 3aJa.
OcptneTo Ha Bepnata e MHoro octpo n CnHOTo My dbpnaHe MoKe da HapaHn npbCTHTe BN.
5. Поверка на Вернхото macLo
O YpeBc Ce DoCTaB 6e3 3apeEHO BepNKHO MacNo. Ipeyn ynoTpe6a HanbHHeMacneHnpe3epBoap c OcnrypeHOTo BepNKHO MacNo. (Φur.14)
O No Bpeme Ha pa6oTa nepHOnDnHNo npOBepBaIte np03OpHTO 3a MacIoTO HdoJIbAaTe NO Heo6XoDMocT.
O Horato OCHNpyeHTo BepnKHo MacNo Cbbpwn, H3noJ3BaIte BepnKHo MacNo HiKOKI (npoJaBa ce OTdeJIHO) HIN EKBNAJEHTHO BepnKHO MacNo.
Cma3BaHeTO C BepnHIO MaIcNo CTaBA aBTOMaTHUHO. CKopocTtHa NpOaBaHe Ha MacIoo 3a aBTOMaTHUHO cMa3BaHe e a6pnuHo HAcTpoeHa Ha MaKcMmaJIHa CTeneH.
3a Da HamaHrte CkOpocTtHa NoidaBaHe, 3aBbPTeTepeRyIaTopa Ha MacJeHata NOMna, pa3nOLOKeH OT3aHa TIAOTO, NO YAcOBHNKOBaTa CTpeJIka. (Фиr.15)
3ABEJIEXHA
KanaHTbHa MaCJIeHnpe3epBoap e OKoI 200 ml. Pn npEnbJBAHe n3JIuHOTo MacNo Iue n3JIe3e npes npelNBnka.
O IpenopbUbaMe da ce 3aIacHTe C BepnHIO MaCNo. AHO npoDbJIHKTe da pa6OTnte 6e3 BepnHIO MaCNo, BepnRaTAMoKe da npepee nn DnBnraTeJrTa da Ce NOBpeN.
He donyckaIte nonaIaHe Ha npax nn DpyrN yKdI TeLa B MacJIeHn pe3epBoap.
AkoBMaclenHnpe3epBoapnonaHaT npaxIpyuN yHKTeNa,ypebMoKe Da ce NOBpeiN.
O Octabehoto B pe3epboapa BepHHo MacIO MOHe Da npoteue npaDN KOHCTpykunra Ta Ha ypeDa. ToBa He e npn3HaK 3a NOBpeDa, HO MCTOTO, KbTeTO CbxpaHBAte ypeDa,MOKe Da ce n3cana, 3aTOBa6bDEte BHIMATEJIHN.
Korato npn6npaTe ypeDa, n3npa3Hete MacJeHna pe3epBoap u cNoKeTe noD ypeDa napuaI, KOHTO da Inoeme eBENTyaJIHn TeOBe.
6. Cbbp3BaHe Ha uenceIa KbM HOHTaKTA
7. NpOBeRka Ha cBcTOrHHeTo Ha cnIpaYkata
O Korato Hatachete Cnycbka npn Hatachat OTKIOUOBAu 6yToH, ypeBt Ce BKNIOUba, a KOraTO OTNcyche Tcnycbka, ypeBt Ce N3KIOUBa.
O OcbEN TOBa, eHOBpeMeHHo C OCB06OJaBaHe Ha npBekIIOUbaTeJIa, yCTpOncTBOT3aJeICTBA CnnpaHa 3a CnnpaHe BbpTeHeTo Ha BepNKHHr TpNOH.
O Ipeyn ynoTpe6a ce yBepTe, ye cnnpaKaTa e 3aJeNCTBaHa.
BHIMAHNE
BHHMaBaIte 3a OTo6JIbCKBaUaTa Cnla npn 3aJeCTBaHe Ha cnIPAyKaTata.
PnH3nyckaHe Ha ypeHa mHa onaCHOcT OT HapaHraBaHe.
- Поберна Ha поаBaHeTo Ha БерннHo MacNo (Фиг. 15, 16)
O Ipn BkIIOUyBaHe Ha ypeDa BepnHHO MacNo aBTOMaTHUHO Cma3Ba BepnRaTaN HHaTa.
Ako 2do 3 MNHyTn Cnei BkIIOUbaHe Ha ypeHa He 3aONOHe Da H3JIH3a MacNo, IpOBepTe DaJIH He ce e HaTPypaJdPbBeceH npax OKoJO MaCleHaTa dIO3a.
(BnKTe,ПоИнсТВаHe Ha MacJIeHaTа IIO3a")
(BnTe,IpOBeRpaHaBepnKHOToMaCIO")
- IpenopbHnteHIO e da n3NOJ3BaTe aBtOMaTHueH npekbcBaay 3a yTeKn nn yCTpOncTBO, 3acHaO OCTaTbUeH TOK.
DieCTBnHe Ha cnYcbHa
Korato HATNCHETe CnycbKa npHaTnCHaT OTKIOUbau 6yToH, Beprata ce BbptN. (ΦnR.17)
CnycbkT He MoKe Da 6bJe HaTnCHaT, aKO OTKJIIOUBAUNr 6yTOH He e HAtNCHaT.
CneHaTnckaHe Ha cnycbKa Bepurata ue Ce BbpTN, DOKaTO cnycbKbTe HaTnchat. CbIo Taka LED lamnata OCTaba BKIOUeHa.
PnOtnyckane Ha cnycbKa ce 3aedcTba cnpaHa, KOrTO CNIPA BbpTeHeTo Ha BepnRaTa.
NPEdYnPEXDEHNE
He fHKcapaIte OTKIOUbaUNA 6yTOH B HATNCHATO CbCTOHHNE.
Ako cnycbkbT ce 3aDenCTBa clyuahHO, ypeBbT MoKe da Ce BHIouH N da npuHH HapaHbaHe.
Ynotpe6a Ha cko6ata Ha uencena
Chobata Ha uenceI npedotbpaTBA n3BaXdaHTo Ha Kaeba ot KOHTaTa. (Φnr. 18)
ПОUCEДУРN 3A PR3AHE
IPEdynPEXHEHNE
O Ipei npa6oTa ce yBepTe, ye BepnKHaTa cnnpaKa pa60tn.
O IIO Bpeme Ha pa6oTa Ip6xTe 3IpaBO p6KoxBaTKHte C DBe p6ue.
O Horato peHete DbPBO OTIOJy, BHIMaBaIte BepnraTa Da He ce ydapu BDbPBOTo.
Ako ypeBbT OTCHOu Ha3a, HMa onaCHOcOT HapaHraBaHe.
O Ipn npekbcbahe Ha pa6oTa Ta nnCne Pa6oTa, BnHaN n3HIOUBAIte yCTpOcTBOTOn H3BaHdaTe ePcEa OT KOHTaKaT.
BnHarn cIeTe pa6oTHoMЯcTo n OKoIHocCTTa 3a npedmetn, KOHTo MoT a NpHnHrT HapAHBaHn, INuHeHTN nn NOBpeu, n, aKo mTaKnBa, nOTcPaHraBaTe npEBapnteNo.
No-cneuaHNO, KOrato onpeJeIe No3nUraTcN 3a pa6ota, ce norgnKeTe Td a cTa6nHa N da HMa npEdMeTb, B KOHTo 6xTe MoJIn Da ce CnBHeTe.
Pn noBaJIaHe Ha IbPBeTa BnHaRn BHIMaBaiTe 3a NocOKaTa, B KOrTO DbPBoTo 1e NaIHe nnIe Ce N3TbPKaJI, H npEdbapntEnHO onpeJeTe 6e3oNaCHO MxCTO, KbDeTo 1e Ce OTdpbHHeTe.
① Ybepete ce, ye ypeBt en3HIOUeH
Ako 电Cbbp3aH KbM KOHTaKaT,doKaTo npeBHLIOHBATEJr e Hecb3HaTeJIHO 3aJeIcTBaH, yCTpOINCTBOTO MOKe HeOuaKBaHO da CTapTnPa, KOeTO MOKe Da DOBeDe Do 3IIOJLyKa.
② 3aDéηCTBaHe Ha cnYcbHa
Cne KaTo ce yBepnTe, Ye BepnraTa He e B KOHTaKT C MaTePnAna,HaTncHeTe cnycbKa H3anoHHepe p3aHTo, KOraTO cKOpocTTa Ha Bepnata Ce yBelenHi.
BHIMAHNE
O Korato BkIIOBaTe ypeDa, ce yBepeTe, ye Bepnata He e B KOHTaKT C MaTePnAla NnC HSeO DpyrO.
O No Bpeme Ha pa6ota He donyckaIte BepnraTa da BJIe3e B KOHTaTc Dpyr MaTePnaI nn npeMet. NocneuaJHo, KOraTO npNKIOUHTe C pR3aHeTo, Na3eTe BepnraTa OT KOHTaKT CbC 3EMrTa.
3ABEJIENKHA
DOniBaIteMaCNo CBOeBpeMeHNO,3aJaHeCe CBbPwN.
1. 06u npoueypr 3a p83aHe
(1) BkIIOHeTe 3axpaHbAHeto, DbPHeHN TpnoHa IeHO HAcTpaHa OT dPBoTO 3a p3aHe. 3aNoUHeTe p3aHTo YAK CJIeK KaTO ypeBbT DOCTnHE NbJHa CHOPoCT.
(2) Korato pehTe TBHko napye Ibpo, onpeTe oCHOBaTa Ha IINHaT B DbPBOTo H peHTe B nocKa HaDoJy, KaKTo e NOKa3aHo Ha Phr. 19.
(3) KoraTo peKeTe De6eNo napYe DbPBO, ONpeTe B Hero rpe6Ha, pa3nOIOJHcH OTnpEHa ypeDa, H peKeTe Ha loCTOB npHHcN, H3NOI3BaIKn rpe6Ha KaTO ONOPHa TOUHa Ha 3aBbPtaHe, KaKTo e nOKa3aHO HaΦr.20.
(4) Korato pekete DpBo xopn3oHTaJIHO, o6bpHeTe ypeDa HADCHO, Taka Ye WnHata Da e OTDOJy, IN dpbKTE rOpHATA qact Ha npedHaTa pBkoXBaTKa C IABaTc n pbKa. DpbKTE WnHata Xopn3oHTaJIHO IN onpete rpebeHa (pa3noJIOHEN OTnped Ha ypeDa) B MaTePnAIA. N3NoJ3BaIte rpebeHa KATO ONOPHa TOUHa Ha 3aBbPtaHe n pekeTe DpBoTO, 3aBbPtaIKu 3aDHaTa pbKOXBaTKa HADCHO. (ФИR.21)
(5) Horato peXeTe DbPBo OTdony, OnpTe Jeko rOpHaTa. Yact Ha uHaBbTO. (ФИr.22)
(6)Преди pa6oTa ce 3aNo3HaITe nOdp6Ho c HnHCTpyKcHInTe nPpemHHe TpaKTnueCko OByeHne IIN NOHe ce ynpaKHHBaTe C pR3aHe Ha TpyN Bbpxy Marape.
(7) Korato peXeTe Tpyn nn DbpeHn MaTePnAIn, KOHTo HMaT onopa, OcnIpyTe NODxOJaOnopa, KaTo r3aKpeNITe HEnoDBnHO Bbpxy Marape nn nno dpyr NaHH.
BHIMAHNE
O Korato peke Te Ibpo OToIy, mA onaHocTypeBt Da OTCKOH KbM Bac, aKO BepnraTa yIapn CInHO IbpoTO.
He peKeTe DOKpaI dbpBTo, 3aIOuBaIKN OToJy, TbI KaTO IMa OnaCHOCT WHaTa Da OTXbpKHe HaOpe 6e3KOHTpOJIHO, KOrATo 3aBbPWIte Pra3aHeTO.
He donyckaTe BnIIOyeHa Bepna Da BJIe3e B KOHTaKT CbC 3emrTa HnC TeJeHa Orpada.
2. PǎzáHe Ha KJIoHn
(1) P3aHe Ha KIOHn OT npaBO dbpBO: De6eIte KIOHn TbPBOHaJaHNo ce peXaT OT ToHk, KOrTO e Ha pa3CTOHNe OT CTBOLA Ha DpbBOTo. TbPBO OTeKHeTe OKIo eHa TpeTa OTOny, a CneTobA OTeKHeTe HAnbHNO KIOHa OTrope. HaKpaAOTpeXeTe OCTaHaJIata Yact OT KIOHa, HapabHO Cbc CTBOLA Ha DpbBOTo. (Φur.23)
BHIMAHNE
BnHaHc ne naTe oT naaun KIOHN.
BnHaHn 6bTeHe HaUpeK 3a OTKaH Na Bepurata.
(2) P3aHe Ha KIOHn OT OTeeHn DbPBeTa: TbpBO OTpeKHe TE KIOHnTE, KOtO He DoNHPaT 3emrta, a CneTOBa OTpeKHe Te3n, KOtO RaDOnHPaT. Korato peKHe De6eHN KIOHn, KOtO DoNHPaT 3emrTa, NpBBO OTpeKHe NOIOBnHaTa OTrope, CneT TOBa UeJIIN KIOH OTdoJy. (Φnr.24)
BHIMAHNE
O Korato peKeTe KIOH, KOHTO DonHpat 3emrTa, BHIMaBaIte uHaTa Da He Ce 3aKJIHH OT HaTnCA.
B noceHnna ean Ha p3aHeTo BnMaBaIte TpybT Ha DbpBOTo Da He Ce N3TpkoNn Bhe3aHNO.
3. P83aHe Ha Tpynn
Korato pekeTe Tpyn, pa3noJooHeH no HaunHa, nokaah HaΦnr.25, pBpBO cpeKeTe OKoIe edHa TpeTa OTdOly, cneT OBA OTpeKeTe DOKpaN OTrope. Korato pekeTe Tpyn, KOTo e npocTprH NaBb6HaTHHa, KaHTo e NOKa3aHO HaΦnr.26, pBpBO cpeKeTe OKoIO DBe Tpetn OTrope, cJeT OBA peKeTe HArope ot DOJIHaTa CTpaHa.
BHHMAHNE
BHHMaBaIte uHHaTa da He ce 3aKJIINHn B dbpBOTo OTHATNCKA.
O Horato pa6OTte Ha haKIOH, BuHaN 3actaBaIte OT roPHaTcTaPHa Ha Tpynnte. Ako 3actaHete OTdoHaTcTaPHa, OtpaHaHTe Tpyn MoKe da Ce n3TbPKaJIr KbM Bac.
4. Nobalna He Ha DpbBeta
(1)3aceK(HaΦur.27):
HanpaBete 3aceHa OT cTpaHata, B KOHTO NOCOKa NCKATE Da naDHe DbPBOTO. Dbl6oHHata Ha 3aceKa Tpr6Ba da 6bDe 1/3 ot dAmetbpa Ha DbPBOTO. HNKORA He NOBAJrTe DbPBeTa, 6e3 Da CTe HAnpaBnIN NOxOJaU 3aceK.
(2) 3aDcpe3 (2HaΦnur.27):
HanpaBete 3aJen Cpe3 OKoI0 5cm haXOpn3OHTaHnHa 3aceK n ycnpoeHNO Ha Hero.
Ako Bepurata ce 3aKJINHn No BpeMe Ha pra3aHeTo, cnpeTe TpnoHa nH3NoJI3BaIte KJIInHObe, 3a Da JocBO6oNDte. He peKeTe npe3 DpbROTO.
BHIMMAHNE
O NobaJIaHTo Ha IbPBeTa TpIbBa Da CTaBa No HauHH, KOHTo He Cb3DaBA OnaCHOCT 3a Xopa, Bb3dUuHN npOBODHn IN HAHaCraHe Ha MaTePnaJHn UeTH.
O 3aIbIKNHTeHNO cToIe OT rOpHaTa cTpaHa npn HAKIOHeH TepeH, TbN KaTO dPBoTO BepoTHO ue Ce N3TbPkajn CneI NOBaJIHeTo My.
PpeDna3Hmepn npnpa3aHe
3aXBaT/HaTHcK BbPxy BePnHHNr TpnoH
BnHaI npbXTe BepHHnTprnoH 3dpAo.
OcBeH TOBa He npInaraiTe No- roJAM OT Heo6xOJMnHa HATNCK. DOnbHInTeHata Cnla, npInararaHa Bbpxy BepnHHn TpnoH NO BpeMe Ha p3aHe, HMa Da yBeJIuHn CKOpocTtHa p3aHe. ToBa ige npTeOBapn DBnIrAteJI, ige BLOSh eFekTNBHOCTTa N ige npUHHIOBpeHa HDBnrAteJI nn WnHATA.
I3noI3BaIte ypeda, KOraTo Bepurata pa60Tu CymepeHa ckopocT.
IIO-KOHKpeTHO, KOrato Bepurata cnpe (3aceye) npaPi npeKomepeH hATnCK, MoKe da npeDn3BnKa HapahraBaHe nn NOBpeDa Ha ypeDa.
BepnroyIOBHTeI
O BepiroyIOBNTeIe pa3nOLOXeH Ha OCHOBHOT TOIIO ToHNO IOBepurata, KaTO cyHNKUHTaMy e Da npEJa3N OepaTopa da He 6bde ydapeH OT ckbcaHa Bepira.
O KoratoBepnataCeCKbca, CMeHete RcHOBa cbo6pa3Ho HNCTpyKUnnte B,MoHTaX (CMraHa) Ha Bepnata".
3ATOUBAHE HA BEPHΓATA
PNEyPENKDEHNE
3a da npedotbpaTne HnUeHTN, BnHaHn nKIOuBaTe npBHKUOBAteI N 3BaKaJaTe Ue IeIe OKTaKTa. OcbEN TOBa, KOraTO n3NoJ3BaTe BepNKHn TpNOHn, BnHaHn Hocete De6JI npKaBnU.
3A6EJIeHHKA
3aTohe BepnraTaN perynpaTe orpanuHHTeHa H NODaBaHeTO, KOITc Ce NaDa B cHTbPa Ha WInHaTa, KOraTO T e MOHTnpaHa KbM OCHOBHOTo TJIIO.
Български
Korato Bepirata Ce 3aTbH, DnRrAteJIr T BCRA qacr O T rIToCe HATOBAPBa n eFHKachOCTTa HamaJIraBa.
OnTmHaHaTa pa60Ta Ha ypea H3NcKBa YecTa noDpBxKa Ha BepnRaTa 3a noDbPkaHe Ha OCTpoTaHa.
1. 3aToUbaHe Ha ocTpneTaTata
JpBkTe KpbIaTa Nnla CnprMo OcTpneTo No TaKbBaHaun, Ye eHa neta OT HeHnna DnAmETbp Da H3JIN3aHaD BbPxA Ha OCTpneTo, KaT0 e NOKa3aHO HaΦnr.28. 3aTOeTe OCTpneTata, DpbKeHKn KpbIaTa Nnla NOD bFbIOT 30^ cnprMo WnHaT, KaT0 e NOKa3aHO HaΦnr.29, I aDpBkTe npaba, KaT0 e NOKa3aHO HaΦnr. 30. 3aTOuBaTe BCnHn OCTpneTa NOd eEHn HcbuN bFbI, B pOtnHBen CnyaH ePhiKaCHocTTa Ha p3aHe ue Ce Hapywn. PpaBnHInTe Brn 3a 3aTOUbaHe Ha OCTpneTata Ca NOKa3AHn HAΦnr.31.
2. Perynpahe Ha cTbNkata Ha noDaBaHe IPEyIpeXHEHNE
He IaIpaIte ropHata qacT Ha 6yfepeHnTe Cbbp3Baun 3BeHa n 6yfeepHnTe BOeun 3BeHa n He donyckaTe DeΦOpMnpaHe Ha Te3n YactN.
O Pn OrpaHnHTeJIHe Ha NpdaBaHTo Tp6Ba Da ce Cna3Ba YcTaHOBeHTe pa3Mepu HOpMn, Tb KaTO B IpOTIBeH ClyuA MoHe Da Hapache OnaCHOCTTa OT ObpaTeH ydAp HapaHraBaHe.
ByepHo Cbbp3Baao 3BeHO
ByeepHo BODeIoo 3BeHO
OrpaHnHTeJIte Ha noDaBaHeTo Tpr6Ba da 6bdaT NopeDeEH eHaKBO, Tb KaTO Te onpeJeT KOKo MaTePnaI Da ce noEme OT rOpHnPa b6 Ha 3b6a npn Pra3aHe.
Korato 3aToCbTe BepurTa, 3aDbJNHTeHNo npOBepBaTe OpaHnHTeJIte Ha nOdaBaHeTo Ha BCEKN DBA-TPn PbTN.
CLOKHe T 3a orpaHnHTeIN Bbpxy Bepurata, OCTabeTe orpaHnHTeIN Da ce BNkDa B KaHaJa n 3nnIeTe NpdaBaUaTc Ce ot 3a 6noHa YacCT C nIOCKa nnla. (33) (33) 3a orpaHnHTeIN n nIOCKaTa nnla ce npodaBAt OTdEInHo.)
Cne KaTo 3aHInTe OprpaHnHTeIa 3aKpbTlTe npedHaTa My qact Do npeduHOTcBCToHHe. (Фиг.34)
Cle3aTOBaHTo CIOKeTe BepnTaBbB BepnHO MacNo, 3a Da OTMNEte CTpyKHTe.
AHO He OTMnTe CTpyKkIe, BepnIa T u HnHaTa 6bp30 ue Ce N3HocrT.
IODAPbXKA IN IPOBEPHA
Cne pa6oTa npOBepTe BcKa qact n N3BbPwTe CbOTBeTHnTe DeIcTBnA NO NODpBXHkata Ppei np6npaHe Ha ypea.
PPEyPPEKDEHNE
No Bpeme Ha noDpBxKHa n npOBepKa, BnHaHn 13HIOUByaTe yCTpoiCTBOTO n 13BaXdaIte eNceJa OT KOHTaTa.
- He nocTaaybCBy Okpemnx periohax.
KomnJIeKT cTaHApTHOrO npuJaM MoKe 6yTu 3MiHeHn 6e3 nonepdKeHH.
ДОДАТСЕ ПИЛДДА (КУПУOTьСЕ OKРЕМО)
MaTnIOndJIa6eH3OpiuN
Kpyrnn HannoK
O 3'eHnhyBaoy6MeKyBaivrNbHH
Kpyrnn Hannok i 3'EnHyBaay O6MeKyBaiv Rn6nHn BnKOpNCOTByoTbcra Ila HaRoCTpeHHaHaHIOra. DoklaHniwe npix 3actocyBaHHaTaIe BnyHkTi «FoctpHHa3aHaHIOra»
O Koxyx IaHiora
IiD yac nepenecenHn a6o 36epiraHn 6eH30nnn 3aBKn 3aKpBaTe IaHcUor KOHyXOM.
KOMnJIeKT cTaNdApTHOrO npNlaAaM MoKe 6yTu 3MiHeH N 6e3 nonepedxehn.
OBJIACTI 3ACTOCYBAHHR
3araJIbHe npn3HaueHn: pi3aHHn DepeBnHn.
BCTAHOBJIENHRA (3AMIHA) LAHцIOTA ПИЛКИ
NONEPEDXEHNA
O 0u6 yHnKHyTN HeuaChnx BnnaKIB,3aBKnBnMkaIe npucptpi i BiD'edHyTe wTeNceIbHy BnKy BiD po3eTKN.
He BnKOpncToBnyTe IaHcyoBny a6o uHy nnKn, 0o BiDpi3HaTbcra BiD BkA3aHnx y po3diJi «TEXHIYXAPARTEPNCN」
OBEPEXHO
OJaraTe 3axnChi pyKaBnCi i6yDBe o6epeKHi, 0o6 He TpaBMyBaTnCra NaHcIOrm NIIKN.
NPHMITKA
O Npe3HimaHHaHaIgora BndaIITb TnpCy 3
KoIobKa 3MaUyBaHHaHaIgora,OTBOPy dIy MaCTnla
Ta na3a WnHi.
HaKoPiueHHa TnpC MoKe cnpuHHTn BHXiD
IHcTpymeHTa 3 IaNy.
O BnKOpncToByTe BiIDNoBIDHn Tn IaHcIora BiINOBiDHO Do Bk3aHnx TexHiHx XapaKTepNCtN. Y pa3i BCTaHOBLeHHra UHH HeBiNOBIdHOrTO npy, IaHcIg MoHe 3 3JeTI n i CnpuHHHT TpaBMvBaHH.
1. 3HimahnHa 6iHuOHi KpnuKn (MaI.4)
① NobepeHITb rBnHT, 0o6 nocna6nTu Horo.
② Nocna6Te HataKHHpoJHK, NOBepHyBUN Horo Ha nibO6ePa.
③ NObepHiTB rBnHT i3HimiTb 6iHy KpnuKy.
2. 3HimahnHaHouTa uHHu (MaI.5)
3HimaTe IaHIOI I uHHy B HApPmKy, Noka3aHomy cTpiKIOI.
- OJraHnHOBOro IaHcIora Ha 3y6caTe KOleco (MaI.6,7)
3aKnaIbIb IaHcUor 3a KineCb 5HHN, 3BaKaIOuH HAnpAmOk IaHcUra, a Notim npabnIbHO OJrHiTb NOro Ha 3y6uaCTe KOleco.
4. BctahOBJIeHHI 6iHoi I KpIshKII
① NObepHITb peryIaTOp HATrHy Ha 6iHn KpnuTaKIM YINOM, 106 KOHTAKTHa DInRAHka MexaHi3My HATrYBaHHa LaHCIOra yBIIUla y BiINObiHN OTBip Ha WnHI, i npNkpiniTb 6iHy KpnuKy (MaI.8).
② OdHH pa3 nobephiTB RBHHT, IO6 TmMycOBO HOrO 3aKpInHTn (MaI.9).
5. PerylIOBaHHHaHTaRy IaHcIora (MaI. 10)
O PiHnBw Bropy KIneCb WmHn, NOBepHitb peryIaTOp HATry, 06 BiDpeRyIIOBaTu HAraIaHcIora.
O NobepTaIe peryIaTOp Bnpabo 36iJIbWeHHHaTAYaHcIora iBnIO -Ja3MeHweHH.
6. Npebipka Hatary IanaIora (MaI. 11)
BidperyIIOHe HataI IaHIOra TaK, 0o6 uiINHa MIX npNbiHOIO IaHKOIO i WnHOIO pRn IerKOMy NiHIMaHHI IaHOrA HaedcepeDInHOIO WnHNCTaHOBnla BiO 0,5 do 1 MM.
7. 3aKpyyBaHHr TbHnTa (MaI.12)
① 3aBepwnBwn peryIOBaHHn, nIHIMtB Bropy KHeuB uHHn i 3akpyTITb rBnHT do yNOpY.
② BoNT MaE 6yTu NaDiIHo 3aKpyeHn.
NONEPEXEHNA
Iicra peryIIOBaHH HaTary IaHcIora nepeBipTe, YI rBnHT NOBHCtIO 3aKpyeHn.
HEnOBHicTIO 3aKpyeHn rBnHT MoKe CTaTN npuHHoTO TpaBMyBaHHr.
OgIaIPiIaIroTOBHa Do BnHOpNCTAHH
IpepeBnKOpNCtAHHm BnKoHa'Te HAcTyNHy nepeBipKy Ta NiDroTOBky.
NONEPEXHEH
O NpekehHaTeC, 0o DHepeJIO HnBHeHHaHbM B6yTe KOpCTyBaTncA, BiDNoBIdae BnMOrAm Do HnBHeHHa3HaueHnMaHa KaNleuHa Kopnyci Bnpo6y.
O uo6 yHnKHyTu HeuaChnx BnnaKnB, 3aBKnBnBOHOHTe KpOKn 1-5, 0o6 yneBHNTncb, 0o WTeNCeJIbHy BnIHy BiD'edHaHO BiD po3eTKn.
He iKc Ie KHOINKy po36IOkYBaHHB HaTnCHyTOMy cTaHi.
KIO nepemknauBnadKOBOyBMKHeTbC, IHCTpymENT MOKe HeouikyBaHO 3anyCTNTuC i CnpuHHTN TpaBMvBaHH.
1. NpebipTe, H BmHHeHO nepemnau
O NpepeKoHaHTecra, 0 npemMkaJ KNBHeHHa3haxoDHTbCRA BnoJKeHHI BUMKHEHO.
KuO wTenCeIbHa BnEJa NiKNoyeHa Do pO3eTKn, KOJI npemHKauchxOAnTbcB NOLOKeHHY VBIMKHEHO, IInCTpyMeHT heraHOnoNouHe npauOBaTu, a ce MoKe npn3BeCTn Do HeUaCHOrO BnnaDky.
O RaKIO yBIMKHyTu nepemHKaU, ODHouacHO HaTnCKaOuH KhoNky po36IokyBaHHiaHCTpyMeHT yBIMKHeTbCra, a NicJa BiDnyckaHHpeMnKaHa BmKHeTbcra.
2. Npebipka noobhybaIhoro shypa
Hko po6o4a DllnHa BidaJeHa BiD JxpePa HnBHeHH, BNKOpNCTOByTe NODOBKyBaHaeKHOI TOBunH Ta HOMHaLy HaBaHTaKeHH. BnKOpNCTOByTe RkOMora KOPOTwn NODOBKyBaH, RKOTo DOCTaTHbO DnBaWNx Notpe6.
3. Ipebipka Hatary lahucora
O KaHnHaTnHaIuHa He BiDpeYnbObaHo HaJeHHM HnHOM, icHyE pn3nN nOwKoJHeHHaLauOra a60 nnHn Ta BnXoMy IHcTpymeHTa 3 NaNy. BiDpeYnIOte HATr IaHzUra BiINOBiHO Do KpOKIB 5-7 po3diny «BCTaHOBJEHn (3amHa) LaHOra nIIKN»
O ToKn IaHucr HOBn, BIn JereKo po3TgYeTbCra, Tomy HaTc nIi peyIpaHno nepeBiprTa 3a noTpe6n KopuIyBaTu.
O Hpim toro, noTpi6Ho nepeBiprTn, nn haDiinHO 3aKpyeHOrBnHT.
4. Npebipka ralbma IaHcIora (MaI.13) IONEPEIXEHHA
O Xoua raIbMo IaHcIora e MexaHi3MOM abapiHoi 3yHHN, NOKlaDaTnCra IInHe Ha HbOro He MoXHa. IpaioTe 3 iHCTpyMeHToM O6epEHHo, U6 yHNKHyTN pnsuhy 3BOPOTHO ydpy.
O TaIbMo IaHcIOra npn3HaueHe dIe BnKOpNCaHHB abapiHnx CITyaicx i nId Yac 3anycky IHCTpyMeHTa. He BnKOpNCTOByTe Noro 6e3 noTpe6n.
O lio6 hakonueHa Tnpca He 3aBaKaJa pyxy raIbMa IaHcIora, peryIaRPHo NCTbTe IHCTpyMeHT.
O TaIbMo IaHIOra E BaJINBIM KOMNoHErTOM, 0r rapaHTye 6e3neKy BHKOpNCtAHHH IHCTpyMeHTa. RaKIO Bac He BnaIaTObYe po6oTa rAIBMa, 3BepHiTbcB B aBTOpN3OBaHn cepBicHN ueHr HiKOKI dJa BHKOHAnHr Orlny Ta peMOHTy.
Talbmo IaHcIora - ue MexaHi3M abapiHoi 3yNHHKIIaHcIora IIIKn Ha BnAdoK 3BOPoTHoro ydapy TOnio. (DInBtbcra «PpUHH 3BOpOTHO rdy Ta 3acob Noro yHNKHeHHra').
yKpaIHcbKa
Bhacniok 3aiaHHraIbMa IaHcIora NOtOBXOM BaKeIe BnepeIaHcIg NnK 3yNnHReTbcR.
Iio6 BiInyctnTn raJbMo, NotarHITb BaXilb rAlbMa do ce6e.
Pn nepeBipci po60tn raIbMa IaHcIora 3aBKn BmNkaTe npnaD, BiEeHNyIte WTeNCelHy BInKy BiD PO3eTK, aKTHByIe BaXJIb RaIbMa Ta NotraHITb NaHcIg nnny pykoIO.
JaHOr He pyxatmEtbcra, ce 03HaataMe, ralbmo npaioe.
ПРИМITA
8. Ipebeipka BHTpaTn MaCTnla (MaI. 15, 16)
O PicIa BBIMKHeHHIHCtpymeHTa MaCTnIO NOuHaec aBTOMaTHUHO 3MaUyBaTu NaHcIOr Ta UINHy NIIKN.
O RaHIO MaCTnHO He 3'ABNTbcr Ypee3 2-3 XBUNHH nICJRA 3anycKy IHCTpyMeHTa, nepeBipTe, Hn HabKOHO KOLO6Ka NODaqi MaCTnHa He HaONuNlaCra Tnpca.
(ДиВ.«ЧишенихолобкадлmaMactILA»). (ДиВ.«ПepeBipka mactILA laHцюг»)
- PaIIMO KOpIcTbATnCABOTOMaTHHIM BmHKaHem i3 3axNCTOM BiBnTOky Ha 3eMnlo a6o npnCTpOeM 3axNCHO BiKJIIOUeHHA.
Pobota nepemukaua
Hkuo yBIMKHyTN nepemnKaU, ODHoyacHO HaTnCKaIOuN KHOJky po36LOkyBaHHaHaIOr nnHnOepeTaTMetbCra (Ma1.17).
KHO KhoNky po36IOkyBaHH He HaTnCHyTO, yBIMKHyTN nepemukau HEMOKJIBO.
IicIaBIMKHeHHnpeMnKaaHaHcIg npOobHyoe oBeptTaTnca, NOKn Bn He BiDnyCTnTe nepeMnKa.
IicraBIDynckaHHnnepeMnKaaCnpaOboye ralbmo,
yKe 3ynHRe o6eTahHaanuora.
NONEPEДЖЕHHA
He iKcyTe KhoNky po36IOkyBaHHB HATNCHTOMy cTaHi.
JaHIO nepemHKaBnadaKOBO yBIMKHeTbcra, IHCTpyMeHT MOKe HeOciKyBaHO 3aIyCTNTncra i CnpuHHNTn TpaBMyBaHH.
BukopncTahnaikcaTopa BnJIKN
ΦikcaTop wTeNceI npn3NaHEni IaI naonepeJKeHH BITrIyBaHH wTeNceJIra 3a Ka6JIb. (MaI.18)
POBOUH INPOUEC
NONEPEXEHNA
IpeBnKOpNCTaHHm nepekoHaTecb, 0rTaIbMo IaHOra npauoe.
O PiIaC KOpNCTyBaHHH IHCtpymeHTOM MiHOTpHMaTe Horo oboma pyKamn.
O Po3nnIIOUOn K0IoOy 3Hn3y, CTeKTe, Ioo6 IaHcIg nnKn He BdapAeB No Hi.
KuO cnla 3BOpOTHO yApy BiUToBXHe IHCTpyMeHT, ce MOKe npn3BecTn do TpaBMyaHHa.
O PiД yac nepepb y po60ti a6o nicIЯKHyHЯ p60tN 3aBxDN BmHKaIte npncTpI i BiI'EDHyIe TTeNCeJIbHy BnKy BiDpo3eTKI.
3aBKnOrJaTepo6OyDJIaHkyTaHaBkoNlHIO Tepntopio.IpeBipTe,HNHeMaeHaHINpEpmetIB, KMIoKytbpn3BecTNOtpaBMvBaHHa,HeuacHOro BnnaKy a6036oB p6oTo IHcTpymenta.KeTO TaKi npEpmTe, np6eptbix 3aBvachO.
3okpema, BnbpauOn Micue IJn HIR, nepeBipTe HauiHicTb onOp Ta BiCyTHicTb npedMeTiB, 06 kIMoKHa CnITKNHYtncr.
Iiud 3pi3aHHn DepeB 3aBKn peTeBbHO Bn6npaHnHaPmOK, y Akomy DepeBO BnaDe qn NOKOTnbC, i HanepeBn3Haayte Micue Jn 6e3neuHoi eBAkyaui Ta IJx Do HbOro.
① NpeBipka BmKHeHH npucTropo
KIO WTeNcBHy BnHKy NiKIOUeHO Do PO3ETK N B cey hac nepemHKaH HeCBiIDOMO BBIMKHeHO, ToI npCTpi MoHe HecNoIBaHo 3AnyCTNTNC, IIO MOKe np3BecTN DO Heaachoro BnnaDHy.
② YbIMKHeHHnepemnKaHa
IpebeipnBwn, 0o IaHcIg nnKHe TOpKaetbcr DepeBa,yBIMKHiTb nepeMnKauy i pO3noyHt b pi3aHHa KOnI NaHcIg Ha6epe WBNkOCTi.
OBEPEXHO
O Npepd yBIMKHeHHm IHCTpyMeHt a nepeBipTe, Yn IaHucI rnnk He TOpKaetbcra CToPOHHix npeMetIB nn MaTepiJIb.
OPiJ yac po60n CTeKHe, 06 IaHcIg NnIKn He TOpKaBcT CToPOHHIX npEdMeTIB YN MaTepiAJIb. 3OkpeMa, nCnI 3aBePweHHr po60n He KnaDiTb IHCTpyMeHr TaK, 06 IaHcIg TOpKaBc3emNi.
PIMMITKA
3aBvacho 3aJIbBaIte B iHCTpyMeHT MaCTnIO, IIO6 3aNo6irTu NOrO NOBHomByuHepNaHHIO.
1. Tnnobi po6oqi npoceypn
(1) YbIMKHTb JHbIeHHa IHCTpymeHTa, TpMaOuN NnKy Ha neBHi BiDcTaHI BiD DepeBa. Po3NoHNaTe piaHHa LiWe NiCIA TORo, Ra IHCTpymeHT 3anpaQoe Ha NobHi WbNDKOCTi.
(2) Po3nHIOUOHToKHy depeB'ry 6aIky, nocTaBTe HxHHo yactHny wHHN BnPHTyJdo depeBHHi nIJIraTe B HAnpRMrky DoHN3y, JIK NOKa3aHO Ha Man.19.
(3) P03nHIOUOHToBCTy 6aIky, noCTaBte 3y6uATnyop Ha nepeDHI qACTHI iHCTpyMeHTA BnpNTyJdo DepeBHHi I nIIraTe 3a npHcUNOM BaKeJI, BHKOpNCTOByOCHy6uATNYop y RaKocTi ToHKn OnOpH, kN OKA3aHO Ha Man.20.
(4)Плдчсюнтабного рo3иювань noBepHITb KOpnyc IHcTpymeHTa BnpaBO,Tak шOB shHa nINKn Po3taWObYBaIacb 3HN3y,ITpImaIte LiBOO pyKIO 3a BepxHIO qactHy 6iHoi pyKN. TpImaIte WInHy ropnsHTaJIbHO,a 3y6uATn yNOp Ha nepeDHI qactHi IHcTpymeHTa NOCTaBTE Ha DepeBNHy. BnKOpncTOByOuN 3y6uATn yNOp y RaKocTi ToUKn onOpN,Bpi3aIteCb y DepeBNHy,NoBepTaOuN pyKIO BnpaBO (MaJ.21).
(5) Bpi3aOuHcB y DepeBnHy 3Hn3y, 3JIeKt TopKaITeCg DepeBa BepXhBoIO YacTINHO O WnHN (MaI.22).
(6) Okpim peTeIbHOro BnBcEHHa IHcTpkyi, nepu HIX NOaTH KOpNCTyBaTnCRA IHcTpymeHTOM, nonpaKTHKyItecra 3 INIKOIO, HApNKlaIaD, PO3INIOUOn KoIoOn Ha K03Jax dJa pyHOrO p03NIIOBAHH.
(7) 3a6e3neuYte HaJIeKHy NiItpmky 6aIOK Ta KOIoN pepeo3nIIIOBAHHM. ΦIKcyIte ix 3a DonomorO Ko3JIb a60 iHUnx BiIDNoBIDHX 3acO6IB.
OBEPEKHHO
OПд ус розиювань колои 3ни3уВ pa3i сиьного 3iTKненя LaHцORA 3 DepeBUNHO icHy e pn3NK 3BopoTHoro ydapy i BiДшTOBxvBaHHI nHCTpyMeHTa B 6ik KOpNCTyBaHa.
O He po3nIIOJTe KOLOHy NOBHCtIO 3HN3y DOROpN, OckIbKn B TaKOMy pa3i icHy e He6e3neKa HEKOHrpoJIbObaHO KNDka WInH Bropy nicJra 3aBepseHHa po3nIy.
3anobiraTe doTOpky BBIMKHeHOI nIIKN Do 3emNi 3aropoki 3dpotraHOi citKn.
2. 06pi3aHHraIIOK
(1) O6pi3aHHr rIOH Ha JHBOMy DepeBi ToBcTy rIKy cIiD CNoHaTHy 06pi3aTHn Ha neBHIN BiDCTaHI BiD CTOBbypa DepeBa. CNooyATky po3nnJraTe npN6n3HO TpeTHy diaMeTp a RIKN 3HN3y, a Notim DopiXe II 3ropn. Nicna zuoro 06piKTe 3aIIuWOK rIKn npn CTOB6pyi (MaI.23).
OBEPEXHHO
O Bydte o6epexhi, 06 riHa He Bnla Ha Bac.
O 3aBKn 3BaKaITe Ha NMOBipHicTb 3BOpOTHOyDapy.
(2) O6pi3aHHr iIIOK 3i3pi3aHnx DepeB CnooyatKy o6p3aTe rIKn, kI He TopKaHObCra 3eMJI, a Notim Ti, 10 TopKaIObCra. O6pi3aOuN TOBcTy rIKy, 10 TopKaEbCra 3eMJI, cnepyo3nnJrte II do NOLOBHN 3rOpN, a Notim DonnJrte 3H3y (MaI.24).
OBEPEKHO
O6p3aUcH rIkn, 10 TOphAIOBc8 3eMJI, 6yDbTe o6peKHi, 106 1nHa PIIKN He 3irHyJNac nId HATNCOM.
Ha 3aBepwalbHomy etani o6piaHHraIOK BpaXoBynte,IO KOLOda MoKe paNTOBO NOKOTHTNCrA.
3. Po3nIIOBaHHaHOJIO
PiJ yac po3nHOBaHH K0LOJN,po3TaIIOBaHOi,RAK noka3aHo Ha Man.25, cnoatHy po3nJIyTe TpeTHy diaMeTp a KOLOJN 3HN3y, a NotIM dOnnJrte II 3ropn.
PiHac po3nHOBAHHa KOIOH, 0o Mae NopoKHHHy, HnOKa3aHO Ha Man.26, CNoHTy po3nHJrTe Dbi TpeTHn DiAMetpa KIOO3rOpH, a NotIM DoNNJIrTe II 3HN3y.
OBEPEKHO
O Ipaoute obepeKHo, 06 uHa nKn He 3irHyIacn HATNCKOM BCEpeDNI KOLOn.
O IpaouHa cxnI, 3aBKnCTiTe Bnue KOIOJN.
KoTO CToTn HnXy e no cxny, BiPizHa YactNa
KOLOMMOKe NOKOTNTNCr y BaWOMy HanpymKy.
4. 3pi3aHHA DepeB
(1) 3po6itb niDnHIOBaHHa (1)K NOKa3aHO Ha MaJ.27): 3po6itb niDnHIOBaHHa B TOMy HAnpMky, y Akomy notpi6Ho 3BaJIHTn DepeBO. IIn6Ha niDnHIOBaHHa MaE CTAHOBHTn 1/3 diAmetpa cTob6ypa. He 3pi3aIte DepeBO, He 3po6NBni NiDnHIOBaHHa.
(2)3po6itb Haipi3 i3 60ky, npotnleJHHoro NaDiHHo DepeBa (2)K nOKa3aHO Ha Man.27): 3po6itb Haipi3 i3 60ky, npotnleJHHoro HnpanMky NaHHepeBa, Ha 5 CM Bnue i napaleJbHo do Ropu3OHTaBHoro niDnNIOBAHHA.
JaHIO JaHIOr 3acTpRHe B DepeBnHi niJ yac CnNIOBaHHra, 3ynHITb nnKy i BNTaHITb II 3a DonOMorOIO KInHIB. He npOnNIHOte CTOB6yp 3a Diametpom BiD noaTKy Do KINz.
OBEPEXHO
O DepeBa notpi6Ho 3pi3aTuK, uo6 ix naHnHa He cTaHOBnIO He6e3neKn DnIaHoeT Ta 3arpo3n NoWKoJKeHHa LiHi eNeKTponepepa Yn IHnx 06'ekTIB.
O IpaucuHn Ha cxnI, cTiNe Bnue DepeBa, ockiBkn nicna naHHa depeBO MOKe NOKOTNTNCBHN3.
3axo6e3neHn iud pa6oTn
TpmaHHaTOBxaHHaHaHIOBOI NIK
3aBKnHaaiHNOyTpMnyTe NJIky.
KpimToro,piqac KopncTyBaHHnIKoHO He DOKkadaaTe 3aBnx 3ycnIb. PnpKladaOuHnHaMipHy CnIN Do IaHcIgOBOI NIIKN, BN He 36iJIbWnte Wbndkocti piahnn. Ce IInwe cnpnuHnHTb 3aNBe HabaHTaKeHH Ha DBnHy,peewKOJaTHme po60Ti Ta npn3BeDe do nolomKn DBNyHa a6o wHn NIIKN. BnKOpNCtObyte iHCTpyMeHt i3 paioHaJbHOU WbndkicTIO. 3OKpema, kkuo NIIKA 3ynHnTBcR (3actPraHrHe) BHacnlIDOK HAdmipHO r 3ycnIJIa, ce MOKe npn3BecTN DO TpaBMvBaHH KOpNCTyBaHa a6o BNXOdy IHCTpyMeHTa 3 naDy.
YIOBIOBauHaHIOra
O YIobIOBau IaHIOra po3TaioBaHH Ha npBODHI roIbci 6e3nocepEHHo iJ IaHIOROM dJra 3anobirAHn MOJIINBOCTI TpaBMyBaHH KOpNCTyBaHa IaHIOROOI IIJIKN PO3IPBAHIM LaHIOROM.
O Y BnnaKy po3pNBy naHcIora nnHn 3aMiHt b Noro HOBm, 3BepHyBwncb do po3diy “BctaHOBJIeHHa (3amHa) naHcIora nnIKN".
TOCTPIHNAE3LAHIOI
NONEPEXHEH
Uo6 yHnKHyTu HeuacnX BnnaHb, 3aBKnBnMkaIe nepemKaayi BiEeHnyTe WTeNceIbHy BNKy BiD po3eTKN.
Kpim TOrO, npaIooyn 3 LaHcIyorom, 3aBKn OJraTte cyynki 3axnchi pykabuci.
NIPMITHA
TocpiIb IaHIOg I peryIIOte 06MeKyBaU rIi6HHn nocepeDNI HiHn, He 3HimaOuN IaHIOg i3 IHCTpyMeNTa.
YkpaIHcbKa
Koln IaHcIg nnKn 3aTyNlHOETbcra, 36IbWyETbcra HabaHTaKeHH Ha DBNrHy Ta iHwi deTaJI IHCTpyMeHa i noripWvETbcra efeKTnBHCtB po60Tu.
IJIa 3a6e3neueHH ONTImaJIbHOI npOdyKTNBHOCTi IHCTpyMeHTa peryIraRHO roCTpiTb IaHcIg nnIKn.
1. TocpiHnJe3
TpmaTe KpyrHn HAnIOK i3 Ha6opy 6iJa Ie3a
IahUora TAK, Oo6 OndHa n'ra Ta Noro Diametpa
BnCTynala 3a Bepx Ie3a, JN NOkAsaHO Ha Man.28.
Tocptiptb Ie3a, TpmaOuN KpyrHn HAnIOK nID
KytOM 30^ BiD WHH, JN NOkAsaHO Ha Man.29. Pn
Cbomy KpyrHn HAnIOK CnID TpMaTHn PnRAMO, JN
NOKa3aHO Ha Man.30. Yci Ie3a LaHcIora 06OB'RAKOBO
CnID Tocptn NiD OndAkoBIM KytOM, iHaKwae
eFekTNBnICTb po6OTn IHCTpymEnta noripwnTbcra.
BiNoBidHi Kytn 3arOCTpOBAHHn Ie3 BkAsaHO Ha
MaI.31.
2. PeryIIOBaHHo6MeJyBaHa rJIbHnHN IONEPEDHEHH
He 1yte Bepxhi yactn HnyopnHex 3eHybaIbHnx i 3axncn npBIDnX IaHOK Ta o6epiraTe ci deTalii BiD 6ydb-koROpoDy deOpmaui.
O PerynobAHn O6MeHyBaiv IIN6HnMae 3iInCHOBaTNC BiNObiHNO Do po3MipIB Ta fOpM MaTepiAIB, iHaKHe MoKe 36iNbHTncr NMOBipHicTB 3BOPOTHO yApY, 0 MoKe npn3BeCTn Do TpaBMyBaHH.
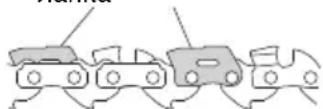
YnopHa 3'EnHyBaIbHa IaHka
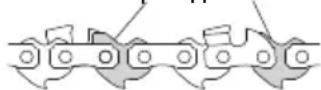
3axncha npBnHa nHaKa
O6MeKyuBayi TnBnHn CJIa BnpiBHTn OHaKOB0, OckIbKn BOHn BVKnOpNCOTByoTbc DaIpeRyIOBaHHa 3aIIn6LeHH NIIKn B DepeBHy.
Haroctpiooun IaHucIg nnKn, nepeBipraTe 6mbexyBaaynnbHH KooHHn dpyn qn Tpeti pa3.
Po3mictiB 3'eHyBaay o6MeKyBaivrIinHnHa IaHcyTak,io6o6MeKyBaaibyIO BnIDHO BHOLO6Ky, i 3a DOnOMOIO pIacKOHO HnJIka BpiIBHnTe YactHy, 0o BnCTynae 3a MeKi 3'eHyBaHa (MaI.33) (3'eHyBaay o6MeKyBaivrIinHnTa PnIackn HAnIOK npOdaTObCg OKpEmo).
Iicra niHnHOBaHHo6MeKyBaayrN6HH, 3aKpyrltbno npepdHIO qactHy, k6yNo do cbooro (Ma).34).
IicJIra roCTpiHHaHcIora 3aHypiTb Noro B MaCTnlo dJaHaHcIora, 0o6 3MHTuOwypKn.
HkuO owpyn He 3MHTn, IaHciI i WnHa nnKn WbNDKo 3HOwYBaTMyTbcra.
TEXHICHE OBCJLYTOBYAHHJI INPEBIPHA
Iicra BnKOpncTaHHBnHOHaTe orJa Ta 06cLyroByBaHH KoxHoi DeTalipnepe 36epiraHHaM IHCTpymEnTy.
NONEPEXHEH
IiD qac Texo6cLyroByBaHHra Ta nepeBipKn 3aBKnBIMnKaIte npncptpi i BiD'EDHynte WTeNceJbHy BnKyBiD po3eTKn.
1.Ornaaniora
O NepioDnH OOrJaIe TaHcIor. RaIIO 3 IaHcIorOM Uocb He TaK, 3aMIniTb NOro BiNObiIDHO Do BKa3IBOK y po3diI «BCTaHOBJIeHHra (3aMiHa) LaHcIora NIIKNU»
O IpepebipraTe HaTg IaHcIora i HaDiHicTb Noro KpInJIeHHJ.
O PnHHHb KOpNCyBaHHI HCTpymeHTOM, RAKIO IaHcIg 3atynITbcra, I HarocptPiB HorO BiNobiDHO DO BkA3IBOK y po3diI «FocpiHHIe3 IaHcUora».
O PicIe BnKOpNCTaHHI HcTpMeHTa 3MaunyTe IaHIO Ta WHy NIIKN MaTNIOM JIra 3anobirAHK Kopo3ii.
OBEPEKHHO
PraiouOHy 3 LaHIOrOM, OJraIe 3axnChi pyKaBnCi, 06 3anobirtn TpaBMyBaHHIO.
2. OuHsEHHa 6iHoI KpHsKn (MaI.35)
BntpiTb 6yNb-9i 3aIuKn TnpCn Ha DeTaIax iHCTpyMeHTa.
NPMMITHA
Ipeed uuueHnM 6iHoo KpnKn, BiDcHy rAibMbHOCTpiKn, JOno6Ka IJMaTnHa i HINn NnIKN3himiTb LaHcIg BiNObIDHO Do BkAsIBOK y po3diI «BctaHOBLeHHra (3amHa) LaHcIora nnIKN».
3. YnueHHa Holo6Ha JIy MaCTHla (MaJ. 36)
IpeeduueHHm HoNo6Ka dJa MaCTnna 3HimItb 6iHy KpnKy Ta uHy nKn.
4. YnueHHa nnHn nlln (MaI. 7, 37)
Htnpca 3akynopntb na3 wnnn a60 holo6ok dna Mactnla, MaTNO He nOdaBaTHMeTbc8, 1o MoKe npn3BecTN DO BNXOy IHCTpyMeHTa 3 naNy.
Nicra BnKopncTahHn IHcTpMeHTa Ta niD qac 3amHH naHcOra 3HIMITb WnHy i BnDaIITb BCIO TnpCy, zo HAKONNnHnAcb y Na3i. (DNBtbcr «BcTaHOBJIeHHa (3amHa) nAHCJORA nnKn»).
5.OrnhaTe 6mexyBaayanuora (MaI.38)
O6MeKyuBaJnaHcIora He dae IaHcIpy NnIN BApHTN onepaTopaBpa3i po3pNBy a6o nocla6JIeHHra IaHcIora.
O6MeKyuBaHnUra Ta 6iHy KpNShKy o6'EdHaHO B OndHy CtpyKtpy.
OrnHbTe o6MeKyuBaYnaHcIora, 0o6 nepeKoHaTncy y BiDcyTHOCTi NOkOKeHb.
6. IpepeBipka MoHTaHHnx TBnHTiB
Perynpho nepebiprnte BcIMontaHHI TBHHTNI CTKe 3a Tm, 06 BOHN 6yHn HaDInHO 3aTARHyTI. KIO BOHN NocnaBnncr, HeraiHo 3atRHiTb IX 3HOy. Kaio cboRo He 3pO6nTu, Taka HeD6aNICTb MOKe npn3BeCTn Do HeuacnX BnnaKIB.
7. Texhichu o6cnyrobyBaHHa BnryHa
TolOBHM KOMnoHEhTom eJeKtpoiHcTpymeHTy o6MOTKa DnRgamma.
Pnndinrte HaJIeKHy yBary TOMy, 06 6MOtKy He 6yIIO NOWKoJKeHTo Ta/a6o Do He Ie IOTpaIIIO MaCTNIO a6o Boga.
8. 3amHa ByrilbHnx zuTOK
366 36636678 Bawy 6e3neky 3axnctnB iD ypaKeHH eJekTPnHm CtpymOM, orJa i 3amiHy ByrIbHnx 9iTOK cboRIO nCTpyMeHTa cnID npOBODnT TJIbKN B YNOBHOBAHEHOMY CEPBICHOMY CEHTPI HiKOKI.
9. 3OBHIMH OYNCKa
JaHIO JaHcIOrOba NIIka 3a6pydHnITbcra, npoTpiTB II M'HOOCyXoHOraHupKIO a60raHuHypKOIO, 3BOLOKeHO B MnIbHomy po3HHi. He BNkOpNCTOByte dIra ZbORo XloPHi PO3HHNK, 6eH3HN a60 PO3HHNKn IJr foap6, OCKJIbKn BOHn MOxTy b NOWKODHTN nlaactMacOBI qACTHHN.
10.36epirahn
PiJ Yac 36epirAHnIHCTpyMeHTy BHKoHaIte OunueHH Ta o6cnyroByBaHH KOHooI DeTani Ta BCTaHOBITb KOKyx IaHOra Ha WnHy NnKn.
36epiraaTe naHcIy noNky no3a MeKamnDocxHHocTi diTei 3a Tempepatyn He Bnue 40^
OBEPEKHO
PiI yac po6oTu i DOrnA dy cIi 6paTu Do yBaru MicueBi HOpMn i CTAHapTu.
BHBIP AHCECYAPIB
IpepiK akcecyapib daHoro npncTpoIO Bka3aHO Ha ctopiU 235.
TAPAHTI
Mn rapaHTyEmo, 0o aBtOMaTnHi IHcTpymeHTn HiKOKI BnroTOBHeH 3rIdHO MicueBnx BkazIBOK. rapaHTiHa po3noBcOJHyEeTBcRa Ha deΦeKTn a6o NOuKOJKeHHaYepe3 3IOBKnBaHHa, HnpaBnJIbHe KOpNCTyBaHHa 6o 3BnuAaHne cnpauOBaHHa. RaMu Bo MaTe ckapn, 6ybJaCKa, HadiWnlb abTomatuHn iHcTpymeHT, He po3bpaOOn Ioro, i3 rAPAHTIHHM CEPTNIKATOM, AKN 3hAxOOnTbcB KInci IHcTpkyKci, do ABTopn3ObaHOro cepbichoro zentpy HiKOKI.
InΦopmaia npo wym ta Bi6paio
BmiprHi BeJHnHn Bn3HaYeHi 3riIHO EN60745 i Bn3HaHO TaKIMN, 0o BiIDNoiDaIOb ISO 4871.
BumipraHH pIBeHb notyHXocTi 3Byky B cnibBiIDHOweHHi A: 108 d5 (A)
BnMipraHni piBeHb TnCKy 3ByKy B cnIBBiDHOWeHHi A: 95 dE (A)
TnxmbaK:2d5(A).
OdaaTeHaBvHnKn.
Пове 3начени Вибрацii (ВeКТОРна сумma ТрпakciaлььHorо) визниета зriДно EN60745.
ah=4,0M/c2
Ioxn6kaK=1,5M/c2
3a3HaeyHPiBHe B6paui 6yB BmipHn 3rIdHO CTaHapTHOro Tecty i 6yB BnKOpNCTaHn Pn NopiBHHI IHCTpyMeHTiMiK Co6oH. BiH MoKe BnKOpNCTyByBaTnCra DnI NepBHHOrO Bn3HaeyHH BnLIHy.
NONEPEXHEH
O Bi6paizi niD yac cnpaBHHbOro KOpNCyBaHHMoKe BIdpi3HrTnCBAID 3aABNeHOI, 3aJeKHO BID cnocoby 3actocyBaHHHInCTpyMeHTy.
O Bn3haityb 3axoyn 6e3neKn IJy onepaTopa 3riHOn npaHTnHOro 3actocyBaHH (6epyN Do yBarN Bci YactHH pOboYoro cIKNy, Taki Jk BmHKaHH IHCTpymEnTy i HOro pObotn BXOLOCTy Ha dOtaTOK do BnKOHHaHH poOoux 3aBdaHb).
NPMMITHA
Yepe3 noctiHi DocJIiJHKeHH i po3BnTOK, Rki 3diNCHoe HiKOKI, TexHI XiapaKTepnCTnKN MoKyTB 3miHOBaTnC6e3 nonepeJKeHH.
(HepeBoOpnHaBbIXHcTpHuN)
CHMBOJbl
IPEdYPPEKDEHNE
Hnke npBedeHb CnMBOJIb, HcNoJIb3yEmblEДЯ yCTpOJCTBa. Npeed Haayalom pa6oTBI 06a3aTeIbHO y6eIHTecb B TOM, YTO Bbl NOHMaete Hx 3HaueHHe.
c) OToeHNHtE WTeNCEbHyIO BnIky OT HCTOuHNHa NHTAHN N/INN NOPTaTHBbI IN 6aTapeHbI NCTOCHN INHTAHN O T 3JeHTPOHcHtpMeHtA nepeD HaayanOM BbINOJIHeHHa KaOH-JIn6o H3 peryIHpOBOK, nepeD cMeHO npHaJdLeHHocTe Hnn XpaHeHHem 3JeKTPoHcHtpMeHtOB.
Takne npoФинаKTnueChne MEPb6e3OnachOCTnymeHbWt OnaCHOCTb HnpeHaMepeHHoroBHLIOUeHnДBvraTeIg 3NeKTPoHnChtpyMeHTa.
d) XpaHnte HeCNoJIb3yEmbIe 3JIeHTpOHnHCTpyMeHTbl B HeOCTynHomIaIaTeMecTe, HHe pa3peWaaTeJIIOJAM, He 3HaIOUHM HaO6paUaTbcNc3JIeHTpOHnHCTpyMeHTOM HIn He N3yUHbUHMdaHHoe pyKOBOIDCTBO, pa6OtaTb c3JIeHTpOHnHCTpyMeHTOM.
3NeKTPoHnCTpyMeHtbl npedctabJIOT onaCHOCTb Bpykax HenoIroTOBHeHHbIX NOb3OBaTeJeN.
e) CoepKHTe 3JIeKTHpOHnHCTpyMeHTbI B HcnpaBHOCTN. IpOBepbTe, HeT JIN HecooCHOCTN JIN 3aEJaHH YBuHJyUHXCA qAcTei, NOBpeHKDeHnA DeTaJe NIN KaHorOJINo6 DpyrOrO 06ctOraTeNbCTBa, KOTOpoe MOHeT NOBnRAh Ha FyHNuONHpOBaHne 3JIeKTHpOHnHCTpyMeHTOB.
Pn HauHnn NOBpeKdEHHN OTPeMoHTpyIte 3JIeKtpoHHCTpymENT nepeedero 3KcnIyataune.
B OJbwoe KOJImYeCTBO HeCCHaCTHbIX CnyaEB CB3aHO C IIOXIM 06cIyKHBaHHeM 3NeKTPoHNHCTpyMeHTOB.
f) CoepKHepeKHyune HNCTpyMeHTbIOcTPO 3aTOeHHbIMN NCHCTbIMN.
HaJIeHauI M 6pa3OM cOepHauIeNcB HcnpaBHOCHTn peKyuIe NHCpymEHTbIC OCTpbIMn peKyuIMN KpOMKaMn 6ydyT MeHbIe 3aEdaTb N 6byT IerYe B ynpabLeHIn.
g) HcnoIb3yIte 3JIeKTPoHnCTpyMeHT, npHnAdJeHHOCTn, HacadH N T.I. B COOTBETCTBn C daHHbIM pyKOBoDCTBOM, npHnMa BO BHmAHne ycIOBnN O6beM BblINOJIHReMo pa60tbl.
HcnoIb3OBAHne 3NEKTPoHnHCTpyMeHTa IJIy BblIOJIHeHnpa6OT He no npRmOMy Ha3HaueHnIO MOKeT pINBecTn K ONaCHO nTuayuN.
5) O6cIyHbHaHne
a) 06cIyHnBaHne BaWero 3JIeKTHpOHnHCTpyMeHTa DOLJHHO BbINOHLrTbcra HBAHnΦnUPOBaHHbIM npedCTaBnteJIem peMOHTHO ClyH6bl C nCNoJIb3OBAHNEM TOJIbHO NDEHTNuHbIX 3aNaChbIX YacTei.
3TO ObecneuHT coxpaHnOCTb n 6e3oNaCHOCTb 3JIeKTPoHnHCTpyMeHtA.
MEPA IPEDOCTOPOXHOCTN
AepKHTe nOdaJIbWe oT dTeH N HEMoUHbIX IIOJe.
Ecnn HNCTpyMeHbI He NcNoB3yIOtca, HX CneJyET XpaHHTb B HeOCTynHom dJa DeTeu HEmoUHbIX IIOde MeCe.
ПРавILA TEXHIN БЕЗПАСНОCTN ДЛЯ ЭЛЕКТРИЧЕСКОДЦЕНОД ПИЛБI
- DepeKHe BCE Yactn TeHa Ha ydaJIeHnn OT 1enHOI NIIbI BO Bpempa60tbl 3JeKTPnuEckOu 1enHOI NIIbI pa60tbl. Pepe3ayncKOM 3JeKTPnuEckOu CEHNHOI NIIbI y6eHTecb, Yo OHa Hn C He CoPnKacaetcR. KpaTHOBpemeHHa HEBHMATEJIbHOCTB BO Bpempa60tbl 3JeKTPnuEckOu CEHNHOI NIIbI MoJET pInBecTn K TOMy, YTO ODeJDa IINI TELO nonaDyT BHee.
- 063aTeIbHo DepeHnTe 3JeKtpnueckyUo CenHyu nnly npabOryko 3a 3adHIOpyKoTky, a JbeOy pyKo3a nepedHIOpyKoTky.Ecnn 3JeKtpnueckyUo CenHyu nnly depKaTby pykamn HAObOpOT, 3TO yBelenuBaet OanachocTb TpaBMbl, N0eTOMy HIKOrda He deNaIte 3TOTO.
3.Дернite 3ЛЕКТПОHCTPymeHT TOlbko 3a 30IINPOBAHHbIE NOBepxHOCTN 3axBaTa, TaK KaK ZENHЯ NIIa MOKeT COpNIKOCHyTBcR Co CkpbToI npOBoHDn IIN CO6CTBeHHbIM WHypOM. CoPNIKOCHOBHe NcEHNo NINbI c npOBODm "NOd HAnpJXeHNEM"MOKeT pNBecTN K TOMy, YTO OTKpbITbIe MeTaJIInueckne QactN 3JIeKTPOHNCTPymeHTa 6ydyT "IOd HAnpJXeHNEM", N 3TO MOKeT pNBecTN K NopaJXeHIO ONEpATopa 3JIeKTPuYeCKHM TOKOM. - HcnoJb3yIte 3aunThbIe Ockn n 3aunTy dJa opraHOB clyxa.PekomeHdyETcNcNoJb30BaTb DOONHHTeNbHbIe CpeCDTBa 3aunTbI dJa rOIOBbl pyK,Hor n CTynHe.HadJeKaUaJra 3aunTHaJ oDeHda
yMeHbwaET ONaCHOCTb TpaBM OT JTeTnIX OCKoJIHOB IN HenpeBnDeHHbIX KOHTaKTOB C cENHOI NIIIOI.
- He nCnoIb3yIte 3JIeKtpnuecckHyIO cENHyIO NnIy Ha depeBbIx.Pa6Ota C 3JIeKtpnuecckOu cENHOI INIOI npHaxoJdeHnHa DepeBe MoKeT pINBeCTN K TpaBMe.
- 063aTeIbHO oecneybe HaJeKauyO onopy Ira Hor n paBoTaIe C 3JIeKtpuuecKo 9eHOn HIO ToIbKO CTOr Ha yCToHnBO, 6e3OnacHoi npBHO NOBepxHocTn. Pp npaboTe Ha cKob3KnX Nn HeycToHnBbIX NOBepxHocTnx, HApPmEp, JecTHNuax, MOHHo NoTepeTb paBHOBeCne Nn KOHTpoJb 3a 3JIeKtpuuecKo 9eHOn NlIoI.
- Pn pe3ke HaipjKeHHbIX BetOK onacauTecb IX 6bpaTHoro BbIPrMaHHeH.NPn BBICBO6OJDeHN HaTJKeHn BOLOKOH DpeBecuHb BiIPrMaJIIOUneCeBETKN MOrTy ydapHTb OepaTopa H/IIIN PpNBecTu K NOtepe KOHTPOJ3a 3JeKTPnueCKo CEHNHOIIOJ.
- Bybte oc6eHBO BnMaTeJbHbI nppe3Ke KcTapNkoB mOLOdbIX DepeBbeB. N6Kne MaTePnaJIb MoYr nonaDaTb B cENHyo NnLy u ydapntb Bac nIIN pNBecTu K notepe paBHObecu.
- PnpeHocKe 3eKtpueecko TcHNO nIbI depKHTe ee 3a nepeDHO pYKOrTHy B BbIKIOUeHNOM COCTOHHN Ha pacCTOAHN OT TeHa. Pn TpaHCnOpTnpOBke HIN XpaHeHH N3eKTPueecko cENHO nnbl o6raTeJIbHO NCNoB3yIte KpbIshy HanpaBIAIOe IINbI. PpaBnIBHOe ObaIeHne C 3eKTPueecko TcHNO nIIOY yMeHb7aet BepoAHTHOCTb HEOKndaHHO KOHTaKTa C DBNKUeCnPiBHO cIbIIO.
- CLeNyIe yKa3aHnM no CMa3Ke, HATJKeHIO nJIbI 3aMeHe npHaJLeXHoCTe. HenpaBnBHO HATHyTae IIN CMa3aHHa YeIb MoKET CJOMaTbcr IIN yBeInuHTb BepoTHocTb OTdaH.
- DepeHnTe pyKoTKn cyxIMn, NCTbIMn n CBO6OHBiIMN OT MacJa n KInpa. HInpHbe, MacJIAHbIe pyKoTKnCKoJIb3KHe, YTO npINBODNT K NOTepe KOHTPOJIA.
12.PeKbTe TOLbKO DepeBO.He NcNoIb3yIte 3JIeKTPnueckyIO CEINHyIO NNy DnIa HENpeHa3NaueHHbIX CEJIe.HanpIMep: He NCNoIb3yIte 3JIeKTPnueckyIO CEINHyIO NNy DnIpe3Kn PnactMaCCbl, KameHHo KlaADKn IInn He DepeBraHHbIX CTPONTeJbHbIX MaTePnaIOB. NcNoIb3OBAHne 3JIeKTPnueckOu CEINHO nnbl DnI aonepaun, OTnuaOuxCOr OT npedHa3HaueHHbIX, MOKeT pInBeCTN KOnaChbIM CNTyaqurnM.
PnunHbI OTdauN 3aunTa OT Hee onepaTopa: (Pnc.2)
OToa MoKeT npOn3oHTN, KOrDa nepeHnA qactb nn HaKoHeuHK HnPaBJIouSei uHbI KacaETc npeDMeta, nn KOrDa dpeBecHa np6JnHaetcN 3aueMJeT NlNbHyIO cenb npn pe3Ke.
KoHTaKT HaHOeUHnHa B HeKOtOpbIX CnyuaX MoKeT Bbl3BaTb BHe3aHNYO 6paTHyIO peakuHO, npBODaIyIO K OTdaYe HApBaJIIOUeJ WInHb I BBepx HHa3aD B HApBaJIeHn OepaTopa.
3aueemleHne nIbHOI cEN BMeCTe C haHOHeHNKOM HnpaBraIOUeI uHHb MoKeT 6bICTpo OTKNHyTb HnpaBraIOUcIyO uHHy Ha3aD B HnpaBJeHN OnepaTopa.
JIIO6aI3 3THX peaKzH MoKeT npNBecTn K NOTepe KOHTPOJIA 3a NIILO, YTO MOKeT npNBecTn K cepBe3HO TpaBMe. He noIaraiTeCb ype3MepHo HA npeOxpaHHTeJIbHbIe ycTpoiCTBa, BCTpoeHHbIE B camy Nlly. KaK nolb3OBaTeJIHO 3JIeKtpueckoI cENHO NIIbl, Bam Heo6xoIMo pINHrTb ONpeDeJIeHHbIe DeIcTBnI DJIa npeDoTbPaUeHNH HechAcTHbIX ClyuaeB IN TpaBM BO Bpemra pa60T no pe3ke.
OToaayraBnreTcpe3yIbTaTom HnpaBnIbHorO HcNoJIb3OBaHnIHCTpyMeHTa N/INn HnpaBnIbHbIX
npoceyp HJYN yCNOBn pa60TbI, H 3TOHO MOHHO n36eKaTb, BblIOJIHRA COOTBetCTBYIOUne MEpbI npedocToPOHHOCTN, pNBedeHHBie HNKe:
O ObecneyTe HaJeHHb 3axBaT, 06XBaTHB 60JIbHIM NaIbIeM N OCTaJIbHbIMN PaJIbIaMn pyKoRTKn 3JIeKTPnuecKo YenHO NIIbl, DePJaCb OBeHMn pyKaMn 3a NIny n pacNoJIOHN TeIo n pyKn TaK, YTO6bl 6blY cToOnuBBim K CnJaM OTdaHy. Cnbl OTdau MoTy KOHTPOINpOBaTBcR OpepaTopOM, EcIn BblONHeHb COOTBETCTBYUQne MepbI npedocTopoHHOCtN. He donyckaIte CBO6oHoro DBnKeHn 3JIeKTPnuecKo YenHO NIIbl.
He npKlaDbBaIte ype3MepHbIe ycIIINn I He peXbTe Bblwe ypOBHn PJIeU. 3To NOMORAET npeoTbpaHTb HEnyHHbI KOHTaKT C HaKoneHnikom I ObecneuHBaET LyuWNI KOHTPOlb 3a 3JIeKtpnueckOu cENHO INIOB B HeOHNDaHHbx CNTyaunx.
OДЯЗAMeHbI NcNoB3yIte TOLbKO WnHbI u cenn, yka3aHHbI npOn3BOdnteIem. HEnpaBnJIbHaJ 3aMeHa WnHbI nIN cEN MoKET pNBeCTN K NOJOMKe cENN I/IN OTDaYe.
O BbInonHnTe yKa3aHnI npOn3BODnteI NO 3aToUKe n yXoDy 3a NIIbHOJ cIbIO. UMeHbWeHne BbICOTbl rIy6HOMepa MoKeT npNBecTN KycuJeHHo OTdaue.
Pa6ota topmo3a cenn:
Ecn 3IeKtpnuecka cennha nHa ydapreTcO TBepdbn npedMet Ha BbICOKOH CKOPoCTN, nPONCXODNT Oeyh CnIbHaa peakun H OTdaa.3TO TpydHO KOHTpOIpOBaTB, N MOKeT 6bITb ONaChbIM, OOCbeHHO Dnla JERKOBeCHbIX INHCTpyMeHTOB, KOTOpblte qacto NcNoIb3yIOTCB B pa3Hoo6pa3HbIX NOLOKeHHAx. TopMo3 ZENH HeMeJNeHHO OCTaHaBnBaET BpaueHne ZenB B Clyuae HeoKnDaHHo OTdaun. TopMo3 ZENn aKTNBpyETc pyKo HaKaTHem No HaKlaDke NIn aBTOMaTHHeCKn HEnocpeDCTBEHHO pni OTdaye.
TopMo3 ueH MoJHo OTKIOuHTb TOnbKO Nocne NOHOr OCTaHOBKn DBrTaTeJI. 3aHOBO yCTaHOBNTe pyKoAry B 3aJHee nOLOKeHne (Pnc. 3). IpoBepnTe pa60TOcNOC6HocTb TopMo3a ueH KaJDbI DeHb.
O IJIy BbIOJHHeHN BCEx BnIOB pEmoHTa O63aTeIbHO 06paauTEcB yNOJHOMOeHHbI ΚEHTp TexHueckOrO 06ClyKuBaHnHiKOKI.
PonbItka camocToarTeIbHOro peMOHTa HnCTpyMeHTa MOKET npINBeCTN K HeCuaCTHOMy CnyauIO nn TpaBMe.
- Korda nHCTpymEnT He nCnOJb3yETcra, xpaHnTe ero HndJeXaUIM 6pa30M.
CneIteMacnoIJIaIeHHNOMeCTHTBcyXoeMeCTOBHeIOCTyNaTeHINB3anePtoE MeCTO.
- EcIn npedynpeKdaHou HaKleKy 6oIbue He BnHO, CHIMTE ee nn ydaHte DpyrM CnOCOBom, a 3aTeM HaKleTe HOByo npedynpeKdaOuYIO HaKleNky.
CTAHДAPTHbIE IPNHADJIEXKHOCTN
O ΦyTlAp ceH.. 1
O HappaBnaHua 1
O Lcnb. 1
O 3aKIM BnIKN
O Macno 3JIeKtpnuecko ueHNO nIbI (100 mI) ......... 1
- He nocTaBnIeTcB HekOtOpbIX perNoHax npOdaHn.
CocTab H TnI DOnOJIHHTeJIbHbIX npHaJ,IeJHHOCTei MOKeT 6bITb I3MeHeH 6e3 IpeBapHTeJIbHOro yBeDOMJIeHnI.
ДОПОЛНITEЛьнbie ПИHAДLEЖHOCTN (ЮСТАВЛЯЮТСОТДЕЛБHQ)
Macno 3JIeKtpnuecko ueHNO nHbI
KpyrblnHaHnIbHnK
O Ⅲa6loH rIy6bHOMepa Kpyrbln HannbHK n 8a6loH rIy6bHOMepa npedHa3HaueHb IJN HCNoJIb3ObAHn npn 3aToUHe Ie3Bn cen. YTO Kacaetc npnmeHenn, nokayncta, o6paHTteCb K pa3dely, O3arNaBHeHHomy "3aToUKa Ie3Bn cen".
O OyTJrP ueH
O6raTeIbHo depKHTe FyTlnp cENn Ha cENn npn nepeHocHe 3JeKtpueccko cENHO nnBv BpemXpaHeHH.
CocTab N TIN DOONHHTeHBHX npHaJleXHOCTe MoKeT 6bITb H3MeHeH 6e3 npedBapHTeHBOyBEdomJIeHnI.
HA3HAUHNE
O6uHnpuHnBpe3Kn DepeBa.
YCTAHOBHA (3AMEHA) ПИльноцпи
NPEdYnPEKDEHNE
OCTOPOXHHO
ПРИМЕЧАНЕ
Bo n36eXaHne HeCuaCThBIX CnyuAeB Bcerda BBKluOaIte yCTpoNcTBO N OTcoEINHnTe 1TEncelbHyIO BNkY O TPO3ETKn.
He nCnoJb3yIte nIIbHbIe cenn nn HnnpaBIAUcne IHHbl, OTnuaHcNEcra OT yka3aHHbIX B pa3dene «CNEUINHAKUIN».
HaBeBaIe pyKaBnCbI n 6yNbTe octopoHbI BO n36eKaHne TpaBMnpoBaHnNnJbHOBnCeNbIO.
O Pn ydaJIeHnn nIbHOJ cENH cHIMNte ONUKc C roPbIuHa dJa MaCna, OTBepCTra dJa MacLa Hnpoe3n HanpaBraIOUe WINbI. HakonJIeHne ONIOK MOKeT npNBecTH K C60IO B pa6oTe INHCTpyMeHTa.
O NcnoIb3ayIte nIbHyU qenb npabInbHoro Tnna B COOTBeTCTBnC TexHnueeCKHM XapaKTePncTnKaAMN. Ecnn Bby yCTaHOBITE HnPaBIAIOuO uINHy He npabInbHorO Tnna, nIbHaar cenb MoKet COCKOHTb, n 3TO MOKeT pNBecTH K TpaBMe.
1. YdaJIeHHe 6oKOBoH KpbIshKn (Pnc.4)
① Odn pa3 nobepnTe KhoNky, TTo6bl ocna6ntb ee.
② NObepHnTe peryIaTOp HaTaJKeHHaHNoIOBHy, TTo6bI Ocna6ntb erO.
③ ПовернITE КНОнку и удалие 6OKOBую Крblшky.
2. YdaJIeHne nIIbHOJ cenn HnnpaBIAIOUeH uHHbI (Pnc.5) YdaJIte nIIbHyIO cenb HnnpaBIAIOUyIO uHHy B HnnpaBIAEHN, yKa3aAHOM CTpeJIkoI.
3.Пркpenenne HOBOI NILbHOI cENI K 3Be3doUHe (Pnc.6,7) IprkpeNTe NIIbHyIO cenb K HaKOHeuHky HnpaBJIIOueI uHHbI, o6paaJ BHMaHne Ha HnpaBJIeHne NIIbHOI cENI, a 3aTeM HaDeKHO npKpeNTe HOByIO NIIbHyIO cENb C NOMOsbIO 3Be3doUKN.
4. YctaHOBb6OKOBH KpbIshn
① HactpoIte peryIaTOp HaTJHcHn6OKOBON KpbIuKn TaK, YTO6bI BTyIka HaTJHKHO YoCTpOuCTBa cenn 6bla BCTaBJIeHa B OTBepCTne HAToHKHO OYCTPOUCTBa cENn HAnpaBIAHOUsen WInHbI, IN npNkpeNTe 6OKOByIO KpbIuKy. (Pnc.8)
② OdHH pa3 NOBepHnTe KhoNHy, YTO6bI BpeMeHHO 3aΦHKnPoBaTbe.(Pnc.9)
5. HactpoHaHaTaeHnIJIbHOIeHn (Pnc. 10)
O NpHmHaKoHeuHKn HnpaBraUoIe WnHbI, NobopaHBaIte peryIaTOp HaTJKeHnA, TTO6bI HAcTpOnTb HaTaKeHne NIIbHOI cEN.
O NobopaunBautepeyraTOp HataKeHn BnpaBO, T06bl yBeJIuHTb HataKeHne PInlbHOI ceHN, IN BLeBO, YTO yMeHbUHTb erO.
- Поверна натужени пьью сени (Pnc. 11)
HaCtpoIe HataJKeHne NnBHOI cENI TaK, YTO6bI 3a3Op MeJy npINBOHbIM pbUarOM NnBHOI cENI HAnpabJIIOSeI uHOB 6bl O T 0,5 do 1 MM, KOrda Bbl CJIerka npInoDHmAEte NnBHyO cENb prdOM c CEHTpOM HApBaJIIOSeI uHbI.
- 3aHpenJIeHne KHOHN (Pnc. 12)
① Nocne 3aBepWeHn HAcTpoe NOHMNTe HnpaBraIouyU WnHy nONHOCTbO 3aKpyTNe KHOINKy.
② y6eHnTeCb, yTO 60IaHeKHO 3aKpyueH.
IPEyIpeKdEHHe
Iocne HacpoKn HataKeHna NlboHou cenu y6eNTecb, YTO KHOHaNoHOCtBuO 3aKpyHeHa.
Ecn OHa paKpyeHa, 3To MoKeT npBecTn.
He KInCnpyTe KHOJky 6JIOKINPOBKN, NOKa OHa HauKaTa.
EcnnepeKluOaTeIb cLyuHaHNo npBEdTcB DeiCTBHe, HNCTpyMeHT MOKeT HeoKnDaHHO HaTaTb pa60TaTb, N3TO MOKeT pNBecTn K TpaBMe.
HcnoIb3ObaHneΦHKcaTopaBnJIKN
He donyckaiaTe 3aueMleHnna 3aKHMOM BnIKn shypa, nyuero ot ceteBOB BNIKN. (Pnc.18)
ПОUEДУРы PE3н
PNEyPENKDEHNE
O Ipepa60To y6eHTecb, TTO TOpMo3 cenn pa6oTaet.
O Bo Bpemn nCnoB30BaHne HaJeKHo 06xBaTnte pykoTky o6eMHn pykamn.
O Pn pe3Ke dpeBecnHbI CHN3y y6eINTecb, YTO NJIbHaA cenb He ydaJareT no dpeBecnHe.
Ecn HnctpymEnT OTCaKnBaet Ha3aI, MoKeT npOn30rTn TpaBma.
O Bo Bpemn nepepbioB B pa6oTe nnnoocne OKOHaHnpa60bI BcERda BbIKHouaNe YcTpoNCTBO HOTCOeHNHnTe 7TeNCeJIbHyIO BNky OTPO3ETKN.
Pycchn
O6raTeJIbHo Ha6IIOJaIte 3a pa6oey O6laCTbIO n OkpyKaIOSei O6JIaCTbIO, y6eINTEcB, YTO HET npEIMeTob, KOToPbIE MOryT Bbl3BaTb TpaBMbl, HeChACTHbIe ClyuAn Nn C60B pa6ote, IN B Clyuae INx HAInuYra 3apaHee ydaJInte INX.
B yactnoctn, npB bIbope onopbl nHr BO BpeMa paobtby6eDntecb, yTO OHa yCTOnuHbN aHTo HET npEpmetOB, oKOTOpbIE MOHHO CNOTKHyTbcra.
Pn py6ke cTOnuX DepeBbEB 063aTeIbHo 06paTne Oco6oe BHNMaHHe Ha HAnpaBLeHne, B KOTOpom 6ydyT NaTaB Nn KaNTbCn DepeBb, n 3apaHee OnpeDeJIte DnA Ce6r 6ObNaCTb 6e3OnacHO 3BaKyaunn Npyb OTxOJa.
① Y6eHNTecb, yTO HNCTpyMeHT BblKlIOUeH Ecnn WTeNCeJIbHaB BNka BkIIOUeHa B po3eTKy, KOrda nepeKIIIOUaTeIb BkIIOUeH HeOCO3HaHHo, yCTPOJCTBO MOKeT HEOKIaHHo HaaTaB pa60TaTb, yTO MOKeT CTAb pInuHHO HeCuaCTHOrO clyuHa.
②ПиВeДeHnE nepeKIOuAteIaB DeIcTBnE Y6eINBwInCb, yTO nINbHaЯ cIeNb He cOnpNKACAeTcA C DpeBecHOn, PnPBEdNTe NepeKIOUaTeIb B DeIcTBnE n HauHnTe pe3Hy, KOrDa cHOpocTb NINbHOJ cENy YBeJIuHITcR.
OCTOPOHHO
O Pn BkHoueHH HNCTpyMeHTa y6eHNTecb, YTO NJIbHaJcEh He COnpHKacaETcC MaTePnaJOM IIN Yem-JI6o eue.
O Bo BpemnncnoB3OBAHn6yDbTe octopoHbI, TTO6blnnlbHnauehHe cnpnkacanaC dpyrmm MaTeepnalaMn nn npedMeTAM. B yactHoCTn, npn 3aBepweHH pe3Kn 6yDbTe BHMaTeJbHbI, TTO6bl OHa He KOCHyJaCb 3eMIn.
PIMMEUAHNE
3a6laorobpeMeHHO 3aOpHnHTe MacJHbI 6aK, YTO6bI He dOnyCTNTb NOLHOrO H3pacXoOBAHnMaCna B INHcTpymente.
Pocne pa6oTbI BblnoHnTe npOBepky nTexHnuecKoe 06clnyKBaHHe KaJdoN Yactn NHCtpymeHTa neped TEM, KaK y6paTb erO Ha xpaHHe.
PDEyPENKDEHNE
Bo Bpemr Texnueckoro 06cnykuaHn n Ocmotpa Bcerda BbIKIOUaHTe yCTpoNCTBO n OTcoEINHnTe WTeNCelbHyIO BNky OT pO3ETKn.
1. PpOBePHa nHbHbIX cepei
O NepnoDnueChn npOBepaTe nnIbHyIO ueb. B clyuae HapyuH Neu 3aMeHnte ee Ha HOByIO B COOTBETCTBUN C pa3dJIOM «YcTaHOBka (3aMeHa) nINbHOJ cenN".
O PpOBepbTe HATJXHeHne cenn n onpeJeIHTe, npaBnJIbHO IIN OHa HATJHyTa.
O IpeKpaTHe NCNoJIb3OBAHne NHCtpyMeHTa B Clyuae 3AtyIeHnI NIIbHOJ cENI N 3aTOHTe ee B COOTBETCTBnC pa3dEJOM «3aToKa JezBnI cENI".
O Nocne HcNoIb3OBaHn TuaTeIbHO CmaKbTe INJIbHyIO cENb HHaIpaBIAIOUne WInHbIC NOMOuBO MaCJa DnAaUNTBIOT Koppo3Hn.
OCTOPOXHHO
HaedeBaTe pyKaBnUcI dIy npedOTbPaueHn TpaBM npu nCNOJb3OBAHN NJIbHOJ cEN.
2. Ynctka 6oHOBoi KpbIshn (Pnc. 35)
OuHCTHe uyaJIte BCE OINIKn, OCTaBUnueCBAHHTPNuactTei.
ПОНМЕЧАНЕ
Pn YnCTke 60KOBOKpbIshKn, KaMepbT OPMo3HOJeHTbl, TOpblsHa DnMa Macla Zenn HAnpaBnaHouceiWNHbI CM. IpOueDpyy "YcTaHOBka (aMeHa) NInlbHOU cenn" u ydaJIte nnIbHyIO cenb.
3. Ounctka ropIbIsha macla Iy cenn (Pnc. 36)
IpepeOuNCTKoRopblkMaCnaIaIeHN CHIMITE6OKOByIO KpbIkyHnApPabLIOUOHy.
4. OuncTka HappaBraIooe Iunhbl (Pnc. 7, 37)
Korda Onilnkn N NOO6hble BeuecTbHaKaanlNaIbOTcB Inpoe3H HAnpaBJIooe WInHbI NN B TOpNbIuKe Macna DJIa CEIN, MacNo MoKeT HeBbITEKaTb, YTO MOKe T npNBecTN K C6oU B paBoTeNHCTpyMeHTa.
YdaIInTe HnpaBnaIOyUo HnHy n OunchTe BCE ONINK, CkONNBwneC B npope3n, NocLe hCNOb3OBaHnH nn npn 3aMeHe nNlbHOJ cENn. (O6patNTecb K «YctaHOBHa (3aMeHa) nNlbHOJ cENn".)
5. NpoBepbTe yIIOBHTeIb cenn (Pnc. 38)
YIOBHTeIb cENn IpeHa3HaueH dIy MaKcImaIbHO 3aunTbI OepaTopo OT yDapa NIIbHOJ cENN B Clyuae ocna6JeHHn nnnoLOmKn cENn.
YIOBHTeIb cENn 6oKOBa Ka 06beHHeBb EHNHyO CTpykTpy.
PpOBepbTe yIOBHTeJIb 1eHn Ha HauHne NOBpeKdEHH.
6. Ocmotp HpeeneHHbIX BnHTOB
PeryIpaHO BbINOJIHnIte OcMOTp BceX KpeNeHHbIX BNHTOB IN PpOBepaIe Ix HAdJeKaUyIO 3aTJHKy. Ppi OcIa6JIeHN KaKx-Im6o BNHTOB,HEMeJeHHO 3aTAHnte IN NOBTOPO. HeBbINOJIHeHne 3TOrO Tpe6oBaHnM MoKeT PnIBecTH N C cepBe3HOJ OnaCHOCTN.
7. 06cnyHbAHne DBratela
O6MoTka DnIraTeJI npedCTaBnaeT c6oJ "cepdue" 3JeKToHnHcTpymEHTa.
Co6IIOaITe HaJIeJkaUne Mepbl npEOCTOpOJHOCHTn 3aIITbI O6MOTKN OT NOBpeKdEHN H/INI NOnaDaHnHa Hee BJIarN, Macla HIN BObl.
8. 3aMeHa yrolbHbIX ΜeTOK
YTo6bl 06cneuHb Bauy 6e3oNaChOCTb 3aunHTb OT nopaKeHn 3JIeKTPnueckHM TOKOM,OCMOTp N 3aMeHy yroJbHbIX 9eTOK 3TOrO INCHTpymeHa CNeJeYET npOBODHT b TOJbKO B YNOJHOMOUEHHOM CEPBNCHOM LECTPE HiKOKI.
9. HapyxHa oUcTHa
Ecn 3JekTpuecka cennha nla 3arpa3HnTcra, BbITPte 3JekTpueckyIO cenHyIO nnly MmKoN cyXOn TkAHbIO nIN TkaHbIO, CMOeHHO NMBIbHOB Odo. He NCNoJIb3yIte pactBOPHTeIN, CoepKaUne Xlop, 6eH3NH nIN pa36abNTeIB dIg KpacNI, TaK KaK OH NMOyT pactBOPNT IIaCTMaccy.
10. XpaheneHne
Pn nomeeHnn HNCTpyMeHTa Ha XpaHeHne BbIOJIHNTE YnCTKny INTexHnuecKoe OBCLyJKNBaHne KaJDoyn Cactn IN PnIKpeNITe FyTlAp Cpenn Kn HnPaBIAIOUeI WnHe.
XpaHnTe 3JIeKTPnueChyIO ZENHy IO NmIy B MeCTe C TemnepaTypoN, He npeBbIshaOuSei 40^, n BHe DocTyna DeTeN.
OCTOPOXHHO
Ipn HcnoJb3ObaHnn nn Texo6cLyKnBaHNn HNCTpyMeHTa Bcerda CneDnTe 3a BbINOnHeHnEm BCEx npaBn H Hopm 6e30nacHOCTn.
BbIbOP PnHaJLeJXHOCTeN
Cnncok npHnHaJIeKHOCTe DaHHoM MaunHbI yKa3aH Ha cTpaHnue 235.
TAPAHTR
Mbl rapaHTnpyem COOTBETCTBNE aBTOMaTueeCKNX HiCTpyMeHOB HiKOKI HopMaTHNBbIM/HaUNoHaJIbHBIM NOLOKeHNm. DaHHa rapaHTnHe pacnpoCTpaHReTc Hn DeFeKtbl nn yUep6, Bo3NKw BCLeDCTBne He npabNbHO nCNOJb3OBAHnne nn HeHaJNeJaIero 0bpaSeHnA, a TaKHe HopMaJIbHO r3HocA. B cNyuae NODaunn JAno6bl OTnpaBnTe aBTOMaTueeCHN INCTpyMeHBT B Hepa3O6paHHom COCTOHN BmecTe C TAPAHTNIHbIM CEPTINΦKATOM, KOtOpBI HaxoNTbcR B KOHcE INHCTpyKcUNn No o6paJeHNIO, B ABTOpN3OBAHHbI ueHrPo 06cLyHbAHnHiKOKI.
Hhopmaun, kacaouaacr co3daBaemoro wymn Bn6paun
I3MepaembIe BeINuHbI 6bln OnpedeJeHbI B COOTBeTCTBnC EN60745 n 3aBHeHbIB COOTBeTCTBnC ISO 4871.
I3MepeHHbI cpeHBeB3BeWeHHbI ypoBeHb 3ByKOBoMouHocTn:108d5(A)
I3MepeHHbI cpeHBeB3BeWeHHbI ypoBeHb 3ByKOBOrO daBHeHn:95d6(A)
NorpewhoctbK:2d5(A)
HaedeBaIteHayuHnKn.
O6uHe 3NaueHnBn6paun (cymmaBeKTopoB TpnaKcnalbHoro Ka6e) onpeJeIOTc B COOTBETCTBnC EN60745.
ah, SG = 4.0M / c^2
IorpeWHOCTbK=1,5M/c2
3aBLeHHoe CymMapHoe 3HaueHne Bn6paunn 6bIIO N3MepeHO B COOTBeTCTBUN CO CTaHdapTHbIM METoIDOM NcblTaHNI MOKeT PnImeHrTbcra DJI CpABHeHn HNCTpyMeHTOB.
OHO TaKHe MOKeT HcNoJIb3OBaTbcra DJIr npEeBapHTeJIbHOJ OueHKn BO3dEChTBn.
PNEyPPEKDEHNE
O YpOBeHbBn6paunn BO BpeM qakTneCkOro HCNoJb3OBaHnna 3JIeKtpOnHCTpyMeHTa MOKeT OTINuATbcr OT 3aRbJIeHHORO CymMaPHO r 3HaueHnRA, B 3aBNCmOcTHOT CNOCo6a HcNoJb3OBaHnMaunHbl.
O OnpeJeIHTb Mepbl npedocTopoHHOCTH, YTO6bl 3aunTtB onepaTopa, KOToPbIE OCHOBaHb Ha paCye Bo3dEChTBn Prn fakTNHeCKHX yCIOBnX NCNoJIb3OBAHn (pHnHMAR BO BHUMAHne BCE nepnOdbI zHKLa 3KcNlyaTaunn Kpme BpeMeHN 3anycka, To eCTb KOrda HnCTpymEH BbIKJIOueH, pa60taet Ha XOLOCTOM XOdy).
ПОНМЕЧАНЕ
Ha ochobahnn noctoHHbIX nporpamm HCCJIeObaHn n pa3BHTn, HiKOKI OCTaBnIOT 3a co60 IpaBO Ha n3MeHeHne yKa3aHHbIX 3deCb TexHuecknx daHHbIX 6e3 npedBaHPteJbHorO yBeDOMleHn.

91PX-45XJ (3 / 8× 12^ ):6697852
91PX-52XJ (3 / 8× 14^ ):6697854
91PX-57XJ (3 / 8× 16^ ):6697889
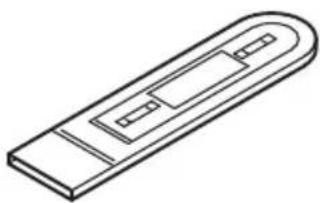
12":6699181
14":6699116
16": 6699115
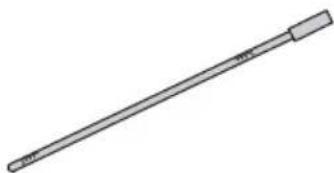
6698688 6697724
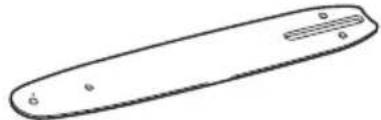
12":6696990
14":6696991
16": 6696992
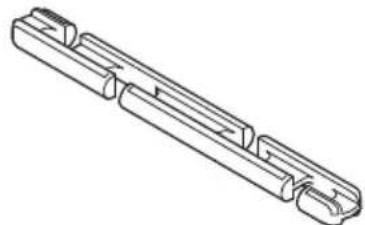
309686
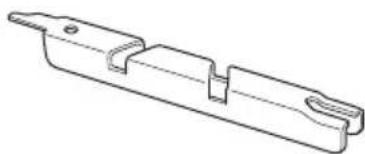
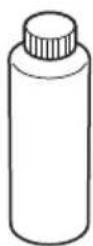
957681
| English Dansk Romänä | |||
| GARANTIE CERTIFICATE | CARANTIBEVIS | ||
| 1 Model No.2 Serial No.3 Date of Purchase4 Customer Name and Address5 Dealer Name and Address(Please stamp dealer name and address) | 1 Model No.2 Serien No.3 Kjöbsdato4 Kundes navn og adresse5 Forhandlers navn og adresse(Indsøt stempel med forhandlers navn og adresse) | 1 Model nr.2 Nr. de série3 Data cumpärarii4 Numele与此 adress clientulii5 Numele与此 adress distributorulii(Vå rugam aplicati stampila cu numele与此 adress distributorulii) | 1 Model nr.2 Nenr. de série3 Data cumpärarii4 Numele与此 adress clientulii5 Numele与此 adress distributorulii) |
| Deutsch Norsk Slovenžina | |||
| GARANTIESCHEIN | GARANTISERTIFIKAT | ||
| 1 Modell-Nr.2 Serien-Nr.3 Kaufdatum4 Name und Anschrift des Kunden5 Name und Anschrift des Handlorders(Bitte mit Daten und Anschrift des Handlerabsenteln) | 1 Modellnr.2 Serien.3 Kjöpsdato4 Kundens navn og adresse5 Forhandlers narn og adresse(Vennligst stemple forhandlers narn og adresse) | 1 Št. modela2 Serijska ŠT. Datum nakupa4 Ime in naslov kupca5 Ime in naslov prodajalca(Prosimo vitsnite zig z imenom in naslov promodajalca) | 1 Št. modela2 Serijska ŠT. Datum nakupa4 Ime in naslov kupca5 Ime in naslov prodajalca(Peciatka s nazvom a adressu predajcu) |
| Français Suomi Slovenčina | |||
| CERTIFICATE DE GARANTIE | TAKUUTODISTUS | ||
| 1 No. de classe2 No. de classe3 Date d'achat4 Nom et adresse du client5 Nom et adresse du revendeur(Cachet portant le nom et l'adresse du revendeur) | 1 Malli nro2 Sarja nro3 Ostopäävamäärä4 Asiakkaan nimj ia osoite5 Myjän nimj ia osoite(Leimaa myjän nimj ia osoite) | ZÁRUÇNÑLY LISTA | |
| Italiano Eλλινίκα Βυρarcsκi | |||
| CERTIFICATE DI GARANZIA | ΠΙΣΤΟΙΝΙΤΙΚΟ ΕΥΓΗΝΗΣ | ||
| 1 Modello2 N"di classe3 Data di acquireto4 Nome e indirizzo dell'acquirente5 Nome e indirizzo del rivenditore(Si prega di apporre il timbro con questi dati) | 1 Ap. Movtěλou2 Aúθεν Ap.3 Héperpόγπia αγορά4 Ovoja kai δειθύνουση πελάτη5 Ovoja kai δειθύνουση μετατωλήτη(Порараλούμεν αν χρησιμοιηβει αφραγίδα) | 1 TAPAHÜNIHOHEN CEPTMΦHAT2 TAPAHÜNIHOHEN CEPTMΦHAT | |
| Nederland Polski Srpski | |||
| GARANTIEBEWIJS | GWARANCJA | ||
| 1 Modellnummer2 Seriennummer3 Datum van aankoop4 Naam en adres van de gebruiker5 Naam en adres van de handelaar(Stempel a.u.b. naam en adres vande de handelaar) | 1 Model2 Numer serjyny3 Data zakupa4 Nazwa klinta i adres5 Nazwa dealera i adres(Pieczęć punktu sprzedañy) | 1 Br. modela2 Serijski br.3 Datum kupcovne4 Ime i adresa kupca5 Ime i adresa prodavca(Molimo da stavite pećat na ime i adresu trgovca) | |
| Espanol Magyar Hrvatski | |||
| CERTIFICADO DE GARANTÍA | GARANCIA BIZONYLAT | ||
| 1 Nstreamo de classe2 Nstreamo de classe3 Fecha de adquisión4 Nombre y direccion del cliente5 Nombre y direccion del distribuidor(Se ruega poner el sello del distribuidor con su nombre y direccion) | 1 Tipusszám2 Sorozatszám3 A vásárlasátáuma4 A Vásáráó neve és cime5 A Kereskedő neve és cime(Kerjukide olhelyezni a Kereskedő novének és címenek pecsétjét) | 1 Br. modela2 Serijski br.3 Datum kupcovne4 Ime i adresa kupca5 Ime i adresa trgovca(Molimo stavite pećat na ime i adresu trgovca) | |
| Portugues Česina Yükrainchý | |||
| CERTIFICADO DE GARANTIA | ZÁRUÇNÍ LIST | ||
| 1 Nstreamo do classe2 Nstreamo do classe3 Data de compra4 Nome e morada do cliente5 Nome e morada do distribuidor(Per favor, carimbe o nome e morada do distribuidor) | 1 Model &2 Série &3 Datum nákupa4 Mýné a adresa zákována4 Mýné a adresa prodejece(Prosíme o razitko se jménem a adressu prodejece) | 1 TAPAHÜNIHOHEN CEPTMΦHAT2 TAPAHÜNIHOHEN CEPTMΦHAT | |
| Svenska Türke | Ruscký | ||
| GARANTICERTI KAT | GARANTI SERTI FIKASI | ||
| 1 Modellnr2 Serien2 Inkópsdatum4 Kundens nickn oh adress5 Försäljarens nickn oh adress(Stämpla försäljarens nickn oh adress) | 1 Model No.2 Seri No.3 Satin Alma Tarihi4 Müşörteri ve Adresi5 Bayi Adi ve Adresi(Lütfen bayi adini ve adresini kaçë olarak basin) | 1 Modye Nr2 CseriýnbnyNr3 Dàgata prindabnna4 Imi i adresa kündenta4 Imi i adresa trgovca(Monçayncta, BVcêtsa, noctabene neapatny 3 imenem i adreccio dinepa) | |
HiKOKI
| ① | |
| ② | |
| ③ | |
| ④ | |
| ⑤ |
Siemensring 34, 47877 willich, Germany
Tel: +49 2154 49930
Fax: +49 2154 499350
URL: http://www.hikoki-powertools.de
Hikoki Power Tools Norway AS
Kjeller Vest 7, N-2007 Kjeller, Norway
Tel: (+47) 6692 6600
Fax: (+47) 6692 6650
URL: http://www.hikoki-powertools.no
Hikoki Power Tools Netherlands B.V.
Brabanthaven 11, 3433 PJ Nieuwegein, The Netherlands
Tel: +31 30 6084040
Fax: +31 30 6067266
URL: http://www.hikoki-powertools.nl
Hikoki Power Tools Sweden AB
Rotebergsvagen 2B SE-192 78 Sollentuna, Sweden
Tel: (+46) 859899900
Fax: (+46) 859899940
URL: http://www.hikoki-powertools.se
Hikoki Power Tools (U.K.) Ltd.
Precedent Drive, Rooksley, Milton Keynes, MK 13, 8PJ,
United Kingdom
Tel: +44 1908 660663
Fax: +44 1908 606642
URL: http://www.hikoki-powertools.uk
Hikoki Power Tools Denmark A/S
Lillebaeltsvej 90, 6715 Esbjerg N, Denmark
Tel: (+45) 75 14 32 00
Fax: (+45) 75 14 36 66
URL: http://www.hikoki-powertools.dk
Hikoki Power Tools France S.A.S.
Hikoki Power Tools Belgium N.V./S.A.
Koningin Astridlaan 51, B-1780 Wemmel, Belgium
Tel: +32 2 460 1720
Fax: +32 2 460 2542
URL http://www.hikoki-powertools.be
Hikoki Power Tools Italia S.p.A
Via Piave 35, 36077, Altavilla Vicentina (VI), Italy
Tel: +39 0444 548111
Fax: +39 0444 548110
URL: http://www.hikoki-powertools.it
Hikoki Power Tools Ibérica, S.A.
C/ Puigbarral, 26-28, Pol. Ind. Can Petit, 08227 Terrassa
(Barcelona), Spain
Tel: +34 93 735 6722
Fax: +34 93 735 7442
URL: http://www.hikoki-powertools.es
Hikoki Power Tools Romania S.R.L.
Ring Road, No. 66, Mustang Traco Warehouses, Warehouse
No.1, Pantelimon City, 077145, Ilfov County, Romania

- CS 30SB·CS 35SB·CS 40SB
- (Original instructions)
- SYMBOLS
- WARNING
- WHAT IS WHAT? (Fig. 1)
- GENERAL POWER TOOL SAFETY WARNINGS
- CHAIN SAW SAFETY WARNINGS
- Chain brake operation:
- ADDITIONAL SAFETY WARNINGS
- English
- STANDARD ACCESSORIES
- OPTIONAL ACCESSORIES (SOLD SEPARATELY)
- APPLICATIONS
- INSTALLING (REPLACING) SAW CHAIN
- CAUTION
- NOTE
- INSPECTION AND PREPARATION PRIOR TO USE
- Checking the chain oil
- Connecting the plug to the receptacle
- Checking brake is engaged
- Checking chain oil discharge (Figs. 15, 16)
- Switch operation
- Using the plug clip
- CUTTING PROCEDURES
- ① Ensuring the unit is switched off
- ② Engaging the switch
- General cutting procedures
- Branch cutting
- Log cutting
- Felling trees
- Precaution for cutting work
- Gripping/pushing force of chain saw
- Chain catcher
- SHARPENING OF THE CHAIN BLADE
- Blade sharpening
- Adjustment of depth gage
- MAINTENANCE AND INSPECTION
- Inspection of saw chains
- Cleaning the side cover (Fig. 35)
- Cleaning the chain oil spout (Fig. 36)
- Cleaning the guide bar (Figs. 7, 37)
- Inspect the chain catcher (Fig. 38)
- Inspecting the mounting screws
- Maintenance of the motor
- Replacing the carbon brushes
- Cleaning of the outside
- Storage
- SELECTING ACCESSORIES
- GUARANTEE
- IMPORTANT
- Correct connection of the plug
- Information concerning airborne noise and vibration
- VEILIGHEIDSWAARSCHUWINGEN VOOR DE KETTINGZAAGMACHINE
- HVAD ER HVAD? (Fig. 1)
- ENIOE'QPHsH KAI NPOETOIMAIA IPIN ANO TH XP'HsH
- PPOEIODOIHEN
- DODATNA VARNOSTNA OPOZORILA
- OBsI MEPH3A B63OJACHOCT IPN PABOTA C EJEKTPUYeCHN HHCTPYMEHTN
- PNEyNPEHDEHNE
- 3)Лична6e3oNaCHOCT
- 5) 06cIyHbAHe
- BHIMAHNE
- БЕЗПАСНСТ ПИР PAБOTA CBEPИЖЕНТПОH
- Pnunnnn HauHH 3a npedotbpaTbaHe Ha o6paTeH yap:(Φnr.2)
- Pa60aHa BepnKaTa CnpaHa:
- ДОПБЛНТЕЛН
- PPEyPENKDEHNA 3A
- BE3ONACHOCT
- Былгарский
- 3A6EJIENKHA
- Поверка на Вернхото macLo
- 3ABEJIEXHA
- Cbbp3BaHe Ha uenceIa KbM HOHTaKTA
- NpOBeRka Ha cBcTOrHHeTo Ha cnIpaYkata
- DieCTBnHe Ha cnYcbHa
- NPEdYnPEXDEHNE
- Ynotpe6a Ha cko6ata Ha uencena
- ПОUCEДУРN 3A PR3AHE
- IPEdynPEXHEHNE
- ① Ybepete ce, ye ypeBt en3HIOUeH
- 3ABEJIENKHA
- 06u npoueypr 3a p83aHe
- PǎzáHe Ha KJIoHn
- P83aHe Ha Tpynn
- BHHMAHNE
- Nobalna He Ha DpbBeta
- BHIMMAHNE
- PpeDna3Hmepn npnpa3aHe
- 3aXBaT/HaTHcK BbPxy BePnHHNr TpnoH
- BepnroyIOBHTeI
- 3ATOUBAHE HA BEPHΓATA
- PNEyPENKDEHNE
- 3A6EJIeHHKA
- Български
- 3aToUbaHe Ha ocTpneTaTata
- Perynpahe Ha cTbNkata Ha noDaBaHe IPEyIpeXHEHNE
- IODAPbXKA IN IPOBEPHA
- PPEyPPEKDEHNE
- ДОДАТСЕ ПИЛДДА (КУПУOTьСЕ OKРЕМО)
- OBJIACTI 3ACTOCYBAHHR
- BCTAHOBJIENHRA (3AMIHA) LAHцIOTA ПИЛКИ
- NONEPEDXEHNA
- OBEPEXHO
- NPHMITKA
- 3HimahnHa 6iHuOHi KpnuKn (MaI.4)
- BctahOBJIeHHI 6iHoi I KpIshKII
- 3aKpyyBaHHr TbHnTa (MaI.12)
- NONEPEXEHNA
- OgIaIPiIaIroTOBHa Do BnHOpNCTAHH
- NONEPEXHEH
- NpebipTe, H BmHHeHO nepemnau
- Npebipka noobhybaIhoro shypa
- Ipebipka Hatary lahucora
- Npebipka ralbma IaHcIora (MaI.13) IONEPEIXEHHA
- yKpaIHcbKa
- ПРИМITA
- Ipebeipka BHTpaTn MaCTnla (MaI. 15, 16)
- Pobota nepemukaua
- NONEPEДЖЕHHA
- BukopncTahnaikcaTopa BnJIKN
- POBOUH INPOUEC
- ① NpeBipka BmKHeHH npucTropo
- ② YbIMKHeHHnepemnKaHa
- PIMMITKA
- Tnnobi po6oqi npoceypn
- OBEPEKHHO
- 06pi3aHHraIIOK
- OBEPEXHHO
- OBEPEKHO
- Po3nIIOBaHHaHOJIO
- 3pi3aHHA DepeB
- 3axo6e3neHn iud pa6oTn
- TpmaHHaTOBxaHHaHaHIOBOI NIK
- YIOBIOBauHaHIOra
- TOCTPIHNAE3LAHIOI
- NIPMITHA
- TocpiHnJe3
- PeryIIOBaHHo6MeJyBaHa rJIbHnHN IONEPEDHEHH
- TEXHICHE OBCJLYTOBYAHHJI INPEBIPHA
- 1.Ornaaniora
- OuHsEHHa 6iHoI KpHsKn (MaI.35)
- NPMMITHA
- YnueHHa Holo6Ha JIy MaCTHla (MaJ. 36)
- YnueHHa nnHn nlln (MaI. 7, 37)
- 5.OrnhaTe 6mexyBaayanuora (MaI.38)
- IpepeBipka MoHTaHHnx TBnHTiB
- Texhichu o6cnyrobyBaHHa BnryHa
- 3amHa ByrilbHnx zuTOK
- 3OBHIMH OYNCKa
- 10.36epirahn
- BHBIP AHCECYAPIB
- TAPAHTI
- InΦopmaia npo wym ta Bi6paio
- (HepeBoOpnHaBbIXHcTpHuN)
- CHMBOJbl
- IPEdYPPEKDEHNE
- 5) O6cIyHbHaHne
- MEPA IPEDOCTOPOXHOCTN
- ПРавILA TEXHIN БЕЗПАСНОCTN ДЛЯ ЭЛЕКТРИЧЕСКОДЦЕНОД ПИЛБI
- PnunHbI OTdauN 3aunTa OT Hee onepaTopa: (Pnc.2)
- Pa6ota topmo3a cenn:
- CTAHДAPTHbIE IPNHADJIEXKHOCTN
- ДОПОЛНITEЛьнbie ПИHAДLEЖHOCTN (ЮСТАВЛЯЮТСОТДЕЛБHQ)
- HA3HAUHNE
- YCTAHOBHA (3AMEHA) ПИльноцпи
- NPEdYnPEKDEHNE
- OCTOPOXHHO
- ПРИМЕЧАНЕ
- IPEyIpeKdEHHe
- HcnoIb3ObaHneΦHKcaTopaBnJIKN
- ПОUEДУРы PE3н
- Pycchn
- OCTOPOHHO
- PIMMEUAHNE
- PDEyPENKDEHNE
- PpOBePHa nHbHbIX cepei
- Ynctka 6oHOBoi KpbIshn (Pnc. 35)
- ПОНМЕЧАНЕ
- Ounctka ropIbIsha macla Iy cenn (Pnc. 36)
- OuncTka HappaBraIooe Iunhbl (Pnc. 7, 37)
- NpoBepbTe yIIOBHTeIb cenn (Pnc. 38)
- Ocmotp HpeeneHHbIX BnHTOB
- 06cnyHbAHne DBratela
- 3aMeHa yrolbHbIX ΜeTOK
- HapyxHa oUcTHa
- XpaheneHne
- BbIbOP PnHaJLeJXHOCTeN
- TAPAHTR
- Hhopmaun, kacaouaacr co3daBaemoro wymn Bn6paun
- PNEyPPEKDEHNE
- HiKOKI
- Hikoki Power Tools Norway AS
- Hikoki Power Tools Netherlands B.V.
- Hikoki Power Tools Sweden AB
- Hikoki Power Tools (U.K.) Ltd.
- Hikoki Power Tools Denmark A/S
- Hikoki Power Tools France S.A.S.
- Hikoki Power Tools Belgium N.V./S.A.
- Hikoki Power Tools Italia S.p.A
- Hikoki Power Tools Ibérica, S.A.
- Hikoki Power Tools Romania S.R.L.
Brand : HiKOKI
Model : CS 30SB
Category : Saw