USER MANUAL RM 10.5T DOMETIC
© 2023 Domatic Group. The visual appearance of the contents of this manual is protected by copyright and design law. The underlying technical design and the products contained herein may be protected by design, patent or be patent pending. The trademarks mentioned in this manual belong to Domatic Sweden AB. All rights are reserved.
NOTICE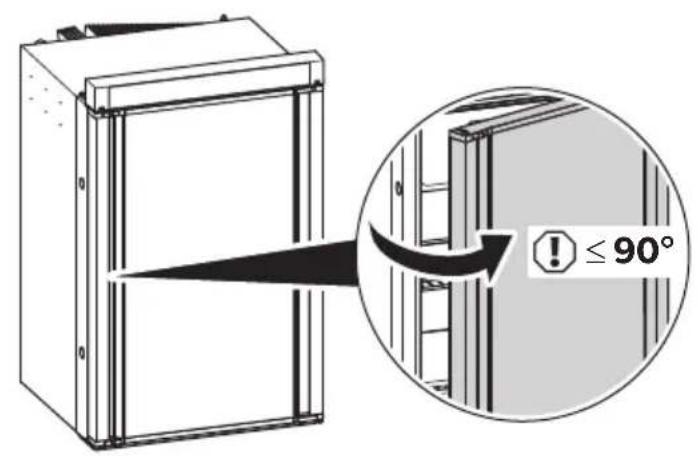
3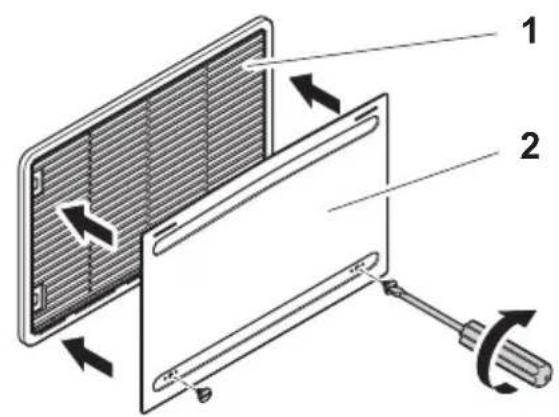
4 RM 10.5T, RMS 10.5T, RMS 10.5XT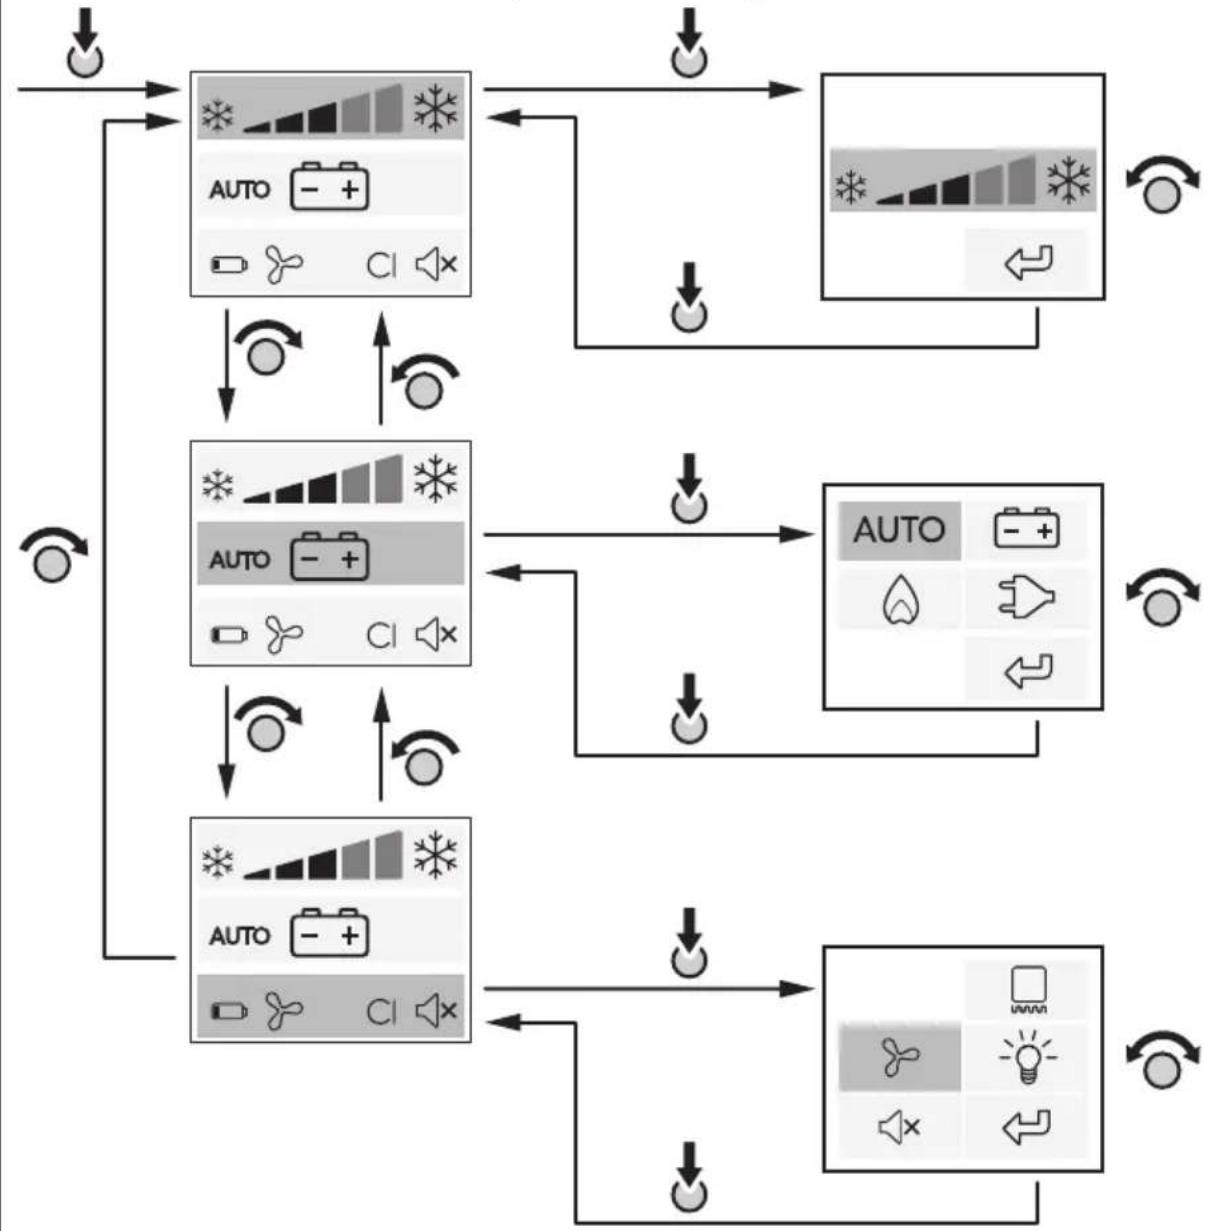
7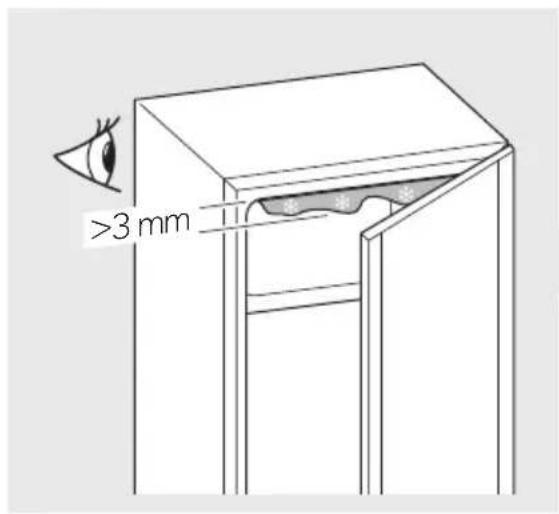
10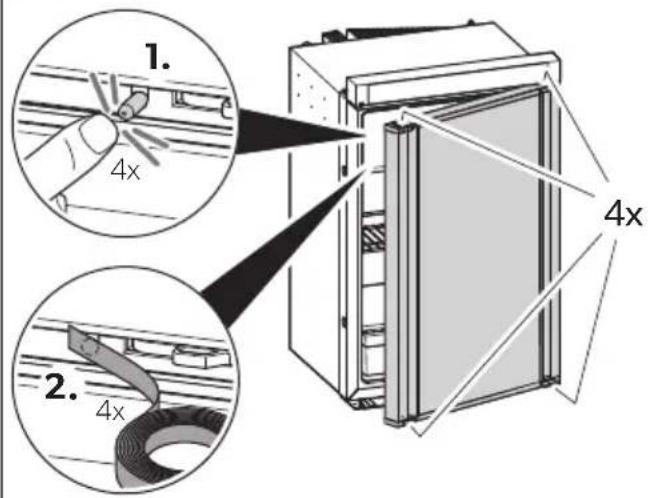
11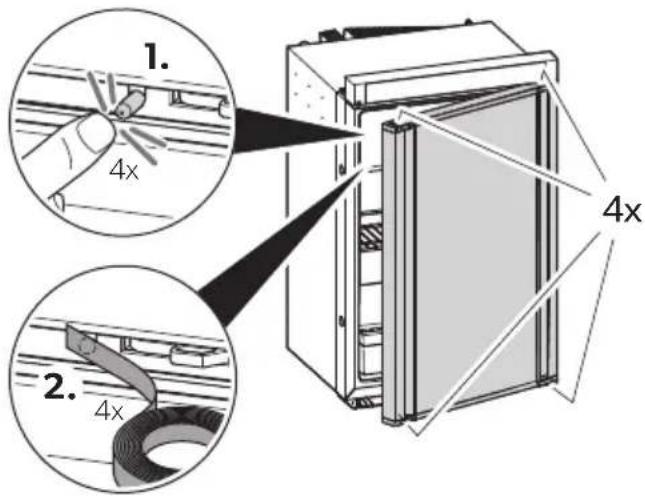
12
Please read these instructions carefully and follow all instructions, guidelines, and warnings included in this product manual in order to ensure that you install, use, and maintain the product properly at all times. These instructions MUST stay with this product.
By using the product, you hereby confirm that you have read all instructions, guidelines, and warnings carefully and that you understand and agree to abide by the terms and conditions as set forth herein. You agree to use this product only for the intended purpose and application and in accordance with the instructions, guidelines, and warnings as set forth in this product manual as well as in accordance with all applicable laws and regulations. A failure to read and follow the instructions and warnings set forth herein may result in an injury to yourself and others, damage to your product or damage to other property in the vicinity. This product manual, including the instructions, guidelines, and warnings, and related documentation, may be subject to changes and updates. For up-to-date product information, please visit documents.dometic.com.
Contents
1 Explanation of symbols. 11 2 Safety instructions 12 3 Accessories 16 4 Intended use 17 5 Technical description 17 6 Using the refrigerator 19 7 Troubleshooting 26 8 Cleaning and maintenance. 31 9 Warranty 33 10 Disposal. 33 11 Technical data 34
1 Explanation of symbols

WARNING!
Safety instruction: Indicates a hazardous situation that, if not avoided, could result in death or serious injury.

CAUTION!
Safety instruction: Indicates a hazardous situation that, if not avoided, could result in minor or moderate injury.

NOTICE!
Indicates a situation that, if not avoided, can result in property damage.

NOTE
Supplementary information for operating the product.
2 Safety instructions
This product is only suitable for the intended purpose and application in accordance with these instructions.
This manual provides information that is necessary for proper installation and/or operation of the product. Poor installation and/or improper operating or maintenance will result in unsatisfactory performance and a possible failure.
The manufacturer accepts no liability for any injury or damage to the product resulting from:
- Incorrect assembly or connection, including excess voltage
- Incorrect maintenance or use of spare parts other than original spare parts provided by the manufacturer
- Alterations to the product without express permission from the manufacturer
- Use for purposes other than those described in this manual
Domatic reserves the right to change product appearance and product specifications.
2.1 General safety

WARNING! Failure to obey these warnings could result in death or serious injury.
Electrocution hazard
- Installation and removal of the device may only be carried out by qualified personnel.
- Do not operate the device if it is visibly damaged.
- If this device's power cable is damaged, it must be replaced by the manufacturer, customer service or a similarly qualified person in order to prevent safety hazards.
- This device may only be repaired by qualified personnel. Improper repairs can result in considerable danger or damage to the device.
Fire hazard
- The refrigerant in the refrigerant circuit is highly flammable. In the event of any damage to the refrigerant circuit (smell of ammonia):
- Switch off the device.
- Avoid naked flames and sparks. Air the room well.
Explosion hazard
- Do not store any explosive substances, such as spray cans with propellants, in the device.
Health hazard
- Never open the absorber unit. It is under high pressure and can cause injury if it is opened.
- This device can be used by children aged from 8 years and above and persons with reduced physical, sensory or mental capabilities or lack of experience and knowledge if they have been given supervision or instruction concerning use of the device in a safe way and understand the hazards involved. Children shall not play with the device.
- Cleaning and user maintenance shall not be made by children without supervision.
- Children aged from 3 to 8 years are allowed to load and unload refrigerating devices.

CAUTION! Failure to obey these cautions could result in minor or moderate injury.
Risk of crushing
- Do not put your fingers into the hinge.

NOTICE! Damage hazard
- Keep the condensation drain clean at all times.
- The device lighting may only be replaced by customer service.
- Do not use a high-pressure cleaner near the ventilation grill when cleaning the vehicle.
- Attach the winter covers (accessories) of the ventilation grille when the vehicle is cleaned from the outside or not used for a prolonged period of time.
- Do not open the refrigerant circuit under any circumstances.
- The refrigerator is not suitable for storing substances which are caustic or contain solvents.
- The refrigerator may not be exposed to rain.
2.2 Safe operation

CAUTION! Failure to obey these cautions could result in minor or moderate injury.
Risk of injury
- Close and lock the device door before beginning a journey.
- The cooling aggregate at the back of the device becomes very hot during operation. Protect yourself from coming into contact with hot parts when removing ventilation grills.

NOTICE! Damage hazard
- Do not use electrical devices inside the device unless they are recommended by the manufacturer for that purpose.
- Ensure that the ventilation openings are not covered.
- Danger of overheating!
Always ensure sufficient ventilation so that the heat generated during operation can dissipate. Make sure that the refrigerator is sufficiently far away from walls and other objects so that the air can circulate.
- Do not fill the inner container with ice or fluid.
- Protect the refrigerator and the cable against heat and moisture.
- Make sure that foodstuffs do not touch the walls of the cooling area.
2.3 Safety when operating with gas

WARNING! Failure to obey these warnings could result in death or serious injury.
Explosion hazard
- Only operate the device at the pressure shown on the type plate. Only use pressure controllers with a fixed setting which comply with the national regulations.
- While driving only operate the device with gas if the vehicle manufacturer allows the operation of the gas system while driving (see vehicle's manual).
- Check the national requirements for operating the device with gas during driving.
- Never operate the device with gas:
- At petrol stations
- In parking garages
- On ferries
- While transporting the caravan or mobile home with a transport vehicle or tow truck
- Never use a naked flame to check the device for leaks.
In case of gas odor:
- Close the gas supply cock and the valve on the cylinder.
- Open all windows and leave the room.
- Do not press an electric switch.
- Put out any naked flames.
- Have the gas system checked by a specialist.
- Never store liquid gas cylinders in unventilated areas or below ground level (funnel shaped holes in the ground).
- Keep liquid gas cylinders away from direct sunlight. The temperature may not exceed 50°C .

NOTICE! Damage hazard
- Only use propane or butane gas, not natural gas (see rating plate).
NOTE
- Ignition problems may occur at altitudes above 1000 m. Switch to a different energy source.
2.4 Safety when operating

CAUTION! Failure to obey these cautions could result in minor or moderate injury.
Health hazard
- Make sure that you only put items in the device which may be chilled at the selected temperature.
- Food may only be stored in its original packaging or in suitable containers.
- Opening the door for long periods can cause significant increase of the temperature in the compartments of the device.
- Clean regularly surfaces that can come in contact with food and accessible drainage systems.
- Store raw meat and fish in suitable containers in the device, so that it is not in contact with or can drip onto other food.
- If the device is left empty for long periods:
- Switch off the device.
- Defrost the device.
- Clean and dry the device.
- Leave the door open to prevent mold developing within the device.
Risk of injury
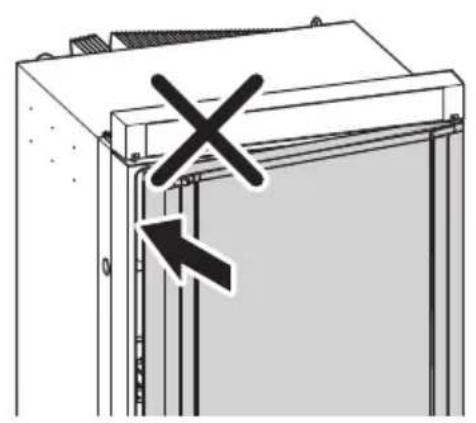
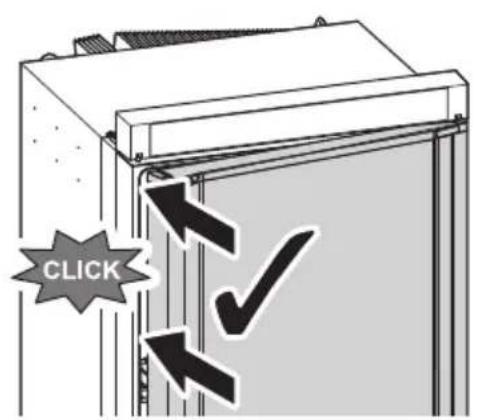
- The device door or the freezer door can completely detach from the device if used incorrectly. Push the doors closed until you hear a clear click at the top and bottom.
- Do not lean on the open device door.

NOTICE! Damage hazard
- If the door is not locked correctly on the opposite side, push on that side at the top and the bottom until it locks in place.
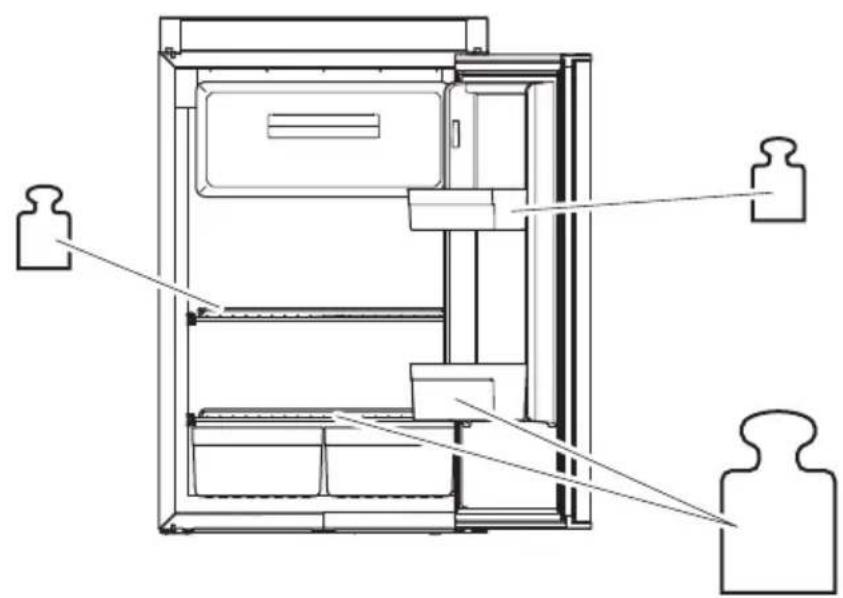
- Only store heavy objects such as bottles or cans in the device door, in the vegetable compartment or on the bottom shelf.

NOTE
- Ask your vehicle manufacturer if the battery management of your vehicle shuts down the devices to protect the battery.
- Put the device door and the freezer door into the winter position if you are not going to use the device for a longer period of time. This prevents mold from forming.
- For ambient temperatures of +15°C to +25°C, select the average temperature setting.
3 Accessories
Description
Winter cover WA 130 for the ventilation grill LS 200
Optional Fan Kit REF-FANKIT
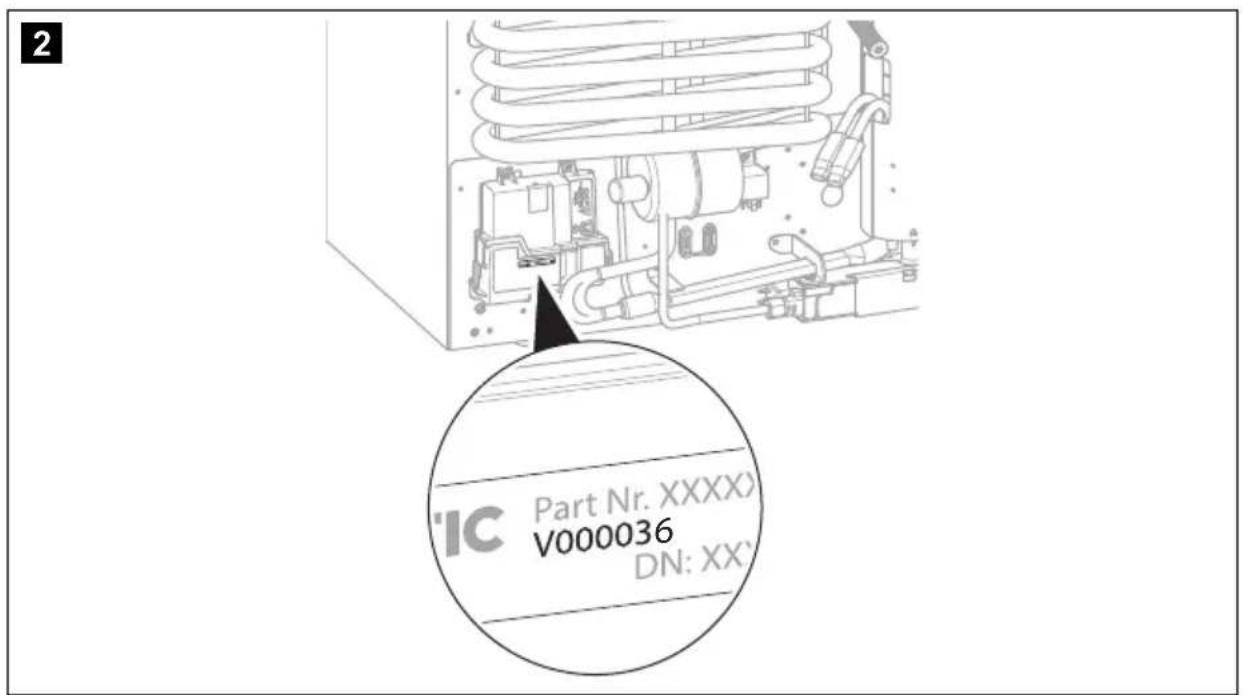
Note: The Fan Kit can only be installed in refrigerators with software version 36 or higher (fig. 2, page 4).
Optional Battery pack Pack R10-BP for stand-alone gas operation
Optional storage kit
4 Intended use
The device is suitable for:
- Installation in caravans and motor homes
- Cooling, deep-freezing and storing food
The device is not suitable for:
- Storing medications
- Storing corrosive substances or substances that contain solvents
- Quick-freezing food
5 Technical description
The refrigerator is an absorber refrigerator and is designed for operation
- on a DC power supply (12 V) on an AC power supply with liquefied gas (propane or butane)
The refrigerator has an automatic operating mode that selects the most economical type of energy connected. The refrigerator unit operates silently.
5.1 Operating and display elements
RM10.5T, RMS10.5T, RMS10.5XT
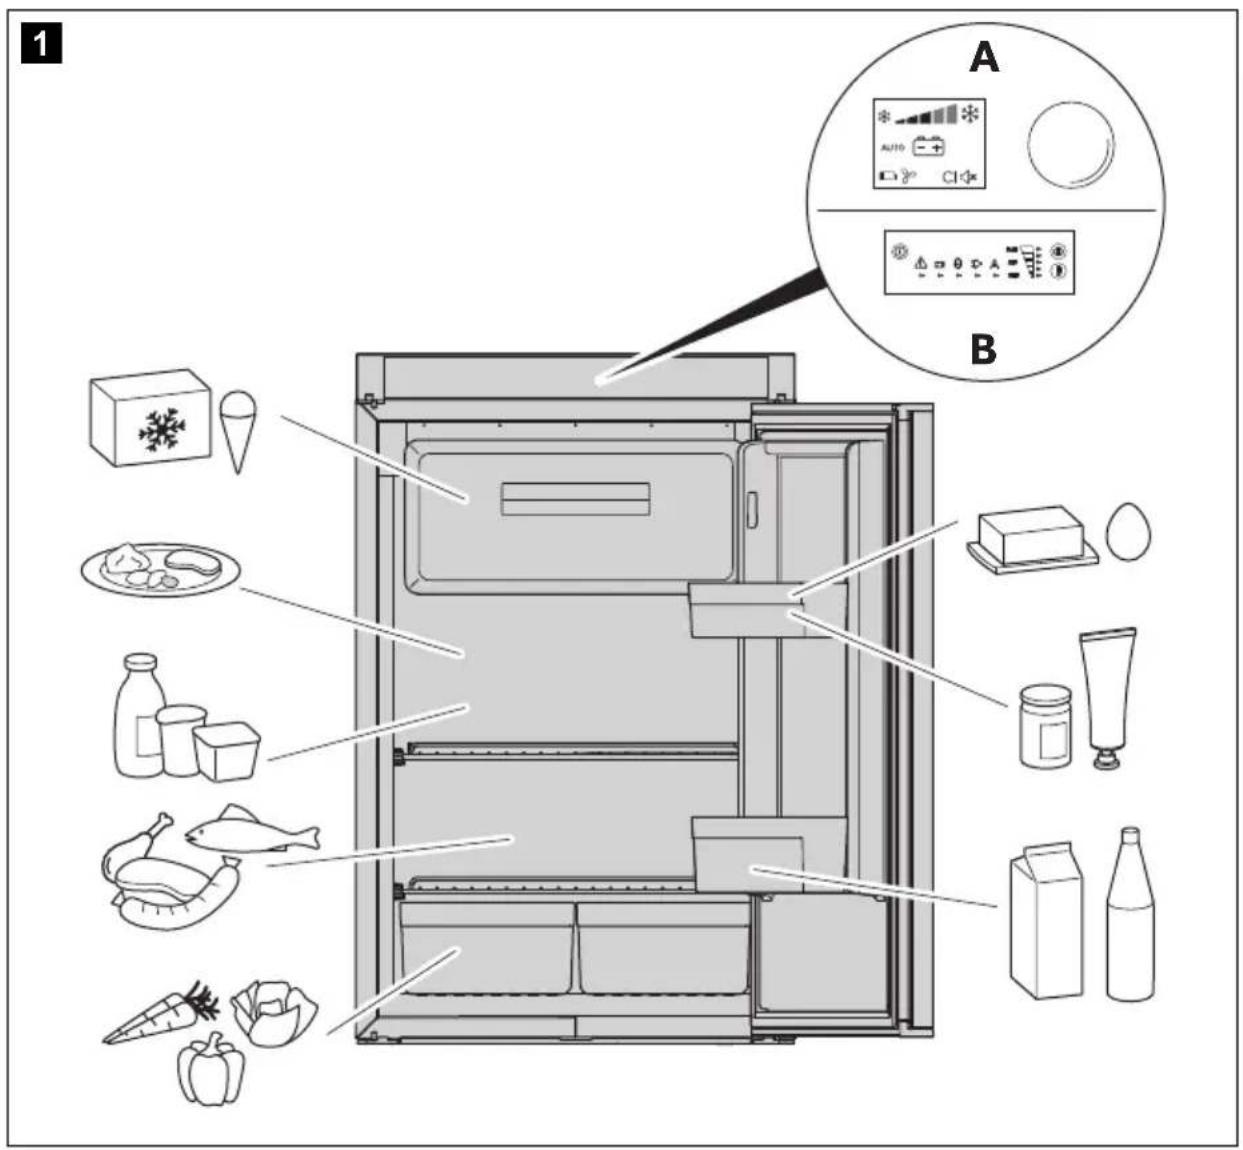
The TFT display features the following operating and display elements (fig. 1 A, page 4):
| Symbol Description |
| * | Cooling capacity indicator |
| Operation with AC power |
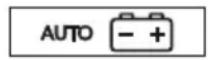
| - + | Operation with DC power |
| Operation with gas |
| AUTO | Automatic mode:
In automatic mode, the refrigerator automatically selects the most economical operating mode in the following order of priority: |
| □ | Battery:
Symbol lights up when the battery packs (optional) are fitted and the device is in stand-alone gas mode. |
| ♀ | Fan (optional):
Symbol lights up when die fan function is activated. |
| CI | Symbol lights up when the refrigerator is connected to the CI bus. |
| ◇ | Dim TFT display
After 30 seconds, the brightness of the display is reduced to the set level. |
| ▲ | Beep off:
• Error messages and warnings are not signaled acoustically.
• Door left open for an extended period is signaled acoustically. |
| ◇ | Beep on:
Error messages, warning messages and door left open for an extended period are signaled acoustically. |
| ◇ | Confirm selection and return to the main menu |
RM10.5S, RMS10.5S, RMS10.5XS
The LED display features the following operating and display elements (fig. 1 B, page 4):
| Symbol Description |
| ① | ON/OFF button |
| ▲ | Fault indicator |
| @ | Operation with DC power |
| ◇ | Operation with gas |
| ► | Operation with AC power |
| A | Automatic mode |
| ▼ | Temperature indicator |
| MODE | Energy selection button |
| Temperature selection button |
6 Using the refrigerator

NOTE
- Before starting your new refrigerator for the first time, clean it inside and outside with a damp cloth for hygienic reasons.
- When using the refrigerator for the first time, there may be a mild odor which will disappear after a few hours. Air out the living space well.
- Park the vehicle so that it is level, especially when starting up and filling the refrigerator before setting off on a journey.
- The cooling capacity can be affected by:
- the ambient temperature (e.g., when the vehicle is exposed to direct sunlight)
- the amount of food to be refrigerated
- how often you open the door
6.1 Tips for optimal refrigerator operation
- Do not store goods in the refrigerator for the first 12 hours after start-up.
- Protect the interior of the vehicle from warming up excessively (e.g., sunshades in the windows, air conditioner).
- Protect the refrigerator from direct sunlight (e.g., sunshades in the windows).
6.2 Operation at low outdoor temperatures

NOTICE!
In AC power mode and DC power mode, install both winter covers. In gas mode or automatic mode, install the lower winter cover only. This prevents heat from building up and ensures the fumes from the refrigerator can dissipate properly.

NOTE
Cold air can impact the performance of the cooling unit. Install the winter covers if you determine a loss of cooling capacity at low ambient temperatures.
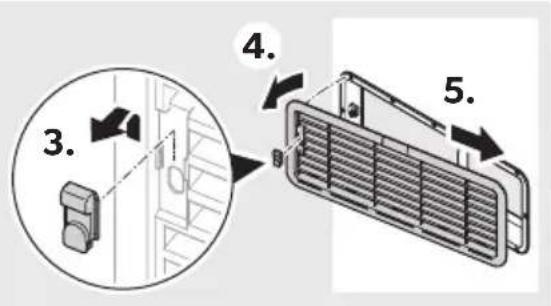
Install the winter covers (accessory) as shown in fig. 3, page 5.
6.3 Switching on the refrigerator
Press for 2 seconds
- RM10.5T, RMS10.5T, RMS10.5XT: the control knob
- RM10.5S, RMS10.5S, RMS10.5XS: the button
The refrigerator starts with the most recent settings.
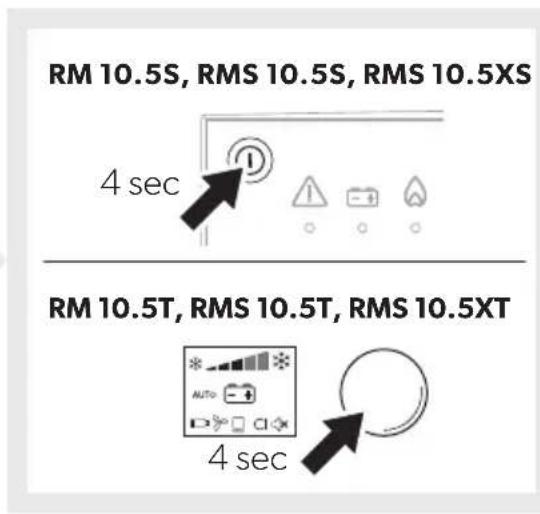
6.4 Switching off the refrigerator
Press for 4 seconds
- RM10.5T, RMS10.5T, RMS10.5XT: the control knob
- RM10.5S, RMS10.5S, RMS10.5XS: the button
A beep sounds and the refrigerator switches off.
6.5 Operating the refrigerator (RM 10.5T, RMS 10.5T, RMS 10.5XT)
Menu navigation: fig. 4, page 5
Press the control knob to activate the TFT display.
The main menu is divided into three lines:
| Main menu Detail menu |
| Cooling capacity menu |
| Operating mode menu |
| Settings menu |
Turn the control knob to select the desired detail menu. Press the control knob to open the selected detail menu.
Turn the control knob to navigate through the detail menu. Selected settings are displayed in blue. Press the control knob to choose the selected setting. Confirm the selection using
6.6 Operating the refrigerator (RM 10.5S, RMS 10.5S, RMS 10.5XS)
Controls
Repeatedly press mode, until the LED indicates the desired operating mode. Repeatedly press, until the desired temperature level is set.
6.7 Tank stop mode

WARNING!
Turn off the refrigerator or select a different operating mode if refueling takes longer than 15 minutes.
If the vehicle's ignition is switched off, the refrigerator will switch to tank stop mode for safety reasons. This blocks gas operation for 15 minutes. The refrigerator then automatically switches back to the standard automatic mode.
In tank stop mode
- RM10.5T, RMS10.5T, RMS10.5XT: the symbol is displayed
- RM10.5S, RMS10.5S, RMS10.5XS: the LED flashes
6.8 Stand-alone gas mode (accessory)

WARNING!
In stand-alone gas mode, the refrigerator must be switched off manually during refueling.

NOTE
- When no AC or DC power is connected, there is a load on the batteries even when the refrigerator is off.
- Remove the batteries when the refrigerator is not in use (risk of leakage).
For stand-alone gas mode, the optional battery packs must be installed. This makes connecting to AC or DC power unnecessary.
When using 12 batteries (type AA), the refrigerator can be operated in stand-alone gas mode for 2 to 3 days.
Please note the following special features when using stand-alone gas mode:
- The light inside the refrigerator remains switched off.
- The display turns off 2 seconds after the last activity.
- The display briefly switches on every 15 seconds. This indicates that the refrigerator is switched on.
- If there are error messages, the display stays switched on.
Stand-alone gas mode is indicated
- RM10.5T, RMS10.5T, RMS10.5XT: by the symbols and
- RM10.5S, RMS10.5S, RMS10.5XS: by the flashing of LED every 15 seconds
The batteries in the battery packs must be replaced
- RM10.5T, RMS10.5T, RMS10.5XT: when the error "E 14" is displayed
- RM10.5S, RMS10.5S, RMS10.5XS: when the error / is displayed
6.9 Setting the cooling capacity

NOTE
For ambient temperatures of +15°C to +25°C, select the average cooling capacity.
Set the cooling capacity:
- RM10.5T, RMS10.5T, RMS10.5XT: Select the desired temperature level in the cooling capacity menu.
- RM10.5S, RMS10.5S, RMS10.5XS: Repeatedly press until the desired temperature level is selected.
6.10 Fan operation (optional)
For fan operation the optional fan must be installed.
When switching on the device, the fan is switched on for a short time (function test). During the device's operation the fan only switches on:
- When the ambient temperature is above 32°C.
- When the set cooling temperature is not reached within 2 hours.
- RM10.5T, RMS10.5T, RMS10.5XT: When the fan function is activated.

NOTE
RM10.5T, RMS10.5T, RMS10.5XT: In delivery state, the fan function is activated.
RM10.5S, RMS10.5S, RMS10.5XS: The fan function is always activated and can not be deactivated.
RM10.5T, RMS10.5T, RMS10.5XT
The fan operation is indicated by the symbol 业

6.11 Using the refrigerator door

CAUTION! - Risk of injury
- The refrigerator door or freezer compartment door can completely detach from the device if used incorrectly.
- Do not lean on the open refrigerator door.

NOTE
If the door is not secured correctly on the opposite side, carefully push on the top and bottom of the door on that side until it is secured in place.
Closing and securing the refrigerator door
Press the door shut until you clearly hear it click at the top and bottom. The door is now closed and secured.
6.12 Notes on storing food

CAUTION! - Health hazard!
- Please check whether the cooling capacity of the refrigerator is suitable for the food you wish to cool.
- Opening the door for long periods can cause significant increase of the temperature in the compartments of the refrigerator.
- Store raw meat and fish in suitable containers in the refrigerator, so that raw meat and fish is not in contact with or drip onto other food.
- Food may only be stored in its original packaging or in suitable containers.
- The freezer compartment is suitable for making ice cubes and for keeping frozen food. It is not suitable for freezing previously unfrozen food.
- If the refrigerator is exposed to a room temperature below +10°C for an extended period, a uniform temperature cannot be guaranteed in the freezer compartment. This can lead to an increase in the freezer compartment temperature and the goods stored in it may defrost.

NOTICE!
- The maximum weight per door shelf is 6 kg. The maximum weight for the entire door is 7.5 kg.
- Store heavy objects such as bottles or cans in the refrigerator door, in the lower storage compartment, or on the bottom shelf only.
- Do not keep carbonated drinks in the freezer compartment.
Store food as shown (fig. 1, page 4).
6.13 Positioning the shelves

WARNING! Children beware!
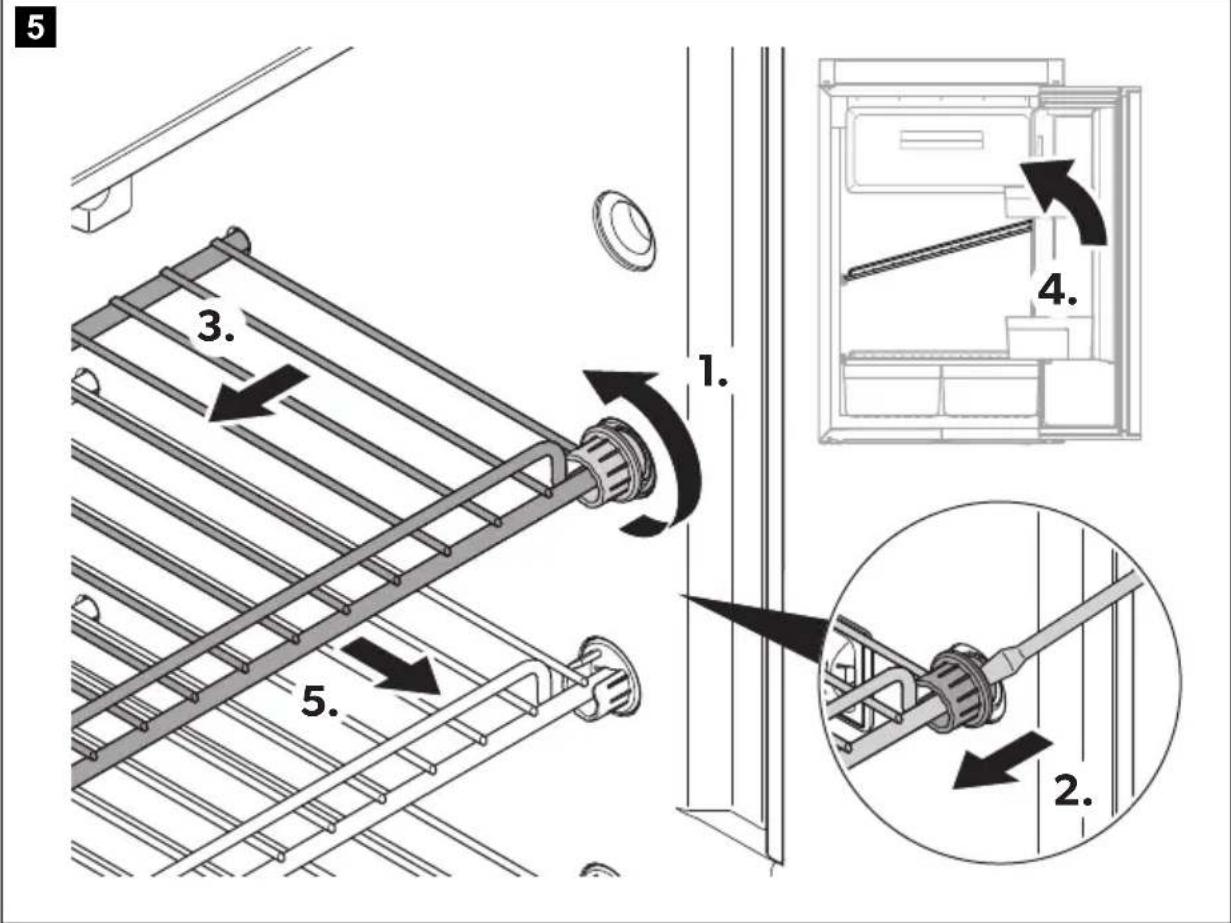
All shelves are fixed in place to prevent children from climbing into the refrigerator.
- Only remove the shelves for cleaning purposes.
- Refit the shelves and secure them in place.
Remove the shelf as shown (fig. 5, page 6). Refit the shelf in the reverse order.
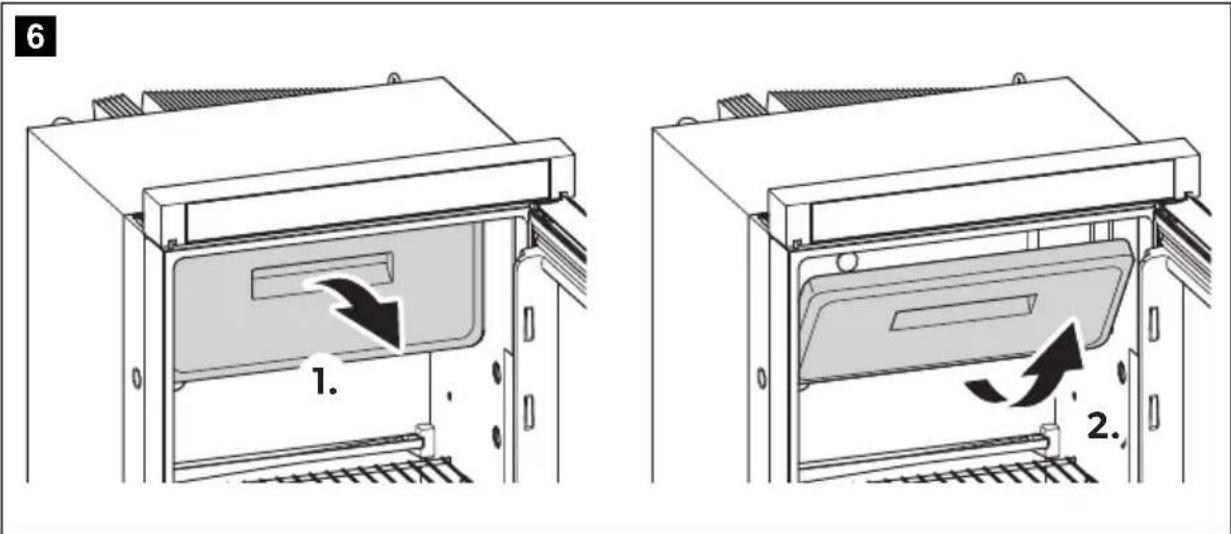
6.14 Removing the freezer compartment
You can take out the freezer compartment to make more space in the refrigerator compartment.

NOTE
- Keep the freezer compartment door and the base in a safe place to prevent any damage.
- When installing, replace the parts in the reverse order.
Proceed as shown (fig. 6, page 6).
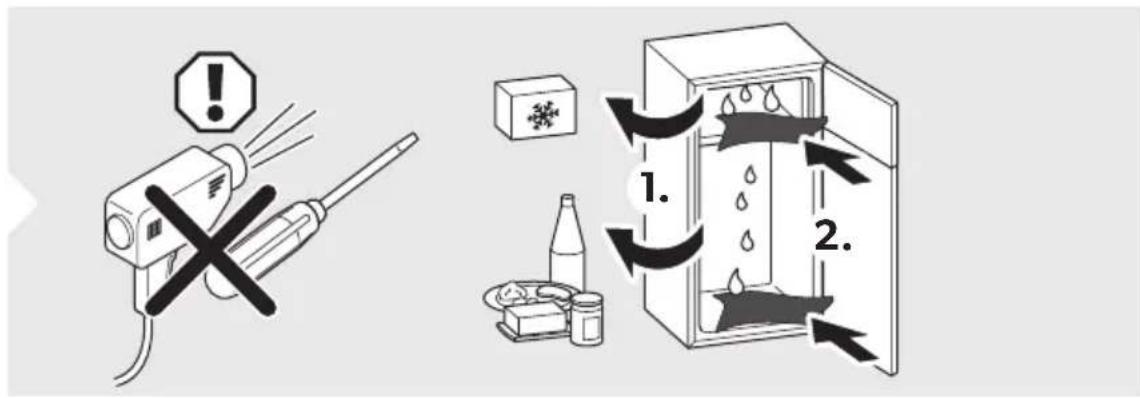
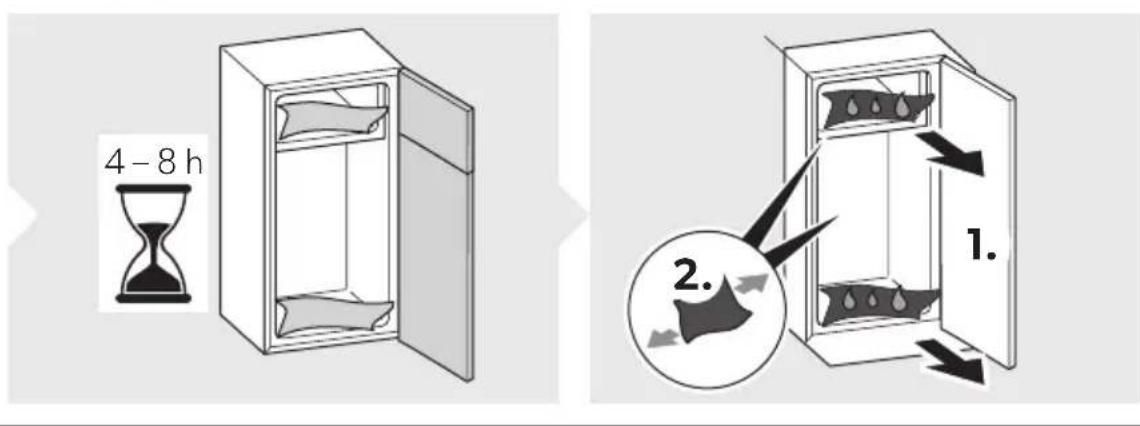
6.15 Defrosting the refrigerator

NOTICE!
Do not use mechanical tools or a hair dryer to remove ice or to loosen frozen items.

NOTE
Over time, frost builds up on the cooling fins inside the refrigerator. If this layer of frost is about 3 mm thick, you should defrost the refrigerator.
Proceed as shown (fig. 7, page 7).
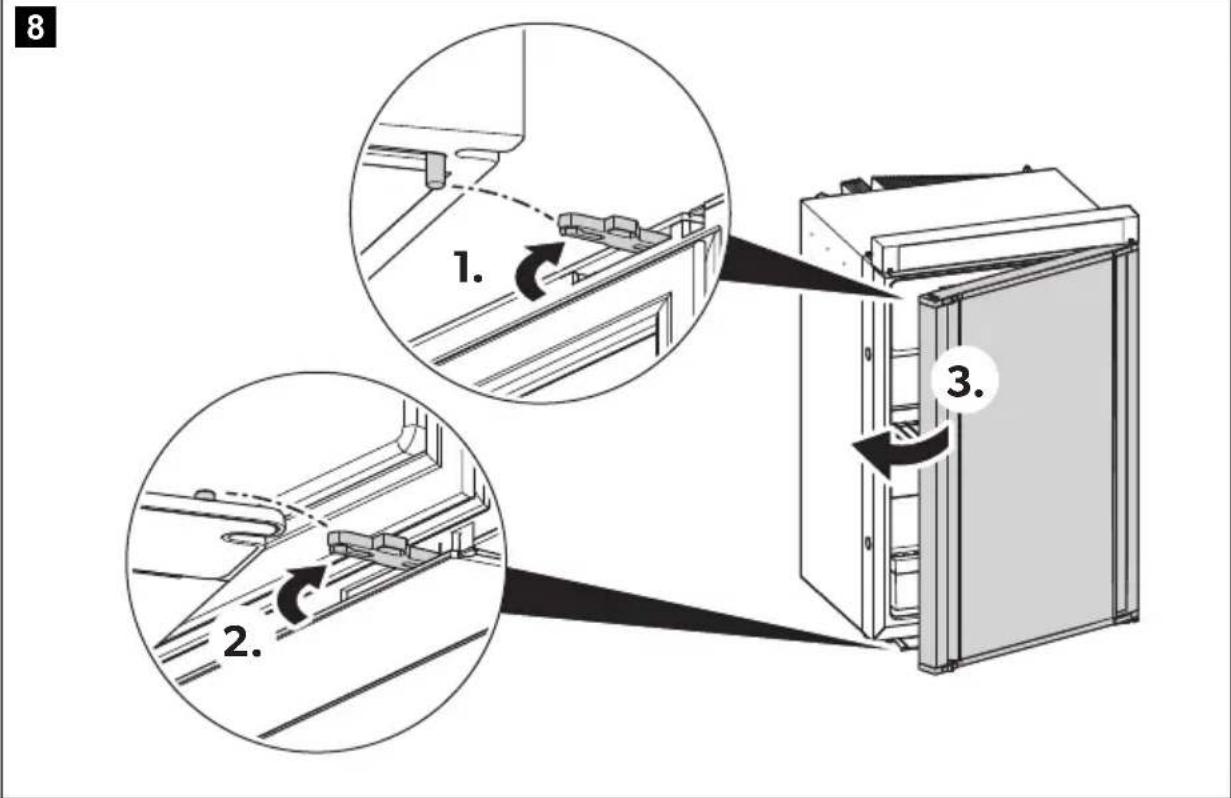
6.16 Positioning the refrigerator door in the winter position

CAUTION!
The winter position may not be used while driving.
Place the refrigerator door and the freezer compartment door into the winter position if you are not going to use the refrigerator for an extended period of time. This prevents mold from forming.
Defrost the refrigerator (chapter "Defrosting the refrigerator" on page 25).
Unscrew the hook near the securing mechanism all the way at the top and bottom of one side of the door (fig. 8, page 8). Press against the refrigerator door. The protruding pin snaps into the hook.
Open the door in winter mode as follows:
Pull the door toward you. Push the protruding hooks at the top and bottom of the door back in.
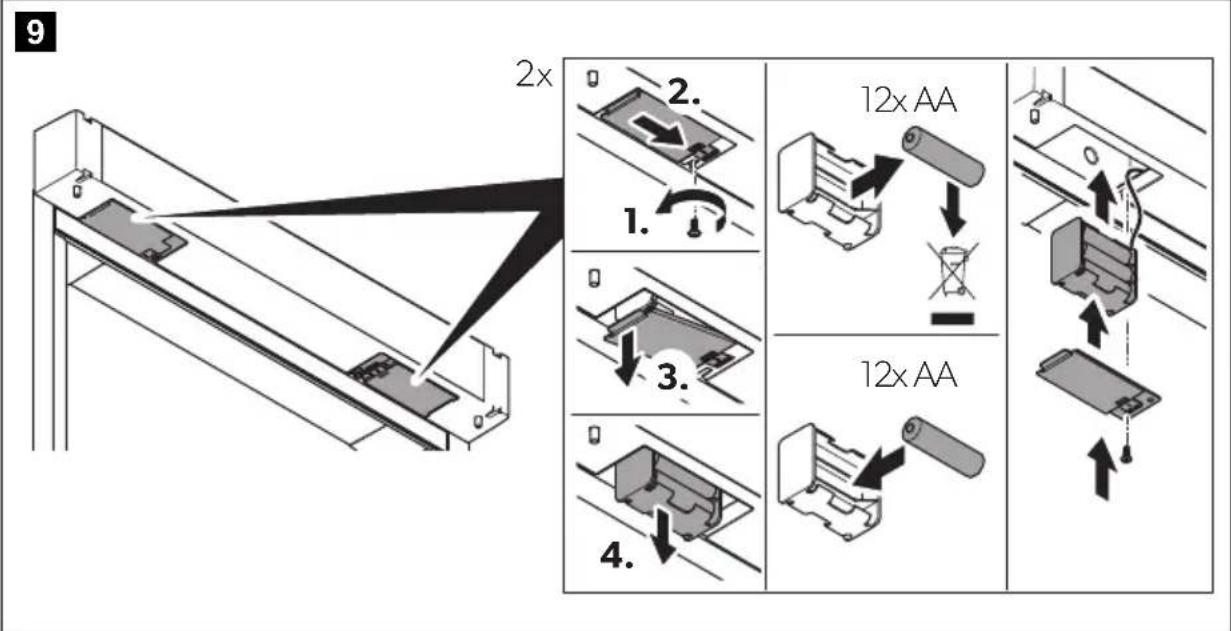
6.17 Optional battery packs
If the vehicle's own 12 V DC battery power supply is unavailable or if the power supply is cut off while the appliance is in operation, the electronic control unit automatically switches over to the internal battery power (if batteries are inserted).
The compartments for the battery packs (accessories) are located on the right and left under the operating element. A total of 12 AA batteries are needed.
Proceed as shown in fig. 9, page 8 to insert the batteries.
7 Troubleshooting

NOTE
To safely operate 12 V consumer units in the caravan while driving, it must be ensured that the towing vehicle provides sufficient voltage. On some vehicles, the battery management system may automatically switch off the consumer units to protect the battery. Ask your vehicle manufacturer for more information.
Fault Possible cause Suggested remedy
| In AC power mode:
The refrigerator does not work. | The fuse in the AC power supply is defective. | Replace the fuse. |
| The vehicle is not connected to the AC power supply. | Connect the vehicle to the AC power supply. |
| The AC heating element is defective. | Contact an authorized customer service point. |
| Fault Possible cause Suggested remedy |
| In DC power mode:
The refrigerator does not work. | The fuse in the DC cable is defective. | The fuse on the relay must be replaced.
Contact an authorized customer service point. |
| The vehicle fuse has blown. Replace the vehicle fuse. (Please refer to the operating manual of your vehicle.) |
| The vehicle battery is discharged. Test the battery and charge it. |
| The ignition is not switched on. Switch on the ignition. |
| The DC heating element is defective. | Contact an authorized customer service point. |
| In gas mode:
The refrigerator does not work. | The gas cylinder is empty. Replace the gas cylinder. |
| The gas valve is closed. Turn the valve to open. |
| Air is in the gas line. Switch the refrigerator off and on again. Repeat the procedure three or four times if necessary.
If installed, switch on the stove and repeat the process on the refrigerator if necessary. |
| In automatic mode:
The refrigerator is being operated with gas although it is connected to the AC power supply. | The grid voltage is too low. The refrigerator automatically switches back to AC power supply as soon as the grid voltage is sufficient again. |
| The refrigerator is not cooling adequately. | The ventilation around the cooling unit is not sufficient. | Check that the ventilation grille is not obstructed. |
| The evaporator is iced up. Check whether the refrigerator door closes properly. Make sure that the refrigerator seal fits correctly and is not damaged. Defrost the refrigerator. |
| The temperature is set too high. Set a lower temperature. |
| The ambient temperature is too high. | Remove the ventilation grille for a while so that warm air can escape quicker. |
| Too much food was placed in the refrigerator at the same time. | Remove some of the food. |
| Too much warm food was placed in the refrigerator at the same time. | Remove the warm food and leave it to cool down before putting it in again. |
| The refrigerator has not been operating for very long. | Check the temperature again after four or five hours. |
7.1 Fault messages and signal tones
All faults are indicated by a warning symbol, a fault ID and a beep. The beeping lasts for 2 minutes and is repeated every 30 minutes until the error has been rectified.
If multiple faults occur, the display shows the most recent fault. The underlying faults are displayed after the last fault has been confirmed.
RM10.5T, RMS10.5T, RMS10.5XT: Faults are indicated by a fault code with a warning symbol ( ) in the middle of the TFT display.
RM10.5S, RMS10.5S, RMS10.5XS: In the event of a fault, the LED warning symbol (△) in the display lights up continuously and the LEDs flash according to the fault.
WARNING type fault messages
All faults of the WARNING type are reset automatically once the fault has been rectified.
| RM10.5T, RMS10.5T, RMS10.5XT | RM10.5S, RMS10.5S, RMS10.5XS | Fault Solution |
| W01 | | Defective temperature sen-sor in the refrigerator com-partment | Contact an authorized customer service point. |
| W05 | | AC power not connected or AC voltage <190 V | Connect the refrigerator to AC power or select a different energy type, e.g. gas or DC power. |
| W06 | | DC power not connected Connect the refrigerator to DC power or select a different energy type, e.g. gas or AC power. |
| W11 | | DC over voltage (>16 V). Reduce the DC supply voltage. |
| | Tank stop mode: Gas oper- tion is blocked for 15 minutes. | Wait 15 minutes or switch to another operating mode. |
| W10 + beep | Beep | The door has been open for more than 2 minutes. | Close the door. |
ERROR type fault messages
All faults of the ERROR type must be reset manually:
• RM10.5T, RMS10.5T, RMS10.5XT: Press the control knob for 2 seconds. • RM10.5S, RMS10.5S, RMS10.5XS: Press ① for 2 seconds.
A beep sounds. The error has been reset.
| RM10.5T, RM10.5T, RMS10.5XT | RM10.5S, RMS10.5S, RMS10.5XS | Fault Solution | |
| E03 No connection between power module and display | Contact an authorized customer service point. |
| E07 No cooling capacity in gas mode | Check if the device is at an angle and adjust it so it is level, if necessary. Reset the error. Contact customer service if this error occurs again. |
| E08 No cooling capacity in AC power mode | Check if the device is at an angle and adjust it so it is level, if necessary. Reset the error. Contact customer service if this error occurs again. |
| E09 No cooling capacity in DC power mode | Check if the device is at an angle and adjust it so it is level, if necessary. Reset the error. Contact customer service if this error occurs again. |
| E12 Gas valve test error Gas operation is not possible. | Reset the error. Contact customer service if this error occurs again. |
| E13 Internal communication error Gas operation not possible. | Reset the error. Contact customer service if this error occurs again. |
| E14 In stand-alone gas mode: The battery charge of the battery packs is too low | Insert new batteries and then reset the error. |
| E50 Gas lock after 3 ignition attempts | Ignition not possible. The gas cylinder is empty. Replace the gas cylinder. Reset the error. |
| RM10.5T, RM10.5S, RMS10.5S, RMS10.5XS | RM10.5S, RMS10.5S, RMS10.5XS | Fault Solution | |
| E51 Gas lock, internal error in the power module | Reset the error. Contact customer service if this error occurs again. |
| E52 Ground contact, gas valve Reset the error. | Contact customer service if this error occurs again. |
| E53 Ground contact, ignition electrode | Reset the error. Contact customer service if this error occurs again. |
Refrigerator door does not close

NOTE
If the door no longer closes, then the door handle is blocked on the opened side.
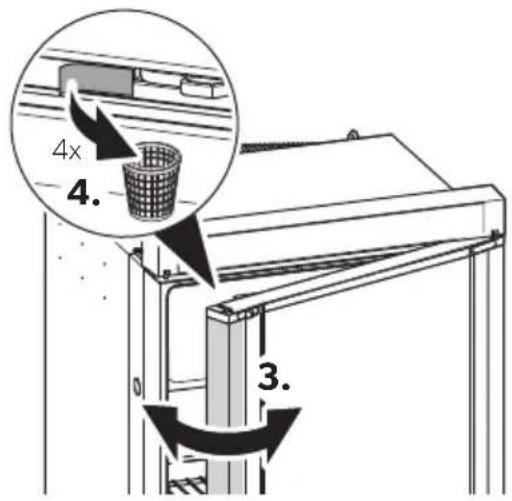
• Remove the door handle blockage as shown (fig. 10, page 9).
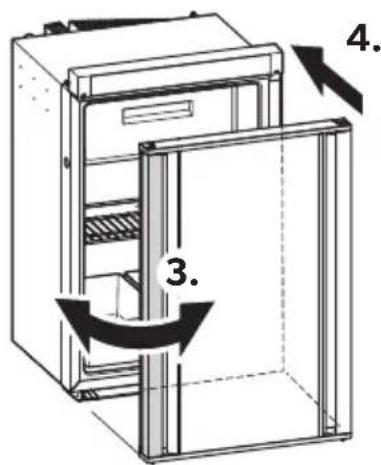
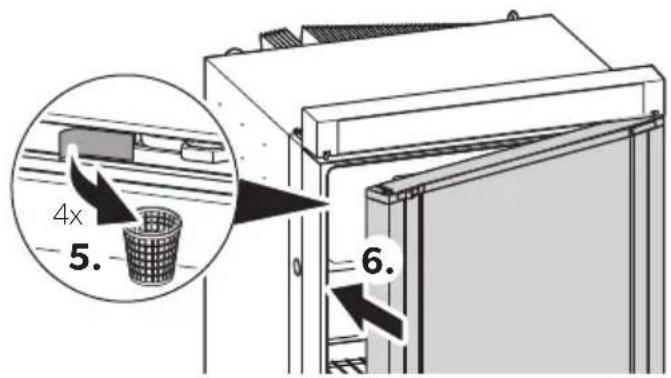
Refrigerator door has completely detached from the device

CAUTION! Risk of injury
The door can completely detach from the device if the locking pins have been tampered with or are twisted.
Insert the door as shown (fig. 11, page 9).
8 Cleaning and maintenance

WARNING!
Always disconnect the refrigerator from the energy supply before cleaning and servicing it.

NOTICE!
When cleaning, never use sharp cleaning agents or hard or pointed tools to remove layers of ice or to loosen objects which have frozen in place.
Clean the refrigerator regularly and when it gets dirty using a damp cloth. Make sure that no water drips into the seals. This can damage the electronics. Wipe the refrigerator dry with a cloth after cleaning. Check the condensate drain regularly.
Clean the condensate drain when necessary. If it is blocked, the condensate collects on the bottom of the refrigerator.
Make sure that the ventilation grilles in the outer wall of the mobile home or caravan and the refrigerator roof ventilator are free from dust and pollutants. This ensures that the heat generated during operation can dissipate, the refrigerator is not damaged and the cooling capacity is not reduced.
8.1 Cleaning the gas burner

WARNING!
- Allow the burner to cool down before cleaning it.
- Do not modify the gas equipment.

NOTE
- Dirt in the gas burner is indicated by poor ignition or deflagrations.
- The manufacturer also recommends cleaning the burner after it has not been used for an extended period, and at least once a year.
- When using liquefied petroleum gas, the cleaning interval is reduced to half yearly or quarterly, depending on the level of dirt.
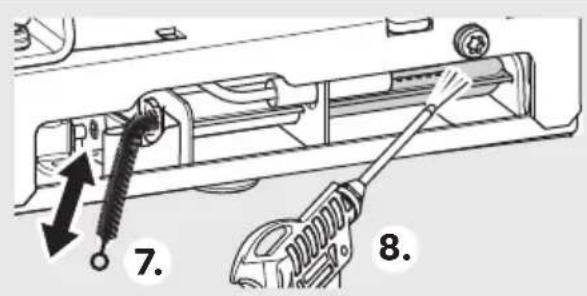
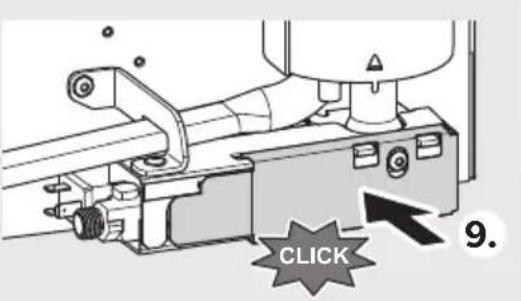
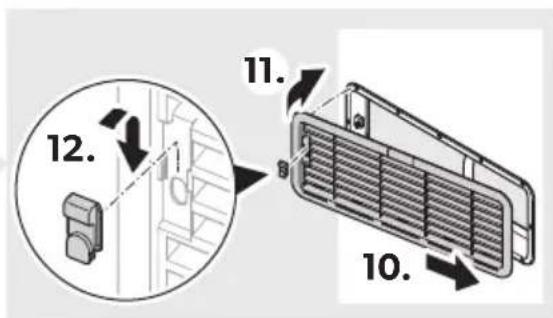
Proceed as shown (fig. 12, page 10).
8.2 Maintenance

WARNING!
Work on gas and electrical installations may only be performed by qualified technicians.
Have the gas system and connected flues inspected before starting up the device for the first time, and by an authorized professional every two years to ensure they comply with the national safety requirements.
Keep a record of any maintenance performed.
9 Warranty
The statutory warranty period applies. If the product is defective, please contact your retailer or the manufacturer's branch in your country (see dometic.com/dealer).
For repair and warranty processing, please include the following documents when you send in the product:
A copy of the receipt with purchasing date - A reason for the claim or description of the fault
Note that self-repair or non-professional repair can have safety consequences and might void the warranty.
10 Disposal

NOTE
This device contains flammable insulation blowing gas. Only have the device removed and disposed of by a specialist.
Recycling products with non-replaceable batteries, rechargeable batteries or light sources

If the product contains any non-replaceable batteries, rechargeable batteries or light sources, you don't have to remove them before disposal. If you wish to finally dispose of the product, ask your local recycling center or specialist dealer for details about how to do this in accordance with the applicable disposal regulations. The product can be disposed free of charge.
Recycling packaging material

- Place the packaging material in the appropriate recycling waste bins wherever possible.
11 Technical data
| RM10.5(S)(T) | RMS10.5(S)(T) | RMS10.5X(S)(T) |
| Connection voltage: | 230 V~/50 Hz12 V= |
| Capacity | | | |
| Gross capacity: | 88 I | 78 I | 92 I |
| Refrigerator compartment: | 78.7 I | 69.1 I | 80.3 I |
| Freezer compartment: | 9.2 I | 9.2 I | 12.1 I |
| Total net capacity: | 86 I | 76 I | 90 I |
| Excluding freezer compartment | | | |
| Gross capacity: | 93 I | 83 I | 98 I |
| Net capacity: | 91 I | 81 I | 96 I |
| Power input: | 135 W (230 V~)130 W (12 V= |
| Energy consumption: 2.8 kWh/24 h(230 V~) | 2.5 kWh / 24(230 V~) | 3.2 kWh / 24h(230 V~) |
| Gas consumption: 270 g/24 h | |
| Climate class: SN | |
| Dimensions H x W x D: | 821 x 523 x 548 mm | 821 x 523 x603 mm |
| Weight: | 28 kg | 27.4kg | 29 kg |
| Inspection/certification: | CE E1 |
For the current EU Declaration of Conformity for your device, please refer to the respective product page on dometic.com or contact the manufacturer directly (see back page).
Detailed information

dometic.com
RM10.5S, RMS10.5S, RMS10.5XS
5 Technical description
RM10.5S, RMS10.5S, RMS10.5XS
RM10.5S, RMS10.5S, RMS10.5XS
RM10.5S, RMS10.5S, RMS10.5XS
- RM10.5T, RMS10.5T, RMS10.5XT: control button - RM10.5S, RMS10.5S, RMS10.5XS: button ①
- RM10.5T, RMS10.5T, RMS10.5XT: control button - RM10.5S, RMS10.5S, RMS10.5XS: button ①
6.13 Positioning the shelves

RM10.5S, RMS10.5S, RMS10.5XS
RM10.5S, RMS10.5S, RMS10.5XS
WARNING-type error messages
2.2 Safety during operation

RM10.5S, RMS10.5S, RMS10.5XS
The LED display has the following operating and display elements (fig. 1 B, page 4):
WARNING! Danger for children!
RM10.5S, RMS10.5S, RMS10.5XS
WARNING! Danger for children!
6.14 Remove the freezer jacket
CAUTION! Risk of injury
- Always keep the condensate drain clean.
- The lighting in the appliance must only be replaced by customer service.
- Do not use high-pressure cleaners to clean the vehicle in the area around the ventilation grille.
- Mount the winter covers on the ventilation grille (accessory) when the vehicle is cleaned on the outside or taken out of service for a longer period.
- Never open the cooling circuit.
- The refrigerator is not suitable for storing corrosive or solvent-containing substances.
- The refrigerator must not be exposed to rain.
2.2 Safety during operation

CAUTION! Risk of injury
CAUTION! Risk of injury
- Use only liquid gas, no natural gas (see nameplate).
NOTE
- At altitudes above 1000 m, ignition problems may occur. Switch to another energy type if possible.
CAUTION! Risk of injury
RM10.5S, RMS10.5S, RMS10.5XS
The LED display has the following operating and display elements (fig. 1 B, page 4):
| Symbol Beskrivelse |
| ① | PÅ/AV-tast |
| Δ | Feilindikering |
| ← | Drift med likestrøm |
| ○ | Drift med gass |
| → | Drift med vekselstrøm |
| A | Automatisch modus |
| ∥ | Temperaturindikering |
| MODE | Energivelgertast |
| θ | Temperaturvalgknapp |
6 Using the refrigerator

WARNING! Dangerous for children!
RM10.5S, RMS10.5S, RMS10.5XS
Indicates a situation that, if not avoided, may result in property damage.

INSTRUCTION
Supplementary information on operating the device.
2 Safety instructions
This device is intended for use as intended and in accordance with this manual.
This manual contains information necessary for proper installation and/or operation. Improper installation and/or inadequate maintenance may result in unsatisfactory performance and possible failure.
The manufacturer is not liable for any injuries or damage to the product resulting from the following:
- Incorrect assembly or connection, including excessive voltage
- Incorrect maintenance or use of spare parts other than the original spare parts provided by the manufacturer
- Changes to the product without the explicit approval of the manufacturer
- Use for purposes other than those specified in this manual
Dometic reserves the right to change the product's appearance and technical specifications.
2.1 Safety instructions

Do not insert hands into the hinge.

WARNING! Risk of damage
Always keep the condensate drain hole clean. The lighting must only be replaced by customer service personnel. Do not use a high-pressure cleaner in the area of the ventilation grille. Clean the ventilation grilles with a high-pressure cleaner. - Install winter covers for the ventilation grilles (accessories) if you park the car outside or leave it unused for an extended period. - It is strictly forbidden to open the cooling circuit. - The refrigerator is not intended for storing medicines or solutions containing solvents. Do not allow rain to enter the refrigerator.
2.2 Safety instructions for operation

CAUTION! Failure to follow these warnings may result in minor or moderate injury.
Risk of injury
At altitudes above 1000 meters, ignition difficulties may occur. If possible, switch to another energy source.
2.4 Safety instructions for use

CAUTION! Failure to follow these warnings may result in minor or moderate injury.
Health hazard
- Check whether the cooling capacity of the device matches the characteristics of the food products that need to be cooled.
- Food products may only be stored in their original packaging or in suitable containers.
- Leaving the doors open for an extended period can lead to a significant increase in temperature inside the device compartments.
- Regularly clean the surfaces that may come into contact with food products or potable water systems. Store raw meat and fish in the device in suitable containers so that they do not come into contact with other food products or drip onto them.
- The device is not used for a long time:
- Turn off the device. - Defrost the device. - Clean and dry the device.
To prevent mold.
Risk of injury
The device door and the freezer drawer may detach from the device if not used correctly. Press on the door until you hear a loud click at the top and bottom. Do not lean on the open door of the device.

ATTENTION! Risk of damage
- If the door on the opposite side is not locked properly, push it carefully from top to bottom until it locks. Place heavy items, such as bottles or cans, on the shelves in the door of the device, in the lower drawer or on the lower grid.

INSTRUCTION
- Contact the manufacturer of the transport vehicle to find out if the air conditioning control system of your transport vehicle consumes power when the ignition is off.
- Set the device door and freezer compartment to the winter position if you do not intend to use the device for a long time. This will prevent the formation of mold.
- If the ambient temperature is between +15 °C and +25 °C, select the medium temperature setting.
Accessories
Description
Ice cube tray for the ventilation grille LS 200
Additional ventilation kit REF-FANKIT
Note: The ventilation kit can only be installed on refrigerators with software version 36 or later (Fig. 2, page 4).
Additional kit for autonomous operation of the refrigerator from a gas supply source
Additional kit for storage
From a 12V DC source, from an AC source, from liquefied gas (propane or butane)
The refrigerator has an automatic operating mode in which the device automatically selects the optimal power source from the available ones. The refrigerator operates silently.
5.1 Control and indication elements
RM10.5T, RMS10.5T, RMS10.5XT
RM10.5S, RMS10.5S, RMS10.5XS
The refrigerator has the following control and indication elements (Fig. 1 B, page 4):
Cooling power menu
Operating mode menu

Settings menu
Turn the control knob to select the desired menu item. To enter the selected menu, press the control knob. To navigate through the submenu, turn the control knob. Selected settings are displayed in blue. To select the desired setting, press the control knob. Confirm the selection by pressing
6.6 Refrigerator control
(RM 10.5S, RMS 10.5S, RMS 10.5XS)
Control elements
Press MODE until the indicator shows the required operating mode. Press until the required temperature level is set.
6.7 Operating mode at filling stations

WARNING!
Switch off the refrigerator or select another mode if the vehicle is to be refueled for more than 15 minutes.
If the vehicle's ignition is switched off, the refrigerator automatically switches to the filling station operating mode for safety reasons. This blocks gas operation for 15 minutes. Then the refrigerator automatically switches back to the standard automatic mode.
Operating time at filling stations
- RM10.5T, RMS10.5T, RMS10.5XT: symbol is displayed
- RM10.5S, RMS10.5S, RMS10.5XS: indicator flashes

6.8 Automatic operation on gas (optional)

WARNING!
In automatic gas operation mode, the refrigerator must be switched off before refueling.

NOTE
- If there is no source of direct or alternating current, the batteries are subjected to load even if the refrigerator is switched off.
- Install batteries if the refrigerator is not in use (risk of leakage).
For autonomous operation on gas, it is necessary to install additional batteries. In this case, connecting to constant or alternating current sources is not required.
When using 12 batteries (type AA), the refrigerator can operate in autonomous mode on gas for 2-3 days.
Note the following features of autonomous operation on gas:
- The light in the refrigerator compartment is always off.
- The display turns off 2 seconds after the last action.
- The display turns on briefly every 15 seconds. Thus, the refrigerator indicates that it is operating. If an error occurs, the display flashes.
Autonomous operation on gas is indicated by the following:
- RM10.5T, RMS10.5T, RMS10.5XT: symbols


- RM10.5S, RMS10.5S, RMS10.5XS: flashing LED for seconds
Batteries need to be replaced
- RM10.5T, RMS10.5T, RMS10.5XT: When displaying error "E 14"
- RM10.5S, RMS10.5S, RMS10.5XS: When displaying error


6.9 Adjusting the Cooling Power

INSTRUCTION
If the ambient temperature is between +15 °C and +25 °C, select the cooling power.
Adjust the cooling power:
RM10.5T, RMS10.5T, RMS10.5XT: Select the required temperature level in the cooling power menu. - RM10.5S, RMS10.5S, RMS10.5XS: Press several times until the required temperature level is selected.
6.10 Fan Operation (Cooling)
For fan operation, the cooling function must be set (on).
The fan turns on for a certain time when the device is switched on (function check). During device operation, the fan turns on only in the following cases:
- When the ambient temperature reaches 32 °C; when the set cooling temperature is not reached within 2 hours;
- RM10.5T, RMS10.5T, RMS10.5XT: when the cooling function is active.

INSTRUCTION
RM10.5T, RMS10.5T, RMS10.5XT: In standby mode, the cooling function is active.
RM10.5S, RMS10.5S, RMS10.5XS: The fan function is always active and cannot be deactivated.
RM10.5T, RMS10.5T, RMS10.5XT
The fan operating mode can be determined by the symbol.

6.11 Installation of the refrigerator door

WARNING! - Risk of injury
- If the refrigerator door is not used correctly, the freezer door may completely detach from the appliance. Do not lean on the open refrigerator door.

NOTE
If the door has not locked on the opposite side, move it up and down until it locks.
Closing and locking the refrigerator door
Press on the refrigerator door until it clicks at the top and bottom. The door is now closed and locked.
6.12 Instructions for storing food

Remove the shelf as shown (fig. 5, p. 6). Install the shelf in place by following the reverse procedure.
6.14 Removing the freezer drawer
To increase the internal space, you can remove the freezer drawer.

NOTE
Store the door and freezer drawer in a safe place to prevent damage. - Installation of the freezer drawer is carried out in the reverse order.
Follow the steps as shown (fig. 6, p. 6).
6.15 Defrosting the refrigerator

Do not use mechanical tools to speed up defrosting or to separate frozen products.

INSTRUCTION
Ice forms on the cooling fins over time. The freezer must be defrosted when the ice layer reaches 3 mm.
Follow the instructions as shown (fig. 7, p. 7).
6.16 Setting the refrigerator door to winter position

CAUTION!
It is forbidden to use the winter position during operation.
If the refrigerator will not be used for a long time, move the refrigerator and freezer compartment doors to the winter position. This will prevent the formation of ice.
Defrost the refrigerator (see "Defrosting the refrigerator" on p. 298). Open the hooks located next to the hinge mechanism, at the top and bottom on one side of the door (fig. 8, p. 8). Press the refrigerator door. The protruding pin engages with the hook.
Open the door in winter mode as follows:
Pull the door towards you. Press the protruding pins at the top and bottom of the door.
6.17 Optional batteries
If power from the vehicle's own 12 V battery is unavailable or if the power source is disconnected while the appliance is in operation, the electronic control unit automatically switches to power from the internal batteries (if the battery is inserted).
The battery compartments (accessories) are located to the left and right of the control element. Two AA batteries are required.
To install the batteries, perform the actions as shown in Fig. 9, p. 8.
7 Troubleshooting

WARNING
To avoid injury or damage to property, before connecting to a 12V power source, make sure that the vehicle provides the required voltage. In some vehicles, the battery management system automatically disconnects the consumer to protect the vehicle battery. Information about this can be obtained from the vehicle manufacturer.
Fault Possible cause Remedy
Fault Possible cause Remedy
Install new batteries, then perform a fault reset.
E50 Fuse blown
After 3 attempts
Check fuse.
Empty gas cylinder. Replace gas cylinder.
Perform a fault reset.
E51 Fuse blown,

Internal fault or power supply
Perform a fault reset.
Contact an authorized service center if the malfunction occurs again.
E52 Error

TIN
Perform a reset of the malfunction.
Contact an authorized service center if the malfunction occurs again.
E53 Grounding of the heating element

electrode
Perform a reset of the malfunction.
Contact an authorized service center if the malfunction occurs again.
The refrigerator door does not close

NOTE
The door may not close because the door handle is locked in the open position.
Unlock the door handle as shown (fig. 10, p. 9).
The refrigerator door does not close completely due to the device

CAUTION! Risk of injury
The door must be disconnected from the device before cleaning to avoid damage or deformation of the electronic components.
Insert the door as shown (Fig. 11, page 9).
8 Cleaning and maintenance

WARNING!
Before performing cleaning and maintenance work, disconnect the refrigerator from the power supply.

CAUTION!
Do not use impact tools or separate frozen products with knives, scrapers, hard or sharp instruments.
Regularly or as needed, wipe the refrigerator with a damp cloth. Make sure that water does not get into the lighting. This can lead to damage to the electrical equipment. After cleaning, dry the refrigerator with a dry cloth. Regularly check the drain hole.
If necessary, clean the drain hole. If it is clogged, the defrost water will accumulate inside the refrigerator.
Make sure that the ventilation grilles on the outer wall of the motorhome or caravan and the refrigerator ventilation louvers are not clogged. Only when there is no clogging is the efficient removal of heat generated during operation ensured, the correct operation of the refrigerator and the required cooling capacity.
8.1 Cleaning the gas burner

WARNING!
Allow the burner to cool before cleaning. It is forbidden to use open flame for defrosting.

NOTE
- Poor ignition and soot emissions may indicate contamination of the gas burner.
- The manufacturer recommends installing the burner in case of prolonged non-use, at least once a year.
- When using liquefied petroleum gas, it is necessary to clean the burner more often — at least once every three months, depending on the degree of contamination.
Follow the operating instructions as shown (Fig. 12, p. 10).
8.2 Maintenance and service

WARNING!
Work on the gas and electrical equipment may only be carried out by certified specialists.
When first putting into operation, and then every two years, it is necessary to check the gas system and gas flues for compliance with local safety requirements. The check must be carried out by a certified specialist.
Keep documents confirming the maintenance work performed.
9 Warranty
The statutory warranty period applies. If the product is defective, contact the authorized dealer or the manufacturer's representative in your country (see dometic.com/dealer).
When contacting for repair or warranty service, the following information must also be provided:
- Copy of the invoice with the purchase date
- Describe the defect and explain the malfunction.
Note that self-performed or unprofessional repairs may have consequences for safety and can lead to voiding of the warranty.
10 Disposal

This device contains recommended spare parts.
It is allowed to disassemble and dispose of the device only by specialists.
Recycling of products with built-in batteries, accumulators, and light sources
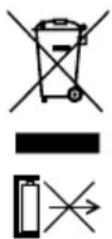
If the product contains built-in batteries, accumulators, and light sources, they must be removed before disposal. If you finally take the product out of service, obtain information from the relevant center on secondary recycling or secondary use in accordance with the applicable disposal regulations.
The product can be disposed of free of charge.
Recycling of packaging material

If possible, dispose of packaging material in the trash, after or during secondary recycling.
11 Technical specifications
RM10.5S, RMS10.5S, RMS10.5XS
RM10.5S, RMS10.5S, RMS10.5XS
RM10.5S, RMS10.5S, RMS10.5XS
RM10.5S, RMS10.5S, RMS10.5XS
RM10.5S, RMS10.5S, RMS10.5XS
RM10.5S, RMS10.5S, RMS10.5XS
- RM10.5S, RMS10.5S, RMS10.5XS: when it turns off
RM10.5S, RMS10.5S, RMS10.5XS
RM10.5S, RMS10.5S, RMS10.5XS
Danger of crushing
Do not place the appliance in the room.

WARNING! Danger of injury
- Clean the condensate drain pipe regularly. The lighting of the device can be replaced in the service.
- Do not use a high-pressure cleaner near the ventilation grille when cleaning the appliance.
- Install the winter caps (accessories) on the ventilation grille when the appliance is cleaned outdoors or is not used for a long period of time. Never open the cooling system.
The refrigerant is not suitable for storing food or substances that emit vapors. The refrigerant must not be released into the air.
2.2 Safe operation

WARNING! Failure to follow these warnings may lead to minor or moderate injury.
Risk of tipping over
- Close and lock the doors of the device before starting it.
- The cooling and heating parts of the device become hot during operation. Avoid contact with hot parts when removing the ventilation grilles.

Do not use electrical devices inside the refrigerator, unless they are of the type recommended by the manufacturer for this purpose.
- Make sure that the ventilation openings are not covered.
- Danger of interruption!
The appliance must be provided with sufficient ventilation, so that the heat generated during operation can be dissipated. Make sure that the refrigerator is sufficiently far from walls or other objects, so that the air can circulate.
Do not fill the interior with flammable substances. - Protection against heat and moisture. - Make sure that the storage products do not touch the walls of the cooling space.
2.3 Safety when working with gas

WARNING! Failure to follow these warnings may result in serious injury.
Danger of explosion
Operate the device only with the voltage indicated on the type plate. Use only voltage regulators with fixed setting that comply with national regulations.
- During refueling, work with the gas off, unless the manufacturer of the vehicle allows the gas system to operate during refueling (see the vehicle's manual).
- Observe the national requirements for operating the device on gas during refueling.
- Never work with the gas device:
- On gasoline
- On the ferry - When transporting by car, van, or other vehicle.
- Never open the flame to check for gas leaks. In case of gas smell:
- Close the gas cylinder valve and the bottle valve. - Open all windows and leave the room. - Do not touch electrical switches. - Extinguish all open flames. - The gas system must be checked by a specialist.
Never store bottles with liquid gas in rooms without ventilation or below ground level (recessed spaces in the ground). - Store bottles with liquid gas in places away from direct sunlight. The temperature must not exceed 50°C.

WARNING! Risk of injury
- Use only approved bottles, not improvised gas (see table and safety instructions).

INSTRUCTIONS
RM10.5S, RMS10.5S, RMS10.5XS
The light indicator and the control elements are located differently (Fig. 1 B, p. 4):
| Симboл Опсане |
| ① | Бутон BKЛ/N3КЛ |
| Δ | Индikatop 3a Heизправноct |
| Рабota с постаянотOKOBо 3axpaнвае |
| Рабota с ra3 |
| Рабota с поменlpвOTOKOBо 3axpaнвае |
| A | АВТOMATИЧEN ржIM |
| Индikatop 3a Temперatype |
| MODE | Бутон 3a ИЗбор на[eнерг范围内]ЗTOчнк |
| Бутон 3a ИЗбор на Temперatype |
6.2 Operation at low ambient temperatures

In refrigerant flow mode, install the winter kit. In gas or automatic mode, install only the winter kit. This prevents overloading of the compressor and ensures that the evaporator can be defrosted properly.

INSTRUCTION
Cold air can affect the cooling unit. Install the winter kit if you have installed the cooling capacity kit for low ambient temperatures.
Install the winter kit (accessory) as shown in fig. 3, page 5.
6.3 Switching on the refrigerator
Press for 2 seconds
-RM10.5T,RMS10.5T,RMS10.5XT: control button -RM10.5S,RMS10.5S,RMS10.5XS: button ①
The refrigerator starts with the fastest settings.
6.4 Switching off the refrigerator
Press for 2 seconds
-RM10.5T,RMS10.5T,RMS10.5XT: control button -RM10.5S,RMS10.5S,RMS10.5XS: button ①
An acoustic signal sounds and the refrigerator switches off.
6.5 Working with the refrigerator
(RM 10.5T, RMS 10.5T, RMS 10.5XT)
Press the control button to activate the TFT display.
The main menu is divided into three fields:
Main menu Detailed menu
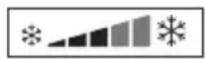
Standby power menu
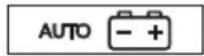
Operating menu
Settings menu
Press the control button to select a detailed menu item. Press the control button to open the selected detailed menu. Press the control button to navigate in the detailed menu. Mark the setting to be displayed in the list.
Press the control button to select the marked setting.
Selection field
6.6 Working with the remote control
(RM 10.5S, RMS 10.5S, RMS 10.5XS)
Control elements
Press MODE repeatedly until the display shows the desired operating mode. Press repeatedly until the desired temperature level is set.
6.7 Heating mode during charging

The refrigerator will automatically switch to gas operation when it is started with gas.
If the refrigerator is started with gas, the refrigerator will switch to gas operation when it is started. This blocks the gas operation for 15 minutes. After that, the refrigerator automatically switches back to standard automatic mode.
Start-up time
·RM10.5T, RMS10.5T, RMS10.5XT: the symbol is displayed

• RM10.5S, RMS10.5S, RMS10.5XS: the light flashes
6.8 Gas operation mode (optional)

WARNING!
The gas operation time of the refrigerator must be set at the time of starting with gas.

INSTRUCTION
When not connected to AC or DC power, the batteries are charged when the refrigerators are switched off. - Remove the battery when the refrigerator is not in use (risk of leaks).
For gas operation mode, the battery compartment must be installed. This makes the connection to AC or DC power unnecessary.
When using 12 batteries (type AA), the refrigerator can operate in gas operation mode for 2 to 3 days.
Pay attention to the following special functions when using the gas operation mode:
- The light in the refrigerator remains switched off. - The display switches off 2 seconds after the last activity.
- The display turns on briefly every 15 seconds. This indicates that the refrigerator is on.
- If there is an error message, the display stays on.
Indicated mode of independent operation of the gas
- RM10.5T, RMS10.5T, RMS10.5XT: via symbols
RM10.5S, RMS10.5S, RMS10.5XS: via pressing the light button for 15 seconds

- RM10.5T, RMS10.5T, RMS10.5XT: when error "E 14" is shown
- RM10.5S, RMS10.5S, RMS10.5XS: when the error is shown
6.9 Setting the cooling power

INSTRUCTION
At an ambient temperature from +15°C to +25°C, select the average cooling power.
Set the cooling power:
- RM10.5T, RMS10.5T, RMS10.5XT: Select the desired temperature level in the cooling power menu. - RM10.5S, RMS10.5S, RMS10.5XS: Press several times until the desired temperature level is selected.
6.10 Operation of the Ventilator (optional)
To operate the ventilator, the base ventilator must be installed.
When the device is switched on, the ventilator switches on for a short time (functional test). During operation of the device, the ventilator switches on only:
When the ambient temperature is above 32°C - When the set cooling temperature has not been reached within 2 hours. - RM10.5T, RMS10.5T, RMS10.5XT: When the ventilator function is activated.

INSTRUCTION
RM10.5T, RMS10.5T, RMS10.5XT: When the function of the ventilator is activated.
RM10.5S, RMS10.5S, RMS10.5XS: The function of the ventilator is always activated and cannot be deactivated.
RM10.5T, RMS10.5T, RMS10.5XT
The operation of the ventilator is indicated by the symbol
6.11 Using the Refrigerator Door

CAUTION! - Risk of injury
The refrigerator door or the freezer compartment door can be opened incorrectly if used improperly. Do not lean on the open door of the refrigerator.

INSTRUCTION
If the door is not properly secured from the opposite side, carefully press the upper and lower part of the door from that side until it is secured in place.
Closing and securing the refrigerator door
Hattinche Te Bpaata, DOKATO He yyeTe rcho, Ye ippaKba B rohpata n DonHaTa qact. BpataBeuee3aTbOpenaN3akpepeHa.
6.12 Tips for storing food products

WARNING! - Health hazard!
- The power of your refrigerator may not be sufficient to cool the food products you want to cool.
- Opening the door for a long time can lead to a significant increase in temperature in the compartments of the refrigerator.
- Store raw meat and fish in suitable containers in the refrigerator, so that they do not come into contact with and do not drip onto other food products. Food products must be stored in their original packaging or in suitable containers.
- The deep-freeze compartment is suitable for making ice cubes and for storing frozen food products. It is not suitable for freezing previously frozen food products.
- If the refrigerator is exposed to an ambient temperature above +10°C for an extended period of time, the deep-freeze compartment cannot guarantee the same temperature. This can lead to an increase in the temperature of the deep-freeze compartment and the products stored in it may thaw.

WARNING!
- The maximum load for the door shelf is 6 kg. The maximum load for the drawer shelf is 7.5 kg.
- Store heavier products such as bottles and cans only in the door of the refrigerator, in the full storage compartment or on the bottom shelf.
- Do not store carbonated drinks in the deep-freeze compartment.
Store food products as shown (fig. 1, p. 4).
6.13 Installing the appliance

WARNING! Keep away from children!
Keep the appliance away from sources of heat to prevent damage to the appliance.
Clean the filters with a brush. - Put the filters back and secure them firmly.
Clean the filters as shown (fig. 5, p. 6).
Put the filters back in the reverse order.
6.14 Removing the compartment for deep freezing
You can remove the compartment for deep freezing to make more room in the refrigerator compartment.

NOTE
- Keep the compartment for deep freezing and its base in a safe place to prevent damage. - When installing, replace the parts in the reverse order.
Proceed as shown (fig. 6, p. 6).
6.15 Defrosting the refrigerator

WARNING!
Do not use mechanical tools or ice scrapers to remove ice or to free frozen products.

NOTE
Over time, frost builds up on the cooling ribs in the refrigerator. If this layer of frost is about 3 mm thick, you must defrost the refrigerator.
Proceed as shown (fig. 7, p. 7).
7 Troubleshooting

WARNING
For safe operation of the 12-volt consumers in the caravan during the inverter, it is guaranteed that the vehicle's electrical system provides sufficient voltage. In case of any vehicle system, the battery management system may automatically disconnect the consumers to protect the battery. Contact the vehicle manufacturer for more information.
If multiple faults occur, the display shows the most recent fault. The remaining faults are shown after confirming the last fault.
RM10.5T, RMS10.5T, RMS10.5XT: Faults are indicated with a fault code with warning symbol ( ) in the middle of the TFT display.
RM10.5S, RMS10.5S, RMS10.5XS: In case of a fault, the warning LED (△) flashes continuously and the LEDs indicate the fault.
Fault messages of type "WARNING"
All faults of type WARNING are reset automatically after the fault is resolved.
| RM10.5T, RMS10.5T, RMS10.5XT | RM10.5S, RMS10.5S, RMS10.5XS | Пов徕а Ршениe | |
| W01 | | Деб feкт endempeat typeendemb v otdeleneite noxnaidennka | Свьржete се с оторисяпан цentыз a obscужвае на клиенти. |
| W05 | | ПromeнлвOTOКOBOTOЗхраимвае не eSBvp3aHOniNi npromeнлвOTOКOBTOНашиожениe e < 190 V | Свьржete xlaidenнika KMnpomen-HIWBOTOKOB 3axpaanbahe niNi n36e-peTe дуг тип eHeprtneH n3ToCHNK,HaNPIMeR ra3 NiNi nOCTOHHOTOKOB 3axpaanbahe. |
| W06 | | ПостянотOKOBOTOЗхраимBaHe He e CBvp3aHOb | Свьржete xlaidenнika KMnpOSTAHOTOKOB 3axpaanbahe niNi n36e-peTe dpyr tni eHeprtneH n3ToCHNK,HaNPIMeR ra3 NiNi nPOMeHIIBOTOKOB 3axpaanbahe. |
| W11 | | Сврънапөсение напостянHTOKOBOTOЗхраимBaHe (>16V). | Hamanete habржениeto Na oonto-rHHTOKOBOTO 3axpaanbahe. |
| | Рекин endepepepepepepepepepepepepepepepepepepepepepepepepepepepepepepepepepepepepepepepepepepepepepepepepepepepepepepepepepepepepepepepepepepepepepepepepepepepepepepepepepepepepepepepepepepepepepepepepepepepepe pepepepepepepepepepepepepepepepepepepepepepepepepepepepepepepepepepepepepepepepepepepepepepepepepepepepepepepepepepepepepepepepepepepepepepepepepepepepepepepepepepepepepepepepepepepepepepepepepepepepeperpepepepepepepepepepepepepepepepepepepepepepepepepepepepepepepepepepepepepepepepepepepepepepepepepepepepepepepepepepepepepepepepepepepepepepepepepepepepepepepepepepepepepepepepepepepepepepepepepepepePepepepepepepepepepepepepepepepepepepepepepepepepepepepepepepepepepepepepepepepepepepepepepepepepepepepepepepepepepepepepepepepepepepepepepepepepepepepepepepepepepepepepepepepepepepepepepepepepepepepePEPEPEPEPEPEPEPEPEPEPEPEPEPEPEPEPEPEPEPEPEPEPEPEPEPEPEPEPEPEPEPEPEPEPEPEPEPEPEPEPEPEPEPEPEPEPEPEPEPEPEPEPEPEPEPEPEPEPEPEPEPEPEPEPEPEPEPEPEPEPEPEPEPEPEPEPEPEPEPEPEPEPEPEPEPEPEPEPEPEPEPEPEPEPEPEPEPEPEPE PEPEPEPEPEPEPEPEPEPEPEPEPEPEPEPEPEPEPEPEPEPEPEPEPEPEPEPEPEPEPEPEPEPEPEPEPEPEPEPEPEPEPEPEPEPEPEPEPEPEPEPEPEPEPEPEPEPEPEPEPEPEPEPEPEPEPEPEPEPEPEPEPEPEPEPEPEPEPEPEPEPEPEPEPEPEPEPEPEPEPEPEPEPEPEPEPEPEPEPEPERPEPEPEPEPEPEPEPEPEPEPEPEPEPEPEPEPEPEPEPEPEPEPEPEPEPEPEPEPEPEPEPEPEPEPEPEPEPEPEPEPEPEPEPEPEPEPEPEPEPEPEPEPEPEPEPEPEPEPEPEPEPEPEPEPEPEPEPEPEPEPEPEPEPEPEPEPEPEPEPEPEPEPEPEPEPEPEPEPEPEPEPEPEPEPEPEPEPEPEPAPEPAPEPAPEPAPEPAPEPAPEPAPEPAPEPAPEPAPEPAPEPAPEPAPEPAPEPAPEPAPEPAPEPAPEPAPEPAPEPAPEPAPEPAPEPAPEPAPEPAPEPAPEPAPEPAPEPAPEPAPEPAPEPAPEPAPEPAPEPAPEPAPEPAPEPAPEPAPEPAPEPAPEPAPEPAPEPAPEPAPEPAPEPAPEPAPEPAPEPAPAPAPAPAPAPAPAPAPAPAPAPAPAPAPAPAPAPAPAPAPAPAPAPAPAPAPAPAPAPAPAPAPAPAPAPAPAPAPAPAPAPAPAPAPAPAPAPAPAPAPAPAPAPAPAPAPAPAPAPAPAPAPAPAPAPAPAPAPAPAPAPAPAPAPAPAPAPAPAPAPAPAPAPAPAPAPAPAPAPAPAPAPAPAPAPAPAPAPAPapapapapapapapapapapapapapapapapapapapapapapapapapapapapapapapapapapapapapapapapapapapapapapapapapapapapapapapapapapapapapapapapapapapapapapapapapapapapapapapapapapapapapapapapapapapapapapapapapapapapAPAPAPAPAPAPAPAPAPAPAPAPAPAPAPAPAPAPAPAPAPAPAPAPAPAPAPAPAPAPAPAPAPAPAPAPAPAPAPAPAPAPAPAPAPAPAPAPAPAPAPAPAPAPAPAPAPAPAPAPAPAPAPAPAPAPAPAPAPAPAPAPAPAPAPAPAPAPAPAPAPAPAPAPAPAPAPAPAPAPAPAPAPAPAPAPAPAPAPATAPAPAPAPAPAPAPAPAPAPAPAPAPAPAPAPAPAPAPAPAPAPAPAPAPAPAPAPAPAPAPAPAPAPAPAPAPAPAPAPAPAPAPAPAPAPAPAPAPAPAPAPAPAPAPAPAPAPAPAPAPAPAPAPAPAPAPAPAPAPAPAPAPAPAPAPAPAPAPAPAPAPAPAPAPAPAPAPAPAPAPAPAPAPAPAPAPAPAPANPAPEPAPEPAPEPAPEPAPEPAPEPAPEPAPEPAPEPAPEPAPEPAPEPAPEPAPEPAPEPAPEPAPEPAPEPAPEPAPEPAPEPAPEPAPEPAPEPAPEPAPEPAPEPAPEPAPEPAPEPAPEPAPEPAPEPAPEPAPEPAPEPAPEPAPEPAPEPAPEPAPEPAPEPAPEPAPEPAPEPAPEPAPEPAPEPAPEPApePApePApePApePApePApePApePApePApePApePApePApePApePApePApePApePApePApePApePApePApePApePApePApePApePApePApePApePApePApePApePApePApePApePApePApePApePApePApePApePApePApePApePApePApePApePApePApePApePApePA pePApePA pePApePA pePA pePA pePA pePA pePA pePA pePA pePA pePA pePA pePA pePA pePA pePA pePA pePA pePA pePA pePA pePA pePA pePA pePA pePA pePA pePA pePA pePA pePA pePA pePA pePA pePA pePA pePA pePA pePA pePA pePA pePA pePA pePA pePA pePA pePA pePA pePA pePA pePA pePA nePAPAPAPAPAPAPAPAPAPAPAPAPAPAPAPAPAPAPAPAPAPAPAPAPAPAPAPAPAPAPAPAPAPAPAPAPAPAPAPAPAPAPAPAPAPAPAPAPAPAPAPAPAPAPAPAPAPAPAPAPAPAPAPAPAPAPAPAPAPAPAPAPAPAPAPAPAPAPAPAPAPAPAPAPAPAPAPAPAPAPAPAPAPAPAPAPAPAPapAPAPAPAPAPAPAPAPAPAPAPAPAPAPAPAPAPAPAPAPAPAPAPAPAPAPAPAPAPAPAPAPAPAPAPAPAPAPAPAPAPAPAPAPAPAPAPAPAPAPAPAPAPAPAPAPAPAPAPAPAPAPAPAPAPAPAPAPAPAPAPAPAPAPAPAPAPAPAPAPAPAPAPAPAPAPAPAPAPAPAPAPAPAPAPAPAPAPapAnePApEePApEePApEePApEePApEePApEePApEePApEePApEePApEePApEePApEePApEePApEePApEePApEePApEePApEePApEePApEePApEePApEePApEePApEePApEePApEeePApEePApEePApEePApEePApEePApEePApEePApEePApEePApEePApEePApEePApEePApEePApEePApEePApEePApEePApEePApEePApEePApEePApEePApEePApEaePApEePApEePApEePApEePApEePApEePApEePApEePApEePApEePApEePApEePApEePApEePApEePApEePApEePApEePApEePApEePApEePApEePApEePApEePApE eePApEePApEePApEePApEePApEePApEePApEePApEePApEePApEePApEePApEePApEePApEePApEePApEePApEePApEePApEePApEePApEePApEePApEePApEePApE ePpAePpAePpAePpAePpAePpAePpAePpAePpAePpAePpAePpAePpAePpAePpAePpAePpAePpAePpAePpAePpAePpAePpAePpAePpAePpAeePpAeePpAeePpAeePpAeePpAeePpAeePpAeePpAeePpAeePpAeePpAeePpAeePpAeePpAeePpAeePpAeePpAeePpAeePpAeePpAeePpAeePpAeePpAeePpAeePpAeesPpAeePpAeePpAeePpAeePpAeePpAeePpAeePpAeePpAeePpAeePpAeePpAeePpAeePpAeePpAeePpAeePpAeePpAeePpAeePpAeePpAeePpAeePpAeePpAeePpAEE PpAeePpAeePpAeePpAeePpAeePpAeePpAeePpAeePpAeePpAeePpAeePpAeePpAeePpAeePpAeePpAeePpAeePpAeePpAeePpAeePpAeePpAeePpAeePpAeePpAee PpAeePpAeePpAeePpAeePpAeePpAeePpAeePpAeePpAeePpAeePpAeePpAeePpAeePpAeePpAeePpAeePpAeePpAeePpAeePpAeePpAeePpAeePpAeePpAeePpAEE pAeePpAeePpAeePpAeePpAeePpAeePpAeePpAeePpAeePpAeePpAeePpAeePpAeePpAeePpAeePpAeePpAeePpAeePpAeePpAeePpAeePpAeePpAeePpAeePpAeeP pAeePpAeePpAeePpAeePpAeePpAeePpAeePpAeePpAeePpAeePpAeePpAeePpAeePpAeePpAeePpAeePpAeePpAeePpAeePpAeePpAeePpAeePpAeePpAeePpAee P pAeePpAeePpAeePpAeePpAeePpAeePpAeePpAeePpAeePpAeePpAeePpAeePpAeePpAeePpAeePpAeePpAeePpAeePpAeePpAeePpAeePpAeePpAeePpAeePpAee pAeePpAeePpAeePpAeePpAeePpAeePpAeePpAeePpAeePpAeePpAeePpAeePpAeePpAeePpAeePpAeePpAeePpAeePpAeePpAeePpAeePpAeePpAeePpAeePpAeeF pAeePpAeePpAeePpAeePpAeePpAeePpAeePpAeePpAeePpAeePpAeePpAeePpAeePpAeePpAeePpAeePpAeePpAeePpAeePpAeePpAeePpAeePpAeePpAeePpAee F pAeePpAeePpAeePpAeePpAeePpAeePpAeePpAeePpAeePpAeePpAeePpAeePpAeePpAeePpAeePpAeePpAeePpAeePpAeePpAeePpAeePpAeePpAeePpAeePpAeePF pAeePpAeePpAeePpAeePpAeePpAeePpAeePpAeePpAeePpAeePpAeePpAeePpAeePpAeePpAeePpAeePpAeePpAeePpAeePpAeePpAeePpAeePpAeePpAeePpAee PF pAeePpAeePpAeePpAeePpAeePpAeePpAeePpAeePpAeePpAeePpAeePpAeePpAeePpAeePpAeePpAeePpAeePpAeePpAeePpAeePpAeePpAeePpAeePpAeePpAeePG pAeePpAeePpAeePpAeePpAeePpAeePpAeePpAeePpAeePpAeePpAeePpAeePpAeePpAeePpAeePpAeePpAeePpAeePpAeePpAeePpAeePpAeePpAeePpAeePpAeePP pAeePpAeePpAeePpAeePpAeePpAeePpAeePpAeePpAeePpAeePpAeePpAeePpAeePpAeePpAeePpAeePpAeePpAeePpAeePpAeePpAeePpAeePpAeePpAeePpAeePT pAeePpAeePpAeePpAeePpAeePpAeePpAeePpAeePpAeePpAeePpAeePpAeePpAeePpAeePpAeePpAeePpAeePpAeePpAeePpAeePpAeePpAeePpAeePpAeePpAeeC pAeePpAeePpAeePpAeePpAeePpAeePpAeePpAeePpAeePpAeePpAeePpAeePpAeePpAeePpAeePpAeePpAeePpAeePpAeePpAeePpAeePpAeePpAeePpAeePpAeePS pAeePpAeePpAeePpAeePpAeePpAeePpAeePpAeePpAeePpAeePpAeePpAeePpAeePpAeePpAeePpAeePpAeePpAeePpAeePpAeePpAeePpAeePpAeePpAeePpAeePM pAeePpAeePpAeePpAeePpAeePpAeePpAeePpAeePpAeePpAeePpAeePpAeePpAeePpAeePpAeePpAeePpAeePpAeePpAeePpAeePpAeePpAeePpAeePpAeePpAee PM pAeePpAeePpAeePpAeePpAeePpAeePpAeePpAeePpAeePpAeePpAeePpAeePpAeePpAeePpAeePpAeePpAeePpAeePpAeePpAeePpAeePpAeePpAeePpAeePpAee | |
Fault messages of type "ALARM"
All faults of type ALARM must be reset manually:
• RM10.5T, RMS10.5T, RMS10.5XT: Press the control button for 2 seconds. • RM10.5S, RMS10.5S, RMS10.5XS: Press ① for 2 seconds.
√ Two acoustic signals sound. √ The alarm is reset.
| RM10.5T, RM10.5T, RMS10.5XT | RM10.5S, RMS10.5S, RMS10.5XS | Пов徕а Ршениe | |
| E03 Ная врьке мөхдү зхран-BAшяma моул n диспөя | Свьpxete ce с оториэран центрэз обсунхале на клиень. |
| E07 Ная охладиета на мошноctВ реким на ra3 | П探测ete дani урEbт e по bгл и ro penylipайte тaka, че за e ���ve-lipан, akо e Neobxodimo.Нулрайte rpeшкata.Свьpxete ce c отдана за обсунх-bане на клиень, akо таши гршkaВьзнокhe оTOHOB. |
| E08 Ная охладиета на мошноctВ реким на поменлвOTO-koBO 3axpaHbaNe | П探测ete дani урEbт e по bгл и ro penylipайte тaka, че за e ���ve-lipан, akо e Neobxodimo.Нулрайte rpeшкata.Свьpxete ce c oтдана за обсунх-bане на клиень, akо таши гршkaВьзнокhe оTOHOB. |
| E09 Ная охладиета на мошноctВ реким на постаяното-koBO 3axpaHbaNe | П探测ete дani урEbт e по bгл и ro penylipайte тaka, че за e ���ve-lipан, akо e Neobxodimo.Нулрайte rpeшкata.Свьpxete ce c oтдана за обсунх-bане на клиень, akо таши гprшkaВьзнокhe oTOHOB. |
| E12 Гешка рри探测ка наra3OB BeHTIN | Равotasна ra3 He e Вьзмохна.Hулрайte rpeшкata.Свьpxete ce c oтдана за обсунх-bане на клиень, akо таши гршkaВьзнокhe oTOHOB. |
| E13 Вьтешна komункационna rpeшka | Равotasна ra3 He e Вьзмохна.Hулрайte rpeшкata.Cвьpxete ce c oтдана за обсунх-bане на клиень, akо таши гршkaВьзнокhe oTOHOB. |
| E14В реким на сambостаятелna pa6ota на ra3:Зарыт на 6aterпіte вkomпіektіte c 6aterпіе Тьрдінськ | Пов徕а Нови 6aterпіи спед_TOва hyлрайte rpeшкata. |
| RM10.5T, RM10.5S, RMS10.5S, RMS10.5XS | RM10.5S, RMS10.5S, RMS10.5XS | Пов徕а Ршениe | |
| E50 Бл_OKиране на за за спед | 3 опITA 3a залванe | Залванeto He e Вьзмохно. Газовата 6утунka e празна. Сname-he тгazовата 6утунka. Hунираіte решкatinga. | |
| E51 Бл_OKиране на за за, | Бытpeшna решka в захсан-
Вашия мodyцn | Hунираіte решкatinga.
Свьржete ce c OTдени 3a обс顺序-
ВаHE Na КлиECHТи, aKO ТAZИ решka
ВьЗИКнЕ OTHOBO. | |
| E52 Контак сбс за зема, ra3OB вен-
ТIN | Hунираіte решкatinga.
Свьржete ce c OTдени 3a обс顺序-
ВаHE Na КлиECHТи, aKO ТAZИ решka
ВьЗИКнЕ OTHOBO. | | |
| E53 Контак сбс за зема, залипто-
пен enektpond | Hунираіte решкatinga.
Свьржete ce c OTдени 3a обс顺序-
ВаHE Na КлиECHТи, aKO ТAZИ решka
ВьЗИКнЕ OTHOBO. | | |
Door does not close

WARNING
If the door does not close, the door lock is blocked by the open striker.
Remove the blocking stopper on the door of the refrigerator, as shown (Fig. 10, p. 9).
The refrigerator door is completely separated from the unit.

WARNING! Risk of injury
The door can be completely separated from the unit if the locking pins have been manipulated or damaged.
Place the door as shown (Fig. 11, p. 9).
8 Cleaning and maintenance

WARNING!
Always disconnect the refrigerator from the power supply before cleaning and servicing.

CAUTION!
When cleaning, never use cleaning agents with hard particles, sharp instruments, or tools for removing layers of ice or for freeing products that have frozen in place.
Clean the refrigerator regularly and when it is frozen with a damp cloth. Make sure that water does not penetrate the ventilation openings. This can damage the electrical components. After cleaning, dry the refrigerator with a cloth. Regularly check the condensate drain.
Clean the condensate drain when necessary. If it is clogged, condensate will collect at the bottom of the refrigerator.
Make sure that the ventilation grilles in the rear wall of the mobile home or the ventilation openings of the refrigerator are free of dust and dirt. This ensures that the heat can be dissipated during operation, the refrigerator is not damaged, and the cooling capacity is not reduced.
RM10.5S, RMS10.5S, RMS10.5XS
- RM10.5S, RMS10.5S, RMS10.5XS: LED light
6.8 Gas mode (accessory)

WARNING!
6.17 Optional battery packs
RM10.5S, RMS10.5S, RMS10.5XS
RM10.5S, RMS10.5S, RMS10.5XS
RM10.5S, RMS10.5S, RMS10.5XS
LED display and control elements (fig. 1B, page 4).
dometic.com/sales-offices