AquaMax Eco Premium 20000 - Water pump OASE - Free user manual and instructions
Find the device manual for free AquaMax Eco Premium 20000 OASE in PDF.
| Technical Features | Details |
|---|---|
| Maximum Flow Rate | 20000 L/h |
| Maximum Lift Height | 5.5 m |
| Power Consumption | 220 W |
| Motor Type | Alternating Current Motor |
| Dimensions | 40 x 30 x 25 cm |
| Weight | 6.5 kg |
| Recommended Use | Swimming pools, fountains, ponds |
| Maintenance | Regular filter cleaning, seal inspection |
| Safety | Dry run protection, IP68 protection class |
| Warranty | 2 years |
| Included Accessories | Connectors, adapters |
Frequently Asked Questions - AquaMax Eco Premium 20000 OASE
User questions about AquaMax Eco Premium 20000 OASE
0 question about this device. Answer the ones you know or ask your own.
Ask a new question about this device
Download the instructions for your Water pump in PDF format for free! Find your manual AquaMax Eco Premium 20000 - OASE and take your electronic device back in hand. On this page are published all the documents necessary for the use of your device. AquaMax Eco Premium 20000 by OASE.
USER MANUAL AquaMax Eco Premium 20000 OASE
Environmental Function Control (EFC)
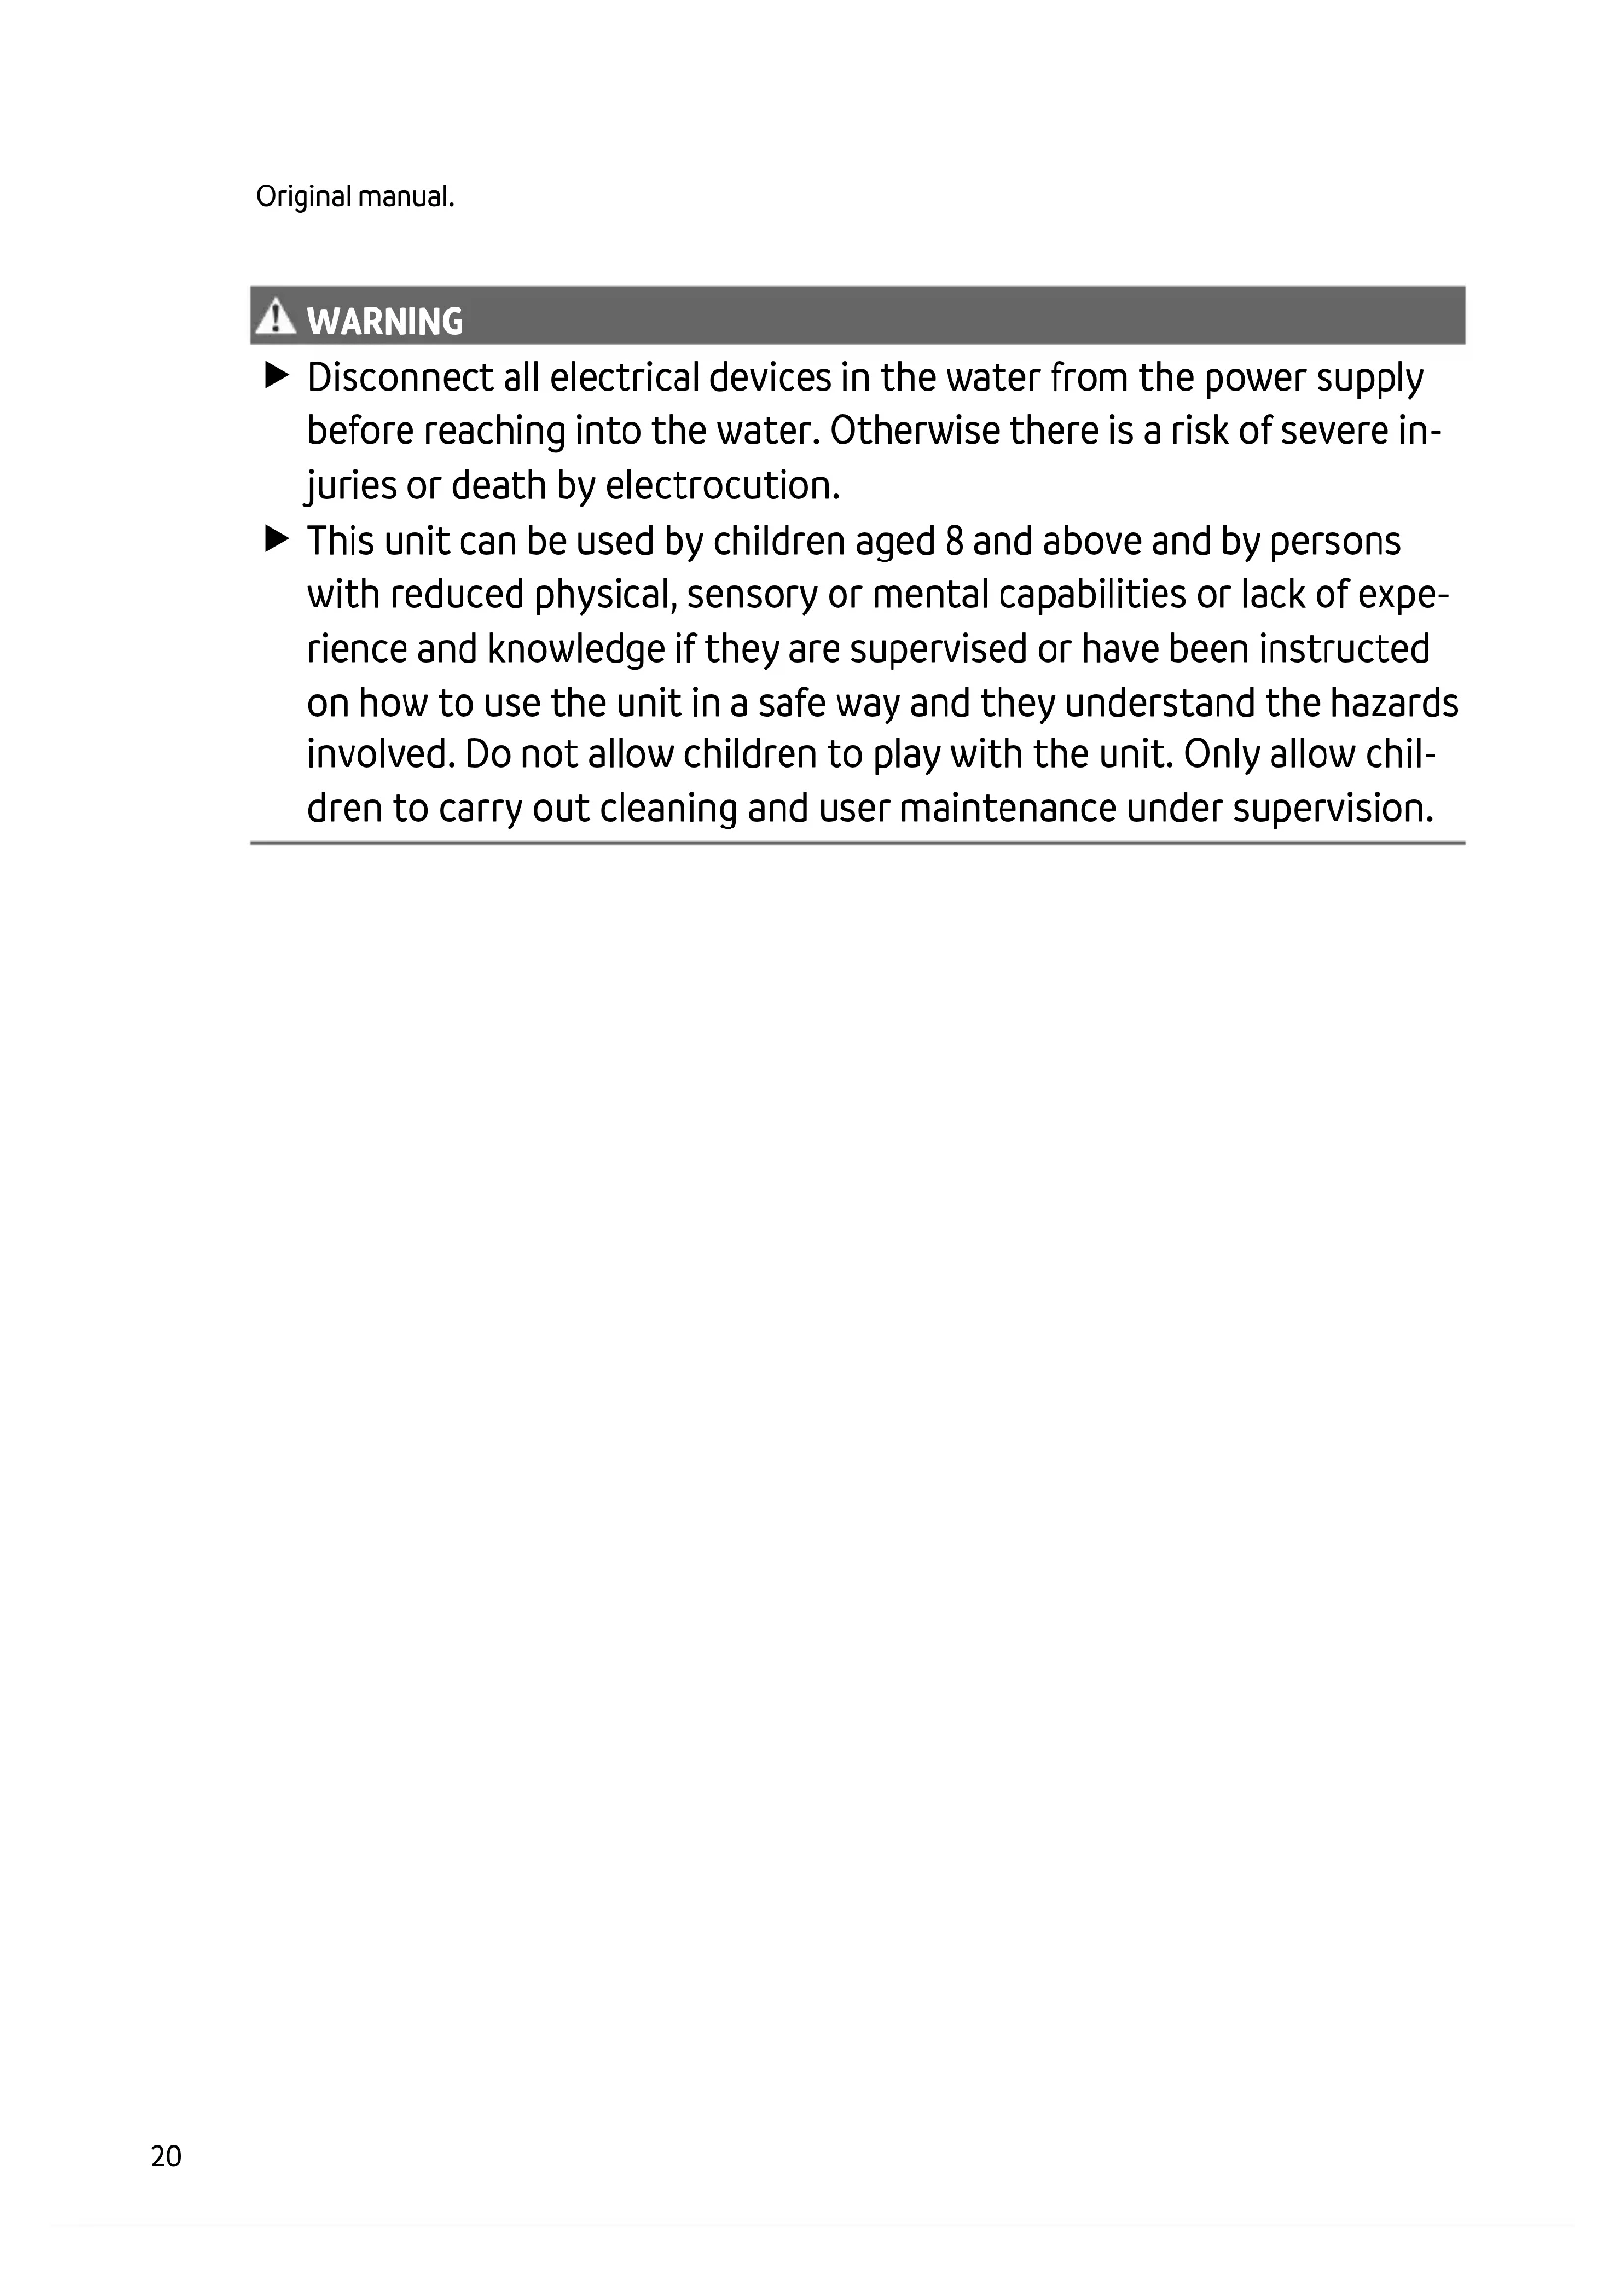
- Disconnect all electrical devices in the water from the power supply before reaching into the water. Otherwise there is a risk of severe injuries or death by electrocution.
This unit can be used by children aged 8 and above and by persons with reduced physical, sensory or mental capabilities or lack of experience and knowledge if they are supervised or have been instructed on how to use the unit in a safe way and they understand the hazards involved. Do not allow children to play with the unit. Only allow children to carry out cleaning and user maintenance under supervision.
Safety information
Electrical connection
-
Special regulations apply for electrical installation in outdoor spaces. Only a qualified electrician may perform the electrical installation.
-
The qualified electrician has the necessary professional training, knowledge and experience to perform electrical installation in outdoor spaces. The electrician can detect potential dangers and knows how to adhere to regional and national standards, regulations and directives.
-
For your own safety, please consult a qualified electrician.
-
Only connect the unit if the electrical data of the unit and the power supply match.
- Only plug the unit into a correctly installed outlet. Ensure that the unit is fused for a rated fault current of max. 30mA by means of a fault current protection device.
- Extension cables and power distributors (e.g. outlet strips) must be suitable for outdoor use (splash-proof).
- Protect open plugs and sockets from moisture.
Safe operation
- Do not use the unit, if electrical lines or the housing are damaged.
- Dispose of the unit if its power connection cable is damaged. The power connection cable cannot be replaced.
- The impeller unit in the pump contains a magnet with a strong magnetic field that may affect the operation of pacemakers or implantable cardioverter defibrillators (ICDs). Keep a distance of at least 0.2m between the implant and the magnet.
- Do not carry or pull the unit by its power cable.
- Route lines in such a way that they are protected from damage and do not present a tripping hazard.
- Never carry out technical changes to the unit.
- Only carry out work on the unit that is described in this manual.
- Only use original spare parts and accessories.
- Should problems occur, please contact the authorised customer service or OASE.
EN
Intended use
Only use the product described in this manual as follows:
- For pumping normal pond water for filter systems, waterfall systems and water course systems.
- While adhering to the technical specifications. ( Technical data)
- Adherence to the permissible water quality. ( Permissible water quality)
The following restrictions apply to the unit:
- Do not use in swimming ponds.
- Never use the unit with fluids other than water.
- Never run the unit without water.
- Do not use in conjunction with chemicals, foodstuff, easily flammable or explosive substances.
- Do not connect to the domestic water supply.
- Do not use for commercial or industrial purposes.
- According to EMC (Electromagnetic Compatibility), this is a class A unit. The unit may cause malfunctions in living environments. It is the user's responsibility to take suitable counter-measures.
Product Description
Overview
EN
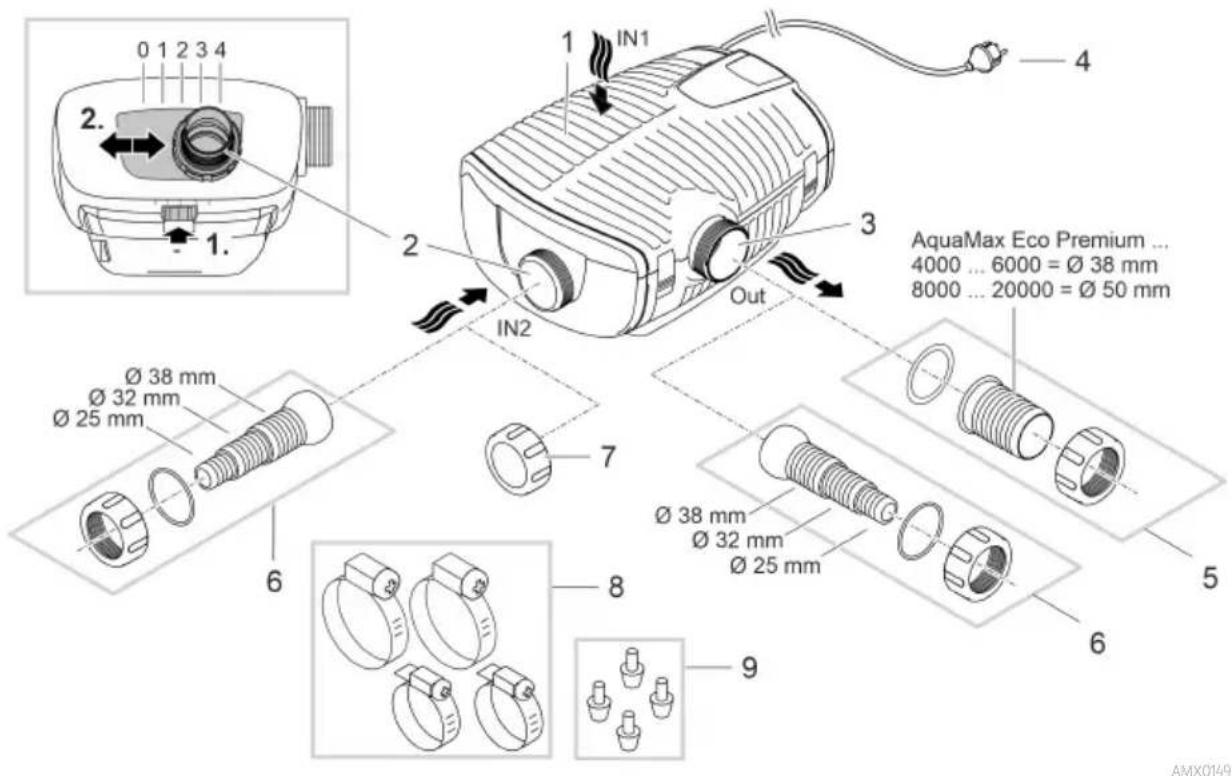
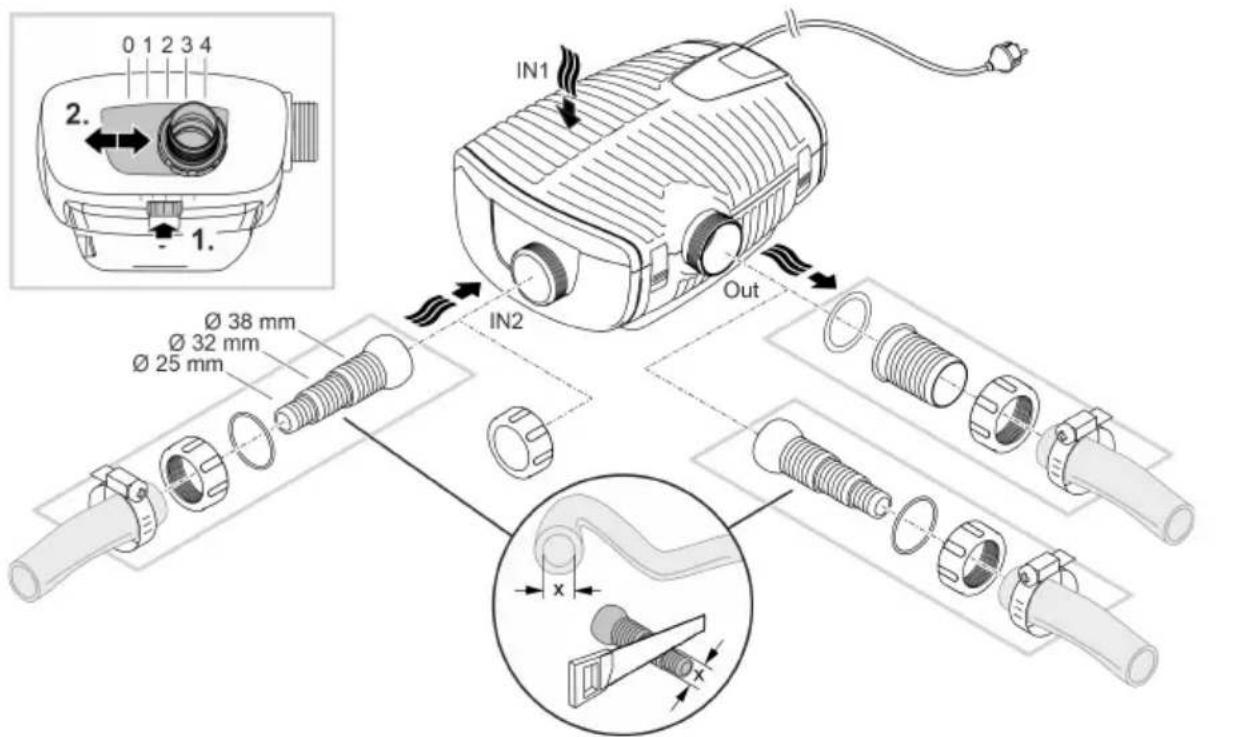
1 Inlet 1 (suction side)
Filter housing
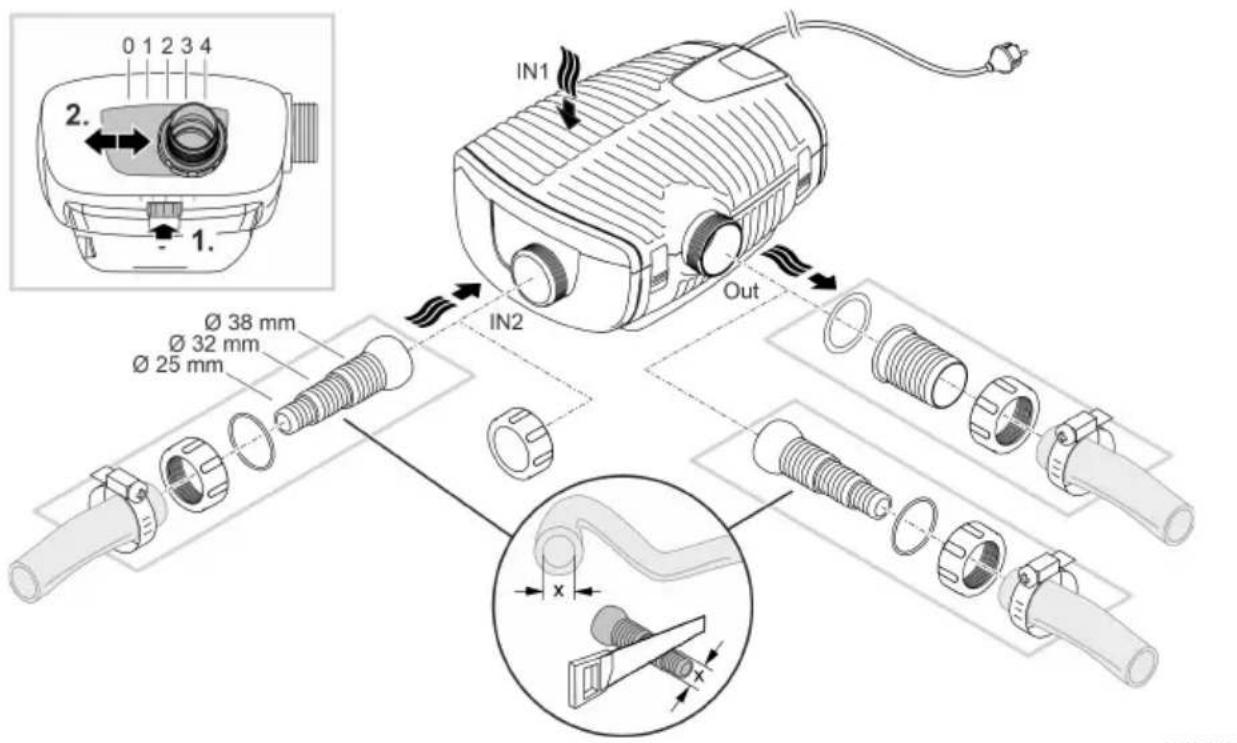
2 Inlet 2 (suction side)
-
Connection of a satellite filter or skimmer.
-
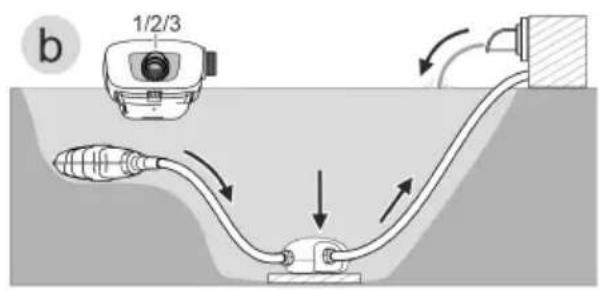
The flow rate at inlet 2 and with it the flow ratio of inlet 1 to inlet 2 is adjustable. To do so, release the locking mechanism and push the connection to one of the following positions:
Position 0: Inlet 2 is closed, water flow only via inlet 1.
Position 1/2/3: Inlet 2 is open by approx. 25 / 50 / 75% ; meaning water flow via inlet 1 and 2 according to set intake ratio.
-Position 4: Inlet 1 is closed, water flow only via inlet 2.
3 Outlet (pressure side)
- Connection of the return line into the pond (e.g. via a water course).
4 Power cable
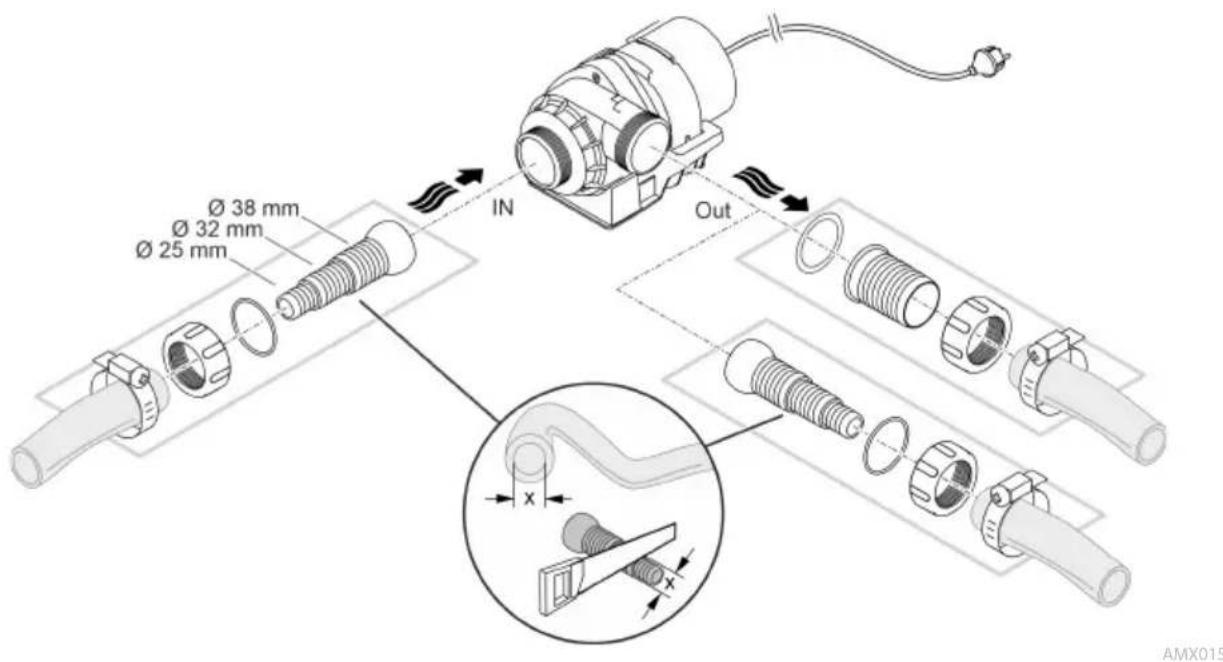
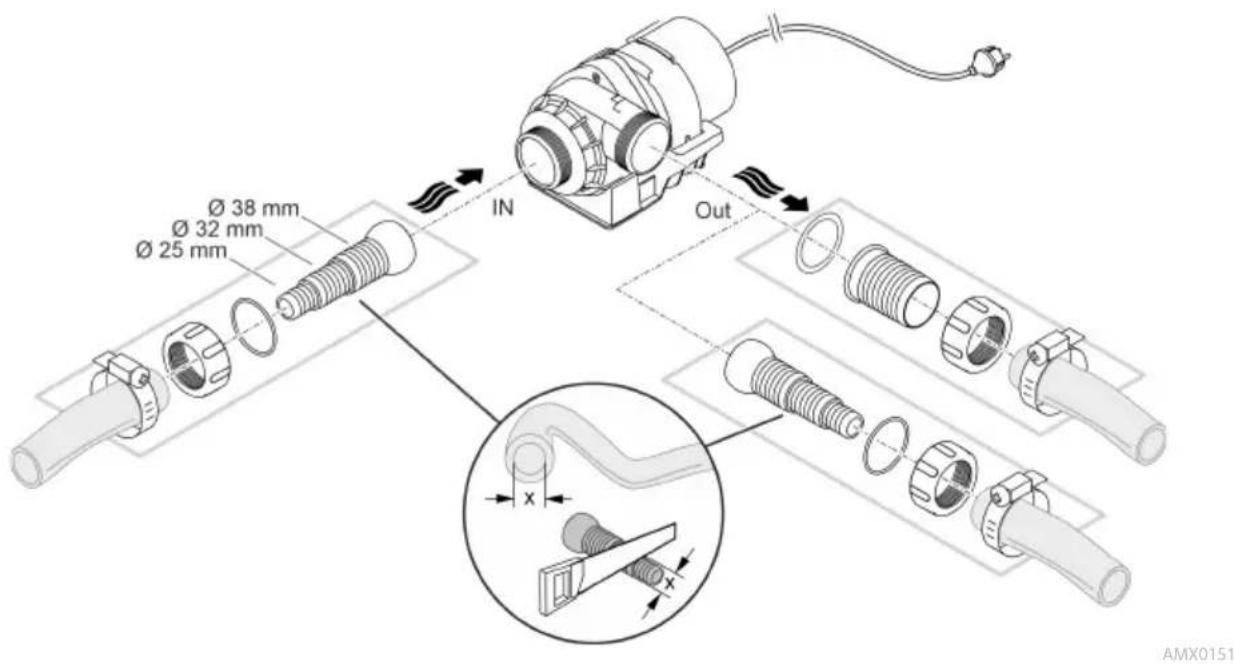
5 Hose sleeve for outlet (recommendation).
6 Stepped hose adapter for inlet 2 and outlet (alternative).
7 Cover cap for closing inlet 2 when it is not in use.
8 Hose clips for fastening hoses on the hose sleeves.
9 Rubber feet for pump holder for dry installation.
Symbols on the unit
| IP68 4.0 m | The unit is dust-tight and water-tight down to 4 m. |
| Possible danger for persons with pacemakers. | |
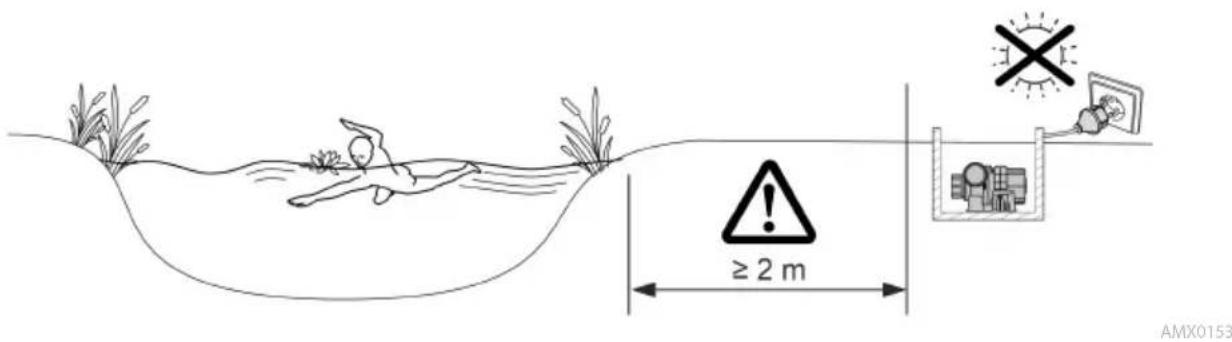
| Protect the unit from direct sunlight. | |
| Do not dispose of the unit with normal household waste. | |
| Read the operating instructions. |
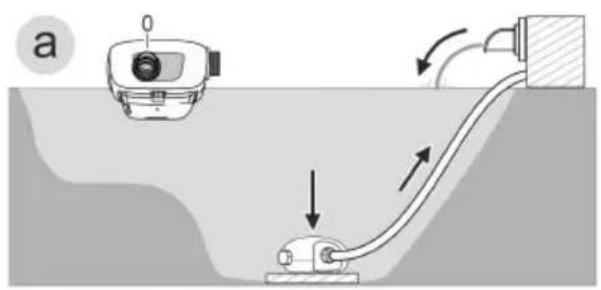
Installation variants

-
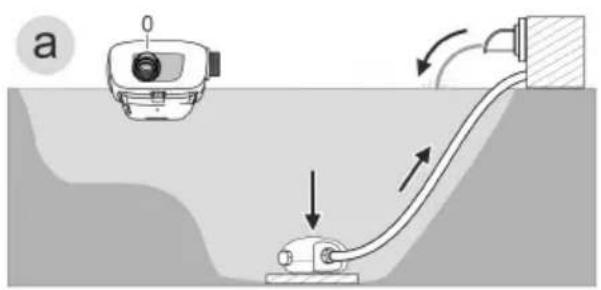
Variant (a): Water flow only via the filter housing (inlet 1).
-
Set inlet 2 to position "0".
-
Close inlet 2 using the cover cap.
-
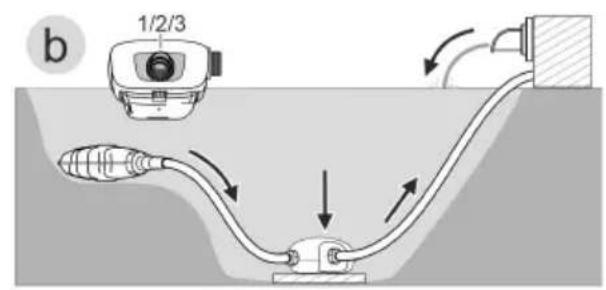
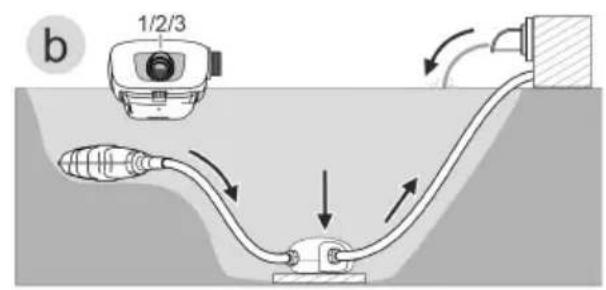
Variant (b): Water flow via the filter housing (inlet 1) and additionally via a satellite filter or a skimmer on inlet 2.
-
Set inlet 2 to position "1", "2" or "3", depending on the desired flow ratio (25/50/75%).
-
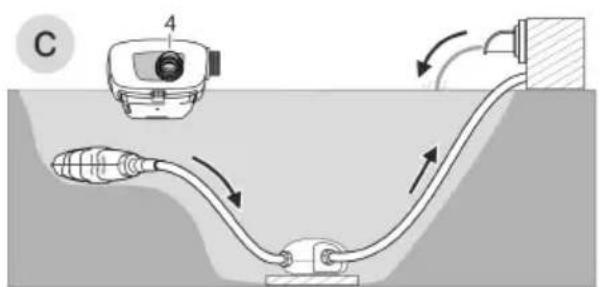
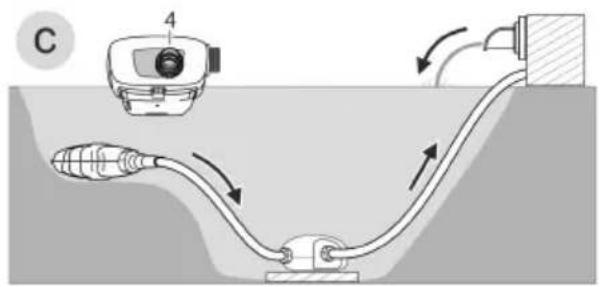
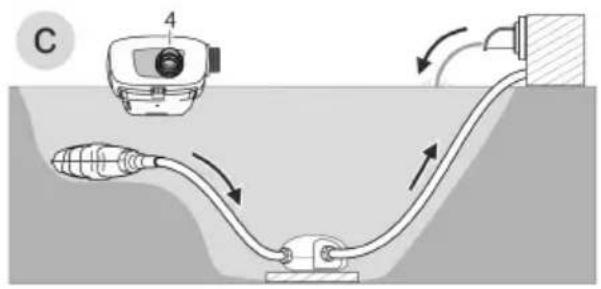
Variant (c): Water flow only via a satellite filter or a skimmer on inlet 2.
-
Set inlet 2 to position "4".
-
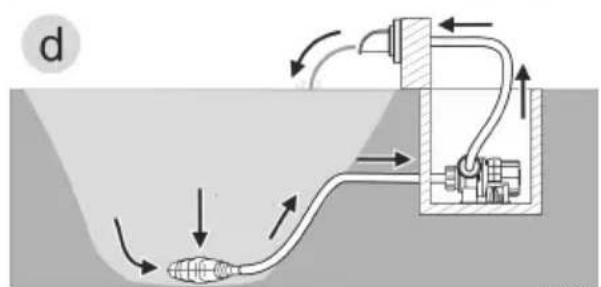
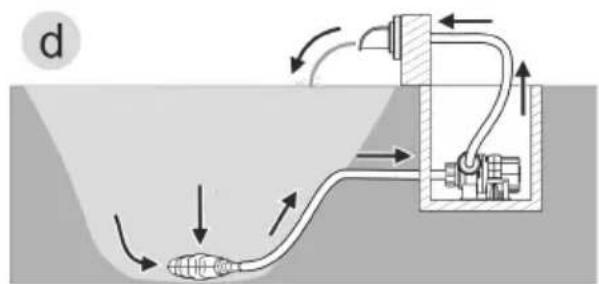
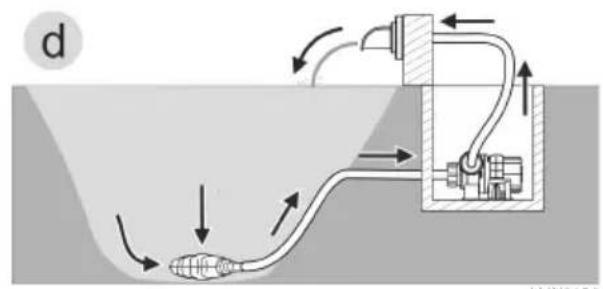
Variant (d): Dry pump installation.
-
This variant requires the pump to be installed without a filter housing.
-
The pump is installed outside of the pond but lower than the water level.
Seasonal Flow Control (SFC)
With the SFC function activated, the pump automatically optimises and reduces the amount of water and the delivery head by up to 50% . Thanks to the SFC function the pump adapts to the individual pond ecology throughout the year and supports the pond biology through temperature-dependent circulation (winter mode, transition mode and summer mode).
The SFC function is switched on and off at the pump. The SFC function reduces the power consumption of the pump; without SFC, the pump permanently operates at maximum throughput. The seasonal flow control does not function when the pump is installed on land (dry installation). If a skimmer, satellite filter or Oase InScenario control unit is used, we recommend deactivating the SFC depending on the unit.
Installation and connection
The pump can be installed submerged (in water) or dry (outside the water).
The use of the pump is only permitted with observance of the specified water quality.
( Permissible water quality)
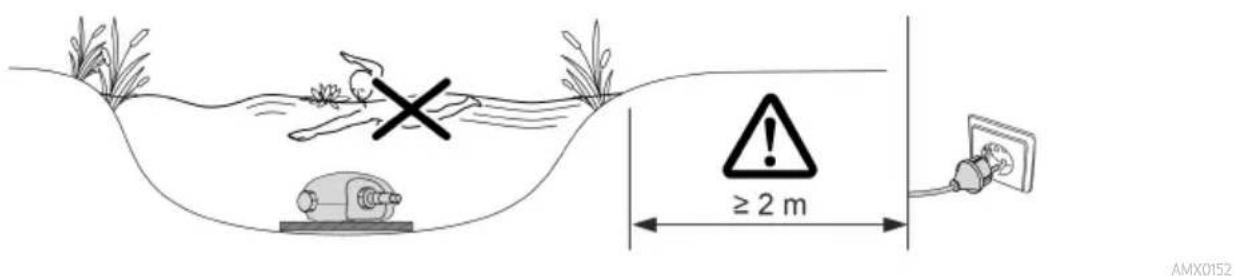
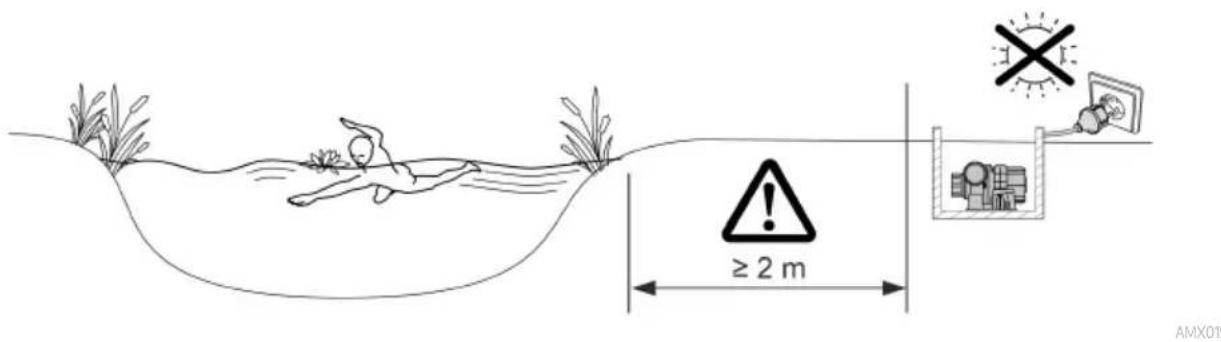
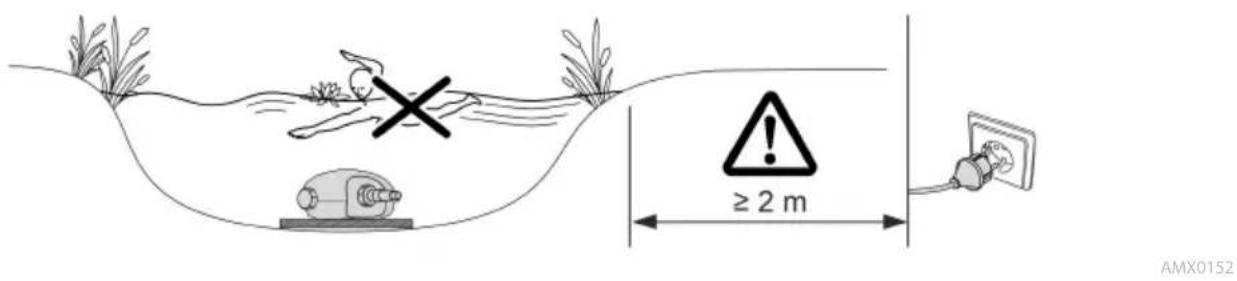
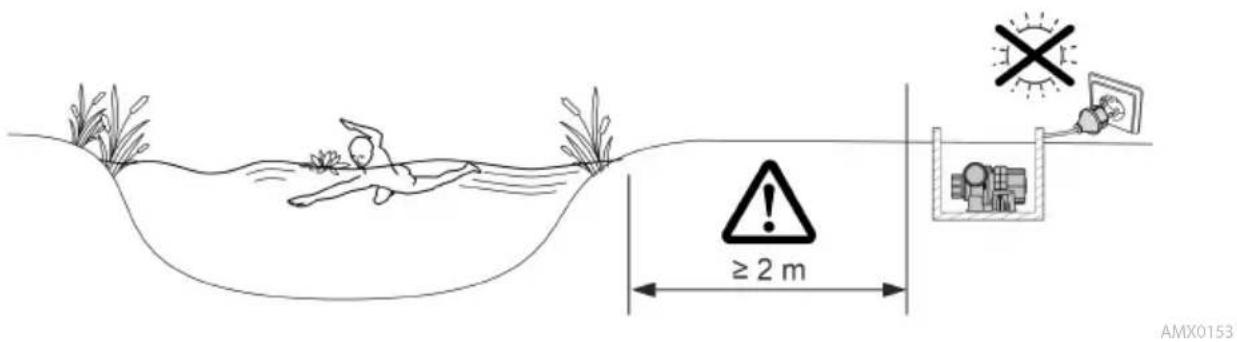
WARNING
Severe injuries or death due to operation of this unit in a swimming pond. Defective electrical components will electrify the water with dangerous electrical voltage.
Never operate the unit in a swimming pond.
CAUTION
Rotating components in the intake and pressure socket area. Risk of injury when reaching into the sockets.
In particular, observe the following: A unit that has stopped due to overload can start up unexpectedly!
Do not reach into the opening of the intake socket or pressure socket while the power plug is plugged in.
If the sockets are freely accessible during operation, e.g. if no hoses are connected, use a hand guard to secure the sockets. The hand guard is available as an accessory.
NOTE
If the pump is used for conveying excessively soiled water, the impeller unit will be subject to increased wear and will require earlier replacement.
Thoroughly clean the pond or pool before installing the pump.
Install the pump at a raised level above the bottom of the pond. This reduces intake of muddy water.
① Avoid direct sunlight on unit components that are not submerged, as they may overheat. If necessary, use a protective cover.
Submerged installation of the pump
Connecting
Connect the pump according to the desired installation variant. ( Installation variants)
AMX0150
Do not plug the power plug into the socket yet!
Installation
- Place the pump horizontally on a stable, mud-free surface.
- Ensure secure and stable positioning of the pump.
- Only operate the pump when it is fully submerged.
① The pull rope allows you to simply pull the pump from the water.
- Fasten the pull rope on the bottom filter casing through the round openings and make a knot.
EN
Install the unit at a dry place
Dry installation requires the pump to be installed without a filter housing.
Conversion

AMX0144
Connecting

Do not plug the power plug into the socket yet!
Installation
- Place the pump horizontally on a stable, mud-free surface.
- Ensure secure and stable positioning of the pump.
NOTE
Prevent the pump from running dry. Otherwise the pump will be destroyed.
- Only operate the pump when it is submerged or flooded.
Switching ON/OFF
- Switching on: Plug the power plug into the outlet.
- The unit switches on immediately.
- Switching off: Pull the power plug from the outlet.
Environmental Function Control (EFC)
When started up, the pump automatically performs a pre-programmed self-test (Environmental Function Control (EFC)). The pump detects if it is running dry / blocked or submerged. The pump shuts down automatically after 60 to 120 seconds if it runs dry/is blocked. In the event of a malfunction, disconnect the power supply and "flood the pump" or remove the obstacle. Afterwards, the unit can be restarted.
Maintenance and cleaning
CAUTION
Risk of injury due to unexpected start-up. Internal monitoring functions may switch off the unit and automatically reactivate it.
Disconnect the power plug before carrying out any work on the unit.
NOTE
Do not use aggressive cleaning agents or chemical solutions. These agents can damage the housing, impair the function of the device and harm animals, plants and the environment.
If possible, clean the unit with clear water and a soft brush or a sponge; remove stubborn dirt with the aid of the recommended cleaning agents.
Cleaning the device
Clean the unit as required but at least twice per year.
- When cleaning the pump, pay particular attention to the impeller unit and the pump housing.
-
Recommended cleaning agent for removing stubborn limescale deposits:
-
Pump cleaning agent PumpClean from OASE.
Vinegar- and chlorine-free household cleaning agent. - After cleaning, thoroughly rinse all parts in clean water.
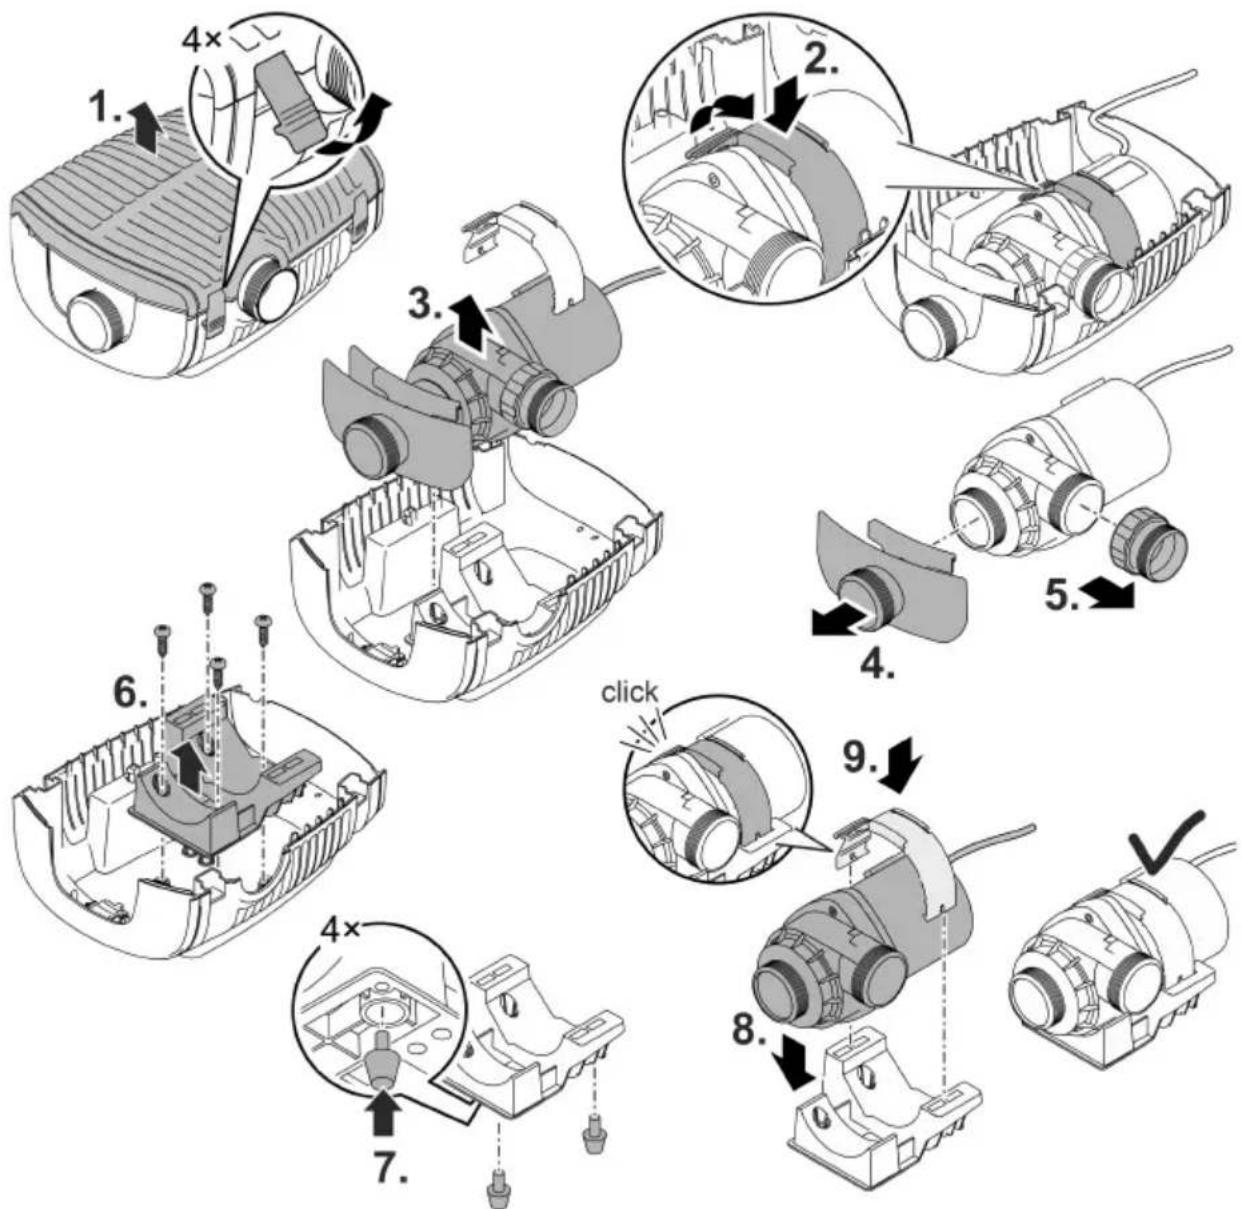
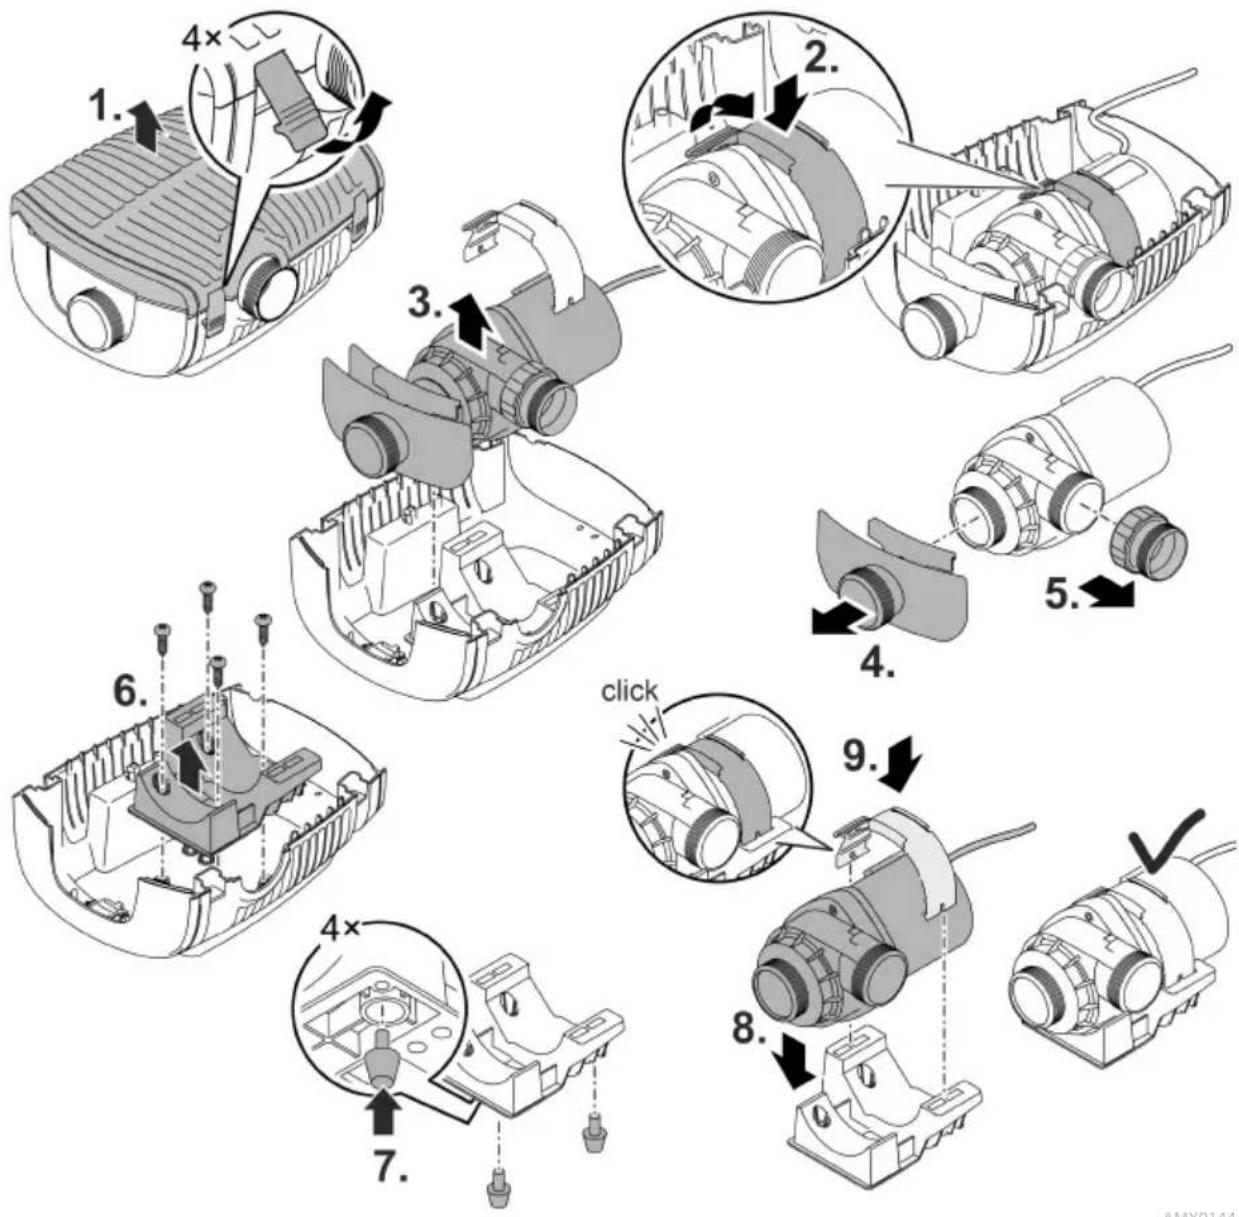
Removing/cleaning the pump
- Pull the power plug and remove all connections.
- Dismantle the unit as shown in the figure.

AMX0145
-
Reassemble the unit in reverse order.
During reassembly check that -
the clamp fastening the pump in the holder is securely engaged.
- the connection cable is guided out through the groove in the housing and that it is not kinked or pinched significantly.
AMX0146
EN
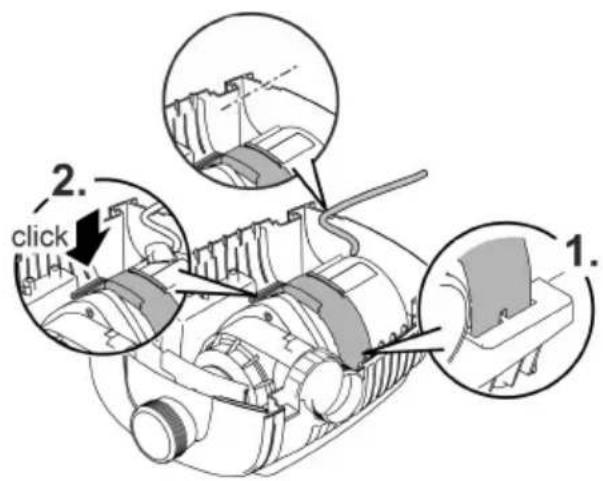
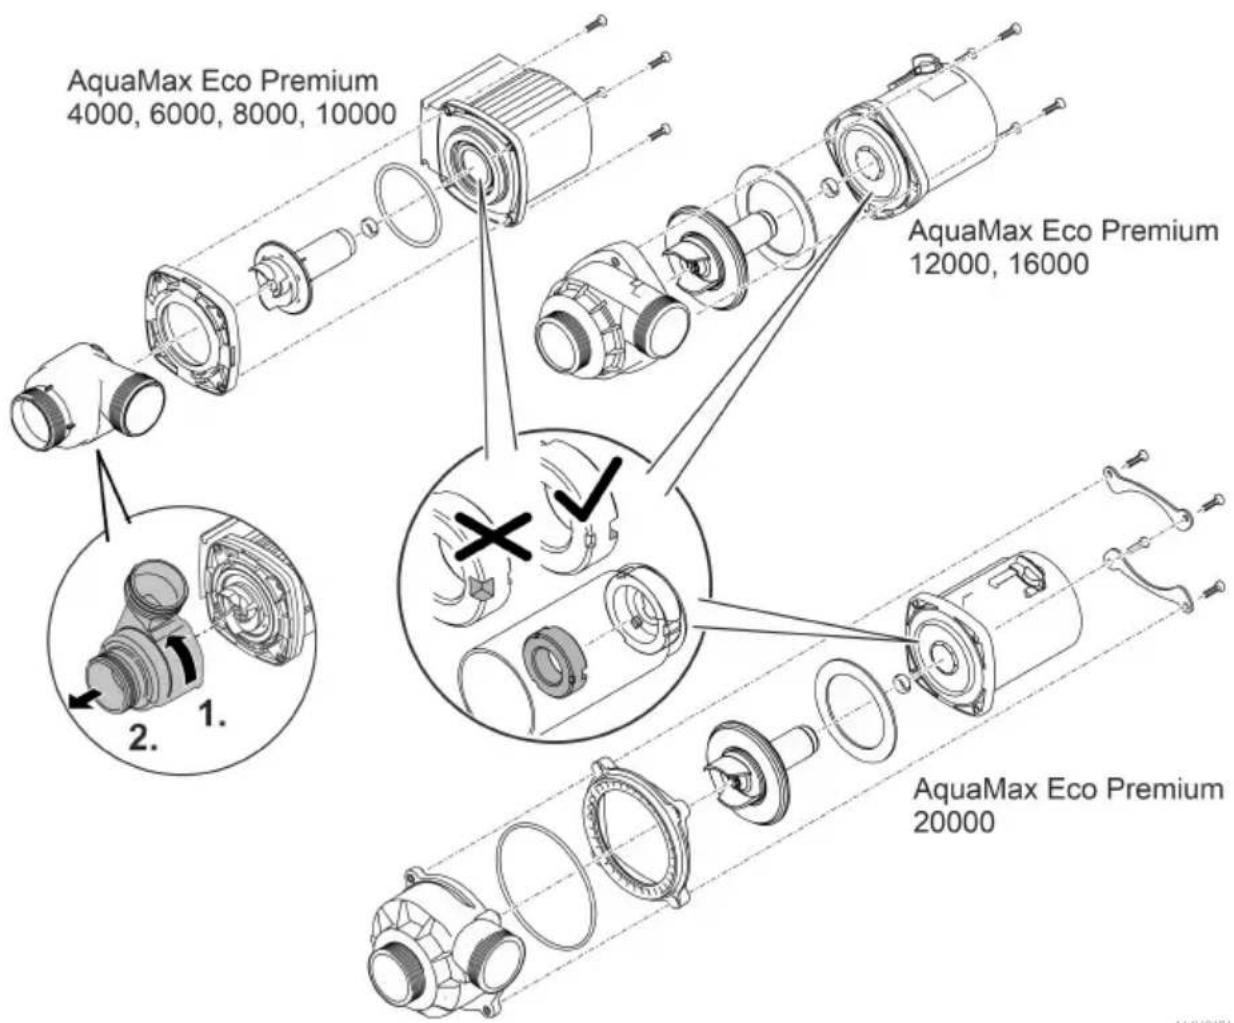
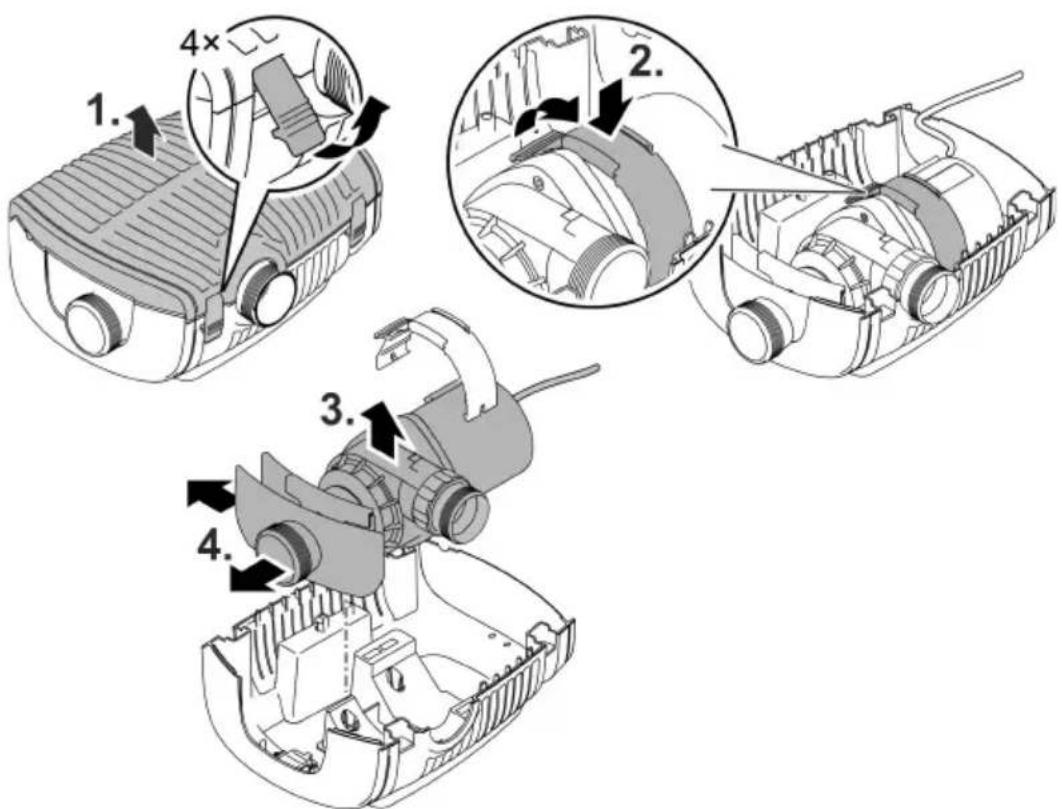
Cleaning/replacing the impeller unit
- Dismantle the pump as shown in the figure.
- Use a brush under clear water to clean the components.
- Check all components for damage. Replace damaged or worn components.
- Assemble the pump in reverse order.
① When the impeller is pulled out, the radial bearing in the motor housing may come loose. During reassembly, check that it is positioned correctly. If necessary, push the radial bearing into the motor housing with the wide grooves first.
Storage/winter protection
The unit is frost resistant to minus 20^ . Should you store the unit outside of the pond, clean it thoroughly with a soft brush and water, check it for damage, then store immersed in water or filled with water. Do not immerse the power plug in water!
EN
Malfunction remedy
| Malfunction | Cause | Remedy |
| Pump does not start | No mains voltage | Check the mains voltage. |
| Supply lines kinked | Route the supply lines without kinks | |
| Supply lines blocked. | Check/clean the supply lines | |
| Impeller unit is blocked | Remove blockage, check impeller unit for ease of movement | |
| Pump does not transport fluid insufficient delivered quantity | Filter housing clogged | Clean strainer casings |
| Excessive loss in the supply lines | Reduce hose length to the necessary minimum, remove unnecessary connection parts | |
| Impeller unit is running snug- gishly | Check impeller unit for ease of movement | |
| Pump switches off after oper- ating briefly | Water heavily soiled | Clean pump |
| Impeller unit is blocked | Remove blockage, check impeller unit for ease of movement | |
| Pump has run dry | Check/clean the supply lines | |
| Water temperature too high | Adhere to the maximum permissible water temperature. (→ Technical data) |
Technical data
Unit data
| AquaMax Eco Premium | 4000 | 6000 | 8000 | 10000 | ||
| Connection voltage | V AC 220 ... 240 | |||||
| Mains frequency | Hz | 50/60 | 50/60 | 50/60 | 50/60 | |
| Max. power consumption | W | 35 | 45 | 60 | 88 | |
| Max. pump capacity | I/h | 4000 | 6000 | 8000 | 10000 | |
| Max. pump head | m | 3.3 | 3.7 | 4.1 | 4.7 | |
| Protection type | IP68 | IP68 | IP68 | IP68 | ||
| Max. immersion depth | m | 4 | 4 | 4 | 4 | |
| Inlet port | Thread | G2 | G2 | G2 | G2 | |
| Connection, hose | mm | 25, 32, 38 | 25, 32, 38 | 25, 32, 38 | 25, 32, 38 | |
| Outlet port | Thread | G2 | G2 | G2 | G2 | |
| Connection, hose | mm | 25, 32, 38 | 25, 32, 38 | 25, 32, 38, 50 | 25, 32, 38, 50 | |
| Max. particle size, coarse dirt particles | mm | 10 | 10 | 10 | 10 | |
| Filter supply surface area | cm² | 1000 | 1000 | 1000 | 1000 | |
| Water temperature (submerged installation) | During operation | °C | (→Permissible water quality) | |||
| Out of operation | °C | -20 ... +35 | -20 ... +35 | -20 ... +35 | -20 ... +35 | |
| Ambient temperature (dry installation) | During operation and convection | °C | +4 ... +30 | +4 ... +30 | +4 ... +30 | +4 ... +30 |
| During operation and forced cooling | °C | +4 ... +40 | +4 ... +40 | +4 ... +40 | +4 ... +40 | |
| Dimensions | Length | mm | 340 | 340 | 340 | 340 |
| Width | mm | 280 | 280 | 280 | 280 | |
| Height | mm | 165 | 165 | 165 | 165 | |
| Connection cable length | m | 10 | 10 | 10 | 10 | |
| Weight | kg | 5.3 | 5.3 | 5.3 | 5.3 | |
| AquaMax Eco Premium | 12000 | 16000 | 20000 | |
| Connection voltage | V AC | 220 ... 240 | 220 ... 240 | 220 ... 240 |
| Mains frequency | Hz | 50/60 | 50/60 | 50/60 |
| Max. power consumption | W | 110 | 145 | 180 |
| Max. pump capacity | l/h | 12000 | 15600 | 19500 |
| Max. pump head | m | 5.0 | 5.2 | 5.4 |
| Protection type | IP68 | IP68 | IP68 | |
| Max. immersion depth | m | 4 | 4 | 4 |
| Inlet port | Thread | G2 | G2 | G2 |
| Connection, hose | mm | 25, 32, 38 | 25, 32, 38 | |
| Outlet port | Thread | G2 | G2 | G2 |
| Connection, hose | mm | 25, 32, 38, 50 | 25, 32, 38, 50 | |
| Max. particle size, coarse dirt particles | mm | 11 | 11 | |
| Filter supply surface area | cm² | 1000 | 1000 | |
| Water temperature (submerged installation) | During operation | °C | (→Permissible water quality) | |
| Out of operation | °C | -20 ... +35 | -20 ... +35 | |
| Ambient temperature (dry installation) | During operation and convection | °C | +4 ... +30 | +4 ... +30 |
| During operation and forced cooling | °C | +4 ... +40 | +4 ... +40 | |
| Dimensions | Length | mm | 340 | 340 |
| Width | mm | 280 | 280 | |
| Height | mm | 165 | 165 | |
| Connection cable length | m | 10 | 10 | |
| Weight | kg | 5.4 | 5.4 | |
Permissible water quality
Fresh water, pond water
| pH value | 6.8 ... 8.5 | |
| Hardness | °dH | 8 ... 15 |
| Free chlorine | mg/l | <0.3 |
| Chloride content | mg/l | <250 |
| Salt content | % | <0.4 |
| Overall dry residue | mg/l | <50 |
| Temperature | °C | +4 ... +35 |
Wear parts
- Impeller unit
- Bearing in the motor block
Disposal
NOTE
Do not dispose of this unit with household waste.
- Dispose of the unit by using the return system provided for this purpose.
- Should you have questions, please contact your local disposal company. They will give you information on how to correctly dispose of the unit.
▶ Render the unit unusable by cutting the cables.

AVERTISSEMENT
Environmental Function Control (EFC)
Environmental Function Control (EFC)
Environmental Function Control (EFC)
Environmental Function Control (EFC)
Environmental Function Control (EFC)
Environmental Function Control (EFC)
Environmental Function Control (EFC)
Montere ut/rengjore pumpen
Environmental Function Control (EFC)
Environmental Function Control (EFC)
Environmental Function Control (EFC)
Environmental Function Control (EFC)
Environmental Function Control (EFC)
Environmental Function Control (EFC)
Čerpadlo vykonáva pri uvedeni do prevádzky automaticicky vopred naprogramová autotest (Environmental Function Control (EFC)). Čerpadlo rozoznáva, cis je v behu naSucho/zblokovaní alebo v ponorenom stave. V pripechodu naSucho/prizablokovaní sa Čerpadlo automatickyp 60 až 120 sekundách vypne. V pripechory prurušte privod prúdu „zaplavte Čerpadlo“, prip. odstránte prekázku. Potom možete opat pristroj uviest do prevádzky.

POZOR
Environmental Function Control (EFC)
Environmental Function Control (EFC)
Prilikom pušanja u rad pumpa automatski obavlja unaprijed programirano samostalno testiranje ispravnosti (Environmental Function Control (EFC)). Pumpa prepoznaje radi li pritom na suho, je li blokirana ili uronjena. U slučaju rada na suho ili blokiranja, pumpa se automatski isključuje nakon otprilike 60 do 120 sekundi. U slučaju smetnje, prekinite dovod elektricne energije i „potopite pumpu" odn. uklonite prepreku. Nakon toga urežaj možete ponovo uključiti.
Cisćenje i održavanje

OPREZ
Environmental Function Control (EFC)
1 BxoI 1 (BcmyKaTeHa cTpaHa)
KopnycHaΦnTbpa
2 BxoJ 2 (BcmykaTeHa cTpaHa)
- PnpcbeHnHaHe Ha caTeJIuTeH nIITbP uN cKmEp.
- Ie6ntbHa Bxod 2 n no To3n Haunh CboTHoWeHneTo Ha ne6nta Mexky Bxod 1 n 2 ce pepynpa. Pa3xa6ete 3a ueTa 3akIouBaHeto n oCtabeTepncBeHNrBaHToB eHa ot cneHNte P03u:
-Позицяо:ВхoД 2eЗаТьорeн;побаBaHe Ha BOda calO npe3 BxOД 1.
-Позиця 1/2/3:ВхoД 2 e otворен Ha OK.25/50/75%,T.e.побанe Ha Bɔda npe3 BxOД 1и 2 cblnacH noctpoeHOTc botHOWeHne Ha de6uTa.
-Позиця4:BxOД 1 eЗТВОпeн; ПОДаВaHe Na BОДа сAmо пeз BxOД 2.
3 I3xoJ (HaOpHa cTpaHa)
- PnpcbéeINHBAHe Ha o6paTHnI NOtOK KbM e3epoTo (HaNP. npe3 noToue).
4 Mpeko Ka6eI
5 HaupaHnK 3a n3XoJ (npenopbka).
6 CtbneHnat HaKpaHHK 3a BXoD 2 n uN3XoD (anTepeHaTnBa).
7 Kanaye 3a 3aTbapHe Ha BXoD 2, aKO Toi He Ce n3noJ3Ba.
8 Cko6n 3a Mapkyu 3a fukncpaHe Ha MapkyuBbpxy HkaPauHka 3a Mapkyu.
9 TymenKpaueTa 3a Dbpkau 3a NOMn npu cyx MOHTaX.
CnmboN Bbpxy ypea
| IP68 4.0 m | Уреты т有很大ховпением до 4 m. |
| Възмен риck заха с有很大сенийкьри. | |
| Пазete урEDA от有很大яka с有很大чева сberлеси. | |
| Нейизьрлайе урEDA с有很大чayнITE有很大�ови от有很大ьци. | |
| Прочete ръкововоството за有很大сениадаци. |
BapnaHTn 3a MOHTaK


-
Bapnant (a): Побаане на вoga само ппз корnyca на Фильба (BXOD 1).
-
HactpoIte BxOd 2 Ha no3uIa "0".
-
3aTbOpTe BXoJ 2 c KaNaueTo.
BapnaHT (b): IopabaHe Ha Boda npe3 Kopnyc Ha fntbpa (BXo1) n donbHnTeNo npe3 caTeNTeh fntbnp nn cKmep Ha BXo2.
- HacrpoTe BxoJa 2 Ha no3uIa,1",2" nIIN "3" cnopeJKeIaHOTcBtHOseHne Ha de6nTa (25/50/75%).
BapnaHT (c): PoidaBaHe Ha Boda cMo npe3 caTeiNTeH fuiTbp uIN cKIMep npn BXoI 2.
-
HactpoIte BxOd 2 Ha no3uIa_4".
-
Bapnant (d): IV3noJ3BaIte cyx MOHTaK 3a nomnata.
-ПиТоЗИВарианТnomnataТрябВаДа ceMOHTupa6e3КОрпуcaHaФиNTbpa.
- Momnata ce MOHTnpa N3BbH e3ePOTO, HO NOJ HNBOTO Ha BOJaTa.
Seasonal Flow Control (SFC)
Pn cyx MoTax NomNaTa Tp86Ba Da ce MoHTnpa 6e3 Kopnyca Ha hnItbpa.
Ppeo6opyDbaHe
AMX0144
Cbbp3BaHe
Bce oue He BkIouBaIte MpeXOBn aadTep B KOHTaKtA!
HcTanaa
- NocTabete nomnata Xopu3OHTaIIHO Bbpxy TBbpda, YnCTa OT IlaAM OCHOBa.
- Ocnrypete cta6nHNO noJoxHe Ha nomnata.
YKA3AHHE
Pomnata He Tp6Ba da pa6oTu 6e3 Boda. B npotuBEN clyuaH nomnata uce ce nobpei.
BkIIOUBaHe / N3KJIIOUBaHe
BkIouBaHe:BkIouTe UenCeNa B KOHTaTa.
- YpeBbT ce BkIIOUba BeHara.
- ɪzhkɪnəyBaHe:ɪzBaɪdTe ɪzencεna OT KɔHtakTa.
Environmental Function Control (EFC)
Пи руckaиЕ В eкплоатuaюnomпаТИЗБьршВа aВТOMaTичНО пpeДВapИTeЛHо nporpaMnраHo CamOTeCTBaHe (Environmental Function Control - конрн Ha ekологиHuTeФункци (EFC)). Пи Hero nomпаТа pa3no3нава дд eВ ржим Ha pa6ToHa cyxo / 6лokирOBka nii B notoNeHO cbCTOЯнe. B clyuay Na peЖIM Ha pa6ToHa cyxo / 6lOKирOBka nomпаТа ce n3KIIouvBa aВТOMaTичНО сеД okono 60do 120 cekyni. B cnyaui Ha nobpeDA ppeKbCHete eIeKTPo3axpAHBaHeto N "HabODHeTe nomnata", CbOTBETHO otCTpaHete npo6JIema. CneI TOBA OTHOBO можete DA ekслоaTnpaTe урда.
EneKtpnue He npncdHaHHa
- Дя[elektpuHnx npucTroB Ha BiDkpNtomy nobiTpi 3actocobyToBcra cneiaIbHi npaBnla. EneKtpomOHTaXHi po60Tu MoKe BnKOHyBaTn Inue KBaIΦiKOBaHn eNeKTpNK.
- EneKtpnk NOBHeH MaTn BiINOBiHy KBaJIiΦiKaciU, 3HaHHa Ta DoCBiD, i MaTn Do3BiN npoBOuNTn eNeKtpomOHTaxHi po6Ot Na ByNuCi. BiN NOBHeH ycBiIDOMIbAtn MoJxNBBy He6e3NeKy Ta DToPmMyBaTncr PerioHaIbHnx Ta HaciOHaIbHnx CtAndapTiB, npaBnI Ta HOpM.
- Y pa3i BUNHKHeHnI nTuHb I npo6IeM 3BepTaITeCg Do KBaniIiKOBaHOrO eNeKTpNka.
-Пд' endу Te npnstpi Jnwe y BnnaKy,Якpo noro eNeKtpnHi xapaKtepncnkn 36iraIOTbCra 3 daHmN dJxepela XnBHeHHa.
-Пидкюаite npictpi Tlbkn Do npabunbHO BCTaHOBHeoi po3eTK.О6laHaHHЯ noBHHO 6yTu 3axuueHO 3a DOIOMORIO npictpoIO 3axnCHOrO BUMKHeHHa 3 MaKcImaJIbHIM po3paxyHKOBm ctpymom 30 mA. - Побжувачи розпдьнки (наррклад, колдк) NOBHHI 6уTN npn3haeHi ДЯ викорисанна на BiДКрИТOMY NOВITPI (Зхишeti BiД BODЯнx 6рИЗOK).
3axnctitb BiikpnTi wTekepn Ta po3'Em Ni BoJorNi.
Бezneuya ekcnnyatacia
He BnKOpncToBvIe npncpti y pa3i noWkoJKeHNe eNeKtpuHnx 3'edHaHb a6o Kopnycy.
- Ytunizye npucpti, kso MepexeBn 3'EDhyBaHn Ka6eNb nozkOJKeHo. MepeXeBn 3'EDHyBaHn Ka6eNb 3amHNTn HEMOXJINBO.
Typ6iHa npncIpoMoMiCTb y CBOII KOHcTpyKciMaHIT i3 cnIbHM MaHITHM NOJem, 1o MoKe BnInHyTu Ha po6Otu KapIOCTmMyJatopa a6o imNaHToBaHOrO dei6puiJaTopa (ICD). 36epiraTe BiCTaHb He MeHwe 0,2 M mix imNaHTaTOM i marHITom.
He nepenocbte i He targHItb npucpii 3a eJektpuHn ka6eJIb.
- Ka6eni cnid npoknaadn TaK, 0o6 3axnCTnix BID NOWKODKeHb i He CTBOPIOBaTn He-6e3neky naIHnIHHa Iy IIOdei.
He 3iInCHIOte TexHicHNx 3MiH y npunctpoi.
- Побовские з пистоим тільки ti po6otи, яко опесни вций inhctpykцii.
BnKOpncToByTe TInbKn OpurHaJIbHi 3aIacHI yactHNI oPurHaJIbHI KOMnJIeKTyIOi.
- RaKIO BUNIKNI npo6nEMN, 3BepHITbCra DO yNOBHOBaXeHOI cLyX6N O6cnyROByBaHHa KJIeHTIB a6O B KOMNaHIo OASE.
BukopncTaHn npntpoo 3a npn3HaueHnarn
BnKOpncToByTe npncTpi, onncaHn y ci n HcTpkykci, nnse HaCtynHM cHHom:
- Дя посякayвань 3вчайноі CTаВКОБоі BODи дя ФлбтпВ, ВОс国安діВ та StTuHnx CtrpymKIB.
- BiñnoBínHO Do TexHíuHnX xapaKTepeNCTnK. (→ TexHíuHi xapaKTepeNCTnKn)
3 DoTpMaHHaM Do3B0JeHnx npaMeTpiv kOcTi BOu. ( DOnyctmixapaKTepeNtIKn BOu)
Ha npnila noiupoIbca HacTynHi o6mxeHHa:
He BnKOpNCToBvBaTu nCTaBky, npu3HaueHOMy IJIraIpaBaHHa.
- Hikon He nepekauye iHwy piinHy, Kpim BODn.
- Hikoln He ekcnnyaTyBaTn 6e3 noaui BOn.
He donyckaTn KOHTaKTy 3 ximikaTAMN, xapOOBUMn npOdyKTAMN,JeRko3aIMNCtUMn Ta Bn6bYOBUMn MaTePiaIamN
He niklouatn do BOoONPOBOy B 6yINHky.
HeIy KomepuiHoro a6o npomncIOBO BUKOpunctaHH.
- BiДиВИДно ДО HOPM eЛeКТрOMaRHiTHOI cyMiCHoCTi (EMC) - Ze npicTpri KIacy A. Y JxHtIOBnX paJOhax npICTpri MoKe cIpruHЯrtn paIaIonepeWkoJn. KopNcTyBaU nobInHe BxITn HaJIeKHNx 3axOJIB.
UK
Onnc Bnpo6y
Orna

1 BxiI 1 (CTopoHa BCMOKTyBaHH)
KopnycphiBtpa
2 BxiI2 (CTopoHa BCMOKTyBaHHa
- NaTPy6OK cynyTHbOrO φiNbTpY a6o ckimepy.
BntpaTaHaBXoDi2,a,otXe,pexm BnTpTu mix BxOamn 1i2e perynbOBAHm.Дя zuoro Tpe6a nocna6uTu 3aTnCKyBaHHry nepecyHyTu naTpy6ok B odHe 3 HaCTynHnx noLoXKeHb:
-NonoxeHH80:Bxid23akpnto;noaBaHHBODnTilbKnuepe3Bxid1.
-NoJoxeHH 1/2/3:Bxid 2Bikpnto npn6n3Ho Ha 25/50/75%; ue 03Haaye noaBaHH BOIN Upe3 Bxid 1i 2BIDNOBIDHO DO HanaTObaHOro peKmMy BuTpatn.
-Положеня 4:Вид 1 зakрно;падаьнг Вори тільки чеpres BXiД 2.
3 Buxi (ctopoHa harHitaHHa
- Patpy6ok 3nBHO rO uHaHry y CTaBOK (Hanp., uepe3 Teuio cTpyMka).
4 MepexeBn ka6enb
5 HakoHeuHk IuaHaIra IJy BxOdy (peKoMeHdaui).
6 Cxiaactn IuaHroBn HakoHeuHK dIy BxOdy 2 Ta BxOdy (aIbTepeHaTna).
7 KpnuKa IJI 3aKpNBaHH BxOy 2, AIO BIN He BnKOpNCTOBYeTbC.
8 ⅢlaHrobiXomTuIpaKcaiIuHaHaKOHeHHKaXIpaHaHriB.
9 TymoBi HixkN DnI TpImaHa HAcOcy npBCTaHOBJeHHi Ha cyxy.
CnmboHnHa npuctpoi
| IP68 4.0 m | Пристрий вожонеровник по 4 м IMа€ зхост вд палу. |
| He6e3neчно за оcis 3 karдiooctumyларotom. | |
| Зхостить рисстрий вд пonaдангя пreamи сонячни поменiB. | |
| Зборонero утлізвати рисстriй i3 3ВичайнIM побутоим смітяМ. | |
| Прочайе inhystрукцию 3 ekсплуataцii. |
BapiaHTN BCTaHOBJIeHHJ
BapiaHT (a): PoidaBaHHa BOnu chepe3 Kopnyc fIbTpa (BXiD 1).
- IpepectabeBxid 2 B noJoxKeHHN «0».
- PpeeknIe Bxid 2 KpnuKoH.
Bapiant (b): Iopabahna Boi uepe3 Kopnyc fInbtpa (BXi1) i odaTkoBo uepe3 catenitHn fInbtp a6o ckimep Ha BXoI 2.
- BctaHOBITb Bxid 2В полжehнг «1», «2» a6o «3», заожно BiДnotpi6HOrO peKIMy BnTpATn (25/50/75%).
Bapiant (c): PoidaBaHnBa Bodi TInbKn Uepe3 Uepe3 caTeiTHn fInbTp a6o cKimep Ha Bxodi 2.
- IpepectabeBxid 2 B noJoxKeHHN «4».
Bapiant (d): BctaHObitb Hacocy cyxomy cTaHI.
-ДяцboroВаiptyHacoc NOBHeB BCTaHOBnOBaTncb6e3KOpnycaΦinbtpa.
- Haoc BCTaHOBIOEbCnO3a MeXaMn CTabKa aIe HIXue pIBH NOBepxHi BOIN.
UK
Seasonal Flow Control (SFC)
BctaHOBJIeHHa Ta NidkIIOUcHHeHH
Hacoc moxHa BCTaHOBIOBaTn 6e3nocepEnbO 3aHypeHm (y Boi) a6o B cyxomy micu (no3a BOIO).
EknpnyataiHaocaD03BoneHaTilbKn3DOpTuMaHHaBkazHo 6'My BOnn.
(→ДоустMuixapakTepructKINBOUN)
yBABA!
Pnncpti moe cTaTn npuHNOc cepno3nX TpaBM a6o Cmepti, kso BIn BnKOpNCTOBy-ctbCBAJbHOMy CTABky. Y BoDi moe BuHkATn He6e3neuHa eJeKtpnHa Hnpyra uepe3 HecnpabHi eJeKtpnuHi Detani npncptoio.
BukopocobnyTe npnilaTinbkn kkuo B BOi HemaIIOeI.
OBEPEXHO
Ietani, 0o o6eptaotbcs B 30HI BCMOKtyBaJIbHOrO naTp6ka Ta HanipHoro naTp6ka. MoJXINBE OTpIMaHHra TpaM, JaKIO 6paTncb pykamn 3a naTp6kn.
3BepHtB 0c06nBy ybary: Upe3 nepeBaHTaXeHHa, npncTpiJ 0o 3ynHnBCa MoKe pa- nTOBO 3anyCTNTscra!
He TopkaITeCb OTBOPY BCMOKTyBaIbHOro naTppy6Ka Ta HanipHOrO naTppy6Ka, KOJI MepeKeBn IWeKep BCTaBJIeHn B p03eTKy.
JaKuo nID yac eKcnnyatauii doctyn Do naTpy6kIB BiDkpNTn, Hanp., JaKuo He nID'eHaHi ShnaHn, To naTpy6Kn Heo6XiHo 3aKpNTn 3acobAmn 3axNCTy BiD TopKaHH. 3aco6n 3aXnCTy BiD npONohyOTbcra kdoTaTKOBe o6laHaHH.
ПРИМITKA
Y pa3i noaqui cnIbHO 3amUneHOI BODn 3HOuBaHHa HAcOca MoKe BiD6yBaTncs IWBnDi, TOMy Ioro Heo6xIDHO BuacHO 3AmIHOBaTI.
PetelbHO nouCTiB CTaBOK a6o BOOnMy nepei BCTaHOJIeHHa HaCoCa.
BCTaHOBIb HAcOC BnIe HaI dHOM cTaBka. Ie Do3BOJIe yHnKHyTn 3acMOKTyBaHH MyIy.
① YHnKaITe npraMnx COHauHnx npomeHIB Ha KOMNoHEHTn npnCTpOIO, kI He 3aHypeHi y BODy, ockJIbKn ue MoKe npu3BecTn do iX CunbHoro HarpiBaHHa. Pn Heo6xidHocTi BnKOpNCTOByte 3axncHe NOKpnTTT.
3aHypeHn npictpoio
PikKIOUeHHa
Пидключаite Haoc BiiDIOBiIDHO Do 6aKaHOro BapiaHTy iHCTaIaJI. ( BapiaHTn BCTaHOBJIeHHa)
Iokn He BcTabraTe MepeXeBm wTeKeP b po3etky!
BctaHOBJIeHHA
- PonomictiB Hacoc Tropn3OHTaIbHO Ha TBepDy NOBepXHIO, 10 He Mictntb MyIy.
- PepekoHaTecb, 3o HAcoc 3HaxOaNTbcB 6e3neuHomy noloxeHHi.
- Eknnyatynte Hacoc Jnwe ToDi, KOnn BIn NobHicTIO 3aHypeHn y BOdy.
3a donomoroio trocy npn notpe6i moxha Ierko BITrHytn Hacoc i3 BOIN. -IpoTgHITb Tpoc uepe3 kpyrni OTBOpn Ha HxKHi o6oJOnci fInbTpTy Ta 3aB'jXiTb Ha HbOMy By30J.
YctaHOBka npnCTpoIO B cyxomy micti
Дя Варiaнту Bстановлень в сухomy мicci насoc поинен Bстановлобатиб 6e3 коруca Финър.
Ipepeo6naHaHHa
UK
πiǎkIoueHЯ
Pokn He BCTabIaTe MepeXeBn wTekep B po3eTk!
BcTaHOBJIeHHa

- Nomicitb Hacoc ropn3oHTaIbHO Ha TBepny NOBepxHIO, 00 He Mictntb MyIy.
- IpekehauTecb, 10 Haoc 3HaxoDITbcB 6e3neuHomy noLoxKeHHI.
ПРИМITKA
He donyckatn po60ty hacoca B cyxomy cTaHi. IhaKwe hacoc pyuHyETbca.
EknnyaTyBaTn Hacoc, TInbKn KOIN Bn 3aHypeHn Ch Bkptn BOHO.
BmUKaHHBmUKaHH
- YbIMKHeHHA: BCTaBTe wTeKepeB po3eTKy.
- Pnpctpi Bmkaetbca Opa3y.
BumKHeHHa: BntraHt b wTeKepe i3 po3eTKn.
Environmental Function Control (EFC)
При зауску насoc abTomatун поюдь nonepeнь зарогамову садоянocу (Environmental Function Control (EFC)). Haboc визначe, в якову саши Виразу роботи Na cyхy/6лokуваня насoc abTomatун Виимkaetbcya chepe 60 - 120 cekynd.У pazi винкипомлки, BiДКЛЮчын haboc BiД eilektpomepeksi i 3aHypte haboc y Bodу a60 BИдалтп пошкоу. Пис zuboro постpoem 3HOBy можна КористуВатия.

OBEPEKHO
He6e3neKa TpaBMyBaHnHape3 Hepepe6aCyBaHn 3aynck. DyHKci BHyTpipHbOro KOHTpOIO npIcTpoIO MOKyTB BMINKaTI npIcTpi i aBTOMaTHUHO BMINKaTI 3HOBy.
Npeed npoBeeHnM po6iT ha npucTpoBnTgHyTN BnKy 3 po3eTKn.
ПРИMITKA
He BnKOpNCToBMyTe arpeCnBHi MmOci 3ac06n a6o ximiuHi po3uHH. LcI 3ac06n MoKyTB NOsKOJNTN KOpNyc, NoripuHTN fynKcIOHyBaHnR npicTpoTu 3aBdaTn ShKOJN TBapnHaM, pocInnHaT Na HABKOLINHbOMy cepeIOBnU.
Mo moxnnBOcTi OunuAaTe npncTpii nuCTOIO BDOIO Ta M'koIO uTkoIO a6o ry6KOIO.
Pn cTIkOMy 3a6pydHeHHI BnKOpNCTOByTe peKomeHDoBaHI MnUoyi 3aco6N.
OuHnHn npntpo
① OuηaaiTe npictriŋ y pa3i Heo6xidnocti, aJe ⅢOHaIMMeHwe 2 pa3n Ha pik.
- Oco6nbo peTeBHO nouchitb po6oey koneco hacocai Kopnyc hacocca.
- PekomeHdoBaHi 3ac6n dIy uIeHH npi cTIkOMy BaIIHOMy BiKlaJeHHi:
- Φιλτρ Ḁαςηνης ΜρμρCleān BiΩ OASE.
- Ino6yTObi 3aco6n dny uHneHHa OCHOBIO uTOBOI KNCJOTn Ta XNOpY.
- Petelbno npomntn Bci deTani nuCTOIO BOIOIO niCJI uNCTKN.
Демонох/очшенинна hoocу
BntaHtB uTeKeP Ta BiD'EnHaNte YcPi KIOUeHHA.
- Po36epiB npucpii,Ян pOKa3aHo Ha mAIIOHky.
AMX0145
UcynHHe HecnpaBHOCTeI
| Hecnpabhnicb | Прична | Усунения |
| Hacoc He 3anyskaeTbca | Вidсутня habрuya y elekt-puyni'mepeksi | Перевироти habрuya в мерекi |
| Линii пidve徳ня поелamHi | Пробл actи liinii пidve徳ня 6e3 nepe-rinHIB | |
| Линii пidve徳ня засmiceni | Перевироти/nprouchntti liinii pindwe-deHnry | |
| Турбиha 3a6lokoBаHA | Усун'tи 6lokybaHHa, поевироти bilbHe obepTaHnHa Typ6iHn | |
| Hacoc He npaioe HedoctatnЯnotyxNichtb | Kopnuc φilbtrpa 3a6lokoBaNiy 6prdOm | Почистити частни Фльстра |
| Надто велник Втори в trpy-6oPpOBoDax | Вrokerotni shlaHng Na Heo6xIDHy mIni-MaIbHy DoBxINHy, BvdaIHTn HeNoTpri-6nI 3'EDhyBaIbHi DeTani | |
| Робоче kolес поаго ру-xaETbCS | Перевирп leerkiCTb xodу po6oOro By-3na | |
| Череш КорOTКий поміжок часу habOC BIMNKaEТбСя | Вoda дуже 3a6pudHeNa | Очироти haboc |
| Турбиha 3a6lokoBaHa | Усун'tи 6lokybaHHa, поевироти bilbHe obepTaHnHa Typ6iHn | |
| Hacoc пацював 6e3 ВODи | Перевироти/nprouchntti liinii pindwe-deHnry | |
| Занадто виска Temпера-Tура ВODи | ДотримуВатиь Мaksimально Д03BO-lenHoI Temпера typn BODи. (→Texnichi xapakterpcntkni) |
UK
TexhichixapakTepnCTnKn
TexhiHi daHHi npuctpoIO
3NeKtpnuecko coeHHeHne
- Дя залкрпогдкючень Вн РOMEшни DeиctbyOT OCOбie nHCTpyKcunn. Pa6otbl no залкрпогдкючehию DoJxkeн BbINONHЯТь TOnbKO KBaINФИцрOBaHHь Зл ek- TpNK.
- KbaHnΦnucpOBaHHbI ΘeKtpNK DoJxH e HMeTb CneuaJIbHOe 6pa3OBAHne, O6naDaTb 3HaHnAIMN ObltOM N DoJxH e HMeTb PpaBO BblONHraTb pa6Otb I NO 3eKtpPOIOKJIIOUeHNIO BHe NOMEuEHN. KbAlnΦnucpOBaHHbI ΘeKtpNK DoJxH e 6bITbOCBeDOMLeH O HaJIuH N Bo3MOXHbIX ONaCHOCTe N DoJxH e Co6IIOdaTb MeCTHbIe N 06uerocydapCTBHeHHbIe HOpMbI, IHCTpyKcII N NoCTaHOBJIeHnI.
- Пи ВОЗнКовень Ворpoсов и пробlem образаайтесь К спецаду-элькТрику.
- ПоклюаиустpoистBOК сети толькВТOMсураe,Кordаэл ektpиескпх.apakTepистУстpoистBA COOTBeTCTBYIOT DAHHbIM cTeBOrO эл ektpoNTaHЯ.
- Поклоча Te yctpoiCTBO TOnbKO K Po3eTke, yCTaHOBJIeHHOIN NO INHCTpyKcIM. YcTPOIcTB OJXHO 6bITb 3aUHeNO aBTOMaTHueCKIM BbIKIOuAteJIem C MaKcImaJIb-HbIM paCyeTHbIM TOKOM yTeuKN 30 mA.
- YdHnHtEni npacnpedEnTeN (Haepmep, KOJokn) dOJIHHb6bTb npeHa3HaueHbI DnNCNoB3OBaHnHa OTKpbITOM BO3dyXe (3aunuHbI OT BODaHbIX 6pb13r).
- 3aünuaηte O T Bnaɪn O T Kpbɪtble WTeKepeɪn I RHeɪda pO3eTOK.
Бezonauchnii pexum pa6oTbi
- Henb3a noB3OBaTbcra yCTpoiCtBOM, eCNI erO KOpNyc NIIu 3JIeKtpnueckne Ka6eNn noBpeXdHbl.
-Данhoe yctpoCTBO HxHNO yTINn3nPoBaTb,ecn erO ceTeBO Ka6eNb OkaxKeTc noBpeJdeHHbIM.CeTeBO Ka6eNb 3aMeHe He NoJIeKNT.
Pa6ouy y3en coepknt MaHNT CnIbHbIM MaHHTbIM NOJEM, KOTOPOE MOKET NOBnraTb Ha pa6Oty KapdnoCTmUyTAToPA NIN NmPnAHTnpOBaHHbIX DeΦn6pnnlAToPOB (ICD). BbIepeKnBaTe pacCToRHe MExdy NmPnAHTaTOM n MaHHTom He MeHee 0,2M.
He nepenocnte n He TAHnTe yCTpoiCtBO, depXa erO 3a 3neKtpnueckn Ka6eb! - YknaIbIbaiTe 3neKtpokabeTak, yTO6bl OHI 6bln 3aunueHbI OT BO3MOxHbIX NOBpeJXdEHH N yTO6bl IIOJN He MOrJIuYepe3 HNX CNOTKHytbcra.
3anpeaetcBHOCTb N3MeHnB KOHCTpyKuIO yCTPOIcTBA. - Byc troiCTBe pa3peaetcBbINONHrTb TOnbKO Te pa60TbI, KOTOpbIE ONNCAHbIB DaH-HOM pyKOBODCTBe NO 3KcPnyatau.
- IcnoJb3yIte TOnbKO opnHaJIbHbIe 3aIpaCTn n npHaJIeXHOCTn.
- Ecni Bo3HnKHyT npo6IeMbl npoc6ba o6paaTaBcra KaBTOpN3OBaHHOMy cepBnCHOMy OTdEny 06cnykBaHnna nI K fnpMe-n3rOToBnTeIIO OASE.
IcnoIb3OBAHne np6opa no Ha3NaueHnIO
OnncahHoe B daHHOM pKOBODCTBe NO 3KcNlyaTaun n3dJeNe pa3peWaeTcNcNoIb30BaTb TOnbKO CneDyUoUm O6pa3OM:
1 BxoI 1 (CTopoHa BCaCbIbAHnI)
KopnycΦnIbTpTa
2 BxoD 2 (CTopoHa BCacbIbAHn)
- Повклоченke KBСпOMORAteЛьНOMу Фильту улсКИММеру.
- O6bemnotoka, npoxoJusn uepe3 Bxod 2 n onpeJenuJusn Tem caMbIM COOTHOweHne BCacbIBaEMbIX notOKOB Ha Bxode 1 n 2, moKHo peryInpoBaTb. Pa36nokpyIte fNKcTopn nepeDbHbTe wTycep dJa noDcoEHHeHn B OdHy n3 CNeDyUOxN PO3uJN:
-103nucn 0:BxOJ 23akpyT;nepeKaUKa BObl BbINOJIHReTc TOnbKO Uepe3 BXoI 1.
-Поиця 1/2/3:ВхoД 2ОТКрblт пим.нa 25/50/75%;эTO OЗначаET,чTO поЕракa BOды чepe3 BxOД 1и 2 ВьЮЛHЯETСВУka3aHHOM COOTHошен.
-03n4: BxO1 3aKpyT; nepeKaUka BObl BbINOJHReTc TOnbko Uepe3 BXoI2.
3 BbIXoD (HaOpHa cToPOHa)
- トtyeep nna noeknioueHnna o6paTHoro cInBa B BOIOem (Haip. BmecTe c pybem).
4 3nektpoka6eb
5 ⅢnHaROBbI HaKoHEnK dIy BbIXOa (peKOMeHdyTeTc).
6 ⅢaHROBbI HakoHeuHK-EnOka IIN BxOda 2 IN BbxOda (aIbTePHaTNBbI BapNaHT).
7 3arnyuoka yto6b3aKpbItb BxOd 2,ecn OH He nCnoJb3yeTc.
8 ⅢaHROBbIe 3axmbl dnn 3akpenneHnnaHROBa HlaNaHROBbIX HaKoHeuHKaX.
9 Pe3nHOBBie OOnOpbI dJa DepeKaTeNHaHocA, KOrda erO yCTaHaBnBaIOT B CyXOM MeCTe.
CnmbolbHa npu6ope
| IP68 4.0 m | УсточькоNBыile- И ВODОнгpoиuaemoe до Г lyбины погухжени 4 М. |
| Проблемает онлайнддллдддддддддддддддддддддддддддддддддддддддддддддддддддддддддддддддддддддддддддддддддддддддддддддддддддд徳. | |
| Зашашие усточьо BTВОздддддддддддддддддддддддддддддддддддддддддддддддддддддддддддддддддддддддддддддддддддддддддддддддддддkill. | |
| Данhoe усточьо Heльзя утллзирobаравь вмосте с обьчныдомаш- ним OTхорами. | |
| Прочайу ружовадъю окрлуатаци! |
BapnaTbI NOdkloueHnA

Ceteboi wTekep noka He BcTabnayTe B po3eKy!
MoHTaX
Pa3MeaTb HAcOC HyXHO TOpN3OHTaIbHO Ha IpoYHom N CBO6oHOM OT Ula OCHOBaHN.
- 06ecneyte yctOnuBoe noJoxHe ne yctpoNCTBa.
ПускВэкплуataцию
YKA3AHHE
Hacoc He doJKeH pa6OtaTb BCyXIO. B npOTnBHom cIyuae BO3MOxHO NOBpeKdHeHc Hacoca.
BknioaTe hacoc B pa6Oy TOnbKO TOrda, KOrda OH NnHOCTbIO NORpyKeH B BOy nIN 3aIIT BOIo.
BkIIOueHne/BbIKIOueHne
BknIOuHTb:BCTaBBte wTeKep Bpo3eTKy. -YcTPOINCTBO BKNIOUaETcHMeDneHHO.
- BbIKIIOHTb: BbIHbTe WTeKeP n3 PO3eTKN.
Environmental Function Control (EFC)
Пи русke В Экплuyaataцию Haboc aBTOMaTnueckn BbINOJHЯET 3anpoIpaMMnpOBaHHoe CamOTecTnPOBaHne (Environmental Function Control (EFC)).Hacoc camOCToTeJIbHO onpeДeJaT CBOe pa6Ooyee coCTOHaHE - IIN OH HaxODITc Ha XOLOCTOM XOy/6IOKIn- POBka IIN HaxODITcB NOrpyKeHHOM COCTOHN. B clyuae haxOxJdeHna XOLOCTOM XOy/6IOKInPobKe HACOC OTKIIouaETc ABTomaTnueckn npIM. uepe3 60 - 120 cekyHd. B clyuae c6oB Ba6Ote OTKIIouHTe nOdaUy HapRjKeHnI "3aTOnITE HaCOC BOIo" IIN yCTpAHnte MeSHAIOUeE 3ToMу npenrTCTBHe. Pocne 3TOrO Bbl CHOBA MoKeTe 3KcNlyaTnPOBaTb yCTpOYCTBO.
OCTOPOXHO
Onachoctb noIyuHTb TpaBMy OT HenpeHaMepeHHoro BKIOueHn. BHyTpehnne KOHTpOJIbHbIe yHKUIM MOrY UcTpoIcTB OTKIOUaTb I CHOBa eRO aBTOMaTNUeCKN BKIOu- qaTb.
- Перац haayanom pa6ot c npnbopom Heo6xOIMO BbInHyTb ceTeBOI uTekep n3 po3eTKn.
YKA3AHHE
He nCnoB3yIte arpeccnBhIe cpeCTBa IJIa YnCTKn IIN XmMueckne paCTBOpnten. 3TN CpeCTBa MOryt NOBpeDITb KOpNyc HAcOca, OTrpuCaTeNbHO NOBnIaTb Ha erO pa6o- qHcnn HAHeCTN yUeP6 JxIBOThIM, pAcTeHNm IN OKpyKaIOuSei cpe.
YnCTHTe yCTPOINCTBO NO BO3MOXHOCTN TOJbKO YnCTOIN BOIO IN MRAKO JETKOK INI INy6koB. B cnuyae cTOnkux 3aqrpa3HeHn IcNoJIb3yInTe peKOMeHNDoBaHHbIe YnCTAunCepeDCTBa.
Pouncntb yctpoictbo
1 YnCTnte yctpoiCTBO nO Mepe Heo6xoDnMoCTn, Ho He peXe 2-x pa3 B roD.
B Hacoce HxKHO uCTnTb npexde Bcero pa6oyn y3en n Kopnyc.
- PekomeHnyeMoE YnCTaUee cpeIcTBO npN CTOIKNX OTIOKeHNx n3BeCTN: -OuInTeNb Hacoca PumpClean OASE.
-БыITOBoe MOIOUeE cpeIcTBo 6e3 coIepKaHnN xIopa n yKcyca.
- После очирtenын поportов Спдталу систон Ворон.
Демонох/очимстka hacocа
BbHbTe UTeNCeBHyU BUNKv NOTCOEINHHTe BCE NOIKIOUOHeHnA.
Pa36epnte yctpOInCTBO KaK 3TO NOKa3aHO Ha pncyHKe.

AMX0145
C6Opky yCTpOINCTBa BbINOJIHЯITE B 06paTHOH IOcNEIOBAtIbHOCTN.
BoBpMa c6OpKn npOBepbTe, yTo6bl
- HaneKHO 3aUeJIKNHUYINCb 3aXnMbI, VndePknBaIOuNHe HaCOC B DePkaTeJe.
- coeHnTeBnKa6eN npoxoJn no KaHaBKe Ha Kopnyce n UTo6bl OH 6bl He CUNbHO COHTNJN 3aXkT.

AMX0146
Ounstka/3aMeHa pa6oeryo y3la
Pa36epnte Hacoc KaK 3TO yka3aHo Ha pncyHke.
- ПонICTte BCE KOMNOHeHTbI UeTkoB B YUcToB BOJe.
- Поберпс Вс части На налчиме NOВржден. 3amehite NOBpejdeHHbIe nIN n3-HoшeHHbIe Yactn.
- Co6epeHacoc B o6paTHoN nOcneJDoBaTeIbHoCTn.
1 Pn n3BneHnn pa6oeryo y3na MoKet OTKpeNTbcra paNaIbHbI NOIuINHcB KOpnyce 3NeKTpOMToPA. Bo BpeM c6opKn npOBepbTe, qTO6bl OH 6bl npaBnBHO BCTaBHe. Ecn NiOTpe6yETc, To BdABITE wnpOKne na3bl paNanBHorO noDunHnHnKa Ha erO MeCTo B Kopnyce 3NeKTpOMToPA.

AMX0154
XpaHHeHa cKlae/xpaHHeB 3mHee BpeMa
Pnp6op mopo3oyctoynB do mnHyc 20 ^ C .Ecn Bby 6yndeTe xpaHntb np6op BHe BDOema,TaTeNbHO BByNCHTe erO MrgKoI qeTKoN BOo, nPoBepbTe, HeT nn NOBpeKeHN, IN XpaHnTe erO B NorpyxehHom IIN 3aNpabNeHHOM BOo coCToHN. TeKepe HdoJxHoxDNTbcraBBoe!
YcTpaHHeNHeHcnpaBHOCTN
| Henschnpabnoctb | Прична | Устраенье随意п随意п随意п随意п随意п随意п随意п随意п随意п随意п随意п随意п随意п随意п随意п随意п随意п随意п随意п随意п随意п随意п随意п随意п随意п随意п随意п随意п随意п随意п随意п随意п随意п随意п随意п随意п随意п随意п随意п随意п随意п随意п随意п随意п随意п随意п随意п随意п随意п随意п随意рп随意п随意п随意п随意п随意п随意п随意п随意п随意п随意п随意п随意п随意п随意п随意п随意п随意п随意п随意п随意п随意п随意п随意п随意п随意п随意п随意п随意п随意п随意п随意п随意п随意п随意п随意п随意п随意п随意п随意п随意п随意п随意п随意п随意п随意п随意п随意п随意п随意п隨地 Таю Равло Небостаточая поиз bodи- тейность насoca | Поверсы с来不及可以 Поверсы с来不及可以 Поверсы с来不及可以 Поверсы с来不及可以 Поверсы с来不及可以 Поверсы с来不及可以 Поверсы с来不及可以 Поверсы с来不及可以 Поверсы с来不及可以 Поверсы с来不及可以 Поверсы с来不及可以 Поверсы с来不及可以 Поверсы с来不及可以 Повер Sally Тяжелухд Тяжелухд Тяжелухд Тяжелухд Тяжелухд Тяжелухд Тяжелухд Тяжелухд Тяжелухд Тяжелухд Тяжелухд Тяжелухд Тяжелухд Тяожелухд Тяожелухд Тяожелухд Тяожелухд Тяожелухд Тяожелухд Тяожелухд Тяожелухд Тяожелухд Тяожелухд Тяожелухд Тяожелухд Тяожелухл Тяожелухл Тяожелухл Тяожелухл Тяожелухл Тяожелухл Тяожелухл Тяожелухл Тяожелухл Тяожелухл Тяожелухл Тяожелухл Тяожелухл Тяowitz Тяowitz Тяowitz Тяowitz Тяowitz Тяowitz Тяowitz Тяowitz Тяowitz Тяowitz Тяowitz Тяowitz Тяowitz Тяowitz Тяowitz Тяowitz Тяowitz Тяowitz Тяowitz Тяowitz Тяowitz Тяowitz Тяowitz Тяowitz Тяowitz Тяazzi Тяazzi Тяazzi Тяazzi Тяazzi Тяazzi Тяazzi Тяazzi Тяazzi Тяazzi Тяazzi Тяazzi Тяazzi Тяazzi Тяazzi Тяazzi Тяazzi Тяazzi Тяazzi Тяazzi Тяazzi Тяazzi Тяazzi Тяazzi Тяazzi Тяazi Тяazzi Тяazzi Тяazzi Тяazzi Тяazzi Тяazzi Тяazzi Тяazzi Тяazzi Тяazzi Тяazzi Тяazzi Тяazzi Тяazzi Тяazzi Тяazzi Тяazzi Тяazzi Тяazzi Тяazzi Тяazzi Тяazzi Тяazzi Тяazzi Тяanzi Тяazzi Тяazzi Тяazzi Тяazzi Тяazzi Тяazzi Тяazzi Тяazzi Тяazzi Тяazzi Тяazzi Тяazzi Тяazzi Тяazzi Тяazzi Тяazzi Тяazzi Тяazzi Тяazzi Тяazzi Тяazzi Тяazzi Тяazzi Тяazzi Тяassis Тяassis Тяassis Тяassis Тяassis Тяassis Тяassis Тяassis Тяassis Тяassis Тяassis Тяassis Тяassis Тяassis Тяassis Тяassis Тяassis Тяassis Тяassis Тяassis Тяassis Тяassis Тяassis Тяassis Тяassis Тя chassis Тя chassis Тя chassis Тя chassis Тя chassis Тя chassis Тя chassis Тя chassis Тя chassis Тя chassis Тя chassis Тя chassis Тя chassis Тя chassis Тя chassis Тя chassis Тя chassis Тя chassis Тя chassis Тя chassis Тя chassis Тя chassis Тя chassis Тя chassis Тя chassis Тяassis Тяassis Тяassis Тяassis Тяassis Тяassis Тяassis Тяassis Тяassis Тяassis Тяassis Тяassis Тяassis Тяassis Тяassis Тяassis Тяassis Тяassis Тяassis Тяassis Тяassis Тяassis Тяassis Тяassis Тяannis Тяassis Тяassis Тяassis Тяassis Тяassis Тяassis Тяassis Тяassis Тяassis Тяassis Тяassis Тяassis Тяassis Тяassis Тяassis Тяassis Тяassis Тяassis Тяassis Тяassis Тяassis Тяassis Тяassis Тяassis Тяallis Тяassis Тяassis Тяassis Тяassis Тяassis Тяassis Тяassis Тяassis Тяassis Тяassis Тяassis Тяassis Тяassis Тяassis Тяassis Тяassis Тяassis Тяassis Тяassis Тяassis Тяassis Тяassis Тяassis Тяassis Тя Mattis Тяassis Тяassis Тяassis Тяassis Тяassis Тяassis Тяassis Тяassis Тяassis Тяassis Тяassis Тяassis Тяassis Тяassis Тяassis Тяassis Тяassis Тяassis Тяassis Тяassis Тяassis Тяassis Тяassis Тяassis Тяegis Тяassis Тяassis Тяassis Тяassis Тяassis Тяassis Тяassis Тяassis Тяassis Тяassis Тяassis Тяassis Тяassis Тяassis Тяassis Тяassis Тяassis Тяassis Тяassis Тяassis Тяassis Тяassis Тяassis Тяassis Тяialis Тяassis Тяassis Тяassis Тяassis Тяassis Тяassis Тяassis Тяassis Тяassis Тяassis Тяassis Тяassis Тяassis Тяassis Тяassis Тяassis Тяassis Тяassis Тяassis Тяassis Тяassis Тяassis Тяassis Тяassis Тяxis Тяassis Тяassis Тяassis Тяassis Тяassis Тяassis Тяassis Тяassis Тяassis Тяassis Тяassis Тяassis Тяassis Тяassis Тяassis Тяassis Тяassis Тяassis Тяassis Тяassis Тяassis Тяassis Тяassis Тяassis Тяosas Тяassis Тяassis Тяassis Тяassis Тяassis Тяassis Тяassis Тяassis Тяassis Тяassis Тяassis Тяassis Тяassis Тяassis Тяassis Тяassis Тяassis Тяassis Тяassis Тяassis Тяassis Тяassis Тяassis Тяassis Тя assassin Тяassis Тяassis Тяassis Тяassis Тяassis Тяassis Тяassis Тяassis Тяassis Тяassis Тяassis Тяassis Тяassis Тяassis Тяassis Тяassis Тяassis Тяassis Тяassis Тяassis Тяassis Тяassis Тяassis Тяassis Тя件事 Тяassis Тяassis Тяassis Тяassis Тяassis Тяassis Тяassis Тяassis Тяassis Тяassis Тяassis Тяassis Тяassis Тяassis Тяassis Тяassis Тяassis Тяassis Тяassis Тяassis Тяassis Тяassis Тяassis Тяassis Тяinois Тяassis Тяassis Тяassis Тяassis Тяassis Тяassis Тяassis Тяassis Тяassis Тяassis Тяassis Тяassis Тяassis Тяassis Тяassis Тяassis Тяassis Тяassis Тяassis Тяassis Тяassis Тяassis Тяassis Тяassis Тяrosis Тяassis Тяassis Тяassis Тяassis Тяassis Тяassis Тяassis Тяassis Тяassis Тяassis Тяassis Тяassis Тяassis Тяassis Тяassis Тяassis Тяassis Тяassis Тяassis Тяassis Тяassis Тяassis Тяassis Тяassis Тяosis Тяassis Тяassis Тяassis Тяassis Тяassis Тяassis Тяassis Тяassis Тяassis Тяassis Тяassis Тяassis Тяassis Тяassis Тяassis Тяassis Тяassis Тяassis Тяassis Тяassis Тяassis Тяassis Тяassis Тяassis Тя oasis Тяassis Тяassis Тяassis Тяassis Тяassis Тяassis Тяassis Тяassis Тяassis Тяassis Тяassis Тяassis Тяassis Тяassis Тяassis Тяassis Тяassis Тяassis Тяassis Тяassis Тяassis Тяassis Тяassis Тяassis Тяasis Тяassis Тяassis Тяassis Тяassis Тяassis Тяassis Тяassis Тяassis Тяassis Тяassis Тяassis Тяassis Тяassis Тяassis Тяassis Тяassis Тяassis Тяassis Тяassis Тяassis Тяassis Тяassis Тяassis Тяassis Тяreas Тяassis Тяassis Тяassis Тяassis Тяassis Тяassis Тяassis Тяassis Тяassis Тяassis Тяassis Тяassis Тяassis Тяassis Тяassis Тяassis Тяassis Тяassis Тяassis Тяassis Тяassis Тяassis Тяassis Тяassis Тяatism Тяassis Тяassis Тяassis Тяassis Тяassis Тяassis Тяassis Тяassis Тяassis Тяassis Тяassis Тяassis Тяassis Тяassis Тяassis Тяassis Тяassis Тяassis Тяassis Тяassis Тяassis Тяassis Тяassis Тяassis ТяRossi Тяassis Тяassis Тяassis Тяassis Тяassis Тяassis Тяassis Тяassis Тяassis Тяassis Тяassis Тяassis Тяassis Тяassis Тяassis Тяassis Тяassis Тяassis Тяassis Тяassis Тяassis Тяassis Тяassis Тяassis Тяcas Тяassis Тяassis Тяassis Тяassis Тяassis Тяassis Тяassis Тяassis Тяassis Тяassis Тяassis Тяassis Тяassis Тяassis Тяassis Тяassis Тяassis Тяassis Тяassis Тяassis Тяassis Тяassis Тяassis Тяassis Тяasion Тяassis Тяassis Тяassis Тяassis Тяassis Тяassis Тяassis Тяassis Тяassis Тяassis Тяassis Тяassis Тяassis Тяassis Тяassis Тяassis Тяassis Тяassis Тяassis Тяassis Тяassis Тяassis Тяassis Тяassis Тяastics Тяassis Тяassis Тяassis Тяassis Тяassis Тяassis Тяassis Тяassis Тяassis Тяassis Тяassis Тяassis Тяassis Тяassis Тяassis Тяassis Тяassis Тяassis Тяassis Тяassis Тяassis Тяassis Тяassis Тяassis Тяassist Тяassis Тяassis Тяassis Тяassis Тяassis Тяassis Тяassis Тяassis Тяassis Тяassis Тяassis Тяassis Тяassis Тяassis Тяassis Тяassis Тяassis Тяassis Тяassis Тяassis Тяassis Тяassis Тяassis Тяassis Тя assists Тяassis Тяassis Тяassis Тяassis Тяassis Тяassis Тяassis Тяassis Тяassis Тяassis Тяassis Тяassis Тяassis Тяassis Тяassis Тяassis Тяassis Тяassis Тяassis Тяassis Тяassis Тяassis Тяassis Тяassis Тяass Тяassis Тяassis Тяassis Тяassis Тяassis Тяassis Тяassis Тяassis Тяassis Тяassis Тяassis Тяassis Тяassis Тяassis Тяassis Тяassis Тяassis Тяassis Тяassis Тяassis Тяassis Тяassis Тяassis Тяassis Тя assist Тяassis Тяassis Тяassis Тяassis Тяassis Тяassis Тяassis Тяassis Тяassis Тяassis Тяassis Тяassis Тяassis Тяassis Тяassis Тяassis Тяassis Тяassis Тяassis Тяassis Тяassis Тяassis Тяassis Тяassis ТяAss Тяassis Тяassis Тяassis Тяassis Тяassis Тяassis Тяassis Тяassis Тяassis Тяassis Тяassis Тяassis Тяassis Тяassis Тяassis Тяassis Тяassis Тяassis Тяassis Тяassis Тяassis Тяassis Тяassis Тяassis Тяassin Тяassis Тяassis Тяassis Тяassis Тяassis Тяassis Тяassis Тяassis Тяassis Тяassis Тяassis Тяassis Тяassis Тяassis Тяassis Тяassis Тяassis Тяassis Тяassis Тяassis Тяassis Тяassis Тяassis Тяassis Тяissues Тяassis Тяassis Тяassis Тяassis Тяassis Тяassis Тяassis Тяassis Тяassis Тяassis Тяassis Тяassis Тяassis Тяassis Тяassis Тяassis Тяassis Тяassis Тяassis Тяassis Тяassis Тяassis Тяassis Тяassis Тя金融业 Tayass |
RU
TexHnueckne napaMeTpbl
TexHmueckne xapaKTepeNcTnKn yCTpoiCTBa
| AquaMax Eco Premium | 4000 | 6000 | 8000 | 10000 | ||
| Нарражени на в王先生 | V по.TOKA | 220 ... 240 | ||||
| Частota тoka в сetime | Гц | 50/60 | 50/60 | 50/60 | 50/60 | |
| Макс. по引爆демая мошноctь | W | 35 | 45 | 60 | 88 | |
| Макс. объem поачи | л/ч | 4000 | 6000 | 8000 | 10000 | |
| Макс. висота поачи | M | 3,3 | 3,7 | 4,1 | 4,7 | |
| Вид зашты | IP68 | IP68 | IP68 | IP68 | ||
| Макс. глибina по рожени | M | 4 | 4 | 4 | 4 | |
| Васьвадоцая сто-рona | Рezьбa | G2 | G2 | G2 | ||
| Повлоченишалнога | MM | 25, 32, 38 | 25, 32, 38 | 25, 32, 38 | ||
| Напорна стода | Рezьбa | G2 | G2 | G2 | ||
| Повлоченишалнога | MM | 25, 32, 38 | 25, 32, 38 | 25, 32, 38, 50 | ||
| Макс. размер частиц grяз | MM | 10 | 10 | 10 | 10 | |
| Плозадь Феловара на сто роне поачи cm² | 1000 | 1000 | 1000 | 1000 | ||
| Tempepatура воры (размешени в по-grуженихом состаян) | В павOTE | °C | (→Дорочимbleпокастени каесто Воры) | |||
| В неразочем состаян | °C | -20 ... +35 | -20 ... +35 | -20 ... +35 | ||
| Tempepatура okry- жанные среading (размешени в су- хом мостe) | В павOTE等相关 состаян | °C | +4 ... +30 | +4 ... +30 | +4 ... +30 | |
| B павOTE等相关 при hum'dпеловом хом мостe | °C | +4 ... +40 | +4 ... +40 | +4 ... +40 | ||
| Габарты | Длиа | MM | 340 | 340 | 340 | |
| ШирINA | MM | 280 | 280 | 280 | ||
| Выcodуа | MM | 165 | 165 | 165 | ||
| Длиа с来不及提到的河口河口河口河口河口河口河口河口河口河口河口河口河口河口河口河口河口河口河口河口河口河口河口河口河口河口河口河口河口河口河口河口河口河口河口河口河口河口河口河口河口河口河口河口河口河口河口河口河口河口河号河号河号河号河号河号河号河号河号河号河号河号河号河号河号河号河号河号河号河号河号河号河号河号河号河号河号河号河号河号河号河号河号河号河号河号河号河号河号河号河号河号河号河号河号河号河号河号河号河号河口河口河口河口河口河口河口河口河口河口河口河口河口河口河口河口河口河口河口河口河口河口河口河口河口河口河口河口河口河口河口河口河口河口河口河口河口河口河口河口河口河口河口河口河口河口河口河口河口河岸假假假假假假假假假假假假假假假假假假假假假假假假假假假假假假假假假假假假假假假假假假假假假假假假假假假假假假假假假假假假假假假假假假假假假假假假假假假假假假假假假假假假假假假假假假假假假假假假假假假假真假假假假假假假假假假假假假假假假假假假假假假假假假假假假假假假假假假假假假假假假假假假假假假假假假假假假假假假假假假假假假假假假假假假假假假假假假假假假假假假假假假假假假假假假假假假假假假假假假假假假设假假假假假假假假假假假假假假假假假假假假假假假假假假假假假假假假假假假假假假假假假假假假假假假假假假假假假假假假假假假假假假假假假假假假假假假假假假假假假假假假假假假假假假假假假假假假假假假假假假假真假假假假假假假假假假假假假假假假假假假假假假假假假假假假假假假假假假假假假假假假假假假假假假假假假假假假假假假假假假假假假假假假假假假假假假假假假假假假假假假假假假假假假假假假假假假假假假假假假假假假假如假假假假假假假假假假假假假假假假假假假假假假假假假假假假假假假假假假假假假假假假假假假假假假假假假假假假假假假假假假假假假假假假假假假假假假假假假假假假假假假假假假假假假假假假假假假假假假假假假假假虚假假假假假假假假假假假假假假假假假假假假假假假假假假假假假假假假假假假假假假假假假假假假假假假假假假假假假假假假假假假假假假假假假假假假假假假假假假假假假假假假假假假假假假假假假假假假假假假假假假假假发发发发发发发发发发发发发发发发发发发发发发发发发发发发发发发发发发发发发发发发发发发发发发发发发发发发发发发发发发发发发发发发发发发发发发发发发发发发发发发发发发发发发发发发发发发发发发发发发发发发发送发送发送发送发送发送发送发送发送发送发送发送发送发送发送发送发送发送发送发送发送发送发送发送发送发送发送发送发送发送发送发送发送发送发送发送发送发送发送发送发送发送发送发送发送发送发送发送发送发送发送发送发送发送发送发送发送发送发送发送发送发送发送发送发送发送发送发送发送发送发送发送发送发送发送发送发送发送发送发送发送发送发送发送发送发送发送发送发送发送发送发送发送发送发送发送发送发送发送发送发发发发发发发发发发发发发发发发发发发发发发发发发发发发发发发发发发发发发发发发发发发发发发发发发发发发发发发发发发发发发发发发发发发发发发发发发发发发发发发发发发发发发发发发发发发发发发发发发发发发表发表发表发表发表发表发表发表发表发表发表发表发表发表发表发表发表发表发表发表发表发表发表发表发表发表发表发表发表发表发表发表发表发表发表发表发表发表发表发表发表发表发表发表发表发表发表发表发表发表发表发表发表发表发表发表发表发表发表发表发表发表发表发表发表发表发表发表发表发表发表发表发表发表发表发表发表发表发表发表发表发表发表发表发表发表发表发表发表发表发表发表发表发表发表发表发表发表发表发表发表了发表发表发表发表发表发表发表发表发表发表发表发表发表发表发表发表发表发表发表发表发表发表发表发表发表发表发表发表发表发表发表发表发表发表发表发表发表发表发表发表发表发表发表发表发表发表发表发表发表发表发表发表发表发表发表发表发表发表发表发表发表发表发表发表发表发表发表发表发表发表发表发表发表发表发表发表发表发表发表发表发表发表发表发表发表发表发表发表发表发表发表发表发表发表发表发表发表发表发表發表发表发表发表发表发表发表发表发表发表发表发表发表发表发表发表发表发表发表发表发表发表发表发表发表发表发表发表发表发表发表发表发表发表发表发表发表发表发表发表发表发表发表发表发表发表发表发表发表发表发表发表发表发表发表发表发表发表发表发表发表发表发表发表发表发表发表发表发表发表发表发表发表发表发表发表发表发表发表发表发表发表发表发表发表发表发表发表发表发表发表发表发表发表发表发表发表发表发表发表发票发票发票发票发票发票发票发票发票发票发票发票发票发票发票发票发票发票发票发票发票发票发票发票发票发票发票发票发票发票发票发票发票发票发票发票发票发票发票发票发票发票发票发票发票发票发票发票发票发票发票发票发票发票发票发票发票发票发票发票发票发票发票发票发票发票发票发票发票发票发票发票发票发票发票发票发票发票发票发票发票发票发票发票发票发票发票发票发票发票发票发票发票发票发票发票发票发票发票发票票票票票票票票票票票票票票票票票票票票票票票票票票票票票票票票票票票票票票票票票票票票票票票票票票票票票票票票票票票票票票票票票票票票票票票票票票票票票票票票票票票票票票票票票票票票票票票票票票票票票客客客客客客客客客客客客客客客客客客客客客客客客客客客客客客客客客客客客客客客客客客客客客客客客客客客客客客客客客客客客客客客客客客客客客客客客客客客客客客客客客客客客客客客客客客客客客客客客客客客客考考考考考考考考考考考考考考考考考考考考考考考考考考考考考考考考考考考考考考考考考考考考考考考考考考考考考考考考考考考考考考考考考考考考考考考考考考考考考考考考考考考考考考考考考考考考考考考考考考考考 <|im_start|>assistant | Макс. по引爆демая сто-рona | Рezьбa | G2 | G2 | G2 | |
| Повлоченишалнога | MM | 25, 32, 38 | 25, 32, 38 | 25, 32, 38 | ||
| Напорна стода | Рezьбa | G2 | G2 | G2 | ||
| Макс. по引爆демая сто-рona | Повлоченишалнога | MM | 25, 32, 38 | 25, 32, 38 | 25, 32, 38 | |
| Темпера ратура воры (размешени в по- рухенham состаян) | В павOTE | °C | -20 ... +35 | -20 ... +35 | -20 ... +35 | |