ProMax ClearDrain 11000 - Water pump OASE - Free user manual and instructions
Find the device manual for free ProMax ClearDrain 11000 OASE in PDF.
User questions about ProMax ClearDrain 11000 OASE
0 question about this device. Answer the ones you know or ask your own.
Ask a new question about this device
Download the instructions for your Water pump in PDF format for free! Find your manual ProMax ClearDrain 11000 - OASE and take your electronic device back in hand. On this page are published all the documents necessary for the use of your device. ProMax ClearDrain 11000 by OASE.
USER MANUAL ProMax ClearDrain 11000 OASE
natural_image
Two identical portable lighting fixtures with black and silver casing, no visible text or symbols.ProMax ClearDrain
7000, 11000, 14000
EN Operating instructions
FR Notice d'emploi
text_image
Technical diagram of a mechanical device with numbered parts for identificationProMax ClearDrain 11000, 14000

text_image
Technical diagram of a mechanical device with numbered components and an inset detail viewPOX0001
ProMax ClearDrain 7000 11000, 14000
natural_image
Technical line drawing of a mechanical device with attached cable and connector (no text or symbols)POX0007
natural_image
Technical line drawing of a mechanical device with a close-up inset showing a component detail (no text or symbols)POX0006
natural_image
Mechanical assembly diagram showing a valve and ring mechanism with directional arrows (no text or labels)POX0012
Pumpe aufstellen
DE
natural_image
Mechanical assembly diagram showing a clamp securing a component (no text or symbols visible)POX0003
Betrieb
WARNING
natural_image
Technical line drawing of a mechanical component with a magnified inset showing internal detail (no text or symbols)POX0122
Lagern/Überwintern
▶ Disconnect all electrical devices in the water from the power supply before reaching into the water. Otherwise there is a risk of severe injuries or death by electrocution.
This unit can be used by children aged 8 and above and by persons with reduced physical, sensory or mental capabilities or lack of experience and knowledge if they are supervised or have been instructed on how to use the unit in a safe way and they understand the hazards involved. Do not allow children to play with the unit. Only allow children to carry out cleaning and user maintenance under supervision.
Safety information
Electrical connection
- Special regulations apply for electrical installation in outdoor spaces. Only a qualified electrician may perform the electrical installation.
— The qualified electrician has the necessary professional training, knowledge and experience to perform electrical installation in outdoor spaces. The electrician can detect potential dangers and knows how to adhere to regional and national standards, regulations and directives.
— For your own safety, please consult a qualified electrician.
- Only connect the unit if the electrical data of the unit and the power supply match.
- Only plug the unit into a correctly installed outlet. Ensure that the unit is fused for a rated fault current of max. 30 mA by means of a fault current protection device.
- Extension cables and power distributors (e.g. outlet strips) must be suitable for outdoor use (splash-proof).
- Protect open plugs and sockets from moisture.
Safe operation
- Do not use the unit, if electrical lines or the housing are damaged.
- Do not carry or pull the unit by its power cable.
- Route lines in such a way that they are protected from damage and do not present a tripping hazard.
• Never carry out technical changes to the unit.
• Only carry out work on the unit that is described in this manual.
- Only use original spare parts and accessories.
Product Description
Overview
EN

text_image
ProMax ClearDrain 7000 1 2 3 4 5 6 7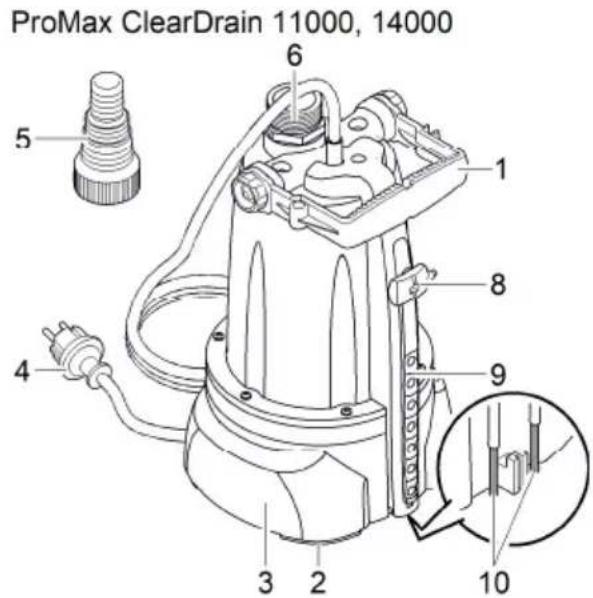
text_image
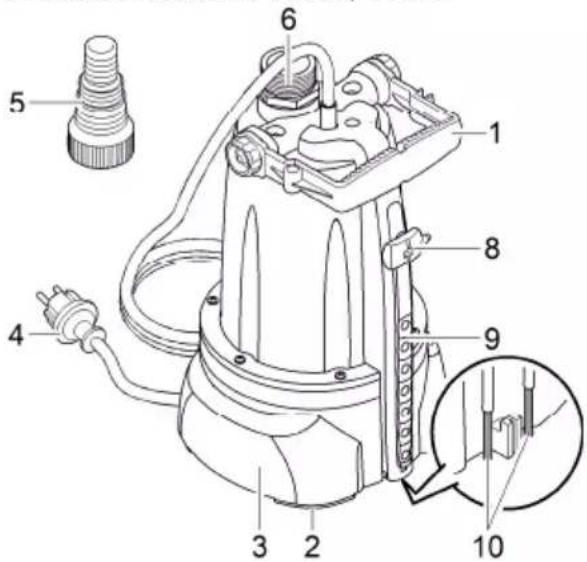
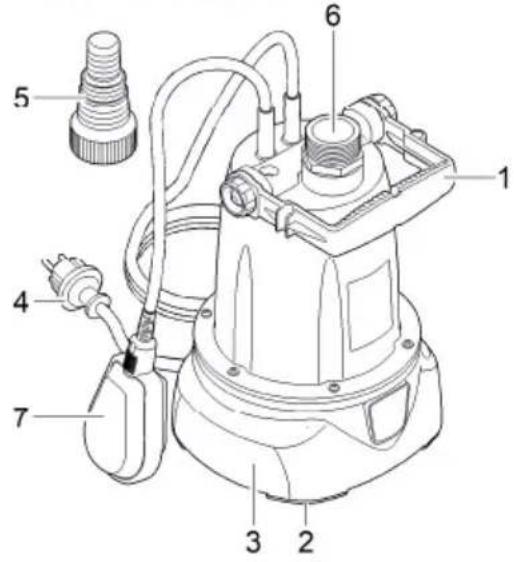
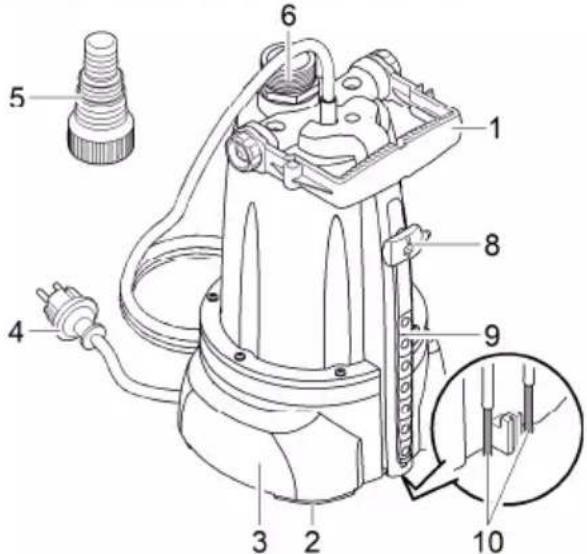
ProMax ClearDrain 11000, 14000 5 6 1 8 9 4 3 2 10POX0001
ProMax ClearDrain 7000 11000, 14000
| 1 Handle, adjustable | ● | ● |
| 2 Spacer ring for setting the residual water height | ● | ● |
| 3 Pump base | ||
| 4 Power connection cable | ● | ● |
| 5 Stepped hose adapter | ● | ● |
| 6 Connection, pressure side G 114 | ● | ● |
| 7 Float switch | ● | - |
| 8 Sensor, detects the water level and switches on the pump - | ● | |
| 9 Sensor slots, setting the activation height - | ● | |
| 10 Metal contacts, detect the minimum water level - | ● |
Intended use
Only use the product described in this manual as follows:
- For pumping clear water or rain water.
- For pumping dirty water and max. 5 mm large particles.
• For irrigating and watering. - For transferring water from and draining basins or ponds/pools.
• Extraction of water from a well.
— Only for irrigation and watering purposes! - For pumping the water out of water butts/rain barrels or cisterns.
- While adhering to the technical specifications. (→Technical data)
The following restrictions apply to the unit:
• Not suitable for salt water.
- Never use for pumping dirty water/waste water.
• Not suitable for drinking water.
- Do not connect to the drinking water supply.
- Do not use for long-term operation (e.g. continuous recirculation of the water in a pond).
- Do not use for commercial or industrial purposes.
- Do not use in conjunction with chemicals, foodstuff, easily flammable or explosive substances.
Installation and connection
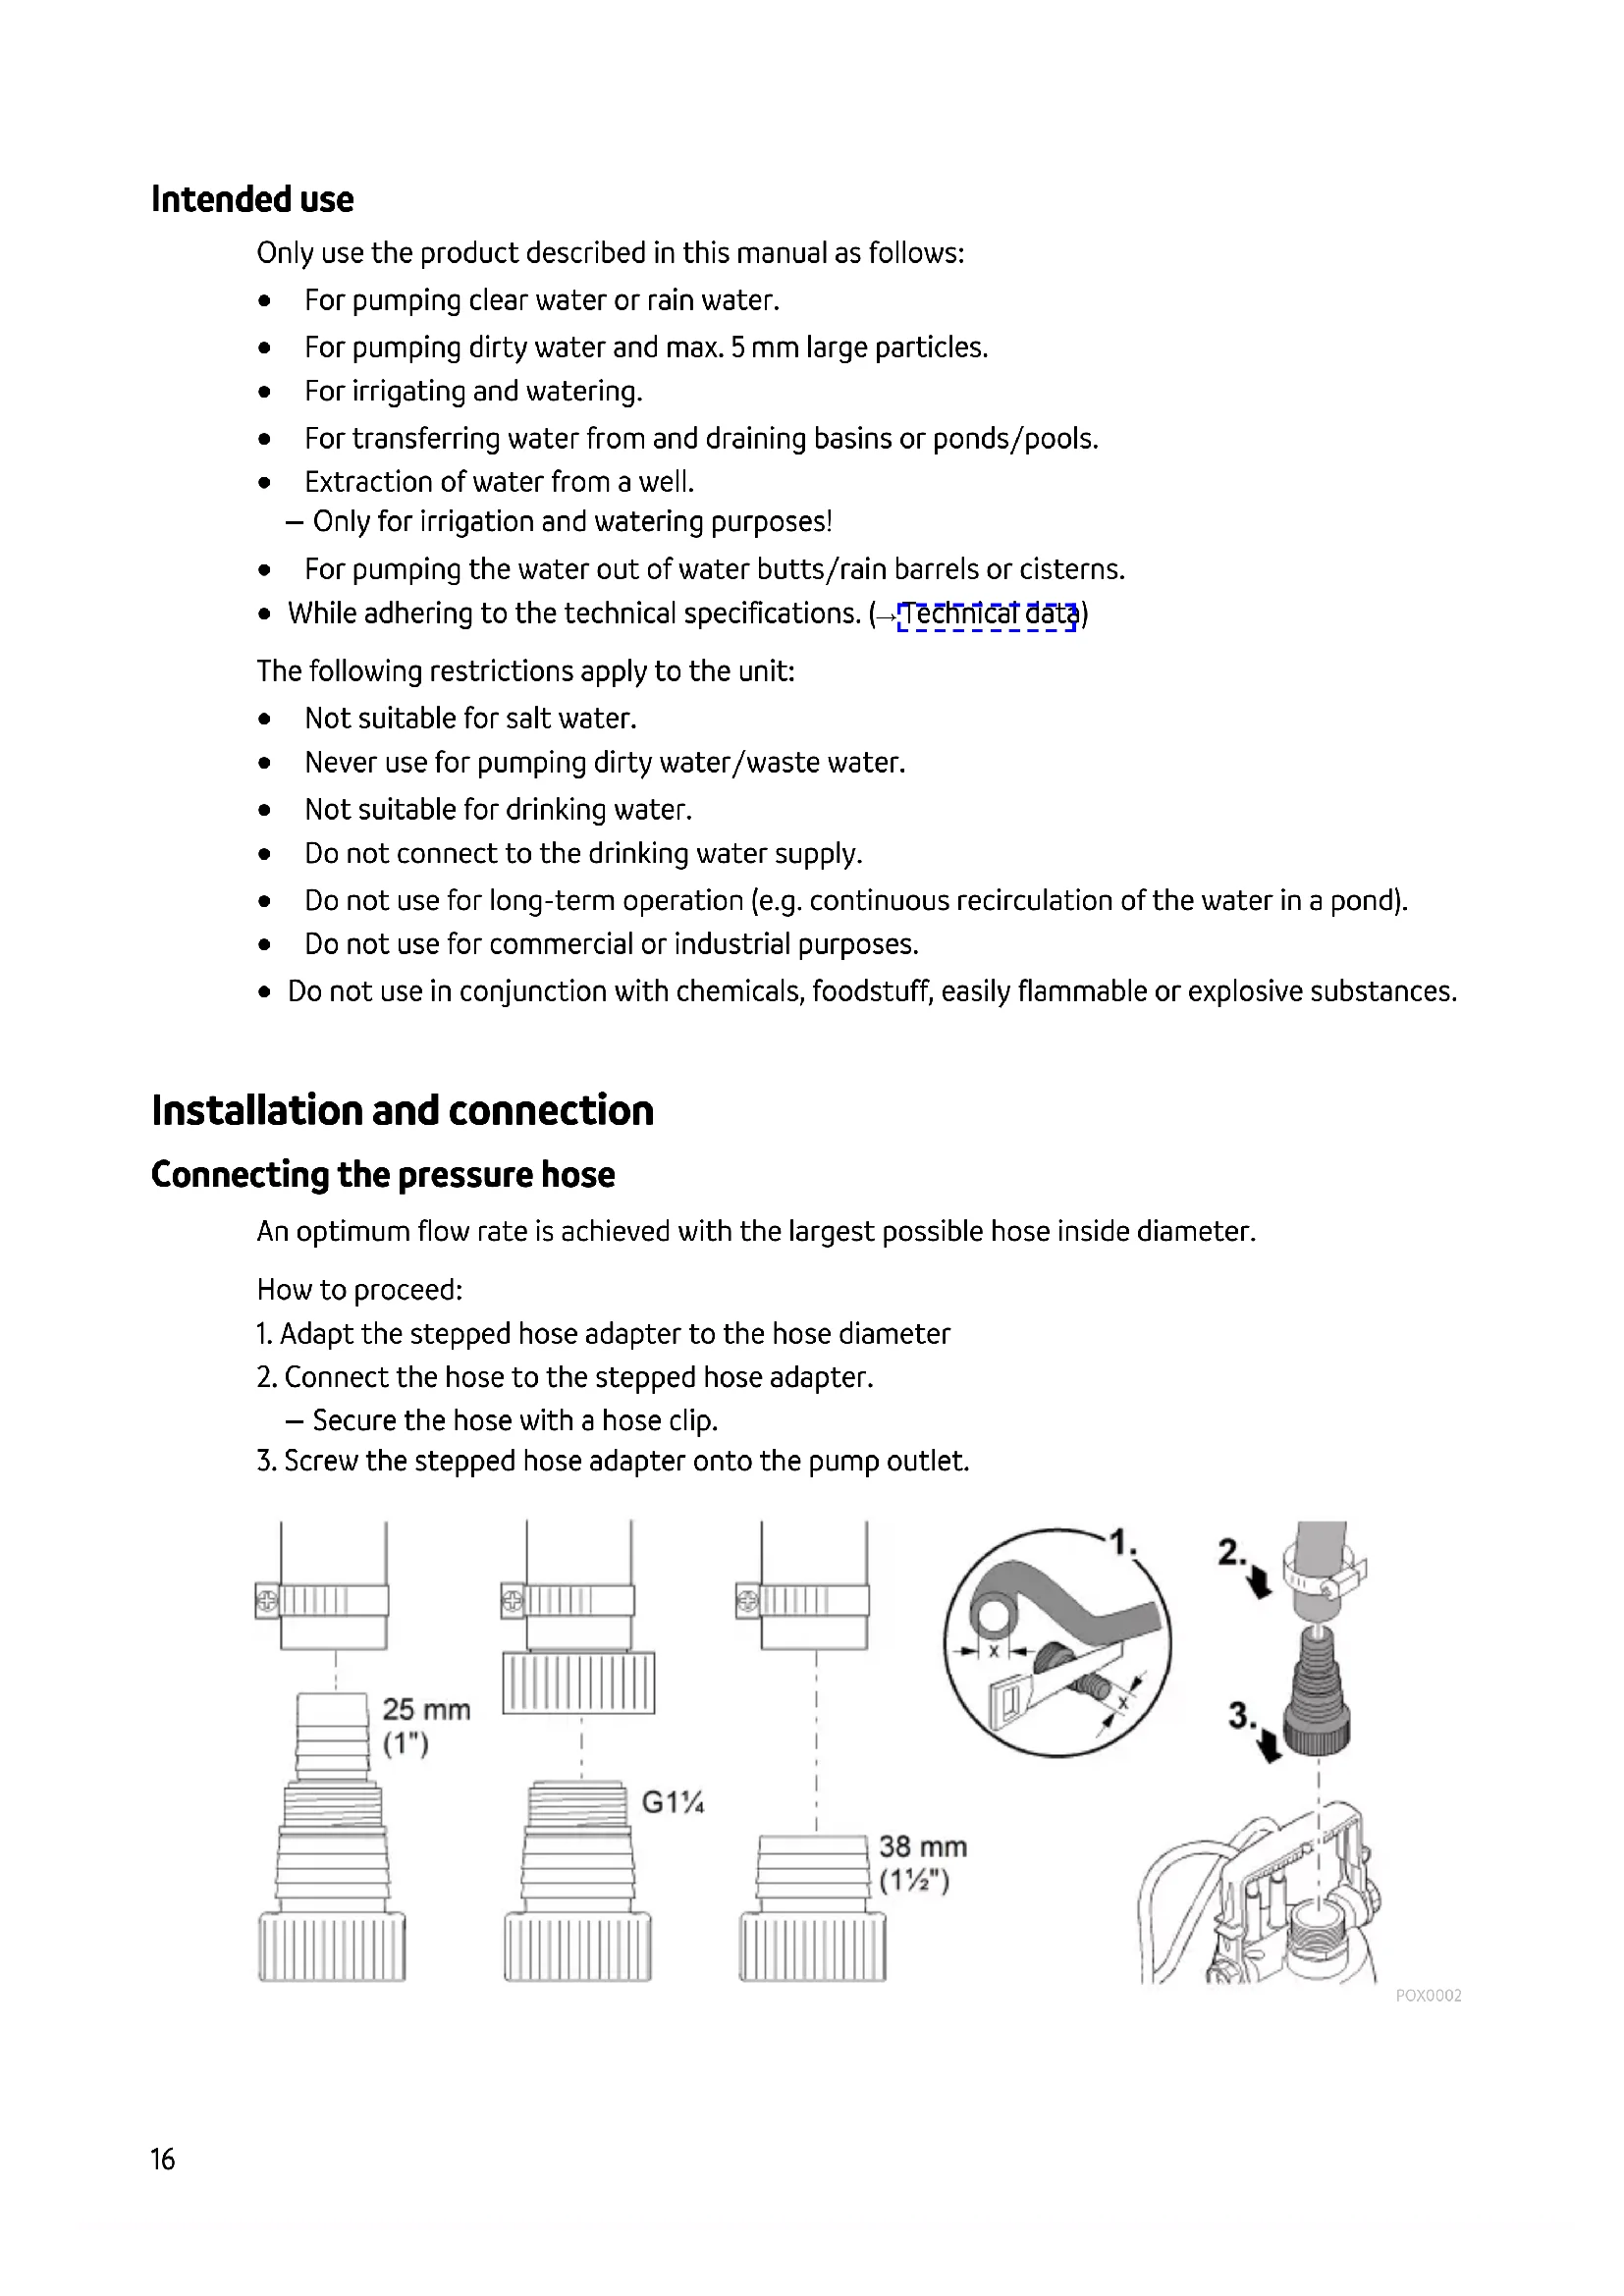
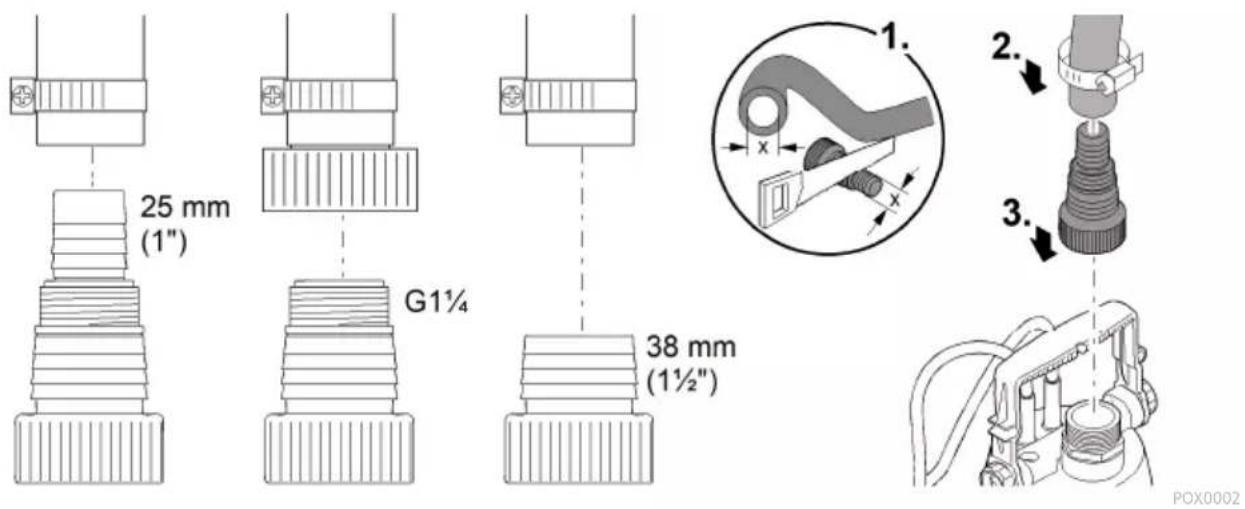
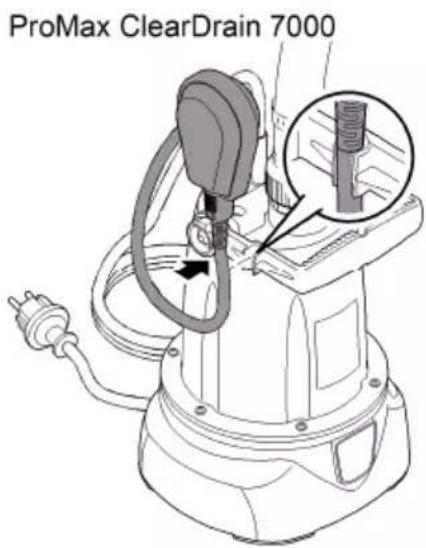
Connecting the pressure hose
An optimum flow rate is achieved with the largest possible hose inside diameter.
How to proceed:
- Adapt the stepped hose adapter to the hose diameter
- Connect the hose to the stepped hose adapter.
— Secure the hose with a hose clip.
- Screw the stepped hose adapter onto the pump outlet.
text_image
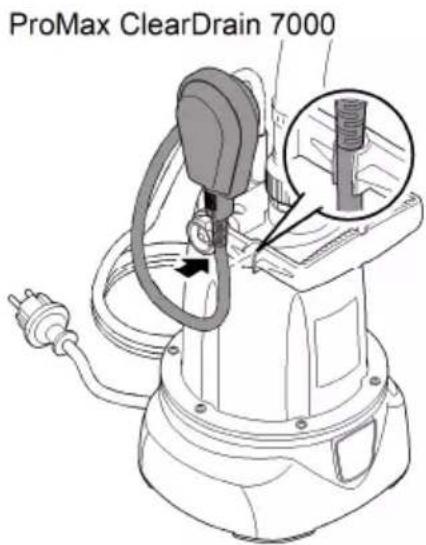
25 mm (1") G1¼ 38 mm (1½") POX0002Automatic mode ProMax ClearDrain 7000
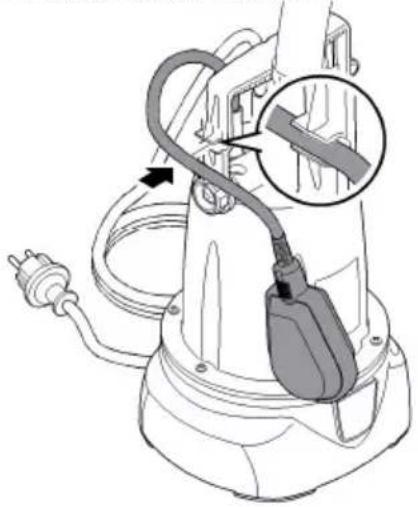
When the water level rises, it lifts the float switch until the switch-on point is reached and the pump switches on.
When the water level drops, the float switch lowers until the switch-off point is reached and the pump switches off.
- Push the float switch cable into the cable clip.
— The shorter the cable between the float switch and the cable clip, the lower the switch-on point and the higher the switch-off point.
To ensure fault-free function, ensure that the cable length between the float switch and the cable bracket is at least 100 mm.
The minimum residual water height is only reached in manual mode.
ProMax ClearDrain 7000
natural_image
Line drawing of an electric shock absorber with a plug inserted, showing wiring and a magnified inset (no text or symbols)POX0004
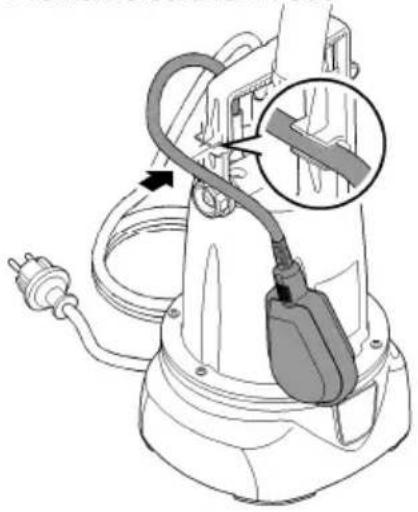
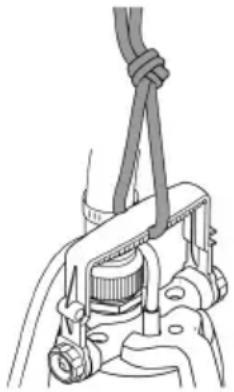
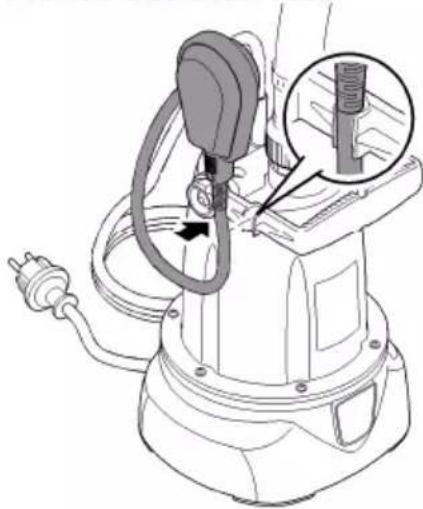
Manual mode ProMax ClearDrain 7000
The pump remains permanently switched on if the float switch is set vertically and the cable points downward.
NOTE
The pump can run dry in manual mode. Running the pump dry increases wear.
▶ Switch off the pump when the minimum water level is reached.
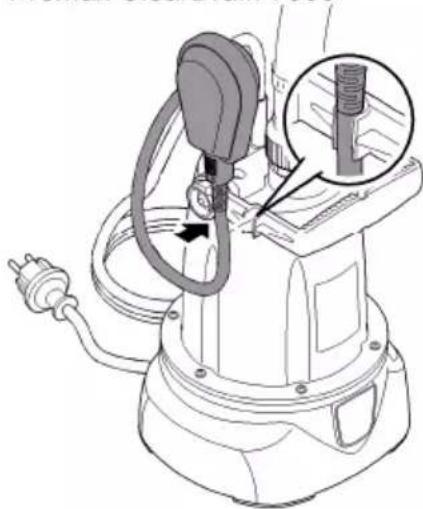
- Move the handle into the horizontal position and push the cable directly at the transition to the float switch into the cable clip such that the float switch is in a vertical position.
text_image
ProMax ClearDrain 7000POX0005
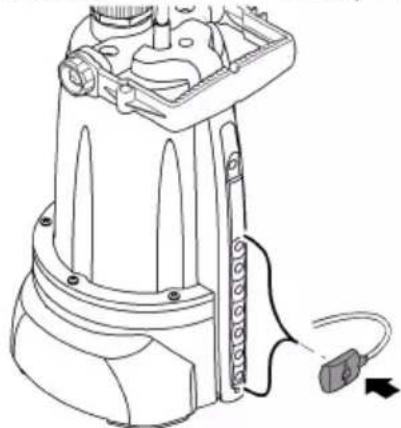
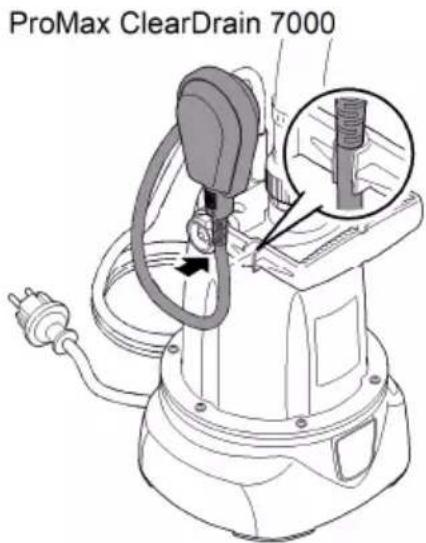
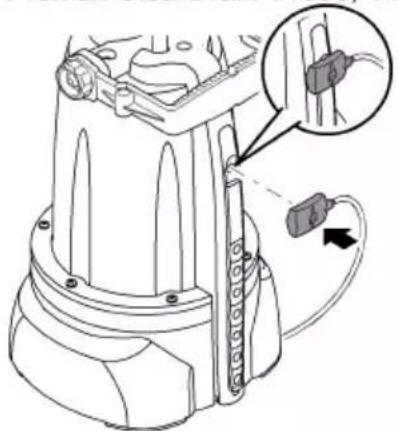
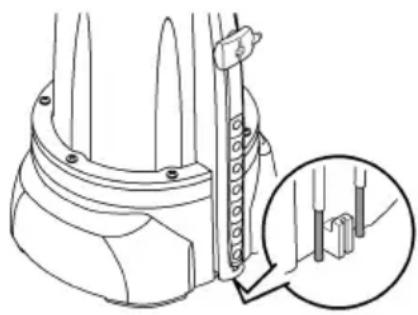
Automatic mode ProMax ClearDrain 11000, 14000
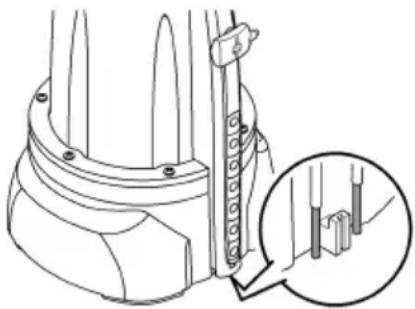
The pump switches on when the rising water reaches the sensor.
Metal contacts at the bottom of the sensor strip detect the minimum water level (switch-off point). When the minimum water level is reached, the pump switches off.
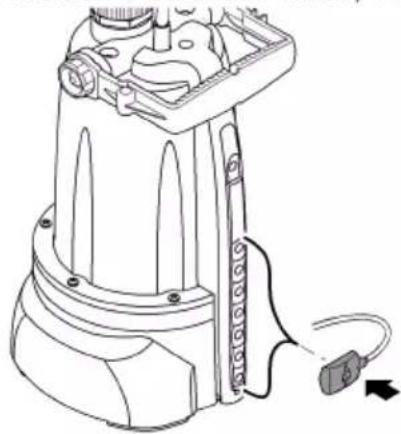
- Fit the sensor onto the sensor strip in the desired switch-on position.
ProMax ClearDrain 11000, 14000
natural_image
Line drawing of a mechanical device with attached cable and connector (no text or symbols)POX0007
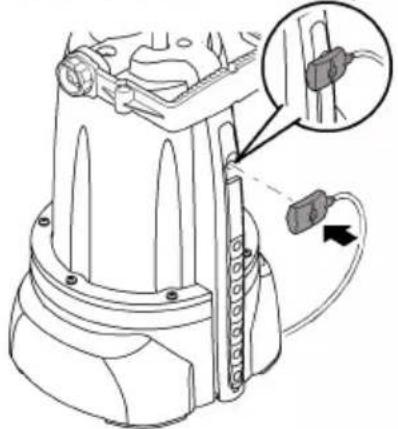
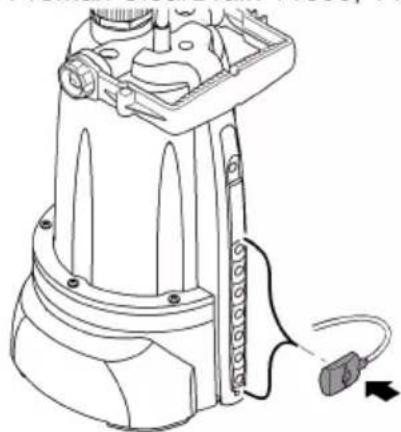
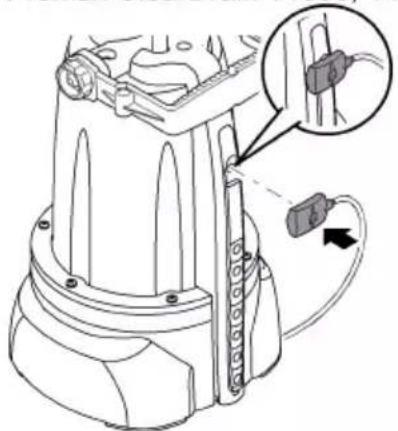
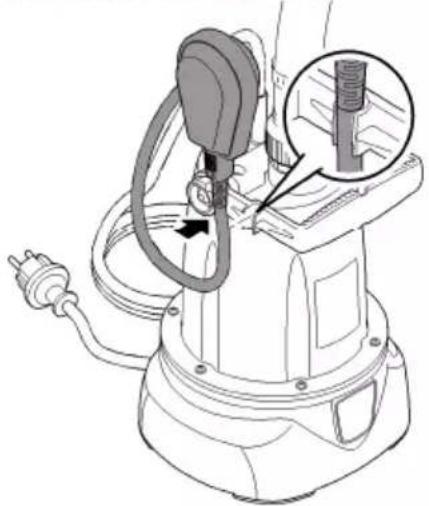
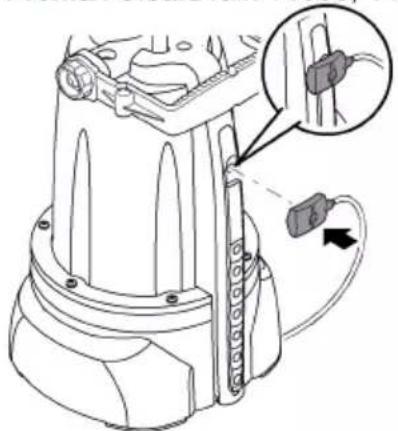
Manual mode ProMax ClearDrain 11000, 14000
The pump is switched on when the sensor is inserted in the top-most position of the sensor strip.
Metal contacts at the bottom of the sensor strip detect the minimum water level (deactivation point). When the minimum water level is reached, the pump switches off with a brief delay.
- Repeat the process: Reinsert the sensor in the top position of the sensor strip.
ProMax ClearDrain 11000, 14000
natural_image
Technical line drawing of a mechanical device with a close-up inset showing internal components (no text or symbols)EN
POX0006
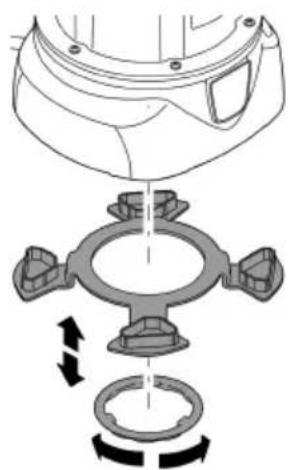
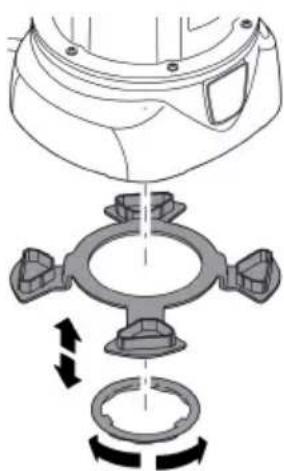
Setting the residual water level
The pump can pump the water down to a depth of 6 mm to 8 mm or down to 1 mm.
- Residual water level 6 ... 8 mm: Fit the spacer ring and secure with the retaining ring (bayonet closure).
- Residual water level down to 1 mm (shallow extraction): Release the retaining ring (bayonet closure) and remove the spacer ring.
i Shallow extraction is only possible in manual mode.
natural_image
Mechanical assembly diagram showing a valve and pump mechanism with directional arrows (no text or labels)POX0012
Installing the pump
• Install the pump in a horizontal and stable position in the water.
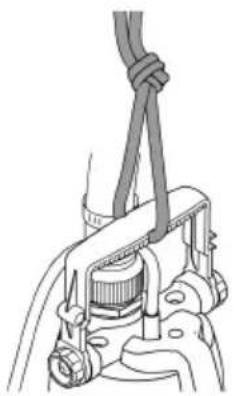
- If it needs to be lowered into a well or a shaft, fasten a rope to the handle. Do not carry it by the power connection cable.
- Install the pump such that it does not take in dirt particles with a size >5 mm, which would block the intake. Install the pump in a raised position if necessary.
- ProMax ClearDrain 7000: Ensure that the float switch can always move freely.

natural_image
Mechanical assembly diagram showing a clamp securing a component (no text or symbols visible)POX0003
Operation
WARNING
Risk of severe injuries or death by electric shock.
▶ Only operate the pump if no persons are in the water.
▶ Disconnect all electrical devices in the water from the power supply before reaching into the water.
NOTE
The pump is not suitable for continuous operation. Continuous operation will reduce the pump service life accordingly.
Switching on the unit
- Insert the power plug into the socket.
— The pump is ready for operation.
— The pump will start up as soon as the level of the water reaches the switch-on height.
Switching off the unit
- Disconnect the power plug.
- When the pump is switched off, residual water in the hose may flow back and out of the pump intake.
i After using the pump, rinse it with clear water.
Maintenance and cleaning
NOTE
Do not use aggressive cleaning agents or chemical solutions. These agents can damage the housing, impair the function of the device and harm animals, plants and the environment.
▶ If possible, clean the unit with clear water and a soft brush or a sponge; remove stubborn dirt with the aid of the recommended cleaning agents.
EN
i Clean the unit as required but at least twice per year.
- Recommended cleaning agent for removing stubborn limescale deposits:
— Pump cleaning agent PumpClean from OASE.
— Vinegar- and chlorine-free household cleaning agent.
• After cleaning, thoroughly rinse all parts in clean water.
ProMax ClearDrain 11000, 14000
Metal contacts detect the minimum and maximum water level. If the minimum water level is reached in automatic mode, the pump switches off.
- Regularly clean the metal contacts to ensure that the pump switches on and off reliably.
natural_image
Technical line drawing of a mechanical component with a magnified inset showing internal detail (no text or symbols)POX0122
Storage/winter protection
The unit is not frost-proof and has to be removed and put into storage if minus temperatures are expected.
How to correctly store the unit:
• Thoroughly clean the unit.
- Check the unit for damage and replace damaged components.
- Store the unit in a dry and frost-free place.
- Protect open plug connections from moisture and dirt.
- Drain/empty hoses and connections as much as possible.
Malfunction remedy
Malfunction Cause Remedy
| Pump does not start. Power supply interrupted Check the fuse and electrical plug connections. | ||
| Pump switches off after a short running period. | Overload protection has switched the pump off due to overheating. | Clean the intake and pressure hose.Allow the pump to cool down. |
| The pump is running but is not delivering, or the delivered quantity is insufficient | Pressure hose kinked | Route the pressure hose without kinksCheck the outlet and clean if necessary |
| Intake blocked | Clean the intake | |
| Air in the pressure hose | Expel the air from the pressure hose. | |
| If applicable:Non-return valve incorrectly fitted in the pressure hose or clogged | Correctly fit the non-return valve.Clean the non-return valve. | |
| Impeller defective or worn Contact OASE | The impeller may only be replaced by the OASE Service. | |
Technical data
ProMax ClearDrain 7000 11000 14000
| Rated voltage V AC 230 230 230 | |||||
| Rated frequency Hz 50 50 50 | |||||
| Rated power W 375 650 950 | |||||
| Protection type IPX8 IPX8 IPX8 | |||||
| Connection, pressure side - G11⁄4 G11⁄4 G11⁄4 | |||||
| Minimum switch-on height / maximum switch-off height | mm | 470/180 | 25/3 | 25/3 | |
| Maximum switch-on height / minimum switch-off height | mm | 640/70 150/3 | 150/3 | ||
| Minimum water level for starting up | mm | 2 | 2 | 2 | |
| Flow rate | Max. | l/h | 7500 | 11500 | 14500 |
| Head height | Max. | m | 7 | 8 | 12.5 |
| Immersion depth | Max. | m | 7 | 7 | 7 |
| Switching ON/switching OFF | Float switch | ● | - | - | |
| Sensor | - | ● | ● | ||
| Particle size | Max. | mm | 5 | 5 | 5 |
| Power connection cable | Length | m | 10 | 10 | 10 |
| Dimensions | Length | mm | 193 | 193 | 193 |
| Width | mm | 179 | 179 | 179 | |
| Height | mm | 352 393 393 | |||
| Weight | kg 4.7 | 6.4 | 7.7 | ||
EN
Wear parts
The following components are wear parts and may only be replaced by the OASE Service.
- Impeller
Disposal
NOTE
Do not dispose of this unit with household waste.
▶ Dispose of the unit by using the return system provided for this purpose.
▶ Should you have questions, please contact your local disposal company. They will give you information on how to correctly dispose of the unit.
▶ Render the unit unusable by cutting the cables.

AVERTISSEMENT
natural_image
Line drawing of an electric shock absorber with a cable and plug, showing internal components (no text or symbols)POX0004
Mode manuel ProMax ClearDrain 7000
natural_image
Technical line drawing of a mechanical device with attached cable and connector (no text or symbols)POX0007
Mode manuel ProMax ClearDrain 11000, 14000
natural_image
Technical line drawing of a mechanical device with a close-up inset showing internal components (no text or symbols)POX0006
natural_image
Mechanical assembly diagram showing a valve mechanism with rotating components (no text or labels)POX0012
Installation de la pompe
natural_image
Mechanical assembly diagram showing a clamping mechanism with rope and lever (no text or labels)POX0003
Exploitation

AVERTISSEMENT
natural_image
Technical line drawing of a mechanical component with a magnified inset showing detail (no text or symbols)POX0122
text_image
Technical diagram of a mechanical device with numbered parts for identificationProMax ClearDrain 11000, 14000

text_image
Technical diagram of a mechanical device with numbered components and an inset view showing internal structure.POX0001
ProMax ClearDrain 7000 11000, 14000
natural_image
Diagram of an electric shock absorber with a plug inserted, showing internal components and wiring (no text or labels)POX0004
Handmatige werking ProMax ClearDrain 7000
natural_image
Line drawing of a mechanical device with attached cable and connector (no text or symbols)POX0007
Handmatige werking ProMax ClearDrain 11000, 14000
natural_image
Technical line drawing of a mechanical device with a close-up inset showing internal components (no text or symbols)NL
POX0006
natural_image
Mechanical assembly diagram showing a valve mechanism with rotating components (no text or labels)POX0012
Pomp opstellen
natural_image
Mechanical assembly diagram showing a clamp securing a component (no text or symbols visible)POX0003
Werking
WAARSCHUWING
natural_image
Technical line drawing of a mechanical component with a magnified inset showing internal detail (no text or symbols)POX0122
Opslag/overwinteren
text_image
Technical diagram of a mechanical device with numbered parts for identificationProMax ClearDrain 11000, 14000

text_image
Technical diagram of a mechanical device with numbered components and an inset detail viewPOX0001
ProMax ClearDrain 7000 11000, 14000
natural_image
Diagram of an electric shock absorber with a plug inserted, showing internal components and wiring (no text or labels)POX0004
Funcionamiento manual ProMax ClearDrain 7000
natural_image
Line drawing of a mechanical device with attached cable and directional arrow (no text or symbols)POX0007
Funcionamiento manual ProMax ClearDrain 11000, 14000
natural_image
Technical line drawing of a mechanical device with a close-up inset showing a component detail (no text or symbols)POX0006
natural_image
Mechanical assembly diagram showing a valve and ring mechanism with directional arrows (no text or labels)POX0012
natural_image
Mechanical assembly diagram showing a clamp or clamp device with no visible text or symbolsES
POX0003
Funcionamiento

ADVERTENCIA
natural_image
Technical line drawing of a mechanical component with a magnified inset showing internal detail (no text or symbols)POX0122
text_image
Technical diagram of a mechanical device with numbered parts for identificationProMax ClearDrain 11000, 14000

text_image
Technical diagram of a mechanical device with numbered components and an inset detail viewPOX0001
natural_image
Line drawing of an electric shock absorber with a cable and plug, showing internal components and wiring (no text or symbols)POX0004
Modo manual ProMax ClearDrain 7000
natural_image
Line drawing of a mechanical device with attached cable and connector (no text or symbols)POX0007
Modo manual ProMax ClearDrain 11000, 14000
natural_image
Technical line drawing of a mechanical device with a close-up inset showing a component detail (no text or symbols)natural_image
Mechanical assembly diagram showing a valve and pump mechanism with directional arrows (no text or labels)Posicionar a bomba
natural_image
Mechanical assembly diagram showing a clamp securing a component (no text or symbols visible)POX0003
Operação
! AVISO
natural_image
Technical line drawing of a mechanical component with a magnified inset showing internal detail (no text or symbols)POX0122
Armazenar/Invernar
text_image
Technical diagram of a mechanical device with numbered parts for identificationProMax ClearDrain 11000, 14000

text_image
Technical diagram of a mechanical device with numbered components and an inset detail viewPOX0001
ProMax ClearDrain 7000 11000, 14000
natural_image
Line drawing of an electric shock absorber with a plug inserted, showing internal components and wiring (no text or symbols)POX0004
natural_image
Technical line drawing of a mechanical device with a magnified inset showing a threaded component (no text or symbols present)natural_image
Line drawing of a mechanical device with attached cable and connector (no text or symbols)natural_image
Technical line drawing of a mechanical device with a close-up inset showing a component detail (no text or symbols)POX0006
natural_image
Mechanical assembly diagram showing a valve and pump mechanism with directional arrows (no text or labels)POX0012
Posa della pompa
natural_image
Mechanical assembly diagram showing a clamp or spring attached to a mechanical component (no text or symbols visible)Funzionamento
AVVERTENZA
natural_image
Technical line drawing of a mechanical component with a magnified inset showing internal detail (no text or symbols)POX0122
natural_image
Line drawing of an electric shock absorber with a cable and plug, showing internal components and wiring (no text or symbols)DA
POX0004
Manuel drift ProMax ClearDrain 7000
natural_image
Line drawing of a mechanical device with a plug and cable, showing a close-up inset of a threaded component (no text or symbols)POX0005
Automatisk drift ProMax ClearDrain 11000, 14000
natural_image
Technical line drawing of a mechanical device with attached cable and connector (no text or symbols)POX0007
Manuel drift ProMax ClearDrain 11000, 14000
natural_image
Technical line drawing of a mechanical device with a close-up inset showing internal components (no text or symbols)DA
POX0006
natural_image
Diagram of a mechanical assembly with rotating components and directional arrows (no text or symbols)POX0012
Opstilling af pumpe
natural_image
Mechanical assembly diagram showing a clamp or clamping device with no visible text or symbolsPOX0003
Drift

ADVARSEL
natural_image
Technical line drawing of a mechanical component with a magnified inset showing internal detail (no text or symbols)POX0122
Opbevaring/overvintring
text_image
Technical diagram of a mechanical device with numbered parts for identificationProMax ClearDrain 11000, 14000

text_image
Technical diagram of a mechanical device with numbered components and an inset detail viewPOX0001
ProMax ClearDrain 7000 11000, 14000
natural_image
Line drawing of an electric shock absorber with a magnified inset showing internal components (no text or symbols)POX0004
Manuell drift ProMax ClearDrain 7000
natural_image
Line drawing of a mechanical device with a magnified inset showing a threaded component (no text or symbols)Automatisk drift ProMax ClearDrain 11000, 14000
natural_image
Line drawing of a mechanical device with attached cable and connector (no text or symbols)Manuell drift ProMax ClearDrain 11000, 14000
natural_image
Technical line drawing of a mechanical device with a close-up inset showing a component detail (no text or symbols)POX0006
natural_image
Mechanical assembly diagram showing a clamping mechanism with rotating components (no text or labels)POX0012
Plasser pumpen
natural_image
Mechanical assembly diagram showing a clamp securing a component (no text or symbols visible)POX0003
NO
Drift

ADVARSEL
natural_image
Technical line drawing of a mechanical component with an inset close-up showing internal components (no text or symbols)POX0122
Lagring/overvintring
Apparatet er ikke frostsikkert og må demonteres og lagres innendørs hvis man forventer frost. Slik lagrer du apparatet riktig:
text_image
Technical diagram of a mechanical device with numbered parts for identificationProMax ClearDrain 11000, 14000

text_image
Technical diagram of a mechanical device with numbered components and an inset detail viewPOX0001
ProMax ClearDrain 7000 11000, 14000
natural_image
Line drawing of an electric shock absorber with a magnified inset showing internal components (no text or symbols)Manuell drift ProMax ClearDrain 7000
natural_image
Line drawing of a mechanical device with a plug and cable, showing a close-up inset of a threaded component (no text or symbols)POX0005
Automatisk drift ProMax ClearDrain 11000, 14000
natural_image
Technical line drawing of a mechanical device with attached cable and connector (no text or symbols)POX0007
Manuell drift ProMax ClearDrain 11000, 14000
natural_image
Technical line drawing of a mechanical device with a close-up inset showing internal components (no text or symbols)POX0006
natural_image
Mechanical assembly diagram showing a valve and pump mechanism with directional arrows (no text or labels)POX0012
Placera pumpen
natural_image
Mechanical assembly diagram showing a clamp securing a component (no text or symbols visible)POX0003
Användning
WARNING
natural_image
Technical line drawing of a mechanical component with a magnified inset showing internal detail (no text or symbols)text_image
Technical diagram of a mechanical device with numbered parts for identificationProMax ClearDrain 11000, 14000

text_image
Technical diagram of a mechanical device with numbered components and an inset detail viewPOX0001
natural_image
Line drawing of an electric shock absorber with a cable and plug, showing internal components and wiring (no text or symbols)POX0004
natural_image
Technical line drawing of a mechanical device with attached cable and connector (no text or symbols)natural_image
Technical line drawing of a mechanical device with a close-up inset showing a component detail (no text or symbols)POX0006
natural_image
Mechanical assembly diagram showing a valve and pump mechanism with directional arrows (no text or labels)POX0012
natural_image
Mechanical assembly diagram showing a clamp securing a component (no text or symbols visible)POX0003
Käyttö
VAROITUS
natural_image
Technical line drawing of a mechanical component with a magnified inset showing detail (no text or symbols)POX0122
text_image
Technical diagram of a mechanical device with numbered parts for identificationProMax ClearDrain 11000, 14000

text_image
Technical diagram of a mechanical device with numbered components and an inset detail viewPOX0001
text_image
25 mm (1")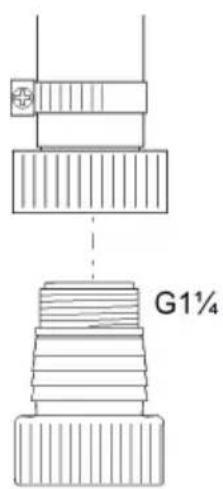
text_image
G1¼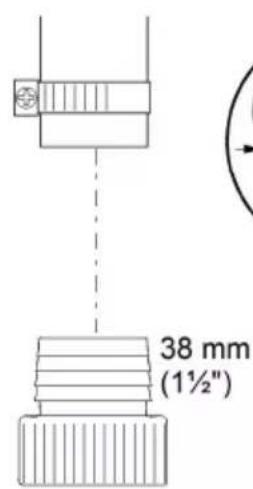
text_image
38 mm (1½")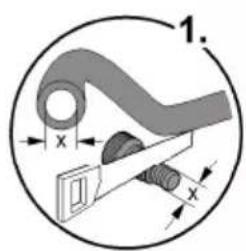
text_image
1. x x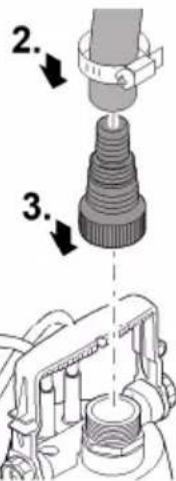
text_image
Technical diagram showing a mechanical assembly with numbered steps and component detailsPOX0002
Automata üzemmód ProMax ClearDrain 7000
C ¥ E ¥ A ¥; û· C □□□□¥ A ßæÓ A æμßÓì¡¥ A 'â'æ'μ-¥ E ¥ A μ C òæCÔÂßæÓÂÔìhu';æ D æCμû æÖ ¥Ì∅û· CæC μìì¦Å C òæCÔÂßæÓÂÔ A μÂßæÓÂæμßÓì¡¥ A 'â'æ'μ-æôÂÄÄ¥;hʊ ^ a csol.
natural_image
Line drawing of an electric shock absorber with a magnified inset showing internal components (no text or symbols)HU
POX0004
natural_image
Technical line drawing of a mechanical device with attached cable and connector (no text or symbols)POX0007
natural_image
Technical line drawing of a mechanical device with a close-up inset showing a component detail (no text or symbols)POX0006
natural_image
Mechanical assembly diagram showing a valve mechanism with rotating components (no text or labels)POX0012
natural_image
Mechanical assembly diagram showing a clamp securing a component (no text or symbols visible)POX0003
Üzem
! FIGYELMEZTETÉS
â à õi a é Ó Â Ó C i ³ à à ó æ û à æ o Â Ã Ó æ æ â o  ’æ ¥   ¥ ^3 ¥i æ ’¥ à à à ® ¥Îl k
natural_image
Technical line drawing of a mechanical component with a magnified inset showing internal detail (no text or symbols)HU
POX0122
Tárolás/Telelés
A æ I¥ ® ^- Ä Å ‘æ ^3 I ® ^- Ä ¥ æ¥i‘I Å æ ¥ ‘æ ^- ®¥ Å . Igy tárolja helyesen a készüléket:
text_image
Technical diagram of a mechanical device with numbered parts for identificationProMax ClearDrain 11000, 14000

text_image
Technical diagram of a mechanical device with numbered components and an inset detail viewPOX0001
ProMax ClearDrain 7000 11000, 14000
| 1 Uchwyt, regulowany | • | • |
| 2 Nμ¥âçμ¥Í¡ÃæiÎæÓüáÓñæiüμÎμßÓCμÓËñüÓ¡Ãâ¥æCîΣ kowej. | • | • |
| 3 Podstawka pompy | ||
| 4 Uμ¥μÓüÃßâÇ¥üÔ¡ßÓ¡ÊßC¥İμÓüà | • | • |
| 5 UiÓßİμÓüÎÎÂÓÍÎÔüÂüüć | • | • |
| 6 NâÇÃÊßÇ¥œiâÓÎáiÊÓÇÌYÀ"uF | • | • |
| 7 NâÇ¥ÊßCÎμÂßBÊÄüÂÓüà | • | - |
| 8 ČñÂIμ¡ÓüÄÄäÄüÎμßÓCμÓËñüÓ¡ÃμüÊßCÎμßßÓËßà | - | • |
| 9 Gniazda wtykowe czujnika, ustawienie poziomu wody do üÊßCÎμßßÓËßà | - | • |
| 10 UiÃÂμÈ¥¡ÃÓü¥üÄåÄüÂàÈμÎμËßAÏÄßÓCμÓËüÓ¡Ã | - | • |
natural_image
Diagram of an electric shock absorber with a cable and plug, showing internal components and wiring (no text or labels)POX0004
[âäâ¤Î¤NâÓ;¤â¤Â¥¤â¤âµì¿ŽUUU]
ΝόΕβ□□À¥æi□□μ□⁻Å¥□Ĉ□Ê□□ĈÓÌ□hu□À¥çÂμ□ßâĈ¥Ê□□ĈÌμÂ□ßÊÄü□ÂÓüÄ□ñæì□üμÓÌÄ□À¥æì□ü□ßÓÇ ¥Â□æÂμ¥âÓü□ÌÄ□À¥æì□ü¡;ÕÊΥ□
WSKAZÓWKA
kìàǎμ¥œi¥áÓùìμìàCì¥-ÓèÓc¥¡ÓÀçì¡Óæñ³Óμ¥-nßOÉBÄY«kßâCăß¡Âñæñ³Óμ¥ ßÓÉBßñÄY-¿CüμÂæCÓI¥Ëñ«CñcÄμñ¥
▶ kÃʼÇüßÓËßßßßÓóœμ¼Ïµ¼µñëµIµËåI¥´ÓßßÓÇμÓËñüÜÓ¡ÄY
- ˜æiǚμññ³üÄiüßÓÇÄÀμßÓÇμÓË¥Àhuä¥Âüµæ̤¤¥ÇßÓç⥡IµÓüÜëµ¥ÀænßâCʤCε¤ßÊÄüÂÓü¥-Ó¡Óñ³üÄiñ¤ÂÓü¥-Ólu줤ÃßâǥʤCε¤ßÊÄüÂÓüÄ£w kierunku pionowym.
text_image
ProMax ClearDrain 7000PL
POX0005
natural_image
Technical line drawing of a mechanical device with attached cable and connector (no text or symbols)POX0007
[âäâ¤ÎäNâÓ;¤â¤Â¥¤â¤µÌ¤u¶UÇUÇlu¤u¥ÜUÇ]
NÓËßüÊ¿Cæμħū¡Ä¿CñÀlμ¿Cóæi̇lμ¥üÊóćOÏÄ¡;Ó̇lìÀüÄcæC¥-Ó̇lùC¡;IàÜAμæiùμ UïÄÂμÈ¥iÄÓü¥î̇j;ÓÄ¥ÄμæiùÄ¿CñÀlμÂÔü̂â¥À¥æiânÄàÈμlμÉÄlìÄßÓÇμÓÉüÓ¡Äøβšn NÓÓæμ̄īμǖμñ·ÉμlμÉÄÌ¥-ÓßÓÇμÓÉñüÓ¡Älìæi̇ßnÀ¥üÄÊ¿C¥lμ¥ßÓÉßÄČÂôìÂμË
• NÓüiÔâCá¡Ó¡ßÓæißÓü¡Iμ¶NÓÍÓüIμ¥üÊÓcá□CñÀIμ¡¡Ó¡IàÜÄcæC¥-Ó□-Iμ□Cj□□I czujników.
ProMax ClearDrain 11000, 14000
![OASE ProMax ClearDrain 11000 - [âäâ¤ÎäNâÓ;¤â¤Â¥¤â¤µÌ¤u¶UÇUÇlu¤u¥ÜUÇ] - 1](/content/2026/03/521804/images/4fc4382213da91125a55a4b76e52036b57000ec138c0a3cdca894bbc89cc816d.jpg)
natural_image
Technical line drawing of a mechanical device with a close-up inset showing a component detail (no text or symbols)POX0006
natural_image
Mechanical assembly diagram showing a valve and pump mechanism with directional arrows (no text or labels)POX0012
Ustawienie pompy
• NÓËßüñæiüμüßóCμÓëÓμäeïμÅIμ¥üüÓjCμ¥V
• k ^1 ¥Åñ ^2 ÓßñæC ^3 Ç¥Iμ ^4 ßÓËßÄ ^5 ¡Óæiñ ^6 ¡Cμ¥IÂμßâCÃËÓ ^7 Óü ^8 ¡ÄμI ^9 ¡Óñ ^10 ³üÄiñ¥¡<μ¥ßâC ^11 ìÀ ^12 Ç ^13  ^14 ¥Äæμ¥μÓüÄ¥ ^15
• NÓËß¡ñæiùμùììÂhuìc¥Àùμ¥;Ó³Ó¡CμÊÓ¡Ó°CææIμ°CÎμ¥°CÃæCÎ¥ÍÓùμ¥ÂÁÓç¡.
ÀÓÂÓüìμúòÓùúÓâñææIμ¥kà°Cμ¥°BÓiâC¥Äñæiùμ°BÓËß¡I°BÓ¡üA'æC¥Iμñ¥
- NáÓ;āānǎ Á¥īaānā μìZUUYlNáC¥E̅n̅CìμA̅B̅E̅AùA̅OùA̅EñæμÈμ¥īn̅C̃s¥üIμÓÌèÉócÂμüÓç nego ruchu.

natural_image
Mechanical assembly diagram showing a clamp securing a cable (no text or symbols)POX0003
Eksploatacja
! BU[Qw|z]<(□□
;ÓcÂμüÓç□□Ó¡Îμ¥æμ¥Îμ□□μι̇cÂμ ^3 Ó□â̇c¥ÍμμçÈμ¥âμμ̇üüÄIμÂñßÓâ̇c¥Îμ□□ßâ̇;¥Ë¥Â¥ÂiâÃ□
<μ⁻¡Ä¡Iμ¥üE̅¿C̄¿ñâC̄¡;C¥IμluÂμ¥¡ÄüüÜÓ¡Cμ¥ßâC¥ÄüÄ¡Äñ¡Cμ¥k
PL
▶ NâÇ¥¡üÊÓç¥ìμ¥Ëä¡;ÓüÓ¡Ä¡IÀ¥çáӡÊ...Çáӡæμ¥μüæÇÃæiÂμ¥ñâC¡;Ç¥ìμ¶¥Å¥¡nÀ¥æμüüÜÓ¡Çμ¥Y
WSKAZÓWKA
NÓËß☐☐Iμ¥☐À¥æi☐ßâCăæiÓæÓü☐☐☐¡Ó☐iâÃ☐ñ☐ßâ☐Ã☐¡Ên-Óiâü☐Ê¥ÀV☐k☐iâÃ☐μ¥☐ßâ☐Ã☐¡Ên-Óiâü☐ìâü☐ÊÓç☐☐ßÓËBÄ☐ÇÓæi☐Iμ¥☐ÇI☐☐ÇIμ¥☐æÂaÔ☐ÓIÀV☐
kÊ□□C□Iμ¥□ñâC□;C¥Iμ□□
natural_image
Technical line drawing of a mechanical component with a magnified inset showing internal detail (no text or symbols)POX0122
text_image
Technical diagram of a mechanical device with numbered parts for identificationProMax ClearDrain 11000, 14000

text_image
Technical diagram of a mechanical device with numbered components and an inset detail viewPOX0001
| ProMax ClearDrain 7000 11000, 14000 | |||
| 1 | QñÂÓÀ¥îæëÓČIÓæi·ÎÎæiÎÎYη☐ | • | • |
| 2 | ÎμæÎÎÎηÎÂÓñĆ¥ÂßâÓÎæiÎÎÎÎÎÎÎÎÎÎÎÎÎÎÎÎÎÎÎÎÎÎÎÎÎÎÎÎÎÎÎÎÎÎÎÎÎÎÎÎÎÎÎÎÎÎÎÎÎÎÎÎÎÎÎÎÎÎÎÎÎÎÎÎÎÎÎÎÎÎÎÎÎÎÎÎÎÎÎÎÎÎÎÎÎÎÎÎÎÎÎÎÎÎÎÎÎÎÎÎ ÎÂÓÎÎÎÎÎÎÎÎÎÎÎÎÎÎÎÎÎÎÎÎÎÎÎÎÎÎÎÎÎÎÎÎÎÎÎÎÎÎÎÎÎÎÎÎÎÎÎÎÎÎÎÎÎÎÎÎÎÎÎÎÎÎÎÎÎÎÎÎÎÎÎÎÎÎÎÎÎÎÎÎÎÎÎÎÎÎÎÎÎÎÎÎÎÎÎÎÎÎÎîÎÎÎÎÎÎÎÎÎÎÎÎÎÎÎÎÎÎÎÎÎÎÎÎÎÎÎÎÎÎÎÎÎÎÎÎÎÎÎÎÎÎÎÎÎÎÎÎÎÎÎÎÎÎÎÎÎÎÎÎÎÎÎÎÎÎÎÎÎÎÎÎÎÎÎÎÎÎÎÎÎÎÎÎÎÎÎÎÎÎÎÎÎÎÎÎÎÎÎ îÂÓÎÎÎÎÎÎÎÎÎÎÎÎÎÎÎÎÎÎÎÎÎÎÎÎÎÎÎÎÎÎÎÎÎÎÎÎÎÎÎÎÎÎÎÎÎÎÎÎÎÎÎÎÎÎÎÎÎÎÎÎÎÎÎÎÎÎÎÎÎÎÎÎÎÎÎÎÎÎÎÎÎÎÎÎÎÎÎÎÎÎÎÎÎÎÎÎÎîÎîÎÎÎÎÎÎÎÎÎÎÎÎÎÎÎÎÎÎÎÎÎÎÎÎÎÎÎÎÎÎÎÎÎÎÎÎÎÎÎÎÎÎÎÎÎÎÎÎÎÎÎÎÎÎÎÎÎÎÎÎÎÎÎÎÎÎÎÎÎÎÎÎÎÎÎÎÎÎÎÎÎÎÎÎÎÎÎÎÎÎÎÎÎÎÎÎÎîÎ ÎÂÓÎÎÎÎÎÎÎÎÎÎÎÎÎÎÎÎÎÎÎÎÎÎÎÎÎÎÎÎÎÎÎÎÎÎÎÎÎÎÎÎÎÎÎÎÎÎÎÎÎÎÎÎÎÎÎÎÎÎÎÎÎÎÎÎÎÎÎÎÎÎÎÎÎÎÎÎÎÎÎÎÎÎÎÎÎÎÎÎÎÎÎÎÎÎÎîÎÎÎîÎÎÎÎÎÎÎÎÎÎÎÎÎÎÎÎÎÎÎÎÎÎÎÎÎÎÎÎÎÎÎÎÎÎÎÎÎÎÎÎÎÎÎÎÎÎÎÎÎÎÎÎÎÎÎÎÎÎÎÎÎÎÎÎÎÎÎÎÎÎÎÎÎÎÎÎÎÎÎÎÎÎÎÎÎÎÎÎÎÎÎÎÎÎÎîÎÎÎ ÎÂÓÎÎÎÎÎÎÎÎÎÎÎÎÎÎÎÎÎÎÎÎÎÎÎÎÎÎÎÎÎÎÎÎÎÎÎÎÎÎÎÎÎÎÎÎÎÎÎÎÎÎÎÎÎÎÎÎÎÎÎÎÎÎÎÎÎÎÎÎÎÎÎÎÎÎÎÎÎÎÎÎÎÎÎÎÎÎÎÎÎÎÎÎÎîÎÎÎÎÎîÎÎÎÎÎÎÎÎÎÎÎÎÎÎÎÎÎÎÎÎÎÎÎÎÎÎÎÎÎÎÎÎÎÎÎÎÎÎÎÎÎÎÎÎÎÎÎÎÎÎÎÎÎÎÎÎÎÎÎÎÎÎÎÎÎÎÎÎÎÎÎÎÎÎÎÎÎÎÎÎÎÎÎÎÎÎÎÎÎÎÎÎÎîÎÎÎÎÎ ÎÂÓÎÎÎÎÎÎÎÎÎÎÎÎÎÎÎÎÎÎÎÎÎÎÎÎÎÎÎÎÎÎÎÎÎÎÎÎÎÎÎÎÎÎÎÎÎÎÎÎÎÎÎÎÎÎÎÎÎÎÎÎÎÎÎÎÎÎÎÎÎÎÎÎÎÎÎÎÎÎÎÎÎÎÎÎÎÎÎÎÎÎÎîÎÎÎÎÎÎÎîÎÎÎÎÎÎÎÎÎÎÎÎÎÎÎÎÎÎÎÎÎÎÎÎÎÎÎÎÎÎÎÎÎÎÎÎÎÎÎÎÎÎÎÎÎÎÎÎÎÎÎÎÎÎÎÎÎÎÎÎÎÎÎÎÎÎÎÎÎÎÎÎÎÎÎÎÎÎÎÎÎÎÎÎÎÎÎÎÎÎÎîÎÎÎÎÎÎÎ ÎÂÓÎÎÎÎÎÎÎÎÎÎÎÎÎÎÎÎÎÎÎÎÎÎÎÎÎÎÎÎÎÎÎÎÎÎÎÎÎÎÎÎÎÎÎÎÎÎÎÎÎÎÎÎÎÎÎÎÎÎÎÎÎÎÎÎÎÎÎÎÎÎÎÎÎÎÎÎÎÎÎÎÎÎÎÎÎÎÎÎÎîÎÎÎÎÎÎÎÎÎîÎÎÎÎÎÎÎÎÎÎÎÎÎÎÎÎÎÎÎÎÎÎÎÎÎÎÎÎÎÎÎÎÎÎÎÎÎÎÎÎÎÎÎÎÎÎÎÎÎÎÎÎÎÎÎÎÎÎÎÎÎÎÎÎÎÎÎÎÎÎÎÎÎÎÎÎÎÎÎÎÎÎÎÎÎÎÎÎÎîÎÎÎÎÎÎÎÎÎ ÎÂÓÔ'Ê'É'Ê'Ê'Ê'Ê'Ê'Ê'Ê'Ê'Ê'Ê'Ê'Ê'Ê'Ê'Ê'Ê'Ê'Ê'Ê'Ê'Ê'Ê'Ê'Ê'Ê'Ê'Ê'Ê'Ê'Ê'Ê'Ê'Ê'Ê'Ê'Ê'Ê'Ê'Ê'Ê'Ê'Ê'Ê'Ê'Ê'Ê'Ê'Ê'Ê'Ê'Â'Ê'Ê'Ê'Ê'Ê'Ê'Ê'Ê'Ê'Ê'Ê'Ê'Ê'Ê'Ê'Ê'Ê'Ê'Ê'Ê'Ê'Ê'Ê'Ê'Ê'Ê'Ê'Ê'Ê'Ê'Ê'Ê'Ê'Ê'Ê'Ê'Ê'Ê'Ê'Ê'Ê'Ê'Ê'Ê'Ê'Ê'Ê'Ê'Ê'Ã'Ã'Ã'Ã'Ã'Ã'Ã'Ã'Ã'Ã'Ã'Ã'Ã'Ã'Ã'Ã'Ã'Ã'Ã'Ã'Ã'Ã'Ã'Ã'Ã'Ã'Ã'Ã'Ã'Ã'Ã'Ã'Ã'Ã'Ã'Ã'Ã'Ã'Ã'Ã'Ã'Ã'Ã'Ã'Ã'Ã'Ã'Ã'Ã'Ã'Â'Ã'Ã'Ã'Ã'Ã'Ã'Ã'Ã'Ã'Ã'Ã'Ã'Ã'Ã'Ã'Ã'Ã'Ã'Ã'Ã'Ã'Ã'Ã'Ã'Ã'Ã'Ã'Ã'Ã'Ã'Ã'Ã'Ã'Ã'Ã'Ã'Ã'Ã'Ã'Ã'Ã'Ã'Ã'Ã'Ã'Ã'Ã'Ã'Ã'ã'Ã'Ã'Ã'Ã'Ã'Ã'Ã'Ã'Ã'Ã'Ã'Ã'Ã'Ã'Ã'Ã'Ã'Ã'Ã'Ã'Ã'Ã'Ã'Ã'Ã'Ã'Ã'Ã'Ã'Ã'Ã'Ã'Ã'Ã'Ã'Ã'Ã'Ã'Ã'Ã'Ã'Ã'Ã'Ã'Ã'Ã'Ã'Ã'Ã'A'Ã'Ã'Ã'Ã'Ã'Ã'Ã'Ã'Ã'Ã'Ã'Ã'Ã'Ã'Ã'Ã'Ã'Ã'Ã'Ã'Ã'Ã'Ã'Ã'Ã'Ã'Ã'Ã'Ã'Ã'Ã'Ã'Ã'Ã'Ã'Ã'Ã'Ã'Ã'Ã'Ã'Ã'Ã'Ã'Ã'Ã'Ã'Ã'Ã'Á'Ã'Ã'Ã'Ã'Ã'Ã'Ã'Ã'Ã'Ã'Ã'Ã'Ã'Ã'Ã'Ã'Ã'Ã'Ã'Ã'Ã'Ã'Ã'Ã'Ã'Ã'Ã'Ã'Ã'Ã'Ã'Ã'Ã'Ã'Ã'Ã'Ã'Ã'Ã'Ã'Ã'Ã'Ã'Ã'Ã'Ã'Ã'Ã'Ã'Α'Ã'Ã'Ã'Ã'Ã'Ã'Ã'Ã'Ã'Ã'Ã'Ã'Ã'Ã'Ã'Ã'Ã'Ã'Ã'Ã'Ã'Ã'Ã'Ã'Ã'Ã'Ã'Ã'Ã'Ã'Ã'Ã'Ã'Ã'Ã'Ã'Ã'Ã'Ã'Ã'Ã'Ã'Ã'Ã'Ã'Ã'Ã'Ã'Ã' Ã'Ã'Ã'Ã'Ã'Ã'Ã'Ã'Ã'Ã'Ã'Ã'Ã'Ã'Ã'Ã'Ã'Ã'Ã'Ã'Ã'Ã'Ã'Ã'Ã'Ã'Ã'Ã'Ã'Ã'Ã'Ã'Ã'Ã'Ã'Ã'Ã'Ã'Ã'Ã'Ã'Ã'Ã'Ã'Ã'Ã'Ã'Ã'Ã'Ã'aira'Ã'Ã'Ã'Ã'Ã'Ã'Ã'Ã'Ã'Ã'Ã'Ã'Ã'Ã'Ã'Ã'Ã'Ã'Ã'Ã'Ã'Ã'Ã'Ã'Ã'Ã'Ã'Ã'Ã'Ã'Ã'Ã'Ã'Ã'Ã'Ã'Ã'Ã'Ã'Ã'Ã'Ã'Ã'Ã'Ã'Ã'Ã'Ã'Ã'Pal'Pal'Pal'Pal'Pal'Pal'Pal'Pal'Pal'Pal'Pal'Pal'Pal'Pal'Pal'Pal'Pal'Pal'Pal'Pal'Pal'Pal'Pal'Pal'Pal'Pal'Pal'Pal'Pal'Pal'Pal'Pal'Pal'Pal'Pal'Pal'Pal'Pal'Pal'Pal'Pal'Pal'Pal'Pal'Pal'Pal'Pal'Pal'Pal'Pal'Pall'Pal'Pal'Pal'Pal'Pal'Pal'Pal'Pal'Pal'Pal'Pal'Pal'Pal'Pal'Pal'Pal'Pal'Pal'Pal'Pal'Pal'Pal'Pal'Pal'Pal'Pal'Pal'Pal'Pal'Pal'Pal'Pal'Pal'Pal'Pal'Pal'Pal'Pal'Pal'Pal'Pal'Pal'Pal'Pal'Pal'Pal'Pal'Pal'Pal' Pal'Pal'Pal'Pal'Pal'Pal'Pal'Pal'Pal'Pal'Pal'Pal'Pal'Pal'Pal'Pal'Pal'Pal'Pal'Pal'Pal'Pal'Pal'Pal'Pal'Pal'Pal'Pal'Pal'Pal'Pal'Pal'Pal'Pal'Pal'Pal'Pal'Pal'Pal'Pal'Pal'Pal'Pal'Pal'Pal'Pal'Pal'Pal'Pal'Pal'Pa'lPal'Pal'Pal'Pal'Pal'Pal'Pal'Pal'Pal'Pal'Pal'Pal'Pal'Pal'Pal'Pal'Pal'Pal'Pal'Pal'Pal'Pal'Pal'Pal'Pal'Pal'Pal'Pal'Pal'Pal'Pal'Pal'Pal'Pal'Pal'Pal'Pal'Pal'Pal'Pal'Pal'Pal'Pal'Pal'Pal'Pal'Pal'Pal'Pal'Pal''Pal''Pal''Pal''Pal''Pal''Pal''Pal''Pal''Pal''Pal''Pal''Pal''Pal''Pal''Pal''Pal''Pal''Pal''Pal''Pal''Pal''Pal''Pal''Pal''Pal''Pal''Pal''Pal''Pal''Pal''Pal''Pal''Pal''Pal''Pal''Pal''Pal''Pal''Pal''Pal''Pal''Pal''Pal''Pal''Pal''Pal''Pal''Pal''Pal''Pal''' |
NÓñČμì·『û』æÓñÅ』;ñ¶æ¶ñⶥIă˶ò¶¥Å¥Ë¶
jǎâÓ¥ÂlußÓßæÎăüüóÉiÓïüó¡ñhußOñC·ü¥Ài¥ßOñC¥IæÅ¥¡ñA··ÈßBùæÓ¥ËU
• 『¥âßì·』μæì¡úÓ;Ăì『¥Ó』;¥èíÓù¡úÓ;ĂY
• ¥âß¡·èßμìû¡ûӡá¡¡æiµ¡Óû¥ÂμÂÓæiµÈÿ¥ÿÉËY
• ZavlaČování a zalévání.
• N䥥âßûηӡ¥âßûηΡ¡âC·Î¥Ó□□□C¡IùY
• B¡§âûӡáC¥æiñ¡IÄY
— Pouze k zavlaČování a zalévání!
• B¡§âûӡáCΡ;âC·ÎΡ;¥êîÓûÓñûÓ¡ñÎ¥Ó¡CÎμæi¥â¥I¥
• Näμ¡¡Ó¡âǥ̷쥳Ìμ¡Âã³ò¡Àù¥īōj→Techničké údaje)
NâÓßä·æiâÓÀßÄï·ÏœÅ¥¡ñÀ·Ï·ÓË¥ÇYì·U
natural_image
Line drawing of an electric shock absorber with a magnified inset showing internal components (no text or symbols)POX0004
CS
Qñ¡·βâÓûÓC¡NáÓ;ā¶A¥¶a¶μìZUUU
¥âß¡; ÁÓÀ¥Ï¥næïÅ¥°CßÎñì¡lu¡ÃČÀ¥°BÁÓû°ÂÓûăæ߷ΰ°û¥°æûμæ¡ßÓÁÓÇ¥°°°Â°¥Â¡iÓÂù¥'
\`NBwBQ<[]<<\*[]
jānī·EīBaOuOChīEùC¥□§C¥i□¥aβ□;AóIaen3ÓY□jBä·B□;§BáOuOChīIaen3ÓBó;A13□□¥aβ□;CūaèYl, EñObOia¥yì·Y
natural_image
Line drawing of a mechanical device with a plug and cable, showing a close-up inset of a threaded component (no text or symbols)POX0005
Automatický provozProMax ClearDrain 11000, 14000
¥âß¡;ÂÓæ¥;Cßì¥hù;CàeiÓñßÀ··ûÓ¡;Óæ³ì¥æ¥ìCóâñY
3ÓúÓú¡¿ÁÓìì¿ÂiÄhu¿Âi¥â¡ÀæÓññúæ¥ìCóáÓú¡¿Âμèi§¡¿ÓÅ¥hu¿CÎÈ¥ìùA·ÈμìμÈÅ췳šμ ûÄßìñì·PY¿3¡ÄÇÀ¥¡¿Óæ¿C¥ÍÓÈμìμÈÅ췳šμìÄñúÓ¡Ähu¿¥âß¡¿ÁÓæ¥ùÄßI¥Y
• wæiâ¡¥æ¥ÎCÓâ¡Iæ¥ÎCÓâÓû¡Âμ觡ÓßÓĆ¡Óû¡¡æ߷Τ•ßÓÁÓ³ÄV
ProMax ClearDrain 11000, 14000
natural_image
Technical line drawing of a mechanical device with attached cable and connector (no text or symbols)POX0007
Qñ¡·¡sāóúóC̄NáÓ;āāA¥ããμìuUUUhúYUUU
¥âß¡; ÁÓæ¥ÇÍßì¥hu¡; ĀČÀ¥œl·Ë……Iæ¥ìCÓáÓù¡; Áμèi§ûì¥ÀuÃèe·☐ßÓÁÓÇ¥Y 3ÓúÓù¡; ÁÓìì; AiÃhuÂì¥â¡; ÀæÓñûæ¥ìCÓáÓù¡; Âμèi§¡; ÓÀ¥hu; CΕȥìûÀ·☐ËμìμË:ÄI·³Ä¡; μ ûÃßînì·PYÑÓ¡; Óæ:Ç¥I·☐ËμìμË:ÄI·³Ä¡; μìÃûÓ¡; AÓßÓ:Aâàì¡; βâÓ¡A¥û§ûÃßì¥
• NÓæiñßÓßÂñÀi¥U¥ÎCÓ⡶æ¥ÎCÓâÓû|Âμèi§ñë·æi§i¥ÎCÎÓûñ¡;ÓÎ¥ÀuÄèe·ßÓÁÓ³ÄY
ProMax ClearDrain 11000, 14000
natural_image
Technical line drawing of a mechanical device with a close-up inset showing a component detail (no text or symbols)POX0006
natural_image
Mechanical assembly diagram showing a valve and pump mechanism with rotational arrows (no text or labels)CS
POX0012
(ÌæìÀÀÀÀÀÀÀÀÀÀÀÀÀÀÀÀÀÀÀÀÀÀÀÀÀÀÀÀÀÀÀÀÀÀÀÀÀÀÀÀÀÀÀÀÀÀÀÀÀÀÀÀÀÀÀÀÀÀÀÀÀÀÀÀÀÀÀÀÀÀÀÀÀÀÀÀÀÀÀÀÀÀÀÀÀÀÀÀÀÀÀÀÀÀÀÀÀÀÀÀààààààààààààààààààààààààààààààààààààààààààààààààààààààààààààààààààààààààààààààààààààààààààààààù
• 『¥â§』; ÁÓßÓæìü쥡;ÓûÓ¡; ÄûÓ¡; ÓáÓûì§□□□æìμÂì§V
• Näμæßnèi§ì·¡Óæiñ¡lÄl¥óè³iÄñ§yúl§ì¥ÂâñÂÓÀ¥iμÂlÓY<¥lÓæi¥Cæ·iÓuăÂ
• ִ¥âß¡; ÁÓßÓæi‘û쥒; Álu‘‘Ã’ÈÓ³ÁÓ¡; ÓÀ·î‘Îæi‘·Ì¥’μæiÓìnjý mm a aby nebyl blokován r‘û‘••ÓiùÓâYj‘ßä·ß¡; §ßÓïa¥’ÄßÓæi‘û쥒¥âß¡; ÁӑΑûAûăe¥’¿È·æiÓY
• NáÓ;āāA¥aâμìZUUUINAÓûÂÓuãæß·Ìàæ¥Èñæ·ûC;ÄËÓùúÓÀI§ßÓ³ÄÓûìY
natural_image
Mechanical assembly diagram showing a clamp and bracket assembly (no text or symbols)POX0003
Provoz
! VAROVÁNÍ
;ùC¥¡ÓÀ·ì¡úCì|ÈñCâI§ì·ì¥ÓñæEâ¶Y췥¥ÂiâμÂăEßâÓñ;¥ËV
▶ ¥âß¡;ÂÓ¡ßâÓûÓCñÀi¥À¥Ì¡ßÓÂñ¡;楻û¥»ûÓ¡§ì¥Ç¡âCñÀ·☐Ç¡;Ì¡ÓæÓÄY
▶ አä·û¥¡Ì¥Ć¡æ³Ì¥ì¥¡Ó¡ûÓ¡ĂhuÓ¡βÓÀ쥡û襳ÌĶ¥Â¥Âiâμ¡Â¡ßä·æiâÓÀ¥Ó¡¥Â¥Âiâμ¡Â¡æ·i
\`NBwBQ<[]<\*[]
¥âß¡ÅÓÌYì·ñⶥIÓßâÓ¡ÅÓñ³Ó¡ÓăßâÓûOÇVÑäμ¡ÅÓñ³Ó¡Ó¡ÈßâÓûOÇñ¡Ó³C·ÂÍÓ¡ßí•ËñÎÂâ¶Yì·ČµûÓiÎÓæù¶¥âß¡ÅÏY'
wßIñì·ßä·æiâÓÀ¥
• w¶æñl쥶C¶æiâ¶Âñ¶;Ó¶C¶æñûÂÄY¶
-『¥âß』;ÂÓ『À¥‖ßäμßâ‖û¥ÌÓ『Â‖ßâÓûÓCñ¥‖
- 『¥âß』; ÁӶ楶aÓC§³ÌYlu‖À‖ÂËμA¥‖; Ó涳ÌY¶æì‖û‖úÓ; Ā‖uăeÂÄ‖ßaÓ‖C‖ßìñì·V
jÄßÌñì·☐ßä·æìâÓÀ¥
• jÃi³I§i¥¦C□æiâ¡Âñ¿C¥¦C□æñûÂÄY
- NÓÎûÃßÎñì·À¥ËÓĆÌ¡Î¥³Îîûá¿ÎîÂÓûÓñûÓ¡ñγ¡¿μ¥ÎÎÎÂÎæÎûΕ³ÓÓîûÓâñÎâ¥âß
① jÃߤ³Ì§ì¥¤¥âß¡;ÂÓ¤ßÓ¤ßÓñǵi•¤µæìÓñ¤ûÓ¡Óñ¥¤
\`NBwBQ<[]<\*[]
<¥ßÓñC·û¥À쥡C¡¡I¡¡\~â¥æμûì·µæiμ·ßâÓæi䥡Âḁ́Ó☐³¥Ëμ¡âÓÇÍÓÂÃΥ[ÄiÓßâÓæiä¥ßÓèÂÓ¡μìÂâÃiÂhʊÎîâñèμì®ñΡμßä·æiâÓÀ¥¶èÂÓ¡·Çû·äùÈhuâÓæiÂμìÈμÇúûÓiì·ËñÎ
▶ Ṙμæi§ì¥ßä·æiâÓÀßÓÂñ¡À¥¤iÓËÓÇì¡ßÓñC¥¤μæiÓñ¤ûÓ¡Óñ¤Ï˧ÂÃăȕ¤âï¤Â¥Ë¡I¥¤Ó´Âß·ûÀ·▪▪ÎY¤μæiÓïäμæi§ì¥¡ÓßÓâñ¥İa˵¤µæiµ•ËµßâÓœi䥡ÂÄY
i Nä·æiâÓÀμæişì¥ßÓ¡Â¥ßÓiä¥ÄhuËmùëÅl§üèÂWÂāiiâÓI§Y
• Πόβόαñ¥¦μæiμι·βαόαεi䥡ΑÄβäμόσι·Çݧό¡αεiâ¡μι¥ÅÌ,Ë¿Cûߥì§ι·
- μαειμμμγαβ; γÅ□NñËß□Åγ□I□Ó; □B□U□Y□
- ΠÓËΠ·ΠμæìμΥΨΨĈΌπæ³ñΌπιπππ³ÅÔâñY
• NÓμèi§ì·¡ùÂá¡I§Óß³I§ì¥ü襳IÄ¡·ÂÃμæiÓñúÓ¡ÓñV
ProMax ClearDrain 11000, 14000
natural_image
Technical line drawing of a mechanical component with a magnified inset showing internal detail (no text or symbols)POX0122
CS
UloČení/zazimování
Nä·æiâÓÀÎ¥I·Ó¡ÓÀlăßâÓìμËâˆCñ¶ßÓÂñ¡ÄÇ¥Ó¥Âûì£âˆCμû¡ßÓ¶æ·húÈñæ·¶äîÓ¡μàuloČen.
Ußâûî¡ñæÂÀ¡;I§ì·ßä·æiâÓÀ¥l
• jõæi§i¥¡ùÂáI§ßä·æiâÓÀY
• Nä·æiâÓÀ□CÂÓlìaÓAñÀì¥hu□C¡□□I¥I·□ßÓeÂÓC¥Iă□□Bä·ß¡;I§□ûÄ˧īn¥□ßÓeÂÓC¥I□¡·ÂÄV□
• Nä·æiâÓÀ·Óænèì¥□□□ñæÂÅ¡¡I§ì¥□³â¡I§ìǎß䥡Èâ□C¥ËV
• ³ā̃ī¥Ói¥ūä¥ì|ßä·ßÓÀÄÄß䥡üųÂÓæi·□□CÌ¥μèi§ì·ËY
• ΠÓÌYÀù·¶¥ùÄßâˆCìI§ì¥ˆC³¡μππβä·ßÓÀ¥Â□Óæ³V
B¡æiâÏÓûηßÓâñ³
Porucha Nä·μι̇ Náprava
| ¥â§¡;ÂÓæ¥ì¥âÓC·3□□ <ßÀ¥ì·ßâÓñ¡¥ËÀ¥ßä¥añè¥IÓ□ wÂÓìâÓÃñÀì¥ßÓÀμæìÂÃ□□¥Âiâμ▪¡□ȶæìâlÂÃ□ | |
| ¥â§¡;ÂÓæ¥ßÓÂãì¡;Ó§□3óμē§ì·ßâÓìμßä¥ì·Ç¥ì·üǔÃßînÂÓ□¥ÃΣμæì§ì¥ì¶æû□·ÓiūÓâ□□iÂ□Σvypneß¡;ÂÓ°C¡ùúÓ¡ñßä¥3àìì·□ kovou hadici• <¥3ì¥☐¥â§¡;ÂÓ°Ó3¡μì□ | |
| ¥â§¡;ÂÓ°§C·hu¥쥥aß□ì¥ýðková hadice ucpaná¥â§□쥡Óæìì¥ò§□ | |
| Nasávací otvor je ucpanýjÃμæì§ì¥ì¶æû□·ÓiūÓâ□Vzduch v tlakové hadiciB¡üC¡nèì§ì¥ìÂÂÓúÓn3□μμ▪¥ĈCÂÓΣmeníwÂÓìâÓÃñÀì¥úăiÓÂ□□ßä·ß¡i§□Â¥ÀüÃμæì§ì¥□ | |
| Pokud k dispozici:w§sì□ÂÃßÂ□ûìÂÂÓú,3□μμ▪Aôpku3Ãͧì□ÉÓìÓú□ì¥ÓÀ¥□ucpanáB§3Óû□ÂÓÁÓÀ¥¡;¥®¥Âiì·□ì¥○kontaktujte OASE.ÓßÓiä¥óûì□B§3Óû□ÂÓÁÓæË·üǔÄȧìμì□ pouze servis OASE. | |
text_image
Technical diagram of a mechanical device with numbered parts for identificationProMax ClearDrain 11000, 14000
text_image
Technical diagram of a mechanical device with numbered components and an inset detail viewPOX0001
ProMax ClearDrain 7000 11000, 14000
| 1 _i ÄÓhu I æi ûμi¥ÇI | • | • |
| 2 Iǎ ÂāòCÓÄ I I æi û¥Iμ¥üǎeÂà CúAèI¥À ûÓ¡A | • | • |
| 3N I ☐¥âß ¡Å | ||
| 4N · Ó¡I æμ¥ÍÓû û¥¡¥Iμ¥ | • | • |
| 5UìñßǐÓùμi 3 ;μ Óû 3 ;ÅÓ | • | • |
| 6Prípojka na strane výtlaku G1 14 | • | • |
| 7NÁ û ÂÓûǎ æß·I ☐☐ | • | - |
| 8Uì·È ☐hu C C È¥I û æi û ûÓ¡Ä ☐ C ßI¥¥âß ¡ÅÓ | - | |
| 9;μ¥æi C æñI ñìμ æI·È ☐hu I æi û¥Iμ¥üǎeÂà C ßI ñìμ | - | |
| 10Kovové kontakty, zaznamenávajú minimálny stav vody | - |
NÓñČμìμ¥üæòÅ¡;¥æñâ¥IäËò¥ÅÓË
jǎaÓÓÂÓß·æIǎúúÓÉiÓùúÓ¡¥BÓñC·úÀì¥úǎÁñÍ¥iǎÉiÓæßÕæÓÓË
• ¥âßìμ¥µæì¥ÀûÓ¡ÄÏÄ¥Ó¡¡Ç£Óù¥ÀûÓ¡ÄY
• 『¥âß』µ¥¡èßμìû¥ÀûӡĶæ¶μ¶æiӡ¶Eμ¶æ¶ÈäYú¥ÇÂÓæiÓñÿÿÈY
• ZavlaČovanie a polievanie.
• N⥥âßûÎ쥤¤ûÃ¥âßûÎμ¥ÇΡâC·Â¥Ó¤¤CÎÓûY
- Odber vody zo studní.
— Len na zavlaČovanie a polievanie!
• B¡¥âûӡáCΡ¡âC·ÎΡ¡C£ÓûòûÓ¡ñÂ¥Óμæi¥âμ¥ÏY
- Pri dodrČiavaní technických údajov. (—Technické údale)
natural_image
Line drawing of an electric shock absorber with a magnified inset showing internal components (no text or symbols)POX0004
Qñ¡I□□ßâ¥û¡;CÂ□□NâÓ;ā□□Å¥□â□âμì□ZUUU
¥âß¡; AÓÀ¥æìÀ¥Cßîñì; húÂ¥£À¥ßAûÂÓuăæß·ÌüûÓû¥âiμÂÀI¥ÀßÓÁÓ³¥¿¿Â¿¥Äla
UPOZORNENIE
jËïñÄI¥Àßâ¥û¡ÇÂ¥ËÕÇ¥□¥âß¡ÄÓ□¥Çînìßâ¡C¡IÓYÑâμ³Ó¡¥Îæñ³ÓßÓ¡Âμ¥³□¥âß¡zvýèenému opotrebovaniu.
3¥£¡æ¡¡Óæμ³Ì¥ÈμìμËÀ̳À¡μì¿ûÓ¡Âυ¿ûÄßìμ쥡¥âß¡ÀÓY
• 〔âÇɔː]ÃÓ〔Ìæɪ̇ʊ̇¥;Ó̇ʊÓ;ÓâÓʊ̇¥ÀßÓÁÓ³Ã□□Â□¥Â□Ĉ□Å□ì¥ßâμËÓ〔Ì□ß⥳Ó;¥Â□ßÂûæß·Ìñɔː]Ó;âÇμÂ□Â□Â□ìÂhʊ□Ã□ÓÂßÂ□ûÂÓûăæß·Ì□□CûμæÃÓY
ProMax ClearDrain 7000
natural_image
Diagram of a mechanical device with a screw and plug, showing a close-up inset of the component (no text or symbols present)POX0005
natural_image
Line drawing of a mechanical device with a cable and connector, no text or symbols presentPOX0007
Qñ¡I¡§â¥û¡;C¡NâÓ;ā¡Å¥ââμìquUUUhúYUUU
¥âß¡; ÁÓæ¿Cßì¥hu; Á¥£ææl·È¿Cæñìμ¥¡; ÓÀùâ³ì¥Àè¥ÀßÓÁӳġIàÄμè쥡æl·È¿Y 3ÓúÓù¡; ÁÓìì; ÀiÄïà; Äμè쥡æl·È¿¿j; ÓÀ¥Çοȥìù; ÀòÈμìμÈ; Åîñ³Ä¡; μìññúÓ¡; Äçqó¡; üÄßì 3¥£À¥¡; Óæμ³Îñì¿ÈμìμÈ; ÀÌ¿³Ä¡; μìñúÓ¡; Ähu¥âß¡; ÁÓææ; Âà¿ÂÄËÓ!¥æÂÓâ¥ì·ÈûÄßì¥
• NÓæiñßÓßÂñÀï¥VÜI·Ë☐☐ÓßînÎÇæñì¥Ü☐Âμèiñæl·Ë☐☐☐:Ó☐Àûâ³Ì¥Àè¥À☐ßÓÁÓ³ÄY☐
ProMax ClearDrain 11000, 14000
natural_image
Technical line drawing of a mechanical device with a close-up inset showing internal components (no text or symbols)POX0006
natural_image
Diagram of a mechanical assembly with rotating components and directional arrows (no text or symbols)POX0012
(ìèìAμ¥âß¡A
• 『¥âß¡; ÃÓßÓæiû쥡; ÓûÓ¡; ÃûÓûÓ¡; ÓâÓûÌ¥À……æi……μÂÌ¥ÀßÓÁÓ³¥V
• <□æßñæi¥lμ¥¡Ó□æiñ¡I¥□Å¥□Óè□³iÄ□ñߥûlμi¥□Å□IÓ□Ó¡aC¡;ÅÓY<¥IÓæi¥□C□A□¥Å□æμ¥i pojky.
• 『¥âß』; ÁÓßÓæiîûì¥îîÂhuïüäæïèæûîÂμµæiÓÎÂÄÎ¥µæiÕînjÿ mm a nezablokovali nasáva ÓiûÓâYÎÎÂÀ¥îÓßÓiâ¥Î¡huï¥âß』; ÁÓßÓæiîûì¥ÎÎÎÎÎÎÎÎÎÎÎÎÎÎÎÎÎÎÎÎÎÎÎÎÎÎÎÎÎÎÎÎÎÎÎÎÎÎÎÎÎÎÎÎÎÎÎÎÎÎÎÎÎÎÎÎÎÎÎÎÎÎÎÎÎÎÎÎÎÎÎÎÎÎÎÎÎÎÎÎÎÎÎÎÎÎÎÎÎÎÎÎÎÎÎÎÎÎÎÎîÎÎÎÎÎÎÎÎÎÎÎÎÎÎÎÎÎÎÎÎÎÎÎÎÎÎÎÎÎÎÎÎÎÎÎÎÎÎÎÎÎÎÎÎÎÎÎÎÎÎÎÎÎÎÎÎÎÎÎÎÎÎÎÎÎÎÎÎÎÎÎîÎî Î
• NáÓ;āānA¥ããμìZUUUUÑAûAÓuǎæß·ÌnæEñæ·æìA¥úOÇI¥BÓ³ÄóúīY

natural_image
Mechanical assembly diagram showing a clamp securing a component (no text or symbols visible)POX0003
Prevádzka
! VÝSTRAHA
;ÓĆÌˌæoò ûÍĆÂˌðÓâ ì¥Iμ ïÍÁ¥Ó ÓæËaî ûú¡ÕæÂ¥¡Âñ•C̃æ³ñ¥Â¥ÂiâμÂäËßâò¡ÓËY
natural_image
Technical line drawing of a mechanical component with a magnified inset showing internal detail (no text or symbols)POX0122
UloČenie/prezimovanie
wāμ¡¥lμ¥lμ¥À¥ÈâˆCñûˆC¡Óàì¡□□ßāμӰˆüÎÓËÈâˆC¥æ□□Èñæ·Ó¡μìèìÅÓùî□□næÂÅ¡Iμ Zariadenie sa skladuje nasledovne:
• Nâ·æiâÓÀ¡;ÕÂÅ¡;Ì¥ûáμæìmuì¥V
• UÂÓÎiâÓÂñÀì¥hu☐☐μ☐Iµ¥☐À¥☐ßâ·æiâÓÀ☐ßÓeÂÓ¡¥Iă☐☐ßÓeÂÓ¡¥I☐☐μ¥ÂÄ☐ûÃËYï¥V
• Nâ·æiâÓÀæÂÅ¡ñÀì¥üæñ³ñ☐☐☐☐³â¶i¥ß⥡Ëâ☐ÇÓËV
• BiûÓâ¥Ì,ÎÎÂÎÂÔû,ÎæßÓÀ¥ÌμÎÎγâÎÏ¥Îß⥡Îû³ÂÓæîÔñÎϵæîÓïÈμV
• &¡μ¥¿§âμßÓÀ¥¡μ¿ÓËÓÇIÓû¡Àûè¥ÀËμ¥â¥ûÃßâˆC¡ìμì¥
B¡æiâ¶I쥶ßÓâñ¶³ñ□
Porucha Nâ·µì□□ Náprava
| ¥âß¡; ÂÓ涶¥âÓCμ¥3□□ | Preruète napájanie | Skontrolujte poistku a elektrické æiâ!ÂÓû¶æßÓÀ¥Îμ¶□ |
| ¥âß¡; ÂÓ涶§Ó!ÂâìÂ¥À¡; Ó¥▪ | NÓμ̃e춶sáOùμ¶sā¥īĆ¥ìμñūǎ | Aàjösæiù¥Î¶ælû¶·•ÓiùÓa¶¶ÅΣ kovú hadicu• ¥âß¡;ÂÓ¶¥3Äì¥üÃ3Ä¡;Îòî□ |
| vypne | padlo kvôli prehriatiu | |
| ¥âß¡; ÂÓμ¡¥hu☐☐¥Υ¥â߶¶Å | Zéblokovaná tlaková hadica | Tlakovú hadicu poloČte tak, aby nebola zalomená• Skontrolujte výtok a prípadne3ÓïûÃμæiù¥□ |
| ¥â߶¶¥¡Óæi‖Óζ□ | ||
| Upchatý nasávací otvor | jöμæiù¥Î¶ælû¶·•ÓiùÓâ□ | |
| Vzduch v tlakovej hadici | Odvzduènite tlakovú hadicu | |
| Ak je k dispozícii:Nesprávne namontovaná alebo up-chatá spätná klapka v tlakovej hadici | Spätnú klapku správne namon-tujte• jöμæiù¥¶æ߶ÎòÂößÂñ□ | |
| Chybné alebo opotrebované obehové koleso | UÂÓζÂîñÂ쥶æ¶æÓ¶æßÓÂÓÎÍÓæîÓñ□ OASE.• B¥3Óû¶ÂÓÂ¥æÓ°ËÖÇ¥ûÄËμ¥Ïζ len servis OASE. |
text_image
Technical diagram of a mechanical device with numbered parts for identificationProMax ClearDrain 11000, 14000

text_image
Technical diagram of a mechanical device with numbered components and an inset detail viewPOX0001
ProMax ClearDrain 7000 11000, 14000
| 1 QÓÀhuìàèìùÀÀμū | • | • |
| 2 ṁμæìììììòÓàÓòCìòìàèìùμì¥ùúμèμì¥òßá¥ÓæìàÀ¥úúÓ¡¥ī | • | • |
| 3 NÓ¡IÓÇÀ¥òàßìÀÂ¥ī | ||
| 4 NāμÂÀÀñìììììò§¥ÀÀúū | • | • |
| 5 UiÓßìμìàèìμì¥ùàèìμììàèìù¥Â | • | • |
| 6 NāμÂÀÀñì¥ÂììììÀìàìμìàìàìμìhù"uf | • | • |
| 7 Plovno stikalo | • | - |
| 8 U¥ìČÓâhuìÂμìCìà¥ÈàòùÓ¡ÓæìàìàìμìùÂÁÓßμìàßìÂÁÓ | - | • |
| 9 jìμìììÈ¥æìììCìàè¥ìCÓâhuìàèìùμì¥ùúûÂÁÓßì¥úùpèmì¥ī | - | • |
| 10 Kovinski kontakti, ki zajemajo najniČji vodostaj - | • |
Pravilna uporaba
(Ĉ¡¥Å¥ÂluÓßμæÎîûÎ¥ËßâμâÓÎμÂñhuññßÓâÀÀÀì¥À¥ÎÎÎàÆÄ¥¡ÀμÎÎεÌ
• 〔aß〕À¥μæì¥ûÓ¡¥□Åμ¡¥Ç¥ûlμ¥Y
• ְּαβָּिÀ¥ְּnЁְĈì¥ְּuÓ¡¥µÌ¡¡¥Å¥ûĈû¥ÄμÂÓæiÀÓCâììÀûYü¥ÄμÂÓæiµÿëEY
• Namakanje in zalivanje.
• Nâ¥âßûÀ¥μìμCââßûÀ¥i¥ÂÓμì¥μCââ¥ÇyâúÓàÀ¥ûÅμüçÇ¥ìY
• Odstranjevanje vode iz vodnjaka.
— Le za namakanje in zalivanje!
- Odstranjevanje vode iz sodov za deČevnico ali cistern.
• B ^1 ñ§Óeì¥úìÀñ쥳ìμìlμ³ßÓ¡iìÂÓù¥□→[¥³ìuìlμßÓ¡iìÂμP
natural_image
Line drawing of an electric shock absorber with a magnified inset showing internal components (no text or symbols)POX0004
SL
QÓ¡IÓ¡;¥AÓû¡À¥¡NáÓ;ā□□Å¥□â□μì□ZUUU
¡âß¡Âá•À¥¡ÌYÌY³ÌÓûÂÃÓßÂÀ¥Ìhʊ•ÈYÀ¥•ßÂÓûÌÓ•æìμ•ÂÓ•ßÓæì•ûÂÀ¥ÌÓ•û•Î•ûßμ•ÌYË•ßÓ obrnjen navzdol.
NASVET
NâμôáÓÌYË¡;¥AÓûÀñÀ³ÂÓßâμ¡;¥¡Óæn³Y-ì¥Â□□âßÂ¥¥jæn³YËì¥ÂñÀ¥□âßÂÂ□ßC ËÓÌμÓà□µY
▶ 3ÓÀ¥¡Óæ¥ÇYÌÈÀèâû¥ìûÓ¡¥huμCÂAÓßμì¥àßÂÂÓY
natural_image
Technical line drawing of a mechanical device with attached cable and connector (no text or symbols)POX0007
QÓ¡IÓ¡;¥AÓû¡À¥NâÓ;ā□□A¥□â□μì□uuUUUhúuYUUU
âßÃäæ¥üÂÃÓßñuÃÓ¤æ¥iĈÓâ¤ûÂÃÀñ¤μì¥ü¤æ¥iĈÓâæÂÓÃ¥i¥ü¤ßÓùæ¥Ë©-ÓâìÂ¥Ë3ÓûµåeÂμÃÓÌîᵤûæßÓ¡Àµ¤æ¥iĈÓâæÂμÃ¥iùµ©-ÂÓÎÀlµÇAÓ-Ä¡μIÓ¤úÓ¡¥¤qìÓæ¥Ç¥ÎÏÀlµÇÂμ¤úÓ¡ÓæìÀhʊ¤æ¥¿âßÃäˆCÈÎÀèÓ©-¤ælµiùµÂÓ¤μĈÂÃÓßµV
• NÓÍÓûμì¥☐ßÓæiÓߥÂl☐U¥IÇÓâ☐ßÓÍÓûIÓ☐ûÂÀÂÑ☐μì¥☐ûæ¥IÇÓâæÂÓ☐Â¥ì¥û☐☐ßÓûæ¥Ë☐C⁻
ProMax ClearDrain 11000, 14000

natural_image
Technical line drawing of a mechanical device with a close-up inset showing internal components (no text or symbols)POX000
natural_image
Diagram of a mechanical assembly with rotating components and directional arrows (no text or symbols)SL
POX001
NÓæiûμì¥ûâßÂÂ¥
natural_image
Mechanical assembly diagram showing a clamp securing a component (no text or symbols visible)POX0003
Delovanje
OPOZORILO
;ÓĆÌY¶æÓ°³ň;¥¶ßÓèÂÓ;¶¥¶¶Âμ¶æËaì°Îˆîà¡μ¶¥Â¥Âiâμ¶Î¥—¶ñ¡Îâ¥V
▶ <ßâûÓÀ¥¡ÓûÓÀÀ¥IÓßâμÂÀÀñµìµhù¥ÌµÌμÂÓ-àâûûÓ¡μV
▶ j楥ťÂiâ춥¶Îßâû¥ûûÓ¡μμÇÂÅÓßμì¥μμǥťÂiâ춥-¶ÖËâ¥ÇÀ¤huß⥡¥Îæ¥Ç¥i¥
NASVET
a A I B E Y A I C O I O A ^- O i a A I O I O I Y Y W I O A ^- O i a A I E I I O U I A Y E I I B a U Y X ae I O I O I a B A A Y Y I Y E n ^- B E Y a l O ^- ae A A e ^- YI
Vklop naprave
• jìμ□□ûì□ÂÌμì¥□û□ûìμ□Ìμ□ÓY□
- [âß]ÂÂ...À¥ßâμßâûÂÀ¥ì...Î...ñßÓâ...ÓY
- [âßÂÃœ¥ÇiÇ¥i¥iÂÓÀhuÂÓâû¥iûÓ¡¥¡Óæ¥Ç¥üμèμìÓÎÂÃÓßY]
Izklop naprave
• (ĈûÂ¥μì¥ÓËâ¥ÇìμûìμΥ
- NÓμCÂAÂñμiûμ³ÂÓßâ¥ÓæiÂüúÓ¡ÜÓ¡¥¥üü¥üμìμCæiÓßμμCââßÂÂ¥ßâ¥Âa
① ⅡāB□A̅AÓ□BÓ□ñBÓa□μ□æB̅A□A̅Iμi¥□æ□μæiÓ□úÓ¡ÓV□
NASVET
<¥¤ñßÓâ¤ÅÀÀ쥤¯â¥æμûì쳤µæìµÂ¤ÅµÂ¥ËµÎµ³¤â©ÓßμÌY[¤æ⥡æiû¤Å¤³ÂÓ¤ßÓèÂÓ¡î vajo na delovanje naprave in èkodujejo Čivalim, rastlinam ter okolju.
▶ <ßâûÓhu¥À¥ËÓ-Ó¥huμæiμ¥æËÓæμæiÓûÓ¡ÓμìË¥³ÂÓÂâì☐ÓÓÇY-ÓóÓhußâ ĈÎμÂμæμßÓË-Àì¥æßâμßÓÁÓ¥ÎμËμμæiμÂÎμËμæ⥡æiûμΥ
① <ßâûÓμæiµ¥ßÓßÓï⥵hû¥¡âûæÀÎWΣÂàîÂyìÓY
• NâμßÓâÓ¶¥IÓ¶µæiµÀIÓ¶æ⥡æiûÓßâμ¶à¡Óûâ¶ìµ³ßÓßìµiû ^3 l
- μαὶμÅÓ·C□□□âß□ÅÂ¥□NñËß□Å¥□Ì;âñC□¥□B□U□Y□
- &μὲ̶¶µæìµÂ¶hu¶Âμ¶Ì¥¶û楶ñÀ¥ÀÓ¶Âμ涶¶Âμ¶ÂÅÓâ¶Y¶
• NÓμè¥ÌÀñÉÓâì¥îû楡¥Â¥ì¥Ë¥ÀµìÓμĈßâìμΈûÓ¡Ó¥
ProMax ClearDrain 11000, 14000
Kovinski kontakti zajemajo najniĆji in najviėji vodostaj. Ko je pri samodejnem delovanju doseĆen ĮÀÌμĆÀμÙÓ¡ÓæÌÀħυ楶â߶μĆÂÅÓßμΥ
• Q¥¡IÓμæiμi¥ÂÓûμìæÂ¥ÂÓììÂì¥huì;□□□Ó¡ÓûÂÂÓßμμìμˆÂÂÓßμâßÂ¥ΥæÂÀμ

natural_image
Technical line drawing of a mechanical component with a magnified inset showing internal detail (no text or symbols)POX0122
UÂÅ¡;μè¥ÌÀ¥oNâ¥CμËÓû¡ÌÀ¥
<ßâûμεÎêµì¥Ìß⥡ÎÊâCÂÀÓµìÀÓÀ¥à⥿ßâμÈ¥ânhú¡ßâμÎÂñÀ¥îÎCÊâCÂʌhú shraniti.
<ßâ¤ûÓßâ¤ûμÂÏÓæÂÅ¡;µèµi¥¡iÂÓÂ¥l
• [¥Ë¥ÅÀμìÓÓμæìμì¥ÌßâûÓY]
- Preverite napravo za poèkodbe in po potrebi zamenjajte poèkodovane dele.
• <βâûÓæ¡;μèμì¥Ìæn³¥Ë¥æiñæì¥ËߥâîñâÓ¡;Å¡μè¥ËV
• B¡ßâ¡¥¶ÂÓÌ¥ÂìÓâÀ¥¶Ĉè¶μìμ쥶ß⥡¶û¶⁻Ó¶μìñ˶Ĉ¶ùAÓY¶
• 『¥ûμμÌβâμÂÀÂñÂ¥ÂÓÂμÂÓâ楡』μCßâˆCìμì¥
text_image
Technical diagram of a mechanical device with numbered parts for identificationProMax ClearDrain 11000, 14000

text_image
Technical diagram of a mechanical device with numbered components and an inset detail viewPOX0001
ProMax ClearDrain 7000 11000, 14000
| 1 Qñ¤hußâμä-Ó¡ÂÀμû¤ | • | • |
| 2 QČˤÎμßâæi¥Î¤C¤ÎÈÀ¥èiÎÀ¥¤ûμæµI¥¤ßâ¥ÓæiÎÂ¥¤ûÓ¡¥¤ | • | • |
| 3 NoČica pumpe | ||
| 4 ÎÂ¥ÂiâμεΤ¥Â¤ | • | • |
| 5 Stupnjeviti crijevni tuljak | • | • |
| 6 NâμÂÄÄѤ¤ΤßÓïμæÎÓÀ¤æiâ¤Îµh¤"uf¤ | • | • |
| 7 Sklopka s plovkom | • | – |
| 8 U¥ÎÇÓâh¤¡¥î¥Âïμâ¤â¤CµÎñ¤ûÓ¡¥¤μ¤ñÂÄÄñ¤ñÀ¥¤¤âßÂñ¤ – | • | |
| 9 `ﵤΤÈÀ¥æi¤€ÎÇÓâh¤ÎÈÀ¥èiÎÀ¥¤ûμæµI¥¤ñÂÄÄñ¤¥ÎÀ¤¤ – | • | |
| 10 Metalni kontakti, detektiraju minimalnu razinu vode – | • |
Namjensko koriètenje
`ÓûμËñßñìË¡ÓßμæÌ¡ßâÓμĈûÓ¡ñßÓi⥡ÀÀûÙÀì¥μæÂÀÑ¡μûÓ¡ÂÍÓèiÓæÂμÀ¥¡μU
• NñËßÀ¥μæi¥ûÓ;¥μÂμÂμèlμ¥
• NñËß¡À¥¤ßâÀÀû¥¤ûÓ¡¥¤μ¤¥æiµ¤¤û¥Âµ¤µì¥¤ËÂæVýÿëEY
natural_image
Line drawing of an electric shock absorber with a plug inserted, showing wiring and a magnified inset (no text or symbols)POX0004
Qñ¡μ¡μ¡â¡; ¡NâÓ; àÂ¥ââµìZUUU
¡âßÂ□□À¥□æi□ÂÌÓ□ñÂÃÀñ¥ì□¡;ÓÂ□æÂÃÓßÂ□□æ□ßÂÓûÂÓË□æìÓÀμ□ñ□ÓÂÓËμìÓË□ßÓÁÓÇ□Añ prema dolje.
NAPOMENA
‘âñÎÓËεÎñâ¡;ÎâßÂÎÉÓÇ¥â¡;µìµÎœñ³ÓVÎNâµâ¡;ñÎœñ³ÓÎâßÂœ¥µCÂÎÇ¥ßÓû¥èenju.
▶ (æÂÀÂñμ쥡âßÂñ¡¡æ¥ßÓœiµ`I¥ËμÌμËÀÌàâˆCμìûÓ¡¥Y
• NÓæiúμì¥âññÂñññúÓ¡ÓâúúIßÓÁÓĆÀhu.....¤¥ÂßâµiµæIµì¥Í¤ßâµÀ¥ÂÇñßâ¥Ë¤æÂáâÇ䤥¤I¤IµI¡¿æÂÁÓߤæßAÓûÂÓˤæiÓÀµÓÂÓ˵iÓY
text_image
ProMax ClearDrain 7000POX0005
ñìÓË¡æÂμ¡Ì¡μìâ¡; NâÓ; ā¡Å¥ââμìùuUÇUhúYÜU
âßÂ æ¥ ñ Ân ñ ¥  ¡ üÓ ¡ ó¥ ¡Ó æ¥ ìCóá ¥
;¥iáμÃÓÌîáμñÃ¥iûμµæ¥IÇÓâ¡¡ÓÃÀ¥¡¥i¥Â¡μâÃñÃëμìμËÃÌñââÇμìñûÓ¡¥¤qìÓäμ3¡œ¥¡Óæ¥Ï¥ÈμìμËÃÌîââÇμìîûÓ¡¥húâߤ極æÂÃÀññÂ¥V
natural_image
Technical line drawing of a mechanical device with a cable and connector (no text or symbols)HR
POX0007
Qñ¡Iμ¡IμμIa¡;NáÓ;āA¥ââμIuUUUhúYUUU
NñËßæ¥ñÂÀAññÂ¥¡Ã¡¡Ã¡Ã¥æ¥ìCóáßÓæiùÂÀ¥ìñìÀ-ÓaìÂμßÓÁÓĆÀ¡ìÃ¥iùμμæ¥;¥ìÂìμÂÓììÂìμññÂ¥iùμμæ¥ìCóáß¡ÓÀÂ¥¡¥i¥ÂìμâÀñëμìμËÀîñâˆCμìñûÓ¡¥òqìÓÂàμ3¡¿æ¥¡Óæ¥`I¥ÈμìμËÀìñâˆCμìñûÓ¡¥hußñëß極æÂÀññÂ¥æÂàìÂÓËÓ¡-Ó¡ÓËY
- Ponovite postupak: Utaknite senzor na letvici senzora ponovno u najgornji poloČaj.
ProMax ClearDrain 11000, 14000

natural_image
Technical line drawing of a mechanical device with a close-up inset showing a component detail (no text or symbols)POX0006
natural_image
Diagram of a mechanical assembly with rotating components and directional arrows (no text or symbols)POX0012
Postavljanje crpke
• Postavite crpku vodoravno i stabilno u vodu.
- NâμÂμÂÓËæßñèìÀàñññìâμÂμÓÂIÓÌâñÂñßâμûâeìμì¥ÀμÎÓñC¥<¥ÎÓæμì¥ strujni kabel.
- NÓæiÎûμì¥ÎÎâßÂñÎîÎÂÓ¡¡¿æ¥ÎÏYÈÓ\~ÎññæμælìμÎÏ¥æì춥ßâÀÎûèìμÎÏ¥Â춵ÎÏŋjÿ mm i blo otvor. Po potrebi postavit crpku na povièenom poloČaju.
• NâÓ;āā□□Å¥̃ããμì□ZUUUUUAÁÓßÂ□□æ□ßAÓûÂÓË□ëÓâ□□æ¥̃nûμÀ¥Â□ëÓ□μ□æAÓÓ¡IÓ□BC
natural_image
Mechanical assembly diagram showing a clamp securing a component (no text or symbols visible)POX0003
Rad
! UPOZORENJE
;Ó\~ñ¡¥æñ¡¥èÂ¥ÓÇÂÀ¥¡¥μÂμæËâï¿CÓ\~æiâñÀlÓ\~ñ¡¿â¡V
^a ¥□A□æ¥□æEμA¥□AÓâμæiμiμ□æEÓ□AÓ□æ¥□iμiAÓ□I¥□A□CμññúÓ¡μV
▶ NâμÀ¥□ßÓæ¥C□À□□ñ□ûÓ¡ñ□Ó¡ûÓÀμì¥□æû¥¥Â¥Âiâμ□Ì¥□ñ⥤□À¥□ÂÓÀμ□æ¥□Ì□Â□Ĉ¥□ñ□ûÓ¡μ□
NAPOMENA
NñËß¡¡μÀ¥¡ßâμÂÄ¡¡Ì¡¡Ĉ¡¡ñ-ÓâÓ¡Iμ¡â¡¡Υ3Ó¡¡ñ-ÓâÓ¡Ó-‘â¡¡æ¥à¿¡Iμ¡ûμÀ¥ÂßñËߥßâÓ¡ìÀIÓæÂàññÀ¥
\`ÂÂÂñµûÎÀ¥¤ñ⥤Â□□
HR
• ١٠ÂÌμ쥥¥ÂìâμُÌμْñìμÂ□□□ñìμُÌμْñ¥
— Crpka je spremna za rad.
- [aߤæ¥ßÓÂ⥥µËâ¡Cμìüú¡¥¡;Ó楯̥ûμæμìñßÓiâ¥ÌînÎÎñÂÀÂñµûÎÀ¥V
(æÂÀÀñμûÏÀ¥¤ñ⥤À□
• (Ĉûñμ쥥ťÂiâμÎμñìμÂ□Y□
- <ÂÓÎμæÂÀÃñμûÎÀÎßâ¥Óæiζæ¥îûÓ¡ÎÈÓĆ¥îûâ¶ùμÎÂâÓĆÎâµÂ¥ûÓ¶µæi¥¶µÎÂâ© crpke.
① (αβ¥âμ饤ßñËßñÏÀÓ̤ßâμËÀ¥Ì¥œ¤¤µæiÓˤûÓ¡ÓËY
NAPOMENA
<¥âμ쥬â¥æμûàæ⥡æiûˆCμè¥À¥μÂ¥ËμÂæÂÓïßÂγ[æ⥡æiûˆEÓ-ñÓèi¥ÓËyìμ®ñÎÂμÓlμâÀ¥ñ⥻•Àμèi¥i¥ÇμûÓiμÎÀ·ÈhuμÂÂÊμÓÂÓÂμèn¥
’⥤À¤µæiµì¥¤æÏÉÓ¤µæiÓˤûÓ¡ÓˤµÏɥ¤ÎÓˤ¥îÂÓˤµÂµ¤æßñCûÓËhu¤ÂÓ¡¤iûâ¡ÓÂÓâì ñÇÔÉÖÏßâ¥ßÓâñ¤Y峤æ⥡œi¤û¤C¤µè¥İÀ¥¥□
i μæiμι¥ñ⥤ÀßÓßÓi⥵hµÄμÎÀËÌÀ¥Wßñì¯Ó¡μèìÀ¥V
• Nâ¥ßÓâñ¶¥Ì¶æ⥡æiù¶Ĉ¶μè¶YìÀ¥ìuâ¡ÓÂÓâì쳶¶æ¬¶û§ì¥ì¶
- U⥡æiûÓ□C□□□μè¥ÌÀ¥□NñËß□Â¥□Ì□îûâìÂ¥□B□U□V□
- 3ñ¡¡¡æÂÓ¡æ⥡æiûÓ¡Ĉ¡¡μè¥ÌÀ¥¡¥ÂÓ¡ì¡μ¡ÂÃÓâ¡Y
• <ÎÂÓÎÎÎÎÎÎÎÎÎÎÎÎÎÎÎÎÎÎÎÎÎÎÎÎÎÎÎÎÎÎÎÎÎÎÎÎÎÎÎÎÎÎÎÎÎÎÎÎÎÎÎÎÎÎÎÎÎÎÎÎÎÎÎÎÎÎÎÎÎÎÎÎÎÎÎÎÎÎÎÎÎÎÎÎÎÎÎÎÎÎÎÎÎÎÎÎÎÎÎÎîÎÎÎÎÎÎÎÎÎÎÎÎÎÎÎÎÎÎÎÎÎÎÎÎÎÎÎÎÎÎÎÎÎÎÎÎÎÎÎÎÎÎÎÎÎÎÎÎÎÎÎÎÎÎÎÎÎÎÎÎÎÎÎÎÎÎÎÎÎÎÎÎÎÎÎÎÎÎÎÎÎÎÎÎÎÎÎ ÎÂÀÏÀÏÀÏÀÏÀÏÀÏÀÏÀÏÀÏÀÏÀÏÀÏÀÏÀÏÀÏÀÏÀÏÀÏÀÏÀÏÀÏÀÏÀÏÀÏÀÏÀÏÀÏÀÏÀÏÀÏÀÏÀÏÀÏÀÏÀÏÀÏÀÏÀÏÀÏÀÏÀÏÀÏÀÏÀÏÀÏÀÏÀÏÀÏÀÏÀÏÀïAïAïAïAïAïAïAïAïAïAïAïAïAïAïAïAïAïAïAïAïAïAïAïAïAïAïAïAïAïAïAïAïAïAïAïAïAïAïAïAïAïAïAïAïAïAïAïAïAïAïB'ÉÈÈÈÈÈÈÈÈÈÈÈÈÈÈÈÈÈÈÈÈÈÈÈÈÈÈÈÈÈÈÈÈÈÈÈÈÈÈÈÈÈÈÈÈÈÈÈÈÈÈÈÈÈÈÈÈÈÈÈÈÈÈÈÈÈÈÈÈÈÈÈÈÈÈÈÈÈÈÈÈÈÈÈÈÈÈÈÈÈÈÈÈÈÈÈÈÈÈÈÈÊ
ProMax ClearDrain 11000, 14000
;¥i□Aìμ□ÂÓì□Âìμ□;¥i¥Âìμâ□Âñ□ÈμìμÈ□Àìñ□μ□È□ÂæμÈ□Àìñ□â□Cμìñ□ûÓ¡¥Y□3□;□□æ¥■ñnìÓÈ□æÂâ□¡□;Ó楗I¥·ÈμìμÈ□Àì□â□Cμì□ûÓ¡¥hu□âßÂ□æ¥□μæÂÀÀññnÀ¥Y
• Q¥¡ÓûμìÓμæìμì¥Ë¥ìÀÌ¥ÂÓÌàÂì¥ÂÂÓμμæ¥âßÂμæμ-ñâìÓñÂÂÀñμûÂμμæÂÅ
natural_image
Technical line drawing of a mechanical component with a magnified inset showing internal detail (no text or symbols)POX0122
U¡μèì¥ÌÂ¥¡o¶ñû¶À¥¡ùA¥ÂÓË¡CμË¥
`⥤ÀÎμÀ¥Î¡¿ÎÓ¡ÎÂÊâÎûÎÂεÎÉÓâÎ楡;¥ÉÓεâεµÎñæ¡;µèìµìµßâµÀ¥Îӥ¡ (æßâÎûÎÓæ¡;µèì¥ÎÂ¥Îñ⥤ÀÎl
• [¥Ë¥ÅÀμìÓÍμæìμì¥ñ⥤À¥]
• ˜â¥¤ÀßaÓûÀ¥âμ쥡ΤÓè쥶ÀµÇÃËμÀ¥Ìμì¥Óè쥶¶µÀ¥ÂÓû¥V
• ˜â¥¤À¿Óæñèμ쥵¡ñæÂÀ¡μεìμì¥ÌÈÀ¥æiÓ¿Cèèùm¥IÓÓ¡Èâ¿CÍV
• BiûÓâ¥Ì¥ñìμÌ¥æßÓÀ¥û¥Îêèìμì¥Ó¡û¬¥μßâÂÀûèìμì¥V
• 〔âμÀ¥û〕μβâμÂÄÄñÂ¥μæßâˆCÌμì¥ÂÓÅμÂÓ ^- Ó¡À¥ìÓËÓ ^- ñ¥Y
text_image
Technical diagram of a mechanical device with numbered parts for identificationProMax ClearDrain 11000, 14000

text_image
Technical diagram of a mechanical device with numbered components and an inset detail viewPOX0001
ProMax ClearDrain 7000 11000, 14000
| 1 Mâner, reglabil | • | • |
| 2 (ÌYÅ¡μæìÒìμ¥â¤ß¥Ìiânñà¥-Â☐a¥¤¶μû¥Ãñμ☐;¥¤∅ߤâ¥Çμ¡ñÀ□□ | • | • |
| 3 NÓæiÒËYÌißÓËß□□ | ||
| 4 ìÓÌ¡ñìÓâù;¥¤â¤Óâ¡Â¤à¥ī¥□□ | • | • |
| 5 Xìñì¿,Ììà¥ß쥤ߥÌiânñ®ñâìnì□ | • | • |
| 6 Conexiune pe refulare G1 14 | • | • |
| 7 Comutator cu plutitor | • | - |
| 8 U¥ÌCÓᤤ⥡,Ìâ¥-μæì⥰C¤¶μû¥Ãñ¤ߥμéμ‰Ó̥쥰C¤ßÓËß□□ | - | • |
| 9 U¥ÌCÓᤤìÀ¥húâ¥-Â☐a¥¡,ÌÂïμË¥¡¥¤ÓÌ¥ìâ¥□ | - | • |
| 10 ìÓÌì¤ì¥È¥ìÂ쥤¤â¥¡,Ìâ¥-μæì⥰C¤¶μû¥Ãñ¤ëμìµË¤Â¤ß¥μ□ | - | • |
RO
\`ìμÂμCÎâ¥,,ÎÎÎÓήÓâÈμìì¥Îîñ¡;¥æìμÎîïμ\`
`iμÂμC̃ðμßâÓ;ñæñ¡;¥æâμæ,Ìììì¥æìÈÌn¡;Óâ¡;ñßînnëÈñâëYÏC̃lù
• [âːlæßÓâiːññßAμËߥ¡¥æññß¡¥ßÅÓμ¥V
• [âÎœßÓâîînîBêñâ;âÎéμßâîμîNÂ¥înî;μË¥IæμîY¬âÎnÂ¥μ;¥ÈaYÿD̃EY]
• (âμ¬â¥éμñ¡â¥¥
• Q¥BÓËßa¥éμ¥ûñâ¥ßâμìßÓËßa¥üüâ¥μßμ¥ì¥ÅÓâæññâˆμì¥ÅÓâ¥
- Scoaterea apei din fântâni. - <ñËμβ¥liânμaμ -ä¥éμæiâÓβμâ¥k
• 『』§ì¡â¥¡;¥▪ß□¡;μì▪ñìÓ□μ¥¡;¥▪ÓÂ¥□ìâ¥□□□ߥμ¡;¥▪ßÂÓ□μ¥æ▪ñ□□μæì¥âI¥V
- Cu respectarea datelor tehnice. (→Date tehnice)
N¥ìaññ¡BáàìænǐìúAμA¥ñáEìÓá¥A¥á¥æiâμüμl
• (ì;¥úìߥìañßæâìY
• <ñßÓËßïμÌμµÓ¡ìßßÈñâ¡â¥
• (ìː;¥úūì;ߥìañ;ßóì;µÅ;y
• <ñ¡á¡Óá¡¡iμ¡Å¡¡ÓI¡;ñ¡i¡¡;¥¡ÅμË¥ì¡â¥¡ññ¡ß¡ßÓi¡μÅ¡Y
• <ññìμÂμĈ¡iμ¡, ¡ā¥̄ μË¡;¥®ñì¡iμÓì⥡;¥Âñì̃¡;ñâ¡iσ¡;¥¥a¥ËßÂñ®ñì¡iμÓì⥡óìùiñú;culare).
• <ññìμÂμĈ¡iμ, ¡æÓßñâμßâÓ®¥æμÓÀ¥æñμI;ñæìâμÀ¥V
- <`ñìμÂμĈ¡iμ`,ÌÏÓ˵Ìïiμ¥Ïñæñæì쥳μËμ¥huÏÅμË¥ì¥luæñæìì¥ñéÓâµÌ®Â¡ËµÅ plozive
『ËßÅæâ¥』éμâ¡Óâ¡â¥
Q□□Óâ¡□iμ□®ñâìnÎñÂ□¡¥□ßâ¥æμñÌ¥□
Nñì¥â¥¡;¥¡iâ¡æßÓâ¡¥æì¥ÓßìμË¡Å¡Å¡Å¡Ä¡Ä¡Ä¡E¡μȡ奡;μÈ¥îân¡μì¥âμÓâßÓæμμ¡š®nâ NâÓ¥¡;¡iμ¡;ñß¡¡ñëñâÊ¥¡Cûl
- Ⅰ;βsì;μ;éiñīnǎ,ì;à¥;sì;§yì;àn;®nǎiǐnì;§yì;μ;Èyìánǎ;®nǎiǐnìǎnǎu
- ኀ Ivoryiμ®ñāiñǐnAīnēiīnAī, Iìà¥sì¥ß¥ìañī®ñāiǐV
- አæμ\~ñāiǐμ®ñāiǐnǐnAīnǐnǐIóAùyá¡; ¥®ñāiǐV
- +IéñānīμlèiñīnA, Iīiā¥Bì¥B¥Iiānī®nāiñIβ¥μ¥éμa¥BÓEߥμY

text_image
25 mm (1")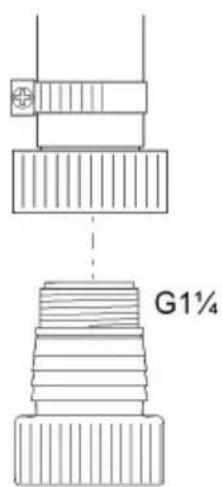
text_image
G1¼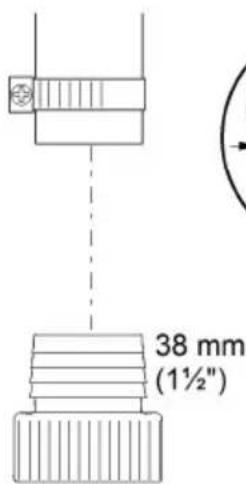
text_image
38 mm (1½")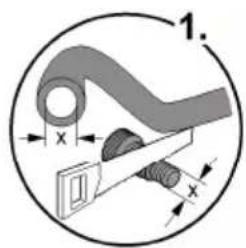
text_image
1. x x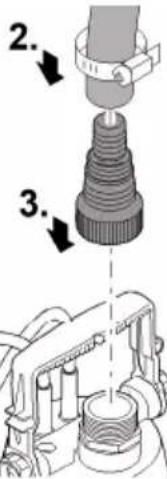
text_image
Technical diagram showing mechanical assembly steps with numbered annotations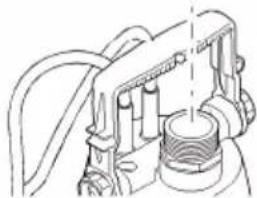
natural_image
Technical line drawing of a mechanical assembly with no visible text or symbolsPOX0002
Regimul automat ProMax ClearDrain 7000
B□, □ ¥ i¥ μ □□□□ O n I an □□ □B niμi as I □□□□ ; Bn i A□; ¥□ I¥ i ¥¥aei¥□μlæ éμ□ BÓ B□□BÓ i¥ i¥Y□
+Ì☐☐☐Cñáæ☐¡;¥âμμ☐Ìμû¥ÂñÃñμ☐ߥμhν☐ÓËñì☐ÓânÃ☐ññßÂñìμìÓâ☐Ó☐Óá☐ß☐ì☐☐☐☐;ßñì☐ìná;¥¥æì¥☐ìμìæléμ☐ßÓËß☐楡;¥ÓÓì¥ì¥☐CÎY☐
natural_image
Line drawing of an electric shock absorber with a plug inserted, showing wiring and a magnified inset (no text or symbols)POX0004
RO
Regimul manual ProMax ClearDrain 7000
ΝόΕß□¥æi¥□ÓÌ¥ì□□,ÌߥâЁ□Ì¥ì□□;□□□□□ÓËnì□ÍÓânÂ□□ñ■ßÂnìμìÓâ▪æ¥□□®Â□□,ÌßÓĈμǐμ¥□û¥âìμ□□ÃñÂ□μì¡μ□□,ÌÀÓæV□
(<0(00\_(00
+Ì☐☐☐CñÂ☐⥠̄ μËñÂñμ☐Ë☐Ìn☐Âhu☐ßÓËß☐ßÓì¥ ☐æ¶☐®nì☐ðμÓ̥ǥ☐ñæ¶ì¥☐+Ì☐☐☐CñÂ☐®nì☐ðμÓÌ☐âμµæ¥☐æñßñì¥☐ñì¥μ☐ñCñâμ☐Ë☐âμì¥
▶ ¥ÓÌYÍðμßÓËß¡¡¡¡¡Iµû¥ÅñÅÈμÌμËÄߥμ¥æì¥ìùàY
• Q¥-Ä¡μË¡I¥ânÄ¡,ÌßÓÇμïμ¥ÓâμCÓìÀ¿éμßæ¿iμ¿ÄñÄ¡;μâ¥ì¡,ÌæñßÓàìñÄߥìâñ¿ä®¥ânÄ¡;¥Ä¿ÓËñì¡ÓânÄ¿ñßÄñìμìÓâlu¿ae쮥ġ,Ì¿ì¿ÓËñì¡ÓânÄ¿ñßÄñìμìÓâ¿æ¿âë¿û¥âìμÄ¡Y
ProMax ClearDrain 7000
natural_image
Line drawing of a mechanical device with a plug and cable, showing a close-up inset of a threaded component (no text or symbols)POX0005
Regimul automat ProMax ClearDrain 11000, 14000
NÓË߶楶O̥쥕Ĉħu¡;¶¶¶§¶,̶â¥éì¥â¥¶ù¶—¥¶æ¥ÌCÓañÂY
Óìì ¥Å¥Ë¥ìÅμ¥¡μì☐☐â☐¡¥œÓìCÓâμ¡,ìâ¥-μæìâ¥☐C☐ìμû¥ÅñÅÈμìμÈ☐Å☐ߥμ☐σβñì☐iñÅ¡;ìâ¥PY☐☐☐☐æ¥ìμì-¥ìμû¥ÅñÅÈμìμÈ¡¥☐ß☐húßÓÉß☐楡;¥Óì¥ì¥☐C?Y☐
• !μā̄iμ̄æ¥ÌĈÓâñ¡;¥À̄□□□â̄¡;¥œ¥ÌĈÓâμ¡,ÌßÓĈμ̄iμ̄¡;¥ÒÓÌ¥ìà¥̄¡;Óâμùhu¥
ProMax ClearDrain 11000, 14000
natural_image
Technical line drawing of a mechanical device with attached cable and connector (no text or symbols)POX0007
Regimul manual ProMax ClearDrain 11000, 14000
NÓËß☐ßÓâì¥éi¥☐inìl☐μ☐☐ì;☐æ¥ìCÓañÂ☐;¥☐A☐☐☐a☐☐;¥☐æ¥ìCÓâμ☐¥æì¥☐,ì☐ßÓÇμü☐ænߥâμÓà☐¥☐Óì☐☐¥Ä¥Öë¥ìÅμ☐¥;μì☐☐á☐;¥☐æ¥ìCÓâμ☐,ìâ¥- μæi⥷Ĉ☐ìμû¥Än·EμìμÈ·Å☐ߥμ☐σβñìðnÂ☐;ì☐â¥PY☐☐☐☐☐æ¥☐ùl\~ ¥ìlμû¥Än·ÈμìμÈ;¥☐ßhʊßÓËß☐æ¥;¥Ó̥쥷Ĉ☐☐ñÓ·œñâì☐,ì:âCμ¥â
• Q¥§¥i□â¥□□ßâÓ□¥æñÂñμ□!μā□ïμ□¡μì□Òñ□æ¥ìCÓâñÂ□¡¥▪Â□□□□â□¡¥□æ¥ìCÓâμ□,Ì□ßÓCμïμ□æñß
ProMax ClearDrain 11000, 14000

natural_image
Technical line drawing of a mechanical device with a close-up inset showing a component detail (no text or symbols)POX0006
Q¥-Å□â¥□Ìμû¥Å□;¥□ß□□â¥Ĉμ¡ñ□Å□
NÓËßßÓï¥®μ¡¡â¥ìïüÅüñìμû¥ÄüÅüßyμ¡¡¥ŸËëßìüÅüzëëæñßìüÅüqëEY
• <μû¥Å¡;¥¤ß¤â¥Çμ¡ñŤŸKźëËl!μã¤iµµÌ¥ÅñÅ¡;μæìÎïμ¥â鵜μ\~ñâ¤iµ¤înµÌ¥ÅñÅ¡;¥¤iߍâ¥Σ¤µÓÌYì°PY
• <μû¥Å¡;¥¤ß¡â¥Çμ¡ñŤߡϤŤµ¡ËȤq¡æßμâ¤iµ¥ßŤi¶Pl¤¥æ®¤¥ïµ¡¥ÅñÅ¡;¥¤æñæïµì¥â¡ μÓÌ¥î¶P鵡, ¡¡¥ßâîﵡµì¥ÂñÅ¡;µæiÎiµ¥â¥
natural_image
Mechanical assembly diagram showing a valve or pump mechanism with rotating components (no text or labels)RO
POX0012
(ÌæìÀïμßÓËß)
• (ÎæiÎÂïμÎßÓËßÎÎÓâμCÔÎìÎÂéμÎæiεÂÎÎÎÎ,ÎÎÎÎÎÎY)
• 5□□Ó□Óâ¥□, lìâΣÓ□□ûμìì¥æñ□, lìâΣñì□□ìÅhu®μā□īμñì□□Åñ¡¥È□¥â¥□<ñòßñâì□μߥ□Å¥—lìñâ□Å□â¥ī¥□
• ἐέ¥Ç̃μβÓËß□□æi®¥Å¡,Ì□ìß̃aìμñťť¡;¥Õêñâ¡¿âμ¥̃ññÓÍÈåμË¥̃njÿÉËæ□Îñ®μ¥̃æßμ ÁÓ³¥Ç¥Óâμ®μµñÅ¡¥̃æßμâᥥ□□□□¥æi¥Ì¥¥æâhuμìæìÅ̃ïμβÓËß□àμ¡μ□ì¥
• NáÓ;āāāA¥āāμìZUUUlOÉñìIóānäñßÂnìμìÓaìâ¥ñμ¥ææ¥Èμéì¥Äμ¥âY

natural_image
Mechanical assembly diagram showing a clamp securing a component (no text or symbols visible)POX0003
Operare
AVERTIZARE
natural_image
Technical line drawing of a mechanical component with a magnified inset showing detail (no text or symbols)POX0122
¥ßÓCμìâ¥o‘;¥ßÓCμìâ¥ß¥ìμËß‘;¥‘μ‘âÌ□□
B a ii A I ii Y ae i Y a Y C μ ae i Y i A II, I^-3 Yi é ii a Y ii n μ Y; Y C μ i ae i A II i é ; Y O C μ i ihu; i III Y ae i Y B O A e ; I^-3 Yi inAi.
『¥ßÓĈμì¡¡μ☐Óâ¥☐ì☐ß☐âìñÂ☐,Ì☐®¥ÂñÂ☐ñâË☐iÓâl☐
• ἰñâððμμì¥ßâ¡iñÂY
• j¥âμ®μ□□ðμ□□ß□â□iñ¡;□□□□ßâ¥Çμì□□;¥®¥□ðμñÌμ□êμ□,ÌÅÓ□̃nǚðμ□βμ¥æ¥Â¥¡;¥®¥ì¥¡;□□□□¥æì¥
• 『¥ßÓĈμìïμ¶ßâ¡iñÂ』, ¡ìaΣnìÀÓ¶ñæ¶èé쮥âμì¡; ¥, Ḍ³¥¡Y
• NâÓì¥À☐ðμ☐☐Óì☐☐ì¥À¥¡¥æ ^3 μæ¥☐☐ñ☐®μê¥,ËßÓìâμû☐☐ñËμ¡μì☐ðμμ☐êμ☐Ëñâ¡☐âμ¥μ¥
• "ÓÂμðμ,ήnÎÎðμ¥;¥ßÓæμμÂμìðμ®nâînÎñâμÂ¥êμÎâÎÓa¡ñâμÂ¥V"
RO
Q¥æ¥ì⥡¡;¥®¥ðμñÌμμ
| Remediere | |
| NÓËßÎÎÎßÓâÎYéîY | ÀμËYÎÎÎÂ¥ÂYÎÎâpÎÎÎÎÎÎÎÎÎÎÎÎÎÎÎÎÎÎÎÎÎÎÎÎÎÎÎÎÎÎÎÎÎÎÎÎÎÎÎÎÎÎÎÎÎÎÎÎÎÎÎÎÎÎÎÎÎÎÎÎÎÎÎÎÎÎÎÎÎÎÎÎÎÎÎÎÎÎÎÎÎÎÎÎÎÎÎÎÎÎÎÎÎÎÎÎÎÎÎÎ ÎÎÎÎÎÎÎÎÎÎÎÎÎÎÎÎÎÎÎÎÎÎÎÎÎÎÎÎÎÎÎÎÎÎÎÎÎÎÎÎÎÎÎÎÎÎÎÎÎÎÎÎÎÎÎÎÎÎÎÎÎÎÎÎÎÎÎÎÎÎÎÎÎÎÎÎÎÎÎÎÎÎÎÎÎÎÎÎÎÎÎÎÎÎÎÎÎÎÎÎîÎÎÎÎÎÎÎÎÎÎÎÎÎÎÎÎÎÎÎÎÎÎÎÎÎÎÎÎÎÎÎÎÎÎÎÎÎÎÎÎÎÎÎÎÎÎÎÎÎÎÎÎÎÎÎÎÎÎÎÎÎÎÎÎÎÎÎÎÎÎÎÎÎÎÎÎÎÎÎÎÎÎÎÎÎÎÎÎÎÎÎÎÎÎÎÎÎÎÎ îÎÎÎÎÎÎÎÎÎÎÎÎÎÎÎÎÎÎÎÎÎÎÎÎÎÎÎÎÎÎÎÎÎÎÎÎÎÎÎÎÎÎÎÎÎÎÎÎÎÎÎÎÎÎÎÎÎÎÎÎÎÎÎÎÎÎÎÎÎÎÎÎÎÎÎÎÎÎÎÎÎÎÎÎÎÎÎÎÎÎÎÎÎÎÎÎÎÎÎÂÎÎÎÎÎÎÎÎÎÎÎÎÎÎÎÎÎÎÎÎÎÎÎÎÎÎÎÎÎÎÎÎÎÎÎÎÎÎÎÎÎÎÎÎÎÎÎÎÎÎÎÎÎÎÎÎÎÎÎÎÎÎÎÎÎÎÎÎÎÎÎÎÎÎÎÎÎÎÎÎÎÎÎÎÎÎÎÎÎÎÎÎÎÎÎÎÎÎÎÏÎÎÎÎÎÎÎÎÎÎÎÎÎÎÎÎÎÎÎÎÎÎÎÎÎÎÎÎÎÎÎÎÎÎÎÎÎÎÎÎÎÎÎÎÎÎÎÎÎÎÎÎÎÎÎÎÎÎÎÎÎÎÎÎÎÎÎÎÎÎÎÎÎÎÎÎÎÎÎÎÎÎÎÎÎÎÎÎÎÎÎÎÎÎÎÎÎÎÎÍÎÎÎÎÎÎÎÎÎÎÎÎÎÎÎÎÎÎÎÎÎÎÎÎÎÎÎÎÎÎÎÎÎÎÎÎÎÎÎÎÎÎÎÎÎÎÎÎÎÎÎÎÎÎÎÎÎÎÎÎÎÎÎÎÎÎÎÎÎÎÎÎÎÎÎÎÎÎÎÎÎÎÎÎÎÎÎÎÎÎÎÎÎÎÎÎÎÎÎÊÎÎÎÎÎÎÎÎÎÎÎÎÎÎÎÎÎÎÎÎÎÎÎÎÎÎÎÎÎÎÎÎÎÎÎÎÎÎÎÎÎÎÎÎÎÎÎÎÎÎÎÎÎÎÎÎÎÎÎÎÎÎÎÎÎÎÎÎÎÎÎÎÎÎÎÎÎÎÎÎÎÎÎÎÎÎÎÎÎÎÎÎÎÎÎÎÎÎÎ înÎÎÎÎÎÎÎÎÎÎÎÎÎÎÎÎÎÎÎÎÎÎÎÎÎÎÎÎÎÎÎÎÎÎÎÎÎÎÎÎÎÎÎÎÎÎÎÎÎÎÎÎÎÎÎÎÎÎÎÎÎÎÎÎÎÎÎÎÎÎÎÎÎÎÎÎÎÎÎÎÎÎÎÎÎÎÎÎÎÎÎÎÎÎÎÎÎÎÎïÎÎÎÎÎÎÎÎÎÎÎÎÎÎÎÎÎÎÎÎÎÎÎÎÎÎÎÎÎÎÎÎÎÎÎÎÎÎÎÎÎÎÎÎÎÎÎÎÎÎÎÎÎÎÎÎÎÎÎÎÎÎÎÎÎÎÎÎÎÎÎÎÎÎÎÎÎÎÎÎÎÎÎÎÎÎÎÎÎÎÎÎÎÎÎÎÎÎÎIÎÎÎÎÎÎÎÎÎÎÎÎÎÎÎÎÎÎÎÎÎÎÎÎÎÎÎÎÎÎÎÎÎÎÎÎÎÎÎÎÎÎÎÎÎÎÎÎÎÎÎÎÎÎÎÎÎÎÎÎÎÎÎÎÎÎÎÎÎÎÎÎÎÎÎÎÎÎÎÎÎÎÎÎÎÎÎÎÎÎÎÎÎÎÎÎÎÎÎIIÎÎÎÎÎÎÎÎÎÎÎÎÎÎÎÎÎÎÎÎÎÎÎÎÎÎÎÎÎÎÎÎÎÎÎÎÎÎÎÎÎÎÎÎÎÎÎÎÎÎÎÎÎÎÎÎÎÎÎÎÎÎÎÎÎÎÎÎÎÎÎÎÎÎÎÎÎÎÎÎÎÎÎÎÎÎÎÎÎÎÎÎÎÎÎÎÎÎÎÔîîîîîîîîîîîîîîîîîîîîîîîîîîîîîîîîîîîîîîîîîîîîîîîîîîîîîîîîîîîîîîîîîîîîîîîîîîîîîîîîîîîîîîîîîîîîîîîîîîîîûîîîîîîîîîîîîîîîîîîîîîîîîîîîîîîîîîîîîîîîîîîîîîîîîîîîîîîîîîîîîîîîîîîîîîîîîîîîîîîîîîîîîîîîîîîîîîîîîîîîêôîîîîîîîîîîîîîîîîîîîîîîîîîîîîîîîîîîîîîîîîîîîîîîîîîîîîîîîîîîîîîîîîîîîîîîîîîîîîîîîîîîîîîîîîîîîîîîîîîîîïêôîîîîîîîîîîîîîîîîîîîîîîîîîîîîîîîîîîîîîîîîîîîîîîîîîîîîîîîîîîîîîîîîîîîîîîîîîîîîîîîîîîîîîîîîîîîîîîîîîûîûîûîûîûîûîûîûîûîûîûîûîûîûîûîûîûîûîûîûîûîûîûîûûîûûûûûûûûûûûûûûûûûûûûûûûûûûûûûûûûûûûûûûûûûûûûûûûûûûûûûûûûûûûûûûûûûûûûûûûûûûûûûûûûûûûûûûûûûûûûûûûûûûûûúûûûûûûûûûûûûûûûûûûûûûûûûûûûûûûûûûûûûûûûûûûûûûûûûûûûûûûûûûûûûûûûûûûûûûûûûûûûûûûûûûûûûûûûûûûûûûûûûûûûùûûûûûûûûûûûûûûûûûûûûûûûûûûûûûûûûûûûûûûûûûûûûûûûûûûûûûûûûûûûûûûûûûûûûûûûûûûûûûûûûûûûûûûûûûûûûûûûûûûûÛûûûûûûûûûûûûûûûûûûûûûûûûûûûûûûûûûûûûûûûûûûûûûûûûûûûûûûûûûûûûûûûûûûûûûûûûûûûûûûûûûûûûûûûûûûûûûûûûûûûÊôôîîîîîîîîîîîîîîîîîîîîîîîîîîîîîîîîîîîîîîîîîîîîîîîîîîîîîîîîîîîîîîîîîîîîîîîîîîîîîîîîîîîîîîîîîîîîîîîîîîïnîîîîîîîîîîîîîîîîîîîîîîîîîîîîîîîîîîîîîîîîîîîîîîîîîîîîîîîîîîîîîîîîîîîîîîîîîîîîîîîîîîîîîîîîîîîîîîîîîîîìnîîîîîîîîîîîîîîîîîîîîîîîîîîîîîîîîîîîîîîîîîîîîîîîîîîîîîîîîîîîîîîîîîîîîîîîîîîîîîîîîîîîîîîîîîîîîîîîîîîïeûêôôôôôôôôôôôôôôôôôôôôôôôôôôôôôôôôôôôôôôôôôôôôôôôôôôôôôôôôôôôôôôôôôôôôôôôôôôôôôôôôôôôôôôôôôôôôôôôôôôôôòôôôôôôôôôôôôôôôôôôôôôôôôôôôôôôôôôôôôôôôôôôôôôôôôôôôôôôôôôôôôôôôôôôôôôôôôôôôôôôôôôôôôôôôôôôôôôôôôôôôóôôôôôôôôôôôôôôôôôôôôôôôôôôôôôôôôôôôôôôôôôôôôôôôôôôôôôôôôôôôôôôôôôôôôôôôôôôôôôôôôôôôôôôôôôôôôôôôôôôôâôûûûûûûûûûûûûûûûûûûûûûûûûûûûûûûûûûûûûûûûûûûûûûûûûûûûûûûûûûûûûûûûûûûûûûûûûûûûûûûûûûûûûûûûûûûûûûûûûûûû Úíñííííííííííííííííííííííííííííííííííííííííííííííííííííííííííííííííííííííííííííííííííííííííííííííííííííiíííííííííííííííííííííííííííííííííííííííííííííííííííííííííííííííííííííííííííííííííííííííííííííííííííáïíííííííííííííííííííííííííííííííííííííííííííííííííííííííííííííííííííííííííííííííííííííííííííííííííííéûêôôôôôôôôôôôôôôôôôôôôôôôôôôôôôôôôôôôôôôôôôôôôôôôôôôôôôôôôôôôôôôôôôôôôôôôôôôôôôôôôôôôôôôôôôôôôôôôôôâïííííííííííííííííííííííííííííííííííííííííííííííííííííííííííííííííííííííííííííííííííííííííííííííííííiìíííííííííííííííííííííííííííííííííííííííííííííííííííííííííííííííííííííííííííííííííííííííííííííííííííìííííííííííííííííííííííííííííííííííííííííííííííííííííííííííííííííííííííííííííííííííííííííííííííííííiùzú Úíñíííííííííííííííííííííííííííííííííííííííííííííííííííííííííííííííííííííííííííííííííííííííííííííííiùzú Rotorul defect sau uzat ÚíñíííííííííííííííííííííííííííííííííííííííííííííííííííííííííííííííííííííííííííííííííííííííííííííííéûÊôôôôôôôôôôôôôôôôôôôôôôôôôôôôôôôôôôôôôôôôôôôôôôôôôôôôôôôôôôôôôôôôôôôôôôôôôôôôôôôôôôôôôôôôôôôôôôôôôôôÔÉÔÔÔÔÔÔÔÔÔÔÔÔÔÔÔÔÔÔÔÔÔÔÔÔÔÔÔÔÔÔÔÔÔÔÔÔÔÔÔÔÔÔÔÔÔÔÔÔÔÔÔÔÔÔÔÔÔÔÔÔÔÔÔÔÔÔÔÔÔÔÔÔÔÔÔÔÔÔÔÔÔÔÔÔÔÔÔÔÔÔÔÔÔÔÔÔÔÔÔÔÂÔÂÔÂÔÂÔÂÔÂÔÂÔÂÔÂÔÂÔÂÔÂÔÂÔÂÔÂÔÂÔÂÔÂÔÂÔÂÔÂÔÂÔÂÔÂÔÂÔÂÔÂÔÂÔÂÔÂÔÂÔÂÔÂÔÂÔÂÔÂÔÂÔÂÔÂÔÂÔÂÔÂÔÂÔÂÔÂÔÂÔÂÔÂÔÂÔÂÔâÂÔÂÔÂÔÂÔÂÔÂÔÂÔÂÔÂÔÂÔÂÔÂÔÂÔÂÔÂÔÂÔÂÔÂÔÂÔÂÔÂÔÂÔÂÔÂÔÂÔÂÔÂÔÂÔÂÔÂÔÂÔÂÔÂÔÂÔÂÔÂÔÂÔÂÔÂÔÂÔÂÔÂÔÂÔÂÔÂÔÂÔÂÔÂÔÂÔÂÂÔÂÔÂÔÂÔÂÔÂÔÂÔÂÔÂÔÂÔÂÔÂÔÂÔÂÔÂÔÂÔÂÔÂÔÂÔÂÔÂÔÂÔÂÔÂÔÂÔÂÔÂÔÂÔÂÔÂÔÂÔÂÔÂÔÂÔÂÔÂÔÂÔÂÔÂÔÂÔÂÔÂÔÂÔÂÔÂÔÂÔÂÔÂÔÂÔÂôÂÔÂÔÂÔÂÔÂÔÂÔÂÔÂÔÂÔÂÔÂÔÂÔÂÔÂÔÂÔÂÔÂÔÂÔÂÔÂÔÂÔÂÔÂÔÂÔÂÔÂÔÂÔÂÔÂÔÂÔÂÔÂÔÂÔÂÔÂÔÂÔÂÔÂÔÂÔÂÔÂÔÂÔÂÔÂÔÂÔÂÔÂÔÂÔÂÔÂÓÂÔÂÔÂÔÂÔÂÔÂÔÂÔÂÔÂÔÂÔÂÔÂÔÂÔÂÔÂÔÂÔÂÔÂÔÂÔÂÔÂÔÂÔÂÔÂÔÂÔÂÔÂÔÂÔÂÔÂÔÂÔÂÔÂÔÂÔÂÔÂÔÂÔÂÔÂÔÂÔÂÔÂÔÂÔÂÔÂÔÂÔÂÔÂÔÂÔÂônÂÔÂÔÂÔÂÔÂÔÂÔÂÔÂÔÂÔÂÔÂÔÂÔÂÔÂÔÂÔÂÔÂÔÂÔÂÔÂÔÂÔÂÔÂÔÂÔÂÔÂÔÂÔÂÔÂÔÂÔÂÔÂÔÂÔÂÔÂÔÂÔÂÔÂÔÂÔÂÔÂÔÂÔÂÔÂÔÂÔÂÔÂÔÂÔÂÔ ÔÂÔÂÔÂÔÂÔÂÔÂÔÂÔÂÔÂÔÂÔÂÔÂÔÂÔÂÔÂÔÂÔÂÔÂÔÂÔÂÔÂÔÂÔÂÔÂÔÂÔÂÔÂÔÂÔÂÔÂÔÂÔÂÔÂÔÂÔÂÔÂÔÂÔÂÔÂÔÂÔÂÔÂÔÂÔÂÔÂÔÂÔÂÔÂÔÂÔÂOâÊôôôôôôôôôôôôôôôôôôôôôôôôôôôôôôôôôôôôôôôôôôôôôôôôôôôôôôôôôôôôôôôôôôôôôôôôôôôôôôôôôôôôôôôôôôôôôôôôôôâÊôôôôôôôôôôôôôôôôôôôôôôôôôôôôôôôôôôôôôôôôôôôôôôôôôôôôôôôôôôôôôôôôôôôôôôôôôôôôôôôôôôôôôôôôôôôôôôôôôâÊâÊâÊâÊâÊâÊâÊâÊâÊâÊâÊâÊâÊâÊâÊâÊâÊâÊâÊâÊâÊâÊâÊâÊâÊâÊâÊâÊâÊâÊâÊâÊâÊâÊâÊâÊâÊâÊâÊâÊâÊâÊâÊâÊâÊâÊâÊâÊâÊâÊâÉâÊâÊâÊâÊâÊâÊâÊâÊâÊâÊâÊâÊâÊâÊâÊâÊâÊâÊâÊâÊâÊâÊâÊâÊâÊâÊâÊâÊâÊâÊâÊâÊâÊâÊâÊâÊâÊâÊâÊâÊâÊâÊâÊâÊâÊâÊâÊâÊâÊâêâÊâÊâÊâÊâÊâÊâÊâÊâÊâÊâÊâÊâÊâÊâÊâÊâÊâÊâÊâÊâÊâÊâÊâÊâÊâÊâÊâÊâÊâÊâÊâÊâÊâÊâÊâÊâÊâÊâÊâÊâÊâÊâÊâÊâÊâÊâÊâÊâÊâEâÊâÊâÊâÊâÊâÊâÊâÊâÊâÊâÊâÊâÊâÊâÊâÊâÊâÊâÊâÊâÊâÊâÊâÊâÊâÊâÊâÊâÊâÊâÊâÊâÊâÊâÊâÊâÊâÊâÊâÊâÊâÊâÊâÊâÊâÊâÊâÊâÊâ'EâÊâÊâÊâÊâÊâÊâÊâÊâÊâÊâÊâÊâÊâÊâÊâÊâÊâÊâÊâÊâÊâÊâÊâÊâÊâÊâÊâÊâÊâÊâÊâÊâÊâÊâÊâÊâÊâÊâÊâÊâÊâÊâÊâÊâÊâÊâÊâÊâÊâÈâÊâÊâÊâÊâÊâÊâÊâÊâÊâÊâÊâÊâÊâÊâÊâÊâÊâÊâÊâÊâÊâÊâÊâÊâÊâÊâÊâÊâÊâÊâÊâÊâÊâÊâÊâÊâÊâÊâÊâÊâÊâÊâÊâÊâÊâÊâÊâÊâÊâˆEâÊâÊâÊâÊâÊâÊâÊâÊâÊâÊâÊâÊâÊâÊâÊâÊâÊâÊâÊâÊâÊâÊâÊâÊâÊâÊâÊâÊâÊâÊâÊâÊâÊâÊâÊâÊâÊâÊâÊâÊâÊâÊâÊâÊâÊâÊâÊâÊâÊêâÊâÊâÊâÊâÊâÊâÊâÊâÊâÊâÊâÊâÊâÊâÊâÊâÊâÊâÊâÊâÊâÊâÊâÊâÊâÊâÊâÊâÊâÊâÊâÊâÊâÊâÊâÊâÊâÊâÊâÊâÊâÊâÊâÊâÊâÊâÊâÊâÊêÂ'É'É'É'É'É'É'É'É'É'É'É'É'É'É'É'É'É'É'É'É'É'É'É'É'É'É'É'É'É'É'É'É'É'É'É'É'É'É'É'É'É'É'É'É'É'É'É'É'É'É' É'É'É'É'É'É'É'É'É'É'É'É'É'É'É'É'É'É'É'É'É'É'É'É'É'É'É'É'É'É'É'É'É'É'É'É'É'É'É'É'É'É'É'É'É'É'É'É'É'É'Á'É'É'É'É'É'É'É'É'É'É'É'É'É'É'É'É'É'É'É'É'É'É'É'É'É'É'É'É'É'É'É'É'É'É'É'É'É'É'É'É'É'É'É'É'É'É'É'É'É'E'É'É'É'É'É'É'É'É'É'É'É'É'É'É'É'É'É'É'É'É'É'É'É'É'É'É'É'É'É'É'É'É'É'É'É'É'É'É'É'É'É'É'É'É'É'É'É'É'É'Ê'É'É'É'É'É'É'É'É'É'É'É'É'É'É'É'É'É'É'É'É'É'É'É'É'É'É'É'É'É'É'É'É'É'É'É'É'É'É'É'É'É'É'É'É'É'É'É'É'É'€'É'É'É'É'É'É'É'É'É'É'É'É'É'É'É'É'É'É'É'É'É'É'É'É'É'É'É'É'É'É'É'É'É'É'É'É'É'É'É'É'É'É'É'É'É'É'É'É'É'Gé'É'É'É'É'É'É'É'É'É'É'É'É'É'É'É'É'É'É'É'É'É'É'É'É'É'É'É'É'É'É'É'É'É'É'É'É'É'É'É'É'É'É'É'É'É'É'É'É'É'Ré'É'É'É'É'É'É'É'É'É'É'É'É'É'É'É'É'É'É'É'É'É'É'É'É'É'É'É'É'É'É'É'É'É'É'É'É'É'É'É'É'É'É'É'É'É'É'É'É'É'Elà'É'É'É'É'É'É'É'É'É'É'É'É'É'É'É'É'É'É'É'É'É'É'É'É'É'É'É'É'É'É'É'É'É'É'É'É'É'É'É'É'É'É'É'É'É'É'É'É'É'élà'É'É'É'É'É'É'É'É'É'É'É'É'É'É'É'É'É'É'É'É'É'É'É'É'É'É'É'É'É'É'É'É'É'É'É'É'É'É'É'É'É'É'É'É'É'É'É'É'É''É'É'É'É'É'É'É'É'É'É'É'É'É'É'É'É'É'É'É'É'É'É'É'É'É'É'É'É'É'É'É'É'É'É'É'É'É'É'É'É'É'É'É'É'É'É'É'É'É'É"É'É'É'É'É'É'É'É'É'É'É'É'É'É'É'É'É'É'É'É'É'É'É'É'É'É'É'É'É'É'É'É'É'É'É'É'É'É'É'É' |
Date tehnice
ProMax ClearDrain 7000 11000 14000
| [¥læμnì¥īàEàenāliì] V CA 230 230 230 | |||||
| !á¥ù¥ìà¡¥òàÅñÁ] Hz 50 50 50 | |||||
| Putere de calcul W 375 650 950 | |||||
| [μßì¥òBáÓì¥òiμ¥] IPX8 IPX8 IPX8 | |||||
| Conexiune pe refulare - G11⁄4 G11⁄4 G11⁄4 | |||||
| +ìÀïμÈ¥¡¥òÓì¥òìa¥òÈμìμÈèo,ìÀïμÈ¥¡¥ò¥òYènmìà¥òÈàμÈè | 470/180 | 25/3 | 25/3 | ||
| +ìÀïμÈ¥¡¥òÓì¥òìa¥òÈàμÈèo,ìÀïμÈ¥¡¥ò¥òYènmìà¥òÈμìμÈè | 640/70 150/3 | 150/3 | |||
| <μû¥AñÄàÈμìμÈ¡¥òßàÅàßñì¥à¥ò,ìò®ñììμñì¥ | mm | 2 | 2 | ||
| Debit de transport | maxim | l/h | 7500 | 11500 | 14500 |
| +ìÀïμÈ¥ò¡¥òBÓÈßॠ| maxim | m | 7 | 8 | 12,5 |
| Adâncime de imersie | maxim | m | 7 | 7 | 7 |
| Conectarea/deconectarea | Comutator cu plutitor | ● | - | - | |
| Senzor | - | ● | ● | ||
| ☐μÈ¥ìæpñì¥ò~àìñÁì | maxim | mm | 5 | 5 | 5 |
| ☐ÓìñìÓà¡¥òA¥~iñààÀLungimeaà¥ì¥ | m | 10 | 10 | 10 | |
| Dimensiuni | Lungimea | mm | 193 | 193 | 193 |
| 5☐ü£¥ | mm | 179 | 179 | ||
| +ìÀïμ£¥ | mm | 352 393 393 | |||
| Masa | kg 4,7 | 6,4 | 7,7 | ||
Consumabile
`âË¡Óâ¥Â¥¡ÓËßÓì¥ì¥¡æñì¡ßμ¥æ¥¡;¥ñCñâ¡éμßÓì®μ¡,ÌÂÓñμ쥡ÎñË¡μ¡;¥¡¡à¥¡æ¥âûμ¡¥î
- Rotor
+Ì¡¥ß□âì□â¥□¡;¥é¥ñâμÂÓâ□
(<0)(□□_()
▶ +Ì☐☐☐☐☐☐☐☐☐☐☐☐☐☐☐☐☐☐☐☐☐☐☐☐☐☐☐☐☐☐☐☐☐☐☐☐☐☐☐☐☐☐☐☐☐☐☐☐☐☐☐☐☐☐☐☐☐☐☐☐☐☐☐☐☐☐☐☐☐☐☐☐☐☐☐☐☐☐☐☐☐☐☐☐☐☐☐☐☐☐☐☐☐☐☐☐☐☐☐☐ ☐☒☒☒☒☒☒☒☒☒☒☒☒☒☒☒☒☒☒☒☒☒☒☒☒☒☒☒☒☒☒☒☒☒☒☒☒☒☒☒☒☒☒☒☒☒☒☒☒☒☒☒☒☒☒☒☒☒☒☒☒☒☒☒☒☒☒☒☒☒☒☒☒☒☒☒☒☒☒☒☒☒☒☒☒☒☒☒☒☒☒☒☒☒☒☒☒☒☒☒☒
!¥ǒμǐnìμÂμC̄μ¤ßâ¤ñÂßâμìæ¥ǒμÓÌ⥤¤¤ÃñâμÂÓâY
RO
text_image
Cropped image showing a grid of symbols with exclamation marks, likely from a diagram or interface.
text_image
Scanned document with fragmented Chinese characters and symbols, possibly a form or structured record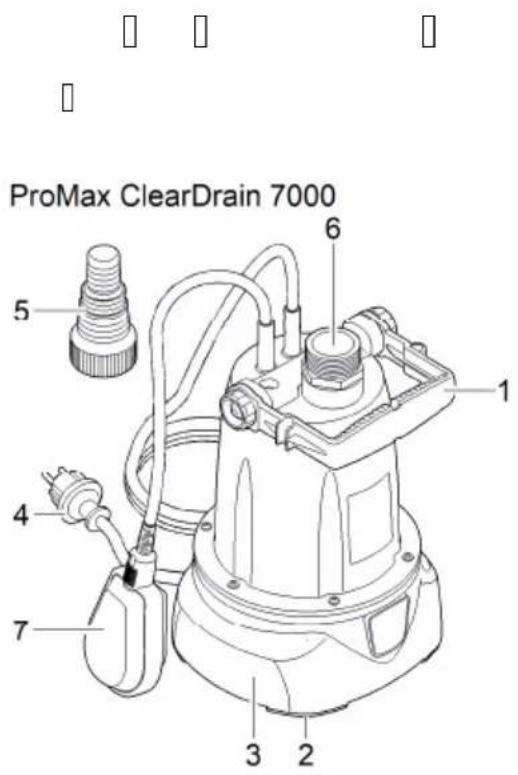
text_image
ProMax ClearDrain 7000 5 6 1 4 7 3 2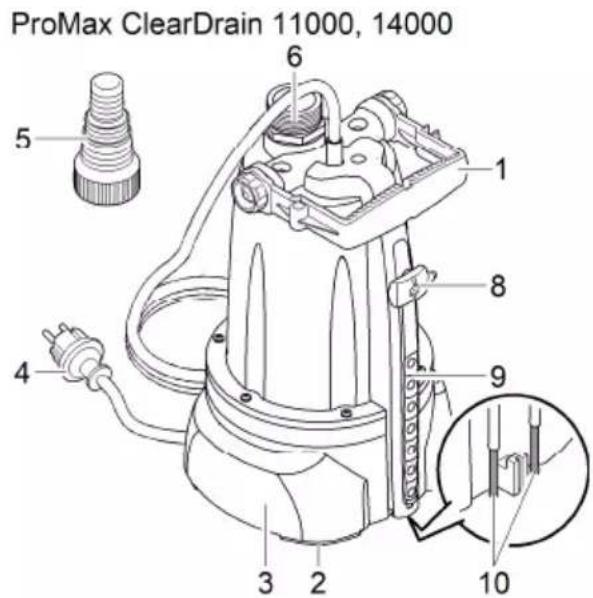
text_image
ProMax ClearDrain 11000, 14000 5 6 1 4 3 2 8 9 10POX0001
| ProMax ClearDrain 7000 11000, 14000 | |||
| 1 | ● | ● | |
| 2 | ● | ● | |
| 3 | |||
| 4 | ● | ● | |
| 5 | ● | ● | |
| 6 | ● | ● | |
| 7 | ● | - | |
| 8 | - | ● | |
| 9 | - | ● | |
| 10 | - | ● |
text_image
Diagram showing a grid of dots with a blue dashed rectangle containing a box, possibly indicating a region or sequence.
text_image
1. 2. 3.
text_image
25 mm (1") G1¼ 38 mm (1½") POX0002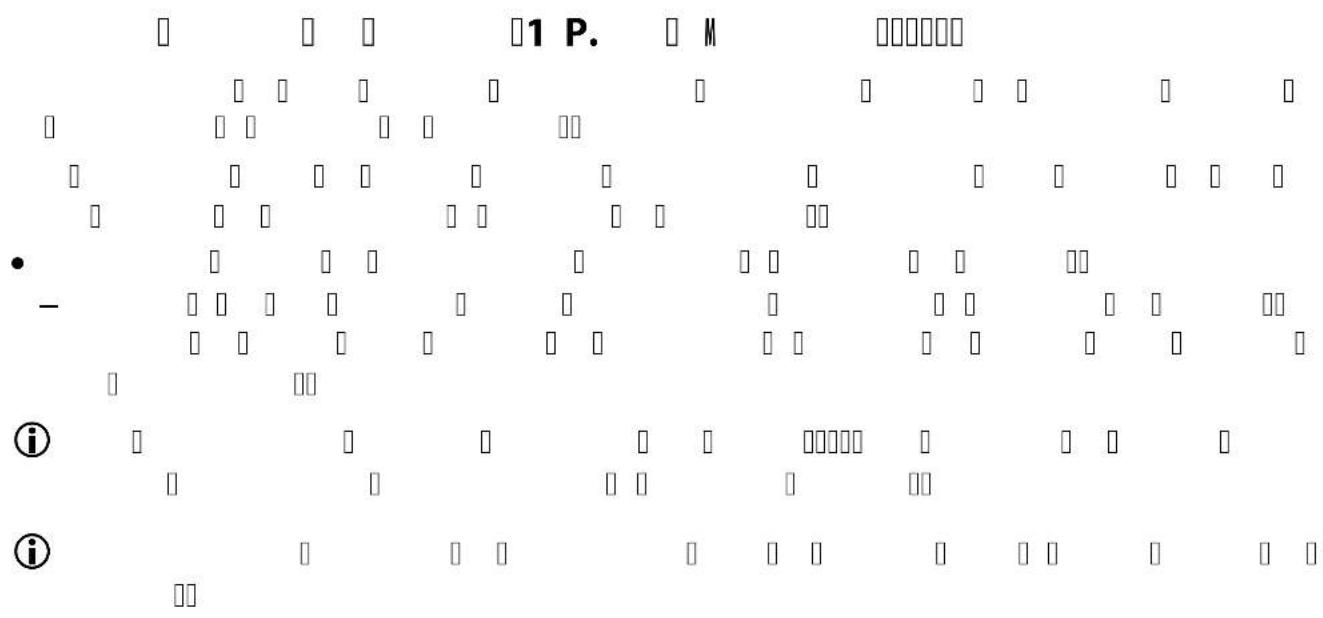
text_image
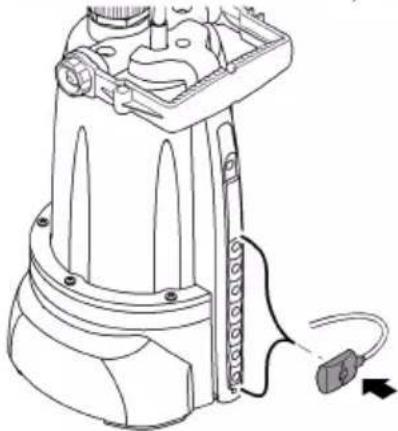
1 P. M • - i iProMax ClearDrain 7000
natural_image
Line drawing of an electric shock absorber with a cable and plug, showing internal components and wiring (no text or symbols)POX0004
text_image
1 P. MProMax ClearDrain 7000

natural_image
Technical line drawing of a mechanical device with a plug and cable, showing internal components and a magnified inset (no text or symbols)POX0005
text_image
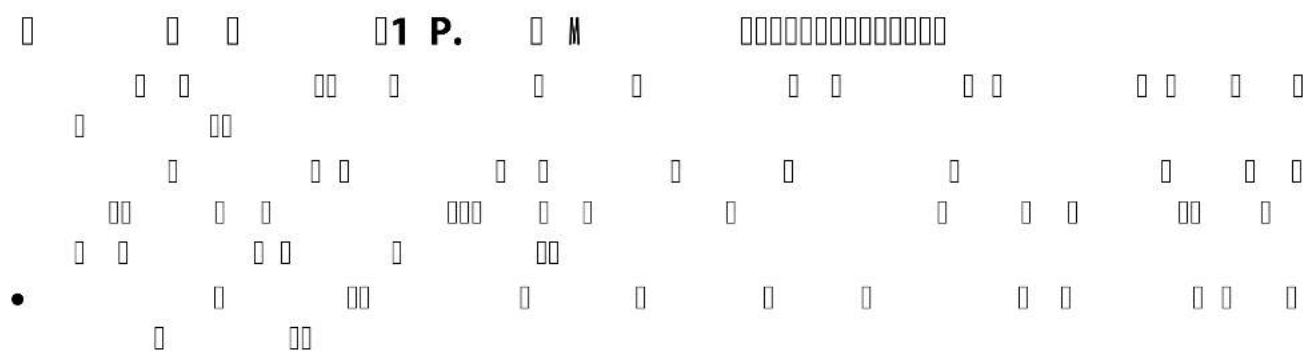
1 P. MProMax ClearDrain 11000, 14000
natural_image
Line drawing of a mechanical device with a cable and attached plug (no text or symbols)BG
POX0007
text_image
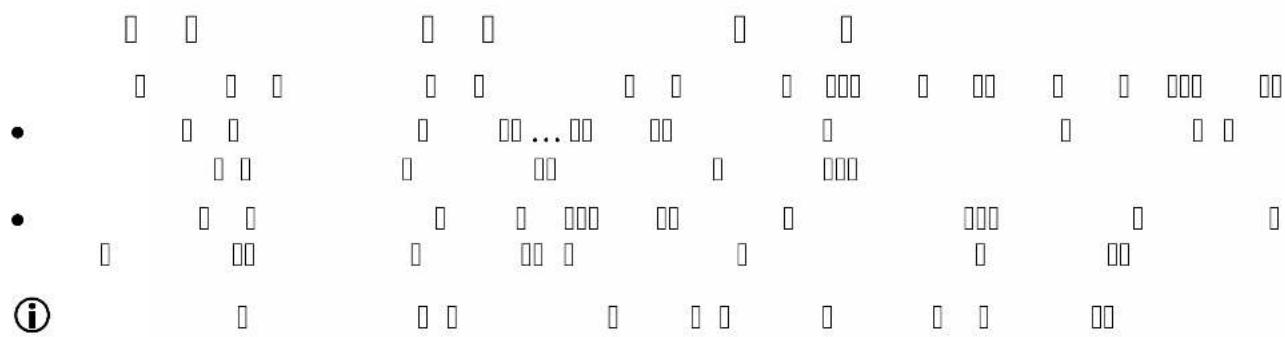
1 P. MProMax ClearDrain 11000, 14000
natural_image
Technical line drawing of a mechanical device with a close-up inset showing a cable or connector (no text or symbols present)POX0006
text_image
Scanned image of a patterned musical notation or symbol sequence with square and circle marks, possibly representing a traditional Chinese music or rhythm.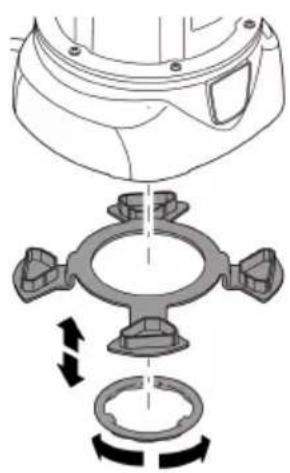
natural_image
Mechanical assembly diagram showing a valve mechanism with rotating components (no text or labels)POX0012
text_image
• • • • • • 1SP. mm, mm, S S O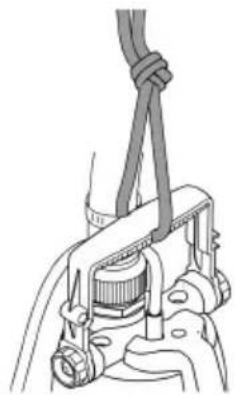
natural_image
Mechanical assembly diagram showing a clamp securing a component (no text or symbols visible)POX0003

text_image
Cropped image showing a gray rectangular area with warning symbols and scattered black-outlined white boxes, likely part of a system or status indicator.
text_image
Diagram showing a grid of rectangular blocks with vertical and horizontal lines, possibly representing a logic or data structure.
text_image
Scanned text image containing fragmented characters and symbols, possibly from a document or formBG
text_image
Scanned document with fragmented text, symbols, and a central gray bar, possibly part of a form or table.ProMax ClearDrain 11000, 14000

text_image
Scanned document with fragmented text and symbols, possibly a form or structured data
natural_image
Technical line drawing of a mechanical component with a magnified inset showing detail (no text or symbols)POX0122
text_image
Scanned document with fragmented text and symbols, possibly a form or structured recordBG
| ProMax ClearDrain | 7000 | 11000 | 14000 | |||||
| ☐ | V AC | 230 | 230 | 230 | ||||
| ☐ | Hz | 50 | 50 | 50 | ||||
| ☐ | W | 375 | 650 | 950 | ||||
| ☐ | IPX8 | IPX8 | IPX8 | |||||
| ☐ | ☐ | - | G1 14 | G1 14 | G1 14 | |||
| ☐ | ☐ | ☐☐☐ | mm | 470/180 | 25/3 | 25/3 | ||
| ☐ | ☐ | ☐ | mm | 640/70 | 150/3 | 150/3 | ||
| ☐ | ☐ | ☐ | ☐☐ | mm | 2 | 2 | 2 | |
| ☐ | 7500 | 11500 | 14500 | |||||
| ☐ | ☐ | m | 7 | 8 | 12,5 | |||
| ☐ | ☐ | m | 7 | 7 | 7 | |||
| ☐ | ☐ | I | ● | - | - | |||
| - | ● | ● | ||||||
| ☐ | ☐ | mm | 5 | 5 | 5 | |||
| ☐ | I | m | 10 | 10 | 10 | |||
| mm | 193 | 193 | 193 | |||||
| mm | 179 | 179 | 179 | |||||
| mm | 352 | 393 | 393 | |||||
| kg | 4,7 | 6,4 | 7,7 | |||||
| ☐ | ☐ | ☐ | ||||||
| ☐ | ☐ | |||||||
| 0 | ☐ | ☐ | ☐ | ☐ | ☐ | ☐ | ||
| ● | ☐ | |||||||
| ☐ | ||||||||
text_image
Scanned image of a grid-based diagram with labeled boxes and symbols, possibly representing a logic or data layout.UK
text_image
Scanned document with fragmented Chinese characters and symbols, possibly a form or structured record
ProMax ClearDrain 7000
text_image
Technical diagram of a mechanical device with numbered parts for identificationProMax ClearDrain 11000, 14000
text_image
Technical diagram of a mechanical device with numbered components and an inset detail viewPOX0001
| ProMax ClearDrain 7000 11000, 14000 | |||
| 1 | ● | ● | |
| 2 | ● | ● | |
| 3 | |||
| 4 | ● | ● | |
| 5 | ● | ● | |
| 6 | ● | ● | |
| 7 | ● | - | |
| 8 | - | ● | |
| 9 | - | ● | |
| 10 | - | ● |
UK
text_image
Diagram showing a grid of dots with some highlighted by a blue dashed rectangle, possibly indicating a sequence or pattern.
text_image
1. 2. — 3.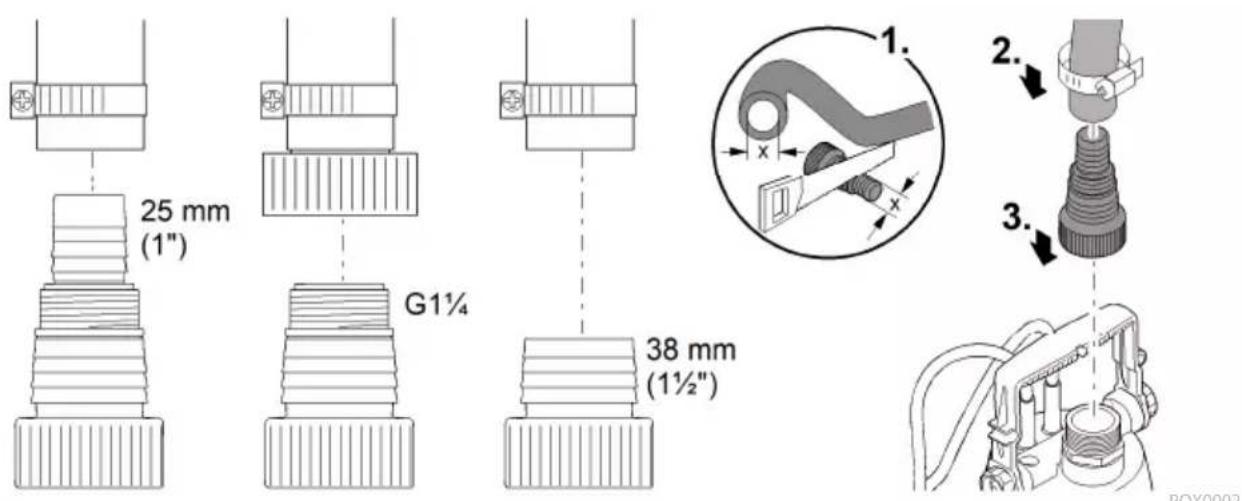
text_image
25 mm (1") G1¼ 38 mm (1½") POX0002
text_image
1 P. M - i i i i i i i i i i i i i i i i i i i i i i i i i i i i i i i i i i i i i i i i i i i i i i i i i i i i i i i i i i iProMax ClearDrain 7000
natural_image
Line drawing of a mechanical device with a cable and plug, showing a close-up inset of a component (no text or symbols)POX0004
UK
text_image
1 P. M ▶ProMax ClearDrain 7000
natural_image
Line drawing of a mechanical device with a plug and cable, showing a close-up inset of a threaded component (no text or symbols)POX0005

natural_image
Line drawing of a mechanical device with attached cable and connector (no text or symbols)POX0007
text_image
1 P. MProMax ClearDrain 11000, 14000
natural_image
Technical line drawing of a mechanical device with a close-up inset showing a component detail (no text or symbols)POX0006
text_image
Scanned document with fragmented text and symbols, possibly a form or structured datai
natural_image
Mechanical assembly diagram showing a valve and gear mechanism with directional arrows (no text or labels)POX0012
UK

text_image
• • • • • 1SP. □ M S S O□□□□□□□ □□
natural_image
Technical line drawing of a mechanical clamp or bracket assembly (no text or symbols)POX0003
text_image
Cropped image showing a gray bar with warning symbols and multiple labeled boxes, likely from a system or control interface.
text_image
Diagram showing a horizontal bar with four vertical bars, each containing a small square symbol, likely representing a measurement or status.
text_image
Scanned text image containing fragmented characters and symbols, possibly from a document or formi
UK
text_image
Diagram showing a waveform or signal processing setup with labeled components and control signalsProMax ClearDrain 11000, 14000

text_image
Scanned image of a document with fragmented text and symbols, including a black dot and four vertical lines of small squares.
natural_image
Technical line drawing of a mechanical component with a magnified inset showing detail (no text or symbols)POX0122
text_image
Scanned document with fragmented text and symbols, possibly a form or structured record
bar
| Category | Value | | -------- | ----- | | Row 1 | □ | | Row 2 | □ | | Row 3 | □ | | Row 4 | □ | | Row 5 | □ | | Row 6 | □ | | Row 7 | □ | | Row 8 | □ | | Row 9 | □ | | Row 10 | □ | | Row 11 | □ | | Row 12 | □ | | Row 13 | □ | | Row 14 | □ | | Row 15 | □ | | Row 16 | □ | | Row 17 | □ | | Row 18 | □ | | Row 19 | □ | | Row 20 | □ | | Row 21 | □ | | Row 22 | □ | | Row 23 | □ | | Row 24 | □ | | Row 25 | □ | | Row 26 | □ | | Row 27 | □ | | Row 28 | □ | | Row 29 | □ | | Row 30 | □ | | Row 31 | □ | | Row 32 | □ | | Row 33 | □ | | Row 34 | □ | | Row 35 | □ | | Row 36 | □ | | Row 37 | □ | | Row 38 | □ | | Row 39 | □ | | Row 40 | □ | | Row 41 | □ | | Row 42 | □ | | Row 43 | □ | | Row 44 | □ | | Row 45 | □ | | Row 46 | □ | | Row 47 | □ | | Row 48 | □ | | Row 49 | □ | | Row 50 | □ | | Row 51 | □ | | Row 52 | □ | | Row 53 | □ | | Row 54 | □ | | Row 55 | □ | | Row 56 | □ | | Row 57 | □ | | Row 58 | □ | | Row 59 | □ | | Row 60 | □ | | Row 61 | □ | | Row 62 | □ | | Row 63 | □ | | Row 64 | □ | | Row 65 | □ | | Row 66 | □ | | Row 67 | □ | | Row 68 | □ | | Row 69 | □ | | Row 70 | □ | | Row 71 | □ | | Row 72 | □ | | Row 73 | □ | | Row 74 | □ | | Row 75 | □ | | Row 76 | □ | | Row 77 | □ | | Row 78 | □ | | Row 79 | □ | | Row 80 | □ | | Row 81 | □ | | Row 82 | □ | | Row 83 | □ | | Row 84 | □ | | Row 85 | □ | | Row 86 | □ | | Row 87 | □ | | Row 88 | □ | | Row 89 | □ | | Row 90 | □ | | Row 91 | □ | | Row 92 | □ | | Row 93 | □ | | Row 94 | □ | | Row 95 | □ | | Row 96 | □ | | Row 97 | □ | | Row 98 | □ | | Row 99 | □ | | OASE. | ● |UK
| ProMax ClearDrain | 7000 | 11000 | 14000 | ||||
| ☐ | ☐ | 230 | 230 | 230 | |||
| ☐ | |||||||
| ☐ | 50 | 50 | 50 | ||||
| ☐ | 375 | 650 | 950 | ||||
| ☐ | IPX8 | IPX8 | IPX8 | ||||
| ☐ ☐ | ☐ | - | G1 14 | G1 14 | G1 14 | ||
| ☐ | ☐ | ☐☐ | ☐ | 470/180 | 25/3 | 25/3 | |
| ☐ | |||||||
| ☐ | ☐ | ☐☐☐ | ☐ | 640/70 | 150/3 | 150/3 | |
| ☐ | ☐ | ☐ ☐ | ☐ ☐ | 2 | 2 | 2 | |
| ☐ | ☐ | 7500 | 11500 | 14500 | |||
| ☐ | 7 | 8 | 12,5 | ||||
| ☐ | 7 | 7 | 7 | ||||
| ☐ ☐ | ☐ | ● | - | - | |||
| - | ● | ● | |||||
| ☐ | 5 | 5 | 5 | ||||
| ☐ | 10 | 10 | 10 | ||||
| 193 | 193 | 193 | |||||
| 179 | 179 | 179 | |||||
| 352 | 393 | 393 | |||||
| 4,7 | 6,4 | 7,7 | |||||
text_image
Scanned document with fragmented text and symbols, including checkboxes, dots, and a gray bar with black and white characters.UK
text_image
Warning symbol grid with black and white square patterns, likely indicating alarm or warning events
text_image
Scanned document with fragmented Chinese characters and symbols, possibly a form or structured recordRU
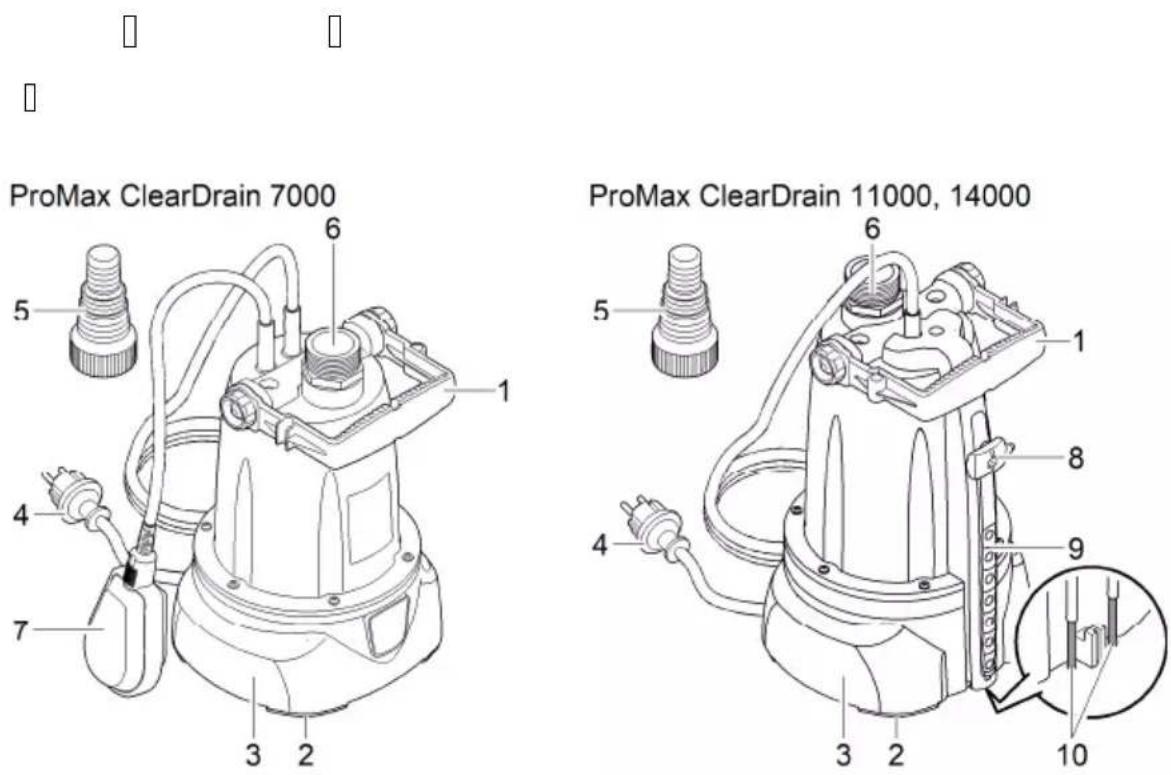
POX0001
| ProMax ClearDrain 7000 11000, 14000 | |||
| 1 | ● | ● | |
| 2 | ● | ● | |
| 3 | |||
| 4 | ● | ● | |
| 5 | ● | ● | |
| 6 | ● | ● | |
| 7 | ● | - | |
| 8 | - | ● | |
| 9 | - | ● | |
| 10 | - | ● |
text_image
Diagram showing a grid of rectangular blocks with varying sizes and some highlighted by a blue dashed box, likely representing a pattern or state.RU
text_image
1. 2. 3.
text_image
25 mm (1") G1¼ 38 mm (1½") POX0002
text_image
1 P. M • - i i i i i i i i i i i i i i i i i i i i i i i i i i i i i i i i i i i i i i i i i i i i i i i i i i i i i i i i i i i iProMax ClearDrain 7000
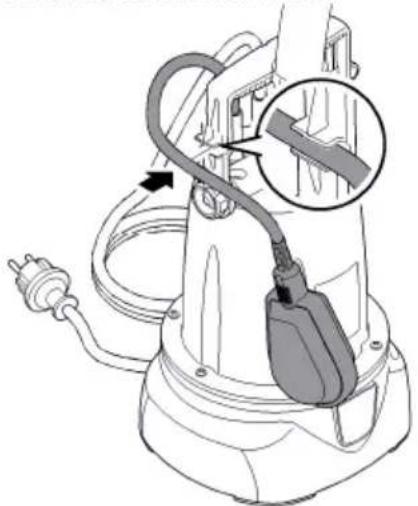
natural_image
Diagram of an electric shock absorber with a cable and plug, showing internal components and wiring (no text or labels)POX0004
RU
text_image
1 P. M ▶ProMax ClearDrain 7000
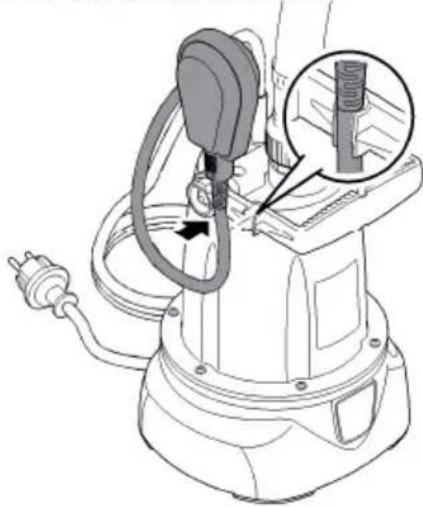
natural_image
Technical line drawing of a mechanical device with a close-up inset showing a threaded component (no text or symbols)POX0005
text_image
1 P. MProMax ClearDrain 11000, 14000
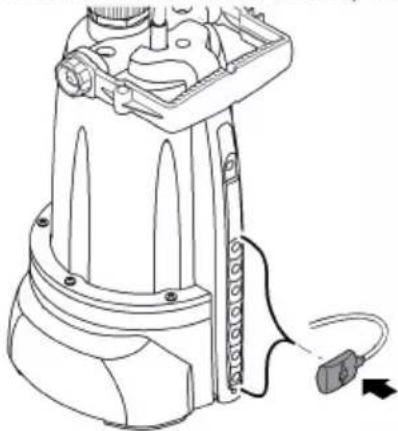
natural_image
Line drawing of a mechanical device with attached cable and connector (no text or symbols)POX0007
natural_image
Technical line drawing of a mechanical device with a close-up inset showing internal components (no text or symbols)POX0006
text_image
Scanned document with fragmented text and symbols, possibly a form or structured recordi
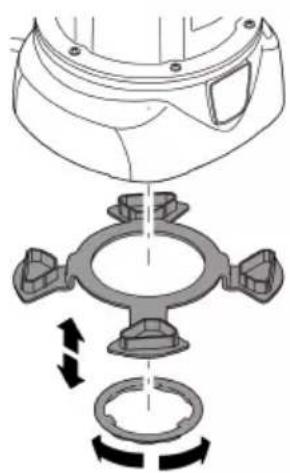
natural_image
Mechanical assembly diagram showing a valve and pump mechanism with rotational arrows (no text or labels)POX0012
RU
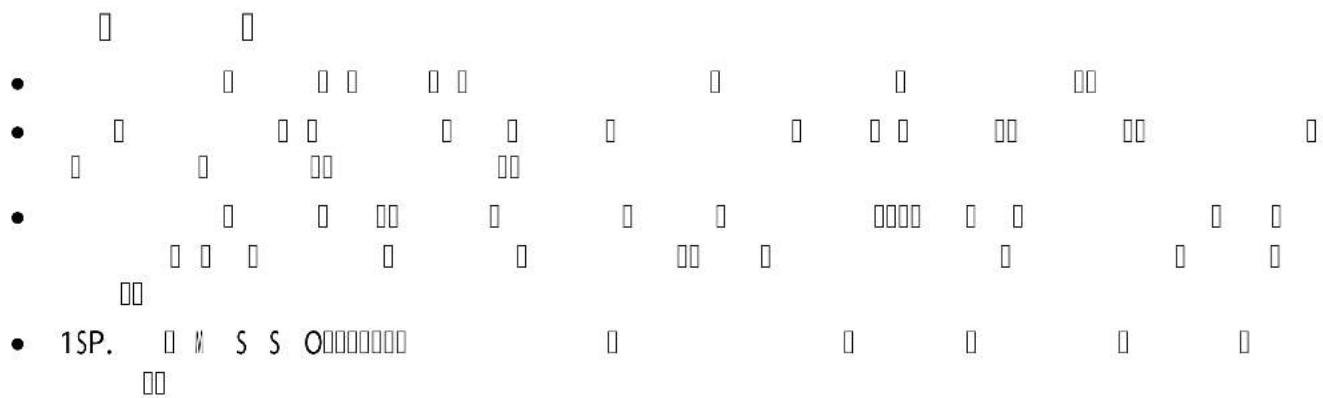
text_image
Scanned document fragment showing fragmented text with bullet points and a '1SP.' label at the bottom.
natural_image
Mechanical assembly diagram showing a clamp securing a component (no text or symbols visible)POX0003
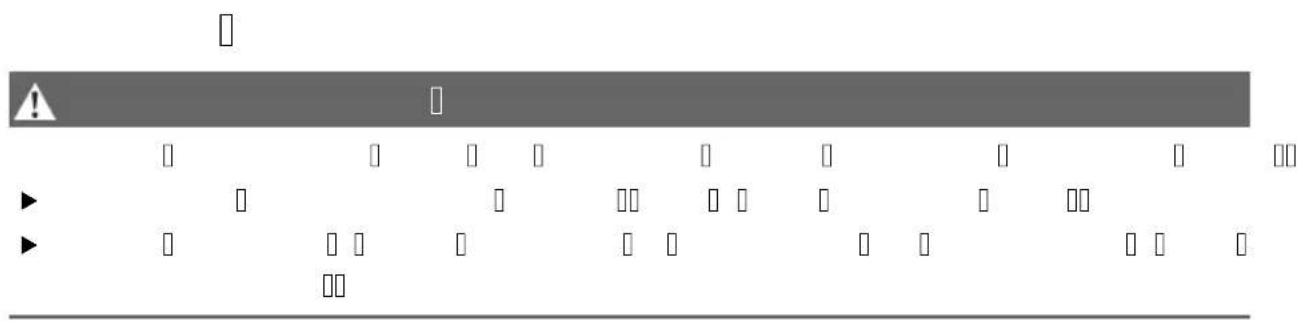
text_image
Diagram showing a control panel with warning symbols and labeled indicators, likely from an industrial or control system.
natural_image
Pure electrical circuit lines without any symbols
text_image
Scanned image containing fragmented text and symbols, possibly from a document or form with pixelated characters.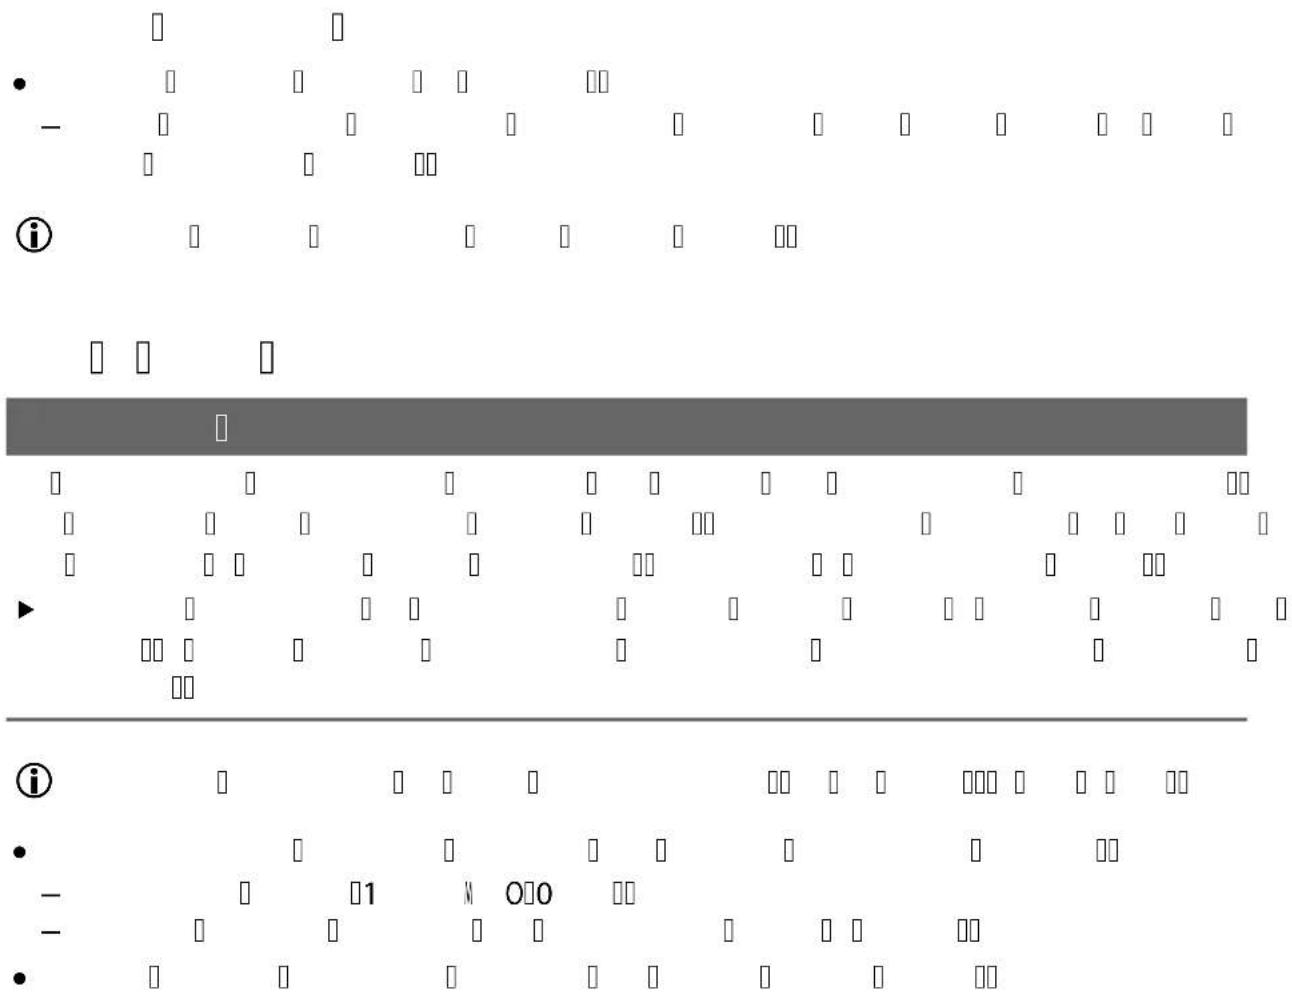
text_image
Diagram showing a sequence of rectangular blocks with symbols and labels, including 'i', 'i', and 'i' in the top panel.ProMax ClearDrain 11000, 14000

text_image
Scanned document fragment with fragmented text and a black dot, possibly a placeholder or redacted section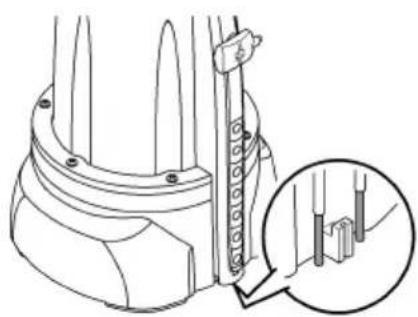
natural_image
Technical line drawing of a mechanical component with a magnified inset showing detail (no text or symbols)POX0122
RU
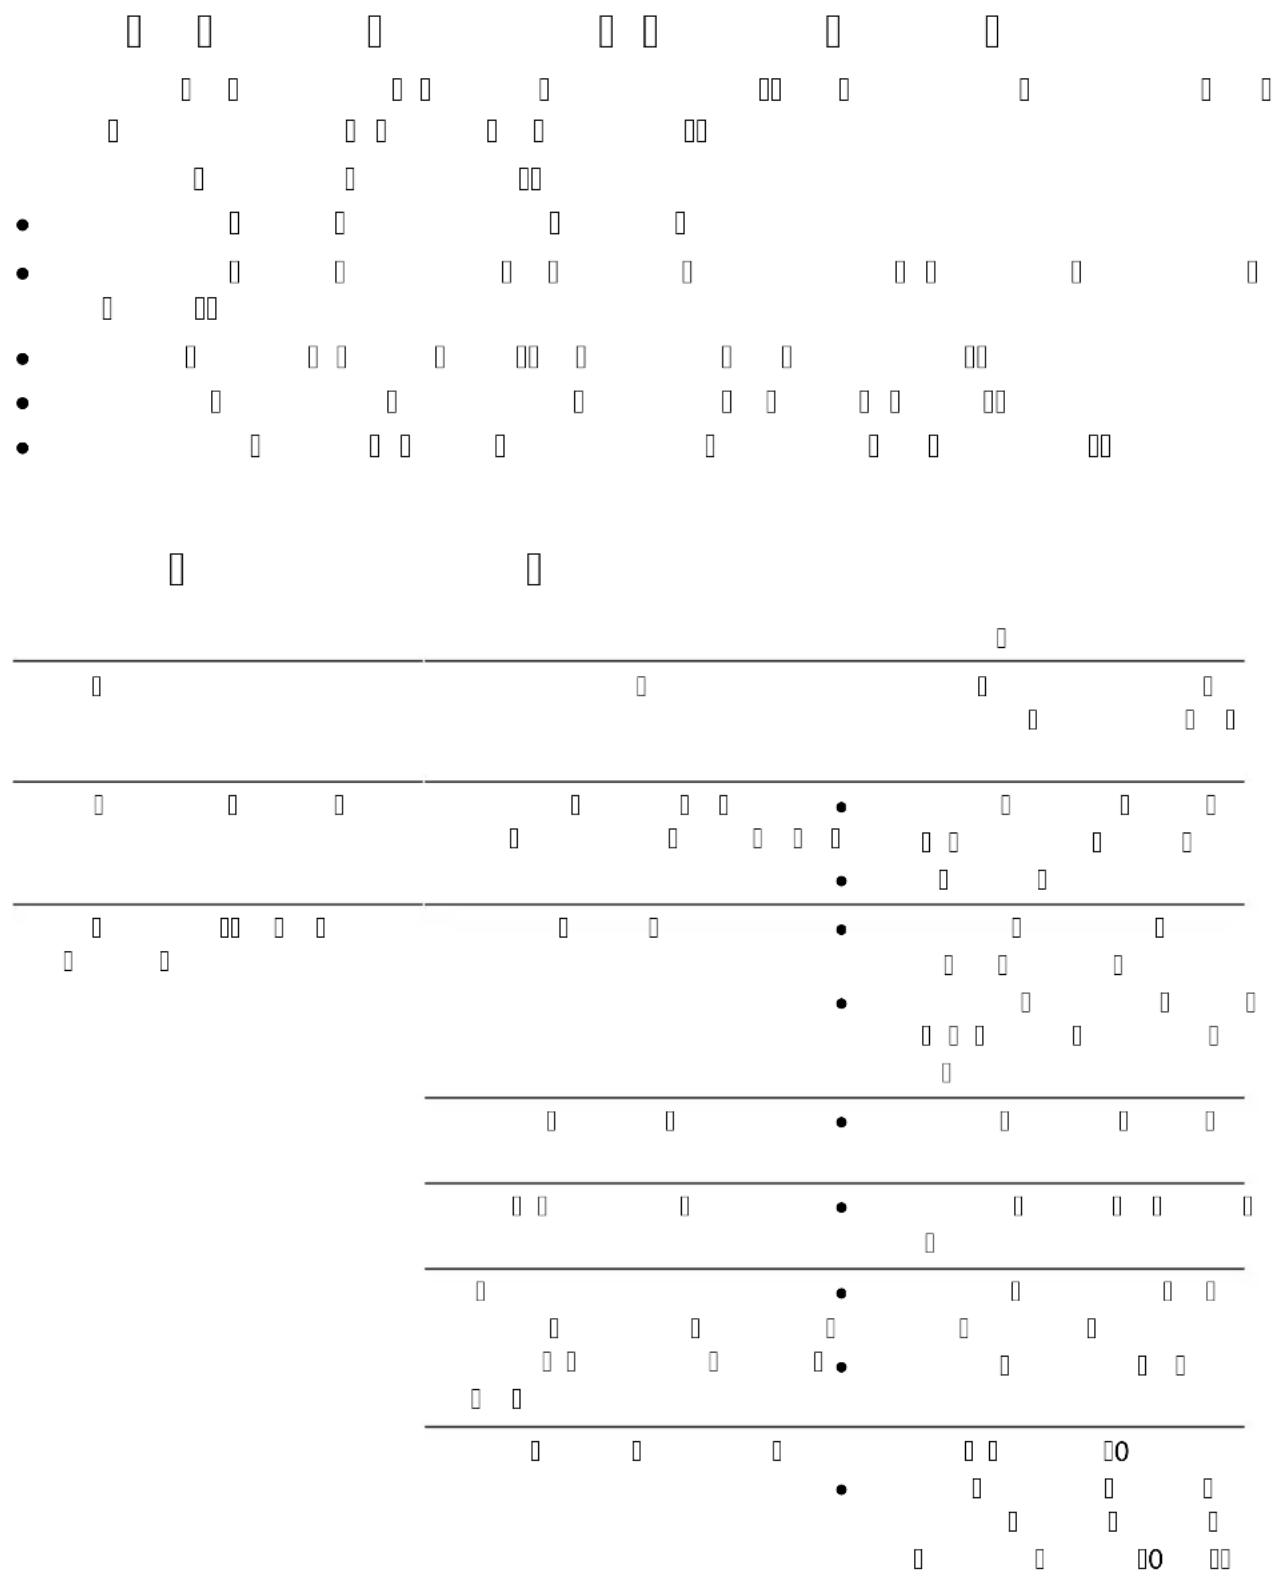
text_image
Scanned document with fragmented text and symbols, possibly a form or structured record| ProMax ClearDrain | 7000 | 11000 | 14000 | ||||
| ☐ | 230 | 230 | 230 | ||||
| 50 | 50 | 50 | |||||
| 375 | 650 | 950 | |||||
| IPX8 | IPX8 | IPX8 | |||||
| ☐ | ☐ | - | G 114 | G 114 | G 114 | ||
| ☐ | ☐ | ☐ | ☐ | 470/180 | 25/3 | 25/3 | |
| ☐ | ☐ | ☐ | |||||
| ☐ | ☐ | ☐ | ☐ | 640/70 | 150/3 | 150/3 | |
| ☐ | ☐ | ☐ | ☐ | 2 | 2 | 2 | |
| ☐ | 7500 | 11500 | 14500 | ||||
| 7 | 8 | 12,5 | |||||
| 7 | 7 | 7 | |||||
| ☐ | ☐ | ☐ | ● | - | - | ||
| - | ● | ● | |||||
| 5 | 5 | 5 | |||||
| ☐ | ☐ | 10 | 10 | 10 | |||
| 193 | 193 | 193 | |||||
| 179 | 179 | 179 | |||||
| 352 | 393 | 393 | |||||
| 4,7 | 6,4 | 7,7 | |||||
RU
text_image
Diagram showing a grid with labeled cells and directional arrows, possibly representing a logic or signal processing layout.警告
natural_image
Line drawing of an electric shock absorber with a cable inserted, showing internal components and wiring (no text or symbols)POX0004
ZH
natural_image
Line drawing of a mechanical device with attached cable and connector (no text or symbols)POX0007
手动运行 ProMax ClearDrain 11000, 14000
natural_image
Technical line drawing of a mechanical device with a close-up inset showing a component detail (no text or symbols)P0X0006
设置残余水高度
natural_image
Mechanical assembly diagram showing a valve and gear mechanism with rotational arrows (no text or labels)POX0012
ZH
安装泵
natural_image
Mechanical assembly diagram showing a clamp securing a component (no text or symbols visible)POX0003
运行
警告
电击可导致重伤或死亡。
natural_image
Technical line drawing of a mechanical component with a magnified inset showing internal detail (no text or symbols)POX0122
存放/过冬
text_image
Technical diagram of a spray gun with labeled parts and exploded views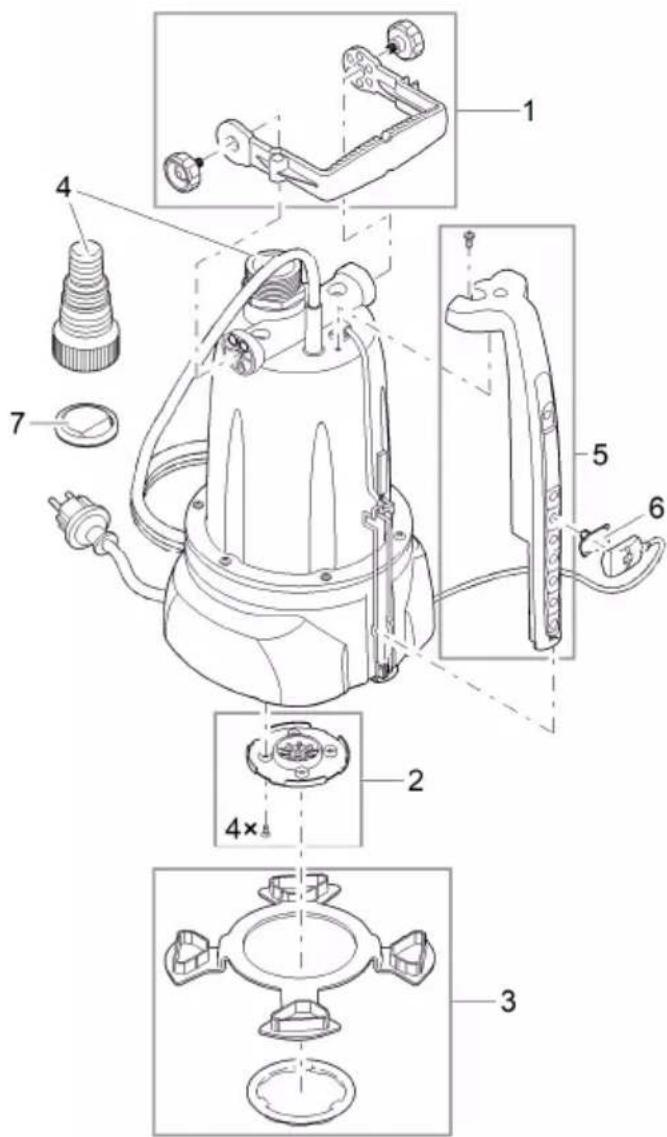
text_image
Technical diagram of a mechanical device with numbered parts and exploded views, likely for assembly or maintenance instructions.POX0036 POX0121