JumpingJet Rainbow Star Erweiterungsset - Water pump OASE - Free user manual and instructions
Find the device manual for free JumpingJet Rainbow Star Erweiterungsset OASE in PDF.

| Product type | Add-On kit for illuminated fountain |
| Brand | OASE |
| Model | JumpingJet Rainbow Star extension set |
| Category | Water pump (accessory) |
| Control unit power supply | 230 V~ / 50 Hz |
| Output voltage | 12 V~ |
| Recommended pump | OASE Neptun 6000 |
| Maximum number of jets | 2 (connected simultaneously) |
| Programs | 5 basic programs with remote control |
| Remote control range | Up to 80 m (without obstacles) |
| Enclosure protection | IP X4 (with protective cover) |
| Recommended water depth | At least 300 mm at impact point |
| Minimum distance control unit - water | 2 m (according to installation standards) |
| Maintenance | Regular cleaning of filter and strainer |
| Winter storage | Frost-resistant, store in a dry place |
| Delivery contents | Jumping Jet Rainbow Star, 5 m hose, Y-distributor, filters, clamps, Allen key, etc. |
Frequently Asked Questions - JumpingJet Rainbow Star Erweiterungsset OASE
User questions about JumpingJet Rainbow Star Erweiterungsset OASE
0 question about this device. Answer the ones you know or ask your own.
Ask a new question about this device
Download the instructions for your Water pump in PDF format for free! Find your manual JumpingJet Rainbow Star Erweiterungsset - OASE and take your electronic device back in hand. On this page are published all the documents necessary for the use of your device. JumpingJet Rainbow Star Erweiterungsset by OASE.
USER MANUAL JumpingJet Rainbow Star Erweiterungsset OASE
natural_image
Black-and-white photo of a jet engine spraying water with visible exhaust plume and spray, no text or symbols presentJumpingJet Rainbow Star Set/Add-On Set
EN Operating instructions
FR Notice d'emploi
natural_image
Black industrial electric shaver with attached cable and power cord, no visible text or symbols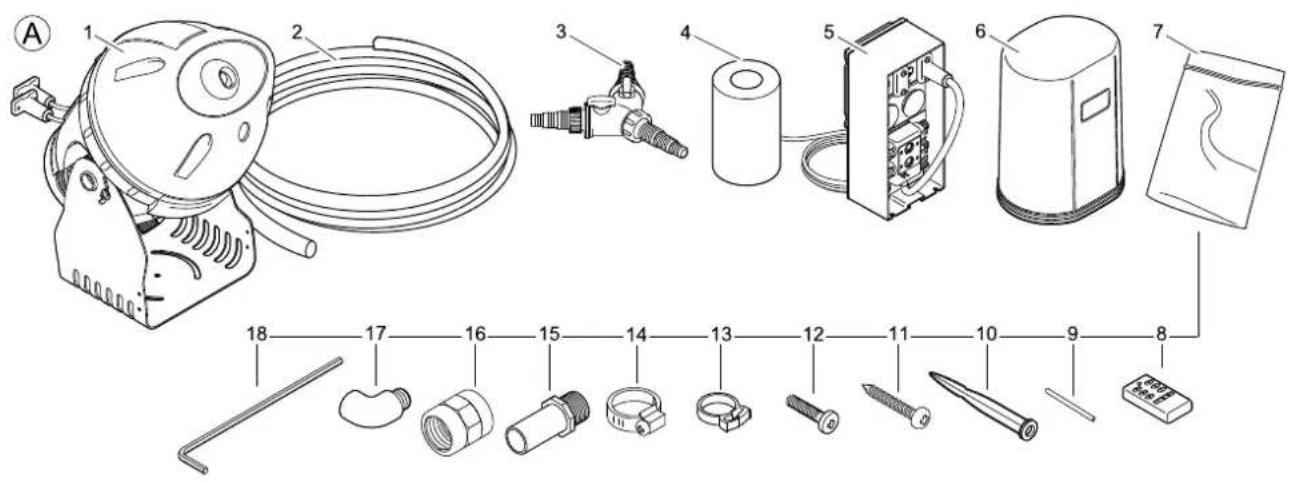


line
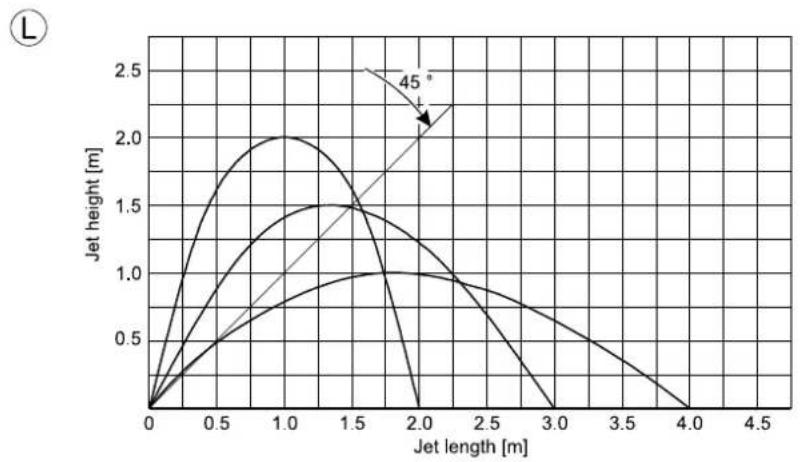
| Jet length [m] | Jet height [m] | | -------------- | -------------- | | 0.0 | 0.0 | | 0.5 | 1.0 | | 1.0 | 2.0 | | 1.5 | 1.5 | | 2.0 | 1.0 | | 2.5 | 0.5 | | 3.0 | 0.0 | | 3.5 | 0.0 | | 4.0 | 0.0 | | 4.5 | 0.0 |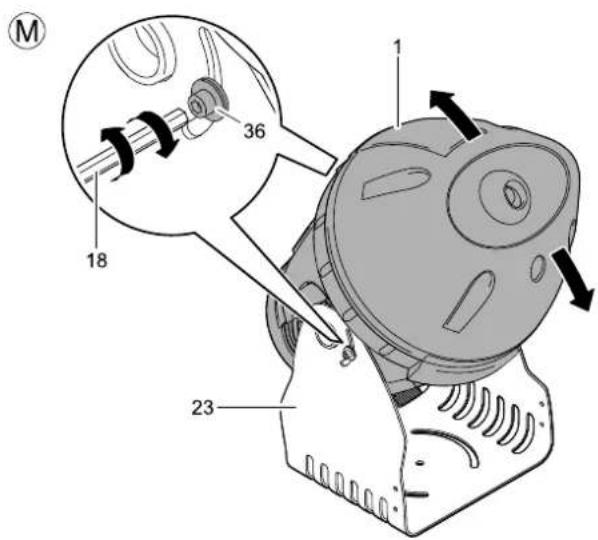

Vorwort
Welcome to OASE Living Water. Congratulations on the purchase of the Jumping Jet Rainbow Star set or the Jumping Jet Rainbow Star Add-On set respectively.
Prior to commissioning the unit, please read the instructions of use carefully and fully familiarise yourself with the unit. Ensure that all work with this unit is only carried out in accordance with these instructions.
Adhere to the safety information for the correct and safe use of the unit.
Keep these operating instructions in a safe place! Please also hand over the operating instructions when passing the unit on to a new owner.
Table of Contents
1 Scope of delivery.... 17
2 Legal conditions 18
2.1 Intended use 18
3 Safety information 18
3.1 Hazards encountered by the combination of water and electricity 18
3.2 Correct electrical installation.... 18
3.3 Safe operation of the unit.... 18
4 Installation 20
5 Start-up....21
6 Operation....23
7 Maintenance and cleaning 24
8 Storage/Over-wintering 24
9 Remedy of faults 25
10 Disposal....25
Technical data 226
Symbols on the unit....229
Spare parts 231
1 Scope of delivery
Jumping Jet Rainbow Star Set (Fig. A)
The Jumping Jet Rainbow Star set forms the basis for your water feature effects.
| Fig. A Number Description | |||
| 1 1 Jumping Jet Rainbow Star | |||
| 2 1 4 m fabric hose (1') | |||
| 4 | 1 | Spare filter | |
| 5 1 12V Master control box | |||
| 6 | 1 | Protection hood | |
| 7 1 Set of accessories | |||
| 8 1 Hand-held transmitter (including battery, type P 23GA) | |||
| 9 1 Pin (to actuate the Teach-in key) | |||
| 10 | 1 | Ground stake | |
| 11 2 Self-tapping screw 4.8 x 25 mm | |||
| 12 2 Threaded screw M5 x 22 mm | |||
| 13 | 4 | Cable clip | |
| 14 | 2 | Hose clip | |
| 15 | 1 | Hose nozzle | |
| 16 | 1 | Double socket | |
| 17 | 2 | Angle piece | |
| 18 1 Alley key, 5 mm | |||
| 1 Instructions of use | |||
Jumping Jet Rainbow Star Add-On set (Fig. A)
The Jumping Jet Rainbow Star Add-On set includes extension elements for the Jumping Jet Rainbow Star set. Both sets include identical Jumping Jet Rainbow Stars which provide the same water feature effects.
| Fig. A Number Description | |||
| 1 1 Jumping Jet Rainbow Star | |||
| 2 1 5 m fabric hose (1') | |||
| 3 | 1 | Y | distributor |
| 4 | 1 | Spare | filter |
| 7 1 Set of accessories | |||
| 11 2 Self-tapping screw 4.8 x 25 mm | |||
| 12 2 Threaded screw M5 x 22 mm | |||
| 13 | 4 | Cable | clip |
| 14 | 2 | Hose | clip |
| 15 | 1 | Hose | nozzle |
| 16 | 1 | Double | socket |
| 17 | 2 | Angle | piece |
| 18 1 Alley key, 5 mm | |||
| 1 Instructions of use | |||

A pump (not included in our delivery) is required to operate the Jumping Jet Rainbow Star. We recommend the use of the powerful “Neptun 6000” pump from OASE. This pump is designed to operate two Jumping Jet Rainbow Stars at the same time (synchronously).
We also recommend the garden outlet "In Scenio FM Master 3" for easy control of the Neptun 6000. With this outlet you can remote radio control the Neptun 6000 and regulate its flow rate to set the jet range and jet height of the Jumping Jet Rainbow Star.
2 Legal conditions
2.1 Intended use
The Jumping Jet Rainbow Star set and the Jumping Jet Rainbow Star Add-On set were designed for use in clear or treated water. Both create light and water effects. The Jumping Jet Rainbow Star may only be used in indoor or outdoor basins or ponds. The quality of the water jet could be impaired as the fish population increases and the water quality diminishes. This can lead to an increase service in requirement for the unit. We recommend to place the Jumping Jet Rainbow Star at a wind protected place, knowing that the water jet could be interrupted by wind. The Jumping Jet Rainbow Star requires frost protection.
A maximum of two Jumping Jet Rainbow Stars may be connected to the 12V Master control box. The hand-held transmitter allows the selection of five default programs at the 12V Master control box to synchronously access a maximum of two Jumping Jet Rainbow Stars.
3 Safety information
OASE has built the Jumping Jet Rainbow Star Set and the Jumping Jet Rainbow Star Add-On set according to the state-of-the-art following the current safety regulations. Despite the above, hazards for persons and assets can emanate from the Jumping Jet Rainbow Star if it is used in an improper manner or not in accordance with its intended use, or if the safety instructions are ignored. Also note the safety information given for the units you want to connect.
This unit can be used by children from the age of 8 and by persons with physical, sensory or mental impairments or lack of experience and knowledge, as long as they are supervised or instructed on how to use the unit safely and are able to understand the potential hazards. Do not allow children to play with the unit. Do not allow children to clean or maintain the unit without close supervision.
3.1 Hazards encountered by the combination of water and electricity
The combination of water and electricity can lead to death or severe injury from electrocution, if the unit is incorrectly connected or misused.
▶ Prior to reaching into the water, always switch off the mains voltage to all units used in the water.
3.2 Correct electrical installation
For your own safety, consult a qualified electrician when you have questions or encounter problems.
Electrical installations at garden ponds must meet the international and national regulations valid for installers.
For the installation of the 12V Master control box, keep a minimum distance of 2 m from the garden pond or basin (Fig. B).
▶ Only connect the Jumping Jet Rainbow Star and the 12V Master control box when the electrical data of the power supply coincide with the electrical data on the type plate.
▶ Only connect the supply cables of the Jumping Jet Rainbow Star to the 12V Master control box. Note the correct plug-socket assignment.
▶ Only connect the 12V Master control box power cable to a correctly installed wet room earthed contact socket or to a "In Scenio FM Master 3" garden socket.
▶ Please note that the power supply must be fused via a fault current protection system with a maximum reference fault current of 30 mA.
▶ Only use cables that are uncoiled.
▶ Extension cables must be approved for outdoor use and meet DIN VDE 0620 standards.
▶ Route the connection cable so that damage is excluded.
▶ Keep all connection points dry. Risk of electrocution.
▶ Operation of the 12V Master control box is only allowed with the protection hood closed. In this manner, connections and plugs are protected from rain and splash water (type of protection IP X4). The 12V Master control box, the connections and plugs are not water-proof and must not be routed or installed in water.
3.3 Safe operation of the unit
▶ Only operate the Jumping Jet Rainbow Star when no-one is in the water.
▶ Do not carry or pull the units by the power cable.
- Do not operate defective units. Never operate the unit if either the cable or the housing is defective! Pull the power plug immediately. Repairs of connection cables may only be carried out by the manufacturer / supplier.
▶ Position the Jumping Jet Rainbow Star such that danger of injury to persons is excluded (e.g. causes by a water jet or light beam suddenly emerging).
▶ Never look directly into the water jet outlet opening or into the light source of the Jumping Jet Rainbow Star.
▶ Because of its weight, always have two persons carry the Jumping Jet Rainbow Star. - Avoid vibrations and impacts in order not to damage the drive unit and the electronics in the Jumping Jet Rainbow Star.
▶ Never open the housing or its attendant components, unless this is explicitly mentioned in these instructions of use.
▶ Always pull the power plugs of all units located in the water prior to starting work on the Jumping Jet Rainbow Star.
The Jumping Jet Rainbow Star is not suitable for dry installation. The water exits the container via a lateral bypass when no water jet is produced. It must be guaranteed that the emerging water can return to the point from which it was taken.
▶ Where the water jet hits the water surface, the water depth must be at least 300 mm to avoid heavy water splashes. During operation, the point where the jet hits the water surface could vary, depending on the degree of clogging of the filter and screen.
This point should not be too close to the basin rim (> 1 m). Never guide the water jet beyond the basin rim, as in this case splash water cannot be avoided.
▶ Never connect the unit to the domestic water supply.
▶ Adhere to the maximum water level height specified in these instructions of use.
The cleaning interval of filter and screen in the Jumping Jet Rainbow Star depends on the quality of the water supplied.
During the frost period, take the Jumping Rainbow Star out of operation and store it at a frost protected place.
▶ Clean the suction filter basket of the connected pump at regular intervals.
4 Installation
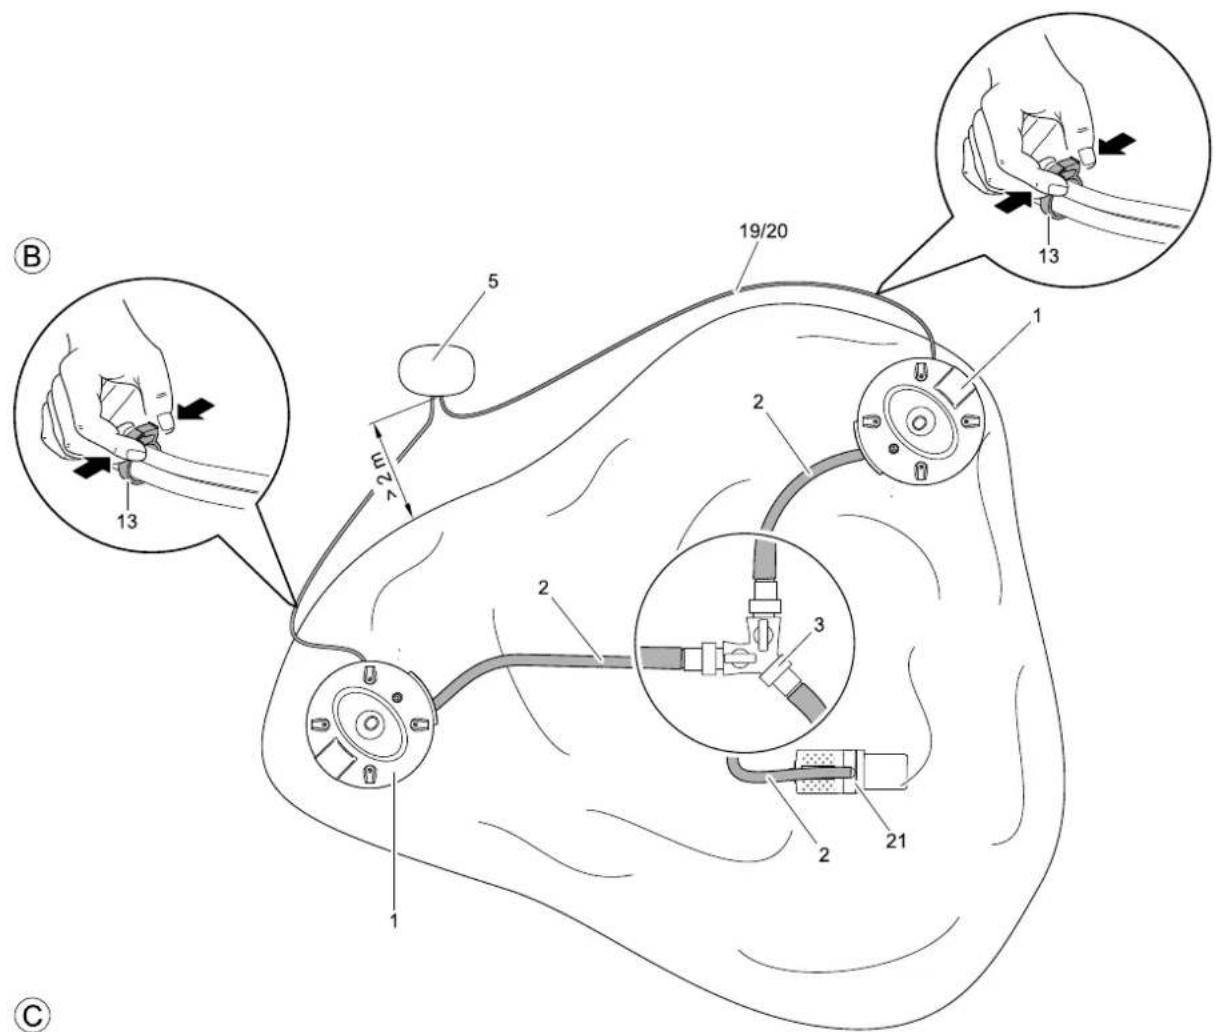
Installation (Fig. B, C):
Carefully plan the installation of the Jumping Jet Rainbow Star. Careful planning and taking the environmental conditions into account will lead to optimum operating conditions for the Jumping Jet Rainbow Star. The following points can help you with your planning.
▶ Position the Jumping Jet Rainbow Star (1) and the 12V Master control box (5) at a sufficient distance from each other.
- Keep a minimum distance to the water for the installation of the 12V Master control box (5). For the prescribed distances, please refer to the regulations for installers of electrical installations in/at garden ponds valid in your country.
- When laying cables (19/20), please note the maximum cable lengths. Use the cable clips (13) to ensure proper routing of the two connection cables of the Jumping Jet Rainbow Star.
- Position the Jumping Jet Rainbow Star (1) in a wind protected place. Risk of the water jet being broken apart by wind.
- Where the water jet hits the water surface, the water depth must be at least 300 mm to avoid heavy water splashes.
This point should not be too close to the basin rim (> 1 m). Never guide the water jet beyond the basin rim, as in this case splash water cannot be avoided.
▶ Take the installation of another Jumping Jet Rainbow Star (1) (Jumping Jet Rainbow Star Add-On set) into account that you might want to install in the future.
Place the pump (21) at a higher level to prevent drawing in of dirt particles from the bottom of the basin. This increases the cleaning interval for the Jumping Jet Rainbow Star (1).
▶ Note the required water depth for the Jumping Jet Rainbow Star (Fig. C).
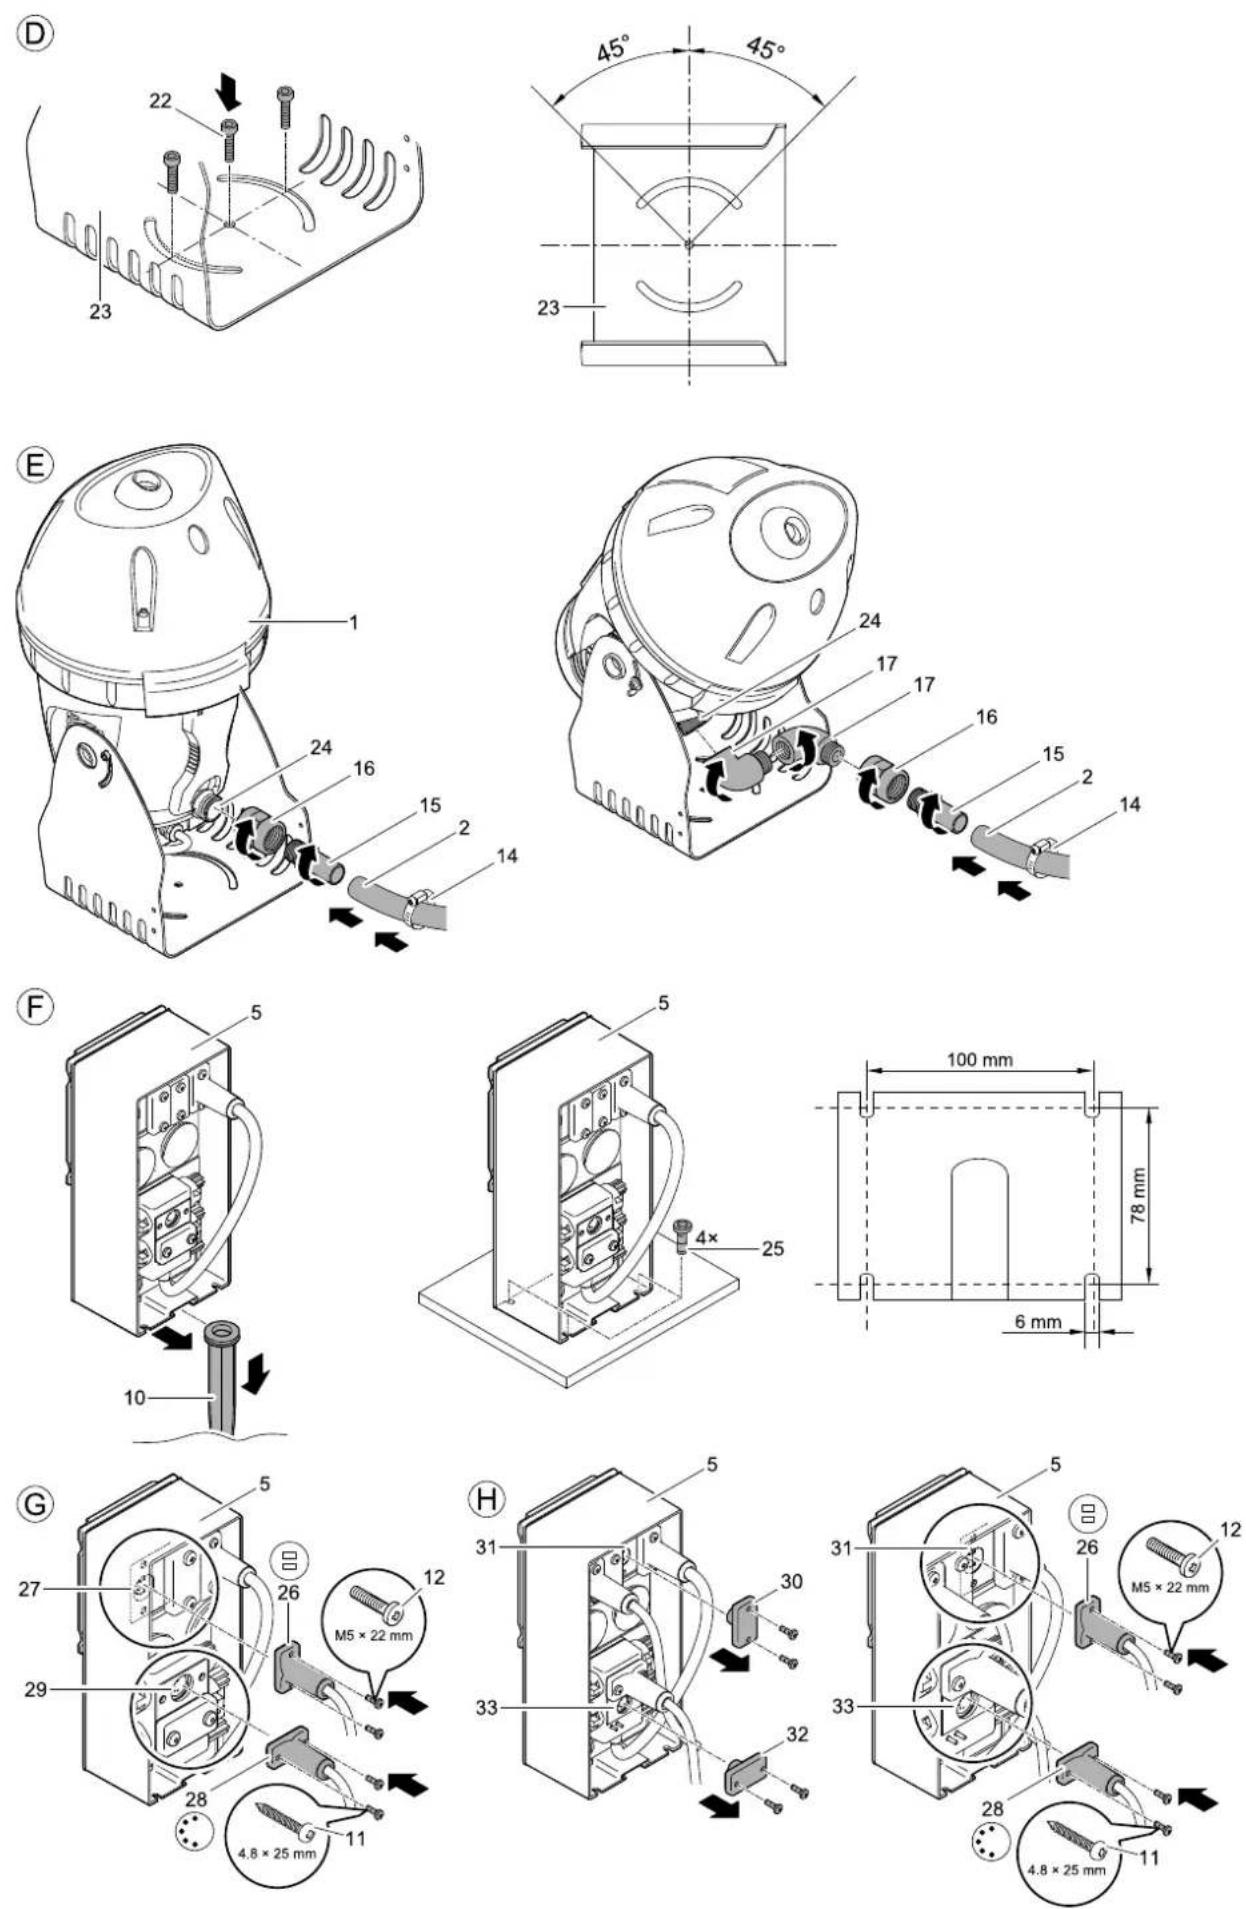
Installation of the Jumping Jet Rainbow Star (Fig. D, E)
Install the Jumping Jet Rainbow Star level and free from vibrations on a sturdy platform.
- Fasten the unit foot (23) on the platform using 3 screws (22) (not included in our scope of delivery). Turn the unit to the desired position and tighten the screws (22).
- Connect the hose (2) (Fig. E)
In the case of steep inclination angles of the Jumping Jet Rainbow Star (1), the stepped hose adapter (15) with socket (16) can be directly screwed onto the inlet (24).
In the case of flat inclination angles, screw the two angle pieces (17) on the inlet (24) to be able to fit the stepped hose adapter (15) including the socket (16).
-
Slide the hose clip (14) over the hose (2), plug the hose (2) on the stepped hose adapter (15), and secure by means of the hose clip (14).
-
Connect the other hose end to the pump. Adhere to the information given in the pump operating instructions.
-
Where two Jumping Jet Rainbow Stars (1) are used, connect each hose end to the Y distributor (Fig. B, 3) and use hose (2) to connect the Y distributor to the pump. The Y distributor is part of the delivery of the Jumping Jet Rainbow Star Add-On set.
Installation of the 12V Master control box (Fig. F)
- Push the ground stake (10) fully into the soil at the desired position, then slide the control box (5) onto the ground stake (10).
- As an alternative, the control box (5) can be screwed on using 4 screws (25) (not part of the scope of delivery) inserted through the screw slots provided for this purpose in the housing of the control box (5).
Connection of the Jumping Jet Rainbow Star to the 12V Master control box (Fig. G, I)

The receiver integrated in the 12V Master control box is factory-connected to the transformer by the 12V plug.
- Insert the 5-pole plug (28) of the Jumping Jet Rainbow Star in the top socket (29) of the receiver and secure with the two 4.8 mm self-tapping screws (11) (part of our delivery).
- Insert the 2pole plug (26) of the Jumping Jet Rainbow Star in the left socket (27) of the transformer and secure with the two M5 screws (12) (part of our delivery).
- Place the protection hood (6) over the 12V Master control box (5). Ensure that the receiving aerial (34) is unobstructed.
The IP X4 protection is only guaranteed when the protection hood is in place!
Connect the Jumping Jet Rainbow Star of the Add-On set to the 12V Master control box (Fig. H, I)
- If necessary, remove the protection hood (6) from the 12V Master control box (5).
- Remove the two screws from the cover (32) of the receiver, remove cover (32), insert the 5-pole plug (28) of the Jumping Jet Rainbow Star in the socket (33) and secure with the two 4.8 mm self-tapping screws (11).
- Remove the two screws from the cover (30) of the transformer, remove cover (30), insert the 2-pole plug (26) of the Jumping Jet Rainbow Star in the socket (31) of the transformer and secure with the two M5 screws (12).
- Place the protection hood (6) over the 12V Master control box (5). Ensure that the receiving aerial (34) is unobstructed.
The IP X4 protection is only guaranteed when the protection hood is in place!
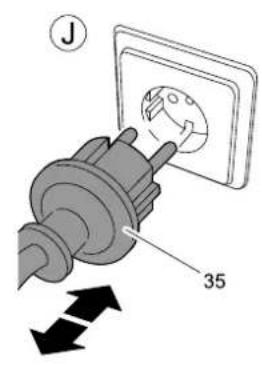
5 Start-up

Attention! Dangerous electrical voltage.
Possible consequences: Death or severe injury.
Protective measures: Disconnect the power plug (Figure J, 35) prior to reaching into the water and commencing work.
Follow the safety information!
Pump and 12V Master control box switch on automatically once the power connection is established.
Switching on (Fig. J): Plug the power plug (35) into the socket.
Switching off (Fig. J): Disconnect the power plug (35).
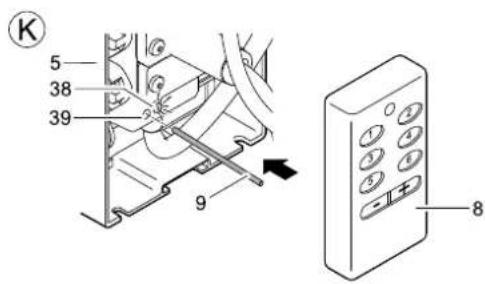
Manual transmitter teach-in (Fig. K)
To be able to commission the Jumping Jet Rainbow Star set, set the manual transmitter (8) to the receiver in the 12V Master control box (5) beforehand.
The receiver is equipped with a teach-in button (39) for the receiver to be set to the transmit signal of the manual transmitter (8).
- Insert the pin (9) into the opening for the teach-in button (39) until you feel a resistance.
- Briefly actuate the teach-in button (39) using the pin (9). The green LED (38) lights up once.
- Press any button of the manual transmitter (8) for at least 3 sec. The green LED (38) lights up once.
This completes the teaching in of the manual transmitter (8) to the receiver. Check the function of the manual transmitter by actuating one of its buttons. The green LED (38) on the receiver must light up, the 'water' picture of the Jumping Jet Rainbow Star must change.

▶ A maximum of 10 manual transmitters can be set to the receiver.
The manual transmitter has a maximum range of 80 m. Obstacles between transmitter and receiver, a low battery in the manual transmitter, or electro-magnetic radiation of electrical equipment will impair the range.
Deleting stored manual transmitters (Fig. K)
▶ Actuate the teach-in button (39) using the pin (9) for at least 5 sec.
This deletes all manual transmitters stored in the receiver.
Setting the water jet (Fig. L - P)
The water jet of the Jumping Jet Rainbow Star has a parabolic shape. The jet height and range are determined by the pump rating (flow rate) and the inclination angle of the Jumping Jet Rainbow Star set. Jet height, jet range and water quality notably influence the quality of the water jet and the light emittance.
-
Undo the Allen screws (36) on both sides of the unit foot (23) using the Allan key (18) and bring the Jumping Jet Rainbow Star (1) to the desired inclination angle.
The diagram (Fig. L) shows water jet shapes of the Jumping Jet Rainbow Star resulting from different inclination angles. -
Retighten the Allan screws (36).
-
Set the pump flow rate.
The flow rate of electrically controlled pumps is set with the control unit (e.g. "In Scenio FM Master 3"), the flow rate of pumps without control feature is set manually by means of a slide in the pump suction or pressure area.
-
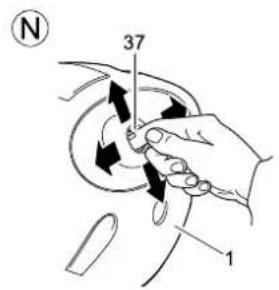
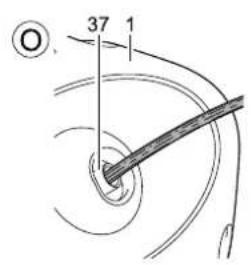
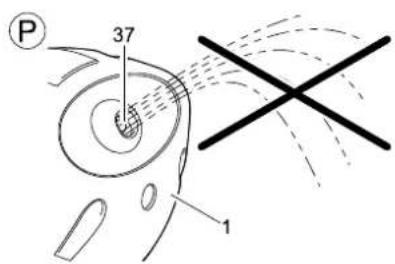
Align the jet diaphragm (37) in the hood of the Jumping (1) Jet such that the water jet passes the centre of the jet diaphragm (37) (Fig. O). Ensure that the water jet is not deflected by the water jet diaphragm (37) (Fig. P).
-
Prior to reaching into the water, disconnect the power supply to all units used in the water. Slide the jet diaphragm (37) to the optimum position (Fig. O). Switch the units on again and check the position. It might be necessary to repeat the process.
6 Operation
5 basic programs can be activated with the 12V Master control box, allowing you to run various animations on the Jumping Jet Rainbow Star. Each basic program can be activated at the manual transmitter by a dedicated button.
▶ Basic programs 1 to 4
The main functions of these basic programs, such as, for instance, chaselight or pulsed jet are programmed as a default. The different colours (blue, turquoise, yellow, red, white, green) of the jet lighting also change according to a defined cycle. In addition, you can set the jet lighting to a desired colour or switch it off altogether.
▶ Basic program 5
This program is of a random play nature. All functions are automatically activated and alternate. You cannot set one steady colour or deactivate the colour. However, you can accelerate or decelerate the speeds of the program's progress.
| Note! The function will be activated as soon as the button concerned is released.Selecting a basic program- You start or change to the basic program concerned by briefly pressing one of the buttons 1 to 5.Any additional functions set will be reset.Activating additional functions for basic programs 1 to 4- Setting the colour: Wait until the desired colour appears in the water jet, then press the [−] button.- Allow the colours to run through one after the other: Press the [+] button.- Switch off the light: Keep the [+] button pressed for 2 sec.Activating additional functions for basic program 5- Double the play speed: Press the [+] button.- Halve the play speed: Press the [−] button.Switching of the Jumping Jet Rainbow Star- Switch off water jet and light: Press the [6] button. |
Example
You want to set the "red" colour for an uninterrupted jet with chaselight.
- Press the [2] button.
The colours pass through in succession.
-
Wait until the "red" colour appears in the water jet.
-
Now set the colour by briefly pressing the [−] button.
Review of the program functions
| Button [1] | [2] | [3] | [4] | [5] | [6] | |||||
| Basic program | Uninterrupted jet | Jet section | Uninterrupted jet and chaselight | Jet section and chaselight | Ramdom play, all functions change cyclically | Switch off water jet and light | ||||
| Light colour | blue | Light changes at 4 sec intervals | cold light colour changes at 4 sec intervals | Light colour changes at 4 sec intervals | Light colour changes at 4 sec intervals | |||||
| turquoise | ||||||||||
| yellow | ||||||||||
| red | ||||||||||
| white | ||||||||||
| green | ||||||||||
| [-] | (1 × short) | Additional function switch off the light | The light colour currently shown in the basic program can be set by pressing the button | Halve the play speed | ||||||
| [-] | (1 × long) | |||||||||
| [+] | (1 × long) | The light colour changes again at the 4 sec. interval | Double the play speed | |||||||
7 Maintenance and cleaning

Attention! Dangerous electrical voltage.
Possible consequences: Death or severe injury.
Protective measures: Disconnect the power plugs of all the units in the water prior to reaching into the water and commencing work.
The cleaning intervals depend on the water quality. Clean filter and screen of the Jumping Jet Rainbow Star as soon as the quality of the water jet diminishes.
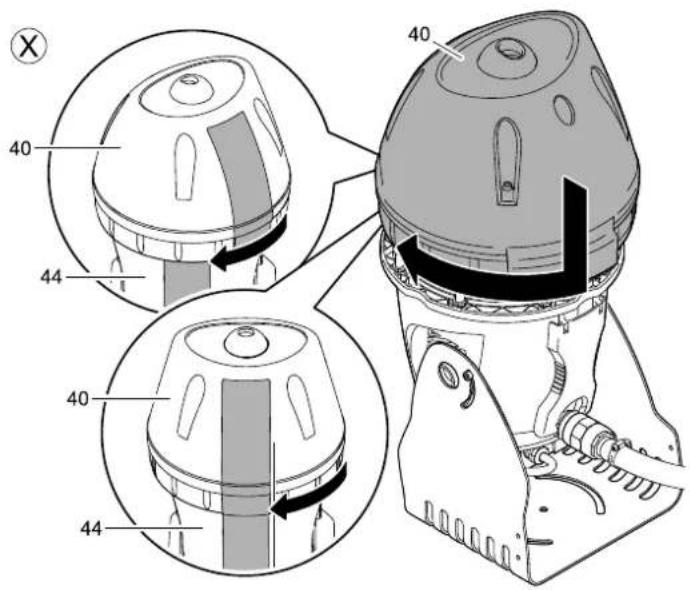
Cleaning filter and screen (Fig. Q - X)
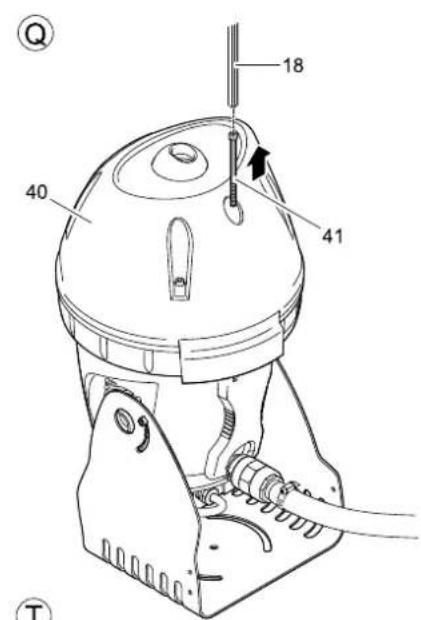
- Remove the locking screw (41) using an Allan key (18).
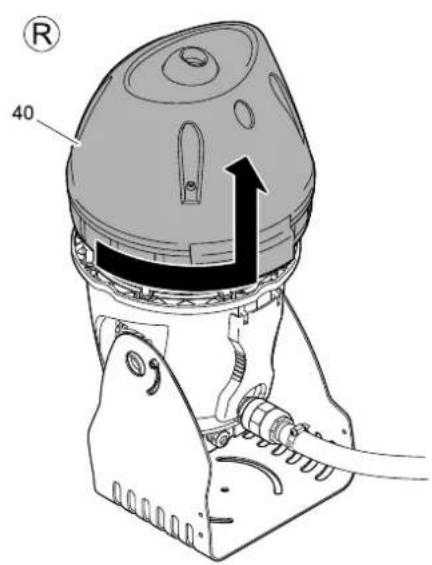
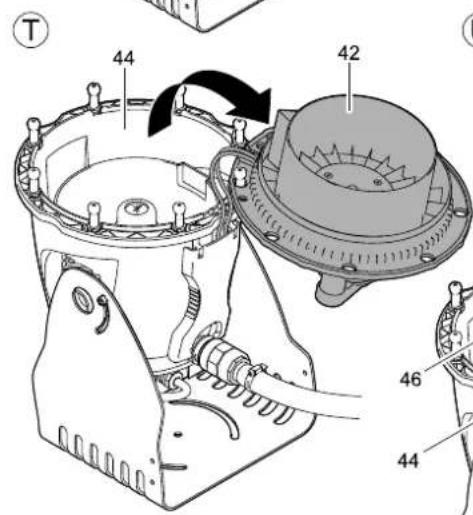
- Turn the hood (40) counter-clockwise against the stop and lift off.
- Lift the cover (42) and remove the O ring (43).
- Turn the cover (42) upside down and suspend it on a pin at the container (44). Important: Do not pull on the cables, otherwise they will be damaged.
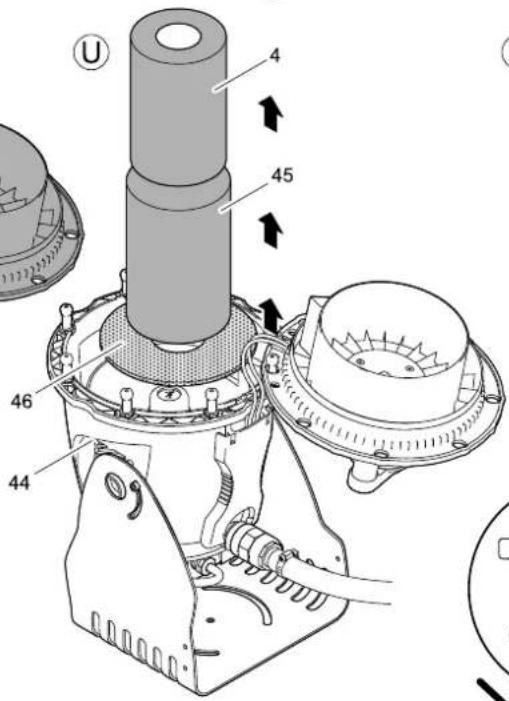
- Take the filter (4) including screen (45) out of the container.
- Pull the filter (4) out of the screen (45) and carefully wash both.
- If necessary, remove and clean the diffusor plate (46).
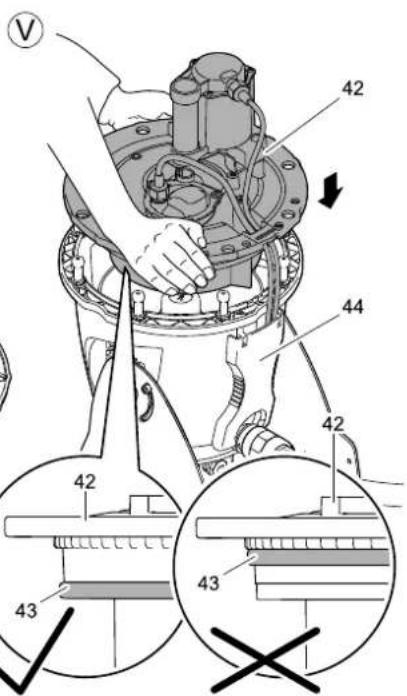
- Reassemble filter (4) and screen (45) in the reverse order and reinsert into the container (44).
- Place the O ring (43) on the rim of the cover (42) (Fig. V), then press the cover (42) uniformly onto the container (44). The O ring (43) is a roll ring that only adopts its final position when the cover (42) is put into place.
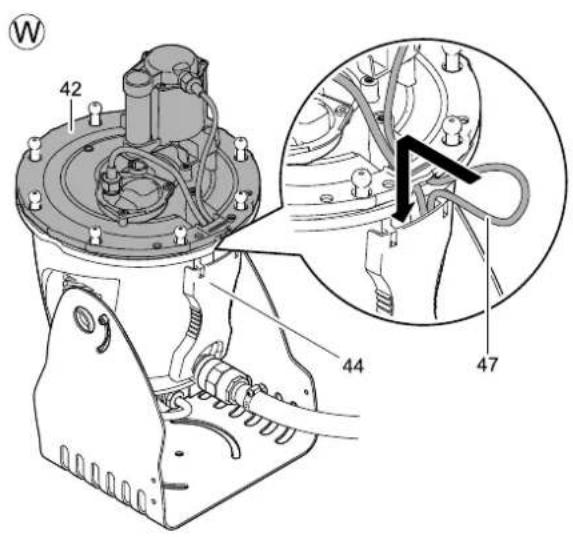
- Remove the lugs of the two connection cables (47). To this effect, push the connection cables (47) back into the cable duct at the container (44).
- Place the hood (40) onto the container (44). Ensure that the contour of the cover (40) and that of the container (44) are offset in relation to each other. Subsequently, turn the hood (40) clockwise up to the stop.
8 Storage/Over-wintering
Put the Jumping Jet Rainbow Star out of operation at temperatures below zero. Thoroughly clean and check the units for damage. Dry the Jumping Jet Rainbow Star and store it in a frost-free place.
9 Remedy of faults
| Fault | Cause | Remedy |
| No water jet emerges | Manual transmitter not taught in | Set manual transmitter to the receiver |
| The Jumping Jet Rainbow Star is too deep in the water | Adapt unit to the water depth | |
| Power plug of pump or 12V Master control box not inserted | Connect unit to the power supply | |
| The jet diaphragm not centred around the water jet | Adjust the jet diaphragm such that the water jet can pass unhindered | |
| No basic program active Activate a basic program using the manual transmitter | ||
| Water emerges from the nozzle uncontrolled | The water does not pass the centre of the jet diaphragm | Adjust the jet diaphragm such that the water jet can pass unhindered |
| Jet length shortens Filter and screen | are clogged Clean filter and screen | |
| The Jumping Jet Rainbow Star is too deep in the water | Adapt unit to the water depth | |
| The water jet contours seem diffused, jet loses its crystal clear appearance | Water jet is torn apart by strong wind — | |
| Filter and screen are clogged Clean filter and screen | ||
| Pump takes in air Check the pump immersion depth | ||
| Lighting has failed The minus button | at the manual transmitter was pressed by accident | Switch the light on again by pressing the plus button |
| The LED of the spotlight is defective Contact | the OASE service | |
10

Disposal
Do not dispose of this unit with domestic waste! For disposal purposes, please use the return system provided. Disable the unit beforehand by cutting off the cables.