AquaMax Eco Gravity 15000 - Water pump OASE - Free user manual and instructions
Find the device manual for free AquaMax Eco Gravity 15000 OASE in PDF.

User questions about AquaMax Eco Gravity 15000 OASE
0 question about this device. Answer the ones you know or ask your own.
Ask a new question about this device
Download the instructions for your Water pump in PDF format for free! Find your manual AquaMax Eco Gravity 15000 - OASE and take your electronic device back in hand. On this page are published all the documents necessary for the use of your device. AquaMax Eco Gravity 15000 by OASE.
USER MANUAL AquaMax Eco Gravity 15000 OASE
natural_image
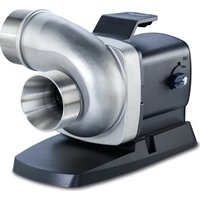
Black industrial pump with mesh vent and two plastic fittings (no text or symbols visible)AquaMax Eco Gravity
10000, 15000, 20000
EN Operating instructions
FR Notice d'emploi
AMX0178
| 1 | 2 | 3 | 4 | 5 | 6 | 7 | |
| DE | Saugstutzen | Druckstutzen | Berührschutz | Pumpengehäuse | Gerätefuß | Rohranschluss | Schlauchanschluss |
| EN | Suction socket | Pressure socket | Contact protection | Pump housing | Support foot | Tube connection | Hose connection |
| FR | Buse d'aspiration | Raccord de tuyau de refoulement | Protection de contact | Carter de pompe | Pied de l'appareil | Raccord de tube | Raccordement de tuyau |
| NL | Aanzuigopening | Spuitkop | Aanraakbeveiling | Pomphuis | Apparaatvoet | Buisaansluiting | Slangaansluiting |
| ES | Tubuladura de aspiración | Tubuladura de presión | Protección contra contacto accidental | Carcasa de la bomba | Pie del equipo | Empalme de tubos | Empalme de tubo flexible |
| PT | Boca de aspiração | Bocal de saída de pressão | Protecção contra o contacto | Carcaça da bomba | Pé | Ligação do tubo | Conexão da mangueira |
| IT | Tronchetto di aspirazione | Tronchetto di pressione | Protezione contro le scariche | Carcassa della pompa | Piede dell'apparecchio | Allacciamento tubo | Allacciamento tubo flessibile |
| DA | Sugestuds | Trykstuds | Berøringsbeskyt-telse | Pumpehus | Apparatfod | Rørtislutning | Slangetilslutning |
| NO | Sugestuss | Trykkstuss | Berøringsstuss | Pumpehus | Fot | Rørtilkobling | Slangetilkobling |
| SV | Sugstos | Tryckstos | Beröringsskydd | Pumphus | Apparatbotten | Röranslutning | Slanganslutning |
| FI | Imuistukka | Paineistukka | Kosketussuoja | Pumpun kotelo | Laitejalusta | Putkilitäntä | Letkulilitäntä |
| HU | Usisni priključak | Potisni priključak | Zaštita od dodirivanja | Kućište pumpe | Nogar uređaja | Priključak cijevi | Priključak crijeva |
| PL | Króciec ssawny | Króciec tłoczny | Osłona | Obudowa pompy | Podstawa urządzenia | Przyłącze rury | Przyłącze węża |
| CS | Sací hrdlo | Výtlačné hrdlo | Ochrana proti dotyku | Těleso čerpadla | Patka přístroje | Přípojka trubky | Hadicová přípojka |
| SK | Sacie hrdlo | Výtlačné hrdlo | Ochrana proti dotyku | Teleso čerpadla | Pätka prístroja | Prípojka rúrky | Hadicová prípojka |
| SL | Sesalni priključek | Tlačni priključek | Zaščita pred dotikom | Ohišje črpalke | Podnožje aparata | Priključek cevi | Priključek gibke cevi |
| HR | Usisni priključak | Potisni priključak | Zaštita od dodirivanja | Kućište pumpe | Nogar uređaja | Priključak cijevi | Priključak crijeva |
| RO | Štuť de aspiratie | Štuť de presiune | Protectie la atingere | Carcasa pompei | Picior aparat | Conexiune pentru teavă | Conexiune pentru furtun |
| BG | Всмукателни накрайници | Пневматични накрайници | Контактна защита | Корпус на помпата | Краче на уреда | Тръбна връзка | Връзка за маркуча |
| UK | Всмоктувальний патрубок | Нагнітальний патрубок | Контактний запобіжник | Корпус насоса | Стійка пристрою | Підключення труб | Підключення шланга |
| RU | Всасывающий патрубок | Напорный патрубок | Защита от соприкосновения | Корпус насоса | Лапка прибора | Соединение для трубы | Соединение для шланга |
| CN | 抽水接管 | 压水接管 | 防护网 | 泵外壳 | 设备底座 | 管接头 | 软管接头 |
A
natural_image
Technical line drawing of a mechanical device with internal components and mounting brackets (no text or symbols)B
natural_image
Technical line drawing of a mechanical clamp or clamping device with no visible text or symbolsC
natural_image
Technical line drawing of an electric motor assembly with housing, cooling fan, and clamping mechanism (no text or labels)D

natural_image
Simple line drawing of a mechanical device submerged in a container with a cable, no text or symbols present.AMX0179
Original manual. This manual belongs with the unit and must always be passed on together with the unit.
WARNING
- Disconnect all electrical devices in the water from the power supply before reaching into the water. Otherwise there is a risk of severe injuries or death by electrocution.
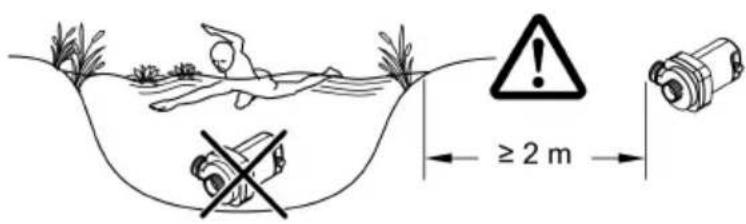
- Only operate the unit if no persons are in the water.
- This unit can be used by children aged 8 and above and by persons with reduced physical, sensory or mental capabilities or lack of experience and knowledge if they are supervised or have been instructed on how to use the unit in a safe way and they understand the hazards involved. Do not allow children to play with the unit. Only allow children to carry out cleaning and user maintenance under supervision.
Safety information
Electrical connection
- Special regulations apply for electrical installation in outdoor spaces. Only a qualified electrician may perform the electrical installation.
- The qualified electrician has the necessary professional training, knowledge and experience to perform electrical installation in outdoor spaces. The electrician can detect potential dangers and knows how to adhere to regional and national standards, regulations and directives.
- For your own safety, please consult a qualified electrician.
- Only plug the unit into a correctly installed outlet. Ensure that the unit is fused for a rated fault current of max. 30 mA by means of a fault current protection device.
- Extension cables and power distributors (e.g. outlet strips) must be suitable for outdoor use (splash-proof).
- Protect open plugs and sockets from moisture.
Safe operation
- Do not use the unit, if electrical lines or the housing are damaged.
- Dispose of the unit if its power connection cable is damaged. The power connection cable cannot be replaced.
- Do not carry or pull the unit by its power cable.
- Route lines in such a way that they are protected from damage and do not present a tripping hazard.
- The impeller unit in the pump contains a magnet with a strong magnetic field that may affect the operation of pacemakers or implantable cardioverter defibrillators (ICDs). Keep a distance of at least 0.2 m between the implant and the magnet.
- Never carry out technical changes to the unit.
- Only carry out work on the unit that is described in this manual.
- Only use original spare parts and accessories.
- Should problems occur, please contact the authorised customer service or OASE.
Intended use
Only use the product described in this manual as follows:
- As a downstream gravitation filter pump to be used in gravity operated filter systems.
- For pumping normal pond water for filter systems, waterfall systems and water course systems.
- While adhering to the technical specifications.
- Adherence to the permissible water quality.
The following restrictions apply to the unit:
- Do not use in swimming ponds.
- Never use the unit with fluids other than water.
- Never run the unit without water.
- Do not use in conjunction with chemicals, foodstuff, easily flammable or explosive substances.
- Do not connect to the domestic water supply.
Assembly
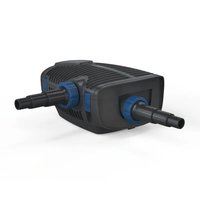
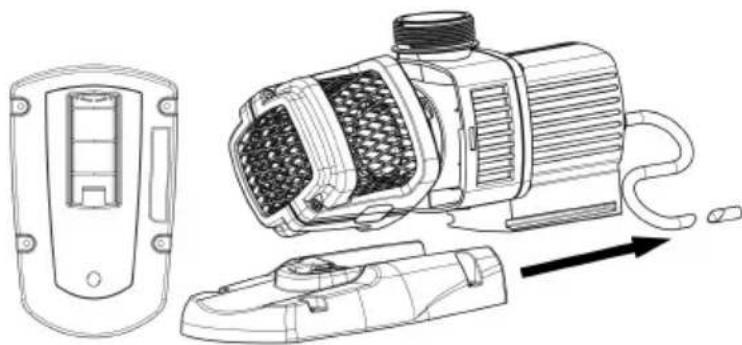
Only use the unit in its horizontal position and ensure stable seating on a firm ground downstream of the filter unit, seen in flow direction. Fastening of the unit to the ground can be facilitated by removing the unit foot towards the rear by unlocking the engagement lever on the underside of the unit foot (C). For installation, slide the unit body on the unit foot until it engages.
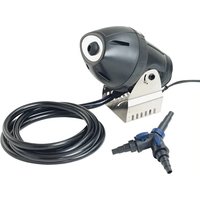
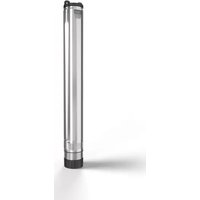
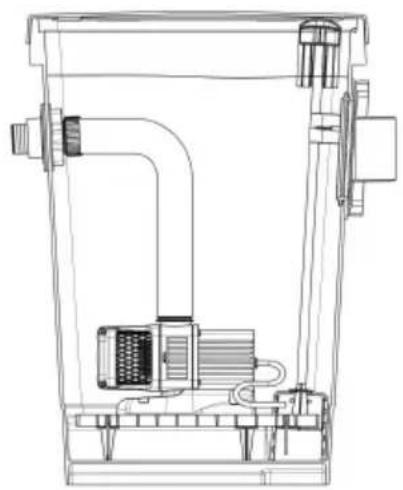
The unit can be installed submersed (A = filter module) or dry (B = pump chamber). Always position the unit below the water line to prevent dry running and the intake of air when switching on and operating the unit. Never connect the unit to a water line. Use the enclosed adapter set to ease tube (6) or hose (7) installation. When fitting the tube, ensure that the unit is installed without any tension.
Submerged installation (A)
At the pressure socket (2), connect the line returning the water into the pond. When submerged, insert the unit into the filter module. Ensure that the unit never runs without water flowing through! Maximum installation depth: 4 metres.
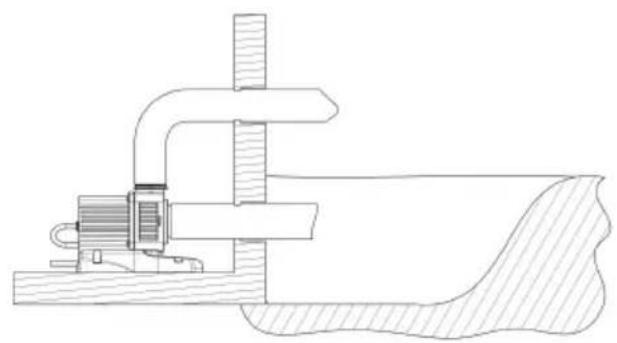
Dry installation (B)
Disconnect the power supply first, then secure the unit to prevent unintentional switching on. Remove the contact protection (3) by turning it counter-clockwise. Do not reach into the pump opening (1). If necessary, fasten the suction hose using the adapter set provided for tube (6) or hose (7) installation. Connect the suction hose to the suction socket (1).
Install the unit so that it is not exposed to direct sun radiation (max. 40 °C).
Commissioning/start-up

NOTE
Prevent the pump from running dry. Otherwise the pump will be destroyed.
- Only operate the pump when it is immersed.

NOTE
Sensitive electrical components. Incorrect connection will destroy the unit.
- Do not connect the unit to a dimmable power supply.
This is how to connect the power supply:
Switching on: Connect the unit to the mains. The unit switches on immediately.
Switching off: Disconnect the unit from the mains.
Maintenance and cleaning

WARNING
Possible death or severe injury from hazardous electrical voltage!
- Prior to reaching into the water, isolate (switch off and disconnect) all units/devices used in the water.
- Isolate the device (disconnect from the power supply) before carrying out any work on it.
Cleaning the device
Recommendation regarding cleaning:
- Do not use aggressive cleaning agents or chemical solutions as they could attack the housing or impair the function of the unit.
- Recommended cleaning agent for removing stubborn limescale deposits:
- Pump cleaning agent PumpClean from OASE.
– Vinegar- and chlorine-free household cleaning agent.
• After cleaning, thoroughly rinse all parts in clean water.
Dry run/blockage protection
The unit switches off automatically if it runs without water or if the impeller unit is blocked.
- Check that the unit is below the water line and that it does not run dry or take in air during operation.
- If the impeller unit is blocked, pull the power plug first and ensure that the unit cannot be switched on unintentionally. Turn the contact protection counter-clockwise or unscrew the screw-connection of the suction line. Overcome the cause of the blockage through the pump opening. Refit the contact protection or retighten the screw-connection. Restore the power connection and put the unit into operation.
- This switch-off function is reset by pulling the power plug.
Replacing the impeller unit
Disconnect the power supply first, then secure the unit to prevent unintentional switching on. Turn the contact protection counter-clockwise or unscrew the screw-connection of the suction line. Undo the 4 screws from the motor block which fix the pump housing. Pull the impeller unit out of the motor block by overcoming a slight resistance, then replace it with a new impeller unit. Refit and securely tighten the pump housing. Refit the contact protection or retighten the screw-connection. Restore the power connection and put the unit into operation. Only use original OASE spare parts.
Storage/winter protection
The unit is frost-proof to -20^ . If lower temperatures are expected, remove the unit and place it in storage.
• Thoroughly clean the unit.
- Check the unit for damage and replace damaged components.
- Store the pump submerged and in a frost-free environment.
- Protect electrical connections from moisture and dirt.
Malfunction remedy
| Malfunction | Cause | Remedy |
| The unit is not operating | No power supplyDefective fuseFI switch trippedPump rotor blocked | Check power supplyCheck fuse and replace, if necessaryCheck switch system and connection cableCheck rotor for blockages and remove if found |
| Unit delivers very little or not at all | Strainer not covered by waterSlide valve closedAir pocket in the systemContact protection clogged | Check water level and position of the pumpCheck the hose systemCheck the hose systemCheck and clean |
Wear parts
- Impeller unit
Spare parts

The use of original parts from OASE ensures continued safe and reliable operation of the unit. Please visit our website for spare parts drawings and spare parts. www.oase.com/ersatzteile
Disposal

NOTE
Do not dispose of this unit with domestic waste.
- Render the unit unusable beforehand by cutting the cables and dispose of the unit via the return system provided for this purpose.