
Quisson 4000 - Barbecue BARBECOOK - Free user manual and instructions
Find the device manual for free Quisson 4000 BARBECOOK in PDF.
| Product type | Gas barbecue |
| Brand | Barbecook |
| Model | Quisson 4000 |
| Category | Barbecue |
| Use | Outdoor only, sheltered from wind and more than 3 m from any structure |
| Compatible gas | Propane or butane, depending on the country (suitable regulator and hose required) |
| Number of burners | Several main burners, 1 side burner, 1 rotisserie burner (optional) |
| Ignition | Electric (AA battery not included) or by match |
| Thermostat | Timer and thermometer with probe to control cooking |
| Heating system | Turbo Heating System (burner caps distributing heat evenly) |
| Material of the tank | Enamelled steel |
| Material of the grates | Chrome-plated steel (large central grate, two small side grates) |
| Grates | One large central and two small side grates |
| Rotisserie | Optional, with motor requiring 2 D batteries (not included) |
| Cleaning the grate | With Barbecook cleaner or mild detergent, rinse and dry |
| Cleaning the tank | Use a disposable Leaf® before cooking to facilitate cleaning |
| Cleaning the burners | Brush the burners and venturis regularly to prevent blockages |
| Safety | Leak check recommended before each use; open lid before ignition |
| Maximum temperature | 300°C (do not exceed for more than 5 minutes) |
| Warranty | 2 years against manufacturing defects |
| Spare parts | Available at www.barbecook.com |
| Included accessories | Starter kit with leak test tool, hose sleeves, E tab |
Frequently Asked Questions - Quisson 4000 BARBECOOK
User questions about Quisson 4000 BARBECOOK
0 question about this device. Answer the ones you know or ask your own.
Ask a new question about this device
Download the instructions for your Barbecue in PDF format for free! Find your manual Quisson 4000 - BARBECOOK and take your electronic device back in hand. On this page are published all the documents necessary for the use of your device. Quisson 4000 by BARBECOOK.
USER MANUAL Quisson 4000 BARBECOOK
[EN] Go to barbecook.com, register your Barbecook and your Barbecook experience will be further improved!
[BG] Nocete barbecook.com, perictpaite cbo Barbecook, 3a da nojutyte oce no-rotjmo ydoBtBopeHne ot Barbecook!
[SL] Pobjdite na splétrno stran barbecook.com, registrirajte vašo napravo Barbecook in vaša izkusnja Barbecook bo še boljsa!
[HR] Posjetite stranicu barbecook.com, registrirajte Vaš proizvod Barbecook i još više uživajte u korištenju proizvoda Barbecook.
EN-User guide .5
NL - Gebruiksaanwijzing 21
FR - Mode d'emploi 37
DE-Bedienungsanleitung 53
CZ-Uživatelská príručka. 69
BG-PbkoBoCTBO3a noTppe6nteJra 85
DA - Brugervejledning 101
EL-OsnyieCxnpans 117
ES-Guia del usuario. 133
ET-Kasutusjuhend 149
FI-Kayttoopas. 165
HU-Hasznalatiutasitas. 181
IT-Guida all'uso 197
LT - Naudotojo vadovas. 213
LV-Lietosanaspamaciba 229
PL-Instrukcja uzytkownika 245
PT - Manual do utiliser 261
RO-Ghid deutilizare. 277
SK - Navod na použivanie 293
SI - Priročnik za uporabo. 309
SV - Bruksanvising 325
NO-Brukerhandbok 341
HR - Korisnicki prischnik 357
EN - USER GUIDE
1 Register your appliance. 6
2 About this manual 6
3 Important safety instructions.. 6
Read and follow the instructions 6
- Be cautious with gas. 6
- Select an appropriate location. 6
Use your common sense. 6
4 Recurrent concepts. 6
- Venturis 6
- Burner hoods 7
Enamel 7
Flare-ups. 7
5Assembling the appliance 7
- Safety instructions 7
To assemble the appliance 7
6 Connecting gas to the appliance 7
- Which cylinder, hose and regulator? 7
- Safety instructions 8
- Connecting the hose to the appliance. 8
- Connecting the hose and cylinder to the regulator.. 8
- Replacing the cylinder 9
7 Checking for gas leaks. 9
Why check for gas leaks? 9
- When check for gas leaks? 9
- Safety instructions 9
- Which materials do I need? 9
To check for gas leaks. 9
In case of a gas leak 10
8 Getting the appliance ready for use 10
Before each use. 10
Before first use (in a long time) 10
- Burning in the appliance 10
9 Lighting the burners 10
- Safety instructions 10
- Lighting the main burners 10
- Lighting the side burner. 11
- Lighting the spit burner. 11
- Switching the burners off. 12
Relighting the burners. 12 - Checking the flames 12
10 Using the timer and thermometer 12
- Icons and control buttons. 13
- Setting the timer alarm 13
- Setting the thermometer alarm. 13
Clearing an alarm. 13 - Checking the food temperature. 13
Temperature guidelines. 13
11 Useful tips and tricks. 13
Preheating the appliance. 13
Preventing food from sticking. 13
- Direct and indirect grilling 13
Grilling with closed lid. 14
- Watching the temperature 14
- Making optimal use of the heat 14
Taking advantage of the heat zones. 14
Roasting food on the spit 14
- Avoiding flare-ups. 14
12 Maintaining the appliance 14
- Cleaning the grill 14
- Cleaning the bowl 15
- Cleaning the burners and venturis. 15
- Maintaining enamel, stainless steel and powder coated parts. 16
- Storing the appliance. 16
- Storing gas cylinders 16
- Ordering spare parts. 16
13 Warranty. 16
Covered 16
Not covered 16
14 Technical specifications. 17
Type label. 17
- Injector diameters 17
15 Troubleshooting 18
1 REGISTER YOUR APPLIANCE
Thank you for purchasing a Barbecook appliance! We are sure it will bring you lots of happy barbecue moments.
To optimize your experience, register your appliance at www.barbecook.com. It takes only a few minutes and yields some major benefits:
- You get access to our personalized after sales service. This allows you, for example, to quickly find spare parts for your appliance or to profit from an optimal warranty service.
We can inform you about interesting product updates and direct you to the product information and specifications that are relevant for your appliance.
For more information about registering your appliance, refer to www.barbecook.com.
Barbecook respects your privacy. Your data will not be sold, distributed or shared with third parties.
2 ABOUT THIS MANUAL
This manual is composed of two parts:
- The first part is the part that you are reading now. It includes instructions for the assembly, use and maintenance of your appliance.
- The second part starts on page 373. It includes all kinds of illustrations (exploded views, assembly drawings, type labels) of the appliances that are described in this manual.
3 IMPORTANT SAFETY INSTRUCTIONS
3.1 Read and follow the instructions
Read the instructions before using the appliance. Always follow the instructions carefully. Assembling or using the appliance differently can cause fires and material damage.

Damages caused by not following the instructions (improper assembly, misuse, inadequate maintenance...) are not covered by the warranty.
3.2 Be cautious with gas
Working with gas is perfectly safe, but requires some extra caution:
Always store gas cylinders outdoors, in a well-ventilated area. Make sure they are not exposed to excessive heat or direct sunlight.
- Never store your gas cylinder or spare gas cylinder in the cabinet of your appliance.
- While in use, put your gas cylinder in the cylinder cart at the side of the appliance.
- Never store your spare gas cylinder near a gas appliance in use.
- Always turn off the gas supply at the gas cylinder after use.
- Never smoke near a gas appliance in use or near a gas cylinder (full/empty).

If you smell gas, immediately close the gas supply, extinguish all flames and open the lid of the appliance. If the smell lasts, call your gas supplier or the fire department.
3.3 Select an appropriate location
Use the appliance outdoors only. Using it indoors, even in a garage or shed, can cause carbon monoxide poisoning.
When selecting an outdoor location, always:
- Place the appliance at least three meters away from any building, in an open and well-ventilated area.
- Make sure there is a free air flow to the burners and the vent holes in the cabinet at all times.
- Make sure the appliance is not under an overhanging structure (a porch, a shelter...) or under foliage.
- Put the appliance on a firm and stable surface. Never put it on a moving vehicle (a boat, a trailer...).
To prevent formation of rust on stainless steel, avoid contact with chlorine, salt and iron. We recommend not using the appliance near the coast, near railways or near swimming pools.
3.4 Use your common sense
Always use your common sense when using the appliance:
Use outdoors only.
- Do not move the appliance during use.
- Do not leave the appliance unattended during use, especially in the presence of children and animals.
- WARNING! Some accessible parts may become very hot. Keep young children away.
- Use appropriate protection when handling hot parts (lid, grill...).
- The appliance must be kept away from flammable materials during use.
- Keep flammable materials, flammable liquids and dissoluble objects away from an appliance in use.
- Do not use wood, charcoal, lava rocks or ceramic briquettes on a gas appliance.
- Do not use the appliance when you have consumed alcohol or taken drugs.
- Do not modify the appliance.
4 RECURRENT CONCEPTS
This part includes definitions of some less familiar concepts. These concepts are used in several topics of the manual.
4.1 Venturis
The venturis are the small tubes attached to the entrance of the burners. At the side of the venturis, there is a hole. This is visible on the main burners and on the side burner:

When the gas is on its way to the burners, it passes through the venturis. Thanks to the holes at the sides, the gas is then mixed with air and - as a result - with oxygen. This is necessary for a good ignition in the burners: only the correct mixture of gas and oxygen will ignite properly and will result in nice flames.
4.2 Burner hoods
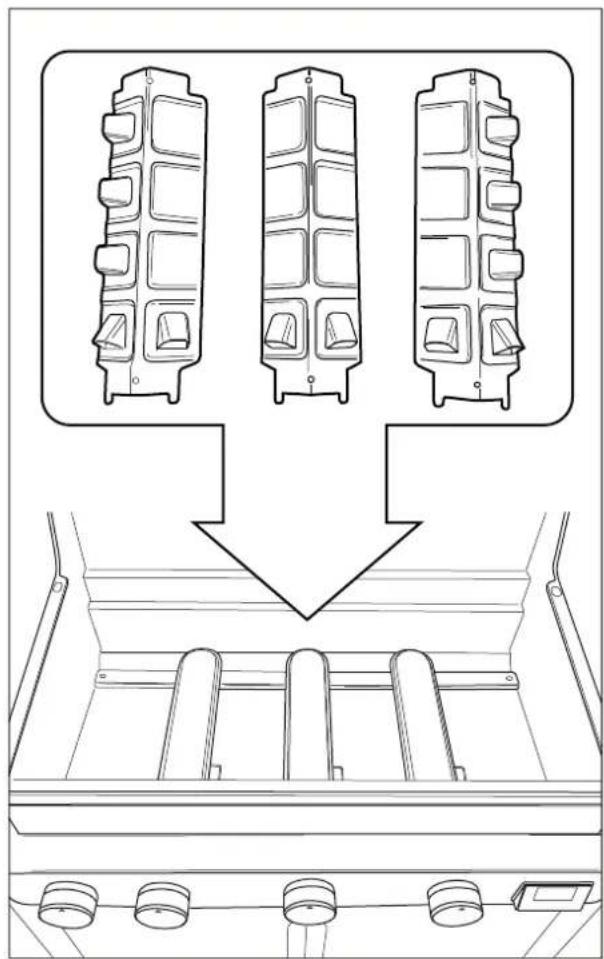
The burner hoods are the hoods that you mount above the burners of your appliance. They protect the burners from dripping fat and play a crucial role in the Turbo Heating System. The roofed holes at the sides of the hoods distribute the heat over the grill, so it is heated much faster and more evenly.

Pay special attention to the burner hoods when assembling your appliance. The Turbo Heating System can only function properly if each hood is mounted above the correct burner.

4.3 Enamel
Some parts of the appliance are covered in a layer of melted glass, called enamel. This enamel protects the underlying metal from corrosion. Enamel is a high-quality material: it is resistant to rust, does not fade under the influence of high temperatures and is very easy to maintain.

Because the enamel is less flexible than the metal which it covers, pieces of enamel can chip off when you handle the appliance incorrectly. To avoid problems, be careful when assembling enamelled parts and always maintain the enamel as described further in this manual.
4.4 Flare-ups
Flare-ups are sudden flames that spark from the bowl when you are grilling. They are usually caused by dripping fat or marinade.
5 ASSEMBLING THE APPLIANCE
5.1 Safety instructions
- Do not modify the appliance when assembling it. It is very dangerous and not allowed to alter parts that are pre-assembled and/or sealed by the manufacturer.
Always follow the assembly instructions carefully. - The user is responsible for the correct assembly of the appliance. Damages caused by improper assembly are not covered by the warranty.
5.2 To assemble the appliance
You need a cross-slotted screwdriver, a flat-slotted screwdriver and an AA battery (electrical igniter). If your appliance comes with aspitburner,youalsoneedtwoDbatteries(spitburnerengine). There are no batteries supplied with the appliance.
1 Put the appliance on a flat and clean surface.
2. Assemble the appliance as shown on the assembly drawings. You find them in the second part of this manual, after the exploded view of your appliance.

Be careful when assembling enamelled parts. The tools and screws may damage the enamel. Use the provided fiber washers to protect the enamel around the screws.

The blister packs can contain more screws than necessary. Screws can be left over after the assembly.
6 CONNECTING GAS TO THE APPLIANCE
6.1 Which cylinder, hose and regulator?
Before you can connect gas to the appliance, you have to buy a gas cylinder, hose and pressure regulator. Always buy materials that comply with all national standards and with the gas type(s) and nominal pressure(s) mentioned on the appliance.
The table below shows you which cylinder, hose and regulator you have to use. In Belgium (BE), for example, you have to use a propane cylinder with a hose and regulator for 37 mbar or a butane cylinder with a hose and regulator for 28-30 mbar.
| Country Cylinder, hose and regulator | |
| DK, GR, NO, SE, EE, LT, LV, CZ, PL, MT, HU, SI, SK | Propane, 30 mbar / Butane, 30 mbar |
| ES, GB, IE, PT, BE, FR, LU, IT | Propane, 37 mbar / Butane, 28-30 mbar |
| NL Propane, 30 or 50 | mbar / Butane, 30 mbar |
| CY Propane, 30 or 37 | mbar / Butane, 28-30 mbar |

We recommend connecting the appliance to propane. Propane offers a high-quality combustion and is less sensitive to frost.

Buy your pressure regulator and gas cylinder together. Not all regulators fit all cylinders.
6.2 Safety instructions
- Never connect the cylinder directly to the appliance. Always mount a pressure regulator on the cylinder first.
- Never modify pre-assembled or sealed parts of the cylinder, the hose or the pressure regulator.
-
Keep the hose as short as possible (1,5 m maximum) to prevent it from dragging on the ground.
While connecting the cylinder, hose and pressure regulator: -
Never distort the hose.
Always keep the cylinder in an upright position. -
Never open the gas supply.
-
Check for leaks each time you make changes to the gas connection. See "7 Checking for gas leaks".
6.3 Connecting the hose to the appliance
To connect the gas hose to the appliance, you have to mount a coupling on the gas tube of the appliance. The appliance comes with two couplings, both intended for particular countries:
| Country Coupling | |
| BE, CH, CZ, DK, ES, FI, GB, IE, IT, PT, SI Coupling A | |
| FR Coupling B | |

If your country is not in the table, use the coupling that complies with your national standards.

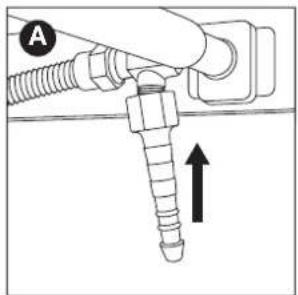
6.3.1 COUPLING A
You need a 19 mm spanner and a cross-slotted screwdriver.
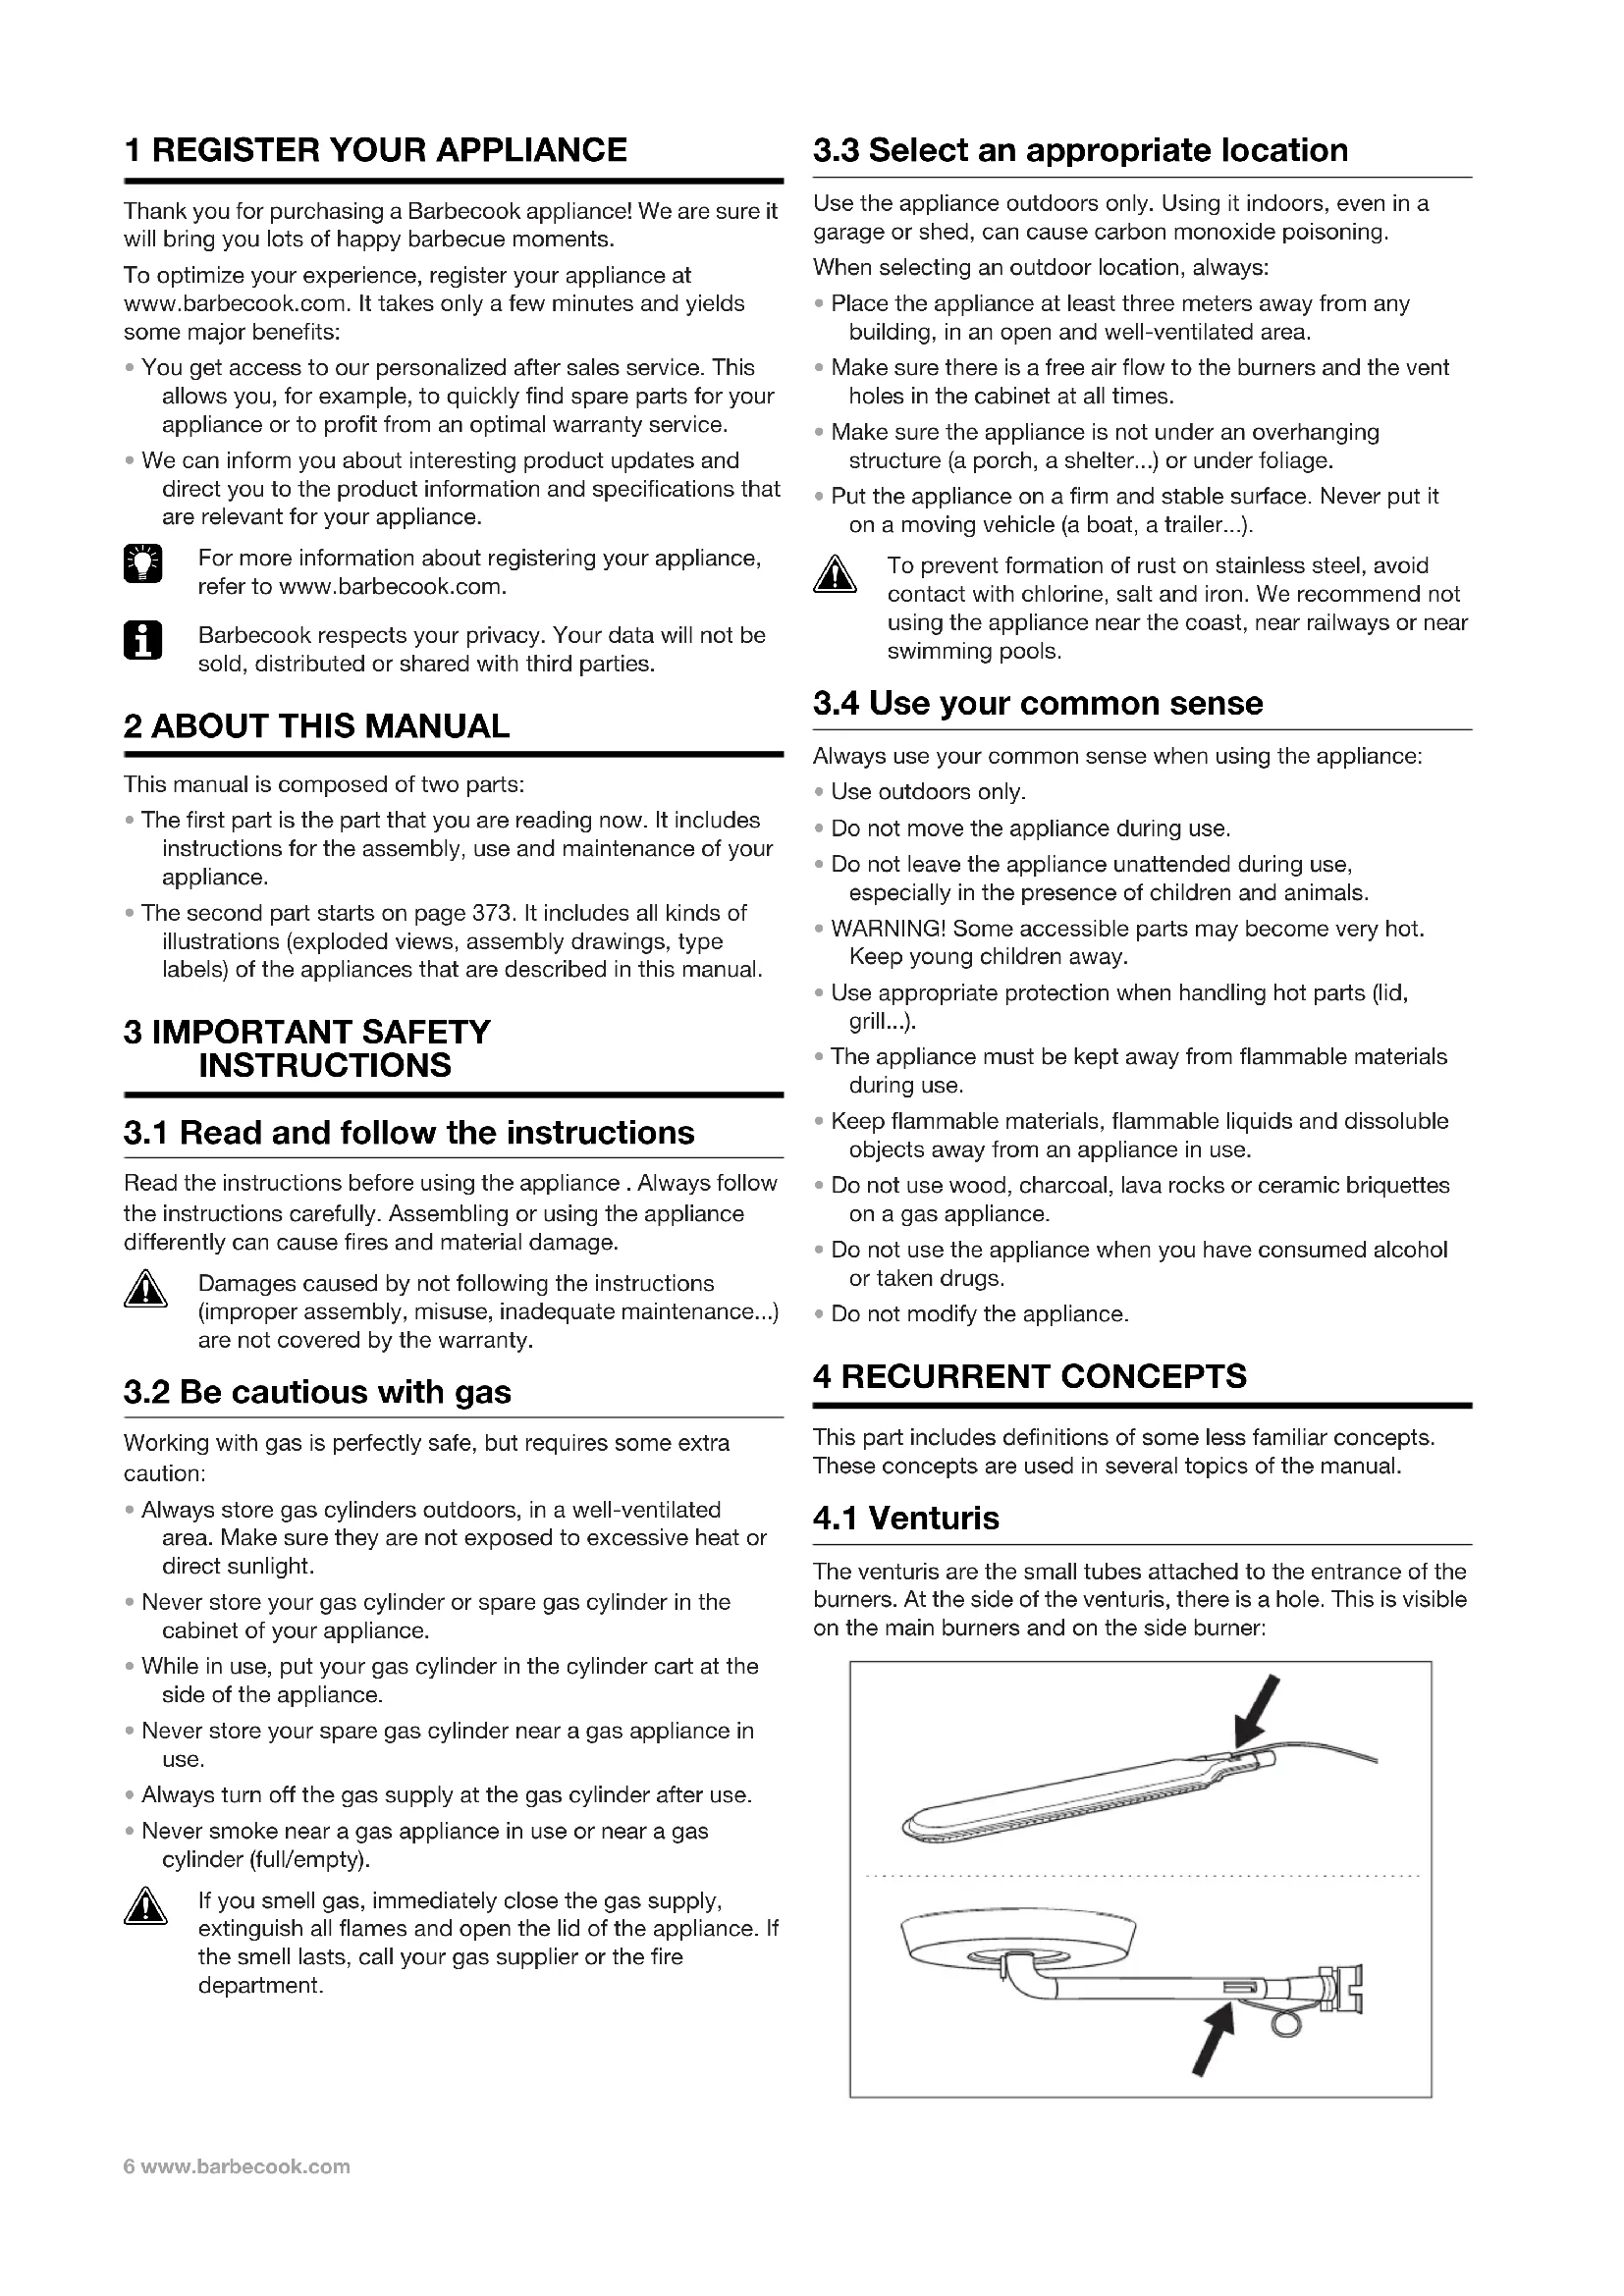
1 Screw the coupling on the gas tube of the appliance (A) and tighten it with a 19mm spanner (B).


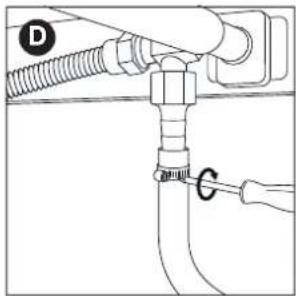
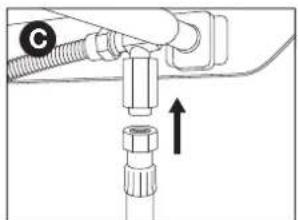
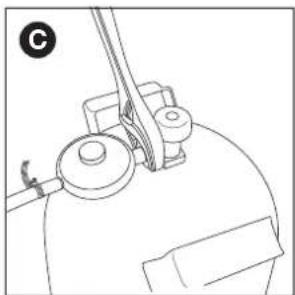
2 Slide the hose over the coupling (C) and tighten the clamping ring with a cross-slotted screwdriver (D).

6.3.2 COUPLING B
You need a 22 mm spanner and an adjustable spanner.
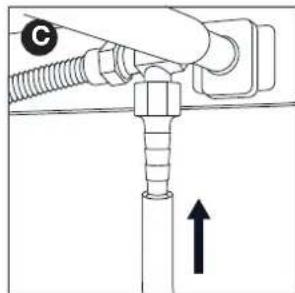
1 Screw the coupling on the gas tube of the appliance (A) and tighten it with a 22mm spanner (B).


2 Screw the gas hose on the coupling (C) and tighten it with two spanners. Hold the coupling with a 22mm spanner, while turning the hose with an adjustable spanner (D).

6.4 Connecting the hose and cylinder to the regulator
Depending on the type of pressure regulator you use, you need a cross-slotted screwdriver and/or an adjustable spanner.
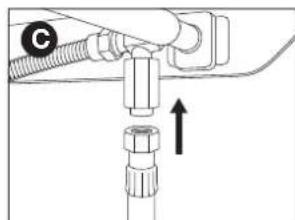
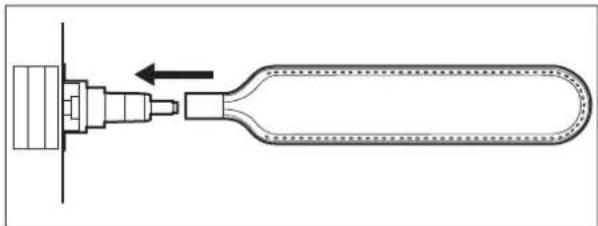
1 Connect the hose to the pressure regulator. Do one of the following:
- If the hose has a clamping ring, slide the hose over the regulator and tighten the clamping ring with a cross-slotted screwdriver (A).
If the hose has a nut, screw the hose on the regulator and tighten the nut with an adjustable spanner (B).

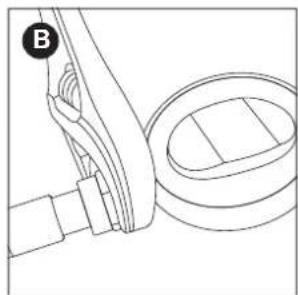
2 Connect the pressure regulator to the gas cylinder. Do one of the following:
- If the regulator has a nut, screw the regulator clockwise on the cylinder and tighten the nut with an adjustable spanner (C).
- If the regulator has a screw thread, screw the regulator counter-clockwise on the cylinder (D).


6.5 Replacing the cylinder
1 Close the gas supply and set all control knobs to OFF.
2 Disconnect the empty cylinder and connect the full cylinder.
3 Check the cylinder, the hose and all gas connections for leaks. See "7 Checking for gas leaks".
7 CHECKING FOR GAS LEAKS
7.1 Why check for gas leaks?
Propane and butane are heavier than air. As a result, they do not float away when leaking from the appliance. Especially on windless days, a leak can cause the gas to collect in and around the appliance. That accumulated gas can then ignite and explode.
7.2 When check for gas leaks?
- Before the first use or before the first use after a long period of non-use.

Also check for gas leaks if your appliance was assembled by your dealer.
Each time you replace a gas component.
- At least once a year, preferably at the beginning of the season.
7.3 Safety instructions
- Put the appliance outdoors, in a well-ventilated area. Make sure there are no flames or heat sources near the appliance.
- Never use a lighter or match to check for gas leaks.
- Do not smoke and do not light the burners when checking for gas leaks.
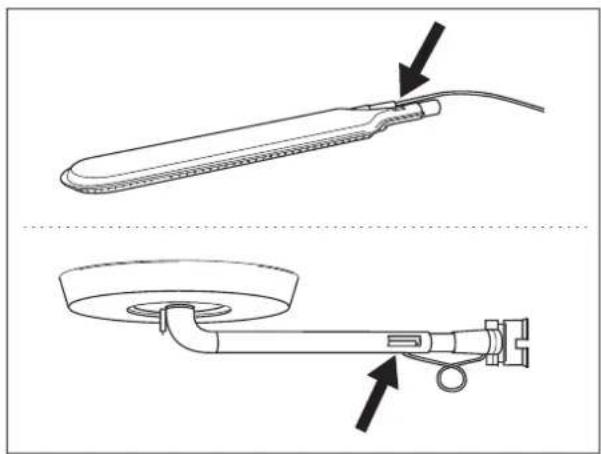
7.4 Which materials do I need?
To check for gas leaks, you need:
- A testing liquid. You can use a ready-made leak spray or a mixture of water (50%) and dish-washing soap (50%).
- The leak test tool that came with your appliance. You use it to suck up the testing liquid and apply it to the gas component or connection that you want to check.

7.5 To check for gas leaks
You check for gas leaks by applying a testing liquid to all gas components and connections. If the bubbles on a particular component or connection grow, there is gas leak:


To check for gas leaks, proceed as follows:
1 Put the appliance outside.
2 Get your leak test tool and testing liquid (leak spray or water/soap mixture).
3 Open the lid and set all control knobs to OFF.
4 Open the gas supply slightly. Turn the valve of the gas cylinder only once.
5 Suck up some testing liquid with the leak test tool and apply it to the area that you want to check. You have to check:
The welds of the gas cylinder (A)
The hose (B)
The connections between the cylinder and the pressure regulator and between the pressure regulator and the hose (C)
- The connection between the hose and the appliance (D)
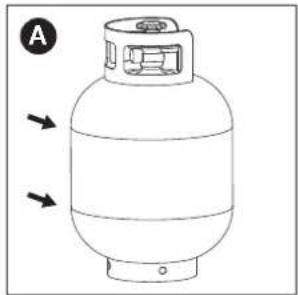


1 Your pressure regulator and coupling may be different from the ones in the illustrations.
6 Do one of the following:
If you detect a leak, continue as described in "In case of a gas leak".
- If there are no leaks, close the gas supply, rinse all components thoroughly with water and dry them well.
7.6 In case of a gas leak
1 Close the gas supply and do one of the following:
- If you detected a leak on one of the connections, tighten that connection.
- If you detected a leak on the cylinder or hose, replace the cylinder or hose.
2 Recheck the connection or component on which you detected the leak.
3 If the leak is not repaired, contact a Barbecook dealer. Do not use the appliance until the leak is repaired.
For a list of nearby Barbecook dealers, refer to www.barbecook.com.
8 GETTING THE APPLIANCE READY FOR USE
8.1 Before each use
Each time you use the appliance, make sure that:
The appliance is in an appropriate location. See "3.3 Select an appropriate location".
- The gas hose does not drag on the ground and cannot come into contact with a hot surface or with dripping fat.
- The bowl is clean. We recommend putting a new Leaf® in the bowl before each use. See "12.2 Cleaning the bowl".
- The burners and venturis are not blocked by insect nests or spider webs. See "12.3 Cleaning the burners and venturis".
The appliance is assembled correctly. Pay special attention to:
The burner hoods. Each hood has to be placed above the correct burner. See "4.2 Burner hoods".
The venturis of the burners. They have to be placed over the openings of the gas valves.
If you want to be absolutely sure that your gas connection is okay, you can check your appliance on gas leaks before each use. See "7 Checking for gas leaks".
8.2 Before first use (in a long time)
If you use the appliance for the first time or for the first time after a long period of non-use, you have to execute some extra checks:
Make sure that you have read, understood and checked all the instructions in this manual (only before first use).
- Check the appliance for gas leaks. See "7 Checking for gas leaks".
Also check for gas leaks if your appliance was assembled by your dealer.
- Clean the burners and venturis (only before first use in a long time). See "12.3 Cleaning the burners and venturis".
- Burn in the appliance before you put any food on it (only before first use). See "8.3 Burning in the appliance".
8.3 Burning in the appliance
By burning in the appliance before the first use, you remove remaining manufacturing greases from the appliance. Proceed as follows:
1 Light the main burners and set their control knobs to HIGH. See "9.2 Lighting the main burners".
2 Close the lid and let the appliance burn for 15 minutes. Do not put any food on the grill yet.
3 After 15 minutes, open the lid and let the appliance burn for another 5 minutes (control knobs still set to HIGH).
4 After 5 minutes, the appliance is ready for use. You can now put food on the grill.
To light the burners with the electrical igniter, you have to install an AA battery in the igniter. That battery is not supplied with the appliance. You find the battery case of the igniter inside the cabinet of your appliance.
9.1 Safety instructions
Before you light the appliance, execute all checks listed in "8 Getting the appliance ready for use".
- Make sure the lid is always open when you light a burner.
- Never bend directly over a burner when lighting it.
9.2 Lighting the main burners
9.2.1 USING THE IGNITER
1 Open the lid and set the control knobs of the main burners to OFF.
2 If no other burner is lit yet, open the gas supply and wait ten seconds. This allows the gas to stabilize.
3 Push in the control knob of one burner, set it to HIGH and hold it for a moment. The build-in igniter will cause sparks, which will light the burner.

Always light one main burner to start with. Never light all main burners at the same time.
4 If the burner does not light after three attempts, set its control knob to OFF, close the gas supply and wait 5 minutes. This allows any accumulated gas to escape.
5. Retry lighting the burner. If it still does not light, try lighting it with a match or refer to "15 Troubleshooting" to determine the cause of the problem.
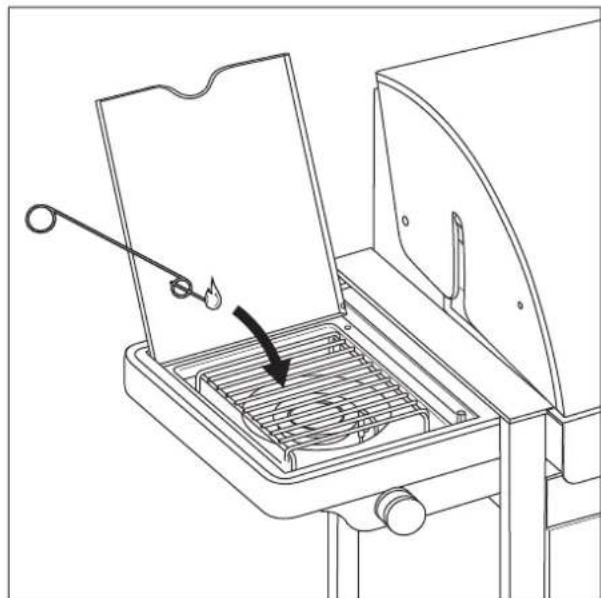
9.2.2 USING A MATCH
1 Place a match in the match holder.

2 Open the lid and set the control knobs of the main burners to OFF.
3 If no other burner is lit yet, open the gas supply and wait ten seconds. This allows the gas to stabilize.
4 Light the match and hold it about 13mm from the burner.

5 Set the control knob of one burner to HIGH.

Always light one main burner to start with. Never light all main burners at the same time.
6 If the burner does not light within 5 seconds, set its control knob to OFF, close the gas supply and wait 5 minutes. This allows any accumulated gas to escape.
7 Retry lighting the burner. If it still does not light, refer to "15 Troubleshooting" to determine the cause of the problem.
9.3 Lighting the side burner

The side burner can only carry vessels with a maximum weight of 9kg and a maximum diameter of 220~mm .
9.3.1 USING THE IGNITER
1 Open the lid and set the control knob of the side burner to OFF.
2 If no other burner is lit yet, open the gas supply and wait ten seconds. This allows the gas to stabilize.
3 Push in the control knob of the side burner, set it to HIGH and hold it for a moment. The build-in igniter will cause sparks, which will light the side burner.
4 If the burner does not light after three attempts, set its control knob to OFF, close the gas supply and wait 5 minutes. This allows any accumulated gas to escape.
5 Retry lighting the side burner. If it still does not light, try lighting it with a match or refer to "15 Troubleshooting" to determine the cause of the problem.
9.3.2 USING A MATCH
1 Place a match in the match holder.
2 Open the lid and set the control knob of the side burner to OFF.
3 If no other burner is lit yet, open the gas supply and wait ten seconds. This allows the gas to stabilize.
4 Light the match and hold it about 13mm from the side burner.
5 Set the control knob of the side burner to HIGH.
6 If the side burner does not light within 5 seconds, set its control knob to OFF, close the gas supply and wait 5 minutes. This allows any accumulated gas to escape.
7 Retry lighting the side burner. If it still does not light, refer to "15 Troubleshooting" to determine the cause of the problem.
9.4 Lighting the spit burner

Before you can use the spit burner, you have to install two D batteries in the spit burner engine. These batteries are not supplied with the appliance.
9.4.1 USING THE IGNITER
1 Open the lid and set the control knob of the spit burner to OFF.
2 Remove the grills and warming rack from the appliance and put them aside.
3 If no other burner is lit yet, open the gas supply and wait ten seconds. This allows the gas to stabilize.
4 Push in the control knob of the spit burner, set it to HIGH and hold it for a moment. The build-in igniter will cause sparks, which will light the spit burner.
5 If the burner does not light after three attempts, set its control knob to OFF, close the gas supply and wait 5 minutes. This allows any accumulated gas to escape.
6 Retry lighting the spit burner. If it still does not light, try lighting it with a match or refer to "15 Troubleshooting" to determine the cause of the problem.
9.4.2 USING A MATCH
1 Place a match in the match holder.
2 Open the lid and set the control knob of the spit burner to OFF.
3 If no other burner is lit yet, open the gas supply and wait ten seconds. This allows the gas to stabilize.
4 Light the match and hold it to the left of the spit burner.
5 Set the control knob of the spit burner to HIGH.
6 If the burner does not light within 5 seconds, set its control knob to OFF, close the gas supply and wait 5 minutes. This allows any accumulated gas to escape.
7 Retry lighting the spit burner. If it still does not light, refer to "15 Troubleshooting" to determine the cause of the problem.
9.5 Switching the burners off
If you no longer use the burners, you have to switch them off. Proceed as follows:
1 Close the gas supply.
2 Set the control knobs of the burners to OFF.

By closing the gas supply first, you make sure there is no gas left in the appliance.
9.6 Relighting the burners
If a burner goes out while in use, proceed as follows:
1 Open the lid and close the gas supply.
2 Set all control knobs to OFF and wait 5 minutes. This allows any accumulated gas to escape.
3 Relight the burner(s).
9.7 Checking the flames
Each time you light a burner, you have to check its flames. A perfect flame is almost completely blue, with some yellow at the top. Sporadic yellow flames are normal and not harmful.
If there is something wrong with the flames, do one of the following to solve the problem:
| If the flames are... Do | the following... |
| Low and entirely yellow | 1 Immediately close the gas supply and set all control knobs to OFF.2 Refer to "15 Troubleshooting" to determine the cause of the problem.Most likely, the venturis are blocked. |
| Higher than the bowl | 1 Immediately close the gas supply and set all control knobs to OFF.2 Wait 5 minutes to allow any accumulated gas to escape.3 Relight the burner(s).4 If the problem persists, refer to "15 Troubleshooting" to determine the cause of the problem. |

10 USING THE TIMER AND THERMOMETER
The appliance is equipped with a timer and thermometer. You can use them to set an alarm, which can either go off after a certain amount of time or when the food reached a certain temperature. You can also use the thermometer to check and follow up the temperature of your food.

If you do not use the thermometer, we recommend storing the thermometer probe and cable indoors.
10.1 Icons and control buttons
On the timer and thermometer, you find the following icons and control buttons:
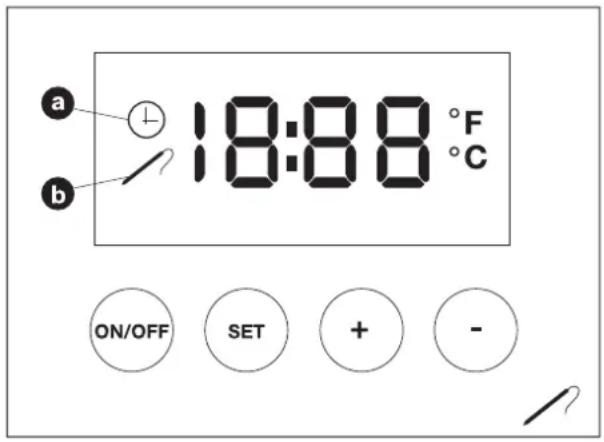
| Icon按钮 Description | |
| Clock icon (A) Displayed when you are setting the timer alarm and when the timer alarm is set. | |
| Probe icon (B) Displayed when you are setting the thermometer alarm and when the thermometer alarm is set. | |
| ON/OFF button Allows you to switch the timer/thermometer on and off and to switch between °C and °F. | |
| SET button Allows you to enter the setting mode, in which you can set the timer and/or thermometer alarm. | |
| + and - buttons Allow you to set the timer or thermometer alarm to the correct time or temperature. |
10.2 Setting the timer alarm
1 Switch on the timer and thermometer by pressing the ON/OFF button.
2 Press the SET button once or twice, until the display shows the clock icon and the default setting 0:00.
3 Use the + and - buttons to set the correct time.
4 When finished, do not press any buttons for five seconds.
The timer automatically quits the setting mode. The alarm will go off after the set amount of time.
10.3 Setting the thermometer alarm
1 Switch on the timer and thermometer by pressing the ON/OFF button.
2 Plug the thermometer probe into the food.
After a few moments, the thermometer shows the current temperature of the food.
3 Press the SET button once or twice, until the display shows the probe icon and the default setting ---
4 Switch between degrees Fahrenheit (^) and Celsius (^) by pressing the ON/OFF button.
5 Use the + and - buttons to set the correct temperature.
6 When finished, do not press any buttons for five seconds.
The thermometer automatically quits the setting mode. The alarm will go off when the food reached the set temperature.
10.4 Clearing an alarm
1 Press the SET button once or twice, until the display shows the alarm that you want to clear.
2 To clear the alarm, press the SET button again and hold it for a few moments.
10.5 Checking the food temperature
1 Switch on the thermometer by pressing the ON/OFF button.
2 Plug the thermometer probe into your food.
After a few moments, the thermometer shows the current temperature of the food.
3 If you want to follow up the temperature of your food, leave the probe plugged in.
4 When finished, remove the probe from the food and switch off the thermometer by pressing the ON/OFF button.
10.6 Temperature guidelines
The thermometer alarm is especially helpful to prepare meat. If you plug the probe into the center of your meat, you can make the alarm go off when the meat is cooked to your liking. This table indicates to which temperature you should set the alarm:
| Meat How done? Temperature | ||
| Red meat Very rare | 45 - 49,5 °C | |
| Rare | 50 - 54,5 °C | |
| Medium | 55 - 59,5 °C | |
| Medium well | 60 - 64,5 °C | |
| Well | 65 - 69,5 °C | |
| Pork | Not applicable | 79 - 100 °C |
| Poultry | Not applicable | 79 - 100 °C |
11 USEFUL TIPS AND TRICKS
11.1 Preheating the appliance
By preheating your appliance, you make sure the grill is hot enough by the time you put food on it. Proceed as follows:
1 Light the burner(s) and set their control knob(s) to HIGH.
2 Close the lid and leave the appliance for ten minutes.
3 After ten minutes, open the lid and put your food on the grill.
4 If you need less heat now, set the control knob(s) to a lower position.
11.2 Preventing food from sticking
To prevent your food from sticking to the grill:
- Oil the food lightly with a brush before you put it on the grill. You can also oil the grill itself.
- Preheat the appliance. The warmer the grill when you put food on it, the less the food will stick.
- Do not turn the food too quickly. Let it catch some heat first.
11.3 Direct and indirect grilling
Depending on the type of food you are preparing and on how you want to prepare it, you can grill directly or indirectly:
| Method Description Use | |
| Direct Put your food directly above a lit burner, set that burner to a high position and keep the lid open. | To sear meat and vegetables |
| Indirect Put your food next to a lit burner, set that burner to a medium/low position and close the lid. | To further cook seared meat |

When grilling under a closed lid, always keep an eye on the lid thermometer to make sure the appliance does not get too hot. See "11.5 Watching the temperature".
11.4 Grilling with closed lid
Closing the lid while grilling has some important advantages:
- The temperature of the grill is higher and remains more constant.
- You reduce the cooking time of your food and keep your food more moist.
- You reduce flare-ups and save gas.

When grilling under a closed lid, always keep an eye on the lid thermometer to make sure the appliance does not get too hot. See "11.5 Watching the temperature".
11.5 Watching the temperature
Your appliance is equipped with powerful burners, so it heats up rapidly and you can keep the temperature steady. When grilling under a closed lid, however, you have to make sure that the appliance does not get too hot. Keep an eye on the lid thermometer and take into account the following guidelines:
A normal cooking temperature is about 210^ . At higher temperatures, dripping and accumulated fat can ignite.
The temperature should never be over 300^ for more than five minutes. This can damage and deform the appliance.

If the appliance gets too hot, cool it down by opening the lid and setting the burners to a lower position.
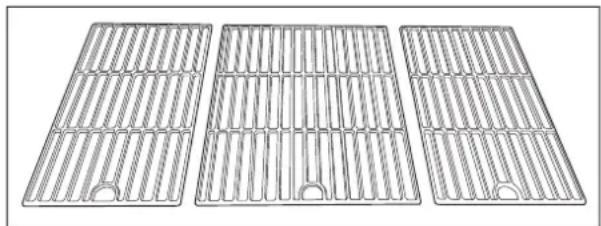
11.6 Making optimal use of the heat
The central part of the bowl is hotter than the sides. To allow you to use that hottest part to its full potential, the appliance is equipped with grills of different sizes. It comes with:
One large grill, to be placed in the centre of the bowl.
- Two smaller grills, to be placed at the sides of the bowl.
If you place the grills correctly in the bowl and light all the burners, the entire central grill will be heated to the maximum. Like that, you expand the hottest part of the bowl and you can make optimal use of the grill surface of your appliance.
11.7 Taking advantage of the heat zones
When all burners are lit, the burner hoods distribute the heat as evenly as possible over the grill. Despite this even heating, some
zones are still hotter than others. You can take advantage of these heat zones to grill your food to perfection:
| Zone Hot? Use to... | |
| Front Hot Grill delicate food (prawns, fish...) | |
| Centre Hotter Prepare food that needs some time to cook (e.g. sausages,chicken ties...) | |
| Back Hottest Sear meat and vegetables |

You can also create heat zones by playing with the power of the burners. You can, for example, set a burner to a lower position and use the zone above that burner for delicate food or food that needs some time to cook.
11.8 Roasting food on the spit
To roast food on the spit, you have to make the main burners and spit burner act together. To prepare a spit-roasted chicken, for example, proceed as follows:
1 Remove the grills and warming rack from the appliance and put them aside.
2 Light the main burners and close the lid to preheat the appliance. In the meantime, put the chicken on the spit.
3 After ten minutes, open the lid, switch off the middle burner and set the side burners to LOW. You can put a dish on the middle burner to catch dripping fat.
4 Put the spit above the burners and close the lid. The hot air will now cook the chicken, just like in a traditional oven.
5 When the chicken is partially cooked, light the spit burner to crisp the chicken skin. Open the lid when lighting the burner and close it afterwards.
6 Keep an eye on the chicken to make sure the skin does not burn. Switch the spit burner off once the skin is crisp enough.

When grilling under a closed lid, always keep an eye on the lid thermometer to make sure the appliance does not get too hot. See "11.5 Watching the temperature".
11.9 Avoiding flare-ups
During grilling, some flare-ups are normal. Too many flare-ups, however, increase the temperature in the appliance and can ignite accumulated fat. To avoid flare-ups:
- Make sure the bowl is clean when you start grilling. We recommend putting a new Leaf® in the bowl before each use. See "12.2 Cleaning the bowl".
- Regularly check if the fat drain hole is not blocked and if the fat drip tray or cup is not full yet.
- When grilling fatty meat, trim excess fat, close the lid and set the burners to a medium or low position.
12 MAINTAINING THE APPLIANCE
12.1 Cleaning the grill
We recommend cleaning the grill after each use, with the Barbecook cleaner. Proceed as follows:
1 Spray the foam on the grill and let it act for a while.
The foam discolours, as it soaks off the dirt and greases.
2 Remove the foam with a soft sponge and water and rinse the grill thoroughly.
3 Dry the grill well and store it in a dry place. This prevents formation of rust.

You can also clean the grill with a soft detergent or with sodium bicarbonate. Never use oven cleaners on the grill.
12.2 Cleaning the bowl
We recommend cleaning the bowl after each use. The easiest way to do this is by putting a Leaf® in the bowl before you start grilling. The Leaf® is a foil that fits the bowl perfectly and that catches all residues and greases. When the appliance cooled down, just remove the Leaf® and the bowl is clean.

Register your appliance at www.barbecook.com to find out which type of Leaf you need.
12.3 Cleaning the burners and venturis
12.3.1 WHY CLEAN THE BURNERS AND VENTURIS?
Spiders and insects can make webs and nests in the burners and venturis. This may block the gas supply to the burners. As a result:
- You cannot light the burners. If you manage to light them anyway, they will only produce smoky and yellow flames.
- The gas can start burning outside the venturis, at the control knobs. These fires are called flash-backs and can result in serious injuries and material damage.


Damages caused by blocked burners and venturis are regarded as inadequate maintenance and are not covered by the warranty.
12.3.2 WHEN CLEAN THE BURNERS AND VENTURIS?
You have to clean the burners and venturis of your appliance:
Before the first use after a long period of non-use.
- At least twice a year, of which once at the beginning of the season.
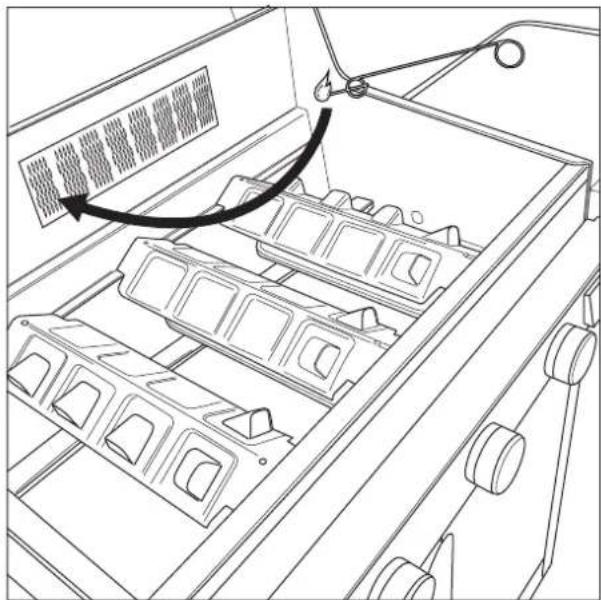
12.3.3 TO CLEAN THE BURNERS AND VENTURIS
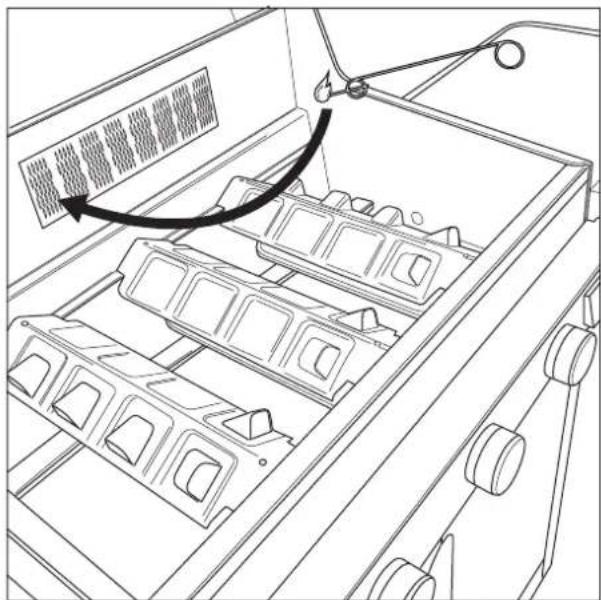
1 Remove the burners from the appliance as shown on the illustrations. If you notice that a burner is damaged, you have to replace it.


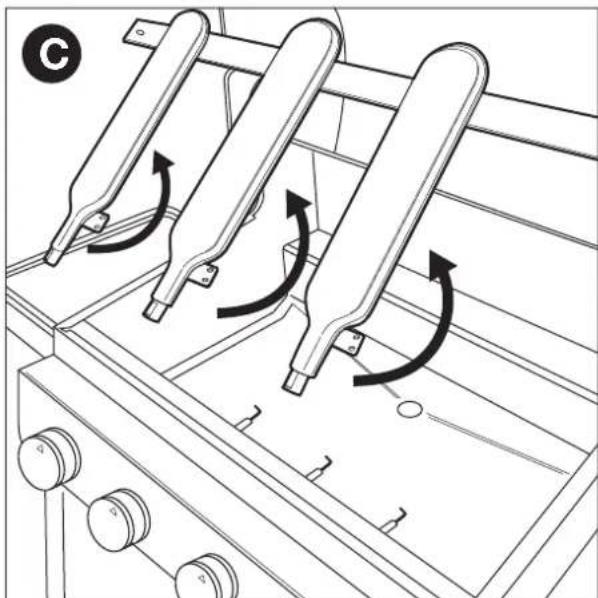
2 Clean the burners and venturis with a small brush or a homemade pipe cleaner (an unfolded paperclip, a pipe brush...).
3 Put the burners back. Make sure to place the venturis over the openings of the gas valves.
12.4 Maintaining enamel, stainless steel and powder coated parts
The appliance is composed of enamelled, stainless steel and powder coated parts. Each material has to be maintained differently:
| Material How to maintain this material | |
| Enamel | ·Do not use sharp objects and do not knock against a hard surface. ·Avoid contact with cold liquids while still hot. ·You can use metal sponges and abrasive detergents. |
| Stainless steel | ·Do not use aggressive, abrasive or metal detergents. ·Use soft detergents and let them act on the steel. ·Use a soft sponge or cloth. ·Rinse thoroughly after cleaning and dry well before storing. |
| Powder coated | ·Do not use sharp objects. Use soft detergents and a soft sponge or cloth. ·Rinse thoroughly after cleaning and dry well before storing. |

To prevent formation of rust on stainless steel, avoid contact with chlorine, salt and iron. We recommend not using the appliance near the coast, near railways or near swimming pools.

Damages caused by not following these instructions are regarded as inadequate maintenance and are not covered by the warranty.
Below the exploded view of your appliance (second part of the manual), you find a list with all parts of which the appliance is composed. This list includes a symbol that specifies the material of each part, so you can use it to check how you have to maintain a particular part. The parts lists use the following symbols:
| Symbol Material | |
| ● | Enamel |
| ■ | Stainless steel |
| ★ | Powder coated |
12.5 Storing the appliance
If you do not use your appliance for a longer period of time, store it in a dry place. Before you store the appliance:
- Disconnect the gas cylinder. Never store your appliance indoors (not even in a garage or shed) as long as it is connected to the gas cylinder.
- Clean the burners and the grills, rub them with oil and wrap them in paper.
-
If your appliance is equipped with a spit burner, remove the spit burner engine and store it in a dry place.
-
Cover your appliance with a Barbecook cover. Register your appliance at www.barbecook.com to find out which cover you need.
12.6 Storing gas cylinders
These instructions apply to both empty and full gas cylinders.
Always store gas cylinders outdoors, in a well-ventilated area. Make sure they are not exposed to excessive heat or direct sunlight.
- Never store a gas cylinder in an area that can become very hot (in a car, on a boat...).
- Never store your gas cylinder or spare gas cylinder in the cabinet of your appliance.
- Never store your spare gas cylinder near a gas appliance in use.
Always store gas cylinders outside the reach of children.
Always store and transport gas cylinders in upright position.
12.7 Ordering spare parts
Parts that are directly exposed to fire or intense heat have to be replaced from time to time. To order a spare part:
1 Look up the reference number of the part you need. You find a list of all reference numbers below the exploded views in the second part of this manual and on www.barbecook.com.

If you registered your appliance online, you will automatically be guided to the correct list.
- Order the spare part at your point of sale. You can order parts both under and outside warranty.
13 WARRANTY
13.1 Covered
Your appliance comes with a warranty of two years, starting from the date of purchase. This warranty covers all manufacturing defects, provided that:
- You used, assembled and maintained your appliance according to the instructions in this manual. Damages caused by misuse, incorrect assembly or inadequate maintenance are not regarded as manufacturing defects.
-
You can present the receipt and the unique serial number of your appliance. This serial number starts with a G, followed by 15 digits. You can find it:
-
On this manual and on the starter pack that included the manual.
- On the packaging of the appliance.
-
On the type label on the inside of the cabinet door (Quisson, Siesta 4 and Siesta 6) or on the inside of the bottom front panel (Spring, Siesta 2 and Siesta 3).
-
The Barbecook quality department confirms that the parts are defective and that they proved defective under normal use, correct assembly and adequate maintenance.
If one of the above conditions is not met, you cannot claim any form of contribution. In all cases, the warranty is limited to the repair or replacement of the defective part(s).
13.2 Not covered
The following damages and defects are not covered by the warranty:
- Normal wear and tear (rusting, distortion, discolouration...) of parts that are directly exposed to fire or intense heat. It is normal to replace these parts from time to time.
- Visual irregularities that are inherent to the manufacturing process. These irregularities are not regarded as manufacturing defects.
- All damages caused by inadequate maintenance, incorrect storage, improper assembly or modifications made to pre-assembled parts.
- All damages caused by misuse and abuse of the appliance (not using it according to the instructions in this manual, using it for commercial purposes...).
- All consequential damages caused by careless or non-compliant use of the appliance.
- Rust or discolouration caused by external influences, the use of aggressive detergents, exposure to chlorine... These damages are not regarded as manufacturing defects.
14 TECHNICAL SPECIFICATIONS
14.1 Type label
The type label lists all the technical specifications of your appliance. You can find it:
In the second part of this manual.
- On the inside of the cabinet door.
14.2 Injector diameters
Main burner: 0,99 mm
- Side burner: 0,65 mm
- Spit burner 0,82 mm
| Problem Probable cause(s) Solution(s) | ||
| Not enough heat | ·Gas supply not open ·Venturis not placed over openings of gas valves ·Burner openings blocked ·Gas cylinder (almost) empty ·Pressure regulator not connected correctly to cylinder and/or hose | ·Open gas supply ·Place venturis over openings of gas valves ·Clean burner openings or replace burners ·Replace gas cylinder ·Reconnect pressure regulator to cylinder and/or hose |
| Excessive heat and/or flare-ups | ·Food too fatty ·Fat drain hole blocked, fat in bowl and/or fat on burners ·Burner hoods not mounted correctly ·Temperature too high | ·Trim excess fat or set burners to a low position ·Clean fat drain hole, bowl and burners ·Mount burner hoods correctly ·Set burners to a lower temperature and/or grill food indirectly |
| Heat not distributed evenly over grill surface | Some heat differences are normal, see "11.6 Making optimal use of the heat" and "11.7 Taking advantage of the heat zones". Probable cause(s) for big heat differences: ·Burners hoods not mounted correctly ·Appliance not preheated | ·Mount burner hoods correctly ·Preheat appliance |
| Yellow flames | ·Burners or venturis blocked ·Salt on burners ·Appliance connected to butane | ·Clean burners and venturis ·Clean burners ·Connect appliance to propane, using an appropriate pressure regulator |
| Incomplete flame Burner blocked, pierced or rusted Clean or replace burner | ||
| Flash-backs (flames outside venturis/at control knobs) | Burners or venturis blocked | 1 Close gas supply and set burners to OFF. 2 Let appliance cool down. 3 Clean burners and venturis. |
| Flames higher than edge of bowl | ·Lots of wind ·Gas cylinder (almost) empty ·Fat in bowl and/or on burners | ·Put appliance with rear side towards wind ·Replace gas cylinder ·Clean bowl, clean burners and replace Leaf® |
| Pressure regulator hums | ·Hot weather ·New (full) gas cylinder | Not a hazard or defect. Should stop automatically after a while. |
| Burner whistles when set to LOW | Gas injector, venturi and/or burner dirty Clean gas injector, venturi and burner | |
| Impossible to light burner (using either igniter or match) | ·Burner or venturi blocked ·No gas supply | ·Clean burner and venturi ·Open gas supply and press safety knob on pressure regulator (not present on all regulators) |
| Impossible to light burner with igniter | ·No battery installed or battery not installed correctly ·Igniter wiring not mounted correctly ·Electrode damaged ·Faulty ground ·Faulty igniter | ·(Re)Install battery, with terminals positioned correctly ·Check and re-assemble all igniter connections ·Replace electrode ·Check and re-assemble electrodes, burners and igniter ·Replace igniter |
| No sparks nor sound when pressing igniter | ·No battery installed or battery not installed correctly ·Empty battery ·Igniter button not assembled correctly ·Faulty spark generator | ·(Re)Install battery, with terminals positioned correctly ·Replace battery ·Re-assemble igniter button ·Replace spark generator |
| Only sound (no sparks) when pressing igniter | ·Faulty ground ·Burner and electrode too far apart | ·Reconnect spark generator and electrodes ·Slightly bend electrode to bring it closer to the burner |
| Sparks present that do not originate from burners | Faulty wiring Replace wiring | |
| Problem Probable cause(s) Solution(s) | ||
| Sparks present, but not on all electrodes and/or not powerful enough | ·Faulty ground ·Low battery ·Wet or broken electrodes | ·Reconnect spark generator and electrodes ·Replace battery ·Dry electrodes with paper towels or replace electrodes |
2 Over dele handleiding. 22
14 Specifications techniques 50
6 Cbbp3BaHe Ha ra3Ta c ypeHa 88
KaKb6yTuJa,Mapkyu nperylaTOp? 88
VHcTpkykUIM 3a6e3oNaCHOCT. 88
Cbpb3BaHeHaMapkyaKbmypea 88
Cbpy3BaHe Ha Mapkyu n 6yTuNkata KbM perynatopa 89
-Подмяна на 6утнкata... 89
7Поверказ TeчовиHa ra3. 89
3aio da npOBepBaTe 3a TeOBe Ha ra3?.....89
Kora da npOBepuTe 3a TeOBe Ha ra3? 89
- HcTpyKm 3a 6e3oNaCHOCT. 90
KaKbMaTePnAnMne Heo6xOum? 90
3a da npOBepuTe 3a TeOBe Ha ra3. 90
BcnyaHaTeHa ra3. 90
8IoproToBkaHa ypea 3a n3no3BaHe. 90
- Ppeu BcKa ynoTpe6a 90
-ПпeДи ПьВаТаУNotpe6a(CneДДьЛьгпериODнСыхра themselves 91 - 06rapaHe Ha ypeda 91
93anaIbaHeHa ropeKnTe. 91
- IHCtpyKm 3a 6e3oNaChocT. 91
3anaJbAne Ha rnaBnTe ropeIkn 91
3anaIbaHe Ha cTpaHnHaTa rOpelka. 92
3anaIbaHe Ha ropeKkaTa 3a uwoBe. 92 - ɪnəkʌŋoʊbahe Ha rɒpeɪknte. 93
-ПовторноЗаалване на ropelкпerte 93
-Пюверка на пламьциTe 93
10 N3noJ3BaHe Ha TaIMepa n TepMoMeTbpa. 93
- IkoHn KoHTpOJIHn 6yToHn 94
Hactpoika Ha anapMa 3a TaMepa. 94
HactpoKaHa anapMa 3a Tempepatpata. 94
AHyIpaHe Ha aIapMa. 94
-ПоберкаHaTemпepaТураТаHa xpaHata 94 - Yka3aHn 3a TeMpePaTpaTa. 94
11 Pono3Hn CbBeTu npenopbKn 95
-Ппсдварителнозатонлгенhaурда.. 95
-ПпетовТьразын Ha 3альенbaHeTo Ha xpaHaTa ... 95
-ДирекTHOи HeДирекTHOпeчHe Na ckapa... 95
-Пeуне He Na ckapa cbc 3aTbOpeH Kanak. 95
CnepeHa TemnepaTypata. 95
- ONTUMaJIHo Bb3NoI3BaHe OT TOnJIHaTa. 95
- 13BJIuHaHe Ha nOla ot 3OHnTe Ha TOnIIHa. 95
- Pteuehe Ha xpaHa Ha 1uu 96
U36BaHe Ha BHe3aHn PnAmbui 96
12 Pndpbkka Ha ypea. 96
-Почистваноаckapata. 96
-Почиствае на Кура.. 96
-Поуиствае На رорелкпг e И Трьбпг На BeHtypn96
ПодпьжkaHaЧаСпКртNeOTЕмДИ, HepbЖdaemaCTOMaHaИЧАТСпрахОВпOKртNe 97
CbXpaHHeHa ypea. 97
CbxpaHraBaHe Ha raoBn 6yTuJIKn 98
- POpbUka Ha pe3epBn YacTn 98
13Fapanu 98
KaKBO ce nokpna oT rapaHnra Ta 98
KaKBo He ce nokpmba ot rapaHpyTa. 98
14Texnueckn cneunkaun 98
4.1 Tpb6n Ha BeHTypn
Tp6nTe Ha BeHTypn Ca MaIKn Tp6nK, 3aKpeHn 3a BxOda Ha ropeKnTe. OCTpaHn Ha Tp6nTe nMa oTBop. ToBa e BuIMo Ha rnaBHnTe ropeKn n CTpaHnHaTa ropEnka:
Korato ra3Ta npOtuHa KbM ropeKnTe, Tn npemHaba npe3 Tpb6nte. BnaOapene Ha OTbOpnte OTCpaHn, Ra3Ta ce CmecBa c Bb3dyx N B pe3yIaT ha TOBa - C Knclopod. Toba e Heo6xOIMO 3a Do6pTo 3anaIbaHe B ropeKnTe: camo npabunHaTa Cmec ot ras N Knclopod Ie Ce 3anaI npabunHO Ie ce noJyat xy6aBn PnAmBu.
4.2 Ko3npkn Ha ropelkata
Ko3npknte Ha ropeIkata ca Ko3npknte, KOIO Ce MOHTnpat Ha dropeIknte Ha Bauny ypeI. Te npedna3Bat ropeIknte OT kaneuMa3HnHa n irpaT KnOyoba pOnB Turbo Heating System. OToBopnte c nokpnbOTcTaPnHa KaO3npknte pa3npdeJrT TOnnHaTa No ckapTa, KoETo N03BOJBA MHoro no-6bp30 nNo-paBHomepHo HargBahe.
2 O6bpHete CnEuaHb BHMaHHe Ha Ko3npKInTe, KOraTo crNo6BaTe ypeHa. Turbo Heating System MoKe da
fYHKUHnpa npabuHcMo aKO BcKa Ko3npKa e MOHTnpaHa HaTouHaTa rOpelka.
4.3 EmaiJ
Hakon cactn Ha ypea ca nokpnTc nlaact pa3tono HCTbKIO, HapeeHO emaII. To3n eamn npedna3Ba metana noI hero ot Kopo3n. EmaIbTe BucOKokaeeCTBeH MaTePnAn:ToI e ycTouHB Ha pbXka, He n36JIeHra Ba NOd BlINrHHeTO Ha BUCOKI TEMepaTpUe I neceH 3a NoDpXkKa.
1 TbI KaTO eMaJIbT He e ToJIOKOBa TbBkAB, KOJIKOTo MeTAla, KOITNO NOKPINA, NapYeTA OT eMaJIna MoRAT da ce OTKbCHat npn HEnpabINHO 6opabeHe c ypeHa.3a da n36eHHTe Pno6bEMn, 6bTe BHNMaTeHN npn CrIIO6BaHe Ha eMaJInpaHIne YacTu IN BuHaN IIOIbPxJaTe eMaJIna, KaKTo e ONUcaHo B TOBa pbKOBOcTBO.
4.4 Bhe3aHn nlaMbci
NCKPte Ca BHe3aHn PnAmbuc, KOITo N3nn3aT OT Kynata, KOrato neyete Ha ckapa. Te obHKHObeHo ca npuHHeHn OT Kaenea Ma3HHa nn MapHaTa.
5 CΓΙΟΥΒΑΗ ΜΑ ηΡΕΝΑ
5.1 NHCtpyKznn 3a 6e3oNaCHOCT
He moDnFmupaTe ypeDa npCrNo6BaHTo My. Mhoro onachO e H He e No3BOJeHO Da ce npOMEHr TAcTHe, KOnTO ca npeBapuTeJIHo CrNo6eHN U/nn 3aneYaTaHn OT npOn3BOUInTeJ.
BnHaHn CneIeBaIte BHMaTeJIHO INcTpkyuMnte 3a crNo6BaHe.
- IopTe6nteJIrHocn OTROBOPHOCT 3a npabJINHOTo crNo6BaHe Ha ypeHa. NOBpeIte, pNCHHeHn OT HnpaBnIHc rNo6BaHe, He ce NOKpNBat OT rapaHtTa.
5.2 3a da crrno6nte ypeda
Heo6xOuMa Bn e Kpbctata OTBeTpKa, npaba OTBeTpKa n AA 6aTepe (eneKtpueckn3anaHnten).AkoypeBbTBnBKnIOyBa ropeJa 3a WnWObe, ue ca BN Heo6xOuMn n D 6aTepe (Dburatena Roepkata 3a WnWObe). Cypeda Hece doctabrt 6aTepe.
1 NocTaBte UpeHa paBaH uNCTa NOBbpxHOCT.
2 Crno6eTe ypea, KaKTo e noka3aHo Ha cepTeXKeTte 3a crNo6BaHe. MoKeTe Da rH HamePnTe BbB BToPaTa Yact Ha TOBa pBkoBOcTBO cnei pa3rNo6eHnT N3rIeH Na ypea.

BHMabaIte npn crIo6BaHe Ha emaJInpaHITe Yactn. HCTpymENTITE N BHTOBETe MORAT Da NOBpeJrT emaJa. 3nON3BaIte npedocTaBeHITe BNAKHECTN Wa6n, 3a Da npedna3nte emaJa OKOLO BHTOBETe.

PaketyeTo C BnHTOBe MoKe Da CbIbPxna NobYe BuHTOBe,OTKoJIKOTo Ca Heo6xOaMm.CneI crNo6BaHe MoKe Da OCTaHaT BuHTOBe.
6 CBbP3BAHE HA ΓA3TA C YPEDA
6.1 KaKBa 6yTnIka, Mapkyu nperylaTop?
IpeuJa CbpxKeTe Ra3Ta KbM ypeDa, Tpr6Ba Da Kynite Ra3OBA 6ytnka, Mapkyu nperynataop Ha HanaReHTo. BnHaru KnyBaTMe MATEpnaJ, KOITOTROBapra Ha BCNUKn HaUNoHaJIHc CTaHdaptNa Ha TnPa(OBeTe) ra3 n HOMNHaJHO HAnraHe, yKa3aHn no ypeDa.
Ta6nuaTao-noIOny noka3Ba kon 6ytuKn,MapkyuH nperylatoN Tp6Ba Da n3noJ3Bate. B BeJIrga (BE) HapnPmep Tpa6Ba da n3noJ3BaTe nponaHOb a 6ytuJa c mapkyu nperylatoP 3a 37 mbar nn 6ytanoba 6ytuKa c mapkyu nperylatoP 3a 28-30 mbar.
| Държава Бутник, маркуни р发电机 | |
| DK, GR, NO, SE, EE, LT, LV, CZ, PL, MT, HU, SI, SK | Пронан, 30 mbar / Бутан, 30 mbar |
| ES, GB, IE, PT, BE, FR, LU, IT | Пронан, 37 mbar / Бутан, 28-30 mbar |
| NL П探测, 30 поли 50 mbar / Бутан, 30 mbar | |
| СY П探测, 30 поли 37 mbar / Бутан, 28-30 mbar | |

PpenopbYBaMe Bn Da CbpxKeTe ypeDa KbM nponaH. PponaHbT npednaRa BnCOKOKaYeCTBeHo 3anaIbaHe n e no-cna6o YyBCTBnteHn Ha ckpex.

Kynete perylaTOP n ra3oBa 6ytuNka 3aeHNo. He BCnUKN peYlAToPn nacBAt Ha BCuKn 6ytuNkn.
6.2Инструкцииза6e3onaCHOCT
Hikora He cBp3BaIte 6ytNkata DnpeKTHo Kbmyepa. BuHaRn pBo MOHTnpaTe peYnaTOp Ha HAnraHeTo Ha 6ytNkata.
Hikora He npomehny Te pndbarnteJIO crIIOeHN nn 3aneaTeHn cactn Ha 6ytuJaTa, Mapkya nn peylaTopa Ha HauraHeTo.
- PóndbpxaTe MapkyuA Bb3MoxHo Ha-NkC (MaKcIMyM 1,5 M), 3a Da IpeDToBpaTte BlaueHeTo My No 3emrTa.
-Дokato CBbp3BaTe 6yTnIkaTa, Маркучи Perynatopa HаняraHTo:
- HnKora He n3KpBBAuTe Mapkya.
BnHaH npbXte 6ytNkata B n3npaBeHo noJoxKeHne.
HnKora He OTBapJTe ra3OOnaBaHaHeTo.
-Поберяbaite 3a TeYObe Ha ra3 BnHaR, KOraTo npaBInTe npOMeHn NO CBp3BaHeTo Ha ra3Ta. BnKTe "7 Поберрka 3a TeYObe Ha ra3".
6.3 Cbbp3BaHe Ha Mapkyua Kbmypeda
3a da cBbpxeTe Mapkya 3a ra3Ta KbM ypeA, Tp6Ba da MOHTnapeT KynnyHr Ha Tpb6aTa 3a ra3Ta Ha ypeA. YpeBt ce IOCTABc DBA KynnyHra, KOINTO ca npedHa3HaueHn 3a onpeJeHn DbpxkAb:
| Дыржава Кунлунг | |
| BE, CH, CZ, DK, ES, FI, GB, IE, IT, PT, SI Кунлунг A | |
| FR Кунлунг B |

Ako Baata Ta DpkaBa He e B CnncKa, n3non3baTe KynlyHra, KOTo OTROBapra Ha BaWite HauNoHaHnCTaHdaptN.

6.3.1 KynnyrA
Heo6xoMm Bn e 19-MM raeuen Knou N Kpbctata OTBepKa.
1 3aBHTe KynnyHra KbM rA3OBaTa Tpb6a Ha ypeHa (A) n ro 3aTeHHeTc 19-MM raeeyen KInou (B).

2ПьзHTe Маркуанд Кунгra(C)и 3aterHETe CTraun npbCTeh C KpbCTata OTBepTKa(D).

6.3.2 KynnnyrB
Heo6xOuM Bu e 22-MM raeueH KIOU nperynnpyem raeueH KIOU.
1 3aBHTe KynnyHra KbMa ra3oBaTa Tpb6a Ha ypeHa (A) n ro 3aterheTe c 22-MM raeeyen knou (B).


23aBHTeTe Mapkya 3ra3Ta 3a KynnyHra (C) n ro 3aTeHHeTe C Dbata RaeyHn KIOUy. 3aDpBxTe KynIyHra C 22-MM raeHEn KIOU, DOKaTO 3aBbPtaTe Mapkya c peryInpyEmraeHEn KIOU(D).

6.4 Cbbp3BaHe Ha Mapkya n 6ytNkata KbM perylaTopa
B 3abucmocr OT TnHa perylaTopa Ha HanaReHTo, KOIto n3no3BaTe, Ca Bu Heo6xOaMn Kpbctata OTBeptKa n/nnn peRynpyem raeueh KnIOU.
1 CbpxkTe Mapkya KbM peryIaTopa Ha HauraHTo. N3BbPwTe eH0 OT cneHNTE DeiCTBn:
Ako MapkybT mHa CTraa NpbcTeH, nIb3HeTe MapkyuHa Hd peryIaTopa I 3aterHete cTraaun npbcTeH C KpbCTata OTBepTKa (A).
Ako MapkybT mma raKa, 3aBnHTeTe MapKyua 3apepylaTopa n 3aterHete raKaTa C perylnpyem raehen KIOU (B).


2 Cbpxkete peryataTopa Ha HnraHTo KbM r3OBaTa 6ytjka. N3BbPwTe eNo O t CneHnTe DeICTBn:
Ako perynatopbT nma raKa, 3aBnHTepeperynaTopa 3a 6ytnkata no nocoka Ha yacOBnKOBaTa cTpelenka n 3aterheTe raKaTa C perynpyem raeuen KIOU (C).
Ako peryanaTopbT hMa BnHTOba pe36a, 3aBnHTepeRyNaTopa 3a 6ytNkata no nocoka, 06paHa HaYacOBHnKOBaTa CTpeNka (D).

6.5 NpMna Ha 6yTnIkaTa
1 PpeKbchete ra3oNoDaBaHTo n NoCTaBe BCnUKN KOHTpOJIHN KOnYeTa B noJoxKeHne OFF (N3Kn.).
2Pa3kahe npa3HaTa 6ytjka n CbbpKTe nJHaTa 6ytjka.
3Проверетe6tнлкata,MapkyuaиBCNчknra3OBnВpb3kn3a TeOBe.BuxTe"7Проверka3aTeOBeHa ra3".
1PpeKbcHeTe ra3oNoBaHaTeTo nIpeDnpiMeTe eHNOOTcJeHNHTe DeiCTBn:
AKO CTe OTKPNJIN TeH Ha ra3 OT HRAKOOT Bpb3KInTe, 3aTeRHeTe Ta3n Bpb3Ka.
- Ako Cte OTKpNl Tce Ha ra3 OT 6yTnIkata Nnn Mapkyu, NOdMeHete 6yTnIkata Nnn Mapkyu.
2ПюовереоТНОВВрьзкаТаИЛКOMнОHEHTNTe,OTKONTOCTe OTkpINI TEHHa ra3.
3 Ako He cTe B cbCToHHe Da KopurnapaTe Teya, ce CBbpxKeTe C TbproBeu Ha Barbecook. He n3noJI3BaIte ypeDa,doKaTo TeYbT He 6bJe KopurnpaH.
3a cnncbHK ha Tbproun Ha Barbecook noceTe www.barbecook.com.
8 NOДГOTOBKA HA YPEDA 3A ИЗПОЛ3BAHE
8.1Ппeдь BCякa уnotpe6a
PnBc8a ynoTpe6a Ha ypea, npOBepBaIe 3a cIeHTo:
- YpeBt e Ha noDxOJaIo MЯcTo. BuxTe "3.3 N36epeteNoDxOJaIoo MAcTo".
MapkybT 3a ra3 He ce BnaH IO 3emra H He Bn3a B KOHTaKT C ropeuA NOBbpxHOCT Nn KaneUa Ma3HnHa.
Kynata e ncta. IpenopbUbame Bn da noCTabTe HOB Leaf B Kynata npedn BCra kya ynoTpe6a. BuxkTe "12.2 NocntBaHe Ha Kynata". -
FopejknTe n Tpb6nTe Ha BeHtpyn He ca 3anyuHe n O T rHe3da Ha Hacekomn nn NaJxnnn. BuxTe "12.3 POnucTbaHe Ha ropejknTe n Tpb6nTe Ha BeHtpyn".
-
YpeBt e npaBnHc rIo6e. O6bpHeTe cneuaHb BHMaHHe Ha:
-
Ko3npknte Ha ropejkaTa. Bcra Ka Ko3npKa Tpr6Ba da 6bJe noctaBeHa Hnd npabHnHaTa ropejka. BuxTe "4.2 Ko3npKn Ha ropejkaTa".
Tpb6nte Ha BeHtpyn Ha ropEnknte. Te Tp86ba da ca nocTaBeHN HAD OTBOpHTe HA KlnaHaNHTe 3a ra3.


Ako nckate da cte a6coJIOTHO cnrypHn, ye ra3Ta e npabJInHO CBpb3aHa, MoXeTe Da npOBepBaTe ypeDa 3a TeOBe Ha ra3 ppei BcraKa ynotpe6a. BuxTe "7 PpOBepka 3a TeOBe Ha ra3".
9.1 INHCTpyKznn 3a 6e3oNaCHOCT
-ПпелдаЗаллenteуpeda,ИЗБьршete BCчкnpOBepkn,ИЗбpoehиВ"8ПоДгOTOBKaHaуpeda3aИЗнOL3BaHe".
- KanakbT Tp6Ba BnHaN da e OTbOpH, KOrato 3anaIbaTe ropeKa.
HnKora He ce HabeXdaiTe DnpeKTHO HaI rOpelka, KOraTO 3anaBate.
9.2 3anaJbAHe Ha rJaBnTe RopeJIKN
9.2.1 3N0NJ3BAHE HA 3AATAJNTEN
1 OTbopete Kanaka I noctabete KOHTpoJIHnTe KOnyTaHa rIaBHnTe ropeKIn B noJoxKeHne OFF (N3KnI.).
2AkoBce OSe He e 3anaIeHa dpyra ropeIka,OTbopeTe ra30nOdaBaHeTo n 3uKaaiTe Decet cekyHn. Toba no3BOJRA Cta6nnIm3npaHeTo Ha ra3Ta.
3 HaTncheTe KOHTpOJHOTo KOnYe Ha eHa ropeJIka, HAcTpOte rO do noloxKeHne HIGH (BucOko) n ro 3aApbXte 3a MOMENT. BrpaJeHnA T3anaJInte Ie npedn3BnKa NcKpn, KOITo Ie 3anaJIrT ropeKata.

Bnhar 3anaIbaTe nbpBo eHa rIabHa ropeIka. Hnkora He 3anaIbaTe BCnuKn rIabHn ropeIkn eHOBpemehNO.
4 Ako ropekkahe ce 3ana n cne Tpu onnta, HacptpoTe KOHTPOJHOTO KONue Ha noIOXeHne OFF (N3KJI.), npeKbcheTe ra3oNoDAbaHeTo u 3uKaaiTe 5 MNHyTN. ToBa N03BOJRA Ba HA HATpynHaTa r3 Da ce n3napi.
5 OOnTaIte OTHOBA da 3anaJIte ropeKaTa. Ako ropeKaTaBce OSe He MoKe Da ce 3anaII, onTaNTe Da Ra 3anaJIte CKn6pnt IIN BIXKTe "15 OTKpNBAHe n OTcPaHraBaHe Ha Hen3npaBHOCTn", 3a Da onpeDeJIte npuHaTa 3a npo6Iema.
9.2.2 3N0JI3BAHE HA KN6PNT
1 NocTabete KneUka Kn6pnt B cToiKaTa 3a Kn6pnt.

2 OTBOpTe KanaKa n NoCTaBeTe KOHTPOJIHnTe KOJIeTa Ha rnaBnTe ropeJKN B noJoxKeHne OFF (U3Kn.).
3AkoBce OSe He e 3anaIeHa npyra ropeIka,OTbopeTe ra3oNODaBaHeTo n 3uKaaiTe Decet cekyn. Toba no3BOJRA Cta6nHn3upaHeTo Ha ra3Ta.
4 3anaIe Te KneYkata Kn6pnt I Ra 3aApbXTe Ha OKoJ0 13 MM OT rOpelKATA.

5 Hactpoite KOHTPOHOTO KONHe Ha ropeIkaTa Do noJoxKeHne HIGH (Bucoko).

BnHa 3anaBaTe nbpBo eHa rIaBHa ropeKKa. Hnkora He 3anaBaTe BCnUKN rIaBn rOpEnKn eoHOBpemHo.
6 Ako ropekkaTHe ce 3anaB paMKnte Ha 5 cekyHn, HactpoTe KOHTPOHTo I KOnYe Ha noLoXeHne OFF (N3Kn.),npekbcHete ra3oNoDaBaHeto n3uKaIte 5 MNHTN.ToBa No3BOJRAHa HATpyNaHATA ra3 da Ce n3nap.
7 OOnTaIte OTHOBO Da 3aapanite ropeKkata.AKO BCE Oue He ce nain, BnXTe "15 OTkpBaHe n OTcpanHaBe Ha HEn3npaBHOCTN", 3a da onpeDenite npuHnata 3a npo6nema.
9.3 3anaIbaHe Ha cTpaHnHaTa ropeIka

CtpaHnHaTa ropeKa moKe da n3dbpxKu cbdoBe c MaKcImaJIHo terNo 9 Kr u MaKcImaJeH dnaMeTbp 220 MM.
9.3.1 3NOJ3BAHE HA 3AATAIINTEJI
1 OTbOpTe KaIaKa I NOCTaBeTe KOHTPOJHOTO KONHe Ha CTpaHnUHaT a RopEnKa B NIOJoxKeHne OFF (U3Kn).
2Ako BCE Oue He e 3anahe Ha pyra ropejka,OTbopete ra3oNODaBaHeTo u n3uKaaiTe Decet cekyHn. ToBa n03BOJRA CTA6uH3uHaHETo HA r3ta.
3HaTnchTe KOHTPOJHOTO KOnyHe Ha CTPaHNuHaTa RopEnKa, HAcTpoIte Ro Do NonoXeHne HIGH (BucOko) n ro 3aApbXKe 3a MOMENT. BrpaedHnT 3anaInTe Ie npedn3BnKa nckpn, KOnTO Ue 3anaJrT CTPaHNuHaTa RopEnKa.
4 Ako ropekkaTHe ce 3ana n Cne Tp n ONTa, HacptpoTe KOHTPOHOTO KONue Ha NONOxEHNe OFF (N3Kn.), PpeKbCHETe ra3oNoDaBaHETo n M3uKaAte 5 MNHyTu. ToBa NO3BOJRAHa HAHTPyNaHaTa Ra3 Da Ce N3napn.
5 OOnTaIte OTHOBA Da 3anaJIte CtpaHnHaT a ropeKa.Ako ropeKATA BCE Oue He MoKe Da ce 3anAn, ONtAaTe da ra 3anaJIte c Kn6pnt uNn BnXKe "15 OTkpBaHe nOTCTpaHraBaHe Ha HEm3npabHOCTn", 3a Da onpeDenTe npuHaTa 3a npo6Jema.
9.3.2 3N013BAHE HA KINBPNT
1 NocTabeTe KneUka K6pnt B cToiKaTa 3a K6pnt.
2 OTBopete Kanaka n noCTaBeTe KOHTPOJHOTO KONHe Ha cTpaHnHaTa ropeKb B noJoxKeHne OFF (U3Kn.).
3 Ako BCE OSe He e 3aIanaHa Dpyra RopeJa, OTBopete ra30nOdaBaHeTo N 3uKaAte Decet CeKHyd. ToBa nO3BOJBA Cta6NIM3UpaHETo Ha Ra3Ta.
4 3anaTe KneUkata K6pnt n 3a npbXTe Ha OKoNo 13 MM OT CtpaHHATA RopeJIka.

5 HactpoTe KOHTponHTo KOnYe Ha CtpaHnHaTa RopeKa Do noJoxKeHne HIGH (Bucoko).
6 Ako cTpaHnHaTa ropeJka He ce 3anaB paMKnte Ha 5 CEkyHm, HacTpoTe KOHTponHTo N KOnYe Ha noJoxHeNe OFF (Mkn.), npKbChete ra3oNoDaBaHeTo n 3aKaAte 5 MNHyTN. TOBA NO3BOJRA Ba HA HATpyNaHATA ra3 da Ce n3napi.
7 OOnTaIte OTHOBO Da 3aIaIInTe CToPaHnHHaTc RopEnKa. Ako BCE OSe He Ce NaII, BIXTe "15 OTKpINBaHe N OTCTpaHraBaHe Ha HEn3npaBHOCTn", 3a Da onpeDenTe npHnHaTc 3a npo6nema.
9.4 3anaIbaHe Ha ropeIkaTa 3a

3a da moxete da n3non3BaTe ropekata 3a shuwoBe, Tp6Ba da noctabute Dbe 6atepn D B dBnraTeHa ropekata 3a shuwoBe. Te3n 6atepn He ce doctabrt Cypeda.
9.4.1 3N0J3BAHE HA 3AATAJNTEN
1 OTbopete Kanaka n noctabete KOHTPOJHOTO KONue Ha ropeNkata 3a uwoB e b noJoxKeHne OFF (M3Kn.).
2OCTpaHete ckapnte n CTOkata 3a 3aTOnnHe OT ypeHa n OCTaBeTe HACTpaHn.
3 Ako BCE OSe He e 3anaIeHa dpyra ropeIka, OTBopeTe ra3ONoDABaHTo n 3uKaaIte Decet CekyHn. ToBa I03BOJRA Cta6NIM3NuPAHeTO Ha r3Ta.
4 HatncheTe KOHTponHTo KOnue Ha ropeNkata 3a WnOBe, Hactpoite Ro do nnoXeHne HIGH (Bucoko) ng ro 3aepbXte 3a MOMeHT. BrpaedHnT 3anaIuTe Ie npedn3BnKa nCKpI, KOITo Ue 3anaIaT rOpEKNaT 3a WnOBe.
5 Ako ropekata He ce 3ana n cie Tpn ONTa, HacptpoTe KOHTPOHOTo KONHe Ha noIOXeHne OFF (N3Kn.), npekbche Ta3ONoDaBaHeto N3yakaTe 5 MNHyTn. ToBa no3BOJRA Ba HA HATpyNaHaTa Ra3 Da ce n3napn.
6 OOnTaiTe OTHOBo Da 3aapanTe rOpEnKaTa 3a WIOBe. Ako ropeKata BCE OSe He MoKe Da ce 3aapan, ONTaNte da J 3anaIe C Kn6pnt uIN BuxKTe "15 OTkpBaHe nOTCTpaHbAHe Ha HEn3npabHocHTn", 3a Da onpeDeJIte npuHHaTa 3a npo6Iema.
9.4.2 N3N0J3BAHE HA KINBPNT
1 NocTabete KneUka Kn6pnt B cToiKaTa 3a Kn6pnt.
2OTbOpTe Kanaka NocTaBe KOHTpOJHOTo KOnYe Ha ropeKata 3a WIOBE B noJOKeHne OFF (M3Kn.).
3AkoBce OSe He e 3anaHeHa npyra ropenka,OTbopete ra3oNODaBaHTo n N3aKaIte Decet cekyHn. Toba no3BOJBA Cta6nIn3npaHTo Ha r3Ta.
4 3anaIe Te KneUkata Kn6pnt n aapbXTe HnraBO OT ropeKATA 3a WIOBE.
5 Hactpoite KOHTpOJIHOTo KOnHe Ha rOpEnKaTa 3a WnWoBe do noloxehne HIGH (Bucoko).
6 Ako ropekata He ce 3anaB paMKnte Ha 5 ckyHn, Hactpoite KOHTponHTo KOnHe Ha noLoXeHne OFF (N3Kl.), npekbchete ra3oNoDaBaHeto n3uKaaiTe 5 MNHyT. TOBa No3BOJRA Ba HA HatpyNaHaTa ra3 da Ce n3nap.
7 OntaTe OTHOBO Da 3aapanite ropekata 3a WIOBE. Ako BCE OSe He Ce naH, BIXTe "15 OTKpBaHe nOTcTpaHBAHe Ha HEn3npaBHOCTn", 3a Da onpeDente npuHaTa 3a npo6Iema.
9.5 N3KJIIOUBaHe Ha ropeJIKeTe
Ako Behe He n3non3Bate ropeJIKeTe, Tp6Ba Da rN n3KnOHTe. Hanpabete cJeHTo:
1PpeKbcheTe ra3oNoDaBaHaTeO.
2HactpoTe KOHTPOHNITE KONUeta Ha ropeKNTe do noJooKeHne OFF (N3Kn.).

Upe3 npekbcaheTo Ha ra3oNoDaBaHeTo npbBO, OcnrypbaTe IInncataHa OctaHaHa ra3 B ypeda.
9.6 NOBTOPO 3anaJbAHe Ha ropeJIKNTe
Ako HraKo rOpeIka n3rache No Bpeme Ha n3nol3BaHe, HanpaBete cneHTo:
1 OToBopTe Kanaka n npekbcheTe ra3oNoDaBaHeTO.
2 HactpoIte KOHTpOHNHe TKeOnyeta Do noJIOKeHne OFF (N3Kn.) n 3aKaaiTe 5 MNHyTN. ToBa no3BOJRA Ha HATpynaHaTa r3 da Ce n3napn.
3 3anaaneTe OTHOBO ropeIkaT(aT)
11.7 IV3BJIyHa He Ha NOJI3a OT 3OHIne Ha TOJIINHa
Korato BCnukn ropekn ca 3anaJeH, KO3npKTe Ha ropeJkTe pa3npedeTToPnHaTa Bb3MOxHO Ha-paBHomepHo nO ckapata. Bbnpeku ToBa, paBHomepHo 3aToPnHe, HkON 3OHn ca no-ropeu OT dpyrN. MoKeTe Da ce Bb3no3BaTe ot Te3n 3OHn Ha TOnnHa, 3a da croTBte XpaHaTa cn Do cbBbPseHCTBO:
| Зona Горец? История, за на... | ||
| Оп��д Горец – Дусяпесу – Дусяпесу – Дусяпесу – Дусяпесу – Дусяпесу – Дусяпесу – Дусяпесу – Дусяпесу – Дуroids – Дуroids – Дуroids – Дуroids – Дуroids – Дуroids – Дуroids – Дуroids – Дуroids – Дуroids – Дуroids – Дуroids – Дуroids – Дуroids – Дуroids – Дуroids – Дуroids – Дуroids – Дуroids – Дуroids – Дуroids – Дуroids – Дуroids – Дуroids – Дуroids – Дуroid – Дуroid – Дуroid – Дуroid – Дуroid – Дуroid – Дуroid – Дуroid – Дуroid – Дуroid – Дуroid – Дуroid – Дуroid – Дуroid – Дуroid – Дуroid – Дуroid – Дуroid – Дуroid – Дуroid – Дуroid – Дуroid – Дуroid – Дуroid – Дуroid – Дуroids – Дуroid – Дуroid – Дуroid – Дуroid – Дуroid – Дуroid – Дуroid – Дуroid – Дуroid – Дуroid – Дуroid – Дуroid – Дуroid – Дуroid – Дуroid – Дуroid – Дуroid – Дуroid – Дуroid – Дуroid – Дуroid – Дуroid – Дуroid – Дуroids – Дуroids – Дуroid – Дуroid – Дуroid – Дуroid – Дуroid – Дуroid – Дуroid – Дуroid – Дуroid – Дуroid – Дуroid – Дуroid – Дуroid – Дуroid – Дуroid – Дуroid – Дуroid – Дуroid – Дуroid – Дуroid – Дуroid – Дуroid – Дуroids – Дуroid – Дуroids – Дуroid – Дуroid – Дуroid – Дуroid – Дуroid – Дуroid – Дуroid – Дуroid – Дуroid – Дуroid – Дуroid – Дуroid – Дуroid – Дуroid – Дуroid – Дуroid – Дуroid – Дуroid – Дуroid – Дуroid – Дуroid – Дуroid – Дуroids – Дуroids – Дуroids – Дуroid – Дуroid – Дуroid – Дуroid – Дуroid – Дуroid – Дуroid – Дуroid – Дуroid – Дуroid – Дуroid – Дуroid – Дуroid – Дуroid – Дуroid – Дуroid – Дуroid – Дуroid – Дуroid – Дуroid – Дуroid – Дуroids – Дуroid – Дуroid – Дуroids – Дуroid – Дуroid – Дуroid – Дуroid – Дуroid – Дуroid – Дуroid – Дуroid – Дуroid – Дуroid – Дуroid – Дуroid – Дуroid – Дуroid – Дуroid – Дуroid – Дуroid – Дуroid – Дуroid – Дуroid – Дуroid – Дуroids – Дуroid – Дуroids – Дуroids – Дуroid – Дуroid – Дуroid – Дуroid – Дуroid – Дуroid – Дуroid – Дуroid – Дуroid – Дуroid – Дуroid – Дуroid – Дуroid – Дуroid – Дуroid – Дуroid – Дуroid – Дуroid – Дуroid – Дуroid – Дуroid – Дуroids – Дуroids – Дуroid – Дуroids – Дуroid – Дуroid – Дуroid – Дуroid – Дуroid – Дуroid – Дуroid – Дуroid – Дуroid – Дуroid – Дуroid – Дуroid – Дуroid – Дуroid – Дуroid – Дуroid – Дуroid – Дуroid – Дуroid – Дуroid – Дуroid – Дуroids – Дуroids – Дуroids – Дуroids – Дуroid – Дуroid – Дуroid – Дуroid – Дуroid – Дуroid – Дуroid – Дуroid – Дуroid – Дуroid – Дуroid – Дуroid – Дуroid – Дуroid – Дуroid – Дуroid – Дуroid – Дуroid – Дуroid – Дуroid – Дуroids – Дуroid – Дуroid – Дуroid – Дуroids – Дуroid – Дуroid – Дуroid – Дуroid – Дуroid – Дуroid – Дуroid – Дуroid – Дуroid – Дуroid – Дуroid – Дуroid – Дуroid – Дуroid – Дуroid – Дуroid – Дуroid – Дуroid – Дуroid – Дуroid – Дуroids – Дуroid – Дуroid – Дуroids – Дуroids – Дуroid – Дуroid – Дуroid – Дуroid – Дуroid – Дуroid – Дуroid – Дуroid – Дуroid – Дуroid – Дуroid – Дуroid – Дуroid – Дуroid – Дуroid – Дуroid – Дуroid – Дуroid – Дуroid – Дуroid – Дуroids – Дуroid – Дуroids – Дуroid – Дуroids – Дуroid – Дуroid – Дуroid – Дуroid – Дуroid – Дуroid – Дуroid – Дуroid – Дуroid – Дуroid – Дуroid – Дуroid – Дуroid – Дуroid – Дуroid – Дуroid – Дуroid – Дуroid – Дуroid – Дуroid – Дуroids – Дуroid – Дуroids – Дуroids – Дуroids – Дуroid – Дуroid – Дуroid – Дуroid – Дуroid – Дуroid – Дуroid – Дуroid – Дуroid – Дуroid – Дуroid – Дуroid – Дуroid – Дуroid – Дуroid – Дуroid – Дуroid – Дуroid – Дуroid – Дуroid – Дуroids – Дуroids – Дуroid – Дуroid – Дуroids – Дуroid – Дуroid – Дуroid – Дуroid – Дуroid – Дуroid – Дуroid – Дуroid – Дуroid – Дуroid – Дуroid – Дуroid – Дуroid – Дуroid – Дуroid – Дуroid – Дуroid – Дуroid – Дуroid – Дуroid – Дуroids – Дуroids – Дуroid – Дуroids – Дуroids – Дуroid – Дуroid – Дуroid – Дуroid – Дуroid – Дуroid – Дуroid – Дуroid – Дуroid – Дуroid – Дуroid – Дуroid – Дуroid – Дуroid – Дуroid – Дуroid – Дуroid – Дуroid – Дуroid – Дуroid – Дуroids – Дуroids – Дуroids – Дуroid – Дуroids – Дуroid – Дуroid – Дуroid – Дуroid – Дуroid – Дуroid – Дуroid – Дуroid – Дуroid – Дуroid – Дуroid – Дуroid – Дуroid – Дуroid – Дуroid – Дуroid – Дуroid – Дуroid – Дуroid – Дуroid – Дуroids – Дуroids – Дуroids – Дуroids – Дуroids – Дуroid – Дуroid – Дуroid – Дуroid – Дуroid – Дуroid – Дуroid – Дуroid – Дуroid – Дуroid – Дуroid – Дуroid – Дуroid – Дуroid – Дуroid – Дуroid – Дуroid – Дуroid – Дуroid – Дуroids – Дуroid – Дуroid – Дуroid – Дуroid – Дуroids – Дуroid – Дуroid – Дуroid – Дуroid – Дуroid – Дуroid – Дуroid – Дуroid – Дуroid – Дуroid – Дуroid – Дуroid – Дуroid – Дуroid – Дуroid – Дуroid – Дуroid – Дуroid – Дуroid – Дуroids – Дуroid – Дуroid – Дуroid – Дуroids – Дуroids – Дуroid – Дуroid – Дуroid – Дуroid – Дуroid – Дуroid – Дуroid – Дуroid – Дуroid – Дуroid – Дуroid – Дуroid – Дуroid – Дуroid – Дуroid – Дуroid – Дуroid – Дуroid – Дуroid – Дуroids – Дуroid – Дуroid – Дуroids – Дуroid – Дуroids – Дуroid – Дуroid – Дуroid – Дуroid – Дуroid – Дуroid – Дуroid – Дуroid – Дуroid – Дуroid – Дуroid – Дуroid – Дуroid – Дуroid – Дуroid – Дуroid – Дуroid – Дуroid – Дуroid – Дуroids – Дуroid – Дуroid – Дуroids – Дуroids – Дуroids – Дуroid – Дуroid – Дуroid – Дуroid – Дуroid – Дуroid – Дуroid – Дуroid – Дуroid – Дуroid – Дуroid – Дуroid – Дуroid – Дуroid – Дуroid – Дуroid – Дуroid – Дуroid – Дуroid – Дуroids – Дуroid – Дуroids – Дуroid – Дуroid – Дуroids – Дуroid – Дуroid – Дуroid – Дуroid – Дуroid – Дуroid – Дуroid – Дуroid – Дуroid – Дуroid – Дуroid – Дуroid – Дуroid – Дуroid – Дуroid – Дуroid – Дуroid – Дуroid – Дуroid – Дуroids – Дуroid – Дуroids – Дуroid – Дуroids – Дуroids – Дуroid – Дуroid – Дуroid – Дуroid – Дуroid – Дуroid – Дуroid – Дуroid – Дуroid – Дуroid – Дуroid – Дуroid – Дуroid – Дуroid – Дуroid – Дуroid – Дуroid – Дуroid – Дуroid – Дуroids – Дуroid – Дуroids – Дуroids – Дуroid – Дуroids – Дуroid – Дуroid – Дуroid – Дуroid – Дуroid – Дуroid – Дуroid – Дуroid – Дуroid – Дуroid – Дуroid – Дуroid – Дуroid – Дуroid – Дуroid – Дуroid – Дуroid – Дуroid – Дуroid – Дуroids – Дуroid – Дуroids – Дуroids – Дуroids – Дуroids – Дуroid – Дуroid – Дуroid – Дуroid – Дуroid – Дуroid – Дуroid – Дуroid – Дуroid – Дуroid – Дуroid – Дуroid – Дуroid – Дуroid – Дуroid – Дуroid – Дуroid – Дуroid – Дуroid – Дуroids – Дуroids – Дуroid – Дуroid – Дуroid – Дуroids – Дуroid – Дуroid – Дуroid – Дуroid – Дуroid – Дуroid – Дуroid – Дуroid – Дуroid – Дуroid – Дуroid – Дуroid – Дуroid – Дуroid – Дуroid – Дуroid – Дуroid – Дуroid – Дуroid – Дуroids – Дуroids – Дуroid – Дуroid – Дуroids – Дуroids – Дуroid – Дуroid – Дуroid – Дуroid – Дуroid – Дуroid – Дуroid – Дуroid – Дуroid – Дуroid – Дуroid – Дуroid – Дуroid – Дуroid – Дуroid – Дуroid – Дуroid – Дуroid – Дуroid – Дуroids – Дуroids – Дуroid – Дуroids – Дуroid – Дуroids – Дуroid – Дуroid – Дуroid – Дуroid – Дуroid – Дуroid – Дуroid – Дуroid – Дуroid – Дуroid – Дуroid – Дуroid – Дуroid – Дуroid – Дуroid – Дуroid – Дуroid – Дуroid – Дуroid – Дуroids – Дуroids – Дуroid – Дуroids – Дуroids – Дуroids – Дуroid – Дуroid – Дуroid – Дуroid – Дуroid – Дуroid – Дуroid – Дуroid – Дуroid – Дуroid – Дуroid – Дуroid – Дуroid – Дуroid – Дуroid – Дуroid – Дуroid – Дуroid – Дуroid – Дуroids – Дуroids – Дуroids – Дуroid – Дуroid – Дуroids – Дуroid – Дуroid – Дуroid – Дуroid – Дуroid – Дуroid – Дуroid – Дуroid – Дуroid – Дуroid – Дуroid – Дуroid – Дуroid – Дуroid – Дуroid – Дуroid – Дуroid – Дуroid – Дуroid – Дуroids – Дуroids – Дуroids – Дуroid – Дуroids – Дуroids – Дуroid – Дуroid – Дуroid – Дуroid – Дуroid – Дуroid – Дуroid – Дуroid – Дуroid – Дуroid – Дуroid – Дуroid – Дуroid – Дуroid – Дуroid – Дуroid – Дуroid – Дуroid – Дуroid – Дуroids – Дуroids – Дуroids – Дуroids – Дуroid – Дуroids – Дуroid – Дуroid – Дуroid – Дуroid – Дуroid – Дуroid – Дуroid – Дуroid – Дуroid – Дуroid – Дуroid – Дуroid – Дуroid – Дуroid – Дуroid – Дуroid – Дуroid – Дуroid – Дуroid – Дуroids – Дуroids – Дуroids – Дуroids – Дуroids – Дуroids – Дуroid – Дуroid – Дуroid – Дуroid – Дуroid – Дуroid – Дуroid – Дуroid – Дуroid – Дуroid – Дуroid – Дуroid – Дуroid – Дуroid – Дуroid – Дуroid – Дуroid – Дуroid – Дуroids – Дуroid – Дуroid – Дуroid – Дуroid – Дуroid – Дуroids – Дуroid – Дуroid – Дуroid – Дуroid – Дуroid – Дуroid – Дуroid – Дуroid – Дуroid – Дуroid – Дуroid – Дуroid – Дуroid – Дуroid – Дуroid – Дуroid – Дуroid – Дуroid – Дуroids – Дуroid – Дуroid – Дуroid – Дуroid – Дуroids – Дуroids – Дуroid – Дуroid – Дуroid – Дуroid – Дуroid – Дуroid – Дуroid – Дуroid – Дуroid – Дуroid – Дуroid – Дуroid – Дуroid – Дуroid – Дуroid – Дуroid – Дуroid – Дуroid – Дуroids – Дуroid – Дуroid – Дуroid – Дуroids – Дуroid – Дуroids – Дуroid – Дуroid – Дуroid – Дуroid – Дуroid – Дуroid – Дуroid – Дуroid – Дуroid – Дуroid – Дуroid – Дуroid – Дуroid – Дуroid – Дуroid – Дуroid – Дуroid – Дуroid – Дуroids – Дуroid – Дуroid – Дуroid – Дуroids – Дуroids – Дуroids – Дуroid – Дуroid – Дуroid – Дуroid – Дуroid – Дуroid – Дуroid – Дуroid – Дуroid – Дуroid – Дуroid – Дуroid – Дуroid – Дуroid – Дуroid – Дуroid – Дуroid – Дуroid – Дуroids – Дуroid – Дуroid – Дуroids – Дуroid – Дуroid – Дуroids – Дуroid – Дуroid – Дуroid – Дуroid – Дуroid – Дуroid – Дуroid – Дуroid – Дуroid – Дуroid – Дуroid – Дуroid – Дуroid – Дуroid – Дуroid – Дуroid – Дуroid – Дуroid – Дуroids –Дуroid - - - - - - - - - - - - - - - - - - - - - - - - - - - - - - - - - - - - - - - - - - - - - - - - - - - - - - - - - - - - - - - - - - - - - - - - - - - - - - - - - - - - - - - - - - - - - - - - - - - - - - - - - - - - - - - - - - - - - - - - - - - - - - - - - - - - - - - - - - - - - - - - - - - - - - - - - - - - - - - - - - - - - - - - - - - - - - - - - - - - - - - - - - - - - - - - - - - - - - - - - - - - - - - - - - - - - - - - - - - - - - - - - - - - - - - - - - - - - - - - - - - - - - - - - - - - - - - - - - - - - - - - - - - - - - - - - - - - - - - - - - - - - - - - - - - - - - - - - - - "Опгела: История". "История". "История". "История". "История". "История". "История". "История". "История". "История". "История". "История". "История". "История". "История". "История". "История". "История". "Опгела: История". "История". "История". "История". "История". "История". "История". "История". "История". "История". "История". "История". "История". "История". "История". "Псюгела". "Псюгела". "Псюгела". "Псюгела". "Псюгела". "Псюгела". "Псюгела". "Псюгела". "Псюгела". "Псюгела". "Псюгела". "Псюгела". "Псюгела". "ПСюгела". "ПСюгела". "ПСюгела". "ПСюгела". "ПСюгела". "ПСюгела". "ПСюгела". "ПСюгела". "ПСюгела". "ПСюгела". "ПСюгела". "ПСюгела". "ПСюгелa". "ПСюгела". "ПСюгела". "ПСюгела". "ПСюгела". "ПСюгела". "ПСюгела". "ПСюгела". "ПСюгела". "ПСюгела". "ПСюгела". "ПСюгела". "ПСюгела". "Псюгела". "Псюгела". "ПСюгела". "ПСюгела". "ПСюгела". "ПСюгела". "ПСюгела". "ПСюгела". "ПСюгела". "ПСюгела". "ПСюгела". "ПСюгелa". "ПСюгела". "ПСюгелa". "ПСюгела". "ПСюгела". "ПСюгела". "ПСюгела". "ПСюгела". "ПСюгела". "ПСюгела". "ПСюгела". "ПСюгела". "ПСюгела". "Псюгела". "ПСюгела". "ПСюгела". "ПСюгела". "ПСюгела". "ПСюгела". "ПСюгела". "ПСюгела". "ПСюгела". "ПСюгела". "ПСюгела". "ПСюгелa". "ПСюгелa". "ПСюгелa". "ПСюгелa". "ПСюгелa". "ПСюгелa". "ПСюгелa". "ПСюгелa". "ПСюгелa". "ПСюгелa". "ПСюгелa". "ПСюгелa". "ПСюгелa". "Псюгела". "ПСюгела". "ПСюгела". "ПСюгела". "ПСюгела". "ПСюгела". "ПСюгела". "ПСюгела". "ПСюгела". "ПСюгела". "ПСюгела". "ПСюгела". "Псюгелa". "ПСюгелa". "ПСюгелa". "ПСюгелa". "ПСюгелa". "ПСюгелa". "ПСюгелa". "ПСюгелa". "ПСюгелa". "ПСюгелa". "ПСюгелa". "ПСюгелa". "ПСюгела". "ПСюгелa". "ПСюгелa". "ПСюгелa". "ПСюгелa". "ПСюгелa". "ПСюгелa". "ПСюгелa". "ПСюгелa". "ПСюгелa". "ПСюгелa". "ПСюгелa". "Псюгелa". "ПСюгелa". "ПСюгелa". "ПСюгелa". "ПСюгелa". "ПСюгелa". "ПСюгелa". "ПСюгелa". "ПСюгелa". "ПСюгелa". "ПСюгелa". "ПСюгелa". "Псюгелa". "Псюгелa". "ПСюгелa". "ПСюгелa". "ПСюгелa". "ПСюгелa". "ПСюгелa". "ПСюгелa". "ПСюгелa". "ПСюгелa". "ПСюгелa". "ПСюгелa". "ПСюгела". "ПСюгела". "ПСюгелa". "ПСюгелa". "ПСюгелa". "ПСюгелa". "ПСюгелa". "ПСюгелa". "ПСюгелa". "ПСюгелa". "ПСюгелa". "ПСюгелa". "Псюгелa". "ПСюгелa". "Псюгелa". "ПСюгелa". "ПСюгелa". "ПСюгелa". "ПСюгелa". "ПСюгелa". "ПСюгелa". "ПСюгелa". "ПСюгелa". "ПСюгелa". "ПСюгела". "ПСюгелa". "ПСюгела". "ПСюгелa". "ПСюгелa". "ПСюгелa". "ПСюгелa". "ПСюгелa". "ПСюгелa". "ПСюгелa". "ПСюгелa". "ПСюгелa". "ПСюгEL". "ПСюгEL". "ПСюгEL". "ПСюгEL". "ПСюгEL". "ПСюгEL". "ПСюгEL". "ПСюгEL". "ПСюгEL". "ПСюгEL". "ПСюгEL". "ПСюгEL". "ПСюгEL". "ПСюгEL". "ПСюгEL". “ПСюгEL”. "ПСюгEL". "ПСюгEL". "ПСюгEL". "ПСюгEL". "ПСюгEL". "ПСюгEL". "ПСюгEL". "ПСюгEL". "ПСюгEL". "ПСюгEL". "ПСюгEL". "ПСюгEL". "ПСюгEL". "ПСюгEL". "Рсюгела". "Рсюгела". "Рсюгела". "Рсюгела". "Рсюгела". "Рсюгела". "Рсюгела". "Рсюгела". "Рсюгела". "Рсюгела". "Рсюгела". "Рсюгела". "Рсюгела". "РСюгела". "РСюгела". "РСюгела". "РСюгела". "РСюгела". "РСюгела". "РСюгела". "РСюгела". "РСюгела". "РСюгела". "РСюгела". "РСюгела". "РСюгелa". "РСюгелa". "РСюгелa". "РСюгелa". "РСюгелa". "РСюгелa". "РСюгелa". "РСюгелa". "РСюгелa". "РСюгелa". "РСюгелa". "РСюгелa". "РСюгелa". "Рсюгела". "Рсюгела". "Рсюгела". "Рсюгела". "Рсюгела". "Рсюгела". "Рсюгела". "Рсюгела". "Рсюгела". "Рсюгела". "Рсюгела". "Рсюгела". "Рбюгела". "Рбюгела". "Рбюгела". "Рбюгела". "Рбюгела". "Рбюгела". "Рбюгела". "Рбюгела". "Рбюгела". "Рбюгела". "Рбюгела". "Рбюгела". "Рбюгелa". "Рбюгела". "Рбюгела". "Рбюгела". "Рбюгела". "Рбюгела". "Рбюгела". "Рбюгела". "Рбюгела". "Рбюгела". "Рбюгела". "Рбюгела". "Рбюгела". "Рсюгела". "Рсюгела". "Рсюгела". "Рсюгела". "Рсюгела". "Рсюгела". "Рсюгела". "Рсюгела". "Рсюгела". "Рсюгела". "Рсюгела". "Рсюгелa". "Рсюгелa". "Рсюгелa". "Рсюгелa". "Рсюгелa". "Рсюгелa". "Рсюгелa". "Рсюгелa". "РсюгEL". "РсюгEL". "РсюгEL". "РсюгEL". "РсюgEL". "РсюgEL". "РсюgEL". "РсюgEL". "РсюgEL". "РсюgEL". "РсюgEL". "РсюgEL". "РсюgEL". "РсюgEL". "РсюgEL". "РсюgEL". "РсюgEL". "РсюgEL". "РсюgEL". "Опгела: История". "История". "История". "История". "История". "История". "История". "История". "История". "История". "История". "История". "История". "История". "История". "Иostorious" "Опгела: История". "История". "История". "История". "История". "История". "История". "История" "Опгела: История". "История". "История". "История". "История" "Опгела: История". "История". "История". "История" "Опгела: История". "История". "История" "Опгела: История". "История". "История" "Опгела: История". "История" "Опгела: История". "История" "Опгела: История". "История" "Опгела: История". "История" "Опгела: История". "История" "Опгела: История". “История” "Опгела: История". "История" "Опгела: История". "История" "Опгела: История". "История" "Опгела: История". "История" "Опгела: История". "История" "Опьогела". "Овогelа" "Овогelа". "Овогelа" "Овогelа". "Овогelа" "Овогelа". "Овогelа" "Овогelа". "Овогelа" "Овогelа". "Овогelа" "Овогelа". "Овогelа" "Овогelа". "Овогelа" "Овогelа" "Овогelа" "Овогelа" "Овогelа" "Овогelа" "Овогelа" "Овогelа" "Овогelа" "Овогelа" "Овогelа" "Овогelа" "Овогelа" "Овогelа" "Оьогelа" "Оьогelа" "Оьогelа" "Оьогelа" "Оьогelа" "Оьогelа" "Оьогelа" "Оьогelа" "Оьогelа" "Оьогelа" "Оьогelа" "Оьогelа" "Оьогelа" | ||

Mokete cBIO da cb3daTe 30Hn Ha TOnnHa, KaTO NaCTPone CnnaT a HropeKIne. Hanpimep MOkeTe Da NaCTPone ropeIka Ha Nscka IOnuNy n Da n3NoJ3BaTe 3oHaTa Hnd Ta3n ropeIka 3a fHnHa XpaHa nn XpaHa, KOrTO Ce HyKdae OT n3BeCTHO BpeMe 3a rOTBeHe.
11.8Пechе HeХpaHa Haшш
3a da neyete xpaHa Ha 1n1sHa, Tp6Ba da HApapate rnaBnTe ropeKIn n ropeIkaTa 3a 1n1oBe da pa60T 3aeDHO. 3a da n3neye Ta He Ha 1n1n HAnpImep, HAnpaBeTe cneHOTO:
1 OToTpaHHe cKapIte n cToiKaTa 3a 3aToPiJaHe oT ypeHa n IIOCTaBeTe HAcTpaHn.
23anaIe rnaBnIte ropeIkn n 3aTbOpTe kanaKa, 3a Da 3aToIInTe ypeJa. MekyBpeMeHNO noCTaBeTe NnIeTo Ha IwHa.
3 CnE nceT MNHyTN OTBopeTe Kanaka, n3KlIOueTe cpeHata ropelka n HacptoIte CTpaHnHInTe ropeKN Do noLoXKeHne LOW (Hncko). MoKeTe Da NoCTaBnTE YHHN Bbpxy cpeHaTa rOpelka, KOrTo da yJaBa KaNeuTa Ma3HnHa.
4 NocTaBete uHa HaI rOpEknTe n 3aTbOpTe Kanaka. RopeuT Bb3dyx Ue CrotBn PnIeTO TOH0 KaKTo B TpaNIOHHa FypHa.
5 Korato nIeTo e qacTnHc croTbeHo, 3anaTe ropeKkata 3a uWObE, 3a da npeneyete KOxata Ha nIeTo. OTbopeTe KanaKa, Korato 3anaBate ropeKkata, I ro 3aTBopTe cJeT TOBa.
6 HsIIOJaBaIe nIeTo, 3a da He npereOpTe KOKaTa. N3KJIouTe rOpeIkaTa 3a WIIWOBe, cIeI KaTO KOKaTa ce npeneue doCTaTbHIO.

Korato neyete Ha ckapa no3aTbOpen KaNAk, BNHaRn CneTe TepMometbpa Ha KaNaka, 3a Da CTe CnrypHn, Ye ypeBt HMa da nperpee. BnXte "11.5 CneJeHe Ha TemnepaTypata".
11.9 N36raBaHe Ha BHe3aHn nJaMbci
IbpeHa neeHe Ha cKapa e HopMaJIHO da Ce IOBRT BHe3aHn NlAmbU. IpEkanEHO MHorOTo BHe3aHn NlAmbU, oBaue, yBeJIuHaBt TempePaTypA Ta Bypea N MoRat Da 3aNaJrT HaTpynaHaTa Ma3HnHa. 3a Da N36erHete BHe3aHnTe NlAmbU:
- Поверяbaite дду Куntа eчста, korato 3anovbte da neeTe ha ckapa. Прорьваме вда постуг Te HOB Leaf B Kynata npdIn BcraKa ynoTpe6a. BuxTe "12.2 NocntBaHe Ha Kynata".
-Поверява对接педовныдд OTворьт 3аизтуне на МаЗнина He e 3anyшен И дд ТаВATA nДИЧAKATA 3a KaNeцma3HNiHa He e ПьЛн. -МаЗнина He e TbJIHa.
Korato neyeTe Ma3Ho MECO, n3peXeTe n3nHHaTa Ma3HHa, 3aTBopTe KaNaka n HactpoTte rOpEKNTE Ha CpeHNO uN HNCO NOJOKHeIe.
12ПОДДРьЖКАHA YPEДA
Ako pernctpnpate cB0ypeoHnaH,ABTOMaTHHO 6bnde HacooyH KBM npabunHnCnCBK.
2 Nopbuae pe3epBnata Ha 136paHOTo MCTO 3a nokynpka. MoKeTe da npbUbaTe pe3epBnHaCTN KaKTO B rapaHIOHH, Taka N B N3BbHRapaHIOHH yCIOBnI.
13 TAPAHUN
13.1 KaKBO ce nOKpNbA ot rapaHcIyTa
Baunrypeedce npoaba cDberodmHa rapaunr OTaTataHa nokynka.Ta3n rapaunry BkIIOyBa BCNUKn npOn3BOcCTBeHn defeektn, npu ycnoBne, ye:
CTe n3n3BaJI, crIIOBnI IN NOIbIpxKaIN CBOI ypeI B CboTBcETCBnE C INHCTpyKUInTE B TOBA pKBoBOcTBO. IOBpeIte, npuHNHeN O T HeNPaBUNHa yNoTppe6a, HnpabUNHO CRIO6BaHe NII HeOCTaTbUHa PNOIpBXKa He ce CHTaT 3a npON3BOcTBeHn DeΦeKtN.
Mokete da npedocabnte KbntaHnra Ta yHnkaHnna cepneH Homep Ha Baunyaype. To3n cepneH Homep 3anoBa c G, nocneDbHo ot 15 uipn. Mokete da ro HamepuTe:
BTOBA pBkoBOJCTBO IN B KpaTKOTo yPTBaHe, BKJIIOUeHO B pBkoBOJCTBOTO.
Ha onaKobkaTa Ha ypea.
Ha etnkeTa 3a Tnna Ha npodykTa OT BbTpewHata CtpaHa HbpaTata Ha ukaFa (Quisson, Siesta 4 n Siesta 6) nnOT BbTpewHata CtpaHa Ha dOJIHHra NpeDeH nAHeI (Spring, Siesta 2 n Siesta 3).
- Barbecook OtДeЛьТ NO kaueCTBOTO NOTbpyn, Ye chaTnte ca DepeKTHи CA depeKTpapani npn HopMaJIHaTa ynotpe6a, npabINHO crIIO6BaHe n IOCTaTBHа noDpBxka.
Ako eJHO OT rOpHnTe ycNoBnHe e n3nBnHeHo, He MoKeTe da npTeHNipate 3a KaKbATO n Da e fOpMa Ha KOMneHcauN. BvB BCnUKN Cnyan rapaHnraTa e OrpaHnueHa Do peMOHTa nn NIOmHaTa Hn DepeKTHata(NTe) Yact(N).
13.2 KaKBO He ce nOKpNbA OT rapaHcIyTa
CneHnTe nobpeu n DepeKTu He ce nokpmbat O rapaHnraTa:
HopmaHNO n3HocBaHe (pbKdrcBaHe, n3KpmbraBe, 06e3cBeTBAHe n np.) Ha yactnTE, KOInTO ca dIpeKTHO n3IOKeHN Ha orbH nn CUNHa TOnLIHa. POnMraHaTa Ha Te3n Yactn OT BpeMe Ha BpeMe e HopmaJIHa.
Bn3yaJIHn HeCbOTBeTCTBn, KOITo Ca npncbIu 3a npOn3BODCTBeHn IpoUec. Te3n HeCbOTBeTCTBn He Ce CHTaT 3a npOn3BODCTBeHn DeEeKTH.
BcNkIOBpei, npuHHeH O T HeOCTaTbUHa NOpPbXka, HnPaBnHO CbxpaHeHne, HnpaBnHO crNo6BaHe uMOnuΦnKaun, HanpaBeH No npedBapntHo crNo6eHnte qactn.
Bcunnopei, npuHHeH OTHnnpaBnHIO n3NoI3BaHe nn 3IoynoTpe6a Cypea (aKo He ce n3NoI3Ba Cnopei INCTpykUnTe B TOBA pBkoBOdCTBO, aKO CE n3NoI3Ba 3a TbproBCKn ueHn np.).
BcNKn NOBpeDn BCLeJeCTBne Ha HeBHNMaTeJHo n3PON3BaHe IINn 3PON3BaHe Ha ypeDa He No npedHa3NaueHne.
PbJka nIIN o6e3uBETBaHe, npHnHeHn OT BbHnBnHn, n3noJI3BaHeTo Ha arpeCnBH Mnuei npenapaTu, n3larAHeTo Ha xnp i dp. Te3n nobpeDi He ce cHTat 3a npon3BOdCTBeHn DepeKtN.
14 TEXHnueCKN CNEUΦnKAuIN
14.1 Etniket 3a TUN
EtuketbT 3a TIN H36poBa BCNUKn TEXHnueckn CneuNphiKaunn Ha Bauny ypeI. MoKeTe da ro HamepuTe:
BbB Btopa Ta YaCT Ha TOBa pbKOBoDCTBO.
Ha BbTpewHata CtpaHa Ha BpaTata Ha wkaFa.
14.2ДиametpnHa nHKeKTopnTe
- ΓλανΗ προενικα: 0,99 MM
CTpaHnHa ropeKka:0,65 MM - Topejka 3a wuObe:0,82 MM
| ПюбLEM Вераян(a) preliminary(a) Peшени(a) | |
| Нема достаьно топлина | • Газларовно не отворец • ТрьбITE на Бenvугпе не са постavenи над OTBOPITE на каланитe за ra3ta • OTBOPITE на горелкite са залушени • Газовата бутilianska e (почу) прараза • Perugал�ыт на habоганно не e сььрзан правлино кьм bутilianskatа и/и маркуда |
| Прекалега топлина и/nл Всесалеги пламьши | • Хранatable и рекалеги мазна • OTBOPBTа за Истuingе на мазниatinga в mazнинь в Кунота и/nл мазниatinga no ropeлкITE • КозеркITE на рорелкata не са монтуpani правлино • Temnéрауета e Тьрдс bиска |
| Торлината не оразпеделега разнориму по поьхнocтта надскapatura | Hормално уда за лима Истебто на р�леска в Торлината; виз tweet "1.6 OTIMALINBO bьзолзbahe ot Торлината" и "11.7 Истiviане на палда Зд�ны на торлеса". Ворята(и) пониatinga 3a rolемпаллки в торлината: • КозеркITE на рорелкite не са монтуpani правлино • УрдБТ не оразырателиноград |
| Жылtn Пламьши | • Газларов по поьхнocтта • Рогал�ыт и по рогелкite на Вenvугп. 30 • Col no рогелкite • УрдБТ e Сььрзан Кьм burtan |
| Немьен пламьк 3аушени, рожыпл mь Балдуп (палмьши) Истын ТрьбITE на В envунчпri/Priy kontrpoлнite Кошета) | • Пождтete рогелкite и рогелкite на Вenvугп • Пождтete рогелкite • Свьржte ур ded Кьm подан. Исторы покордуся рогулators на habоганeto |
| Пламьшие са по-bиски от рьба на куната | • Спелен ветлр • Газовата bьзлеска e (почу) • Мазнинь в куната и/и по рогелкite |
| Perugал�ыт на habоганно брмч | • Гешио врeme • Нoba (пьлina) разова burtkan |
| Горелкatingа CBUSTI, korato e в послженье LOW (Hincko) | 3ambpсен ra3ozв Истебто, trьба на Вenvугп n/лл рогелka |
| Горелкatingа не може на ce залани (н'tto csc залалител, н'tto c kibpit) | • 3auneshа рогелк� и по рогелкite • Нama ra3ozopodabane |
| Горелкatingа не може на ce залани сьс залалитel | • He e noctabeha batepyraи и batepyrae a noctabeha helipavilino • Залалителя не e okaebelн павлино • Пов徴ен eletkpond • Гешио zasemaybae |
| Горелкatingа не може на ce залани сьс залалитel | • Пождтete (OTHO) batepyra, kato nozhiouniharate nprabilino Klemite • Поверete и ocbsцьettinge оТНОВ BCNUKII Врьзки на залалитelia • Пождтete eletkponda • Поверete и сглобerte оТНОВ eletkpondite, rogelкite и залалитelia • Пождтete zalalitentelia |
| ПюбLEM Вераян(a) поочина(n) Peшени(e) | |
| При НатиckaHe Ha 3аалителя Не Излдат Искри и He ce чува Звук | · He e поставе ha 6atepyra ta nii 6atepyra ta e посстavena He nprabinlo · ИзчepпаHa 6atepyra · Бутоьт Ha 3aалителя He e crtlo6eH npabilho · Пов体现在 ИскрorehepaTop |
| При НатиckaHe Ha 3аалителя се чува само 3вук (He ce виждат Искри) | · Гешино 3a3eMyBaHe · Тьрде отданeHi edin OT dprug ropeIka n eilektrpoi |
| Има Искри, конт He Излдат OT ropeIknite | Гешино OkabelЯBaHe Пожмehete okabelЯBaHo |
| Има Искри, Ho He pri Bcunckn eilektrpoDi n/nii He ca doctaTbUHO сilHni | · Гешино 3a3eMyBaHe · ИзтоцeHa 6atepyra · Мokри nii Chyneni eilektrpoi |
DA - BRUGERVEJLEDNING
1 Reglstrering af din grill. 102
| Land Sammenkobling | |
| BE, CH, CZ, DK, ES, FI, GB, IE, IT, PT, SI Sammenkobling A | |
| FR Sammenkobling | B |

10.2 Indstilling at timeralarmen
3 Olulised ohutusjuhised 150
3 OLULISED OHUTUSJUHISED
9 ACCENSIONE DEI FORNELLI

9.2.1 USO DELL'ACCENSIONE ELETTRICA
9.2.2 USO DEI FIAMMIFERI
9.7 Verificar as chamas
6.1 Katero jeklenko, cev in regulator?
6 TILKOBLING AV GASS TIL APPARATET
6.1 Hvilken flaske, slange, regulator
För du kan koble gasstilförselen til apparatet, mä du kjöpe en gassflaske, slange og trykkregulator. Alltid kjöp materialer som oppfyller alle nasjonale standarder og med gastype(r) og nominelt trykk som angitt på apparatet.
Tabellen nedenfor viser hvilken gassflaske, slange og regula-tor du ma bruke. I Belgia (BE), for eksempel, ma du bruke en propanflaske med en slange og regulator pa 37 mbar ell butanflasker med en slange og regulator pa 28-30 mbar.
| Land Flaske, | slange, regulator |
| DK, GR, NO, SE, EE, LT, LV, CZ, PL, MT, HU, SI, SK | Propan, 30 mbar / Butan, 30 mbar |
| ES, GB, IE, PT, BE, FR, LU, IT | Propan, 37 mbar / Butan, 28-30 mbar |
| NL Propan, 30 eller 50 mbar / Butan, 30 mbar | |
| CY Propan, 30 eller 37 mbar / Butan, 28-30 mbar | |

7 SJEKKING FOR GASSLEKKASJE
12 VEDLIKEHOLD AV APPARATET
10 UPORABA BROJACA VREMENA I TERMOMETRA
Ure'daj je opremljen brojacem vremena i termometrom. Mozete ih koristiti kako biste postavili alarm koji se moze oglasiti nakon odredenog vremena ili kada hrana dostigne odredenu temperaturu. Mozete koristiti termometar kako biste provjerili i pratili temperaturu Vase hrane.

Ako ne koristite termometar preporucamo Vam da sondu termometra i kablove pohranite u zatvorenom prostoru.
10.1 Ikone i kontrolni gumbi
Na brojacu vremena i termometru cete pronaci sljedece ikone i kontrolne gumbe:
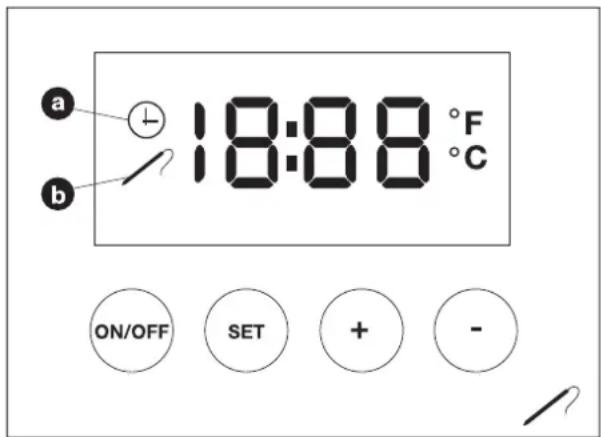
| ikona/gumb Opis | |
| Ikona SATA (A) Prikazu je se kad postavljate alarm brojača vremena i kad je alarm brojača vremena namješten. | |
| Ikona sonde (B) Prikazu je se kad postavljate alarm termometra i kad je alarm termometra namješten. | |
| Gumb ON/OFF Omogućava Vam ukljućivanje i iskljućivanje brojača vremena/termometra i prebacivanje izmerodu °C i °F. | |
| Gumb SET Omogućava Vam pristupanje načinu postavljanja u kojem možete namjetiti alarm brojača vremena i/ili termometra. | |
| Gumbi + i - Omogućavaju Vam postavljanje alarma brojača vremena ili termometra na točno vrijeme ili temperaturu. | |
10.2 Postavljanje alarma brojaca vremena
6

included
AA battery
LR6,AM3
1.5V
7


X4


X4


X4


8


0
X2

X2

X2
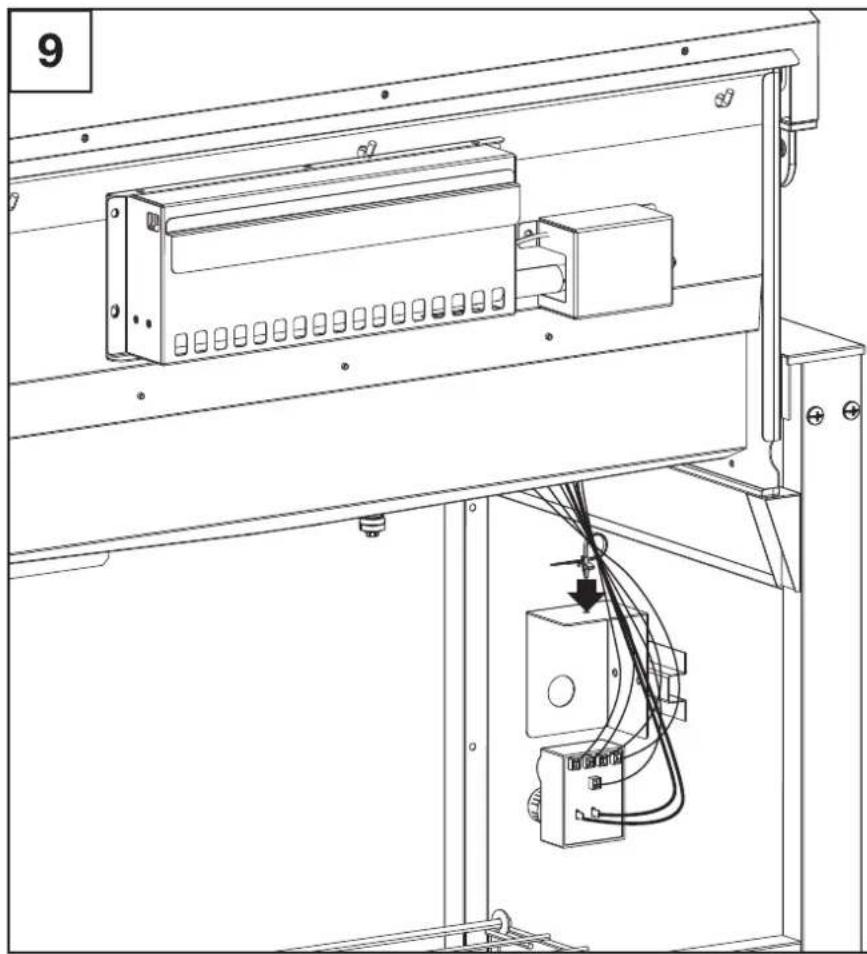
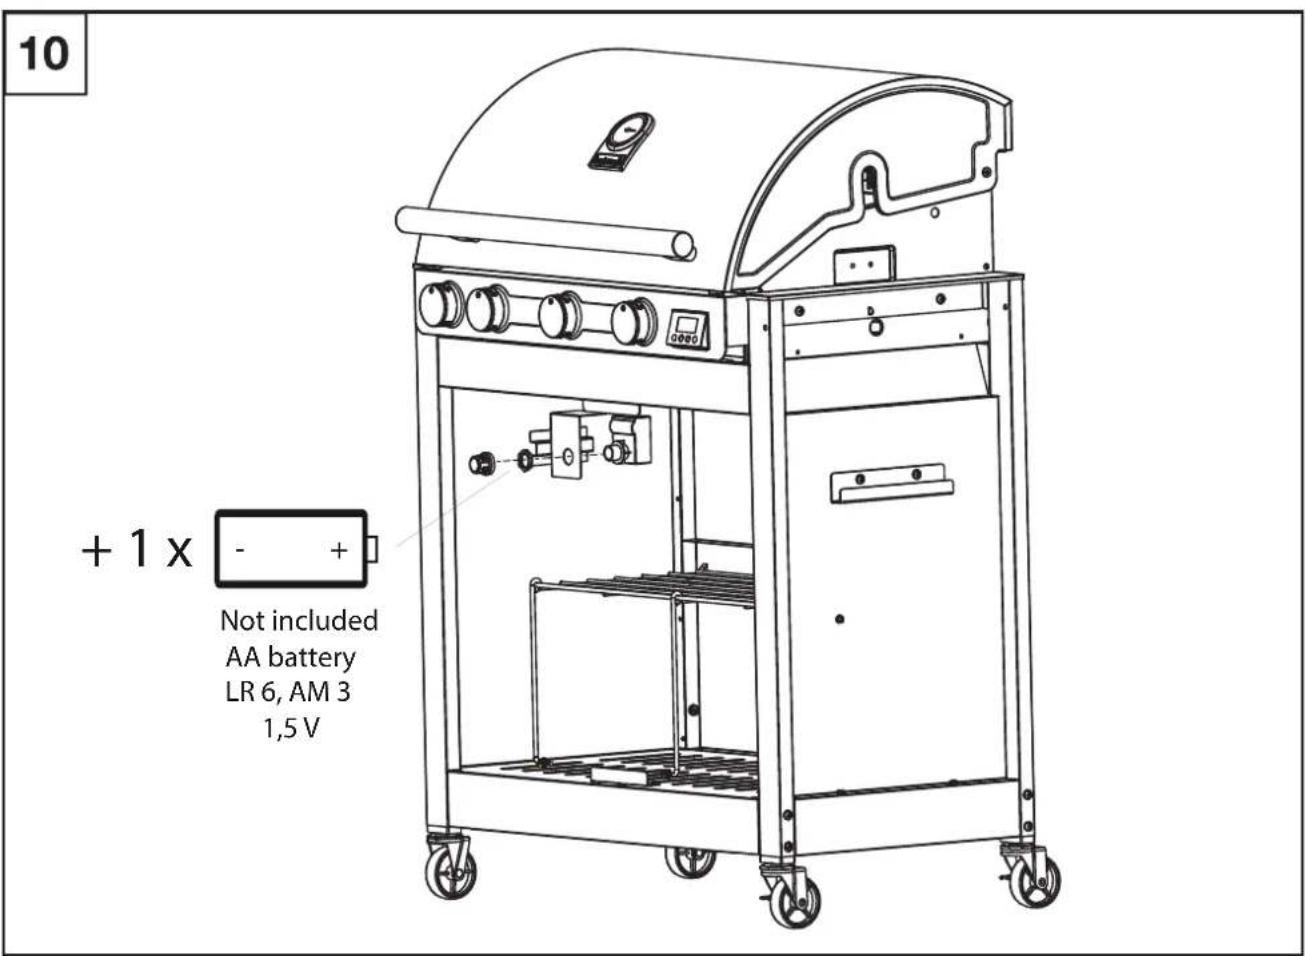

11

12

13

14

15


X2


X2


X3


X4


X1


X1


X1

X1
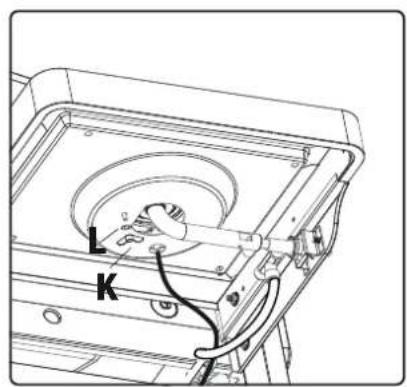
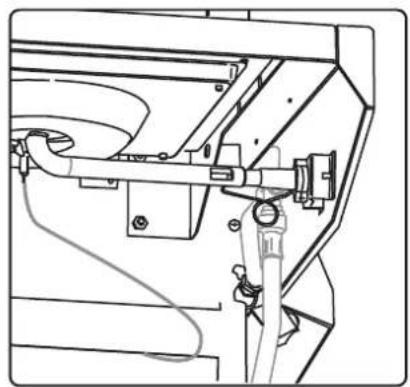


16


X2

X2
$$ + 2 \times \boxed {- +} $$
Not included
D battery
LR 20, MN13000
1.5V
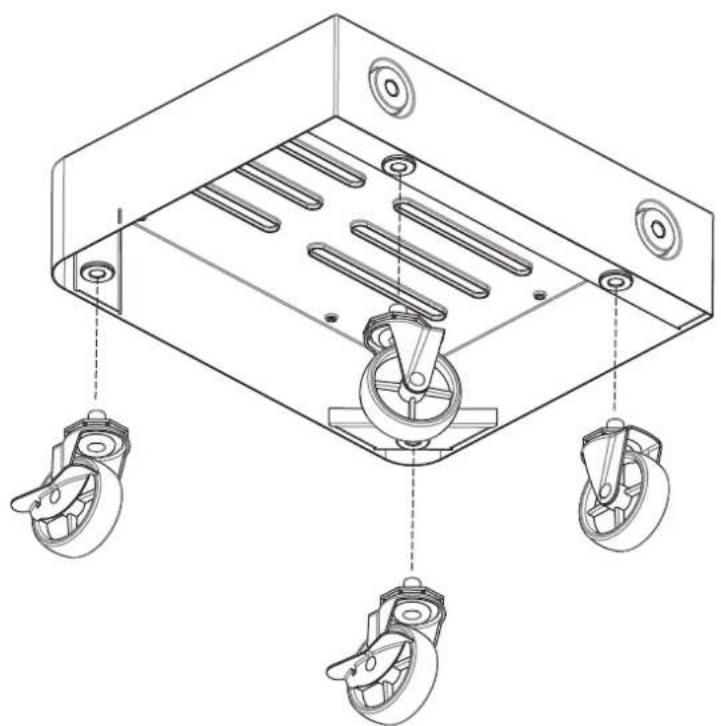
17
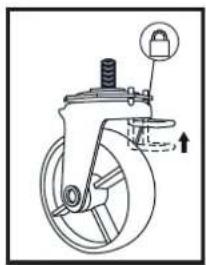


18

19


X6


X6


X6

20


X6


X6


X6

21
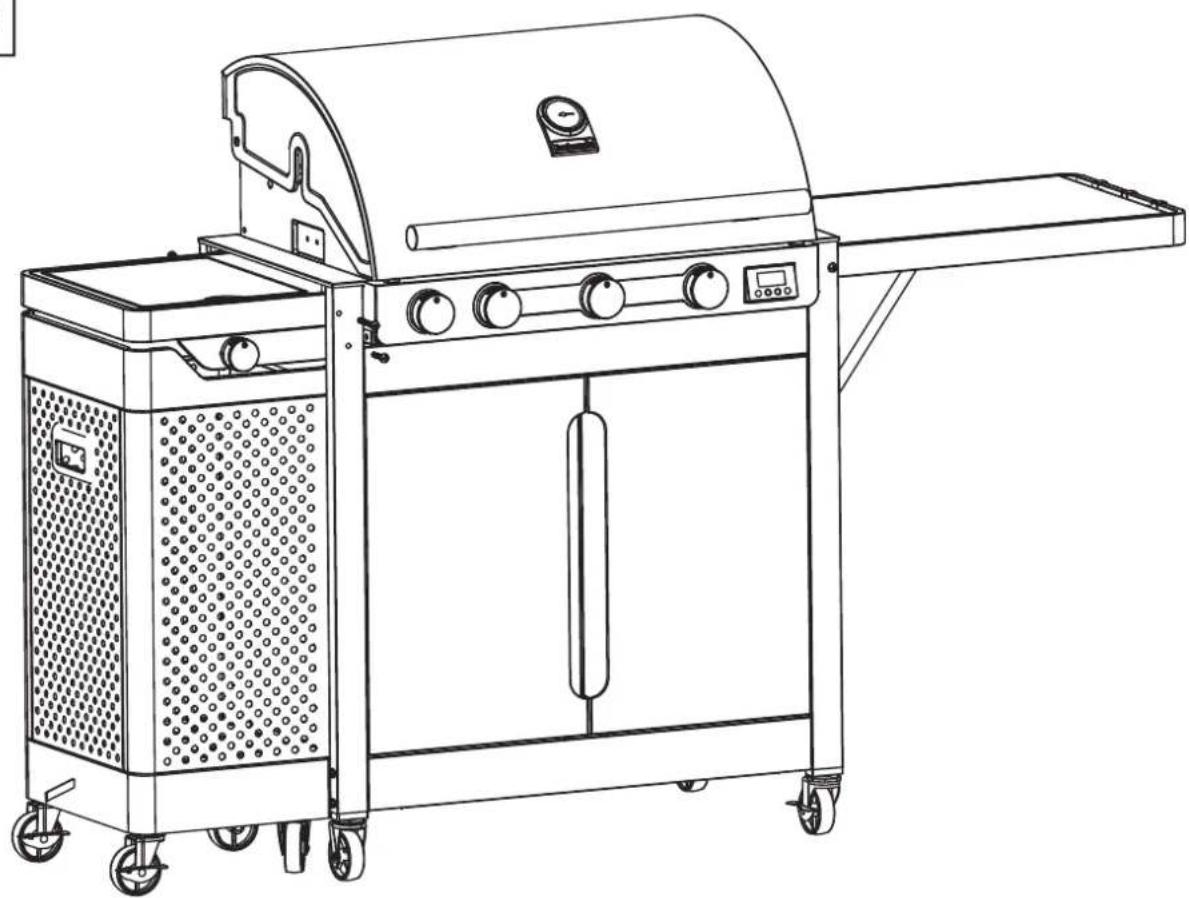
22
| A | B | C D E F | G H | I | J | |||||||||||||
| G30 | G31 | G30 | G31 | G30 | G31 | G30 | G31 | |||||||||||
| barbecook® | Quisson 4000 gasbarbecue | LU-NL-DK-FL-SE-CY-CZ-EE-LT-MT-SK-SI-BG-IS-NO-TR-HR-RO-IT HU-LV | 28-30 mbar | propane, butane or their mixtures | I3 B/P (30) | 1.5 V battery | 15.4 kW | 1121 g/h | 1100 g/h | 11.4 kW | 830 g/h | 814 g/h | 1.8 kW | 131 g/h | 129 g/h | 2.2 kW | 160 g/h | 157 g/h |
| BE-FR-IT-LU-IE-GB-GR -PT-ES-CY-CZ-LT-SK-CH-SI-LV | 28-30 mbar | butane | I3 + (28-30/37) | 15.4 kW | 1121 g/h | 1100 g/h | 11.4 kW | 830 g/h | 814 g/h | 1.8 kW | 131 g/h | 129 g/h | 2.2 kW | 160 g/h | 157 g/h | |||
| 37 mbar | propane | |||||||||||||||||
Insulator hoofobrander - Injecteur bruleur principale - Injctor main burner - Injktor Hauptbrenner - Inietore bruciatore capo - Inyector para horilla principal - Injctor quimador principal - Insprufningspumpen head gasbrannaren - Den store braenders dyse type - Suutin paapolitimen - Tryska hlavnic hoiiku - Tryska bochnyh horikov
Type - Tipo - Tipypi: 0,99 mm
Innsbrader jizrander - Injetor brueur laterale - Injetor side bumer - Injetor siebenkocher - Injetore crucitatera laterale - Inyector para hornilla lateral - Injctor cueimador laterale - Inspruningspumken side gasbrannere - Side brenten dysetype - Suutin sivupolttmen - Tryska bocnihofarku - Tryska bocnch horakov - Type - Typ - Tipo - Tyypol: 0.65 mm Innsbrader abchaartank - Injetor brueur amire - Injetor rear bumer - Injetor hinter Brenner - Injetore crucitatero posterior - Inyector para hornilla trasera - Injetor quimiaran tegarunda - Inspruningspumken baler gasbrannere - Bagaste branders dysetype - Suutin takapollten - Imenovita kapacana - Manova kapacana
Type-Typi-Typppi:0.82 mm A:MeK-MeRque-Marke-Brand-Mapka-Znacka-Marke-MdPka-Mcra-Kaubamrk-TuOtenmki-robnmaik-MaKaZenklas -Prozime-Merke-Marka-Marca-Marca-Znacka-Znarnka-Märke B:Model-Appliance model Model des Gerats-Appliance model-MoDen ha ypeDa-Model zaifzeni-Maskinens model-Movrlo
Barbecook, are registered trade marks of SAEY Home & Garden N.V. Industrielaan 4 | B-8501 Heule (Kortrijk) Belgium