
080.955A - Detector Laserliner - Free user manual and instructions
Find the device manual for free 080.955A Laserliner in PDF.
| Product Type | Electronic detector for metals and live wires |
| Brand | Laserliner |
| Model | 080.955A (CombiFinder Plus) |
| Dimensions (L x H x W) | 85 mm x 180 mm x 38 mm |
| Weight (including battery) | 180 g |
| Power Supply | 1 alkaline 9V battery (type 6LR61) |
| Measurement Modes | METAL-SCAN (metal detection); AC-SCAN (live wire detection) |
| METAL-SCAN Detection Depth (Ferrous) | Up to 7.5 cm |
| METAL-SCAN Detection Depth (Non-Ferrous) | Up to 5 cm |
| AC-SCAN Detection Depth | Up to 4 cm |
| AC Voltage Range | 110 - 230 V, 50 - 60 Hz |
| Operating Temperature | 0°C ... 40°C |
| Storage Temperature | -20°C ... 70°C |
| Display | Backlit LCD screen with visual and audible indicators |
| Calibration | Automatic (Auto-Cal and Auto-Cal Plus) and manual |
| Auto Power Off | Approx. 30 s after last measurement |
| Safety | Cut off power before working near electrical lines; built-in voltage warning |
| Maintenance | Clean with a dry, non-abrasive cloth; remove battery if not used for extended periods |
| Spare Parts | Not available separately; standard 9V battery easily replaceable |
| General Information | Compliant with EU standards; dispose of via WEEE |
Frequently Asked Questions - 080.955A Laserliner
User questions about 080.955A Laserliner
0 question about this device. Answer the ones you know or ask your own.
Ask a new question about this device
Download the instructions for your Detector in PDF format for free! Find your manual 080.955A - Laserliner and take your electronic device back in hand. On this page are published all the documents necessary for the use of your device. 080.955A by Laserliner.
USER MANUAL 080.955A Laserliner
Read the operating instructions and the enclosed brochure „Guarantee and additional notices“ completely. Follow the instructions they contain. Safely keep these documents for future reference.
Function / Application
Electronic detector for metal and live conductors. The CombiFinder Plus is equipped with an LC display with user guide, ensuring easy and reliable operation. Acoustic and optical detection signals to locate objects facilitates handling and ensures a high level of functional reliability.
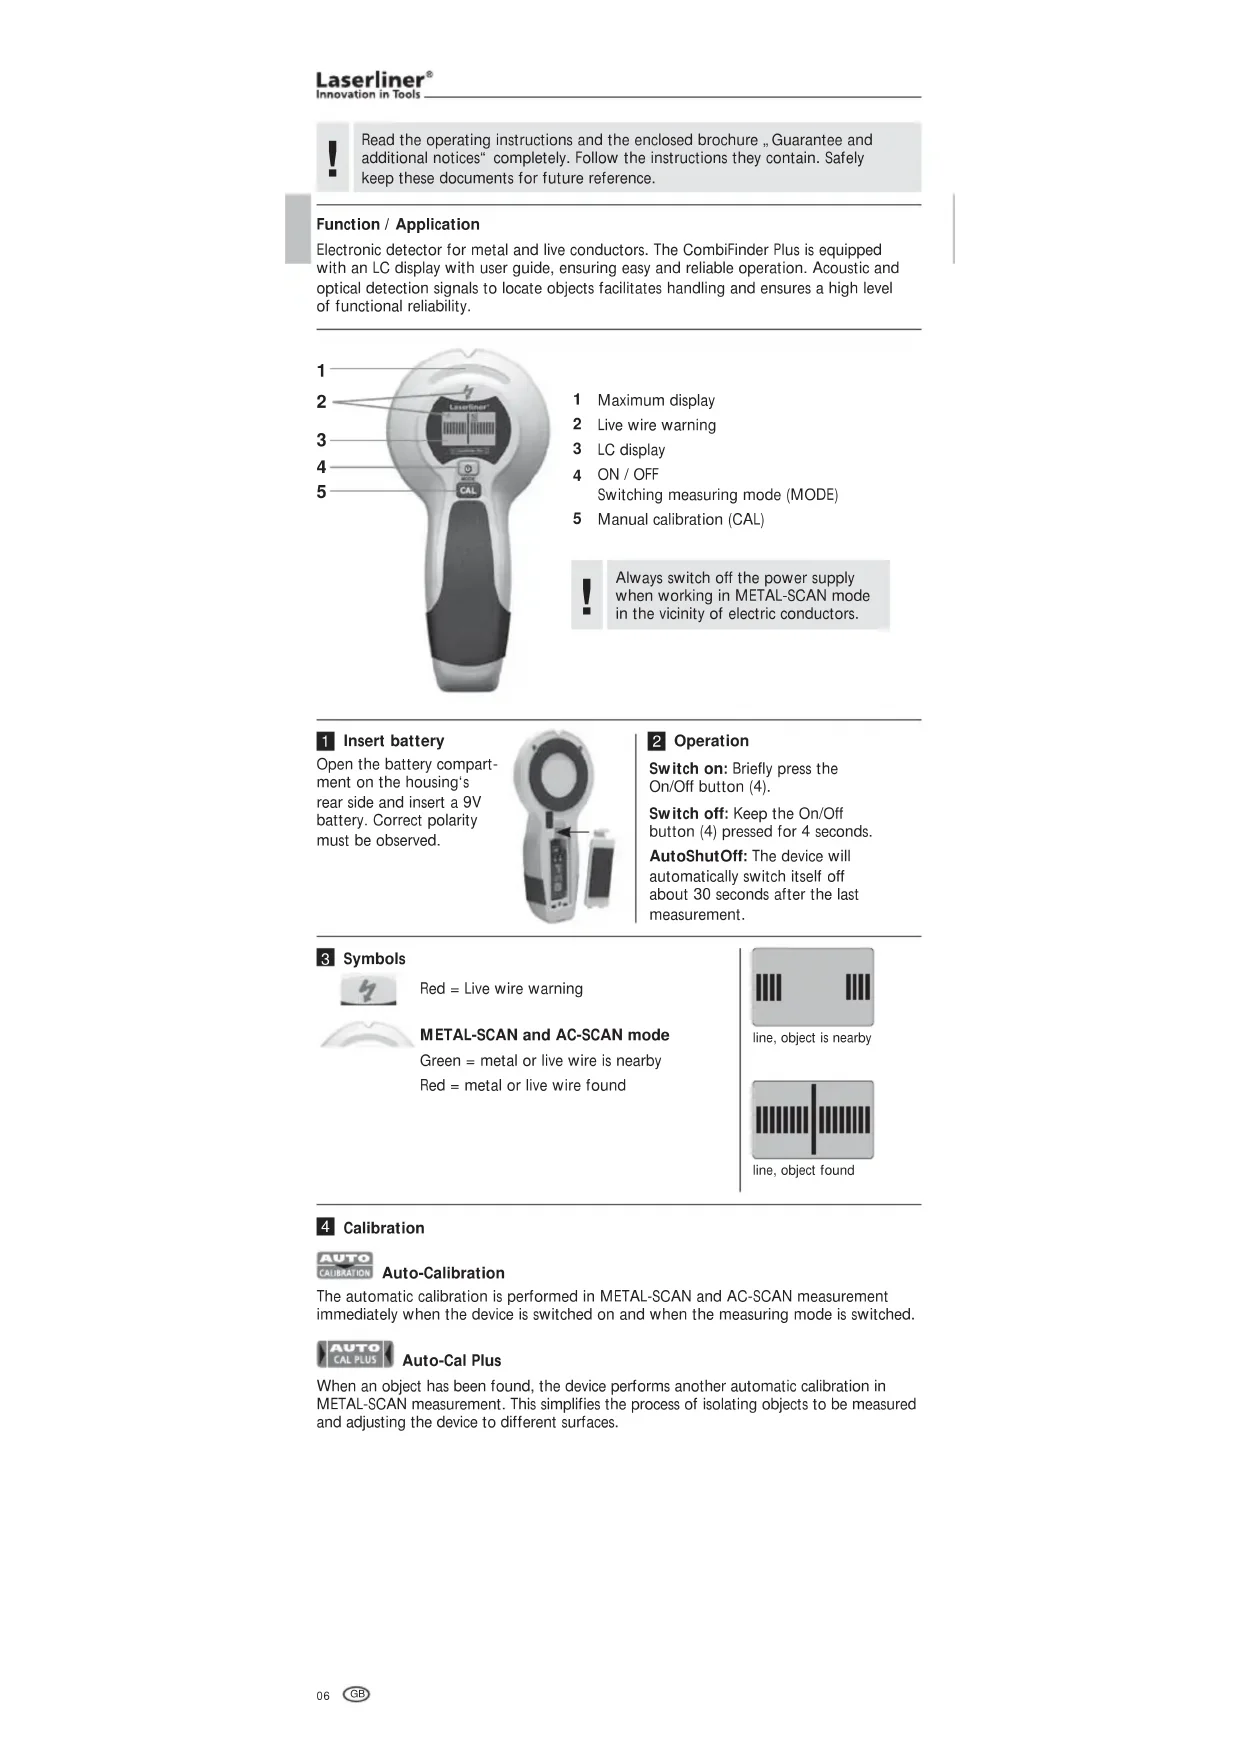
1 Maximum display
2 Live wire warning
3 LC display
4 ON/OFF Switching measuring mode (MODE)
5 Manual calibration (CAL)

Always switch off the power supply when working in METAL-SCAN mode in the vicinity of electric conductors.
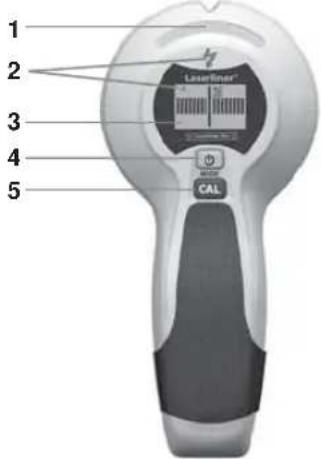
Insert battery
Open the battery compartment on the housing's rear side and insert a 9V battery. Correct polarity must be observed.
2 Operation
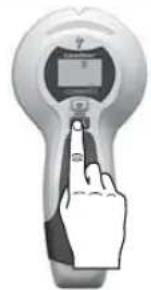
Switch on: Briefly press the On/Off button (4).
Switch off: Keep the On/Off button (4) pressed for 4 seconds.
AutoShutOff: The device will automatically switch itself off about 30 seconds after the last measurement.
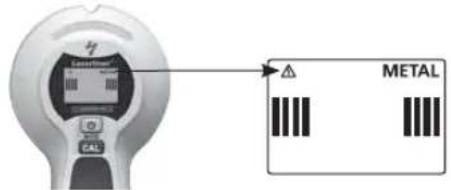
3 Symbols

Red = Live wire warning
METAL-SCAN and AC-SCAN mode
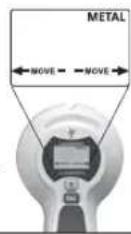
Green = metal or live wire is nearby Red = metal or live wire found
line, object is nearby
line, object found
4 Calibration

Auto-Calibration
The automatic calibration is performed in METAL-SCAN and AC-SCAN measurement immediately when the device is switched on and when the measuring mode is switched.

Auto-Cal Plus
When an object has been found, the device performs another automatic calibration in METAL-SCAN measurement. This simplifies the process of isolating objects to be measured and adjusting the device to different surfaces.
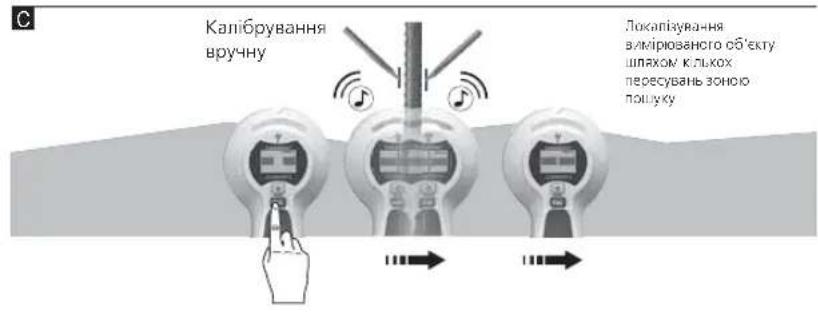
Manual calibration
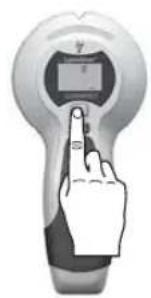
Pressing the CAL button (5) manually calibrates the device. This allows measurements to be restarted and objects to be isolated more precisely.
Maximum sensitivity is achieved when the device is held in the air while calibrating.

The device and the wall must maintain contact during calibration (except for calibration in mid-air) and throughout the entire measurement process. A hand should remain at the device the entire time as well.
5 Select measurement mode
Briefly press the Mode button (4).
METAL-SCAN: Detecting metal in all non-metallic materials AC-SCAN: Locating live lines directly under non-metallic cladding
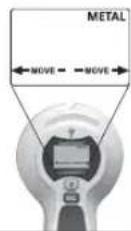
6 Measuring in METAL-SCAN mode
The tool is able to detect hidden metal in all non-metallic materials, e.g. brick, concrete, screed, wood, plaster fibreboard, gas concrete, ceramic and mineral building materials.
- Select METAL-SCAN (button 4).
- As soon as the display switches from CAL to CAL OK, you can move the device.
- MOVE: Move the tool slowly across the surface.

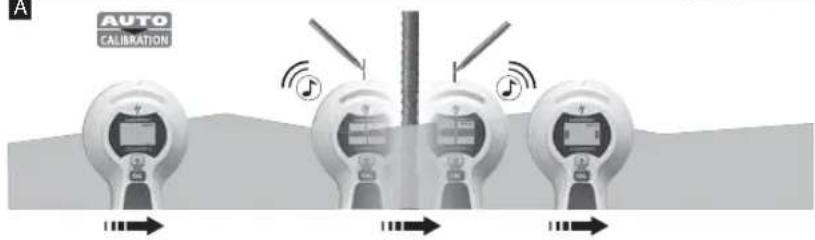
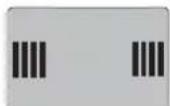
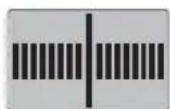
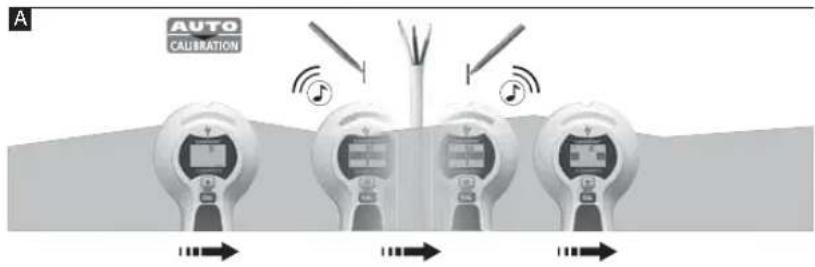
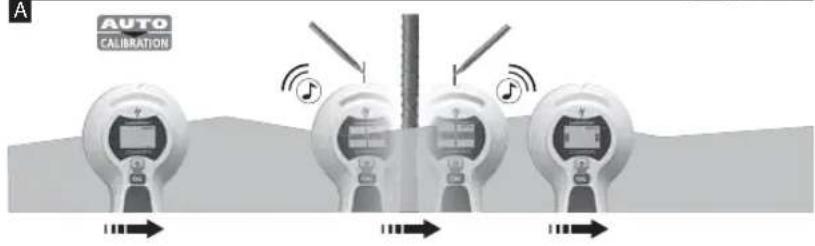
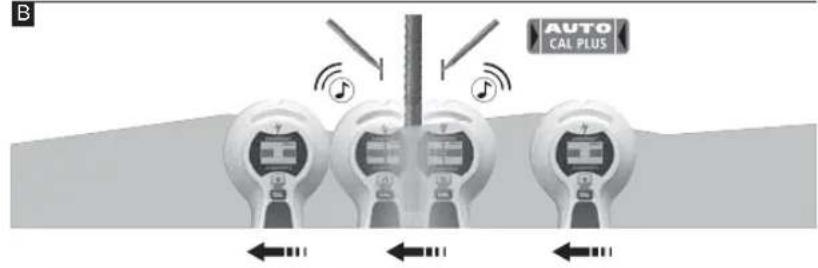
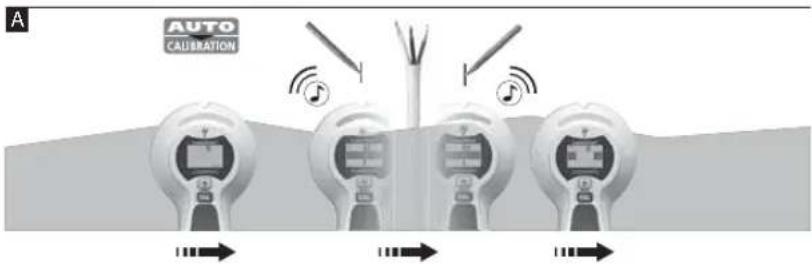
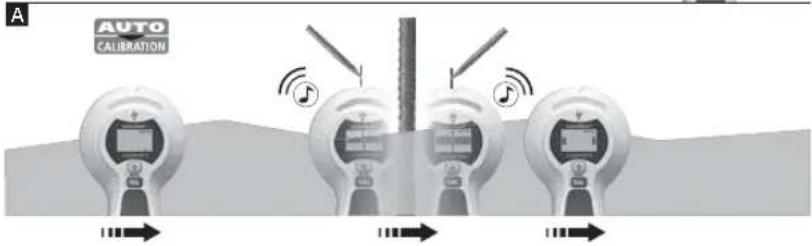
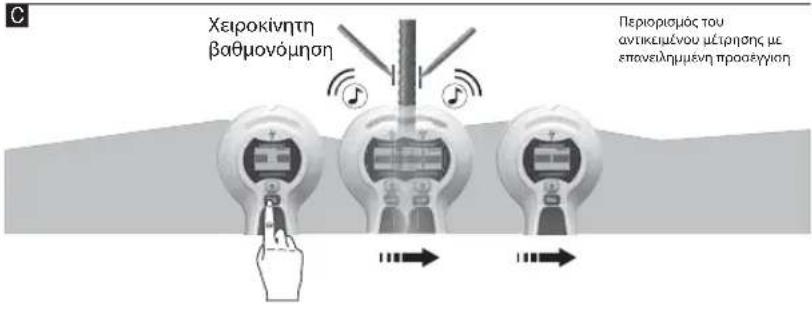
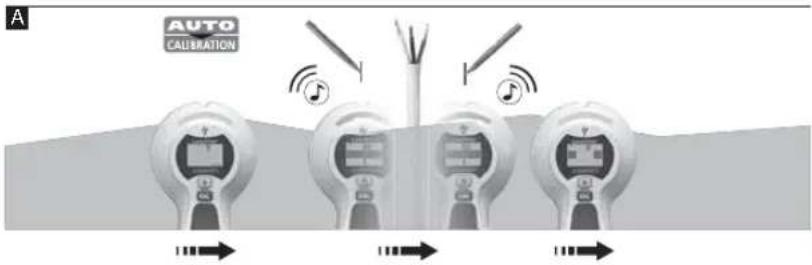
A
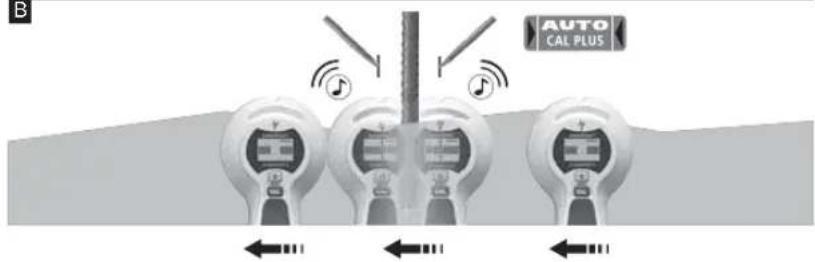
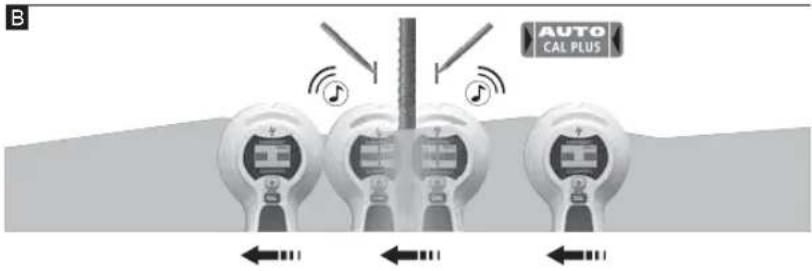
B
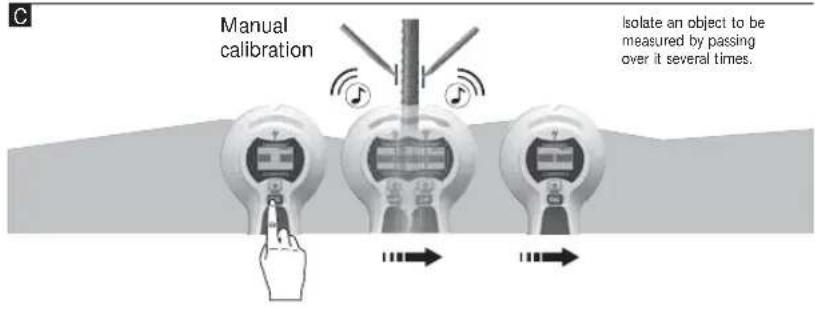
C
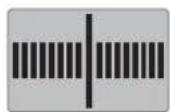
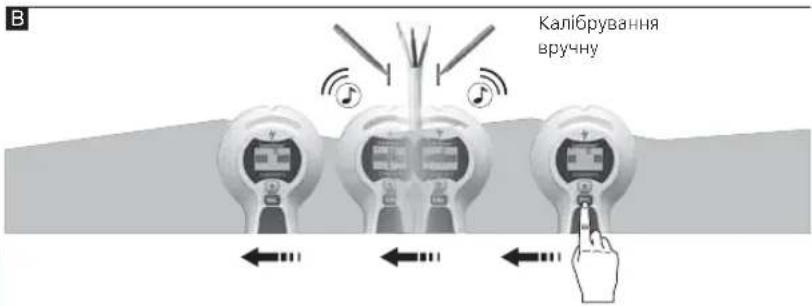
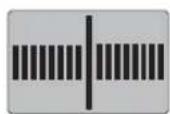
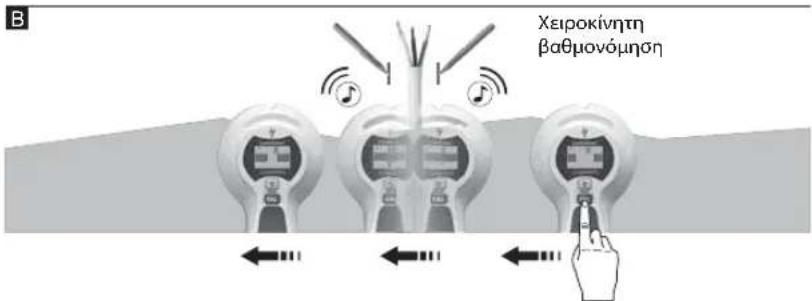
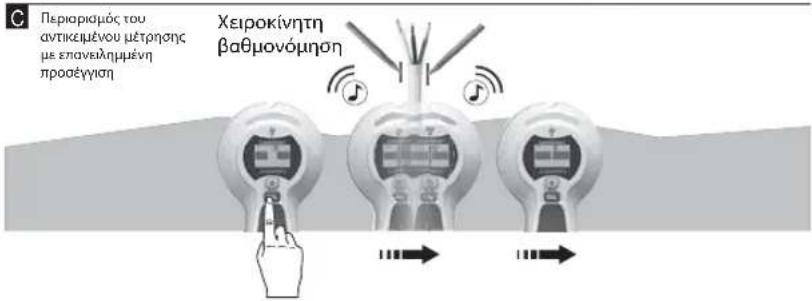
Tip 1: The position between the two markings is the mid-point of the metal object. Through the high measuring sensitivity, thick metal objects appear broader than they are in real life. Therefore move the device over the newly found object as shown in Image B. The device is calibrated automatically during this process. Manual calibration should be performed near the place found last as shown in Image C. Repeat this step as needed.
Tip 2: The position where you start is important: First place the device in a position where you know there is no metal. Otherwise, the message "ERROR" will appear in the display. To remedy: Move the device to another position a few centimetres away and start measuring again.
Tip 3: In the case of complicated applications, e.g. ribbed steel, scan the surface both horizontally and vertically.
Tip 4: Flexible floor and wall heating pipes which contain a metal foil and are located near the surface may also be detected. Test for this function in places where you know the position of such pipes.
Tip 5: To avoid interference while scanning, keep your free hand and other objects at least 15cm away from the device.
Tip 6: The device only finds the outer edge of metal structures set into the wall for doors, windows and corners. Afterwards search for the other edge of the metal structure. Slide the device sideways across the wall. When the maximum indication appears you have reached the metal structure's edge.
Tip 7: Ensure that you have really detected a metal object. To do so, check on both sides whether other metal objects are present at equal distances, usually at 30, 40 or 60~cm . Also check that it is a metal object by scanning at several places directly above and below the position of the first find.
Tip 8: Textured ceilings: The ceiling must be covered with cardboard to protect it. In this case, perform detection with maximum sensitivity, i.e. calibrate the device in mid-air.
Note: If an object is deep inside a wall, the device may not indicate it clearly.
7 Measuring in AC-SCAN mode
For localising live wires directly beneath the plaster or behind wooden panels and other non-metallic panelling. It is not possible to detect live wires in dry walls with metal studs.
- Select AC-SCAN (button 4).
- As soon as the display switches from CAL to CAL OK, you can move the device.
- MOVE: Move the tool slowly across the surface.
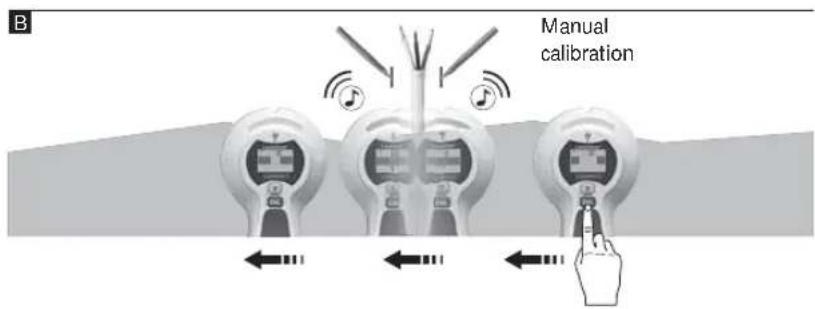
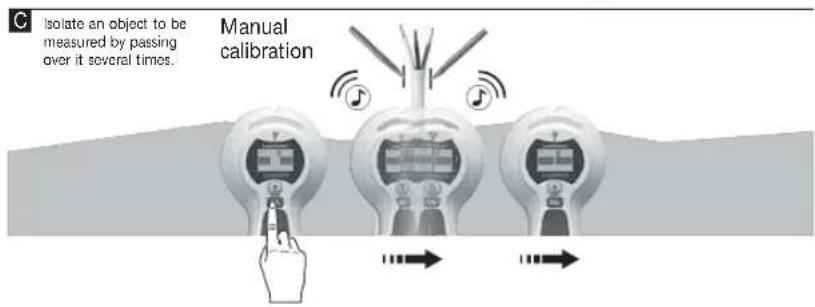
Tip 1: Manual calibration should be performed near the place found last as shown in Image B/C. Repeat this step as needed.
Tip 2: Because of static charges, electric fields may be detected at the side of the actual position of the wire. To carry away these charges, lay your free hand on the wall.
Tip 3: Move the tool slowly as friction can generate interfering electric charges.
Tip 4: If you suspect that wires must be present but cannot find any, this may be because they are shielded in conduits. Use METAL-SCAN in order to localise conduits.
Tip 5: Metal in walls (e.g. metal studs) transmit electrical fields and may therefore cause interference. In this case, switch to METAL-SCAN in order to find the wire.
Tip 6: The position where you start is important: To achieve maximum sensitivity, start by placing the device in a position which is known not to be near live wires.
Note: If an object is deep inside a wall, the device may not indicate it clearly.

Wires which are at a depth of more than 4cm may not be detected.
METAL-SCAN: Current monitoring
Continuous current monitoring in unshielded wires as soon as an electrical field is detected.

Always switch off the power supply when working near electric wires.
9 Backlight
The device features backlighting.
| Technical data | |
| Detection range AC 110 - 230V, 50 - 60 Hz | |
| Operating temperature 0°C ... 40°C (32°F ... 104°F) | |
| Storage temperature -20°C ... 70°C (-4°F ... 158°F) | |
| Power supply 1 x 9V alkaline battery (type 6) LR 61) | |
| Dimensions (W x H x D) 85 mm x 180 mm x | 38 mm |
| Weight (incl. battery) 180 g | |
| Measuring depth | |
| Targeted metal location: Ferro-Scan / Non-Ferro-Scan (METAL-SCAN) | Up to 7,5 cm / up to 5 cm depth |
| Targeted location of live supply lines (AC-SCAN) | Up to 4 cm depth |
| Location of dead supply lines Up to 4 cm depth | |
Subject to technical alterations. 12.2012
EU directives and disposal
This device complies with all necessary standards for the free movement of goods within the EU.
This product is an electric device and must be collected separately for disposal according to the European Directive on waste electrical and electronic equipment.
Further safety and supplementary notices at: www.laserliner.com/info

METAL-SCAN: Spaendings adversel
Rd = Spenningsvarsel
METAL-og AC-SCAN-modus
BMMKHeHHaHHTCHyTH KHOITKY BIMKHeHHbMKNHeHHA(4)YtpyMByatn4cKyuIy
AutoShutOff: npn6n3Ho uepe3 30 cekyHnni nnc octaHHbO BnMIPOBaHH HpnuIaA bATOMaTHHO BmNKAcTbCBA.
3Haekn
UepBoHnI =PionepeJxKeHHy 0do eneKtpoipotB
Pekmno nowky Metany (METAL-SCAN) i nowky Hanpyr 3miHHoro ctpymy (AC-SCAN)
3eHn=Metan a6o npoBic nHnpyroIO no6n3y
HepBoHH=MeaI a6o npoiu nHnpyo 3HaJeHo

Ipaobid,ObE'KTHIO6H3y
PpOJI,06'KTHaHJHeHO
4 Kani6pyBaHHa

Auto-Calibration
AbTomNHie KaniibpyBaHHa 3dijCHCTbC B peximax nowky Metany (METAL-SCAN) i nowky Hapnyr 3mHHO CTpyM (AC SCAN) BIDpaay nicra BBIMKCHHH npnady, a taKoY y pa3i 3mHIn pexmy BmipIOBAAHH. PnJ cac KaniibpyBaHH Ha dncnei 3'nbTbcN iHnkaiai CAL Y ueac npnaed he pyxatni. KOnHa NDCnnei 3'ABNTbcN CALOK (3 KanibpyBaHHa Mye rapa3), moXHa noHHTaNo nowyk.

Auto-Cal Plus
TbnKn-Ho 6yde 3HaJEno 06'KT, B pexMMI NOwky Metany (METAL-SCAN) aBtOMaTHHe Kani6pyBaHH B1DyBaETBCIe pa3. TmCAMM NOneUlyEETBCNIOKAJI3yBaHH BIMIPOBAHx 06'kTB I npuAunuBaHH npuAau ydo pIHnx MATEPIABIN OCHOB.
Kani6pyBaHnBpyuHy
Bpyny npnna,kanibpyotb,HaTCHyBnKhONky (CAL)5. TaKMMHOMMOXHa3HOBy po3noHaTN BmIPIOBAHHa60 1e ToHIIe NOKANIAYBtN BmIPIOBAHI 6E'kTN.
MakmamabHoiyTnBocTi npnaDocrae,aKIo nIac KanipbyBaHHNoTpMaTHB nobitpi.


Piic KaIIbpyBaHHa (3a BnHtKOM KJIb6pyBaHHB NIOBipi), a TAKOX IpOTHIOM yCBO RIMIPOBAHN IIpniad i CTHa MAIOB Ipepe6yBatn B KOHTAKTI MIX CO6OIO. Pyka TAKOK Mac 3aannatmca Ha npnnadi.
5 Bn6ip pexkmy BmipioBaHHa
Kopotkoyacho Hatachny Khonky Bv6ppeximib (4).
METAL-SCAN: 3haxoJxehnMy Metany B ycx HEmetaneBnx MaTcpiJax
AC-SCAN:JIOKani3yBaHHeNEKTPponpOboKNiHAnpyroHO 6e3nocepENbHO NHeMeTaneBmM ObiuBkAm

6 BmipobahnB METAL-SCAN
Ppnnn MOnke 3HaHn TnpnxOBaHI Metan B 6yIb-RKINx HEmetaneBnx KOHCTpykLJax, HanpknAa, 3 cERnn, 6eToHy, WtYkaTpyKn, rincoboro fiiponity, dpeBa, ra06eToHy, Kepamki Ta Mincpanib.
-Bu6epinb METAL-SCAN (Khoika 4).
-TinbKn-Ho《CAL》3minHtbcHa《CALOK》,npnnaMoxHa pyxatn.
- MOVE: nobinbno nepecybaite npnla n no nobepxhi.
A
B
C
Iopapa 1: no3nui mix ToKAMN -cepeHn ToKa metaeBoro o6'ekTy. Ype3 BnCOky
yTNJIbICTB BmIPIOBHaM metaEbeo6'ekTn 3aOaTcBTOBMMH, HIX e HacnpaBdi. Tomy npinapd
3HOBy pyxaoTb HAp 3aHneHM BMIPIOBAHm 06'ekTom (DVB. pncyHOK B). Pp n bomy
Ppnapd ABOMATMHo KANIpyBaHn BpyHcyi D3iINCHATn No6hny BiJ
OctAHBOrO 3HaJeDEHO rMICs (DNB. pncyHOK C). NOBtOpInu IIO npoueUpy 3a Heoo6xHicHIO
Laserliner
Innovation in Tools
Iopada 2: Bawa BuxiHa No3iJy DxkE XaBnJa; cnoAHTK bCTAHOBIT npinad Ha Mic, De 3aBIDoma HmAc BkAn. IHaKue Ha dncnneI 3'ABTBCa NobIDomHHe IOdo NOMInK (ERROR). PIeHHa: nepemictitb npinad Ha KINKa bCaHmTePrib B INHc Micne Ta npoEBITEzamipn zHOby.
Iopada 3: BcklndnX BNadkax, Hapniknad, 3pebpcnto 0tannio, npoBcdtb IropnoHTaJIbHe, IBepTKaJIbHe cKaHyBaHH.
Pnpa4:OxipimToro,3aNeBnHexoCTABINMOKByTHNURBNEHRIHYKI NIIJNROROBi aBO CTHHI HApribAHIpyb6,06rOpHyTI metaneBIO FOJIbROO,RKl 3hAxOHTCB6NIIBKO BID NOBEPXHi. TpeBpIe IIO OyHKUIO B MUCIAE,Dae HaneBHO npoxOJNT py7Ba.
Iopada 5: oob yHnKHyT npeWko, trmaTe bInbny pyky a6o iHni npedmet niD cac 30NyBaHH Ha BiCTaHI OOHAmEHU 15 CM BID npnAly.
Pnpa 6: npnana 3haoDntb nwe 30BHIu Kpaan MetaneBux KOHCTpykui, kki, moKNIBO, BcTaHOBneH HABKO Dpeep, biKo iKYtB. Pnic lybo BIDwykaite IHsni Kpaan MetaneBoi KOHCTpykui. Npepemittn pnaad b61 no cihi. NoBa MaKcImaIbHOI INDKAuaO OHaHaTInme DOCAHTHHRA Kpaio MeTAeBOI KOHCTpykui.
Iopada 7: nepekoHaTecra B ToMy, 00 DiHcH HatpanHn Ha MetaneBn 06'KT. Ipepeipte, Hn e 3 06x CTOpIH HaOnHakOBi BInCTaHI, k npAunno, 30, 40 a6o 60 cm, iHnn MetaneBn 06'KT. DnATKO BOpepiTE B NekkOx MCuix 6e3IOcepeHb Ho n i nn HauHnM Miciem, nTo cnpabJl MetaneBn 06'KT.
Popa 8: teKcIpyoBaHI cIeJI cIeIO cIIu HAKpBaHn 3axXCHMM KAPTOHM. NooyK y bOmy BnnaKy BnKOHyTe npn MaKcMaMbHi yTITINBOCTi npnAyny; ToTo BIKaJIbpyrTe npnAynd y nobirTI.
Iopana: IHKOnn, kHIO 6EKT 3haxoNtbcnye rno60k B ctiHi, MoKe TpanNTnc, IIOMAKcMmAbHoI Hdkaui He dyde.
7 BmipobAHBAc-SCAN
Noyek eneKtpoipoi 11i utykatypkoio, B depeB'raHnx Hn HInx HEmaIeBnx KOHcIpykuiX. 3HaIn eEeKtpoipoi B cyNX Cihax 3 metaIeBO apMaIypoIO, MaaJI. SaJIkAmH HEmOxIIINBO. -Bb6epTb AC-SCAN (KhONka 4).
-TinbKn-Ho《CAL》3mHnTbcHa《CAL OK》,npnlaMoxKa pyxatn.
-MOVE: noBilbHo nepecyBaIe npnnaD no nobepxHi.
A
B

C
Popa 1: KaipbpaHnB BpyHn CIII 3IINCHNIO6m3By IOCTAHBOI 3HaIeHO MICa (IINB. PncyHOK B/C). NOBTOPHTN IIOPOeDpy 3A He06xHnicTIO.
Iopada 2: uepe3 cTaNHHI pO3pHn eNEKTPNHe None moXHa fikcyBAtn Ha BicTaHi BID camnx npotIB. Lio6 HeITpani3yBAtn daHI pO3pHn, npHTyniB do CTINH iHNY pyky.
Popa3: nepemiuie Tnpuaia Nobilho, TaK KtepMoKe TeHepyBn enekpnHi po3pa.
Iopapa4:KIO BO BBAeTe,HO HA 0bmy MciMaoTb Bytn dpTo,ane 3aHn ix He MoXeTe,ue 3NaHTb,IO BOH BkPti I0raicio. BnkOpictoyte METAL-SCAN dna nowky 10boBAnx dpotIB.
Iopana 5: metan B CTInax (hanpknan, apmatpa) CTbOpKe BnacHi eneKtpnHi nolr i Tomy MOXe cnpuHHTn nepeWkoNi.
B daHomy BinaaKy i na nowky cektpoipotb npemkhibcB pckm METAL SCAN.
Iopada 6: Baasa BuxiHa No3uHia HauBnHb BaxNBA: CnoaTKy BCTAHOBt npnna Ha Micue, ne 3abioMa HeMaE npTbe enektpoxnBHeHH.
Iopada:HKoN,AKIO6KT3HAXOITBCyXeTINBOCTHI,MOKe TpaNTnCRA,IO MAKcMmaIbHOIHINKauJIHe 6ydc.

IpoTn, 30 3haxoJbTaC h RaN6Hn6Bn6 BInbSe 4 Cm, npnaD MoKe He po3ni3HaTn.
METAL-SCAN: PionepejxeHHaOHO HABHocTI HanpyrN
IocTne nonepeJxHnHaBHOCTi HAnpyrN B He3oNBaHnx DpOax Opa3y nCnA pikCyBaHH
eneKtpuHHoro nonn.

PpauKoHnIObIyBicEIEKtpOIIPOBOQKn,3aXmN BIMMkaIe EIEKtpOxNBIENHH.
9 Backlight
PnnaMac cyHKuio foHOBO rniCByBaHH.
Texhi ni dani
conductor de tensiune gasit

Un cablu, objecte estine in apropriere
Cablu, object gasit
4 Calibrare

Auto-Calibration
6 Māsurare METAL-SCAN
6 Mecpnon METAL-SCAN
Houkeun evtoniKe kalumueva metaalaa oea ta un metaalika uikia n. nepa,okupodega, kovia, uvoaoaviabc aepoakupodega, kepaikka kai opukta doikua uikia.
- Eπλεξε METAL-SCAN (πληκτρο 4).
- Moic a aaéi TO CAL OE CAL OK moperte va metakivnoe T OOKeun.
-MOVE:KIVIOTE moukeun apya naw ano thv enipaveia.


Sigma 1: MetaEw twv doonadow evai to keVtpo Tou metaaikou aviteiEvou. Aoyw tnc upnlc evaiooiaoc metpnoc, ta naia metaaikac aviteiyeva napovoiacovta apabutepa anTnv npayatikotnta. Metakivnote EaVa tn ouakeun naw ao to avakeiuevo metpnoc nou pknate, b.yapikn aneikovion B. H ouokeun baOmuovetra tote autouatwc. H xepokivtn baovoun th gnpeen va ekteelitai kovta ot th eon nou bpeneke teevuaia, b.yapikn aneikovion C. EnavaalaeTe n diaikiaoviaavxpeiaotei.
2: 2nau 2: npavri kivai npaxik theo: TOnoetneT n ouakeun e eva onueio, niow ano to onoi dev unapxei mea. diaopopetika 0a epaviote eva opaalma (ERROR). Avtuetwn opalatoc: Metakivnte tn ouakeun epiKa ekatoTa nepa ano to tpeoxov oneio kal Eekinote Ea vtnepnon.
ZuBouAn 3: Ze ananntnkec eapapoyec, n.x. oE oibnpoc me eooykwata, avxveoTe Tny Empaiveia kai opizovria kai katheta.
ZouBouAn 4: EmLeov, mOpov va avIxveoov EukamTol eniadienoi kai enitoioi owAne Cepavoc nou nepieXov metaalkn meuPavn kai piaKovtai Kovta otny emipaveia. Dokiaote auty tn aeitoupyia oe onueia onou ywpiCete tn diabpoun evoc owAivva.
ZouBou5n 5: Poc anotponn BaaBov kata tn diapkeia tnc diadkaiaac avxveuongkpatate to euethetape xepi oac n aoira atkeieeva touaixotov 15 cm kaip ana ono tn ouakeun.
ZouBouAn 6: H ouakeun aniyveuei mOto EeWtepiok aKp ToV mTaAikw kataokeuw, oI onoiec elav evex, tonoBetnnevec yup ao noptec, npapua kai yviec, Katoniv avixveuote Tnv aan akn tnc metaalknc kataokeun. Upete npoc to nn ouakeun nauv tov toxio. Moic epaovitei n evdiN Mey., onaive ot pdoate oTo aKp Tc meTALIKNC kataokeunc.
ZuBouA7:BeBaiWgeTe OTExeOvTuCavVxveUeiEvaMetaAALIOAVTIKEIevo.EEyEeEvunapoxouaAalaAetaAIAKcavTkeIevaKAIOTICuoNAEUPcEIOECAnoTaeic,Katavova av30,40n60cm.EyETEmnpooTeaOEpiiooTepaOnueaueaNoNawkaiNo Katw anoTo npwToonueioNouAvVxveUeNKe,YiaTo AVpoketaiYiaMetaAALIOAVTIKEIevo.
ZuBouA 8:aype opopcH Oopn npenei va kalunetae e vna pootateutko xaptovi. Se autn tvnpintwn npayatonoote avixveon m eyiotaen eaiooia tnc ouokeun, nla. baovounote tn oukeun otov aepa.
YnOeIe: 2 avKeIeva nou piaKovTai OE meyao baOoc meo aToov toxO mopei n evSeIe naivai oThevnc.

Mérpηση AC-SCAN
Avaywopion peuatooppw aywyw aqueoa katw ano to enixpiaa n katw ano Euivec kai loienc metaalikec eenevduoeic. Opeuatoopopo aywyoi dev avayvwpiovtai ae toixouc Enpac dounnc me metaaika npopil atepewan yuooavidow.
- Eπλεξτε AC-SCAN (πληκτρο 4).
- Moiic aalaei to CAL oE CAL OK miopeite va metakivnoetn oukeun
- MOVE: Kivnote t n ouokean apya naaw ano thv emapaveia.


ZouBou1n 1: H xepokivtn Baoovopnan O npenei va ekteaeirai kovta ot n th eon nou pOeKTEAEUTAia, BA. ypaikn anekovian B/C. EnavaaabeTn siaikaciava xpeiaotei.
SuBouA n 2: Aoyw otatikou qopriou, eivai duvaro un oovthnkev a vixveuou nKeptiKa neia naeupika tnc npaymuiknc thec ayuw. MetaIbaTe auto to qoptio, akoumuuvtac to eueeepo xepi oac otov toixo.
Zuou3: Epyaceote apya, kaow n TpiBn evbextal va 8noupynoi poptio npaeuBoaic.
Sigma 4: Eav unoTETe oTI unapxouv aywyo aAa dev bpiokete kavevav, autoi evdexetai va eivai opaikioevoi oe kavalia kaawdiw. Xpnoiponointo METAL-SCAN, yia va evtoniote metalkia kavalia kaawdiw.
Zmuol5:To metaAIOOtuOUC (n.x. metaAIA npoipia opeowc yuooov) metapepei nektpika n6ia kai npayei etoi npaaotikec tpiic. e autn tv nepintwn aalae ae leitoupyia METAL-SCAN, npokieevou va poeite tov ayyo.

- Function / Application
- Insert battery
- Operation
- Symbols
- Calibration
- Auto-Calibration
- Auto-Cal Plus
- Manual calibration
- Select measurement mode
- Measuring in METAL-SCAN mode
- Measuring in AC-SCAN mode
- METAL-SCAN: Current monitoring
- Backlight
- EU directives and disposal
- METAL-SCAN: Spaendings adversel
- METAL-og AC-SCAN-modus
- 3Haekn
- Pekmno nowky Metany (METAL-SCAN) i nowky Hanpyr 3miHHoro ctpymy (AC-SCAN)
- Kani6pyBaHHa
- Kani6pyBaHnBpyuHy
- Bn6ip pexkmy BmipioBaHHa
- BmipobahnB METAL-SCAN
- Laserliner
- BmipobAHBAc-SCAN
- METAL-SCAN: PionepejxeHHaOHO HABHocTI HanpyrN
- Calibrare
- Māsurare METAL-SCAN
- Mecpnon METAL-SCAN
- Mérpηση AC-SCAN
Brand : Laserliner
Model : 080.955A
Category : Detector