
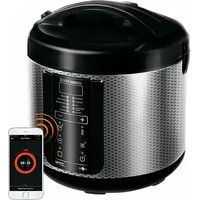
RMKM911E - Multi-cooker Redmond - Free user manual and instructions
Find the device manual for free RMKM911E Redmond in PDF.
| Brand | Redmond |
| Model | RMK-M911E |
| Product type | Multi-cooker |
| Power | 860-1000 W |
| Voltage | 220-240 V, 50/60 Hz |
| Electrical protection | Class I |
| Bowl capacity | 5 L |
| Bowl/pan coating | Ceramic non-stick |
| Display | Color touch LED |
| 3D heating | Yes |
| Dimensions | 377 × 285 × 240 mm |
| Net weight | 5.7 kg |
| Number of cooking modes | 17 automatic modes |
| Cooking modes | MULTICOOK, OATMEAL, STEW, FRY, SOUP, STEAM, PASTA, SLOW COOK, BOIL, BAKE, GRAIN, PILAF, YOGURT/DOUGH, PIZZA, BREAD, DESSERT, QUICK COOK |
| MASTERFRY function | Mobile heating element for pan use |
| Keep warm | Up to 24 h (deactivatable) |
| Reheating | Up to 24 h |
| Delayed start | Up to 24 h (except FRY, PASTA, QUICK COOK modes) |
| MULTICOOK temperature range | 35-170 °C (in 5 °C increments) |
| Included accessories | Bowl, pan, tongs, steam tray, fry basket with handle, measuring cup, ladle, spatula, cookbook, ladle holder, power cord |
| Care and cleaning | Bowl dishwasher safe; removable inner lid; detachable steam valve; do not immerse appliance |
| Safety | Overheat protection; automatic shutdown; lid with lock; mobile heating element with tongs |
| Repairability | Repairs exclusively by an authorized service center |
Frequently Asked Questions - RMKM911E Redmond
User questions about RMKM911E Redmond
0 question about this device. Answer the ones you know or ask your own.
Ask a new question about this device
Download the instructions for your Multi-cooker in PDF format for free! Find your manual RMKM911E - Redmond and take your electronic device back in hand. On this page are published all the documents necessary for the use of your device. RMKM911E by Redmond.
USER MANUAL RMKM911E Redmond
natural_image
Line drawing of a hand inserting a component into a container with an arrow indicating the process (no text or symbols present)2
natural_image
Line drawing of a hand placing a component into a circular container with a handle, showing internal structure and motion arrow (no text or symbols)A5
natural_image
Line drawing of a rice cooker with lid open, showing internal components (no text or symbols)
natural_image
Diagram of a mechanical component with concentric rings and mounting brackets (no text or symbols)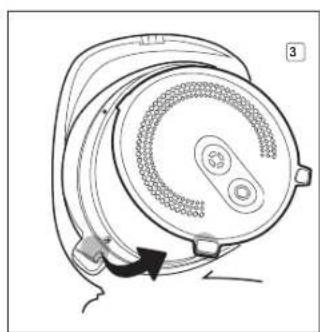
natural_image
Diagram of a speaker with a circular head and attached cable, showing motion direction (no text or symbols)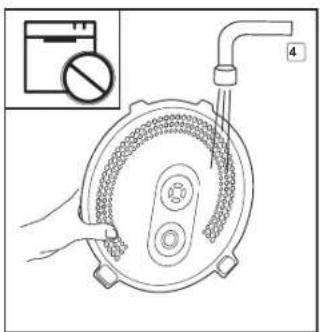
natural_image
Illustration of hands holding a circular object with a textured surface, no text or symbols present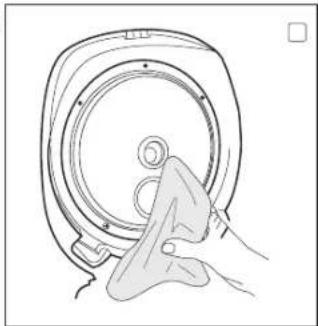
natural_image
Line drawing of a hand cleaning a circular mechanical component (no text or symbols)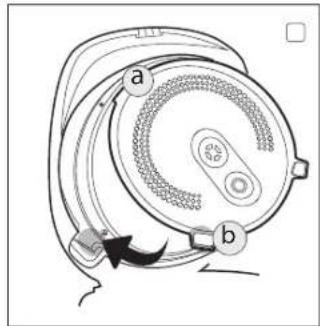
natural_image
Line drawing of two hands holding a circular object with concentric rings and central features (no text or symbols)A6
natural_image
Line drawing of a hand pressing down on a digital kitchen appliance (no text or symbols)
natural_image
Line drawing of a hand placing a circular object onto a rice cooker (no text or symbols)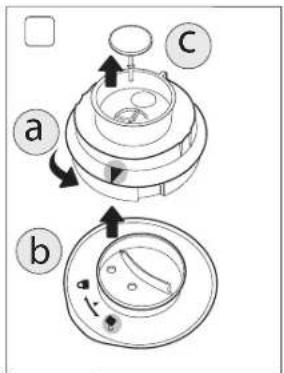
natural_image
Exploded view diagram of a shower system with no text or symbols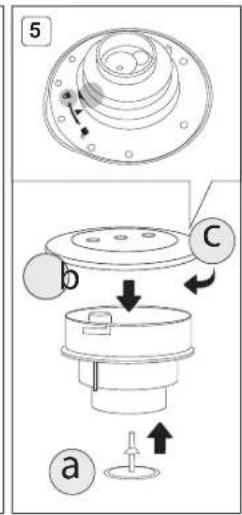
natural_image
Line drawing of a hand inserting a circular component into a rice cooker (no text or symbols)
Carefully read all instructions before operating and save them for future reference. By carefully following these instructions you can considerably prolong the service life of your appliance.
The safety measures and instructions contained in this manual do not cover all possible situations that may arise during the operation of the appliance. When operating the device the user should be guided by common sense, be cautious and attentive.
IMPORTANT SAFEGUARDS
- The manufacturer shall not be responsible for any failures arising from the use of this product in a manner inconsistent with the technical or safety standards.
- This appliance is intended to be used for nonindustrial use in house hold and similar spheres of application. Industrial application or any other misuse will be regarded as violation of proper service conditions. Should this happen, manufacturer is not responsible for possible consequences.
- Before plugging in the appliance ensure that the circuit voltage matches operating voltage of the appliance (see technical specifications or manufacturer's plate on the appliance).
- Use an extension cord designed for power consumption of the appliance as the parameter mismatch may result in a short circuit or fire outbreak.
- The appliance must be grounded. Connect the appliance only to a properly installed power point. Failure to do so may result in the risk of electrical shock. Use only grounded extension cords.

CAUTION! While in use the appliance heats up! Care should be taken to avoid touching the housing, bowl, or any other metal parts while operating. Make sure your hands are protected before handling the device. To avoid burns, do not lean over the appliance while opening the lid.
- When changing the position of the disc heating element it is necessary to use the tongs, included in set – it will eliminate the possibility of burns or other accidental injuries.
- When setting the heating disc to the upper position, ensure it is tightly fixed in the slots on the walls of the working chamber. Incorrect mounting of the heating element may lead to both its unrestricted displacement during operation and failure.

Be sure to use a thermal glove for gripping the tongs. DO NOT touch the heating disc regardless of the position it's in!
To avoid electrocution do not change the position of the heating element, if the appliance is plugged in!
DO NOT close the lid if the disc heating element is set to an upper position.
- Unplug the appliance after use, before cleaning or moving. Remove the power cord with dry hands holding it by the plug, not cord.
- Do not place the cord in doorframes or by heat sources. Do not twist or bend the power cord, ensure it is not in contact with sharp objects, corners and edges of furniture.

PLEASE, NOTE: damaging the cord may lead to a failure that will not be covered by the warranty. If the cable is damaged or requires replacing, contact an authorized service centre to have the cord replaced.
- Never place the device on soft surfaces or cover it to keep ventilation slots clear of any obstruction.
- Do not operate the appliance outdoors to prevent water or any foreign object or insect from getting into the device. Doing so may result in serious damage of the appliance.
- Always unplug the device and let it cool down before cleaning. Follow cleaning and general maintenance guidelines when cleaning the unit.

DO NOT immerse the device in water or wash it in running water!
- This appliance can be used by children aged from 8 years and above and persons with reduced physical, sensory or mental capabilities or lack of experience and knowledge if they have been given supervision or instruction concerning use of the appliance in a safe way and understand the hazards involved. Children shall not play with the appliance. Keep the appliance and
REDMOND
its cord out of reach of children aged less than 8 years. Cleaning and user maintenance shall not be made by children without supervision.
- Keep packaging (film, foam plastic and other) out of reach of children as they may choke on them.
- No kind of modification or adjustment to the product is allowed. All the repairs should be carried out by an authorized service centre. Failure to do so may result in the device breakage, property damage or physical injury.
STOP CAUTION! Do not use the appliance in case any defect has been noticed.
Technical Specifications
| Model | RMK-M911E |
| Power input | 860-1000 W |
| Supply voltage | 220-240 V, 50/60 Hz |
| Electrical safety | class I |
| Bowl capacity | 5 L |
| Bowl / frying pan coating | ceramic non-stick |
| Display | colour, LED |
| 3D heating | yes |
| Overall dimensions | 377 × 285 × 240 mm |
| Net weight | 5,7 kg |
Programmes
| 1. MULTICOOK | 7. PASTA |
| 2. OATMEAL | 8. SLOW COOK |
| 3. STEW | 9. BOIL |
| 4. FRY | 10. BAKE |
| 5. SOUP | 11. GRAIN |
| 6. STEAM | 12. PILAF |
| 13. YOGURT/DOUGH |
| 14. PIZZA |
| 15. BREAD |
| 16. DESSERT |
| 17. QUICK COOK |
Functions
| MASTERFRY function (lift of heating element) | |
| Keep Warm function....up to 24 hours | |
| Deactivation of Keep Warm in advance....yes | |
| Packaging Arrangement | |
| Multikitchen....1 pc | |
| Bowl....1 pc | |
| Frying pan....1 pc | |
| Tongs....1 pc | |
| Steaming container....1 pc | |
| Yogurt jars....6 pcs. | |
| Measuring cup....1 pc |
| available | |
| Reheat function....up to 24 hours | |
| Time Delay function....up to 24 hours | |
| Serving spoon....1 pc. | |
| Stirring paddle....1 pc. | |
| Cookbook....1 pc. | |
| Spoon/Paddle holder....1 pc. | |
| User manual....1 pc. | |
| Service booklet....1 pc. | |
| Power cord....1 pc. | |
In accordance with the policy of continuous improvement, the manufacturer reserves the right to make any modifications to design, packaging arrangement, or technical specifications of the product without prior notice. The specification allows an error of ≤10% .
Multikitchen RMK-M911E Assembly A1
| 1. Upper lid | 8. Carrying handle | 15. Streaming container |
| 2. Removable inner lid | 9. Removable steam valve | 16. Set of yogurt jars |
| 3. Raisable heating element | 10. Stirling paddle | 17. Spoon/paddle holder |
| 4. Bowl | 11. Serving spoon | 18. Power cord |
| 5. Lid release button | 12. Measuring cup | 19. Container for collecting condensate |
| 6. Control panel with display | 13. Frying pan | |
| 7. Housing | 14. Tongs |
Control Panel A2
The REDMOND RMK-M911E multikitchen is equipped with a touch control panel with colour LED multifunction display.
- "Reheat/Cancel" button disables/reactivates the Reheat function, interrupts the programme and cancels all settings.
-
"Time Delay" button is used to enter the time setting mode in the Time Delay function.
-
"Time Delay" button is used to enter the time setting mode in the time
-
"Temperature" button is used to adjust temperature in "MULTICOOK"
-
"Temperature" button is used to adjust temperature in "MultiLook".
-
"Hour" button is used to adjust the hours in time setting and Time Delay modes.
-
"Min" button is used to adjust the minutes in time setting and Time Delay modes.
-
"Quick Cook" button starts the "QUICK COOK" programme.
-
*Menu / Keep Warm* button is used to select an automatic cooking programme and to disable the Keep Warm function in advance.
-
"Start" button starts the cooking programme.
-
Display.
Display A3
- "QUICK COOK" programme indicator
- Operating programme/Reheat function indicator
- Cooking stage indicator
- "MULTICOOK" temperature indicator
- "Time Delay" indicator
- Indicator of the timer operation
- Timer
- Selected programme indicator
I. PRIOR TO FIRST USE
Carefully remove the multicooker and its accessories from the packaging. Dispose of all packaging materials.
Keep all warning labels, including the serial number identification label located on the housing. The absence of the serial number will deprive you of your warranty benefits!
After transportation or storage at low temperatures allow the appliance to stay at room temperature for at least 2 hours before using.
Wipe the housing of the appliance with a soft, damp cloth. Rinse the inner bowl with warm soapy water and dry thoroughly. An odour on first use of the appliance is normal and does not indicate a malfunction. In such case, clean the appliance, following "Cleaning and Maintenance".
ATTENTION! It is forbidden to lift the device with the filled bowl by the handle.
Do not switch on the device without the bowl installed or with empty bowl inside. In case of accidental start of a cooking program, it may result in critical overheating or damage of the anti-stick coating. Before frying, pour inside a little vegetable or sunflower oil.
STOP ATTENTION! It is forbidden to lift the device by the handles of the bowl!
II. OPERATION
Setting The Cooking Time
The REDMOND RMK-M911E multikitchen allows you to adjust default cooking time of each programme manually (except "QUICK COOK"). Time adjustment range and interval depend on the selected cooking programme. To set the cooking time:
-
Select the cooking programme. Press the "Hour" button repeatedly to adjust the hours. Hold the button down to scroll through the digits.
-
Press the "Min" button repeatedly to adjust the minutes. Hold the button down to scroll through the digits.
- To set the cooking time shorter than 1 hour press the "Hour" button repeatedly to reset time to zero. Adjust the minutes using the "Min" button.
- When the time is set (display keeps blinking) proceed to the next stage in accordance with the programme selected. To cancel all settings, press the "Reheat/Cancel" button and reset.
i Manually adjusting the cooking time, consider time adjustment range and interval of selected programme, given in the table of default settings.
For your convenience the cooking time range in all programmes starts with the minimum setting, enabling you to prolong the operating time of the programme, if the dish is undercooked.
in certain automatic programmes countdown starts only when the device reaches its operating temperature. E.g. If you set the "STEAM" programme of 5 minutes, the countdown of the programme begins only when the water comes to a full bowl providing enough steam.
in the "PASTA" programme, the countdown begins after water starts boiling and the "Start" button is being repressed.
MASTERFRY function A4
The REDMOND RMK-M911E multikitchen is equipped with a ralisable heating element. It allows you to use both the bowl and the frying pan in the multikitchen (included in set).
Be sure to use a thermal glove for gripping the tongs. Do not touch the heating disc regardless of the position it's in! For safety reasons use tongs when changing the position of the heating element (included in set).
To fix the heating element into the upper position carefully lift it until tight and slightly turn counterclockwise until secure fixation of the mounts in the slots on the walls of the working chamber.
To place the disc heating element into the lower position slightly lift it, so that its mounts exit slots on the walls of the working chamber, and, having turned the disc clockwise, carefully lower it.
DO NOT try to change the position of the heating element if the appliance is plugged in! DO NOT share the list if the else heating element is set to an upper position.
For cooking in the multikitchen use only frying pan, included in set.
Time Delay Function
This function allows setting the programme to finish by certain time. Cooking time may be delayed for a period from 10 minutes to 24 hours in 10-minute intervals. Setting the Time Delay function, take the cooking time of the programme into consideration. The time of a delay should be longer than the cooking time of the selected programme; otherwise the programme starts running right after you press "Start".
When the automatic programme is selected and the temperature and cooking time are adjusted, you may set the 'Time Delay'. 1. Press the "Time Delay" button to enter the Time Delay setting mode. The words Time Delay are displayed. The timer is blinking.
- Press the "Hour" button repeatedly to adjust the hours in 24-hour format. Hold the button down to scroll through the digits.
- Press the "Min" button repeatedly to adjust the minutes. Hold the button down to scroll through the digits.
- If you need to set a delay shorter than 1 hour, repeatedly press the "Hour" button to reset time to zero and adjust the minutes using the "Min" button.
- To cancel the settings press the "Reheat/Cancel" button and reset.
- When the time is set press and hold down the "Start" button. The Time Delay function indicator lights up. Set programme starts running and the countdown begins.
- Your meal will be ready when the time set expires. When the programme finishes, the device automatically switches to "Keep Warm" (the "Reheat/Cancel" button indicator lights up).
- Press the "Reheat/Cancel" button to cancel the "Keep Warm". The button indicator goes off.
The Time Delay function is available in ati automatic programmes except "FRY", "PASTA" and "QUICK COOK". It is not recommended to use the Time Delay function if dairy and other perishable products are being used (eggs, fresh milk, meat, cheese etc.).
Setting the "Time Delay" in the "STEAM" programme remember that the countdown starts only when the device reaches its operating temperature (water comes to a full boil).
Keep Warm Function
The function is activated at the end of a cooking programme. When the programme finishes, the temperature of the meal (70-75°C) is being maintained for a period of time up to 24 hours. The "Reheat/Cancel" button indicator lights up and the "Keep Warm" count up is being displayed. Press and hold down the "Reheat/Cancel" button to disable the function.
Disabling The "Keep Warm" In Advance
Automatic activation of the Keep Warm function at the end of the programme may sometimes be undesirable. REDMOND RMK-M911E allows you to deactivate the function in advance, while setting the programme or during its operation. Press and hold down the "Menu / Keep Warm" button to disable the function. The "Reheat/Cancel" button indicator goes off. To reactivate the function, repress and hold down the "Menu / Keep Warm" button (the "Reheat/Cancel" button indicator goes off).
Reheat Function
REDMOND RMK-M911E can be used for warming up cold meals. To reheat cold meals:
- Put the products into the bowl. Place the bowl inside the device.
- Close the lid until it clicks into place and plug in the unit.
- Press and hold down the "Reheat/Cancel" button for a few seconds until an audible signal is heated. Corresponding indicators light up and the "reheating" process begins. The timer starts its countdown.
The meal will be warmed up to 70-75°C and the temperature will be maintained for the next 24 hours. To cancel the function press and hold down the "Reheat/Cancel" button. Corresponding indicators go off.
The function may operate for a period of 24 hours, however, we recommend using it moderately, because a prolonged thermot exposure may sometimes affect flavour characteristics of the meal.
Standard Operating Procedure for Automatic Programmes
IMPORTANT! When using the water boiling device (for example, when boiling products), DO NOT set the cooking temperature above 100°C. It may result in overheating and failure of the device. For the same reason, DO NOT use the BREAD, FRY and BAKE programs to boil water.
- Measure the ingredients according to the recipe.
- Put them into the bowl. Make sure that all the ingredients including liquid are below the scale mark indicating maximum capacity. Place the bowl inside the device. The bowl and the heating element must fit tightly.
- Close the lid until it clicks into place. Plug in the unit.
ATTENTION! If you cook at high temperatures with much vegetable oil, always leave the device Ido open.
- Repeatedly press the "Menu / Keep Warm" button to select the programme (corresponding indicator lights up).
- If you are not satisfied with the default cooking time, you can change this value by pressing the "Hour" and "Min" buttons. In the MULTICOOK program it is also possible to change the cooking temperature before the start. When this program is selected, the cooking temperature indicator lights up on the display. Press the "Temperature" button to select the desired value.
- Set Time Delayfunction if needed. Time Delayfunction is not available in the "FRY", "PASTA" and "QUICK COOK" programmes.
- Press and hold down the "Start" button. The "Start" and "Reheat/Cancel" button indicators light up. Set programme starts running and the countdown begins. Countdown of the "STEAM" programme begins only when water comes to a full boil, providing enough steam. In "PASTA" after water comes to a full boil, products are added and the "Start" button is being repressed.
- Press and hold down the "Menu / Keep Warm" button to disable the Keep Warm function in advance if needed (the "Reheat/Cancel" button indicator goes off). Repress the "Menu / Keep Warm" button to reactivate the function. The Keep Warm function is not available in the "YOGURT/DOUGH" and "BREAD" programmes.
- When cooking time expires, the device makes an audible sound. Depending on your settings the unit either switches to "Keep Warm" (the "Reheat/Cancel" button indicator Lights up) or enters standby mode (the "Start" button indicator blinks).
- To interrupt cooking process at any stage, to cancel the set programme or the Keep Warm function press and hold down the "Reheat/Cancel" button.
in the Cooking Tips section you can find answers to the most frequently asked questions.
To achieve better cooking results, we recommend to refer to the cookbook provided. Each out of recipes has been adjusted for this particular model.
If you did not achieve the desired result using automatic programmes, try versatile programme called "MULTICOOK", featuring a wide time and temperature adjustment range. This programme gives endless opportunities for new culinary experiments.
REDMOND
"MULTICOOK" Programme
This programme can be used to cook any meal with your personal time and temperature settings. REDMOND RMK-M911E, featuring the "MULTICOOK" programme will be able to replace a big number of kitchen appliances. Now any recipe, either from your family cookbook or Internet, can be adjusted for your multikitchen.
For your convenience, the device does not switch to "Keep Warm" automatically by the end of the programme if the cooking temperature is less than 80°C. It may be manually reactivated by pressing and holding down the "Menu / Keep Warm" button right after the programme starts running. The "Reheat/Cancel" button indicator lights up.
- Programme's default temperature is 100°C, default time is 15 minutes.
- Temperature adjustment range (use "Temperature" button to adjust) is from 35°C to 170°C in 5°C intervals.
- Cooking time adjustment range is from 5 minutes to 12 hours with the following intervals: less than 1 hour 1 minute, over an hour 5 minutes.

A big number of various dishes can be prepared with the help of "MULTICOOK". Follow the recommendations of our chefs given in the recipe book and the table of recommended temperature settings.

If you use the MULTICOOK program for boiling water (for example, when cooking products), do NOT set the cooking temperature above 100°C.
"OATMEAL" Programme
This programme is recommended for cooking various porridges using milk. Programme's default time is 10 minutes. Manual time adjustment is available. Time adjustment range is from 5 minutes to 1.5 hours with 1 minute intervals.
The "OATMEAL" programme is recommended for cooking various porridges using pasteurized low fat milk. To avoid the porridge boiling away, we recommend you do the following:
- rinse grain thoroughly before cooking;
• grease the sides of the bowl with butter; - follow proportions suggested in the recipe book. Increase or reduce amount of ingredients proportionally;
• using whole milk dilute it by half with water.
Cooking results may vary depending on the place of origin and the manufacturer of the products used.
If you do not manage to achieve the desired result, please consult the "Cooking Tips" chapter to receive necessary recommendations on cooking or use the multifunctional "MULTICOOK" programme. Set the temperature for 95°C. Follow the proportions and cooking time settings given in the recipe.
"STEW" Programme
This programme is recommended for stewing vegetables, meat, fish, poultry, and seafood. Programme's default time is 1 hour. Manual time adjustment is available. Time adjustment range is from 20 minutes to 12 hours in 5-minute intervals.
"FRY" Programme
This programme is recommended for frying meat, vegetables, poultry, and seafood. Programme's default time is 15 minutes. Manual time adjustment is available. Cooking time adjustment range is from 5 minutes to 1.5 hours with 1 minute intervals. The Time Delay function is not available in this programme.

To prevent food from burning follow instructions given in the recipe book and stir ingredients thoroughly while frying.
"SOUP" Programme
This programme is recommended for cooking various broths, soups (chunky, bisque, cream soup etc.) and making fruit and berry drinks. Programme's default time is 1 hour. Manual time adjustment is available. Cooking time adjustment range is from 20 minutes to 8 hours in 5-minute intervals.
"STEAM" Programme
This programme is recommended for steaming meat, fish, vegetablese and children meals. Programme's default time is 15 minutes. Manual time adjustment is available. Cooking time adjustment range is from 5 minutes to 2 hours in 5-minute intervals. Use the steaming container provided to steam the foods.
- Pour 600-1000 ml of water into the bowl. Place the steaming container in.
- Measure the ingredients and put them into the container. Place the bowl inside the device. The bowl and the heating element must fit tightly.
- Follow steps 3 to 10 given in "Standard operating procedure for automatic programmes".

Countdown of the programme does not start until the device reaches its operating temperature (water comes to a full boil). If you want to adjust the default settings of the programme we advise consulting the table of recommended steaming time settings for various products.
"PASTA" Programme
This programme is recommended for cooking pasta, sausages, eggs, etc. Programme's default time is 8 minutes. Manual time adjustment is available. Cooking time adjustment range is from 2 to 20 minutes with 1 minute intervals. Cooking time of the programme covers the period of time needed to bring water to a boil and to cook the ingredients. The device produces an audible sound upon boiling alarming you to put Ingredients Inside the bowl. Repress the "Start" button to begin the countdown. Time Delay function is not available in this programme.

During preparation of certain products (posta, etc.), foam might arise. To avoid foam boiling over, we recommend you to open the lid a few minutes after the products have been added into boiling water.
"SLOW COOK" Programme
This programme is recommended for cooking stewed meat or baked milk. Programme's default time is 5 hours. Manual time adjustment is available. Cooking time adjustment range is from 1 to 8 hours in 10-minute intervals.
"BOIL" Programme
This programme is recommended for cooking beans and vegetables. Programme's default time is 40 minutes. Manual time adjustment is available. Cooking time adjustment range is from 5 minutes to 2 hours in 5-minute intervals.
"BAKE" Programme
This programme is recommended for baking cakes, puddings, pies, puff, and yeast pastry. Programme's default time is 1 hour. Manual time adjustment is available. Cooking time adjustment range is from 20 minutes to 8 hours in 5-minute intervals.

Doneness of a cake may be checked with a toothpick. Insert a toothpick in and If it comes out dry, your cake is ready. We recommend disabling the Keep Warm function when baking.
"GRAIN" Programme
This programme is recommended for cooking various grains. Programme's default time is 35 minutes. Manual time adjustment is available. Cooking time adjustment range is from 5 minutes to 4 hours in 5-minute intervals.
"PILAF" Programme
This programme is recommended for cooking different pilafs, paella or risotto. Programme's default time is 1 hour. Manual time adjustment is available. Cooking time adjustment range is from 20 minutes to 1.5 hours in 10-minute intervals.
"YOGURT/DOUGH" Programme
This programme is recommended for making healthy and delicious homemade yogurts and proofing yeast dough. Default time is 8 hours. Manual time adjustment is available. Cooking time adjustment range is from 6 to 12 hours in 10-minute intervals.
The Keep Warm function is not available in this programme. Adding ingredients into the bowl make sure that it is filled only to half of its size.
"PIZZA" Programme
This programme is recommended for making pizza. Default time is 25 minutes. Manual time adjustment is available. Cooking time adjustment range is from 20 minutes to 1 hour in 5-minute intervals.
"BREAD" Programme
This programme is recommended for baking white and wheat-rye breads. The programme includes complete baking cycle starting from the process of proofing dough and up until the moment you take the freshly baked product out. Default time is 3 hours. Manual time adjustment is available. Cooking time adjustment range is from 1 to 6 hours in 10-minute intervals. The Keep Warm function is not available in this programme.
- Adding ingredients into the bowl make sure that it is filled only to half of its size.
- Remember, that the baking starts one hour after the beginning of the programme when the dough has proofed.
- Before using baking flour, we advise you sift it, removing any impurities and adding to it some air.
- It is not recommended to use the "Time Delay" function because this may affect the quality of pastry.
• Do not open the lid until the programme finishes!
- In order to minimize the cooking time and to simplify the process of baking we advise using baking flour mixes.
"DESSERT" Programme
This programme is recommended for making various desserts using fruits and berries. Default time is 1 hour. Manual time adjustment is available. Cooking time adjustment range is from 5 minutes to 4 hours in 5-minute intervals.
"QUICK COOK" Programme
This programme is recommended for quick cooking rice and other grains. Manual time adjustment and the Time Delay function are not available in this programme.
III. ADDITIONAL FEATURES
- Making Fondue
- Pasteurizing Liquids
• Making Cheese, Cottage Cheese
• Reheating Baby Food
- Deep frying
- Tableware and Personal Items Sterilization

Recipes specified in the section of dishes can be found in the recipe book or on the website www.redmond.company.
IV. OPTIONAL ACCESSORIES
Additional accessories for the REDMOND RMK-M911E multikitchen and information on the innovations are available through www.redmond.company and our authorized dealers.
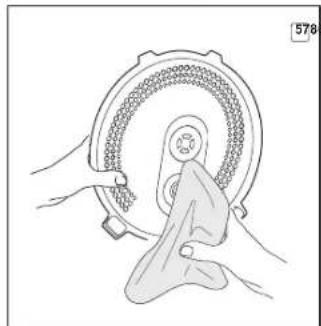
V. CLEANING AND GENERAL MAINTENANCE GUIDELINES
Before you start cleaning the device, make sure that it is unplugged and has cooled down. Use soft cloth and mild soap to clean. We recommend you to clean the appliance after each use.
Prior to first use or in order to remove the odour steam half a lemon for 15 minutes using the "STEAM" programme.
DO NOT use a sponge with hard or abrasive surface; solvent and abrasive cleaning methods (gasoline, acetone) are not allowed. DO NOT immerse the device in water or wash it under running water.
Steam valve, inner aluminum lid, and the bowl need to be cleaned after each use. The bowl is dishwasher safe. By the end of cleaning, wipe the bowl dry.
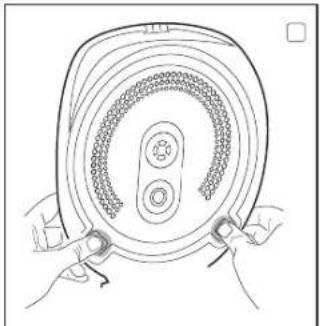
To clean the inner lid (A5):
-
Open the lid.
-
Press 2 plastic holders on the inner side of the lid pointing towards the centre until open.
-
Gently pull the inner lid towards yourself and down to get it separated from the main lid.
-
Wipe the surfaces of both lids with wet cloth or tissue. Wash under running water, using mild soap if needed. Not dishwasher safe. Carry out the assembly in return sequence: slide the inner lid into upper groves overlapping it with the main lid. Gently push the holders until they click into place. Make sure that the inner lid fits tightly.
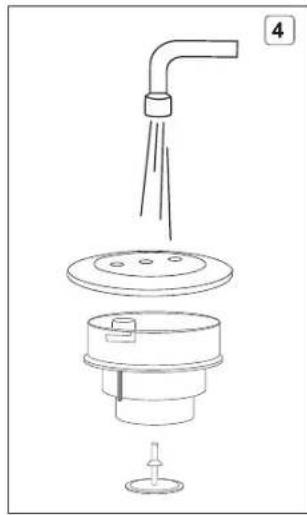
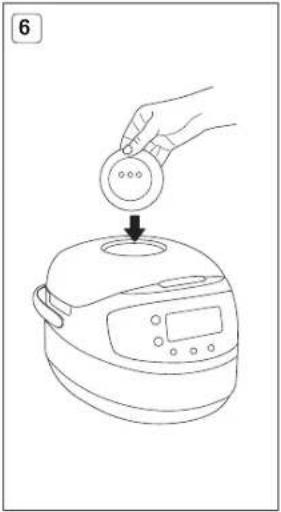
The steam valve is located on the top lid of the device and consists of two parts: the cover and the main part. To clean the steam valve;
-
Take the cover of the steam valve off by pulling it gently up and towards yourself as shown on A6.
-
Inside the removed cover, turn the main part of the steam valve anticlockwise (in direction of 2) to remove.
-
Take the rubber sealing ring out; wash all parts of the steam valve following cleaning and general maintenance guidelines provided.
CAUTION! Do not twist or stretch the rubber sealing ring to avoid its deformation.
- Carry out the assembly of the steam valve in return sequence: place the rubber sealing ring back into the holder; overlap the groves of the main part of the valve with the corresponding ledges on the inside of the cover and turn the valve clockwise in direction of Install the steam valve back into the lid of the device, with the extraction ledge facing the back.
Condensation may accumulate in the special cavity around the bowl and in condensation container at the back of the device. 1. Open the device and take the bowl out. Lift the front side of the device if needed, to let the condensate flow down into the container.
- Pull container towards yourself to remove.
- Pour condensate out. Rinse the container and put it back into place.
- Remove condensate remaining in the cavity around the bowl using cloth or tissue.
Transportation and Storage
Before repeated operation or storage completely dry all parts of the appliance. Store the assembled appliance in a dry, ventilated place away from heating appliances and direct sunlight. During transportation and storage, do not expose the device to mechanical stress, that may lead to damage of the device and/or violation of the package integrity. Keep the device package away from water and other liquids.
VI. COOKING TIPS
This chapter familiarizes you with the practical tips and solutions to some common problems you may experience when using the multikitchen.
| Possible causes Solutions | ||
| The lid of the device was open or was not closed properly, so the cooking temperature was not high enough | Try to avoid opening the lid while cooking. Close the lid until it clicks into place. Make sure that the rubber sealing ring located on the inner side of the lid is not deformed or damaged in any way. | |
| Cooking temperature was not observed because the bowl and the heating element did not fit tightly | There should not be any foreign objects between the lid and the housing of the device, remove if any. Always make sure that the heating element is clean and fits tightly with the bowl before cooking | |
| Wrong ingredients or settings were chosen. General proportions were not observed, the foods were cut into pieces that are a bit too hip. Wrong time settings. Chosen recipe is not appropriate for the appliance | We recommend that you use recipes adapted for the device. Choose proven recipes only. Set the time and cooking programme, choose ingredients, proportions, and the size of pieces according to the recipe | |
| Steaming: the amount of water in the bowl is not enough to provide enough steam density | Use the amount of water recommended. If in doubt, check the water level while steaming | |
| Frying | Too much vegetable oil was added | For regular frying and an amount of vegetable oil just enough to cover the bottom of the bowl. Follow recommendations given in the recipe while deep frying |
| Too much liquid inside the bowl | Do not close the lid of the device while frying unless specified in the recipe. Defrost and let drain the ingredients before frying | |
| Boiling: the broth boiled away while cooking acidic foods | Certain foods need to be washed or sutured before cooking. Follow recommendations given in the recipe | |
| Baking (dough failed to bake through) | While proving the dough has reached the inner lid and covered the steam valve | Use a smaller amount of dough |
| Too much dough in the bowl | Take the product out of the bowl, turn it over and place back. Bake until read Next time use smaller amount of dough | |
| Wrong ingredients or time settings, the foods were cut into pieces that are a bit too small | We recommend that you use the recipes adapted for your model.Set the time and cooking programme, choose ingredients, proportions and the size of the pieces according to the recipe |
REDMOND
| The dish was in the bowl on the Keep Warm function for too long after being cooked | We recommend that you use the Keep Warm function mode moderately. If your device enables you to switch "Keep Warm" off in advance, use it to avoid the problem |
| Milk boils away | Depending on both quality and properties of the milk used, it may boil away. To avoid this, we recommend that you use only ultra-pasteurized skimmed milks. Mix the milk with some water if needed |
| Foods were not properly processed (were not rinsed well, etc.).Wrong general proportions or ingredients | We recommend that you use the recipes adapted for the device. Try choosing proven recipes only. Set the time and cooking programme, choose ingredients, proportions, and the size of the pieces according to the recipe.Whole grains, meat, fish, and seafood need to be thoroughly rinsed before cooking |
| The product forms a foam | It is recommended to rinse the product thoroughly remove the valve or cook with the lid open |
THE DISH GETS BURNT
| The bowl was not properly washed before cooking. Non-stick coating is damaged | Before cooking ensure that the bowl is clean and has no coating defects |
| General amount of ingredients is smaller than recommended | Use proven recipes adapted for the device |
| Cooking time was too long | Reduce the cooking time or follow recommendations given in the recipe adapted for your model |
| Frying: oil was not added; the ingredients have not been stirred or turned over | For regular frying add an amount of vegetable oil just enough to cover the bottom of the bowl.For proper frying stir or turn the ingredients occasionally in the bowl while cooking |
| Steaming: not enough liquid Add more liquid. Avoid opening the lid while cooking | |
| Boiling: not enough liquid in the bowl (proportions were not observed) | Follow recommended amounts of liquids and solids while cooking |
| Baking: the bowl was not greased before baking | Grease the bottom and sides of the bowl with butter or vegetable oil before baking (do not pour oil inside) |
INGREDIENTS LOSE THEIR SHAPE WHEN COOKED
| The ingredients have been stirred a bit too often | While frying foods, it is enough to stir the ingredients every 5-7 minutes |
| Cooking time was too long Reduce cooking | time or follow recommendations given in the recipe adapted for the device |
PASTRY IS DAMP
| Improper ingredients were used (juicy fruit or vegetables, frozen berries, sour cream, etc.) | Use ingredients according to the recipe. Avoid using ingredients that contain excess moisture or use them in smaller amounts |
| The baked product has been left in the multi-kitchen with the closed lid for too long | We recommend that you take the baked product out of the bowl right after the baking cycle is over or leave it on "Keep Warm" mode for a short period of time only |
PASTRY WON'T RISE
| Eggs and sugar were not whisked well. | |
| The dough sat for too long before being baked | Use proven recipes adapted for the device. Choose, measure and process the ingredients according to the recommendations given in the recipe |
| The flour wasn't sifed or the dough was not kneaded well | |
| Wrong ingredients |
i Certain REDMOND multikitchens feature overheat protection in the "STEW" and "SOUP" programmes. In case there is not enough liquid in the bowl, the appliance activates overheat protection, automatically interrupts the programme, and switches to the Keep Warm.
Recommended Steam Times for Different Foods
| No Meal Weight, g / Quantity, pcs. Water, ml Cooking time, min | ||||
| 1. Pork/beef fillet (cut into 1.5-2 cm cubes) 500 800 30/40 | ||||
| 2 | Mutton fillet (cut into 1.5-2 cm cubes) | 500 | 800 | 40 |
| 3 | Chicken fillet (cut into 1.5-2 cm cubes) | 500 | 800 | 20 |
| 4 | Meathalls/cutlets | 500 800 25/40 | ||
| 5 | Fish (fillet) | 300 | 800 | 15 |
| 6 | Seafood mix (frozen) | 300 800 5 | ||
| 7 | Dumplings | 5 pcs. | 800 | 25/30 |
| 8 | Potatoes (cut into 4 pieces) 500 800 | 20 | ||
| 9 | Carrots (cut into 1.5-2 cm cubes) | 500 | 800 | 35 |
| 10 | Beet (cut into 4 pieces) | 500 | 1300 | 90 |
| 11 | Vegetables (frozen) | 500 | 800 | 5 |
| 12 | Eggs | 5 pcs. | 800 | 10 |
Remember that these are general recommendations only. In reality, cooking time may vary from the recommended one, depending on the quality of the product used and on your personal preferences.
"MULTICOOK" Temperature Adjustment Recommendations
| Temperature, °C | Recommendations for use | Temperature, °C | Recommendations for use |
| 35 | Proofing dough and making vinegar | 105°C | Cooking jellied meat |
| 40 | Making yogurt | 110°C | Sterilization |
| 45 | Leavening | 115°C | Making sugar syrup |
| 50 | Fermentation | 120°C | Making brisket |
| 55 | Fondant | 125°C | Stewing meat |
| 60 | Making green tea and preparing baby food | 130°C | Making puddings |
| Temperature, °C | Recommendations for use | Temperature, °C | Recommendations for use |
| 65 | Cooking vacuum sealed meat 135°C Browning | cooked foods | |
| 70 | Preparing punch 140°C Smoking various foods | ||
| 75 | Pasteurizing liquids and making white tea | 145°C Baking fish and vegetables in foil | |
| 80 | Preparing mulled wine 150°C Baking meat in foil | ||
| 85 | Making cottage cheese and other time consuming meals | 155°C Frying yeast dough | |
| 90 | Making red tea 160°C Frying poultry | ||
| 95 | Cooking porridges using milk 165°C Frying steaks | ||
| 100 | Cooking meringues and jams 170°C | Deep frying French fries and chicken nuggets |
Table of default settings
| Programme Recommendations for use | Cooking time, set by default | Time adjustment range/ setting interval | Time Delay | Preheating stage | Keep Warm |
| MULTICOOK | Cooking various meals with your personal time and temperature settings | 15 min | 5 min - 1 hour / 1 min1 hour - 12 hours / 5 min | √ | |
| OATMEAL | Cooking porridges using milk | 10 min | 5 min - 1.5 hour / 1 min | √ | |
| STEW | Stewing meat, fish, vegetables, etc. | 1 hour | 20 min - 12 hours / 5 min | √ | |
| FRY | Frying meat, fish, vegetables, etc. | 15 min | 5 min - 1.5 hour / 1 min | ||
| SOUP | Making various soups and broths | 1 hour | 20 min - 8 hours / 5 min | √ | |
| STEAM | Steaming meat, fish, vegetables, etc. | 15 min | 5 min - 2 hours / 5 min | √ | √ |
| PASTA | Cooking pasta, sausages and other semi-finished products | 8 min | 2 min - 20 min / 1 min | √ | |
| SLOW COOK | Making stewed meat, boxed milk, brisket, jellied meat and aspic | 5 hours | 1 hour - 8 hours / 10 min | √ | |
| BOIL | Cooking beans and vegetables | 40 min | 5 min - 2 hours / 5 min | √ | |
| BAKE | Baking cakes, puddings, pies, puff and yeast pastry | 1 hour | 20 min - 8 hours / 5 min | √ | |
| GRAIN | Cooking grains and other side dishes | 55 min | 5 min - 4 hours / 5 min | √ | |
| PILAF | Making meat, fish, poultry and seafood pills | 1 hour | 20 min - 1.5 hours / 10 min | √ |
| Programme | Recommendations for use | Cooking time, set by default | Time adjustment range/ setting interval | Time Delay | Prehabiting stage | Keep Warm |
| YOGURT/ DOUGH | Making different kinds of yogurt; proofing dough | 8 hours | 6 hours - 12 hours / 10 min | √ | ||
| PIZZA | Making pizza | 25 min | 20 min - 1 hour / 5 min | √ | √ | |
| BREAD | Baking white and wheat-eye breads including the proofing cycle | 3 hours | 1 hour - 6 hours / 10 min | √ | ||
| DESSERT | Making desserts using fresh fruits and berries | 1 hour | 5 min - 4 hours / 5 min | √ | √ | |
| QUICK COOK | Quick cooking rice and other grains | 30 min | - | √ |
VII. BEFORE CALLING FOR SERVICE
| Problem | Possible causes | Solution |
| Error message is displayed on the screen: E1 - E3 | System failure, possible control board or heating element | Unplug the appliance and let it cool down. Close the lid until tight, plug in the appliance failure. |
| When cooking in „FRY" program with the lifted heating element, the device displays the E3 error message | Too low quantity of products is cooking or products are stuck to the bottom of the pan | This situation does not mean that it is a malfunction of the device; it is caused by the operation of overheat protection. To continue working with the multi-kitchen, the device should be unplugged from the outlet for 2-3 minutes, and then should be plugged into the outlet again. To avoid the error to appear again, use "MULTICOOK" program with the temperature set to 170°C |
| The appliance does not switch on | Power cord is not connected to the appliance and (or) to the outlet | Unplug the appliance and let it cool down. Close the lid until tight, plug in the appliance |
| Faulty electrical outlet | Plug in the appliance to the working outlet | |
| Power supply failure | Check the voltage supply. In case of its failure, contact an authorized organization. | |
| The meal is taking too long to cook | Power supply interruption (voltage level is unstable or below the standard) | Check the stable voltage supply. If it is unstable or below the standard, contact an authorized organization. |
| There is a foreign object or particles between the bowl and the heating element (litter, grain, pieces of food) | Unplug the appliance and let it cool down. Remove the foreign object or particles. | |
| The bowl is installed with the distortion | Install the bowl properly | |
| Heating element is dirty | Unplug the appliance and let it cool down. Clean the heating element. |
REDMOND
| Problem Possible causes Solution | |||
| The steam comes off from under the lid during cooking process | The tightness of connection between the bowl and inner lid is broken. | The bowl is improperly installed into the housing | Install the bowl properly |
| The lid is loosely closed or there is a foreign object under it | Check for any foreign objects (litter, grain, pieces of food) between the lid and the housing, remove them. Always close the multicooker lid until it clicks into place. | ||
| Sealing rubber on the inner lid is dirty, deformed or damaged | Check the condition of the sealing rubber on the inner lid. Probably it needs to be replaced. | ||

Environmentally friendly disposal (WEEE)
The packaging, user manual and the device itself shall be taken to the applicable collection point for the recycling
of electrical and electronic equipment. Do not throw away the electronic waste to help protect the environment.
Old appliances must not be disposed with other household waste but must be collected separately. Municipal
disposal of recyclable wastes is free of charge. The owners of old appliances are required to bring it to a waste
facility centre. With this treated as appropriate.
This appliance is labelled in accordance with European Directive 2012/19/EU concerning used electrical and electronic appliances (waste electrical and electronic equipment WEEE).
The guideline determines the framework for the return and recycling of used appliances as applicable throughout the EU.

Programma "SLOW COOK"
Programa "SLOW COOK"
Programa "YOGURT/DOUGH"
Programa "SLOW COOK"
Programa "YOGURT/DOUGH"
Program "YOGURT/DOUGH"
Program "QUICK COOK"
UNDER KOGNING PRODUKTET KOGER UD
PRODUKT HAR TABT FORM EFTER SKÆRING
nutter - for intervallet mer enn 1 time.

Program "YOGURT/DOUGH"
Program "QUICK COOK"
RETTEN ER FOR MYE TILBEREDT
Program "YOGURT/DOUGH"
Program "QUICK COOK"
BAKET HAR INTE STIGIT UPP
GAMINYS PRARADO SAVO PIRMINĘ FORMA
Programma "SLOW COOK"
TOIT EI SAANUD VALMIS
"QUICK COOK" program
NEM EMELKEDETT FEL A SÜTEMENY
Program \_SLOW COOK™
Program "QUICK COOK"
Program \_SLOW COOK™
Program \_QUICK COOK"
JEDLO NIE JE ÚPLNE HOTOVÉ
HRANA JE PREMALO KUHANA
| Možni vzroki Raztopine | |
| Pokrov naprave je bil odprt ali ni bil pravilno zaprt, zato temperatura kuhanja ni bila dovoj visoka | Ne odpirajte pokrovo med kuhanjem |
| Zapri pokrov, cokler se ne poszavi na svoje mesto. Pre-prížuje se, da tensile ije gume na notranji strani pokrova ni deformirano ali poškodovanje na noben način | Nádoba musi byl pripevnená k pristorju rovné a pevne pripevnená na spodnej strane vykurovacieho disku. Ustatie se, že v malskudtylih nie sú žiadne cudzie predmety. Zabránte kontaminácii vykurovacieho disku |


- IMPORTANT SAFEGUARDS
- REDMOND
- Control Panel A2
- Display A3
- PRIOR TO FIRST USE
- OPERATION
- Setting The Cooking Time
- MASTERFRY function A4
- Time Delay Function
- Keep Warm Function
- Disabling The "Keep Warm" In Advance
- Reheat Function
- Standard Operating Procedure for Automatic Programmes
- "MULTICOOK" Programme
- "OATMEAL" Programme
- "STEW" Programme
- "FRY" Programme
- "SOUP" Programme
- "STEAM" Programme
- "PASTA" Programme
- "SLOW COOK" Programme
- "BOIL" Programme
- "BAKE" Programme
- "GRAIN" Programme
- "PILAF" Programme
- "YOGURT/DOUGH" Programme
- "PIZZA" Programme
- "BREAD" Programme
- "DESSERT" Programme
- "QUICK COOK" Programme
- ADDITIONAL FEATURES
- OPTIONAL ACCESSORIES
- CLEANING AND GENERAL MAINTENANCE GUIDELINES
- Transportation and Storage
- COOKING TIPS
- Environmentally friendly disposal (WEEE)
- Programma "SLOW COOK"
- Programa "SLOW COOK"
- Programa "YOGURT/DOUGH"
- Program "YOGURT/DOUGH"
- Program "QUICK COOK"
- "QUICK COOK" program
- Program \_SLOW COOK™
- Program \_QUICK COOK"
Brand : Redmond
Model : RMKM911E
Category : Multi-cooker