SASALARM120 - Alarm system KONIG - Free user manual and instructions
Find the device manual for free SASALARM120 KONIG in PDF.
User questions about SASALARM120 KONIG
0 question about this device. Answer the ones you know or ask your own.
Ask a new question about this device
Download the instructions for your Alarm system in PDF format for free! Find your manual SASALARM120 - KONIG and take your electronic device back in hand. On this page are published all the documents necessary for the use of your device. SASALARM120 by KONIG.
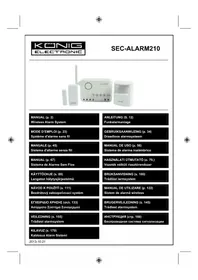
USER MANUAL SASALARM120 KONIG
MANUAL DE USO (p. 57)
MANUAL (p. 68)
HASZNÁLATI ÚTMUTATÓ (o. 79)
KÄYTTÖOHJE (s. 90)
natural_image
Group of white electronic devices connected to a central control panel (no visible text or symbols)
natural_image
Exterior view of a modern office building (no signage)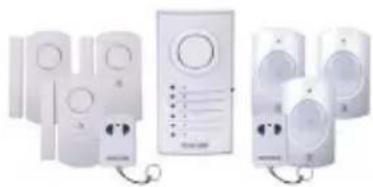
natural_image
Product line of white electronic devices with attached speakers and a control panel (no visible text or symbols)Alarm systems

KÖNIG
ENGLISH
Introduction:
Multi functional Plug and Play wireless alarm system. Easy and quick installation. It operates on batteries, thus making adapters and wiring redundant. Secures houses, offices, shops, etc. in just a few minutes.
The alarm unit with ultra loud siren and LED indicators shows which sensor is triggered. Supplied with 2x RF controlled remote controls to arm or disarm the system. Function switch on alarm unit for alarm or door bell use (chime).
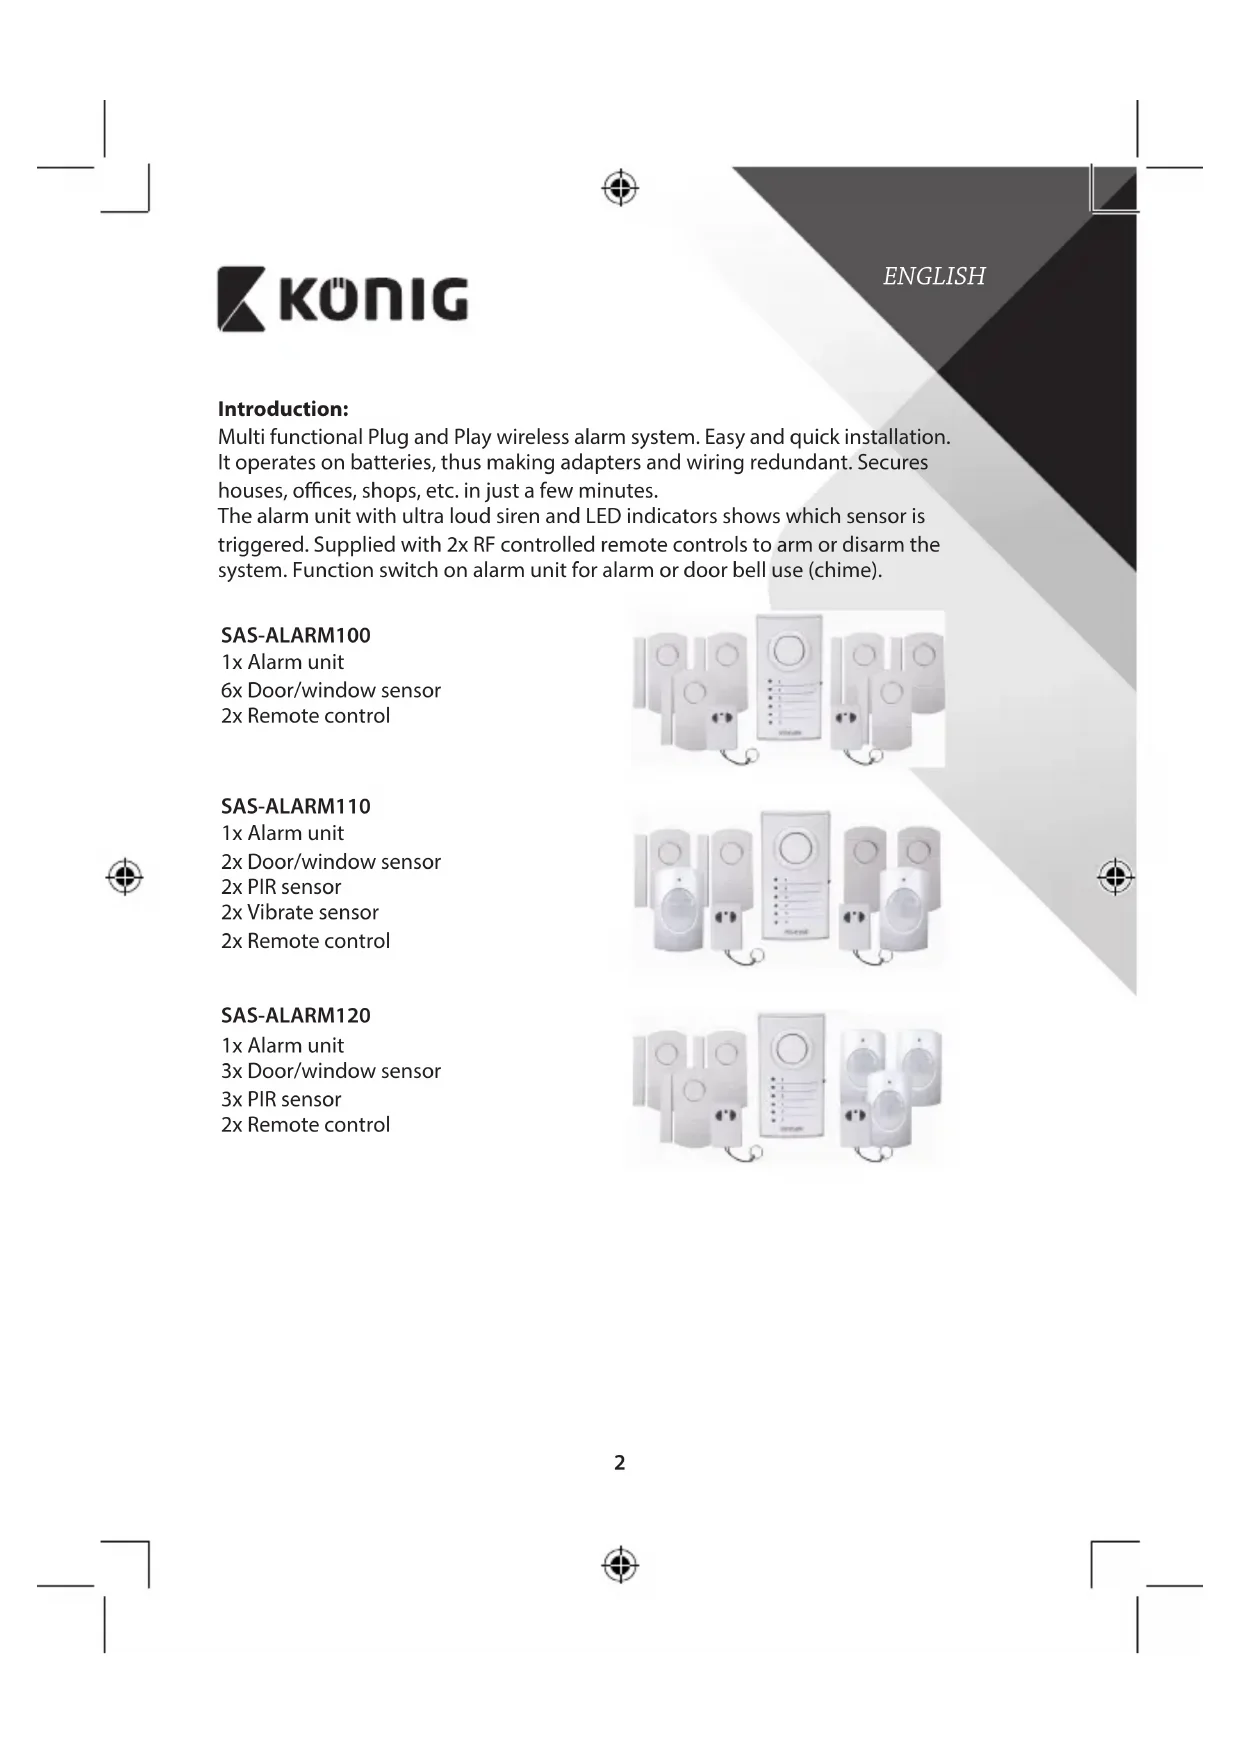
SAS-ALARM100
1x Alarm unit
6x Door/window sensor
2x Remote control
SAS-ALARM110
1x Alarm unit
2x Door/window sensor
2x PIR sensor
2x Vibrate sensor
2x Remote control
SAS-ALARM120
1x Alarm unit
natural_image
Illustration of multiple white sound lockers with attached devices and a central control panel (no text or symbols visible)
natural_image
Exterior view of a modern security camera with multiple speakers and a central display unit (no visible text or symbols)
natural_image
Illustration of multiple white electronic devices with speaker modules and connectors (no text or symbols visible)
KÖNIG
ENGLISH
Description alarm unit (SAS-ALARM100/110/120):
Figure 1
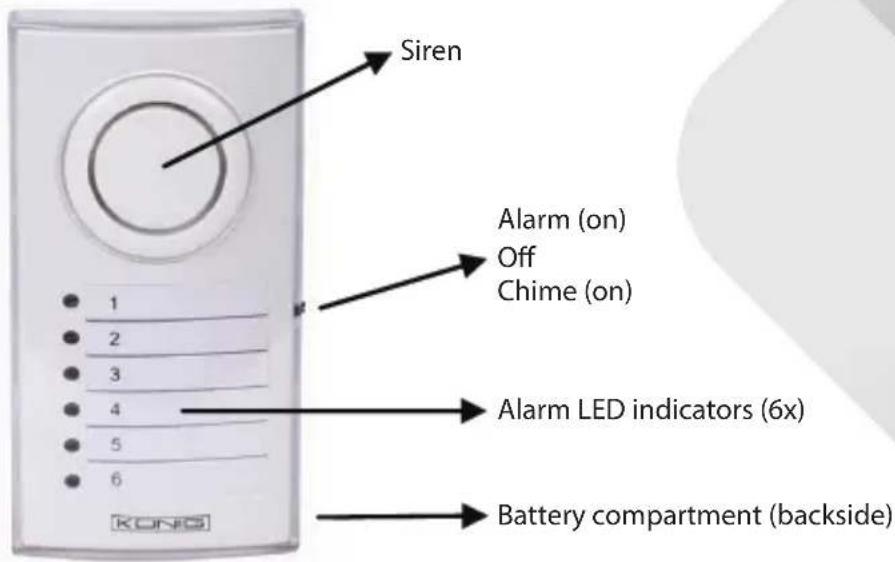
text_image
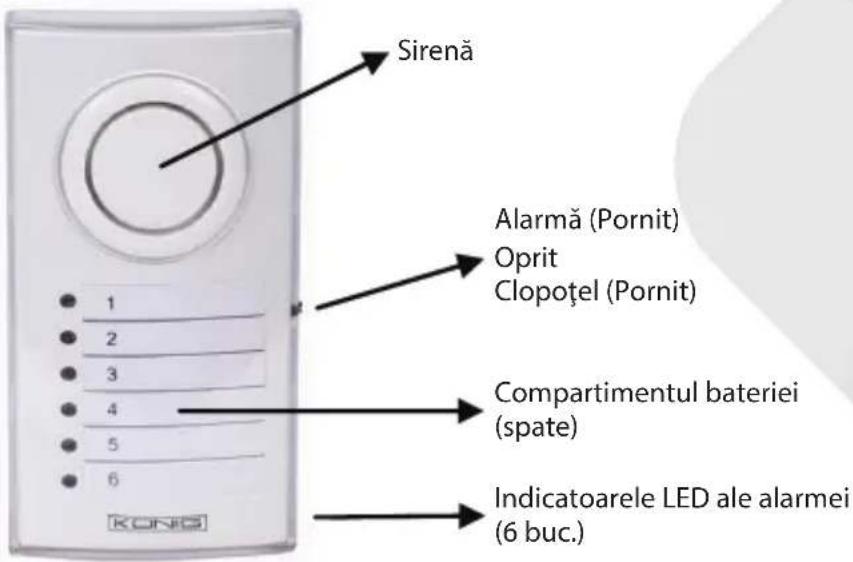
Siren Alarm (on) Off Chime (on) 1 2 3 4 5 6 Alarm LED indicators (6x) Battery compartment (backside)Description door/window sensor (SAS-ALARM100/110/120):
Figure 2
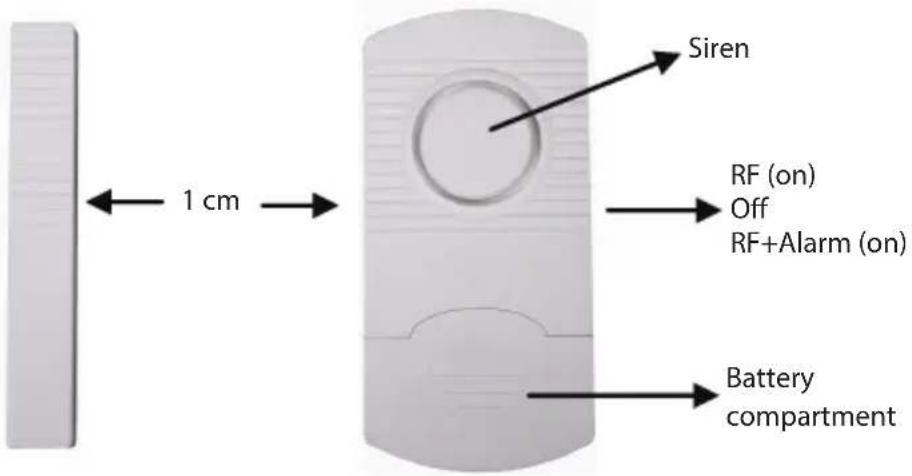
text_image
Siren 1 cm RF (on) Off RF+Alarm (on) Battery compartment
KÖNIG
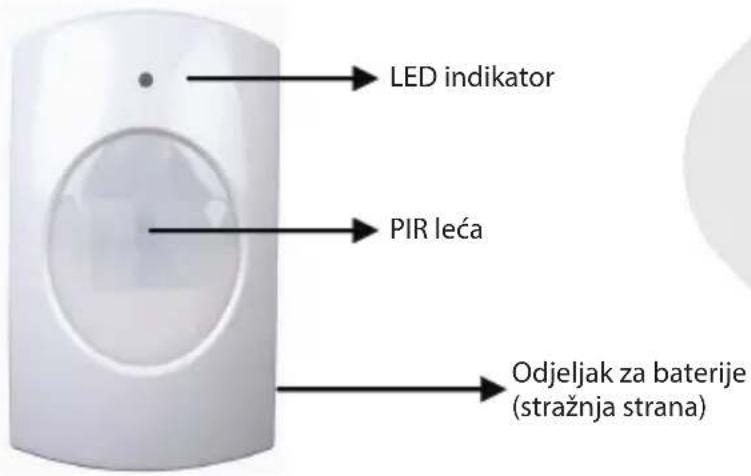
Description PIR sensor (SAS-ALARM110/120): Figure 3
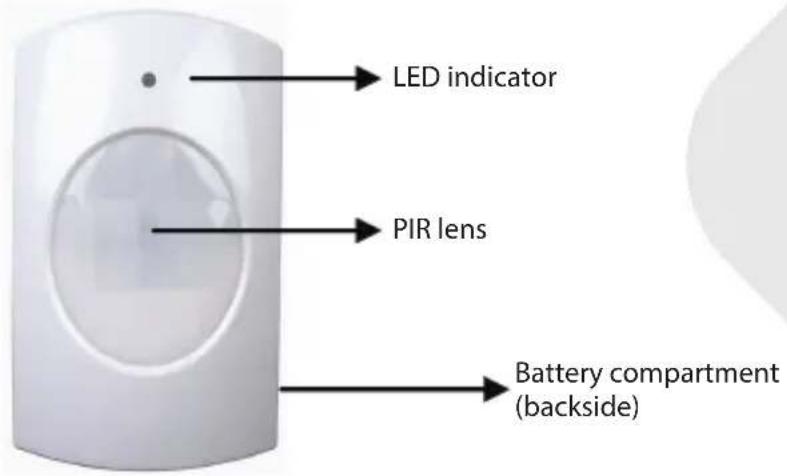
text_image
LED indicator PIR lens Battery compartment (backside)Description vibrate sensor (SAS-ALARM110): Figure 4

text_image
Siren RF (on) Off RF+Alarm (on) Battery compartment VIBRATE ALARMENGLISH

KÖNIG
ENGLISH
Description remote control (SAS-ALARM100/110/120): Figure 5
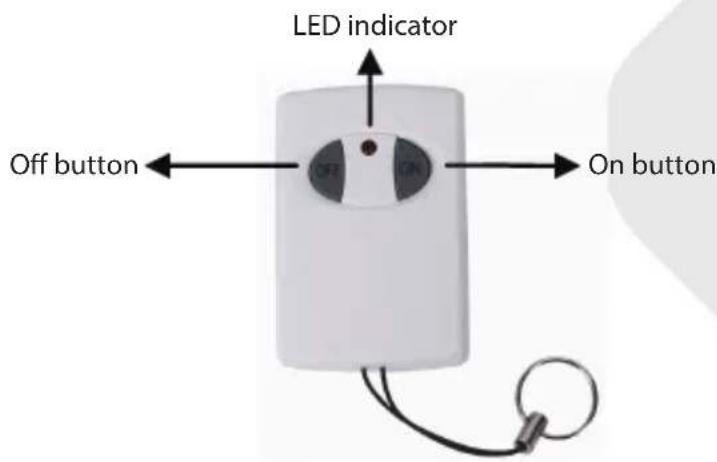
text_image
LED indicator Off button ← OFF → On buttonInstallation SAS-ALARM100
- Insert, according to the diagram inside the battery compartment, (backside) the batteries for the alarm unit (3x AA).
- Install the door/window sensor with the adhesive tape to doors and windows. Note: maximum 1 cm distance between magnetic contact and sensor (see figure 2). Switch on the sensor to RF or RF+ALARM. If switched to RF+ALARM, the sensor will send, when triggered, a signal to the alarm unit and the siren of the sensor itself will also sound. In this case the siren of the sensor and the alarm unit will both sound.
- Remove the transparent front cover of the alarm unit to write down the position of the sensors corresponding with the numbered LED. (e.g. sensor 1=front door, 2=kitchen window, etc.).
- Install the alarm unit to a location. The distance between the alarm unit and the most far away door/window sensor may not exceed 60 m (open area) ^* .
- Switch on the alarm unit to ALARM or CHIME function. If switched to CHIME, the alarm unit will sound like a door bell when a door or window is opened. Switched to ALARM generates a 100 dB loud siren. When the alarm unit is switched on, the alarm is not armed (active) yet. Push the ON button on the remote control to arm the alarm and OFF to disarm. The delay time for entering and leaving the protected area is between 20\~25 seconds.

KÖNIG
ENGLISH
- It's recommended to test the alarm system for correct operation with first use and every 3 months.
Procedure:
a) Switch the alarm unit on to ALARM or CHIME (for testing recommended).
b) Push the ON button on the remote control to arm the alarm.
c) Wait for 20\~25 seconds (delay time).
d) Open every door or window one by one and check if the corresponding LED lights up and the CHIME sounds.
e) Disarm the alarm if everything operates correct.
f) The alarm system is ready to use.
Note:
1) The alarm unit will give a conformation tone when armed or disarmed. The tone for CHIME is different as for ALARM.
2) If a sensor does not need to be switched on, it's possible to switch off every sensor individually with the on/off switch. In this case the sensor is no part of the alarm system anymore when armed.
3) A sensor switched to RF+ALARM will always give an alarm sound on the sensor itself, unless the alarm unit is armed or disarmed.
4) When a sensor is triggered and the siren of the alarm unit sounds, it needs to be switched off with on/off switch of the alarm unit. After that the alarm unit can be switched on again. When the alarm keeps on going after arming the system, check if every door or window is closed properly.
Installation SAS-ALARM110
- Insert, according to the diagram inside the battery compartment, (backside) the batteries for the alarm unit (3x AA).
- Install the door/window sensor with the adhesive tape to doors and windows. Note: maximum 1 cm distance between magnetic contact and sensor (see figure 2). Switch on the sensor to RF or RF+ALARM. If switched to RF+ALARM, the sensor will send, when triggered, a signal to the alarm unit and the siren of the sensor itself will also sound. In this case the siren of the sensor and the alarm unit will both sound.
- Install the vibration sensor with the adhesive tape to windows (on the glass). Switch on the sensor to RF or RF+ALARM. If switched to RF+ALARM, the sensor will send, when triggered, a signal to the alarm unit and the siren of the sensor itself will also sound. In this case the siren of the sensor and the alarm unit will both sound. Note: the vibrate sensor is very sensitive.

KÖNIG
ENGLISH
The slightest vibration will trigger the sensor. It's not recommended to install the vibrate sensor on windows near to doors. Slamming doors will trigger the sensor.
-
Insert, according to the diagram inside the battery compartment, (backside) the batteries for PIR sensor (3x AAA). The PIR sensor needs to warm up for 30\~40 seconds for first use. In this period it cannot detect motion. Install the PIR sensor at a height of 1\~1.5 m for best performance. Do not install the PIR sensor into direct sunlight, facing towards windows, objects that move easily and heat or cold source.
-
Remove the transparent front cover of the alarm unit to write down the position of the sensors corresponding with the numbered LED. (e.g. sensor 1=front door, 2=kitchen window, etc.).
-
Install the alarm unit to a location. The distance between the alarm unit and the most far away sensor may not exceed 60 m (open area) ^* .
-
Switch on the alarm unit to ALARM or CHIME function. If switched to CHIME, the alarm unit will sound like a door bell when a door or window is opened. Switched to ALARM generates a 100 dB loud siren. When the alarm unit is switched on, the alarm is not armed (active) yet. Push the ON button on the remote control to arm the alarm and OFF to disarm. The delay time for entering and leaving the protected area is between 20\~25 seconds.
-
It's recommended to test the alarm system for correct operation with first use and every 3 months. Procedure:
a) Switch on the alarm unit to ALARM or CHIME (for testing recommend).
b) Push the ON button on the remote control to arm the alarm.
c) Wait for 20\~25 seconds (delay time).
d) For testing door/window sensor, open every door or window one by one and check if the corresponding LED lights up and the CHIME sounds.
e) For testing PIR sensor, move around the PIR sensor and check if the corresponding LED lights up and the CHIME sounds. Note: the LED indicator on the PIR sensor lights up also.
f) For testing vibrate sensor, hit carefully on the window and check if the corresponding LED lights up and the CHIME sounds.
g) Disarm the alarm if everything operates correct.
h) The alarm system is ready to use.

KÖNIG
ENGLISH
Note:
1) The alarm unit will give a conformation tone when armed or disarmed. The tone for CHIME is different as for ALARM.
2) If a sensor does not need to be switched on, it's possible to switch off every sensor individually with the on/off switch. In this case the sensor is no part of the alarm system anymore when armed (except PIR sensor).
3) A sensor switched to RF+ALARM will always give an alarm sound on the sensor itself, unless the alarm unit is armed or disarmed.
4) When a sensor is triggered and the siren of the alarm unit sounds, it needs to be switched off with on/off switch of the alarm unit. After that the alarm unit can be switched on again. When the alarm keeps on going after arming the system, check if every sensor is installed properly.
Installation SAS-ALARM120
- Insert, according to the diagram inside the battery compartment, (backside) the batteries for the alarm unit (3x AA).
- Install the door/window sensor with the adhesive tape to doors and windows. Note: maximum 1 cm distance between magnetic contact and sensor (see figure 2). Switch on the sensor to RF or RF+ALARM. If switched to RF+ALARM, the sensor will send, when triggered, a signal to the alarm unit and the siren of the sensor itself will also sound. In this case the siren of the sensor and the alarm unit will both sound.
- Insert, according to the diagram inside the battery compartment, (backside) the batteries for PIR sensor (3x AAA). The PIR sensor needs to warm up for 30\~40 seconds for first use. In this period it cannot detect motion. Install the PIR sensor at a height of 1\~1.5 m for best performance. Do not install the PIR sensor into direct sunlight, facing towards windows, objects that move easily and heat or cold source.
- Remove the transparent front cover of the alarm unit to write down the position of the sensors corresponding with the numbered LED. (e.g. sensor 1=front door, 2=kitchen window, etc.).
- Install the alarm unit to a location. The distance between the alarm unit and the most far away sensor may not exceed 60 m (open area)*.
- Switch on the alarm unit to ALARM or CHIME function. If switched to CHIME, the alarm unit will sound like a door bell when a door or window is opened. Switched to ALARM generates a 100 dB loud siren. When the alarm unit is switched on, the alarm is not armed (active) yet. Push the ON button

KÖNIG
ENGLISH
on the remote control to arm the alarm and OFF to disarm. The delay time for entering and leaving the protected area is between 20\~25 seconds.
- It's recommended to test the alarm system for correct operation with first use and every 3 months.
Procedure:
a) Switch on the alarm unit to ALARM or CHIME (for testing recommend).
b) Push the ON button on the remote control to arm the alarm.
c) Wait for 20\~25 seconds (delay time).
d) For testing door/window sensor, open every door or window one by one and check if the corresponding LED lights up and the CHIME sounds.
e) For testing PIR sensor, move around the PIR sensor and check if the corresponding LED lights up and the CHIME sounds. Note: the LED indicator on the PIR sensor lights up also.
f) Disarm the alarm if everything operates correct.
g) The alarm system is ready to use.
Note:
1) The alarm unit will give a conformation tone when armed or disarmed. The tone for CHIME is different as for ALARM.
2) If a sensor does not need to be switched on, it's possible to switch off every sensor individually with the on/off switch. In this case the sensor is no part of the alarm system anymore when armed (except PIR sensor).
3) A sensor switched to RF+ALARM will always give an alarm sound on the sensor itself, unless the alarm unit is armed or disarmed.
4) When a sensor is triggered and the siren of the alarm unit sounds, it needs to be switched off with on/off switch of the alarm unit. After that the alarm unit can be switched on again. When the alarm keeps on going after arming the system, check if every sensor is installed properly.
Specifications:
Alarm unit (figure 1):
• Power: 4.5 V DC (3x battery AA, not included)
• Standby current: <1.5 mA
• Chime current: <90 mA
• Alarm current: <130 mA
• Alarm volume: 100 dB (0.5 m)

KÖNIG
• Chime volume: 90 dB (0.5 m)
- Switch: alarm/chime/off
• LED indicator: 6
• Frequency: 433 MHz ± 250 kHz
• Dimensions: 5.7 (W) x 3.9 (D) x 10.9 (H) cm
- Delay time: 20\~25 sec.
Door/window sensor (figure 2):
• Power: 4.5 V DC (3x battery LR44, included)
• Standby current: <10 A
• Transmission current: <6 mA
• Working distance: +/-60 m (open area)*
• Alarm volume: 95 dB (0.5 m)
• Switch: RF + alarm/RF/off
• Frequency: 433 MHz ± 250 kHz
• Dimensions with magnet contact: 6 (W) x1 (D) x 9.9 (H) cm
PIR sensor (figure 3):
• Power: 4.5 V DC (3x battery AA, not included)
• Standby current: <100 A
- Transmission current: <5 mA
• Working distance: +/-60 m (open area)*
• Detecting range: 5\~8 m
• Detecting angle: 100° (horizontal)/80° (vertical)
• Installation height: 1.5 m (recommended)
• Frequency: 433 MHz ± 250 kHz
• Dimensions: 6 (W) x 5 (D) x 9.8 (H) cm
Vibrate sensor (figure 4):
• Power: 4.5 V DC (3x battery LR44, included)
- Standby current: <10 μA
- Transmission current: <6 mA
• Working distance: +/-60 m (open area)*
• Frequency: 433 MHz ± 250 kHz
ENGLISH

KÖNIG
• Alarm volume: 95 dB (0.5 m)
• Dimensions: 4.8 (W) x 1 (D) x 9.9 (H) cm
Remote control (figure 5):
• Power: 12 V DC (3x battery LR44, included)
• Standby current: 0
• Transmission current: <10 mA
- Working distance: +/- 30 m (open area)*
- Buttons: on/off
• LED indicator: 1
• Frequency: 433 MHz ± 250 kHz
• Dimensions: 3.5 (W) x 1.3 (D) x 5.2 (H) cm
* Working distance of remote control and sensors can vary due to environmental circumstances.
ENGLISH

KÖNIG
ENGLISH
Safety precautions:
Do not expose the product to water or moisture.
Maintenance:
Clean only with a dry cloth.
Do not use cleaning solvents or abrasives.
Warranty:
No guarantee or liability can be accepted for any changes and modifications of the product or damage caused due to incorrect use of this product.
General:
Designs and specifications are subject to change without notice.
All logos, brands or brand logos and product names are trademarks or registered trademarks of their respective holders and are hereby recognised as such.
This manual was produced with care. However, no rights can be derived. König Electronic can not accept liability for any errors in this manual or their consequences.
Keep this manual and packaging for future reference.
Attention:

This product is marked with this symbol. It means that used electrical and electronic products should not be mixed with general household waste. There is a separate collections system for these products.
This product has been manufactured and supplied in compliance with all relevant regulations and directives, valid for all member states of the European Union. It also complies to all applicable specifications and regulations in the country of sales.
Formal documentation is available upon request. This includes, but is not limited to: Declaration of Conformity (and product identity), Material Safety Data Sheet, product test report.
Please contact our customer service desk for support:
via website: http://www.nedis.com/en-us/contact/contact-form.htm
via e-mail: service@nedis.com
via telephone: +31 (0)73-5993965 (during office hours)
NEDIS B.V., De Tweeling 28, 5215 MC 's-Hertogenbosch, THE NETHERLANDS

KÖNIG
DEUTSCH
Einführung:
natural_image
Group of white electronic devices with attached cables, no visible text or symbolsSAS-ALARM110
natural_image
Exterior view of a modern office building (no signage)SAS-ALARM120
natural_image
Illustration of multiple white household appliances with control panels and earphones, no visible text or symbols
KÖNIG
DEUTSCH
Installation SAS-ALARM120
natural_image
Illustration of multiple white sound alert devices with attached control panels (no text or symbols visible)
natural_image
Exterior view of a modern office building (no signage)
natural_image
Product line of white outdoor security camera modules with attached cables (no visible text or symbols)
KÖNIG
FRANÇAIS
Installation SAS-ALARM120
natural_image
Group of white electronic devices with attached cables, no visible text or symbols
natural_image
Exterior view of a modern office building (no signage)
natural_image
Illustration of multiple white household appliances with control panels and earphones, no visible text or symbols
KÖNIG
NEDERLANDS
natural_image
Illustration of multiple white sound alert devices with attached control panels (no text or symbols visible)
natural_image
Exterior view of a modern office building (no signage)
natural_image
Illustration of multiple white sound lockers with attached devices and cables (no text or symbols visible)
KÖNIG
ITALIANO
natural_image
Group of white electronic devices with attached cables and a central control panel (no visible text or symbols)
natural_image
Exterior view of a modern office building (no signage)
natural_image
Illustration of multiple white household appliances connected by wires, no text or symbols visible
KÖNIG
ESPAÑOL
natural_image
Group of white electronic security camera modules with attached cables, no visible text or symbolsSAS-ALARM110
natural_image
Exterior view of a modern office building (no signage)SAS-ALARM120
natural_image
Product line of white electronic devices with attached control panels and cables (no visible text or symbols)
KÖNIG
PORTUGUÊS
natural_image
Group of white electronic security camera modules with attached cables, no visible text or symbolsSAS-ALARM110
natural_image
Exterior view of a modern office building (no signage)SAS-ALARM120
natural_image
Product line of white electronic devices with attached control panels and cables (no visible text or symbols)
KÖNIG
MAGYAR
natural_image
Illustration of multiple white sound alert devices with attached control panels (no text or symbols visible)SAS-ALARM110
natural_image
Exterior view of a modern office building (no signage)SAS-ALARM120
natural_image
Product line of white outdoor security camera modules with attached cables (no visible text or symbols)
KÖNIG
SUOMI
natural_image
Illustration of multiple white sound alert devices with attached control panels (no text or symbols visible)
natural_image
Exterior view of a modern office building (no signage)
natural_image
Illustration of multiple white sound lockers with attached devices and cables (no text or symbols visible)
KÖNIG
SVENSKA
natural_image
Group of white electronic devices with attached cables, no visible text or symbolsSAS-ALARM110
natural_image
Exterior view of a modern office building (no signage)SAS-ALARM120
natural_image
Illustration of multiple white household appliances with control panels and earphones, no visible text or symbols
KÖNIG
ČESKY
natural_image
Illustration of multiple white sound alert devices with attached control panels (no text or symbols visible)
natural_image
Exterior view of a modern office building (no signage)
natural_image
Product line of white outdoor security camera modules with attached cables (no visible text or symbols)
KÖNIG
ROMÂNĂ
Descrierea centralei (SAS-ALARM100/110/120): Figura 1
natural_image
Group of white electronic devices with attached cables and a central control panel (no visible text or symbols)
natural_image
Exterior view of a modern office building (no signage)
natural_image
Illustration of multiple white electronic devices with attached cables, no visible text or symbols
KÖNIG
ΕΛΛΗΝΙΚΑ
natural_image
Illustration of multiple white sound absorators with attached devices and a central control unit (no text or symbols visible)
natural_image
Exterior view of a modern security camera with multiple speakers and a central display unit (no visible text or symbols)
natural_image
Illustration of multiple white electronic devices with speaker modules and connectors (no text or symbols visible)
KÖNIG
DANSK
Oversigt over alarmenheden (SAS-ALARM100/110/120):
Fig. 1
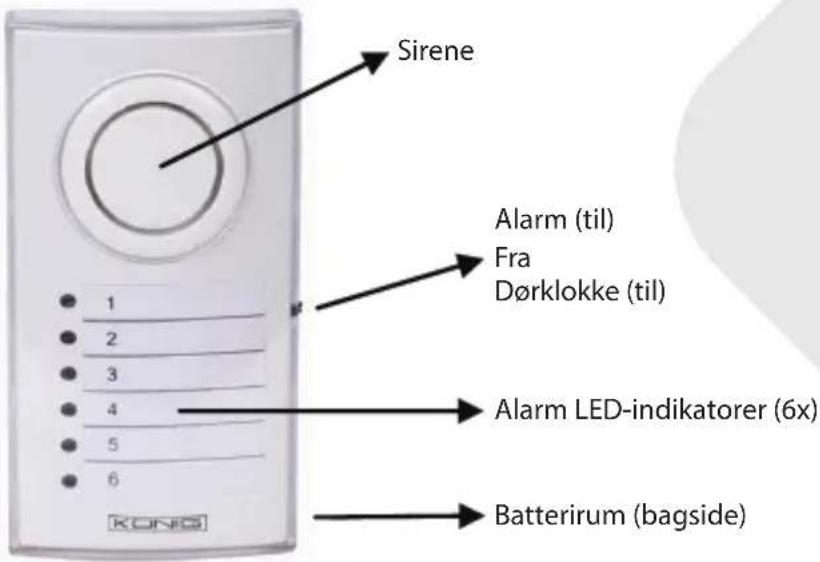
text_image
Sirene Alarm (til) Fra Dørklokke (til) 1 2 3 4 5 6 Alarm LED-indikatorer (6x) Batterirum (bagside)Oversigt over dør-/vinduessensor (SAS-ALARM100/110/120):
Fig. 2

text_image
Sirene RF (til) Fra RF+Alarm (til) Batterirum 1 cm
KÖNIG
Oversigt over PIR-sensor (SAS-ALARM110/120):
Fig. 3

text_image
LED-indikatorlys PIR-linse Batterirum (bagside)DANSK
Oversigt over vibrationssensor (SAS-ALARM110):
Fig. 4

text_image
Sirene RF (til) Fra RF+Alarm (til) Batterirum VIBRATE ALARM
KÖNIG
DANSK
Oversigt over fjernbetjening (SAS-ALARM100/110/120):
Fig. 5
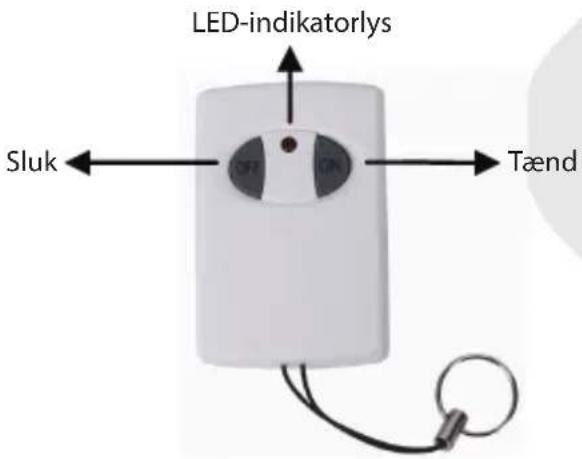
text_image
LED-indikatorlys Sluk Tændnatural_image
Illustration of multiple white sound alert devices with attached control panels (no text or symbols visible)SAS-ALARM110
natural_image
Exterior view of a modern office building (no signage)SAS-ALARM120
1 stk. alarmenhet
3 stk. dør-/vindussensorer
3 stk. PIR-sensorer
2 stk. fjernkontroller
natural_image
Product line of white outdoor security camera modules with attached cables (no visible text or symbols)
KÖNIG
NORSK
natural_image
Group of white electronic devices with attached speakers and a control panel (no visible text or symbols)SAS-ALARM110
natural_image
Exterior view of a modern security camera with multiple speakers and a central display unit (no visible text or symbols)SAS-ALARM120
natural_image
Product photo of multiple white electronic devices with speakers and control panels, no visible text or symbols
KÖNIG
РУССКИЙ
natural_image
Illustration of multiple white sound alert devices with attached control panels (no text or symbols visible)
natural_image
Exterior view of a modern office building (no signage)
natural_image
Product line of white outdoor security camera modules with attached cables (no visible text or symbols)
KÖNIG
TÜRKÇE
natural_image
Illustration of multiple white sound alert devices with attached control panels (no text or symbols visible)
natural_image
Exterior view of a modern office building (no signage)
natural_image
Product line of white outdoor security camera modules with attached cables (no visible text or symbols)
KÖNIG
EESTI
natural_image
Group of white electronic devices with attached black cables, no visible text or symbolsSAS-ALARM110
1x jednotka alarmu
natural_image
Exterior view of a modern security camera with multiple speakers and a display unit (no visible text or symbols)SAS-ALARM120
1x jednotka alarmu
natural_image
Product photo of multiple white electronic devices with speakers and control panels, no visible text or symbols
KÖNIG
SLOVENSKY
natural_image
Group of white electronic devices with attached cables and a central control panel (no visible text or symbols)
natural_image
Exterior view of a modern office building (no signage)
natural_image
Illustration of multiple white electronic devices connected by wires, no text or symbols visible
KÖNIG
LATVIEŠU
PIR sensors (3. attêls):
natural_image
Group of white electronic security camera modules with attached cables, no visible text or symbolsSAS-ALARM110
natural_image
Exterior view of a modern office building (no signage)SAS-ALARM120
natural_image
Product line of white electronic devices with attached control panels and cables (no visible text or symbols)
KÖNIG
LIETUVIŠKAI
natural_image
Illustration of multiple white sound alert devices with attached control panels (no text or symbols visible)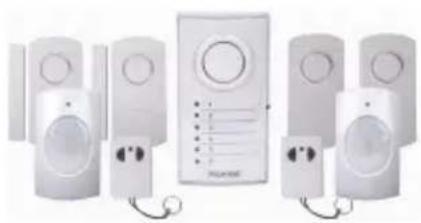
natural_image
Exterior view of a modern office building (no signage)
natural_image
Product line of white outdoor security camera modules with attached cables (no visible text or symbols)
KÖNIG
HRVATSKI
Opis alarmne jedinice (SAS-ALARM100/110/120): Slika 1

text_image
Sirena Alarm (uključen) Isključen Zvono (uključeno) Alarmni LED pokazivači (6x) Odjeljak za baterije (stražnja strana)Opis senzora za vrata/prozore (SAS-ALARM100/110/120): Slika 2

text_image
Sirena RF (uključeno) Isključen RF+Alarm (uključeno) Baterijski odjeljak 1 cm
KÖNIG
HRVATSKI
Opis pasivnog infracrvenog senzora (SAS-ALARM110/120): Slika 3
text_image
LED indikator PIR leća Odjeljak za baterije (stražnja strana)Opis senzora vibracija (SAS-ALARM110): Slika 4

text_image
Sirena RF (uključeno) Isključen RF+Alarm (uključeno) Baterijski odjeljak VIBRATE ALARM
KÖNIG
HRVATSKI
natural_image
Group of white electronic devices with attached black cables, no visible text or symbolsSAS-ALARM110
natural_image
Exterior view of a modern office building (no signage)SAS-ALARM120
natural_image
Product photo of multiple white electronic devices with speakers and control panels, no visible text or symbols
KÖNIG
БЪЛГАРСКИ
natural_image
Group of white electronic devices with attached cables, no visible text or symbolsSAS-ALARM110
natural_image
Exterior view of a modern office building (no signage)SAS-ALARM120
natural_image
Illustration of multiple white household appliances with control panels and earphones, no visible text or symbols
KÖNIG
POLSKI
natural_image
Illustration of multiple white sound alert devices with attached control panels (no text or symbols visible)
natural_image
Exterior view of a modern office building (no signage)
natural_image
Product line of white outdoor security camera modules with attached cables (no visible text or symbols)
KÖNIG
SLOVENSKI
Opis alarmne enote (SAS-ALARM100/110/120): Slika 1