SECALARM210 - Alarm system KONIG - Free user manual and instructions
Find the device manual for free SECALARM210 KONIG in PDF.
| Product type | Wireless alarm system |
| Brand | Konig |
| Model | SECALARM210 |
| Dimensions (alarm center) | Approximately 150 x 100 x 30 mm |
| Weight (alarm center) | Approximately 300 g (with batteries) |
| Main power supply | 12 V DC adapter (included) |
| Backup power | 4 AAA batteries (not included) - up to 48 hours |
| Built-in siren | 105 dB |
| Number of zones | 3 alarm zones + 1 alert zone (zone 4) |
| Maximum number of detectors | 16 (4 per zone) |
| Compatible detectors | Door/window opening detector SEC-ASDW10, PIR motion detector SEC-ASMS10 |
| Arming functions | Full arming (Away) and partial arming (Home) |
| Exit delay | 45 seconds in Away mode |
| Entry delay | 30 seconds in Away mode |
| Zone bypass | Yes, temporary per zone |
| User password | 4 digits, adjustable (default 1234) |
| Alert types | Chime, Alert, or OFF |
| Detector fault indications | Rapid flashing of zone indicator |
| Maintenance | Clean with a dry cloth, do not use solvents |
| Safety | Risk of electric shock – do not open, unplug if problem occurs |
| Warranty | Warranty not applicable in case of modification or incorrect use |
| Country of manufacture | Netherlands (headquarters NEDIS B.V.) |
Frequently Asked Questions - SECALARM210 KONIG
User questions about SECALARM210 KONIG
0 question about this device. Answer the ones you know or ask your own.
Ask a new question about this device
Download the instructions for your Alarm system in PDF format for free! Find your manual SECALARM210 - KONIG and take your electronic device back in hand. On this page are published all the documents necessary for the use of your device. SECALARM210 by KONIG.
USER MANUAL SECALARM210 KONIG
text_image
KÖNIG ELECTRONICSEC-ALARM210

natural_image
Product photo of a KONSO wireless home security device with attached door and antenna (no visible text or symbols)MANUAL (p. 2)
Wireless Alarm System
MODE D'EMPLOI (p. 23)
MANUAL DE USO (p. 56)
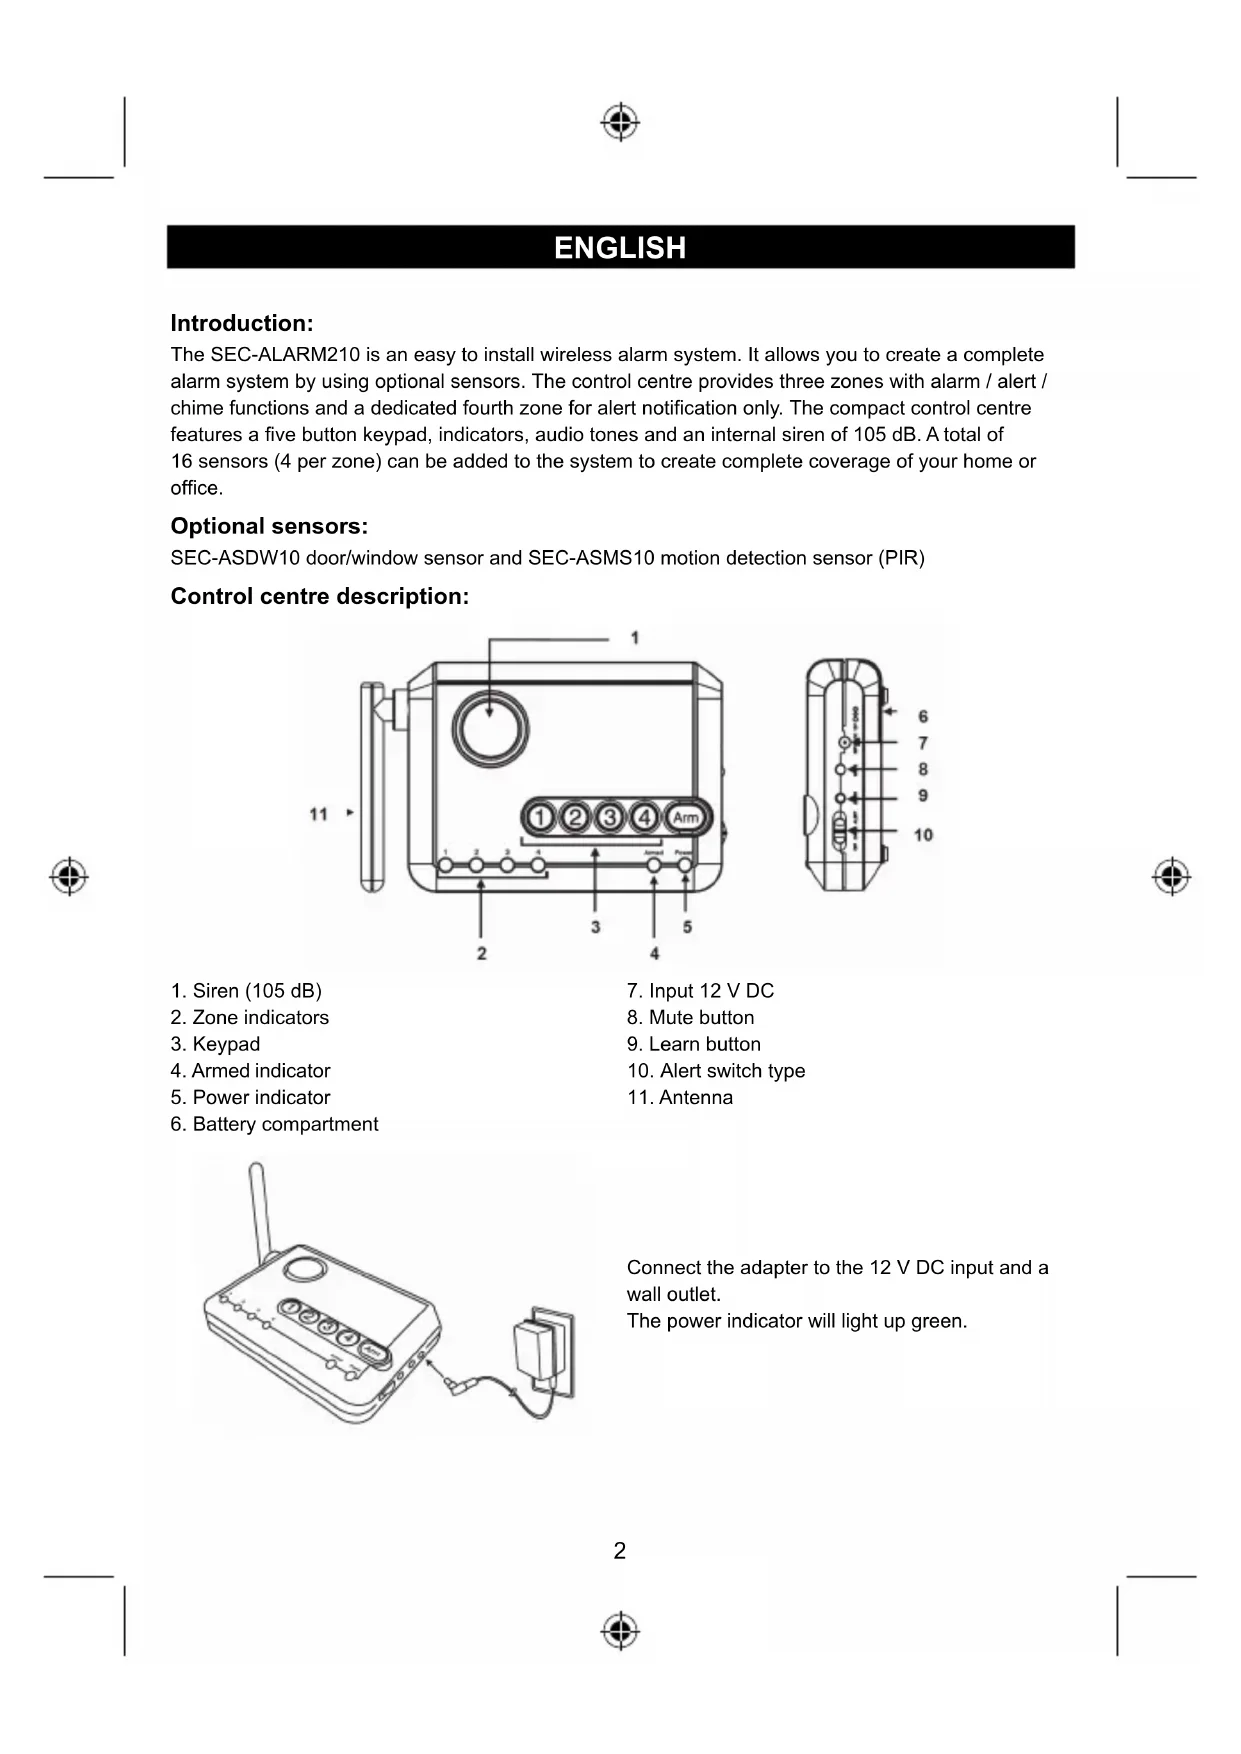
The SEC-ALARM210 is an easy to install wireless alarm system. It allows you to create a complete alarm system by using optional sensors. The control centre provides three zones with alarm / alert / chime functions and a dedicated fourth zone for alert notification only. The compact control centre features a five button keypad, indicators, audio tones and an internal siren of 105 dB. A total of 16 sensors (4 per zone) can be added to the system to create complete coverage of your home or office.
Optional sensors:
SEC-ASDW10 door/window sensor and SEC-ASMS10 motion detection sensor (PIR)
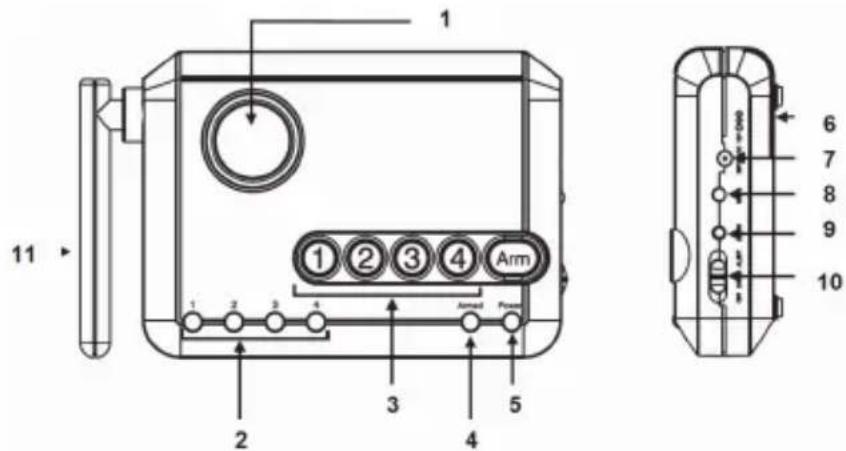
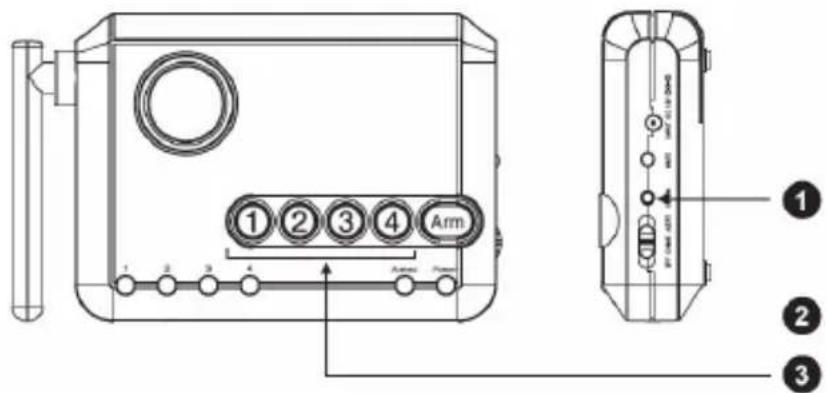
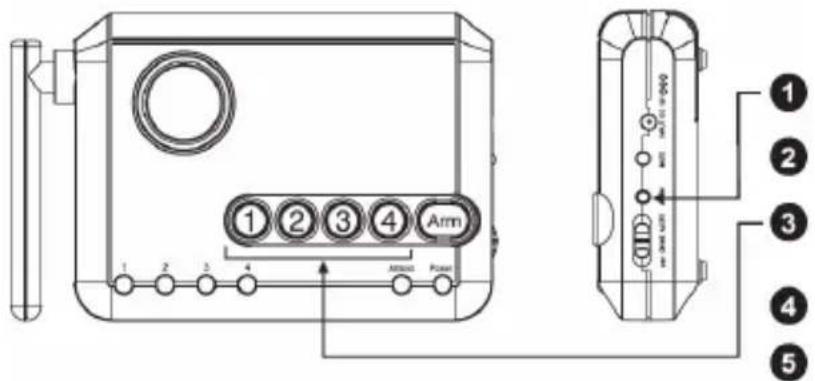
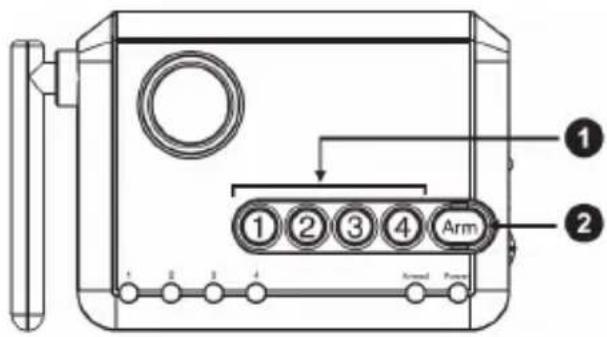
Control centre description:
text_image
1 11 2 3 4 Arm 5 6 7 8 9 10 1 2 3 4 Armad Power- Siren (105 dB)
- Zone indicators
- Keypad
- Armed indicator
- Power indicator
-
Battery compartment
-
Input 12 V DC
- Mute button
- Learn button
- Alert switch type
- Antenna
natural_image
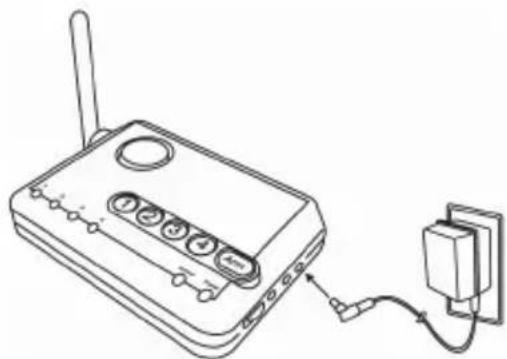
Line drawing of a wireless router connected to a wall-mounted power outlet (no text or symbols)Connect the adapter to the 12 V DC input and a wall outlet.
The power indicator will light up green.
natural_image
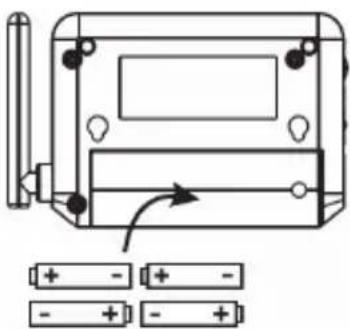
Technical line drawing of a battery pack with an arrow indicating rotation, accompanied by two battery cells (no text or symbols present)Insert 4 x AAA batteries for back-up during power failure.
Synchronising the door/window sensor(s) to the control centre:
Before proceeding, please remove the battery isolator from the sensor, and place the magnet beside the transmitter (where the red marking is)

text_image
Press 3 seconds → Long beepStep 1:
Press and hold the "Learn Button" on the control centre for 3 seconds. Control centre beeps once and you may release the "Learn Button".

text_image
Press the zone buttonStep 2:
Press the "Zone Button" (1, 2, 3, or 4) once for what you want to program the sensor to. The selected zone indicator will flash.
Zone indicator flashing
Step 3:
Activate the Door Window Sensor by separating the magnet from the sensor unit.

flowchart
graph LR
    A["Magnet button"] --> B["Sensor"]
    B --> C["Separate the magnet from the sensor"]
    C --> D["Control centre "long beep". Zone indicator OFF"]
    D --> E["You will hear a long beep and the zone indicator stops flashing. The sensor is now programmed to the control centre"]
Note:
You may program up to 4 sensors to one zone. Zone 4 is an alert zone; sensors in this zone are for alert purpose ONLY and will not trigger the alarm.
Step 4:
After synchronising the sensor to the control centre, you may test the communication by placing the magnet beside the transmitter (where the red marking is) and then removing the magnet from the transmitter.

natural_image
Line drawing of two hands holding a small electronic device (no text or symbols visible)When the magnetic contact is closed, the receiver will not beep.
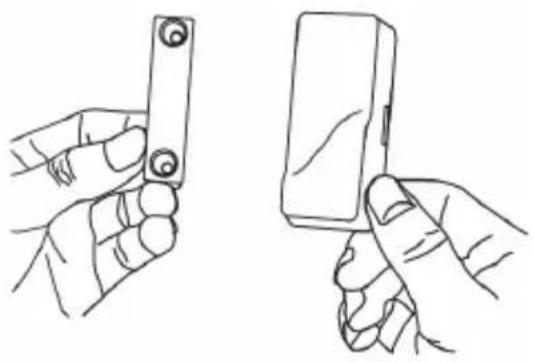
natural_image
Line drawings of two hands holding a rectangular object, one with circular ends and the other with a rectangular body (no text or symbols)When the magnetic contact is broken (open), you will hear a beep and a zone indicator will flash
Beeping will be according to the zone number (type of alert switch is set to alert) 1 beep for zone 1, 2 beeps for zone 2 etc, until the sensor is closed.
Note: If the type of alert switch is set to chime, the control centre will chime once for every signal activated. If the switch is set to OFF, no audio alert will sound.
Step 5:
The sensor should be mounted on a door or window frame with double sided tape. The magnet should be mounted on a door or window with double sided tape or screws. Make sure the magnet is aligned with the red marking on the transmitter. If the König logo is upside down after mounting the sensor, remove the front cover and rotate it so it is in the upright position.

(A) Red marking on this side
(B) Magnet
(C) Sensor
After mounting the sensor, test it by opening and closing the door or window. The control centre should respond in the same way as described in step 4.
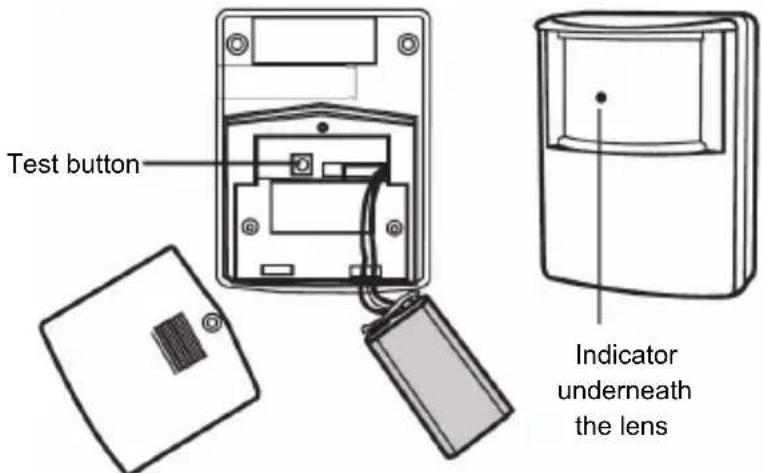
Synchronising the motion detection sensor(s) to the control centre:
Before starting the process, first insert a 9 V alkaline battery (not included) into the battery compartment.
text_image
Test button Indicator underneath the lensControl centre will not respond to the motion detection sensor unless:
1) The control centre is armed in away mode (it will only respond to motion detection sensors in zones 1, 2 and 3)
2) Motion detection sensor is programmed into zone 4, which is a dedicated alert zone.
It is important to select which zone you program the motion detection sensor to. If you set up the motion detection sensor for security purpose where it will cause an alarm with an intruder break-in, you should program the motion detection sensor to either zone 1, 2 or 3. DO NOT program it to zone 4 as it is a dedicated alert zone. Sensors in this zone will not cause an alarm.
If you set up the motion detection sensor for alert purposes where it does not need to cause an alarm when motion is detected, you should program the motion detection sensor to zone 4. DO NOT program to Zone 1, 2, or 3, as motion detection sensors in these zones will not provide any alert
beeping indications. Please select in which zone you need to program the motion detection sensor before proceeding further.
Repeat step 1 and 2 of the previous chapter to start the synchronising process.
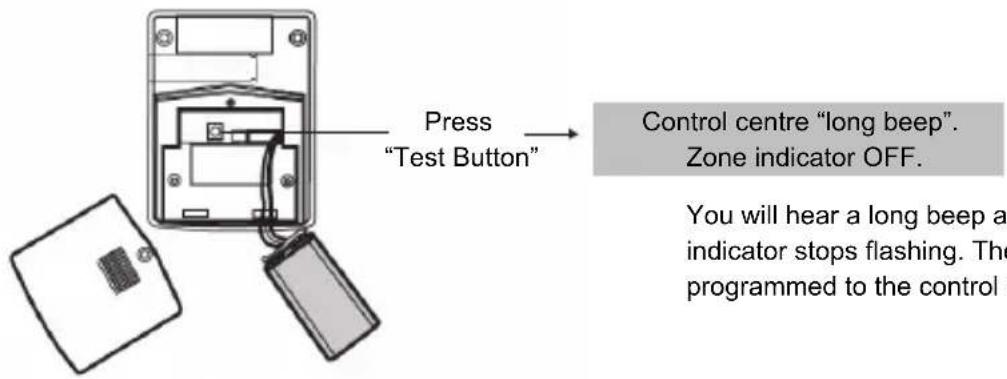
Step 3:
Activate the motion detection sensor by pressing the "Test Button" on the back of the motion detection sensor.
text_image
Press "Test Button" Control centre "long beep". Zone indicator OFF. You will hear a long beep and indicator stops flashing. The programmed to the controlYou will hear a long beep and the zone indicator stops flashing. The sensor is now programmed to the control centre
Note:
You may program up to 4 sensors to one zone. Zone 4 is an alert zone. Sensors in this zone are for alert purpose ONLY and will not trigger the alarm.
Step 4:
After programming the motion detection sensor to the control centre, you may place the control centre in test mode to verify the communication between the motion detection sensor and the control centre.
1) Remove the adapter and all batteries from the control centre.
2) Press and hold the "Mute Button" and plug the AC adapter back into the control centre. All LED indicators will be ON; you may release the "Mute Button". The control centre is now in "Test Mode", and it will respond to all motion detection and other sensors.
3) Place the type of alert switch to "Alert" and you may now activate the motion detection sensor by pressing the "Test Button" of the motion detection sensor. You may also move in front of the motion detection sensor. Please refer to step 6 for detailed information on how to walk to test the motion detection sensor.
4) The control centre will respond by flashing the zone indicator and alert beeping, according to the zone number. 1 beep for zone 1, 2 beeps for zone 2 etc. The beeping will last around 15 seconds for each activation. After testing, unplug the adapter and plug it back into the control centre; it will return to normal operating mode.
Step 5:
You may now close the battery cover and re-insert the screw. Mount the ball-head joint on the wall with screws provided. Slide the back of the sensor into the ball-head joint. The mounting angle can be adjusted.

natural_image
Illustration showing two hands holding a tool and a device with an arrow indicating direction (no text or symbols)Step 6:
A walk test should be performed after the motion detection sensor has been mounted. Walk in the detected area, if motion is detected, a red light inside the sensor will light up. If the red light does not light up, motion has not been detected and you may need to re-position the sensor. Ensure you test all the locations that you would like the motion detection sensor to cover.

natural_image
Silhouette of a person standing with two wires extending outward toward a camera (no text or symbols)Detecting area in meters
Note:
- Perform the walk test after the battery has been inserted for more than one minute.
- Before performing the walk test, the motion detection sensor should not detect any motion.
- After motion is detected once, the motion detection sensor will not be triggered unless no motion is detected for 20 seconds. Wait for at least 20 seconds during walk testing between 2 activations. The motion detection sensor only detects the first motion and again after 20 seconds.

text_image
55° 1.2M 55° 11° 22° 23° 22° 12°If you experience false triggering, please pay attention to the following.
- When installing the motion sensor, avoid placing it near heating or cooling devices. Air movement, especially those caused by changes in temperature, may trigger the motion detection sensor and cause false alarms. Please carefully test your motion detection sensor so that it will only be triggered by wanted movement.
- There is a jumper for sensitivity setting. You may change the sensitivity to low if you experience false triggering. You will find the jumper setting on the left side of the test button. You can place the small black plastic part on the pins with position 1 or 2. Position 1 is high sensitivity and position 2 is low sensitivity.
System status, sensor failure and low battery indication:
The control centre constantly monitors its sensors. If the control centre fails to communicate with any sensors, the zone indicator will start flashing rapidly.
When sensor failure occurs, try the following:
-
Check if the sensor is located where it should be, and whether there is any physical damage to the sensor.
-
If the failed sensor is not physically damaged, try to activate the sensor and see if the control centre reacts to such activation.
-
If not, try to remove the sensor from its location, and bring it closer to the control centre and activate the sensor. It is possible that the sensor is installed too far from the control centre and it
cannot establish a steady communication with it. If this is the case, please install the sensor closer to the control centre.
- Replace the battery of the sensor in that zone if the control centre does not respond when the sensor is activated within short range. If you have multiple sensors in a zone, you may test the function of each sensor to identify which sensor is giving problems.
Erase sensors:
To erase a sensor from a zone, the control centre will erase all sensors in that zone. All sensors to a particular zone will need to be synchronised again.
To erase a zone:
Step 1: Press and hold the "Learn Button" on the control centre. The unit will beep once.
Step 2: While holding the "Learn button", also press and hold the zone button to be erased. Hold both buttons for 5 seconds until the control centre emits 2 beeps and the zone indicator flashes twice.
Step 3: Release all buttons.
text_image
Arm ① ② ③ ④ Arm ① ② ③Password set up:
The password is used for arming and disarming the control centre. The factory default password is 1 2 3 4. It is recommended to set up your own password by following the steps below.
Step 1: Press and hold the "Learn Button".
Step 2: While holding the "Learn Button", also press and hold the "Arm Button". Hold for 3 seconds until you hear a long beep and the green power indicator flashes.
Step 3: Release both buttons. Enter the current password (with first use it is 1 2 3 4). You will hear 2 beeps.
Step 4: Enter the new 4-digit password, you will hear 2 beeps.
Step 5: Enter the new 4-digit password again to confirm. A long beep will sound and the green indicator will stop flashing indicating your new password has been set.
text_image
1 2 3 4 Arm 1 2 3 4 ARMALL Power ① ② ③ ④ ⑤Operating the alert function:
An alert notification is given when
any sensor is activated while the
system is disarmed. Different
alert notifications can be
provided but it depends on the
setting of the type of alert switch
on the side of the control centre.
Example: ZONE 1
Door/window
sensor
DOOR OPEN
BEEP
BEEP
Type of alert switch Audio Alert Zone indicator flashing
OFF
None
CHIME Chime once when sensor is activated Yes
ALERT Alert beeping depends on zone number Yes
If the type of alert switch is set to “Alert”, the number of beeps depends on which zone is activated.
The beeping will continue until the sensor is deactivated, for example, door is closed.
Example:
Zone 1 sensor: “1 beep, pause, 1 beep, pause, 1 beep, pause... etc.”
Zone 2 sensor: "2 beeps, pause, 2 beeps, pause, 2 beeps, pause... etc."
Zone 3 sensor: “3 beeps, pause, 3 beeps, pause, 3 beeps, pause... etc.”
Zone 4 sensor: “4 beeps, pause, 4 beeps, pause, 4 beeps, pause... etc.”
To temporarily disable the beeping while it is sounding, you may press the “Mute Button” on the side of the control centre. It will stop all the current beeping. This is useful when a window needs to be opened for a while for ventilation. To deactivate the mute, reset the sensor (for example close the window), the mute function will be deactivated. If the window sensor is activated again, the beeping will continue.
Note: motion sensors in zone 1, 2 and 3 will not respond in alert mode when the system is disarmed.
Motion sensors in zones 1, 2 and 3 will only respond when the control centre is armed. If you would like to have alert indication for motion sensors, you must program the motion sensors in zone 4.
Operating the alarm function:
You may arm the control centre in 2 different ways: 1) Arm Home and 2) Arm Away
1) Arm Home:
This setting is used when you wish to secure the area but will be at home and moving around within the armed area. In Arm Home setting, any motion sensors in zone 1, 2 and 3 will not respond to any movement. Alarm will sound instantly if any of the sensors in zone 1, 2, and 3 are activated (except motion sensors).
Example:
If you would like to arm the system at night, where all the doors/windows are not expected to be opened, you can arm the system in home mode. Even walking inside the house (also activates motion sensor); will not activate the alarm, unless the monitored doors or windows are opened.
To arm the control centre in home mode:
Step 1: Enter the 4-digit password
Step 2: Press and hold the "Arm Button" for 3 seconds. The arm indicator will be ON steady, indicating the control centre is now armed in home mode.
Step 3: To disarm, enter the 4-digit password.
text_image
Arm 1 2 3 4 Arm Power2) Arm Away
This setting is used when you leave home. By arming the system in Away mode, you will have 45 seconds to leave after arming. After 45 seconds, all sensors in zones 1, 2, and 3 are armed. Activating these sensors in Arm Away mode will result in 30 seconds entry delay. If a valid password is not entered during the 30 second entry delay, the alarm will sound.

text_image
Arm Control Power 1 2 3 4 1 2 3 4To arm the Control Panel in Away mode:
Step 1: Enter the 4-digit Password
Step 2: Press the "Arm Button" twice. The Arm indicator will flash indicating the control centre is now armed in Away mode.
Step 3: To disarm, enter the 4-digit Password.
Note: If a sensor in zone 4 is activated, it will not activate the alarm. Zone 4 is a dedicated alert zone, it will sound alert beeping only.
Disarm alarm:
To disarm the system, enter the 4-digit password. The Arm indicator will be off if a valid password is entered. If the alarm is activated, enter the 4-digit password to stop the alarm sound. After entering the valid password, the entry delay or alarm will stop. The green power indicator will flash for 3 seconds, which is normal.
Bypass zone alarm:
There may be occasions when you would like to temporarily prevent the sensors in a zone from triggering the alarm. In this situation you can bypass a zone when arming the control centre. Once the system is disarmed, the bypass setting will be removed.
Example:
You may want to leave a window open but to arm the system you can bypass the zone with the window sensor and continue to arm the system. Without bypassing this zone, the control centre cannot be armed.
To bypass a zone:
Step 1: Press and hold the "Zone Button" that you want to bypass for 3 seconds. After 3 seconds the zone indicator will go steady, indicating this zone is set to bypass.
Step 2: Arm the system (Home or Away)
To remove the bypass, press and hold the zone button for 3 seconds, or disarm the system.
System status:
1) Back-up batteries
The control centre offers up to 48 hours battery back-up in case of power failure. The system can operate without batteries, but it is recommended to install 4 x AAA alkaline batteries. To ensure the back-up batteries are in good condition, there is a built-in battery monitor in the control centre.
To test the batteries:
Step 1: All batteries should be installed to the control centre and the adapter is plugged in.
Step 2: Remove the adapter from the control centre.
Step 3: Monitor the green power indicator based on the information below and determine the batteries condition.
Green power indicator > On > Good Condition
Green power indicator > Flashing > Batteries are low, replace batteries
Green power indicator > Off > Batteries are dead, replace batteries
2) Reset password
In case the password is forgotten, you can reset the password back to the factory default value, 1 2 3 4.
To reset the password:
Step 1: Remove adapter and all batteries
Step 2: Press and hold the "Learn Button" and plug the adapter back in (keep pressing the "Learn Button"). Wait until all 4 zone indicators are on. Release the "Learn Button".
Step 3: Zone 1 indicator begins to flash. It will take 4 hours to complete this restore process.
Step 4: The password is restored when all 4 zone indicators are off.
Do not operate the control centre during the password restore process.
Safety precautions:

text_image
CAUTION RISK OF ELECTRIC SHOCK DO NOT OPENTo reduce risk of electric shock, this product should ONLY be opened by an authorized technician when service is required. Disconnect the product from mains and other equipment if a problem should occur. Do not expose the product to water or moisture.
Maintenance:
Clean only with a dry cloth. Do not use cleaning solvents or abrasives.
Warranty:
No guarantee or liability can be accepted for any changes and modifications of the product or damage caused due to incorrect use of this product.
General:
Designs and specifications are subject to change without notice.
All logos brands and product names are trademarks or registered trademarks of their respective holders and are hereby recognized as such.
Keep this manual and packaging for future reference.
Attention:

This product is marked with this symbol. It means that used electrical and electronic products should not be mixed with general household waste. There is a separate collections system for these products.
This product has been manufactured and supplied in compliance with all relevant regulations and directives, valid for all member states of the European Union. It also complies with all applicable specifications and regulations in the country of sales.
Formal documentation is available upon request. This includes, but is not limited to: Declaration of Conformity (and product identity), Material Safety Data Sheet and product test report.
Please contact our customer service desk for support:
via website: http://www.nedis.com/en-us/contact/contact-form.htm
via e-mail: service@nedis.com
via telephone: +31 (0)73-5993965 (during office hours)
NEDIS B.V., De Tweeling 28, 5215 MC 's-Hertogenbosch, THE NETHERLANDS
DEUTSCH
Einleitung:
natural_image
Line drawing of a wireless router connected to a wall-mounted power outlet (no text or symbols)natural_image
Pure technical line drawing of a mechanical component with no text or symbols

natural_image
Line drawing of two hands holding a small electronic device (no text or symbols visible)natural_image
Line drawings of two hands holding a small electronic device (no text or symbols present)text_image
(A) (B) (C)text_image
(A) (C) (B)natural_image
Illustration showing a hand using a screwdriver to adjust a component, and a hand holding a device with an arrow indicating rotation (no text or symbols present)Schritt 6:
natural_image
Silhouette of a person standing with two wires extending outward toward a camera (no text or symbols)Hinweis:
text_image
Arm 1 2 3 4 Arm/Power 1 2 3 42) Scharf abwesend
natural_image
Technical line drawing of a wireless router connected to a wall-mounted power outlet, with battery pack and switch panel below (no text or symbols)natural_image
Line drawing of two hands holding a small rectangular object with circular pins (no text or symbols)natural_image
Line drawings of two hands holding a rectangular object, one with circular ends and the other with a rectangular body (no text or symbols)text_image
(A) (B) (C)
text_image
(A) (C) (B)natural_image
Illustration showing two hands holding tools and a device with an arrow indicating direction (no text or symbols)Etape 6 :
natural_image
Silhouette of a person standing with two diagonal lines projecting a camera toward the camera (no text or symbols)text_image
Arm ① ② ③ ④ 1 2 3 4 Internal Power ① ② ③natural_image
Line drawing of a wireless router connected to a wall-mounted power outlet (no text or symbols)natural_image
Pure technical line drawing of a mechanical component with no text or symbols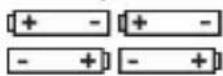
text_image
Technical diagram of a vertical cylindrical device with internal components and labeled ports3 Seconden drukken → Lange toon pieptoon
Stap 1:
natural_image
Line drawing of two hands holding a small electronic device (no text or symbols)natural_image
Line drawings of two hands holding a small electronic device (no text or symbols present)text_image
(A) (B) (C)text_image
(A) (C) (B)natural_image
Illustration showing a hand holding a screwdriver next to a device with an arrow indicating rotation (no text or symbols)Stap 6:
natural_image
Silhouette of a person standing with two diagonal lines projecting a camera toward the camera (no text or symbols)natural_image
Technical line drawing of a wireless router connected to a wall-mounted power outlet, with battery pack and wiring diagram below (no text or symbols)natural_image
Line drawing of two hands holding a small rectangular object with circular pins (no text or symbols)natural_image
Line drawings of two hands holding a rectangular object, no text or symbols presenttext_image
(A) (B) (C)text_image
(A) (C) (B)natural_image
Illustration showing a hand holding a screwdriver next to a device with an arrow indicating rotation (no text or symbols)Passo 6:
natural_image
Silhouette of a person standing with two wires extending from a camera (no text or symbols)text_image
Arm 1 2 3 4 1 2 3 4 Arm/Powernatural_image
Line drawing of a wireless router connected to an electrical outlet (no text or symbols)text_image
Diagram of a battery pack with labeled components and polarity indicators for charge distributiontext_image
Technical diagram of a vertical cylindrical device with labeled components and internal connectionstext_image
1 2 3 4 Arm Arm0 Forcenatural_image
Line drawing of two hands holding a small electronic device (no text or symbols visible)natural_image
Line drawings of two hands holding a small electronic device (no text or symbols present)text_image
(A) (B) (C)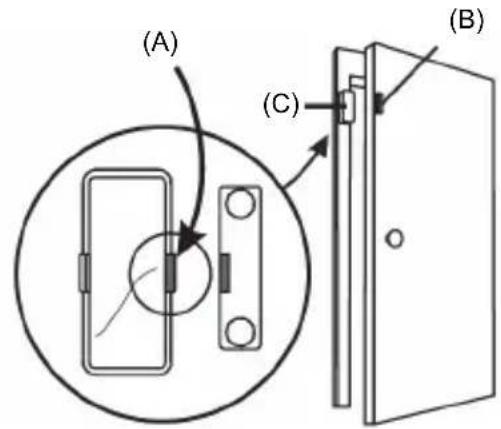
text_image
(A) (C) (B)natural_image
Illustration showing a hand holding a switch connected to a device, and another hand holding a container with an arrow indicating rotation (no text or symbols present)Paso 6:
natural_image
Silhouette of a person standing with two wires extending outward toward a camera (no text or symbols)text_image
Arm 1 2 3 4 Control Control Control Control Control Control Control Control Control Control Control Control Control Control Control Control Control Control Control Control Control Control Control Control Control Control Control Control Control Control Control Control Control Control Control Control Control Control Control Control Control Control Control Control Control Control Control Control Control Control CNC Control CNC Control CNC Control CNC Control CNC Control CNC Control CNC Control CNC Control CNC Control CNC Control CNC Control CNC Control CNC Control CNC Control CNC Control CNC Control CNC Control CNC Control CNC Control CNC Control CNC Control CNC Control CNC Control CNC Control CNC Control CNC Lower Bound CNC Upper Boundtext_image
Arm 1 2 3 4 Arm Control2) Modo alejado
text_image
1 2 3 4 Arm Arranged Powernatural_image
Line drawing of two hands holding a small electronic device (no text or symbols visible)natural_image
Line drawings of two hands holding a small electronic device (no text or symbols present)text_image
(A) (B) (C)text_image
(A) (C) (B)natural_image
Illustration showing two hands performing a manual tool on a component, with an arrow indicating direction (no text or symbols present)Passo 6:
natural_image
Silhouette of a person using a surveying instrument to observe or observe a camera (no text or symbols present)Para testar as pilhas:
natural_image
Line drawing of a wireless router connected to a wall-mounted power outlet (no text or symbols)natural_image
Diagram of a device casing with battery terminals and an arrow indicating rotation (no text or symbols)natural_image
Line drawing of two hands holding a small electronic device (no text or symbols visible)natural_image
Line drawings of two hands holding a rectangular object, one with circular ends and the other with a rectangular body (no text or symbols)text_image
(A) (B) (C)
text_image
(A) (C) (B)natural_image
Illustration showing a hand holding a switch and a device with an arrow indicating rotation (no text or symbols)6. lépés
natural_image
Silhouette of a person using a surveying instrument to observe or observe a camera (no text or symbols present)natural_image
Line drawing of a wireless router connected to a wall-mounted power outlet, with battery pack and switch panel below (no text or symbols)Paina painiketta "Zone"
natural_image
Line drawing of two hands holding a small rectangular object with circular pins (no text or symbols)natural_image
Line drawings of two hands holding a rectangular object, one with circular holes and the other with a rectangular block (no text or symbols)text_image
(A) (B) (C)
text_image
(A) (C) (B)natural_image
Illustration showing a hand holding a screwdriver and a hand holding a device with an arrow indicating rotation (no text or symbols present)natural_image
Silhouette of a person using a surveying instrument to observe or observe a camera (no text or symbols present)Huomautus:
text_image
Arm 1 2 3 4 Arm panel 1 2 3 4 Arm panel 1 2 3Salasanan asettaminen:
text_image
1 2 3 4 Arm Arm#d Pressnatural_image
Line drawing of a wireless router connected to a wall-mounted power outlet (no text or symbols)natural_image
Pure technical line drawing of a mechanical component with no text, numbers, or symbolsnatural_image
Line drawing of two hands holding a small electronic device (no text or symbols)natural_image
Line drawings of two hands holding a small electronic device (no text or symbols present)text_image
(A) (B) (C)
text_image
(A) (C) (B)natural_image
Illustration showing a hand holding a screwdriver next to a device with an arrow indicating rotation (no text or symbols)Steg 6:
natural_image
Silhouette of a person standing with a camera mounted on a pole, no text or symbols presenttext_image
Arm ① ② ③ ④ ②natural_image
Line drawing of a wireless router connected to a wall-mounted power outlet (no text or symbols)natural_image
Pure technical line drawing of a mechanical component with no text or symbols
text_image
Technical diagram of a vertical cylindrical device with labeled components and directional arrows indicating flow or movement.text_image
1 2 3 4 Arm 1 2 3 4 Junction Phasenatural_image
Line drawing of two hands holding a small electronic device (no text or symbols)natural_image
Line drawings of two hands holding a rectangular object, one with circular holes and the other with a rectangular block (no text or symbols)text_image
(A) (B) (C)
text_image
(A) (C) (B)natural_image
Illustration showing two hands holding a tool and a device with an arrow indicating direction (no text or symbols)Krok 6:
natural_image
Silhouette of a person standing with two diagonal lines extending outward toward a camera (no text or symbols)Poznámka:
text_image
1 2 3 4 Arm Arm#d Presstext_image
① ② Arm Arm4 PensDeaktivace alarmu:
natural_image
Line drawing of a wireless router connected to a wall-mounted power outlet (no text or symbols)natural_image
Technical line drawing of a battery pack with an arrow indicating rotation and battery symbols below (no text or labels)natural_image
Line drawing of two hands holding a small electronic device (no text or symbols visible)natural_image
Line drawings of two hands holding a rectangular device, no text or symbols presenttext_image
(A) (B) (C)
text_image
(A) (C) (B)natural_image
Illustration showing a hand holding a screwdriver and a hand holding a device with an arrow indicating rotation (no text or symbols present)Etapa 6:
natural_image
Silhouette of a person standing with two diagonal lines extending outward, possibly illustrating a vision or perspective (no text or symbols present)natural_image
Line drawing of a wireless router connected to a wall-mounted power outlet (no text or symbols)natural_image
Pure technical line drawing of a mechanical component with no text or symbols

text_image
Technical diagram of a vertical cylindrical device with internal components and labeled portsnatural_image
Line drawing of two hands holding a small electronic device (no text or symbols)natural_image
Line drawings of two hands holding a small electronic device (no text or symbols present)text_image
(A) (B) (C)
text_image
(A) (C) (B)natural_image
Illustration showing two hands holding a tool and a device with an arrow indicating direction (no text or symbols)Βήμα 6:
natural_image
Silhouette of a person standing with two wires extending from a camera (no text or symbols)Σημείωση:
text_image
Arm ① ② ③ ④ Arm Power ① ② ③text_image
Arm 1 2 3 4 1 2 3 4 Arm/Power2) Οπλισμός Απών
text_image
Arm 1 2 3 4 1 2 3 4 Arm/Powernatural_image
Line drawing of a wireless router connected to a wall-mounted power outlet (no text or symbols)natural_image
Diagram of a battery pack with an arrow indicating rotation, accompanied by two battery cells (no text or symbols present)natural_image
Line drawing of two hands holding a small electronic device (no text or symbols visible)natural_image
Line drawings of two hands holding a small electronic device (no text or symbols present)text_image
(A) (B) (C)
text_image
(A) (C) (B)(A) Rød markering på denne side
(B) Magnet
(C) Sensor
natural_image
Illustration showing a hand holding a screwdriver next to a device with an arrow indicating rotation (no text or symbols)Trin 6:
natural_image
Silhouette of a person standing with two diagonal lines projecting onto a camera (no text or symbols)Zone 1 sensor: "1 bip, pause, 1 bip, pause, 1 bip, pause... osv."
Zone 2 sensor: "2 bip, pause, 2 bip, pause, 2 bip, pause... osv."
Zone 3 sensor: "3 bip, pause, 3 bip, pause, 3 bip, pause... osv."


Ja
Zone 4 sensor: "4 bip, pause, 4 bip, pause, 4 bip, pause... osv."
text_image
Arm 1 2 3 4 1 2 3 4 Arm Arm/Port2) Aktiver som Væk
text_image
Arm 1 2 3 4 Arm Armnatural_image
Line drawing of a wireless router connected to a wall-mounted power outlet, with battery bank and switch components shown below (no text or symbols)natural_image
Line drawing of two hands holding a small electronic device (no text or symbols)natural_image
Line drawings of two hands holding a small electronic device (no text or symbols present)text_image
(A) (B) (C)text_image
(A) (C) (B)text_image
Test-knapp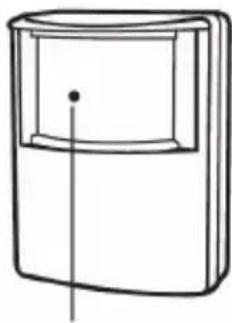
natural_image
Simple line drawing of a rectangular device with a vertical line and a dot on the side (no text or symbols)Indikator under linsen
natural_image
Illustration showing a hand holding a screwdriver and a close-up of a mechanical component being adjusted (no text or symbols present)Trinn 6:
natural_image
Silhouette of a person standing with two rays projecting onto a camera (no text or symbols)Sone 1-sensor: "1 pip, pause, 1 pip, pause, 1 pip, pause... osv."
Sone 2-sensor: "2 pip, pause, 2 pip, pause, 2 pip, pause... osv."
Sone 3-sensor: "3 pip, pause, 3 pip, pause, 3 pip, pause... osv."
Sone 4-sensor: "4 pip, pause, 4 pip, pause, 4 pip, pause... osv."
text_image
① ② ③ ④ Arm ②Deaktivere alarm:
natural_image
Line drawing of a wireless router connected to a wall-mounted power outlet (no text or symbols)natural_image
Pure technical line drawing of a mechanical component with no text or symbols

text_image
Technical diagram of a vertical cylindrical device with internal components and labeled portsnatural_image
Line drawing of two hands holding a small electronic device (no text or symbols)natural_image
Line drawings of two hands holding a small electronic device (no text or symbols present)text_image
(A) (B) (C)text_image
(A) (C) (B)natural_image
Illustration showing a hand holding a screwdriver and a hand holding a device with an arrow indicating rotation (no text or symbols present)War 6:
natural_image
Silhouette of a person using a surveying instrument to observe or observe a camera (no text or symbols present)text_image
Arm 1 2 3 4 Arm Control Panel 1 2 3Настройка пароля:
text_image
Arm ① ② ③ ④ ②text_image
Arm Control Powernatural_image
Line drawing of a wireless router connected to a wall-mounted power outlet (no text or symbols)natural_image
Diagram of a battery pack with an arrow indicating rotation, accompanied by two battery cells (no text or symbols present)natural_image
Line drawing of two hands holding a small electronic device (no text or symbols visible)natural_image
Line drawings of two hands holding a rectangular object, one with circular ends and the other with a rectangular block (no text or symbols)text_image
(A) (B) (C)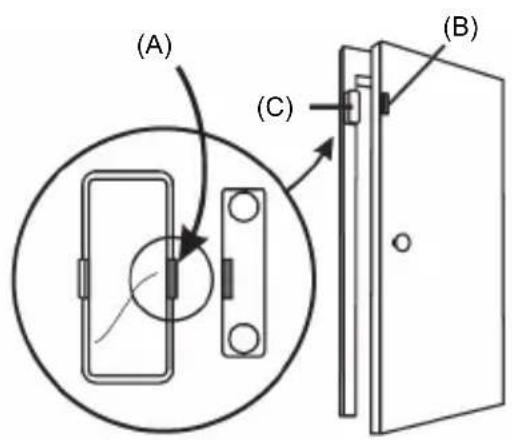
text_image
(A) (C) (B)natural_image
Illustration showing a hand holding a screwdriver next to a device with an arrow indicating rotation (no text or symbols)Adım 6:
natural_image
Silhouette of a person using a surveying instrument to observe or observe a camera (no text or symbols present)