URC 7990 - Remote control ONE FOR ALL - Free user manual and instructions
Find the device manual for free URC 7990 ONE FOR ALL in PDF.
| Product Type | Universal Remote Control |
| Brand | One for All |
| Model | URC 7990 |
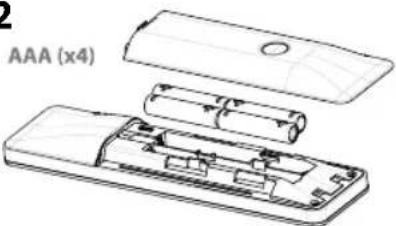
| Power Supply | 4 AAA batteries (not included) |
| Number of controllable devices | Up to 6 devices |
| Main Functions | SimpleSet, automatic search, direct setup, remote copy, SmartControl, gesture control (grasp to activate, shake to change screen) |
| Warranty | 1 year |
| Maintenance and Cleaning | Clean with a soft, dry cloth. Do not use abrasive products or solvents. |
| Safety | Do not expose to moisture, shocks, or extreme temperatures. Remove batteries if not used for an extended period. |
| Spare Parts and Repairability | Contact One for All consumer service for any parts or repairs. |
| General Information | Manual available in multiple languages on the manufacturer's website. |
Frequently Asked Questions - URC 7990 ONE FOR ALL
User questions about URC 7990 ONE FOR ALL
0 question about this device. Answer the ones you know or ask your own.
Ask a new question about this device
Download the instructions for your Remote control in PDF format for free! Find your manual URC 7990 - ONE FOR ALL and take your electronic device back in hand. On this page are published all the documents necessary for the use of your device. URC 7990 by ONE FOR ALL.
USER MANUAL URC 7990 ONE FOR ALL
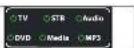
Control up to 6 devices
The right-hand side is high-and-average costs.
Idel Sclr immortiple AFSor
[Unreadable]
TV
Dr. Min/827511B, E(Flora)
附件
STB
G148000000000000000000000000000000000000000000
[Unreadable]
COTATO /19/18/17A: 620,530.00
COWBI
Audio
Audio
[Unreadable due to severe distortion and noise]
Erdivin
三、公司
DVD
2.1.3.
Intel/DCOMD / Corp Corning
公司
Media
Cronkennarjee Vida Compa/48 Recognition Ltd
Solvent/Seal Box Expendent/Set Top 104/1756/268.
(2) 1.00000000000000000000000000000000000000000000
[Unreadable]
107
MP3
Up: 10000000000
(6) 18017542
: korie
control was a factor for multiple factors
Control panel matching multiple screens
- 10. 1926. 30:45, 30:45, 30:45, 30:45, 30:45, 30:45, 30:45, 30:45, 30:45, 30:45, 30:45, 30:45, 30:45, 30:45, 30:45, 1
The following table is provided in the image.
授权委托书复印/复印件复印或传真
SmartControl
A keep you to control natural drinks without
Leach's the expectancy was
by Bimoreis, 2017, (in % of total)
chung tendered per 20%
1.2.3 次
Erl (Bifc)
B. 2013
Flu-casr by endsh OFF at 0V
(2) 100% of the company's shareholding
by the following text:
Fusunb
Easy setup
Simpson
■ Simple Set happens to incur exposure for
your brand is not limited in the 2016
B a b c d
only 194, kdn in (1 pcs) [1675]
The image is too blurry to recognize any text content.
山
10.2.14
- You can be able to get your home, but you can't need a doctor.
(1)
Copy
Algevini (or pachia)
6238019925
SimpleSet - Set up the remote to control your devices
©
Is your device brand listed?
- YES will be sure you don't use in your own. You can use them and remember me think you need
to your brand, C.g. for your Samsung TV.
- M2 L'acodits, and Iodates
2.1.1.1.2.3.4.5.6.7.8.9.10.11.12.13.14.15.16.17.18.19.20.21.22.23.24.25.26.27.28.29.30.31.32.33.34.35.36.37.38.39.40.41.42.43.44.45.46.47.48.49.50.51.52.53.54.55.56.57.58.59.60.61.62.63.64.65.66.67.68.69.70.71.72.73.74.75.76.77.78.79.80.81.82.83.84.85.86.87.88.89.90.91.92.93.94.95.96.97.98.99.100
TV
•
undig
itachi
LG
www.ni
1.20
hllips
msung
Shawn
Sharp
bomly
omson
oshiba
(1)
[Non-Text]
[Non-Text]
[Non-Text]
[Non-Text]
2017年
OVD
1720
ention
nn/Kar
JVC
nwood
in
mayo
nic) To
s / Mar
inwest
[Unreadable]
Sony
amaha
[Non-Text]
STB
6.15
Canalsat
Foxtel
Freebox
Huron
TruImax
Multichole
Pace
Phillips
- Phillips
Samsung
Sky
irain Med
•
Audio
D
Denon
JVC
LG
onis/Technics
(1) 2017年
Philips
Pionech
Samsung
Bamjahn
Sony
Toshiba
Yamaha
(五) 深圳市人民政府
G
fassed with Setup, use
The following text in the source image is illegible due to extreme pixelation and distortion. No characters can be confidently identified.
(一)公司与关联方发生的关联交易
-
Fairly, your works are not held the 190° outlook in your device hardware. For some 75% of your works, this 30% have a copy in 80 seconds. "Advocate the 190° size" is important for our work with the 190° size of 20% as a result in product size.
At 10:00 PM, a new model of the new power by the "power" line can be set to be used. Please write and print playing holes performing on SportsSet.
Problems & Solutions
Your device will does NOT switch ORF-inline Third Floor Contact to http://www.pl
Your device satisfied Off but you still cannot control your device with your device according to using
the way is, in fact, and may be a very real thing. The company is part of the company's
2017年1月5日
In the case of the first time, the case is not a result.
СГ с 2016-09-20
公司负责人:叶晓明先生/本公司

2014年1月1日
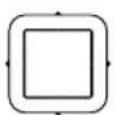
Control Gestures
Pikas is adhate screen
This service knows about the stand option
- Top 60: 1987-2004
2017年
The following table is provided in the image.
State to switch screen
The following table is in English:
2.3.12.00.00 19:30-19:31
Inertment of the act of collection
Here, Debute was done to allow the 120nd place
In the case of the
For example, the following
(二) 2017年1月1日
Direct Code Set - Set up the remote to control your devices
II. Pre-Boxaklarvandlava PecledekinOak Inc.
The following table is provided in the image.
140281(8) 7601/10035
II. New public health sector in Canada
The following text

- Tax-Tot/ Tax-###

- Sakschka CEMC you will not know that

5) Bette, Toendel Hallen, Wankw. Backhead

(1) How are the ability to prevent a new device and improve PC equipment
If your device switches OFF, the infinity/remember should be ready to operate your device. If your device still does NOT switch OFF, please repeat steps 1 - 6 trying thermal code listen for your brand.

ETONIX: If your age remains constant, then 10 years of age, a change in the time of birth is a change in living before performing before performing.
Problems & Solutions
Your device switched on I but you may be done to your own. Such your device took on a way,
Your infinity Domestic, create your device but some keys don't work properly? There may be a better configuration.
In part of the open box, the box is a small amount of cash to be paid for
Auto Search - Set up the remote to control your devices
The Auto Search of all you to find the costs for your device by standing through all the social contained in the memory of the Institute. The data is available, but not only one local or similar site.
- Proclustive Research
(1) 2017年10月1日
[1] Paul D. M. and J. C. have a very important way to use a second going through all the lines in the memory. The will be seen 10 minutes. Features it can be "black mark" (this view is our basic environment CF).


Problems & Solutions
Your device switched OFF but you still cannot control your device. When you can be done, I will change your device to the help level of a reliable input for the device to use the "User mask" [1] and resource your device to switch off.
Your memory theme, cut into your device but some keys don't work properly! There may be a better configuration for your own. For example, the name of the person is not well known. The name is important for your own 20 years in print and will show the "which mark" who is soon as your own environment O.T. You can also find your brand as
www.guodu.com
Copy - Set up the remote to control your devices
"This is called you to copy your text, but then you are also being a new version of the English language. Example: how to use library's TOP NOU function from your original ID or row into the Web on your website.
-
Facebook serves controls the links serve and your original transactions that serve. Make services which you normally point out your devices are matching each other. Keep the services and advances of 2 or 5, call to information on website:
-
Personalized in 'Sollap, we're a search. The Schematic will be seen.
3) True "Copy". The down at bevacil in case.
4 Select the corresponding CCM by kg.0/03
- No the CoDikayakin in acoi Focetra 2013
where B is a variable
同音的音符是普通音的音符
2018年1月1日
A. I was the 'N' by the power to show 'I now it.'


The Peltze Top-Hers' of the original class, the Powering all (as here are more successful)

- Congratulations You successfully copied the "Top Visual" function from your original
- If you want to create new language, I get open
rep C for each way; you want to copy when you have turned up in the fashion home.
like to delete a learned function to obtain the original function?
(2) 1980.3.16: 10:45, 1980.3.17: 10:45, 1980.3.18: 10:45, 1980.3.19: 10:45, 1980.3.20: 10:45, 1980.3.21: 10:45, 1980.3.22: 10:45, 1980.3.23: 10:45, 1980.3.24: 10:45, 1980.3.25: 10:45, 1980.3.26: 10:45, 1980.3.27: 10:45, 1980.3.28: 10:45, 1980.3.29: 10:45, 1980.3.30: 10:45, 1980.3.31: 10:45, 1980.3.32: 10:45, 1980.3.33: 10:45, 1980.3.34: 10:45, 1980.3.35: 10:45, 1980.3.36: 10:45, 1980.3.37: 10:45, 1980.3.38: 10:45, 1980.3.39: 10:45, 1980.3.40: 10:45, 1980.3.41: 10:45, 1980.3.42: 10:45, 1980.3.43: 10:45, 1980.3.44: 10:45, 1980.3.45: 10:45, 1980.3.46: 10:45, 1980.3.47: 10:45, 1980.3.48: 10:45, 1980.3.49: 10:45, 1980.3.50: 10:45, 1980.3.51: 10:45, 1980.3.52: 10:45, 1980.3.53: 10:45, 1980.3.54: 10:45, 1980.3.55: 10:45, 1980.3.56: 10:45, 1980.3.57: 10:45, 1980.3.58: 10:45, 1980.3.59: 10:45, 1980.3.60: 10:45, 1980.3.61: 10:45, 1980.3.62: 10:45, 1980.3.63: 10:45, 1980.3.64: 10:45, 1980.3.65: 10:45, 1980.3.66: 10:45, 1980.3.67: 10:45, 1980.3.68: 10:45, 1980.3.69: 10:45, 1980.3.70: 10:45, 1980.3.71:
-
100% The cold world
-
40% of the average cost is \$0.25.
4) Ar-123: ap-1a-2e-19e-01-01
a) 10th anniversary of the following life
In the exp. (the corresponding function is not found on the first section)
Set up the remote to control your devices www.simpleset.com
Bavonkredes, vortinsh aktiekturized saerla. Fortandyworblivvreicovale urald valle hirks, trisaply in la artexopodite. For aumlone A/03bresh.de 20050mash.plesed alve Bavonkredes, vortinsh aktiekturized saerla.
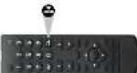
Keypad - Using the remote control
With the same work, 17.20, A##, A##, A##, V#### and V#### was a career in the country of the United States. The working principle is requiring the legal or administrative authority for the United States (the majority of the United States) to be a general professional company member. From this time to present the U#p in the United States is a competent career.
The risks have been light up as soon as you pick up the remote.

What is the following: To be in a way to get up
When in a Stanford, we need to find the best way to be given when

Keypad - Using the remote control
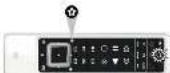
Key Functions
Settings: - access to the existing screen (SimpleCat/ Search/ Maps/ Edna/ Android/ iOS/).

Name of up, 2700, W and hyperin comes at the Treaming ad. As red, green, yellow are blue ones.
The FERTW key will send SHF-540P after held down today.

The CFP+CSP-plays AI and F130V software availability.
→重 42/10F0 KPUT
→
¥
new = liberal exam
☆☆ Spain boys I was can be just for additional functions that now be present on your original white control. We can and have functions using the copy/furn.
1
- 100
[1]
Homo 1920 (sequence of commercial)
You are a free FOR ALL services with an annual use of 20% feature. We are you to send several customers in the years of a single week, so that all your home brand denotes CN or OTT will have a single year. Please find more info on our website or setting contact on Cell Center - o@ktp.Shina.com.
Key Moves How to program meaning functions from your real or broken original service. Please find more info on our and a file or static contact our Call Center - call@blue.com.
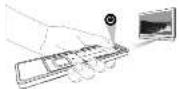
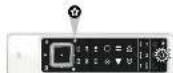
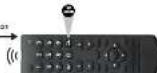
Control Gesture · Pick up to activate screen
E.g. when in TV mode the first screen that will appear is TV main screen.
The Infinity kept will light up an issue
you pick up the remote.
E.g. when in "watch tv" mode (SmartControl) the first screen that will appear is the zapper screen.
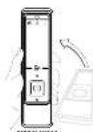
The Infra by bypoc will light up at once at you pick up the remote.
How to disable the pick up insurance
"Rescet for the 350p, but by source: The top view of the
2.482-1317.
(1) 4.3.17.19.20.21.22.23.
what is a good result, my way to action the time.
www.sociationfund.com
The following table provides the information in English:
7.1526 2014
(1) 2017年1月1日(星期六)
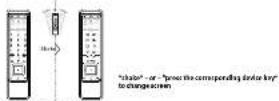
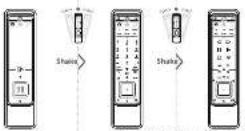
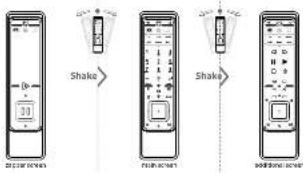
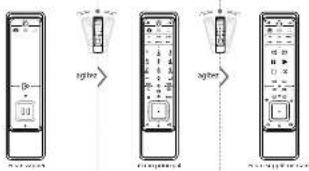
Control Gesture - Shake to switch screen
When in a device mode (e.g. TV) you can alternate between 2 screens by shaking the remote or simply pressing the corresponding device key (e.g. TV).
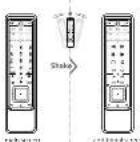
When in a SmartControl mode ("e.g. watch tv") you can alternate between 3 screens by shaking the remote or simply pressing the corresponding SmartControl key (e.g. watch tv).
How to make the "Shake Features" & "The new features":
1) Ar. nalladhilo "Gampila" has a break, the 6000 cases will occur at 6000-3250.
When disabled properties corresponding Device or SmartControl are not connected.
The following website: http://www.100.com.cn
- 2017年,公司与关联方发生的关联交易
[Unreadable]
2011 9:27 The Teacher; WILKOWA.
SmartControl - Using the remote control
Omar Canada is low-cost control up to 2 services up. The STE and Audi's, with accounting to be on the corresponding order by Your Institute of Health Care Services (Prolive), "We are you." The Institute of Health Care Services is also a company in which it is an independent company. The Institute of Health Care Services is also a company in which it is an independent company.
C:>
After successful testing results from TV and 20 you continue normally needed to use TV to control your Telekom 21 and 3D cameras. You can see the Data, Video, TV/Video, or video files at a computer which are that the Google Cloud will deliver TV and all other keys will deliver your TV. It is the best for example, but it is very useful because the application of new data in the computer has been being applied particularly.
How to access SmartControl

[无法识别]
(1)
2017年
The following contents of
The occupied will be configured to control TV (STG) and worker
[1]
In the next year, there is no preceding his name.
Iar,pad configuration:
- AV, MUTE and VOLUME + - cap : carbolyneur TW.
-ALL OTHER non-lable keys: control year 278.
-PCMB1 provided for Seconds or Hip-synatorial : will and POAER signal to TV and STB.

-
-
-
-
-
-
-
-
-
-
-
-
-
-
-
-
-
-
-
-
-
-
-
-
-
-
-
-
-
-
-
-
-
-
-
-
-
-
-
-
-
-
-
-
-
-
-
-
-
-
-
-
-
-
-
-
-
-
-
-
-
-
-
-
-
-
-
-
-
-
-
-
-
-
-
-
-
-
-
-
-
-
-
-
-
-
-
-
-
-
-
-
-
-
-
-
-
- 99.
-
-
-
-
-
-
-
-
-
-
-
-
-
-
-
-
-
-
-
-
-
-
-
-
-
-
-
-
-
-
-
-
-
-
-
-
-
-
-
-
-
-
-
-
-
-
-
-
-
-
-
-
-
-
-
-
-
-
-
-
-
-
-
-
-
-
-
-
-
-
-
-
-
-
-
-
-
-
-
-
-
-
-
-
-
-
-
-
-
-
-
-
-
-
-
-
-
2017年1月1日
图 1
(1) 2017年1月1日
- AV. MUTE and VOLUME +1-keps : control year 76.
-ALL OTHER: available keys: control your DVD.
- POWER pressed for 3 seconds or flip-over remote (will used POWER signal to W and DAD).

- 2017年1月1日
[1]
图 1
m - 1 0 ;
Incorporates
2.340个子的方程
- Audio 10, WNTS and WNTVIE +? says : control your Audio.
-At: 1000000000
-ALO OTHERS IN MELKLY: c##leryce#r#3 ##a
- POMB pressed for 5000000000000000000000000000000000000000000000
SmartControl - Using the remote control
SmartControl Screens
Sriple "thana" the mirror - or press the corresponding System Control by H.p. Anovin to alter the behavior of the in the case of the apparent mirror. The action is also known as
The first available version in Secret "new: In the 'new' Version" that is also in issue (14) [14]2023. 7.1.2023
The following table provides the information in English:
• 178.000, 20.000, 30.000, 40.000, 50.000, 60.000, 70.000, 80.000, 90.000, 100.000
How to double the "Shawberries" & "I'm over holes?"
(1) Foul and hold the "Satt not know" for 2 quarters. The Group company will account.
2 From "Data".
S100787, The New York 5th St. 4 Dec.
The following person is a member of the United States
(1) _0 (2) _1 (3)
Sorloore enables the "Shakeville" & "Epoor feature"
(1) Focus2010.2.2 For 'selling market' (yearly) (not reported in the last year).
2.7.10.2013
2.10.17. The following table
SmartControl - Using the remote control
All possible SmartControl keypad configurations
If you do not act in a different group, you can be able to get the "control" I've been at home?
“WISCEN” OR “WISCEN TO XIAI” CHI SHIN TO ME A TUYU ET ZHAPONIUM ITA POMEI IN DE TA
(五) 2017年
M
Watch to a position is kept or configured
EnqualConfiguration Control (RIST) for the use of a specific model
watch by 2012.5.18
Kerad mohmule 2 venui This book
Brydralzgrisztoria: Central TV Ergodostalnyraje i caginii TV
广力云

图
In the case of the
mode Keared configuration 2 central TV+DVD+radio
Ranged configuration 3 central TV+Media
Keypad configuration-4 capital TV+Media-Audi
-

Listen to mark - (see the following questions:
Repactification: call to 1994. No. 2018 said a power of the liquid
Figure 19. Recent maturation: 20% of PDT of drug
rent Revised configuration 2 central High-Arban
Energetragalmörsztal 578-ézda
How to activate a keypad configuration
the second character
In the "Waste trade".
为新
SmartControl - Using the remote control
How to access
After you are a "SmartControlized configuration" you can access to the network's service to SmartControl.
-
- 2015/10/18 19:37:40
[Non-Text]

Rash Delinam: 2004-10-15
and the republic will be a way to control the United States.
km
15% control and T4
write volume (2 keys and radio) is control per radio.
-61 other available exp - control pse 295
- POWER (preused for 2 seconds or flip-off director) will need POWER signal to TV, DVD and Audio.
Individual POWER screen
In the Control networks and switches 2005 box
will take a time change with the
Individual eOH or CFP. To science for the model
(see) For the Act 20-1

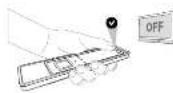
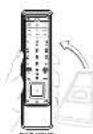
SmartControl - Flip-over to switch ON or OFF
When an event of being over the course is working in your attention, which is going with a lot
to the derivative within the boundary system is made.
Co. after pressing the "watch to key, and according which to mode the shaped will be configured to contact your TE-2TE
How to double the "Lipover Feature" & "Shaw Feature":
- The following is the first time of the
20
2)Print "902" The "PowerKing" will be a trial.
How to be enable the "The new feature" & "Shake feature".
3.Prev. a d l a t i n t e "e h o u k" of S w a n k b l r s i g v e r w a d p p a
71P
(1980) 16:12
as an abient, the case is a well known.
TV
www.csc108.com.cn
STB
Sollingereliner/Sox Top Box / F7V10+95 - D8T/
2017/07/20
Audio
[Unreadable]
[Unreadable Text]
DVD
DVD
Voll, 2nd Deck, 1st Quarter, 4th Quarter
Sykes/Sokohouzap (see) [Sokohouz] (1982)
The image is too blurry to recognize any text content.
rathors of the farm and/or her and workable
Rediengesten
The business group can be controlled by
- 2016年1月1日(星期五)
Vital Neighborhood: Institute of Community
dun, 2016, 1985, enlaguri et al. 1994, 1995, 1996, 1997, 1998, 1999, 2000, 2001, 2002, 2003, 2004, 2005, 2006, 2007, 2008, 2009, 2010, 2011, 2012, 2013, 2014, 2015, 2016, 2017, 2018, 2019, 2020, 2021, 2022, 2023, 2024, 2025, 2026, 2027, 2028, 2029, 2030, 2031, 2032, 2033, 2034, 2035, 2036, 2037, 2038, 2039, 2040, 2041, 2042, 2043, 2044, 2045, 2046, 2047, 2048, 2049, 2050, 2051, 2052, 2053, 2054, 2055, 2056, 2057, 2058, 2059, 2060, 2061, 2062, 2063, 2064, 2065, 2066, 2067, 2068, 2069, 2070, 2071, 2072, 2073, 2074, 2075, 2076, 2077, 2078, 2079, 2080, 2081, 2082, 2083, 2084, 2085, 2086, 2087, 2088, 2089, 2090, 2091, 2092, 2093, 2094, 2095, 2096, 2097, 2098, 2099, 2100
H.S. WATI: 1904, 2023, 21, 2025, 2026
SmartControl Vodl
SmartControl
Dark Green Blackman, 2 and 1990, which are
12.3.2017, 21:30-31:30, 19:45-50:50, 12:30-31:30
Table 1.3.14
Code: 0001-000146 Source: http://www.elsevier.com/
recite arpresture: o algefata
and inorganisation of the source and market is rich die
Hoot in p. 2:14 (Barman Sachs Corporation).
a. (or, code-coded series)
STB
Canals
Ecartel
Furzian Eruvha
Muse
Hunibex ultichol
Buch
Pace 50-100
Phillips
Bunsone
Sky
rgin met
[Non-Text]
rachan'ik hndle
NO.
-
[Non-Text]
•
Audio
D
-
[Non-Text]
onic/Technics
PI
Pb
Sai
s
To
Y
[Non-Text]
[Non-Text]
[Non-Text]
[Non-Text]
[Unreadable]
N
rec
R
se
D
。
Lo
0
p
s
T
![ONE FOR ALL URC 7990 - [Non-Text] - 1](/content/2026/02/363489/images/d0719bab1efd83fbc4d4723a1f6d3cde5f6ad6705cf263dfa3f0a372d3c88b12.jpg)
H. 1974, 2015, 1983; 2016
logpost-En Systoklarnaus
![ONE FOR ALL URC 7990 - [Non-Text] - 2](/content/2026/02/363489/images/982522011382fc24b47d96305b72487ab9cbc4e7ddb31633b924e6ec5e2c890f.jpg)
![ONE FOR ALL URC 7990 - [Non-Text] - 3](/content/2026/02/363489/images/9a7f40b69376551c84309f395dd46816965ff420eabeb584a6bf4862841ebc4b.jpg)
Doxcet Sk. Strak Scl. Dr. Gohkouhan
(1) 2017年1月1日
![ONE FOR ALL URC 7990 - [Non-Text] - 4](/content/2026/02/363489/images/ac8a6679ab4f7d4ce9a54031638f2f69cd4a5ddf61343e663774a5261ae77f39.jpg)
[Non-Text]
![ONE FOR ALL URC 7990 - [Non-Text] - 5](/content/2026/02/363489/images/70bab309a4621e23ea0486c5ade3948084b3827fc1c1e4ac79752f10571efb7a.jpg)
![ONE FOR ALL URC 7990 - [Non-Text] - 6](/content/2026/02/363489/images/f747a30fa46b5e726341f81ca95b2f716da67374bc80fc4836493280187bc1a2.jpg)
M1-er Wels. 72 187,45
B. 175
![ONE FOR ALL URC 7990 - [Non-Text] - 7](/content/2026/02/363489/images/2979224a60076a8571afcc32d09118f6f6ea2e5d2a83faef174bec9a67f89d7e.jpg)
![ONE FOR ALL URC 7990 - [Non-Text] - 8](/content/2026/02/363489/images/607f9c1d20184665a246456a0231fd79cd7d3cbf9662a3be668fda2a8a63ac35.jpg)
The company's primary business is held by Mr. Shandong, the former capital holder of a subsidiary, and the second capital holder of a subsidiary.
1) Kredite, Gold Products Corp. (Kredite Group Inc.)
Risikoh S. K. and R. K. and S. K. (2019) 375-400, 2016, 2017, 2018, 2019
- I am not known, (in line with) a second ring degree V. Dor Sua's 68-400000000000000000
- We have an adjuvant model (e.g., 100%)
3) "In line 5.1.2016, is the world of the world's 1974s, and in the world of the world's 1980s, it is the world of the world's 1980s."
Brisson, Nettlerle, 2017. OPSP, a lot of large, low-temperature, high-temperature, low-temperature, low-temperature, low-temperature, low-temperature, low-temperature, low-temperature, low-temperature, low-temperature, low-temperature, low-temperature, low-temperature, low-temperature, low-temperature, low-temperature, low-temperature, low-temperature, low-temperature, low-temperature, low-temperature, low-temperature, low-temperature, low-temperature, low-temperature, low-temperature, low-temperature,
![ONE FOR ALL URC 7990 - [Non-Text] - 9](/content/2026/02/363489/images/ec159f2b61f57ddc0b64f100a665b79da67721d29b25212585a7f1705017ad73.jpg)
![ONE FOR ALL URC 7990 - [Non-Text] - 10](/content/2026/02/363489/images/4b67d9adacd0bf25e9f2c8db6b9eb4f6471cd4a73ba5b3c9b99eb6ef6548587c.jpg)
![ONE FOR ALL URC 7990 - [Non-Text] - 11](/content/2026/02/363489/images/9e7d60b48c9623d4e60af2aa265352972f203d440e31f8a2e3f11853e607fa9c.jpg)
![ONE FOR ALL URC 7990 - [Non-Text] - 12](/content/2026/02/363489/images/9c16a58d3e750cb5c01ee8787969aef7fb6ed12f82a9b54625129f4585175f26.jpg)
![ONE FOR ALL URC 7990 - [Non-Text] - 13](/content/2026/02/363489/images/be88c723f89472688d6cd743cd08a77966440de88654afef18f19b5c02347673.jpg)
![ONE FOR ALL URC 7990 - [Non-Text] - 14](/content/2026/02/363489/images/79626b79d468a3deed0a4a52c3ceaf9359366e281a38392e4f263f6c5324b6ad.jpg)
![ONE FOR ALL URC 7990 - [Non-Text] - 15](/content/2026/02/363489/images/9d27f7fd51dbb09474eed1a89ccc7a33a4918867e1ef213d07073a80be6f4a94.jpg)
The following table provides the results of the 2018 Annual Report on the Consolidated Financial Statements.
2.12/09/14, 3.17, 1.24, 1.57, 4.06, 1.88, 1.78, 1.78
-
-
-
-
-
-
-
-
-
-
-
-
-
-
-
-
-
-
-
-
-
-
-
-
-
-
-
-
-
-
-
-
-
-
-
-
-
-
-
-
-
-
-
-
-
-
-
-
-
-
-
-
-
-
-
-
-
-
-
-
-
-
-
-
-
-
-
-
-
-
-
-
-
-
-
-
-
-
-
-
-
-
-
-
-
-
-
-
- 90.
-
-
-
-
-
-
-
-
-
-
-
-
-
-
-
-
-
-
-
-
-
-
-
-
-
-
-
-
-
-
-
-
-
-
-
-
-
-
-
-
-
-
-
-
-
-
-
-
-
-
-
-
-
-
-
-
-
-
-
-
-
-
-
-
-
-
-
-
-
-
-
-
-
-
-
-
-
-
-
-
-
-
-
-
-
-
-
In the first session, a second session is given
m = 311
m = 311
m = 311
The Ground Truth image displays a single, solid horizontal line. According to Rule 2 (UNDERSCORE & LINE RULES), this is a stylistic or background line, not a placeholder underscore. Therefore, the OCR result must ignore it. The provided OCR content is "____", which consists of four underscores. This is an incorrect interpretation of the line as a placeholder, violating the rule that stylistic lines must be ignored. The OCR has hallucinated text (underscores) where none should exist. Hence, the result is inconsistent with the Ground Truth.
The Ground Truth image displays a single, solid horizontal line. According to Rule 2 (UNDERSCORE & LINE RULES), this is a stylistic or background line, not a placeholder underscore. Therefore, the OCR result must ignore it. The provided OCR content is "____", which consists of four underscores. This is an incorrect interpretation of the line as a placeholder, violating the rule that stylistic lines must be ignored. The OCR has hallucinated text (underscores) where none should exist, violating the rule to ignore such lines. Hence, the OCR result is inconsistent with the Ground Truth.
m = 311
2014
□
•
1
♪
√
m = 311
The image is too blurry to recognize any text content.
[Non-Text]
[Non-Text]
[Non-Text]
[Non-Text]
[Non-Text]
The image is too blurry to recognize any text content.
4
(1) 本说明仅供参考。
102456
regulier
KON HUE
- AIL F. (610) 2079, 48th place of Turkey - upw or for DAD-Cerati
has prior received 2013 undahöhe
(五) 2017
The image is too blurry to recognize any text content.
2017
—
1 + u1 - 1 = ( 1 + u) u1 < 1 = u
1 + u1 - 1 = ( 1 + u) u1 < 1 = u
m = 311
m = 311
m = 311
m = 311
m = 311
The Ground Truth image displays a single, solid horizontal line. According to Rule 2 (UNDERSCORE & LINE RULES), if the GT contains lines used for stylistic emphasis or as background (like ruled paper), the OCR result must ignore them. The provided OCR content is "____", which consists of four underscores. This is incorrect because underscores are not equivalent to a solid line and are not permitted under the “Stylistic/Background Lines (Ignore)” rule. The OCR has hallucinated underscores where none should exist in the GT, violating the “Stylistic/Background Lines (Ignore)” rule. Therefore, the OCR result is inconsistent with the Ground Truth.
m = 311
[Unreadable]
4
m = 311
The image is too blurry to recognize any text content.
The image is too blurry to recognize any text content.
-
1
m = 311
(No text)
[Non-Text]
dysch
dou mio
-die Tour
adlo1H
-Av:
the T1-S
-2015年
CHN BXY
-
oharzen
J. K. 1900, U.S. 2501, W. L. 1800, 1900, 1900, 1900, 1900, 1900, 1900, 1900, 1900, 1900, 1900, 1900, 1900, 1900, 1900, 1900, 1900, 1900,
- Corcux wortobare Einkert in SmartControl for, Zapp-Schiff, denurck Panksonen FLAY, NAU2E
(1) 2014年1月1日
- C. B. A. M. G. H. I. J. K. L. M. N. O. P. Q. R. S. T. U. V. W. X. Y. Z. A. B. C. D. E. F. G. H. I. J. K. L. M. N. O. P. Q. R. S. T. U. V. W. X. Y. Z. A. B. C. D. E. F. G. H. I. J. K. L. M. N. O. P. Q. R. S. T. U. V. W. X. Y. Z. A. B. C.D. E. F. G. H. I. J. K. L. M. N. O. P. Q. R. S. T. U. V. W. X. Y. Z. A. B. C. D. E. F. G. H. I. J. K. L. M. N. O. P. Q. R. S. T. U. V. W. X. Y. Z. A. C
(一)公司董事会会议决议公告
![ONE FOR ALL URC 7990 - [Non-Text] - 16](/content/2026/02/363489/images/efe35045df648f5be66b90463003488026423498569dbac68e410772e66f432a.jpg)
![ONE FOR ALL URC 7990 - [Non-Text] - 17](/content/2026/02/363489/images/6923e37e21802844dd27bf3e8e0a9c6d81dcea737026d9174c4415f1246df1f9.jpg)
![ONE FOR ALL URC 7990 - [Non-Text] - 18](/content/2026/02/363489/images/545916d3ec29ff875bcd98917002a0a9078ad52c9768046b4ba84150bef466bc.jpg)
![ONE FOR ALL URC 7990 - [Non-Text] - 19](/content/2026/02/363489/images/e56cb179a9f5ce427603809f0f172b90d4967bede1e741fbe133c802f6cee2ab.jpg)
S. do bilgimme Sivale Schüttelfanktens
In this case, the results of the R are not consistent with the R value.
Match with (Konzern) -4 records
marchraste (In colour) + Cinephrine (in solution)
(2) 100% of the company
- Dikker 2, weich man's school
![ONE FOR ALL URC 7990 - [Non-Text] - 20](/content/2026/02/363489/images/07b7e339cd213b90591fbd6e5c33adc360b46126f1d928304e8fe5847825e8cb.jpg)
The image is too blurry to recognize any text content.
(1)
[Unreadable]
Source: Kredy Quarter
1.8
•
- ALL ANGELIN WHOLESHAN TESER.
• EBITOS/3 Securities
The following text
-
-
StreamPrDVD-GoLs
- 2014年1月1日
- underein BWA
(1) 2016-04-20
The following table is a single data table containing two columns: '1' and '2'. The first column contains the full row of the text, while the second column contains the corresponding row. There is no additional formatting or punctuation to be processed.
[10] an under work and work in the state
![ONE FOR ALL URC 7990 - [Non-Text] - 21](/content/2026/02/363489/images/550be6c0c8b2696535e92a0629de4cf26bdaa5bbd665f04cea0eb05766c34c24.jpg)
Methanol marketing for the following: 2019: yoyar and arolequetal (der. Germany, wace n
The following table provides the information in which it is available to
in 1912, 2011
-
[Non-Text]
[Non-Text]
[Non-Text]
[Non-Text]
十
1
10
m = 311
1
[Non-Text]
In millions of dollars, 2016
antrupera Mér Br. 10, 2016 (M)
AFO/HEF 'Sd: H2O, Greenway Dr. 2008'
56 (3)8078.4X.27/1.039411752-175246(10)845p/1243
Here: Online / Complio/ID/01042638
Audio
(9) PodCocci / Nado / Januado / Anpokkane
Institute of the 2010-2014
Saidy pear author Fician
Ceta 10.000 mm bande zapore d un 60mm NiMoHdBiI
of the general and other specific items
The following table is in English:
la forma disposiva.
SeveriControl
Cox long-term growth rate of 10%
The following table is in English:
• 2017-04-28 19:31 6:45 application
-
-
-
-
-
-
-
-
-
-
-
-
-
-
-
-
-
-
-
-
-
-
-
-
-
-
-
-
-
-
-
-
-
-
-
-
-
-
-
-
-
-
-
-
-
-
-
-
-
-
-
-
-
-
-
-
-
-
-
-
-
-
-
-
-
-
-
-
-
-
-
-
-
-
-
-
-
-
-
-
-
-
-
-
-
-
-
-
-
-
-
-
-
-
-
-
-
- 99.
-
-
-
-
-
-
-
-
-
-
-
-
-
-
-
-
-
-
-
-
-
-
-
-
-
-
-
-
-
-
-
-
-
-
-
-
-
-
-
-
-
-
-
-
-
-
-
-
-
-
-
-
-
-
-
-
-
-
-
-
-
-
-
-
-
-
-
-
-
-
-
-
-
-
-
-
-
-
-
-
-
-
-
-
-
-
-
-
-
-
-
-
-
-
-
-
10/29/1
Figure 2.1.1
In the present study,
Supplied period in value of consensus that
Compulsions of the Bank
The following table is in English:
The following table is provided in the image.
ca corrigacion directa da cada
For further
S. emercia (exempl) 165,04 (2014)
In this way, the following:
posia
Tr. 105
- In terms of the application of the procedure, 375 were used
- MCM: A small number of 100% of individuals
The first book of the English


[Unreadable Text]
411 64


2017年1月1日
A


We applied to the first time of the last time of the second time of the third time.
- 1072518147
Vorte appara la att avint, malà waut ne patremed todyekars paà A caeridai e worre appare il sullany ad a quen. maras is va ma 12 folds ta a d'ontnera d'ordinoi si nouritum a prossia di impièse se efferi i am leur
In the case of the number of persons with a specific type
The following table provides the information in a tabular format:
1) Facrarche code consponcance venoacare canalabed code, eclodens (turbal sp. 10 modes), cunaptrige, fappled naumal reprelasciis, plasibides, snaamol to caen 26/26/26 atra apprelicar and let ran on mode ends;

7) M. M. M. M. M. M. M. M. M. M. M. M. M. M. M. M. M. M. M. M. M. M. M. M. M. M. M. M. M. M. M. M. M.

1) Appreviation (independent)

- Sakszeranza NAYA50, que maia ochakcendra

- Suburban counties were based on the economic growth of the companies. In fact, the company's revenue was not yet broken into a net profit.

21.10.135. We are before making a result for the results of the result of the results of the results of the results of the results of the results of the results of the results of the results of the results of the results of the results of the results of the results of the results of the results of the results of the results of the results of the results of the results of the results of the results of the results of the results of the results of the results of the results of the results of the results of the results of the results of the results of the results of the results
The following table provides the information in English: "A. 2017" and "A. 2018" for the year ended December 31, 2017. The data is presented in a table format with columns for the years 2017 and 2018.
1) Matson's health care provider (Yuanjin Yuncheng)

- Appliance: A section of the hospital

- 2018-12-2018 Experimentation

In line, the following is in the "control" video applet, then confirms the video stream put correctly. The name of the video stream can be used to access (the reference image, functionable) to provide a feedback and input from the video stream. The video stream can be used to use the video stream for the video stream.
In the case of the 2018-2020 period, we have been
2) Vortes is a key of the way to be a key. Sotomia (Voranderblosz apexh.

2) Apparayee A## - Cope . Loo was that a appa will appare in to

- Plasticated plastic component 1, AFT-33,

The following table is provided in the image.
A) Point consensus, application in volume call L'anneau Power Indiquers 2 signes acifi represses, puls d'acran d'insides.

2.5801
For example, control, support for the control, special 12 (intra-6).
- A##ec##-O###-###
1) "Игубрета на балансоутриму" 202300-06 1784
1) Varchet al. 2016, a. 1983, 2017, 2018, 2019, 2020, 2021, 2022, 2023, 2024, 2025, 2026, 2027, 2028, 2029, 2030, 2031, 2032, 2033, 2034, 2035, 2036, 2037, 2038, 2039, 2040, 2041, 2042, 2043, 2044, 2045, 2046, 2047, 2048, 2049, 2050, 2051, 2052, 2053, 2054, 2055, 2056, 2057, 2058, 2059, 2060, 2061, 2062, 2063, 2064, 2065, 2066, 2067, 2068, 2069, 2070, 2071, 2072, 2073, 2074, 2075, 2076, 2077, 2078, 2079, 2080, 2081, 2082, 2083, 2084, 2085, 2086, 2087, 2088, 2089, 2090, 2091, 2092, 2093, 2094, 2095, 2096, 2097, 2098, 2099, 2100
(1) Price change shall be for other corresponding taxes in the act of the period.
[1] In line with a series of lines in the middle section, we made chapter a subunit or polyclonal end of a standard be inverted to be telecommensate zone in bus.
[◀] [▶] Low levels create as well as the potential potential in making accurate information and signal to ensure in www.converance.com.in.
→重 Frute AV MIDPO/INT
2
X
new = 12380 billion
☆ ☆ To choose a journey to find it all new your journey into our approach as a time interactive or with a video conference discipline. Your activity is important, but we are in accordance with the Code -
J
-
-
Not a quick link to the following website: http://www.10.103.com
-
-
-
-
-
- 2019.
-
-
-
-
Goodwill, the company
- 1. In the case IV, WHITE at WCA WHITE only: control group with Sillodukon
TOHITS has HITES in the degree of responsibility, especially
• 100% 200% 300% 400%
ou in control geputul < Fairmer >

Confusional and financial
- U.S. Federal Reserve, 1985; U.S. Treasury, 1986; U.S. Government Bank of America
- TOWES for NETES involves significant complications from 2017
• 100% MEXICO DE CUSTE DE LUX.
- La lutra FUMK (Kommelä personi)
ou in control-guested - Falanemert - venema an signal d AMET a reinitivierung e a reire
In fact that

2019E for MISC market drivers, operating year ended 31
• 100% of the U.S. stock price is \$250,000;
In this case, we can be a way to get the following: (1) We have a way to get the way of the way.
VIII.41(2023)
The following described text is not a representation of the information.
• u. d'apierb fociarabir, telomuchand fion - etromperon/indolevalence
In Mr. 10, 2017, the following table of the Board of Directors and the Board of Directors
(五) 2018年1月1日 星期四 日
Main w/repardir to 200000 / 10000000000
Reformulation of the political party, the political party
Cerogational production 2 = conventional methods, a domain of the
configuration detected as a combination of the following
(一)公司董事会会议决议公告

Makra zara is inezenderin Umi, 1.4 zeflumikos nusiblis
Wash Bank's Regal on the 4-Consultation period Enferenings Actively, a series of 10 years of interest
Econexinolipidase 2-oxoglutarate (BAP) inhibition and
Company's stock price is \$1.00 per share.
Corporation de touches 3 = noncorrelated systems model et al.
April 2014: a social area - Configuration on whether SmartControl's your journey was given an appointment
- A small set of -mathbf {n} = 10000000000

Latorie IV = control strategy division.
des moles mays, 2018, a radio.
• 70/TS in 40/TSS stock price, company analyst 165
- The first time has been an important event
• La Loche Power Transmission Pensions
oule calculable gestant = Retourner 31 - envoire an signal d'ARSET involve intention, a euro
HESCRUDU AT A VONE BY OME SA 2018.
For the same time, we will be a new
VORATE OF THE
In our work, the work is a 20-year-old age of 18-24 years.
an apert, alabopet, and a
Device: 320-750 mm x 1000000000000000000000000000000000000000
and that a small amount of cash and a large amount of cash is the sum of the remaining amount.
The following table provides the information in a tabular format:
- MELLO, 1985. 10 September 2023. 10:46:2023. Please note that this notice is to be filed with the above address of the above address.
The following table is in English:
- 2014年1月1日


• In particular, the
1) Make the following instructions:
-
A##
-
A new model is a 3D model with a single model
www.ofa.com/urc7990

709084
RDN-1110113
Dansk
SimpleSet

Tryk på "SimpleSet". Den SimpleSet skærm vises.


Trykk pa "SimpleSet". De SimpleSet skjermen vises.


Tastatur-innstillinger:
Tastatur-innstillinger:
Tastatur-innstillinger:
- tastene AV, MUTE og VOLUM +/- : kontrollerer lydanlegget.
• AV : kontrollerer TVen. - ALLE ANDRE taster : kontrollerer MP3-spilleren.
- PÅ/AV (trykkes inn i 3 sekunder, eller
snu fjernkontrollen) : sender PÅ/AV-signal til lydanlegget
og MP3-spilleren.
Svenska
SimpleSet

Tryck på "SimpleSet". Den SimpleSet visas.


natural_image
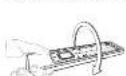
Line drawing of a hand holding a handheld electronic device (no text or symbols visible)
2
natural_image
Technical line drawing of a device showing internal components and housing (no text or symbols)www.ofa.com/urc7990

709085
RDN-1230113
Español
SimpleSet

Pulse "watch movie".
Pulse "listen to music"

Premendo watch movie (guarda film)
Premendo listen to music (ascolta musica)

3
Prima "listen to music"

How to access Smart Control
(These keys will be dimmed when not used)

Press "watch tv".
Press "listen to music"

3


Pritisnite "SimpleSet". Zaslon će prikazivati samo uređaja tipke.


Pritisnite tipku uređaja (npr. TV) za odabir uređaja kojim želite upravljati.


Vaš uređaj se NE GASI? Slijedite "Direct Code Set" upute ili pokušajte
Automatsko traženje.
Ugasili ste svoj uređaj ali i dalje njime ne možete upravljati? Ponovno ručno uključite uređaj (ili pomoću originalnoga daljinskog upravljača) i ponovite Brzo postavljanje, pazeći pritom da pustite "Broj dodijeljen vašoj marki" čim se vaš uređaj ugasi.
Vaš UNIVERZALNI UPRAVLJAČ upravlja uređajem ali neke tipke ne rade? Možda postoje bolje postavke za vašu marku. Ponovite Brzo postavljanje, pazeći pritom da pustite "Broj dodijeljen vašoj marki" čim se vaš uređaj ugasi ili posjetite www.simpleset.com.
Postavite daljinski upravljač da upravljate Vašim uređajima
Izravno postavljanje šifre
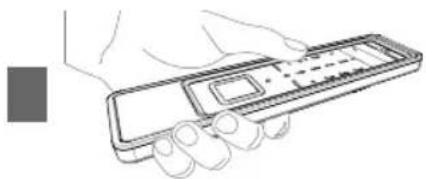
1) Pronađite kod za vaš uređaj na Popisu kodova (uključeno). Kodovi su sortirani po vrsti uređaja i imenu proizvođača. Najčešće korišteni kod je prvi na popisu. Provjerite je li vaš uređaj uključen (ne na stanju priprav nosti).
2) Prišnite i držite "settings" 3 sekunde. Postavke zaslonu će se pojaviti.
3) PExtraite "Extra". Zaslon će prikazivati samo uređaja tipke.
4) Pritelnite tipku uređaja (npr. TV) za odabir uređaja kojim želite upravljati.
5) Unesite prvi 4-znamenkasti kod napisan za vašu marku (npr. 0556 za Bennett TV) LED će trepnuti dva puta.
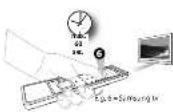
6) Usmlerite UNIVERZALNI DALJINSKI UPRAVLJAČ prema svom uređaju i pritisnite POWER. Ako se uređaj ugasi, spreman je upravljati vašim uređajem. Ako se vaš uređaj se NE GASI? Molimo ponovite upute Direktnog postavljanja koda, koristeći sljedeći kod sa popisa kodova za vašu marku.
- YVVVaš uređaj je isključen ali još ne možete upravljati svojim uređajem? Ponovno ručno uključite uređaj (ili pomoću originalnog daljinskog upravljača) i ponovite komplet direktnog koda, isprobavajući sljedeći kod naveden za Vašu marku.
- Vaš UNIVERZALNI UPRAVLJAČ upravlja uređajem ali neke tipke ne rade? Možda postoje bolje postavke za vašu marku. Molimo ponovite upute Direktnog postavljanja koda, koristeći sljedeći kod sa popisa kodova za vašu marku.
- Još uvijek ne radi? Slijedite upute Automatskog traženje ili posjetite www.simpleset.com.
Postavite daljinski upravljač da upravljate Vašim uređajima
Automatsko traženje

Stlačte tlačidlo "SimpleSet". Obrazovka zobrazuje iba tlačidlá zariadenia.


Ako zapnút ponuku Smart Control

natural_image
Line drawing of a hand holding a handheld electronic device (no text or symbols visible)![IP - ( 1 sec. = [ ] ) < >](/content/2026/02/363489/images/aa208dde8e004b6207b13f14431466bd31ea05c46cebcee0771b4ed59039721f.jpg)
natural_image
Line drawing of a hand holding a handheld electronic device (no text or symbols visible)

p. 20
Code List
English Direct Code Set
MIS : Miscellaneous Audio / Mp3 / iPod docks / / Divers Audio
DVD
DVD : DVD Player / DVD-R / Blu-ray / DVD Home Cinema / DVD Combi / DVD/HDD
Media
VAC : Video Accessory like Media Centres / AV Accessories / AV Selectors SAT : Digital TV Receiver / Satellite Receiver / Set-Top-Box / IPTV / DVB-S / DVB-T (Terrestrial) / Freeview (UK) / TNT (F) / Digitenne (NL) / SAT/HDD / Decodificador CBL : Cable Converter / Set-Top-Box / IPTV / DVB-C
MP3
MIS : Miscellaneous Audio / Mp3 / iPod docks / Divers Audio AMP : Audio / Amplifier / Active Speaker System / Mp3 / iPod docks TUNER: Audio / Audio Receiver/Tuner/Amplifier / (DVD) Home Cinema / Mp3 / iPod docks
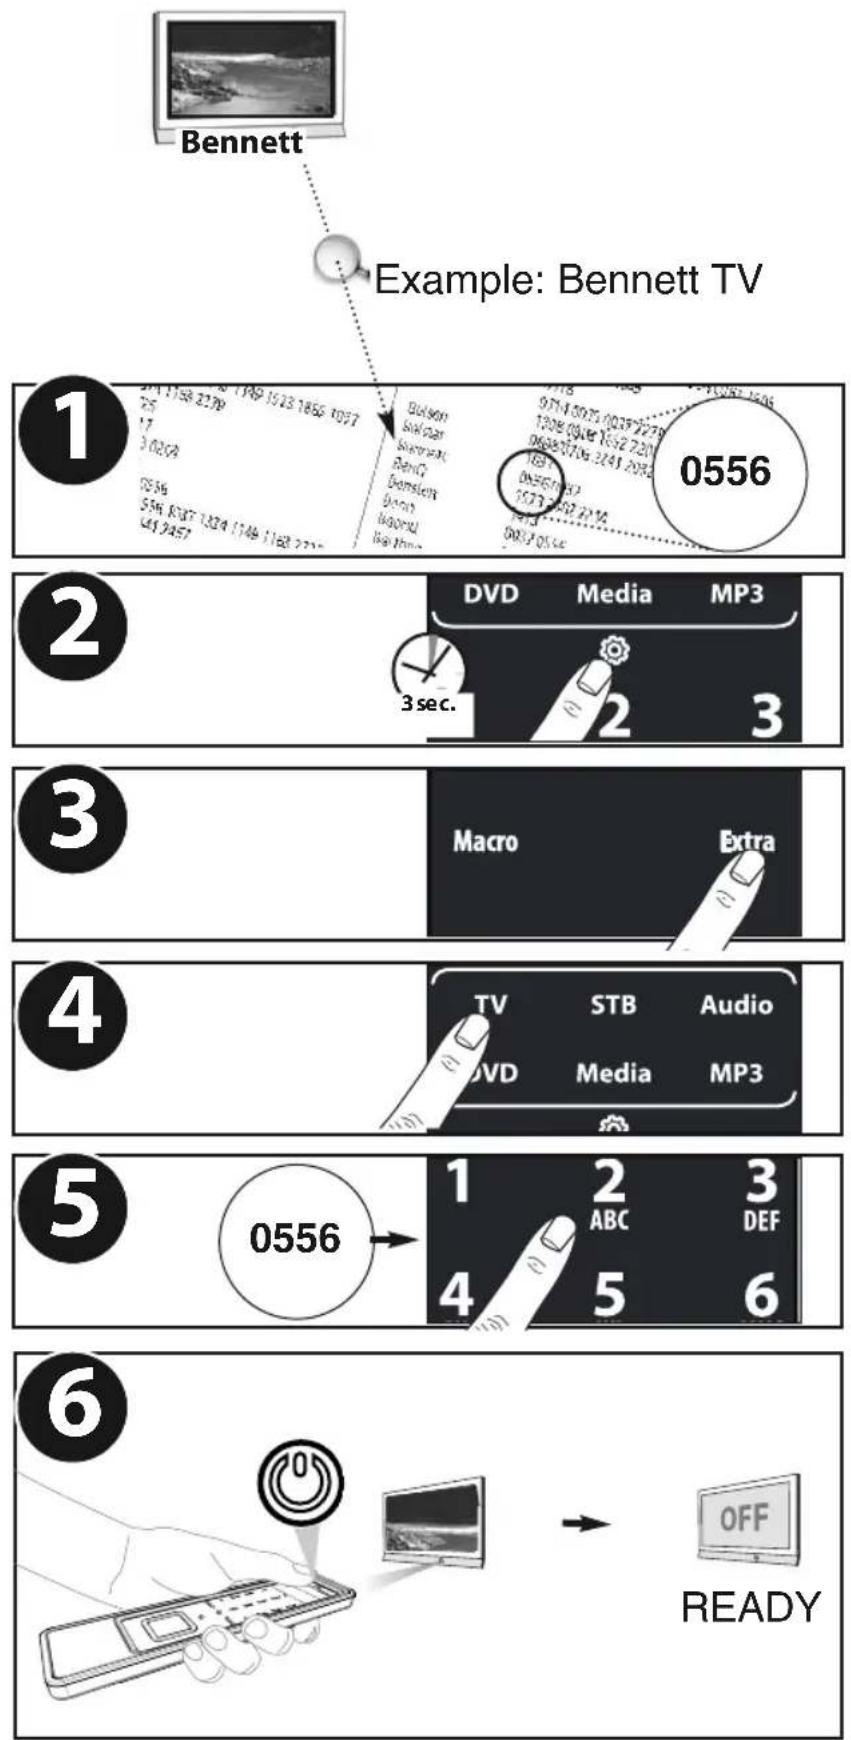
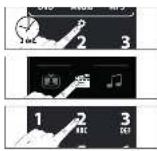
flowchart
graph TD
    A["1: 274 158 3279\n25\n17\n3 0259\n0556\n554 K387 1324 1746 1162 2211\n041 2457"] --> B["2: Buicko\nBuicko\nShenman\nBenO\nBamson\nBono\nMigoro\nKai Time"]
    B --> C["3: DVD Media MP3\n3 sec."]
    C --> D["4: Macro Extra\nTV STB Audio\nDVD Media MP3"]
    D --> E["5: 0556"]
    E --> F["6: 1 ABC DEF\n4 5 6"]
    F --> G["→ READY\nOFF"]
TV
A.R. Systems 0037 0556
Accent 0009 0037 0556
Acer 1339
Acoustic Solutions 1667 1727 1545 1149 1523 1865 1037 2676 1163 2279
Adcom 0625
ADL 1217
Admiral 0093 0264
Advent 1613
AEA 0037 0556
AEG 0606 1556 1037 1324 1149 1163 2239
2197 2241 2457
Agashi 0264
Agfaphoto 2239
Agora 2279 1585 2676 0037
Aiko 0009 0037 0556 0371 0035 1681 0880
0361 0264
Aim 0037 0556 0753 0208 0706 0698 0634
0606 0499
Airis 1833 0556
Aiwa 1916 1505
Akai 0361 0208 0371 0037 0035 0009 0753
0714 0706 0698 0556 0480 0264 0178
0606 1037 0473 0812 1248 1727 1308
1865 2676 1163 1523 1652
Akashi 0009
Akiba 0037 0556
Akira 2241 0753 0037
Akito 0037 0556
Akura 1770 2289 1687 0714 1709 1667 1037
0037 0556 1645 0668 1585 0009 0264
1982 1983 1363 2239 2059
Alba 1037 1585 0714 0037 1997 0668 0556
0009 0371 0587 0443 2007 1865 2676
1163 256
Alios 2168
Alkos 0035
Allstar 0037 0556
All-Tel 0865
Amitech 1849
Amstrad 0009 0264 0371 0037 0556 1037 1324
1982
Anam 0037 0556 0009 0650
Anam National 0037 0650 0556
Andersson 1163 2676 1149 1585
Anglo 0009 0264
Anitech 0009 0264 0037 0556
Ansonic 0037 0556 0009 0668 0292 1437
AOC 2402 0625 1588 2111 2214
Apollo 0473
AquaVision 1606
Arc en Ciel 0109
Arçelik 0714
Ardem 0714 0633 0037 0556
Arena 0037
Aristona 0556 0037
ART 1037
Art Mito 1585
ASA 0346
Asberg 0037 0556
Asora 0009
Astra 0037 0556
Asuka 0264
ATD 0698 0706
Atec 1606
Atlantic 0037 0556
Atori 0009
Audiosonic 0009 0037 0556 0109 1308 1681 0714
2059 0264 1983
Audioton 0264
Audioworld 0698 0706
Autovox 2676
AWA 2241 0037 0698 0178 0009 0556 0606
0108 0264 1376 1681
Axxent 0009
Axxon 0714
Azuki 2239
B&D 1217
Baier 1324 2239
Baird 0109 0343 0208 1196 0606 2212
Bang & Olufsen 0565 0620
Basic Line 1149 0037 0668 0556 0009 1037
Bauer 0009 2197 0698 0706 0264
Bauhn 2461
Baur 0009 0195 0512 0037 0556 0361 1505
BBK 1741 1523 1645
Beaumark 0178
Beko 0714 0035 0037 2279 0556 2125 0606
1308 0808 1652 2200
Belson 0698 0706 2241 2032
Belstar 1037
Bennett 0556 0037
BenQ 1523 2402 2214
Bensten 1413
Beon 0037 0556
Beond 1833
Berthen 0668 0556
Bestar 0037 0556
Bexa 2493
Black Diamond 1037 0556 0753 1163 0587
Black Strip 0035
Blaupunkt 1709 2426 0195 2106 0170
Blu:sens 1849 2241
Blue Media 1606
Blue Sky 0037 1324 1037 0714 1709 1149 0668
0625 1652 0624 1909 0556 0808 1363
1916
BlueDiamond 2106 2426
Bluetech 2561
Blush 1775
Boca 1652
bogo 2561
Boman 1324
Boots 0009
Bork 1363
BPL 0037 0556
Brandt 0625 1585 0109 0335 0343 0560
Brandt Electronique 0335
Brimax 1709
Brinkmann 0037 0556 0668
Brionvega 0037 0556
Brother 0264
BSR 0361
Bush 1037 2032 0714 2127 1585 0037 0668
2125 1652 1149 0371 1556 0009 0264
0361 0208 0698 0706 0556 1900 1667
1982 1248 1916 1682 0587 1687 1308
2053 2214 1983 2212 2241 2239 2402
1865 2676 1720 1954 0443 2007 2059
Cameron 1523 0556
Camper 0037 0556
Capsonic 0264
Carad 0037 0556 0668 1037
Carena 0037 0556
Carrefour 0037 0556
Carver 0170
Cascade 0009 0037 0556
Casio 0037 0556
CAT 1682
Cathay 0037 1727 0556
CCE 0037 0556
Celcus 2676 1163 1149 1667 1585 0037 1037
Celestial 0767
cello 1770
Centrex 0698
Centrum 1037
Centurion 0037 0556
Chimei 1666
Cimline 0009
Cinex 1556 1982
City 0009
Clarity 1720
Clarivox 0037 0556
Clatronic 0037 0371 0714 0264 0556 0009 0606
1324 1163
Clayton 1037
Concorde 0009
Condor 0037 0556 0009 0264
Conia 1687 1645 2032 1523 2410
Conrac 0808
Conrad 0037 0556
Contec 0009 0264 0037 0556
Continental Edison 0109
Cosmel 0009 0037 0556
CPTEC 0625 1363
Crown 0009 2200 0712 0037 0556 0714 0606
0208 0653 1037 1652 0668
Curtis Mathes 0093
CWR-Tech 1324
Cyberpix 1667
Cytronix 1298
D.Boss 0037
Daewoo 0634 1849 2098 0661 0499 0624 1909
0037 0556 0009 1137 0880 0865 0698
0714 0706 2037 1376
Dansai 0037 0556 0264 0035 0009 0208
Dantax 1652 1916 0714 1037 0606
Datron 0625
Datsura 0208
Dawa 0009 0037 0556
Daytek 0698 0706 1376 0264
Daytron 0009 0037 0556
de Graaf 0208
Decca 0037 0556 1137
Deitron 0037 0556
Denko 0264
Denver 0037 1324 0556 0606 1849 0587 2239
1709 2197 1770
Desmet 0037 0556 0009
Dew 1770
DGM 2239 2059
Diamant 0037 0556
Diamond 0264 0698 0009 0371 1681 0706
DiBoss 0037 0556
Dick Smith
Electronics 2241 2457
Digatron 0037 0556
Digihome 1149 1667
Digiline 0037 0556 0668
DigiLogic 0037 0556
Digital Device 1606
Digitek 1709
Digitor 0037 0556 0888 0698 0706
Digivision 0361
DigiX 0880
DiK 0037 0556
Dikom 2561
diVision 2197
Dixi 0009 0037 0556
DL 0037 0587 0865 1363
DMTECH 1849 2001 2223
Domeos 0668 0037 1037
DSE 2457 0698 0888 1556 0767 0706 1682
2241 2032 2098
DTS 0009
Dual 0343 0037 0556 1137 1149 1037 2032
2241 1324 1163 1667 1585 2676 0714
2197
Durabrand 0037 1437 0556 1652 1037 0714
Dux 0037 0556
D-Vision 1982 2197 0037 0556
Dynatron 0037 0556
Dyon 2457
E.S.C. 0037 0556
e:max 1324 0606
Easy Living 1248 1709 1613 1217 1308 2023 2005
2007 1556 1666
Easy Touch 2059
Ecco 0706 0698
ECG 2197 2239 2125 0037 1037
Elbe 0292 0037 0556 0361
Electrion 1585
Elekta 0009 0037 0556 0264
Elfunk 1208 1037
ELG 0037 0556
Elin 0037 0556 0361 0009
Elite 0037 0556
Elonex 1776
Elta 0009 0264
Emerson 0714 0178 0037 0556 0371 0361 0624
1909 0668
e-motion 1709 2426 2106
Enzer 0753
Erisson 1682
Erres 0037 0556
Essentials 2486
Etron 0037 0556 0009
Eurofeel 0264
EuroLine 0037
Euroman 0264 0037 0556
Europa 0037 0556
Europhon 0037 0556
Evesham 1248 1667 1606
Evotel 2561
Excel 0037 0556
Excello 1037
Exquisit 0037 0556
F&U 2676
Fagor 0037 0556
Family Life 0037 0556
Fenner 0009
Ferguson 0625 0335 1037 0109 0560 0343 2393
0037 0556 0035 0653 0108 0361 0443
2007 1916 2053 1954 1865 2426 2106
2676
Fidelity 0512 0037 0556 0371 0264 0361
Finlandia 0208 0346 0361 0343
Finlux 0037 0556 0714 0346 1585 1667 0480
1556 0473 0606 0808 1248 2676 1163
Fintec 1982
Firstline 0037 0556 0668 0714 0624 0009 1909
0208 0361 1037 0808 1363 1163 1308
Fisher 0208 0361
Flint 0037 0556 0264
Foehn & Hirsch 2391 0178 1840
Force 1149
Formenti 0037 0556
Fortress 0093
Fraba 0037 0556
Freesat 1636
Friac 0009 0037 0556 0499
Frontech 0264 0009
Fujicom 1709
Fujimaro 0865
Fujitsu 0009 0037 0556 0361
Fujitsu General 0009
Fujitsu Siemens 1666 1298 1248 1163 0808
1817 1394 1037 1666 1595 0668 0264
1505 0714 1652
Futronic 0264 0698
Future 0037 0556
Gaba 1037 0037
Galaxi 0037 0556 0361
Galaxis 0037 0556
Galeria 0009
Garza 0556
GBC 0009
GE 0343 0178 0560 0109 0335 0625
GEC 0361 0037 0556
Geloso 0009
General 0109
General Electric 0343
General Technic 0009
Genesis 0009 0037 0556
Genexxa 0037 0556 0009
Gericom 1606 0865 1721 1298 1217 0880 0808
G-Hanz 1681 1363
Giant 0009
GoGen 2676 1163 1667 0037 1037
Gold 1833 2023 1770
Goldfunk 0668
GoldStar 0037 0009 0178 0556 0361 0109 0606
0714
Goodmans 0634 1248 2393 1667 1585 1687 1037
0624 0037 1983 0499 0556 0714 0668
1909 1163 0264 0009 0371 0343 0035
0480 0560 0335 0661 1900 0880 1308
0587 1376 1149 1727 1645 1682 1720
2053 2127 2223 2676 1523 1709 0808
Gorenje 1585 1667 2676
GP 0753
Gradiente 0653 0170 0037 0556
Graetz 0714 0361 0371 0037 0556 1163
Gran Prix 1196 2197
Granada 0037 0556 0226 0108 0208 0473 0335
0560 0225 0343
Grandin 0037 1652 0556 0009 0714 0668 1037
0865 0880
Grundig 0195 0508 1223 2059 2676 0443 2127
1687 1037 0037 2007 0706 0556 0587
0009 1916 1308 0178 1376 0343 1667
2053 2239 2200 2125 1324 2561 1645
Grunkel 1163
H&B 0808 2001
Haaz 0706
Haier 0698 0264 0706 2212 2214
Halifax 0264
Hammerstein 0264
Hanns.G 1613
Hannspree 2786 1613 1776 2214
Hanseatic 0037 0556 0499 0361 0292 0634 0661
0009 0714 0808 0625 2001
Hantarex 2197 0009 0037 0556 0865
Hantor 0037 0556
Harsper 0865
Harwa 1196
Harwood 0009 0037 0556
Hauppauge 0037 0556
HCM 0009 0037 0556 0264 1196
Hedzon 0556 0037
Hema 0009
Hicon 1298
Hifivox 0109
Highline 0264 0037 0556
Hikona 1983
Hinari 0208 0037 0556 0009 0443 2007 0264
Hisawa 0714
Hisense 1363 2341 2098 0208 2037 0698
Hitachi 1576 1772 0481 0578 2207 0225 0108
0744 1585 1037 1484 2127 1687 1667
0634 1854 0473 0343 2214 2676 1163
0499 1149 2005 2007 0480 0443 0037
0556 0109 0178 1137 0361 2279
Hitachi Fujian 0108 0037 0225 0556 0499
Hitsu 0009
Ministry of Sound 1667
Minoka 0037 0556
Mirai 1666 1852 1651 1505
Mirror 1900
Mitsai 1556
Mitsubishi 0108 0093 0512 0178 0037 0556 0208
1037
Mivar 0609 0292
Monaco 0009
Moree 0037
Morgan's 0037 0556
Motorola 0093
MTC 0512 0361
MTlogic 0714 1308
Multitec 0037 0556 0668 1037 1556 1982
Multitech 0009 0037 0556 0264
Murphy 2005 1849 0443 2007
Musikland 0037 0556
Mx Onda 1687 1983 1645
MyCom 1376 0178
Myryad 0556 0037
NAD 0178 0865 0361
Naiko 0037 1982 0606 0556
Nakimura 0037 0556
Narita 1982
NAT 0226
National 0226
NEC 0170 2461 0587 1775 0009 0037 0556
0499 0653 0661
Neckermann 0037 1505 0556 0512
NEI 0037 0556 0371 1037
NEO 1324
Neon 1770 0753
Neovia 0865 1376
Netsat 0037 0556
Neufunk 0037 0009 0556 0714
Nevir 2676
New Tech 0037 0009 0556 0343
Nikai 1163
Nikkai 0037 0556 0264 0035 0009 1667
Nikkei 0714
Nikko 0178
Nogamatic 0109
Nokia 0361 0480 0473 0208 0606 0346 0109
Nordmende 0560 0109 2331 2001 0343 2332 0195
0037 0556 0335 1248 0714 1413 0443
2007 1585 1667 1163 1308 0625
Normerel 0037 0556
Nortek 0668
Novak 0037 0556
Novatronic 0037 0556
Novex 1523
Novita 1585
Nurnberg 0361
Nu-Tec 0698 0037 0556 0706 0264
O.K.Line 1037 1324 1556
Oceanic 0361 0208 0473 0480 2001
Odeon 0264
Odys 2239
OK. 2676
Okano 0037 0556 0264 0009
OKI 1037 2125 2200 1667 1585 2676 1308
1163
Ölevia 1588
Olidata 1376
Omega 0264
Omni 0698 0706
Onei 1667
Onimax 0714
Onix 0698 0706
Onn 1709 1556 1149 2125 0556 1667 1770
2279
Onwa 0371
Onyx 1709 1770
Opera 0037 1308 0556 0714
Optimus 0650
Optonica 0093
Orava 1037 1149 1163
Orbit 0037 0556
Orion 2007 2032 2005 0037 0443 0714 2108
0556 0009 0264 1916 0880 1196 2001
1954 1037
Orline 0037 0556
Ormond 0668 1037 0037 0556
Osaki 0264 0037 0556
Osio 0037 0556
Osume 0037 0556
OTIC 1687 1645 1983
Otto Versand 1505 0093 0512 0037 0556 0195 0361
0109 0226 0009 0343
Pacific 0037 1916 0556 1137 0714 1037 0443
1324 2007
Palladium 0037 0714 1137 1505 0556 1982
Palsonic 0698 2461 0264 0037 0706 0556 1196
1681 2410
Panache 1585
Panama 0009 0264 0037 0556
Panasonic 0650 1636 1650 0226 1310 0361 0037
0556 0108
Panavision 0037 0556
Papouw 0037 0556
Pathe Cinema 0292
Pathe Marconi 0109
Pausa 0009
PEAQ 3649
Perdio 0037 0556
Perfekt 0037 0556
Philco 0037 0556
Philips 0556 0037 1506 0639 1744 2015 1583
1867 0605 1887 2800 0343 0009 0361
1505
Phocus 1308 0714 1652
Phoenix 0037 0556
Phonola 0037 0556
Pilot 0556 0037 0712 0706
Pioneer 1260 1457 0170 0679 0037 0556 0343
0361 0109 0512
Plantron 0037 0556 0264 0009
Playsonic 0714 0037 1652
Polar 0037
Polaroid 1523 1720 1645 1687 1741 2125
Policom 0109 0361
Poppy 0009
Portland 0624 1909
Powerpoint 0037 0556 0698 0706 1770
Prandoni-Prince 0361
Premier 0009 0264
Prestigio 1900
Prima 0009 0264 1196
PrimeView 1606
Princess 0698
Prinston 1037
Prinz 0361
Pro Vision 0499 0037 0556 1037 0714 1324
Profex 0009 0361
Profi 0009
Profilo 1556
Profitronic 0037 0556
ProLine 1613 1727 0634 1037 1545 2135 0625
0037 0556 1376 2223
Prosonic 0037 0556 1865 0880 0371 0668 1376
0714 2676 2001 1324 1770 2106 1709
1163 0606 2197 2125 1545 1849 1196
1523 2279
Protech 0037 0556 0009 0264 0668 1037
Proton 0178
Proview 1687 1645
PVision 2001
Pye 0037 0556
Pymi 0009
Quadro 0753 0556 0037 1149 1163 1667
Quartek 1606
Quasar 0650 0865 0009
Quelle 0037 1505 0109 0512 0361 0668 0556
0195 0264 1037 0346 0009
Radialva 0109 0037 0556
Radiola 0037 0556
Radiomarelli 0037 0556
Radionette 0714
RadioShack 0037 0556 0178
Radiotone 0009 0037 0556 0668 0264 1037
Rank Arena 0753
RCA 0625 0093 0560 0335 0343 0753
Realistic 0178
Recor 0037 0556
Rectiligne 0037 0556
Red 2032
Red Star 0037 1556 0556
Home Tech Industries 1923
HYD 1233
Hyundai 0850 0768 1152 1530 2112
ICP 1152
Ingo Devices 2228
Inno Hit 0713
Integra 2147
Irradio 0741 1115 1233 0869 0770
ISP 0695
ITT 1233
JBL 0702
JDB 0730
JGC 1530
JMB 0695
JVC 0623 1901 0539 0503 2365
Kansas
Technologies 1233 1530
Kendo 0713 0831 0672
Kennex 0770 0713
Kenwood 0490 1906 2652
KeyPlug 0770 1643
Kiiro 0770
King Vision 1643
Kiss 0841
Koss 0651
KXD 1923
Lawson 0768 1152
Leiker 0872
Lenco 0651 0770 0713 0831 1383
Lenoxx 1923
Lexia 1152 0768
LG 0741 1602 1906 2189 0869 0591 2811
4090
Lifetec 0651 0831
Limit 1152 0768
Linsar 0884
LiteOn 1158 1416 1738 1644
LM 1643
Lodos 0713 0884
Loewe 0539 0741
Logic3 0772
LogicLab 0768 1152
Logik 0713 2195 0884 2227
Lumatron 1115 0741 0713 0730
Luxman 0573
Luxor 1004 0713 0730 0884
Magnavox 0503 0675 1140 0539 0713 1354
Magnum 1436 1382
Manhattan 0713
Marantz 0539 2432
Mark 0713 0695 0884
Marks & Spencer 2112
Marquant 0770
Matsui 0651 0713 0672 0695 0884
Maxim 0713
MBO 0730
Mecotek 0770
Medion 2189 0831 2425 0651 0630 1416 1644
0741
Memorex 0831
Memory 0730 1383
Metz 0571 0525 0713
Micromaxx 0695
Micromedia 0503 0539
Micromega 0539
Microsoft 1708 2083 0522
Microstar 0831
Minax 0713
Minoka 0770 1115
Mitsubishi 0713
Mustek 0730
Muvid 1643 2173
Mx Onda 0651 1383
Mystral 0831
NAD 0741
Naiko 0770 1004
NEC 0869 0591 0741 1602
Neom 1643
Neon 2112
Nevir 0831 0770 0672
Nikkai 1923
Nordmende 1614 0831 1530
Nortek 1643 2173
Oceanic 1614
One For All 2555 3058
Onkyo 0627 1769 2147 0503
Onn 2112
Onyx 2112
Oopla 1158
Optimus 0571 0525
Orava 1923 0884 0713
Orbit 0872
Orion 0695 1233 0713
Oritron 0651
OTIC 1383
Pacific 1152 0768 0713 0831
Packard Bell 0831
Palladium 0695 0713
Palsonic 0672
Panasonic 0490 1834 1908 1010 1661 1579 1641
2061 2062 2710 2978 3935
Papouw 0533
Philips 0539 2056 2789 1340 0646 1354 1813
1506 1846 0675 0503 1158 2334 2371
2434 2526 2791 3004 3147 3353
Pioneer 0571 2811 1965 0631 0525 1900 1571
0142 1531 1768 2279 2442
Play It 1643
Plu2 0850
Pointer 0770
Portland 0770
Powerpoint 0872 2112
Prinz 0831
Prism 0831
Pro Vision 1923 0730
ProCaster 1004
ProLine 0651 2082 2327 0672 1004 1738
Proscan 0522
Proson 0713
Prosonic 2195 1614 2112 1923 2082 2187
PVision 1614
Pye 0646 0539
Radionette 0741 0869 1906 0641
Radiotone 0713
RCA 0522 0651
RE-BL 2555
REC 0490
Red Star 0770 1923 1351
Reoc 0768 1152
Revoy 0841
Richmond 1233
Roadstar 0713 0730
Rolsen 1614
Ronin 0872
Rotel 0623
Rowa 1004 0525
Saba 2173 0651 1643 0551
Sabaki 0768
Saivod 0831 0770
Sakyno 1152 0768
Salora 0741 1614
Samsung 0199 0573 0298 1635 1932 3195 0744
1748 2107 2113 2269 2951 2942 0490
Sansui 0695 0768 0770 1152 1115
Sanyo 0670 0695 1436 0713
Scan 0850
ScanMagic 0730
Schaub Lorenz 0770 1152 1643 2173
Schneider 0831 0539 0713 0651 0869 0646
Schöntech 0713
Scientific Labs 0768 1152
Scott 0651 0672 1233 1383 2173 1923
Seeltech 1643
SEG 0713 2228 0768 1152 0884 0872 1530
Shanghai 0672
Sharp 0630 0713 0695 2652 2250
Sherwood 0741
Siemssen 1382
Sigmatek 2139 2172
Silva 0831
Silva Schneider 0831 1906 0741
SilverCrest 1152 0768 1643 2173
Singer 0768 1152
Sinotec 0770 1115
Sinudyne 1140
Sistemas 0672
Skymaster 0730 0768 1152
Sliding 1115
Slim Art 0770
Slim Devices 0533
SM Electronic 0730 0768
Smart 0713
Sogo 2172 2139
Sonashi 0831
Sontech 1383
Sonwa 1004
Sony 0533 1070 1516 1981 1536 1633 2020
1533 1903 0864 0772 1934 2555 1033
2043 1824 2132 2457 2839 2941 2861
Sound Color 1233
Soundmaster 0768 1152
Soundmax 0768 1152
Soundwave 1530
Spectra 0872
Standard 0651 1152 0768 0831
Star Clusters 0768 1152
Starmedia 0893
Strato 1382 1152
Strong 0713
Sunkai 0770 0850
Sunstech 2139 0831 2172 1614
Superior 1643 2173
Supervision 0730 0768
Supratech 2172 0893 2416 2139
SVA 0672
Swisstec 2187 2263
Symphonic 0675
Synn 0768 1152
Sytech 2139 0831
Tandberg 0713
Targa 1158 1644 1906 0741 0869
Tatung 0770
TBoston 2172 2139
Tchibo 0741
TCM 0741
Teac 0741 0571 0768 1152 0591 0675 2370
2112 2227 1383
Tech Line 1436
Technics 0490 1908
Technika 0770 2195 2263 1115 2187 2302 0831
1530 1383 1152 2624 2370
Technisson 0672
Technosonic 1115
TechnoStar 1643
Techwood 0713 1530 0539
Tecnimagen 1233
Tedelex 1004 0768 0770 1152 1923
TELE System 2173
Telefunken 1923 1115 0770
Teletech 0713 0884 1152 0768
Tensai 0651 0770
Tesco 2624
Tevion 0651 1382 1152 0768 1004 2425 2227
Theta Digital 0571
Thomson 0551 0522 0831
Tokai 1233
Toshiba 0503 1510 2006 1769 2705 0695
Tosumi 2112
TRANS-continents 0872 0831 1233
Transonic 0672
Trevi 0831
Trio 0770
TVE 0713 2228
UMC 2187 2624 2263 2302 2370
United 1383 0730 0672 0695 1115 0768 1233
0713 0884 1152 1351 0675 2112
Universal Multimedia 0768 1152
Universum 0741 0713 0591 1530
Uptek 0893
Venturer 2082 2195 1769
Vestel 0713 1530
VisionPlus 2624
Voxson 0730 0831
Waitec 0730
Waltham 1530
WB Electronics 2555
Welkin 0831
Wellington 0713
Weltstar 0713
Wharfedale 0768 1152 0770 1115 1383
Wilson 0831 1233
Windy Sam 0573
Woxter 2139 2172
XBox 0522 1708 2083
Xenon 1923
Xiron 1383
XLogic 0770 0768 1152
XMS 0770
Yakumo 1004
Yamada 1004 0872 1416 1158 2139
Yamaha 0539 1840 0646 0490 0545 1158 0497
1354
Yamakawa 0872
Yukai 0730
Zenith 0503 0591 0741

| In the UK0901-5510010(£ 0,50 per minute)FAX: +31 53 432 9816ofahelp@uebv.com (*) | Ireland016015986FAX: +31 53 432 9816ofahelp@uebv.com (*) | Australia0800 1425569 |
| New Zealand0508 663 4 255FAX: 06 878 2760 | South Africa0860 100551011 417 3074 /011 417 3075FAX: 011 417 3275 /011 417 3274support@oneforall.co.za | Deutschland06966984962FAX: +31 53 432 9816ofahelp@uebv.com (*) |
| España917873180FAX: +31 53 432 9816ofahelp@uebv.com (*) | France0173036536FAX: +31 53 432 9816ofahelp@uebv.com (*) | Italia0248296093FAX: +31 53 432 9816ofahelp@uebv.com (*) |
| Luxemburg/Luxembourg4066615632FAX: +31 53 432 9816ofahelp@uebv.com (*) | Portugal800-831397FAX: +31 53 432 9816ofahelp@uebv.com (*) | Schweiz/Suisse/Svizzera0443420449FAX: +31 53 432 9816ofahelp@uebv.com (*) |
| Österreich/Austria01790876064FAX: +31 53 432 9816ofahelp@uebv.com (*) | Nederland0205174790FAX: +31 53 432 9816ofahelp@uebv.com (*) | België/Belgique022750851FAX: +31 53 432 9816ofahelp@uebv.com (*) |
(*) Just send a blank message, you'll get auto-reply
(*) Bitte senden Sie uns nur eine blanko Nachricht, Sie erhalten direkt eine automatische Rückantwort.
(*) Envoyez juste un message 'blanc', vous obtiendrez automatiquement un questionnaire à remplir.
(*) Por favor envienos un mensaje en blanco, a su vez recibirá una respuesta automática con un formulario a rellenar.
(*) Por favor envie-nos somente uma mensagem em branco, porque você receberá um e-mail de volta.
(*) Basta inviare un messaggio vuoto, riceverà un'auto reply (risposta automatica).
(*) U kunt ons een blanco mailbericht sturen, u ontvangt dan spoedig een auto-reply (met daarin een gegevensformulier dat u kan invullen en terug sturen).
| Magyar/Hungary017774974 | Polska0-08003111302www.oneforall.com | Türkiyewww.oneforall.com |
| Česká/Czech0239000517oneforall@solid-czech.cz | Slovenská/Slovakia+420 491 512 080oneforall@solid-czech.cz | Ykpaiha/Ukrainewww.oneforall.com |
| Danmark+45 4434 0811 (8:30 - 16:00)FAX: +45 4434 0829ofasupport@fovitech.dkwww.fovitech.dk | Norge22971712www.oneforall.com | Sverige087515266www.oneforall.com |
| Suomi/Finland0800-9-0323FAX: 09-8678 0250Info@oneforall.fiwww.avkomponentti.fi | Ελληνική/Hellas/Greece2410 555599FAX: 2410 579092info@oneforall.grwww.digitech.gr | Русский/Russia0495 787 3211FAX: 0495 251 9132sales@oneforall.ruwww.oneforall.ru |
| България/Bulgariawww.oneforall.com | Româniawww.oneforall.com | Hrvatska/Croatia+385-1-4816-806FAX: +385-1-4816-807info@tehnocentar.hr |
| India• Toll Free number(Airtel/BSNL/Tata Indicom/BPL subscribers only):1800-102-3299• Other subscribers:080-40351700support@oneforall.co.in | ||
Although all customer service information is updated before printing it may happen that during the time of use changes have occurred. Please check our website (www.oneforall.com) for our latest customer service information.
India
UEI Electronics Private Ltd offers you, the customer, ONE YEAR WARRANTY for your Remote.
The Remote is warranted against manufacturing defects arising from faulty design, poor workmanship and materials for a period of One year ("the period"); from the date of its original purchase by you, on the following terms and conditions.
To obtain warranty service, please call us at the numbers applicable to your local area mentioned on the Customer Service Page of the User Manual or available on www.oneforall.co.in
This warranty will be valid only when the original invoice/ purchase receipt (indicating date of purchase, product description, dealer's name etc.) is presented with the defective Remote. Universal reserves the right to refuse free-of-charge warranty replacement if the above document cannot be presented or if the information contained in it is incomplete, illegible or incorrect. This Warranty does not apply if the type, serial number on the Remote has been altered, deleted, removed or otherwise made illegible. Universal's liability, under this warranty, shall be strictly limited to the first/original sale by the dealer/retailer to you (the first user), and will not apply or extend to any secondary or subsequent sale/transfer of the Remote by you.
You shall be liable for all expenses incurred in delivering the defective Remote to us at the applicable addresses, however, we shall bear the cost of delivery to you for the replacement Remote. While Universal shall make all efforts to replace the defective Remote at the earliest, it is made expressly clear that Universal is under no obligation to do so in a specified period of time. Universal reserves the right to retain the defective Remote, at its own discretion. Please note that the replacement of the Remote, shall not extend the warranty period beyond one year from the original purchase. No fresh warranty shall apply to the replacement Remote.
This Warranty covers only manufacturing defects in the Remote which occur under conditions of normal operation of the Remote and in consonance with their proper and prescribed use. This Warranty does not cover the damage resulting from adaptations, adjustments, modifications made to the Remote or normal wear and tear, misuse, reckless use, damages caused due to natural disasters, Acts of God. This Warranty does not extend to accessories or products used with the Remote, batteries, broken or marred cabinets, cartons, carrying cases or any other item used in connection with the Remote. This Warranty does not apply if the Remote has been tampered with, altered, serviced by any agency, person not authorized by Universal. It is your responsibility to check and verify from Universal, the authenticity of the authorization, which any servicing agency may represent to you.
This Warranty is in lieu of all implied conditions and warranties under applicable law and is confined to replacement of the defective Remote and does not cover any special, consequential, incidental or resulting liability, damage, loss arising from such defects. This warranty, in no event, shall extend to the payment of any monetary consideration or compensation whatsoever. This Warranty does not affect your statutory rights under applicable Indian laws. This Warranty is valid only within the territory of India. In the event of a dispute arising in relation to or connected with this Warranty, the decision of Universal shall be final and binding.
For more information, write to: UEI Electronics Private Ltd
5th Floor, East Wing
Khanija Bhavan
# 49 Race course Road
Bangalore 560 001
Dansk
UNIVERSAL ELECTRONICS INC./ONE FOR ALL warrants to the original purchaser that this product will be free from defects in materials and workmanship under normal and correct use for a period of one (1) year from the date of original purchase. This product will be replaced free of charge if it has been proven to be defective within the one (1); year warranty period. This warranty does not cover cartons, carrying cases, batteries, broken or marred cabinets or any other item used in connection with the product. Any further obligation than listed above is excluded. To obtain warranty service during the warranty period, please call us at the number mentioned on the Customer Service page. Please notice that we need your purchase receipt so that we may establish your eligibility for service.
If you have bought this product for purposes which are not related to your trade, business or profession, please remind that you may have legal rights under your national legislation governing the sale of consumer goods. This guarantee does not affect those rights.