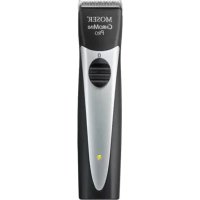
ChromStyle - Beard trimmer MOSER - Free user manual and instructions
Find the device manual for free ChromStyle MOSER in PDF.
User questions about ChromStyle MOSER
0 question about this device. Answer the ones you know or ask your own.
Ask a new question about this device
Download the instructions for your Beard trimmer in PDF format for free! Find your manual ChromStyle - MOSER and take your electronic device back in hand. On this page are published all the documents necessary for the use of your device. ChromStyle by MOSER.
USER MANUAL ChromStyle MOSER
Operation Manual Cord/Cordless Hair Clipper

natural_image
Black and silver hairbrush tool with a circular head and three buttons, mounted on a base (no visible text or symbols)| OriginalbetriebsanleitungNetz-/Akku-Haarschneidemaschine Typ 1871 Li+ |
| Translation of the original operation manualCord/cordless hair clipper type 1871 Li+ |
| Traduction du mode d'emploi d'origineTondeuse à cheveux secteur / batterie type 1871 Li+ |
| Traduzione delle istruzioni per l'uso originaliTagliacapelli a rete/batteria tipo 1871 Li+ |
| Traducción del manual de uso originalMáquina de corte de pelo con alimentación de red/por batería 1871 Li+ |
| Tradução do manual de utilização original – Máquina para corte decabelo com bateria e ligação à rede eléctrica Tipo 1871 Li+ |
| Vertaling van de originele gebruiksaanwijzingSnoer/snoerloze tondeuse type 1871 Li+ |
| Översättning av originalbruksanvisningNät-/batteridriven härklippningsmaskin Typ 1871 Li+ |
| Oversettelse av den originale bruksanvisningenNett-/batteridrevet härklippemaskin type 1871 Li+ |
| Alkuperäiskäyttöohjeen käännösTyypin 1871 Li+ verkko-/akkukäyttöinen hiustenleikkuukone |
| Orijinal kullanma kılavuzunun çevirisiElektrikli/bataryalı saç kesme makinesi Tip 1871 Li+ |
| Tłumaczenie oryginalnej instrukcji obsługi – Maszynka do strzyżeniawłosów z zasilaniem sieciowym/akumulatorowym typu 1871 Li+ |
| Překlad originálního návodu k použitíZastřihovač vlasů s napájením ze sitě/akumulátoru typ 1871 Li+ |
| Preklad originálneho návodu na obsluhuSiet’ový/akumulátorový strihač vlasov typ 1871 Li+ |
| Az eredeti használati utasítás fordításaHálózatról / akkumulátorról működtethető 1871 Li+ típusú hajvágó gép |
| Prevod originalnih navodil za uporaboAparat za striženje las na omrežní / akumulatorski pogon tip 1871 Li+ |
| Traducerea manualului de utilizare original – Maşină de tuns părulmodel tip 1871 Li+ cu alimentare de la priză/acumulator |
| Превод на оригиналното упътване – Машинка за подстригване –работа на ток и с акумулатор тип 1871 Li+ |
| Перевод оригинального руководства по эксплуатации – Аккумуляторно-сетевая машинка для стрижки волос, тип 1871 Li+ |
| Переклад оригінальної інструкції – Машинка для стриження волосся,яка працює від електромережі та акумуляторів, тип 1871 Li+ |
| Μετάφραση των πρωτότυπων οδηγιών λειτουργίαςΚουρευτική μηχανή ρεύματος/μπαταρίας τύπος 1871 Li+ |
1
C
text_image
M L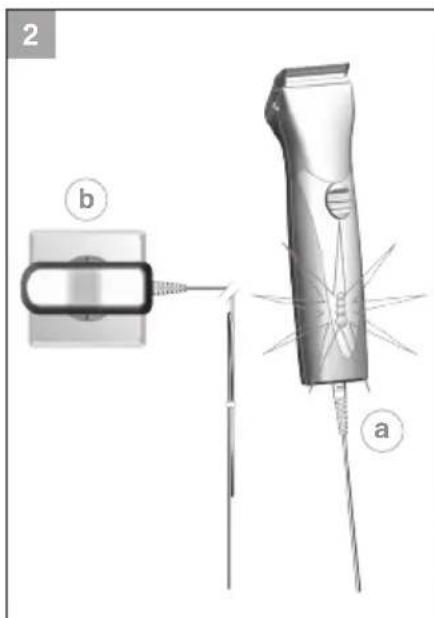
text_image
2 b a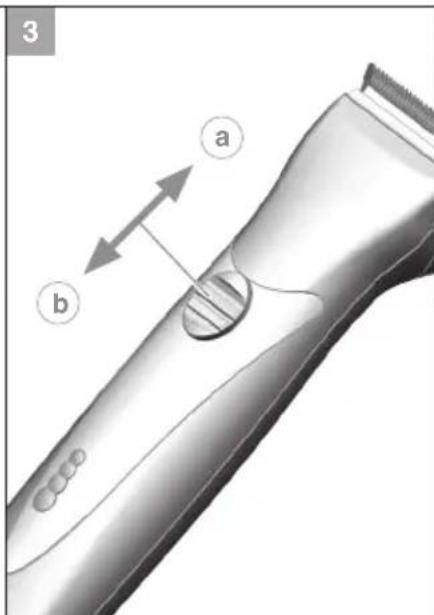
text_image
3 a b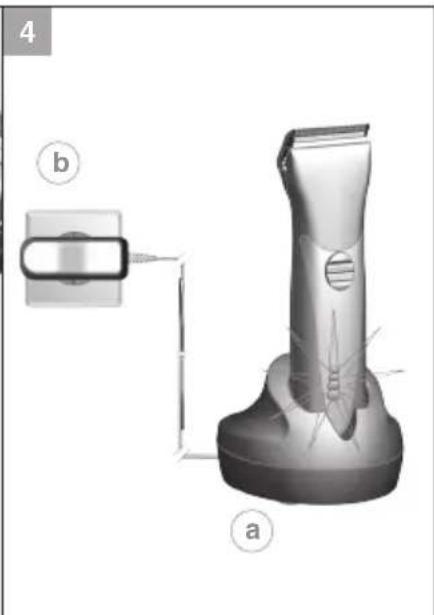
natural_image
3D rendering of a hairbrush with labeled parts (a and b), showing blade structure and mounting bracket (no text or symbols beyond labels)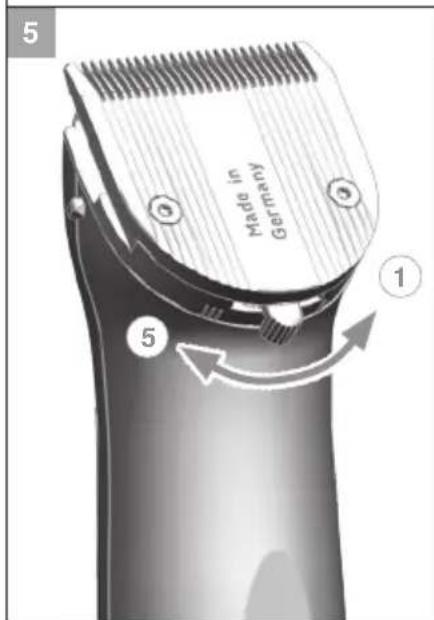
text_image
Made in Germany ① ⑤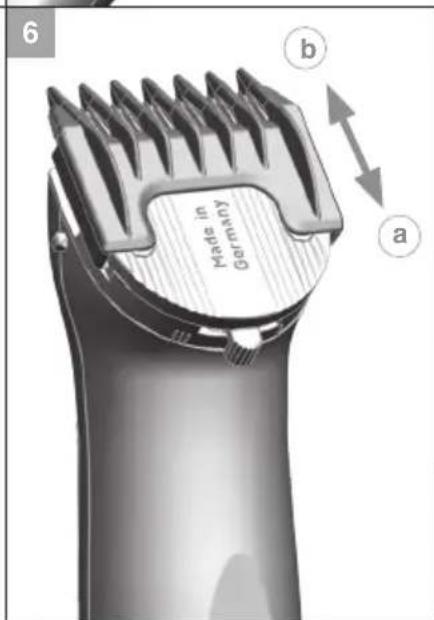
text_image
6 Made in Germany a b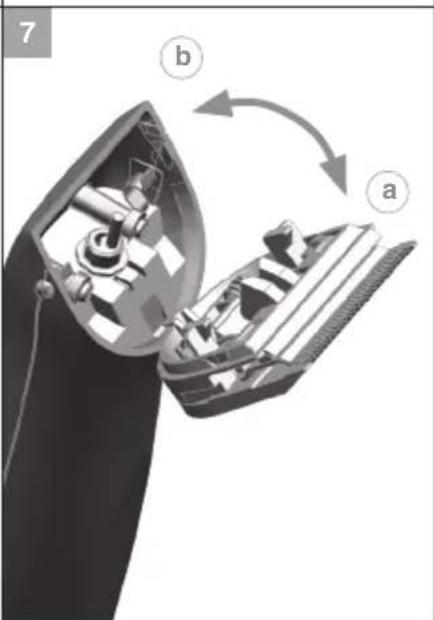
natural_image
Diagram of a hairless machine showing internal components and a rotating mechanism (no text or symbols)
natural_image
Close-up of a hairbrush cutting into an open socket, showing internal components and a close-up view (no text or symbols visible)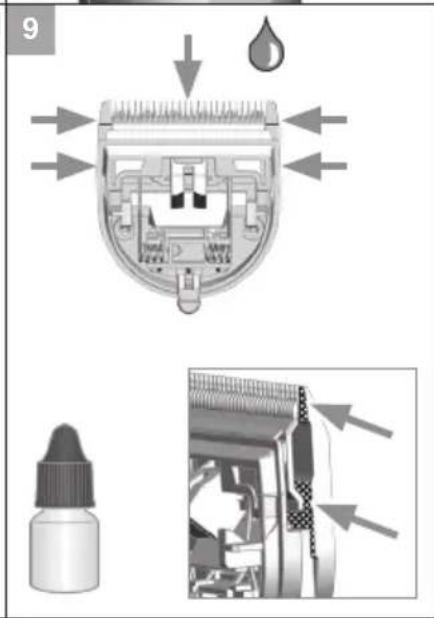
text_image
9General safety instructions
Intended use
- Only use hair clippers to cut human hair, beard hair and eyebrows.
- Only use animal clippers to cut animal hair and animal fur.
Requirements on the user
- Read the operation manual in full and familiarise yourself with it before the first use.
- This appliance is not intended for use by persons (including children) with reduced physical, sensory or mental capabilities, or lack of experience and knowledge, unless they have been given supervision or instruction concerning use of the appliance by a person responsible for their safety. Children should be supervised to ensure that they do not play with the appliance.
- Keep the appliance out of reach of animals and protected against the effects of the weather.
Hazards
Please adhere to the following safety instructions!

Danger! Electric shock due to damage to appliance/plug-in transformer.
▶ Do not use the appliance if it is not working correctly, if it is damaged or if it has fallen into water. Repairs may only be performed at an authorised service centre using original spare parts in order to avoid hazards.
▶ Never use the appliance if the mains cable or plug-in transformer is damaged. A damaged mains cable or plug-in transformer may only be replaced with an original spare part by an authorised service centre or another similarly qualified person, in order to avoid hazards.
▶ Only specialists properly trained in the handling of electrotechnical appliances may repair electrical equipment.

Danger! Electric shock due to penetration of liquid.
▶ Never touch electrical equipment that has fallen into water. Disconnect from the mains immediately.
▶ Never use electrical equipment in the bath or under the shower.
▶ Always position or store electrical equipment where it cannot fall into water (e.g. washbasin). Prevent electrical equipment from coming into contact with water and other liquids.
▶ Only use and store the appliance in dry rooms.
As additional safety measure, it is recommended that a tested residual current appliance (RCD) with a residual operating current of not more than 30 mA be installed in the bathroom circuit.

Danger of explosion!
▶ Never use the appliance where aerosol (spray) products are being used or where oxygen is released.
▶ Do not attempt to replace the battery.
▶ Do not expose the appliance to temperatures below 0^ C and above +40^ C for any length of time. Avoid direct exposure to sunlight.

Warning! Injuries due to incorrect handling.
▶ To prevent injury, never use the appliance if the blade set is damaged.
▶ Always switch the appliance off before storage, as the appliance can fall down due to the vibrations.

Handle with care! Damage due to incorrect power supply.
▶ Only operate the appliance with an alternating current and with the voltage stated on the nameplate.

Handle with care! Injuries due to incorrect handling.
▶ Only use accessories recommended by the manufacturer.
▶ Only use the plug-in transformer that is included in the delivery for charging the appliance. Only replace defective plug-in transformers with original spare parts, which you can order via our service centres.
▶ Never insert or allow objects to fall into the openings of the appliance.
▶ When disconnecting the appliance from the mains, never pull on the mains cable or on the appliance itself.
▶ Do not wind the mains cable around the appliance.
▶ Keep the mains cable and appliance away from hot surfaces.
▶ Make sure that the mains cable is not twisted or kinked when charging or storing.
▶ Do not use disposable batteries. Batteries should only be replaced at authorised service centres.
General user information
Information about using the operation manual
▶ Before using the appliance for the first time, you must read and understand the operation manual completely.
▶ Consider the operation manual as part of the product and store it in a safe and accessible place.
▶ Include this operation manual if passing the appliance on to a third party.
▶ In case of conflicts with national safety specifications or instructions, the national requirements must be followed.
Explanation of symbols and notes

DANGER
Danger of electric shock which may result in serious physical injury or death.

DANGER
Danger of explosion which may result in serious physical injury or death.

WARNING
Warning of possible physical injury or a health risk.

CAUTION
Information about danger of material damage.

Note with useful information and tips.
▶ Action to be taken by owner.
- Carry out these actions in the sequence described.
Product description
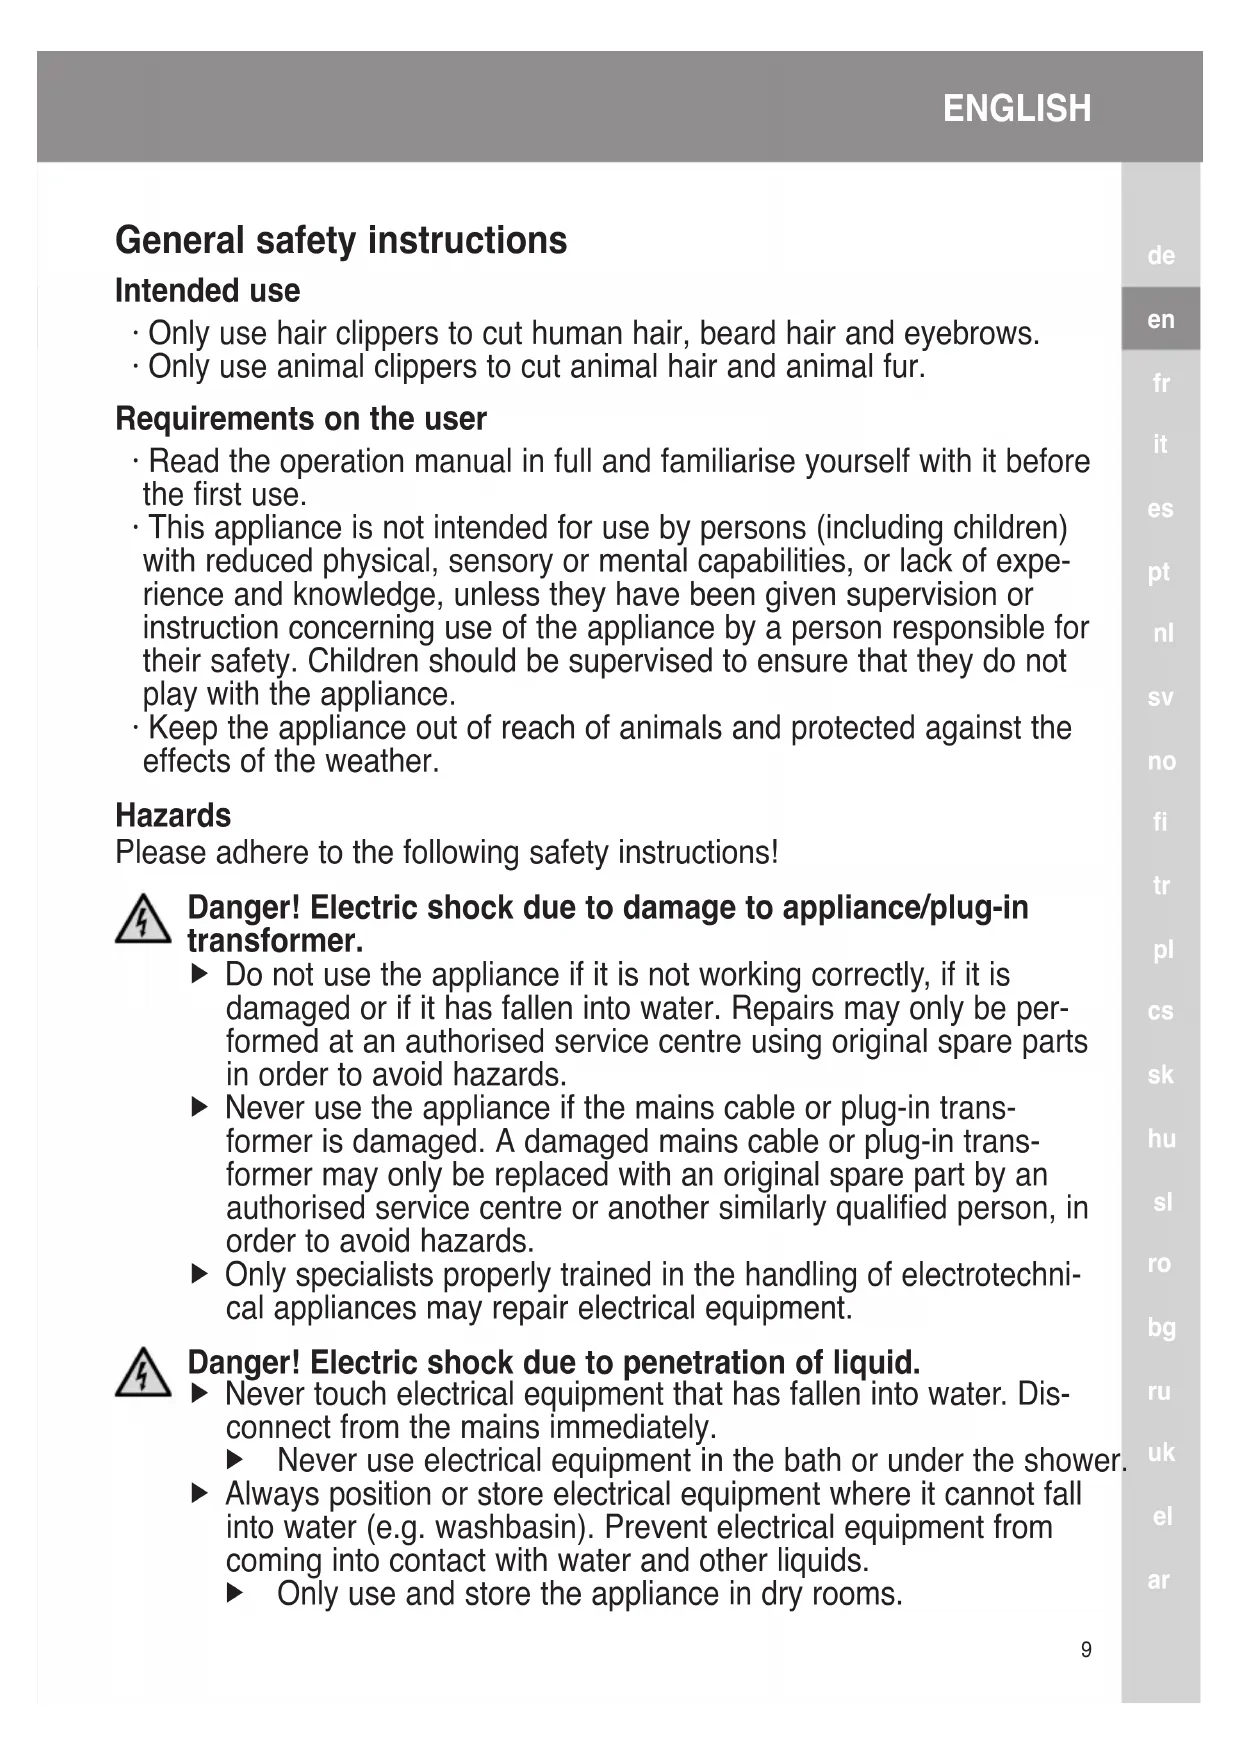
Description of parts (Fig. 1)
A Blade set
B On/off switch
C Battery power indicator
D Charging stand
E Cutting-length adjustment
F Appliance socket
G Charging stand socket
H Attachment comb, cutting length 3 mm
I Attachment comb, cutting length 6 mm
J Attachment comb, cutting length 9 mm
K Attachment comb, cutting length 12 mm
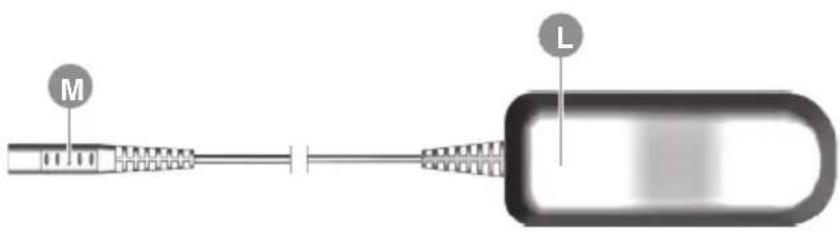
L Plug-in transformer
M Appliance plug
N Cleaning brush
Oil for blade set
Technical data
Hand-held appliance
Drive unit: DC motor
Battery: Li-ION battery (LiFePO4)
Battery operating time: up to 90 minutes
Dimensions (LxWxH): 178 x 46 x 50 mm
Weight: approx. 290 g
Emission sound pressure level: max. 63 dB(A) @ 25 cm
Vibration: < 2.5 m/s
Charging stand
Dimensions
with accessories (LxWxH): 96 x 120 x 72 mm
Weight: approx. 91 g
Plug-in transformer
Type Adapter 6000
Power consumption: max. 12 W
Operating voltage: 100 - 240 V / 50 - 60 Hz
The appliance is safety insulated and radio screened. It meets the requirements of EU Electromagnetic Compatibility Directive 2004/108/EC and Machinery Directive 2006/42/EC.
Operation
Preparation

Keep the packaging material for safe storage or transport later.
▶ Check that the contents are complete.
▶ Check all the parts for possible transport damage.
Safety

Handle with care! Damage due to incorrect power supply.
▶ Only operate the appliance with an alternating current and with the voltage stated on the nameplate.
Charging the battery
- Connect the appliance plug (M) on the plug-in transformer to the charging stand socket (G) (Fig. 4@).

- The appliance can also be connected directly to the plug-in transformer for charging (Fig. 2 ^a/b ).
-
Battery overcharging is prevented thanks to intelligent charge management.
-
Connect the plug-in transformer to the mains socket (Fig. 4⑥).
- Switch off the appliance using the on/off switch (Fig. 3⑥).
- Place appliance on the charging stand (Fig. 4) or connect directly to the plug-in transformer (Fig. 2a/b). A signal will sound and the charging process begins.

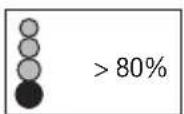
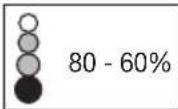
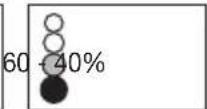
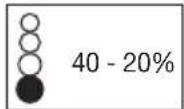
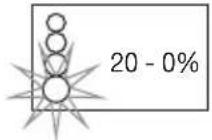
- Depending on the charge status, the corresponding segment of the battery power indicator will flash during the charging process. Once the battery is fully charged, all segments of the battery power indicator will remain lit continuously.
- After the appliance has been removed from the charging stand, the display goes out after approx. 30 seconds (power saving mode).
-
It should take around 60 minutes for the appliance to charge to full capacity.
-
Once the battery is fully charged, a signal will sound.
Battery operation
- Switch on the appliance using the on/off switch and switch off after use (Fig. 3(a)/b).

- After the appliance has been switched off, the display goes out about 30 seconds later (power saving mode).
- When the battery is fully charged, the appliance can be used for up to 90 minutes without mains connection.
- The charge status of the battery is displayed by the battery power indicator (C).
- When the battery has fully run down, the appliance switches itself off automatically.
- In case of insufficient maintenance of the blade set, the operating time can be reduced considerably.
Mains operation
- Connect the appliance plug (M) on the plug-in transformer to the appliance socket (F) (Fig. 2@).
- Connect the plug-in transformer to the mains socket (Fig. 2 ^b ).
- Switch on the appliance using the on/off switch and switch off after use (Fig. 3(a)/b).
Operation
Setting the cutting length
The cutting length can be adjusted to between 0.7mm and 3mm (5 possible positions) using the cutting-length adjustment integrated into the blade set (Fig. 5).
Cutting with the attachment comb
The appliance can also be operated with attachment combs.
▶ In order to achieve the indicated cutting length, the cutting length adjustment lever should be set to position 1 (Fig. 5).

The following attachment combs are included as standard: 3 mm, 6 mm, 9 mm and 12 mm cutting lengths.
Attaching/removing the attachment comb
- Slide the attachment comb on to the blade set in the direction of the arrow until it reaches the limit stop (Fig. 6@).
- The attachment comb can be removed by pushing it in the direction of the arrow (Fig. 6⑥).
Maintenance
Cleaning and care

Danger! Electric shock due to penetration of liquid.
▶ Switch the appliance off and disconnect from the power supply, before you start with cleaning and care.
▶ Do not immerse the appliance in water!
▶ Do not allow any liquid to get inside the appliance.
▶ Only reconnect the appliance to the power supply if it is completely dry.

Handle with care! Danger from aggressive chemicals.
Aggressive chemicals could damage the appliance and accessories.
▶ Never use solvents or scouring agents.
▶ Only use cleaning agents and blade set oil recommended by the manufacturer.

Hygienic spray and blade set oil are available from your dealer or our service centre.
Remove the attachment comb (Fig. 6) after every use and lift the blade set out of the housing (Fig. 7). Use the cleaning brush to remove any cut hairs from the housing opening and from the blade set (Fig. 8). The cleaning lever can also be pressed. This allows the cut hairs that accumulate between the bottom blade and the top blade to be easily removed using the cleaning brush (EASY CLEANING).
▶ Only wipe the appliance with a soft, slightly damp cloth.
▶ The blade set using the hygienic spray.
▶ Oil the blade set with the blade set oil (Fig. 9).

For a good and long-lasting cutting performance, it is important to oil the blade set frequently
▶ If the cutting performance deteriorates after long use despite regular cleaning and oiling, the blade set should be replaced.
Automatic sensor system
To give you advance notice of an urgent need for maintenance care, your hair cutting appliance has been equipped with an automatic sensor system.

- The sensor system automatically recognises when the blade set needs oiling or cleaning. After the appliance is switched off, an acoustic signal will sound and the battery power indicator will flash for 2 minutes.
- The acoustic signal and the flashing of the battery power indicator can be cancelled (turned off) by briefly switching the appliance on and off.
- Before using the appliance again, it is strongly recommended to clean the appliance and oil the blade set. See chapter Cleaning and care.
- Failure to observe these instructions may result in damage to and early failure of the appliance, which will void all guarantee claims.
Changing the blade set

Warning! Injuries and material damage due to incorrect handling.
▶ Switch the appliance off and disconnect from the power supply before changing the blade set.
- Switch the appliance off using the on/off switch (Fig. 3 ⑥) and disconnect from the power supply.
- Slide the blade set off the housing in the direction of the arrow (Fig. 7@). Remove the blade set.
- Replace the blade set by hooking it into the housing and pressing it down until it clicks into position (Fig. 7⑥).
Problem elimination
Blade set is cutting badly or pulling hair out.
Cause: Blade set is dirty or worn out.
▶ Clean and oil the blade set (Fig. 8/9); if this does not resolve the problem, replace the blade set (Fig. 7).
Battery life is too short.
Carefully clean and oil the blade set (Fig. 8/9). A blade set that is very dirty and has not been oiled can halve the available battery life! If the blade set is clean and oiled and the battery life is still far too short, it is likely that the batteries are nearing the end of their life.

Battery life generally decreases at a steady rate when the appliance is used on a day-to-day basis. The batteries used here are specially designed for professional and everyday use, but are also affected by this.
Skin injury
Cause: Too much contact pressure on the skin.
▶ Reduce contact pressure when cutting close to skin.
Cause: Damaged blade set.
▶ Check whether the blade edges were damaged during use and replace the blade set if necessary.
Battery power indicator light does not light up.
Cause: Appliance has not been correctly placed on the charging stand.
▶ Ensure that the hand-held appliance has been correctly placed on the charging stand.
Cause: Defective power supply.
▶ Ensure that the power supply unit is plugged into the mains socket.
▶ Check the mains cable for possible damage.
▶ Check the power supply.
Entire battery power indicator is flashing
▶ Check whether the blade set is blocked and the blade is able to move. Switch the appliance on and off. If the entire display is flashing, please contact your specialist retailer or a WAHL service centre.
Disposal

Handle with care! Environmental damage in the case of incorrect disposal.
▶ Discharge batteries prior to disposal!
▶ Correct disposal will ensure environmental protection and prevent any potentially harmful impacts on people and the environment.
Adhere to the relevant legal requirements when disposing of the appliance.
Information on the disposal of electrical and electronic appliances in the European Community:
Within the European Community, national regulations are specified for the disposal of electrical appliances, based on EU Waste Electrical and Electronic Equipment Directive 2002/96/EC (WEEE). In accordance with this, the appliance can no longer be disposed of with the local or domestic waste.
The appliance will be accepted free of charge by local collection points or recycling centres.
Batarya: Li-ION batarya (LiFePO4)
Akumulator: Li-Ionski akumulator (LiFePO4)
Kapaciteta akumulatorja: do 90 min
Mere (DxŠxV): 178 x 46 x 50 mm
Teža: pribl. 290 g
Raven oddanega
Greutate: circa 91 g