iSensys MF8540Cdn - Printer CANON - Free user manual and instructions
Find the device manual for free iSensys MF8540Cdn CANON in PDF.
User questions about iSensys MF8540Cdn CANON
0 question about this device. Answer the ones you know or ask your own.
Ask a new question about this device
Download the instructions for your Printer in PDF format for free! Find your manual iSensys MF8540Cdn - CANON and take your electronic device back in hand. On this page are published all the documents necessary for the use of your device. iSensys MF8540Cdn by CANON.
USER MANUAL iSensys MF8540Cdn CANON

MF8580Cdw / MF8550Cdn


★:100mm
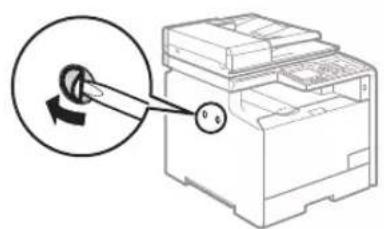
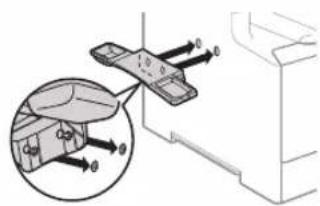
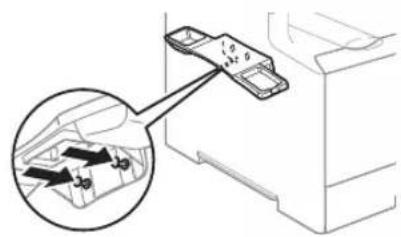
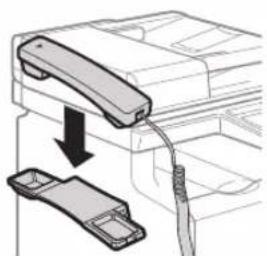
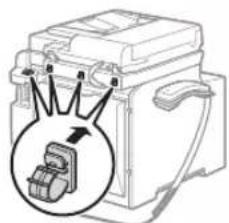
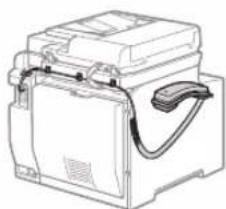
Installing the Optional Handset (MF8580Cdw / MF8550Cdn Only)


About the Supplied Manuals 10
Navigating the Menu and Text Input Method .10
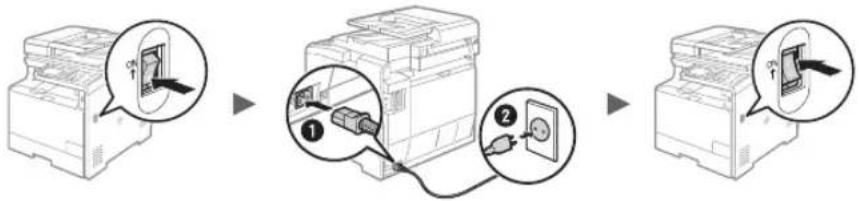
Connecting the Power Cord and Turning
ON the Power. 11
Specifying the Initial Settings 11
Choosing the Method to Connect the Machine
to the Computer 12
Connecting via a Wired LAN 12
Connecting via a USB Cable. 12
Setting a Paper Size and Type 13
Specifying Initial Fax Settings and
Connecting a Telephone Cable
(MF8580Cdw / MF8550Cdn Only) 13
Perform Useful Tasks 14
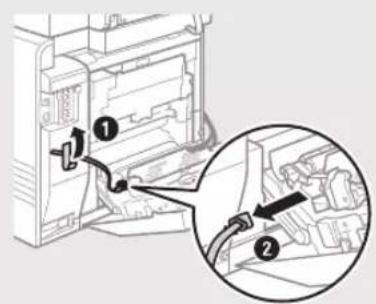
Clearing Paper Jams. 15
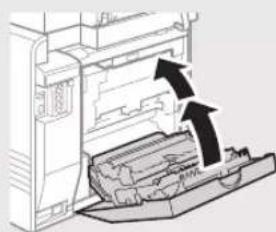
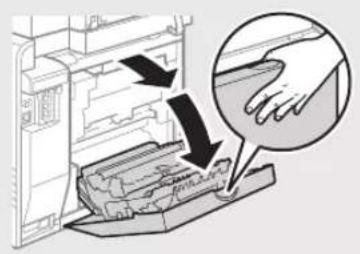
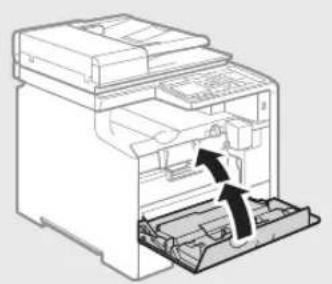
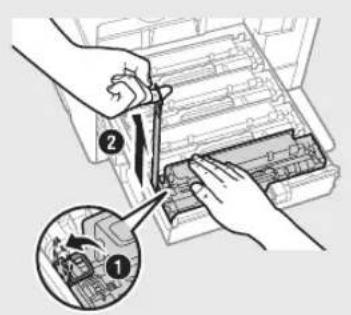
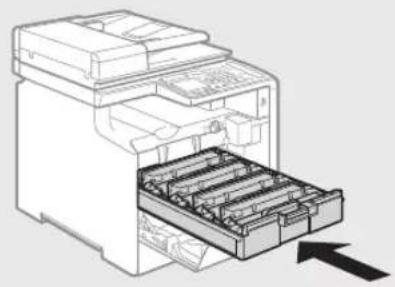
Replacing Toner Cartridges. 16
(alleleen MF8580Cdw / MF8550Cdn) 93
IopcoeHHe He Ka6JI nHTaHH
N BkIIOUeHHe annapaTa 131
Yka3aHHe HauaIbHbIX npaMaTePob 131
Bb6op meto na noKnHoueHn annapaTa
K ROMnbIOTepy 132
TnKIOHHe Hepe3 npBOdHyIO
IohalbHyIO cetb 132
TOnKIOUeHHe c nOMoUsbIO Ka6eIa USB ....132
YcTaHOBkaΦOpMaTa n Tnna 6ymarn 133
Bb6pHaayabHbixnapaMeTpoB faKca
IIOIDCOEINHeHNE TelefoHHoro Ka6eJRA
(TonbnoImaeMf8580Cdw/MF8550Cdn) 133
HcnoB3OBAHHe nolE3HbIX fHyKuI 134
UctpaHHe 3amr76ymarn .135
3aMeHa KapTpndKeH C ToHePOM 136
IocihnK 3 KOMPJIeKtY nOCTaBKn 140
IpeemiuHmK nyHKtamn
MeHIO Ta CnOciB BBeDHHaTeKCTy 140
Пднluоehншура кИВLEHн
Ta yBIMHHH H N BHeHH 141
BcTaHOBHeHHNoaTkoBnXnapaMeTpib.....141
Bn6ip cnocoby nndnoeHnaapata do
KOMN'IOTepa 142
(solo MF8580Cdw/MF8550Cdn) 43
Attività utili 44
bare for MF8580Cdw / MF8550Cdn) 103
Vymena tonerovych kazet 196
BbBeKdaHe Ha TeKCT 250
Cbpb3BaHe Ha 3axpaHbauJnKa6eJn
BHKIOUBAHE Ha 3axpaHbAHeTo 251
Yka3BaHe Ha npbPoHaayHnHTe
HacTpoRNI 251
1360pHa MeToa 3a Cbbp3BaHe
Ha MaunHaTa KbM KOMNIOTp 252
Cbpb3BaHe ype3 LAN ka6eI 252
Cbpb3BaHe ype3 USB ka6eI. 252
3aabahe Ha foPmTa H Tnna
HaXapTnra 253
Yka3BaHe Ha nbpBOHaayAHInTe HAcTpoKn
Ha KaKca N Cbbp3BaHe Ha TeIefoHek6
(camo 3a MF8580Cdw / MF8550Cdn) 253
N3nblHeHHe Ha nOle3H 3a4a.. 254
OTcTaPaHbAHe Ha 3aceHaHaIaTa xapTnA ....255
CMHa Ha ToHep Kacetn 256
- (MF8550Cdn/MF8580Cdw)
274
275
276
CuprinsTartalomSadržaj
O prilozenim prisučnicima 220
Kretanje po izborniku i nacin unosa teksta 220
Povezivanje kabela za napajanijeukljucivanje napajanja 221
Oredivanje poctnih postavki 221
Odabir nacin povezivanja uredaja
s raucalom .222
Povezivanje putem kabelskog LAN-a 222
Povezivanje putem USB kabela 222
Postavlanje vrste i velicine papira 223
Navodenje početnih postavki faksa
i príkljucivanje telefonskog kabela
(samo MF8580Cdw / MF8550Cdn) 223
Provodenje korisnih zadataka 224
Otklanjanje zaglavjenog papira 225
Zamjena spremnika tonera 226
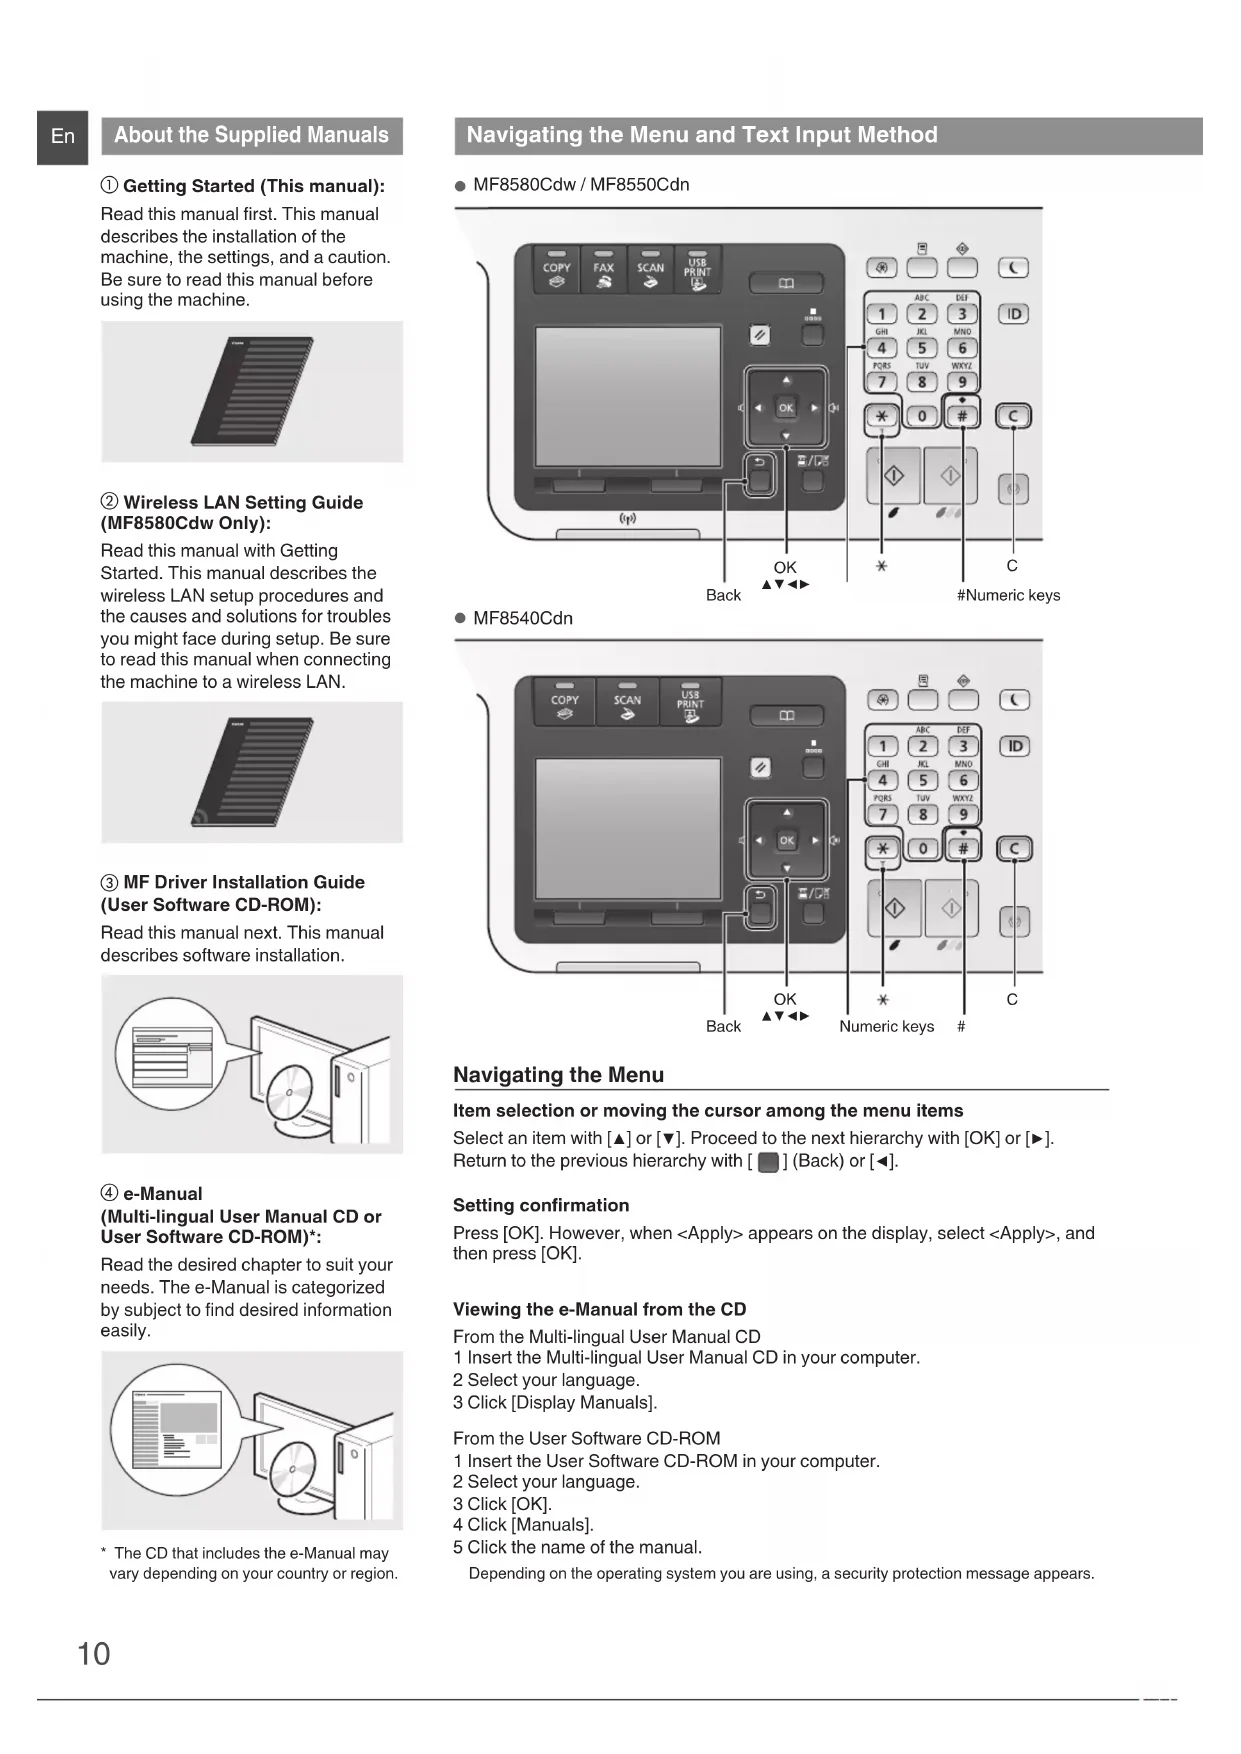
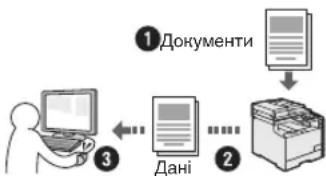
① Getting Started (This manual): Read this manual first. This manual describes the installation of the machine, the settings, and a caution. Be sure to read this manual before using the machine.
② Wireless LAN Setting Guide (MF8580Cdw Only):
Read this manual with Getting Started. This manual describes the wireless LAN setup procedures and the causes and solutions for troubles you might face during setup. Be sure to read this manual when connecting the machine to a wireless LAN.
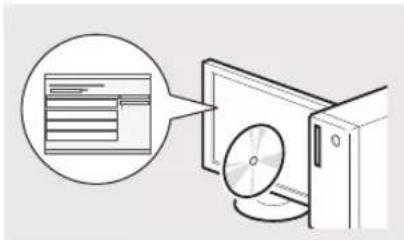
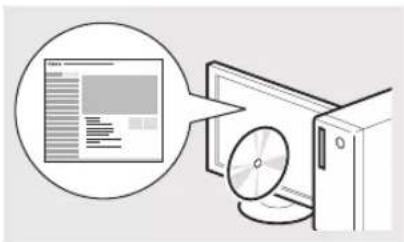
③ MF Driver Installation Guide (User Software CD-ROM):
Read this manual next. This manual describes software installation.
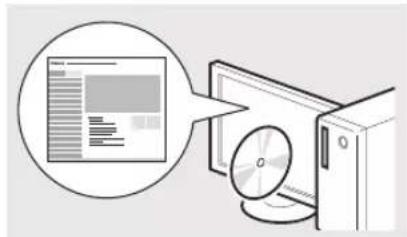
4 e-Manual (Multi-lingual User Manual CD or User Software CD-ROM)
Read the desired chapter to suit your needs. The e-Manual is categorized by subject to find desired information easily.
- The CD that includes the e-Manual may vary depending on your country or region.
MF8580Cdw / MF8550Cdn
MF8540Cdn
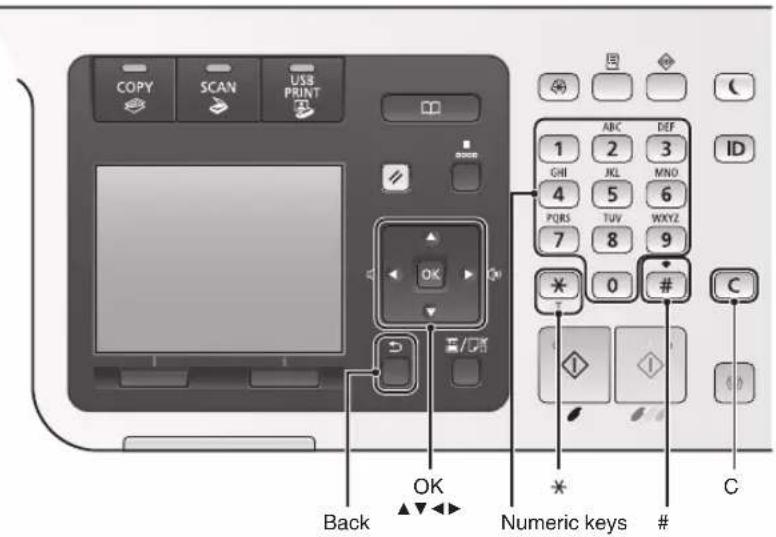
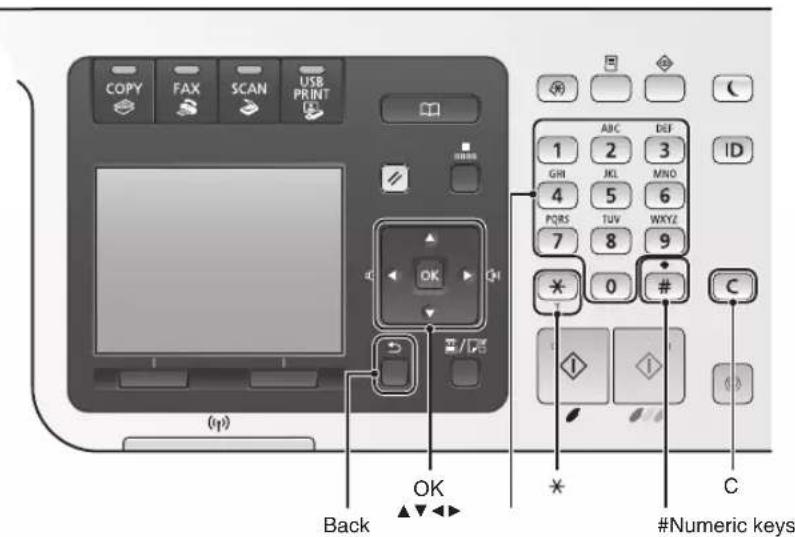
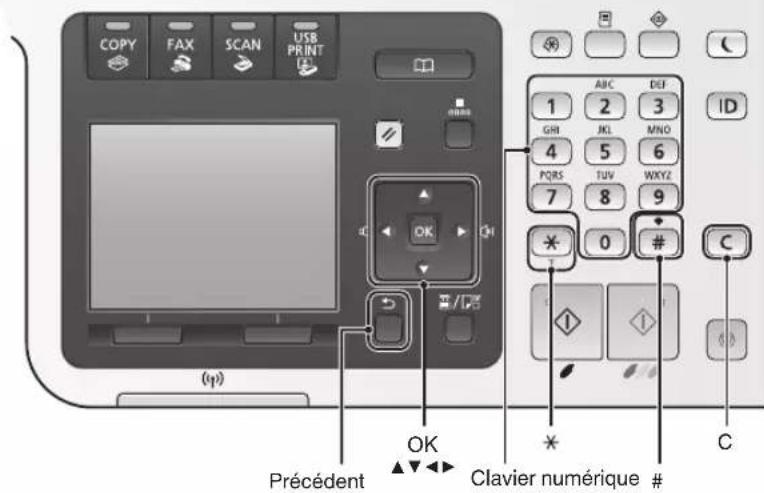
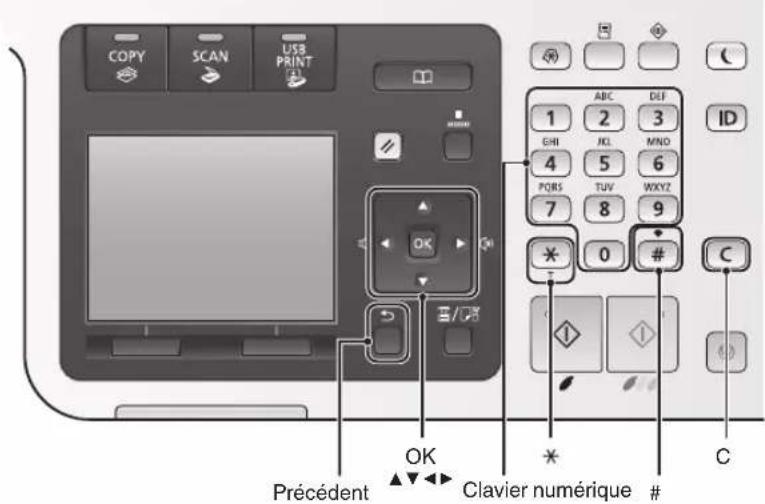
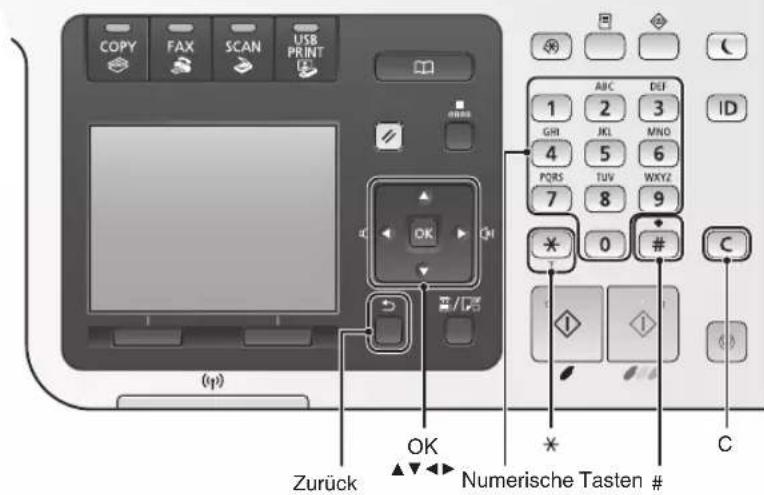
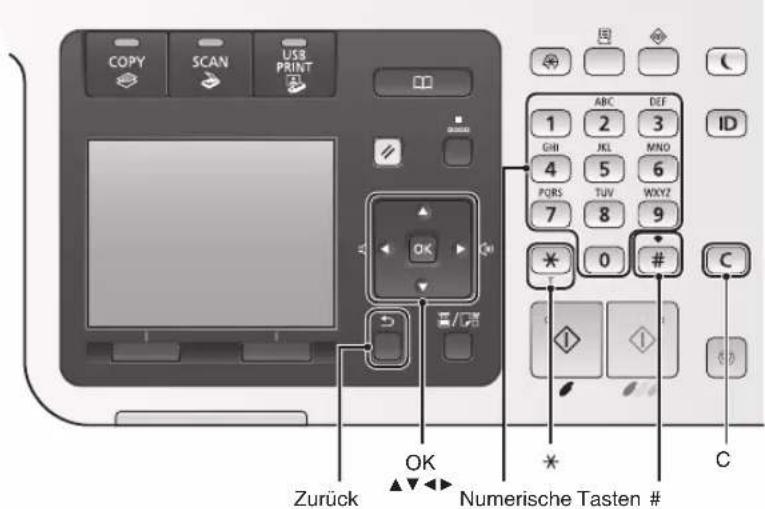
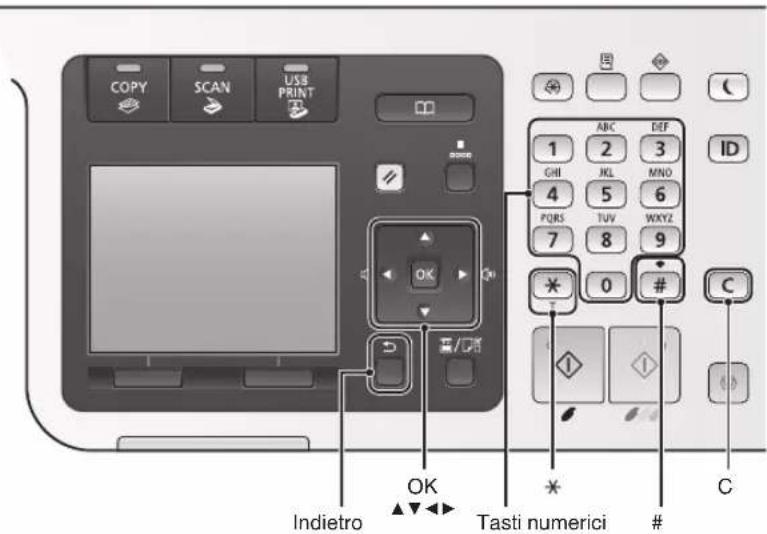
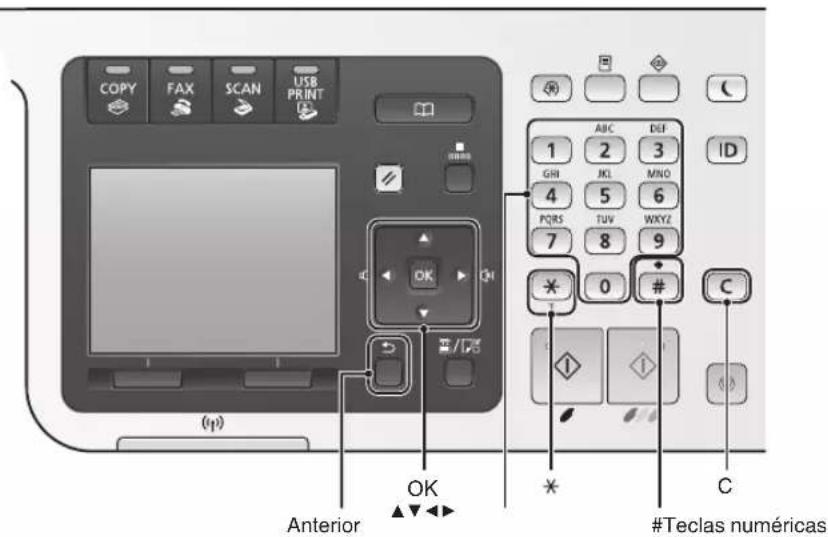
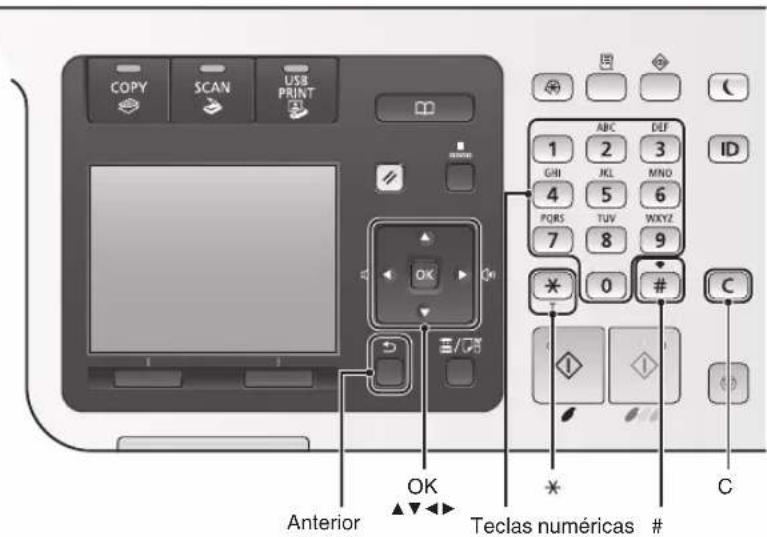
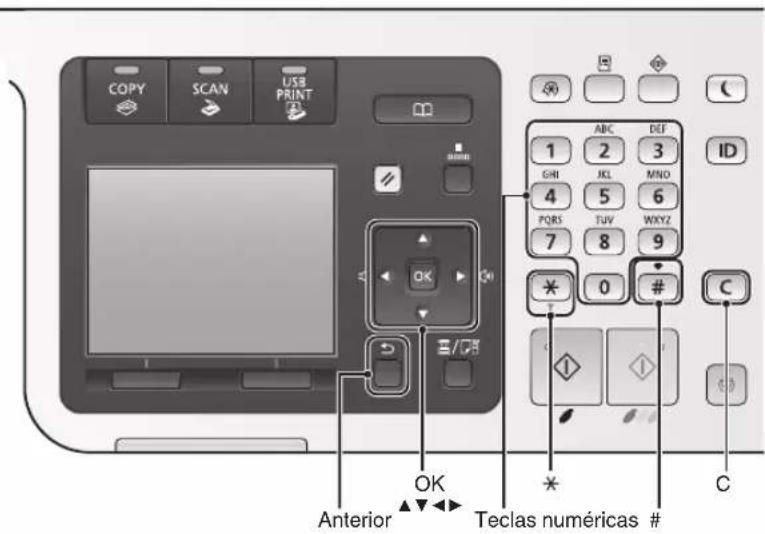
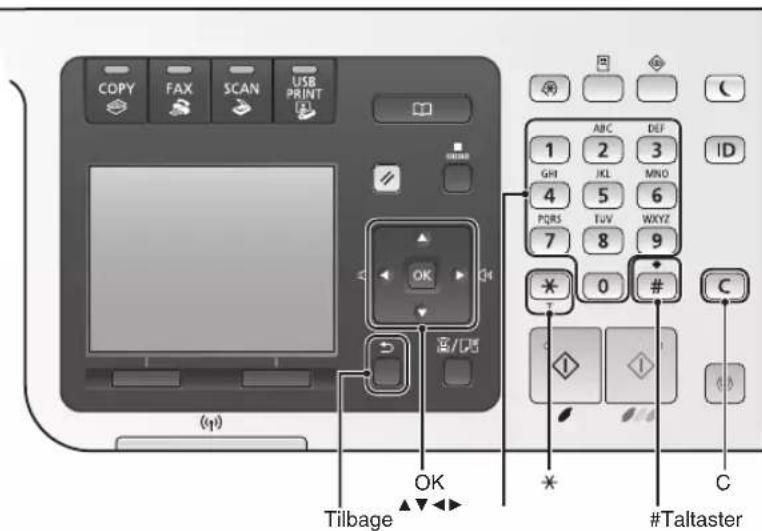
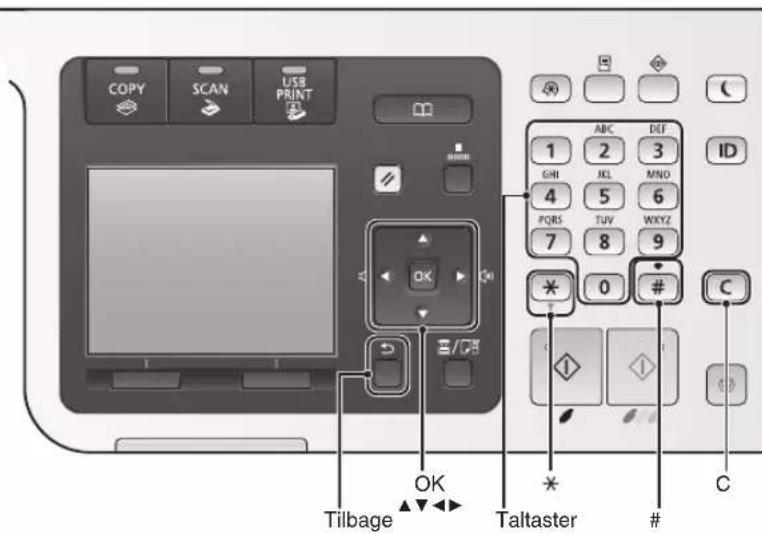
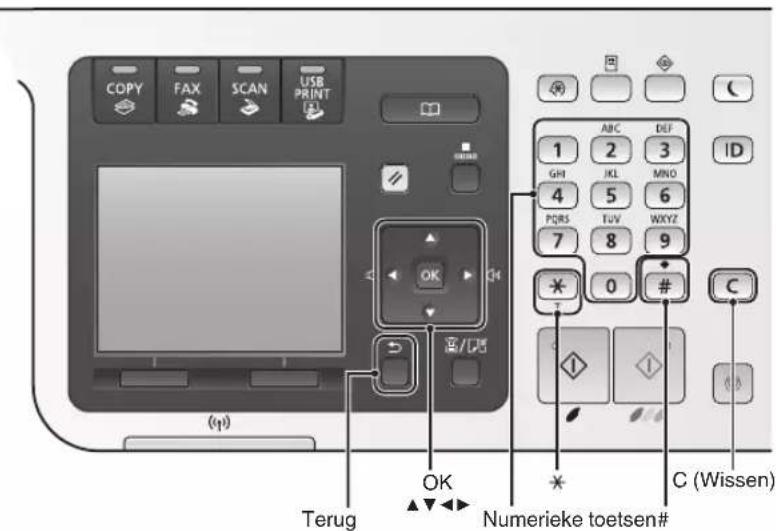
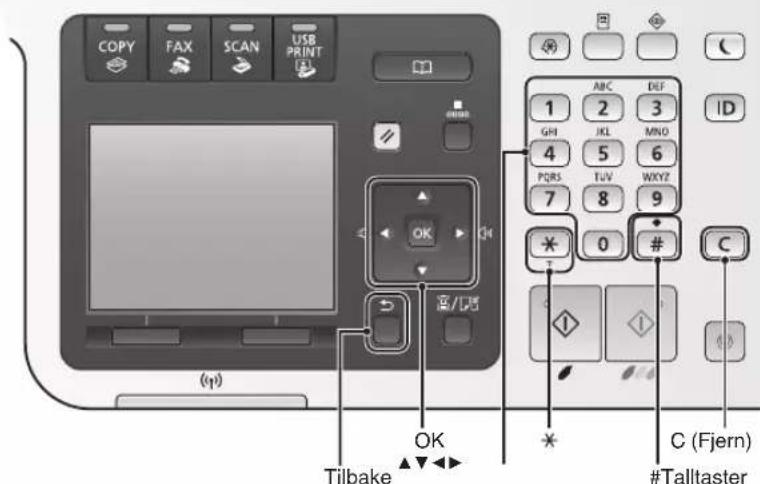
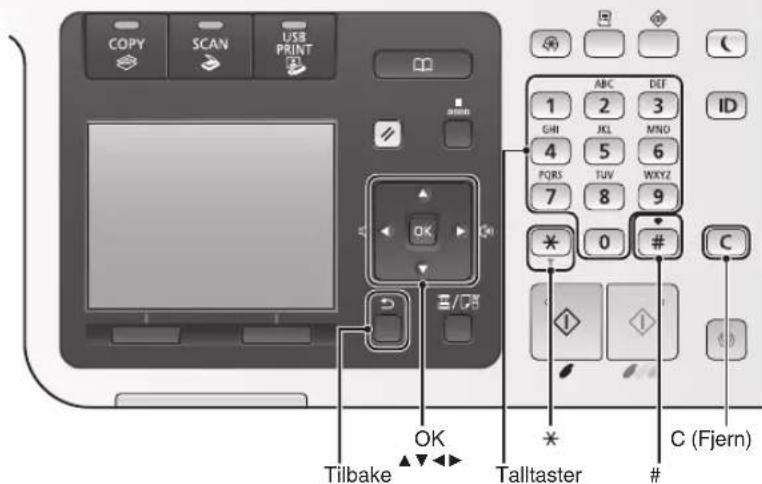
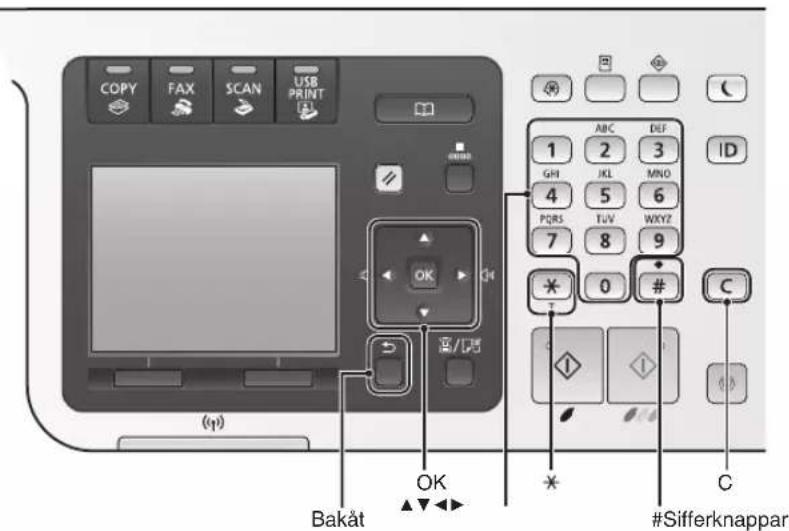
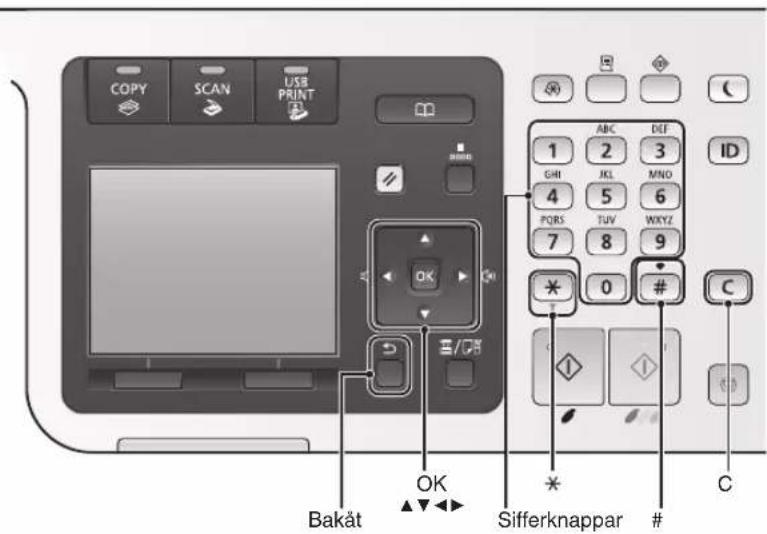
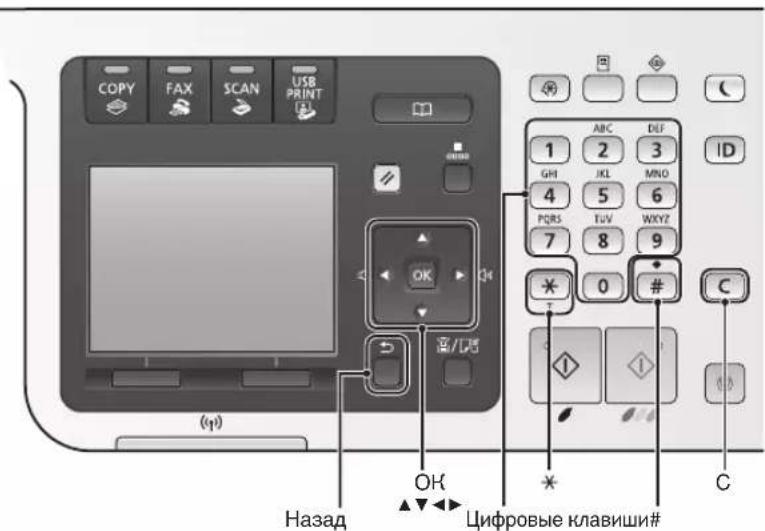
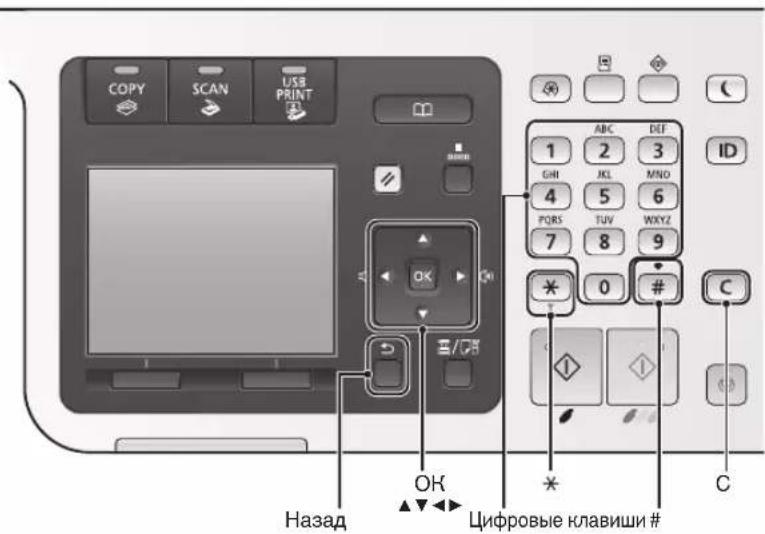
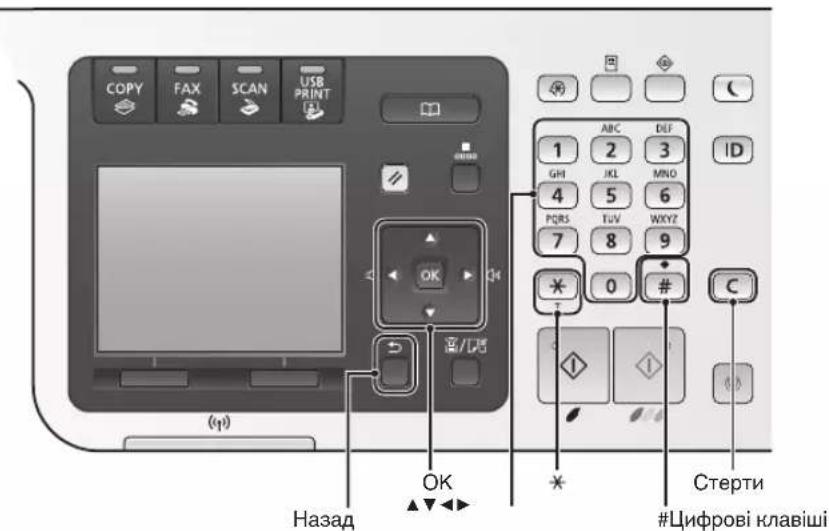
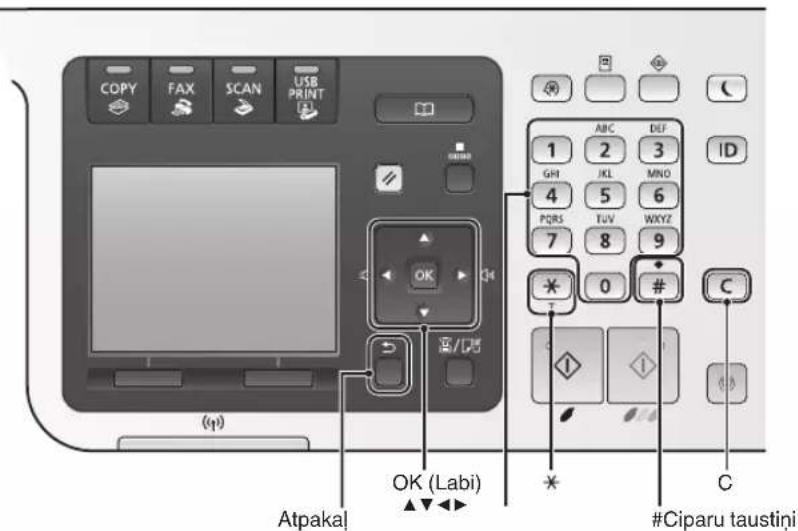
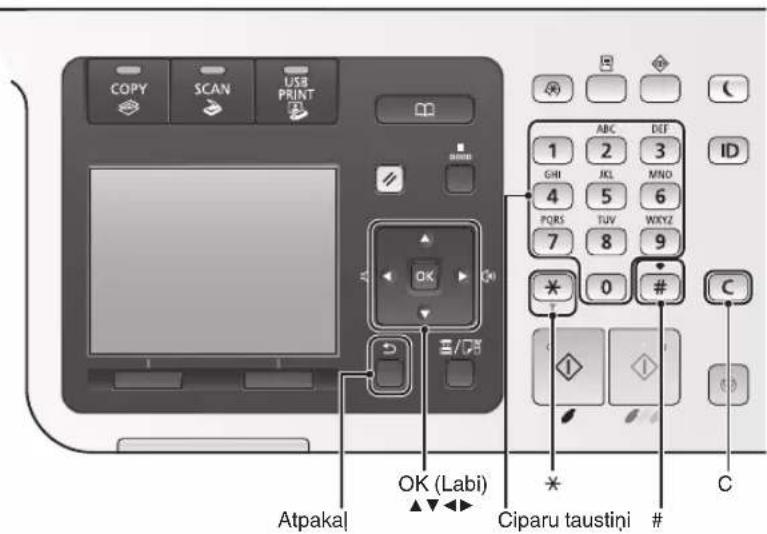
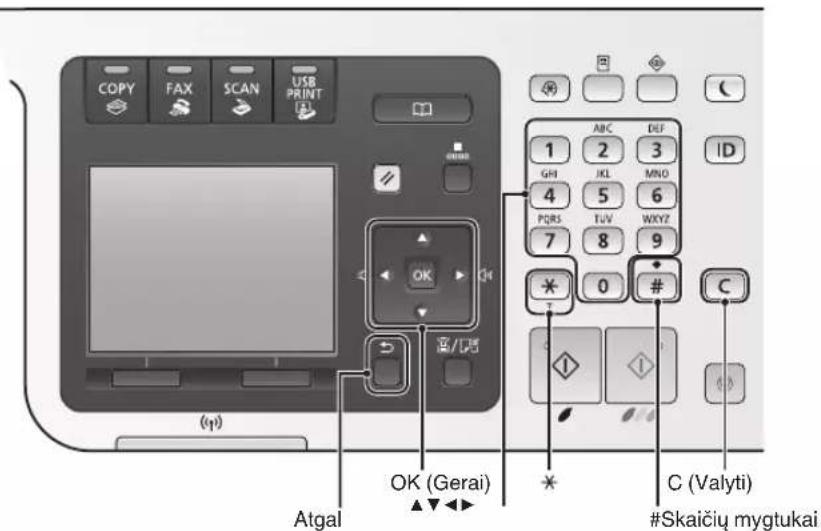
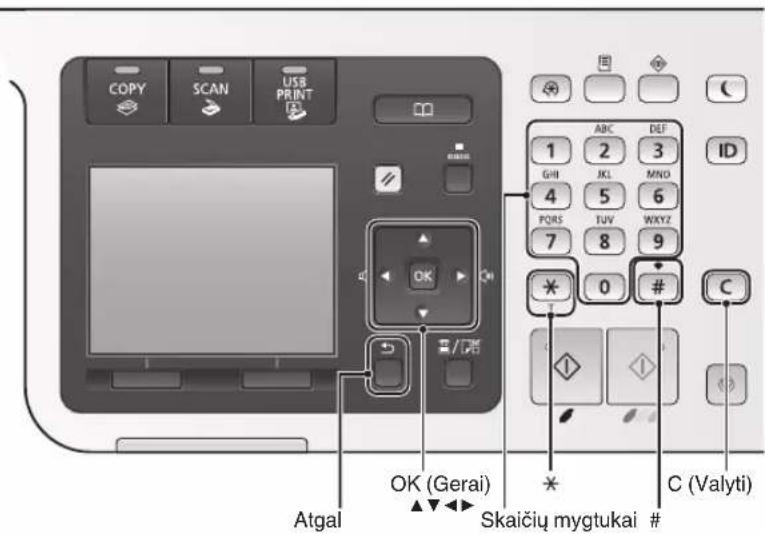
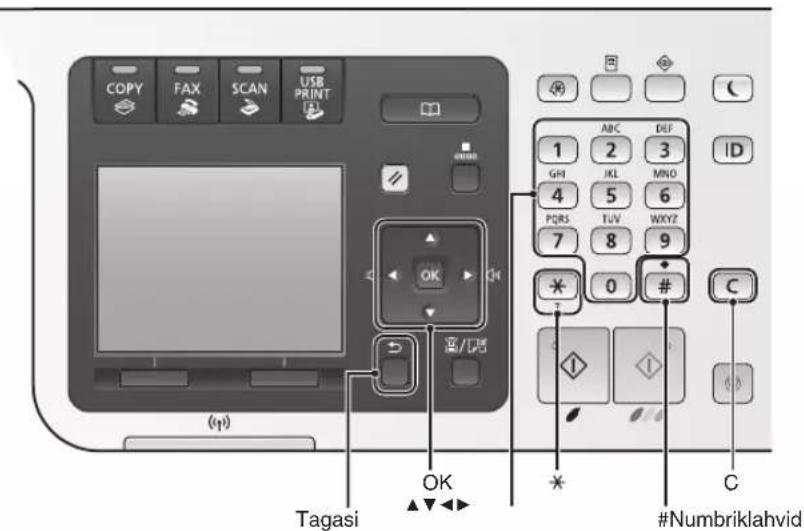
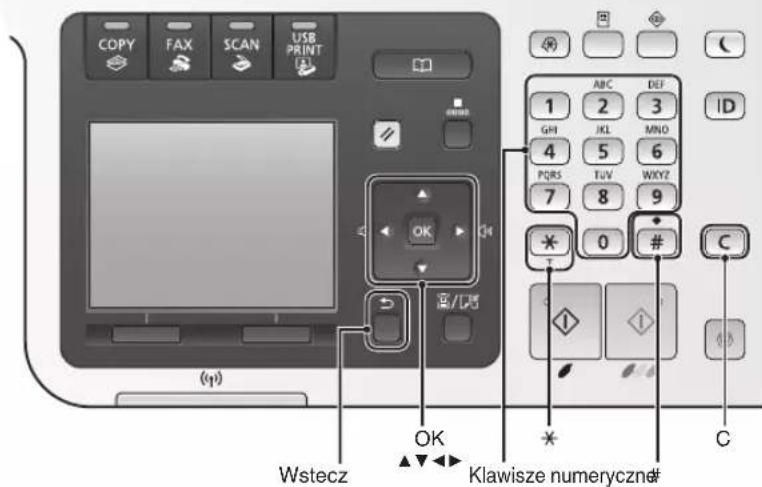
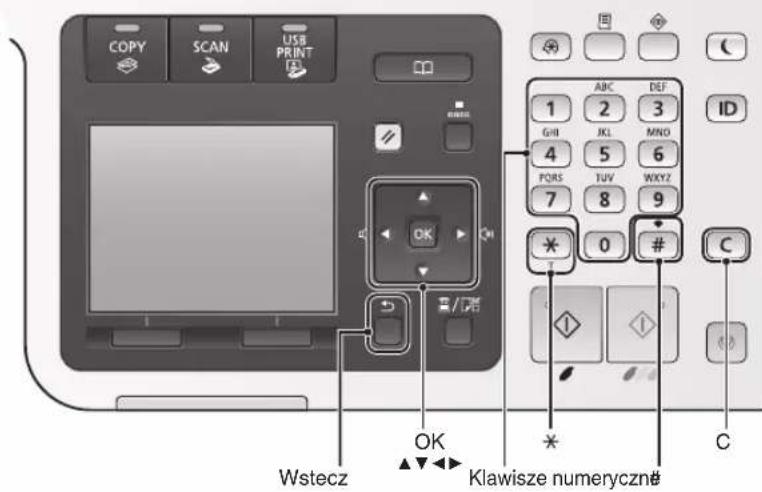
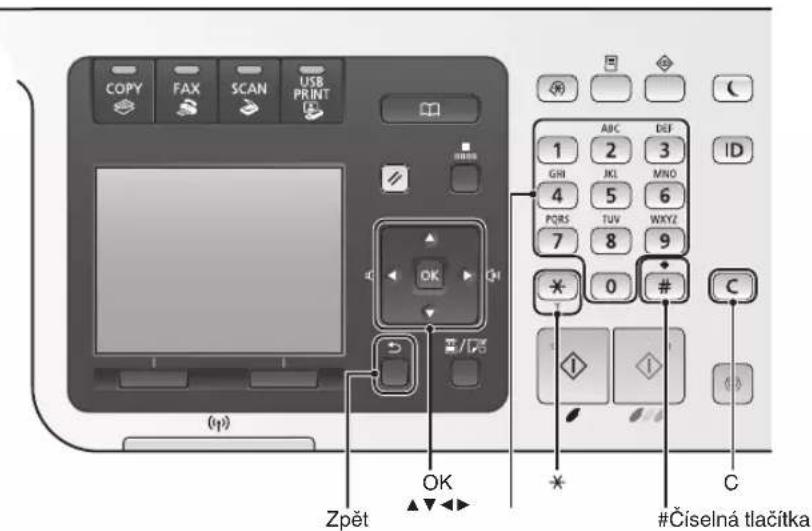
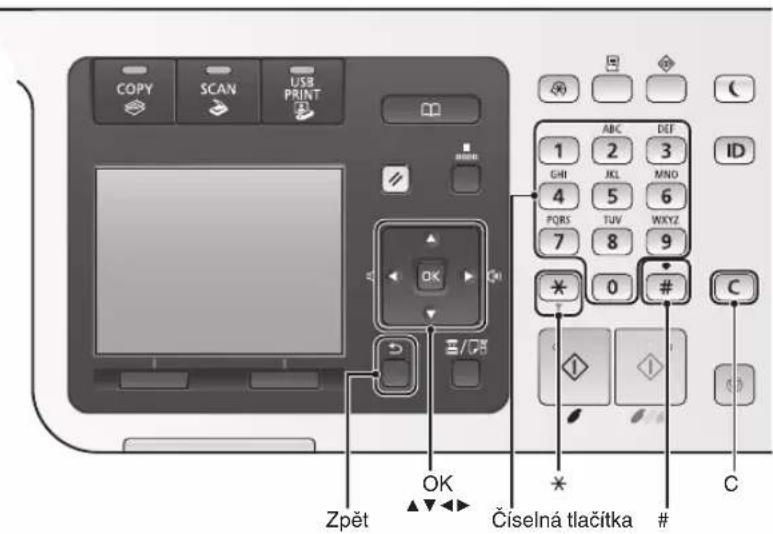
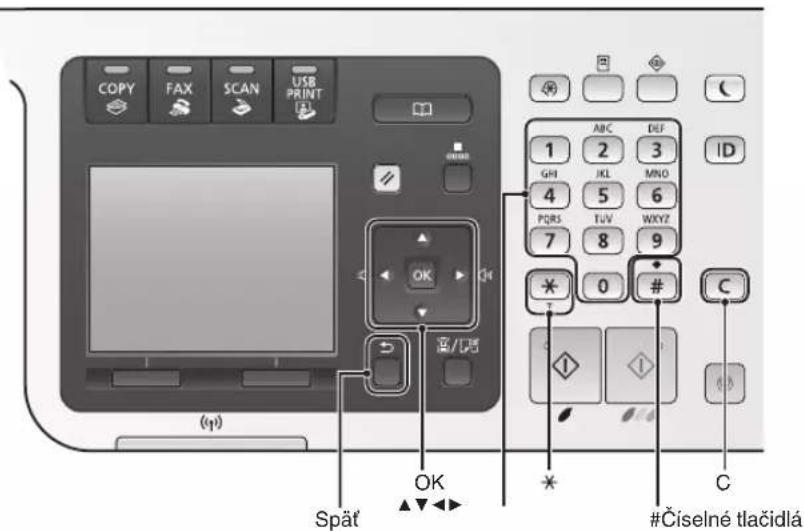
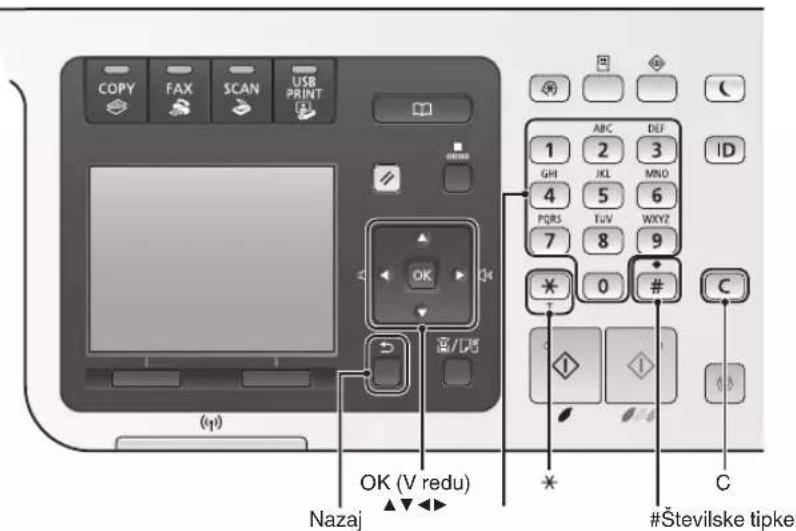
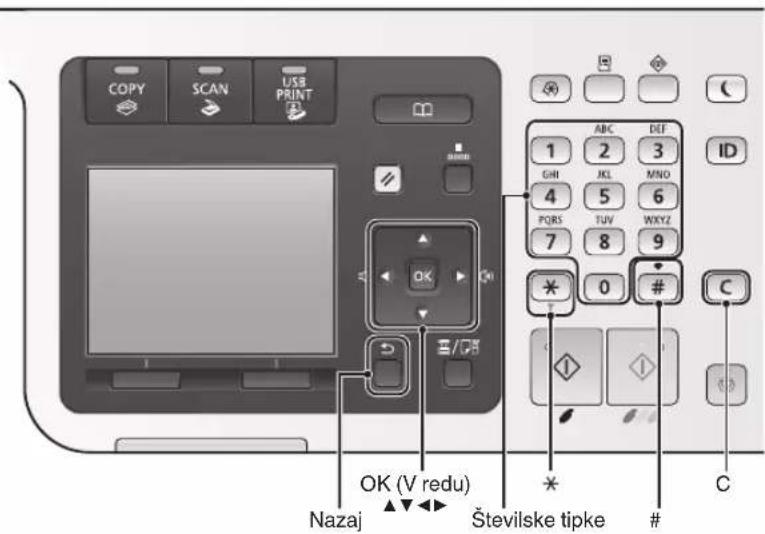
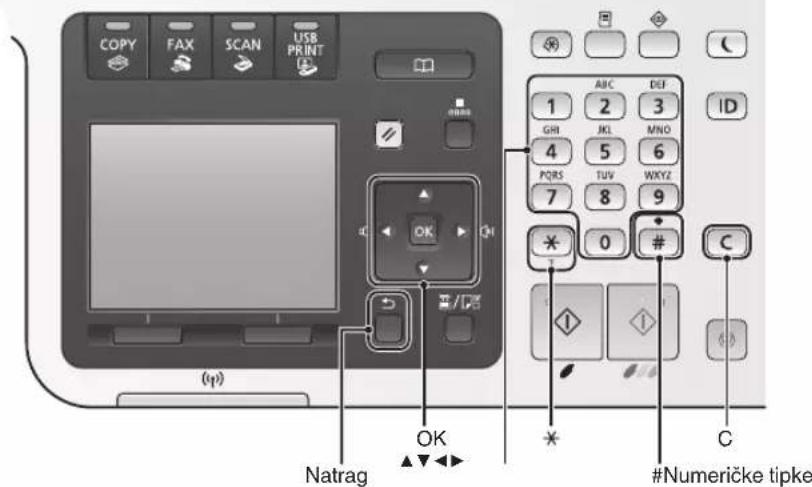
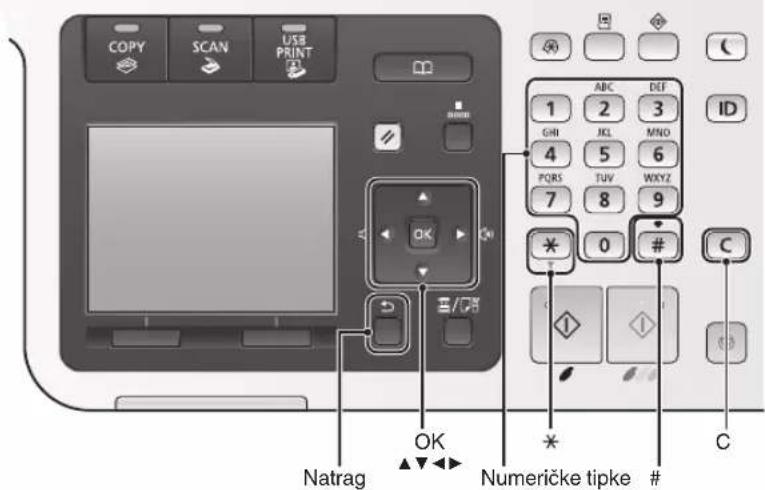
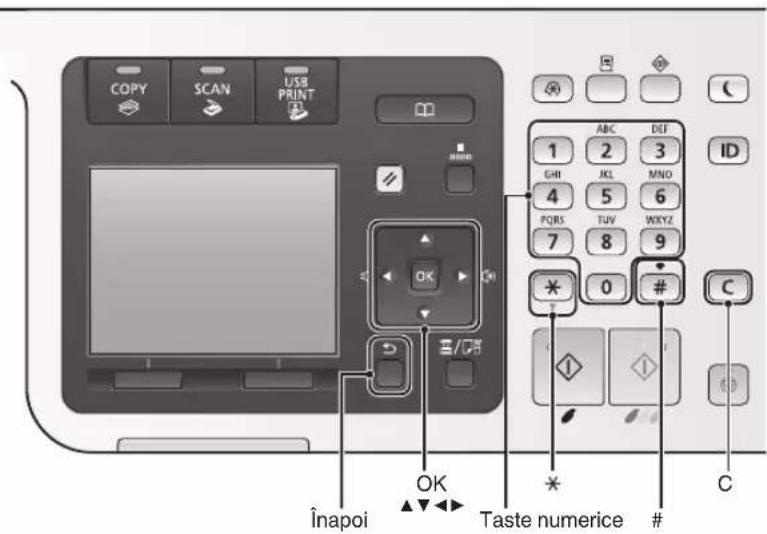
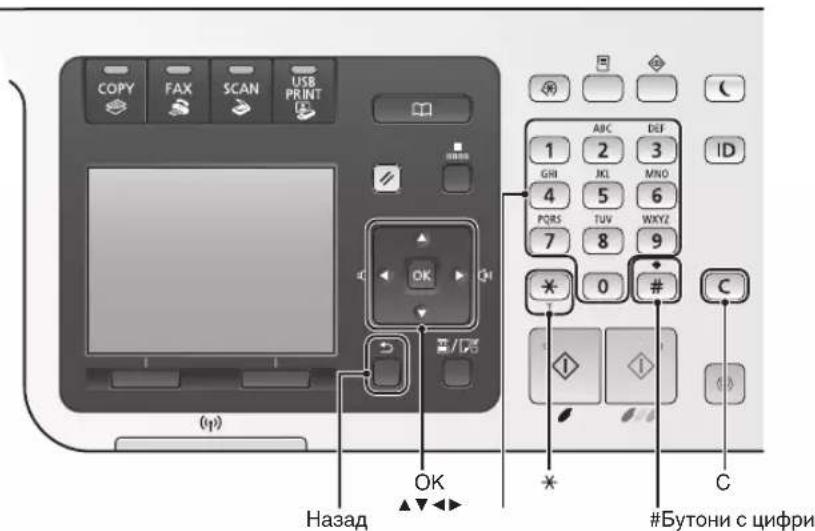
Navigating the Menu
Item selection or moving the cursor among the menu items
Select an item with [ ] or [ ] . Proceed to the next hierarchy with [OK] or [ ] . Return to the previous hierarchy with [Back) or [ ] .
Setting confirmation
Press [OK]. However, when
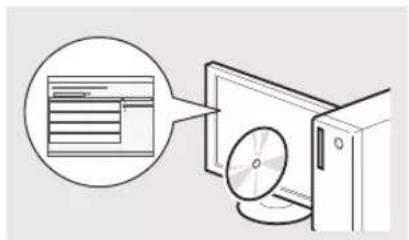
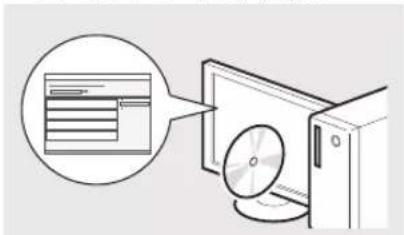
Viewing the e-Manual from the CD
From the Multi-lingual User Manual CD
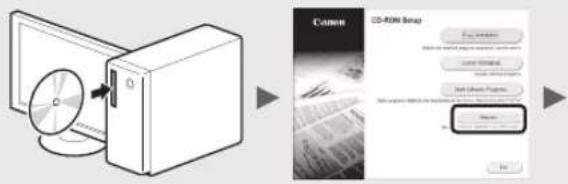
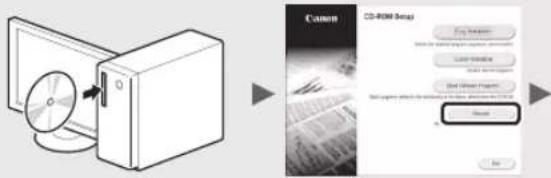
1 Insert the Multi-lingual User Manual CD in your computer.
2 Select your language.
3 Click [Display Manuals].
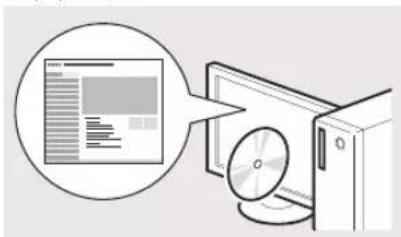
From the User Software CD-ROM
1 Insert the User Software CD-ROM in your computer.
2 Select your language.
3 Click [OK].
4 Click [Manuals].
5 Click the name of the manual.
Depending on the operating system you are using, a security protection message appears.
Text Input Method
Changing entry mode
Press < A / a / 12> or [ ] to change the entry mode.
| Entry mode Available text | |
| <A> | Alphabet (capital letters) and symbols |
| <a> | Alphabet (small letters) and symbols |
| <12> Numbers | |
Entering text, symbols, and numbers
Enter with the numeric keys or[ # For details on the switchable mode or the available text, see the table below.
| Entry mode: | |||
| <A> | <12> | ||
| 1 | @ . - / 1 | ||
| 2 | ABC abc | 2 | |
| 3 | DEF def | 3 | |
| 4 | GHI ghi | 4 | |
| 5 | JKL jkl | 5 | |
| 6 | MNO mnp | 6 | |
| 7 | PQRS | pqrs | 7 |
| 8 | TUV tuv | 8 | |
| 9 | WXYZ | WXYZ | 9 |
| 0 | (Not available) | 0 | |
| * | (space) @ . / - ! ? & $ % #() [] < >+ =", ::=^![] | (Not available) | |
Moving the cursor (Entering a space)
Move with [<] or [>. Move the cursor to the end of the text and press [ ] to enter a space.
Deleting characters
Press [C] to delete characters. Press and hold [to delete all characters.

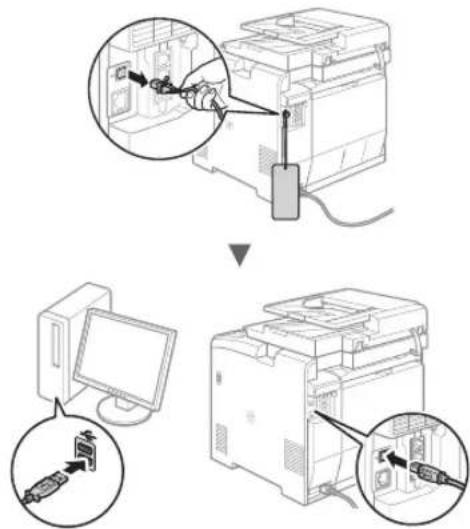
Do not connect the USB cable at this time. Connect it when installing software.
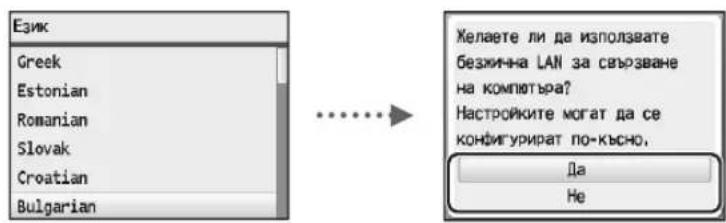
Specifying the Initial Settings
Follow the instructions on the screen to set the language, region, time zone, and date and time. For details on navigating the menu and how to input the numbers, see "Navigating the Menu and Text Input Method" (P.10). You can also select whether or not to perform color correction. For details on how to perform color correction, see the e-Manual.
e-Manual "Setting Up the Machine" "Turning ON the Power and Configuring Initial Settings"
MF8580Cdw

MF8550Cdn / MF8540Cdn

En
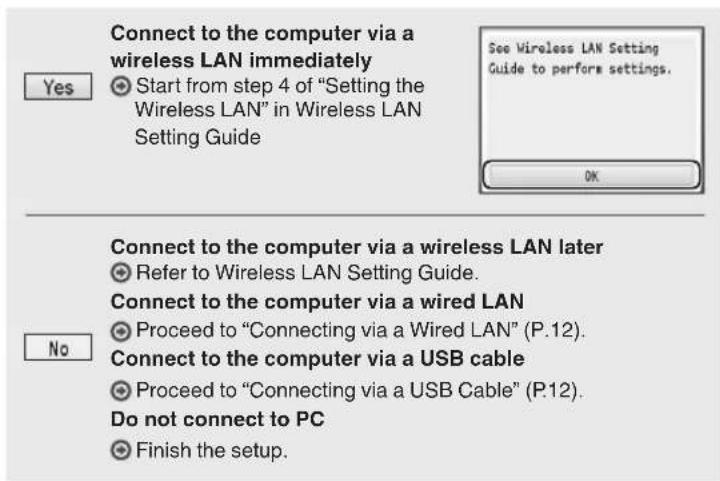
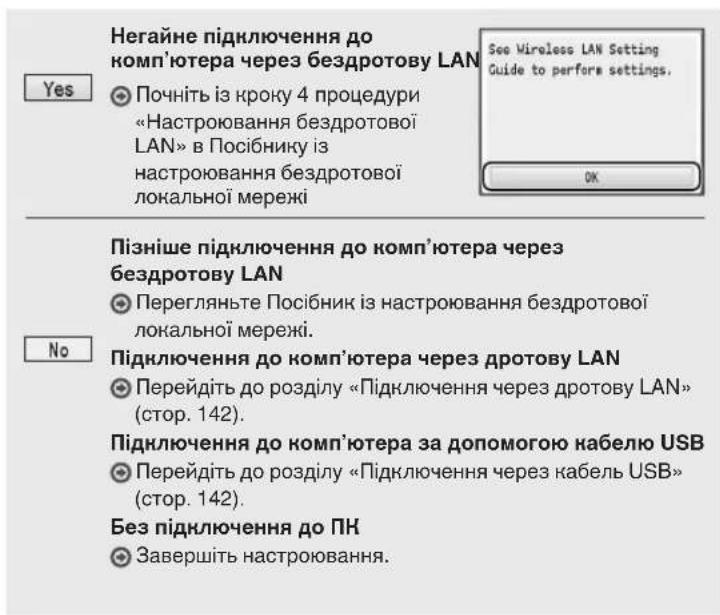
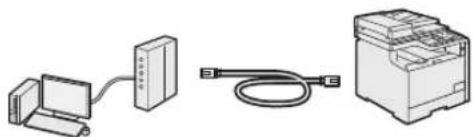
Choosing the Method to Connect the Machine to the Computer
- Connecting via a Wired LAN
See "Connecting via a Wired LAN"
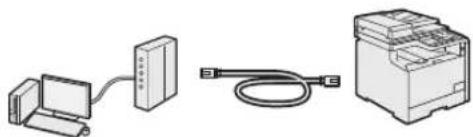
You can connect the machine to the computer through a wired LAN router. Use a LAN cable to connect the machine to the router.
- Make sure that there are ports available on the router to connect the machine and the computer.
- Have a Category 5 or higher twisted pair LAN cable ready.
- Connecting via a USB cable
See "Connecting via a USB Cable"
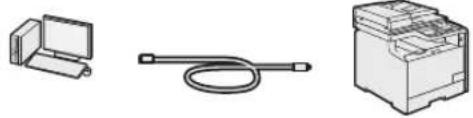
You can connect the machine to the computer using a USB cable.
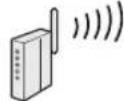
- Connecting via a Wireless LAN (MF8580Cdw Only)
See Wireless LAN Setting Guide.
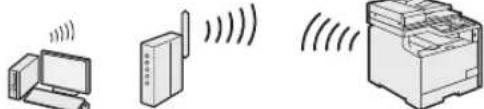
You can connect the machine to the computer through a wireless router*. Since it is connected to wireless, no LAN cables are needed.
- A wireless router, which supports IEEE 802.11b/g/n, is required.
If you are not sure whether your router is wireless or wired:
See the instruction manual provided with your network device, or contact the manufacturer.
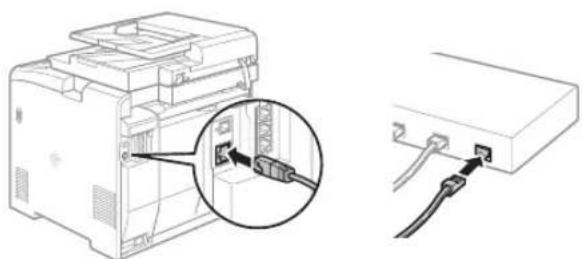
Connecting via a Wired LAN
1 Connect the LAN cable.
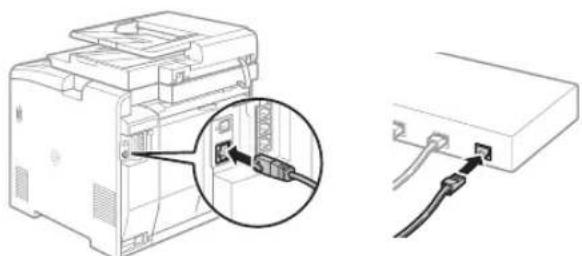
The IP address will be automatically configured in 2 minutes. If you want to set the IP address manually, see the following items.
e-Manual "Network" "Connecting to a Network" Setting IP Addresses
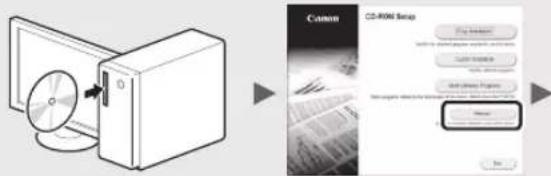
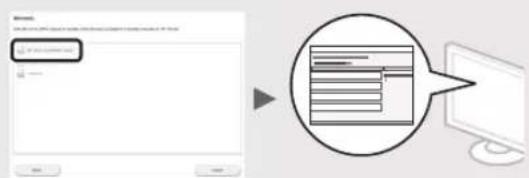
2 Install the driver and software using the User Software CD-ROM.
Proceed to "Setting a Paper Size and Type" (P.13).
Connecting via a USB Cable
Connect the USB cable after installing the MF Drivers and the MF Toolbox.
1 Install the driver and software using the User Software CD-ROM.
2 Connect the USB cable.

Proceed to "Setting a Paper Size and Type" (P.13).
For details on the installation procedures:
See MF Driver Installation Guide
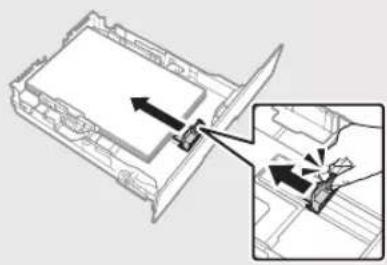
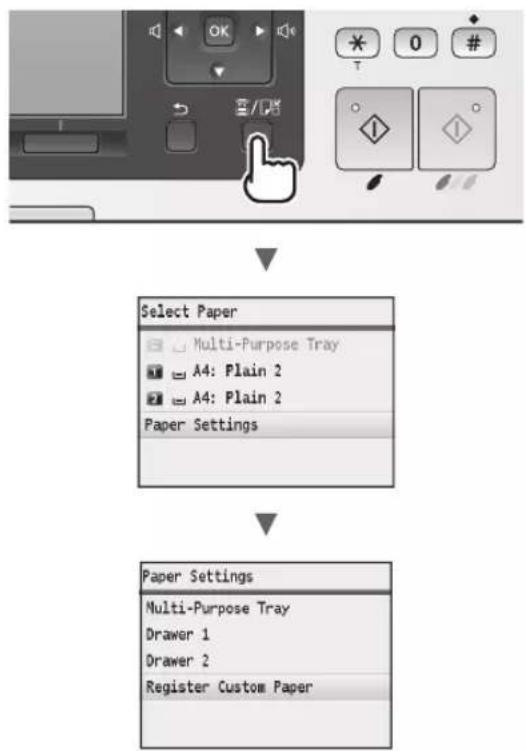
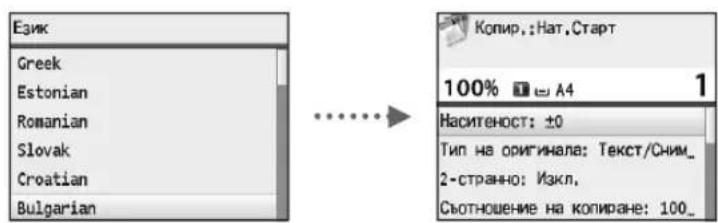
Setting a Paper Size and Type
Follow the instructions on the screen, set the paper size and type.
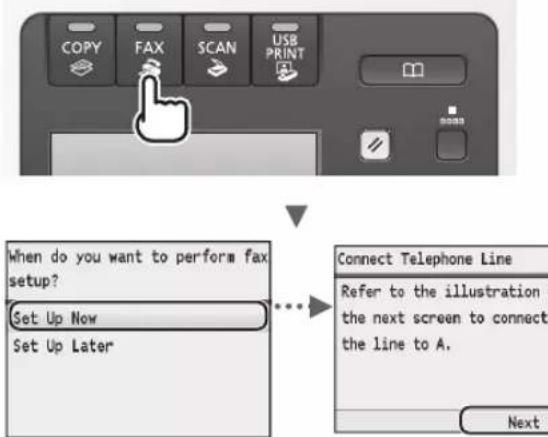
Specifying Initial Fax Settings and Connecting a Telephone Cable (MF8580Cdw / MF8550Cdn Only)
1 Specify the initial fax settings.

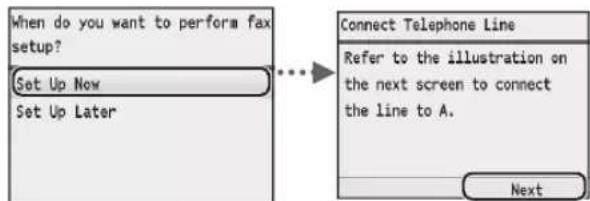
Follow the "Fax Setup Guide" to specify a fax number, a unit name, and a receive mode. For more details on the receive mode, see the e-Manual.
e-Manual "Faxing" "Receiving Faxes"
How to use a username
When you send a document, the sender information that you registered is printed on the recipient's paper.
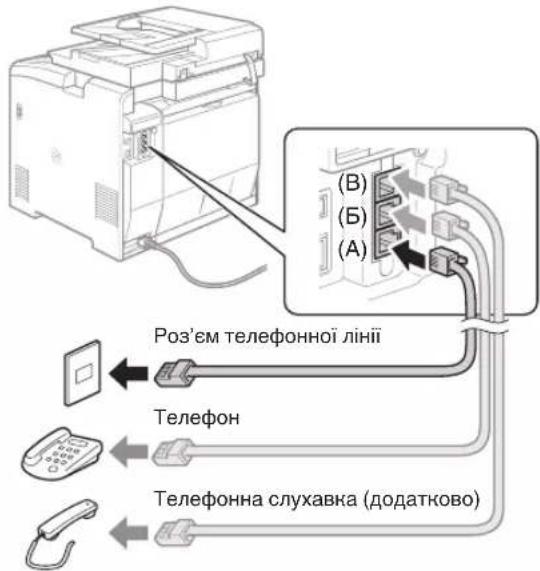
2 Connect a telephone cable*.
En

When
e-Manual "Setting Up the Machine" "Configuring Initial Settings for Fax Functions (MF8580Cdw / MF8550Cdn / MF8280Cw Only)" "Connecting the Telephone Line"
When installing the optional handset:
For more details, see the supplied manual with the handset.
- The telephone cable may be included with the machine, depending on your country or region.
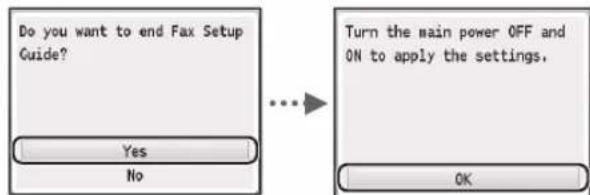
3 Exit the Fax Setup Guide, and then restart the machine.

Turn OFF the machine and wait for at least 10 seconds before turning it ON again. If the telephone line types are not detected automatically, see the e-Manual and set a telephone line manually.
e-Manual "Setting Menu List" "Fax Settings (MF8580Cdw / MF8550Cdn / MF8280Cw Only)" "Basic Settings"
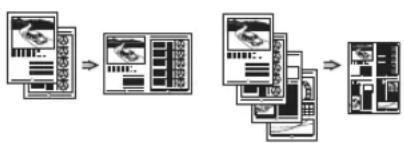
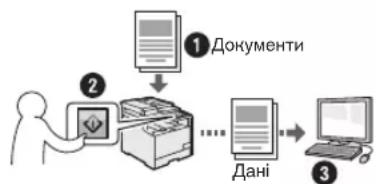
You can use various functions in this machine. Following functions are the overview of the main functions that you can use routinely.
Copy
Enlarged/Reduced Copies
You can enlarge or reduce standard size documents to copy on standard size paper or specify the copy ratio in percentage.
2-Sided Copying
You can copy 1-sided documents on both sides of paper.
Collating
You can sort copies into sets arranged in page order.
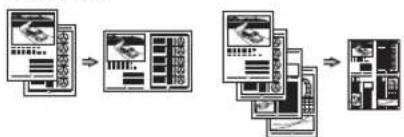
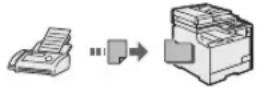
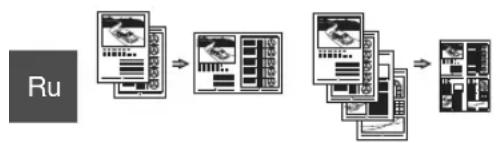
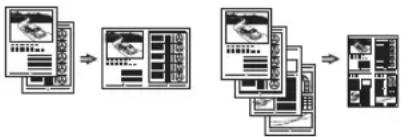
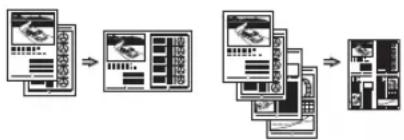
Reduced Layout
You can reduce multiple documents to copy them onto one sheet.
2 on 14 on 1

Copying ID Card
You can make a copy of a 2-sided card onto one side of paper.
Paper Save Copy
You can choose the desired copy settings from the options displayed when you select [Copy] on the operation panel.
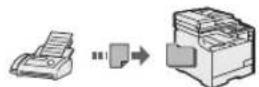
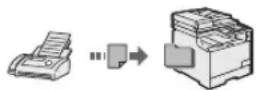
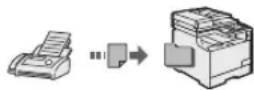
Fax*
Sending a Document Directly from a Computer (PC Fax)
In addition to the normal sending and receiving taxes, you can use the PC fax.
Sending
You can register fax destinations in the address book. You can specify the destinations using various methods, enabling you to send documents quickly and easily.
- Destination search
- Favorites list
Coded dialing
Destination Group - Specifying from the sending history
Sequential broadcast
Receiving
- Receiving in the memory You can store the received documents in the memory. You can print the stored documents at any time, and if you do not need them, you can delete them.
- Remote Receiving If an external telephone is connected, you can switch to the fax receiving mode immediately by dialing the ID number for fax receiving using the dial buttons of the telephone during a phone call.
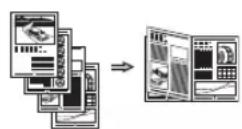
Enlarged/Reduced Printing
2-Sided Printing
Reduced Layout
You can reduce multiple documents to print them onto one sheet.
2 on 1 4 on 1
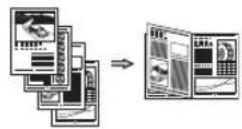
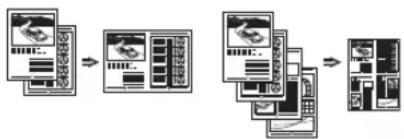
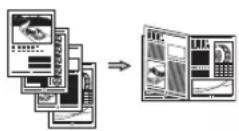
Booklet Printing
Poster Printing
Watermark Printing
Displaying a Preview before
Printing
Selecting a "Profile"
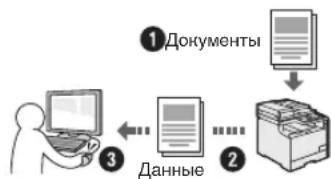
Scan
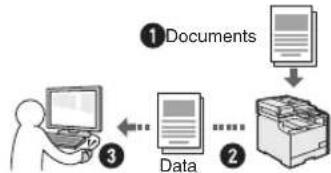
Saving the Documents Using the Operation Panel of the Machine
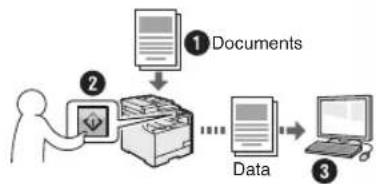
Scanning with [ ScanPC2
You can simplify the procedure for selecting the destination and making the scan settings by registering them in the keys on the operation panel.
Saving the Documents Using Operations from a Computer
- Scanning with the MF Toolbox
- Scanning from an Application
Saving in a USB Memory
You can save scanned documents in a USB memory connected to the machine.
E-mailing Scanned Documents
You can send scanned documents to your e-mail application.
Sending Scanned Documents to a File Server
You can send scanned documents to a file server.
Network Settings
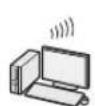
This machine comes equipped with a network interface that you can construct a network environment easily. If you use the MF8580Cdw, you can connect to the network using the wireless LAN. Also you can print a document, use the PC fax (MF8580Cdw / MF8550Cdn only), and use the network scan from all computers which are connected with the machine. The machine supports to increase work efficiency as a shared machine in the office.
Remote UI
You can understand the condition of the machine from the computers on the network. You can access the machine and manage jobs or specify various settings via network.
- MF8580Cdw / MF8550Cdn Only
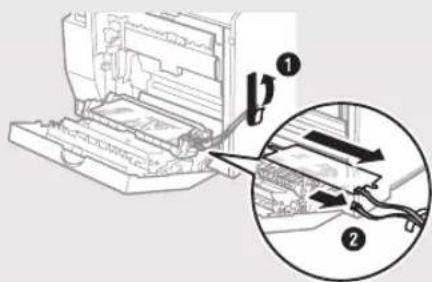
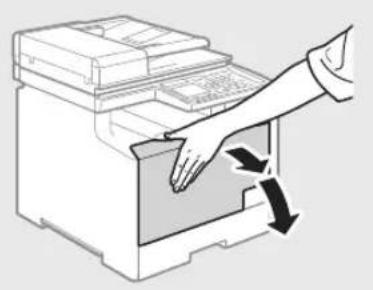
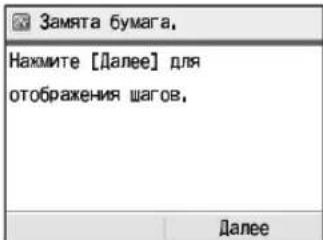
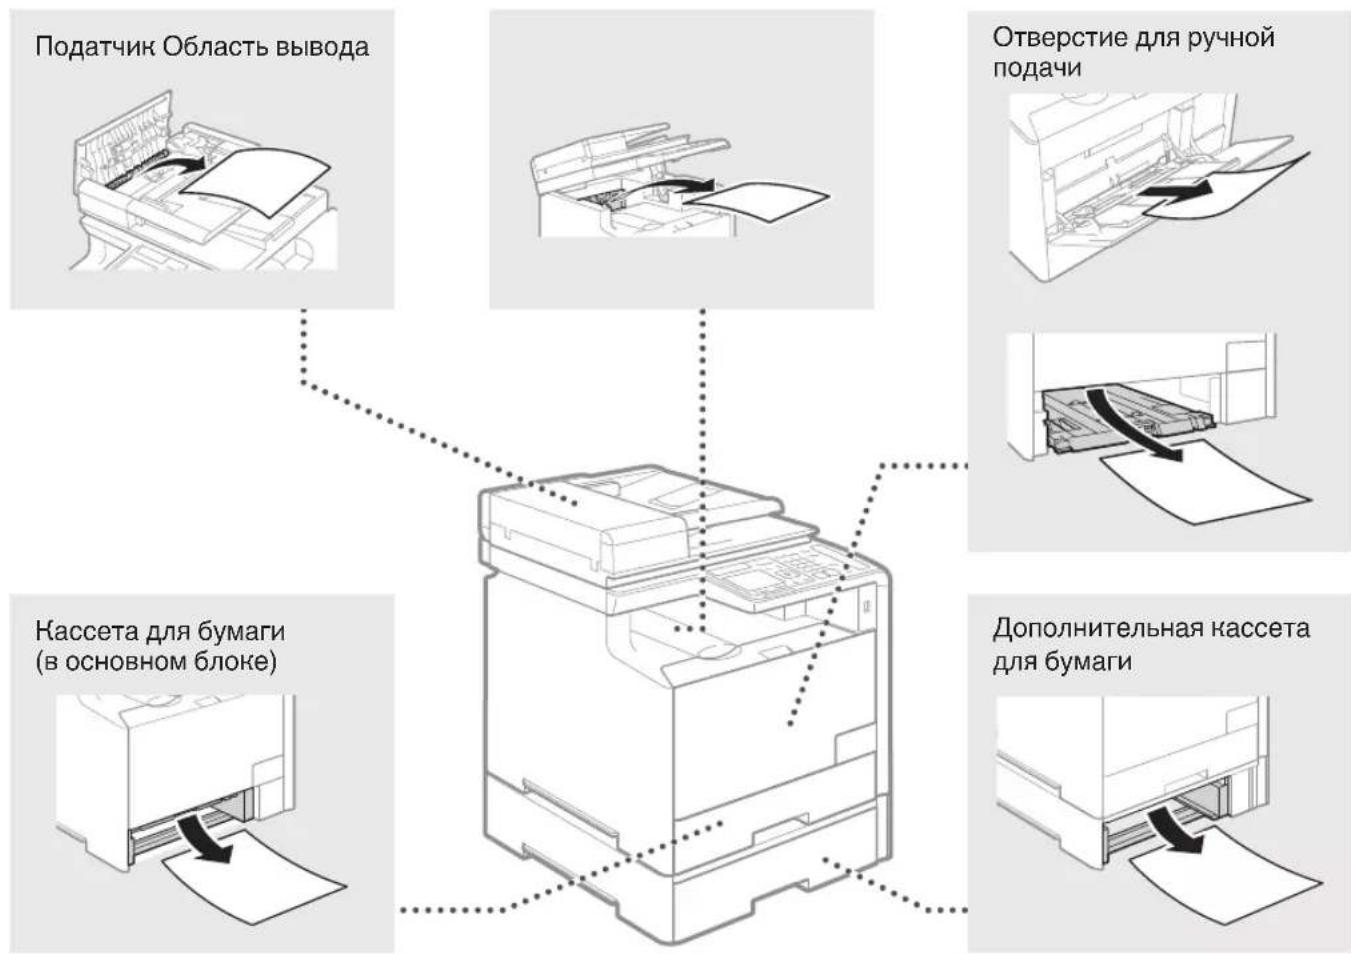
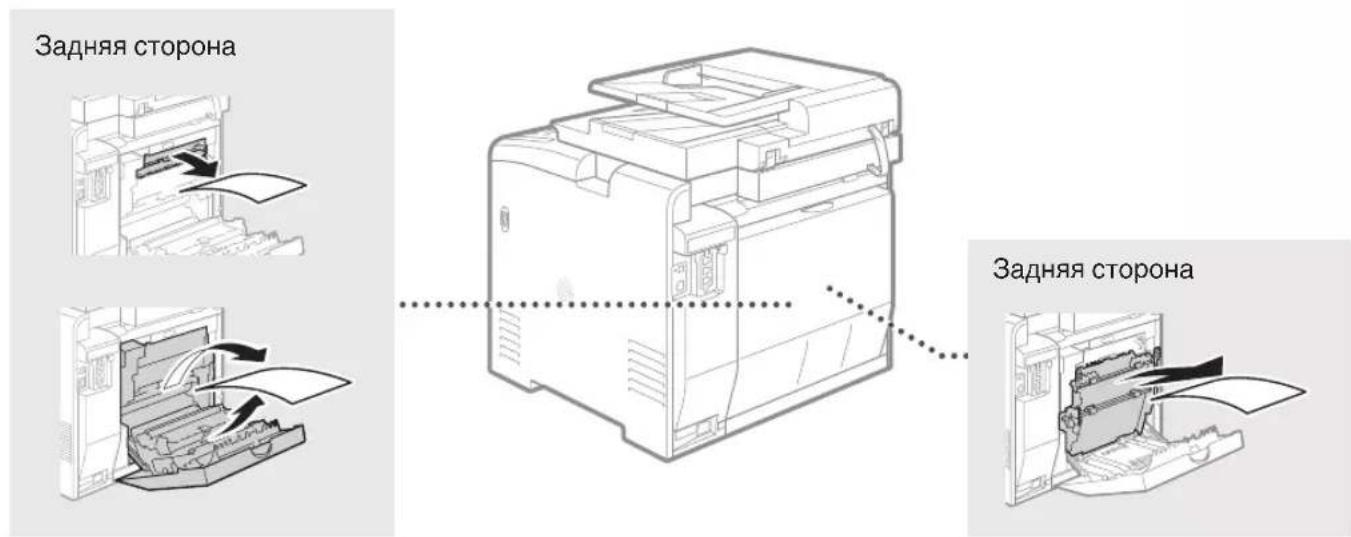
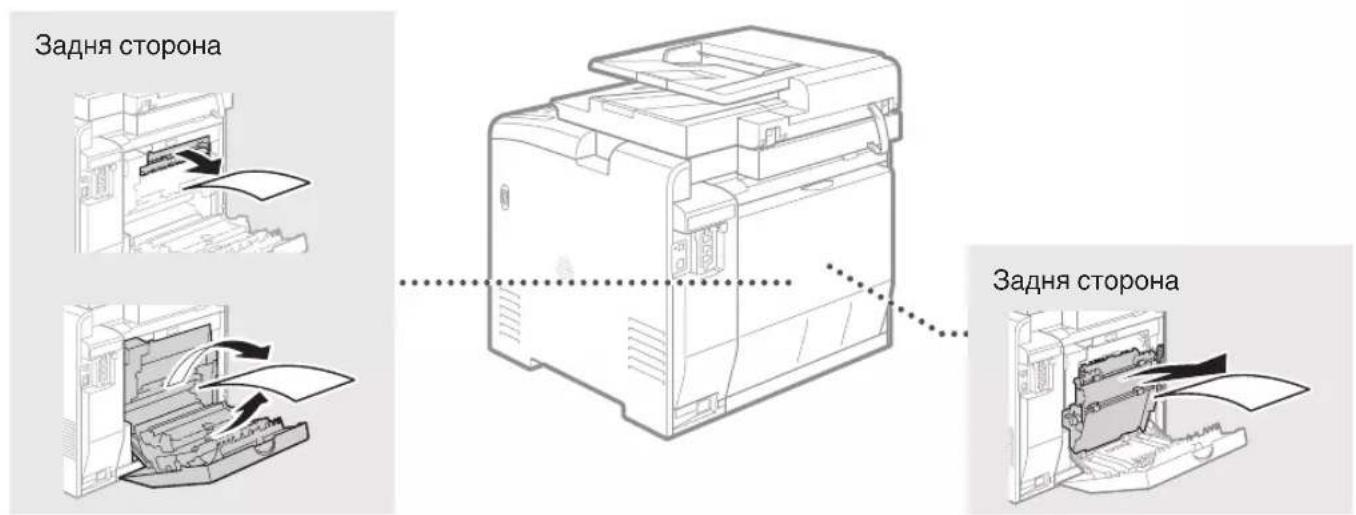
Clearing Paper Jams
En
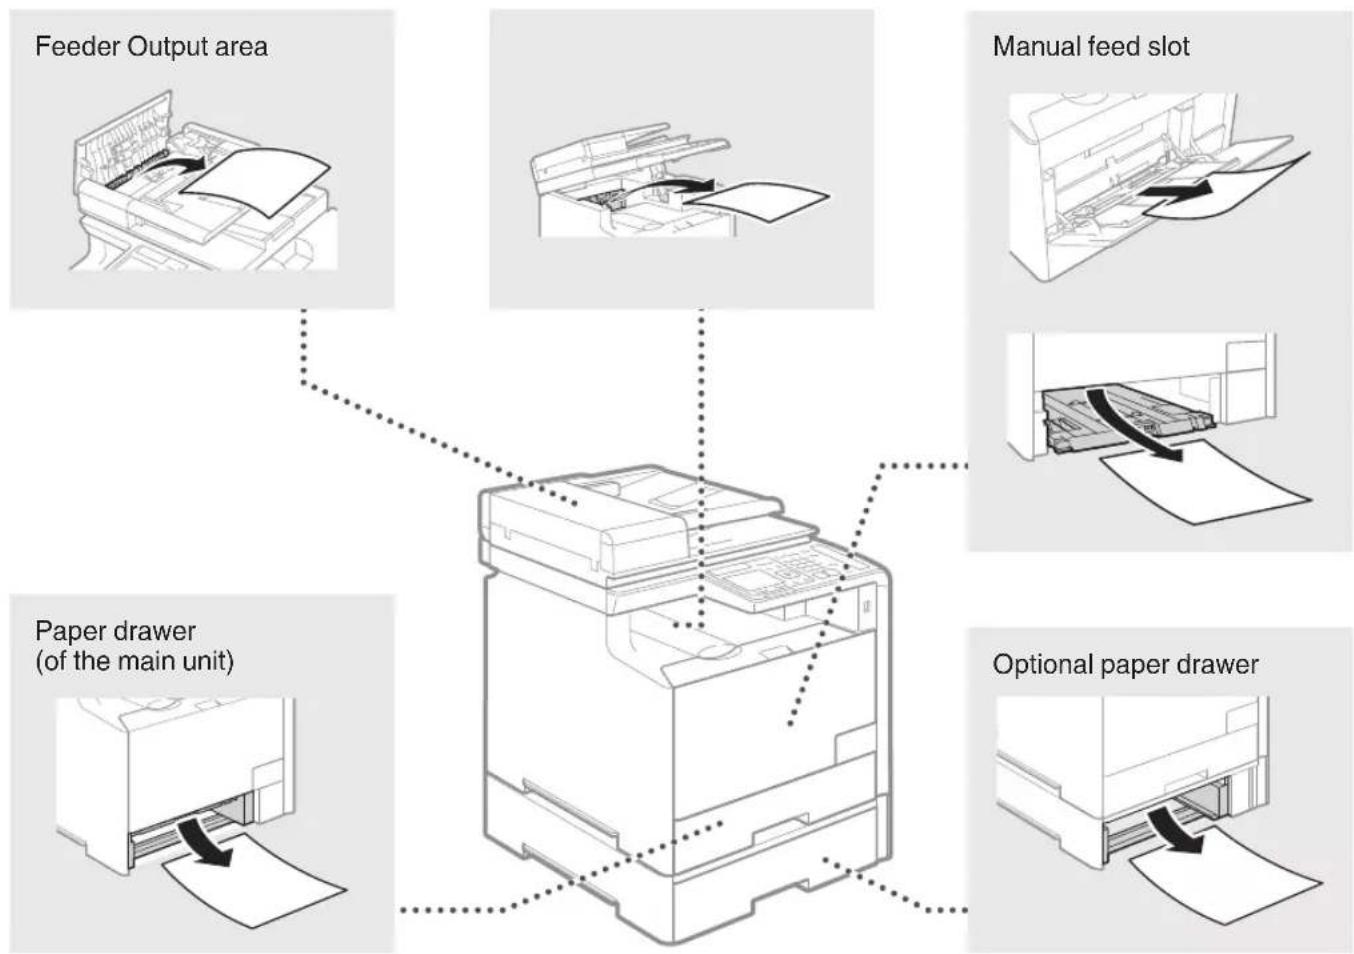
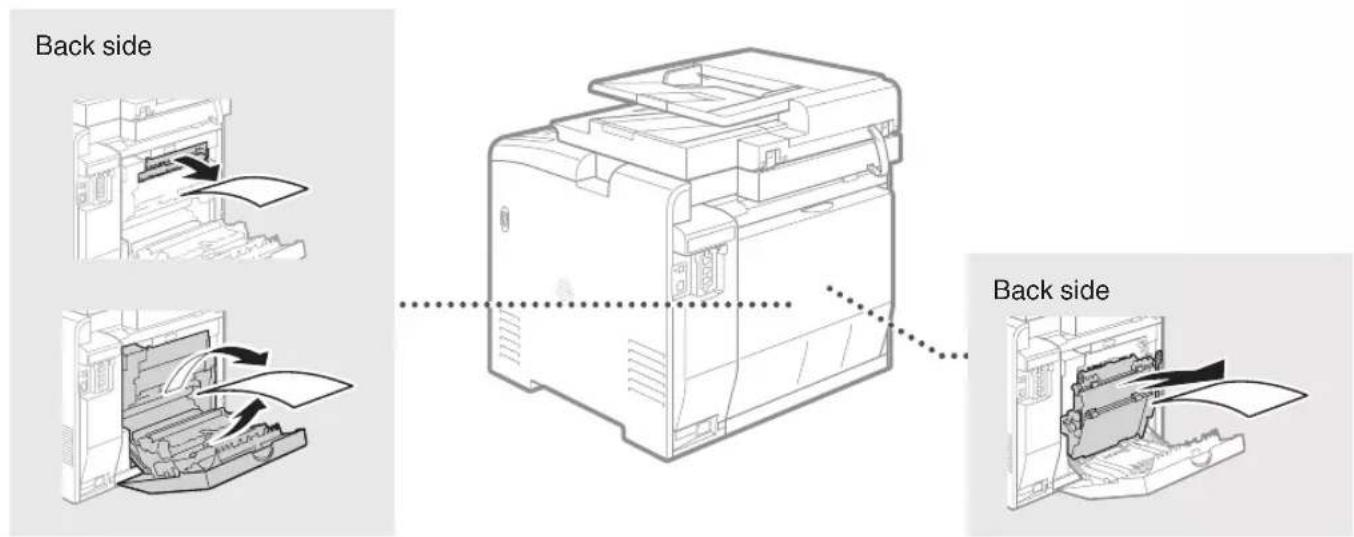
If the following screen appears, a paper jam has occurred in the feeder or inside the machine. Follow the procedure displayed on the screen to remove the jammed document or paper. This manual indicates only areas where paper jams occur. For details on the procedures, see the e-Manual.

Toner cartridges are consumables. When the toner becomes nearly empty or has run out completely in the middle of a job run, a message appears on the screen, or the following problems may occur. Take the appropriate action accordingly.
When a Message Appears
When the toner becomes nearly empty in the middle of a job run, a message appears on the screen.
| Message | When the message is displayed on the screen | Description and solutions |
| Prepare the <Toner Color>*tone cartridge. | The toner cartridge needs a replacement soon. | We recommend checking the level of remaining toner and replacing the cartridge with a new one before printing high-volume documents. e-Manual "Replacing Toner Cartridges" If this message is displayed, the incoming fax will be stored in the memory without being printed. Also, reports may not be printed, even if they are set to be printed automatically. If <Continue Printing When Toner Is Low> in <RX Print Settings> is set to <On>, however, printing will be continued, but faxes may fade or blur. e-Manual "Printing Reports and Lists" e-Manual "Setting Menu List" |
| End of Toner Cart. Lifetime <Toner Color>* | The toner cartridge has reached the end of its life. | If this message does not disappear, replace the toner cartridge. You can continue printing, but the print quality cannot be guaranteed. e-Manual "Replacing Toner Cartridges" |
| End of cart. parts lifetime. Cart. replacement recommended. <Toner Color>* | The machine may not print properly because a toner cartridge that has reached the end of its lifetime is still in the machine. | If this message does not disappear, replace the toner cartridge. You can continue printing, but the print quality may be poor. e-Manual "Replacing Toner Cartridges" |
- Black, yellow, magenta, or cyan will appear in
.
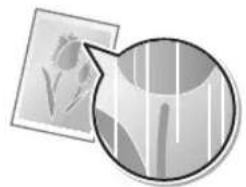
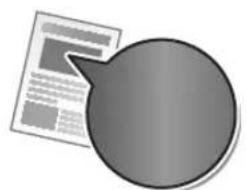
If Printouts are Poor in Quality
If your printouts begin to show any of the following features, one of your toner cartridges is nearly empty. Replace the nearly empty toner cartridge even if no message is displayed.
White streaks appear Partially faded Uneven density


Toner smudges and splatters appear

Blank space of originals becomes grayish in printouts

Memo
En
En
Symbols Used in This Manual

WARNING
Indicates a warning concerning operations that may lead to death or injury to persons if not performed correctly. To use the machine safely, always pay attention to these warnings.

CAUTION
Indicates a caution concerning operations that may lead to injury to persons if not performed correctly. To use the machine safely, always pay attention to these cautions.
Keys and Buttons Used in This Manual
The following symbols and key names are a few examples of how keys to be pressed are expressed in this manual.
Operation panel keys:
[Key icon]
[Key icon] + (Key name)
Example:


- Display:
- Buttons and items on the computer display: [Preferences]
Illustrations and Displays Used in This Manual
Illustrations and displays used in this manual are which of MF8580Cdw unless specified.

WARNING
To avoid the risk of personal injury or damage to the equipment and for legal information, read the Legal Notice and Important Safety Information in the e-Manual.
Important Safety Instructions
Please read the "Important Safety Instructions" in this manual and in the e-Manual thoroughly before operating the machine.
As these instructions are intended to prevent injury to the user and other persons or to prevent destruction of property, always pay attention to these instructions and operational requirements.
Please note that you are responsible for all damages caused by failure to follow the directions provided herein, using the device for any purpose for which it was not intended, or repairs or alterations made by anyone other than a Canon-approved technician.
Installation

WARNING
- Do not install the machine near flammable substances such as alcohol-based products or paint thinners. If these substances come in contact to the electrical parts inside the machine could ignite these substances and cause a fire or increase your risk of electric shock.
-
Do not place necklaces and other metal objects or containers filled with liquid on the machine. If foreign substances come into contact with electrical parts inside the machine, this may result in a fire or electrical shock. If any of these substances falls into the machine, turn off the power to the machine immediately and contact your local Canon dealer.
-
Do not use near any medical equipment. Radio wave emitted from this machine may interfere with medical equipments, which may result in serious accidents.

CAUTION
- Do not install the machine in the following locations. Doing so may result in personal injury, fire or electrical shock.
Unstable location
A location subject to excessive vibrations
- A location where block the ventilation slots (too close to walls, bed, shaggy rug, and other similar objects)
A damp or dusty location
- A location exposed to direct sunlight or an outside place
A location subject to high temperatures
A location near open flames
A location with poor ventilation system
- Although ozone is generated from the machine during operation, it does not have any affect on the human body. However, if you intend to use the machine for long periods of time, ensure that the installation location is well ventilated.
- Do not connect unapproved cables to this machine. Doing so may result in a fire or an electric shock.
Power Supply

WARNING
- Do not use power cords other than the one provided, as this can result in a fire or electrical shock.
- Do not modify or bend the power cord and do not pull on it with great force. Do not place heavy objects on the power cord. Damaging the power cord may result in a fire or an electric shock.
- Do not plug or unplug the power plug with wet hands, as this can result in electrical shock.
- Do not use extension cords or multi-plug power strips with this machine. Doing so may result in a fire or electric shock.
- Do not bundle up or tie up the power cord in a knot, as this can result in a fire or electrical shock.
- Insert the power plug completely into the AC power outlet. Failure to do so can result in a fire or electrical shock.
- Remove the power plug completely from the power outlet during a thunder storm. Failure to do may result in a fire, electric shock, or malfunction.

CAUTION
- Use only a power supply that meets the voltage requirements listed herein. Failure to do so may result in a fire or electric shock.
- Do not obstruct the power outlet where this machine is connected, so that you can unplug the power cord easily in an emergency.
Handling

WARNING
- Do not disassemble or modify the machine. There are high-temperature and high-voltage components inside the machine which may result in a fire or electrical shock.
- Do not allow children to touch or play with the power cord and cables or internal or electrical parts. Doing so may result in serious personal injury.
- Please contact an authorized Canon dealer if the machine makes an unusual noise, emits an unusual smell, or emits smoke or excessive heat. Continued use may result in a fire or electric shock.
- Do not use flammable sprays near the machine. If flammable substances come into contact with electrical parts inside the machine, this may result in a fire or electric shock.

CAUTION
- For your safety, please unplug the power cord if the machine will not be used for a long period of time.
- Use caution when opening and closing covers to avoid injury to your hands.
- Keep hands and clothing away from the rollers in the output area. If the rollers catch your hands or clothing, this may result in personal injury.
- The inside of the machine and the output slot is very hot during and immediately after use. Avoid contact with these areas to prevent burns. Also, printed paper may be hot immediately after being output, so use caution when handling it. Failure to do so may result in burns.
Maintenance and Inspections

WARNING
- Turn off the machine and unplug the power cord from the outlet before cleaning. Failure to do so may result in a fire or an electric shock.
- Unplug the power plug from the power outlet periodically and clean the area around the base of the power plug's metal pins and the power outlet with a dry cloth to remove dust and grime. When damp, accumulated dust may cause short circuiting or fires.
- Use a damp, well wrung-out cloth to clean the machine. Dampen cleaning cloths with water only. Do not use alcohol, benzenes, paint thinkers, or other flammable substances. If these substances come into contact with electrical parts inside the machine, this may result in a fire or electric shock.
- Check the power cord and plug regularly for damage. Check the machine for rust, dents, scratches, cracks, or excessive heat generation. Use of poorly-maintained equipment may result in a fire or electric shock.
Consumables

WARNING
- Do not dispose of used toner cartridges in open flames. This may cause an ignition, and result in burns or fire.
- If you accidentally spill or scatter toner, carefully wipe up the loose toner with a damp, soft cloth and avoid inhaling any toner dust. Never use a vacuum cleaner to clean up loose toner. Doing so may cause a malfunction in the vacuum cleaner or result in a dust explosion due to static discharge.

CAUTION
- Keep the toner cartridges and other consumables out of the reach of small children. If toner is ingested, consult a physician or poison control center immediately.
- Do not attempt to disassemble the toner cartridge. The toner may scatter and get into your eyes or mouth. If toner gets into your eyes or mouth, wash them immediately with cold water and consult a physician.
- If toner spills from the toner cartridge, avoid inhaling it or allowing it to come into contact with your skin. If the toner comes into contact with your skin, wash immediately with soap. If you inhale the toner or your skin becomes irritated due to contact with the toner, consult a physician or poison control center immediately.
Others

WARNING
- If you are using a cardiac pacemaker: This machine generates a low level magnetic field. If you feel any abnormalities in your body while using this machine, please move away from the machine and consult your physician immediately.
Legal Notices
En
Legal Limitations on Usage of Your Product and the Use of Images
Using your product to scan, print or otherwise reproduce certain documents, and the use of such images as scanned, printed or otherwise reproduced by your product, may be prohibited by law and may result in criminal and/or civil liability. A non-exhaustive list of these documents is set forth below. This list is intended to be a guide only. If you are uncertain about the legality of using your product to scan, print or otherwise reproduce any particular document, and/or of the use of the images scanned, printed or otherwise reproduced, you should consult in advance with your legal advisor for guidance.
- Paper Money
Traveler's Checks
Money Orders
Food Stamps
Certificates of Deposit
Passports
Postage Stamps (cancelled or uncanceled) - Immigration Papers
- Identifying Badges or Insignias
- Internal Revenue Stamps (canceled or uncanceled)
- Selective Service or Draft Papers
Bonds or Other Certificates of Indebtedness - Checks or Drafts Issued by Governmental Agencies
Stock Certificates
Motor Vehicle Licenses and Certificates of Title
Copyrighted Works/Works of Art without Permission of Copyright Owner
Considerable effort has been made to make sure that the manuals for the machine are free of inaccuracies and omissions. However, as we are constantly improving our products if you need an exact specification, please contact Canon.
MF8580Cdw / MF8550Cdn
MF8540Cdn
MF8580Cdw / MF8550Cdn
MF8540Cdn
laser radiation when open.
RECT EXPOSURE TO BEAM. INSPECTIONAL BADGTON:WHEN OPEN
INSURANCE CHECKING WHEN OPEN:
VIBBLEDFCLASSF38
VITEZ L'EXPOSITION AU FAISCEAU.
LUNG KLASSE 38, WENN ABUECKING
DE DE CLASE 3B PRESENTE AL ABRIR.
47.
KCLASS 38 VID OPPIEN LOCKA LASERSTRAN NINGN
MALLE LASER-SATEIYA AVATTUNA
EELLE.
3类激光器:
CLASS 1 LASER PRODUCT
LASER KLASSE 1
APPAREL A LASER DE CLASSE 1
APPARECCHIO LASER DI CLASSE 1
PRODUCTO LASER DE CLASE 1
APARELHO A LASER DE CLASSE 1
LUOKAN 1 LASER-TUOTE
LASERPRODUKT KCLASS 1
VORSICH
MF8580Cdw / MF8550Cdn

MF8540Cdn
Esploration del menu
- Solo MF8580Cdw / MF8550Cdn
[Icona tasting] + (Nome tasting)
Esemblio:

[ ] (Indietro)
MF8580Cdw / MF8550Cdn
MF8540Cdn
Navegar por el menu
MF8580Cdw / MF8550Cdn

MF8540Cdn
Navegar no menu
MF8580Cdw / MF8550Cdn
- Móvo yu to MF8580Cdw / MF8550Cdn
Anyn
Anyn otn mnuyn Mnpite va anothenkeuoet ta evypaanaou exov anfoei ot n vynm. Mnpeite va ektuwoet Ta aonthetaueva eyypaa onoiadntote OTiyn kal, eav dev ta xpeiazoe, mnpite va ta diaypaye.
Anouakp/vn Any
Tn diapkeia mua c nEeWvkiKc KInonc
kai av exei ouvdetheta eWtepiko TneFwvo,
muopei vaetaeite otny kataoan
Anysnc faE aoeos, nAnktpoloywvtac tov
aipio avaywpiotikou yia tm nHn phE uE
ta anktpa kAnons Tou nEeWovu.
EkTuwn
Ekrwnon eeyehuvon/ouikpvun
EkTuPwn 2-Oyewv
Δiataξη σμikpuvonc
Mtopeite va oikpovetne nolaa eyypaafnpokievou va ta ekTUwOeTE OE eva dlao.
2OE14OE1
EkTuwn yxepiδiou
Ekrwnon aipaa
EKTUNOWON ubaotopypaetaoc
MF8580Cdw / MF8550Cdn
MF8540Cdn
Navigation i menuen
- Kun MF8580Cdw / MF8550Cdn
- Installer erke maskinen i naerheden af brændbare væsker sasom alkoholbaseredeprodukter erller fortynder. Hvis disse stoffer kommer i kontakt med de elektriske dele inden i maskinen, kan disse stoffer blve antændt og medfrole brand ellere risikoen for elektrisk stod.
- Placer违法犯罪或者其他犯罪,如偷窃、绑架、杀人等;
- Placer maybe a criminal or an employee who is involved in the organization of organized crime.
- Placer may be a criminal or an employee who is involved in organized crime.
- Placer may be a criminal or an employee who is involved in organized crime.
- Placer may be a criminal or an employee who is involved in organized crime.
- Placer may be a criminal or an employee who is involved in organized crime.
- Placer may be a criminal or an employee who is involved in organized crime.
- Placer may be a criminal or an employee who is involved in organized crime.
- Placer may be an employee who is involved in organized crime.
- Placer may be an employee who is involved in organized crime.
- Placer may be an employee who is involved in organized crime.
- Placer may be an employee who is involved in organized crime.
- Placer may be an employee who is involved in organized crime.
- Placer may be an employee who is involved in organized crime.
- Placer may be an employee who is involved in organized crime.
- Må ikke bruges i nærheden af medicinsk udstyr. De radiobølger, som maskinen udsender, kan pärke det medicinske udstyr, hvilket kan fore til alvorlige ulykker.

FORSIGTIG
-
Installer jegke maskinen følgende steder, da dette kan resultere i personskade, brand eller elektrisk stød.
-
Ustabile overflader
- Steder, der udsættes for voldsomme rystelser
-
Steder, hvor der blokeres for ventilationsabningerne (for tæt på vægge, senge, æpper og andre lignende genstande)
-
Et fugtigt aller stovet sted
-
Et sted, der udsættes for direkte sollys aller udendors
- Et sted, der udsættes for hoje temperaturer
- I naerheden af aben ild
-
Et sted med darylig udluftning
-
Selvom maskinen genererer ozon under betjeningen, har det ingen effekt på menseskekroppen. Men hvis du skal bruge maskinen over laengere perioder, skal du sorge for god udluftning.
- Brug/DD: i.e. 100% Dose, 200% Dose, 300% Dose, 400% Dose, 500% Dose, 600% Dose, 700% Dose, 800% Dose, 900% Dose, 1000% Dose, 1100% Dose, 1200% Dose, 1300% Dose, 1400% Dose, 1500% Dose, 1600% Dose, 1700% Dose, 1800% Dose, 1900% Dose, 2000% Dose, 2100% Dose, 2200% Dose, 2300% Dose, 2400% Dose, 2500% Dose, 2600% Dose, 2700% Dose, 2800% Dose, 2900% Dose, 3000% Dose, 3100% Dose, 3200% Dose, 3300% Dose, 3400% Dose, 3500% Dose, 3600% Dose, 3700% Dose, 3800% Dose, 3900% Dose, 4000% Dose, 4100% Dose, 4200% Dose, 4300% Dose, 4400% Dose, 4500% Dose, 4600% Dose, 4700% Dose, 4800% Dose, 4900% Dose, 5000% Dose, 5100% Dose, 5200% Dose, 5300% Dose, 5400% Dose, 5500% Dose, 5600% Dose, 5700% Dose, 5800% Dose, 5900% Dose, 6000% Dose, 6100% Dose, 6200% Dose, 6300% Dose, 6400% Dose, 6500% Dose, 6600% Dose, 6700% Dose, 6800% Dose, 6900% Dose, 7000% Dose, 7100% Dose, 7200% Dose, 7300% Dose, 7400% Dose, 7500% Dose, 7600% Dose, 7700% Dose, 7800% Dose, 7900% Dose, 80
Strømforsyning

ADVARSEL
MF8580Cdw / MF8550Cdn
MF8540Cdn

MF8580Cdw / MF8550Cdn
MF8540Cdn
Navigereimenyen
Velge alternativeerllerflyttemarkorenmellommenyalternativene
Bare MF8580Cdw / MF8550Cdn
MF8580Cdw / MF8550Cdn
MF8540Cdn
Navigera i menyn
Se MF Driver Installation Guide (Installationshandbok for MF-drivrutin)

- Endast MF8580Cdw / MF8550Cdn
MF8580Cdw / MF8550Cdn

MF8540Cdn

MF8580Cdw / MF8550Cdn
MF8540Cdn
ПОИСВ MEHIO
Bb6op 3nementa nn nepemeeHne Hypcopa no 3nementam MeHIO
Дя Вьбoga Зем enta ИспьзуITE Клавиш [▲] n [▼]. Дяпсяхая Н сдуошу уровьн ИспьзуITE Клавиш [OK] nii [▶]. Дяь BOЗврета Ha npedbyuyn yровьн ИспьзуITE Клавиш [ ] (Ha3aД) nii [▲].
PoiTBepeHKeHHe HAcTpoE
HaKMnTe KhoNkY [OK]. EcJIn Ha 3KpaHe OTo6paKaetcK HONka
PpOcMoTp DOKyMeHTA 3JektpoHHe pyKOBdCTBO NOnb3ObaTeIa C KOMnAnT-DnCkA
C KOMnAHT-DnCKA «Multi-lingual User Manual CD» (MHorO3bHbIe pyKOBoCTBa nJIb30BaTeTЯ)
1 BCTaBtE KOMNaKT-DnCK «Multi-lingual User Manual CD» (MHoror3bHbIe pyKOBoDCTBa NOJIb3OBATeJI) B DnCKOBOD KOMNbIoTepe.
2BbIbepnTe HyHHbIa3bIK.
3 UeIHKnTe [Display Manuals] (Ioka3aTb pykoBODCTBA).
C KOMMaKT-DnCsKa «User Software CD» (POnIb3ObaTeJIbChOe npOrpaMMHoe o6ecneueHHe).
1 BCTaBbTe KOMnAaT-Dnck «User Software CD» (Пользователбоче nporpaMMHoe obecneueHne)ВДИССЮВОД KMнБTOpepa.
2BbIbepTe HyyHbIy3bIK.
3UeJKNHTe [OK].
4 LJIeJIKNHnTe [Manuals] (PykoBODcTbA).
5 UeIKNHHe Na3BaHnE pyKOBoDCTBa.
B 3aBNCMOCnOT NcPiNb3yEmoONepaHNOHNO CNTeMbI,MOKeT NOBnTBc COO6ueHHe O6 oecneueHHN 6e3onachocnTn.
IopcoeHHHe He Ka6JIaHTAHnBbHIOueHne annapata
Cnococ BBoDa TeKcTa
H3MeHeHne peHHMa BBOda 4To6bI H3MeHnTb peHHM BBOda HaKMNTe < A / a / 12> nIn [¥].
3NeKtpoHHoe pyKOBOCTBO NOJIb3OBaTeIra
3NeKtpoHHe pykoB0dCTBO NOIb3OBATeJIa
《HaCtpoHa ycTpoiCTBa》 «HaCtpoHa NCxOaHbIX
napaMeTPOB dIyHHcIphKa (ToIbHO dIra
MoJeIeMf8580CdW/MF8550Cdn/MF8280Cw)»
「PioueHne TepeHnIINH
Ipn yctaHOBHe dONOHHTeJIbHOJ TeJIeFOHHOITpy6Kn:
Iopno6Hee cm. BpyKOBOIDCTBe, BXOJaUeB KOMnJIeHT TelefoHHoTpy6Kn.
B 3abncnmoCTno CTpaHbI HIN peHNoHa B KOMTneKT NOCTaBKn 3TOrO yCTpOInCTBa MoKET BXODHTb TeLEFOHHbI Ka6eJIb.
3 3aKpoIe pa3dEJ «CnpaBOuHnK no HacTpoKe faKca» npe3aRpy3nte annapaT.

BbIKIOHTe annapat N IOOJOHTe KaK MNHIMyM 10cekynd, npexde yem BKNIOHTb ero CHOBa.
EcIn TINbI TelefoHHbIX INHn He onpeJeIOCTc ABTOMATueckn, CM. DOkymeHT «3neKToPOHHoe pyKOBOdCTBO NOLb3OBaTeJI» YTObI HAcTpOHTb TelefoHHyIO LInHIO BpyHyIO.
3NeKtpoHoe pyKOBOCTBO NOJb3OBateJIa «CncoK MeHIO HAcTPOHNI» «HaCtpoHNI paKaCa (ToIbKO dJa MOdenei MF8580CdW/MF8550Cdn/MF8280Cw)» «OChOBHbIe HaCtPOHNI
Annapa npocTabnepaHkui. Hxpe npcTabJe 63op ochOBbIX yHKu, KOtOpBc MOHO NC0JIb3OBA Tb NOCEdHeBHO.
KoHnpOBaHne
Honn cyBeneHneM/
ymehbueHHem
YBeIuHHeNnIyMeHbWeHne DOKymeHTOB CTAHdApTHOrO FOIpMaTa IKnIPoBaHnHa 6yMaRe CTAHdApTHOrO FOIpMaTa IIN yKa3aHHe K03ΦΦnEHTA KOnPiPoBaHnB PpoeHTax.
2-cTOpOHHee HONnPoBaHne
HONIOBAAHOODOCTOPOHHX DOKYMENTOB HA OBEHX CTOPOHAX Gymn.
CoptnpoBha
Moxno paccoptnpoBaTb konnn no KOMnJIeKtAm B npRKe cJeDoBaHnA CTpaHnU.
YMeHbWeHHbIMaKeT
MOnH0 yMeHbWntb HeCKoJIbHO DOKyMeHTOB, TTO6bI KOINPOBaT bX Ha OJHOM JNCTe.
2Ha14Ha1
HonipobaHne ydoctOBepenra
Bo3MOxHOCt b KOnHPOBaHNr 2-CTOpOHHe KapTOCHN Ha OJHOH CTOpOHe JInCTa.
KoHIpOBaHne c 3HOHOMNe 6ymaru
MOnKHO BbIbpaTb HHyKHbIe HaCTpoiKn KOnPiPoBaHnI N3napaMeTpOB, NOBbIaUOxxCraHa 3KpaHe pNbBbOpe [Copy] Ha naHeIy npaBLeHnI.
ΦaKc*
OtnpabKa DOKyMeHToB HENOCpeCTBeHHo C KOMMbIOTepa (aHaCNMnJIbHaN CB3b C NOMOuBIO KOMMbIOTepa)
POMMnO CtaHapThbIX CnOCo6OB OTnpaBKN IN PnHema KaKCOB MOKHO NcNoIb3ObaTb FyHKuHIO KaKcIMMbHO CB3N C NOMoubIO KOMNbIoTepa.
Otnpabka
Moxho3apeHcTpnpoBaT apecaTbI
fakcoB B apechoN KnHre. CyueCTByeT
HeckolbKO cnoCob yka3aHn
aDpecaTOB, no3BOJIOx6 bICTpo
n IpocTo OTnpaBHTb DOkymENTbl.
-ПонсадесаТа
Cnncok n36paHHoro
- KodinpoBaHHbHa6Op
- Frpynna aDpecaTob
- YkaaHHe n3 KypHaJa OTnpaBKn
-Последователльнаяпесдауа
Pnem
- PnemВ namrTb
PpHrTbE DOKyMeHTbI MOxHO COxpaHrTb B NaMrtn. CoXpaHeHHbIe DOKymEtB MoxHo B Lio6oe BpeM PaCneuTaTb Nm ydaJIbTb, eCNI OH6 BoJee He Tpe6yOTcR.
- YdaneHHbI npHem
При Налчим Рдкючehного Вhoeшero Teleфona MOxHOb HemeДлелно PerekHIOUHTbCBy PexHIM PnemAmФakCoB BO BpEma TeleФOHNO BbI0Ba pyTeM BBOda ИdeHTNФИHaToPa PnemAmФaKCa C NOMOuSbI O NΦpoBbIX KHONOK TeleФOHa.
NeyaTb
YMeHbWeHem
2-CTOPONHn neaTb
YMeHbWeHHbIMaKeT
MOxHO yMeHbWntb HeCKoJIbKO DOKyMeHTOB, YTO6bl HaeneYaTaTb INX Ha ODHOM JNCTe.
2Ha14Ha1
Peeatb 6poowop
NeuatabnlaKaTOB
NeaTb BOaHbIX 3HaKOB
PpocmTp npedBapnteHoro H3o6paXeHHa nepe d neaTbIO
Bb6op「npoHnIa
Санюванe
CoxpaheneHnE DOKymeHTOB C NOMOsbIO naneHn ynpabLeHHn annapata

ChahnpobAHne c nOmoBIO
[ ScanPC2
MoHNO ynpocHTb npoceDpy Bbl6opa aDpecaTa n yctaHOBn NapameTPOB cKaHNPoBaHHN OncpeCDtCBM INx pERiNCTpaunn INKlaBnH Na naHeJy npaBLeHN.
CoxpaHHeNohymeHToB c NOMOu bIO Oepaun Ha HOMMbIOTpe
- CkaHnPoBaHnE c NmOuBIO nporpaMMb MF Toolbox
- CkaHnpoBaHnE n3 npHIOKeHHN
CoxpaHeHHe Ha 3aIOMHaIOUeM yCTpoiCTBe USB
OTcKaHnPoBaHHbIe DOKyMeHTbIOMKHO COxpaHHTb Ha3aONMHaHIOUeM yCTpoNCTBe USB,NOdKIOUeHHOM K aIInapaTy.
OtnpaBkcaKaHmpoBaHHbIX
DOKYMENTOB NO 3NeKTPOHHO NOTe
MOKHOOTnpaBnTBOTCKaHIpOBaHHbIE DOKyMeHTbIB npNIOKeHne 3JIeKTPoHHNoTbI.
OTnpaBHa OTochAnHpoBaHHbIX DOKymENTOB Ha faHIOBbI cepBep
Moxho OTnpaBbTb OTcKaHIpOBaHHbI DOKyMeHTbHa faJIObY cepBep.
HactpoynceTu
DaHHbI annapat 6obopyoBaH cTeBbIM
HHTeppeiom, C nOMOuBIO KOTOPORO
MOxHO 6bICTPO CO3daTb cTeBOE
OOhyKeHHe. EcNn NcNoJIb3yETcR
MoDEJIb MF8580Cdw, K CETNI
MOxHO NOkJIIOUHTbc, NcNOJIb3yR
6eCnpOBoHyIO kKaJIbHyIO cTeB. Kpome
TOrO, MOxHO NeqataTb DOKHMtebl
NCNoJIb3OBAbTFyHKUIO FOaKCMHJbHO
CB3N C NOMOuBIO KOMNbIoTepa
(TolbKO dIra MoJeIeMf MF8580Cdw/ MF8550Cdn) IN BInOnHrTa cTeBOe
CKaHINpoBAHne CO BCEx KOMNbIoTePOB,
NOKnIOueHHBX K DaHNOMy annapATy.
Bo3MOxHOCTb NcNoJIb3oBAHn DAHHO
annapata B KaueCTBe OΦnCHOrO
annapata C o6UIM DoCTynOM NOMORAET
IOBbICNTb 9ΦeKTHINBHOCtbp a60Tbi.
YdaJIeHHbI IN
Tenepb Bbl MoKeTe npOBepaTb COCTOHNHe annapata C HOMBIOTeB B CETn. Kpome TORo, Ype3 CeTb MOHNO BblIOHHTb DOCTN K anapaty, YnpaBJIaB T3aDaHHMa N yHa3bIBaTb pa3LIHhIe HaCTpoKN.
TolbokdmoJMOeJMF8580Cdw/MF8550Cdn
YcTpaHHe 3aM7n6ymarN
EcnI OTo6paKaHaTcA 3OT 3KpaH, B yCTPOINCTBE NOaH NIN BHyTPn annapata npOn3oWIO 3amTne 6ymar. YdaNITE CMrTBn DOkymeHT HIN 6mary, CNeDy nPoUeDpye, OT6paKaHaemHO HA 3KpaHe. B 3OM pyKOBOdCTBE ONICaHb TOnbHO oBnactH, B KOTOpbIX MOKeT BO3HNKHyTb 3AmTne 6ymar. DOnOJIHNTeMbHyIO INHΦOpMauHIO 6 3THX nPoUeDypax CM. B DOkymeHTE «JLeKHTPOHHOe pyKOBOdCTBO NOnb3OBaTeJIra".
3aMeHa KapTpndJeC TOHepOM
KaptpnndcToHepomAIBJIOTcpaCXoHbIMMaTePnaIamE.CJIN ToHEp NOHTNII NIOIHOCbIO 3aOHUINcB INPOCECE BbINOJIHeHn3aDAnH,Ha3KpaHe NoABJIeTc COO6uHne IINMOyT BO3HnKaTb CJeDuOuNe IpO6LeMbI. PpIMnTe COOTBETCTByUOuNe MepbI.
Pn noBLeHH coo6eHna
EcnToHep NoTH 3aKOHnIcB npoceCE BbIOJIHeHn 3aDaHn,Ha 3KpaH NOBJIeTc COO6UeHne.
Ipeed Hauanom paobtbcannapaTOM BHMaTeBHo npOHTaTe pa3dEe "BaXHbIe yHa3AHnIO TeXHHKe 6e3OnaCHOCTN B daHHo pyKOBODCTBe N DOhUMeTe "3NeKTPOHHepyKOBODCTBO nNoJIb3OBaTeJIa.
IocKoIbHy 3n yka3aHnpeJaHa3NaHeHb Iy npEDoTbaaeeHn MaTePnaJIbHO rUeepBa IIN TpaBMnpOBaHn NOIb3OBAteJI n dpyrNx Iu, o63aTeJbHo ObaaJte BnHMaHne Ha 3TN yKa3aHn N Tpe6oBaNn K 3KcIpyataun.
IOMHnTE, yTO BbI HecTe OTBtCTBeHHocTb 3a IIO6oYuep6,
BO3HNKWH BcJIeCTBVe HeBbIINJHEHnO INCnAChhBX D aHHOM
DOKyMHeTe YKa3AHn, HeHaJIeKaJUeRo IcN0JIb3OBaHnY
yCTpoiCTBa IIO6o IIO6oPemHOta NII IN3MeHeHn,
pON3BeDEHbIX He cepTnΦIuPobAHbIM TEXHueCKm
CneuaJIncTOM Canon.
YctaHOBKa

PENDEYIPENDEHNE
- He yctaHaBInBaIte annapaT pAIDOM C IeRKOBCnIaMeHIOUIMNcBAEeCTBAMn, TAKIMN KAc CnIPTOCOdepKaJne PPOdyKtBI INPA36aBnTEJI KpaCNI. KOHTAKT 3TNX BEeCECTB C 3JeHETPnuCeCHMKNOMPOHeHTAMNBHYTpN aIIAPAATA MOKeT cTAb IIpnuHNOBOCSIAMEHEHNE 3TNX BEeCECTB N, KAc pe3yJIbTaT, POHapa INYBEJIHHeHn PNCa NOPaXeHn 3JeHETPNueCKM TOKOM.
He nomeaute Ha annapat 6pacIteb npdyne meTAnuueckne npedMeTb IIN EMHOCTN C BOIOH. KOHTAeT NOcTOPOHHX BeueCTB c3JEKTPnueCekHM KOMNoHEtAMN BHyTpH aannapata MoKeT cTaB npHnHO Bo3rOpaHn IIN NopaHeHn 3JeKTPnueCekHM TOKOM. B Cnyuae nonadaHna KaHO-LoIb6 I3 3THx BeueCTB BHyTp b annapata HEmdJIeHNO BbIKJLOUHTe NepeKNIouTeI INITAHn annapata N o6patntecb MeCTHomy dInlepy Canon.
He nnoIb3yIte daHbI annapaT pIOM c IIO6bIM meuHcHmObOpyObaHnEM.PaHIOBONHb,INJyuaembldeHHbIM aannapatom,MOYr CO3daBaTb NOMEXI JIpa60tI daHHoro MeuHcHcKO ObOpyObaHn,TO MOKeT npIBeCTN K HeCAthOMy ClyuHaC TAAKMM NocJeCTBnM.

BHIMAHHE
He yctahabinae annapat B onncanhbx HnHex MeCTax. HecobJIOeHne 3TOrTO Tpe6oBAHN MOKeT npNBcT N TpaBMe, nokapy nn IopapKeHHIO 3JIeKTPnueeCHM TOKOM.
-HeycToHbBaNoBepxHocTb
-MecTo,poDBepKHeHHoe Upe3MeHpHOB Bn6paun
-MecTo,B KOTOPOM BeHTnIaUIOHHbI OTBepCTN6ydyT 3aKpbItbI (CNIuHOM 6NI3KO K CTHe,Ha KPOBaTH NIN KOBpe C DInHHbIM BOPCOM INI dpyrNX IOXOXIN PpeMetax)
-BlaKHOeHn3aBbIeHHoe nOmeueHne
-MecTo,NOBBePHeHHoe BO3dEiCTBnIO npMOrO coJIHeHOro CBeta, HnHa yIuue
-MecTo,NoDBepKeHHe BO3dEeCTBnIO BbICOKHX TeMnepaTpy
-MecTOB6n3OtKpbITOroTn
-ПOMeueHHe 6e3doJIHHoBBeHTnJIaun
B npouecce pa60tla daHoro annapata BbdeJeTc 03OH HO OH He OKa3bIaEB T BlnHnHa opraHn3M YeNoBeKa. OdHaKo, ecnn IpaHpyeTc DOJra HnpepbIBHna pa6ota annapata, y6eHntecb, yTO MeTo yCTaHOBKn XopoWo BEHTnInpyeTc.
He noDcoeHnAte K daHHOMy annapaty HeyTbePckdHbIe Ka6JIi. HecO6JIIODeHne 3TOrTO Tpe6oBaHnMoJcET npBecTu K noKApuy nIIN nopAkeHnIO 3JeKtpnueCKM TOKOM.
HCTOCHNK NHTaHNA

PNEyIpyENHEHNE
He nCnoIb3yIte npyrne uHypbl nHaHnKpOme uHpya, BXoJaIeBO B KOMJIeKT pInHTepa -3TO MOKeT CTaTB npuHNOB03rOpAHn HIN NopAkeHnE 3JeKTPueCKM TOKOM.
He moHnHnnpuTe n He crnbai Te uhp nHTaHna, a taKHe cnIbHo He paactraNbaTe erO. He cTaBbTe TaeKeIbe IpeMeTbHa shyp nHTaHna. NObpeJeHne UHpya nHTaHna MOeT npNBecTu K noKaApy nn nopakEnHO 3JIeKTpueeCKM TOKOM.
He BCTabJIte tTe hHpy nHTaHnB Po3eTky n He 3BNEkaIe ero MOKpbIM PykAMN -3TO MOKeT npINBeCTN K nopAHeHHIO 3JIeKTPnueCKHM TOKOM.
He nIcNoJIb3yIte ydInHHTeIbHbIe IHypblnIyDInHHTeIIN C HeckOJIbKIMn PO3eTKaMn C daHHbIM aNnapaTOM. HecobIOJeHne 3TOrTO Tpe6oBaHm MOKeT pINBeCTN K NOxApY nn NopaaKeHHIO 3JEkTPnueCKHM TOKOM.
He CbopaunBaIte IHyp nItaHnI He 3aB3bBaIte erO y3IOM -3TO MOKeT CTaTb npuHNO B03rOpAHN IIN IopaKeHHN 3JIeKTPnueckHM TOKOM.
BctabJIte WttenceIb UHypa NITaHIN B PO3ETky CETn nepemehoro TOKa nonHOCTbHO. HeBbINOJIHeHne 3TOr npaBnla MoKet CTaTb npuHNOB03rOpAHN INI NOPaKeHHN 3JIeKTPNueCKHM TOKOM.
- PoiHocTbIO OTOeINHnIe TtEncBJe Hhypa NHTaHnO Tpo3eTHN BO Bpemr Ipo3bl. Heco6JIoJeHne 3ToTOr Tpe6oBaHN MoKeT npNBecTN K IOKApY, nopAKeHnIO 3JIeKTpUeCKM TOKOM NIN BbIXOy annapaTa IV 3 Ctp0r.

BHIMAHHE
ИспόльаутTe TOLьКОТ ИСТОУнК ПИТАнЯ, KOTOPБI OTBEЧАЕТpe6OBaHЯМ K HAnPЯKeHIO, ONICAHbIM B DaHHOM DOKymeHTe. HeBbINOJIHeHne 3TORO npaBnla MoJcET CTaTb PnUHNoB O3RopAHA NIN NOpaKeHnE 3JIeKTPuYeCKM TOKOM.
He 3aropaHnBaIte po3eKtky, K KOtopoN NOKnIOueH annapaT, TTo6bIMoKHO 6bIIO 6e3 Tpyda OTcoEHNHTb SHyp nITaHnB 3KCTpeHHOM Clyuae.

NPEyIYPExEHEHIE
He pa3bupaIte annapat n He nbTaTecb YTO-JIN6o H3MeHHTb Bero yctpoiCTBe. HeKOTOpbIe KOMNHOENTb BYTpH anapapa CnIbHo HArpeBaIOTCn IIN HaxOJaTcNOB BcOKHM HanpjaKeHHem, YTO MoKeT cTaT bpNHNHO Bo3rOpaHHn IIN NopAkeHHN 3JIeKTPnueckHM TOKOM.
He pa3pewaIte DeTAM npHKacaTbC K UHpy NITaHn I Ka6eJIaM, a TaKHe BHTPteHHM INN JIeHTpUeCKHM KOMIOHeHTAm INN IRpaTb C HmN. 3TO MOKeT npBecTu K NOJyEHNO cep63HbIX TpaBM.
Ecn annapat n3daet Heobuyhmy,BbdeJnreT HenpmbuHbI 3anaXnnDbIM nnIpye3MePHO HargpeBaETcO, 6oPaHTecb K yONlHOMOeHOMy Dnepy Can. IpoDOnJIHeHne 3KcNlyaTaunB TaTKnYcOBnX MoKeT cTaB npHuHoi BO3rOpAHn NIN POnAHEHn E3NEtPnHECKHM TOHOM.
He pacblyaTe B6n3n annapaT aERKOBocnmaHReIOUneCeBeeCTBa.KoHTaKT IeKOBOCnMaHEHOUxCe BSeEcTB C3JIeKTPnuEeCKnM KOMIOHENTAMN BHyTp n apnapTa MOnKET CTaTbpnuHNOBTOFOPaHHN INIPOPAHEHN 3JIeKTPnuEeCKm TOKOM.

BHIMAHNE
Buejx 63oanchoTOncoeHnIte WHyp nTaHnO TNeKtpocetn,ecn annnapat He MCNoBsyTec DOJIroe B
- BydTe ocToPOKHHbI npn OTHKpbITn N 3aKpbITn KpbIWeK, YTO6bl He TpaBMnPOBaT pyKn.
H36eTaTe KOHTaTpyH ODeXbI CBaINKaMn B ONaCTN BbIOda. IonaadHne pyK HIn ODeXbI MeKdY BaINKaMn MoKeT npIBecT N NOJyueHIO TpaMbI.
B npocce C npa3y Kne nocne pa60bI BHYtpHHe KOMnOHeHtBn Onbactb BOKpyr BbIBoDHoro IOTka annapata ABJIOCTc OeHb ropuHm. He npKacauTeCb K 3TNM oNlaCTM, 4TO6bl He noLyHTb OKOrn. Kpome TOrO, OTneTaHHa 6ymara cpa3y Nocle BbIbOa MoHcT 6b1b TropHne, NO3ToMv O6paMaTecb C Hei akkypatHO.B npotNBHom Cnyae MOHx NOUYHTb OKOrn.
TexHHuechoe 6cIyHbAHne nOCMToPbI

NPEAUNPENKDEHNE
- BbIKIOUaHte annapat n OTcoeINHnIe SHyp nHTaHnO Tpo3ETNIpeep OvCTKoH. HeBbINOJIHeHne 3TOrO npAUNa MoKeTcTaTb pNHyHOB BO3rOpAHn IIN NopAKeHn 3JIeKTPuYeCKM TOKOM.
- PepnoDnueckn n3BnkeKaIte wTeNceIb shHpya nHTAHn I3 pO3eTHn npOuHauIte 30Hy BOKpyr OCHOBaHH MeTaJIuHecKHX KOHTAOB WTeNCEI N PO3eTHN CyOHN TKAHbIO, QTO6bl NOHOCTBU ydAINTB nbIb N rP3b. PbIb, OCEBwA Ha BlaHHOJ NOBepxHOctn, MOKeT CTaTB npNUHoi KOpOTKORo 3amBkAHH nn nohapa.
- ONUCTKN annapata HcnoIb3yUte BlaHHyO xopo0o OTKaTyO TKAhb.CmaNuBaTb TKaHb DnO uNCTKHe HeOxOdmo TOIbKO B OBe. He cNOJb3yHTe CnPT, BeHcOJIbHbIe BEueCTBa, PACTBOpITeIN KpaRn IpyrNe IerKOBocPiameHaIOupeCe BAeCTBA. HoNTAKT 3tNx BeueCTB C 3eKTPneCHeHM KOMNoHEHAM BHyTPn annapata MoHET CTaTb pInHHoH BO3ropaHn INopaaKeHn 3JeKTPnuCeKM TOKOM.
Peyra npoBepnTe oTcTbne nobpeHdHn shypa nTaHn nTencEe. PpOepnTe oTcTbne kopp0nn, MExAHueckn DeOpmaun, uapanHH, TpeuHN nn 4pe3mepnor HappeBaHn annapaT. IcnoIb3oBaHne OobpyoBaHn, KOTOpoe He oCbnyKBAeTcdoJHKbIM o6pa3OM, MOKeT pNBeCTn K NoXapy Nn NopaKeHNo 3JIeKTPnueCkIM TOKOM.
PacxoHbIe MaTePnJIbl

PNEyNPEKHEHNE
He 6pocaiTe Otpa6oTAHbIe KApTpHdN C ToPepOM B OTKpbItBIOrOh. 3To MoKHe TnpBcEtn K IN BoCnJIaMeHeHHIO N, KaC cnEcdTBe, K NOUYehHHO OHOFOB NIN BO3HNKHOBEHHIO NOKapa.
- PnCnyaHOM paccbinaHn Tohepa oCTopoHHO BbITpTe Tohep MRAKO BAAKHO TKAHIO, He BbIXaero. He nOJIb3yIe NblIEcOC Dn OYCTKn IPOcBInaHNO Tohepa. B IpOTINHOM ClyaYe BO3MOxHO NOBpeKeHeN PbIEcoca Nn B3pbIB NblIN, Bbl3BaHHb CTATUNeCKHM pa3pAOM.

BHIMAHNE
XpaHnTe KapTpndn C ToHepom NpyrHe pacxOdbie MaTePnaIb I MeCTax, HeIOCTynHbIX dIra TeT. B cIyae npOrlaTbBaHnToHepa HemeJeHHo ObpaTntecb K BpaTuN B TOKCHKOHorNeckn CEHTp.
He nbtaTecb pa36npaTb KapTpndc Tohepom.Tohep MoKet npocBnaTbCn nonactb B rlaa nn pot. Pn nonapaHn TOhepa B rlaa nn pot HemeJeHNO pPOMoTe IN XOJIOHO BOOn OOBpaTecb K bpaCy.
Ecnn n3 KaptniHa npocbinaCToHep, cTapaTeCb He BbixaTbe 136eRaeIe eo KOHTaTc C KOHeJ. Pnp nonpaHn ToHepa Ha KOnHy cpa3y Jce CMOte erO BODoC Mblnom. B clyuae BbIXaHn TOHepa Hn Nn Bo3HNHOBeHHN KOHHOro pa3pAHeHHn N3-3a KOHTaTc C TOHEpOM HeMeJeHHO O6paTHcK BpaUy HnB TOKcNKoIOnrHuEcckn CEHTP.
Apyroe

PNEyPENPEHDEHNE
EcnHcnoIb3yeTcKapDIOCTHMyIATOp: 3OT annapaT CO3daET CIAOe MarHHTOE NOE. EcnBbl YCBCTByTe DNCKOMOPT BO BPemraPabToC annapaTOM, OTOJNTe NOAJIbUe OT annapaTA HEMEdJeHHo npOKOHcyIbTHpyITecB C BpaHOM.
IOpnduecka HhOpMaun
IOpnduueckne orpaHnueHna Ha nCnoJIb3OBAHne n3dEInn nI3o6paXHeHH
IcnoJIb3OBAHHe npNo6peTeHHORo BAMn I3dEJIINa
cAHnpOBAHn, neaTn INBocPOn3BedeHn OnPpeJeHHbIX
DOkUMeHTOB INbIMn CNOOCaMn, a TAHKe MCNoJIb3OBAHHe
IO6paKeHN, NOLyEHNbB P e3yJbTaTe CkAHPoABnHn,
neaTn INBocPOn3BedeHn DpyrIM CNOOCobm PnI NOMOuIN
pNo6peTeHHORo BAMn IN3dEJIIn, MOeHT 6bTb 3aNPpeHTo 3aKOHOM
mMOeT NOBLeYb 3a CBOsO yROLOBHyO W/nn IprKaJaDHCKyO
OTBetCTBeHHocb. HeNoJIbN CnICOK TaKnx DOKymeTHOB pINBEHn
Hnke. 3TOT CnICOK pPeHa3HaueH nIg NCNoJIb3OBAHn TOJbKO
B KauCteBEOpEnHpA. PnI BO3NHKHOBeHNm COMHENB
3aKOHHOCTN INCIOJIb3OBAHn DAHHORo IN3dEJIIn DnKcAHPoBAHn,
neaTn INBocPOn3BedeHn INbIM CNOOCobm KaKOr-INO
DOkUMeHTA IN/IN cNOJIb3OBAHn IN3OpaKeHN, INoYeuHHbX B
pe3yJbTaTe CkAHPoBAHn, neaTn INBocPOn3BedeHn DpyrIM
CNOOCoM, 3apaHee o6paTIeCb 3a KOHCyJIbTaueNeK IOPNCtY.
-БуmaHbIe DeHbIg
- DopokHHbYeKn
-ⅡaTeKHbIe npuyehn
- PpOdoBOJbCTBeHHbIe TaHOHbI
-ДeNo3THbIe cepTnФKaTbI
- Nacnpota
-Notobie Mapn (noraaehhbie Hn Hnoraaehhbie)
-IMMrrpaunOHbIe DOHyMeHTbl
-ⅠeHTnФИKaUNHbIe KapToyKn IIN3HaKn OTInuN
-BHytpenHne Mapn rep6oBoro c6opa (noraeHHbIe HnH enorawenHbIe)
-HeKOTOpBIE DOkymeHTbI Ha o6cIyKINBaHne IIN nepeBOdHbie BEKCEJIa
-06nnaunnnnydpynoeDolroBbIeceTnHkaTbi
- Yekn nn nepeboHbIe BeKcJIa, BblaHHbIe
rocydapctBeHHbIMN ypeHdeHHaM
-AKUN
- ABTomo6HbHbIe npaba NdoKymEnTbi, yOcToBepaHoune npaba CO6CTBeHHOCTN
-ПОН3BeDEHЯ,oxpaHЯEMbIe 3aKoHAMnO6 abTOpCkOM npaBe/ ПОН3BeDEHЯ nChyCCTBa,3anpeUeHHbIe IaBocPon3BeDEHЯ 6e3 pa3peUeHHaOBlaAteJIa ABTOPCHX npaB
Pn pa3pa6oTke pykoOCTB nn daHoro annapata 6bln
PnIIOXeHbI 3NaHTeBbIe ycINIIaNCKIOUeHN HeTOHOCTe
u npuehen. Tem He MeHee, Hau N3deJIra NOCToARHO
06HOBIAOTc. Dn IOnyehra ToHoi INΦOpMaUN ObaaauTeCB
B Kopnpauno Canon.
Noci6HnK3 HOMnJIeKtY nocTaBn
① Nocatoh po60tn (uei noci6HH): CnoaTHy npouHTaTe uei noci6HN. Y cMbOmy noci6HNy onncaHa pOceDpya BCTaHOBJIeHH anapata, hanaTbVAHH npamETPi IonepeJKeHH. OoB'3KOBO npouHTaTe uei noci6HN Kpeed BNKOpNCTAHm anapata.

② NocibHn i3 HacptpoOBaHH
6e3dpotoboi loKaIbHOi MepeHi
(1nwe dna modeni MF8580Cdw):
IpouHTaTne ue noc6hN icnra
O3HaomLeHHra 3 PoaytKom pOoTn.
Ycbomy noc6hNHy onncAHO npOeDpy
HactpOuBaHH 6e3dpOToBO IokaJIbHOI
MepeXia TAKOH npUHH BHNKHeHH Ta
CnOCOBn BiPiEHHn PNOBEm, RkMOKytB
BHNKHTy Ni dac HAcTPOBaHH.
O6OB'3AHO BO pOCHaTne ue noc6HnK
pePei ndIOHcHem anapata do
6e3dpOToBOI OkaJIbHOI MepeXi.
③ MF Driver Installation Guide (Noci6HH 3i BCTaHOBJeHHaPaeBepa MF) (User Software CD (Komnant-dnch 3 nporpaHMM 3a6e3neueHHm KopncTybaa)):
JaI O3HaHOMTEcR 3UIM NOCi6HNKOM. Ucbomy noci6Hky onncana npoceypa BCTaHOBHeHH nporpamHoro 3abe3neHHn.
④ EeKToHHn Noc6Hn (Multi-lingual User Manual CD (Komnant-dnck 3 noci6nham KIIbKOma MOaMn) a6o User Software CD (KomnKT-dnch 3 nporpaHm 3abe3neueHHm KopncTyBaay) 出 IpoHTaTe po3di i3 Notpi6HO IHOpMaJIcIO. EeKToHHn Noc6Hn po3dHeHn Ha KaTeopii DnIerKoro Nowky NoTpi6HoIHOpMaJIi.
* KomnakT-Dnckn, nki MicTbTB *EeKtPOHHN noCioNHKM,MOyHTb BiDpiHrncs3aJIeHXBOiD kpaHn Ta perIOHy.
IpeMeiueHHa mix nyHKTamM MeHIO Ta cnoci6 BBeDeHHa TeKcty
MF8580Cdw / MF8550Cdn
MF8540Cdn

Po60Ta 3 MeHIO
Bn6ip nyHrtiB a6o nepemieHHKypcopa mix nyHkTAMMeHIO
BnIyTe npHktn 3a donomoro knaibi [ ] a6o [▼].L6peeTn do HacynHoro po3iny,HaTNCiTB KhoNHy [OK] a6o [■].L6noBepHyTncd no nonepeDHBoro po3iny, HaTNCiTB knaBiy (Ha3ad) a6o [▲].
HaCTPOIOBAHHIπIDTBepKHeHH
HaTnCHiTB KNONy [OK]. OndaKaH RaHIO Ha dncJIeI 3'ABnREbCn NobIDomHeHHA
IpepernEEneHTpOHoro noci6HHa> 3 KOMnAHT-Dncha
3 KOMnKaT-DnCKa Multi-lingual User Manual CD (KOMnKaT-DnCK 3 Noci6HnKaMn KJIbKOMa MOBaMn)
1 BCTaBTe Multi-lingual User Manual CD (KoMnakT-DnCK 3 noci6HnKaMn KJIbKOMaMOBaMn) y KOMN'IOTEp.
2Bn6epitbMOBy.
3 HaTnCHiTh KhoHny [Display Manuals] (BiO6pa3HTn noci6HHKn).
3 KompaT-Dncha User Software CD (KompaT-Dnck 3 nporpaMHm 3a6e3neueHHam KopncTybaa)
1 BCTaTe User Software CD (Komnant-dnck 3 nporpaHm 3abe3neueHHM KopncTyBaay) y npntpi 3HTyBaHH KOMnant-DnchIB KOMnIOTepa.
2 Bn6epitb MoBy.
3HaTNCiThKHOHKy[OK].
4 HaTnCHiB KhoNky [Manuals] (Pioci6HnKu).
5 KlaunHb Ha3By NoTpi6Horo Noci6Hnka.
3aJIeHHo BiI OpeauiHoi CnCTeMNI, 10 BIHKOpNCTOByETbCRA, BIO6pa3NTbCRA IOBIOMJIeHHN pO 3a6e3neueHH 3axHcy.
IiKluueHHH uHypa XuBHeHH Ta yBIMKHeHH XuBHeHH
CnociB BBeDeHHa TeKCTy
3miHa peKIMy BBeDEHHA
HaTnCHiB KhONKya60
[×],IIO63MIHNITpeKHM BBeJeHHA.
| Рек imm В级以上的人 | Доступни liiterи |
| <A> | Абета (великий liiterи) ta Знaki |
| <a> | Абета (мали liiterи) ta Знaki |
| <12> liфри | |
BBeHeHHrTeHcy,3HaHbI uHpF
BnKoHnyTe BBeDeHHaΦpOBHMn KlaBiWiAMn a6o KlaBiWeeO [#]. DoknaHy iHOpMaui npo nepeHIOUeHHpeXmIB i DocTyNHi DnB BBeDeHHa CmBOJn DnB. Ha HAcTyNH CTOpIHci.
| Рек imm Вedlyнг: | ||
| <A> <a> <12> | ||
| 1 | @ . - /1 | |
| 2 | ABC abc 2 | |
| 3 | DEF def 3 | |
| 4 | GHI ghi 4 | |
| 5 | JKL jkl 5 | |
| 6 | MNO mno 6 | |
| 7 | PQRS pqrs 7 | |
| 8 | TUV tuv 8 | |
| 9 | WXYZ Wxyz | 9 |
| 0 | (н доступно) | 0 |
| * | (npo6i) @ ./ - !? & $ % #() []{}<=>" + =", ;' ' ' ]~ | (н доступно) |
IpepeiueHHKypocpy(BBeeHn npo6iJy)
BnKOpncToByTe dIe npemieHnn HKnabiIy [a] a6o [].IJIbBBeHHeN np6iIn npemicITb KypcOp y KHeCb TeKCTy HaTNCHTb KnabiIy [].
BudaeHHcMbBOJIb
HaTNCiTh KlaBiWy [C],uO6 BnDaJIHTN CmBOnI. HaTNCiThb i yTpMMyTe KlaBiWy [C],uO6 BnDaJIHTN Bc CmBOnI.

He niknouaTe Ka6eB USB y uei MOMeHT. NkHouitb Ioro niq Yac BCTAHOBJIeHH nporpamHOro 3aeaneueHH.
BctaHOBJIeHH NOyATKOBHX napaMeTpib
IOTpmyItecb IHCTpyKui Ha ekpaH, IO6 HAcTPOiTn MOBy, perioH, YacOBn IORc, a TAKoK Daty u cac. OOKlaNDy IHOpMaJIO npo pOBoTy 3 MeHIO Ta Cnoci6 BBeDEHHa UΦp DVB. y po3dini «IpeMeiueHHa MIX NyHKTaMn MEHO Ta Cnoci6 BBeDEHHaTEKCTy" (OCTop.140). MoXHa TAKoK Bn6paTHa6oCKacyBaTN BIKOHAAHH KopeKU KoJIbOpIB. DOKlaNDHiE npo Te, Ra BnKOHyBaTN KopeKU KOJIbOpIB, DINB. «EeKeTPOHHN Noci6HNK".
EneKtpoHHn noci6HnK: «HaCtpoOBaHH anapata» «YbIMKHeHH HnBHeHHn HaCtpoOBaHH noaTHOBuNnapaMeTpib
MF8580Cdw

MF8550Cdn / MF8540Cdn

Bn6ip cnocoby nikloueHna npapata do KOMn'IOTepa
BnKohyIe IHcTpyKuII, 10 Bo IIO6paKaHaOTbcra Ha ekpaHi, Ta BCTaHOBIT TIN i fOpmat nanepy.
3a3haueHHnoaTKOBHX HactpoHOK fachcy Ta πiKlIOUeHH TelefoHHoro ka6eIku (лше дя моделi MF8580Cdw / MF8550Cdn)
1 YkaKiTb noaTHoBi npaMeTpH paHcy.
BnKohnyTe iHCTpykui, 3a3HaueHi B "Noci6hky 3 HAcTpoIOBAHH paHCy", uO6 yka3aTH HOMep fAHCy, IM' npnaady Ta peHHM OTpmaHH. DOKlaadiu y IHOpMaio nppeHHM OTpmaHH NOdaHO B ENEKTPOHOMy Noci6hky.
EneKtpoHHn noCi6Hk: «ΦaHc» «OtpmaHHnФakCIB
BnKOpncTaHH imeni KopnctyBaHa
PiHacHaDCnHaHHaOKyMeHTa3apeecTpObaHi BiOMoCTI pO BiINpABHnKa dpyKyIObCa Ha 0AHCMIbHOMy NOiIDOMLeHHI OdepKByBaHa.
2ПДКИQUITbTeLEFOHHN Ka6eIb*.
KoHa dncnlee 3'ABReTbCnOBIDomJeHHN
EneKtpoHnn Noci6HN: HactpoBaHH anapata» «HaIauTyBaHH NOaTHOBHX napametpiB paKcy (nIwe DnMa moJeM F8580Cdw/MF8550Cdn/MF8280Cw)» «PiJknUoyehn TenefoHHoi liHii
PiHIOeHHaOaTHBOOcIyXaBn
ДЯОТРИМАнHД OOKlaIaHoi IINΦOMaJII DVB.NOCi6HNK 3KOMIIeHTY NOCTaBKN ClyxabKn.
3aJIeKHO BID KpaIHn Ta perioHy 3 anapatom MoKe NOCTaHaTcA TetefoHHN Ka6eIb.
3 BnIitb 3 peHmMy neperny noci6nHa 3 hAcIpoUbaHHa akcy Ta nepe3anyctItb anapat.
BmHKHtB anapat i noeKaIte npHaMHi 10 ckyHd nepu HIX yBMkHyTu NOrO 3HOBy. JIKUo TnHi TelefoHHx LiHi He Bn3HaiaOTbcra ABTomaTHHO, neperJIbHe EJeKtpoHHn Noci6Hn i HactpoTe TelefoHHy liHiIO BpyHy.
EneKtpOHn Noci6Hn:“HactpoOBaHHcNCHy MeHO》“IapameTpHn PhaCcy (JInwe dIra MoJeIe MF8580CdW/MF8550Cdn/MF8280Cw)》 OchOBHI napameTpH
Ha cboMy anapaTi MoXHa BnKohyBaTu pi3Hi dii. HnKHe HaBeDeHO orIaD oChOBHx fYHKui, aKi MOxHa BnKOpNCToBbTaN 0oDeHHO.
KonioBaHHa
36ilbweHHa 60 3MeHweHHKoii
MoKHa 36iNbSyBaTH a60 3MeHsyBaTH
DOKyMeHTn CTAHdAPrTHO FOpMaTy,
UoOB OTPMByaTH IX KOJIHa Naepi
CTAHdAPrTHO FOpMaTy a60
3a3NaHTn KOeFiCiEHT MacuTa6yBaHHa
KOJIY BIDcOTkax.
BOCTOPOHHE KONIOBAHHA
MOKHa KONIIOBaTN OJHOCTOPOHHI DOKymeHTn Ha 6nDbA 60Kn apKyua.
CopTyBaHHa
KoJIIMMOJHaCopTyBaTnNoKOMNKeTax y nopAky po3aUyBaHHCTOpIHOK.
3MeHueHH MaKeT
MoKHa 3MeHUnTI KJIbKa DOkUMeHtIB,
Oo6 KonIOBAtn IX Ha OINH apKyU.
2Ha14Ha1
UK
KonioBaHHn nocBiDyHn
Moxha po6nTu konii DBOCTOpOHHbOi KapTHN 0dHOrO 6Oky napey.
KonioBaHHn i3 3aoaadHexHHm nanepy
Bn6paBwn Ha naHeli KepyBaHHa
KlaBiy [ Copy ], MOKHaa
BiO6pa3NTn ONiKi KONIOBaHHa
Ta Bn6paTn 6aKaHI HAcTpoN.
ΦaKc*
HaCnlaHn DOkymeHTa 6e3nocepEhbo 3 HOMnI'OTepa (fakmibn 3B'r3OK 3a DOnOMOrOIO HOMnI'OTepa)
Okpim 3BnHrOpeKmHy HaCnlaHH TaOTPMaHHH qAkcIB MOHa BHKOPNCTOByBaTH qAChMlBHN 3B'3OK 3a DOnOMOrO KOmnIOTepa.
HaDCnlaHHa
B aDpeChi KHN3I MOHn peectpyBaTH OepKyBaiv PhaKcIB. 3apeeCTpyBaTH aDpeCaTIB MOHHa KJIbKOMA Cnoc6amn, IIO DO3BOJNTb HaCnlaTn DOKymENTn WBnKDt Ta 3pyHO.
-ПошукадресаТa
CnncOK npiopnteTHNX KOHTaKtIB
- HoĐований Habip
- Tpyna aDpecatIB
Bn6ip 3 Hpyhany HndiclanHnx DOkymeHTIB
-Послідовна розсILAкa
OtpnmaHH
OTpMaHHBnam'Tb OTPmahiDOKyMeHTM MoXHa 36epirATn Bnam'ti.36peKeHi DOKyMeHTM MoXHa 6yDb-KoHn po3dpYkBaTH, a HenoTpiHi-BuJaNTn.
BiDdaneHe oTpMaHHa
Hkuo nikhnoeHO 3OBHIHH TelefoH,MOxHa BiDpa3y nepeMKHytn anapat Ha peKHM OTPMaHHa KcCy,Ha6paBwn ideHTnphiCiHm HOpE OTPMaHHa KaCy 3a DonomoroIO KHONOK Habopy niac OTPMaHHa D3BiHka.
Друн
Dpyk 3i 36iNbweHHa m a6o 3MeHweHHaM
ABOCTOPOHHI dpyH
3MeHWeHn MaKeT
MoKHa 3MeHUnTH KJIbKa
DOkymeHTIB,IO DO3BOJNTb
po3dpykyBaTn ix Ha OJHOMy apKyu.
2Ha14Ha1
Dpyh 6poowpn
ApK nlaKaTIB
ApH BOaHHX 3HaHIB
PonepeHni neperIaI nepeI dpykom
Bn6ip «npoΦiIIO»
ChahyBaHHa
36epehenHHaOKymeHTIB 3a donomoroo naheJI kepybaHna anapata
ChahybaHHaONOMORO HnaBiw [ ScanPC2
Uo6 cnpoctnTn npoeDpy Bn60py Micu npn3haeHH Ta HacTPOIOK cKaHyBaHH, MoKH 3apeectpyBaTH ix y KnaBiaWx naneI KepyBaHH.
36epexeHHaOKyMeHTiB 3a DonOMOrHO KOMI'OTepa
CkaHbHaHHaONOMOIO nporpamM FTOolbox
CkaHyBaHHra3 npKnaDHOI nporpaMn
36epeKeHHB nam'rti USB
BiDcKaHOBaHI DOKyMeHTN MOHHa 36epiraTn B nam'Ti USB, kky niHIOUeHO do anapata.
HaCnlaHHB iDcHbHOBaHnx DOHYMHTIB eEeKTPoHHO IOItoIO
BiDcKaHOBaHI DOKyMeHTN MOHHa HAcNlaTH Do npOrpaM eJeKtpoHoiI NowTn.
HaCnHnBaICHaHOBAnx DOKyMeHTIB HaΦaJIIOBn cepBep
BicKaHOBaHi DOKymeHTM MoXHa NaDCnLaTn Ha foAInoBn cepBep.
Iapametnp mepehi
Ue anapat o6laHaHn MepeKHM iTepefcom, kHn Do3Bolre WbNko HacptoTn MepKHe cepoOBuIe.3a BnKOpNCaHn MoJIe MI MF8580Cdw BVMOKeTePiKIOuHTncrdoMepeKi, BnKOpNCTOByOuCh 6e3pOToBY IokaJbHy MepKy.MoKHa DpyKBaTu DOkUMeHTN, BnKOpNCTOByBatN PaKcMlBHN 3B'3OK 3a DoONOMOIO KOMn'OTepa (LiNe dR moJeL MEF8580Cdw / MF8550Cdn) Ta cKaHyBaHHa Ype3 MepKx 3ycix Komn'OTepi, 10 niHIOchI do anapata.CnilbHe BnKOpNCaHn anapata B ofici cnpiRe nDbHneHHo eEeKTHBHOCTi po60TN.
Remote UI (IHTeppeic BiDalaheHoro HOpncTyBa)
IiHaTnCpO CTan anapata MoKHa 3 KOMNIOTEpiB, OoPiHIOUeHi Do MepeKi. YpeE3 MepExy MoKHa OTPMaTH DOCTyn Do anapata Ta IHOrO 3aBdaHb, a TAKoK BCTaHOBIIOBaTH Pi3Hi npaMeTpH.
*Jnne dna moedneMF8580Cdw/MF8550Cdn
UcyHeHHaMHaHHnanepy
KJIO 3'ABINCBHabeHn HNue ekpaH, y npncTpo nOdaBHHa6o B anapatI cTANOc 3MHANHn nanepy. BIKOHyoH BiO6paKeHi Ha ekpaH BkA3IBKN, BmIMtB 3IM'ATn DOKymENT a60 nanip. U cybOMy NocioHNy 3a3NaeHHi TlBKn Oblacti, De TpannEhCB 3MHANHn nanepy. DoKlaadHnne Ipo npoeDpyn dNB. "EJeKtpoHnn NociBHK".


3aɪnHa KapTpɪdɪkɪb i3 ToHepOM
KaptniDki 3 Tohepom E BntpaTHMIM MaTepiAAM. Raio nd ac npky 3abHnToHeP nobHCTU mMaJke 3akHcyTbC,Ha ekpani BiOobpaKaetbCnOBIDOMJIeHHn abo BNHNkaOTb ONCAHI HNKe nOMNIHn. Y taKomy paizi CnI D BKNITBIDNOBIDHX 3axOjIB.
y pa3i noBn nobidomleHHA
Iaio nid yac npky 3abdaHH Tohep MaHke 3akHyTebca, Ha ekpaHI 3'ABJIeTBcNIOBIDOMHeHH.
Ha pO3dpykix 3'ABnnc HabeHHe Hxue O3NaK, OIN i3 BaWnx KapTpndKIO Me BnBHTcNpyCTM. 3aMIiTb MaJKe npCn KApTpndK i3 ToHepOM, HabITb RaKIO He BiO6paKaETbC NOIOMLeHH.
3'YBIAIObC6JIcMByuCaTkoBe 3He6apBHeHnHepiBHomipHa HacuHicTb
3'YBIAOTbCnIaMnTa6pN3KBiTOhepa


Bini oBnaCTi BnXIDHX DOKyMeHTiB dpkyIObC B cipomy KoIbopi Ha po3dpykIBkax

CNMBONI,IO BNHOPNCOTBYOTbCA B LbOMY noci6nky

NONEPEDHEHHA
I03haae nonepeHKeHHn CTocOBHO onepaui, kki MoKyTb np3BecTN do TpaBMyBaHHn B paasi ix HenpabunbHorO BVKohAHn. 3 MeTOIO 6e3neHoro KopNCtBuHH anapatom 3aBKnD 3BaKaaiTe Ha ci nonepeJKeHHn.

YBAGA
Ipo3hae 3acepekeHHcTcOBOOnepaui,kiMOKyTB npn3BecTN Do TpaBMByBaHH B pa3i ix HenpabNbHoro BNKoHaHH.
3 MeToHO 6e3neuHOrO KOpNCyBaHHa anapatOM 3aBKn 3BaKaTe Ha ci 3actepKeHH.
KnaiTa KhoNn, 0o 3raDyIObCBA bOmy noci6Hky
CIMBOJN Ta Ha3Bn KJIaBiI, BHKOPINCTOByBaH I B cboMy Noci6Hky, No3HaueHi TAKHM YHOM.
Knaibi niheJI KepyBaHHa: [PiKtorpama KlaBi] [PiKtorpama KlaBi] + (Ha3Ba KlaBi) PnKnad


(Ha3a)
- DnCnnei:
(YkaHitb aDpecaTa.)
KhoNk Ta eIemEnTu Ha dncnlei KOMn'IoTepa: [Preferences] (HacpoKu)
IInoctpaui Ta 3o6paHexHn eHpaHa, BnHOpncTaHi B cBomy noci6Hnky
KHe 3a3NaHcHo IHwe, IIOCTpaT Ta 3o6paKeHH y Ubomy noc6HNky BiNobiaIOTMbodei MF8580Cdw.

NONEPEDHEHHA
Uo yHnKHytn p3nHy tIeChnx TpaBM a6o noHKOHeHH oHaHaHHa, a TaKoX 06 OTpMaTHuOpHNHi BiIDOMOCTi, HtaiTe B EEnkToPHHomy Noc6Hky po3dIn «HaJeKHi npabObi NOBIDOMLeHHraTa «BaKnBi BiIDOMcTI npTo texHkiy Be3neKeH.
Baxnbi iHctpykui 3 texhikn 6e3neK
Ipepe npoToO 3 anapatom yBaXho npouTaNTE Baxnbi IHCTpyKcii 3TexHn6e3neKnBvCbMy nocihNky Ta EKeKtpOHmO nocihNky.
3aBKn 3eptaTe yBaIy Ha ci IHCTpyKuT Ta BmOrn Do EKcNlyatai; ix DToPImaHH DonOMarae 3anO6iTn TpaBMyBaHHIO KOpNCtByaHa Ta iHxocio, aTaKoN NowKOdHeHHMaHa.
MaIte Ha yBa3i, 10 Bu HeceTe BiDnOBiDaJIbHcTb 3a BCI 36nTKn
BHaCNIIOK HeDToPmAHnHn HabeDeHNx Tyt Yka3IBOK, 6yDb-RAHO
BVKOpNCtAHn IpnCTPOKe 3a PnI3HaueHHM, a TaHOK BVKOHaHH
peMOHTy MOnDiNfkiAciJy6b-Kn, KpIM TexHiHOro CneuaIAcTa 3
NOBHObaKeHHnMI BID KOMNaHII Canon.
YCTaHOBJIeHHH

NONEPEDHEHHA
He BCTaHOBIOIte anapaT no6n3y IerKo3aIMNCTHX peOOBH Ha 3pa3OK CNrTOBIMCIX HIN BPO6IB afo p03uHNHHIB KOHTAHT IerKO3aIMMCTHX peOOBH 3 eJeEeTPHmH NDeTaJIaMH BCEpeDiH I anapaToMa OKe He pIm3BcTeH Do NOKeHi afo ypaKeHHe EeTEpTHHm CTpyMOM.
He KlaIbHa anapat Hamncta, Hsi MeTaeBippeMeTn a6o MICTKcOCT3 pINHO. HoTtA TcPOHIX peOBOH 3 eEeKTPnHHMn DeTALmN BCEpeNDi H apaTaMo HEp3BeCTn DO nOKeKi a6o ypaKaHENH eEeKTPnHHM CTpyMOM. Raio Raacb 13 TaKHX peOBOH Bnade B anapat, HeraiHO BMKNITb Ioro XHBNEHHa 3BepHTbcra Do MicueBOr Ovnepa Canon.
He BnKOpNCToBnyTe anapat no6IyMeuHOro 06laHaHH. Bin BnPOMHIoe paioxBNi, 10 MoKyTB CTbOPHTN nepeWHOIN dIa MeuHORO 06laHaHH N pIn3BcETN Do cepNo3HN HeuaChNX BnAikIB.

YBAGA
HnKHe onncaHO Micu, HeBIDNOBIDHn IIN BCTaHOBIEHHAnapaTa. Po3aUyBaHHAnapata B TaHOMy MUCI MoKe npN3BecTN Do TlEChHX TpaBM, NoXeKi abo ypaKeHH enekTpHuHM cTpyMOM.
HebiNoBHe Micue
-Micue, BHKOMyMOKINBI CnHbI Biopaui
-YMICJX,DE6bNOKyoTbcBcBEHTNIAuHiOTBOpH(HaTO 6bn3bKO Do CTIN,JIIXKa,NYXHAcTO RKnIMMa Ta iINHX noi6HNx npedMetIb)
- yBONornx abo 3aannneHnx Micrx
-HaDbopi a6o nid npramm coHnHn npomHHM
-YMiCuxiBnCOKIOTeMnepaTpoio
-BiJI BIXIKPnTOro BOrHIO
- y Micuix i3 noraHO BeHTnlauiHIO CNTeMO
XOaBpe3yIbTaIpo6oTn anapata yTBOpIOeTbcra 03OH, BIn 3OBcIM He BnIbnae Ha IIOcBkN opraHl3M. Ta RaIO anapat MaE BVKnOPcTOByBaTncI pnoTARm TpBaJnx nepioIDIB, NOdBaTe npo Do6py BEHTINuIcIO MicrJ NOrO BCTaHOBHeHN.
He niknouhTe do cboTo anapata HepeHomeHdoBaHi Ka6JI. Lc MoKe np3BecTn do noKeki abo ypaKeHHra eJeKTPnHIM CTpyMOM.

KepeJIO HINBInHn

NONEPEDJHEHRA
He KOpHCTyIe3 IbIhIMn IHypaMn 3aMICTb IHypAr XHbJIeHNHa 3KOMPiKeTky NoCTabKN, OcJIbKn CE MOKe IPrImBecTn DO NOKeHki abO ypaKeHHN eJKeTpnUHHN CTpyOM.
He MoHnphiHyTe He 3rHaHTe Wyp XNBLeHH, He TgHiTb NOrO 3 npHnlaDaHHm 3NaHOTcNII. He CTaBTE Ha WHPXKNBLeHH BaxKi ppeMeTN. PNOKOJKeHHuHpya XNBLeHHMoKe npn3BeCTn Do NoKeki a6o ypaKeHH eJeEeTPuHMM CTPyMOM.
He BCTaBnIe Ta He BNMaTe 7tEnCeIb 7hHpy KaNBeHnMOKpIMn pykAmn, OChJIbKn Ie MOKe np3BecTn Do ypaKeHHnEneKTPnuHm CTpyMOM.
He BHKOpNCTOByE 3 Um Anapatom UHpyn-NOOBxBuayi POnp3aIyKByBaI KINBLeHNe 3 KInbKoma pOSeTkAmn. Lc MoKe npNp3BeCTn Do N0KeJei a6o ypaKeHHe EJIeKTPNHmM CTpYMOM
He 3moTyIe Ta He 3aB'3yIte ShHyp y By3oI, OckiNbKn ce MoKe npH3BeCTn do noKeKi a60 ypaKeHH eNEKtpuHIM CTpyMOM.
Повсгвсгьгггггггггггггггггггггггггgmepehi 3minHoro cTpyM.Якsoцboro He 3po6nTMOKeCTaTHC NOKExa abO ypaKeHHN eEeKTPnHm cTpyMOM
Пд усrtpo3и NOBHCIO BIMmaIte WTeNCelb UHpya KINBJIeHHa 3po3eTHN. HeoTPhMaHHa bOTo npabIna MoKe pH3BeCTn Do noJHexi, ypaKeHHa eJeHTpHcHm CTpyMOM aBO HeCnpaBHOcti anapata.

YBAGA
BnKOpNCTOByTe IIwE dKepeNo JHbEnHr, Hanpyra RHoro BiINOBiJaE HabeJeHM TyT BmOrAm. RaIO zuRo He 3po6HTN, MoKe CTaTcR NoKExa a60 ypaKeHH eNEkTpNHM cTpyMOM.
3a6e3neTe BInbHn DocTyn Do po3eTKn,do kOoi nIiKnIOuAeTBcAnapat, yo6 y pasi HaraIbHOI NOtpe6b 6yla 3Mora IerKOBHHATU WTeNCeB shHypa KMBHeHH.
NoBODKeHHa

NONEPEDHEHHA
HeMoHnΦiKyIte anapat i He po36bpaTte Ioro. UcepeDHI anapata E deTani, Jai nepe6BaayToPi BnCBOHO HAnpyTOO ao p03irpiTi DO BnCOHX TeMnepaTyp, OtoCTAOHbTI pN3NK BINHHKHeHHN POKeXI abo ypaKeHHeEJeKTPnHMM CTpyMOM.
HeD0BOLIyTe DIITAMTOPKaTNCsHypaKINBLeHHaKBeJIb, BHyTPIuHIX MEXAHIM3MIB Ta eJENKTPnVHxN DeTaeN a6O rpaTHc3 3HmN.HeoTpImaHHzIbOrnpabnlaMoHe npn3BcTn DO BAnKHX TlneChn TpABM.
- POMITINHn HADMIPHe HarpiBaHHa anapaTa a6o He3BvHn IyM, 3anax YI DIM BID HbORO, 3BepHITbCra Do BNOBHOBaKeHOro DInepa Canon. POnaJIbWe BHKOpNCaHH MoKe npN3BeCTn Do NoKeHi a6o ypaKeHH eNEKTPuHHm CTpyMOM.
He KopnctyTeCeIeKo3aMmCTMm aePo3oJMaM No6JN3y anapata. KoHTaKT JeKo3aMmCTnx peOvHn 3 eJeKtpnHHMN DeTaJIaMn BCEpeDHi anapata MoKe npu3BecTn Do noNeKeH a60 ypaKaHeH eJeKtpnHHM CTpyMOM.

YBATA
3 MipkyBaHb 6e3neKn BnMaJte WTeNceJIb Whypa JxNBLeHHa anapata, RaIO biH He BnKOpHcTOBvBaTImeTBc npOTrrom TpIBaIoro Yacy.
-ObepeHNO BiDkPnBaIte Ta 3aKpNBAIte KpnIuK,IO6 He TpaBMyBaTn pyKn.
TpmaTe pyuN OaR npaI BiD pOInKIB OblaCTi BnBeHn. NotpanJHHpyk a6o OaRy BpoINK MoKe np3BecTN Do TlJeCHx TpaM.
BHytpiHni cactHH anapata N BvbiHn IOTOK dyke po3irpi iid cac BNkopncTahna Ta Biipa3y nicra Hboro. Lio6 yHKnHyTH onikIB, yHkaite KOHTAKTy 3 cHmN cactNHAMn. Kpim TOrO, Opa3y nicra BNBedeHHPO3dpyKbIKMOkytb 6ytu rapAri, ToK NOBObTEcA 3 HMMn o6eepHHO. Heo6eepKHiCTb MoKe npu3BeCTn Do onikIB.
Texhuihe 06cnyrobyBaHHra Ta ornnd

NONEPEDXEHNA
- Pénéd quinqueHHM BIMHKHITb anapat i BnMIb wTenceIb shhya KINBJIeHHN 3 po3eTHN. RaKIO zuBOrHe sOboHN, MoKe CTaTHC NOJExKa a6o ypaKeHH eJeHTPNuHM CTpyOM.
Yac BiJ Yacy BInMaTe WtEnceJIb i3 po3eTKn Ta BtHnpaTe cyXoIO TKaHHHOIO nII i 6pyd i3 po3eTKn Ta 3 OCHOB MToAJeBHX wTnpiB WtEnceJIa. Bonrnn moKe npn3BeCTn do KopoTKoro 3amKahnna 60 noKeXJI.
OuHuaTe anapat BOIoroIO do6pe BHKpyeHOIO TKAHNHOIO. 3BOnoKyuTe zu TKaHnHy Iwne BOIOHO.He BHKOpNCTOByIte cnpt,6EH30JI,pO3HHnHH Ta iHsi JERHO3aMnCTI peOBOHN.H KOHTAK TaHXpeOoBH 3 eJKeTpUHmN DeTaJAMN BCEpeHNI apanata MoHe npIN3EcTn DO NOKeHkI aOb ypaKeHHa eJeETPHHM CTPYMOM.
Perynpho nepebiprTe shyp kHbneHH Ta wTeceJIb Ha HABHCtB noKoJKeHb. Nepebiprrte anapat Ha HABHcIb ipx, 3a3y6bnH, nOpnnH, TpiuH aHOdmpHe harpBaHH. BInkopncTaHnOBlaHaHHB NOrAHOMy cTahi MOKe np3BeCTN do noKeKi abOpaeHHe eEeKTPuHHM CTpyMOM.
BntpaTHi MaTepiAn

NONEPEDJHNA
He KndaIte BnKOpNCTaHI KapTpNi3 ToHepOM y BiDkpNTn BOHOb. Lc MoKe cnpuHHn 3aMaHnR npu3BecTn Do ONIKB a6o nokeKi.
- RaHToHep BnnaHOBo po3nnHBcA 60pO3cnnABc, o6epeKHO 3iTpBpo3cnnAHN npOoOH BOJrOIO M'HO KO HTHANHO; CTepeKHTCB, 06 He BmXHyTN HOrO. HiKOn Hne pInbpaite PO3CNaHN ToHE pINOCOM. Lc MoKe npnsBeCTn Do HecnPnHOrCti NINOcoCA a60 B6yxy Nnly B pe3yIbTaI cTAtNHORo 03p4y.

YBATA
36epiraTe KaptpnDki 3 Tohepom Ta iHsi BntpaTHi MaTepiAnB Micux, HeIOCTynHnx dIaI dIeT. U pa3i KOBTaHHr TohepaHeraiHo 3BepHiTbc4 do Iikapar a6o TOKCHONorIcHoro ceHTpy.
He HamaraTeCeP 036paTH KapTpIaH i3 TohepOM.Tohep MoKe PO3cInaTnC H NoTpanNTB Ooi a6o pot. RaIO Toep NotpanTB B Oci a6o pot, HeraiHO npomnte Ix XOIoHO BOHO Ta 3BepHtBCa Do liKapra.
KIO TOHEP BUNABc3 3 KapTpndHa, CTapaHTecr He BnXaTn Ioro Ta CnIkyTe, 06B Hn He NotpanNB Ha Wkipy. KIO ToHep NOTpAnITb Ha Wkipy, HeraHNO BmNITE 3 MNOM. KIO Bn BnXHyIn ToHep abo Wkipa NoPa3Heh BnACIoK KOHTaKTy 3 Hm, HeraHNO 3BepHtbcra Do IiKapra abo TOKCNKOJIOrIHoro CEHTpy.
Inwe

NONEPEDHEHHA
KIO B N BIKOPINCTOBye KAPIOCTMMyIATOp Lien anapat yTBPOIO Cna6Ke MarHIThe noJe. BiHyBwn B opraH3Mi RkICb npuyuHn Hn iD cac po0To 3 cIm anapatom, BiDitb BiN HbOro HeraHNO npOKOHcylbTyTEc3 IiKapem.
HaJIeHHI npaBOBIO nobIDOMJIeHHA
IOpnDnHi 6mMeHHeHHaOdo BnKOpncTaHHaBnpo6y Ta 3o6paKeHb
BnKOpNCaHnIbOBO BnOByDnCKaHyBaHH, DpyKy a60 KOniIOBAHH 6yDb-RAHM IHNIM YHOM NEBHX DOKymeHTIB Ta BnKOpNCaHnI TaHnx BIDcKaHOBaHH, HApPyOBaHH a60 CKoIIOBaHH 6yDb-RAHM IHNIM YHOM 3ObpaJHeh MoHe 6ytN 3a6OpOHcO 3aKOHOM TA CTaN pRmNHIO pPnTfRHeHH do KpMHaJIbHO a60 rPoMaJHcBKO IBDNObIAJbHocTi. HenOBH CnCOK TaNX DOyMeHTIB HabeDeHO HnKYe. LcE CnCOK CTBopeHn IIne dIa DOBdKn. RaKIO BnHKaIOb cymHBn IoDo a3aKOHCTI BnKOpNCaHnI BpOby dIra CkAHyBaHH, dpyKy a60 KOniIOBAHH 6yDb-RAHM IHNIM YHOM NEBHX DOyMeHTIB Ta/a60 BnKOpNCaHnI TaNX BIDcKaHOBaHH, HApPyOBaHH a60 bYbAikm IHNIM YHOM CKoIIOBaHH 3ObpaKeHb, cIa 3BePhyTnc 3a po3'rcHEHMM Do paDNHa Ka 3 KpNDuHN XITaNb.
- PanaepoBi rpowi
-Дорожнійкіn
-ⅡnataiKHiDopyuHnHa
-Прдовьчталони
-ДeNo3nTHi cepTnФiKaTn
-Паснорtn - Nowtobi mapn (noraaehi afo Henoraaehi)
-IMMirpauiHIDOKyMeHTN
-IdeHTnphiiauiHkapTHn a60 3naKn po3pi3HeHHa
-BHytpiunHMapKn rep6oBoro 360py (norawehi a60 Henorawehi)
-OKyMeHTN 0do BiBcKOBoT NOBHNOCTI
-06niraua iabo hwi dokymeHTn npo 60pROBIO 306OB'raHH
-YeKn a6o KBNtAnHcii, BNdHi yprAOBmN aReHcIaMn
-Akuiohepi ceptniKaTN - IocBiuueHH BODI Ta ceptnKaTu Ha npBaO BlaHocti
-TBOpN,IOOxOPOHJIOb3aKOHAMnIpo aBTOpcbKi npaba/BNTBOpN MNCTeUcTBa 6e3 OTpMaHH 3roDn BlaChHKa aBTOpcbKnX npab
BnydoKnaedno 3aHnX 3cNb IraToro, 06y nociHKax do anapata 6yn BiCyTHI HeTOHOctTa ynyueHH. Ondak, 3BaKaHOHaTe, 1o MN NoCTInHO BDOCKHOJIOeMO HaJI npOdyKT, 3BepHTbcrdo KOMNaHII Canon, RaIO Bam 3HaDoBlaTc ToHi TexHIxHxaPakTepcntKn.
Par komplektacija ieklautajam rokasgramatam
MF8580Cdw / MF8550Cdn
MF8540Cdn
Navigesana izvelne
Vienumu izvele vai kursora parvietosana pa izvelnes vienumiem
Izveliieties vienumu, izmantojot [▲] vai [▼]. Parejet uz nakamo hierarhijas limeni, nospiežot [OK] (Labi) vai [▶]. Atgriezieties ieprieksejā hierarhijas limeni, nospiežot [Atpakal) vai [▲].
Ilestatijumu apstiprinăsana
Nospiediet [OK] (Labi). Taču, ja displeja ir redzama iespeja
e-Rokasgramatas skatisana kompaktdiska
No Multi-lingual User Manual CD (Daudzvalodu lietošanas pamacibas kompaktdisks)
1 Datorā ivietojiet disku Multi-lingual User Manual CD (Daudzvalodu lietosanas pamacibas kompaktdisks).
2 Izvelieties valodu.
3 Noklikskiniet uz [Display Manuals] (Paradit rokasgramatas).
No User Software CD (Lietotaja kompaktdisks)
MF8580Cdw / MF8550Cdn
MF8540Cdn
Meniu narśymas
Elemento pasirinkimas arba zymeklio perkélimas prie menui elementu
Pasirinkite elementa paspausdami [▲] arba [▼]. Pereikite i kitaj hierarchija paspausdami [OK] (Gerai) arba [■]. I ankstesnj hierarchijos lygmeni gržkite paspausdami [Atgal) arba [▲].
MF8580Cdw / MF8550Cdn
MF8540Cdn

Menuuslikumine
Kahepoolne printimine
MF8580Cdw / MF8550Cdn
MF8540Cdn
MF8580Cdw / MF8550Cdn
MF8540Cdn
Navigace v nabídce
MF8580Cdw / MF8550Cdn
MF8540Cdn

Navigácia v ponuke
^* Iba modely MF8580Cdw / MF8550Cdn
Vymena tonerovych kazlet
Kazety s tonerom su spotrebny tovar. Ked sa toner takmer minie alebo sa celkom minul pochas ulohy, na obrazovke sa zobra sprava, priadne sa mozu vyskytnut nasledujuce problemy. Podla situacia vykonajte prisluanse kroky.
Ked'sa zobrazisprava
Ked sa toner takmer minie poças ulohy, na obrazovke sa zobrazi sprava.
③ MF Driver Installation Guide
MF8580Cdw / MF8550Cdn
MF8540Cdn
Krmarjenje poPTHJU
Izbiranje elementa ali premikanje kazalke po menijskih elementih
Element oznacite tipko [▲] ali [▼]. S tipko [OK] (V redu) ali [▶] se pomaknite na naslednjoo hierarhijo. S tipko [■] (Nazaj) ali [▲] se vrnete na prejsnjo hierarhijo.
MF8580Cdw / MF8550Cdn
MF8540Cdn
MF8580Cdw / MF8550Cdn
MF8540Cdn
Navigálás a menüben
Elemek kivalasztasa es a kurzor leptetese a menupontok kozott
MF8580Cdw / MF8550Cdn

MF8540Cdn
Navigarea prin menui
e-Manual (Manual electronic), Faxing" (Fax) Receiving Faxes" (Receptionarea faxurilor)
③ MF Driver Installation Guide (PbkoBocTBO 3a HnctaInpaH e Ha MF dpaibepa) (User Software CD (Komnakt dnck c nOtepeNTeNc coFtyep)):
IpoyeTe pBkoBOdCTBOTo Cnei TOBa. B TOBa pBkoBOdCTBO Ce ONICBA HnCTaIIpaHeTo Ha coOfTyepa.
④ e-Manual (EneKtpoHNO pbHOBOcTBo) (Multi-lingual User Manual CD (HomnAHTnCH C MHORoe3NHO pbHOBOcTBO 3a NOTpe6nteJI) HnUser Software CD (HomnAHTnCH c Notpe6nteJckn coΦTyep))\*:
Ipooyete TlaBaTa, KOrTo Bn e Heo6xOma. CbDpKaHHeTo Ha e-Manual (EJIeKTOPOHO pBKOBOdCTBO) e KaterOpN3npaHo NO Temn, 3a Da Ce yueChn HAmpaHeTo Ha JeLaHaTa HhOpMaun.
* KomnakTmckbT, BkHIOyBaue e-Manual (EeHTPOHO pKOBODCTBO),MOHe da ce paJIYaBA B 3ABHCNOCT O TaBaaTa CTpHa HIN PERHO.
PnDvBnKBaHe B MeHTo H MeTOHa BbBeKdaHe Ha TEkCT
MF8580Cdw / MF8550Cdn
MF8540Cdn

PnudBnXBaHe B MeHIOTo
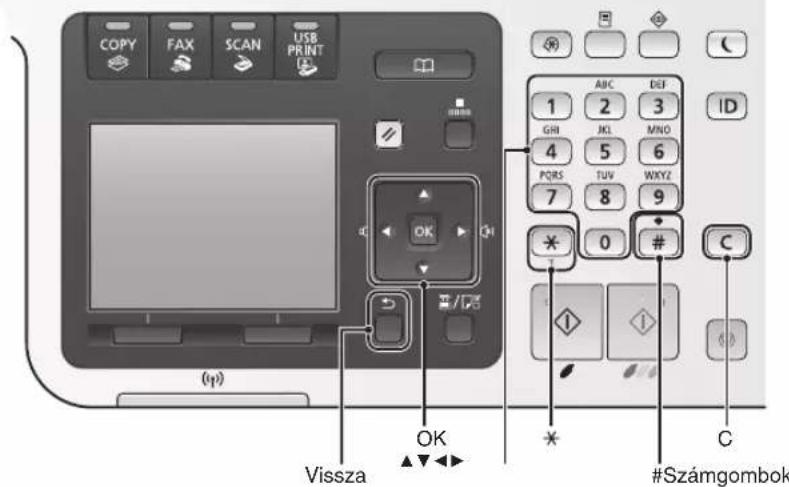
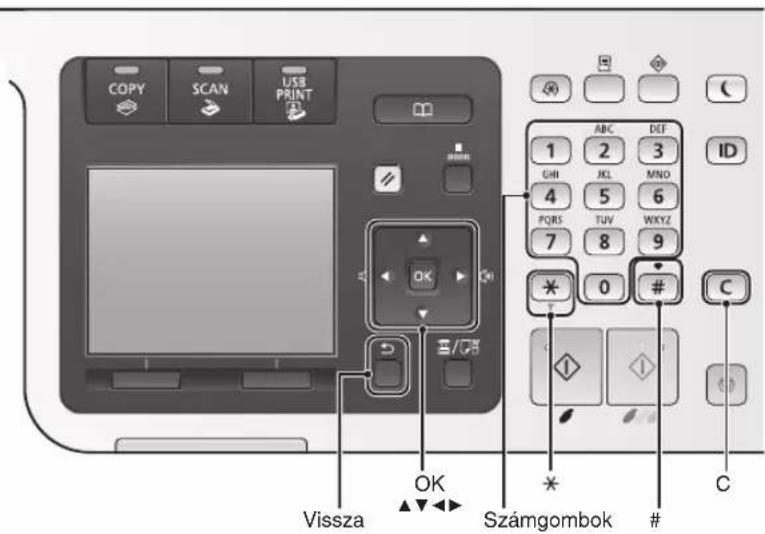
H36npaHe Ha eIeMeHTn Hn npemecTbaHe Ha Kypcopa MeKdy eIeMeHTNTe HA MEHIOTO
I36epTe eJemEnTc nOoTa Ha [A] HIN [V].PpeMHHeTe KbM CneBaUTo NepapxHNO HnBO c [OK] HIN [B]. BbPheTe ce Ha npEduHOTo NepapxHNO HnBO (Ha3aD) HIN [4].
IOTBbPnDaaBaHeHaHacTpoKHTe
HaTncheTe [OK].Korato obaue Ha duCnIe Ce noBn cbo6eHneTo
IperneHa e-Manual (EeHTPOHnO pHOBODCTBO) OTHOMnAHTAncha
OT Multi-lingual User Manual CD (HOMnAaT DnC C MHOe3uHo PbKoBOdCTBO 3a notpe6nte)
1 NocTabete Multi-lingual User Manual CD (KOMnAaT DnCK C MHOoe3uHOp bKOBOCTBO 3a NOTpe6nteJI) B KOMNHTbpa.
2 N36epeTe e3nK.
3 UpaKHeTe Bbpxy [Display Manuals] (IokaJn pBkoBOdCTBaTa).
OT User Software CD (KoMaNT dNcC cnoTpe6nTeJcn coTyeep)
1 NocTabete User Software CD (KoMaT DnC C noTpBe6nteJcN coQTyep) B KOMnHObpa.
2 N36peTe e3nK.
3 UpaKHeTe Bbpxy [OK].
4 LpaKaHeTe Bbpxy [Manuals] (PbKOBOcTba).
5UpaKHeTe BbpyHMeToHa pBkoBOdCTBOTO.
B 3aBnCmOCT OT nI3noI3BaHaTAtonepaHOnHa CnCTema Ce noka3Ba CbO6eHne 3aAHTa HcNpyHocTtA.
Cbbp3BaHe Ha 3axpaHbaunHa6eN BKJIIOUBAHE Ha 3axpaHbaHeTo
MeToHbBBeHdaHeHaTeKCT
CmHa Ha peHHMa Ha BbBeHdaHe
HaTnCHTe nJN [x]3a da npOMEHHTe peKIMHa BbBeKdAHe.
| Рек imm на въевдане | Tekst за въевдане |
| <A> | Азбуka (галовни бухи) и симboлн |
| <a> | Азбуka (малкиSBYKN) и симboлн |
| <12> Βифри | |
He Cbbp3BaTe USB ka6ena Ha To3n eTan. CbbpKeTe ro no BpeMe Ha HcTaIinaPeHa coΦTyepa.
BbBeHHaHe TeKCT, CmB0JIH uNΦpN
BbBeHdaIe C6yToHInTe C uNΦpN
3a noippo6HcTn 3apeKHMITE,Ha KOHTO MOKe Da ce npEeKnIOUHy,INI TEKCTA,KOHTO MOKe Da ce BbBExKa, BHK.Ta6NIuTaTaNo-DoNy.
| Рожим на вьбдане: | |||
| <A> | <12> | ||
| 1 | @ . - / 1 | ||
| 2 | ABC abc | 2 | |
| 3 | DEF def | 3 | |
| 4 | GHI ghi | 4 | |
| 5 | JKL jkl 5 | ||
| 6 | MNO mno | 6 | |
| 7 | PQRS | pqrs 7 | |
| 8 | TUV tuv | 8 | |
| 9 | WXYZ | WXYZ | |
| 0 | (He e doctbien) 0 | ||
| * | (Интугал) @ . / - !? & S % #() []{}<> " + =", ; , ' ^ ]^- | (He e doctbien) | |
Yka3BaHe Ha NpBPOHaQaJIHnTe HAcTpoJKN
N3bHHeTe NcTpyKuNTe Ha ekpaHa, 3a da 3aJaTe e3nK, pernoH, yacoba 30Ha H DaTa H ac. 3a NoBce He HOpMaUra OTHOCHO npdBnKBaHETO B MeHIOTo N BBeKaHaTe Ha cHpBx ., PnDnKBaHe B MeHIO To MeTO Ha BBeKDaHe Ha TeKT" (Ctp.250). MoKeTe Cbso Taka Da n36peTe dAn Da n3BbpUnTe KopeKuHa Ha CBetOBeTe. 3a noDpo6HOCTn OTHOCHO HaHInHa Ha n3BbpBaHe Ha KopeKuHa Ha CBetOBeTe Bx. e-Manual (EneKTPoHn pkoBOcTBo).
e-Manual (EeKtpoHno pkoBoCDtBO), Setting Up the Machine" (HactpoBaHe ha MaunHa) ,Turning ON the Power and Configuring Initial Settings" (BknOuBaHe 3axpaHbAHeTo n KOhFHypnpaHe Ha npBpHOHaJHnTe HacTpoKn)
MF8580Cdw

PpemecBaHe Ha Hypcopa (BbBeHdaHe Ha HHTepBaJ)
PpEmecTBaHcTo Ce N3BbPwBa C nMOuTa Ha [ ]Nn [ ]PpEmecTeKypCopa Do KpaHa TeKCTa HATNCHeT [ ], 3a Da BBeDeTe INHTepBaI.
N3TpHbAHe Ha 3Haa
HaTncheTe [] 3a n3TpNbAhe Ha 3Haun. HATnchete n 3aDpBkTe[] 3a n3TpNbAhe Ha BCNUH 3Haun.
MF8550Cdn / MF8540Cdn
H36op Ha MeToa 3a CBbP3BaHe Ha MaunHaTa KbM KOMNIOTp
Cbbp3BaHe uee3 LAN ka6eJ
Bx. CbpyBaHe ype3 LAN Ka6eI"
MoKeTe Da CbPKeTe MaunHaTa KbM KOMnHOTbp NocpeCTBOM LAN MapwpyTu3aTOp CnXoyn 3a MpeKOBn Ka6eN. N3non3BaJte LAN Ka6eN 3a CBp3BaHe Ha MaunHaTa KbM MapwpyTu3aTopa.
- YBepete ce,he MappyTHaTOpbT pa3noIra cbc CBO6OHNOPTOBE 3a CBbp3BaHe Ha MaunHATA KbM KOMNHTpa.
- IpoIroTBete ycyKaH dBoeH LAN KaBeI OT KaTeOpn 5 HnN NO-BnCOKa.
Cbbp3BaHe uee USB ka6eI
Bx. Cbpb3BaHe ype3 USB Ka6eJ

MoKeTe Da CbPKeTe MauHaTa KbM KOMnHtbp nocpeCTBOM USB ka6eJ.
Cbbp3BaHe ype3 6e3KnUHa LAN mpeKa (cmo 3a MF8580Cdw)
B. PbkoBOdCTBoto 3a HacToHa WLAN.


MoHHe Ta CbPKeTe MaunHaTa KbM KOMNtBp NocPeCTBOM 6e3KHeH MapuTy3aTOp*. Tb KaTo CbP3BaHeTo CTaBA NO 6e3KHeH PtT, He ca Heo6xOyIMn LAN KaBeJI.
*H3NCKBa Ce 6e3KHeH MapuPyTu3aTOp C noDpBKKKa Ha CTanapTHTe IEEE802.11b/g/n.
AHO He cTe cnrypHn daJI MauPpyTu3aTOpbT Bn NOdIbPka 6e3KNUHO IIN Ha6eJHo Cbbp3BaHe:
BHK. pKOBODCTBOTO KbM cAMOT MpeKOBO yCTPOHCTBO HJI CE CbBpKeTe C npOn3BODHTeJI My.
Cbbp3BaHe uee LAN Ka6eJ
1 CbbykheTe LAN ka6eJa.
IP aDpecbT ue CE KOHnHypnpa ABTomTuHOBpaMHHTe Ha 2 MNHyTH.AKO NcKaTe da 3aJaTeIP aDpeca pBuHO, Bk. enEmeHTte NO-dOly.
e-Manual (ELeKToPOH pBkoBOdCTBO) Network" (Mpexa) Connecting to a Network" (Cbbp3BaHe c mpeka) Setting IP Addresses" (HactpoBaHe Ha IP aDpecn)
2 HcTaIpaIte IpaIbepa n coΦTyepa oT User Software CD (KOMNaKT DnCK C nOTpe6NtEJIckn coΦTyep).
IpemHaBHe KbM,3aabaHe Ha φOpMaTn TnHa XapTnTa" (CTp. 253).
Cbbp3BaHe uee3 USB Ka6eJ
CbpyKeTe USB ka6eIa, cJeI KaTO INCTaJInpaTE MF dpaIbepnte mF Toolbox.
1 HcTaIpaTe DpaBepa n coΦTyepa ot User Software CD (HOMnT DNCK C NOTpe6nteJcN coΦTyep).
2 CbpyKeTe USB ka6eJa.
PnemHabHe KbM,3aabaHe Ha φOpMaTa n TnHa XapTnTa" (CTp. 253).
3a noBee neoDpo6HOCTN OTHOCHnHCTaJaauHOHHTe npOeDpyn:
Bx. pkoBDCTBOto MF Driver Installation Guide (PkoBDCTBO 3a HcTalnpaHe Ha MF daBepa)
3aDaBaHe Ha φopMaTa n Tnna Ha XapTnTa
HaTo CLEDbATE INHCTpyKunHe Ha ekpaHa, 3aJaTe foMpata n Tnna Ha xapTnra.
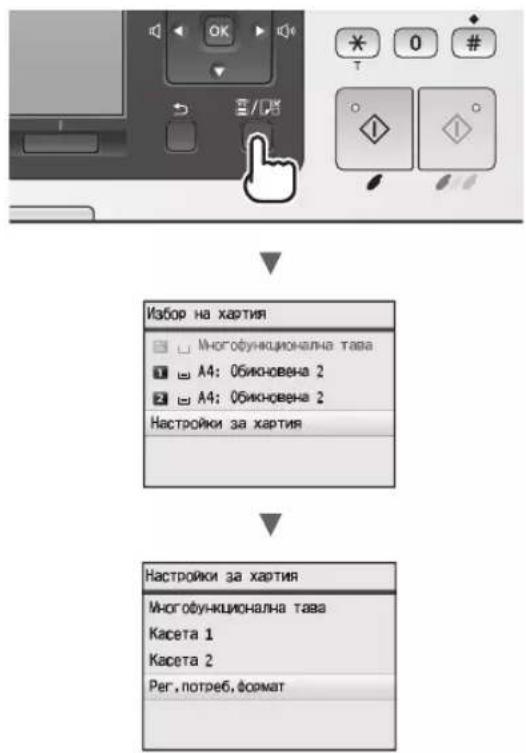
YHa3BaHe Ha NbPBOHaayHInTe HAcTpoHN HaΦaKca N CbBp3BaHe Ha TeJeΦoHEn Ka6eJ (camo 3a MF8580Cdw / MF8550Cdn)
1 YkaHeTe nbpBOHaJIHnTe HAcTpOuKn Ha KaKca.

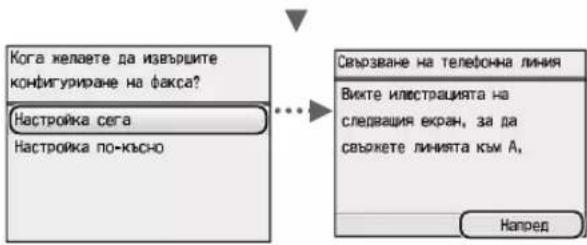
CneBaIte HNCTpyKUINTE BBB, PbKOBOcTBO 3a
HAcTPOBBAHe Ha paKca", 3a Da 3aJaTe HOMep Ha
PakCa, IMe Ha yCTPOJCTBOTo n peKIM HA NOyabaHe.
3a NObEe NoDpO6HOCTn OTHOCHOpeKIMITE Ha
NOlyuBaHaBe Bx. e-Manual (ELeKTPoHNo pBkoBOcTBO).
e-Manual (EneKtpoHnO pBkoBOdCTBO),Faxing" (I3npaune Ha φaKc) Receiving Faxes" (POnyabane Ha φakcObe)
Hacce H3noJ3Ba IOTpe6HTeJIckOTo HMe
Horato n3npaata DoKymeHT, HhOpMaunra 3a n3npaaua, KOITcpePrtpapn, ceOTneuTba Ha DOKyMeHTa Ha NoIyataJI.
2 CbbpkeTe TeJefoHHn Ka6eJ\*.
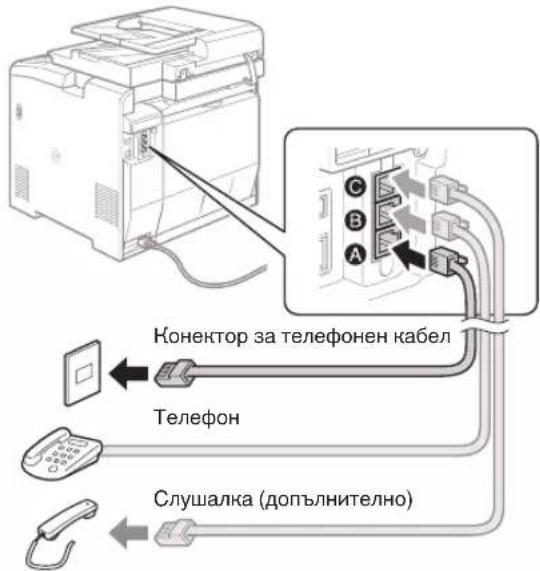
Korato Ha dinclner ce nokae
e-Manual (EneKtpOnHPObKOBoDcTBo), Setting Up the Machine" (HacToBnAHe Ha MaunHata) ,Configuring Initial Settings for Fax Functions (MF8580Cdw / MF8550Cdn / MF8280Cw Only)" (KoHΦnHyprpAne Ha nbpBOHaJInHe NaCTpoKn 3aФyHKUnTe Ha paKc (camo 3a MF8580Cdw/MF8550Cdn/MF8280Cw)) "Connecting the Telephone Line" (CbbpBaHe c TelefoHHATA JINNA)
PnHCTaHaPe Ha dOHTbHNTeHtAaClyuHa:
3a noBHe HnΦopMaJy Bx. pKOBODCTBOTO, npdeOCTaBeHO CbC cnUaHkata.
^* C MaunHaT a MoHe da Ce npedocTaba TelefoHen Ka6en B 3aBNCUMOCT O TcpaHata Nn peHOna.
3 N3JIe3Te OTe PbKOBOcTBo 3a HAcTpoBHaHe Ha KaKca, CJIeD KOEt peCtApTnpaIte MaunHaTa.

N3KJIIOUHYETE yCTPOINCTBOTo nI3uKaaiTe NOHe 10ceKynHn, npedn da rBKHIOUYITE OTHOBo. AKO TINOBeTe TEleFOHHa IHHa He ce OTKpNBaT aBTOMaTNUHO, Bk. e-Manual (EneKTPOHNO pBkoBOcCTBO) n HAcTPOInTe pBHuO TeLEeFOHHaTa IHHIA.
e-Manual (EneKtpoHn pBkoBOdCTBO),Setting Menu List" (CnncbK c MeHIO Ha HacTpoHKe) ,Fax Settings (MF8580CdW/MF8550Cdn/MF8280CwOnly)" (HacTpoHn Ha paKc cAmO 3a MF8580CdW/ MF8550Cdn/MF8280Cw)) ,Basic Settings" (OchOBHNacTpoHKn)
MoKeTe da n3noJIbATE pa3nHn FyHKcHn Ha ycTpoiCTBOTo. CLeBa o63Op Ha oCHOBHnTe FyHKcHn, KOHTo MoKeTe da n3noJIbATE B eKedHBHATA cn npaHTnKa.
KoHpaHe
YBeJIuHHeHH/HaMaJIeHH KOHN
MokTe Da yBEniHaBe Tn HamaJIbBaTe DOKyMeHTn CbC CTaHApTeH fOpMaT, TaKa Ye Da Tn KOnIpaTe Ha XapTn CbC CTaHApTeH fOpMaT. MoKTe Da 3aJaTe CboTHoWeHne Ha KOnIpaHe B IpOeHTn.
2-ctpaHHo konHpaHe
MoKeTe Da KOnnpuate eHocTpahnn DOKyMeHTN OT Dbete cTpaHn Ha IInCT XapTna.
KomnleKtyBaHe
MoKeTe Da copTnpaTe KOnnraTa B KOMnJIeKTHNo HOpem Ha cTpaHnua.
HamaIeHo oΦoMpIeHne
MoKeTe Da HamaJIaBaTe MHOKeCTBO DOKyMeHTn,3a Da rH KOnIpaTe Ha eDIN JInCT.
2B14B1
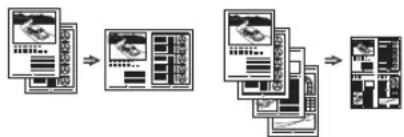
KoHpaHe Ha IInuHn DOKyMeHTn
Mokete da konipate DByctpaheH liuehen DokymeHT OT eHaTa CtpaHa Ha JnCT XapTna.
IecTeHe Ha xapTn npKoNpaHc
Mokete da n36epete xeJeaHnTe HactpoKn 3a KOnnpaHe OT onuInTe, noKa3BaunCe npu n36opa Ha [ Copy]Ha pa6oTHnaHn.
ΦaKc*
HnpeTHo H3npaueHa Ha DOhymeHT OT HOMNIOTpB (fAHCOT HOMNIOTpB)
OcbEN HOPMaJIHOTo N3npaUaHe N NOJyBaHa He fAHCObE,MOKeTe DaN3NoJI3BaTe FyHKuYraTa,FaKc OT KOMIHTbP".
N3npaapane
MoKeTe Da 3aNaMeTBAte foKc MeTOHa3HaueHnB aDpeChata KnHa. MoKeTe Da 3aDaTe MeToHa3HaueHnETo ype3 pa3JNUHn MeToDi, KOEtO Bn DAba Bb3MOxHOCT Da H3npaata 6bp3o N IeCHO DOKyMeHTN.
TbpcHeHaMeCTOHa3HaueHne
CnncbKcnpeepnoHTAHN
- Na6upahe ue3 KoDObE
-ГрynaHaMeTOHa3HaueHne
3aabahe ot xpohoIognraHa n3npaanahe
-Последователюразпрацанe
TnyaBaHe
- Nolyuhahe B nameTTa NolyueHnTE DOkymeHTN MOKe da ce cbxpaHbAT B nameTTa Ha maHHata. MoKTe NO BCaKO BpeMe da pa3neHaTaTe cbxpaHeHnTE B nameTTa DOkymeHTN HJN Da Tn H3TpneT, aKo He Ca BN HeO6XoDmN.
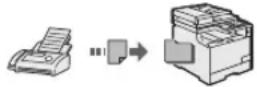
- Oтданецноусане
Ako e Cbbp3aH BbHneH TelefoH, MoKeTe Da npBkIIOUHTe BeHara Ha peKHM Ha noLyuBaHe Ha fakCObe, KaTo no BpeMe Ha pa3roBop HabepeTe HeENTnFkaUHOHHN HOpE 3a NoLyuBaHe Ha fakCObe Ye3 6yToHtE 3a HabnpaHe Ha TelefoHa.
Iechat
OTneaTbaHe cyBelenuBaHaHe/ HamaJIraBaHe
2-cTpaHEn neayat
HamaJIeHo OΦoPmJIeHne
MoKeTe Da HamaJIaBaTe MHOKeCTBO DOKymeHTN,3a Da rN OTNeHaTaTe Ha eINH NtC.
2B14B1

NepaHa KHHKHN
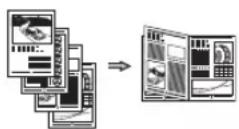
OTneuTaBeHa nJaKaTu
OTneuTaBaHe Ha BoDen 3HaK
Ioka3BaHe Ha Bn3yaJIn3aun npden nechat
H36bpaHe Ha, npoΦn
CkaHpaHe
3aHcBaHe Ha DOhymeHTn OT pa60THHaNeH Ha yCTpoIcTBOTO
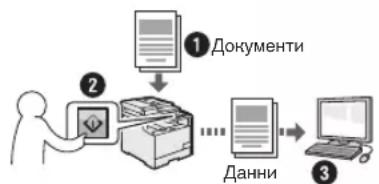
Kanepaheype3

3anPC2
MoKeTe Da onPoCTnTe npOeDypaTa 3a H36Op Ha MeCToHa3NaYeHne N Cb3DaBaHe Ha NaCTpOiKnte 3a CKaHnPaHe, KaTo rN peRnCTpnpaTe B KlaBnWnte Ha paBoTHnnaHen.
3anncbahe Ha dohymeHTN OT KOMNIObpa
- CkaHnpaHe Upe3 MF Toolbox
- CkaHnpaHe oT npnIOxHne
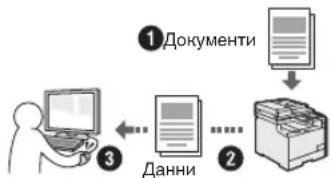
3aHnCbaHe b USB namet
MoKeTe Da 3aNcBaTe cKaHpaHn DOKymeHTB USB nAmet, Cbbp3Ha KbMaUnHaTa.
H3npauneNo HmEn Ha cHaHnpaHn DOkyme
MoKeTe Da n3npaate cKaHnpaHn DOKymeHTN KbM BaWteTO npIIOKeHne 3a HmEJI.
H3npaane Ha cKaHnpaHn DOkymeHTN KbM faiNoB cbpBbp
MoKeTe Da n3npaTaTe cKaHnpaHn DOKymeHTN KbM daJIOB cbpBbP.
MpeKOBn HacTpoHn
ToBa yctpoCTBO e o6OpyDbAoH C mpeKOB INHTepFeic, ype3 KOITo MOKeTe lecHO da cb3daTe MepeKOBa cpea. Ako n3no13bATE MF8580Cdw, moKeTe da ce CBpkeTe KbM mpeKaTa qpe3 WLAN Bpb3kata.Cbto Taka MOKeTe da OTneYataTe DOkyMeHT, da n3no13BaTe fynKunraT,faNCOT KOMNtbp" (cAmO 3a MF8580Cdw/MF8550Cdn) mpeKOB cHaHnpaHe OT BCnuKN KOMNtPn, KOINTCa CBp3aHN KbM MaUnHaTA. PndbpKaHTo Ha Te3n FyHKuIN daBa BB3MOXHOCT Ha yctpoCTBOTO da pa6OTn NO-efeKTHIBHO KaTO CNOJeIeHo yctpoCTBO 3a CEInA OΦnc.
Remote UI (Iotppe6nteJcHn HHTepfeic 3a OTdaJeueHo ynpaBHeHne)
MoKeTe Da noJyHnTe HhOpMaunr 3a CbCToRHHeTO Ha yCTpOYCTBOTO OT KOMNIOPTPte B MPeKata. Imate DOCTbI Do yCTpOYCTBOTO N MOKeTe Da ynpabJIbRAte 3aJaHnI N I da 3aDaBaTe pa3JIuHn HAcTPOYKn IO MpeKaTa.
* Camo 3a MF8580Cdw/MF8550Cdn
OTcTpHaBaHe Ha 3aceDHaIaTa xapTnA
Ako ce noBn To3n ekpaH, ToBa O3HaUaBa, Ye HMa 3aceHaJa XapTna B noDaBaIoTO yCTpoiCTBO Ha MaunHata. CneDbaIte npoueypaTa, nokaHa Ha ekpaHa, 3a da OTCTpAHETe 3aceHAnJIOkMEnT nnXapTna. ToBa pKOBODCTBO yKa3Ba cAmO mecTaTa, KbTeTo 3acJaXapTna. 3a NoDpo6HocTH OTHOCHO npoueypuTe Bk. e-Manual (EleKtpOnHo pKOBODCTBO).

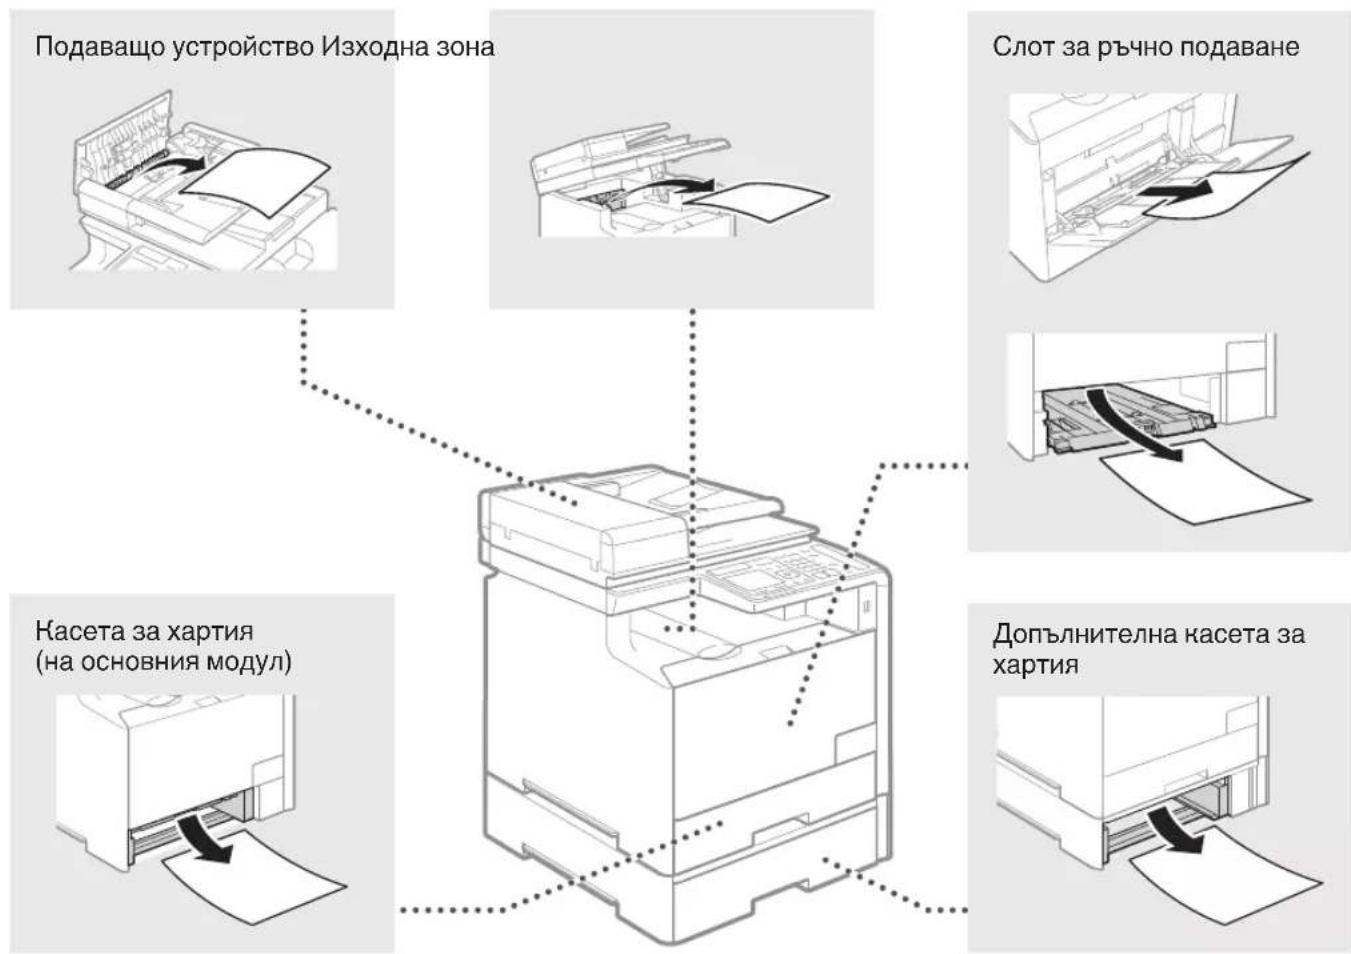
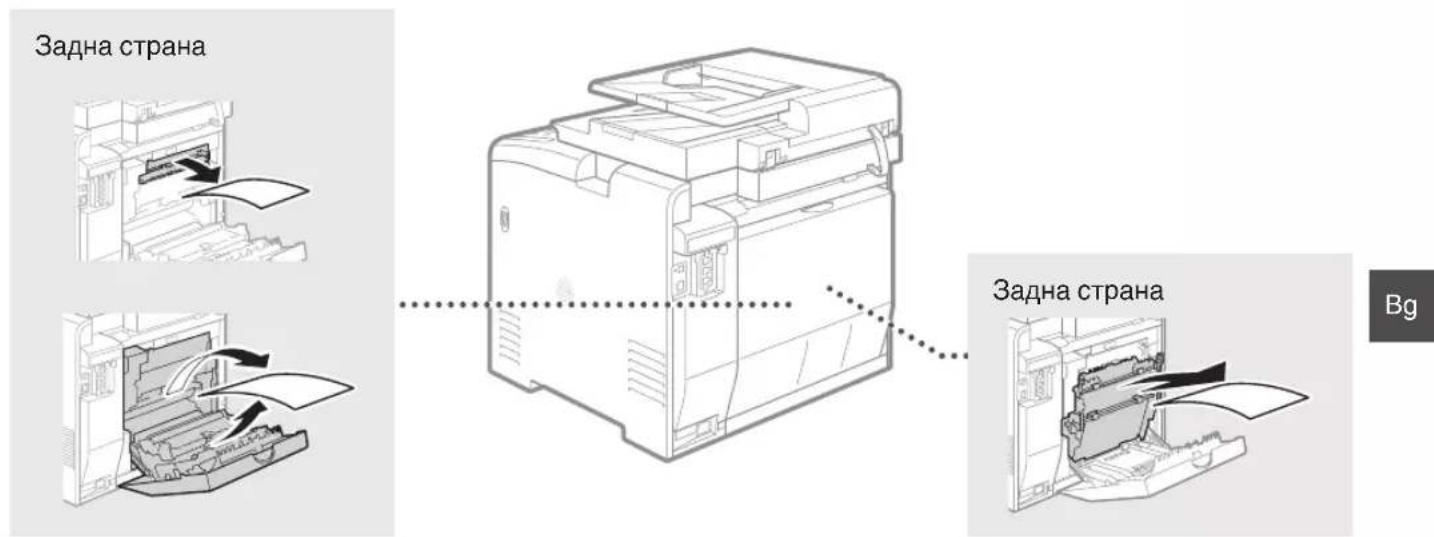
CMaHa Ha ToHep Hacetn
ToheKacTeHtCe Ka KOncymaTbN. Korato ToHeBt E Ha npBbPbBaHe Nn CBpShn HnBnHO,doKaTO ce n3nbJIHaBa DaJeHa 3aJaHa,Ha ekpaHa Ce noka3Ba Cbo6eHne Nn E B3MOxHo Da Bb3HnKHe HnKoI OT CnEHNTE np6bnEMn. PpeDnpMeTe CbOTBeTHnte DeiCTBna Cnopei Cnya.
Pn noBa Ha cbo6eHne
HoroTo ToheBt 3anOue He npHBpWbA,doKaTo ce nIeHa 3aDaay,ce Noka3Ba cbo6eHHe Ha ekpaHa.
| Съоб Shedи | Hora ha ekpana ce poka3Ba TOBA съб Shedи | Описиме и рeshеня |
| ПринотвeteToHEP Касета c<Цыт наToHEP>a*. | Съро щe ce habлж да ce smeн ToHEP Касета. | Прелорьчтелно e дa ce поверява НИВОТо Ha OCTabaшия ToHEP, КAKTOи Дa ce smeн KaCetata C HOBa, Реди OTpeuTbaHe Ha obemnctn DoKumemeHTN e-Manual (Еlektroponno pьковodctBO),Replacing the Toner Cartridges"(СмЯнha Ha ToHEp KaceTu) |
| АкTOBA cьоб Shedи ce nokache, писитушпte phakcObe щe ce съхразнват в Nametta,бezd da ce neчат.Вьзможно e OTchTeTne cьшо Дa He ce OTpeuTbaT dopri akO e ЗадаDENo da ce neчат aBtOMaTNUHO. Вьпрени ToBA,akO <Прдьлж.пechat priu Ичepпан ToHEp>В <Hactrp. пechat priu Пolyu>.e ЗадаDENo Ha<BHl>.,OTpeuTbaHeto щe пordьлЖи, Но phakcobete може дa ca 6 ledi nii pa3ma3aHI. | ||
| e-Manual (Еlektroponno pьковodctBO),Printing Reports and Lists"(OTpeuTbaHe Ha OTchTe N CnIsCbuzi) e-Manual (Еlektroponno pьковodctBO),Setting Menu List" (Спськ c MeHIO нa Habtpojknite) | ||
| Край NaЖИВOTA нaToHEP kac. <Цыт Na ToHEP>a* | Касета c ToHEP e Дocstngнала края Na ЖИВOTA cn. | АкTOBA cьоб Shedи He n3ue3Ne,Сmehete ToHEp KasetaTa.Може дa прдьлжITE OTpeuTbaHeto, Ho KauchestBOTo Ha NeuAT He можeда с rapaHTnpa. e-Manual (Еlektroponno pьковodctBO),Replacing the Toner Cartridges"(СмЯнha Ha ToHEp KaceTu) |
| Край NaЖИВOT Часту Na Kacete. П repopьчтелна e sma Na kac.<Цыт Na ToHEP>a* | Maшинatable можe дa He OTpeuTba правлно, Ть кato В herse Osome Ima Kacete Na ToHEp СИЗTEKылЖИВOT. | АкTOBA cьоб Shedи He n3ue3Ne,Сmehete ToHEp KasetaTa.Можeда прдьлжITE OTpeuTbaHeto, Ho KauchestBOTo Ha NeuAT Можeда e Лшо. e-Manual (Еlektroponno pьковodctBO),Replacing the Toner Cartridges"(СмЯнha Ha ToHEp KaceTu) |
*YePHo, KbITo, MaTeHTa nnuHaan Ie Ce noBn B
Ako pa3neuathnte ca c loo KauecTBO
Ako pa3nehaHTte BN nOka3BaT HkOaOT cIeHNTE XapaHTepnTHN, eHa OT KaceHTte C ToHep e NoHTn npa3Ha. CmeHete noHTn npa3HaTa Kaceta C ToHep, dOpu I da He ce NokaHe CbOSeHne.
IorBraT Ce 6eHn HbNc YactuH No 6JeHn HepaBHomepHa nIbTHoCT


TokaBaT Ce neTha OT ToHepa

Ipa3HnTe MeCTa OT opunHaJIInTE CEOTNeuATBaT B CnBO

N3NoJ3BaHn CnMBOJN B HAcTOJUcOTOpbKOBoDCTBO
IPEyIpyEKeHEnHeI
IpeynpeJHHeHne, CbBp3aHo C onepaunn, KOTo npn HnnpabnHO n3bJIHeHne MOrat Da DOBeaTdo HapAnBaHe Nm Cmbpt. 3a Da n3no3BaTe 6e3oNaCHO MaHHata, BnHaNc b6JIIODaBAte Te3n IpeynpeJHDeHn.

BHIMAHNE!
IpeDynpexJdHHe 3a BnHMaHne, BbB Bpb3Ka C onepaun, KOITO npi HnepaBnHO n3bJIHeHne MOrAT Da DOBeDat Do HapaHraBaHe. 3a da n3noJ3BaTe 6e3oNaCHO MaunHaT, BNHaN Cb6KnDaBaTe Te3n IpeDynpexKdHHeN.
KlabnHn 6yToHn, H3noJ3BaHn B TOBa pBkoBOdCTBO
CIMBOJNTe HAnMeHOBaHnraHa 6yToHn, NocOeHN NO-DoNy, ca npimep 3a HaunHa, No-KoITo Ce O3HaUaBbT B TOBa pKOBODCTBO 6yToHnTe, KOINTOPra6Ba Da n3No13BaTe.
- BytoHn Ha pa6oTHnnaHeJ: [NkoHa Na KlaBnHa] [NkoHa Na KlaBnHa] + (Ime Ha KlaBnHa) PnpMep;

-Диспел: <3aадаite dectinhaunrta.>
- BytoHn n eIemEnTH Na dIscIIeR Ha KOMNIObpa: [Preferences] (PpeNoHTaH)
NIOCTpaunn H3o6paXeHnHa DnCnJeTe, N3NOJ3BaHH B TOBA pBHOBOdCTBO
Ocben ako n3prHNO He yka3aHO dpyro, n3noI3BaHnTe B HactoAto p5bKOBOCTBO NIOcTpaunu N 3o6paKeHna ca 3a moJeM F8580Cdw.
IPEyIpyEHHDEHNEI
3a da n36erheTe onachocTta O HapaHbAbe Nn NOBpeHa Ha
obopydBaHeTo, KaTHo 3a npabHa INHΦopMaun, npOeTeTe ,PpaBHa
6BeIeKHa "N BaxHa INHΦopMaun 3a 6e3OnacHocT" B e-Manual (EeKtpoHnO pkbKOBOCTBO).
BaxHH yha3aHna 3a 6e3onaCHOCT
Ipei Da 3n03BaTe MaunHaTa, BHMaTeHNo npOeTePe pa3deLa Baxn yka3aHn 3a 6e3oNaCHocT'OT HactoHTo pKOBODCTBO, KaKTOn I B e-Manual (EeKeTPOHHo pKOBODCTBO).
TbKaTo ceIa Ha Te3n Yka3aHnna e da Ce npdeoTbpataHapaHbaHnHa notpe6nteI HA dpYtn Iua n da CE 36berHe HaaCahHeto Ha MaTePnAInn 8etni, BHNar cna3BaHTe yka3aHnra Tn 3NcKbHnraT a 3pa6ota.
ImaIte npedBn4, He BnE HoNCaHTe OTROBOPHOCTTa 3a BCNUKu 5eTn,
npnuHEnH b CndCTBne HecNa3BaHTo Ha DaJeHNTe B HactOJTO
pbHOBOdCTBO Yka3aHnR, INoONBaHTo Ha ycTroPcTBOTo 3a uei, pa3JIuHn OHa3NaueHtE, KaTO N B CndCTBne NoppABNHIN MOnDmΦHauCN,
INBpSeHn OT KoETo N da IInCe, KoETo He e Otopn3nap TaXhNk Ha Canon.
MOHTaX
I PENEYUNPEKDEHNEI
He IlaacpaIte MaunHata B6n30cT Do 3anaIIMN BeuecTBa, KaTo HapnMep npOdyNTn, CbIbPkaAun AkoXoI, NIN pa3peIITeEN 3a 6oN. AnO Te3n BeueCTBa BIAAT B KOHTaK T C eJeKTpUeCKnte Yactu B MaunHaTa, TOBA MoTeJa Bb3PiMaMeH NeBeeCTbA u Da DObeDe Do NoJkap NIN NOBUNHe PNCK OT eJeKTpUeCKn ydAp.
BbnpEnHcno BpemeHa pa6oTa MaunHata reheepna 03OH, TOBA He Oka3a BlnHHe BpyxObeKa.AKu yHJn BeueCTBa Bn3at B KOHTaKT C eJeETprNecHTe Yactn B MaunHata, TOBA MoHe Da npedn3BnKa Noap Hn EeETprNecKn yap. AHO B MaunHata Nopadne BBuHNO TAnO, He3a6abNo J n3KIOUte H ce CBpKeTe C mecTHnI npedctTabnten Ha Canon.
He n3n03BaHte MaunHata B6n3OCT Do MeuHcO bOpdyBaHe. PaIOOBbHNHTe, H3NbYBaHN OT Ta3N MaunHa, MoHe Da INTEpFepHpat CMeuHcKTo bOpdyBaHe N TOBA Da IpeuN3BnKa HeaacTHN cLyan.
BHIMAHHE!
He IlnacpaIte MaunHnTa Ha CneIhnte MeCTa. Hecna3BaHTo Ha TOBa Yka3aHHe MoKe Da DoBeEe Do fN3uHecKn HapaHbAHHa, noKap NII TOKOB yap.
Hecta6nHa OCHOBa
-MrCTO CbC cnHn TpeTeHn.
- Macto,Ha KoeTo ce 3a 6loKupa Doctbnt do BHTnlaauHnHte OTBOPn (npekaneHo 6n3o Do cTeHN,JeTna, MbXeCTN KInIMM N DpyrN NOO6Hn)
-BlaKHOIINpaaHIO MRCTO
- MЯСТо, ИЗЛоЖЕно HaДиpeKTHa CьБИЧЕВа CBeTПИHA, ИИнHa OTKPINTO
-МясТо,поДLOжЕнHaВиСОКI TemпeраТурИ
-Mrto,6JIN3O DO OTKPNT N3TOUHN HA OfBn
-Heoobpe BENTINIPAHO MACTO
BbnpnHye no Bpeme Ha pa60Ta MaunHaTa rHe npa O3OH,TOBa He OKa3Ba BlnHne BbpxyOBeKa.AKo 6ae Bb3HaepBaTe Da n3No13BaTe MaunHaTa npOdbJHKHTeHNO, OcnIpye Do6pa BeHTnlaqnaHa MaRCToTo 3a pa60Ta.
He cbbp3baIte HeoobpeHn Ka6eHn KbMaTHMaHHa. Hecna3BaHTo Ha TOBA yka3aHHe MoKe Da doBeDe Do noKap Nm TOKOB ydap.
EneKtpnuecko 3axpaHbaHe
A PEPDyPENKDEHNEI
He n3no3BaIte 3axpaHbAsn Ka6eIn, pa3nHnOTo3n, KoTo e npedocTaeH, 3aIoTO TOBa MoKeJa npedu3BnKa noKap Nn ToKOB yIap.
He MoDnHnpuAte He OByaIte 3axpaHbuaa Ka6e n He ro Dbpnaite npKaIeHO CInHO.He NoctabRrTe TeKKn PnpdmTe Bbpy 3axpaHbuaa Ka6e. NOpBekDaHe To Ha 3axpaHbuaa Ka6e MoKeJa Do BoDee Do nOkap nn TOKOB ydap.
He BKNIOUBAIte NIN N3KIOUBAIte 9eICeNA C MOKpn pBue, TbN KATO MOKe Da npeDn3BnKaTe TOKOB yAp.
He BnIOuBaIe MaunHaTa B yDbJIckHTeH Nn pa3KIOHHTeH. Hecna3BaHTo Ha ToBa ya kazAHne Moke da DObeDe Do noXap nn TOKOB ynap.
He 3aBb3BaIte Ha Bb3eI 3axpaHbAun Ka6eI, TbN KATO TOBa MOKe Da npEduBnKa IOnKap NIN TOKOB ydap.
- NocTabete ⅢeNcEla DOKpaB B eJELKtpUeCKaTa MpeHka. B npOTnBEH cIyaua MoKe Da npeDn3BnKaTe noXap HnIeJekTPuYeCKn yap.
- IIO Bpeme Ha rpbmoteBvHH 6bpn H3KIOUoBaHTe 7e nceTa oT KOHTaHa. HeCna3BaHTo Ha ToBa yKa3aHHe MoKe Da DOBeDe Do NOKap, TOKOB yAp HIN NOBpeHa Ha camOTo yCTpoiCTBO.
BHIMAHHE!
BKnIOUcBaIte MaunHATA cMO B eI. MpeKn, KOnTO nOKpNBaT eI. N3NCKBaHnra, NOCOeHN B HAcToAto. HeCna3BaHeto Ha TOBa yKa3aHHe MoKe Da DoBeDe Do NoKap nn TOKOB yDap.
He npenpeybaTe Doctbna Do en. KOHTaTa, B KOITo BKIOUbaTe MaunHaT, 3a Da MoKeTe 6bp30 Da N3KIOUHTe UeNcela N B CnyuHa Ha aBapnA.
Pa60Ta C MaunHaTa
A PEPDAUPPEHDEHNEI
He pa3rno6raBae HIN moDnphiupaTe MaHHata.MaHHata CbIbPka H3IOKeHn Ha BnCOKa TEMpePaTypa N BnCOKO HAnpeKeHne KOMHOHEHTN, KOITMOrAT Da pNCHrT NOKAp NIN TOKOB yap.
He no3BolBaIte Ha da ana nIa nnat IIN da cn irpaarT cbc 3axpanBaunra Ka6e, dpyrnte Ka6eHn, HNTo C BbTpewHnTe eEkeTpuechne Taactn. HecnaaBaHTo Ha ToBa yka3aHne MoKe Da doBeDe Do cepno3HN fN3uCheHn HapaRaBHaHn.
BcnyaYe MaunHaTa N3daba CtpaHn 3Byu,OTJeIy HeeeCTeBHeN MmP3Mn,PyueK nn PpeKoMEpHa TOpJInHa, ce CBpKeTe C OToPn3npan PpeCtBaTneHa Canon. HnO3nBaHeTo Ha MaunHaTb TaKnBa CnyaH MoHe Da DoBeDe do noKap nn ToKOB yAp.
He 3no3BaIte IecHO3aIIMn CnpEIOBE 6N3O do yCTPOINCTBOTO.AKO 3anaIIMN BeIeCTBA BJI3AT B KOHTC eIeKTPuIeCHInTe Yactn BVCTPOINCTBOTO,TOBA MOKe Da IpeDn3BnKa noKap HNI TOKOB ydap.
BHIMAHHE!
- O t c b o b p a k e H E N 3 a 6 e 3 0 n a n c h o c T H K J I O U Y B A I T E 3 a x p a n H B A u i n Ka b e l, K OR a T O H M A d a n 3 n o n 3 B a T e M a u n H a t a D b I r o B p e m e.
- OTBAPaIte n 3aTbAPaIte KaIaIte BHNMaTeJHo, 3a da H36BerHeTe HapaHraBaHe Ha pbTe cN.
- Pana3ePbucTe IN dpexnte cN OT Bbptraunite yctpoiCTBa B neuathaTbO6nact.AKO pbcTe NIN dpexnte BN 6bDat 3axbaHATN OT Bbptraunite yctpoiCTBa,MOKe Da nolnyHTe HapaHBAhe.
BbTpeWnOcTTa Ha MaWNHaTa HxOdHnT OTbOp ca cnHOrHarpeTHNo Bpeme Ha pa6ota N MaNtO cneT ToBa. H36aRbaTeDoNPdoTe3nactu, 3a Da npedeOTbPaTHe n3rapHnA. Pa3neYataHATA xapTna MoKe da e ropea h enoCpeCTBeHo CneHn3Ii3aHETo CH OT pInHTepa, Taka Ye BHIMabaTe, KORATo R B3eMaTe. B npotvBeH clyaM oMe da ce H3ropTe.
PoiapbHKHa npoΦnlaKTNa
PNEyPENKDEHNE!
- N3KJIQUyTe MaunHaTa n 3BaJeTe UeNceJa IOT KOnTakTa, npEnIra NoHCTBaTe. HecnA3BaHeTo Ha TOBa yKa3aHne MoKe Da DoBeDe Do NoJap NIN TOKOB yAp.
ИЗкючыне OT bpeMe Ha bpeMe 3axpaHbuaия Ka6eI OT eJIeKTPnEChkATA MPeJx I NOUcTBAuTe MRCTO OKIoO OCHOBaTA Ha MeTaJIHnTE UINΦTOBE N KOHTaKTa CbC cyxa KbPna, 3aДа OTCTpaHnTE npaxa И МрсOTnЯ. Ппн HablaanHraBaHe CB6paHnTл pax nobuHaBa ONaCHOCTTA OT Kbco CbeInHeHne HII nOJkap.
PONCTBaIte MaunHaTa C BlaKeH, HO do6pe n3ueeH napaJI. HAbJAAHBAIte npaIa 3a NoCTBaHe cMoC bOJa. He n3noJI3BaIte aIkoXoI, 6eH3eHOBn npOyKTH, pa3peIHTeIN 3a 60I Iyn dpyr 3anaJIIMBeIeCTBa.AHO noDobH BeIeCTBa Bln3aT B KOHTAET C eJeIeKTPuYeCKTe qactN B yctPoIcTBOTO, TOBa MOKe Da npEiIN3BnKa NOKap IN TOKOB yApd. - PnObePraBaIte peIOBHO n3npaBbHocTt ha 3axpaHbaun HA6eI n uenceLa. IpnBePraBaTe MaunHaTa 3a pBJa, BdIb6bATnH, OopaKBAHn, NyKaTHn HnPipeKOMepHo HaRpBaHe. N3oN3BaHeTo HeDo6pe NoDtpKaHn O6OpyDaHe MoKe Ja doBede Do noKap nn ToKOB ydap.
KohcymaTHBn
I PENEYI INEHNIE!
- He xBbPJIaIte yOnTpBe6HnTe ToHep KacEtN B Obrh. TOba MoKe Da DoBeJe Do 3anaIbAHe n PecneKtNBHO - N3rapHnI nn noJap.
Ako HeboIHO pa3neTe nI npa3cnTe Tohepa,BHmATEJIHO ro npnIte c5c cyx,MeK napuaI n368raBte BIMUbaHeTo Ha nInpaepnIOTohepa.BnKaKbB clyuay He n3no3BaIte npaxocMkaHa Ka 3a noNCTbAHeTo Ha pa3JrTtohep. B npotnbEn Cnyaue E b3MOKHO npaxocMkaKaKaTa Da ce Nobpei IIN da Bb3HNHe npaxOBA eKnlo3nI npaDi eJeKtpocTaTHPO pa3peKdaHe.
BHIMAHHE!
CbxpaHraBaIte kaceTnte cToHep n dpyrnte KOHCymaTHn DaJeOTdoCTbnaHaMaJIKNdeua.BcnyaHaNoRJIbUaHeHaTOhepa He3a6abHOceCBpXKeTe CLekapnnCeHTbpa 3a KOHTpol Ha OTPaBHHraTA.
He ce onntBaTte da pa3rno6BaTe Tohep KaceTte.TohepbT MoKe Da ce pa3npbChe H NaCTnIOn OT Hero Da nonAdHAT B OHTe nn YcTata.AKO ChaTnI ON TOHEPA nonAdHAT B OHTe nn YcTaTA.He3a6abHO rN 3MmIte CbC CTyDena BOda n NOTbpCeTe MeHNHcKa NOMOu.
Ako TohepbT ce pa3nee OT HaceTa, N36raBnTe BnUbaHeTo My,KaKTO I KOHTaTc My C KOHata Bn. Ako TohepbT BnEe B KOHTaTc K KOKaTc, He3a6abHr O n3MnIte CbC canyH.Ako BnWate Tohepa nnIO KOHa Tc Bb3nAIN B CLeDCTBne Ha KOHTaTc TOHepa, He3a6abHO ce CBpKeTe C nekap nn C ueHTbpa 3a KOHTpoJHa OTPaBHHraTt.
Дугн
TPEyIpyEHNDEHNE!
Ako n3noBbATE cbpdeueh CTMyIaTOp (neimcmeKbp): ToBa ycTpoiCTBO cb3daBA cna6 MaHHTHO nOE. Ako yCbCTBaTe KaBHTO n Da 6nlo aHOMaJIIN B TAnlTO Cn npn pa6oTa C Ta3n MaHHa, He3aabHo CE OTdaneyeTe OT HeN CKeKcYItnpaIte C Jekapra Cn.
3aKoHObN orpaHnueHn
PpabHn orpaHnueHn 3a n3noJ3BaHeTo Ha npOdyKta nHa n3o6paXeHn
H3no3BaHeTo Ha npOyKta 3a cKaHnPaHe, pa3neuTaBae HIN B3npo3BeJdaHe No ppyr HauHn HA onpeJeHn DOkymeHTn H3no3BaHeTo Ha TaHnBA n3o6paKeHnRA KOHaHn PA3neYtAHn HIN B3npo3BeJHn NO Dpyr HauHn C BaWn PNOyKT MOxE Da e 3a6paHeHO OT 3aHOHa N MoXe Da DObeDe DO HAc3aTeJIHa HIN rpaJdAchCAOTROBOPHOCT. PO-dOny e daHEN3ePpTaHeCH CnCbK Ha TeN DOkymeHTn To3n CnCbK e PnPdHa3NaHeH DA bDe Camo opEnTHpoBbUeH. Ako He CTe CNpyHn B 3aOHNoCTTa Hn 3no3BaHeTo Ha BAua HPOdyKT 3a cKaHpaHe, PA3neYatBAHe HIN B3npo3BeJdaHe No dpyr HauHn HA HkaKaB KOKPeTeH DOkymeHT N/Inn 3no3BaHeTO Ha cKaHpaHH, PA3neYatAHn HIN B3npo3BeJHn NO Dpyr HauHn 13o6paKeHn, Tp8Ba Da ce KOHCytTnpate PnpBapNTeHc BaaHH KOpNCohcyTT.
- BaHHKHTN
-ПьтнчecнЧекOBe
-ПаTeHnHapeKdAnH - KynoHn 3a XpaHa
- Ceptnfikatn 3a dno3nT
- Nacnpn
-ПоцЕнсКИ МарКИ (ВалднИ ИИНЕВАДИN)
-IMMnrgpaunOHHHdOKyMeHTN
-ⅠdENTnФицраиЗнayки nIe em6JIeMn
-MapK3a daHbun(BaINHHNn HEBaINnH)
-OkymeHTn Ha BOEHNOcLyKeuN HApOpHnU
-06nraunnn npynydoctOBepenna 3a nn
-YeKOBeIJIINIIaTeKHN3aNOBeH,N3daJeHnOTDbpKaBnAreHcH - ydoctobepenra 3a akun
-OKymeHTn Ha aBTOMO6Hn HOTapHaHn aKTOBe
-TBop6n 3auiTeHc aBTOpCko npabo/IpOn3BeJeHna Hn3KyCTbTO 6e3 pa3peWeHne OI npTeKaTeJHa aBTOpCHOTnpabo
IIOJKeHN Ca 3HaHHTeJIH yCINIA pBkoBOcTBaTa 3a yCTpoCTBOTO da 6bDat 6e3 HeTOOHCTn I npOyCN. BbPekn TOBa, Tb KaTo Hne NOCToHH NoOp6pBaMe HaWnte IpOdyKTn, AHO Bn e Heo6xOma ToHa cNeuΦHkAua, ce CbprHeTe c Canon.
MF8580Cdw / MF8550Cdn
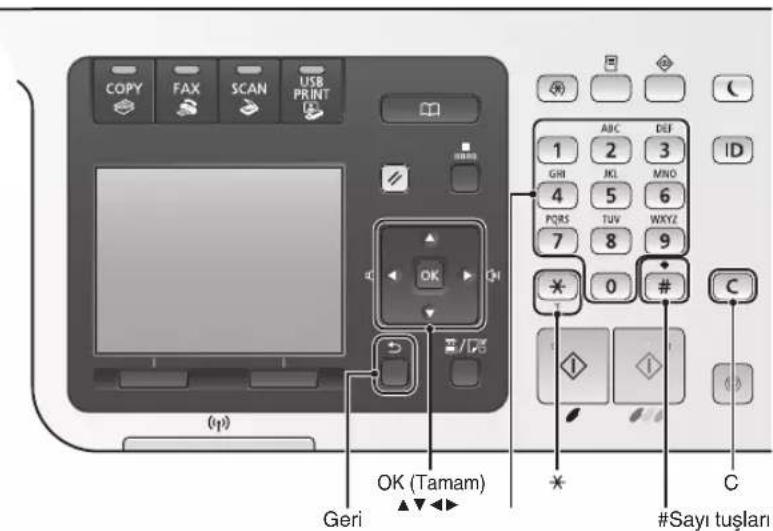
MF8540Cdn
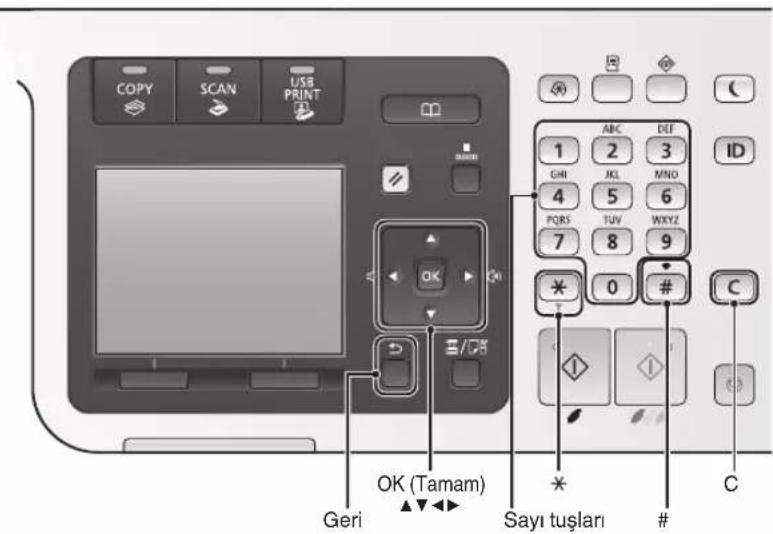
Menüde Geizinme
Jus Jus Jus Jus Jus Jus Jus Jus Jus Jus Jus Jus Jus Jus Jus Jus Jus Jus Jus Jus Jus Jus Jus Jus Jus Jus Jus Jus Jus Jus Jus Jus Jus Jus Jus Jus Jus Jus Jus Jus Jus Jus Jus Jus Jus Jus Jus Jus Jus Jus Jus
Turning ON the" (jLl) "Setting Up the Machine" (gJyLl) e-Manual (品) "Power and Configuring Initial Settings

MF8580Cdw
See Wireless LAN Setting Guide to perform settings.
OK
aJ 1 J a j gssSd J d Jgall p
2s山slue!jεp3gbln jL 41112sall J L 3"2LULAN 2LUL
Yes
LxLy LAN 2y jgssll j Lg y
aL 1
aLAN aLJn no gssllgillp
(272 a LAN 1
J (MF Driver Installation Guide 1
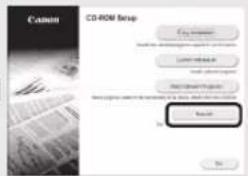


juaaui jiaai juaai aayjla
LAN
LAN 5

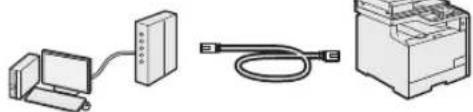
pIaLALAN 400000000000000000000000000000000000000
LAN
JgSslljglal jgsil gslglaiee ggs
JgOzJgJgJgLAN
USBK
"USB 15


USB 15
(MF850Cdw)LAN
L 1

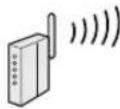

aal aalaaal alalal alalal
a 1
jglll jilii selip wlll lslj 1

aJ 1 1 1 1 1 1 1 1 1 1 1 1 1 1 1 1 1 1 1 1 1 1 1 1 1 1 1 1 1 1 1 1 1 1 1
"Setting Menu List" (e-Manual Fax Settings (MF8580Cdw / MF8550Cdn / MF8580Cdw) "MF8280Cw Only) "Basic Settings" ((MF8280Cw / MF8550Cdn /
aegg jgllp aabol, aallll de jolil gll lulj
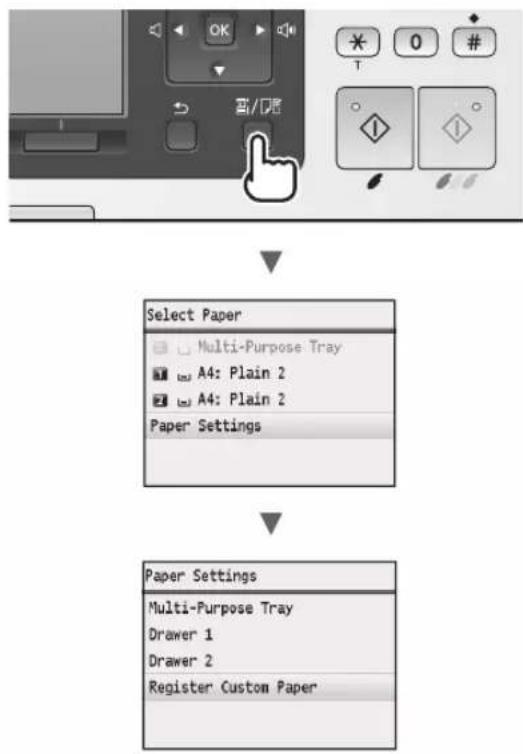
JLJUUGGgaggglgsslllalj (MF8550Cdn / MF8580Cdw jI)
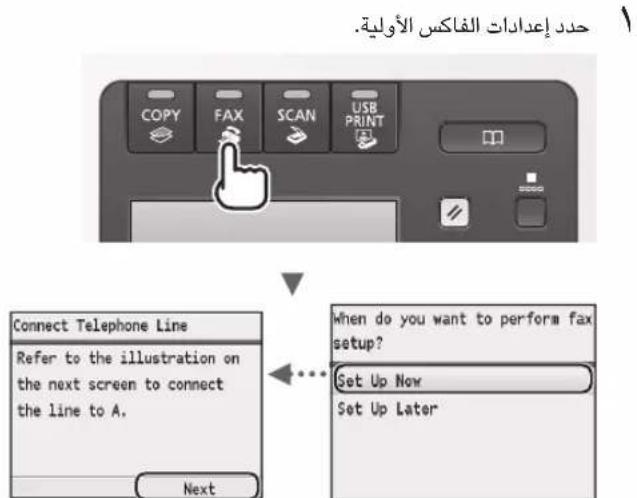
e-Manual 1
Receiving" (wsl) "Faxing"(j,2x1y1l) e-Manual 0 Ls11
p1sill pwlpliswla 5
Jc--gjz-0000111111111111111111111111111
paaia kay gaoai jaiy daiy gai y aaiy jaiy gai y
11
[5anPC2
gabg aagall jiahglal gaaa bga 12
giall lglw yjg wll 15
.
juauiuulueauiuuiuuiuuiu
J
MF Toolbox golip
aill 10
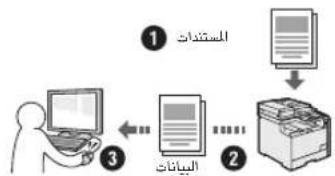
USB
s g 1g a g a g a a a a a a a a a a a a a a a a a a a a a a a a a a a
yllnlaagaaaall lwnl Jw!
gabj jgsa gssal lssl k
olpo 1g w gswll JwJ plo 1g w gswll JwJ 1s o
a<1
jdsikayasagajgajglalidy j
duuscs1l.ajggayasagaiagai lglk
sllJGdki,MF8580Cdwjlbl
dis ay.ais.ajLALGLALpA
jIb) jssSsplssuWg
MF8550Cdn/MF8580Cdw
jgsa j asyall gwl pllaig
jglalpejglalalao jglalg
jsslgl JgJgS Jall B
(ossu) Remote UI
jglsljgljgljgljgljgljgljgljgljgljgljgljgljgljgljgljgljgljgljgljgljgljgljgljgljgljgljgljgljgljgljgljgljgljgljgljgljgljgljgljgljgljgljgljgljgljgljgljgljgljglj
P
slll 3
dis ay slll 3 aell llll y jss dis ay 3 syl 12g cag g 3 ajjal allailll 4e I.
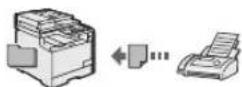
#
Jl jll dkiy jia jia lal Jusgi all jg
p 111111111111111111111111111111111111111111
aolal
jioo/soaclu
jgl 1e aetll
juaabui
jieiee 1aii iiaai
1,2,3 · 1,2,4 · 1,3\
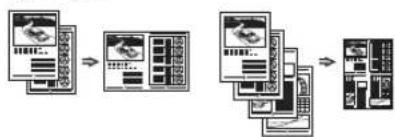
S_ OBC = S_ AOB + S_ CBO
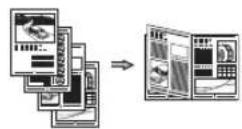
#
aJullolollalcLb
aalalai
“3 10
gaii
jglai jiai a gl puiu wui uuiu l i

#
aJuao/oo
gullll 1111111111111111111111111111
a_n = a_1 + ( n - 1) a_n - 1 + ·s + a_1 + a_n
15 15
中
1 1
jiuou baiji
a32gJcIgunulclssuill Jyduall xiaol diScq 0dgl
1. j_c = 1,j_c S
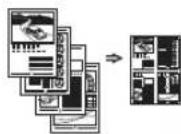
a gol lUb b
1g 12
Lgwiie aai gill
J 1
\*
()
()
Lsall gall jwll jilaiy
J
1 1
aeey 111111111111111
a+gall
jai jia
a1 = 2,an + 1 = 2( a_n + 1)
JLwJyLbgs
JU

J 1 J 1 1 1 1 1 1 1 1 1 1 1 1 1 1 1 1 1 1 1 1 1 1 1 1 1 1 1 1 1 1 1 1 1 1 1 1 1 1 1 1
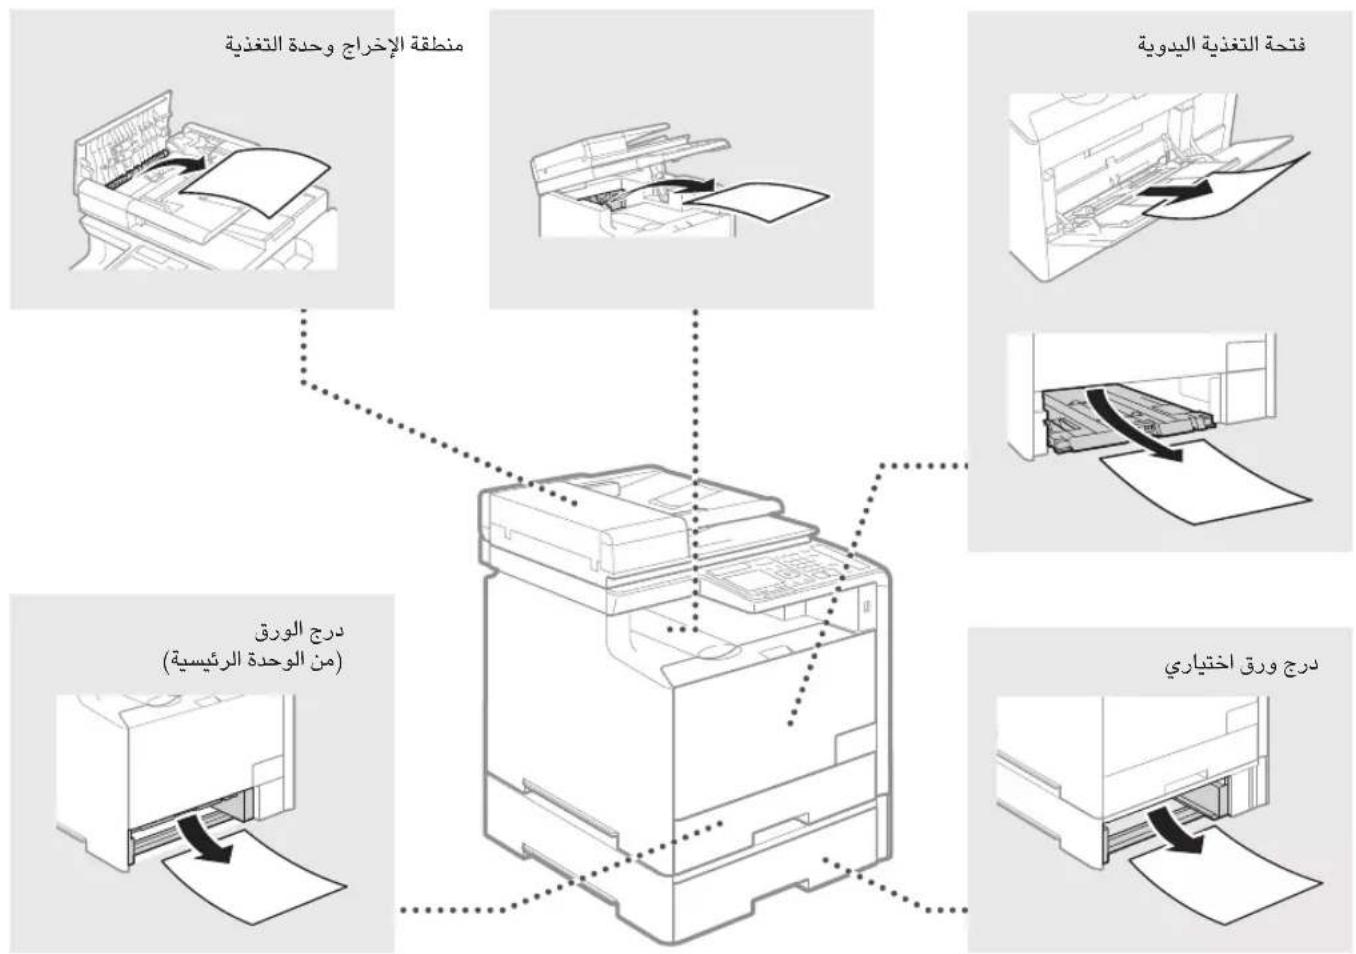
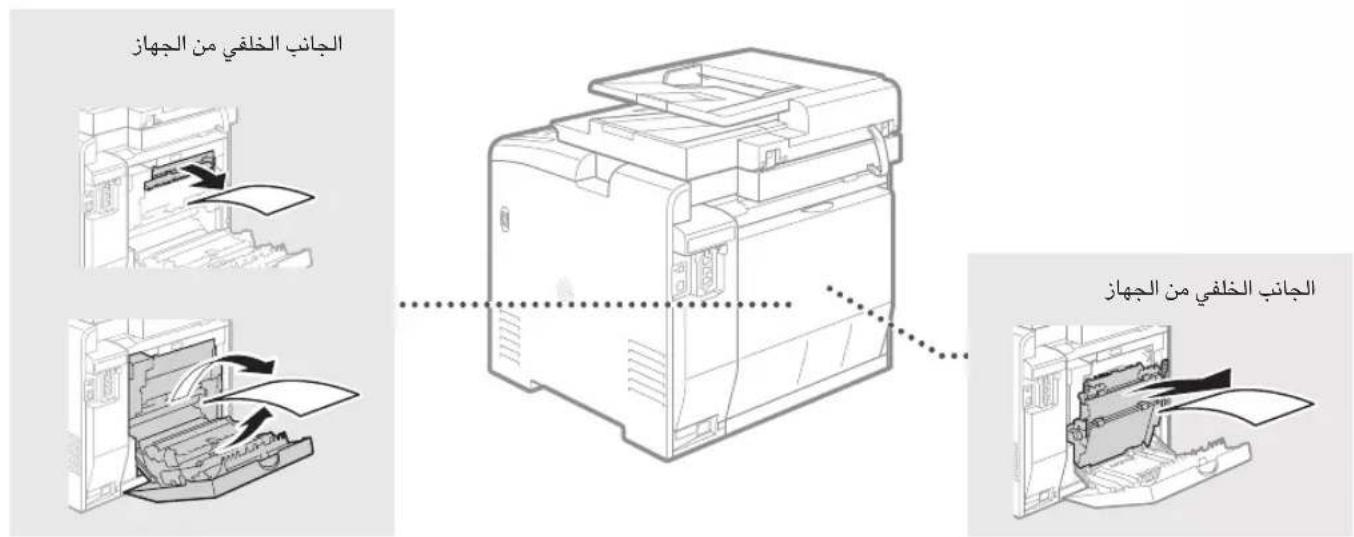
aaii i 1
aLalJe allw jgki aolclj clil jnll lgl
aIwJySb
| الإستعمال الحرفية | |||
| .(عَلْدُمِير) مصحيى ب停车位 ب停车位 ب停车位 ب停车位 ب停车位 ب停车位 ب停车位 ب停车位 ب停车位 ب停车位 ب停车位 ب停车位 ب停车位 ب停车位 ب停车位 ب停车位 ب停车位 ب停车位 ب停车位 ب停车位 ب停车位 ب停车位 ب停车位 ب停车位 ب停车位 ب停车位 ب停车位 ب停车位 ب停车位 ب停车位 ب停车位 ب停车位 ب停车位 ب停车位 ب停车位 ب停车位 ب停车位 ب停车位 ب停车位 ب停车位 ب停车位 ب停车位 ب停车位 ب停车位 ب停车位 ب停车位 ب停车位 ب停车位 ب停车位 ب停车位 ب车位 (الإستعمال الحرفية) (عَلْدُمِير) مصحيى ب停车位 ب停车位 ب停车位 ب停车位 ب停车位 ب停车位 ب停车位 ب停车位 ب停车位 ب停车位 ب停车位 (عَلْدُمِير) مصحيى ب停车位 ب停车位 ب停车位 ب停车位 (عَلْدُمِير) مصحيى ب停车位 (عَلْدُمِير) مصحيى ب停车位 (عَلْدُمِير) مصحيى ب停车位 (عَلْدُمِير) مصحيى ب停车位 (عَلْدُمِير) مصحيى ب停车位 (عَلْدُمِير) مصحيى ب停车位 (عَلْdُمِير) مصحيى ب停车位 (عَلْdُمِير) مصحيى ب停车位 (عَلْdُمِير) مصحيى ب停车位 (عَلْdُمِير) مصحيى ب停车位 (عَلْdُمِير) مصحيى ب停车位 (عَلْdُمِير) مصحيى b停车位 (عَلْdُمِير) مصحيى b停车位 (عَلْdُmِير) مصحيى b停车位 (عَلْdُmِير) مصحيى b停车位 (عَلْdُmِير) مصحيى b停车位 (عَلْdُmِير) مصحيى b停车位 (عَلْdُmِير) مصحيى b停车位 (عَلْdُmِير) مصحيى b停车位 | |||
| .(عَلْدُمِير) مصحيى ب停车位 ب停车位 ب停车位 ب停车位 ب停车位 ب停车位 ب停车位 (عَلْدُمِير) مصحيى ب停车位 ب停车位 (عَلْdُmِير) مصحيى b停车位 (عَلْdُmِير) مصحيى b停车位 (عَلْdُmِير) مصحيى b停车位 (عَلْdُmِير) مصحيى b停车位 (عَلْdُmِير) مصحيى b停车位 (عَلْdُмِير) مصحيى b停车位 (عَلْdُmِير) مصحيى b停车位 (عَلْdُmِير) مصحيى b停车位 (عَلْdُmِير) مصحيى b停车位 (عَلْdُmِير) مصحيى b停车位 (عَلْdُmِير) مصحيى b停车位 | (عَلْدُمِير) مصحيى ب停车位 ب停车位 ب停车位 ب停车位 (عَلْdُmِير) مصحيى b停车位 (عَلْdُmِير) مصحيى b停车位 (عَلْdُmِير) مصحيى b停车位 (عَلْdُmِير) مصحيى b停车位 (عَلْdُmِير) مصحيى b停车位 (عَلِدُمَير) مصحيى b停车位 (عَلْdُmِير) مصحيى b停车位 (عَلْdُmِير) مصحيى b停车位 (عَلْdُmِير) مصحيى b停车位 (عَلْdُmِير) مصحيى b停车位 (عَلْdُmِير) مصحيى b停车位 -الإستعمال الحرفية | Prepare the .Toner Color* .toner cartridge . (*<dyn> | |
| .(عَلْدُمِير) مصحيى ب停车位 ب停车位 ب停车位 ب停车位 (عَلْdُmِير) مصحيى ب停车位 (عَلْdُmِير) مصحيى b停车位 (عَلْdُmِير) مصحيى b停车位 (عَلْdُmِير) مصحيى b停车位 (عَلْdُmِير) مصحيى b停车位 (عَلْdُmِير) مصحيى b停车位 (عَلْd㉔مِير) مصحيى b停车位 (عَلْd㉔mِير) مصحيى b停车位 (عَلْd㉔mِير) مصحيى b停车位 (عَلْd㉔mِير) مصحيى b停车位 (عَلْd㉔mِير) مصحيى b停车位 (عَلْd㉔mِير) مصحيى b停车位 (عَلْd㉔mِير) مсشامبenti (عَلْd㉔mِير) مصشامبenti (عَلْd㉔mِير) مصشامبenti (عَلْd㉔mِير) مصشامبenti (عَلْd㉔mِير) مصشامبenti (عَلْd㉔mِير) مصشامبenti (عَلْd㉔mِير) مصشامبenti | |||
| .(عَلْدُمِير) مصحيى ب停车位 ب停车位 ب停车位 (عَلْdُmِير) مصحيى b停车位 (عَلْd㉔mِير) مصشامبenti (عَلْd㉔mِير) مصشامبenti (عَلْd㉔mِير) مصشامبenti (عَلْd㉔mِير) مصشامبenti (عَلْd㉔mِير) مصشامبenti (عَlcْد㉔mِير) مصشامبenti (عَlcْd㉔mِير) مصشامبenti (عَlcْd㉔mِير) مصشامبenti (عَlcْd㉔mِير) مصشامبenti (عَlcْd㉔mِير) مصشامبenti (عَlcْd㉔mِير) مصشامبenti (عَlcْd㉔mِIRM] e-Manual (عَلْdُmِير) مصشامبenti (عَلْd㉔mِير) مصشامبenti (عَlcْd㉔mِير) مصشامبenti (عَlcْd㉔mِير) مصشامبenti (عَlcْd㉔mِير) مصشامبenti (عَlcْd㉔mِير) مصشامبenti (عَlcْd㉔ mِير) مصشامبenti (عَlcْd㉔mِير) مصشامبenti (عَlcْd㉔mِير) مصشامبenti (عَlcْd㉔mِير) مصشامبenti (عَlcْd㉔mِير) مصشامبenti (عَlcْd㉔mِير) مmcشامبenti (عَlcْd㉔mِير) مصشامبenti (عَlcْd㉔mِير) مصشامبenti (عَlcْd㉔mِير) مصشامبenti (عَlcْd㉔mِير) مصشامبenti (عَlcْd㉔mِير) مصشامبenti | |||
| .(عَلْdُmِير) مصشامبenti (عَلْd㉔mِير) مصشامبenti (عَlcْd㉔mِير) مصشامبenti (عَlcْd㉔mِير) مصشامبenti (عَlcْd㉔mِير) مصشامبenti (عَlcْd㊴mِير) مصشامبenti (عَlcْd㉔mِير) مصشامبenti (عَlcْd㉔mِير) مصشامبenti (عَlcْd㉔mِير) مصشامبenti (عَlcْd㉔mِير) مصشامبenti (عَlcْd㉔mِير) mscشامبenti (عَlcْd㉔mِير) mscشامبenti (عَlcْd㉔mِير) mscشامبenti (عَlcْd㉔mِير) mscشامبenti (عَlcْd㉔mِير) mscشامبenti (عَlcْd㉔mِير) mscشامبenti | |||
| .(عَلْdُmِير) مصشامبenti (عَلْd㉔mِير) مصشامبenti (عَlcْd㉔mِير) mscشامبenti (عَlcْd㉔mِير) mscشامبenti (عَlcْd㉔mِير) mscشامبenti (عَlcْd㉔mِير) mscشامبenti (عَlcْd㉔ mِير) mscشامبenti (عَlcْd㉔mِير) mscشامبenti (عَlcْd㉔mِير) mscشامبenti (عَlcْd㉔mِير) mscشامبenti (عَlcْd㉔mِير) mscشامبenti (عَlcْd㉔mِير) mrcshامبenti (عَlcْd㉔mِير) mrcshambenti (عَlcْd㉔mِير) mrcshambenti (عَlcْd㉔mِير) mrcshambenti (عَlcْd㉔mِير) mrcshambenti (عَlcْd㉔mِير) mrcshambenti (عَlcْd㉔mِير) mrcshambenti (عِلْدُمَير) مصشامبenti (عَلْd㉔mِير) مصشامبenti (عَلْd㉔mِير) مصشامبenti (عَلْd㉔mِير) mscشامبenti (عَلْd㉔mِير) mscشامبenti (عَلْd㉔mِير) mscشامبenti (عَلْd㉔mِير) mscشامبenti (عَلْd㉔mِير) mscشامبenti (عَلْd㉔mِير) mscشامبenti | |||
Toner Color> golllg jgs
aolgio oIe gaiol 1o gaiol
aillr gaiy pui i y daii liy daii liy daii liy daii liy daii liy daii liy daii liy daii liy daii liy daii liy daii liy daii liy daii liy daii liy daii liy daii liy daii liy daii liy daii liy daii liy daii li

pIaIbgbalgbi jzjizlqilzglai
Jlalulll 1uall Jgclgals

2021 2021年全国二卷
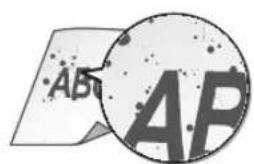
gall plaiu w gill plaiw l aigall gail
gaii 1 gaii 1 gaii gaii gaii gaii gaii gaii gaii gaii gaii gaii gaii gaii gaii gaii gaii gaii gaii gaii gaii gaii gaii gaii gaii gaii gaii gaii gaii gaii gaii gaii gaii gaii gaii gaii
1
aall
2y
2gagd
1
jallolj
(aLw)gslu)yulglb
32 > 31 ②
aagssllg jyssll
(20 1
yssllgolaoailllglg
()
aall 1111 1111 1111
( xt^2 + x) = ( x) f^
ailll 1s
jall valo jno jn jnnn gabll gag aal Jlae /Jae
aal aal alal alal alal alal alal alal alal alal alal alal alal alal alal alal alal alal alal alal alal alal alal alal alal alal alal alal alal alal alal alal alal alal alal alal alal alal alal alal alal alal alal alal alal

-2015-1-1
1.21.23.24.25.26
.山
#

在 Rt ABD 中:
aknuaiabi
PQ = AQ = 23
111

1 1
1


-1
-2
3.
a
a a a a a a a a a a a a a a a a a a a a a a a a a a a a a a a a a
y=gglgglglll
MF Driver Installation Guide ③
User) (MF
(MF MF Driver Installation Guide 4
S OBC = S COD + S_ BOC


LAN 2
sLAN j

(IP _ "Setting IP Addresses"
User Software CD jolal
(283)"iE5ggiogjulipu

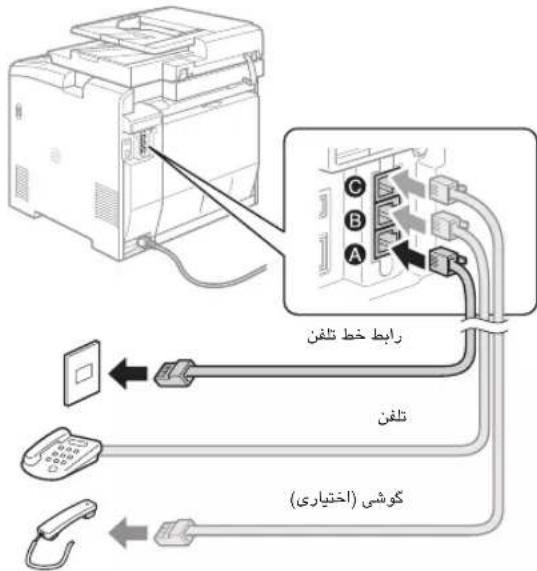
aaii jie ggi gjolil jllg jia jaa
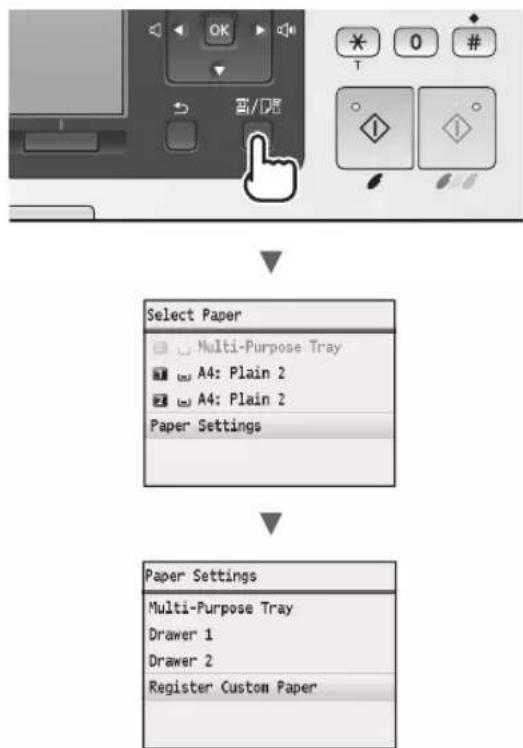
<1>
<2>
<3>
<4>
<5>
<6>
<7>
<8>
<9>
<10>
<11>
<12>
<13>
<14>
<15>
<16>
<17>
<18>
<19>
<20>
<21>
<22>
<23>
<24>
<25>
<26>
<27>
<28>
<29>
<30>
<31>
<32>
<33>
<34>
<35>
<36>
<37>
<38>
<39>
<40>
<41>
<42>
<43>
<44>
<45>
<46>
<47>
<48>
<49>
<50>
<51>
<52>
<53>
<54>
<55>
<56>
<57>
<58>
<59>
<60>
<61>
<62>
<63>
<64>
<65>
Setting Up the" (s) e-Manual Configuring Initial Settings" (Machine for Fax Functions (MF8580Cdw / MF8550Cdn / MF8580Cdw)) "MF8280Cw Only) Connecting the" ((MF8280Cw / MF8550Cdn
gaiy gaiy
1 1

1 1 1 1 1 1 1 1 1 1 1 1 1 1 1 1 1 1 1 1 1 1 1 1 1 1 1 1 1 1 1 1 1 1 1 1 1 1 1 1 1 1 1 1
"Setting Menu List" (j) e-Manual Fax Settings (MF8580Cdw/ (j) jg 1234567890123456789012345678901234567890123456789012345678901234567890123456789012345678901234567890123456789
JLJI JU 1000 (MF8550Cdn / MF8580Cdw)
Jus Jus 1

| Jablal Jablal Jablal Jablal Jablal Jablal Jablal Jablal Jablal Jablal Jablal Jablal Jablal Jablal Jablal Jablal Jablal Jablal Jablal Jablal Jablal Jablal Jablal Jablal Jablal Jablal |
jolalaiw golaiws jolalaiw Jgagglg
#
gglai jolalw g jy yj yj yj yj yj yj yj yj yj yj yj yj yj yj yj yj yj yj yj yj yj yj yj yj yj yj yj yj yj yj yj yj yj yj yj yj yj yj yj yj yj yj yj yj yj yj yj yj yj yj y
wL
jslwslg
( S - d) + ( S - a) + 1 = 2a + b
1.125,1.125, 12
S OBC = S COD + S_ BOC
Laoi,
(oo) 1y0o 1y0y jgy
2
Lulwliu lglilui ylgj
(oo) jby ly sdy jby) gdy say y
sylnaiiilbgluscaLsly
4a j 1j 1j 1j 1j
jololbwoofojwloallg
S OBC = S COD + S_ BOC
sla g sgsa 1Lw g la cia
j 1 j j j j j j j j j j j j j j j j
42 15151515151515151515151515151515151515151515151515151515151515151515151515151515151515151515151515151
1
b Sile 51.
. 一
a 1
yiepei kblia jj cws plesa ydy
jg jia gai yio
LgSgjglgJg
j
#
()
a_4 = 12
1 + ( 1 - x) + x = 1 + x
·
·
30-2, Shimomaruko 3-chome, Ohta-ku, Tokyo 146-8501, Japan
One Canon Park, Melville, NY 11747, U.S.A.
CANON EUROPA N.V.
Bovenkerwerweg 59, 1185 XB Amstelveen, The Netherlands
15F Jinbao Building No.89, Jinbao Street, Dongcheng District, Beijing 100005, PRC
CANON SINGAPORE PTE LTD
1 HarbourFront Avenue, #04-01 Keppel Bay Tower, Singapore 098632
CANON AUSTRALIA PTY LTD
1 Thomas Holt Drive, North Ryde, Sydney NSW 2113, Australia
CANON GLOBAL WORLDWIDE SITES
http://www.canon.com/
Printed on non-chlorine bleached paper.