USER MANUAL SPRAYVAC20 SCHEPPACH

https://www.scheppach.com/de/service


SprayVac20
| DE | Nass- / Trockensauger
Originalbedienungsanleitung | 6 |
| GB | Wet / dry vacuum cleaner
Translation of original instruction manual | 19 |
| FR | Aspirateur eau et poussière
Traduction des instructions d'origine | 29 |
| IT | Aspiratore solidi/liquidi
La traduzione dal manuale di istruzioni originale | 40 |
| NL | Nat en droogstofzuiger
Vertaling van de originele gebruikshandelieiding | 51 |
| ES | Aspiracedor en húmedo-seco
Traducción del manual de instructiones original | 61 |
| PT | Aspirador a húmido / seco
Traducción do manual de operación original | 72 |
| CZ | Vysavač pro mokré/suché vysávání
Překlad originálnoho námovu k obšluze | 83 |
| SK | Mokro/suchý vysávač
Preklad originálneho námovu na obšluhu | 93 |
| HU | Nedves/száraz porszivó
Eredeti használati utaslítás fordlítása | 103 |
| PL | Odkurzacz do pracy na mokro /sucho
Tlumaczenie oryginalej instrukcji obslugi | 113 |
| HR | Usisivač za mokro/suho Čišćenje
Prijevod originalog priručnika za uporabu | 124 |
| SI | Sesalnik za mokro in suho sesanje
Prevod originalnih navodil za uporabo | 134 |
| EE | Märg-/kuivimur
Originaalkáïtusjuhendi tõige | 144 |
| LT | Šlapio /sauso valmyo siurblys
Originalinos naudojimo instrukcjisos vertimas | 154 |
| LV | Puteklustusūcëjs mitrai/sausai tīrīsānai
Origiñálas lietošanas instrukcjias tulkojums | 164 |
| SE | Våt-/torrsug
Oversättning av original-bruksanvisning | 174 |
| FI | Märkă-/kuivaimuri
Käannös alkuperäisestä käytööhjeesta | 184 |
| DK | Våd-/tørsuger
Oversættelse fra den oprindelige betjeningsvejledning | 194 |
1
2

15
16
17
18

19
20
Homepage: https://www.scheppach.com/de/service

https://www.scheppach.com/de/service

Explanation of the symbols on the device
Symbols are used in this manual to draw your attention to potential hazards. The safety symbols and the accompanying explanations must be fully understood. The warnings themselves will not rectify a hazard and cannot replace proper accident prevention measures.
| Warning - read the instruction manual to reduce the risk of injury. |
| The product complies with the applicable European directives. |
| Protection class II: This wet/dry vacuum cleaner is double-insulated and need not be connected to an earthed socket. |
| We have marked points in these operating instructions that impact your safety with this symbol. |
Table of contents:
- Introduction 21
- Device description 21
- Scope of delivery 22
- Proper use 22
- General safety information 22
- Residual risks 23
- Technical data 23
- Unpacking 24
- Assembly/Before commissioning 24
- Start up 25
- Electrical connection 26
- Cleaning 26
- Storage 27
- Maintenance 27
- Disposal and recycling 27
- Troubleshooting 28
1. Introduction
Manufacturer:
Scheppach GmbH
Günzburg Straße 69
D-89335 Ichenhausen
Dear Customer
We hope your new tool brings you much enjoyment and success.
Note:
In accordance with the applicable product liability laws, the manufacturer of this device assumes no liability for damage to the device or caused by the device arising from:
- Improper handling,
Non-compliance with the operating manual,
- Repairs carried out by third parties, unauthorised specialists.
- Installing and replacing non-original spare parts
Application other than specified
- Failure of the electrical system in the event of the electrical regulations and VDE provisions 0100, DIN 13 / VDE0113 not being observed
Please consider:
Read through the complete text in the operating manual before installing and commissioning the device.
The operating manual is intended to help the user to become familiar with the machine and take advantage of its application possibilities in accordance with the recommendations.
The operating manual includes important instructions for safe, proper and economic operation of the device, for avoiding danger, for minimising repair costs and downtimes, and for increasing the reliability and extending the service life of the device.
In addition to the safety instructions in this operating manual, you must also observe the regulations applicable to the operation of the device in your country.
Keep the operating manual package with the machine at all times and store it in a plastic cover to protect it from dirt and moisture. They must be read and carefully observed by all operating personnel before starting the work.
The device may only be used by personnel who have been trained to use it and who have been instructed with respect to the associated hazards.
The required minimum age must be observed.
In addition to the safety instructions in this operating manual and the separate regulations of your country, the generally recognised technical rules relating to the operation of such machines must also be observed.
We accept no liability for accidents or damage that occur due to a failure to observe this manual and the safety instructions.
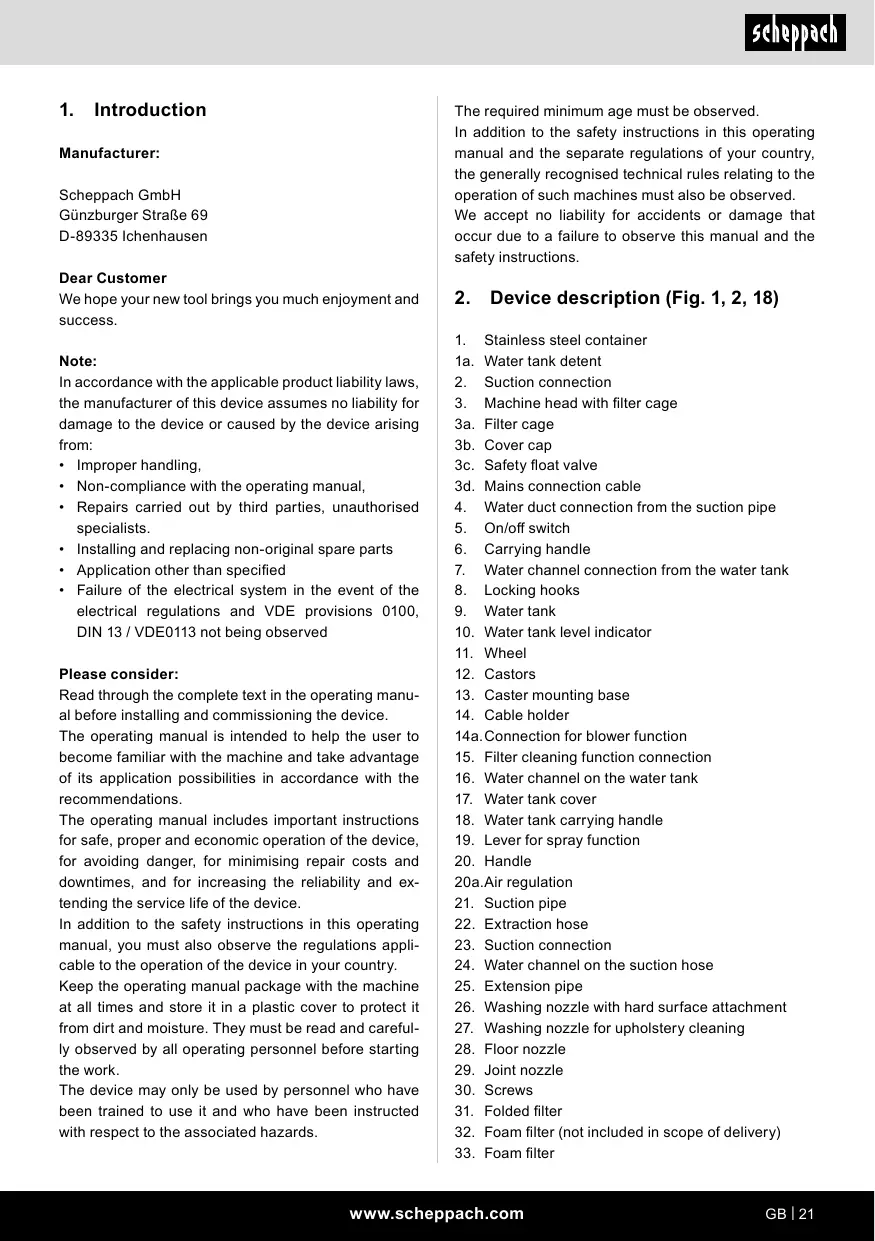
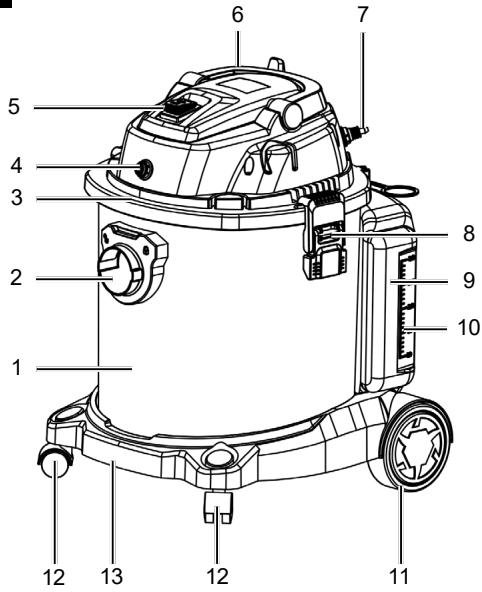
2. Device description (Fig. 1, 2, 18)
- Stainless steel container
1a. Water tank detent
- Suction connection
- Machine head with filter cage
3a. Filter cage
3b. Cover cap
3c. Safety float valve
3d. Mains connection cable
- Water duct connection from the suction pipe
- On/off switch
- Carrying handle
- Water channel connection from the water tank
- Locking hooks
- Water tank
- Water tank level indicator
11.Wheel
- Castors
- Caster mounting base
- Cable holder
14a.Connection for blower function
- Filter cleaning function connection
- Water channel on the water tank
- Water tank cover
- Water tank carrying handle
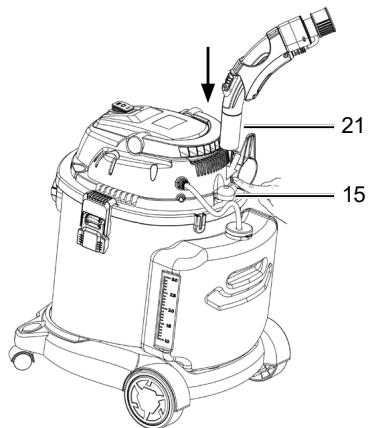
- Lever for spray function
- Handle
20a.Air regulation
- Suction pipe
- Extraction hose
- Suction connection
- Water channel on the suction hose
- Extension pipe
- Washing nozzle with hard surface attachment
- Washing nozzle for upholstery cleaning
- Floor nozzle
- Joint nozzle
- Screws
- Folded filter
- Foam filter (not included in scope of delivery)
-
Foam filter
-
Paper filter bag
- Water spray nozzle
- Upholstery nozzle
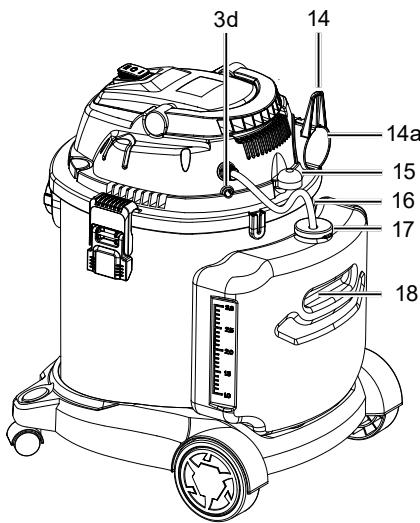
3. Scope of delivery (fig. 2)
Washing vacuum 1x
Water tank. 1x
Wheel 2x
Castors. 2x
Screws 4x
Extraction hose. 1x
Extension pipe 2x
Washing nozzle with hard surface insert.....1x
Washing nozzle for upholstery cleaning.....1x
Floor nozzle 1x
Joint nozzle 1x
Foam filter 1x
Paper filter bag. 1x
Folded filter 1x
Upholstery nozzle. 1x
4. Proper use
The device is intended as a washing vacuum cleaner for cleaning carpets.
The device can also be used as a wet and dry vacuum cleaner in domestic areas such as in the household, hobby room, car or garage, or for extracting water.
This device is not suitable for commercial use. Commercial use will invalidate the warranty.
The vacuuming of flammable, explosive or hazardous substances is forbidden.
The machine may only be used in the intended manner. Any use beyond this is improper. The user/operator, not the manufacturer, is responsible for damages or injuries of any type resulting from this.
An element of the intended use is also the observance of the safety instructions, as well as the assembly instructions and operating information in the operating manual.
Persons who operate and maintain the machine must be familiar with it and must be informed about potential dangers.
In addition, the applicable accident prevention regulations must be strictly observed.
Other general occupational health and safety-related rules and regulations must be observed.
The liability of the manufacturer and resulting damages are excluded in the event of modifications of the machine.
The machine may only be operated with original parts and original accessories from the manufacturer.
The safety, operating and maintenance specifications of the manufacturer, as well as the dimensions specified in the technical data, must be observed.
Please observe that our equipment was not designed with the intention of use for commercial or industrial purposes. We assume no guarantee if the equipment is used in commercial or industrial applications, or for equivalent work.
The device is intended for use by adults. Children over the age of 16 may use the tool except under supervision. The manufacturer is not liable for damage caused by an improper use or incorrect operation of this device.
DANGER!
- Connect the device to alternating current only. The voltage must match the type plate on the device.
- Never touch the mains plug and socket with wet hands.
- Do not pull the mains plug out of the socket by pulling on the connection cable.
- Check the connection cable with the mains plug for damage before each use. Immediately replace a damaged connection cable by an authorised customer service / qualified electrician in order to avoid hazards.
- To avoid electrical accidents, we recommend using sockets with an upstream residual current circuit breaker (max. 30mA nominal tripping current).
- Pull out the mains plug before carrying out any cleaning and maintenance work!
- All repair work, also to any electrical components, must be carried out by an authorised customer service centre.
Attention!
-
This device is not designed to be operated by persons with impaired physical, sensory or mental capabilities, or who have insufficient experience and/or insufficient knowledge unless they are being supervised by a person who is responsible for their safety or they are receiving instruction about how this device is to be used.
-
Children may only use the device if they are over 8 years old and if they are supervised by a person responsible for their safety or if they have received instructions from them on how to use the device and have understood the resultant hazards.
Children may not play with the device.
- Children should be supervised in order to ensure that they do not play with the device.
- Cleaning and user maintenance must not be carried out by children unsupervised.
- Keep packaging material away from children, there is a risk of suffocation!
- It is recommended to switch off the device after each usage and before maintenance work.
- Risk of fire. Do not vacuum any burning or glowing particles.
- Do not operate the device in explosive environments.
- If foam forms or liquid escapes, switch off the device immediately or pull out the mains plug!
- Do not use abrasive cleaners, glass or all-purpose cleaners! Do not immerse the device in water.
Certain substances can form explosive vapours or mixtures when they are swirled with the suction air! Never vacuum the following substances:
- Explosive or flammable gases, liquids and dusts (reactive dusts)
- Reactive metal dusts (such as aluminum, magnesium, zinc) combined with strongly alkaline and acidic cleaning agents
- Undiluted strong acids and alkalis
- Organic solvents (such as gasoline, paint thinner, acetone, heating oil).
In addition, these substances can corrode the materials used on the device.
WARNING!
This power tool generates an electromagnetic field during operation. This field can impair active or passive medical implants under certain conditions. In order to prevent the risk of serious or deadly injuries, we recommend that persons with medical implants consult with their physician and the manufacturer of the medical implant prior to operating the power tool.
6. Residual risks
The machine has been built according to the state-of-the-art and the recognised technical safety requirements. However, individual residual risks can arise during operation.
- Health hazard due to electrical power, with the use of improper electrical connection cables.
- Furthermore, despite all precautions having been met, some non-obvious residual risks may still remain.
- Residual risks can be minimised if the "Safety information" and the "Proper use" together with the operating manual as a whole are observed.
- Avoid accidental starting of the machine: the operating button may not be pressed when inserting the plug in an outlet. Use the tool attachment that is recommended in this operating manual. This is how to ensure that your machine provides optimum performance.
- Keep your hands away from the work area, when the machine is in operation.
7. Technical data
| Mains voltage | 220-240 V~ / 50/60 Hz |
| Power | 1600 W |
| Suction capacity | 20000 Pa |
| Spray pressure | approx . 3 bar |
| Output | 0.5 l/min |
| Protection class | II |
| Protection category | IPX4 |
| Dirty water tank capacity | 20 L |
| Water tank capacity | 3.5 L |
| Weight | 7,5 kg |
Technical changes reserved!
8. Unpacking
- Open the packaging and carefully remove the device.
- Remove the packaging material, as well as the packaging and transport safety devices (if present).
- Check whether the scope of delivery is complete.
- Check the device and accessory parts for transport damage. In the event of complaints the carrier must be informed immediately. Later claims will not be recognised.
- If possible, keep the packaging until the expiry of the warranty period.
- Familiarise yourself with the product by means of the operating instructions before using for the first time.
- With accessories as well as wearing parts and replacement parts use only original parts. Replacement parts can be obtained from your dealer.
- When ordering please provide our article number as well as type and year of manufacture for your equipment.
WARNING!
The device and the packaging material are not children's toys! Do not let children play with plastic bags, films or small parts! There is a danger of choking or suffocating!
9. Assembly / Before commissioning
ATTENTION!
Prior to use, ensure that the device has been correctly and fully assembled.
Unpacking (Fig. 1, 2)
- Release the locking hooks (8) and remove the machine head with filter cage (3). The accessories are located inside the stainless steel container (1). Only the extension pipes (25) are located outside the stainless steel container (1) in the packaging. Remove all of the accessories from the stainless steel container (1).
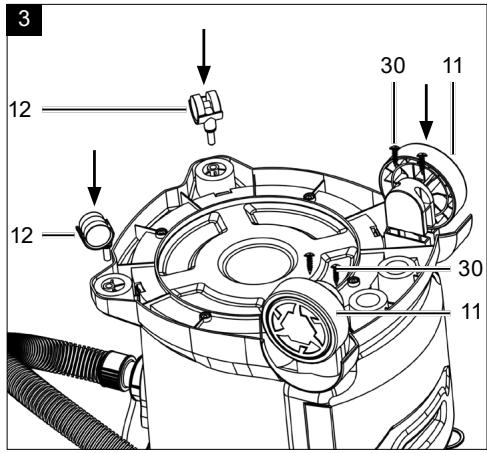
Installation of the roller mounts (11 + 12) (Fig. 3)
- Turn the stainless steel container (1) upside down. (The machine head with filter cage (3) must be removed.)
- Slide the wheels (11) into the recesses provided on the caster mounting base (13) and screw them in place with the screws (30).
Installation of the castors (12) (Fig. 3)
- Press the two deflection rollers (12) into the holes provided in the roller mounts (12a).
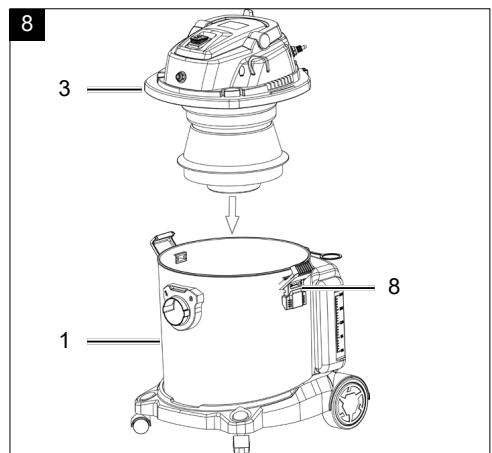
Installing the machine head with filter cage (3) (Fig. 8)
- Place the machine head with filter cage (3) on the stainless steel container (1).
- Secure the machine head (3) with the locking hooks (8). When installing the machine head with filter cage (3), ensure that the locking hooks (8) latch into place correctly. The water channel connection (4) must be above the vacuum connection (2).
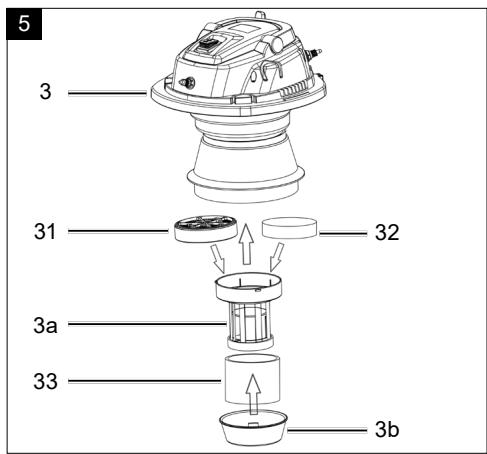
Installing the filter (33) (Fig. 5, 6)
Never use the device without filter! Always ensure that the filters are correctly fitted.
Installing the foam filter (33)
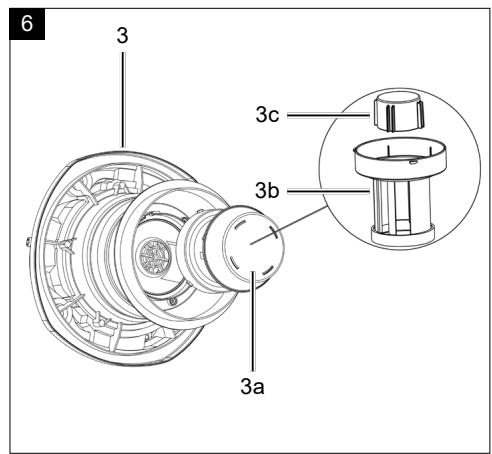
- For wet vacuuming, open and remove the filter cage (3a) by turning it anti-clockwise (Fig. 6).
- Pull off the clipped cover cap (3b) with a screwdriver (not included in the scope of delivery), pull the foam filter (33) over the filter cage with safety float valve (3c) and refit the cover cap (3b) (Fig. 5).
- Now reinsert the filter cage by turning it clockwise (Fig. 6).
To avoid tearing the foam filter (33),
- only insert a dry filter
- knock the edge of the filter over a little to insert it and then roll it back again.
Fit the folded filter (31) and foam filter (32) (not included in the scope of delivery)
- Open and remove the filter cage (3a) by turning it anti-clockwise (Fig. 6).
- Insert the hepa filter (31) or foam filter (32) and replace the filter cage by turning it clockwise (Fig. 6).
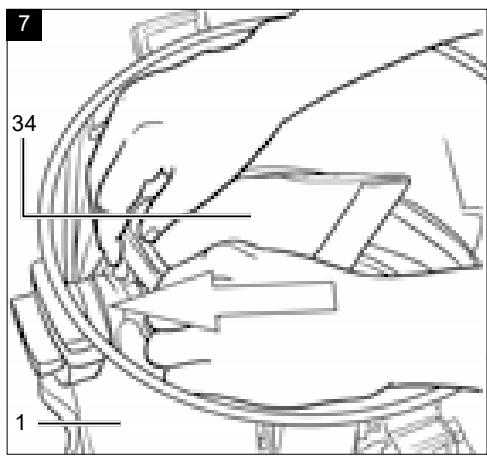
Installing the paper filter bag (34) (fig. 7)
It is recommended to use an additional paper filter bag (34) when vacuuming fine, dry dirt.
- Slide the paper filter bag (34) over the suction opening in the stainless steel container (1). The paper filter bag (34) is only suitable for dry vacuuming. The paper filter bag (34) makes it easier to dispose of the dust collected.
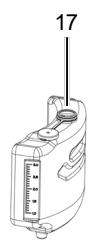
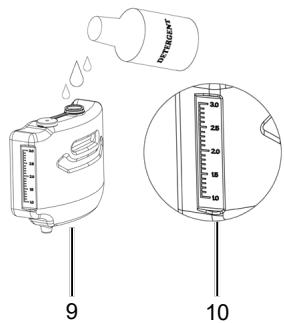
Filling the water tank (Fig. 15)
The water tank (9) can be removed for filling or filled directly at the device.
- Fill the water tank (9) through the opening (17) with clear water (max. 3 l). Pay attention to the markings on the container (10)
- If the water tank is heavily contaminated or stained, add a little cleaning agent, e.g. carpet and upholstery cleaner.
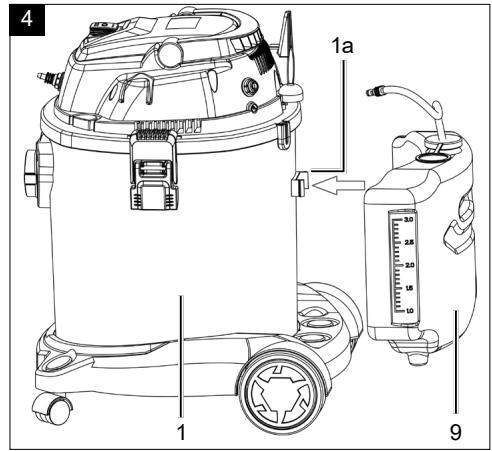
Installing the water tank (Fig. 4)
- Take the water tank (9) by the handle (18) and place it in the openings of the caster mounting base (13).
- Now press the water tank (9) against the detent (1a) until it locks into place.
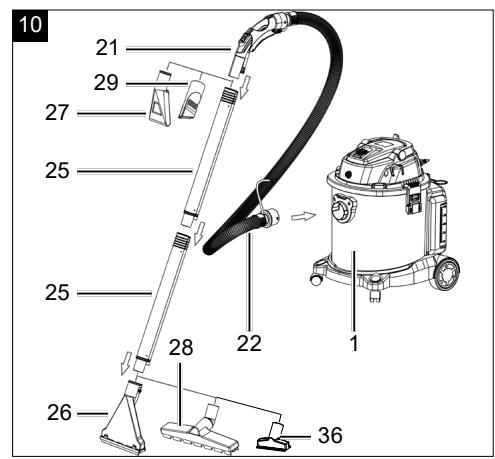
Installing the suction hose (Fig. 10)
- Connect the suction hose (22) to the corresponding port, depending on the desired use, on the wet and dry vacuum cleaner.
Vacuuming (Fig. 10)
- Connect the suction hose (22) to the suction hose connection (2).
- To do so, slide the end of the suction hose (23) with the two nipples into the suction hose port (2).
- Insert the two nipples into the recesses. In the end position, turn the suction hose (22) in a clockwise direction.
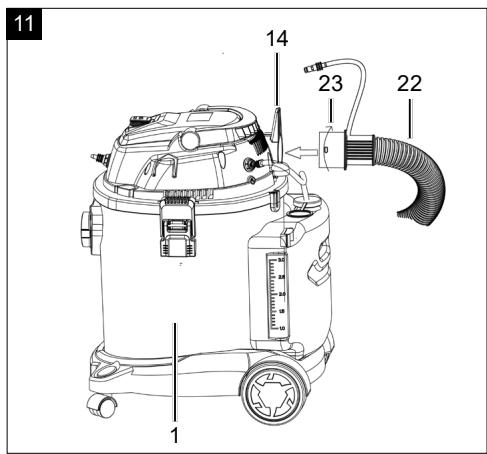
Blowing (Fig. 11)
- Connect the suction hose (22) to the blast function connection port (14a).
- Slide the end of the suction hose (23) with the two nipples into the blast function connection port (14a).
- Insert the two nipples into the recesses. In the end position, turn the suction hose (22) in a clockwise direction.
Fitting plastic extension tubes (25), suction hose (22) and nozzles (26, 27, 28, 29, 36)
(Fig. 10, 13)
- Connect the plastic extension tubes (25) together.
- Connect the assembled plastic extension tubes with the bent end of the suction hose (21).
- Fit one of the corresponding nozzles (26, 27, 28, 29, 36) to the end of the plastic tube (25) or the curved end of the suction pipe (21).
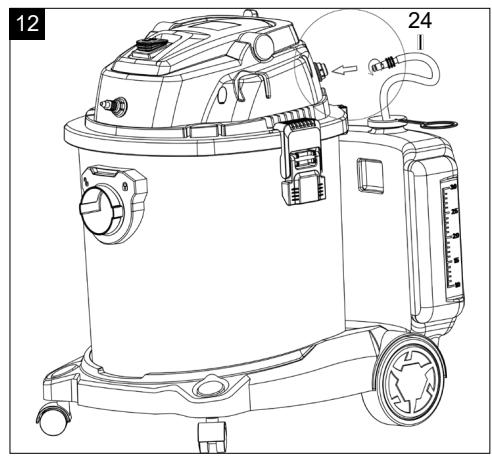
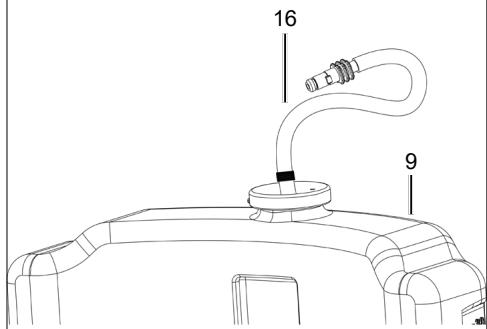
Fitting the water channels (16, 24, 25) (fig. 12, 13)
- To do this, push the end of the respective water channel (16, 24) with the two nipples into the water channel connection (4, 7).
- Insert the two nipples into the recesses. In the end position, turn the water channel (16, 24) in a clockwise direction. (Fig. 12, 13).
- Slide the end of the water channel from the end of the plastic tube (25) or the curved end of the suction pipe (21) with the two nipples into the recesses at one of the corresponding nozzles (26, 27, 28, 29).
- In the end position, turn the water channel in a clockwise direction. (Fig. 13).
10. Start up
Warning! Switch the device off if liquid or foam emerges with the exhaust air during wet vacuuming.
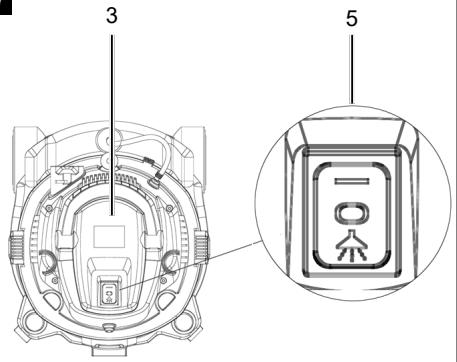
Switching on/off (fig. 11)
- Connect the mains plug of the device.
-
Press the on/off switch (5):
-
Switch setting 0: Off
- Switch setting I: On
- Switch setting II: On + spray function
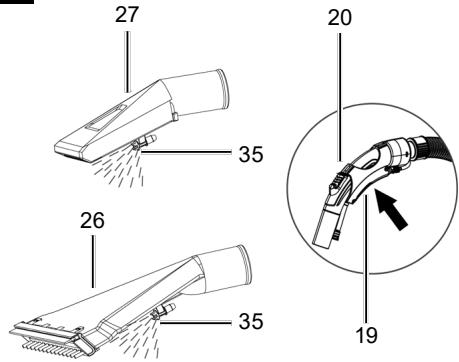
Switching on the washing function (Fig. 19)
- Switch on the device with the spray function (see Switching on/off)
- Press the pump switch (19)
Air regulation (Fig. 19)
The device has an air control (20a) with which the suction capacity can be adjusted.
- To do this, move the air regulation switch (20a) on the handle (20) until the desired air regulation is reached.
Wet vacuuming
- Use the foam filter (33) for wet vacuuming.
- Ensure that the foam filter (33) is correctly fitted.
- If the stainless steel container (1) is full, the safety float valve (3c) closes the suction port and suction operation is interrupted.
Attention!
The device is not suitable for vacuuming flammable liquids. For wet vacuuming, use the only the foam filter (3) provided
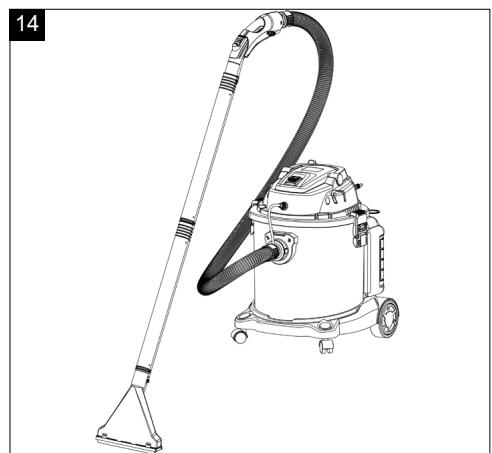
Suction washing (Fig. 18)
Only use the washing nozzle with hard surface attachment (26) or the washing nozzle for upholstery cleaning (27) for vacuum washing.
Use the foam filter (33) for wet vacuuming. Ensure that it is correctly fitted.
- Fill the water tank (9).
- Pull (do not push!) the nozzle (26, 27) in stripes over the carpet / upholstery. Allow the stripes to overlap slightly to ensure thorough cleaning.
- Press the spray function lever (19) on the handle part to switch on the spray function.
- Empty the stainless steel container (1) immediately after vacuuming, as it is not designed to store liquids.
11. Electrical connection
The electrical motor installed is connected and ready for operation. The connection complies with the applicable VDE and DIN provisions.
The customer's mains connection as well as the extension cable used must also comply with these regulations.
Damaged electrical connection cable
The insulation on electrical connection cables is often damaged.
This may have the following causes:
- Pressure points, where connection cables are passed through windows or doors.
- Kinks where the connection cable has been improperly fastened or routed.
- Places where the connection cables have been cut due to being driven over.
- Insulation damage due to being ripped out of the wall outlet.
- Cracks due to the insulation ageing.
Such damaged electrical connection cables must not be used and are life-threatening due to the insulation damage.
Check the electrical connection cables for damage regularly. Ensure that the connection cables are disconnected from electrical power when checking for damage.
Electrical connection cables must comply with the applicable VDE and DIN provisions. Only use connection cables of the same designation.
The printing of the type designation on the connection cable is mandatory.
Connection type Y
If the mains connection cable of this device is damaged, it must be replaced by the manufacturer, their service department or a similarly qualified person to avoid dangers.
For single-phase AC motors, we recommend a fuse rating of C 16A or K 16A for machines with a high starting current (from 3000 watts)!
12. Cleaning
WARNING!
Pull out the mains plug before carrying out any adjustments, maintenance or repair work!
- Keep protective devices, air vents and the motor housing as free of dust and dirt as possible. Rub the device clean with a clean cloth or blow it off with compressed air at low pressure.
- We recommend that you clean the device directly after every use.
- Clean the device at regular intervals using a damp cloth and a little soft soap. Do not use any cleaning products or solvents; they could attack the plastic parts of the device. Make sure that no water can penetrate the device interior. Water entering a power tool will increase the risk of electric shock.
- Remove the water tank and the motor head and empty the water tank (9) and the stainless steel container (1) after each operation.
- Wash out the foam filters (32, 33) with lukewarm water and soap and let them air dry.
- Rinse the water channels (16, 24, 25) with clear water and empty them afterwards.
- Replace paper filter bag when full
- Clean the device only with a soft brush or a damp cloth.
13. Storage
Store the device and its accessories in a dark, dry and frost-free place that is inaccessible to children. The optimum storage temperature lies between 5 and 30^ .
Store the power tool in its original packaging. Cover the power tool to protect it from dust or moisture. Store the operating manual with the power tool.
- Wrap the mains connection cable (3d) around the cable holder (14).
- On the upper side of the caster mounting base (13) there are two recesses to which the extension pipes (25) can be attached for storage.
- On the top of the motor head (3) there are four recesses to which the washing nozzle with hard surface attachment (26), the washing nozzle with upholstery cleaning (27), the floor nozzle (28) and the joint nozzle (29) can be attached for storage.
14. Maintenance
The device has no further internal parts that require maintenance.
With this product, it is necessary to note that the following parts are subject to natural or usage-related wear, or that the following parts are required as consumables.
Wearing parts*: Foam filter, HEPA filter, paper filter bag
- may not be included in the scope of supply!
Connections and repairs
Connections and repair work on the electrical equipment may only be carried out by electricians.
Please provide the following information in the event of any queries:
Type of current for the motor
Data of machine type plate
Data of motor type plate
Spare parts and accessories can be obtained from our service centre. To do this, scan the QR code on the front page.
15. Disposal and recycling

The device is supplied in packaging to avoid transport damages. This packaging is raw material and can thus be used again or can be reintegrated into the raw material cycle.

The device and its accessories are made of different materials, such as metals and plaske defective components to special waste distes. Check with your specialist dealer or municinistration!
Old devices must not be disposed of with household waste!

This symbol indicates that this product must not be disposed of together with domestic waste in compliance with the Directive (2012/19/EU) pertaining to waste electrical and
electronic equipment (WEEE). This product must be handed over at the intended collection point. This can be done, for example, by returning it when purchasing a similar product or delivering it to an authorised collection point for the recycling of old electrical and electronic devices. Improper handling of waste equipment may have negative consequences for the environment and human health due to potentially hazardous substances that are often contained in electrical and electronic equipment. By properly disposing of this product, you are also contributing to the effective use of natural resources. You can obtain information on collection points for waste equipment from your municipal administration, public waste disposal authority, an authorised body for the disposal of waste electrical and electronic equipment or your waste disposal company.
16. Troubleshooting
The following table shows fault symptoms and describes remedial measures in the event of your machine failing to work properly. If you cannot localise and rectify the problem with this, please contact your service workshop.
| Fault | Possible cause | Remedy |
| Motor does not run | Check whether the plug is plugged in. | Plug the mains plug back in to the socket. |
| Check whether there is power to the socket. | Check socket, mains connection cable, lead, plug and fuse, if necessary, have repaired by an electrician |
| Check whether the vacuum cleaner on/off switch is switched on | Switch the on/off switch on. |
| On/off switch defective | Repair by customer service department |
| Carbon brushes worn |
| Engine defective |
| Low or lacking suction capacity | Air regulation on the handle open | Close air regulation |
| Vacuum hose or nozzles clogged | Switch off the hoover to clear blockages and obstructions. |
| Container open | Close container |
| Container or dust bag full | Empty container / replace dust bag |
| Filter full or clogged | Empty, clean or replace filter |
| Float in filter cage does not move | Clear the float |
| Float does not switch off the device | Float in filter cage does not move | Clear the float |
| Dust or dirt is blown out of the device | Filter absent or not fitted correctly | Insert absent filter or check correct fit of filter |
| Water channel leaking | Water channels not connected properly | Connect and lock the water channels correctly |
| Sealing ring missing or porous | Insert / replace sealing ring |
| Low or no spraying performance | Water channel clogged | Clean water channel |
| Water channel kinked | Avoid kinking the water channel |
| Spray pump defective | Repair by customer service department |
| Only air coming out of the spray nozzle | Water tank empty | Fill up the water tank |
| Water channel is not connected to the water tank | Fit the water channel correctly |
Luchtregeling (afb. 19)
Regulator zraka (sl. 19)
Veekanalite (16, 24, 25) monteerimine (joon. 12, 13)
- Lukake selleks veekanali (16, 24) vastav ots mole-
ma niplaga veekanaliuhendusse (4, 7).
- Pange molemad niplid suvenditesse. Keerake veekanalit (16, 24) lopp-positsioonis paripeva. (joon. 12, 13).
- Lukake veekanali ots plasttoru (25) otsalt maha voi kaarja imitoru (21) ots molema nipiga suvenditesse uhel vastavatest dusidest (26, 27, 28, 29).
- Keerake veekanalit lopp-positsioonis paripeva. (joon. 13).
10. Käikuvötmine
Hoiatus! Lulitage seade valja, kui margimemisel tungib koos heitohuga valja vedelikku voi vahtu.
Sisse-/valjalulitamine (joon. 11)
| 2000/14/EG_2005/88/EG |
| Annex V |
| Annex VI
Noise: measured LWA = xx dB(A); guaranteed LWA = xx dB(A)
P = xx KW; L/Ø = cm
Notified Body:
Notified Body No.: |
| 2006/42/EG |
| Annex IV
Notified Body:
Notified Body No.:
Certificate No.: |
Standard references:
EN 62233:2008; EN 60335-2-10:2003+A1:2008; EN 60335-2-2:2010+A11:2012+A1:2013;
EN 60335-2-2:2010+A11:2014+A13:2017+A1:2019+A2:2019+A14:2019+A15:2021; EN IEC 55014-1:2021;
EN IEC 55014-2:2021; EN IEC 61000-3-2:2019+A1:2021; EN 6100-3-3:2013+A1:2019
This declaration of conformity is issued under the sole responsibility of the manufacturer.
The object of the declaration described above fulfils the regulations of the directive 2011/65/EU of the European Parliament and Council from 8th June 2011, on the restriction of the use of certain hazardous substances in electrical and electronic equipment.
Subject to change without notice
Documents registrar: Georg Kohler
Günzburger Str. 69, D-89335 Ichenhausen
Standard references:
EN 62233:2008; EN 60335-2-10:2003+A1:2008; EN 60335-2-2:2010+A11:2012+A1:2013;
EN 60335-2-2:2010+A11:2014+A13:2017+A1:2019+A2:2019+A14:2019+A15:2021; EN IEC 55014-1:2021;
EN IEC 55014-2:2021; EN IEC 61000-3-2:2019+A1:2021; EN 6100-3-3:2013+A1:2019
This declaration of conformity is issued under the sole responsibility of the manufacturer.
The object of the declaration described above fulfils the regulations of the directive 2011/65/EU of the European Parliament and Council from 8th June 2011, on the restriction of the use of certain hazardous substances in electrical and electronic equipment.
Subject to change without notice
Documents registrar: Georg Kohler
Günzburger Str. 69, D-89335 Ichenhausen
Garantie DE
Apparent defects must be notified within 8 days from the receipt of the goods. Otherwise, the buyer's rights of claim due to such defects are invalidated. We guarantee for our machines in case of proper treatment for the time of the statutory warranty period from delivery in such a way that we replace any machine part free of charge which provably becomes unusable due to faulty material or defects of fabrication within such period of time. With respect to parts not manufactured by us we only warrant insofar as we are entitled to warranty claims against the upstream suppliers. The costs for the installation of the new parts shall be borne by the buyer. The cancellation of sale or the reduction of purchase price as well as any other claims for damages shall be excluded.
Garantie FR
Apparent defects must be notified within 8 days from the receipt of the goods. Otherwise, the buyer's rights of claim due to such defects are invalidated. We guarantee for our machines in case of proper treatment for the time of the statutory warranty period from delivery in such a way that we replace any machine part free of charge which provably becomes unusable due to faulty material or defects of fabrication within such period of time. With respect to parts not manufactured by us we only warrant insofar as we are entitled to warranty claims against the upstream suppliers. The costs for the installation of the new parts shall be borne by the buyer. The cancellation of sale or the reduction of purchase price as well as any other claims for damages shall be excluded.
Záruka CZ
Apparent defects must be notified within 8 days from the receipt of the goods. Otherwise, the buyer's rights of claim due to such defects are invalidated. We guarantee for our machines in case of proper treatment for the time of the statutory warranty period from delivery in such a way that we replace any machine part free of charge which provably becomes unusable due to faulty material or defects of fabrication within such period of time. With respect to parts not manufactured by us we only warrant insofar as we are entitled to warranty claims against the upstream suppliers. The costs for the installation of the new parts shall be borne by the buyer. The cancellation of sale or the reduction of purchase price as well as any other claims for damages shall be excluded.
Garantii EE