USER MANUAL clipso minut easy 6L TEFAL
Before using your pressure cooker, please take the time to read all the instructions and always refer to the "User guide". Improper use may result in damage.
For your safety, this pressure cooker complies with the applicable standards and regulations:
- Pressure Equipment Directive
- Materials that come into contact with food products
- Environment
| BEFORE USE | MAKE SURE
■ Make sure that the steam release outlet (B) is not obstructed - fig 13.
■ that the bearing* or the piston* of the safety valve (E) is mobile - fig 17 or fig 17a.
■ that the lid gasket is placed under each notch of the lid - fig 14.
■ that the lid handles are properly fastened. The lid handles are safety components. Never remove them or replace them yourself. |
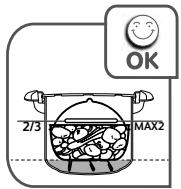
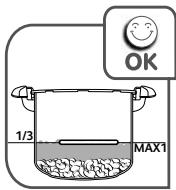
| ALWAYS RESPECT THE FOLLOWING FILLING QUANTITIES | ■ Never use your pressure cooker without liquid, as this could damage it. Make sure there's always enough liquid in the device when cooking.
■ Minimum quantity of liquid 250 ml/25 cl - fig 4.
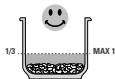
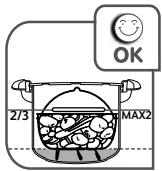
■ Maximum quantity of food 2/3 of the height of the pan, MAX 2 mark - fig 5.
■ When steaming food, the food in the steam basket*must not come into contact with the water and must not exceed the MAX 2 mark on the pan - fig 7.
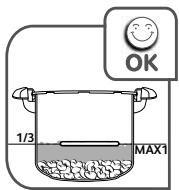
■ Maximum 1/3 (mark MAX 1) of the height of the pan for foodstuffs that expand and/or foam during cooking, such as rice, pulses, dehydrated vegetables, stewed fruit, pumpkin, courgettes, carrots, potatoes, fillets of fish, etc. - fig 6. |
Pirinç
| SU İNCINDE
Sepet olmadan.
MAX 1 | | SU MİKTARI | PIRINC MİKTARI | PIŞIRME
SÜRESI |
| 2 Kılışi | 400 ml / 2 bardak | 150 g / 1 bardak | 7-8 dk |
| 4 Kılışi | 500 ml / 2,5 bardak | 250 g / 2 bardak |
| 6 Kılışi | 700 ml / 3,5 bardak | 375 g / 3 bardak |
Et/ balik
| TAZE | DONDURULMUS |
| Bildircin: 4 | 9 ilA 10 dk | 18 ilA 20 dk |
| Ördek (1,8 kg) | 45 ilA 47 dk | 50 ilA 55 dk |
| Piliç: 2 (1,3 kg) | 23 ilA 25 dk | 40 ilA 45 dk |
| Somon bîftegli: 4 (0,8 kg) | 5 ilA 6 dk | 7 ilA 8 dk |
| Domuz eti bonfile: 2 adet 350 g parça | 13 ilA 15 dk | 26 ilA 29 dk |
| Dana eti bonfile: 0,7 kg | 17 ilA 21 dk | 33 ilA 38 dk |
| Keler baligi fileto 1 kg Parça olarak 75 g | 5 ilA 6 dk | 7 ilA 8 dk |
| Tavşan (1,5 kg parça olarak) | 8 ilA 9 dk | 20 ilA 23 dk |
| Dana sarma: 4 | 10 ilA 12 dk | x |
| Tavuk (1,35 kg) | 23 ilA 25 dk | 1 sa ilA 1 sa 10 |
| Süigir biftek (1 kg Ø 8-11 cm) | 30 ilA 35 dk | 45 ilA 50 dk |
| Domuz biftek (0,8 kg Ø 8-10 cm) | 30 ilA 35 dk | 1 sa 05 ilA 1 sa 15 |
| Dana biftek (0,8 kg Ø 5-7 cm) | 17 ilA 19 dk | 37 ilA 40 dk |
| Kuzu bacak: 2 (veya 0,95 kg) | 40 ilA 45 dk | 1 sa 05 ilA 1 sa 15 |
| Ton baligi biftek: 4 (veya 0,7 kg) | 5 ilA 6 dk | 7 ilA 9 dk |
BEFORE AND DURING COOKING
- Ensure close supervision if you are using the pressure cooker near children.
The steam is very hot when it leaves the operating valve. Be careful of jets of steam.
- Your device cooks using pressure. Improper use may result in scalding injuries. Make sure the pressure cooker is properly closed before use. (See "Closing" section).
During cooking, check that the valve murmurs regularly. If there is not enough steam being released, release the pressure and open the lid then check that there is sufficient liquid, and check that the steam release duct is not blocked. If there is still not enough steam being released, increase the heat source slightly.
-
Do not cook food that could block the ducts of the safety components:
-
blueberries, cranberries
- pearl barley, spelt, millet
- oat flakes
-split peas
- noodles, macaroni, spaghetti
-rhubarb
-
blackcurrants, redcurrants
-
When cooking large pieces of meat and food with a surface skin layer (whole sausages, tongue, poultry, etc.): we recommend that you prick the skin using a knife or fork before cooking. During cooking, boiling liquid could become trapped under the skin and create spatters.
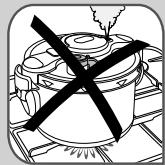
- Never use your pressure cooker to cook milk-based recipes (such as rice pudding, semolina pudding...).
- Never use coarse salt in your pressure cooker, only use fine salt at the end of cooking. That way you will avoid the appearance of "pitting", which could damage the base of your pressure cooker.
- Never use your pressure cooker to fry under pressure using oil.
- Do not leave your pressure cooker unsupervised when heating oil or fats. Continuing to heat a smoking oil will degrade it and may increase the temperature of the oil enough for flames to appear.
- Do not use your pressure cooker for any other purpose than the one it is meant for.
- Do not put your pressure cooker in a hot oven.
- Never use aluminium foil unsecured on a container in your pressure cooker. Always secure with string.
- Never use cling film in your pressure cooker.
- Alcohol vapours are flammable. Bring to the boil for approximately 2 minutes before putting the lid on. Check your pressure cooker on a regular basis when cooking alcohol-based recipes.
- Only use the compatible heat source(s) listed in the user guide.
| AFTER COOKING | ■ For models with a non-stick coating: do not use whisks or sharp utensils made of metal. Do not tap the rim of the pan to remove food from utensils, as it could damage it and cause leaks.
■ Steadily turn the operating valve (A) to adjust the decompression speed, and finish opposite the pictogram mark - fig 10. If, when releasing steam, you notice any food or liquid starts to spurt out, return the operating valve (A) to the "Pressure Cooking" position, then carry out fast decompression in cold water - (refer to the "End of cooking in 'Pressure Cooking' mode" section).
■ If the pressure indicator (D) does not go down, carry out fast decompression in cold water - (refer to the "End of cooking in 'Pressure Cooking' mode" section).
■ Never interfere with the pressure indicator.
■ For foodstuffs that expand and/or foam during cooking, such as rice, pulses, dehydrated vegetables, stewed fruit, pumpkin, courgettes, carrots, potatoes, fillets of fish, etc. Let your pressure cooker cool down for a few minutes, and then carry out fast decompression in cold water - (refer to the section 'End of cooking in pressure Cooker mode'). Methodically and gently shake the pressure cooker each time before opening, after having checked that the pressure indicator has gone down to the lowered position, to prevent bubbles of steam from overflowing and burning you. This operation is particularly important when steam is released quickly or after cooling down under tap water.
■ Always be very careful when moving your pressure cooker under pressure. Do not touch hot surfaces. Use oven mitts when necessary. Lift using both of the handles.
■ For soups, we recommend that you do a fast decompression in cold water (refer to the "End of cooking in 'Pressure Cooking' mode" section).
■ Make sure the operating valve (A) is in the steam release position before opening the pressure cooker. The pressure indicator (D) should be in the lowered position.
■ Never use force to open your pressure cooker. Make sure the internal pressure has been released. The pressure indicator (D) should be in the lowered position. (See "Safety" section). |
CLEANING AND MAINTENANCE
If you notice that a part of your pressure cooker is broken or cracked, do not attempt to open it under any circumstances. Wait for it to cool down completely before moving it. Do not use it again and take it to a TEFAL Approved Service Centre for repair.
- Do not tamper with the safety systems other than when following the cleaning and maintenance instructions.
Only use the correct TEFAL original parts for your model.
- Do not leave food in the pressure cooker.
- Wash and rinse your pressure cooker immediately after each use.
- Never put the operating valve (A), the gasket (I), the cook control (F), or the pan with non-stick coating in the dishwasher.
- Never place the cook control (F) under water.
- Never use bleach or chlorine-based products, which could affect the quality of the stainless steel.
- Do not let the lid soak in water.
- Change the gasket every year, or immediately if it is split or broken.
Make sure you get your pressure cooker checked in a TEFAL Approved Service Centre after 10 years of use.
- To store your pressure cooker: rest the lid upside down on the pan, to avoid premature wear of the lid's gasket.
KEEP THESE INSTRUCTIONS
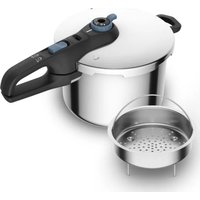
Description of diagram
A. Operating valve
B. Steam release outlet
C. Valve positioning mark
D. Pressure indicator (See section "Safety")
E. Safety valve
F. Removable timer*
G. Lid handle
H. Lid
I. Gasket
J. Steam basket
K./L. Trivet
M. Buttons for folding the handles
N. Fixed pan handle
0. Folding pan handle*
P. Maximum filling marks (max 1 and max 2)
Q Pan
Compulsory checks before each use_
Checking the operating valve (A)
- Check that the draining hole of the operating valve is not obstructed (refer to the "Removing and replacing the operating valve" section).
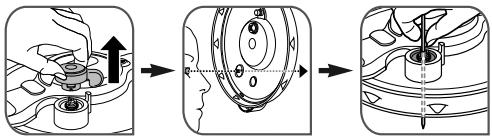
Checking the safety valve (E): depending on model
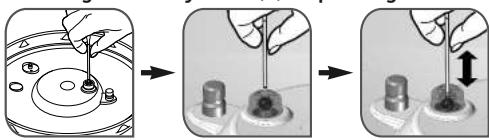
- Check that the bearing* of the safety valve is mobile (using a cotton bud, with the cotton wool tip removed).
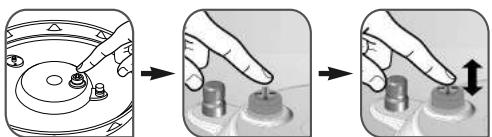
- Check that the piston* of the safety valve is mobile (press the piston several times with your finger)
Features
Your pressure cooker's base diameter - reference
| Capacity | Pot diameter | Base diameter | Fixed handle models* | Folding handle models* | Pot material |
| 3 L | 22 cm | 15.5 cm | P46205 | - | Stainless steel |
| 18 cm | P46605 | - |
| 4 L | 22 cm | 14 cm | P46042 | - | Coated aluminium |
| 17.5 cm | P47042 | - | Coated aluminium |
| 4.5 L | 22 cm | 15.5 cm | P46206 | - | Stainless steel |
| 5 L | 24 cm | 14 cm | P46051 | - | Coated aluminium |
| 19.7 cm | P47051 | - | Coated aluminium |
| 5.2 L | 24 cm | 20 cm | P46654 | - | Stainless steel |
| 6 L | 22 cm | 15.5 cm | P46207 | P49007 | Stainless steel |
| 24 cm | 17.5 cm | P48007 | - | Coated aluminium |
| 7.5 L | 24 cm | 18 cm | P46248 | P49048 | Stainless steel |
| 9 L | 24 cm | 18 cm | P46249 | P49049 | Stainless steel |
| Set 5 L/7.5 L | 24 cm | 14 cm | P46051 | - | Stainless steel |
| 18 cm | P46248 | - |
Maximum operating pressure: 65kPa / 9 psi/9 lbs
Maximum safety pressure: 120kPa / 17.4 psi/17.4 lbs
Compatible heat sources

GAS

ELECTRIC (Solid plate)

ELECTRIC
(Radiant or halogen ceramic hobs)

ELECTRIC
(Ceramic induction bob)

ELECTRIC
(Spiral resistor)
- Your pressure cooker can be used on all heat sources including induction but excluding Aga hobs.
- On an electric, ceramic or induction hob, use a plate with a diameter equal to or less than that of your pressure cooker base.
- On ceramic hobs, make sure that the base of the pot is clean and dry.
- On gas, the flame should not extend beyond the diameter of the pot.
- On all heat sources, make sure that your pressure cooker is well centred.

Pressure cooking
Stewpot*

Steam release
Opening
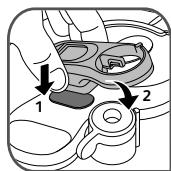
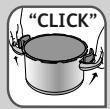
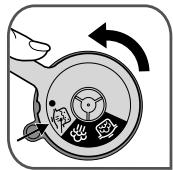
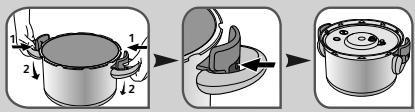
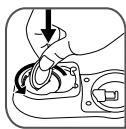
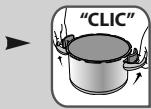
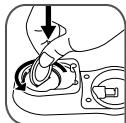
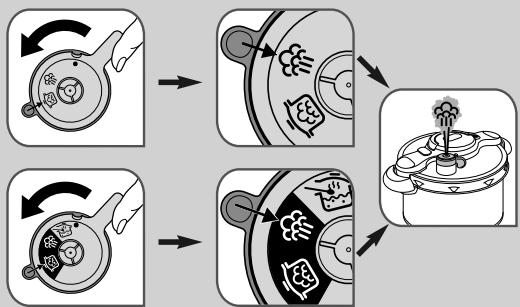
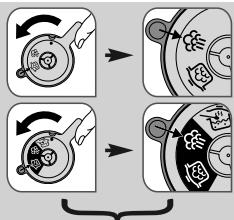
- Switch the lid handle from a horizontal position to a vertical position - Fig. 3. The lid turns.
- Lift the lid.
In case of difficulties opening the lid; rinse the gasket under water and replace it in the lid without drying it - fig 18 and take care to insert it under each of the grooves on the lid - fig 14.
Closing
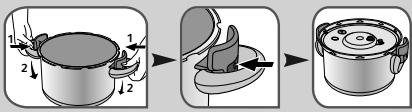
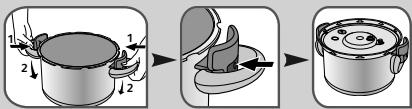
- Ensure that the lid handle is in a vertical position.
- Place the lid on the pot as indicated in - Fig. 1 by lining up the plastic part with the pot handles.
- Lower the lid handle back from a vertical position to a horizontal position - Fig. 2.
- It is normal that the lid turns on the pot. when the pressure cooker is closed but not in operation. This effect disappears when it is pressurised.
If you are unable to close the lid:
- Check the correct positioning of the gasket.
In case of difficulties closing the lid, rinse the gasket under water and replace it in the lid without drying it - fig 18 and take care to insert it under each of the grooves on the lid - fig 14.
Using for the first time
For models with a non-stick coating: wash and use cooking oil to lightly oil
the entire interior surface.
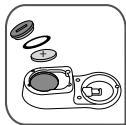
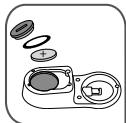
Depending on the model:
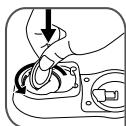
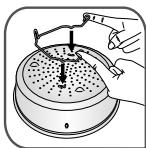
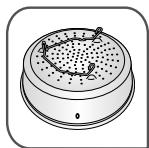
Put the trivet* (L) and the steam basket*(J) in the pan base.
- Clip the trivet (K) to the steam basket (J) as shown in the diagram opposite, then set the assembly in the pan base.
- Fill the pot (Q) with water up to 2/3 (MAX 2) - fig 5.
- Close your pressure cooker.
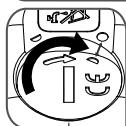
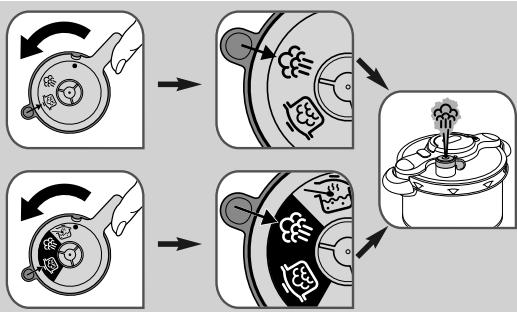
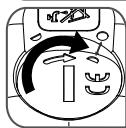
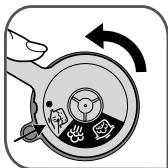
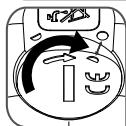
Align the pictogram for the operating valve (A) with the valve positioning mark (C) - fig 10.

- Place your pressure cooker on a heat source then set to maximum power.
- When steam begins to exit the valve, turn down the heat source and set a timer to 20 min.
After 20 min., turn off your heat source.
- Gradually turn the operating valve (A), adjusting the speed that pressure is released by how far you open the valve, to align the pictogram for the operating valve (A) with the valve positioning mark (C).
- When the pressure indicator (D) drops down again, your pressure cooker is no longer under pressure.
- Open your pressure cooker - Fig. 3.
Clean with washing-up liquid.
Minimum and maximum fill level
Minimum 250ml - Fig.4.
Maximum 2/3 of the height of the pot, MAX 2 mark - Fig. 5.
- Never use coarse salt in your pressure cooker, only use fine salt at the end of cooking.
For some foods:
- For foodstuffs that expand and/or foam during cooking, such as rice, pulses, dehydrated vegetables, stewed fruit, pumpkin, courgettes, carrots, potatoes, fillets of fish, etc. do not fill your pressure cooker above 1/3 (MAX 1) of the depth of the pan.
At the end of cooking, let your pressure cooker cool down for a few minutes, and then cool by standing in cold water (refer to the "End of cooking in 'Pressure Cooking' mode - fast decompression" section).
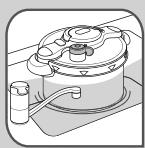
Using the steam basket*
Pour 750ml of water into the bottom of the pot (Q).
Depending on the model:
Put the trivet* (L) and the steam basket* (J) in the pan base.
OR
- Clip the trivet (K) to the steam basket (J), then set the assembly in the pan base.
- When steam cooking, the food in the steam basket* must not be in contact with the water.
In the 3L model, it is normal for the water level to cover a little of the bottom of the steam basket.
The food in the steam basket* must not touch the lid of the pressure cooker.
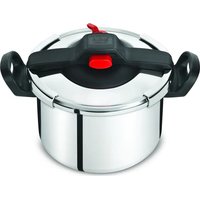
Fitting and removal of the
Operating valve (A)
To remove the operating valve (A):
Align the groove with the operating valve positioning mark (C) by pressing down on the ring of the operating valve (A).
Remove it - Fig. 11.
To fit the operating valve:
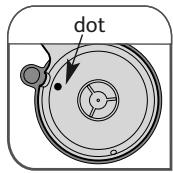
Fit the operating valve (A) - fig 8 by aligning the groove of the operating valve, marked with a dot, with the positioning mark (C) (see opposite).
Press the operating valve (A) so that it engages on the steam release outlet (B), then turn it to the pictogram symbol required.
Press on the operating valve pictograms (A) and turn.
Using the cook control\*
The cook control cannot be used in the Stewpot mode.
The cook control (F) has been designed to help you obtain the best cooking result by allowing you to optimise energy consumption. It automatically counts down the cooking time once the temperature required for "Pressure Cooking" is reached
During cooking, check that the operating valve (A) murmurs regularly. If there is not enough steam, increase the heat source slightly; if there is too much steam, reduce the heat source.
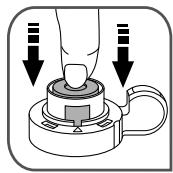
1 To switch on the cook control: press the button.
2 Program the cooking time (in minutes).
If you made a mistake with the cooking time, wait for 4 seconds until the flame symbol does not flash any more, then hold the button down to reset.
3 Start with the heat source at maximum power.
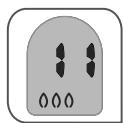
As soon as your pressure cooker has reached the cooking temperature, the cook control rings and the countdown begins (numbers flash).
Reduce the power of the heat source.
If you wish, you can now remove the cook control from the pressure cooker and take it with you. The time will continue to count down.
At the end of the cooking time, the cook control rings.
- To stop the cook control ringing, press the button.
Turn off the heat source.
Holding the button down resets and switches off the cook control.
Fitting and removing the cook control*
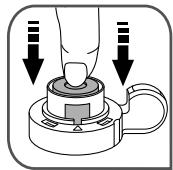
To fit the cook control (F) - Fig. 12, first insert the front part into the module and then press to clip the rear part.
To remove the cook control (F), lift it using the tab and remove it.


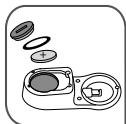
Changing the cook control* battery

The cook control battery is a CR2032 button battery.
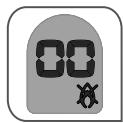
If the symbol appears, or if you no longer have a display, change the battery.
The battery life depends on how often the cook control is used.
- The cook control battery contains Dimethoxyethane no. CAS 110-71 - 4. It is in accordance with the European regulations. For your safety and environmental protection: do not open the battery, do not expose it to high temperatures, do not throw it away with household waste; Dispose of battery at a battery disposal point.
Non-rechargeable batteries should not be recharged.
- Different types of batteries or new and used batteries should not be mixed.
Batteries must be inserted according to the correct polarity.
- Used batteries must be removed from the pressure cooker and disposed of correctly.
If the pressure cooker is to be stored without being used for a long period, you are advised to remove the batteries.
The power supply terminals must not be short circuited.
- Proceed to a flat work surface.
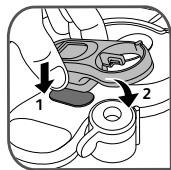
- To remove the battery from your cook control, place the cook control on a flat work surface. Open the battery cover with a coin, turning it anti-clockwise so that the 12 moon on the cover aligns with the 12 moon on the cook control (see illustration opposite).
Replace the battery.
- Replace the battery sealing ring in its casing.
- To refit the battery cover, position the 12 moon of the battery cover facing the 12 moon of the cook control. Gently turn the battery cover clockwise, while pressing lightly, to align the 12 moon of the battery cover with the full moon on the cook control (see illustration opposite)
- Do not force the battery cover when you close it. Do not turn beyond the stops.
If you lose your cook control, you can purchase another from any of our TEFAL Approved Service Centres.
Never place the cook control* in water, nor in the dishwasher.
Never use the cook control* in "Stewpot" mode.
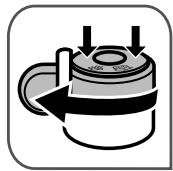
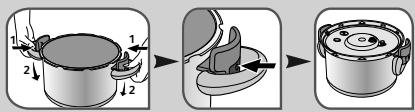
Folding handles*
Before use, ensure that you remove any labels from each of the handles.
Do not try to fold the handles without pressing the buttons (M).
Never remove the folding handles from the pan; only the TEFAL Approved Service Centre is qualified to do this.
To fold the handles
To put the handles into the position for use:
Never place your pressure cooker on a heat source with the handles down.


Before cooking
Before each use, remove the operating valve (A) - fig 11 and check the steam release outlet (B) is not blocked - fig 13.
- Check that the safety valve (E) is mobile (see the sections "Cleaning" and "Compulsory checks before each use") - fig 17 and fig 17a.
- Add your ingredients and the liquid.
- Close your pressure cooker - fig 2
In case of difficulties closing the lid: rinse the gasket under water and replace it in the lid without drying it - fig 18 and take care to insert it under each of the grooves on the lid - fig 14.
Fit the operating valve (A) - fig 8.

Cooking with "Pressure Cooking"
Turn the operating valve (A) to the cooking with "Pressure Cooking" position -fig 10. The pressure cooker operates at 65kPa /9 lbs (psi).
Make sure your pressure cooker is properly closed before use - Fig. 2.
- Place your pressure cooker on a heat source then set to maximum power.
For models equipped with a cook control*: programme the cooking time indicated on the recipe (see section "Using the cook control").
A jangling noise and wisps of smoke emitted from the pressure cooker indicator are normal when bringing the Clipso Minut up to pressure, as the air escapes before cooking.
During "Pressure Cooking"
- When the operating valve (A) is constantly emitting steam and making a regular sound (PSCHHHT), lower the heat source.
- Then either begin timing the food manually or program the cook control* (depending on your model), for the cooking time indicated in the recipe.
- During cooking, check that the valve murmurs regularly. If there is not enough steam being released, increase the heat source slightly. If there is too much steam, reduce it.
End of "Pressure Cooking"
To release the steam:
- When the heat source has been turned off, you have two options:
Gradual pressure release:
This is used for stews, vegetables, meat joints and fish dishes.
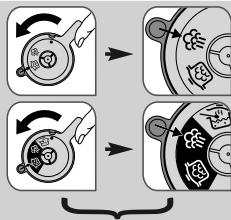
- Gradually turn the operating valve (A), adjusting the speed that the pressure is released by how far you open the valve, until the steam release symbol is opposite the positioning mark (C).
If, when releasing steam, you notice any food or liquid start to spurt out, return the operating valve (A) to the "Pressure Cooking" position 0 , then carry out fast decompression under cold water.
If the pressure indicator (D) does not go down, place your pressure cooker in a sink half-filled with cold tap water until the pressure indicator (D) comes down.
- Fast pressure release with cold water:
This is used for soups, rice, pasta, egg custards, cake and pudding mixes, recipes containing rice or pasta, and recipes with a high liquid content.
- Place the base of your pressure cooker in a sink half-filled with cold tap water.
- When the pressure indicator (D) drops down, your pressure cooker is no longer under pressure. Turn the operating valve (A) to the position 密 .

Etape 1
Etape 2
- For foodstuffs that expand and/or foam during cooking, such as rice, pulses, dehydrated vegetables, stewed fruit, pumpkin, courgettes, carrots, potatoes, fillets of fish, etc. Let your pressure cooker cool down for a few minutes, and then place in sink half-filled with cold tap water. Methodically and gently shake the pressure cooker each time before opening, after having checked that the pressure indicator has gone down completely, to prevent bubbles of steam from overflowing and burning you. This operation is particularly important when steam is released quickly or after cooling down with tap water. For soups, we recommend that you do a fast pressure release with cold water (see Step 1 above).
You can open your pressure cooker - fig 3.
- In case of difficulties opening the lid: rinse the gasket under water and replace it in the lid without drying it - fig 18 and take care to insert it under each of the grooves on the lid - fig 14.
Never interfere with the pressure indicator (D).
Cooking with the "Stewpot"*
- Turn the operating valve (A) to the "Stewpot" position. To do this, apply enough force to turn past the notch for the steam release position.
Make sure the pressure cooker is properly closed before use - fig. 2.
- Place your pressure cooker on a heat source set at low or medium power.
- Then start timing the food manually.
Note: The cook control cannot be used with Stewpot mode.
During 'stewpot' cooking, you can open your pressure cooker at any time to stir, check whether the food is cooked or add ingredients.
In case of difficulties opening the lid: rinse the gasket in water and replace it in the lid without drying it - fig 18 and take care to insert it under each of the grooves on the lid - fig 14
- If the heat source is too high, the pressure cooker may lock (the pressure indicator (D) rises and blocks the opening) and the lid handle may not work or may not allow opening of the pressure cooker. In this case, reduce or turn off the heat source. If you are using cast iron heating plates, remove the pressure cooker from the heat source.
For models with a non-stick coating: do not use whisks or sharp utensils made of metal. Do not tap the rim of the pan to remove food from utensils, as it could damage it and cause leaks.
- Never let fat or oil burn until completely carbonised. The cooking fumes could be dangerous to animals with a particularly sensitive respiratory system, such as birds. Bird owners should keep them away from the kitchen.
Safety
Your pressure cooker is equipped with several safety devices:
Closing safety:
- If the lid is not positioned correctly or if you forget to fold back the lid handle, steam will leak from the pressure indicator (D) of the pressure cooker and the pressure may not increase.
Opening safety:
- If your pressure cooker is under pressure, the pressure indicator (D) is up and the opening/closing lid handle (G) should not be used.
- Never try to forcibly open your pressure cooker.
- Above all do not touch the pressure indicator (D).
- Make sure that the interior pressure has fallen, checking that the pressure indicator (D) is in the lowered position before opening the pressure cooker.
- The lid handles are safety components. Never replace them yourself. Never use any other models of handles.
-
If you moved the opening/closing lid handle (G) to a vertical position while the pressure cooker was still under pressure, you are not able to open it. This function is an additional safety measure. In this circumstance, move the lid handle back to a horizontal position and wait until the pressure indicator (D) is in the lowered position.
-
Two safety devices against overpressure:
- First safety device: the safety valve (E) releases the pressure - fig 19.
- Second safety device: the gasket allows steam to escape from the lid - fig 19.
If one of the overpressure safety systems is triggered:
Turn off the heat source.
- Allow the pressure cooker to cool completely without moving it.
Open.
- Check and clean the operating valve (A), the steam release outlet (B), the safety valve (E) and the gasket (I) - fig 15 - 16 - 17 and 17a . Refer to the sections "Cleaning" and "Compulsory checks before each use".
If, after these checks and cleaning, your product leaks or no longer works, take it to a TEFAL Approved Service Centre.
Cleaning
To ensure the correct operation of your pressure cooker, follow these cleaning and maintenance recommendations after each use.
The browning and marks which may appear following long use do not affect the operation of the pressure cooker.
Wear on the exterior coating (depending on model) caused by contact between the lid and the pan is normal.
For pressure cookers with non stick coating (according to model): the slight scratches and abrasions that may appear with use do not affect the coating's non stick performance.
- Wash your pressure cooker after each use using warm water with a little washing-up liquid. Follow the same procedure for the basket*.
- Do not use bleach or chemicals containing chlorine.
Do not heat your pan when empty.
To clean the inside of the stainless steel pot:
- Wash using a sponge and washing-up liquid.
If the interior of the steel pot has an iridescent sheen or white marks (mineral deposits), clean using a sponge with a little white vinegar.
You can wash the stainless steel pan and basket in the dishwasher.
To clean the inside of the aluminium pot with a non stick coating:
- Wash the pan by hand only using hot water, washing-up liquid and a soft sponge.
- Do not use scouring powder or abrasive sponges.
If you have burned some food, fill your pan with hot water and leave to soak. Then clean with washing-up liquid.
Do not put the pan with a non-stick coating (depending on model) in the dishwasher, because detergent tablets contain substances that are very aggressive and corrosive for aluminium parts.
Pans with a non-stick interior coating (according to model), may slightly alter in colour inside (yellowing or staining) after long term use. This is normal.
To clean the outside of the pot:
- Wash using a sponge and washing-up liquid.
To clean the lid:
- Wash the lid using a damp sponge and washing-up liquid.
Drain the lid vertically to remove the remaining water between the metal and plastic parts of the lid.
After removing the operating valve (A), the gasket (I) and the cook control* (F), you can put the lid in the dishwasher.
To clean the gasket of the lid:
After each use, clean the gasket (I) and its housing.
To replace the gasket, refer to - Fig. 14 and ensure that the gasket is properly inserted beneath each of the grooves on the lid.
To clean the operating valve (A):
Remove the operating valve (A) - Fig. 11
Clean the operating valve (A) under cold tap water - Fig. 15.
- Check its mobility: see figure opposite.
Never put the operating valve (A), the gasket (I), the cook control* (F), or the pan with non-stick coating in the dishwasher.
To clean the steam release outlet (B) located on the lid:
Remove the valve (A)-Fig.11
- Check to make sure the steam release outlet is clear of debris and round - Fig. 13. If needed, clean it with a tooth pick - Fig. 16 and rinse it.
To clean the safety valve (E):
Clean the part of the safety valve located inside the lid by washing under water.
- Check its proper functioning by pressing firmly on the bearing (using a cotton bud, with the cotton wool tip removed), which must be mobile - fig 17 or by pressing the piston several times with your finger (it must be mobile) - fig 17a. Refer to the section "Compulsory checks before each use".
To clean the cook control* (F):
Use a clean dry cloth.
- Do not use any solvents.
- Never place the cook control in water, nor in the dishwasher.
Maintenance
To change your pressure cooker's gasket:
- Change your pressure cooker's gasket every year or if split or damaged.
Always use an original TEFAL gasket corresponding to your model (see section "Accessories")
To replace the gasket, refer to - Fig 14 and ensure that the gasket is properly inserted beneath each of the grooves on the lid.
To store your pressure cooker:
- Turn the lid over and store it upside down on the pan.
- The pressure cooker's opening and closing system does not require any specific maintenance apart from cleaning.
Make sure you get your pressure cooker checked in a TEFAL Approved Service Centre after 10 years of use.
TEFAL Accessories
- Commercially available pressure cooker accessories are:
| Accessories | References |
| Gasket | 3/4/4.5/6 L: outer diameter of gasket: 24 cm | X1010008 |
| 5/7.5/9 L: outer diameter of gasket: 27 cm | X1010007 |
| Steam basket* | 3/4.5/4/6 L: for pot with 22 cm diameter | 792185 |
| 5/7.5/9 L: for pot with 24 cm diameter | 792654 |
| Trivet* (L) | 792691 |
| Trivet* (K) | X1030007 |
| Cook control* | X1060007 |
To replace other parts or for repairs, contact a TEFAL Approved Service Centre.
- Only use the correct TEFAL original parts for your model.
Guarantee
- When used as recommended in the manual, the stainless steel pan of your new TEFAL pressure cooker is guaranteed for 10 years against:
- Any defect linked to the metallic structure of your pot,
- Any premature deterioration of the base metal
- All other pot materials and all other parts of your pressure cooker are guaranteed against defects in workmanship or materials, for the period of guarantee defined in valid legislation in force in the country where the product was purchased from the date of purchase.
- This contractual guarantee is established upon presentation of the receipt or invoice showing the date of purchase.
These guarantees exclude:
- Scratches and discolouration resulting from ageing for pans with non stick coating.
-
Damage resulting from failure to comply with important precautions, or negligent use, particularly:
-
Impacts, falls, use in the oven, etc.
-
Only TEFAL Approved Service Centres are authorised to provide this guarantee service.
- Please call our local rate number to find out the address of your nearest TEFAL Approved Service Centre.
Groupe SEB Canada
36 Newmill Gate, Unit 2, Scarborough, Ontario M1V 0E2
Call:800-418-3325
Regulatory markings
| Labelling | Location |
| Trademark | On the lid. |
| Year and manufacturing batch
Model reference
Maximum safety pressure (SP)
Maximum operating pressure (OP) | On the lid. |
| Capacity | On the outer base of the pot. |
| Manufacturer's postal address | On the outer base of the pot. |
Think of the environment!

① Your appliance contains valuable materials which can be recovered or recycled.
Leave it at a local civic waste collection point.
Troubleshooting
| Problems | Recommendations |
| If opening and/or closing the lid becomes difficult: | Remove the gasket, and run it under water- fig 18.
Put it back in the lid without wiping it, take care to insert it under each of the grooves on the lid - fig 15. |
| If you are unable to close the lid: | Check that the lid handle is in a vertical position.
Check that the gasket is positioned correctly (see section “Cleaning and Maintenance”).
Check that the lid is positioned as indicated in - fig 1.
Rinse the gasket under water and replace it in the lid without drying it - fig 18 and take care to insert it under each of the grooves on the lid - fig 14. |
| If your pressure cooker has been heated under pressure without liquid inside: | Have your pressure cooker checked by a TEFAL Approved Service Centre. |
| If the safety valve emits clicking noises or wisps of steam: | This is normal during the first few minutes: it allows air to escape before cooking. |
| If the pressure indicator has not risen and nothing is escaping through the steam release outlet (B) during cooking: | This is normal during the first few minutes.
If the phenomenon persists, check that:
- The quantity of liquid in the pan is sufficient.
- The heat source is strong enough, otherwise increase it.
- The operating valve (A) is positioned on.
Your pressure cooker is properly closed.
- There is no deterioration at the gasket or edge of the pan.
- The gasket is correctly positioned. |
| If the pressure indicator has risen and nothing is escaping through the steam release outlet (B) during cooking: | This is normal during the first few minutes.
If this persists, half fill your sink with cold water and submerge the bottom of your pressure cooker until the pressure indicator (D) comes down.
Clean the operating valve (A) - fig 15 and the steam release outlet - fig 16 and check that the bearing* or piston* of the safety valve moves without difficulty - fig 17 or 17a. |
| If steam leaks from around the lid, check: | The correct closure of the lid.
The position of the gasket in the lid.
The condition of the gasket; replace if needed.
The cleanliness of the lid, gasket and its housing in the lid.
The condition of the edge of the pan. |
| If you are unable to open the lid: | Check that the pressure indicator (D) is in the lowered position. If not, depressurise by half filling your sink with cold water and submerge the bottom of your pressure cooker until the pressure indicator comes down. Never interfere with the pressure indicator (D).
Turn the operating valve (A) to the position ◆ |
| If the food is not cooked or is burned, check: | The cooking time.
The power of the heat source.
The correct position of the operating valve (A).
The quantity of liquid. |
| If food has burnt in your pressure cooker: | Fill the pot with water and soak for a while before washing.
Never use bleach or chlorine-containing chemicals. |
| If one of the overpressure safety systems is triggered: | Turn off the heat source.
Let your pressure cooker cool down without moving it.
Wait for the pressure indicator to fall and open the pressure cooker.
Check and clean the operating valve (A), the steam release outlet, the safety valve and the gasket.
If the problem persists, have your pressure cooker checked by a TEFAL Approved Service Centre. |
| If you notice the appearance of oxidation marks on the exterior (stainless steel models only) | The use of high performance stainless steel does not prevent the appearance of oxidation in extreme cases.
If you notice oxidation marks, remove them by rubbing with an abrasive sponge before using your pressure cooker again. |
| If you cannot put the folding handles * in the position for use: | Check that:
■ The buttons (M)* are mobile.
■ If the phenomenon persists, have your product checked by a TEFAL Approved Service Centre. |
| If you cannot fold the folding handles*: | Do not force them.
Make sure you press the buttons all the way down*(M).
If the phenomenon persists, have your product checked by a TEFAL Approved Service Centre. |
Golden rules when pressure cooking (for UK Consumers)
For 5 Litre, 5.2 Litre and 6 Litre models only.
- The minimum quantity of liquid required for normal cooking is 250ml ( 12 pint) for the first 14 hour cooking. For each additional 14 hour, or part of 14 hour, add a further 150ml ( 14 pint) of liquid. For example, 45 minutes cooking requires 600ml (1 pint) of liquid. Note: This is only a general guide. Certain foods, such as rice, pulses, steamed puddings and Christmas puddings may require extra water (see details below).
- When steaming foods in the basket use a minimum of 750ml (1¼ pint) water in the cooker.
- Always use a liquid that gives off steam when boiled e.g. water stock, wine, beer, cider. Never use oil or fat. All pressure cooking requires some liquid.
- Whatever the size of pressure cooker, the maximum filling level when all the ingredients and liquid have been added are:
Solid foods e.g. vegetables, meat joints: no more than two-thirds full (MAX 2 mark)
Liquids and cereals e.g. soups, stews, cereal and pasta: no more than half full
Foods that swell during cooking e.g. rice, dried beans, dried peas, dried vegetables, stewed fruit (compotes), pumpkin, courgette and potatoes, etc: no more than one-third full (MAX 1 mark).
-
When cooking pulses they swell up and tend to froth up. Use 1.2 litres (2 pints) water for every 450g (1 lb) pre-soaked weight of pulses. Remember all dried peas and dried beans, must be soaked in boiling water for 1 hour before cooking. Drain, rinse thoroughly and cook in fresh water. Never eat uncooked beans or peas. Soaking is not necessary for red lentils. The high temperatures achieved in the pressure cooker ensure that any natural toxins in the pulses are destroyed. Canned beans and pulses can simply be drained and rinsed before adding to the pressure cooker.
-
For steamed suet puddings, sponge puddings or Christmas puddings, a short pre-steaming time is best to enable the raising agent to activate and prevent a heavy, close texture. Extra liquid is required so use a minimum of 112 pint/900 ml of boiling water for a combined steaming and cooking time of up to 1 hour. For each additional 1/4 hour of cooking, or part of 1/4 hour, add a further 1/4 pint/150 ml of boiling water. Pre-steaming is done with the operating valve in the steam release position on a low heat for the required time. Then turn the operating valve to , and increase the heat to bring to full pressure. Lower the heat and pressure cook for the required time.
Pressure operates at 65kPa (9psi/9lbs).
- Never cook dumplings with the lid tightly closed, as they could rise up and block the safety devices. Cook the stew and at the end of cooking, release the steam and cook gently for about 10 - 15 minutes without the lid on.
- Pressure cooking times vary according to the size of individual pieces or thickness of the food, not the weight.
- To prevent discolouration of the inside of the stainless steel pot, caused by mineral deposits in hard water areas, add a tablespoon of lemon juice or vinegar.
- Cooking containers must withstand temperatures of 130^ ( 250^ ). Any covering on containers, e.g. foil, greaseproof paper, must be securely tied otherwise they could block the safety devices. Do not use plastic lids as they prevent steam from being in contact with the food. Also, they could distort and come off during cooking which could block the safety outlets.
- Accurate timing is essential when pressure cooking to prevent overcooking, especially with vegetables, fruit and fish.
- Never make milk-based recipes (such as rice pudding, semolina pudding..) when pressure cooking.
Australian - NZ warranty COOKWARE, BAKeware AND PRESSURE COOKERS Limited Replacement Guarantee
Our goods come with guarantees that cannot be excluded under the Australian Consumer Law. You are entitled to a replacement or refund for a major failure and compensation for any other reasonably foreseeable loss or damage. You are also entitled to have the goods repaired or replaced if the goods fail to be of acceptable quality and the failure does not amount to a major failure. In addition to these statutory rights and any other rights and remedies you may have under the law, Groupe SEB Australia Pty Ltd (we or us) guarantees this Jamie Oliver by Tefal/T-fal/All-Clad/Moulinex product will be free of defects in material and craftsmanship including handles, body, knobs, lids and fixings for 12 months from the date of purchase. We also guarantee the non-stick coating of this Jamie Oliver by Tefal/T-fal/All-Clad/Moulinex product will be free of blistering or peeling for the life of the Jamie Oliver by Tefal/T-fal/All-Clad/Moulinex product. Should your Jamie Oliver by Tefal/T-fal/All-Clad/Moulinex product develop a defect during the guarantee period or the non-stick coating peel during the life of your Jamie Oliver by Tefal/T-fal/All-Clad/Moulinex product, you should return it, at your cost, to the retailer from which you purchased it from, together with your receipt as proof of purchase. The retailer will then forward your claim directly to us for processing. Alternatively, if the retailer is unable to help you, you may contact us directly at:
Groupe SEB Australia Pty Ltd, Customer Service Department, Unit 1, No 10 Hill Rd, Homebush NSW 2127 T: +61 2 9748 7944
If on receipt your Jamie Oliver by Tefal/T-fal/All-Clad/Moulinex product is found to be defective or the non-stick coating has peeled, we will, at our cost, replace or repair the product in our discretion. Only the defective part or accessory will be repaired or replaced. Packaging, instructions etc. will not be replaced unless faulty. This guarantee excludes defects caused by the Jamie Oliver by Tefal/T-fal/All-Clad/Moulinex product not being used in accordance with instructions, accidental damage (including overheating), misuse or being tampered with by unauthorised persons. It also does not apply if the Jamie Oliver by Tefal/T-fal/All-Clad/Moulinex product is used commercially and excludes consumable items (including accessories such as pressure regulators and safety devices), dishwasher effects and damages, stains, dents, discolouration, scratches or scuffs due to normal wear and tear, and your costs of claiming under the guarantee.
COOKING TABLE
Vegetable
VEGETABLES (FRESH)
STEAM
Ingredients in the steam basket and 750 ml water in the bottom of the pressure cooker.


IMMERSION
Ingredients in water and without the basket.
PULSES
IMMERSION
Without the basket.

| 180 |
| Artichokes, 2 whole, 600g each (immersion) | 30 to 35 mins |
| Asparagus, white (Steam) | 5 to 6 mins |
| Aubergines, peeled and sliced (3mm), 850g (Steam) | 10 to 12 mins |
| Beetroot, red, cut into quarters (Immersion) | 20 to 25 mins
(according to size) |
| Broccoli florets 600 g (steam) | 9 to 11 mins |
| Brussel sprouts (steam) | 10 to 12 mins |
| Cabbage, sliced and green, 500 g (Immersion) | 5 to 6 mins |
| Carrots cut into round slices (3 mm) 600 g (steam) | 17 to 19 mins |
| Cauliflower florets 600 g (steam) | 10 to 12 mins |
| Celeriac, sliced (immersion) 600 g | 7 to 9 mins |
| Chard, sliced (2cm) 700 g (Steam) | 15 to 17 mins |
| Courgettes in round slices (3 mm) 600 g (steam) | 12 to 15 mins |
| Chicory cut in half (900 g) (steam) | 14 to 16 mins |
| Fennel cut into strips (600 g) (steam) | 6 to 9 mins |
| Fine green beans (600 g) (steam) | 10 to 12 mins |
| Flageolet beans, dried 250 g (Immersion) | 35 to 40 mins |
| Leek, whole and white 650 g (Steam) | 9 to 11 mins |
| Lentils, green 250 g (Immersion) | 14 to 16 mins |
| Mushrooms, sliced 800 g (Immersion) | 4 to 5 mins |
| Peas (steam) | 6 to 8 mins |
| Peppers cut in half (550 g) (steam) | 14 to 16 mins |
| Pickling onions (steam) | 7 to 8 mins |
| Potatoes cut in half (950 g) (steam) | 20 to 25 mins
(according to size) |
| Pumpkin, cut in pieces (3 to 5 cm) 600 g (steam) | 13 to 18 mins |
| Spinach (steam) | 3 to 4 mins |
| Split peas 250 g (immersion) | 18 to 20 mins |
| Turnips, diced (500 g) (steam) | 14 to 16 mins |
| IMMERSION Without the basket. 1/3 MAX 1 | | QUANTITY OF WATER | QUANTITY OF RICE | COOKING TIME |
| 2 PEOPLE | 400 ml / 2 glasses | 150 g / 1 glass | 7 to 8 mins |
| 4 PEOPLE | 500 ml / 2.5 glasses | 250 g / 2 glasses |
| 6 PEOPLE | 700 ml / 3.5 glasses | 375 g / 3 glasses |
Meat/fish
| FRESH | FROZEN |
| Chicken (1.35 kg) | 23 to 25 mins | x |
| Duck (1.8 kg) | 45 to 47 mins | x |
| Lamb shanks: 2 (0.95 kg) | 40 to 45 mins | 1 h05 to 1 h15 |
| Monkfish fillets (1 kg)
in pieces of 75 g | 5 to 6 mins | 7 to 8 mins |
| Pork fillet (tenderloin)
2 pieces of 350 g | 13 to 15 mins | 26 to 29 mins |
| Pork joint (0.8 kg, 8–10 cm diameter) | 30 to 35 mins | 1 h05 to 1h15 |
| Poussins: 2 (1.3 kg) | 23 to 25 mins | 40 to 45 mins |
| Quail: 4 | 9 to 10 mins | 18 to 20 mins |
| Roast beef (1 kg, 8–11 cm diameter) | 30 to 35 mins
(medium) ** | 45 to 50 mins (medium)** |
| Salmon steaks: 4 (0.8 kg) | 5 to 6 mins | 7 to 8 mins |
| Tuna steaks: 4 (0.7 kg) | 5 to 6 mins | 7 to 9 mins |
| Veal fillets: 0.7 kg | 17 to 21 mins | 33 to 38 mins |
| Veal joint (0.8 kg, 5–7 cm diameter) | 17 to 19 mins | 37 to 40 mins |
**Cook for an additional 5 minutes for well done meat.
Note: For models 5 litres and below ensure that meat joints and poultry do not exceed the mark on the inside of the pot. Choose meat joints and poultry 8cm or less in height.
PRECAUTIONS IMPORTANTES
Para rebater as pegas
Under tillagning i laget "Tryckkokare"
BAJHINI PEPiA3HIM MEPKN
Ipei Da n3non3BaTe TeHJxepaTa NoI hAnlaRe, npOeTe TE BCNUKm HnCTpyKuN I npu HxJa BUNHaR IpabBeT cnpBaKc TToBA pBkoBDCTBO. HenpabunHata ynoTpe6a Ha ypeA MoKe da doBede do ueTn.
PC orneHa Baawata 6e3oNaCHOCT TO3n ypeD cbOTBeTCTBa Ha N3NCKBaHnraTa Ha CneHNITE DeiCTBaUa CTaHdAPTN HOPMaTHBHN DOKUMENTI:
-Директпа 3a Сьорьхенята NOД Налгаге
-MatepnaI, KOINTOBIN3aT B KOHTaKT C xpaH
-Опаьане на Okолнага срда
2 HaCtpoIe BpeMeTo 3a roTBeHe (B MmHyTN).
Ako cte Hactponn HeipabuHIO BpeMeTo 3a rotBeHe, n3aKaaiTe 4 cekyHnD,doKATO CmBBOJbT C pIaMbUITE cnpe Da MInra, CneI KOeTO HaTNCHE Te PPOdbNkITeHNO 6yToHa 3a3aHyjBaHe.
BkIIOUeTe TOINHHNIA N3TOUHIK Ha MaKcIMaJIHa MOUHOCT.
4 Cnej KaTo TeHJxepaTa NOI HAIraHe IOCTnHrTe TMnepaTypa 3a roTBeHe, TaIMpeBt N3daba 3ByKOB CUNHaN I 3aNouBa Da OTHTu BpEmTo (UINPHTeMrt).
HaMaJIeTe MoUHOCCTTa Ha TOnIIHHNn I3TOUHNK.
Toraba Mojke Te da Cbainte Taimepa ot npodykta n da ro B3emete cbcce6e cn. Bpemeto pnoDblixna da ce otHTnla.
5 CnEi n3TuHaHe Ha BpeMeTo Ha rOtBeHe TaIeMepbT N3daBa 3ByKOB CnHaN.
3aДаИЗКЛЮЧТЕ 3ВУКаHaТаймера,HaTиСHTe 6уTOHa.
N3KJIIOHETeTOJINHHNIAI3TOUHNK.
IpojblkntnoHaTnckaHe Ha6yToHa Hynipa TaMepa.
TocTabaHHe n CbAJaHe Ha TaIMepa\*
3a da noctabnTe taMepa (F) - Dnr. 12, nbpBO BKapaIte yactTa C6yToHa B NaHena, Cnei KOeTO HATNCHeTcpeuynoloxhata Yact, 3a da zakOruaTe.
3a da cBaIte TaMepa (F), nobHnTe ro n ro n3BaJeTe.


Ako 6aTepeHnTe He ca npe3apeKdaun, He Tpa6Ba da ce 3apeKdaT.
Pa3nHHe BINOHE HOBUNyNtpe6BaHNbAtePNN He Tp6Ba Da ce CmecBaT.
BaTeepnIe Tp86Ba Da 6bDat NocTaBEni Cnopei npaBunHaT a NoJIpaHcct.
I3TOUeHnTe 6aTeepn Tp8Ba Da 6bDaT n3BaJeHn OT yCTpoiCTBTo n da 6bDaT n3XBpJHn No 6e3OnaceH HauHH.
AkyctpoCTBTO HMa da ce n3no3Ba 3a nbIbI nepIOI OT BpeMe,6aTePmTe Tpa6Ba da bDaatn3BaDeHn.
3axpaHbuaIte KJIeMn He TpR6Ba Da ca B KOHTaKT.
Pa6oTeC ypea Bbpxy paBEN pa6oTeH nIOT.
3a da n3b4nnte 6atepna ot taMepa, cBanete Kanauchata Ha 6atepnta C nOmoUta Ha MOHeta, KATO BbPTIte 6oPato H aCobNkoBATA cTpeKla, DOKaTO NOLmeceCbT Ha Kanauchata Ha 6atepna C ce m3paBNc NOLmeceHa taiMepa (BVkTe n06paKeHHTo Hacepu).
CmeheTe 6aTeepnraTa.
IocTaBeTe 6paTHO yIbTHeHnETo BrHe3DoTo My.
3a da noctabite o6paTHo kanaVkata Ha 6aTepyra, noCTabete Nolymecea Ha kanaVkata Ha 6aTepyra cpeu yonlmeeca Ha taHMepra. 3aBpTeBE BnImateHNO kanaVkata Ha 6aTepyra NO Pocoka Ha YacOBHKOBaTA CTePka, ynpaxHbAaKNI JeK HaTtCK, DOKATO NOLymeceBt Ha kanaVkata Ha 6aTepyra He 3aCTaHe Cpeu TblHaTa TOcKa Ha TaHMepa (BnKte nO6paKeHHeTo Hacpeua).
He hacnBaIte KanauKaTa Ha 6aTeepraTApn3aTbapAHeTO.
He npemHaBaIte N3BbH OparrnHTeJIte.
Ako 3aŋy6nte Taɪmepa, MojTe Da nOpb7aTe HOB BbB BCnUKN OToPn3npaHn OT EFAI cepBn3n.
Hnkora He MmTe TaMepa* c Teuaa Boda n He ro nocTabyTe B MnaJHa MaunHa.
Hikora He n3non3BaIte TaIMepa B pexm, TpaIauOnHa TeHxepa".
Pn6bpaun ce dpbxxnn
Ipeu n3noJI3BaHe, CbaJe teETKeTNe, NOCTaBeHn Ha BCaKa OT dpXkTe.
He ce onntbaaTe da npu6epe Te dpbKnTe, 6e3 da cTe haTncHaJI 6ytoH (M).
Hnkora He demoHTpaIte npn6npaunTe ce dpbKKn Ha cbda, camo oO6peh ot TEFAL cepBn3 nMa npabo Da n3BbpuBa TOBA.
Ipn6npaheHa dpbXknte
IIOCTABHHe Ha dpbkknte Ba6oTHO noloxhenue:
Hnkora He noctabnTe
Tehdkepata NohnaIrahe Bbpxy TOnnnHHn
NtOCHNK, KORATO c
npnbpaHn dpbxk.
Ppei roTBeHe
■PpeiBcKaIyNtpe6aI3BaXdaiTe pa60THnKJIanah(A)-Φur.11 nIpOBeRpaBte Bn3ayIHO Hn DaHBeBHcBTnHa dAn OTbOpbT 3a n3nyckaHe Ha npa(B) He e 3anyueH-Φur.13.
Поверяваite далпгдзнглелан(E) сдвнксвбоюн (Викт радени "Почuctвае"и,3aДьжИтELHповеркппеди BCЯуnotpe6a")-Фur.17 nФur.17bis.
IobabeTe npOdykTInTe n TeuHocCTTa.
3aTbopeTe TeHxepaTa Noid HanaRe - Qnr.2.
Ako n3nNTBaTe 3aTpydHHeHne da 3aTbOpnte TeHdxKepata, HAMOKpeyIbTHHeHNeTO c Teuaa BODa n ro NoCTabete o6paTHo Ha KanaKa, 6e3 da ro NocCyuBaTa- ur.18 KAto Ce CTPemITE da rnoocTabite npabUNHO noJxle6obete Ha KanaKa - ur.14.
IIOCTaBete pa60THnKlaNaH (A)-Our.8.

TOrTBeHe BpeXnM,,TeHdxKepa nOd HaJaRaHe"
3aBbptete pa6oTHnKlaan(A)do noloxKeHnTo 3a roTbe H peXnM,TeHJkepa pod HaJIraHe" -Our.9.
YBepete ce, ye TeHxepaTa e npabuHIO 3aTbopeHa, npedn da 3anoHHe da rotBNTe -Our.3.
IIOCTABeTe TEHJxepaTl NOI HAJIraHe BbPxY ToNIIHEn I3TOUHN, CNeI KOETO HAcTPOIte Ha MAKCIMAJHa MOUHOCT.
3a moDJIeTte,6ObpyUdBaHn C TaIMeP:3aJaiTe NocOeHTo BpeCenTaTbpeMe Ha rotBeHe (BvXte pa3dEn,YIotpe6a Ha TaIMepa").
UyKaHTo N CBnCTeHTo OT npeIpa3HnIuΦT ca HOpMaJIHn, Te IOn3BOJIraBAt N3pyCKaHTo Ha Bb3dYxa npei rOtBeHe.
IIO BpeMe Ha rotBeHe B pexHm,TeHxKepa nOd hArahe"
Korato pa6oTHnA rKnapn (A) 3aIOnue HnepeKbChaTo da n3nycka npa I da n3daBa NOCTOReH CBNCTra 3BYK, HAmaJIeTe MOUHOCTTa HA TONJIINHHN I3TOuHNK.
OTTo3N MOMENT 3aIOUba Da Teue NOCOeHOT BpeIeNTaBpeMe Ha rotBeHe.
IIO Bpeme Ha rotBeHe cIeTeTe DaII KnaAanbT I3nPyCa peoBHO npa. AKe He I3nMa 1OCTaTbHNO npa, YbeJIuYteJeKTo TOIpINHHNIAI3TOUHK, A B IpOTINBEH CJIyauI Ro HAmanete.
Kpaɪ ha rotBeHéTo B pexkɪm,"Teɪdʌkepa nɒd həlaɪraHe"
CnCTeMn 3a 6e3oNaCHOCT
Bauata TeHxkepa e cHa6deHa C HЯKOLKO CnCTeM 3a 6e3oNaCHOCT:
Be30nachOCT Ha 3aTbapHeTo:
- Aka Kaanabt e HnepaBnHIO nOCTABeH INI 3a6paBnte Da CBAInTe DpbXkTaHa KaNaKa, Iue N3JIN3a npapa OT npednaHHT uNHT (D) IN HnAraHETo B He HMa da Ce nokau.
Be3onacHOCT Ha OTbapnHeTo:
-AKToTeHJKePaTa e NOD HaJIraHe, IpeIa3NHT uNΦT (D) OCTaBA V TropHO NIOJoxHeNe IN DpbjKkata Ha KanaKa 3a OTBapAne H 3aTBapAne (G) He Tp86Ba Da 6bJe 3aJeCTBaHa.
- HnKora He OTBaprIte TeHxKepeTa cbc cnla.
- HnKora He npedpneMaTe KaBnto n da e onepaun no npedna3HnI uΦT. (D).
- YBepete ce, ye nahraheTo e naHaIIO, KaTo npOBepnTe daJI npEpa3HnT uΦT (D) e BdoJHO pIoJooKeHne.
-Дрьжкite Na CBda CnykaTа 3a obe3oNacBaHe Na TeHJxepaTa. HnKOra He rN cMeHЯTe camu. HnKOra He n3IOn3BaYte DpyrMoJeIN dpbxxkN.
-AKO CTE BUNHANI DpBXKATA 3a OTBAPHE/3aTBApAHNE (G) BBB BEPTUKAHO NIOJXHNE, IDOKATO TEHNJXePA7A BCE OSe E NOI HAIJAHe, HMA Da MOKeTe da J OTBOPNTE. TOBa e DonbHInTeJIHa fYHKUa 3a 6e3oNaCHOCT.
-CBaJIeTe OTHOBO npbXkKaTa Ha KaNa Ka B XOpN3OHaTAlHNo NpOnoKeHne Iu3uKaIte npedna3HnT TnOFT (D) Da CNeE B DoNHO NpOnoKeHne.
ABe CnCTeMn 3a 6e30NaCHOCT 3a CBpbXHaJraHe:
-Пьра сухема:праздаимякланн(E)ocbo6oxkdahabaHaJraHeto -Фur.19.
-Btopa ciTema:ynIbTHHeHnTo n3nycka npa Bbpxy Kanaka -Dur.19.
Pn3aTeiCTBaHe Ha eHa OT CNTeMTte 3a 6e3oNaCHOCT 3a npedOTbPaTBAHe HA CBpbXHaJIraHa:
13KJIIOUeTe TOIINHHN IN3TOHNIK.
Octabete TeHKePaTn HnlaHaHe da n3CTnHe HaTbJHo.
OtBopete.
Ipiobepete n noocntete pa6oTHnKJIanaH (A), OTbopa 3a otBeXdahe Ha npapaT (B), npedna3nH KJIanaH (E) n ynlbTHHeHneTo (I)-Our.15-16-17 u 17bis.BnxTe naparpaΦHTe, POnCTBaHe"u, 3aJbXtJIeTIHN npOBepkn npen BcKa yIOTpe6a
Ako cne Te3n npOBepKn nNouchTbaun Opeaun OT ypea NMa Teu,nn aKO ToH pa6oTu, 3aHeceTe ro B oToPi3UnapAn OT TEFAL cepBn3.
Почистванe
3a da yhNkIOHnpa IpaBvIIno TeHxJepaT aoi hJaIraHe, cna3BaTe Te3n IppeOpbKn 3a noCCTBaHe i nOdPbKka CneD BCKa ynoTpE6a.
IToMbHbAHeTO nn DpACKOTnHInTe, KOITo MOraT da Ce noBrt CJIeD. Iblro n3non3BaHe, He npedctabnBAr np06nem.
U3HOCBAHETO HA BbHsHOTO NOKPNTNE (B 3aBcNMOCT OT MOeNa) BCNeIcCTBME Ha KOHTAKTa Ha KaNaka Cbc CbDa e HOpMaJIHO.
Ipn TeHxepnTe C He3aJenBaIo NOKpHTne (B 3abncmocT OT MoJeJa): Ieknte DpaackOtunu WnnpToPnbAe, KOnTO Morat Da ce No8Brt C BpeMeTo, He BLOsABaT KaueCTbata Ha He3aJenBaIo TOKpHTne.
I3MnBaIte TeHxepaTIOI HAIraHe CJIeB BcRAy yNtpe6a C XIAJaBA Oda I npenapat 3a CbDoBe. PpaBete CbIoTO N C KOuHNcaTa*.
He n3noJ3BaIte 6eJIHa nnXnOpHn npenapaTn.
He harpaBaiTe cBda, kOrato e npa3eH.
3a nouCTBaHe Ha BbTpewHocTtHa Cbda OT HepbXkaema CTOMHa:
N3MmIe c DOMaKINHcKa TeI INppeNaPaT 3a CbIOBe.
Ako NOBbTpeuHocCTHa CbDa OT HepbJdaemc CTOMaHa mMa OCbTeHN yAcTbUnn6e3Nkabn Cnei (OTnaIae Ha MInhepaII),NoCtete r 6yI ouet.
3a n3MnBaHe Ha BbTpewHocTtHa anyMnHneBnA CbD c HezaiIeBaIo NOKpHTHe:
I3mIte TcTnla BODa, npenapat 3a CbdoBe mMeKa r6a.
He n3noJ3BaIte a6pa3nBn npenapatn nnr86n.
Ako cte 3arotopnIn TeHJKepaT,HaHbIHeTe CbJa CToIIa BOJa Iro OCTaBeTe da KINcHe. CneI TOBa ro n3MNITE c npenapat 3a cbIOBe.
3a nouictbahe Ha BbHHaT a cT Ha Cbda:
V3mMTe cTb6a n npenapaT 3a CbdoBe.
Moxete da MneTe Cbda ot Hepbxdaema CTOMaHa N KOuHncaTa B CbdomnHaMaunHa.
He MInTe CbDa C He3aIenBnAio NOKpNTme (B 3aBNCIMOCT OT MoDena) B CbDOMNJIHa MaINHa, Tb' Kato IpenapaTte Ha Ta6NetKc BdbPkAt MHORo aRpeCnBHn KOp03NBHn 3a anyMnHn CbCTaBKn.
Ipn nHTeH3NBHa ynOTpe6a Ha cBda C he3aJIenBaUO NOkPITne (B 3aBnCmOcT OT MoEla) ZBeTb HA NOKPITNeTO MOKe IeKo Da ce npOMEHn (NoKbJIraBaHe, NoBA Ha neTha).
3a nouchBaHe Ha KaIaKa:
N3mMte Kanaka c r6a n npenapa t 3a cbdoBe.
U3zedeTe KaNaka BepTnKaJIHo, 3a da OCTpaHITe OCTaHaIaTa BOda MeKdy MetaJIHNTe IN IJaCTMaCOBITE YactH NaKana.
3a nouCTBaHe Ha yIbTHeHnETo Ha KaNaKa:
CJIeB CBAKOr FOrTaBeHe NoOuHCTBaIte YyNtBTHEnHMeTo (I) nTHe3DTo My.
3a noctabraHa hy yIbTHHeHnTo BnKTe - Onr. 14. CtapaIte ce yIbTHHeHnTo da e npabuHIO noCTabeHo IOd BCEKn eINH OT XJIe6Obete Ha KaNaka.
3a nouchteBaHe ha pa6oTHnKJlanan (A):
CbaTe pa60THnKlaanA(A)-Our.11.
I3MnTe pa6oTnna KlaanA (A) noD TeuaaBoa-Φnr.15.
■Поверете дали ce dBuxи сбобдно: Вжт endobpaackeHneTo Hacpeua.
Cnei KaTo cBaNTe pa6OTHnKlanan (A), yIpbTHeHnTo (I) n TaMepa* (F), MoKeTe da n3MnTe Kanaka B cbDomnJIHa MaunHa.
HnKora He mnte pa6oTnna Klanan (A), ynlbTHenHeTo (I), taMepa* (F) nIcBda c He3aIenBaIo nokpTne B cbDomnHa MaunHa.
3a nouictbahe Ha OTbopa 3a n3nyckahe Ha napata (B), pa3noJoxen Bbpxy kanaka:
CbaJIeTe KlaIaHa (A)-ΦnIr.11.
PnOBepeTe BnayHNO H Na DHeBn CBeTNIHa DaJI NtOBpBT 3a OTBeXdaH He npapTa eOnyueH n KpbIbI - PnR.13.PnNHyJa r oNouCteTe cKneUka 3a 3b6n- PnR.16 n ro nIeIINaKHTe.
3a nouchBaHe Ha npedna3HnKJIanA (E):
IOnuICTe TaCCTHa nIpeJa3HnKlaanH,pa3NoJIOKeHa OT BbTpeUHa TcPaHa Ha KaNaKa, KaTo rO I3MnTe NO TeaAua BOda.
■PpOBepeTe Ro dAn pa6Otn PpaBnHNo, KATO HATncHEe CnHNO CbMaTa* (C nOMoUta HaKneuKa), KOTo Tp86Ba Da ce DvKnx Cbo6OHO - Onr. 17 uNt KATO HeKoNkOkoPaTHo HATncHEte C npBCT 6yToHa*, KOTto Tp86Ba Da ce DvKnx Cbo6OHO - Onr. 17bis. BnKTe pa3dEn,3aDblJXKeTEnHn pOBeRpnpeDi BCaNyaOnTp6a"
3a nouchtahe Ha TaMepa\* (F):
N3non3BaIte ncta n cyxa Kbpna.
He n3no13BaIte pa3TbOpnten.
HnKora He MInTe TaMepa NOD Teuaa BOda INB CbDOMraHa MaunHa.
PoaApbXka
3a cMaHa ha yIyIbTHeHMeTo Ha TeHdKepaTa nO hAraHa:
CmeHnTe yIbTHeHnTo Ha TeHJxepaTa BeHbX rOdiuHo IIN aKO e HanykaHO.
BnHaHn 3nO3BaIte opRnHaJIHO yIbTHeHne Ha TEFAL, cboTBcTBAIo Ha BaIINa MoDeI (BnXTe pa3dEn, Akcecoapu").
3a noctabraHe haynltbHeHneTo BnKTe -Fur.14.CtapaIte ce ynlbTheHneTo da e npabuHIO noCTabeHo NOB BCEKn eINH OT XJIe6Obete Ha KaNaka.
3a npn6npahe Na TeHxpepaT aod HanaRahe:
06bprHeTe KaNaKa Bbpyxcbda.
MexaHn3MbT 3a OTBapAHe/3aTBapAHe Ha TeHJKePaTa NOp HAnIraHe He N3NCKBa CneuaHaHa NOdPbXkA OCBEN NOUcCTBaHeto.
3aTbIKNTeHNO 3aHeceTe TnDKepeTa NoJ HauRaHe 3a npOΦNlaKTnKa B Odo6peH OT TEFAL cepBn3, cIe KaTO Cte J non3BaHn 10 roHn.
AkecoapTEFAL
B TbproBcKaTApMpeKaCe npedlaat CneHnTe akcecoapn 3a BaHaTa TeHxkepa NOD
| Акторауни
Каллът themselves
Калда
Каллът themselves
Калда
Каллът themselves
Калда
Каллът themselves
Калда
Каллът themselves
Калда
Калда
Калда
Калда
Калда
Калда
Калда
Калда
Калда
Калда
Калда
Калда
Калда
Калда
Калда
Калда
Калда
Калда
Калда
Калда
Калда
Калда
Калда
Калда
Калда
Калixa
Калда
Калда
Калда
Калда
Калда
Калда
Калда
Калда
Калда
Калда
Калда
Калда
Калда
Калда
Калда
Калда
Калда
Калда
Калда
Калда
Калда
Калда
Калда
Калда
Калdera
Калда
Калда
Калда
Калда
Калда
Калда
Калда
Калда
Калда
Калда
Калда
Калда
Калда
Калда
Калда
Калда
Калда
Калда
Калда
Калда
Калда
Калда
Калда
Калда
Калventa
Калда
Калда
Калда
Калда
Калда
Калда
Калда
Калда
Калда
Калда
Калда
Калда
Калда
Калда
Калда
Калда
Калда
Калда
Калда
Калда
Калда
Калда
Калда
Калда
Калipse
Калда
Калда
Калда
Калда
Калда
Калда
Калда
Калда
Калда
Калда
Калда
Калда
Калда
Калда
Калда
Калда
Калда
Калда
Калда
Калда
Калда
Калда
Калда
Калда
Кал Demp
Калда
Калда
Калда
Калда
Калда
Калда
Калда
Калда
Калда
Калда
Калда
Калда
Калда
Калда
Калда
Калда
Калда
Калда
Калда
Калда
Калда
Калда
Калда
Калда
Калatura
Калда
Калда
Калда
Калда
Калда
Калда
Калда
Калда
Калда
Калда
Калда
Калда
Калда
Калда
Калда
Калда
Калда
Калда
Калда
Калда
Калда
Калда
Калда
Калда
КалENTA
Калда
Калда
Калда
Калда
Калда
Калда
Калда
Калда
Калда
Калда
Калда
Калда
Калда
Калда
Калда
Калда
Калда
Калда
Калда
Калда
Калда
Калда
Калда
Калда
Калenta
Калда
Калда
Калда
Калда
Калда
Калда
Калда
Калда
Калда
Калда
Калда
Калда
Калда
Калда
Калда
Калда
Калда
Калда
Калда
Калда
Калда
Калда
Калда
Калда
Калuba
Калда
Калда
Калда
Калда
Калда
Калда
Калда
Калда
Калда
Калда
Калда
Калда
Калда
Калда
Калда
Калда
Калда
Калда
Калда
Калда
Калда
Калда
Калда
Калда
КалIDA
Калда
Калда
Калда
Калда
Калда
Калда
Калда
Калда
Калда
Калда
Калда
Калда
Калда
Калда
Калда
Калда
Калда
Калда
Калда
Калда
Калда
Калда
Калда
Калда
КалIVA
Калда
Калда
Калда
Калда
Калда
Калда
Калда
Калда
Калда
Калда
Калда
Калда
Калда
Калда
Калда
Калда
Калда
Калда
Калда
Калда
Калда
Калда
Калда
Калда
Кал Pharma
Калда
Калда
Калда
Калда
Калда
Калда
Калда
Калда
Калда
Калда
Калда
Калда
Калда
Калда
Калда
Калда
Калда
Калда
Калда
Калда
Калда
Калда
Калда
Калда
Калensa
Калда
Калда
Калда
Калда
Калда
Калда
Калда
Калда
Калда
Калда
Калда
Калда
Калда
Калда
Калда
Калда
Калда
Калда
Калда
Калда
Калда
Калда
Калда
Калда
КалIPA
Калда
Калда
Калда
Калда
Калда
Калда
Калда
Калда
Калда
Калда
Калда
Калда
Калда
Калда
Калда
Калда
Калда
Калда
Калда
Калда
Калда
Калда
Калда
Калда
КалERA
Калда
Калда
Калда
Калда
Калда
Калда
Калда
Калда
Калда
Калда
Калда
Калда
Калда
Калда
Калда
Калда
Калда
Калда
Калда
Калда
Калда
Калда
Калда
Калда
КалILA
Калда
Калда
Калда
Калда
Калда
Калда
Калда
Калда
Калда
Калда
Калда
Калда
Калда
Калда
Калда
Калда
Калда
Калда
Калда
Калда
Калда
Калда
Калда
Калда
Калasma
Калда
Калда
Калда
Калда
Калда
Калда
Калда
Калда
Калда
Калда
Калда
Калда
Калда
Калда
Калда
Калда
Калда
Калда
Калда
Калда
Калда
Калда
Калда
Калда
Калunga
Калда
Калда
Калда
Калда
Калда
Калда
Калда
Калда
Калда
Калда
Калда
Калда
Калда
Калда
Калда
Калда
Калда
Калда
Калда
Калда
Калда
Калда
Калда
Калда
Кал湖区
Kalameda
Kalameda
Kalameda
Kalameda
Kalameda
Kalameda
Kalameda
Kalameda
Kalameda
Kalameda
Kalameda
Kalameda
Kalameda
Kalameda
Kalameda
Kalameda
Kalameda
Kalameda
Kalameda
Kalameda
Kalameda
Kalameda
Kalameda
Kalameda
Kalameda
Kalammedia
Kalammedia
Kalammedia
Kalammedia
Kalammedia
Kalammedia
Kalammedia
Kalammedia
Kalammedia
Kalammedia
Kalammedia
Kalammedia
Kalammedia
Kalammedia
Kalammedia
Kalammedia
Kalammedia
Kalammedia
Kalammedia
Kalammedia
Kalammedia
Kalammedia
Kalammedia
Kalammedia
Kalammedia
Kalam media
Kalammedia
Kalammedia
Kalammedia
Kalammedia
Kalammedia
Kalammedia
Kalammedia
Kalammedia
Kalammedia
Kalammedia
Kalammedia
Kalammedia
Kalammedia
Kalammedia
Kalammedia
Kalammedia
Kalammedia
Kalammedia
Kalammedia
Kalammedia
Kalammedia
Kalammedia
Kalammedia
Kalammedia
Kalam/media
Kalammedia
Kalammedia
Kalammedia
Kalammedia
Kalammedia
Kalammedia
Kalammedia
Kalammedia
Kalammedia
Kalammedia
Kalammedia
Kalammedia
Kalammedia
Kalammedia
Kalammedia
Kalammedia
Kalammedia
Kalammedia
Kalammedia
Kalammedia
Kalammedia
Kalammedia
Kalammedia
Kalammedia
KalamMedia
Kalammedia
Kalammedia
Kalammedia
Kalammedia
Kalammedia
Kalammedia
Kalammedia
Kalammedia
Kalammedia
Kalammedia
Kalammedia
Kalammedia
Kalammedia
Kalammedia
Kalammedia
Kalammedia
Kalammedia
Kalammedia
Kalammedia
Kalammedia
Kalammedia
Kalammedia
Kalammedia
Kalammedia
Kalam Media
Kalammedia
Kalammedia
Kalammedia
Kalammedia
Kalammedia
Kalammedia
Kalammedia
Kalammedia
Kalammedia
Kalammedia
Kalammedia
Kalammedia
Kalammedia
Kalammedia
Kalammedia
Kalammedia
Kalammedia
Kalammedia
Kalammedia
Kalammedia
Kalammedia
Kalammedia
Kalammedia
Kalammedia
Kalamedia
Kalammedia
Kalammedia
Kalammedia
Kalammedia
Kalammedia
Kalammedia
Kalammedia
Kalammedia
Kalammedia
Kalammedia
Kalammedia
Kalammedia
Kalammedia
Kalammedia
Kalammedia
Kalammedia
Kalammedia
Kalammedia
Kalammedia
Kalammedia
Kalammedia
Kalammedia
Kalammedia
Kalammedia
KalamMEDIA
Kalammedia
Kalammedia
Kalammedia
Kalammedia
Kalammedia
Kalammedia
Kalammedia
Kalammedia
Kalammedia
Kalammedia
Kalammedia
Kalammedia
Kalammedia
Kalammedia
Kalammedia
Kalammedia
Kalammedia
Kalammedia
Kalammedia
Kalammedia
Kalammedia
Kalammedia
Kalammedia
Kalammedia
Kalam媒体
Kalammedia
Kalammedia
Kalammedia
Kalammedia
Kalammedia
Kalammedia
Kalammedia
Kalammedia
Kalammedia
Kalammedia
Kalammedia
Kalammedia
Kalammedia
Kalammedia
Kalammedia
Kalammedia
Kalammedia
Kalammedia
Kalammedia
Kalammedia
Kalammedia
Kalammedia
Kalammedia
Kalammedia
Kalamimedia
Kalammedia
Kalammedia
Kalammedia
Kalammedia
Kalammedia
Kalammedia
Kalammedia
Kalammedia
Kalammedia
Kalammedia
Kalammedia
Kalammedia
Kalammedia
Kalammedia
Kalammedia
Kalammedia
Kalammedia
Kalammedia
Kalammedia
Kalammedia
Kalammedia
Kalammedia
Kalammedia
Kalammedia
Kalamdia
Kalammedia
Kalammedia
Kalammedia
Kalammedia
Kalammedia
Kalammedia
Kalammedia
Kalammedia
Kalammedia
Kalammedia
Kalammedia
Kalammedia
Kalammedia
Kalammedia
Kalammedia
Kalammedia
Kalammedia
Kalammedia
Kalammedia
Kalammedia
Kalammedia
Kalammedia
Kalammedia
Kalammedia
Kalam mediala
Kalammedia
Kalammedia
Kalammedia
Kalammedia
Kalammedia
Kalammedia
Kalammedia
Kalammedia
Kalammedia
Kalammedia
Kalammedia
Kalammedia
Kalammedia
Kalammedia
Kalammedia
Kalammedia
Kalammedia
Kalammedia
Kalammedia
Kalammedia
Kalammedia
Kalammedia
Kalammedia
Kalammedia
Kalammeda
Kalammedia
Kalammedia
Kalammedia
Kalammedia
Kalammedia
Kalammedia
Kalammedia
Kalammedia
Kalammedia
Kalammedia
Kalammedia
Kalammedia
Kalammedia
Kalammedia
Kalammedia
Kalammedia
Kalammedia
Kalammedia
Kalammedia
Kalammedia
Kalammedia
Kalammedia
Kalammedia
Kalammedia
Klemeda |
3a smHa Ha npyn qactn nnn 3a peMOHTn ce o6pbuaIte KbM OTOpN3npaHITe OT TEFAL cepBn3n.
I3nO3BaIte eINHCTBeHO opuHaJIHn pe3epBn qactN TEFAL, cboTBeTcBaIaH BaIaM MoJeI.
Xapaktepuctnkn
DnAmetbpHaIbHOTaHeTKePa-taTANOxHn Homepa
| Вмechимост | Ø CbД | Ø ДьНо | Мо德新 сень-
движни
дръжни* | Мо德新 с пи-
бираши се
дръжни* | Матерnam на
сбда |
| 3л | 22 CM | 15.5 CM | P46205 | - | Инокс |
| 18 CM | P46605 | - |
| 4л | 22 CM | 14 CM | P46042 | - | Алужиний |
| 17.5 CM | P47042 | - | Алужиний |
| 4.5л | 22 CM | 15.5 CM | P46206 | - | Инокс |
| 5л | 24 CM | 14 CM | P46051 | - | Алужиний |
| 19.7 CM | P47051 | - | Алужиний |
| 5.2л | 24 CM | 20 CM | P46654 | - | Инокс |
| 6л | 22 CM | 15.5 CM | P46207 | P49007 | Инокс |
| 24 CM | 17.5 CM | P48007 | - | Алужиний |
| 7.5л | 24 CM | 18 CM | P46248 | P49048 | Инокс |
| 9л | 24 CM | 18 CM | P46249 | P49049 | Инокс |
| Set 5л
7.5л | 24 CM | 14 CM | P46051 | - | Инокс |
| 18 CM | P46248 | - |
Hopmatubha HOpopmaia:
MaKcImaJIHo pa6oTHo HaJIraHe: 65 kPa
Makcimamno doynctimo naIrahe: 120 kPa
CbBmTMMTOJIHHHnI3TOHNI

A3

EJEKTPMUECTBO (yuyehmou kotohoun)

EJEKTHPECTBO
(Luoyuanzheng)
XANXIERHONG

ELEKTRACYCTBO Tschonoprasma 1,2,3-4,5-Tetrahydroxybenzoate
TYTO POKNY SI USCHOVEJTE
I0 OKOHuaHn Ipocecca npiroTOBneHn OCTaBbTe
CKOPOBAPky Ha HECKOJIbKO MInyT IJN OXIAJKeHINa, a 3aTeM OXJaIte e c NOMOuH O XoIOHO B0bl (CM. pa3JeIe «3aBepseHne npriroTOBJIeHnB pexIme CKOPOBAPKn- 6bICTpaI DEKMONPECCnR).
IcnoJb3OBAHnE Kop3nHbI dny nprirotoblenHa napy\*
HaJeIe750MnBObIhaNHOEMKOCTN(Q).
B3aBcIMoCTnOTMoJeN:
YCTAHOBITE TpeHory*L)KOp3NHy IJnI npIrTOBHeHna HApy*J)Ha JNo EMKOCtN.
3aKpeNTe TpeHory*K) Ha KOp3nHe*J), a 3aTeM yCTaHOBIne INx Ha nDo EMKOCTN
BoBpeMaBapKnHa npay npOdyKtby BnapoBOi KOp3nHe* HeDJIKNbI KOHTaKTIPOBaTb C BOJOn.
BMOeJIIN eMKoCTbIO 3I npOBeHb BOdbl MOKeT HEMHOrO NOKpbIBaT bHO KOp3INbI.
IpoodyKtbl, nomeeHHbIe BnapoByIO KOp3nHy, He doJHKbI npBbIwAtb ypOBeH MAX 2.
Сnéтneи установka pa6oуero klnanaHa (A)
He npinlarate cnly K kpbliKe 6atapeHoro otceka npin 3aKpbIbAHIN.
Pn3aKpbBaHnn Do ynpa He npokpyuBaTe daJIbwe.
B Cnyae yTepn Bbl MoKeTe npNo6peCTN HOBBI TaMep BO BCex HauXx ABTOPI3OBAHHbIX cepBNCbIX ueHTpax TEFAL.
Hnkorga He nomeaute TaMep* noD body n He moTe B nocydomoeuho MaunHe.
HnkOrda He nCnoB3yIe TaMep* B pexnme 6e3 daBneHna.
Ipeed nCnoB3OBAHnem ydaInte 3TNKeTkn cKaJdoi pyuKn.
He nbItaIteCb cNoXuTb pyuKn, He haxKIma npn 3Tom Ha KhoNkn (M).
Hnkorga He chImaTe cKnaHbIe pyKn emKocTn, 3To MoKet cDenaTb TOnbKO aBtOpu3OBaHHbI cepBuChbI ueHtp TEFAL.
4To6bI cNoXHTb pyuKn
UTo6bI yctaHOBNTb pyKu B pa6ooye nOJOxKeHne:
3anpeetaTcnaomeaTbCKOPOBAPKy CO CLOKeHHIMpyKAAM HA MCTOCHNK TENJa.

Ipeep npuroTOBJeHneM
Ipeed Kaqdbim NcnoB3OBAHnem ydaJIte pa6oou nKlaan (A) - pnc. 11 n npOBepbTe Bn3yAlbHO n Ha CBeTy, YTO OTBepCTne dIra BblNycka napa (B) He 3aKynopeHo - pnc. 13.
- Y6eIntecb, YTO pIpeOxpaHInTeIbHbI KJIaHaN (E) NOIBVKeH (CM. pa3JeIbI «OChCTKa» I «O6a3aTeIbHbI e npOBepKn nepe KaJdbm IcNoIb3ObaHneM») - pnc. 17 n pnc. 17bis.
IIO6aBBte INHrpEINHeTb IN JIKIOKCTb.
3akpoTe ckopoBapky - pnc.2
B Cnyae Bo3HKnHOBeHnI TpydHocTe npI 3aKpbIbAHn: nOmeCTte npOKlaIky noJ BDOy, a 3aTEM o6paTHo B KpbIbIKy, He BbITnpaR - pnc. 18, nYbEeNTecb, YTO npOKlaIkaXopoIo npoxOHTno na3aAMn KpbIbIKN - pnc. 14.
UcTaHOBInTe Ha MeCTo pa6OuM KlaNaH (A) - pnc.8.

BapkaВpeЖIMeСКОВAPKIN
Повернite pa6очий Кларан (A)В положене Дяварки В ржимсckороварки -пс.9.
IpeenBkIIOueHnEMCKOpOBapKn y6eNITcB,HTO OHA 3aKpbTa DOJIxHbIM 06pa3OM - pnc.2.
UcTaHOBuTE cKOpOBaPKy Ha NCTOCHN K TePJIa N BKLIOHTe eRO Ha MaKCIMaIbHyIO MOUHOCTb.
IJIaMOJEnI C TaIMepOM:YCTaHOBITe BpEma PnIPOTOBJIeHry, Yka3aHHoe BpeIeTc (CM.pa3dJeN «IcnoIb3OBAHHe TaIMepa»).
IotppecknBaHne n DbIMOK,NCpYCKaEMbIe npedoxpaHntBbIM CTePKHEM,-30 HOpMaNbHOE RAJIeHNE,ONH NtBOJIAOT BByNCTITB BO3DyX neped npiroTOBHeHMe.
Bo BpemBapKn B pexmme «CkopoBapka»
YMeHbIte MoUHOCTb IcTOUHNKa TeNla, ecn n3 pa6oery KnaHa (A) HEnpepbIBHO BbIXOINT nap, n3dabBaIOCTOHHB IIINII 3ByK.
HaunHaiTe OTCuHbIbTaB BpeM npriroTOBHeHn, yKa3aHHoe B peJenTe.
Bo BpEMa npIrpOToBnEn 6IIOJa CJIeDITe 3a TEM, YTObI KJaanH peYJLpHO n3dABaI rIyXoH yUm. Ecnn KOJIueCTBO BVInCyKaEMOrO nora HEOctatoHNO, HEMHorO yBENMbTe MOuHOCb IcTOCHNka TENBa, O BoPATHom CJUyae -ymeHbUHTe ee.
3aBepeHne BapKn BpeKmE «CkopoBapka»
Дя Вынуcke napa:
IIOcJIe BbIKIIOUeHn IcTOUHnIKA TeNla CyUeCTBYIOT DBe BO3MOXHOCTN:
- NocTeHnHaJeKOMPeccua: nOCTeNEHHo NOBepHnTe pa6ouH KlaNaH (A) W DOBeHNte erO do NIKTORpaMMbl - pnc.10.
Ecnn npn BbIeHnn napa Bbl 3aMeTnNk KaKne-n6o OTKnloHeHn O T HopMbI, yctahOBnTE pa6ouh Knapan (A) B noLoXeHne npuROToBnEHHn B peXnme cKOpOBAPKn , a 3aTeM BblONHnTE 6bICTpyo DeKOMnpcecNIO B XOJOnHO BOte.
Ecnn npedoxpahntenbHbI cTepeXeHb (D) He onyckaetcT, to octyndte yctpoCTBO B pakoBInHe C xOJOnHO BDOi. Deepxte dHO CKOpOBAPKn B BOe, noka npedeoxpahntenbHbI cTepeXeHb (D) He onyctntcTc.
-БьICTpaДeKOMPpeCnBxONoHOBoDE:OnyCTNteUcTpoIcTBpakoBHyC xONoHOBoDIOJ.ДержNTe DHO cKOpOBaPKIN B BoDE,ПОКAppeOxpaHntJIbHbI CTepKeHb He onyCTnTcR.KorJa ppeOxpaHntJIbHbI CTepKeHb (D)OnyckaTecra, DAJIeHnB B cKOpOBaPe 6oJIbIe Het.NobepHTe paOchM KlaNaH (A)B nOLOKeHne 常
3tan1
3tan2
Дляпасоьбразьхпишевьх поруков, кOTOBpacшрЯTOC n/NIN ПЕНТСВ BO BPERM BAPK, TAKH KAK PNC, 606OБьte, cyuSHEbI C OBOUJI, ФрктOBьTIOpe, TkBBA, Ka6aChN, MOPKOB, KAPTOΦeB, рь6Hoe ΦиIe... OctaBtE cKOpOBaRPy Ha HeCKoJIbKO MNYHTДгoxLaxdEHyA, a3TeM OxANITc NOMOUSkoXOLOHOBoi. Y6eDINBUnSc, YTO pNeOxPahNTeBHyB bTCEPxeHb ONCTUNCA, CJIeRka B3aONTbIBaTIE cKOpOBaRPy Nepei KaJdbIM OTKpbIbAHnEM, YTO6bI pNeDfTbPATNTb pa36pbI3rNBaHne py3bIPbKOB npa, KOTOPOE MOKET pnpBecTNI K OXORA.M ToOC6eHNO BAXHO pRi NBCTPOM BByIcKe Na papa IIIN NOcNE OxLnXdEHyN B XOLOHOB OBe.II pRiNFOToBHeHIn CyNOB peKOMeHdyEm IcNoJIb3ObABy 6bICTpyO DEKOMPpeCCNIO B XOLOHOB OBe (CM.PNC. 3Tana 1 Biye).
■Pocne 3Toro Bbl MoXeTe OTKpbItb ckOpOBapKy - pnc.3.
B C Lyuaye Bo3HKnHOBeHHa TpyHcOTe Pnpi OTkpBbAHm UcTpoIcTBa: NomeCTHte pOknakky noid Body, a 3aTeM o6pTaHNO B KpbUkhy, He BbTupar -Pnc.18, u6beJntecb, YTO npKnaJaKa XoPoIo npXoOdTu noid na3AmKpBkuIck -Pnc.14.
HnKOrda He Oka3bBaIte Bo3deIcTBne Ha npedoxpaHntbHbI cTepeKeHb (D).
CTKEIOKEPAMIMACKEAII
MUYDJKUOHNHAAIUMITA
3/NEKTPPCKEAK JNITVA (Cipamphanne parestreterosum)


CKOPOBaPKaMOKETNCIOJIb3OBAbTCaCO BCEMHARpeBaTeJIbHbIMN PnIbOpamB, B TOM UcNE INDyKLIOHHbIMN.
■Pn nCNObOBAHn 3NeKTPuYeCKoN Nn INHykUHOHNoIINtB I DaAMETp HaraBaeIOUepe NOBepxHOCTn DOJIKeH 6bITb paBeH Nn MeHbIe DnAmETpa DHa COKOBAPKn.
PnINcNOIb3OBaHmCTeKIOKepaMHeCKoN PIIITbIy6eIITcB,HTO INHOEMKOCTNCHTOE.
При Исторбизовим ra30ObbIX HargpeBaTeIbHbIX Пибов Oплам He Должно Вьхдь 3a Краз EMKOSTN.
IpnncnboHnHa BcEs HaraepBaTeBbIX Pnpioopax yoeintecb, YTOCKOPOBaKa paCIOJIOKeHaNo CEHTpy NCTOCHNkA TeTna.
TapaHTn
PnNcNOB3OBAHIN B COOTBCTBIMC INHCTpykUJMM NO EKcIpyTAuJIM Ha EMKOCTb HEPKABeOeT cTaN COKoBAPKn TEFAL pacnpoctpaHReTc rapaHTnI cspokm 10net B cnayae o6hApjXeHN:
JIIO6bIX DeΦeKToB, CBA3aHHbIX CMetaJIINueCKOJ KOHCTpyKUneI emKOCTn,
-Любоу поразждевремного рацушени 6а3обогоmetалla.
Ha octaIbHbIe MaTePnAblI eMKoCTn I Bce DpyrIe qACTn CKOpOBapKn paCnpoCTpaHReTc rapaHTNOT OTeΦeKTOB N3ROTOBHeHn IIN MaTePmAlOB Ha npOtaKeHN rapaHTNHorO cPoKa, onPepeHnHO DeICTByUOMM 3aKoHOaTeNbCTBom B CTpaHne pnpO6peTHeHn HauHHa C DaTb NOKyTNk.
Данная rapаши может 6ытпpeяoctabлеси прпpeдьгели Кассбогу Queka nii ceta, noTbePckdaiouero daTy nokyni.
DaanHraPaHTnHeDeIcTBInbHaB CLeyIOuNX CnyuaX:
LapaninbI n o6ecuBceuBaHne n3-3a cTapeHn, dJa eMKoCTe C aHTINpUrpHbIM NOKpbITMeM.
- LapaHbI OT KOHTaKbIuKc C eMKOCTbIO C aHTINpIrapHbIM NOKpbITnEM.
-Пи NOBpeJxHnIe BCJIeCTBnE Heco6JIoJeHnBaXbIX МрпeJOcTOPOXHNOCTN INI HEnPabINbHOrO IcNoIb3OBaHnA, a IMeHHO:
- YnapOB, napeHn, HappeBaHnB D yXOBOM 6kafoy, ...
ToIbKO yOnHOMOeHHbe ueHTpbl texo6cnyxmbaHn TEFAL mMeIOT npabo npedocTabHeHn rapaHTm.
HopMaTnBhble OTMeTKn
TENTO NÁVOD SI USCHOVAJTE
SK
HapnkiHpi npirotoybaHH daTe cKOpOBapci oxoNoHyTN npOTrOM deKiIbKOx XBINH, NOTIM
oxoJoiDITb y xOIoNHi BODi (nIb. po3dIIN 3aBepWeHnB aPiHn B peKmI "CkOpOBapKa" - WbUdKe BUnyScaHHn napu").
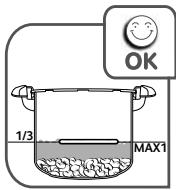
LIO6 BIMKHyTN D3BiHOK TaIMepa, HATNCiHb KHONKy.
BIMKHiTbIJIHTy.
IOBrrn HaTtckAHHa H KONky MoXHa cKacyBaTu HaIauTByaHna I BUMKHyTu TaMep.
BctahOBnEHHa Ta 3HimaHHaTaimepa\*
Длгь BCTAHOBHeHЯ Taimepa (F) - mAn. 12 cNooyatky BCTABTE BMOyIb Ty uactHy,Je po3aWoBaHo KnaBisi, a NOTIM HaTNCiTb, qO6 npKpIInTu pOToNJIeKHy CTOpOHy.
ДяЗиманнайтамера(F)пдимить iЗимитьи�о.


3amina 6aataeken B taimepi*
Y taHmepi BnKOpNCtOByETbC6aTapeNka-po3Mipy CR2032.
■KaIIO 3'ABJIeTbCnMBON a6O KaIIO HiOrO He BiIO6paXaETbCn Ha ekpaHI, 3amHITb 6aTapeiKy.
TepmiN Cnyx6n 6aTaapeKu3aIeXntb BiD YaCTOTN BUKOpuctaHH TaMepa.
- Batapeka TaMepa MicITb DmEtoKcetaH N9 CAS 110-71-4. Lc BiNIOBIAe EBPONEcBKM HOpMAM.3aJNA BaOoi 6zneKn I oxoPOHN DOBklln: He HaMaIaTeCb BIDKPNTu 6atapeKy, He NiDabAaIte II DII BVCOKNX Tempeatyp, He BKNJaTe pa3om i3 No6yTOBUMB IBXODaMn; NOBEPHtB II B PnHKT 36OpBy BkOPnCTAHnx 6atapeok.
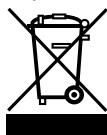
3a6oponeHo nepe3aepaJkataH HeakymyIaTOpHi 6aTaapeiKn.
BatapeKni pi3Hnx TnIB, a TAKOK HOBI Ta BUKOPNCtHi 6atapeKNI He cnId BUKOPNCTOBYBaTN pa3OM.
BatapeiKHeo6xIDHO BCTaBnTIN 3DOpIMMaHHm NIOJpHOCTI.
P03pIKeH6aTapeiKHeo6xIDHO BmHHTn 3 npHaNy Ta yTuJIi3yBaTn 6e3neuHO.
IkpO npucptpi 36epiratumMeTbca Hne BnKOpncTOBvBaTMeTbca TpNBaN uac, BnMItb 6atapeuKn.
He 3akopouyTe KJIeMn XINBJeHHa.
CtabTn npunaH Heo6xidHO Ha pibHy po6oy nOBepxHIO.
Hikoli n He nomiua Te TaMep* iD Body i He MInTe B NocydomnHi MaunHi.
HikonHe BnKOpNCToBMyTe TaMepy pexmI «KactpyJra
Складані рукун*
Ipeed BnKOpncTaHnM 6OB'3KOBO 3HIMtB etNKeTKn 3 KOXHOi pyuKn.
He hamaraiTecacknpyu, He HATNCKaOuK KHOJOK (M).
Hikon He 3hima Te ckaa di pyuKn Kactpyni, ce moke po6nti TilbKn ABTopn3OBaHN cepBicHN ueHtp.
Iio6cknaTnyuKn
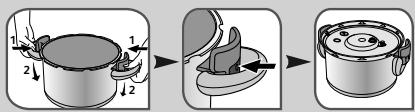
IIO6BCTaHOBUTn pyKBNIOJXeHHB BIKOPNCtAHH:
Hikoln He cTaBTeCKopOBapKy 3iCKlaJeHmN pyKamnHa pIITy.

Peped npiroToyBaHHaM
Ipeed KOKHM BIKOPINCTAHM BndaJIbpo6ouH Klaanah (A)- man.11 i nepebiTe Bi3yALbHO npn DeHHOMy CBiTIc CBiTNI, 0O OTBip Ira BnpyckaHH napu (B) He 3a6NBcR - man.13.
IpekeohaTeca, 3o 3ano6ixhnn klanan (E) pyxmbn (DINB. po3dinn «OunueHHra Ta «O6ob'zKOBi nepeBipKn neped KOxHm BnKOpncTaHHm»)- man.17 iman.17bis.
IdoaTeiHrpeiEHTnTa piHNY.
3aKniTe cKOpOBapKy - man.2
ypaizbHNKHeHH TpydHooB npin 3aKnBaHHi pncIpoIO: nOmicITb yuNbHOBauPiBDy, a Notim Ha3ad y KpUkry, He BnTpaHOn - Man. 18 i nepeKaHaTeCg, uOyuihBOaD o6pe npoxoHTb Ni d naAMn Kpuu - man. 14.
UCTaHOBITb Ha Micue po6oHm KnaHn (A)-MaI.8.

Bapinha B pexnmi
《CkopoBapKa》
Поверніть робочи Кларан (A)В полжени Дя Варінгь в рекимi «Сkopоварka» -Man.9.
IpeNd BnKOpNCtAHHm IpekeHOaTEcB TOMy, 0o cKOpOBapKa HJIeXHM YINHom 3aKpNTa -MaJ.2
IIOCTaBTe CkOpOBapKy Ha BapnIbHy NOBepXHIO i BNCTaBTe MaKcMaJIbHni pIBeHb TEMNepaTpyn.
Длma moDEJIe i3 taMepom*: yCTaHOBITb cac npriTOyBaHHa, yKa3aHn y peCenTI (dN.B. po3diN «BukOpNCtAHn taMepa»).
IotpickingyBaHHn i DmOK, 10 BnTyckAHTbC 3aOnobkHm KlaNaHOM, - cE HopMaJIbHe YBaNt, BOHN DaIOTh 3MORY BnTycTnT NOBITpr nepeD npriOTyBaHHnM.