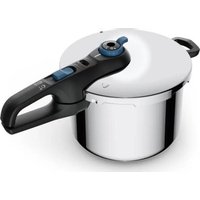
Secure Trendy P25807 - Pressure Cooker TEFAL - Free user manual and instructions
Find the device manual for free Secure Trendy P25807 TEFAL in PDF.

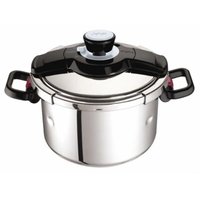
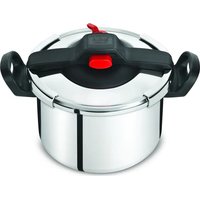
| Product type | Pressure cooker |
| Brand | Tefal |
| Model | Secure Trendy P25807 |
| Capacity | 6 liters |
| Maximum safety pressure | 150 kPa |
| Operating pressure | 80 kPa |
| Pot material | Stainless steel |
| Compatible heat sources | Gas, electric, halogen, induction, radiant |
| Functions | Pressure cooking, steam cooking |
| Safety devices | Closing safety, opening safety, safety valve, safety gasket |
| Included accessories | Steam basket, tripod, operating valve, lid gasket |
| Cleaning and maintenance | Pot and basket dishwasher safe; valve, gasket and timer hand wash |
| Gasket lifespan | 1 year or as soon as it has a cut |
| Pot warranty | 10 years against metal structure defects |
| Other parts warranty | In accordance with applicable law |
| Repairability | Original TEFAL parts available; repair by authorized centers |
| Weight (estimated) | Approximately 3.5 kg |
Frequently Asked Questions - Secure Trendy P25807 TEFAL
User questions about Secure Trendy P25807 TEFAL
0 question about this device. Answer the ones you know or ask your own.
Ask a new question about this device
Download the instructions for your Pressure Cooker in PDF format for free! Find your manual Secure Trendy P25807 - TEFAL and take your electronic device back in hand. On this page are published all the documents necessary for the use of your device. Secure Trendy P25807 by TEFAL.
USER MANUAL Secure Trendy P25807 TEFAL
AUSTRALIAN · NZ WARRANTY
COOKWARE, BAKEWARE AND PRESSURE COOKERS
Limited Replacement Guarantee
Our goods come with guarantees that cannot be excluded under the Australian Consumer Law. You are entitled to a replacement or refund for a major failure and compensation for any other reasonably foreseeable loss or damage. You are also entitled to have the goods repaired or replaced if the goods fail to be of acceptable quality and the failure does not amount to a major failure. In addition to these statutory rights and any other rights and remedies you may have under the law. Groupe SEB Australia Pty Ltd (we or just guarantees this Jamie Oliver by Telol/Tefal/All-Clad/Moulinex product will be free of defects in material and craftsmanship including handles, body, knots, lids and founds for 12 months from the date of purchase. We also guarantee the non-sick coating of this product by Telol/Tefal/All-Clad/Moulinex product will be free of blistering or permitting for the life of the same quarter by Telol/Tefal/All-Clad/Moulinex product. Similarly, our Jamie Oliver by Telol/Tefal/All-Clad/Moulinex product develop a defect during the guarantee period or the non-sick coating peel during the life of your Jamie Oliver by Telol/Tefal/All-Clad/Moulinex product, you should return it at your cost. to the retailer from which you purchased it from, together with your receipt as proof of purchase. The retailer will then forward your claim directly to us for processing. Alternatively, if the retailer is unable to help you, you may contact us directly at:
Tefel Australia - PO Box 404, North Ryde, NSW.
1670-PH:1300 307 824 Tcfol New Zealand - PH:0800 700 711
If on receipt your Jamie Oliver by Tefal/Tefal/All-Clad/Maulinex product is found to be defective at the non-stick coating has pleased, we will, at our cost, replace or repair the product in our discretion. Only the defective part or accessory will be repaired or replaced. Packaging, instructions etc. will not be replaced unless faulty. This guarantee excludes defects caused by the Jamie Oliver by Tefal/Tefal/All-Clad/Maulinex product not being used in accordance with instructions, accidental damage (including overheating), misuse or being jampered with by unauthorised persons. It also does not apply if the Jamie Oliver by Tefal/Tefal/All-Clad/Maulinex product is used commercially and excludes consumable items (including accessories such as pressure regulators and safety devices), dishwasher effects and damages, stains dents, discolouration, scratches or sculls due to normal wear and tear, and your costs of claiming under the warranty.
www.tefal.com
TEFALSAS. 21260 Selongay
FRANCE
Tefal®
natural_image
Line drawing of a cooking pot with a lid and handle (no text or symbols)
دليل الاستعمال - Brugsvejledning
Bedienungsanleitung - Οδηγίες χρήσης - User Guide Guía del usuario - Käytöönje
Guide de l'utilisateur - Guida all'uso - Gebruikershandleiding Brukermanual - Manual de instruções - Bruksanvisning Kullanıcı Kılavuzu - 使用指南
www.tefal.com
AR p.17
DA p.18
DE p.34
EL p.50
EN p.66
ES p.85
FA p.117
FI p.118
FR p. 134
IT p.151
NL p.167
NO p.183
PT p.160
SV p.215
TR p.231
ZH p.247
Curtisagall, gla, pa, da#a, pa, da#a, da#a. "Kur og timet med'elge like p#e m#ade m#te", "Kur and Timet ber berl'men". Modem m#te in the L#t om#ing an#tion. "I am a g###s##m #g ####k#### ####c## on opus#a pr#d#o", "Basket and timet not included with cwtom modes." "Oceitik y el potentiador me cwtom incides on equines modetes. U##al ###### #### #### #### #### ##". "Kur og optin ##nu, knu, knu beln# m#ade m#. "P#es et minu# non minu# dans cwtom modes." "C#e ###### n##r##ed m#ade model." "Mand en timet ##y se##p##de m#ade m#d om#ng opns", "Kur og timet belgir like med p#e k#ade m#ade m#. "C#o b##le indido on o#ans modeos." "On m#ade m#on i#n#sed m#ade m. "Sepete e##m##### belh## m#ede deh delj##". "B####### ###### ###### ####
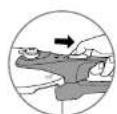
Fig.1 Fig.2 Fig.3


Fig.4Fig.5
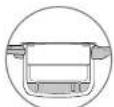
Fig.7 Fig.8 Fig.9
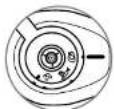
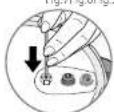
Fig.10Flq.11Flq.12
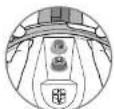

Fig.13Fig.14Fig.15

أن ي compartments cannot be
Before using your pressure cooker, please take the time
to read all the instructions and always refer to the "User guide".
Improper use may result in damage.
For your safety, this pressure cooker complies with the applicable standards and regulations:
- Pressure Equipment Directive
- Materials that come into contact with food products
- Environment*
BEFORE USE
MAKE SURE
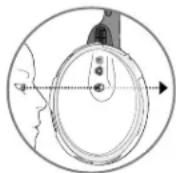
■ that the steam release outlet (B) is not obstructed.
■ that the safety valve's locking indicator (C) is mobile
■ that the lid gasket is placed under each notch of the lid
fig 12.
■ that the lid handles are properly fastened. The lid handles are safety components. Never remove them or replace them yourself
ALWAYS ADHERE TO THE FOLLOWING FILLING QUANTITIES
- Never use your pressure cooker without liquid, as this could damage it. Make sure there's always enough liquid in the device when cooking.
■ Minimum quantity of liquid 250 ml/25 cl.
■ Maximum quantity of food 2/3 of the height of the pan, MAX 2 mark - fig 6. - When steaming food, the food in the steam basket* must not come into contact with the water and must not exceed the MAX 2 mark on the pan - fig 5.
- For foods that swell in size and/or froth during cooking, such as rice, pulses, dried beans, stewed fruit, pumpkin, courgettes, carrots, potatoes, fish fillets, etc., the maximum filling quantity is 1/3 (MAX 1 mark).
■ Ensure close supervision if you are using the pressure cooker near children.
■ The steam is very hot when it leaves the operating valve. Be careful of jets of steam.
- Your pressure cooker cooks using pressure. Improper use may result in scalding injuries. Make sure the pressure cooker is properly closed before use. (See "Closing" section).
- During cooking, check that the valve murmurs regularly. If there is not enough steam being released, release the pressure and open the lid then check that there is sufficient liquid, and check that the steam release valve is not blocked. If there is still not enough steam being released valve, increase the heat source slightly.
■ Do not cook food that could block the vents of the safety components:
- blueberries, cranberries
- pearl barley, spelt, millet
- porridge oats
- split peas
- noodles, macaroni, spaghetti
- rhubarb
- blackcurrants, redcurrants
- When cooking large pieces of meat and food with a surface skin layer (whole sausages, tongue, poultry, etc.) : we recommend that you prick the skin using a knife or fork before cooking. During cooking, boiling liquid could become trapped under the skin and create spatters.
- Never use your pressure cooker to cook milk-based recipes (such as rice pudding, semolina pudding...).
- Never use coarse salt in your pressure cooker, only use fine salt at the end of cooking. That way you will avoid the appearance of "pitting", which could damage the base of your pressure cooker.
■ Never use your pressure cooker to fry under pressure using oil. - Do not leave your pressure cooker unsupervised when heating oil or fats. Continuing to heat a smoking oil will degrade it and may increase the temperature of the oil enough for flames to appear.
- Do not use your pressure cooker for any other purpose than the one it is meant for.
■ Do not put your pressure cooker in a hot oven. - Never use aluminium foil unsecured on a container in your pressure cooker. Always secure with string.
■ Never use cling film in your pressure cooker. -
Alcohol vapours are flammable. Bring to the boil for approximately 2 minutes before putting the lid on. Check your pressure cooker on a regular basis when cooking alcohol-based recipes.
■ Only use the compatible heat source(s) listed in the user guide. -
Gradually turn the operating valve (A) to adjust the pressure release speed, until it aligns with the symbol - fig 9. If, when releasing steam, you notice any food or liquid starts to spurt out, return the operating valve (A) to the position, then carry out rapid pressure release by standing the pressure cooker in a sink half filled with cold water - (refer to the "End of cooking section.).
If the pressure indicator (D) does not go down, carry out rapid pressure release a sink half filled with in cold water - (refer to the "End of cooking section).
■ Never interfere with the pressure indicator. - For foodstuffs that expand and/or foam during cooking, such as rice, pulses, dehydrated vegetables, stewed fruit, pumpkin, courgettes, carrots, potatoes, fillets of fish, etc. Let your pressure cooker cool down for a few minutes, and then carry out rapid pressure release in cold water - (refer to the section 'End of cooking). Always gently shake the pressure cooker each time before opening, after having checked that the pressure indicator has gone down to the lowered position, to prevent bubbles of steam from overflowing and burning you. This operation is particularly important when steam is released quickly or after cooling down the pressure cooker under tap water.
- Always be very careful when moving your pressure cooker under pressure. Do not touch hot surfaces. Use oven mitts when necessary. Lift using both of the handles.
■For soups, we recommend that you do a rapid pressure release in cold water (refer to the "End of cooking" section).
■Make sure the operating valve (A) is in the steam release position before opening the pressure cooker. The pressure indicator (D) should be in the lowered position. - Never use force to open your pressure cooker. Make sure the internal pressure has been released. The pressure indicator (D) should be in the lowered position. (See “Safety” section).
If you notice that any part of your pressure cooker is broken or cracked, do not attempt to open it under any circumstances. Wait for it to cool down completely before moving it. Do not use it again and take it to a TEFAL Approved Service Centre for repair.
■ Do not tamper with the safety systems other than when following the cleaning and maintenance instructions.
■ Only use the genuine TEFAL parts that correspond to your model.
■ Do not leave food in the pressure cooker.
■ Wash and rinse your pressure cooker immediately after each use.
■ Never put the operating valve (A), the gasket (I), the cook control* (G (d)), in the dishwasher.
■ Never place the timer* (G (d)) in water.
■ Never use bleach or chlorine-based products, which could affect the quality of the stainless steel.
■ Do not let the lid soak in water.
■ Change the gasket every year, or immediately if it is split or shows signs of cracking..
■ Make sure you get your pressure cooker at a TEFAL Approved Service Centre after 10 years of use.
■ To store your pressure cooker: rest the lid upside down on the pan, to avoid premature wear of the lid's gasket.
RETAIN THESE INSTRUCTIONS
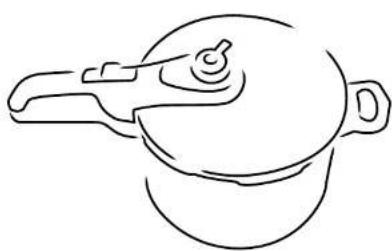
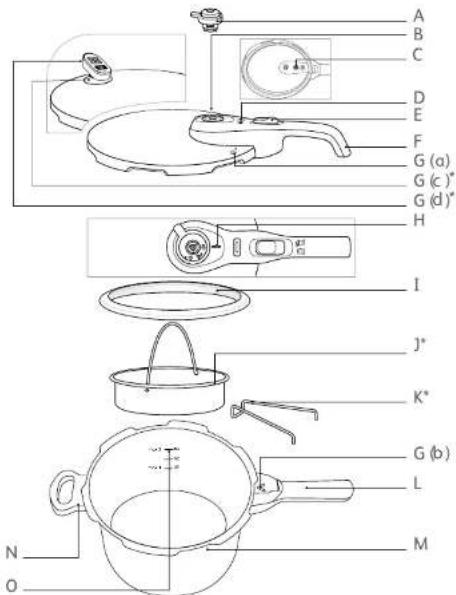
■ DESCRIPTIVE DIAGRAM
A. Operating valve
B. Steam release outlet
C. Safety valve
D. Pressure indicator
E. Lid release button
F. Lid handle
G(a). Lid positioning mark
G(b). Lid-pot positioning mark
G(c). Timer holder*
G(d). Timer*
H. Operating valve positioning mark
I. Lid gasket
J. Steam basket*
K. Trivet*
L. Long pot handle
M. Pot
N. Short pot handle
- Maximum marks (Max1
and Max 2) for filling
■ COMPULSORY CHECKS PRIOR TO EACH USE
Checking the Operating Valve
- Check that the operating valve's steam release outlet is not obstructed. Clean if necessary using a toothpick (see section 'To clean the steam release outlet' page 22)
Checking the Safety Valve
natural_image
Three-step diagram showing a hand pressing a button on a car interior, then adjusting the button (no text or symbols present)- Check that the piston is mobile (press the piston several times with your finger). (see section 'To clean the safety valve')
CHARACTERISTICS
Pressure cooker bottom diameter - model references
| Capacity | Total Capacity** | Diameter of pressure cooker | Diameter of Base | STAINLESS STEEL model without timer | Stainless steel model with timer* | Maximum safe pressure |
| 3 L | 3,7 L | 20 cm 17 | cm P258 | 40 P25940 | 150 kPa | |
| 4 L | 4,7 L | 22 cm 15 | cm | P25804 P259 | 04 | |
| 6 L | 6,7 L | P25807 P259 | 07 | |||
| 7 L | 7,7 L | P25808 P259 | 908 | |||
| 8 L | 8,7 L | P25844 P259 | 44 |
** Product capacity with the lid in position.
Technical information: Maximum operating pressure: 80 kPa (12 psi/12 lb)
COMPATIBLE HEAT SOURCES
GAS

SEALED PLATE ELECTRIC

CERAMIC HALOGEN

INDUCTION

ELECTRIC
(spiral ring element)

- This pressure cooker is suitable for all hobs, including induction, but excluding Agas.
- On solid plate, ceramic or induction hobs, ensure that the diameter of the hot plate does not exceed that of the pressure cooker base.
- On a ceramic or halogen hob, ensure that the pressure cooker base is always clean and dry.
- On a gas hob, the flame must never exceed the diameter of the pressure cooker base.
- On all hobs, check that your pressure cooker is well centred.
- Whatever type of hob you use, make sure the bottom of your pressure cooker is clean and dry before placing it on the hob.
TEFAL ACCESSORIES
- The following accessories are available for the pressure cooker:
| Accessory Reference number | |
| Lid gasket (4, 6, 7, 8L) X9010101 | |
| Steam basket* 792185 | |
| Trivet* 792691 | |
- To change other parts (including the 3L's gasket) or for repairs, contact an Approved TEFAL Service Centre (please go to: www.tefal.com).
- Only use original TEFAL parts corresponding to your model.
USE
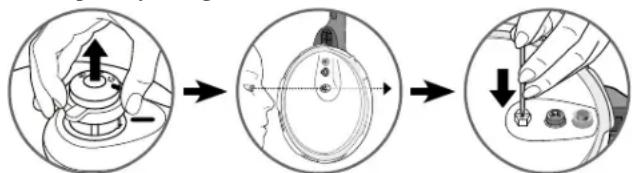
OPENING
- Using your thumb, pull back on the lid release button (E) and hold it in the retracted position - Fig.1.
- Holding the long handle of the pot (L) with one hand, turn the long handle of the lid (F) with the other hand in an anti-clockwise direction until open - Fig. 2.
- Then lift the lid.
- Do not open the pressure cooker until the unit has cooled and all internal pressure has been released. If the handles are difficult to push apart, this indicates that the cooker is still pressurised - do not force it open. Any pressure in the cooker can be hazardous.
CLOSING
When the appliance is closed but not in opera • Place the lid horizontally onto the pot, aligning the lid positioning marks G(a) and G(b).- Fig. 3
tion, it is normal for the lid • Turn the lid in a clockwise direction until it to move slightly relative to the pot. This effect disappears when the stops - Fig. 3 and you hear the button click as it engages - Fig. 4.
appears when the product is pressurised. If you are unable to turn the lid, ensure that the opening button (E) is properly retracted.
MINIMUM FILL LEVEL
- Always put at least 25 cl/ 250 ml (2 cups) of liquid in the pressure cooker when in use
For steam cooking*:
- The pot must contain at least 75 cl/ 750 ml (6 cups) of water.
- Place the basket* (J) on the trivet* (K) provided for this purpose - Fig. 5.
MAXIMUM FILL LEVEL
- Never fill your pressure cooker to more than two-thirds full (mark MAX 2 for maximum filling) (O).
For certain foods:
- For foodstuffs that expand and/or foam during cooking, such as rice, pulses, dehydrated vegetables, stewed fruit, pumpkin, courgettes, carrots, potatoes, fillets of fish, etc. Let your pressure cooker cool down for a few minutes, and then place in sink half-filled with cold tap water. Methodically and gently shake the pressure cooker each time before opening, after having checked that the pressure indicator has gone down completely, to prevent bubbles of steam from overflowing and burning you. This operation is particularly important when steam is released quickly or after cooling down with tap water. For soups, we recommend that you do a fast pressure release with cold water (see Step 1 above).
Food placed
in the
steamer
basket* must
not exceed
the MAX2
mark.

■ USING THE OPERATING VALVE (A)
To fit the operating valve (A):
Caution, these operations must only be carried out when the product is cold and not in use.
- Place the operating valve (A) in position, aligning the symbol ☐ on the valve with the positioning mark (H) as shown in the diagram opposite.
- Press down on the valve then turn it to the symbol or ④ shown in the diagram opposite.
To remove the operating valve:
Caution, these operations must only be carried out when the product is cold and not in use.
- Press down on the valve then turn it to align the symbol with the positioning mark (H) as shown in the drawing opposite.
- Remove the valve as shown in the drawing opposite.
To cook vegetables or delicate foods:
- Position the pictogram on the valve opposite the positioning mark (H) - Fig.7.
•Pressure operates at 50kPa (7 psi / 7lbs pressure).
To cook meat or frozen foods:
- Position the pictogram on the valve opposite the positioning mark (H) - Fig. 8.
- Pressure operates at 80kPa (12 psi / 12lbs pressure).

BEFORE FIRST USE
- Thoroughly clean the pressure cooker and its components before first use.
- Place the basket trivet (K) in the bottom of the pot and place the basket (J) on top of it*.
- Fill the pot to two-thirds full with water (maximum mark (Max 2) for filling (O)).
- Close the pressure cooker.
- Position the symbol ⊗ opposite the positioning mark (H) - Fig. 8.
- Place the pressure cooker on a heat source, then set to maximum power.
- When steam begins to escape from the valve, turn down the heat and leave for 20 min.
- For models equipped with a timer, program 20 min.
It is normal for steam to be present near the pressure indicator (D) when the product begins operating.
• After the 20 min is up, turn off your heat source.
- Gradually turn the valve (A), adjusting the speed that the pressure is released by how far you open the valve, until it aligns opposite the symbol - Fig. 9.
- When the pressure indicator (D) drops down, your pressure cooker is no longer under pressure.
- Open the pressure cooker- Fig. 1 - 2.
- Rinse the pressure cooker with water and dry it.
BEFORE COOKING
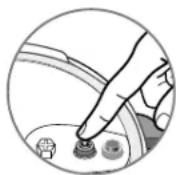
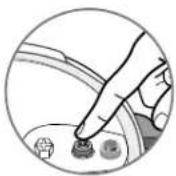
- Before each use, remove the valve (A) (see section 'Using the operating valve') and check visually and against the light that the steam release outlet (B) is not obstructed (See diagram opposite). If necessary, clean it with a toothpick - Fig. 10.
- Check that the piston (C) is mobile (see drawing opposite) and see section 'Cleaning and maintenance'.
- Add your ingredients and the liquid.
- Close the pressure cooker - Fig. 3 and ensure that it is properly closed - Fig. 4.
- Position ↗ or ☑ on the valve to the positioning mark H - Fig.7 or 8.
- Place the pressure cooker on a heat source, then set it to maximum power.

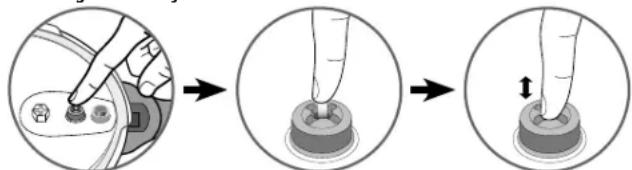
TIMER\* (OPTIONAL)


Starting position (the two half-moons facing each other)

Closed position (the half moon in front of the whole moon)
- The timer is only available on certain models. Removable and independent, the timer will alert you when the cooking time is complete. You can take it with you so that you are free to get on with other tasks or you can leave it in its holder (G(c)) during cooking.
- Your pressure cooker is designed to work both with and without its timer.
Operation:
- Power on: press the button once; the two zero display appears.
- Select the cooking time (60 minutes maximum): press the button.
- Pulsing: minute-by-minute countdown
- Continuous: scrolling countdown
- Cooking time countdown: upon releasing the button after a few seconds, the selected time flashes: the countdown has started.
The countdown should start as soon as the valve 'whispers'.
- Audible alarms: at the end of cooking, the timer warns you with a series of beeps. To stop the alarm, press the button. Turn off the heat source and manually release the pressure (see section "End of Cooking")
• The timer automatically turns off. - Programming error: you can reset the programmed time at any time by pressing and holding the button for more than two seconds.
- Installation: place the timer on its holder (G(c)) on top of the lid.
- Removal: Gently lift the timer upwards.
Recommendations for use:
- Do not put the timer in the dishwasher. Never submerge the timer in water. Clean the timer using a clean cloth. Do not use solvents to clean the timer.

Disposal:
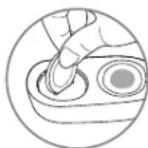
- The lifespan of your timer depends on how often you use it. However, when you notice a total or partial loss of the display, you will need to remove the battery for disposal.
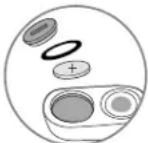
- The cook control battery is a CR2032 button battery. The cook control battery contains Dimethoxyethane no. CAS 110-71 - 4. It is in accordance with the European regulations. For your safety and environmental protection: do not open the battery, do not expose it to high temperatures, do not throw it away with household waste; Dispose of battery at a battery disposal point.
- Your battery is housed in the battery compartment: you can replace it or have it replaced by a retailer authorised for this type of service, as shown in the diagram opposite.
- You can purchase another timer at all of our TEFAL-approved Service Centres.
*Basket and timer not included with certain models.
DURING COOKING
The pressure indicator (D) prevents the pressure from rising in the pressure cooker if it is not properly closed.
- It is normal for steam to be present at the pressure indicator (D) when the product begins operating.
- When steam escapes continuously from the operating valve (A), with a steady "pschhht" sound, reduce the heat until the valve (A) continues to whisper steadily.
- Leave for the cooking time indicated in the recipe.
- For models equipped with a timer, program the time indicated in the recipe.
- As soon as the cooking time is over, turn off the heat source.
END OF COOKING
To release the steam:
- Slow pressure release:
- This is used for stews, vegetables, meat joints and fish dishes.
- Gradually turn the valve (A), adjusting the speed that the pressure is released by how far you open the valve, until it aligns opposite the mark with the symbol 🌐 - Fig. 9. When the pressure indicator (D) drops down again, your pressure cooker is no longer under pressure.
The pressure indicator (D) prevents the pressure cooker from being opened if it is still under pressure.
- Rapid pressure release:
- Special case foods:
- This is used for soups, rice, pasta, egg custards, cake and pudding mixes, recipes containing rice or pasta and recipes with a high liquid content.
- You may place your pressure cooker in a sink half-filled with cold tap water, to speed up the decompression, see diagram opposite. When the pressure indicator (D) drops down, your pressure cooker is no longer under pressure.
- You may open your pressure cooker - Fig. 1 and 2.
- When cooking special case foods which expand or foam during cooking e.g sliced carrots, pumpkins (see cooking table) or dried vegetables, wait for the pressure indicator (D) to drop before opening. Reduce the recommended cooking time slightly. Alternatively, use the rapid pressure release method stated above.
- When cooking soups, we would advise you to carry out a rapid pressure release (see section ‘Rapid pressure release’).
*Basket and timer not included with certain models.
If while releasing the steam, you notice any food or liquid start to spray out from the valve, return the operating valve (A) to 📋 or 📊 mark- Fig.7 or 8-, wait a minute and then slowly turn the operating valve again to the steam release position, ensuring nothing else spurts out.
Shaking the contents once the pressure cooker is totally decompressed. But we can't shake it under pressure.
CLEANING AND MAINTENANCE
■ CLEANING THE PRESSURE COOKER
To ensure the correct operation of your pressure cooker, follow these cleaning and maintenance recommendations after each use:
- Wash the pressure cooker (pot and lid) after each use with warm water and washing-up liquid. Follow the same procedure for the basket*.
- Do not use bleach or chlorinated products.
- Do not overheat your pan when it is empty.
To clean the inside of the pot:
- Wash using a sponge and washing-up liquid.
- The appearance of white spots in the bottom of the pot does not affect the quality of the metal at all. These are limescale deposits. To remove them, use a sponge with a little white vinegar.
To clean the outside of the pot:
- Wash using a sponge and washing-up liquid.
To clean the lid:
- Wash the lid under a stream of warm water with a sponge and washing-up liquid and rinse well. If your model has a timer, remember to remove it before cleaning.
To clean the lid gasket:
• After each use, clean the gasket (I) and its groove.
- To replace the gasket, please refer to - Fig. 11 - 12. Make sure the gasket is fitted under each notch of the lid.
To clean the operating valve (A):
- Remove the operating valve (A), see section 'Using the operating valve'.
- Clean the operating valve (A) under the tap.
To clean the timer (G(d))
- Do not put the timer in the dishwasher. Never run the timer under water. Clean the timer with a clean cloth. Do not use solvents to clean the timer.
Wash your pressure cooker after each use.
The browning and marks which may appear following extended use do not affect the operation of the pressure cooker.
Only the pot is dishwasher-safe.
To extend the lifespan of your pressure cooker, do not overheat the pot when it is empty.
It is essential to have your pressure cooker checked at a TEFAL Approved Service Centre after 10 years of use.
To clean the steam release outlet (B):
- Remove the valve (A).
- Visually inspect against the light that the steam release outlet is round and clear of debris. See drawing opposite. If necessary, clean it with a toothpick - Fig. 10.
To clean the safety valve (C):
- Clean the part of the safety valve on the inside of the lid by placing it under running water.
- Check its correct operation by lightly pressing down on the piston, which must move freely. See drawing opposite.
To change the gasket of your pressure cooker:
- Change the gasket of your pressure cooker every year or if split or damaged.
- Always use an original genuine TEFAL gasket corresponding to your model.
To store your pressure cooker:
- Place the lid upside-down on the pot.
Never use a sharp or pointed object to carry out this operation.
SAFETY
Your pressure cooker is fitted with several safety devices:
- Closing safety:
- If the appliance is not properly closed, the pressure indicator (D) cannot rise and the pressure cooker cannot build pressure.
- Opening safety:
If the pressure cooker is under pressure, the release button (E) cannot be operated. Never open the pressure cooker by force. Above all, do not interfere with the pressure indicator (D).
- Two safety devices against overpressure:
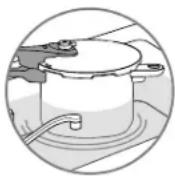
- First device: the safety valve (C) releases the pressure and steam escapes horizontally from the top of the lid - Fig.14
Second device: the gasket (I) permits steam to escape vertically from the small hole located on the edge of the lid or along the side of the pot - Fig.15. Caution, this may extinguish the flame on a gas hob.
- If one of the overpressure safety systems is triggered:
- Turn off the heat source.
- Leave the pressure cooker to cool completely at room temperature.
- Open the pressure cooker.
- Check and clean the operating valve (A) - Fig.13, the steam release outlet (B) - Fig.10, the safety valve (C) (see drawing opposite) and the gasket (I).
GUARANTEE
- When used as recommended in these instructions, the pot of your new TEFAL pressure cooker is guaranteed for 10 years against:
- Any defect associated with the metal structure of your pot,
- Any premature deterioration of the base metal.
- All other parts of your pressure cooker are guaranteed against defects in workmanship or materials, for the period of guarantee defined in valid legislation in force in the country where the product was purchased from the date of purchase. For full details of the guarantee terms and conditions please refer to www.tefal.com
- This contractual guarantee shall be honoured upon presentation of the receipt or invoice showing the date of purchase.
These guarantees exclude:
- Damage resulting from failure to comply with important precautions, or negligent use, particularly:
- Knocks, dropping, use in the oven, etc.
- Dishwasher safe lid, operating valve and timer.
- Only TEFAL Approved Service Centres are authorised to provide this guarantee service (please go to: www.tefal.com).
TEFAL ANSWERS YOUR QUESTIONS
| Problems | Recommendations |
| If the pressure cooker has been heated under pressure without liquid inside | Have your pressure cooker checked by a TEFAL Approved Service Centre. |
| If the pressure indicator has not risen and nothing escapes through the valve during cooking | This is normal during the first few minutes.If the problem persists, check that:- The heat source is sufficiently high; if not, increase it.- The quantity of liquid in the pot is sufficient.- The operating valve is positioned to one of the symbolsor- The lid is properly closed.- The gasket or the rim of the pot is not damaged.- The gasket is positioned correctly. |
| If the pressure indicator has risen and nothing is escaping through the valve during cooking | This is normal during the first few minutes.If the problem persists, put your pressure cooker in a sink half-filled with cold water, see sections 'Rapid Pressure Release' and 'Special Case', then open it.Clean the operating valve and the steam release outlet and check that the piston moves freely. |
| If steam leaks from around the lid and the pressure indicator (D) is in the down position. | That the lid is properly closed.The position of the gasket in the lid.The condition of the gasket; replace it if necessary.The cleanliness of the lid, the gasket and its groove in the lid, the safety valve and the operating valve.The condition of the rim of the pot. |
| If you are unable to open the lid | Check that the pressure indicator is in the down position.If not, depressurise; if necessary, put your pressure cooker in a sink half-filled with cold water, see sections 'Rapid pressure release' and 'Special case'. |
| If the food is not cooked or is burned, check | The cooking time.The power of the heat source.The correct position of the operating valve.The quantity of liquid. |
| If food is burned onto the pressure cooker | Leave the interior of the pot to soak for some time before washing it.Never use bleach or products containing chlorine. |
| If you cannot close the lid | Check that the lid handle is in the vertical position.Check that the seal is positioned correctly (see the "Cleaning and maintenance" paragraph).Check drying that the lid is correctly positioned as shown in - Fig 11.Run the seal under water and put it back in the lid without wiping it - Fig 17 and make sure to place it under the notches in the lid - Fig 12 |
| If the pressure indicator makes clicking sounds and emits jets of steam | This is normal for the first few minutes :it allows the air to escape before cooking. |
| If one of the safety systems is triggered | Turn off the beat.Leave your pressure cooker to cool down without moving it.Wait for the pressure indicator to go gown and open it.Check and clean the operating valve (A), the steam release vent, the safety valve and the seal.Ensure that the pressure cooker has been filled appropriately and and the quantity of liquid sufficient.If the problem persists, consult a Tefal approved service centre. |
VEGETABLES
| Cooking | FRESHValve position | FROZENValve position | ||
| Artichokes whole | steam** 18 min -immersion*** 15 min - | |||
| Asparagus whole immersion 5 min - | ||||
| Beetroot | peel after cooking | steam | 20 - 30 min | - |
| Broccoli | florets | steam | 3 min 3 min | |
| Brussels sprouts | whole | steam | 7 min | 5 min immersion |
| Carrots (special case food) | round slices | steam | 7 min | 5 min |
| Cauliflower | florets | immersion 3 min 4 min | ||
| Celery | 5-cm pieces | steam | 6 min - | |
| immersion | 10 min - | |||
| Courgettes | 2.5 cm slices | steam | 6 min 30 | 9 min |
| immersion 2 min - | ||||
| Endive (Chicory) | 2.5 cm slices | steam | 12 min | - |
| Green beans | whole or sliced | steam | 8 min 9 min | |
| Green cabbage | thinly sliced | steam | 6 min - | |
| leaves | steam | 7 min - | ||
| Green lentils (dried vegetables) | immersion | 10 min - | ||
| Leeks | 5.cm slices | steam | 2 min 30 | - |
| Mushrooms | thinly sliced | steam | 1 min 5 min | |
| whole immersion | 1 min 30 | - | ||
| Peas | steam | 1 min 30 | 4 min | |
| Potatoes (such as King Edward) | quartered | steam | 12 min - | |
| quartered | immersion 6 min - | |||
| Pumpkin (mashed)(special case food) | pieces | immersion 8 min - | ||
| Rice (long grain white) | see note below | immersion 7 min - | ||
| Semi-dried beans *** | immersion | 20 min - | ||
| Spinach | steam | 5 min 8 min | ||
| immersion 3 min - | ||||
| Turnips | 2.5 cm cubes | steam | 7 min - | |
| immersion 6 min - | ||||
| Wheat (dried vegetables)**** | immersion | 15 min - | ||
MEAT AND FISH
| MEAT AND FISH | FRESH Valve position |
| Beef (1 kg topside) 32 min (medium)***** | |
| Chicken (1.2 kg whole) 22 min | |
| Lamb (1.3 kg leg) 40 min (medium)***** | |
| Monkfish (0.6 kg fillets) (special case food) 4 min | |
| Pork (1 kg roast) 28 min | |
| Salmon (4 steaks 0.6 kg) (special case food) 6 min | |
| Tuna (4 x 0.6 kg steaks) (special case food) 7 min |
** Cooked in steam basket (depending on model). *** Food immersed in the water.
**** Not available in some countries. **** Cook for an additional 5 minutes for well done meat.
RICE: never fill pan more than one-third full including liquid as rice froths and boils up during cooking.
■ GOLDEN RULES WHEN PRESSURE COOKING (FOR UK CONSUMERS) FOR 6 LITRE, 7 LITRE AND 8 LITRE MODELS ONLY
- The minimum quantity of liquid required for normal cooking is 250 ml ( 14 pint) for the first 14 hour cooking. For each additional 14 hour, or part of 14 hour, add a further 150 ml ( 14 pint) of liquid. For example, 45 minutes cooking requires 600 ml (1 pint) of liquid. Note: This is only a general guide. Certain foods, such as rice, pulses, steamed puddings and Christmas puddings may require extra water (see text below).
- When steaming foods in the basket use a minimum of 750 ml (1¼ pint) water in the cooker.
- Always use a liquid that gives off steam when boiled e.g. water stock, wine, beer, cider. Never use oil or fat. All pressure cooking requires some liquid.
- The maximum filling level when all the ingredients and liquid have been added are:
- Solid foods e.g. vegetables, meat joints: no more than two-thirds full (Max 2 mark) Liquids and cereals e.g. soups, stews, cereal and pasta: no more than half full (MAX 2 mark).
- Foods that swell or froth during cooking e.g. dried beans and dried peas, rice, stewed fruit, compotes, pumpkin, courgette, potatoes: no more than one-third full (MAX 1 mark).
- When cooking pulses they swell up and tend to froth up. Use 1.2 litres (2 pints) water for every 450g (1 lb) pre-soaked weight of pulses. Remember all dried peas and dried beans, must be soaked in boiling water for 1 hour before cooking. Drain, rinse thoroughly and cook in fresh water. Never eat uncooked beans or peas. Soaking is not necessary for red lentils. The high temperatures achieved in the pressure cooker ensure that any natural toxins in the pulses are destroyed. Canned beans and pulses can simply be drained and rinsed before adding to the pressure cooker.
- For steamed suet puddings, sponge puddings or Christmas puddings, a short pre-steaming time is best to enable the raising agent to activate and prevent a heavy, close texture. Extra liquid is required so use a minimum of 1½ pint/900 ml of boiling water for a combined steaming and cooking time of up to 1 hour. For each additional ¼ hour of cooking, or part of ¼ hour, add a further ¼ pint/150 ml of boiling water. Pre-steaming is done with the operating valve in the steam release position on a low heat for the required time. Then turn the operating valve to either 📋 or 🌐 and increase the heat to bring to full pressure. Lower the heat and pressure cook for the required time.
- Pressure operates at 50kPa (7 psi / 7lbs pressure) and pressure 80kPa (12 psi / 12lbs pressure).
-
Never cook dumplings with the lid tightly closed, as they could rise up and block the safety devices. Cook the stew and at the end of cooking, release the steam and cook gently for about 10 - 15 minutes without the lid on.
-
Pressure cooking times vary according to the size of individual pieces or thickness of the food, not the weight.
- To prevent discolouration of the interior, caused by mineral deposits in hard water areas, add a tablespoon of lemon juice or vinegar.
- Cooking containers must withstand temperatures of 130°C (250°F). Any covering on containers, e.g. foil, or greaseproof paper, must be securely tied otherwise they could block the safety devices. Do not use plastic lids as they prevent steam from being in contact with the food. Also, they could distort and come off during cooking which could block the safety outlets.
- Accurate timing is essential when pressure cooking to prevent overcooking, especially with vegetables, fruit and fish.
- Never make milk-based recipes, such as rice pudding, semolina pudding, etc, when pressure cooking.
■ FOR 3 LITRE AND 3.7 LITRE MODELS
- The golden rules on page 66 and 67 apply for 3 litre and 3.7 litre models, with the exception of cooking pulses as the quantities of pulses and water should be reduced proportionally. Due to the shallow height of 3 litre and 3.7 litres models, there is insufficient space to cook steamed suet pudding, sponge puddings and Christmas pudding, in these models as the pudding basin must not exceed the MAX 2 mark.
■ REGULATORY MARKINGS
| Marking Location | |
| Identification of manufacturer and commercial brand | Lid and lid handle |
| Year and batch of manufacture On the pot | |
| Model referenceMaximum safe pressure (PS)Maximum operating pressure (PF) | On the lid |
| Capacity Bottom of pot |
■ ELECTRICAL OR ELECTRONIC PRODUCT AT THE END OF ITS LIFE
- Let's protect the environment!

① Your appliance contains many materials which can be recovered or recycled.
Leave it at a local civic waste collection point for processing.
PRECAUCIONES IMPORTANTES
natural_image
Three-step diagram showing a hand pressing a button on a car interior, then adjusting the button (no text or symbols present)MINUTEUR\* (EN OPTION)

VOOR INGEBRUIKNAME
FÖRE FÖRSTA ANVÄNDNING
İLK KULLANIMDAN ÖNCE
natural_image
Two circular diagrams showing a mechanical component and a hand interacting with a small object (no text or symbols present)計時器\*(選用)


起始位置(兩個半月並排對準)