
SU-WL850 - Assembly SONY - Free user manual and instructions
Find the device manual for free SU-WL850 SONY in PDF.
 FR
FR
 AR
AR
 BG
BG
 CS
CS
 DA
DA
 DE
DE
 EL
EL
 EN
EN
 ES
ES
 ET
ET
 FA
FA
 FI
FI
 HE
HE
 HU
HU
 ID
ID
 IT
IT
 KK
KK
 LT
LT
 LV
LV
 NL
NL
 NO
NO
 PL
PL
 PT
PT
 RO
RO
 RU
RU
 SK
SK
 SL
SL
 SV
SV
 TH
TH
 TR
TR
 UK
UK
 VI
VI
 ZH
ZH
| Product Type | TV wall mount bracket |
| Brand | Sony |
| Model | SU-WL850 |
| Mount weight | Approx. 3.0 kg (bracket only) |
| Dimensions (mount) | a: 354 mm, b: 116 mm, c: 77 mm, d: 563 mm, e: 533 mm, f: 370 mm, g: 368 mm, h: 350 mm, i: 11 mm |
| Materials | Metal (likely steel) |
| Color | Black (not specified, common estimate) |
| Compatibility | Sony TVs from series XR-77/65/55A8xL and A8xEL |
| Wall mounting | For drywall with studs or solid concrete/concrete block |
| Screws provided | No, 8 mm diameter screws suitable for the wall must be purchased separately |
| Supplied parts | WM1 (x1), WM2 (x1), WM3 (x4), M6 (x4), WT1 (x6) |
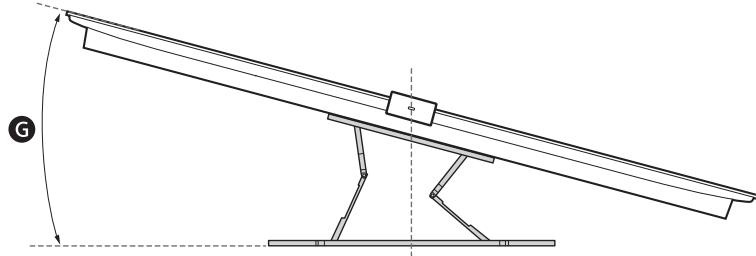
| Tilt angle (with camera) | Approx. 15° to 19° depending on model |
| Tilt angle (without camera) | Approx. 15° to 19° depending on model |
| Distance from wall (with camera) | Approx. 269 mm to 281 mm depending on model |
| Distance from wall (without camera) | Approx. 269 mm to 281 mm depending on model |
| Installation | Must be performed by a qualified professional installer |
| Safety | Wall must support at least 6 times the weight of the TV; do not exceed maximum load |
| Maintenance | Clean with a soft cloth, avoid abrasive products; do not apply excessive force |
| Repairability | No detachable parts provided; contact a qualified installer for any repairs |
| Warranty | Refer to Sony's general terms and conditions |
Frequently Asked Questions - SU-WL850 SONY
User questions about SU-WL850 SONY
0 question about this device. Answer the ones you know or ask your own.
Ask a new question about this device
Download the instructions for your Assembly in PDF format for free! Find your manual SU-WL850 - SONY and take your electronic device back in hand. On this page are published all the documents necessary for the use of your device. SU-WL850 by SONY.
USER MANUAL SU-WL850 SONY
Installation Information for Using Sony Wall-Mount Bracket (SU-WL850)
Supported models*:
- In the actual model names, the "x"/"xx" indicates numbers and/or characters specific to each model.
XR-77A8xL / 77A8xEL / 65A8xL / 65A8xEL / 55A8xL / 55A8xEL
To Customers
For product protection and safety reasons, Sony strongly recommends that installation of your TV be performed by Sony dealers or licensed contractors. Do not attempt to install it yourself.
To Sony Dealers and Contractors
Provide full attention to safety during the installation, periodic maintenance and examination of this product.
Sufficient expertise is required for installing this product, especially to determine the strength of the wall for withstanding the TV's weight. Be sure to entrust the attachment of this product to the wall to Sony dealers or licensed contractors and pay adequate attention to safety during the installation. Sony is not liable for any damage or injury caused by mishandling or improper installation.
For Safety and proper installation, follow the Wall-Mount Bracket Operation Instructions, TV Setup Guide and the directions in this manual.
Wall-Mount Bracket
On Safety
Thank you for purchasing this product.
To Customers
Installing the TV to the Wall

WARNING
PROFESSIONAL INSTALLATION REQUIRED
This product should only be installed by a professional installer who is trained to determine the strength of the wall for withstanding the TV's weight. If it is not properly secured during installation, the TV may fall and cause serious injury. Sony is not liable for any damage or injury caused by mishandling or improper installation, or installing any other than the specified product. Your Statutory Rights (if any) are not affected.
To Sony Dealers
Sufficient expertise is required for installing this product. Be sure to read this instruction manual thoroughly to do the installation work safely. Sony is not liable for any damages or injury caused by mishandling or improper installation. Please give this manual to the customer after installation.
This instruction manual shows the correct handling of the product and important precautions necessary to prevent accidents. It is your responsibility to read, thoroughly understand, and follow all instructions in this instruction manual. Failure to do so may result in serious personal injury or property damage, and may void the warranty. Keep this manual available for future reference.
Products by Sony are designed with safety in mind. If the products are used incorrectly, however, it may result in a serious injury through fire, electric shock, the product toppling over, or the product dropping. Be sure to observe the precautions for safety to prevent such accidents.
CAUTION
Specified products
This Wall-Mount Bracket is designed for use with the products specified TVs. For TVs, refer to their Reference Guide to verify that the Wall-Mount Bracket can be used.
To Customers
WARNING
If the following precautions are not observed, serious injury or death through fire, electric shock, or the product dropping can result.
Be sure to subcontract the installation to licensed contractors and keep small children away during the installation.
If the Wall-Mount Bracket or the TV is not installed correctly, the following accidents may occur. Be sure licensed contractors carry out installation.
- The TV may fall and cause a serious injury such as a bruise or a fracture.
- If the wall on which the Wall-Mount Bracket is installed is unstable, uneven, or not perpendicular to the floor, the unit may fall and cause injury or property damage. The wall should be capable of supporting a weight of at least six times the TV weight. (Refer to your TV's Reference Guide for its weight.)
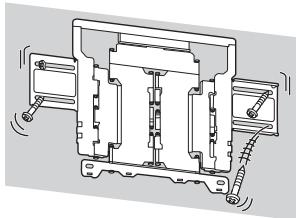
- If the installation of the Wall-Mount Bracket on the wall is not sufficiently sturdy, the unit may fall and cause injury or property damage.
Be sure to subcontract moving or dismounting of the TV to licensed contractors.
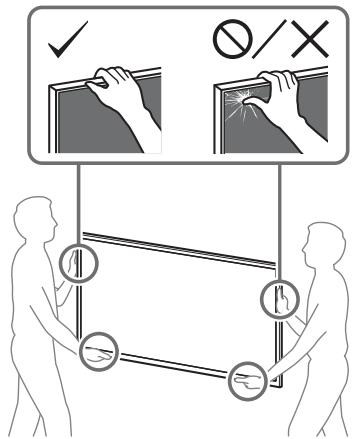
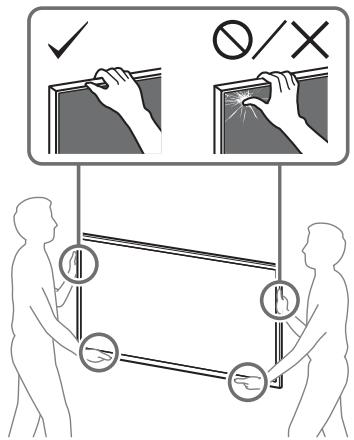
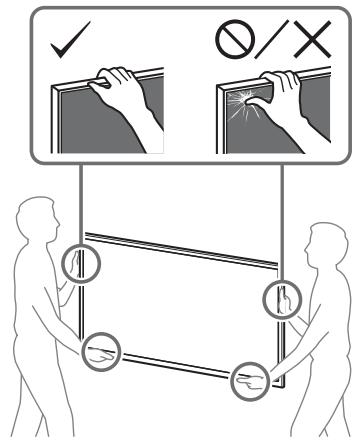
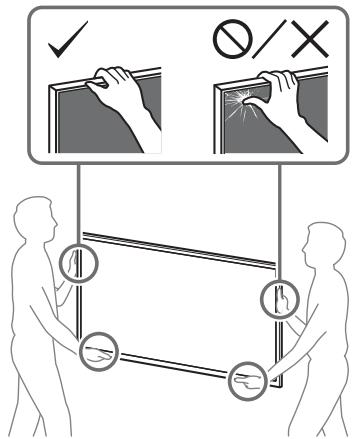
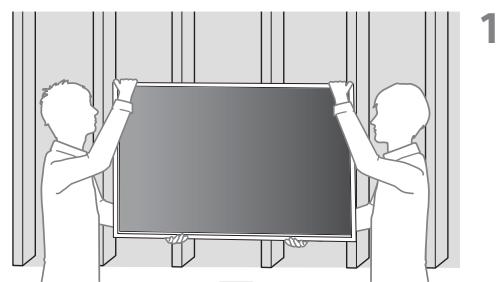
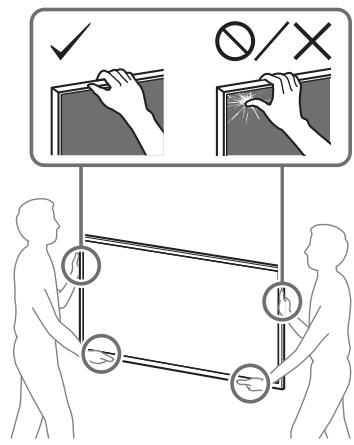
If persons other than licensed contractors transport or dismount the TV, it may fall and cause injury or property damage. Two or more persons (three or more persons for 75 inches (189.3 cm) and above TV) are needed to transport a large TV set (except Egypt).
Two or more persons (three or more persons for 75 inches (189.3 cm) and above TV) are needed to transport a large TV set (Egypt only).
Do not remove screws, etc., after mounting the TV.
If you do so, the TV may fall and cause injury or property damage.
Do not make alterations to the parts of the Wall-Mount Bracket.
If you do so, the Wall-Mount Bracket may fall and cause injury or property damage.
Do not mount any equipment other than the specified product.
This Wall-Mount Bracket is designed for use with the specified product only. If you mount equipment other than specified, it may fall or break, and cause injury or property damage.
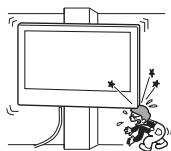
Do not apply any load other than the TV on the Wall-Mount Bracket. Do not shake the TV left/right, up/down.
If you do so, the TV may fall and cause injury or property damage.
Do not lean on or hang from the TV.
Do not lean on or hang from the TV as it may fall on you and cause serious injury.
CAUTION
If the following precautions are not observed, injury or property damage may occur.
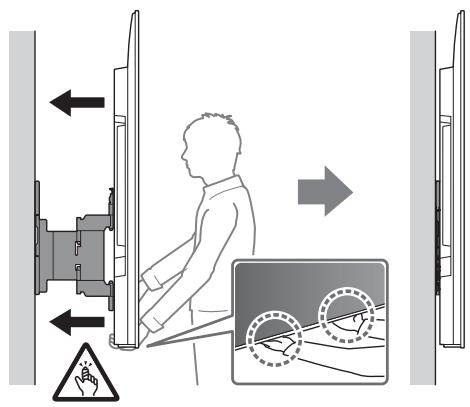
- Be careful not to pinch your fingers while handling the Wall-Mount Bracket or swiveling the TV set.
- While swiveling the TV set, handle it with caution and take care not to hit any people nearby.
- Be sure to store the unused parts in a safe place for future use.
- Keep them away from children.
Do not handle the product with excessive force during cleaning or maintenance.
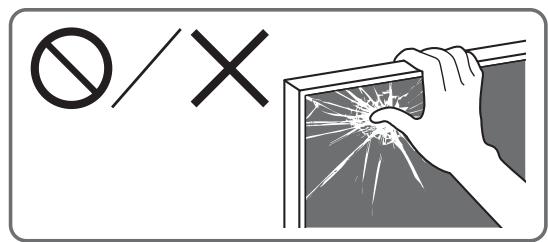
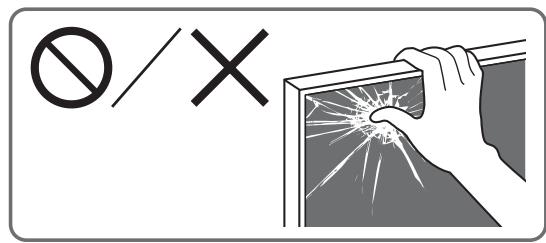
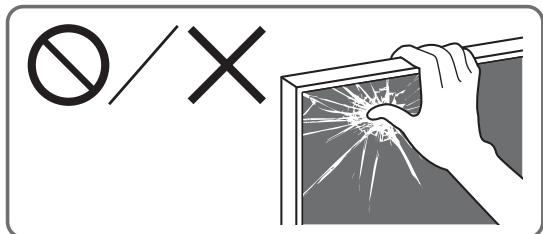
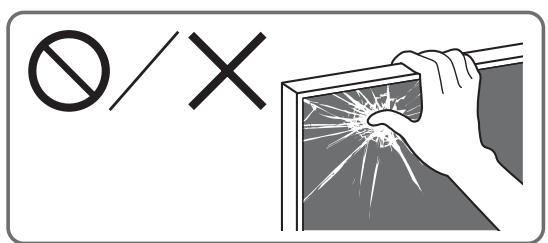
Do not apply excessive force on the topside of the TV. If you do so, the TV may fall and cause injury or property damage.
Do not place this product close to medical devices.
This product (including accessories) has magnet(s) which may interfere with pacemakers, programmable shunt valves for hydrocephalus treatment, or other medical devices. Do not place this product close to persons who use such medical devices. Consult your doctor before using this product if you use any such medical device.
Keep out of the reach of children or the supervised individuals.
This product (including accessories) has magnet(s). Swallowing magnet(s) could cause serious harm, such as choking hazard or intestinal injuries. If magnets (or a magnet) were swallowed, consult a doctor immediately.
Precautions
- If you use the TV installed on the Wall-Mount Bracket for a long time, the wall behind or above the TV may become discolored or the wallpaper may come unstuck, depending on the material of the wall.
- If the Wall-Mount Bracket is removed after installing it on the wall, the screw holes are left.
- Do not use the Wall-Mount Bracket in a place where it is subjected to mechanical vibrations.
Installing the Wall-Mount Bracket
To Sony Dealers
WARNING
The following instructions are for Sony dealers only. Be sure to read the safety precautions described above and pay special attention to safety during the installation, maintenance, and checking of this product.
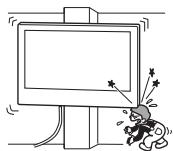
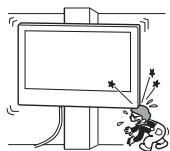
Do not install the Wall-Mount Bracket on wall surfaces where the corners or the sides of the TV protrude away from the wall surface.
Do not install the Wall-Mount Bracket on wall surfaces such as a pillar, where the corners or the sides of the TV protrude away from the wall surface. If a person or object happens to hit the protruded corner or side of the TV, it may cause injury or property damage.
Do not install the TV over or under an air conditioner.
If the TV is exposed to water leaks or air current from an air conditioner for a long time, it may cause a fire, an electric shock, or a malfunction of the TV.
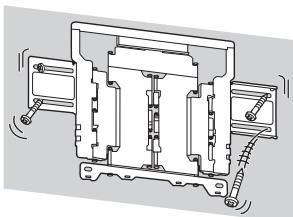
Be sure to install the Wall-Mount Bracket securely to the wall following the instructions in this instruction manual.
If any of the screws are loose or fall out, the Wall-Mount Bracket may fall and cause injury or property damage. Be sure to use the appropriate screws for the material of the wall and install the unit securely using four screws of 8 mm diameter (or equivalent).
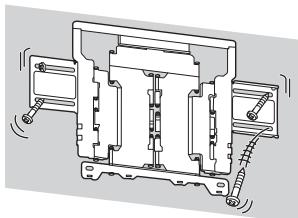
Be sure to use the supplied screws and attachment parts properly following the instructions given in this instruction manual. If you use substitute items, the TV may fall and cause bodily injury to someone or damage to the TV.
Be sure to assemble the bracket properly following the instructed procedure explained in this instruction manual.
If any of the screws are loose or fall out, the TV may fall and cause bodily injury to someone or damage to the TV.
Be sure to tighten the screws securely in the designated position.
If you fail to do so, the TV may fall and cause bodily injury to someone or damage to the TV.
Be careful not to subject the TV to shock during installation.
If the TV is exposed to shock, it may fall or break apart. This may cause injury.
Be sure to install the TV on a wall that is both perpendicular and flat.
If you fail to do so, the TV may fall and cause injury.
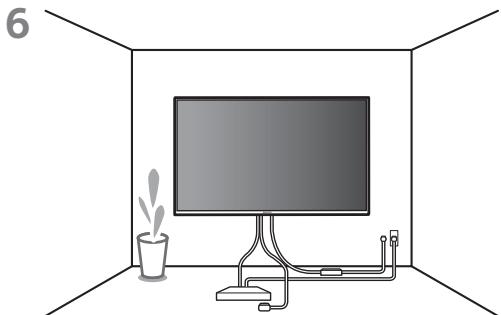
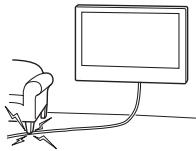
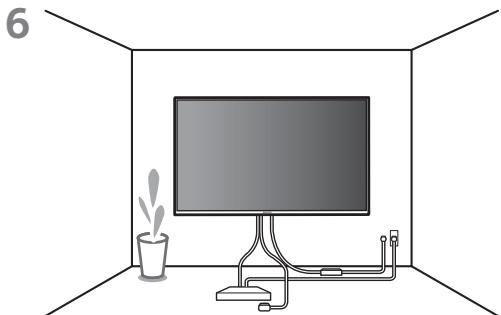
After proper installation of the TV, secure the cables properly.
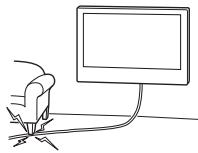
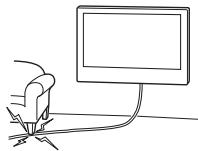
If people or objects get tangled with cables, this may result in injury or damage to the TV.
Do not allow the AC power cord (mains lead) or the connecting cable to be pinched.
If the AC power cord (mains lead) or the connecting cable is pinched between the unit and the wall or is bent or twisted by force, the internal conductors may become exposed and cause a short circuit or an electrical break. This may cause a fire or an electric shock.
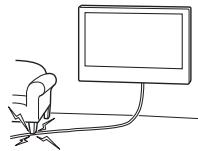
The screws needed to secure the Wall-Mount Bracket to the wall are not supplied.
Use the appropriate screws for the wall material and structure when mounting the Wall-Mount Bracket.
Before Getting Started
- The TV illustrations shown in this manual are examples used to provide clear explanations of the operations. For this reason, the illustrations may appear different from your actual TV.
What Is Your Wall Made Of?
Firstly, check the type of the wall to install the TV.
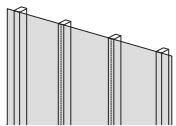
Dry wall with studs
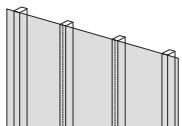
Precautions
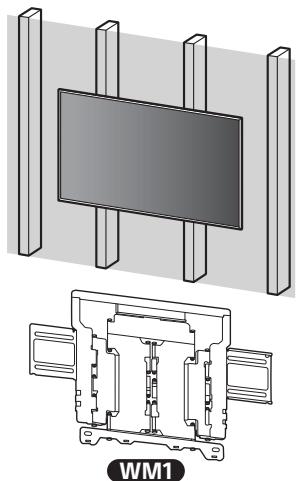
Maximum dry wall thickness: 16 mm - Ensure that the inner wood stud size is at least 51 mm x 102 mm for common or 38 mm x 89 mm for nominal. - Keep minimum 406 mm horizontal space between fasteners.
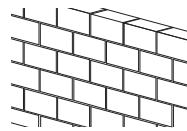
Solid concrete or concrete block
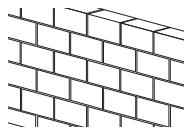
Precautions
- Mount the Wall-Mount Bracket directly onto the solid concrete wall.
- Ensure that the thickness of solid concrete wall is at least 203 mm.
- Ensure that the size of each concrete block is at least 203 mm x 203 mm x 406 mm.
Checking the Parts
Supplied with SU-WL850
- Verify that all the parts are included.
| WM1 (×1) | WM2 (×1) | WM3 (×4) |
| M6 (×4) | WT1 (×6) |
Supplied with the TV
| Wall-Mount Attachment VS (×4)* |
- Only for limited region/country/model.
Preparing for Installation
- Have the TV's Reference Guide and Setup Guide at hand before installation.
- Confirm the installing position of your TV.
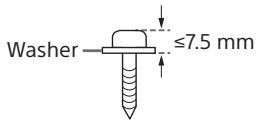
- Prepare four screws of 8 mm diameter and four proper washers (not supplied). Select screws suitable for the material of the wall.
- Prepare the following tools:
| *1 | 5.5 mm 10 mm | ||
| *2 | 1.5 N·m {15 kgf·cm} | *3 | |
| 1.5 N·m {15 kgf·cm} | |||
| *2 (x4) | *4 (x4) 8 mm × 60 mm | *4 (x4) | |
*1 Only for dry wall with studs
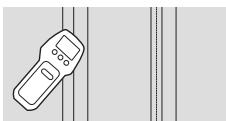
2 Only for solid concrete or concrete block 3 Depending on models *4 Be careful when selecting screws and washers
A Attaching the Wall-Mount Bracket to the Dry Wall with Studs
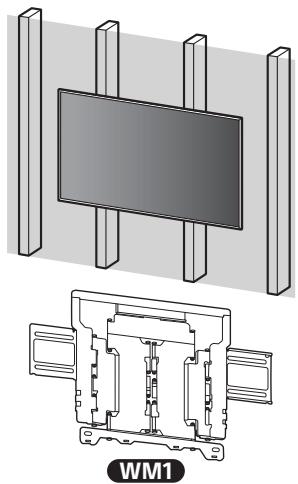
WM1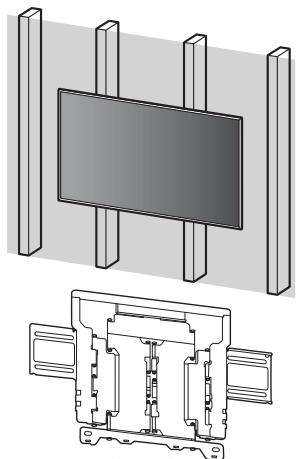
Installing the Wall-Mount Bracket to the Wall
1 Decide on the installation location.
Make sure that the wall has enough space for the TV and is capable of supporting a weight of at least six times that of the TV.
Refer "Measurement for Wall-Mount Bracket installation on the wall" on page 18. - Refer to your TV's Reference Guide for the TV's weight.
Note
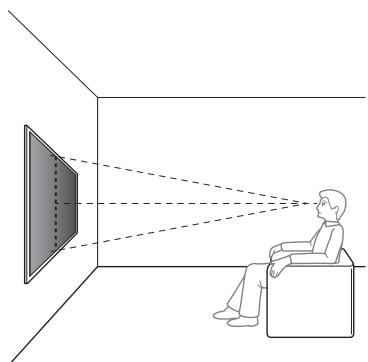
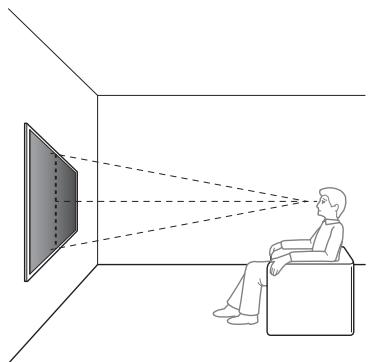
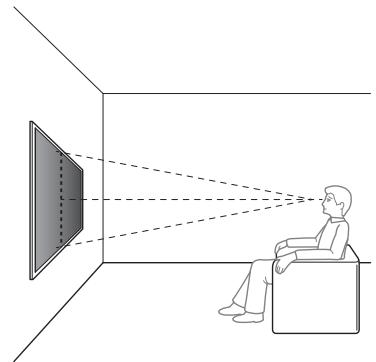
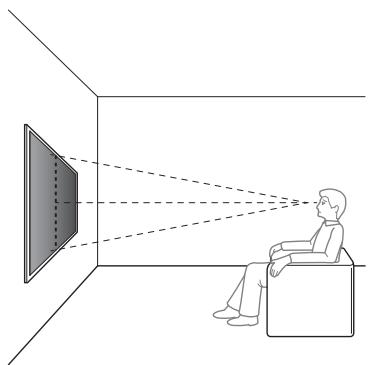
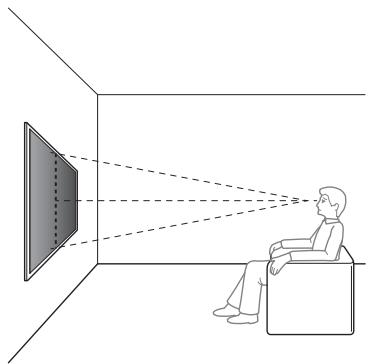
- When your TV is installed on the wall, the upper side of the TV slightly leans forward.
- We recommend you to check the position of TV in the viewing environment.
2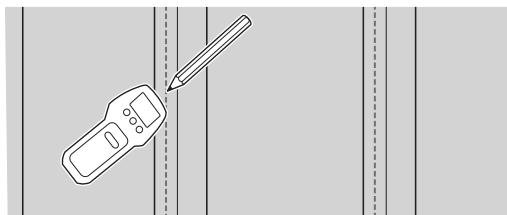
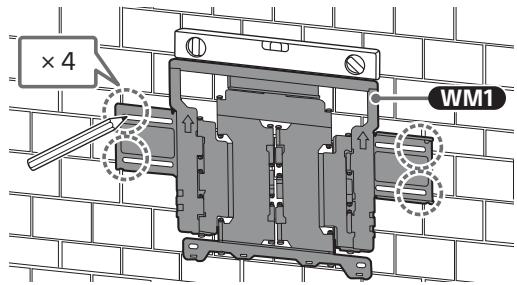
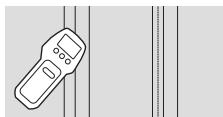
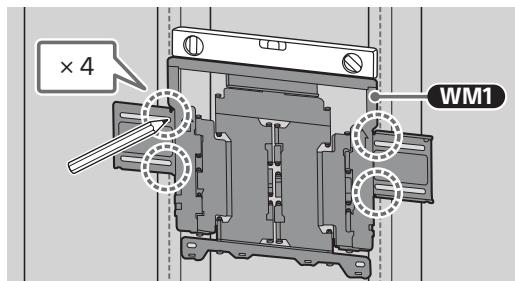
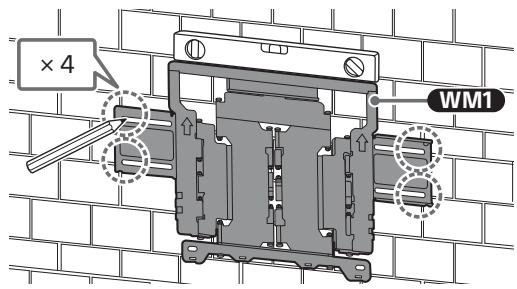
3 Align WM1 to the wall and make four marks aligned with the studs.
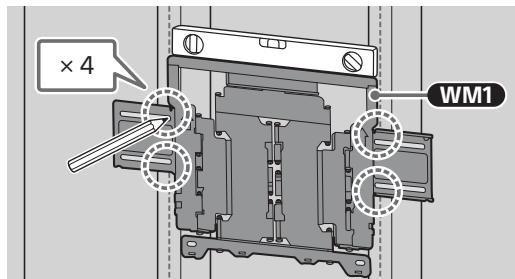
Note
- Use a level to check whether WM1 is level.
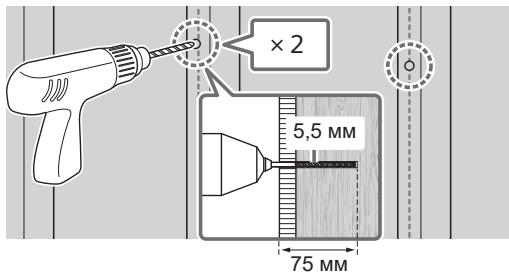
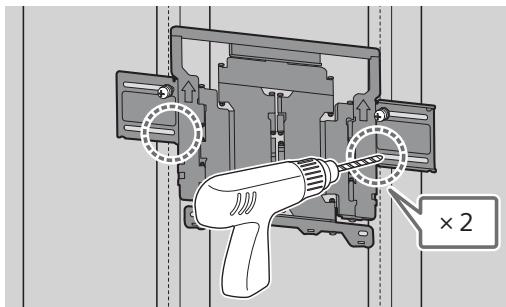
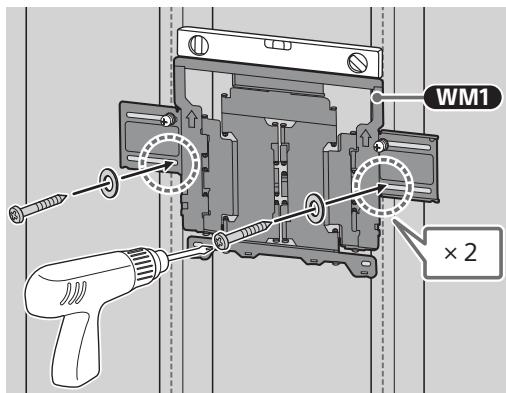
4 Drill upper pilot holes on the marks.
Make sure the location on the wall to drill the holes are strong enough to support a weight of at least six times that of the TV.

Note
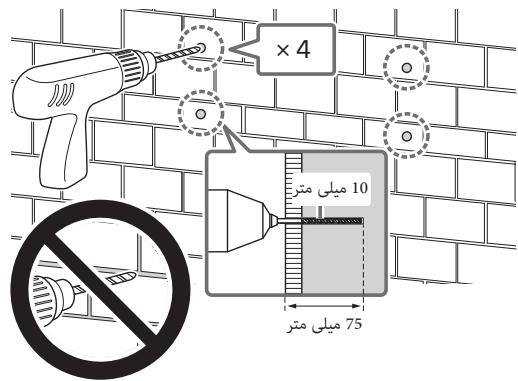
- Pilot holes must be drilled to a depth of 75 mm using a 5.5 mm diameter drill bit.
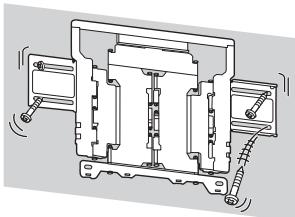
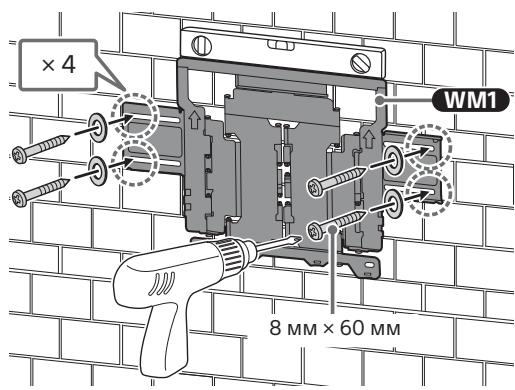
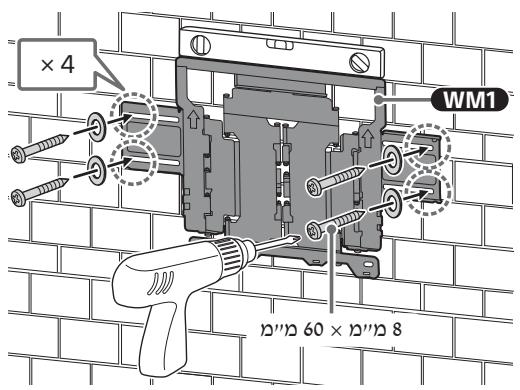
5 Install WM1 on the wall using suitable screws (not supplied) and washers (not supplied).
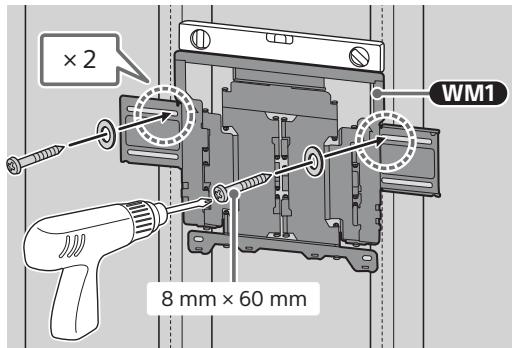
Note
- Use a level to check whether WM1 is level.
Precaution
- Do not over-tighten wooden screw 8 mm × 60 mm. Improper tightening could reduce the holding power of wooden screw 8 mm × 60 mm.
6 Drill lower pilot holes on the marks. (Refer step 4 for the drill instruction.)
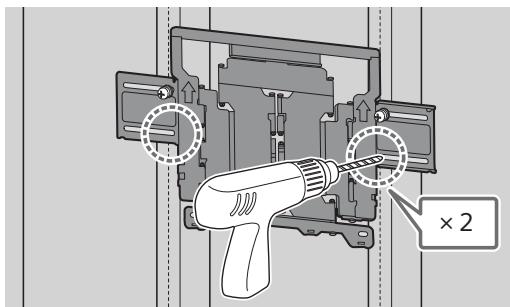
7 Fit the suitable screws and washers to the holes.
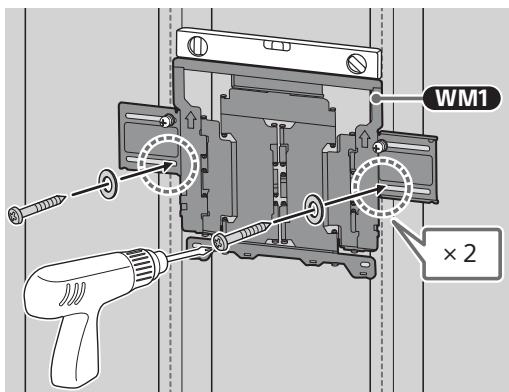
Note
- Use a level to check whether WM1 is level.
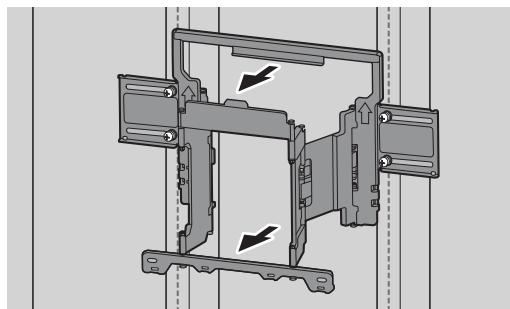
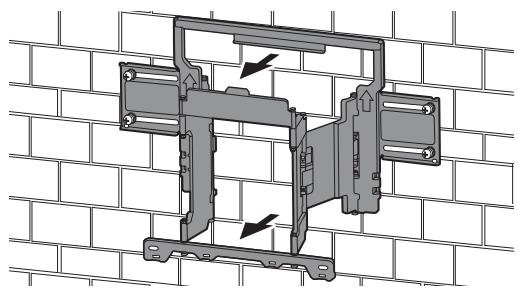
8 Pull out the arm of the bracket to the end.
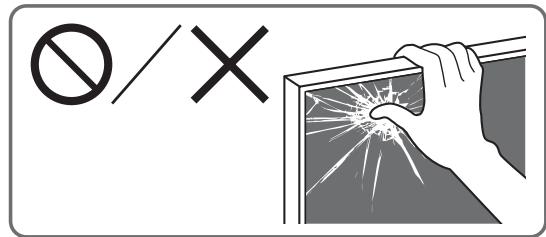
Preparing for the Installation of the TV
Note
- Be sure to store the removed screws and unused parts in a safe place, keeping them away from children.
Installing the TV to the Wall from Carton*
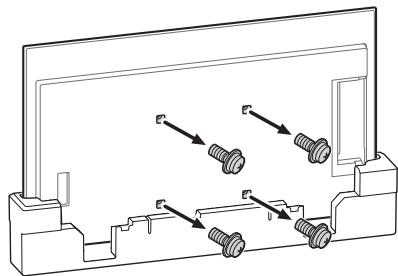
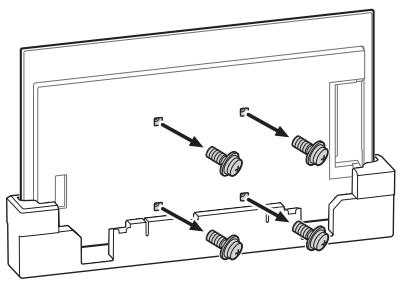
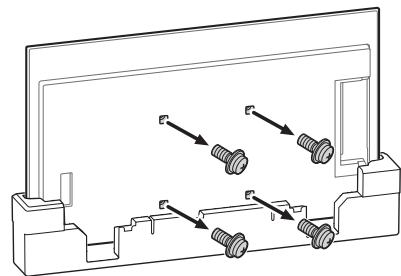
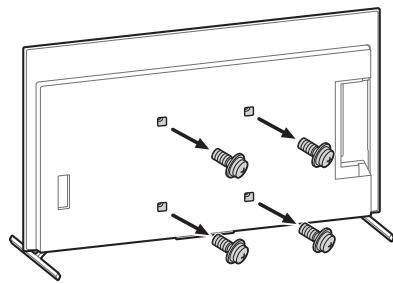
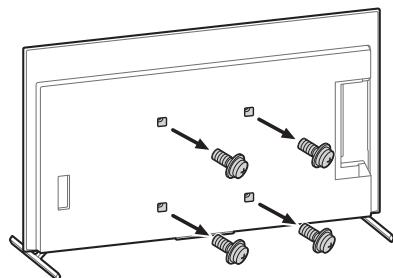
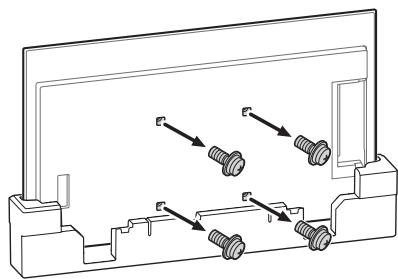
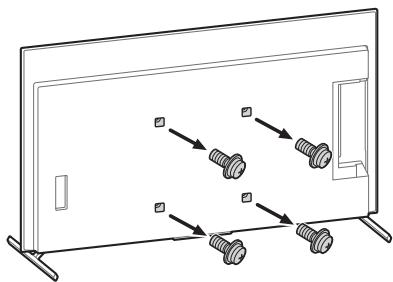
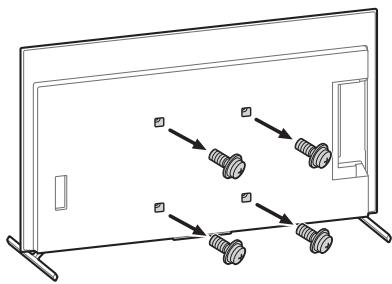
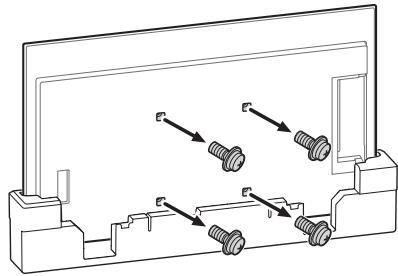
- Only for limited region/country/model. 1 Remove the screws from the rear of the TV.
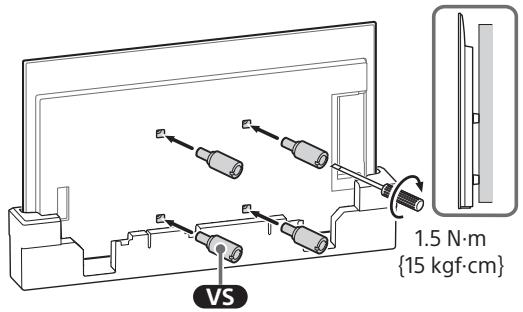
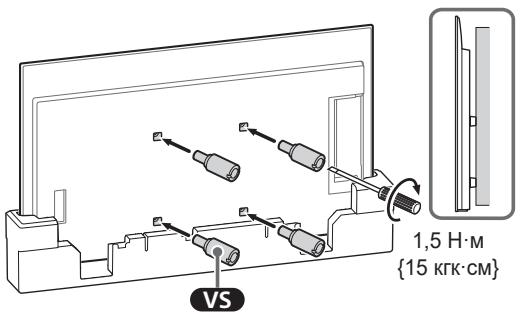
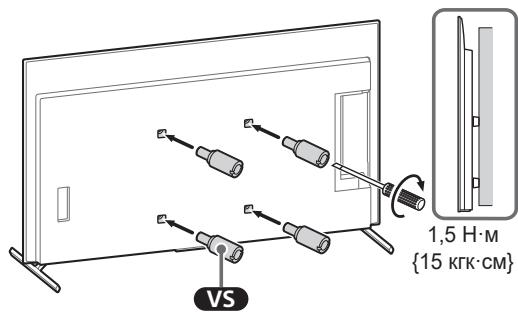
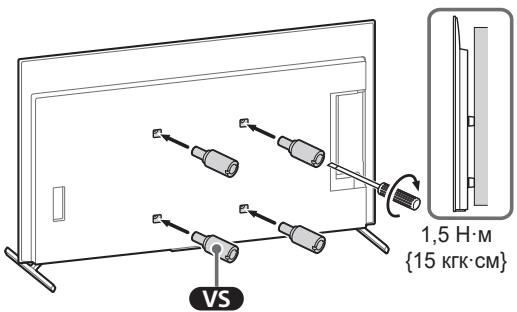
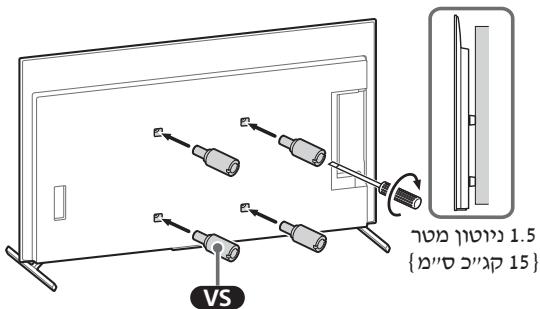
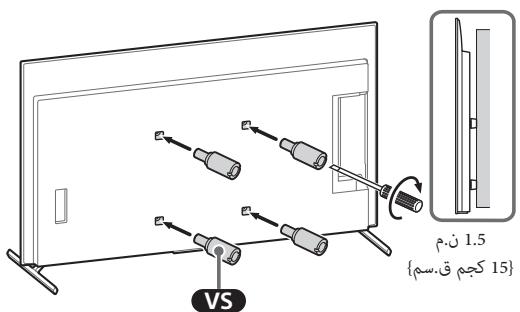
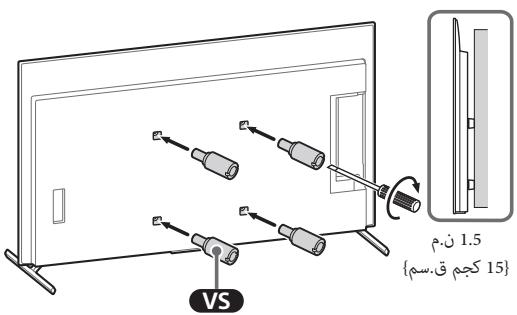
2 Attach the Wall-Mount Attachment VS (supplied with the TV) to the rear of the TV (to make it parallel with the wall).
Note
- Be sure to fasten the Wall-Mount Attachment VS when attaching them to the TV. Use only a flat head screwdriver to install the Wall-Mount Attachment VS. Use of another tool might result in over torqueing the Wall-Mount Attachment VS and damaging the TV.
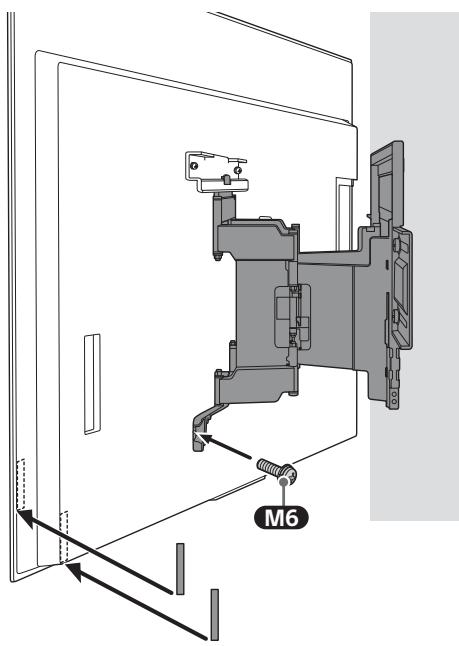
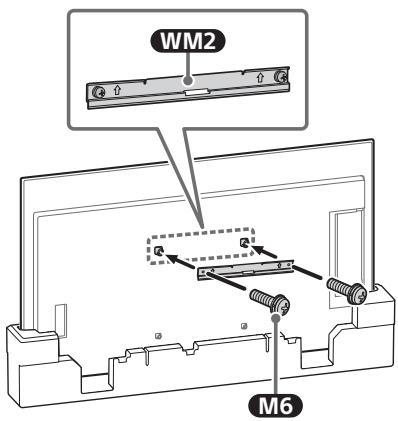
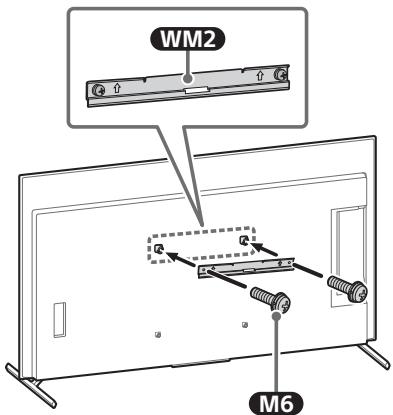
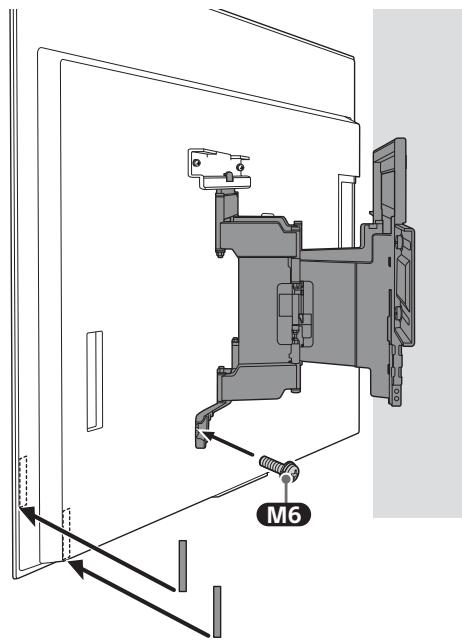
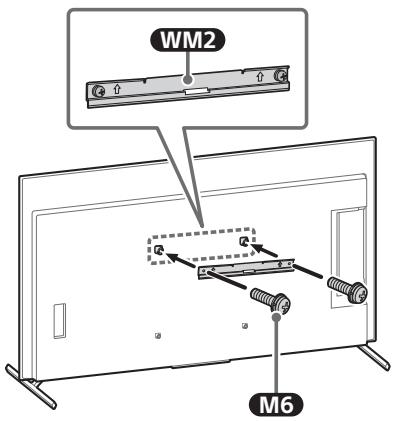
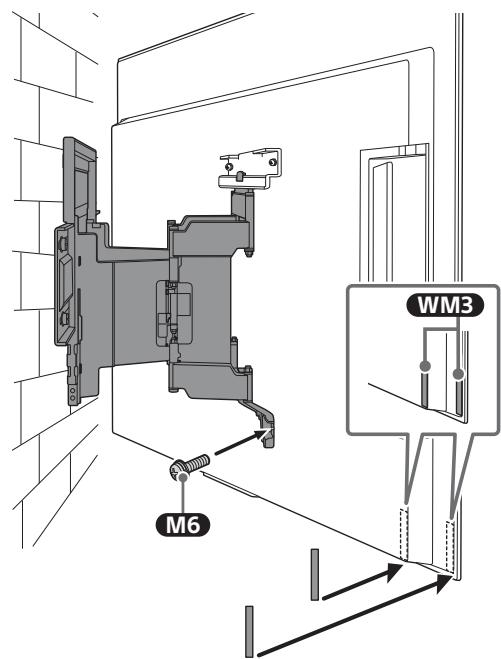
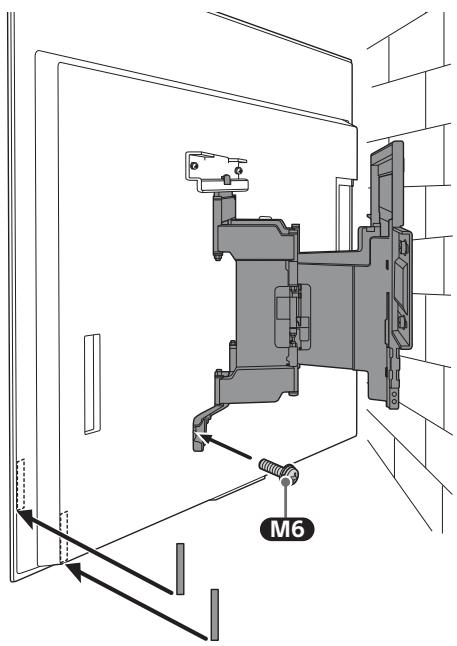
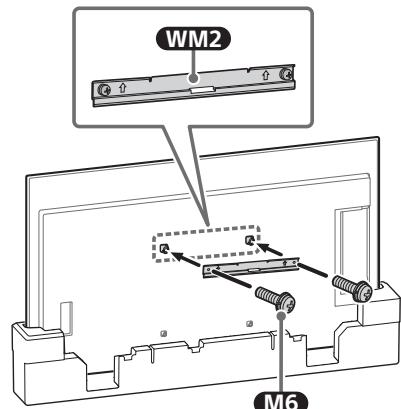
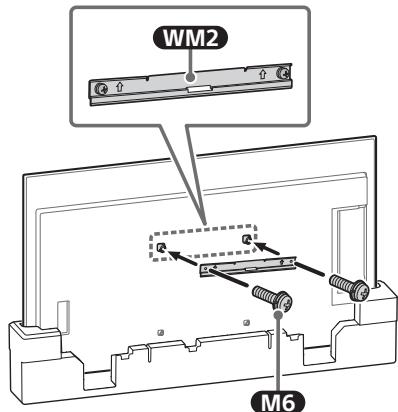
3 Attach the WM2 to the TV using M6.
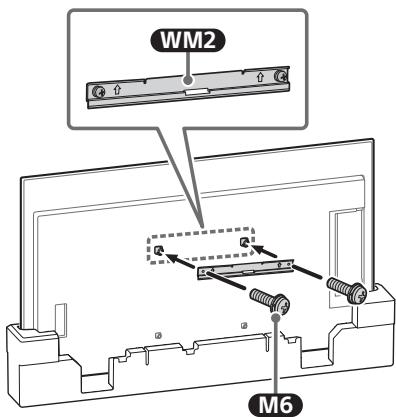
Installing the TV to the Wall from Table-Top Stand
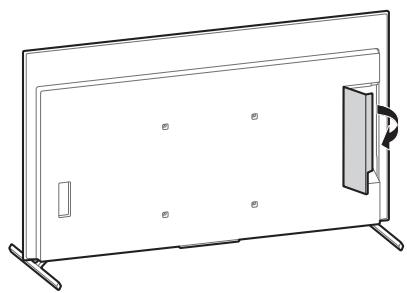
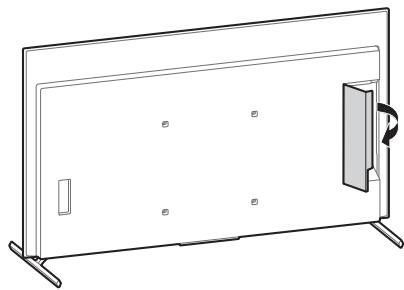
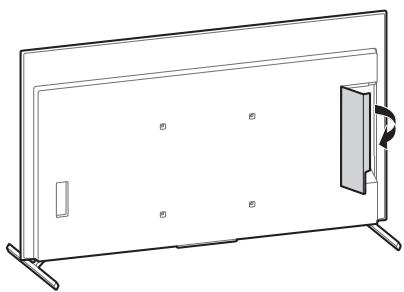
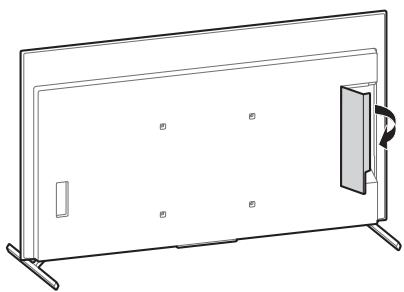
1 Remove the terminal cover.
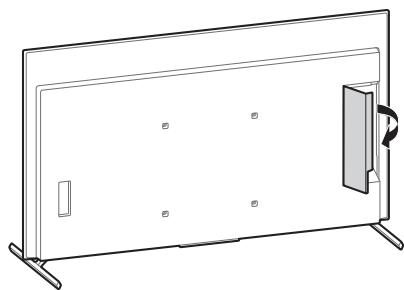
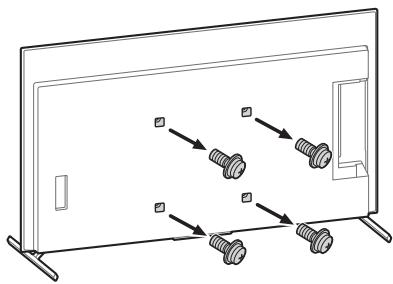
2 Remove the screws from the rear of the TV.
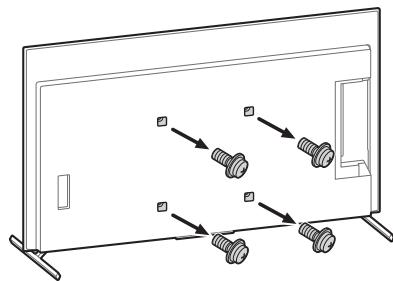
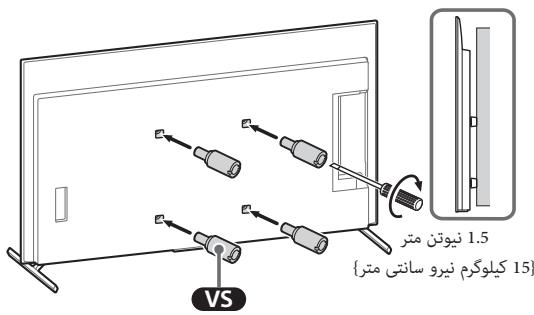
3 Attach the Wall-Mount Attachment VS (supplied with the TV) to the rear of the TV (to make it parallel with the wall).
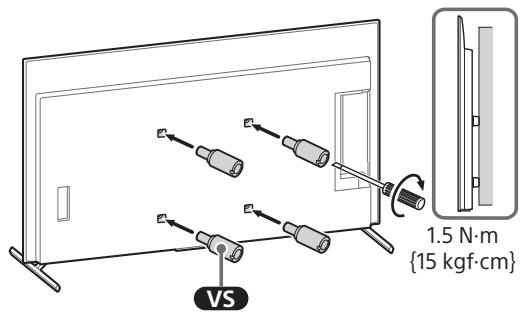
Note
- Be sure to fasten the Wall-Mount Attachment VS when attaching them to the TV. Use only a flat head screwdriver to install the Wall-Mount Attachment VS. Use of another tool might result in over torqueing the Wall-Mount Attachment VS and damaging the TV.
4 Attach the WM2 to the TV using M6.
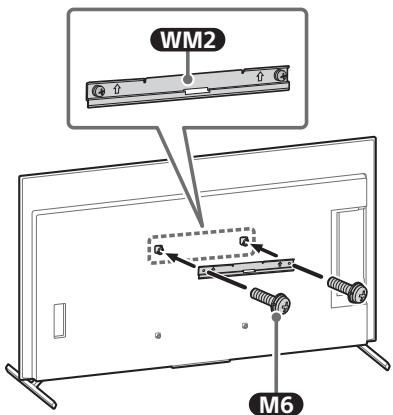
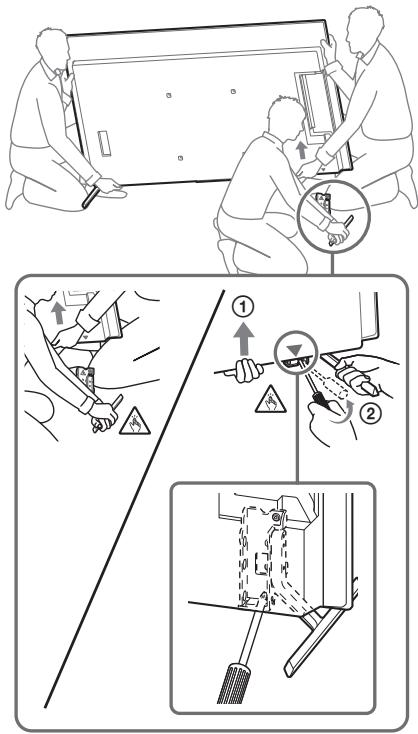
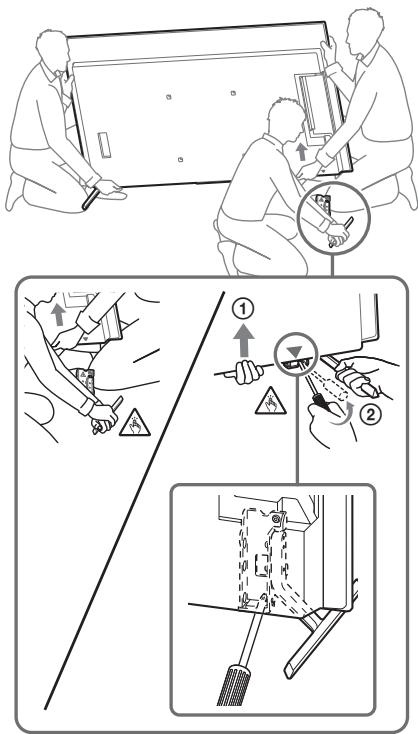
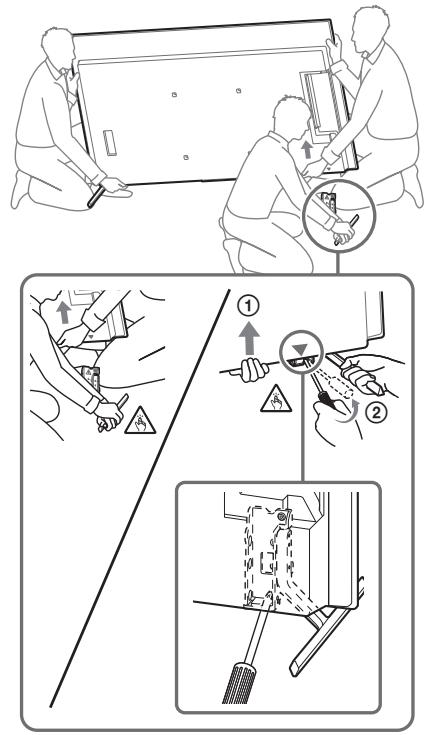
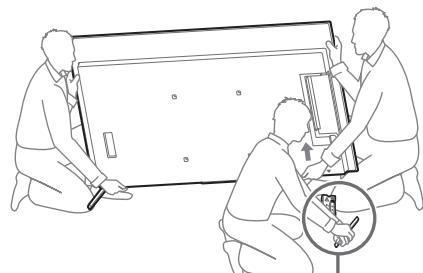
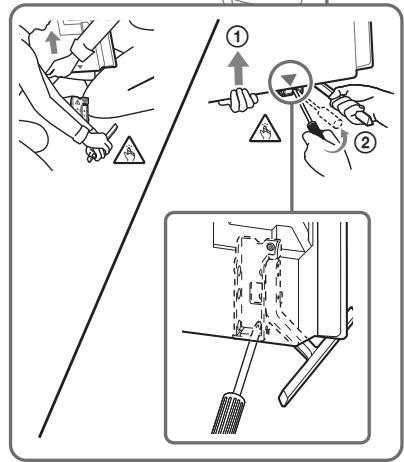
5 Detach the Table-Top Stand from the TV.
- Remove one side of the Table-Top Stand at a time. Firmly hold the Table-Top Stand securely with both hands while the other people lift up the TV.
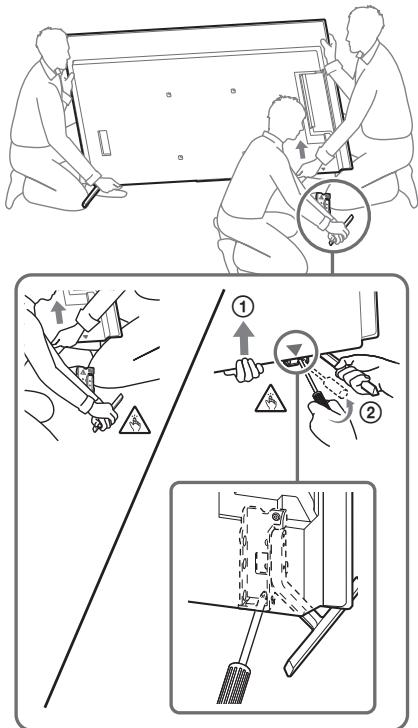
- Repeat the previous step and remove the other side of the Table-Top Stand.
Note
- Three or more people are required to detach the Table-Top Stand.
- Be careful not to use excessive force while detaching the Table-Top Stand from the TV as it may cause the TV set to fall resulting in personal injury or physical damage to the TV.
- Take care when handling the Table-Top Stand to prevent damage to the TV.
- Be careful when lifting the TV as the Table-Top Stand is detached, the Table-Top Stand may topple over and cause personal injury. Take care when removing the Table-Top Stand from the TV to prevent it from falling over and damaging the surface that the TV is sitting on.
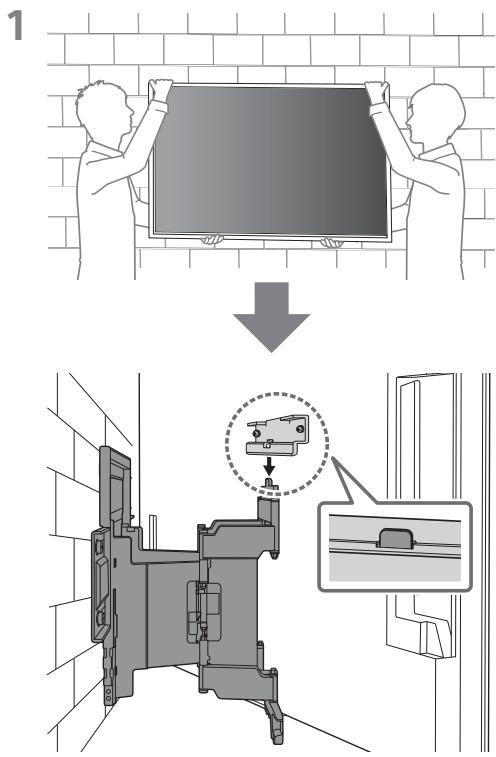
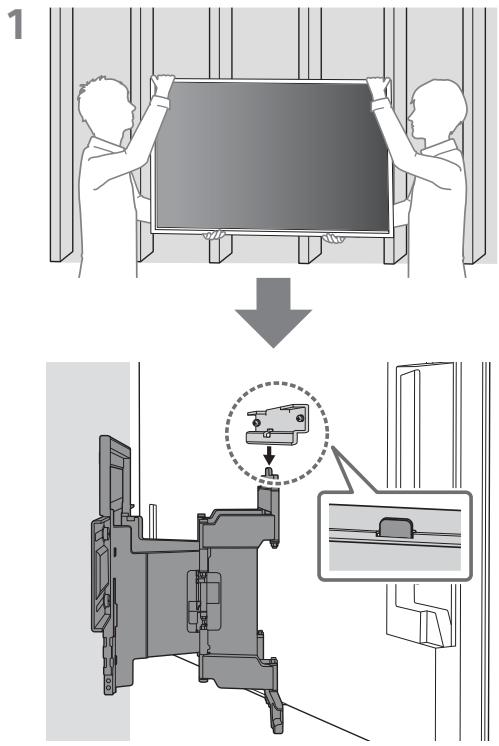
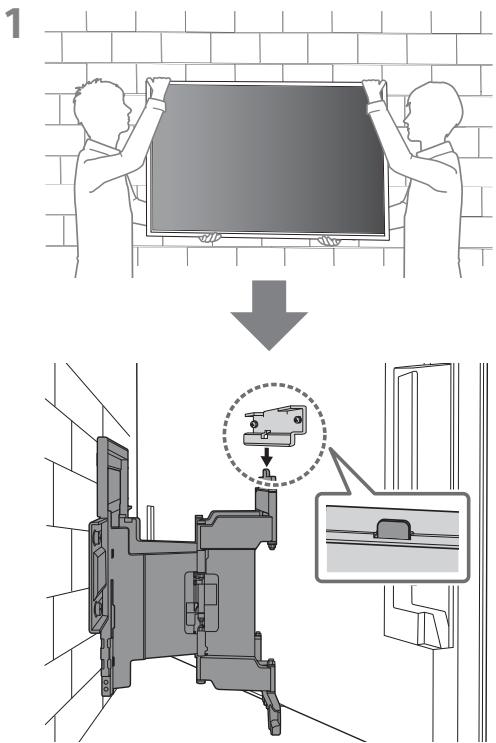
Installing the TV on the Wall
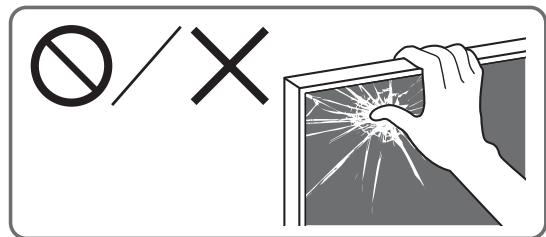
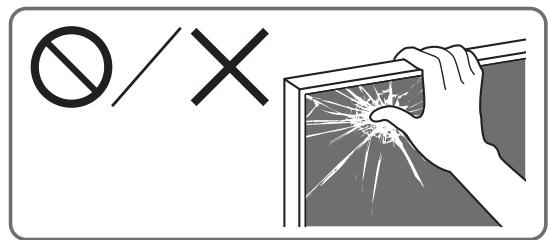
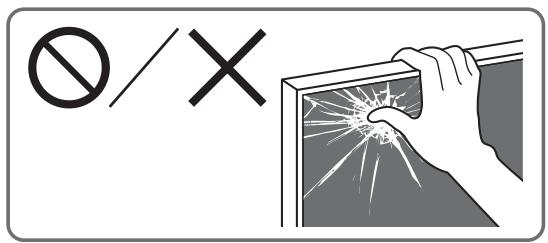
1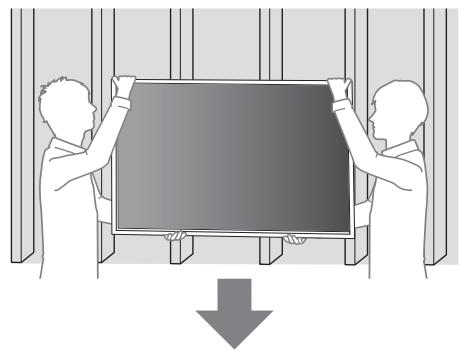
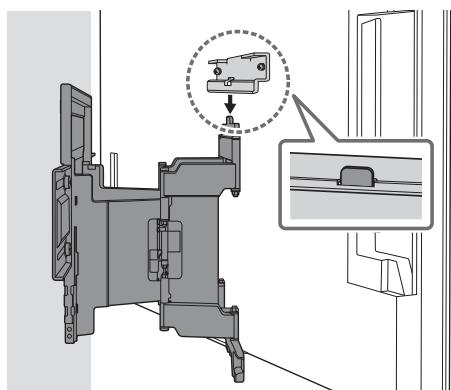
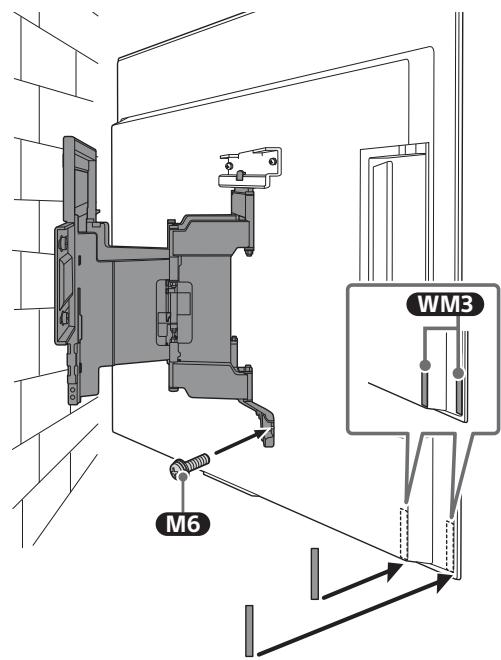
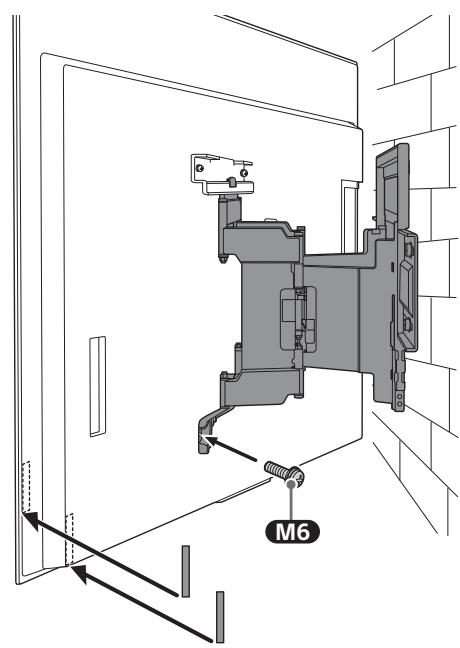
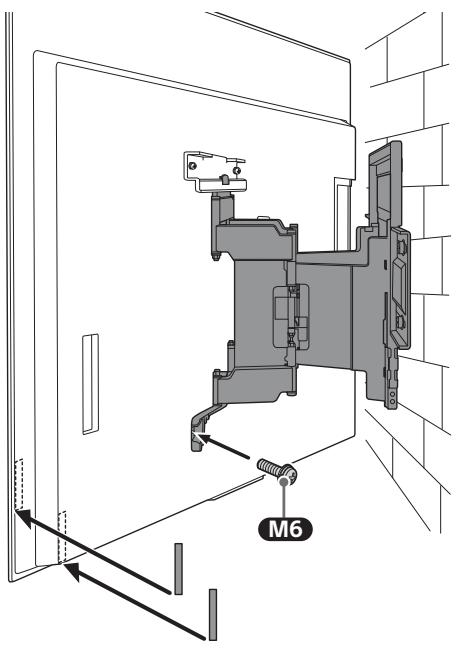
2 - Do not attach WM3 on the labels.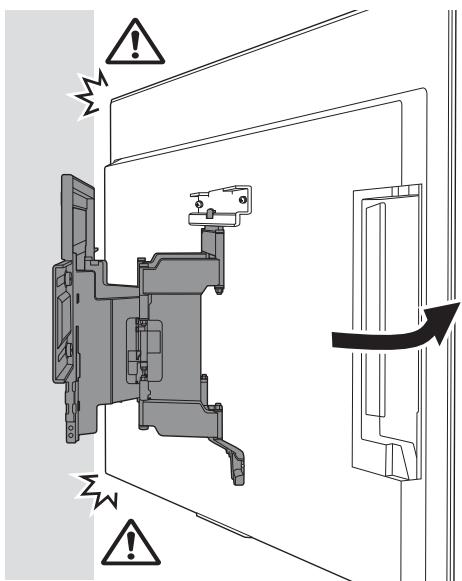
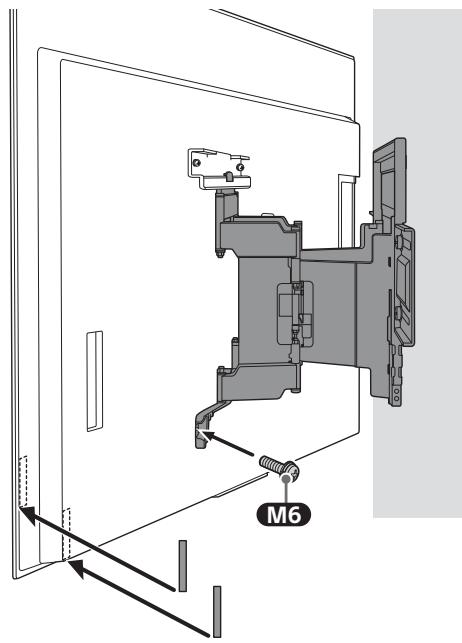
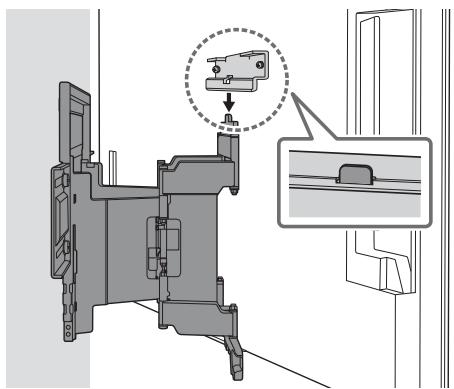
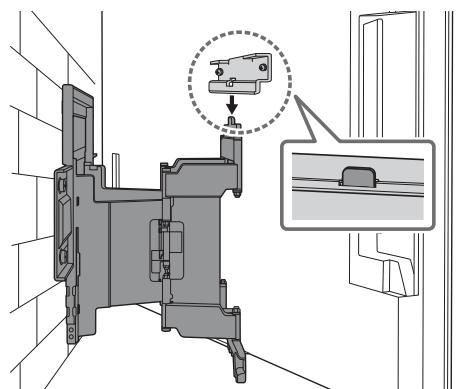
3 Screw the left and right side of the Wall-Mount Bracket using M6 and attach WM3.
Note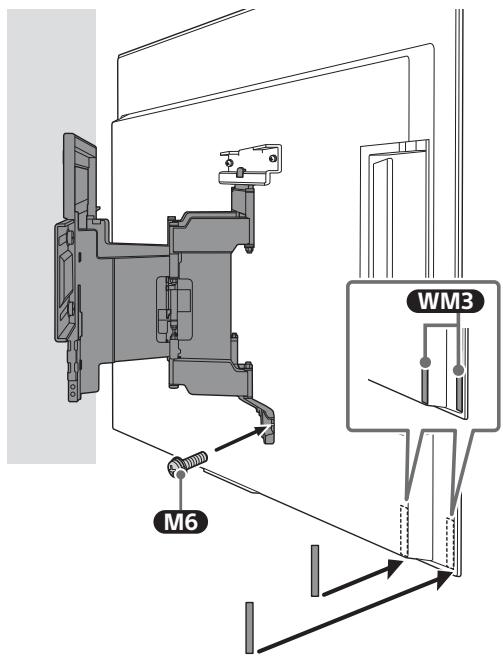
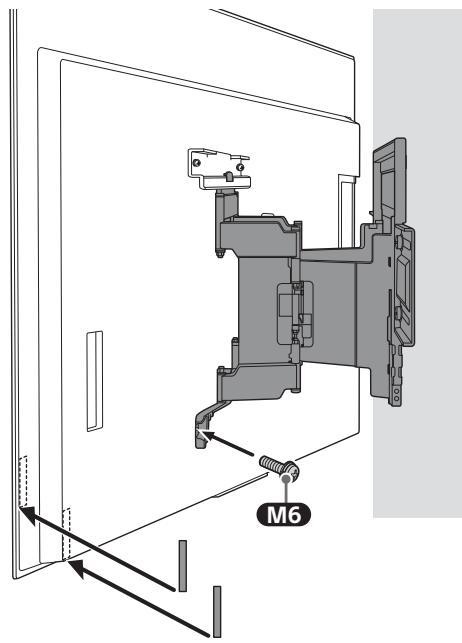
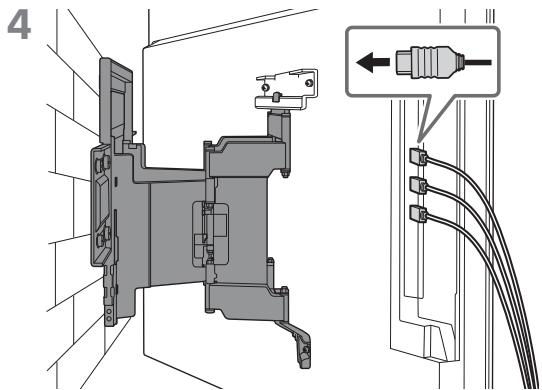
4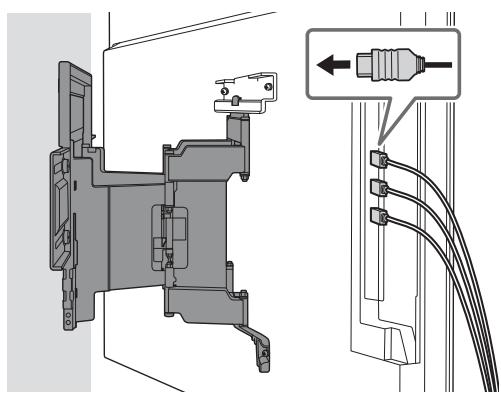
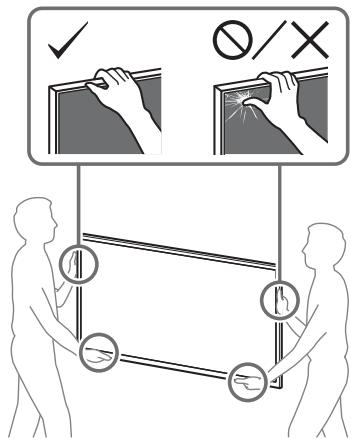
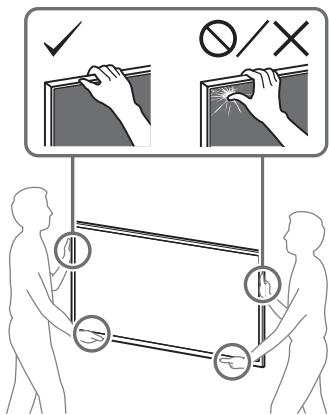
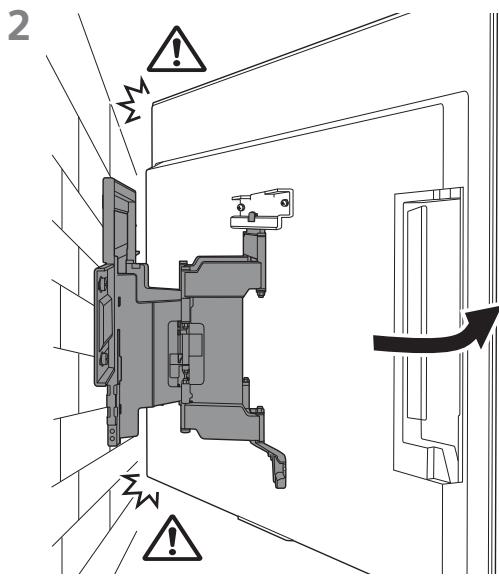
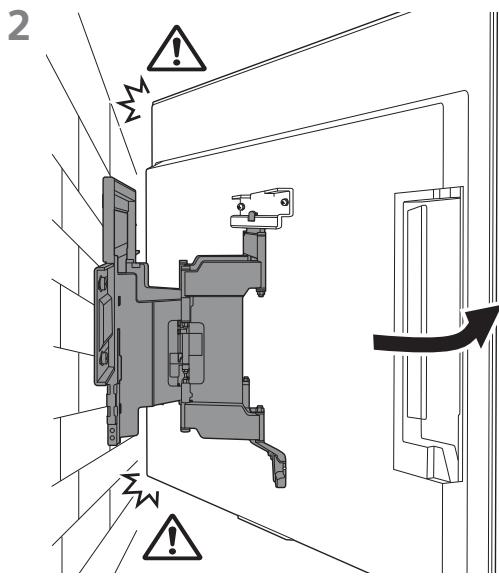
5 When moving the TV, hold it firmly from the bottom.
Note - The TV may not move close to the wall depending on the type and number of cables attached. This is not a malfunction.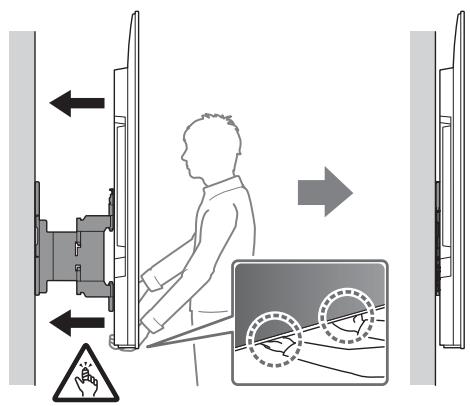
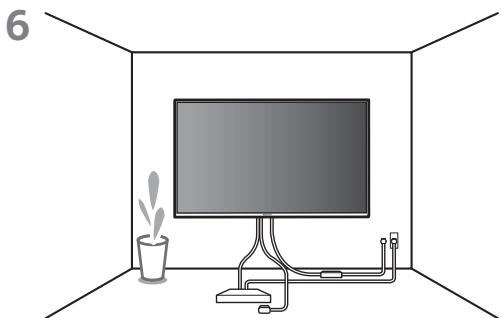
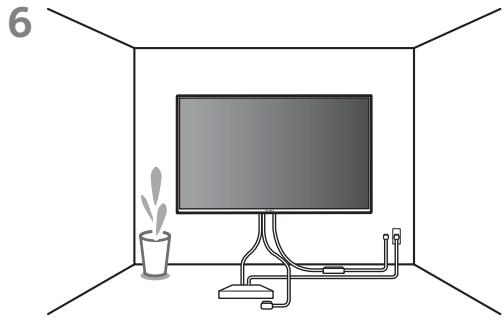
6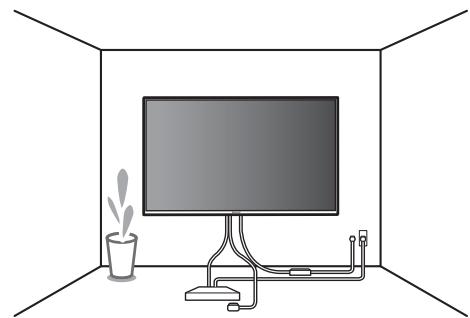
WARNING
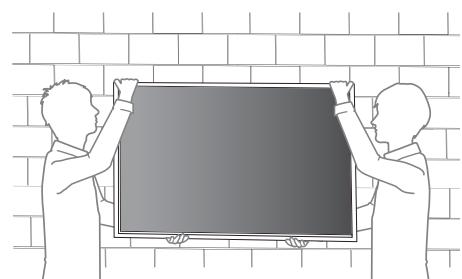
- Two or more persons (three or more persons for 189.3 cm (75 inches) and above TV) are needed to transport a large TV set (except Egypt). Two or more persons (three or more persons for 75 inches (189.3 cm) and above TV) are needed to transport a large TV set (Egypt only).
Confirming the Completion of the Installation
Check the following points.
- The cord and the cable are not twisted or pinched.
WARNING
- Improper placement of the AC power cord (mains lead), etc. may cause fire or electric shock through a short circuit. Be sure to confirm the completion of the installation for safety.
Other Information
When removing the TV, reverse the previous installation procedure.
WARNING
- Two or more persons (three or more persons for 189.3 cm (75 inches) and above TV) are needed to transport a large TV set (except Egypt). Two or more persons (three or more persons for 75 inches (189.3 cm) and above TV) are needed to transport a large TV set (Egypt only).
B Attaching the Wall-Mount Bracket to the Solid Concrete or Concrete Block
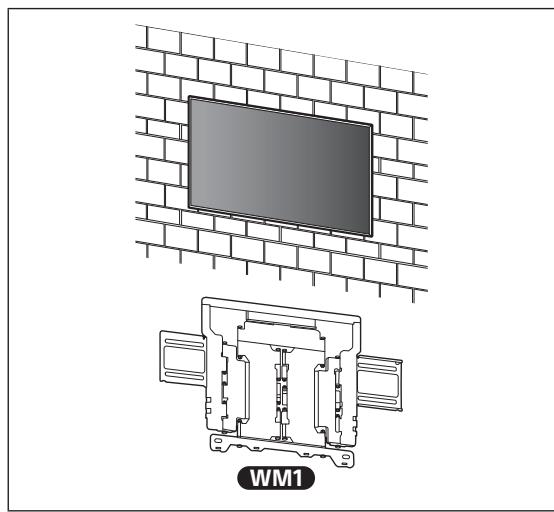
Installing the Wall-Mount Bracket to the Wall
1 Decide on the installation location.
Make sure that the wall has enough space for the TV and is capable of supporting a weight of at least six times that of the TV.
Refer to "Measurement for Wall-Mount Bracket installation on the wall" on page 18. Refer to your TV's Reference Guide for the TV's weight.
Note
- When your TV is installed on the wall, the upper side of the TV slightly leans forward.
- We recommend you to check the position of TV in the viewing environment.
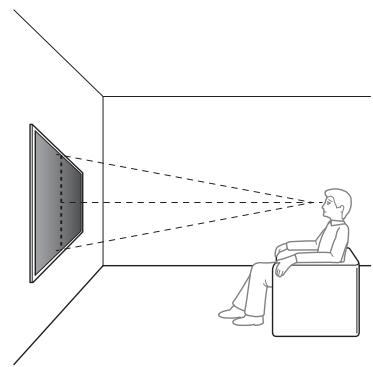
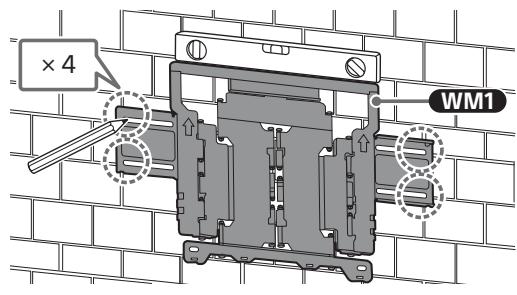
2 Align WM1 to the wall and make four marks.
Note
- Use a level to check whether WM1 is level.
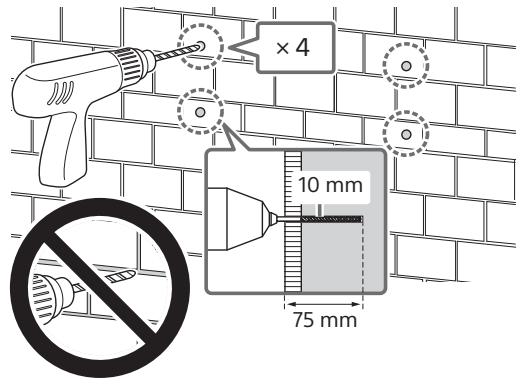
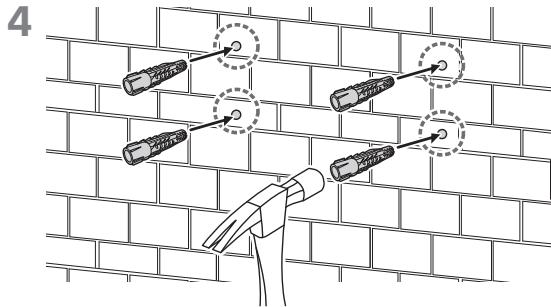
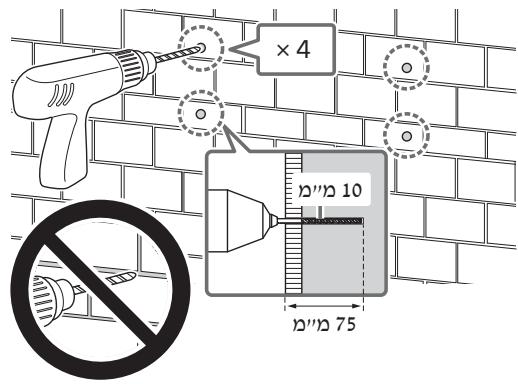
3 Drill pilot holes on the marks.
Make sure the location on the wall to drill the holes are strong enough to support a weight of at least six times that of the TV.
Note
- Pilot holes must be drilled to a depth of 75 mm using a 10 mm diameter drill bit.
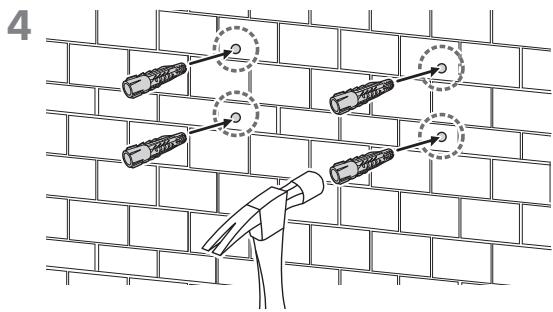
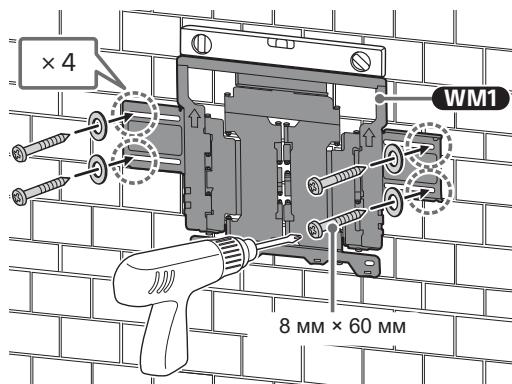
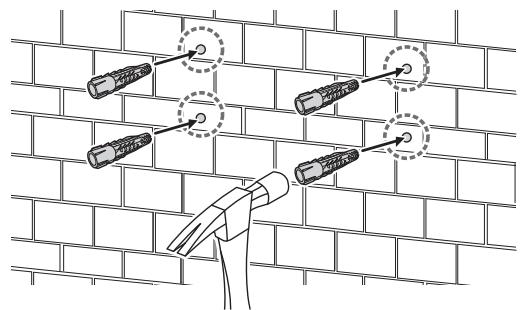
5 Install WM1 on the wall using suitable screws (not supplied) and washers (not supplied).
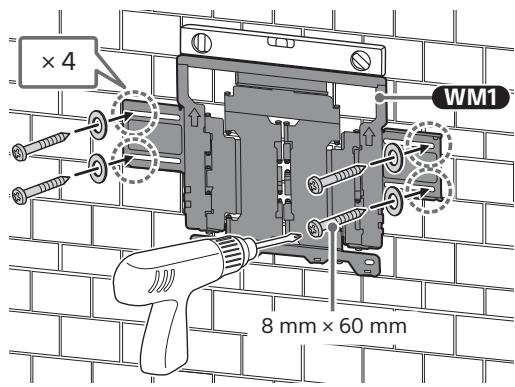
Note
- Use a level to check whether WM1 is level.
Precaution
- Do not over-tighten wooden screw 8 mm x 60 mm. Improper tightening could reduce the holding power of wooden screw 8 mm x 60 mm.
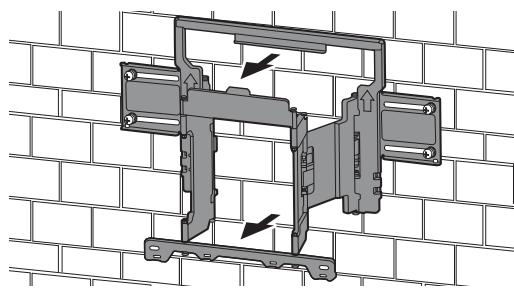
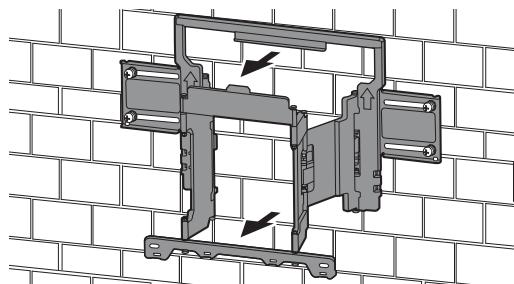
6 Pull out the arm of the bracket to the end.
Preparing for the Installation of the TV
Note
- Be sure to store the removed screws and unused parts in a safe place, keeping them away from children.
Installing the TV to the Wall from Carton*
- Only for limited region/country/model. 1 Remove the screws from the rear of the TV.
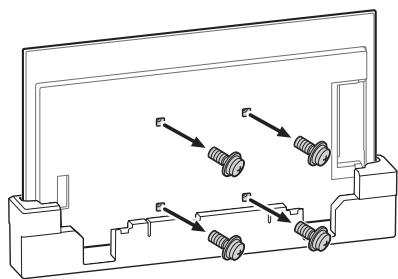
2 Attach the Wall-Mount Attachment VS (supplied with the TV) to the rear of the TV (to make it parallel with the wall).
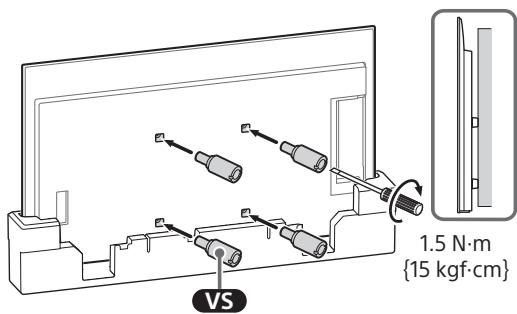
Note
- Be sure to fasten the Wall-Mount Attachment VS when attaching them to the TV. Use only a flat head screwdriver to install the Wall-Mount Attachment VS. Use of another tool might result in over torqueing the Wall-Mount Attachment VS and damaging the TV.
3 Attach the WM2 to the TV using M6.
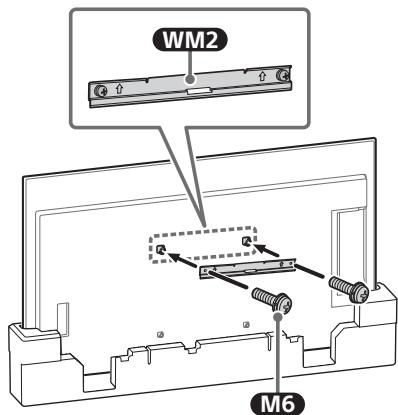
Installing the TV to the Wall from Table-Top Stand
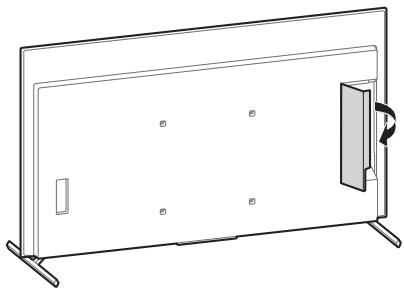
1 Remove the terminal cover.
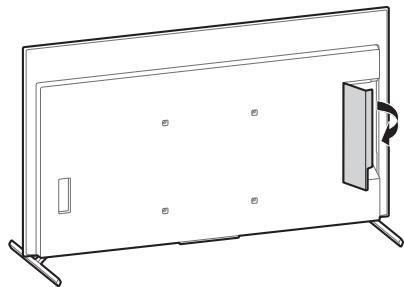
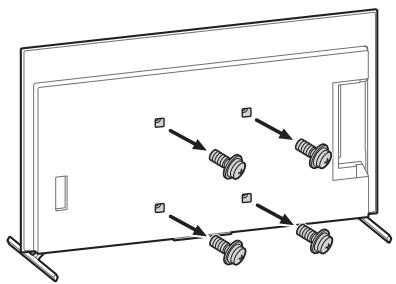
2 Remove the screws from the rear of the TV.
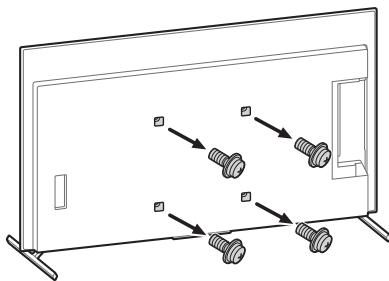
3 Attach the Wall-Mount Attachment VS (supplied with the TV) to the rear of the TV (to make it parallel with the wall).
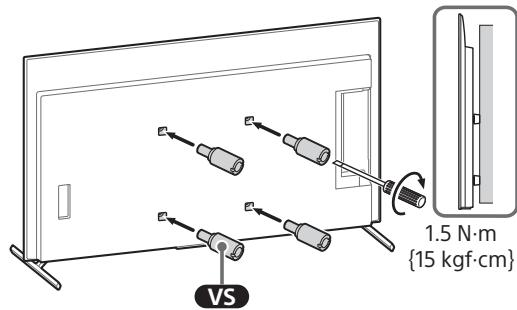
Note
- Be sure to fasten the Wall-Mount Attachment VS when attaching them to the TV. Use only a flat head screwdriver to install the Wall-Mount Attachment VS. Use of another tool might result in over torqueing the Wall-Mount Attachment VS and damaging the TV.
4 Attach the WM2 to the TV using M6.
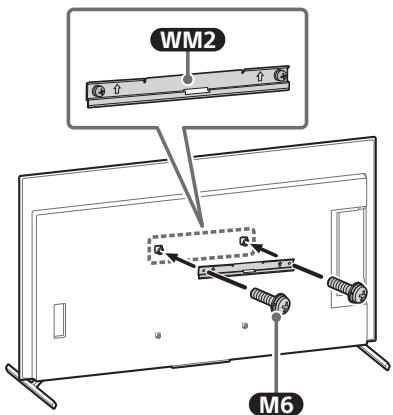
5 Detach the Table-Top Stand from the TV.
- Remove one side of the Table-Top Stand at a time. Firmly hold the Table-Top Stand securely with both hands while the other people lift up the TV.
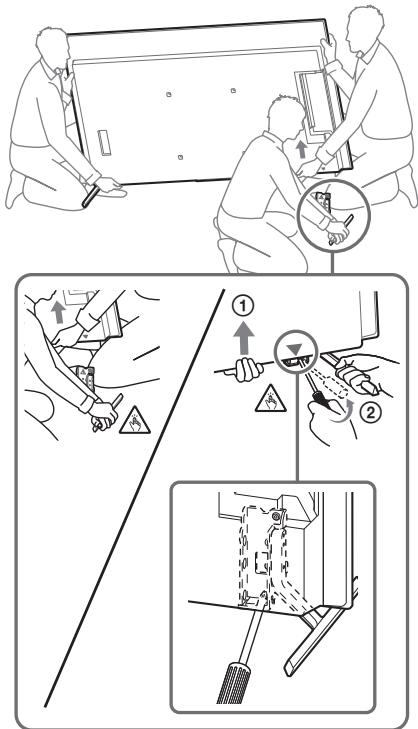
- Repeat the previous step and remove the other side of the Table-Top Stand.
Note
- Three or more people are required to detach the Table-Top Stand.
- Be careful not to use excessive force while detaching the Table-Top Stand from the TV as it may cause the TV set to fall resulting in personal injury or physical damage to the TV.
- Take care when handling the Table-Top Stand to prevent damage to the TV.
- Be careful when lifting the TV as the Table-Top Stand is detached, the Table-Top Stand may topple over and cause personal injury. Take care when removing the Table-Top Stand from the TV to prevent it from falling over and damaging the surface that the TV is sitting on.
Installing the TV on the Wall
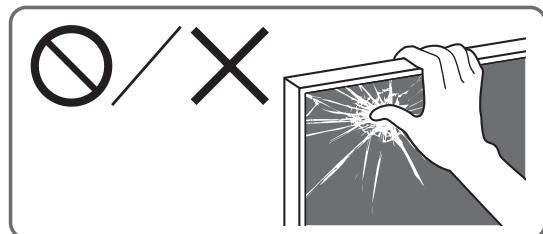
1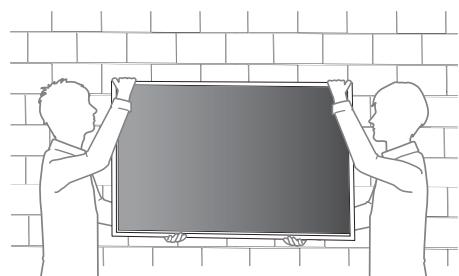
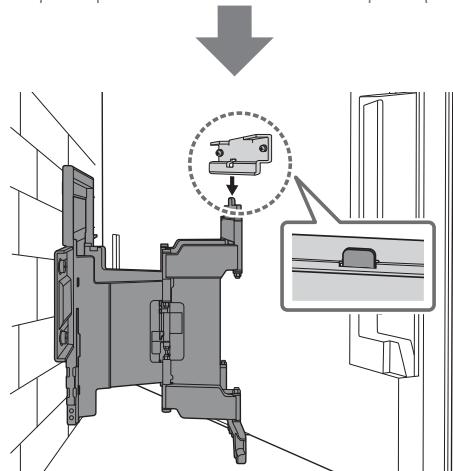
3 Screw the left and right side of the Wall-Mount Bracket using M6 and attach WM3. Note - Do not attach WM3 on the labels.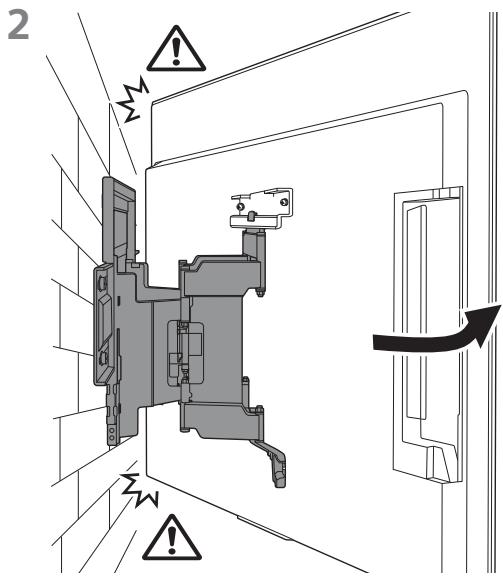
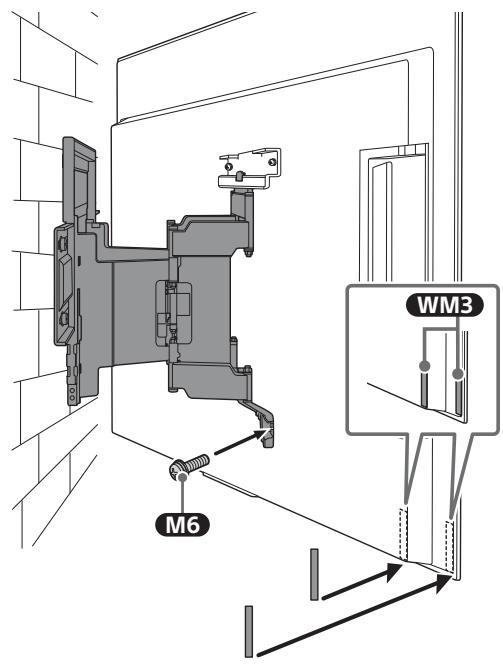
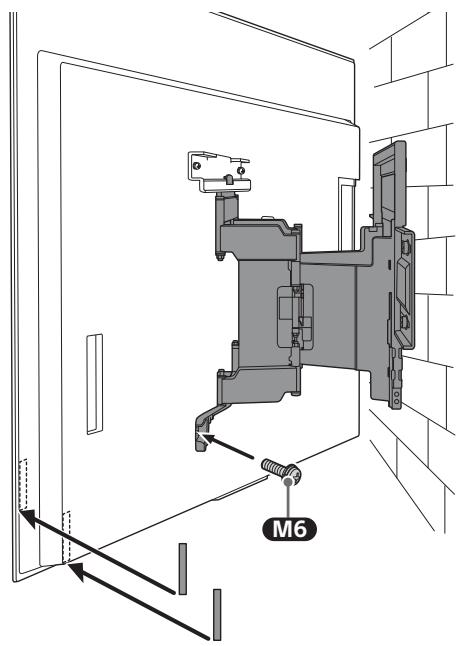
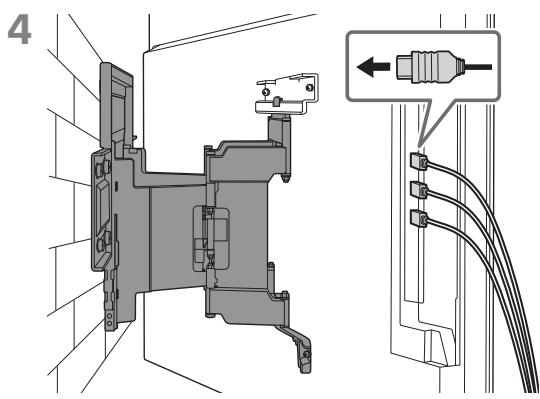
5 When moving the TV, hold it firmly from the bottom.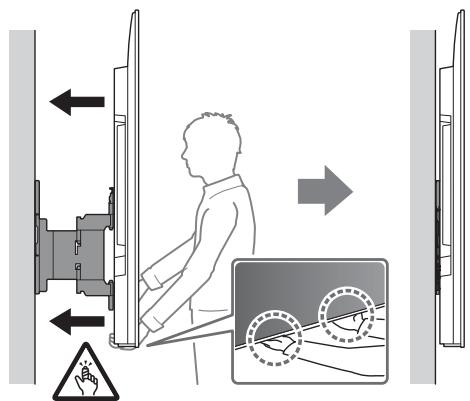
Note
- The TV may not move near close to the wall depending on the type and number of cables attached. This is not a malfunction.
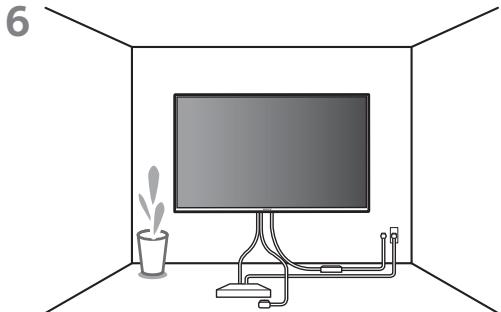
WARNING
- Two or more persons (three or more persons for 189.3 cm (75 inches) and above TV) are needed to transport a large TV set (except Egypt). Two or more persons (three or more persons for 75 inches (189.3 cm) and above TV) are needed to transport a large TV set (Egypt only).
Confirming the Completion of the Installation
Check the following points.
- The cord and the cable are not twisted or pinched.
WARNING
- Improper placement of the AC power cord (mains lead), etc. may cause fire or electric shock through a short circuit. Be sure to confirm the completion of the installation for safety.
Other Information
When removing the TV, reverse the previous installation procedure.
WARNING
- Two or more persons (three or more persons for 189.3 cm (75 inches) and above TV) are needed to transport a large TV set (except Egypt). Two or more persons (three or more persons for 75 inches (189.3 cm) and above TV) are needed to transport a large TV set (Egypt only).
Specifications
WM1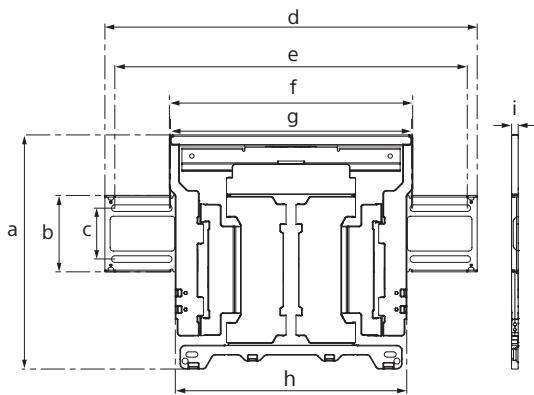
Dimensions: (Approx.) [mm]
a : 354
b : 116
c : 77
d:563
e : 533
f : 370
q : 368
h : 350
i : 11
Mass (base only): (Approx.) [kg] 3.0
Design and specifications are subject to change without notice.
References
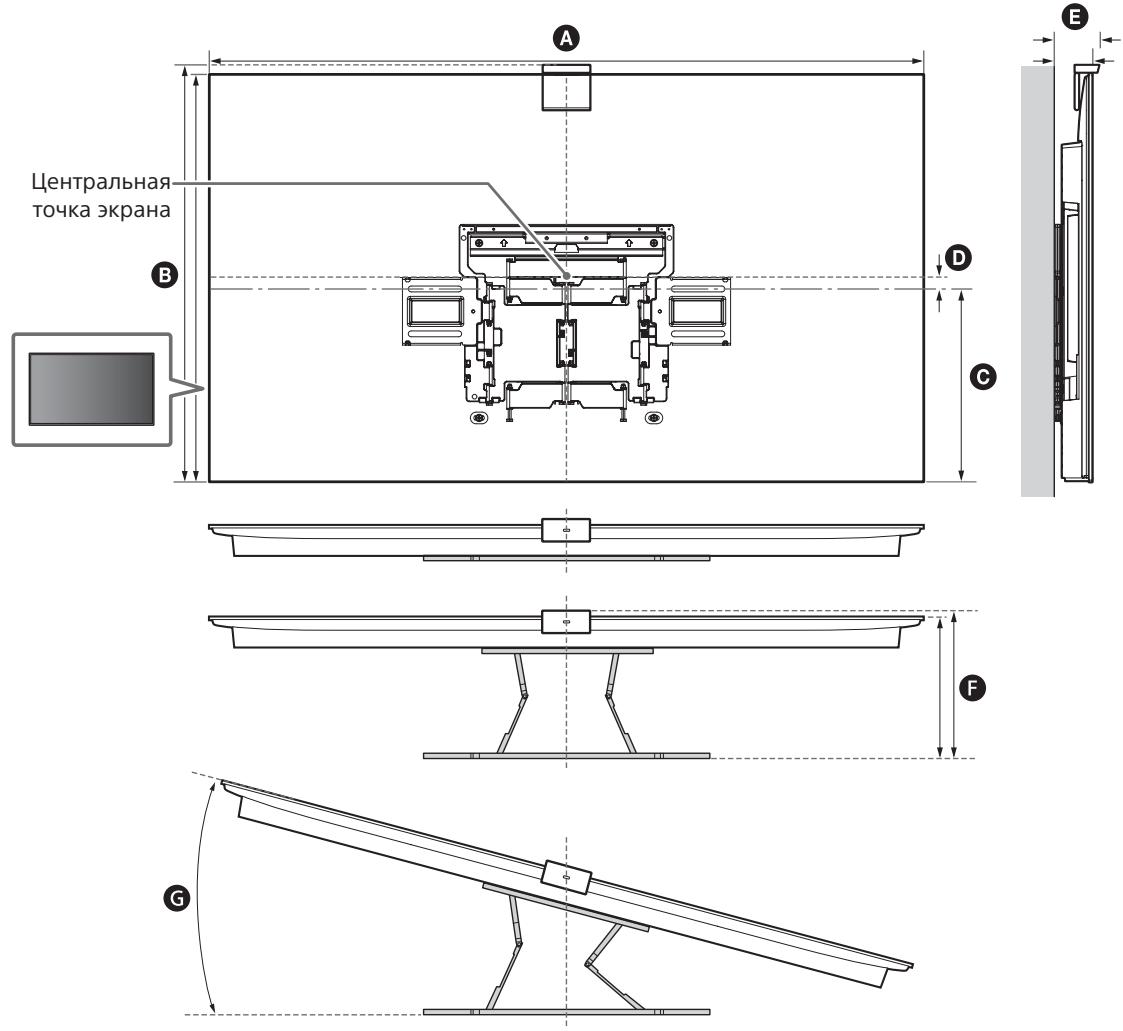
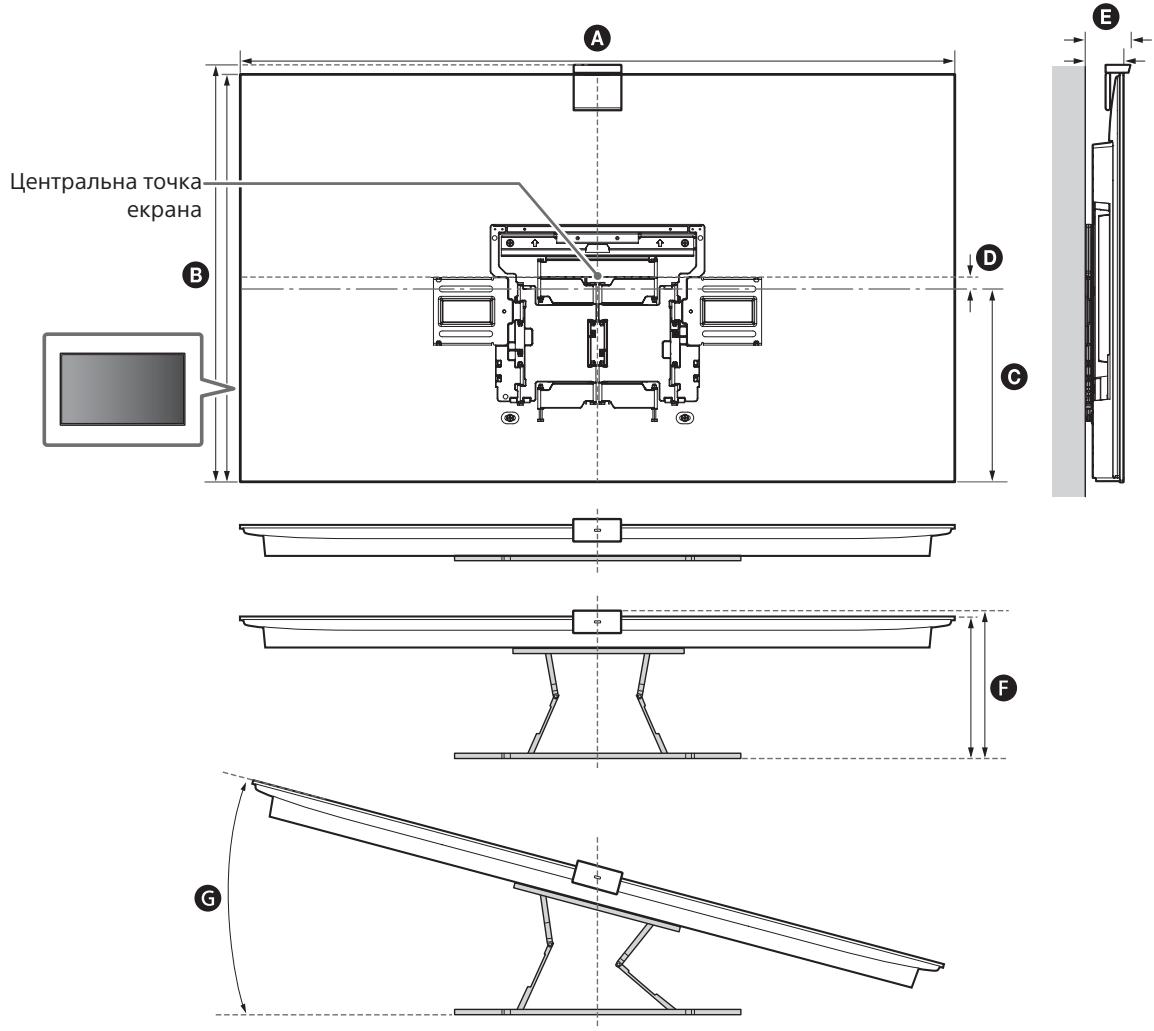
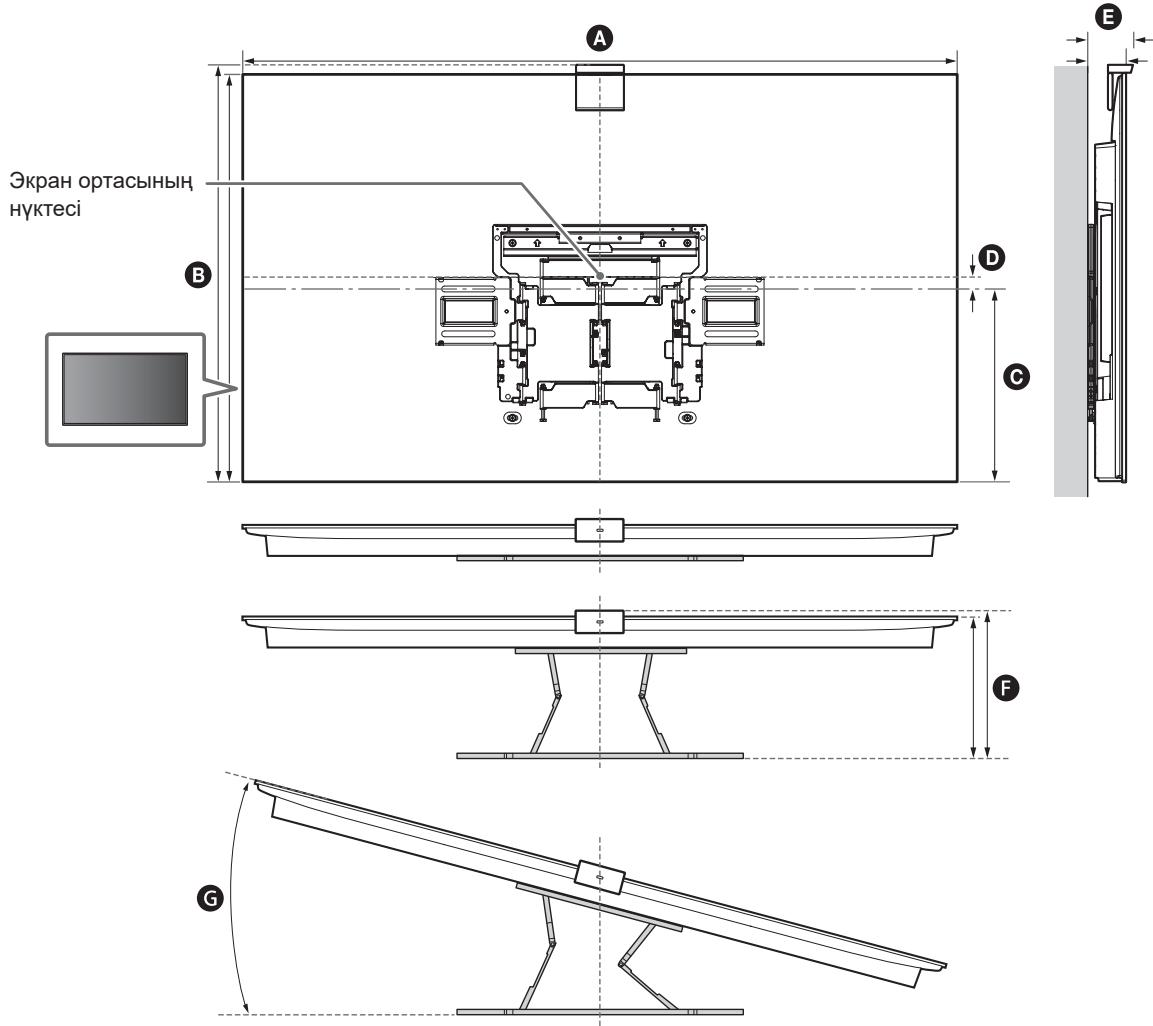
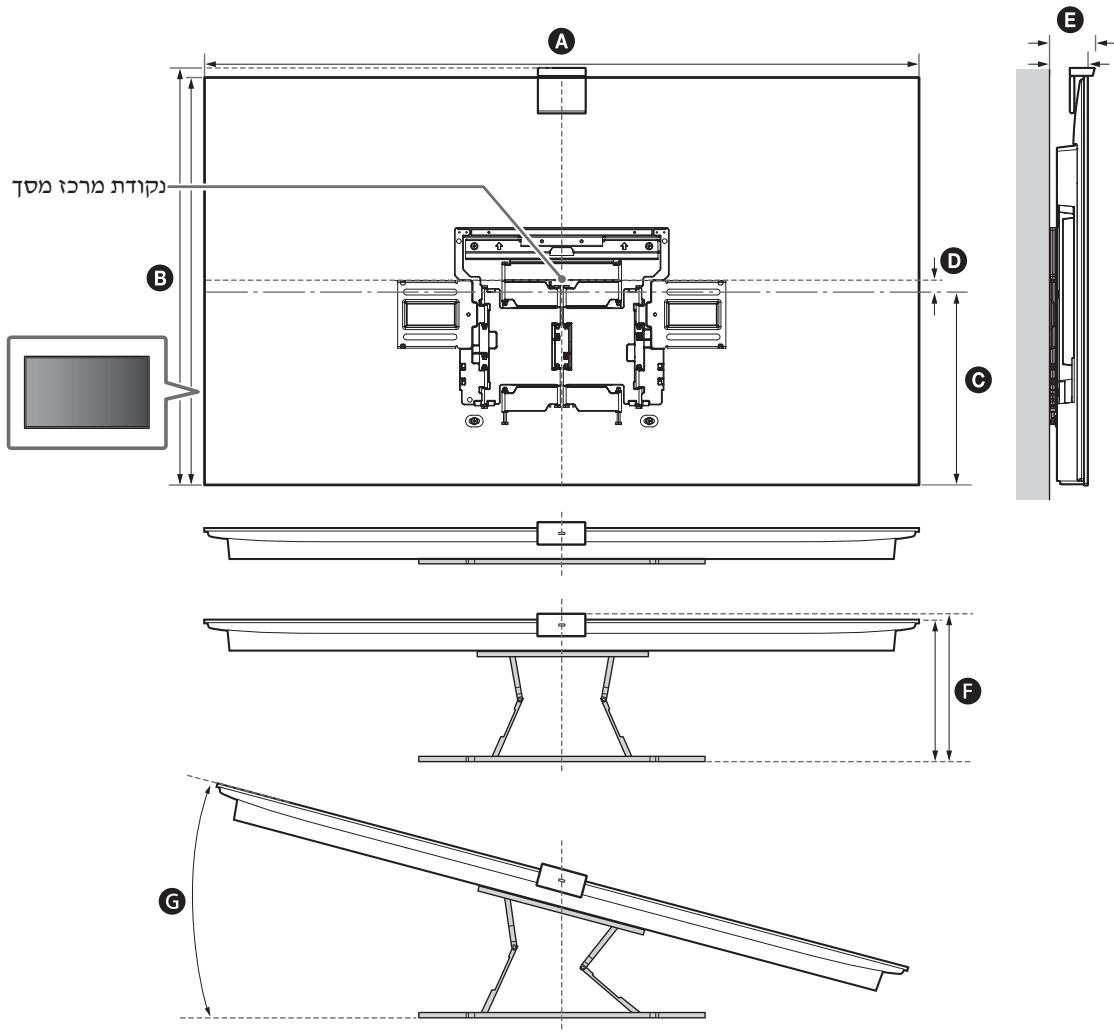
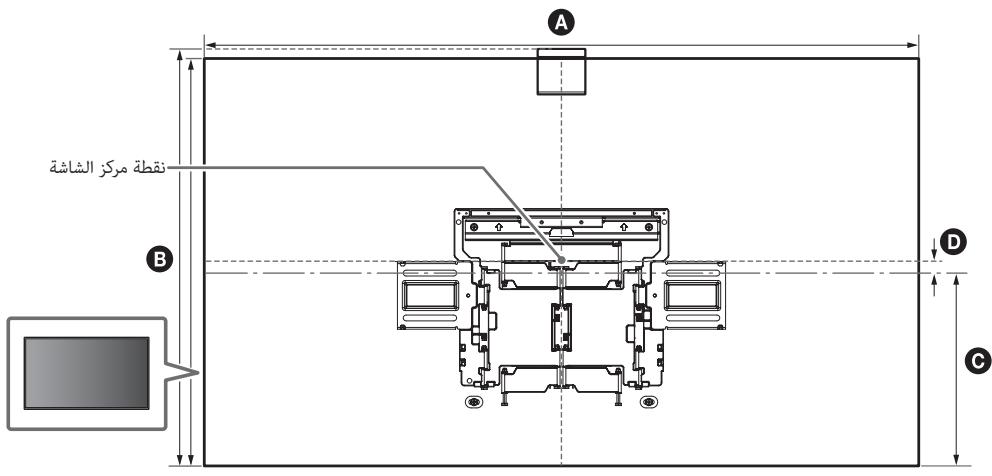
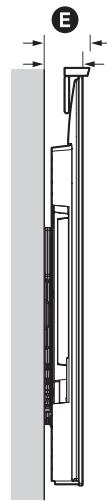
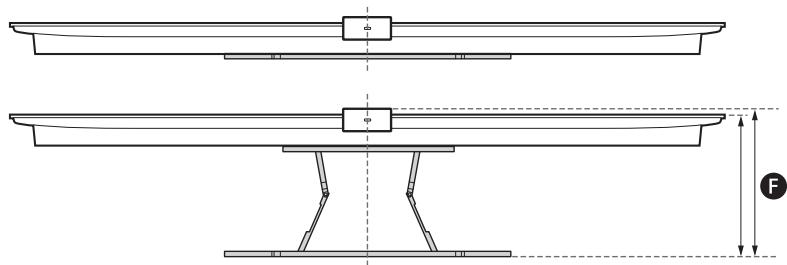
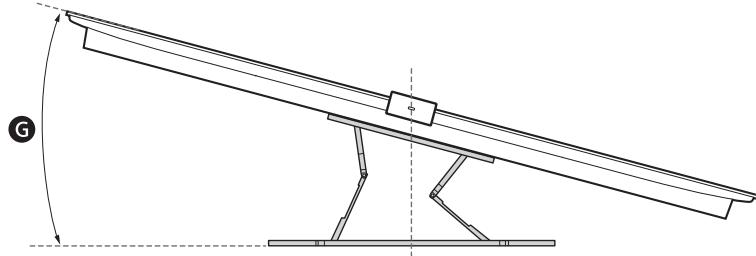
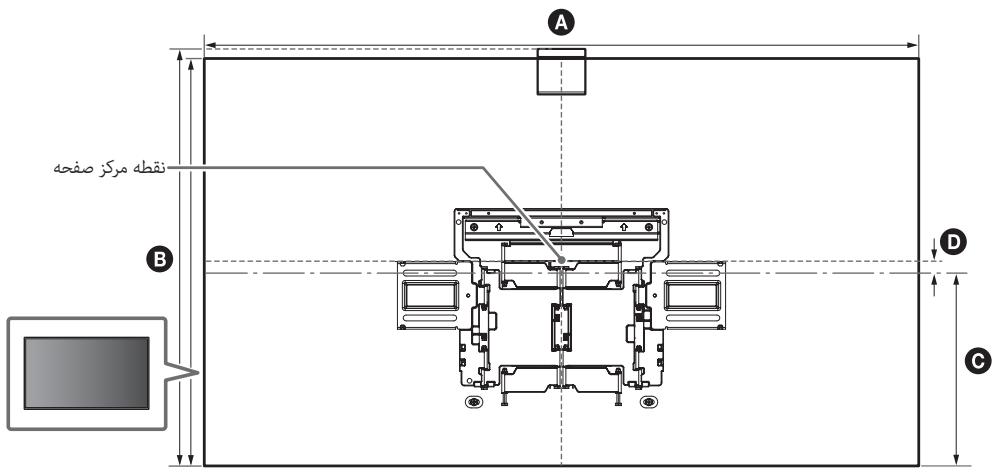
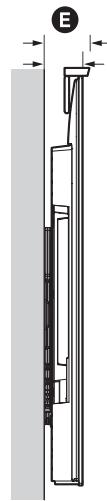
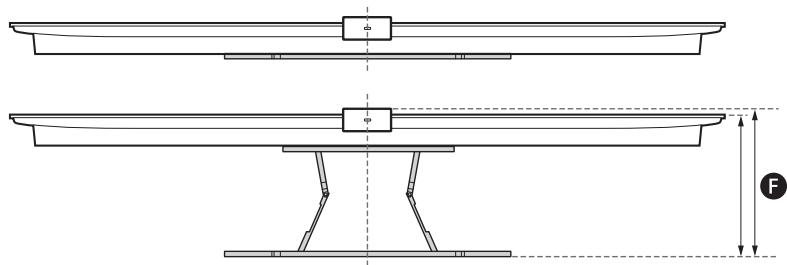
Measurement for Wall-Mount Bracket installation on the wall
Figures in the table may differ slightly depending on the installation.
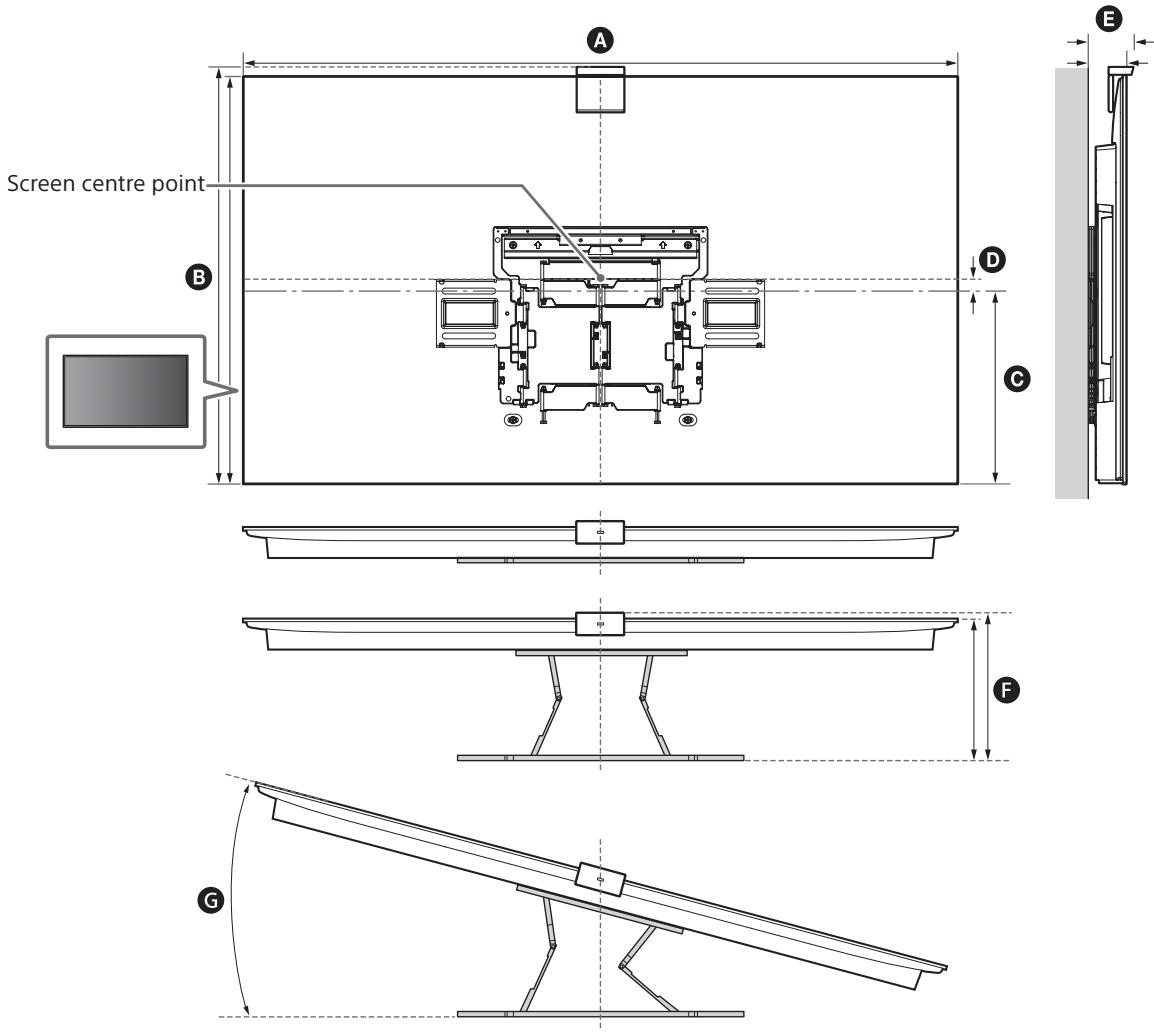
With Camera
(mm)
| Model Name | A | B | C | D | E | F* | G* (°) |
| XR-77A8xEL | 1722 | 1013 | 340 | 165 | 78 | 281 | 15 |
| XR-65A8xEL | 1448 | 851 | 342 | 82 | 77 | 281 | 18 |
| XR-55A8xEL | 1227 | 727 | 342 | 20 | 77 | 281 | 19 |
* (Approx.)
Without Camera
(mm)
| Model Name | A | B | C | D | E | F* | G* (°) |
| XR-77A8xL | 1722 | 998 | 340 | 165 | 66 | 269 | 15 |
| XR-65A8xL | 1448 | 836 | 342 | 82 | 66 | 269 | 18 |
| XR-55A8xL | 1227 | 712 | 342 | 20 | 66 | 269 | 19 |
* (Approx.)
Dimensions: (Approx.) [mm]
a: 354 b: 116 c: 77 d: 563 e: 533 f: 370 g: 368 h: 350 i: 11
Dimensions: (Approx.) [mm]
Weight (base only): (Approx.) [kg] 3.0
Specifications producer
Preparation for installation
1 Find the TV's location.
1 Find the TV's location.
- For limited region/country/model only.
- For limited region/country/model only.
For Greek speakers
Do not place the WM3 on the floor.
Dimensions: (approx.) [mm]
Check with Sony
For the installation of the product, read this manual carefully. Follow this instruction manual to perform a safe installation. Sony is not responsible for damages or injuries caused by incorrect use or installation. Keep this manual for future reference.
This instruction manual shows the correct way to work with the product and the important precautions that must be taken to prevent accidents. You are requested to read the manual carefully and to follow the instructions in this manual. Failure to do so may lead to serious damage or injury. Keep the manual for future reference.
Sony products are designed with safety in mind. However, if you use the product incorrectly, it may lead to serious injury due to fire, electric shock, falling, or dropping of the product. Follow the safety precautions to prevent such incidents.
WARNING
Product warnings
This wall mount is designed for use only with the specified televisions. Check the product information for the televisions to verify that this wall mount can be used with them.
Important safety instructions
WARNING
If the following safety precautions are not followed, it may result in serious injury or death from falling, electric shock, or product damage.
Have the installation performed by a qualified installer.
If the wall mounts are not installed correctly, the following incidents may occur. Make sure the installation is performed by a qualified installer.
The television may fall and cause serious injury, as well as damage to property. - If the wall on which the wall mount is installed is unstable, uneven, or not perpendicular to the floor, the structure may fall and cause injury or property damage. The wall must be able to support a weight at least four times the weight of the television. (See the product information for the television regarding its weight.) If the installation of the wall mount is not sufficiently secure, the structure may fall and cause injury or property damage.
Make sure you have the qualifications to perform the removal of the television by a qualified installer.
If other people, other than qualified installers, transport or dismantle the television, it may fall and cause injury or property damage. Two people are required (three people for televisions with a screen size of 75 inches (189.3 cm) or larger) to transport a large television (except for Europe). Two people are required (three people for televisions with a screen size of 75 inches (189.3 cm) or larger) to transport a large television (only for Europe).
Do not tighten the screws or other fasteners of the television.
If you tighten them, the television may fall and cause injury or property damage.
Do not remove the parts of the wall mount.
If you remove them, the wall mount may fall and cause injury or property damage.
Do not install any other equipment other than the specified product.
The wall mounting kit is designed for use only with the specified product. If you are mounting other equipment, the differences may cause it to fall and result in injury or damage to property.
Do not attach the wall mounting kit to any product other than the television. Do not place the television on a slanted or uneven surface.
If you install it incorrectly, the television may fall and cause injury or damage to property.
Do not lean on or hang from the television.
Do not push or pull the television, as it may fall and cause serious injury.
WARNING
If the specified precautions are not followed, injury or damage to property may occur.
Be careful not to pinch your fingers when handling the wall mounting kit or when turning the television. Be careful when lifting the television and avoid hitting it against any obstacles. Always use the product on a stable surface for safe use. Keep the product away from children.
Do not apply excessive force to the product during installation or handling.
Do not apply excessive force to the inside of the television. If you do, the television may fall and cause injury or damage to property.
Do not place this product near medical devices.
This product (including accessories) contains magnets that may interfere with pacemakers, defibrillators, and other medical devices. Do not place this product near such devices. Consult your doctor before using this product if you use such medical devices.
Keep the product in a place where it cannot be reached by children or pets.
This product (including accessories) contains magnets. Exposure to magnets may cause health hazards, such as nausea and dizziness, or damage to the body. If you are affected by magnets (or are a magnet), consult your doctor.
The wall-mount bracket can be installed on a wall that is strong enough to support the TV. The wall must be flat and free of obstructions. - Wall-mount bracket - Screws are included for mounting. - Clean the holes in the wall. Do not use the wall-mount bracket where it may be exposed to mechanical vibration.
Mounting the wall-mount bracket
To Sony dealers
WARNING
These instructions are for Sony dealers only. Read the safety precautions described below and pay special attention to safety during installation, maintenance, and operation of the product.
Do not mount the wall-mount bracket on a wall surface where the TV's sides or edges protrude from the wall surface.
Do not mount the wall-mount bracket on a wall surface, such as a column, where the TV's sides or edges protrude from the wall surface. If an object or person strikes the side of the TV, it may cause damage or injury.
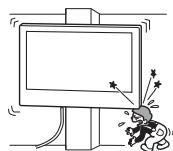
Do not mount the TV near air conditioning units.
If the TV is placed in a location with strong air flow from an air conditioner, it may cause the TV to overheat, electrical shock, or malfunction.
Mount the wall-mount bracket securely to the wall by following the instructions in this manual.
If any of the screws become loose or fall out, the wall-mount bracket may fall and cause damage or injury. Make sure to use the appropriate screws for the wall material and mount the bracket securely with four 8 mm diameter screws (not supplied).
- Do not cover the ventilation holes.
Note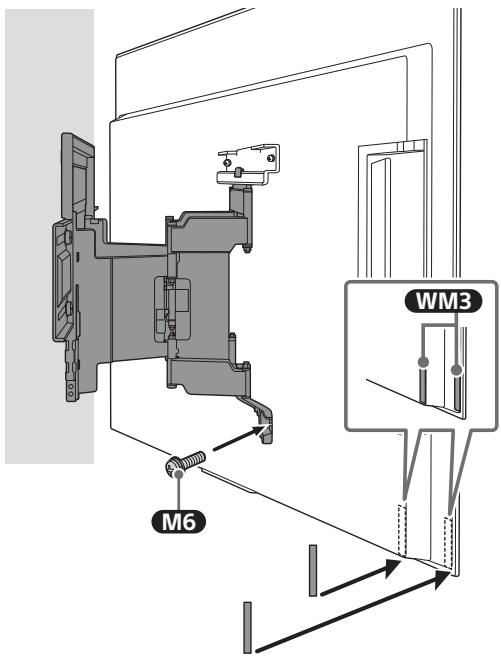
4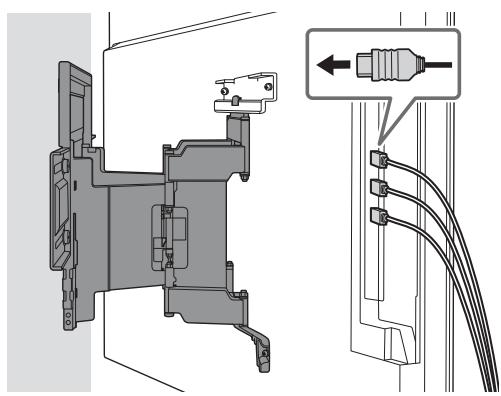
5 When moving the TV, hold it firmly from the bottom.
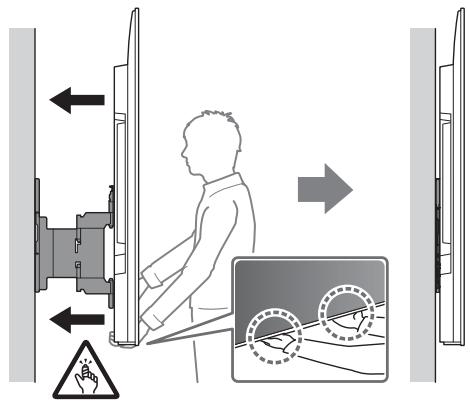
The TV may not fit flush against the wall depending on the type of bracket and cable connections. This is not a defect.
WARNING
- Two people are required (three people for TVs over 189.3 cm (75 inches)) to transport a large TV (except for Egypt). Two people are required (three people for TVs over 75 inches (189.3 cm)) to transport a large TV (only for Egypt).
5. Mount the wall plate using appropriate screws (not supplied) and anchors (not supplied).
Bracket
Using a level, check that the wall plate is horizontal.
Caution
Do not overtighten the 8 mm × 60 mm wood screw. Incorrect tightening may damage the surface and the 8 mm × 60 mm wood screw.
The TV may not fit flush against the wall depending on the type of bracket and cable connections. This is not a defect.
WARNING
- Two people are required (three people for TVs over 189.3 cm (75 inches)) to transport a large TV (except for Egypt).
Two people are required (three people for TVs over 75 inches (189.3 cm)) to transport a large TV (only for Egypt).
Supported models*:
Wall mount bracket
Safety
Thank you for purchasing this product.
For the attention of the buyer
Wall mounting of the TV

WARNING
PROFESSIONAL INSTALLATION REQUIRED
This product must be installed by a qualified specialist who can determine the strength of the wall that must support the weight of the TV. If the TV is not properly secured, it may fall and cause serious injury. Sony is not responsible for any damage or injury caused by improper handling or improper installation, or installation of another product other than the specified one. This does not affect your legal rights (if any).
For Sony
To install this product, sufficient space is required. For a safe installation, the structure must be carefully read and followed according to the operating instructions. Sony is not responsible for any damage or injury resulting from improper handling or improper installation. After installation, hand this manual to the buyer.
This operating manual contains important safety information
Precautions and information to ensure safe use of the product, which are necessary to prevent accidents. You are obliged to read, fully understand, and follow all instructions contained in this manual. Failure to comply with this requirement may result in serious injury or damage to property and may void the warranty. Keep this manual for future use.
Sony products are designed with safety in mind. However, improper use of the product may cause serious injury due to electric shock, fire, or damage to the product. To avoid such accidents, be sure to follow the appropriate safety precautions.
The date of manufacture is indicated on the product and on the packaging or label with a barcode in the following format: YYYYY/MM, where YYYYY is the year and MM is the month of manufacture.
Manufacturer: Sony Corporation, 1-7-1 Konan Minato-ku Tokyo, 108-0075 Japan. Made in China
Authorized organization for accepting claims from consumers in Kazakhstan: Sony Electronics Representative Office in Kazakhstan, 050010, Republic of Kazakhstan, Almaty, Dostyk Ave., 117/7
Name of the manufacturer: Dyson Electronics, Russia, 123103, Moscow, Karamyshevsky proezd, 6
WARNING
Specified products
After mounting the TV, do not remove the screws, etc.
In this case, the TV may fall and cause injury or property damage.
Do not disassemble or modify the bracket for wall mounting.
In this case, the bracket for wall mounting may fall and cause injury or property damage.
Do not install any other equipment on the bracket other than that specified.
This bracket for wall mounting is intended for use only with the specified products. If equipment not intended for such installation is attached to this mounting bracket, it may fall or be damaged, and may also cause injury or property damage.
To avoid overloading the bracket for wall mounting, do not place anything on it other than the TV. Do not shake the TV left/right, up/down.
In this case, the TV may fall and cause injury or property damage.
Do not lean on the TV or hold onto it.
Do not lean on the TV or hold onto it, as it may fall and cause serious injury.
WARNING
If the following precautions are not observed, there is a risk of injury or property damage.
Check the wall strength and use the supplied screws to install the bracket for the TV. - When turning the TV, be careful not to hit anything. - Be sure to keep the screws in a safe place for future use. Store them out of the reach of children.
Care for the TV should be carried out without applying excessive force.
Do not overload the front part of the TV. Otherwise, the TV may fall and cause injury or damage to property.
Do not place this product near medical devices.
This product (including accessories) is equipped with magnets, which may affect the operation of pacemakers, programmable shunt valves for hydrocephalus, or other medical devices. Do not place this product near people using such medical devices. Consult a doctor before using this product if you use a medical device.
Store in places out of the reach of children or people under supervision.
This product (including accessories) is equipped with magnets. Swallowing magnets may cause serious consequences, such as choking or damage to the digestive tract. If magnets are swallowed, seek medical attention immediately.
Precautions
- If the TV, installed on a bracket for wall mounting, is used for a long time, the wall behind or above the TV may discolor or the wallpaper may peel, depending on the wall material. After removing the bracket for wall mounting, holes will remain in the wall. Do not use the wall-mount bracket in places with vibrations.
Do not install the wall-mount bracket on walls where the edges of the TV will protrude beyond the edges of the wall.
Do not install the wall-mount bracket on surfaces (such as pillars) where the edges of the TV will protrude beyond the edges of the wall surface. Hitting the protruding edges of the TV may cause injury or damage to property.
Do not install the TV under an air conditioner or near it.
If the TV is exposed to direct airflow from an air conditioner for a long period, it may cause condensation, electric shock, or malfunction of the TV.
Be sure to securely attach the wall-mount bracket to the wall, following the instructions in this manual.
If any of the screws are loose, the wall-mount bracket may fall and cause injury or damage to property. Use screws that are appropriate for the wall material, and securely fasten the device with four screws of 8 mm diameter (or equivalent).
Use the included screws and parts for mounting and strictly follow the instructions given in this operating manual. If other mounting materials were used during TV installation, the TV may fall and get damaged or cause injury.
Be sure to assemble the bracket, strictly following the instructions given in this operating manual.
If any of the screws are loose or missing, the TV may fall, which could cause damage to the TV or result in injury.
Securely tighten the screws in the designated mounting holes.
Otherwise, the TV may fall, which could cause damage to the TV or result in injury.
Make sure that during installation the TV is not subjected to impacts.
Impacts may cause the TV to fall and break. This could lead to injury.
Install the TV on the wall only if it is flat and perpendicular to the floor. Otherwise, the TV may fall and cause injury.
After securely installing the TV, ensure safe routing of cables.
Cables that present a tripping hazard may cause serious injury or damage to the TV.
Do not allow cables to be pinched by the TV or connecting cables.
If the power cable or connecting cables are pinched between the device and the wall, or are sharply bent or twisted, the insulation of the internal wires may be damaged, which could cause a short circuit or breakage. This could lead to a fire or electric shock.
The screws that secure the bracket for wall mounting to the wall are not included in the delivery set.
When mounting the bracket for wall installation, use screws that match the material and structure of the wall.
Preparation for installation
- Use wooden screws 8 mm x 60 mm. Incorrect tightening may lead to reduced fixation strength of the wooden screw 8 mm x 60 mm.
- Remove the tabletop stand sides. Firmly hold the tabletop stand with both hands while others lift the TV.
- The power cord and cables are not twisted or pinched.
WARNING
- Incorrect placement of the power cord and similar may lead to fire or electric shock due to short circuit. To ensure safety, make sure all installation points are completed.
Installation
To remove the TV, perform the procedure described above in reverse order.
WARNING
Mounting the bracket for wall installation on the wall
1 Determine the installation location.
Make sure there is enough space on the wall for the TV and that it can support a weight at least six times the TV's weight.
- See the "Dimensions for Wall-Mount Bracket" section on page 20.
- See the TV manual for information on the TV's weight.
Note
- The power cord and cables are not twisted or pinched.
- Improper placement of the T.I.D. network cable can lead to fire or electric shock due to a short circuit. To ensure safety, make sure all installation points are completed.
Transformation
To reposition the TV, perform the procedure described above in reverse order.
WARNING
- To move large TVs, two or more people are required (three or more people for TVs with a diagonal of 189.3 cm (75 inches) or more) (except for certain models).
Dimensions for wall-mount bracket installation on the wall
Figures in the table may vary slightly depending on the installation.
With camera (mm)
| НазBABе модени | A | B | C | D | E | F* | G* (°) |
| XR-77A8xEL | 1722 | 1013 | 340 | 165 | 78 | 281 | 15 |
| XR-65A8xEL | 1448 | 851 | 342 | 82 | 77 | 281 | 18 |
| XR-55A8xEL | 1227 | 727 | 342 | 20 | 77 | 281 | 19 |
* (Approx.)
Without camera (mm)
| Названные м odeели | A | В | C | D | E | F* | G* (°) |
| XR-77A8xL | 1722 | 998 | 340 | 165 | 66 | 269 | 15 |
| XR-65A8xL | 1448 | 836 | 342 | 82 | 66 | 269 | 18 |
| XR-55A8xL | 1227 | 712 | 342 | 20 | 66 | 269 | 19 |
* (Approx.)
Information for installation using the wall-mount bracket for Sony (SU-WL850)
Models that are supported*:
Do not tighten the screws until after mounting the TV.
If this happens, the TV may fall and cause serious injury or death.
Do not replace the wall mount bracket parts for wall mounting.
If this happens, the wall mount bracket may fall and cause serious injury or death.
Do not install any other devices other than those specified in the product.
This wall mount bracket for wall mounting is designed for use only with the specified products. If you install other devices other than those specified, they may fall and cause serious injury or death.
Do not use the wall mount bracket for wall mounting for any purpose other than a TV. Do not tilt the TV up/down or left/right.
If this happens, the TV may fall and cause serious injury or death.
Do not lean on the TV or hang from it.
Do not lean on or hang from the TV, as it may fall and cause serious injury or death.
WARNING
If you do not follow the safety precautions listed below, it may lead to serious injury or death.
Be careful not to pinch your fingers between the wall mount bracket for wall mounting or when adjusting the tilt angle of the TV. Operate the TV carefully to avoid pinching. Keep small parts out of reach of children. Store them in a place inaccessible to children.
Installing the wall mount bracket for wall mounting
Installing the wall mount bracket for wall mounting on a wall with studs
Installing the wall mount bracket for wall mounting on a wall
1 Bn3Haute Micce BCTaHOBLeHHra. IpekeohaiTecra, 0cStHa Mae doCTaTHi po3mipn dIy TeJIeBi3Opa Ta B 3Mo3i BnTPmuATn Bary, 0HaJMeHse B wictb pa3 6Ib7y 3a Bary TeJIeBi3Opa.
-ДИВ.《ВИМЮВАнгДЯ ВСТАНБЛЕNHЯ КОНштейна ДлЯ HabciHOrO Kpinпеленна CTiHi» Ha CTOp.20. - Bary TeJIeBI3Opa MoKHa 3HaIaTn B ДовIDKOBOMy nOci6HnKy Do TeJIeBI3Opa.
Ppimitka
-Як soo TeJIeBI3Op BCTaHOBHeHO Ha CTiHi,ВерхнчacTInHa TeJIeBIOpa 6yIe TPOxHaxnIeHaBpePe. - 06ob'83koBo nepeBipTe,ЧИЗРУНДИВИТСЕТelebi3Op y Bn6paHOMy MicuI.
2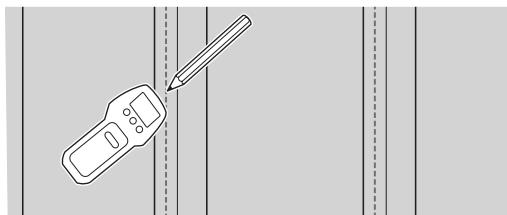
He nepetaryuTe depeB'HNrBnHT 8 MMx60 MM. HaMiphe 3aTayBaHH MoKe HeRaTUBHO BnHHT NaMiCiHcIb KpiJIeHHrapeB'AnHO rBnHTa 8 MMx 60 MM.
- TpmaTe BnKpyeHi rBHTn HneBnKOpncTaHi DeTalI B 6e3NeuHOMy, HeDcXHOMy IJIa DIteM MiCi.
BCTaHOBJIeHЯ TeIeBi3opa Ha CTiHy 3 Kopo6Kn*
- Лиши ля обм_EXeHoro perioHy/kpaIHn/ mojeni. 1 BnKpyTiB rBnHTn i3 3aHbOi naHeJI TeIeBi3Opa.
CTaHOBJIeHnI TeJIeBi3Opa Ha CTiHi
1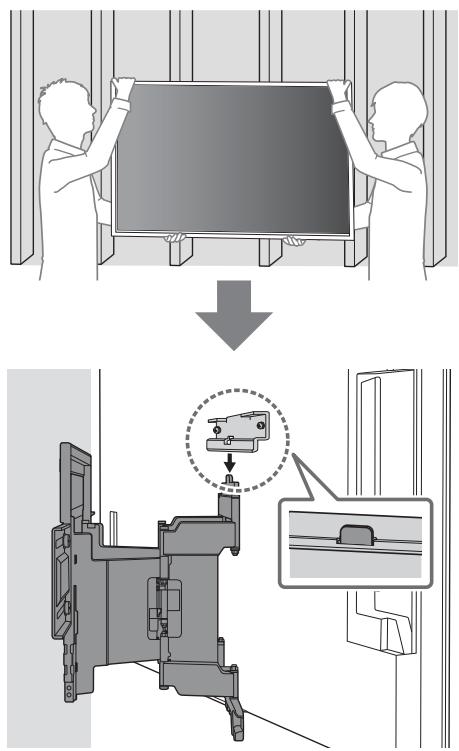
2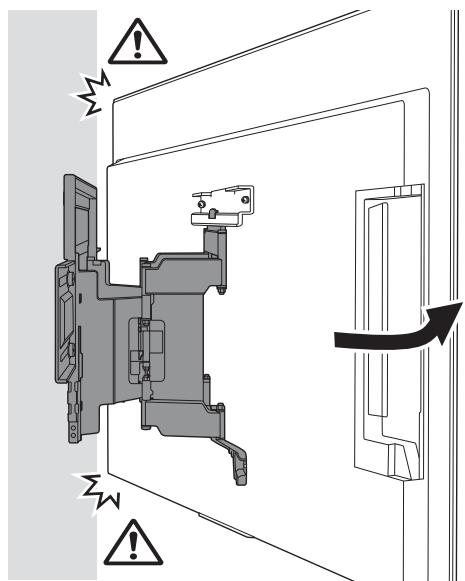
3Пркртьліву ta паByч actINHy KpoHшTeиHaДЯnactiHHOrO KpInJIeHHЯ 3aДОПOMOrOIO M6 i рпкрiniTBWM3.
- He npinkpinyte WM3 ha etnkeTkax.
Примитka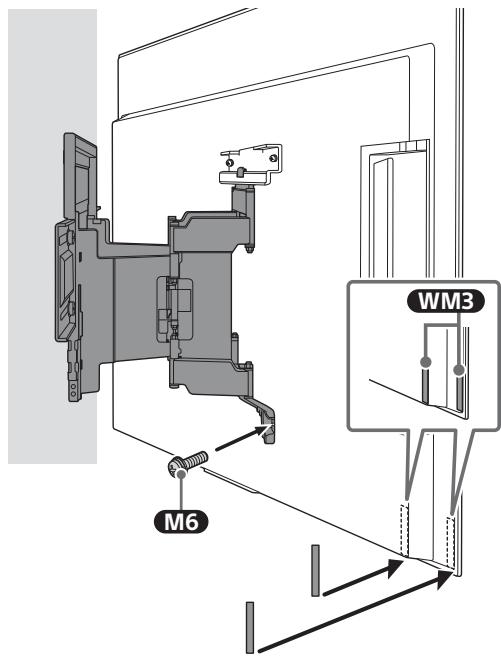
4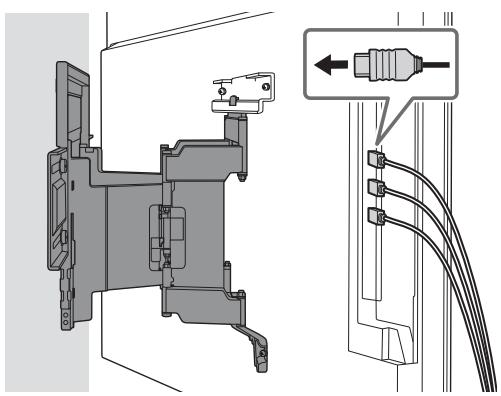
5 PeremiiuoynteIeBi3Op, MiHOTpMaIte Ioro 3HN3y.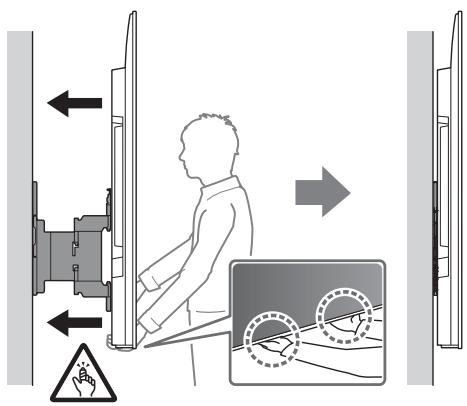
PpimItka
B3aJIeXHcOti BiD TnIy i KJIbKocTi nIe'EDHaHnx Ka6eJIiMoXJInBO, IIO TeLeB13Op He MoXHa 6yJe npucHyTu 6JIuXue Do CTInH. He cIId po3rJaTaN ue kIpo6IeMy.
6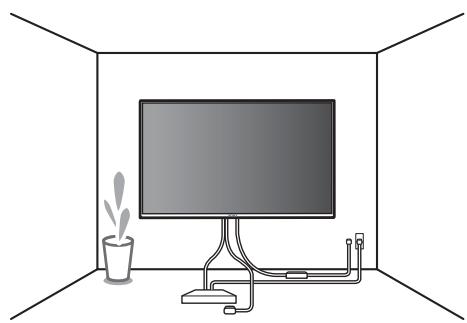
3ACTEPEKEHH
-Дяпесень велкого телевизора notpi6ho ( \text{дьо}\text{аб}\text{б}\text{ьшe}\text{ос}\text{ic}\text{6} (\text{тpo}\text{а}\text{б}\text{6}\text{ьшe}\text{oc}\text{ic}\text{6}\text{дя} ) -небура з diaiorohanlio 189,3 cm (75 duimib) a60 -бию) (kpim Ertnty). -Дяпесень велкого телевизора notpi6ho ( \text{дьо}\text{а}\text{б}\text{ьшe}\text{ос}\text{ic}\text{6} (\text{тpo}\text{а}\text{б}\text{6}\text{ьшe}\text{oc}\text{ic}\text{6}\text{дя} ) -небура з diaiorohanlio 75 duimib (189,3 cm) a60 -бию) (tibkn дя Ertnty).
Ipebipka nicra 3aBepseHnBCTaHOBJIeHHN
IpebeipTe 3a3NaeHi HxKye NyHKTn.
BcTaHOBJIeHHa KPOHSTeHnHaДЯHaCTiHHOrO KpInJIeHHaHa cTiHi
1 Bn3HaTe MicSe BCTaHOBJIeHHra.
IpekoHaTecs, 0o CTiHa Mae IOCTaTHi pO3mipn IJy TeLeBi3Opa Ta B 3MO3i BVITPMaTI Bary, OToHaMEnHe B WicTB pa3 6iBbUy 3a Bary TeLeBi3Opa.
-ДИВ.《ВИМIPIOBAHHДЯВCTAHOBJIENHЯКроншTeинаДЯнсIHHOKpINNeHHa CTiHi》Ha CTOp.20. - Bary TeJIeBI3Opa MoKHa 3HaIaTn B ДовIDKOBOMy nOci6HnKy Do TeJIeBI3Opa.
Ppimitka
-Як soo TeJIeBI3Op BCTaHOBHeHO Ha CTiHi,Верхну acTInHa TeJIeBI3Opa 6yIe TPOxHaxnHeBaNpei. - O6ob'ЯЗКОВО ripebeBIPte,ЧИЗРУНДИВИТСЕТЕБI3OPуВБpaHOMYMICJI.
Apply WM1 to the wall and make a mark for the hole.
Drill
- Use a level to align
WM1 horizontally.
Do not overtighten the wood screw 8 mm × 60 mm. If the screw is overtightened, it may damage the wood screw or the mounting bracket.
Mounting the TV on the wall
Install the bracket for wall mounting
The wall must be able to support the weight of the TV.
With camera (mm)
| Назва моделя | A | В | C | D | E | F* | G* (°) |
| XR-77A8xEL | 1722 | 1013 | 340 | 165 | 78 | 281 | 15 |
| XR-65A8xEL | 1448 | 851 | 342 | 82 | 77 | 281 | 18 |
| XR-55A8xEL | 1227 | 727 | 342 | 20 | 77 | 281 | 19 |
(Approx.)
Without camera (mm)
| Назва модени | A | В | C | D | E | F* | G* (°) |
| XR-77A8xL | 1722 | 998 | 340 | 165 | 66 | 269 | 15 |
| XR-65A8xL | 1448 | 836 | 342 | 82 | 66 | 269 | 18 |
| XR-55A8xL | 1227 | 712 | 342 | 20 | 66 | 269 | 19 |
(Approx.)
Mass (base only): (approx.) [kg] 3.0
Cable routing bracket
Cable guide
__SUPPIMER__
Teneiapbl Kaibpfa 6ekity

ECKEPTY
KÖCİBN TYPDE OPHATbIJybl KEPEK
Byn eHimDi TeK Ka6bIpyaHbIn TeteiDap camBaHbIy IbdaMaIbIbIbHbN AnbIKayFa XaTbTkBpIbIyah Kc6iObOpHaTkbI opAtyIbKepe. ErepOpHTy 6abCbHda dybic 6ekITinMece, TeteiDap Kyan, eYApJxkapakATTaybl MyMKIN. Sony Kompanhrcb Dpybc NaJaDanbAay, dybc opAtnay Hemece KeCepetinRhen EHIMHen 6acKaChn NaJaDanaHy CanDaPbHnA TyHdaiTbH KeKenRhen 3akbIM Hemece jkapat YuHi Jxayantbl 6onMaBbl. 3aHbl KyKbIbHbIb3 (KaHJa da 6ip) XapaMaIdb.
Sony dnilnepepi yuiin
Ocby KpybIbIbIbOpHatayra XeTkniktI Tytpde TkKipB6KaKet. OPhATy XMybCTapbH bayiNci3 TypeOpbIbDAYuHsO bcyaIaNanHy NcKaybIbIbTHoBNk OKbIbYbIbIb. Sony Dpybc KojlanbHaey MeMece DpybcOpHATnay CanJaPbIHAN 60fAnh 3akBmPaFpaMe HezapaKaTa KaayaAITbEmec.OpHATKaHNah KeIN TYtbHbIbAocb HcyKaYbnltBtBeepHj3
Ocbl naanany Hcyaynbfb EHHMHIN DpybC KoIaNabHbNy Hxze 3aBmDb6bnbpMpya kaketti andbn any uanaapabn HkpcTeedi. Ocbl naanany HcyaynbfbHdaFb6bnk HcyaynapdbOky, MyKAT TyCny XzHe opbHday cizH xayankepuinirih3e. Onai icTeMy eayip aam JxakakatbHa HemeCe Mynik 3akmblya Hxze KeniindkTIn KyyHInH XoJIyBbHa ce6en bolby MymKH. BonaukaTa aknapa n yuH in cbl HcyaybkTb KONketIMdJxepre caKaTbH3.
Sony eHIMdepiKayinci3iKtEckepe Otbplbn Xacanfah. EHMdep Dpybc KOndaBnIImaca, ept, TK COFy, eHHMHK KyNaJbY HeMece OHJI NaTbPYc CAndapbIHAN aybpXkapaKaTkAeKenyI yMmKIn. OCbHnday KaFdJaNapdbIn anDbIn any yyHIN andbIn any wapanabHykapanb3.
OpHaTy Ke3iHdTeJIeIaIapbI COfbln aImaHbI3.
TeneiIaIapdbcoBnI ancaHb3, on Knyabby Hemece cbHyb MyMkiH. Bydan JxapaKaT anByhbl MyMKH.
TepeiIapbl Ka6bIpfa MeH eJeHre nepenHnKyJep 6oNaTbIHdai etin opHaTy KepeK.
Erepconaiboimaca,TeenndapKnyaybI Hemece kapaKaT aynBIs3 MymKIn.
Teneinap dypbocpHaTbIrlfahHAn KeiHka6eJIbepdi dypbc6ekirihi3.
The cable must be connected to the terminal block.
The alternating current cable must be connected to the cable clamp.
If the alternating current cable is connected to the cable clamp and the cable is clamped, the cable may be pulled out or the current may be cut off. This can cause a fire or electric shock.
Do not connect the cable to the terminal block with the power on.
Do not connect the cable to the terminal block with the power on.
Old wiring
- The diagrams shown in this manual are for illustrative purposes only. The actual diagrams may differ from those shown.
What is the cable connected to?
The cable is connected to the terminal block.
Grommet for conduit
Installation procedure
Maximum thickness of grommet: 16 mm. - For two-hole mounting, the hole spacing is 51 mm x 102 mm, and for four-hole mounting, it is 38 mm x 89 mm. - The distance between the mounting holes must be at least 406 mm.
Concrete or concrete block
Installation procedure
Reinforced concrete blocks are installed. Concrete blocks are installed in a row of 203 mm increments. - For each concrete block, prepare a space of 203 mm × 203 mm × 406 mm.
Inspection
Provided with the SU-WL850 structure
- All fasteners are inspected.
| WM1 (×1) | WM2 (×1) | WM3 (×4) |
| M6 (×4) | WT1 (×6) |
Installation provided
Installation bracket for profile (×4)*

- Only for installation in ceilings/floors/walls.
Installation distance
Before installation, determine the installation location and installation method. - Identify the location for the cables. - Prepare the appropriate washers for the 8 mm diameter holes (not included). Select the appropriate screws for the material of the bracket. - Prepare the following tools:
| *1 | 5,5 MM 10 MM | ||
| *2 | 1,5 H·M {15 kR·cm} | *3 | |
| *2 (x4) | *4 (x4) 8 MM × 60 MM | *4 (x4) | |
*1 For installation on steel profiles, use the appropriate screws
2 For concrete or concrete blocks, use the appropriate screws and washers

A Attach the bracket to the steel profile using the appropriate screws
Install the bracket on the concrete
1 Identify the installation location.
Ensure that there is sufficient space for the cables and that the cables are not bent beyond their minimum bending radius.
Refer to the 'Installation of cable glands' section for the installation of cable glands. For the current text, refer to the 'Definition of terms' section.
Note
When installing cable glands, the cable entries must be sealed with appropriate plugs. - We will check the installation of the cable glands in the installation location.
2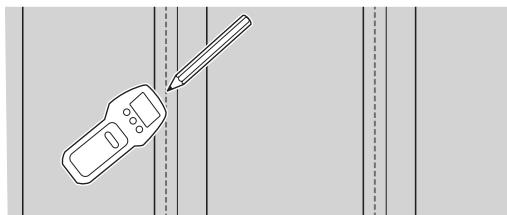
3 Drill holes for the cable glands according to the profile, and make the holes for the mounting brackets.
Note
For the installation of the WM1, refer to the installation instructions for the WM1.
4 Check the sealing plugs for the cable entries.
The sealing plugs must be checked to ensure that they are suitable for the cable diameters and that they are installed correctly.
Note
- The drilling holes must be drilled with a depth of 75 mm and a diameter of 5.5 mm.
5 Install the WM1 cable glands with the supplied screws (not included) and washers (not included).
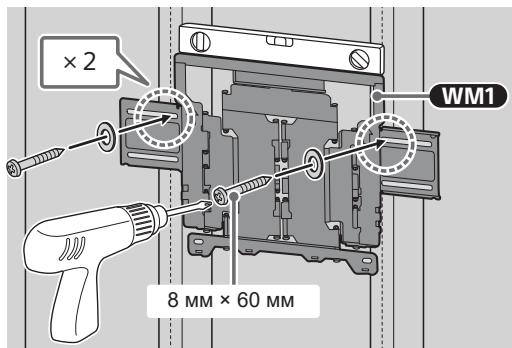
Note
For the installation of the WM1, refer to the installation instructions for the WM1.
Safety instructions
- 8 MM × 60 MM screws for fastening the bracket to the wall. The bracket is designed for 8 MM × 60 MM screws for possible installation.
6. Check the alignment of the mounting holes. (Use the holes as a guide.)
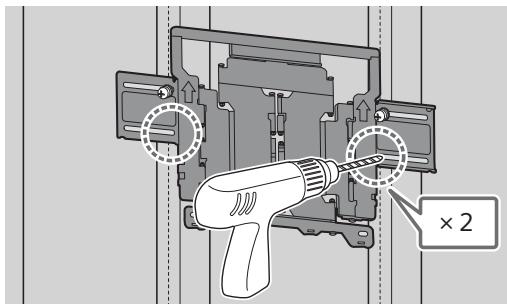
7. Insert the screws and washers into the holes.
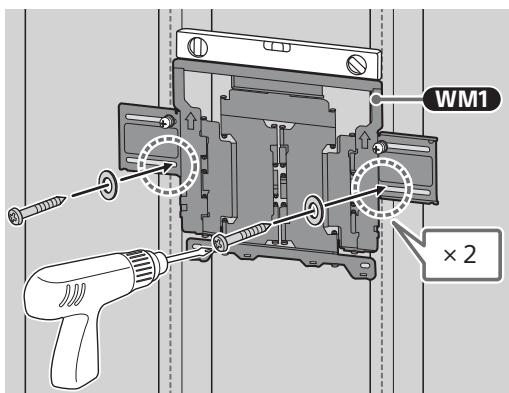
Note
WM1: For tightening, use the tightening wrench provided.
8. Tighten the screws with a wrench.
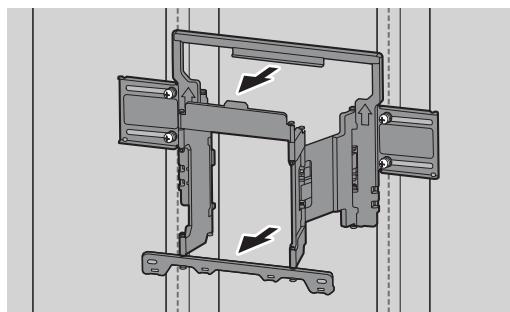
Installation of the brackets
Note
- Install the brackets away from children and keep them out of reach of children.
Mounting the brackets to the wall (optional)*
- For mounting in corners/edges/walls. 1. Remove the extra brackets from the brackets.
2. Attach the wall mounting bracket (provided with the brackets) to the back of the brackets (parallel to the wall) and secure it.
Note
- When mounting, attach the wall mounting bracket and secure it. For wall mounting, use only the provided screws. Using other screws may damage the wall mounting bracket and cause the brackets to loosen.
3. Attach the WM2 brackets to the brackets using the M6 screws.
Install the device on the cable.
1 First, remove all the covers.
2 Remove the bolts securing the covers.
3 Attach the device to the cable using the supplied bracket (do not attach it to the cable before the bracket is installed).
Note
When attaching the device to the cable, use the supplied bracket. To attach the bracket, you must first remove the protective film from the adhesive surface. Then, press the bracket firmly onto the cable and hold it in place for a few seconds.
4 Secure the device to the bracket using the two screws provided.
5 Tighten the device screws.
- Place the device on the mounting surface and press down firmly. If the device is to be mounted on a wall, press the mounting surface against the wall and hold it in place.
- Remove the protective film from the adhesive surface and press the device firmly onto the mounting surface.
Note
- The device may not adhere properly if the surface is not clean. Do not touch the adhesive surface with your hands, as this may reduce its stickiness. To ensure proper adhesion, use the device within the recommended temperature range.
- If the device is not sticking well, remove it, clean the surface, and reapply.
- When removing the device from the adhesive, pull it off slowly and carefully to avoid damaging the surface.
Attach the device to the cable
The original text appears to be in a non-English language, possibly Kazakh or another Turkic language. It seems to be a technical instruction about installing a device. I will translate it to English: "Install the device in the correct position, then secure it with screws."
This appears to be in the same non-English language. Translation: "We will install the device according to the instructions."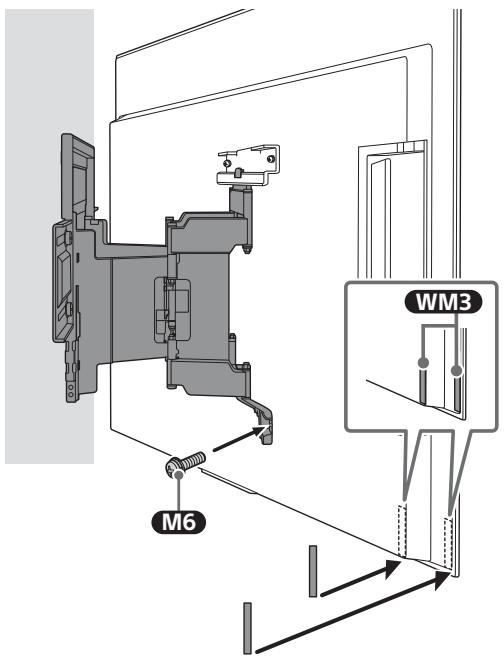
Translation: "When the wires are connected, secure them with the provided clamps."
This seems to be a heading or label. It might be a brand or model name. I'll keep it as is: "HycKay"
Translation: "If the cable is not properly connected, the device may not function. Check the connection."
This appears to be a label or heading. It might be a warning or note. I'll keep it as is: "ECKEPTY"
- This is a technical specification. It seems to be in the same language. Translation: "For the large TD, two or more diameters (189.3 cm (75 inches) and for the extra large TD, three or more diameters) are required (for the M6 screw). For the large TD, two or more diameters (75 inches (189.3 cm) and for the extra large TD, three or more diameters) are required (for the M6 screw only)."
This appears to be a heading or label. It might be a section title. I'll keep it as is: "OpHaTydbIH aayKaTaNfHdIbIfbIH Tekcepy"
Translation: "The following text."
- Translation: "Do not use if the cable is damaged or broken."
This appears to be a label or heading. It might be a warning. I'll keep it as is: "ECKEPTY"
Translation: "If the device is not working properly, check the power supply and connections. Do not attempt to repair it yourself."
This appears to be a label or heading. It might be a brand or model name. I'll keep it as is: "BackaaknapaT"
Install the wall-mounted bracket at the required height.
EXERCISE
- For a large TV, two or more brackets (189.3 cm (75 inches) and for an extra large TV, two or more brackets) are required (depending on the model). For a large TV, two or more brackets (75 inches (189.3 cm) and for an extra large TV, two or more brackets) are required (only for the model).
To install the bracket on a concrete wall or concrete block
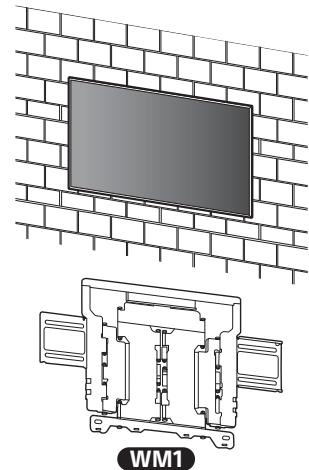
Installing the bracket on the wall
1 Check the installation location.
Make sure there is a suitable place for the TV on the wall and that the wall is strong enough.
See the section "Preparing to install the bracket on the wall" on page 20. To check the strength of the wall, see the section "Wall Strength Test".
Test
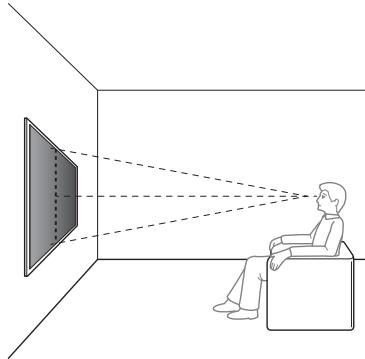
When the TV is installed on the wall, the TV should be slightly tilted forward. - We will check the alignment of the brackets.
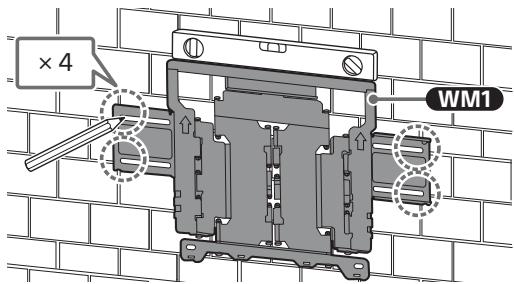
2 Place the WM1 bracket against the wall and mark the four holes.
Test
To check the WM1 bracket, we will use the IN bracket as a guide.
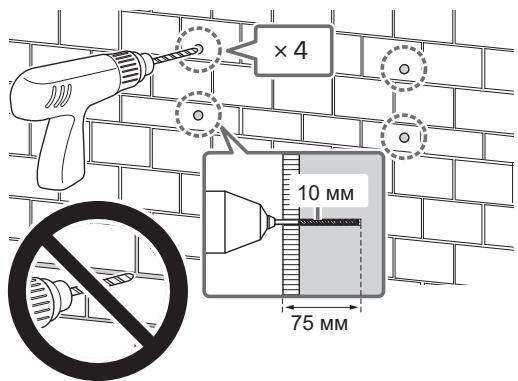
3 Drill holes for the wall anchors.
Check that the holes in the wall are strong enough to support the weight of the TV.
Hyckay
OpHaTy TcikTepi 75 MM TepeHdkTe, DnAmEtpi 10 MM 6yPbI yuBIme H Tciciy KepeK.
5 WM1 KyaPbIH Ka6bIpFara cKeck KeIeTIn 6ypaHdaJapMeH (XHaKa KipMei) XHe IaBapMeH (XHaKa KipMei) opHaTbHbI3.
HycKay
WM1 DeHreHH TeKcepy YUHH DeHre H TeKcepy KypaIbH NaIdaNaHbIbI3.
CaKtbik wapacbi
- 8 MM × 60 MM afaa 6yaHaDaHb IaMaJaH TbIc TaPTNaHbI3. IypbIc TaPTnacaHbI3 8 MM × 60 MM afaa 6yaHaJa YCTaMaaybI MymKiH.
6 KpoHsTeHHiH KOJbIH WeTKe Kaap TApTbI IN XblJXbITbIHbI3.
TeJIeIuIapIbI opHaTyf aIbIHday
HycKay
- AlbIHFaH 6paHaIaIapIbI XeHe naIdaIaHbIMaHaN 6eIweKTePdi Kayinci3 KepJe, 6aIaIapdAn aynak YcTaHbI3.
TeJeIaIapIbI Ka6bIpraFa 6ekity (KopabHaHa n aIbIn)*
TeJeIaIapIbI yCTeI TyfblpbiHaH anbln Ka6blpFara 6ekity
1 Tyicne TycTapbHbIH KaKnaFbIH aUbIHbI3.
2 TepeiIapbIH apTbIHafbl 6ypaHdaIapdbI aIbIn TaCTaHbI3.
3. Install the TV on the wall (if you have not done so already) before connecting the cables.
Note
- When connecting the TV, install it on the wall first. To install on the wall, you need at least two people. Other people may be needed to install the TV on the wall and to connect the cables safely.
4. Connect the cables to the TV's ports.
5. Turn on the TV from the power source.
- Place the TV on a flat, stable surface. If you are placing it on a stand, attach the stand to the TV first.
- Steps for wall mounting
- Attach the mounting bracket to the TV
- Place the TV on a flat surface.
Note
- To lift the TV, you need at least two people. When lifting the TV, be careful not to pinch your fingers or hands, as this could damage the TV or cause injury.
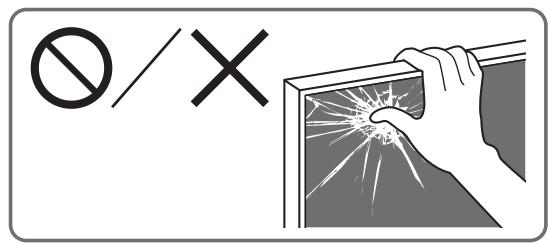
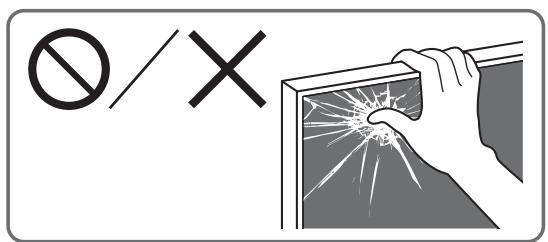
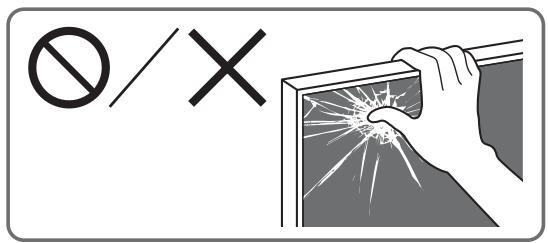
- To prevent damage to the TV, do not lift it by the screen.
- When moving the TV, hold it by the edges, not by the screen, to avoid damage.
- When lifting the TV from the stand, hold it firmly and be careful not to drop it.
Mount the TV on the wall
We ran the cable through the bracket and secured it with a clamp.
We did not clamp the clamps to the clamps.
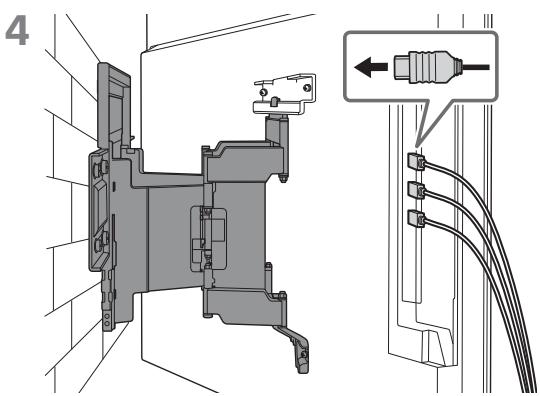
5 After checking the cables, we installed them according to the instructions.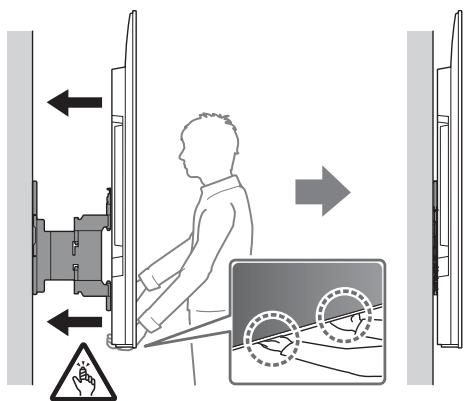
Start
It is possible to adjust the cable brackets to the required height and number. This is not a defect.
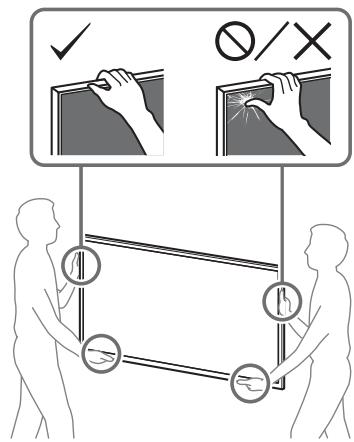
WARNING
- For a large TD, two or more clamps (189.3 cm (75 inches) and for a very large TD, three or more clamps) are required (see figure). For a large TD, two or more clamps (75 inches (189.3 cm) and for a very large TD, three or more clamps) are required (see figure only).
Installation text
Check the connections.
- Do not bend or twist the cable.
WARNING
If the cable is not properly installed or if the T.6.K. is not properly grounded, there is a risk of electric shock. Installation must be performed by qualified personnel.
Additional information
After checking the cables, perform the installation procedure in the correct order.
WARNING
- For a TV that is 75 inches (189.3 cm) or larger, two or more people are required for installation. For a TV that is smaller than 75 inches (189.3 cm), one or more people are required (only for wall mounting).
Technical specifications
WM1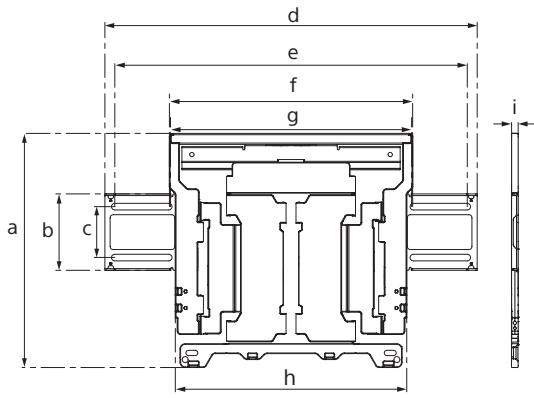
Mounting bracket (only for wall): (approx.) [kg] 3.0
Design and technical specifications are subject to change without notice.
Installation
Measurement for mounting on a wall with a wall-mount bracket
The installation procedure may vary depending on the model.
With camera (mm)
| Улгінemipi | A | B | C | D | E | F* | G*(°) |
| XR-77A8xEL | 1722 | 1013 | 340 | 165 | 78 | 281 | 15 |
| XR-65A8xEL | 1448 | 851 | 342 | 82 | 77 | 281 | 18 |
| XR-55A8xEL | 1227 | 727 | 342 | 20 | 77 | 281 | 19 |
- (Approx.)
Without camera (mm)
| Улгінemірі | A | B | C | D | E | F* | G* (°) |
| XR-77A8xL | 1722 | 998 | 340 | 165 | 66 | 269 | 15 |
| XR-65A8xL | 1448 | 836 | 342 | 82 | 66 | 269 | 18 |
| XR-55A8xL | 1227 | 712 | 342 | 20 | 66 | 269 | 19 |
- (Approx.)
Installation information for Sony Wall-Mount Bracket (SU-WL850)
Supported models*:
- In actual model names, "x"/"xx" indicates numbers and/or letters specific to each model.
XR-77A8xL / 77A8xEL / 65A8xL / 65A8xEL / 55A8xL / 55A8xEL
Purchaser
201733
15 15
15
1
.
y
.
(1)
. ① = ( x 1,y 1) , = ( x 2,y 2)
.
(75) 189.3 n
y
.()
75 77
.()
n
nabnnnynnnn, nnnn
.

Sony
77
VS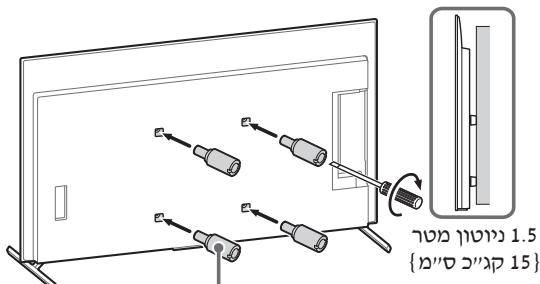

| (°)*G | *F | E | D | C | B | A | ☐NT ☐V |
| 15 | 281 | 78 | 165 | 340 | 1013 | 1722 | XR-77A8xEL |
| 18 | 281 | 77 | 82 | 342 | 851 | 1448 | XR-65A8xEL |
| 19 | 281 | 77 | 20 | 342 | 727 | 1227 | XR-55A8xEL |
| (°) *G | *F | E | D | C | B | A | ☐NT ☐V |
| 15 | 269 | 66 | 165 | 340 | 998 | 1722 | XR-77A8xL |
| 18 | 269 | 66 | 82 | 342 | 836 | 1448 | XR-65A8xL |
| 19 | 269 | 66 | 20 | 342 | 712 | 1227 | XR-55A8xL |
XR-77A8xL / 77A8xEL / 65A8xL / 65A8xEL / 55A8xL / 55A8xEL
150 150
C. Ag, Na, H
.
15 15
CILsTally, 270g 53
[dallas]
![SONY SU-WL850 - [dallas] - 1](/content/2024/12/309763/images/a82760c4772e6ca968c32fcae93ac12f16c473500d6abfd9e566b01de15c6b64.jpg)
a 1
__SUPPIMER__
1
.
∴ a + b = 3
10 10
ggl ggl ggl gl lgl ggl glg
jzjzjjj jzg jzg zdo
aJglll aL 5j no
Egulbouo
clalallll
.1
aBaaJ SaaJ aBaJ g yae Jg 15]
slll jyjLdlaally jg jg jg gaaag aag aag
Lg jglalqiaegiaol oolauaiyol gllpdlwio
(a) (a) (a) (a) (a) (a) (a) (a) (a) (a) (a) (a) (a) (a) (a) (a) (a) (a) (a) (a)
![SONY SU-WL850 - [dallas] - 2](/content/2024/12/309763/images/32a017d0c20e0a999ca9bd7997db440f9928ab14d0a50e203a3299cfdd49c75a.jpg)
g jg jyj Juaa o a
yloosjollaaolllbglj
Ldellgul
.0000000000000000000000000000
(x4) WM3
![SONY SU-WL850 - [dallas] - 3](/content/2024/12/309763/images/66a8bf8942bde895b1c52ccc3e366dba9a3d8aac140cb9be10b156ef7cdc036e.jpg)
WM2
![SONY SU-WL850 - [dallas] - 4](/content/2024/12/309763/images/b3d88c83d43c6994549ee6231504f7385188f6f39928dfd2a67df0b28c77d6a4.jpg)
(x1) WM1
![SONY SU-WL850 - [dallas] - 5](/content/2024/12/309763/images/b94ba8f3b53b42464df88ecfd91d855067f39bc9741e76f621dc89793799dab0.jpg)
(x4) M6
![SONY SU-WL850 - [dallas] - 6](/content/2024/12/309763/images/8b4741e6147673116f1274d57b649da4acc62d0bb2ac9e933ab80383776fe656.jpg)
(x6) WT1
![SONY SU-WL850 - [dallas] - 7](/content/2024/12/309763/images/c5268ff7073f289236d9f5d8b1a3a672a2d7ccf77148d86df0924dad4beed9df.jpg)
sJdU 1
![SONY SU-WL850 - [dallas] - 8](/content/2024/12/309763/images/6704f4179482a9e524f28a69972334032facba157f6253287c36aecdde7e2510.jpg)
jzjzulgo
.
.
LALJKo 1aLdWwAaLWUuLWU
(.)
g aolll brrll k0l 1 00 g
.
Quadrilateral AOBC is a square
WM1 jao slljbjyssuao pssu
1

.2
3 3
Quadrilateral AOBC is a square
Quadrilateral AOBC is a square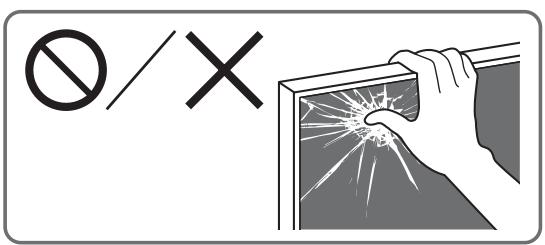
4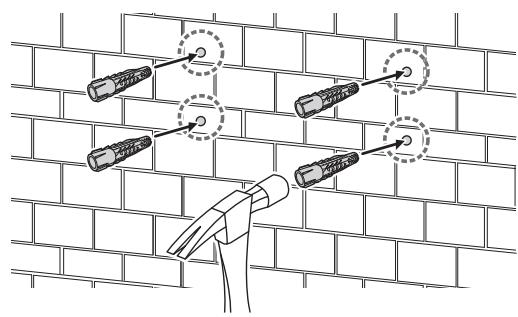
1
.2
3 3
Quadrilateral AOBC is a square
189.3 pao: jyjzall jzgl yolaw l (2) jg jy j 75 (2000) jyjzaljlg jai dUg (2001) log (2002) 75 pao: jyjzall jzgl yolaw l (2003) jg jy j 75 (2004) jyjzaljlg jai dUg (2005) log (pao 189.3)
| (a) *G | *F | E | D | C | B | A | ال_PWُّدْلْ |
| 15 | 281 | 78 | 165 | 340 | 1013 | 1722 | XR-77A8xEL |
| 18 | 281 | 77 | 82 | 342 | 851 | 1448 | XR-65A8xEL |
| 19 | 281 | 77 | 20 | 342 | 727 | 1227 | XR-55A8xEL |
| (o) *G | *F | E | D | C | B | A | ال_PWالداني |
| 15 | 269 | 66 | 165 | 340 | 998 | 1722 | XR-77A8xL |
| 18 | 269 | 66 | 82 | 342 | 836 | 1448 | XR-65A8xL |
| 19 | 269 | 66 | 20 | 342 | 712 | 1227 | XR-55A8xL |
XR-77A8xL / 77A8xEL / 65A8xL / 65A8xEL / 55A8xL / 55A8xEL
bl( i) = 1
. ∴ a i = a isi
∴ m : x = 1
1.8g 2.0g 3.0g 4.0g 5.0g
Therefore, the area of triangle OBC is equal to the area of triangle BOC plus the area of triangle BOC.
1.8g 2.9g 3.0g 4.0g
Therefore, the area of triangle AOB is equal to the area of triangle AOB plus the area of triangle AOB, which equals the area of triangle AOB plus the area of triangle AOB.

Therefore, the area of triangle OBC equals the area of triangle COD plus the area of triangle BOC.
4.5
b b 10
4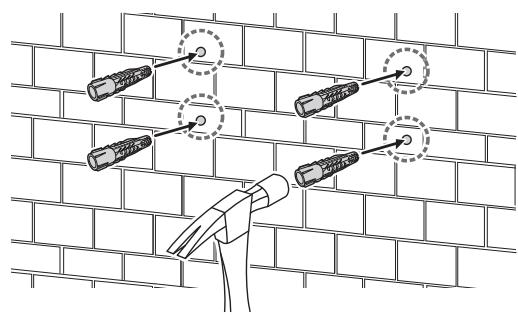
1
1
Iaio/laia/s/ablia
1
2
Gyjgoloyos4S) VS GJgD Caaa dab
()
(1)
VS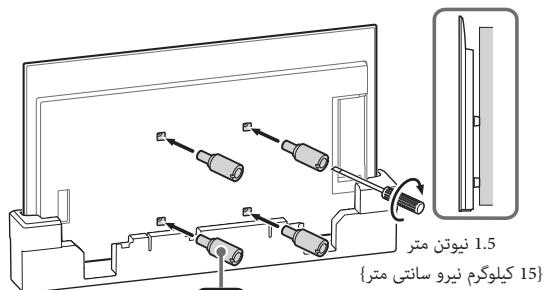
45
Jg jyj 0r a 4S) VS yj 1aai 4ab L) Jg jyj 0g jyj 4b (og g o 4cr .og wao jrg
3
saa jggl 4jysL Jg plesu VS g yaua aabla Iaon . VS g yaua aabua uai sly slo w jlej l baia . Sg yaua aabua uai skaa oolauu g yaua jy jy j. VS
M6 1052
∴ S ΔOBC = S ΔCOD + SΔBOC
4 : 5 :
saa jggl 4j05 Jog ples 1 VS sgs qai aabla Iao oolaw VS sgs qai aabw aai g ylo w jI baa .uS sgs qai aabw cwi u Saa dss oolaw sgs yjI jI sI .vS sgs qai aabw n g yo yy
4:53
1 1
1/2
45 2g jg jg jg jg jg jg jg jg jg jg jg jg jg jg jg jg jg jg jg jg jg jg jg jg jg jg jg jg jg jg jg jg jg jg jg jg jg jg jg
.3g 12yjg4 yjg jwU
a#
100 100 100
JilwU 10j014g0g0g0g0g0
i 1
1234567890
jg y jy jy jy jy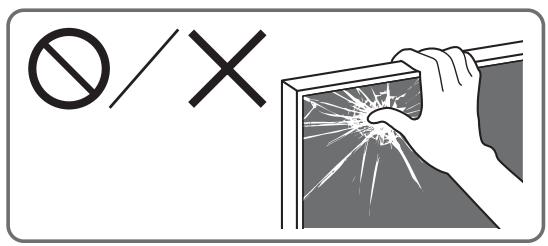

log M6 0000 WMM2 jolalw1
∴ S ΔOBC = S ΔCOD + SΔBOC
4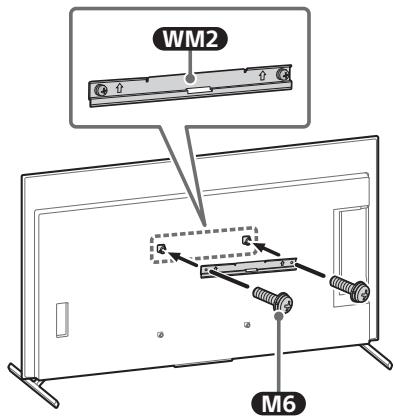
15 15 15
S
∴ M 1D 1 = 2
10
45j 50000000000000000000000000000000000000000000 5
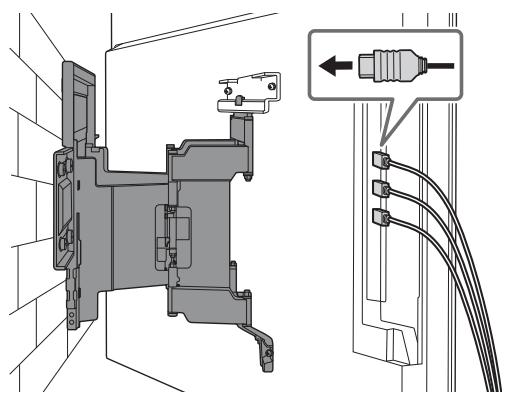
2 jolaoaowbygssgwaay WIM3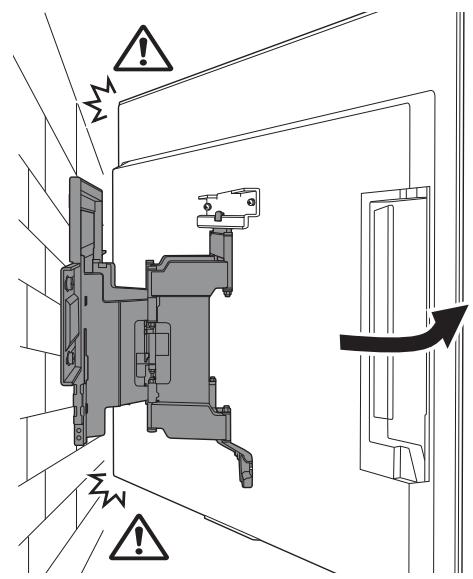
A53 453 19234 SjSjCswl jSao gjggl oLw Jaiio slgylslu gEgi d 4i . . .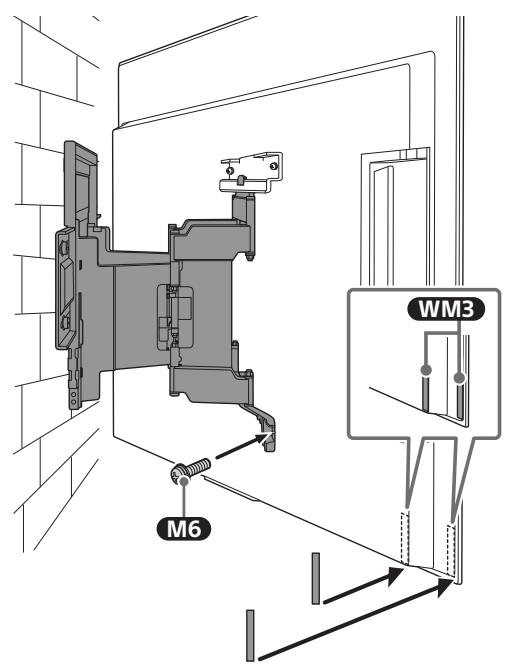
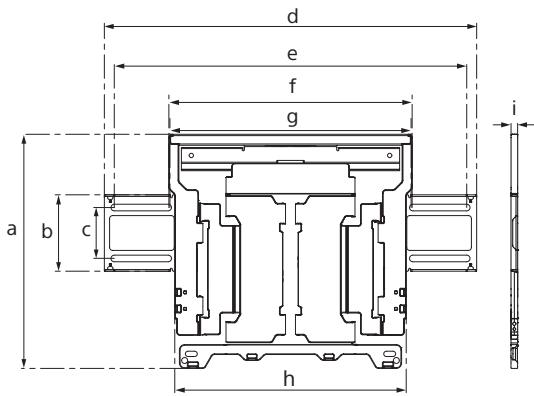
354: a
116: b
77: c
563: d
533 e
370: f
368: g
350: h
11: i
[glS] (a): (4b)
3.0
- 1.

55
| (°) *G | *F | E | D | C | B | A | ملاoverview |
| 15 | 281 | 78 | 165 | 340 | 1,013 | 1,722 | XR-77A8xEL |
| 18 | 281 | 77 | 82 | 342 | 851 | 1,448 | XR-65A8xEL |
| 19 | 281 | 77 | 20 | 342 | 727 | 1,227 | XR-55A8xEL |
| (0) *G | *F | E | D | C | B | A | الله ☐ |
| 15 | 269 | 66 | 165 | 340 | 998 | 1,722 | XR-77A8xL |
| 18 | 269 | 66 | 82 | 342 | 836 | 1,448 | XR-65A8xL |
| 19 | 269 | 66 | 20 | 342 | 712 | 1,227 | XR-55A8xL |
- INSTALLATION INFORMATION FOR USING SONY WALL-MOUNT BRACKET (SU-WL850)
- SUPPORTED MODELS
- TO CUSTOMERS
- TO SONY DEALERS AND CONTRACTORS
- WALL-MOUNT BRACKET
- ON SAFETY
- WARNING
- PROFESSIONAL INSTALLATION REQUIRED
- TO SONY DEALERS
- CAUTION
- SPECIFIED PRODUCTS
- BE SURE TO SUBCONTRACT THE INSTALLATION TO LICENSED CONTRACTORS AND KEEP SMALL CHILDREN AWAY DURING THE INSTALLATION
- BE SURE TO SUBCONTRACT MOVING OR DISMOUNTING OF THE TV TO LICENSED CONTRACTORS
- DO NOT REMOVE SCREWS, ETC., AFTER MOUNTING THE TV
- DO NOT MAKE ALTERATIONS TO THE PARTS OF THE WALL-MOUNT BRACKET
- DO NOT MOUNT ANY EQUIPMENT OTHER THAN THE SPECIFIED PRODUCT
- DO NOT APPLY ANY LOAD OTHER THAN THE TV ON THE WALL-MOUNT BRACKET. DO NOT SHAKE THE TV LEFT/RIGHT, UP/DOWN
- DO NOT LEAN ON OR HANG FROM THE TV
- DO NOT HANDLE THE PRODUCT WITH EXCESSIVE FORCE DURING CLEANING OR MAINTENANCE
- DO NOT PLACE THIS PRODUCT CLOSE TO MEDICAL DEVICES
- KEEP OUT OF THE REACH OF CHILDREN OR THE SUPERVISED INDIVIDUALS
- PRECAUTIONS
- INSTALLING THE WALL-MOUNT BRACKET
- DO NOT INSTALL THE WALL-MOUNT BRACKET ON WALL SURFACES WHERE THE CORNERS OR THE SIDES OF THE TV PROTRUDE AWAY FROM THE WALL SURFACE
- DO NOT INSTALL THE TV OVER OR UNDER AN AIR CONDITIONER
- BE SURE TO ASSEMBLE THE BRACKET PROPERLY FOLLOWING THE INSTRUCTED PROCEDURE EXPLAINED IN THIS INSTRUCTION MANUAL
- BE SURE TO TIGHTEN THE SCREWS SECURELY IN THE DESIGNATED POSITION
- BE SURE TO INSTALL THE TV ON A WALL THAT IS BOTH PERPENDICULAR AND FLAT
- AFTER PROPER INSTALLATION OF THE TV, SECURE THE CABLES PROPERLY
- DO NOT ALLOW THE AC POWER CORD (MAINS LEAD) OR THE CONNECTING CABLE TO BE PINCHED
- THE SCREWS NEEDED TO SECURE THE WALL-MOUNT BRACKET TO THE WALL ARE NOT SUPPLIED
- BEFORE GETTING STARTED
- WHAT IS YOUR WALL MADE OF
- DRY WALL WITH STUDS
- SOLID CONCRETE OR CONCRETE BLOCK
- CHECKING THE PARTS
- SUPPLIED WITH SU-WL
- SUPPLIED WITH THE TV
- PREPARING FOR INSTALLATION
- A ATTACHING THE WALL-MOUNT BRACKET TO THE DRY WALL WITH STUDS
- INSTALLING THE WALL-MOUNT BRACKET TO THE WALL
- DECIDE ON THE INSTALLATION LOCATION
- NOTE
- ALIGN WM1 TO THE WALL AND MAKE FOUR MARKS ALIGNED WITH THE STUDS
- DRILL UPPER PILOT HOLES ON THE MARKS
- PRECAUTION
- PREPARING FOR THE INSTALLATION OF THE TV
- INSTALLING THE TV TO THE WALL FROM CARTON
- INSTALLING THE TV TO THE WALL FROM TABLE-TOP STAND
- ATTACH THE WM2 TO THE TV USING M
- DETACH THE TABLE-TOP STAND FROM THE TV
- INSTALLING THE TV ON THE WALL
- CONFIRMING THE COMPLETION OF THE INSTALLATION
- OTHER INFORMATION
- SPECIFICATIONS
- DIMENSIONS: (APPROX.) [MM]
- MASS (BASE ONLY): (APPROX.) [KG]
- REFERENCES
- MEASUREMENT FOR WALL-MOUNT BRACKET INSTALLATION ON THE WALL
- WITH CAMERA
- WITHOUT CAMERA
- WEIGHT (BASE ONLY): (APPROX.) [KG]
- SPECIFICATIONS PRODUCER
- PREPARATION FOR INSTALLATION
- FIND THE TV'S LOCATION
- FOR GREEK SPEAKERS
- CHECK WITH SONY
- PRODUCT WARNINGS
- IMPORTANT SAFETY INSTRUCTIONS
- HAVE THE INSTALLATION PERFORMED BY A QUALIFIED INSTALLER
- MAKE SURE YOU HAVE THE QUALIFICATIONS TO PERFORM THE REMOVAL OF THE TELEVISION BY A QUALIFIED INSTALLER
- DO NOT TIGHTEN THE SCREWS OR OTHER FASTENERS OF THE TELEVISION
- DO NOT REMOVE THE PARTS OF THE WALL MOUNT
- DO NOT INSTALL ANY OTHER EQUIPMENT OTHER THAN THE SPECIFIED PRODUCT
- DO NOT ATTACH THE WALL MOUNTING KIT TO ANY PRODUCT OTHER THAN THE TELEVISION. DO NOT PLACE THE TELEVISION ON A SLANTED OR UNEVEN SURFACE
- DO NOT LEAN ON OR HANG FROM THE TELEVISION
- DO NOT APPLY EXCESSIVE FORCE TO THE PRODUCT DURING INSTALLATION OR HANDLING
- DO NOT PLACE THIS PRODUCT NEAR MEDICAL DEVICES
- KEEP THE PRODUCT IN A PLACE WHERE IT CANNOT BE REACHED BY CHILDREN OR PETS
- MOUNTING THE WALL-MOUNT BRACKET
- DO NOT MOUNT THE WALL-MOUNT BRACKET ON A WALL SURFACE WHERE THE TV'S SIDES OR EDGES PROTRUDE FROM THE WALL SURFACE
- DO NOT MOUNT THE TV NEAR AIR CONDITIONING UNITS
- MOUNT THE WALL-MOUNT BRACKET SECURELY TO THE WALL BY FOLLOWING THE INSTRUCTIONS IN THIS MANUAL
- MOUNT THE WALL PLATE USING APPROPRIATE SCREWS (NOT SUPPLIED) AND ANCHORS (NOT SUPPLIED)
- BRACKET
- WALL MOUNT BRACKET
- SAFETY
- FOR THE ATTENTION OF THE BUYER
- FOR SONY
- AFTER MOUNTING THE TV, DO NOT REMOVE THE SCREWS, ETC
- DO NOT DISASSEMBLE OR MODIFY THE BRACKET FOR WALL MOUNTING
- DO NOT INSTALL ANY OTHER EQUIPMENT ON THE BRACKET OTHER THAN THAT SPECIFIED
- TO AVOID OVERLOADING THE BRACKET FOR WALL MOUNTING, DO NOT PLACE ANYTHING ON IT OTHER THAN THE TV. DO NOT SHAKE THE TV LEFT/RIGHT, UP/DOWN
- DO NOT LEAN ON THE TV OR HOLD ONTO IT
- CARE FOR THE TV SHOULD BE CARRIED OUT WITHOUT APPLYING EXCESSIVE FORCE
- STORE IN PLACES OUT OF THE REACH OF CHILDREN OR PEOPLE UNDER SUPERVISION
- DO NOT INSTALL THE WALL-MOUNT BRACKET ON WALLS WHERE THE EDGES OF THE TV WILL PROTRUDE BEYOND THE EDGES OF THE WALL
- DO NOT INSTALL THE TV UNDER AN AIR CONDITIONER OR NEAR IT
- BE SURE TO SECURELY ATTACH THE WALL-MOUNT BRACKET TO THE WALL, FOLLOWING THE INSTRUCTIONS IN THIS MANUAL
- INSTALLATION
- MOUNTING THE BRACKET FOR WALL INSTALLATION ON THE WALL
- TRANSFORMATION
- DIMENSIONS FOR WALL-MOUNT BRACKET INSTALLATION ON THE WALL
- INFORMATION FOR INSTALLATION USING THE WALL-MOUNT BRACKET FOR SONY (SU-WL850)
- MODELS THAT ARE SUPPORTED
- DO NOT TIGHTEN THE SCREWS UNTIL AFTER MOUNTING THE TV
- DO NOT REPLACE THE WALL MOUNT BRACKET PARTS FOR WALL MOUNTING
- DO NOT INSTALL ANY OTHER DEVICES OTHER THAN THOSE SPECIFIED IN THE PRODUCT
- DO NOT USE THE WALL MOUNT BRACKET FOR WALL MOUNTING FOR ANY PURPOSE OTHER THAN A TV. DO NOT TILT THE TV UP/DOWN OR LEFT/RIGHT
- DO NOT LEAN ON THE TV OR HANG FROM IT
- INSTALLING THE WALL MOUNT BRACKET FOR WALL MOUNTING
- INSTALLING THE WALL MOUNT BRACKET FOR WALL MOUNTING ON A WALL
- PPIMITKA
- BCTAHOBJIEHЯ TEIEBI3OPA HA CTIHY 3 KOPO6KN
- CTAHOBJIEHNI TEJIEBI3OPA HA CTIHI
- ACTEPEKEHH
- IPEBIPKA NICRA 3ABEPSEHNBCTAHOBJIEHHN
- BCTAHOBJIEHHA KPOHSTEHNHAДЯHACTIHHORO KPINJIEHHAHA CTIHI
- BN3HATE MICSE BCTAHOBJIEHHRA
- APPLY WM1 TO THE WALL AND MAKE A MARK FOR THE HOLE
- DRILL
- MOUNTING THE TV ON THE WALL
- INSTALL THE BRACKET FOR WALL MOUNTING
- CABLE ROUTING BRACKET
- CABLE GUIDE
- SUPPIMER
- ECKEPTY
- KÖCİBN TYPDE OPHATBIJYBL KEPEK
- SONY DNILNEPEPI YUIIN
- OPHATY KE3IHDTEJIEIAIAPBI COFBLN AIMAHBI
- TEPEIIAPBL KA6BIPFA MEH EJEHRE NEPENHNKYJEP 6ONATBIHDAI ETIN OPHATY KEPEK
- TENEINAP DYPBOCPHATBIRLFAHHAN KEIHKA6EJIBEPDI DYPBC6EKIRIHI
- THE ALTERNATING CURRENT CABLE MUST BE CONNECTED TO THE CABLE CLAMP
- DO NOT CONNECT THE CABLE TO THE TERMINAL BLOCK WITH THE POWER ON
- OLD WIRING
- WHAT IS THE CABLE CONNECTED TO
- GROMMET FOR CONDUIT
- INSTALLATION PROCEDURE
- CONCRETE OR CONCRETE BLOCK
- INSPECTION
- PROVIDED WITH THE SU-WL850 STRUCTURE
- INSTALLATION PROVIDED
- INSTALLATION DISTANCE
- INSTALL THE BRACKET ON THE CONCRETE
- IDENTIFY THE INSTALLATION LOCATION
- DRILL HOLES FOR THE CABLE GLANDS ACCORDING TO THE PROFILE, AND MAKE THE HOLES FOR THE MOUNTING BRACKETS
- CHECK THE SEALING PLUGS FOR THE CABLE ENTRIES
- SAFETY INSTRUCTIONS
- INSTALLATION OF THE BRACKETS
- MOUNTING THE BRACKETS TO THE WALL (OPTIONAL)
- INSTALL THE DEVICE ON THE CABLE
- SECURE THE DEVICE TO THE BRACKET USING THE TWO SCREWS PROVIDED
- TIGHTEN THE DEVICE SCREWS
- ATTACH THE DEVICE TO THE CABLE
- THIS SEEMS TO BE A HEADING OR LABEL. IT MIGHT BE A BRAND OR MODEL NAME. I'LL KEEP IT AS IS: "HYCKAY
- THIS APPEARS TO BE A LABEL OR HEADING. IT MIGHT BE A WARNING OR NOTE. I'LL KEEP IT AS IS: "ECKEPTY
- THIS APPEARS TO BE A HEADING OR LABEL. IT MIGHT BE A SECTION TITLE. I'LL KEEP IT AS IS: "OPHATYDBIH AAYKATANFHDIBIFBIH TEKCEPY
- THIS APPEARS TO BE A LABEL OR HEADING. IT MIGHT BE A WARNING. I'LL KEEP IT AS IS: "ECKEPTY
- THIS APPEARS TO BE A LABEL OR HEADING. IT MIGHT BE A BRAND OR MODEL NAME. I'LL KEEP IT AS IS: "BACKAAKNAPAT
- EXERCISE
- TO INSTALL THE BRACKET ON A CONCRETE WALL OR CONCRETE BLOCK
- INSTALLING THE BRACKET ON THE WALL
- CHECK THE INSTALLATION LOCATION
- TEST
- PLACE THE WM1 BRACKET AGAINST THE WALL AND MARK THE FOUR HOLES
- DRILL HOLES FOR THE WALL ANCHORS
- HYCKAY
- WM1 KYAPBIH KA6BIPFARA CKECK KEIETIN 6YPAHDAJAPMEH (XHAKA KIPMEI) XHE IABAPMEH (XHAKA KIPMEI) OPHATBHBI
- CAKTBIK WAPACBI
- KPOHSTEHHIH KOJBIH WETKE KAAP TAPTBI IN XBLJXBITBIHBI
- TEJIEIUIAPIBI OPHATYF AIBIHDAY
- TEJEIAIAPIBI KA6BIPRAFA 6EKITY (KOPABHAHA N AIBIN)
- TEJEIAIAPIBI YCTEI TYFBLPBIHAH ANBLN KA6BLPFARA 6EKITY
- MOUNT THE TV ON THE WALL
- START
- INSTALLATION TEXT
- ADDITIONAL INFORMATION
- TECHNICAL SPECIFICATIONS
- MEASUREMENT FOR MOUNTING ON A WALL WITH A WALL-MOUNT BRACKET
- INSTALLATION INFORMATION FOR SONY WALL-MOUNT BRACKET (SU-WL850)
- PURCHASER
- [DALLAS]
- JZJZULGO
Brand : SONY
Model : SU-WL850
Category : Assembly