USER MANUAL EZ855D MOULINEX
Digital recipe book
EASY FRY™ MEGA
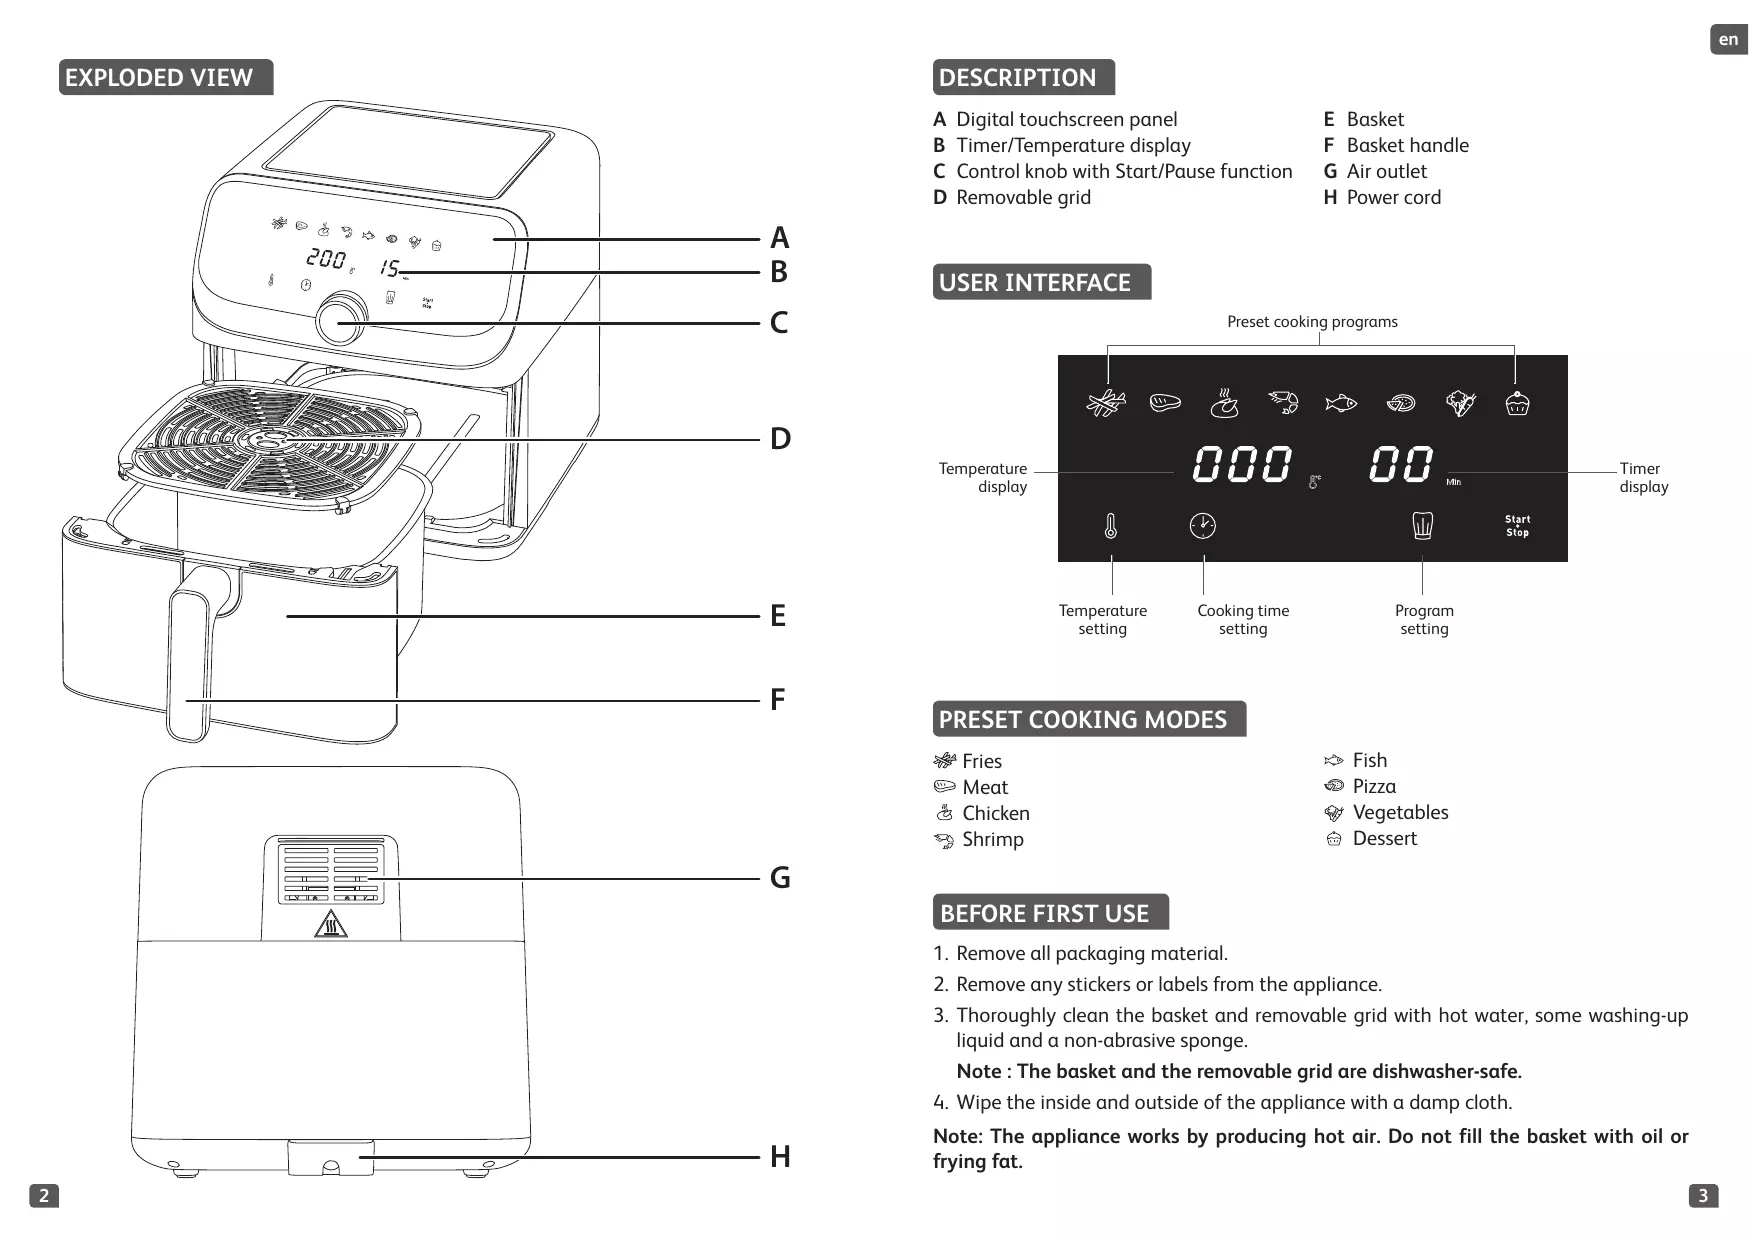
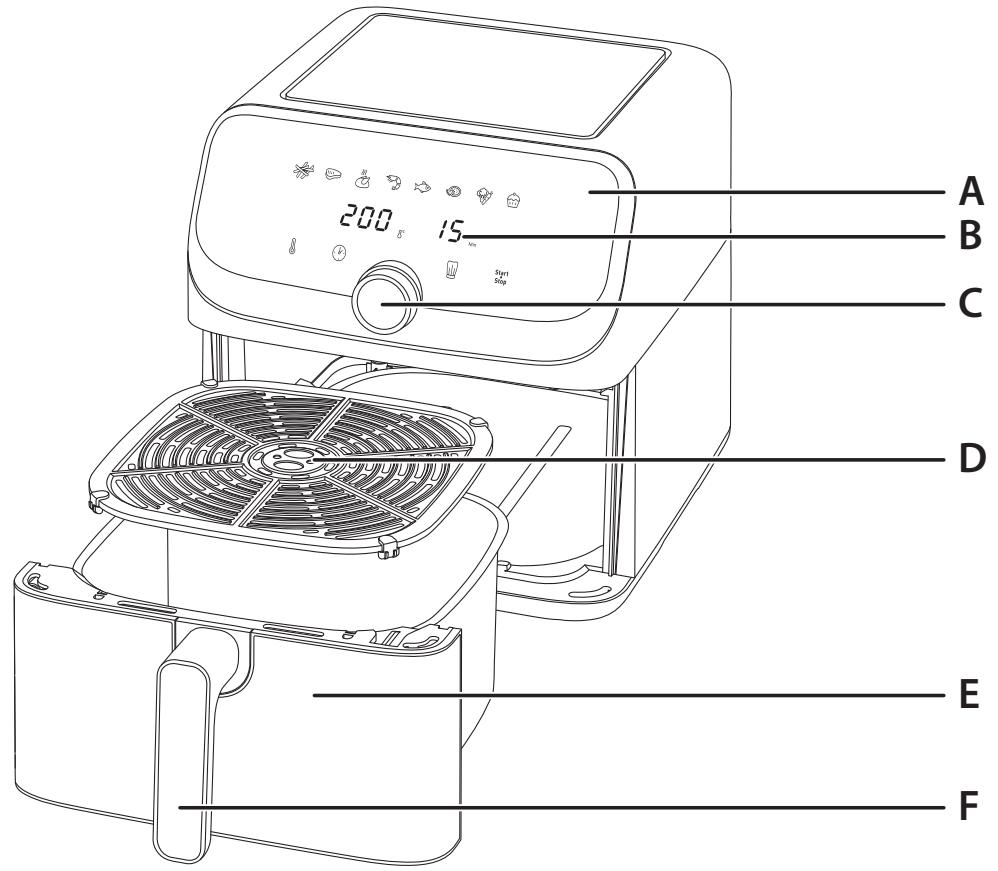
EXPLODED VIEW
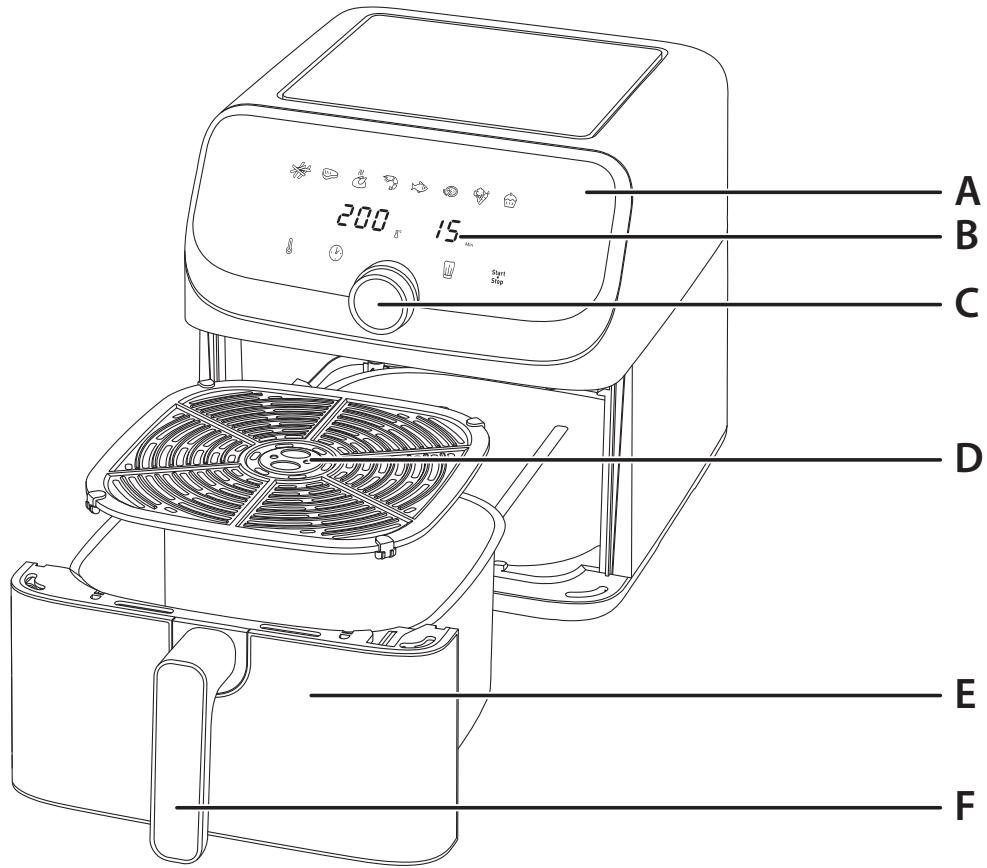

DESCRIPTION
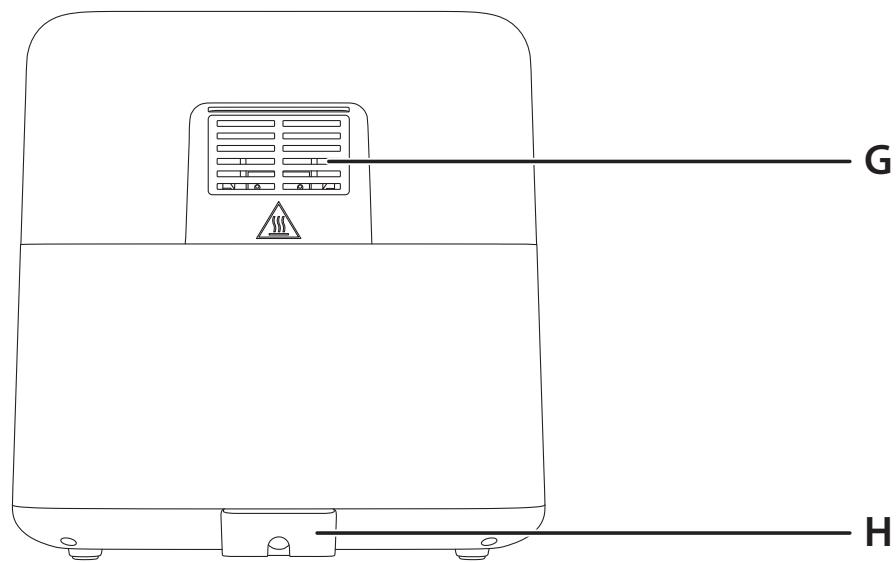
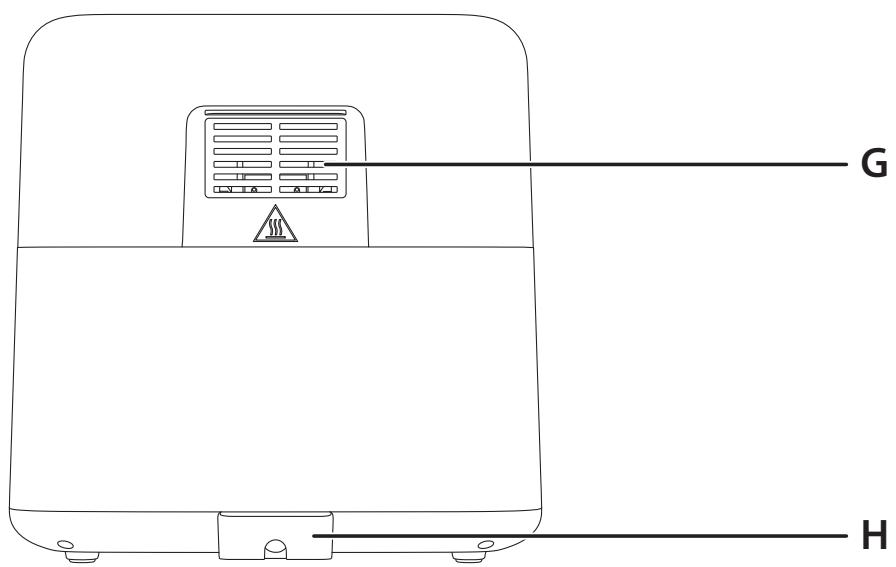
A Digital touchscreen panel B Timer/Temperature display C Control knob with Start/Pause function D Removable grid
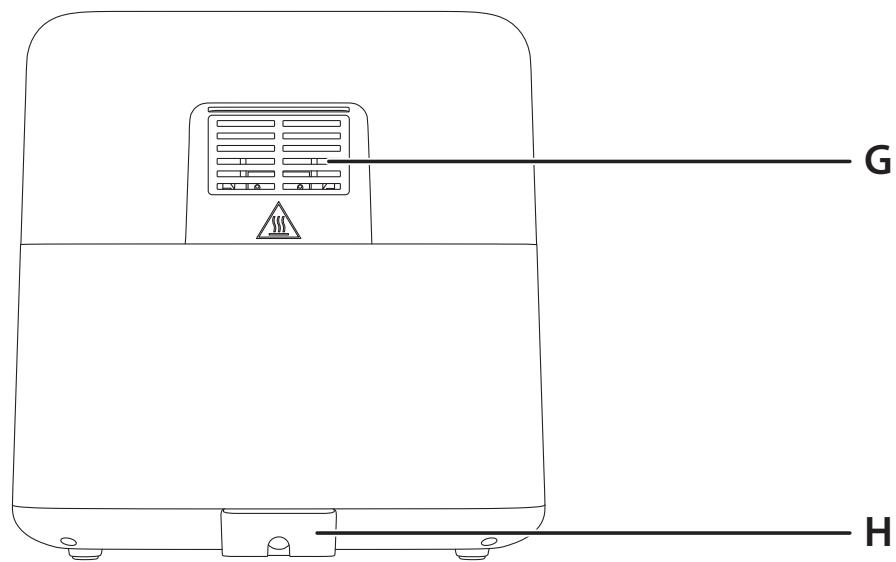
E Basket F Basket handle G Air outlet H Power cord
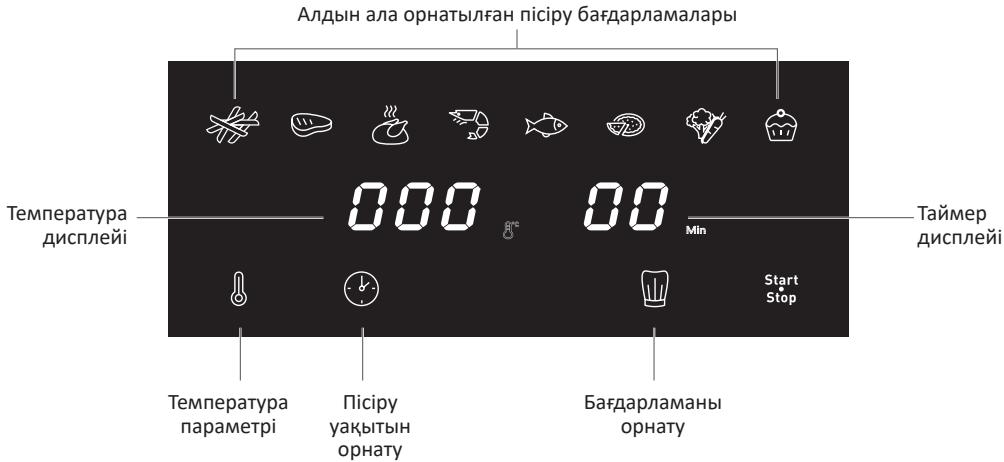
USER INTERFACE
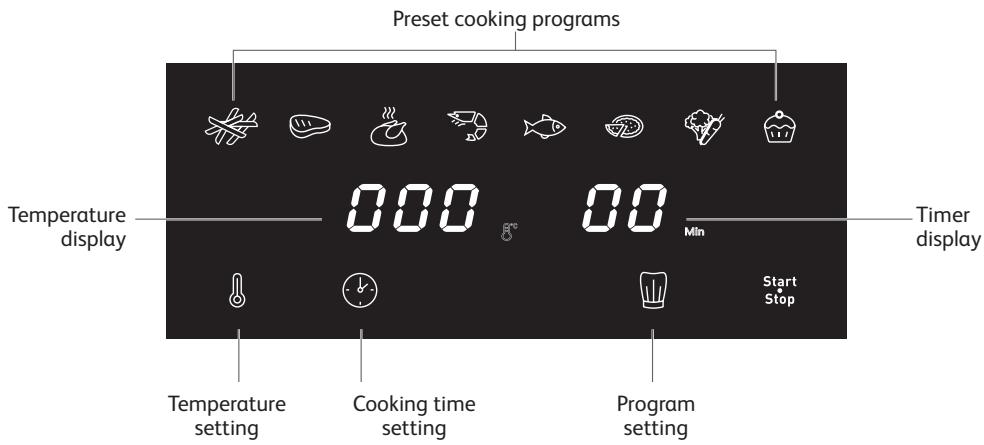
PRESET COOKING MODES
Fries Meat Chicken Shrimp
Fish Pizza Vegetables Dessert
BEFORE FIRST USE
- Remove all packaging material.
- Remove any stickers or labels from the appliance.
- Thoroughly clean the basket and removable grid with hot water, some washing-up liquid and a non-abrasive sponge.
Note: The basket and the removable grid are dishwasher-safe.
- Wipe the inside and outside of the appliance with a damp cloth.
Note: The appliance works by producing hot air. Do not fill the basket with oil or frying fat.
PREPARING FOR USE
- Place the appliance on a flat, stable, heat-resistant work surface away from water splashes.
- Do not fill the basket with oil or any other liquid.
Do not put anything on top of the appliance. This disrupts the airflow and affects the hot air frying result.
IMPORTANT: To prevent the appliance from overheating, do not place it in a corner or below a wall cupboard. A gap of at least 15 cm should be left around the appliance to allow air to circulate.
USING THE APPLIANCE
- Connect the power supply cord to an electrical socket, ensuring that the voltage matches the voltage indicated on the rating plate. Be careful when using the appliance.
- Carefully pull the basket with its removable grid out of the appliance.
- Place the food in the basket.
- Note: Never exceed the maximum amount indicated in the table (see section 'Cooking Guide'), as this could affect the quality of the end result.
- Slide the basket back into the appliance.
- Caution: Do not touch the basket during use and for some time after use, as it gets very hot. Only hold the basket by the handle.
- Press Start to switch on the appliance. Display shows the default "Manual" program: 200°C / 15 minutes. The Start button will be flashing.
- You may now select between the preset cooking mode or the manual settings.
a. If choosing preset cooking mode:
- Press the button. Fries mode will start flashing.
- Select the desired cooking mode by turning the control knob (these modes are described in detail in the 'Cooking guide' section).
- If you need to adjust the temperature: Press the button, then use the control knob to adjust the temperature. Control range - Min. 80°C, Max. 200°C. After your selection, the temperature will flash for 6 seconds and the temperature is set.
- If you need to adjust the timer: Press the button, then use the control knob to adjust the time. Control range - Min. 1 minute, Max. 60 minutes. After your selection, the timer will flash for 6 seconds and the timer is set.
b. If choosing manual settings:
- Press start/stop again to begin the cooking process with default "Manual" program (200°C/15 minutes).
- If you need to adjust the temperature: Press the button, then use the control knob to adjust the temperature. Control range - Min. 80°C, Max. 200°C. After your selection, the temperature will flash for 6 seconds and the temperature is set.
- If you need to adjust the timer: Press the button, then use the control knob to adjust the time. Control range - Min. 1 minute, Max. 60 minutes. After your selection, the timer will flash for 6 seconds and the timer is set.
- To return to the default "Manual" program, simply press the button again.
- Confirm the cooking mode by pressing the start button. This will launch the cooking process. Cooking starts. The remaining cooking time is displayed on the screen.
- Some food will require shaking halfway through the cooking time for optimal cooking results (see section 'Cooking guide'). To shake the food, press the center of the control knob or the Start/Stop button to pause the cooking process. Pull the basket out of the appliance by the handle and shake it. Slide the basket back into the appliance, then press the center of the control knob or the Start/Stop button again and cooking will resume.
- Tip: You can set the timer to half of the cooking time, and when the timer sounds, shake the ingredients. Then set the timer again for the remaining cooking time.
- Note: When basket is removed, the appliance goes into Pause mode. Basket needs to be returned to appliance within 10 minutes for cooking to resume. If basket is not returned to appliance within 10 minutes, the program, temperature, and time need to be reset.
- Warning: If there is a lot of food, the basket can get heavy. When shaking, use both hands and oven mitt to avoid burning.
- When you hear the timer sound, the cooking time set has finished. Pull the basket out of the appliance and place it on a heat-resistant surface.
- Check if the food is ready.
If the food is not ready yet, simply slide the basket back into the appliance and set the timer for a few extra minutes.
- When the food is cooked, use a pair of non-metallic tongs (e.g., silicone tongs) to lift the food out of the basket. Excess oil from the food is collected in the bottom of the basket.
- Caution: Never turn the basket upside-down, as the removable grid and hot oil could fall out.
- After cooking, the basket, the grid, and the food are very hot. Handle with caution. Use both hands and oven mitt if the basket is too heavy.
- Depending on the type of food cooked in the appliance, be careful as steam may escape from the basket.
- When a batch of food is ready, the appliance is instantly ready for preparing another batch of food.
- If you want to terminate cooking before the end of the program, press and hold the Start button for 2 seconds to switch off the appliance.
COOKING GUIDE
The table below helps you to select the basic settings for the food you want to prepare. Note: The cooking times below are only a guide and may vary according to the variety and batch of ingredients used. Shape and brand may also affect results. Therefore, you may need to adjust the cooking time slightly.
| Quantity | Approx. time (min) | Temperature (°C) | Cooking mode | Shake* | Extra information |
| Potatoes & Fries |
| Frozen fries (10 x 10 mm standard thickness) | 500 g - 1,5 kg | 22 - 40 min | 180°C | | Yes | |
| Homemade French fries (8 x 8 mm) | 900 g - 1,5 kg | 28 - 37 min | 180°C | | Yes | Add 1 tbsp of oil |
| Roasted Potatoes | 500 g - 1,7 kg | 45 min | 180°C | | Yes | Add 1 tbsp of oil |
| Meat & Poultry |
| Steak | 100 - 600 g (1 to 4 pcs) | 12 min | 180°C | | | |
| Roasted chicken | up to 2 kgs | 45 - 60 min | 200°C | | | |
| Chicken legs | 500 g - 1,5 kg | 40 min | 200°C | | | |
| Chicken breasts | 200 - 900 g | 30 - 40 min | 180°C | | | |
| Lamb chops | 200 g - 1 kg (1 to 8 pcs) | 33 min | 200°C | | | |
| Sausages | 300 g - 1 kg (4 to 15 pcs) | 15 - 20 min | 200°C | | | |
| Fish |
| Salmon fillet | 100 - 700 g (1 to 5 pcs) | 12 - 18 min | 160°C | | | |
| Shrimps | 300 - 600 g (15 to 30 pcs) | 6 - 14 min | 190°C | | Yes | |
| Snacks |
| Frozen chicken nuggets | 300 - 700 g (15 to 25 pcs) | 10 - 15 min | 200°C | | | Flip at mid-cooking |
| Frozen cheese sticks | 400 - 700 g (5 to 10 pcs) | 13 min | 180°C | | Yes | |
| Frozen onion rings | 250 - 600 g (20 to 30 pcs) | 5 - 7 min | 200°C | | Yes | |
| Fried spring rolls | 250 - 350 g (8 to 20 pcs) | 10 min | 200°C | | Yes | |
| Frozen pizza | 200 - 500 g (one 24 cm pizza) | 5 - 15 min | 190°C | | | |
| Fresh pizza | 200 - 500 g (one 24 cm pizza) | 5 - 10 min | 190°C | | | |
| Quantity | Approx. time (min) | Temperature (°C) | Cooking mode | Shake* | Extra information |
| Vegetables |
| Zucchini | 200 - 400 g | 15 - 18 min | 180°C | | | |
| Cauliflower | 300 - 600 g | 14 - 16 min | 180°C | | | |
| Baking |
| Muffins | 4 to 9 pcs | 18 min | 180°C | | | Use a baking tin/oven dish** |
| Cake | 150 - 400 g | 18 min | 180°C | | | |
- Shake at least half way through cooking.
Tips: in order to improve the cooking result, do not hesitate to shake 2-3 times when cooking.
IMPORTANT: To avoid damaging your appliance, never exceed the maximum quantities of ingredients and liquids indicated in the instruction manual and in the recipes.
Place the cake tin/oven dish in the bowl.
When you use mixtures that rise (such as with cake, quiche or muffins) the oven dish should not be filled more than halfway.
TIPS
- Smaller foods usually require a slightly shorter cooking time than larger size foods.
- Shaking smaller size foods halfway through the cooking time improves the end result and can help prevent uneven cooking.
- To make your potatoes extra crispy, try adding a small amount of oil before cooking and shake to evenly cover. We recommend 14ml of oil (1 tablespoon).
- Snacks that can be cooked in an oven can also be cooked in the appliance.
- The optimal recommended quantity for cooking fries is 1500 grams.
- Use ready-made puff and short crust pastry to make filled snacks quickly and easily.
- Place an oven dish in the appliance's basket if you want to bake a cake or quiche or if you want to fry delicate ingredients or filled ingredients. You can use an oven dish in silicon, stainless steel, aluminum, or terracotta.
- You can also use the appliance to reheat food. To reheat food, set the temperature to 160°C for up to 10 minutes. Cooking time could be adjusted depending on food quantity in order to fully reheat the food.
CLEANING
Clean the appliance after every use.
The basket and the grid have a non-stick coating. Do not use metal kitchen utensils or abrasive cleaning materials to clean them, as this may damage the non-stick coating.
- Remove the mains plug from the wall socket and let the appliance cool down.
Note: Remove the basket to let the appliance cool down more quickly.
- Wipe the outside of the appliance with a damp cloth.
- Clean the basket and grid with hot water, some washing-up liquid and a non-abrasive sponge. You can use a degreasing liquid to remove any remaining dirt.
Note: The basket and the removable grid are dishwasher-safe.
Tip: If food debris/residue is stuck at the bottom of the basket and the grid, fill them with hot water and some washing-up liquid. Let the basket and the grid soak for approximately 10 minutes. Then rinse clean and dry.
- Wipe inside of the appliance with hot water and a damp cloth.
- Clean the heating element with a dry, cleaning brush to remove any food residues.
- Do not immerse the appliance in water or any other liquid.
STORAGE
- Unplug the appliance and let it cool down.
- Make sure all parts are clean and dry.
GUARANTEE AND SERVICE
If you need service or information or if you have a problem, please visit the brand website or contact the brand Consumer Care Center in your country. You can find the phone number in the worldwide guarantee leaflet. If there is no Consumer Care Center in your country, go to your local brand dealer.
TROUBLESHOOTING
If you encounter problems with the appliance, visit the brand website for a list of frequently asked questions or contact the Consumer Care Center in your country.
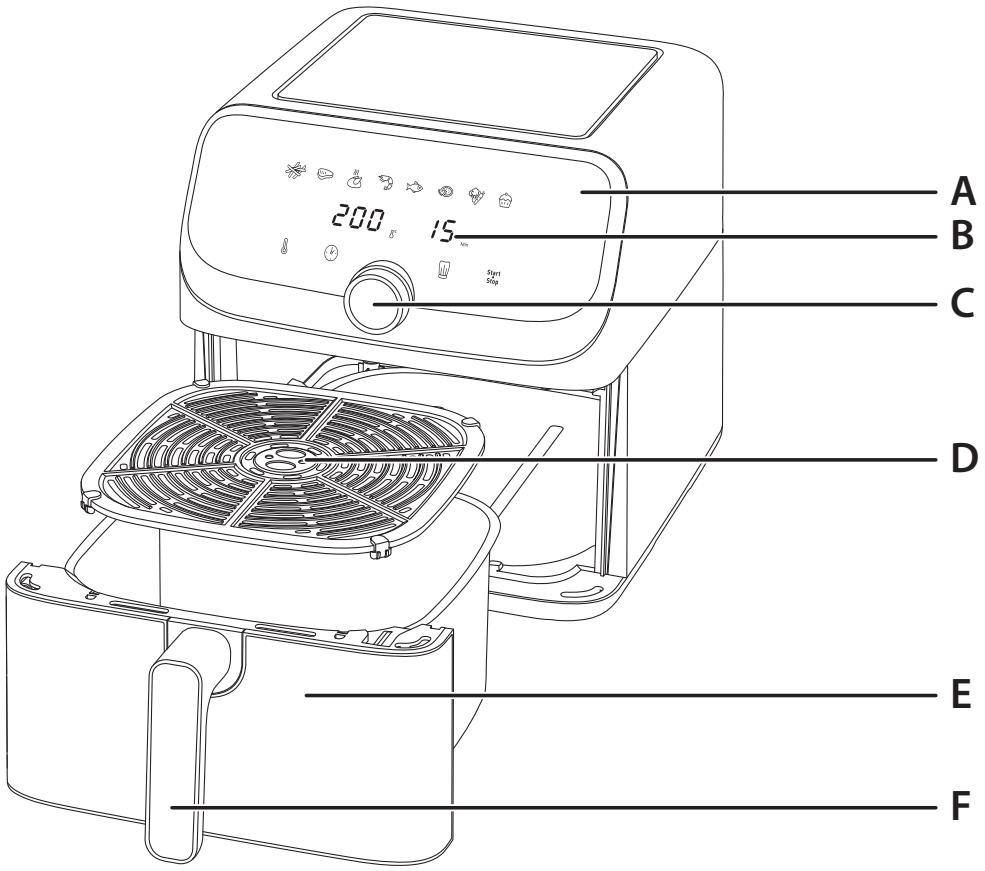
DESCRIPTION
DETAILED VIEW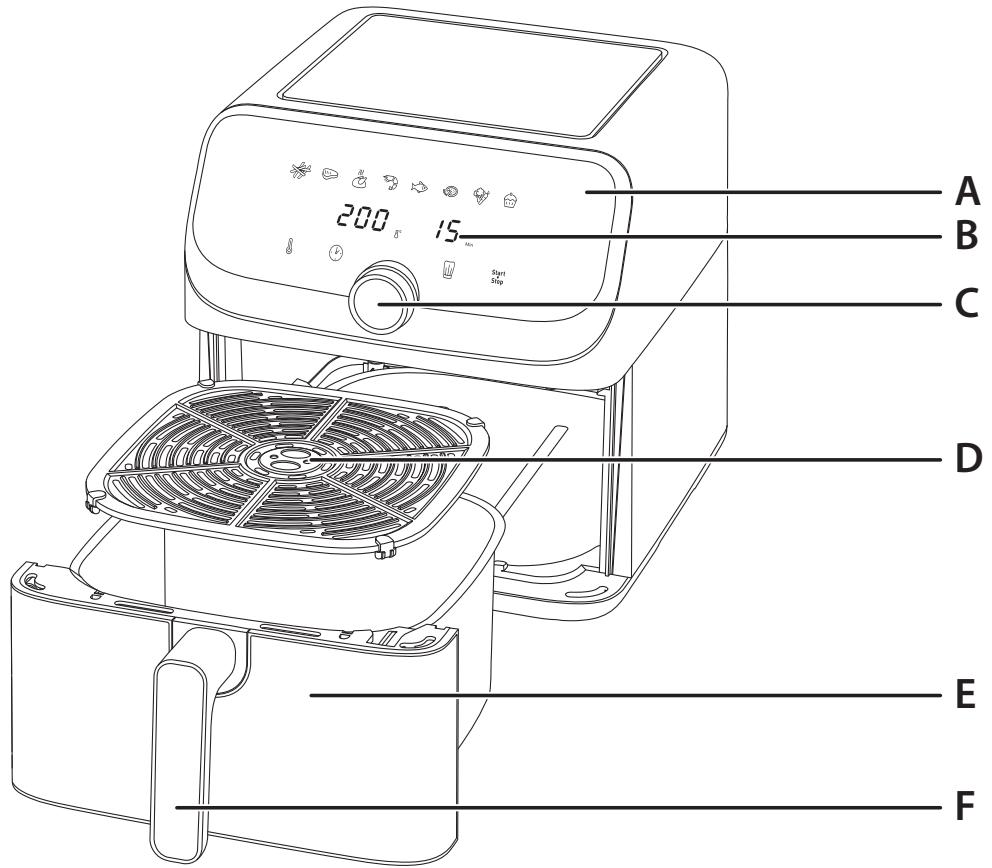
DESCRIPTION
A Digital touch panel
E Basket
Fry Chicken Shrimp
Fish Pizza Vegetables Dessert
BEFORE FIRST USE
PRESET COOKING MODES
French fries
Fish

Meat
Pizza

Chicken
Vegetables

Shrimp
Dessert
STEPS BEFORE FIRST USE
Tip: To improve cooking results, do not hesitate to shake 2-3 times during cooking.
IMPORTANT! To avoid damage to the appliance, do not exceed the maximum amount of ingredients and liquids given in the instruction manual and in the recipes.
USER INTERFACE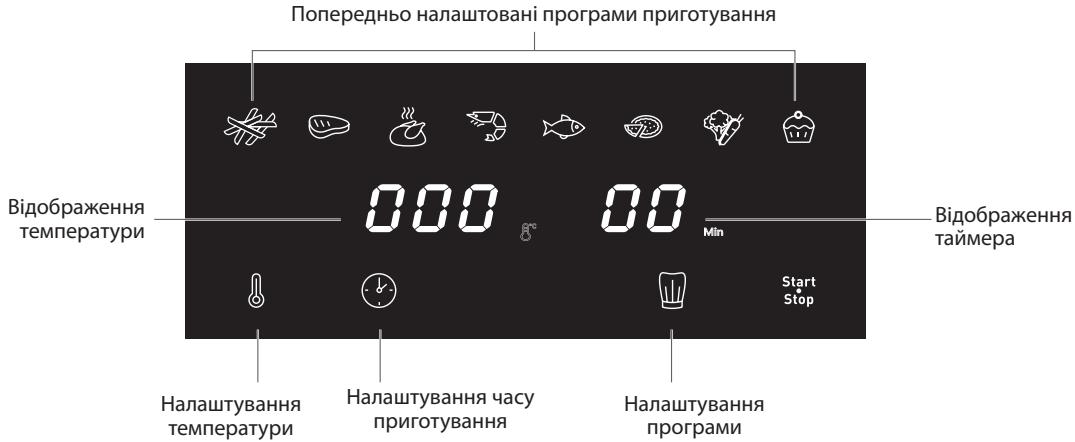
COOKING MODES ARE SET
Fry
Meat
Chicken
Shrimp
Fish
Pizza
Vegetables
The cooking time for the dish is indicated in the instructions for preparation.
Note. The cooking time is indicated in the regulatory documents and may vary depending on the type of potato batch used. The shape and type of the products may affect the cooking time. Therefore, you may need to slightly adjust the cooking time.
| КльбICTь | Приб车联网ский час(xвлини) | Tempepatура(℃) | Рек immприготувашия | Стушеваня* | Ддаткова iнформача |
| Картоллф di |
| Заморожени
Картоллф di | 500 g - 1,5 kg | 22 - 40
хвлини | 180°C | | Тak | |
| Домашни
Картоллф di | 900 g - 1,5 kg | 28 - 37
хвлини | 180°C | | Тak | Ддати 1 столов
ложку олii |
| Сможени
Картолля | 500 g - 1,7 kg | 45 xвлини | 180°C | | Тak | Ддати 1 столов
ложку олii |
| M'ясо та пttця |
| стейк | 100 - 600 g
(bi'd 1 do 4 smt) | 12 xвлини | 180°C | | | |
| Сможени
Керka | ≤ 2 kgs | 45 - 60
хвлини | 200°C | | | |
| Курчініжки | 500 g - 1,5 kg | 40 xвлини | 200°C | | | |
| Курчі ng rudіки | 200 - 900 g | 30 - 40
хвлини | 180°C | | | |
| Баранчі
Вidбивни | 200 g - 1 kg
(bi'd 1 do 8 smt) | 33 xвлини | 200°C | | | |
| Кobбасi | 300 g - 1 kg
(bi'd 4 do 15 smt) | 15 - 20
хвлини | 200°C | | | |
| Риба |
| Фile loсося | 100 - 700 g
(bi'd 1 do 5 smt) | 12 - 18
хвлини | 160°C | | | |
| Креевские | 300 - 600 g
(bi'd 15 do 30 smt) | 6 - 14 xвлини | 190°C | | Тak | |
| Зakussи |
| Заморожени
Курчін hareетс | 300 - 700 g
(bi'd 15 do 25 smt) | 10 - 15
хвлини | 200°C | | | Пелеверны в се行政部门
приготувашия |
| Заморожени
сирни палочи | 400 - 700 g
(bi'd 5 do 10 smt) | 13 xвлини | 180°C | | Тak | |
| Заморожени
Кльczя пьунi | 250 - 600 g
(bi'd 20 do 30 smt) | 5 - 7 xвлини | 200°C | | Тak | |
| Сможени
Весені рози | 250 - 350 g
(bi'd 8 do 20 smt) | 10 xвлини | 200°C | | Тak | |
| Заморожени
піца | 200 - 500 g
(ODna piца 24 sm) | 5 - 15 xвлини | 190°C | | | |
| Сөвіа піца | 200 - 500 g
(ODna piца 24 sm) | 5 - 10 xвлини | 190°C | | | |
TROUBLESHOOTING
If you have problems with the device, check the list of frequently asked questions on the manufacturer's website or contact the service center in your country.
CONTROL PANEL
A Digital sensor touch keys
E Display
B Timer/Temperature display
F Display keys
C Start/Pause function key
G Sound signal
D Additional functions

- The bar is made of material of high quality.
- The hooks and belts are made of high quality.
- Wipe the surface with a dry cloth, then clean with a damp cloth and a soft abrasive sponge.
Danger: Do not use the device near flammable gases.
- The smoke from burnt food is harmful to health.
Danger: The device is intended for household use only. Do not use it for industrial or commercial purposes.
CONNECTION TO THE MAINS
- Do not immerse the device, cord, or plug in water or any other liquid.
- Do not use it for industrial or other non-household purposes.
Do not place the device on a hot surface. This may cause fire or damage to the device.
Warning: To prevent the device from tipping over, place it on a stable, flat surface. To ensure proper ventilation, leave at least 15 cm of space around the device.
CONNECTING TO THE MAINS
- Before connecting, check that the voltage indicated on the rating plate matches your local mains voltage. Connect the plug to a suitable socket. Do not use the device if it is damaged.
- Do not use the device near flammable gases.
- Do not use the device outdoors.
- Danger: Do not exceed the maximum filling level indicated (see "Filling"). This may cause the device to malfunction.
- Set the device to the drying mode.
- Warning: Before cleaning and maintenance, turn off the device and let it cool down. Do not immerse the device in water.
- To start drying, press the Start button. Then select the "Program" mode as follows: 200°C / 15 min. The Start button will light up.
- There may be differences between the drying modes and the program parameters.
a. If you have selected a drying mode:
Press the Start button. The indicator light will turn on. - The selected drying mode will be displayed on the control panel (the indicators "Drying" will light up). If the temperature needs to be adjusted: press the Start button, then use the control knob to adjust the temperature. The adjustment range is min. 80°C, max. 200°C. After adjustment, the temperature will be displayed for 6 seconds and then the temperature will be set. If the timer needs to be adjusted: press the Start button, then use the control knob to adjust the timer. The adjustment range is min. 1 min, max. 60 min. After adjustment, the timer will be displayed for 6 seconds and then the timer will be set.
b. If you have selected a program:
- To start the drying process with the "Program" mode (200°C/15 min), press the Start/Stop button.
If the temperature needs to be adjusted: press the Start button, then use the control knob to adjust the temperature. The adjustment range is min. 80°C, max. 200°C. After adjustment, the temperature will be displayed for 6 seconds and then the temperature will be set. If the timer needs to be adjusted: press the Start button, then use the control knob to adjust the timer. The adjustment range is min. 1 min, max. 60 min. After adjustment, the timer will be displayed for 6 seconds and then the timer will be set.
- To start the "Program" mode, press the Start/Stop button.
- The Start/Stop button is used to start or stop the drying process. It is used to start the drying process. Press it to start drying. The remaining time will be displayed.
- To start the process, some models may require pressing the button twice (see "Process Start"). To start the model, press the Start Stop button or the process start button. Check the indicator light and press it. Press the indicator light, then press the Start Stop button or the process start button again and the process will start.
- Note: If the timer is set to the process start position, when the timer reaches zero, the indicator will light up. Then press the process start button again to reset the timer.
- Expert: When the appliance is first used, set the switch to "Start" mode. To activate the appliance, it must be left on for 10 minutes. If the appliance does not turn on within 10 minutes, check the power supply, temperature, and start button.
- Warning: If the model is too large, the appliance may not work. To avoid damage, use both hands and place it on a flat surface.
- When the timer is set, the process start button will light up. Remove the appliance from the power source and place it on a heat-resistant surface.
- Do not touch the hot surface.
If the model is too large, place the appliance back on the power source and set the timer for a few more minutes.
- When the process is complete, use metal tools (such as scissors or pliers) to remove the model from the appliance. Do not touch the appliance with bare hands.
- Warning: Do not touch the appliance with wet hands, as this may cause electric shock or fire.
- NicipireHHen KeiHce6et, Top XaHe TaFAM eTe bICTbIK 6OlaDbI. A6aJIaNkOJaHaHbIHbI3. Ce6et TbIM aybip 6oJca, eki KOJaDaJa, new KOnFa6bIH da naJaHaHaHbIHbI3.
- Ce6eTTE daaBihdanaFah TaFam TypiHe 6aHbICTbl a6aB 6oIbIHb3, ce6e6i ce6eTEN 6y wHfYbi MYMKiH.
- TaFAMhblH 6ip 6eJIiri DaIbIH 6oNfAH Ke3De, KypbIINfbl TaFAMhbIH eKInwi 6eJIirH daIbIHdayfa 6ipDeH daIbIH 6oJaBl.
- BaTapaIama aayKaTAmai TypbIn nicipydi TOKtaTKbIHb3 KeIce, KypblfblHbI eWipy ywiH Start TynMeCIN 2 cekyHd 6acbln TypbHbI3. Stop
TICIPY HYCKAYIbIFbl
Tomehderi keTe daBbHdaJaTaBH TaFAMbH, Heri3ri npaMeTpIepiTHaDayfKa KomeKteceDi. Eckeptne.Tomehderi nicipy yaKbITapbl TeK Hcckay petIHde 6epilreH XaHe naDaHaBbIFan KaptonbH, Typi MeH napTncaBHa 6aJIaNbICTbE3repYi MymKiH. BaCa TaFamdap ysiH eJwemi, NiSiHi XaHe 6peHdi HtNHexeIepre acep etyi MymKiH. CoNDbIKtAH nicipy yaKbITbH a3dan peTtey kaxet 6onyb MyMkiH.
| Мелшени | Болжамды
уakсы (min) | Tempepatура
(℃) | Пису
рекиш | Шайкay* | Косьима aknapат |
| Картол пен Фри |
| Муздастылган Фри
(10 mm x 10 mm) | 500 g - 1,5 kg | 22 - 40 min | 180°C | | Иa | |
| Удade жасалган Фри
karтобы (8 x 8 mm) | 900 g - 1,5 kg | 28 - 37 min | 180°C | | Иa | 1 ac kасык, май касынbíЗ |
| Кусырлылган karтор | 500 g - 1,7 kg | 45 min | 180°C | | Иa | 1 ac kасык, май касынbíЗ |
| Ет пен кус eti |
| Сточ | 100 - 600 g
(1-дан 4 дana) | 12 min | 180°C | | | |
| Кусырлылган тayык | ≤ 2 kgs | 45 - 60 min | 200°C | | | |
| Тayыктын,аяктары | 500 g - 1,5 kg | 40 min | 200°C | | | |
| Тayыктын, tec eti | 200 - 900 g | 30 - 40 min | 180°C | | | |
| Коий eti | 200 g - 1 kg
(1-дан 8 дana) | 33 min | 200°C | | | |
| Шухсылган | 300 g - 1 kg
(4-дан 15 дana) | 15 - 20 min | 200°C | | | |
| Балык |
| Акserке Фиесi | 100 - 700 g
(1-дан 5 дana) | 12 - 18 min | 160°C | | | |
| Асшаян | 300 - 600 g
(15-дан 30 дana) | 6 - 14 min | 190°C | | Иa | |
| Жechил таfram'dar |
| Муздастылган тayык
нагrettсы | 300 - 700 g
(15-дан 25 дana) | 10 - 15 min | 200°C | | | Жартулай писpresенен кейн
аydарынbíЗ |
| Муздастылган ipimшік
таякшалары | 400 - 700 g
(5-дан 10 дana) | 13 min | 180°C | | Иa | |
| Муздастылган пья
сакиналары | 250 - 600 g
(20-дан 30 дana) | 5 - 7 min | 200°C | | Иa | |
| Кусырлылган серіпелі
ралдар | 250 - 350 g
(8-дан 20 дana) | 10 min | 200°C | | Иa | |
| Муздастылган пица | 200 - 500 g
(6ip 24 см пица) | 5 - 15 min | 190°C | | | |
| Жана пица | 200 - 500 g
(6ip 24 сm пица) | 5 - 10 min | 190°C | | | |
| Мелшeri | Болжамы
уakытbi (min) | Tempepatура
(℃) | Пису
рекиMi | Шayкay* | Косьима aknapat |
| Көністер |
| Асkaбak | 200 - 400 g | 15 - 18 min | 180°C | | | |
| Турлі-тусті орамжалыразіk | 300 - 600 g | 14 - 16 min | 180°C | | | |
| Пису |
| Maфдин | 4-den 9 дana | 18 min | 180°C | | | Пису're apналган пiwинд/пew
tabaын райданынд** |
| Торт | 150 - 400 g | 18 min | 180°C | | | |
* Nicipy npoceciHJkapTbICHa KeIReHe de apaIacTbipbIbI3.
KeHecTeP: niciPy hətnkeciH jakcapTu yuin niciPy Ke3iHne 2-3 pet uaydaH tapbH6aHbI3.
MAHb3Db! Kypblfblh3fa 3aKbIM KeNTipMeY yin HnAdaNHybI HyckayblfbHa JHe peentinepe6epiReH INrpeJeHHTep Mey bIKtbkTapdb eKaawm AkcmaJbM MeJIwePiH acbpMaHb3.
**TopT niwihiH/new Ta6aBbH bIbIcKa caIbIbI3. KeTepiTeH KocnanaIapbl (MbICaIb, TopTaK, KINKe Hemece Kekcke apHaIaNfAH KocnanaIapbl) naIdaIaNfAH Ke3Je, neW Ta6aBbH JApTbcIHah ApTbIK TOnTbipy Fa 60MaJbl.
KEHECTEP
- ⅢaftbH TaFamDap yuH iDeTTE KJIeMe YIKeH TaFamDapFa KapaFaHaTe3 nicei.
- WafbH TaFamDapbl Nicipy yaKbIbHbIH XapTbcHa DeiH WaiKay COHfbI NaTNKeHi KaKcapTaDbI JxHe 6ipKeJIki nicnei kanyfKaJ0l 6epMeNdi.
- KaptontbI KbITbIPnak ety ywiH, nicipe aIdbIHda a3 MJIWepe MaJ Kocbl KePiH3 de, 6ipKeNki apaIacTbIpy ywiH waiKaHbI3. Bi3 14 mI MaI (1 ac KaCbIK) KyIObl YcBHaMbl3.
- Newte nicipyre 60anaTbH JKeHJ TaFamDapDbI Kypblfblda da nicipyre 60anaDbI.
- Kapton nicipyre aphaIfah OHtaIbI yCbIbIfAH MJIsep: 1500 rpaMM. ToTbIpbnFaH JeHt TaFamMapDbI Te3 JHe OHaJ Kacay yH daHbIH KaTnapbl JHe KbItbIpNaK KaMbpDbl NaJaDaHbHbI3.
- TopHemeCe KnW NicipriHi3 KeIcE HemeCe H3IK INHpeDneHTepDi HemeCe TOnTbIPbIHFaH INHpeDneHTepDi KybpfbHb3 KeIce, Neu Ta6aFbIH KybpfbHbIH, Ce6eTIHe caNbHbI3. Ci3 KpemHniDeH, ToT 6acnaTbIH 6oNaTTah, AInOMHHiDeH HemeCe TeppaKotaDaH JxacaIHaN neiKe apHaIaNfAH bIDbICTb NaIdaIaHa aJaCbI3. KypblfblbTaFAMdbk3dbpy ywiH de naJaIahyfa 60anaDb. TaFAMdb Kbl3dbpy ywiH TeMnepaTpaHb1 160°C Ka, yaBittb1 10 MInyTk aeiH opHaTbHb3. TaFAMdb ToBbIMeH Kb3dbpy ywiH TaFAMhBnM eIsepiHe 6aJlAhbICTb NiCipy yaKbITbH peTteyre 60anaDbI.
TA3AJIAY
KypbIINFbIHb KONJaHFaH CaNbIH Ta3aJAn OTbIpbIHbI3.
Ce6e TnH TopbIH Xa6bcnaiTbIH Xa6bIHbI 6ap. Onapbl Ta3anay ywiH metaJI acy bIDbICTapBH Hemece KbipatBH Ta3anaFbiW MaTePnaIapDbI naJaIaN6aHbI3, ce6e6i 6yn Xa6bcnaiTbIH Xa6bIHdbI 3aKbIMdaybl MyMKIn.
- AshaHbI pO3eTkaJaHaN cybIpHbI 3 KHe KypblfblHbI cybITbn aIbIhbl3. Eckptne: KpybIfblbIH Te3ipec cyfaBH KaIacahbl3, ce6etti wblfapbin aIbHbl3.
- KypblfblHbH, cbIpTbH dbIMkbH wy6peKeH cyptiH3.
- Ce6eTTi JhHe rpnIbdi bIcTbIK CymH, JyfblI cYbIKTBkIne HJHa He KbpMaIbIH r6KaMeH Ta3aJaHbI3. KaIFaH IacTbI KeTipy ywiH MaI KeTipeTIH cybIKTBkTI KOndAHyfa 60laDbI.
EckepTne. bIbIc neH aIbIH6aIbI TOpIbI bIbIC KxyfblTa KyyFa 6OlaIbI.
Kehec: erepece6et nen TopdbH Ty6iHe TaMaK KaIbIKTapbl TypbIn KaIca, OIapDbI bICTbIK cyMeH XaNe a3dAn KyfbIc syBikTbIKneH TOnTbipbIHbI3. Ce6eTI XaHe Top HayacBH waamMeH 10 MHyTKa KaIdbipbIHbI3. OdaH KeiH Ta3aIan Kyybin, KypFaTbIHbI3.
- KypbIJIfBbIH, iiiH bICTbIK, cymeH JxHe dblIMKbI, Wy6peKeNeh cyptiH3.
- Ke3 KeIreH TaFAM KaIbIbIKTapbIH Ketipy ywiH KbI3dbipfbiw 3JleMeHTTI Kypfak Ta3aIay UeTKacbIMe H Ta3aJaHaB13.
- KypbIfBihCyHa Hemece 6aKa cyBikTbIKKa caMaHbI3.
CAKTAY
- KypbIfblHbI TokTaH aKbIpaTbIN, CyblBn aJIbIhbl3. 2.Барлб,6ошeктIHra3a apKypfak ekeHH TeKcepiH3.
KENIIДIK JXэHE Kbl3MET KOPCETY
Erep ci3re KbI3MeT Hemece aknapaT KaKet 6oIca Hemece macele TybHda, 6peHd Be6caiTbHa Kipin3 Hemece eniHizderi 6peHdtIn TybHyBnapdbI KOJay opTaIbIfbHa xa6apLaCbHb3. TenefoH Hemipin Anemdk Kenilik KitanwacbHaH Tabyfa 6oIaBl. Erep eIiH3e TybHyBnapdbI KOJay opTaIbFbI 6oImaca, JepriikTi 6peHd DnIepiHe 6apblb3.
AKAYIbIKTAPDbIXOIO
Erep KpybIfblfa KaTbICTbl Macele TybIHdaCa, XnI KoBbIaTbIH cypaKTap Ti3iMIn any uyin Be6-caNTka KpiH3 Hemece eJIi3deri TyTbIHyBbIapDbI KOJday OptaJIbIFblHa xa6aplaCbIHbI3.
DETAILED VIEW

DESCRIPTION
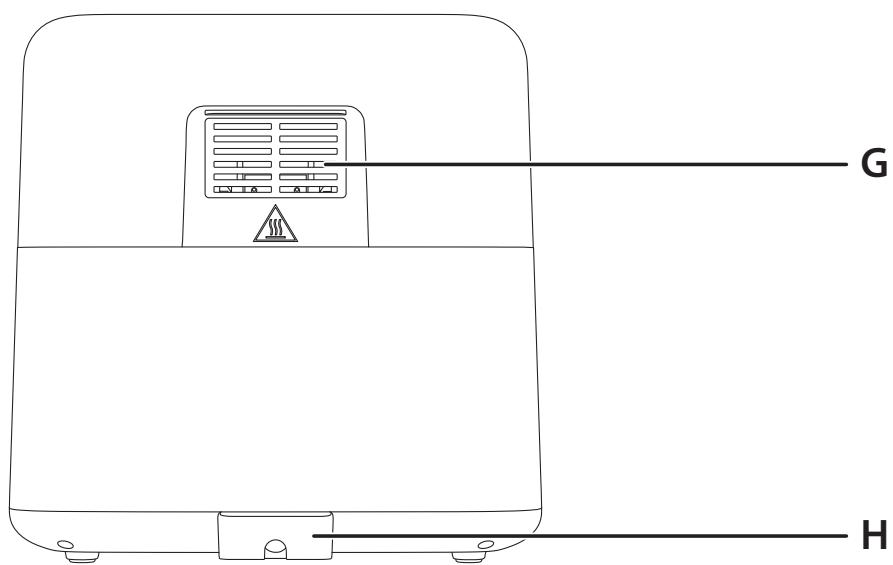
A Digital touch panel B Basket C Timer/temperature display D Control button with Start/Pause function E Removable basket F Basket handle G Air outlet H Power cord
F Basket handle G Air outlet H Power cord
USER INTERFACE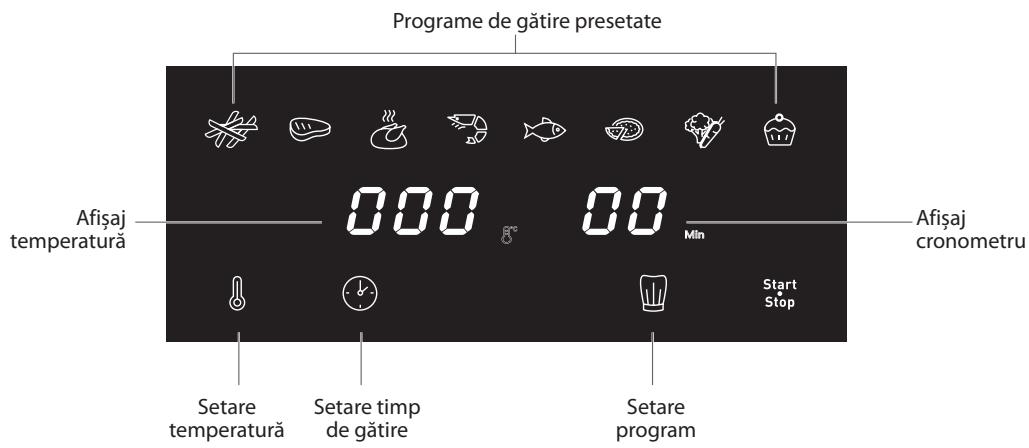
PRESET COOKING MODES
French fries Fish Meat Pizza Chicken Vegetables Shrimp
BEFORE FIRST USE
| الإستعمال | *العال | العربية | (°C) | (العربية) | (العربية) | (العربية) | (العربية) |
| الإستعمال |
| العال | | 180°C | 22-40\( \text{Å} \) | 500 g - 1,5 kg | | |
| الإستعمال | العال | | 180°C | 28-37\( \text{Å} \) | 900 g - 1,5 kg | | |
| الإستعمال | العال | | 180°C | 45\( \text{Å} \) | 500 g - 1,7 kg | | |
| الإستعمال |
| | | 180°C | 12\( \text{Å} \) | 100 - 600 g (العivalence 4 US 1) | | |
| | | 200°C | 45-60\( \text{Å} \) | ≤ 2 kgs | | |
| | | 200°C | 40\( \text{Å} \) | 500 g - 1,5 kg | | |
| | | 180°C | 30-40\( \text{Å} \) | 200 - 900 g | | |
| | | 200°C | 33\( \text{Å} \) | 200 g - 1 kg (العivalence 8 US 1) | | |
| | | 200°C | 15-20\( \text{Å} \) | 300 g - 1 kg (العivalence 15 US 4) | | |
| الإستعمال |
| | | 160°C | 12-18\( \text{Å} \) | 100 - 700 g (العivalence 5 US 1) | | |
| العال | | 190°C | 6-14\( \text{Å} \) | 300 - 600 g (العivalence 30 US 15) | | |
| الإستعمال |
| الإستعمال | العال | | 200°C | 10-15\( \text{Å} \) | 300 - 700 g (العivalence 25 US 15) | | |
| العال | | 180°C | 13\( \text{Å} \) | 400 - 700 g (العivalence 10 US 5) | | |
| العال | | 200°C | 5-7\( \text{Å} \) | 250 - 600 g (العivalence 30 US 20) | | |
| العال | | 200°C | 10\( \text{Å} \) | 250 - 350 g (العivalence 20 US 8) | | |
| | | 190°C | 5-15\( \text{Å} \) | 200 - 500 g (العivalence 24 US 20 US 20) | | |
| | | 190°C | 5-10\( \text{Å} \) | 200 - 500 g (العivalence 24 US 20 US 20) | | |
gabll 80 goc gabll hauu. gabll aoc u 1d 36 50 80 80 80 80 80 80 80 80 80 80 80 80 80 80 80 80 80 80 80 80 80 80 80 80
aaiil
albll .(《gall 105) aillia gab gai juaaall gall cag aiaia gjll aebbl y baa .9
a 1 1 1 1 1 1 1 1 1 1 1 1 1 1 1 1 1 1 1 1 1 1 1 1 1 1 1 1 1 1 1 1
Og 000000000000000000000000000000000000000000
.
10 1gab jglal alll olae! y. .aogall aayy gol jlgjol jldalal
aJgolal aJgolal Jgolal 10 10 gJgolal Jgolal
.
Jll alil jn nn nnnnll lal pndw bdua dai. pabn no jy gjg jy aai aai aai s: j
.
gaaa aas ae gag jao daww waw. yabll cog bdo no elayill uu yio oos gawlaolis .10
.
Jzolp 15 13 loo
aLol 153d g b0g o0g jglzll alalol sI gss lclpall p113
jolalbblay (jSulwll jolbal Jlll lss) jusie jie [haol puciw. pall gab jo slgill .12
. aLwJn JyLwJ eJg pJbJ nn JyJzJg zJy