KG39NAIAU - Refrigerator SIEMENS - Free user manual and instructions

Find the device manual for free KG39NAIAU SIEMENS in PDF.
SIEMENS KG39NAIAU - Refrigerator
📄 700 pages English EN Download 💬 AI Question 10 questions ⚙️ Specs
Notice SIEMENS KG39NAIAU - page 152
Pick your language and provide your email: we'll send you a specifically translated version.
Product type Fridge freezer combination
Brand Siemens
Model KG39NAIAU
Dimensions (H x W x D) 180 x 60 x 65 cm
Total net capacity 350 L
Net weight 80 kg
Electrical supply 220-240 V, 50 Hz
Energy class A+++
Annual energy consumption 180 kWh
Cooling function NoFrost, MultiAirFlow, SuperCool
Freezing function SuperFreeze
Display and controls Touchscreen digital display
Door alarm Yes, audible and visual
Child lock Yes
Maintenance and cleaning Automatic defrosting, interior cleaning with soft cloth
Spare parts and repairability Parts available for 10 years

Frequently Asked Questions - KG39NAIAU SIEMENS

How to adjust the refrigerator temperature?
Use the touchscreen to access the temperature menu. Press the refrigerator symbol and adjust with the arrows. The recommended temperature is 4°C.
What to do if the door alarm goes off?
The alarm sounds if the door remains open too long. Close it properly. If the alarm persists, check that nothing prevents closing.
How to activate the SuperFreeze function?
Press the SuperFreeze button on the screen. The appliance freezes food quickly. It stops automatically after 48 hours.
Why is there condensation inside?
This can happen in humid weather or if the door is opened frequently. Check that the seals are clean and ventilation is unobstructed.
How to clean the refrigerator compartment?
Unplug the appliance. Remove food and shelves. Clean with a soft cloth and soapy water. Rinse and dry. Do not use abrasive products.
The water filter indicator is flashing, what should I do?
If your model is equipped with a water dispenser, replace the filter every 6 months. Refer to the manual for replacement instructions.
How to change the interior light bulb?
Unplug the appliance. Remove the bulb cover by turning it. Replace with a bulb of the same type (often E14, max 40W). Replace the cover.
What does error code 'E01' mean?
Error code E01 indicates a temperature sensor fault. Contact Siemens customer service for assistance.
Can I install the refrigerator in an unheated garage?
Yes, but the ambient temperature must not drop below 5°C to ensure proper operation and avoid freezing.
How to save energy with this appliance?
Place the appliance away from heat sources, let food cool before storing, do not open the door unnecessarily, and check that the seals are airtight.

User questions about KG39NAIAU SIEMENS

0 question about this device. Answer the ones you know or ask your own.

Ask a new question about this device

Your email remains private: it is only used to notify you if someone answers your question.

No questions yet. Be the first to ask one.

Download the instructions for your Refrigerator in PDF format for free! Find your manual KG39NAIAU - SIEMENS and take your electronic device back in hand. On this page are published all the documents necessary for the use of your device. KG39NAIAU by SIEMENS.

USER MANUAL KG39NAIAU SIEMENS

Isometric line drawing of a wall-mounted shelf with an eye icon (no text or symbols)

SIEMENS KG39NAIAU - 2

Repair

Diagram showing three-step installation of a screwdriver on a door, with numbered instructions for each step.

Technical diagram showing a blue tool with numbered components and directional arrows indicating assembly or installation steps.

SIEMENS KG39NAIAU - Repair - 3

Repair

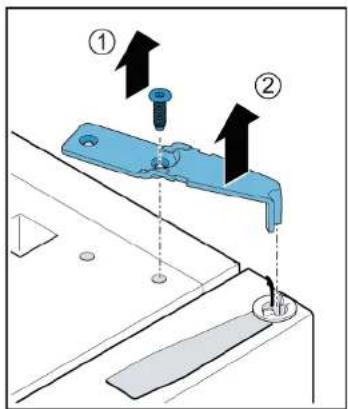
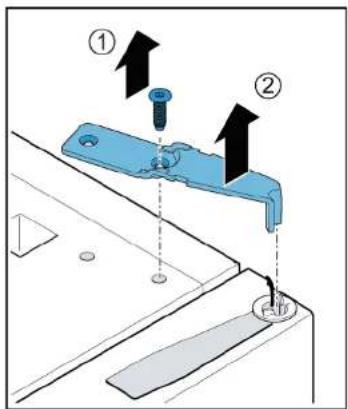
  1. Unscrew the screw (1).
  2. Remove the top hinge (2).

Technical diagram showing mechanical assembly with labeled parts and directional arrows indicating movement or assembly.

SIEMENS KG39NAIAU - Repair - 2

Repair

SIEMENS KG39NAIAU - Repair - 1

Repair

Illustration of hands connecting a cable to a rectangular panel with shelves (no text or symbols)

Isometric line drawing of a wall-mounted shelf with an eye icon above (no text or symbols).

SIEMENS KG39NAIAU - Repair - 3

Repair

SIEMENS KG39NAIAU - Repair - 1

The door seal is installed.

SIEMENS KG39NAIAU - Repair - 2

Repair

SIEMENS KG39NAIAU - Repair - 1

Torx TX20 6.3 mm (1/4") [00340865]

SIEMENS KG39NAIAU - Repair - 2

SIEMENS KG39NAIAU - Repair - 3

SIEMENS KG39NAIAU - Repair - 4

SIEMENS KG39NAIAU - Repair - 5

SIEMENS KG39NAIAU - Repair - 6

SIEMENS KG39NAIAU - Repair - 7

SIEMENS KG39NAIAU - Repair - 8

SIEMENS KG39NAIAU - Repair - 9

SIEMENS KG39NAIAU - Repair - 10

SIEMENS KG39NAIAU - Repair - 11

Requirement:

SIEMENS KG39NAIAU - Repair - 12

Repair

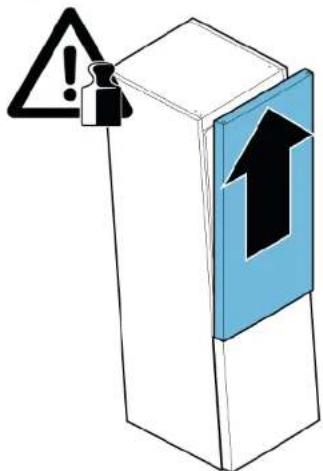
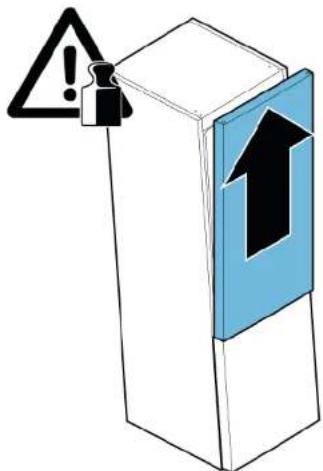
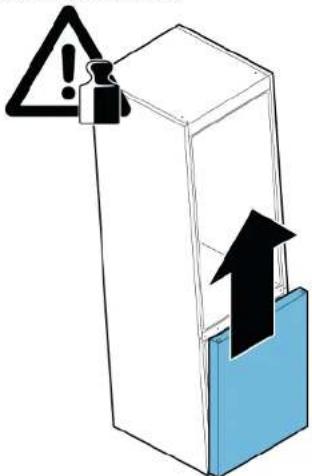
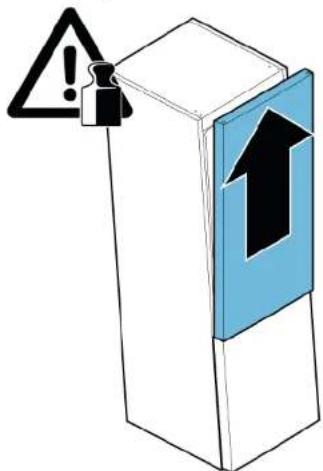
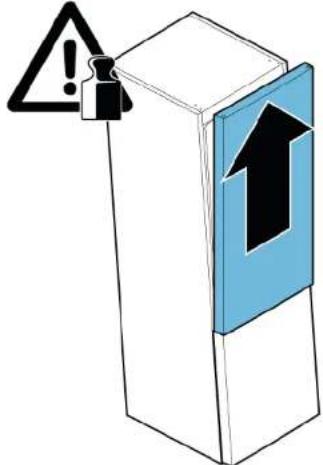
  1. Remove the top door.

Warning symbol and warning icon on a 3D block, indicating alert or hazard.

The upper hinge has been removed.

4.3.2 Installing the upper door hinge

▶ Install in reverse order.

SIEMENS KG39NAIAU - Installing the upper door hinge - 1

Repair

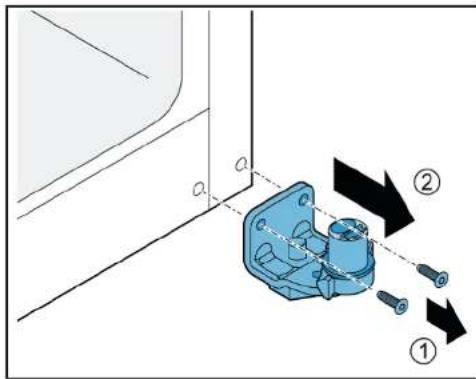
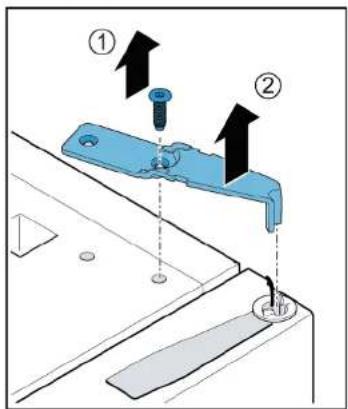
  1. Unscrew the screw (1).
  2. Remove the upper hinge (2).

Technical diagram showing mechanical assembly with numbered components and directional arrows indicating assembly steps.

SIEMENS KG39NAIAU - Repair - 2

Repair

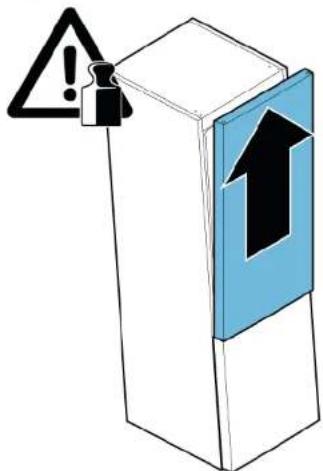
  1. Remove the upper door.

Warning symbol and warning icon on a 3D block, indicating alert or hazard.

The upper hinge has been removed.

4.4.2 Installing the upper door hinge

▶ Install in reverse order.

SIEMENS KG39NAIAU - Installing the upper door hinge - 1

Repair

Torx TX20 6.3 mm (1/4") [00340865]

SIEMENS KG39NAIAU - Repair - 1

WARNING: Heavy, large appliances! Back and spine injuries. ► Removing appliance doors is... ► Moving the appliance requires... ► Use only suitable tools...

SIEMENS KG39NAIAU - Repair - 3

SIEMENS KG39NAIAU - Repair - 4

SIEMENS KG39NAIAU - Repair - 5

SIEMENS KG39NAIAU - Repair - 6

SIEMENS KG39NAIAU - Repair - 7

SIEMENS KG39NAIAU - Repair - 8

SIEMENS KG39NAIAU - Repair - 9

SIEMENS KG39NAIAU - Repair - 10

Requirement:

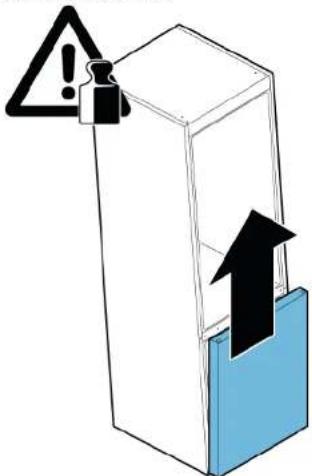
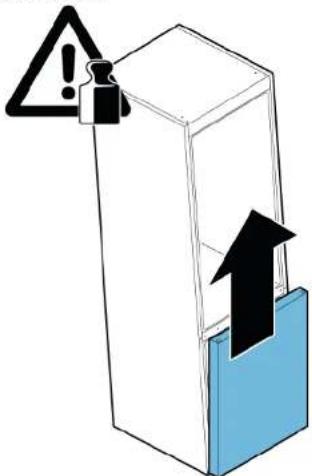
  1. Remove the lower door.SIEMENS KG39NAIAU - Requirement: - 1

The shelf has been removed.

4.7.2 Installing the shelf

The bottle shelf has been removed.

4.8.2 Installing the bottle shelf

▶ Install in reverse order.

SIEMENS KG39NAIAU - Installing the bottle shelf - 1

Repair

→ The container has been removed.

4.10.2 Installing the container

The rear hooks are released.

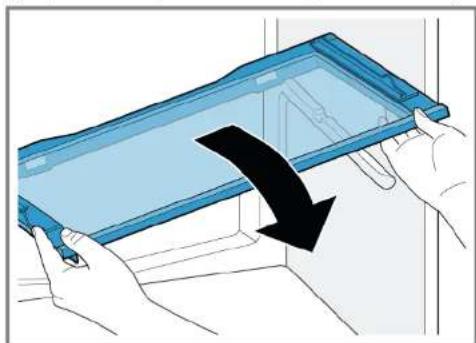
  1. Remove the sealing frame.
  2. Lift the shelf above the fruit and vegetable container and turn it sideways.

Illustration of hands holding a blue tray with a black arrow indicating downward motion (no text or symbols).

The frozen food container has been removed.

4.13.2 Installing the frozen food container

Install in reverse order.

SIEMENS KG39NAIAU - Installing the frozen food container - 1

Repair

4.14 Replacing the upper LED light

Special tools:

Diagram showing LED lighting application on a door panel, with labeled components and directional arrows.

SIEMENS KG39NAIAU - Replacing the upper LED light - 2

Repair

  1. Press the retaining hook to release it (1).
  2. Pull the LED module upward out of the housing.
  3. Dispose of the LED module housing used for safety reasons for transporting spare parts (3).

Diagram illustrating a mechanical assembly with labeled steps and components, showing green component placement and a grid basket.

Illustration of hands connecting a cable to a rectangular panel with shelves (no text or symbols).

Isometric line drawing of a wall-mounted shelf with an eye icon (no text or symbols)

SIEMENS KG39NAIAU - Repair - 4

Repair

Diagram showing three-step installation of a screwdriver on a door, with numbered instructions for each step.

Technical diagram showing a blue tool with numbered components and directional arrows indicating movement or assembly.

SIEMENS KG39NAIAU - Repair - 3

Repair

Technical diagram showing three-step assembly of a blue device with labeled components and connection arrows

SIEMENS KG39NAIAU - Repair - 2

Repair

Technical diagram showing two mechanical assembly steps with numbered components and directional arrows indicating assembly direction.

SIEMENS KG39NAIAU - Repair - 2

Repair

Technical diagram showing a blue mechanical component with labeled parts and directional arrows indicating motion or assembly.

Diagram showing airflow or movement of a blue container with arrows indicating direction and numbered labels ① and ②

SIEMENS KG39NAIAU - Repair - 3

Repair

Illustration of hands connecting a cable to a rectangular panel with shelves (no text or symbols)

Isometric line drawing of a wall-mounted shelf with an eye icon (no text or symbols)

SIEMENS KG39NAIAU - Repair - 3

Repair

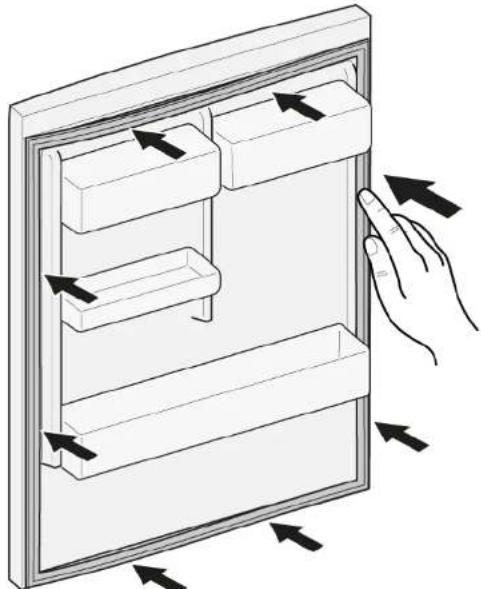
  1. Press the entire gasket gradually into the groove.

Diagram of a hand interacting with a refrigerator drawer, showing multiple compartments and directional arrows indicating movement.

Diagram showing three-step installation of a screwdriver on a door, with numbered instructions for each step.

Technical diagram showing a blue tool with numbered components and directional arrows indicating movement or assembly.

SIEMENS KG39NAIAU - Repair - 4

Repair

▶ Make sure to secure appliances against slipping.

SIEMENS KG39NAIAU - Repair - 1

SIEMENS KG39NAIAU - Repair - 2

CAUTION!

The shelf has been removed.

① LED light ②

SIEMENS KG39NAIAU - CAUTION! - 2

Repair

SIEMENS KG39NAIAU - Repair - 1

The LED freezer light is disconnected.

Diagram of hands connecting a cable to a rectangular panel with shelves, showing structural details, no text or symbols.

Isometric line drawing of a wall-mounted shelf with an eye icon, no text or symbols.

SIEMENS KG39NAIAU - Repair - 4

Repair

SIEMENS KG39NAIAU - Repair - 1

The appliance is disconnected from the power supply. The door is open.

Technical diagram showing a blue tool with numbered components and directional arrows indicating assembly or installation steps.

SIEMENS KG39NAIAU - Repair - 3

Repair

SIEMENS KG39NAIAU - Repair - 1

Repair

SIEMENS KG39NAIAU - Repair - 1

Repair

SIEMENS KG39NAIAU - Repair - 1

Self-repair hints - Fridge-freezer

i Concerning this document.... 152

1.1 Important information.... 152

1.1.1 Purpose.... 152

1.2 Explanation of symbols 152

1.2.1 Danger levels.... 152

1.2.2 Hazard symbols 152

1.2.3 Structure of the warnings.... 153

1.2.4 General symbols.... 153

Safety....

2.1 General Safety instructions 154

2.1.1 All domestic appliances 154

Tools and aids....1

Repair

4.4 Replacing door upper hinge (door with display) 162

4.4.1 Removing door upper hinge.... 162

4.4.2 Installing door upper hinge.... 163

4.5 Replacing door middle hinge 164

4.5.1 Removing door middle hinge 164

4.5.2 Installing door middle hinge 165

4.6 Replacing door lower hinge 166

4.6.1 Removing door lower hinge 166

4.6.2 Installing door lower hinge 166

4.7 Replacing shelf 167

4.7.1 Removing shelf 167

4.7.2 Installing shelf 167

4.8 Replacing bottle tray 168

4.8.1 Removing bottle tray 168

4.8.2 Installing bottle tray 168

4.9 Replacing door rack 169

4.9.1 Removing door rack 169

4.11 Replacing fruit and vegetable container 171

4.11.1 Removing fruit and vegetable container 171

4.11.2 Installing fruit and vegetable container 171

4.12 Replacing shelf above the fruit and vegetable container 172

4.12.1 Removing shelf above the fruit and vegetable container.... 172

4.12.2 Installing shelf above the fruit and vegetable container 173

4.13 Replacing frozen food container 174

4.13.1 Removing frozen food container 174

4.13.2 Installing frozen food container 174

4.14 Replacing LED top lamp 175

4.14.1 Removing LED top lamp 175

4.14.2 Installing LED top lamp 175

4.15 Replacing LED side lamp 176

4.15.1 Removing LED side lamp.... 176

4.15.2 Installing LED side lamp.... 177

4.16 Replacing LED freezer lamp 179

4.16.1 Removing LED freezer lamp 179

4.16.2 Installing LED freezer lamp 179

i Concerning this document

1.1 Important information

1.1.1 Purpose

These repair hints support consumers in repairing appliances themselves in accordance with the applicable eco-design regulation (as of 03/2021).

They contain information on how to exchange defined spare parts, including warnings and risks.

In case of questions, please contact our customer service. We will only be liable for damages if the repair hints have been followed properly.

1.2 Explanation of symbols

1.2.1 Danger levels

The warning levels consist of a symbol and a signal word. The signal word indicates the severity of the danger.

Warning level Meaning
DangerNon-observance of the warning message will result in death or serious injuries.
WarningNon-observance of the warning message could result in death or serious injuries.
CautionNon-observance of the warning message could result in minor injuries.
NoticeNon-observance of the warning message could result in damage to property.

Table 1: Danger levels

1.2.2 Hazard symbols

Hazard symbols are symbolic representations that give an indication of the kind of danger. The following hazard symbols are used in this document:

Hazard symbol Meaning
SIEMENS KG39NAIAU - Hazard symbols - 1General warning message
SIEMENS KG39NAIAU - Hazard symbols - 2Danger from electrical voltage
SIEMENS KG39NAIAU - Hazard symbols - 3Risk of explosion
SIEMENS KG39NAIAU - Hazard symbols - 4Danger of cuts
SIEMENS KG39NAIAU - Hazard symbols - 5Danger of crushing

i Concerning this document

Hazard symbol Meaning
SIEMENS KG39NAIAU - i Concerning this document - 1Danger from hot surfaces
SIEMENS KG39NAIAU - i Concerning this document - 2Danger from strong magnetic field
SIEMENS KG39NAIAU - i Concerning this document - 3Danger from non-ionizing radiation

Table 2: Hazard symbols

1.2.3 Structure of the warnings

Warnings in this document have a standardized appearance and a standardized structure.

SIEMENS KG39NAIAU - Structure of the warnings - 1

SIEMENS KG39NAIAU - Structure of the warnings - 2

Type and source of danger!

Possible consequences of ignoring the danger / warning.

▶ Measures and prohibitions for preventing the danger.

The following example shows a warning that warns against electric shock due to live parts. The measure for avoiding the danger is mentioned.

SIEMENS KG39NAIAU - Structure of the warnings - 3

SIEMENS KG39NAIAU - Structure of the warnings - 4

Risk of electric shock due to live parts!

Death by electrocution

- Disconnect appliances from electrical supply at least 60 seconds before starting repairs.

1.2.4 General symbols

The following general symbols are used in this document:

Gen. symbol Meaning
Identification of a special tip (text and/or graphic)
Identification of a simple tip (only text)
Identification of a link to a video tutorial
Gen. symbol Meaning
Identification of required tools
Identification of required preconditions
Identification of a condition (if ..., then ...)
Identification of a result
[Start] Identification of a key or button
[00123456] Identification of a material number
Status Identification of displayed text / window(in the appliance's display)

Table 3: General symbols

Safety

2.1 General Safety instructions

2.1.1 All domestic appliances

Risk of electric shock due to live parts!

  • Errors by repairs involving electrical components can lead to electrical shock! ■ Disconnect the appliance from the mains for at least 60 seconds before starting work. ■ After the repair have a safety test according VDE 0701 or country-specific regulations performed.

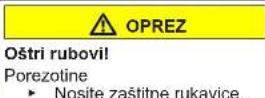
Risk of injury from sharp edges!

■ Wear protective gloves.

Risk of crushing during repair, maintenance, troubleshooting and service due to heavy and moving components

■ Wear protective shoes. ■ Secure heavy components from falling down. ■ Do not stick body parts into moving components.

Risk to the appliance's safety / function!

■ Only use original spare parts.

Risk of damage to electrostatically sensitive components (ESDs)!

- Do not touch the modules, including connections and conductor paths.

SIEMENS KG39NAIAU - Risk of damage to electrostatically sensitive components (ESDs)! - 1

Tools and aids

Designation Details Images
Torx Bit TX20[00340865]6,3 mm (1/4")SIEMENS KG39NAIAU - Tools and aids - 1
Special tool[00342180]

SIEMENS KG39NAIAU - Tools and aids - 2

Repair

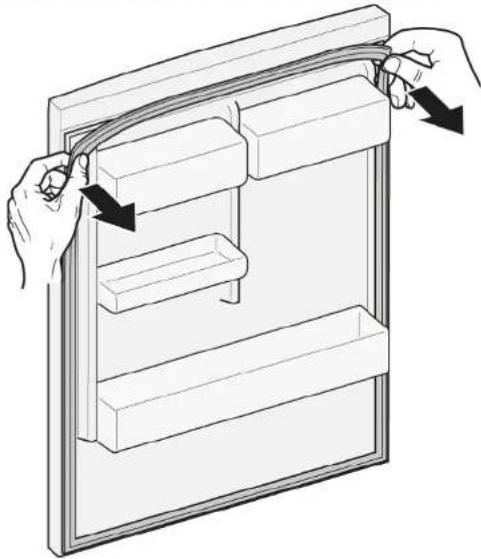
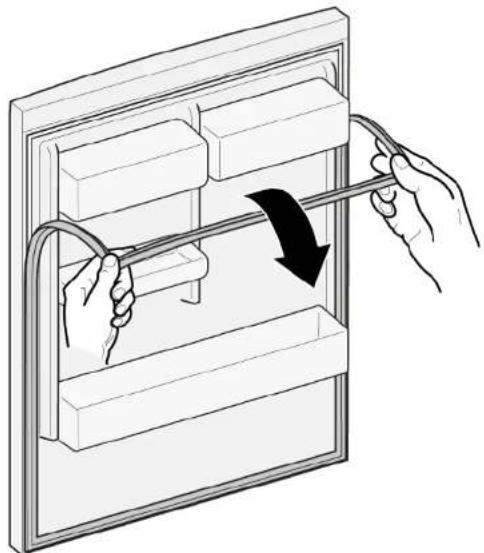
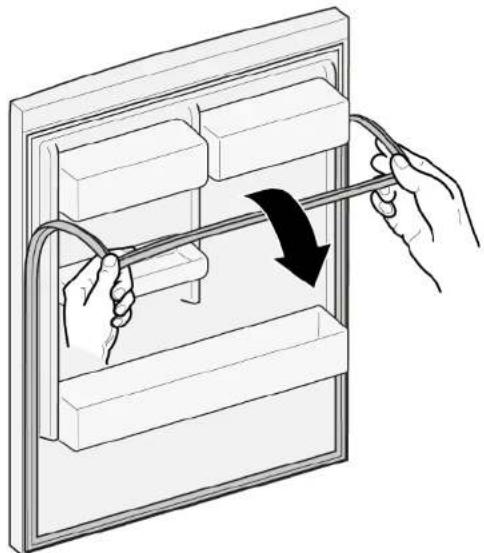
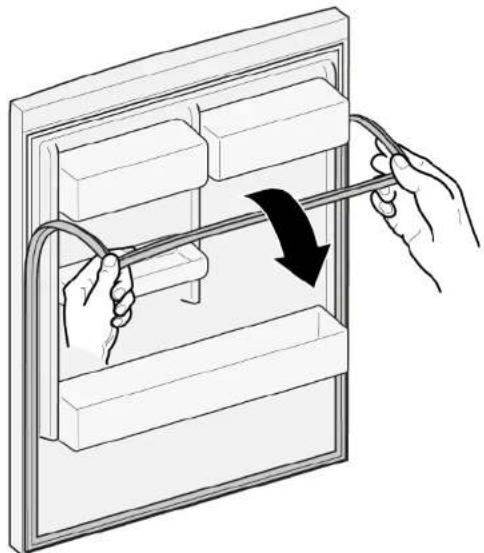
  1. Release door gasket from the groove on right and left corner.

Illustration of hands connecting a cable to a rectangular panel with shelves (no text or symbols).

  1. Pull out door gasket from groove.

Illustration of hands holding a cable with a black arrow indicating direction (no text or symbols).

SIEMENS KG39NAIAU - Repair - 3

Door gasket is removed.

Thickness of new door gasket may deviate slightly from thickness of old door gasket. This will not affect closing behavior and long-term function. If your appliance has adjustable hinges or hinge attachments, you can optimize the closing behavior subsequently. Small side holes in door gasket are functional (required for ventilation). These are not production faults.

Repair

  1. Check groove for gasket for damage.

Isometric line drawing of a wall-mounted shelf with an eye icon, showing internal compartments and directional arrows (no text or symbols).

  1. If groove for gasket is damaged.
  2. Contact customer service.
  3. Slight deformation of door gasket is normal and does not affect its function. It is recommended to straighten door gasket before inserting it into appliance.

Heat door gasket with a hair dryer or hot water and manually reshape it.

  1. Push corners of gasket at the top and bottom to the groove.

Line drawing of a refrigerator with hand gestures indicating side placement (no text or symbols).

SIEMENS KG39NAIAU - Repair - 3

Repair

  1. Press whole gasket step by step into the groove.

Diagram of a hand interacting with a refrigerator drawer, showing shelves and drawers with directional arrows (no text or symbols).

SIEMENS KG39NAIAU - Repair - 2

Door gasket is installed.

SIEMENS KG39NAIAU - Repair - 3

Repair

4.2 Replacing door handle

Required tools:

Torx Bit TX20 6.3 mm (1/4") [00340865]

Slotted screwdriver Blade 10 mm x 1.6 mm x 200 mm

Prerequisite:

√ Appliance is disconnected from power supply. √ Door is open.

4.2.1 Removing door handle

  1. Remove two screw caps (1).
  2. Unscrew two screws (2).
  3. Remove door handle (3).

Diagram showing three-step installation of a screwdriver on a door, with numbered instructions for each step.

SIEMENS KG39NAIAU - Removing door handle - 2

Door handle is removed.

SIEMENS KG39NAIAU - Removing door handle - 3

Door handle for the second door can be removed in the same manner.

▶ Install in reverse order.

SIEMENS KG39NAIAU - Removing door handle - 4

Repair

SIEMENS KG39NAIAU - Repair - 1

SIEMENS KG39NAIAU - Repair - 2

SIEMENS KG39NAIAU - Repair - 3

SIEMENS KG39NAIAU - Repair - 4

SIEMENS KG39NAIAU - Repair - 5

SIEMENS KG39NAIAU - Repair - 6

SIEMENS KG39NAIAU - Repair - 7

SIEMENS KG39NAIAU - Repair - 8

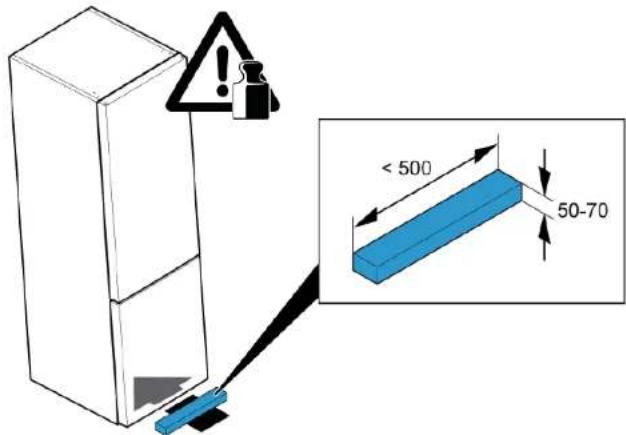
Prerequisite:

Appliance is disconnected from power supply. Appliance interior fittings are removed.

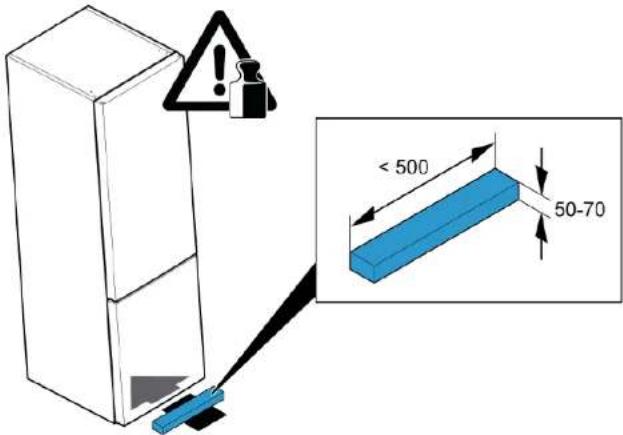
  1. Slide supporting part under base section.

< 500 50-70

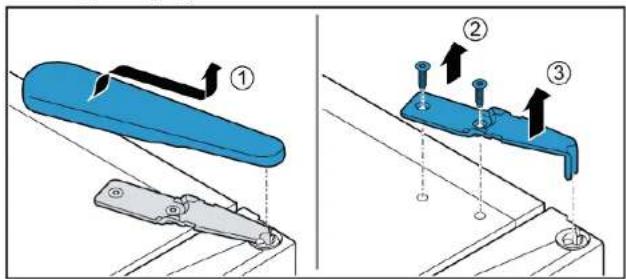
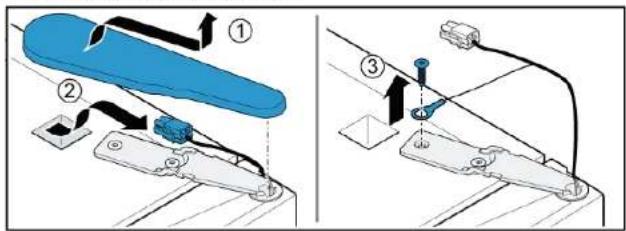
  1. Remove upper hinge cover (1).
  2. Unscrew two screws (2).
  3. Remove upper hinge (3).

Technical diagram showing a blue tool with numbered components and directional arrows indicating assembly or movement.

SIEMENS KG39NAIAU - Repair - 11

Repair

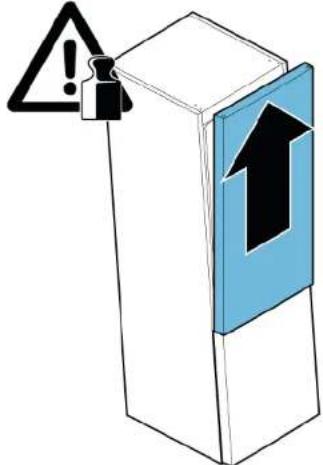
  1. Remove upper door.

Warning sign with warning symbol and upward arrow inside a blue box, indicating caution or hazard.

Upper hinge is removed.

Install in reverse order.

SIEMENS KG39NAIAU - Repair - 2

Repair

4.4 Replacing door upper hinge (door with display)

Required tools:

Torx Bit TX20 6,3 mm (1/4") [00340865]

SIEMENS KG39NAIAU - Replacing door upper hinge (door with display) - 1

SIEMENS KG39NAIAU - Replacing door upper hinge (door with display) - 2

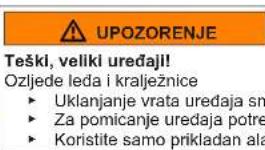
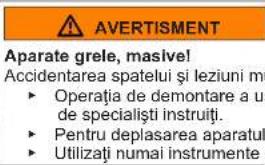
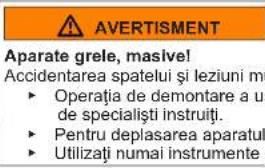
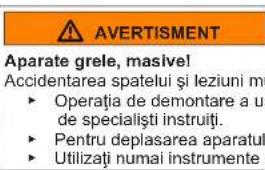
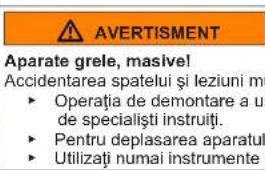
Heavy, bulky appliances!

Back and muscle injuries

  • Appliance door removal operation should only be carried out by trained specialists. ▶ To move the appliance, two people are required. ▶ Use only suitable tools and equipment.

SIEMENS KG39NAIAU - Replacing door upper hinge (door with display) - 3

SIEMENS KG39NAIAU - Replacing door upper hinge (door with display) - 4

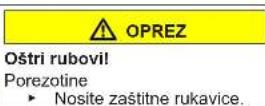
Sharp edges!

Cut injuries

▶ Wear protective gloves.

SIEMENS KG39NAIAU - Replacing door upper hinge (door with display) - 5

SIEMENS KG39NAIAU - Replacing door upper hinge (door with display) - 6

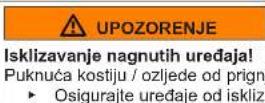
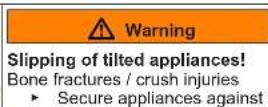
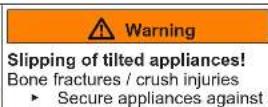
Slipping of tilted appliances!

Bone fractures / crush injuries

- Secure appliances against slipping.

SIEMENS KG39NAIAU - Replacing door upper hinge (door with display) - 7

SIEMENS KG39NAIAU - Replacing door upper hinge (door with display) - 8

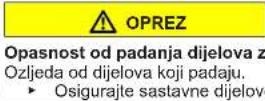
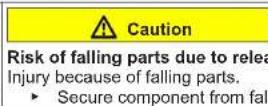
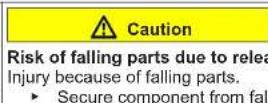
Risk of falling parts due to released screws!

Injury because of falling parts.

- Secure component from falling down.

SIEMENS KG39NAIAU - Replacing door upper hinge (door with display) - 9

SIEMENS KG39NAIAU - Replacing door upper hinge (door with display) - 10

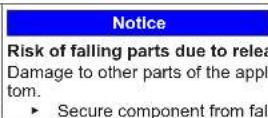
Risk of falling parts due to released screws!

Damage to other parts of the appliance or at customers home e.g. bottom.

- Secure component from falling down.

SIEMENS KG39NAIAU - Replacing door upper hinge (door with display) - 11

SIEMENS KG39NAIAU - Replacing door upper hinge (door with display) - 12

Risk of electric shock due to live parts!

Danger to life through electric shock in case of improper repair

Electric parts should be repaired by qualified electricians. After the repair, have a safety test performed according to VDE 0701 or country-specific regulations.

SIEMENS KG39NAIAU - Replacing door upper hinge (door with display) - 13

SIEMENS KG39NAIAU - Replacing door upper hinge (door with display) - 14

Risk of electric shock due to live parts!

Death by electrocution

- Disconnect appliances from electrical supply at least 60 seconds before starting repairs.

Prerequisite:

√ Appliance is disconnected from power supply. √ Appliance interior fittings are removed.

  1. Slide supporting part under base section.

< 500 50-70

SIEMENS KG39NAIAU - Replacing door upper hinge (door with display) - 16

Repair

  1. Remove upper hinge cover (1).
  2. Disconnect electrical connection (2).
  3. Unscrew ground connection screw (3).

Technical diagram showing three steps of a mechanical assembly with labeled components and directional arrows.

  1. Unscrew the screw (1).
  2. Remove upper hinge (2).

Technical diagram showing mechanical assembly with labeled parts and directional arrows indicating movement or force.

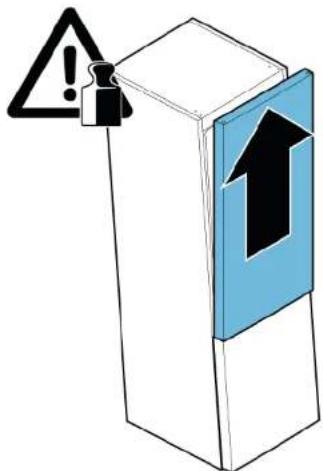
  1. Remove upper door.

Warning symbol and warning icon on a 3D block, indicating alert or hazard.

Upper hinge is removed.

Install in reverse order.

SIEMENS KG39NAIAU - Repair - 4

Repair

4.5 Replacing door middle hinge

Required tools:

Torx Bit TX20 6.3 mm (1/4") [00340865]

SIEMENS KG39NAIAU - Replacing door middle hinge - 1

Warning: Heavy, bulky appliances! Risk of back and muscle injuries. Appliance door removal should be performed by trained specialists. To move the appliance, two people are required. Use only suitable tools and equipment.

SIEMENS KG39NAIAU - Replacing door middle hinge - 3

SIEMENS KG39NAIAU - Replacing door middle hinge - 4

SIEMENS KG39NAIAU - Replacing door middle hinge - 5

SIEMENS KG39NAIAU - Replacing door middle hinge - 6

SIEMENS KG39NAIAU - Replacing door middle hinge - 7

SIEMENS KG39NAIAU - Replacing door middle hinge - 8

SIEMENS KG39NAIAU - Replacing door middle hinge - 9

SIEMENS KG39NAIAU - Replacing door middle hinge - 10

Prerequisite:

Appliance is disconnected from power supply. Appliance interior fittings are removed. Door upper hinge is removed.

Upper door is removed.

4.5.1 Removing door middle hinge

  1. Unscrew two screws (1).
  2. Remove middle hinge (2).

Technical diagram showing two mechanical assembly steps with numbered components and directional arrows indicating movement or assembly.

SIEMENS KG39NAIAU - Removing door middle hinge - 2

Repair

  1. Remove lower door.

Diagram showing a device with warning symbols and an upward arrow, indicating a warning or alert mechanism.

SIEMENS KG39NAIAU - Repair - 2

Middle hinge is removed.

4.5.2 Installing door middle hinge

Install in reverse order.

SIEMENS KG39NAIAU - Installing door middle hinge - 1

Repair

4.6 Replacing door lower hinge

Required tools:

Torx Bit TX20 6.3 mm (1/4") [00340865]

SIEMENS KG39NAIAU - Replacing door lower hinge - 1

SIEMENS KG39NAIAU - Replacing door lower hinge - 2

Heavy, bulky appliances!

Back and muscle injuries

▶ Appliance door removal operation should only be carried out by trained specialists. To move the appliance, two people are required. ▶ Use only suitable tools and equipment.

SIEMENS KG39NAIAU - Replacing door lower hinge - 3

SIEMENS KG39NAIAU - Replacing door lower hinge - 4

Sharp edges!

Cut injuries

▶ Wear protective gloves.

SIEMENS KG39NAIAU - Replacing door lower hinge - 5

SIEMENS KG39NAIAU - Replacing door lower hinge - 6

Slipping of tilted appliances!

Bone fractures / crush injuries

- Secure appliances against slipping.

SIEMENS KG39NAIAU - Replacing door lower hinge - 7

SIEMENS KG39NAIAU - Replacing door lower hinge - 8

Risk of falling parts due to released screws!

Injury because of falling parts.

- Secure component from falling down.

SIEMENS KG39NAIAU - Replacing door lower hinge - 9

SIEMENS KG39NAIAU - Replacing door lower hinge - 10

Risk of falling parts due to released screws!

Damage to other parts of the appliance or at customers home e.g. bot-

tom.

- Secure component from falling down.

Prerequisite:

√ Appliance is disconnected from power supply. √ Appliance interior fittings are removed. √ Upper hinge is removed.

√ Middle hinge is removed.

4.6.1 Removing door lower hinge

▶ 1. Unscrew two screws (1).

  1. Remove lower hinge (2).

Technical diagram showing a blue mechanical component with labeled parts and directional arrows indicating motion or assembly.

Door lower hinge is removed.

▶ Install in reverse order.

SIEMENS KG39NAIAU - Removing door lower hinge - 2

Repair

4.7 Replacing shelf

Prerequisite:

√ Door is open.

4.7.1 Removing shelf

▶ 1. Lift the shelf at the rear (1).

  1. Release shelf (2).

Diagram illustrating fluid flow through a sloped surface with labeled components and directional arrows.

Shelf is removed.

4.7.2 Installing shelf

Install in reverse order.

SIEMENS KG39NAIAU - Installing shelf - 1

Repair

4.8 Replacing bottle tray

Prerequisite:

Door is open.

4.8.1 Removing bottle tray

Pull out bottle tray.

Abstract diagram with wavy lines and a black arrow pointing downward (no text or symbols).

Bottle tray is removed.

4.8.2 Installing bottle tray

Install in reverse order.

SIEMENS KG39NAIAU - Installing bottle tray - 1

Repair

4.9 Replacing door rack

Prerequisite:

Door is open.

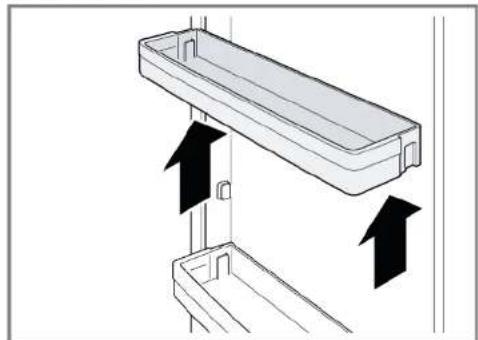
Lift door rack upwards.

Diagram showing two mechanical components with upward arrows indicating motion or assembly (no text or symbols).

Door rack is removed.

Install in reverse order.

SIEMENS KG39NAIAU - Replacing door rack - 2

Repair

4.10 Replacing storage container

Prerequisite:

Door is open.

4.10.1 Removing storage container

  1. Pull out the storage container as far as it will go. 2.1. Lift the storage container at the front (1).
  2. Remove container (2).SIEMENS KG39NAIAU - Removing storage container - 1

Storage container is removed.SIEMENS KG39NAIAU - Removing storage container - 2

4.10.2 Installing storage container

Install in reverse order.

Repair

4.11 Replacing fruit and vegetable container

Prerequisite:

√ Door is open.

4.11.1 Removing fruit and vegetable container

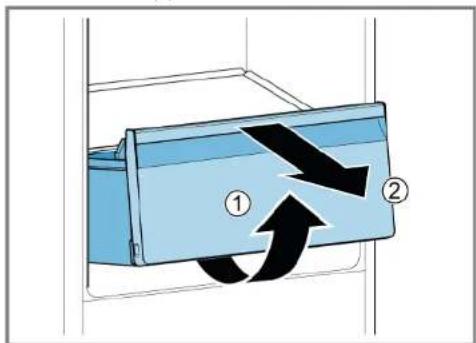
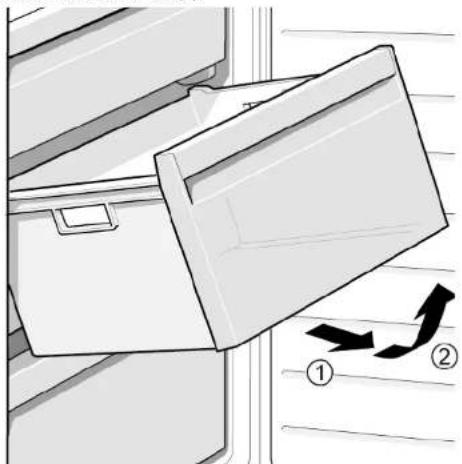
  1. Pull out the fruit and vegetable container as far as it will go.
  2. Lift the fruit and vegetable container at the front (1).
  3. Remove container (2).

Diagram showing a blue container with black arrows indicating flow or movement, labeled with numbers 1 and 2.

→ Fruit and vegetable container is removed.

4.11.2 Installing fruit and vegetable container

▶ Install in reverse order.

SIEMENS KG39NAIAU - Installing fruit and vegetable container - 1

Repair

4.12 Replacing shelf above the fruit and vegetable container

Prerequisite:

Door is open. √ Fruit and vegetable container is removed.→ Page 171

4.12.1 Removing shelf above the fruit and vegetable container

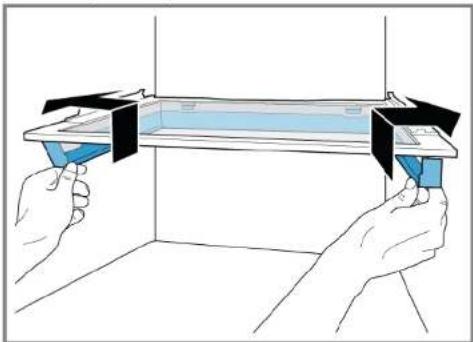
  1. Push the sealing frame upwards and out.

Illustration of two hands holding a transparent shelf with blue and black components, no text or symbols present.

Side hooks are released.

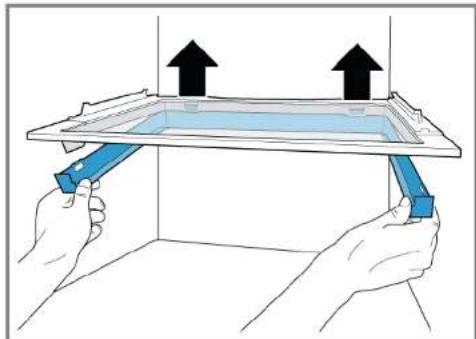
  1. Lift up the sealing frame and slide it backwards.

Illustration of hands holding a tray with blue handles, showing upward arrows indicating movement or force (no text or symbols).

Rear hooks are released.

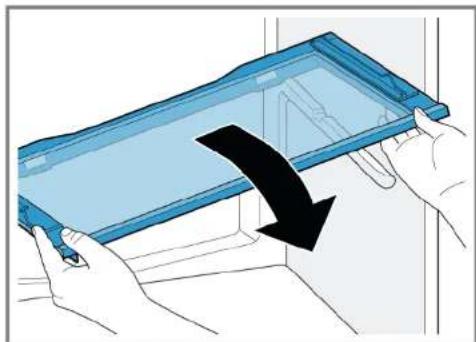
  1. Remove the sealing frame.
  2. Lift up the shelf above the fruit and vegetable container and swivel it out to the side.

Illustration of hands holding a blue tray with a black arrow indicating downward motion (no text or symbols).

Shelf above the fruit and vegetable container is removed.

Repair

4.12.2 Installing shelf above the fruit and vegetable container

▶ Install in reverse order.

SIEMENS KG39NAIAU - Installing shelf above the fruit and vegetable container - 1

Repair

4.13 Replacing frozen food container

Prerequisite:

Door is open.

4.13.1 Removing frozen food container

  1. Pull out frozen food container all the way (1).
  2. Remove food container (2).

Diagram of a refrigerator with an open door and directional arrows indicating movement (no text or symbols).

Frozen food container is removed.

4.13.2 Installing frozen food container

Install in reverse order.

SIEMENS KG39NAIAU - Installing frozen food container - 1

Repair

4.14 Replacing LED top lamp

Required tools:

SIEMENS KG39NAIAU - Replacing LED top lamp - 1

Special tool [00342180]

SIEMENS KG39NAIAU - Replacing LED top lamp - 2

Your appliance features a maintenance-free LED light. These lights may be repaired by customer service or authorized technicians only!

SIEMENS KG39NAIAU - Replacing LED top lamp - 3

Danger

Risk of electric shock due to live parts!

Danger to life through electric shock in case of improper repair - Electrical parts should be repaired by qualified electricians. - After the repair, have a safety test performed according to VDE 0701 or country-specific regulations.

SIEMENS KG39NAIAU - Danger - 1

Danger

Risk of electric shock due to live parts! Death by electrocution

- Disconnect appliances from electrical supply at least 60 seconds before starting repairs.

SIEMENS KG39NAIAU - Danger - 1

Caution

Sharp edges!

Cut injuries

▶ Wear protective gloves.
Prerequisite:

√ Appliance is disconnected from power supply. √ Door is open.

4.14.1 Removing LED top lamp

  1. Slide disassembly tool between LED top lamp and refrigerator compartment innerliner to release lamp hooks (1).
  2. Remove LED top lamp (2).

Diagram showing LED lighting application on a door panel, with labeled steps 1 and 2 indicating light path and component placement.

  1. Disconnect LED top lamp electrical connection. LED top lamp is removed.

4.14.2 Installing LED top lamp

Install in reverse order.

SIEMENS KG39NAIAU - Installing LED top lamp - 1

Repair

4.15 Replacing LED side lamp

Required tools:

SIEMENS KG39NAIAU - Replacing LED side lamp - 1

Special tool [00342180]

SIEMENS KG39NAIAU - Replacing LED side lamp - 2

Your appliance features a maintenance-free LED light.

These lights may be repaired by customer service or authorised technicians only!

SIEMENS KG39NAIAU - Replacing LED side lamp - 3

SIEMENS KG39NAIAU - Replacing LED side lamp - 4

Danger

Risk of electric shock due to live parts!

Danger to life through electric shock in case of improper repair

Electric parts should be repaired by a qualified electrician.

After the repair, have a safety test according to VDE 0701 or country-specific regulations performed.

SIEMENS KG39NAIAU - Danger - 1

SIEMENS KG39NAIAU - Danger - 2

Danger

Risk of electric shock due to live parts!

Death by electrocution

- Disconnect appliances from electrical supply at least 60 seconds before starting repairs.

SIEMENS KG39NAIAU - Danger - 1

SIEMENS KG39NAIAU - Danger - 2

Caution

Sharp edges!

Cut injuries

▶ Wear protective gloves.

SIEMENS KG39NAIAU - Caution - 1

Notice

Risk of damage to electrostatically sensitive components (ESDs)!

Components damage

Before touching ESDs, use an electrostatic protection system (wristband with earth safe plug).

- Do not touch connections and conductor paths of the modules.

▶ Only transport ESDs in conductive materials or original packaging.

- Keep ESDs clear of electrostatically chargeable materials (i.e. plastic).

Prerequisite:

√ Appliance is disconnected from power supply. √ Door is open.

SIEMENS KG39NAIAU - Notice - 1

RC interior fittings are removed.

4.15.1 Removing LED side lamp

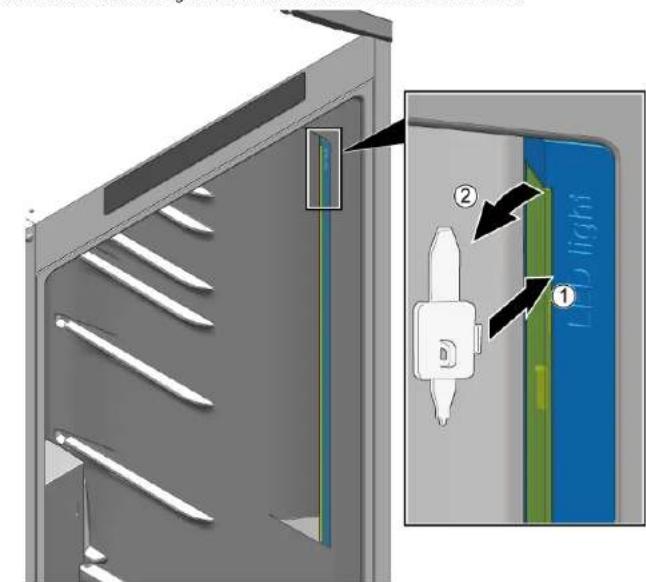
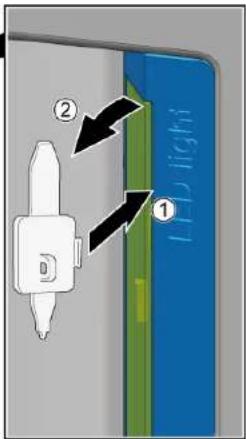
  1. Slide disassembly tool between lamp diffusor and housing to release hook (1).
  2. Move out lamp diffusor (2).
  3. Release succeeding diffusor fixation hooks in the same manner.

Technical diagram showing a device with labeled components and directional arrows, including 'LED light' label.

Lamp diffusor is removed.SIEMENS KG39NAIAU - Removing LED side lamp - 2

SIEMENS KG39NAIAU - Removing LED side lamp - 3

Repair

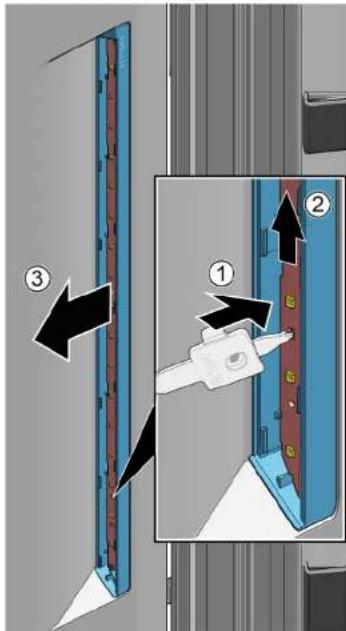
  1. Press fixation hook to release it (1).
  2. Move LED module up approx. 1 cm to remove to disconnect it from electrical socket (2).
  3. Remove LED module (3).

Technical diagram showing a mechanical assembly with labeled parts and directional arrows indicating motion or assembly.

LED side lamp is removed.SIEMENS KG39NAIAU - Repair - 2

4.15.2 Installing LED side lamp

SIEMENS KG39NAIAU - Installing LED side lamp - 1

Due to lamp diffusor hooks are easy to break during removal process, spare part LED side lamp is the set that includes LED module and lamp diffusor.

  1. Slide disassembly tool between lamp diffusor and housing to release hook (1).
  2. Move out lamp diffusor (2).
  3. Release succeeding diffusor fixation hooks in the same manner.

Technical diagram showing a mechanical assembly with labeled parts and directional arrows indicating motion or assembly steps.

SIEMENS KG39NAIAU - Installing LED side lamp - 3

Repair

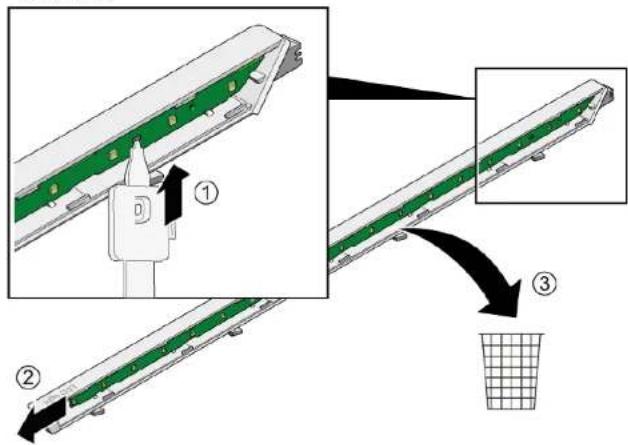
  1. Press fixation hook to release it (1).
  2. Slide LED module up out the housing.
  3. Scrap LED module housing that is used for spare part transportation security reasons (3).

Diagram illustrating a mechanical assembly with labeled steps and components, showing green component placement and a grid basket.

  1. Install LED module and lamp diffusor in reverse order to removal.

SIEMENS KG39NAIAU - Repair - 2

Repair

4.16 Replacing LED freezer lamp

Required tools:

SIEMENS KG39NAIAU - Replacing LED freezer lamp - 1

Special tool [00342180]

SIEMENS KG39NAIAU - Replacing LED freezer lamp - 2

Your appliance features a maintenance-free LED light.

These lights may be repaired by customer service or authorized technicians only!

SIEMENS KG39NAIAU - Replacing LED freezer lamp - 3

Danger

Risk of electric shock due to live parts!

Danger to life through electric shock in case of improper repair

▶ Electric parts should be repaired by qualified electricians.

After the repair, have a safety test performed according to VDE 0701 or country-specific regulations.

SIEMENS KG39NAIAU - Danger - 1

Danger

Risk of electric shock due to live parts!

Death by electrocution

- Disconnect appliances from electrical supply at least 60 seconds before starting repairs.

SIEMENS KG39NAIAU - Danger - 1

Caution

Sharp edges!

Cut injuries

▶ Wear protective gloves.

Prerequisite:

√ Appliance is disconnected from power supply. √ Door is open.

4.16.1 Removing LED freezer lamp

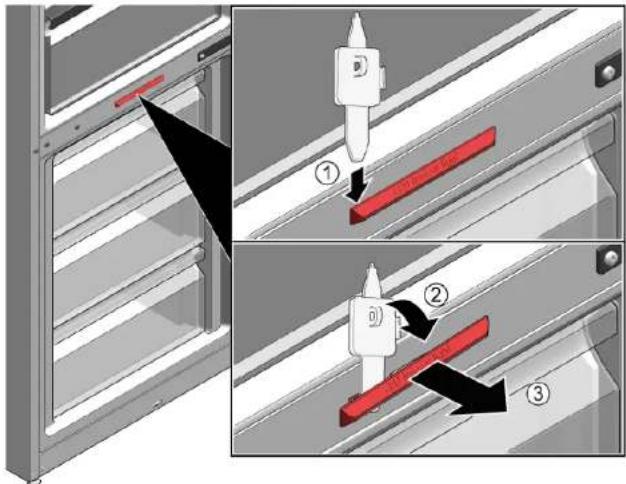
  1. Slide disassembly tool between lamp and housing at the side of lamp to create gap (1).
  2. Slide disassembly tool on the other side of lamp fixation hook and rotate it forward (2).
  3. Remove LED freezer lamp (3).

Technical diagram showing three-step assembly steps of a mechanical component with red and black parts, labeled 1, 2, and 3.

SIEMENS KG39NAIAU - Removing LED freezer lamp - 2

LED freezer lamp is disconnected.

SIEMENS KG39NAIAU - Removing LED freezer lamp - 3

LED freezer lamp is removed.

4.16.2 Installing LED freezer lamp

▶ Install in reverse order.

1.1 Important information 181

Isometric line drawing of a refrigerator with an eye icon above, showing shelves and doors (no text or symbols).

SIEMENS KG39NAIAU - Installing LED freezer lamp - 2

Repair

  1. Press the entire seal into the groove piece by piece.
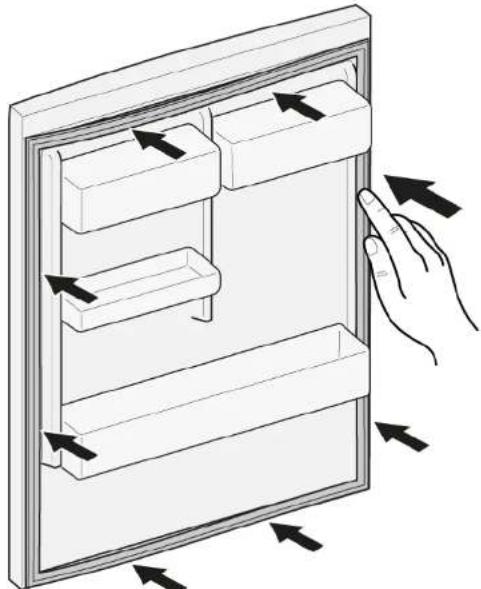
Diagram of a hand interacting with a refrigerator drawer, showing shelves and drawers with arrows indicating movement (no text or symbols).

Diagram showing three-step installation of a screwdriver on a door, with numbered instructions for each step.

Technical diagram showing a blue tool with numbered components and directional arrows indicating movement or assembly.

SIEMENS KG39NAIAU - Repair - 4

Repair

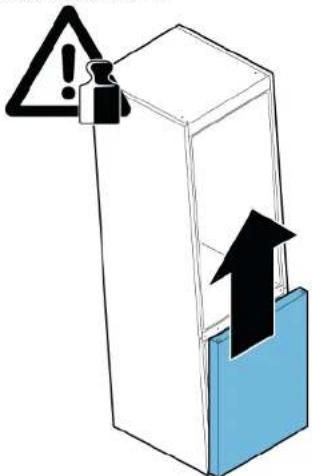
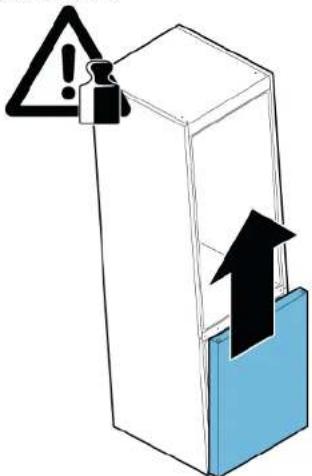
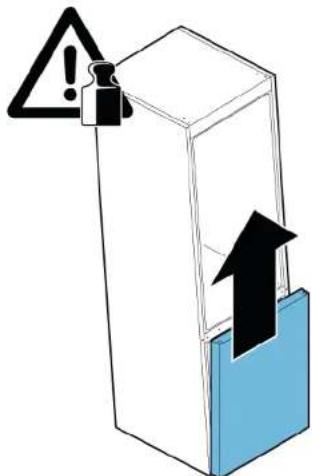
  1. Remove the lower door.

Diagram showing a warning sign with an exclamation mark and an upward arrow inside a container, likely indicating a hazard or alert.

Diagram of a roof drainage system with wavy roof lines and black directional arrows indicating flow or movement (no text or symbols).

Diagram showing two mechanical components with upward arrows indicating motion or assembly (no text or symbols).

Diagram showing airflow or movement between two blue containers labeled ① and ②, with arrows indicating direction.

The side hooks are released.

The rear hooks are released.

Diagram showing a device with LED status indicator and labeled parts, including a zoomed-in view of the component.

② ① LED light

Technical diagram showing a mechanical assembly with labeled parts and directional arrows indicating motion or assembly.

SIEMENS KG39NAIAU - Repair - 8

Repair

Diagram of hands connecting a cable to a rectangular panel with shelves, showing structural details (no text or symbols).

Isometric line drawing of a wall-mounted shelf with an eye icon above.

SIEMENS KG39NAIAU - Repair - 3

Repair

Diagram showing three-step installation of a screwdriver on a door, with numbered instructions for each step.

Technical diagram showing a blue tool with numbered components and directional arrows indicating assembly or installation steps.

SIEMENS KG39NAIAU - Repair - 3

Repair

  1. Remove the upper door.

Warning symbol and warning icon on a 3D block, indicating alert or hazard.

Technical diagram showing three-step assembly of a blue device with labeled components and directional arrows indicating motion.

SIEMENS KG39NAIAU - Repair - 3

Repair

  1. Remove the upper door.

Warning symbol and warning icon on a 3D block, indicating alert or hazard.

Technical diagram showing two mechanical assembly steps with numbered components and directional arrows indicating motion or assembly.

  1. Remove the lower door.

Diagram showing a warning sign with an exclamation mark and an upward arrow inside a container, likely indicating a hazard or alert.

SIEMENS KG39NAIAU - Repair - 4

The shelf has been removed.

The lamp diffuser has been removed.SIEMENS KG39NAIAU - Repair - 5

Repair

SIEMENS KG39NAIAU - Repair - 1

Repair

Diagram of hands connecting a cable to a door panel with shelves, showing structural details, no text or symbols.

  1. Remove the door gasket from the groove.
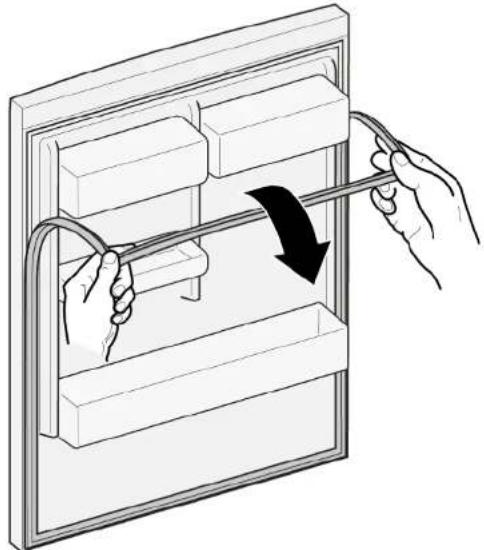
Illustration of hands holding a cable with a black arrow indicating direction, no text or symbols.

Isometric line drawing of a wall-mounted shelf with an eye icon above, no text or symbols.

SIEMENS KG39NAIAU - Repair - 4

Repair

Diagram showing three-step installation of a screwdriver on a door, with numbered instructions for each step.

Technical diagram showing a blue tool with numbered components and directional arrows indicating assembly or movement.

SIEMENS KG39NAIAU - Repair - 3

Repair

SIEMENS KG39NAIAU - Repair - 1

Repair

SIEMENS KG39NAIAU - Repair - 1

Repair

Diagram showing a blue container with black arrows indicating flow or movement, labeled with numbers ① and ②.

SIEMENS KG39NAIAU - Repair - 2

Repair

Diagram of hands connecting a cable to a storage unit panel, no text or symbols.

Isometric line drawing of a wall-mounted shelf with an eye icon, no text or symbols.

SIEMENS KG39NAIAU - Repair - 3

Repair

Diagram showing three-step installation of a screwdriver tool, with numbered instructions for each step.

Technical diagram showing a blue tool with labeled parts and numbered annotations (①, ②, ③, ④).

SIEMENS KG39NAIAU - Repair - 3

Repair

SIEMENS KG39NAIAU - Repair - 1

Repair

SIEMENS KG39NAIAU - Repair - 1

Repair

SIEMENS KG39NAIAU - Repair - 1

Repair

Illustration of hands connecting a cable to a storage unit panel, no text or symbols.

Isometric line drawing of a wall-mounted shelf with an eye icon, no text or symbols.

SIEMENS KG39NAIAU - Repair - 3

Repair

Diagram showing three-step installation of a screwdriver on a door, with numbered instructions for each step.

Technical diagram showing a blue tool with numbered components and directional arrows indicating movement or assembly.

SIEMENS KG39NAIAU - Repair - 3

Repair

SIEMENS KG39NAIAU - Repair - 1

Repair

The shelf has been removed.Diagram of a roof drainage system with wavy roof lines and a black arrow indicating flow direction (no text or symbols).

The door shelf has been removed.

The fruit and vegetable drawer has been removed.

Illustration of hands connecting a cable to a rectangular panel with shelves.

Isometric line drawing of a wall-mounted shelf with an eye icon above.

SIEMENS KG39NAIAU - Repair - 4

Repair

Diagram showing three-step installation of a screwdriver on a door, with numbered instructions for each step.

Technical diagram showing a blue tool with numbered components and directional arrows indicating assembly or movement.

SIEMENS KG39NAIAU - Repair - 3

Repair

SIEMENS KG39NAIAU - Repair - 1

Repair

Technical diagram showing two mechanical assembly steps with numbered components and directional arrows indicating movement or assembly.

SIEMENS KG39NAIAU - Repair - 2

Repair

Technical diagram showing a blue mechanical component with labeled parts and directional arrows indicating motion or assembly.

SIEMENS KG39NAIAU - Repair - 2

Repair

Diagram of hands connecting a cable to a rectangular panel with shelves, showing structural details (no text or symbols)

SIEMENS KG39NAIAU - Repair - 2

Repair

Diagram showing three-step installation of a screwdriver on a door, with numbered instructions for each step.

Technical diagram showing a blue tool with labeled parts and numbered annotations (①, ②, ③, ④)

Repair

  1. Unscrew the screw (1).
  2. Remove the upper hinge (2).

Technical diagram showing mechanical assembly with numbered components and directional arrows indicating assembly steps.

Repair

Repair

The side stops disengage.

The rear stops disengage.

Repair

Diagram of hands connecting a cable to a rectangular panel with shelves, showing structural details (no text or symbols).

Isometric line drawing of a wall-mounted shelf with an eye icon (no text or symbols).

SIEMENS KG39NAIAU - Repair - 3

Reassembly

Diagram showing three-step installation of a screwdriver on a door, with numbered instructions for each step.

SIEMENS KG39NAIAU - Reassembly - 2

The door handle has been removed.

SIEMENS KG39NAIAU - Reassembly - 3

Remove the other door handles in the same way.

SIEMENS KG39NAIAU - Reassembly - 4

Repair

The shelf has been removed.

The fruit and vegetable container has been removed.

4.11.2 Installing the fruit and vegetable container
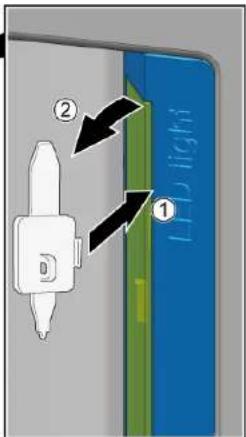
Diagram showing a device with labeled parts and directional arrows, likely illustrating a process or assembly.

The light diffuser has been removed.

SIEMENS KG39NAIAU - Installing the fruit and vegetable container - 2

Repair

SIEMENS KG39NAIAU - Repair - 1

Repairs

Illustration of hands connecting a cable to a rectangular panel with shelves (no text or symbols)

Isometric line drawing of a wall-mounted shelf with an eye icon (no text or symbols)

SIEMENS KG39NAIAU - Repairs - 3

Repairs

Diagram showing three-step installation of a screwdriver on a door, with numbered instructions for each step.

Technical diagram showing a blue tool with numbered components and directional arrows indicating movement or assembly.

SIEMENS KG39NAIAU - Repairs - 3

Repairs

  1. Remove the top door.

Warning symbol and warning icon on a 3D block, indicating alert or hazard

Technical diagram showing a mechanical assembly with labeled components and a directional arrow.

  1. Remove the top door.

Warning sign with a warning symbol and an upward arrow inside a blue box, indicating alert or hazard.

  1. Remove the bottom door.

Diagram showing a warning sign with an exclamation mark and an upward arrow inside a box, indicating a hazard or caution.

The shelf is removed.

Highlight: ① ②

SIEMENS KG39NAIAU - Repairs - 6

Repairs

Illustration of hands connecting a cable to a rectangular panel with shelves (no text or symbols)

Isometric line drawing of a wall-mounted shelf with an eye icon (no text or symbols)

SIEMENS KG39NAIAU - Repairs - 3

Repairs

Diagram showing three-step installation of a screwdriver on a door, with numbered instructions for each step.

Technical diagram showing a blue tool with numbered components and directional arrows indicating assembly or movement.

SIEMENS KG39NAIAU - Repairs - 3

Repairs

The hinge is disassembled.

  1. Unscrew the screw (1).
  2. Disassemble the upper hinge (2).

Technical diagram showing mechanical assembly with labeled parts and directional arrows indicating movement or force.

The hinge is disassembled.

→ The lower door hinge is disassembled.

4.6.2 Assembly of the lower door hinge

The bottle shelf is disassembled.

4.8.2 Assembly of the bottle shelf

Diagram showing a blue shelf with numbered arrows indicating flow or movement, labeled ① and ②.

Illustration of two hands holding a transparent shelf with blue and black components, no text or symbols present.

→ The container for frozen goods is disassembled.

  1. Disconnect the electrical connection for the upper LED lamp. The upper LED lamp is disassembled.

The lamp diffuser is disassembled.SIEMENS KG39NAIAU - Assembly of the bottle shelf - 3

Repair

The side LED lamp is disassembled.

SIEMENS KG39NAIAU - Repair - 1

Repair

The LED lamp for the freezer is disconnected. The LED lamp for the freezer is disassembled.

4.16.2 Assembly of the LED lamp for the freezer

Isometric line drawing of a wall-mounted shelf with an eye icon pointing to the top panel (no text or symbols)

SIEMENS KG39NAIAU - Assembly of the LED lamp for the freezer - 2

Repair

Diagram showing three-step installation of a screwdriver on a door panel, with numbered instructions for each step.

Technical diagram showing a blue tool with numbered components and directional arrows indicating movement or assembly.

SIEMENS KG39NAIAU - Repair - 3

Repair

SIEMENS KG39NAIAU - Repair - 1

Repairs

SIEMENS KG39NAIAU - Repairs - 1

Repairs

The shelf is removed.

4.7.2 Installing the shelf

Illustration of hands connecting a cable to a rectangular panel with shelves (no text or symbols).

Isometric line drawing of a wall-mounted shelf with an eye icon (no text or symbols).

SIEMENS KG39NAIAU - Installing the shelf - 3

Repair

Diagram showing three-step installation of a screwdriver on a door, with numbered instructions for each step.

Technical diagram showing a blue tool with numbered components and directional arrows indicating movement or assembly.

SIEMENS KG39NAIAU - Repair - 3

Repair

  1. Remove the upper door.

Warning symbol and warning icon on a 3D block, indicating alert or hazard.

  1. Loosen screw (1).
  2. Remove the upper hinge (2).

Technical diagram showing mechanical assembly with numbered components and directional arrows indicating assembly steps.

SIEMENS KG39NAIAU - Repair - 3

Repair

  1. Remove the upper door.

Warning symbol and warning icon on a 3D block, indicating alert or hazard.

SIEMENS KG39NAIAU - Repair - 2

Repair

  1. Remove the lower door.

Diagram showing a warning sign with an exclamation mark and an upward arrow inside a container, likely indicating caution or hazard.

Diagram of hands connecting a cable to a rectangular panel with shelves, showing structural details (no text or symbols).

Isometric line drawing of a wall-mounted shelf with an eye icon (no text or symbols).

SIEMENS KG39NAIAU - Repair - 4

Repair

SIEMENS KG39NAIAU - Repair - 1

Torx TX20 cap 6.3 mm (1/4") [00340865]

SIEMENS KG39NAIAU - Repair - 2

Torx TX20 cap 6.3 mm (1/4") [00340865]

SIEMENS KG39NAIAU - Repair - 3

Technical diagram showing a blue tool with numbered components and directional arrows indicating assembly or installation steps.

SIEMENS KG39NAIAU - Repair - 5

Repair

Torx TX20 cap 6.3 mm (1/4") [00340865]

SIEMENS KG39NAIAU - Repair - 1

Technical diagram showing three steps of a mechanical assembly with labeled components and directional arrows.

  1. Unscrew the screw (1).
  2. Remove the top hinge (2).

Technical diagram showing two labeled mechanical components with arrows indicating assembly or installation steps.

SIEMENS KG39NAIAU - Repair - 4

Repair

Torx TX20 cap 6.3 mm (1/4") [00340865]

SIEMENS KG39NAIAU - Repair - 1

Technical diagram showing two mechanical assembly steps with numbered components and directional arrows indicating movement or assembly.

SIEMENS KG39NAIAU - Repair - 3

Repair

Torx TX20 cap 6.3 mm (1/4") [00340865]

SIEMENS KG39NAIAU - Repair - 1

Technical diagram showing a blue mechanical component with labeled parts and directional arrows indicating motion or assembly.

Special tool [00342180]

Diagram showing LED switch placement on a door panel, with numbered instructions and a magnified view of the component.

Special tool [00342180]

Technical diagram showing a door panel with labeled components and an inset view of the door panel with a blue label 'Light'.

Special instrument [00342180]

Technical diagram showing three-step assembly steps of a mechanical component with red and black parts, labeled ①, ②, and ③.

Diagram of hands connecting a cable to a rectangular panel with shelves, showing structural details (no text or symbols).

  1. Pull the seal out of the groove.

Illustration of hands holding a cable with a black arrow indicating direction (no text or symbols).

Isometric line drawing of a wall-mounted shelf with an eye icon above (no text or symbols).

SIEMENS KG39NAIAU - Repair - 9

Repair

SIEMENS KG39NAIAU - Repair - 1

The door seal is installed.

SIEMENS KG39NAIAU - Repair - 2

Repair

Technical diagram showing a blue tool with numbered components and directional arrows indicating movement or assembly.

SIEMENS KG39NAIAU - Repair - 2

Repair

  1. Remove the top door.

Warning symbol and warning icon on a 3D block, indicating alert or hazard.

Technical diagram showing three steps of a cable or connector assembly with labeled components and directional arrows.

  1. Unscrew the screw (1).
  2. Remove the top hinge (2).

Technical diagram showing mechanical assembly with numbered components and directional arrows indicating assembly steps.

SIEMENS KG39NAIAU - Repair - 4

Repair

  1. Remove the top door.

Warning symbol and warning icon on a 3D block, indicating alert or hazard.

Technical diagram showing two mechanical assembly steps with numbered components and directional arrows indicating movement or assembly.

SIEMENS KG39NAIAU - Repair - 3

Repair

The bottle storage compartment is removed.

4.8.2 Installing the bottle storage compartment

The shelf in the door has been removed.

4.9.2 Installing the door shelf

Diagram showing airflow or fluid flow between two containers with labeled arrows and numbered components.

SIEMENS KG39NAIAU - Installing the door shelf - 2

Repair

Diagram of hands connecting a cable to a door panel with shelves, showing structural components (no text or symbols).

  1. Pull the door gasket out of the groove.

Illustration of hands holding a cable with a black arrow indicating direction (no text or symbols).

Isometric line drawing of a wall-mounted shelf with an eye icon above (no text or symbols).

SIEMENS KG39NAIAU - Repair - 4

Repair

  1. Press the entire gasket into the groove step by step.

Diagram of a hand interacting with a refrigerator drawer, showing shelves and drawers with directional arrows (no text or symbols).

Diagram showing three-step installation of a screwdriver on a door, with numbered instructions for each step.

Technical diagram showing a blue mechanical component being adjusted to a bracket with numbered parts and directional arrows indicating motion.

SIEMENS KG39NAIAU - Repair - 4

Repair

  1. Remove the upper door.

Warning symbol and warning icon on a 3D block, indicating alert or hazard.

Back and muscle injuries

  1. Unscrew the screw (1).
  2. Remove the upper hinge (2).

Technical diagram showing mechanical assembly with numbered components and directional arrows indicating assembly steps.

SIEMENS KG39NAIAU - Repair - 3

Repair

  1. Remove the top door.

Warning symbol and warning icon on a 3D block, indicating alert or hazard.

Back and muscle injuries

  1. Remove the bottom door.

Diagram showing a warning sign with an exclamation mark and an upward arrow inside a container, likely indicating hazard or caution.

The shelf is removed.

4.7.2 Installing the shelf

- Install in reverse order.

SIEMENS KG39NAIAU - Installing the shelf - 1

Repair

4.8 Replacing the bottle holder

Requirement:

The door is open.

4.8.1 Removing the bottle holder

Illustration of two hands holding a transparent container with blue liquid, no text or symbols present.

The shelf above the fruit and vegetable drawer is removed.

Repair

SIEMENS KG39NAIAU - Repair - 1

Repair

SIEMENS KG39NAIAU - Repair - 1

Repair

Diagram showing three-step installation of a screwdriver on a door, with numbered instructions for each step.

Technical diagram showing a blue mechanical component with numbered parts and directional arrows indicating assembly or alignment.

SIEMENS KG39NAIAU - Repair - 3

Repair

  1. Unscrew the screw (1).
  2. Remove the upper hinge (2).

Technical diagram showing mechanical assembly with numbered components and directional arrows indicating assembly steps.

SIEMENS KG39NAIAU - Repair - 2

Repair

SIEMENS KG39NAIAU - Repair - 1

Repair

SIEMENS KG39NAIAU - Repair - 1

Repair

Illustration of hands connecting a cable to a rectangular panel with shelves (no text or symbols)

Isometric line drawing of a wall-mounted shelf with an eye icon (no text or symbols)

SIEMENS KG39NAIAU - Repair - 3

Repair

Diagram showing three-step installation of a screwdriver on a door, with numbered instructions for each step.

Technical diagram showing a blue tool with numbered components and directional arrows indicating assembly or movement.

SIEMENS KG39NAIAU - Repair - 3

Repair

The bottle shelf has been removed.

4.8.2 Mounting the bottle shelf

The door shelf has been removed.

Illustration of two hands holding a transparent shelf with blue and black components, no text or symbols present

The side hooks have been loosened.

The rear hooks have been loosened.

The lamp diffuser has been removed.SIEMENS KG39NAIAU - Mounting the bottle shelf - 2

SIEMENS KG39NAIAU - Mounting the bottle shelf - 3

Repair

The LED side lamp has been removed.SIEMENS KG39NAIAU - Repair - 1

4.15.2 Installing the LED side lamp

Technical diagram showing a mechanical assembly with labeled parts and directional arrows indicating motion or assembly steps.

SIEMENS KG39NAIAU - Installing the LED side lamp - 2

Repair

SIEMENS KG39NAIAU - Repair - 1

The LED freezer lamp has been detached.

Illustration of hands connecting a cable to a rectangular panel with shelves (no text or symbols)

Isometric line drawing of a wall-mounted shelf with an eye icon above (no text or symbols)

SIEMENS KG39NAIAU - Repair - 4

Repair

Diagram showing three-step installation of a screwdriver on a door, with numbered instructions for each step.

Technical diagram showing three-step assembly of a blue tool with labeled parts and arrows indicating motion or assembly.

SIEMENS KG39NAIAU - Repair - 3

Repair

  1. Remove the top cover.

Warning sign with warning symbol and upward arrow inside a blue box, indicating alert or hazard

SIEMENS KG39NAIAU - Repair - 2

Repair

  1. Remove the top cover.

Warning sign with warning symbol and upward arrow inside a blue box, indicating caution or hazard

  1. Remove the bottom door.

Diagram showing a warning sign with an exclamation mark and an upward arrow inside a container, indicating a hazard or alert.

Table of contents Click a title to access it
Manual assistant
Powered by Anthropic
Waiting for your message
Product information

Brand : SIEMENS

Model : KG39NAIAU

Category : Refrigerator