
AWH380 - Auto welding helmet SCHEPPACH - Free user manual and instructions
Find the device manual for free AWH380 SCHEPPACH in PDF.

| Product type | Automatic welding helmet |
| Brand | Scheppach |
| Model | AWH380 |
| Viewing field | 92 x 42 mm |
| UV/IR filter size | 110 x 90 x 10 mm |
| Weight | approx. 0.45 kg |
| Power supply | Solar cell + 2 CR2032 lithium button batteries |
| Brightness level (inactive) | DIN 4 |
| Darkening level | DIN 9 to DIN 13 (adjustable) |
| UV/IR protection class | DIN 16 |
| Switching time light → dark | < 0.7 ms |
| Switching time dark → light | 0.15 ~ 0.50 s |
| Grinding function | Yes (grind position) |
| Compatible welding processes | SMAW, MAG, TIG/GTAW, MIG (heavy/light), PAC, PAW |
| Working temperature | -5°C to +55°C |
| Storage temperature | -20°C to +70°C |
| Maximum service life | 2000 hours |
| Protective screen material | Flexible material (replaceable) |
| Cleaning | Soft cloth and mild soap; do not use solvents |
| Battery replacement | Built-in CR2032 lithium batteries (not user-replaceable) |
| Warranty | Statutory warranty period (defective parts) |
Frequently Asked Questions - AWH380 SCHEPPACH
User questions about AWH380 SCHEPPACH
0 question about this device. Answer the ones you know or ask your own.
Ask a new question about this device
Download the instructions for your Auto welding helmet in PDF format for free! Find your manual AWH380 - SCHEPPACH and take your electronic device back in hand. On this page are published all the documents necessary for the use of your device. AWH380 by SCHEPPACH.
USER MANUAL AWH380 SCHEPPACH
https://www.sohappacob.com/delai service


AWH380
| DE | Automatik Schweizhelm Originalbedienungsanleitung | 4 |
| GB | Automatic welding helmet Translation of original instruction manual | 16 |
| FR | Casque de soudage automatique Traduction des instructions d'origine | 25 |
| IT | Casco per saldatura automatico La traduzione dal manuale di istruzioni originale | 35 |
| NL | Automatische lashelm Vertaling van de originele gebruikshandleiding | 44 |
| ES | Carena de soldar automatica Traducción del manual de instrucciones original | 54 |
| PT | Capacete de soldador automatico Traduição do manual de operação original | 63 |
| CZ | Automatická svářěčská helma Překlad originálího námodu k obšluge | 73 |
| SK | Automatická zváracia kuklaPreklad originálneho námodu na obšluhu | 82 |
| HU | Automata hegesztǒpajzs Eredeti használati utasítás fordítsa | 91 |
| PL | Automatyczny kask spawalniczy Tłumaczenia oryginalnej instrukcji obslugi | 100 |
| HR | Automatska kaciga za zavarivanje Prijevod originalog priručnika za uporabu | 110 |
| SI | Avtomatska varilna Čelada Prevod originalnih navodil za uporabo | 119 |
| EE | Automaat-keevitusmask Originaalkāitusjuhendi tõlge | 128 |
| LT | Automatinis suvirinimo šalmas Originalios naudojimo instrukcijos vertimas | 137 |
| LV | Automātiska metināsanas kivere Originalās lietošanas instrukcijas tulkojums | 146 |
| SE | Automatisk svetshjälm Översättning av original-bruksanvisning | 155 |
| FI | Automaattihitsauskypärä Käännös alkuperälsestä käytöohjeesta | 164 |
| DK | Automatisk svejsehjelm Oversættelse fra den oprindelige betjeningsvejledning | 173 |
1
2

Homepage: https://www.scheppach.com/de/service
Explanation of Symbols
The use of symbols in this handbook is designed to direct your attention to possible risks. You must make sure that you understand the safety symbols and explanations accompanying them.Warnings themselves cannot remove risks and cannot substitute correct action for the prevention of accidents.
| CAUTION! Read the operating instructions to reduce the risk of inquiry! | |
| ATTENTION! Arc rays can burn eyes! | |
| WARNING! Welding helmets do not provide unlimited eye, ear and face protection. | |
| Attention! | In these operating instructions we have marked the places that have to do with your safety with this sign. |
Table of contents: Page:
- Introduction 18
- Layout (Fig. 1 + 2) 18
- Scope of delivery 18
- Intended use 19
- Safety regulations 19
- Before starting the equipment (Fig. 1 + 2) 21
- Assembling and operation 21
- Technical data 22
- Cleaning and maintenance 22
- Storage 23
- Disposal and recycling.. 23
- Troubleshooting 24
- Declaration of conformity 185
1. Introduction
Manufacturer:
Scheppach GmbH
Günzburgerstraße 69
D-89335 Ichenhausen
Dear Customer,
We hope your new tool brings you much enjoyment and success.
Note:
According to the applicable product liability laws, the manufacturer of the device does not assume liability for damages to the product or damages caused by the product that occurs due to:
- Improper handling,
Non-compliance of the operating instructions, - Repairs by third parties, not by authorized service technicians,
- Installation and replacement of non-original spare parts,
Application other than specified, - A breakdown of the electrical system that occurs due to the non-compliance of the electric regulations and VDE regulations 0100, DIN 57113 / VDE0113.
We recommend:
Read through the complete text in the operating instructions before installing and commissioning the device. The operating instructions are intended to help the user to become familiar with the machine and take advantage of its application possibilities in accordance with the recommendations.
The operating instructions contain important information on how to operate the machine safely, professionally and economically, how to avoid danger, costly repairs, reduce downtimes and how to increase reliability and service life of the machine.
In addition to the safety regulations in the operating instructions, you have to meet the applicable regulations that apply for the operation of the machine in your country. Keep the operating instructions package with the machine at all times and store it in a plastic cover to protect it from dirt and moisture.
Read the instruction manual each time before operating the machine and carefully follow its information.
The machine can only be operated by persons who were instructed concerning the operation of the machine and who are informed about the associated dangers. The minimum age requirement must be complied with.
In addition to the safety requirements in these operating instructions and your country's applicable regulations, you should observe the generally recognized technical rules concerning the operation of woodworking machines.
We cannot accept any liability for damage or accidents which arise due to a failure to follow these instructions and the safety instructions.
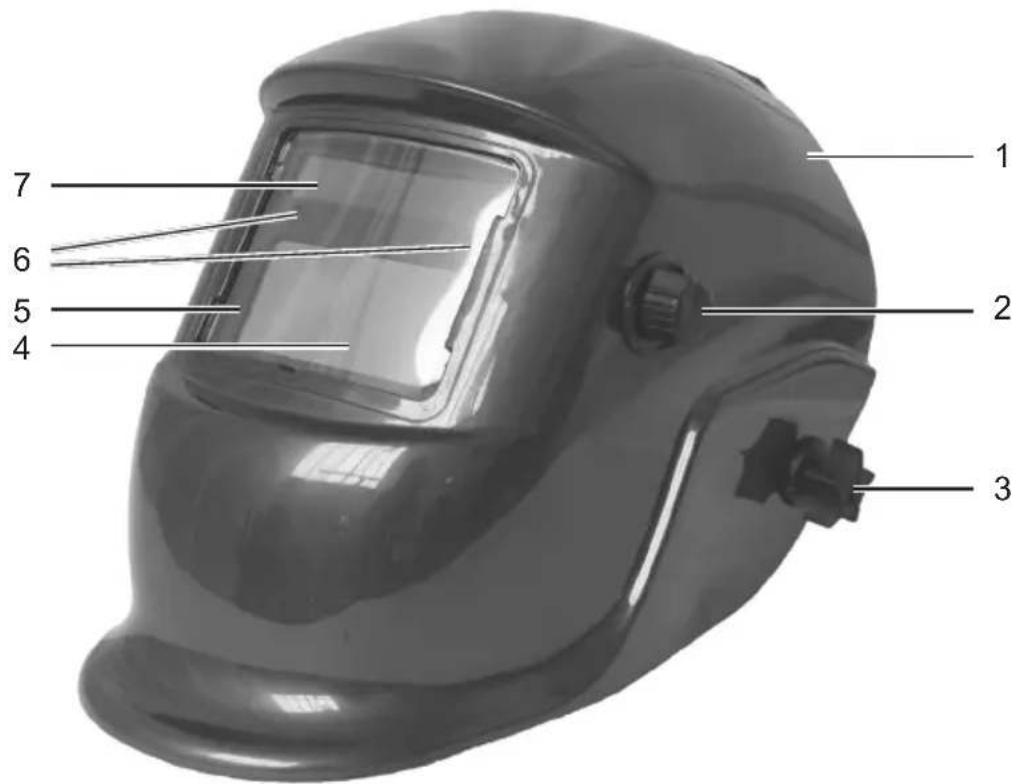
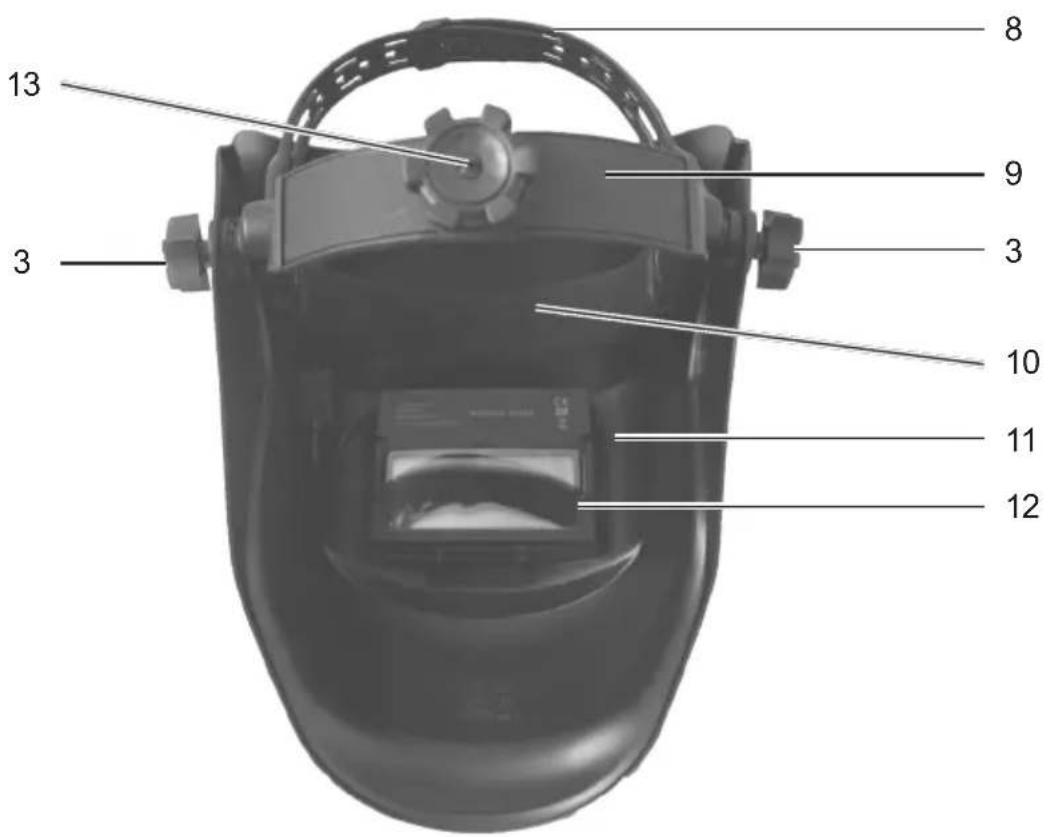
2. Layout (Fig. 1 + 2)
- Helmet casing
- Darkening regulator
- Locking button for headband (side)
- UV/IR Filter
- Protection pane
- Arc sensor
- Solar panel
- Headband top
- Headband rear
- Headband front
- Welding filter
- Rear pane
- Adjustable headband bottom (back)
- Tilt angle adjustment lever
3. Scope of delivery
ATTENTION! The device and packaging materials are not toys! Children must not be allowed to play with plastic bags, film and small parts! There is a risk of swallowing and suffocation!
1x Auto Dimming Welding Helmet
1x Operation manual
- Open the packaging and remove the device carefully.
- Remove the packaging material as well as the packaging and transport bracing (if available).
- Check that the delivery is complete.
- Check the device and accessory parts for transport damage.
- If possible, store the packaging until the warranty period has expired.
4. Intended use
This welding helmet protects the eyes and face from sparks, splashes and UV rays while welding and automatically adapts to the lighting conditions.
It ensures an immediate, sensor-controlled darkening upon arc ignition as well as automatic illumination at the end of the welding procedure (including a short delay to protect against afterglow). This welding helmet provides a freely adjustable DIN protection level with a lateral adjustment wheel and is also adjustable for flying sparks during grinding work.
Only use the product as described and for its indicated purpose. Keep these instructions in a safe place. When passing this product on to others, please also include all the documents. Any use other than the intended is prohibited and potentially dangerous. Damages resulting from non compliance or misuse are not covered by the warranty and are not included in the manufacturer's liability. This device has been designed for household use and may not be used for commercial or industrial purposes.
5. Safety regulations
WARNING: Read all safety warnings and all instructions. Failure to follow the warnings and instructions may result in electric shock, fire and/or serious injury.
Following these instructions will prevent difficulties that may occur during the installation and use of this Auto Dimming Welding Helmet. All technical data about this welding helmet is on the label, please learn about this product's technical facts. Please study the instructions first, as they may save considerable time and trouble during use, in addition to providing important safety information.
Save all warnings and instructions for future reference.
-
Do not use this or any other welding product unless you have been completely instructed in its use.
-
Do not use the welding helmet if the lens is cracked, if the lens or sensors are dirt, or if the lens or front retaining frame is loose.
-
Keep work area clean. Cluttered areas invite injuries
-
Observe work area conditions. Do not use welding helmets in damp or wet locations. Do not expose to rain. Keep work area well lit. Do not use auto-darkening helmets in the presence of flammable gases or liquids.
-
Keep children and animals away. Children must never be allowed in the work area. Do not let them handle this helmet.
-
Store idle equipment. When not in use, helmets must be stored in a dry location. Always lock up helmets and keep out of reach of children.
-
Dress properly. Do not wear loose clothing or jewellery. Keep your hair, clothing, and gloves away from moving parts. Protective gear is essential to protect against welding rays, some examples are a leather welding apron,welding sleeves, jeans without cuffs, work boots. Wear restrictive hair covering to contain long hair.
-
Use eye and ear protection. When welding, wear approved impact safety goggles under the welding helmet. Wear an approved safety mask and ear muffs when welding.
-
Stay alert. Watch what you are doing, use common sense. Do not weld when you are tired.
-
Check for damaged parts. Before using any helmet, any part that appears damaged should be carefully checked to determine that it will operate properly and perform its intended function. Check for alignment and binding of moving parts, any broken parts, or mounting fixtures, and any other condition that may affect proper operation. Any part that is damaged should be properly repaired or replaced by a qualified technician. Do not use the helmet if any switch does not operate properly.
-
Replace parts and accessories. When servicing, use only identical replacement parts. Use of any other parts can render helmet in effective, possibly cause eye damage, and will void the warranty. Only use accessories intended for use with this helmet. Accessories are available from After Sales Support.
-
Do not weld if under the influence of alcohol or drugs. Read warning labels on prescriptions to determine if your judgment or reflexes are impaired while taking drugs. If there is any doubt, do not weld.
-
Maintenance. For your safety, service and maintenance should be performed regularly only by a qualified technician.
-
This helmet provides protection for intended purpose only. There are certain applications for which this helmet was designed. Do not modify this helmet and do not use this helmet for a purpose for which it was not intended.
- The welding helmet with automatic darkening is not suitable for laser and gas welding.
- Please ensure that you have set the automatic darkening before each welding procedure.
Only use the welding helmet in temperatures between -5^ and +55^ . The filter's reaction time will slow down if this temperature has not been reached or is exceeded. - The welding helmet will not protect against severe impact hazard.
- The welding helmet will not protect against explosive devices or corrosive liquids.
-
Maintain the helmet and lens correctly to help ensure reliable protection:
-
Clean filter's surfaces regularly. Keep sensors and solar cells clean using a clean lint-free tissue/cloth. Do not use any solvents on filter's screen or helmet components. Protect filter from liquid and dirt contact. Do not immerse the filter in water.
-
Should the auto dimming welding helmet not darken upon striking an arc, stop welding immediately and have the helmet checked by a qualified service technician.
-
Replace the front lens cover if it be comes cracked, scratched, pitted, or otherwise damaged.
-
Do not any modifications to either the Auto-Darkening Filter or the rest of the helmet, other than those specified in this manual. Do not use any replacement parts other than those specified in this manual. Unauthorized modifications and replacement parts will void the warranty and expose the user to the risk of personal injury. Do not open or tamper with the Auto-Darkening Filter.
-
Do not place the helmet's Auto-Darkening Filter on a hot surface.
- Severe personal injury and/or blindness may occur if the user fails to follow the afore mentioned warnings and/or fails to following the operation instructions.
- Maintain labels and nameplates on the tool. These carry important safety information.
- Stay alert, watch what you are doing, and use common sense.
IMPORTANT! When the welding helmet is turned off, not being used and/or stored, always keep the helmet with filter sensors downward. Other wise this may drain the battery usage.
- Inhalation hazard: Welding and plasma cutting produce toxic fumes:
-
Exposure to welding or cutting exhaust fumes can increase the risk of developing certain cancers, such as cancer of the larynx and lung cancer. Some diseases that may be linked to exposure to welding or plasma cutting exhaust fumes are:
-
Early onset of Parkinson's Disease
- Heart Disease
- Ulcers
- Damage to the reproductive organs
- Inflammation of the small intestine or stomach
- Kidney damage
- Respiratory diseases such as emphysema, bronchitis, or pneumonia
Use natural or forced air ventilation and wear an approved respirator to protect against the fumes produced to reduce the risk of developing the above illnesses.
WARNING! If the Auto- Darkening Filter does not darken when the arc is struck, immediately stop welding and consult the owner's manual.
- Use impact resistant safety goggles and ear protection at all times when using this welding helmet.
- Inspect the filter lens frequently. Immediately replace any scratched, cracked, or pitted cover lenses or filter lenses.
WARNING! Materials that come into contact with the wearer's skin may cause allergic reactions in people with sensitive skin.
WARNING! If protection against high-speed particles at extreme temperatures is required, the eye protection chosen must be labelled with the letter T directly after the letter for the impact intensity, i.e. FT, BT or AT. If the letter for the impact intensity is not followed by the letter T, the eye protection may only be used against high-speed particles at room temperature.
6. Beforestarting the equipment (Fig. 1 + 2)
ATTENTION! Only use the welding helmet with the protection pane (5) and rear pane (12) mounted.
ATTENTION! Keep the UV filter's sensors (6) clean and clear.
-
Remove the backing foil from the protection pane (5), the rear pane (12) and helmet casing (1).
-
Check the protection pane (5) and rear pane (12) for scratches, signs of cracks or other damage. If the protective pane (5) or rear pane (12) has scratches, cracks or irregularities, it must be replaced before use, as serious injuries may occur otherwise.
-
Convince yourself of the proper functioning of the automatic welding shield with a bright light source. Test procedure: Bring the viewing panel closer to an external light source with a value of more than 40W and examine whether or not the screen darkens or illuminates.
7. Assembling and operation
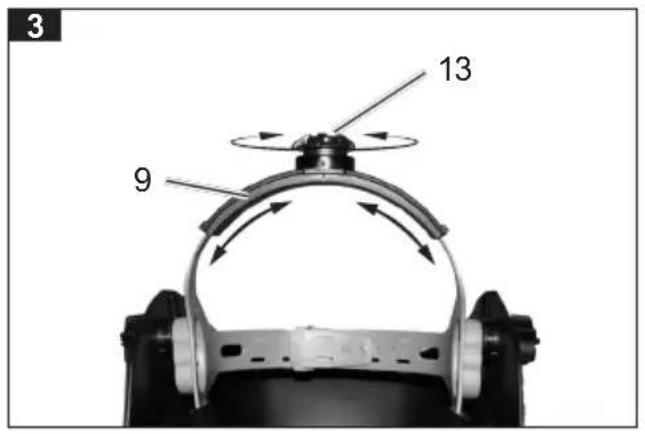
7.1. Setting the head circumference (Fig. 3)
To reduce the size of the rear headband turn the adjustable headband button (13) for the rear headband (9) clockwise.
To increase the size of the rear headband turn the adjustable headband button (13) for the rear headband (9) counterwise.
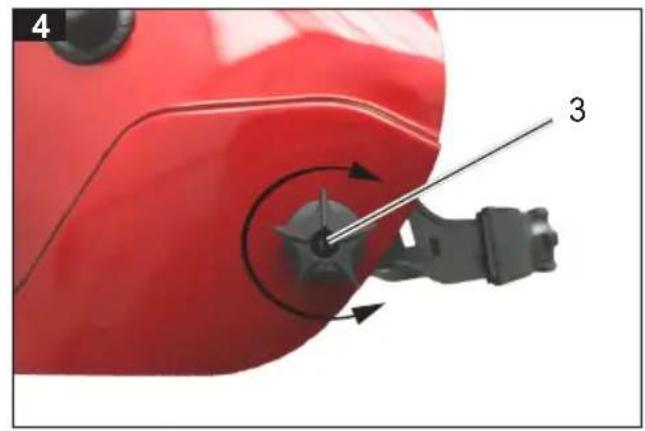
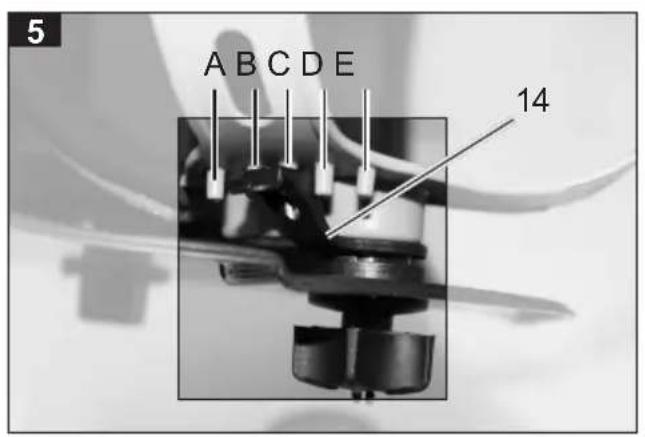
7.2. Adjusting the angle and distance (Fig. 4 - 6)
- Loosen the locking buttons for headband (3) on the left and the right of the automatic welding helmet a few turns counter wise.
The angle can be adjusted by locking the tilt angle adjustment lever (14) on both sides into the corresponding plastic pin (A,B,C,D,E) (The inclination angle adjustment lever must be adjusted in the same position on both sides). (Fig. 5)
-
The distance of the face to the rear pane can be adjusted in three settings (F,G,H) (Fig. 6)
-
When you have chosen the ideal setting for you, re-tighten the locking buttons for headband (3) on both sides.
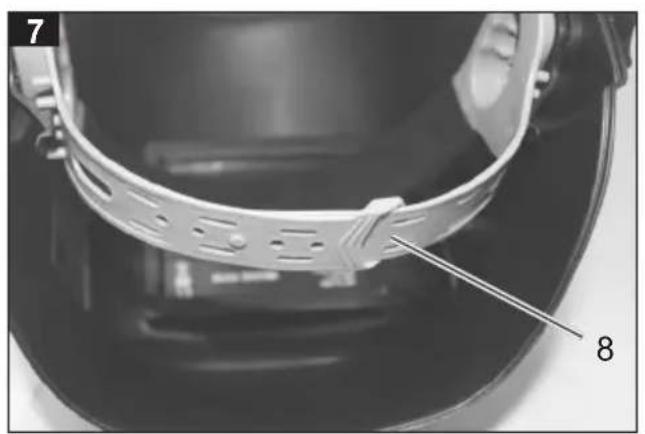
7.3 Setting of the head height (Fig. 7)
- The head height of the welding helmet can be adjusted by moving the plastic pin of the top head band (8).
ATTENTION! Adjust the Auto Dimming Welding Helmet according to your head size.
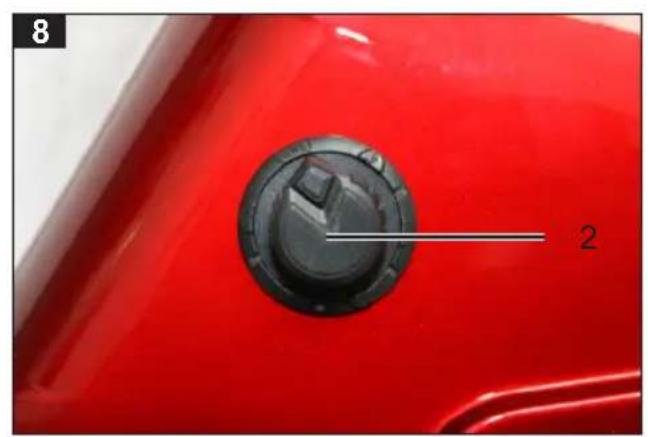
7.4 Setting the safety level (Fig. 1 + 8)
- Set the appropriate darkening shade before the welding procedure (see the following table). The darkening shade may be manually adjusted from 9 to 13 by twisting the darkening regulator (2) on the outside of the helmet.
ATTENTION! The darkening regulator (2) has the setting position "grind". If the darkening regulator (9) is set to this position the automatic darkening is deactivated. Only use this setting when you do not wish to use the welding helmet for welding. The automatic darkening then is no longer active.
Table for setting the protection levels
| Welding Process | Arc current (amperes) | ||||||||||||||||||||||
| 1.5 | 6 | 10 | 15 | 30 | 40 | 60 | 70 | 100 | 125 | 150 | 175 | 200 | 225 | 250 | 300 | 350 | 400 | 450 | 500 | 600 | |||
| SMAW | 8 | 9 | 10 | 11 | 12 | 13 | 14 | ||||||||||||||||
| MAG | 8 | 9 | 10 | 11 | 12 | 13 | 14 | ||||||||||||||||
| TIG/ GTAW | 8 | 9 | 10 | 11 | 12 | 13 | |||||||||||||||||
| MIG (heavy) | 9 | 10 | 11 | 12 | 13 | 14 | |||||||||||||||||
| MIG (light) | 10 | 11 | 12 | 13 | 14 | ||||||||||||||||||
| PAC | 9 | 10 | 11 | 12 | 13 | ||||||||||||||||||
| PAW | 4 | 5 | 6 | 7 | 8 | 9 | 10 | 11 | 12 | ||||||||||||||
- SMAW: welding with sheath electrodes
- MAG: welding with metal active gas
TIG/GTAW: welding with inert gas
MIG (heavy): welding of heavy metals
MIG (light): welding of alloys and light metals
PAC: plasma cutting
PAW: plasma welding
WARNING! If the Auto-Darkening Filter does not darken when the arc is struck, immediately stop welding and consult the owner's manual.
8. Technical data
Field of vision: 92 × 42 ~mm
Filter cartridge size: 110 × 90 × 10 mm
Light state DIN 4
Dark state DIN 9 -DIN 13
Bright to dark < 0.7 ms
Dark to bright 0.15~0.50 s
UV / IR protection DIN 16
Power ON/OFF Fully automatic
Solar cell +2x CR2032 Power supply lithium batteries.
Grinding function Yes
Operating temperature -5^ +55^
Storing temperature -20°C~+70°C
| Weight | (approximately) 0.45 kg |
| Welding processes | SMAW, MAG, TIG/ GTAW, MIG (heavy), MIG (light), PAC, PAW |
| Lifetime max. | 2000 hours |
9. Cleaning and maintenance
9.1 Cleaning of the shield
- Keep the automatic welding screen free of dust and dirt. Clean the product with a soft, dry cloth, with a cloth dampened with pure alcohol or with a cloth dampened with disinfectant. Do not use solvents. These can attack and damage the plastic parts of the protective shield.
- Ensure that no water or moisture gets inside the unit.
- We recommend you to clean the device immediately after each use.
9.2 Cleaning the fabric cover on the front headband (10)
- The front headband fabric can be removed for cleaning. To do this, loosen it from the three brackets on the front headband (10).
- Clean the fabric with some soft soap and water. Let it dry afterwards. Then mount the fabric again in the opposite direction on the three brackets.
9.3 Replacing of the protection pane (5)
- To remove the protection pane (5) grasp into the recessed grip below the protection pane (5) and remove it forwards.
- To insert the new protection pane, slightly squeeze and put into the retaining pins.
The viewing pane is made of flexible material and can be bent. Take care that it is not kinked.
CAUTION! The built-in lithium battery cannot be removed or changed.
Spare parts and accessories can be obtained from our service centre. To do this, scan the QR code on the cover page.
10. Storage
- Store the device and its accessories in a dark, dry and frost-proof place that is inaccessible to children. The optimum storage temperature is between 5 and 30^ .
- Store the electrical tool in its original packaging.
- Cover the electrical tool in order to protect it from dust and moisture.
- Store the operating manual with the electrical tool.
WARNING! When the helmet is turned off, not being used or stored, always keep the filter sensors on the helmet facing downwards to avoid draining the battery power.
11. Disposal and recycling
Notes for packaging


The packaging materials are recyclable. Please dispose of packaging in an environmentally friendly manner.
Notes on the electrical and electronic equipment act [ElektroG]
![SCHEPPACH AWH380 - Notes on the electrical and electronic equipment act [ElektroG] - 1](/content/2026/05/756632/images/7463ec374ea61245acaeb2610be32fef12e986aca66c91ec49791304ecfd653b.jpg)
Waste electrical and electronic equipment does not belong in household waste, but must be collected and disposed of separately!
-
Old batteries or rechargeable batteries that are not permanently installed in the old unit must be removed before handing them in! Their disposal is regulated by the battery act.
-
Owners or users of electrical and electronic devices are legally obliged to return them after use.
-
The end user is responsible for deleting their personal data from the old device being disposed of!
-
The symbol of the crossed-out dustbin means that waste electrical and electronic equipment must not be disposed of with household waste.
-
Waste electrical and electronic equipment can be handed in free of charge at the following places:
-
Public disposal or collection points (e.g. municipal works yards)
-
Points of sale of electrical appliances (stationary and online), provided that dealers are obliged to take them back or offer to do so voluntarily.
-
Up to three waste electrical devices per type of device, with an edge length of no more than 25 centimetres, can be returned free of charge to the manufacturer without prior purchase of a new device from the manufacturer or taken to another authorised collection point in your vicinity.
Further supplementary take-back conditions of the manufacturers and distributors can be obtained from the respective customer service.
- If the manufacturer delivers a new electrical appliance to a private household, the manufacturer can arrange for the free collection of the old electrical appliance upon request from the end user. Please contact the manufacturer's customer service for this.
These statements only apply to devices installed and sold in the countries of the European Union and which are subject to the European Directive 2012/19/EU. In countries outside the European Union, different regulations may apply to the disposal of waste electrical and electronic equipment.
Information on the battery act [BattG]
![SCHEPPACH AWH380 - Information on the battery act [BattG] - 1](/content/2026/05/756632/images/ad2f3b294ffa5ef94b64f7384bfa2ca36cee393c5ebc061835a7c7ef30e7dddf.jpg)
Old batteries and rechargeable batteries do not belong in household waste, but must be collected or disposed of separately!
-
For safe removal of primary batteries or rechargeable batteries from the electrical appliance and for information on their type or chemical system, please refer to the additional information in the operating or assembly instructions.
-
Owners or users of primary batteries and rechargeable batteries are legally obliged to return them after use. The return is limited to household quantities.
-
Old batteries may contain pollutants or heavy metals that can harm the environment or human health. Recycling old batteries and using the resources they contain helps to protect these two important issues.
- The symbol of the crossed-out dustbin means that primary batteries and rechargeable batteries must not be disposed of with household waste.
- If the signs Hg, Cd or Pb are also located below the dustbin symbol, this stands for the following:
Hg: Battery contains more than 0.0005% mercury
Cd: Battery contains more than 0.002% cadmium
- Pb: Battery contains more than 0.004% lead
-
Rechargeable batteries and primary batteries can be returned free of charge to the following places:
-
Public disposal or collection points (e.g. municipal works yards)
-
Sales points for primary batteries and rechargeable batteries
Take-back points of the common take-back system for old device batteries
Take-back point of the manufacturer (if not a member of the common take-back system)
These statements are only valid for rechargeable batteries and primary batteries sold in the countries of the European Union and subject to the European Directive 2006/66/EC. In countries outside the European Union, different regulations may apply to the disposal of rechargeable batteries and primary batteries.
12. Troubleshooting
| Fault Possible cause Remedy | ||
| Filter does not darken in the intended way or flickers. | Protector is polluted or damaged. Protector | has to be cleaned or replaced. |
| Arc sensor is not clear. Clean the surface of | the arc sensor. | |
| Welding current is to small. Sensitivity has to be set to its maximum. | ||
| Battery is low. Battery has to be changed. | ||
| Slow reaction. | The ambient temperature is too low. | Welding helmet must not be used below -5°C. |
| Sensitivity is too low. Sensitivity has to be increased. | ||
| Poor visibility. | Viewing pane is dirty. Viewing pane has to be cleaned. | |
| Backing foil on the viewing pane was not removed. | Backing foil has to be removed. | |
| The ambient light is not sufficient. Lighting conditions have to be adjusted. | ||
| The wrong darkening shade has been set. | Reset the darkening shade. | |
| Welding helmet slips. Head | band is not adjusted correctly. Headband has to be set more firmly. | |
Legendedeusymboles
EC Declaration of Conformity
Standard references:
EN 379:2009-07; EN 175:1997-08; EN 166:2002-04
This declaration of conformity is issued under the sole responsibility of the manufacturer.
The object of the declaration described above fulfils the regulations of the directive 2011/65/EU of the European Parliament and Council from 8th June 2011, on the restriction of the use of certain hazardous substances in electrical and electronic equipment.
Subject to change without notice
Documents registrar: Viktor Hartl Gunzburger Str. 69, D-89335 Ichenhausen
EC Declaration of Conformity
Standard references:
EN 379:2009-07; EN 175:1997-08; EN 166:2002-04
This declaration of conformity is issued under the sole responsibility of the manufacturer.
The object of the declaration described above fulfils the regulations of the directive 2011/65/EU of the European Parliament and Council from 8th June 2011, on the restriction of the use of certain hazardous substances in electrical and electronic equipment.
Subject to change without notice
Documents registrar: Viktor Hartl
Günzburger Str. 69, D-89335 Ichenhausen
CE - Declaration of Conformity
Hersteller - manufacturer:
NINGBO GEOSTAR PHOTOELECTRIC TECHNOLOGY CO.,LTD
1508-149, Building 037, No. 52 Huihai Road High Tech Zone, Ningbo 315040, Zhejiang, China
Einführer - importer:
SCHEPPACH GMBH
Günzburger Str. 69
D-89335 Ichenhausen
| DE | erklärt folgende Konformität gemäß EU-Richtlinie und Normen für den Antikel |
| GB | hereby declares the following conformity under the EU Directive and standards for the following article |
| FR | déclare la conformité suivante selon la directive UE et les normes pour l'article |
| IT | dichiara la seguente conformità seconde le dirittive e le normative UE per l'articleolo |
| ES | declara la conformità seguente según la directiva la UE y las normas para el articulo |
| PT | declara o seguente conformità com a Directiva da UE e as normas para o seguente artigo |
| DK | erklær hermed, at følgende produit er i overensstammelse med neden-stændende EUdirektiver og standarder |
| NL | verklaart hierbij dat het volgende articel voldoet aan deaarop betrekking hebbbende EG-richtlijnen en normen |
| FI | vakuutta taten, etta seuraava tuote täytää ala esitetyt EU-direktivit ja standardit |
| SE | försakrar hamed fällande overensstammelse enligt EU-direktiv och standarder für fällande artikeln |
| PL | deklaruje, ze produkt jest zgodny z nastepujacymi dyrektywami UE i normami |
| LT | pareiskia, taip atitiktis pagal ES direktyvos ir standartai ši straipsnj |
| HU | az EU-irányel és a vonatkoź szabványok szerinti kõvetkezo megfelelo-segi nyilatkozatot teszi a termékre |
| SI | izjavlja sledeco skladnost z EU-direktivo in normami za artikel |
| CZ | prohlasuje následujíci shodu podle smernice EU a norem pro vyrobek |
| SK | prehlasuje nasledujúcu zhodu podla smernice EU a noriem pre vyrobok |
| HR | ovime izjavljuje da postoji sukladnost prema EU-smjernica i normama za sljedecce artikle |
| RS | potvrduje sledeću usklaDENost prema smernicama EZ i normama za artikal |
| RO | declarţă urmâtoarea conformitate corespunzător directivelor ŞI normelor UE pentru articolul |
| BG | Декларпа сьотьтHTоTo сьотьтCTВи сьласно Дірек-ТИВа на EC и HOPМУ за-apТКУП |
Article name:
Brand:
Art.No.:
Herstellungsdatum / Date of manufacture:
Verfallsdatum / Date of expiry:
AWH380
Scheppach
7906602701
07/2019
07/2022
X
(EU) 2016/425
Notified Body:
Notified Body No.:
Certificate No.
Standard references:
EN 379:2009-07; EN 175:1997-08; EN166:2002-04
This declaration of conformity is issued under the sole responsibility of the manufacturer.
Apparent defects must be notified within 8 days from the receipt of the goods. Otherwise, the buyer's rights of claim due to such defects are invalidated. We guarantee for our machines in case of proper treatment for the time of the statutory warranty period from delivery in such a way that we replace any machine part free of charge which provably becomes unusable due to faulty material or defects of fabrication within such period of time. With respect to parts not manufactured by us we only warrant insofar as we are entitled to warranty claims against the upstream suppliers. The costs for the installation of the new parts shall be borne by the buyer. The cancellation of sale or the reduction of purchase price as well as any other claims for damages shall be excluded.
Garantie FR
Apparent defects must be notified within 8 days from the receipt of the goods. Otherwise, the buyer's rights of claim due to such defects are invalidated. We guarantee for our machines in case of proper treatment for the time of the statutory warranty period from delivery in such a way that we replace any machine part free of charge which provably becomes unusable due to faulty material or defects of fabrication within such period of time. With respect to parts not manufactured by us we only warrant insofar as we are entitled to warranty claims against the upstream suppliers. The costs for the installation of the new parts shall be borne by the buyer. The cancellation of sale or the reduction of purchase price as well as any other claims for damages shall be excluded.
Záruka CZ
Apparent defects must be notified within 8 days from the receipt of the goods. Otherwise, the buyer's rights of claim due to such defects are invalidated. We guarantee for our machines in case of proper treatment for the time of the statutory warranty period from delivery in such a way that we replace any machine part free of charge which provably becomes unusable due to faulty material or defects of fabrication within such period of time. With respect to parts not manufactured by us we only warrant insofar as we are entitled to warranty claims against the upstream suppliers. The costs for the installation of the new parts shall be borne by the buyer. The cancellation of sale or the reduction of purchase price as well as any other claims for damages shall be excluded.