P3D 800 - Drill HILTI - Free user manual and instructions
Find the device manual for free P3D 800 HILTI in PDF.

| Product type | High-speed 3D laser scanning system |
| Brand | Hilti |
| Model | P3D 800 |
| Weight (with battery) | 6.05 kg |
| Power supply | Li-Ion battery, 11.1 V, 6.5 Ah |
| Operating temperature | -20 °C to 50 °C |
| Storage temperature | -40 °C to 70 °C |
| Laser class (pointer) | Class 2 (620-650 nm, max 1 mW) |
| Laser class (measurement) | Class 1 (1530-1570 nm, max 50 mW) |
| WiFi connectivity | 2.4 GHz and 5 GHz (power ≤ 18 dBm / 15 dBm) |
| Memory card support | SDHC, min 32 GB, class 10, FAT32 system |
| Main functions | 3D scan, point clouds, georeferencing, flatness analysis, BIM comparison, three-dimensional measurements |
| Package contents | 3D laser scanner, USB cable, SD card, cleaning wipes, card reader, case, instruction manual, certificate |
| Maintenance and cleaning | Clean the housing with a slightly damp cloth; do not use silicone-based products; clean the lenses with a soft cloth and lens paper |
| Safety | Read all instructions; do not modify the device; use only Hilti batteries and chargers; avoid direct laser radiation |
| Spare parts and repairability | Repairs exclusively by Hilti service center; use original spare parts; contact the Hilti Store |
| General information | Manufacturer's warranty via Hilti partner; complies with FCC and IC; technical documentation available at qr.hilti.com |
Frequently Asked Questions - P3D 800 HILTI
User questions about P3D 800 HILTI
0 question about this device. Answer the ones you know or ask your own.
Ask a new question about this device
Download the instructions for your Drill in PDF format for free! Find your manual P3D 800 - HILTI and take your electronic device back in hand. On this page are published all the documents necessary for the use of your device. P3D 800 by HILTI.
USER MANUAL P3D 800 HILTI
qr.hilti.com/manual/?id=2425770
Deutsch 1
English 13
Nederlands 25
Français 38
Español 50
Português 63
Italiano 76
Dansk 88
Svenska 100
Norsk 112
Suomi 123
Eesti 135
Latviešu 146
Lietuvių 158
Polski 170
Česky 183
Slovenčina 195
Magyar 207
Slovenščina 219
3
natural_image
Diagram of a mechanical component with colored circular markers around its body (no text or symbols)
natural_image
3D diagram of a mechanical component with three arms and green circular annotations (no text or symbols)4
natural_image
Close-up of a mechanical component with a labeled arrow pointing to a small component (no text or symbols visible)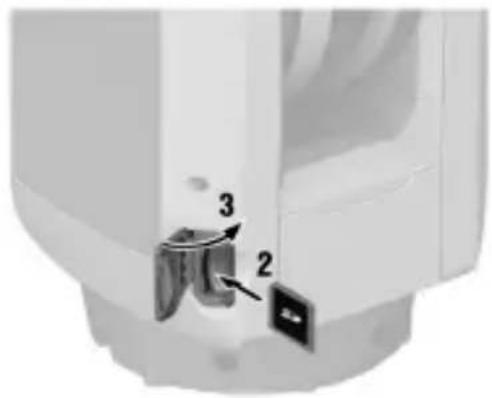
natural_image
Close-up of a mechanical component with numbered parts (2, 3), no visible text or symbolsInformation about the operating instructions
About these operating instructions
- Warning! Read and understand all accompanying documentation, including but not limited to instructions, safety warnings, illustrations, and specifications provided with this product. Familiarize yourself with all the instructions, safety warnings, illustrations, specifications, components, and functions of the product before use. Failure to do so may result in electric shock, fire, and serious injury. Save all warnings and instructions for future reference.
- HILTI products are designed for professional users and only trained, authorized personnel are permitted to operate, service and maintain the products. This personnel must be specifically informed about the possible hazards. The product and its ancillary equipment can present hazard if used incorrectly by untrained personnel or if used not in accordance with the intended use.
- The accompanying documentation corresponds to the current state of the art at the time of printing. Please always check for the latest version on the product's page on Hilti's website. To do this, follow the link or scan the QR code in this documentation, marked with the symbol.
- Ensure that these operating instructions are with the product when it is given to other persons.
Explanation of symbols
Warnings
Warnings alert persons to hazards that occur when handling or using the product. The following signal words are used:

DANGER
DANGER !
- Draws attention to imminent danger that will lead to serious personal injury or fatality.

WARNING
WARNING!
- Draws attention to a potential threat of danger that can lead to serious injury or fatality.

CAUTION
CAUTION !
- Draws attention to a potentially dangerous situation that could lead to personal injury or damage to the equipment or other property.
Symbols in the operating instructions
The following symbols are used in these operating instructions:


Comply with the operating instructions
Instructions for use and other useful information
Dealing with recyclable materials
Do not dispose of electric equipment and batteries as household waste
Hilti Li-ion battery
Hilti charger
Symbols in illustrations
The following symbols are used in illustrations:

These numbers refer to the illustrations at the beginning of these operating instructions.

The numbers in illustrations refer to important work steps or to components important for the work steps. In the text, the corresponding numbers draw attention to these work steps or components, e.g. (3).

Item reference numbers are used in the overview illustration and refer to the numbers used in the key in the product overview section.

This symbol is intended to draw your special attention to certain points for handling the product.
Product-dependent symbols
General symbols
Symbols used in relation to the product.

The product supports near-field communication (NFC) technology compatible with iOS and Android platforms.

Li-ion battery
Sticker on the product
Laser information
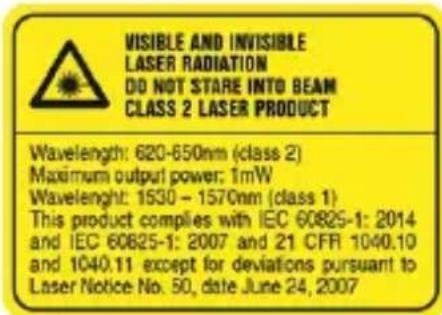
VISIBLE AND INVISIBLE LASER RADIATION! DO NOT LOOK INTO THE LASER BEAM! LASER CLASS 2 PRODUCT.
Wavelength 620-650 nm (class 2), maximum output power 1 mW
Wavelength 1530-1570 nm (class 1)
This product corresponds to the standard IEC 60825-1:2007 / EN 60825-1:2014 and corresponds to CFR 21 § 1040 (Laser Notice 50).
Safety
General safety instructions, measuring tools
WARNING! Read all safety precautions and other instructions. Measuring tools can prese hazards if handled incorrectly. Failure to observe the safety instructions and other instructions can result in damage to the measuring tool and/or serious injury.
Keep all safety precautions and instructions for future reference.
Work area safety
- Keep your workplace clean and well lit. Cluttered or poorly lit workplaces invite accidents.
- Do not operate the product in explosive atmospheres, such as in the presence of fla liquids, gases or dust.
- Keep children and other persons clear when the product is in use.
▶ Use the product only within its specified limits.
▶ Comply with your national accident prevention regulations.
Electrical safety
- Do not expose the product to rain or moisture. Penetrating moisture can cause short circuits, electrical shock, burns or explosions.
Although the product is protected against the entry of moisture, it should be wiped before being put away in its transport container.
Personal safety
- Stay alert, watch what you are doing and use common sense when operating a meal tool. Do not use a measuring tool while you are tired or under the influence of drug or medication. A moment of inattention while operating the measuring tool can result in serious personal injury.
- Avoid unusual body positions. Keep proper footing and balance at all times.
- Wear personal protective equipment. Wearing personal protective equipment reduces the risk of injury.
- Do not render safety devices ineffective and do not remove information and warning notices.
- Avoid accidental starting. Make sure that the measuring tool is switched off before connecting it to the battery and before picking it up or carrying it.
- Use the product and accessories in accordance with these instructions and in the way specified for this special type of tool. Take the working conditions and the work to be performed into account. Use of products for applications different from those intended could result in hazardous situations.
- Do not lull yourself into a false sense of security and do not flout the safety rules measuring tools, even if you are familiar with the measuring tool after using it many. Carelessness can result in serious injury within a fraction of a second.
▶ Do not use the measuring tool in the vicinity of medical devices.
Using and handling the measuring tool
▶ Use the product and accessories only when they are in perfect working order.
- Store measuring tools out of reach of children when not in use. Do not allow persons are not familiar with the product or these instructions to operate it. Measuring tools and dangerous in the hands of inexperienced persons.
▶ Measuring tools need care and attention. Check that moving parts operate satisfactori and do not jam, and make sure that no parts are broken or damaged in such a way measuring tool might no longer function correctly. Have damaged parts repaired before using the measuring tool. Many accidents are caused by poorly maintained measuring tools.
- Do not under any circumstances modify or tamper with the product. Changes or modifications not expressly approved by Hilti may restrict the user's authorization to operate the product.
▶ Check the accuracy of the measuring tool before using it for important measurements if it has been dropped or subjected to other mechanical stresses.
▶ Due to the measuring principle employed, the results of measurements can be negative affected by certain ambient conditions. These include, for example, the proximity of devices that produce strong magnetic or electro-magnetic fields, vibrations and temperature changes.
▶ Rapidly changing measuring conditions can falsify the results.
- When the product is brought into a warm environment from very cold conditions, or versa, allow it to become acclimatized before use. Big differences in temperature can lead to incorrect operation and incorrect results.
- When adapters or accessories are used, make sure they are mounted securely.
The measuring tool is designed for the tough conditions of jobsite use, but as with optical and electrical products (e.g. binoculars, spectacles, cameras) it must be handled with care.
The specified operating and storage temperatures must be observed.
Additional safety instructions for laser measuring tools
▶ Laser radiation in excess of Class 2 can be emitted if the product is opened without correct procedure being followed. Have the product repaired only by Hilti Service.
- Secure the area in which you will be taking measurements. While setting up the process, make sure that you do not direct the laser beam toward yourself or others. Laser beam should be projected well above or well below eye height.
- Keep the laser exit window clean in order to avoid measurement errors.
▶ Check the accuracy of the product before use and several times during use.
- Readings taken in the vicinity of reflective objects or surfaces, through panes of glass or similar materials can falsify the result of measurement.
- Mount the product on a suitable holder or bracket or on a tripod, or set it on a smooth, level surface.
- Do not work with surveyor's staffs in the vicinity of high-voltage electricity cables.
- Make sure that no other laser measuring tool that can influence your measurements is in use in the vicinity.
▶ Do not permit the laser beam to project beyond the controlled area.
Additional safety instructions
▶ Use the product and accessories only when they are in perfect working order.
▶ Never tamper with or modify the product or accessories in any way.
- Risk of injury by falling tools and/or accessories. Before starting work, check that the battery and installed accessories are secure.
▶ Do not touch rotating parts. Risk of injury.
Careful handling and use of batteries
- Comply with the following safety instructions for the safe handling and use of Li-ion batteries. Failure to comply can lead to skin irritation, severe corrosive injury, chemical burns, fire and/or explosion.
▶ Use only batteries that are in perfect working order.
▶ Treat batteries with care in order to avoid damage and prevent leakage of fluids that are extremely harmful to health!
▶ Do not under any circumstances modify or tamper with batteries! - Do not disassemble, crush or incinerate batteries and do not subject them to temperatures over 80 °C (176 °F).
▶ Never use or charge a battery that has suffered an impact or been damaged in any other way. Check your batteries regularly for signs of damage.
▶ Never use recycled or repaired batteries.
▶ Never use the battery or a battery-operated power tool as a striking tool.
▶ Never expose batteries to the direct rays of the sun, elevated temperature, sparking, or open flame. This can lead to explosions. - Do not touch the battery poles with your fingers, tools, jewelry, or other electrically conductive objects. This can damage the battery and also cause material damage and personal injury.
- Keep batteries away from rain, moisture and liquids. Penetrating moisture can cause short circuits, electric shock, burns, fire and explosions.
▶ Use only chargers and power tools approved for the specific battery type. Read and follow the relevant operating instructions.
▶ Do not use or store the battery in explosive environments.
If the battery is too hot to touch, it may be defective. Put the battery in a place where it is clearly visible and where there is no risk of fire, at an adequate distance from flammable materials. All the battery to cool down. If it is still too hot to touch after an hour, the battery is faulty. Consult Hilti Service or read the document entitled "Instructions on safety and use for Hilti Li-ion batteries".

Observe the special guidelines applicable to the transport, storage and use of lithium-ion batteries.
Read the instructions on safety and use of Hilti Li-ion batteries that you can access by scanning the QR code at the end of these operating instructions.
Description
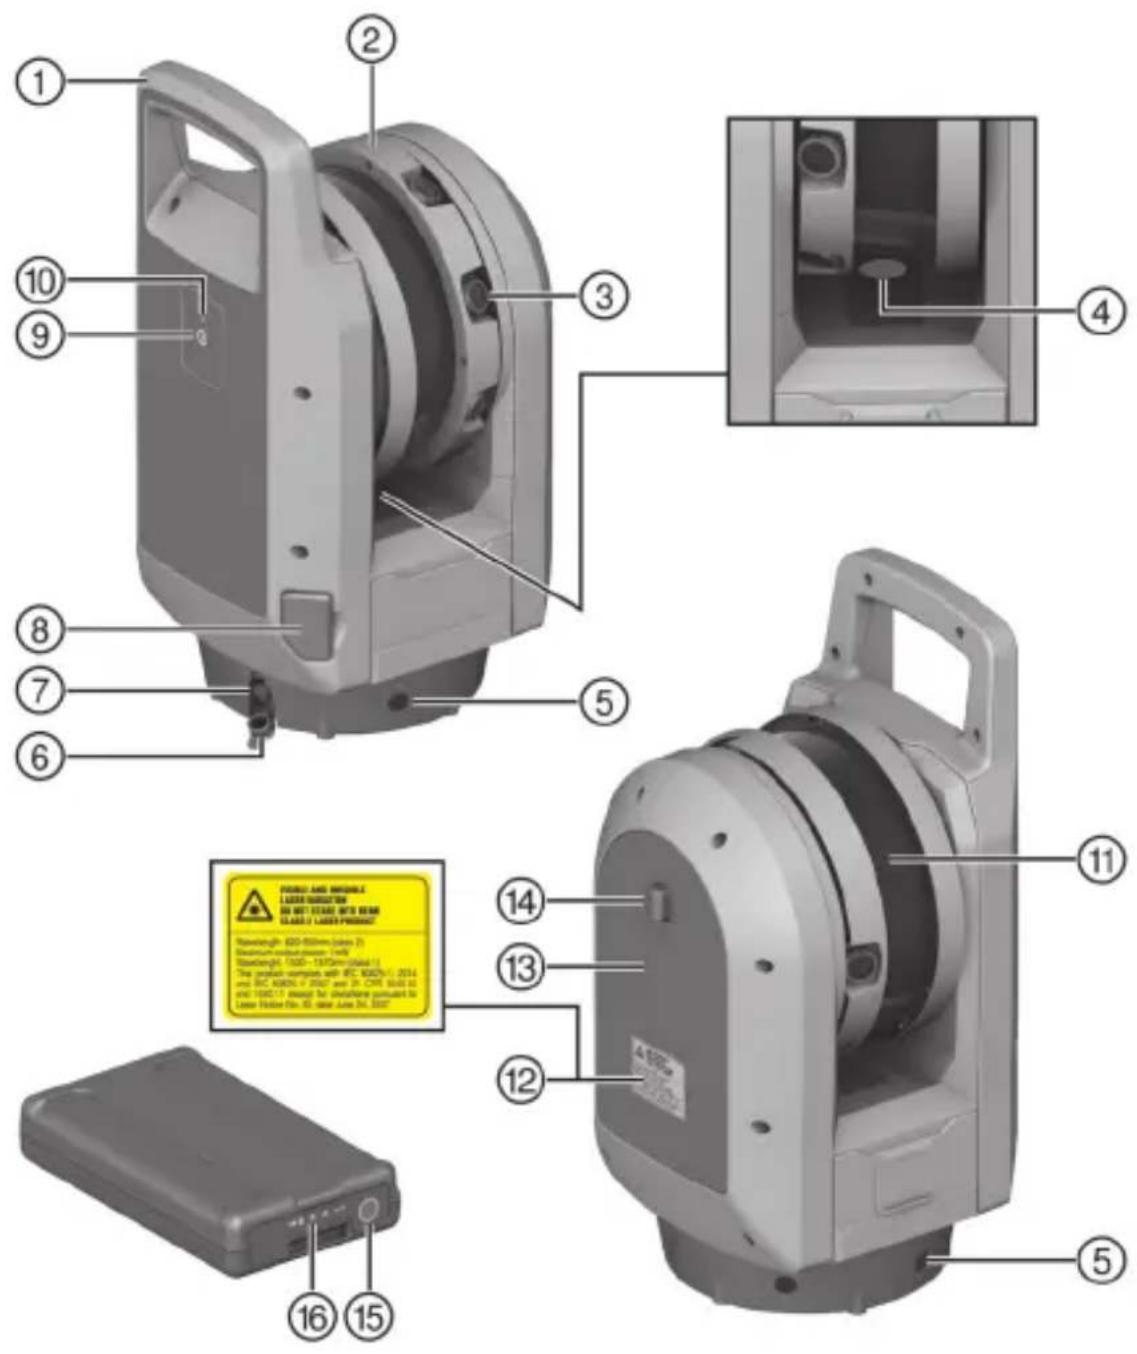
Product overview
① Carrying handle
② Camera unit
③ Camera lenses
④ Automatic calibration system
⑤ Multi-color LEDs, status indicator
⑥ Rubber cap
⑦ Data interface
⑧ Cover, SD card slot
⑨ On/off/scan button
⑩ Mode indicator LED
⑪ Laser pointer
⑫ Laser warning
⑬ Cover, battery compartment
⑭ Release button, battery compartment cover
⑮ Button, state of charge indicator
⑯ Charge state indicator for battery
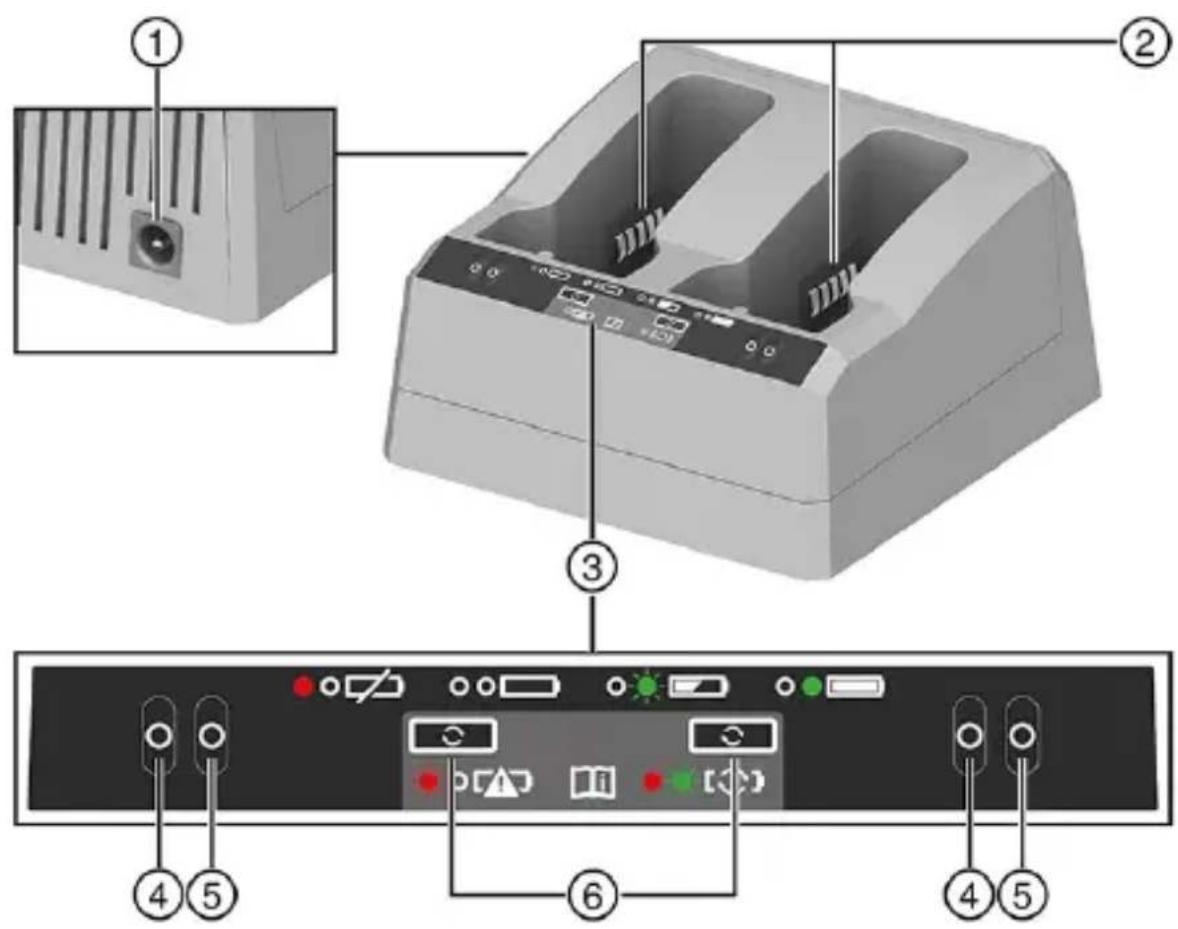
Overview, charger
① Socket, power supply unit (at rear)
② Battery bays
③ Controls and indicators panel
④ Red LED
Intended use
The product described is a high-speed 3D laser scanning system. It is designed for scanning, registering and refining 3D models (point clouds) of a real environment.
The product enables you to acquire, process and export data and to create geo-references, 3D visualizations and analyses.
The product is also designed for checking the flatness of floors, for 3D comparison of BIM model and point clouds and for measuring and calculating distances and three-dimensional positions.
- Use only Hilti Li-ion batteries of the POA 99 series with this product.
- Use only Hilti chargers of the POA 87 series to charge these batteries.
Laser
The instrument has one visible laser source and one infrared laser source:
- Class 2 laser with a wavelength of 620 to 650~nm for the laser pointer function, activation by t application software.
• Class 1 laser with a wavelength of 1530 to 1570 nm for scan measurements.
Items supplied
3D laser scanner, USB cable, SD card, cleaning cloths, SD card reader, case, operating instruction manufacturer's certificate
Other system products approved for use with this product can be found at your local Hilti Store or at: www.hilti.group
Mode indicator LED
The product has an LED that indicates the product's mode.
| Status Meaning | |
| The LED does not show. The product is switched off. | |
| The LED flashes yellow (2x per second). The product is switching on / off. | |
| The LED slow-flashes yellow (1x per 2 seconds). | The product is ready for use, but is not connected to a controller. |
| The LED shows steady yellow. The product is ready for use and is connected to a controller. | |
| The LED quick-flashes yellow. The firmware of the product is being updated. | |
Multi-color LEDs, status indicator
The product has five LEDs that indicate different statuses by means of different colors and steady showing/flashing behavior.
The status indicators and the leveling aid can be activated/deactivated as necessary via the control
Status displays
| Status Meaning | |
| All LEDs do not show. The product is switched off. | |
| All LEDs flash orange. The product is being switched on/off, it is performing a diagnosis report or field calibration report or the firmware is being updated. | |
| All LEDs show steady green. | The product is ready for scanning. |
| All LEDs flash blue. | The product is initialized, calibrated and leveled and is scanning. |
| All LEDs flash white. | The product is acquiring images. |
| All LEDs show steady red. The product has detected a problem. Problems can be: Battery, SDHC card, leveling, calibration, data acquisition or hardware fault. | |
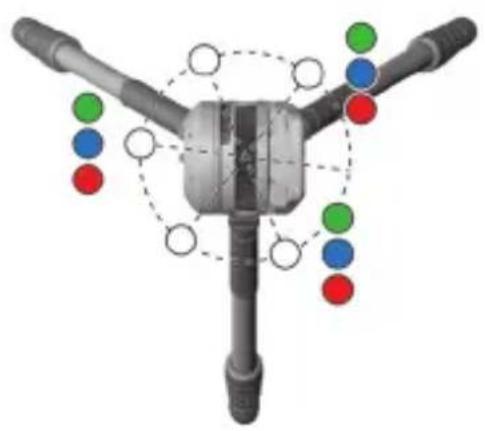
Leveling aid
With the leveling aid activated, three of the five LEDs flash in different colors to indicate whether nearby tripod leg has to be adjusted. When the product is correctly leveled all five LEDs show st green.
| Status Meaning | |
| All LEDs show steady green. The product is leveled. | |
| One (1) LED flashes green. The nearby tripod | leg does not have to adjusted. |
| One (1) LED flashes blue. The nearby tripod leg is set too low. | |
| One (1) LED flashes red. The nearby tripod leg is set too high. | |
Acoustic signals
| Status Meaning | |
| Acoustic signals rising in volume The product | is switching on |
| Acoustic signals falling in volume The product | is switching off. |
| Single acoustic signal Scan starting or SDHC | card is being removed. |
| Long tone The product is performing a scan or a diagnosis report or field calibration report. | |
| Short acoustic signal The product has successfully created a high-accuracy point. | |
| Two (2) short acoustic signals | The product was unable to create a high-accuracy point. |
| Four (4) acoustic signals | The product has experienced a problem or has shifted during the operation.The battery is discharged.Insufficient free space on the memory card. |
| One (1) short acoustic signal, pause for 10 seconds, three (3) short acoustic signals | After the on / off button has been pressed ar held down for ten seconds, a filed called "em gencylog.zip" is saved to the memory card. T file helpsHilti Service to troubleshoot problem with the product. |
| One (1) short acoustic signal, pause of 10 seconds, three (3) short acoustic signals, pause for 10 seconds, five (5) acoustic signals | The WiFi password is reset to the factory default and the WiFi settings are reset to the 2. GHz automatic mode. |
Li-ion battery charge state display
The Li-ion battery features a state of charge display.
| Status Meaning | |
| Four (4) LEDs show steady green. | Charge status: 75 % to 100 % |
| Three (3) LEDs show steady green. | Charge status: 50 % to 75 % |
| Two (2) LEDs show steady green. | Charge status: 25 % to 50 % |
| One (1) LED shows steady green. | Charge status: 10 % to 25 % |
| No LEDs show. The battery is completely discharged. | |
| Four (4) LEDs flash green. The battery has to be refreshed. | |

When not in operation, battery state of charge can be indicated by lightly pressing the state charge button.
While charging is in progress, state of charge is indicated by the indicator on the charger.
Technical data Product information
| Scanner EDM laser class (eye-safe in accordance with IEC EN 60825-1:2014) | ||
| Wavelength, infrared laser | 1,530 nm ... 1,570 nm (invisible) | |
| Maximum output power, infrared laser (in scan mode) | < 50 mW (rotation frequency >20 Hz) | |
| Laser pointer | Laser class 2 | |
| Wavelength, laser pointer | 620 nm ... 650 nm | |
| Maximum output power, laser pointer | 1 mW | |
| Weight | 6.05 kg (13.34 lb) including battery | |
| Ambient temperature for operation | -20 °C ... 50 °C (-4 °F ... 122 °F) | |
| Storage temperature | -40 °C ... 70 °C (-40 °F ... 158 °F) | |
| Maximum relative humidity | 95 % | |
| Frequency | 2,412 MHz ... 2,472 MHz, 5,150 MHz ... 5,350 MHz, 5,470 MHz ... 5,730 MHz, 5,735 MHz ... 5,835 MHz | |
| transmitting power 2.4 GHz WiFi | ≤ 18 dBm | |
| 5 GHz WiFi ≤ 15 dBm | ||
| Battery type | Li-ion, 11.1 V, 6.5 Ah | |
| Product generation, 3D laser scanner | 01 | |
| Product generation, charger | 01 | |
Charger
Charging the battery

If the battery temperature is below 0 °C , allow the battery to return to room temperature bef being recharged.
- Make sure that the contacts on the battery and the contacts on the charger are clean and dry
- Place the charger on a sturdy, flat surface to ensure adequate air circulation underneath the charger.
-
Connect the charger to the power source via the power supply unit or the 12 V socket adapter. The charger performs a search of the slots to ascertain whether batteries are inserted.
-
Insert the battery into an available slot.
The red LED on the charger goes out. This can take up to five seconds.
The green LED on the charger flashes while the charging operation is active.
- When the battery is fully charged, the green LED on the charger shows steadily.

If two batteries are inserted into the charger, the batteries are recharged one after the other
Preparations at the workplace

WARNING
Risk of injury by inadvertent starting!
▶ Before inserting the battery, make sure that the product is switched off.
- Remove the battery before making any adjustments to the power tool or before changing accessories.
Observe the safety instructions and warnings in this documentation and on the product.
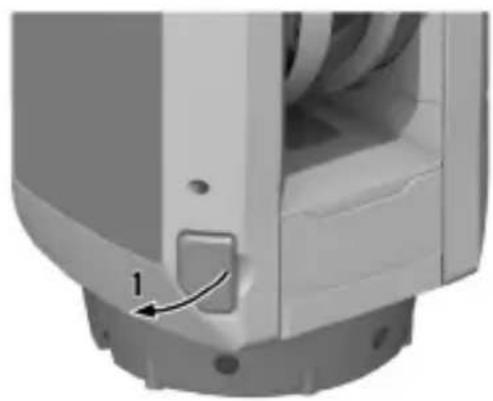
Inserting the battery

Prior to first use, remove the strip of adhesive tape from the battery's contacts.

WARNING
Risk of injury by short circuit or falling battery!
Before inserting the battery, make sure that the contacts on the battery and the contacts on the product are free of foreign matter.
▶ Make sure that the battery always engages correctly.
- Charge the battery fully before using it for the first time.
- To release, press the catch of the battery compartment down and open the battery compartment
- Slide the battery into the battery compartment.
The battery contacts must face toward the instrument underside and inward.
- Close the battery compartment.
Inserting memory car

The instrument is supplied with an SDHC memory card with 32 GB capacity.
Make sure the product is switched off for insertion or removal of an SDHC card.

It is not possible for data to be written to the SDHC card if the write-protection switch is in locked position. Be sure to unlock the write-protection switch.
- Open the cover of the slot for the SDHC card.
- Insert the SDHC card into the slot until it clicks into engagement.
- To remove the SDHC card, apply light pressure to push the SDHC card into the slot to disengage it.
- Close the cover.

Hilti recommends using SDHC memory cards (formatted in the FAT32 file system by default with a minimum capacity of 32 GB, class 10 speed and an operating temperature between -20 °C and 85 °C (-4 °F and 185 °F). If you use an SDXC memory card with extended s capacity, it must correspond to the specifications stated above and be formatted in the FAT32 file system. Use the functions of SD card management in the application software ensure that the SDXC memory card is formatted in the FAT32 file system. More information can be found in the user guide of the application software.
HILTI
Setting up product and tripod
- Set the tripod legs to the required height.
- Spread the tripod legs well apart for more stability.
- Set up the tripod on a sub-base that is as flat and steady as possible.
- Make sure that the tripod head is perceptibly straight and correct the height of the tripod legs necessary.
- Make sure that the tripod is steady.
- Set the product centered on the tripod head.
- Screw the product securely to the tripod head.
Operation
Observe the safety instructions and warnings in this documentation and on the product.
Switching on / off
- Short-press the on / off button to switch the product on.
- Press the on / off button and hold it down for 1 to 5 seconds to switch the product off.
▶ The status indicator LED flashes yellow.
▶ Acoustic signals falling in volume sound until the product has switched off.
Switching on and operating PLC 600 tablet
- Switch the PLC 600 tablet on.
- Start the Hilti Onsite Scan application on the PLC 600 tablet.
- Comply with the notifications and instructions that appear on the display of the PLC 600 tablet
Moving from station to station
- Use both hands to grip two legs of the tripod near the tripod head and lift the tripod together the installed product.
- Move the product to the next station.
▶ Make sure there are enough overlapping areas with the previous station. - Keep the distance between successive stations to less than 10 m (33 ft).

Adequate overlap and limiting the distance between stations are two factors that contribute to good scan registration.
- Set the tripod and product down at the new station.
▶ If registration between two stations fails, include an intermediate station between these two to improve overlap and/or reduce the distance between stations.
Care and maintenance
WARNING
Risk of injury with battery inserted!
▶ Always remove the battery before carrying out care and maintenance tasks!
Care of the product
- Carefully remove stubborn dirt.
- Use only a slightly damp cloth to clean the housing. Do not use cleaning agents containing silicone as these can attack the plastic parts.
- Use a dry, clean cloth to clean the contacts of the product.
If the product has been exposed to very humid conditions or rain, allow the product to dry off be stowing it in the transport case. If this is not possible, remove the product from the transport case after it has been transported and allow the product and the transport case to air-dry. Do not wipe over the lenses and/or the laser exit window and if condensation has formed allow it to evaporate the ordinary way.
Cleaning lenses and laser exit window
- Blow the dust off lenses and laser exit window.
- Moisten the remaining dust with a spray bottle and then wipe it off carefully with a soft cloth. Do not rub!

Excessively rough cleaning material and careless cleaning can scratch the glass and impai the accuracy of the device.
- With the enclosed cleaning cloths or with lens tissues, using a circular action carefully wipe the lenses from the middle outward toward the lens edge. Do not rub!
▶ Do not touch lenses or laser exit window with your fingers.
Care of the Li-ion batteries
- Never use a battery with clogged air vents. Clean the air vents carefully using a dry, soft brush
- Avoid unnecessary exposure of the battery to dust and dirt. Never expose the battery to high levels of moisture (e.g. by being dipped in water or left in the rain).
If a battery has been soaked by moisture, treat it as a damaged battery. Isolate it in a non-flammable container and consult Hilti Service.
- Keep the battery free of extraneous oil and grease. Do not permit dust or dirt to accumulate unnecessarily on the battery. Clean the battery with a dry, soft brush or a clean, dry cloth. Do use cleaning agents containing silicone as these can attack the plastic parts.
Do not touch the contacts of the battery and do not remove the factory-applied grease from the contacts.
- Use only a slightly damp cloth to clean the housing. Do not use cleaning agents containing silicone as these can attack the plastic parts.
Maintenance

WARNING
Danger of electric shock! Improper repairs to electrical components may lead to serious injuries including burns.
- Repairs to the electrical section of the tool or appliance may be carried out only by trained electrical specialists.
- Check all visible parts and controls for signs of damage at regular intervals and make sure that they all function correctly.
- Do not use the product if signs of damage are found or if parts malfunction. Immediately have product repaired by Hilti Service.
- After cleaning and maintenance, install all guards and protective devices and check that they are in full working order.

To help ensure safe and reliable operation, use only genuine Hilti spare parts, consumables a accessories. Spare parts, consumables and accessories approved by Hilti for use with your product can be found at your Hilti Store or online at: www.hilti.group
Transport and storage
Transport of cordless power tools and batteries

CAUTION
Accidental starting during transport!
▶ Always transport your products with the batteries removed!
▶ Remove the battery/batteries.
▶ Never transport the product with tripod installed. Otherwise, the tripod leg screws can be damaged.
▶ Never carry the product by the rotating mirror. Always use the carrying handle to carry the product.
HILTI
If the product is moved from (extremely) cold conditions to warmer conditions, the product should remain inside the closed transport case for at least 15 minutes to prevent the formation of inte condensation. Then open the transport case and wait until all moisture has disappeared.
▶ Never transport batteries loose and unprotected. During transport, batteries should be protected from excessive shock and vibration and isolated from any conductive materials or other batteries that may come in contact with the terminals and cause a short circuit. Comply with the local applicable regulations for transporting batteries.
- Do not send batteries through the mail. Consult your shipper for instructions on how to ship undamaged batteries.
- Prior to each use and before and after prolonged transport, check the product and the batteries for damage.
Storage of cordless power tools and batteries

WARNING
Accidental damage caused by defective or leaking batteries!
▶ Always store your products with the batteries removed!
- Store the product and the batteries in a cool and dry place. Comply with the temperature limits stated in the technical data.
▶ If the product is to remain unused for a lengthy period of time, store it upright.
- Do not store batteries on the charger. Always remove the battery from the charger when the charging operation has completed.
▶ Never leave batteries in direct sunlight, on sources of heat, or behind glass.
- Store the product and batteries where they cannot be accessed by children or unauthorized persons.
- Prior to each use and before and after prolonged storage, check the product and the batteries for damage.
Disposal

WARNING
Risk of injury due to incorrect disposal! Health hazards due to escaping gases or liquids.
▶ DO NOT send batteries through the mail!
▶ Cover the terminals with a non-conductive material (such as electrical tape) to prevent short circuiting.
- Dispose of your battery out of the reach of children.
- Dispose of the battery at your Hilti Store, or consult your local governmental garbage disposal or public health and safety resources for disposal instructions.
Most of the materials from which Hilti products are manufactured can be recycled. The materi must be correctly separated before they can be recycled. In many countries, your old tools, mach or appliances can be returned to Hilti for recycling. Ask Hilti Service or your Hilti sales representative for further information.

- Do not dispose of power tools, electronic equipment or batteries as household waste!
Manufacturer's warranty
▶ Please contact your local Hilti representative if you have questions about the warranty conditions.
FCC statement (applicable in US)/IC statement (applicable in Canada)

This equipment has been tested and found to comply with the limits for a class B digital device, pursuant to part 15 of the FCC rules. These limits are designed to provide reasonable protection against harmful interference in a residential installation. This equipment generates, uses, and can radiate radio frequency energy and, if not installed and used in accordance with the instructions, may cause interference to radio communications.
However, there is no guarantee that interference will not occur in a particular installation. If this equipment does cause harmful interference to radio or television reception, which can be determin by turning the equipment off and on, the user is encouraged to try to correct the interference by taking the following measures:
- Re-orient or relocate the receiving antenna.
- Increase the separation between the equipment and receiver.
- Connect the equipment to a power outlet on a circuit different from that to which the receiver is connected.
- Consult the dealer or an experienced TV/radio technician for assistance.
This device is in compliance with paragraph 15 of the FCC Regulations and RSS-210 of the ISED Regulations.
Operation is subject to the following two conditions:
- This device shall cause no harmful interference.
- This device must accept any interference received, including interference that may cause undesired operation.

Changes or modifications not expressly approved by Hilti can restrict the user's right to operate the device.
Further information
For more information on operation, technology, environment, RoHS declaration (markets in China and Taiwan only) and recycling, follow this link: qr.hilti.com/manual/?id=2425770
This link is also to be found in these operating instructions in the form of a QR code, indicated by symbol 📋
RAYONNEMENT LASER VISIBLE ET INVISIBLE ! NE PAS REGARDER DIRECTEMENT DANS LE FAISCEAU ! PRODUIT DE CLASSE DE LASER 2.
SYNLIGE OG USYNLIGE LASERSTRÅLER! UNDGÅ AT SE IND I LASEREN! PRODUKT I LASERKLASSE 2.
SYNLIG OG USYNLIG LASERSTRÅLING! IKKE SE INN I STRÅLEN! PRODUKT I LASERKLASSE 2.
NÄKYVIÄ JA NÄKYMÄTTÖMIÄ LASERSÄTEITÄ! ÄLÄ KATSO SÄTEESEEN! LASERLUOKAN 2 LAITE.
NÄHTAV JA NÄHTAMATU LASERKIIRGUS! ÄRGE VAADAKE OTSE LASERKIIRE SUUNAS! LASERI KLASSI 2 TOODE.
VISIBLE AND INVISIBLE LASER RADIATION DO NOT STARE INTO BEAM CLASS 2 LASER PRODUCT
Wavelength: 620-650nm (class 2) Maximum output power: 1mW Wavelength: 1530 - 1570nm (class 1) This product complies with IEC 60825-1: 2014 and IEC 60825-1: 2007 and 21 CFR 1040.10 and 1040.11 except for deviations pursuant to Laser Notice No. 50, date June 24, 2007
REDZAMS UN NEREDZAMS LAZERA STAROJUMS! NESKATITIES LAZERA STARA! LAZERA 2. KLASES IZSTRADAJUMS.
MATOMAS IR NEMATOMAS LAZERIO SPINDULYS! NEŽIŪRĖTI I SPINDULI! 2 LAZERIO KLASĖS PRIETAI- SAS.
WIDZIALNE I NIEWIDZIALNE PROMIENIOWANIE LASEROWE! NIE PATRZEĆ W ŻRÓDŁO PROMIENIA LASERA! PRODUKT KLASY LASERA 2.
VIDITELNÉ A NEVIDITELNÉ LASEROVÉ ZÁŘENÍ! NEDI-VEJTE SE DO PAPRSKU! VÝROBEK TRÍDY LASERU 2.
Declaration of conformity
Declaration of conformity
The manufacturer declares, on his sole responsibility, that the product described here complies with the applicable legislation and standards.
The technical documentation is filed here:
Hilti Entwicklungsgesellschaft mbH | Tool Certification | Hiltistrasse 6 | D-86916 Kaufering, Germany
Product information
| High-speed 3D laser scanning system P3D | 800 (01) |
| Generation 01 | |
| Serial no. 1-999999999999 |
Head of Quality and Process Management
Business Area Electric Tools & Accessories

Christophe Lamon
Head of BU Measuring
Business Unit Measuring Systems
UK CA
UK Declaration of Conformity
Declaration of conformity
The manufacturer declares, on his sole responsibility, that the product described here complies with the applicable legislation and standards.
The technical documentation is filed here:
Hilti Entwicklungsgesellschaft mbH | Tool Certification | Hiltistrasse 6 | D-86916 Kaufering, Germany Product information
| High-speed 3D laser scanning system P3D | 800 (01) |
| Generation 01 | |
| Serial no. 1-99999999999 |
Manufacturer:
Hilti Corporation
Supply of Machinery (Safety) Regulations 2008
Radio Equipment Regulations 2017
The Restriction of the Use of Certain Hazardous Substances in Electrical and Electronic Equipment Regulations 2012
UK Importer:
Hilti (Gt. Britain) Limited
No. 1 Circle Square, 3 Symphony Park
Manchester, England, M1 7FS
EN 61010-1:2010, AI:2019, AC:2019
EN 301 409-1 V2.2.3
EN 300 328 V2.2.2

EN 301 489-17 V3.2.4
EN 301 090 V2.1.1
Scheen, 22.01.2025

Dr. Tahar Zrilli
Head of Quality and Process Management Business Area Electric Tools & Accessories

Christophe Lamon
Head of BU Measuring
Business Unit Measuring Systems

Hilti Corporation
LI-9494 Schaan
Tel.:+423 234 21 11
Fax:+423 234 29 65
www.hilti.group