USER MANUAL MX-ST40F SAMSUNG
Refer to the table below for an explanation of symbols which may be on your Samsung product.
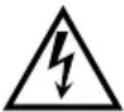 | CAUTIONRISK OF ELECTRIC SHOCKDO NOT OPEN | |
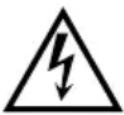 | This symbol indicates that high voltage is present inside. It is dangerous to make any kind of contact with any internal part of this product. |
 | This symbol indicates that this product has included important literature concerning operation and maintenance. |
 | Class II product: This symbol indicates that it does not require a safety connection to electrical earth (ground). If this symbol is not present on a product with a power cord, the product MUST have a reliable connection to protective earth (ground). |
 | AC voltage: This symbol indicates that the rated voltage marked with the symbol is AC voltage. |
 | DC voltage: This symbol indicates that the rated voltage marked with the symbol is DC voltage. |
 | Caution, Consult instructions for use: This symbol instructs the user to consult the user manual for further safety related information. |
WARNING
- To reduce the risk of fire or electric shock, do not expose this appliance to rain or moisture.
- This product contains chemicals known to the State of California to cause cancer and birth defects or other reproductive harm.
- The battery (battery or batteries or battery pack) shall not be exposed to excessive heat such as sunshine, fire or the like.
- Do not use liquid fumigators containing chemicals, such as mosquito repellent or air freshener, around the product. If steam comes in contact with the product surface or enters the product, it may cause stains or malfunction.
CAUTION
- TO PREVENT ELECTRIC SHOCK, MATCH WIDE BLADE OF PLUG TO WIDE SLOT, FULLY INSERT.
- This apparatus shall always be connected to a AC outlet with a protective grounding connection.
- To disconnect the apparatus from the mains, the plug must be pulled out from the mains socket, therefore the mains plug shall be readily operable.
- Do not expose this apparatus to dripping or splashing. Do not put objects filled with liquids, such as vases on the apparatus.
- To turn this apparatus off completely, you must pull the power plug out of the wall socket. Consequently, the power plug must be easily and readily accessible at all times.
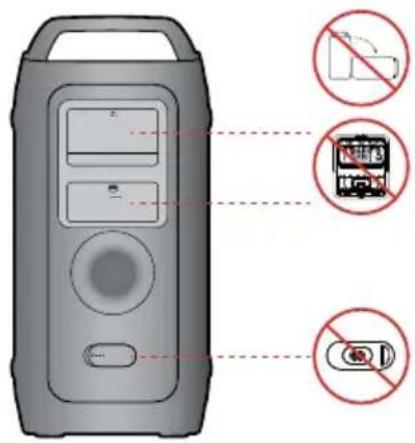
To avoid deterioration of water resistance
Check the following and use the unit correctly.
- Deformation or damage from dropping the unit or subjecting it to mechanical shock may cause deterioration of the water resistance.
- This unit does not have a design that is resistant to water pressure. Use of the unit in a location where high water pressure is applied, such as in the shower, may cause a malfunction.
- Do not pour high-temperature water or blow hot air from a hair dryer or any other appliance on the unit directly. Also never use the unit in a place subject to high temperatures, such as in a sauna or near a heat source.
- Handle the cap with care. Port cover and AC plug cover play a very important role in maintenance of the water resistance. When using the unit, make sure that the cap is closed completely. When closing the cap, be careful not to allow foreign objects inside. If the cap is not closed completely the water resistance may deteriorate and may cause a malfunction of the unit as a result of water entering the unit.
- IPX4 cannot be met when any JACK or AC power is plugged in.
- Do not lay down the product horizontally to ensure it remains water resistant.
• The Sound Tower provides durability by IPX4.
| Protection against solids | IP | Protection against water |
| 0 | 4 |
| No requirements X X No requirements | |
| No protection 0 0 No protection | |
| Solids>50 mm 1 1 Vertically falling water | |
| Solids>12 mm 2 2 Vertically water-enclosure tilted 15° | |
| Solids>2.5 mm 3 3 Sprayed water 60° from vertical | |
| Solids>1.0 mm | 4 | 4 | Splashed water from all directions |
| Dust Protected | 5 5 | | Hosing jets from all directions |
| Dust tight | 6 | 6 | Strong hosing jets from all directions |
| - | | 7 | Temporary Immersion: 1m for 30 minutes |
| - | | 8 | Immersion: manufacture defined depth and time |
PRECAUTIONS
- Ensure that the AC power supply in your house complies with the power requirements listed on the identification sticker located on the bottom of your product. Make sure the ventilation slots are not covered. Do not place the unit on amplifiers or other equipment which may become hot. This unit is designed for continuous use. To fully turn off the unit, disconnect the AC plug from the wall outlet. Unplug the unit if you intend to leave it unused for a long period of time.
- During thunderstorms, disconnect the AC plug from the wall outlet. Voltage peaks due to lightning could damage the unit.
- Do not expose the unit to direct sunlight or other heat sources. This could lead to overheating and cause the unit to malfunction.
-
Protect the product from moisture (i.e. vases), and excess heat (e.g. a fireplace) or equipment creating strong magnetic or electric fields. Unplug the power cable from the AC wall socket if the unit malfunctions. Your product is not intended for industrial use. It is for personal use only. Condensation may occur if your product has been stored in cold temperatures. If transporting the unit during the winter, wait approximately 2 hours or until the unit has reached room temperature before using.
-
The battery used with this product contains chemicals that are harmful to the environment. Do not dispose of the battery in the general household trash. Do not expose the battery to excess heat, direct sunlight, or fire. Do not short circuit, disassemble, or overheat the battery.
CAUTION : Danger of explosion if the battery is replaced incorrectly. Replace only with the same or equivalent type.
Others
- As the battery is manufactured only for this product, do not use the battery for other electronic appliances or other purposes.
- When discarding a dead battery, put it into a battery collection box for recycling.
- To protect the battery, the battery cannot be charged when the temperature is lower than 3 °C or higher than 42 °C.
- When the battery level is low, recharge it. If the level of the battery remains low for a long period of time, it can cause the performance of the battery to degrade.
- Do not apply heat to the battery and do not put the battery in a fire.
- To protect the battery, the Sound Tower may not operate when the temperature is lower than -17 °C or higher than 57 °C.
CONTENTS
01 CHECKING THE COMPONENTS 1
02 PRODUCT OVERVIEW 2
Top Panel of the Sound Tower 2
Rear Panel of the Sound Tower 4
Connecting Electrical Power 7
How to use Audio Group 8
04 CONNECTING AN EXTERNAL DEVICE 14
Connecting using an Analog Audio (AUX) Cable 14
Connecting a mobile device via Bluetooth 15
05 CONNECTING A USB STORAGE DEVICE 18
Software Update 19
Connecting an External Microphone 20
Connecting an External Guitar 21
How to use Sound Mode 22
How to use the DJ Effect 22
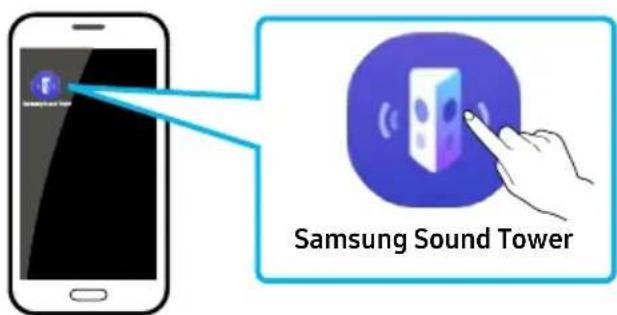
06 USING THE SAMSUNG SOUND TOWER APP 23
Install Samsung Sound Tower App 23
Launching the Samsung Sound Tower App 23
07 TROUBLESHOOTING 24
08 LICENSE 25
09 IMPORTANT NOTES ABOUT SERVICE 26
10 SPECIFICATIONS AND GUIDE 27
Specifications
27
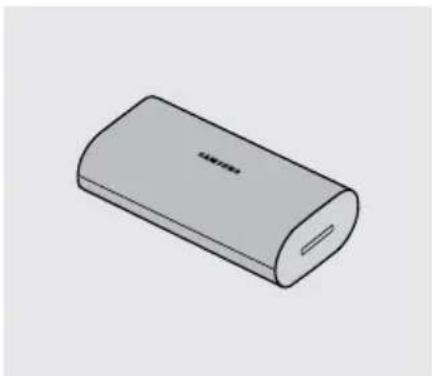
01 CHECKING THE COMPONENTS
natural_image
Illustration of a cylindrical device with control panel and buttons (no text or symbols)
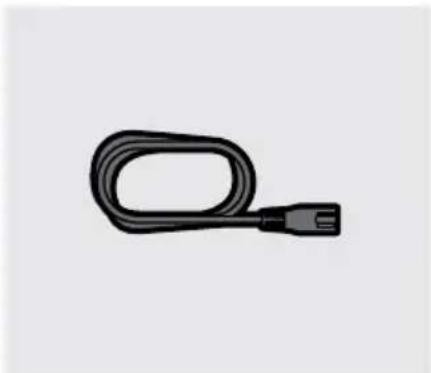
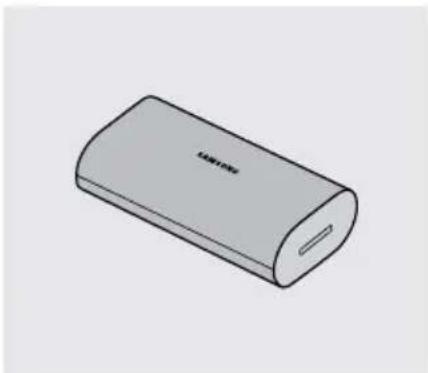
Sound Tower Main Unit

natural_image
Simple black cable with a connector, isolated on white background (no text or symbols)
Power Cord Battery

natural_image
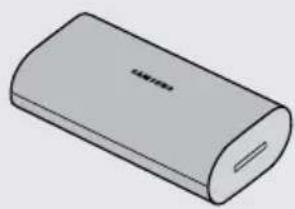
Illustration of a cylindrical electronic device with a slot and label 'TAMYON' on the body (no other text or symbols)
- For more information about the power supply and power consumption, refer to the label attached to the product. (Label: Rear of the Sound Tower Main Unit)
- To purchase additional components or optional cables, contact a Samsung Service Center or Samsung Customer Care.
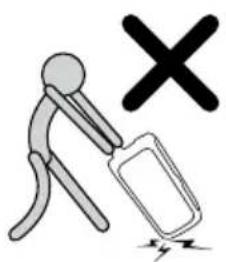
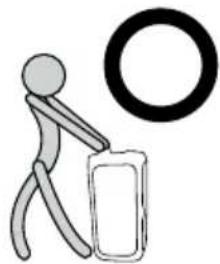
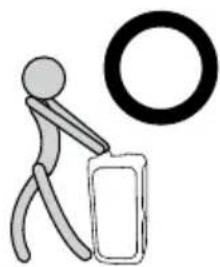
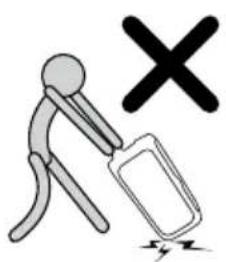
- When moving the product, do not drag or pull the product from the ground. Lift the product when moving the product.
- Design and specifications are subject to change without prior notice.
natural_image
Simple line drawing of a stick figure pushing a box with a large circle nearby (no text or symbols)

02 PRODUCT OVERVIEW
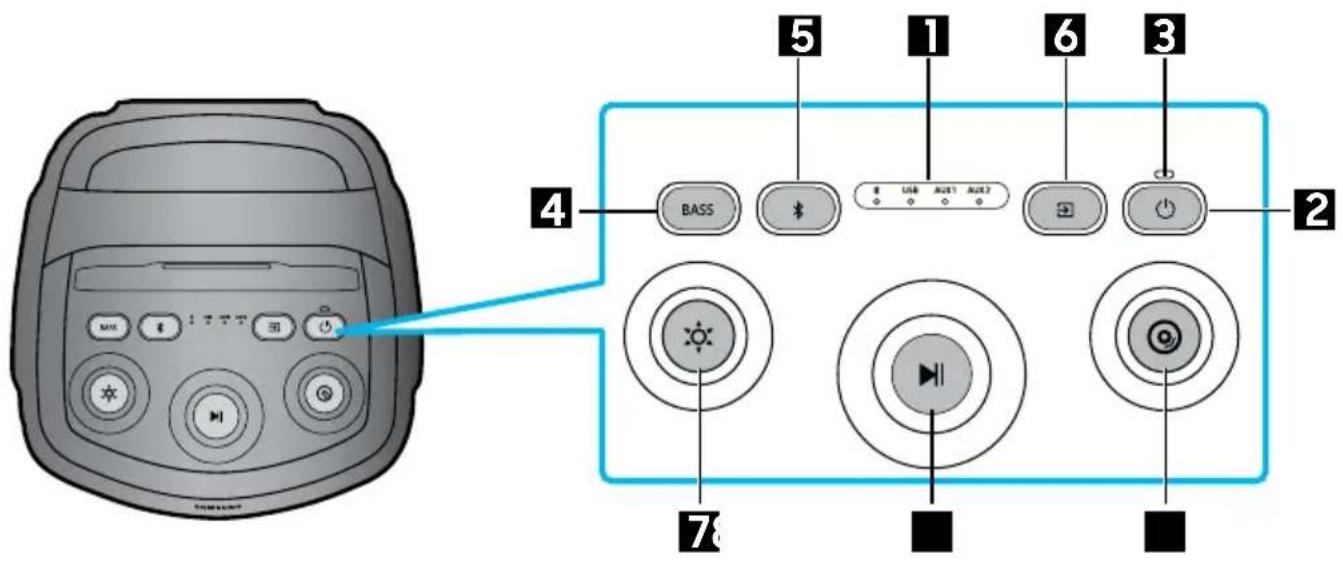
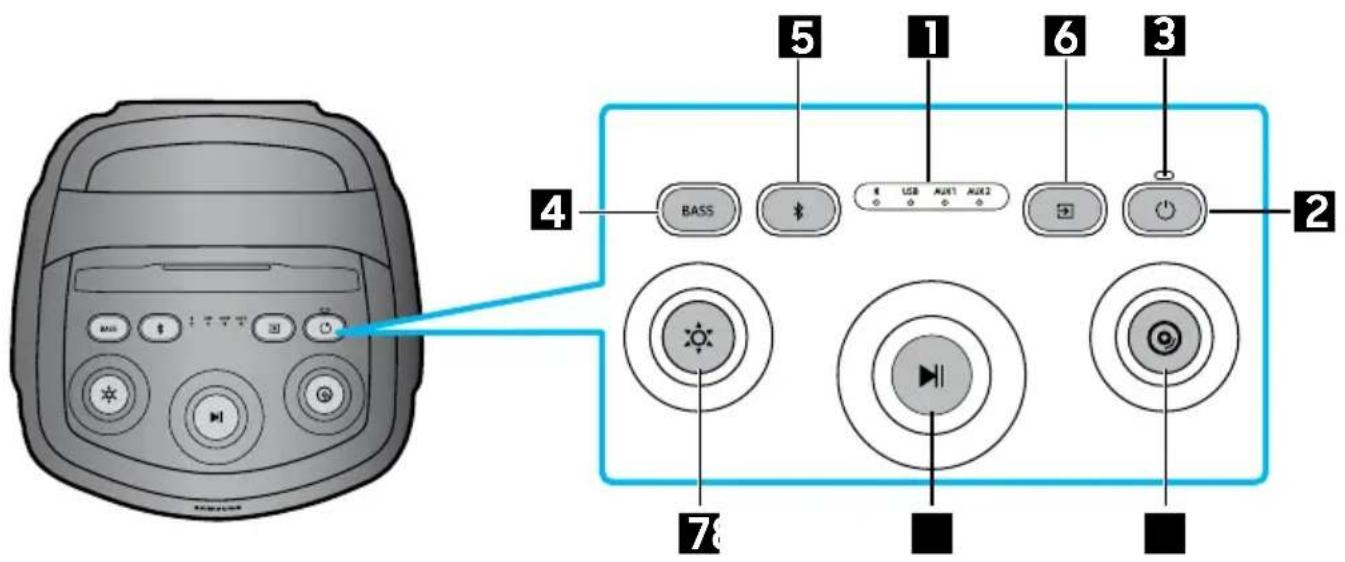
Top Panel of the Sound Tower

| 1 | LED Indicator | Displays operating messages or current source of the Sound Tower system. The information sources represented by each LED are as follows: *(Bluetooth) USB(USB) AUX1(AUX1) AUX2(AUX2) |
| 2 | Power Turns the Sound Tower on and off. | |
| 3 | Charge LED Displaying battery level information of Sound Tower. | |
| 4 | BASS | Press the BASS button to change the bass mode. |
| 5 | Bluetooth PAIRING | Press and hold the button to enter Bluetooth Pairing mode, and the LED blinks blue. |
| 6 | Source Press to select a source connected to the Sound Tower. | |
| 7 | Light | Press the (Light) button and the white light flashes, then rotate the button to switch between different Mood presets. Order: Festival → Energetic → Delight → Chill → Focus → Sports → Off → Festival → Energetic → ... |
| 8 | Play/Pause | • Play/PausePress the ▷ button to pause a music temporarily.When you press the button again, the music plays.Double press Play/Pause skips music to the next one.Press 3 times to switch to the previous one. |
| 9 | DJ | This button lets you Play a sampler (DJ audio effect).Sampler (DJ audio effect) changes once rotate a jog (12 samplers)• Order: Air Horn→ Whistle → Crowd Cheer→Jeering→ Siren → Clap→rewind → Scratch → "No Way!" → "Are you ready" → "3,2,1"→ "Ok, Let's Go"→Air Horn→...• Play a sampler whenever change to notify what sampler is selected |
Rear Panel of the Sound Tower
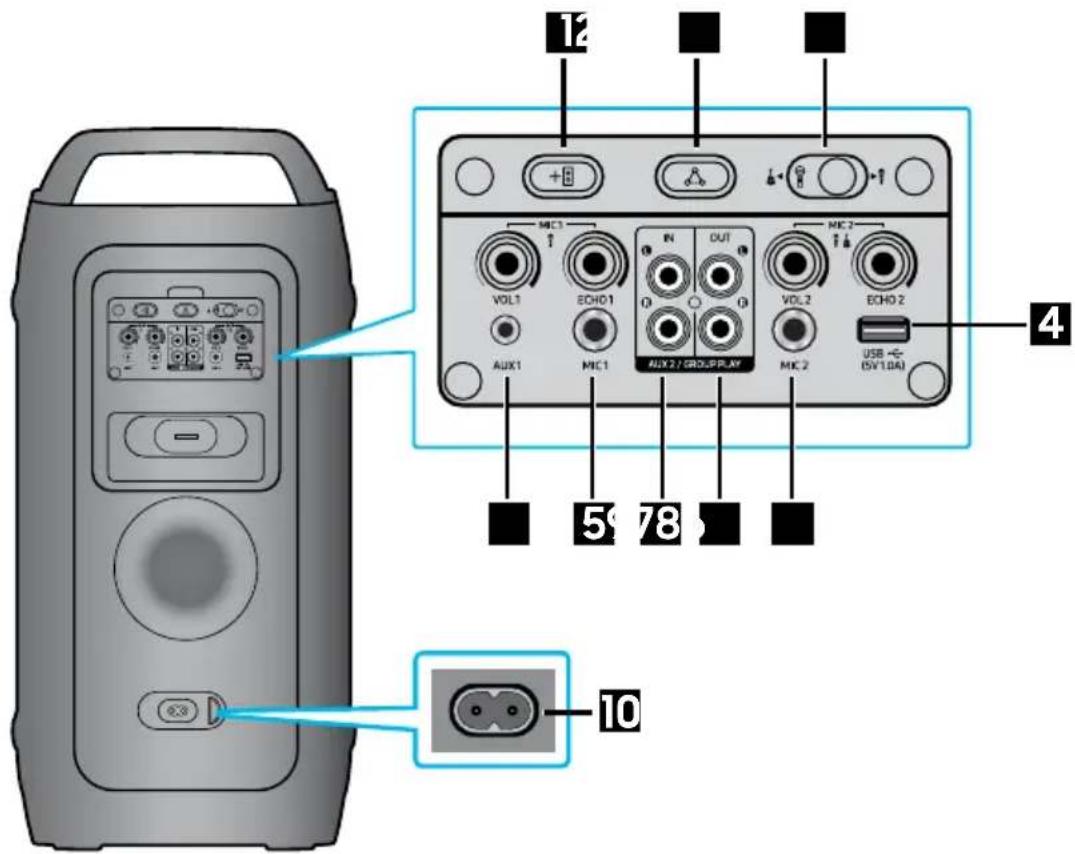
| 1 | ADD STEREO | Press the ADD STEREO button to connect to another same model Sound Tower wirelessly. |
| 2 | GROUP PLAY | Press the GROUP PLAY button to connect up to ten Sound Tower systems wirelessly. |
| 3 | MIC2/GUITAR | Toggle the switch to MIC2 or GUITAR input source. |
| 4 | USB | Connect a USB device to the USB ports on the main unit.If you connect your cell phone to the USB port, you can charge it.• Press the → (Source) button to select USB. |
| 5 | MIC1 | Connect your microphone to the MIC1 jack. |
| 6 | MIC2 Connect your microphone or guitar to the MIC2 jack. |
| 7 | AUX2/GROUP PLAY IN Terminals | Use an Audio Cable (not supplied) to connect AUX2 (IN) terminals on the main unit to Audio Out on an external analogue output device.Be sure to match connector colours.If the external analogue output device has only one Audio Out jack, connect either left or right.Press the → (Source) button to select AUX2.If the product is in AUX2 mode with no playback and no command input for more than 20 minutes, the system will turn off.If the product is in AUX2 mode with playback for more than 8 hours and no command input, the system will turn off. |
| 8 | GROUP PLAY OUT Terminals | Use an Audio Cable (not supplied) to connect GROUP PLAY (OUT) terminals on the main unit to Audio In on an external analog output device. |
| 9 | AUX1 | Use an Audio (AUX) Cable (not supplied) to connect AUX1 jack on the main unit to Audio Out on an external device.If the product is in AUX1 mode with no playback and no command input for more than 20 minutes, the system will turn off.If the product is in AUX1 mode with playback for more than 8 hours and no command input, the system will turn off. |
| 10 | Power | Connect the power cord to the Power jack and connect the other end of the power cord to a wall socket to supply electrical power to the Sound Tower. |
Charge LED State of the Sound Tower:
| Charging state Charge LED | |
| not charging and 100% ~ 31% power Green | |
| not charging and 30% ~ 11% power Orange | |
| not charging and 10% ~ 5% power Red | |
| Charging and full charge Blue | |
| Charging and 99% ~ 31% power Green Blink | |
| Charging and 30% ~ 11% power Orange Blink | |
| Charging and 10% ~ 5% power Red Blink | |
※ Auto power down if battery 5%.
In DC mode shutdown, the entire system power will be turned off.

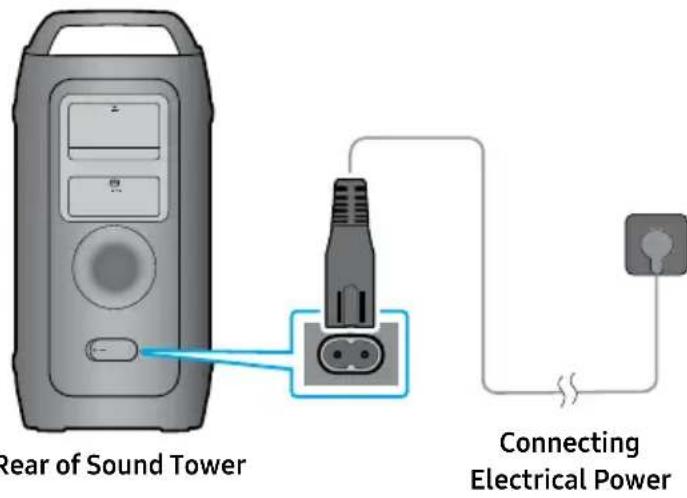
Connecting Electrical Power
Use the power cord to connect the Sound Tower to an electrical outlet in the following order:
Connect the power cord to the Sound Tower and then to a wall socket.
See the illustrations below.
- Before first use, please charge power to wake up the battery.
- When the AC cord is pressed in, the built-in battery will be charged automatically until the battery is fully charged. The LED indicator on the top panel will show the current charging state. (refer to page ENG - 6)
- When you unplug the set to run on battery, the volume level drops dramatically.
- For more information about the required electrical power and power consumption, refer to the label attached to the product. (Label: Rear of the Sound Tower)
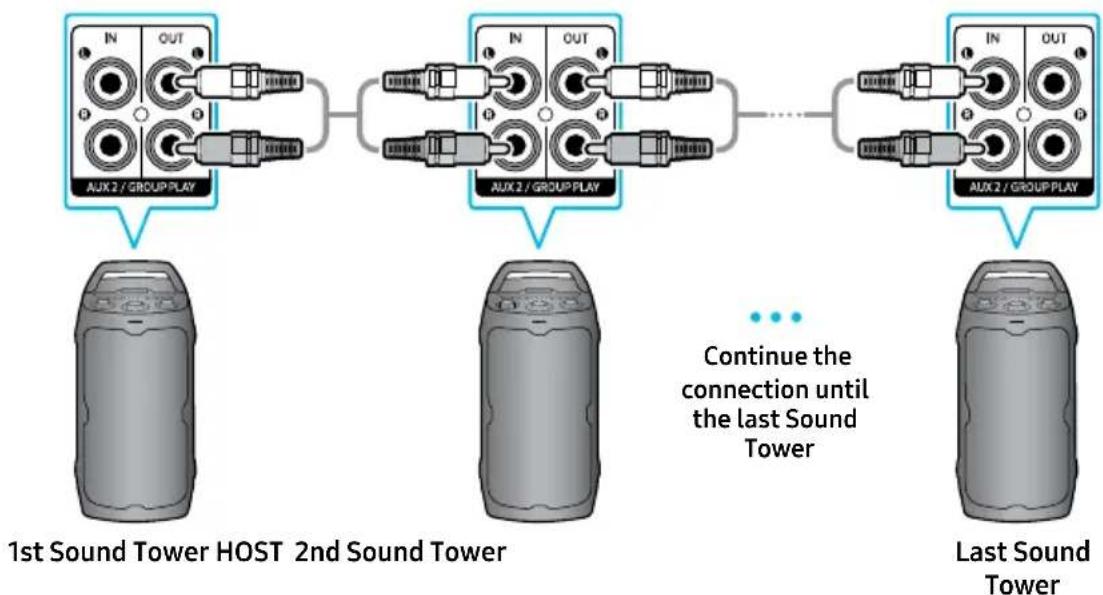
How to use Audio Group
You can connect multiple audio systems in a group to create a party environment and produce higher sound output. Set one Sound Tower as the HOST and any music played on it will be shared among any other Sound Tower systems in the Audio group.
Connecting the wired Group Play mode
flowchart
graph TD
    A["1st Sound Tower HOST 2nd Sound Tower"] --> B["AUX2 / GROUP PLAY"]
    B --> C["AUX2 / GROUP PLAY"]
    C --> D["AUX2 / GROUP PLAY"]
    D --> E["Last Sound Tower"]
    style A fill:#f9f,stroke:#333
    style B fill:#ccf,stroke:#333
    style C fill:#cfc,stroke:#333
    style D fill:#fcc,stroke:#333
    note right of C Continue the connection until the last sound tower
Set up Group Play by connecting all the systems using audio cables (not supplied). Use the → (Source) button to change the source to AUX2 for every Sound Tower system except the 1st (or HOST) Sound Tower system.
Connect the RCA cable to the AUX2 OUT on the HOST and AUX2 IN on the SUB as shown by using the RCA cable (not supplied).
NOTES
- The 1st Sound Tower HOST can play music from any source.
- Depending on the length or characteristics of the cable, there may be a difference in operating distance.
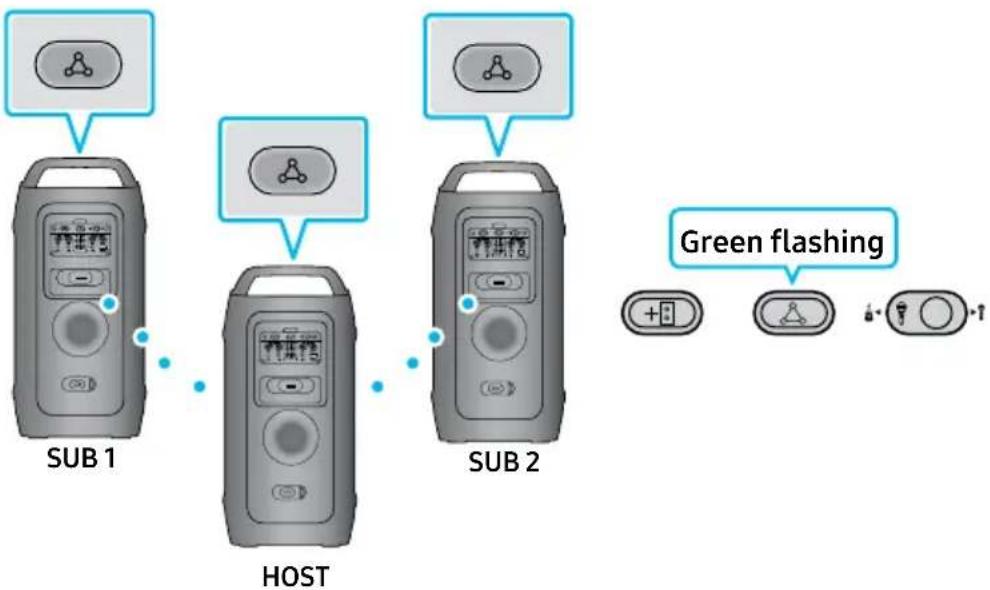
Connecting the wireless Group Play mode
To use Wireless Group Play, you can use either the Physical Buttons located on the back of the device or in Samsung Sound Tower app.
You can connect up to ten Sound Tower systems with the wireless Group Play function.
flowchart
graph TD
    A["Sub 1"] --> B["HOST"]
    B --> C["SUB 2"]
    D["Green flashing"] --> E["+3"]
    F["+1"] --> G["+1"]
    H["+1"] --> I["+1"]
- Connect the HOST System:
Press the GROUP PLAY button on the HOST Sound Tower system.
After the GROUP PLAY LED slowly blinks for 10 seconds, the GROUP PLAY LED will blink rapidly for 30 seconds.
- Connect the First Sub System (SUB 1):
Press the GROUPPLAY button on the second Sound Tower system (SUB 1).
The GROUP PLAY LED will start blinking.
Once connected to the HOST, both the GROUP PLAY LEDs on SUB 1 and the HOST will stop blinking and remain lit.
- Connect the Second Sub System (SUB 2):
Press the GROUP PLAY button on the third Sound Tower system (SUB 2).
A tone prompt will play, indicating that the GROUP PLAY button on the system has stopped blinking.
- Add Additional Systems:
If you want to add more Sound Tower systems, repeat step 3 for each additional unit.
- Play Music:
Play music on the HOST Sound Tower system.
Sound will output from all connected systems simultaneously.
Using the Samsung Sound Tower App:
-
Download & Open the Samsung Sound Tower app on your smartphone or tablet.
-
Connect Sound Tower via Bluetooth.
-
Navigate to the Group Play settings.
- Toggle the switch to turn Wireless Group Play on or off.
How to know which is HOST & which is SUB:
HOST - Shows "Bluetooth Button LED Light On" & Bluetooth small indicator on.
SUB - Shows only Bluetooth small indicator on. No light on Bluetooth button
NOTES
- In Group play mode, "HOST" Sound Tower can connect to the Samsung TV. After the connection is successful, the Group play mode automatically exits.
- The wireless Group Play connection is available for MX-ST50F/MX-ST40F.
- Environmental conditions or other factors with connected devices may have effect on playback quality.
- If the red LED is on the GROUP PLAY button, an error has occurred in the wireless Group Play connection. Try turning off and then turn on, then follow the steps from 1 to 3.
- The ADD STEREO button and ✕ PAIRING button on the SUB Sound Tower systems are not available while in wireless Group Play mode.
- The ADD STEREO button on the HOST Sound Tower system is not available while in wireless Group Play mode.
- Long press "GROUP PLAY" in Bluetooth Source state to enter Group mode as "HOST". All SUB units must be connected one by one. For example, after HOST is connected, press GROUP PLAY button on SUB 1 to connect, and after SUB 1 is connected, you should connect SUB 2 and SUB 3 one by one sequentially.
- While using Group Play, currently connected Bluetooth devices are disconnected and Bluetooth connection is disabled.
- Bluetooth devices can search and connect with the HOST Sound Tower only.
- When in Group Play mode, the SUB cannot connect to a Bluetooth device.
- If the Sound Tower is powered off and then turned back on, or if a source other than Bluetooth is selected on a SUB unit while in Group Play mode, the Group Play connection will be disconnected.
Disconnecting the wireless Group Play mode
- Press and hold the GROUP PLAY button over 5 seconds (HOST or SUB) after Group Play is connected or press the GROUP PLAY button (HOST or SUB) before Group Play is connected.
- Tone prompt instead and the LED above the GROUP PLAY button is off.
- If you select any source other than Bluetooth on the SUB units or turn off the HOST Sound Tower, the Group Play mode is disconnected.
- If the disconnection is made from the HOST Sound Tower, Group Play is disconnected.
Wireless Group Play connections
1. Connected to Smartphone:
- Connect smartphone via Bluetooth to HOST Sound Tower, then connect other SUB Sound Towers wireless Group play to HOST.
- Play/Pause, audio skip, volume increase/decrease buttons on set only works on HOST Sound Tower.
- SUB Sound Towers volume can be adjusted separately on the set.
2. Connected to Mic/Guitar, USB, AUX:
- Mic/Guitar: When microphone or Guitar is connected on MIC 1 or MIC 2 and Group play LEDs are paired, sound only produces from the Sound Tower that it is plugged in.
- USB: Wireless Stereo connection stay connected but sound only produces from the HOST Sound Tower where USB is connected.
- AUX: When plugged on AUX 1 and Source on AUX 1, Sound only produces from HOST Sound Tower.
LED Indications
| LED STATE Description |
| Green | Blink Waiting for a wireless Group Play connection. |
| Solid The wireless Group Play connection was successful. |
| Red Solid There is an error with the wireless Group Play connection. |
NOTE
- In wireless connection, Playback quality can be unstable depending on Bluetooth environment. For better play, please keep the device in wired Group Play mode.
- The first Bluetooth connection should be within 1m.
- The lighting colors between MAIN Sound Tower and SUB Sound Tower may vary.
Using wireless ADD Stereo Group mode
To use Wireless ADD Stereo, you can use either the Physical Buttons located on the back of the device or in Samsung Sound Tower app.
Connect two Sound Tower and use them with your Smartphone or Samsung TV to enjoy stereo sound.
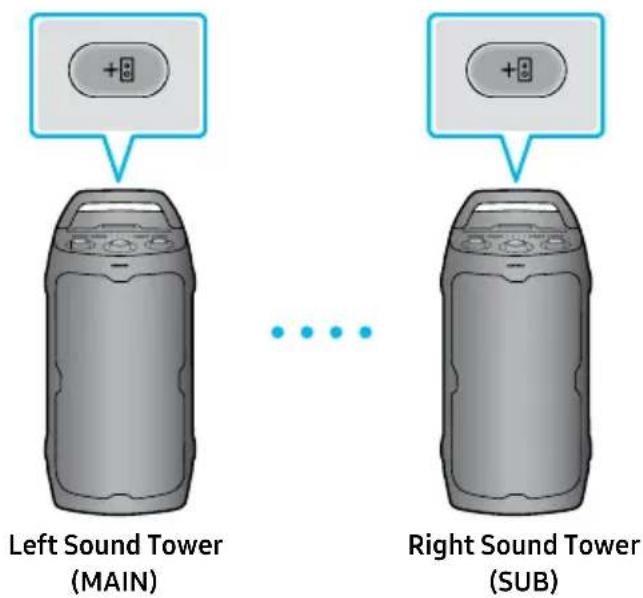
- Press the ADD STEREO button on the left Sound Tower system. The LED blinks on the ADD STEREO button.
- Press the ADD STEREO button on the right Sound Tower system. The LED blinks on the ADD STEREO button.
- When the connection is made, tone prompt. Back panel ADD LED Green Indicator Steady on.
- The MAIN Sound Tower system outputs left channel sound and the SUB Sound Tower system outputs right channel sound. Press the ADD STEREO button on the MAIN or SUB Sound Tower to change the sound channel of the Sound Tower.
- Sound is output from both Sound Tower.
Using the Samsung Sound Tower App:
- Download & Open the Samsung Sound Tower app on your smartphone or tablet.
- Connect Sound Tower via Bluetooth.
- Navigate to the Stereo settings.
- Toggle the switch to turn Wireless ADD Stereo on or off.
How to know which is HOST & which is SUB:
HOST - Shows "Bluetooth Button LED Light On" & Bluetooth small indicator on.
SUB - Shows only Bluetooth small indicator on. No light on Bluetooth button*
NOTES
- To use the Stereo Group mode, both Sound Tower systems must be the same model.
-
Environmental conditions or other factors with connected devices may have effect on playback quality.
-
If the red LED is on the ADD STEREO, an error has occurred in the Stereo Group connection. Turn off both Sound Tower systems, unplug them from the power source if they are connected. Then turn on & try Step 1 to 3 again. If not plugged replug them. Turn off both Sound Tower systems. Then turn on & try Step 1 to 3 again.
- Bluetooth PAIRING and GROUP PLAY on the SUB Sound Tower systems are disabled while in Stereo Group mode.
- The GROUP PLAY button on the MAIN Sound Tower system is not available while in Stereo Group mode.
- When ADD Stereo is connected wirelessly to Smartphone via Bluetooth: Play/Pause button on set only works with HOST Sound Tower not SUB Sound Tower.
- In mode other than "Bluetooth" (ex. USB, AUX mode), music is played only in MAIN Sound Tower and music is not played in SUB Sound Tower.
- If you try to connect a Bluetooth device while Stereo Group is connecting, the Stereo Group mode may fail.
Wireless Stereo connection:
1. Connected to Smartphone:
- Wireless Stereo can be connected to same model Sound Towers.
- Play/Pause, audio skip, previous audio functions are applicable to HOST Sound Tower.
- Play/Pause is the only function supported on SUB Sound Tower.
2. Connected to Mic/Guitar, USB, AUX:
- Mic/Guitar: Wireless Stereo connects solid green light but sound produces only on the unit that Mic/Guitar is connected to.
- USB: Wireless Stereo connection stay connected but sound only produces from the HOST Sound Tower where USB is connected.
- AUX: When plugged on AUX 1 and Source on AUX 1, Sound only produces from HOST Sound Tower. Only volume level can be adjusted on SUB Sound Tower.
Terminate the Stereo Group mode
Press the ADD STEREO button (MAIN or SUB) for at least 5 seconds while the Stereo Group is connected.
- Tone prompt and the LED above the ADD STEREO button is off.
LED Indications
| LED STATE Description |
| Green | Blink Waiting for a Stereo Group connection. |
| Solid The | Stereo Group connection is successful. |
| Red Solid There is an error with the Stereo Group connection. |
04 CONNECTING AN EXTERNAL DEVICE
Connect to an external device via a wired or wireless network to play the external device's sound through the Sound Tower.
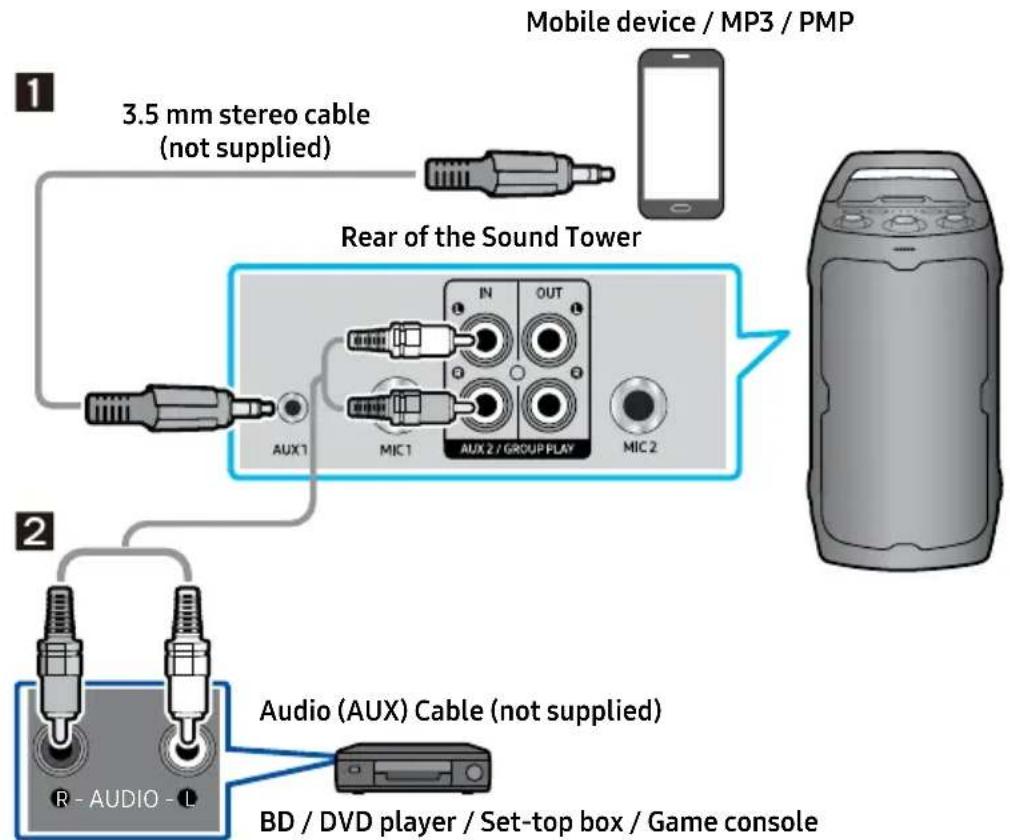
Connecting using an Analog Audio (AUX) Cable
flowchart
graph TD
    A["Mobile device / MP3 / PMP"] --> B["3.5 mm stereo cable (not supplied)"]
    B --> C["Rear of the Sound Tower"]
    C --> D["AUX1"]
    C --> E["MIC1"]
    C --> F["AUX 2 / GROUP PLAY"]
    C --> G["MIC 2"]
    H["2 Audio (AUX) Cable (not supplied)"] --> I["BD / DVD player / Set-top box / Game console"]
1 3.5 mm stereo Cable (AUX1)
- Connect AUX1 jack on the main unit to the AUDIO OUT jack of the Source Device using an 3.5 mm stereo cable.
- Select "AUX1" mode by pressing the → (Source) button on the top panel.
2 Audio Cable (AUX2)
- Connect AUX2 (IN) terminals on the main unit to the AUDIO OUT terminals of the Source Device using an audio cable.
- Select "AUX2" mode by pressing the → (Source) button on the top panel.
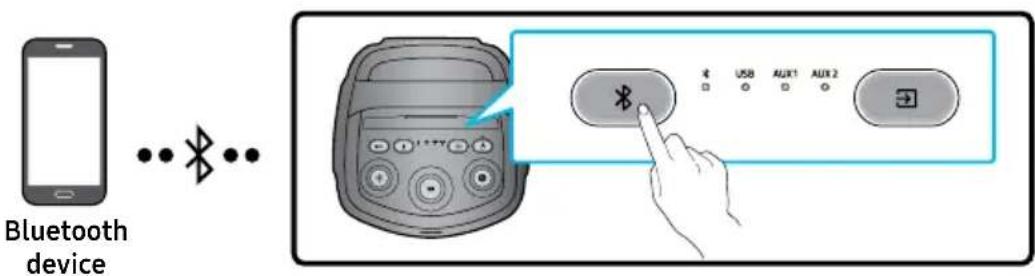
Connecting a mobile device via Bluetooth
When a mobile device is connected using Bluetooth, you can hear stereo sound without the hassle of cabling.
* In battery mode, when the Sound Tower is power off, Bluetooth connection and the Sound Tower APP are not available.
The initial connection
-
Press and hold the ✗ PAIRING button on the top panel for more than 5 seconds to enter the "Bluetooth PAIRING" mode.
-
On your device, select "[AV] Sound Tower 40F" from the list that appears.
• After the device is connected and the Bluetooth light on the top panel is steady on.
- Play music files from the device connected via Bluetooth through the Sound Tower.
If the device fails to connect
• Sound Tower will play prompt sound when Bluetooth disconnect.
- If a previously connected Sound Tower listing (e.g. "[AV] Sound Tower 40F") appears in the list, delete it.
- Then repeat steps 1 and 2.
What is the difference between Bluetooth READY and Bluetooth PAIRING?
- Bluetooth READY: In this mode, you can use the previously connected TV or mobile device to connect to Sound Tower.
- Bluetooth PAIRING: In this mode, you can connect a new device to the Sound Tower. (hold down the ✝ PAIRING button on the panel for more than 5 seconds to enter the ✝ PAIRING state.)
Bluetooth Multi connection
Sound Tower supports up-to two simultaneous Bluetooth device connections. Sound Tower can play music through one of the connected Bluetooth devices without disconnecting the second device.
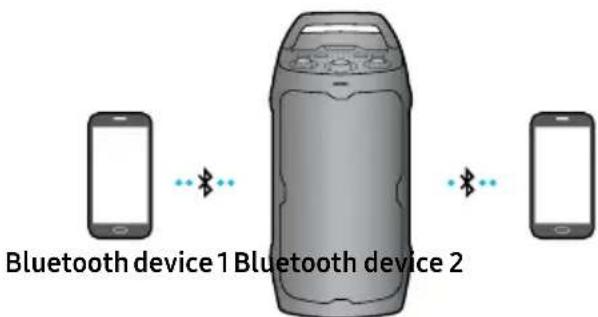
-
Connect Sound Tower to the first device and the second device respectively for the first time. (See ENG - 15)
-
Music can be played on only one of the two connected devices, and when the music is played on the other device, the music on the playing device is paused.
NOTES
- If you want to connect Sound Tower to a third device, you can disconnect Sound Tower from one of the two currently connected devices and then connect Sound Tower to the third device. (Multi connection would not work on Samsung TVs.)
- With the Sound Tower and two devices currently connected, when pairing to a new Bluetooth device, the devices currently connected should be disconnected.
- You can connect to two Bluetooth devices at the same time.
- Environmental conditions or other factors with connected devices may have effect on playback quality.
- The Sound Tower automatically turns off after 18 minutes with no command input in the ready state.
- The Sound Tower may not perform Bluetooth search or connection correctly under the following circumstances:
- If there is a strong electrical field around the Sound Tower.
- If several Bluetooth devices are simultaneously paired with the Sound Tower.
- If the Bluetooth device is turned off, not in place, or malfunctions.
- Electronic devices may cause radio interference. Devices that generate electromagnetic waves must be kept away from the Sound Tower main unit - e.g., microwaves, wireless LAN devices, etc.
- Bluetooth Multi connection may not be supported depending on the connected device's specifications.
- Removable/detachable Bluetooth devices such as Dongles, Adapters, etc. used on Smartphones, laptops, TVs, etc. do not support Bluetooth Multi connection.
- After Bluetooth Multi connection pairing, there may be a slight delay before music starts playing depending on the Bluetooth devices.
- If you move too far out of range from the Sound Tower without first disconnecting your Bluetooth device, it may take a few minutes to connect other Bluetooth devices. If you turn the Sound Tower off and back on, you can connect other Bluetooth devices without waiting.
LED Indications
| LED STATE Description | |
| Blue | Fast Blink Bluetooth PAIRING mode |
| Blink Bluetooth READY mode |
| Solid A Bluetooth device is connected. |
Using Bluetooth Power On
When the Sound Tower is turned off, you can connect your smart device via a Bluetooth connection to turn it on. Battery status cannot use Bluetooth power on.
- Press and hold the BASS button on the top panel to set the Bluetooth Power On function on. Lighting bar will be blink white once.
- Only works when Sound Tower is plugged into power - cannot wake up Sound Tower with Bluetooth when unplugged from outlet.
-
When the Sound Tower is off, connect your smart device via Bluetooth. (For information on Bluetooth connections, refer to your smart device's manual.)
-
When the connection is complete, the Sound Tower turns itself on automatically in Bluetooth mode.
- Select the desired music to play from your smart device.
NOTE
- Each time you press and hold the BASS button for 5 seconds. LED lighting bar will be blink white once and status switched:
BLUETOOTH POWER-ON → BLUETOOTH POWER-OFF
05 CONNECTING A USB STORAGE DEVICE
You can play music files located on USB storage device through the Sound Tower.
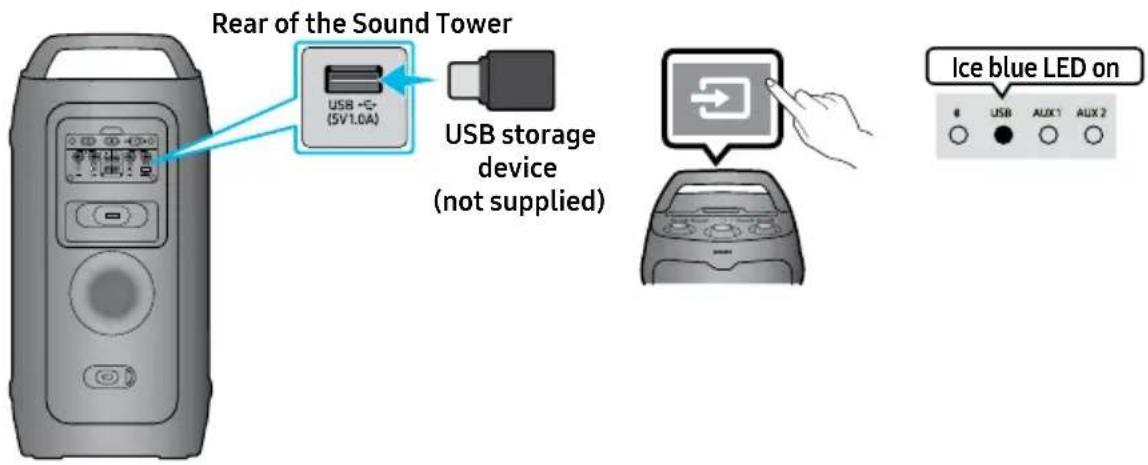
- Connect a USB storage device to the USB port on your Sound Tower.
- Press the → (Source) button on the top panel and then select "USB".
- The second USB indicator on the top panel is steady on.
-
Play music files from the USB storage device through the Sound Tower.
-
The Sound Tower automatically turns off (Auto Power Down) if USB device is not connected, playback stopped, or there is no input for more than 18 minutes.
- Music skips when (Play/Pause) button is pressed twice on set. Press 3 times to switch to the previous song.
NOTES
- This product only supports USB storage devices that are formatted in the FAT and FAT32 file system.
- A maximum of 2000 files can be played per USB storage device.
- A maximum of 200 folders can be read per USB storage device.
Supported Audio Formats
| Extension CODEC Sampling Rate Bitrate | | |
| *.mp3 | MPEG1 Layer2 32KHz ~ 48KHz 32Kbps ~ 320Kbps |
| MPEG1 Layer3 32KHz ~ 48KHz 32Kbps ~ 320Kbps |
| MPEG2 Layer3 16KHz ~ 24KHz 8Kbps ~ 160Kbps |
| MPEG2.5 Layer3 8KHz ~ 12KHz 8Kbps ~ 160Kbps |
| *.wav LPCM 32KHz ~ 192KHz 1,024Kbps ~ 9,216Kbps | |
| *.aac | AAC-LC(MPEG2,/MPEG4) | 32KHz ~ 48KHz 32Kbps ~ 320Kbps |
| *.flac | FLAC | 32KHz ~ 192KHz | 162Kbps ~ 8,100Kbps |
NOTES
- The above table shows supported sampling rates and bit rates. Files in formats that are not supported will not play.
• 32-bit data size is not supported.
Software Update
Samsung may offer updates for the Sound Tower's system firmware in the future.
If an update is offered, you can update the firmware by connecting a USB device with the firmware update stored on it to the USB port on your Sound Tower. For more information about how to download update files, go to the Samsung Electronics website at www.samsung.com → Support. Then, enter or select the model number of your Sound Tower, select the Software & Apps option, and then Downloads. Note that the option names can vary.
If the upgrade takes more than 10 minutes, it means the upgrade process is stuck. Please press and hold the Power button on the top panel for 10 seconds and wait 1 minute. Press the Power button again to start the device and operate it to re-upgrade via USB. Then, wait until the upgrade is complete. (Reset upgrade only supports FAT format)
Software upgrades can also be performed by using the APP.
Connecting an External Microphone
You can output your voice from the system by connecting a dynamic microphone with a normal plug (not supplied).
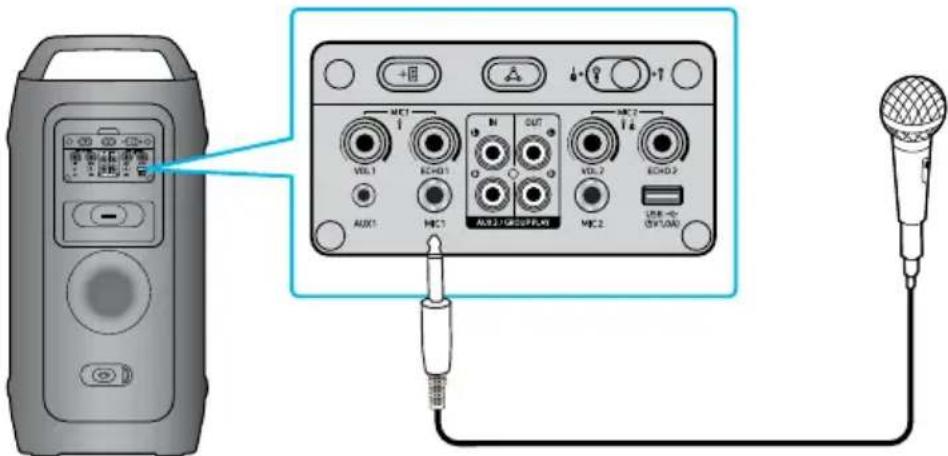
- Turn the MIC LEVEL knob to MIN to reduce the microphone volume level.
- Connect an optional microphone to the MIC jack on the unit.
- Adjust the volume using the MIC "VOL" knob.
- Adjust the Effect of the echo using the MIC "ECHO" knob.
- Speak or sing into the connected microphone.
NOTES
- When using the wireless Group Play or Stereo mode, the audio from the microphone connected to the Host or Sub system will be output only on Sound Tower that it is plugged in. In contrast, microphones connected to Sub systems will only be heard on their respective systems.
- When Sound Tower is in battery mode, the MIC sound level will be lower.
- Toggle the switch to MIC 2 or GUITAR input source (Volume is lower compared on Microphone source).
Connecting an External Guitar
You can output your voice from the system by connecting a Guitar with a normal plug (not supplied).
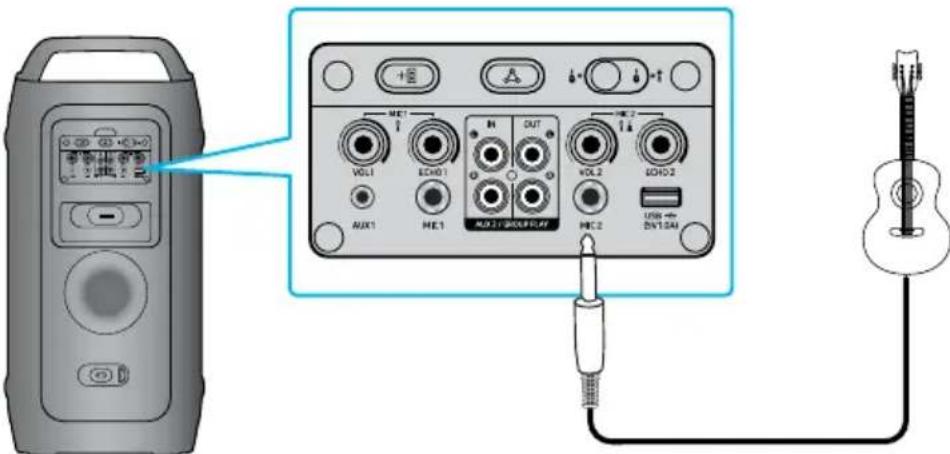
- Turn the MIC LEVEL knob to MIN to reduce the Guitar volume level.
- Connect an optional Guitar to the MIC 2 jack on the unit.
- Adjust the volume using the MIC 2 "VOL" knob.
- Play into the connected guitar.
NOTES
- When using the wireless Group Play or Stereo mode, the audio from the guitar connected to the Host or Sub system will be output only on Sound Tower that it is plugged in. In contrast, Guitar connected to Sub systems will only be heard on their respective systems.
- When Sound Tower is in battery mode, the Guitar sound level will be lower.
How to use Sound Mode
Your Sound Tower provides predefined equalizer settings that are optimized for particular music genres.
- Press the SOUND MODE on the APP.
- Each time you change the SOUND MODE, the Sound Tower cycles through the available sound effects: Standard, Wide, Stadium, Outdoor.
NOTES
- Default sound mode is Standard.
- When turned off, press and hold the ▶ button on product for more than 5 seconds to turn on in the default Sound Mode setting.
How to use the DJ Effect
The DJ Effect function lets you add DJ sound effects to your music. The level of each effect is adjustable.
- Users can slide in APP to change effect and value, and the range is between 0 and 3.
NOTE
- When turned off, press and hold the ▶ button on product for more than 5 seconds to turn on in the default DJ Effect setting.
06 USING THE SAMSUNG SOUND TOWER APP
Install Samsung Sound Tower App
To control this product with your Smart Device and the Samsung Sound Tower app, download the Samsung Sound Tower App from the Google Play Store or Apple App Store, and install it on your Smart Device.
NOTES
- The Samsung Sound Tower app is compatible with Android mobile phone devices running Android OS 6.0 or later.
- The Samsung Sound Tower app is compatible with Apple mobile devices running iOS 13.0 or later.
Market search: Samsung Sound Tower


Launching the Samsung Sound Tower App
To launch and use the Samsung Sound Tower app, touch the Samsung Sound Tower icon on your smart device, and then follow the directions on the screen.
07 TROUBLESHOOTING
Before seeking assistance, check the following.
The unit will not turn on.
→ The battery may be fully discharged.
Please connect the power plug and try to turn it on
→ After removing the power plug, turn off the Sound Tower. And insert power plug again, turn on the Sound Tower.
→ Power cycle the external device and try again.
→ If there is no signal, the Sound Tower automatically turns off after a certain period of time. Turn on the power.
Sound dropouts occur in Bluetooth mode.
→ See the Bluetooth connection sections on ENG - 15.
Sound is not produced.
Is the volume set to minimum?
→ Adjust the Volume.
Stereo Group connection is not working.
Is the system in wireless Group Play mode?
→ Disconnect the wireless Group Play mode and try Stereo Group connection again.
It cannot make a Bluetooth connection.
Is the system connected to another system in wireless Group Play mode or Stereo Group mode?
→ Try Bluetooth connection again after disconnecting the wireless Group Play or Stereo Group connection.
Are the two Bluetooth devices already connected?
→ Try Bluetooth connection again after disconnecting other Bluetooth connections.
Is the system in wireless Group Play mode or Stereo Group mode?
→ Try again after disconnecting the wireless Group Play or Stereo Group connection.
I want to switch the HOST system to the other in wireless Group Play or Stereo Group connection.
→ Long press Group button 5 seconds, and after it use Group LED to judge instead connect the others one by one.
→ With Stereo Group mode, HOST is fixed. You can not change others as HOST.
It cannot make a "Wireless/Wired Group/Add Stereo/Bluetooth" connection.
Test after Turn off/on Sound Tower.
Hard reset Sound Tower.
Is the distance between systems too far?
→ It is recommended to make a "Wireless/Wired Group/Add Stereo/Bluetooth" pairing within 1 meter from the system.
→ The recommended operating distance between Sound Tower systems is closer than 10 meters.
Sound Tower not turning on when attempting to wake up via Bluetooth.
→ The Auto Bluetooth Turn-On feature is only functional when the unit is connected to a power source.
Customer Reset does not work.
→ Customer Reset does not work in DC Mode. Please connect the AC cord to operate the Customer Reset.
08 LICENSE

AURACAST.

Bluetooth®
The Bluetooth ^® word mark and logos are registered trademarks owned by Bluetooth SIG, Inc. The Auracast ^™ word mark and logos are trademarks owned by the Bluetooth SIG. Any use of such marks by Samsung Electronics Co., Ltd. is under license Other trademarks and trade names are those of their respective owners.
* Group Play with Auracast™ controls each Sound Tower individually for ST40F and ST50F only. In wireless connection, playback quality may be unstable depending on Bluetooth® environments.
Please visit www.samsung.com/global/ecodesign_energy to find further information about off mode, standby mode, and networked standby mode associated with EU standby ecodesign regulation.
Open Source License Notice
Open Source used in this product can be found on the following webpage (http://opensource.samsung.com).
09IMPORTANT NOTES ABOUT SERVICE
- Figures and illustrations in this User Manual are provided for reference only and may differ from actual product appearance.
- An administration fee may be charged if either
(a) an engineer is called out at your request and there is no defect with the product (i.e. where the user manual has not been read).
(b) you bring the unit to a repair centre and there is no defect with the product (i.e. where the user manual has not been read).
- You will be informed of the administration fee amount before a technician visits.
10 SPECIFICATIONS AND GUIDE
Specifications
| Model Name MX-ST40F | |
| USB 5V/1.0A | |
| Weight 12.73kg | |
| Dimensions (W x H x D) 303.0×620.0×310.0mm | |
| Operating Temperature Range +5°C to +35°C | |
| Operating Humidity Range 10 % ~ 75 % | |
| Overall Power Consumption 40W | |
| AMPLIFIER Max Output Power | Power cord plug-in 160W |
| Battery 80W |
| Battery Type Lithium-ion 33.48Wh | |
| Battery play time up to 12hrs | |
| Battery charge time | <3.5hrs |
| Li-ion Rechargeable Battery | Battery Model | B3672CMS_FSC, 2INR22/71 |
| Nominal Voltage | 7.2 V______ |
| Rated Capacity | 4650 mAh, 33.48 Wh |
| Limited Charge Voltage | 8.3 V______ |
| Typical Capacity | 4700mAh, 33.84 Wh |
| Overall Standby Power Consumption (W) | 2.0W |
| Bluetooth Port deactivation method | Press and hold theBASSbutton for more than 5 seconds to turn off Bluetooth Power function. |
NOTES
• Samsung Electronics Co., Ltd reserves the right to change the specifications without notice.
• Weight and dimensions are approximate.
- Battery Play time and Battery charge time vary with use conditions.
- In an extremely cold or hot environment, charging stops for safety. To resolve these issues, disconnect the AC power cord and connect it again in an operating temperature between 5°C and 35°C.
- Hereby, Samsung declares that this radio equipment is in compliance with Directive 2014/53/EU and the relevant UK statutory requirements. The full text of the declaration of conformity is available at the following internet address: http://www.samsung.com go to Support and enter the model name. This equipment may be operated in all EU countries and in the UK.
- WIRELESS DEVICE OUTPUT POWER
Bluetooth max transmitter power
100 mW at 2.4 GHz - 2.4835 GHz
[Correct disposal of batteries in this product]
(Applicable in countries with separate collection systems)
This marking on the battery, manual or packaging indicates that the batteries in this product should not be disposed of with other household waste at the end of their working life. Where marked, the chemical symbols Hg, Cd or Pb indicate that the battery contains mercury, cadmium or lead above the reference levels in EC Directive 2006/66.
If batteries are not properly disposed of, these substances can cause harm to human health or the environment.
To protect natural resources and to promote material reuse, please separate batteries from other types of waste and recycle them through your local, free battery return system.
Correct Disposal of This Product
(Waste Electrical & Electronic Equipment)
(Applicable in countries with separate collection systems)
This marking on the product, accessories or literature indicates that the product and its electronic accessories (e.g. charger, headset, USB cable) should not be disposed of with other household waste at the end of their working life. To prevent possible harm to the environment or human health from uncontrolled waste disposal, please separate these items from other types of waste and recycle them responsibly to promote the sustainable reuse of material resources.
Household users should contact either the retailer where they purchased this product, or their local government office, for details of where and how they can take these items for environmentally safe recycling.
Business users should contact their supplier and check the terms and conditions of the purchase contract. This product and its electronic accessories should not be mixed with other commercial wastes for disposal.
For information on Samsung's environmental commitments and product specific regulatory obligations e.g. REACH, WEEE, Batteries, visit:
https://www.samsung.com/uk/sustainability/environment/environment-data/
© 2025 Samsung Electronics Co., Ltd. All rights reserved.
If you have any questions or comments relating to Samsung products, please contact the Samsung customer care Centre.
| Country/Region | Samsung Service Centre | Web Site |
| UK | 0333 000 0333 | www.samsung.com/uk/support |
| IRELAND (EIRE) | 0818 717100 www.samsung.com/ie/support |
| GERMANY | 06196 77 555 77 | www.samsung.com/de/support |
| FRANCE 01 48 | 63 00 00 www.samsung.com/fr/support |
| SPAIN | 91175 0015 | www.samsung.com/es/support |
| PORTUGAL | 210 608 098 Chamada para a rede fi xa nacional Dias úteis das 9h às 20h | www.samsung.com/pt/support |
| LUXEMBURG 26 | 03 710 | www.samsung.com/be_fr/support |
| NETHERLANDS | 088 90 90100 | www.samsung.com/nl/support |
| BELGIUM | BE NL: +32 3 808 05 07 BE FR: +32 262 002 10 | www.samsung.com/be/support (Dutch) www.samsung.com/be_fr/support (French) |
| NORWAY | 21 62 90 99 | www.samsung.com/no/support |
| DENMARK 70 70 | 19 70 www.samsung.com/dk/support | |
| FINLAND | 0800 528 475 | www.samsung.com/fi/support |
| SWEDEN 077 | 400 300 www.samsung.com/se/support |
| AUSTRIA | 0800 72 67 864 (0800-SAMSUNG) | www.samsung.com/at/support |
| SWITZERLAND | 0800 726 786 | www.samsung.com/ch/support (German) www.samsung.com/ch_fr/support (French) |
| HUNGARY | 061 42 92 312  | www.samsung.com/hu/support |
| CZECH | 800 - SAMSUNG (800-726786)  | www.samsung.com/cz/support |
| SLOVAKIA | 0800 - SAMSUNG (0800-726 786)  | www.samsung.com/sk/support |
| Country/Region | Samsung Service Centre | Web Site |
| CROATIA 072 | 726 786 www.samsung.com/hr/support | |
| BOSNIA 055 | 233 999www.samsung.com/ba/support | |
| NORTH MACEDONIA | 023 207 777 | www.samsung.com/mk/support |
| MONTENEGRO | 020 405 888 | www.samsung.com/support |
| SLOVENIA | 080 697 267 (brezplačna številka) | www.samsung.com/si/support |
| SERBIA | 011 321 6899 | www.samsung.com/rs/support |
| KOSOVO 038 | 40 30 90www.samsung.com/support | |
| ALBANIA | 045 620 202 | www.samsung.com/al/support |
| BULGARIA | 0800 111 31 - Безплатен за всички оператори*3000 - Цена на един градски разговор или според тарифата на мобилният оператор09:00 до 18:00 - Понеделник до Петък | www.samsung.com/bg/support |
| ROMANIA | 0800872678 - Apel gratuit*8000 - Apel tarifat în rețeaProgram Call CenterLuni - Vineri: 9 AM - 6 PM | www.samsung.com/ro/support |
| ITALIA | 800- SAMSUNG (800.7267864) | www.samsung.com/it/support |
| CYPRUS | 8009 4000 only from landline, toll free | www.samsung.com/gr/support |
| GREECE | 80111-SAMSUNG (80111 726 7864) from mobile and land line(+30) 210 6897691 from mobile and land line |
| POLAND | 801-172-678** (optata według taryfy operatora) | www.samsung.com/pl/support/ |
| LITHUANIA | 0-800-77777 | www.samsung.com/lt/support |
| LATVIA | 8000-7267 | www.samsung.com/lw/support |
| ESTONIA | 800-7267 www.samsung.com/ee/support |
| Country/Region | Samsung Service Centre | Web Site |
| CROATIA 072 | 726 786 www.samsung.com/hr/support | |
| BOSNIA 055 | 233 999www.samsung.com/ba/support | |
| NORTH MACEDONIA | 023 207 777 | www.samsung.com/mk/support |
| MONTENEGRO | 020 405 888 | www.samsung.com/support |
| SLOVENIA | 080 697 267 (brezplačna številka) | www.samsung.com/si/support |
| SERBIA | 011 321 6899 | www.samsung.com/rs/support |
| KOSOVO 038 | 40 30 90www.samsung.com/support | |
| ALBANIA | 045 620 202 | www.samsung.com/al/support |
| BULGARIA | 0800 111 31 - Безплатен за всички оператори*3000 - Цена на един градски разговор или според тарифата на мобилният оператор09:00 до 18:00 - Понеделник до Петък | www.samsung.com/bg/support |
| ROMANIA | 0800872678 - Apel gratuit*8000 - Apel tarifat în rețeaProgram Call CenterLuni - Vineri: 9 AM - 6 PM | www.samsung.com/ro/support |
| ITALIA | 800-SAMSUNG (800.7267864) | www.samsung.com/it/support |
| CYPRUS | 8009 4000 only from landline, toll free | www.samsung.com/gr/support |
| GREECE | 80111-SAMSUNG (80111 726 7864)from mobile and land line(+30) 210 6897691 from mobile and land line |
| POLAND | 801-172-678** (opłata według taryfy operatora) | www.samsung.com/pl/support/ |
| LITHUANIA | 0-800-77777 | www.samsung.com/lt/support |
| LATVIA | 8000-7267 | www.samsung.com/lw/support |
| ESTONIA | 800-7267 www.samsung.com/ee/support |
AVERTISSEMENTS
POUR ÉVITER LES RISQUES DE CHOC
ÉLECTRIQUE, NE DÉMONTEZ PAS LE CAPOT.
L'APPAREIL NE CONTIENT PAS DE PIÈCES
RÉPARABLES PAR L'UTILISATEUR ; S'ADRESSER
À UN SERVICE APRÈS-VENTE QUALIFIÉ.
natural_image
Illustration of a cylindrical device with control panel and buttons (no text or symbols)
Unité principale Sound Tower
natural_image
Illustration of a black U-shaped cable with a connector (no text or symbols)
natural_image
Simple line drawing of a cylindrical electronic device with a slot and label (no text or symbols on the body)

natural_image
Simple line drawing of a stick figure pushing a box with a large circle nearby (no text or symbols)

02 APERÇU DU PRODUIT
natural_image
Illustration of a cylindrical device with control panel and buttons (no text or symbols)
natural_image
Simple black-and-white illustration of a U-shaped cable or connector (no text or symbols)
natural_image
Illustration of a cylindrical electronic device with a slot and label (no text or symbols on the body)

natural_image
Simple stick figure carrying a box with a large circle above, no text or symbols present

02 PANORAMICA DEL PRODOTTO
Connessioni Group Play wireless
https://www.samsung.com/it/sustainability/environment/environment-data/
natural_image
Illustration of a cylindrical device with control panel and buttons (no text or symbols)
natural_image
Simple black cable with a connector, isolated on white background (no text or symbols)
natural_image
Illustration of a cylindrical electronic device with a slot and label 'LEMON' on the body (no other text or symbols)
natural_image
Simple line drawing of a person pushing a device with a 'X' symbol above, no text or labels present.
natural_image
Simple stick figure walking with a large circle above, no text or symbols present
natural_image
Illustration of a cylindrical device with control panel and buttons (no text or symbols)
natural_image
Simple black-and-white illustration of a U-shaped cable or connector (no text or symbols)
natural_image
Illustration of a cylindrical electronic device with a labeled port (no text or symbols on the body)

natural_image
Simple line drawing of a stick figure pushing a large object with a circular hole (no text or symbols)
This Samsung product is warranted for the period of twelve (12) months from the original date of purchase, against defective materials and workmanship. In the event that warranty service is required, you should return the product to the retailer from whom it was purchased. However, Samsung Authorised Dealers and Authorised Service in the countries listed in Warranty Conditions will comply with the warranty on the terms issued to purchasers in the country concerned. Details of our Authorised Service Centres are available from:
Samsung Electronics U.K. Ltd.
Samsung Customer Support Centre
Selectapost 38, Sheffi eld, S97 3FJ, United Kingdom
United Kingdom: Tel. 0333 000 0333
www.samsung.com/uk/support
EIRE: Tel. 0818 717100
www.samsung.com/ie/support
■ WARRANTY CONDITIONS1.
- The warranty is only valid if, when warranty service is required, the warranty card is fully and properly completed and is presented with the original invoice or sales slip or confirmation, and the serial number on the product has not been defaced.
- amsung's obligations are limited to the repair or, at its discretion, replacement of the product or the defective part. Repaired or replaced products may include new and or refurbished components and equipment.
- Warranty repairs must be carried out by Authorised Samsung Dealers or Authorised Service Centres. No re-imbursement will be made for repairs carried out by non-Samsung Dealers and, any such repair work and damage to the products caused by such repair work will not be covered by this warranty.
- This product is not considered to be defective in materials nor workmanship by reason that it requires adaptation in order to conform to national or local technical or safety standards in force in any Country other than the one for which the product was originally designed and manufactured. This warranty will not cover, and no re-imbursement will be made for such adaptation nor any damage which may result.
- This warranty covers none of the following:
a) Periodic check-ups, maintenance and repair or replacement of parts due to normal wear and tear.
b) Cost relating to transport, removal or installation of the product.
c) Misuse, including the failure to use this product for its normal purposes or incorrect installation.
d) Use of this product in a commercial/ business environment, which shall include, but is not limited to, the following: any use for profit or financial gain, public display or events such as clubs, bars and restaurants including continuous statistical or graphical display, or any commercial use of continuous or intentional long term display of News reels ("tickers"), static or fixed images such as timetables and 4:3 pictures or video content displaying permanent black bars.
e) Damage caused by Lightning, Water, Fire, Acts of God, War, Public Disturbances, incorrect mains voltage, improper ventilation or any other cause beyond the control of Samsung.
f) Spillage of food or liquid or use of any other hazardous substances, which may affect the product.
g) Performance due to differences in broadcasting method between countries.
-
This warranty is valid for any person who legally acquired possession of the product during the warranty period.
-
The consumer's statutory rights in any applicable national legislation whether against the retailer arising from the purchase contract or otherwise are not affected by this warranty Unless there is national legislation to the contrary, the rights under this warranty are the consumer's sole rights and Samsung, its subsidiaries and distributors shall not be liable for indirect or consequential loss or any damage to connected storage media or any other related equipment or material.
-
Some products may differ from these guidelines. Please check with your dealer or the local Samsung web-site.
-
Samsung shall honour warranties for all EU specification products purchased by a consumer within the following European countries listed.
- UK, Republic of Ireland, Germany, France, Italy, Malta, Spain, Portugal, The Netherlands, Belgium, Luxembourg, Denmark, Sweden, Finland, Poland, Hungary, Czech Republic, Slovakia, Austria, Slovenia, Croatia, Estonia, Latvia, Lithuania, Greece, Cyprus, Romania, Bulgaria, Switzerland, Norway, Lichtenstein and Iceland.
SAMSUNG ELECTRONICS (U.K.) LTD.
SAMSUNG
© 2025 Samsung Electronics Co., Ltd. All rights reserved.
If you have any questions or comments relating to Samsung products, please contact the Samsung customer care Centre.
| Country/Region | Samsung Service Centre | Web Site |
| UK | 0333 000 0333 | www.samsung.com/uk/support |
| IRELAND (EIRE) | 0818 717100 | www.samsung.com/ie/support |
| GERMANY | 06196 77 55577 | www.samsung.com/de/support |
| FRANCE | 01 48 63 00 00 | www.samsung.com/fr/support |
| SPAIN | 91175 00 15 | www.samsung.com/es/support |
| PORTUGAL | 210 608 098Chamada para a rede fixa nacionalDías úteis das 9h às 20h | www.samsung.com/pt/support |
| LUXEMBURG | 261 03 710 | www.samsung.com/be_fr/support |
| NETHERLANDS | 088 90 90 100 | www.samsung.com/nl/support |
| BELGIUM | 02-201-24-18 | www.samsung.com/be/support(Dutch)www.samsung.com/be_fr/support(French) |
| NORWAY | 21 62 90 99 | www.samsung.com/no/support |
| DENMARK | 70 70 19 70 | www.samsung.com/dk/support |
| FINLAND | 030-622 75 15 | www.samsung.com/fi/support |
| SWEDEN | 0771-400 300 | www.samsung.com/se/support |
| AUSTRIA | 0800 72 67 864 (0800-SAMSUNG) | www.samsung.com/at/support |
| Country/Region | Samsung Service Centre 📞 | Web Site |
| NORTH MACEDONIA | 023 207 777 | www.samsung.com/mk/support |
| MONTENEGRO | 020 405 888 | www.samsung.com/support |
| SLOVENIA | 080 697 267 (brezplačna številka) | www.samsung.com/si/support |
| SERBIA | 011 321 6899 | www.samsung.com/rs/support |
| KOSOVO | 038 40 30 90 | www.samsung.com/support |
| ALBANIA | 045 620 202 | www.samsung.com/al/support |
| BULGARIA | 0800 111 31 - Безплатен за всички оператори*3000 - Цена на един градски разговор или според тарифата на мобилниятоператор09:00 до 18:00 - Понеделник до Петък | www.samsung.com/bg/support |
| ROMANIA | 0800872678 - Apel gratuit*8000 - Apel tarifat în rețeaProgram Call CenterLuni - Vineri: 9 AM - 6 PM | www.samsung.com/ro/support |
| ITALIA | 800-SAMSUNG (800.7267864) | www.samsung.com/it/support |
| CYPRUS | 8009 4000 only from landline, toll free | www.samsung.com/gr/support |
| 80111-SAMSUNG (80111 726 7864)from mobile and land line |
VEILIGHEIDSINSTRUCTIES
OPEN NOOIT DE BEHUIZING VAN DIT APPARAAT, WANT DAN LOOPT U HET GEVAAR EEN ELEKTRISCHE SCHOK TE KRIJGEN. DE BEHUIZING BEVAT GEEN ONDERDELEN DIE U ZELF KUNT REPAREREN. LAAT ONDERHOUD OVER AAN DE VAKHANDEL.
natural_image
Illustration of a cylindrical device with control panel and buttons (no text or symbols)
natural_image
Simple line drawing of a black cable with a connector (no text or symbols)
Netsnoer Batterij
natural_image
Illustration of a cylindrical electronic device with a slot and label 'TAW-VAN' on the top (no other text or symbols)
natural_image
Simple stick figure carrying a bag with a large circle nearby (no text or symbols)

02 PRODUCTOVERZICHT
07 PROBLEEMOPLOSSING
- UITGANGSVERMOGEN DRAADLOOS APPARAAT
BLUETOOTH max. zendervermogen
natural_image
Illustration of a cylindrical device with control panel and buttons (no text or symbols)
natural_image
Simple line drawing of a black cable with a connector (no text or symbols)
Netzkabel Akku
natural_image
Illustration of a cylindrical electronic device with a slot and label 'TAW-VAN' on the top (no other text or symbols)

natural_image
Simple stick figure carrying a bag with a large circle nearby (no text or symbols)

02 PRODUKTÜBERSICHT
Wie erkennt man, was HOST und was SUB ist:
Wie erkennt man, was HOST und was SUB ist:
• Sound Tower er holdbart i henhold til IPX4.
Sound Towers toppanel 2
Bageste panel på Sound Tower 4
03 TILSLUTNING AF SOUND TOWER 7
natural_image
Illustration of a cylindrical device with control panel and buttons (no text or symbols)
natural_image
Simple line drawing of a black cable with a connector (no text or symbols)
Strømkabel Batteri

natural_image
Illustration of a cylindrical electronic device with a slot and label 'TAMYON' on the body (no other text or symbols)

natural_image
Simple stick figure carrying a large circle, no text or symbols present

02 PRODUKTOVERSIGT
Sound Towers toppanel
TÆNDING MED BLUETOOTH → SLUKNING MED BLUETOOTH
05 TILSLUTNING AF EN USB-LAGERENHED
- Drej knappen MIC LEVEL til MIN for at reducere guitarens lydstyrke.
- Tilslut en valgfri guitar til MIC 2-stikket på enheden.
- Juster lydstyrken med knappen MIC 2 "VOL".
- Spil på den tilsluttede guitar.
BEMÆRKNINGER
natural_image
Illustration of a cylindrical device with control panel and buttons (no text or symbols)
natural_image
Black cable with a connector, isolated on white background (no text or symbols)
Virtajohto Akku

natural_image
Illustration of a cylindrical electronic device with a label 'TAMO' on its side (no other text or symbols)

natural_image
Simple stick figure drawing with a large circle and a rectangular block, no text or symbols present

02 TUOTE YLEISESTI
natural_image
Illustration of a cylindrical device with control panel and buttons (no text or symbols)
Sound Tower-hovedenhet

natural_image
Simple black cable with a connector, isolated on white background (no text or symbols)
Strømkabel Batteri

natural_image
Illustration of a cylindrical electronic device with a slot and label 'TAMO' (no other text or symbols)
natural_image
Illustration of a person pushing a device with a 'X' symbol above, no text or labels present

natural_image
Simple stick figure drawing with a large circle and a rectangular block, no text or symbols present

02 PRODUKTOVERSIKT
Ladestatus for Sound Tower:
Bluetooth multi-tilkobling
- Vri MIC LEVEL-knappen til MIN for å redusere mikrofonvolumet.
- Koble til en mikrofon i MIC-inngangen på enheten.
- Juster volumet med MIC «VOL»-knappen.
- Juster ekkoeffekten med MIC «ECHO»-knappen.
- Snakk eller syng i den tilkoblede mikrofonen.
MERKNADER
- Vri MIC LEVEL-knappen til MIN for å redusere gitarlydnivået.
- Koble til en gitar i MIC 2-inngangen på enheten.
- Juster volumet med MIC 2 «VOL»-knappen.
- Spill på den tilkoblede gitaren.
MERKNADER
Åpne Samsung Sound Tower App
INNEHÅLLSFÖRTECKNING
01 KONTROLL AV KOMPONENTERNA 1
02 PRODUKTÖVERSIKT 2
natural_image
Illustration of a cylindrical device with control panel and buttons (no text or symbols)
natural_image
Simple black cable with a connector, isolated on white background (no text or symbols)
Nätsladd Batteri
natural_image
Illustration of a cylindrical electronic device with a slot and label 'Laser' on its side (no other text or symbols)
natural_image
Illustration of a person pushing a device with a 'X' symbol above, no text or labels present

natural_image
Simple stick figure drawing with a large circle and a rectangular block, no text or symbols present
02 PRODUKTÖVERSIKT
natural_image
Illustration of a cylindrical device with control panel and buttons (no text or symbols)
natural_image
Simple black cable with a connector, isolated on white background (no text or symbols)
Cablu de alimentare Baterie
natural_image
Illustration of a cylindrical electronic device with a slot and label (no text or symbols on the body)
natural_image
Illustration of a cylindrical electronic device with a slot and label (no text or symbols on the body)
natural_image
Illustration of a person pushing a device with a 'X' symbol above, no text or labels present
natural_image
Simple line drawing of a stick figure pushing a box with a large circle above (no text or symbols)
02 PREZENTARE GENERALĂ A PRODUSULUI
natural_image
Illustration of a cylindrical device with control panel and buttons (no text or symbols)
natural_image
Simple black-and-white illustration of a U-shaped cable or connector (no text or symbols)
natural_image
Illustration of a gray cylindrical electronic device with a slot and label 'TAWLI' on its side (no other text or symbols)
natural_image
Simple line drawing of a person pushing a cart with a 'X' symbol above, no text or labels present

natural_image
Simple line drawing of a stick figure pushing a large object with a circular hole (no text or symbols)

natural_image
Illustration of a cylindrical device with control panel and buttons (no text or symbols)
natural_image
Simple black cable with a connector, no text or symbols visible
natural_image
Illustration of a cylindrical electronic device with a slot and label (no text or symbols on the body)
natural_image
Simple line drawing of a person pushing a device with a 'X' symbol above, no text or labels present.

natural_image
Simple stick figure walking with a large circle above it (no text or symbols)
02 ELEMENTY URZĄDZENIA
Panel górný systemu Sound Tower
Stan diody LED systemu Sound Tower:
flowchart
graph LR
    A["Pierwszy system\nSound Tower — HOST"] --> B["AUX 2 / GROUP PLAY"]
    B --> C["OUT"]
    C --> D["IN"]
    D --> E["AUX 2 / GROUP PLAY"]
    E --> F["OUT"]
    F --> G["IN"]
    G --> H["AUX 2 / GROUP PLAY"]
    H --> I["OUT"]
    I --> J["IN"]
    J --> K["OUT"]
    K --> L["IN"]
    L --> M["AUX 2 / GROUP PLAY"]
    M --> N["OUT"]
    N --> O["IN"]
    O --> P["OUT"]
    P --> Q["IN"]
    Q --> R["OUT"]
    R --> S["IN"]
    S --> T["OUT"]
    T --> U["IN"]
    U --> V["OUT"]
    V --> W["IN"]
    W --> X["OUT"]
    X --> Y["IN"]
    Y --> Z["OUT"]
    Z --> AA["IN"]
    AA --> AB["OUT"]
    AB --> AC["IN"]
    AC --> AD["OUT"]
    AD --> AE["IN"]
    AE --> AF["OUT"]
    AF --> AG["IN"]
    AG --> AH["OUT"]
    AH --> AI["IN"]
    AI --> AJ["OUT"]
    AJ --> AK["IN"]
    AK --> AL["OUT"]
    AL --> AM["IN"]
    AM --> AN["OUT"]
    AN --> AO["IN"]
    AO --> AP["OUT"]
    AP --> AQ["IN"]
    AQ --> AR["OUT"]
    AR --> AS["IN"]
    AS --> AT["OUT"]
    AT --> AU["IN"]
    AU --> AV["OUT"]
    AV --> AW["IN"]
    AW --> AX["OUT"]
    AX --> AY["IN"]
    AY --> AZ["OUT"]
    AZ --> BA["IN"]
    BA --> BB["OUT"]
    BB --> BC["IN"]
    BC --> BD["OUT"]
    BD --> BE["IN"]
    BE --> BF["OUT"]
    BF --> BG["IN"]
    BG --> BH["OUT"]
    BH --> BI["IN"]
    BI --> BJ["OUT"]
    BJ --> BK["IN"]
    BK --> BL["OUT"]
    BL --> BM["IN"]
    BM --> BN["OUT"]
    BN --> BO["IN"]
    BO --> BP["OUT"]
    BP --> BQ["IN"]
    BQ --> BR["OUT"]
    BR --> BS["IN"]
    BS --> BT["OUT"]
    BT --> BU["IN"]
    BU --> BV["OUT"]
    BV --> BW["IN"]
    BW --> BX["OUT"]
    BX --> BY["IN"]
    BY --> BZ["OUT"]
    BZ --> CA["IN"]
    CA --> CB["OUT"]
    CB --> CC["IN"]
    CC --> CD["OUT"]
    CD --> CE["IN"]
    CE --> CF["OUT"]
    CF --> CG["IN"]
    CG --> CH["OUT"]
    CH --> CI["IN"]
    CI --> CJ["OUT"]
    CJ --> CK["IN"]
    CK --> CR["OUT"]
    CR --> CS["IN"]
    CS --> CT["OUT"]
    CT --> CU["IN"]
    CU --> CV["OUT"]
    CV --> CW["IN"]
    CW --> CX["OUT"]
    CX --> CY["IN"]
    CY --> CZ["OUT"]
natural_image
Illustration of a cylindrical device with control panel and buttons (no text or symbols)
natural_image
Simple black cable with a connector, isolated on white background (no text or symbols)
natural_image
Illustration of a cylindrical electronic device with a slot and label 'TAMYON' on the body (no other text or symbols)
natural_image
Simple stick figure carrying a container with a large circle nearby (no text or symbols)

02 POPIS VÝROBKU
Horní panel Sound Tower

- Reproduktor Sound Tower poskytuje odolnost s ochranou triedy IPX4.
natural_image
Illustration of a cylindrical device with control panel and buttons (no text or symbols)
Hlavná jednotka reproduktora
Sound Tower

natural_image
Simple black cable with a connector, isolated on white background (no text or symbols)
natural_image
Illustration of a cylindrical electronic device with a slot and label 'Laser' (no other text or symbols)

natural_image
Simple stick figure walking with a large circular object nearby (no text or symbols)

02 PREHL'AD VÝROBKU
Horný panel reproduktora Sound Tower

L'avý reproduktor Sound Tower (hlavný systém MAIN)
Pravý reproduktor Sound Tower (podsystém SUB)
natural_image
Illustration of a cylindrical device with control panel and buttons (no text or symbols)
natural_image
Simple black-and-white illustration of a U-shaped cable or connector (no text or symbols)
natural_image
Illustration of a cylindrical electronic device with a slot and label (no text or symbols on the body)

natural_image
Simple stick figure carrying a large circle, no text or symbols present

02 TERMÉK ÁTTEKINTÉSE
• Sound Tower zvučnik ima razinu izdržljivosti IPX4.
natural_image
Illustration of a cylindrical device with control panel and buttons (no text or symbols)
Glavna jedinica Sound Tower
zvučnika

natural_image
Simple black-and-white illustration of a U-shaped cable or connector (no text or symbols)
Kabel za napajanje Baterija

natural_image
Illustration of a cylindrical electronic device with a labeled port (no text or symbols on the body)
- Dodatne informacije o napajanju i potrošnji energije potražite na oznaci pričvršćenoj na proizvod. (Oznaka: stražnja strana glavne jedinice Sound Tower zvučnika)
- Ako želite kupiti dodatne komponente ili kabele, obratite se Servisnom centru Samsung ili Službi za korisnike Samsung.
- Prilikom premještanja proizvoda, nemojte potezati niti vući proizvod po tlu. Podignite ga kada ga želite premjestiti.
- Dizajn i specifikacije mogu se mijenjati bez prethodne najave.

natural_image
Simple stick figure drawing a walking figure next to a large circle (no text or symbols)

02 PREGLED PROIZVODA
Gornja ploča Sound Tower zvučnika

Upotreba fizičkih gumba:
- Pritisnite gumb ADD STEREO na lijevoj strani Sound Tower sustava. Treperi LED indikator gumba ADD STEREO.
- Pritisnite gumb ADD STEREO na desnoj strani Sound Tower sustava. Treperi LED indikator gumba ADD STEREO.
- Kada se uspostavi veza, začut ćete zvučni signal. Na stražnjoj ploči postojano svijetli zeleni LED indikator ADD.
- Postavite kotačić MIC LEVEL na MIN za smanjenje razine glasnoće mikrofona.
- Priključite dodatni mikrofon u priključak MIC na jedinici.
- Prilagodite razinu glasnoće pomoću kotačića MIC „VOL”.
- Prilagodite efekt jeke pomoću kotačića MIC „ECHO”.
- Govorite ili pjevajte u povezani mikrofon.
NAPOMENE
- Tijekom upotrebe bežičnog načina rada GROUP PLAY ili Stereo, zvuk iz mikrofona povezanog sa sustavom HOST ili SUB čut će se samo na uključenom Sound Tower zvučniku. Za razliku od toga, mikrofoni povezani sa sustavima SUB čut će se samo na pripadajućim sustavima.
- Kada je Sound Tower u načinu rada putem baterije, razina zvuka mikrofona bit će niža.
- Prebacite ulazni izvor na MIC 2 ili GUITAR (razina glasnoće je niža u usporedbi s opcijom kada je izvor mikrofon).
- Postavite kotačić MIC LEVEL na MIN za smanjenje razine glasnoće gitare.
- Priključite dodatnu gitaru u priključak MIC 2 na jedinici.
- Prilagodite razinu glasnoće pomoću kotačića MIC 2 „VOL”.
- Svirajte povezanu gitaru.
NAPOMENE
- Tijekom upotrebe bežičnog načina rada GROUP PLAY ili Stereo, zvuk iz gitare povezane sa sustavom HOST ili SUB čut će se samo na uključenom Sound Tower zvučniku. Za razliku od toga, gitara povezana sa sustavima SUB čut će se samo na pripadajućim sustavima.
- Kada je Sound Tower u načinu rada putem baterije, razina zvuka gitare bit će niža.
Kako upotrebljavati način SOUND MODE
- Sound Tower pruža izdržljivost po standardu IPX4.
| Zaštita od čvrstih tela | IP | Zaštita od vode |
| 0 | 4 |
| Nema zahteva X X Nema zahteva | |
| Bez zaštite 0 0 Bez zaštite | | |
| Čvrsta tela > 50 mm 1 1 | Vertikalno padajuće kapi vode | |
| Čvrsta tela > 12 mm 2 2 | Vertikalna voda – kućište nagnuto za 15° | |
| Čvrsta tela > 2,5 mm 3 3 | Prskana voda pod uglom od 60° od vertikale | |
| Čvrsta tela > 1,0 mm 4 4 | Prskanje vodom iz svih pravaca | |
| Zaštićeno od prašine | 5 | 5 | Mlazevi vode iz svih pravaca |
| Nepropusno za prašinu | 6 6 | | Jaki mlazevi vode iz svih pravaca |
| - | | 7 | Privremeno uranjanje: 1 m na 30 minuta |
| - | | 8 | Uranjanje: dubina i vreme definisani od strane proizvođača |
MERE OPREZA
- Proverite da li je napajanje naizmeničnom strujom u vašoj kući u skladu sa zahtevima za napajanje navedenim na identifikacionoj nalepnici koja se nalazi sa donje strane proizvoda. Uverite se da otvori za ventilaciju nisu pokriveni. Ne stavljajte uređaj na pojačala ili drugu opremu koja može da se zagreje. Ovaj uređaj je namenjen za stalnu upotrebu. Da biste u potpunosti isključili uređaj, isključite AC priključak iz zidne utičnice. Isključite uređaj ako ne nameravate da ga koristite u dužem vremenskom periodu.
- Za vreme grmljavine izvucite mrežni utikač iz utičnice. Pikovi napona zbog grmljavine mogu oštetiti uređaj.
- Ne izlažite uređaj direktnom sunčevom zračenju ili drugim izvorima toplote. To može da dovede do pregrevanja i kvara uređaja.
-
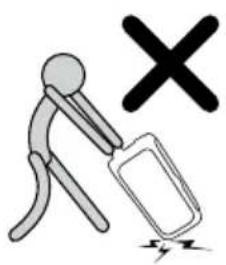
Zaštitite proizvod od vlage (tj. vaza) i prevelike toplote (npr. kamin) ili opreme koja stvara jaka magnetna ili električna polja. Iskopčajte mrežni kabl iz mrežnog izvora (utičnice) ako uređaj ne funkcioniše pravilno. Ovaj proizvod nije namenjen za industrijsku upotrebu. Ovaj proizvod koristite samo za ličnu upotrebu. Ako je vaš proizvod čuvan na hladnom mestu može da se javi kondenzacija. Ako se uređaj transportuje zimi, pre korišćenja sačekajte oko 2 sata da uređaj postigne sobnu temperaturu.
-
Baterije koje se koriste sa ovim proizvodom sadrže hemikalije koje su štetne po okolinu. Ne stavljajte baterije u kućni otpad. Nemojte odlagati baterije u vatru. Nemojte kratkospajati, rastavljati niti previše zagrevati baterije.
OPREZ: U slučaju nepravilne zamene baterija postoji opasnost od eksplozije. Baterije zamenite isključivo novim baterijama istog tipa.
Ostalo
natural_image
Illustration of a cylindrical device with control panel and buttons (no text or symbols)
Glavna jedinica Sound
Tower uređaja

natural_image
Simple black-and-white illustration of a U-shaped cable or connector (no text or symbols)
Kabl za napajanje Baterija

natural_image
Illustration of a gray cylindrical electronic device with a slot and label 'TAWA' on the body (no other text or symbols)
- Za više informacija o potrebnom napajanju i potrošnji energije, pogledajte nalepnicu na proizvodu. (Nalepnica: Zadnja strana glavne jedinice Sound Tower uređaja)
- Da biste kupili dodatne komponente ili opcione kablove, obratite se Samsung servisnom centru ili Samsung korisničkoj podršci.
- Kada pomerate proizvod, nemojte ga vući po zemlji. Podignite proizvod kada ga pomerate.
- Dizajn i specifikacije su podložni promenama bez prethodne najave.
natural_image
Simple line drawing of a person pushing a cart with a 'X' symbol above, no text or labels present

natural_image
Simple stick figure carrying a large circle, no text or symbols present

02 PREGLED PROIZVODA
Gornja tabla Sound Tower uređaja

| 1 | LED indikator | Prikazuje poruke o radu ili trenutni izvor sistema Sound Tower. Izvori informacija koje predstavlja svaki LED indikator su sledeći: *(Bluetooth) USB(USB) AUX1(AUX1) AUX2(AUX2) |
| 2 | Uključivanje/isključivanje | Uključuje i isključuje Sound Tower. |
| 3 | LED za punjenje | Prikazivanje informacija o nivou napunjenosti baterije Sound Tower uređaja. |
| 4 | BASS | Pritisnite dugme BASS da biste promenili bas režim. |
| 5 | Bluetooth PAIRING | Pritisnite i zadržite dugme da biste ušli u režim Bluetooth Pairing LED indikator treperi plavo. |
| 6 | Izvor Pritisnite da biste izabrali izvor povezan sa Sound Tower uređajem. |
| 7 | Svetlo | Pritisnite dugme (Svetlo); kada bela lampica zatreperi, rotirajte dugme da biste se prebacivali između različitih unapred podešenih raspoloženja.Redosled: Festival → Energično → Uživanje → Opušteno → Fokus → Спорт → Isključeno → Festival → Energično → ... |
| 8 | Reprodukcija/Pauza | Reprodukcija/PauzaPritisnite da biste privremeno pauzirali muziku.Kada ponovo pritisnete dugme, muzika se reprodukuje.Ako dvaput pritisnete na dugme Reprodukcija/Pauza, preskočićete na sledeću pesmu.Pritisnite 3 puta da biste se prebacili na prethodnu. |
| 9 | DJ | Ovo dugme vam omogućava da reprodukujete sempler(DJ audio efekat).Sempler (DJ audio-efekat) se menja jednim okretanjem džog točkića (12 semplera)Redosled: Vazdušna sirena → Zvižduk → Navijanje publike → Negodovanje → Sirena → Aplauz→premotavanje → Grebanje → „No Way!“ → „Are you ready“ → „3,2,1“ → „Ok, Let’s Go“ → Vazdušna sirena → ...Reprodukujte sempler svaki put kada ga promenite da biste dobili obaveštenje o tome koji je sempler izabran |
Zadnja tabla Sound Tower uređaja

| 1 | ADD STEREO | Pritisnite dugme ADD STEREO da biste se bežično povezali sa drugim Sound Tower uređajem istog modela. |
| 2 | GROUP PLAY | Pritisnite dugme GROUP PLAY da biste bežično povezali do deset Sound Tower sistema.. |
| 3 | MIC2/GUITAR | Prebacite prekidač na ulazni izvor MIC2 ili GITARA. |
| 4 | USB | Povežite USB uređaj sa USB portovima na glavnoj jedinici.Ako povežete mobilni telefon sa USB portom, možete ga puniti.Pritisnite dugme→(Source) da biste izabrali USB. |
| 5 | MIC1 Povežite mikrofon sa MIC1 priključkom. | |
| 6 | MIC2 Povežite mikrofon ili gitaru sa MIC2 priključkom. | |
| 7 | Terminali AUX2/GROUP PLAY IN | Koristite audio-kabl (ne isporučuje se uz proizvod) da biste povezali terminale AUX2 (IN) na glavnoj jedinici sa audio-izlazom na spoljnom analognom izlaznom uređaju.Obavezno spojite odgovarajuće boje konektora.Ako spoljni analogni izlazni uređaj ima samo jedan izlazni audio priključak, povežite levi ili desni.Pritisnite dugme → (Izvor) da biste izabrali AUX2.Ako je proizvod u režimu AUX2 i nema reprodukcije niti ulazne komande duže od 20 minuta, sistem se isključuje.Ako je proizvod u režimu AUX2 i reprodukcija traje više od 8 sati bez ulazne komande, sistem se isključuje. |
| 8 | Terminali GROUP PLAY OUT | Koristite audio-kabl (ne isporučuje se) da biste povezali terminale GROUP PLAY (OUT) na glavnoj jedinici sa audio-ulazom na spoljnom analognom izlaznom uređaju. |
| 9 | AUX1 | Koristite Audio (AUX) kabl (ne isporučuje se) da povežete priključak AUX1 na glavnoj jedinici sa audio-izlazom na spoljnom uređaju.Ako je proizvod u režimu AUX1 i nema reprodukcije niti ulazne komande duže od 20 minuta, sistem se isključuje.Ako je proizvod u režimu AUX1 i reprodukcija traje više od 8 sati bez ulazne komande, sistem se isključuje. |
| 10 | Napajanje | Povežite kabl za napajanje sa priključkom za Napajanje a drugi kraj kabla za napajanje sa zidnom utičnicom da biste obezbedili električnu energiju za Sound Tower. |
Stanje LED indikatora punjenja na Sound Tower uređaju:
| Stanje punjenja LED za punjenje | |
| ne puni se i 100% ~ 31% napunjenosti Zelena | |
| ne puni se i 30% ~ 11% napunjenosti Narandžasta | |
| ne puni se i 10% ~ 5% napunjenosti Crvena | |
| Puni se i potpuno napunjena Plava | |
| Puni se i 99% ~ 31% napunjenosti Zelena treperi | |
| Puni se i 30% ~ 11% napunjenosti Narandžasta treperi | |
| Puni se i 10% ~ 5% napunjenosti Crvena treperi | |
※ Automatsko isključivanje ako je nivo baterije 5%.
Pri isključivanju u DC režimu, napajanje celog sistema će biti isključeno.
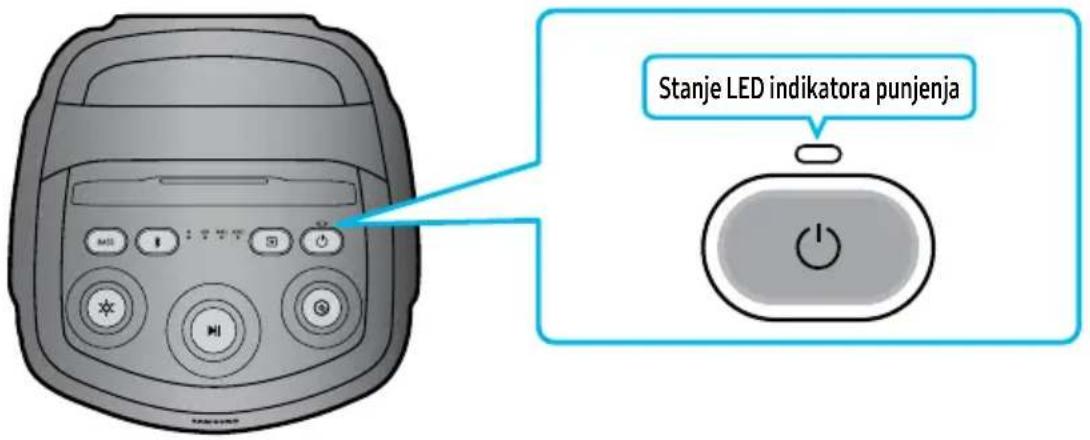
03 POVEZIVANJE SOUND TOWER UREĐAJA
- Okrenite dugme MIC LEVEL na MIN da biste smanjili jačinu zvuka mikrofona.
- Povežite opcioni mikrofon sa MIC priključkom na jedinici.
- Podesite jačinu zvuka pomoću dugmeta MIC „VOL“.
- Podesite eho efekat pomoću dugmeta MIC „ECHO“.
- Govorite ili pevajte u povezani mikrofon.
NAPOMENE
- Kada koristite bežični režim Group Play ili Stereo, zvuk sa mikrofona povezanog na Host ili Sub sistem će se emitovati samo na Sound Tower uređaju na koji je priključen. Nasuprot tome, mikrofoni povezani na Sub sisteme će se čuti samo na njihovim odgovarajućim sistemima.
- Kada je Sound Tower u režimu rada na bateriju, nivo zvuka mikrofona MIC će biti niži.
- Prebacite prekidač na ulazni izvor MIC 2 ili GITARA (jačina zvuka je niža u poređenju sa izvorom mikrofona).
Povezivanje spoljne gitare
- Okrenite dugme MIC LEVEL na MIN da biste smanjili jačinu zvuka gitare.
- Povežite opcionu gitaru sa MIC 2 priključkom na jedinici.
- Podesite jačinu zvuka pomoću dugmeta MIC 2 „VOL“.
- Svirajte na povezanoj gitari.
NAPOMENE
- Kada koristite bežični režim Group Play ili Stereo, zvuk sa gitare povezane na Host ili Sub sistem će se emitovati samo na Sound Tower uređaju na koji je priključen. Nasuprot tome, gitare povezane na Sub sisteme će se čuti samo na njihovim odgovarajućim sistemima.
- Kada je Sound Tower u režimu rada na bateriju, nivo zvuka gitare će biti niži.
Kako se koristi režim zvuka
Sound Tower pruža unapred definisana podešavanja ekvilajzera koja su optimizovana za određene muzičke žanrove.
- Pritisnite REŽIM ZVUKA u APLIKACIJI.
- Svaki put kada promenite REŽIM ZVUKA, Sound Tower se kreće kroz dostupne zvučne efekte: Standardni, Široki, Stadion, Na otvorenom.
NAPOMENE
- Podrazumevani režim zvuka je Standardni.
- Kada je isključen, pritisnite i držite dugme Đna proizvodu duže od 5 sekundi da biste ga uključili sa podrazumevanim podešavanjima režima zvuka.
natural_image
Illustration of a cylindrical device with control panel and buttons (no text or symbols)
natural_image
Simple black-and-white illustration of a U-shaped cable or connector (no text or symbols)
Napajalni kabel Baterija

natural_image
Illustration of a gray cylindrical device with a slot, resembling a battery pack or charging case (no text or symbols visible)
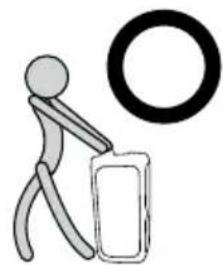
natural_image
Simple line drawing of a stick figure pushing a large object with a circular ring above (no text or symbols)
02 PREGLED IZDELKA
- Obrnite gumb MIC LEVEL na MIN, da zmanjšate glasnost mikrofona.
- Priključite dodatni mikrofon v vtičnico MIC na enoti.
- Glasnost prilagodite z gumbom MIC »VOL«.
- Učinek odmeva prilagodite z gumbom MIC »ECHO«.
- Govorite ali pojte v priključen mikrofon.
OPOMBE
- Obrnite gumb MIC LEVEL na MIN, da zmanjšate glasnost kitare.
- Priključite dodatno kitaro v vtičnico MIC 2 na enoti.
- Glasnost prilagodite z gumbom MIC 2 »VOL«.
- Igrajte s priključeno kitaro.
OPOMBE
natural_image
Illustration of a cylindrical device with control panel and buttons (no text or symbols)
natural_image
Simple black cable with a connector, isolated on white background (no text or symbols)
natural_image
Illustration of a cylindrical electronic device with a slot and label '100V' on its side (no other text or symbols)

natural_image
Simple stick figure carrying a bag with a large circle nearby (no text or symbols)

natural_image
Illustration of a cylindrical device with control panel and buttons (no text or symbols)
natural_image
Simple black cable with a connector, isolated on white background (no text or symbols)
Barošanas vads Akumulators
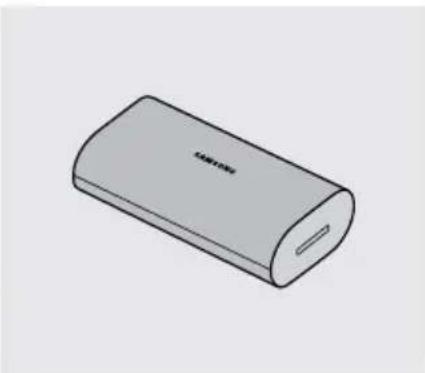
natural_image
Illustration of a cylindrical electronic device with a slot and label (no text or symbols on the body)
natural_image
Illustration of a person pushing a device with a 'X' symbol above, no text or labels present

natural_image
Simple stick figure carrying a large circle, no text or symbols present

02 PĀRSKATS PAR PRODUKTU
"Sound Tower" augšējais panelis

- "Sound Tower HOST" 2. "Sound Tower"
natural_image
Illustration of a cylindrical device with control panel and buttons (no text or symbols)
natural_image
Simple line drawing of a black cable with a connector (no text or symbols)
Toitejuhe Aku
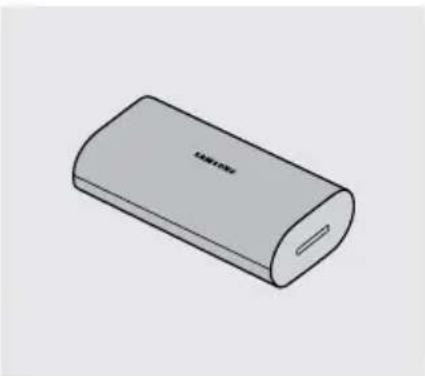
natural_image
Illustration of a cylindrical electronic device with a slot and label 'LAMPION' (no other text or symbols)

natural_image
Simple stick figure carrying a bag with a large circle nearby (no text or symbols)
02 TOOTE ÜLEVAADE
natural_image
Illustration of a cylindrical device with control panel and buttons (no text or symbols)
„Sound Tower“ pagrindinis jrenginys
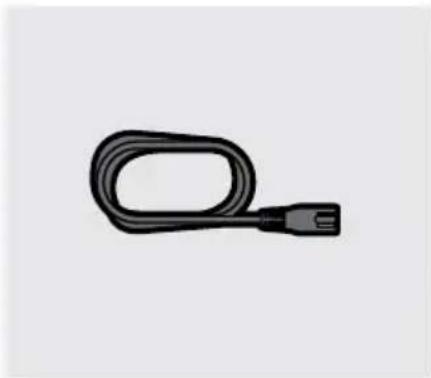
natural_image
Simple black-and-white illustration of a U-shaped cable or connector (no text or symbols)
Maitinimo laidas Baterija
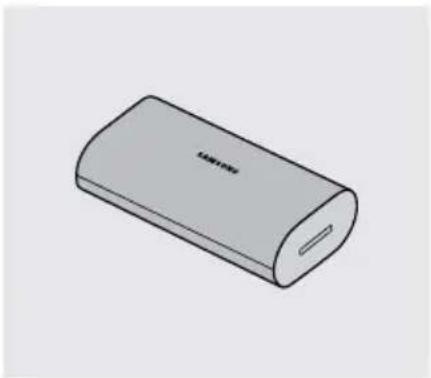
natural_image
Illustration of a gray cylindrical device with a slot and label 'TAWA' on its side (no other text or symbols)

natural_image
Simple line drawing of a stick figure pushing a large object with a circular ring above (no text or symbols)

02 GAMINIO APŽVALGA
Viršutinis „Sound Tower“ skydelis
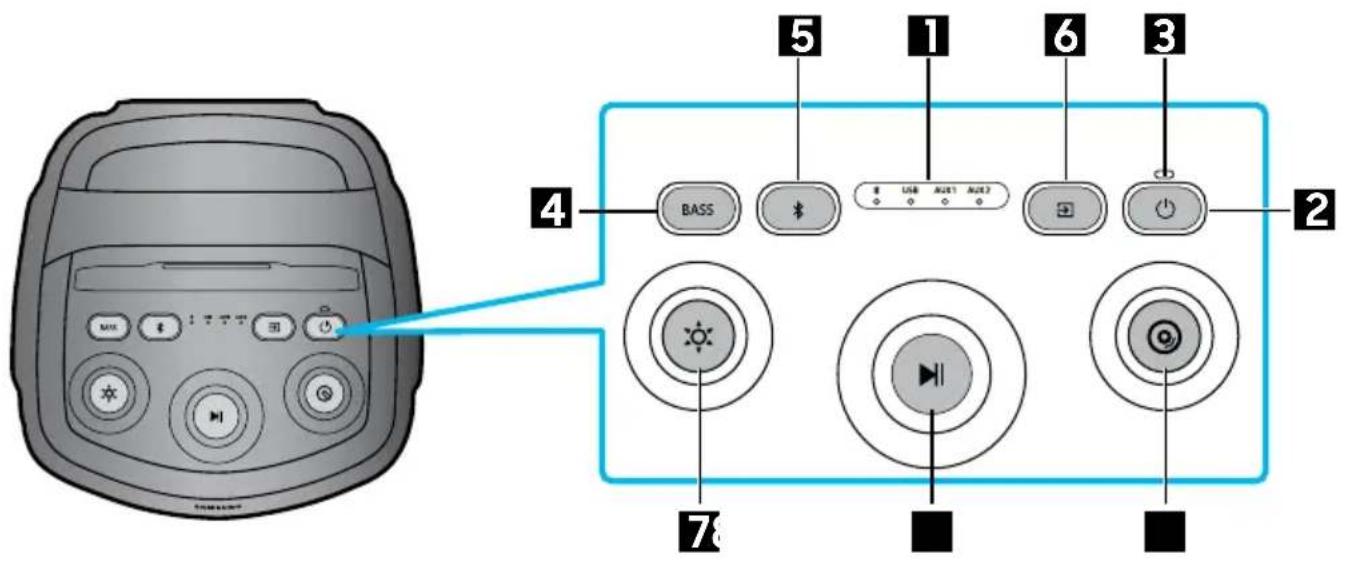
© 2025 Samsung Electronics Co., Ltd. All rights reserved.
If you have any questions or comments relating to Samsung products, please contact the Samsung customer care Centre.
| Country/Region | Samsung Service Centre | Web Site |
| UK 0333 000 0333 | www.samsung.com/uk/support |
| IRELAND (EIRE) | 0818 717100 | www.samsung.com/ie/support |
| GERMANY | 06196 77 555 77 | www.samsung.com/de/support |
| FRANCE 01 48 63 00 00 www.samsung.com/fr/support |
| SPAIN | 91175 0015 | www.samsung.com/es/support |
| PORTUGAL | 210 608 098Chamada para a rede fi xa nacionalDias úteis das 9h às 20h | www.samsung.com/pt/support |
| LUXEMBURG | 261 03 710 | www.samsung.com/be_fr/support |
| NETHERLANDS | 088 90 90100 | www.samsung.com/nl/support |
| BELGIUM | BE NL: +32 3 808 05 07BE FR: +32 262 002 10 | www.samsung.com/be/support (Dutch)www.samsung.com/be_fr/support (French) |
| NORWAY 21 62 90 99 | www.samsung.com/no/support |
| DENMARK | 70 70 19 70 | www.samsung.com/dk/support |
| FINLAND | 0800 528 475 | www.samsung.com/fi/support |
| SWEDEN 077-400 300 | www.samsung.com/se/support |
| AUSTRIA | 0800 72 67 864 (0800-SAMSUNG) | www.samsung.com/at/support |
| SWITZERLAND | 0800 726 786 | www.samsung.com/ch/support (German)www.samsung.com/ch_fr/support (French) |
| HUNGARY | 06 1 42 92 312 |  | www.samsung.com/hu/support |
| CZECH | 800 - SAMSUNG(800-726786) |  | www.samsung.com/cz/support |
| SLOVAKIA | 0800 - SAMSUNG(0800-726 786) |  | www.samsung.com/sk/support |
| Country/Region | Samsung Service Centre | Web Site |
| CROATIA | 072 726 786 | www.samsung.com/hr/support |
| BOSNIA | 055 233 999 | www.samsung.com/ba/support |
| NORTH MACEDONIA | 023 207 777 | www.samsung.com/mk/support |
| MONTENEGRO | 020 405 888 | www.samsung.com/support |
| SLOVENIA | 080 697 267 (brezplačna številka) | www.samsung.com/si/support |
| SERBIA | 011 321 6899 | www.samsung.com/rs/support |
| KOSOVO | 038 40 30 90 | www.samsung.com/support |
| ALBANIA | 045 620 202 | www.samsung.com/al/support |
| BULGARIA | 0800 111 31 - Безплатен за всички оператори *3000 - Цена на един градски разговор или според тарифата на мобилният оператор 09:00 до 18:00 - Понеделник до Петък | www.samsung.com/bg/support |
| ROMANIA | 0800872678 - Apel gratuit *8000 - Apel tarifat în rețea Program Call Center Luni - Vineri: 9 AM - 6 PM | www.samsung.com/ro/support |
| ITALIA | 800-SAMSUNG (800.7267864) | www.samsung.com/it/support |
| CYPRUS | 8009 4000 only from landline, toll free | www.samsung.com/gr/support |
| GREECE | 80111-SAMSUNG (80111 726 7864) from mobile and land line (+30) 210 6897691 from mobile and land line |
| POLAND | 801-172-678* *(opłata według taryfy operatora) | www.samsung.com/pl/support/ |
| LITHUANIA | 0-800-77777 | www.samsung.com/lt/support |
| LATVIA | 8000-7267 | www.samsung.com/lv/support |
| ESTONIA | 800-7267 | www.samsung.com/ee/support |