
HT-SPR52021 - Soundbar SHARP - Free user manual and instructions
Find the device manual for free HT-SPR52021 SHARP in PDF.

| Product Type | Wireless Rear Surround Speakers |
| Channels | 2 surround channels + 2 height channels |
| Power Supply | 100-240 V AC, 50/60 Hz |
| Compatibility | Sharp Q soundbars (models HT-SBW53121 and HT-SBW55121) |
| Wireless Connection | Yes, manual pairing via PAIR button |
| Mounting | Stand or wall mount (brackets included) |
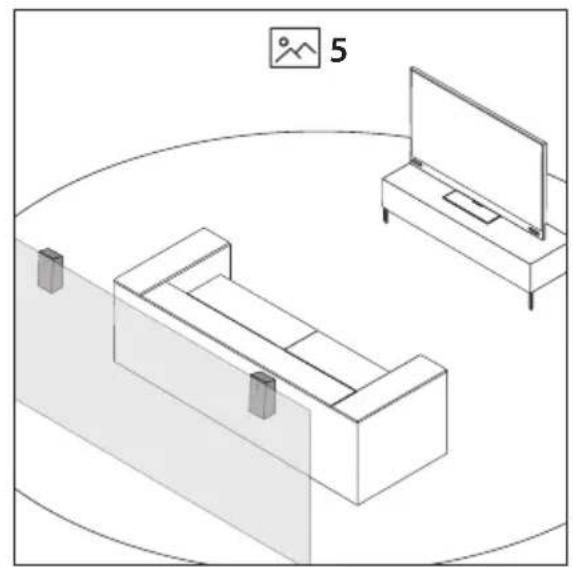
| Recommended Placement | Behind the listening position, at ear level, minimum 50 cm from ceiling |
| Adjustments | Individual volume (-5 to +5), mute |
| Safety | Double insulation (Class II) |
| Cleaning | Soft dry cloth, light vacuuming of the grille |
| Maintenance | No user-serviceable parts |
| Disposal | Do not dispose of with household waste (WEEE) |
Frequently Asked Questions - HT-SPR52021 SHARP
User questions about HT-SPR52021 SHARP
0 question about this device. Answer the ones you know or ask your own.
Ask a new question about this device
Download the instructions for your Soundbar in PDF format for free! Find your manual HT-SPR52021 - SHARP and take your electronic device back in hand. On this page are published all the documents necessary for the use of your device. HT-SPR52021 by SHARP.
USER MANUAL HT-SPR52021 SHARP
natural_image
Two modern audio speakers standing on stands, no visible text or symbolsUser manual
HT-SPR52021

Wireless Rear Surround
Speakers

natural_image
Diagram showing a room layout with a TV, a sofa, and a monitor, all without any text or symbols.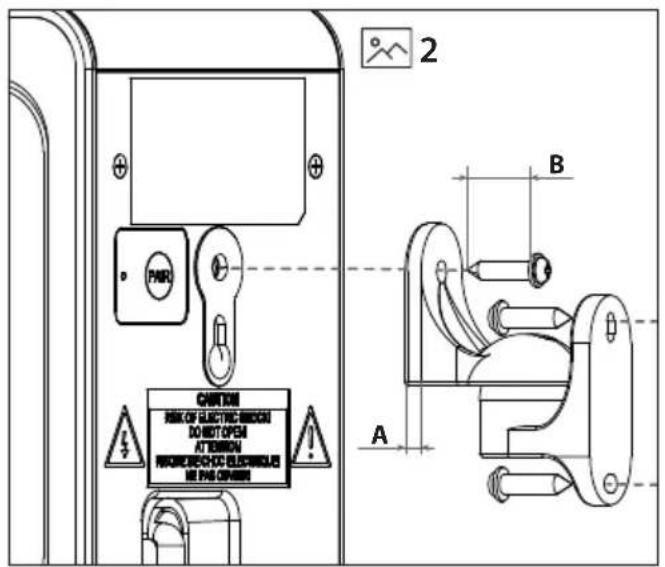
natural_image
Isometric line drawing of a room layout with a sofa, TV, and monitor (no text or symbols)* EN: Hook mount depth
BG: Дълбочина на монтажа на куката
CS: Hloubka montáže háku
DA:Krogmonteringsdybde
DE: Hakenmontagetiefe
EL: Βάθος τοποθέτησης γάντζου
ES: Profundidad de montaje del gancho
ET: Konksu paigaldamise sügavus
FI: Koukun asennussyvyys
FR: Profondeur de montage du crochet
HR: Dubina montaže kuke
HU: Kampószerelési mélység
IT: Profondità di montaggio del gancio
LT: Kablio montavimo gylis
LV: Āka montāžas dzilums
NL: Haakmontagediepte
NO:Krokmonteringsdybde
PL: Głębokość montażu haka
PT: Profundidade de montagem do gancho
RO: Adâncimea de montare a càrligului
SK: Híbka montáže háku
SL: Globina montaže kljuke
SR: Dubina montaže kuke
SV: Krokmontagedjup
UA: Глибина кріплення гачка
Important safety instructions
Please follow all safety instructions and heed all warnings. Keep this manual for future reference.

This symbol instructs the user to consult the user manual for further safety, operational and maintenance related information.

Refers to class II equipment.
This symbol indicates that this product has a double insulation system and does not require a safety connection to electrical earth (ground).

Refers to alternating current (AC).
This symbol indicates that the rated voltage marked with the symbol is AC voltage.

For indoor use only

Energy efficiency marking with level VI
Precautions
Damage
- Please inspect the product for damage after unpacking. If there is damage in any way do not operate the product and consult your dealer.
To prevent the risk of electric shock, do not remove cover (or back panel). No user serviceable parts inside; please refer servicing to qualified service personnel.
Power connection and accessibility
- Do not handle the power cable with wet hands as it may cause an electric shock. If the power plug does not fit into your outlet, do not force the plug into an electrical socket. Switch off the product completely before unplugging. Disconnect the power cable if it is not used for a long time. Ensure that the power plug is always easily accessible. Do not attach extension cables.
Power source
- Ensure that the product is plugged into AC 100-240V 50/60Hz power outlets. Using higher voltage may cause the product to malfunction or even catch fire.
Fused moulded power plug (Non rewireable) - UK, Malta, Cyprus and Ireland only.
- The power cable on this equipment is supplied with a moulded plug incorporating a 5 Amp fuse. The value of the fuse is indicated on the pin face of the plug and if it requires replacing, a fuse approved to BS1362 of the same rating must be used.
Power cord protection
- Do not damage the power cord, do not place any heavy objects on it, do not stretch it or bend it. Damage to the power cord can result in fire or electric shock. If the power cord is damaged, it must be replaced by the manufacturer, a service agent or similarly qualified persons.
Child safety
- Always follow basic safety precautions when using this product, especially when children are present. Children should be supervised to ensure that they do not play with the product.
Location
- When in use this product should be placed on a flat, stable surface with no part of the product overhanging an edge. Alternatively this product may be wall mounted as instructed in this user manual.
Ventilation
- Slots and openings in the cabinet are provided for ventilation and to ensure reliable operation of the product protecting it from overheating. These openings must not be blocked or covered. Ensure a minimum distance of 5cm around the product for sufficient ventilation. Never let anyone push anything into holes, slots or any other openings in the product's casing as this could result in an electric shock.
Heat and operating temperature
- Do not install near any heat sources such as radiators, heat registers, stoves, or other apparatus (including amplifiers) that produce heat. Avoid exposure to direct sunlight.
Naked flames
- To prevent the risk of fire, keep candles or open flames away from this product.
Water, moisture, and liquid entry
- To prevent the risk of fire or electric shock, do not expose this product to rain, water or moisture. Do not place objects filled with liquids on or near this product.
Storms and lightning
- Storms are dangerous for all electric products. If the power is struck by lightning, the product might get damaged, even if it is turned off. You should disconnect all the cables and connectors of the product before a storm.
Maintenance
- Unplug the power plug from the power source before cleaning the product. Use the soft brush attachment of your vacuum cleaner and lightly vacuum the speakers fabric. Use a soft and clean cloth to clean the speakers cabinets. Never clean them with chemicals or detergents.
Service and repair
- This product does not contain any parts that are serviceable by the user. Exposing the internal parts inside the product may endanger your life. In case of a fault, contact the manufacturer or authorised service department. The manufacturers guarantee does not extend to faults caused by repairs carried out by unauthorised third parties.
Disposal of this equipment
Information for users on collection and disposal of old equipment.
This symbol on a product means that the product is covered by European Directive 2012/19/EU and must not be disposed of or dumped with your other household waste.

This symbol means that the product is designed and manufactured so that it can be recycled and reused.
These symbols on the products, packaging, and/or accompanying documents mean that used electrical and electronic products and batteries should not be mixed with general household waste. Household users should contact either the retailer where they purchased this product, or their local government office, for details of where and how they can take these items for environmentally safe recycling.
CE and UKCA statement:
- Hereby, Sharp Consumer Electronics Poland sp. z o.o. declares that this audio device is in compliance with the essential requirements and other relevant provisions of RED Directive 2014/53/EU and UK Radio Equipment Regulations 2017.
- The full CE text and UKCA declaration of conformity are available at sharpconsumer.eu and then entering download section of your model and choosing "CE Statements".
Compatibility
These speakers work only with SHARP Q Soundbars.
Please check you have the correct model of SHARP Soundbar.
Compatible soundbar models are:
- HT-SBW53121(SL)
- HT-SBW53121(BK)
- HT-SBW55121(SL)
- HT-SBW55121(BK)
The HT-SPR52021 wireless rear surround speakers add an additional 2 surround channels and 2 height channels to the above models.
Box contents
• Left rear surround speaker
• Right rear surround speaker
• EU AC power cable (2 pcs)
• UK AC power cable (2 pcs)
- Speaker wall-mount fixings
- User manual
- Warranty card
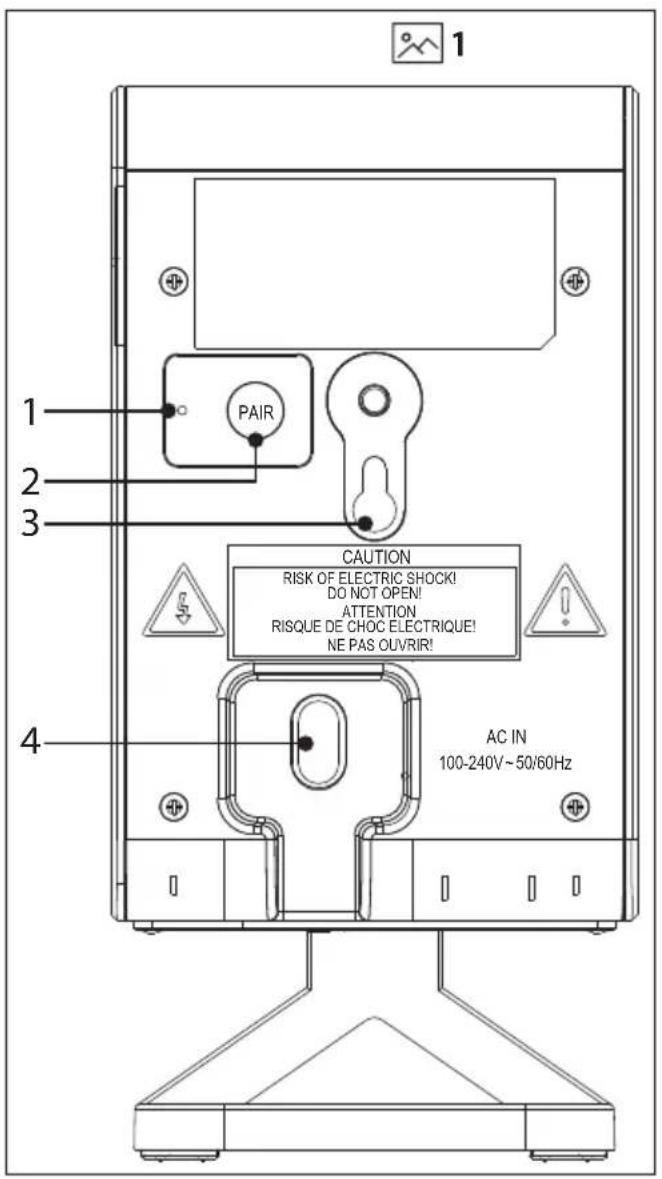
Controls
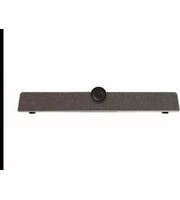
Rear surround speaker
(Refer to 1 on page 1)
- PAIR indicator.
- PAIR button – Please refer to section "Speaker pairing".
- Wall mount / screw hook.
- AC IN power input.
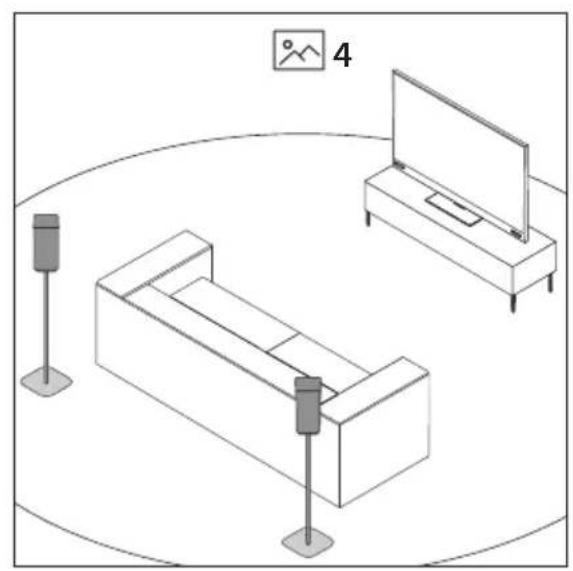
Placement and mounting
Placement
To enjoy immersive audio from your Sharp Q wireless rear surround speakers, place the speakers behind your preferred listening position, ideally at ear level. The speakers can be placed on speaker stands, furniture or you can mount the speakers to a suitable wall.
NOTE:
- Refer to the rating label on the back of each speaker to check if it is the left or right speaker. L is for the left speaker and R for the right speaker.
A Place the speakers upright on the speaker stands/furniture at ear level behind your preferred listening position. (Refer to 4 on page 1)
B Place the speakers on the wall using wall mounts at ear level behind your preferred listening position. (Refer to 5 on page 1)
IMPORTANT NOTES:
- Do not mount the speakers too close to the ceiling. The minimum distance between the speaker and the ceiling should be 50cm .
- The height effect won't be noticeable in rooms with very high ceilings.
- Installation must be carried out by qualified personnel only. Incorrect assembly can result in severe personal injury and property damage (if you intend to install this product yourself, you must check for installations such as electrical wiring and plumbing that may be buried inside the wall). It is the installer's responsibility to verify that the wall will safely support the total load of the unit and wall brackets.
- Additional tools (not included) are required for the installation.
- Do not over-tighten screws.
- Keep this user manual for future reference.
- Use an electronic stud finder to check the wall type before drilling and mounting.
Your wall mount preference will determine the type of wall mounting option you use on the speaker.
A: Using the wall mount hole
Refer to the table below and 2 on page 1. Ensure the correct screw is used.
| A:Depth of wall bracket plate (mm) | B:Length of screw requiredMIN~MAX (mm) |
| 2-6mm 14 mm |
NOTES:
– The depth of the screw hole on the speaker is 17.4 mm
- The correct screw type to use is:
Imperial: 1/4-20 inch
Metric: 6.35 mm diameter, 1.27 mm thread pitch
- When mounting to the wall, remove the plastic stand.
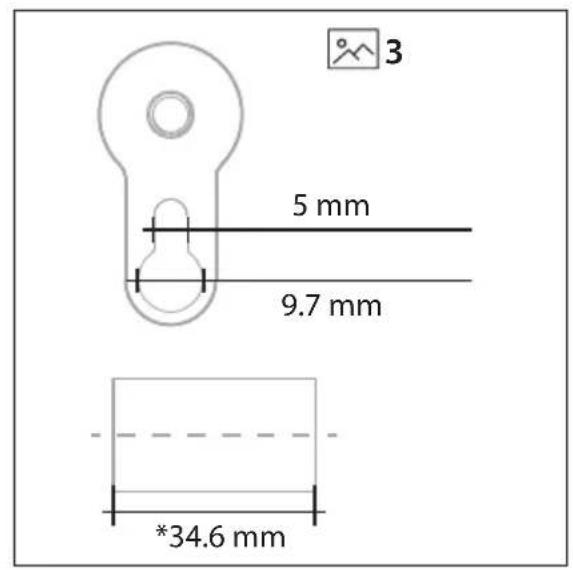
B: Using the slot and hook mount
Wall mount the speakers using the slot and hook mount. (Refer to 3 on page 1) Ensure the screw used will fit into the wall mount hook securely.
NOTES:
- When using the slot and hook mount, ensure that the speakers are not free to move around freely.
- When mounting to the wall, remove the plastic stand.
Initial set up
Connect to power
Risk of product damage! Ensure that the power supply voltage corresponds to the voltage printed on the back of the unit. Connect the power cable to the AC IN socket of the unit and then into a mains socket.
Speaker pairing
Manual pairing
You will need to manually pair the rear surround speakers to the soundbar before you can use them with the soundbar.
- Ensure that all the cables are securely connected and the soundbar is in STANDBY.
- Press and hold the PAIR button on the rear of the speaker for 3 seconds. The speaker will enter pairing mode and the PAIR indicator will flash quickly.
- Press the ⏻ button on the soundbar or on the remote control to switch the soundbar on.
- Press the MENU button on the remote control, then use the directional control on the remote control to highlight
. Press▶ and wait for 5 seconds. - When the speaker is paired with the main unit, the PAIR Indicator will be solid and the soundbar will display
. - If the PAIR indicator blinks, the wireless connection has failed. The soundbar will display
. Unplug the power cable from the speaker and then reconnect the power cable after 4 minutes. Repeat steps 1 \~ 4.
NOTE:
- If the wireless connection fails again, check if there is conflict or strong interference (for example, interference from an electronic device) around
your location. Remove these conflicts or strong interferences and repeat the above procedures.
Menu Operation
Please refer to your soundbar user manual for the full menu operation instructions.
SPKVOL
Opens the rear surround speaker volume sub menu.
SPK L or SPK R. Adjust the volume of each surround speaker.
Choose between VOL +5 and VOL -5.
MUTE. Change this setting to mute the rear speakers. Options are ON or OFF.
NOTE:
- The default setting is OFF. If switched ON, the rear surround speakers will remain muted until they are unmuted, even if the system has been in standby. Unplugging the soundbar from the mains power supply will automatically switch muting OFF again.
WLPAIR
Select this to manually pair the subwoofer and (optional) surround speakers.
WL VER
Shows the current wireless version.
Room calibration and positional adjustment
The volume of the rear speakers can be adjusted relative to the soundbar. This manual calibration allows for greater flexibility when positioning the system components in the room.
The default volume for each component is set to 0 and can be adjusted from -5 to +5. Based on the listening position, the default volumes assume a distance of 1.5m from the rear speakers.
Use the
Troubleshooting
Q: Sometimes I notice minor distortions in voices played through the rear surround speakers (available to purchase separately).
A: This should only occur when a 2.0 channel stereo audio source is being upmixed to 5.1.4 or 7.1.4 channels. With 2.0 channel audio formats, vocals are generally intended to be played from the soundbar only (this is not always the case with multi-channel audio sources).
However, in some circumstances voices from 2.0 channel audio sources cannot be separated reliably by the Dolby and DTS upmixer; the result may be that you notice some voices are played through the rear surround speakers at a low volume, and in some instances these voices may sound distorted. We recommend that the rear surround speakers are positioned at least 1m from your listening position and at this distance any vocal distortion should not be noticeable. If you do notice this behaviour, you can temporarily mute the rear surround speakers. To do this:
Long press the ✕ on the remote control or on the soundbar to mute the rear surround speakers. Long press again to un-mute.
Or, you can use the soundbar menu:
Navigate the soundbar's menu to select
Use << or >> to select
NOTE:
- The default setting is OFF. If switched ON, the rear surround speakers will remain muted until they are unmuted, even if the system has been in standby. Unplugging the soundbar from the mains power supply will automatically switch muting OFF again.
Fused moulded power plug (Non rewireable) - UK, Malta, Kypr a Irsko pouze.
Olulised ohutusjuhised
Kompatybilne modele soundbarów to:
- HT-SBW53121(SL)
- HT-SBW53121(BK)
- HT-SBW55121(SL)
- HT-SBW55121(BK)
Coluna traseira surround
Sharp Consumer Electronics Poland sp. z o.o.
Ostaszewo 57B, 87-148 Lysomice, Poland
Made in China
SAU/MAN/0195 V3
www.sharpconsumer.com
SHARP


- User manual
- Important safety instructions
- Please follow all safety instructions and heed all warnings. Keep this manual for future reference.
- Precautions
- Damage
- Power connection and accessibility
- Power source
- Fused moulded power plug (Non rewireable) - UK, Malta, Cyprus and Ireland only.
- Power cord protection
- Child safety
- Location
- Ventilation
- Heat and operating temperature
- Naked flames
- Water, moisture, and liquid entry
- Storms and lightning
- Maintenance
- Service and repair
- Disposal of this equipment
- CE and UKCA statement:
- Compatibility
- Box contents
- Controls
- Rear surround speaker
- Placement and mounting
- Placement
- NOTE:
- IMPORTANT NOTES:
- A: Using the wall mount hole
- NOTES:
- B: Using the slot and hook mount
- Initial set up
- Connect to power
- Speaker pairing
- Manual pairing
- Menu Operation
- SPKVOL
- WLPAIR
- WL VER
- Room calibration and positional adjustment
- Troubleshooting
- Fused moulded power plug (Non rewireable) - UK, Malta, Kypr a Irsko pouze.
- Olulised ohutusjuhised
- Coluna traseira surround
Brand : SHARP
Model : HT-SPR52021
Category : Soundbar