
C60 Li - Battery charger AL-KO - Free user manual and instructions
Find the device manual for free C60 Li AL-KO in PDF.

| Brand | AL-KO |
| Model | C60 Li |
| Product type | Battery charger for lithium-ion battery |
| Compatible batteries | B50 Li (ref. 113559) and B100 Li (ref. 113698) |
| Power supply | 100-240 V ~ 50/60 Hz |
| Wall mounting | Possible, hole spacing 89 mm |
| Status indicator | Green LED (charging finished), green flashing (charging), red fixed (battery fault), red flashing (inappropriate temperature) |
| Main functions | Automatic charge level detection, automatic shutdown at end of charge, perfect charging from any level |
| Intended use | Indoors only, on non-flammable surface and well ventilated |
| Maintenance and cleaning | Clean contacts with a dry cloth; do not use water or harsh products |
| Safety | Do not open, do not expose to moisture, do not use in explosive environment, do not recharge non-rechargeable batteries |
| Weight (estimated) | Approx. 0.5 kg |
| Dimensions (estimated) | Approx. 150 x 100 x 80 mm |
| Warranty | Legal warranty against manufacturing defects (repair or replacement) |
| After-sales service | Contact the nearest AL-KO service center (see website) |
| Spare parts | Use only original AL-KO parts |
| Repairability | Repair only by qualified personnel |
| Languages of the manual | French, German, English, and 20 other languages |
Frequently Asked Questions - C60 Li AL-KO
User questions about C60 Li AL-KO
0 question about this device. Answer the ones you know or ask your own.
Ask a new question about this device
Download the instructions for your Battery charger in PDF format for free! Find your manual C60 Li - AL-KO and take your electronic device back in hand. On this page are published all the documents necessary for the use of your device. C60 Li by AL-KO.
USER MANUAL C60 Li AL-KO
natural_image
Black ELKO brand electric shock absorber with charging cable and power outlet (no visible text or symbols)


Inhaltsverzeichnis
Deutsch 6
English....12
Nederlands 17
Français....23
Español 29
Italiano 35
Slovenščina 41
Hrvatski....46
Српски....51
Polski 57
Česky 63
Slovenská 68
Magyarul....74
Dansk 80
Svensk 85
Norsk 90
Suomi 95
Eesti 100
Lietuvių 105
Latviešu 110
български 116
Русский 123
Україна....129
Türkçe 135
© 2020
AL-KO KOBER GROUP Kötz, Germany
This documentation or excerpts therefrom may not be reproduced or disclosed to third parties without the express permission of the AL-KO KOBER GROUP.
01
*: Not included.

C60 Li

113858
G1990012
100 - 240 V (AC)
50/60 Hz, 160 W
14,4 V - 20 V (DC)
6A
ca. 700 g


C60 Li
B50 Li
ca. 40 min
B100 Li
ca. 60 min

B50 Li (ABP118L25)

B100 Li (ABP118L5)

113559 113698
18 V (20 V max.)
2,5 Ah 5 Ah
45 Wh 90 Wh
$$ 0 ^ {\circ} \mathrm{C} - + 4 5 ^ {\circ} \mathrm{C} $$
$$ 0 ^ {\circ} \mathrm{C} - + 2 5 ^ {\circ} \mathrm{C} $$
$$ (1 1 0 \times 7 5 \times 4 0) \mathrm{mm} (1 1 0 \times 7 5 \times 6 5) \mathrm{mm} $$
0,35 kg 0,65 kg
1 About these operating instructions ..... 12
1.1 Symbols on the title page.... 12
1.2 Legends and signal words ...... 12
2 Product description 12
2.1 Designated use 12
2.2 Possible foreseeable misuse .... 13
2.3 Product overview.... 13
3 Safety instructions .... 13
4 Start-up 15
4.1 Setting up the charger.... 15
4.2 Mounting the charger on the wall ..... 15
5 Operation 15
5.1 Charging the rechargeable battery..... 15
5.2 Status displays on the charger..... 15
6 Help in case of malfunction.... 15
7 Disposal 16
8 After-Sales / Service 16
9 Guarantee.... 16
1 ABOUT THESE OPERATING INSTRUCTIONS
The German version is the original operating instructions. All additional language versions are translations of the original operating instructions.
■ Always safeguard these operating instructions so that they can be consulted if you need any information about the appliance.
■ Only pass on the appliance to other persons together with these operating instructions.
■ Comply with the safety and warning information in these operating instructions.
1.1 Symbols on the title page
Symbol Meaning

It is essential to read through these operating instructions carefully before start-up. This is essential for safe working and trouble-free handling.
Symbol Meaning

Operating instructions

To avoid electric shock, do not damage or cut the power cable!
1.2 Legends and signal words
⚠️ DANGER! Denotes an imminently dangerous situation which will result in fatal or serious injury if not avoided.
WARNING! Denotes a potentially dangerous situation which can result in fatal or serious injury if not avoided.
CAUTION! Denotes a potentially dangerous situation which can result in minor or moderate injury if not avoided.
IMPORTANT! Denotes a situation which can result in material damage if not avoided.
NOTE Special instructions for ease of understanding and handling.
2 PRODUCT DESCRIPTION
The C60 Li charger is intended exclusively for charging the rechargeable batteries listed here:
Item No. 113559 113698
Designation B50 Li B100 Li
Model (EN 62133) ABP118L25 ABP118L5
As soon as the rechargeable battery is connected to the charger, the charger automatically detects the charge status of the rechargeable battery. The charging process then begins. It ends automatically when the rechargeable battery is fully charged.
The rechargeable battery can be charged in any charge state. Interrupting the charging process does not damage the rechargeable battery.
2.1 Designated use
The charger is intended exclusively for charging the rechargeable batteries listed in these operat-
ing instructions. Other rechargeable batteries, rechargeable battery packs or non-rechargeable batteries must not be charged with this appliance.
The appliance is intended solely for indoor use.
Any use other than the intended use described here is deemed as an improper use.

DANGER! Danger of explosion and fire!
Persons can be severely or fatally injured if the appliance causes an explosion because it was used in a potentially explosive environment.
■ Do not use the appliance in potentially explosive environments.

WARNING! Danger of fire and electric
shock! Persons can be severely or fatally injured if the charging unit causes a fire due to a short-circuit because it was exposed to moisture and humidity.
■ Only operate the appliance indoors and do not expose it to moisture and humidity.

WARNING! Danger of exploding or burst-open of non-rechargeable batteries! De-
pending on the model, non-rechargeable batteries can explode or burst open when charged. Escaping electrolyte fluid can get onto the skin and into the eyes, causing serious acid burns.
■ Do not charge any non-rechargeable batteries.
If you come into contact with electrolyte fluid, wash the contact point with copious soap and water. If electrolyte fluid gets into the eyes, rinse the eyes immediately with copious amounts of water and then consult a doctor.
2.2 Possible foreseeable misuse
The appliance must not be used in explosive and fire-risk environments.
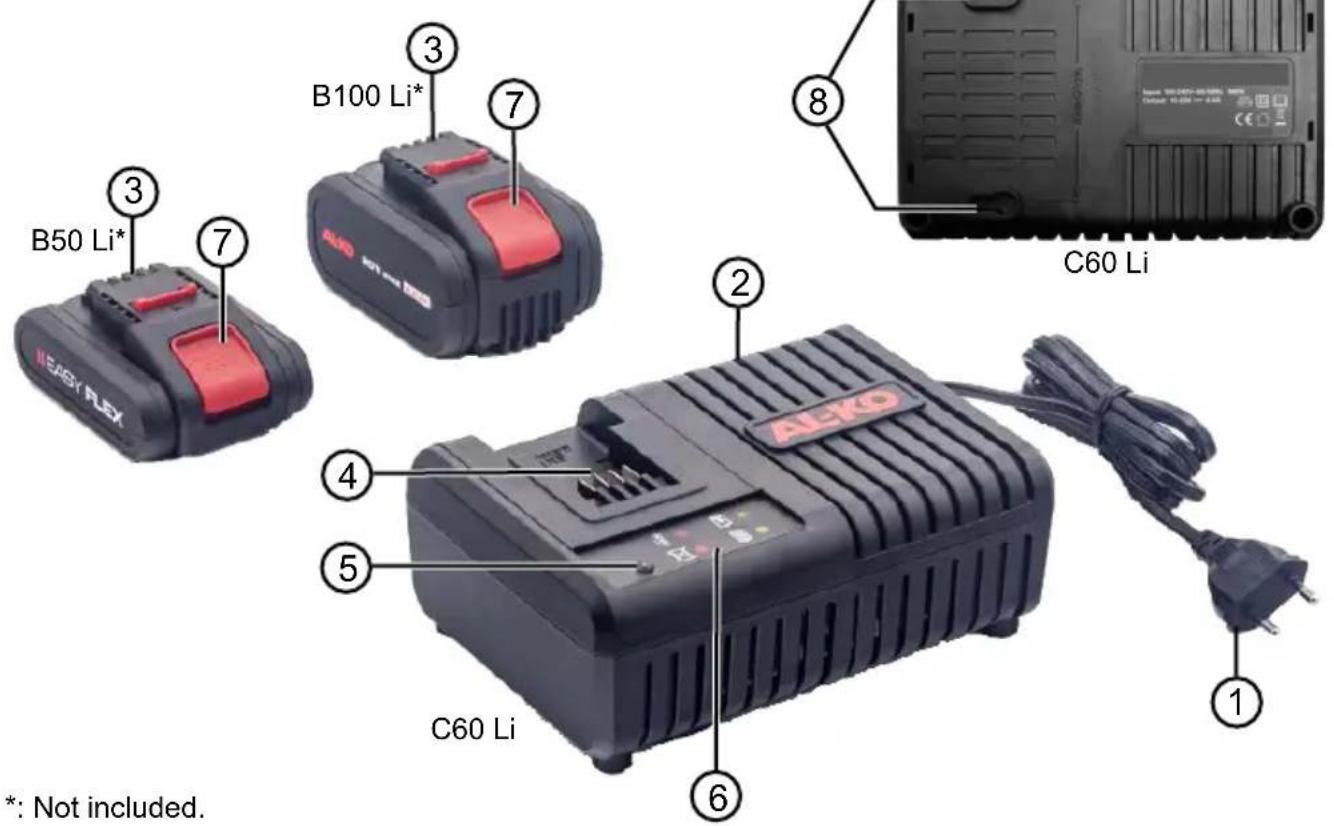
2.3 Product overview
Product overview (01)
No. Component
| 1 Mains cable with power plug |
| 2 Charger |
| 3 Rechargeable battery* |
| 4 Rechargeable battery compartment |
| 5 LED for displaying the operating states |
| 6 Symbols for the operating states |
No. Component
| 7 Release button on the rechargeable battery* |
| 8 Attachment holes for wall mounting(spacing: 89 mm) |
*: Not included in the scope of supply.
3 SAFETY INSTRUCTIONS
This section mentions all the basic safety and warning information to be heeded when using the charger. Read these instructions.
■ Only use the appliance as designated, i.e. for charging the intended rechargeable batteries.
Before each use, inspect the entire appliance – and especially the mains cable and the rechargeable battery compartment – for damage. Only use the appliance when it is in proper working order.
■ Do not use the appliance in environments where there is a potential risk of explosion and/or fire.
■ Only operate the appliance indoors and do not expose it to moisture and humidity.
■ Always place the charging unit on a well ventilated and non-inflammable surface because it heats up during the charging process. Keep the ventilation slots clear and do not cover the appliance.
■ Prior to connecting the charging unit, find out if the mains voltage
stated in the "Technical data" is available.
■ Only use the mains cable for connecting the charging unit. Do not carry the charging unit by the mains cable and do not pull the power plug out of the power outlet by the mains cable.
■ Protect the mains cable from heat, oil and sharp edges to prevent it from being damaged.
- Do not use the charging unit and rechargeable battery when soiled or wet. Clean and dry the appliance and rechargeable battery prior to operation.
- Keep the charged and unused rechargeable battery away from metallic objects to prevent bridging the contacts (e.g. paper clips, coins, keys, nails, screws). Burns or fire can result from a short-circuit.
■ Only charge original rechargeable batteries from AL-KO in the charging unit.
- Do not open the charging unit and rechargeable battery. There is a danger of electric shock and short-circuit.
■ For your own safety, have your appliance repaired by qualified specialist personnel only using original spare parts.
■ An improperly used and damaged rechargeable battery can cause vapours and electrolyte liquid to escape. In this case, vent the room thoroughly and consult a doctor if you notice any symptoms.
If accidental contact with electrolyte liquid occurs, flush with water and thoroughly rinse the eyes immediately. Then consult a doctor.
This appliance can be used by children of 8 years and older and by persons with reduced physical, sensory or mental capabilities, or those lacking experience and knowledge, if they are supervised or have been instructed with regard to the safe use of the appliance and the ensuing risks. Children must not be allowed to play with the appliance. Cleaning and maintenance must not be carried out by children without supervision.
■ People with very strong and complex restrictions may have needs that exceed the instructions described here.
■ Store unused appliances in a dry and locked place. Unauthorised persons and children must not have access to the appliance.
4 START-UP
IMPORTANT! Danger of material damage due to incorrect mains voltage! Incorrect mains voltage can damage the charging unit and the rechargeable battery.
■ Before connecting the charging unit, make sure that the mains voltage matches the voltage stated in the "Technical data".
4.1 Setting up the charger
- Remove the charger from the packaging.
- Place the charger on a non-inflammable, level surface at a safe distance from other objects.
- Insert the mains plug. The charger is ready for operation.
4.2 Mounting the charger on the wall
The charger has two attachment holes (01/8) 89 mm apart on its underside. These allow the charger to be attached to a vertical surface, e.g. wall or board.
- Screw two round-head screws into the surface until the screw heads are protruding by approx. 2 to 3 mm.
- Hook the charger over the screw heads.
- Check that the charger is securely supported. If not, remove the charger again and screw the screws slightly further into the surface.
5 OPERATION
5.1 Charging the rechargeable battery
CAUTION! Danger of fire during
charging! Due to heating of the charger, there is a danger of fire if it is placed on an inflammable surface and is not adequately ventilated.
■ Always use the charger on a non-inflammable surface or in a non-combustible environment.
If available: Keep the ventilation slots free.
- Insert the mains plug (01/1) of the charger (01/2) into the power socket.
- Push the rechargeable battery (01/3) into the rechargeable battery slot (01/4) until it engages. The charging process begins.
- When the LED (01/5) indicates that charging has been completed (see chapter 5.2 "Status displays on the charger", page 15):
■ Press the release button (01/7) and remove the rechargeable battery.
■ Remove the mains plug from the power socket.
5.2 Status displays on the charger
The LED (01/5) on the charger unit indicates the charge status of the rechargeable battery:
| Symbol(01/6) | Explanation |
 | LED lights green: The rechargeable battery is fully charged. |
 | LED flashes green: The rechargeable battery is charging. |
 | LED lights red: The rechargeable battery is defective. |
 | LED flashes red: The rechargeable battery is too hot or too cold and will therefore not charge. |
6 HELP IN CASE OF MALFUNCTION
NOTE For malfunctions that are not listed in this table or that you cannot resolve yourself, please contact our customer service.
The rechargeable battery cannot be pushed into the charger.
| Possible cause | Solution |
| Wrong charger | Charge the rechargeable battery using the charger provided. |
| Rechargeable battery incorrectly positioned. | Turn the rechargeable battery so that the contacts of the rechargeable battery and the charger are aligned. |
The rechargeable battery is not charging.
* Use only OEM accessories.
| LED on the charger | Possible cause | Solution |
| LED lights up permanently red. | The service life of the rechargeable battery has expired. | Replace the rechargeable battery.* |
| The rechargeable battery is not fully inserted in the charger. | Push the rechargeable battery fully into the charger. | |
| The plug contacts of the rechargeable battery or charger are soiled. | Disconnect the power plug and clean the plug contacts with a dry cloth. If the fault occurs again, contact a service centre. | |
| The rechargeable battery or charger is faulty. | Replace the rechargeable battery.* | |
| LED flashes red. | The rechargeable battery or charger is too hot. | Disconnect the power plug and let the rechargeable battery and charger cool down. Keep the ventilation slots of the charger clear. |
| LED is not active. | No mains voltage. | Insert the mains plug or check that mains voltage is present. |
7 DISPOSAL
Information on the German Electrical and Electronic Equipment Act (ElectroG)

■ Electrical and electronic appliances do not belong in household waste, but should be collected and disposed of separately.
- Owners or users of electrical and electronic appliances are obliged by law to return them after use.
The symbol of the crossed-through rubbish bin means that electrical and electronic appliances may not be disposed of in the household rubbish. Electrical and electronic appliances can be handed in at the following places at no charge:
■ Public service disposal or collection points (e.g. municipal building yards)
■ Points of sale of electrical appliances (stationary and online) provided traders are obliged to take them back or offer this voluntarily.
These statements only apply to appliances that are installed and sold in the countries of the European Union and are subject to European Directive 2012/19/EU. Different provisions may apply to the disposal of electrical and electronic appliances in countries outside the European Union.
8 AFTER-SALES / SERVICE
In the event of questions of warranty, repair or spare parts, please contact your nearest AL-KO Service Centre. These can be found on the Internet at:
www.al-ko.com/service-contacts
9 GUARANTEE
We will resolve any material or manufacturing faults on the appliance during the legal warranty period for claims relating to faults, in accordance with our choice either to repair or replace. The legal warranty period is determined by the legislation of the country in which the appliance was purchased.
Our warranty promise applies only if:
■ These operating instructions are heeded
■ The appliance is handled correctly
■ Original spare parts have been used
The warranty becomes void in the case of:
■ Unauthorised repair attempts
■ Unauthorised technical modifications
Non-intended use
The guarantee excludes:
■ Paint damage that can be attributed to normal wear and tear
■ Wear parts that are marked with a frame xxxxxx (x) on the spare parts card
The guarantee period commences with purchase by the first end user. The date on the proof of purchase is decisive. In the event of a guarantee claim, please take this guarantee declaration and the original proof of purchase, and contact your dealer or the nearest authorised customer service centre. This statement does not affect the purchaser's statutory claims for defects against the vendor.
VERTALING VAN DE ORIGINELE GEBRUIKERSHANDLEIDING
Inhoudsopgave
2 PRODUCTOMSCHRIJVING
www.al-ko.com/service-contacts
9 GARANTIE
www.al-ko.com/service-contacts
9 GARANZIA
8 SERVISNA SLUŽBA/SERVIS
www.al-ko.com/service-contacts
9 GARANCIJA
www.al-ko.com/service-contacts
9 JAMSTVO
Možebitne greške u materijalu ili proizvodnji na uređaju uklonit ćemo tijekom zakonskoga roka zastare za jamstvo na nedostatke prema vlastitom izboru popravljanjem ili zamjenskom dostavom. Rok zastare određuje se prema pravu države u kojoj je uređaj kupljen.
www.al-ko.com/service-contacts
9 ГАРАНЦИЈА
www.al-ko.com/service-contacts
9 ZÁRUKA
www.al-ko.com/service-contacts
9 ZÁRUKA
8 Kundeservice/service.... 84
9 Garanti 84
1 OM DENNE BRUGSANVISNING
www.al-ko.com/service-contacts
9 GARANTI
www.al-ko.com/service-contacts
9 GARANTI
www.al-ko.com/service-contacts
9 GARANTI
www.al-ko.com/service-contacts
9 GARANTII
www.al-ko.com/service-contacts
9 GARANTIJA
www.al-ko.com/service-contacts
9 GARANTIJA
www.al-ko.com/service-contacts