
SC55P - Thermal scarifier SCHEPPACH - Free user manual and instructions
Find the device manual for free SC55P SCHEPPACH in PDF.

| Product type | Petrol scarifier |
| Brand | Scheppach |
| Model | SC55P |
| Engine type | 1 cylinder, 4-stroke |
| Displacement | 212 cc |
| Maximum power | 4.1 kW (5.5 HP) |
| Rated speed | 3400 rpm |
| Fuel | Unleaded petrol |
| Tank capacity | 3.6 L |
| Engine oil | 10W30 / SAE 30 |
| Oil capacity | 0.6 L |
| Spark plug | F7RTC |
| Working width | 400 mm |
| Number of blades | 15 |
| Blade diameter | 165 mm |
| Collection bag capacity | 40 L |
| Weight | 31.2 kg |
| Depth adjustment | 6 positions (+10 / -12 mm) |
| Intended use | Private garden, leisure |
| Routine maintenance | Oil change, air filter cleaning, spark plug, belt |
| Safety | Engine brake, emergency stop, anti-start protection |
Frequently Asked Questions - SC55P SCHEPPACH
User questions about SC55P SCHEPPACH
0 question about this device. Answer the ones you know or ask your own.
Ask a new question about this device
Download the instructions for your Thermal scarifier in PDF format for free! Find your manual SC55P - SCHEPPACH and take your electronic device back in hand. On this page are published all the documents necessary for the use of your device. SC55P by SCHEPPACH.
USER MANUAL SC55P SCHEPPACH
natural_image
Black-and-white photo of a lawn mower with visible blades and mounting bracket (no text or symbols)
Made in P.R.C.
SC55P
| DE | Benzin-VertikutiererOriginalbetriebsanleitung | 9 |
| GB | Petrol scarifierTranslation of original instruction manual | 25 |
| FR | Scarificateur thermiqueTraduction des instructions d'origine | 38 |
| IT | Scarificatore a benzinaLa traduzione dal manuale di istruzioni originale | 52 |
| NL | Benzine verticuteermachineVertaling van de originele gebruikshandleiding | 66 |
| ES | Escarificador de gasolinaTraducción del manual de instrucciones original | 79 |
| PT | Escarificador a gasolinaTradução do manual de operação original | 93 |
| CZ | Benzínová vertikutátorPřeklad originálního návodu k obsluze | 107 |
| SK | Benzínový vertikutátorPreklad originálneho návodu na obsluhu | 120 |
| HU | Benzines gyepszellőztetőEredeti használati utasítás fordítása | 133 |
| PL | Benzynowy wertykulator elektrycznyTłumaczenie oryginalnej instrukcji obsługi | 146 |
| HR | Benzinski vertikulatorPrijevod originalnog priručnika za uporabu | 160 |
| SI | Bencinski vertikulatorPrevod originalnih navodil za uporabo | 173 |
| EE | Bensiini-vertikuteerijaOriginaalkältusjuhendi tõlge | 186 |
| LT | Benzininis aeratoriusOriginalios naudojimo instrukcijos vertimas | 198 |
| LV | Benzīna skarifikatorsOriginālas lietošanas instrukcijas tulkojums | 211 |
| SE | Bensindriven vertikalskärareÖversättning av original-bruksanvisning | 224 |
| FI | Bensiinikäyttöinen ilmaajaKäännös alkuperäisestä käyttöohjeesta | 237 |
| DK | Benzindrevet perforatorOversættelse fra den oprindelige betjeningsvejledning | 250 |
| NO | Bensindrevet riverOversettelse av den originale brukerveiledningen | 263 |
| BG | Бензинов култиваторПревод на оригиналното ръководство за експлоатация | 275 |
| GR | Веуζινοκίνητος εκχερσωτήςΜετάφραση του πρωτοτύπου των οδηγιών χρήσης | 289 |
| RO | Afânător electric pe benzinăTraducere din manualul de exploatare original | 304 |
| RS | Benzinski vertikulatorPrevod originalnog uputstva za upotrebu | 317 |
| TR | Benzinli tırmıklayıcıOrijinal kullanım talimatı çevirisi | 330 |
2
natural_image
Line drawing of a lawn mower with a tool inserted, showing mechanical components and wiring (no text or symbols)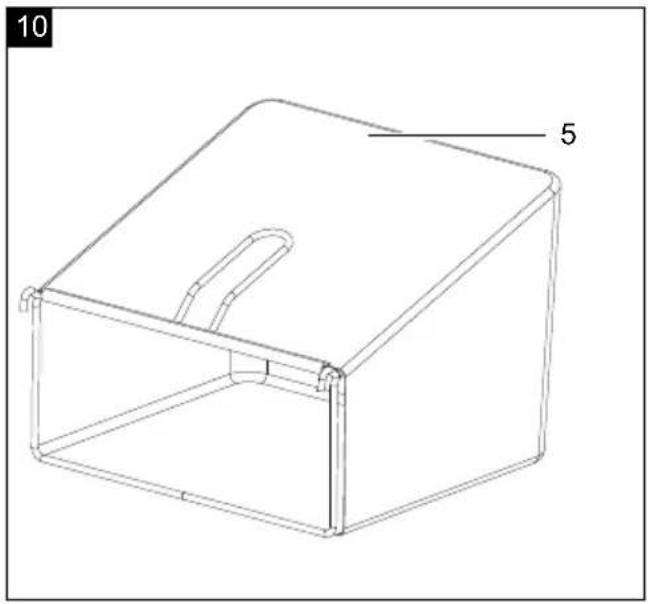
natural_image
Line drawing of a rectangular box with a handle and label '5' (no text or symbols on the diagram itself)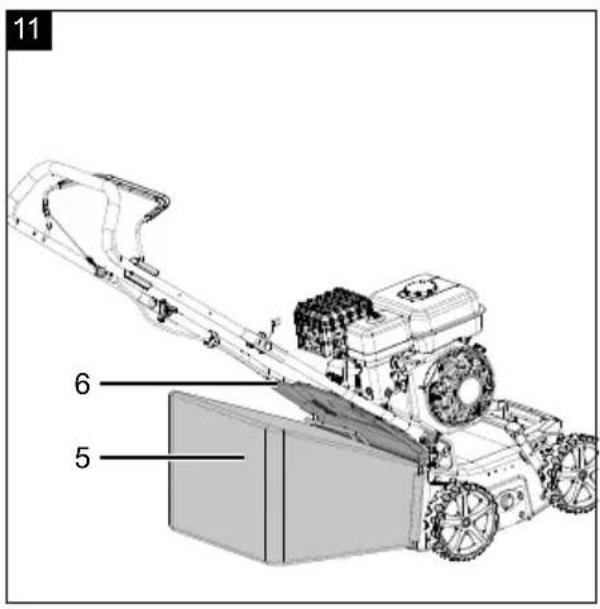
Günzburger Straße 69
D-89335 Ichenhausen
Verehrter Kunde,
• 2x Gabelschlüssel SW13*
Homepage: https://www.scheppach.com/de/service
Explanation of the symbols on the product
 | Attention! Read the operating manual before commissioning. |
 | Keep third parties (persons and animals) away from the danger zone. |
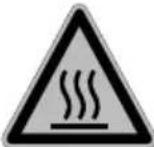 | Hot surfaces! |
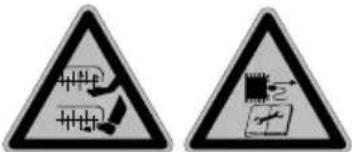 | Sharp work tools - Do not cut your fingers or toes - Disconnect spark plug connector prior to maintenance. |
 | Important. The exhaust gases are very toxic. Do not operate the motor in rooms that are not ventilated. |
 | Do not scarify/aerate in the rain! |
 | Wear hearing and eye protection. |
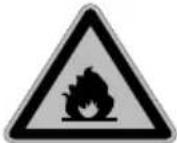 | ATTENTION! Operating materials are flammable and explosive - danger of burning! |
 | Fill with oil and fuel prior to commissioning. |
 | Guaranteed sound power level in dB | |
 | Check the oil level. | |
 | Fuel valve open/closed | |
 | Choke on/off | |
 | Mechanical engine brake | |
 | The product complies with the applicable European directives. | |
 | The product complies with the applicable Serbian directives. |
Table of contents: Page:
- Introduction....28
- Product description (Fig. 1 - 21)....28
- Scope of delivery (Fig. 2)....28
- Proper use 29
- General safety instructions.... 29
- Technical data.... 32
- Unpacking 33
- Assembly 33
- Before commissioning 33
- Operation....33
- Cleaning 34
- Maintenance 34
- Storage 36
- Disposal and recycling....36
- Troubleshooting 37
- Declaration of conformity 344
1. Introduction
Manufacturer:
Scheppach GmbH
Günzburger Straße 69
D-89335 Ichenhausen
Dear Customer,
We hope your new product brings you much enjoyment and success.
Note:
In accordance with the applicable product liability laws, the manufacturer of this product assumes no liability for damage to the product or caused by the product arising from:
- Improper handling,
- Failure to comply with the operating manual,
- Repairs carried out by third parties, unauthorised specialists,
• Installing and replacing non-original spare parts, - Improper use,
- Failures of the electrical system in the event of the electrical regulations and VDE provisions 0100, DIN 57113 / VDE0113 not being observed.
Note:
The operating manual is part of this product. It includes important instructions for the safe, proper and economic operation of the product, for avoiding danger, for minimising repair costs and downtimes and for increasing the reliability and extending the service life of the product. In addition to the safety instructions in this operating manual, you must also observe the regulations applicable to the operation of the product in your country.
Familiarise yourself with all operating and safety instructions before using the product. Only operate the product as described and for the specified areas of application. Keep the operating manual in a good place and hand over all documents when passing the product on to third parties.
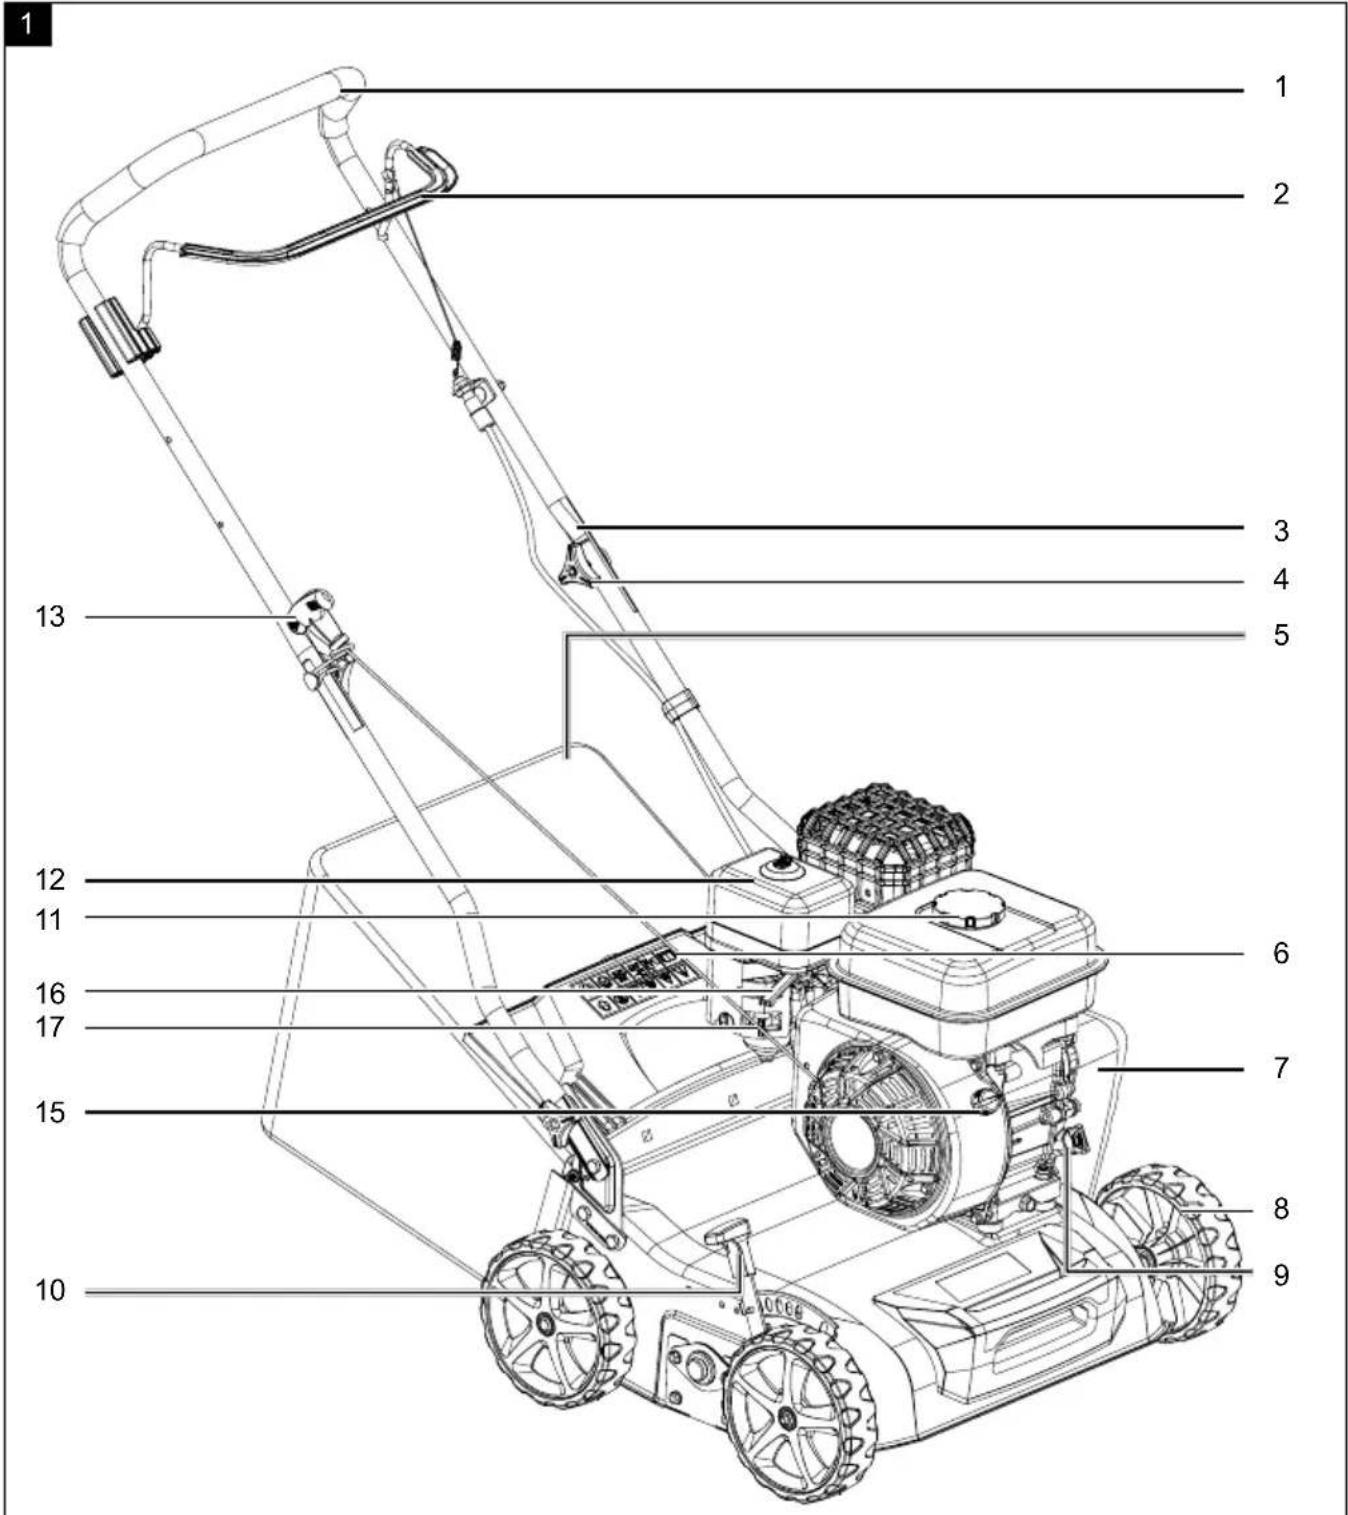
2. Product description (Fig. 1 - 21)
- Handle
- Engine brake lever
- Lower push bar
- Plastic star grip nut
- Catch basket
- Discharge flap
- Belt cover
7a. Phillips screw
7b. Allen screw
8. Wheels
8a. Wheel caps
8b. Collar nuts
9. Oil dipstick
9a. Oil drain screw
10. Working height adjustment
11. Fuel filler cap
12. Air filter cover
12a. Wing nut
13. Pull starter
14. Tensioning pulley
14a. Securing nut
14b. V-belt
15. Main switch
16. Fuel valve
17. Choke lever
18. Nut
18a. Lock nut
19. Spark plug connector
19a. Spark plug
A. Cable clamp
B. Pull cord holder
C. Bolt screw
D. Securing nut
E. Square neck screw M8x30
F. Flat head screw M8x45
G. Washer
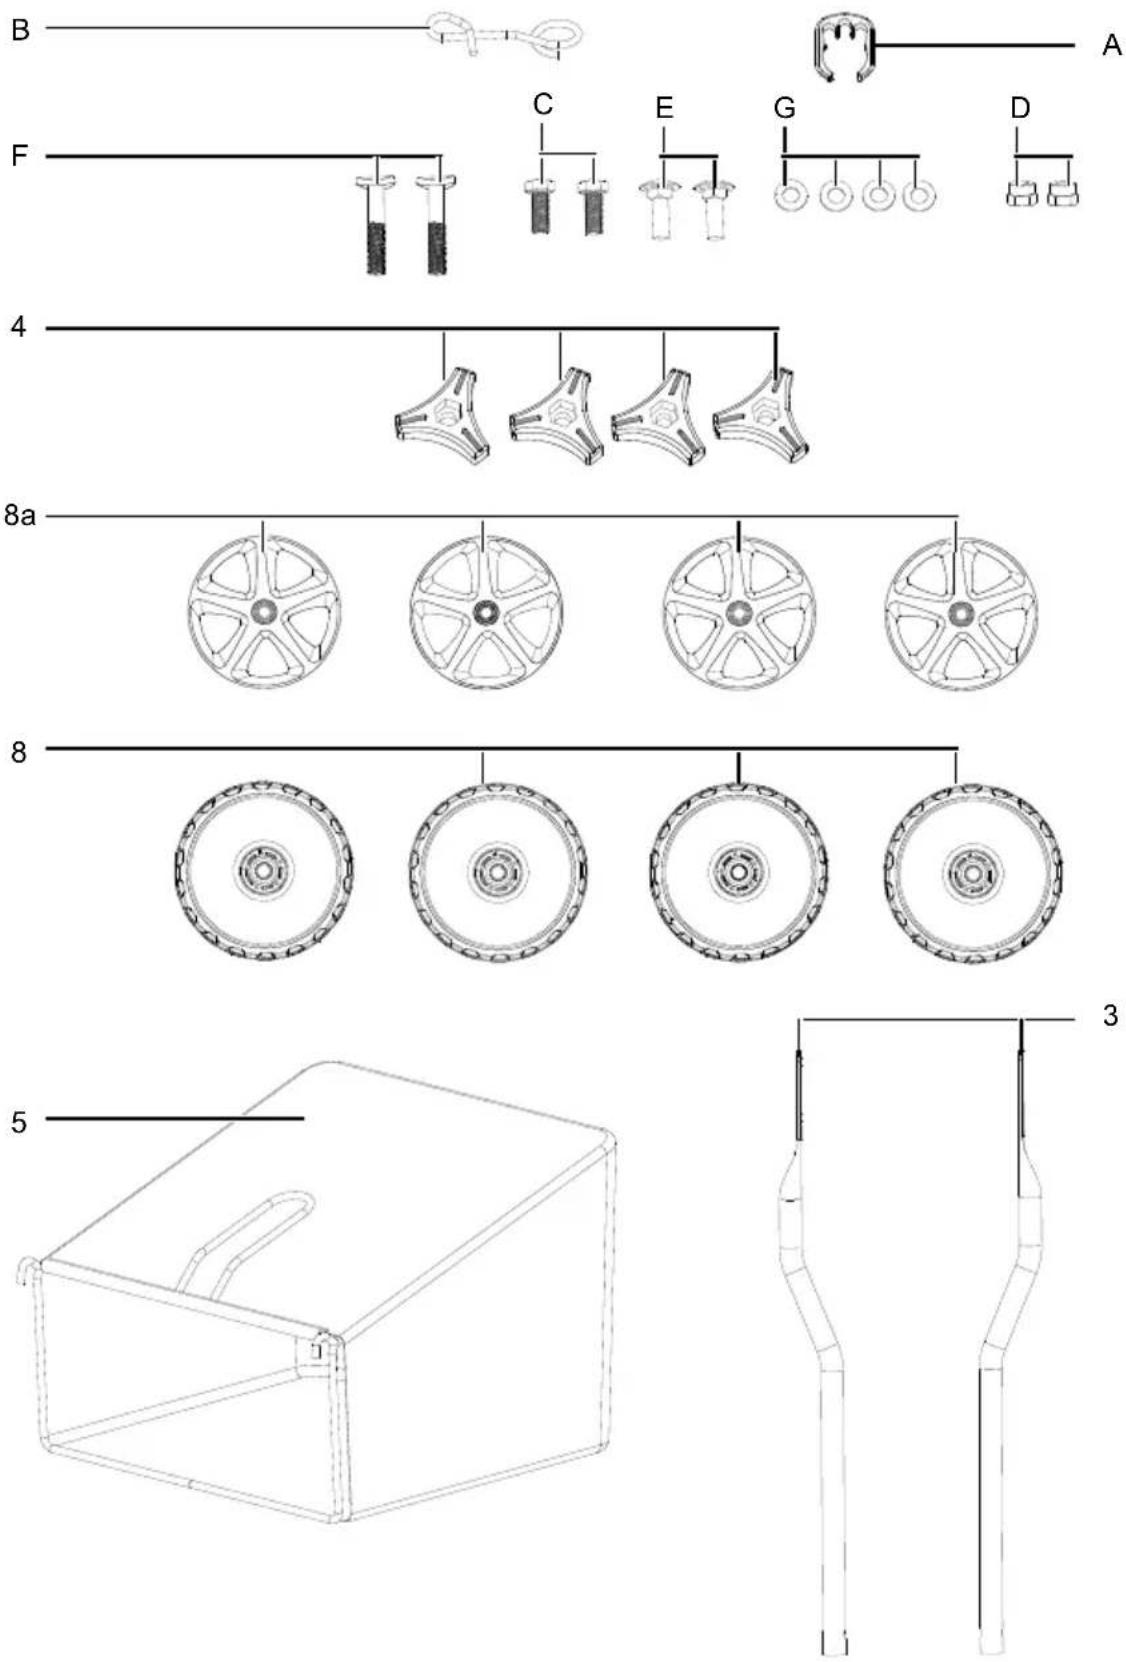
3. Scope of delivery (Fig. 2)
Item Quantity Designation
| 3 | 2x | Lower push bar |
| 4 | 4x | Plastic star grip nut |
| 5 | 1x | Catch basket |
| 8 | 4x | Wheels |
| 8 a | 4x | Wheel cap |
| A | 1x | Cable clamp |
| B | 1x | Pull cord holder |
| C | 2x | Bolt screw |
| D | 2x | Securing nut |
| E | 2x | Square neck screw M8x30 |
| F | 2x | Flat head screw M8x45 |
| G | 4x | Washer |
1x Operating manual
1x Petrol scarifier
4. Proper use
The product is used as a scarifier. Moss and weeds are pulled out of the ground together with their roots using the scarifying roller and the soil is loosened. This helps the lawn to absorb nutrients better and cleans it. We recommend scarifying the lawn in spring (April) and autumn (October).
The scarifier is suitable for private use around the home and hobby garden.
Scarifiers for private home and hobby gardens are deemed to be ones that do not normally exceed 10 hours of use per year and are predominantly used for the upkeep of grass or lawns, but are not used in public grounds, parks, sports facilities or in agriculture or forestry.
The observance of the manufacturer's usage instructions included is a prerequisite for the proper use of the scarifier. The user instructions also contain the operating, maintenance and servicing conditions.
⚠ Warning! Due to physical hazards to the user, the scarifier must not be used as a shredder for shredding tree and hedge cuttings. Furthermore, the scarifier must not be used as a motor hoe and for levelling ground elevations, such as molehills.
For safety reasons, the scarifier must not be used as a drive unit for other work tools and tool sets of any kind except those explicitly approved by the manufacturer.
The product may only be used in the intended manner. Any use beyond this is improper. The user/operator, not the manufacturer, is responsible for damages or injuries of any type resulting from this.
Please note that our products were not designed with the intention of use for commercial or industrial purposes. We assume no guarantee if the product is used in commercial or industrial applications, or for equivalent work.
Explanation of the signal words in the operating manual
Warning
Signal word to indicate a potentially hazardous situation which, if not avoided, could result in death or serious injury.
DANGER
Signal word to indicate an imminently hazardous situation which, if not avoided, will result in death or serious injury.
CAUTION
Signal word to indicate a potentially hazardous situation which, if not avoided, could result in minor or moderate injury.
ATTENTION
Signal word to indicate a potentially hazardous situation which, if not avoided, could result in product or property damage.
5. General safety instructions
General safety regulations
Familiarise yourself with your product.
The user manual and the markings on the machine must be both read and understood.
Learn how and for which purposes the machine is used. Address the potential hazards of the machine.
Learn how to control and operate the machine correctly. Learn how to rapidly bring the machine and controls to a stop or shut them down.
All instructions and safety notes in the user manual accompanying the machine separately must be read and understood. Do not attempt to operate the machine until you have a thorough understanding of how to operate and maintain the motor and how to avoid accidental injury and/or damage to property.
Safety at the workplace
Never start or run the motor indoors. The exhaust gases are dangerous and contain carbon monoxide, an odourless and poisonous gas.
Only operate this unit in a well-ventilated outdoor area.
Never operate the machine if there is inadequate visibility or light. Never operate the machine on steep inclines. Always work in a horizontal line to the ground, never from top to bottom.
Personal safety
- Never operate the machine when under the influence of drugs, alcohol or other medicines which may affect your ability to use the machine properly.
- Wear appropriate clothing. Wear long trousers, boots and gloves. Do not wear loose clothing, shorts or any type of jewellery. Tie long hair up at shoulder length. Always keep hair, clothing and gloves away from moving parts. Loose clothing, jewellery or long hair may become entangled in moving parts.
- Wear protective equipment. Always wear eye protection.
- Protective equipment, such as dust protection masks, safety helmets or hearing protection, which are used in relevant conditions, reduce personal injury.
- Check the machine prior to starting it. Do not remove separating protective devices and keep them in good condition. Ensure that all nuts, bolts, etc. are tight.
- Never operate the machine if it requires repair or if its mechanics are damaged.
- Replace damaged, missing or non-functional parts prior to using the machine. Check leak-tightness. Maintain safe working conditions for the machine.
- Under no circumstances should protective devices be tampered with. Regularly check their functionality.
- The machine must not be used if it cannot be switched on or off using the motor switch. Machines running on petrol that cannot be controlled using the motor switch are hazardous and must be replaced.
- Regularly check that spanners have been removed from the machine before starting. Personal injury can result from a spanner left on a rotating part.
-
Keep alert and use common sense when operating the machine.
-
Do not bend too far when working. Do not operate the machine barefoot or with sandals or similar light footwear. Wear safety shoes that protect your feet and improve your grip on slippery surfaces.
- Always maintain a firm stance and balance. This allows the machine to be more easily controlled in unexpected situations.
- Avoid unintentional start-up. Ensure that the motor is switched off prior to transporting the machine or carrying out maintenance or servicing work on the unit. Transporting the machine or carrying out maintenance or servicing work on the machine while the motor is running can lead to accidents.
- Check the area in which the machine is to be used and remove any stones, sticks, wires, bones and other foreign objects that could be caught and ejected.
- If devices with rear discharge and rear rollers exposed are operated without a safety catch, then full eye protection must be worn.
- Do not run the combustion engine in closed rooms in which hazardous carbon monoxide can collect.
Safe handling of operating materials
⚠ WARNING: Petrol is highly flammable!
- Fuel is highly flammable and its vapours can explode if ignited. Take appropriate measures when using fuel so as to reduce the risk of serious personal injury.
- Remain in a clean, well-ventilated outdoor area when filling or draining the tank and use an approved fuel collection container. Smoking prohibited. Avoid ignition sparks, open flames or any other source of ignition in the vicinity of the area when filling fuel or operating the unit. Never fill the tank when inside the building.
- To avoid sparking or arcing, keep earthed conductive objects, such as tools, away from unprotected live electrical parts and connections. They may ignite fumes or vapours.
- Always switch off the motor and allow it to cool down before refilling the tank. Do not remove the cap from the tank or fill up with fuel while the engine is running or warm. Never operate the machine if the fuel system is leaking.
- Slightly open the cap of the tank to release pressure in the tank.
-
Do not overfill the tank (to approx. 1.5 cm below the filler neck for space in the event of fuel expanding due to heat generated by the motor).
-
Replace the caps of the tank and the container securely and wipe up any spilled fuel. Never operate the unit if the tank cover is not attached.
- Avoid sources of ignition in case of spilled fuel. Do not try to start the motor if fuel has been spilled. Instead, remove the machine from the affected area and avoid sources of ignition until the vapours from the fuel have dissipated.
- Store fuel in specially made containers that have been approved for this purpose.
- Store fuel in a cool, well-ventilated location away from sparks, open flames or other sources of ignition.
- Never store fuel or the machine containing a tank filled with fuel in a building where exhaust fumes could come into contact with ignition sparks, open flames or any other ignition source, such as water heaters, ovens, dryers or similar. Allow the motor to cool down before placing it in a housing.
- If petrol overflows, no attempts should be made to start the engine. Instead, the machine must be removed from the area contaminated with petrol. Do not try to start the engine until the fuel vapours have evaporated.
- For safety reasons, the fuel tank cap and other fuel caps must be replaced if damaged.
Notes on use and care of the machine
- Do not lift or carry the machine when the motor is running. Stop work tools if crossing surfaces other than grass and when transporting the machine from and to the surface to be worked on.
- Do not operate the machine using force. Use the right machine for your application. Using the right machine will do the job in a better and safer way.
- Do not change the motor speed regulator settings and do not run the motor at too high a speed. The speed regulator controls the maximum operating speed deemed safe for the motor.
- Do not run the motor fast if the ground is not being worked.
- Never put hands and feet on or under rotating parts. Always keep clear of the ejection opening.
-
Avoid contact with hot fuel, oil, exhaust fumes and hot surfaces. Do not touch the motor or the silencer. These parts become extremely hot during operation. They also remain hot for a short time after the unit has been switched off. Allow the motor to cool down before carrying out maintenance or adjustment work.
-
If the machine starts to make unusual noises or vibrate abnormally, immediately switch off the motor, disconnect the ignition cable and find the cause. Unusual noises or vibrations are generally a warning sign.
- Only use connections and accessories that have been approved by the manufacturer. Failure to comply with this requirement may result in personal injury.
- Service the machine. Check whether any parts in motion are misaligned or blocked. Check parts for breakage or check to see if there is any other condition that might affect the operation of the machine. Have the machine repaired before use if it is damaged. Many accidents occur due to inadequately serviced equipment.
- Clear the motor and silencer of grass, leaves, excessive grease or built-up carbon to reduce the risk of fire.
- Keep cutting tools sharp and clean. Cutting tools with sharp cutting edges that have been properly maintained are less likely to jam and are easier to control.
- Never pour or splash water or any other liquid on the unit. Keep handlebars dry, clean and free of deposits. Clean after each use.
- Adhere to laws and regulations concerning the proper disposal of fuel, oil, etc., in order to protect the environment.
- Keep the machine out of the reach of children when not in use and do not allow persons unfamiliar with the machine or these instructions to operate the machine. The machine is dangerous in the hands of untrained users.
- Replace damaged silencers.
- Prior to use. always perform a visual inspection to check whether the work tools and bolts are worn out or damaged. To prevent an imbalance, worn out or damaged work tools and bolts may only be replaced in sets. Only work with the machine in daylight or with good artificial lighting.
- If possible, avoid using the device on wet grass or take special care to prevent slipping.
- Only guide the machine at walking pace.
- Always work across a slope, never upwards or downwards.
- Take particular care when changing direction on a slope.
- Do not work on excessively steep slopes.
-
Take particular care when reversing the machine or pulling it towards you.
-
Never use the machine with damaged or missing safety guards, e.g. without deflectors and/or catcher.
-
Disconnect all work tools and drives before starting the engine.
-
Start or press the starter switch with caution in accordance with the manufacturer's instructions. Ensure that your feet are far enough away from the work tool(s).
-
When starting the engine, do not tilt the machine unless it has to be lifted during the process. In this case, only tilt as far as absolutely required and only lift the side away from the operator.
-
Do not start the engine if you are standing in front of the ejector chute.
-
Close the throttle valve when running down the engine; if the engine is equipped with a petrol shut-off valve, close this after aerating the soil or scarifying
-
Switch the motor off by removing the spark plug connector and the ignition key on machines with a battery starter:
- if you leave the machine
- before refuelling
- Switch the motor off by removing the spark plug connector and the ignition key on machines with a battery starter:
- before releasing blockages or rectifying obstructions in the ejector chute,
- before checking or cleaning the machine, or performing work on it,
- if it came into contact with a foreign object. Inspect the machine for damage and perform the required repairs before starting again and working with the machine,
- if the machine starts to vibrate unusually strongly (inspect immediately)
Corrective maintenance instructions
Switch off the motor prior to cleaning, repairing, inspecting or adjusting the machine and ensure that all parts in motion have been stopped.
Disconnect the ignition cable and position the cable away from the spark plug in order to prevent accidental starting.
Have the machine repaired by qualified personnel using only original spare parts. This ensures that the safety of the machine is upheld.
6. Technical data
Type of engine Single-cylinder / 4-stroke
| Displacement 212 cm3 | |
| Max. motor performance | 4.1 kW/5.5 HP |
| Rotation speed 3400 rpm | |
| Fuel Unleaded petrol | |
| Tank contents 3.6 l | |
| CO2 output 289.55 g/kWh | |
| Engine oil 10W 30 / SAE 30 | |
| Spark plug F7RTC | |
| Oil/tank capacity 0.6 l | |
| Depth setting +10 / -12 | |
| Working width of 400 mm | |
| Number of blades 15 | |
| Blade ∅ 165 | |
| Catch basket capacity | 40 l |
| Weight | 31.2 kg |
Subject to technical changes!
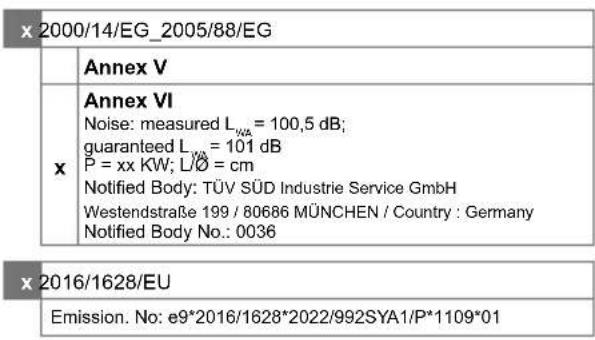
Information about noise level measured in accordance with applicable standards:
$$ \text { Sound pressure } L _ {\mathrm{pA}} = 7 8. 6 \mathrm{dB} $$
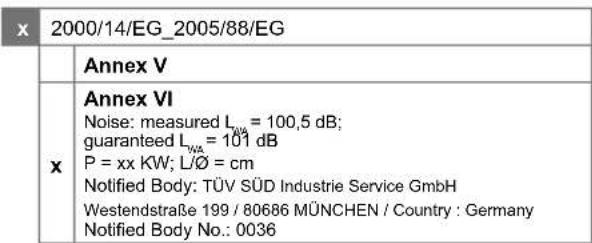
$$ \text { Sound power level } L _ {\mathrm{wA}} = 1 0 0. 5 \mathrm{dB} $$
$$ \text { Measurement uncertainty } K _ {\mathrm{pA}} = 1. 9 \mathrm{dB} $$
Wear hearing protection.
Exposure to noise can cause hearing loss.
Vibration:
$$ \text { Vibration } A _ {\mathrm{hv}} (\text { left / right }) = 8. 3 8 \mathrm{m} / \mathrm{s} 2 $$
$$ \text { Measurement uncertainty } K _ {\mathrm{pA}} = 1. 5 \mathrm{m} / \mathrm{s} ^ {2} $$
Keep the noise level and vibration to a minimum!
• Only use faultless products.
- Maintain and clean the product at regular intervals.
- Adapt your working methods to the product.
• Do not overload the product.
• Have the product checked if necessary.
- Switch the product off if it is not in use.
- Wear gloves.
7. Unpacking
ATTENTION!
The product and the packaging material are not children's toys! Do not let children play with plastic bags, films or small parts! There is a danger of choking or suffocating!
- Open the packaging and carefully remove the product.
- Remove the packaging material, as well as the packaging and transport safety devices (if present).
- Check whether the scope of delivery is complete.
- Check the product and accessory parts for transport damage.
- If possible, keep the packaging until the expiry of the warranty period.
8. Assembly
Attention!
Always make sure the product is fully assembled before commissioning!
Place the product on a level, even surface!
Tool required:
- 2x open-ended spanner, size 13*
* = not included in the scope of delivery!
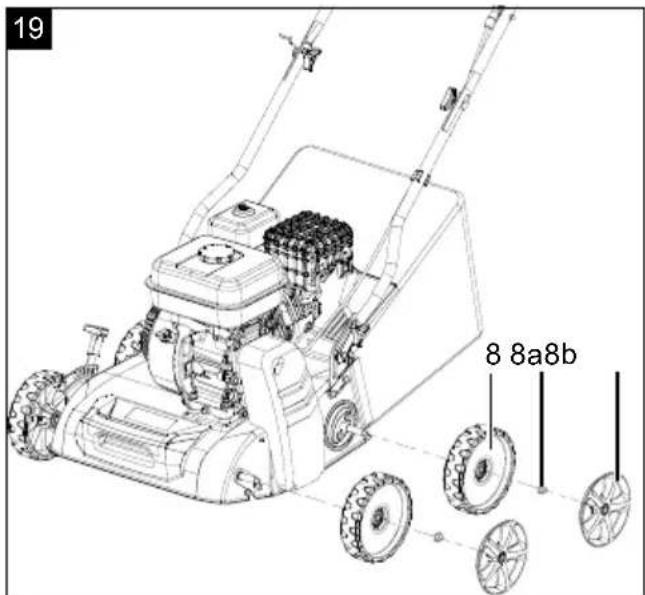
8.1 Fitting the wheels (8) and wheel caps (8a) (Fig. 19)
- Loosen the pre-assembled collar nut (8b) using an open-ended spanner size 13*.
- Place the wheel (8) on the wheel hub.
- Mount the collar nut (8b) back onto the wheel hub, using an open-ended spanner size 13 mm*.
- Position the wheel cap (8a) on the wheel (8) and press it on evenly until all clips have engaged.
- Repeat this process for all wheels (8).
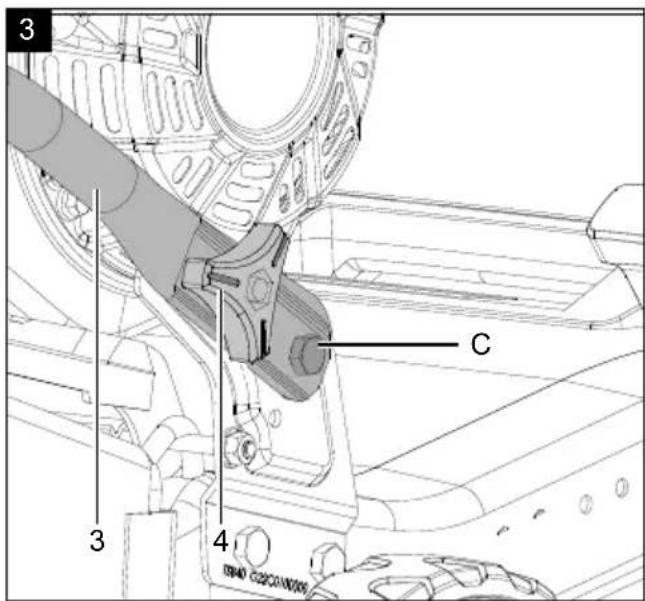
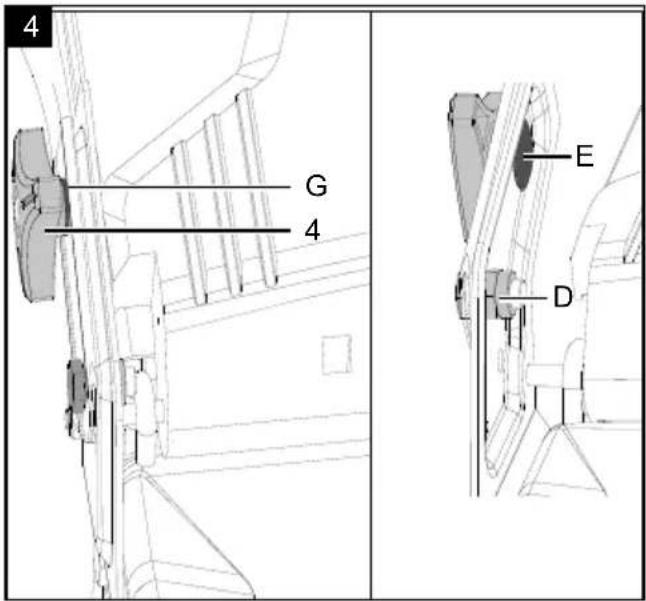
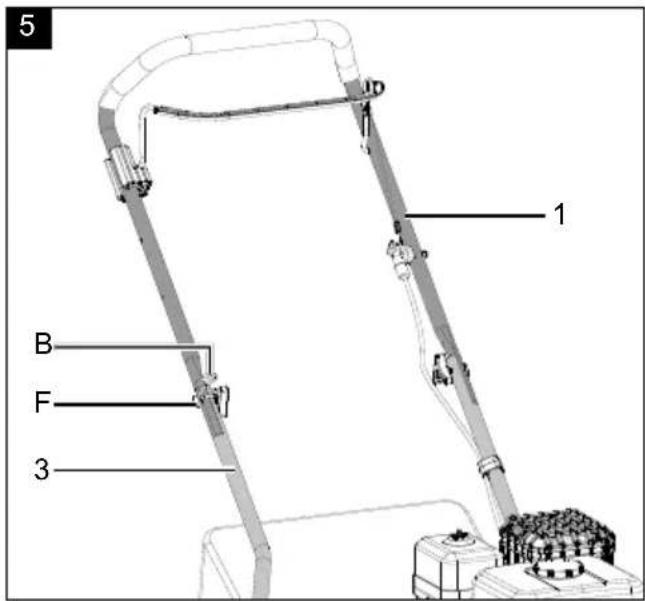
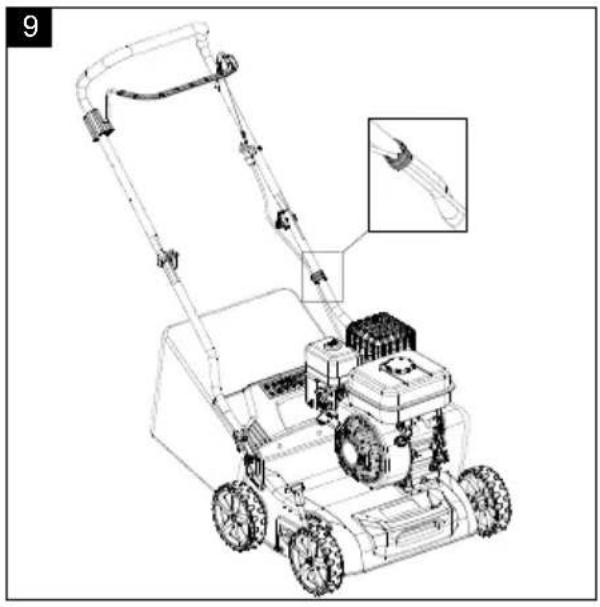
8.2 Fitting the lower (3) and upper guide rail (Fig. 3 - 9)
-
Fit the lower push bar (3) as shown in Figures 3 + 4. Fix the lower push bar (3) with the bolt screw (C) and the locknut (D) as well as with the square neck screw (E), the washer (G) and the plastic star nut (4), using two open-end spanners size 13.
-
Repeat the process on the other side.
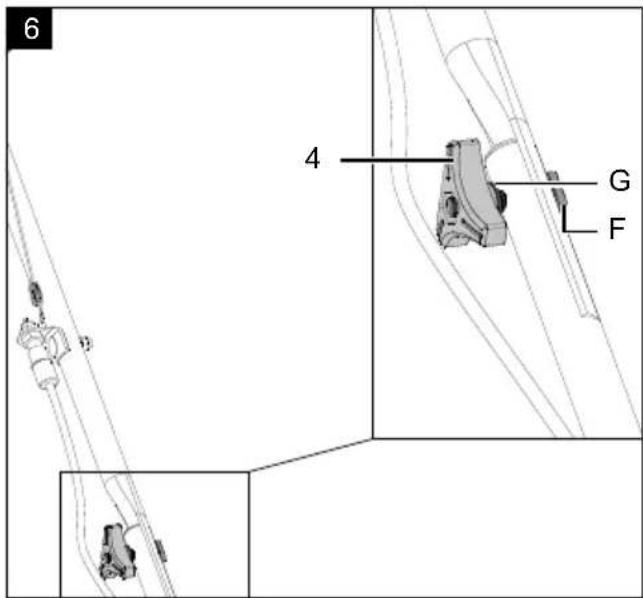
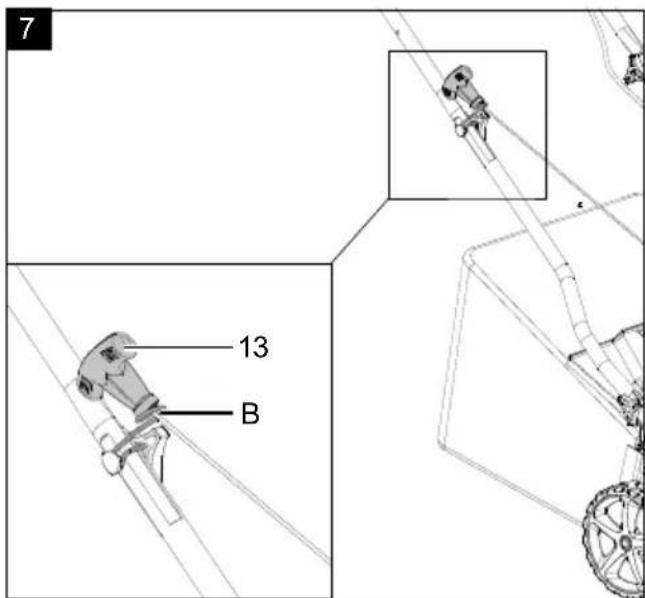
-
Connect the upper push bar to the lower push bar (3). Use the two plastic star nuts (4) with the flat head screws (F) and washers (G) for this purpose. On the right-hand side, place the cable holder (B) on the flat head screw (F) before fitting the washer (G) and plastic star nut (4).
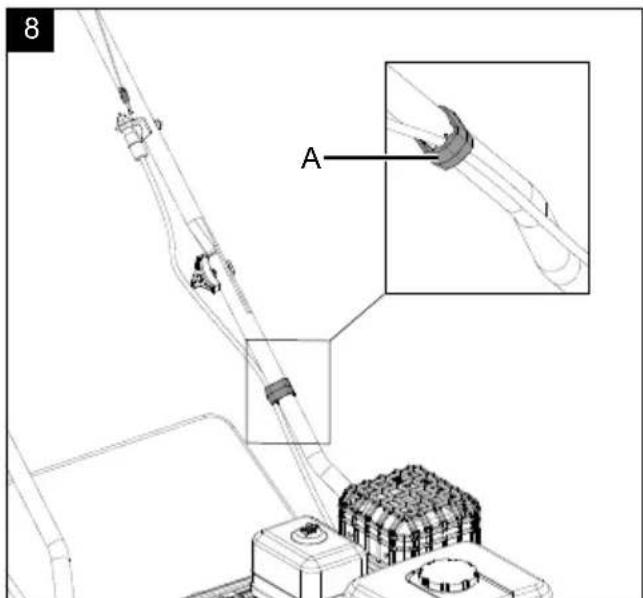
- Fix the cable with the cable clamp (A) on the lower push bar (3). (fig. 8 + 9)
9. Before commissioning
9.1 Hooking in the catch basket (5) (Fig. 10 - 11)
- Lift the discharge flap (6).
- Hang in the catch basket (5) from above.
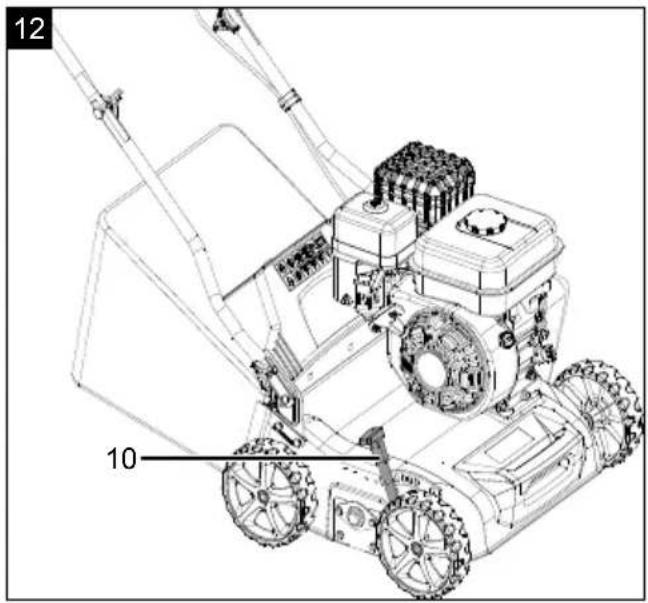
9.2 Working height adjustment (10) (Fig. 12)
- Reach for the lever of the working height adjustment (10) and pull it slightly outwards.
- Move the lever towards the desired position to set one of six working heights.
- Release the lever separately in the desired position to secure the working height.
10. Operation
⚠ Attention!
The engine does not come with oil in it. Therefore, ensure that you add oil before starting it up. The oil level in the motor must be checked before any work is undertaken.
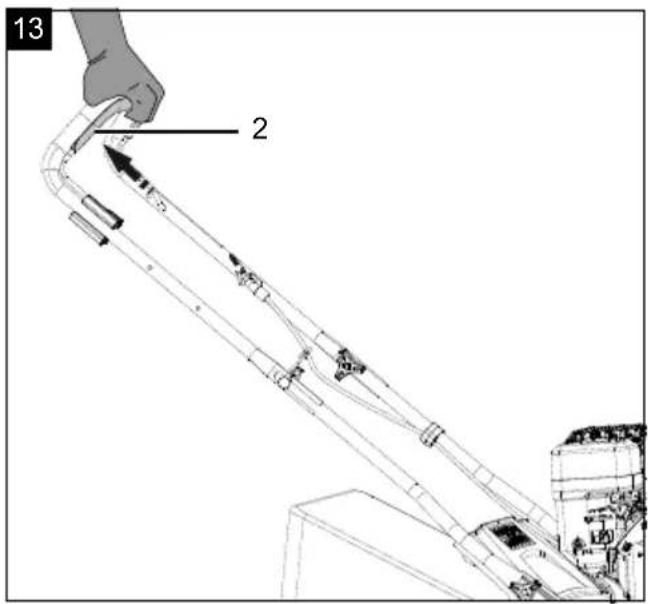
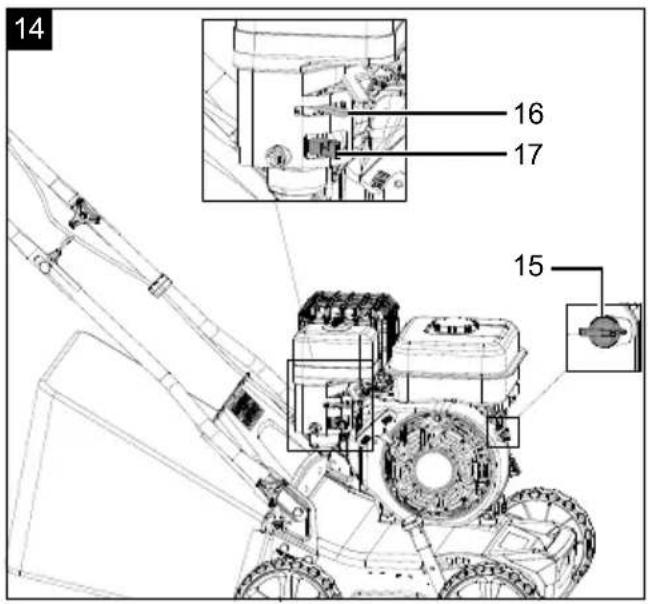
Starting the product (Fig. 13, 14)
In order to avoid unintentional starting of the motor, it is equipped with a motor brake, which must always be actuated during operation, since otherwise the motor will stop.
Attention: When releasing the engine brake lever (2), it must return to the starting position causing the motor to stop. If this is not the case, the product must not be used.
- Move the main switch (15) into the "ON" position and then open the petrol valve (16). To do this, set the valve to "ON".
- Set the choke lever (17) to the "Choke" position. Note: The choke is not normally required when re-starting a warm engine.
- Actuate the engine brake lever (2) and firmly pull the pull starter (13) until the engine starts.
- Allow the engine to warm up for a short time and then set the choke lever (17) to the "RUN" position.
Attention: Always slowly pull out the pull starter (13) until you feel the first resistance before pulling it out quickly to start. Do not allow the pull starter (13) to fling back after starting has been completed
Attention: The scarifying roller rotates when the engine is started.
Attention! Never open the discharge flap (6) when the motor is still running. The rotating roller may lead to injuries. Always carefully secure the discharge flap (6).
The safety distance between the housing and the user given by the guide rails must always be maintained. Special care must be taken when working and changing direction on embankments and slopes. Make sure you have a secure footing, wear shoes with non-slip, well gripping soles and long trousers. Always work across slopes.
For safety reasons, slopes with an inclination of more than 15 degrees must not be scarified with the product. Exercise particular caution when moving backwards and pulling the product, risk of tripping!
Scarifying
When scarifying, the grass surface and the grass seam are scratched using the scarifying blade. This removes moss, mulch and weeds, and cuts the fine roots on the top. Therefore, air, light, water ant nutrients reach the grass root better, resulting in the grass growing better and thicker. Furthermore, cutting the fine roots encourages grass growth. This promotes grass durability.
Scarifying should be performed a maximum of twice per year.
Ideally in April/May and/or September/October. Fertilise and water the grass surface after scarifying in order to obtain an even better result.
Advice on how to work properly
- An overlapping working method is recommended when working. Guide the product in as straight a path as possible to obtain a clean result. These paths should always overlap by a few centimetres so that there are no streaks left. First scarify lengthways and then widthways in order to obtain a chessboard pattern.
-
As soon as grass cuttings are left lying behind on the ground during working, the catch basket must be emptied. Attention! Before removing the catch basket, switch off the motor and wait for the roller to come to a standstill!
-
Re-sow sections without grass or with little grass after scarifying.
- In order to unhook the catch basket (5), lift the discharge flap (6) using one hand and remove the catch basket (5) with the other hand! It depends on the grass growth of the lawn and the hardness of the soil as to how often the lawn should be worked.
- Keep the underside of the product clean and remove any earth and grass deposits. Deposits impede the start-up process and impair the quality. On slopes, the path should be made perpendicular to the slope. Switch off the motor before carrying out any checks on the roller.
Attention! The roller continues to rotate for a few seconds after the motor is switched off. Never try to stop the roller. If the moving roller hits an object, switch off the product and wait until the roller comes to a complete stop. Then check the condition of the roller. If damaged, it must be replaced.
11. Cleaning
- Keep protective devices, air vents and the engine housing as free of dust and dirt as possible. Rub the product clean with a clean cloth or blow it off with compressed air at low pressure.
• We recommend that you clean the product directly after every use. - Clean the product at regular intervals using a damp cloth and a little soft soap. Do not use any cleaning products or solvents; they could attack the plastic parts of the product. Make sure that no water can penetrate the interior of the product.
- In order to reduce the risk of fire, keep the engine, exhaust, battery box and the area surrounding the fuel tank free of grass, straw, moss, leaves or escaping grease.
12. Maintenance
⚠ Warning
Have maintenance and repair tasks that are not described in this operating manual, carried out by a specialist workshop. Use only original spare parts.
There is a risk of accident! Always carry out maintenance and cleaning work when the engine is switched off. There is a danger of injury! Let the Product cool down before all maintenance and cleaning tasks. Elements of the engine are hot. There is a danger of injury and burning!
Tool required:
- Open-ended spanner size 13*
- Open-ended spanner size 20*
- Allen key, 5mm*
• Phillips screwdriver* - Spark plug wrench*
• Copper wire brush* - Collection bucket*
- Funnel*
- Cloth*
* = may not be included in the scope of delivery!
- A worn or damaged cutting roller should be replaced by an authorised specialist.
- Ensure that all fixing elements (bolts, nuts, etc.) are always tightened so that it is safe to work with the scarifier.
- Store your scarifier in a dry space.
- All screwed parts as well as the wheels and axles should be cleaned and then oiled to ensure a long service life.
- Regular maintenance of the scarifier will not only ensure its durability and performance, but will also help to scarify your lawn carefully and easily.
- Perform a general check of the scarifier at the end of the season and remove all accumulated debris. Always check the condition of the scarifier prior to the start of the season. Contact our customer service centre for repairs.
- Check the catcher regularly for wear or damaged parts.
- Check the product regularly and replace worn out or damaged parts for safety reasons.
- If the fuel tank has to be drained, you must do this outdoors. Store the drained fuel in a special container for fuel or dispose of it with due care.
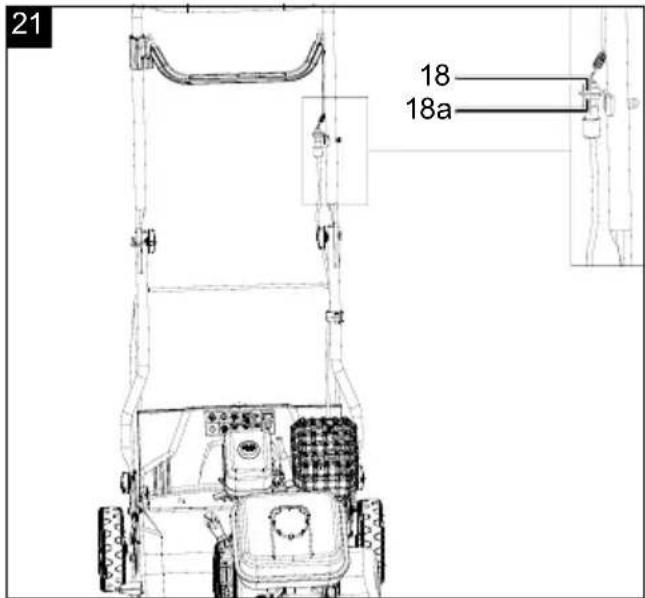
12.1 Changing the engine brake (Fig. 21)
- Loosen the counternut (18a).
- Turn the nut (18) in the desired direction, depending on whether you want to set the engine brake tighter or looser.
- Tighten the counternut (18a) again.
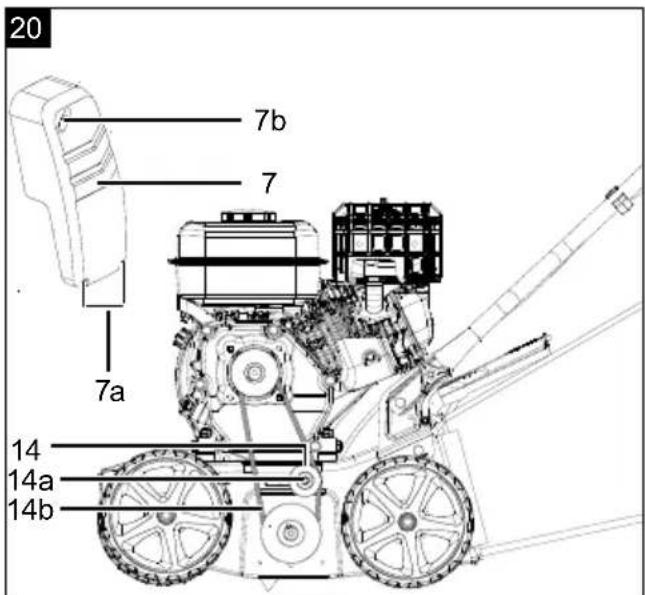
12.2 Tightening the V-belt (14b) (Fig. 20)
- Loosen the two Phillips screws (7a) on the belt cover (7) using a Phillips screwdriver*.
- Loosen the Allen screw (7b) using an Allen key 5mm*.
- Remove the belt cover (7).
-
Loosen the locknut (14a) using an open-ended spanner size 13* for this.
-
Push the tensioning pulley (14) outwards to tighten the V-belt (14b).
- Hold the tensioning pulley (14) in position and tighten the locknut (14a) again.
- Refit the belt cover (7).
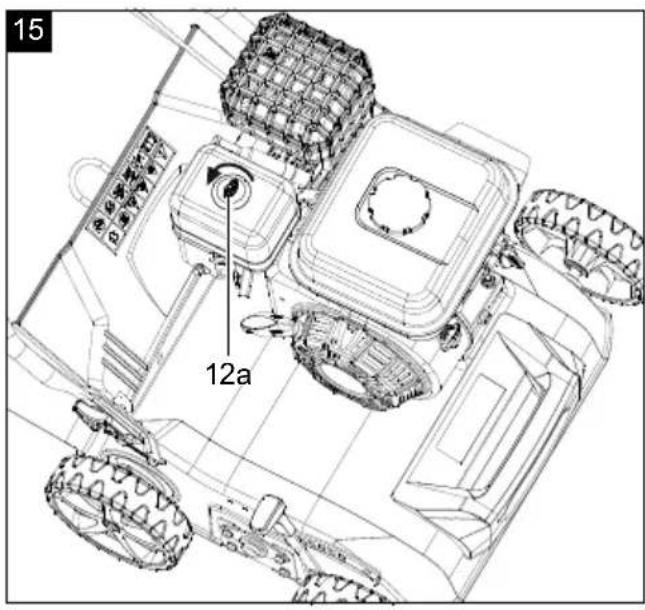
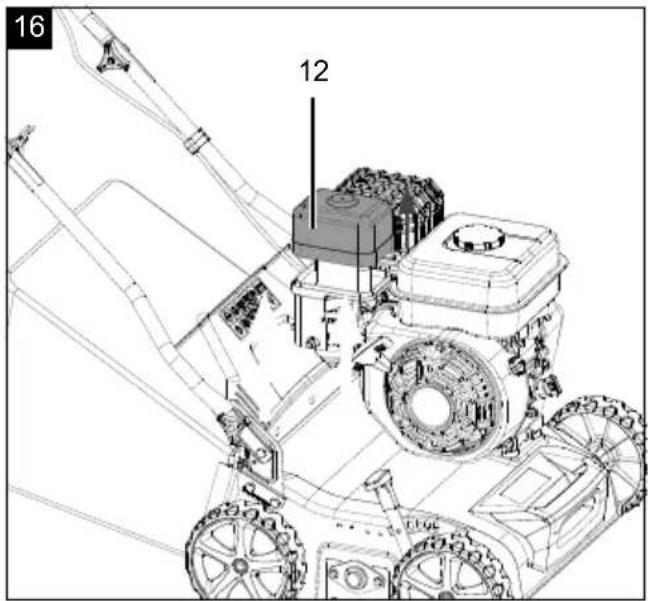
12.3 Air filter maintenance (Fig. 15, 16)
Fouled air filters diminish the engine output due to reduced air supply to the carburettor. Regular inspection is therefore essential. The air filter should be checked every 50 operating hours and cleaned as required. The air filter must be checked more often in case of very dusty air.
- Loosen the wing nut (12a) on the air filter cover (12).
- Remove the filter.
- Clean the air filter only by knocking out or with compressed air.
- The re-assembly takes place in reverse order.
Attention: Never clean the air filter with petrol or combustible solvents.
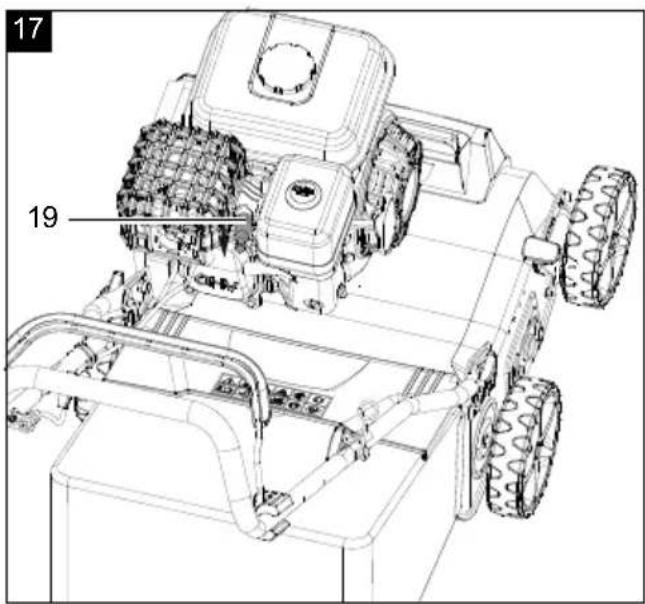
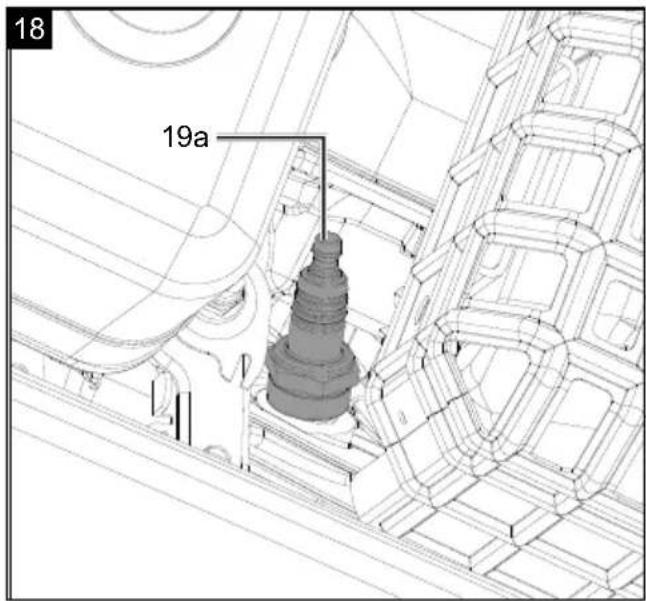
12.4 Maintaining/replacing the spark plug (19a) (Fig. 17, 18)
Check the spark plug (19a) for contamination for the first time after 10 operating hours and clean it with a copper wire brush* if necessary. Then service the spark plug every 50 operating hours.
- Pull off the spark plug connector (19) with a twisting motion.
- Remove the spark plug (19a) with a spark plug wrench*.
- The re-assembly takes place in reverse order.
12.5 Checking the oil level (Fig. 22)
Place the product on a level, even surface.
- Start the engine and let it run for a short time.
- Turn the oil dipstick (9) anticlockwise to unscrew it and wipe it with a clean, lint-free cloth*.
- Reinsert the oil dipstick (9) and check the oil level without screwing the oil dipstick (9) tight again.
- Pull the oil dipstick (9) out and read the oil level in the horizontal position. The oil level must be positioned between both markings of the oil dipstick (9).
- Then screw the oil dipstick (9) in again.
12.6 Changing the engine oil (Fig. 22, 23)
The oil change should be carried out annually at operating temperature before the start of the season. Use only 4-stroke engine oil (10W 30 / SAE 30).
- Place a collection bucket* under the oil drain screw (9a).
- Remove the oil drain screw (9a) and the oil dipstick (9).
- Tilt the product forward slightly and allow all the oil to drain out.
- Refit the oil drain screw (9a).
- Fill a maximum of 0.6 litres of fresh oil into the oil filling opening, using a funnel*.
- Screw the oil dipstick (9) back in and let the product run for a short time.
- Then check the oil level again as described in 12.5.
Service information
With this product, it is necessary to note that the following parts are subject to natural or usage-related wear, or that the following parts are required as consumables.
Wearing parts*: oil*, spark plug*, V-belt*, cutting roller*
* may not be included in the scope of delivery!
Spare parts and accessories can be obtained from our Service Centre. To do this, scan the QR code on the front page.
13. Storage
Preparation for storing the product Warning: Do not remove the petrol in enclosed spaces, near fire or when smoking. Petrol fumes can cause explosions and fire.
- Empty the fuel tank with a petrol extraction pump.
- Start the engine and let it run until any remaining petrol has been used up.
⚠ WARNING: Never store the product with petrol in the tank inside a building in which fuel vapours may come into contact with naked flames or sparks! - Change the oil at the end of every season. To do so, remove the used engine oil from a warm engine and refill with fresh oil.
-
Remove the spark plug from the cylinder head. Fill the cylinder with approx. 20 ml of oil from an oil can. Slowly pull back the starter handle, which will bathe the cylinder wall with oil. Attach the spark plug again.
-
Clean the cooling fins of the cylinder and the housing.
- Be sure to clean the entire product to protect the paint.
- Store the product in a well-ventilated place or area.
Preparing the product for transport
- Empty the fuel tank with a petrol extraction pump.
- Keep the motor running until the remaining petrol has been used up.
- Drain the motor oil of the warm motor.
- Remove the spark plug connector from the spark plug.
- Clean the cooling fins of the cylinder and the housing.
- Dismantle the push bars if necessary. Ensure that the cable pulls are not kinked.
14. Disposal and recycling
Notes for packaging


The packaging materials are recyclable. Please dispose of packaging in an environmentally friendly manner.
You can find out how to dispose of the disused device from your local authority or city administration.
Fuels and oils
- Before disposing of the device, the fuel tank and the motor oil tank must be emptied!
- Fuel and engine oil do not belong in household waste or drains, but must be collected or disposed of separately!
- Empty oil and fuel tanks must be disposed of in an environmentally friendly manner.
15. Troubleshooting
| Fault Possible cause Remedy | ||
| Engine does not start | Engine brake lever not pressed Press engine brake lever | |
| Spark plug is defective Replace spark plug | ||
| Fuel tank empty Refill with fuel | ||
| Fuel valve closed Fuel valve open | ||
| Engine power diminishes | Ground too hard Correct scarifying depth | |
| Scarifier housing clogged Clean housing | ||
| Blade heavily worn Replace blade | ||
| Air filter dirty Clean the air filter | ||
| Improper scarifying | Blade is worn Replace blade | |
| Incorrect scarifying depth Correct scarifying depth | ||
| Motor runs, cutting roller does not rotate | Belt torn Have checked by customer service workshop | |
| Belt loose Retighten belt | ||
Günzburger Straße 69
D-89335 Ichenhausen
Cher client,
Günzburger Straße 69
D-89335 Ichenhausen, Germania
Egregio cliente,
Günzburger Straße 69
D-89335 Ichenhausen
Geachte klant,
⚠ WAARSCHUWING: Benzine is zeer ontvlambaar!
Günzburger Straße 69
Günzburger Straße 69
Günzburger Straße 69
D-89335 Ichenhausen
Vážený zákazníku,
Günzburger Straße 69
D-89335 Ichenhausen
Vážený zákazník,
Günzburger Straße 69
D-89335 Ichenhausen
Kedves Ügyfelünk!
Günzburger Straße 69
D-89335 Ichenhausen
Szanowny Kliencie,
Günzburger Straße 69
D-89335 Ichenhausen
Poštovani kupci,
Želimo vam mnogo zadovoljstva i uspjeha prilikom ra- da s novim proizvodom.
Napomena:
Prema važećem njemačkom Zakonu o odgovornosti za proizvode, proizvođač ovog proizvoda ne odgovara za štete koje nastanu na ovom proizvodu ili koje ovaj proizvod uzrokuje u slučaju:
• neispravnog rukovanja,
- nepridržavanja priručnika za uporabu,
- popravaka koje obavljaju neovlašteni stručnjaci,
• montaže i zamjene neoriginalnih rezervnih dijelova,
- nenamjenske uporabe,
- kvarova električnog sustava zbog nepridržavanja propisa i odredaba o električnoj energiji VDE 0100, DIN 57113 / VDE0113.
Günzburger Straße 69
D-89335 Ichenhausen
Spoštovani kupec,
Želimo vam veliko veselja in uspeha pri delu z vašim novim izdelkom.
Napotek:
Proizvajalec tega izdelka skladno z veljavnim zakonom o odgovornosti za izdelke ne jamči za poškodbe na tem izdelku ali poškodbe s tem izdelkom, do katerih pride pri:
Günzburger Straße 69
D-89335 Ichenhausen
Austatud klient!
Günzburger Straße 69
D-89335 Ichenhausen
Gerbiamas kliente,
Günzburger Straße 69
Günzburger Straße 69
D-89335 Ichenhausen
Bästa kund!
Günzburger Straße 69
D-89335 Ichenhausen
Arvoisa asiakas,
Günzburger Straße 69
D-89335 Ichenhausen, Tyskland
Kære kunde,
Günzburger Straße 69
D-89335 Ichenhausen
Kjære kunde,
Günzburger Straße 69
D-89335 Ichenhausen, Германия
Уважаеми клиенти,
Günzburger Straße 69
D-89335 Ichenhausen
Αξιότιμε πελάτη,
Günzburger Straße 69
D-89335 Ichenhausen
Stimate client,
Günzburger Straße 69
D-89335 Ichenhausen
Poštovani kupče,
Günzburger Straße 69
D-89335 Ichenhausen
İthalatçı:
EU Declaration of Conformity
| X 2006/42/EG | |
| Annex IV Notified Body: Notified Body No.: Certificate No.: | |
Standard references:
EN 13684:2018; EN ISO 14982:2009
This declaration of conformity is issued under the sole responsibility of the manufacturer.
The object of the declaration described above fulfils the regulations of the directive 2011/65/EU of the European Parliament and Council from 8th June 2011, on the restriction of the use of certain hazardous substances in electrical and electronic equipment.
Subject to change without notice
Documents registrar: Stefan Hartinger Günzburger Str. 69, D-89335 Ichenhausen
EU Declaration of Conformity
| X | 2006/42/EG | |
| Annex IV Notified Body: Notified Body No.: Certificate No.: | ||

Standard references:
EN 13684:2018; EN ISO 14982:2009
This declaration of conformity is issued under the sole responsibility of the manufacturer.
The object of the declaration described above fulfils the regulations of the directive 2011/65/EU of the European Parliament and Council from 8th June 2011, on the restriction of the use of certain hazardous substances in electrical and electronic equipment.
Subject to change without notice
Documents registrar: Stefan Hartinger Günzburger Str. 69, D-89335 Ichenhausen
EU Declaration of Conformity
AB uygunluk beyani
CE
Scheppach GmbH, Günzburger Str. 69, D-89335 Ichenhausen
| DE | erklärt folgende Konformität gemäß EU-Richtlinien und Normen für den Artikel | RO | declară următoarea conformitate corespunzător directivelor și normelor UE pentru articolul |
| GB | hereby declares the following conformity under the EU Directive and standards for the following article | GR | δηλώνει την ακόλουθη συμμόρφωση σύμφωνα με την Οδηγία ΕΕ και τα πρότυπα για το προϊόν |
| BG | декларира съответното съответствие съгласно Дирек-тива на ЕС и норми за артикул | TR | Burada açıklanan ürünün geçerli yönetmeliklere ve standartlara uygun olduğunu tamamen kendi sorumluluğumuz altında beyan ediyoruz. |
| RS | potvrđuje sledeću usklađenost prema smernicama EZ i normama za artikal |
Standard references:
EN 13684:2018; EN ISO 14982:2009
This declaration of conformity is issued under the sole responsibility of the manufacturer.
The object of the declaration described above fulfils the regulations of the directive 2011/65/EU of the European Parliament and Council from 8th June 2011, on the restriction of the use of certain hazardous substances in electrical and electronic equipment.
Subject to change without notice
Documents registrar: Stefan Hartinger Günzburger Str. 69, D-89335 Ichenhausen
Garantie DE
Apparent defects must be notified within 8 days from the receipt of the goods. Otherwise, the buyer loses its rights of claim due to such defects are invalidated. We guarantee for our machines in case of proper treatment for the time of the statutory warranty period from delivery in such a way that we replace any machine part free of charge which provably becomes unusable due to faulty material or defects of fabrication within such period of time. With respect to parts not manufactured by us we only warrant insofar as we are entitled to warranty claims against the upstream suppliers. The costs for the installation of the new parts shall be borne by the buyer. The cancellation of sale or the reduction of purchase price as well as any other claims for damages shall be excluded.
Garantie FR
Apparent defects must be notified within 8 days from the receipt of the goods. Otherwise, the buyer's rights of claim due to such defects are invalidated. We guarantee for our machines in case of proper treatment for the time of the statutory warranty period from delivery in such a way that we replace any machine part free of charge which provably becomes unusable due to faulty material or defects of fabrication within such period of time. With respect to parts not manufactured by us we only warrant insofar as we are entitled to warranty claims against the upstream suppliers. The costs for the installation of the new parts shall be borne by the buyer. The cancellation of sale or the reduction of purchase price as well as any other claims for damages shall be excluded.
Záruka CZ
Apparent defects must be notified within 8 days from the receipt of the goods. Otherwise, the buyer is rights of claim due to such defects are invalidated. We guarantee for our machines in case of proper treatment for the time of the statutory warranty period from delivery in such a way that we replace any machine part free of charge which provably becomes unusable due to faulty material or defects of fabrication within such period of time. With respect to parts not manufactured by us we only warrant insofar as we are entitled to warranty claims against the upstream suppliers. The costs for the installation of the new parts shall be borne by the buyer. The cancellation of sale or the reduction of purchase price as well as any other claims for damages shall be excluded.
Garantii EE
Apparent defects must be notified within 8 days from the receipt of the goods. Otherwise, the buyer's rights of claim due to such defects are invalidated. We guarantee for our machines in case of proper treatment for the time of the statutory warranty period from delivery in such a way that we replace any machine part free of charge which provably becomes unusable due to faulty material or defects of fabrication within such period of time. With respect to parts not manufactured by us we only warrant insofar as we are entitled to warranty claims against the upstream suppliers. The costs for the installation of the new parts shall be borne by the buyer. The cancellation of sale or the reduction of purchase price as well as any other claims for damages shall be excluded.