MBS1200xts - Saw SCHEPPACH - Free user manual and instructions
Find the device manual for free MBS1200xts SCHEPPACH in PDF.


User questions about MBS1200xts SCHEPPACH
0 question about this device. Answer the ones you know or ask your own.
Ask a new question about this device
Download the instructions for your Saw in PDF format for free! Find your manual MBS1200xts - SCHEPPACH and take your electronic device back in hand. On this page are published all the documents necessary for the use of your device. MBS1200xts by SCHEPPACH.
USER MANUAL MBS1200xts SCHEPPACH
natural_image
Black industrial cutting machine with visible mechanical components and mounting base (no text or symbols)
text_image
https://www.scheppach.com/sde/service scheppachMade in P.R.C.
MBS1200xt MBS1200xts
| DE | MetallbandsägeOriginalbetriebsanleitung | 5 |
| GB | Metal band sawTranslation of original instruction manual | 20 |
| FR | Scie à ruban pour métauxTraduction des instructions d'origine | 32 |
| IT | Sega a nastro per metalliLa traduzione dal manuale di istruzioni originale | 45 |
| NL | MetaallintzaagVertaling van de originele gebruikshandleiding | 58 |
| ES | Sierra de cinta para metalesTraducción del manual de instrucciones original | 71 |
| PT | Serra de fita metálicaTradução do manual de operação original | 84 |
| CZ | Pila s kovovým pásemPřeklad originálního návodu k obsluze | 97 |
| SK | Pásová píla na kovPreklad originálneho návodu na obsluhu | 109 |
| HU | Fém szalagfúrészEredeti használati utasítás fordítása | 121 |
| PL | Piła taśmowa do metaluTłumaczenie oryginalnej instrukcji obsługi | 134 |
| HR | Metalna tračna pilaPrijevod originalnog priručnika za uporabu | 147 |
| SI | Tračna žaga za kovinoPrevod originalnih navodil za uporabo | 159 |
| EE | MetallilintsaagOriginaalkältusjuhendi tõlge | 171 |
| LT | Juostinis metalo pjūklasOriginalios naudojimo instrukcijos vertimas | 183 |
| LV | Metāla lentzāgisOriginālas lietošanas instrukcijas tulkojums | 195 |
| SE | MetallbandsågÖversättning av original-bruksanvisning | 207 |
| FI | MetallivannesahaKäännös alkuperäisestä käyttöohjeesta | 219 |
| DK | MetalbåndsavOversættelse fra den oprindelige betjeningsvejledning | 231 |
| NO | MetallbåndsagOversettelse av den originale brukerveiledningen | 243 |
| BG | Банциг за металПревод на оригиналното ръководство за експлоатация | 255 |
| GR | Корделотріovo μετάλλουМетафраση του πρωτοτύπου των οδηγιών χρήσης | 269 |
| RO | Ferăstrău cu bandă metalicăTraducere din manualul de exploatare original | 283 |
| RS | Tračna testera za metalPrevod originalnog uputstva za upotrebu | 296 |
| TR | Metal şeritli testereOrijinal kullanım talimatı çevirisi | 308 |
text_image
1 2 3 4 5 6 7 8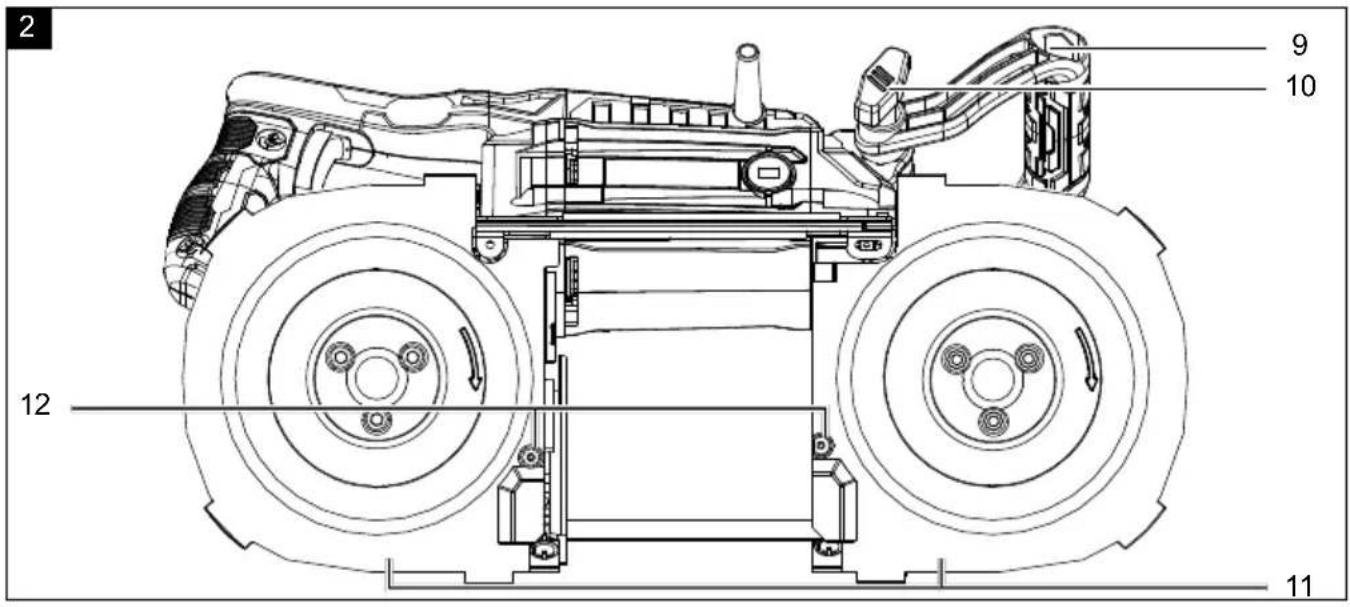
text_image
2 9 10 12 11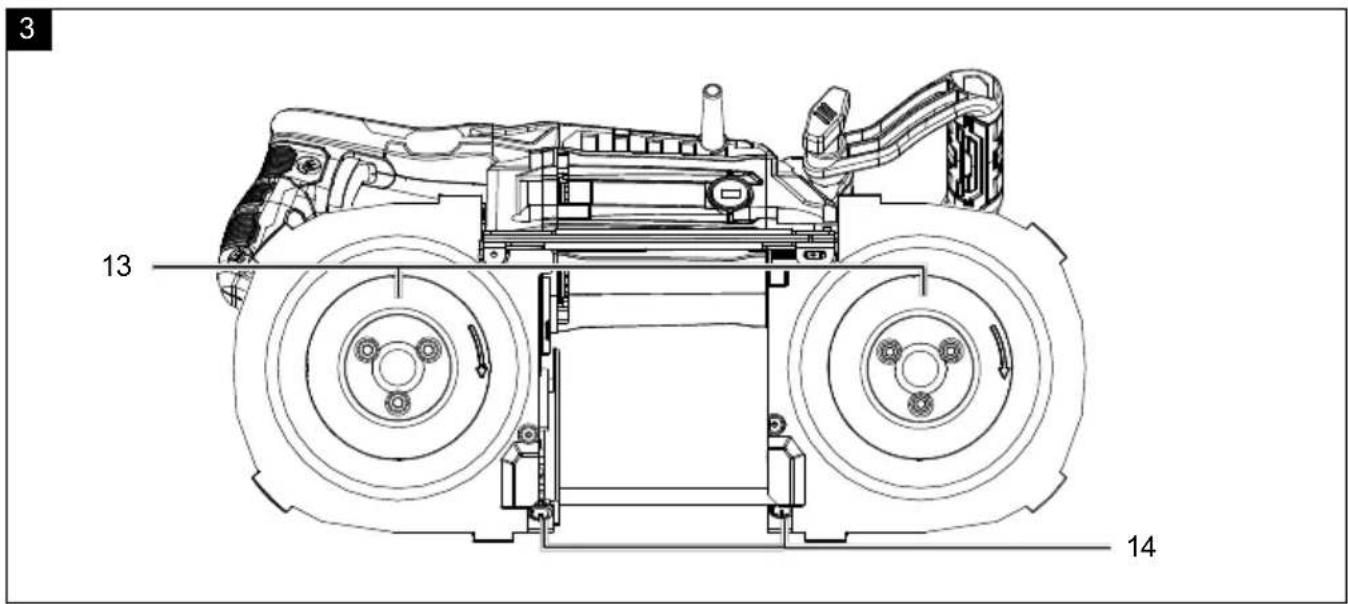
text_image
3 13 14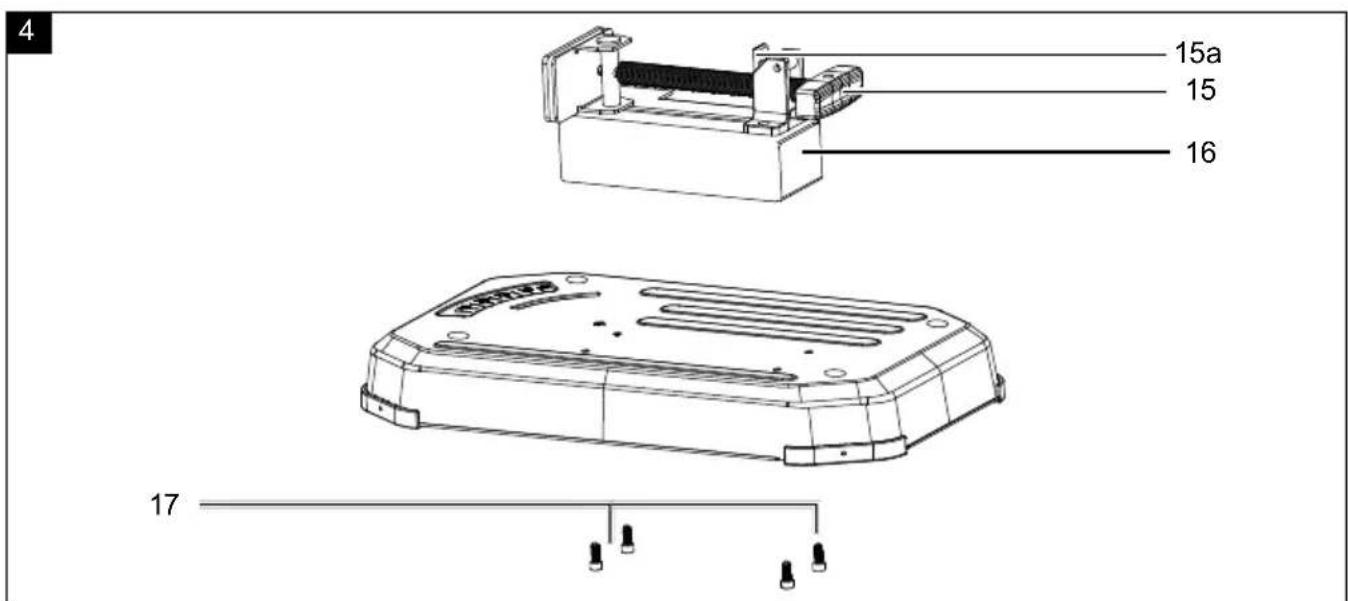
text_image
4 15a 15 16 17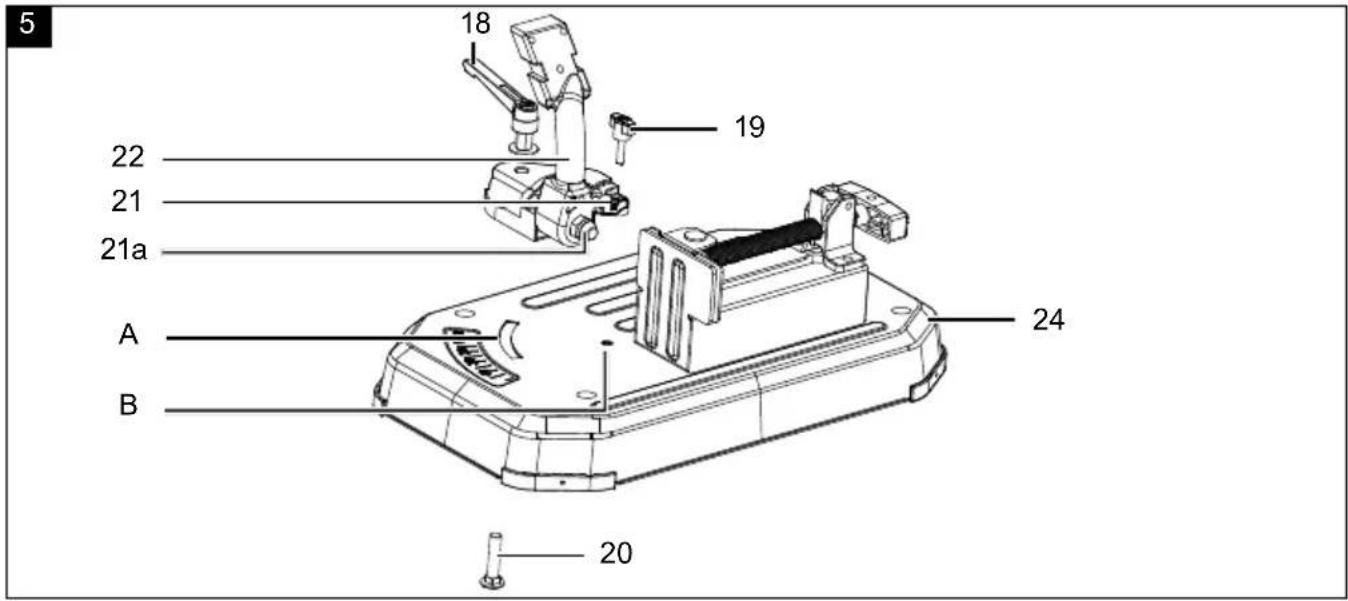
text_image
5 18 19 22 21 21a A B 24 20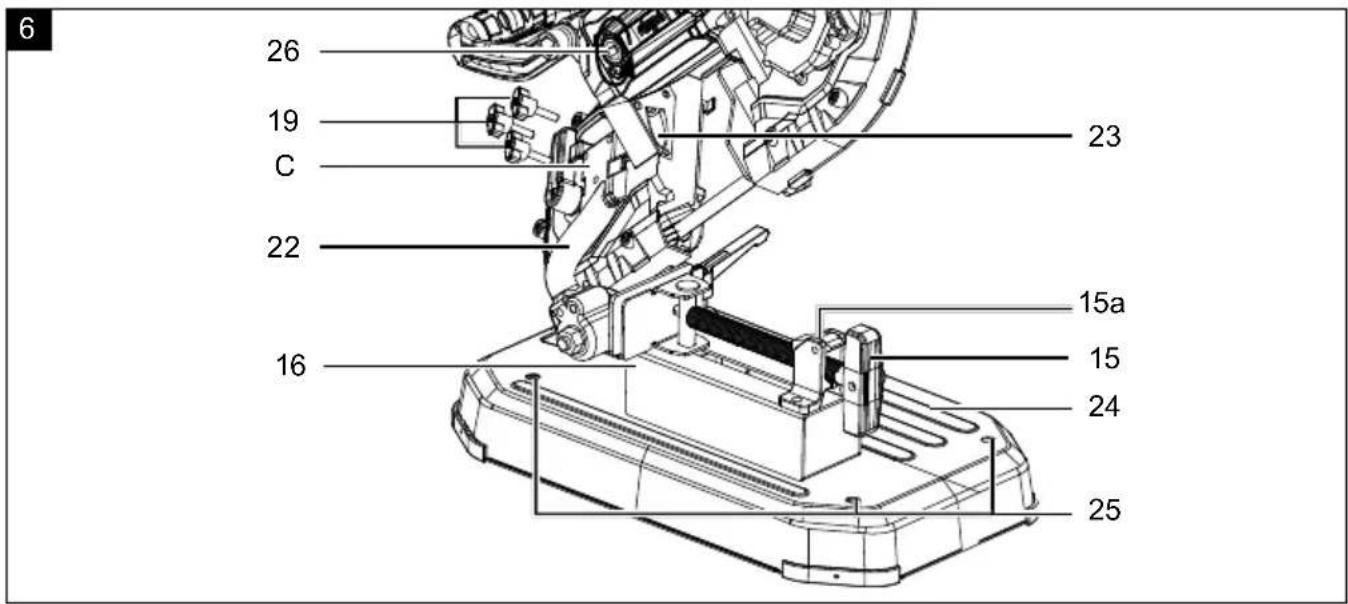
text_image
6 26 19 C 23 22 16 15a 15 24 25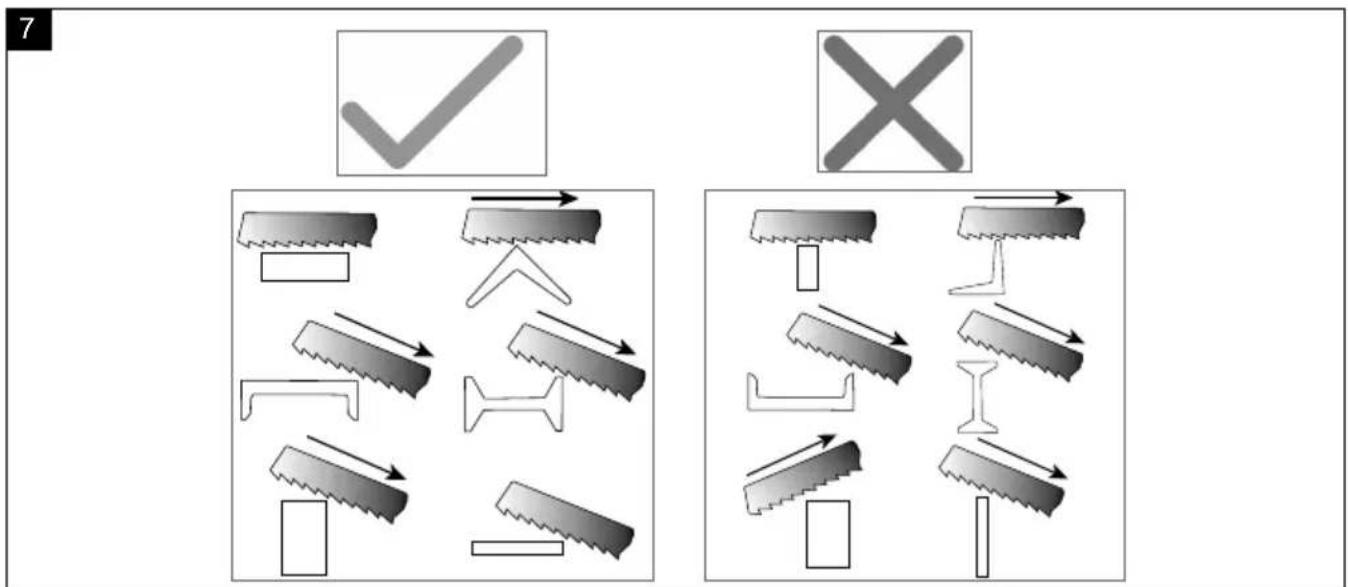
text_image
7 ✓ ×Günzburger Straße 69
D-89335 Ichenhausen
Verehrter Kunde,
Homepage: https://www.scheppach.com/de/service
text_image
https://www.scheppach.com/de/service scheppachExplanation of the symbols on the product
 | Warning! Disregard results in a risk of death or injury, or damage to the tool! |
 | Before commissioning, read and observe the operating manual and safety instructions! |
 | Wear safety goggles! |
 | Wear hearing protection! |
 | If dust builds up, wear respiratory protection! |
 | Attention! Danger of injury! Do not reach into saw band while it is running! |
 | Wear protective gloves. |
 | Attention! Before assembly, cleaning, modification, servicing, storage and transport, the device must be switched off and disconnected from the power supply. |
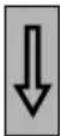 | Saw band direction |
| [Y05X] | Protection class II (double insulation) |
 | The product complies with the applicable European directives. |
 | The product complies with the applicable Serbian directives. |
Table of contents: Page:
- Introduction....22
- Description of the product 22
- Scope of delivery 22
- Proper use 22
- General safety instructions.... 23
- Technical data....25
- Unpacking....26
- Layout 26
- Before commissioning 26
- Start-up 28
- Working instructions....28
- Electrical connection 28
- Cleaning....29
- Storage 29
- Maintenance 29
- Transport....30
- Disposal and recycling....30
- Troubleshooting .... 31
- Declaration of conformity 321
1. Introduction
Manufacturer:
Scheppach GmbH
Günzburger Straße 69
D-89335 Ichenhausen
Dear Customer,
We hope your new product brings you much enjoyment and success.
Note:
In accordance with the applicable product liability laws, the manufacturer of this product assumes no liability for damage to the product or caused by the product arising from:
- Improper handling
• Non-compliance with the operating manual
• Repairs carried out by third parties, unauthorised specialists
• Installing and replacing non-original spare parts - Improper use
- Failure of the electrical system in the event of the electrical regulations and VDE provisions 0100, DIN 57113 / VDE 0113 not being observed
Note:
The operating manual is part of this product. It includes important instructions for the safe, proper and economic operation of the product, for avoiding danger, for minimising repair costs and downtimes and for increasing the reliability and extending the service life of the product. In addition to the safety instructions in this operating manual, you must also observe the regulations applicable to the operation of the product in your country. Familiarise yourself with all operating and safety instructions before using the product. Only operate the product as described and for the specified areas of application. Keep the operating manual in a good place and hand over all documents when passing the product on to third parties.
2. Description of the product
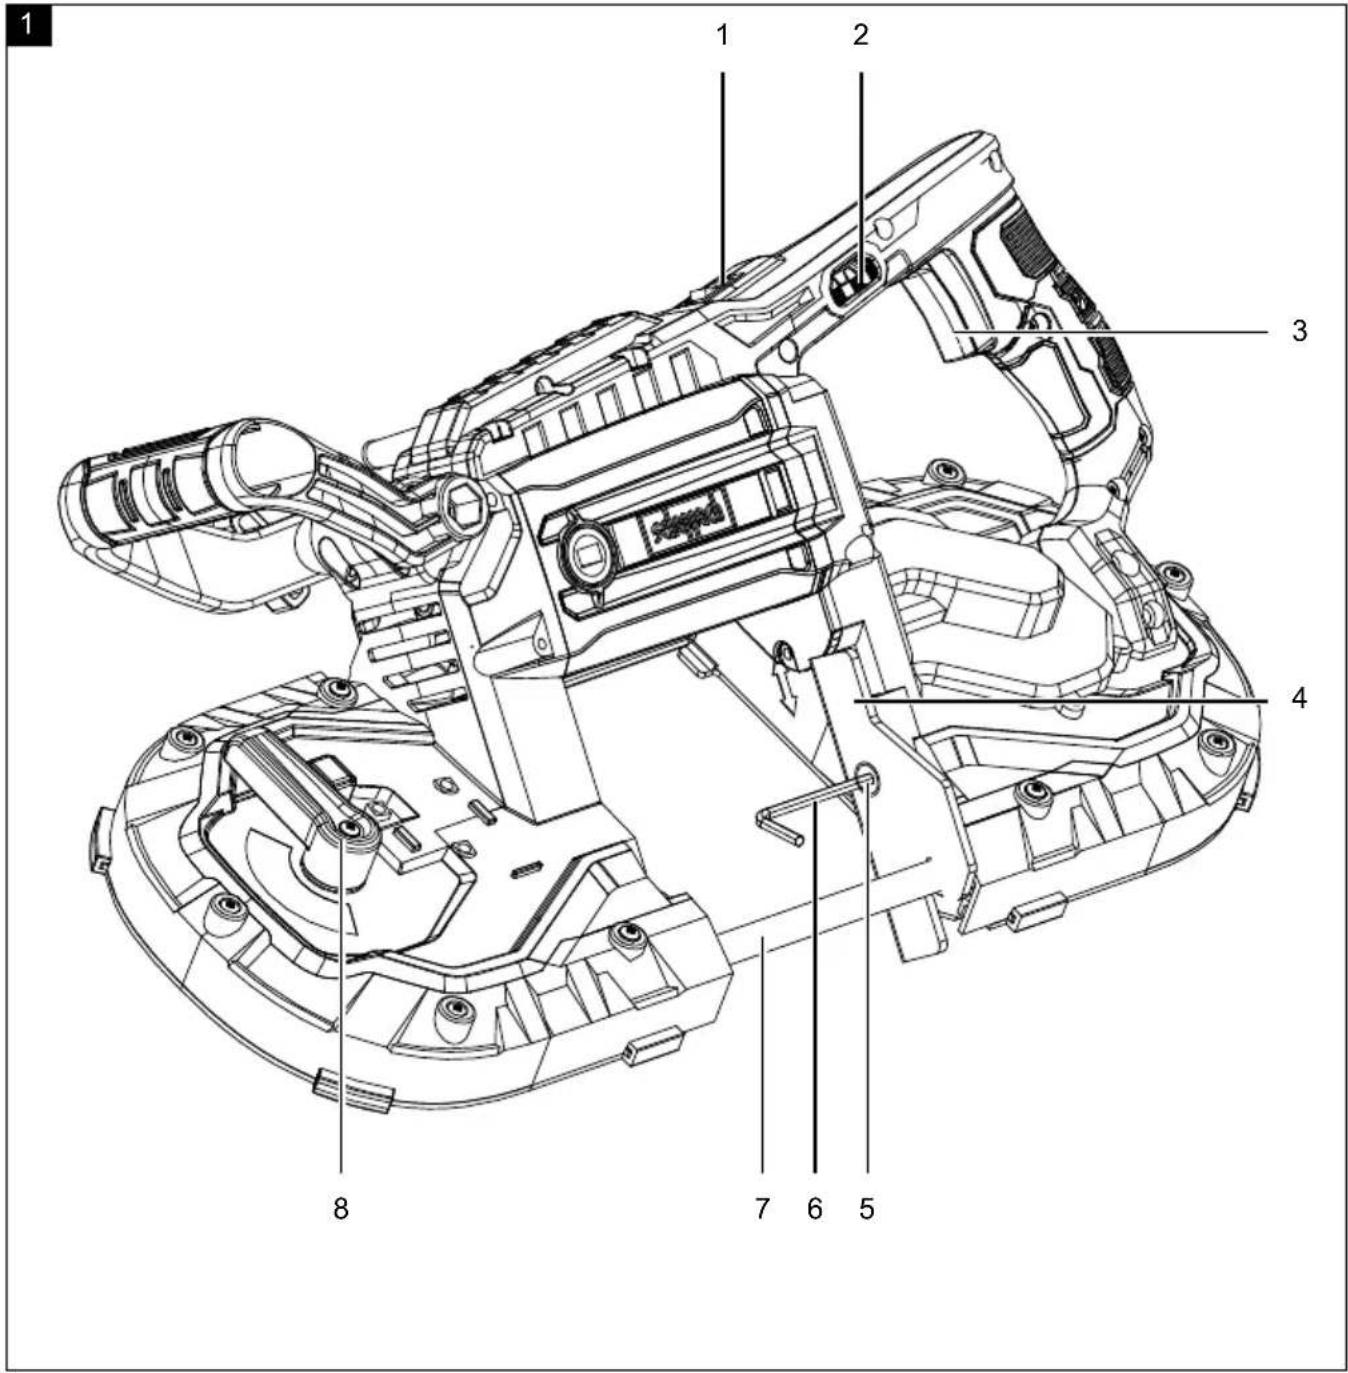
- Light switch
- Speed setting wheel
- On/off switch
- Workpiece stop
- Workpiece stop screw
- Allen key
-
Saw band
-
Saw band tightening lever
- Handle
- Wing screw on the handle
- Protective covers
- Locking screws
- Rubber wheels
- Guide rollers
- Handle on the vice
15a. Quick adjustment - Bench vice
- Cylinder-head screws with hexagon socket
- Cutting angle adjustment
- Long wing screw
- Screw for the cutting angle adjustment
- Locking pin
21a. Nut - Swivel arm
- Work lamp
- Saw table
- Holes
- Carbon brushes
3. Scope of delivery
- Metal band saw
- Saw table (pre-fitted)
• 4 wing screws, long (pre-fitted) - Allen key (4 mm)
- Allen key (6 mm)
• 2x saw band (1x pre-assembled) (Art. no. 5901511904) - Operating manual
4. Proper use
The portable metal band saw with speed setting is exclusively suited for cutting wood, pipes, profiles and thin non-ferrous metals.
The shape of the workpieces must be such that safe clamping in the machine vice is possible and such that the workpiece is prevented from jumping out during the sawing process.
The machine may only be used in the intended manner. Any use beyond this is improper. The user/operator, not the manufacturer, is responsible for damages or injuries of any type resulting from this.
Only saw bands that are suitable for the machine may be used. An element of the intended use is also the observance of the safety instructions, as well as the assembly instructions and operating information in the operating manual.
Persons who operate and maintain the machine must be familiar with the manual and must be informed about potential dangers. In addition, the applicable accident prevention regulations must be strictly observed. Other general occupational health and safety-related rules and regulations must be observed.
The liability of the manufacturer and resulting damages are excluded in the event of modifications of the machine.
The machine may only be operated with original parts and original accessories from the manufacturer.
The safety, operating and maintenance specifications of the manufacturer, as well as the dimensions specified in the technical data, must be observed.
Despite use as intended, specific risk factors cannot be entirely eliminated. Due to the design and layout of the machine, the following risks remain:
- Danger of injury to the eyes when the necessary eye protection is not used.
- Hearing damage when the necessary hearing protection is not used.
- Harmful emissions of wood dusts during use in enclosed areas.
- Risk of accident due to contact with the hands in the uncovered cutting area of the tool.
- Danger of injury during a workpiece change (cutting hazard).
- Danger due to the ejection of workpieces or parts of the workpiece.
- Crushing of fingers.
• Danger due to kick-back. - Tilting of the workpiece due to insufficient workpiece support surface.
- Touching the cutting tool.
- Ejection of branches and workpiece parts.
Please note that our equipment was not designed with the intention of use for commercial or industrial purposes. We assume no guarantee if the device is used in commercial or industrial applications, or for equivalent work.
5. General safety instructions
- WARNING Read all safety information and instructions. Failure to observe safety information and instructions can result in electric shock, fire and/or serious injuries.
- Save all warnings and instructions for future reference.
- The term "electrical tool" used in the safety instructions refers to mains-powered electrical tools (with a mains cable).
1 Work area safety
- Keep your work area clean and well-lit. Cluttered or dark areas invite accidents.
- Do not operate power tools in explosive atmospheres, such as in the presence of flammable liquids, gases or dust. Power tools create sparks which may ignite the dust or fumes.
- Keep children and bystanders away while operating a power tool. Distractions may cause you to lose control of the device.
2 Electrical safety
- Power tool plugs must match the outlet. Never modify the plug in any way. Do not use any adapter plugs with earthed (grounded) power tools. Unmodified plugs and matching outlets will reduce risk of electric shock.
- Avoid body contact with earthed or grounded surfaces, such as pipes, radiators, ranges and refrigerators. There is an increased risk of electric shock if your body is earthed or grounded.
- Do not expose power tools to rain or wet conditions. Water entering a power tool will increase the risk of electric shock.
- Do not use the cable for another purpose, for example, carrying or hanging the power tool or pulling the plug out of the socket. Keep the cable away from heat, oil, sharp edges or moving device parts. Damaged or coiled cables increase the risk of an electric shock.
- If you work with an electric tool outdoors, only use extension cables that are also suitable for outdoor use. Use of a cord suitable for outdoor use reduces the risk of electric shock.
- If operating a power tool in a damp location is unavoidable, use a residual current device (RCD) protected supply. Use of an RCD reduces the risk of electric shock.
3 Safety of personnel
- Stay alert, watch what you are doing and use common sense when operating a power tool. Do not use a power tool while you are tired or under the influence of drugs, alcohol or medication. A moment of carelessness when using electrical tools can result in serious injuries.
- Wear personal protective equipment and always safety goggles. Protective equipment such as a dust mask, non-skid safety shoes, safety helmet or hearing protection used for appropriate conditions will reduce personal injuries.
- Prevent unintentional starting. Make sure the switch is in the off-position before connecting to the power supply, picking up or carrying the electric tool. Keeping your finger on the switch or having the device switched on when you connect it to the power supply may result in accidents.
- Remove any adjusting tools or spanners/keys before turning the power tool on. A tool or spanner that is located in a rotating device part may result in injuries.
- Avoid abnormal postures. Keep proper footing and balance at all times. This enables better control of the power tool in unexpected situations.
- Wear suitable clothing. Do not wear loose clothing or jewellery. Keep hair, clothing and gloves away from moving parts. Loose clothes, jewellery or long hair can be caught in moving parts.
- If dust extraction and collection devices can be mounted, make sure that they are connected and used properly. Use of dust extraction can reduce dust-related hazards.
4 Power tool use and care
- Do not overload the device. Use the correct power tool for your application. The correct power tool will do the job better and safer at the rate for which it was designed.
- Do not use the power tool if the switch does not turn it on and off. Any power tool that cannot be controlled with the switch is dangerous and must be repaired.
- Disconnect the plug from the power source and/or the battery pack from the power tool before making any adjustments, changing accessories, or storing power tools. Such preventive safety measures reduce the risk of starting the power tool accidentally.
- Store idle power tools out of the reach of children and Do not let people use the device who are not familiar with it or who have not read these instructions.
• Power tools are dangerous in the hands of untrained users.
- Maintain power tools. Check whether moving parts function properly and do not get stuck and whether parts are broken or are damaged and thus adversely affect the electric tool function. Have damaged parts repaired before using the device. Many accidents are caused by poorly maintained power tools.
- Keep cutting tools sharp and clean. Properly maintained cutting tools with sharp cutting edges are less likely to bind and are easier to control.
- Use the power tool, tool attachments and tool bits etc. in accordance with these instructions. Take into account the working conditions and the work to be performed. Use of the power tool for operations different from those intended could result in a hazardous situation.
5 Service
- Only have your power tool repaired by qualified specialists and only with original spare parts. This ensures that safety of the electric tool is maintained.
Warning! This power tool generates an electromagnetic field during operation. This field can impair active or passive medical implants under certain circumstances. In order to prevent the risk of serious or deadly injuries, we recommend that persons with medical implants consult with their physician and the manufacturer of the medical implant prior to operating the power tool.
Additional safety instructions - portable band saws
- When performing work during which the cutting device could come into contact with concealed power lines, hold the electrical tool by the insulated handle surfaces. Contact between the cutting tool and a live power line can also electrify metal device parts and lead to an electric shock.
- Keep your hands away from the sawing area and saw band.
- Before use, always ensure that the portable band saw is clean.
- Stop operation immediately, if you notice anything unusual.
-
Prior to using the tool, always make sure that all components are properly and safely fitted.
• Always proceed with caution when fitting or removing the saw band.
• Always keep your hands away from the cutting path of the saw band. -
Before sawing, always wait until the motor has reached full speed.
• Always keep the handles dry, clean and free of oil and grease. Hold the tool firmly during work. - Always remain alert, in particular when performing repetitive, monotonous tasks. Always make sure your hands are in the correct position in relation to the saw band.
• Never remove the workpiece stop. - Maintain a distance from end pieces, which fall down after sawing. They may be hot, sharp and/or heavy. They could cause serious injuries.
- Air intakes often cover moving parts and should be kept clear. Loose-fitting clothing, jewellery and long hair may become caught in the moving parts.
Residual risks
The power tool is state-of-the-art and has been built according to the recognised technical safety regulations. However, individual residual risks can arise during operation.
- Danger of injury for fingers and hands due to the running band saw blade with improper guiding of the workpiece. Injuries due to the workpiece being ejected at high speed due to improper holding or guiding, such as working without the stop.
- Risk to health from wood dust or wood chippings. It is essential that personal protective equipment, such as eye protection, is worn.
- Injuries due to defective saw band. Check the integrity of the saw band regularly.
- Danger of injury for fingers and hands when changing the saw band. Wear suitable work gloves.
- Danger of injury when the machine is switched on from the running saw band.
- Hazard due to electrical power, with the use of improper electrical connection cables.
- Danger to health from running saw band due to long hair and loose clothing. Wear personal protective equipment such as a hair net and close-fitting work clothing.
• Furthermore, despite all precautions having been met, some non-obvious residual risks may still remain. - Residual risks can be minimised if the “General safety instructions” and the “Proper use” are observed along with the whole of the operating instructions.
6. Technical data
AC motor 230 V\~ / 50 Hz
Motor output 1100 W
Cutting width at 90° 127 mm x 127 mm
Cutting width at 45° 127 mm x 40 mm
Idle speed 0 - 290 rpm
Saw band 1140 x 12.7 x 0.65
Band saw blade speed 0-2.4 m/s
Protection class II
Pivot range 0-45°
Subject to technical changes!
Noise and vibration
⚠ Warning: Noise can have serious effects on your health. If the machine noise exceeds 85 dB, please wear suitable hearing protection.
The noise and vibration levels have been determined in accordance with EN 60745.
Noise data
| Sound power level L_WA | 101.7 dB |
| Sound pressure level L_pA | 90.7 dB |
| Uncertainty K_wa/pA | 3 dB |
Vibration parameters
| Vibration a_h | 6.94 m/s ^2 |
| Uncertainty K_h | 1.5 m/s ^2 |
- The specified vibration emission value has been measured according to a standardised test procedure and can be used for comparison of one power tool with another.
- The specified vibration emission value can also be used for an initial assessment of the load.
Warning:
- The vibration emission value can vary from the specified value during the actual use of the electric tool, depending on the type and the manner in which the electric tool is used;
- Try to minimise stress from vibrations as low as possible. Some examples of means for reducing the vibration stress are wearing gloves while using the tool and limiting work time.
In doing so, all parts of the operating cycle must be taken into account (such as times in which the power tool is switched off or times in which it is switched on, but is not running under a load).
7. Unpacking
- Open the packaging and carefully remove the device.
- Remove the packaging material, as well as the packaging and transport safety devices (if present).
- Check whether the scope of delivery is complete.
- Check the device and accessory parts for transport damage. In the event of complaints the carrier must be informed immediately. Later claims will not be recognised.
- If possible, keep the packaging until the expiry of the warranty period.
- Familiarise yourself with the device by means of the operating manual before using for the first time.
- With accessories as well as wearing parts and replacement parts use only original parts. Spare parts can be obtained from your specialist dealer.
- When ordering please provide our article number as well as type and year of manufacture for your device.
⚠ WARNING!
The device and the packaging material are not children's toys! Do not let children play with plastic bags, films or small parts! There is a danger of choking or suffocating!
8. Layout
Warning!
Always pull the mains plug out of the socket before carrying out work on the device.
Ensure that all parts are pre-fitted. The instructions are only for possible maintenance work.
8.1 Fitting the handle (pre-fitted), Fig. 2
- Hold the handle (9) in position at the corresponding location.
- Slide the wing screw (10) through the handle (9) and the housing and tighten the wing screw (10) in the handle.
8.2 Fitting the vice (pre-fitted), Fig. 4
- Fasten the vice (16) using the 4 cylinder-head screws with hexagon socket (17) provided into the corresponding holes on the rear of the saw table (see Fig. 4). Use a 5 mm Allen key for this (not included in the scope of delivery).
8.3 Fitting the cutting angle adjustment to the saw table (pre-fitted), Fig. 5
- Completely remove the screw (20) from the cutting angle adjustment (18).
- Insert the screw (20) from below through the angle recess (A) on the saw table (24) and retighten the screw (20) using the cutting angle adjustment.
- Fasten the swivel arm using the long wing screw (19) through the hole (B) on the saw table.
8.4 Fitting the band saw on the swivel arm, Fig. 6
If you want to use the device with the saw table (24), proceed as follows:
- Fasten the swivel arm (22) using the 3 long wing screws (19) supplied into the corresponding holes (C) of the device housing.
NOTE!
- When delivered, the nut (21a) may be too tight. Loosen the nut (21a) slightly using a 19mm screw-driver (Fig. 5).
- Tighten the nut (21a) using a 19mm screwdriver from time to time, if the swivel arm (22) has too much play.
⚠ WARNING!
- The band saw may only be used without the saw table (24) if the user has secure footing. Furthermore, the workpiece must be secured against slipping on a workbench, e.g. clamped in a vice.
- Ensure that the mains cable cannot get near the saw band at all times.
9. Before commissioning
ATTENTION!
Always make sure the device is fully assembled before commissioning!
Check all screws and connections for firm seating. Check that the saw band is in perfect condition.
Remove all tools from the clamping jaw and the saw table.
• The saw band must be able to run freely.
- In case of previously machined wood, be aware of any foreign bodies, such as nails or screws, etc.
- Before pressing the on/off switch (3), make sure that the saw band is correctly fitted, and that moving parts run smoothly.
- Before connecting the machine, make certain that the data on the type plate matches with the mains power data.
9.1 Adjusting the handle, Fig. 2
⚠ For safety reasons, please disconnect the power cable from the mains.
The handle (9) allows the user to maintain a firm hold during use.
- In order to adjust the handle (9), loosen the wing screws (10) on the handle.
- Turn the handle (9) to the desired position.
• Retighten the wing screw (10).
9.2 Using the vice, Fig. 6
- Turn the handle on the vice (15) clockwise to clamp the workpiece.
- Turn the handle on the vice (15) anti-clockwise to loosen the workpiece.
NOTE!
You can also fold the quick adjustment (15a) upwards in order to adjust the vice (16) more quickly.
- Fold the quick adjustment (15a) down again in order to fix the vice (16) in place.
- Then carry out a fine adjustment using the vice handle (15).
9.3 Transport lock, Fig. 5
- Remove the locking pin (21) in order to be able to swivel the band saw upwards.
- Swivel the band saw downwards and push the locking pin (21) in.
- Now you can transport the band saw with the saw table easier.
- Undo the cutting angle adjustment (18) by turning it anti-clockwise.
- Adjust to the desired cutting angle using the specified degrees.
- Tighten the cutting angle adjustment (18) clockwise.
9.5 Adjusting the workpiece stop, Fig. 1
⚠ For safety reasons, please disconnect the power cable from the mains.
- In normal operation, the workpiece stop (4) must be secured in the lowest position.
- If the workpiece stop (4) gets in the way when sawing, you can loosen the workpiece stop screw (5). Use the Allen key (6) provided for this. You can slide the workpiece stop (4) upwards. Then fasten the workpiece stop (4) again with the workpiece stop screw (5).
9.6 Changing the saw band, Fig. 1, 2, 3
⚠ WARNING!
Wear protective gloves in order to prevent injuries.
- Loosen the saw band tightening lever (8) by turning it anti-clockwise.
- Loosen both locking screws (12) with the Allen key (6) provided.
- Remove both protective covers (11).
- Remove the saw blade (7) carefully. Start on the guide rollers (14) (see Fig. 3).
- Check the guide rollers (14) and remove all coarse chips that may be in here. Jammed chips may prevent the guide rollers (14) from turning and lead to flat spots.
- The rubber wheels (13) should be checked for looseness or damage when changing the saw band Wipe chips off the rubber wheels (13).
- Position the saw band (7) such that the teeth are on the base and are angled in the direction of the workpiece stop (4).
- Slide the saw band (7) into the guide rollers (14). Make sure that the guide rollers (14) fully grip the saw band (7).
- Hold the saw band (7) in the guide rollers (14) and place it around both rubber wheels (13).
NOTE!
Make sure that the direction arrows on the saw band (7) (if present) match those on the rubber wheels (13).
- Retighten the saw band tightening lever (8) by turning it clockwise.
- Remount both protective covers (11).
⚠ WARNING!
- Only operate the device with the protective covers (11) mounted!
- Switch the metal band saw on and off a few times, to ensure that the saw band is sitting correctly.
- Maintain physical distance from the saw band area during this test.
10. Start-up
Attention!
Always make sure the device is fully assembled before commissioning!
10.1 Switching the device on/off
CAUTION:
Before connecting the machine to the mains power supply, always make sure that the on/off switch (3) is functioning properly.
Switching on:
Keep the on/off switch (3) pressed.
Switching off:
Release the on/off switch (3).
Attention: The saw band runs after the device has been switched off.
10.2 Switching the work lamp on and off, Fig. 1 + 6
Switching on:
Set the light switch (1) to the "I" position. The work lamp (23) lights up.
Switching off:
Set the light switch (1) to the "0" position. The work light goes out.
10.3 Setting the drilling speed, Fig. 1
CAUTION:
Never change the speed with the device running.
- Set the speed setting wheel (2) to a position between 1 and 6.
- Choose a suitable speed for the workpiece to be cut.
CAUTION:
The speed setting wheel (4) can only be turned up to 6 and back to 1. If it is forcibly turned past 6 or beyond 1, it may no longer be possible to adjust the speed.
11. Working instructions
11.1 Tips for better sawing (Fig. 7)
The following recommendations should be applied as a guideline (see "Recommended sawing positions" table in Figure 7).
- Never twist the saw band during the cutting process.
- Never use liquid coolant for the metal band saw.
The use of liquid coolants causes deposits on the rubber belts (7) and reduces the cutting performance.
- If severe vibrations arise during the cutting process, make sure that the sawn workpiece is securely clamped. If the vibrations continue, replace the saw band.
- Secure the workpiece against slipping, e.g. using the vice (16) of the saw table (24).
- Use the net weight of the saw when sawing. Do not apply any additional pressure.
- Wait until the saw has reached its full speed before carefully bringing it into contact with the workpiece.
- If the saw band (7) is blocked, switch the device off immediately.
- Do not twist the saw band (7) while cutting.
- Ensure that the device is stable and safe. The device can be secured in a suitable place for safety. There are 4 holes (25) in the base of the enclosure for fixing on a firm and level surface. To do this, insert suitable fixing material (not included in the scope of delivery) corresponding to the base through the 4 holes (25). Use the fixing material to fix the device to the base.
⚠ WARNING!
Remove the workpiece only after the saw has come to a standstill.
12. Electrical connection
The electrical motor installed is connected and ready for operation. The connection complies with the applicable VDE and DIN provisions.
The customer's mains connection as well as the extension cable used must also comply with these regulations.
Damaged electrical connection cable
The insulation on electrical connection cables is often damaged.
This may have the following causes:
- Pressure points, where connection cables are passed through windows or doors.
- Kinks where the connection cable has been improperly fastened or routed.
- Places where the connection cables have been cut due to being driven over.
• Insulation damage due to being ripped out of the wall outlet.
- Cracks due to the insulation ageing.
Such damaged electrical connection cables must not be used and are life-threatening due to the insulation damage.
Check the electrical connection cables for damage regularly. Ensure that the connection cables are disconnected from electrical power when checking for damage.
Electrical connection cables must comply with the applicable VDE and DIN provisions. Only use connection cables with the designation H05VV-F.
The printing of the type designation on the connection cable is mandatory.
Connection type Y
If the mains connection cable of this device is damaged, it must be replaced by the manufacturer, their service department or a similarly qualified person to avoid dangers.
AC motor
• The mains voltage must be 220-240 V\~.
- Extension cables up to 25 m long must have a cross-section of 1.5 mm ^2 .
Connections and repair work on the electrical equipment may only be carried out by electricians.
Please provide the following information in the event of any enquiries:
• Type of current for the motor
• Machine data - type plate
• Motor data - type plate
13. Cleaning
Danger!
Disconnect the mains plug before carrying out any cleaning work.
- Keep protective devices, air vents and the engine housing as free of dust and dirt as possible. Rub the device clean with a clean cloth or blow it off with compressed air at low pressure. We recommend that you clean the device directly after every use.
- Clean the device at regular intervals using a damp cloth and a little soft soap. Do not use any cleaning products or solvents; they could attack the plastic parts of the device. Make sure that no water can penetrate the device interior. Water penetrating an electric device increases the risk of an electric shock.
14. Storage
Store the device and its accessories in a dark, dry and frost-free place that is inaccessible to children. The optimum storage temperature is between 5 and 30°C.
Store the power tool in its original packaging.
Cover the power tool to protect it from dust or moisture.
Store the operating manual with the power tool.
15. Maintenance
Attention!
Disconnect the mains plug before carrying out any maintenance work.
General maintenance tasks
Wipe swarf and dust off the machine from time to time with a cloth.
Do not oil the motor.
Do not use corrosive cleaning agents for cleaning the plastic.
Brush inspection, Fig. 6
If the machine is new, check the carbon brushes after the first 50 operating hours or if a new brush has been mounted. After the initial check, check every 10 operating hours.
If the carbon is worn down to a length of 6 mm, or the spring or the shunt wire is burnt or damaged, both brushes must be replaced. If the brushes are found to be usable after removal, they can be reinstalled.
-
To maintain the carbon brushes, open both locks (as shown in Figure 6) anti-clockwise.
-
Then remove the carbon brushes.
-
Re-insert the carbon brushes in reverse order.
Service information
With this product, it is necessary to note that the following parts are subject to natural or usage-related wear, or that the following parts are required as consumables.
Wearing parts*: Carbon brushes, saw band
* may not be included in the scope of delivery!
Connections and repairs
Connections and repair work on the electrical equipment may only be carried out by electricians.
Important note in the case of repairs:
For return delivery of the device for repair, please ensure for safety reasons that it is free of oil and fuel when it is sent to the service centre.
Spare parts and accessories can be obtained from our Service Centre. To do this, scan the QR code on the front page.
16. Transport
Transport the metal band saw by holding it by the handles (9) using your hands.
Carry the machine on the saw table (24) with the metal band saw mounted to the saw table.
17. Disposal and recycling
Notes for packaging


The packaging materials are recyclable. Please dispose of packaging in an environmentally friendly manner.
Notes on the electrical and electronic equipment act (ElektroG)
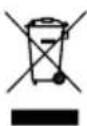
Waste electrical and electronic equipment does not belong in household waste, but must be collected and disposed of separately!
- Used batteries or rechargeable batteries that are not installed permanently in the old device must be removed non-destructively before disposal! Their disposal is regulated by the battery act.
- Owners or users of electrical and electronic devices are legally obliged to return them after use.
- The end user is responsible for deleting their personal data from the old device being disposed of!
- The symbol of the crossed-out dustbin means that waste electrical and electronic equipment must not be disposed of with household waste.
- Waste electrical and electronic equipment can be handed in free of charge at the following places:
- Public disposal or collection points (e.g. municipal works yards)
- Points of sale of electrical appliances (stationary and online), provided that dealers are obliged to take them back or offer to do so voluntarily.
- Up to three waste electrical devices per type of device, with an edge length of no more than 25 centimetres, can be returned free of charge to the manufacturer without prior purchase of a new device from the manufacturer or taken to another authorised collection point in your vicinity.
- Further supplementary take-back conditions of the manufacturers and distributors can be obtained from the respective customer service.
- If the manufacturer delivers a new electrical device to a private household, the manufacturer can arrange for the free collection of the old electrical device upon request from the end user. Please contact the manufacturer's customer service for this.
• These statements only apply to devices installed and sold in the countries of the European Union and which are subject to the European Directive 2012/19/EU. In countries outside the European Union, different regulations may apply to the disposal of waste electrical and electronic equipment.
18. Troubleshooting
The following table shows fault symptoms and describes remedial measures in the event of your machine failing to work properly. If you cannot localise and rectify the problem with this, please contact your service workshop.
| Fault Possible cause Remedy | ||
| Motor does not work Engine, cable or connector defective, fuses burnt. | Have the machine checked by a specialist. Never repair the engine yourself. Danger! Check the fuses and replace them if necessary. | |
| The engine runs slowly and does not reach the operating speed. | Voltage too low, coils damaged, capacitor burnt. | Have the voltage checked by a utility provider. Have the engine checked by a specialist. Have the capacitor replaced by a specialist. |
| Motor makes excessive noise | Coils damaged, motor defective Have the engine checked by a specialist. | |
| The motor does not reach its full power. | Circuits in the network are overloaded (lamps, other motors, etc.) | Do not use any other equipment or engines on the same circuit. |
| Motor overheats easily. Overloading of the motor, insufficient cooling of the motor | Avoid overloading the engine while cutting. Remove dust from the engine in order to ensure optimal cooling of the engine. | |
| Saw cut is rough or wavy. | Saw band dull, tooth shape not appropriate for the material thickness | Sharpen the saw band or insert a suitable saw band. |
| Workpiece pulls away and/or splinters. | Excessive cutting pressure and/or band saw blade not suitable for use. | Insert a suitable saw band. |
| Burn marks on the wood when working. | Band saw blade blunt. Incorrect speed. | Replace the saw band. Choose a suitable speed for the workpiece to be cut. |
| Band saw blade jams when working. | Band saw blade blunt. Band saw blade resinous. | Replace the saw band. Clean the saw band. |
Günzburger Straße 69
D-89335 Ichenhausen
Cher client,
Günzburger Straße 69
D-89335 Ichenhausen, Germania
Egregio cliente,
Günzburger Straße 69
D-89335 Ichenhausen
Geachte klant,
Günzburger Straße 69
Günzburger Straße 69
Günzburger Straße 69
D-89335 Ichenhausen
Vážený zákazníku,
Günzburger Straße 69
D-89335 Ichenhausen
Vážený zákazník,
Günzburger Straße 69
D-89335 Ichenhausen
Kedves Ügyfelünk!
Günzburger Straße 69
D-89335 Ichenhausen
Szanowny Kliencie,
Günzburger Straße 69
D-89335 Ichenhausen
Poštovani kupci,
želimo vam mnogo zadovoljstva i uspjeha pri radu s novim proizvodom.
Napomena:
Prema važećem njemačkom Zakonu o odgovornosti za proizvode, proizvođač ovog proizvoda ne odgovara za štete koje nastanu na ovom proizvodu ili koje ovaj proizvod uzrokuje u slučaju:
- neispravnog rukovanja
- nepridržavanja priručnika za uporabu
- popravaka koje obave drugi, neovlašteni stručnjaci
• montaže i zamjene neoriginalnih rezervnih dijelova - nenamjenske uporabe
- kvarova električnog sustava zbog nepoštivanja električnih propisa i VDE propisa 0100, DIN 57113 / VDE 0113
Günzburger Straße 69
D-89335 Ichenhausen
Spoštovani kupec,
želimo vam veliko veselja in uspeha pri delu z vašim novim izdelkom.
Napotek:
Proizvajalec tega izdelka skladno z veljavnim zakonom o odgovornosti za izdelke ne jamči za poškodbe na tem izdelku ali poškodbe s tem izdelkom, do katerih pride pri:
Günzburger Straße 69
D-89335 Ichenhausen
Austatud klient!
Günzburger Straße 69
D-89335 Ichenhausen
Gerbiamas kliente,
Günzburger Straße 69
Günzburger Straße 69
D-89335 Ichenhausen
Bästa kund!
Günzburger Straße 69
D-89335 Ichenhausen
Arvoisa asiakas,
Günzburger Straße 69
D-89335 Ichenhausen, Tyskland
Kære kunde,
Günzburger Straße 69
D-89335 Ichenhausen
Kjære kunde,
10.3 Stille inn turtall, fig. 1
⚠ FORSIKTIG:
Günzburger Straße 69
D-89335 Ichenhausen, Германия
Уважаеми клиенти,
Günzburger Straße 69
D-89335 Ichenhausen
Αξιότιμε πελάτη,
Günzburger Straße 69
D-89335 Ichenhausen
Stimate client,
Günzburger Straße 69
D-89335 Ichenhausen
Poštovani kupče,
Günzburger Straße 69
D-89335 Ichenhausen
İthalatçı:
text_image
Exploded view diagram of a mechanical assembly with labeled components and assembly detailsEU Declaration of Conformity
METALLBANDSÄGE - MBS1200xt / MBS1200xts
METAL BAND SAW - MBS1200xt / MBS1200xts
SCIE À RUBAN MÉTALLIQUE - MBS1200xt / MBS1200xts
| 2000/14/EG_2005/88/EG | |
| Noise: measured LWA= xx dB; guaranteed LWA= xx dB | |
| Annex V | |
| Annex VI | |
| X 2006/42/EG | |
| Annex IV Notified Body: Notified Body No.: Certificate No.: | |
| 2016/1628/EU | |
| Emission. No: |
Standard references:
EN 60745-1:2009/A11:2010; EN 60745-2-20:2009; EN 55014-1:2017/A11:2020; EN IEC 55014-1:2021;
EN 55014-2:2015; EN IEC 55014-2:2021; EN IEC 61000-3-2:2019; EN IEC 61000-3-2:2019/A1:2021;
EN 61000-3-3:2013/A1:2019
This declaration of conformity is issued under the sole responsibility of the manufacturer.
The object of the declaration described above fulfils the regulations of the directive 2011/65/EU of the European Parliament and Council from 8th June 2011, on the restriction of the use of certain hazardous substances in electrical and electronic equipment.
Subject to change without notice
Documents registrar: Dawid Hudzik
Günzburger Str. 69, D-89335 Ichenhausen
EU Declaration of Conformity
Article name: METAL BAND SAW - MBS1200xt / MBS1200xts
Nom d'article:
Standard references:
EN 60745-1:2009/A11:2010; EN 60745-2-20:2009; EN 55014-1:2017/A11:2020; EN IEC 55014-1:2021;
EN 55014-2:2015; EN IEC 55014-2:2021; EN IEC 61000-3-2:2019; EN IEC 61000-3-2:2019/A1:2021;
EN 61000-3-3:2013/A1:2019
This declaration of conformity is issued under the sole responsibility of the manufacturer.
The object of the declaration described above fulfils the regulations of the directive 2011/65/EU of the European Parliament and Council from 8th June 2011, on the restriction of the use of certain hazardous substances in electrical and electronic equipment.
Subject to change without notice
Documents registrar: Dawid Hudzik
Günzburger Str. 69, D-89335 Ichenhausen
EU Declaration of Conformity
Article name: METAL BAND SAW - MBS1200xt / MBS1200xts
Nom d'article:
METALLBANDSÄGE - MBS1200xt / MBS1200xts
SCIE À RUBAN MÉTALLIQUE - MBS1200xt / MBS1200xts
5901511901 / 5901511904
| 2014/29/EU | 2004/22/EG | 89/686/EWG_96/58/EG | |||
| 2014/35/EU | 2014/68/EU | 90/396/EWG | |||
| X | 2014/30/EU | X | 2011/65/EU* | ||
| X | 2006/42/EG | ||||
| Annex IVNotified Body:Notified Body No.:Certificate No.: | 2016/1628/EUEmission. No: | ||||
Standard references:
EN 60745-1:2009/A11:2010; EN 60745-2-20:2009; EN 55014-1:2017/A11:2020; EN IEC 55014-1:2021;
EN 55014-2:2015; EN IEC 55014-2:2021; EN IEC 61000-3-2:2019; EN IEC 61000-3-2:2019/A1:2021;
EN 61000-3-3:2013/A1:2019
This declaration of conformity is issued under the sole responsibility of the manufacturer.
The object of the declaration described above fulfils the regulations of the directive 2011/65/EU of the European Parliament and Council from 8th June 2011, on the restriction of the use of certain hazardous substances in electrical and electronic equipment.
Subject to change without notice
Documents registrar: Dawid Hudzik
Günzburger Str. 69, D-89335 Ichenhausen
EU Declaration of Conformity
AB uygunluk beyanı
CE
Scheppach GmbH, Günzburger Str. 69, D-89335 Ichenhausen
| DE | erklärt folgende Konformität gemäß EU-Richtlinien und Normen für den Artikel | RO | declară următoarea conformitate corespunzător directivelor și normelor UE pentru articolul |
| GB | hereby declares the following conformity under the EU Directive and standards for the following article | GR | δηλώνει την ακόλουθη συμμόρφωση σύμφωνα με την Οδηγία ΕΕ και τα πρότυτα για το προϊόν |
| BG | декларира съответното съответствие съгласно Дирек-тива на ЕС и норми за артикул | TR | Burada açıklanan ürünün geçerli yönetmeliklere ve standart-lara uygun olduğunu tamamen kendi sorumluluğumuz altında beyan ediyoruz. |
| RS | potvrđuje sledeću usklađenost prema smernicama EZ i normama za artikal |
Article name: METAL BAND SAW - MBS1200xt / MBS1200xts
Ürün Tanım:
METALLBANDSÄGE - MBS1200xt / MBS1200xts
METAL ŞERITLI TESTERE - MBS1200xt / MBS1200xts
5901511901 / 5901511904
| 2014/29/EU | 2004/22/EG | 89/686/EWG_96/58/EG | |||
| 2014/35/EU | 2014/68/EU | 90/396/EWG | |||
| X | 2014/30/EU | X | 2011/65/EU* | ||
| X 2006/42/EG | |||||
| Annex IVNotified Body:Notified Body No.:Certificate No.: | |||||
Standard references:
EN 60745-1:2009/A11:2010; EN 60745-2-20:2009; EN 55014-1:2017/A11:2020; EN IEC 55014-1:2021;
EN 55014-2:2015; EN IEC 55014-2:2021; EN IEC 61000-3-2:2019; EN IEC 61000-3-2:2019/A1:2021;
EN 61000-3-3:2013/A1:2019
This declaration of conformity is issued under the sole responsibility of the manufacturer.
The object of the declaration described above fulfils the regulations of the directive 2011/65/EU of the European Parliament and Council from 8th June 2011, on the restriction of the use of certain hazardous substances in electrical and electronic equipment.
Subject to change without notice
Documents registrar: Dawid Hudzik
Günzburger Str. 69, D-89335 Ichenhausen
Garantie DE
Apparent defects must be notified within 8 days from the receipt of the goods. Otherwise, the buyer loses its rights of claim due to such defects are invalidated. We guarantee for our machines in case of proper treatment for the time of the statutory warranty period from delivery in such a way that we replace any machine part free of charge which provably becomes unusable due to faulty material or defects of fabrication within such period of time. With respect to parts not manufactured by us we only warrant insofar as we are entitled to warranty claims against the upstream suppliers. The costs for the installation of the new parts shall be borne by the buyer. The cancellation of sale or the reduction of purchase price as well as any other claims for damages shall be excluded.
Garantie FR
Apparent defects must be notified within 8 days from the receipt of the goods. Otherwise, the buyer's rights of claim due to such defects are invalidated. We guarantee for our machines in case of proper treatment for the time of the statutory warranty period from delivery in such a way that we replace any machine part free of charge which provably becomes unusable due to faulty material or defects of fabrication within such period of time. With respect to parts not manufactured by us we only warrant insofar as we are entitled to warranty claims against the upstream suppliers. The costs for the installation of the new parts shall be borne by the buyer. The cancellation of sale or the reduction of purchase price as well as any other claims for damages shall be excluded.
Záruka CZ
Apparent defects must be notified within 8 days from the receipt of the goods. Otherwise, the buyer is rights of claim due to such defects are invalidated. We guarantee for our machines in case of proper treatment for the time of the statutory warranty period from delivery in such a way that we replace any machine part free of charge which provably becomes unusable due to faulty material or defects of fabrication within such period of time. With respect to parts not manufactured by us we only warrant insofar as we are entitled to warranty claims against the upstream suppliers. The costs for the installation of the new parts shall be borne by the buyer. The cancellation of sale or the reduction of purchase price as well as any other claims for damages shall be excluded.
Garantii EE
Apparent defects must be notified within 8 days from the receipt of the goods. Otherwise, the buyer's rights of claim due to such defects are invalidated. We guarantee for our machines in case of proper treatment for the time of the statutory warranty period from delivery in such a way that we replace any machine part free of charge which provably becomes unusable due to faulty material or defects of fabrication within such period of time. With respect to parts not manufactured by us we only warrant insofar as we are entitled to warranty claims against the upstream suppliers. The costs for the installation of the new parts shall be borne by the buyer. The cancellation of sale or the reduction of purchase price as well as any other claims for damages shall be excluded.