gks 41/400 b - Saw SCHEPPACH - Free user manual and instructions
Find the device manual for free gks 41/400 b SCHEPPACH in PDF.

| Product type | Petrol chainsaw |
| Brand | Scheppach |
| Model | GKS 41/400 B |
| Dimensions (L x W x H) | 405 x 240 x 280 mm |
| Weight (without bar and chain) | 4.6 kg |
| Engine | 2-stroke, air-cooled, displacement 40.1 cm³ |
| Maximum power | 1.5 kW |
| Fuel | Petrol/oil mixture 40:1 |
| Fuel tank capacity | 0.39 L |
| Chain oil tank capacity | 0.21 L |
| Bar length | 400 mm |
| Cutting length | 370 mm |
| Chain pitch | 0.375" (3/8") |
| Chain gauge | 1.27 mm |
| Recommended chain | Oregon 91P057X |
| Recommended bar | Oregon 160SDEA041 |
| Maximum chain speed | 21 m/s |
| Idle speed | 3100 ± 300 min⁻¹ |
| Maximum speed | 11000 min⁻¹ |
| Chain brake | Yes, inertia |
| Automatic oiler | Yes |
| Sound pressure level LpA | 100 dB(A) |
| Sound power level LWA | 113 dB(A) |
| Vibration front handle | 8.51 m/s² |
| Vibration rear handle | 9.0 m/s² |
| Emission category | Euro II |
| Warranty | Legal (defective parts replaced free of charge) |
Frequently Asked Questions - gks 41/400 b SCHEPPACH
User questions about gks 41/400 b SCHEPPACH
0 question about this device. Answer the ones you know or ask your own.
Ask a new question about this device
Download the instructions for your Saw in PDF format for free! Find your manual gks 41/400 b - SCHEPPACH and take your electronic device back in hand. On this page are published all the documents necessary for the use of your device. gks 41/400 b by SCHEPPACH.
USER MANUAL gks 41/400 b SCHEPPACH
natural_image
Blue and white OREGON electric chain saw with black and white blades (no text or symbols on the device itself)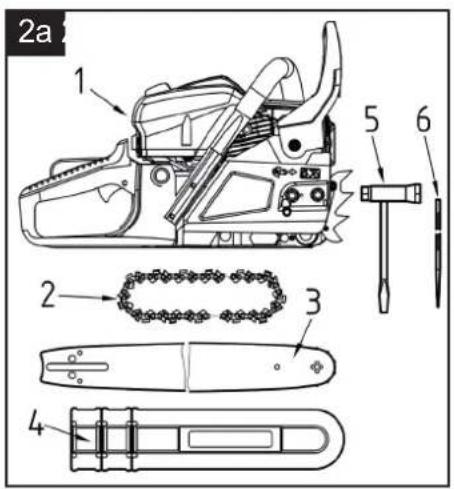

natural_image
Illustration of a hand using a chain to interact with a gear (no text or symbols present)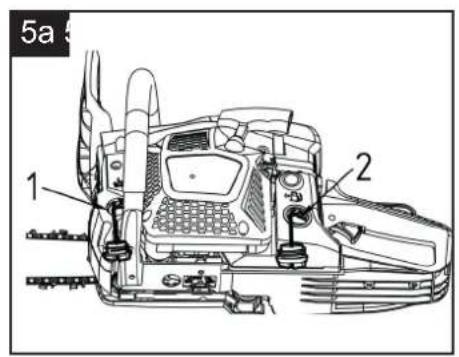

natural_image
Technical diagram of a mechanical device with directional arrows indicating motion or movement (no text or symbols)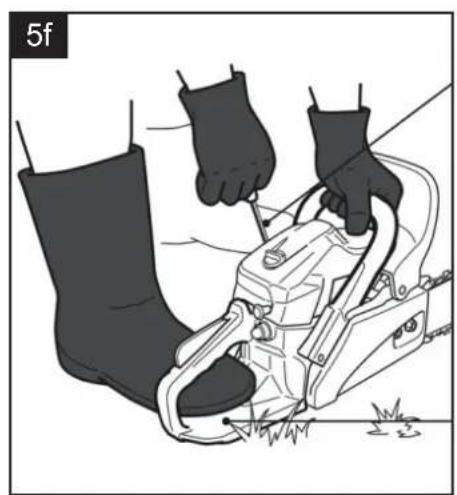
natural_image
Illustration of hands operating a chain-link robotic device with grass at the base (no text or symbols)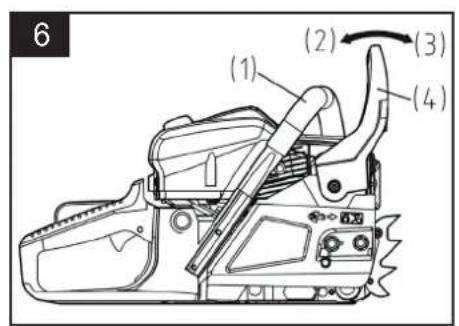

natural_image
Illustration of a person using a manual power tool to cut wood or wood grain (no text or symbols present)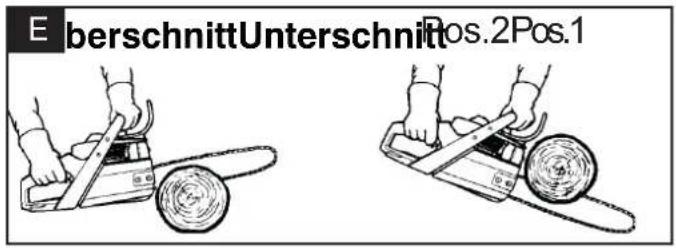
natural_image
Technical line drawing of a mechanical device with hoses and components (no text or symbols)
natural_image
Illustration of a hand holding a grid-based device with a magnified inset showing a small component (no text or symbols)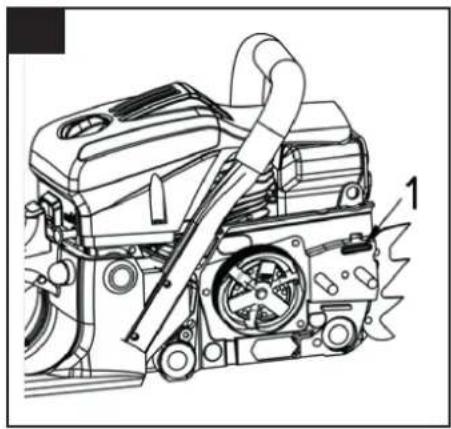
natural_image
Technical line drawing of a mechanical engine assembly (no text or symbols)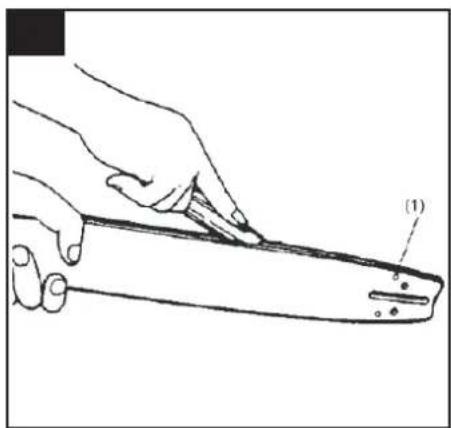
natural_image
Line drawing of a hand holding a tool with a labeled component (1), no text or symbols present
natural_image
Technical line drawing of a mechanical device with no visible text or symbols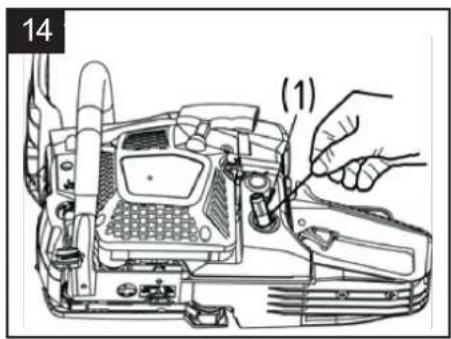
natural_image
Simple line drawing of a mechanical component with an arrow pointing right (no text or symbols)
Günzburger Straße 69
D-89335 Ichenhausen
VEREHRTER KUNDE,
Explanation of symbols on the product


Read, understand and follow all warnings


Warning! Chance of kickback (kickback). Beware of a check of the chain saw and avoid contact with the tip of the bar.

Do not use the device with one hand


Use the device with both hands.


Always wear safety glasses, hearing protection and a safety helmet


Read the complete user guide before using the appliance


Wear security and anti-vibration gloves when you use the device


Always wear non-skid safety shoes with cut protection when using this product


Fuel filler cap


Filling hole for chain oil.


Choke knob


Adjustment screw for oil pump


Adjustments for carburettor:
L Low Speed
H High Speed
T Idle Speed


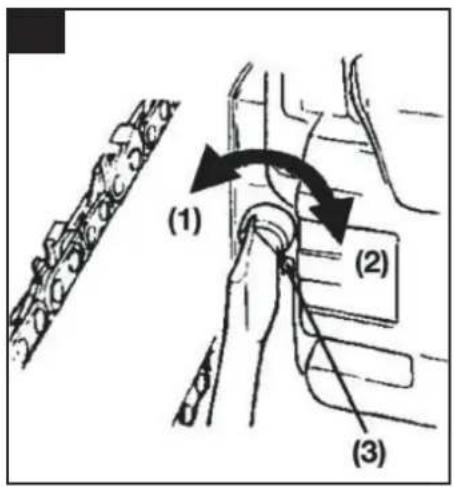
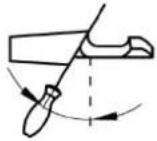
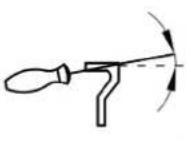
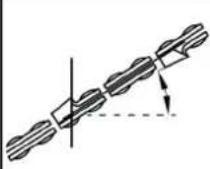
Setting the chain tension:
White arrow: Loosen chain
Black arrow: Tighten chain

natural_image
Simple line drawing of a mechanical component with an arrow pointing right (no text or symbols)
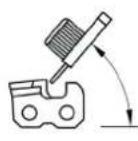
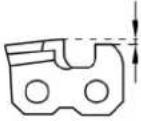
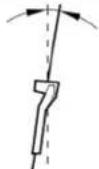
Installation direction of chain


Guaranteed sound power level of the device.
Introduction
MANUFACTURER:
scheppach
Günzburger Straße 69
D-89335 Ichenhausen
DEAR CUSTOMER,
We wish you much joy and success in working with your new appliance.
NOTE:
According to the applicable product liability laws, the manufacturer of the device does not assume liability for damages to the product or damages caused by the product that occurs due to:
- Improper handling,
• Non-compliance of the operating instructions, - Repairs by third parties, not by authorized service technicians,
- Installation and replacement of non-original spare parts,
• Application other than specified,
- A breakdown of the electrical system that occurs due to the non-compliance of the electric regulations and VDE regulations 0100, DIN 57113 / VDE0113.
We recommend:
Read through the complete text in the operating instructions before installing and commissioning the device. The operating instructions are intended to help the user to become familiar with the machine and take advantage of its application possibilities in accordance with the recommendations. The operating instructions contain important information on how to operate the machine safely, professionally and economically, how to avoid danger, costly repairs, reduce downtimes and how to increase reliability and service life of the machine.
In addition to the safety regulations in the operating instructions, you have to meet the applicable regulations that apply for the operation of the machine in your country. Keep the operating instructions package with the machine at all times and store it in a plastic cover to protect it from dirt and moisture. Read the instruction manual each time before operating the machine and carefully follow its information. The machine can only be operated by persons who were instructed concerning the operation of the machine and who are informed about the associated dangers. The minimum age requirement must be complied with.
Specifications
| Machine length x width x height | 405x240x280 mm |
| Weight without bar and chain | 4.6 kg |
| Weight with bar and chain 5.2 kg | |
| Cutting Length 370 mm | |
| Bar Length 400 mm | |
| Automatic chain oiling yes | |
| Chain Oil Specialist Chain Oil | |
| Chain oil tank capacity 0.21 l | |
| Chain Division 0.375" | |
| Chain Thickness 1.27 mm | |
| Chain Type Oregon 91P057X | |
| Chain Brake yes | |
| Bar Type | Oregon 160SDEA041 |
| Chain Speed Max | 21 m/s |
| Motor | 2 cylinder, air-cooled |
| Engine Capacity | 40.1 cm^3 |
| Maximum Motor Capacity | 1.5 kW |
| Idle Speed | 3100±300 min^-1 |
| Maximum Speed with Cutting Attachment | 11000 min^-1 |
| Fuel Tank Capacity | 0.39 l |
| Fuel Type | 40:1 Mix |
| Carburettor | Walbro |
| Emission Class | Euro II |
Keep the noise emissions and vibrations to a minimum.
- Only use appliances which are in perfect working order.
• Service and clean the appliance regularly. - Adapt your working style to suit the appliance.
- Do not overload the appliance.
- Have the appliance serviced whenever necessary.
- Switch the appliance off when it is not in use.
- Wear protective gloves.
| Sound Pressure Level L_pA | 100 dB(A) |
| Uncertainty K_pA | 3 dB |
| Sound Power Level L_WA | 113 dB(A) |
| Vibration Front Handle | 8.51 m/s2 |
| Vibration Rear Handle | 9.0 m/s2 |
| Uncertainty | 1.5 m/s2 |
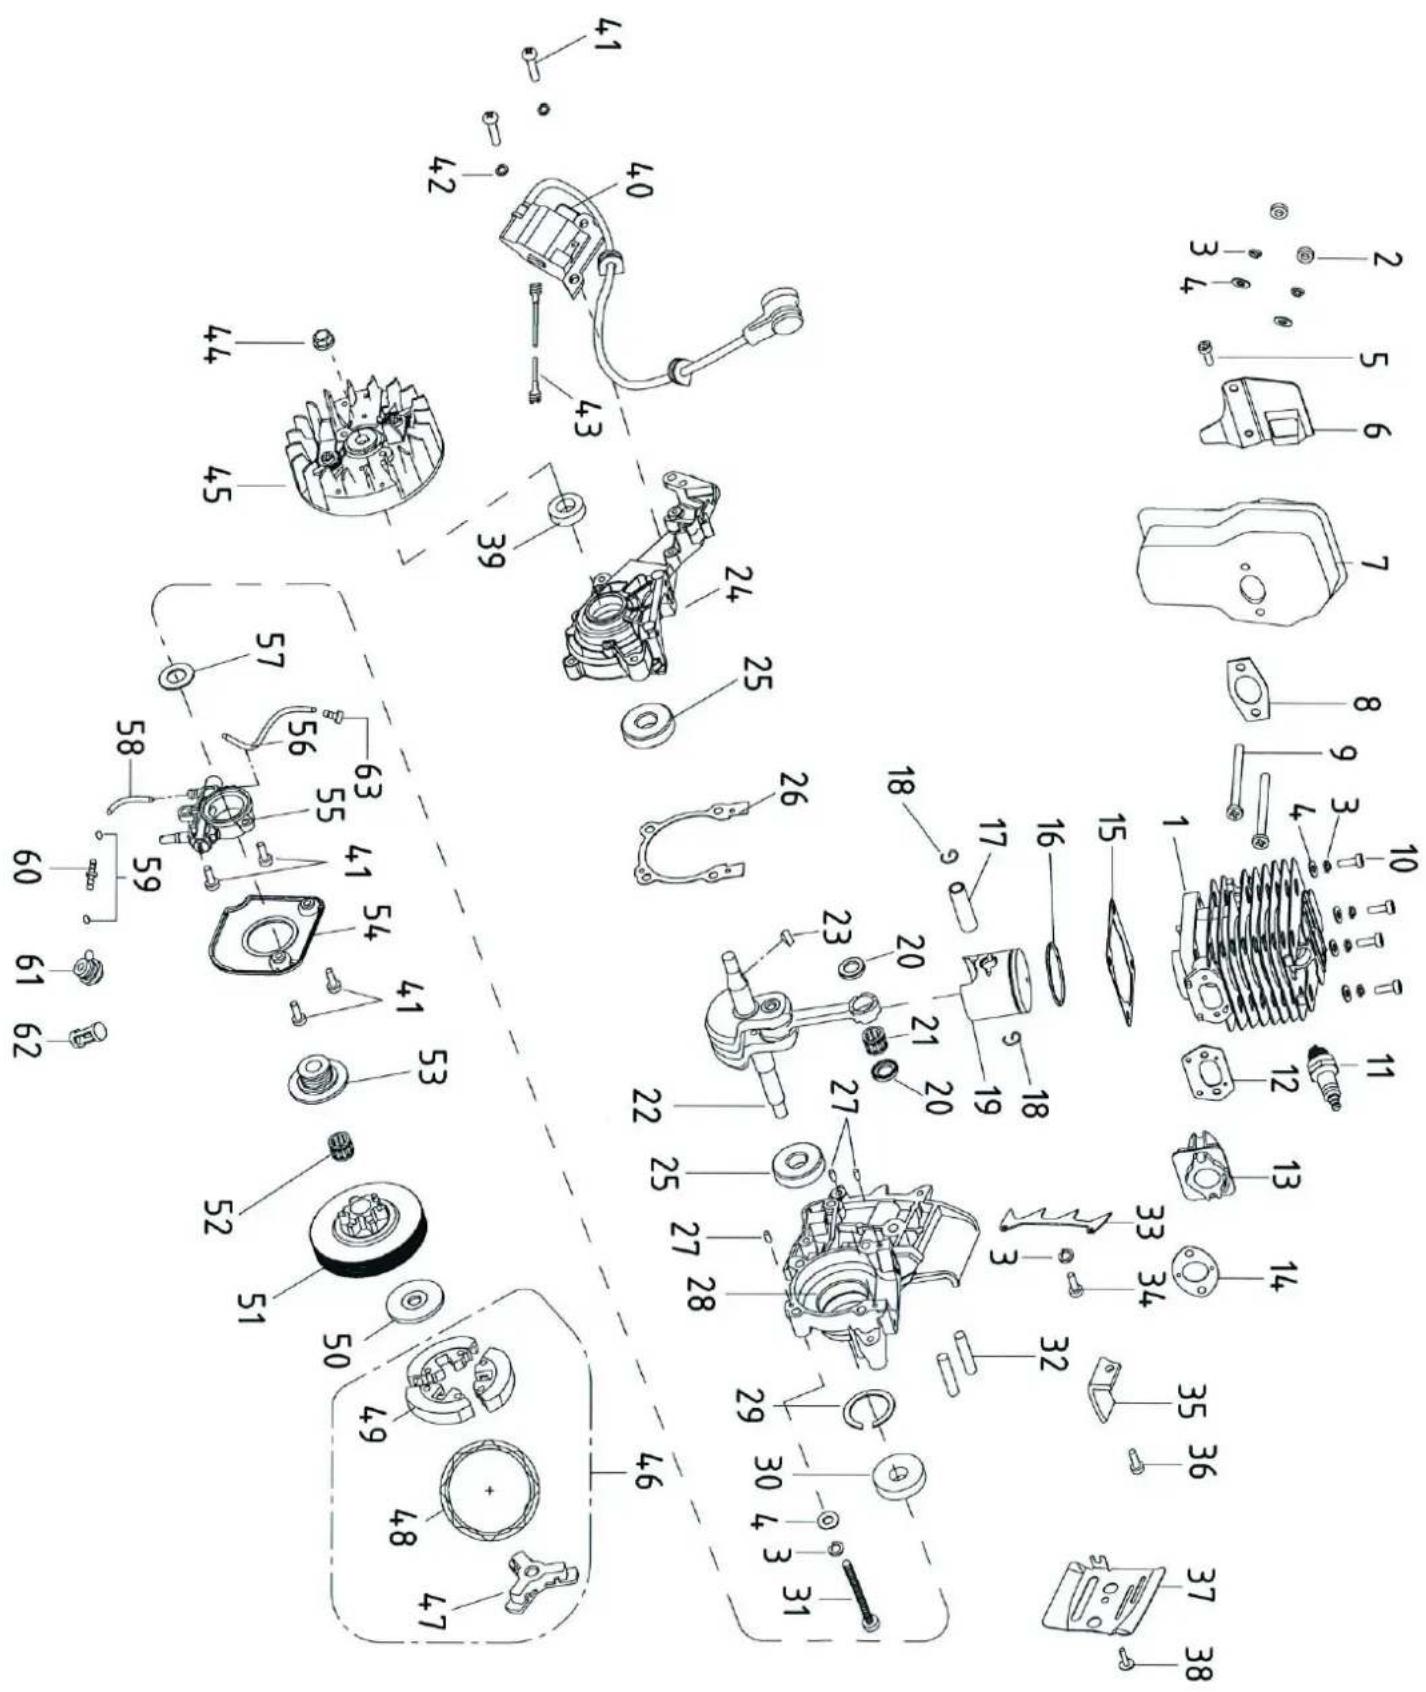
Device Description (Fig. 1)
- Chain
- Bar
- Front Hand Guard / Chain Brake Lever
- Starter Handle
- Air Filter Cover
- Air Filter Mounting Nut
- Choke Knob
- Throttle Lock
- Rear Handle
- Throttle
- On/Off Switch
- Fuel Tank Cap
- Oil Tank Cap
- Front Handle
- Bar Cover
- Petrol Pump Knob
- Decompression Valve (if present)
- Cover
- Claw Stop
- Chain Catcher Protection
Safety Functions (Fig. 1)
1 CHAIN WITH LOW KICK helps you reduce kick-back and this catches better with specially designed safety devices.
3 CHAIN BRAKE LEVER / HAND GUARD protects the left hand of the operator, should it slip off the front handle while saw is running.
3 CHAIN BRAKE is a safety feature to reduce injuries caused by a running chain. Activate the CHAIN BRAKE LEVER and the running chain will stop within milliseconds.
8 THROTTLE LOCK prevents accidental acceleration of the motor. The throttle lever can be pressed only when the throttle lock is depressed.
11 ON / OFF SWITCH immediately stops the motor when it is turned off. The stop switch must be set to ON to start the engine (again).
20 CHAIN GUARD reduces the risk of injury, should the chain break or slip away with the engine running.
Caution: Familiarize yourself with the saw and its parts.
General safety instructions
Safety Instructions
Warning: When using gas tools, basic safety precautions, including the following, should always be followed to reduce the risk of serious personal injury and/or damage to the unit.
Read all these instructions before operating this product and save these instructions.
1 DO NOT operate a chain saw with one hand! Serious injury to the operator, helpers, bystanders, or any combination of these persons may result from one-handed operation. A chain saw is intended for two-handed use.
2 Do NOT use the saw if you are tired, ill or under the influence of alcohol and/or drugs.
3 Use safety footwear, snug-fitting clothing, protective gloves, and eye, hearing and head protection devices.
4 Use caution when handling fuel. Move the chain saw at least 10 feet (3m) from the fueling point before starting the engine.
5 DO NOT allow other persons to be near when starting or cutting with the chain saw. Keep bystanders and animals out of the work area.
6 DO NOT start cutting until you have a clear work area, secure footing, and a planned retreat path from the falling tree.
7 Keep all parts of your body away from the saw chain when the engine is running.
8 Before you start the engine, make sure that the saw chain is not contacting anything.
9 Carry the chain saw with the engine stopped, the guide bar and saw chain to the rear, and the muffler away from your body.
10 NEVER use a chainsaw which is damaged, incorrectly set or incompletely and loosely assembled. Make sure that the chainsaw stops when the chain brake is applied.
11 Shut off the engine before setting the chain saw down.
12 Use extreme caution when cutting small size brush and saplings because slender material may catch the saw chain and be whipped toward you or pull you off balance.
13 When cutting a limb that is under tension, be alert for springback so that you will not be struck when the tension in the wood fibers is released.
14 Keep the handles dry, clean, and free of oil or fuel mixture.
15 Operate the chain saw only in well-ventilated areas.
16 DO NOT operate a chain saw in a tree unless you have been specifically trained to do so.
17 All chain saw service, other than the items listed in the user manual safety and maintenance instructions, should be performed by competent chain saw service personnel.
18 When transporting your chain saw, use the appropriate guide bar scabbard.
- DO NOT operate your chain saw near or around flammable liquids or gases whether in or out of doors. An explosion and/or fire may result.
- Do not tank fuel, oil or lubrication when the engine of chain saw is running.
- USE THE RIGHT TOOL: Cut wood only. Do not use the chain saw for purposes for which it was not intended. For example, do not use the chain saw for cutting plastic, masonry, or nonbuilding materials.
- The engine will create toxic exhaust fumes as soon as the engine is started. Never work in enclosed rooms or in rooms with poor ventilation.
- Important: National regulations differ in some countries and may restrict the use of the machine
- To detect significant damage or defects, the equipment must be inspected each time before use and each time after being dropped or suffering other shocks.
- If any liquid is spilled while filling the oil tank or the fuel tank, the equipment must be cleaned to remove the spilled liquid.
Note: The following appendix is primarily for the end user or occasional user. The chainsaw is designed for occasional use by home owners, garden owners and campers and is for general work such as stump-grubbing, cutting firewood, etc. It is not designed for lengthy use. If it is used for a lengthy period, the vibrations it causes in the hands of the user may result in circulation problems (white finger syndrome). The hand-arm vibration syndrome (vibration white finger) is a vascular disease that involves seizure-like spasms of the fingers and toes. The affected areas are no longer sufficiently supplied with blood and therefore appear extremely pale. The frequent use of vibrating equipment may trigger nerve damage in people with an impaired circulation (for example smokers, diabetics). Should you observe any unusual impairments, interrupt your work immediately and consult a doctor. Follow these instructions in order to reduce the dangers:
- Keep your body and in particular your hands warm when working in the cold
- Take regular breaks and move your hands to stimulate the blood circulation during the breaks.
- Ensure that the equipment makes the least possible vibration through regular maintenance and solid parts on the equipment.
Kickback may occur when the nose or tip of the guide bar touches an object, or when the wood closes in and pinches the saw chain in the cut. If the bar tip contacts, it may cause a lightning-fast reverse reaction, kicking the guide bar up and back towards the operator. Pinching the saw chain along the top of the guide bar may push the guide bar rapidly back towards the operator. Either of these reactions may cause you to lose control of the saw, which could result in serious personal injury. Do not rely exclusively upon the safety devices built into your saw. As a chain saw user, you
should take several steps to keep your cutting jobs free from accident or injury.
1 With a basic understanding of kickback, you can reduce or eliminate the element of surprise. Sudden surprise contributes to accidents.
2 Keep a good firm grip on the saw with both hands, the right hand on the rear handle, and the left hand on the front handle, when the engine is running. Use a firm grip with thumbs and fingers encircling the chain saw handles. A firm grip will help you reduce kickback and maintain control of the saw. Don't let go.
3 Make sure that the area in which you are cutting is free from obstructions. Do not let the nose of the guide bar contact a log, branch, or any other obstruction which could be hit while you are operating the saw.
4 Cut at high engine speeds.
5 Do not overreach or cut above shoulder height.
6 Follow manufacturer's sharpening and maintenance instructions for the saw chain.
7 Only use replacement bars and chains specified by the manufacturer or the equivalent.
8 If the equipment becomes jammed when cutting, switch it off immediately and free it carefully. Finally, check the equipment for damage (e.g. a bent chain bar) and carry out a test run.
Proper use
The chain is designed exclusively for sawing wood. You may only fell trees if you have received the appropriate training. The manufacturer cannot be held liable for damage caused by improper or incorrect usage. The machine is to be used only for its prescribed purpose. Any other use is deemed to be a case of misuse. The user / operator and not the manufacturer will be liable for any damage or injuries of any kind caused as a result of this.
Please note that our equipment has not been designed for use in commercial, trade or industrial applications. Our warranty will be voided if the machine is used in commercial, trade or industrial businesses or for equivalent purposes.
Before starting up
⚠ Caution: Start the engine only when the saw is fully assembled.
⚠ Caution: When handling the chain always wear protective gloves.
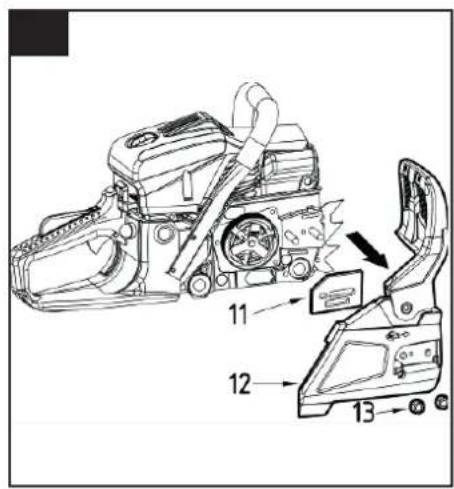
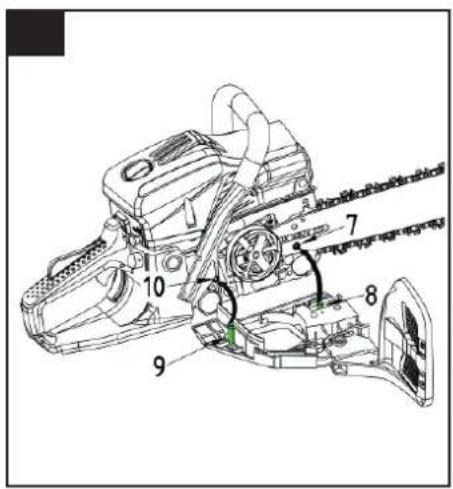
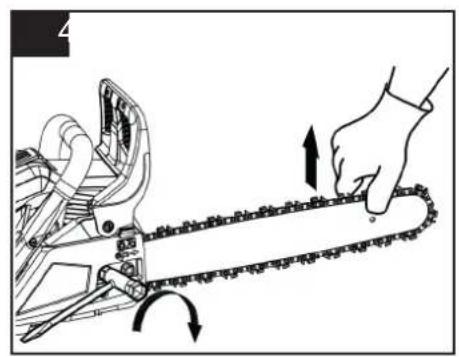
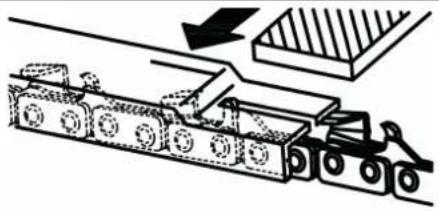
Assembling the bar, and the chain (Fig.2a-c)
Delivery of the device includes the following parts:
1 Chainsaw
2 Chain
3 Bar
4 Bar Cover
5 Socket
6 Chain File
Open the box and assemble the bar and chain as follows:
- Press the front hand guard back so that the chain brake is disabled.
- Loosen the two nuts (13) and remove the cover (12) and spacer (11).
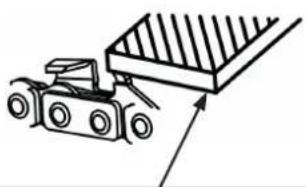
- Slide the chain around the sprocket, next slide the saw chain around the bar. Pay attention to the installation direction of the chain.
- Mount the bar on the two threaded pins
- Insert the chain tensioning screw (8) into the lower hole (7) of the chain bar.
- Install the cover (12) and tighten the nuts (13) by hand.
- Make sure that the pin (9) fits into the hole (10) of the housing.
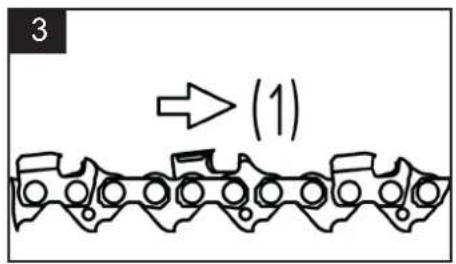
Installation direction of the chain (Fig. 3 item 1)
Tensioning the chain (4a-c)
- Hold the front part tight with your hand.
- Adjust the chain tension using the tension screw (3) so that the chain rests entirely on the bar, but not under great tension.
- Tighten the mounting nut for the bar with the key (12-15 Nm).
- Check with your hand that the chain runs smoothly on the rail and has the proper voltage.
- Where necessary, set up the chain tension.
⚠️ Note: If the chain is TOO LOOSE or TOO TIGHT on the drive wheel and bar, the crankshaft bearings will wear out faster.
⚠️ Note: New chains expand, so they must be reset after about 5 cuts. This is normal for a new chain, and the future interval settings will increase.
Fuel and Chain Oil
⚠ Warning: fuel and chain oil are highly flammable. Do not smoke and or expose the unit to an open flame when you use the device.
Fuel
For optimal results, use normal unleaded fuel blended with special 2-stroke oil.
Fuel mixture
Mix the fuel with 2-stroke oil in a suitable container. Shake the container to mix everything carefully.
⚠ Caution: Never use pure gasoline for this saw. It will damage the engine and you will lose the warranty for this product. Do not use a fuel mixture that has been stored for longer than 90 days.
⚠ Caution: Special 2-stroke oil must be used for air-cooled 2-stroke engines with a 40:1 ratio. Do not use 2-stroke oil product with a mixing ratio of 100:1. Insufficient oil will damage the engine and, in this case, void the warranty for the motor.
Recommended fuels
Some conventional gasolines are blended with ingredients such as alcohol or ether compounds to meet the standards for clean exhaust gases. The engine runs satisfactorily with all grades of gasoline, but for the purpose of self-propulsion with oxygenated gasolines, it is best to use regular gasoline. At best, use regular unleaded gasoline.
Oiling of the chain and bar
Every time the fuel tank is filled with gasoline, oil must also be added to the chain oil tank. It is recommended to use commercial chain oil.
Starting
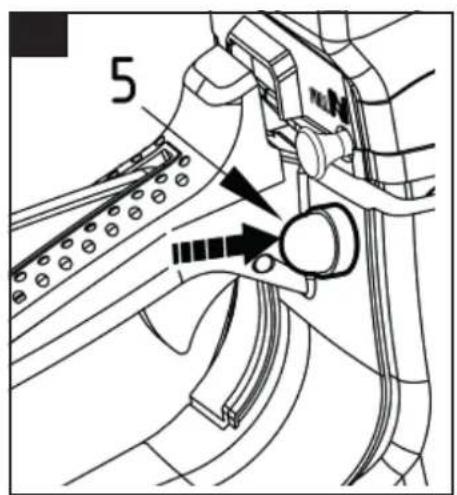
Start the appliance (Fig. 5a-f)
- Your device is equipped with an Easy-Start system that helps you start the machine.
- Remove the oil tank cap (1) and fuel tank cap (2).
- Fill the chain oil tank (1) to 80% with chain oil.
- Pour the petrol-/oil mixture into the fuel tank (2).
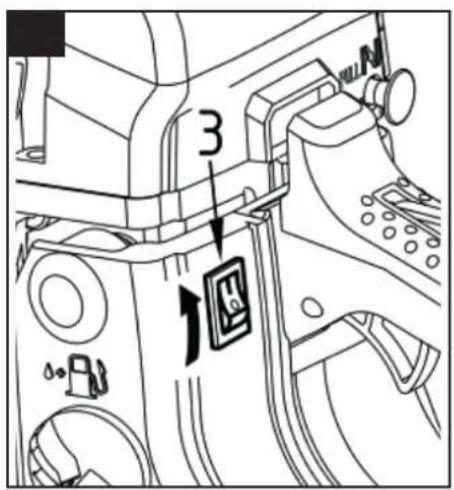
- Set the power switch (3) to position „I“.
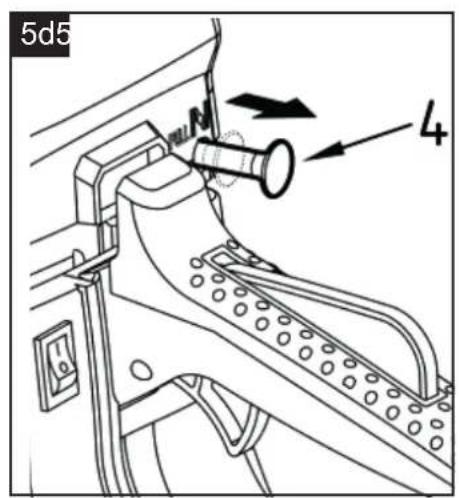
- Press the fuel pump button (5) until this is filled with fuel.
- Pull out the CHOKE knob (4).
Note: When restarting immediately after stopping the engine, do not pull out the CHOKE knob (4).
- Press the front handle forward to activate the chain brake
- Place the saw on a firm, level surface. Hold the saw firmly with the foot as indicated. Quickly pull the starter 2 times. Pay attention to the running chain!
- Once the engine has started, press the thrott-
le trigger lock and the throttle lever so that the CHOKE button clicks into place again.
- Pull the front handle backwards to release the chain brake.
- Let the engine warm up, controlling the throttle setting and letting the chain run briefly.
Caution: Before you start the engine, make sure that the chain isn't touching anything and the chain brake is activated before each start.
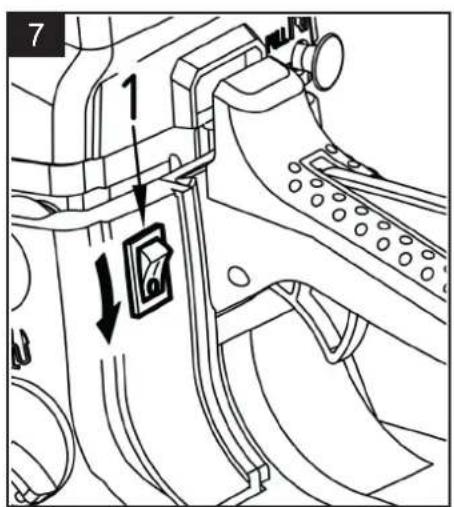
Stopping the motor (Fig. 7)
- Release the throttle lever and wait until the engine is idling.
- Set the power switch to „Stop (0)“ to stop the motor.
⚠️ Note: To stop the engine in an emergency, activate the chain brake and set the ON / OFF switch to „Stop (0)“
Oil Supply Control
To check the chain lubrication keep the chain on a piece of paper and give full throttle for a few seconds. On the paper the quantity of oil can be checked.
⚠️ Note: Make sure that there is always enough oil in the tank because chain lubrication is always on.
Chain Brake (Fig. 6)
⚠️ Note: Before each use always check that the chain brake is functioning.
- Hold the chain saw by the front handle (1).
- Press the front hand guard (4) forward to position
- Press the pedal, the chain should not move.
- Pull the front handle (4) back to position 2. Press the pedal, the chain should move.
Working Instructions
▲ Important Notes
- Use the device exclusively for sawing wood. Do not cut metal, plastics, masonry, building material that is not made of wood, etc.
- Turn off the engine when the saw comes into contact with a foreign object. Inspect the saw and repair it if necessary.
- Protect the chain from dirt and sand. Even a small amount of dirt will quickly blunt a chain and increase the risk of kickback.
- Start by cutting a few small logs, using the exercise to get a feel for your device before you tackle more difficult tasks.
- Squeeze the throttle trigger and allow it to reach full speed before you start cutting.
- Press the casing of the chain saw against the log when you start sawing.
- Give full throttle during the entire sawing process.
- Allow the saw to work. Exert only slight downward pressure.
- Release the throttle trigger as soon as you have fi-
nished your work, so that the engine is idling. If you leave the unit to continue to run at full throttle without a load, it will cause unnecessary wear.
- In order not to lose control of the device you should lean towards the end of the incision so there is no pressure on the saw.
- Stop the engine before putting down the saw.
Felling Trees – Only after appropriate training
Caution: Watch for broken or dead branches that could fall during sawing and cause serious injury. Do not saw near buildings or electrical wires if you do not know in which direction the felled tree could fall. Do not work at night since you will not be able to see properly, or in rain, snow or storm, as it is difficult to predict the the direction in which the tree could fall.
- Plan your work in advance.
- The work area around the tree should be clear so you have a firm foothold.
- The operator should always stand on the uphill side of the terrain as the tree is expected to roll or slide after felling.
- Check for broken or dead branches, which can fall and cause serious injury.
The following conditions may affect the direction in which a tree falls:
• Wind direction and speed.
- Lean of the tree. The inclination is not always visible due to uneven or sloping terrain. Determine the lean of the tree using a solder or a spirit level.
- Branch growth (and hence weight) on one side only.
- Surrounding trees and obstacles.
Look for decay and rot. If the trunk is rotted, it may suddenly collapse and fall on you. Make sure there is enough space for the tree to fall safely. Keep a distance of 2 1/2 tree lengths from the nearest person or other objects. Engine noise can drown out a warning call.
Remove dirt, stones, loose bark, nails, staples, and wire from the tree where you are going to cut.
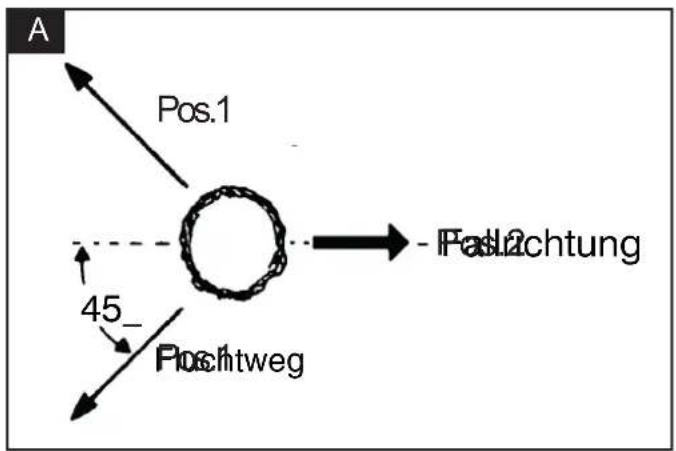
⚠ Keep an escape route (Fig. A)
Item 1: Plan of emergency exits
Item 2: Position in which the tree falls
Felling of large trees - only with appropriate training (15 cm in diameter)
Fell large trees using the notch method. Here, a wedge is laterally cut out of the tree according to the desired direction of fall. After a cut has been made on the case of the other side of the tree, the tree will fall in the direction of the wedge.
⚠️ Note: If the tree has large prop roots, they should be removed before making the notch. If the saw is used to remove the prop roots, the chain should not touch the ground, to prevent it from becoming become blunt.
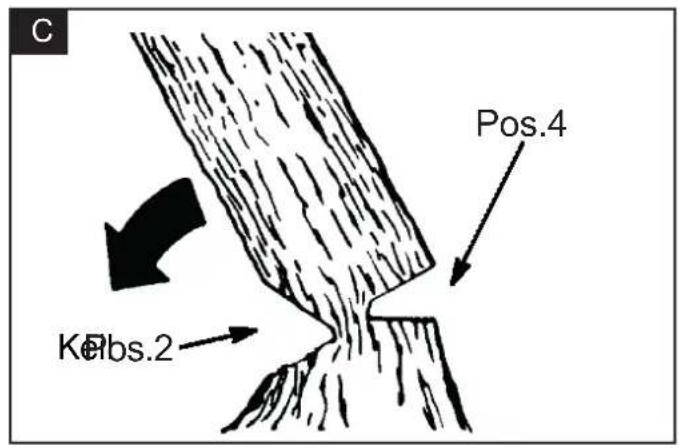
Undercut and felling of the tree (Fig. B-C)
- For the first undercut, saw the upper section (Item 1) of the wedge (item 2). Cut 1/3 into the tree. Next, saw the lower section (item 3) of the wedge (item 2). Now remove the excised wedge.
- Next, you can run the felling cut (Fig. 4) on the opposite side of the tree. Do this at approximately 5 cm above the centre of the notch. This will leave enough uncut wood present between the felling cut (Item 4) and the wedge (item 2), which form a hinge while falling. This hinge will help prevent the tree from falling in the wrong direction.
△ Note: Before the felling cut is complete, open the cut when necessary with the help of wedges to control the direction of the fall. Use only wood - or plastic wedges. Steel or iron wedges can cause kickback and damage to the device.
- Be alert to signs that the tree is starting to fall: cracking sounds, widening of the felling cut, or movement in the upper branches.
- Where the tree starts to fall, stop saw, turn it off, and move away quickly.
- To avoid injury, do not cut down a partially felled tree with your saw. Pay special attention to partially felled trees that may be poorly supported. If a tree does not fall completely, set the saw aside and pull with a cable winch, block and tackle, or tractor.
Sawing a felled tree (Bucking)
The term „BUCK“ means to cut a felled tree trunk into the desired log length.
Caution: Do not stand on the log while it is being cut. Any portion can roll, and you may lose your footing and control over the device. Never run the saw on sloping ground.
Important Notes
• Always only cut one log at a time.
- Be careful when cutting splintery wood. You could be hit by sharp wood particles.
- Cut small logs or branches on a sawhorse. When cutting logs, another person should hold the trunk. Do not secure the trunk with your leg or foot.
- If you use the saw in places where trunks and roots are tangled, drag the logs into a clear spot, and lift the cleared logs first.
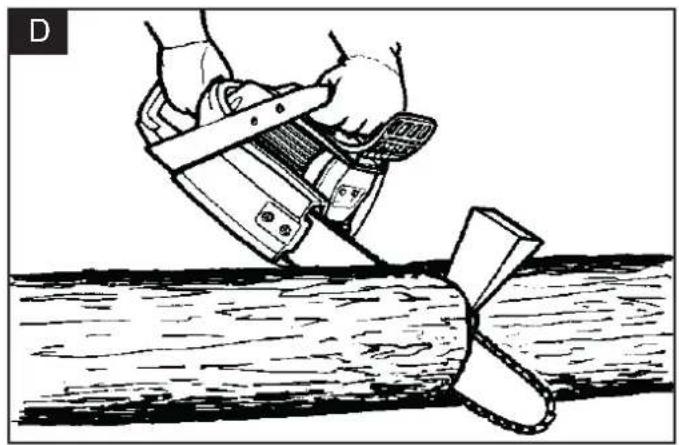
Different cuts for BUCKING (Fig. D)
Caution: If the saw is clamped into a log, do not pull it out by force. You risk losing control of the device, thereby resulting in injury and / or damage to the saw. Hold the saw, and drive a plastic or wood - wedge into the cut until the saw can be pulled out easily. Position the saw carefully and allow it to cut again. Start the saw if it is trapped in a trunk.
Upper section (Fig. E, Item 1)
Position the saw at the upper end of the log. With the overcut apply only slight downward pressure.
Sub-section (Fig. E, item 2)
Place the undercut at the bottom of the trunk, holding the top of the saw down against the log. Practice the undercut; it is just as easy to train from the top. Hold the saw firmly and maintain control. The saw will push backwards (towards you).
⚠ Caution: Never hold the saw upside down for an undercut. In this position, you have no control over the device. Always execute the first cut on the compression side of the log. The compression side of a log is where the pressure of the root weight is concentrated.
Bucking without supports (Fig. F)
- Cut 1/3 of the diameter (Item 1) into the tree.
- Turn the log over and finish with a second upper section (Item 2).
- Look at the compression side so that the saw does not become trapped. See the figure for cuts in trunks on the compression side.
Bucking with trunks or support (Fig.-H)
- Remember to always take your first cut (Pos1) on the pressure side.
- Cut about 1/3 of the way into the trunk.
• Perform the second cut out (item 2).
Limbing and Trimming
⚠ Attention: Always pay attention to, and protect yourself against kickback. Never let the moving chain at the top of the guide bar come into contact with other branches or objects when limbing or trimming. Such contact can cause serious injury.
⚠ Attention: Climb the tree for pruning or trimming. Do not stand on ladders, platforms, etc. as you may lose your balance and lose control of the device.
Important Notes
- Work slowly, and hold the saw firmly with both hands. Ensure safe standing position and balance.
- Watch out for spring backs. Use extreme caution when cutting small size limbs. Pliable material may catch in the saw chain and be whipped toward you or pull you off balance.
- Watch out for spring backs. This is especially true for branches that are bent or under pressure. Avoid coming in contact with the branch or the saw when there is tension in the wood.
- Keep your work area clear. Keep the path clear of branches to avoid tripping over them.
Limbing
• Always limb a tree after it is felled. Only then can limbing be completed safely and correctly.
- Leave the larger limbs that are underneath the felled tree, and use them as support while you continue to work.
- Start at the base of the felled tree and work your way up to the top. Remove small limbs with one cut.
• Make sure to always have the tree between you and the saw.
- Remove larger, supporting branches using the me-
thods in the section „Bucking without restraints“.
• Always cut small and freely hanging limbs with one cut. By undercutting they could fall in and pinch the saw.
Trimming (Fig. I)
⚠ Attention: Leave stubs in branches or below cut them to shoulder level only. Never cut branches above shoulder height. Leave such work to an expert.
- Make the first cut (Item 1) 1/3 in the bottom of the limb.
- Then cut the second section (Item 2) all the way through the branch. The third section (item 3) is a general section that allows you to separate the branch at 2.5 to 5cm from the trunk.
Cleaning and maintenance
⚠ Warning: Disconnect the spark plug boot before doing any cleaning and maintenance work!
Cleaning
- Keep all safety devices, air vents and the motor-housing free of dirt and dust as far as possible. Wipe the equipment with a clean cloth or blow it-with compressed air at low pressure.
• We recommend that you clean the device immediately each time you have finished using it.
- Clean the equipment regularly with a moist cloth and some soft soap. Do not use cleaning agents or solvents; these could attack the plastic parts of the equipment. Ensure that no water can seep into the device.
Air filter (Fig.8-9)
- Clean the air filter after each use.
- Unscrew the air filter mounting nut and remove the cover.
- Remove the air filter.
- Open the air filter with a screwdriver.
- Clean the air filter. Wash the filter in clean, warm, soapy water. Let the air dry completely.
- Insert the air filter. Put on the cover of the engine / air filter. Make sure the cover is installed correctly. Tighten the screw that secures the cover.
⚠️ Note: It is advisable to keep a stock of spare filters.
Oil supply opening (Fig. 10)
- Check the oil supply opening (item 1) after each use.
- Dissemble the bar.
- Check the oil outlet (item 1) for obstructions.
Bar (Fig.11-12)
- Clean the bar after each use.
- Remove the bar from the machine.
- Remove sawdust from the bar and the oil channel (Item 1).
- Lubricate the teeth (item 3) through the oiling hole (item 2) with an oil syringe.
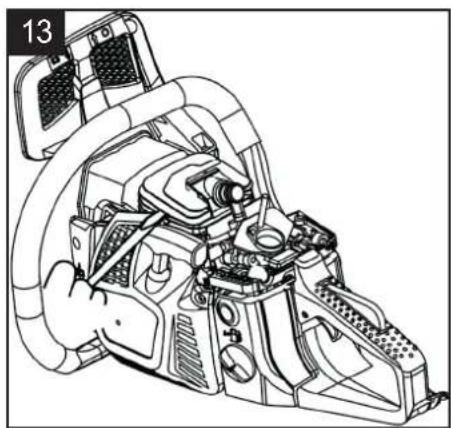
Cylinder fins (Fig. 13)
- Clean the cylinder fins after each use. To do this, use compressed air at low pressure or use a brush.
- Dust and dirt between the fins on the cylinder may cause the machine to overheat.
Other maintenance points before each use
- Check for leakage from oil or fuel tanks.
- Check the unit for loose parts and screws. Specifically, the chain, the bar and the hand grips.
- If you find defects on the machine, fix them immediately.
Fuel filter (Fig 14)
⚠ Caution: Never operate the saw without the fuel filter. After every 100 hours of operation the fuel filter needs to be cleaned or replaced when damaged. Drain the fuel tank completely before replacing the filter.
- Remove the fuel tank cap.
• Make a handle from soft wire. - Insert it into the opening of the fuel tank and hook the fuel hose. Pull the fuel hose carefully to the opening until you can grab it with your fingers.
⚠️ Note: Pull the hose so it is not quite out of the tank.
- Lift the fuel filter (item 1) from the tank.
- Remove the filter with a twisting motion and clean it. If it is damaged, discard the filter.
- Insert the cleaned filter or a new one. Plug one end of the filter into the tank opening.
- Make sure the filter is seated in the lower tank cap. Move the filter with a long screwdriver to put it in its proper slot.
- Fill the tank with fresh fuel mixture. Put the cap on the tank.
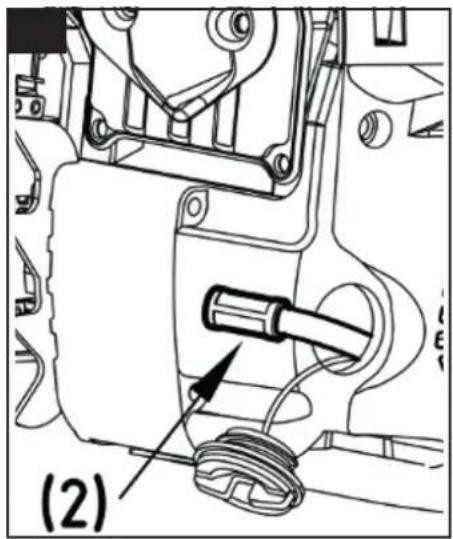
Oil Filter (Fig 15)
⚠ Caution: Never operate the saw without the oil filter (item 2). After every 100 hours of operation the oil filter needs to be cleaned or replaced when damaged. Empty the oil tank completely before replacing the filter.
- Remove the oil tank cap.
• Make a handle from soft wire. - Insert it into the opening of the oil tank and hook to the oil hose. Pull the oil hose carefully to the opening until you can grab it with your fingers.
⚠️ Note: Pull the hose so it is not quite out of the tank.
- Lift the oil filter (Item 1) out of the tank.
- Remove the filter with a twisting motion and clean it. If it is damaged, discard the filter.
- Insert the cleaned filter or a new one. Plug one end of the filter into the tank opening.
- Make sure the filter is seated in the lower tank cap. Move the filter with a long screwdriver to put it in its proper slot.
- Fill the tank with fresh oil. Put the cap on the tank.
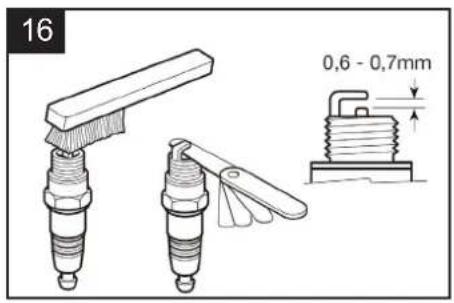
Spark plug (Fig 16)
△ Note: In order for the saw motor to remain powerful, the spark plug must be clean and properly gapped (0.6 mm). Spark plugs should be cleaned or replaced every 20 hours.
- Set the power switch to „Stop (0)“.
- Remove the air filter cover by removing the air filter mounting nut. The cover can then be removed.
- Remove the air filter.
- Disconnect the spark plug from the ignition wire by gently pulling it and turning the spark plug.
- Remove the spark plug with a spark plug wrench. DO NOT USE OTHER TOOLS.
- Clean the spark plug with a copper wire brush or replace it with a new one.
Carburetor setting
The carburetor has been set to its perfect adjustment at the factory. If it requires adjusting, take the saw to your nearest authorized after-sales service outlet.
⚠ Warning: You may not make settings on the carburetor itself!
Bar
- Check after every 8 hours of work to ensure uniform wear.
Chain
Chain Tension
Periodically check the chain tension and adjust if necessary, so that after use the chain is snug against the rail, but still loose enough that it can be pulled by hand.
Breaking in a new saw chain
A new chain and bar will need chain readjustment after as few as 5 cuts. This is normal during the breakin period, and the interval between future adjustments will begin to lengthen quickly.
⚠ Warning: Never have more than 3 links removed from a loop of chain. This could cause damage to the sprocket.
Chain lubrication
Always make sure the automatic oiler system is working properly. Keep the oil tank filled with Chain, Bar and Sprocket Oil.
Adequate lubrication of the bar and chain during cutting operations is essential to minimize friction with the guide bar.
Never starve the bar and chain of lubricating oil. Running the saw dry or with too little oil will decrease cutting efficiency, shorten saw chain life, cause rapid dulling of chain, and lead to excessive wear of bar from overheating. Too little oil is evidenced by smoke or bar discoloration.
Chain Sharpening
△ Note: For smooth and safe operation, it is important that the chain is always sharp. The chain should be sharpened when:
• Wood shavings are dust-like.
- You have to expend extra power sawing
• The saw cut is not straight.
• The vibration increases.
• Fuel consumption increases.
⚠️ Note: We recommend that a professional sharpen the chain.
| Instructions for sharpening a saw chain: | |||||
| Chainsaw type | File diameter Upper angle lower angle | Upper tilt angle (55°) | Standard depth | ||
 |  |  |  |  | |
| Chucking rotation angle | Chucking inclination angle | side angle | |||
 |  |  | |||
| 21BPX | ca. 4.8 mm | 30° | 10° | 85° | 0.64 mm |
 |  | ||||
| depth stop file | |||||
Storage
⚠ Caution: Never put a chain saw into storage for longer than 30 days without carrying out the following steps.
Storing a chain saw
Storing a chain saw for longer than 30 days requires storage maintenance. Unless the storage instructions are followed, fuel remaining in the carburetor will evaporate, leaving gum-like deposits. This could lead to difficult starting and result in costly repairs.
- Remove the fuel tank cap slowly to release any pressure in tank. Carefully drain the fuel tank.
- Start the engine and let it run until the unit stops to remove fuel from carburetor.
- Allow the engine to cool (approx. 5 minutes).
- Remove the spark plug.
- Pour 1 teaspoon of clean 2-cycle oil into the combustion chamber. Pull starter rope slowly several times to coat internal components. Replace spark plug.
⚠️ Note: Store the unit in a dry place and away from possible sources of ignition such as a furnace, gas hot water heater, gas dryer, etc.
Puttig the saw back into operation
- Remove spark plug.
- Pull starter rope briskly to clear excess oil from combustion chamber.
- Clean the spark plug and check that the electrode gap is correct.
• Prepare unit for operation. - Fill fuel tank with proper fuel / oil mixture.
Disposal and recycling
The unit is supplied in packaging to prevent its being damaged in transit. This packaging is raw material and can therefore be reused or can be returned to the raw material system.
The unit and its accessories are made of various types of material, such as metal and plastic. Defective components must be disposed of as
Important hint in case of sending the equipment to a service station:
Due to security reasons please see to it that the equipment is sent back free of oil and gas!
| Troubleshooting guide | ||
| Problem Probable cause Corrective Action | ||
| Unit won't start or starts but will not run. | Incorrect starting procedures. Follow instructions in the User Manual. | |
| Incorrect carburetor mixture adjustment setting. | Have carburetor adjusted by an Authorized Service Center. | |
| Fouled spark plug. Clean / gap or replace plug. | ||
| Fuel filter plugged. Replace fuel filter. | ||
| Unit starts, but engine has low power. | Incorrect lever position on choke. Move to RUN position. | |
| Dirty air filter. Remove, clean and reinstall filter. | ||
| Incorrect carburetor mixture adjustment setting. | Have carburetor adjusted by an Authorized Service Center. | |
| Engine hesitates. | Incorrect carburetor mixture adjustment setting. | Have carburetor adjusted by an Authorized Service Center. |
| No power under load. Incorrectly gapped spark plug. Clean / gap or replace plug. | ||
| Runs erratically. | Incorrect carburetor mixture adjustment setting. | Have carburetor adjusted by an Authorized Service Center. |
| Smokes excessively. | Incorrect fuel mixture. | Use properly mixed fuel (40:1 mixture). |
| Poor performance when operated | Blunt chainLoose chain | Sharpen or replace the chainTension the chain |
| Engine dies | Empty petrol tankFuel filter in the wrong position in the tank | Fill up the petrol tankCompletely fill the petrol tank or or re-position the fuel filter in the petrol tank |
| Insufficient chain lubrication (the cutter rail and chain get hot) | Empty oil tank for the chain | Top up the oil tank for the chain |
| Oil lubrication openings moved | Clean the oil lubrication hole in the cutter barClean the groove in the cutter bar | |
natural_image
Simple line drawing of a mechanical component with an arrow pointing right (no text or symbols)
Günzburger Straße 69
D-89335 Ichenhausen
CHER CLIENT,
| 2009/105/EC | |
| 2006/95/EC | |
| 2006/28/EC | |
| 2005/32/EC | |
| X | 2004/108/EC |
| 2004/22/EC | |
| 1999/5/EC | |
| 97/23/EC | |
| 90/396/EC | |
| X | 2011/65/EU |
| 89/686/EC_96/58/EC | ||
| X 2006/42/EC | ||
| X | Annex IVNotified Body: Intertek Deutschland GmbH, Stangenstraße 1,70771 Leinfelden-EchterdingenNotified Body No.: 0905 | |
| X 2000/14/EC_2005/88/EC | ||
| X | Annex V | |
| Annex VINoise: measured L_WA =xx dB(A); guaranteed L_WA =xx dB(A)Notified Body: | ||
| X 2004/26/EC | ||
| Emission. No: e11*97/68SA*2011/88*/0747*05 | ||
Standard references: 81-1; EN ISO 14982; ZEK 01.4-08
| Ichenhausen, den 21.05.2014 | M. B.-MUnterschrift / Markus Bindhammer / Technical Director |
| First CE: 2014Art.-No. 1910103903Subject to change without notice | Documents registar: Christian DrößlerGünzburger Str. 69, D-89335 Ichenhausen |
Motor
Garantie DE
Apparent defects must be notified within 8 days from the receipt of the goods. Otherwise, the buyer's rights of claim due to such defects are invalidated. We guarantee for our machines in case of proper treatment for the time of the statutory warranty period from delivery in such a way that we replace any machine part free of charge which provably becomes unusable due to faulty material or defects of fabrication within such period of time. With respect to parts not
manufactured by us we only warrant insofar as we are entitled to warranty claims against the upstream suppliers. The costs for the installation of the new parts shall be borne by the buyer. The cancellation of sale or the reduction of purchase price as well as any other claims for damages shall be excluded.