kg 210 - Saw SCHEPPACH - Free user manual and instructions
Find the device manual for free kg 210 SCHEPPACH in PDF.

User questions about kg 210 SCHEPPACH
0 question about this device. Answer the ones you know or ask your own.
Ask a new question about this device
Download the instructions for your Saw in PDF format for free! Find your manual kg 210 - SCHEPPACH and take your electronic device back in hand. On this page are published all the documents necessary for the use of your device. kg 210 by SCHEPPACH.
USER MANUAL kg 210 SCHEPPACH
natural_image
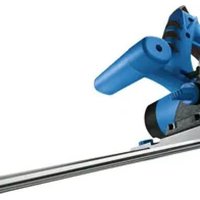
Exterior view of a modern cut-cutting power tool with visible blade and cutting edge (no text or symbols)| D | Kapp- und GehrungssägeOriginalbetriebsanleitung |
| GB | Undercut Mitre SawTranslation from original manual |
| FR | Scie à onglets mixtesTraduction à partir de la notice originale |
| IT | TroncatriceTraduzione dal libretto d'istruzione originale |
| FIN | Katkaisu- ja JiriisahaKäännös alkuperäisestä käyttöohjeesta |
| DK | Afkorter- eg GeringssavOversættelse fra den originale brugervejledning |
| CZ | Kapovací a pokosová pilaPřeklad z originálního návodu |
| EST | Kompleksne miiusaagAlgupärase käsiraamatu tõlge |
| LAT | Kombinētais škērszāğisInstrukcijas origināla tulkojums |
| LIT | Kampinis nuožulnauspjovimo pjūklasVertimas paimtas iš originalaus vartotojo vadovo |
| SK | Skracovacia a pokosová pílaPreklad originálu - Úvod |
| PL | Pilarka kątowaTłumaczenie oryginału instrukcji obsługi |
| HR | Pila ukosnicaPrijevod izvornog priručnika |
| SL | Čelilna in zajeralna žagaPrevod iz originalnega priročnika |
| HU | Sarkaló fúrész Azeredeti használati utasítás fordítása |
| BG | Настолен герунг циркулярПревод на оригиналното ръководство |
natural_image
Mechanical assembly component with labeled part '16' and arrow indicator (no readable text or symbols beyond label)Günzburger Straße 69
D-89335 Ichenhausen
VEREHRTER KUNDE,
Günzburger Straße 69
D-89335 Ichenhausen
DEAR CUSTOMER,
we wish you a pleasant and successful working experience with your new machine.
According to the applicable product liability law the manufacturer of this device is not liable for damages which arise on or in connection with this device in case of:
- improper handling,
• non-compliance with the instructions for use,
• repairs by third party, non authorized skilled workers,
• installation and replacement of non-original spare parts, - improper use,
- failures of the electrical system due to the non-compliance with the electrical specifications and the VDE 0100, DIN 57113 / VDE 0113 regulations
Recommendations:
Read the entire text of the operating instructions prior to the assembly and operation of the device.
These operating instructions are intended to make it easier for you to get familiar with your device and utilize its intended possibilities of use.
The operating instructions contain important notes on how to work safely, properly and economically with your machine and how to avoid dangers, save repair costs, reduce downtime, and increase the reliability and working life of the machine.
In addition to the safety regulations contained herein, you must in any case comply with the applicable regulations of your country with respect to the operation of the machine.
Put the operating instructions in a clear plastic folder to protect them from dirt and humidity, and store them near the machine. The instructions must be read and carefully observed by each operator prior to starting the work. Only persons who have been trained in the use of the machine and have been informed on the related dangers and risks are allowed to use the machine. The required minimum age must be met.
In addition to the safety notes contained in the present operating instructions and the special regulations of your country, the generally recognized technical rules for the operation of wood working machines must be observed.
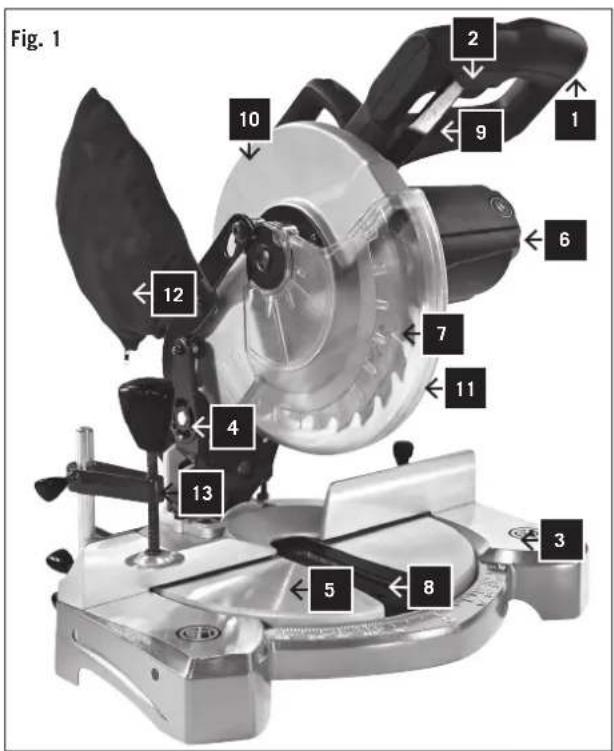
LEGEND, FIG. 1
1 Grip
2 Start switch
3 Base
4 Joint for casing / base
5 Rotary table
6 Motor
7 Saw blade
8 Table insert
9 Ratchet lever
10 Saw blade guard, fixed
11 Saw blade guard, moveable
12 Chip bag
13 Clamping jaw
| kg 210 | |
| Scope of delivery | |
| Undercut Mitre Saw | |
| dust collector bag | |
| workpiece holder | |
| tooling for sawblade change SW 6 | |
| 3 supports | |
| 2 carbon brushes | |
| Operating instructions | |
| Technical Data | |
| DimensionsL x W x H mm | 690 x 550 x 440 |
| ø revolving table mm | 385 x 150 |
| Table height mm | 55 |
| Saw blade ø mm | 210/30/2,6/1,6 WZ 24 |
| Speed 1/min | 5000 |
| Cutting rate m/s | 55 |
| Swivel range | 2 x 45° |
| Tool cutting edge inclination | 45° |
| Doublemitering 45° x 45° | left |
| Adjustments | 45°, 30°, 22,5°, 15°, 0°, 15°, 22,5°, 30°, 45° |
| Weight kg | 7,7 |
| Cut data for rip cutting | |
| 90°/90°/ | 120 x 60 mm |
| 90°/45° | 80 x 60 mm |
| 45°/90° | 120 x 35 mm |
| 45°/45° | 80 x 35 mm |
| Drive | |
| Motor V/Hz | 220-240 ~ 50 |
| Input W | S6 25% 1500W |
Subject to technical modifications!
The height of the workpiece must be at least 3 mm.
Make sure that the workpiece is always secured with the clamping device.
Information on noise
The noise levels of the machine during operation are as follows:
$$ L _ {D A}: 9 9. 6 \mathrm{dB(A)} K = 3 \mathrm{dB(A)} $$
$$ L _ {w A}: 1 1 2. 6 \mathrm{dB(A)} K = 3 \mathrm{dB(A)} $$
$$ \text { Vibration: } 4. 5 1 \mathrm{m} / \mathrm{s} ^ {2} \quad \mathrm{K} = 1. 5 \mathrm{m} / \mathrm{s} ^ {2} $$
Warning: Noise can seriously damage your health. If the engine noise exceeds 85 dB (A), please wear appropriate hearing protection. If the electrical connection is faulty, the current may drop when the machine starts. This may affect other machines (e.g. flashing lights). If the electric output corresponds to Zmax <0.27, such interference should not occur. (If it does, notify your dealer).
- The vibration emission value given below has been measured by a standardized test, and can be used for comparing one power tool to another;
- The vibration emission value given below may also be used for a first assessment of exposure.
Warning:
- The vibration emission value may vary during actual use of the power tool from the specified value, depending on the manner in which the power tool is used;
- Try to keep exposure to vibration to a minimum. Examples of ways to reduce vibration levels are wearing
gloves when using the tool and limiting working hours. In doing so, all parts of the operating cycle must be taken into account (for example, times in which the power tool is turned off, or when it is turned on without load).
General notes
• After unpacking, check all parts for any transport damage. Inform the supplier immediately of any faults.
• Later complaints cannot be considered.
• Make sure the delivery is complete.
- Before putting into operation, familiarize yourself with the machine by carefully reading these instructions.
- Use only original SCHEPPACH accessories, wearing or re place ment parts. You can find replacement parts at your SCHEPPACH dealer.
- When ordering, include our item number and the type and year of construction of the machine.
In these operating instructions we have marked the places that have to do with your safety with this sign: △
⚠️ General Safety Notes
- Provide adequate lighting in the workplace.
• Use the clamping device to secure the workpiece.
• Follow the instructions for changing tools. - Keep handles dry and free from oil and grease.
- Distribute the safety instructions to all persons working on the machine.
- Keep all safety and hazard warnings on the machine in complete and legible condition at all times.
- Check power cords. No faulty cables.
- Make sure that the machine is stable and on solid ground.
- Take care when working: there is risk of injury to fingers, hands and eyes.
- Keep children away from the machine when it is plugged in.
- When the machine is being operated, all guards and covers must be properly fitted.
- The operator must be at least 18 years old. Apprentices must be at least 16 years old and should be supervised when using the machine.
- Persons working on the machine should not be distracted.
- Keep the machine work station clear of chips and wood waste.
- Wear tight-fitting clothing. Take off jewelry, rings and watches.
- Wear a cap or hairnet to protect long hair.
- The safety devices on the machine must not be dismantled or destroyed.
- Perform refitting, adjustment, measurement and cleaning work only when the engine is turned off. Unplug and wait for the rotating parts of the tool to come to a complete standstill.
- Switch off the machine when troubleshooting. Unplug the machine.
• Installation, repair and maintenance work on the electrical installation may only be carried out by qualified
professionals.
- All protective and safety equipment must be immediately re-installed after repairs and maintenance are completed.
- Do not expose the machine to moisture and do not use near flammable liquids or gases.
- Take care during machine operation. Use common sense when working. Do not use the power tool when you are tired or distracted.
- Never use outdoors when the general weather and environmental conditions do not allow it (e.g. charged atmospheres, during a lightning storm or when it is raining).
- Wear appropriate clothing: Do not wear wide sleeves, scarves, neckties, necklaces, or bracelets, which could get caught in the moving machine parts.
- Always use personal safety devices: appropriate regulation goggles, well-fitting gloves, outer or inner ear protection and a hood that covers the hair if necessary.
- Pay attention to the power cable: it must never catch on the machine or cause the machine to become unplugged. Protect it from sharp edges, oil and overheating.
- If an extension cord is needed, use only approved products.
- Guard against electric shock: avoid contact with grounded objects such as pipes, radiators and refrigerators.
- Keep your work area clean.
- Do not overload the power tool - you will work more safely within an appropriate output range.
- Wear safety glasses and a dust mask when carrying out work which generates dust.
- Always connect the dust collection device every time you work.
- Do not use the cable for purposes for which it was not intended. Do not use it to pull the plug from the socket. Keep the cable away from heat, oil and sharp edges.
- Avoid inappropriate body posture. Keep proper footing and keep your balance at all times.
- Do not leave any wrenches or key tools in the machine. Before turning the machine on, make sure that adjusting keys and wrenches have been removed.
- Store unused power tools safely. They should be stored in a dry place, locked or placed up high so that they are out of reach of children.
• Use the correct power tool. - Do not use low output machines for heavy work.
- Do not use the power tool for purposes for which it was not intended.
- When working outdoors, non-skid footwear is recommended.
- Take good care of tools. Keep cutting tools sharp and clean for better and safer working conditions.
- Regularly check the power tool's power cord and have it replaced by a certified technician if damaged.
- Inspect extension cords regularly and replace them if they are damaged.
- Avoid accidental starting of the machine.
-
Make sure that the switch is off when plugging it into the mains.
-
Check the power tool for damage.
- Before further use of the power tool, safety devices or slightly damaged parts should be carefully inspected for proper and intended function.
- Verify that the moving parts work properly and do not jam and check that there are no damaged parts. All parts must be installed correctly and meet all requirements to ensure the proper operation of the power tool.
- Damaged safety devices or other parts must be repaired by an authorized dealer in accordance with regulations or replaced, unless otherwise specified in the instructions.
- Damaged switches must be replaced at a service station.
- Do not use electric tools with switches that cannot be turned on and off.
- ATTENTION
- The use of other service tools and other accessories can mean a risk of personal injury.
- Your power tool should be repaired by a qualified electrician.
- This power tool complies with the relevant safety regulations. Repairs may only be performed by a qualified electrician, using original replacement parts, otherwise injury to the user may occur.
Additional safety notes for miter saws
- Do not use deformed or damaged blades.
- Do not operate the saw without guards in place.
- Replace the table insert when worn.
- The saw should only be used to cut wood, wood-like materials and plastics.
- Use only the manufacturer's recommended saw blades that meet the EN847-1 standard.
- Attach a dust collector to your miter saw during operation.
- Select the blades according to the material to be cut.
- Check the maximum depth of cut.
- When cutting longer pieces always use extension rails and insert clamps or other clamping devices for better grip.
- Wear ear protection.
• The operator station is in front of the machine.
• Use the clamping device to secure the workpiece.
- Turn off the power tool if the blade gets stuck in the workpiece or the workpiece gets wedged.
• Warning: Do not use blades made of high speed steel.
- Keep the floor area free of loose particles such as wood chips and cuttings.
- Make sure that the blade speed indicated on its label is at least as high as that of the saw speed.
- Use gloves when handling saw blades and rough materials.
- Be sure to use only shims and spindle rings that are suitable for the purpose specified by the manufacturer.
- Warning: Do not remove cuttings or other parts of the workpiece from the cutting area while the machine is running and the saw has not yet come to a complete stop.
• Always clamp the workpiece to the saw table.
- Make sure that the machine is sitting securely before beginning to saw.
WARNING! Noise can be harmful to your health. If a sound level of 85dB (A) is exceeded, ear protection must be worn.
Before each use, all guards and other parts should be carefully inspected to see whether they still fulfill their functions.
Check for alignment, smooth operation, breakage or other damage that could impair function. A
damaged part should either be immediately and professionally repaired or replaced.
⚠ Hazard from blocking workpieces or parts thereof! If blockage occurs, please proceed as follows:
-
Switch the device off
-
Unplug it
-
Wear gloves
-
Correct the blockage with appropriate tools.
Additional safety instructions for laser light
The laser light and laser radiation used in this system comply with class 1 and a maximum performance of 390 W and 650 nm wave length. Normally laser does not represent an optical danger, although staring into the beam can cause flash blinding.
Warning: Do not look directly into the laser beam, since this could represent a risk. Please observe the following safety instructions:
- The laser may only be used and maintained in accordance with the instructions of the manufacturer.
- Only point the beam onto the work piece, and never at a person or another object.
- The laser beam must not deliberately be pointed at persons. It must not be pointed into the eyes of a person for more than 0.25 seconds.
- Always make sure that the laser beam is directed onto a robust work piece without a reflecting surface. That means that timber and materials with a rough surface are acceptable. Shiny, reflecting plates or similar materials are not suitable for laser, since the reflecting surface could return the beam to the operator.
- Do not exchange the laser light unit for another type. Repairs have to be conducted by the manufacturer or an authorised specialised company.
Caution: You must only apply the regulation and adjustment tools and methods described in this manual. Non-observance can lead to dangerous radiation.
⚠️ Proper use
CE tested machines meet all valid EC machine guidelines as well as all relevant guidelines for each machine.
- The machine must only be used in technically perfect condition in accordance with its designated use and the in structions set out in the operating manual, and only by safety-conscious persons who are fully aware of the risks involved in operating the machine. Any functional disorders, especially those affecting the safety of the machine, sholud therefore be rectified immediately.
• Any other use exceeds authorization. The manufacturer
is not responsible for any damages resulting from unauthorized use; risk is the sole responsibility of the operator.
- The safety, work and maintenance instructions of the manufacturer as well as the technical data given in the calibrations and dimensions must be adhered to.
- Relevant accident prevention regulations and other, gene rally recognized safety-technical rules must also be adhered to.
- The machine may only be used, maintained, and operated by persons familiar with it and instructed in its operation and procedures. Arbitrary alterations to the machine release the manufacturer from all responsibility for any resulting damages.
- The machine may only be used with original accessories and tools made by the manufacturer.
⚠️ Remaining hazards
The machine has been built using modern technology in accor dance with recognized safety rules. Some remaining hazards, how ever, may still exist.
- Only process selected woods without defects such as: Branch knots, edge cracks, surface cracks. Wood with such defects is prone to splintering and can be hazardous.
- Wood which is not correctly glued can explode when being processed due to centrifugal force.
- Trim work piece to a rectangular shape, center and cor rectly secure before processing. Unbalanced work pieces can be hazardous.
- Long hair and loose clothing can be hazardous when the work piece is rotating. Wear personal protective gear such as a hair net and tight fitting work clothes.
- Saw dust and wood chips can be hazardous. Wear personal protective gear such as safety goggles and a dust mask.
- The use of incorrect or damaged mains cables can lead to injuries caused by electricity.
- Even when all safety measures are taken, some remaining hazards which are not yet evident may still be present.
- Remaining hazards can be minimized by following the instructions in „Safety Precautions“, „Proper Use“ and in the entire operating manual.
- Do not force the machine unnecessarily: excessive cutting pressure may lead to rapid deterioration of the blade and a decrease in performance in terms of finish and cutting precision.
- When cutting aluminium and plastics always use the app ro priate clamps: all workpieces must be clamped down firmly.
- Avoid accidental starts: do not press the start button while inserting the plug into the socket.
- Always use the tools recommended in this manual to obtain the best results from your cutting-off machine.
- Always keep hands away from the work area when the machine is running; before performing tasks of any kind release the main switch button located on the handgrip, thus disconnecting the machine.
• Always keep hands away from the work area when the
machine is running; before performing tasks of any kind release the main switch button located on the handgrip, thus disconnecting the machine.
Assembly
WARNING! For your own safety, only insert the mains plug in a socket after you have completed all assembly steps, and read and understood the safety and operating instructions.
Take the saw out of its packing and position it on the work bench.
Remove the saw from the packaging and place it on a workbench. (Positioning of the saw on the workbench - see next page under „POSITIONING / WORKSPACE“)
Assembling the saw dust bag
- Press the flaps of the metal ring together and attach it to the discharge opening in the engine area.
⚠️ Suitable use
Intended usage
The machine cuts:
• Wood and wood-like materials
- Plastic
Inappropriate usage
The machine is not suitable for:
- Ferrous materials, steel and cast iron, as well as all other types of materials that are not listed, especially food.
• Compound saw without protection. - Materials which are larger than the indicated cutting data:
| 90°/90°/ | 120 x 60 mm |
| 90°/45° | 80 x 60 mm |
| 45°/90° | 120 x 35 mm |
| 45°/45° | 80 x 35 mm |
Start-up
Observe the safety notes in the operating instructions before operating the machine.
REMOVAL OF PACKAGING
Remove the box used to protect the machine during trans portion and keep it intact for future transportation and storage.
DISPLACEMENT
As the undercut mitre saw is relatively small and light, it can be easily transported even by one person. It is sufficient to lift the saw by the handle after the locking button (13) has been locked in the lowest position.
TRANSPORT
In case the machine needs to be transported put it in the original packing in which it was delivered. See to it that it is placed in the correct position (regard signs on box). If possible secure the box with straps to avoid unintended
movement or loss of parts of the machine.
POSITION/WORK STATION
Place the machine on a work bench or on a sufficiently flat base/pedestal to ensure the best possible stability. Bearing in mind ergonomic criteria, the ideal height of the bench or of the base should be such that the base surface or the upper work surface is between 90 and 95 cm. from the ground.
Always ensure that there is at least 80 cm. of manoeuvring space in all directions around the machine in order to perform all necessary cleaning, maintenance and adjust ment operations safely with a sufficient amount of space available.
CAUTION: Ensure the machine is placed in a suitable position both in terms of environmental conditions and lighting.
Always bear in mind that general environmental conditions are of fundamental importance to prevent accidents.
ELECTRICAL CONNECTIONS
Check that the electrical system to which the machine is connected is earthed in compliance with current safety regulations and that the current socket is in perfect condition.
The electrical system must be fitted with a magnetothermal protective device to safeguard all conductors from short circuits and overload.
The selection of this device should be in line with the following electrical specifications of the machine stated on the motor.
NOTE: Your mitre-saw's electrical system is equipped with an undervoltage relay which automatically opens the circuit when the voltage falls below a minimum pre-established limit and which prevents the self-reset of machine functions when voltage returns to normal levels.
If the machine stops involutarily, do not be allarmed. Make sure that there has not been a voltage failure in the electrical system.
ADJUSTING
ATTENTION: All the adjustment procedures illustrated below must be performed when the machine's engine is off.
Cross-cutting Operation:
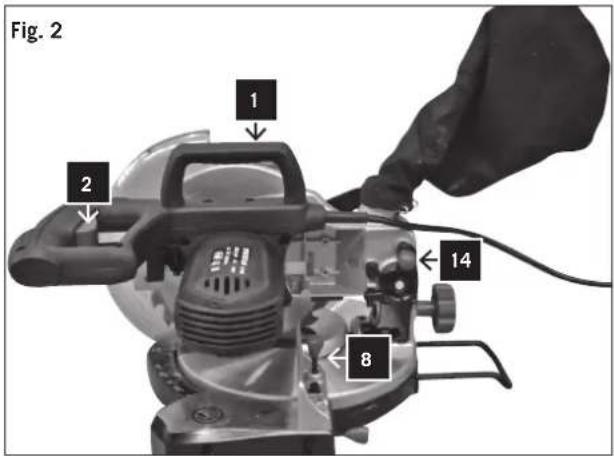
Swiveling the Table Top (Fig. 2)
By turning the table, the undercut mitre saw can be moved to the left and right-hand side. Using the scale, an exact angle setting is possible. 15^ , 22,5^ , 30^ , angles from 0^ to 45^ can be fast and precisely set.
For swinging the turning table, release the locking screw (8) and turn the unit at the handle (1) until the desired angle is obtained. Then secure with locking screw (8).
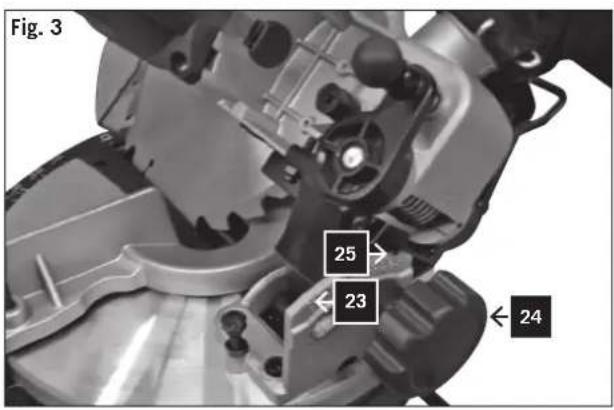
Tilting the Saw Unit (Fig. 3)
The saw unit can be tilted up to an angle of 45^ .
Loosen the hand grip (24) on the back of the machine and, using the scale, tilt the unit to the desired angular position. The angle can be determined using the indicator (25) on the scale (23). Finally, the hand grip must be securely re-tightened.
Operations
After having performed all the above procedures and opera tions, you may begin cutting.
ATTENTION: Always keep hands away from the cutting area and do not try to approach it when the machine is running.
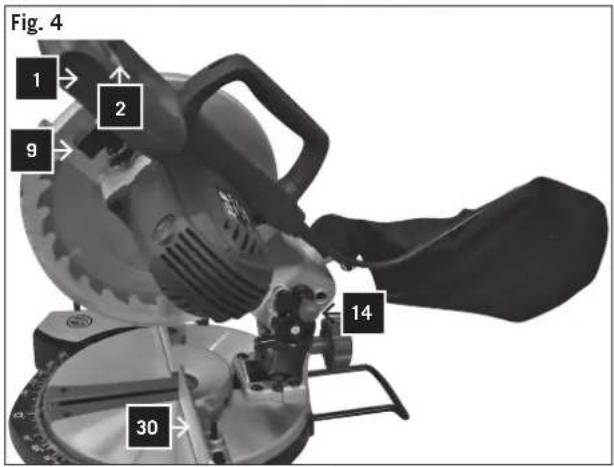
Cross-cutting Operation (Fig. 4)
• Release the locking button (13)
- Raise the saw unit using the hand grip (1) until the unit locks into the uppermost position.
- Press the work piece uniformly against the block bars (30), while assuring that your hand is outside the cutting zone of the saw blade.
- With the right hand on the hand grip (1), press the ratchet lever (9), so that the unit can be swiveled downward.
• After pressing of the start button (2) the engine starts running.
- Apply the saw blade slowly to the work piece and cut through it by applying slight pressure.
- Swing the unit back into the starting position until it locks into place.
- Release the hand grip (1), so that the motor shuts off.
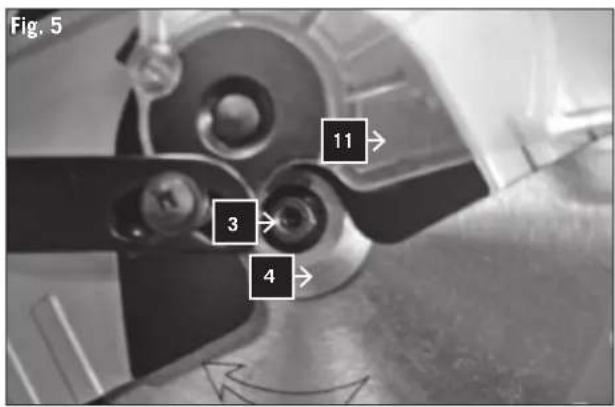
Changing the saw blade (Fig. 5)
- Pull the power plug.
- Put the sawing unit in the upper position.
- Release the movable saw blade guard (11) by pressing the lock (9) and lifting the saw blade guard at the same time to free the saw blade.
- Release the saw blade fixing screw (Attention: left-handed thread).
- Remove bolt (3) and saw blade flange (4).
• Take off the saw blade with caution (risk of injury through saw blade teeth). - Place the new saw blade onto the inner saw blade flange, observing the turning direction of the saw blade.
- Put the outer saw blade flange in place and firmly tighten the screw.
• Return the saw blade guard to the correct position.
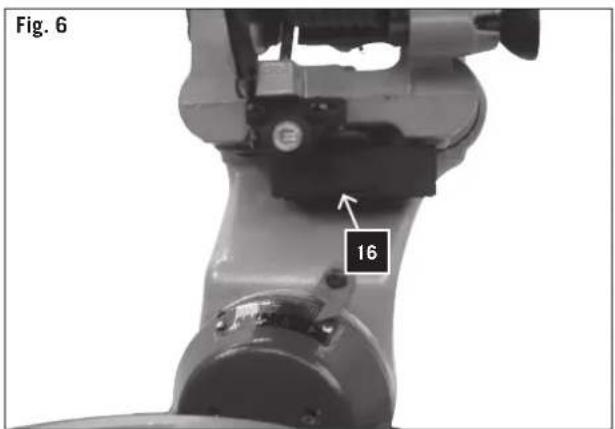
Replacing the laser's batteries (fig. 6)
- Remove the laser battery compartment cover 16. Remove both batteries.
- Replace both batteries with the same or an equivalent type. Make sure that the poles face in the same direction as the old batteries.
- Close the battery compartment cover.
Electrical connection
The installed electric motor is completely wired ready for operation.
The customer's connection to the power supply system, and any extension cables that may be used, must conform with local regulations.
Important remark:
The motor is automatically switched off in the event of an overload. The motor can be switched on again after a cooling down period that can vary.
Defective electrical connection cables
Electrical connection cables often suffer insulation damage.
Possible causes are:
- Pinch points when connection cables are run through window or door gaps.
- Kinks resulting from incorrect attachment or laying of the connection cable.
• Cuts resulting from running over the connecting cable. - Insulation damage resulting from forcefully pulling out of the wall socket.
• Cracks through aging of insulation.
Such defective electrical connection cables must not be used as the insulation damage makes them extremely hazardous.
Check electrical connection cables regularly for damage. Make sure the cable is disconnected from the mains when checking.
Electrical connection cables must comply with the regulations applicable in your country.
Single-phase motor
- The mains voltage must coincide with the voltage specified on the motor's rating plate.
- Extension cables up to a length of 25 m must have a cross-section of 1.5 mm2, and beyond 25 m at least 2.5 mm2.
- The connection to the mains must be protected with a 16 A slow-acting fuse.
Only a qualified electrician is permitted to connect the machine and complete repairs on its electrical equipment.
In the event of enquiries please specify the following data:
• Motor manufacturer
• Type of current of the motor
• Data recorded on the machine's rating plate
• Data recorded on the switch's rating plate
If a motor has to be returned, it must always be dispatched with the complete driving unit and switch.
Accessories
SAWDUST SUCTION REMOVAL SYSTEM
The circular saw is equipped with a suction connector, so that it can be connected to a suction system. Optionally, a dust bag can also be installed.
The hose of the suction system is fastened to the suction con nector with a hose clamp. We recommend that you empty the bag or the container of the suction assembly from time to time and clean the filter.
The air flow rate of the suction system must amount to at least 30 meters per second.
Maintenance
If specialist personnel must be brought in for extraordinary ser vice or repairs during the warranty period and thereafter, please contact a service provider recommended by us or contact the manufacturer directly.
- Overhauls, maintenance work, cleaning, as well as the eli mi nation of any malfunctions must only be undertaken after turning off the motor.
- All protective and safety equipment must be reinstalled immediately upon completion of any repair or maintenance work.
REGULAR MAINTENANCE
The regular maintenance decribed above and in the paragraph below can be carried out by unskilled personnel.
- Do not oil the mitre-saw, cause cutting must be carried out in dry conditions (including the cutting of alu minium and aluminium alloys); all rotating parts are self-lubricating.
- During maintenance, wear protective gear if possible (accident-prevention goggles and gloves).
- Remove cuttings when necessary both from the cutting area, work surfaces and support bases.
Use of an aspirator or brush is recommended.
ATTENTION: Do not use compressed air jets!
- Regularly check blade conditions: if difficulties should arise during cutting, have it sharpened by skilled personnel or replace it if necessary.
ASSISTENCE
When in need of skilled personnel for special maintenance, or for repairs, both during and following the guarantee pe riod, always apply to authorized centres for assistance or directly to the manufacturer if there is no authorized centre in your area.
DISPOSAL OF THE MACHINE.
Once its operating activity is finished, the disposal of the machine must take place through a normal collection and disposal Center for industrial waste.
Trouble shooting
Problem Possible Cause Help
| The motor does not run. Faulty motor, power supply cable or plug.Burned out fuses. | Have the machine checked by skilled personnel. Do not try to repair the machine yourselves as it may be dangerous. Check the fuses and replace them if necessary. | |
| The motor starts slowly and does not reach running speed. | Low power supply voltage. Damaged windings.Burned out capacitor. | Ask for the Electricity Board to check the voltage available. Have the machine motor checked by skilled personnel. Have the capacitor replaced by skilled personnel. |
| Excessive motor noise. Damaged windings. Faulty motor. Have the motor checked by skilled personnel. | ||
| The motor does not reach full power. | Overloaded circuit due to lighting, utilities or other motors. | Do not use other utilities or motors on the circuit to which the cutting-off machine is connected. |
| Motor overheats easily Overload of the motor; inadequate cooling of the motor | Prevent overloading the motor when cutting; remove dust from the motor to ensure an optimum cooling of the motor | |
| Decrease in cutting power when sawing | The saw blade is too small (sharpened too often) | Re-adjust the end stop of the saw unit |
| The saw cut is rough or wavy | The saw blade is dull; the tooth shape is not suited to the thickness of the material | Re-sharpen the saw blade or use an appropriate saw blade |
| The work piece rips or splinters | The cutting pressure is excessive or the saw blade is not suited to the application | Use the correct saw blade |
CONSTRUCTEUR:
scheppach
Günzburger Straße 69
D-89335 Ichenhausen
CHER CLIENT,
Günzburger Straße 69
D-89335 Ichenhausen
GENTILE CLIENTE,
Günzburger Straße 69
D-89335 Ichenhausen
HYVÄ ASIAKAS,
Günzburger Straße 69
D-89335 Ichenhausen
Ærede kunde,
Günzburger Straße 69
D-89335 Ichenhausen
Vážení zákazníci,
Günzburger Straße 69
D-89335 Ichenhausen
Lugupeetud klient,
Günzburger Straße 69
D-89335 Ichenhausen
Cienījamais klient!
Günzburger Straße 69
D-89335 Ichenhausen
Mielas kliente,
Günzburger Straße 69
D-89335 Ichenhausen
Vážený zákazník,
Günzburger Straße 69
D-89335 Ichenhausen
Szanowni Klienci,
Günzburger Straße 69
D-89335 Ichenhausen
POŠTOVANI KORISNIČE,
Günzburger Straße 69
D-89335 Ichenhausen
■ SPOŠTOVANI KUPEC,
LpA: 99.6 dB (A) K=3 dB (A)
LwA: 112.6 dB (A) K=3 dB (A)
Vibracija: 4.51m/s2 K=1.5m/s2
Opozorilo:
Günzburger Straße 69
D-89335 Ichenhausen
KEDVES VÁSÁRLÓ!
Günzburger Straße 69
D-89335 Ichenhausen
ЗАБЕЛЕЖКА,
| 2009/105/EC | 89/686/EC_96/58/EC | ||
| X 2006/95/EC | X 2006/42/EC | ||
| Annex IVNotified Body:Notified Body No.:Reg. No.: | |||
| 2006/28/EC | |||
| 2005/32/EC | |||
| X 2004/108/EC | 2000/14/EC_2005/88/EC | ||
| Annex V | |||
| Annex VINoise: measured L_WA = xx dB(A); guaranteed L_WA = xx dB(A)Notified Body:Notified Body No.: | |||
| 2004/22/EC | |||
| 1999/5/EC | |||
| 97/23/EC | 2004/26/EC | ||
| 90/396/EC | Emission. No: | ||
| X 2011/65/EU | |||
Standard references: EN 61029-1; EN 61029-2-9; EN 55014-1; EN 55014-2; EN 61000-3-2; EN 61000-3-3
Subject to change without notice
Apparent defects must be notified within 8 days from the receipt of the goods. Otherwise, the buyeris rights of claim due to such defects are invalidated. We guarantee for our machines in case of proper treatment for the time of the statutory warranty period from delivery in such a way that we replace any machine part free of charge which provably becomes unusable due to faulty material or defects of fabrication within such period of time. With respect to parts not
manufactured by us we only warrant insofar as we are entitled to warranty claims against the upstream suppliers. The costs for the installation of the new parts shall be borne by the buyer. The cancellation of sale or the reduction of purchase price as well as any other claims for damages shall be excluded.