
04-640 - Lawn mower NEO tools - Free user manual and instructions
Find the device manual for free 04-640 NEO tools in PDF.

| Product type | Cordless lawn mower |
| Brand | NEO tools |
| Model | 04-640 |
| Supply voltage | 36 V DC (2 × 18 V) |
| Battery type | Lithium-ion |
| Number of batteries required | 2 |
| No-load speed | 3280 min⁻¹ |
| Protection rating | IPX4 |
| Safety class | III |
| Cutting width | 380 mm |
| Number of cutting height adjustments | 6 |
| Cutting height range | 25 – 75 mm |
| Grass catcher capacity | 45 L |
| Weight | 13 kg |
| Production year | 2024 |
| Motor | Brushless |
| Sound pressure level (LpA) | 78.4 dB(A) (K=3 dB(A)) |
| Sound power level (LwA) | 90.2 dB(A) (K=3 dB(A)) |
| Vibration acceleration value | 1.23 m/s² (K=1.5 m/s²) |
| Functions | Mulching, grass catcher, safety key, foldable and height-adjustable handle, transport handle |
| Safety protections | Protection against overload, overheating, and deep discharge of the battery |
| Maintenance | Clean after use, sharpen or replace the blade, store in a dry and cool place |
| Spare parts available | Cutting blade, battery, charger, grass bag |
| Repairability | Repairs by authorized service center; use of original parts recommended |
Frequently Asked Questions - 04-640 NEO tools
User questions about 04-640 NEO tools
0 question about this device. Answer the ones you know or ask your own.
Ask a new question about this device
Download the instructions for your Lawn mower in PDF format for free! Find your manual 04-640 - NEO tools and take your electronic device back in hand. On this page are published all the documents necessary for the use of your device. 04-640 by NEO tools.
USER MANUAL 04-640 NEO tools
natural_image
Black and white photo of a NEO Motors lawn mower with visible branding (no text or symbols on the device itself)04-640


NEO GRAPHITE


natural_image
Icon of a person reading a book inside a circle (no text or symbols)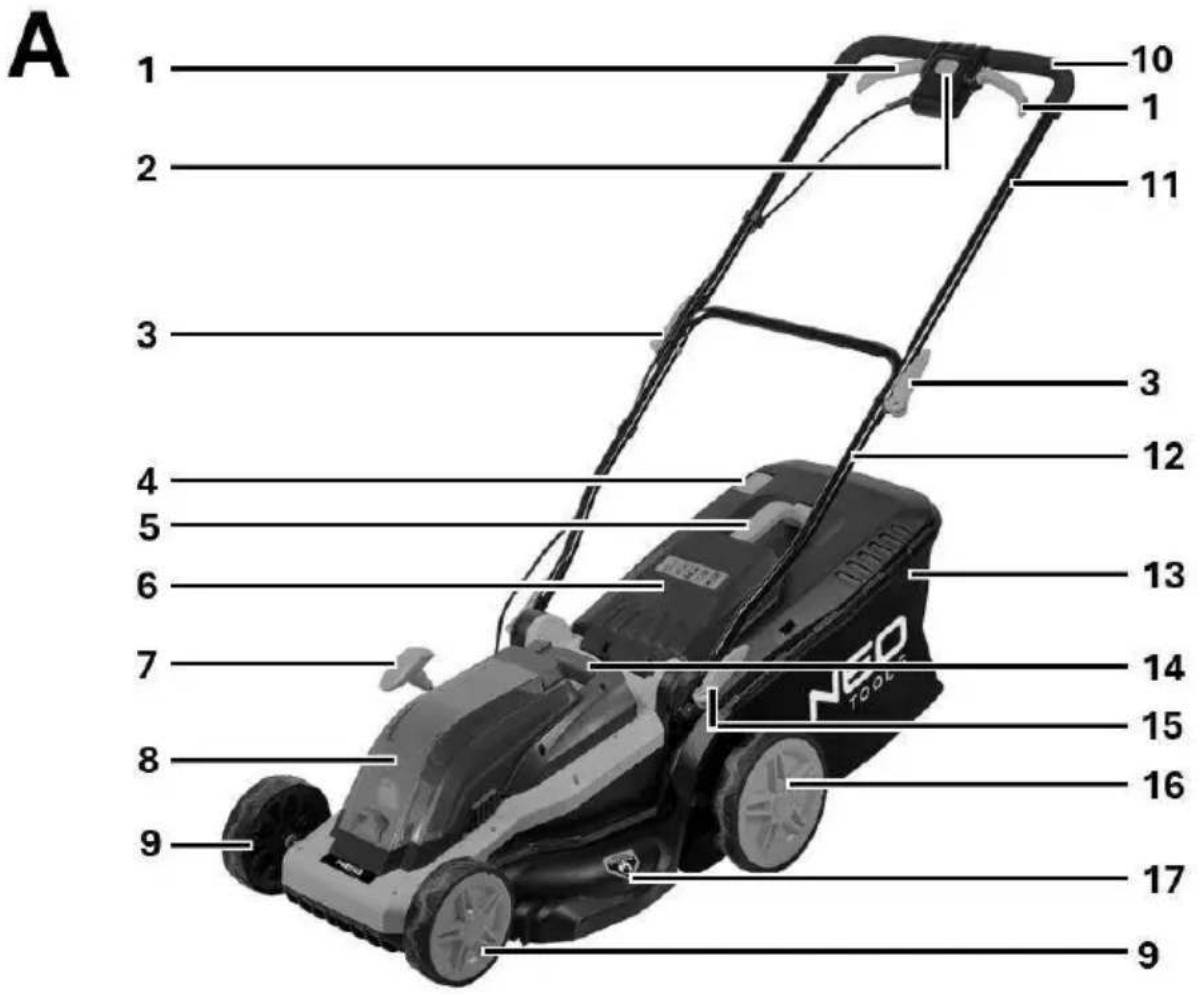

C
natural_image
Close-up of a hand holding a mechanical component with wires, labeled '1' (no visible text or symbols on the main subject)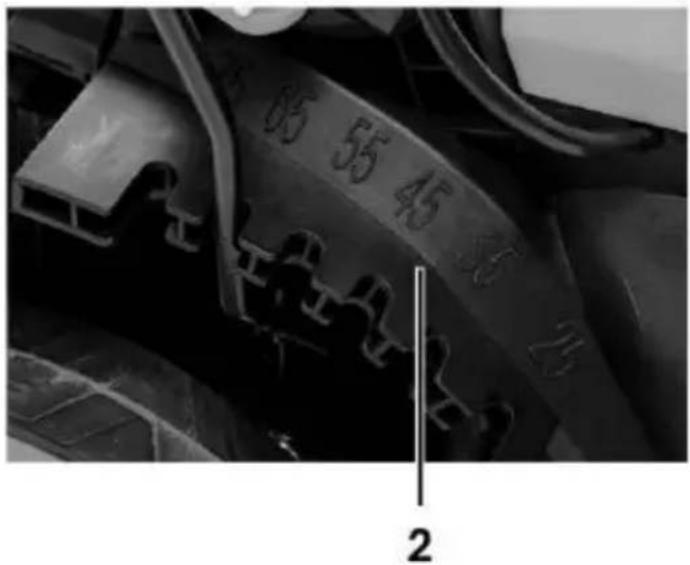
D

natural_image
Close-up of a small electronic device with a grid and a pointer, labeled '4' (no readable text or symbols on the device itself)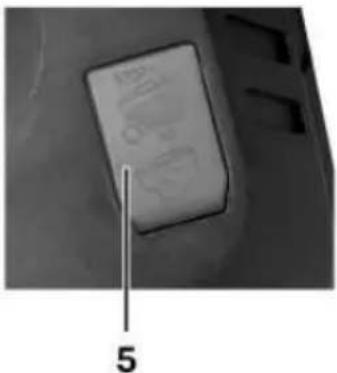
E
natural_image
Close-up of a mechanical component with labeled parts 6 and 7, showing internal structure and no readable text or symbols.ENGLISH (EN) TRANSLATION OF THE ORIGINAL INSTRUCTIONS....9
GTX Poland Sp. Z o.o. Sp.k.
UI. Pograniczna 2/4
02-285 Warszawa

Paweł Kowalski
ATTENTION: BEFORE USING THE POWER TOOL, PLEASE READ THIS MANUAL CAREFULLY AND KEEP IT FOR FUTURE REFERENCE.
SPECIFIC SAFETY RULES
SAFETY INSTRUCTIONS FOR USE OF LAWNMOWERS
Safety in practical use of cordless mowers
Instruction
- Read the instructions carefully. Familiarise yourself with the controls and the correct use of the unit.
- Never allow children or anyone not familiar with the instructions for operating the appliance to operate it. National regulations may specify the exact age of the operator.
- Never mow when other people, especially children or pets, are around.
- Remember that the operator or user is responsible for accidents or hazards that occur to other people or the environment.
Preparation
- Always wear sturdy footwear and long trousers when mowing. Do not operate the machine with bare feet or in open sandals. Avoid damaged clothing that is too loose or that has dangling straps or ribbons.
- Carefully inspect the area where the unit will be operating and remove all objects that could get into the unit.
- Always check knives, bolts and knife assembly equipment for wear or damage before use. Replace worn or damaged parts in assemblies to maintain balance. Replace damaged or illegible plates.
Use
- Bone only in daylight or with good artificial lighting.
- Avoid mowing wet grass.
• Always make sure your legs on an incline are standing firmly. - Come on, never run.
- Mow across the slope, never up or down.
• Take extra care when changing direction on a slope. - Do not mow on excessively sloping slopes.
- Pay particular attention when reversing or pulling the unit towards you.
- Switch off the drive of the cutting element(s) if the unit needs to be tilted when moving it on surfaces other than grass and when being transported to and from the mowing area.
- Do not use the appliance with damaged covers or housings or without a safety device, e.g. the enclosed grass covers and/or bins.
- Start the engine carefully according to the instructions, taking care that the feet are away from the cutting element(s).
- Do not tilt the machine when starting the engine, except when it needs to be tilted during start-up. In this case, do not tilt more than necessary and lift only the part that is away from the operator.
- Do not start the appliance while standing in front of the discharge opening.
- Do not keep hands or feet near rotating parts. Ensure that the ejection port is not clogged at all times.
- Do not carry the appliance with the engine running.
- Stop the unit and remove the locking assembly before maintenance when the batteries are in the sockets. Ensure all moving parts are not in motion
every time you walk away from the device,
before cleaning or pushing the outlet,
before checking, cleaning or repairing the appliance,
after being hit by a foreign object. Check the unit for damage and, if necessary, carry out repairs before restarting and operating the unit
➢ if the appliance starts to vibrate excessively (check immediately)
▶ check for damage,
replace or repair any damaged part,
➢ Check and tighten loose parts.
Maintenance and storage
- Keep all nuts, bolts and screws in good condition to be sure the unit will operate safely.
- Check the grass container frequently for wear or damage.
- Be careful with multi-blade machines, as the rotation of one cutting element can cause the rotation of other blades.
- Be careful when adjusting the appliance to avoid getting your fingers between the moving blades and the fixed parts of the appliance.
• Always leave the unit to cool down before the next start-up. - Watch out for the blade of the knives. The knives still rotate when the engine is switched off - remove the damaged assembly before maintenance.
- Replace, for safety reasons, worn or damaged parts. Use only original spare parts and equipment.
ATTENTION! Despite the inherently safe design, the use of safety measures and additional protective measures, there is always a risk of residual injury during operation.
Explanation of the used pictograms
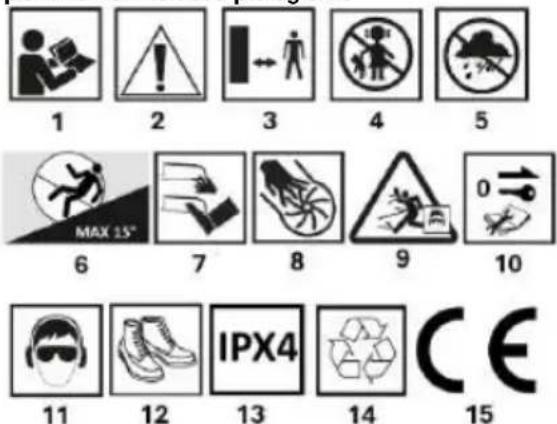
1.WARNING! Read the operating instructions 2.WARNING: Danger
3.Keep bystanders at an appropriate distance
4. Keep children away from the tool
Protect the device from moisture
6.Maximum slope of 15°
- Watch out for sharp knife edges.
8.Knives rotate when the engine is switched off
-
Beware of hazardous debris
-
Remove locking assembly before maintenance when batteries are in sockets
-
Wear personal protective equipment (safety goggles, ear protection)
-
Use protective clothing - footwear
-
Protection class IPX4
14.Selectively recycled
- Meets the requirements of European standards and directives
NOTE: This equipment may be used by children and by people with reduced physical and mental capabilities and lack of experience and familiarity with the equipment if supervision or instruction is provided on how to use the equipment safely so that the associated risks are understood. Children should not play with the equipment. Unsupervised children should not clean or maintain the equipment.
CHARGER AND BATTERY SAFETY RULES
PROPER BATTERY HANDLING AND OPERATION
- The battery charging process should be under the control of the user.
- Avoid charging the battery at temperatures below 0°C.
- Only charge the batteries with the charger recommended by the manufacturer. The use of a charger designed to charge a different type of battery poses a risk of fire.
- When the battery is not in use, keep it away from metal objects such as paper clips, coins, keys nails, screws or other small metal items that can short-circuit the battery terminals. Short-circuiting the battery terminals can cause burns or fire.
In the event of damage and/or misuse of the battery, gases may be released. Ventilate the room, consult a doctor in case of discomfort. The gases may damage the respiratory tract.
- Fluid leakage from the battery may occur in extreme conditions. Liquid leaking from the battery can cause irritation or burns. If a leak is detected, proceed as follows:
- Carefully wipe off the liquid with a piece of cloth. Avoid contact of the liquid with the skin or eyes.
- if the liquid comes into contact with the skin, the relevant area on the body should be washed immediately with copious amounts of clean water, or neutralise the liquid with a mild acid such as lemon juice or vinegar.
- if the liquid gets into the eyes, rinse them immediately with plenty of clean water for at least 10 minutes and seek medical advice.
- Do not use a battery that is damaged or modified. Damaged or modified batteries may act unpredictably, leading to fire, explosion or danger of injury.
The battery must not be exposed to moisture or water.
- Always keep the battery away from a heat source. Do not leave it in a high-temperature environment for long periods of time (in direct sunlight, near radiators or anywhere where the temperature exceeds 45^ C).
- Do not expose the battery to fire or excessive temperatures. Exposure to fire or temperatures above 130^ may cause an explosion.
NOTE: A temperature of 130^ C can be specified as 265^ F.
All charging instructions must be followed, and the battery must not be charged at a temperature outside the range specified in the rating table in the operating instructions. Charging incorrectly or at temperatures outside the specified range can damage the battery and increase the risk of fire.
BATTERY REPAIR:
- Damaged batteries must not be repaired. Repairs to the battery are only permitted by the manufacturer or an authorised service centre.
- The used battery should be taken to a disposal centre for this type of hazardous waste.
SAFETY INSTRUCTIONS FOR THE CHARGER
- The charger must not be exposed to moisture or water. The ingress of water into the charger increases the risk of shock. The charger may only be used indoors in dry rooms.
- Unplug the charger from the mains before carrying out any maintenance or cleaning.
- Do not use the charger placed on a flammable surface (e.g. paper, textiles) or in the vicinity of flammable substances. Due to the charger's temperature increase during the charging process, there is a danger of fire.
- Check the condition of the charger, cable and plug each time before use. If damage is found - do not use the charger. Do not attempt to disassemble the charger. Refer all repairs to an authorised service workshop. Improper installation of the charger may result in a risk of electric shock or fire.
- Children and physically, emotionally or mentally handicapped persons, as well as other persons whose experience or knowledge is insufficient to operate the charger with all safety precautions, should not operate the charger without the supervision of a responsible person. Otherwise there is a danger that the device will be mishandled resulting in injury.
When the charger is not in use, it should be disconnected from the mains.
All charging instructions must be followed, and the battery must not be charged at a temperature outside the range specified in the rating table in the operating instructions. Charging incorrectly or at temperatures outside the specified range can damage the battery and increase the risk of fire.
CHARGER REPAIR
- A defective charger must not be repaired. Repairs to the charger are only permitted by the manufacturer or an authorised service centre.
ATTENTION: The device is designed for indoor operation.
Despite the use of an inherently safe design, the use of safety measures and additional protective measures, there is always a residual risk of injury during work.
Li-lon batteries can leak, catch fire or explode if they are heated to high temperatures or short-circuited. Do not store them in the car during hot and sunny days. Do not open the battery pack. Li-lon batteries contain electronic safety devices which, if damaged, can cause the battery to catch fire or explode.
CONSTRUCTION AND APPLICATION
The mower is a battery-powered machine. It is powered by a brushless motor. The mower is designed for mowing lawns in the home garden. Only use accessories suitable for this appliance and follow the instructions in the operating manual. The grass should be mowed in even strips. The mower can be pushed or pulled. The mower is intended for amateur use only.
WARNING! Do not use the unit for any purpose other than its intended use.
DESCRIPTION OF THE GRAPHIC PAGES
The numbering below refers to the components of the unit shown on the graphic pages of this manual.
| Fig. A | Description |
| 1 | Starting lever for the mower |
| 2 | Start button |
| 3 | Upper mower arm lock |
| 4 | Fill level flap for the grass container |
| 5 | Grass catcher box holder |
| 6 | Rear flap |
| 7 | Cutting height adjustment lever |
| 8 | Battery compartment cover |
| 9 | Front running wheels |
| 10 | Mower guide handle |
| 11 | Upper arm of the mower handle |
| 12 | Lower mower attachment arm |
| 13 | Grass catcher box |
| 14 | Handle for carrying the mower |
| 15 | Lower mower arm lock |
| 16 | Rear wheels |
| 17 | Knife sheath |
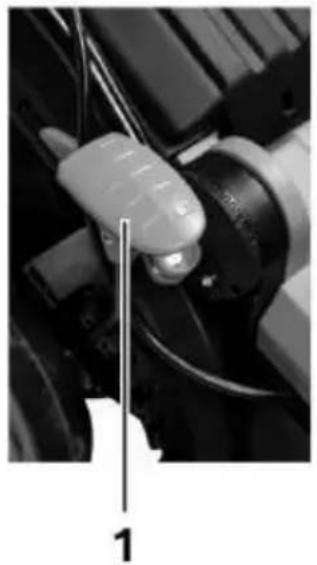
| Fig. B | Description |
| 1 | Battery compartment cover |
| 2 | Cutting height adjustment lever |
| 3 | Security key |
| 4 | Battery socket |
| 5 | Cover of mulching attachment |
| 6 | Mower bar angle adjustment |
| 7 | Locking lever |
| Fig. C | Description |
| 1 | Cutting height adjustment lever |
| 2 | Mowing height adjustment scale |
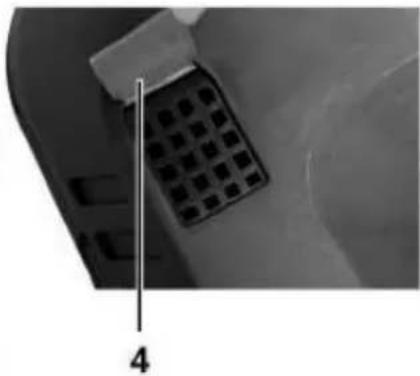
| Fig. D | Description |
| 1 | Mower guide handle |
| 2 | Starting lever for the mower |
| 3 | Start button |
| 4 | The grass container has space |
| 5 | Grass container full |
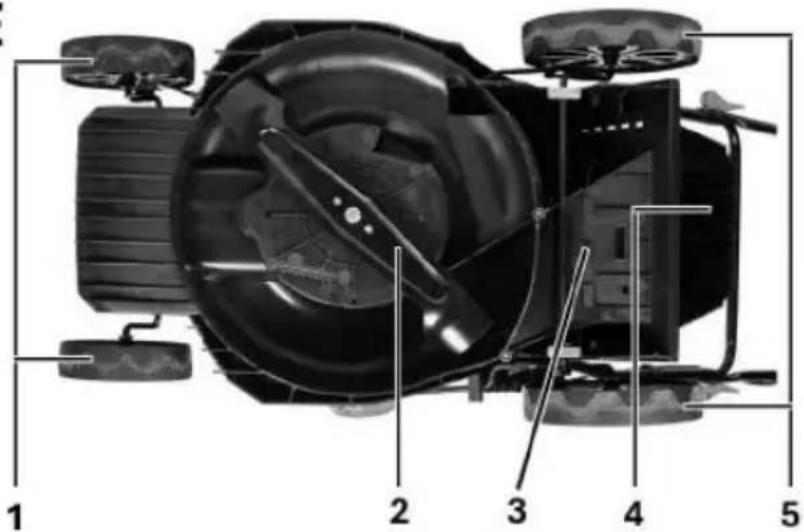
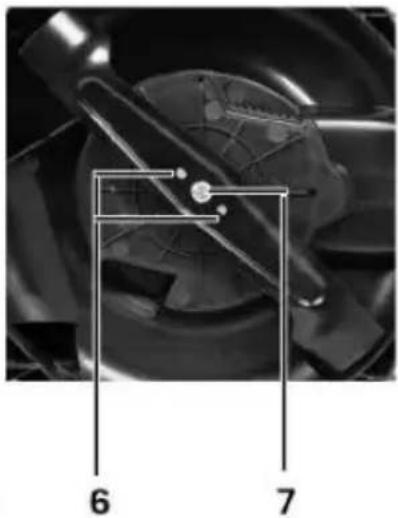
| Fig. E | Description |
| 1 | Front running wheels |
| 2 | Mowing blade |
| 3 | Grass ejection tunnel |
| 4 | Rear flap |
| 5 | Rear wheels |
| 6 | Mower blade fixing bolt |
| 7 | Mower blade position pins |
EQUIPMENT AND ACCESSORIES
- Mower - 1 pc.
- Grass catcher with handle - 1 pc.
- Mulching pad - 1 pc.
- Safety key - 1 pc.
- Locking knobs - 2 pcs.
- Screws and washers - 2 kpl.
• Technical documentation - 3 pcs.
PREPARATION FOR WORK
ATTENTION: Remove the batteries and safety key Fig. B3 before adjusting the unit. Do not start the unit before all components are correctly assembled.
HANDLE HEIGHT ADJUSTMENT
The handle lock knobs are located on both sides of the handle Fig. A15. The action of locking or unlocking must be carried out in parallel for each knob. The height of the handle can be adjusted in a number of positions depending on the needs such as the height of the mower operator.
- Turn the locking knob fig. B7 on both sides of the mower. The locking pin will leave the socket allowing adjustment.
- Firmly grasp the lower handle and adjust its height. When the locking pin comes together with the socket, turn the locking knob Fig. B6 back, locking the position and the handle/guide.
FOLDING HANDLES
- Open the outlet cover and remove the grass catcher by pulling the handle (the key should be removed).
- Press down and turn the top handle lock knobs Fig. A3 clockwise. Then fold down the top handle.
- Disassembly takes place analogously, in reverse order.
INSTALLATION OF A GRASS CATCHER
- Lift the outlet cover Fig. A6.
• Pull out the mulching pad Fig. B5
- Suspend the grass catcher fig. A13 with the hooks on the rod. The grass catcher has a convenient handle fig. A5 for carrying it to empty it of grass clippings. Close the outlet cover fig. A6.
NOTE: Always ensure that the grass catcher is properly fixed.
SETTING THE MOWING HEIGHT
WARNING! Before changing the cutting height setting, switch off the mower and disconnect the batteries or remove the safety key from the socket.
The cutting height is adjusted using the cutting height lever Fig. C1 in six positions between 25-75 mm.
- Remove the safety key.
- Pull the mowing height adjustment lever Fig. C1 out of the recess.
- By moving the mowing adjustment lever, select the desired mowing height Fig. C2.
- Place the mowing height adjustment lever into one of the selected mowing height adjustment lever locking recesses on the mower housing. While adjusting, hold the mower with the front handle Fig. A14.
TRANSPORT HANDLE
The mower has a convenient and practical carrying handle on the housing. The mower should be carried by two people Fig. A14.
OPERATION AND SETTINGS
ON/OFF
NOTE!
Always use batteries of the same type with an equal degree of charge.
Check the state of charge of both batteries before each use.
WARNING! The batteries must be installed in the sockets fig. B4 in the compartment fig. A7 before start-up. The unit requires 2 batteries otherwise it will not start. The batteries should be of the same capacity and with a similar level of charge in order for the appliance to operate correctly. The lawnmower has a safety key in the battery compartment which must be inserted into the socket for the appliance to operate. Failure to place the safety key in the socket will result in the mower not being able to start despite the batteries being fitted.
WARNING! Before commissioning, ensure that the switch is in the off position and all components are well assembled as described in this manual.
ON - OFF
- Lift the battery compartment cover Fig. A7.
• Install the batteries fig. B4 and place the safety key in the socket fig. B3.
NOTE: The mower is equipped with a safety switch button to prevent accidental start-up.
The mower has a combined switch with two levers.
Switching on
- Press and hold the switch lock button Fig. D3.
- Tighten one of the switch levers against the handle and hold Fig. D2.
- Release pressure on the switch lock button.
Switching off
- Release the switch lever and wait until the cutting blade stops rotating.
CAUTION! The switch safety button must be pressed each time during start-up. Never attempt to lock the switch safety button or the switch lever in the on position.
All parts should be properly fitted and meet the requirements to ensure proper operation of the mower. Any defective safety component or part should be repaired or replaced immediately. The cutting elements are still rotating when the engine is switched off.
DIRECTIONS FOR SAFE USE
- When mowing long grass, work should be done gradually, in layers.
- Move the mower in a smooth motion by pushing or pulling while holding the handle with both hands.
- Keep the working mower away from hard objects and crops.
- Only operate the mower when the grass is dry.
- The mowing speed should be approximately 1 metre per 4 seconds.
• Empty the grass catcher regularly. - When trying to cover the mowing area accurately, use common sense. The mower can be used with or without the grass catcher fitted fig. A13, with the mulching attachment fig. B5.
WARNING! Do not operate the mower without the hopper with the discharge cover lifted Fig. A6.
ATTENTION When operating the mower, remember not to expose the mower with batteries to direct sunlight, especially for extended periods of interruption, leaving the unit unattended. The batteries can become very hot during this time. An increase in temperature can damage both the battery and the mower. Once the critical temperature is exceeded, spontaneous combustion and even explosion of the batteries can occur. Never expose the batteries to direct and prolonged sunlight!
WARNING! Remove the batteries from the unit and disconnect the safety key before performing any installation, adjustment, repair or operation.
CLEANING
- After each mowing operation, remove any grass residue that has accumulated in the cutting blade housing Fig. E2.
- The motor housing should, as far as possible, always be free of dust and dirt.
- Clean the ventilation slots in the engine housing to prevent them from being clogged by grass clippings.
- Wipe the unit with a clean cloth or blow it with low-pressure compressed air.
• Water or chemical cleaning agents must not be used for cleaning - Care must be taken to ensure that no water enters the unit.
- Remove the grass catcher after use and clean thoroughly to prevent mould and odour.
MAINTENANCE AND STORAGE
- Check that the cutting blade has not been damaged by hitting hard objects, if necessary sharpen or replace the cutting blade.
- Check that the ejection opening to the grass catcher is unobstructed.
- Check the grass catcher for wear and deformation.
- Use only original accessories and original spare parts.
- During storage, the handle can be folded as described above.
- When not in use, the device should be stored in a dry, cool place, out of the reach of children.
- Store the device with the batteries removed.
- Do not store at temperatures exceeding 40^
REPLACEMENT OF CUTTING BLADE
NOTE: Wait until the cutting blade has come to a complete stop, remove the batteries from the unit and disconnect the safety key. Use gloves when changing the blade.
- Remove the grass catcher.
- Turn the mower "on its side".
- Grip the cutting blade securely or block it with a piece of wood, for example (use protective gloves).
- Loosen the retaining bolt Fig. E7 of the cutter blade with a spanner by turning to the left.
- Replace or sharpen the cutting blade (if replacing with a new one - the cutting blade must be the same size and weight).
- Attach the cutting knife by proceeding as above in reverse order (the fixing holes fig. E6 in the cutting knife must be seated on the spindle pins).
- It is best to have a qualified person sharpen or replace the cutting blade using original parts.
Any defects should be rectified by the manufacturer's authorised service department.
SECURITY
The mower is equipped with the following safety systems, which shut down the machine in the event of hazardous conditions.
• Overload protection
• Protection against overheating
- Protection against over-discharge of the battery.
PROBLEM SOLVING
Mower does not start
- Missing or incorrectly placed batteries. In this case, the charged batteries must be inserted correctly.
- Battery problems, low voltages - charge or replace battery.
- The security key is not inserted in the ignition - it must be inserted.
Engine stops running after a short while
- Low battery charge - charge or replace battery.
- Cutting height too low - should be increased.
Engine does not reach maximum speed
- Incorrectly placed batteries - place them correctly, according to the instructions.
- Low battery charge - charge or replace battery.
- Problems with the drive train - take to an authorised service centre for repair.
Knife does not rotate (switch off immediately!)
- Foreign body e.g. branch stuck in knife area - remove.
- Problems with the drive train - take to an authorised service centre for repair.
Too much vibration (switch off immediately!)
- Badly balanced or unevenly worn blade - replace it.
RATING DATA
| Cordless mower 04-640 | |
| Parameter | Value |
| Supply voltage | 2x18 VDC0 36 V DC |
| No-load spindle speed | 3280 min^-1 |
| Degree of protection | IPX4 |
| Protection class | III |
| Cutting width | 380 mm |
| Number of cutting height adjustments | 6 |
| Mowing height range | 25-75cm |
| Grass catcher capacity | 45L |
| Mass | 13 kg |
| Year of production | 2024 |
| 04-640 indicates both the type and the designation of the machine | |
NOISE AND VIBRATION DATA
| Sound pressure level | LpA = 78.4 dB(A) K=3 dB(A) |
| Sound power level | LwA = 90,2 dB(A) K=3,0 dB(A) |
| Vibration acceleration values | a_h = 1.23 m/s^2 K=1.5 m/s^2 |
Information on noise and vibration
The noise emission level of the equipment is described by: the emitted sound pressure level Lp and the sound power level Lw (where K denotes measurement uncertainty). The vibrations emitted by the equipment are described by the vibration acceleration value a h (where K is the measurement uncertainty).
The sound pressure level Lpa, the sound power level Lwand the vibration acceleration value an specified in these instructions were measured in accordance with EN 60335-2-77:2010. The specified vibration level can be used for comparison of equipment and for preliminary assessment of vibration exposure.
The vibration level quoted is only representative of the basic use of the unit. If the unit is used for other applications or with other work tools, the vibration level may change. Higher vibration levels will be influenced by insufficient or too infrequent maintenance of the unit. The reasons given above may result in increased vibration exposure during the entire working period.
In order to accurately estimate vibration exposure, it is necessary to take into account periods when the device is switched off or when it is switched on but not used for work. When all factors are accurately estimated, the total vibration exposure may be significantly lower.
In order to protect the user from the effects of vibration, additional safety measures should be implemented, such as cyclical maintenance of the machine and working tools, securing an adequate hand temperature and proper work organisation.
ENVIRONMENTAL PROTECTION
Electrically-powered products should not be disposed of with household waste, but should be taken to the appropriate facilities for disposal. Contact your product dealer or local authority for information on disposal. Waste electrical and electronic equipment contains environmentally inert substances. Equipment that is not recycled poses a potential risk to the environment and human health.
"GTX Poland Spółka z ograniczoną odpowiedzialnością" Spółka komandytowa with its registered office in Warsaw, ul. Pograniczna 2/4 (hereinafter: "GTX Poland") informs that all copyrights to the content of this manual (hereinafter: "Manual"), including among others. All copyrights to the contents of this Manual (hereinafter referred to as "Manual"), including but not limited to its text, photographs, diagrams, drawings, as well as its composition, belong exclusively to GTX Poland and are subject to legal protection pursuant to the Act of February 4, 1994 on Copyright and Related Rights (i.e. Journal of Laws 2006 No. 90 Item 631 as amended). Copying, processing, publishing, modifying for commercial purposes the entire Manual as well as its individual elements without the written consent of GTX Poland is strictly prohibited and may result in civil and criminal liability.
EC Declaration of Conformity
Manufacturer: GTX Poland Sp. z o.o. Sp.k., 2/4 Pograniczna St. 02-285 Warsaw
Product: Cordless mower
Model: 04-640
Trade name: NEO TOOLS
Serial number: 00001 ÷ 99999
The product described above complies with the following documents:
Machinery Directive 2006/42/EC
Electromagnetic Compatibility Directive 2014/30/EU
Noise Emission Directive 2000/14/EC as amended by 2005/88/EC
RoHS Directive 2011/65/EU as amended by Directive 2015/863/EU
Guaranteed sound power level LWA =92 dB(A)
Measured sound power level Lw A=90.2 dB(A) K=1.82 dB(A)
And meets the requirements of the standards:
EN 62841-1:2015+AC:2015+A11:2022; EN IEC 62841-4-3:2021+A11:2021;
EN IEC 55014-1:2021; EN IEC 55014-2:2021;
EN IEC 63000:2018
This declaration relates only to the machinery as placed on the market and does not include components
added by the end user or carried out by him/her subsequently.
Name and address of the EU resident person authorised to prepare the technical dossier:
Signed on behalf of:
GTX Poland Sp. z o.o. Sp.k.
GTX Poland Quality Officer
Warsaw, 2024-11-27
DEUTSCH(DE)
GTX Poland Sp. z o.o. Sp.k.
GTX Poland Sp. z o.o. Sp.k.
INSTRUCTIUNI DE SIGURANTĂ PENTRU ÎNCĂRCĂTOR
GTX Poland Sp. z o.o. Sp.k.
GTX Poland Sp. z o.o. Sp.k.
GTX Poland Sp. z o.o. Sp.k.
POSEBNA VARNOSTNA PRAVILA
VARNOSTNA NAVODILA ZA UPORABO KOSILNIC
NAVODILA ZA VARNO UPORABO
GTX Poland Sp. z o.o. Sp.k.
GTX Poland Sp. z o.o. Sp.k.
GTX Poland Šp. z o.o. Sp.k.
OHUTUSJUHISED LAADIJA JAOKS
GTX Poland Sp. z o.o. Sp.k.
14.Selectively recycled
GTX Poland Sp. z o.o. Sp.k.
POSEBNA SIGURNOSNA PRAVILA
SIGURNOSNE UPUTE ZA UPORABU KOSILICA
Sigurnost u praktičnoj uporabi akumulatorskih kosilica
Instrukcija
- Pažljivo pročitajte upute. Upoznajte se s kontrolama i pravilnom uporabom jedinice.
- Nikada ne dopustite djeci ili bilo kome tko nije upoznat s uputama za rukovanje uređajem da njime upravlja. Nacionalni propisi mogu odrediti točnu dob operatera.
- Nikada nemojte reći kada su drugi ljudi, posebno djeca ili kućni ljubimci, u blizini.
- Imajte na umu da je operater ili korisnik odgovoran za nezgode ili opasnosti koje se događaju drugim ljudima ili okolišu.
Priprema
GTX Poland Sp. z o.o. Sp.k.
2/4 Ulica granice
02-285 Varšava

Paweł Kowalski
GTX Poland Sp. z o.o. Sp.k.
GTX Poland Sp. z o.o. Sp.k.
2/4 Via Pograniczna
02-285 Varsavia

Paweł Kowalski
INKLAPBARE HANDGREPEN
DONNÉES D'ÉVALUATION
Directive Machines 2006/42/CE
GTX Poland Sp. z o.o. Sp.k.
2/4 rue Pograniczna
02-285 Varsovie

Paweł Kowalski


- ATTENTION: BEFORE USING THE POWER TOOL, PLEASE READ THIS MANUAL CAREFULLY AND KEEP IT FOR FUTURE REFERENCE.
- SPECIFIC SAFETY RULES
- SAFETY INSTRUCTIONS FOR USE OF LAWNMOWERS
- Instruction
- Preparation
- Use
- Maintenance and storage
- ATTENTION! Despite the inherently safe design, the use of safety measures and additional protective measures, there is always a risk of residual injury during operation.
- CHARGER AND BATTERY SAFETY RULES
- PROPER BATTERY HANDLING AND OPERATION
- BATTERY REPAIR:
- SAFETY INSTRUCTIONS FOR THE CHARGER
- CHARGER REPAIR
- CONSTRUCTION AND APPLICATION
- DESCRIPTION OF THE GRAPHIC PAGES
- EQUIPMENT AND ACCESSORIES
- HANDLE HEIGHT ADJUSTMENT
- FOLDING HANDLES
- INSTALLATION OF A GRASS CATCHER
- SETTING THE MOWING HEIGHT
- WARNING! Before changing the cutting height setting, switch off the mower and disconnect the batteries or remove the safety key from the socket.
- TRANSPORT HANDLE
- OPERATION AND SETTINGS
- ON/OFF
- NOTE!
- ON - OFF
- Switching on
- Switching off
- CAUTION! The switch safety button must be pressed each time during start-up. Never attempt to lock the switch safety button or the switch lever in the on position.
- DIRECTIONS FOR SAFE USE
- WARNING! Do not operate the mower without the hopper with the discharge cover lifted Fig. A6.
- WARNING! Remove the batteries from the unit and disconnect the safety key before performing any installation, adjustment, repair or operation.
- CLEANING
- REPLACEMENT OF CUTTING BLADE
- NOTE: Wait until the cutting blade has come to a complete stop, remove the batteries from the unit and disconnect the safety key. Use gloves when changing the blade.
- SECURITY
- PROBLEM SOLVING
- Mower does not start
- Engine stops running after a short while
- Engine does not reach maximum speed
- Knife does not rotate (switch off immediately!)
- Too much vibration (switch off immediately!)
- Information on noise and vibration
- In order to accurately estimate vibration exposure, it is necessary to take into account periods when the device is switched off or when it is switched on but not used for work. When all factors are accurately estimated, the total vibration exposure may be significantly lower.
- ENVIRONMENTAL PROTECTION
- EC Declaration of Conformity
- Machinery Directive 2006/42/EC
- DEUTSCH(DE)
- INSTRUCTIUNI DE SIGURANTĂ PENTRU ÎNCĂRCĂTOR
- POSEBNA VARNOSTNA PRAVILA
- VARNOSTNA NAVODILA ZA UPORABO KOSILNIC
- NAVODILA ZA VARNO UPORABO
- OHUTUSJUHISED LAADIJA JAOKS
- POSEBNA SIGURNOSNA PRAVILA
- SIGURNOSNE UPUTE ZA UPORABU KOSILICA
- Instrukcija
- Priprema
- INKLAPBARE HANDGREPEN
Brand : NEO tools
Model : 04-640
Category : Lawn mower