
04-629 - Lawn mower NEO tools - Free user manual and instructions
Find the device manual for free 04-629 NEO tools in PDF.

| Product type | Electric lawn mower |
| Brand | NEO tools |
| Model | 04-629 |
| Power supply | 230-240 V ~ 50 Hz |
| Rated power | 1800 W |
| Cutting diameter | 440 mm |
| Cutting height range | 25-75 mm (6 positions) |
| Grass bag capacity | 45 L |
| Weight | 12.8 kg |
| Blade idle speed | 2800 rpm |
| Protection degree | IPX4 |
| Protection class | II (double insulation) |
| Sound pressure level (LpA) | 85 dB(A) (K=3 dB(A)) |
| Sound power level (LwA) | 95 dB(A) (K=1.2 dB(A)) |
| Vibrations (a_h) | <2.5 m/s² (K=1.5 m/s²) |
| Motor type | Single-phase series commutator motor (alternating current) |
| Safety | Safety button + switch lever; auto-stop when lever is released |
| Cleaning | With cloth or brush; do not spray with water |
| Storage | Unplug, cool down 30 min, store dry out of reach of children |
| Intended use | Private lawns, amateur use |
| Production year | 2024 |
| Standards | EN 62841-1, EN IEC 62841-4-3, EN IEC 63000 |
| CE declaration | Yes – guaranteed sound power level 96 dB(A) |
Frequently Asked Questions - 04-629 NEO tools
User questions about 04-629 NEO tools
0 question about this device. Answer the ones you know or ask your own.
Ask a new question about this device
Download the instructions for your Lawn mower in PDF format for free! Find your manual 04-629 - NEO tools and take your electronic device back in hand. On this page are published all the documents necessary for the use of your device. 04-629 by NEO tools.
USER MANUAL 04-629 NEO tools
natural_image
Black and white photo of a NEO Motors lawn mower with visible branding (no text or symbols on the device itself)04-629


natural_image
Icon of a person using a computer inside a circle (no text or symbols)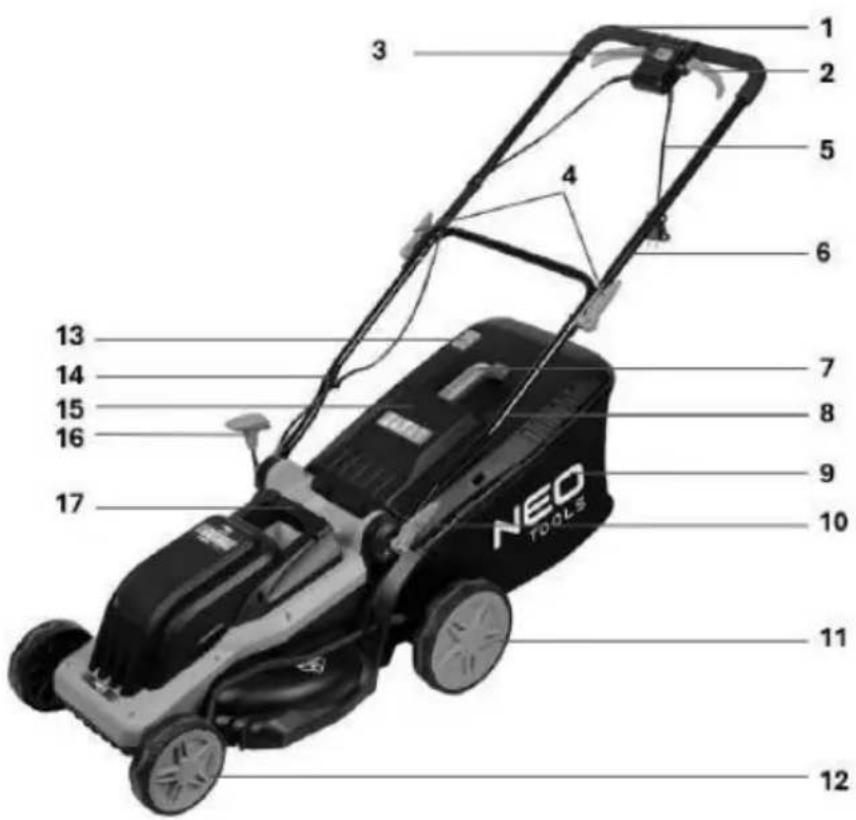
natural_image
Close-up of a small grid-patterned object on a textured surface, possibly a drain or vent, with no visible text or symbols.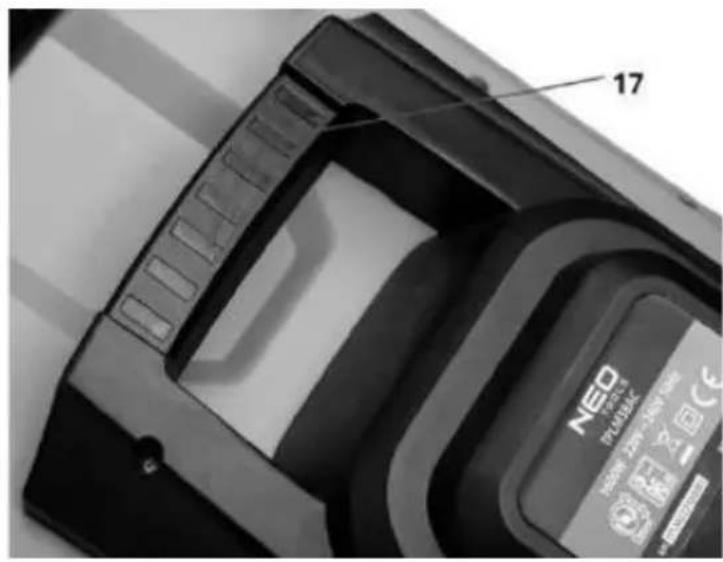

natural_image
Top-down view of a black industrial fan or turbine component with visible blades and housing (no text or symbols)
POLSKI (PL) INSTRUKCJA OBSŁUGI ORYGINALNA....4
ENGLISH (EN) TRANSLATION OF THE ORIGINAL INSTRUCTIONS ....7
Producent: GTX Poland Sp. z o.o. Sp.k,
GTX Poland Sp. Z o.o. Sp.k.
UI. Pograniczna 2/4
02-285 Warszawa

Paweł Kowalski
Mains electric mower
04-629
NOTE: READ THIS MANUAL CAREFULLY BEFORE USING THE POWER TOOL AND KEEP IT FOR FUTURE REFERENCE.
SPECIFIC SAFETY PROVISIONS
SAFETY INSTRUCTIONS FOR USE OF LAWNMOWERS
Safety in the use of mains-powered mowers in practice
Instruction
- Read the instructions carefully. Familiarise yourself with the controls and the correct use of the unit.
- Never allow children or anyone not familiar with the instructions for operating the appliance to operate it. National regulations may specify the exact age of the operator.
- Never mow when other people, especially children or pets, are around.
- Remember that the operator or user is responsible for accidents or hazards that occur to other people or the environment.
PREPARATION
- Always wear sturdy footwear and long trousers when mowing. Do not operate the machine with bare feet or in open sandals. Avoid damaged clothing that is too loose or that has dangling straps or ribbons.
- Check the area where the unit will be operating carefully and remove all objects that could get into the unit.
- Always check knives, bolts and knife assembly equipment for wear or damage before use. Replace worn or damaged parts in assemblies to maintain balance. Replace damaged or illegible plates.
- Check the power cord and extension cord for damage or wear before use. If the cable has been damaged during use, disconnect it from the direct power supply.
DO NOT TOUCH THE CABLE BEFORE DISCONNECTING THE POWER SUPPLY. Do not use the device if the cable is damaged or destroyed.
USE
- Bone only in daylight or with good artificial lighting.
- Avoid mowing wet grass.
•Always make sure your legs on an incline are standing firmly.
- Come on, never run.
- Mow across the slope, never up or down.
•Take extra care when changing direction on a slope.
- Do not mow on excessively sloping slopes.
- Pay particular attention when reversing or pulling the unit towards you.
- Switch off the drive of the cutting element if the unit must be tilted when moving it on surfaces other than grass and when being transported to and from the mowing area.
- Do not use the appliance with damaged covers or housings or without a safety device, e.g. the enclosed grass covers and/or bins.
- Start the engine carefully according to the instructions, taking care that the feet are away from the cutting element.
- Do not tilt the machine when starting the engine, except when it needs to be tilted during start-up. In this case, do not tilt more than necessary and lift only the part that is away from the operator.
- Do not start the appliance while standing in front of the discharge opening.
- Do not keep your hands and feet near rotating parts. Ensure that the ejection port is not clogged at all times.
- Do not carry the appliance with the engine running.
- Stop the appliance and pull the plug out of the socket. Make sure all moving parts are not in motion
- every time you walk away from the device,
- before cleaning or pushing the outlet,
- before checking, cleaning or repairing the appliance,
- after being hit by a foreign object. Check the appliance for damage and, if necessary, carry out repairs before restarting and operating the appliance if it starts to vibrate excessively (check immediately)
- check for damage,
- replace or repair any damaged part,
- Check and tighten loose parts.
MAINTENANCE AND STORAGE
- Unplug the power supply and wait for the blades to stop rotating before carrying out any maintenance or repair work.
- Keep all nuts, bolts and screws in good condition to be sure the unit will operate safely.
- Check the grass container frequently for wear or damage.
- Be careful with multi-blade machines, as the rotation of one cutting element can cause the rotation of other blades.
- Be careful when adjusting the appliance to avoid getting your fingers between the moving blades and the fixed parts of the appliance.
•Always leave the unit to cool down before the next start-up.
- Be careful when handling the knives, even though the drive is switched off, as the knives can still rotate.
-Replace, for safety reasons, worn or damaged parts. Use only original spare parts and equipment.
RECOMMENDATIONS FOR CLASS II EQUIPMENT
The unit must be supplied by a residual current device (RCD) with a tripping current of no more than 30 mA.
Explanation of the used pictograms

-
WARNING Read the operating instructions
-
Keep bystanders at an appropriate distance
-
watch out for sharp knife edges. Knives rotate when the motor is switched off - Pull the plug from the mains socket before maintenance or if the power cord is damaged
-
keep the flexible power cord away from the cutting element Protection class IPX4
-
Second class of protection
-
use personal protective equipment (safety goggles, ear protection)
-
use protective clothing
-
keep children away from the tool
-
Protect the appliance from moisture
-
recycling
-
Maximum slope on which to work
CONSTRUCTION AND APPLICATION
The electric mower is a Class II insulated machine. It is driven by a single-phase AC commutator motor. The mower is designed for mowing lawns in the home garden. Use only accessories suitable for this machine and follow the instructions in the operating manual. The grass should be mowed in even strips. The mower can be pushed or pulled. The mower is intended for amateur use only.
Do not misuse the device.
DESCRIPTION OF THE GRAPHIC PAGES
The numbering below refers to the components of the unit shown on the graphic pages of this manual.
- Steering wheel
2.Switch lever
-
Safety button
-
Upper guide fixing knob
5.Power cable
6.Top guide
7.Grass tank handle
8.Bottom guide
9.Grass container
10.Bottom guide fixing knob
- Rear wheels
12.Front wheels
- Lid of bin fill indicator.
14.Cable holder
15.Grass outlet cover
-
Cutting height adjustment lever
-
Transport handle
18.Blade
- Cutting height level
* There may be differences between the drawing and the product.
PREPARATION FOR WORK
Installation of the guide
Fit the bottom guide
- Raise the lower slide (8) to the desired position and then secure it in place using the slide fixing knob (10)
- Release the locking knob (10) and rotate the lower guide (8) to the correct position and then lock the knob to secure the lower handle in place. Assemble the upper guide (6) to the lower guide (8) using the knob and guide lock washer
Grass container installation
- Place the top of the reservoir (9) on a flat surface, insert the tabs of the handle into the holes and then press down on the handle to lock it in place.
- To place the grass hopper in the mower, lift the grass ejection guard (15) from the mower and place the grass hopper on the tabs located on the metal clamp in the mower.
Connecting the power supply
The mains voltage must be as indicated on the rating plate (230V-240V 50Hz). The mains current protection must be min. 10A
- Secure the power cord (5) of the mower.
- Insert the plug of the mower into the connection socket of the extension cord. Secure the extension cord to prevent it from falling out and disconnecting.
- Do not switch on the appliance until it is fully assembled. Always check the extension cord for signs of damage before switching on the appliance; only use an undamaged extension cord.
Caution: A damaged extension cord can be very dangerous! Creates a danger to the life and health of the user
- When attempting to run the mower in tall grass, the engine can overheat and become damaged.
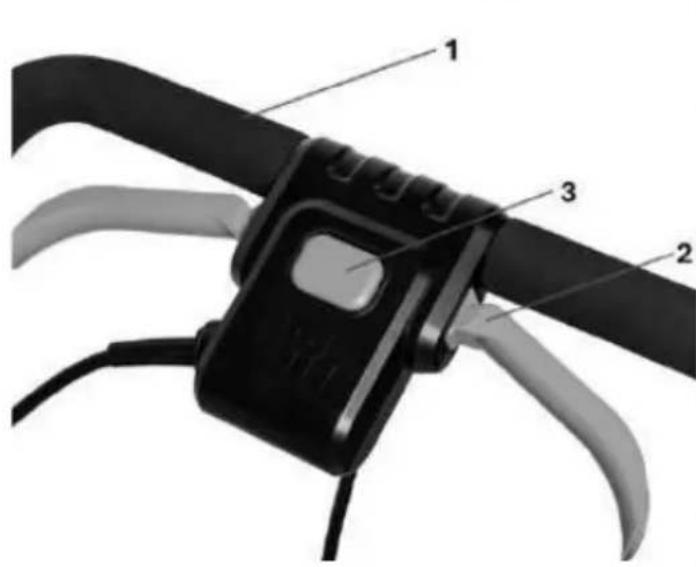
Switching on the mower:
- To start the mower, press and hold the safety button (3) pull the switch lever (2). towards the steering wheel (1). After following the steps in the order shown previously, the mower will start.
- To switch off the mower, release the switch lever (2).
Note: There is no need to press or hold the safety button (3) once the unit has been started.
Mowing height adjustment
Warning! Switch off the mower by releasing the switch lever and wait for the motor and blade to stop before adjusting the cutting height, the blades continue to rotate for a few seconds after the machine is switched off, a rotating blade can cause injury.
For the first cut of the season or after a long time since the last mowing, select the high cut adjustment by pressing the lever (16).
Tips: For long grass, start mowing with the highest setting and then gradually reduce the cutting height.
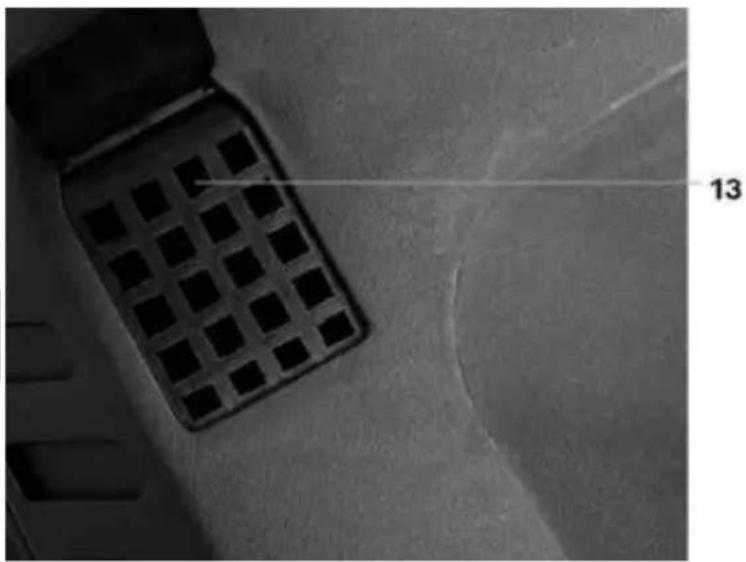
When and how to set up and take down a grass catch basin
Before operating the mower, attach the grass catcher (9), details of grass catcher installation above. When the mower is running, a blast of air from the rotating blade pushes out the grass indicator flap (13). When the grass catcher is full, the indicator flap will rest flat
Grass container disconnection
Note: Empty the tank (9) when full to avoid blocking the outlet and unnecessarily overloading the motor.
Disconnect the grass hopper by performing the following steps:
- Lift the rear grass outlet protection which is on top of the grass container (15)
- Lift the grass hopper (9) upwards to disconnect it from the mower body.
- Lower the rear grass outlet protection (15) downwards.
Note: When mowing, safely place the extension cord on the pavement, path or areas that have already been mowed.
WARNING!
When the engine is switched off, the blade (18) continues to rotate for a few seconds, so do not touch the underside of the mower until the blade has stopped!
Warning! When mowing, do not let the engine run under overload.
When an engine overload occurs, the engine speed slows down and you will hear a change in the engine sound, when this happens, stop mowing, release the switch lever and raise the cutting height. Failure can cause damage to the machine.
Select a cutting height that is suitable for the desired grass height. If necessary, mow in several passes so that the maximum grass cutting height in one pass is 4cm .
When mowing, make sure you avoid areas that could impede the free movement of the extension cord.
Blade
Always disconnect the mower from the power supply before checking the blade (18) in any way. When the engine stops, remember that the blade (18) will continue to run for a few seconds before it stops. Never attempt to stop the blade (18). Check at regular intervals that the blade is correctly fitted, that it is in good condition and that it is well sharpened. Replace it if necessary.
If the rotating blade (18) strikes any object, stop the mower and wait until the blade has come to a complete stop. Then check the condition of the blade (18) and the blade holder. Replace the blade (18) immediately if it has been damaged.
Warning! Stop the mower and remove the plug (5) from the power supply before removing the grass catcher (9).
Always pull the mains plug before carrying out any maintenance or cleaning work!
Note: To ensure long and reliable service, carry out the following maintenance regularly:
- Check for obvious defects such as a loose, dislodged or damaged blade, loose attachments and worn or damaged mower components.
- Check that the covers and guards are undamaged and properly attached to the mower.
- Carry out the necessary maintenance/inspection or repairs before operating the mower.
Warning: Remember to seek professional authorised service when replacing the blade.
Warning: Never carry out any assembly or adjustment operations with the power supply connected to the mower. Always ensure that the power button is in the off position and that the power plug is disconnected from the extension cord.
Cleaning:
- Do not spray the appliance with water. Water ingress can damage components such as the switch/plug and the electric motor.
- Clean the unit with a cloth, hand brush, etc.
Consultation with the Service is required:
➢ If the mower hits an object.
➢ If the engine stops suddenly
➢ If the blade is bent (do not align!)
If the motor shaft is bent (do not align!)
It is recommended to replace the mower blade (18) at the end of the mowing season. Always have the mower blade replaced at an authorised service centre (requires blade balance measurement).
An unbalanced blade (18) causes violent vibration of the mower and a risk of accident!
Checking the grass catcher box and any damaged parts
Check the grass tank for signs of wear at more frequent intervals.
Replace any worn or damaged parts.
Use only original spare parts for maintenance.
The component exposed to the heaviest wear is the blade. Check the condition of the blade and its holder at regular intervals. When the blade is worn, replace it. If there is excessive vibration of the mower, this is a sign that the blade is not properly balanced or deformed due to impact. In this case, replace the blade.
Storing the mower:
- Disconnect the power cable (5).
- Allow the engine to cool for about 30 minutes.
- Check, repair or replace any power cord that shows signs of wear or damage.
- Tighten or replace worn, loose or damaged parts, and clean them thoroughly.
- Thoroughly clean the outside of the unit with a soft brush and cloth. Do not use water, solvents or polishes. Remove all grass and dirt, especially from the vents.
- Turn the unit on its side and clean the blade and its guard. If blades of grass are on or around the blade, remove them with a wooden or plastic tool to protect the blade.
- To protect the mower from rust, wipe all exposed metal parts with a cloth soaked in oil or spray with a light grease.
- Keep the mower and extension cord in a closed, dry place out of the reach of children to prevent unauthorised use or damage.
- Cover loosely with a tarpaulin for extra protection.
- If transporting, remember to secure the unit correctly to the vehicle.
- To reduce the storage space of the mower, the top handle can be folded down.
Note: Do not press down on the electrical cable (5) when folding the handle. Make sure it does not get stuck or entangled when folding or unfolding the top handle.
PROBLEM SOLVING
Always pull the mains plug and wait for the blade to stop before carrying out any maintenance or cleaning work.
| Symptom | Possible problem | Solution |
| Device does not work | Power off | Switch on the power supply |
| Power socket defective | Use a working power socket | |
| Defective extension cable | Check, replace if damaged. | |
| Grass too tall | Increase cutting height | |
| Safety/overload protection has been activated | Allow to cool for a few minutes and increase the cutting heightDo not operate the switch lever at this time, as this will increase the reset time of the safety guard | |
| The mower runs intermittently | Defective extension cable | Check, replace if damaged |
| The grass container is full. | Empty the grass container. | |
| The internal wiring of the mower is damaged | Contact the service | |
| Mower does not work properly | Cutting height too low | Increase cutting height |
| The cutting blade jerks the grass or fails to cut | Replace the blade | |
| Underside of machine heavily clogged | Clean the device | |
| Blade mounted upside down | Fix the blade in the correct position | |
| Cutting blade does not rotate | Cutting blade blocked | Serious damage - contact service recommended |
| Blade nut/bolt loose. | Tighten the blade nut/bolt | |
| Excessive vibration/noise | Blade nut/bolt loose | Tighten the blade nut/bolt |
| Cutting blade defective | Replace the blade |
TECHNICAL SPECIFICATIONS
| Electric mower 04-629 | |
| Parameter | Value |
| Supply voltage | 230-240 V AC |
| Supply frequency | 50 Hz |
| Rated power | 1800 W |
| No-load spindle speed | 3000 /min |
| Degree of protection | IPX4 |
| Mowing diameter | 440 mm |
| Mowing height range | 25-75 mm |
| Number of cutting height positions | 6 |
| Grass catcher capacity | 45 l |
| Protection class | II |
| Mass | 12.8 kg |
| Year of production | 2024 |
| 04-629 indicates both the type and the designation of the machine | |
NOISE AND VIBRATION DATA
| Sound pressure level | Lp_A = 85 dB(A) K = 3 dB(A) |
| Sound power level | Lw_A = 95 dB(A) K = 1,2 dB(A) |
| Vibration acceleration values | a_1 < 2.5 m/s^2 K = 1.5 m/s^2 |
Information on noise and vibration
The noise emission level of the equipment is described by: the emitted sound pressure level Lp and the sound power level Lw (where K denotes measurement uncertainty). The vibrations emitted by the equipment are described by the vibration acceleration value ah (where K is the measurement uncertainty).
The sound pressure level Lp, the sound power level Lw and the vibration acceleration value a h given in these instructions have been measured in accordance with EN 60335-2-77. The vibration level a h given can be used for comparison of equipment and for preliminary assessment of vibration exposure.
The vibration level quoted is only representative of the basic use of the unit. If the unit is used for other applications or with other work tools, the vibration level may change. A higher vibration level will be influenced by insufficient or too infrequent maintenance of the unit. The reasons given above may result in increased vibration exposure during the entire working period.
In order to accurately estimate vibration exposure, it is necessary to take into account periods when the unit is switched off or when it is switched on but not used for work. Once all factors have been accurately estimated, the total vibration exposure may turn out to be much lower.
In order to protect the user from the effects of vibration, additional safety measures should be implemented, such as cyclical maintenance of the machine and working tools, securing an adequate hand temperature and proper work organisation.
ENVIRONMENTAL PROTECTION
Electrically-powered products should not be disposed of with household waste, but should be taken to appropriate facilities for disposal. Contact your product dealer or local authority for information on disposal. Waste electrical and electronic equipment contains environmentally unfriendly substances. Equipment that is not recycled poses a potential risk to the environment and human health.
"GTX Poland Spółka z ograniczoną odpowiedzialnością" Spółka komandytowa with its registered office in Warsaw, ul. Pograniczna 2/4 (hereinafter: "GTX Poland ") informs that all copyrights to the content of this manual (hereinafter: "Manual"), including among others. All copyrights to the contents of this Manual (hereinafter referred to as "Manual"), including but not limited to its text, photographs, diagrams, drawings, as well as its composition, belong exclusively to GTX Poland and are subject to legal protection pursuant to the Act of February 4, 1994 on Copyright and Related Rights (i.e. Journal of Laws 2006 No. 90 Item 631 as amended). Copying, processing, publishing, modifying for commercial purposes the entire Manual as well as its individual elements without the written consent of GTX Poland is strictly prohibited and may result in civil and criminal liability.
EC Declaration of Conformity
Manufacturer: GTX Poland Sp. z o.o. Sp.k,
Trade name: NEO TOOLS
Serial number: 00001 ÷ 99999
The product described above compiles with the following documents:
Machinery Directive 2006/42/EC
Electromagnetic Compatibility Directive 2014/30/EU
RoHS Directive 2011/65/EU as amended by Directive 2015/863/EU
Noise Emission Directive 2000/14/EC as amended by 2005/88/EC
Guaranteed sound power level LWA= 96 dB(A)
Measured sound power level LWA= 94.87 dB(A) K= 1.2 dB(A)
And meets the requirements of the standards:
EN 62841-1:2015 +A11:2022; EN IEC 62841-4-3:2021+A11:2021
EN 62841-1:2015 +A11:2022; EN IEC 62841-4-3:2021+A11:2021 EN IEC 63000:2018
This declaration relates only to the machinery as placed on the market and does not include components
added by the end user or carried out by him/her subsequently.
Name and address of the EU resident person authorised to prepare the technical dossier:
Signed on behalf of:
GTX Poland Sp. z o.o. Sp.k.
Technical Documentation Officer GTX Poland
Warsaw, 2024-07-04
DEUTSCH(DE)
GTX Poland Sp. z o.o. Sp.k.
GTX Poland Sp. z o.o. Sp.k.
GTX Poland Sp. z o.o. Sp.k.
GTX Poland Sp. z o.o. Sp.k.
GTX Poland Sp. z o.o. Sp.k.
GTX Poland Sp. z o.o. Sp.k.
GTX Poland Sp. z o.o. Sp.k.
GTX Poland Sp. z o.o. Sp.k.
GTX Poland Sp. z o.o. Sp.k.
GTX Poland Sp. z o.o. Sp.k.
GTX Poland Sp. z o.o. Sp.k.
GTX Poland Sp. z o.o. Sp.k.
GTX Poland Sp. z o.o. Sp.k.
2/4 Via Pograniczna
02-285 Varsavia
Paweł Kowalski
Fabricant : GTX Poland Sp. z o.o. Sp.k,
2/4 rue Pograniczna 02-285 Varsovie
Produit : Tondeuse
Modèle : 04-629
Nom commercial : NEO TOOLS
GTX Poland Sp. z o.o. Sp.k.
2/4 rue Pograniczna
02-285 Varsovie

Paweł Kowalski


- SPECIFIC SAFETY PROVISIONS
- SAFETY INSTRUCTIONS FOR USE OF LAWNMOWERS
- Instruction
- PREPARATION
- MAINTENANCE AND STORAGE
- RECOMMENDATIONS FOR CLASS II EQUIPMENT
- CONSTRUCTION AND APPLICATION
- Do not misuse the device.
- DESCRIPTION OF THE GRAPHIC PAGES
- PREPARATION FOR WORK
- Installation of the guide
- Fit the bottom guide
- Grass container installation
- Connecting the power supply
- Switching on the mower:
- Mowing height adjustment
- When and how to set up and take down a grass catch basin
- Grass container disconnection
- WARNING!
- When the engine is switched off, the blade (18) continues to rotate for a few seconds, so do not touch the underside of the mower until the blade has stopped!
- Blade
- Always pull the mains plug before carrying out any maintenance or cleaning work!
- Cleaning:
- Consultation with the Service is required:
- An unbalanced blade (18) causes violent vibration of the mower and a risk of accident!
- Checking the grass catcher box and any damaged parts
- Storing the mower:
- PROBLEM SOLVING
- Information on noise and vibration
- ENVIRONMENTAL PROTECTION
- EC Declaration of Conformity
- Paweł Kowalski
Brand : NEO tools
Model : 04-629
Category : Lawn mower