
04-611 - Lawn mower NEO tools - Free user manual and instructions
Find the device manual for free 04-611 NEO tools in PDF.

| Brand | NEO tools |
| Model | 04-611 |
| Product type | Cordless lawn mower |
| Power supply | Lithium-Ion battery 36 V DC (2 batteries required, not included) |
| Motor | Brushless motor |
| Cutting width | 460 mm |
| Cutting height adjustment | 6 positions, from 25 to 75 mm |
| Grass basket capacity | 50 L |
| No-load speed | 2800 min⁻¹ |
| Front wheel diameter | 180 mm |
| Rear wheel diameter | 250 mm |
| Weight | 23.5 kg |
| Protection rating | IPX1 |
| Protection class | III |
| Sound pressure level (LpA) | 80.3 dB(A) (uncertainty K=3 dB(A)) |
| Sound power level (LwA) | 91.3 dB(A) (uncertainty K=1.82 dB(A)) |
| Vibrations (ah) | 2.89 m/s² (uncertainty K=1.5 m/s²) |
| Main functions | Cutting, mulching (with mulching plug), side discharge, grass basket |
| Maintenance and cleaning | Clean with a dry cloth or compressed air; do not use water. Sharpen or replace the blade regularly. |
| Safety | Switch lock button, safety key, overload, overheating and excessive discharge protection |
| Spare parts and repairability | Use only original parts. Blade replacement possible. Have repairs carried out by an authorized service center. |
Frequently Asked Questions - 04-611 NEO tools
User questions about 04-611 NEO tools
0 question about this device. Answer the ones you know or ask your own.
Ask a new question about this device
Download the instructions for your Lawn mower in PDF format for free! Find your manual 04-611 - NEO tools and take your electronic device back in hand. On this page are published all the documents necessary for the use of your device. 04-611 by NEO tools.
USER MANUAL 04-611 NEO tools
natural_image
Black and white photo of a NEO lawn mower with visible branding (no text or symbols on the device itself)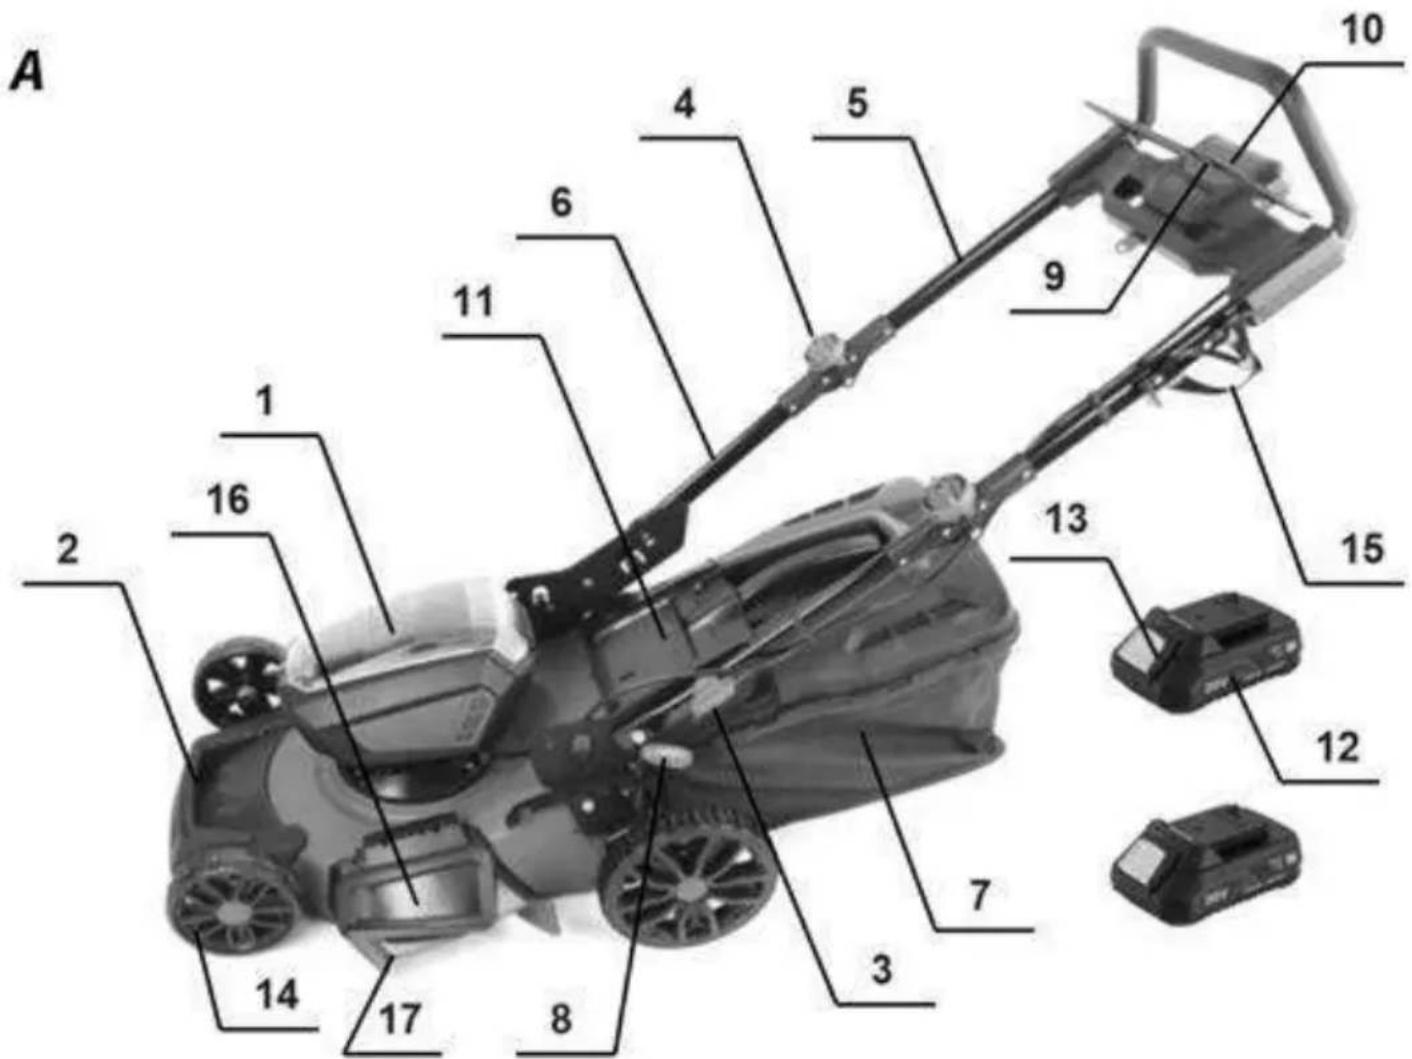
natural_image
Close-up of a hand holding a tool next to a black mechanical component, with no visible text or symbols.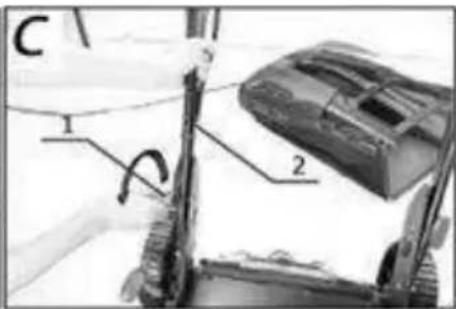
natural_image
Black-and-white photo of a small robotic device with a curved handle and wheels, no visible text or symbols.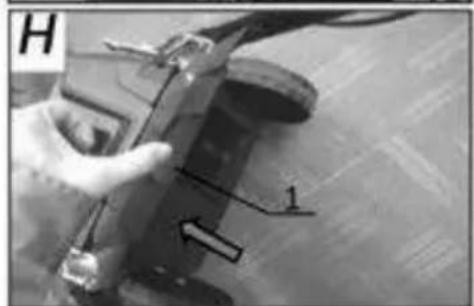
natural_image
Close-up of a hand using a tool to adjust or install a mechanical component (no visible text or symbols)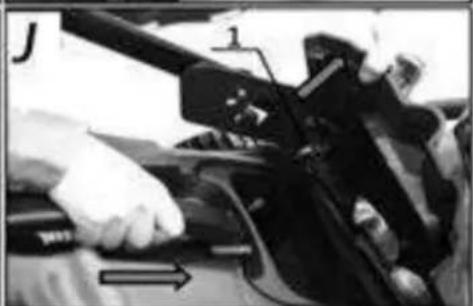
natural_image
Close-up of a hand adjusting a car's front panel, showing mechanical components and a directional arrow (no text or symbols visible)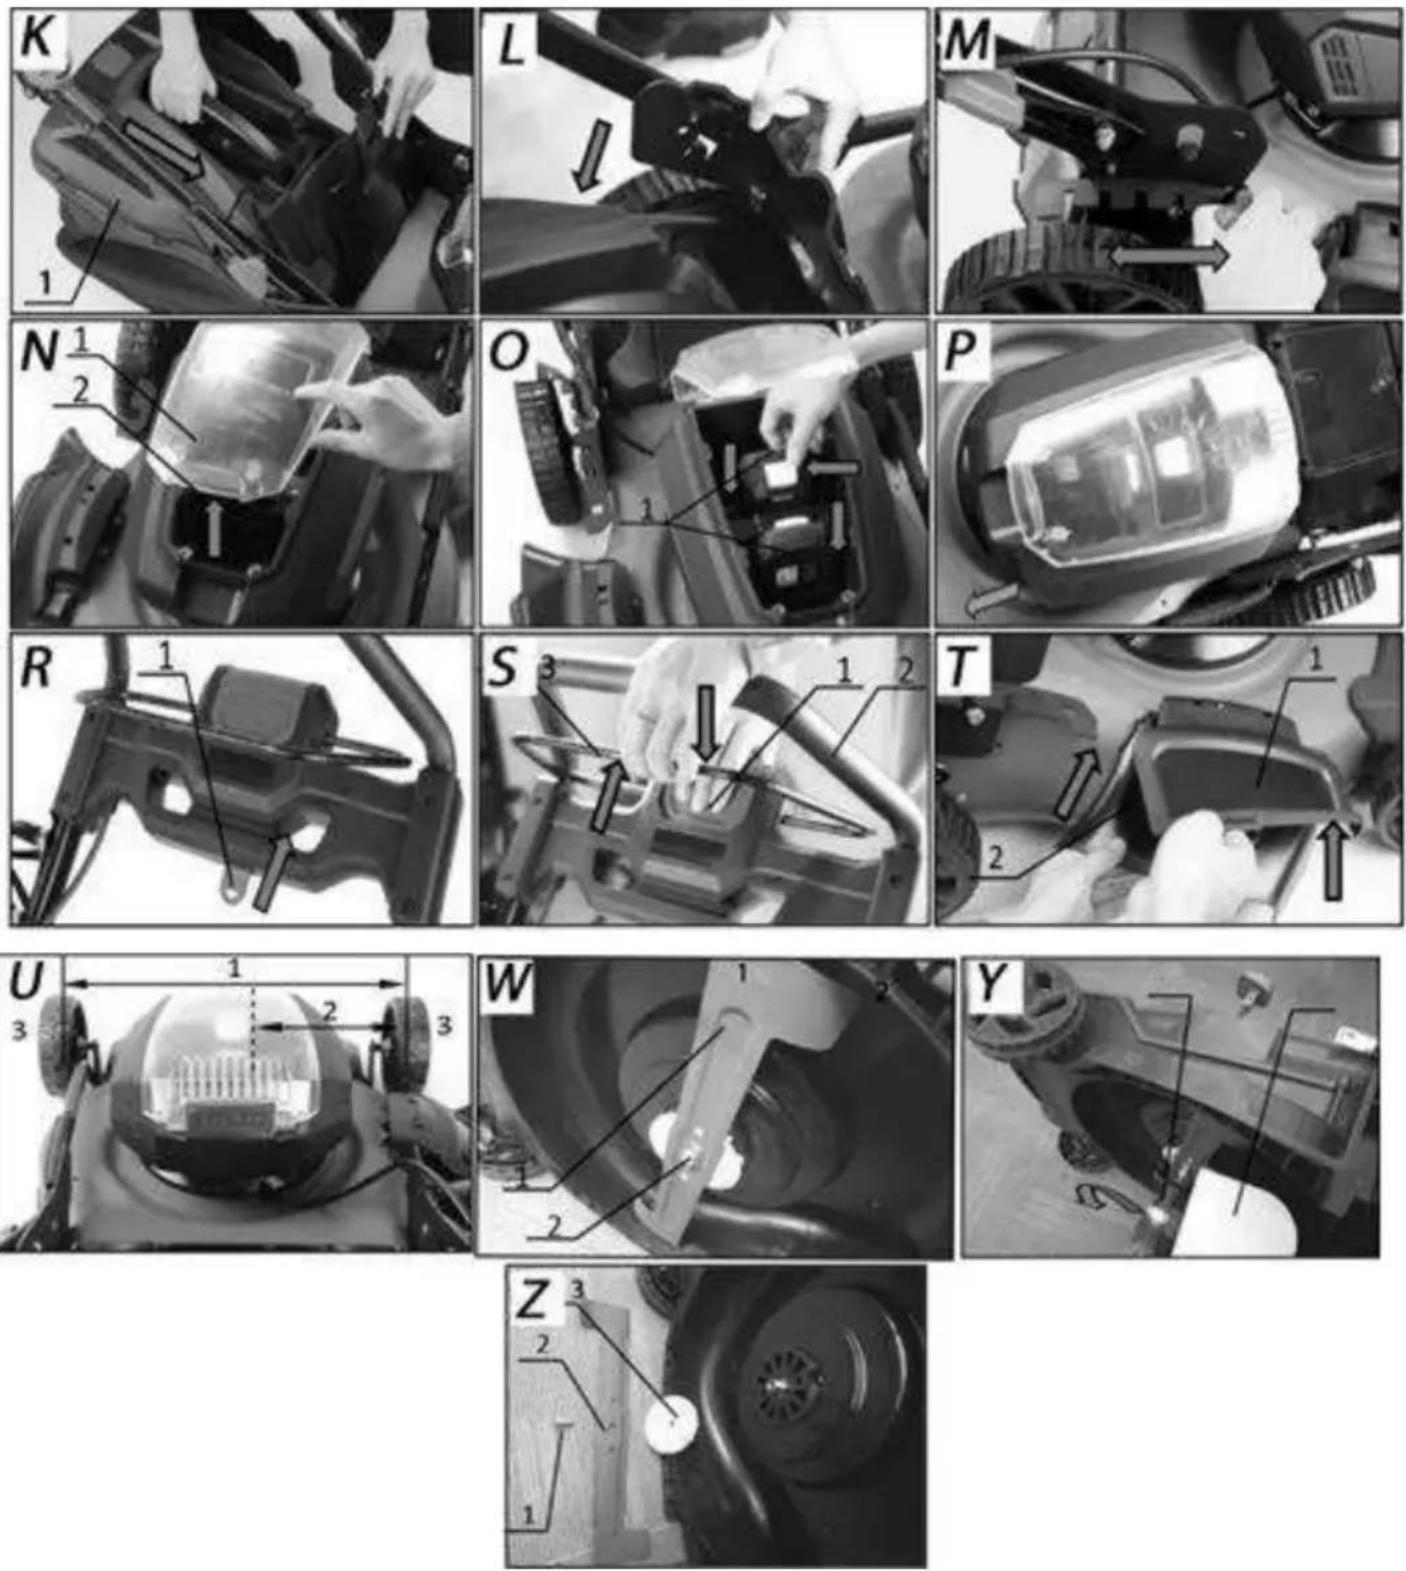
PL ORYGINALNA INSTRUKCJA OBSŁUGI....5
EN TRANSLATION (USER) MANUAL 8
DE ÜBERSETZUNGSHANDBUCH (BENUTZERHANDBUCH) 11
CZ PŘEKLAD (UŽIVATELSKÝ) MANUÁL 27
SK PREKLAD (POUŽÍVATELŠKÁ) PRÍRUČKA 30
SL PRIROČNIK ZA PREVAJANJE (UPORABNIK)....33
LT VERTIMO (VARTOTOJO) VADOVAS.... 36
LV TULKOŠANAS (LIETOTĀJA) ROKASGRĀMATA 39
EE TÖLKE (KASUTAJA) KÄSIRAAMAT.... 41
BG РЪКОВОДСТВО ЗА ПРЕВОД (ПОТРЕБИТЕЛ)...... 44
HR PRIRUČNIK ZA PRIJEVOD (KORISNIK)...... 48
SR PRIRUČNIK ZA PREVOĐENJE (KORISNIK)....50
DANE DOTYCZACE HAŁASU I DRGAŃ

EN TRANSLATION (USER) MANUAL CORDLESS MOWER 04-611
REMARK! BEFORE PROCEEDING WITH THE USE OF POWER TOOLS, YOU SHOULD CAREFULLY READ THIS INSTRUCTION AND SAVE IT FOR FURTHER USE.
DETAILED SAFETY RULES
SAFETY INSTRUCTIONS FOR THE USE OF LAWN MOWERS Safety of using cordless mowers in practice Instruction
- Read the instructions carefully. Familiarize yourself with the control systems and the correct use of the device.
- Never allow children or people who are not familiar with the device's instructions to use the device to use the device. National rules may specify the exact age of the operator.
- Never mow when other people, especially children or pets, are around.
- Remember that the operator or user is responsible for accidents or occurring dangers to other people or the environment.
Preparation
- When mowing, always wear sturdy footwear and long pants. Do not operate the device with bare feet or in open sandals. Avoid damaged clothing that is too loose or that has hanging straps or ribbons.
- Carefully inspect the area where the device will work and remove all items that could get into the device.
- Before use, always check that the knives, screws and equipment of the knife assembly are not worn or damaged. Replace worn or damaged parts in the kits to maintain balance. Replace damaged or illegible plates.
Usufruct
- Mow only in daylight or with good artificial lighting.
- Avoid mowing wet grass.
• Always make sure that your legs on the slope stand firmly. - Come on, never run.
- Mow across the slope, never up or down.
- Be especially careful when changing the direction of travel on a slope.
- Do not mow on excessively inclined slopes.
- Pay special attention when reversing or pulling the device towards you.
- Turn off the drive of the cutting element(s) if the device needs to be tilted when moving it on non-grassy surfaces and when it is transported to and from the mowing site.
- Do not use a device with damaged covers or enclosures and without a safety device, e.g. included covers and/or grass containers.
- Start the engine carefully according to the instructions, paying attention to whether the feet are away from the cutting element(s).
- Do not tilt the device when starting the engine, except when it requires tilting during start-up. In this case, do not tilt more than necessary and lift only the part that is away from the operator.
- Do not start the device while standing in front of the ejection hole.
- Do not keep your hands and feet near rotating parts. Make sure that the ejection hole is not clogged at all times.
- Do not move the device with the engine running.
-
Stop the device and remove the locking unit from maintenance while the batteries are in the sockets. Make sure all moving parts are not in motion
-
Every time you leave your device,
- before cleaning or pushing the outlet,
- before checking, cleaning or repairing the device,
o after being hit by a foreign object. Check that the device is not damaged and, if necessary, perform a repair before restarting and operating the device - if the device starts to vibrate excessively (check immediately)
- check for damage,
○ replace or repair any damaged part, - check and tighten the loose parts.
Maintenance and storage
- Keep all nuts, bolts and screws in good condition to ensure that the device will work safely.
- Check the grass container frequently for worn or damaged.
- In the case of multi-legged devices, be careful, as the rotation of one cutting element may cause the rotation of other knives.
- Be careful when adjusting the device to avoid fingers getting between moving knives and fixed parts of the device.
• Always leave the device to cool before the next start-up. - Watch out for the blade of knives. The knives rotate even after the engine is turned off – remove the damaged assembly before maintenance.
- Replace worn or damaged parts for safety. Use only original spare parts and equipment.
REMARK! Despite the use of a design that is safe by design, the use of protective measures and additional protective measures, there is always a risk of residual injuries during operation.
Explanation of the pictograms used
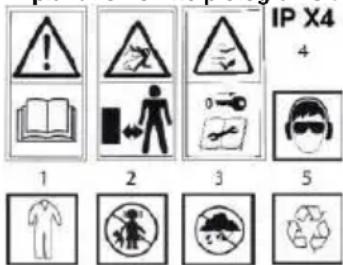


- WARNING! Read the user manual
-
Keep bystanders at a suitable distance
-
Watch out for the sharp edges of knives. Knives rotate when the engine is turned off – Remove the locking unit before maintenance when the batteries are in the sockets
-
IPX4 Class
-
Use personal protective equipment (safety goggles, hearing protectors)
-
Use protective clothing
-
Do not allow children into the tool
-
Protect your device from moisture
-
Recycling
CONSTRUCTION AND APPLICATION
A lawn mower is a battery-powered device. It is driven by a brushless motor. The mower is designed for mowing lawns in the home garden. Use only accessories suitable for this device and follow the instructions in the instruction manual. Grass should be mowed with even stripes. The mower can be pushed or pulled. The mower is intended for amateur use only.
NOTE: This equipment may be used by children at least 8 years of age and by persons with reduced physical and mental abilities and persons with a lack of experience and knowledge of the equipment, if supervision or instruction is provided regarding the safe use of the equipment so that the risks involved are understood. Children should not play with equipment. Unsupervised children should not carry out cleaning and maintenance of equipment.
WARNING! Do not misuse the device.
DESCRIPTION OF GRAPHIC PAGES
The following numbering refers to the elements of the device shown on the graphic pages of this manual.
Figure A:
- Battery compartment cover
- Front handle
- Bottom handle lock knob
- Upper handle lock knob
-
Upper handle
-
Bottom handle
-
Grass basket
-
Cutting height setting lever
-
Switch lever
-
Switch lock button
-
Outlet cover
-
Accumulator
-
Battery button
-
Running wheel
-
Water bottle holder
-
Side guard
-
External mulching cap
* There may be differences between the drawing and the product.
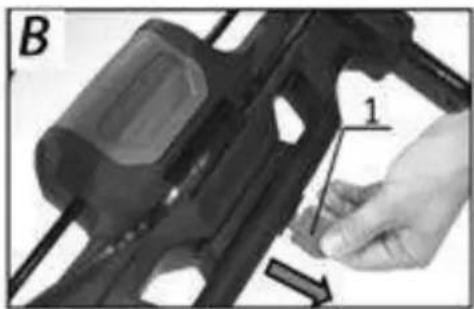
Figure B:
- Security key
Figure C:
- Bottom handle lock knob
2.Bottom handle
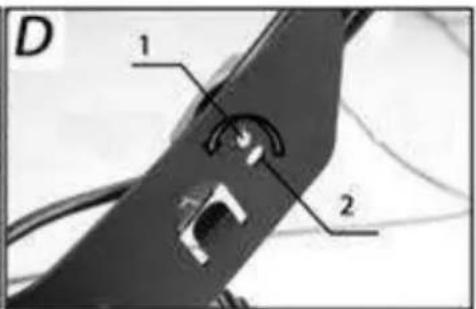
Figure D:
1.Pin
2.Pin hole
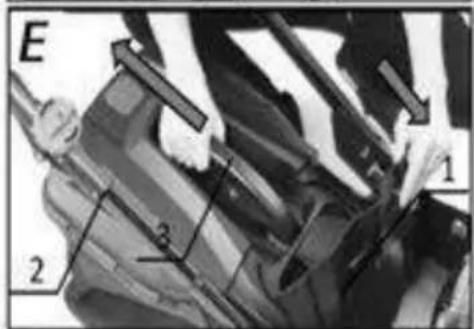
Figure E:
- Outlet cover
2.Grass basket
- Handle
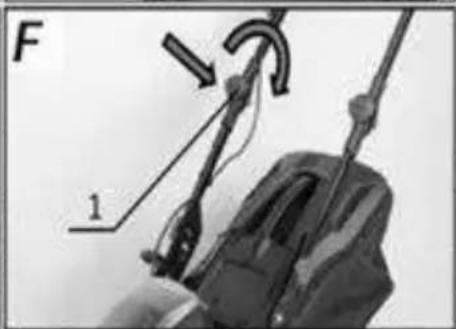
Figure F:
- Upper handle lock knob
Figure H:
- Outlet cover
Figure 1:
- Inner mulching cap
Figure J:
1.Hook
Figure K:
1.Grass basket
Figure M:
- Height adjustment lever
Figure N:
- Battery compartment cover
2.Lid clasp
Figure O:
- Batteries
Figure R:
- Security key
Figure S:
-
Switch lock button
-
Upper handle
3.Switch lever
Figure T:
-
Side cover
-
External mulching cap
Figure U:
-
Cutting width
-
Overlapping area of two mowing lanes
-
Center line
Figure W:
1.Knife
2.Screw
Figure Y:
1.Key
2.A piece of wood
Figure Z:
1.Screw
2.Knife
- Mount
EQUIPMENT AND ACCESSORIES
-
Grass basket-1 pc.
-
Mulching overlay-1 pc.
PREPARATION FOR WORK
REMARK! Before adjusting the device, remove the batteries and the safety key (Fig.B). Do not start the device before you have assembled all the components correctly.
HANDLE HEIGHT ADJUSTMENT
The handle lock knobs are located on both sides of the handle. The locking or unlocking operation shall be carried out in parallel for the individual knobs. The height of the handle can be set in two positions depending on your needs
- Turn the lock knob on both sides of the mower. The locking pin will leave the socket allowing adjustment.
- Firmly grasp the lower handle and adjust its height. When the locking pin comes down with the socket, turn the lock knob back, locking the position (Fig.C, D).
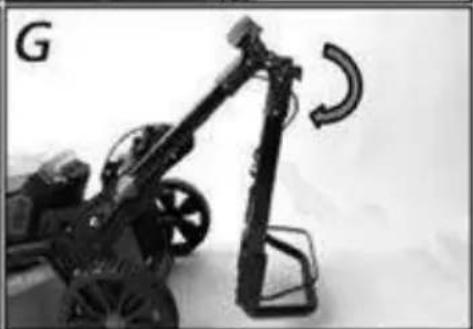
FOLDING THE HANDLE
- Open the outlet cover and remove the grass basket by pulling the handle (the key should be removed).
- Press and turn the knobs of the upper handle lock to the right. Then fold the upper handle.
- The distribution takes place analogously, in reverse order (Fig. E, F, G).
INSTALLATION OF THE GRASS BASKET
- Lift the outlet cover (Fig. H).
• Pull out the mulching cap (Fig. I)
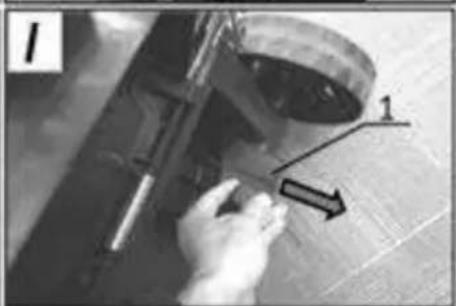
- Hang a grass basket on a bar. The grass basket has a convenient carrying handle to vacuum it from the cut grass. Close the outlet cover (Fig. J, K, L).
REMARK! Always make sure that the grass basket is properly fixed. INSTALLATION OF THE WATER BOTTLE HOLDER
The mower is equipped with a water bottle holder installed with screws. SETTING THE CUTTING HEIGHT
WARNING! Before changing the cutting height setting, turn off the mower and disconnect the batteries or remove the safety key from the socket.
The cutting height is adjusted by means of a cutting height lever in six positions in the range of 25-75 mm.
- Remove the security key.
- Pull the cutting height adjustment lever away from the recess.
- By moving the cutting adjustment lever, select the appropriate cutting height (Fig.M).
- Place the cutting height adjustment lever in one of the selected bays of the cutting height adjustment lever lock on the mower housing. When adjusting, hold the mower with the front handle.
TRANSPORT HANDLE
The mower has a convenient and practical transport handle for carrying on the housing. The mower should be moved in two people. One person should grab on the handle, and the other by both handles.
WORK / SETTINGS
ON/OFF
WARNING! Before starting, the batteries must be installed. The device requires the use of 2 batteries otherwise it will not work. For proper operation of the device, the batteries should be of the same capacity and with a similar degree of charge. The mower has a safety key that must be placed in the socket for the device to start working. Failure to place the safety key in the socket results in the inability to start the mower despite the installed batteries.
WARNING! Before starting, make sure that the switch is in the off position and all components are well assembled, as described in this manual.
ON-OFF
- Lift the battery compartment cover (Fig. N).
- Install the batteries and place the safety key in the slot (Fig. O, P, R).
REMARK! The mower is equipped with a safety button of the switch to protect against accidental starting.
The mower has a combined switch with a lever.
Enable
- Press and hold the switch lock button.
- Pull the switch lever to the handle and hold (Fig. S).
- Release the pressure on the switch lock button.
Disable
- Release the switch lever and wait for the cutting knife to stop turning. REMARK! Each time during start-up, press the safety button of the switch. Never attempt to lock the safety button of the switch or the switch lever in the on position.
All parts should be properly installed and meet the requirements to ensure proper operation of the mower. Any damaged safety component or part should be repaired or replaced immediately. When the engine is turned off, the cutting elements still rotate.
INNER MULCHING CAP
To use the internal mulching cap, you need to disassemble the grass basket.
EXTERNAL MULCHING APPLICATION
An external mulching cap allows the cut grass to be drained to the right side of the mower. To mount the cap, lift the side cover (Fig. T). Disassembly is carried out analogously, in reverse order.
TIPS FOR SAFE USE
- When mowing long grass, the work should be done gradually, in layers.
- The mower should be moved in a smooth motion by pushing or pulling holding the handle with both hands.
- A working mower should be kept away from hard objects and cultivated plants.
- The mower can only be worked when the grass is dry.
- The mowing speed should be about 1 meter per 4 seconds.
• Empty the grass basket regularly. - When trying to accurately cover the mowing area, you should be guided by drawing U.
The mower can be used with or without a grass basket mounted, with a mulching cap.
WARNING! Do not work with a lawn mower without a basket with the outlet cover raised.
REMARK! When working with a lawn mower, remember not to expose the mower with batteries to direct sunlight, especially for a longer break time, leaving the device unattended. The batteries can heat up a lot during this time. An increase in temperature can damage both the battery and the mower. When the critical temperature is exceeded, spontaneous ignition and even explosion of batteries may occur. Never expose batteries to direct and prolonged sunlight!
WARNING! Before proceeding with any installation, adjustment, repair or maintenance activities, remove the batteries from the device and disconnect the security key.
CLEANING
- After each mowing operation, the remnants of grass that have accumulated in the housing of the cutting blade should be removed.
- The engine housing should always be as free from dust and debris as possible.
- Clean the ventilation gaps in the engine housing to prevent them from being clogged by grass clippings.
- Wipe the device with a clean cloth or blow it with low-pressure compressed air.
- Do not use water or chemical cleaners for cleaning
- Care must be taken to ensure that water does not get inside the device.
- At the end of the work, remove the grass basket and clean thoroughly to prevent the formation of mold and unpleasant odor.
MAINTENANCE AND STORAGE
- Check that the cutting knife has not been damaged from impacts on hard objects, if necessary – sharpen or replace the cutting knife.
- Check that the ejection hole into the grass basket is open.
- Check the grass basket for wear and deformation.
- Use only original accessories and original spare parts.
- During storage, the handle can be folded as described above.
- Unused device should be stored in a dry, cool, child-inaccessible place.
- Store the device with the batteries removed.
- Do not store at temperatures exceeding 40^
CUTTING KNIFE REPLACEMENT
- REMARK! Wait for the cutting knife to stop completely, remove the batteries from the device and disconnect the safety key. Use gloves when replacing the knife.
• Disassemble the grass basket. - Turn the mower "to the side" (Fig. W).
- Grasp the cutting knife securely or lock, for example, with a piece of wood. (wear protective gloves).
- Unscrew the screw fixing the cutting knife with a key by turning left (Fig. Y,Z).
- Replace or sharpen the cutting knife (in the case of replacement with a new one – the cutting knife must be of the same size and weight).
- Attach the cutting knife as above in reverse order (the holes in the cutting knife must be mounted on the spindle pins).
- The act of sharpening or replacing a cutting knife is best entrusted to a qualified person using original parts.
- All kinds of defects should be removed by the manufacturer's authorized service.
SECURITY
- The mower is equipped with the following safety systems, disabling the device in dangerous conditions.
• Overload protection
• Overheating protection - Protection against excessive battery discharge.
TECHNICAL PARAMETERS
RATINGS
| Cordless mower 04-611 | |
| Parameter | Value |
| Supply voltage | 36 VDC |
| Spindle speed without load | 2800 min-1 |
| Protection | IPX1 |
| Protection class | III |
| Cutting width | 460 mm |
| Number of cutting height adjustments | 6 |
| Cutting height range | 25-75cm |
| Grass basket capacity | 50L |
| Front wheel diameter | 180mm |
| Rear wheel diameter | 250mm |
| Mass | 23.5kg |
| Year of manufacture | |
| 04-611 means both the type and the designation of the machine | |
NOISE AND VIBRATION DATA
| Sound pressure level | LpA= 80.3 dB(A) K= 3 dB(A) |
| Sound power level | _LwA = 91.3 dB(A) K= 1.82 dB(A) |
| Vibration acceleration value | _ah = 2,89 m/s2K= 1,5 m/s2 |
Information on noise and vibration
The noise emitted by the device is described by: the emitted sound pressure level L_pA and the sound power level LwA (where K is the measurement uncertainty). The vibrations emitted by the device are described by the vibration acceleration value ah (where K is the measurement uncertainty).
The emitted sound pressure level _LPA , the sound power level LwA and the vibration acceleration value ah have been measured in accordance with EN 60335-2-77:2010. The stated vibration level ah can be used to compare devices and to initially assess vibration exposure.
The stated vibration level is representative only for the basic applications of the device. If the device is used for other applications or with other working tools, the vibration level may change. A higher level of vibration will be affected by insufficient or too rare maintenance of the device. The reasons given above may increase the exposure to vibrations during the entire period of operation.
In order to accurately estimate the exposure to vibrations, it is necessary to take into account the periods when the device is turned off or when it is turned on but is not used for operation.
After a thorough estimation of all factors, the total vibration exposure may turn out to be much lower.
In order to protect the user from the effects of vibrations, additional safety measures should be introduced, such as: cyclical maintenance of the device and working tools, protection of the appropriate hand temperature and proper organization of work.
TROUBLESHOOTING
The mower does not turn on
- Missing or incorrect placement of batteries. In this case, you need to insert the charged batteries correctly.
- Battery problems, low voltages - charge or replace the battery.
- The key is not inserted into the ignition – it must be inserted.
- Low battery level - charge or replace the battery.
- Too low cutting height – it should be increased.
The engine stops working after a short while
The engine does not reach maximum speed
- Incorrectly placed batteries - place them correctly, according to the instructions.
- Low battery level - charge or replace the battery.
- Problems with the drive system – return to an authorized service center for repair.
The knife does not rotate (immediately turn off!)
- A foreign body, e.g. a branch, is stuck in the area of the knife – remove.
- Problems with the drive system – return to an authorized service center for repair.
Too strong vibrations (immediately turn off!)
- Blade poorly balanced or unevenly worn – replace it.
ENVIRONMENTAL PROTECTION
Electrically powered products should not be disposed of with household waste, but should be disposed of in appropriate facilities. Information disposal is provided by the dealer of the product or local authorities. Waste electrical and electronic equipment contains substances that are not neutral for the natural environment. Non-recycled equipment is a potential threat to the environment and human health.
"Grupa Topex Spółka z ograniczoną odpowiedzialnością" Spółka komandytowa with its registered office in Warsaw, ul. Pograniczna 2/4 (hereinafter: "Grupa Topex") informs that all copyrights to the content of this manual (hereinafter: the "Manual"), including its text, photos, diagrams, drawings, and its compositions belong exclusively to the Topex Group and are subject to legal protection in accordance with the Act of February 4, 1994, on copyright and related rights (i.e. Journal of Laws of 2006 No. 90 Item 631, as amended).
Copying, processing, publishing, modifying for commercial purposes the entire Manual and its individual elements, without the consent of Grupa Topex expressed in writing, is strictly prohibited and may result in civil and criminal liability.
DE
ÜBERSETZUNGSHANDBUCH (BENUTZERHANDBUCH) AKKU-MÄHER 04-611
PŘEKLAD (UŽIVATELSKÝ) MANUÁL
AKUMULÁTOROVÁ SEKAČKA 04-611
POZNÁMKA! NEŽ ZAČNETE POUŽÍVAT ELEKTRICKÉ NÁŘADÍ, MĚLI BYSTE SI PEČLIVĚ PŘEČÍST TUTO INSTRUKCI A ULOŽIT JI PRO DALŠÍ POUŽITÍ.
PODROBNÁ BEZPEČNOSTNÍ PRAVIDLA
INSTALACE KOŠE NA TRÁVU
EXTERNÍ MULČOVACÍ APLIKACE
DETALJNA SIGURNOSNA PRAVILA
SIGURNOSNE UPUTE ZA UPORABU KOSILICA
Sigurnost korištenja bežičnih kosilica u praksi Instrukcija
- Pažljivo pročitajte upute. Upoznajte se s upravljačkim sustavima i ispravnom uporabom uređaja.
- Nikada nemojte dopustiti djeci ili osobama koje nisu upoznate s uputama uređaja da koriste uređaj za korištenje uređaja. Nacionalnim pravilima može se odrediti točna dob operatera.
- Nikada nemojte kositi kada su drugi ljudi, posebno djeca ili kućni ljubimci, u blizini.
- Imajte na umu da je operater ili korisnik odgovoran za nesreće ili prijetnje za druge ljude ili okoliš.
Priprema
DETALJNA PRAVILA BEZBEDNOSTI
SIGURNOSNA UPUTSTVA ZA UPOTREBU KOSILICA ZA TRAVU Bezbednost korišćenja kosilica bez kablova u praksi
Uputstva
- Pažljivo pročitajte uputstva. Upoznajte se sa kontrolnim sistemima i ispravnom upotrebom uređaja.
- Nikada ne dozvolite deci ili osobama koje nisu upoznate sa uputstvima uređaja da koriste uređaj za korišćenje uređaja. Nacionalna pravila mogu da navedu tačnu starost operatera.
- Nikada ne kosite kada su drugi ljudi, naročito deca ili kućni ljubimci, u blizini.
- Imajte u seti da je operater ili korisnik odgovoran za nezgode ili opasnosti po druge ljude ili okolinu.
Priprema
EKSTERNA MULCHING APLIKACIJA
Spoljašnja kapa za malč dozvoljava da se posečena trava iscedi na desnu stranu kosilice. Da biste postavili poklopac, podignite bočni poklopac (Slič. T). Rastavljivo se sprovodi analogno, obrnutim redosledom.
SAVETI ZA BEZBEDNU UPOTREBU
- Prilikom košenja duge trave, posao treba obavljati postepeno, u slojevima.
- Kosilicu treba pomerati nesmetanim pokretima gurajući ili povlačeći dršku obema rukama.
- Radnu kosilicu treba držati podalje od tvrdih predmeta i kultivisanih biljaka.
- Kosilica može da se radi samo kada je trava suva.
- Brzina košenja bi trebalo da bude oko metar na 4 sekunde.
• Redovno praznite korpu sa travom. - Kada pokušavate da precizno pokrijete područje košenja, trebalo bi da se vodite crtanjem U.
Kosilica se može koristiti sa ili bez montirane travnate korpe, sa malč kapom.
UPOZORENJE! Nemojte raditi sa kosilicom bez korpe sa podignutim poklopacom.
PRIMEDBA! Kada radite sa kosilicom za travu, ne zaboravite da kosilicu ne izlažete baterijama kako biste usmerili sunčevu svetlost, naročito na duže vreme pauze, ostavljajući uređaj bez nadzora. Baterije mogu mnogo da se zagreju za ovo vreme. Povećanje temperature može da ošteti i akumulator i kosilicu. Kada se prekorači kritična temperatura, može doći do spontanog paljenja, pa čak i eksplozije baterija. Nikada ne izlažite baterije direktnoj i produženoj sunčevoj svetlosti!
RAD I ODRŽAVANJE
TEXNIK'ES ΠΑΡΑΜΕΤΡΟΙ
AKPOAMATIKOTHTA
REEMPLACEMENT DU COUTEAU DE COUPE
/Signed for and on behalf of:/
/GRUPA TOPEX Quality Agent/


- EN TRANSLATION (USER) MANUAL CORDLESS MOWER 04-611
- SAFETY INSTRUCTIONS FOR THE USE OF LAWN MOWERS Safety of using cordless mowers in practice Instruction
- Preparation
- Usufruct
- Maintenance and storage
- Explanation of the pictograms used
- CONSTRUCTION AND APPLICATION
- WARNING! Do not misuse the device.
- DESCRIPTION OF GRAPHIC PAGES
- Figure A:
- Figure B:
- Figure C:
- Figure D:
- Figure E:
- Figure F:
- Figure H:
- Figure 1:
- Figure J:
- Figure K:
- Figure M:
- Figure N:
- Figure O:
- Figure R:
- Figure S:
- Figure T:
- Figure U:
- Figure W:
- Figure Y:
- Figure Z:
- EQUIPMENT AND ACCESSORIES
- PREPARATION FOR WORK
- REMARK! Before adjusting the device, remove the batteries and the safety key (Fig.B). Do not start the device before you have assembled all the components correctly.
- HANDLE HEIGHT ADJUSTMENT
- FOLDING THE HANDLE
- INSTALLATION OF THE GRASS BASKET
- REMARK! Always make sure that the grass basket is properly fixed. INSTALLATION OF THE WATER BOTTLE HOLDER
- WARNING! Before changing the cutting height setting, turn off the mower and disconnect the batteries or remove the safety key from the socket.
- TRANSPORT HANDLE
- WORK / SETTINGS
- ON/OFF
- ON-OFF
- Enable
- Disable
- INNER MULCHING CAP
- EXTERNAL MULCHING APPLICATION
- TIPS FOR SAFE USE
- WARNING! Do not work with a lawn mower without a basket with the outlet cover raised.
- WARNING! Before proceeding with any installation, adjustment, repair or maintenance activities, remove the batteries from the device and disconnect the security key.
- CLEANING
- CUTTING KNIFE REPLACEMENT
- SECURITY
- TECHNICAL PARAMETERS
- Information on noise and vibration
- In order to accurately estimate the exposure to vibrations, it is necessary to take into account the periods when the device is turned off or when it is turned on but is not used for operation.
- After a thorough estimation of all factors, the total vibration exposure may turn out to be much lower.
- TROUBLESHOOTING
- The mower does not turn on
- The engine stops working after a short while
- The engine does not reach maximum speed
- The knife does not rotate (immediately turn off!)
- Too strong vibrations (immediately turn off!)
- ENVIRONMENTAL PROTECTION
- DE
- ÜBERSETZUNGSHANDBUCH (BENUTZERHANDBUCH) AKKU-MÄHER 04-611
- INSTALACE KOŠE NA TRÁVU
- EXTERNÍ MULČOVACÍ APLIKACE
- SIGURNOSNE UPUTE ZA UPORABU KOSILICA
- Priprema
- SIGURNOSNA UPUTSTVA ZA UPOTREBU KOSILICA ZA TRAVU Bezbednost korišćenja kosilica bez kablova u praksi
- Uputstva
- EKSTERNA MULCHING APLIKACIJA
- SAVETI ZA BEZBEDNU UPOTREBU
- UPOZORENJE! Nemojte raditi sa kosilicom bez korpe sa podignutim poklopacom.
- RAD I ODRŽAVANJE
- TEXNIK'ES ΠΑΡΑΜΕΤΡΟΙ
- REEMPLACEMENT DU COUTEAU DE COUPE
Brand : NEO tools
Model : 04-611
Category : Lawn mower