ST 4048 - Snow blower AL-KO - Free user manual and instructions
Find the device manual for free ST 4048 AL-KO in PDF.

| Product Type | Cordless Snow Thrower (Single Stage) |
| Brand | AL-KO |
| Model | ST 4048 |
| Power Source | Lithium-ion battery (compatible with B150 Li, B200 Li) |
| Compatible Charger | C05-4230 |
| Motor | Cordless Electric |
| Clearing Width | Not specified (compact) |
| Maximum Snow Height | Fresh and light powder snow |
| Lighting | Adjustable LED lamp with on/off switch |
| Chute Adjustment | Direction (crank) and distance (deflector) |
| Safety | Removable key switch, clutch lever, safety button, overload protection |
| Sound Power Level (measured/guaranteed) | 87 dB(A) / 90 dB(A) |
| Battery | Lithium-ion, charging time approx. 1.5 h |
| Wear Parts | Scraper blade (replaceable) |
| Maintenance | Clean after each use, do not grease, check scraper blade |
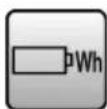
| Transport | Battery subject to dangerous goods regulations (>100 Wh) |
| Warranty | Legal warranty against manufacturing defects |
| Usage | Private, paved or asphalt surfaces, fresh snow |
| Weight | Not specified (light and compact) |
Frequently Asked Questions - ST 4048 AL-KO
User questions about ST 4048 AL-KO
0 question about this device. Answer the ones you know or ask your own.
Ask a new question about this device
Download the instructions for your Snow blower in PDF format for free! Find your manual ST 4048 - AL-KO and take your electronic device back in hand. On this page are published all the documents necessary for the use of your device. ST 4048 by AL-KO.
USER MANUAL ST 4048 AL-KO
natural_image
Line drawing of a lawn mower with handlebars and wheels (no text or symbols)DE
GB
NL
FR
ES
IT
SI
HR
RS
PL
CZ
SK
HU
DK
SE
NO
FI
EE
LT
LV
RU
UA


Inhaltsverzeichnis
Deutsch 8
English....23
Nederlands 38
Français....53
Español 69
Italiano 85
Slovenščina 101
Hrvatski....116
Српски....131
Polski....147
Česky 163
Slovenská 177
Magyarul....192
Dansk 207
Svensk....221
Norsk 235
Suomi 249
Eesti 263
Lietuvių 277
Latviešu 291
Русский 306
Україна....324
© 2018
AL-KO KOBER GROUP Kötz, Germany
This documentation or excerpts therefrom may not be reproduced or disclosed to third parties without the express permission of the AL-KO KOBER GROUP.
01


natural_image
Technical line drawing of a vehicle's front wheel and side-mounted device (no text or symbols)


1180 × 520 × 980 mm
13,5 kg
48 cm
max. 5 m
0,9 kW
2000 ±10 min ^-1
LpA = 77 dB(A) [K = 3 dB(A)]
LwA = 90 dB(A)
5m / s^2 [K = 1,5 m/s², DIN EN ISO 20643]


EnergyFlex 113280

EnergyFlex 113524

36 V
4 Ah/5 Ah
144 Wh/180 Wh

5^ C - 40^ C
Dr. Wolfgang Hergeth Managing Director
TRANSLATION OF THE ORIGINAL INSTRUCTIONS FOR USE Contents
1 About these operating instructions ..... 23
1.1 Legends and signal words ...... 24
2 Product description 24
2.1 Designated use 24
2.2 Possible foreseeable misuse .... 24
2.3 Scope of supply.... 24
2.4 Symbols on the appliance 25
2.5 Safety and protective devices ..... 25
2.6 Product overview (01) 26
3 Safety instructions 26
3.1 Operator 26
3.2 Personal protective equipment...... 26
3.3 Safety in the workplace 27
3.4 Safety of persons and animals...... 27
3.5 Appliance safety.... 27
3.6 Electrical safety 28
3.7 Safety instructions relating to operation 28
4 Installation.... 28
4.1 Unpacking the machine...... 28
4.2 Mounting the lower brace (02) ..... 29
4.3 Mounting the intermediate brace (03) 29
4.4 Mounting the upper brace (04)...... 29
4.5 Fixing the cables to the bar (05)...... 29
4.6 Installing the adjustment crank (06, 07)....29
4.7 Installing the snow deflector (08) ..... 29
5 Commissioning/Decommissioning...... 29
5.1 Charging the rechargeable battery (09, 10)....29
5.2 Determining the charge status of the rechargeable battery (11).... 30
5.3 Inserting and pulling out the rechargeable battery (12) 31
5.4 Switching the power supply on and off (13).... 31
6 Operation.... 31
6.1 Adjusting the ejection direction and distance (14, 15).... 31
6.2 Switching the appliance on and off (16) 32
6.3 Using the LED light (17) 32
7 Work instructions.... 32
8 Maintenance and care.... 32
8.1 Maintenance schedule.... 33
8.2 Replacing the scraper bar (18, 19) ..... 33
9 Help in case of malfunction 33
10 Transport.... 35
11 Storage.... 35
11.1 Storing the appliance.... 35
11.2 Storing the rechargeable battery and charging unit 35
12 Disposal.... 35
13 Guarantee 36
14 Translation of the original EU declaration of conformity.... 37
1 ABOUT THESE OPERATING INSTRUCTIONS
The German version is the original operating instructions. All additional language versions are translations of the original operating instructions.
It is essential to read through these operating instructions carefully before start-up. This is essential for safe working and trouble-free handling.
■ Always safeguard these operating instructions so that they can be consulted if you need any information about the appliance.
■ Only pass on the appliance to other persons together with these operating instructions.
■ Comply with the safety and warning information in these operating instructions.
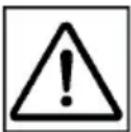
1.1 Legends and signal words

DANGER!
Denotes an imminently dangerous situation which will result in fatal or serious injury if not avoided.

WARNING!
Denotes a potentially dangerous situation which can result in fatal or serious injury if not avoided.

CAUTION!
Denotes a potentially dangerous situation which can result in minor or moderate injury if not avoided.
IMPORTANT!
Denotes a situation which can result in material damage if not avoided.

NOTE
Special instructions for ease of understanding and handling.
2 PRODUCT DESCRIPTION
This appliance is a lightweight and compact, single-stage rechargeable battery-operated snow blower with electric motor that is suitable for clearing light new snow and powder snow. In a single operation, the snow is picked up by the clearing paddle and directly discharged through the discharge channel. The user as well as the rotating clearing paddle move the appliance forwards. The scraper bar scrapes on the ground and loosens the snow. To do so, the appliance must be pressed onto the ground by the user.
The energy-saving LED light provides more visibility at twilight and on snowy days.
Due to the rechargeable battery operation, there is no obstructive mains connection cable.
2.1 Designated use
This appliance is intended exclusively for clearing freshly fallen, loose wet snow and powder snow on paved paths and areas – such as patios, garage entrances, footpaths or car parking spaces – in the private sector. The paths and areas to be cleared must be on solid ground and have a smooth surface, e.g. concrete paving, granite paving or asphalt.
This appliance is intended solely for use in non-commercial applications. Any other use (as well as unauthorised conversions or add-ons) are regarded as contrary to the intended use and will result in exclusion of the warranty as well as loss of conformity (CE mark); the manufacturer will thus decline any responsibility for damage and/or injury suffered by the user or third parties.
2.2 Possible foreseeable misuse
The appliance is not suitable for clearing unpaved paths and areas – e.g. gravel surfaces, gravel paths or meadows. Snow in great quantities and depth, very wet snow and hard-packed snow and ice can no longer be cleared with this appliance.
The tool is designed neither for commercial use in public parks and sports facilities, nor for use in farming and forestry.
2.3 Scope of supply

NOTE
The rechargeable battery and charging unit are not included in the scope of delivery and must be purchased separately.
The items listed here are part of the scope of supply. Check that all items are included:
No. Component
| 1 Snow blower |
| 2 Discharge channel |
| 3 Lower brace |
| 4 Intermediate brace |
| 5 Upper brace |
| 6 Adjustment crank with extension shaft |
| 7 Star handles (9x) |
| 8 Locking screws, long (6x) |
| 9 Locking screws, short (2x) |
| 10 Washers (8x) |
| 11 Cable holders (4x) |
| 12 Cotter pins (2x) |
2.4 Symbols on the appliance
Symbol Meaning
Pay special attention when handling this product.

Read the operating instructions before starting operation.
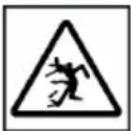
Danger due to objects being thrown out! Do not direct the discharge channel at persons or animals.
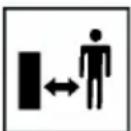
Keep other people out of the danger area. Maintain a safety distance.
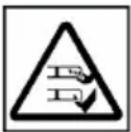
Do not reach or step into rotating parts. Keep hands, feet and items of clothing away. Switch off the appliance before cleaning the discharge channel.
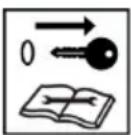
Always switch off the power supply with the key switch, remove the key and take out the rechargeable battery before servicing the appliance. To avoid injury, keep hands, feet, and clothing away from rotating tools.
Immediately after use, remove the key from the key switch and take the rechargeable battery out the appliance.

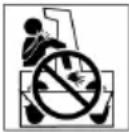
Wear ear protection.

Wear eye protection.

Wear protective gloves!
Symbol Meaning

Do not reach or step into the clearing paddle.
Do not reach into the discharge channel. Switch off the appliance before cleaning the discharge channel.
2.5 Safety and protective devices

WARNING!
Risk of injury
Defective and disabled safety and protective devices can lead to serious injury.
■ Have any defective safety and protective devices repaired.
■ Never disable safety and protective devices.
Key switch
The key switch is located next to the rechargeable battery compartment under the cover of the battery compartment. Use this to switch off the power supply before maintenance work or breaks in work to avoid injuries caused by unintentional switching on.
The key of the key switch can be removed in the Off position.
Motor switch bracket
The appliance is fitted with a motor switch bracket. In case of danger, simply release it. The motor and clearing paddle are stopped.
Safety button
In order to switch on the motor by means of the motor switch bracket, the safety button must be pressed beforehand.
Overload protection
If the appliance is blocked by overload or picked-up foreign objects, the overload protection trips and the motor stops.
Adjustable discharge channel
Adjust the discharge channel and the snow deflector in such a way that the ejected snow cannot endanger persons or animals and/or cause property damage.
On roads, ensure that road traffic is not impaired and that road users are not at risk.
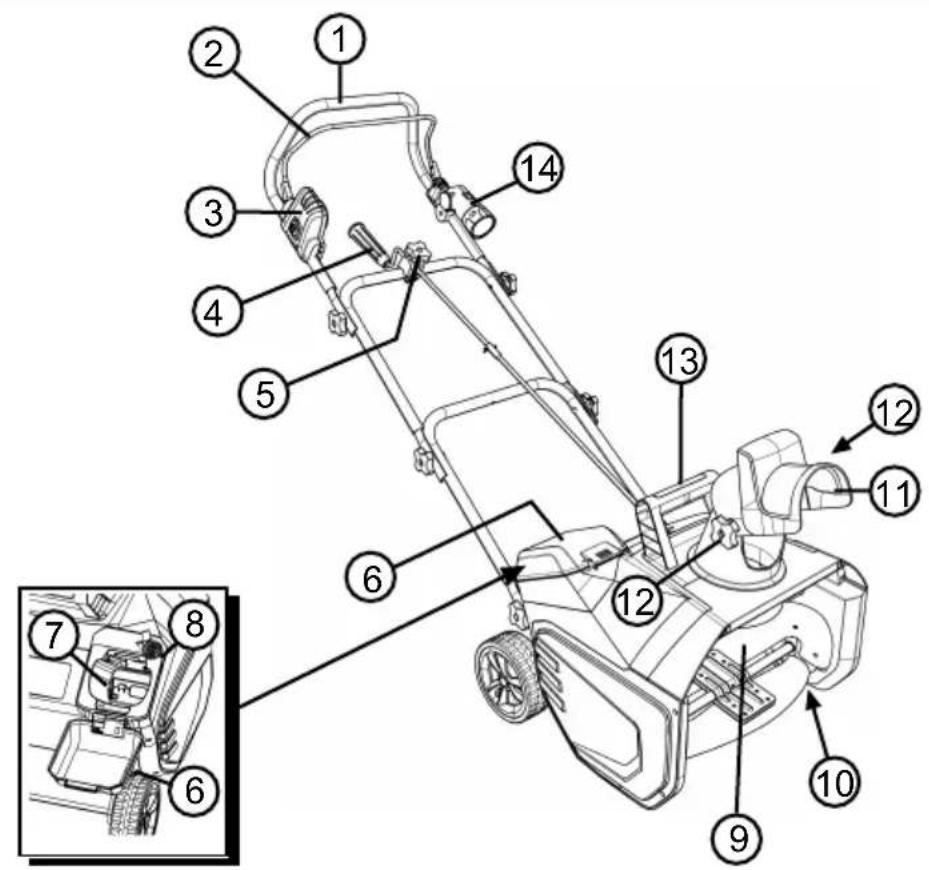
2.6 Product overview (01)
No. Component
1 Handlebar (consisting of lower brace, intermediate brace and upper brace)
2 Motor switch bracket on motor switch
3 Motor switch with safety switch
4 Adjustment crank for turning the discharge channel
5 Star bolt for fixing the adjustment crank
6 Cover of the rechargeable battery compartment
7 Rechargeable battery compartment
8 Key switch on the rechargeable battery compartment
9 Clearing paddle
10 Scraper bar (18/2, seen from below)
11 Rotating discharge channel with snow deflector
12 Star screws for changing the angle of the snow deflector
13 Handle
14 LED light with on/off switch
3 SAFETY INSTRUCTIONS

DANGER!
Danger of fatal injury and danger of extremely severe injury!
Lack of knowledge of the safety instructions and operating instructions can lead to extremely serious and even fatal injury.
- Observe all safety instructions and instructions for use in these operating instructions as well the operating instructions which are referred to before you start using the appliance.
- Keep all supplied documents in a safe place for future reference.

WARNING!
Danger from rotating appliance parts!
Reaching into rotating appliance parts will result in serious injuries!
■ Never reach into rotating parts.

WARNING!
Risk of injury
Inadvertent switching on of the appli- ance can lead to serious injuries.
■ Always switch off the power supply of the device with the key switch before maintenance work or breaks in work.

NOTE
Heed the safety instructions for the rechargeable battery and for the charging unit in the separate operating instructions.
3.1 Operator
■ Young people under 16 years of age and people who do not know the operating instructions are not allowed to use the appliance. Observe any country-specific safety regulations concerning the minimum age of the user.
- Do not operate the appliance if you are under the influence of alcohol, drugs or medication.
3.2 Personal protective equipment
■ Wear clothing and protective equipment in accordance with the regulations in order to avoid injury to the head and
limbs as well as to avoid hearing impairment.
■ The personal protective equipment comprises:
■ Hearing protection and protective eyewear
■ Long trousers and sturdy shoes
■ During maintenance and care: Protective gloves
3.3 Safety in the workplace
■ Work only in daylight or under very bright artificial light.
Before work, remove dangerous objects from the work area – e.g. branches, glass and metal pieces, stones – so that they cannot be picked up and ejected.
■ Only use the appliance on paved paths and areas with a solid and smooth surface.
■ Pay attention to stability.
3.4 Safety of persons and animals
■ Use the appliance only for the purposes for which it is intended. Any non-intended use can lead to injury and property damage.
- Never use the appliance on gritted areas or gravel paths – risk of stone chips.
■ Switch on the appliance only when there are no other persons or animals in the working area.
■ Never turn the discharge channel in the direction of persons or animals.
- Keep hands, feet and other parts of the body away from the running clearing paddle.
■ Do not look directly into the LED light. This can cause damage to the eyes.
3.5 Appliance safety
■ Use the appliance only under the following conditions:
■ The appliance is not soiled.
■ The appliance show no signs of damage.
■ All controls function properly.
- Do not overload the device. It is intended for light work in the private sector. Overload can lead to damage to the appliance.
■ Never operate the appliance with worn or defective parts. Always replace defective parts with original spare parts from the manufacturer. If the appliance is operated with worn or defective parts, guarantee claims against the manufacturer are excluded.

NOTE
Repair work is only allowed to be carried out by expert workshops or our service centres.
3.6 Electrical safety
■ To avoid short-circuits and destroying electrical components:
■ Protect the appliance against moisture and do not use it in the rain.
- Do not spray the appliance with water.
- Do not open the appliance.
3.7 Safety instructions relating to operation
■ Never leave an operational appliance unsupervised.
■ Stop the motor, wait for the appliance to stop and remove the battery in the following cases:
■ when the appliance is un-supervised
■ before testing, cleaning and maintaining
■ in case of malfunction and unusual vibrations
■ before clearing blockages (e.g. blocked clearing paddle) and clogging
■ upon contact with dangerous objects and foreign bodies
■ Never lift or carry the appliance when the motor is running.
■ Push the appliance forwards when clearing snow and never go backwards. Never pull the appliance towards your body.
■ Do not move the appliance over obstacles such as branches or tree roots.
■ Switch off the motor if it is necessary to cross another area than the area to be cleared.
■ After contact with dangerous objects and foreign bodies, check the appliance for damage. Have the appliance repaired if it has been damaged.
4 INSTALLATION

WARNING!
Danger if assembly is not carried out completely!
Operation of an incompletely assembled appliance can result in serious injury.
■ Only operate the appliance when it is fully assembled.
- Do not insert the battery into the appliance until it is fully assembled.
- Check that all safety and protective devices are in place and functioning correctly before switching on.
4.1 Unpacking the machine
-
Remove all parts from the packaging.
-
Check that all parts have been delivered (see chapter 2.3 "Scope of supply", page 24).
- Check all parts for transport damage. If any damage is evident or parts are missing, immediately inform the dealer where the appliance was purchased.
4.2 Mounting the lower brace (02)
- Position both ends of the lower brace (02/1) against the pipe ends (02/2) (02/a) in such a way that the insertion holes of the lower brace and the pipe ends line up.
- Insert two long locking screws (02/3) from the inside.
- Place a washer (02/4) on each of the locking screws.
- Screw star handles (02/5) onto the locking screws and firmly tighten.
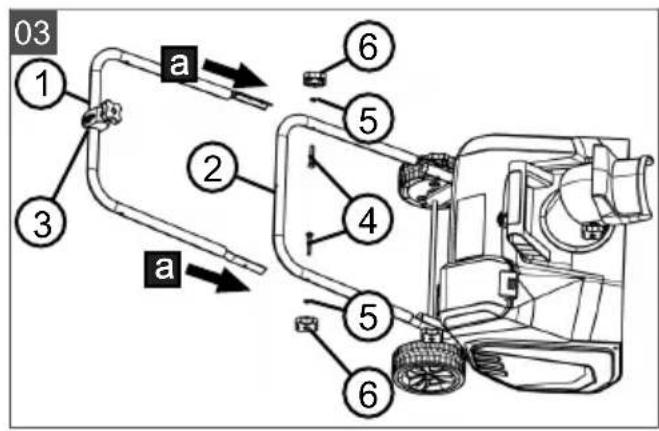
4.3 Mounting the intermediate brace (03)
- Push both ends of the intermediate brace (03/1) onto the lower brace (03/2) (03/a) in such a way that the insertion holes of the intermediate brace and lower brace line up. The guide (03/3) for the adjusting crank must point upwards.
- Insert two long locking screws (03/4) from the inside.
- Place a washer (03/5) on each of the locking screws.
- Screw star handles (03/6) onto the locking screws and firmly tighten.
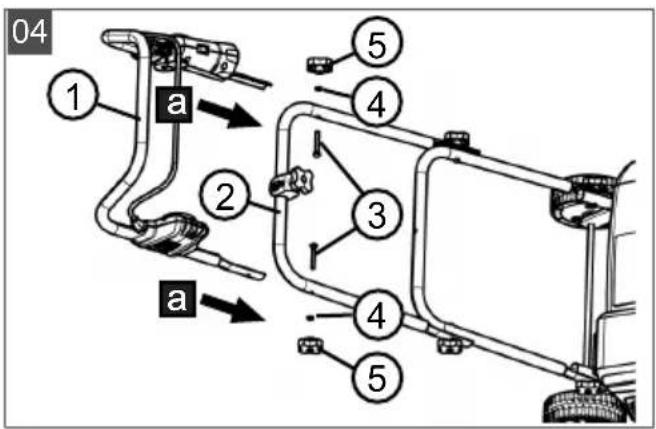
4.4 Mounting the upper brace (04)
- Push both ends of the upper brace (04/1) on-to the intermediate brace (04/2) (04/a) in such a way that the insertion holes of the upper brace and intermediate brace line up. The motor switch, motor switch bracket, handle and LED light must point upwards.
- Insert two long locking screws (04/3) from the inside.
- Place a washer (04/4) on each of the locking screws.
- Screw star handles (04/5) onto the locking screws and firmly tighten.
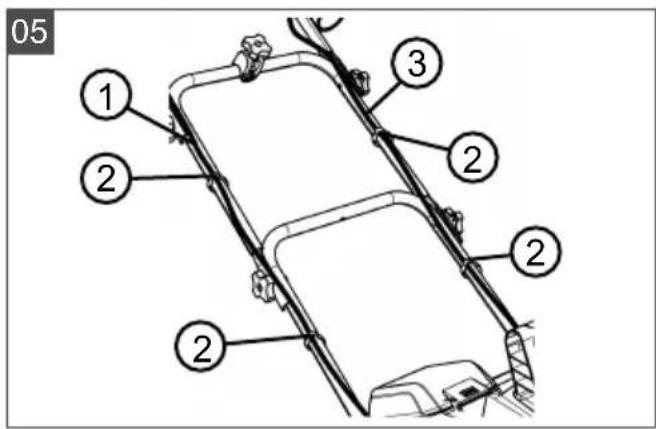
4.5 Fixing the cables to the bar (05)
-
Fix the cable (05/1) of the motor switch with a cable holder (05/2) to the intermediate brace and to the lower brace.
-
Fix the cable (05/3) of the LED light with a cable holder (05/2) to the intermediate brace and to the lower brace.
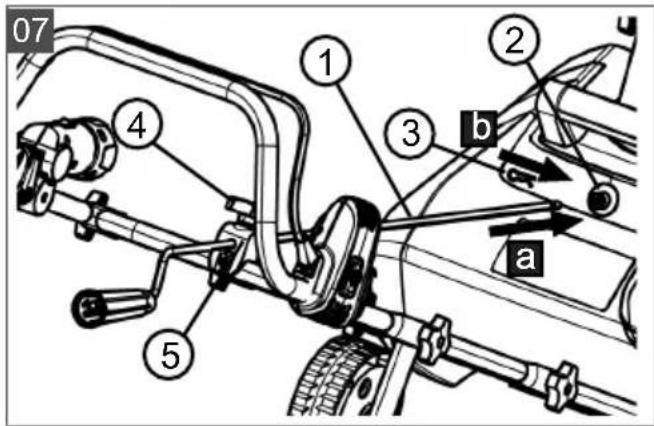
4.6 Installing the adjustment crank (06, 07)
Connecting the adjustment crank to the extension shaft (06)
- Insert the adjusting crank (06/1) through the guide (06/2) onto the intermediate brace (06/a) from above.
- Insert the adjustment crank into the support (06/3) of the extension shaft up to the end stop (06/b).
- Align the adjusting crank and the extension shaft so that their holes line up.
- Push a cotter pin (06/4) through both bores (06/c) until it clicks into place.
Installing and fixing the adjustment crank onto the appliance (07)
- Insert the extension shaft (07/1) into the mounting (07/2) on the appliance (07/a).
- Rotate the extension shaft so that its hole and the hole of the mounting line up.
- Push a cotter pin (07/3) through both bores (07/b) until it clicks into place.
- Turn the star handle (07/4) onto the guide (07/5) and slightly tighten it to fix the adjustment crank (07/c) in place.
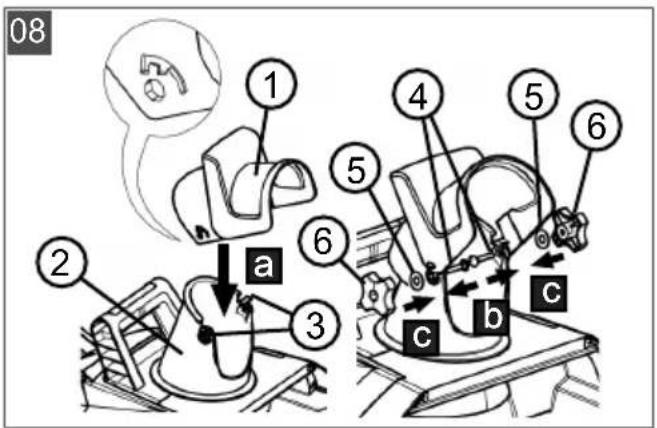
4.7 Installing the snow deflector (08)
- Place the snow deflector (08/1) on the discharge channel (08/2) so that the lugs (08/3) engage in the recesses of the snow deflector on the left and right.
- Insert two short locking screws (08/4) through the holes of the discharge channel from the inside.
- Place a washer (08/5) on each of the locking screws.
- Screw star handles (08/6) onto the locking screws and firmly tighten.
5 COMMISSIONING/DECOMMISSIONING
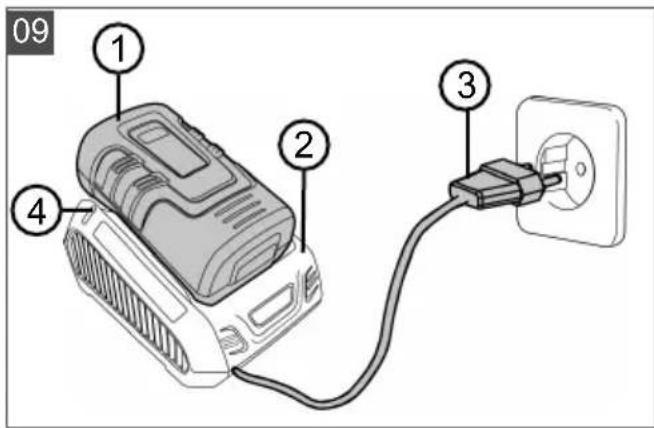
5.1 Charging the rechargeable battery (09, 10)
The rechargeable battery and the charging unit are not included. The following li-ion recharge-
able batteries and charging units from AL-KO can be used:
Product Designation Art. no.
| Li-ion re-chargeable battery | B150 Li (B05-3640) 113280 |
| Li-ion re-chargeable battery | B200 Li (B05-3650) 113524 |
| Charging unit | C05-4230 113281 |
The rechargeable battery is partially charged. Fully charge the rechargeable battery before using it for the first time. The rechargeable battery can be charged in any charge status. Interrupting charging does not damage the rechargeable battery.

NOTE
For detailed information, heed the separate operating instructions for the rechargeable battery and for the charging unit.

CAUTION!
Danger of fire during charging!
The charger heats up when charging. There is a danger of fire if the charger is placed on an inflammable surface and is not adequately ventilated.
■ Always use the charging unit on a non-flammable surface and in a non-combustible environment.
- Insert the rechargeable battery (09/1) in the charging unit (09/2) and plug the power plug (09/3) into the power outlet. The charging process begins and the LED for indicating the operating status (09/4) flashes green.
- Observe the LED (09/4). The charging process takes approx. 1.5 hours until fully charged. The charging process ends automatically when the rechargeable battery is fully charged. The LED (09/4) then lights permanently green.
- Disconnect the power plug (09/3) when the LED (09/4) permanently lights green.
-
Press and hold the engaging button on the bottom of the rechargeable battery.
-
Pull the rechargeable battery (09/1) out of the charging unit (09/2).
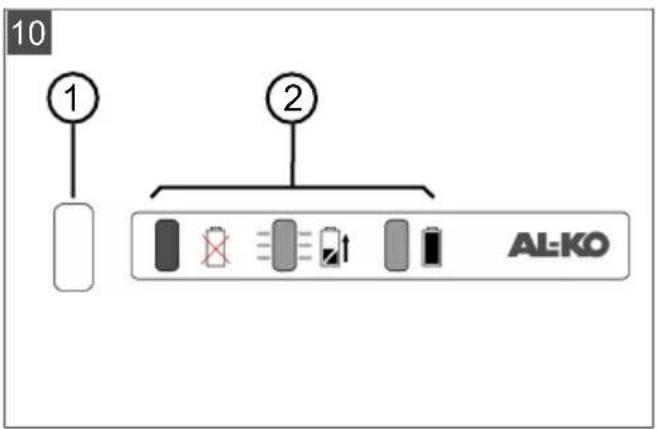
Status displays on the charging unit (10)
The LED (10/1) on the charging unit indicates the charge status of the rechargeable battery and the operating condition of the charging unit. The symbols (10/2) on the charging unit indicate these states:
Symbol LED and charge status
| LED lights green: The rechargeable battery is fully charged. | |
| LED flashes green: The rechargeable battery is charging. | |
| LED lights red: There is no rechargeable battery in the charging unit. | |
| LED flashes red: The rechargeable battery is too hot and will therefore not charge. |
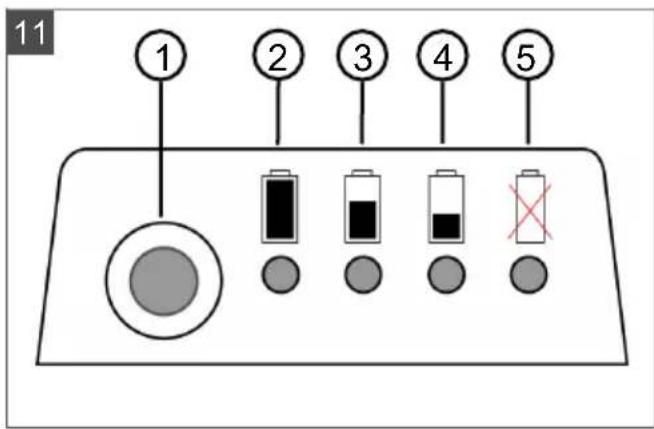
5.2 Determining the charge status of the rechargeable battery (11)
There is a control panel with a pushbutton (11/1) and LED charge status displays (11/2 to 11/5) on the front of the rechargeable battery.
- Press the pushbutton (11/1). The charge status displays light according to the charge status of the rechargeable battery.
- To read the charge status, see section "Charge status displays on the rechargeable battery".
Charge status displays on the rechargeable battery
LEDs Battery charge level
| Green(11/2) | Rechargeable battery is fully charged, i.e. to 100%. |
| Green(11/3, 11/4) | Rechargeable battery is charged to over 50 %. |
| Green(11/4) | Rechargeable battery is charged to less than 50 %. |
| Red (11/5) | The rechargeable battery is fully discharged or the rechargeable battery has been overheated/undercooled. |
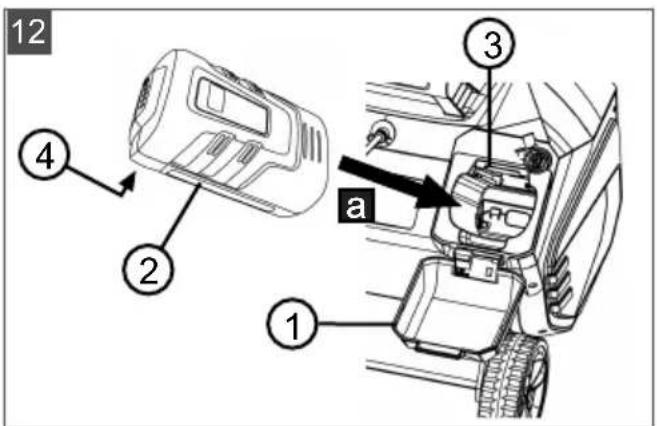
5.3 Inserting and pulling out the rechargeable battery (12)
IMPORTANT!
Danger of damage to the rechargeable battery
If the rechargeable battery is left in the appliance after use, it may damage the rechargeable battery.
Immediately after use, pull the rechargeable battery out of the appliance and store in a frost-protected area.
■ Only insert the rechargeable battery in the appliance immediately before starting work.
Inserting the battery
- Open the cover (12/1) of the rechargeable battery compartment.
- Push the rechargeable battery (12/2) into the rechargeable battery slot (12/3) from above until it engages.
- Close the cover of the rechargeable battery compartment
Pull out the rechargeable battery
- Press and hold the unlock button (12/4) on the rechargeable battery.
- Pull out the rechargeable battery.
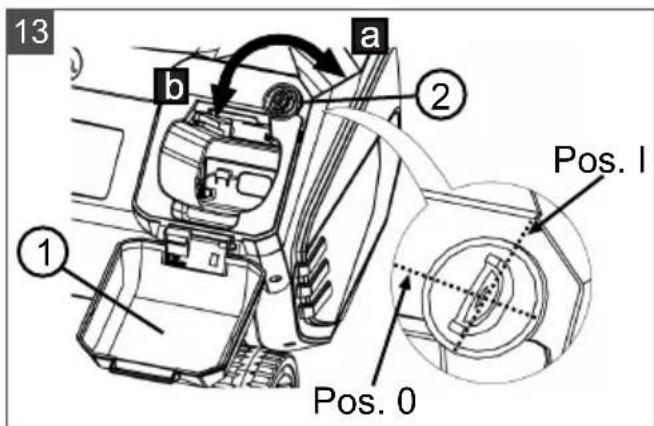
5.4 Switching the power supply on and off (13)
The key switch on the rechargeable battery compartment can be used to switch the power supply for the entire appliance on and off.

WARNING!
Risk of injury
Inadvertent switching on of the appliance can lead to serious injuries.
■ Always switch off the power supply of the device with the key switch before maintenance work or breaks in work.
Switching on the power supply
- Open the cover (13/1) of the rechargeable battery compartment.
-
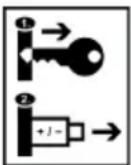
Turn the key switch (13/2) to the right to the On position (I pos.) (13/a). The appliance is supplied with operating voltage, but does not yet begin to operate.
-
Close the cover of the rechargeable battery compartment.
- Switch on the appliance: see chapter 6.2 "Switching the appliance on and off (16)", page 32.
Switching off the power supply
- Turn the key switch (13/2) to the left to the Off position (0 pos.) (13/b).

NOTE
The key of the key switch can be removed in the Off position.
- Immediately after use, pull the rechargeable battery out of the appliance, charge it and store in a frost-protected area. Only insert the rechargeable battery in the appliance immediately before the next use.
6 OPERATION
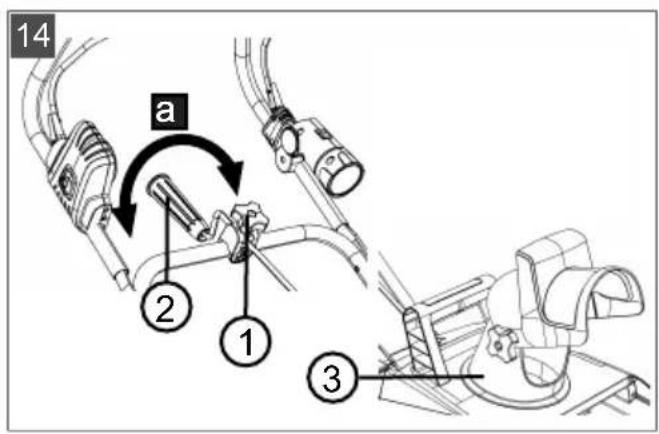
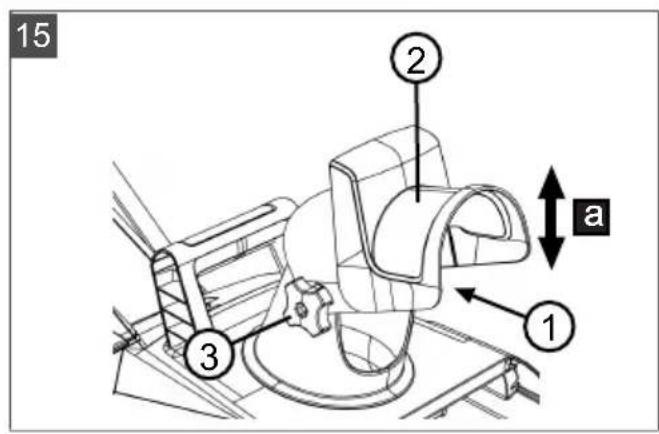
6.1 Adjusting the ejection direction and distance (14, 15)

WARNING!
Objects being discharged!
Risk of injury and risk of material damage due to objects being discharged!
■ Never turn the discharge channel in the direction of persons, animals, windows, cars or doors.
Adjusting the ejection direction
- Loosen the fixing of the adjustment crank (14/2) using the star screw (14/1).
- Push the discharge channel (14/3) in the desired direction (14/a) by turning the adjusting crank.
- Secure the adjusting crank (14/2) with the star screw (14/1) to prevent unwanted rotation of the discharge channel.
Adjusting the ejection distance
- Loosen the fixing of the snow deflector (15/2) using the star screws (15/1).
- Move the snow deflector up or down (15/a):
■ Increasing the ejection distance: Snow deflector upwards.
■ Decreasing the ejection distance: Snow deflector downwards.
- Secure the snow deflector with the star screws (15/3).
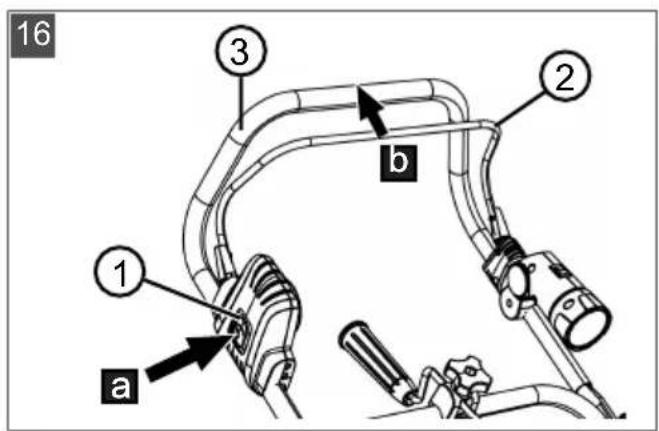
6.2 Switching the appliance on and off (16)
Only switch on the appliance when it is on level ground. The ground must be free of foreign bodies such as stones. Do not lift or tilt the appliance for starting.
Switching on the appliance
- Switching on the power supply: see chapter 5.4 "Switching the power supply on and off (13)", page 31.
- Press the safety button (16/1) and hold (16/a).
- Pull the motor switch bracket (16/2) towards the handlebar (16/3) (16/b). The motor and clearing paddle are started.
- Release the safety button while holding the motor switch bracket.

NOTE
The motor switch bracket does not lock in place. Hold onto the handlebar throughout the entire working period.
Switching off the appliance
- Release the motor switch bracket. It automatically returns to its initial position.
- Wait for the clearing paddle to come to a standstill.
- Switching off the power supply: see chapter 5.4 "Switching the power supply on and off (13)", page 31.

WARNING!
Danger from rotating appliance parts!
Reaching into rotating appliance parts will result in serious injuries!
■ Never reach into rotating parts.
6.3 Using the LED light (17)
Adjusting the height of the LED light
- Press the LED light (17/1) upwards or downwards (17/a) until the desired lighting of the work area is achieved.
Switching the LED light on and off
- Pressing the toggle switch (17/2):
■ Position I: Light on.
■ Position 0: Light off.

CAUTION!
Danger of glare!
Eyes can be dazzled by the glare of the LED light.
■ Never look into the light of the switched-on LED light.
■ Never direct the LED light at other persons or animals.
7 WORK INSTRUCTIONS
- Clear immediately after the snow has fallen while it is still loose. Later, the lower layer becomes icy and makes snow clearing difficult.
If possible, turn the discharge channel so that the snow is blown away in the wind direction. - Clear the snow so that the cleared tracks overlap slightly.
If the snow is heavy and wet or very deep, only clear half the clearing width and push the snow blower slowly forwards. This prevents clogging.
Before use, the wheels and the discharge channel can be sprayed with an non-stick spray (ski wax, Teflon, silicone) to avoid clogging. Check the environmental and appliance compatibility of the spray and comply with the manufacturer's instructions on the label of the spray. - Clean a clogged snow blower with a scraper or stick, but never with your fingers. Completely switch off the snow blower beforehand.
8 MAINTENANCE AND CARE

CAUTION!
Risk of injury
Sharp-edged and moving appliance parts can lead to injury.
■ Always wear protective gloves during maintenance, care and cleaning work.
■ Switch off the appliance and remove the rechargeable battery.
IMPORTANT!
Danger of damage from lubrication
The appliance was lubricated before delivery; any further lubrication can damage the appliance.
■ Do not lubricate the appliance.
8.1 Maintenance schedule
Before every use
- Carry out a visual inspection before each use.
- Check the safety devices, control elements, cables and all screw connections for damage and secure fitting.
- Replace damaged parts before operation.
After each use
■ Clean the discharge channel, the clearing paddle, the handles and the housing.
■ Remove the rechargeable battery from the appliance and store in a frost-protected area.
As required
- Check the scraper bar and replace if worn.
Once per season
Have the appliance checked and serviced in a workshop.
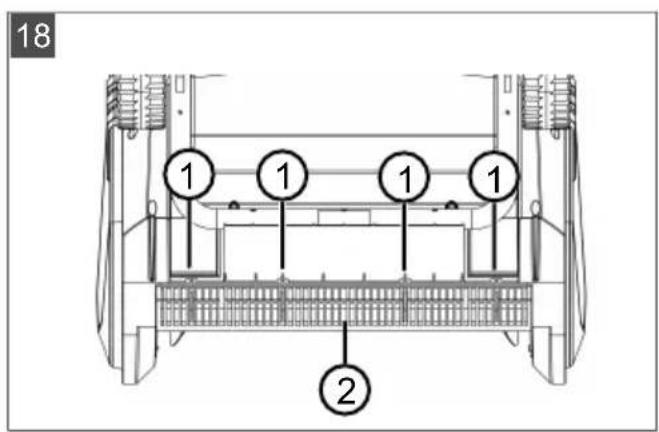
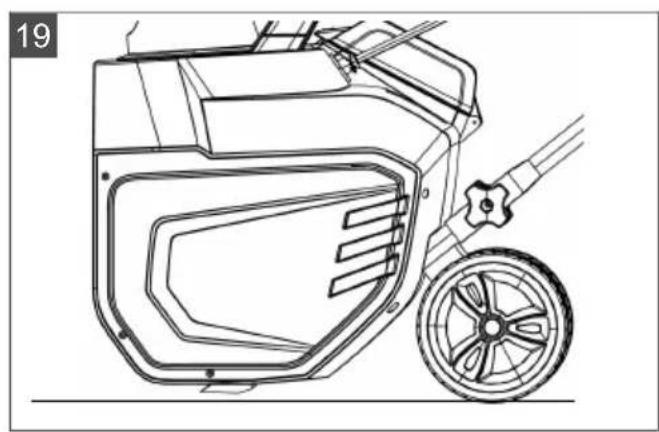
8.2 Replacing the scraper bar (18, 19)
-
Turn the key switch off and remove the battery from the appliance.
-
Set the appliance on its front surface.
- Unscrew the screws (18/1) of the worn scraper bar (18/2).
- Take off the scraper bar.
- Place the new scraper bar on the appliance and align it straight.
- Screw the screw back in.
- Check the setting of the scraper bar. The scraper bar must be aligned as shown in the figure (19).
9 HELP IN CASE OF MALFUNCTION

CAUTION!
Risk of injury
Sharp-edged and moving appliance parts can lead to injury.
■ Always wear protective gloves during maintenance, care and cleaning work.
■ Switch off the appliance and remove the rechargeable battery.

NOTE
If you encounter any malfunctions that are not listed in this table or that you cannot rectify yourself, please contact our customer service.
Malfunction Cause Remedy
| Motor does not run. The power supply is switched off at the key switch. | Switch the power supply on at the key switch. |
| Rechargeable battery missing or not seated correctly. | Insert the rechargeable battery correctly. |
| Rechargeable battery is flat. Charge the rechargeable battery. | |
| The clearing paddle and/or discharge channel are/is clogged. | 1. Switch the appliance off at the key switch and remove the rechargeable battery.2. Remove snow from the appliance using a scraper or a stick. |
| Cables or switches are defective. | Do not operate the tool! Contact an AL-KO service centre. |
| Malfunction Cause Remedy | ||
| Engine is losing power. Rechargeable battery is flat. Charge the rechargeable battery. | ||
| Too much snow in the discharge channel. | 1. Switch the appliance off at the key switch and remove the rechargeable battery.2. Remove snow from the appliance using a scraper or a stick. | |
| Motor stops during clearing. | Motor is overloaded, the overload protection has tripped.Foreign bodies in the discharge channel. | 1. Switch the appliance off at the key switch and remove the rechargeable battery.2. Remove snow and foreign bodies from the appliance using a scraper or stick. |
| Rechargeable battery is flat. Charge the rechargeable battery. | ||
| Appliance not clearing any snow. | The clearing paddle and/or discharge channel are/is clogged. | 1. Switch the appliance off at the key switch and remove the rechargeable battery.2. Remove snow from the appliance using a scraper or a stick. |
| Drive belt is cracked or loose. | Do not operate the tool! Contact an AL-KO service centre. | |
| Appliance not picking snow up from the ground. | Scraper bar is worn. Replace the scraper bar. Contact an AL-KO service centre. | |
| Rechargeable battery operating time is significantly shorter. | Snow is too deep or too wet. | Clear with a narrow clearing width.Push the appliance forwards more slowly.Clear immediately after the snow has fallen. |
| The service life of the rechargeable battery has expired. | Replace the rechargeable battery. Only use genuine accessories from the manufacturer. | |
| Rechargeable battery cannot be charged. | Rechargeable battery contacts are dirty. | Clean the rechargeable battery contacts with a non-metallic object and spray with a contact spray.Do not short-circuit the rechargeable battery contacts with a metallic object. |
| Rechargeable battery or charging unit is defective. | Order spare parts from AL-KO. | |
| Rechargeable battery is too hot. | Allow the battery to cool down. | |
10 TRANSPORT

NOTE
The nominal energy of the rechargeable battery is more than 100 Wh. Therefore, observe the following transport instructions.
The li-ion rechargeable battery contained in the appliance is subject to the hazardous goods law, but can be transported under simplified conditions:
The rechargeable battery can be transported on public roads by the private user without further conditions provided it is packaged for retail sale and the transport serves personal purposes.
■ Commercial users who carry out the transport in connection with their main activity (e.g. delivery from and to building sites, or demonstrations) can also take advantage of this simplification.
In both cases, it is essential to take the mandatory precautions mentioned above to prevent any leakage of the contents. In other cases, it is essential to comply with the regulations of the hazardous goods law. In the case of non-compliance, severe penalties can be imposed on the sender and possibly the transporter.
Additional notes on transport and shipment
■ Only transport or send the li-ion rechargeable battery in an undamaged condition.
For transporting the rechargeable battery, only use the original cardboard box or a suitable hazardous goods cardboard box (not required for rechargeable batteries with a nominal energy less than 100 Wh).
■ Tape off exposed rechargeable battery contacts to avoid a short circuit.
- Secure the rechargeable battery against shifting in the packaging to avoid damage to the rechargeable battery.
■ Ensure the correct marking and documentation of the shipment for transport or shipping (e.g. by parcel service or freight forwarding).
- Check in advance that transport with the selected service provider is possible and indicate the shipment.
We recommend involving a hazardous goods specialist in preparation of the shipment. Also heed any further national regulations.
11 STORAGE
11.1 Storing the appliance
- Turn the key switch off and remove the battery from the appliance.
- Pull out the rechargeable battery.
- Allow the engine to cool down.
- Thoroughly clean the appliance.
-
Rub a thin coat of oil or silicon onto all metal parts for corrosion protection.
-
Store the appliance:
Fold in the handlebar.
Place the appliance on the front side so that it is vertical.
■ Store the appliance in a dry, clean location protected from frost.
■ Cover with a breathable tarpaulin to protect against dust. Do not use plastic film in order to avoid the accumulation of moisture.

CAUTION!
Risk of injury
If the appliance is accessible to children and unauthorised persons during storage, this can result in injury.
■ Only store the appliance when the rechargeable battery has been removed.
■ Store the appliance out of the reach of children and unauthorised persons.
11.2 Storing the rechargeable battery and charging unit

NOTE
Heed the separate operating instructions for the rechargeable battery and for the charging unit.
12 DISPOSAL
Information on the German Electrical and Electronic Equipment Act (ElectroG)

Electrical and electronic appliances do not belong in household waste, but should be collected and disposed of separately.
■ Used batteries or rechargeable batteries that are not installed permanently in the old appli-
ance must be removed before disposal. Their disposal is regulated by the battery law.
- Owners or users of electrical and electronic appliances are obliged by law to return them after use.
■ The end user bears personal responsibility for deleting his personal data from the old appliance to be disposed of.
The symbol of the crossed-through rubbish bin means that electrical and electronic appliances may not be disposed of in the household rubbish.
Electrical and electronic appliances can be handed in at the following places at no charge:
■ Public service disposal or collection points (e.g. municipal building yards)
■ Points of sale of electrical appliances (stationary and online) provided traders are obliged to take them back or offer this voluntarily.
These statements only apply to appliances that are installed and sold in the countries of the European Union and are subject to European Directive 2012/19/EU. Different provisions may apply to the disposal of electrical and electronic appliances in countries outside the European Union.
Information on the German Battery Act (BattG)

■ Used batteries and rechargeable batteries do not belong in household waste, but should be collected and disposed of separately.
For safe removal of batteries or rechargeable batteries from the electrical appliance and for information on their type or chemical system, follow the further information within the operating or installation instructions.
- Owners or users of batteries and rechargeable batteries are obliged by law to return them after use. Return is limited to the handover of customary household quantities.
Used batteries can contain harmful substances or heavy metals that can cause damage to the environment and human health. Reuse of the used batteries and use of the resources contained therein contributes to the protection of these two essential commodities.
The symbol of the crossed-through rubbish bin means that batteries and rechargeable batteries may not be disposed of in household rubbish.
In addition, if the symbol Hg, Cd or Pb appears under the rubbish bin, this stands for the following:
■ Hg: Battery contains more than 0.0005 % mercury
Cd: Battery contains more than 0.002 % cadmium
■ Pb: Battery contains more than 0.004 % lead Rechargeable batteries and batteries can be handed in at the following places at no charge:
■ Public service disposal or collection points (e.g. municipal building yards)
■ Points of sale of batteries and rechargeable batteries
■ Disposal points of the common take-back system for the used batteries of appliances
■ Disposal point of the manufacturer (if not a member of the common take-back system)
These statements apply only to rechargeable batteries and batteries that are sold in the countries of the European Union and that are subject to European Directive 2006/66/EU. Different provisions can apply to the disposal of rechargeable batteries and batteries in countries outside the European Union.
13 GUARANTEE
We will resolve any material or manufacturing faults on the appliance during the legal warranty period for claims relating to faults, in accordance with our choice either to repair or replace. The legal warranty period is determined by the legislation of the country in which the appliance was purchased.
Our warranty promise applies only if:
■ These operating instructions are heeded
The appliance is handled correctly
■ Original spare parts have been used
The warranty becomes void in the case of:
■ Unauthorised repair attempts
■ Unauthorised technical modifications
Non-intended use
The guarantee excludes:
■ Paint damage that can be attributed to normal wear and tear
■ Wear parts that are marked with a frame xxxxxx (x) on the spare parts card
The guarantee period commences with purchase by the first end user. The date on the proof of purchase is decisive. In the event of a guarantee claim, please take this guarantee declaration and the original proof of purchase, and contact your dealer or the nearest authorised customer service centre. This statement does not affect the purchaser's statutory claims for defects against the vendor.
14 TRANSLATION OF THE ORIGINAL EU DECLARATION OF CONFORMITY
We hereby declare that this product in its marketed form conforms to the requirements of the harmonised EU Directives, EU safety standards and the product-specific standards.
| Product | Manufacturer | Duly authorised person for technical file |
| Rechargeable battery-operated snow blower | AL-KO Geräte GmbHIchenhauser Str. 14D-89359 KötzGermany | Andreas HedrichIchenhauser Str. 14D-89359 KötzGermany |
| Serial numberG4022012 |
| Type | EU directives | Harmonised standards |
| ST 4048 | 2006/42/EC | EN 60335-1:2012+A11:2014 |
| 2014/30/EU | ISO 8437-1:1989+A1 | |
| Sound power level | 2000/14/EC | EN 12100:2010 |
| EN ISO 3744 | 2011/65/EU | EN 62233:2008 |
| measured/guaranteed | EN 55014-1:2006+A2:2011 | |
| 87 dB(A)/90 dB(A) | Conformity evaluation | EN 55014-2:1997+A2:2008 |
| 2000/14/EC Appendix V |
Kötz, 01/07/2017

Dr. Wolfgang Hergeth Managing Director
VERTALING VAN DE ORIGINELE GEBRUIKERSHANDLEIDING
Inhoudsopgave
2 PRODUCTOMSCHRIJVING
Dr. Wolfgang Hergeth Managing Director
Dr. Wolfgang Hergeth Managing Director
TRADUZIONE DEL MANUALE PER L'USO ORIGINALE
Sommario
Dr. Wolfgang Hergeth Managing Director
PREVOD ORIGINALNIH NAVODIL
Kazalo vsebine
1 K tem navodilom za uporabo .... 101
1.1 Razlaga znakov in opozorilne besede101
2 Opis izdelka 102
2.1 Namenska uporaba.... 102
2.2 Možna predvidljiva napačna raba .....102
2.3 Obseg dobave.... 102
2.4 Simboli na napravi.... 102
Dr. Wolfgang Hergeth Managing Director
Dr. Wolfgang Hergeth Managing Director
PREKLAD ORIGINÁLNEHO NÁVODU NA POUŽITIE
Obsah
1 O tomto návode na použitie.... 177
Dr. Wolfgang Hergeth Managing Director
AZ EREDETI KEZELÉSI ÚTMUTATÓ FORDÍTÁSA
Tartalomjegyzék
5 SETTE I DRIFT/TA UT AV DRIFT
5.1 Lade batteriet (09, 10)
8 VEDLIKEHOLD OG PLEIE

FORSIKTIG!
Fare for personskader!
Dr. Wolfgang Hergeth Managing Director
ALGUPÄRASE KASUTUSJUHENDI TÖLGE Sisukord
Dr. Wolfgang Hergeth Managing Director
Dr. Wolfgang Hergeth Managing Director