WG44G2F9CH - Washing machine SIEMENS - Free user manual and instructions
Find the device manual for free WG44G2F9CH SIEMENS in PDF.

User questions about WG44G2F9CH SIEMENS
0 question about this device. Answer the ones you know or ask your own.
Ask a new question about this device
Download the instructions for your Washing machine in PDF format for free! Find your manual WG44G2F9CH - SIEMENS and take your electronic device back in hand. On this page are published all the documents necessary for the use of your device. WG44G2F9CH by SIEMENS.
USER MANUAL WG44G2F9CH SIEMENS
4.4 CmHa Ha facadnnahe 10
4.4.1 CbJIaHe Ha pacaHnaHn 10
4.4.2 MoHTnpaHe Ha pacaHna nHaen 11
4.5 CmHa Ha BpataTa 12
4.5.1 ⅢBaJdaHe Ha BpaTaTa... 12
4.5.2 MoHTnpaHe Ha BpaTaTa 12
4.6 CmHa Ha KOMnoHeHTnTe Ha BpaTaTa 13
4.6.1 CbJIaHe Ha KOMnOHeHTIe Ha BpaTaTa 13
4.6.2 MoHTnpaHe Ha KOMnOHeHTNe Ha BpaTata 13
4.7 CmHa Ha Kanaka Ha nomnata 14
4.7.1 CbajHe Ha Kanaka Ha nomnata 14
4.7.2 MoHTnpaHe Ha Kanaka Ha nomnata 14
4.8 CMHa Ha yIbTHHeHneto Ha bpaTata. 15
4.8.1 CbAJIHe Ha yIbTHHeHrTo Ha BpTaTAt 15
4.8.2 MoHTnpaHe Ha ynnbTHHeHneTo Ha BpaTaTa 15
4.9 CmHa Ha KnoHa Ha BpaTaTa 16
4.9.1 CbAJIHe Ha KIOUaKKaTa Ha BpaTaTa 16
4.9.2 MoHTnpaHe Ha KInouaKaTa Ha BpaTaTa 17
4.10 CmHa Ha oCBetnHHeTo Ha 6apabaha 18
4.10.1 CbAJaHe Ha OCBTeJIeHnETo Ha bapaBaHa 18
4.10.2 MoHTpaHe Ha OCBetJeHnTo Ha 6ap6aHa 18
4.11 CmHa Ha npedHnaHen 19
4.11.1 CbIaHHe Ha npednnaHenn 19
4.11.2 MoHTpaHe Ha npedHnaHn 20
OTHOCHO To3n DokyMeHT
1.1 Baxha nHΦopMaζη
1.1.1 Uen
TeHc cBbETn 3a pEmOH T NOMarat Ha Ntpe6nTEnla DpemOHtnpa Cam ypeiB C bOeTBeTcBne C pernameHTa 3a ekONOrocBo6paHO npoeKtnpaHe Ha ypeiNe (OT 03.2021 r.).
Te cbIbpxk HnHOpMaunKa Ka Da CMeHrTe ONpeDeneHn pe3epBn YactN, BKIOHTENHO npdynpckdHn n PNCKOBe.
Ako IMATE HRAKAKBb BNPOCN,MOJcCBpXeTe Ce c HAUNO tONe 3a o6CnykBahe Ha KInENTn.Hocm OTROBOPHOCT 3a UeTn, cmo AKO cbBeNTe 3a peMOT ca cna3EH npabnHNo.
1.2 06aCHeHne Ha cHMBOJInTe
1.2.1 HnBa Ha onaCHOCT
IpeynpeintenHnBaCe cBcTOrT OT CmBOJ nCnHaHa Dyma.CnrHaHaTa yMa noka3Ba cepno3HOCTTA Ha onaCHOCTTA.
| Ниво на п dedурждени 3начени | |
| ОПАСHОCT | Еспаразы新股у на п dedурждени.TО сбоб Shedени по Смьт ини сернони наразяваим. |
| ПРEDУПЕЖДЕНЕ | Еспаразы新股у на п dedурждени.TOT сбob Shedени по Смьт ини сернони наразяваим. |
| ВИМATEЛНО | Еспаразы新股у на п dedурждени.TOT сбob Shedени по Смьт ини наразяваим. |
| ВИМАМЕЛ | Еспаразы新股у на п dedурждени.TOT сбob Shedени по Смьт ини onMy-шостевни.$etп. |
Tabuua 1: Hua Ha onachocm
1.2.2 Cnmbon3a onachoct
CMMBOHNTA 3a onaCHOCT Ca CMMBOIYH NIOB6paKeHNA, KOHTO DABAT INHINKAJIUM 3a BIDAA ONaCHOCT
BTo3n DOKyMeHCTe H3N013BaT CNEdHITe CMBOIN 3a ONaCHOCT:
| Симboл за орасост за чужения | ОвноPre dedупраздітелно сьобсято Орасост от[elekntrочко наpopжени Риск OT[eк科研院所 |
| Орасost от[nорязвany |
OTHOCHO To3n DokyMeHT
| Симbol 3a onachoct 3начени | Опachoct ot пемарази Опachoct ot горец поьрхости |
| Опachoct ot симно магнисто полес | |
| Опachoct ot неонисяцу льчени |
Ta5nuu2: CumbOnu 3a onachocm
1.2.3 CtpyKtpa Ha npéDynpeXkDeHnra
PepynpexdHnraT BTO3N DOKMeHT MMAT CTaHapTN3nPAH BbHwEN BID NCTaHdAPTN3nPAH CtpkTypa.

ONACHOCT
BnHn3ToyHKn Ha onaCHOCTTla!
Bb3mOHH nocneiOn OTnHOpapHe Na onaHocTtAppeynpexkdeHHeTo
Mepkn 3a6paHn 3a npedOBpTaRbAne Ha onachocTtA.
CneHnIaPnMep NOKaBA np6dynpEKeHHe, KoTo yBcOmRA 3a TOKOB Yap, npeIN3BnKAn OH tAcTn NoJ HApEKeHHe. CnOmeHabe Ce MpaKaTa 3a N36RbAe Ha onacHOCTA.

ONACHOCT
Pnck OT TokOB yap npaH nuactn noH anpekeHne!
CmbptOT TOKOB ynap
NkHIOeHTe YEpDite OT eNEKTPnHECKOTAO 3aXpaBaHE oNE 60 CE KHyHN pIeDN 3aONuBHe HA peMOHTA.
1.2.4 06uCNMBOJI
BTO3NIOKYMENTCEH3NON3BATCNEdHNTeO6UINCNMBONI:
| Оьш симвов Зачени | |
| I | Иденихицаре на спесиален сбBet(TEKCT w/ллграфика) |
| I | Иденихицаре на постс сбBet (само TEKCT) |
| I | Иденихицаре на врьзka Кьм Вideо урок |
| I | Иденихицаре на необхочимite И-стру金融市场 |
| I | Иденихицаре на необхочимite поедырпелли усповия |
| I | Иденихицаре на усповie (ako ..., Тогава ... ) |
| I | Иденихицаре на рeshуntat |
| [Стар] | Иденихицаре на Клиочни SFYTOH |
| [00123456] | Иденихицаре на Каталожен Homep |
| [Статус] | Иденихицаре на по��аизяп.TeKT/ празорец (надиспега на урда) |
Ta6nua3:06u cumeonu

Be3onachocT
2.1 06uHnCTpyKuHn 3a 6e3oNaChocT
2.1.1 BcHKn DoMaunHn ypeiN
Puck OT TOKOB yap nopadn qactn noh HanpexeHne!
PpeuKn npn peMOHTN, BKNIOHbaun eNEKTPneeCKN KOMNOHEHTN, MOrat Da doBedeat ToTOKOByap!
Pazakheye ypeda ot enektpnuecka tma mpeka 3a nohe 60 cekyHdi, pneDi da 3a-noohtepeba6ota.
CnepemHOHaT Tp6Ba Da ceIbBpu IIOpeBepka 3a 6beonacOCT cbnachoVDE 0701 nn B cboTETCBNE Cbc nceHnHnHTe 3a cTpanAaTAPoneB6n
Puck OT HapaHbAbe OCTpnpb6oBe!
Hocete npedn3n pbkabun
PCK O T pme3A8nO BpeMe Ha pEmoHT, NOpIbJbKHa,OTcPraBaBAe Ha HEn3PbABHOCTN andepBn3npaIeTkeH NDeBxueCe KOMOnHeHTn
Hocete3aunTHn06yBKn.
3akpenete TeKNTe KOMNOHeHTn, TaKa Ye Da He NaHaT.
He no3BONRAIte KOHTaKT Ha qACTn OT TAnOTo C DmXeU n Ce KOMNoHEHTN.
Pnck 3a 6e3oanacocTtA/foHKuHraTa h ypeda!
- 13no3BaTe caMo opuHnHaHH pe3epBHN qactN.
Pnck OT nobpeHa ha eJektpocTaTuHc yBcTBtEnHH KOMnoHeHTN (ESD)!
He doKocBaIte MoDyIInTe, BKNIOHTeHNO Bpb3Kn I npOBdHkOBu NbTuHa.

IhctpymEnTu n NOMOuHcpeDCTBa
| посочае Порожасту Изображения | |
| Помошен Истру- мент [15000155] | Исттумент за разхлабва- н на пл actмов части |
| Отberека Торх T20 С OTВОР [00340764] | 100 Мm, 3a винтоve сPreдп- ан ecифт |
| Динамометрич= Клоч [15000441] | Динамометрич= Клоч 20 - 100 Nm |
| Плеса OTberека [00340854] | Врьх 3,5 mm x 0,6 mm x 100 mm, 3aшиtna Изолаця 1000 V AC |
| Плеса OTberека [00340855] | Врьх 5,5 mm x 1,0 mm x 125 mm, 3aшиtna Изолаця 1000 V AC |
| Клеси с Истовide- ни челюсти, по- ытл [00341269] | Дылжина 200 MM |
| Клеси розачки [00342182] | Дылжина: 200 MM |
| посочане Робости Изобрахения | ||
| Комбийразан Клич [00340811] | гейнERY Kлич 10°mm, M6 | |
| Combination wrench [00340814] | гейнERY Kлич 13°mm, M8 | |
| Комбийразан Клич [00340817] | гейнERY Kлич 17 mm, M10. | |
| Комбийразан Клич [15000459] | гейнERY Kлич 16°mm, M10 | |

PemOH
4.1 CmHa Ha rohna pa6oTeH nIOT
CneuaJIHHHHTpymeHTn:
HakpaHHK Torx TX20 c oTBOP 152 mm, m3noI3Baema [00341272] DbPKINHa 124 mm, 1/4" wecTOCTeHHa OTBepKa (6,35 mm), 3a BHTOBe C npednaeh uinΦT
N3nCKBaHe:
YpeBt E N3KIOueH OT 3axpaHbAHeTO.
UpeBTe n3KNIOueH OT BOOCHa6DNTeHNHaT MpeXa.
4.1.1 CbajHe h a rohpna pa6oTeH pIOT
1.CBanete BnHTOBete (1).
2.ИЗБУТАЕТЕ РОПОНЯ pa6OTeH nnoT KbM 3aДнЯ Край Ha ypeДа (2).
3. Ppemectete rohpna pabote Hnnot Harope (3), 3a da ro cbainte.
4.1.2 MoHTnpaHHe Ha rOpHna pa6oTeH nIOT

CnepeTe n3oanaTnHa KaBena. KaBent moKe da e 3axBaHAT.
MoHTpaTBe Bo6paTeH peI.

PemOH
4.2 CmHa Ha YekMeDxKeTo 3a nepnHe npenapaT
N3nCKBaHe:
YpeBtE H3KNIOUeHOT 3axpaHBAHeTo.
YpeBt E n3KIOUeH OT BOOCha6DnTeHnHa MPeka.
4.2.1 CbānHe Na YekMeJxKeTo 3a nepuIne H npenapat
1.ИЗТERNTeYeKMeDxKeTo3a nepuInen npenapat.
2.1.HaTnCHete HADONY Bbpxy NOIIOKKaTa(1).
2.CbaneTe YekMeJKeTo 3a nepuInen npenapat (2).
4.2.2 MoThnpaHe Ha YekMeJKeTo 3a nepuInen npenapat
MOnTpaaTeB06paTeHpe.

PemOH
4.3 CmHa Ha dpbkkKaTa Ha ueKMeDxKeTo 3a nepnIeH npenapaT
N3nCKBaHe:
YpeIbTe N3KIOUeHOT 3aXpaHbHaHeTo.
YpeBt E n3KIOUeH OT BOOChA6DITENHaT MpeXa.
YekmeJeKeTo 3a nepuHnI npenapat e cBaaneHo. 8
4.3.1 Cbajhe Ha dpbkkata Ha qekmekeTo 3a nepnien npenapat
1.OcbobodTe Kpenexhnte enemHTN.

2.CBaIeTe DpbKkTaHa YckMeJKeTo 3a nepuHn npenapat.
4.3.2 MoThnpaHe Ha DpBkkKaTHa YekMeJxKeTo 3a nepnne npenapat
MOHTnpaTBeB ObaPteH peI.

PemOH
4.4CMHaHaΦacadHnaHeI
Kato npon3boDInTe Cme 3aBnKeHn da npedocTAM Ha notpe6ntenlte Kato pe3epBHa cact nIeBENn HAnen, BkIOHnTHe NmCTpyuN 3a pEmoHT Bc0tBTcTBne C PermaNTA (EC) 2019/2023. 5bXMe NCaJIa Da otB6nekMx 6hNe, He cNe CMnHATA Ha IiueBnna Hane e Heo6xoMnO da ce hBbPun enEkeTpexnxHeCKA npOBepKa 3a 6beOnacHcOT oKbANmHnpan HeneKpTeHXN, npDe ypeDb Ta 6bJe nyCnat B EKnnoataua. Toba nla TprBaDa ba 6bJe c notBbPdHa KaanHnKnKaunca BcINaCHO cneHnFmHnTE 3a CTpaHata 3akOni, pa3npoeBn n ctaHdpn.


N3nCKBaHe:
YpeBt en3KNIOueHOT 3axpaHBAHeTO.
YpeBt E n3KNIOueH OT BOOCHa6dntenHata Mpeka.
FopHnT PaoboteH Nnot e OCTpaHeH.→7
YekmedkeTo 3a nepunHn npenapaTe cBaneHo.→8
4.4.1 CbanyHe Ha fapaHnnaHn
-
1.CBAnTe BnHToBeTe (1).
-
Ocbo6oTeKepeNekHnTe enMeHTu (2, 3).

PemOH
2.Ocbo6oTe 1eIeCNHTo CbeHNHeHHe Ha KOHTpOJIHHa 6nok.
3.CBaIeTeΦacadHnnaHeJ.
4.4.2 MoHTpaHe Ha paadHnaHn

CnepeTe n3oanaTnHa Ka6ena. Ka6enbT MoKe Da e 3axBaHaT.
MoHTnpaTBe BopaTeH peI.

PemOH
4.5CMHaHaBpTaTa

BHIMATEJHO
Ornopete obnactra ha narrre!
Ppema3BaHe/3axBaUaHHe Ha npbCTnTe
He nocaraTe KbM oBnactTa Ha naHTnte.
Hocete npedna3n pbkabu

BHMMATE/HO
PnCKOT naaunq nactn nopadn paXna6eHN BnHTOBe!
MoHTnpaTBeBobpaTeHpe.

PemOH
4.6 CMHa Ha KOMNoHEnTHe Ha BpaTaTa


PNEpyNPEXKDEHNE
TeKn N NOBmXHN KOMNoHEHTN!
PICK ON pRnEMaBaHe NO BpeMe HA pEmoHT, NoIaDbXkKa, OTCpHaBaHe BA HEn3npaBHOCTN TEXHmecKe 06CnYbAbe
Hocete 3aunTHn obyKn.
3akpenete TeKKTe KOMNoHEHTN, Taka Ye Da He NaHaT.
He 3B8OBJBAeTKe KOHTAK Ha cactn OT TAnToC cDnHexu Cc KOMIOHOENTH.


BHIMATEJIHO
OTBOpTe 0bnaTtHa naHTnTe!
PpeMa3BaHe/3axBaUaHe Ha npbCTnTe
He nocraTe KbM oBnactTHa naHTnte.
Hocete npedna3n pbkabu
N3nCKBaHe:
YpeBt E N3KIOUeH OT 3aXpaHbHeTo.
YpeBt E N3KJIIOUeH OT BOOCha6DHTeNHaTAPpeXa.
Bpatatae cbaneha.→12
4.6.1 CbAraHe Ha KOMNoHEHTHe Ha BpaTaTa
Pa3rno6eTe BpaTaTa OTBH HABbTppe.
MoHTnpaIteB06paTeHpeI.

PemOH
4.7 CmHa Ha Kanaka Ha nomnata
N3nCKBaHe:
YpeBbTe H3KnIOueHOT 3axpaHBaHeTo.
YpeBtE n3KNIOueH OT BOOCHa6nTENHa Mpeka.
4.7.1 CbJIaHe Ha kanaka Ha nomnata
MoHTnpaIteB06paTeHpeI.

PemOH
4.9 CmHa Ha KJIIOHa Ha BpaTaTa
Kato npo3BODIen CME 3aDhJkeHn Da npedocTbIM Ha nOTpe6HTENITE Kato pe3epBA HACT KIOHANKA 3a BPATA, BKNIOHNTHO HNCTPKUIN 3a peMOHT B c0BTETCTBNEc PrrnAMHTA (EC) 2019/2023. BxMKe NcHAne DA tObeENMe 06Abe, Che cne CMHaTa HA KIOHANKA tA BA pATA e Heo6XoIMNO da Ce I3BbPUN eNeKTPOTeXHuecka npoeBpKa 3a 6EonAncoCT O kBNHnPHuPAH eNeKTPOTeXHk, npde ypeBt DA 6BneNyCHAT B EKCNNoataua.Toba NIE Tp5Ba Da 5Be dC notBpDeHa KANHnKau CBrLnHO CNEuHnHnTE 3a CTpaHATA 3AKOH, paanopeDn b CTaNapDrn


m3nckbaHe:
YpeBTe n3KNIOUeH OT 3aXpaHbAHeTO.
YpeBt en3KIOHcH OT BOIOCHA6dIeNTHaT MaPexa.
YpeDInTe ca CBO6OHO DoCTbNH.
FopHnT paOtoEN nnot e OTOCTpaHeH.→7
UeKMeJxKeTo 3a nepuHnna npenapaTe cBaeneHo.→8
NueBnT naHEn eCBaneH.→10
Bpatae cBaneHa.→12
ObTgAunrT npbCTeH cBaanE.
YnnbTHEHMeTo HA BpaTata e CBaneHo.→15
KanakbT Ha NOMnTa e CBaneH.→14
PepnHnT naHEn e cBaJeH.→19
4.9.1 CbānHe Ha KlnóuankaTa Ha BpaTaTa
1.нзкючeteшencenaHaКИОЧANKATAHaBpaTata.
2.OCB6OBeTe KInKoayankaTa Ha BpaTata.
3.CbaneTe KIOUaIKAta Ha BpaTaTa.

PemOH
4.9.2 MoHTnpaHe Ha KInouaJaKaTa Ha BpaTaTa
MOHTnpaTBeBobpaTeHpe.
PpnnnB3BaHe Ha HAcNoHeH ypeH!
KocTHnΦpaKTypH/HapaHbHaONOTnpema3BaHe
Ykpene Te ypeDnTe cpeu npinnb3BaHe.

BHIMATEJIHO
Octpn pb6oBe Ha Kopnyca!
HapaHbHaOMOTnpa3BaHe
HocTe npedna3n pKaBnCn.

BHIMATEJIHO
Pnck OT naaun yactn npadn pa3xa6eHN BnHTOBe!
HapahBaHe npaDn npaaun yact
3akpenete KOMNOHHTa, Taka He da He naHe.
BHIMAHHE!
Pnck OT naaun yactn nopadn pa3xna6eHN BnHTOBE!
NopeHa npTu qactn Ha ypeHa nnB Doma Ha KneHTa, HAp. bHo
10.
3aKpeTe KOMnOHeHTa, TaKa Ye Da He NaDHe.
N3nCKBaHe:
YpeIbTe n3KNIOueH OT 3aXpaHbHaHeTo.
YpeBt E n3KIOUeH OT BOOChA6DITENHaT MpeKa.
Ypeinte ca Cbo6oHdoctbHH.
FopHnT pa60Te H nnot e oCTpaHeH.→7
YekmedkeTo 3a nepunHn npenapat e cbaneno.→8
NueBnT nane en cbanen.→10
Bpatata e cbaneha.12
KanaBt Ha nomnatae cBaJeH.→14
06Tgaaunr npbCTe h cBaen
YnnbTheHMeTo Ha BpaTaTa e OcBooDoHo OT npEHaTcTpaHa.
OCBeTHeHHeTo Ha 6apabHa e OTCpaHeHO (onu).→18
4.11.1 CbAaHe Ha npEHHn naHEn
- Nobunhe Te ypea OTnped
2.CBAnTe BInHTOBeTe OTdony (1).

3.CnycheTe ypeHaHany.
PemoHT
4.CBaIeTe BnHTOBete OTnped, Kato 3anoHHeTe OTdoJy Harope (2,3).
5.CaIeTe npednnaHn
4.11.2 MoNTiPaeHa nppeHnnaHEn
MoHTnpaTBeBopatEnpei.
Poraneni padajicimi dily.
Zajistetejednotlivésoucasteipredpadem
POZORI
Nebezpeci padajicich dilu kvuli uvolnemynsrobum!
Poraneni padajicimi dily.
Zajistetejednotliveoucasti prdedpadem.


124 mm, 1/4" sekskant (6,35 mm), for
4.7 Udskifting of pumpens afdækning
Preindstilling:
- Abn pumpens afdaekning.
- Fjern pumpens afdaekning.
Sorg for at sikre componenten mod at falde ned.


Fare for nedfaldende dele pga. Iosnede skruer!
Sorg for at sikre componenten mod at falde ned.
Preindstilling:
Sorg for at sikre apparater mod at glide.


PAS PAI
Skarpe huskanter!
Snitlaesjoner
Brug beskytteseshandsker.

PAS PAI
Fare for nedfaldende dele pga. Iosnede skruer!
Personskade pga. nedfaldende delet.
Sorg for at sikre componenten mod at falde ned.

BEMERKI
Fare for nedfaldende dele pga. Iosnede skruer!
Sorg for at sikre componenten mod at falde ned.
Preindstilling:
Sorg for at sikre apparater mod at glide.
Preindstilling:
Self-repair hints - Washing machine
Concerning this document. 99
1.1 Important information 99
1.1.1 Purpose 99
1.2 Explanation of symbols 99
1.2.1 Danger levels 99
1.2.2 Hazard symbols 99
1.2.3 Structure of the warnings 100
1.2.4 General symbols 100
Safety. 101
2.1 General Safety instructions 101
2.1.1 All domestic appliances 101
Tools and aids. 102
Repair 103
4.1 Replacing worktop 103
4.1.1 Removing worktop 103
4.1.2 Installing worktop 103
4.2 Replacing detergent drawer 104
4.2.1 Removing detergent drawer 104
4.2.2 Installing detergent drawer 104
4.3 Replacing detergent drawer handle 105
4.3.1 Removing detergent drawer handle 105
4.3.2 Installing detergent drawer handle.. 105
4.4 Replacing fascia panel 106
4.4.1 Removing fascia panel 106
4.4.2 Installing fascia panel 107
4.7 Replacing pump cover 110
4.7.1 Removing pump cover 110
4.7.2 Installing pump cover 110
4.8 Replacing door seal 111
4.11 Replacing front panel 115
4.11.1 Removing front panel 115
4.11.2 Installing front panel.. 116
Concerning this document
1.1 Important information
1.1.1 Purpose
These repair hints support consumer to repair appliances by himself according to the applicable eco-design regulation (as of 03/2021).
They contain information how to exchange defined spare parts including warnings and risks.
In case of questions, please contact our customer service. We will only be liable for damages if the repair hints have been followed properly.
1.2 Explanation of symbols
1.2.1 Danger levels
The warning levels consist of a symbol and a signal word. The signal word indicates the severity of the danger.
Table 1: Danger levels
| Warning level Meaning | |
| Danger | Non-observation of the warning message will result in death or serious injuries. |
| Warning | Non-observation of the warning message could result in death or serious injuries. |
| Caution | Non-observation of the warning message could result in minor injuries. |
| Notice | Non-observation of the warning message could result in damage to property. |
1.2.2 Hazard symbols
Hazard symbols are symbolic representations which give an indication of the kind of danger.
The following hazard symbols are used in this document:
| Hazard symbol Meaning | |
| ! | General warning message |
| Danger from electrical voltage | |
| Risk of explosion | |
| Danger of cuts | |
| Danger of crushing |
Concerning this document
| Hazard symbol Meaning | |
| Danger from hot surfaces | |
| Danger from strong magnetic field | |
| Danger from non-ionizing radiation |
Table 2: Hazard symbols
1.2.3 Structure of the warnings
Warnings in this document have a standardised appearance and a standardised structure.

Danger
Type and source of danger!
Possible consequences of ignoring the danger / warning.
Measures and prohibitions for preventing the danger.
The following example shows a warning that warns against electric shock due to live parts. The measure for avoiding the danger is mentioned.
Danger
Risk of electric shock due to live parts!
Death by electrocution
- Disconnect appliances from electrical supply at least 60 seconds
before starting repairs.
1.2.4 General symbols
The following general symbols are used in this document:
| Gen. symbol Meaning | |
| 1 | Identification of a special tip (text and/or graphic) |
| i | Identification of a simple tip (only text) |
| Identification of a link to a video tutorial |
| Gen. symbol Meaning | |
| Identification of required tools | |
| Identification of required preconditions | |
| Identification of a condition (if ..., then ...) | |
| Identification of a result | |
| [Start]Identification of a key or button | |
| [00123456] Identification of a material number | |
| Status Identification of displayed text / window(in the appliance's display) | |
Table 3: General symbols
Safety
2.1 General Safety instructions
2.1.1 All domestic appliances
Risk of electric shock due to live parts!
- Errors by repairs involving electrical components can lead to electrical shock!
- Disconnect the appliance from the mains for at least 60 seconds before starting work.
After the repair have a safety test according VDE 0701 or country-specific regulations performed.
Risk of injury from sharp edges!
Wear protective gloves.
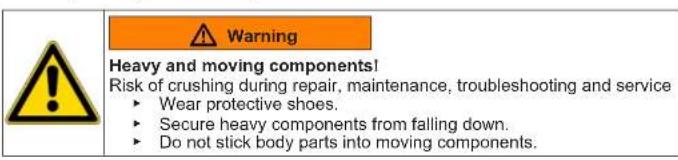
Risk of crushing during repair, maintenance, troubleshooting and service due to heavy and moving components
Wear protective shoes.
- Secure heavy components from falling down.
- Do not stick body parts into moving components.
Risk to the appliance's safety / function!
Only use original spare parts.
Risk of damage to electrostatically sensitive components (ESDs)!
- Do not touch the modules, including connections and conductor paths.

Tools and aids
| Designation Details Images | ||
| Auxiliary tool [15000155] | Tool for loosening out of plastic parts | |
| Screwdriver Torx T20 with bore hole [00340764] | 100 mm, for screws with safety pin | |
| Torque spanner [15000441] | Torque spanner 20 - 100 Nm | |
| Slot screwdriver [00340854] | Blade 3.5 mm x 0.6 mm x 100 mm, Protective Insulation 1000 V AC | |
| Slot screwdriver [00340855] | Blade 5.5 mm x 1.0 mm x 125 mm, Protective Insulation 1000 V AC | |
| Needle-nose pliers, angled pattern [00341269] | Length 200 mm | |
| Side-cutting pliers [00342182] | Length: 200 mm | |
| Designation Details Images | ||
| Combination wrench [00340811] | Wrench size 10°mm, M6 | |
| Combination wrench [00340814] | Wrench size 13°mm, M8 | |
| Combination wrench [00340817] | Wrench size 17 mm, M10 | |
| Combination wrench [15000459] | Wrench size 16°mm, M10 | |

Repair
4.1 Replacing worktop
Required tools:
Torx Bit TX20 with hole Length 152 mm, usable length [00341272]
124 mm. 1/4" hexagon drive
(6.35 mm), for screws with safety pin
Prerequisite:
Appliance is disconnected from power supply.
Appliance is disconnected from water supply.
4.1.1 Removing worktop
- Remove screws (1).
- Push worktop to the back of the appliance (2).
- Move worktop upwards (3) to remove it.
4.1.2 Installing worktop

Observe cable installation. Cable could be trapped.
Install in reverse order.
Repair
4.2 Replacing detergent drawer
Prerequisite:
Appliance is disconnected from power supply.
Appliance is disconnected from water supply.
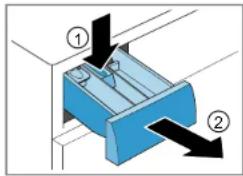
4.2.1 Removing detergent drawer
- Pull out detergent drawer.
2.1. Press down on insert (1)

2. Remove detergent drawer (2).
4.2.2 Installing detergent drawer
Install in reverse order.

Repair
4.3 Replacing detergent drawer handle
Prerequisite:
Appliance is disconnected from power supply.
Appliance is disconnected from water supply.
Detergent drawer has been removed. Page 104
4.3.1 Removing detergent drawer handle
- Release catch elements.
- Remove detergent drawer handle.
4.3.2 Installing detergent drawer handle
Install in reverse order.

Repair
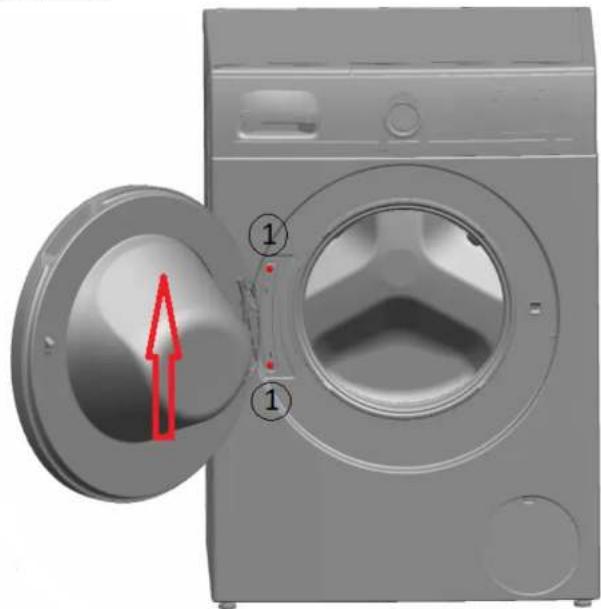
4.4 Replacing fascia panel
As a manufacturer, we are obliged to provide consumers with the spare part fascia panel including repair instructions in accordance with Regulation (EU) 2019/2023. However, we would like to point out that after replacing a fascia panel, an electrotechnical safety test by a qualified electrician is required before the device is put into operation. This person must be verifiably qualified according to the country-specific laws, regulations and standards.

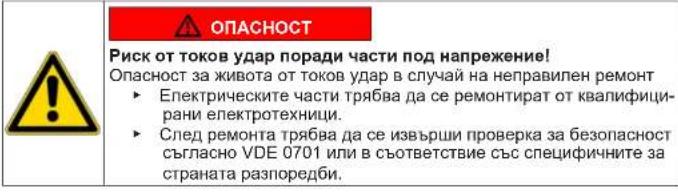
Risk of electric shock due to live parts!
Danger to life through electric shock in case of improper repair
After the repair have a safely test according VDE 0701 or country-specific regulations performed.

Slipping of tilted appliances!
Bone fractures / crush injuries
- Secure appliances against slipping.

Sharp housing edges!
Cut injuries
Wear protective gloves.

Risk of falling parts due to released screws!
Injury because of falling parts.
- Secure component from falling down.

Risk of falling parts due to released screws!
Damage to other parts of the appliance or at customers home e.g. bottom.
- Secure component from falling down.
Prerequisite:

Appliance is disconnected from power supply.

Appliance is disconnected from water supply.
Worktop has been removed. Page 103
Detergent drawer has been removed. Page 104
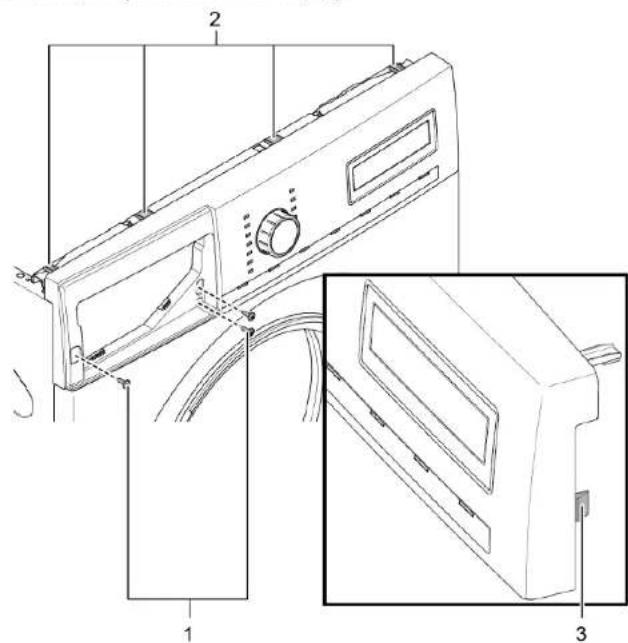
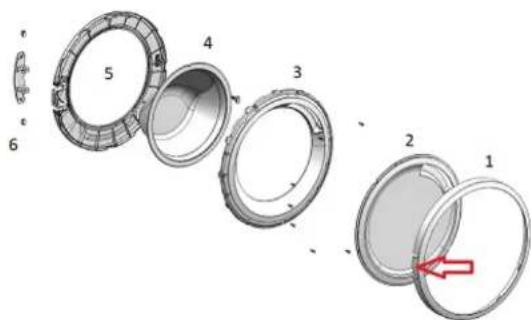
4.4.1 Removing fascia panel
-
- Remove screws (1)
-
Release catch elements (2, 3)
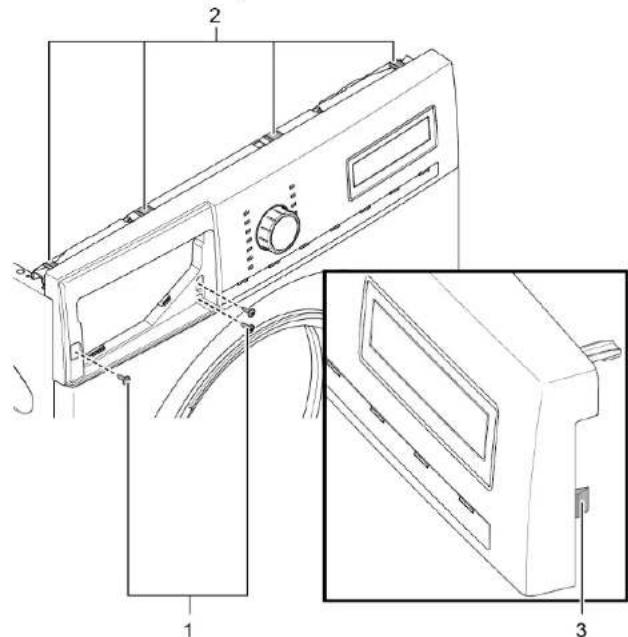
- Release plug contact of control unit.
- Remove fascia panel.

Repair
4.4.2 Installing fascia panel

Observe cable installation. Cable could be trapped.
Install in reverse order.

Repair
4.5 Replacing door

Caution
Open hinge area!
Finger crushing / entrapment
Do not reach into the hinge area.
Wear protective gloves.

Caution
Risk of falling parts due to released screws!
Injury because of falling parts.
- Secure component from falling down.
Notice
Risk of falling parts due to released screws!
Damage to other parts of the appliance or at customers home e.g. bot
tom
Secure component from falling down.
Prerequisite:
Appliance is disconnected from power supply.
Appliance is disconnected from water supply.
Door is opened.
4.5.1 Removing door
- Remove screws (1).
- Remove door upwards.
Install in reverse order.

Repair
4.6 Replacing door components

Prerequisite:
Appliance is disconnected from power supply.
Appliance is disconnected from water supply.
Door has been removed. Page 108
4.6.1 Removing door components
Disassemble door from outside to inside.
4.6.2 Installing door components
Install in reverse order.

Repair
4.7 Replacing pump cover
Prerequisite:
Appliance is disconnected from power supply.
Appliance is disconnected from water supply.
4.7.1 Removing pump cover
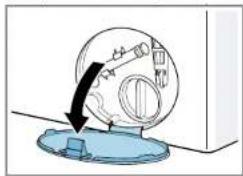
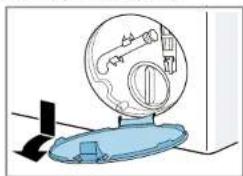
- Open pump cover.

- Remove pump cover.

4.7.2 Installing pump cover
Install in reverse order.

Repair
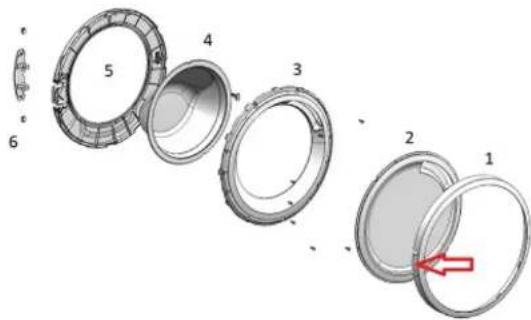
4.8 Replacing door seal


Sharp housing edges!
Cut injuries
Wear protective gloves.


Risk of falling parts due to released screws!
Injury because of falling parts.
Secure component from falling down.

Risk of falling parts due to released screws!
Damage to other parts of the appliance or at customers home e.g. bot
tom.
Secure component from falling down.
Prerequisite:
Appliance is disconnected from power supply.
Appliance is disconnected from water supply.
Appliances is freely accessible.
Worktop has been removed. Page 103
Detergent drawer has been removed. Page 104
Fascia panel has been removed. Page 106
Door has been removed. Page 108
Pump cover has been removed. Page 110
Front panel has been removed. Page 115
Drum light has been removed (optional). Page 114
- Release all hose connections.
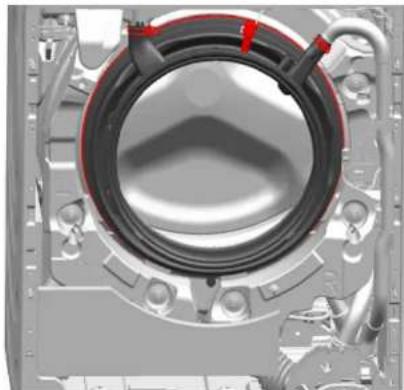
- Remove door seal.
Risk of falling parts due to incorrect installation!
Injury or damage to the appliance.
- Tighten tension ring of boot gasket with 3,4 Nm.
Install in reverse order.

Repair
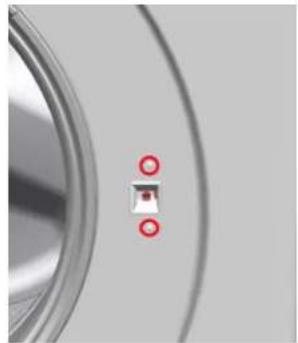
4.9 Replacing door lock
As a manufacturer, we are obliged to provide consumers with the spare part door lock including repair instructions in accordance with Regulation (EU) 2019/2023. However, we would like to point out that after replacing a door lock, an electrotechnical safety test by a qualified electrician is required before the device is put into operation. This person must be verifiably qualified according to the country-specific laws, regulations and standards.

Risk of electric shock due to live parts!
anger to life through electric shock in case of improper repair
After the repair have a safely test according VDE 0701 or country-specific regulations performed.

Slipping of tilted appliances!
Bone fractures / crush injuries
- Secure appliances against slipping.

Sharp housing edges!
Cut injuries
Wear protective gloves.

Risk of falling parts due to released screws!
Injury because of falling parts.
- Secure component from falling down.

Risk of falling parts due to released screws!
Damage to other parts of the appliance or at customers home e.g. bottom.
- Secure component from falling down.
Prerequisite:

Appliance is disconnected from power supply.

Appliance is disconnected from water supply.
Appliances is freely accessible.
Worktop has been removed. Page 103
Detergent drawer has been removed. Page 104
Fascia panel has been removed. Page 106
Door has been removed. Page 108
Tension ring has been removed.
Door seal has been removed. Page 111
Pump cover has been removed. Page 110
Front panel has been removed. Page 115
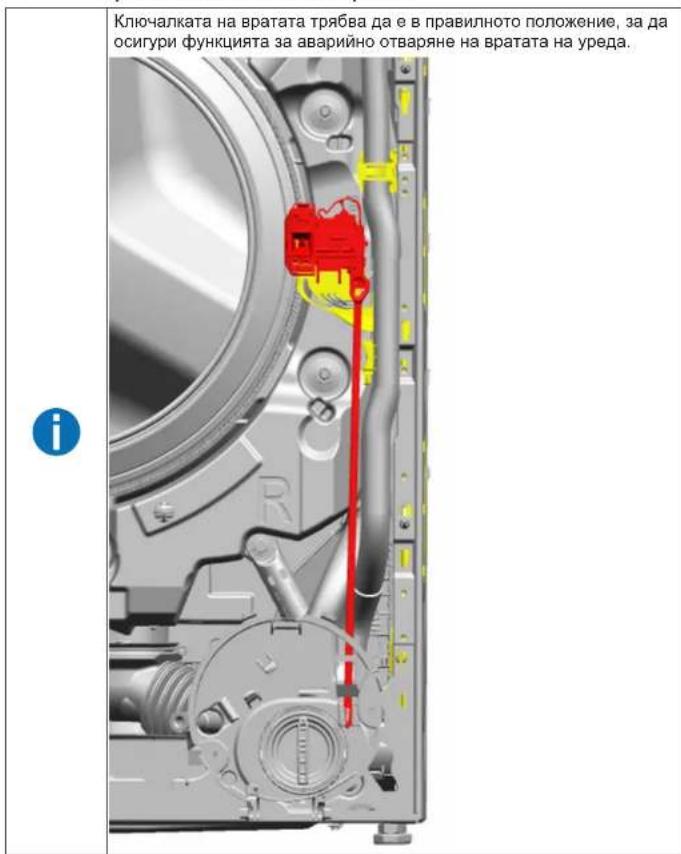
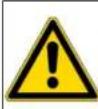
- Disconnect door lock plug.
- Release door lock.
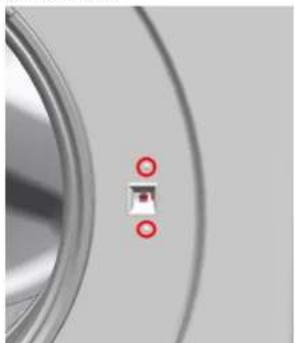
- Remove door lock.

Repair
Install in reverse order.

Repair
4.10 Replacing drum light


Slipping of tilted appliances!
Bone fractures / crush injuries
Secure appliances against slipping.


Sharp housing edges!
Cut injuries
Wear protective gloves.


Risk of falling parts due to released screws!
Injury because of falling parts
- Secure component from falling down.

Risk of falling parts due to released screws!
Damage to other parts of the appliance or at customers home e.g. bot
tom.
Secure component from falling down.
Prerequisite:
Appliance is disconnected from power supply.
Appliance is disconnected from water supply.
Appliances is freely accessible.
Worktop has been removed. Page 103
Detergent drawer has been removed. Page 104
Fascia panel has been removed. Page 106
4.10.1 Removing drum light
- Pull drum light holder out of appliance.
- Disconnect electrical connections.
- Remove drum light from drum light holder.
4.10.2 Installing drum light

Observe cable installation. Cable could be trapped.
Install in reverse order.

Repair
4.11 Replacing front panel


Slipping of tilted appliances!
Bone fractures / crush injuries
- Secure appliances against slipping.


Sharp housing edges!
Cut injuries
Wear protective gloves.


Risk of falling parts due to released screws!
Injury because of falling parts
- Secure component from falling down.


Risk of falling parts due to released screws!
Damage to other parts of the appliance or at customers home e.g. bot
tom.
Secure component from falling down.
Prerequisite:
Appliance is disconnected from power supply.
Appliance is disconnected from water supply.
Appliances is freely accessible.
Worktop has been removed. Page 103
Detergent drawer has been removed. Page 104
Fascia panel has been removed. Page 106
Door has been removed. Page 108
Pump cover has been removed. Page 110
Tension ring has been removed.
Door seal has been released at front.
Drum light has been removed (optional). Page 114
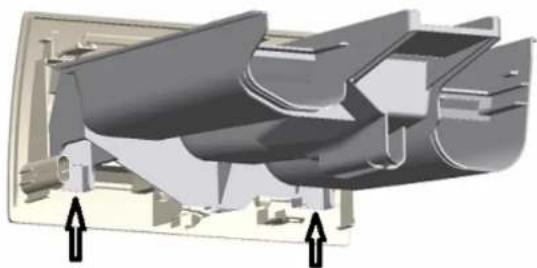
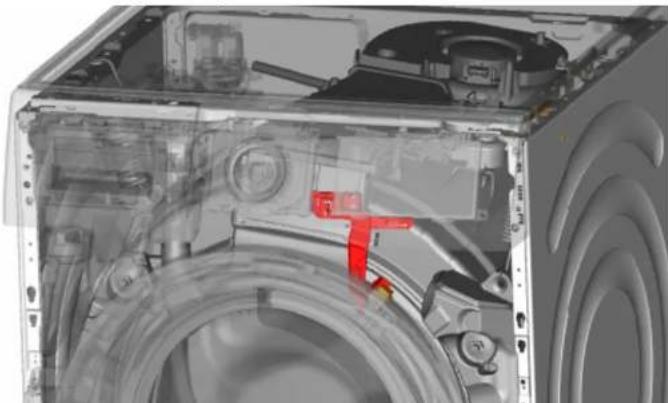
4.11.1 Removing front panel
- Lift up appliance at front.
- Remove screws at bottom (1).
3. Lower appliance down.

Repair
- Remove screws at front beginning from bottom to top (2, 3).

- Remove front panel.
4.11.2 Installing front panel
Install in reverse order.
Remonditeave - Pesumasin
1 Selle dokumendiga seoses 118
1.1 Tahtis teave 118
1.1.1 Eesmark 118
1.2 Sumbolite selgitus 118
1.2.1 Ohutased 118
1.2.2 Ohusumbolid 118
1.2.3 Hoiatuste struktuur 119
1.2.4 Üldised sumbolid 119
Ohutus 120
2.1 Uldised ohutusjuhised 120
2.1.1 Kofik kodumasinad 120
Tabel 1: Ohutasedmed
1.2.2 Ohusumbolid
| Üld.®,®,®,®,®,®,®,®,®,®,®,®,®,®,®,®,®,®,®,®,®,®,®,®,®,®,®,®,®,®,®,®,®,®,®,®,®,®,®,®,®,®,®,®,®,®,®,®,®,®,®,®,®,®,®,®,®,®,®,®,®,®,®,®,®,®,®,®,®,®,®,®,®,®,®,®,®,®,®,®,®,®,®,®,®,®,®,®,®,®,®,®,®,®,®,®,®,®,®,®,® |
| Erinöuande tunnus (tekst ja/vöi graafik) |
| Lihtsa nõuande tunnus (ainult tekst) |
| Videojuhendi lingo tunnus |
m = 311
Mun Torx TX20 152 mm, wipelioo miko 124 mm, 1/4" eayuvko kape (6.35 mm), yia bioce ie pio aqaa
PouT68eO:
H ouakeun eivai aotouvdeevn an to nV npox npofooiac. H ouakeun eivai aotouvdeevn an to nV npox vepou.
4.1.1 Apaipen Kattakio Evyaoias
- AqaipeTe Tc biEc (1).
- TpiwEe To kAtaki EpyaiaG stN TTaw TIAEuP TaoukeuHs (2).
- MetakivneTo To kAtaki EpyaiaG tpoC taTtaw (3) yia va to aphiepoTe.
4.1.2 ToToBETnO KATrAKIOU Epyaioas

IpooeTnEv ykataaon Tuv kaawio To kawio 0a mopooe va Tayideutei.
EykaataoThee TnV aTtBtN tepa.

ETIOKEU
4.2 Avtikataoan ouptapioaoppattavko
Pouu68ean:
Houkeunivai aotouvobéevn to nTv npoxh tropofoosia
Houkeun eivai aTOoUVdeevn anIO TnV npoxn vepou.
4.2.1 Apaipoeon ouptapoiou atopputavtkoU
Fare for a knuse/sette fast fingre
Fare for a knuse/sette fast fingre
- Remova o painel frontal.
4.11.2 Instalar o painei frontal
FARA! Risk for elstotar pa ground ay st
Livsfara pá ground av elstótar vid felaktiga reparaciones