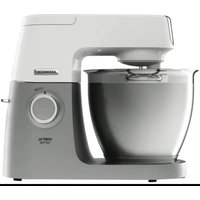
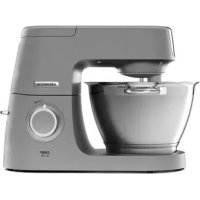
Multipro Compact FDP31 - Food Processor KENWOOD - Free user manual and instructions
Find the device manual for free Multipro Compact FDP31 KENWOOD in PDF.
| Product Type | Compact Food Processor |
| Brand | Kenwood |
| Model | Multipro Compact FDP31 |
| Power Supply | 220-240 V ~ 50/60 Hz |
| Power | Approx. 600 W |
| Bowl Capacity | ~1.5 L |
| Main Functions | Chopping, kneading, emulsifying, slicing, grating, blending (depending on accessory) |
| Speeds | Variable + Pulse (Pulse button) |
| Safety | Bowl and lid lock, overload protection |
| Bowl Material | BPA-free plastic |
| Blade Material | Stainless steel |
| Cleaning | Bowl and accessories dishwasher safe (except motor unit and blade assemblies) |
| Dimensions (approx.) | 25 x 20 x 30 cm |
| Weight (approx.) | 3 kg |
| Included Accessories | Chopping blade, kneading attachment, emulsifier, 4 mm slicing/grating disc, pusher |
| Optional Accessories | Citrus press, grinder, blender, mini chopper, 2 mm disc |
| Cord Length | ~1 m |
| Warranty | 2 years (parts and labor) |
| Date Code | On the label under the appliance (format YYWW) |
Frequently Asked Questions - Multipro Compact FDP31 KENWOOD
User questions about Multipro Compact FDP31 KENWOOD
0 question about this device. Answer the ones you know or ask your own.
Ask a new question about this device
Download the instructions for your Food Processor in PDF format for free! Find your manual Multipro Compact FDP31 - KENWOOD and take your electronic device back in hand. On this page are published all the documents necessary for the use of your device. Multipro Compact FDP31 by KENWOOD.
USER MANUAL Multipro Compact FDP31 KENWOOD
| N | N1 | N2 | N3 | |
| N4 | N5 | N6 | 1-2 | |
| O | MAX (g) (secs) | |||
| 2cm | 2400g 10-30 | |||
| 21.2kg 10-30 | ||||
| 1/4 | P100-250g 5-10 | |||
| 230-50g 20-30 | ||||
| 300g + 150g | 2 10-15 | |||
| 1-275ml H2O 10-20 | ||||
| 2100-200g 30-60 | ||||
| 2500g 10-30 | ||||
| X | ||||
| MAX (g) (secs) | ||||
| Mayo 4-8°C | x4 360ml | 2 | 60-80 | |
| 1250ml 15-20 | ||||
| 340g 550g | 2 30- | 60 | ||
| 1- | ||||
| 750ml | 2 | - | ||
| 1 | - | |||
| 4-8°C | 21.2L | 30-60 | ||
| 4-8°C | 21L 15-30 | |||
| 2-3cm | 6 (125g) | P | 30-40 | |
| 1L | P ↓ 2 | 10 ↓ 50 | ||
| MAX (g) (secs) | ∅ | |||
| 250g | 10-30 | |||
| 250g | 20-40 | |||
| 2100g | 5-10 | |||
| 250g | 30-60 | |||
| 250g | 30-60 | |||
| P50g | - | |||
| P30g | - | |||
| P30g | - | |||
| 2cm | 2/P40g | 30-60 | ||
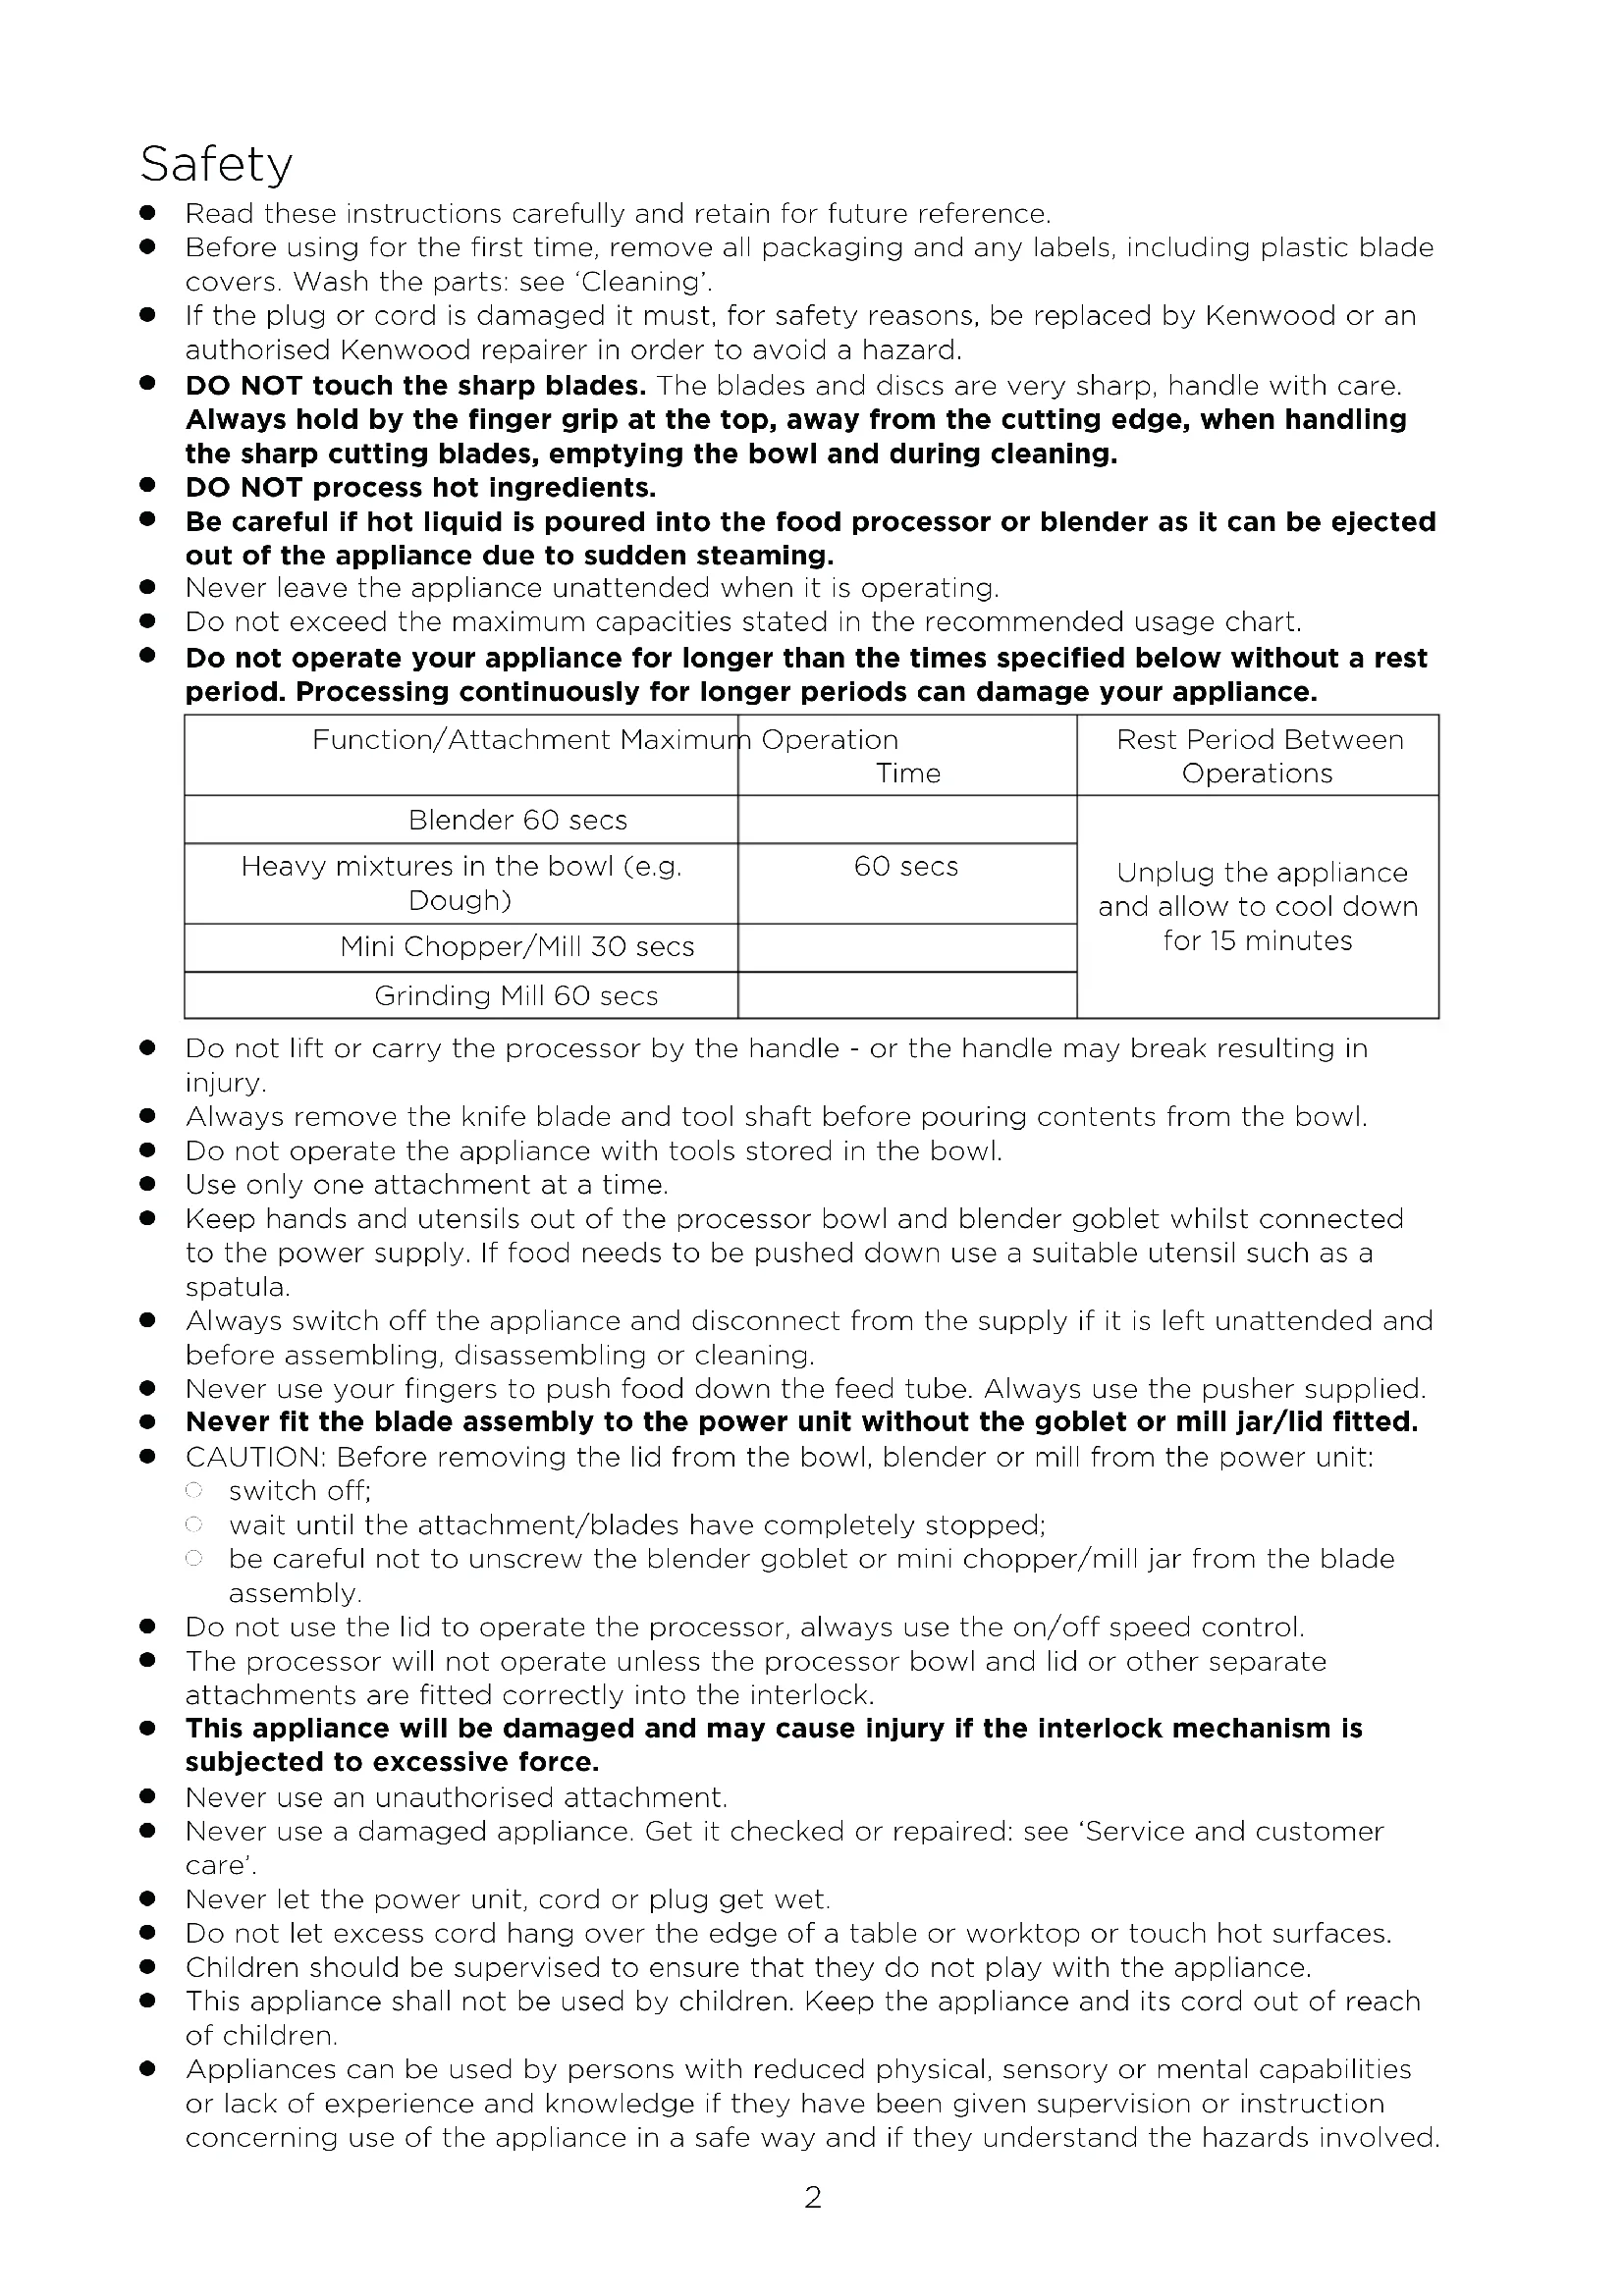
Safety
- Read these instructions carefully and retain for future reference.
- Before using for the first time, remove all packaging and any labels, including plastic blade covers. Wash the parts: see 'Cleaning'.
- If the plug or cord is damaged it must, for safety reasons, be replaced by Kenwood or an authorised Kenwood repairer in order to avoid a hazard.
- DO NOT touch the sharp blades. The blades and discs are very sharp, handle with care. Always hold by the finger grip at the top, away from the cutting edge, when handling the sharp cutting blades, emptying the bowl and during cleaning.
DO NOT process hot ingredients. - Be careful if hot liquid is poured into the food processor or blender as it can be ejected out of the appliance due to sudden steaming.
- Never leave the appliance unattended when it is operating.
- Do not exceed the maximum capacities stated in the recommended usage chart.
- Do not operate your appliance for longer than the times specified below without a rest period. Processing continuously for longer periods can damage your appliance.
| Function/Attachment Maximum | Operation Time | Rest Period Between Operations |
| Blender 60 secs | Unplug the appliance and allow to cool down for 15 minutes | |
| Heavy mixtures in the bowl (e.g. Dough) | 60 secs | |
| Mini Chopper/Mill 30 secs | ||
| Grinding Mill 60 secs |
- Do not lift or carry the processor by the handle - or the handle may break resulting in injury.
Always remove the knife blade and tool shaft before pouring contents from the bowl. - Do not operate the appliance with tools stored in the bowl.
Use only one attachment at a time. - Keep hands and utensils out of the processor bowl and blender goblet whilst connected to the power supply. If food needs to be pushed down use a suitable utensil such as a spatula.
- Always switch off the appliance and disconnect from the supply if it is left unattended and before assembling, disassembling or cleaning.
- Never use your fingers to push food down the feed tube. Always use the pusher supplied.
- Never fit the blade assembly to the power unit without the goblet or mill jar/lid fitted.
- CAUTION: Before removing the lid from the bowl, blender or mill from the power unit:
switch off;
wait until the attachment/blades have completely stopped;
be careful not to unscrew the blender goblet or mini chopper/mill jar from the blade assembly.
- Do not use the lid to operate the processor, always use the on/off speed control.
- The processor will not operate unless the processor bowl and lid or other separate attachments are fitted correctly into the interlock.
- This appliance will be damaged and may cause injury if the interlock mechanism is subjected to excessive force.
- Never use an unauthorised attachment.
- Never use a damaged appliance. Get it checked or repaired: see 'Service and customer care'.
- Never let the power unit, cord or plug get wet.
- Do not let excess cord hang over the edge of a table or worktop or touch hot surfaces.
Children should be supervised to ensure that they do not play with the appliance. - This appliance shall not be used by children. Keep the appliance and its cord out of reach of children.
-
Appliances can be used by persons with reduced physical, sensory or mental capabilities or lack of experience and knowledge if they have been given supervision or instruction concerning use of the appliance in a safe way and if they understand the hazards involved.
-
Only use the appliance for its intended domestic use. Kenwood will not accept any liability if the appliance is subject to improper use, or failure to comply with these instructions.
- Misuse of your processor, blender or mill can result in injury.
- The maximum rating is based on the mini chopper/mill attachment that draws the greatest load. Other attachments may draw less power.
Blender
DO NOT process hot ingredients.
- SCALD RISK: Hot ingredients must be allowed to cool to room temperature before placing in the goblet or before blending.
- Always take care when handling the blade assembly and avoid touching the cutting edge of the blades when cleaning.
- Only operate the blender with the lid in place.
- Only use the goblet with the blade assembly supplied.
- Never run the blender empty.
- Smoothie recipes - never blend frozen ingredients that have formed a solid mass during freezing, break it up before adding to the goblet.
Mill Attachments
- Never fit the blade assembly to the power unit without the jar/lid fitted.
- Never unscrew the jar/lid while the mill is fitted to your appliance.
- Do not touch the sharp blades - Keep the blade assembly away from children.
- Never remove the mill until the blades have completely stopped.
The appliance will not work if the mill is incorrectly fitted. - Do not process hot ingredients in the mill allow to cool down to room temperature before processing.
Mini Chopper/Mill
The processing of spices is not recommended as they may damage the plastic parts.
Grinding Mill
- Do not process dried turmeric root as it is too hard and may damage the blades.
Slicing/Grating Discs
The discs are very sharp; handle with care when fitting, removing and cleaning.
- Always hold by the finger grip away from the cutting edge when handling the sharp cutting blades, emptying the bowl and during cleaning.
- Never use your fingers to push food down the feed tube. Only use the pusher supplied.
- Before removing the lid, switch off wait until the cutting disc has completely stopped.
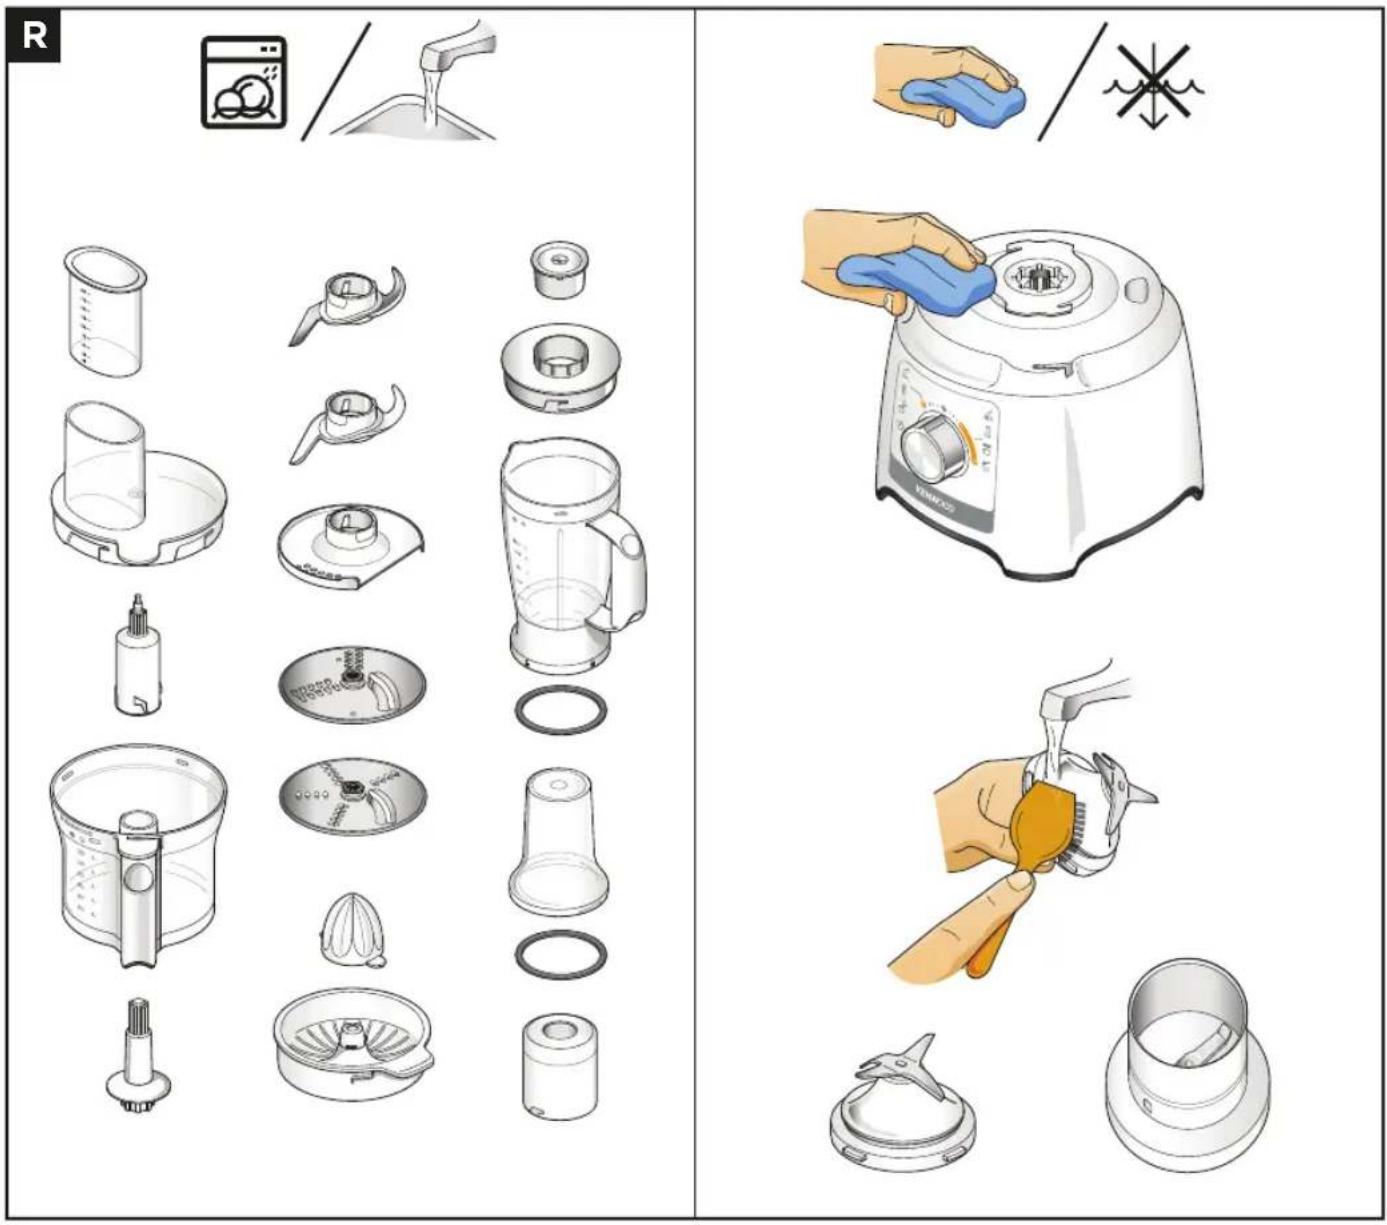
Cleaning
- Switch off, wait for the blades to stop and unplug the blender before cleaning.
- Wipe the power unit with a damp cloth, then dry. Ensure that the interlock area is clear of food debris.
- The bowl, lid, pusher and all attachments/tools apart from the blender and mill blade assemblies are suitable for both handwashing and dishwashing.
- The blade assemblies should be brushed clean and rinsed under running water.
- Do not immerse the power unit or blender/mill blade assemblies in water.
Before plugging in
- Make sure your electricity supply is the same as the one shown on the underside of your appliance.
This appliance conforms to EC Regulation 1935/2004 on materials and articles intended to come into contact with food.
Before using for the first time
1 Remove the plastic blade covers from the knife blade. Take care the blades are very sharp. These covers should be discarded as they are to protect the blade during manufacture and transit only.
2 Wash the parts see 'Care and cleaning'.
Key
Processor
① Pusher
② Feed tube
③ Lid
4 Tool shaft
Bowl
6 Detachable drive shaft
⑦ Power unit
⑧ Speed/pulse control
9 Safety interlocks
10 Cord storage (at back)
Attachments
Not all of the attachments listed below may be included with your food processor. Attachments are dependent upon the model variant. Visit www.kenwoodworld.com for information on how to buy an attachment not included in pack.
Standard Attachments
Knifeblade
Dough tool
13 Emulsifying tool
4mm Slicing/grating disc
Optional Attachments
15 Citrus juicer (if supplied)
A Cone
B Sieve
Grinding mill (if supplied)
A Mill Lid
B Grinding Mill Blade Assembly
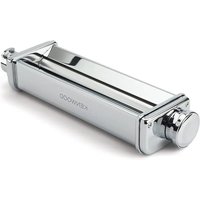
⑦ Plastic blender (if supplied)
A Goblet
B Blade Assembly
C Sealing Ring
D Lid
E Filler Cap
19 2mm Slicing/grating disc
To Use Your Food Processor
Refer to Illustrations C - I
IMPORTANT
Take care when handling sharp blades, always hold by the finger grips.
Always fit the bowl and attachment onto the processor before adding ingredients.
- Do not use the lid to operate the processor, always use the on/off speed control.
- The processor will not operate if the bowl or lld are not flitted correctly into the interlock. Check that the feed tube and bowl handle are situated to the right front hand corner.
Use the pulse (P) for short bursts. The pulse will operate for as long as the control is held in position.
Always switch off and unplug before removing the lid.
- Your processor is not suitable for crushing or grinding coffee beans, or converting granulated sugar to caster sugar.
- When adding almond essence or flavouring to mixtures avoid contact with the plastic as this may result in permanent marking.
1 Fit the detachable drive shaft onto the power unit.
2 Then fit the bowl by aligning the on the bowl with the on the power unit, turn clockwise until it locks
3 To assemble your tool (knife blade, dough tool and emulsifying tool), using the finger grips place the detachable tool part over the tool shaft and lower into place, turn the attachment anticlockwise to lock into place.
4 Fit the assembled tool over the drive shaft.
5 Fit the lid - ensuring the top of the drive shaft/tool locates into the centre of the lid.
6 Plug in, switch on and select a speed. (Refer to the Recommended usage chart).
7 Reverse the above procedure to remove the lid, attachments and bowl.
To Use Your Knife Blade
Refer to Illustrations C - I
1 Follow the instructions under 'To Use your Food Processor'.
Hints and Tips
For coarser textures use the pulse control.
Cut food such as meat, bread, vegetables into cubes approximately 2cm.
- Biscuits should be broken into pieces and added down the feed tube whilst the appliance is running.
Take care not to over-process.
- When making pastry use fat straight from the fridge cut into 2cm cubes.
- For best results when processing sticky fruit/ ingredients such as dates, use 'Pulse' first to break down the ingredients and then continue processing on maximum speed.
To Use Your Dough Tool
Refer to Illustrations C - I
Use for yeasted dough mixes.
1 Follow the instructions under 'To Use your Food Processor'.
Hints and Tips
- Do not process for longer than 60 seconds.
- Place the dry ingredients in the bowl and add the liquid down the feed tube whilst the appliance is running. Process until a smooth elastic ball of dough is formed.
- Re-knead by hand only. Re-kneading in the bowl is not recommended as it may cause the processor to become unstable.
To Use Your Emulsifying Tool
Refer to Illustrations C - I
1 Follow the instructions under 'To Use your Food Processor'.
Hints and Tips
- Ensure the bowl and tool are clean and free from grease before use.
- Mayonnaise - place the egg and seasonings into the bowl and mix for a few seconds. With the machine running, gradually add the oil down the feed tube in a steady stream.
To Use Your Citrus Juicer (if supplied)
Refer to Illustrations J1 - J7
IMPORTANT
- The citrus juicer will not operate if the sieve is not locked correctly.
1 Fit the drive shaft and bowl onto the power unit, followed by the tool shaft.
2 Fit the sieve into the bowl - ensuring the sieve handle is locked into position directly over the bowl handle.
3 Place the cone over the drive shaft turning until it drops all the way down.
4 Cut the fruit in half. Then switch on and press the fruit onto the cone.
Hints and Tips
- For best results store and juice the fruit at room temperature and hand roll on a worktop before juicing.
- To help with juice extraction move the fruit from side to side when juicing.
- When juicing large quantities, empty the sieve regularly to prevent the build up of pulp and seeds.
To Use Your Grinding Mill (if supplied)
Refer to Illustrations K1 - K5
1 Place your ingredients into the blade assembly.
2 Fit the lid and turn clockwise to lock.
3 Place the mill onto the power unit and turn clockwise to lock.
4 Select maximum speed or use the pulse (P).
Hints and Tips
- For optimum performance when processing spices do not process more than 50g at a time.
Whole spices retain their flavour for a much longer time than ground spices so it is best to grind a small quantity fresh at a time to retain the flavour. - To release the maximum flavour and essential oils whole spices are best roasted prior to milling.
- Do not process dried turmeric root in the mill as it is too hard and may damage the blades.
- Cut ginger and coconut into small pieces before processing.
- For best results the main bowl is recommended when chopping herbs.
To Use Your Mini Chopper/Mill (If supplied)
Refer to Illustrations L1 - L5
1 Put the ingredients into the jar.
2 Fit the sealing ring into the blade assembly.
3 Turn the blade assembly upside down. Lower it into the jar, blades down.
4 Screw the blade assembly onto the jar until finger tight. Refer to the graphics on the underside of the blade assembly as follows:
- Unlocked position
- Locked position
5 Place the mill onto the power unit and turn clockwise to lock in position.
6 Select Maximum speed or use the pulse (P).
Hints and Tips
-
Baby food/purée - allow cooked food to cool down to room temperature before processing in the mill.
-
For best results the main bowl is recommended when chopping herbs.
To Use Your Plastic Blender (if supplied)
Refer to Illustrations M1 - M6
IMPORTANT
Leaking will occur if the seal is damaged or incorrectly fitted.
The appliance will not operate if the blender is incorrectly fitted to the interlock.
1 Fit the sealing ring into the blade assembly - ensuring the seal is located correctly in the grooved area.
2 Hold the underside of the blade assembly and insert the blades into the goblet - turn anti-clockwise until it is secure. Refer to the graphics on the underside of the blade assembly as follows:
- Unlocked position
- Locked position
3 Put your ingredients into the goblet.
4 Fit the lid onto the goblet and turn clockwise until it clicks. Fit the filler cap.
5 Place the blender onto the power unit, align the on the blender with the on the power unit and turn clockwise to lock
Hints and Tips
- When making mayonnaise, put all the ingredients, except the oil, into the blender. Remove the filler cap. Then, with the appliance running, add the oil slowly through the hole in the lid.
- Thick mixtures, e.g. pâtés and dips, may need scraping down. If the mixture is difficult to process, add more liquid.
The processing of spices is not recommended as they may damage the plastic parts. - To blend dry ingredients - cut into pieces, remove the filler cap, then with the appliance running, drop the pieces down one by one. Keep your hand over the opening. For best results empty regularly.
To Use Your Cutting Discs (if supplied)
Refer to Illustrations N1 - N6
IMPORTANT
- Never put your fingers in the feed tube.
1 Fit the drive shaft and bowl onto the power unit.
2 Holding by the centre grip, place the disc onto the drive shaft with the appropriate side uppermost.
3 Fit the lid.
4 Put the food in the feed tube.
5 Switch on and push down evenly with the pusher.
Hints and Tips
Use fresh ingredients
- Do not cut food too small. Fill the width of the feed tube fairly full. This prevents the food from slipping sideways during processing.
- When slicing or grating: food placed upright comes out shorter than food placed horizontally.
- There will always be a small amount of waste on the disc or in the bowl after processing.
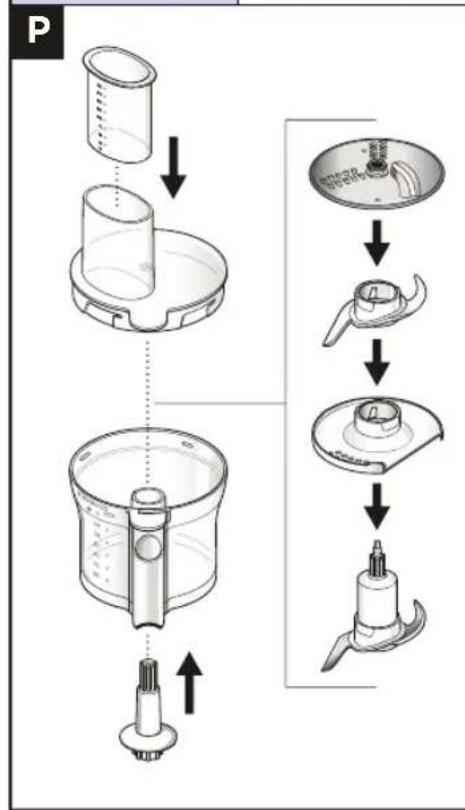
Attachment Storage
Refer to Illustration P
After use the knife blade, emulsifying tool, dough tool and 4mm slicing/grating disc can be stored together in the bowl.
Do not operate the processor, with more than one tool fitted in the bowl. Use only one attachment at a time.
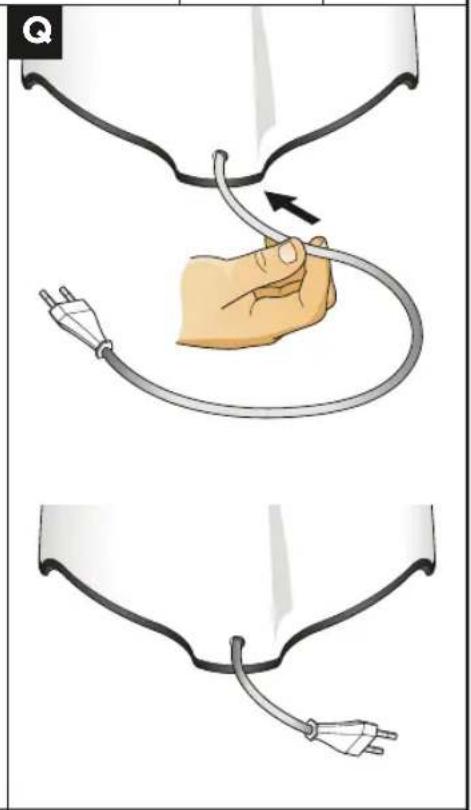
Cord Storage
Refer to Illustration
Insert the cord into the cord storage stuffer box.
Recipe
Prune Marinade
275g Honey (refrigerated)
25g Prunes
50ml Water
1 Place all ingredients into the mini chopper/ mill. Refrigerate overnight.
2 Fit the attachment to the power unit.
3 Switch to pulse for 5 seconds
4 Use as required.
Care and Cleaning
Always switch off and unplug before cleaning.
- Handle the blade and cutting discs with care - they are extremely sharp.
- Some foods may discolour the plastic. This is perfectly normal and will not harm the plastic or affect the flavour of your food. Rub with a cloth dipped in vegetable oil to remove the discolouration.
Power Unit
- Wipe with a damp cloth, then dry. Ensure that the interlock area is clear of food debris.
- Do not immerse the power unit in water.
- Store excess cord in the storage area at the back of the power unit.
Cleaning Instructions - Refer to the relevant illustration R.
Service and Customer Care
- If you experience any problems with the operation of your appliance, before requesting assistance refer to the 'Troubleshooting Guide' section in the manual or visit www.kenwoodworld.com.
- Please note that your product is covered by a warranty, which complies with all legal provisions concerning any existing warranty and consumer rights in the country where the product was purchased.
- If your Kenwood product malfunctions or you find any defects, please send it or bring it to an authorised KENWOOD Service Centre. To find up to date details of your nearest authorised KENWOOD Service centre visit www.kenwoodworld.com or the website specific to your Country.
- Designed and engineered by Kenwood in the UK.
Made in China.

IMPORTANT INFORMATION FOR CORRECT DISPOSAL OF THE PRODUCT IN ACCORDANCE WITH THE EUROPEAN DIRECTIVE ON WASTE ELECTRICAL AND ELECTRONIC EQUIPMENT (WEEE)
At the end of its working life, the product must not be disposed of as urban waste. It must be taken to a special local authority differentiated waste collection centre or to a dealer providing this service.
| Troubleshooting Guide | ||
| Problem Cause Solution | ||
| The processor will not operate. | No Power.Bowl not fitted to power unit correctly.Bowl lid not locked on correctly. | Check processor is plugged in.Check bowl is located correctly and the handle is situated towards the right front hand corner.Check that the lid interlock is located correctly into the handle area.The processor will not work if the bowl and lid are fitted incorrectly.If none of the above check the fuse/circuit breaker in your home. |
| Detachable drive shaft not fitted to power unit. | Fit the detachable drive shaft onto the power unit before fitting the bowl. The bowl tools and attachments will not operate unless the drive shaft is fitted. | |
| Blender or mill will not operate | Blender or mill not locked on correctly.Blender or mill not assembled correctly. | Blender or mill will not operate if fitted incorrectly to the interlock.Check blade assembly is fully tightened into the goblet/jar |
| Processor stops during processing | Processor overloaded/ maximum capacities exceeded.Lid unlocked. | Check maximum capacities stated in the recommended usage chart.Check lid is locked correctly. |
| Blender or multi mill leaking from blade assembly base. | Seal missing.Seal incorrectly fitted Seal damaged. | Check seal is fitted correctly and not damaged. To obtain a replacement seal see ‘Service and customer care’. |
| Unit unstable/heavy vibrations and movement. | Sticky fruit/ingredients such as dates being processed.Speed selected too low. | For best results use ‘Pulse’ first to break down the ingredients and then continue processing on maximum speed. |
| Poor performance of tools/attachments | Refer to hints in relevant ‘using the attachment’ section. Check attachments are assembled correctly. | |
Nederlandss
Veiligheid
Hachoir/moulin compact
Consulte as Ilustracoes C - I
Consulte as Ilustracoes C - I
Consulte as Ilustracoes C - I
Consulte as Ilustracoes J1 - J7
IMPORTANT
Consulte as Ilustracoes K1 - K5
Consulte as Ilustracoes L1 - L5
Consulte as Ilustracoes M1 - M6
IMPORTANT
Consulte as Ilustracoes N1 - N6
IMPORTANT
- Nunca introduza os seu's dedos no tubo de alimentacao.
Conseils I suggestiments
Conseils I suggestiments
Conseils i suggeriments
Conseils i suggeriments
Conseils i suggeriments
Conseils i suggeriments
Consells i suggeriments
-
Oplast position
-
List position
- Oplast position
- Last position
Aenidia paaxapiou
⑫ EpyaIeio Zmuic
EpyaIio yia KpEμεc
14 1
Ppoadetiké aptnmuata
15 AevovooTeiOtnc (eav npexetai)
A KwvoTou oTuΦtn
B Zoupwtnp
16 Paaotikoc Mivi koftnc/Muoc (eav npexetai)
A KaTaku uou
B (\Delta) iataEn (\lambda \varepsilon \pi \dot{1}\delta \omega \nu \mu \dot{\iota} \omega \alpha \alpha \alpha \alpha \alpha \alpha \alpha \alpha \alpha \alpha \alpha \alpha \alpha \alpha \alpha \alpha \alpha \alpha \alpha \alpha \alpha \alpha \alpha \alpha \alpha \alpha \alpha \alpha \alpha \alpha \alpha \alpha \alpha \alpha \alpha \alpha \alpha \alpha \alpha \alpha \alpha \alpha \alpha \alpha \alpha \alpha \alpha \alpha \alpha \alpha \beta
HE CAEDYET 6pa6aTbIbTaT rOpayne HnHpeAeHTbl.
- PNCK OXORA: Npea Tem, ka NomeCTnTb ropyne INHrpeaNHTb B yaSy, an nepea CMeuBaHem m HaDo DaTb OCTbITb DO KOMHaTHoN TeMnepaTypbl.
- Co6IIOaIte octopoxKHOCTb B o6paueHn C hacaKaMn, He KacaITecb peKyuux KpOMOK npu nx YnCTke.
BkauaTe 6eHep ToIbko 3akpbToKpbUkoN. - NoIb3yI Tecb yIeHepa ToIbKO npn HauuN B HeJ peKyuE HaacdKn.
HnkOrda He BkAouaTe npToi 6eHep. - Пи пиг�тOBаEHн CMy3н He CMeUHBaIte CMEp3UHecB TBePdIe KOMKn INHpeAnEHTbl.пeped 3aRpy3KoB YaWy Bcerda pa3AamBaIbTe nx.
HacaKn AAn N3MeAByNTeA
- HnKoIa He HaDeBaIte HoKeBOH 6AOK Ha 6AOK NITaHn, He yCTaHOBnB KyBUnH / KpbIuKy.
- HNKoRda He OTBnHcNBAaTe KyBbUH / KpbIuKy, Noka n3MeAbYnteYb yCTaHOBaeH Ha npu6ope.
He npikacaiTecb K octpbim Ae3Bnram. DepeKnte HOKeBOB 6AOK B MeCTax, HeoctyHbIX DeTAM. - HNKoIa He cHmaiTe n3MeAunTeA b ONoHOn OCTaHOBKn HOKeBOrO 6LoKa.
- EcaH n3MeA bHTeA b yCTaHOB aEN He npabnA bHo, np6op pa6oTaTb He 6yDeT.
He 6pa6aTbIbAte Tropyne INHpeAneHTbl B n3MeAbyNTe: nepeo6pa6oTKoON HdoXKhbl OCTbTB DO KOMHaTHOH TemnepaTypbl.
MHHpe3Ka/u3MeAbUHTeA
He pekomehyeteTc n3MeAbaTb CneuN, TaK KaK OHN MOryT NOBpeaNTb PAACTNKOBbie DeTaNN.
HacaKa-MeAbHnua
He o6pa6aTbIbAInTe cyXoN KOpEnb KypKymbl, TaK KaK OH CAnUkOM TBepdbI IN 3TO MOKeT NOBpeNTb HOxN.
Auck Aa Hape3Kn AOMTKKaMn/N3MeIbYeHna
- Anckn OueHb Octpblc, Co6AHOdaaTe OCTOpOxHOCTb npu yCTaHOBKe, ChrTtN u nCTKe.
BcerdaAepKntecb3a pyky, pacnoAOKeHHyIO CBepx, noaIbwe OT pexyUero Kpa, npn 6paueHn C ocTpbIMN peXyUIMN Ae3BnA M, onopoxHeHn Yaun N B npocece qncTKn.
Hikorda He npotaAknBaIe NnU pykAmB noaHou Tpy6ky. IOnb3yTecb ToAko TOAkaTeAem n3 KOMnAeKta NoCTaBKn. - Ipea CHaTneM KpbIuKo OTKaIOUHTe npi6Op NdoXAnTEcB NOHOr OCTaHOBKn DnCKa.
UcSTka
- Ipepa YnCTKoB BbIKAnOpHTe 6aehAep,doXkAnTeCb OCTaHOBKn Ae3Bn N OTKaHOpHTe BnAKyOT cETN.
- IpoTpnte 6aok nHTaHn BaaXHo TkaHbO, 3aTe M BbCyUHte. Y6eNTecb, yTO B o6aactmexaHn3Ma 6aOKnpOBKn 8 octaTKOB NnIu He octaLoCb⑨.
- YaIsha, KpbIshka, ToIkAteIb I BCE HacaKn/INHCTpyMeHTbl, KpOme 6AnHepa N HOKeBbIX 6AnOKOB MeIbHnUcbl, MoXHO MbITb KaK BpyHyIO, TaK N B NocCyDOMoeHON MaUNHe.
HOKeBbIe 6AnKn CLeAyeT UcHrTb UeTKoN I N OAnOckaTb IpOTouHO BDOJ.
He norpykaTe 6AnK nntAHn HoxKeBbIe 6AnK 6AnHepa/MeAhNcbl B BoAdy
Ipea noAkaueHnem K cTeu 3AekTpOnnTaHn
- Y6eAnTeCb B TOM, qTo HApJxKeHne 3AekTpocETn B BaIeM DOME COOTBcTCTByET yKa3aHHOMy Ha OCHOBaHIM 3AekTpopnp6opa.
- Pπi6op cooTBeCTByeT ἀπεκΤινΕ EC 1935 / 2004 o MaTeρηλαx ηιδελλχ, πpeΔHa3HaueHHbIX ΔλΑ KOHTaKTa C έΠιΣεBBbIMN έρογκΤaM.
PpeaepBbIM HcnoAb3OBaHHeM
1 CHIMNTE IAACTMaCCOBBie 3aIHTbIE HOXHbICpeKyuux Ae3Bn. ByTe OCTopoXHbI, Ae3BnOueHb OCTpbie. Tn HOXHbI
IpeHa3HaueHbI AAn IpeOxApaHeHnAe3Bn TObKO Ha BpEm N3rOToBaeHnITpAHcnpTnpOBKn, TaK YTO OHN Bam 6oAbleHe NoHaO6rTa.
2 PpomOnTe eTaA. Cm. pa3deA yxoA n YnCTka'.
OCHOBHbI KOMnHOHeTbI KyxOHHa MaunHa
① ToAkaTeA
② Pódaiouza Tpyka
③ KpbIwKa
4 BaAaHCTpyMeHTOB
(5) Yama
6 CbemHbI npuBOHOB BAA
7 BAOK NITaHNA
8 PeryAraTOp ckopocTN/IMnYyCbHbI peKIM
BAnoknapoTop 6e30nacHocTn
MecToAAnHypa(c3aN)
HacaAkn
B KOMNAEKT BaWei KxOHNo MaHnHb MoYrT BxOaNTb He BCE nepeuNCaehHbIe HNKe HaCaAKn. Ha6op HacaDOK 3aBncIT OT MoeAn. Nocetnte caT www.kenwoodworld.com, ecAn Bam Tpe6yETcN HΦOpMaun O TOM, KaK KyNtB HacaKy, He BXoAryU B KOMNAEKT NOCTaBKn.
HacaKn, cTaHdapTHa KOMPLeKtau
1 HoX
12 HacaKaAByBbIMeUNBaHnTeCTa
13 ΘMyaCnΦuKaTOp
14 ANCK AAR Hape3KN / TOHKOTo N3MeAByeHn (4 MM)
(MoryT He BXoAHTb B KOMnAeKT NoCTaBKn)
15 COKOBbIXKIMaAka DAAYIHTpyCOBbIX (ecAN BXOANT B KOMNAEKT NOCTABKN)
A KoHyc
B CnTo
16 PAACTMaCCOBbIM MHN H3MeAHTeA/ MeaBnua (ecAN BXoNT B KOMnAeKT NOCTaBKN)
A KpbIiKa MeIbHnUcbl
B HoKeBoI 6AoK MeA bHnUcBi
17 BaeHep c nAActKOBoKpYKKoN (eCn BXOANTB KOMNAEKT)
A Kpykk
B HoKeBoi 6AoK
C YIaONTHInTeAebHOe KOaBcO
D Kpbioka
E KoAnayok HAnBHorO OTBePCTn
18 HacaKa-MeIbHnua (ecN BxOaNTB KOMNaeKT NOCTaBKN)
A KyBUnH
B YIANTHNTeABHOE KOABIO
C HoKeBo6Aok
KaK noAb3OBaTbCЯ KYXOHHO MaunHO
CM. NIAIOCTpaun C - I
BHIMAHNE
BybTe ocToPOxHb npn o6paueHn c octPbIMn Ae3BnA Mn, Bcerda depXHTecb 3a pyuKn AANaBueB.
He 3a6bIbaIte yCTaHOBNTb Ha MaUNHy
HaSy HacaKy nepeA 3arpy3KoN
HHpeAneHTOB.
He nCnoAbyTe KpbIuKy Aa ynpaBaeHn KyxOHHO MaunHO, NOb3yTEcb ToaKo peryaTOpOM BkAUOueHHa/BblKAIOUeHHa ckopocTu.
Ecaa Hkpbikka He npAkehki KaCaeAyeT K 6AOKnpaTopy 6eOnacHocTN, KxOHHa MaunHa pa6oTaTb He 6yAdT. IOnaIoJaa Tpy6Ka n pyKa qAn DOAXHbI 6bITb paCnoAoXeHbI B nepeAHem yrAy cnpaBa.
- IOnb3yntecb IMnYbCHbIM peXNMOM (P)AII npepbIbucto BO3eInCTBna. Imnyabchbn peXIM 6yTe dEInCTBOBaTb AO Tex NOp, NOKa Haxkata KHOJa.
- PepeA cHrTHeM KpbIiKn BceRda BbIKaUoHaTe Pnp6Op N OTKaIOuHaTe erOOT cETn.
KyxoHHyMoHHy Hea3ra NcNOb30BaTb ATOrO, yTo6bl N3MeAbaTb IAN MOOTb KOeHbIe 3epHa IAN DApOcKn caxapHO rceKa B caxaphyIO npdy.
- Pn D06aBaeHm MNHaBHO 3ccEHuN Nn
- PnnpaBbl K CmeCm CTapaiTecb N36eRaTb
- KOHTaKTa C NAACTIKOBbIMN DeTaAAMN,
- TAK KaK 3TO MOKeT PnIBEcTN K CTOI KOMY
- OKpaUNBaHIO.
1 YcTaHOBInTe CbEMHbI npINBOADHO BAn Ha 6AOK NITAHIN.
2 3aTe m yctahOBnTe yauy, coBmecTnBaHa uae C Ha 6AoKe 3AeKtpoDbnTaTeA, n NOBepHnTe No YacOBoN CTpeAKe DO
3 3 To6bI c6paTb INCTpyMeHNT (Ae3BHe HOxHa HAcADKy DAA BbIMeUNBaHNr TeCTa N MyBraTop), BO3BMNTecb 3a pyKn AAnbuev I NOMEcHTte CbEMHyO qactb INCTpyMeHTa Ha Ha BaA DAra INCTpyMeHTa N yCTaHOBIne Ha MeCTo ABNXKeHNem BHN3, NOBepHIne HAcADKy IpOTNB YacOBOn CTpeAKN DAy FHKCaUIN.
4 YcTaHOBnTe co6paHHbI INHCTpyMeHT Ha PpNBoADHO BAA.
5 YcTaHOBnTE KpbIuKy TaK, YTO6bI BepXHJy qACTb npuBOaHOrO BaAa / HacaAKn 6blA no UeHTpy KpbIuKN.
6 PnokauHte npnbop K cetn, BkauHte n BbIbepnte ckopoctb (Cm. Ta6Anu pyekomeHayembIX KOANueCTB IPOaYKTOB
7 NOBTOPHTe OINCAHHYIO BbIe IPOUeApy B o6paTHOM IOPaKe AAR TOrO, YTO6bI CHrTb KpbIuKy, HacAdKn UaWy.
KaK nOa3OBaTbCra Ae3BnEm HOxa
CM. HAAIOCTpaH C - I
1 Caeynte yka3aHnM B pa3deAe "KaK IOAb3OBaTbCk KyXOHHO MaunHOJ".
COBeTbi
AIAIPOAYeHn6Oaee rpy6o KOHCNCTeHNN CNOAB3yntE MMYABCHbI pEXIM.
Maco, Xaeb N OBOUH HapeKbTe Ky6nKaMa pa3MePOM npuMeHO 2 cm.
- NeueHbe cAeMyET NOKpoWntb N 3acblnTaB uepe3 Tpy6ky B Ipouece pa60Tb MaunHbI.
- CλeДnte 3a Tem, UTo6bI He NODBeprTaTb
HrpeDnEHTb Upe3MepHOJ O6pa6OtKe.
KnipAraTeTa CAneMyet Hape3aTb XoAoHbIM Ha Ky6uKN No 2 CM.
- AAN DOCTXKeHn HaAlyuXx pe3yABTaTOB
- INIpepa6OTke ANKINX φpyKTOB /
- INHPeAneHTOB, TAKNX KAK ΦHNIKN,
- INCNOAB3yIte CHaHaA NMIyAChbI peKIM,
- YTO6bI N3MeAByTb INHPeAneHTb, a 3ATEM
- INPOAOJkaTe O6pa6OTky Ha MaKcImaAbHO
- CKOPOCTN.
KaK NOb3OBaTbc8 HaCaKOH AIA BbIMeUNBaHHa Tecta
CM. HAAIOCTpaH C -I
Hcnoa3yETCAA aPOXKxEBORo Tecta.
1 CaeayTe yka3aHnM B pa3deAe "KaK NOAB3OBaTbCk KyxOHHO MaunHOH".
COBeTbI
BpeMra 6paOaTKn He daXkHO npeBbIaTb 60 CEkyHa.
- IomeCTIe cyxne INHpeAneHTb B yauy Ndo6abTte KnAkoCTb Ype3 nOdaHOUTo py6ky B npocece pa60tbi np6opa. PpOAnkaTe Do tex nop, noka He o6pa3yetcraAakn UpyrN KOM TeTa.
- NOBTOPHO 3aMeuBaTcAeMyET ToBko BpyHyIO. He peKoMeHdyEtCra BblOAnHrTb NOBTOPHoe 3aMeuBaHne B YaIe, TaK KaK 3To MOKeT HApUHTb yCTOnuBOcTB KxOHHO MaunHbI.
Kak noAb3OBAbCRA 3MyAbraTopHbIM
CM. Nannocpaun C
1 CædyyTe yka3aHnM b pa3dEe “KaK NOAb3OBAbCk KyxOHNo MaunHOI".
COBeTbI
- Npea,ncnoB3OBAHnem y6eAnTEcB,TO 4aHaHaCACAqYNCtBie Hn HnX HeT Knpa.
MaioHe3 -NoaoXKeTeaIOn npnnpaBbIB aWy n nepemEwaIe B TeueHne HeckoAbxKnx cekyHa. NocTepeHHo 06abAraTe MaACo HnpepbHBIM NOTOKM NO NOaIOUeT py6ke npn BkAUOeHHOM npn6ope.
KaK noAb3OBATbcra COKOBbIXKIMaAKoI AIAI UHTpyCOBbIX (ecAN BXoANT B KOMnAeKT nocTabKn)
CM. HAAHCTpa4n J1-J7
BHIMAHNE
Ecan cno He 3aФИKcnpoBaHo KaK CaeAyeT, COKOBbIXMMAkA AAn LITpyCOBbIX pa60TaTb He 6yTe.
1 YcTaHOBInTe npINBOADHO BAn NHaShy Ha 6AOK nITaHn.
2 YcTaHOBInTe CnTo B yAùy, Cædʒ 3a TeM, yTo6bI pyUka CnTa 6blA 3aΦNkCnpoBaHa B NoλOKeHn, HaxOJaLμEmCγ CTpOΓo HaD pyUkOyAùn.
3 YcTaHOBInTe KOHyc HaA PnIBoADhIM BaAOM, BpaaIeO DO Tex nop, NOKa OH He ONyCTNTcA DO KOHua BHN3.
4 Pa3peXbTe φpyKbI nONoλm. 3aTeM BkAQUHTe np6Op n HaxnMaIte pa3pe3aHHo nOAnBnHKo Ha KOHyC.
COBeTbl
CM. NAAIOCTpaU L1 - L5
1 NomeCTnTe INHrpdeAnHeNTbI B KyBwHn.
2 YcTaHOBInTe ynAOTHInTeAe KOaBIO Ha HOKeBOI 6AoK.
3 NpeBepHnTe HoKeBo6Aok. Onyctnte ero B KyBUnH Ae3BnMaBn3.
4ПиВИNTIte HOXeBOH 6AOK K KyBUnHy DO yIopa.CM.3auchnHa ObOpOTHOH HIXHeN NOBepxHOCTN HOXeBOrO 6Aoka:
-36aOKnpoBaHHaIIO3nua -3a6aOKnpoBaHHaIIO3nua
5 NomeCTIe MeAbHnUy Ha 6AOK NITaHnN IOBepHIne No YacOBoC TpeAKe Do FIKcaun.
6 BbIbepnte MaKcMmaBHyIO CKOpocTb NAn NCnOa3yTe NMpyAChbI peKIM (P).
COBeTbl
- Ipea 6pa60KoB n3MeABynteae npiroTOBAAHbIE AAn dETCKOTo NITAHnI / IIOpe HrpeAneHTbI DOxKHbIOCTbIHytbdo KOMHaTHOH Tempeatpybl.
AAnOCTnKeHn HnAuyWero pe3yAbTaTApn NImeBHeHn TpaB peKOMeHdyETcNcNoA63OBaTb OCHOBHyU qAly.
Kak NOAb3OBaTbCra NAACTNkoBbIM 6AeHApom (ecan BXoAnT B KOMnAeKT noCTabKn)
CM. MAAIOCTpaH N M1 - M6
BHIMAHNE
- Pn OTCyTCTBNN NAN Pn HEnpaBnAbHOYcTaHOBKe KOaBaNPOBNTc npoTeuKa.
Ecan 6aehep HnnpabnabHo COBmeuec 6aknapoam 6e0nacHOCTN, np6op pa6oTaTb He 6ydt.
1 YCTaHOBNTe yIaOTHTeA bHoe KOaHo Ha HOKeBOI 6AnK TaK, YoToBI KOaBIO aKKypaTHO AerAo ByrAy6aHeHne.
2ПиДeрЖИВaHoxKeBO6KCHN3y, BCTaBbTe Ae3BnB Kpykky N NOBepHInTe IpoTINu YacOBoCtpeAknDoФNKcaUN.CM. 3HaUKN Ha O6OpOTHOHnxHeN IOBepXHOCTN HOKeBOrO 6AOKa:
- Pa36λoKIpOBaHna n03nua
-60KIOPOBaHHaNo3n
3 NomeCTnTe INHpeAneHTbI B KpyxKy.
4 YcTaHOBnTe KpbIuKy Ha KpyKky N NOBepHnTe No yacBOy CTpeAke Do UeAUKa. YcTaHOBnTe KOAnayOK HAAIBHO OTBepCTnR.
5 NomeCTnTe 6eHep Ha 6oK 3nTuHnA, COBMeCTnTe Ha 6eHpe c Ha 6oKe, NOBepHnTe No yacOBon CTpeAke, YTo6bl 3a6oKnOpBaTb
COBeTbl
- PpnpnroTOBAAHmMaHOHe3a Bce INrpeAeHTbI, KpOme paCTNTeABHO rO maca, nOmeCTnte B 6AEHep. Chmnte KOAnapOK HAnBHOrOTBepCTn. 3aTeM, npN pa6oTaIOUeM pInbope, MeAeHHo D06aBBTe MaCao YpeE3 OTBepCTne B KpbIuKe.
- TycTbe CMEcH, HApPIMep, NaWTeTb IAN NOAINBbl, INHOaIaIpnXoAnTCr OCTOpOxHo OTCKpe6bBaTb. ECan CMEcH IAOxo CMeuBaOTcR, Do6aBbTe 6oAbe XnKoCTN.
He pekomehayetc CMeuBaTb npnbope cneun, TaK KaK OHN MOyT NOBpeNTb IAACTMACCOBBIE yACTn.
Aa CMeUBaHn Cynxn HrpeDneHTOB HapeKbTe nX Ha KycOuKn, CHMNTe KOaNaOK HaAHBHO OTBepCTnN, Pn pa6oTaIOSeM npnbope, 3arpy3nte KycOuKn Odnn 3a dpYm.
He onyckaIte pykn B noaouyIO Tpy6ky. AAnnoayehnA lyuero pe3yAbTaTapeyApHOnopoknIte yauy.
KaK noAb3OBAbCrapeXyUIMN AnCKaMn (ecAn BxOaHT B KOMIaEkT NoCTaBKn)
CM. NAAIOCTpaN N1 - N6
BHIMAHNE
Hnkorda He donyckaite, yto6bI Baun naBcI OKa3aAncb B NOdaIOue Tpyke.
1 YctaHOBInTe npINBOADHOI BAI N uAry Ha 6AoK nITaHnR.
2 YApKnBa pyky, paCNOAOKeHHyIO B ceHTpe, yCTaHOBtE AnCK Ha npNBOADHO B a COOTBeTCTByIOe CTOpOH N BBepx.
3 YcTaHOBNTe KpbIiKy.
4 NpOAnKeTe npOdyKTBIBIOaIOUyIO Tpy6ky.
5 BkIoUOHTe npnbOp npaBHomepHo HaKIMaTe Bn3 Ha TOAkaTeAb.
COBeTbI
- NcnoB3yIte CBeJxne npOaKyTb.
He pejbTe npoaykTbi CAnuKOM MeAko. 3anoHnIte nOaHouyTo py6ky paBHomepHo N0 BceN uHnHe.Tem cMbIM npeotBpaaaetc CMeueHne npoaykTOB B cTopohy npoobapOTke. - Ppi uHHKOBKe n TOHkOM n3MeAByeHn npOaYkTbI, pa3MeuJaEmbIe BepTuKaAlbHO, 6yAyT Hape3aHbI 6oAee KOpOTKnM KycoHcAMn, yem npOaYkTbI, pa3MeuJaEmbIe Ropn3OHTaMbHO.
HaNcKe HAn YaWe Bcerda OCTaETcHbOaBwOe KOAnueCTBO npoAkyKTOB NOOKOHaHN IpOceCa 6pa60TKn.
XpaHeHne HacaOk
CM. NAAIOCTPaLNUHO
IocAe nCnOaB3OBaHnA Ae3BnE HOxA,
3MybTaTOp, HAcAdKn AAn BbIMeUBaHnA
TeCTa N 4-MnAAmEtpoBbI DnCK AAn Hape3Kn/
HaTnpaHnRA MoXHo NOMeCTuB BMeCTe B YaShy Ha
XpaHeHne.
He nCnoA3yIte KxOHHyMaHInHy,ecnB
yauwe yCTaHOBAnEO 6oAee OAnHO INCTpyMeHTa.
CaeayET NcNoA3OBaTb TOAeKO OAnHacaKyo
OAnHOBpeMeHHO.
XpaHHe Hypa
CM. VAAIOCTpaLNUO
BcTaBbTe WHyp B CeKunIO AAn XpaHeHnI WHypa.
Peuent
MapuHaN3 uepHocAnBa
275 r mea (oxaaKdEHHoro)
25 褒甸
50 MA BOΔbl
1 NomeCTNTe BCE INHpeAneHTbIB MHNn3MeAaHTeA/b/MeaBnUc. NomeCTNTe BXoAoNAbHK Ha HOyb.
2 YcTaHOBnTe HacAky Ha 6Anok nITaHnI.
3 BKAHOHTe NMnybCHbi peKIM Ha 5 cekyHa.
4 Icnoa3yTe no XeAHHIO.
YXoA N OuNCTKa
- Perepa nctkoi npnbopa Bcerda
BbIKHouaTe eO NOTCOeHNHnTE OT CEtN.
Co6IoJaTe octopoxHoCTb B 06paueHn C HOXeBBIM 6AOKOM N peKyuUMN AnCKaMn, OHN Ype3BbIaHNO OCTpbl. - HekotoptbI npoaykTbI MoryT oecuBeuBaTa IIAACTNKOBBIE AeTAA. 3TO CHTaETcH HOpMaA hBIM He npiBOaNT K NOBpeKdEHNIO DeTaeN I He BAnreT Ha BKyc NnU. AYdaAeHNA oecuBeehHO rTHa nOTpnte eTo TkaHbO, CMOueHHo pacttTeA hBIM MaCAm.
БАК ПИТань
BbITpnte BAAxHON TpAnKoN,3aTeM BbICyUHTe.Y6eAnTEcB,yTO B3OHe 6AOKINPOBKn 8 Het OCTaTKOB Nn
He norpykaTe B BoDy 6AnK nTuHa.
Hyp nnta H np Heo6xOAMOCn MoXHo yKOpOTb, NomeCTNB qactb eRO B OTdEHeHne A XpaHeHn B 3aAHeN qactn pnpBOADHO 60ka 9.
HnCTpyKuIN NO uNCTKe:cm. COOTBeTCTByIOUO CXemy
O6cayxKbAHne n 3a60Ta o NOKyNaTeAIX
- EcaB pa6oTe np60pa BO3HnKAN KAKne-AN60 HeNoAaKn, nepeO6paueHnEM B CAYK6y NoAepKKN pOuTIne pa3deA «Ta6Anua NaNcKa NycTaPHeHn HncnPABHOCTe N 3aNNTe Ha caIT www.kenwoodworld.com.
- POMHnTe,HTo Ha np6Op pacnpoctpaHReTcra p aHTnA,OTBeuauOuaB CeM 3aKOHbIMnoXeHHm OTHOCHTeA bHO CyueCTByUeIepaANTnN npab Notpe6nteA B Toi CtpaHe,TdE np6Op 6bl npio6peTeH.
- Пи ВОЗнКовени Нсправно в рабоу прибopa Kenwood и пи обаржени Кадх-лбобдфektob, по calуиста, OTпраьтеш Ил пинеситприбор в abtopиюразаньш сервись сөntр KENWOOD. Актуалы Контakтные дahlь сөрвисьцеHTpoB KENWOOD bbl haideTe ha caite www.kenwoodworld.com Ил Ha caite Дэя Ваше ства.
Kenwood Limited, New Lane, Havant, Hampshire
PO9 2NH, UK
HmnpTeP n ynoHOMOeHHa opraHn3aun Ha npHnTne npTeH3n:
MockBa, yA. CyueBcka, 27, cTp.3
TeA:+7(495)781-26-76
A BoKaA
B AAMac KINHaFbI
CTbIFb3aaybiWdEhReAek
D Kyo caHbIaaybi
E KaKa
18 ΠaactnKTeH JkacaAFAH WafBih MaJdaAafBliU/ YHTaKTaBliU (6epiarE H 60ca)
A YcaKaTafbiW bIaBic
B TbIfbl3aaybiW caKnHa
C AAMac 60airi
19 2 MM Kecy/yrity dNcki
TaFamDbIK npoueccopdbI naaAahy KOAbI
C - I cypeTTepiH KapaHbI3
MAHbl3ab1
- ΘTkip Kv3AepAi yCTaFaH Ke3Ae a6aB 6oAihb3, apKaUaH caycak YCTaFbIITapBHaH YCTaHb3.
- INHpeAeHTTepi Kocnac 6ypbH, apkaaHa TaBaKtBi XHe TipKeMeHi eHdEy KypaBbHa CaAbHbI3.
-
ΘHApAaBih icke Kocy ywiH KaKnaKTbI KOaHaH6aHbI3, aPkaaH Kocy/ewipy XbIAaMbIKTbI peTTerWIn KOaHaHbIHbI3.
Ta6ak HeMece KaKnak Iwki KyaBInTapbHa AYpbic caAblH6aca, eHDey KypaBlj Xymbc icTeMeiDi. Bepy TyTikweci Meh Ta6ak TyTKacbIHbOH JkaK 6ypbiKa OPHAeIFAhBiH TeKcepH3. -
NyaBCTi (P) Kbicka NMnyABC yuH naaHaHbIb3. Nybc peTteri KaAaHbKaONbIAFaHHaH COH iCe KOcblaaDbI.
KaKnaKtbl aAMac 6ypbih apkaaah ewiiphi3 XeHE TOKTaH axbipaTbHbl3. - ΘHdEy KypaIb Kofo 6yPwakTapbIH MaIdaayFa He yCaKaTayFa Hemece TyiipWikTi KaHTtbi YHTaK KaHTKa aHaAdbipyFa apHaAMaFaH.
Baam 3ccehucbH HeMece Kocnaapra DAmeyiIePki KockaH Ke3de NAACTNkAIBK 3aTTapra TNIi36eHi3, OAp TypaKTbI NiIMAi 6epyi MymKiH.
1 AaH6aBj KTeKu6 biik neh Ta6akTbkyat 6eaiirHe caAihb3.
2 OdaH Kein TabaKbI Kyat 6eAirHderi 6eAricimHe Ta6aKaTbI 6eAricH Typaay apKbIbI CaAbl3, OHBI ON KYABITaMaBihua caFAT TIAIme6ypaHbi3.
3 KypaAbl KypacTbipy yuH (nbIwak kyy3i, KaMbp Iyey KypaBx JxHe 3MyAcbnay KypaB) Caycak YCTaFbIITapbIHIN Kemerimeh aIbH6aBbl KypaB 6eaiH KypaB 6iAIHH YcTIHe KOybln, OphbHa TycipH3 De, KOHbIPMaHbOpbHa 6ekity yuH cafAT TiIHe Kapcbl SaftTa 6ypaH3.
4 KypactbipbIaHaH KypaaabI XeTeK 6iAiriHi yCTiHe opHaTbIHbI3.
5 KaKaTbI XeTeKwI 6iAiriH/kypaAdbIH XOFaPbI 6eAiRI KaKaNTbIH OpTacbIHDa 6oAaTBHa CaBb3.
6 Kyat Ka6eaiH, OaH KeiH Kyat Ke3iH KocbIn, KaKeTTi XblAaMbIKTbI TaHaHb13. (YcbHbIFaH naHaAaHy keCTecIH KapaHb13
7 KaKaTbI, TipKeMeAePdi XaHe TaBaKtbl Any yuH Jxofapbldaftbl npouedypaaapabkepicihwe KaTaHaHbI3.
- KYABINTaAMafaH Kaabin
- KyAibTaaFah Kaabin
5 YcaKaTbIiWtBi KyaT 6AorbiHa opHaTbIN, e3 OphbHa KyaBINTay ywiH caFat TiAiH 6aFbITbIMeH 6paHbI3.
6 MaKcImaAdbi KblAaMbIKbI TaHaAHB13 HeMece mNpyABC (P) fYHKUraCbiH naAaAHbI3.
PnAaIKeHecTeP
BaTaraMApb/e36eep,HTaKaTafbluTa eHdEmec 6ypbH niciPiReH TaFAMhIH 6Ame TemnepaTypacBHa caAkbHdaTbIAYbHa MymkiHik 6epiHi3.
KekhicTepaHTaKaTaHaKe3eKaKcbi Htkeepre KAn KeTki3y yuiH, Herizr Ta6ak YCbHbIaDbI.
IIaactnkaIbIK 6AeHApI IaHaAHy XOAbI (6epiAreh 6oIca)
M1 - M6ypeTTepiH KapaHb3
MAHbl3Δbl
TbIFbl3aayblka 3aKbIM KeAe HeMece AYPbIC CaBHa6aca, aFybl MymKiH.
- EAnep iWki KYNbHa dypbc caabH6aca, KpybIAFBi KMBic icTeMeNi.
1 TbIfb3daybIw DeHReAerIH aMac 6aIirHe caBb3-TbIfb3daybIwTbIH OyblFaH aIMaKa dypbicCaBbHFaHbH TeKcepH3.
2 AAMac KINHaFbIHbIH TeMeHri KaFbIHah YCTaI, aAMacTapdbI 60kaAFA caBbIb3, Kayinci3eHdipy yuiH OHbI cFaT TiAiHe KapcbI 6ypaHb3. KeAeci CnKtbl aAMac KINHaFbIHbIH TeMeHRI KaFbIHdaFbl CypeTTepre KapaHb3:
- KyaBInTaAMaFaH KaAbin
- KyabintTaAFAH Kaabin
3 INHrpeneHHTepdi 60kaAfa caabHb3.
4 KaKaTbI 6okaFa caBih3 KHe Kayinci3eHApy yuih TeMeH 6acBih3. Kio CaHblaybiH caBih3.
5 Baeepai Kyat 6airihe caibih3 6aeeperi 6aeriHi KyaT 6airiHderi 6aicimHen TypaaHb3 XHe OHb KYbTTay yuih cafat TiImeH 6paH3.
PnAaIKeHecTeP
MaioHe3 JacaFaH Ke3e, MaHaH 6acka HrpeAneHTTepi 6AeHApre caAihbI3. MoBIn KaKnaFBiH aBn TactHaHbI3. OdaH KeiH KypblAfbi Icke KocBIAFaHda, KaNaKTarbl Tecik apKbIAbi MaNbI JKaAaN KYbIbI3.
KoIO KocnaIap, MbicaIbI, naHTeT XaHe TY3AbIKTap, KbIPbIN aAlydbI KaKeT eTyIMyMKIn. Kocna eHdEyre KnbIH 60Aca, a3aCnCYuBkTBkTBI KOCbIHbI3.
- BeaiKTepei eHdey ycbHbIMaIaby,ce6ebi nactkaabik 6eaiKtepre 3akbIM Keayi MymKiH.
Kypra INHpeaNEHTepi 6eHepen etk3y ywiH, 6eAikTepre 6eAih3, MoBbH KaKnafbHaBbIn TaTaHbI3, OaAH Kein H KypaA icKe KocbIfaHa 6eAikTepi 6ip-6ipAen TaTaHbI3. Icke KockaH Ke3e, KOaHbI3AbI api YCTaHbI3. EH JkaCbI HTeNkeAep ywiH jni 6ocatbIn TypbIHbI3.
Kecy AnckiAepin NaaAaAHy KoAbl (6epiaren 6oIca)
N1 - N6 cypeTTePIH KapaHbI3
MAHbl3ab1
Bepy TyTikweciHe eWkaWah KOaBlHb3AbI caAbIn NTepMeHi3.
1 XeTeK 6iAiri MeH TOCTaFaHAbI KyaT 6AoRbHaOpHaTbIHb3.
2 OpTaabIK Kecy aMafBHyCTan, caikec kafbIH KOfapbl KapaTbIN AnckHj KeTeKwJ 6iikKe caabHbI3.
3 KaKaIbIH Xa6bIHbI3.
4 TaFamBbI 6epy TyTikueiHe caAblb3.
5 KocbHb3 XHe NTepy KypaBImeH Teric NTepiHi3.
PaiAaIkeHeCTepe
KaHa INHpeAneHTepaI KOAnaHbIhbl3
TaFamBbTbIM KILKeHTa6eAikke KeCneH3. Bepy TyTikwecinH eHH Teric ToAblK eTIN TOATbIPbHbI3. ByEhDey Ke3iHae TaFAMHBH KaH-XaFbHa WauBbipaybHbH aAdbH aAaAbI.
KofapbI kapaTbIN caBihFaH TaFam KeA6ey caBihFAH TaFAMHaH Kbickapak eTin 6epiAeji.
- ΘHdereHHeH KeiH dNCKiDe HemeCe Ta6aKaTa apKaWah KaAdbkTbH KIiKHeHTa 6eAiri KaAaAbi.
KoHAbIPMaHbI caKTay
PypeTih KapaHbi3
PaaahraHHaH KeiH nbIaK KyzIH, 3MybCnay KpaBih, KaMbp NlEy KypaBih XHe 4 MM kecy/Topbl AnckHi bIdbicta 6ipre caKTayFa 60aAbI.
Ipoueccopabibbicka 6ipHewe KpaAdbi 6eKITIN, naaHaHa6aHb3. Bip yaKbTTa TcK bip KOHbIPMaHbI NaHaHaHbIHb3.
CbIMAbI caKTay
QypeTIH KapaHbI3
CbIMdbcIMdbCaTayfapaHaAFAHcaFbIu KopapKa caAbHbi3.
Peuert
Kapa epiKke apHaIFaH MapuHa
275 6aa (ToHa3bITbIAFaH)
25 r kapa epiK
50MAcy
1 BapAbyIK INHpeAneHTTI WafBIn YcaKTaFbIwKa/ AnipMeHre caAbyHb3. TyHi 6oBi TOHa3bITKbIwTa caKTaHb3..
2 KoHbipMaHbI KyaT 6AoRbHa opHaTbHb3.
3 IMnyabcpekmiHe 5 cekyHka aybcblb3
4 KaKeTIHWe naAaAHaHbIbI3.
KyTIM KepceTy XaHe Ta3aAay
Ta3aMaMac 6ypbH apKaUah eUipH3 XaHe TOKTaH aXbIpaTbHbI3.
- AAMacTapbl MeH Kecy AnCKTepih KYTIMMeH YCTaHbI3 - OAp TbIM EtKip 60AAbI.
Keinbip TaFamap nactnTih TyciH e3reptyi MYMKIH.5yA oTe KaIbITbJ KafDaJ XaHe OAn PAACTNKKE 3nH KeTIpMei JxHe TaFAMbIH DAmHe ocep etnei. TycHiH e3repTiyi H KeTipy yuH ecimik MaBHa 6aTbIPbIFAH MaTameH cyptiH3.
KyaT 6eAiri
blraa Wy6epekeh CypTin, KypTaBtHb3. 3apa KyaBntay aMaFbHda TaFaM KaAdbfBHBH JOK eKHe HKe3 XeTKi3iH3.
KyaT 6eAiriH cyFa 6aTbIpMaHbI3.
- ApTbIK cbIMAbI KyaT 6eAiriHIN apTbIHaaBbI CaKTay aMfBiHda CaKTaHbI3.
Ta3aay KehiHderi Hcyckayap -Tnicti cypetti KapaHbI3 R.
Kb3MeT Kepcety XaHe TyTbHyBlaapFa KeHec
KypbIaFbIHbH XMbICbIHda KaHdAn Da 6oAMacBH aKayAik TybiHdAaTbH 6oAca, KOMek Cypamac 6ypbH, HcckayabIKTaFBI «aKayabIKTapbl KOIO HyckayabIFBI» 6eIMH KapaHb3 HeMece www.kenwoodworld.com Topa6bHa eTIHi3.
- ΘHIM ΕHIMI caTbI aAFAH eAderI TyTbIHyUbl KYKbIKTapbi MeH Ke3 KeAReH 6ap KeiADEMere KaTbICTbI 6apBik 3aHApFa caiKeC KeniADEMEmeH 6epiAteTihin eckepiH3.
Kenwood eHimi dypbc kymbic icTeMece Hemece KaHdaa da 6oAMacbIH KEMiAiKTep Ta6bIaFaH 6oIca, OHBI eKiAeTTi KENWOOD KbIMET Kepcety optaibfibaHa eKeaiH3 Hemece bepin Xi6epiH3. EH XaKaBH opHaIaackaH KENWOOD KbIMET Kepcety optaibfblBHH XaHaPTbIAFaH AepeKTepiH www.kenwoodworld.com Topabihah Hemece eaiH3re TaH Be6-TopanTah KapaHbI3.
BipikKeH KopoAaKteri Kenwood KomnaHnrcbI KO6aAraH KHe Kacan UbIFapFaH.
KbTaJaXacAFaH.
3Aektp XHE 3AektpOHdbIK XABdbIKTbIH KAAdbIKTAPbl BOHbIHUA EYPONIAbIK (WEEE) ANPEKTHBAMEH BIPRE KOALAHbIATbIH OHIMAI DYPbIC TACTAYFA APHAFAH MAhbl3Abl MAmimetTEP
3KyMbicbH TOKtaKaH Ke3e, eHIM KaAaAik KaAdbk CnKtBt NaHa aCbipbAmaybI Kepek. O KaAdbkTapabcHbINTaHTbH Kb3MeTTaTKapaTBH XepriAkti 6NAtiH apHaBmekemciHe Hemece Ocb Kbl3MeTTi 6epywi CaTywbHbH OpTaAflbHa Xj6epiAyI KepeK.
KyH KoAbI TypaBla aknapat ci3diH eHiMiH3iH ToMeHri 6oArlHe HeMece KecTeHH iJMeH XaHbIHda opHaAacByI MymKiH. KyH KoAbI XbIA, aN KoTapbIHah KeiH anTa HOmpi TpyiHde KepcetiaeI.
ECKEPTNE: AFAWKBi eki caH XbIFa, aA coHfBi eki cAH anTA caHBiHa KaTbICTbl 60aAbI.
MbicaNb: 4-anTa, KaHTap, 2023 = 23T04
| Yʌri TYPE: FDP31 | |
| Kephey 220 - 240 B | |
| Герц 50 - 60 Гu | |
| ВаTT 800 | ВТ |
| СаКТay шapTTapы | Темпетаразуа: +5°C кэнe +45°C .apаλыfы ыλfaλыfык: < 80%. |
| СаКТay мерзimi | Шектусiz. |
| КьИЗмET КорсETY мерзimi | 2 кыл (тayapлардын apнайы Турл相机 5 кы). |
| ТасТay шapTTapы | Эковогаявд.Tаалларfa саи ТасТay kepek. |
| ТасымАдay шapTTapы | ТасымАдay KeziHдe АкТыруfa Жэне Шamадан Тьс ДіріДeуге Жоλ beliefmey kepek. |
| СатушapTTapы | СатушapTTapын eнДірушi beλгіlemeydi, bірак aiMaКТык, VATTык кэнe XaλыКараλыК ержелер мен CTанДарTTapfa саи boу kepek. |
HdipyuiH MeKeHkaBb: Kenwood Limited, New Lane, Havant, Hampshire PO9 2NH, UK
UaBIMdapAbi Ka6bIaayFa eKiIeTTi YnbIM XHe UMnOpTTayu:
"△eAoHn"AAK, Pecen, 127055, Mockey KaAacbl, Kewe CyueBckar
27yu,3KypblabIM
TeA:+7(495)781-26-76
| Акayалытарды кого НУСКayалыfbl | ||
| Акayалык Сбe6i | III | eшim |
| Енdeу кураны Жумьс ictemеиdi. | Куат кок. Тараз Куот SFALIINDEAурбic caLbHbSbAFaH. Тараз КaknaFbIДурбIC KUbInTbAMaFAH | Енdeу Куранынн Tokka KocbIYFaHbH Tekcepiniz. ТаразКынДурбIC calbHfahbH JxHe TUTKaHbH OHжakБурblIgka opHaTbIYFaHbH Tekcepiniz. КaknaTbH iXki KUyPbI TUTKa aIMaFbIHda DpybIC caLbHfAHbH Tekcepiniz. Таразпен КaknaKdAурбIC calbHb6aca,Енdey Кураныжуmbic ictemeii Di Жогарыларын ewbipi boAmaca,унiH3deri сakTaHdbIPbITb/abTomaTTb Tekcepiniz. |
| Альбалыжeteхшi biliK ⑤ KyaTбlaorbHa opHaTbIaMaFAH. | ТостаferdBiOpHaTу aALbHda aALbHbAlbJxTeKuli biliKti ⑤ KyaT bIaRbHa opHaTbHbI3. Тостаfern КураalapbI MeH canTamalaapbI xTeKuli opHaTbIaMaHbHuaЖуMbic ictemeii Di. | |
| Белдер hemecce YHTaFbIIS KUmbic ictemeii di | Белдер hemecce YHTaFbIIS Дурbac KUbInTaNMaFAH. Белдер hemecce YHTaFbIIS Дурbac KUbHaMaFAH. | Белдер hemecce YHTaFbIIS iXki KUyBbHa HdYpbic caLbHb6aca,ЖуMbic ictemeii Di. Алмас КИнТынбБОКАЯ/KUТыгТоЛВk, БekiTiIaReHIn Tekcepiniz. |
| Ендey кураны ЧелдeнжATKaHdA ToKtaIaBl | Ендey KUpaнышamadan TbC ЖуКteIaReH/ МAKcMalaIbI КeIeM acbIbIaFAH. Кaknap KUbInTaNMaFAH. | УсындeнжblaMDaBkДиarpmaMcsHdA КерсeTIaReH MAKcMym KeIeMdi Tekcepiniz. КaknaTbH duByc caLbHfAHbH Tekcepiniz. |
| Белдер hemecce КeN YHTaKtFbIIS aMMacЖинafbl БeIaIirHe TbIFbI3 opHaTbIaMaFAH. | Тсemecciжok Тсemecci duByc opHaTbIaMaFAH Тсemere zaibm keIaIaReH. | ТсemechiN dYpbic opHaTbIYFaHbHжeHne ЗakbIMdaAMaraHbH Tekcepiniz. AbylcTbIbIaTaHbTHcEmeHi aIy yUoiN «KbIzMeT КерсeTuжeHуTbHryuMbIaIapRaKeHec» BeIaMih КарaHbI3. |
| КурbalrTураксbl3/ kaTTb I DiPiaIaDei Di ЖeHne Ko3FaIIaBl. | Курma сяяковужбickak ЖeMlcTeR/NHpeDnEHTTep eHdeIaYe. TaNdaFahn XbIaMaDbIK eTe 6aay. | ИнгroduentTepdi YcaTay yUoi "ИМnyIbC" РекIMiN падаalbHbI3,codaH KeiH eHdeydi MakcMalaDi JxblaMaBkTa JxAlFaCTbIpbIbI3. |
| Кураларын/ ТIPkeMeleperdiH наша ржumbcbl | СаIKEС «TipkeMeHiKoIaDaHy» БaIMiHdeIg KeHeCTepdi KapaHbI3. TipkeMeleperiH IN duByc KUpaCTbIbPaHbH Tekcepiniz. | |
Slovenčina
Bezpečnost
- Pozorne si preciţajte tieto instrukcie a uchovajte si ich pre buducu potrebu.
- Pred prvym pouzitim odstrante vsetky obaly a vsetky stitky, vratane plastovych krytov cepeli. Umyte jegnotlivé casti: pozrite si cast „Cistenie".
- Ak su zăstrčka alebo kabel poskodené, musia sa byt z bezpečnostnych dovodov vymenene spolocnostou Kenwood alebo autorizovaným opravárom Kenwood, aby sa zabránilo nebezpečenstvu.
- NEDOTYKAJTE SA ostrych nozov.Noze a rezacie kotuce su velmi ostre, manipulujte s nimi opatrne. Pri manipulacil s ostrymi rezacimi cepelami, vyprazdnovani msy a pri cistení vždy držte spotrebic za držadlo horého okraja, mimo reznej hrany.
- NESPRACOVÁVAJTE horúce ingredientie.
- Ak sa do kuchynského robota alebo mixéra naleje horúca tekutina, budte opatrní, pretože može dōjst k jej vypudeniu v dosledku nahleho sparovania.
- Nikdy nenechavajte bez dozoru zariadenie v cinnosti.
- Neprekracujte maximale capacitie uvedene v tabulke odporucaneho pouzitia.
- Neuvádzajte toto zarladenie do chodu bez prerušenla na dlhšie, než su casy uvedeni nizšie. Neprestajné spracovávanie trvajúce počas dlhšej doby ho totiž moze poskodit.
He BnKOpncToBvIe HacaAaKn, 10 He npn3HaueH I AaI y.
He BnKOpNCToBMyTe NOsKOxKeHn npuaA. NpeBipka a6o peMOHT 3aIcHIOUToBcra y cneuaBnX uehtpax: AnB. po3di «O6cLyroByBaHHra Ta peMOHT>.
HeOnyckaIte NoTppanAHHBOAOrn Ha 6AOK eAeKToBnryHa, HHyp a6o BnKy.
CaikyTe 3a Tm, 06 Hyp He 3BncaB 3i CToA y He TopkABraPauOIO NOBepxHi.
He 3aIwaiTe dItei6e3 HaIgAly i He dO3BOAraTe im rpaTncr i3 npuAaOM.
Anck AIA Hapi3Kn/HaTnpaHH
- Anckn Dyjke roctpi; niA yac yctaHOBaeHHra, 3HRTT N OUYueHHra 3 HUMN CIAI NOBOANTNCRA o6epexHo.
-Пд уас ВИКОпсТанг roctpnx pIXkUx Xe3, cnopoXнeHЯ qaSi Ta niД yac qnueHЯ 3aBXKdI TpIMaIte 3a pykU noaAli BiD pIXkUyoi KpOMKn qnueHЯ.
Hikon He npoToBxyIte kky Bn3 no 3aBaHTaKyBaIbHi Tpy6i 3a DOnOMOIO nAebI. BnkOpncTOByTe Tiakn ToBxAu, 0o NoCTaHaETbcB KOMNAEkTI.
- Nepu HIX 3HrTn KpNkU, BmKHiTb npuaa Ta doyeKaITeCra, NOKn dNcK He 3yHHBCa NOBHiCTIO.
UHHeHHa.
- Npea YnueHHm BUMKHiTb 6AeHep, 3aueKaITe, NOKN 3yynHrTbcra HOxKi, I BNTaRHiTb UHyp 3 po3eTKn.
- BλOK JKNBΛeHHa CλiD npOTnpaTn CnepSy BOΛΟΤΟ TKaHINHO, a NOTIM cyXO. ΠηpeKoHaɪTeCα, ξΟ B oδλacti δλOKyBaHHa 8 Hemaε 3aʌnʌkɪb iκi.
- YuShy, KpnuKy, ToBxau i Bci HacaKn/InCTpyMeHTn, Kpim 6eHepa Ta HOXiB MAnHa, MoKHa MNTn RaBpyHy, Ta i B nocydomnHi MaunHi.
- BANOJI Ae3a cIa YnCTHTu ⅢITKO Ta npOMBaTu NID npOTiHOO BOHOJ.
He 3aHypioTe 6AnK JKNBaeHHa6o 6AnEep/Hoxi AAn NpepeMeIIOBaHHy y BDOy.
Ipea nikAIOueHHm AOp MepeXe eAekTpOncTaahn
- IpekoHaTecra, 0o Hanpyra eAekTpomepexi y BaWoMy DOMI BIAIOBIAe NOKa3HnKaM, BKA3AHm Ha 3BOPOTHI qACTHI npAAy.
- Lcien npnnaad Biinobiae Bmoram AnpektnBn EC 1935/2004 cTocOBHO MaTePiaIIB, 0o 6e3nocepeHbO KOHTaKTyOTb 3 iKeIO.
IpeepnBnKOpncTahHnM
1 3HIMITb nactKOBi 3axnchi yTApni i3 Ae3a. ByBe Te 06epexhl, Ae3o AyKe roCTpe. He 36epirate ueyTAp, ockiBkn BIn npn3HaueHn AnuE DAy 3axnctTy Ae3 Ni d ac Bnpo6HnTuBa Ta TpaHCnOpTyBaHHn npnAay.
2 IOMnTe Bci AeTaI, AnB. po3aI' OOrAra Ta HnueHHa'.
NokaKyuK
KoM6aH
① LTOBxay
② 3aBaHTaKyBaAlbHa Tpy6Ka
③ Kpnska
4 BaHCTpyMeHTa
⑤ 丫awa
⑥ 3HIMHHI npuBOADHn BaA
⑦ BAOeAekTPOaBnTuHa
PeryAToPpeKIMyWBnKocTi/imnyAbciB
3axnche 6aokyBaHH
Bicik 36epirHnHypy (no3a)
HacaAkn
He Bce 3o6paKeHe npAaDMy MoKe BXOaHTN Do KOMnAeKTy BaWOrO KyXOHHO R KOMbayHy. HaraBHiCTb npAaDMy 3aLeKHTb BiO oBaHoI MoDei. BiDiBaJnte www.kenwoodworld.com dAn OTpImaHHI hOpMaui Ipo Te, RaK KyPiNTu HaCaKn, kI He BXoAryb Do KOMnAeKTy.
CTaHApThe npNAA
Hix
12 HacaKaAByBmUyBaHHraTicTa
13 Pnucpii dAeMyAbyBaHHa
4-MiImetpoBn AUCK AHA Hapi3aHHHaTnpaHH
OaTkoBe npAaA
15 CokoyabnkaAaHTpycoBnx(rKUo noCTaayEbca)
A KoHyc
B CuTo
HacaKa-noApi6HOBaU AIA NOMOy (RAKIO NOCTaayEeBcR)
A KpnuKa HacaKn- noDi6HIOBaHa AAnI NOMOy
B HoxOBn 6aOK HacaKn-NOaPi6HbObaa AaI NOMOAY
17 PAnactNKOBn 6AeHep (aKIO NOCTaHaCTbCra)
A Yawa
B HOKOBIN 6AOK
C YuJIaHIOBaIbHe KIAbUe
D KpnuKa
E KOBnayok 3aANBHOI TOpAOBHNI
KOPNCTyBaTnC KYXOHNM KOM6aHOM
AUB. iAnoctpaui C - I
YBAGA!
BybTe o6epexHi npn NOBOxKeHHi 3 roCTpIMN Ae3AM, 3aBxKAn TpMaIte ix 3a pykIB'
- Yaawa Ta HacaKa MaOTb 6yTN BCTaHOBaeHi Ha npAaApeA Tm, kdoabaTn IHrpeiEHTN.
He KepuTe KOM6aHOM 3a DOnomoroKpUkN. 3aBXAn BnKOpNCToBvTe AByeIbOro peryAToP WnAkoCTi on/off (YBIMKHyTN/BUMKHyTN).
- PpOecop He npaIOBaTmE, kKo qAwa a6o KpUoka BcTaHOBAEHI HnPaBnAbHo. NepeKoHaIteC8, 0o 3aBaHTaKyBaIbHa Tpy6Ka I pyKa yawl po3TaWOBaHI y HanpMyk6AnXHbOro npaBOrO Kyta npNAAdy.
BnKOpncToByIe imNyIbChn peKIM (P) AAn HeAOBInx IHTeHCnBHX nepemiuBaHb. Ppua6yde npaIOBaTu,doKn BaXiA nepeMnkaa yTpmyEcTbcr y BiINOBIHOMy nooKeHHi.
3aBXd BmkaTe npHaTa BlAIOuaTe Noro BiA Mepexi eAekTpOncTauHHaNepeA Tm, k 3HrTN KpNshKy.
KombH He MoKe BnKOpNCToBvBaTnC AaI NoApioHeHHa NmOy KaOBux 3epeH, a6o AAn IepetBopeHHaUkykpoBy NydpY.
PiadacdoabaHnMrgdaeBoi eceHci a6o npncmaKDo cymiwei,HaMaraiTeec He TOPkataNcIaCTNKOBNX DeTaAe, OCKiBKn icHy p3nk CTIKORO noap6yBaHH.
1 BctaHObitb 3HIMnBaa npNBOy Ha 6AOKKINBAeHH.
2 BctaHObit yauy, uo6 no3Haayka Ha
yaWi cnIBnadaa 3 no3HaKoO Ha
6IoCi KINBAeHHra, i NOBepHITb yauy 3a
roAHHHKOBOO cTpiAkoIO, NOK BOHa He 6yDe
3aΦikcoBaHa
3 3i6bpatn HCTpymeHT (Ae3o HOka, IHCTpymeHT AAR 3aMIyBaHHra TCTa Ta eMyABryBaHH), 3a DOnOMorIO pYkIB'po3MictIb 3HIMHy qactHy IHCTpymeHa BAIAHCTpymeHa IOnyCTIb Ha Micce, NOBepHITb HacaKy npOTn rOaNHHKOBoi CTpiAn, 3o6 3aΦikCyBaTn II Ha Micci
4 BctaHObIb 3i6paHn iHCTpyMeHT Ha npNBOADHN BaA.
5 BCTaHOBIb KpNkTyak,io6Bepxna actHa npNBOy/IHCTpyMeHTa 6yIa nO ceHTpy KpnKn.
6PiKIAOHTb npnAAd O Mepeksi
eAektpoioctaayHn, yBIMKHiTb noTo Ta o6epiTB WBNkicTb. (AnB. Ta6AnIOpeKOMeHDoBaHHx WBNkOCTeN O).
7 NOBTOPIb OINcaHy Bnue IpOceApyy y 3BOPOTHomy Noprky AAn TOrO, IO6 3HRTN KpIshKy, HacadKn Ta aWy.
K KopncTyBaTnca Ae30m Hoxa
ANB.inIOCTpauiC
1 OToPmMyIteCb BkazIBOK 3 po3iAly «K KOpNCyBaTnCry KxOHnM KOM6aHOM
Kopnci npaAn
Apybiux TeKcTpy 3acTOcoBynt imyabchn pexum.
Taki npoaykTN, kM'rcO, XAI6, OBOUi Hapi3yIte ky6nKamn po3mipom np6An3HO 2 cm.
- NeuBo cIa NOKpnwnTa 3acnpatn uepe3 Tpy6ky y xodi po60Tu KOM6aHy.
Caikyte3aTm,06He niidaabaTN iHpeiEHTNHaMipHiO6oCi.
- Xkp dAra Ticta cIaHapizatxOAnDMHa ky6nKn no 2 cm.
- AaHaKpaunpe3yAbaTtIB niac TOTyBaHHAINIKX φpyKTIB/CKAAHNKIB, Rk-OT fiHikn, cNoaTKy BapTO BnKOpNCTOByBaTN ΦyHKciIO «IMnybc» AAn NoDiHeHHa, a Notim npoOBAKNITn PnIroTyBaHHa Ha MaKcMaAHi NwNkoCTi.
KopncTyBaTnca iHcTpymeHTOM AAn 3amiyBaHHa Ticta
AIB.iaoctpaui C
BukopncToByeTbcraAaPikXkoBOrO Ticta
1 DoTpmyntecb Bka3iBok 3 po3dIy «K KOpNCtYBaTnCk KyxOHnM KOM6aHOM
Kopnci npaAn
- O6po6ka noBHHa TpNBaTn He doBwe 60 CEkyHd.
- POKaIb cyx iHrpEiHTn do yaWi I OdaBaIte piDHy uepe3 3aBaHTaKyBaIbHy Tpy6Ky B npoueci po6Ot npicTpoIO. O6pO6Ky npoO8KyuTe dOtN, NOK TiCTo He nepETBOpNTbcra Ha rAdky eAactTuHy KYIAIO.
- Повторно замувати сад тільки рукам. He pekomehdyeTbcra 3diinchioBaTN NOBTOpe 3amiybaHHa Y aшi, ockaibkn Ye moKe npns3BeCTn Do HeCTiIKoI pO6OTn KOM6aHHy.
HikoAn He onyckaIte naBul do 3aBaHTaKyBaAhoTpy6Kn.
1 BcTaHOBtBaI npuBOy i yuHa 6AoK eAeKTPOdBnryHa.
2 TpmaHn Aepxak B ueHtpi, yctaHObiB Anck Ha npNBIHN BAI BiIOBIAHO CTOPHOIO BROPY.
3 YctaHObitb KPNiKy.
4 NoklaadItb iHrpeiHCTn DO 3aBaHTaKyBaAhoTpy6kn.
5 YbIMKHTb npnAA Ta NOBIAHOBnpoTobxnyTe iHpeJeHTN 3a DOnOMOROHTOBxay.
Kopnchi npaAn
BukopucToByntcBiXipnoDyKTn.
He pixTe npOyKTn 3aHaT0 MaIeHbKIMu
MmATkAMn. 3anOBHIOte 3aBaHTaKyBaIbHy
tp6ky Ha BcIO shpNHy. ToDi npOyKT nA qac
o6pO6Kn He 6yde 3ickOB3yBaTN B6iK.
- PpOaYkTn, 0o OoAHTbcy BepTKKaHbHomy nooXeHHi, Hap3aOTbcr Ha KopoTwi MMaTOUKN, HIX TI, 0o OoAHTbcr y TOpN3OHTaAusbHomy nooXeHHI.
- Picra 6pO6Kn Ha dNcKy 3aBxAn 3aAuaTumEtbcr HeBeAUKa KIAbKICTb BiXoIIB.
36epiraHHHaHacaOk
AIB. iAOCTpaIIO P
Iicn BnKOpNCTaHHn Ae3o HOxKa, HacAdKy dAeMybryBaHHn, HacAdKy dAe TictTa Ta DnCK dAHapiaHH/TePKn 4 MM MoXHa 36epiratn pa3om y yaSSI.
He BnKOpNCToBvIe KxOHHN KOMbaH, Akuo B 4aUy BCTaHOBAnEO 6iAble OdHoro IHcTpymeHa. BnKOpNCToBvIe AIIe OAnHy HacaKy 3a OAnH pa3.
36epiraHnHaHypa
AIB.iaoctpaio Q
BcTaBTe WHyp y BiDcik 36epirahnH Hhypa.
Peçent
MapnHa3 yOpHocAnBy
275 rMea(y (oxoaoKeHo)
25 ruyopnoCAnBy
50 MwBoaN
1 IomictiYci iHrpeicHTN B MiHi- noApio6HIOBaU/MAnHOK. NocTaBTe B XOAOaIbHK Ha Hi.
2 BcTaHOBIb KpINaeHHa Ha 6AOK XNBaeHHa.
3 Ipeekauitb Ha imnybcHy o6po6ky Ha 5 ceKyHd
4 BnKopncToBvIe 3a nOtpe6oI.
△OΓΛΔTaUHηEHH
3aBKnBnMnKaIe npnaTa BiEHynte Ioro BiA eAEKTpomepeki neped uHn
- Повадьтесь оберекно 3 HOЖЕТа pixkuymн ДИСКAMN - BOHДУЖе Гocтpi.
- DeRki npOdykTN MoKyTb 3He6apBIAOBaTn PAACTNKOBI AeTaIi. LcE BBaXaETbcra HopMaAIBHM RBNiEeM, He npN3BOAnITb DO NOWkoJKeHb PAACTNKOBHX DeTaAeT Ta He BnAIBac Ha CMAK iXKi. Liob BnBeCTn 3He6apBAnEHy PAAMy, NotPiTb II rAHuipKOIO, 3MoueHOIO y pocAHHHI OJIi.
BLoK eAeKToPOABRyHa
- PpOtpiB BOAoroIO raHcyipKOIO,NOTIM BucywiTb. PepeKoHaITeCb, 0030Ha 6aOKyBaHH OUnSeHa BiD CMITTA.
He onyckaTe 6AoK eAeKTpOaBnHyHa y Body.
36epiraTe 3aBy yacTnHy shHypa y BiCiKy
Ara 36epirahnna, knn po3TaWobHo y 3aHi
yactnHi 6oKa eAeKTPoADBnyHa.
IHCtpykuii3uHnEHHa -INB.
BIAIOBIHy IIOCTpaIIO R
O6cAуroByBaHHa Ta peMOHT
- RaKuo B pO6oTI npuAAy BuHKn 6yDb-RAI HeNoAaKn, npea 3BepHeHHaM do cLyKbN niATpumKn npouHTaTe po3iA «YcyHnHa HecnpaBHOCTe» B uCyOMy noci6Hnky a60 3a#iTb Ha caT www.kenwoodworld.com.
- Nam'raTaIte, Ho Ha npuAaNoWnpiOeTbcra paaHtiao BiAnobiAdae BCIM 3akOHn mnoLoXeHHaM oDo icHyiooI rapaHTi Ta npab cnoKmba a B Ti KpaHi, De npuAa6yB npuaHn.
-При винкнehhi HecnpabHocti Bpo60T i npnAky Kenwood a6o npn BnBbEnHi 6yIb- knx DepeKTIb, 6yIb IaCKa, HAIIIAIITb a6o npnHeciTB npnAaB aBTOpIN3OBaHIn cepBicHni ceHTp KENWOOD.AkTyAblHi KOHTaKTHi dHI cepBicHnx CEHTpiB KENWOOD Bu 3HaIaeTe Ha caTI www.kenwoodworld.com a6o Ha caTI DAЯ BaWoi KpaIHn.
CnpoeKToBaHo Ta po3pO6AeHO KOMnHiEo Kenwood, 06'EAHaHe KopoAIBCTBO.
3po6aehoB Kntai.

BAKANBA IHΦOPMAUЯ CTOCOBHO HALEXHOI YTNAI3AUII NPOyKTy 3rIaHO 13 ANPEKTOBOIO IPO YTNAI3AUIO EAEKTPuHOrO TA EAEKTPoHHOrO 05AAADAHHH (WEEE)
IicA 3akHcHn TepmHy eKcnnyatauii He BnKaaTe ue npua,3 iHunm no6yTOBmN BiXoamn.
BIDHecitb npnAAd DO MICeBOrO CneuaAIBHO ABTOPIN3OBaHOro UeHTpy 36npaHHRA BIXOABIB a60 AO DnAepa, knn MoKe HaadTu Taki Nocayr.
( 1,2,3) ( 10,2) l = 2 V
S OBC = S AOB + S_ BOC
L0
1
. 1
.
.
.
a111
J 1 1 1 1 1 1 1 1 1 1 1 1 1 1 1 1 1 1 1 1 1 1 1 1 1 1 1 1 1 1 1 1 1 1 1 1 1 1 1 1 1 1
Lolai yabol 11. dWdI JcJcJcJcJcJcJcJcJcJcJcJcJcJcJcJcJcJcJcJcJcJcJcJcJcJcJcJcJcJcJc
(g)
abio j no sSt. Lg, p, allo Laoa, gnnol . lalll 1y n 1j 1
. lall y d 2
8d jw d w 5
.
1
()
(a)
M1
aLo aLb
Kaaas
Jai jia
Joo 100
J 1
1 1 1 1 1 1 1 1 1 1 1 1 1 1 1
g 1
cill
jai 1
32011 111111111
aLall aIac alal yalglal 10all
aiee aee 1uee
aALL gla (gall) all aagc c jall 0
all aagc agsall aALL g cJall s
jai jia iacalllll jc alil jcll l (yjgall)
J 1
i
J 1
jIJI IJI JIJI 1JJI 1JIJI
Lgogaiol gaii jia 10
joo joll 1,
12y 1
106
jll jai lii gai bai yai iaiy
Pabito Jinyu
()
(
1
aolo a b
aaii 1
1
.(j)
g jyj yj yj j j j j j j j j j j j j j j j j j j j j j j j j j j j j j j j j j j j j
1
Sall = Sall S_all
aaii jia jia jao pabai 8
gag aal gall gall ll
gai (yogai) aalb galeiaaball
a
(P)
cuiuigui
aaii jilgill jia iie Jl 1jle Jusall
aalll aall gllgall no pge 0. no j
aiboll jil