
HW-C410 - Soundbar SAMSUNG - Free user manual and instructions
Find the device manual for free HW-C410 SAMSUNG in PDF.
| Product type | Soundbar |
| Brand | Samsung |
| Model | HW-C410 |
| Dimensions (W x H x D) | 641.0 x 66.5 x 107.0 mm |
| Weight | 2.0 kg |
| Nominal output power | 20 W x 2 |
| Power supply | AC (mains voltage) |
| Standby power consumption | 0.5 W |
| Supported audio formats | LPCM 2ch, Dolby Audio (Dolby Digital), DTS |
| Audio inputs | 1 x Optical (Digital Audio In), 1 x USB (5V 0.5A) |
| Wireless connectivity | Bluetooth, NFC |
| Sound modes | Surround Sound, Standard |
| Equalizer | 7-band EQ (150 Hz - 10 kHz) |
| Audio functions | Sync (audio delay 0-300 ms), Night mode, Voice enhancement, DRC |
| Subwoofer | Not included, adjustable from -6 to +6 |
| USB compatibility | FAT16, FAT32, NTFS; MP3, WMA, AAC, WAV, FLAC files |
| Wall mounting | Possible (optional bracket, M4 screws) |
| Operating temperature | +5°C to +35°C |
| Operating humidity | 10% to 75% |
| Software update | Via USB |
Frequently Asked Questions - HW-C410 SAMSUNG
User questions about HW-C410 SAMSUNG
0 question about this device. Answer the ones you know or ask your own.
Ask a new question about this device
Download the instructions for your Soundbar in PDF format for free! Find your manual HW-C410 - SAMSUNG and take your electronic device back in hand. On this page are published all the documents necessary for the use of your device. HW-C410 by SAMSUNG.
USER MANUAL HW-C410 SAMSUNG
Thank you for purchasing this Samsung product.
To receive more complete service, please register
your product at www.samsung.com/register
SAFETY INFORMATION
SAFETY WARNINGS
TO REDUCE THE RISK OF ELECTRIC SHOCK, DO NOT REMOVE THE COVER (OR BACK).
NO USER-SERVICEABLE PARTS ARE INSIDE.
REFER SERVICING TO QUALIFIED SERVICE PERSONNEL.
Refer to the table below for an explanation of symbols which may be on your Samsung product.
 | CAUTIONRISK OF ELECTRIC SHOCK.DO NOT OPEN. |  |
 | This symbol indicates that high voltage is present inside. It is dangerous to make any kind of contact with any internal part of this product. | |
 | This symbol indicates that this product has included important literature concerning operation and maintenance. | |
 | Class II product: This symbol indicates that it does not require a safety connection to electrical earth (ground). If this symbol is not present on a product with a power cord, the product MUST have a reliable connection to protective earth (ground). | |
 | AC voltage: This symbol indicates that the rated voltage marked with the symbol is AC voltage. | |
 | DC voltage: This symbol indicates that the rated voltage marked with the symbol is DC voltage. | |
 | Caution, Consult instructions for use: This symbol instructs the user to consult the user manual for further safety related information. | |
CAUTION
WARNING
- To reduce the risk of fire or electric shock, do not expose this appliance to rain or moisture.
CAUTION
• TO PREVENT ELECTRIC SHOCK, MATCH WIDE BLADE OF PLUG TO WIDE SLOT, FULLY INSERT.
- This apparatus shall always be connected to a AC outlet with a protective grounding connection.
- To disconnect the apparatus from the mains, the plug must be pulled out from the mains socket, therefore the mains plug shall be readily operable.
- Do not expose this apparatus to dripping or splashing. Do not put objects filled with liquids, such as vases on the apparatus.
- To turn this apparatus off completely, you must pull the power plug out of the wall socket. Consequently, the power plug must be easily and readily accessible at all times.
PRECAUTIONS
- Ensure that the AC power supply in your house complies with the power requirements listed on the identification sticker located on the bottom of your product. Install your product horizontally, on a suitable base (furniture), with enough space around it for ventilation (7\~10 cm). Make sure the ventilation slots are not covered. Do not place the unit on amplifiers or other equipment which may become hot. This unit is designed for continuous use. To fully turn off the unit, disconnect the AC plug from the wall outlet. Unplug the unit if you intend to leave it unused for a long period of time.
- During thunderstorms, disconnect the AC plug from the wall outlet. Voltage peaks due to lightning could damage the unit.
- Do not expose the unit to direct sunlight or other heat sources. This could lead to overheating and cause the unit to malfunction.
-
Protect the product from moisture (i.e. vases), and excess heat (e.g. a fireplace) or equipment creating strong magnetic or electric fields. Unplug the power cable from the AC wall socket if the unit malfunctions. Your product is not intended for industrial use. It is for personal use only. Condensation may occur if your product has been stored in cold temperatures. If transporting the unit during the winter, wait approximately 2 hours until the unit has reached room temperature before using.
-
The battery used with this product contains chemicals that are harmful to the environment. Do not dispose of the battery in the general household trash. Do not expose the battery to excess heat, direct sunlight, or fire. Do not short circuit, disassemble, or overheat the battery.
CAUTION: Danger of explosion if the battery is replaced incorrectly. Replace only with the same or equivalent type.
CONTENTS
01 Checking the Components 6
02 Product Overview 7
Top Panel of the Soundbar 7
Bottom Panel of the Soundbar 8
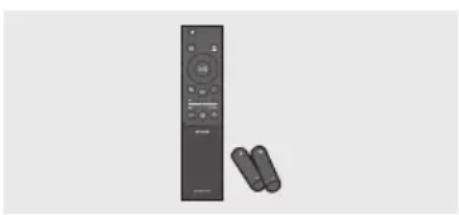
03 Using the Remote Control 9
Inserting Batteries before using the Remote Control (AAA batteries X 2) ____ 9
How to Use the Remote Control ____ 9
Using the Hidden Buttons (Buttons with more than one function) ____ 14
Output specifications for the different sound effect modes ____ 14
Adjusting the Soundbar volume with a TV remote control 15
04 Connecting the Soundbar 16
Connecting Electrical Power 16
05 Using a wired connection to the TV 17
Connecting using an Optical Cable 17
06 Using a wireless connection to the TV 18
Connecting via Bluetooth 18
07 Connecting an External Device 20
Connecting using an Optical Cable ____ 20
08 Connecting a USB Storage Device 21
09 Connecting a Mobile Device 23
Connecting via Bluetooth ____ 23
Connecting a Soundbar to a mobile device via NFC function ____ 26
10 Installing the Wall Mount (Optional) 27
Installation Precautions ____ 27
Wall mount Components ____ 27
11 Software Update 30
Reset ____ 31
12 Troubleshooting 32
13 Licence 33
14 Open Source Licence Notice 34
15 Important Notes About Service 34
16 Specifications and Guide 35
Specifications 35
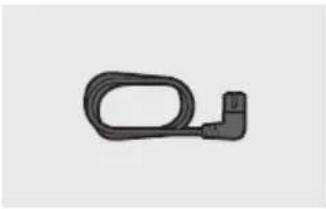
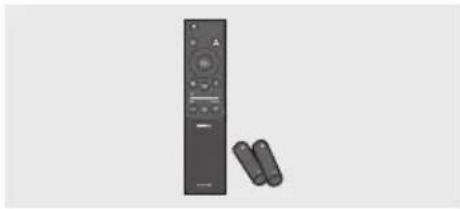
01 CHECKING THE COMPONENTS

natural_image
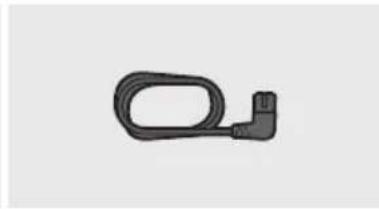
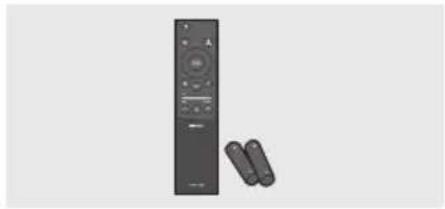
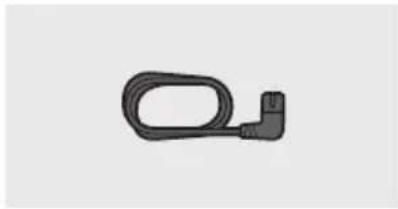
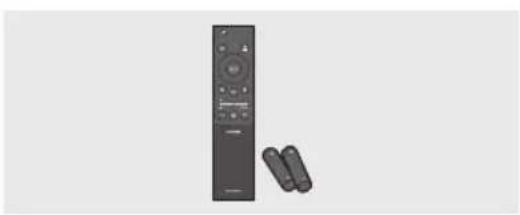
Three grayscale product photos: a rectangular remote box, a flexible cable with a handle, and a remote control unit with two batteries (no text or symbols visible)Soundbar Main Unit Power Cord (Soundbar) Soundbar Remote Control
Batteries
- For more information about the power supply and power consumption, refer to the label attached to the product. (Label: Bottom of the Soundbar Main Unit)
- To purchase additional components or optional cables, contact a Samsung Service Centre or Samsung Customer Care.
- Design, specifications are subject to change without prior notice.
- The appearance of the accessories may differ slightly from the illustrations above.
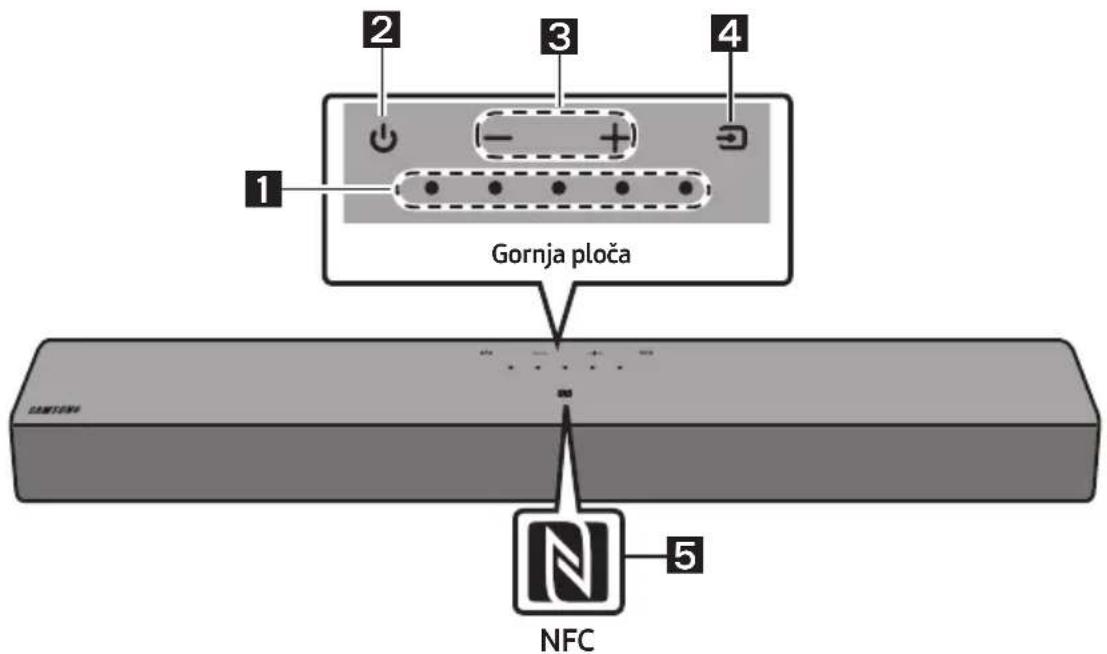
02 PRODUCT OVERVIEW
Top Panel of the Soundbar
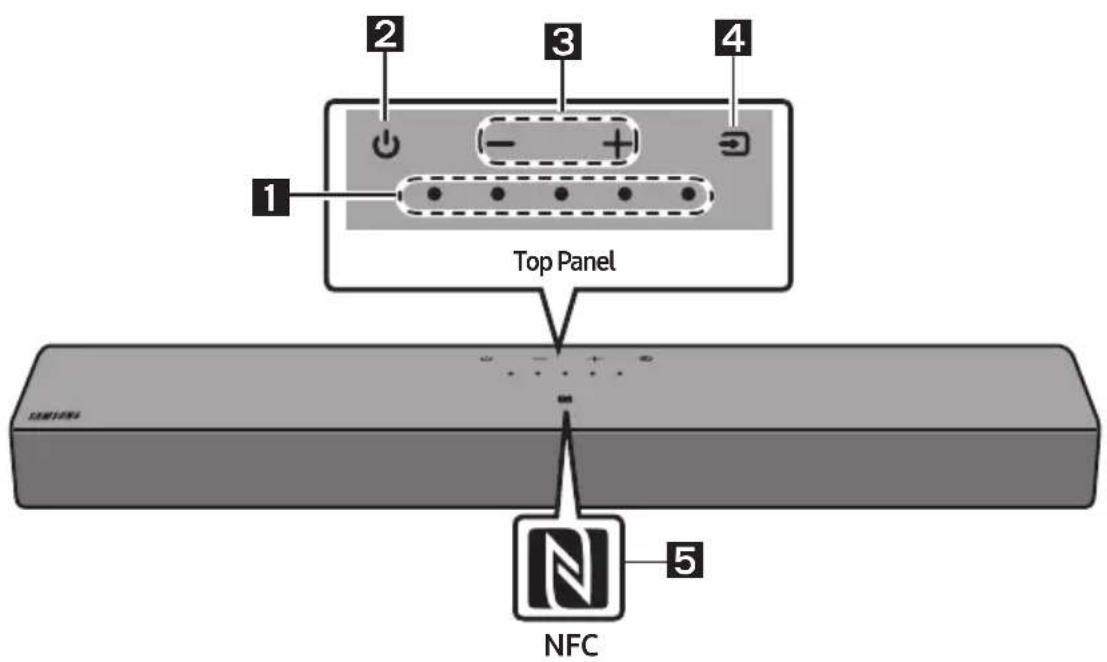
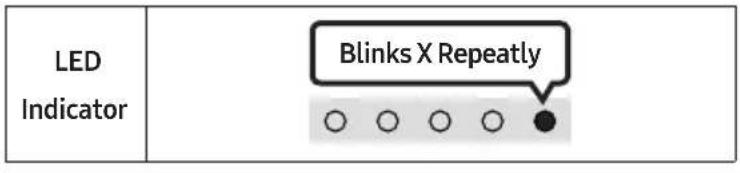
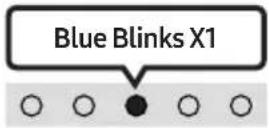
| 1 | LED indicator | The LED Indicator flashes, glows, or changes colour depending on the Soundbar's current mode or status. The colour of the LED indicator and the number of lights indicate the active mode as described below. | ||||
 White LED White LED |  White LED White LED |  Multicolour LED Multicolour LED |  White LED White LED |  White LED White LED | ||
| The Multicolour LED changes to White, Cyan, Green, Red, Yellow, Orange, Purple and Blue depending on the mode or status. | ||||||
| 2 | Power Turns the power on and off. | |||||
| 3 | Volume Adjusts the volume. | |||||
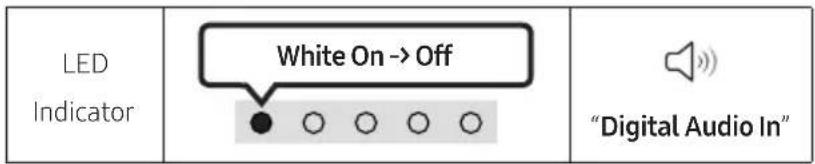
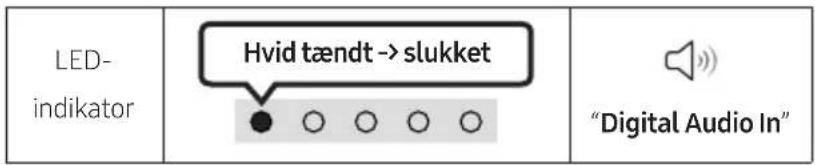
| 4 | Source | Press the (Source) button to change the mode. Each time you change the mode, the LED lights in white and then turns off. | ||||
| LED Indicator | 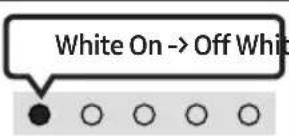 | e | 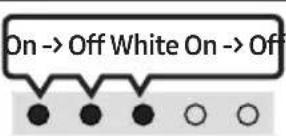 |  | ||
| "Digital Audio In" | "Bluetooth" | "USB" | ||||
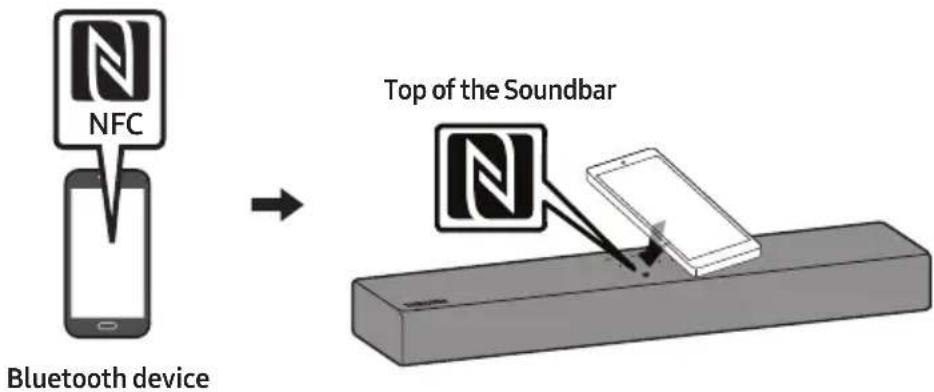
| 5 | NFC Logo | You can activate your Bluetooth connection by placing your phone in the NFC detection area of the Soundbar. |
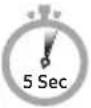
- When you plug in the AC cord, the power button will begin working in 4 to 6 seconds.
- When you turn on this unit, there will be a 4 to 5 second delay before it produces sound.
- If you hear sounds from both the TV and Soundbar, go to the Settings menu for the TV audio and change the TV speaker to External Speaker.
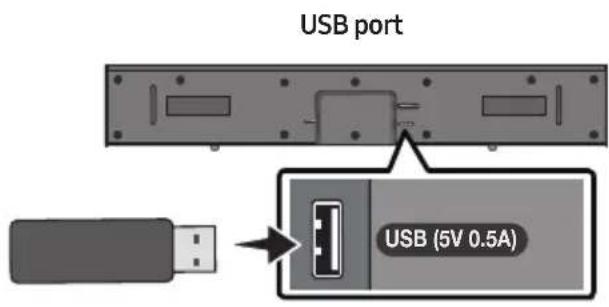
Bottom Panel of the Soundbar
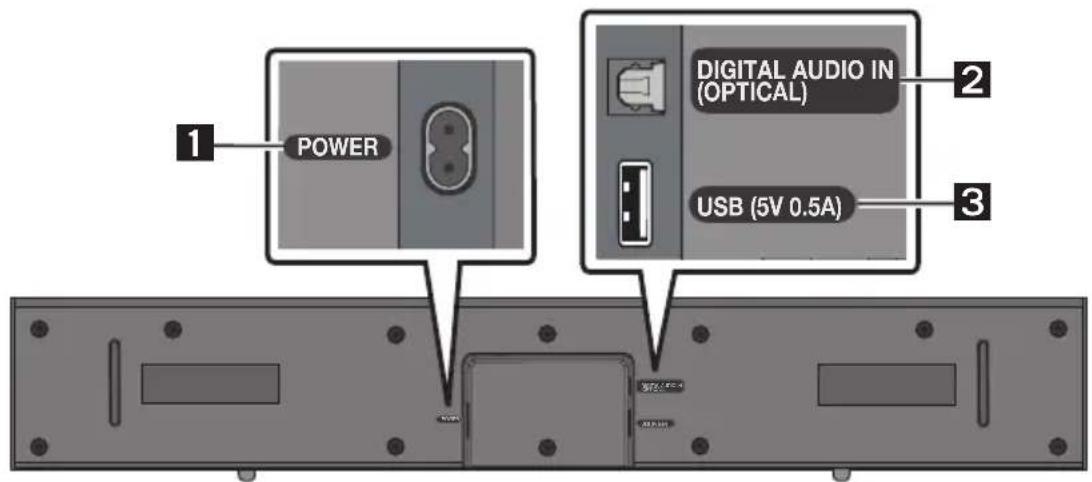
| 1 | POWERConnect the Soundbar's AC power cable. |
| 2 | DIGITAL AUDIO IN (OPTICAL)Connect to the digital (optical) output of an external device. |
| 3 | USB (5V 0.5A)Connect a USB device here to play music files stored on the USB device through the Soundbar. |
- Do not connect this unit or other components to an AC outlet until all connections between components are complete.
03 USING THE REMOTE CONTROL
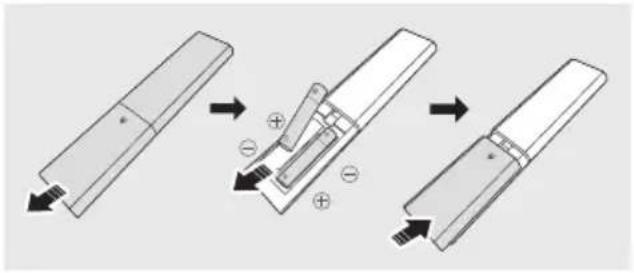
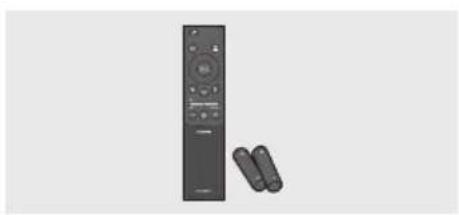
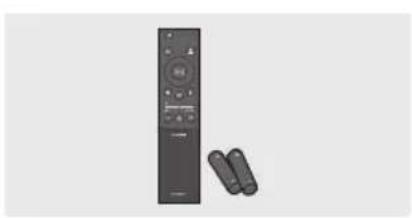
Inserting Batteries before using the Remote Control (AAA batteries X 2)
Slide the back cover in the direction of the arrow until it is completely removed.
Insert 2 AAA batteries (1.5V) so that their orientation is correct. Slide the back cover back into position.
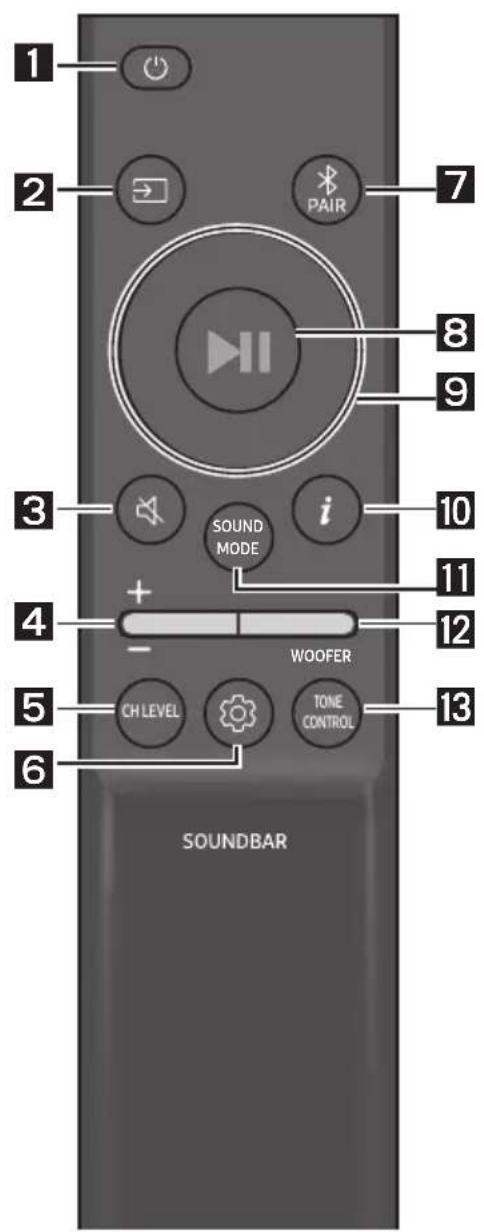
How to Use the Remote Control
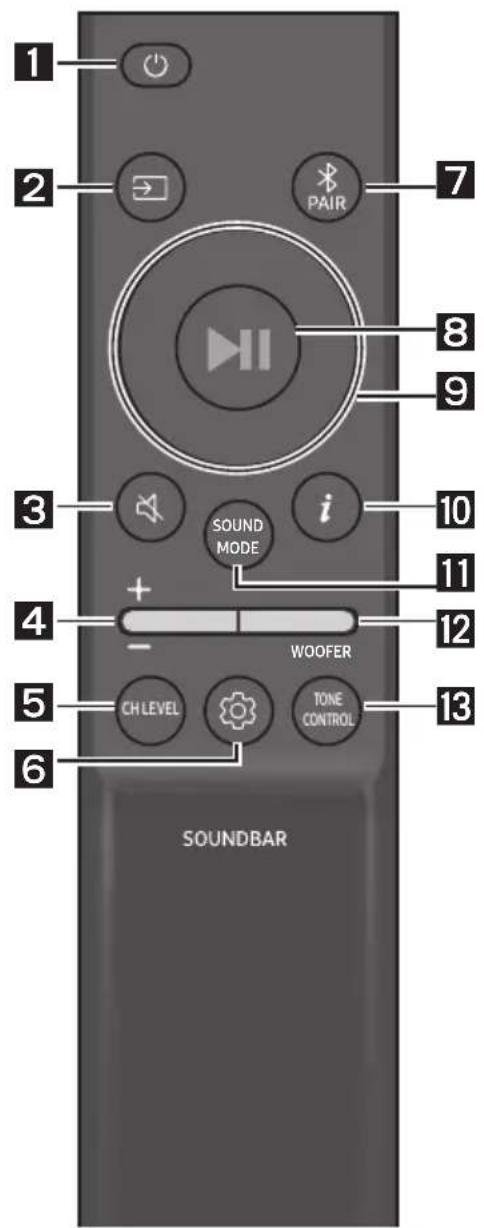
1
Power
Turns the Soundbar on and off.
• Auto Power Down Function
The unit turns off automatically in the following situations:
- In "Digital Audio In" / "Bluetooth" / "USB" mode if there is no audio signal for 18 minutes.
2
(Source)
Press to select a source connected to the Soundbar.
3
(Mute)
Press the 📄 (Mute) button to mute the sound. Press it again to unmute the sound.

Volume
Push the button up or down to adjust the volume.


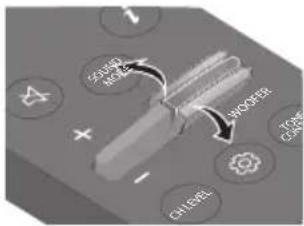
CH LEVEL
By pressing the button, you can adjust the volume of the each speaker.
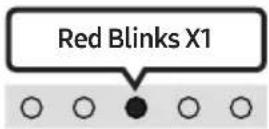
| LED Indicator | White Blinks X1 |
| "Centre Level" |


(Sound Control)
By pressing the button, you can set the audio function. The desired item can be adjusted using the Up/Down buttons. Each time the mode changes, the Multicolour LED blinks in white.
| LED Indicator | White Blinks X1 |
| "Sync" → "Night mode" → "Voice enhancement" |
- If the video on the TV and audio from the Soundbar are not synchronised, select "Sync" in Sound Control, and then set the audio delay between 0\~300 milliseconds by using the Up/Down buttons. (Not available in "USB" or "Bluetooth" mode.)
- "Sync" is only supported for some functions.
- "Night mode" is optimised for night time viewing with the settings adjusted to bring the volume down but keep the dialog clear.
- "Voice enhancement" makes it easier to hear spoken dialog in movies and TV.
7 Band EQ
Press and hold the ⚙ (Sound Control) button for about 5 seconds to adjust the sound for each frequency band. 150Hz, 300Hz, 600Hz, 1.2kHz, 2.5kHz, 5kHz, and 10kHz are selectable using the Left/Right buttons and each can be adjusted to a setting between -6 to +6 using the Up/Down buttons. (Make sure the Sound mode is set to "Standard".)
| 7 Band EQ | |||
 Press and hold the(Sound Control)button for about 5 seconds. Press and hold the(Sound Control)button for about 5 seconds. | 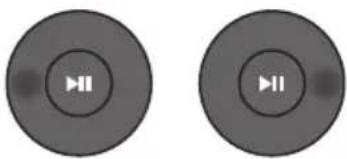 Using theLeft/Rightbuttos and each can be adjusted to setting between -6 to+6. Using theLeft/Rightbuttos and each can be adjusted to setting between -6 to+6. | ||
| “150Hz” | “150Hz” → “300Hz” → “600Hz” → “1.2kHz” → “2.5kHz” → “5kHz” → “10kHz” | ||


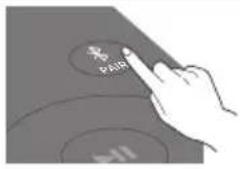
Bluetooth PAIR
Switch the Soundbar to Bluetooth pairing mode.
When you press the button, the LED display changes as shown below.
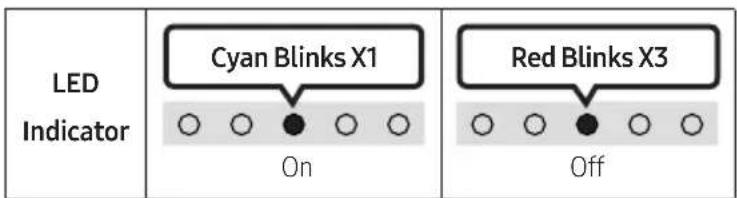
- Until pairing is complete, the Multicolour LED changes as Red → Green → Blue in turn.
| LED Indicator | Red → Green → Blue BlinksPairing → | Cyan Blinks X3Connection is complete |

▶II (Play / Pause)
You can also play or pause music by pressing the button in "USB" mode.

Up/Down/Left/Right
Press Up/Down/Left/Right on the button to select or set functions.
- Repeat
To use the Repeat function in "USB" mode, press the Up button.
- Music Skip
Press the Right button to select the next music file. Press the Left button to select the previous music file.

i(Info)
Press the button to display information about the current function. (See page 7.)
11
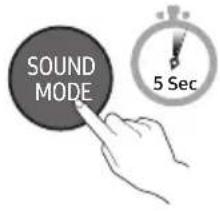
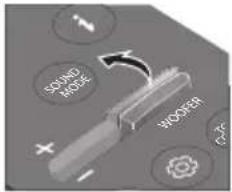
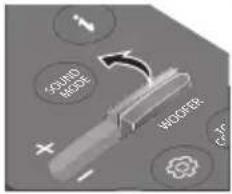
SOUND MODE
By pressing the button, you can select the desired audio mode. Each time the mode changes, the Multicolour LED blinks in white. (The sound mode may differ with the TV model.)
| LED Indicator | |
 | “Surround Sound” → “Standard” |
- Surround Sound
Provides a wider sound field than standard.
- Standard
Outputs the original sound.
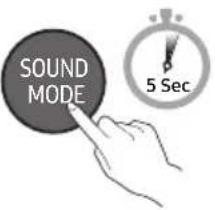
- Bluetooth Power On/Off
This feature automatically turns the Soundbar on when it receives a connection request from a previously connected TV or Bluetooth device. The setting is On by default.
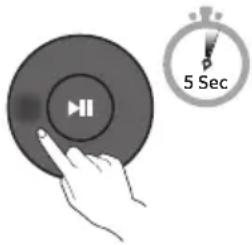
- Press and hold the SOUND MODE button for more than 5 seconds to turn off the Bluetooth Power function.
• DRC (Dynamic Range Control) On/Off
Lets you apply dynamic range control to Dolby Digital tracks. Press and hold the SOUND MODE button for more than 5 seconds while the Soundbar is powered off to turn DRC (Dynamic Range Control) on or off. With the DRC turned on, loud sound is reduced. (The sound may be distorted.)
| SOUND MODE button LED Indicator | ||
 |  On (Default) On (Default) |  Off Off |
| DRC On/Off Toggle On → Off | ||
12
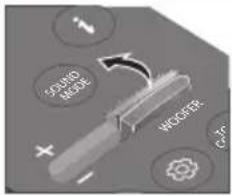
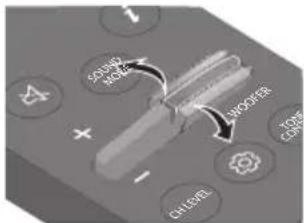
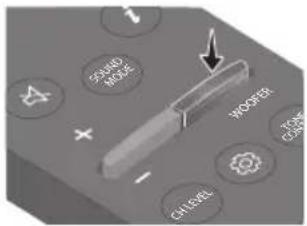
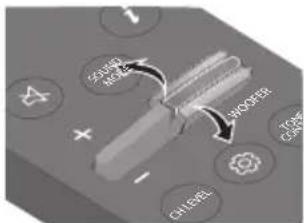
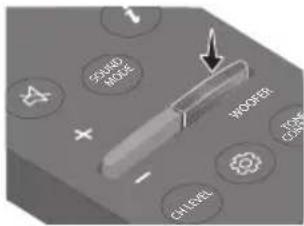
WOOFER (BASS) LEVEL
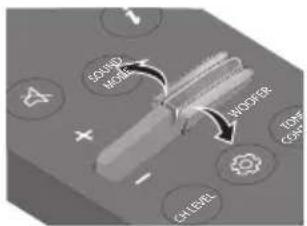
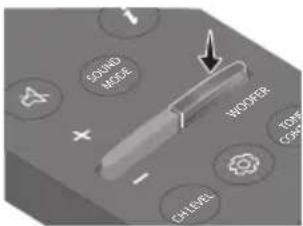
Push the button up or down to adjust the bass level between -6 to +6. To set the woofer (bass) volume level to 0 (Default), press the button. (Subwoofer is not included.)
13
TONE CONTROL
By pressing the button, you can adjust the volume of the treble or bass sound. The desired item can be adjusted using the Up/Down buttons. (This feature is available in all sound modes except "Standard" mode.)
| LED Indicator | 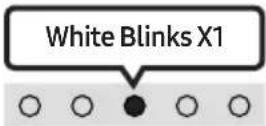 |
 | “Treble” → “Bass” |
Using the Hidden Buttons (Buttons with more than one function)
| Hidden Button | Reference page | |
| Remote Control Button Function | ||
| WOOFER (Up) | TV remote control On/Off | page 15 |
| Left TV Auto connect | On/Off page 19 | |
| (Sound Control) | 7 Band EQ page 11 | |
| SOUND MODE | DRC On/Off page 12 | |
| Bluetooth Power On/Off page 12 | ||
Output specifications for the different sound effect modes
| Effect Input Output | ||
| Surround Sound | 2.0 ch 2.0 ch | |
| 5.1 ch 2.0 ch | ||
| Standard | 2.0 ch 2.0 ch | |
| 5.1 ch 2.0 ch |
Adjusting the Soundbar volume with a TV remote control
Adjust the Soundbar volume using the TV's remote control.
- This function can be used with IR remote controls only. Bluetooth remote controls (remote controls that require pairing) are not supported.
- Set the TV speaker to External Speaker to use this function.
• Manufacturers supporting this function: Samsung, VIZIO, LG, Sony, Sharp, PHILIPS, PANASONIC, TOSHIBA, Hisense, RCA
TV remote control On/Off
- Turn Off the Soundbar.
- Push up and hold the WOOFER button for 5 seconds.
Each time you push the WOOFER button up and hold it for 5 seconds, the mode switches in the following order: "Off-TV Remote" (Default mode), "Samsung-TV Remote", "All-TV Remote".
The LED indicator status changes each time the mode is changed, as shown below.
| Remote Control Button LED Indicator Status | ||
 |  |  "Off-TV Remote"(Default mode) "Off-TV Remote"(Default mode) |
 |  |  "Samsung-TV Remote" "Samsung-TV Remote" |
 |  |  "All-TV Remote" "All-TV Remote" |
04 CONNECTING THE SOUNDBAR
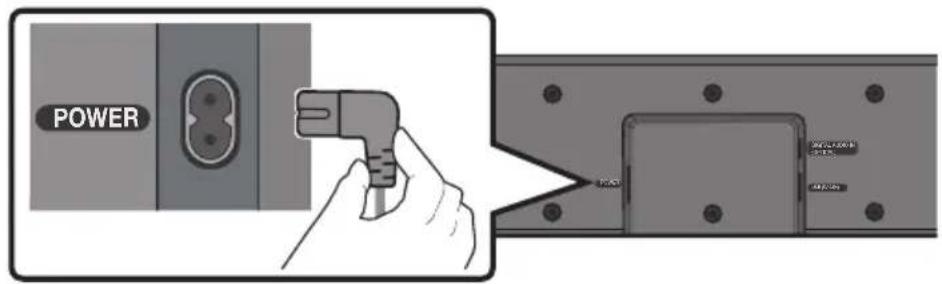
Connecting Electrical Power
Use the power components to connect the Soundbar to an electrical outlet in the following order:
- For more information about the required electrical power and power consumption, refer to the label attached to the product. (Label: Bottom of the Soundbar Main Unit)
- Connect the power cord to the Soundbar.
- Connect the power cord to a wall socket.
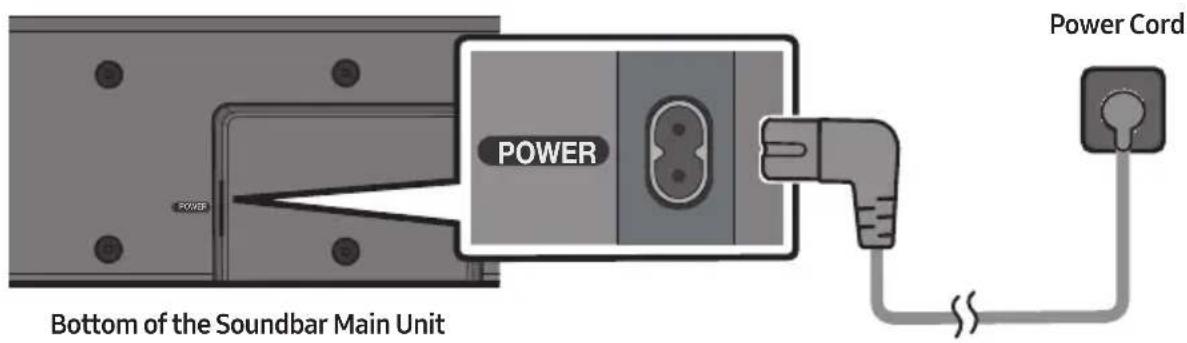
NOTE
- If you unplug and reconnect the power cord when the product is turned on, the Soundbar turns on automatically.
05 USING A WIRED CONNECTION TO THE TV
Connecting using an Optical Cable
Pre-connection Checklist
- When you use an optical cable and the terminals have covers, be sure to remove the covers.

natural_image
Three-step diagram showing a mechanical component before and after assembly, with no visible text or symbols.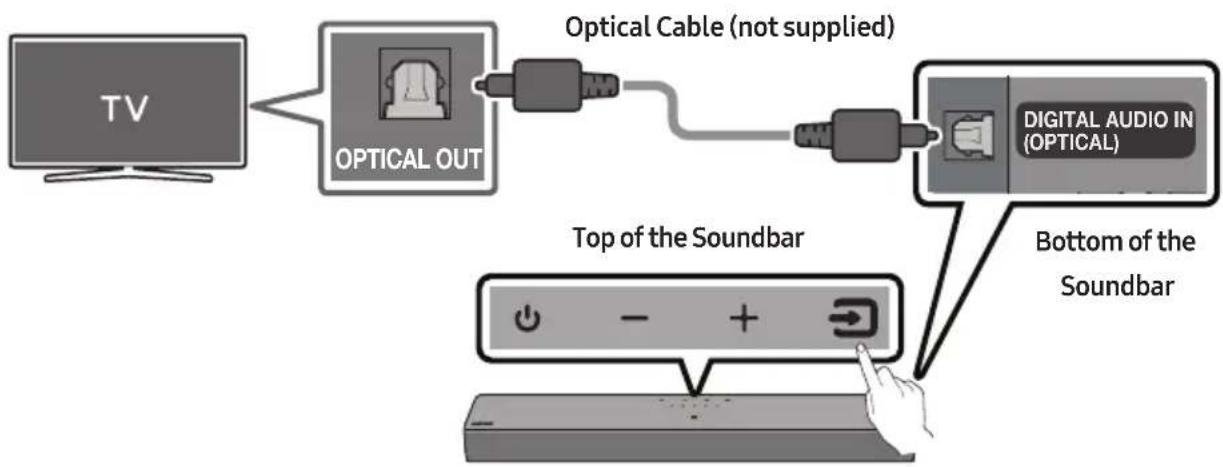
flowchart
graph LR
    A["TV"] --> B["OPTICAL OUT"]
    B --> C["Optical Cable (not supplied)"]
    C --> D["DIGITAL AUDIO IN (OPTICAL)"]
    D --> E["Bottom of the Soundbar"]
    E --> F["Top of the Soundbar"]
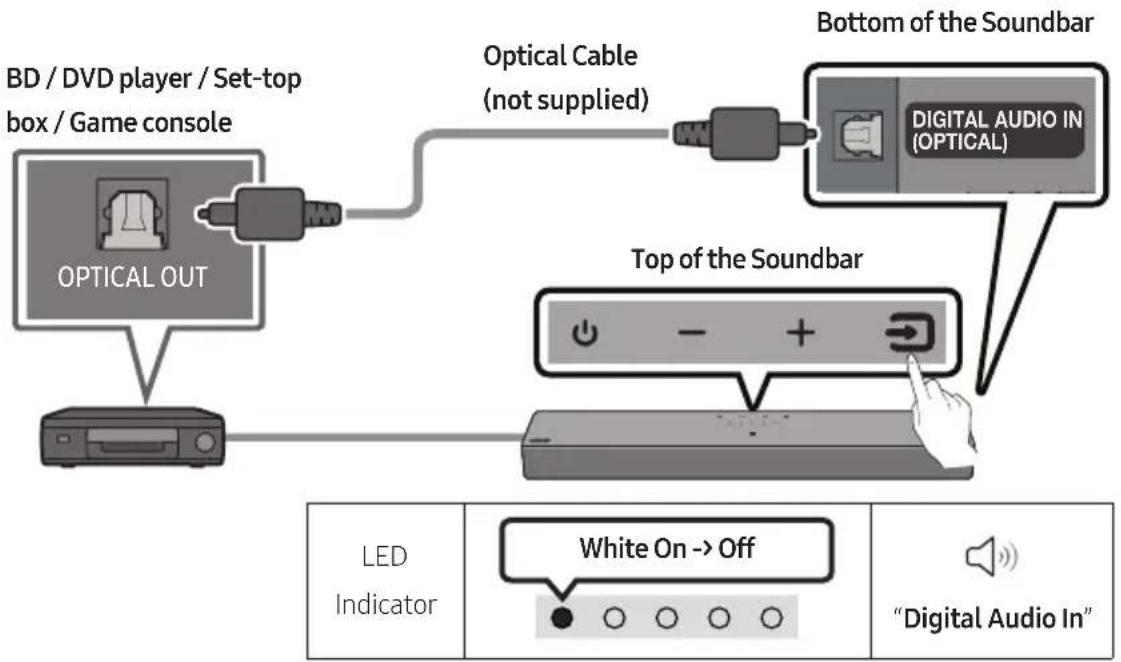
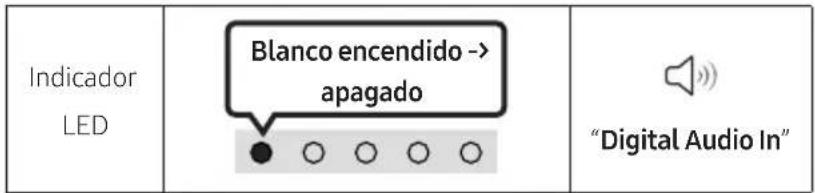
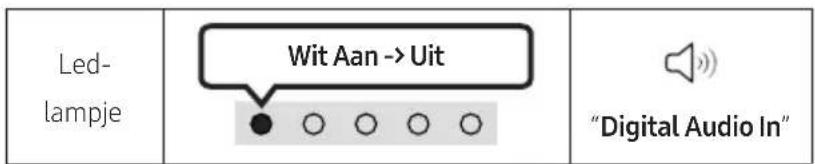
- With the TV and Soundbar turned off, connect the DIGITAL AUDIO IN (OPTICAL) port on the Soundbar and the OPTICAL output port on the TV with the optical cable (not supplied), as shown in the figure.
- Turn on the Soundbar and TV.
- Press the → (Source) button on the top panel or remote control, and then select the "Digital Audio In" mode.
- The TV sound is output from the Soundbar.
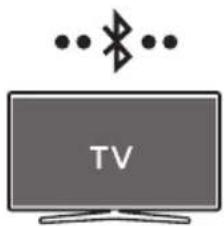
06 USING A WIRELESS CONNECTION TO THE TV
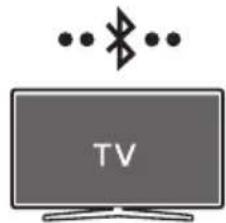
Connecting via Bluetooth
When a Samsung TV is connected using Bluetooth, you can hear stereo sound without the hassle of cables.
- Only one Samsung TV can be connected at a time.
- Samsung TV that supports Bluetooth can be connected. Check the specifications of your TV.
natural_image
Illustration of a TV displaying with Bluetooth symbol above (no text or labels)The initial connection
- Press the ✗PAIR button on the Soundbar remote control or press ➕ (Source) button on the Soundbar top panel to enter the "Bluetooth" mode.
| Bluetooth Pairing button LED Indicator | |
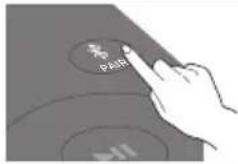 ORWhen in “Bluetooth” mode ORWhen in “Bluetooth” mode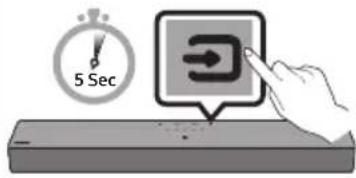 | 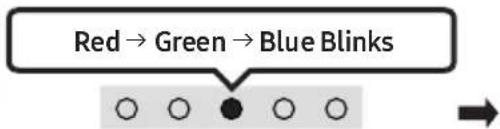 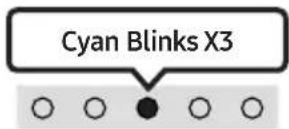 Pairing Connection is completeUntil pairing is complete, the Multicolour LED changes as Red → Green → Blue in turn. Pairing Connection is completeUntil pairing is complete, the Multicolour LED changes as Red → Green → Blue in turn. |
 “Ready to connect via Bluetooth.” “Ready to connect via Bluetooth.” | |
- Select Bluetooth mode on the Samsung TV.
(e.g. Home (💡) → Menu → Settings (💡) → All Settings (💡) → Sound → Sound Output → Bluetooth Speaker List → [AV]Soundbar C4-Series (Bluetooth))
- Select "[AV]Soundbar C4-Series" from the list on TV's screen.
An available Soundbar is indicated with "Needs pairing" or "Paired" on the TV's Bluetooth device list. To connect the Samsung TV to the Soundbar, select the message, and then establish a connection.
- You can now hear Samsung TV sound from the Soundbar.
- If there is a connection log between the Soundbar and Samsung TV, the Soundbar is automatically connected by changing its mode to "Bluetooth".
If the device fails to connect
- If you have an existing Soundbar (e.g., [AV]Soundbar C4-Series) on the list of speakers on the Samsung TV, delete it.
- Then repeat steps 1 through 3.
Disconnecting the Soundbar from the Samsung TV
Press the (Source) button on the top panel or on the remote control to select the mode other than "Bluetooth".
- Disconnecting takes time because the Samsung TV must receive a response from the Soundbar. (The time required may differ, depending on the Samsung TV model.)
TV Auto connect On/Off
To cancel the automatic Bluetooth connection between the Soundbar and TV, press the Left button on the remote control for 5 seconds with the Soundbar in "Bluetooth Ready" status. (Toggle On → Off)
| Left button LED Indicator | ||
 |  On (Default) On (Default) | 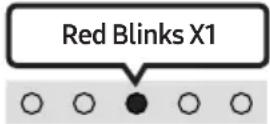 Off Off |
| Bluetooth Ready Toggle | On → Off | |
Notes on Bluetooth connection
- Locate a new device within 1 m to connect via Bluetooth communication.
- If asked for a PIN code when connecting a Bluetooth device, enter <0000>.
- The Soundbar automatically turns off after 18 minutes in the Ready state.
-
The Soundbar may not perform Bluetooth search or connection correctly under the following circumstances:
-
If there is a strong electrical field around the Soundbar.
- If several Bluetooth devices are simultaneously paired with the Soundbar.
- If the Bluetooth device is turned off, not in place, or malfunctions.
- Electronic devices may cause radio interference. Devices that generate electromagnetic waves must be kept away from the Soundbar main unit - e.g., microwaves, wireless LAN devices, etc.
07 CONNECTING AN EXTERNAL DEVICE
Connecting using an Optical Cable
flowchart
graph TD
    A["Optical OUT"] --> B["BD / DVD player / Set-top box / Game console"]
    B --> C["Top of the Soundbar"]
    C --> D["Digital Audio In (OPTICAL)"]
    D --> E["Bottom of the Soundbar"]
    E --> F["White On --> Off"]
    F --> G["Digital Audio In"]
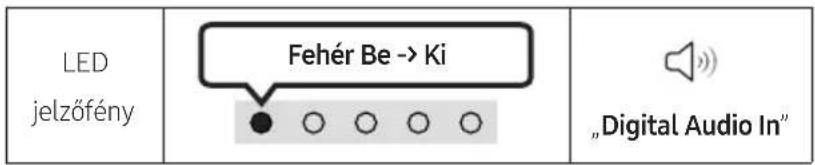
- With the external device and Soundbar turned off, connect the DIGITAL AUDIO IN (OPTICAL) port on the Soundbar and the OPTICAL output port on the external device with the optical cable (not supplied), as shown in the figure.
- Turn on the Soundbar and external device.
- Press the (Source) button on the top panel or remote control, and then select the "Digital Audio In" mode.
- The external device sound is output from the Soundbar.
08 CONNECTING A USB STORAGE DEVICE
You can play music files located on USB storage devices through the Soundbar.
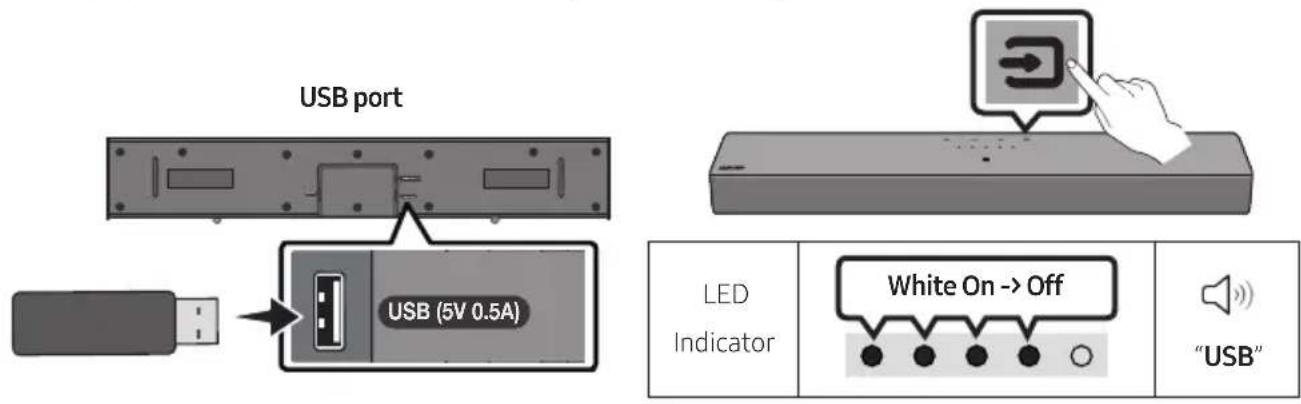
- Connect the USB device to the USB port on the bottom of the product.
- Press the → (Source) button on the top panel or remote control, and then select the "USB" mode.
- Play music files from the USB storage device through the Soundbar.
- The Soundbar automatically turns off (Auto Power Down) if no USB device has been connected for more than 18 minutes.
File Format Type Compatibility list
| Extension | Codec | Sampling Rate | Bit Rate |
| *.mp3 MPEG1 Layer2 32kHz ~ 48kHz 32kbps ~ 320kbps | |||
| MPEG1 Layer3 32kHz ~ 48kHz 32kbps ~ 320kbps | |||
| MPEG2 Layer3 16kHz ~ 24kHz 8kbps ~ 160kbps | |||
| MPEG2.5 Layer3 8kHz ~ 12kHz 8kbps ~ 160kbps | |||
| *.wma WMA7/8/9 32kHz ~ 48kHz 32kbps ~ 320kbps | |||
| *.aac *.m4a | A AC-LC (MPEG2/MPEG4 Audio Only) | 32kHz ~ 48kHz 32kbps ~ 320kbps | |
| *.wav | LPCM | 32kHz ~ 192kHz | 1,024kbps ~ 9,216kbps |
| *.flac | FLAC | 32kHz ~ 192kHz | 162kbps ~ 8,100kbps |
- If there are too many folders (about 200) and files (about 2000) stored on the USB device, it may take the Soundbar some time to access and play files.
- The Soundbar only supports USB devices with FAT16 (\~2GB), FAT32 (\~2TB) or NTFS (\~2TB) file systems.
09 CONNECTING A MOBILE DEVICE
Connecting via Bluetooth
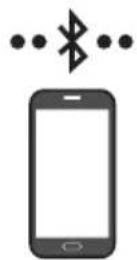
When a mobile device is connected using Bluetooth, you can hear stereo sound without the hassle of cables.
- When you connect a paired Bluetooth device with the Soundbar off, the Soundbar automatically turns on.
mobile device
The initial connection
- When connecting to a new Bluetooth device, make sure the device is within 1 m distance.
- Press the ✗PAIR button on the Soundbar remote control or press → (Source) button on the Soundbar top panel to enter the "Bluetooth" mode.
| Bluetooth Pairing button LED Indicator | |
 ORWhen in “Bluetooth” mode ORWhen in “Bluetooth” mode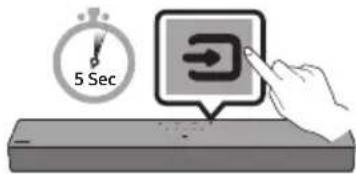 | 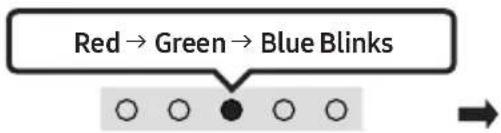 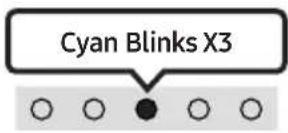 Pairing Connection is completeUntil pairing is complete, the Multicolour LED changes as Red → Green → Blue in turn. Pairing Connection is completeUntil pairing is complete, the Multicolour LED changes as Red → Green → Blue in turn. |
 “Ready to connect via Bluetooth.” “Ready to connect via Bluetooth.” | |
-
On your device, select "[AV]Samsung Soundbar C4-Series" from the list that appears.
-
Play music files from the device connected via Bluetooth through the Soundbar.
If the device fails to connect
- If you have an existing Soundbar (e.g., [AV]Samsung Soundbar C4-Series) on the list of speakers on the Mobile device, delete it.
- Then repeat steps 1 and 2.
Notes on Bluetooth connection
- Locate a new device within 1 m to connect via Bluetooth communication.
- If asked for a PIN code when connecting a Bluetooth device, enter <0000>.
- The Soundbar automatically turns off after 18 minutes in the Ready state.
-
The Soundbar may not perform Bluetooth search or connection correctly under the following circumstances:
-
If there is a strong electrical field around the Soundbar.
- If several Bluetooth devices are simultaneously paired with the Soundbar.
- If the Bluetooth device is turned off, not in place, or malfunctions.
- Electronic devices may cause radio interference. Devices that generate electromagnetic waves must be kept away from the Soundbar main unit - e.g., microwaves, wireless LAN devices, etc.
• The Soundbar supports SBC data (44.1kHz, 48kHz).
- Connect only to a Bluetooth device that supports the A2DP (AV) function.
- You cannot connect the Soundbar to a Bluetooth device that supports only the HF (Hands Free) function.
- When connecting the Soundbar to a Bluetooth device, place them as close to each other as possible.
- The farther the Soundbar and Bluetooth device are from each other, the lower the sound quality will become.
The Bluetooth connection may break when the devices are out of the effective range.
- The Bluetooth connection may not function as intended in areas with poor reception.
- A Bluetooth device may experience noise or malfunction under in the following conditions:
- When the body is in contact with the signal transceiver on the Bluetooth device or Soundbar
- In corners or when there is an obstacle in proximity, such as a wall or partition, where electrical changes may occur.
- When exposed to radio interferences by other products operating on the same frequency ranges, such as medical equipment, microwave ovens, and wireless LAN devices.
-
Obstacles such as doors and walls may still impact the sound quality even when the devices are within the effective range.
-
Note that your Soundbar cannot be paired with other Bluetooth devices while using the Bluetooth option.
- This wireless device may cause electrical interference during operation.
Bluetooth Power On/Off
If a previously paired Bluetooth device tries to pair with the Soundbar when the Bluetooth Power On function is on and the Soundbar is turned off, the Soundbar turns on automatically.
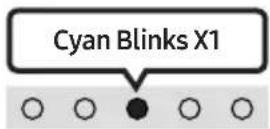
- Press and hold the SOUND MODE button for more than 5 seconds on the remote while the Soundbar is turned on.
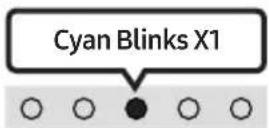
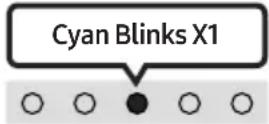
- Multicolour LED indicator on the Soundbar blinks "Cyan".
| SOUND MODE button LED Indicator | ||
 | 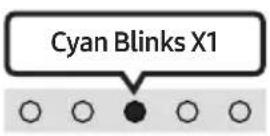 On (Default) On (Default) | 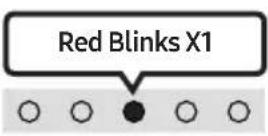 Off Off |
| Bluetooth Power On/Off | Toggle On → Off | |
Disconnecting the Bluetooth device from a Soundbar
You can disconnect a Bluetooth device from the Soundbar. For instructions, see the Bluetooth device's user manual.
• The Soundbar will be disconnected.
- If the Soundbar is disconnected from the Bluetooth device, the multicolour LED indicator on the Soundbar blinks "Red" three times.
Disconnecting the Soundbar from the Bluetooth device
Press the (Source) button on the top panel or on the remote control to select the mode other than "Bluetooth".
- Disconnecting takes time because the Bluetooth device must receive a response from the Soundbar. (Disconnection time may differ, depending on the Bluetooth device)
Connecting a Soundbar to a mobile device via NFC function
Place your mobile device in the NFC detection area on top of the Soundbar.
NOTES
• Make sure that your mobile device has the NFC function turned on and that the screen is active.
- Bluetooth connection is unavailable when NFC of the mobile device is in card emulation mode.
- If asked for a PIN code when connecting a Bluetooth device, enter <0000>.
• The Soundbar automatically turns off after 18 minutes in the Ready state.
- The Soundbar may not perform Bluetooth search or connection correctly under the following circumstances:
- If there is a strong electrical field around the Soundbar.
- If several Bluetooth devices are simultaneously paired with the Soundbar.
-
If the Bluetooth device is turned off, not in place, or malfunctions.
-
Electronic devices may cause radio interference. Devices that generate electromagnetic waves must be kept away from the Soundbar main unit - e.g., microwaves, wireless LAN devices, etc.
• The Soundbar supports SBC data (44.1kHz, 48kHz). - Connect only to a Bluetooth device that supports the A2DP (AV) function.
- You cannot connect the Soundbar to a Bluetooth device that supports only the HF (Hands Free) function.
- Once you have paired the Soundbar to a Bluetooth device, selecting “[AV]Samsung Soundbar C4-Series” from the device’s scanned devices list will automatically change the Soundbar to “Bluetooth” mode.
– Available only if the Soundbar is listed among the Bluetooth device's paired devices.
(The Bluetooth device and the Soundbar must have been previously paired at least once.)
- The Soundbar cannot be paired to another Bluetooth device if already in Bluetooth mode and paired to a Bluetooth device.
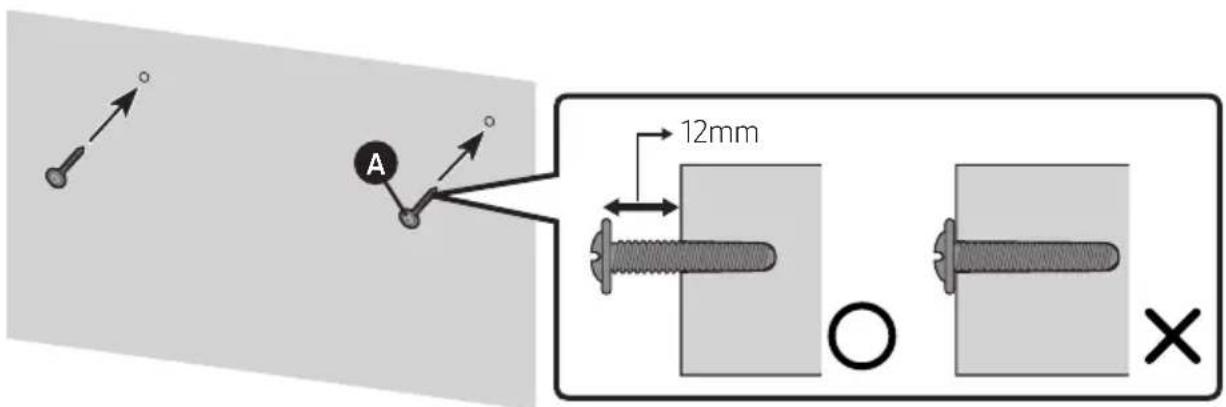
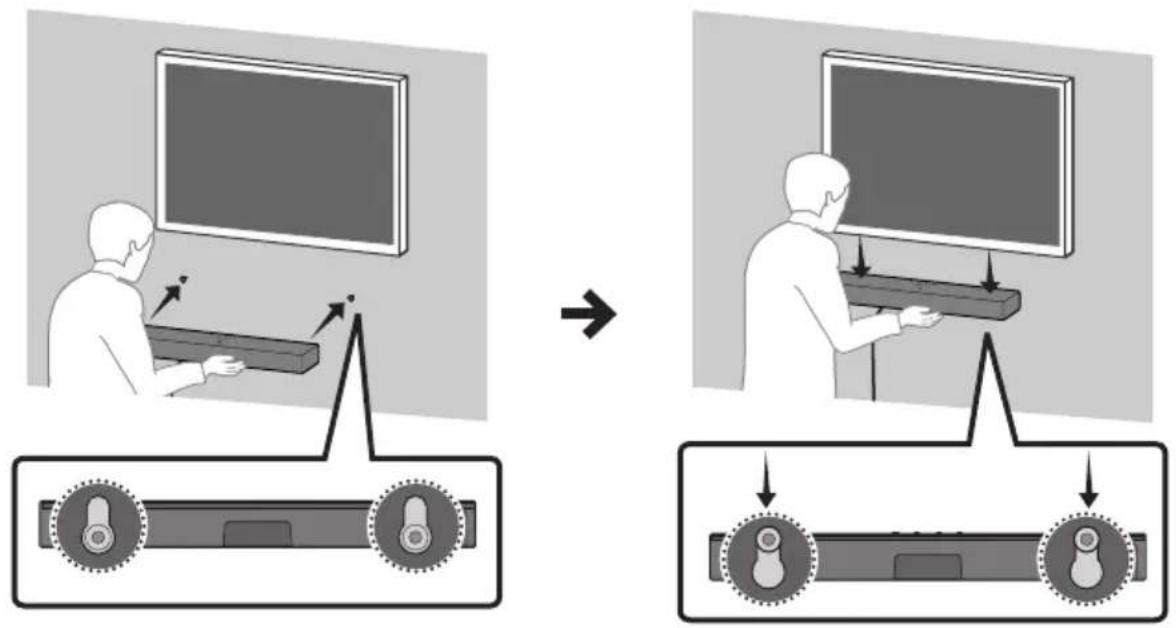
10 INSTALLING THE WALL MOUNT (OPTIONAL)
Installation Precautions
• Install on a vertical wall only.
- Do not install in a place with high temperature or humidity.
- Verify whether the wall is strong enough to support the product's weight. If not, reinforce the wall or choose another installation point.
- Purchase and use the fixing screws or anchors appropriate for the kind of wall you have (plaster board, iron board, wood, etc.). If possible, fix the support screws into wall studs.
- Purchase wall mounting screws according to the type and thickness of the wall you want to mount the Soundbar on.
- Diameter: M4
- Length: 40 mm or longer recommended.
- Connect cables from the unit to external devices before you install the Soundbar on the wall.
- Make sure the unit is turned off and unplugged from the power source before you install it.
Otherwise, it may cause an electric shock.
Wall mount Components
For Installation on Concrete Walls (not supplied)
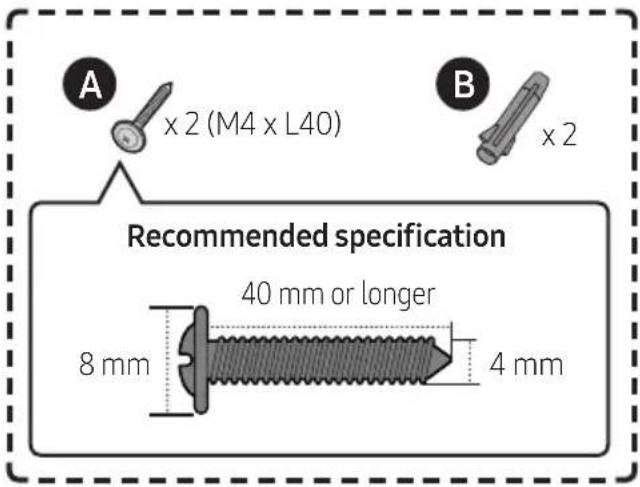
NOTE
- Installations on other types of walls will require different kinds of screws.
1.
NOTES
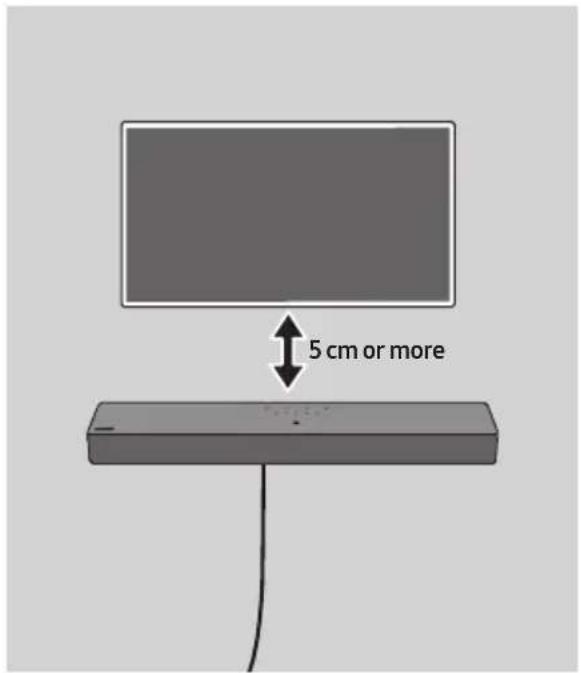
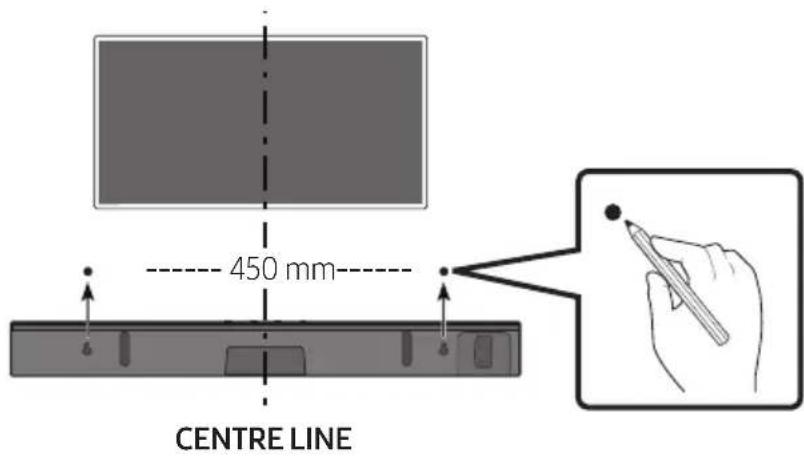
- If your TV is installed on the wall, install the Soundbar 5cm or more below your TV. - Use a pencil to mark the holes' positions.
2.
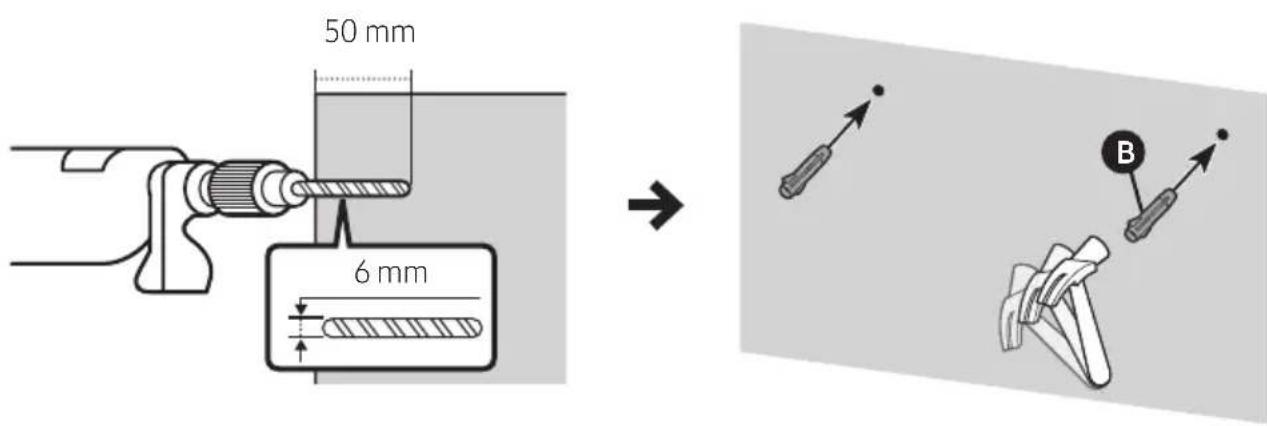
IMPORTANT NOTE
- The installation method shown here is for CONCRETE walls. Installation methods will vary depending on the wall type. For installation on dry wall, we strongly recommend you drill screw support holes into the underlying wood studs.
3.
4.

5.

NOTE
– Supports for wall installation are built into the back of the Soundbar.

CAUTION
- Press the Soundbar down with sufficient force to fix it to the wall. If the Soundbar is not firmly fixed to the wall, it could be accidentally detached, resulting in personal injury.
- Do not bump into or strike the Soundbar (especially from the bottom). The impact could detach the Soundbar from the wall, resulting in personal injury.
11 SOFTWARE UPDATE
Important: After upgrading, keep the original Settings.
- Connect a USB memory stick to the USB port on your computer.
Important: Make sure there are no music files on the USB memory stick drive. This may cause the firmware update to fail. - Go to (samsung.com) → select Enter Model Number and enter the model of your Soundbar. Select manuals and downloads and download the latest software file.
- Save the downloaded software to a USB memory stick and select "Extract Here" to unzip the folder.
-
Turn off the Soundbar and connect the USB stick containing the software update to the USB port.
-
Plug USB into Soudbar and switch to USB source, the software will update automatically and will complete update within 2 minutes. During the update process, the 5 LEDs will start flashing in a loop, and then the 5 LEDs will all be bright white, and then the 5 LEDs will flash in a loop again. When the update is complete, the cyan indicator blinks 3 times, and the soundbar automatically restarts.
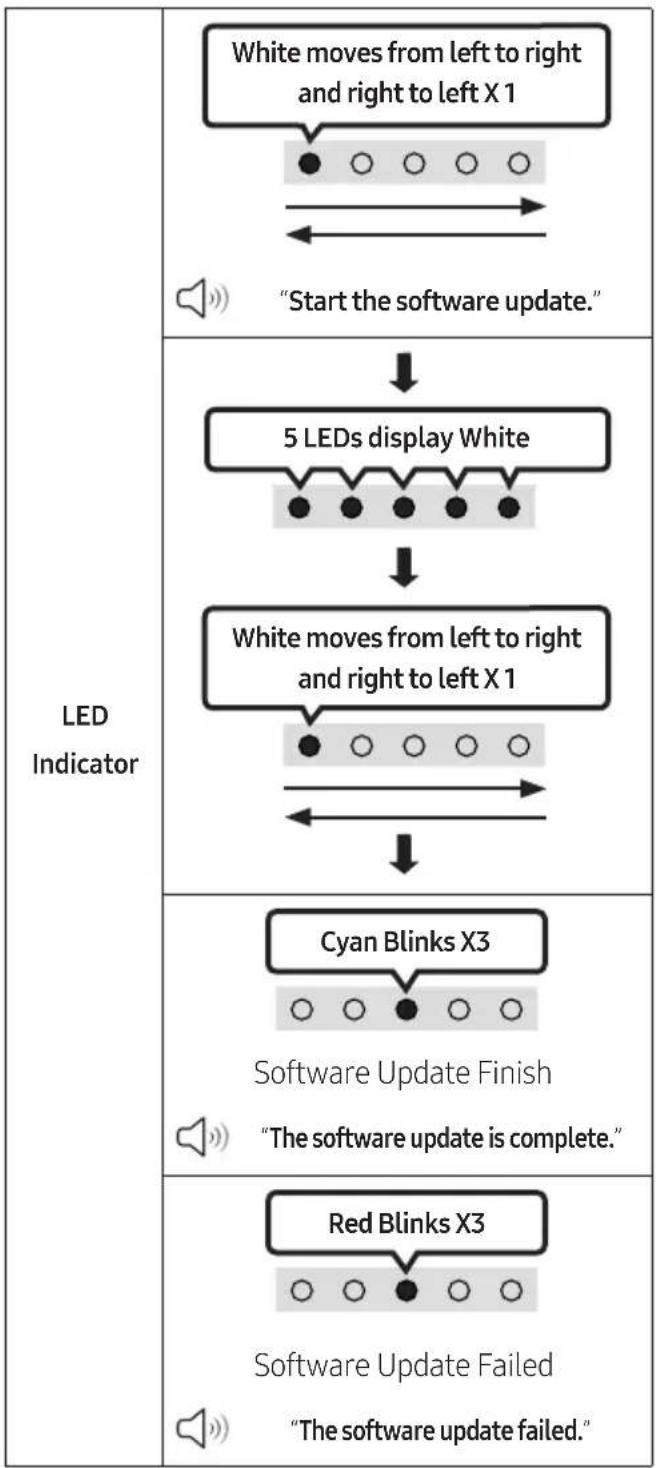
flowchart
graph TD
    A["White moves from left to right and right to left X 1"] --> B["Start the software update."]
    B --> C["5 LEDs display White"]
    C --> D["White moves from left to right and right to left X 1"]
    D --> E["Cyan Blinks X3"]
    E --> F["Software Update Finish "The software update is complete.""]
    F --> G["Red Blinks X3"]
    G --> H["Software Update Failed "The software update failed.""]
- This product has a DUAL BOOT function. If the firmware fails to update, you can update the firmware again.
If LED sequence flashing is not displayed
- Turn off the Soundbar, disconnect and then reconnect the USB storage device that contains the update files to the Soundbar's USB port.
- Disconnect the Soundbar's power cord, reconnect it, and then turn on the Soundbar.
NOTES
- The firmware update may not work properly if audio files supported by the Soundbar are stored in the USB storage device.
- Do not disconnect the power or remove the USB device while updates are being applied. The main unit will turn off automatically after completing the firmware update.
• After upgrading, keep the original Settings. (include Volume, sound field, etc.)
- When the firmware update is complete, the soundbar automatically turns on, and the Voice UI comes out.
If the software update fails, check if the USB stick is defective.
- Mac OS users should use MS-DOS (FAT) as the USB format.
- Updating via USB may not be available, depending on the USB storage device manufacturer.
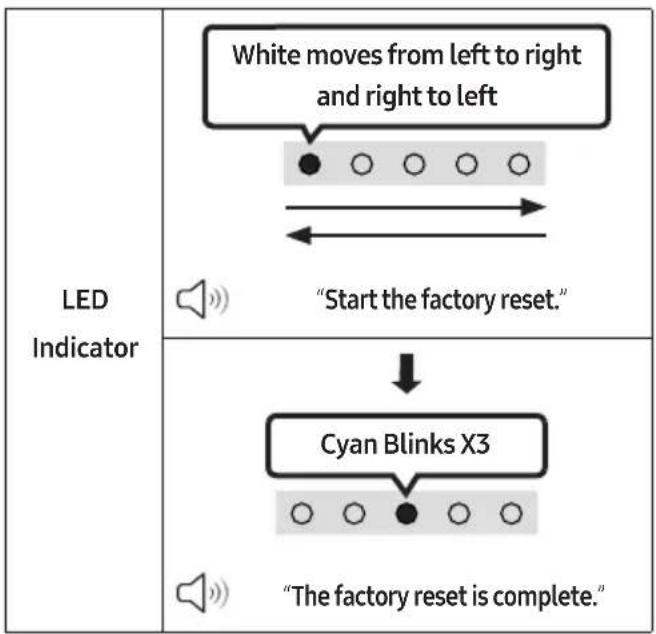
Reset
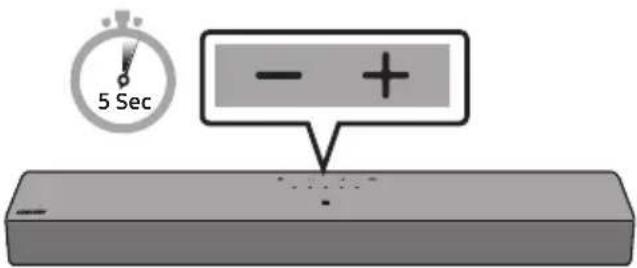
With the Soundbar on, press the - + (Volume) buttons on the body at the same time for at least 5 seconds. The LED display changes as shown below and then the Soundbar is reset.
flowchart
graph TD
    A["White moves from left to right and right to left"] --> B["Start the factory reset"]
    C["Cyan Blinks X3"] --> D["The factory reset is complete"]
CAUTION
- All the settings of the Soundbar are reset. Be sure to perform this only when a reset is required.
12 TROUBLESHOOTING
Before seeking assistance, check the following.
Soundbar does not turn on.
→Check whether the power cord of the Soundbar is correctly inserted into the outlet.
Soundbar works erratically.
→After removing the power cord, insert it again.
→Power cycle the external device and try again.
→If there is no signal, the Soundbar automatically turns off after a certain period of time. Turn on the power. (See page 9.)
Remote control does not work.
→Point the remote directly at the Soundbar.
→Replace the batteries with new ones.
Soundbar does not output any sound.
→The volume of the Soundbar is too low or muted. Adjust the volume.
→When any external device (STB, Bluetooth device, mobile device, etc.) is connected, adjust the volume of the external device.
→For sound output of the TV, select Soundbar. (Samsung TV: Home (
Menu → Settings ( Ⓧ→ All Settings ( ) ➕ → Sound → Sound Output → Select Soundbar)
→The cable connection to the Soundbar may be loose. Remove the cable and connect again.
→Remove the power cord completely, reconnect, and turn the power on.
→ Reset the product and try again.
(See page 31.)
Soundbar does not connect via Bluetooth.
→When connecting a new device, switch to Bluetooth Pairing for connection. (Press the
* PAIR button on the remote control or press the (Source) button on the body for at least 5 seconds.)
→If the Soundbar is connected to another device, disconnect that device first to switch the device.
→Reconnect it after removing the Bluetooth speaker list on the device to connect.
(Samsung TV: Home ( → Menu → Settings ( → All Settings ( ) Sound → Sound Output → Bluetooth Speaker List)
→Remove and reconnect the power plug, then try again.
→ Reset the product and try again.
(See page 31.)
Sound drops out when connected via Bluetooth.
→If your device that is connected via Bluetooth moves too far away from the Soundbar, it may cause the sound to drop out. Move the device closer to the Soundbar.
→If a part of your body is in contact with the Bluetooth transceiver or the product is installed on metal furniture, sound may drop out. Check the installation environment and conditions for use.
Soundbar does not turn on automatically with the TV.
→If you turn off the Soundbar while watching TV, the power synchronization with the TV will be disabled. Power off the TV and Soundbar using the TV remote.
13 LICENCE
Dolby AUDIO
Dolby, Dolby Audio, and the double-D symbol are trademarks of Dolby Laboratories Licensing Corporation. Manufactured under license from Dolby Laboratories. Confidential unpublished works. Copyright 1992-2019 Dolby Laboratories. All rights reserved.

For DTS patents, see http://patents.dts.com. Manufactured under license from DTS, Inc. (for companies headquartered in the U.S./Japan/Taiwan) or under license from DTS Licensing Limited (for all other companies). DTS, DigitalSurround, and the DTS logo are registered trademarks or trademarks of DTS, Inc. in the United States and other countries. © 2021 DTS, Inc. ALL RIGHTS RESERVED.

The Bluetooth® word mark and logos are registered trademarks owned by Bluetooth SIG, Inc. and any use of such marks by Samsung Electronics Co., Ltd. is under license. Other trademarks and trade names are those of their respective owners.
14 OPEN SOURCE LICENCE NOTICE
To send inquiries and requests for questions regarding open sources, contact Samsung Open Source (http://opensource.samsung.com)
15 IMPORTANT NOTES ABOUT SERVICE
- Figures and illustrations in this User Manual are provided for reference only and may differ from actual product appearance.
- An administration fee may be charged if either
(a) an engineer is called out at your request and there is no defect with the product (i.e. where the user manual has not been read).
(b) you bring the unit to a repair centre and there is no defect with the product (i.e. where the user manual has not been read).
- You will be informed of the administration fee amount before a technician visits.
16 SPECIFICATIONS AND GUIDE
Specifications
| Model Name HW-C400 / HW-C410 | |
| USB 5V/0.5A | |
| Weight 2.0 kg | |
| Dimensions (W x H x D) 641.0 x 66.5 x 107.0 mm | |
| Operating Temperature Range +5°C to +35°C | |
| Operating Humidity Range 10% ~ 75% | |
| AMPLIFIER Rated Output power | 20W x 2 |
| Supported play formats | LPCM 2ch, Dolby AudioTM (supporting Dolby® Digital), DTS |
| Overall Standby Power Consumption (W) 0.5W | |
| Bluetooth Port deactivation method | Press and hold the SOUND MODE button for more than 5 seconds to turn off Bluetooth Power function. |
NOTES
- Samsung Electronics Co., Ltd reserves the right to change the specifications without notice.
• Weight and dimensions are approximate.
- Hereby, Samsung declares that this radio equipment is in compliance with Directive 2014/53/EU and the relevant UK statutory requirements. The full text of the declaration of conformity is available at the following internet address: http://www.samsung.com go to Support and enter the model name. This equipment may be operated in all EU countries and in the UK.
- WIRELESS DEVICE OUTPUT POWER
RF max transmitter power
100mW at 2.4GHz - 2.4835GHz
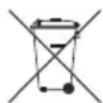
[Correct disposal of batteries in this product]
(Applicable in countries with separate collection systems)
This marking on the battery, manual or packaging indicates that the batteries in this product should not be disposed of with other household waste at the end of their working life. Where marked, the chemical symbols Hg, Cd or Pb indicate that the battery contains mercury, cadmium or lead above the reference levels in EC Directive 2006/66.
If batteries are not properly disposed of, these substances can cause harm to human health or the environment.
To protect natural resources and to promote material reuse, please separate batteries from other types of waste and recycle them through your local, free battery return system.
Correct Disposal of This Product
(Waste Electrical & Electronic Equipment)
(Applicable in countries with separate collection systems)
This marking on the product, accessories or literature indicates that the product and its electronic accessories (e.g. charger, headset, USB cable) should not be disposed of with other household waste at the end of their working life. To prevent possible harm to the environment or human health from uncontrolled waste disposal, please separate these items from other types of waste and recycle them responsibly to promote the sustainable reuse of material resources.
Household users should contact either the retailer where they purchased this product, or their local government office, for details of where and how they can take these items for environmentally safe recycling.
Business users should contact their supplier and check the terms and conditions of the purchase contract. This product and its electronic accessories should not be mixed with other commercial wastes for disposal.
For information on Samsung's environmental commitments and product specific regulatory obligations e.g. REACH, WEEE, Batteries, visit:
www.samsung.com/uk/aboutsamsung/sustainability/environment/our-commitment/data/
INFORMATIONS RELATIVES À LA SÉCURITÉ
AVERTISSEMENTS
POUR ÉVITER LES RISQUES DE CHOC
ÉLECTRIQUE, NE DÉMONTEZ PAS LE CAPOT.
L'APPAREIL NE CONTIENT PAS DE PIÈCES
RÉPARABLES PAR L'UTILISATEUR ; S'ADRESSER À UN SERVICE APRÈS-VENTE QUALIFIÉ.
02 VUE D'ENSEMBLE DU PRODUIT
8 ▶II (Lecture / Pause)
9 Haut/Bas/Gauche/Droite
10 i(Info)
11
SOUND MODE
natural_image
Three-step diagram showing a mechanical component before and after assembly, with no visible text or symbols.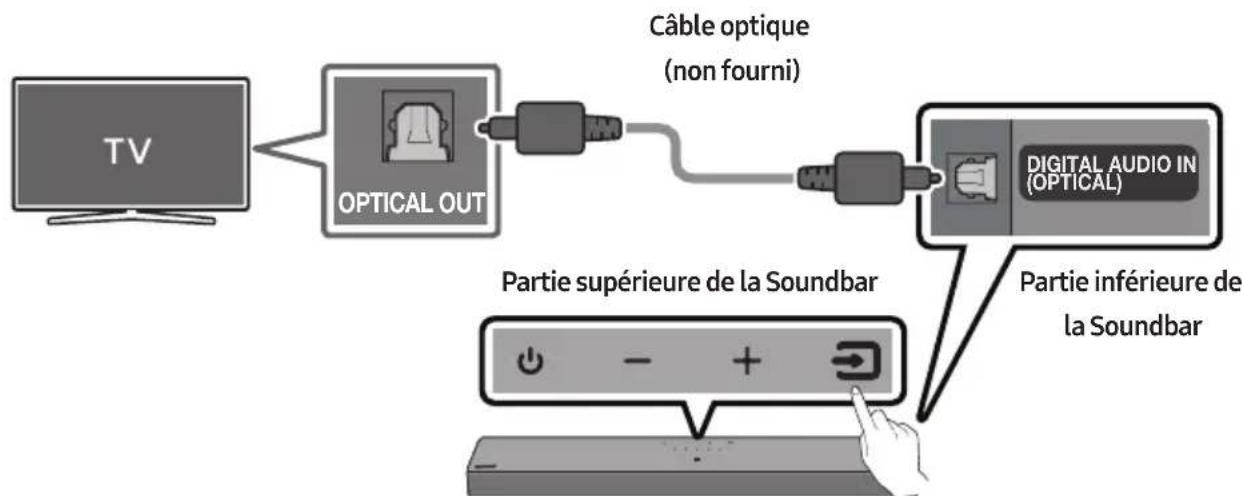
flowchart
graph LR
    A["TV"] --> B["OPTICAL OUT"]
    B --> C["Câble optique (non fourni)"]
    C --> D["DIGITAL AUDIO IN (OPTICAL)"]
    D --> E["Partie inférieure de la Soundbar"]
    E --> F["Partie supérieure de la Soundbar"]
| Indicateur à LED |
natural_image
Illustration of a TV with wireless signal icons above it (no text or symbols on the TV itself)Connexion initiale
4.

5.

REMARQUE
Dolby, Dolby Audio, and the double-D symbol are trademarks of Dolby Laboratories Licensing Corporation. Manufactured under license from Dolby Laboratories. Confidential unpublished works. Copyright 1992-2019 Dolby Laboratories. All rights reserved.


2.0 Channel
For DTS patents, see http://patents.dts.com. Manufactured under license from DTS, Inc. (for companies headquartered in the U.S./Japan/Taiwan) or under license from DTS Licensing Limited (for all other companies). DTS, DigitalSurround, and the DTS logo are registered trademarks or trademarks of DTS, Inc. in the United States and other countries. © 2021 DTS, Inc. ALL RIGHTS RESERVED.

Bluetooth®
The Bluetooth® word mark and logos are registered trademarks owned by Bluetooth SIG, Inc. and any use of such marks by Samsung Electronics Co., Ltd. is under license. Other trademarks and trade names are those of their respective owners.
14 AVIS DE LICENCE LIBRE
natural_image
3D rendering of a rectangular electronic component with a small hole and mounting holes (no text or symbols)natural_image
Simple black outline of a U-shaped connector or clamp (no text or symbols)natural_image
Black remote control with two USB cable connectors beside it (no text or symbols visible)| IndicatoreLED | 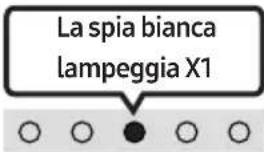 |
| “Sync” → “Night mode” → “Voice enhancement” |
| IndicatoreLED | 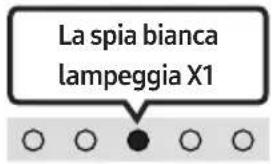 |
| “Surround Sound” → “Standard” |
- Surround Sound
12
LIVELLO WOOFER (BASSO)

natural_image
Three-step diagram showing a mechanical component before and after assembly, with no visible text or symbols.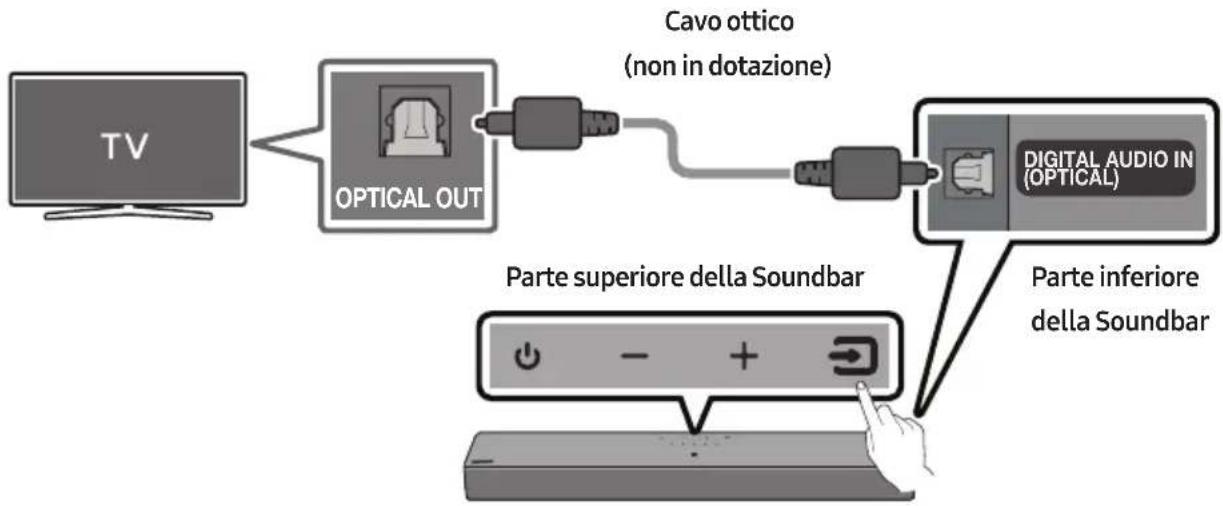
natural_image
Illustration of a TV with wireless signal icons above it (no text or symbols on the TV itself)4.

5.
NOTA
Dolby, Dolby Audio, and the double-D symbol are trademarks of Dolby Laboratories Licensing Corporation. Manufactured under license from Dolby Laboratories. Confidential unpublished works. Copyright 1992-2019 Dolby Laboratories. All rights reserved.

For DTS patents, see http://patents.dts.com. Manufactured under license from DTS, Inc. (for companies headquartered in the U.S./Japan/Taiwan) or under license from DTS Licensing Limited (for all other companies). DTS, DigitalSurround, and the DTS logo are registered trademarks or trademarks of DTS, Inc. in the United States and other countries. © 2021 DTS, Inc. ALL RIGHTS RESERVED.

The Bluetooth® word mark and logos are registered trademarks owned by Bluetooth SIG, Inc. and any use of such marks by Samsung Electronics Co., Ltd. is under license. Other trademarks and trade names are those of their respective owners.
14 AVVISO DI LICENZA OPEN SOURCE
http://www.samsung.com/it/aboutsamsung/sustainability/environment/our-commitment/data/
natural_image
Three-panel image showing a rectangular device, a cable with a handle, and a remote control unit (no text or symbols visible)natural_image
Black remote control tower with two black USB drivelets beside it (no visible text or symbols)| IndicatorLED | 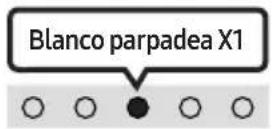 |
| “Surround Sound” → “Standard” |
- Surround Sound
natural_image
Diagram showing a mechanical component before and after assembly, with no visible text or symbols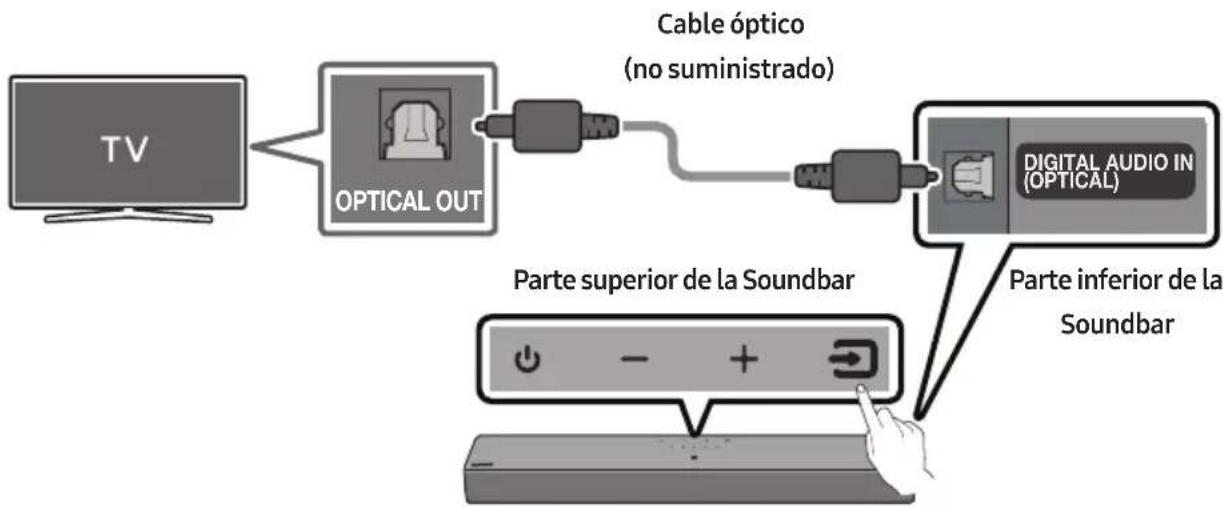
flowchart
graph LR
    A["TV"] --> B["OPTICAL OUT"]
    B --> C["Cable óptico (no suministrado)"]
    C --> D["DIGITAL AUDIO IN (OPTICAL)"]
    D --> E["Parte superior de la Soundbar"]
    E --> F["Parte inferior de la Soundbar"]
natural_image
Illustration of a TV with wireless signal icons above it (no text or symbols on the TV itself)La conexión inicial
NOTAS
4.

5.

NOTA
Dolby, Dolby Audio, and the double-D symbol are trademarks of Dolby Laboratories Licensing Corporation. Manufactured under license from Dolby Laboratories. Confidential unpublished works. Copyright 1992-2019 Dolby Laboratories. All rights reserved.

For DTS patents, see http://patents.dts.com. Manufactured under license from DTS, Inc. (for companies headquartered in the U.S./Japan/Taiwan) or under license from DTS Licensing Limited (for all other companies). DTS, DigitalSurround, and the DTS logo are registered trademarks or trademarks of DTS, Inc. in the United States and other countries. © 2021 DTS, Inc. ALL RIGHTS RESERVED.

The Bluetooth® word mark and logos are registered trademarks owned by Bluetooth SIG, Inc. and any use of such marks by Samsung Electronics Co., Ltd. is under license. Other trademarks and trade names are those of their respective owners.
14 AVISO SOBRE LICENCIA DE CÓDIGO ABIERTO
www.samsung.com/uk/aboutsamsung/sustainability/environment/our-commitment/data/
INFORMAÇÕES DE SEGURANÇA
natural_image
3D rendering of a rectangular electronic component with a small hole and mounting holes (no text or symbols)natural_image
Black plastic connector with a U-shaped handle and a small protrusion (no text or symbols)natural_image
Black remote control device with two attached USB cable (no visible text or symbols)| Indicador LED | 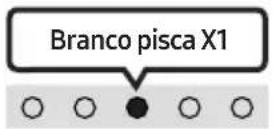 |
| “Surround Sound” → “Standard” |
- Surround Sound

| IndicatorLED | 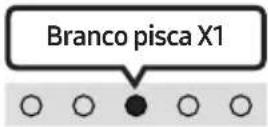 |
 | “Treble” → “Bass” |
natural_image
Diagram showing a mechanical component before and after assembly, with no visible text or symbols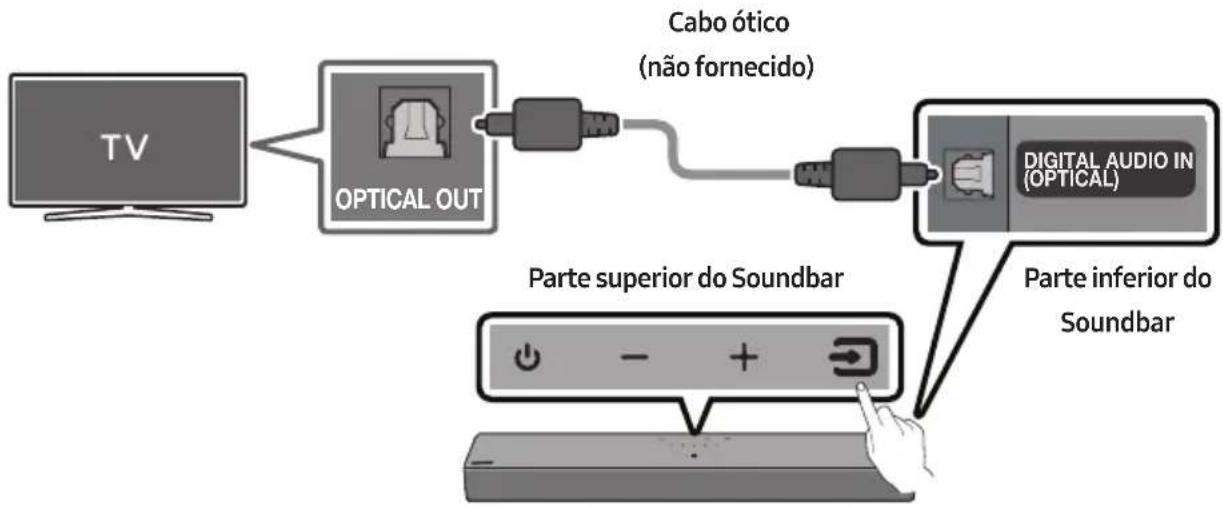
flowchart
graph LR
    A["TV"] --> B["OPTICAL OUT"]
    B --> C["Cabo ótico (não fornecido)"]
    C --> D["DIGITAL AUDIO IN (OPTICAL)"]
    D --> E["Parte inferior do Soundbar"]
    E --> F["Parte superior do Soundbar"]
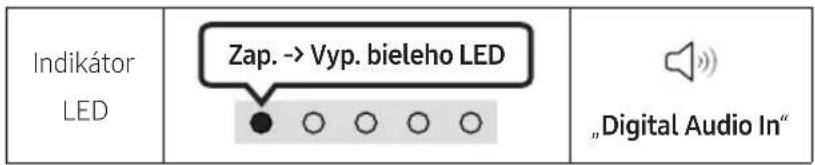
| IndicadorLED | "Digital Audio In" |
natural_image
Illustration of a TV with wireless signal icons above it (no text or symbols on the TV itself)A ligação inicial
NOTAS
NOTA
Dolby, Dolby Audio, and the double-D symbol are trademarks of Dolby Laboratories Licensing Corporation. Manufactured under license from Dolby Laboratories. Confidential unpublished works. Copyright 1992-2019 Dolby Laboratories. All rights reserved.

For DTS patents, see http://patents.dts.com. Manufactured under license from DTS, Inc. (for companies headquartered in the U.S./Japan/Taiwan) or under license from DTS Licensing Limited (for all other companies). DTS, DigitalSurround, and the DTS logo are registered trademarks or trademarks of DTS, Inc. in the United States and other countries. © 2021 DTS, Inc. ALL RIGHTS RESERVED.

The Bluetooth® word mark and logos are registered trademarks owned by Bluetooth SIG, Inc. and any use of such marks by Samsung Electronics Co., Ltd. is under license. Other trademarks and trade names are those of their respective owners.
14 AVISO DE LICENÇA DE OPEN SOURCE
Para enviar perguntas e pedidos de esclarecimento relativamente a fontes abertas, contacte a Samsung Open Source por e-mail (http://opensource.samsung.com)
15 NOTA IMPORTANTE SOBRE O SERVIÇO
www.samsung.com/uk/aboutsamsung/sustainability/environment/our-commitment/data/
VEILIGHEIDSINFORMATIE
VEILIGHEIDSINSTRUCTIES
OPEN NOOIT DE BEHUIZING VAN DIT APPARAAT, WANT DAN LOOPT U HET GEVAAR EEN ELEKTRISCHE SCHOK TE KRIJGEN. DE BEHUIZING BEVAT GEEN ONDERDELEN DIE U ZELF KUNT REPAREREN. LAAT ONDERHOUD OVER AAN DE VAKHANDEL.
natural_image
3D rendering of a rectangular mechanical part with a small inset detail (no text or symbols)natural_image
Black plastic connector with a U-shaped handle and a small protrusion (no text or symbols)Stroomkabel (Soundbar)
natural_image
Exterior view of a black remote control with two USB cable spools beside it (no text or symbols visible)Afstandsbediening/batterijen van de Soundbar
| Led-lampje | |
 | “Surround Sound” → “Standard” |
- Surround Sound
| Led-lampje | 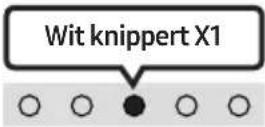 |
 | “Treble” → “Bass” |
"Treble" → "Bass"
natural_image
Three-step diagram showing a mechanical component before and after assembly, with no visible text or symbols.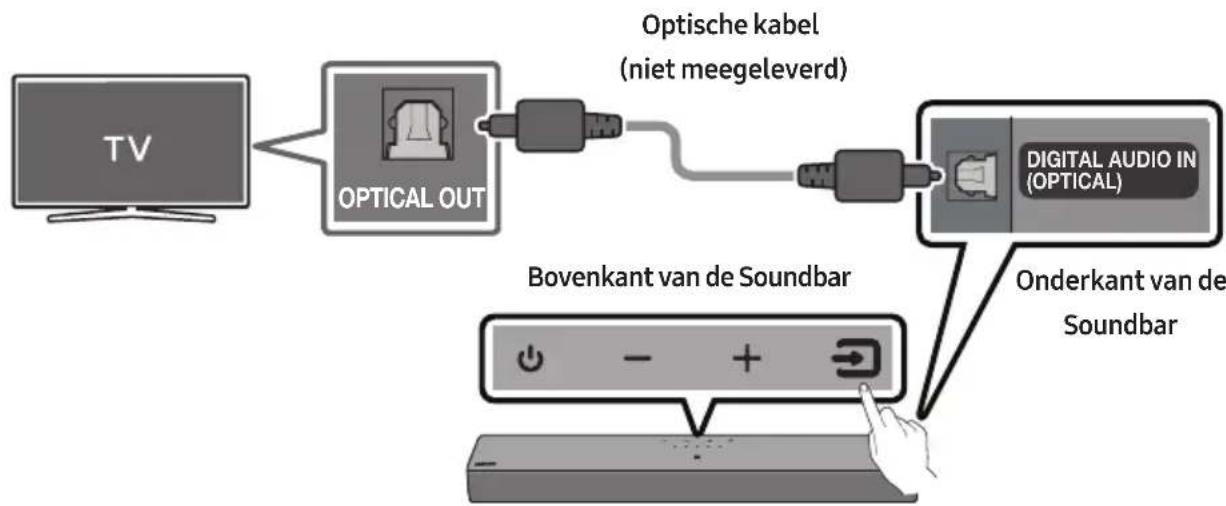
flowchart
graph LR
    A["TV"] --> B["OPTICAL OUT"]
    B --> C["Optische kabel (niet meegeleverd)"]
    C --> D["DIGITAL AUDIO IN (OPTICAL)"]
    D --> E["Onderkant van de Soundbar"]
    E --> F["Bovenkant van de Soundbar"]
OPMERKINGEN
OPMERKING
12 PROBLEEMOPLOSSING
Dolby, Dolby Audio, and the double-D symbol are trademarks of Dolby Laboratories Licensing Corporation. Manufactured under license from Dolby Laboratories. Confidential unpublished works. Copyright 1992-2019 Dolby Laboratories. All rights reserved.


2.0 Channel
For DTS patents, see http://patents.dts.com. Manufactured under license from DTS, Inc. (for companies headquartered in the U.S./Japan/Taiwan) or under license from DTS Licensing Limited (for all other companies). DTS, DigitalSurround, and the DTS logo are registered trademarks or trademarks of DTS, Inc. in the United States and other countries. © 2021 DTS, Inc. ALL RIGHTS RESERVED.
Bluetooth®
The Bluetooth® word mark and logos are registered trademarks owned by Bluetooth SIG, Inc. and any use of such marks by Samsung Electronics Co., Ltd. is under license. Other trademarks and trade names are those of their respective owners.
14 KENNISGEVING OPEN SOURCE- LICENTIE
• UITGANGSVERMOGEN DRAADLOOS APPARAAT
RF max. zendvermogen
100 mW op 2,4 GHz - 2,4835 GHz
www.samsung.com/uk/aboutsamsung/sustainability/environment/our-commitment/data/
natural_image
3D rendering of a rectangular electronic component with no visible text or symbolsSoundbar-Hauptgerät

natural_image
Simple line drawing of a U-shaped connector or latch (no text or symbols)Stromkabel (Soundbar)

natural_image
Exterior view of a black remote control with two smaller USB flash drives (no text or symbols visible)natural_image
Diagram showing three sequential steps of a mechanical component or assembly, with arrows indicating direction (no text or symbols present)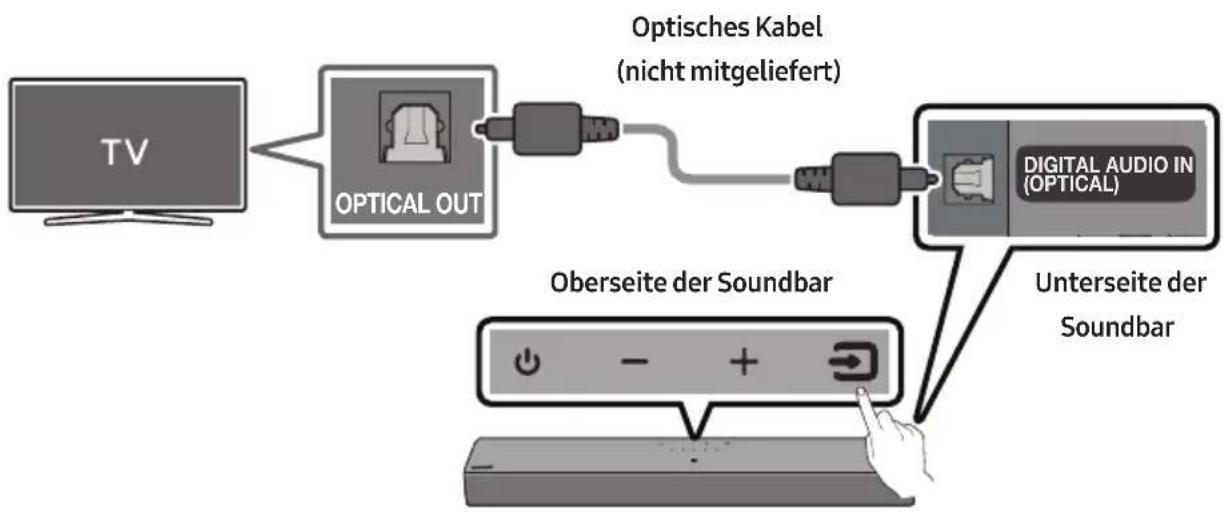
natural_image
Illustration of a flat-screen TV with wireless signal icons above (no text or symbols on screen)HINWEIS
Dolby, Dolby Audio, and the double-D symbol are trademarks of Dolby Laboratories Licensing Corporation. Manufactured under license from Dolby Laboratories. Confidential unpublished works. Copyright 1992-2019 Dolby Laboratories. All rights reserved.

For DTS patents, see http://patents.dts.com. Manufactured under license from DTS, Inc. (for companies headquartered in the U.S./Japan/Taiwan) or under license from DTS Licensing Limited (for all other companies). DTS, DigitalSurround, and the DTS logo are registered trademarks or trademarks of DTS, Inc. in the United States and other countries. © 2021 DTS, Inc. ALL RIGHTS RESERVED.

The Bluetooth® word mark and logos are registered trademarks owned by Bluetooth SIG, Inc. and any use of such marks by Samsung Electronics Co., Ltd. is under license. Other trademarks and trade names are those of their respective owners.
14 BEKANNTMACHUNG ZU OPEN SOURCE LIZENZEN
www.samsung.com/uk/aboutsamsung/sustainability/environment/our-commitment/data/
SÄKERHETSINFORMATION
WARNING
FÖR ATT MINSKA RISKEN FÖR ELEKTRISKA STÖTAR SKALL DU INTE TA BORT HÖLJET (ELLER BAKSIDAN).
DET FINNS INGA DELAR INUTI SOM DU KAN REPARERA. ÖVERLÄMNA SERVICEÅTAGANDEN TILL KVALIFICERAD PERSONAL.
INNEHÅLLSFÖRTECKNING
01 Kontrollera komponenterna 6
natural_image
3D rendering of a rectangular gray object with a small protrusion on top (no text or symbols)Soundbar-huvudenhet
natural_image
Simple black outline of a U-shaped connector or clamp (no text or symbols)Strömsladd (Soundbar)
natural_image
Exterior view of a remote control tower with two rear-mounted cables (no text or symbols visible)Soundbar-fjärrkontroll/batterier
| LED-indikator | 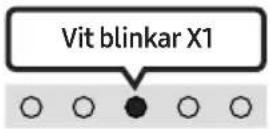 |
 | "Sync" → "Night mode" → "Voice enhancement" |
| LED-indikator | 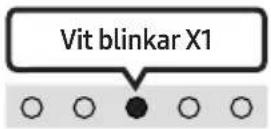 |
| "Surround Sound" → "Standard" |
- Surround Sound
12
NIVÅ WOOFER (BAS)

| LED-indikator | 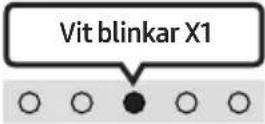 |
| "Treble" → "Bass" |
"Treble" → "Bass"
natural_image
Diagram showing a mechanical component before and after assembly, with no visible text or symbols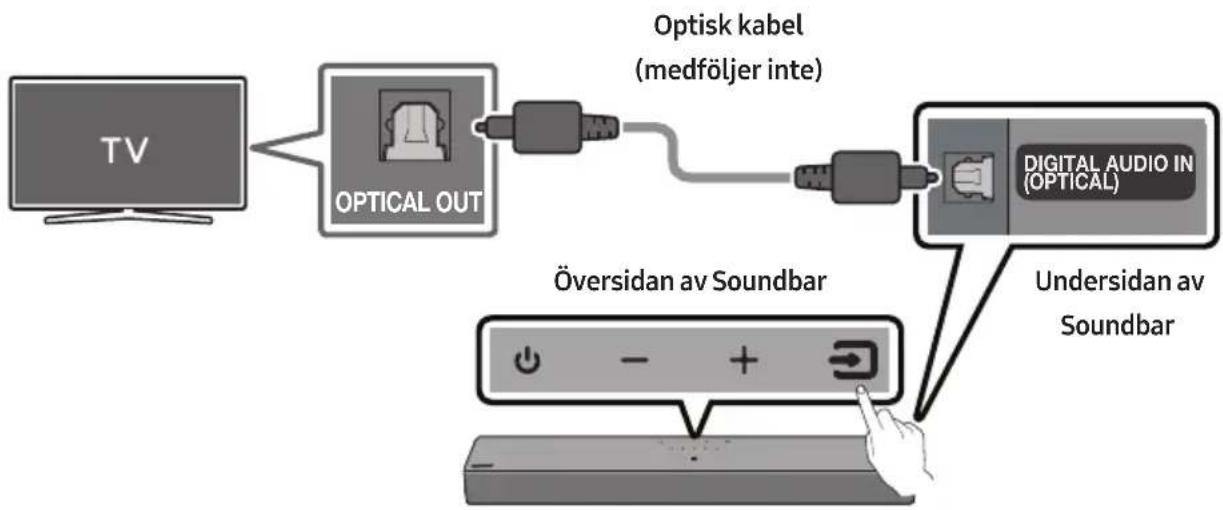
flowchart
graph LR
    TV["TV"] --> OpticalOut["Optical OUT"]
    OpticalOut --> Optiskkabel["Optisk kabel (medföljer inte)"]
    Optiskkabel --> DigitalAudioIn["Digital Audio In (OPTICAL)"]
    DigitalAudioIn --> UndersidanSoundbar["Undersidan av Soundbar"]
    OpticalOut --> OversidanavSoundbar["Översidan av Soundbar"]
| LED-indikator | "Digital Audio In" |
natural_image
Illustration of a TV with wireless signal icons above it (no text or symbols on the TV itself)OBS!
Dolby, Dolby Audio, and the double-D symbol are trademarks of Dolby Laboratories Licensing Corporation. Manufactured under license from Dolby Laboratories. Confidential unpublished works. Copyright 1992-2019 Dolby Laboratories. All rights reserved.

For DTS patents, see http://patents.dts.com. Manufactured under license from DTS, Inc. (for companies headquartered in the U.S./Japan/Taiwan) or under license from DTS Licensing Limited (for all other companies). DTS, DigitalSurround, and the DTS logo are registered trademarks or trademarks of DTS, Inc. in the United States and other countries. © 2021 DTS, Inc. ALL RIGHTS RESERVED.

The Bluetooth® word mark and logos are registered trademarks owned by Bluetooth SIG, Inc. and any use of such marks by Samsung Electronics Co., Ltd. is under license. Other trademarks and trade names are those of their respective owners.
14 LICENSMEDDELANDE FÖR OPEN SOURCE
www.samsung.com/uk/aboutsamsung/sustainability/environment/our-commitment/data/
SIKKERHETSINFORMASJON
SIKERHETSFORANSTALTNINGER
FOR Å REDUSERE FAREN FOR ELEKTRISK ST∅T, TA IKKE AV BAKDEKSLET.
INNVENDIGE DELER KAN IKKE REPARERES AV BRUKEREN. OVERLAT ALL SERVICE TIL KVALIFISERT PERSONELL.
natural_image
3D rendering of a rectangular electronic component with no visible text or symbolsSoundbar-hovedenhet
natural_image
Simple black outline of a U-shaped connector or clamp (no text or symbols)Strømledning (Soundbar)
natural_image
Exterior view of a modern office building (no signage)Soundbar-fjernkontroll/batterier
Avgir originally den.
- Bluetooth Power av/på
natural_image
Diagram showing three sequential steps of a mechanical component or assembly, with no visible text or symbols.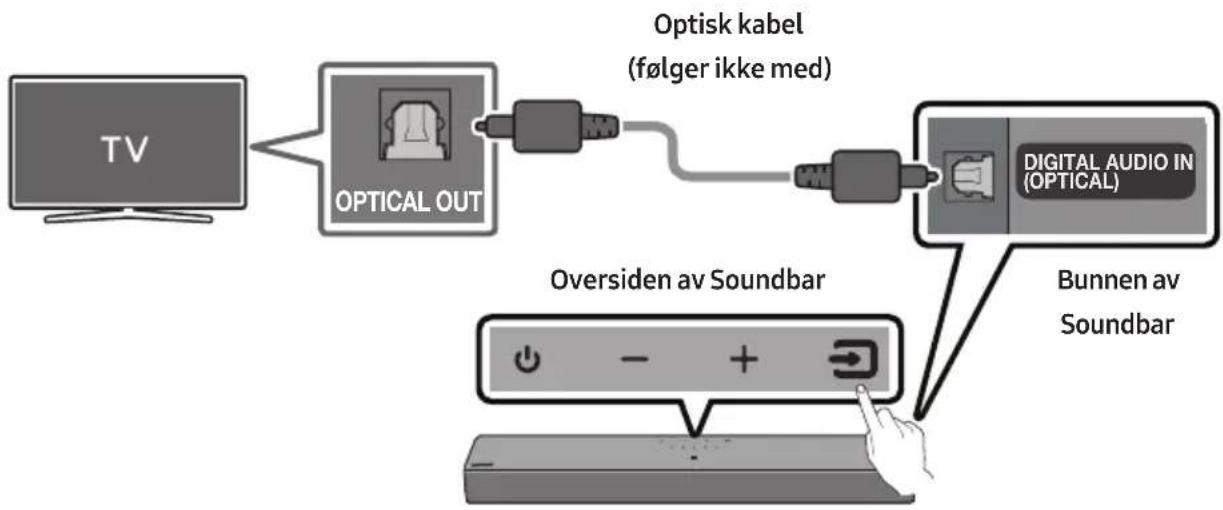
flowchart
graph LR
    TV["TV"] --> OpticalOut["Optical OUT"]
    OpticalOut --> Optiskkabel["Optisk kabel (følger ikke med)"]
    Optiskkabel --> DigitalAudioIn["Digital Audio In (OPTICAL)"]
    DigitalAudioIn --> BunnenSoundbar["Bunnen av Soundbar"]
    OpticalOut --> OversidenavSoundbar["Oversiden av Soundbar"]
4.
5.
MERK
Dolby, Dolby Audio, and the double-D symbol are trademarks of Dolby Laboratories Licensing Corporation. Manufactured under license from Dolby Laboratories. Confidential unpublished works. Copyright 1992-2019 Dolby Laboratories. All rights reserved.

For DTS patents, see http://patents.dts.com. Manufactured under license from DTS, Inc. (for companies headquartered in the U.S./Japan/Taiwan) or under license from DTS Licensing Limited (for all other companies). DTS, DigitalSurround, and the DTS logo are registered trademarks or trademarks of DTS, Inc. in the United States and other countries. © 2021 DTS, Inc. ALL RIGHTS RESERVED.

The Bluetooth® word mark and logos are registered trademarks owned by Bluetooth SIG, Inc. and any use of such marks by Samsung Electronics Co., Ltd. is under license. Other trademarks and trade names are those of their respective owners.
14 LISENSMERKNADER OM ÅPEN KILDEKODE
www.samsung.com/uk/aboutsamsung/sustainability/environment/our-commitment/data/
TURVALLISUUSOHJEET
TURVAOHJEITA
SÄHKÖISKUVAARAN VÄHENTÄMISEKSI ÄLÄ IRROTA TAKAKANTTA.
EI SISÄLLÄ OSIA, JOITA KÄYTTÄJÄ VOISI
KORJATA. JÄTÄ HUOLTO- JA KORJAUSTYÖT
VALTUUTETUN HUOLTOLIIKKEEN TEHTÄVIKSI.
natural_image
3D rendering of a rectangular electronic component with a small hole at the top (no text or symbols visible)Soundbar-päälaite
natural_image
Black rubber strap connector with a small protrusion (no text or symbols)natural_image
Exterior view of a black remote control with two attached devices (no text or symbols visible)WOOFER (BASSO) LEVEL

natural_image
Three-step diagram showing a mechanical component before and after assembly, with no visible text or symbols.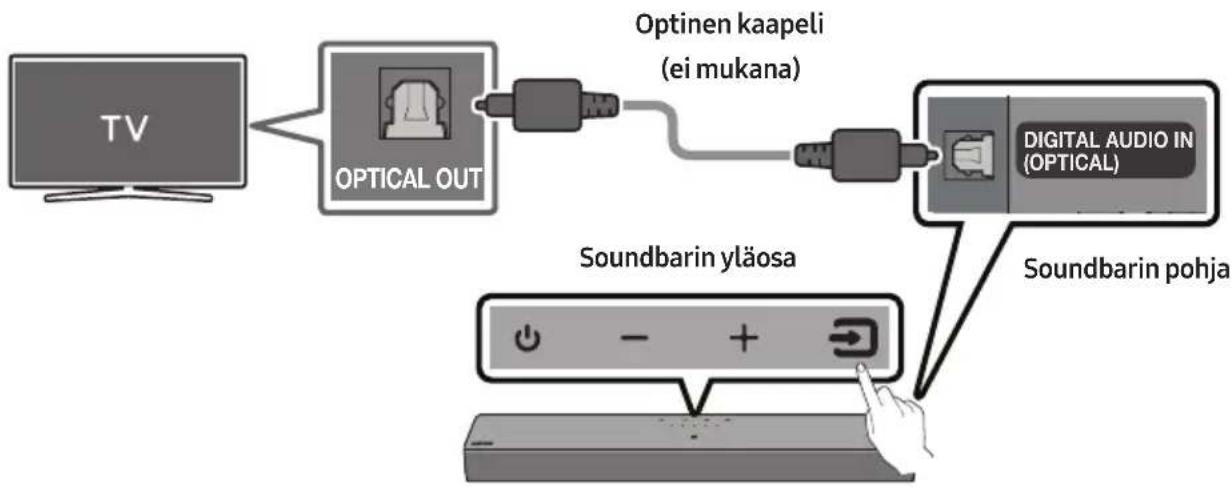
flowchart
graph TD
    A["TV"] --> B["OPTICAL OUT"]
    B --> C["Optinen kaapeli (ei mukana)"]
    C --> D["DIGITAL AUDIO IN (OPTICAL)"]
    D --> E["Soundbarin yläosa"]
    E --> F["Hand pointing to a device with a button icon"]
natural_image
Illustration of a TV with wireless signal icons above it (no text or symbols on the TV itself)Ensimmäinen yhteys
HUOMAUTUS
Dolby, Dolby Audio, and the double-D symbol are trademarks of Dolby Laboratories Licensing Corporation. Manufactured under license from Dolby Laboratories. Confidential unpublished works. Copyright 1992-2019 Dolby Laboratories. All rights reserved.

For DTS patents, see http://patents.dts.com. Manufactured under license from DTS, Inc. (for companies headquartered in the U.S./Japan/Taiwan) or under license from DTS Licensing Limited (for all other companies). DTS, DigitalSurround, and the DTS logo are registered trademarks or trademarks of DTS, Inc. in the United States and other countries. © 2021 DTS, Inc. ALL RIGHTS RESERVED.

The Bluetooth® word mark and logos are registered trademarks owned by Bluetooth SIG, Inc. and any use of such marks by Samsung Electronics Co., Ltd. is under license. Other trademarks and trade names are those of their respective owners.
14 AVOIMEN LÄHDEKIELEN LISENSSI- ILMOITUS
www.samsung.com/uk/aboutsamsung/sustainability/environment/our-commitment/data/
SIKKERHEDSINFORMATIONER
SIKKERHEDSINFORMATIONER
FOR AT MINDSKE RISIKO FOR ELEKTRISK ST∅D MÅ BAGBEKLÆDNINGEN IKKE AFTAGES.
ENHEDENS INDVENDIGE DELE MÅ KUN EFTERSES AF FAGKYNDIGE. OVERLAD ALT REPARATIONSARBJEDE TIL AUTORISEREDE SERVICEFORHANDLERE.
natural_image
3D rendering of a rectangular electronic device with a flat top and small screen (no text or symbols visible)natural_image
Black plastic connector with a U-shaped handle and a small protrusion (no text or symbols)Strømkabel (Soundbar)
natural_image
Exterior view of a black remote control with two USB cable spools beside it (no text or symbols visible)Soundbar fjernbetjening / batterier
| LED-indikator | |
 | “Sync” → “Night mode” → “Voice enhancement” |
| LED-indikator | |
 | “Surround Sound” → “Standard” |
- Surround Sound
Giver et bredere lydfelt end standard.
- Standard
Sender den originale lyd.
- Bluetooth Power Til/Fra
natural_image
Diagram showing three sequential steps of a mechanical component or assembly, with arrows indicating direction (no text or symbols present)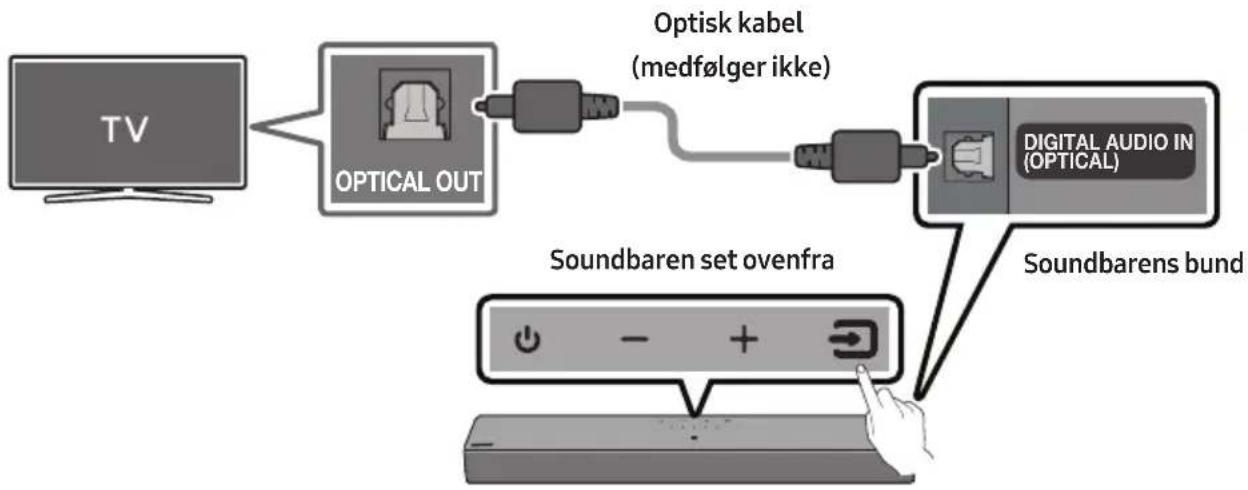
flowchart
graph TD
    A["TV"] --> B["OPTICAL OUT"]
    B --> C["Optisk kabel (medfølger ikke)"]
    C --> D["Digital Audio in (OPTICAL)"]
    D --> E["Soundbaren set ovenfra"]
    E --> F["Soundbarens bund"]
flowchart
graph LR
    A["Bluetooth-enhanced Signal"] --> B["Soundbaren set ovenfra"]
    B --> C["Smartphone with Smartphone"]
BEMÆRKNINGER
BEMÆRK
Dolby, Dolby Audio, and the double-D symbol are trademarks of Dolby Laboratories Licensing Corporation. Manufactured under license from Dolby Laboratories. Confidential unpublished works. Copyright 1992-2019 Dolby Laboratories. All rights reserved.

For DTS patents, see http://patents.dts.com. Manufactured under license from DTS, Inc. (for companies headquartered in the U.S./Japan/Taiwan) or under license from DTS Licensing Limited (for all other companies). DTS, DigitalSurround, and the DTS logo are registered trademarks or trademarks of DTS, Inc. in the United States and other countries. © 2021 DTS, Inc. ALL RIGHTS RESERVED.

The Bluetooth® word mark and logos are registered trademarks owned by Bluetooth SIG, Inc. and any use of such marks by Samsung Electronics Co., Ltd. is under license. Other trademarks and trade names are those of their respective owners.
14 BEMAERKNING VEDR. OPEN SOURCE-LICENS
www.samsung.com/uk/aboutsamsung/sustainability/environment/our-commitment/data/
INFORMATII DE SIGURANTĂ
AVERTISMENTE PRIVIND SIGURANTA
PENTRU A REDUCE RISCUL DE ELECTROCUTARE, NU SCOATEȚI CAPACUL POSTERIOR (SAU DIN SPATE). ÎN INTERIOR NU EXISTĂ PIESE CARE POT FI REPARATE DE UTILIZATOR. PENTRU SERVICE, ADRESAȚI-VĂ PERSONALULUI CALIFICAT.
natural_image
Three grayscale product photos: a rectangular remote box, a cable with a plug, and a remote control unit (no text or symbols visible)
Volum
12
NIVEL WOOFER (BAS)
natural_image
Diagram showing three stages of a mechanical component or assembly: before, after, and after (no text or symbols present)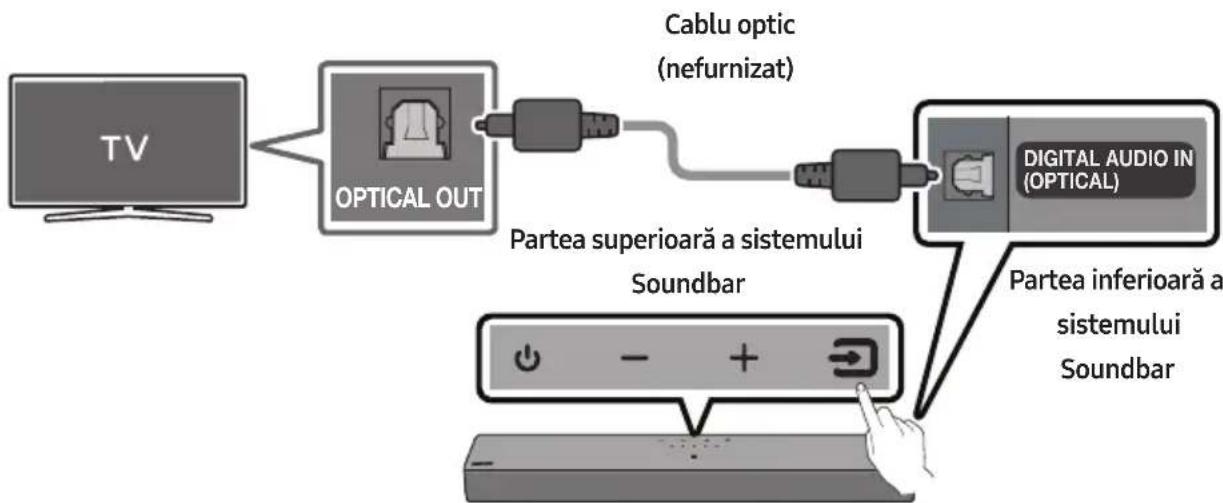
flowchart
graph LR
    TV["TV"] --> OpticalOut["OPTICAL OUT"]
    OpticalOut --> CableOptic["Cablu optic (nefurnizat)"]
    CableOptic --> DigitalAudioDigital["DIGITAL AUDIO IN (OPTICAL)"]
    DigitalAudioDigital --> Soundbar1["Partea superioară a sistemului"]
    DigitalAudioDigital --> Soundbar2["Partea inferioară a sistemului"]
| IndicatorLED | Alb Activat -> Dezactivat | „Digital Audio In” |
natural_image
Illustration of a TV with wireless signal icons above it (no text or symbols on the TV itself)Prima conectare
INFORMATIE IMPORTANTĂ
4.

5.

NOTĂ
Dolby, Dolby Audio, and the double-D symbol are trademarks of Dolby Laboratories Licensing Corporation. Manufactured under license from Dolby Laboratories. Confidential unpublished works. Copyright 1992-2019 Dolby Laboratories. All rights reserved.

For DTS patents, see http://patents.dts.com. Manufactured under license from DTS, Inc. (for companies headquartered in the U.S./Japan/Taiwan) or under license from DTS Licensing Limited (for all other companies). DTS, DigitalSurround, and the DTS logo are registered trademarks or trademarks of DTS, Inc. in the United States and other countries. © 2021 DTS, Inc. ALL RIGHTS RESERVED.

The Bluetooth® word mark and logos are registered trademarks owned by Bluetooth SIG, Inc. and any use of such marks by Samsung Electronics Co., Ltd. is under license. Other trademarks and trade names are those of their respective owners.
14 NOTIFICARE DE LICENȚĂ OPEN SOURCE
15 NOTĂ IMPORTANTĂ DESPRE SERVICE
natural_image
3D rendering of a rectangular electronic component with a small hole at the top (no text or symbols visible)Основно устройство на Soundbar
natural_image
Simple black outline of a U-shaped connector or clamp (no text or symbols)natural_image
Black remote control with two attached cable cars (no visible text or symbols)natural_image
Three-step diagram showing a mechanical component before and after assembly, with no visible text or symbols.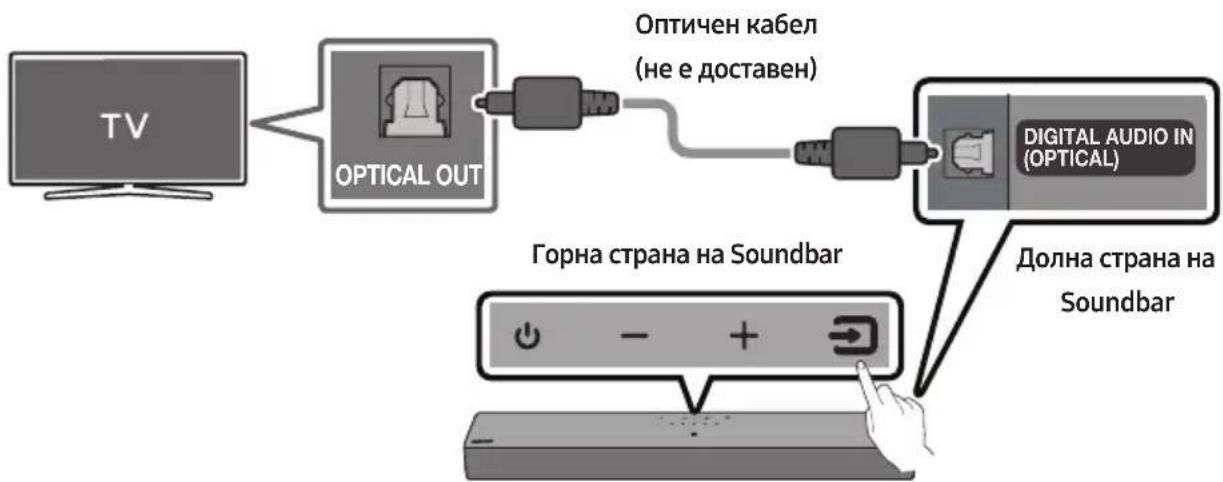
flowchart
graph LR
    A["TV"] --> B["OPTICAL OUT"]
    B --> C["Optичен кабел (не е доставен)"]
    C --> D["DIGITAL AUDIO IN (OPTICAL)"]
    D --> E["Долна страна на Soundbar"]
    E --> F["Горна страна на Soundbar"]

natural_image
Illustration of a TV with wireless signal icons above it (no text or symbols on the TV itself)4.
5.

ЗАБЕЛЕЖКА
Dolby, Dolby Audio, and the double-D symbol are trademarks of Dolby Laboratories Licensing Corporation. Manufactured under license from Dolby Laboratories. Confidential unpublished works. Copyright 1992-2019 Dolby Laboratories. All rights reserved.

For DTS patents, see http://patents.dts.com. Manufactured under license from DTS, Inc. (for companies headquartered in the U.S./Japan/Taiwan) or under license from DTS Licensing Limited (for all other companies). DTS, DigitalSurround, and the DTS logo are registered trademarks or trademarks of DTS, Inc. in the United States and other countries. © 2021 DTS, Inc. ALL RIGHTS RESERVED.

The Bluetooth® word mark and logos are registered trademarks owned by Bluetooth SIG, Inc. and any use of such marks by Samsung Electronics Co., Ltd. is under license. Other trademarks and trade names are those of their respective owners.
14 БЕЛЕЖКА ЗА ЛИЦЕНЗА ЗА ОТВОРЕН КОД
natural_image
Three grayscale product photos: a rectangular box, a coiled cable with a right-angle connector, and a remote control unit (no text or symbols visible)Obstuga pilota
1
Zasilanie
▶II (Odtwarzanie/Pauza)
natural_image
Diagram showing a mechanical component before and after assembly, with no visible text or symbols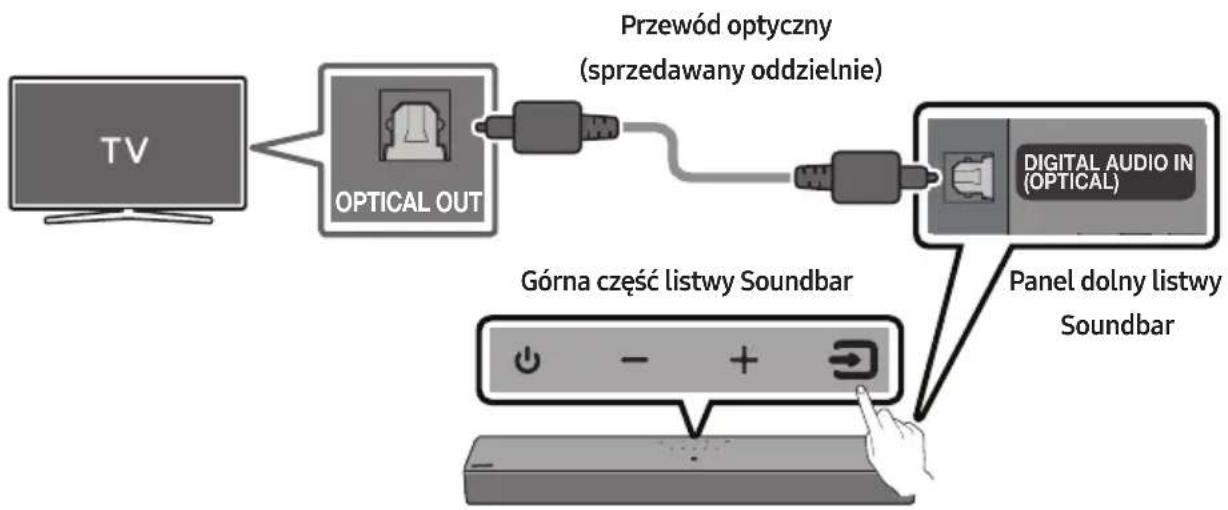
natural_image
Illustration of a TV with wireless signal icons above it (no text or symbols on the TV itself)UWAGA
Dolby, Dolby Audio, and the double-D symbol are trademarks of Dolby Laboratories Licensing Corporation. Manufactured under license from Dolby Laboratories. Confidential unpublished works. Copyright 1992-2019 Dolby Laboratories. All rights reserved.

For DTS patents, see http://patents.dts.com. Manufactured under license from DTS, Inc. (for companies headquartered in the U.S./Japan/Taiwan) or under license from DTS Licensing Limited (for all other companies). DTS, DigitalSurround, and the DTS logo are registered trademarks or trademarks of DTS, Inc. in the United States and other countries. © 2021 DTS, Inc. ALL RIGHTS RESERVED.

The Bluetooth® word mark and logos are registered trademarks owned by Bluetooth SIG, Inc. and any use of such marks by Samsung Electronics Co., Ltd. is under license. Other trademarks and trade names are those of their respective owners.
14 INFORMACJA O LICENCJI OPEN SOURCE
www.samsung.com/uk/aboutsamsung/sustainability/environment/our-commitment/data/
BEZPEČNOSTNÍ INFORMACE
BEZPEČNOSTNÍ VAROVÁNÍ
ABYSTE PŘEDEŠLI RIZIKU ÚRAZU ELEKTRICKÝM PROUDEM, NEODNÍMEJTE ZADNÍ KRYT PŘÍSTROJE.
UVNITŘ PŘÍSTROJE NEJSOU ŽÁDNÁ SERVISNÍ MÍSTA. OPRAVU SVĚRTE KVALIFIKOVANÉMU SERVISNÍMU TECHNIKOVI.
natural_image
3D rendering of a rectangular electronic component with no visible text or symbolsnatural_image
Black plastic connector with a U-shaped handle and right-angle end (no text or symbols)Napájecí kabel (Soundbar)
natural_image
Exterior view of a remote control tower with two USB drive pods beside it (no text or symbols visible)natural_image
Diagram showing a mechanical component before and after assembly, with no visible text or symbols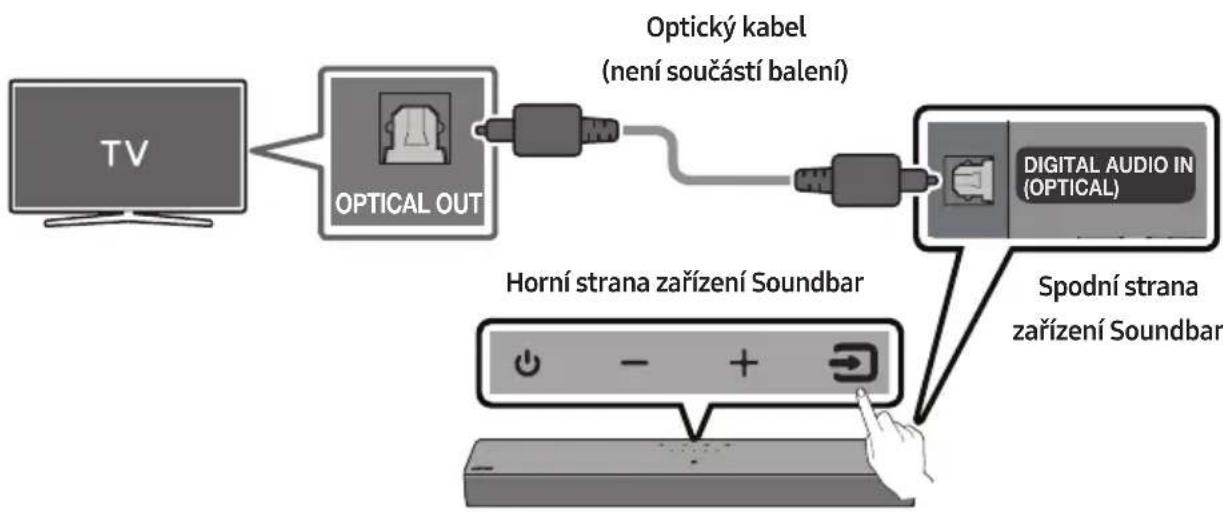
natural_image
Illustration of a TV with wireless signal icons above it (no text or symbols on the TV itself)První připojení
POZNÁMKA
Dolby, Dolby Audio, and the double-D symbol are trademarks of Dolby Laboratories Licensing Corporation. Manufactured under license from Dolby Laboratories. Confidential unpublished works. Copyright 1992-2019 Dolby Laboratories. All rights reserved.

For DTS patents, see http://patents.dts.com. Manufactured under license from DTS, Inc. (for companies headquartered in the U.S./Japan/Taiwan) or under license from DTS Licensing Limited (for all other companies). DTS, DigitalSurround, and the DTS logo are registered trademarks or trademarks of DTS, Inc. in the United States and other countries. © 2021 DTS, Inc. ALL RIGHTS RESERVED.

The Bluetooth® word mark and logos are registered trademarks owned by Bluetooth SIG, Inc. and any use of such marks by Samsung Electronics Co., Ltd. is under license. Other trademarks and trade names are those of their respective owners.
14 POZNÁMKA K LICENCI OTEVŘENÉHO SOFTWARU
natural_image
Three-panel image showing a rectangular device, a cable with a right-angle connector, and a remote control unit (no text or symbols visible)ÚROVNE WOOFER (BASY)


natural_image
Diagram showing a mechanical component before and after assembly, with no visible text or symbols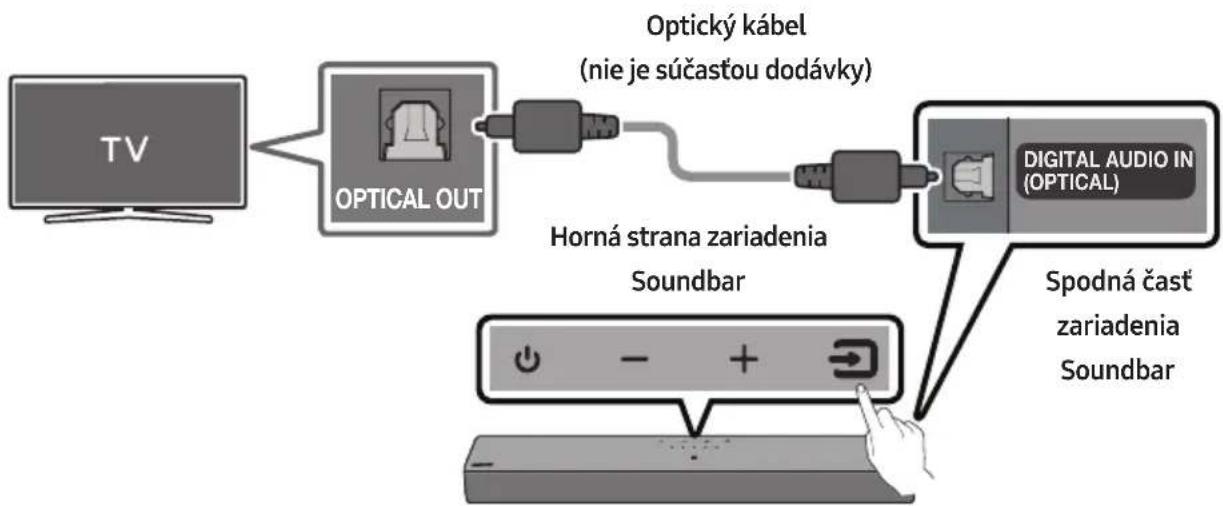
flowchart
graph LR
    A["TV"] --> B["OPTICAL OUT"]
    B --> C["Optický kábel (nie je súčastou dodávky)"]
    C --> D["Horná strana zariadenia Soundbar"]
    D --> E["Digital Audio IN (OPTICAL)"]
    E --> F["Spodná čast zariadenia Soundbar"]
natural_image
Illustration of a flat-screen TV with wireless signal icons above (no text or symbols on screen)Prvotné pripojenie
- Stlačením tlačidla ✝ PAIR na dial'kovom ovládači zariadenia Soundbar alebo ➞ (Zdroj) na hornom paneli zariadenia Soundbar prejdite do režimu „Bluetooth“.
POZNÁMKA
Domov (→ Menu → Nastavenia (
Dolby, Dolby Audio, and the double-D symbol are trademarks of Dolby Laboratories Licensing Corporation. Manufactured under license from Dolby Laboratories. Confidential unpublished works. Copyright 1992-2019 Dolby Laboratories. All rights reserved.

For DTS patents, see http://patents.dts.com. Manufactured under license from DTS, Inc. (for companies headquartered in the U.S./Japan/Taiwan) or under license from DTS Licensing Limited (for all other companies). DTS, DigitalSurround, and the DTS logo are registered trademarks or trademarks of DTS, Inc. in the United States and other countries. © 2021 DTS, Inc. ALL RIGHTS RESERVED.

The Bluetooth® word mark and logos are registered trademarks owned by Bluetooth SIG, Inc. and any use of such marks by Samsung Electronics Co., Ltd. is under license. Other trademarks and trade names are those of their respective owners.
14 POZNÁMKA K LICENCII S OTVORENÝM ZDROJOVÝM KÓDOM
natural_image
3D rendering of a rectangular gray object with a small mark on top (no text or symbols)natural_image
Black plastic connector with a U-shaped handle and right-angle end (no text or symbols)Tápkábel (Soundbar)
natural_image
Black remote control with two USB cablebs beside it (no text or symbols visible)natural_image
Diagram showing a mechanical component before and after assembly, with no visible text or symbols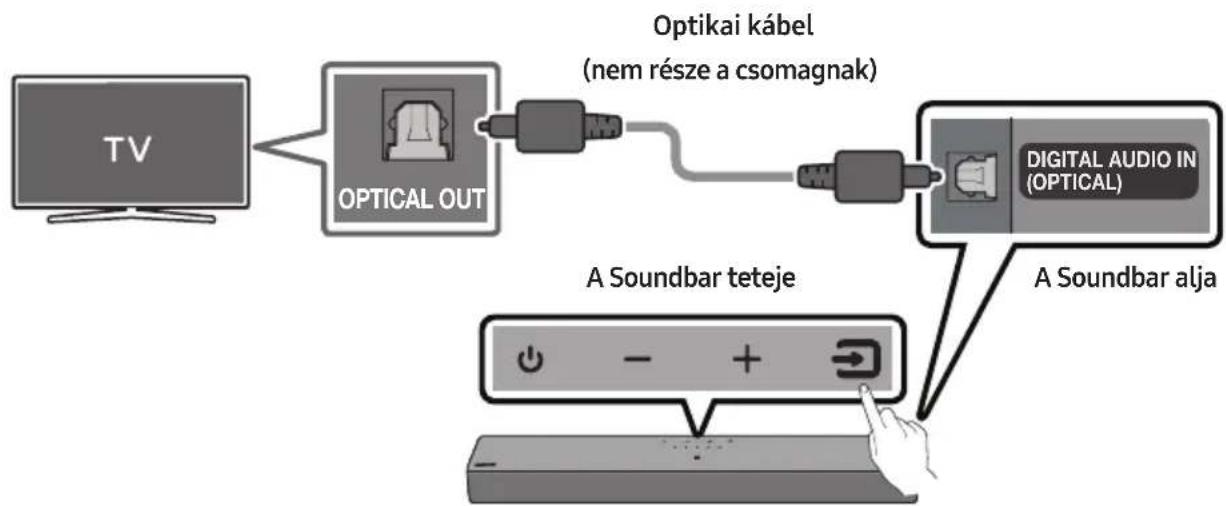
flowchart
graph TD
    A["TV"] --> B["OPTICAL OUT"]
    B --> C["Optikai kabel (nem része a csomagnak)"]
    C --> D["DIGITAL AUDIO IN (OPTICAL)"]
    D --> E["A Soundbar alja"]
    F["A Soundbar teteje"] --> G["Power Indicator Icon"]
MEGJEGYZÉS
flowchart
graph TD
    A["LED jelzőfény"] --> B["Start the factory reset"]
    B --> C["The factory reset is complete"]
FIGYELEM
Dolby, Dolby Audio, and the double-D symbol are trademarks of Dolby Laboratories Licensing Corporation. Manufactured under license from Dolby Laboratories. Confidential unpublished works. Copyright 1992-2019 Dolby Laboratories. All rights reserved.


2.0 Channel
For DTS patents, see http://patents.dts.com. Manufactured under license from DTS, Inc. (for companies headquartered in the U.S./Japan/Taiwan) or under license from DTS Licensing Limited (for all other companies). DTS, DigitalSurround, and the DTS logo are registered trademarks or trademarks of DTS, Inc. in the United States and other countries. © 2021 DTS, Inc. ALL RIGHTS RESERVED.

Bluetooth®
The Bluetooth® word mark and logos are registered trademarks owned by Bluetooth SIG, Inc. and any use of such marks by Samsung Electronics Co., Ltd. is under license. Other trademarks and trade names are those of their respective owners.
14 NYÍLT FORRÁSKÓDÚ LICENC MEGJEGYZÉS
natural_image
3D rendering of a rectangular electronic component with no visible text or symbolsGlavna jedinica sustava Soundbar Kabel napajanja
natural_image
Simple black outline of a U-shaped connector or clamp (no text or symbols)(Soundbar)
natural_image
Exterior view of a remote control with two rear-mounted devices (no text or symbols visible)Daljinski upravljač / baterije sustava Soundbar
- Trebate li više informacija o napajanju i potrošnji energije, pogledajte naljepnicu na proizvodu. (Naljepnica: donja strana glavne jedinice sustava Soundbar)
- Kako biste kupili dodatne sastavne dijelove ili opcijske kabele, obratite se Servisnom centru Samsung ili Korisničkoj podršci Samsung.
- Dizajn i specifikacije mogu se promijeniti bez prethodne najave.
- Izgled dodataka može se neznatno razlikovati od izgleda na prethodnim ilustracijama.
02 PRIKAZ PROIZVODA
Gornja ploča sustava Soundbar
| 1 | POWERPovežite kabel za napajanje zvučnika Soundbar izmjeničnom strujom. |
| 2 | DIGITAL AUDIO IN (OPTICAL)Povežite sa digitalnim (optičkim) izlazom vanjskog uređaja. |
| 3 | USB (5V 0.5A)Povežite USB uređaj kako biste reproducirali glazbu s uređaja USB pomoću uređaja Soundbar. |
natural_image
Diagram showing a mechanical component before and after assembly, with no visible text or symbols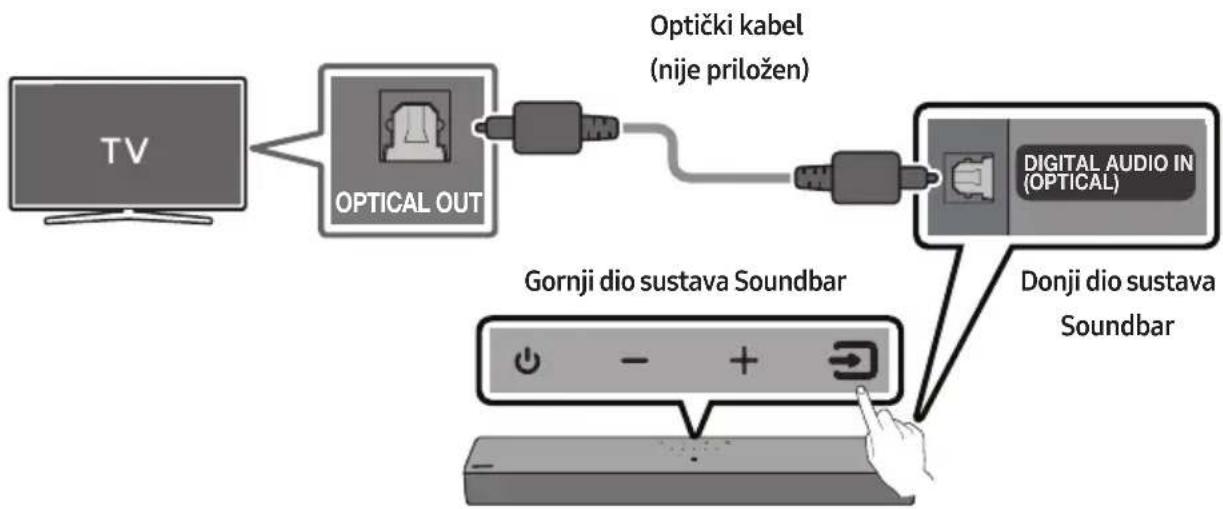
flowchart
graph LR
    A["TV"] --> B["OPTICAL OUT"]
    B --> C["Optički kabel (nije priložen)"]
    C --> D["DIGITAL AUDIO IN (OPTICAL)"]
    D --> E["Gornji dio sustava Soundbar"]
    E --> F["Donji dio sustava Soundbar"]
| LEDindikator |
- Kad su televizor i Soundbar isključeni, povežite ulaz DIGITAL AUDIO IN (OPTICAL) na sustavu Soundbar i izlazni priključak OPTICAL na televizoru s pomoću optičkog kabela (nije priložen), kao što je prikazano na slici.
- Uključite Soundbar i televizor.
- Pritisnite gumb 📄 (Izvor) na gornjoj ploči ili na daljinskom upravljaču, a zatim odaberite način „Digital Audio In”.
- Zvuk televizora se čuje iz Soundbar sustava.
06 BEŽIČNO POVEZIVANJE S TELEVIZOROM
Povezivanje putem Bluetooth veze
Kad je Samsung TV povezan putem Bluetooth veze, možete čuti stereo zvuk bez prethodnog mučenja s kabelima.
- Istodobno se može spojiti samo jedan Samsung TV.
- Može se povezati Samsung TV koji podržava Bluetooth. Provjerite specifikacije svojeg televizora.
Početno povezivanje
NAPOMENA
flowchart
graph TD
    A["LED indicator"] --> B["Start the factory reset"]
    B --> C["Treperi u tirkiznoj boji X3"]
    C --> D["The factory reset is complete"]
OPREZ
- Sve postavke uređaja Soundbar ponovno su postavljene. Ovo izvedite samo ako je ponovno postavljanje potrebno.
12 RJEŠAVANJE PROBLEMA
Dolby, Dolby Audio, and the double-D symbol are trademarks of Dolby Laboratories Licensing Corporation. Manufactured under license from Dolby Laboratories. Confidential unpublished works. Copyright 1992-2019 Dolby Laboratories. All rights reserved.

For DTS patents, see http://patents.dts.com. Manufactured under license from DTS, Inc. (for companies headquartered in the U.S./Japan/Taiwan) or under license from DTS Licensing Limited (for all other companies). DTS, DigitalSurround, and the DTS logo are registered trademarks or trademarks of DTS, Inc. in the United States and other countries. © 2021 DTS, Inc. ALL RIGHTS RESERVED.

The Bluetooth® word mark and logos are registered trademarks owned by Bluetooth SIG, Inc. and any use of such marks by Samsung Electronics Co., Ltd. is under license. Other trademarks and trade names are those of their respective owners.
14 OBAVIJEST O LICENCI ZA UPORABU SOFTVERA OTVORENOG KODA
Želite li poslati upite i zahtjeve u vezi sa softverom otvorenog koda, obratite se grupi Samsung Open Source (http://opensource.samsung.com)
15 VAŽNA NAPOMENA VEZANA UZ SERVIS
- Slike u ovom korisničkom priručniku služe kao samo kao referenca i mogu se razlikovati od stvarnog izgleda proizvoda.
- Moguća je naplata administrativne pristojbe u slučaju
| 1 | LED indikator | LED indikator treperi, svetli ili menja boju u zavisnosti od trenutnog režima ili statusa Soundbar uređaja. Boja LED indikatora i broj lampica ukazuju na režim koji je aktivan, kao što je opisano u nastavku. | ||||
 Bela LED lampica Bela LED lampica | [6T22]Bela LED lampica |  Višebojna LED lampica Višebojna LED lampica |  Bela LED lampica Bela LED lampica |  Bela LED lampica Bela LED lampica | ||
| U zavisnosti od režima ili statusa, višebojna LED lampica menja sledeće boje: Bela, Svetloplava, Zelena, Crvena, Žuta, Narandžasta, Ljubičasta i Plava. | ||||||
| 2 | Napajanje Uključuje i isključuje napajanje. | |||||
| 3 | Jačina zvuka | Podešava jačinu zvuka. | ||||
| 4 | Izvor | Pritisnite dugme → (Izvor) da biste promenili režim. Svaki put kada promenite režim, LED lampica zasvetli u beloj boji, a zatim se isključi. | ||||
| LED indikator | Bela lampica uključeno -> isključeno | Bela lampica uključeno -> isključeno | Bela lampica uključeno -> isključeno | |||
| „Digital Audio In“ | „Bluetooth“ | „USB“ | ||||
| 5 | NFClogotip | Bluetooth povezivanje možete aktivirati tako što ćete svoj telefon postaviti na oblast za otkrivanje NFC signala na Soundbar uređaju. |
Kako se koristi daljinski upravljač
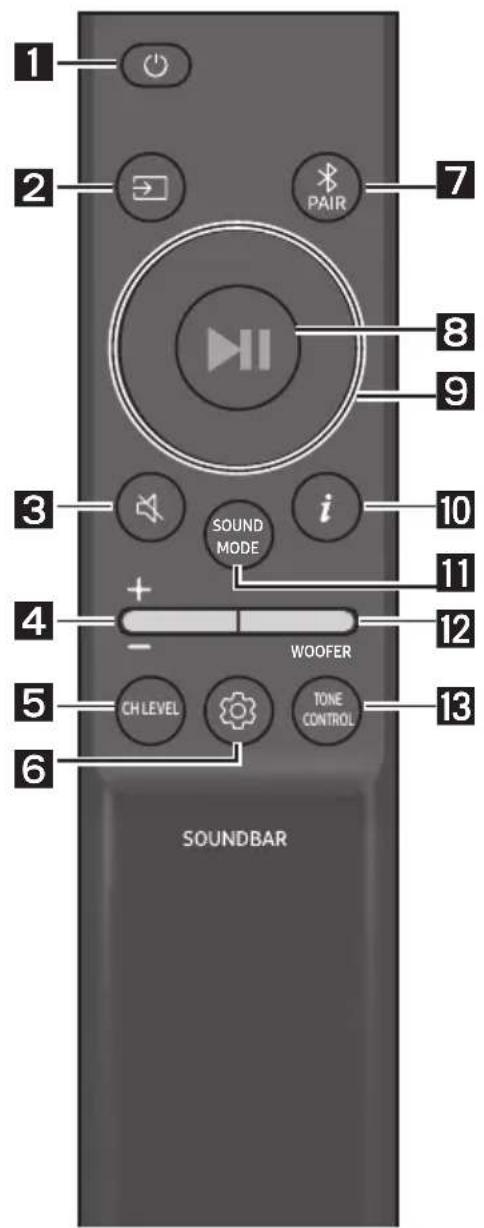
1
Napajanje
natural_image
Diagram showing three sequential steps of a mechanical component or assembly, with no visible text or symbols.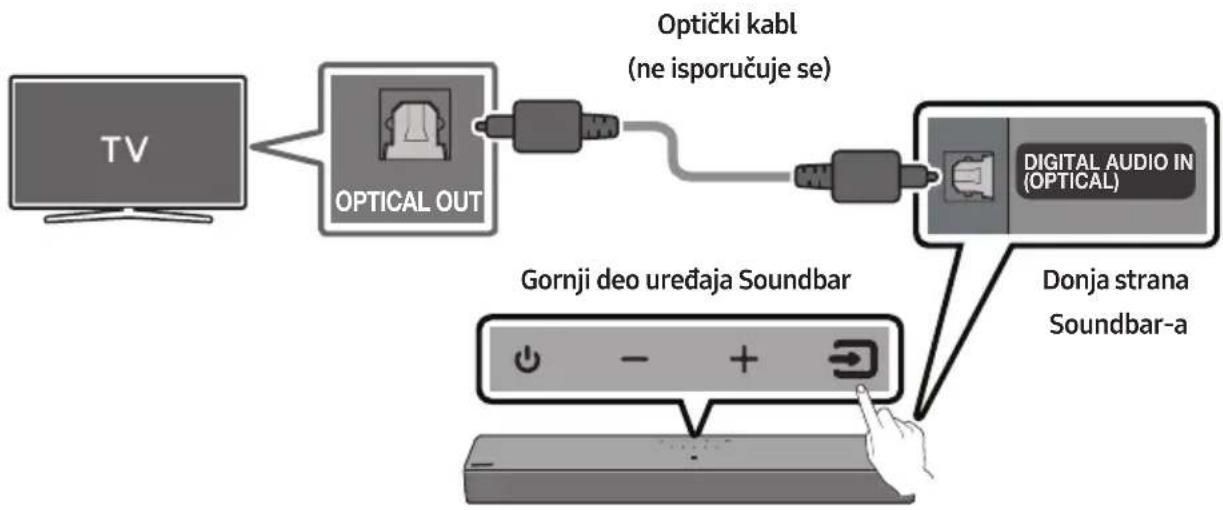
flowchart
graph LR
    A["TV"] --> B["OPTICAL OUT"]
    B --> C["Optički kabl (ne isporučuje se)"]
    C --> D["DIGITAL AUDIO IN (OPTICAL)"]
    D --> E["Donja strana Soundbar-a"]
    F["Gornji deo uređaja Soundbar"] --> G["Power Indicator Icon"]

- Kada su TV i Soundbar isključeni, optičkim kablom (ne isporučuje se) povežite DIGITAL AUDIO IN (OPTICAL) port Soundbar-a i OPTICAL izlazni port TV-a, na način prikazan na slici.
- Uključite Soundbar i TV.
- Pritisnite dugme ➞ (Izvor) na gornjem panelu ili na daljinskom upravljaču i potom izaberite režim „Digital Audio In“.
- Soundbar uređaj emituje zvuk sa televizora.
06 KORIŠĆENJE BEŽIČNE VEZE SA TV-OM
Povezivanje putem Bluetooth veze
Kada se Samsung TV poveže putem Bluetooth veze, možete dobiti stereo zvuk bez petljanja sa kablovima.
- Istovremeno može biti povezan samo jedan Samsung TV.
- Može se povezati Samsung TV koji podržava Bluetooth povezivanje. Proverite specifikacije svog TV-a.
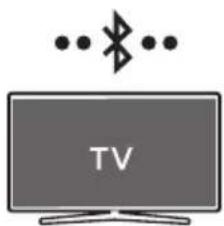
natural_image
Illustration of a flat-screen TV with wireless signal icons above (no text or symbols on screen)Početno povezivanje
- Pritisnite dugme ✝ PAIR na daljinskom upravljaču Soundbar zvučnika ili pritisnite dugme 📄 (Izvor) na gornjem panelu Soundbar zvučnika kako biste otvorili režim „Bluetooth”.
| Dugme za uparivanje pomoćuBluetooth veze | LED indikator | |
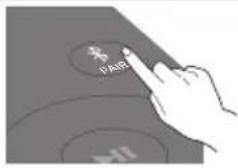 ILIKada je u „Bluetooth“ režimu ILIKada je u „Bluetooth“ režimu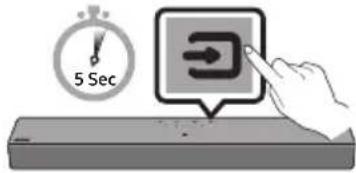 |  Uparivanje Povezivanje za završeno• Dok se uparivanje ne završi, višebojna LED lampica naizmeničnomenja boje: Crvena → Zelena → Plava Uparivanje Povezivanje za završeno• Dok se uparivanje ne završi, višebojna LED lampica naizmeničnomenja boje: Crvena → Zelena → Plava | |
 | „Ready to connect via Bluetooth.“ | |
- Na Samsung TV-u izaberite režim Bluetooth.
(npr. Početna (→ Meni → Podešavanja ( ) Sva podešavanja ( ) → zvuk → Izlaz zvuka → Lista Bluetooth zvučnika → [AV]Soundbar C4-Series (Bluetooth))
- Izaberite „[AV]Soundbar C4-Series“ sa liste na ekranu TV-a.
Dostupan Soundbar je označen sa „Uparivanje neophodno“ ili „Upareno“ na listi Bluetooth uređaja TV-a. Da biste povezali Samsung TV i Soundbar, izaberite poruku, pa zatim uspostavite vezu.
- Sada sa Soundbar-a možete da čujete zvuk Samsung TV-a.
NAPOMENA
– Nosači za montažu na zid su ugrađeni na zadnju stranu uređaja Soundbar.

OPREZ
– Pritisnite uređaj Soundbar snagom koja je dovoljna za pričvršćivanje na zid. Ako uređaj Soundbar nije čvrsto fiksiran na zidu, može se slučajno otkačiti što može dovesti do lične povrede.
– Nemojte da lupate ili udarate uređaj
Soundbar (naročito ne s donje strane).
Udarac bi mogao da odvoji uređaj
Soundbar sa zida, što bi moglo da
dovede do lične povrede.
11 AŽURIRANJE SOFTVERA
Važno: nakon nadogradnje zadržite originalne Postavke.
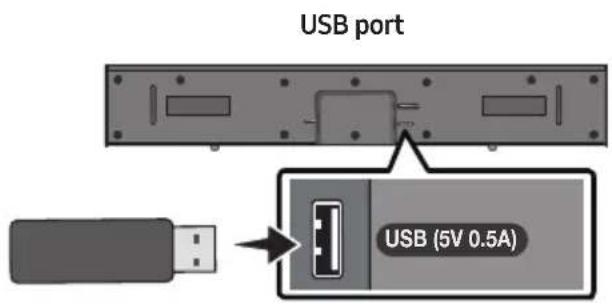
- Priključite USB memorijski uređaj u USB priključak na svom računaru.
Važno: postarajte se da se na USB memorijskom uređaju ne nalaze muzičke datoteke. To može dovesti do neuspelog ažuriranja firmvera. - Otvorite stranicu (samsung.com) → izaberite Unos broja modela i unesite model svog Soundbar zvučnika. Izaberite priručnike i stavke za preuzimanje i preuzmite najnoviju softversku datoteku.
- Sačuvajte preuzeti softver na USB memorijski uređaj i izaberite „Raspakuj ovde” kako biste raspakovali fasciklu.
-
Isključite zvučnik Soundbar i priključite USB stick koji sadrži ažuriranje softvera u USB port.
-
Priključite USB na Soundbar i prebacite na USB izvor, softver će se automatski ažurirati i završiće ažuriranje za 2 minuta. Tokom postupka ažuriranja, 5 LED lampica će početi da trepere u petlji, a zatim će svih 5 LED lampica zasvetleti belo, nakon čega će 5 LED lampica ponovo da trepere u petlji. Kada se ažuriranje završi, indikator cijan boje treperi 3 puta, a Soundbar se automatski restartuje.
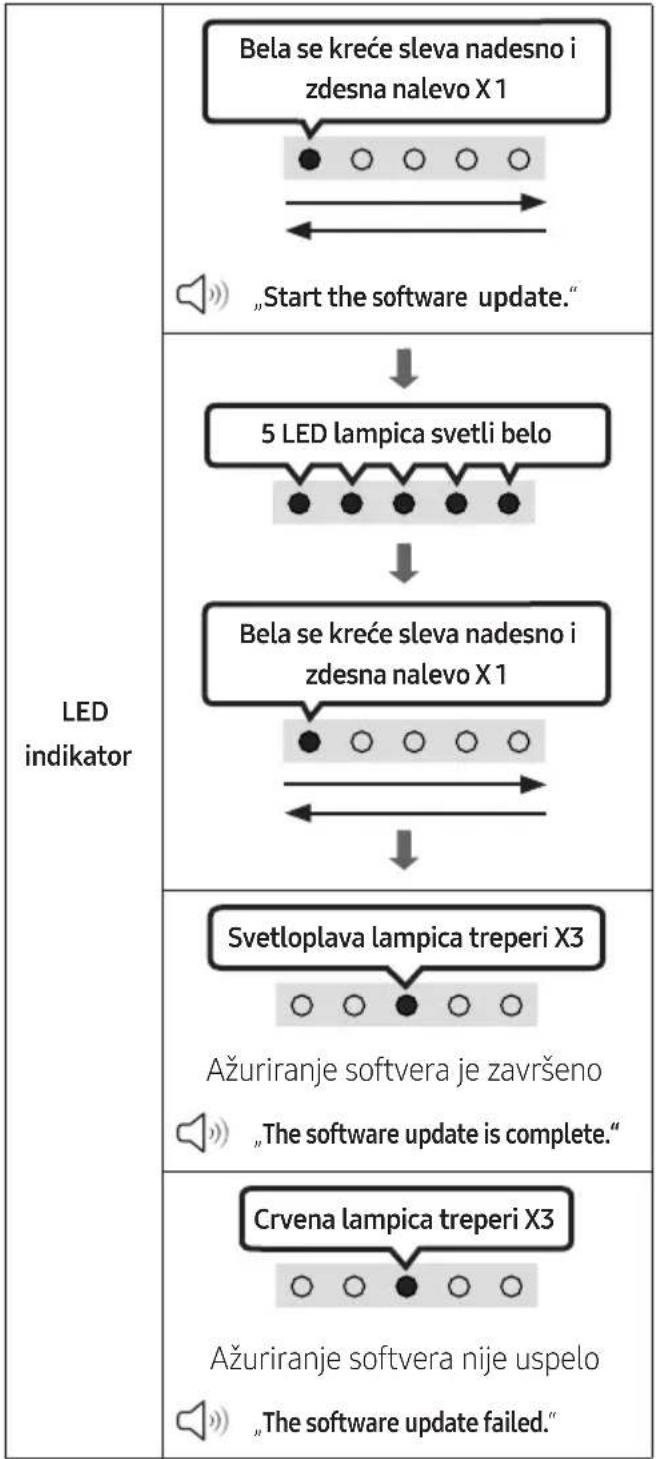
flowchart
graph TD
    A["Bela se kreće sleva nadesno i zdesna nalevo X1"] --> B["Start the software update."]
    B --> C["5 LED lampica svetli belo"]
    C --> D["Bela se kreće sleva nadesno i zdesna nalevo X1"]
    D --> E["Svetloplava lampica treperi X3"]
    E --> F["Ažuriranje softvera je završeno "The software update is complete.""]
    F --> G["Crvena lampica treperi X3"]
    G --> H["Ažuriranje softvera nije uspelo "The software update failed.""]
Dolby, Dolby Audio, and the double-D symbol are trademarks of Dolby Laboratories Licensing Corporation. Manufactured under license from Dolby Laboratories. Confidential unpublished works. Copyright 1992-2019 Dolby Laboratories. All rights reserved.

For DTS patents, see http://patents.dts.com. Manufactured under license from DTS, Inc. (for companies headquartered in the U.S./Japan/Taiwan) or under license from DTS Licensing Limited (for all other companies). DTS, DigitalSurround, and the DTS logo are registered trademarks or trademarks of DTS, Inc. in the United States and other countries. © 2021 DTS, Inc. ALL RIGHTS RESERVED.

The Bluetooth® word mark and logos are registered trademarks owned by Bluetooth SIG, Inc. and any use of such marks by Samsung Electronics Co., Ltd. is under license. Other trademarks and trade names are those of their respective owners.
14 OBAVEŠTENJE O LICENCI OTVORENOG IZVORNOG KODA
Da biste poslali pitanja i zahteve u vezi sa softverom otvorenog koda obratite se grupi
Samsung Open Source
(http://opensource.samsung.com)
15 VAŽNA NAPOMENA O SERVISIRANJU
www.samsung.com/uk/aboutsamsung/sustainability/environment/our-commitment/data/
VARNOSTNI PODATKI
VARNOSTNA OPOZORILA
ZARADI NEVARNOSTI ELEKTRIČNEGA UDARA NE ODPIRAJTE ZADNJEGA (HRBTNEGA) POKROVA.
NAPRAVA NIMA DELOV, KI BI JIH LAHKO POPRAVIL UPORABNIK. SERVIS NAJ OPRAVI USTREZNO USPOSOBLJENA OSEBA.
natural_image
3D rendering of a rectangular electronic component with a small circular feature on top (no text or symbols)natural_image
Simple line drawing of a U-shaped connector or clamp (no text or symbols)(Soundbar)
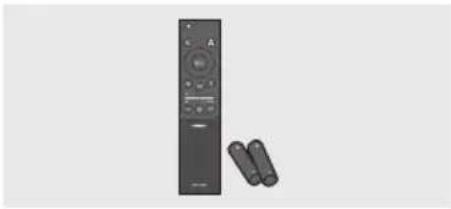
natural_image
Exterior view of a black remote control with two attached devices (no text or symbols visible)natural_image
Diagram showing a mechanical component before and after assembly, with no visible text or symbols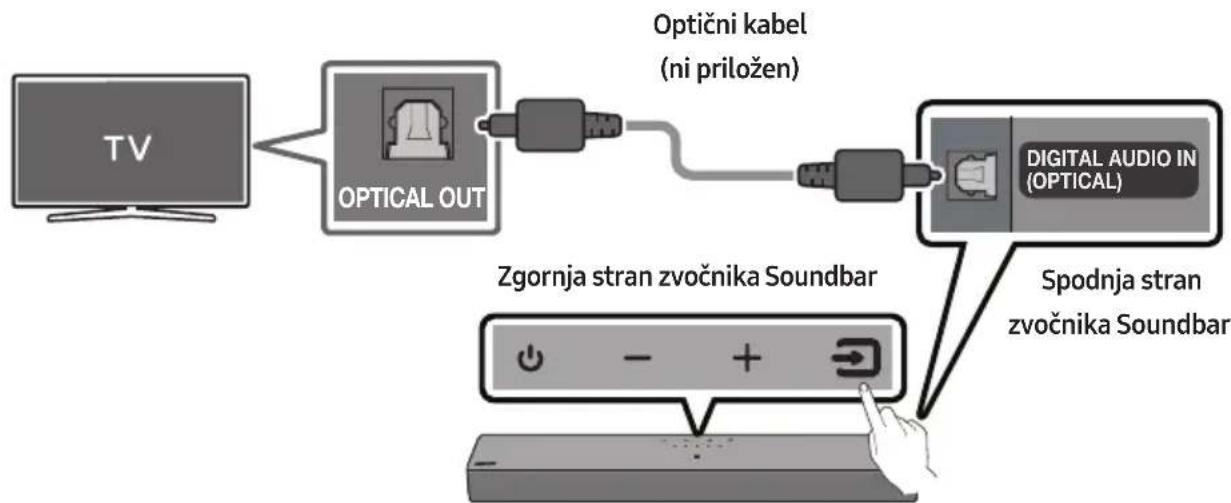
flowchart
graph LR
    A["TV"] --> B["OPTICAL OUT"]
    B --> C["Optični kabel (ni priložen)"]
    C --> D["DIGITAL AUDIO IN (OPTICAL)"]
    D --> E["Zgornja stran zvočnika Soundbar"]
    E --> F["Spodnja stran zvočnika Soundbar"]
| Lučka kazalnika LED |
natural_image
Illustration of a TV with wireless signal icons above (no text or symbols on the TV itself)Začetna povezava
OPOMBA
Dolby, Dolby Audio, and the double-D symbol are trademarks of Dolby Laboratories Licensing Corporation. Manufactured under license from Dolby Laboratories. Confidential unpublished works. Copyright 1992-2019 Dolby Laboratories. All rights reserved.

For DTS patents, see http://patents.dts.com. Manufactured under license from DTS, Inc. (for companies headquartered in the U.S./Japan/Taiwan) or under license from DTS Licensing Limited (for all other companies). DTS, DigitalSurround, and the DTS logo are registered trademarks or trademarks of DTS, Inc. in the United States and other countries. © 2021 DTS, Inc. ALL RIGHTS RESERVED.

The Bluetooth® word mark and logos are registered trademarks owned by Bluetooth SIG, Inc. and any use of such marks by Samsung Electronics Co., Ltd. is under license. Other trademarks and trade names are those of their respective owners.
14 OBVESTILO O ODPRTOKODNIH LICENCAH
www.samsung.com/uk/aboutsamsung/sustainability/environment/our-commitment/data/
natural_image
Three grayscale product photos: a rectangular box, a coiled cable with a right-angle connector, and a remote control unit (no text or symbols visible)ΣΤΑΘΜΗΣ WOOFER (ΜΠΑΣΑ)


natural_image
Diagram showing a mechanical component before and after assembly, with no visible text or symbols
flowchart
graph LR
    A["TV"] --> B["OPTICAL OUT"]
    B --> C["Epáνω μέρος του Soundbar"]
    C --> D["Digital Audio IN (OPTICAL)"]
    D --> E["Kάτω πλευρά του Soundbar"]
    style A fill:#f9f,stroke:#333
    style B fill:#ccf,stroke:#333
    style C fill:#cfc,stroke:#333
    style D fill:#fcc,stroke:#333
    style E fill:#ffc,stroke:#333
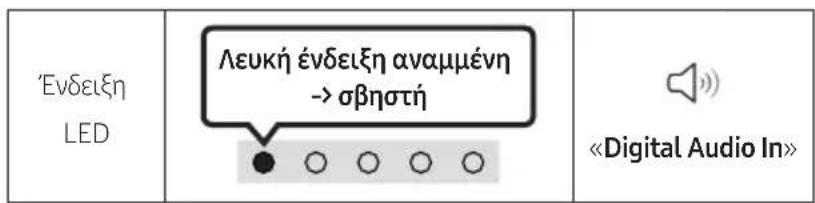
natural_image
Illustration of a TV with wireless signal icons above it (no text or symbols on the TV itself)Αρχική σύνδεση
ΣΗΜΕΙΩΣΗ
Dolby, Dolby Audio, and the double-D symbol are trademarks of Dolby Laboratories Licensing Corporation. Manufactured under license from Dolby Laboratories. Confidential unpublished works. Copyright 1992-2019 Dolby Laboratories. All rights reserved.

For DTS patents, see http://patents.dts.com. Manufactured under license from DTS, Inc. (for companies headquartered in the U.S./Japan/Taiwan) or under license from DTS Licensing Limited (for all other companies). DTS, DigitalSurround, and the DTS logo are registered trademarks or trademarks of DTS, Inc. in the United States and other countries. © 2021 DTS, Inc. ALL RIGHTS RESERVED.

The Bluetooth® word mark and logos are registered trademarks owned by Bluetooth SIG, Inc. and any use of such marks by Samsung Electronics Co., Ltd. is under license. Other trademarks and trade names are those of their respective owners.
natural_image
3D rendering of a rectangular electronic component with no visible text or symbolsnatural_image
Black plastic connector with a U-shaped handle and a small protrusion (no text or symbols)Barošanas vads (Soundbar)
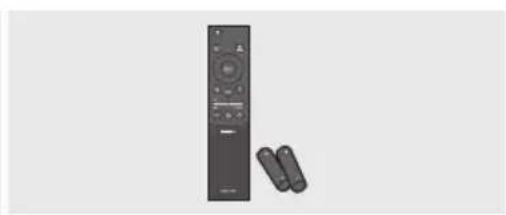
natural_image
Black remote control with two remote devices beside it (no text or symbols visible)02 PRODUKTA PÄRSKATS
12
WOOFER (BASI) LİMEÑA
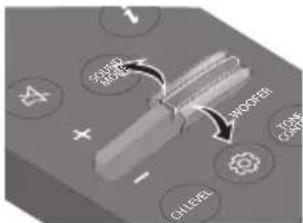
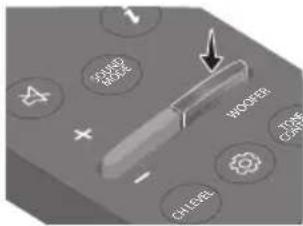
natural_image
Diagram showing three stages of a mechanical component or assembly: before, after, and after (no text or symbols present)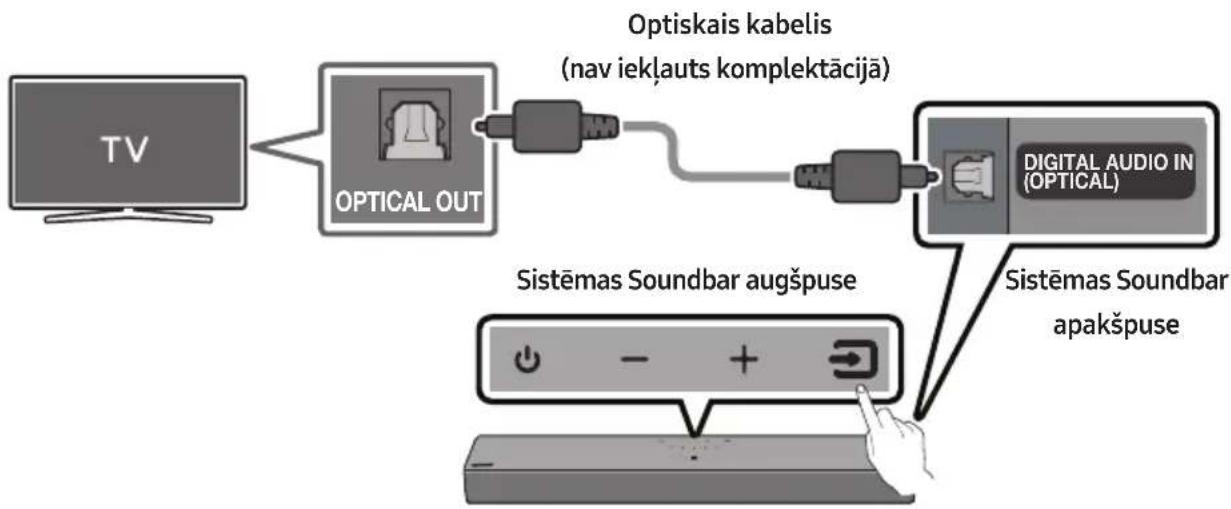
flowchart
graph TD
    A["TV"] --> B["OPTICAL OUT"]
    B --> C["Optiskais kabelis (nav iekļauts komplektācijā)"]
    C --> D["Sistēmas Soundbar augšpuse"]
    D --> E["Sistēmas Soundbar apakšpuse"]
    E --> F["SISTEMAS SOUNDBAR augšpuse"]
    F --> G["SISTEMAS SOUNDBAR apakšpuse"]
| Gaismas diožu indikators |
natural_image
Illustration of a TV with wireless signal icons above it (no text or symbols on the TV itself)flowchart
graph LR
    A["NFC"] --> B["Bluetooth ierice"]
    C["Sistemas Soundbar augspuse"] --> D["Mobile device with microphone"]
PIEZIMES
PIEZIME
12 PROBLÉMU NOVĚRŠANA
Dolby, Dolby Audio, and the double-D symbol are trademarks of Dolby Laboratories Licensing Corporation. Manufactured under license from Dolby Laboratories. Confidential unpublished works. Copyright 1992-2019 Dolby Laboratories. All rights reserved.

For DTS patents, see http://patents.dts.com. Manufactured under license from DTS, Inc. (for companies headquartered in the U.S./Japan/Taiwan) or under license from DTS Licensing Limited (for all other companies). DTS, DigitalSurround, and the DTS logo are registered trademarks or trademarks of DTS, Inc. in the United States and other countries. © 2021 DTS, Inc. ALL RIGHTS RESERVED.

The Bluetooth® word mark and logos are registered trademarks owned by Bluetooth SIG, Inc. and any use of such marks by Samsung Electronics Co., Ltd. is under license. Other trademarks and trade names are those of their respective owners.
14 PAZIÑOJUMS PAR ATVÉRTÃ PIRMKODA LICENCI
natural_image
3D rendering of a rectangular gray object with a small hole at the top (no text or symbols)Soundbari põhiseade
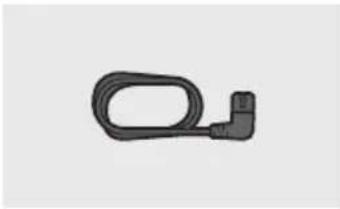
natural_image
Simple black outline of a U-shaped connector or clamp (no text or symbols)Toitejuhe (Soundbar)
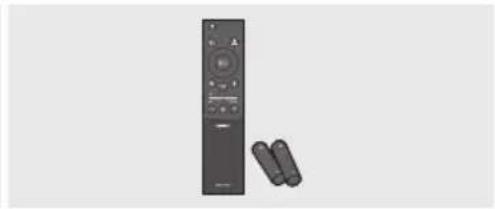
natural_image
Exterior view of a modern remote control with two remote devices beside it (no text or symbols visible)Soundbari kaugjuhtimispult/patareid
12
WOOFER (BASS) TASE


natural_image
Diagram showing a mechanical component before and after assembly, with no visible text or symbols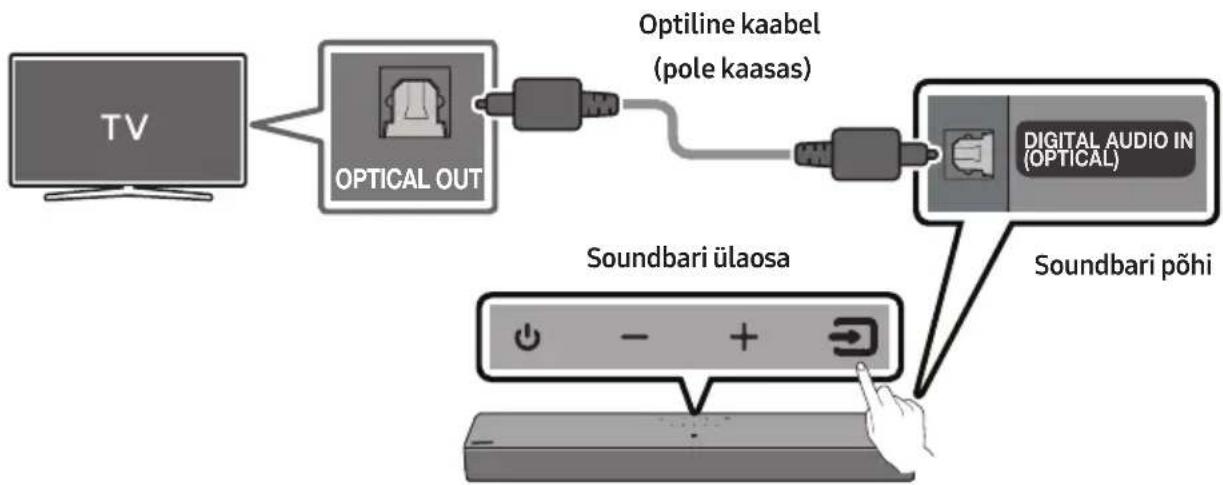
flowchart
graph LR
    TV["TV"] --> OpticalOut["Optical OUT"]
    OpticalOut --> OptilineKaabel["Optiline Kaabel (pole kaasas)"]
    OptilineKaabel --> DigitalAudioIn["Digital Audio In (Optical)"]
    DigitalAudioIn --> SoundbariÜlaosa["Soundbari ülaosa"]
    SoundbariÜlaosa --> SoundbariPõhi["Soundbari Põhi"]
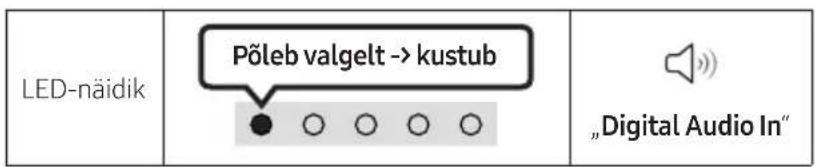
natural_image
Illustration of a TV with wireless signal icons above it (no text or symbols on the TV itself)Esmane ühendus
MÄRKUS
Dolby, Dolby Audio, and the double-D symbol are trademarks of Dolby Laboratories Licensing Corporation. Manufactured under license from Dolby Laboratories. Confidential unpublished works. Copyright 1992-2019 Dolby Laboratories. All rights reserved.

For DTS patents, see http://patents.dts.com. Manufactured under license from DTS, Inc. (for companies headquartered in the U.S./Japan/Taiwan) or under license from DTS Licensing Limited (for all other companies). DTS, DigitalSurround, and the DTS logo are registered trademarks or trademarks of DTS, Inc. in the United States and other countries. © 2021 DTS, Inc. ALL RIGHTS RESERVED.

The Bluetooth® word mark and logos are registered trademarks owned by Bluetooth SIG, Inc. and any use of such marks by Samsung Electronics Co., Ltd. is under license. Other trademarks and trade names are those of their respective owners.
14 AVATUD LÄHTEKOODI LITSENTSI TEATIS
www.samsung.com/ee/aboutsamsung/sustainability/environment/our-commitment/data/
SAUGOS INFORMACIJA
SAUGOS İSPĖJIMAI
NENUIMKITE DANGTELIO (ARBA GALINĖS DALIES), KAD SUMAŽINTUMĖTE ELEKTROS SMŪGIO PAVOJŲ.
JRENGINYJE NÉRA DALIŲ, KURIŲ TECHNINĖ PRIEŽIŪRĄ GALI ATLIKTI NAUDOTOJAS. DĖL TECHNINĖS PRIEŽIŪROS DARBŲ KREIPKITĖS L KVALIFIKUOTUS TECHNINĖS PRIEŽIŪROS SPECIALISTUS.
natural_image
Three technical illustrations: a rectangular box, a black cable with a right-angle connector, and a remote control unit (no text or symbols visible)natural_image
Three-step diagram showing a mechanical component before and after assembly, with no visible text or symbols.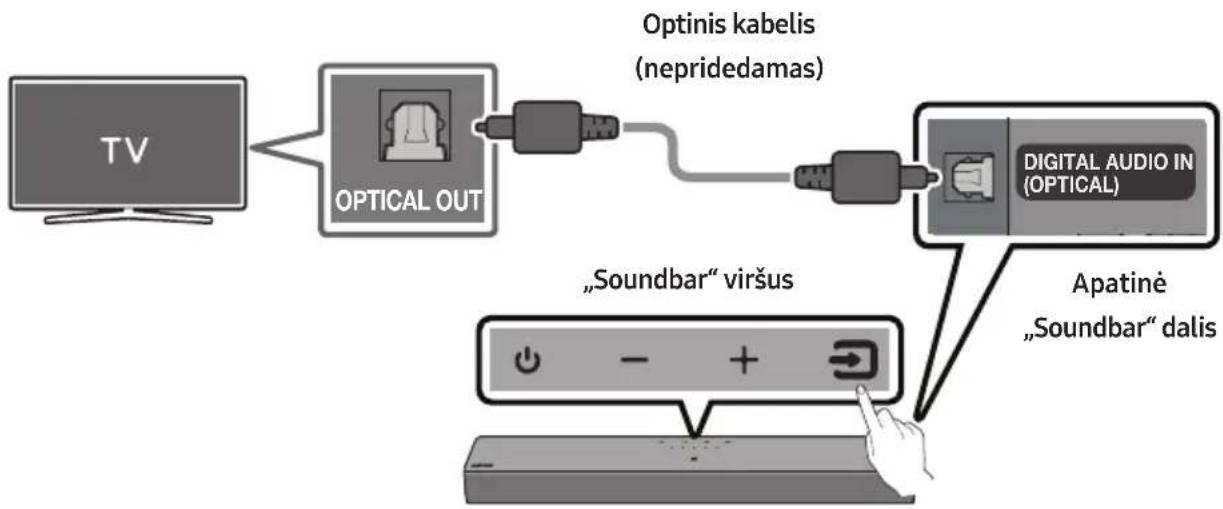
flowchart
graph LR
    TV["TV"] --> OpticalOut["OPTICAL OUT"]
    OpticalOut --> Optiniskabelis["Optinis kabelis (nepridedamas)"]
    Optiniskabelis --> DigitalAudioIn["Digital Audio In (Optical)"]
    DigitalAudioIn --> Apatinė["Apatinė "Soundbar" dalis"]
    OpticalOut --> Soundbar[""Soundbar" viršus"]
| Šviesos diodo indikatorius |
natural_image
Illustration of a flat-screen TV with wireless signal icons above (no text or symbols on screen)PASTABA
Dolby, Dolby Audio, and the double-D symbol are trademarks of Dolby Laboratories Licensing Corporation. Manufactured under license from Dolby Laboratories. Confidential unpublished works. Copyright 1992-2019 Dolby Laboratories. All rights reserved.

For DTS patents, see http://patents.dts.com. Manufactured under license from DTS, Inc. (for companies headquartered in the U.S./Japan/Taiwan) or under license from DTS Licensing Limited (for all other companies). DTS, DigitalSurround, and the DTS logo are registered trademarks or trademarks of DTS, Inc. in the United States and other countries. © 2021 DTS, Inc. ALL RIGHTS RESERVED.

The Bluetooth® word mark and logos are registered trademarks owned by Bluetooth SIG, Inc. and any use of such marks by Samsung Electronics Co., Ltd. is under license. Other trademarks and trade names are those of their respective owners.
14 ATVIROSIOS PROGRAMINĖS JRANGOS LICENCIJOS PRANEŠIMAS
www.samsung.com/uk/aboutsamsung/sustainability/environment/our-commitment/data/
© 2023 Samsung Electronics Co., Ltd. All rights reserved.
Contact SAMSUNG WORLD WIDE
If you have any questions or comments relating to Samsung products, please contact the SAMSUNG customer care Centre.
| Country | Samsung Service Centre | Web Site |
| ■Europe | ||
| UK 0333 000 0333 | www.samsung.com/uk/support | |
| IRELAND (EIRE) 0818 717100 | www.samsung.com/ie/support | |
| GERMANY 06196 77 555 77 | www.samsung.com/de/support | |
| FRANCE 01 48 63 00 00 | www.samsung.com/fr/support | |
| ITALIA 800-SAMSUNG (800.7267864) | www.samsung.com/it/support | |
| SPAIN 91 175 00 15 | www.samsung.com/es/support | |
| PORTUGAL | 210 608 098Chamada para a rede fi xa nacionalDias úteis das 9h às 20h | www.samsung.com/pt/support |
| LUXEMBURG 261 03 710 | www.samsung.com/be_fr/support | |
| NETHERLANDS 088 90 90 100 | www.samsung.com/nl/support | |
| BELGIUM 02-201-24-18 | www.samsung.com/be/support (Dutch)www.samsung.com/be_fr/support (French) | |
| NORWAY 21629099 | www.samsung.com/no/support | |
| DENMARK 707 019 70 | www.samsung.com/dk/support | |
| FINLAND 030-6227 515 | www.samsung.com/fi/support | |
| SWEDEN 0771-400 300 | www.samsung.com/se/support | |
| POLAND | 801-172-678** (optata według taryfy operatora) | http://www.samsung.com/pl/support/ |
| HUNGARY | 0680SAMSUNG (0680-726-7864) | www.samsung.com/hu/support |
| AUSTRIA 0800 72 67 864 (0800-SAMSUNG) | www.samsung.com/at/support | |
| SWITZERLAND | 0800 726 786 | www.samsung.com/ch/support (German)www.samsung.com/ch_fr/support (French) |
| CZECH | 800 - SAMSUNG (800-726786) | www.samsung.com/cz/support |
| Country | Samsung Service Centre 📞 | Web Site |
| SLOVAKIA | 0800 - SAMSUNG (0800-726 786) | www.samsung.com/sk/support |
| CROATIA 072 726 | 786 | www.samsung.com/hr/support |
| BOSNIA | 055 233 999 | www.samsung.com/support |
| NORTH MACEDONIA | 023 207 777 | www.samsung.com/mk/support |
| MONTENEGRO | 020 405 888 | www.samsung.com/support |
| SLOVENIA | 080 697 267 (brezplačna številka) | www.samsung.com/si/support |
| SERBIA | 011 321 6899 | www.samsung.com/rs/support |
| KOSOVO | 038 40 30 90 | www.samsung.com/support |
| ALBANIA 045 620 | 202 | www.samsung.com/al/support |
| BULGARIA | 0800 111 31 - Безплатен за всички оператори*3000 - Цена на един градски разговор или според тарифата на мобилният оператор09:00 до 18:00 - Понеделник до Петък | www.samsung.com/bg/support |
| ROMANIA | 0800872678 - Apel gratuit*8000 - Apel tarifat în rețeaProgram Call CenterLuni - Vineri: 9 AM - 6 PM | www.samsung.com/ro/support |
| CYPRUS | 8009 4000 only from landline, toll free | www.samsung.com/gr/support |
| GREECE | 80111-SAMSUNG (80111 726 7864) only from land line(+30) 210 6897691 from mobile and land line | |
| LITHUANIA | 8-800-77777 | www.samsung.com/lt/support |
| LATVIA | 8000-7267 | www.samsung.com/lv/support |
| ESTONIA 800-7267 | www.samsung.com/ee/support |