BELLE PCX 500 - Vibratory plate ALTRAD - Free user manual and instructions
Find the device manual for free BELLE PCX 500 ALTRAD in PDF.
| Product type | Vibratory plate |
| Brand | Altrad |
| Model | BELLE PCX 500 |
| Working width | 500 mm |
| Height (Honda engine) | 610 mm |
| Length (Honda engine) | 798 mm |
| Weight (Honda engine) | 88 kg |
| Power supply | Unleaded petrol (Honda GX160 engine) or Hatz 1B20-7 diesel |
| Fuel tank capacity | 3.6 L (petrol) |
| Engine oil | SAE 10W30, 0.6 L |
| Vibrator oil | Turbine oil ISO 32, 0.4 L |
| Centrifugal force | 16.5 kN |
| Vibration frequency | 101 Hz |
| Max travel speed (Honda) | 21 m/min |
| Static pressure (Honda) | 351 kg/m² |
| Sound power level | 107 dB(A) |
| Dual Force technology | Yes, compliant with NRSWA HAUC |
| Water sprinkler system | Optional (front water tank) |
| Transport accessories | Removable or fixed wheels as option |
| Periodic maintenance | Engine oil change, air filter cleaning, belt tensioning |
| Spare parts | Available from Altrad Belle |
| Warranty | 1 year (12 months) for the original purchaser |
Frequently Asked Questions - BELLE PCX 500 ALTRAD
User questions about BELLE PCX 500 ALTRAD
0 question about this device. Answer the ones you know or ask your own.
Ask a new question about this device
Download the instructions for your Vibratory plate in PDF format for free! Find your manual BELLE PCX 500 - ALTRAD and take your electronic device back in hand. On this page are published all the documents necessary for the use of your device. BELLE PCX 500 by ALTRAD.
USER MANUAL BELLE PCX 500 ALTRAD
We, Belle Group Sheen UK, Sheen, Nr. Buxton, Derbyshire, SK17 0EU, GB, hereby certify that if the product described within this certificate is bought from an authorised Belle Group dealer within the EEC, it conforms to the following EEC directives: 2006/42/CE (This directive replaces directive 98/37/EC), Electromagnetic Compatibility Directive 2014/30/UE (as amended by 89/336/EEC, 92/31/EEC, 93/68 EEC & 2004/108/CE). The Waste Electrical and Electronic Equipment (WEEE) 2012/19/UE (as amended by 2002/96/CE), the low voltage directive 2014/35/UE (as amended by 2006/95/CE), BS EN ISO 12100-1:2003 Safety of machinery and associated harmonised standards, where applicable. Noise emissions conform to directives 2000/14/EC Annex VI & 2005/88/EC, for machines under article 12 the notified body is AVT Reliability, Unit 2 Easter Court, Europa Boulevard, Warrington, Cheshire, WA5 7ZB, GB. Noise Technical files are held by Ray Neilson at the Belle group Head Office address which is stated above.

PRODUCT TYPE. TYPE DE PRODUIT. TIPO DE PRODUCTO
MODEL MODELE MODELO.
TIPO DE PRODUCTO....PRODUCTTYPE...PRODUKTTYPE
MODELO.. MODEL
NO. DE SÉRIE SERIENUMMER SERIENR
DATA DE FABRIC. FABRICAGEDATUM. FREMSTALLINGSDATO.
NIVEL DE POTÊNCIA GEMETEN LYDEFFEKTNIVEAU
DE SOM MEDIDO / GELUIDSSTERKTKENIVEAU / MÁLT /
(GARANTIDO) (GEGARANDEERD)
PESO. GEWICHT VEGT

Signed by:
Signature:
Medido por:
Assinado por:
Getekend door: Uunderskrevetaf.

Place of Declaration - Sheen, Nr. Buxton, Derbyshire, SK17 0EU, UK
Lieu de déclaration - Sheen, Nr. Buxton, Derbyshire, SK17 0EU, UK
Sted ierklaering - Sheen, Nr. Buxton, Derbyshire, SK17 0EU, UK
Date of Declaration - 2007
SONORA MISURATA / (GARAN)
UPPMATT/
(GARANTERAD)
GEWICH
PESO
VIKT.
PRODUKTTYP.
TUOTETYYPPI
TYP
PRODUKTO......
MODELL
MALLI.
MOD
SERIE NR.
VALMISTU
Nr SERII.
PRODUKSJONSDATO......
VALMISTUS
DATAPRODUKCJI
ALYDKRAFTNIVAMALT/............(GARANTERT)
ANENVOIMAKKUUDEN
SO MITATTU/ (TAATTU)
VEKT.
MASSA
WAGA
·
Unterzeichnet vo:
Firmato da:

Undertechnat.
Signatur:
Allekirjoitus:
Podpial:
Director General - in numele BELLE GROUP (SHEEN), UK
This manual has been written to help you operate and service the Plate Compactor safely. This manual is intended for dealers and operators of the Plate Compactor.
Foreword
The Environment' section gives instructions on how to handle the recycling of discarded apparatus in an environmentally friendly way. The Machine Description' section helps you to familiarise yourself with the machine's layout and controls.
The 'General Safety' and 'Health and Safety' sections explain how to use the machine to ensure your safety and the safety of the general public.
The 'Start and Stop Procedure' helps you with starting and stopping the machine.
The 'Trouble Shooting Guide' helps you if you have a problem with your machine.
The 'Servicing' section is to help you with the general maintenance and servicing of your machine.
The Warranty' Section details the nature of the warranty cover and the claims procedure.
The 'Dual Force' section shows the compaction specification the machine can achieve.
The 'CE certificate' section shows the standards that the machine has been built to.
Directives with regard to the notations.
Text in this manual to which special attention must be paid are shown in the following way:

CAUTION
The product can be at risk. The machine or yourself can be damaged or injured if procedures are not carried out in the correct way.

WARNING
The life of the operator can be at risk.

WARNING

WARNING
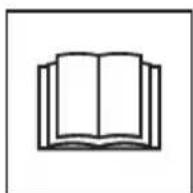
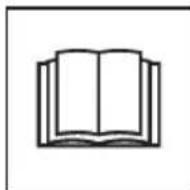
Before you operate or carry out any maintenance on this machine YOU MUST READ and STUDY this manual.
KNOW how to safely use the unit's controls and what you must do for safe maintenance. (NB Be sure that you know how to switch the machine off before you switch on, in case you get into difficulty.)
ALWAYS wear or use the proper safety items required for your personal protection. If you have ANY QUESTIONS about the safe use or maintenance of this unit, ASK YOUR SUPERVISOR OR CONTACT: Altrad Belle (UK): +44 (0) 1298 84606

Contents
How to use this manual 6
Warning 6
Machine Description 7
Environment 7
Technical Data 8
Decals. 9
General Safety 10
Health and Safety 10
Pre-Start Safety Checks 10
Reasons for Compaction 11
Compaction Specification 11
Applications 12
Start & Stop Procedure 12
Operating the Compactor 13
Trouble Shooting Guide 13
Servicing 14
Assembly Instructions 15
Fitting Instructions 15
Dual Force Certificate 16
Warranty 16
C.E. Certificate 2
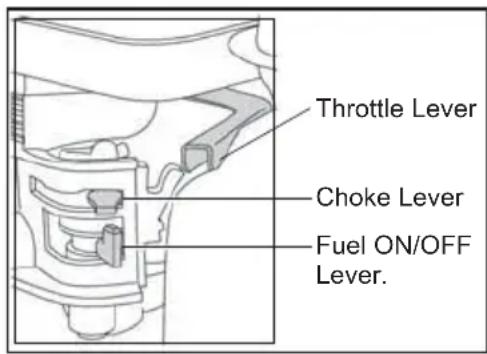
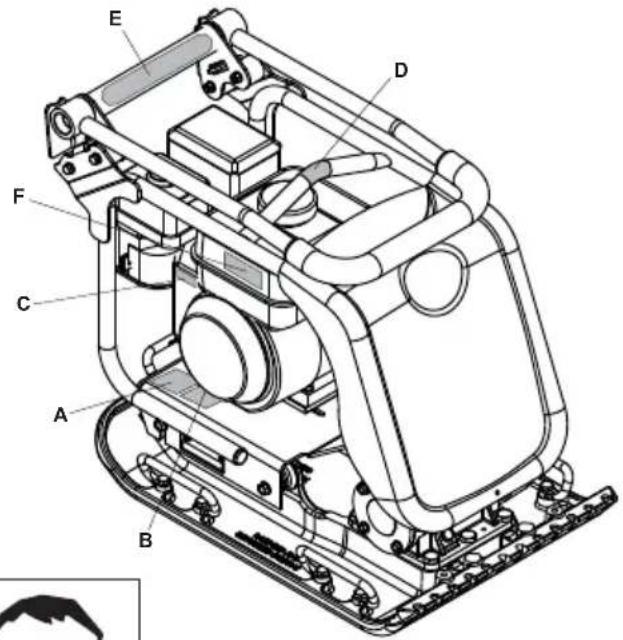
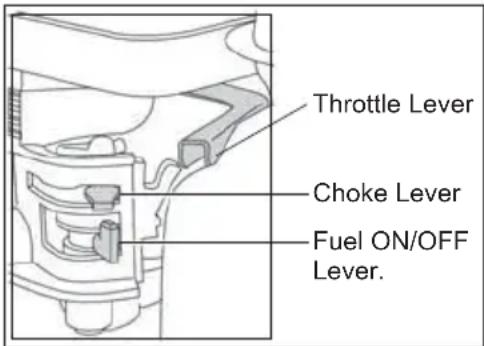
- Throttle lever.
- Choke lever.
- Fuel ON / OFF lever.
- Engine ON/OFF switch.
- Air Filter Housing.
- Fuel Tank.
- Exhaust.
- Recoil Starter Handle.
- Engine oil filler / dipstick.
- Engine oil drain plug.
- Vibrator.
- Vibrator oil check plug.
- Attachment point for Water Spray System or Paving Pad.
- Belt guard.
- Control Handle.
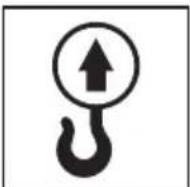
- Lifting Point.
- Attachment points for Transporter Options.
N.B. Drawing based a Honda GX160 engine. Please refer to the manufacturer's literature for Hatz engine details.
Environment

Safe Disposal.

Instructions for the protection of the environment. The machine contains valuable materials. Take the discarded apparatus and accessories to the relevant recycling facilities.
| Component | Material |
| Handle | Steel |
| Front cover | HDPE |
| Main frame | Steel |
| Baseplate | Steel |
| Hand Grips | Rubber |
| Engine | Aluminium |
| Flexible Mounts | Steel and Rubber |
| Various Parts | Steel and Aluminium |
| Water Bottle (if fitted) | Plastic |

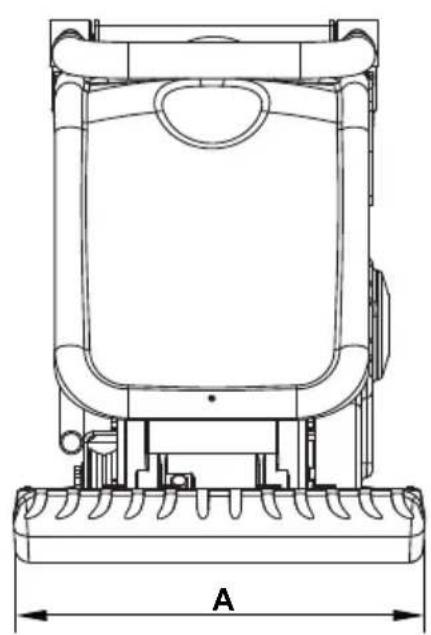
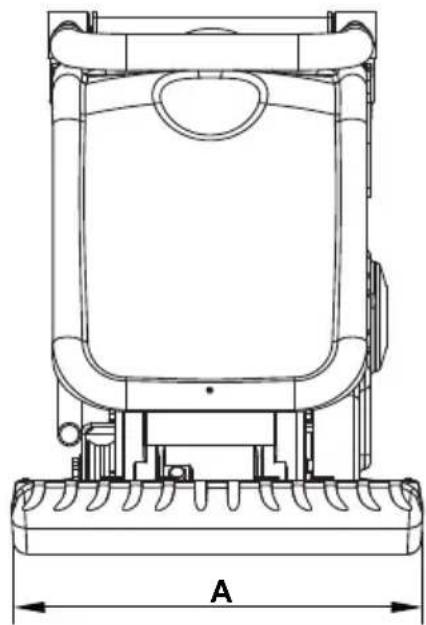
| Model PCX 450 PCX 500 | ||
| A - Machine Width (mm) 450 500 | ||
| B - Machine Height - Honda (mm) 610 610 | ||
| B - Machine Height - Hatz (mm) 75 675 | ||
| C - Machine Length - Honda (mm) 798 798 | ||
| C - Machine Length - Hatz (mm) 870 870 | ||
| Machine Weight - Honda (kg) 86 88 | ||
| Machine Weight - Honda (kg) 86 88 | ||
| Engine RPM 3850 3850 | ||
| Vibrator Force (kN) 16.5 16.5 | ||
| Frequency (Hz) | 101 101 | |
| Max. Travel Speed - Honda (m/min) | 23 21 | |
| Max. Travel Speed - Hatz (m/min) | 22 21 | |
| Static Pressure - Honda (kg/m²) | 382 351 | |
| Static Pressure - Hatz (kg/m²) | 440 404 | |
| Sound Power Level - Honda (dB(A)) | 105 107 | |
| Sound Power Level - Hatz (dB(A)) | 107 107 | |
| 3 Axis Vibration - Honda (m/sec²) 1.90 | 2.96 | |
| 3 Axis Vibration - Hatz (m/sec³) | 2.45 | 2.64 |
| Usage Time - Honda (Mins) | 831 342 | |
| Usage Time - Hatz (Mins) | 499 430 |
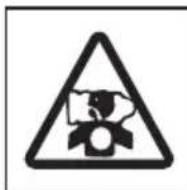
A. Safety Decal
B. Noise Decal
C. Engine RPM Decal
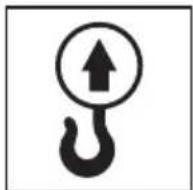
D Lifting Point Decal
E. Low HAV Decal
F. Engine Warning Decal
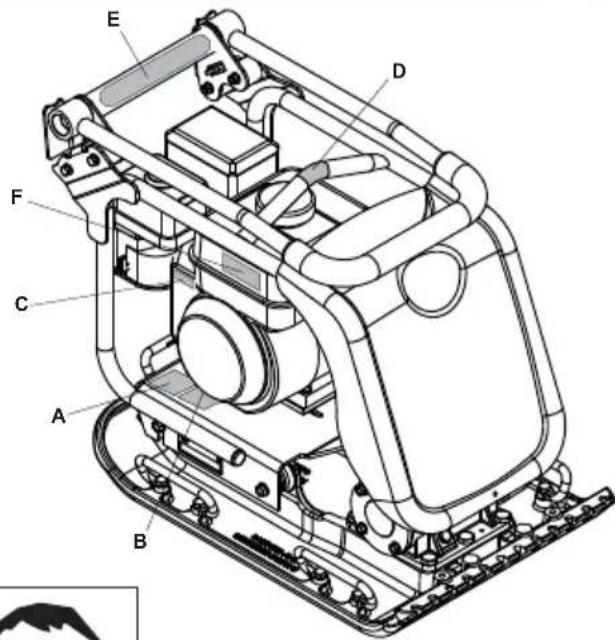
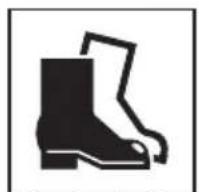
A - Safety Decal (Part No. 19.0.373)

Please Read
Operators
Manual

Wear Protective
Footwear

Wear Ear
Protection

Wear Eye
Protection
B - Noise Decal (800-99951 & 800-99942)
The Noise Level of the machine during operation is 105 / 107dB(A)
C - Engine RPM Decal

Fast Engine
Speed Position

Slow Engine
Speed Position
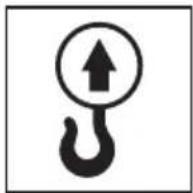
D-Lifting Point Decal
E-Low HAV Decal (800-99965)
The machine has a UK Patented Design which reduces HAV levels allowing a greater Usage Time.
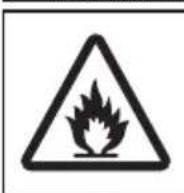
F - Engine Warning Decal
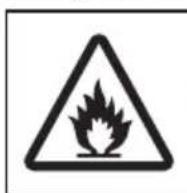

Petrol is highly flammable. Turn off the engine and allow time to cool before refuelling.

The Engine emits toxic Carbon Monoxide. Do not run the Engine in an enclosed area.
Please Read
Engine Manual
For your own personal protection and for the safety of those around you, please read and ensure you fully understand the following safety information. It is the responsibility of the operator to ensure that he/she fully understands how to operate this equipment safely. If you are unsure about the safe and correct use of the Plate Compactor, consult your supervisor or Altrad Belle.

CAUTION
Improper maintenance or use can be hazardous. Read and Understand this section before you perform any maintenance, service or repairs.
- This equipment is heavy and must not be lifted single-handedly, either GET HELP or use suitable lifting equipment. A special transport assembly is available for the compactor (see options).
Cordon off the work area and keep members of the public and unauthorised personnel at a safe distance.
Personal Protective Equipment (PPE) must be worn by the operator whenever this equipment is being used (see Health & Safety).
Make sure you know how to safely switch this machine OFF before you switch it ON in case you get into difficulty. - Always switch OFF the engine before transporting, moving it around the site or servicing it.
- During use the engine becomes very hot, allow the engine to cool before touching it. Never leave the engine running and unattended.
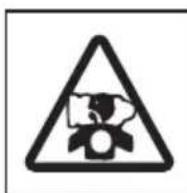
- Never remove or tamper with any guards fitted, they are there for your protection. Always check guards for condition and security, if any are damaged or missing, DO NOT USE THE COMPACTOR until the guard has been replaced or repaired.
- Do not operate the Compactor when you are ill, feeling tired, or when under the influence of alcohol or drugs.
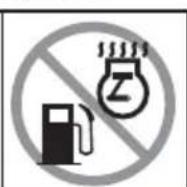
Fuel Safety

CAUTION
Fuel is flammable. It may cause injury and property damage. Shut down the engine, extinguish all open flames and do not smoke while filling the fuel tank. Always wipe up any spilled fuel.
- Before refuelling, switch off the engine and allow it to cool.
- When refuelling, DO NOT smoke or allow naked flames in the area.
Spilt fuel must be made safe immediately, using sand. If fuel is spilt on your clothes, change them. - Store fuel in an approved, purpose made container away from heat and ignition sources.

Health and Safety
Vibration
Some vibration from the compaction operation is transmitted through the handle to the
operator's hands. The Altrad Belle Plate Compactor range has been specifically designed to reduce hand/arm vibration levels. Refer to specifications & technical data for vibration levels and usage times (recommended maximum daily exposure time). DO NOT exceed the maximum usage times.
PPE (Personal Protective Equipment).
Suitable PPE must be worn when using this equipment i.e. Safety Goggles, Gloves, Ear Defenders, Dust Mask and Steel Toe capped footwear. Wear clothing suitable for the work you are doing. Tie back long hair and remove any jewellery which may catch in the equipment's moving parts.
Dust.
The compacting process will occasionally produce dust, which may be hazardous to your health. Always wear a mask that is suited to the type of dust being produced.
Fuel.
Do not ingest fuel or inhale fuel vapours and avoid contact with your skin. Wash fuel splashes immediately.
If you get fuel in your eyes, irritate with copious amounts of water and seek medical attention as soon as possible.
Exhaust Fumes

CAUTION
The exhaust fumes produced by this equipment are highly toxic and can kill!
Do not operate the compactor indoors or in a confined space, make sure the work area is adequately ventilated.

Pre-Start Checks
Pre start-up inspection
The following Pre-start-up inspection must be performed before the start of each work session or after every four hours of use, whichever is first. Please refer to the service section for detailed guidance. If any fault is discovered, the compactor must not be used until the fault is rectified.
- Thoroughly inspect the compactor for signs of damage. Check components are present and secure. Pay special attention to the belt drive safety guard fitted between the engine and the vibrator unit.
- Check the engine oil level and top up as necessary.
- Check the engine fuel level and top up as necessary.
- Check for fuel and oil leaks.
Soil, which has been disturbed or new infill, subbase and blacktop, will have small voids or air pockets which, if not compacted, will lead to one or more problems occurring.
- As traffic crosses the surface of an uncompacted area, the material is compressed. This leads to subsidence of the top surface as the material fills the voids.
- A similar situation occurs with static loads on uncompacted ground. The load (e.g. a building) will sink.
- Materials with voids are more susceptible to water seepage, leading to erosion. Water ingress may also cause the soil to expand during freezing temperatures and contract during dry spells. Expansion and contraction is a major cause of damage to building foundations and normally leads to the structure requiring underpinning.
Compaction increases the density of the material and therefore increases its load bearing capacity. Reduces air voids and therefore reduces the risk of subsidence, expansion and contraction, due to ingress of water.
Compaction Specifi cation

Various methods have been employed in the past to specify the compaction required for various applications. The factors to consider are, material properties, layer thickness, pressure applied, vibration and number of passess. Greater understanding of how compaction works has lead to new compaction specifications being introduced.
The most up to date specification is part of the U.K.'s NRSWA (New Roads & Street Works Act). Civil Engineers are now adopting these specifications to ensure good compaction for all site work.
NRSWA (HAUC specifi cation).
The specification was compiled by HAUC (Highways Authorities & Utilities Committee).
The 'New Roads and Street Works Act 1991, set a new standard for road repairs and reinstatements in the UK. It covers materials, methods, equipment and safety when carrying out reinstatements on roads and footways.
The reason for the act is to ensure repairs and reinstatement are carried out to a higher standard and ultimately last longer. This in turn will reduce the need for costly remedial work and reduce traffic delays.
There are two categories specified for plate compactors.
- 1400 to 1800kg / m^2 2. Over 1800kg / m^2
These figures relate to the static pressure applied by the machine
NOTE: No standard single direction plate compactors comply with this minimum specification. For highways work always use a 'Dual Force' plate compactor.
DUAL FORCE
Altrad Belle studied the act then developed and patented equipment to enable contractors to comply with the act's requirements. The NRSWA legislation requires that compaction equipment meets the minimum specification. By purchasing an Altrad Belle 'Dual Force' plate, you are immediately complying with this part of the act. To comply with the specification and maintain surface tolerance, Altrad Belle 'Dual Force' base plates are divided into two areas providing two stages of compaction.

Stage 1: The full base area compacts the material like a standard machine.
Stage 2: The base rises onto the 'Dual Force' section to give 3 to 4 times the compaction force of standard plates.
Applications/materials fall into three categories:
- Cohesive materials (less than 20% granular) e.g. clay, silt & heavy soils.
- Granular materials (more than 20% granular) e.g hard core, sand & light soils.
- Bituminous materials e.g asphalt (tarmac), cold lay (bitumin emulsion products).
The chart shows the HAUC specifications for layer depth and number of passes for Dual Force' plates. If standard machines are used, optimum compaction can not be guaranteed, however, if layer depths are reduced and number of passes increased, results can be improved.
Moisture content of cohesive & granular materials is critical to effective compaction. If granular material is too dry it will flow around the plate instead of compacting. If the moisture content is too high the material may dry out after compaction and shrinkage will occur.
| 1400 - 1800 kg/m2 | COMPACTION PASSES REQUIRED PER LAYER OF COMPACTED THICKNESS UP TO: | ||||
| 40mm 60mm | 80mm 100mm | 150mm | |||
| Cohesive Materials** | 2** | 4** | 5** | 6** | Reduce Layer Thickness |
| Granular Materials** | 2* | 3* | 4* | 5 | 9 |
| Bituminous | 6 | 10 | 12 | Reduce Layer Thickness | |
- Usually placed in 100mm minimum layer so not specified by HAUC.
** The nature of cohesive materials makes plate compaction difficult. Optimum compaction is not guaranteed and not recommended by HAUC.

Start and Stop Procedure

CAUTION
Improper maintenance can be hazardous. Read and Understand this section before you perform any maintenance, service or repairs.
Honda GX120 & GX160
- Open the fuel tap by moving the fuel ON / OFF lever fully to the right.
- If starting the engine from cold, set the choke ON by moving the choke lever fully to the left. If restarting a warm engine, the choke is usually not required, however, if the engine has cooled to a degree, partial choke may be required.
- Turn the engine ON / OFF switch clockwise to the 'I' position.
- Set the throttle to the idle position by moving the throttle lever fully to the right. Do not start the engine on full throttle, as the compactor will vibrate as soon as the engine starts.
- Taking a firm hold of the control handle with one hand, grasp the recoil starter handle with the other. Pull the recoil starter until engine resistance is felt, then let starter return.
- Taking care not to pull the starter's rope fully out, pull the starter handle briskly.
- Repeat until the engine fires.
- Once the engine fires gradually set the choke lever to the OFF position by moving it to the right.
- If the engine fails to fire after several attempts, follow the trouble-shooting guide on page 8.
- To stop the engine, set the throttle to idle and turn the engine ON / OFF switch anticlockwise to the '0' position.
- Turn the fuel off.
Hatz 1B20-7 Diesel Engine (please refer to the engine manual for full details)
- Turn ON the fuel by moving the fuel ON/OFF lever fully to the right.
- Set the engine speed control to start.
- Taking a firm hold of the control handle with one hand, grasp the recoil starter handle with the other. Pull the handle until engine resistance is felt, then let the starter return.
- Taking care not to pull the starter's rope fully out, pull the starter handle briskly with both hands.
- Repeat this procedure until the engine fires.
- If the engine fails to start after several attempts, consult the engine manual supplied with the compactor.
- To stop the engine, set the throttle control to idle, then press and hold the red stop button until the engine stops.
Operating The Compactor
Take the compactor to where it is required.
If using the 'Detachable' transport attachment to wheel the unit, tilt the compactor forward to raise the transport wheels off the ground. Swing the transporter frame back, then across to disconnect it from the rear of the compactor. Place the transporter frame somewhere safe until next required. For machines with the 'Fixed' transporter tilt the machine forward, pull the transporter rearwards and upwards, lower the machine to the floor and latch the transporter into the 'up' position.
Where it is necessary to use lifting equipment to position the compactor, make sure the lifting equipment has a WLL (Working Load Limit) suitable for the compactors weight (see specification chart on page 4 or the machine numberplate). Attach suitable chains or slings ONLY to the lifting point on the top of the compactor.
If the compactor is fitted with the water spray system and the application requires its use, check that the water outlet valve is closed, then fi II the water bottle with clean water.
- Having carried out the checks listed in the 'pre start' section, you may start the engine.
The Altrad Belle PCX' range of compactors are fitted with a centrifugal clutch, this allows the engine to run at idle without driving the vibrator.
As the engine speed is increased the clutch will engage and will drive the vibrator.
For correct operation, the engine speed should be set to maximum.
- Set the throttle to maximum and use the control handle to steer or turn the compactor.
The vibrator will not only cause the baseplate to vibrate but will also cause it to travel forward. During normal operation you should not have to push the compactor but allow it to travel at its own pace. The speed of travel will be determined by the condition of the surface being compacted.
If the surface to be compacted is on a slope, great care must be taken when controlling the compactor's direction of travel. If necessary, use a suitable rope attached to the compactor at a low point on the chassis, to allow a helper to take part of the compactor's weight. Work up and down a slope not across.
Work the compactor over the surface in an organised pattern until the required compaction has been achieved.
Where there are a number of different layers to be compacted on top of each other, compact each layer individually.
- To stop the compactor vibrating, set the throttle to idle.
Troubleshooting Guide

| Problem Cause Remedy | ||
| Engine will not start. | No fuel. | Open fuel tap. |
| Fill fuel tank. | ||
| Engine switched off. Switch engine on. | ||
| Spark plug fouled. Clean and reset plug gap. | ||
| Engine cold. Close choke. | ||
| Engine flooded. | Honda, open choke, fully open throttle, pull recoil starter until engine fi res. | |
| Hatz, move speed control to stop, pull recoil starter 5 times then repeat start procedure. | ||
| Engine still will not start. Major Fault Contact Agent or Altrad Belle. | ||
| Unit will not vibrate. | Engine speed too slow. Set engine speed | control to fast. |
| Drive belt tension loose. Adjust belt tension. | ||
| Air filter blocked | Clean or renew air filter. | |
| Drive failure. | Contact Agent or Altrad Belle. | |
| Vibrator failure. | Contact Agent or Altrad Belle. | |
| Asphalt adhering to plate. | Lack of lubrication. | Use a water spray system. |
| Paving blocks damaged. | Plate in direct contact with material. | Use a paving pad. |
| Standard pad used on Dual Force plate. Fit correct Dual Force Pad. | ||
| Bituminous surface flaking (laminating). | Over compaction. | Remove and relay. |
| Low travel speed (plate sinking). | Layer thickness too deep. Remove some of the material. | |
| Moisture content too high or too low. | Remove material and adjust. | |
Maintenance
The Altrad Belle PCX' range of Single Direction Plate Compactors are designed to give many years of trouble free operation. It is, however, important that the simple regular maintenance listed in this section is carried out.
It is recommended that an approved Altrad Belle dealer carries out all major maintenance and repairs. Always use genuine Altrad Belle replacement parts, the use of spurious parts may void your warranty.
Before any maintenance is carried out on the machine, switch off the engine. If working on a petrol engined machine, disconnect the HT lead from the sparkplug. If working on a diesel engine, make sure that the stop switch is in the stop position. Always set the compactor on level ground to ensure any fluid levels will be correctly read. Only use recommended oils (see chart on following page).
Running In Period
When the compactor is first used from new, the engine oil must be changed after the initial running in period (see engine manual for full detail). The vibrator shaft case oil must be replaced after the first 100 hours use, then after every 500 working hours. For detail on vibrator shaft case oil replacement, see 'Vibrator unit'. The belt tension should be checked after 4 hours use.
Drive Belt
Remove the belt guard then check the belt tension by placing light finger pressure on the top of the belt, as near central between the engine drive and vibrator pulley. The belt should deflect by between 5mm and 10mm. If the belt tension requires adjustment, loosen the four engine mount bolts enough to allow the engine to be moved. Adjust the engine's position by turning the tension bolt clockwise to increase belt tension, anti-clockwise to decrease. Once set, retighten the engine mount bolts and check the belt tension a second time. Finally, replace the belt guard ensuring it is correctly and securely fitted.
| Routine Maintenance | First 4 Hours | First Month / 20 Hours | 3 Months / 50 Hours | 6 Months / 100 Hours | |
| Engine Oil | Check Level | ✓ | |||
| Change | ✓ | ✓ | |||
| Air Filter | Check Condition / Clean | ✓ | ✓ | ||
| Replace when necessary / Every 12 months | |||||
| Spark Plug Change | ✓ | ||||
| Drive Belt Tension | ✓✓ | ✓ | |||
Oil / Fuel Type & Quantity - Spark Plug Type
| Oil Type | Quantity (Litre) | Fuel Type | Capacity (Litre) | Spark Plug Type | Electrode Gap (mm) | |
| Petrol Honda GX100 | S.A.E. 10W 30 0.6 Unleaded | 2.5 | BM6ES or BPR6ES | 0.7 - 0.8 | ||
| Petrol Honda GX160 | 3.6 | 0.6 - 0.7 | ||||
| Diesel Hatz 1B20-6 | S.A.E. 10W 30 0.9 | Diesel (BS2869) | Refer to Manual | N/A | N/A | N/A |
| Vibrator | Turbine Oil 32 | 0.4 | N/A | N/A | N/A | N/A |
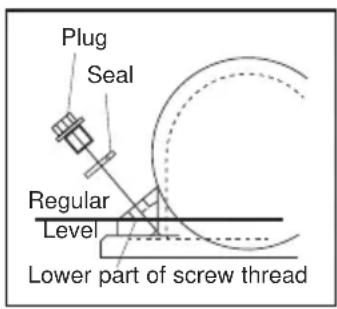
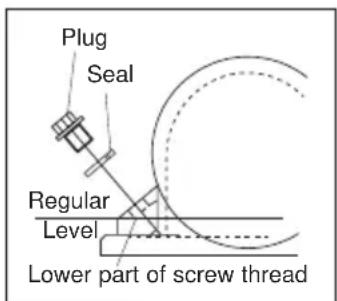
Vibrator Unit.
Remove the plug complete with seal, check that the oil level reaches the bottom thread on the oil plug hole. Top up as necessary with the correct oil (see chart).
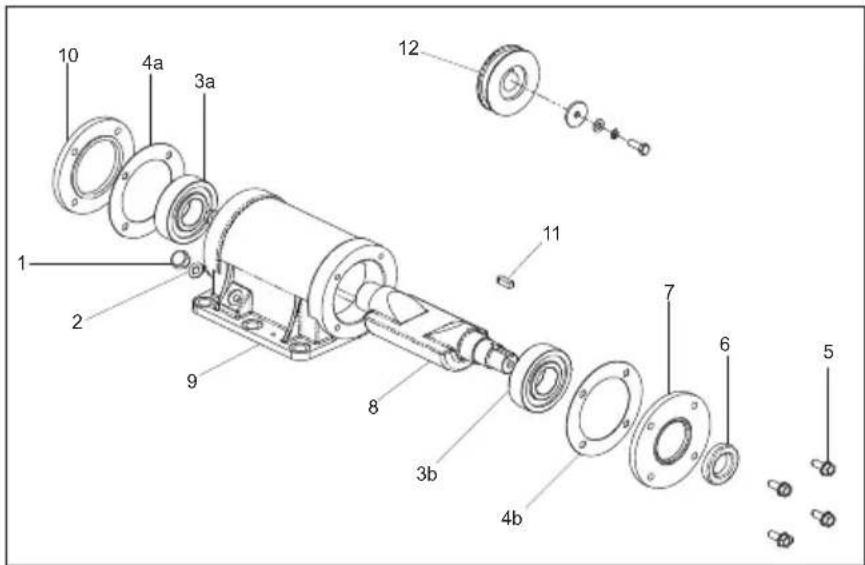
Assembly Instructions for Vibrator
- Clean out Housing (9) with gun wash then blow dry with compressed air.
- Fit rear Bearing (3a) into Housing and push Shaft (8) into Bearing.
- Fit front Bearing (3b) onto Shaft and into Housing.
- Fit Bearing Cover 'B' (10) c/w Gasket (4a) to the rear of the Housing.
- Fit Oil Seal (6) into Bearing Cover 'A' (7).
- Fit Bearing Cover 'A' c/w Gasket (4b) to the front of the Housing.
- Fit Woodruff Key (11) and Pulley (12) onto Shaft.
- Pour oil into oil drain hole in the housing until oil just starts to trickle out.
- Fit Copper Washer (2) and Oil Drain Plug (1).
- Fit Vibrator onto Baseplate and tighten bolts to a torque of 150Nm.
- Run for approximately 2 minutes to ensure oil does not leak from the Vibrator.

Fitting Instructions
GB
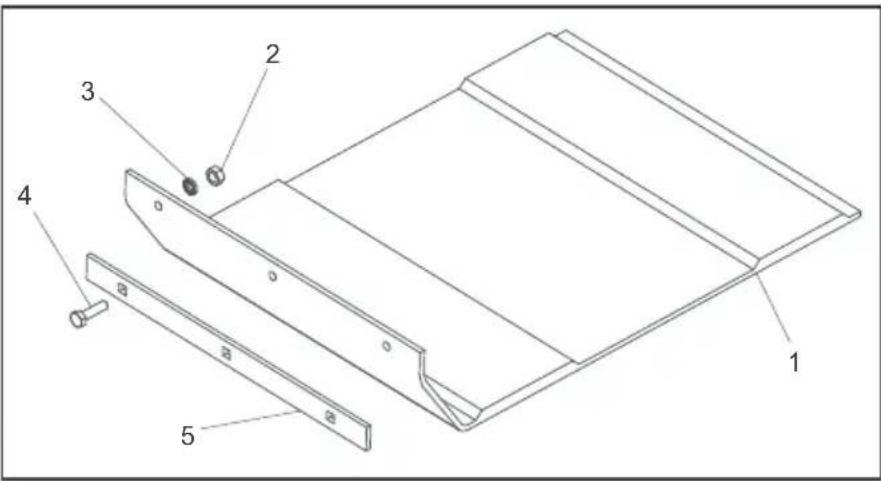
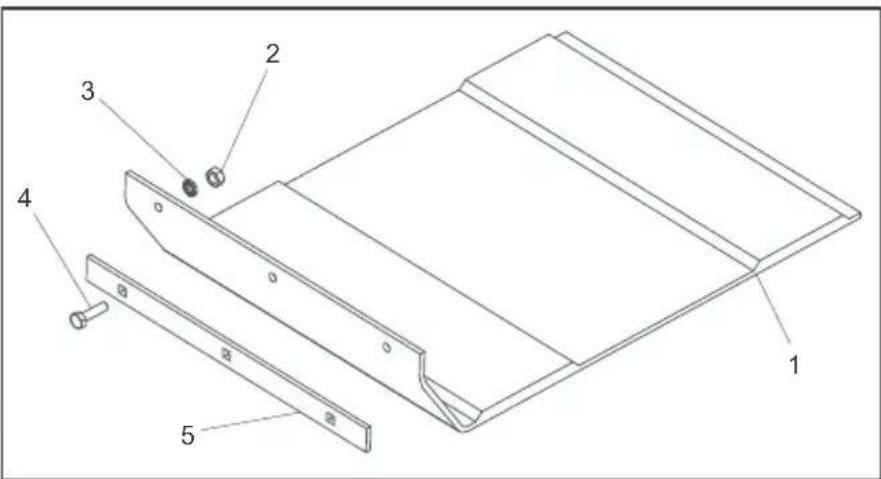
Paving Pad
The paving pad has been designed to be used when tamping down paving slabs and block pavers. However, it should not be used for normal compaction work.
Before fitting, make sure the paving pad you have is the correct size and the correct type (HAUC 'Dual Force' or standard).
To fit the Paving Pad (1), place the pad under the plate ensuring the securing holes line up with the holes on the front of the baseplate.
The securing coach bolts (4) should be passed through the clamp strip (5) then the paving pad (1) and finally through the baseplate. They are in turn secured in place with the nut (2) and washer (3).
Transporter Attachment
The transporter attachment enables the operator to move the compactor to the work place with the minimum of effort.
Removable Transporter Attachment
To fit the transport attachment, align the pivot bracket with the holes on the rear of the baseplate.
The two securing bolts should be passed through the pivot bracket and the baseplate. They are in turn secured in place with the Nyloc nut and washer.
Slide the wheel frame onto the pivot bracket, tilt the compactor forward then swing the wheel frame forward and under. Finally, tilt the compactor back and onto the wheels.
Fixed Transporter Attachment
To fit the transport attachment, align the bracket with the holes on the rear of the bedplate. The two securing bolts should be passed through the bracket and into the bedplate.

This machine is fitted with a 'Dual Force' base plate.

This machine is not fitted with a 'Dual Force' base plate.
When fitted with a 'Dual Force' base plate the Static Weight per Unit Area of this machine is over 1400kg / m^2 and so complies with the NRSWA (HAUC specification) for plate compactors in the category 1400 - 1800kg / m^2 .
Managing
Director

R.
Neilson
'Dual Force' allows Altrad Belle plate compactors to be used for Highways reinstatements in accordance with the specifications stated in the NRSWA (New Roads and Streetworks Act 1991) Appendix A8.
Standard Altrad Belle plate compactors can be retro fitted with 'Dual Force', contact Altrad Belle for details.

Warranty
Your new Altrad Belle PCX' single direction plate compactor is warranted to the original purchaser for a period of one-year (12 months) from the original date of purchase.
The Altrad Belle warranty is against defects in design, materials and workmanship.
The following are not covered under the Altrad Belle warranty:
- Damage caused by abuse, misuse, dropping or other similar damage caused by or as a result of failure to follow assembly, operation or user maintenance instructions.
- Alterations, additions or repairs carried out by persons other than Altrad Belle or their recognised agents.
- Transportation or shipment costs to and from Altrad Belle or their recognised agents, for repair or assessment against a warranty claim, on any machine.
- Materials and/or labour costs to renew, repair or replace components due to fair wear and tear.
The following components are not covered by warranty.
Drivebelt/s
- Engine air filter
Engine spark plug
Altrad Belle and/or their recognised agents, directors, employees or insurers will
not be held liable for consequential or other damages, losses or expenses in
connection with or by reason of or the inability to use the machine for any purpose.
Warranty Claims
All warranty claims should firstly be directed to Altrad Belle, either by telephone, by Fax, by Email, or in writing.
For warranty claims:
Tel: +44(0)1298 84606 Fax: +44(0)1298 84722 Email: Warranty@belle-group.co.uk
Write to:
Altrad Belle Warranty Department,
Sheen, Nr. Buxton
Derbyshire
SK17 0EU
England.
How To Use This Manual
This manual has been written to help you operate and service the Plate Compactor safely. This manual is intended for dealers and operators of the Plate Compactor.
Foreword
The Environment section gives instructions on how to handle the recycling of discarded apparatus in an environmentally friendly way.
The 'Machine Description' section helps you to familiarise yourself with the machine's layout and controls.
The 'General Safety' and 'Health and Safety' sections explain how to use the machine to ensure your safety and the safety of the general public.
The 'Start and Stop Procedure' helps you with starting and stopping the machine.
The 'Trouble Shooting Guide' helps you if you have a problem with your machine.
The 'Servicing' section is to help you with the general maintenance and servicing of your machine.
The Warranty' Section details the nature of the warranty cover and the claims procedure.
The 'Dual Force' section shows the compaction specification the machine can achieve.
The 'CE certificate' section shows the standards that the machine has been built to.
Directives with regard to the notations.
Text in this manual to which special attention must be paid are shown in the following way:

CAUTION
The product can be at risk. The machine or yourself can be damaged or injured if procedures are not carried out in the correct way.

WARNING
The life of the operator can be at risk.
WARNING


WARNING
Before you operate or carry out any maintenance on this machine YOU MUST READ and STUDY this manual.
KNOW how to safely use the unit's controls and what you must do for safe maintenance. (NB Be sure that you know how to switch the machine off before you switch on, in case you get into difficulty.)
ALWAYS wear or use the proper safety items required for your personal protection. If you have ANY QUESTIONS about the safe use or maintenance of this unit, ASK YOUR SUPERVISOR OR CONTACT: Altrad Belle (UK): +44 (0) 1298 84606
Contents

How to use this manual 17
Warning 17
Machine Description 18
Environment 18
Technical Data 19
Decals. 20
General Safety 21
Health and Safety 21
Pre-Start Safety Checks 21
Reasons for Compaction 22
Compaction Specification 22
Applications 23
Start & Stop Procedure 23
Operating the Compactor 24
Trouble Shooting Guide 24
Servicing 25
Assembly Instructions 26
Fitting Instructions 26
Dual Force Certificate 27
Warranty 27
C.E. Certificate 2

- Throttle lever.
- Choke lever.
- Fuel ON / OFF lever.
- Engine ON/OFF switch.
- Air Filter Housing.
- Fuel Tank.
- Exhaust.
- Recoil Starter Handle.
- Engine oil filler / dipstick.
- Engine oil drain plug.
- Vibrator.
- Vibrator oil check plug.
- Attachment point for Water Spray System or Paving Pad.
- Belt guard.
- Control Handle.
- Lifting Point.
- Attachment points for Transporter Options.
N.B. Drawing based a Honda GX160 engine. Please refer to the manufacturer's literature for Hatz engine details.

Safe Disposal.

Instructions for the protection of the environment. The machine contains valuable materials. Take the discarded apparatus and accessories to the relevant recycling facilities.
Environment
| Component | Material |
| Handle | Steel |
| Front cover | HDPE |
| Main frame | Steel |
| Baseplate | Steel |
| Hand Grips | Rubber |
| Engine | Aluminium |
| Flexible Mounts | Steel and Rubber |
| Various Parts | Steel and Aluminium |
| Water Bottle (if fitted) | Plastic |

| Model PCX 450 PCX 500 | ||
| A - Machine Width (in) 17.7 19.7 | ||
| B - Machine Height - Honda (in) 24 24 | ||
| B - Machine Height - Hatz (in) 26.5 26.5 | ||
| C - Machine Length - Honda (in) 31.4 31.4 | ||
| C - Machine Length - Hatz (in) 34.2 34.2 | ||
| Machine Weight - Honda (lbs) 189 194 | ||
| Machine Weight - Honda (lbs) 242 253 | ||
| Engine RPM 3850 3850 | ||
| Vibrator Force (lbf) 3709 3709 | ||
| Frequency (Hz) 101 101 | ||
| Max. Travel Speed - Honda (m/min) | 23 21 | |
| Max. Travel Speed - Hatz (m/min) | 22 21 | |
| Static Pressure - Honda (\( kg/m^2 \)) | 382 351 | |
| Static Pressure - Hatz (\( kg/m^2 \)) | 440 404 | |
| Sound Power Level - Honda (dB(A)) | 105 107 | |
| Sound Power Level - Hatz (dB(A)) | 107 107 | |
| 3 Axis Vibration - Honda (\( m/sec^2 \)) | 1.90 2.96 | |
| 3 Axis Vibration - Hatz (\( m/sec^2 \)) | 2.45 2.64 | |
| Usage Time - Honda (Mins) | 831 342 | |
| Usage Time - Hatz (Mins) | 499 430 |
A. Safety Decal
B. Noise Decal
C. Engine RPM Decal
D Lifting Point Decal
E. Low HAV Decal
F. Engine Warning Decal
A - Safety Decal (Part No. 19.0.373)

Please Read
Operators
Manual
Wear Protective
Footwear

Wear Ear
Protection

Wear Eye
Protection
B-Noise Decal (800-99951 & 800-99942)
The Noise Level of the machine during operation is 105 / 107dB(A)
C - Engine RPM Decal

Fast Engine
Speed Position

Slow Engine
Speed Position
D-Lifting Point Decal
E - Low HAV Decal (800-99965)
The machine has a UK Patented Design which reduces HAV levels allowing a greater Usage Time.
F - Engine Warning Decal
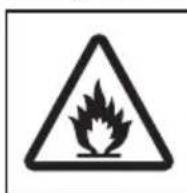
Petrol is highly flammable. Turn off the engine and allow time to cool before refuelling.

The Engine emits toxic Carbon Monoxide. Do not run the Engine in an enclosed area.
Please Read
Engine Manual
General Safety
For your own personal protection and for the safety of those around you, please read and ensure you fully understand the following safety information. It is the responsibility of the operator to ensure that he/she fully understands how to operate this equipment safely. If you are unsure about the safe and correct use of the Plate Compactor, consult your supervisor or Altrad Belle.

CAUTION
Improper maintenance or use can be hazardous. Read and Understand this section before you perform any maintenance, service or repairs.
- This equipment is heavy and must not be lifted single-handedly, either GET HELP or use suitable lifting equipment. A special transport assembly is available for the compactor (see options).
Cordon off the work area and keep members of the public and unauthorised personnel at a safe distance.
Personal Protective Equipment (PPE) must be worn by the operator whenever this equipment is being used (see Health & Safety).
Make sure you know how to safely switch this machine OFF before you switch it ON in case you get into difficulty. - Always switch OFF the engine before transporting, moving it around the site or servicing it.
- During use the engine becomes very hot, allow the engine to cool before touching it. Never leave the engine running and unattended.
- Never remove or tamper with any guards fitted, they are there for your protection. Always check guards for condition and security, if any are damaged or missing, DO NOT USE THE COMPACTOR until the guard has been replaced or repaired.
- Do not operate the Compactor when you are ill, feeling tired, or when under the influence of alcohol or drugs.
Fuel Safety

CAUTION
Fuel is flammable. It may cause injury and property damage. Shut down the engine, extinguish all open flames and do not smoke while filling the fuel tank. Always wipe up any spilled fuel.
- Before refuelling, switch off the engine and allow it to cool.
- When refuelling, DO NOT smoke or allow naked flames in the area.
- Spilt fuel must be made safe immediately, using sand. If fuel is spilt on your clothes, change them.
- Store fuel in an approved, purpose made container away from heat and ignition sources.
Health and Safety

Vibration
Some vibration from the compaction operation is transmitted through the handle to the operator's hands. The Altrad Belle Plate Compactor range has been specifically designed to reduce hand/arm vibration levels. Refer to specifications & technical data for vibration levels and usage times (recommended maximum daily exposure time). DO NOT exceed the maximum usage times.
PPE (Personal Protective Equipment).
Suitable PPE must be worn when using this equipment i.e. Safety Goggles, Gloves, Ear Defenders, Dust Mask and Steel Toe capped footwear. Wear clothing suitable for the work you are doing. Tie back long hair and remove any jewellery which may catch in the equipment's moving parts.
Dust.
The compacting process will occasionally produce dust, which may be hazardous to your health. Always wear a mask that is suited to the type of dust being produced.
Fuel.
Do not ingest fuel or inhale fuel vapours and avoid contact with your skin. Wash fuel splashes immediately.
If you get fuel in your eyes, irritate with copious amounts of water and seek medical attention as soon as possible.
Exhaust Fumes

CAUTION
The exhaust fumes produced by this equipment are highly toxic and can kill!
Do not operate the compactor indoors or in a confined space, make sure the work area is adequately ventilated.
Pre-Start Checks

Pre start-up inspection
The following Pre-start-up inspection must be performed before the start of each work session or after every four hours of use, whichever is first. Please refer to the service section for detailed guidance. If any fault is discovered, the compactor must not be used until the fault is rectified.
- Thoroughly inspect the compactor for signs of damage. Check components are present and secure. Pay special attention to the belt drive safety guard fitted between the engine and the vibrator unit.
- Check the engine oil level and top up as necessary.
- Check the engine fuel level and top up as necessary.
- Check for fuel and oil leaks.
Soil, which has been disturbed or new infill, subbase and blacktop, will have small voids or air pockets which, if not compacted, will lead to one or more problems occurring.
- As traffic crosses the surface of an uncompacted area, the material is compressed. This leads to subsidence of the top surface as the material fills the voids.
- A similar situation occurs with static loads on uncompacted ground. The load (e.g. a building) will sink.
- Materials with voids are more susceptible to water seepage, leading to erosion. Water ingress may also cause the soil to expand during freezing temperatures and contract during dry spells. Expansion and contraction is a major cause of damage to building foundations and normally leads to the structure requiring underpinning.
Compaction increases the density of the material and therefore increases its load bearing capacity. Reduces air voids and therefore reduces the risk of subsidence, expansion and contraction, due to ingress of water.

Compaction Specifi cation
Various methods have been employed in the past to specify the compaction required for various applications. The factors to consider are, material properties, layer thickness, pressure applied, vibration and number of passess. Greater understanding of how compaction works has lead to new compaction specifications being introduced.
The most up to date specification is part of the U.K.'s NRSWA (New Roads & Street Works Act). Civil Engineers are now adopting these specifications to ensure good compaction for all site work.
NRSWA (HAUC specifi cation).
The specification was compiled by HAUC (Highways Authorities & Utilities Committee).
The New Roads and Street Works Act 1991, set a new standard for road repairs and reinstatements in the UK. It covers materials, methods, equipment and safety when carrying out reinstatements on roads and footways.
The reason for the act is to ensure repairs and reinstatement are carried out to a higher standard and ultimately last longer. This in turn will reduce the need for costly remedial work and reduce traffic delays.
There are two categories specified for plate compactors.
- 1400 to 1800kg / m^2 2. Over 1800kg / m^2
These figures relate to the static pressure applied by the machine
NOTE: No standard single direction plate compactors comply with this minimum specification. For highways work always use a 'Dual Force' plate compactor.
DUAL FORCE
Altrad Belle studied the act then developed and patented equipment to enable contractors to comply with the act's requirements. The NRSWA legislation requires that compaction equipment meets the minimum specification. By purchasing an Altrad Belle 'Dual Force' plate, you are immediately complying with this part of the act. To comply with the specification and maintain surface tolerance, Altrad Belle 'Dual Force' base plates are divided into two areas providing two stages of compaction.

Stage 1: The full base area compacts the material like a standard machine.
Stage 2: The base rises onto the 'Dual Force' section to give 3 to 4 times the compaction force of standard plates.
Applications
Applications/materials fall into three categories:
- Cohesive materials (less than 20% granular) e.g clay, silt & heavy soils.
- Granular materials (more than 20% granular) e.g hard core, sand & light soils.
- Bituminous materials e.g asphalt (tarmac), cold lay (bitumin emulsion products).
The chart shows the HAUC specifications for layer depth and number of passes for Dual Force' plates. If standard machines are used, optimum compaction can not be guaranteed, however, if layer depths are reduced and number of passes increased, results can be improved.
Moisture content of cohesive & granular materials is critical to effective compaction. If granular material is too dry it will flow around the plate instead of compacting. If the moisture content is too high the material may dry out after compaction and shrinkage will occur.
| 1400 - 1800 kg/m2 | COMPACTION PASSES REQUIRED PER LAYER OF COMPACTED THICKNESS UP TO: | ||||
| 40mm 60mm | 80mm 100mm | 150mm | |||
| Cohesive Materials** 2** 4** | 5** 6** Reduce Layer Thickness | ||||
| Granular Materials** 2* 3* 4* | 5 | 9 | |||
| Bituminous | 6 | 10 | 12 | Reduce Layer Thickness | |
- Usually placed in 100mm minimum layer so not specified by HAUC.
** The nature of cohesive materials makes plate compaction difficult. Optimum compaction is not guaranteed and not recommended by HAUC.
Start and Stop Procedure


CAUTION
Improper maintenance can be hazardous. Read and Understand this section before you perform any maintenance, service or repairs.
Honda GX120 & GX160
- Open the fuel tap by moving the fuel ON / OFF lever fully to the right.
- If starting the engine from cold, set the choke ON by moving the choke lever fully to the left. If restarting a warm engine, the choke is usually not required, however, if the engine has cooled to a degree, partial choke may be required.
- Turn the engine ON / OFF switch clockwise to the 'I' position.
- Set the throttle to the idle position by moving the throttle lever fully to the right. Do not start the engine on full throttle, as the compactor will vibrate as soon as the engine starts.
- Taking a firm hold of the control handle with one hand, grasp the recoil starter handle with the other. Pull the recoil starter until engine resistance is felt, then let starter return.
- Taking care not to pull the starter's rope fully out, pull the starter handle briskly.
- Repeat until the engine fires.
- Once the engine fires gradually set the choke lever to the OFF position by moving it to the right.
- If the engine fails to fire after several attempts, follow the trouble-shooting guide on page 8.
- To stop the engine, set the throttle to idle and turn the engine ON / OFF switch anticlockwise to the '0' position.
- Turn the fuel off.
Hatz 1B20-7 Diesel Engine (please refer to the engine manual for full details)
- Turn ON the fuel by moving the fuel ON/OFF lever fully to the right.
- Set the engine speed control to start.
- Taking a firm hold of the control handle with one hand, grasp the recoil starter handle with the other. Pull the handle until engine resistance is felt, then let the starter return.
- Taking care not to pull the starter's rope fully out, pull the starter handle briskly with both hands.
- Repeat this procedure until the engine fires.
- If the engine fails to start after several attempts, consult the engine manual supplied with the compactor.
- To stop the engine, set the throttle control to idle, then press and hold the red stop button until the engine stops.
Take the compactor to where it is required.
If using the 'Detachable' transport attachment to wheel the unit, tilt the compactor forward to raise the transport wheels off the ground. Swing the transporter frame back, then across to disconnect it from the rear of the compactor. Place the transporter frame somewhere safe until next required. For machines with the 'Fixed' transporter tilt the machine forward, pull the transporter rearwards and upwards, lower the machine to the floor and latch the transporter into the 'up' position. Where it is necessary to use lifting equipment to position the compactor, make sure the lifting equipment has a WLL (Working Load Limit) suitable for the compactors weight (see specification chart on page 4 or the machine numberplate). Attach suitable chains or slings ONLY to the lifting point on the top of the compactor.
If the compactor is fitted with the water spray system and the application requires its use, check that the water outlet valve is closed, then fi II the water bottle with clean water.
- Having carried out the checks listed in the 'pre start' section, you may start the engine.
The Altrad Belle PCx' range of compactors are fitted with a centrifugal clutch, this allows the engine to run at idle without driving the vibrator.
As the engine speed is increased the clutch will engage and will drive the vibrator.
For correct operation, the engine speed should be set to maximum.
- Set the throttle to maximum and use the control handle to steer or turn the compactor.
The vibrator will not only cause the baseplate to vibrate but will also cause it to travel forward. During normal operation you should not have to push the compactor but allow it to travel at its own pace. The speed of travel will be determined by the condition of the surface being compacted.
If the surface to be compacted is on a slope, great care must be taken when controlling the compactor's direction of travel. If necessary, use a suitable rope attached to the compactor at a low point on the chassis, to allow a helper to take part of the compactor's weight. Work up and down a slope not across.
Work the compactor over the surface in an organised pattern until the required compaction has been achieved.
Where there are a number of different layers to be compacted on top of each other, compact each layer individually.
- To stop the compactor vibrating, set the throttle to idle.

Troubleshooting Guide
| Problem Cause Remedy | ||
| Engine will not start. | No fuel. | Open fuel tap. |
| Fill fuel tank. | ||
| Engine switched off. Switch engine on. | ||
| Spark plug fouled. Clean and reset plug gap. | ||
| Engine cold. Close choke. | ||
| Engine flooded. | Honda, open choke, fully open throttle, pull recoil starter until engine fires. | |
| Hatz, move speed control to stop, pull recoil starter 5 times then repeat start procedure. | ||
| Engine still will not start. Major Fault Contact Agent or Altrad Belle. | ||
| Unit will not vibrate. | Engine speed too slow. Set engine speed | control to fast. |
| Drive belt tension loose. Adjust belt tension. | ||
| Air filter blocked | Clean or renew air filter. | |
| Drive failure. | Contact Agent or Altrad Belle. | |
| Vibrator failure. | Contact Agent or Altrad Belle. | |
| Asphalt adhering to plate. | Lack of lubrication. | Use a water spray system. |
| Paving blocks damaged. | Plate in direct contact with material. | Use a paving pad. |
| Standard pad used on Dual Force plate. Fit correct Dual Force Pad. | ||
| Bituminous surface flaking (laminating). | Over compaction. | Remove and relay. |
| Low travel speed (plate sinking). | Layer thickness too deep. Remove some of the material. | |
| Moisture content too high or too low. | Remove material and adjust. | |
Maintenance
The Altrad Belle PCX' range of Single Direction Plate Compactors are designed to give many years of trouble free operation. It is, however, important that the simple regular maintenance listed in this section is carried out.
It is recommended that an approved Altrad Belle dealer carries out all major maintenance and repairs. Always use genuine Altrad Belle replacement parts, the use of spurious parts may void your warranty.
Before any maintenance is carried out on the machine, switch off the engine. If working on a petrol engined machine, disconnect the HT lead from the sparkplug. If working on a diesel engine, make sure that the stop switch is in the stop position. Always set the compactor on level ground to ensure any fluid levels will be correctly read. Only use recommended oils (see chart on following page).
Running In Period
When the compactor is first used from new, the engine oil must be changed after the initial running in period (see engine manual for full detail). The vibrator shaft case oil must be replaced after the first 100 hours use, then after every 500 working hours. For detail on vibrator shaft case oil replacement, see 'Vibrator unit'. The belt tension should be checked after 4 hours use.
Drive Belt
Remove the belt guard then check the belt tension by placing light finger pressure on the top of the belt, as near central between the engine drive and vibrator pulley. The belt should deflect by between 5mm and 10mm . If the belt tension requires adjustment, loosen the four engine mount bolts enough to allow the engine to be moved. Adjust the engine's position by turning the tension bolt clockwise to increase belt tension, anti-clockwise to decrease. Once set, retighten the engine mount bolts and check the belt tension a second time. Finally, replace the belt guard ensuring it is correctly and securely fitted.
| Routine Maintenance | First 4 Hours | First Month / 20 Hours | 3 Months / 50 Hours | 6 Months / 100 Hours | |
| Engine Oil | Check Level | ✓ | |||
| Change | ✓ | ✓ | |||
| Air Filter | Check Condition / Clean | ✓ | ✓ | ||
| Replace when necessary / Every 12 months | |||||
| Spark Plug Change | ✓ | ||||
| Drive Belt Tension | ✓✓ | ✓ | |||
Oil / Fuel Type & Quantity - Spark Plug Type
| Oil Type | Quantity (Gals) | Fuel Type | Capacity (Gals) | Spark Plug Type | Electrode Gap (mm) | |
| Gasoline Honda GX100 | S.A.E. 10W 30 | .15 Unleaded | 0.66 | BM6ES or BPR6ES | 0.7 - 0.8 | |
| Gasoline Honda GX160 | 0.95 | 0.6 - 0.7 | ||||
| Diesel Hatz 1B20-6 | S.A.E. 10W 30 | .23 | Diesel (BS2869) | Refer to Manual | N/A | N/A |
| Vibrator | Turbine Oil 32 | 0.1 | N/A | N/A | N/A | N/A |
Vibrator Unit.
Remove the plug complete with seal, check that the oil level reaches the bottom thread on the oil plug hole. Top up as necessary with the correct oil (see chart).
Assembly Instructions for Vibrator
- Clean out Housing (9) with gun wash then blow dry with compressed air.
- Fit rear Bearing (3a) into Housing and push Shaft (8) into Bearing.
- Fit front Bearing (3b) onto Shaft and into Housing.
- Fit Bearing Cover 'B' (10) c/w Gasket (4a) to the rear of the Housing.
- Fit Oil Seal (6) into Bearing Cover 'A' (7).
- Fit Bearing Cover 'A' c/w Gasket (4b) to the front of the Housing.
- Fit Woodruff Key (11) and Pulley (12) onto Shaft.
- Pour oil into oil drain hole in the housing until oil just starts to trickle out.
- Fit Copper Washer (2) and Oil Drain Plug (1).
- Fit Vibrator onto Baseplate and tighten bolts to a torque of 150Nm.
- Run for approximately 2 minutes to ensure oil does not leak from the Vibrator.

Fitting Instructions
Paving Pad
The paving pad has been designed to be used when tamping down paving slabs and block pavers. However, it should not be used for normal compaction work.
Before ftting, make sure the paving pad you have is the correct size and the correct type (HAUC 'Dual Force' or standard).
To fit the Paving Pad (1), place the pad under the plate ensuring the securing holes line up with the holes on the front of the baseplate.
The securing coach bolts (4) should be passed through the clamp strip (5) then the paving pad (1) and finally through the baseplate. They are in turn secured in place with the nut (2) and washer (3).
Transporter Attachment
The transporter attachment enables the operator to move the compactor to the work place with the minimum of effort.
Removable Transporter Attachment
To fit the transport attachment, align the pivot bracket with the holes on the rear of the baseplate.
The two securing bolts should be passed through the pivot bracket and the baseplate. They are in turn secured in place with the Nyloc nut and washer.
Slide the wheel frame onto the pivot bracket, tilt the compactor forward then swing the wheel frame forward and under. Finally, tilt the compactor back and onto the wheels.
Fixed Transporter Attachment
To fit the transport attachment, align the bracket with the holes on the rear of the bedplate. The two securing bolts should be passed through the bracket and into the bedplate.
'Dual Force' / HAUC / NRSWA Certificate

This machine is fitted with a 'Dual Force' base plate.

This machine is not fitted with a 'Dual Force' base plate.
When fitted with a 'Dual Force' base plate the Static Weight per Unit Area of this machine is over 1400kg / m^2 and so complies with the NRSWA (HAUC specification) for plate compactors in the category 1400 - 1800kg/m².
Managing
Director

R.
Neilson
Dual Force' allows Altrad Belle plate compactors to be used for Highways reinstatements in accordance with the specifications stated in the NRSWA (New Roads and Streetworks Act 1991) Appendix A8.
Standard Altrad Belle plate compactors can be retro fitted with 'Dual Force', contact Altrad Belle for details.
Warranty

Your new Altrad Belle PCX' single direction plate compactor is warranted to the original purchaser for a period of one-year (12 months) from the original date of purchase.
The Altrad Belle warranty is against defects in design, materials and workmanship.
The following are not covered under the Altrad Belle warranty:
- Damage caused by abuse, misuse, dropping or other similar damage caused by or as a result of failure to follow assembly, operation or user maintenance instructions.
- Alterations, additions or repairs carried out by persons other than Altrad Belle or their recognised agents.
- Transportation or shipment costs to and from Altrad Belle or their recognised agents, for repair or assessment against a warranty claim, on any machine.
- Materials and/or labour costs to renew, repair or replace components due to fair wear and tear.
The following components are not covered by warranty.
Drivebelt's
- Engine air filter
- Engine spark plug
Altrad Belle and/or their recognised agents, directors, employees or insurers will
not be held liable for consequential or other damages, losses or expenses in
connection with or by reason of or the inability to use the machine for any purpose.
Warranty Claims
All warranty claims should firstly be directed to Altrad Belle, either by telephone, by Fax, by Email, or in writing.
For warranty claims:
Tel: +1 540.345.5090 Fax: +1 540.345.5090 Email: BelleGroupInc@aol.com
Write to:
Altrad Belle Inc,
3959 Electric Road,
Roanoke, Suite 360,
VA, 24018
USA

Altrad Belle Warranty Department,
Sheen, Nr. Buxton
Derbyshire
SK17 0EU
England.
Angleterre
Uso de este manual
Directivas relatives as anotacoes.
Certificado Dual Force. 60
Garantia 60
Altrad Belle Warranty Department,
Sheen, Nr. Buxton
Derbyshire
SK17 0EU
England
Altrad Belle Warranty Department,
Sheen, Nr. Buxton
Derbyshire
SK17 0EU
England

Certificato Dual Force. 104
Garanzia 104
Altrad Belle Warranty Department,
Sheen, Nr. Buxton
Derbyshire
SK17 0EU
Inghilterra
Hur man anvanderenna bruksanvisning
Altrad Belle Warranty Department,
Sheen, Nr. Buxton
Derbyshire
SK17 0EU
England
Tel: +44(0)1298 84606 Fax: +44(0)1298 84722 E-post: Warranty@belle-group.co.uk
Postadresse:
Garantiavdelingen i Altrad Belle
Sheen, Nr. Buxton
Derbyshire
SK17 0EU
England
Procedura Start I Stop 144
Praca Zageszczarki 145
Procedura Start I Stop

UWAGA
Email: Warranty@belle-group.co.uk
Altrad Belle Warranty Department,
Sheen, Nr. Buxton
Derbyshire
SK17 0EU
England.
Kak noJIb3OBaTbcra PykoBoDCTBOM
Dahnoe pykoOCTBO 6bIIO HanucaHO C cIbIO NMOy Bam B 6e30nacHoi paOte I o6cnyKbaHHN B6pOPINT n3 cepnn PCX. DaHoe pykoOCTBO npedHa3NaHeo dIy NOCTaBUnKOB I onepaTOPOB B6pOPINT n3 cepnn PCX.
PpeucnoBne
Pa3en Okpykaoouc cpea" npedocTbBAM Hnctpykun no NOBOy yTNIN3aun cnncanHoro annapaTa C yETOM 3auNTbokpykaoue cpebl.
Pa3eI «Onncahne MaunHbI» NOMOXET Bam OCBONTb KOHCTpyKUIO MaunHbI n ee ynpabJeHne.
Pa3dJIbI《06aJ4 6e3oNaChocTb》N《3DopOBBe I 6e3oNaChocTb》O6bYCHRT BAM, KAK NOJIb3OBaTBcRA DaHHoMaHHO C yUeTOM BaWei Co6CTBHeHoi 6e3oNaChocTu, a TAOKe 6e3oNaChocTu OKpyKaHoux NIODei.
«Пюцедура по зауckи и оctановке» NOMOЖET Bam 3anyCTNTb И OCTaHOBNTb MaUINHy.
《CoBtHa CnyaB BO3MOXHbIX HEnoJaOK》NOMOryT Bam B Cnyae,ecn Bbl CTOnKHeTeCb C np6nMaMn B Baue MauHe.
《Texnueckoe 06cnykBaHne》NOMOXET BAM C BONPOCAMN NO O6eMy Texnueckomy 06cnykBaHIO BAWei MaunHBi.
Pa3dEe IraaHTnra" daet aTaBHOe onHcHne OCHOBbIX npHHcINOB rapaHTn, a TaKKe npOeDpybl dIy npedbRbHeHra rapaHTnHbIX npTeH3m.
Pa3dEe IDbOHnA Cnna NOKaKeT XapakTePncTNk yNIOThEHnK, KOTOPo MOxHO DOCTNb, PIPMeHra DaHHyO MaunHy.
Paeden «CeptnuKaT COOTBcTbN» noka3bBaet cTahdApTbI, no KOTOpbIM daHHa MaunHa bblnocTpoHa.
Yka3aHnO OBeuxx, Tpe6yIoUnx NOBbIeHHOro BHMaHnA.
TeKCT B daHHOM pyKOBOcTBe, Ha KOTOpb HEO6xOdmo 6paTntb Oc0eHHe BHMaHne, BbyJeHcNeDyUoUM o6pa3OM:

BHIMAHNE
Hnna npdykunmoKet coepkaTb Ce6e 3neMeHTb pncKa. B cnyuae, ecnn npouedpyb BblONHryOTc HeBepHo, MOket nocpaTaB KaK MaUNHa, TaK N Bbl CamN.

PpeynpeXeHne
Kn3h b onepaTopo MoKet NOBeprHyTbcra OnachOCTn.
PpeDynpexKdEHNHe!


PpeynpeKdHne
Ppejde yem npoBOnTb kaKe-Im6o pa60t bnn BbInOJIHrTaTexO6cJyKnBaHne daHHoMaHNb, Bbl DOJXhbl PPOHTATb n 3yUHTb DaHHoe pyKOBOCTBO.
Heo6xOIMO 3HATb, kak 6e30nacHO nOJIb3OBAtbcra ynpabNeHem DaHHo MaunHbI uTO HADo DeNaTb DnA 6e30nacHOrO BbINOJIHeHnpa6oT no TEXHnueckOMy o6cnykBaHnO.
NB! TTo6bI He nonactb B 3aTpynHtJIbHoe nIoXeHne, y6eHNTEcB B TOM, YTO Bbl 3HaTe KaK 6e3ONaCHO BbIKIOHHTb MaINHy, Do TORO, KAK Bbl ee BKNHOHTe.
BCEHDA HOCHTE INCNOJIb3yIte COOTBETCTBYIOUHE 3aUNTHbIe CpeDCTBa, Heo6xOIMbIe IJRA OBeCNueHn BAeIe 6eONACHOCTN.
Ecni y Bac Bo3HKnHy KaKe-NoBopocbI NO NOBOy 6e3oNacHO IcnoB3OBAHNr IN Texo6cnyKINBaHNr DaHHoMaUNHbI, OpaTntecb K CBOemy pyKOBOdCTBy nnn CBxKNTecb c BenI rpyn
OrnaBneHne

Kak noJIb3OBAtbcra daHbIM PykoBoDCTBOM 149
Ppeunpexdene 149
Oncanhe Maunnbl 150
Okpykaioaay cpea. 150
Texnueckne daHbIe 151
Ipeynpexkaioune 3nki 152
Hnctpykun no 6e3oanachoctn 153
3dopobbe n 6e3oNaChocTb. 153
KoHTpoJIb nepeI 3aynyckOM. 153
PpHnblIytpaMboBaHna 154
XapakTepcntka yTpaM6obBbBaHn. 154
Bo3moKHOCTn npImeHHeN 155
Pa6oTa C Bn6pOJIHToI 155
IpoceDpya no 3anycky n ocTaHOBke. 156
CobetbHa cnuyaB03MOXhIX HnOJaOK 156
Texnueckoe obcnykubanie 157
Hnctpykui no c6opke 158
Hnctpykunno MoNTaKy 158
Ceptnuikat DboHoi Cnbl 159
Tapantna 159
Ceptnuikat COOTBETCTBnA 4
Bennr npn octabnre 3a co6o npabo HmmeHb TeXnueckne npametpb MaunHb 6e npeBaPntbHorO ybeomHeHn IIN KaKx-106 Ohix o8a3aTeNbCTB.

- Pbyar npoccen.
- RykOraTka noococa.
- KpaH nIpaHIOaHIOCTaHOBKn TOnJIbHa
- BbIKIOHATeNb pa6OtblBnIaTeJIa.
- Kopnyc Bo3dyuHoro qnIbTpa.
- TOnnBbIb 6aK.
- BbIXnonna Tpy6a.
- PykOraTka pyuHoro 3anycka.
9.Дигателb:MacnHbI ΦnIbTp/uyn.
10.ДиогateJIb:ДрehaxHbIMacIaHbIM KlaNaH. - Búbpaṭop.
- Побka Дяповерки урOBня macna BBn6paTope.
- Touka kpenneHnI dIra cIcTeMbI paCnblneHnBODbI nII dIra dopoxHoI noDyuKn.
- PpeoXpaHnteJbHbI uNTOK peMHa.
- RykoTka ynpaBneHna.
16.ПодьМньузел.
17.ToKnIJIaBo3MOxHOITpaHCnOpTnpOBKn.
NBIHa npBBeHem qeTeKe n3o6paXeHa BnbpOPINTa c MOTOPOM XoHda GX160.III NOpObHOCTePaobTcMOTOpOM XaCa, noKanyIcTa, oBpaNTeCb K DOKyMeHTaun Ipn3BOIDNTeJI.

OkpykaIOUaIcpeIa
Be3onacha yTuJn3aun

HCTpyKuINo oxpAne OkpyKaIOUe Cpebl. MaunHa cEnaHa n3 ueHHbIX MaTePnaIob. PepeaTe cncaHHbAnnapat N 3nTactN B 6JnxKaUwe npdpnpTne No nepepaOtke yTnIbcbippb.

Poxanyucta,
npoHTaTe
PykoBOCTBO
nonb30BaTeJRA

OeBaIte
CneuaJIbHyIO
3aunTHyIO
06yBb

Ucnonb3yute
cpeCTBa 3aunTbI
opraHcnyxa
cpeDCTBa 3aunTbI

nnaHTbI
opraHOB3peHH
NCNoIb3yInTe
CneuNaBHbIe
B-3NaK "NnΦopMauny o6 ypOBHe wyma" (800-99951 & 800-99942)cpedTba 3aunTbI
YpOBeHb Wyma pa6oTaUoSe MauHHbI - 105 / 107 dE(A)
C-3NaK "O6OpOtbl DnBraTeTae"

BonbwaacKopoctb
BpaueHn
DBrTaTeNa
TolokxeHne

MaJiackopoctb
BpaueHn
Dn
D-3HaK "TakenaxKaHra Toka nOdbema"
E-3nak"Mana nokalbna Bn6paun" (800-99965)
MaunHa Imeet nateHToBaHny KOHCTpyKUIO, KOTopar yMeHbSaET BO3dEeCTBne JOKaIbHO Bn6paun HA pyKn OepaTopa, TTO3BOJrEt YBeINuHTb DOnyCTmOe BpEm ynpabJIeHn MaunHoN OepaTopOM.
F-3nak"3Kcnnyatauny Dnuratela

BEN3HH OeHb ORHeonaceh. BIKNIOHTe DBIgatene b daite eMy ocTbIb nepe 3anpaBkoB.

Dbrarntb bblnetae rdoBHTy MOHooKbc yrnpoda. He BknouhTe Dbrarntb B 3akpblTom nomeuennn.
Poxanynta, npouHTaTe
PykoBOcTBo no 3KcnnyatauIN DBHratae
Ia oecneehn Baaen co6teBHeH0 3auHtbl, a taKke 6e3onachocn OkpykaOuXn Bac nHOeJ, noxanycta, y6edntcB TOM, TTO bI NOHOCbYCBONH NHexcNdeUoHOpMaunno 6e3onachocn. O63aHHocTb OepatoparBnreTcTo, YTOb OH/OHa NOHOCTBIO NOHMAn(a), KAK IMEHNO Hdo pa6otab C daHbIM o6opydOBaHem B 6e3onachom peKmE. Ecn y Bac HeYBEpeHHocn IO NOBOy 6e3onachoro INpABINbHOrIO IcNoJIb3OBAHn B6ponNTb PCX, 6paTnteck BaAeMy pykoBODCTBy nn CBxNtceC b Benne rpn.

BHUMAHNE
HeBepHoe npoBeHeHne TexO6cnyKunBaHnM MoKeT npNBecTN K BO3HKnHOBeHN OAnCHocT. PpOHTte n NOnMMTe 3OT pa3dJI nepeI TeM, KaK HauHHaTb BblONHrTb KaKHe-Ni60 pa60tbl NO TEXHNueCKOMy o6cnyKunBaHnIO nn peMOHTy.
- DAnHoe obOpydoBaHne - TjKeJe, n ero HeIb3n OndHMaTb B OndHouKy; I03OBITE KOrO-HN6yDb HA IOMOuBn nnncnObl3ynte COOTBeTCTByUooee NObemHoe obOpydoBaHne. IJIa Bn6pOnPiNbI bI MeEtCnEuaIbHoe npncnocO6nHeNe dIra TpaHcnpTIpOBKn (CM. CnncOK dononHntelhoro obOpydoBaHna).
OrpaIte MeTo npOBeHnra pa60nt n depKHTe ny6bNky n noCTOpOHnHex Ha 6e3OnaChom pacctOAHn. - Ppi NIO6OM HcNOJIb3OBAHm DAHHORo 6OBOpYOBAHn Onepatop DoJKeH HaDeBaTb cpeICTBa nepcoHaJIbHOHa 3aUHTbl (CIN3); (CM. «3DopOBBe H 6e3OnaHocThB»).
- 4to6bI He nonactb B 3atpydHnHTenbHO nnoXeHHe, y6eHNTeB TOM, YTO Bbl 3HaTe KaK 6e3oNaCHO BkKnHOnTH MaunHy Do TORO, KAK Bbl ee BKNIOHTe.
Cneyert Bcerda BbknouatB dbratenb nepeh Hauanom TpaHcnpTropOBKn, npeHOCOM MaunHbHa MeCTe BblonHeHn paBOTnn npoun3beHnraTexo6cnkykBaHn.
BoBpMaPbIbDraTeNbHakAraTcR;nepeTEmKakTporaTbero,daiTeemyocTb. HkoRaHe ocTabnTe pa6oTaioyMoAsHy 6e3Ha30pa.
HnKorda He ChmMaTe Hr TporaTe KaKe-Im6o npExpaHanTeBHe IuTKn: OH cEnaHb Ira BaWe 3auNTb. CneyET BcERda npOBepaTb COCTOHe npExpaHanTeBHX uTKOB, a TaKke IH KpeNEX; ecnn KaKe-Im6o n3 HIX NOBpeXeHb IIN OTCyTCTByOT HE IOnb3YITECb BN5POPTIINTOJ Do Tex nop, noka npExpaHanTeBHy IuTOK He 6yDet 3aMeHen IIN NoUHNHE.
He paobotaiTe C Bnbponnto,ecnn Bbl 60nbHb,yctanu Hn HaxoDNTcB BCCTOAHN aIKOROBHO Hn HapKOHTueCKTO ONbHHeHn.
Be30nacHoe nCnONb3OBaHne TOnnBa.

BHHMAHNE
TOnnBO JERKO BOCNJAMEHReCTCA.3TO MOKET PnBECTN K TpaBMam N K nopue MMyeCTBa.BbIKIOHTe DnIaTeNb, YcTaPAHNTe BCE OTKpbItbIe IcTOUHNKOrHr Hc Kypnte BO Bpem 3anpaBKn TOJIINBHoro 6aka. CneDyET Bcerda Hacyxo BbITnpaTb npONNBWeecrTONnBO.
- Peped Tem, KAK pON3BODHTb 3aNPaBky, CNeDyET BbIKIOHTb DBNrAteJIb N DaTb EMy OCTbITb.
He Kypnte BO Bpem 3anpaKn, a TaKke yctpaHnTe BCE OTKpbTble nCTOuHNKn ORHb BOKpyr. - PpOJItoe TOnJIbO CJIeIyET HeMeIeHnHO Obe3oNacITb, 3aCInab Eero neckOM. EcnBbl npOJItn ToTJINBO Ha OdEJKy - CmEHnTe ee
XpaHHTe TOnJIbBO B COOTBETCTByUeI N CO3dAHHo IJRA 3TOI UeIN EMKOCTN BdaIIN OT KAKNX-IM60 INTOCHYHKOB TEIIa N OTKpblTOrO rHr.
3dopobbe n 6e30nacchoctb

Bn6paun
Bo Bpem npoBeHn ytpam60bOchBx paobt kakay-to qacb Tb Bn6paun npedaetcyepe3 pykoTky npabHeHn ha pykn onepaTopa. Cepn Bn6ponnnt npon3BODCTBa BeN bpna cneuaIbHO pa3pa6oTaHa c cenbno hOn3NTb ypoBHe Bn6paun KNCTey/pyk. O3hakombTeC b OnncAHem N TexHnueckm daHHbIM npOBHe Bn6paun H Bpemehm NCNoJIb3OBAHn (peKOMeHdyembl B DeHb MaKCMym BpemEH np60tb C MaUNHO). HE PEPBblAHTE mKcImaJIbHO dOncyCTMmoe Bpemr IcNoJIb3OBAHn.
Cn3 (CpeDCTBa nepcoHaIbHoi 3auNTbI)
Pnncno3obAHmno 60pyOBAMHn Heo6xOIMO Haede TB COOTBeCTByUOme BnBb Cn3, TaKne KaK 3aunTHbIe OOKN, NepaATKn, 3auNTbIe HayuHmN, nBtEbyMACKy n oSyBb Co tAInhBMn BCaTBkAMn. CJeNyET Hocntb OdeJy, KOtopa NOxOHT TnT ToT paBoTbI, KOTopyHO BblBOINHReTe. NoDBXKeT DmHHbIe BOIOcbi nCHMNTE KakyHO-Jinbo 6xKyTePHIO, KOtopa MOKeT NONaCTb Mekdy NODbHXHbIMN YactMaMH MaUNHbI.
NbInb
Ppoecc ytpamboKn HIOnda npnBOoNT K nbIneO6pa3OBaHNO, KOtOpoe MOKET NOBpeDnTB BaueMy 3dopobbIO. BceJa hAedeBaTe macky, kOTopaa IPOxODT dIg TnPa BO3NKAHOSe IblIN.
TOnnNo
He ItoaTe TOnJIbNO Hn BbIXaIe erO hcnapeHn, n36eraiTe nprrMO KOHTAKTa TOnJIbNA C KOKe. HeMeJeHHo CMbIAaTE BCE 6pI3rN TOJIbNA. EcNI ToTINBO nonaTe Bam B rna3a, npomoe INx BoJbWMKONUeCTBOM BObl N KaK MoXHO CKopee ObaPITecb 3a Bpaue6Hoi NOMOIOHO.
BbIXlonHbIe ra3bl

BHIMAHNE
BbIXnonHbIe ra3bl, npOn3BOIMMbIe daHHbIM o6OpydoBaHnEM, ouehydoBtBu MOryt yOHTb!
He noIb3yItebc Bn6pOITOn BHyTpN NOMeHn HnB 3akpytOM nOMEeHN, Bcerda CneDyET yBeINTBcR B TOM, YTO 30Ha pa6oTbI DOCTaTOHO xopoio npOBeTPBAeTc.
KoHTpoJIb nepeI 3aynyckOM

Ocmotp nepea 3anyckom
HnkeNyOuOcMOTp dOnJKeH BInONHbTcR nepe HauanOM kKdOro pa6oery cKnA, nIIN oocne kKaJbIX yeTbIeX acOB pa60tB, B 3aBNCIMoCT OTO TTO YTO HAcTyNIT NepBbIM. IJIaTeaIbHorO onncAHnOcbPntecb, noKaNyIcTa, Ka p4aDeny «TexobCnyKINBAHHe». B cNpyae, ecnn 6yET ObHApUKeH KAcO-Ni6o C6oB, Bn6pOonHTo HEnb3a NoIb30BaTcBdoNoNHOrO yCTpaHEnH HeNoJaKN.
- TuaTeIbHO OcMOrTpIe Nb6pONHITy Hn PnpDMET NOBpeXJdHm. PpoBePbTe, YTo6bI Bce KOMNoHEHTbI PnCytCTBOBAnHa CBoNX MecTax B COoTBETCyBIOuNIOJKeHmN. OObeHHeOE BHNMaHne 0bpaTIne Ha To, YTo6bI MeKdy DnBAtenem N 6KnOKom Bn6paTopa 6bln UctahOBJeHn PpeOxPAHnTEbHbN IuNTok pEmH.
- PpOBeBpTe yPoBeHb MacnBa B DnRaTeNe n npn Heo6xOaMOnCTn DoJeTe.
- PpOBeBpTe yPOBeHb TOnnBa n npn Heo6xOaMocTn DoneTte.
- PpOBePbTe BO3MOXHbIe yTeUKN ToJIINBa mACJa.
B cnoe noybl, kotopb pa3pbxnnn nn 3aHO BO 3aONHnn, dyb TO cyrrnHOK nIu chepHO3em, OCTaOTc npCTObl nny3bpN BO3dyxa, KOtOpble, ecn nx He ytpam6oBaTb, mory npNBectn K OJHO nn CELOMpy np6JeM.
- EcnHa He UtpamboBHOH NoBepxHOCTn POnCxoNT DnHexHe TpaHCnOPTa, To MaTePnaI NOBepraeTcHarpy3Ke. IIO MepeTOrO, KaK MaTePnaI 3anONHRe TMeHOUncEGRyCTOTbI, 3TO pNBOHT K nPoCeDAHNO NOBepxHOCTN.
- IIOO6HABBEUbIPOINCXODHTB CNYuAe CTATNUHOH HArpy3KN Ha He yTpam6oBaHHyIO NOBepxHocTb. TReXecTb (HaPnMep, 3aHne) npOBaJIbNAETcKBO3b 3EMNIO.
- MaTePnAJIb, coDepKauIe ncyToIb, 6Oone BOCnpmMnBbI K Bo3JeNCTBIO BOIbI, YTO npNBODIT K 3pO3Hn NOyBbI. CkONJIeHn BOIb MOrY npNBecTn K pa3pbIBy NOBbI BO BpeMg 3amOp03KOB, a TAKKe K ee CxATnIO BO BpeMg 3acyXn. Pa3pbIB N CxATne RABJHOTCR OCHOBHbIMn PnUHAMn NOBpeXdEHN IyHdAMEHTOB 3daHn I O6bUHO PPnBOaRT K TOMy, YTO 3daHne HxKDaETCB INoCTPOKe DOnONHHTeNbBIX CBaI.
Utpam6obbBAHnne npBODNT k yIIOHTHeHHo MaTePnaJa n Tem camblcno6ctByeT poCTy erO rpy3oOnDbemHO. OHO yMeHbwaet KOINueCtBO BO3dyuHbIX ny3bpei N Tem camblm yMeHbwaet CTeneHb onaCHOCTN pOceDaHn, paCUnpeHn nn CkataN 13-3a CKONJIeHN BODbl.

XapakTepnctnka yTpam6OBbBaHnra
Дя Вьясеняхаркетергдутамбовьанндя ра3лчьхцелвпpoшлOM ynotpe6льсьрaklnHbI MeToDbl.ФakTopamKOTopbIe CneyetyuHTbBaTb,ЯBnIOTcCBOICTBa MaTePnana,TOnUHa CNoR,CyueCTByIOaJHarpy3ka,yPOBeHbВ6paunN KONlueCTBO paOchux uKnIOB ytpam60bBAHnH.BoJeE rTy6OKoe NOHMaHNe pInHUNOB DeIcTBnYtpam60bBAHnH npBEno K co3dAnHO HbIX Tpe6oBaHnB Obnactu Ytpam60bBAHnH.HanboJee CObpemeHHbIM Tpe6oBaHmE RaJIureTc N3daHbIN B BeNKo6pntAHn AKT no CTponTeNbCTBy HObIX DoPOR n yUInC (NRSWA).Ha cerOndHnI DeHb DnI ObeCneHnXopoWero KaecTBA BCEX BNOD yTPam60BKN 3TN Tpe6oBaHnBBINOHNHYOTcSTPOITbHbIM CNEuaJIncTaMNI NOBCEMeCTHO.
NRSWA (no cneuФнкaи HAUC - KomTeTa no ynpaJIeHIO npemOHTy wocceHbIX dopor).
CneuKnKaun 6bIa coCTaBHeHa KOMTeTOM HAUC (KoMTET no npabHeHIO npemOHTy wocceHbIX dopor).
Akr no cTpoNTbCTBy HObIX DOpor n yuNc ot 1991 rda ycTaHOBNI HOBII cTaNapTbI dner pemOnTa N BOCCTaHOBJIeHn I DOpor B BeINKOBpntAHm. OH OXBtIbAet BONPOCbl npIMHeMbx MATEPnaIOB, MeTOOB pa60tbl, o6OpyoBaHnra, a TAKKe npOBeMbI 63onacHocn npn BInONHeHn BOcCTaHOBITbHbIX pa60tHa npoe3kX dpORax n TpoTyapax dner neWexOIOB.
UeBbAkTa aBnraTcB oecneHHe BblnoHHeHnpeMOHTbix IN BOCCTaHOBtBbIX DOpOR NO 6Oone BBICOKM CTaHapTAM, B pe3yIbTaTe Yero OHn CMORY TnpoepKaTcB CByIOBNE TBOPuTEbHom COCTOHN B TeueHne 6Oone DInTeNBO Hor OpeMeHn. B CBOIO OepeDb 3TO npBODNT K CHXKeHnIO 3aTpAT Ha pEOHTbIe paBoTI N NoHnKaET 3aepKKn TpaHCnOPTa N3-3a npobok Ha doporax.
B 3aBnMocTn OT XapaKTePncTnK,ДЯ Bn6ponnt ImeIOTc Dbe KateropnN.
- OTo 1400 do 1800 Kr/M 2. CbIe 1800 Kr/M
3TNuOphpbl OTHOCrTcK CnIe CTaTnueCKOro DaBHeHry, OKa3bIBaEMOro MaunHOH Ha NOBepxHOCTb.
PIMMEAHNE: Hn Onda TAnapTna OndocToPOHHB Bn6pOJIHTa He OTBeaet 3TN M Tpe6oBAHm. IIn npOBeHn pa60t Ha WosceHOn dopore BCerda CneDyert pImeHrB Bu6pOJIHTa C «DbOHn CINONJ.
DBOHHA CUNA
BenIpyn 3yHna daHHb AKT n pa3pa6oTajn 3anateHTOBana o6opydOBAHne, KOtOpoe I03BOJrE TNOprAnKam COOTBETCTBOBaTb npBedeHHbIM B AKTe Tpe6oBaHnM.
Iopabnam NRSWA tpe6yetca, yto6bIo o6opyoBaHne IyTpaM6OBBaHncoOTBcTcBOBaJIO MNHMmaNbHbIM Tpe6oBaHnA.
Pnno6peTae Bn6ponnIy C «DboHOn CnIO» OT BenB rpy Bbl cpa3y Jx e OTBeHaTe Tpe6oBaHnM 3Toi AKTa.
IITTOY06bI COOTBETCTBOBaTcNEUΦNkaCmN COXpAHTb DOyck B NOyBe, NIOCKne PNTbC «ДВOHOH CnO» OT BEnb Ipyn DeJIaTc Ha DBe 30Hb OXBaTa yAcTka paOToBt, KaKDaI N3 KOTOpBX npeDyCMtpNBaET DBe CTaDN YTpAM6OBBaHn.

CTaIy 1. BcI IIOUaIb pa6Oey IIITbI yTpaM6OBbIaET MaTePnA IIOIo6HO CTaHapTHoM MaUNHe.
CTaH2. OCHOBAHne npnnoDHnmaetcB nnoXeHne «DboHOcNbI» INa TORO, YTObYBEINHTb CIny UTPaMBoBaHna CTaHdapTHoH nnTb B 3-4 pa3a.
Bo3MOxHocTn npImeHHeHna
CnocobipnpmeHHeMaTePnaJIbI DeJATcHa Tpu KaterOpnn:
- KneiKne MaTePnaJIbI (Mehee 20% rpaHynipOBaHHOCTn), TAKNE KAK IINHa, INNCTbIE N TAAKeJIbIE rpyHTbl.
- rpaHynipobAHbIe MaTePnAbl (60Jee 20% rpaHynipobAHocTn), TaKne KaK cKaJIncTbe YuaCTKn, neCauhble n IerKne noyBbl.
- Bntymhble matepnaIb, taKne kaacphiabT (JeTe6eToH), xonodhbie nponeXn (npodykTbI bHTymHO 3mylbcn).
Tabnua noka3bIaBcT cneuФkaUHAC dnnr rnybHb cnoN KOnueCTBa pa6OuNX uKKnOB ytpam60bHaBHn NnTOc CBOHO B TOM cnYyae,ecnnncnNoB3yeTcStAHdAPTHa MaUNHa,HeBO3MOxHO rapaHTnpoBaT bONmAlNbHOrO ytpam60bHaBHn;TEM He MeHee, 3a CHT yMeHbWeHnra rnybHb cnoN yBeJIuueHn KOnueCTBa pa6OuNX uKKnOB ytpam60bHaBHn pe3yJbTaTb MOrYT 6bITb yNyUWeHb.
KpHTuueckm fakTopom dIy 30fekTnBHOCTn ytpAM6OBbAHnRA BnIeTcRy pOBeHb BnAaXHOCTN KJIeKINx IraPahynipoBaHHbIX MaTepeNaIOB. EcnI rpaHyIpoBAHHbM aTepeNaI cNIuKOM cyXo, To OH bYdET oBTEKaTB yTpAM6BOUHy IO NITy BMeTO TORO, YTO6bl yTpAM6OBbBATcRc. EcIn Jx CoDEPKAHne BnIaRn B MaTepeNaIe CNIuKOM BbICOKOE, To NocNe yTpAM6OBbBAHnRr OH MOKeT NOCDOXHYb, nocLe Yero O6pa3yETcRA BJIeHHe ycUKN/cKIMMaHnR.
| 1400 - 1800 kg/m2 | KOJIENCHETBO HEOBXOДIMbIX PABOQUH X CIIKЛOB YTPAMБОВьIBAHЯ ПРИ YTPAMБОВьIBAHМСЛОТOLIП"HОД | ||||
| 40mm 60m | m 80mm 100mm | 150mm | |||
| Кleinecke MaTEPиалы** 2** 4** | 5** 6** | Следует умени в тол�性у Сл氧 | |||
| Граун�рованные maTePиалы* | 2* | 3* | 4* | 5 | 9 |
| БИтUMные MaTEPиалы | 6 | 10 | 12 | zmniejsz grubość warstwy | |
* O6bIuHO BXoJrT B CoCTaB 100-MM MNHmAlNbHorO CIOJ, B npOTnBHOM Cnyae NOpO6Ho ONuCAHO BAUC.
** Φизческаяnpiroda KneiKnx MaTePnaJIOB 3aTpYdHЯe T ytpam6ObIbAHne. ONTMaJIbHOe ytpam6ObIbAHne He rapaHTnpyETcN He peKoMeHnyETcCo cTOpOnbI HAUC.
PpoeDypa no 3anucky n octahOBke


BHIMAHNE
HeBepHoe BbIOnJIeHHepe pMoHTbIX pa6oT moKet 6bITb onaChbIM. IpeXeJe cHem npBOOHTb KaKne-JIb60 peMOHTbIe pa6oTb IIN BbIOnJIrTaB TexO6cIyJxuBaHne Bbl OJIKHbI IPOCHITATb IN IOHrT daHHbI pa3dEi.
BnraTeIbXoHdbI GX120 nJINGX160
- OtkpoTe TOnJIbHbI KpaH, NOBepHyB pbHaJcK ToTnINBHorO KpaHa Do ynpa BnpaBO.
- B cnyuae, ecn Bbl 3anyckaete XOLOHbI DBrarateNb, BKIOHTe NOcOC, nepeBeda pbyaKok noDCocA do ynopa BneBO. Pn 3anycke TEnIoro DBrarateNb noDCoc 6blyHHe Tpe6yETc, HO ecJIM MOTOp ycNeI 3NaHTeNbHO OCTbITb, TO MOxET notpe6oBaTbcra cactnuHoe ynotpe6JeHne noDCocA.
- IpebeDte BbIKIOuATEJb MOTopa NO YACOBN CTpeJIke B NNOXKeHne "I".
- IpeBene DpocceIb NIOJoxeHne XOIOCToro XOa, nepeBHyB ero Do ynpa Bnpabo.He 3anyckaTe DBnIaTeIb npn OTkpblTom Ha noJIHyB eINuHny DPOCCeIe, TAK KAK B 3TOM Cnyae Bn6ponlnta HauHET Bn6pnpoBaTb cpa3y nocne BKNHOeHn IbnarTeIb.
- Kpenko yxbatnbucb 3a pykortky npablenno Ondno pykO, dpyoR pykO BO3bMntecb 3a pykortky cTapeA. TAnHe CTapTeP Do Tex nOp, NOKa He NOyBCTByeTE COpOTNBneHne DnurateNb, 3aTeM OTnyCTne CTapTeP.
- Octopoxkho, Yo6bI nonHOCTbIO He BbIDepHyTb BepeBky CTapTepa, pe3KO IepHnTe 3a pyKoRrKy CTapTepa.
- NOBTOPRAIte Do Tex nop, noka DnuratEnb He 3aBeTeTcA.
- KaK TOnbKO MOTOp 3apa60TaET, BByKInOuHTe NODCOC NepeBEdr pbHaxKo NOcOCA Do ynpaBnpaBO.
- B cnyuae, ecn nocne HeckonbKnx nonbITOK DBrIaTeJIb TAK N He 3aBeJIcR, o6paTNTecb K pa3dEny «CobetbHa cIyauB O3MOxHbIX HenoJaIOK» Ha cTp.13.
10.ДяTORO yTO6bl OCTAHOBNT BnIaTeNb, nepeBeIte npocCenB nnoJoxeHne xonoctoro XoJa, noCne Yero nepeBeIte BbIKIOuAteNb MOTOpA B noJoxeHne "0" BpaUaer o npOTNB uacBOB CTpeIKN. 3akpoTe TOnnBHyk KpaH.
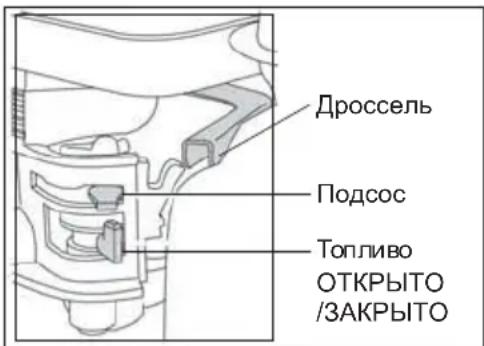
N3eBbIyDnBnateB Xau 1B20-7 (noxaynta, opaTneCb K ONuCAHIO camoro DnBnateB, yTo6bl yToCHNT Bce noDpo6HOCT)
- OTKpoTe TOnJIINBHyI KpaH NOBepHyB pbUaXOK TOnJIINBHorO KpaHa Do yNopa BnpaBO.
- IpeBnIbTe pIuXoK KOHTpOJIckOpOCTI B NOnIOKeHne «CTapT» (“start").
- Tbepo yxbatnbwncb 3a pykoTky npabneHn oHOy pyko, dpyro pyko Bo3bMntecb 3a pykoTky cTapepa. TaHnte cTape do tex nop, noka He noCyBCTByeTe conpOuBHeHne DBrIaTeB, 3aTeM OTNyCTte CTapep.
- Octopokno, Yo6bl NIOHocTbO He BbIePhyTB BepeBky CTapTepa, pe3KO depHnTe 3a pyKoRTky CTapTepa oBeuMn pyKaMn.
- NOBTOPRnTe 3Ty npoueDpy Do Tex nop, noka Dnuratelb He 3aBeTeTcra.
-
B cnyuae, ecn nocne HeckonbKnx nonbITOK DBrIaTeJIb TAK I He 3aBeJIcra, o6paTNTecb K pa3dEny «CobetbHa cnyaB BO3MOxHbIX HenoJADOK».
7.ДЯTORO,уTObI OCTaHOBITb DBIRATEJIb,NepeBEdNTe DpocceJIb B NOJoxKeHne XONOCTOXODa,NoCte Yero HAXMnTe u ydepKINBaIte HaKaToI KpaChyIO KHOJky OCTaHOBKn Do Tex NOp,POKA DBIRATEJIb He nepeCTaHET pa60TaTb. -
NepemeseHne Bn6ponntbK MeCTy npOBeHeHna pa60T.
PnncnoB30BaHnn CbemHO TpaHcnpTHoro npncocobne HnpeMeueHn B6ponntb, cneyet HaKNOHTB B6ponntb Vbpeed TaK, YTo6bl Koneca TpaHCnOpTepa OToBaNtcb ot 3emn. YTo6bl OTcoeHNHb Pamy TpaHCnOpTepa ot B6ponntb, ee cJeYEt BItryHb Ha3ad n pa3BepyHb HaNCOKCk. Pamy TpaHCnOpTepa cJeYET NmecCTNb B KaKoe-JIb6 Be3onacHoe MeTo DO cJeNyUro p3a, Korda OHa BBOB NotpeSyet. Jn MaunH, OChaeeHHbIX «IOCTOAHbIM» TpaHCnOpTHbM npncocobneHnE MauHHy cJeYEt HaKNOHTB Bpeed, BbITryHb TpaHCnOpTep Ha3ad n BBepx, a 3aTeM ONyCTNb MaunHy H Na I 3aueKHyTb TpaHCnOpTEB NOJKeHm «IOdHrTO”.
B Tex cnuyax, korga nnepeMeueHn Bn6ponlntbI Heo6xOaHMo IcnoIb30BaTb NObemHOe OobpyoBaHne, erocneJeT nCNOIb3OBaTc yYeToM TOrO, YTOIO6HOe NOIbEmHOe OobpyoBaHne IOJXHO 6ONaTaTB DoCTaTOHOn dNBA BeCA Bn6ponlntbMOuHOCtBu paOohey Harpy3Kn (CM. TaBNIcy XapakTePncTnK Ha cTp. 6, a TaKke TaBNIyK cy C cepINHbIM HomepOM MaunHbI). POnBOIDte Heo6xOaHMBie ue nn nn 3axmbl TOJIbKO K noDBeMHOMy y3ny, pacNoIoxKeHHbIM Ha BepxHe yactn Bn6ponlntbI.
B cnyuae, ecn Bn6ponnnta o6opydoBaHa cncTeMoN paCbJIeHn BObl, KOtopa Tpe6yeTc dIra BblOnHeHn DaHHbx pa60T, y6eHTecb B TOM, YTO Klnanah DnBblNycka BObl 3akpblT, a 3aTEM 3anoHnTE BOrHyO EMKoCTb uHCTO BDOI.
Iocne toro, kak Bbl npobenBce npobepkn, kotopbte onncaHb B pa3dene «Ipeed 3anyckom», Bbl moKeTe 3anyctntb MaunHy. Bce moDenBn6pOHTBbIpycnPCX cna6xeHbI cHeTpnpxHbIM cCenPneHemK, KOTOpoe n03BOJrAeMaunHe pa6oTaTb h xonocToM xOy b6 HeNocpeDCTBeHHoro nepeDbNxKHeN Bn6pOHTbI. Io Mepe yBENuHHe O6oPtoB DBiratEe, cUePnHeNe HauHet pa6oTaTb N 3aJeCTBye Tn6paTop. DnI npabunbHoi pa6oTb CneDuYt NcNoJIb3OBaTb MaKcImaJIbHbe ObopOToB DnIRaTeIa.
- IpepebeintepoccehHa MaKcHymm HcNoIb3yte pykoTky npabneHn dIy npabneHn pa3Bopota B6ponntbl. B6paTop He tonbKO coo6aet B6paCIOHOHe DnIXeHHe pa6Oe IITe, Ho n pInBOiNT K ee nepMeueHIO Bpeed. Bo Bpem O6bUHO pa60tBAM He cNeDuET NoTaKnBaTb B6ponlnty, a CNeDuET DaTb EMy BO3MOXHOCTb DBnraTbcra cero co6CTBeHHO CKOpocTbIO.
Ckopoocb I BnHexHn 6yJeT OnpeIenrTa CcOCToHHeM yTpAm6oBbAemOn NobepxHocTN.
Ecn ytpamboBbIaemnOBepxHocTb HaxoITcHaCKIOHe,TO npuynpaBneHNn HnpaBneHEm DnXeHn B6pnNTbl Tpe6yETc 60bnJaa OCTopoxHocTb. Pn Heo6xOIMOCtN 3akpeNTe Ha HNXHe YacTN B6pnNTbl NDOxOJaU BopeBky dIra TORO,yTObI NOMOHHK MOYdEpxBaTb Yactb BeCa B6pnNTbl.Pa6oTaIe BBepxNBn3 NO cKnHy,HO He nonepeK erO.
- 06pa6aBbAte NOBepxHocTb B6bpONnToI nnAHomepHo Do Tex nop, noka He 6yTe DOCTnHyTa Tpe6yMaJ CTeNEh yTpAm6OBKN. B Tex MeCTax, Iqe Tpe6yEtCra YTpAm6oBaTb HeckOJIbKO CNoE, HAKNaIbIbAembIX Dpyr Ha Dpyra, CNeDyeT YTpAm6oBBaTb KaKdBi CNOB B OTDeJIbHocTn.
- TTO, TObIOCTaHOBbT Bn6paNIO MaunHbI, nepeBeDInTe DpocceJIb Ha XoIOCTOxOJ.

CobetbHa cnyaB03MOxHbIX HEnoJaOK
3-nouta: Warranty@belle-group.co.uk
B nncbmeHHOM Bnde:
Belle Group Warranty Department
Sheen, Nr. Buxton
Derbyshire
SK170EU
England
Tehnilised andmed. 162
Kleepsud 163
Uldohutusnouded 164
Altrad Belle Warranty Department,
Sheen, Nr. Buxton
Derbyshire
SK170EU
England
E-pastes: Warranty@belle-group.co.uk
Rakstiski
Altrad Belle Warranty Department, Sheen,Nr.Buxton
Derbyshire SK17 0EU
England
el. pastas: Warranty@belle-group.co.uk
Rasykite:
Altrad Belle Warranty Department,
Sheen, Nr. Buxton
Derbyshire
SK17 0EU
England.
Kak da n3noJ3BaMe TOBa pIbKOBOdCTBO
ToBa e pBkoBOCTBO 3a 6e3oNaCHA ekCnnoatau n cepBn3 Ha PCX.
PbKOBOCTBOTO e npedHa3HaueHO 3a TbproBuTe n onepatopute Ha PCX.
PpeiroBop
Pa3dJIbT OknHa cpeda'daBa HNCTpyKuH 3a peUKNIPAHeTo Ha MaUNHaTa No 6eONaceH 3a OKoHNHaTa CpeDa HAINH.
B pa3dena 'OnucHue Ha MauuHama' ca 36poeHN OCHOBHnTe YACTN KOHTPOJHn EJEMeHTn Ha MaunHaTa.
Pa3dIeNTe 'O6ua 6e3onacnocm' n 'Be3onacHu u 3dpaeocnoeHu ycnoeua Ha mpyo'daBAt HcTpyKuMn 3a 6e3onacHa ekCnnoatauHa MaunHata.
'nyck u Cnupahe'BN NOMarat npn NyckaHTo n CNpaHTo Ha MaunHaT.
Pa3dnt 'OmcpaHraeHa Ha Heu3npaHocmu' e pbKOBOcTBO 3a n3nupBaHe n OTCpHaRaHe Ha npo6JIemC MaunHaTa.
B 'Cepeu3'ca ONIcAHN OCHOBHnTe npHnIN Ha cepBn3 nOndpBkKa Ha MaunHaTa.
PaenbT 'Fapauu' onncBa nokpntneTo Ha rapaunra T npoueDypataHa peKlaMaun.
Pa3dntB'Beouha cuna'OnNCBa BnDObete yIbTHHTENH pa60T, KOITOMaHHaTa MOKe da N3BpWA.
CE Cepmuqukam' OINCbA cTaNdapTnTe, no KOnTo e KOHCTpynPaHa MaunHaTa.
3Haun 3a BHMaHHe
TeKCT,Ha KoiTo Tp6Ba Da ce obpHne CneuHaHO BHIMAHHe e OTBeJ3aH CbC bOTBeTeH 3HaK:

BHIMAHNE
IpoNyKtB e n3noKeH ha puck. Ima BepoarTHocMaunHaTa nn Bue da 6bJe/Te/ nobpeeHn/HapaHeHn/ aKO He ce cna3Ba CTPNKTHO pkoBOcTBOTO

PpeynpeXeHne
XINBOTbT Ha onepaTopa Ha MaunHata e n3IOKeH ha pNcK.
BHIMMAHNE


PpeynpeKdHne
Ipei Da 3anoyheTe ekcnloataunn no o6cnykBaHe Ha Ta3n MaunHa IPOCHETETe PA3yHTE TOBa pkoBOdCTBO.
TPR6I
HAYETE Da n3non3BaTe npabuHNO KOHTpOJIHnTe ypeDn Ha MaUHnHaTa n npabunata 3a 6e3oNaCHO TexHuecko o6cIyKbaHe.
(3a6eKKa: Haye Ce npBdo da n3KnHbATE MaunHata, ppe Da Ra BkHOnTe, B cnyaay He B3HnKHe HkaKaBB npo6neM.)
BNHAGHOCTeIINIIN3NOJ3BaIteNIOXOJAeKINIPOBKa INcpeDCTBa 3aIINHa 3aUHTa N6e3oNaCHOCT.
BbP0Cn 3a 6e3oNaChata ekcnloatauia nI INTexHuecko o6cnykBaHe Ha To3n ype, MoKeTe da OTnpaBte KbM CBOA INHXEHP IIO TEXHnKATA HA BE3OInACHOCT IIN HA TEJI: BELLE GROUP (UK): +44 (0) 1298 84606.
CbDbpxaHne

Kak da n3no3BaMe TOBa pBkoBOdCTBO. 193
PpeDynpexkndnne. 193
Oncanhe Ha Maunnata 194
OkoJha cpea 194
Texnueckn daHNI 195
3naui 196
O6ua 6e3oNaChocT 197
Bezonachn i 3dpabocnoBN yCIOBna Ha Tpyd. 197
IpeDnyckoBa KOHTpOHa npOBepKa 197
Ppuchn 3a ynpbTHraBaHe 198
CneuФнkaun 3a yIbTHnTeHn pa6oTn. 198
Прилaxesня 199
Pysck n cnpahe 199
EkcpnoataaHaMaunHata 200
OToTpaHraBaHe Ha Heu3npaBHOCTn 200
CepBn3 201
Hctpyku 3a MoHTax 202
MOnTHIpaHEna donbJIHHTeHHu yCTpoIcTBA 202
TapaHua 203
Ceptnuikat 3a 'DboHa cna/HAUC/NRSWA 203
Deknapaia 3a CbotBcTCTBne 4
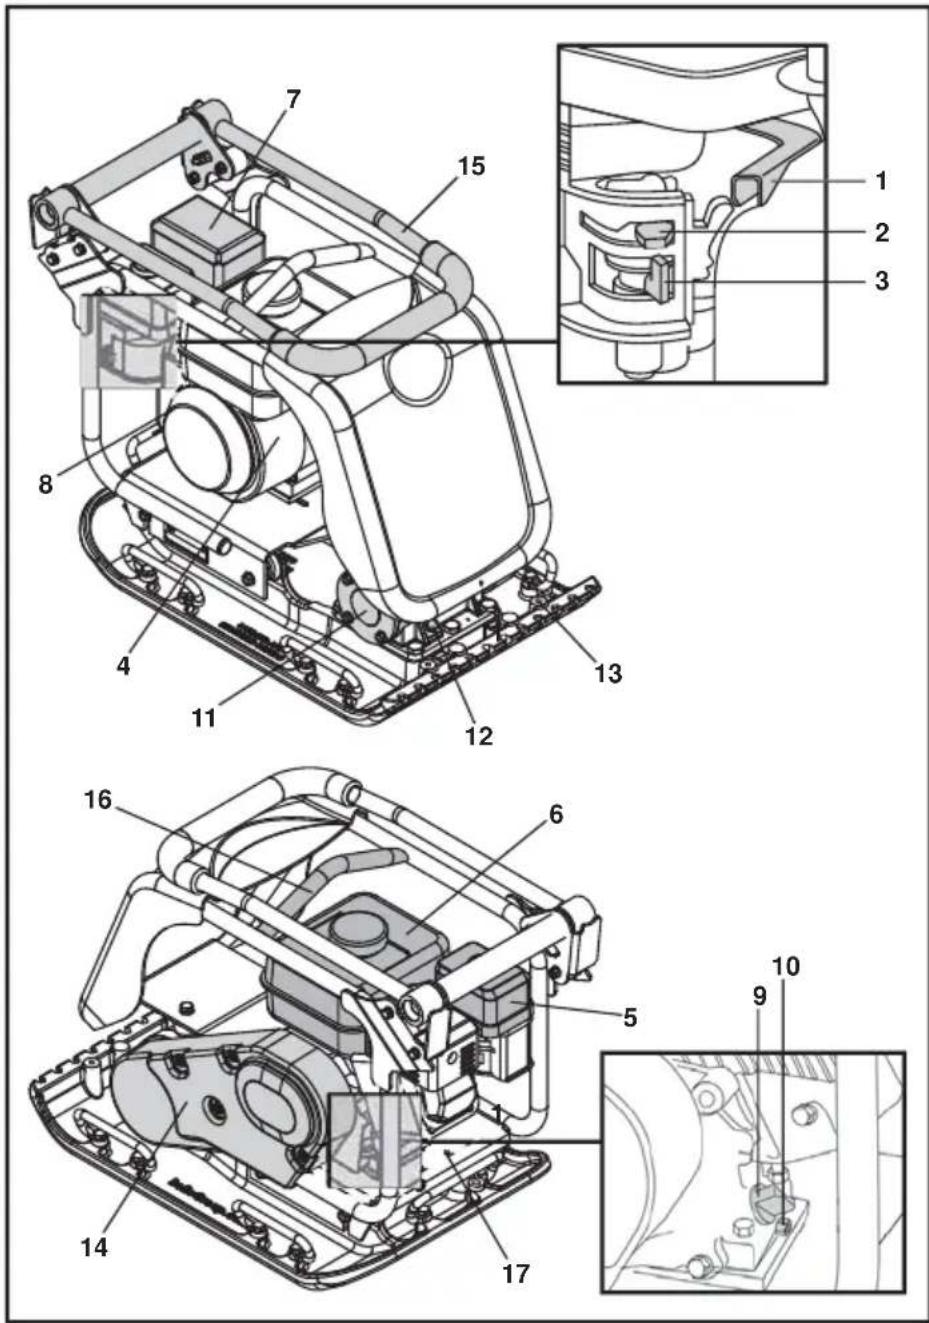
- Ioc3a ckopocTta (obopOTnte) Ha MOTopa
2.ДрocenHaKnana/cMyka/ - Ioc7a nodaBaHe/cnnpaHe Ha roPbBO
- Knou 3a BKNIOUBAHe/N3KIOUBAHe Ha MOTopa
- KoxyHaBb3dyuHHnФnTbp
- Pe3epBoap 3a ropuBO
7.ИЗховдзаитropени ra30BE - PbkoxBatKa Ha pBCHnCTapTeP
- OTBOP 3a ПьнHe He C MacNo / ИМЕВATEI HA HINBOTO
- Побka 3a ИЗTOUBAHe Ha MacNo OT MOToPA
11.Bu6paCIOHEn eJIeMeHT
12.Измервateн Ha HNBOTo Ha MacNo BbB Bu6paUOHHn eIeMeHT - Мясту за моHTиране на ддьнгелпсустpoiCTBa
- Koxyx 3a 3auNTHO orpaxdahe Ha peMbUHaTnpeDaBka
15.Дрьжka 3a HanpaBneHne Ha MaunHaTa
16.Mrto3a noBnrahe
17.МЯСТо 3a MOHTIpaHHe HTOBapONoDEMHO O6OpyDbaHc
3a6eKka:YeTeKaCe 6a3npaHa cepnn151,Cha6deHn C MOTop HONDA GX160.3a Hatz 1B20-7 BxkTe DOKyMeHTaunrTa Ha npoun3BOUnteJr.

Peuzknpahe

Ihctpykun 3a ONa3BaHe Ha OKoHaTa CpeJa.
HrKoNOTyactnteHaMaunHata caOTueHHn MaTePnAn.
Pa3rno6eHnTe yactn n akcecoapn ce peuiknnpaT.
OkoJHa cpea
BnHa n npOBepBaIte cbCToHHeTo n CnHyPbOCTTa Ha 3aUHTHe EMeHTu DaJIH HAKON OT TReX He JIMNCBAt NIN He Ca NOBpeHn. HE ION3BAIITe MaunHata, DOkaTo He 3aMeHnTe NnonpaBtE 3aUHTHe EMeHTn.
HE PABOTETE c Ta3n MaunHa, aKc t6oHn, n3mOpEn uJN NOB BnAHyHe Ha aJkoXon uJN HapKOTu.
Be3onacHocT Ha ropuBoto

BHHMAHNE
TognBTo e necho 3anaHMo. MoKe da npedn3BnKa hapaHbHaNn nn mMyeCTBeHn 3raceTe MOTopa,OTcTaPHeTE BCNUK NOKPNTN PnAmbucn He nyuTe DOkato TbJHnTe pe3epBoapa. BnHarn 3abpcBaIte paJnIoTO ce rOpBO.
- Ppei Da npe3apeDnte, n3KIOUcTe MoTopa I rO ocTabeTe da n3CTnHe.
- Pn npe3apekxdane HE NUYETE n He na3eTe 3oHaT o OTKpnt nnambK.
Pa3nTToTo ropBb Tp6Ba He3a6BaHbNo da ce oBe3oNac c nacbk. Ako pa3neTe roPbno no dpexnte cn, Tp6Ba Da tr CmehnTe.
CbXpaHbAaTe rOpNBOTo B nOxOa3a ceTaN KOHTeHep daNeU OT OKpNT PnAmbK N 3aNaJIteHN H3TOHn.
Be3onacn n 3dpabocnoBnu cNoBna Ha Tpyd

Bn6paun
YactnHa Bn6paunr O T paBoTeaTa MaunHa MoKe da Ce npEnce Ype3 dpBkKa Ta do pbute Ha onepatopc. PCX Ha Belle Group ca cneuHa KOHCTpyuPAnHa da HamaT Bn6paunTe, KOInTO DoCTnRAT do pbute. Hbata Ha Bn6paunr NpEnOpBHTeHTo BPeme Ha paBota C MaunHATA ca nocouEH B CneuΦkaunTe I TexHuecknte daHH. HE HAIBNIAABAYTE MaKcImaHIO donyctmoto BpeMe 3a paBota C MaunHATA.
JnUHa 3aunTHa eKnnpOBka
Pp npabota c Maunnata Hocete JmuaH3aunTHa eKnnnpOBka: 3aunTHn ouHa, pbkabu, tanu 3a yu, 3aunTHa macka n obyBkncbCCTOMaHeNo NOKPTne Ha npctnte. Hocete noxOrao 3a paobotata BN oBneKnIO. BpXeTe nbIgata Koca h3ad n CBanTe 6NxyTata, KOITMOrAT da ce 3aKaayat 3a NOBnKHTte Yactn Ha MaunnHata.
Ppax
PnpnoceHa ynTbTHraBe MoKe Da Ce BnHrpe npax, KOTo MoKe da e Onaceh 3a 3paBeto.
BnHaHn Hocete 3aunTHa macka, kOTo Da BN 3auNTaba O npaxa.
TopNo
PanaTe ce ot norIbUaHe Ha rOpNBo I OT BnIbBaHe Ha napi ot rOpNBOu N36raBaiTe KOHTaKT Ha rOpNBOc KoxKaTa. Ppbcknte ot rOpNBO no KoxKaTa Tpr6Ba He3a6abHo da ce OTMnT. Ako B OunTe BN nonaIHe rOpNBo, 3MMte obUNHO C BOda I NOtbpcTe Jnekapcka nOMOu.
I3ropenra3OBe

BHHMAHNE
I3ropennte raOBe OT MaunHata ca CnHTo TKCuHN MoRat Da npuHHT cmbPT!
He pa6oTe c PCX B 3akpntu nomeueHn uI TeCHn npocTpaHCTBa, yBepeTe ce, ye pa6oTHoTo macto e do6pe BeHTnIpaHo.
IpeDnysKOBa KOHTpOJHa npOBepka

PpeynckOB KOHTPOJ
Ipei Da 3anoyhe Ta6oTa Hn Ha BceK Yetnpu Yaca Ecknnoataa Tp8Ba Da n3BbpuHte CneHn npednyckOB KOHTpO. 3a IIO-noPob6Ha HfOpMaunCe o6bPHeTe KbM pa3deNa 3a cepBn3Ho obcnykBaHe. B cnyaHa nobpeDa He pa6oTe c PCX npedn da OCTpaHIne.
- BHIMATEHNO orIeJaTe PCX 3a npnHaun Ha nobpeJa. IpOBepe TaIN BCNUK KOMNHOHTn Ca Ha MRCTo n Ca B N3npabHOCT. O6bpHeTe CneuaHNO BHIMAHHe Na Koxyxa 3a 3auNTHO orpaxdaHe Ha pembHaTa npedAbka.
- PpOBepeTe HbTO Ha MacNo B MOTopa N XnIpaBnHTo MaCNo I DoNtJIHeTe, aKe e Heo6xOaMo.
- IpoBepTe HNBOTo Ha rOpNBo I dOnbJnHeTe pe3epBoapa, aKo e Heo6xoDIMO.
- PpOBepeTe daHn Hma n3TuHaHe Ha rOpINBO, MaCNo nn Xn DpaBnHcMo CnIO.
Mekdy hacnnaHata npbct nnn HOBn IbIhEx, epa 6aIactpa nn 6ntymHO3Ha nbTHa HAcTNka OCTabat MaKN Bb3dyuHN Jko6OBe, KOtO, aKo He ce yIbTHaT, Moar Da npuHHT N3BecTHn npo6nEM.
- TpaΦnKbT no HeynIbTHeHa 3oHa, KOMnPecnpa MaTePnAna. ToBa Boi N Do nponaAaHe Ha rOpHna Cnoi Korato MaTePnAna 3aIbJIbA npa3HHNHTe.
- IopO6Ha e cIyuaunraTa npi CStaTnH0 HaTobapBaHe no HeKOMnpecnpaHa nobbpxHOCT. TobapbT (HanpIMep crpa) nponaJa.
- HeKOMnpespaHnTe MaepnAn npocMkyBAT NOeue B0da, KoETo BOJ Do epo3na. IpoHNKBaHeTo Ha B0da MoKe da Hakapa npbCTT a Da ce pa3wnp npi Tempepatypn NOD Hyjnta n Da CE CBNE ppi NO BnCOKn Tempepatypn. ToBa pa3wnpraBaHe n CBNBaHe e OCHOBa npuHa 3a NobpeDte Ha CTponTeHNHTe OCHOBn N O6NKnHOBeHo CrpaTa Tpr6Ba Da ce o6e3onacBa.
YnTbTHraBaHTo NOBuaBa NtBTHocCTTa Ha MaTePnaI n Taka NOBuaBa TObApOnoEmHOCTTa My. HamaJIraBa B3dyuHIne Dko6OBe B MaTePnana I HAmJraBa pUcKa OT nponaHe, pa3UnpRaBe n CBuBaHe pN HABn3aHe Ha BOda.

Cneunpkaa 3a ynltHntHn pa60tN
B MnHaITo ca n3non3BaHn pa3nnHm MeToJ 3a onpeJeHHe Ha Heo6xOumInte yNtBTHInTeHN pa60tn. KaTOpnte, KOIT Oka3BaT BnHHe ca xapaKTEpcntkInte Ha MaTePnAna, De6enHa Ha CNoEBeTe, OKa3BaHnrt HATnCK, BbpaCnue N b6pO npemHHabHn. 3a no-eFekTnBha pa60ta ca BBBeEHn HOBn CneuΦnKaun, Na-HOBata OT KOnTO e cact OT NRsWA (3aOKOH 3a CTponteJIcTBOTo Ha HOBn TbTuMa n yNtCu) Ha ObdHHeHTo KpaNCtBO. Te3n CneuΦnKaun ce n3noJ3BAT OT CTponteHnTe INXKeHep, 3a da CE ocNpyrT do6pn yNtBTHInTeHN pa60tn.
Cneunnkaun NRsw (HAUC)
Tasn CnueuФNkuae Ce n3non3Ba ot Komnteta no nbTuHa u KOMyHaJIH yCnyr (HAUC). 3aKoHbT 3a cTpOtncTBOTo Ha HOBn nbTuHa uynuOn ot 1991 r. yctaHOBn HOB n cTaHapTe 3a peMOHTHe N Bb3CTaHOBNTHe npabOTn Ha nbTuHa t. ToI obxbaa MaTePnAnITE, MeToDInTe, o6OpUdBAHeTo n 3nCKBaHnra 3a 6e30nacHoc T pni To3n BnD cTpOtneHN npabOTn. PpiTe e c ceI da BBBeDe NO-BvCOKn cTaHapTe n no-npoJbNkHTeJeH nepnoD ha ekCnloatauHa nbTuHa n naBaxn, Koeto OT cBoR cTpaHa da HAMaJI npa3XODInTe 3a nonpaBKn n 3a6abAByHnra T a no nbTuHa t.
ImaDBe CneuФkaun 3a Tpam6OBKn C nnoa CnpoeK kateropnraT:
- Oτ 1400 do 1800 kg/m2. 2. Hαd 1800 kg/m2.
Lcnpnte nocoubat CTaTnHOTHaJraHe, OKa3BaHO OT MaunHata.
3a6eEka: HTO eHa eHONOCOHa TpAm6oBc c PnOa He OTROApra Ha Te3n MmHmAlnCneuKauM. 3a pa6oTu No Ioocta BnHa nI3noI3BaIte TpAm6oBc c DBoHn Ca nA.
ДВОИнагиа
Belle Group pa3pa6oTHxa nIaTeHTOBaxa o6OpyDbAHe, KOeTo dI a OTROBOpn Ha cneuΦkaUInTe Ha To3n 3aKOH. 3aKohbT n3NCKBa O6OpyDaBaHTo 3a yIINbTHnTEHN pa6Otn dI a OTROBApHa H3NcKBaHnraTa Ha cneuΦkaUInTe. 3aKynBaHTo Ha TpAm6oBkata 'BoHa cnla' Ha Belle Group Bn rapaHTnpa Cna3BaHTo Ha Ta3n YactOT 3aKaHa. IIOuHTe Ha Belle Group ca pa3deneHn Ha DBe Yactn, 3a da MoKe MaunHATA da OTROBOpn Ha cneuΦkaUInTe n Da OCnpyn Dba etana Ha yIINbTHRABaHe.

Etan 1: NbHaTa nOuHa nNoUaTa ocNrypBa yNtBTHraBaHe Ha MaTePnAna KaTo npo O6NKHOBeHa TpaM6oBka
Eran 2: YacTtA DBoHaNa OTo nNoOaTa yBEnuHa Bnata Ha yNtBTHraBaHe 3-4 nTn.
PpnoxKeHnra/MaTeepnaJIte ce pa3JeT Ha Tpu rpyu:
- Cbbp3Baun Maepnann (no-MaIKOOT 20% 3bphectn), Hapnpmep rHa, HaHocn TExka noBa.
- 3bPheTn MaTePnAJI (HaI 20% 3bPheTn), HAnpIMep TBbPda HAcTNJka, IaCbK e IeKa IOvBa.
- Bntymno3Hn MaTePnaJn, HanpImep acpaant (aKaBcN C KaTpaH), npOdykTN OT 6ntymno3Ha emyncnA.
Tabnucata no-dony noka3Ba cneunfkaunite HAUC 3a nbIbOchHa ha cNoeBete n 6po pa60THxOIOBE 3a IIOUHTe DBOHcNJa. Ako ce n3non3Bat cTahapTHMaHIn, He moKe da ce rapaHTnpa ONTMaHNO yINbTHRAHe, HO BbPekn TOBa, aKO nb6oHnHa Ha cNoeBete ce hAmain iCe yBeHHu 6pOra Hpa60THte xOIOBE, pezytatnte MORAT da e noo6pT.
CbIbpxaHnTo Ha BODa e CbBp3Baunite N 3bpHeCTn MaTePnAn Oka3Ba CbIeCTBeHO BInHnE BByx yINbTHnTeHNHepe a60tn. Ako 3bpHeCTn MaTePnAn e npekaHc cyx,TOI ue ce pa3Hece OKoN OIOyA T BMeCTO da CE cIerHe.AKO BOHOTOCbIbpxaHne e npekaHc rONMO, MaTePnANbMOKe Da n3cbXHe CNeD yINbTHraBaHeto n Da ce CBne.
Hatz 1B20-7 n3eNoB dBnraTeI
(3a noBee noDpo6HocTn, BkTe pBkoBOdCTBOTO Ha npou3BOuTeJIA
- OTBOpTe pe3epBoapa 3a ropuBO KaTo DpbHHe TocTa 3a cnipaHe/NoDaBaHe Ha ropuBO HaJaCHO dokpa
- 3abpbTeTe IocTa 3a KOHTpon Ha ckopocTHa no3nCnCTAPT/START/.
- XbaheTe c eHa pKa pKaKaTa 3a KOHTpO, a c dpyrata - pbKoXBaTkata Ha pbHnna CTapTe. NdbpNaIe 6abHO pbHnna CTapTepe, DOKATO NOyBCTBaTe CbnpOTNBHeHne n OCTaBeTe pbKoXBaTkata Da ce BbPHe Ha nbpBOHaayHa No3uHn.
- KaTo BnIMaBaTe da He n3DbpNaTe BbKeTo Ha CTapTepa DOKpa, n3DbpNaTe p3KO cTapTepa C dBe pbCe.
- NOBTOPeTe DOKaTo MToPa3aJaN.
- Ako MOTopa He 3anaI CNeI HraKoIO ONTa, CneBaIte INCTpyKuINTe 3a OTCTpaHbAhe Ha HEn3npabHOCTN.
- 3a da cnpete MOTOPA, MInHeTe Ha HnCKn OobopoTn HnATChEte 3aDpBkTe YepBeHnA CTOn 6yToH DOKaTO MOTOPA cnpe.
MecTeHe
Ako n3no3BaTe 'NoBnKHOTo TpaHcnpTO yCtpoNCTBO Ha KOnema, HAKIOHeTe MaunHaTa HAnpei, 3a da NobnHete TpaHCnOpTNHe KOJIeIa OT 3emra. 3aJIOJIeTIe TpaHCnOpTepa HA3ad, a noce HaneuHO, 3a da ro OTdennrTe OT 3aHata qact Ha MaunHaTa. CknaIpaIte TpaHCnOpTepa Ha beONaCHO MrcTo Do cneBaUaTAYoTpe6a. 3a MaunHnC'ΦukcnpAHTpaHCnOpTep, HAKIOHeTe MaunHata HApE, N3dbPwaiTe TpaHCnOpTepa HA3ad N Harope, HAKIOHeTe MaunHaTa KbM NOda NΦUKCpauTe TpaHCnOpTepa Da rIeJa Harope.
Ako e Heo6xOIMO da n3non3BaTe TObaponoDMHo 60pyDbaHe, ce y6eDeTe, ye 60pyDbaHTo E c JIMHT Ha pa60THo HATOBAPBaHe, noXo4a3a ternTo Ha PCX (Bnx CneuPknauInte B Ta6nUata). NocTaBeTe NoXo4aNn BepnI INTOBAPOnODEMHN pImKn CAMO Ha o6o3NaeHIne MeCTa OTrope Ha MaunHaTata.
Ako MaunHata e obopydBaHa cbc cinTeMa 3a pa3npbckBaHe Ha B0da n ce Hana r Ja n3non3BATE, npOBepTe daHn 3xOda 3a BOdaT a E 3aTBopeH n CneI TOBa HAnbHHe T ByTNkata 3a BOda.
CneKATO CTe HnpanBnn KOnHPOHNTE PNOBepKn, ONncn B pa3deI PpeNcyKOBn, MoKeTe Da 3anaHte DBratEn. MaunHnte OT cepnTA PCX Ha Belle Group ca ChabdeHn C ceHTpoBeKeH CbeHNHTen. ToBa no3BOJBA DBratEna da pa60Tu Ha npaeh XoJ be3 da Ce 3aDbNkBa BVbpaTopa. Ppi yBemuHabe CKOpocTt Ha MOTopa, ce 3aDeiCTBa CbeHNHTen, a Toi - BVbpaTopa. 3a MAKcIMMaHa efeKTNBHocT, DBrATeJIr Tpr6Ba Da e Ha MAKcIMMaHn OobopOtN.
HarracTe O6OpOTHe Ha MaKcMymn 3nON3BaHTe PbXkKaTa 3a KOHTPO 3a HAnpaBnBaTe n 3abPte PCX. Bn6paOnOHnT eIemEHT He cAmO kapa nIOuata Da Bn6pnpa, Ho n IpeDbIXBa MaunHATA Hanpei. IIO BpeMe HA HopMaIIHa eknnoTAuaH He HATNCKaHTe MaunHATA, a a OCTabe Tc Ce DnIXn CBO6oDHO KATO cAmO HApBaBnBaTe NocOKaTc. CkopocTTHa DA BnIXKeHne 3aBNCn OT CbCToHNTo Ha 6pa6oTBaHATA NOBpXHOCT. Ako 6pa6oTBaHATA NOBbpxHOCT e IOd HAKIOH, HAnpaBnBAIte NOCOKaTt Ha MaunHATA C OCOeHO BHMaHne. Ako e Heo6xOIMO, B3MeTe Bxke I RO BbpxTe 3a DOHATA qACT Ha WACNTo, Taka Ye BTOpN YoBeK Da MoKe Da NoEme Yact OT TerNoTo Ha MaunHATA. Pa6oTe Harope n HADOny no HAKNoHa, a He HAnpeHuO.
- DnKTe MaunHata NO NobpXHOCTTa C OprAH3npaH N DeCTBna, DOkato NoCTHHe TKeJHaHATA KOMNAKTHOCT. Ako HMA HAKOJIPO pa3IuHN CIOA eINH BbpyDpyr, yNtBHeTe CNoEBete NocneDoBATEHNO eINH CNeI dpyr. 3a da cnpTe Bn6paunra, MHeTe Ha Hnckn obopOTn.

OTCTpaHЯBaHe Ha Hen3npaBHOCTN
dual force certificate

TA3N MAUINHA E OOBPYDBAHA C PIOOY A DBOHACINLA'.

TA3MAMUHNAHEEOBOPYDBAHACIIIOHA'DBOHACNJA
Korato Maunnata e cnaeHa c nnoa DBoHc nna, CTaTnHOTo HajraHe Ha eHHua nloe Ha 1400kg/m2 n OTBapra Ha n3NCKBaHnraHa NRSWA/HAUC cneuKauin/ 3a Tpam6bKn C ynlbTHntenHa nnoa B kateropnra 1400-1800kg/m2.
Tenepeanen ynpabnten POnncn: He ce yeTe

R.
Neilson
Bnaqapene Ha Iboha cna Tpam6OBKte C ynnbTHNTenHa nnoa Ha Altrad Belle morat da ce nnon3bat 3a cTPONTENpa60n cbflacHO cneunkaunte HA NRSWA (3akOH 3a cTPOTeNCTBOTO Ha HOB nTua uynu ot 1991 r),PpnooxeHae A8.
CTaHapTHHe TpAM6oBKn C nnoa Ha Altrad Belle Moat da 6bDat dOnbHnTeHNO o6OpyBaHn c 'DBoHa cnna'. Cbbpxe ce c Altrad Belle 3a noBeue noDpo6Hoctn.
TapaHcua
Belle Group daba eHoroDnHa (12-MeCHe) rapaun 3a PCX OT daTata Ha nbpBOHaJHATA NOkynKa OT nbpBnKyBa.
RapaunTa Ha Belle Group nokPbBA deEeKn B KOHCTpyKUra, MaTePnaIte N3pa6OtKaT.
TapaunraHa Belle Group He nokpuBa:
- NOBpei, IbIkaIe Ce Ha EKcIIoatau npn HapyuHne npabunata Ha pa6Ota, HenpaBUNHa ynoTp6a, 3nyckane nn npytn PNO6HN NOpei, pniuHHeN O T INI DblkaIe Ce Ha HeCna3BaHe Ha IHCTpykUInTe 3a MOHTax, EKcIIoatau NIN TEXHuecka NoDpBxKa.
- PpomeH, DOnbJIHeHn nn nonpaBKn, n3BbPseHn ot Jnca, konTo He ca ot Belle Group nIn OTexHn Otopn3npaHn npedctabNTen.
- Pa3xOJnte 3a TpaHcnpT nI I nI nI npaahe Ha MaunHaTa Do n ot Belle Group nI IN Texn OToPn3npaHn npedctabnte 3a nonpaBka nI pa3JIeXJaHe Ha HapabeHa peKnaMaui.
- MatepnaIIN u/nn pa3xOnd 3a Tpyd 3a noDHOBBAHe, nonpaBka nn 3amraHa Ha qactn, IbJkaun Ce Ha HopMaJIHO n3HOCBaHe Ha MaunHata.
IapaanraTa He NOKPnBa CJIeHnTe YaCTN:
PembuHaTa npedabka
Bb3dyuHnA qnnTbpHaMOTopa
- 3anaJIntenHaTa CBeU Ha MoTopa
Belle Group n/nnTexnTe OToPn3nPaHn PpeCTaBnTeN, DpuKeTOpn, CnyKHeN nn 3actpaxoBaTeN He Hocr OTROBOPHOCT 3a 1eTn, 3ary6n nn pa3XoDn, Bb3HNkHaNN B pe3yIITat nn BbB Bpb3ka C nn npaDi nn HeBb3MOxHOCCTTa 3a n3non3BaHe Ha MaunHata 3a KaBATO n da e cen.
PeknaMaun
Peklamau nce noadabat npbpo do Belle Group no TeeneoHa, ype3 qakc, e-mail nnn nncMo.
3a peknaamun:
Ten: +44 (0)1538 380000, Φακc: +44 (0)1538 380038
Email: warranty@belle-group.co.uk
Niwte Ha aepc:
UK: Belle Group Warranty Department,
Unit 5, Bode Business Park,
Ball Haye Green, Leek,
Staffordshire,
ST13 6BW
England.
Oi odnyiec exouy ypaotei ia va aac bonnoouov otov aoepaan xeiipmo kai ouvtnpnntou ouptieotn. Oi odnyie c npotiEvtauiaavttpoowiouc kai xeiipotc tou uptieotn.
PpOxyos
H Tnapaypaoc tio Npiipalov'divei odnyie viy nvy avakukawon twv unxavnatw v Te pto 0ikio TPOC to Tepiiaalov. H Tnpaypaoc tio Npiipaipn Tou unxavnatos Bona atnv eoikeiwon m To oxedio kai tic puuioeicouu xavnatos. OI Tnpaypaopit EviKn Aospaleia'kai Yyia kai aopaia' exnyouv Tiwc va xpnoiopoTIOEiTai n npxavntoietai n npxavntoWote va evai aoppai yia oac kai yi ta koivc.
H 'Aiaikaaia evapns kai oratnatparos' Bona oTo Eekivnua kai oTo otatnatma tou nayavnatoc.
O oynoyc Evtonioos naos Bono atav exe Tpobma e To nxaunna.
H npaypaoe tio Suvtnpn' Bono otnv yevikn ouvtnpn kai diaxepion tou jnxavmuoc aac.
H npapaypaoos Eyyunon' eNyei AentoepwC t KaunTe i yyunon kai nTv diaikia oiekknong aTo nV yyunon.
H npapaypaoos Ainnox'deixve TpiPobaiypaes ouimieoTou naxavnatoC.
H IapaypaoC CE Iiototoiniko'delta ta otavtap e ta oToia exi kataaekuaote to npxavna.
Σμβολες σχολιων.
To Keiuevo Oe autc sio oyie tsou xpeiazeta iiaitepn Tpoosyn TpoBaaalea tme To npapakatw TpOTo:

NPOEOXH
To npoiov mtopei va bpiakeTai e kivduo. To unxavnu ma topei va n athe bna h va Tpoknnei Tpaumato oToV xepiotn dev akolouthetaou oi diaikaciec me tov oawto tpanto.

IPOEIAOIOIHsH
H zwn tou xeiipotn mTopei va piketai eKivduvo.

ПОНДОПОIHSH

NPOEIAOIOIH∑H
AIABASTE TIC ONDYIEC TIPV XEPIOTeI NT PPOTTaTHoTe VA EITKEUaTe To mXavna.
Eeeyoc npiv to Eekivnua 208
Aoyoi yia oupiiean 209
PpOdiaypaqcsoumuieans 209
Evarapouyec 210
△iaikaaia evapns kai oatahmuotc 210
XeipiooC tou ouptieotn. 211
Odyos Evotiaou 8aBns 211
Suvtnpnoan 212
O8nyieC ouvapouloynoans 213
OdyieC npoapoyns 213
Pirottoiinko Dittlnc Ioxuc (Dual Force 214
Eyyunon 214
PiToTtoiNtiko C.E 4

Email: warranty@belle-group.co.uk
PáyTE TPOs
Altrad Belle Warranty Department,
Unit 5, Bode Business Park,
Bell Haye Green,
Leek,
Staffordshire ST13 6BW
England.
Altrad Belle Warranty Department
Unit 5 Bode Business Park,
Ball Have Green, Leek
Staffordshire ST13 6BW,
England
Zaručni oddělení:
Tel: +44 (0) 1538 380000 Fax: +44 (0) 1538 380038
Email: warranty@belle-group.co.uk
Certificateul Dual Force 236
Certificateul C.E. 5
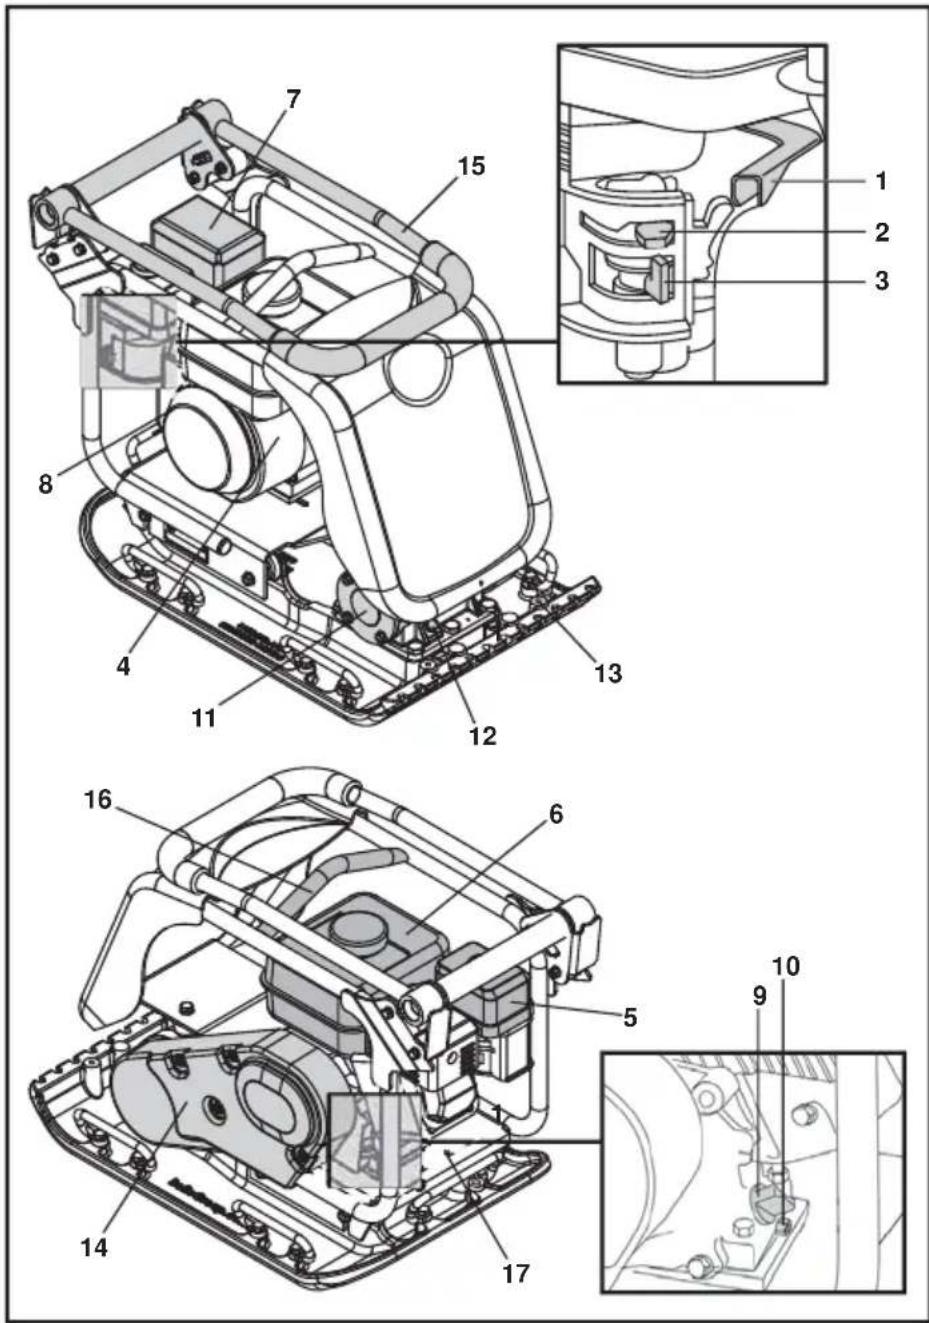
The Noise Level of the machine during operation is 105 / 107dB(A)
C - afisaj motor RPM

Pozitie motor cu viteza mare

Positie motor cu viteza mica
D - afisai ridicare
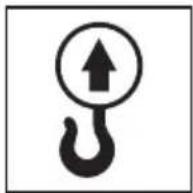
E-Afisare joasa HAV (800-99965)
Aparatul are un design brevetat UK care reduce nivele HAV permietand un tamp mai mare de folosire.
F-Afisaj averizare motor
Specifications privind compactarea

Altrad Belle Warranty Department,
Sheen, Nr. Buxton
Derbyshire
SK17 0EU
England.
Hatz 1B20-7 Dizel motor
Altrad Belle Warranty Department,
Sheen, Nr. Buxton
Derbyshire
SK17 0EU
England.
Ova uputstva su napisana kao pomoc za sigurno rukovanje i servisiranje PCX vibro ploce. Ova uputstva su namjenjena prodavačima i rukovateljima PCX vibro ploce.
Predgovor
Start and Stop Procedure

PAZNJA
Nepravilno održavanje moze biti opasno. Pročitajte i shvatite ovaj odjeljak prise nego što pristupite bilo kakvom održavanju, servisu ili popravku.
Honda GX120 & GX160
- Otvorite dovod goriva okretanjem ruice ventila ON / OFF u desnu stranu do kraja.
- Ako startate hladan motor, postavite cok na ON pomicanjem ruice coka do kraja u lijveo. Ako startate topli motor, cok obicno nije potreban, ali akse motor na pola ohladio, djelomicno otvoreni cok moze biti potreban.
- Okrenite prekidač motora ON / OFF u smjeru kretanja kazalji sata u položaj 'l'.
- Podesite gas u prazan hod pomicuci ruicu gasa do kraja u desno. Nemojte startati motor pri punom gasu, jer ce vibroploca pocti nabijati cim se motor upali.
- Čvrsto držeči upravljačku dršku Jednom rukom, primite hvataljku poteznog starteradrugom rukom. Povucite potezni starter sve dok ne osjetite otpor motora, i tada pustite da se starter vrati u početni položaj.
- Pazeci da uze startera ne izvucete u potpunosti, snazno povucite hvataljku startera.
- Ponavljajte sve dok se motor ne upali.
- Kada motor počne ravnomjerno raditi, pomaknite ručicu Čoka u položaj OFF pomicuci ju u desno.
- Ako se motor ne upali nakon nekoliko pokušaja, provjerite odjeljak Rjesavanje problema.
- Motor se gasi takao da postavite ruicu gasa u prazan hod i okretene prekidac motora ON / OFF u pozaj 0'.
- Zatvorite dovod goriva.
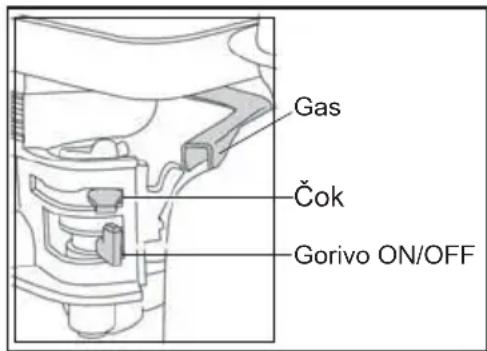
Hatz 1B20-7 dizel motor (molimo provjerite u uputstvima za motor za sve detaljle)
- Otvorite dovod goriva pomici ruicu dovoda ON/OFF do kraja u desno.
- Podesite kontrlu brziine motora u položaj start.
- Čvsto držeči upravljačku drsku Jednom rukom, primithe hvataljku poteznog startera drugom rukom. Povucite potezni starter svedok ne osjetite otpor motora, i tada pustite da se starter vrati u po Četni položaj.
- Pazeci da uze startera ne izvučete u potpunosti, snažno povucite hvataliku startera sa obje ruke.
- Ponavljajte ovu proceduru sve dok se motor ne upali.
- Ako se motor ne upali nakon nekoliko pokušaja, provjerite odjeljak Rješavanje problema.
-
Motor se gasi takdo postavite ruicu gasa u prazan hod, a zatim pritisnite i drzite crveno dugme za zaustavljanje sve dok se motor ne ugasi.
-
Postavljanje vibro ploce na mjesto rada.
Altrad Belle Warranty Department,
Unit 5 Bode Business Park,
Ball Haye Green,
Leek,
Staffordshire
ST13 6BW,
England
Tel: +44(0)1298 84606 Fax: +44(0)1298 84722
Email: warranty@belle-group.co.uk

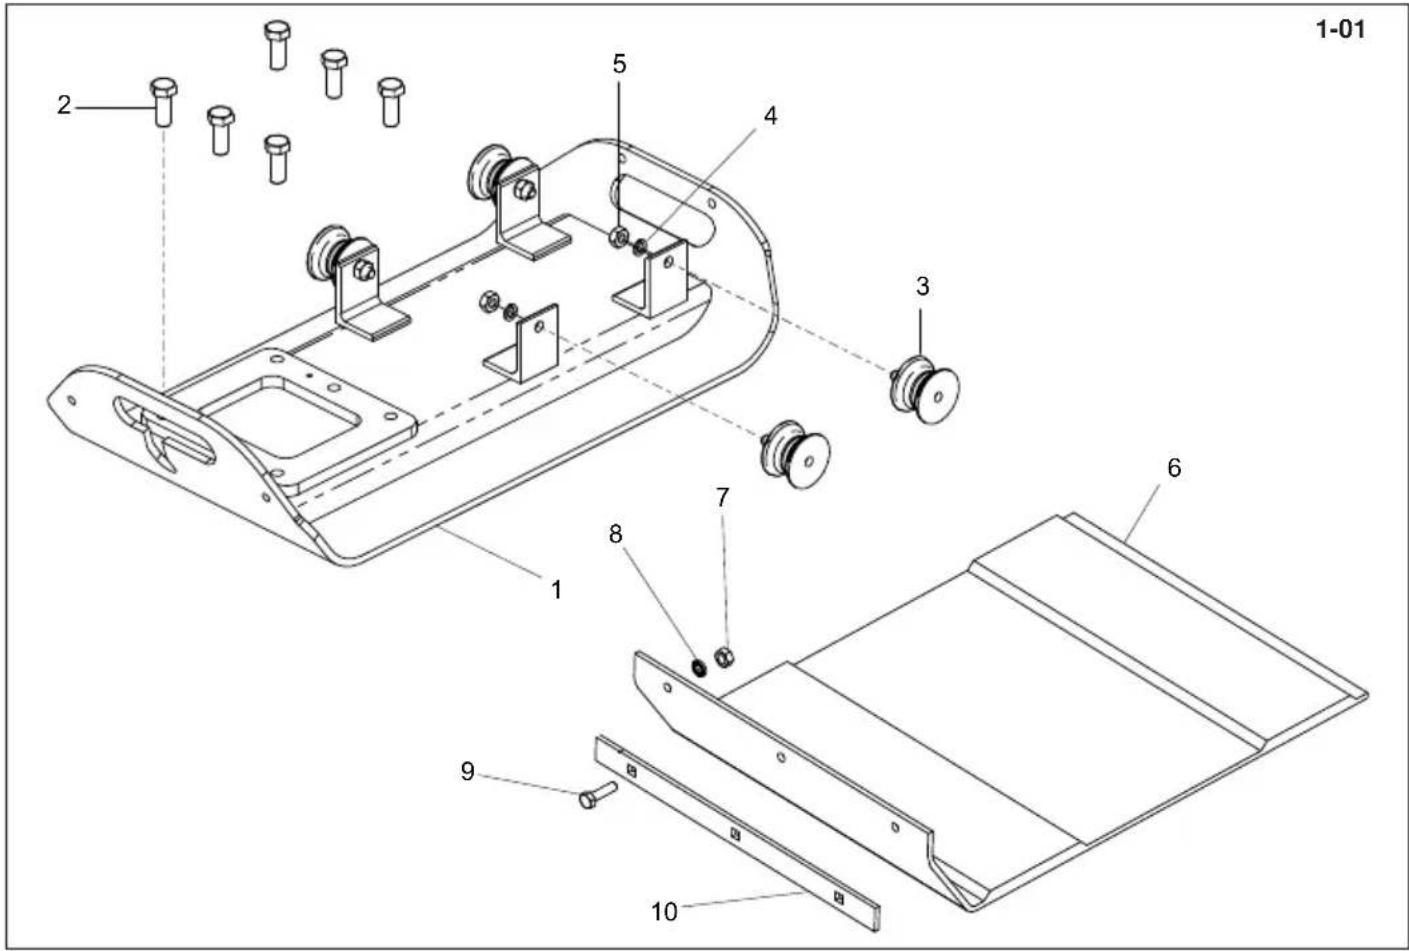
| Baseplate Assembly (Honda / Robin), Plaque d'embase (Honda / Robin), Cto. Placa base (Honda / Robin), Conj. da Placa de Base (Honda / Robin) | |||||
| 1 | 151/02600 | ... | ... | ... | ... |
| 1 | 151/02600 | ... | ... | ... | ... |
| 1 | 151/02600 | ... | ... | ... | ... |
| 1 | 151/02600 | ... | ... | ... | ... |
| 1 | 151/02600 | ... | ... | ... | ... |
| 1 | 151/02700 | ... | ... | ... | ... |
| 1 | 151/02700 | ... | ... | ... | ... |
| 1 | 151/0.215 | ... | ... | ... | ... |
| 1 | 151/0.363 | ... | ... | ... | ... |
| 1 | 151/0.386 | ... | ... | ... | ... |
| 1 | 151/02800 | ... | ... | ... | ... |
| 1 | 151/02800 | ... | ... | ... | ... |
| 1 | 151/02800 | ... | ... | ... | ... |
| 1 | 151/02800 | ... | ... | ... | ... |
| 1 | 151/02900 | ... | ... | ... | ... |
| 1 | 151/02900 | ... | ... | ... | ... |
| 1 | 151/02900 | ... | ... | ... | ... |
| 1 | 151/02900 | ... | ... | ... | ... |
| 1 | 151/02900 | ... | ... | ... | ... |

| Vloerplaat (Honda / Robin), Rüttelplatten-Zsb. (Honda / Robin), Bundplade (Honda / Robin), Gruppo piatra di base (Honda / Robin) | 1-01 | |||||
| 1 | 151/02600 | Vloerplaat | Rüttelplatten | Bundplade | Piastra di Base | PCX 350 |
| 1 | 151/02600 | Vloerplaat | Rüttelplatten | Bundplade | Piastra di Base | PCX 350 HAUC |
| 1 | 151/02600 | Vloerplaat | Rüttelplatten | Bundplade | Piastra di Base | PCX 350A |
| 1 | 151/02600 | Vloerplaat | Rüttelplatten | Bundplade | Piastra di Base | PCX 350A HAUC |
| 1 | 151/02700 | Vloerplaat | Rüttelplatten | Bundplade | Piastra di Base | PCX 400 |
| 1 | 151.0.215 | Vloerplaat | Rüttelplatten | Bundplade | Piastra di Base | PCX 400 HAUC |
| 1 | 151.0.363 | Vloerplaat | Rüttelplatten | Bundplade | Piastra di Base | PCX 400A |
| 1 | 151.0.386 | Vloerplaat | Rüttelplatten | Bundplade | Piastra di Base | PCX 400A HAUC |
| 1 | 151/02800 | Vloerplaat | Rüttelplatten | Bundplade | Piastra di Base | PCX 450 |
| 1 | 151/02800 | Vloerplaat | Rüttelplatten | Bundplade | Piastra di Base | PCX 450 HAUC |
| 1 | 151/02800 | Vloerplaat | Rüttelplatten | Bundplade | Piastra di Base | PCX 450A |
| 1 | 151/02800 | Vloerplaat | Rüttelplatten | Bundplade | Piastra di Base | PCX 450A HAUC |
| 1 | 151/02900 | Vloerplaat | Rüttelplatten | Bundplade | Piastra di Base | PCX 500 |
| 1 | 151/02900 | Vloerplaat | Rüttelplatten | Bundplade | Piastra di Base | PCX 500 HAUC |
| 1 | 151/02900 | Vloerplaat | Rüttelplatten | Bundplade | Piastra di Base | PCX 500A |
| 1 | 151/02900 | Vloerplaat | Rüttelplatten | Bundplade | Piastra di Base | PCX 500A HAUC |
| 2 | 07.9.062 | Schroef | Schaube | Skrue | Vite | M14 x 35 |
| 3 | 21.0.292 | Anti-trilbevestiging | Schwingungsdämpfer | Antivibrationsopheng | Supporto antivibrazioni | Honda/Robin |
| 3 | 21.0.298 | Anti-trilbevestiging | Schwingungsdämpfer | Antivibrationsopheng | Supporto antivibrazioni | Hatz |
| 4 | 4/1003 | Afdichtring | Scheibe | Spændeskive | Rondella | M10 |
| 5 | 8/10003 | Moer | Mutter | Motrik | Dado | M10 |
| 6 | 151.0.271 | Kunststoff onderplaat | Blockpflasterrüttler | Beleagningsklods | Pavimentazione a Bloccchi | PCX 350 |
| 6 | 151.0.272 | Kunststoff onderplaat | Blockpflasterrüttler | Beleagningsklods | Pavimentazione a Bloccchi | PCX 350 HAUC |
| 6 | 151.0.273 | Kunststoff onderplaat | Blockpflasterrüttler | Beleagningsklods | Pavimentazione a Bloccchi | PCX 400 |
| 6 | 151.0.274 | Kunststoff onderplaat | Blockpflasterrüttler | Beleagningsklods | Pavimentazione a Bloccchi | PCX 400 HAUC |
| 6 | 151.0.275 | Kunststoff onderplaat | Blockpflasterrüttler | Beleagningsklods | Pavimentazione a Bloccchi | PCX 450 |
| 6 | 151.0.276 | Kunststoff onderplaat | Blockpflasterrüttler | Beleagningsklods | Pavimentazione a Bloccchi | PCX 450 HAUC |
| 6 | 151.0.277 | Kunststoff onderplaat | Blockpflasterrüttler | Beleagningsklods | Pavimentazione a Bloccchi | PCX 500 |
| 6 | 151.0.278 | Kunststoff onderplaat | Blockpflasterrüttler | Beleagningsklods | Pavimentazione a Bloccchi | PCX 500 HAUC |
| 7 | 8/8008 | Moer | Mutter | Motrik | Dado | M8 |
| 8 | 4/8006 | Afdichtring | Scheibe | Spændeskive | Rondella | M8 |
| 9 | 00.0.860 | Schroef | Schaube | Skrue | Vite | M8 x 30 |
| 10 | 151.0.284 | Clamp Strip | Barrette de blocage | Barra de fijación | Tira de Grampeamento | PCX 350 |
| 10 | 151.0.285 | Clamp Strip | Barrette de blocage | Barra de fijación | Tira de Grampeamento | PCX 400 |
| 10 | 151.0.286 | Clamp Strip | Barrette de blocage | Barra de fijación | Tira de Grampeamento | PCX 450 |
| 10 | 151.0.287 | Clamp Strip | Barrette de blocage | Barra de fijación | Tira de Grampeamento | PCX 500 |

| Baseplate Assembly (Hatz), Plaque d'embase (Hatz), Cto. Placa base (Hatz), Conj. da Placa de Base (Hatz) | 1-02 | |||||
| 1 | 151/02700 | Baseplate | Plaque d'embase | Placa de base | Placa de Base | PCX 400 |
| 1 | 151/02800 | Baseplate | Plaque d'embase | Placa de base | Placa de Base | PCX 450 |
| 1 | 151/02900 | Baseplate | Plaque d'embase | Placa de base | Placa de Base | PCX 500 |
| 1 | 151.0.412 | Baseplate | Plaque d'embase | Placa de base | Placa de Base | PCX 400 HAUC |
| 1 | 151/02800 | Baseplate | Plaque d'embase | Placa de base | Placa de Base | PCX 450 HAUC |
| 1 | 151/02900 | Baseplate | Plaque d'embase | Placa de base | Placa de Base | PCX 500 HAUC |
| 1 | 151.0.415 | Baseplate | Plaque d'embase | Placa de base | Placa de Base | PCX 400A |
| 1 | 151/02800 | Baseplate | Plaque d'embase | Placa de base | Placa de Base | PCX 450A |
| 1 | 151/02900 | Baseplate | Plaque d'embase | Placa de base | Placa de Base | PCX 500A |
| 1 | 151.0.418 | Baseplate | Plaque d'embase | Placa de base | Placa de Base | PCX 400 HAUC A |
| 1 | 151/02800 | Baseplate | Plaque d'embase | Placa de base | Placa de Base | PCX 450 HAUC A |
| 1 | 151/02900 | Baseplate | Plaque d'embase | Placa de base | Placa de Base | PCX 500 HAUC A |
| 2 | 07.9.062 | Screw | Vis | Tornillo | Parafuse | M14 x 35 |
| 3 | 21.0.292 | Anti-Vibration Mount | Tampon antivibratoire | Montura antivibratoria | Bloco Anti-vibracao | Honda Robin |
| 3 | 21.0.298 | Anti-Vibration Mount | Tampon antivibratoire | Montura antivibratoria | Bloco Anti-vibracao | Hatz |
| 4 | 4/1003 | Washer | Rondelle | Arandela | Anilha | M10 |
| 5 | 8/10003 | Nut | Ecrou | Tuerca | Porca | M10 |
| 6 | 151.0.271 | Paving Pad | Tampon de Pavage | Tampón de Pavimentação | Bloco de Pavimentação | PCX 350 |
| 6 | 151.0.272 | Paving Pad | Tampon de Pavage | Tampón de Pavimentação | Bloco de Pavimentação | PCX 350 HAUC |
| 6 | 151.0.273 | Paving Pad | Tampon de Pavage | Tampón de Pavimentação | Bloco de Pavimentação | PCX 400 |
| 6 | 151.0.274 | Paving Pad | Tampon de Pavage | Tampón de Pavimentação | Bloco de Pavimentação | PCX 400 HAUC |
| 6 | 151.0.275 | Paving Pad | Tampon de Pavage | Tampón de Pavimentação | Bloco de Pavimentação | PCX 450 |
| 6 | 151.0.276 | Paving Pad | Tampon de Pavage | Tampón de Pavimentação | Bloco de Pavimentação | PCX 450 HAUC |
| 6 | 151.0.277 | Paving Pad | Tampon de Pavage | Tampón de Pavimentação | Bloco de Pavimentação | PCX 500 |
| 6 | 151.0.278 | Paving Pad | Tampon de Pavage | Tampón de Pavimentação | Bloco de Pavimentação | PCX 500 HAUC |
| 7 | 8/8008 | Nut | Ecrou | Tuerca | Porca | M8 |
| 8 | 4/8006 | Washer | Rondelle | Arandela | Anilha | M8 |
| 9 | 00.0.860 | Bolt | Boulon | Perno | Perno | M8 x 30 |
| 10 | 151.0.284 | Clamp Strip | Barrette de blocage | Barra de fijación | Tira de Grampeamento | PCX 350 |
| 10 | 151.0.285 | Clamp Strip | Barrette de blocage | Barra de fijación | Tira de Grampeamento | PCX 400 |
| 10 | 151.0.286 | Clamp Strip | Barrette de blocage | Barra de fijación | Tira de Grampeamento | PCX 450 |
| 10 | 151.0.287 | Clamp Strip | Barrette de blocage | Barra de fijación | Tira de Grampeamento | PCX 500 |

| Vloerplaat (Hatz), Rüttelplatten-Zsb. (Hatz), Bundplade (Hatz), Gruppo piatra di base (Hatz) | 1-02 | |||||
| 1 | 151/02700 | Vloerplaat | Rüttelplatten | Bundplade | Piastra di Base | PCX 400 |
| 1 | 151/02800 | Vloerplaat | Rüttelplatten | Bundplade | Piastra di Base | PCX 450 |
| 1 | 151/02900 | Vloerplaat | Rüttelplatten | Bundplade | Piastra di Base | PCX 500 |
| 1 | 151.0.412 | Vloerplaat | Rüttelplatten | Bundplade | Piastra di Base | PCX 400 HAUC |
| 1 | 151/02800 | Vloerplaat | Rüttelplatten | Bundplade | Piastra di Base | PCX 450 HAUC |
| 1 | 151/02900 | Vloerplaat | Rüttelplatten | Bundplade | Piastra di Base | PCX 500 HAUC |
| 1 | 151.0.415 | Vloerplaat | Rüttelplatten | Bundplade | Piastra di Base | PCX 400A |
| 1 | 151/02800 | Vloerplaat | Rüttelplatten | Bundplade | Piastra di Base | PCX 450A |
| 1 | 151/02900 | Vloerplaat | Rüttelplatten | Bundplade | Piastra di Base | PCX 500A |
| 1 | 151.0.418 | Vloerplaat | Rüttelplatten | Bundplade | Piastra di Base | PCX 400 HAUC A |
| 1 | 151/02800 | Vloerplaat | Rüttelplatten | Bundplade | Piastra di Base | PCX 450 HAUC A |
| 1 | 151/02900 | Vloerplaat | Rüttelplatten | Bundplade | Piastra di Base | PCX 500 HAUC A |
| 2 | 07.9.062 | Schroef | Schraube | Skrue | Vite | M14 x 35 |
| 3 | 21.0.292 | Anti-trilbevestigting | Schwingungsdämpfer | Antivibrationsopheng | Supporto antivibrazioni | Honda/Robin |
| 3 | 21.0.298 | Anti-trilbevestigting | Schwingungsdämpfer | Antivibrationsopheng | Supporto antivibrazioni | Hatz |
| 4 | 4/1003 | Afdichtring | Scheibe | Spændeskive | Rondella | M10 |
| 5 | 8/1003 | Moer | Mutter | Motrik | Dado | M10 |
| 6 | 151.0.271 | Kunststoff onderplaat | Blockpflasterrüttler | Belægningsklods | Pavimentazione a Bloccchi | PCX 350 |
| 6 | 151.0.272 | Kunststoff onderplaat | Blockpflasterrüttler | Belægningsklods | Pavimentazione a Bloccchi | PCX 350 HAUC |
| 6 | 151.0.273 | Kunststoff onderplaat | Blockpflasterrüttler | Belægningsklods | Pavimentazione a Bloccchi | PCX 400 |
| 6 | 151.0.274 | Kunststoff onderplaat | Blockpflasterrüttler | Belægningsklods | Pavimentazione a Bloccchi | PCX 400 HAUC |
| 6 | 151.0.275 | Kunststoff onderplaat | Blockpflasterrüttler | Belægningsklods | Pavimentazione a Bloccchi | PCX 450 |
| 6 | 151.0.276 | Kunststoff onderplaat | Blockpflasterrüttler | Belægningsklods | Pavimentazione a Bloccchi | PCX 450 HAUC |
| 6 | 151.0.277 | Kunststoff onderplaat | Blockpflasterrüttler | Belægningsklods | Pavimentazione a Bloccchi | PCX 500 |
| 6 | 151.0.278 | Kunststoff onderplaat | Blockpflasterrüttler | Belægningsklods | Pavimentazione a Bloccchi | PCX 500 HAUC |
| 7 | 8/8008 | Moer | Mutter | Motrik | Dado | M8 |
| 8 | 4/8006 | Afdichtring | Scheibe | Spændeskive | Rondella | M8 |
| 9 | 00.0.860 | Schroef | Schraube | Skrue | Vite | M8 x 30 |
| 10 | 151.0.284 | Clamp Strip | Barrette de blocage | Barra de fijación | Tira de Grampeamento | PCX 350 |
| 10 | 151.0.285 | Clamp Strip | Barrette de blocage | Barra de fijación | Tira de Grampeamento | PCX 400 |
| 10 | 151.0.286 | Clamp Strip | Barrette de blocage | Barra de fijación | Tira de Grampeamento | PCX 450 |
| 10 | 151.0.287 | Clamp Strip | Barrette de blocage | Barra de fijación | Tira de Grampeamento | PCX 500 |
1-03
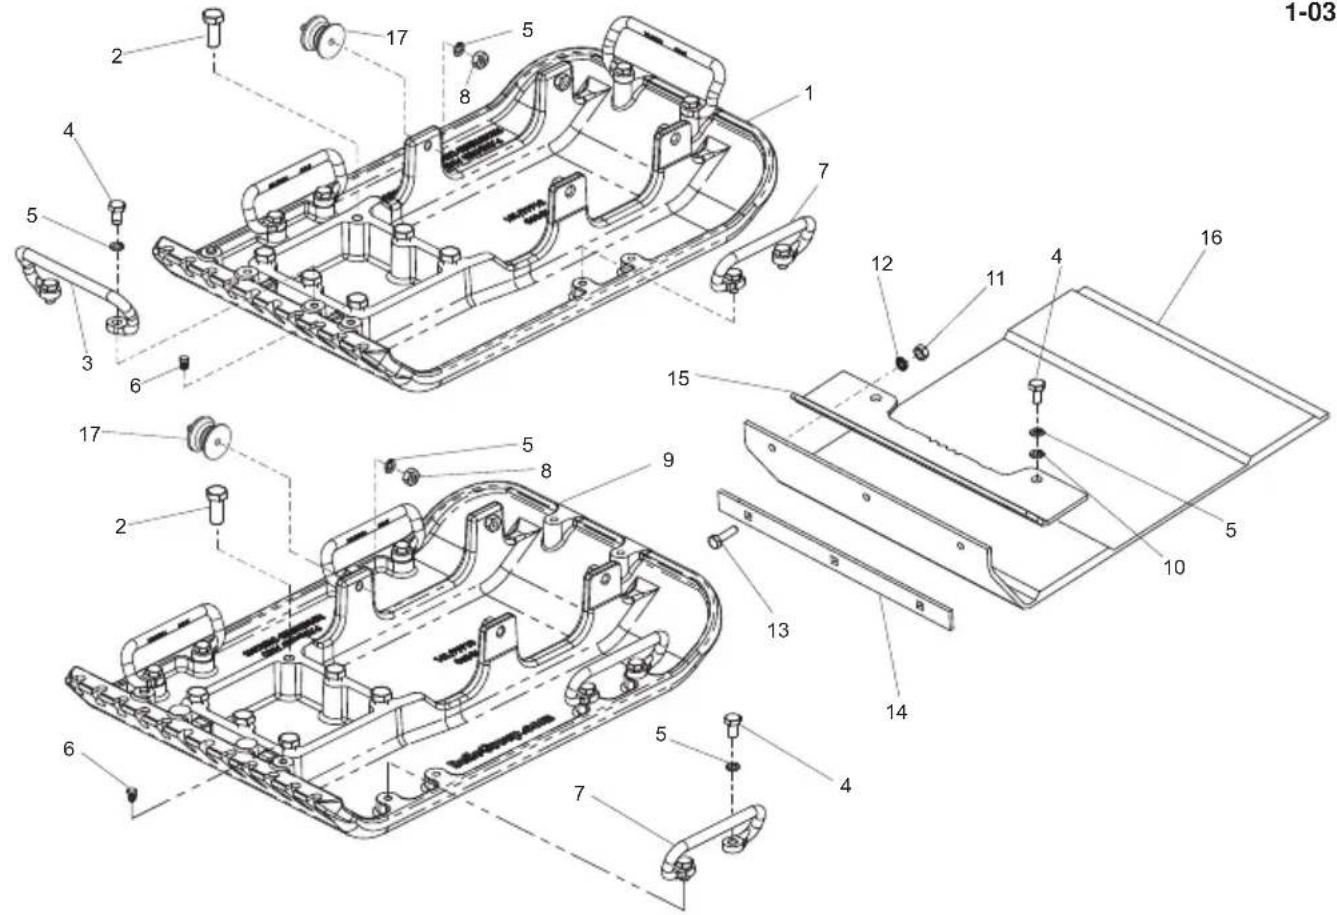
Cast Baseplate Assembly, Elements du patin moulé,
Montaje de plancha base defundacion, Conjunto da placabasefundida
1-03
| 1 | 151/99917 | Baseplate | Plaque d'embase | Placa de base | Placa de Base | PCX 350 |
| 1 | 151/99924 | Baseplate | Plaque d'embase | Placa de base | Placa de Base | PCX 350 HAUC |
| 1 | 151/99913 | Baseplate | Plaque d'embase | Placa de base | Placa de Base | PCX 400 |
| 1 | 151/99925 | Baseplate | Plaque d'embase | Placa de base | Placa de Base | PCX 400 HAUC |
| 2 | 7/14011 | Screw | Vis | Tornillo | Parafuse | M14 x 35 x 2 |
| 3 | 151/99915 | Handle | Guidon | Manillar | Punho | 2 |
| 4 | 7/10004 | Screw | Vis | Tornillo | Parafuse | M10 x 20 |
| 5 | 4/1003 | Washer | Rondelle | Arandela | Anilha | M10 |
| 6 | 3/4037 | Plug | Bougie | Tapon | Bujão | 2 |
| 7 | 151/99914 | Handle | Guidon | Manillar | Punho | 4 |
| 8 | 8/10003 | Nut | Ecrou | Tuerca | Porca | M10 |
| 9 | 151/99918 | Baseplate | Plaque d'embase | Placa de base | Placa de Base | PCX 450 |
| 9 | 151/99926 | Baseplate | Plaque d'embase | Placa de base | Placa de Base | PCX 450 HAUC |
| 9 | 151/99919 | Baseplate | Plaque d'embase | Placa de base | Placa de Base | PCX 500 |
| 9 | 151/99927 | Baseplate | Plaque d'embase | Placa de base | Placa de Base | PCX 500 HAUC |
| 10 | 4/1005 | Washer | Rondelle | Arandela | Anilha | M10 |
| 11 | 8/8008 | Nut | Ecrou | Tuerca | Porca | M10 |
| 12 | 4/8006 | Washer | Rondelle | Arandela | Anilha | M8 |
| 13 | 00.0.860 | Screw | Vis | Tornillo | Parafuse | M8 x 30 |
| 14 | 151.0.284 | Clamp Strip | Barrette de blocage | Barra de fijación | Tira de Grampeamento | PCX 350 |
| 14 | 151.0.285 | Clamp Strip | Barrette de blocage | Barra de fijación | Tira de Grampeamento | PCX 400 |
| 14 | 151.0.286 | Clamp Strip | Barrette de blocage | Barra de fijación | Tira de Grampeamento | PCX 450 |
| 14 | 151.0.287 | Clamp Strip | Barrette de blocage | Barra de fijación | Tira de Grampeamento | PCX 500 |
| 15 | 151/01700 | Bracket | Patte de montage | Escudra | Suporte | PCX 350 |
| 15 | 151/01600 | Bracket | Patte de montage | Escudra | Suporte | PCX 400 |
| 15 | 151/01800 | Bracket | Patte de montage | Escudra | Suporte | PCX 450 |
| 15 | 151/01900 | Bracket | Patte de montage | Escudra | Suporte | PCX 500 |
| 16 | 151.0.271 | Paving Pad | Tampon de Pavage | Tampón de Pavimentación | Bloco de Pavimentação | PCX 350 |
| 16 | 151.0.272 | Paving Pad | Tampon de Pavage | Tampón de Pavimentación | Bloco de Pavimentação | PCX 350 HAUC |
| 16 | 151.0.273 | Paving Pad | Tampon de Pavage | Tampón de Pavimentación | Bloco de Pavimentação | PCX 400 |
| 16 | 151.0.274 | Paving Pad | Tampon de Pavage | Tampón de Pavimentación | Bloco de Pavimentação | PCX 400 HAUC |
| 16 | 151.0.275 | Paving Pad | Tampon de Pavage | Tampón de Pavimentación | Bloco de Pavimentação | PCX 450 |
| 16 | 151.0.276 | Paving Pad | Tampon de Pavage | Tampón de Pavimentación | Bloco de Pavimentação | PCX 450 HAUC |
| 16 | 151.0.277 | Paving Pad | Tampon de Pavage | Tampón de Pavimentación | Bloco de Pavimentação | PCX 500 |
| 16 | 151.0.278 | Paving Pad | Tampon de Pavage | Tampón de Pavimentación | Bloco de Pavimentação | PCX 500 HAUC |
| 17 | 21.0.292 | Anti-Vibration Mount | Tampon antivibratoire | Montura antivibratoria | Bloco Anti-vibração | Honda / Robin |
| 17 | 21.0.298 | Anti-Vibration Mount | Tampon antivibratoire | Montura antivibratoria | Bloco Anti-vibração | Hatz |
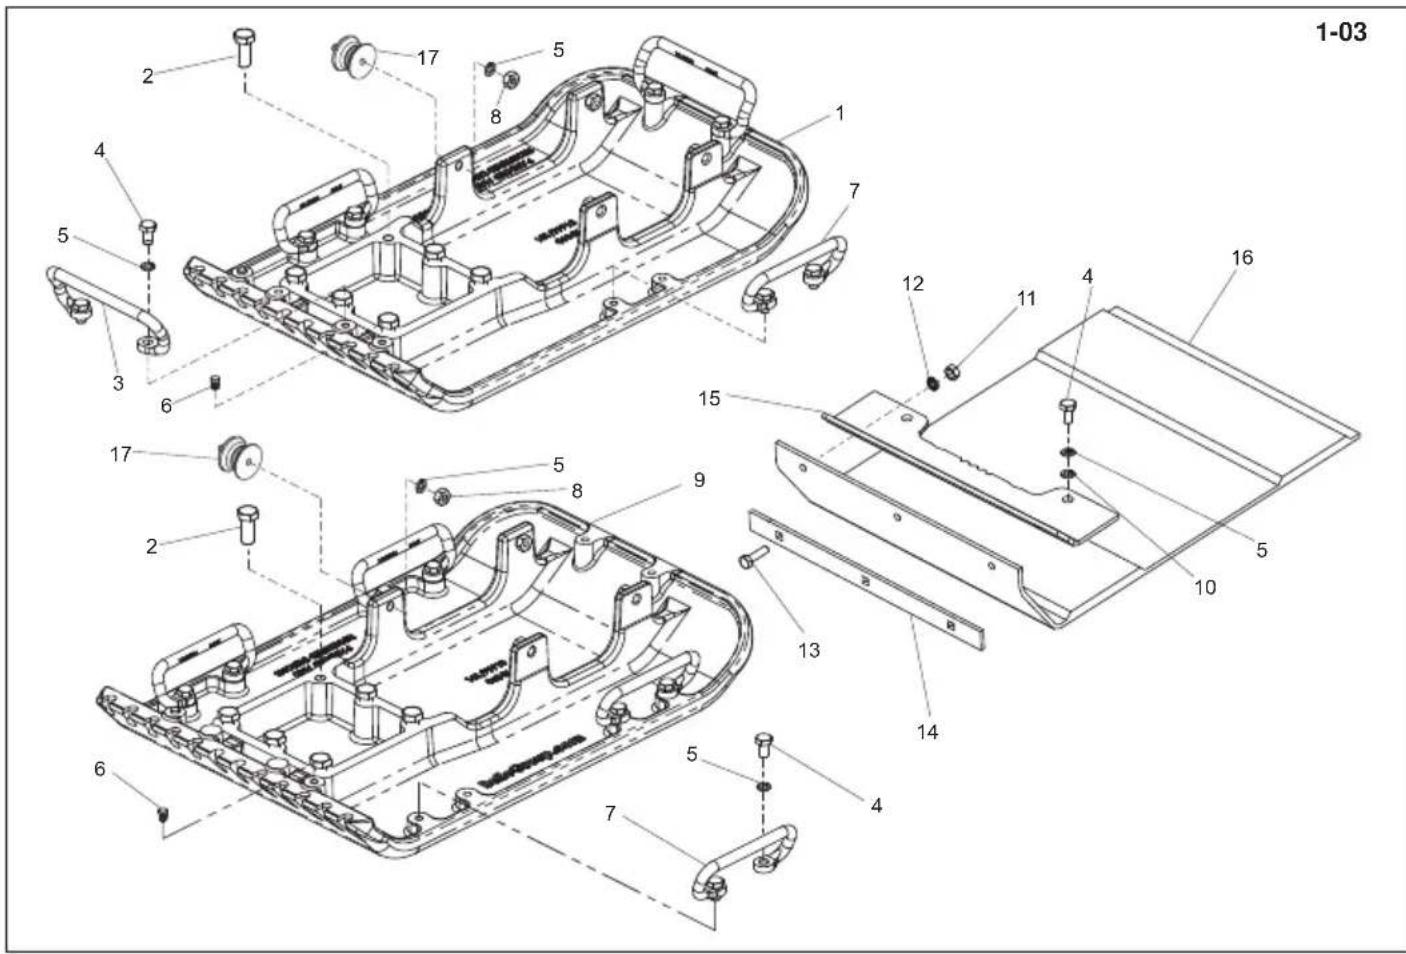
| Gegoten grundplaatassemblage, Gussplatte Zsb.,Stobt fundament, Assemblaggio della forma della piastra di base | |||||||
| 1 | 151/99917 | Vloerplaat | Rütelplatten | Bundplade | Piastra di Base | PCX 350 | .1 |
| 1 | 151/99924 | Vloerplaat | Rütelplatten | Bundplade | Piastra di Base | PCX 350 HAUC | .1 |
| 1 | 151/99913 | Vloerplaat | Rütelplatten | Bundplade | Piastra di Base | PCX 400 | .1 |
| 1 | 151/99925 | Vloerplaat | Rütelplatten | Bundplade | Piastra di Base | PCX 400 HAUC | .1 |
| 2 | 7/14011 | Schroef | Schaube | Skru | Vite | M14 x 35 x 2 | .6 |
| 3 | 151/99915 | Hendel | Griff | Handtag | Impugnatura | .2 | |
| 4 | 7/10004 | Schroef | Schaube | Skru | Vite | M10 x 20 | .10 |
| 5 | 4/1003 | Afdichtring | Scheibe | Spendeskive | Rondella | M10 | .10 |
| 6 | 3/4037 | Plug | Verschlussschraube | Prop | Candela | .2 | |
| 7 | 151/99914 | Hendel | Griff | Handtag | Impugnatura | .4 | |
| 8 | 8/10003 | Moer | Mutter | Motrik | Dado | M10 | .4 |
| 9 | 151/99918 | Vloerplaat | Rütelplatten | Bundplade | Piastra di Base | PCX 450 | .1 |
| 9 | 151/99926 | Vloerplaat | Rütelplatten | Bundplade | Piastra di Base | PCX 450 HAUC | .1 |
| 9 | 151/99919 | Vloerplaat | Rüvelplatten | Bundplade | Piastra di Base | PCX 500 | .1 |
| 9 | 151/99927 | Vloerplaat | Rüvelplatten | Bundplade | Piastra di Base | PCX 500 HAUC | .1 |
| 10 | 4/1005 | Afdichtring | Scheibe | Spendeskive | Rondella | M10 | .2 |
| 11 | 8/8008 | Moer | Mutter | Motrik | Dado | M10 | .2 |
| 12 | 4/8006 | Afdichtring | Scheibe | Spendeskive | Rondella | M8 | .2 |
| 13 | 00.0.860 | Schroef | Schaube | Skru | Vite | M8 x 30 | .2 |
| 14 | 151.0.284 | Klemstrook | Sicherungseinste | Klemmestrimmel | Fascetta di bloccaggio | PCX 350 | .1 |
| 14 | 151.0.285 | Klemstrook | Sicherungseinste | Klemmestrimmel | Fascetta di bloccaggio | PCX 400 | .1 |
| 14 | 151.0.286 | Klemstrook | Sicherungseinste | Klemmestrimmel | Fascetta di bloccaggio | PCX 450 | .1 |
| 14 | 151.0.287 | Klemstrook | Sicherungseinste | Klemmestrimmel | Fascetta di bloccaggio | PCX 500 | .1 |
| 15 | 151/01700 | Steu | Halterung | Beslag | Staffa | PCX 350 | .1 |
| 15 | 151/01600 | Steu | Halterung | Beslag | Staffa | PCX 400 | .1 |
| 15 | 151/01800 | Steu | Halterung | Beslag | Staffa | PCX 450 | .1 |
| 15 | 151/01900 | Steu | Halterung | Beslag | Staffa | PCX 500 | .1 |
| 16 | 151.0.271 | Kunststof onderplaat | Blockpflasterrüttler | Belaegningsklods | Pavimentazione a Blocchi | PCX 350 | .1 |
| 16 | 151.0.272 | Kunststof onderplaat | Blockpflasterrüttler | Belaegningsklods | Pavimentazione a Blocchi | PCX 350 HAUC | .1 |
| 16 | 151.0.273 | Kunststof onderplaat | Blockpflasterrüttler | Belaegningsklods | Pavimentazione a Blocchi | PCX 400 | .1 |
| 16 | 151.0.274 | Kunststof onderplaat | Blockpflasterrüttler | Belaegningsklods | Pavimentazione a Blocchi | PCX 400 HAUC | .1 |
| 16 | 151.0.275 | Kunststof onderplaat | Blockpflasterrüttler | Belaegningsklods | Pavimentazione a Blocchi | PCX 450 | .1 |
| 16 | 151.0.276 | Kunststof onderplaat | Blockpflasterrüttler | Belaegningsklods | Pavimentazione a Blocchi | PCX 450 HAUC | .1 |
| 16 | 151.0.277 | Kunststof onderplaat | Blockpflasterrüttler | Belaegningsklods | Pavimentazione a Blocchi | PCX 500 | .1 |
| 16 | 151.0.278 | Kunststof onderplaat | Blockpflasterrüttler | Belaegningsklods | Pavimentazione a Blocchi | PCX 500 HAUC | .1 |
| 17 | 21.0.292 | Anti-trilbevestiging | Schwingungsdämpfer | Antivibrationsopheng | Supporto antivibrazioni | Honda / Robin | .4 |
| 17 | 21.0.298 | Anti-trilbevestiging | Schwingungsdämpfer | Antivibrationsopheng | Supporto antivibrazioni | Hatz | .4 |

Bedplate and Front Cover (Honda / Robin), Plaque d'assise et Capot Avant (Honda / Robin), 2-01
Bancada y Cubierta delantera (Honda / Robin), Placa de Apoio e Tampa Frontal (Honda / Robin)
E046878 (Export) & 047357 (UK)
| 1 | 151.0.134......Front Cover - Orange ....... Capot Avant - Orange ....... Cubierta Delantera - Naranja ....... Tampa Frontal - Laranja ....... |
| 1 | 151/99932.....Front Cover - Orange ....... Capot Avant - Orange ....... Cubierta Delantera - Naranja ....... Tampa Frontal - Laranja ....... Oswald Record ....... |
| 1 | 151.0.261.....Front Cover - Blue ....... Cubierta Delantera - Azul ....... Tampa Frontal - Azul ....... |
| 1 | 151.0.177.....Front Cover - Green ....... Cubierta Delantera - Verde ....... Tampa Frontal - Verde ....... A-Plant ....... |
| 1 | 151/99904.....Front Cover - Green ....... Cubierta Delantera - Verde ....... Tampa Frontal - Verde ....... Travis Perkins ....... |
| 1 | 151.0.180.....Front Cover - Red ....... Cubierta Delantera - Roja ....... Tampa Frontal - Vermelho ....... |
| 1 | 151/99903.....Front Cover - Red ....... Cubierta Delantera - Roja ....... Tampa Frontal - Vermelho ....... Hire Station ....... |
| 1 | 151.0.179.....Front Cover - Yellow ....... Cubierta Delantera - Amarillo ....... Tampa Frontal - Amarelo ....... |
| 1 | 151.0.406.....Front Cover - Yellow ....... Cubierta Delantera - Amarillo ....... Tampa Frontal - Amarillo ....... Hewden ....... |
| 1 | 151/99951.....Front Cover - White ....... Cubierta Delantera - Blanco ....... Tampa Frontal - Blanco ....... |
| 2 | 07.0.403......Screw ....... Vis ....... Tornillo ....... Parafuse ....... M5 x 16 ....... |
| 3 | 21.0.234....Anti-Vibration Mount ...Tampon antivibratoire ....... Montura antivibratoria ....... Bloco Anti-vibracao ....... |
| 4 | 151.0.161.....Engine Clamp ....... Plaque de Serrage de Motor ....... Placa - Fijacion motor ....... Placa de Base ....... |
| 5 | 4/8003......Washer ....... Rondelle ....... Arandela ....... Anilha ....... M8 ....... 9 |
| 6 | 02.0.031......Screw ....... Vis ....... Tornillo ....... Parafuse ....... M8 x 60 ....... |
| 7 | 21.0.259.....Grommet-Tube End ....... Passe Fil-Extrmedié du tube ....... Anilto-Extremo Tubo ....... Anel Isolante-Extremidade do tubo ....... |
| 8 | 4/6005......Washer ....... Rondelle ....... Arandela ....... Anilha ....... M6 ....... 4 |
| 9 | 02.0.012......Screw ....... Vis ....... Tornillo ....... Parafuse ....... M6 x 16 ....... |
| 10 | 05.3.066......Washer ....... Rondelle ....... Arandela ....... Anilha ....... |
| 11 | 151.0.020......Belt Guard ....... Capot de couroie ....... Protector de la correa ....... Guarda da Cinta ....... Honda / Robin ....... |
| 12 | 7/10025......Screw ....... Vis ....... Tornillo ....... Parafuse ....... M10 x 12 ....... |
| 13 | 8/6011......Nut.... Ecrou ....... Tuerca ....... Porca ....... M6 ....... 3 |
| 14 | 7/8008......Screw ....... Vis ....... Tornillo ....... Parafuse ....... M8 x 16 ....... |
| 15 | 4/8006......Washer ....... Rondelle ....... Arandela ....... Anilha ....... M8 ....... 5 |
| 16 | 8/8001......Nut.... Ecrou ....... Tuerca ....... Porca ....... M8 ....... |
| 17 | 151/00400.....Bedplate ....... Plaque d'assise ....... Bancada ....... Placa de Apio ....... Honda / Robin ....... |
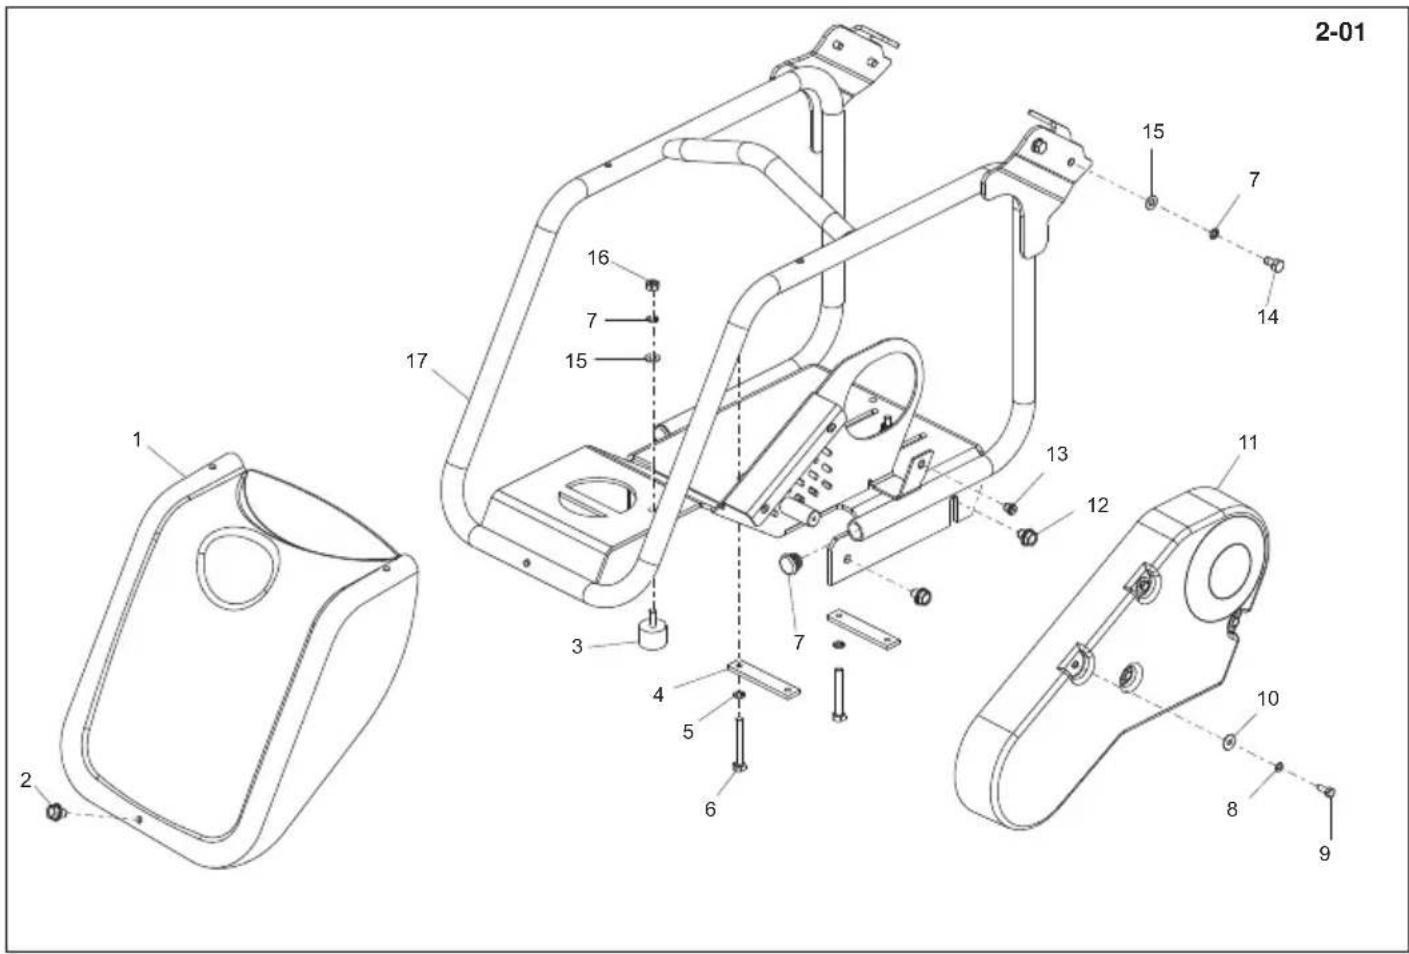
Grondplaat en Voordeksel (Honda / Robin), Sohlplatte und Frontabdeckung (Honda / Robin), 2-01 Fundamentplade en Forreste kappe (Honda / Robin), Piastra di Base e Copertura anteriore (Honda / Robin) -E046878 (Export) & 047357 (UK)
| 1 | 151.0.134....Voordeksel - Oranje....Frontabdeckung- Orange....Forreste kappe - Orange....Copertura anterio - Arancione.... |
| 1 | 151/99932...Voordeksel - Oranje....Frontabdeckung- Orange....Forreste kappe - Orange....Copertura anterio - Arancione.... Oswald Record ... |
| 1 | 151.0.261....Voordeksel - Blauw....Frontabdeckung - Blau....Forreste kappe - Bla....Copertura anterio - Blu ... |
| 1 | 151.0.177....Voordeksel - Groen.....Frontabdeckung - grun ....Forreste kappe - Gron....Copertura anterio- Verde....A-Plant.... |
| 1 | 151/99904....Voordeksel - Groen.....Frontabdeckung - grun ....Forreste kappe - Grun....Copertura anterio - Verde....Travis Perkins.... |
| 1 | 151.0.180....Voordeksel - Rood....Frontabdeckung - Rot....Forreste kappe - Rod....Copertura anterio - Rosso ... |
| 1 | 151/99903....Voordeksel - Rood....Frontabdeckung - Rot....Forreste kappe - Rod....Copertura anterio - Rosso ...Hire Station ... |
| 1 | 151.0.179....Voordeksel - Geel....Frontabdeckung - Gelb....Forreste kappe - Gul....Copertura anterio - Giallo ... |
| 1 | 151.0.406....Voordeksel - Geel....Frontabdeckung - Gelb....Forreste kappe - Gul....Copertura anterio - Giallo ...Hewden ... |
| 1 | 151/99951....Voordeksel - Wit....Frontabdeckung - WeiB....Forreste kappe - Hvid....Copertura anterio - Bianco ... |
| 2 | 07.0.403....Schroef ....Schaube ....Skrue ....Vite ....M5 x 16....3 |
| 3 | 21.0.234....Anti-trilbevestiging....Schwingungsdampfer ....Antivibrationsopheng ....Supporto antivibrazioni ... |
| 4 | 151.0.161....Plaat - Motorklem ...Halteplatte - Motor ...Plade - Motorklamp ....Piastra - Morsetto motore ....2 |
| 5 | 4/8003....Afdichtring....Scheibe....Spendeskive ....Rondella ....M8....9 |
| 6 | 02.0.031....Schroef ....Schaube ....Skrue ....Vite ....M8 x 60 ....1 |
| 7 | 21.0.259....Rubberen ring-bulseind . Auge - Rohrende ....Kordelstrop - Slangestykke ....Anello passacavo in gomma ... |
| estremita tubo ....2 | |
| 8 | 4/6005....Afdichtring....Scheibe....Spendeskive ....Rondella ....M8....4 |
| 9 | 02.0.012....Schroef ....Schaube ....Skrue ....Vite ....M6 x 16....4 |
| 10 | 05.3.066....Afdichtring....Scheibe....Spendeskive ....Rondella ....4 |
| 11 | 151.0.020....Riembeschemkap....Riemenabdeckung....Remskaerm ....Prolezione Cinghia ....Honda / Robin ....1 |
| 12 | 7/10025....Schroef ....Schaube ....Skrue ....Vite ....M10 x 12....4 |
| 13 | 8/6011....Moer ....Mutter ....Matrik ....Dado ....M6....3 |
| 14 | 7/8008....Schroef ....Schaube ....Skrue ....Vite ....M8 x 16....4 |
| 15 | 4/8006....Afdichtring....Scheibe....Spendeskive ....Rondella ....M8....5 |
| 16 | 8/8001....Moer ....Mutter ....Matrik ....Dado ....M8....1 |
| 17 | 151/00400....Grondplaat....Sohlplatte ....Fundamentplade ....Piastra di Base ....Honda / Robin ....1 |
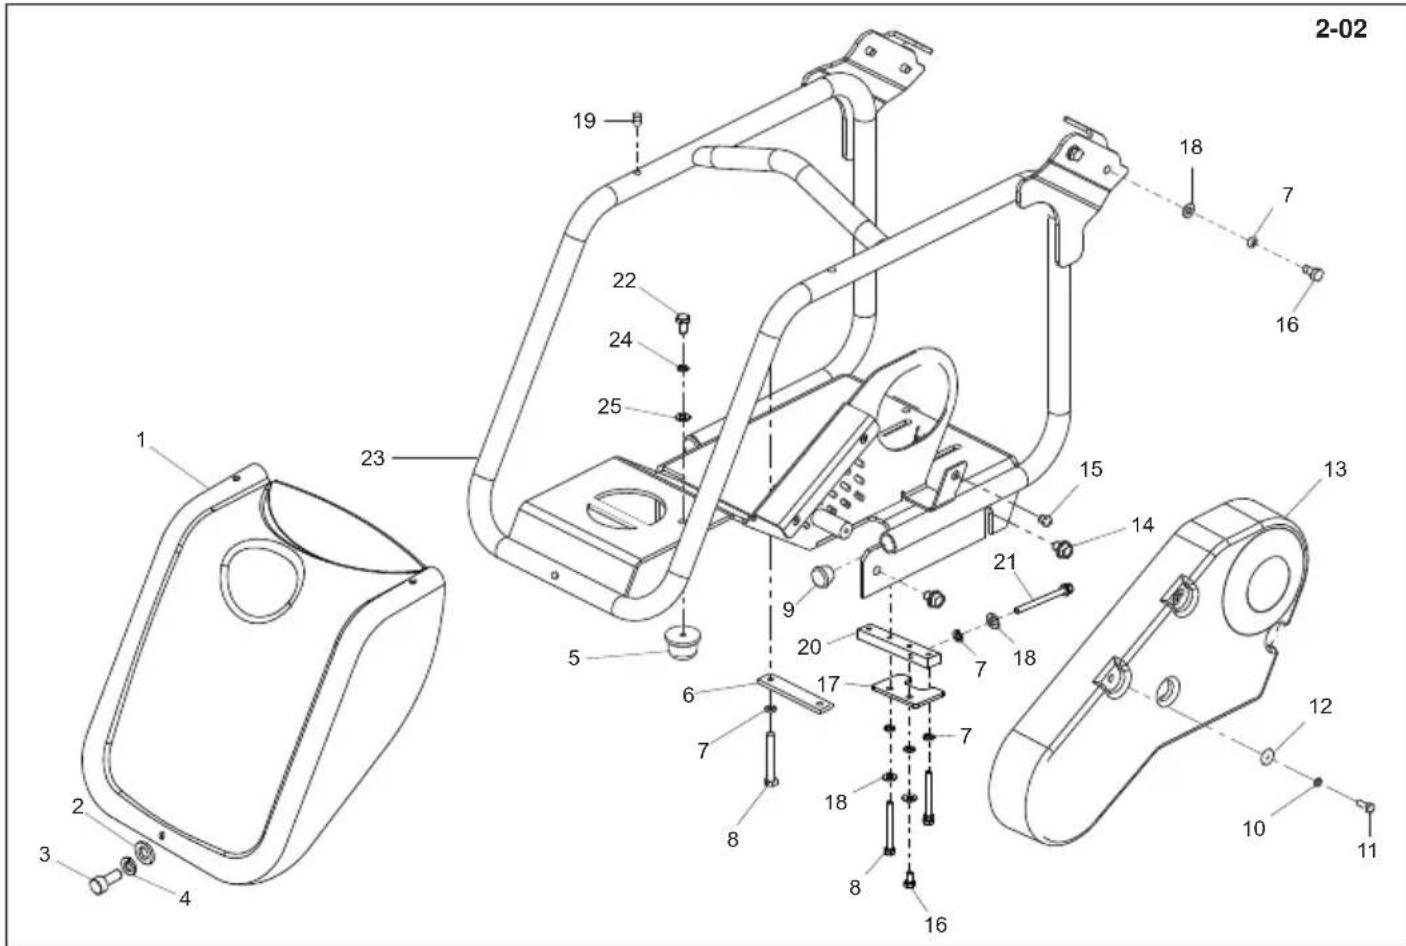
Bedplate and Front Cover (Honda / Robin), Plaque d'assise et Capot Avant (Honda / Robin), 2-02
Bancada y Cubierta delantera (Honda / Robin), Placa de Apoio e Tampa Frontal (Honda / Robin)
E046879 (Export) & 047358 (UK) -1434 (UK)
| 1 | 151.0.134......Front Cover - Orange ....... Capot Avant - Orange ....... Cubierta Delantera - Naranja ....... Tampa Frontal - Laranja ....... |
| 1 | 151/99932......Front Cover - Orange ....... Capot Avant - Orange ....... Cubierta Delantera - Naranja ....... Tampa Frontal - Laranja ....... Oswald Record ....... |
| 1 | 151.0.261......Front Cover - Blue ....... Cubierta Delantera - Azul ....... Tampa Frontal - Azul ....... |
| 1 | 151.0.177......Front Cover - Green ....... Cubierta Delantera - Verde ....... Tampa Frontal - Verde ....... A-Plant ....... |
| 1 | 151/99904......Front Cover - Green ....... Cubierta Delantera - Verde ....... Tampa Frontal - Verde ....... Travis Perkins ....... |
| 1 | 151.0.180......Front Cover - Red ....... Cubierta Delantera - Roja ....... Tampa Frontal - Vermelho ....... |
| 1 | 151/99903......Front Cover - Red ....... Cubierta Delantera - Roja ....... Tampa Frontal - Vermelho ....... Hire Station ....... |
| 1 | 151.0.179......Front Cover - Yellow ....... Cubierta Delantera - Amarillo ....... Tampa Frontal - Amarillo ....... |
| 1 | 151.0.406......Front Cover - Yellow ....... Cubierta Delantera - Amarillo ....... Tampa Frontal - Amarillo ....... Hewden ....... |
| 1 | 151/99951......Front Cover - White ....... Cubierta Delantera - Blanco ....... Tampa Frontal - Branco ....... |
| 2 | 05.0.000......Washer ....... Rondelle ....... Arandela ....... Anilha ....... M5 ....... 3 |
| 3 | 07.0.403......Screw ....... Vis ....... Tornillo ....... Parafuse ....... M5 x 16 ....... 3 |
| 4 | 05.3.017......Washer ....... Rondelle ....... Arandela ....... Anilha ....... M5 ....... 3 |
| 5 | 21.0.333......Anti-Vibration Mount ....... Tampon antivibratoire ....... Montura antivibratoria ....... Bloco Anti-vibracao ....... |
| 6 | 151.0.161......Engine Clamp ....... Plaque de Serrage de Motor ....... Placa - Fijación motor ....... Placa de Base ....... |
| 7 | 4/8003......Washer ....... Rondelle ....... Arandela ....... Anilha ....... M8 ....... 10 |
| 8 | 02.0.031......Screw ....... Vis ....... Tornillo ....... Parafuse ....... M8 x 60 ....... 4 |
| 9 | 21.0.259......Grommet-Tube End ....... Passe Fil-Extrémite du tube ....... Anilto-Extremo Tubo ....... Anel Isolante-Extremidade do tubo ....... |
| 10 | 4/6005......Washer ....... Rondelle ....... Arandela ....... Anilha ....... M6 ....... 4 |
| 11 | 02.0.012......Screw ....... Vis ....... Tornillo ....... Parafuse ....... M6 x 16 ....... 4 |
| 12 | 05.3.066......Washer ....... Rondelle ....... Arandela ....... Anilha ....... 4 |
| 13 | 151.0.020......Belt Guard ....... Capot de couroie ....... Protector de la correa ....... Guarda da Cinta ....... Honda / Robin ....... |
| 14 | 7/10025......Screw ....... Vis ....... Tornillo ....... Parafuse ....... M10 x 12 ....... 4 |
| 15 | 8/6011......Nut.... Ecrou ....... Tuerca ....... Porca ....... M6 ....... 3 |
| 16 | 7/8008......Screw ....... Vis ....... Tornillo ....... Parafuse ....... M8 x 16 ....... 5 |
| 17 | 151-99957......Plate ....... Plaque ....... Placa ....... 1 |
| 18 | 4/8006......Washer ....... Rondelle ....... Arandela ....... Anilha ....... M8 ....... 7 |
| 19 | 01.5.026......Nut.... Ecrou ....... Tuerca ....... Porca ....... M5 ....... 2 |
| 20 | 151.0.049......Block - Belt tensioner ....... Bloc de tendeur de couroie ....... Bloque - tensionador correa ....... Apio - Tensorda Cinta ....... |
| 21 | 02.0.120......Screw ....... Vis ....... Tornillo ....... Parafuse ....... M8 x 100 ....... 1 |
| 22 | 7/10004......Screw ....... Vis ....... Tornillo ....... Parafuse ....... M10 x 20 ....... 1 |
| 23 | 151/00400......Bedplate ....... Plaque d'assise ....... Bancada ....... Placa de Apio ....... Honda / Robin ....... 1 |
| 24 | 4/1003......Washer ....... Rondelle ....... Arandela ....... Anilha ....... M10 ....... 1 |
| 25 | 4/1005......Washer ....... Rondelle ....... Arandela ....... Anilha ....... M10 ....... 1 |
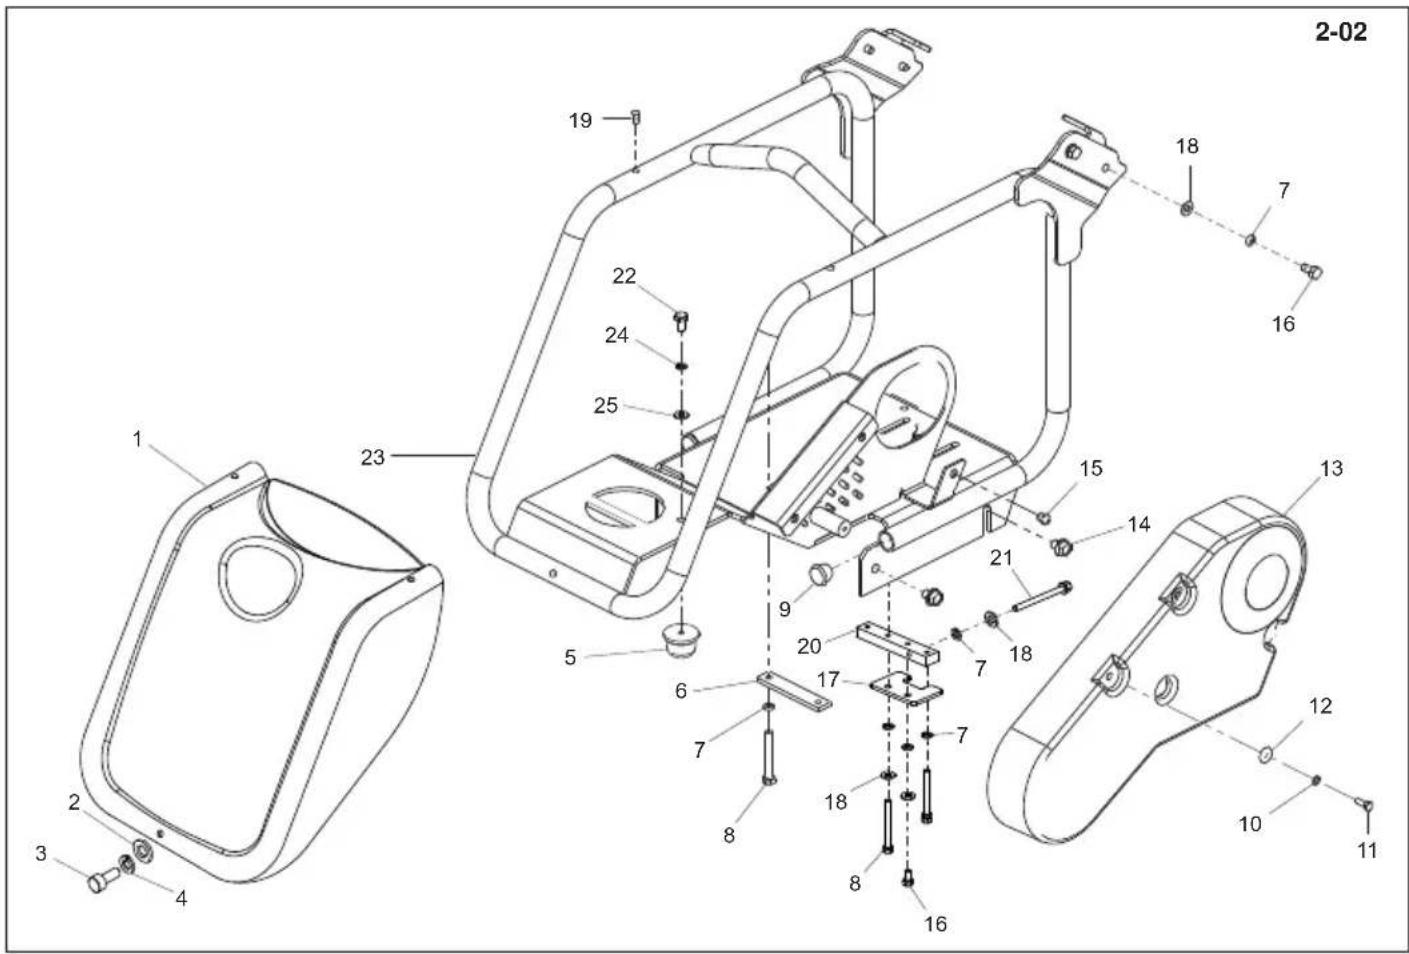
Grondplaat en Voordeksel (Honda / Robin), Sohlplatte und Frontabdeckung (Honda / Robin), 2-02 Fundamentplade en Forreste kappe (Honda / Robin), Piastra di Base e Copertura anteriore (Honda / Robin) E6879 (Export) & 047358 (UK) 07143 UK
| 1 | 151.0.134....Voordeksel - Oranje....Frontabdeckung- Orange....Forreste kappe - Orange....Copertura anterio - Arancione.... |
| 1 | 151/99932...Voordeksel - Oranje....Frontabdeckung- Orange....Forreste kappe - Orange....Copertura anterio - Arancione.... Oswald Record ... |
| 1 | 151.0.261...Voordeksel - Blauw....Frontabdeckung - Blau....Forreste kappe - Bla....Copertura anterio - Blu ... |
| 1 | 151.0.177....Voordeksel - Groen .......Frontabdeckung - grun .......Forreste kappe - Grn....Copertura anterio - Verde....A-Plant.... |
| 1 | 151/99904...Voordeksel - Groen .......Frontabdeckung - grun .......Forreste kappe - Grn....Copertura anterio - Verde....Travis Perkins.... |
| 1 | 151.0.180.....Voordeksel - Rood....Frontabdeckung - Rot....Forreste kappe - Red....Copertura anterio - Rosso .... |
| 1 | 151/99903...Voordeksel - Rood....Frontabdeckung - Rot....Forreste kappe - Rcd....Copertura anterio - Rosso ....Hire Station.... |
| 1 | 151.0.179....Voordeksel - Geel....Frontabdeckung - Gelb....Forreste kappe - Gul....Copertura anterio - Giallo .... |
| 1 | 151.0.406....Voordeksel - Geel....Frontabdeckung - Gelb....Forreste kappe - Gul....Copertura anterio - Giallo ....Hewden .... |
| 1 | 151/99951...Voordeksel - Wit....Frontabdeckung - WeiB....Forreste kappe - Hvid....Copertura anterio - Bianco .... |
| 2 | 05.0.000....Afdichtring....Scheibe....Spendeskive....Rondella ....M5....3 |
| 3 | 07.0.403....Schroef....Schaube....Skrue ....Vite ....M5 x 16....3 |
| 4 | 05.3.017....Afdichtring....Schaube....Spendeskive....Rondella ....M5....3 |
| 5 | 21.0.333....Anti-trilbevestiging....Schwingungsddampfer....Antivibrationsopheng....Supporto antivibrazioni .... |
| 6 | 151.0.161....Plaat - Motorklem....Halteplatte - Motor....Plade - Motorklamp....Piastra - Morsetto motore .... |
| 7 | 4/8003....Afdichtring....Scheibe....Spendeskive....Rondella ....M8....10 |
| 8 | 02.0.031....Schroef....Schaube....Skrue ....Vite ....M8 x 60 ....4 |
| 9 | 21.0.259....Rubberen ring-buiseind . Auge - Rohrende ....Kordelstop - Slangestykke ....Anello passacavo in gomma .... |
| estremita tubo ....2 | |
| 10 | 4/6005....Afdichtring....Scheibe....Spendeskive....Rondella ....M6....4 |
| 11 | 02.0.012....Schroef....Schaube....Skrue ....Vite ....M6 x 16....4 |
| 12 | 05.3.066....Afdichtring....Schaube....Spendeskive....Rondella .... |
| 13 | 151.0.020....Riembeschemkap....Riemenabdeckung....Remskaerm....Protezione Cinghia ....Honda / Robin ....1 |
| 14 | 7/10025....Schroef....Schaube....Skrue ....Vite ....M10 x 12....4 |
| 15 | 8/6011....Moer....Mutter....Matrik....Dado ....M6....3 |
| 16 | 7/8008....Schroef....Schaube....Skrue ....Vite ....M8 x 16....5 |
| 17 | 151-99957....Plaat....Platte....Piastra ....1 |
| 18 | 4/8006....Afdichtring....Scheibe....Spendeskive....Rondella ....M8....7 |
| 19 | 01.5.026....Moer....Mutter....Matrik....Dado ....M5....2 |
| 20 | 151.0.049....Blok - riemspanner...Block - Riemenspanner...Block Remstrammer...Blocco - tendicinghia .... |
| 21 | 02.0.120....Schroef....Schaube....Skrue ....Vite ....M8 x 100....1 |
| 22 | 7/10004....Schroef....Schaube....Skrue ....Vite ....M10 x 20....1 |
| 23 | 151/00400....Grondplaat...Sohlplatte...Fundamentplade...Piastra di Base ....Honda / Robin ....1 |
| 24 | 4/1003....Afdichtring....Scheibe....Spendeskive....Rondella ....M10....1 |
| 25 | 4/1005....Afdichtring....Scheibe....Spendeskive....Rondella ....M10....1 |

Bedplate and Front Cover (Honda / Robin), Plaque d'assise et Capot Avant (Honda / Robin), 2-03
Bancada y Cubierta delantera (Honda / Robin), Placa de Apoio e Tampa Frontal (Honda / Robin)
1071435 (UK)
| 1 | 151.0.134......Front Cover - Orange ....... Capot Avant - Orange ....... Cubierta Delantera - Naranja ....... Tampa Frontal - Laranja ....... |
| 1 | 151/99932.....Front Cover - Orange ....... Capot Avant - Orange ....... Cubierta Delantera - Naranja ....... Tampa Frontal - Laranja ....... Oswald Record ....... |
| 1 | 151.0.261.....Front Cover - Blue ....... Capot Avant - Bleu ....... Cubierta Delantera - Azul ....... Tampa Frontal - Azul ....... |
| 1 | 151.0.177.....Front Cover - Green ....... Capot Avant - Vert ....... Cubierta Delantera - Verde ....... Tampa Frontal - Verde ....... A-Plant ....... |
| 1 | 151/99904.....Front Cover - Green ....... Capot Avant - Vert ....... Cubierta Delantera - Verde ....... Tampa Frontal - Verde ....... Travis Perkins ....... |
| 1 | 151.0.180.....Front Cover - Red ....... Capot Avant - Rouge ....... Cubierta Delantera - Roja ....... Tampa Frontal - Vermelho ....... |
| 1 | 151/99903.....Front Cover - Red ....... Capot Avant - Rouge ....... Cubierta Delantera - Roja ....... Tampa Frontal - Vermelho ....... Hire Station ....... |
| 1 | 151.0.179.....Front Cover - Yellow ....... Capot Avant - Jaune ....... Cubierta Delantera - Amarillo ....... Tampa Frontal - Amarelo ....... |
| 1 | 151.0.406.....Front Cover - Yellow ....... Capot Avant - Jaune ....... Cubierta Delantera - Amarillo ....... Tampa Frontal - Amarelo ....... Hewden ....... |
| 1 | 151/99951.....Front Cover - White ....... Capot Avant - Blanc ....... Cubierta Delantera - Blanco ....... Tampa Frontal - Branco ....... |
| 2 | 7/8059....Screw ....... Vis ....... Tornillo ....... Parafuse ....... M8 x 16 ....... |
| 3 | 21.0.234....Anti-Vibration Mount ..... Tampon antivibratoire ....... Montura antivibratoria ....... Bloco Anti-vibracao ....... |
| 4 | 151.0.161.....Engine Clamp ....... Plaque de Serrage de Motor ....... Placa - Fijacion motor ....... Placa de Base ....... |
| 5 | 4/8003....Washer ....... Rondelle ....... Arandela ....... Anilha ....... M8 ....... 9 |
| 6 | 02.0.031....Screw ....... Vis ....... Tornillo ....... Parafuse ....... M8 x 60 ....... |
| 7 | 21.0.259....Grommet-Tube End ....... Passe Fil-Extrémite du tube ....... Anillo-Extremo Tubo ....... Anel Isolante-Extremidade do tubo ....... |
| 8 | 4/6005....Washer ....... Rondelle ....... Arandela ....... Anilha ....... M6 ....... 4 |
| 9 | 02.0.012....Screw ....... Vis ....... Tornillo ....... Parafuse ....... M6 x 16 ....... |
| 10 | 05.3.066....Washer ....... Rondelle ....... Arandela ....... Anilha ....... |
| 11 | 151.0.020....Belt Guard ....... Capot de couroie ....... Protector de la correa ....... Guarda da Cinta ....... Honda / Robin ....... |
| 12 | 7/10025....Screw ....... Vis ....... Tornillo ....... Parafuse ....... M10 x 12 ....... |
| 13 | 8/6011....Nut.... Ecrou ....... Tuercia ....... Porca ....... M6 ....... 3 |
| 14 | 7/8008....Screw ....... Vis ....... Tornillo ....... Parafuse ....... M8 x 16 ....... |
| 15 | 4/8006....Washer ....... Rondelle ....... Arandela ....... Anilha ....... M8 ....... 5 |
| 16 | 8/8001....Nut.... Ecrou ....... Tuercia ....... Porca ....... M8 ....... |
| 17 | 151/00400....Bedplate ....... Plaque d'assise ....... Bancada ....... Placa de Apio ....... Honda / Robin ....... |
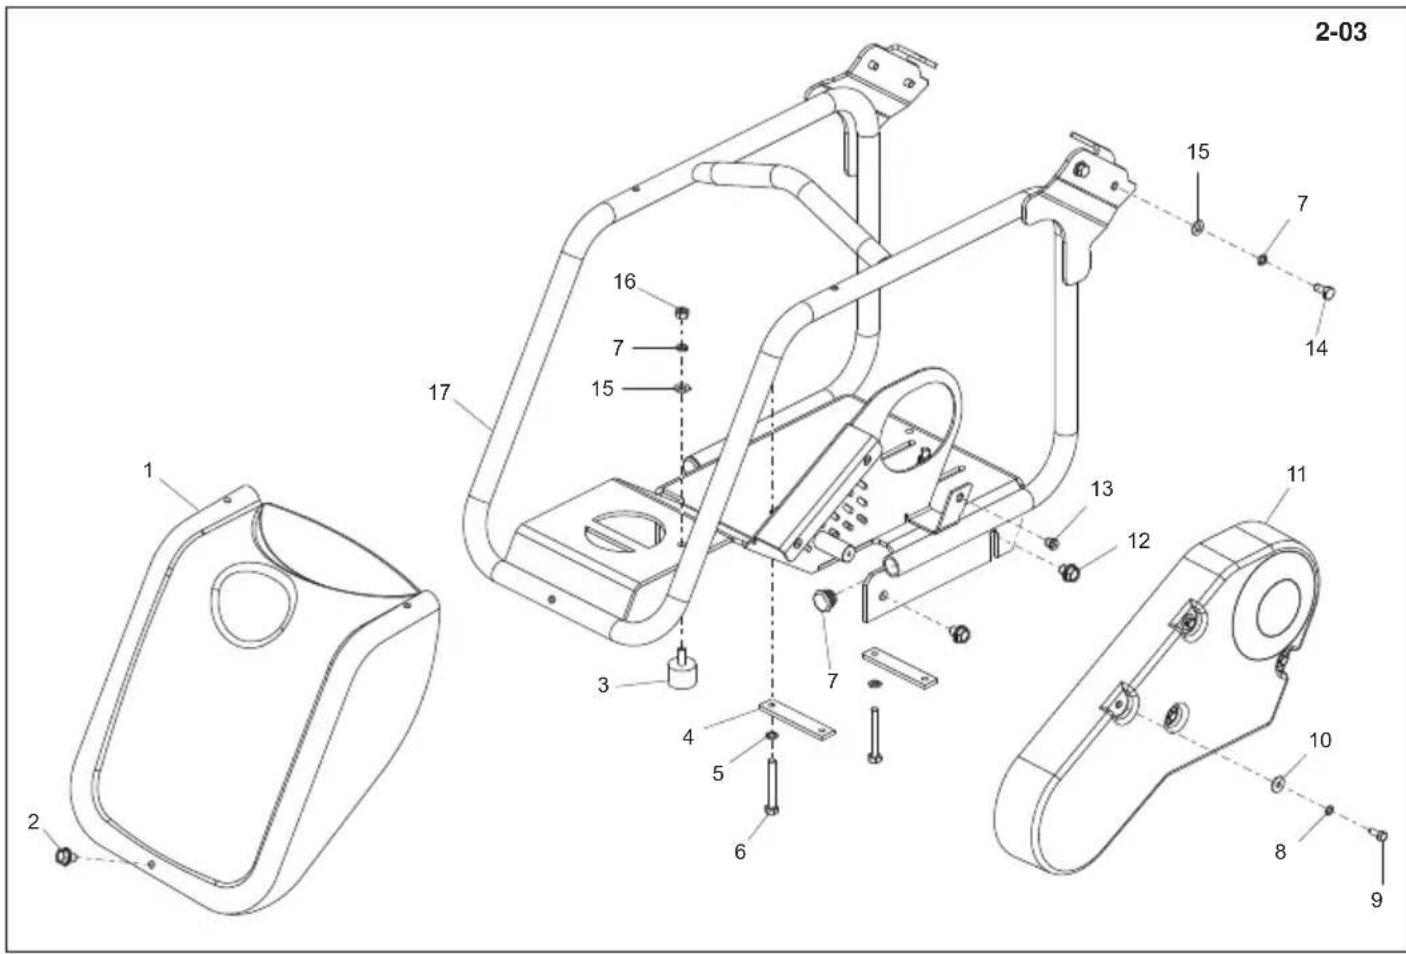
Grondplaat en Voordeksel (Honda / Robin), Sohlplatte und Frontabdeckung (Honda / Robin), 2-03 Fundamentplade en Forreste kappe (Honda / Robin), Piastra di Base e Copertura anteriore (Honda / Robin) H07435 (UK)
| 1 | 151.0.134....Voordeksel - Oranje....Frontabdeckung- Orange....Forreste kappe - Orange....Copertura anterio - Arancione.... |
| 1 | 151/99932....Voordeksel - Oranje....Frontabdeckung- Orange....Forreste kappe - Orange....Copertura anterio - Arancione.... Oswald Record.... |
| 1 | 151.0.261....Voordeksel - Blauw....Frontabdeckung - Blau....Copertura anterio - Blu.... |
| 1 | 151.0.177....Voordeksel - Groen.....Frontabdeckung - grun....Forreste kappe - Gron....Copertura anterio- Verde....A-Plant.... |
| 1 | 151/99904....Voordeksel - Groen.....Frontabdeckung - grun....Forreste kappe - Grün....Copertura anterio - Verde....Travis Perkins.... |
| 1 | 151.0.180....Voordeksel - Rood....Frontabdeckung - Rot....Forreste kappe - Rod....Copertura anterio - Rosso.... |
| 1 | 151/99903....Voordeksel - Rood....Frontabdeckung - Rot....Forreste kappe - Red....Copertura anterio - Rosso....Hire Station.... |
| 1 | 151.0.179....Voordeksel - Geel....Frontabdeckung - Gelb....Forreste kappe - Gul....Copertura anterio - Giallo.... |
| 1 | 151.0.406....Voordeksel - Geel....Frontabdeckung - Gelb....Forreste kappe - Gul....Copertura anterio - Giallo....Hewden.... |
| 1 | 151/99951....Voordeksel - Wit....Frontabdeckung - WeiB....Forreste kappe - Hvid....Copertura anterio - Bianco.... |
| 2 | 7/8059....Schroef .......Schaube .......Skrue .......Vite .......M8 x 16....3 |
| 3 | 21.0.234....Anti-trilbevestiging....Schwingungsdämpfer....Antivibrationsopheng....Supporto antivibrazioni.... |
| 4 | 151.0.161....Plaat - Motorklem ...Halteplatte - Motor ...Plade - Motorklamp ...Piastra - Morsetto motore....2 |
| 5 | 4/8003....Afdichtring....Scheibe....Spendeskive....Rondella....M8....9 |
| 6 | 02.0.031....Schroef .......Schaube .......Skrue .......Vite .......M8 x 60....1 |
| 7 | 21.0.259....Rubberen ring-bulseind . Auge - Rohrende ....Kordelstrop - Slangestykke....Anello passacavo in gomma.... |
| estremita tubo.... | |
| 8 | 4/6005....Afdichtring....Scheibe....Spendeskive....Rondella....M8....4 |
| 9 | 02.0.012....Schroef .......Schaube .......Skrue .......Vite .......M6 x 16....4 |
| 10 | 05.3.066....Afdichtring....Scheibe....Spendeskive....Rondella.... |
| 11 | 151.0.020....Riembeschemkap....Riemenabdeckung....Remskaerm....Prolezione Cinghia....Honda / Robin....1 |
| 12 | 7/10025....Schroef .......Schaube .......Skrue .......Vite .......M10 x 12....4 |
| 13 | 8/6011....Moer .......Mutter .......Matrik .......Dado .......M6....3 |
| 14 | 7/8008....Schroef .......Schaube .......Skrue .......Vite .......M8 x 16....4 |
| 15 | 4/8006....Afdichtring....Scheibe....Spendeskive....Rondella....M8....5 |
| 16 | 8/8001....Moer .......Mutter .......Matrik .......Dado .......M8....1 |
| 17 | 151/00400....Grondplaat....Sohlplatte .......Fundamentplade....Piastra di Base....Honda / Robin....1 |
Bedplate and Front Cover (Hatz), Plaque d'assise et Capot Avant (Hatz), 2-04 Bancada y Cubierta delantera (Hatz), Placa de Apoio e Tampa Frontal (Hatz)
| 1 | 151/99907......Front Cover - Orange... | Capot Avant - Orange... | Cubierta Delantera - Naranja... | Tampa Frontal - Laranja | 1 |
| 1 | 151/99908......Front Cover - Green... | Capot Avant - Vert... | Cubierta Delantera - Verde... | Tampa Frontal - Verde | 1 |
| 1 | 151/99909......Front Cover - Blue... | Capot Avant - Bleu... | Cubierta Delantera - Azul... | Tampa Frontal - Azul | 1 |
| 1 | 151/99910......Front Cover - Red... | Capot Avant - Rouge... | Cubierta Delantera - Roja... | Tampa Frontal - Vermelho | 1 |
| 1 | 151/99911......Front Cover - Yellow... | Capot Avant - Jaune... | Cubierta Delantera - Amarillo... | Tampa Frontal - Amarelo | 1 |
| 1 | 151/99912......Front Cover - Yellow... | Capot Avant - Jaune... | Cubierta Delantera - Amarillo... | Tampa Frontal - Amarelo... | 1 |
| 1 | 151/99952......Front Cover - White... | Capot Avant - Blanc... | Cubierta Delantera - Blanco... | Tampa Frontal - Branco | 1 |
| 2 | Item 3......Washer | Rondelle... | Arandela | Anilha | M5.3 |
| 3 | 7/8059... | Vis... | Tornillo... | Parafuse | M8 x 16.3 |
| 4 | Item 3......Washer | Rondelle... | Arandela | Anilha | M5.3 |
| 5 | 151/00500...Bedplate | Plaque d'assise... | Bancada | Placa de Apoio... | Hatz |
| 6 | 21.0.333...Anti-Vibration Mount... | Tampon antivibratoire... | Montura antivibratoria | Bloco Anti-vibracao | 1 |
| 7 | 151.0.081...Engine Clamp... | Plaque de Serrage de Motor... | Placa - Fijacion motor | Placa de Base | 1 |
| 8 | 4/8006...Washer | Rondelle... | Arandela | Anilha | M8.1 |
| 9 | 4/8003...Washer | Rondelle... | Arandela | Anilha | M8.1 |
| 10 | 7/8052...Screw... | Vis... | Tornillo... | Parafuse | M8 x 45.1 |
| 11 | 02.0.031...Screw... | Vis... | Tornillo... | Parafuse | M8 x 60.1 |
| 12 | 151.0.049...Engine Clamp... | Plaque de Serrage de Motor... | Placa - Fijacion motor | Placa de Base | 1 |
| 13 | 4/8003...Washer | Rondelle... | Arandela | Anilha | M8.1 |
| 14 | 05.3.066...Washer | Rondelle... | Arandela | Anilha | 4 |
| 15 | 4/6005...Washer | Rondelle... | Arandela | Anilha | M6.4 |
| 16 | 02.0.012...Screw... | Vis... | Tornillo... | Parafuse | M6 x 16.4 |
| 17 | 151.0.168...Belt Guard... | Capot de courroie... | Protector de la correa | Guarda da Cinta | Hatz |
| 18 | 02.0.120...Screw... | Vis... | Tornillo... | Parafuse | M8 x 100.1 |
| 19 | 7/10025...Screw... | Vis... | Tornillo... | Parafuse | M10 x 12.2 |
| 20 | 7/8008...Screw... | Vis... | Tornillo... | Parafuse | M8 x 16.4 |
| 21 | 8/6011...Nut... | Ecrou... | Tuerca | Porca | M6.3 |
| 22 | 4/8003...Washer | Rondelle... | Arandela | Anilha | M8.4 |
| 23 | 4/8006...Washer | Rondelle... | Arandela | Anilha | M8.4 |
| 24 | 01.5.026...Nut... | Ecrou... | Tuerca | Porca | M5.3 |
| 25 | 7/10010...Screw... | Vis... | Tornillo... | Parafuse | M10 x 30.1 |
| 26 | 4/1003...Washer | Rondelle... | Arandela | Anilha | M10.1 |
| 27 | 4/1005...Washer | Rondelle... | Arandela | Anilha | M10.1 |
| 28 | 7/10026...Screw... | Vis... | Tornillo... | Parafuse | M10 x 35.2 |
| 29 | 151.0.022...Spacer | Entreose... | Espaciarador | Espacarador | 2 |
| 30 | 21.0.259...Grommet-Tube End... | Passé Fil-Extrémite du tube... | Anilto-Extremo Tubo... | Anel Isolante-Extremidade do tubo | 2 |
| 31 | 151/99996...Spacer... | Entreose... | Espaciarador... | Espacarador... | 1 |
| Grondplaat en Voordeksel (Hatz), Sohlplatte und Frontabdeckung (Hatz), Fundamentplade en Forreste kappe (Hatz), Piastra di Base e Copertura anteriore (Hatz) | ||||||
| 1 | 151/99907 | Voordeksel - Oranje | Frontabdeckung- Orange | Forreste kappe - Orange | Copertura anteriore - Arancione | 1 |
| 1 | 151/99908 | Voordeksel - Groen | Frontabdeckung - grün | Forreste kappe - Grön | Copertura anteriore- Verde | 1 |
| 1 | 151/99909 | Voordeksel - Blauw | Frontabdeckung - Blau | Forreste kappe - Bla | Copertura anteriore - Blu | 1 |
| 1 | 151/99910 | Voordeksel - Rood | Frontabdeckung - Rot | Forreste kappe - Red | Copertura anteriore - Rosso | 1 |
| 1 | 151/99911 | Voordeksel - Geel | Frontabdeckung - Gelb | Forreste kappe - Gul | Copertura anteriore - Giallo | 1 |
| 1 | 151/99912 | Voordeksel - Geel | Frontabdeckung - Gelb | Forreste kappe - Gul | Copertura anteriore - Giallo | 1 |
| 1 | 151/99952 | Voordeksel - Wit | Frontabdeckung - Weiß | Forreste kappe - Hvid | Copertura anteriore - Bianco | 1 |
| 2 | Item 3. | Washer | Rondelle | Arandela | Anilha | M5 |
| 3 | 7/8059 | Screw | Vis | Tornillo | Parafuse | M8 x 16 |
| 4 | Item 3. | Washer | Rondelle | Arandela | Anilha | M5 |
| 5 | 151/00500 | Grondplaat | Sohliatte | Fundamentplade | Piastra di Base | Hatz |
| 6 | 21.0.333 | Anti-trilbevestiging | Schwingungsdamper | Antivibrationsophaeng | Supporto antivibrazioni | 1 |
| 7 | 151.0.081 | Plaat - Motorklem | Halteplatte - Motor | Plade - Motorklamp | Piastra - Morsetto motore | 1 |
| 8 | 4/8006 | Afdichtring | Scheibe | Spendeskive | Rondella | M8 |
| 9 | 4/8003 | Afdichtring | Scheibe | Spendeskive | Rondella | M8 |
| 10 | 7/8052 | Schroef | Schraube | Skru | Vite | M8 x 45 |
| 11 | 02.0.031 | Schroef | Schraube | Skru | Vite | M8 x 60 |
| 12 | 151.0.049 | Plaat - Motorklem | Halteplatte - Motor | Plade - Motorklamp | Piastra - Morsetto motore | 1 |
| 13 | 4/8003 | Afdichtring | Scheibe | Spendeskive | Rondella | M8 |
| 14 | 05.3.066 | Afdichtring | Scheibe | Spendeskive | Rondella | 4 |
| 15 | 4/6005 | Afdichtring | Scheibe | Spendeskive | Rondella | M6 |
| 16 | 02.0.012 | Schroef | Schraube | Skru | Vite | M6 x 16 |
| 17 | 151.0.168 | Riemboschemkap | Riemenabdeckung | Remskaerm | Protezione Cinghia | Hatz |
| 18 | 02.0.120 | Schroef | Schraube | Skru | Vite | M8 x 100 |
| 19 | 7/10025 | Schroef | Schraube | Skru | Vite | M10 x 12 |
| 20 | 7/8008 | Schroef | Schraube | Skru | Vite | M8 x 16 |
| 21 | 8/6011 | Moer | Mutter | Matrik | Dado | M6 |
| 22 | 4/8003 | Afdichtring | Scheibe | Spendeskive | Rondella | M8 |
| 23 | 4/8006 | Afdichtring | Scheibe | Spendeskive | Rondella | M8 |
| 24 | 01.5.026 | Moer | Mutter | Matrik | Dado | M5 |
| 25 | 7/10010 | Schroef | Schraube | Skru | Vite | M10 x 30 |
| 26 | 4/1003 | Afdichtring | Scheibe | Spendeskive | Rondella | M10 |
| 27 | 4/1005 | Afdichtring | Scheibe | Spendeskive | Rondella | M10 |
| 28 | 7/10026 | Schroef | Schraube | Skru | Vite | M10 x 35 |
| 29 | 151.0.022 | Afstandsstuk | Distanzstück | Afstandsstykke | Distanziale | 2 |
| 30 | 21.0.259 | Rubberen ring-buiseind | Auge - Rohrende | Kordelstop - Slangestykke | Anello passacavo in gomma | |
| estremila tubo | ||||||
| 31 | 151/99996 | Afstandsstuk | Distanzstück | Afstandsstykke | Distanziale | |


1 MS12...Plug Bougie. Tapon Bujo 1/4"
2 15.0.102.Washer Rondelle Arandela Anilha 1 / 4^ × 1mm
3 12.1.057.Bearing .Roulement .Cojine .Rolamanto 2
4 943/99904....Gasket... Joint.. Gaxeta. 2
5 7/8037...Screw.. Vis. Tornillo. Parafuse M8 x 20. 8
6 15.0.196..Oil Seal... Joint d'etanchete a l'huile...Obturador aceite... Vendaço de Oleo.
7 77.0.015....End Cover... Carter d'extrimite... Tapa de fondo ... Tampa de extremidade...
8 942/99907...Vibrator Shaft.. .Axe. .Eje .Veio PCX 350
8 77.0.014...Vibrator Shaft.. .Axe... Eje ... Veio PCX 400/450/500 1
9 77.0.013.Housing Carter de boite de vitesses...Envoltura de la transmision...Estojo da caixa de engrenagens 1
10 77.0.016....End Cover... Carter d'extremite... Tapa de fondo ... Tampa de extremidade..
11 PCX/VIB-01 ....Vibrator Assembly... Ensemble vibrateur ... Conjunto de vibrador ... Conjunto do Vibrador ... PCX 400/450/500 ..
11 PCX/VIB-02 ...Vibrator Assembly... Ensemble vibrateur ... Conjunto de vibrador ... Conjunto do Vibrador ... PCX 350 ...
Verwijder de plug en de afdichtring, Rüttlerteil, Vibratorenhed, Gruppo Vibratore 3-01
1 MS12.........Plug . Verschlusschraube Prop . Candela 1/4"
2 15.0.102...Afdichtring... Scheibe... Spendeskive... Cuscinetto... 1/4" x 1mm... 1
3 12.1.057...Lager...Lager... Ro lamanto 2
4 943/99904. . . . . . . . . . . . . . . . . . . . . . . . . . . . . . . . . . . . . . . . . . . . . . . . . . . . . . . . . . . . . . . . . . . . . . . . . . . . . . . ..
5 7/8037...Schroef ..Schaube ...Skrue ...Vite ...M8 x 20...8
6 15.0.196...Olieafdichtring... Oldchtung... Oliepakning... Paraolio
7 77.0.015....Einddeksel....Endschild.... Endedaeksel.... Coperchio Estremita...
8 942/99907..As Welle ..Aksel ..Albero PC X 350 1
8 77.0.014..As Welle ..Aksel ..Albero PCX 400/450/500...
9 77.0.013.Versnellingsbakhuis..Getriebekasten .Garkassehus .Involucro scatola ingranaggi
10 77.0.016....Einddeksel....Endschild.... Endedaksel... Coperchio Estremita..
11 PCX/VIB-01....Trilelement... Ruttelwerk. .Vibratorenhed Gruppo vibratorePCX 400/450/500 1
11 PCX/VIB-02 Trilelement Ruttelwerk. Vibratorenhed Gruppo vibratore PCX 350
4-01
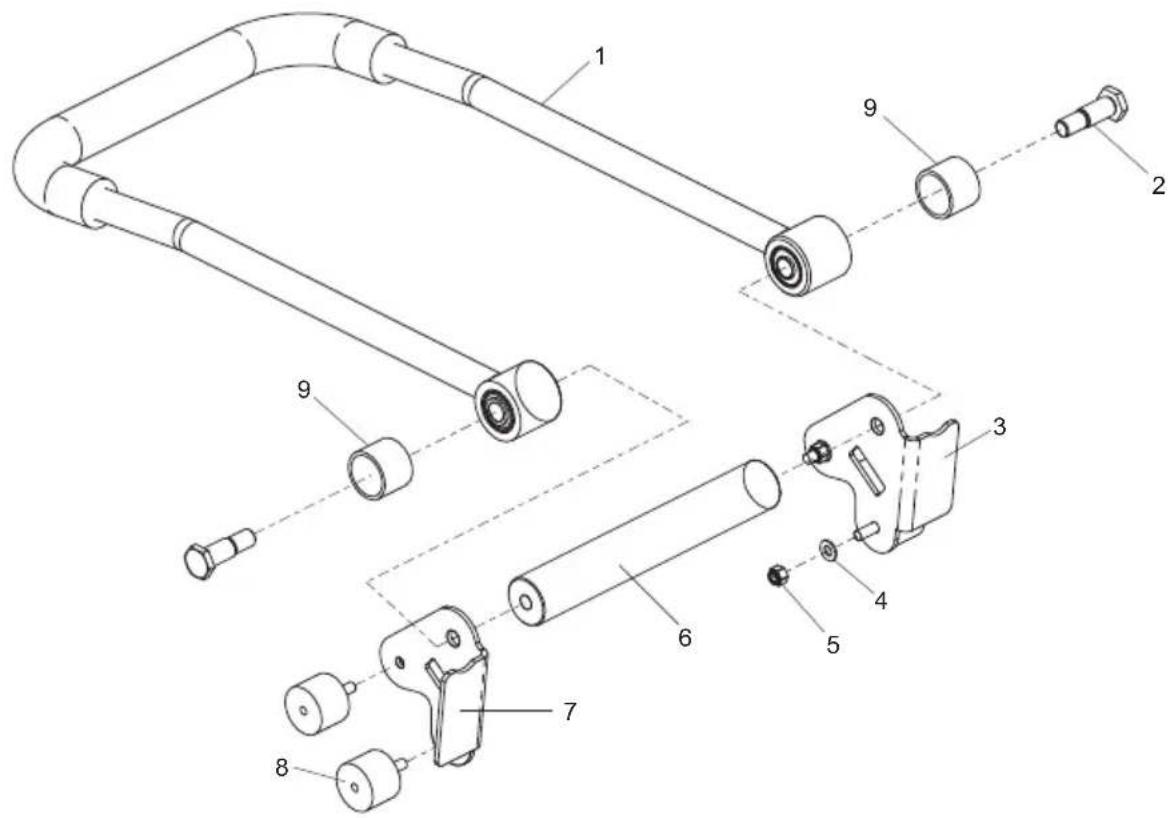
Handle Assembly, Ensemble poignée, Conjunto de manillar, Conjunto do Punho
4-01
1 151/00100SF.....Handle & Bushes - Orange....Guidon & Douilles - Orange...Manillar v Bujes - Orange...Punho y Buchas - Arancione..
1 151/00100BF.....Handle & Bushes - Blue ....... Guidon & Douilles - Bleu.... Manillar y Bujes - Azul. ...Punho y Buchas - Azul.
1 151/00100GF ....Handle & Bushes - Green..... Guidon & Douilles - Vert.....Manillar y Bujes - Verde .... Punho y Buchas - Verde
1 151/00100RF ....Handle & Bushes - Red.....Guidon & Douilles - Rouge....Manillar Bujes - Roja .......Punho y Buchas - Vermelho
1 151/00100YF....Handle & Bushes - Yellow..... Guidon & Douilles - Jaune.....Manillar y Bujes - Amarillo.. Punho y Buchas - Amarelo.
1 151/00100WF.....Handle & Bushes - White ....... Guidon & Douilles - Blanc....Manillar y Bujes - Blanco.... Punho y Buchas - Branco...
2 151.0.019...Bolt... Boulon... Perno... Perno
3 151/99906...Bracket ...Patte de Montage ..Escuadra.. Suporte. 1013118...
3 151/99921.......Bracket . Patte de Montage .. Escuadra.. Suporte. 013119 1
4 4/8006..Washer Rondelle Arandela .Anilha
5 8/8008...Nut... Ecrou Tuerca porca M8.4
6 151/99901 Strut. Bequille Puntal Apoio
7 151/99905...Bracket... Patte de Montage... Escuadra... Suporte... 1013118...
7 151/99920.......Bracket .Patte de Montage .Escuadra .Suporte .013119.
8 21/0157. Anti-Vibration Mount. Tampon Antivibratoire. Montura Antivibratoria. Bloco Anti-vibração.
9 21.0.187 Bush Douille Buje Bucha 2
4-01

Decals, Autocollant, Rótulo, Decalque
8-01
1 800/99962 Decal Autocollant Rótulo Decalque PCX 450
1 800/99963 .Decal .Autocollant Rtoulo .Decalque PCX500
2 800/99951 Decal - Noise Autocollant - Bruits Rótulo - Ruidos Decalque - Ruido Honda GX120
2 800/99942 Decal - Noise Autocollant - Bruits Rótulo - Ruidos Decalque - Ruido Honda GX160 & Hatz
3 19.0.373.Decal Autocollant Rotulo .Decalque 1
4 800/99965 .Decal .. Autocollant Rótulo . Decalque . 8 Hrs +
5 800/99986 .Decal . Autocollant . Rótulo . Decalque . Lifting Point.
6 800/99743. Decal - Engine . Autocollant - Motor . Rótulo - Motor . Decalque - Motor
8-01
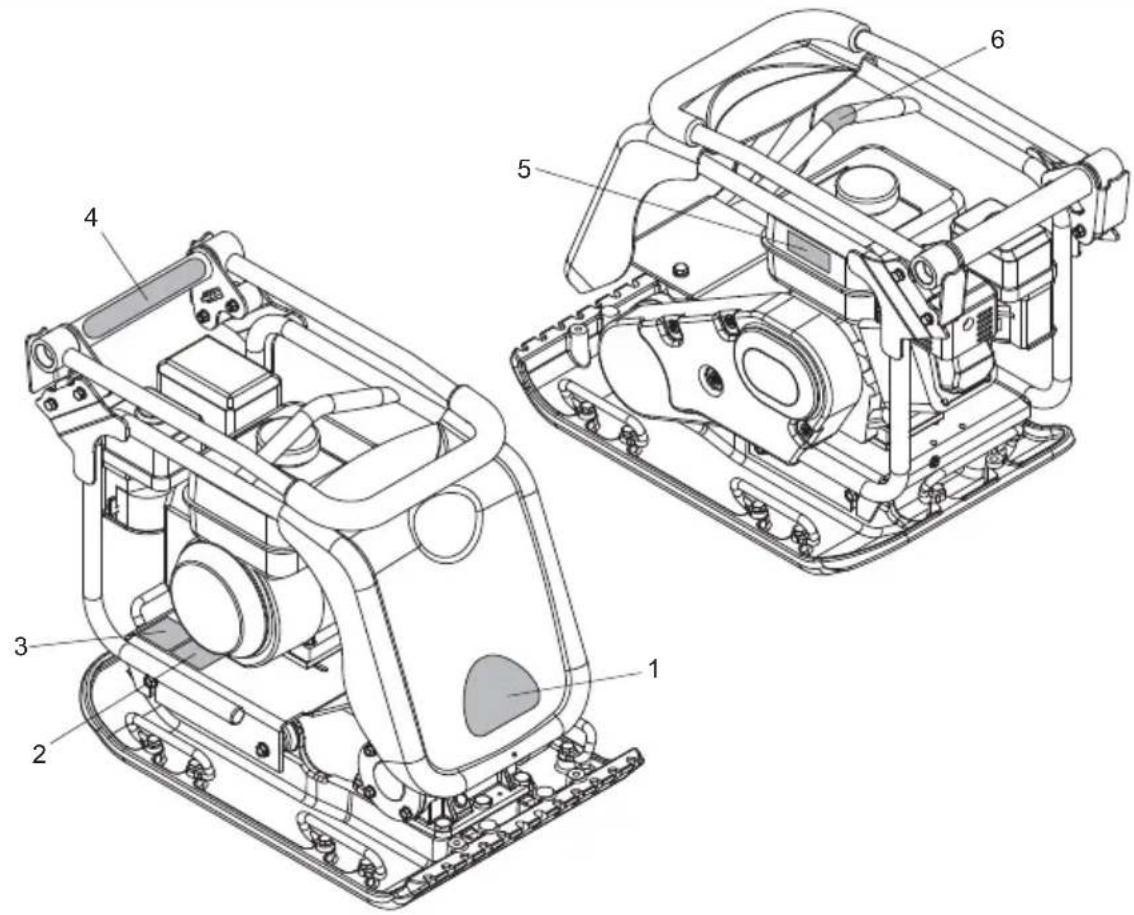
Label, Abziehbild, Skilt, Decalcomania
8-01
1 800/99962 Label .Abziehbild .Skilt .Decalcomania PCX 450.
1 800/99963 Label .Abziehbild Skilt .Decalcomania PCX 500
2 800/99942 Label - Guluid .Abziehbld - Gerauschpegelschild .. Skilt - Skilt Stj. Decalcomania - Sulla rumorosita ... Honda GX120
2 800/99942 .........Label - Guluid .........Abziehbild - Gerauschpegelschild... Skilt - Skilt Stoj....Decalcomania - Sulla rumorosita ... Honda GX160 & Hatz.
3 19.0.373 Label .Abziehbild .Skilt .Decalcomania..
4 800/99965 Label .Abziehbild .Skilt .Decalcomania.8 Hrs +
5 800/99986 Label .Abziehbild Skilt .Decalcomania. Lifting Point
6 800/99743 Label - Motor .Abziehbild - Motor .Skilt - Motor .Decalcomania - Motor e