BELLE RTX 80 D - Vibratory plate ALTRAD - Free user manual and instructions
Find the device manual for free BELLE RTX 80 D ALTRAD in PDF.

| Product type | Vibrating plate (rammer) |
| Brand | Altrad |
| Model | BELLE RTX 80 D |
| Width (mm) | 425 |
| Length (mm) | 700 |
| Height (mm) | 1081 |
| Compaction shoe width (mm) | 280 |
| Compaction shoe length (mm) | 335 |
| Weight (kg) | 86 |
| Engine | Yanmar L48, 4-stroke, air-cooled, single-cylinder |
| Engine power (kW) | 3.5 |
| Fuel type | Diesel |
| Fuel tank capacity (L) | 2.5 |
| Starting | Recoil starter |
| Frequency (Hz) | 10 |
| Impact force (kN) | 20.5 |
| Stroke (mm) | 52 |
| Noise level (dB(A)) | 108 |
| 3-axis vibration (m/s²) | 11.8 |
| Intended use | Preparation of foundations, driveways, footings, curb edges, slabs, street repair works, roadways and sidewalks |
| Personal protective equipment (PPE) | Safety glasses, gloves, ear defenders, safety shoes |
| Routine maintenance | Check engine oil and rammer oil levels, clean air filter, change engine oil and rammer oil according to schedule |
| Warranty | 12 months from date of purchase |
Frequently Asked Questions - BELLE RTX 80 D ALTRAD
User questions about BELLE RTX 80 D ALTRAD
0 question about this device. Answer the ones you know or ask your own.
Ask a new question about this device
Download the instructions for your Vibratory plate in PDF format for free! Find your manual BELLE RTX 80 D - ALTRAD and take your electronic device back in hand. On this page are published all the documents necessary for the use of your device. BELLE RTX 80 D by ALTRAD.
USER MANUAL BELLE RTX 80 D ALTRAD
UKCA Declaration of Conformity
3-21
EC Declaration of Conformity
GB Operators Manual
Us Operators Manual
F Manuel De L'Opérateur
E Manual del Operador
P Manual de Operação
NL Handleiding
DK Betjeningsvejledning
D Bedienungshandbuch
1 Manuale Dell'Operatore
S Bruksanvisning
SF Kayttöohje
PL Instrukcja Obstugi
RUS RykoBoDCTBO dIy onepaTopa
EST Kasutusjuhend
(LV) Lietotāja rokasgrāmata
LT Naudiojimo Instrukcija
BG OnepaTop PbueH

BELLE
LIGHT
CONSTRUCTION
EQUIPMENT
Declaration Of Conformity (DOC)
We, Altrad Belle, Sheen, Nr. Buxton, Derbyshire, SK17 0EU, GB declare that the DoC is issued under our sole responsibility and belongs to the followings product(s):

PRODUCT TYPE
MODEL.
SERIAL No.
DATE OF MANUFACTURE
SOUND POWER LEVEL MEASURED/ (GUARANTEED)
WEIGHT
Object of the Declaration:
Petrol/Diesel engine powered Trench Rammer used for compaction of cohesive material or moist content within trenches.
The object of the declaration described above is in conformity with the relevant Statutory Requirements:
- 2008 No. 1597 Supply of Machinery (Safety) Regulations 2008
- 2001 No. 1701 Noise Emission in the Environment by Equipment for use Outdoors Regulations 2001
The following designated standards and technical specifications have been applied: - EN ISO 12100:2010 Safety of machinery
- EN 500-4:2011 Mobile road construction machinery. Safety.
- ISO 19452:2008 Building construction machinery and equipment. Pedestrian-controlled vibratory (percussion) rammers. Terminology and commercial specifications.
- ISO 3744:2010 Acoustics — Determination of sound power levels and sound energy levels of noise sources using sound pressure
ANP CERTIFICATION LTD. (Approved Body, number 8500) 2 Parkfield Street, Manchester, M14 4PN, UK carried out Internal Control of Production with Assessment of Technical Documentation and Periodical Checking as per Schedule 9 of SI 2001 1701
Technical Files are held by Ray Neilson at the Altrad Belle address stated above:-
Place of Declaration:-
Sheen, Nr. Buxton, Derbyshire, SK17 0EU, UK
Date of Declaration:
February 2022

Managing Director On behalf of Altrad Belle Sheen, Derbyshire, UK
We, Altrad Belle, Sheen, Nr. Buxton, Derbyshire, SK17 0EU, GB declare that the DoC is issued under our sole responsibility and belongs to the followings product(s):
CE
PRODUCT TYPE
MODEL
SERIAL No.
DATE OF MANUFACTURE....
SOUND POWER LEVEL MEASURED/ (GUARANTEED)
WEIGHT
Object of the Declaration:
Petrol/Diesel engine powered Trench Rammer used for compaction of cohesive material or moist content within trenches.
The object of the declaration described above is in conformity with the relevant Union Harmonisation Legislation:
-
2006/42/EC New machinery directive
-
2000/14/EC Noise - equipment for use outdoors
The following harmonised standards and technical specifications have been applied:
-
EN ISO 12100:2010 Safety of machinery
-
EN 500-4:2011 Mobile road construction machinery. Safety.
-
ISO 19452:2008 Building construction machinery and equipment. Pedestrian-controlled vibratory (percussion) rammers. Terminology and commercial specifications.
-
ISO 3744:2010 Acoustics — Determination of sound power levels and sound energy levels of noise sources using sound pressure
VINÇOTTE nv/sa (NB0026) carried out Internal Control of Production with Assessment of Technical Documentation and Periodical Checking as per Annex VI of 2000/14/EC
Technical Files are held by Hugues Menager at the following address:
Altrad (Group Holding), 125 Rue du Mas Carbonnier, 34000, Montpellier, France.
Place of Declaration:-
Sheen, Nr. Buxton, Derbyshire, SK17 0EU, UK
Date of Declaration:
May 2021

Managing Director On behalf of Altrad Belle Sheen, Derbyshire, UK
Deklareeritav toode:
N3nblHHTeJIeH dIpeKTop
Om umemo ha Altrad Belle Sheen, Derbyshire, Obeunehomo kpancmgo
Sheen, Derbyshire, UK
Subsemnati, Altrad Belle, Sheen, Nr. Buxton, Derbyshire, SK17 0EU,
This manual has been written to help you operate and service the RTX Rammer safely. This manual is intended for dealers and operators of the RTX Rammer.
Foreword
The 'Machine Description' section helps you to familiarise yourself with the machine's layout and controls.
The 'Environment' section gives instructions on how to handle the recycling of discarded apparatus in an environmentally friendly way.
The 'General Safety' and 'Health and Safety' sections explain how to use the machine to ensure your safety and the safety of the general public.
The 'Start and Stop Procedure' helps you with starting and stopping the machine.
The 'Trouble Shooting Guide' helps you if you have a problem with your machine.
The 'Service & Maintenance' section is to help you with the general maintenance and servicing of your machine.
The Warranty section details the nature of the warranty cover and the claims procedure.
Directives with regard to the notations.
Text in this manual to which special attention must be paid are shown in the following way:

CAUTION
The product can be at risk. The machine or yourself can be damaged or injured if procedures are not carried out in the correct way.

WARNING
The life of the operator can be at risk.

WARNING

WARNING
Before you operate or carry out any maintenance on this machine YOU MUST READ and STUDY this manual.
KNOW how to safely use the unit's controls and what you must do for safe maintenance. (NB Be sure that you know how to switch the machine off before you switch on, in case you get into difficulty.)
ALWAYS wear or use the proper safety items required for your personal protection. If you have ANY QUESTIONS about the safe use or maintenance of this unit, ASK YOUR SUPERVISOR OR CONTACT: Altrad Belle (UK): +44 (0) 1298 84606

Contents
How to use this manual 22
Warning 22
Machine Description 23
Environment 23
Intended Use 23
Decals 24-26
Technical Data 27
General Safety 28
Health and Safety 28
Pre-Start Safety Checks 29
Long Term Storage 29
Start & Stop Procedure 30-31
Operation 31
Trouble Shooting Guide 32
Service & Maintenance 32-33
Transport 34
Replacement Parts 35
Warranty 35
UKCA Declaration of Conformity 2
EC Declaration of Conformity 3
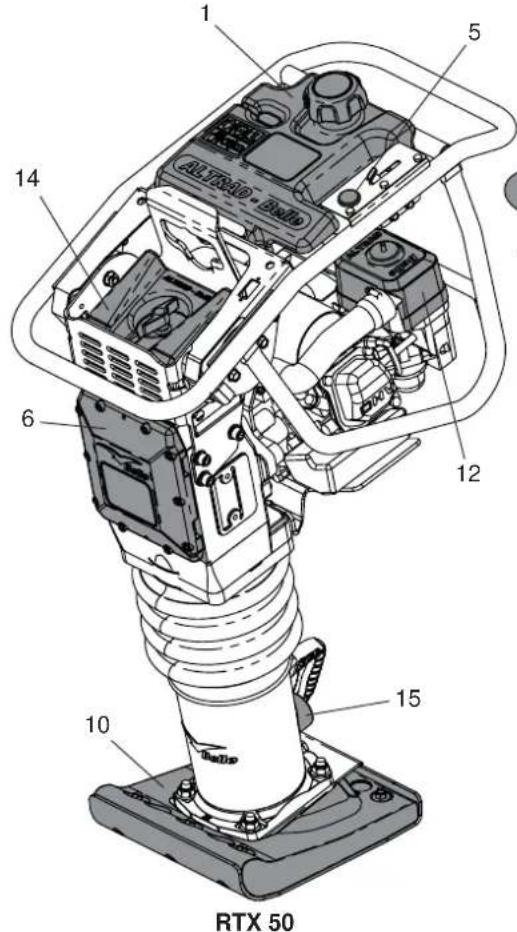
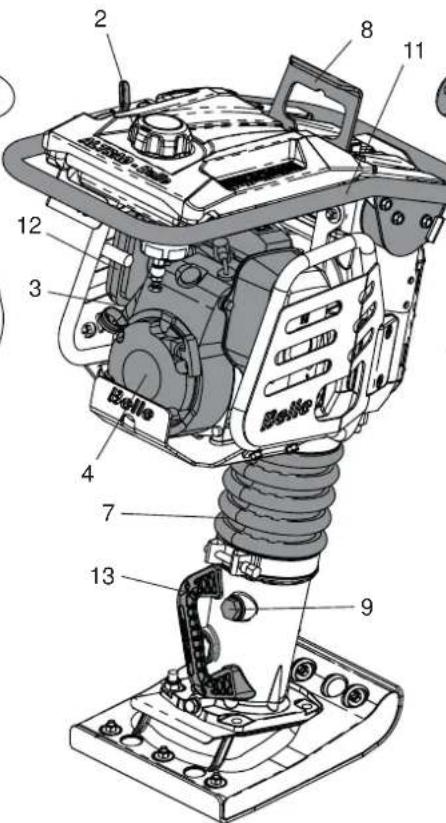
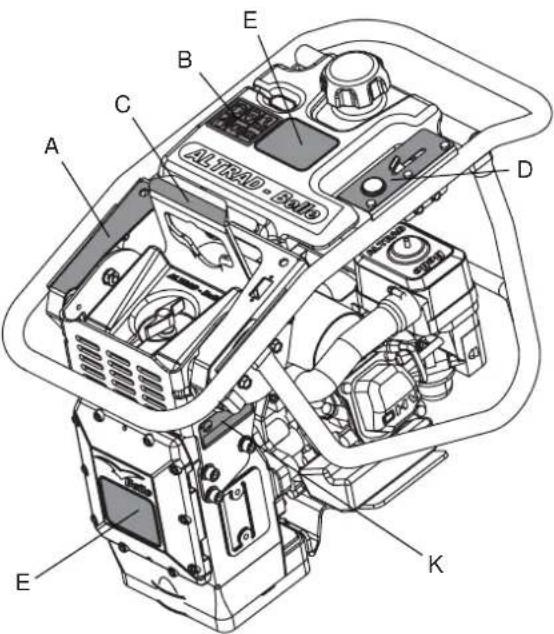
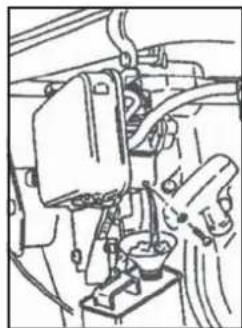
RTX 60/68/70
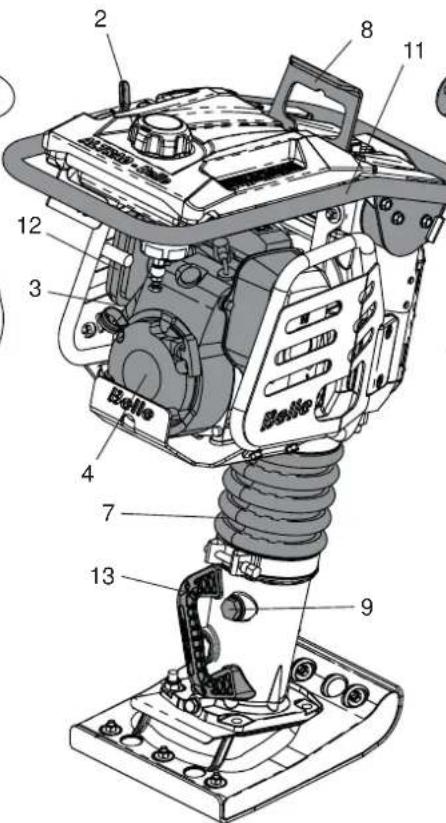
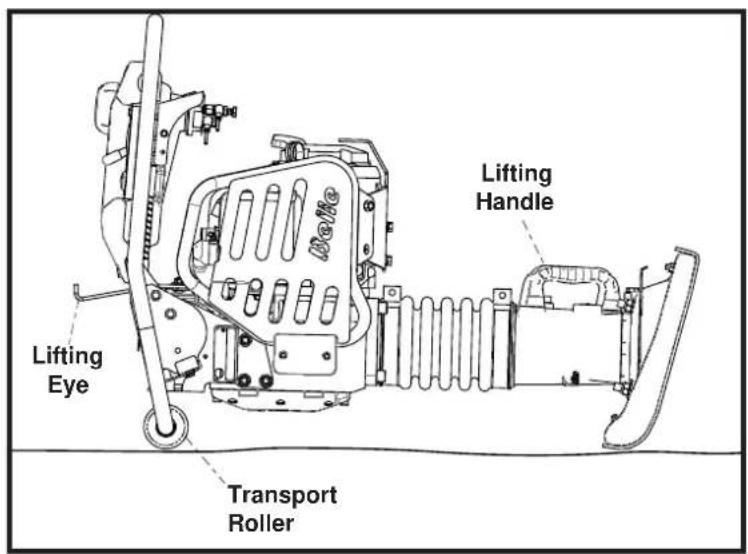
- Fuel Tank. 7. Bellows 13. Lifting Handle
- Throttle Lever.
- Fuel ON / OFF Lever.
- Engine.
- Stop Button.
-
Crankcase.
-
Lifting Eye.
- Leg Oil Plug.
- Ramming Shoe.
- Operating Handle. 17. Decompression Lever
-
Primary Air Cleaner
-
Secondary Air Cleaner (Dual)
- Leg Oil Sight Glass
- Transport Roller (Optional)
Environment

Safe Disposal

Instructions for the protection of the environment. The machine contains valuable materials. Take the discarded apparatus and accessories to the relevant recycling facilities.
| Component Material | |
| Handle Steel | |
| Ramming Shoe | Plywood and Steel or Nylon and Steel |
| Rubber Isolators Rubber and Steel | |
| Bellows Urethane | |
| Crankcase Aluminium | |
| Crankcase Cover Aluminium | |
| Gears Steel | |
| Engine Steel and Aluminium | |
| Transport Roller HDPE | |
| Miscellaneous Plastic Parts Polypropylene | |
| Various Parts Steel and Aluminium | |
Intended Use

This machine is intended for base preparation, driveways, foundations, kerbs, and footings. It can also be used for repair work on streets, highways and/or sidewalks/pavements.

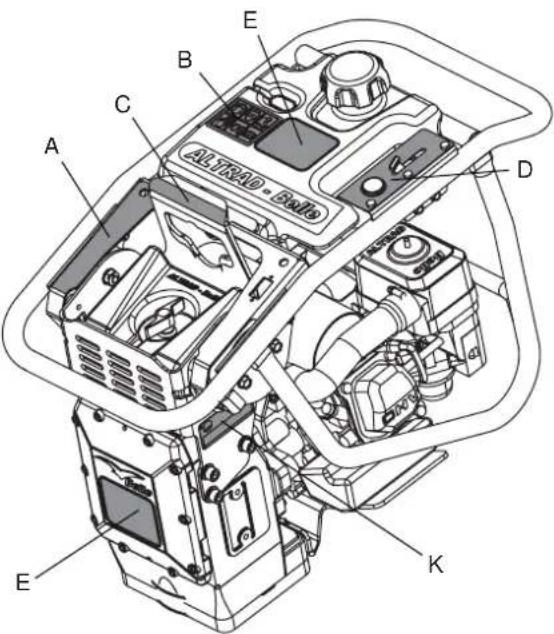

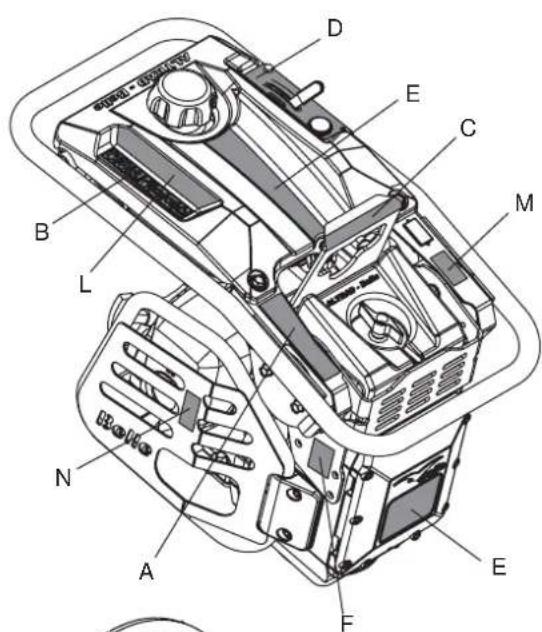
A - Transport Decal (Part No. 800-99631)
On-Site Transport
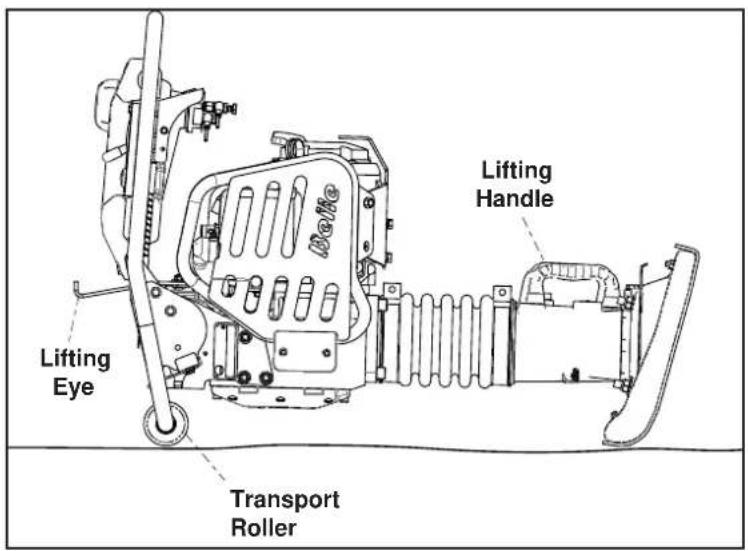
The RTX Rammer may be moved vertically by 2 people, laid on the Transport Roller (if fitted) and pulled using the Lifting Handle or by using a Sling or Hoist on the Lifting Eye. NOTE:- A sling or hoist must not be used on the Lifting Handle.
Road Transport
The RTX Rammer must be transported as far as possible standing up, strapped to the body side board of the truck, or strapped inside a lorry (panel truck). If not possible, it may be laid down only on the Transport Rollers or front bar of the Operating Handle, in stable position and strongly strapped down to guard against rolling or sliding.
B - Safety Symbols

Wear Ear Protection

Wear Eye Protection
Wear Protective Footwear

Wear Protective Gloves

Please Read Operators Manual

CE Compliant

Please Recycle
C-Lifting Eye Decal (Part No.800-99630)
Lifting Eye for use with a Sling or Mechanical Hoist.
D-Throttle Decal (Part No.800-99628)

Max. RPM Position

Idle Position

Emergency Stop Position

Engine Stop Button (Petrol Only)
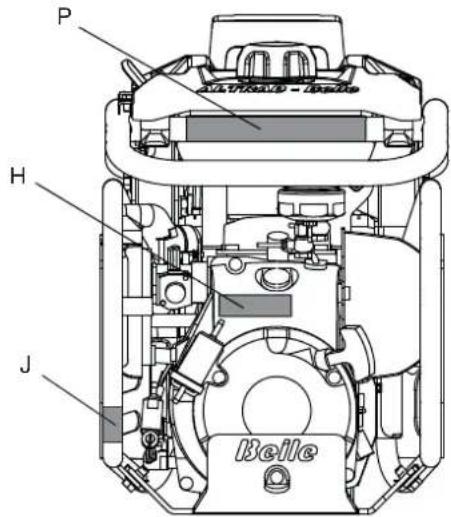
E - Branding Decal
Branding Decal to identify the Model of RTX Rammer.
F-Noise Decal
Guaranteed Sound Power Level of the machine in dB(A).
G - Spring Safety Decal (Part No. 800-99619)
DO NOT loosen or remove any of the Screws from the underside of the Rammer Leg. The Rammer Leg contains a highly compressed Spring which may cause serious injury if released by loosening or removing any of the Screws. Contact dealer for more information.
H - Engine Start Decal (Part No. 800-99625)
To Start the Engine, push the Carburettor Primer Bulb 4 times and then pull the Recoil Handle until the Engine fires.
J-Fuel Valve Decal (800-99634-0)
Fuel Valve 'ON' and 'OFF' positions.
- To START the machine, the Fuel Valve must be in the 'ON' position.
- When the machine is not in use or being transported, the Fuel Valve must be in the 'OFF' position.
K - Serial Plate (Part No. 800-99844)
The Serial Plate contains the machine Serial Number and all other information that you may require when contacting Altrad Belle regarding your machine.
- Serial Number.
- RTX Rammer Model.
- Year of Manufacture.
- Machine Weight.
- Machine Power.

L - Safety Decal (Part No. 800-99831)

WARNING! Please

Read Operators Manual

Wear Protective Footwear

Wear Ear Protection

Wear Eye Protection
M - Exhaust Fumes Warning Decal (Part No. 800-99520)
Engines emit carbon monoxide; operate only in well-ventilated areas.
N - Hot Surface Decal (Part No. 800-99520)
CAUTION! Beware of hot surfaces around the Engine and Exhaust area.
P - Diesel Only Decal (Part No. 800-99524)
CAUTION! Only Diesel must be used in this machine (Diesel models only).
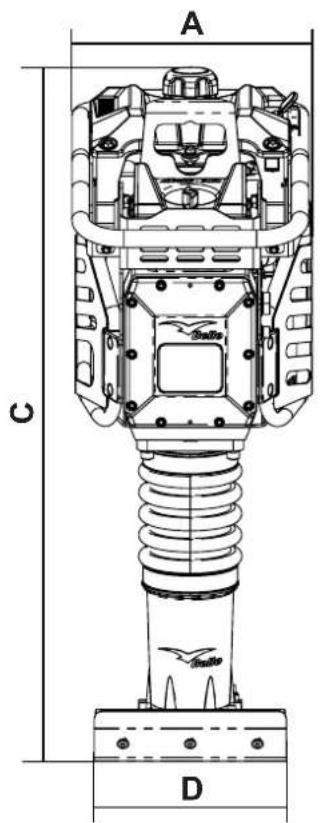

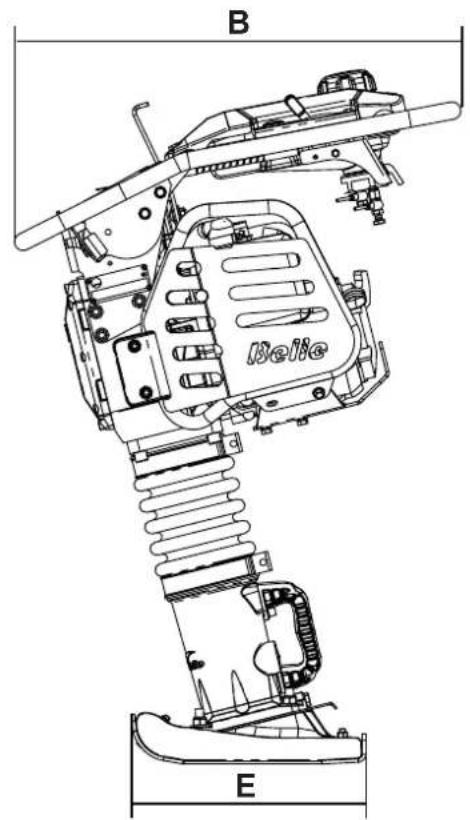
| Model | RTX 50 | RTX 50R | RTX 60C | RTX 60 | RTX 60R | RTX 68 | RTX 68R | RTX 70 | RTX 70R | RTX 80D |
| A - Width (mm) 345 345 345 345 345 345 345 345 345 345 345 345 345 345 345 345 345 345 345 345 345 345 345 345 345 34 | 345 345 345 345 345 345 345 345 345 345 345 345 345 345 345 345 345 345 345 345 345 345 345 345 345 | 45 425 | ||||||||
| B - Length (mm) 670 670 705 705 705 705 705 705 705 705 705 705 705 705 705 705 705 705 705 705 705 705 705 705 705 705 705 704 | 705 | 714 714 | 700 | |||||||
| C - Height (mm) 975 975 975 975 975 1040 | 1040 1040 | 1040 | 1081 | |||||||
| D - Shoe Width* (mm) | 230 | 230 | 165 | 165 | 165 | 280 | 280 | 280 | 280 | 280 |
| E - Shoe Length* (mm) | 335 | 335 | 335 | 335 | 335 | 335 | 335 | 335 | 335 | 335 |
| Engine Models | Honda GX100 | Honda GXR120 | Honda GX100 | Honda GX100 | Honda GXR120 | Honda GX100 | Honda GXR120 | Honda GX100 | Honda GXR120 | Yanmar L48 |
| Engine Type | 4 Stroke, OHC, Air Cooled | Single Cylinder | ||||||||
| Maximum Output (kW) | 2.3 | 2.7 | 2.3 | 2.3 | 2.7 | 2.3 | 2.7 | 2.3 | 2.7 | 3.5 |
| Fuel Type | Unleaded | Diesel | ||||||||
| Fuel Tank Capacity (Ltrs) | 2.5 | 2.5 | 2.5 | 2.5 | 2.5 | 2.5 | 2.5 | 2.5 | 2.5 | 2.5 |
| Carburettor Type | Diaphragm | Injection | ||||||||
| Starting Mechanism | Recoil | |||||||||
| Operational Weight (kg) | 57.7 | 57.7 | 60 | 60 | 60 | 70 | 70 | 72 | 72 | 86 |
| Vibration Frequency (Hz) | 11 | 11 | 11 | 11 | 11 | 11 | 11 | 11 | 11 | 10 |
| Impact Force (kN) | 12.5 | 12.5 | 13.6 | 13.6 | 13.6 | 16 | 16 | 17 | 18 | 20.5 |
| Blows Per Minute (bpm) | 450 - 660 | 450 - 660 | 450 - 700 | 450 - 600 | ||||||
| Stroke (mm) | 52 | 52 | 52 | 52 | 52 | 52 | 52 | 52 | 52 | 52 |
| Noise Level (dB(A)) | 108 108 | 108 108 | 108 108 | 108 108 | 108 | 108 | 108 | 108 | 108 | 11.8 |
| 3 Axis Vibration (m/s2) | 9.82 | 9.82 | 7.25 | 7.25 | 7.25 | 7.45 | 7.45 | 7.49 | 7.49 | 11.8 |
For your own personal protection and for the safety of those around you, please read and ensure you fully understand the following safety information. It is the responsibility of the operator to ensure that he/she fully understands how to operate this equipment safely. If you are unsure about the safe and correct use of your RTX, consult your supervisor or Altrad Belle of companies.

CAUTION
Improper maintenance or use can be hazardous. Read and Understand this section before you perform any maintenance, service or repairs.
This machine must only be used for its intended purpose. This machine must be operated only by well trained personnel.
- The owner of this machine must observe, and train the user of the machine to observe, the effective Labour Protection Regulation in the country of application.
This equipment is heavy and must not be lifted single-handedly, either GET HELP or use suitable lifting equipment.
- This machine must be operated on ground where stability is guaranteed.
Cordon off the work area and keep members of the public and unauthorised personnel at a safe distance.
Personal Protective Equipment (PPE) must be worn by the operator whenever this equipment is being used (See Health & Safety Section).
Make sure you know how to safely switch this machine OFF before you switch it ON in case you get into difficulty.
Always switch OFF the engine and CLOSE the fuel tap before transporting, moving it around the site or servicing it.
- During use the engine becomes very hot, allow the engine to cool before touching it.
- Never leave the engine running and unattended.
- Never remove or tamper with any guards fitted, they are there for your protection. Always check guards for condition and security, if any are damaged or missing, DO NOT USE THE RTX until the guard has been replaced or repaired.
- Do not operate the RTX when you are ill, feeling tired, or when under the influence of alcohol or drugs.
This machine is designed to eliminate the possible risks arising from its use. However, risks DO reside, and these residual risks are not clearly recognisable and may cause personal injury, property damage and possible death. If such unpredictable and unrecognisable risks become apparent, the machine must be stopped immediately, and the operator or his supervisor must take the appropriate measures to eliminate such risks. It is sometimes necessary for the manufacturer to be informed of such an event for future counter measuring.

WARNING
Fuel is flammable. It may cause injury and property damage. Shut down the engine, extinguish all open flames and do not smoke while filling the fuel tank. Always wipe up any spilled fuel.
- Before refuelling, switch off the engine and allow it to cool.
- When refuelling, DO NOT smoke or allow naked flames in the area.
- When refuelling, use a proper funnel, and avoid spilling fuel over the engine.
- Spilt fuel must be made safe immediately, using sand. If fuel is spilt on your clothes, change them.
- Store fuel in an approved, purpose made container away from heat and ignition sources.

Health & Safety
Vibration
Some vibration from the machines operation is transmitted through the handle to the operator's hands. The Altrad Belle RTX range has been specifically designed to reduce hand/arm vibration levels. Refer to specifications & technical data for vibration levels and usage times (recommended maximum daily exposure time). DO NOT exceed the maximum usage times.
PPE (Personal Protective Equipment)
Personal injury or property damage may be caused by knocks, crushing, slipping, tripping, falling, or by flying chips due mainly to the improper or careless handling of the machine, or working in a confined area.
Suitable PPE must be worn when using this equipment i.e. Safety Goggles, Gloves, Ear Defenders, Dust Mask and Steel Toe capped footwear.
Wear clothing suitable for the work you are doing. Tie back long hair and remove any jewellery which may catch in the equipment's moving parts.
Dust
The compaction process can produce dust, which may be hazardous to your health. Always wear a mask that is suited to the type of dust being produced.
Fuel
Oil and fuel used in this machine may cause the following hazards.
- Poisoning if the fuel or oil vapour is inhaled.
- Allergies if the fuel or oil spills on the skin.
- Fire and explosion if the fuel and oil is handled near smoking or open fires.
- Do not ingest fuel or inhale fuel vapours and avoid contact with your skin. Wash fuel splashes immediately. If you get fuel in your eyes, irritate with copious amounts of water and seek medical attention as soon as possible.
Exhaust Fumes

WARNING
The exhaust fumes produced by this equipment are highly toxic and can kill!
Do not operate your RTX Rammer indoors or in a confined space, make sure the work area is adequately ventilated.
Pre start-up inspection
The following Pre-start-up inspection must be performed before the start of each work session or after every four hours of use, whichever is first. Please refer to the service section for detailed guidance. If any fault is discovered, the RTX must not be used until the fault is rectified.
- Thoroughly inspect the RTX for signs of damage.
- Check Hoses, filler openings, Drain Plugs and any other areas for signs of leakage. Fix any leaks before operating.
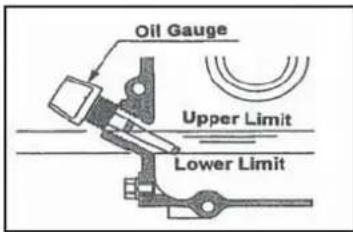
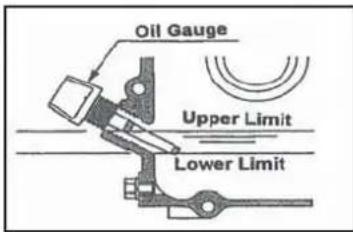
- Check the Engine Oil level and top up as necessary.
3.1 To check the Engine Oil level, place the machine on a flat surface ensuring the Engine is level. To achieve this place the Rammer in the position shown below.
3.2 Remove the Oil Gauge, and observe that the Oil is up to the rim of the filler port. Use Engine Oil with the correct viscosity. (SAE 10W-30 Mineral Oil recommended) - Check the Engine Fuel level and top up as necessary. Use clean Fuel. Use of contaminated Fuel may damage the Fuel system.

CAUTION
NOTICE: This machine uses Unleaded Gasoline/Petrol.
NEVER fill the fuel tank with a mixture of Oil and Gasoline/Petrol.
- Check that the Air Filter is clean. Excessive dust/dirt accumulation within the filter element will cause erratic Engine operation. Clean the Air Filter element when it is contaminated (See Maintenance section).
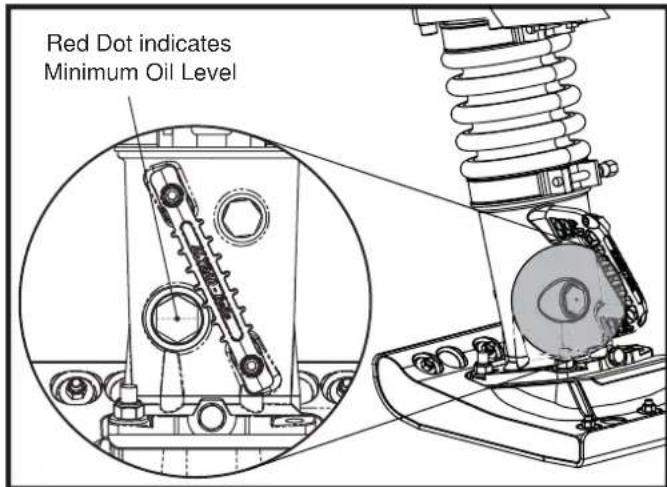
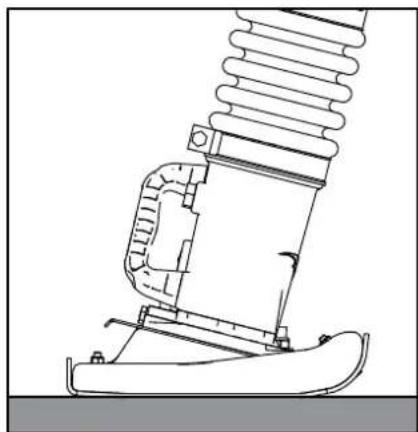
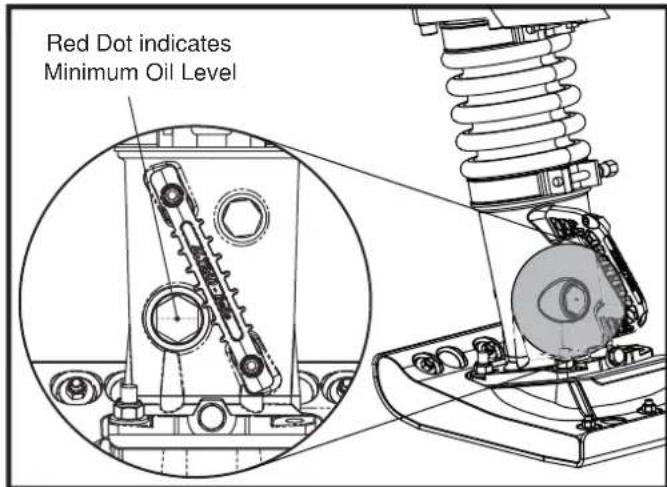
6.1 To check the Rammer Leg Oil level, place the machine on a flat surface ensuring the Foot is flat to the ground, as shown below.
6.2 The minimum level is shown by the Red Dot on the Oil Sight Glass within the Rammer Leg. (SAE 10W-30 Mineral Oil recommended)
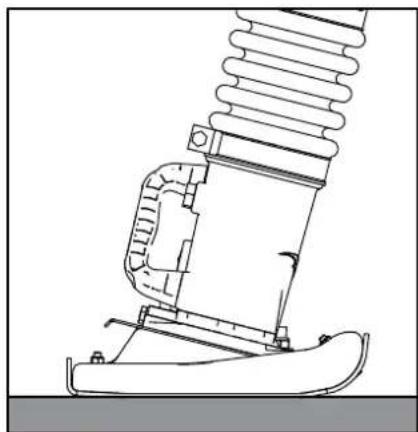
Rammer Leg Oil Check Position

Engine Oil Check Position
Long Term Storage

For long term storage, empty the fuel in the carburettor by running the engine with the fuel tap being closed (Petrol Only)
The chemical composition of fuel will deteriorate after prolonged storage. When the machine needs to be stored for a long time, remove all fuel from the fuel tank. Also remove the fuel from the float chamber of the carburettor by draining the fuel out from the drain plug (see diagram) (Petrol Only)
Clean up oil and dust accumulation on rubber parts.
Clean the ramming shoe and apply a light coating of oil to prevent rust formation.
Cover the machine and store in a dry place.

CAUTION
Improper operation can be hazardous. Read and understand this section before you start the machine.

WARNING
To stop the machine in an emergency, move the Throttle Lever to the Emergency Stop position. This will immediately stop the machine from vibrating.
Honda GX100, GX120 & GXR120
- Open the fuel cock/tap.
- Set the speed control lever to the STARTING position (Halfway between HIGH and LOW position).
- Move the choke lever to the CLOSED position.
- Push the Carburettor Primer Bulb 4 times (or at least 10 times when the machine is new or after machine has had the fuel drain).
- Taking a firm hold of the Operating handle with one hand, grasp the recoil starter handle with the other, Pull the recoil starter handle until engine resistance is felt, then allow the starter to return.
- Taking care not to pull the starter rope fully out, pull the starter handle briskly.
- Repeat until the engine fires.
- Once the engine fires gradually set the choke lever to the OPEN position.
- Allow the engine run at idle for a few minutes to warm up.
- After the engine has warmed up, the machine is ready for operation.
- Move the throttle lever to the high speed position quickly to prevent damage from occurring to the clutch. The 'Full Throttle' position of this machine has been preset at the factory to achieve optimum machine performance.
- With the engine running in the full throttle position, the machine will move forward and compact loose 'lifts'
- In preparation for stopping the engine, move the throttle lever to the LOW position.
- Allow the engine to idle for 1-3 minutes.
- Push and hold the RED Engine Stop button.
- Close the fuel cock/tap.
- Pull the recoil starter slowly until you feel resistance. Then release your hand from the starter knob to set it back to its original position. This will prevent any air or humidity from entering into the cylinder.
Yanmar L48
- Slide the Engine Speed Control Lever to the RUN position.
- Taking a firm hold of the Operating handle with one hand, grasp the recoil starter handle with the other, Pull the recoil starter handle until engine resistance is felt, then allow the starter to return.
- Push the decompression lever down and release it. The decompression lever will automatically return to the original position when the engine starts.
- Taking care not to pull the starter rope fully out, pull the starter handle briskly.
- Repeat until the engine fires.

CAUTION
In cold weather if you have trouble starting the engine, remove the Oil Plug and add 2cc of engine oil to the oil port and reinsert the oil plug.
- Allow the engine run at idle for a few minutes to warm up.
- After the engine has warmed up, the machine is ready for operation.
- Move the throttle lever to the high speed position quickly to prevent damage from occurring to the clutch. The 'Full Throttle' position of this machine has been preset at the factory to achieve optimum machine performance.
- With the engine running in the full throttle position, the machine will move forward and compact loose 'lifts'
- In preparation for stopping the engine, move the throttle lever to the LOW position.
- Allow the engine to idle for 1-3 minutes.
- To stop the engine, set the engine speed lever to the slide the Engine Speed Control Lever to the STOP position
Start & Stop Procedure
NOTICE: The optimum maximum engine revolution has been set at the factory as follows:
| Model Engine | Maximum RPM | ||
| Optimum Upper Limit | |||
| RTX 50 Honda G | GX100 3,800 +/- 50 3,850 | ||
| RTX 50R Honda G | GXR120 3,800 +/- 50 3,850 | ||
| RTX 60 Honda G | GX100 3,800 +/- 50 3,850 | ||
| RTX 60R Honda G | GXR120 3,800 +/- 50 3,850 | ||
| RTX 68 Honda G | GX100 3,800 +/- 50 3,850 | ||
| RTX 68R Honda G | GXR120 3,800 +/- 50 3,850 | ||
| RTX 70 | Honda GX100 | 4,050 +/- 50 | 4,100 |
| RTX 70R | Honda GXR120 4,050 +/- 50 4,100 | ||
| RTX 80D | Yanmar L48 3,400 +/- 50 3,450 | ||

CAUTION
DO NOT alter this setting since irregular vibration or damage to the gear transmission mechanism can result, and both engine and machine warranties will be automatically voided.
Operation

Lifting
Where it is necessary to use lifting equipemnt to position the RTX, check and confirm that the rubber mounts on the operation handle are not damaged or cracked. If they are damaged or cracked, replace the rubber mounts before attempting to lift the machine. Also make sure that the lifting equipment has a WLL (Working Load Limit) suitable for the RTX's weight (See specification chart or the machine Serial Plate). Attach suitable chains or slings ONLY to the lifting point on top of the RTX's operating handle.
NEVER leave the engine running whilst transporting or moving the RTX's, even if it is only a short distance.
Once the checks listed in the 'Pre-Start' section have been carried out, you may start the engine.
The Altrad Belle RTX range of tampers are fitted with a centrifugal clutch, this allows the engine to run at idle without driving the crank mechanism. As the engine speed is increased the clutch will engage and the engine will drive the crank mechanism.
- To avoid damage to the centrifugal clutch, move the throttle lever quickly from the L to H position.

CAUTION
For correct operation, the engine speed should be set to maximum.
- Avoid operating the machine on a fully compacted, hard, or non-yielding surface. Otherwise, the gear transmission mechanism will be damaged, and the life of the machine will be greatly reduced.
- When working in a narrow trench, if the ramming shoe should get caught between the walls of the trench, the rammer may miss-strike and can be severely damaged. The ramming shoe may especially be damaged severely.
- Ensure that the rammer is steered only by using the handle grip. It should only be pushed. The rammer must not be pressed into the materials being compacted. Excessive pressure on the operating handle will lead to unsatisfactory compaction due to the fact that the jumping action is reduced.
Transportation.
When transporting or storing the machine, place the machine in an upright position if at all possible. Should the machine be required to be laid down, NEVER attempt to transport the machine in a manner that the air cleaner faces downwards. Otherwise, the oil in the cylinder may get into the combustion chamber or in the air cleaner, which may result in starting difficulties. Laying the machine forwards (The crankcase cover of the rammer facing downwards) may not cause any spill of the engine oil into the cylinder or air cleaner of the engine. However, if the engine is still hot, spilt fuel on the engine may cause fire. Lay the machine after the machine is completely cooled.
The machine fitted with the transporting roller on the operating handle may be easily loaded and unloaded from a vehicle. Tilt the machine forwards until the transporting roller touches the floor of the vehicle. Lift the lower part of the machine using the grab handle provided at the ramming shoe, and push forward to load the machine. During transportation, the machine should be tied firmly, and placed in an upright position if at all possible. To unload the machine, tilt the machine forward, until the roller touches the floor. Slightly lift the lower part of the machine, and pull the machine out.
Operation at High Altitude
For continuous High-Altitude operation above 1,000m (3,000FT), it will be necessary to change the engine main jet to a type that will allow for correct fueling of the engine. Otherwise, the unit will suffer from a lack of engine power and not work correctly (Petrol Only)
| Problem Cause Remedy | ||
| Engine will not start | No fuel Fill Fuel Tank | |
| Fuel Tap has been closed Open fuel tap. | ||
| Engine not primed. (GX100 Only) | Push the Carburettor Primer Bulb 4 times and pull the Recoil Handle until the Engine fires | |
| Engine not primed. (Diesel Only) | See the Service & Maintenance section of this Manual. | |
| Spark Plug contaminated or damaged. (Petrol Only) | Replace spark plug. | |
| Faulty Carburettor. (Petrol Only) Service | the Carburettor | |
| Engine stops suddenly, or stops when the engine rpm is increased. | See Above See Above | |
| Main jet of the Carburettor clogged with dirt. (GX120 Only) | Take out the main jet of the Carburettor and clean with Compressed air. | |
| Air filter element dirty. Clean the element. | ||
| Spark plug cap is loose. (Petrol Only) Tightly fit cap to plug. | ||
| Engine runs, but machine does not produce impact. | Lack of engine power See above. | |
| Clutch is slipping | Dismantle clutch assembly, Clean shoe and drum with proper solvent. Replace clutch shoe if necessary. | |
| Crank mechanism is damaged Contact Dealer. |

Service & Maintenance
Maintenance
The Altrad Belle RTX Range is designed to give many years of trouble free operation. It is, however, important that the simple regular maintenance listed in this section is carried out.
It is recommended that an approved Altrad Belle dealer carries out all major maintenance and repairs. Always use genuine Altrad Belle replacement parts, the use of spurious parts may void your warranty.
Before any maintenance is carried out on the machine, switch off the engine. If working on a petrol engined machine, disconnect the HT lead from the sparkplug.
Always set the RTX on level ground to ensure any fluid levels will be correctly read. Only use recommended oils (see chart).
Servicing the Engine
Service the engine according to the engine manufacturer's specifications. Refer to the engine operation and maintenance manual.
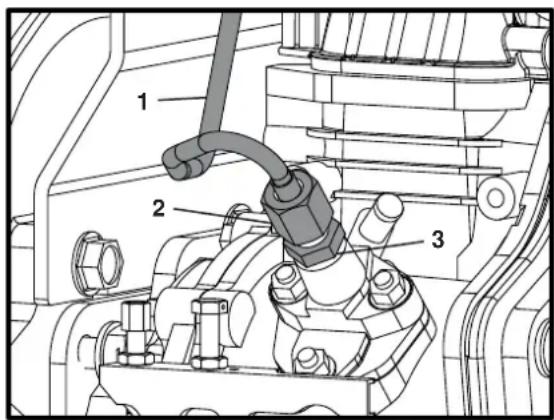
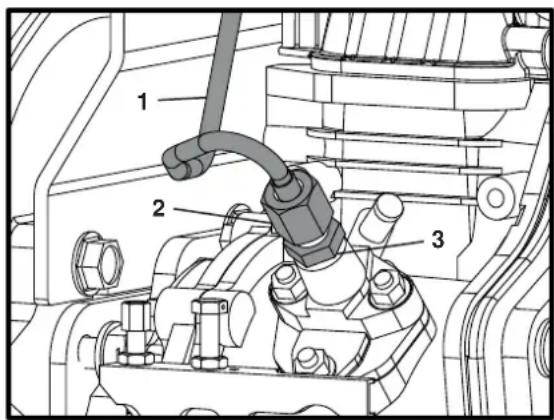
Yanmar L48 Engine Priming
In the event of running out of Diesel or after a change of the Fuel Filter, the Yanmar engine will need to be primed. Please follow the below instructions.

CAUTION
Before starting the Priming procedure, please ensure the Fuel Tank is full and the Fuel Cap is not fitted to the tank.
- Open the fuel cock/tap.
- Slide the Engine Speed Control Lever to the RUN position.
- Using 2 × 17mm Spanners, unlock the Injector Pipe (Item 1) by loosening the Injector Pipe Nut (Item 2).
- Slacken the Injector Pump Nozzle (Item 3) by 2 full revolutions
NOTE:- DO NOT remove the Injector Pump Nozzle.
- Hold the Injector Pipe away from the Injector Pump Nozzle and wait until Diesel is running freely without any air bubbles.
- Re-tighten the Injector Pump Nozzle to a setting of 12Nm.
- Re-fit the Injector Pipe and tighten to 12Nm.
8 Re-fit the Fuel Cap and start the engine using the Start and Stop Procedure section of this manual.
Service & Maintenance
Every 8 Hours or Daily
- Check for loose bolt and nuts, retighten if necessary.
- Check and clean air filter element, re-lube the element according to the engine manufacturer's recommendations. If operating conditions are unusually dusty and severe, filter element cleaning should be done more frequently.
- Check oil level in crankcase of engine and replenish as necessary. Check oil level in the ramming cylinder as per following procedures.
3a. Make sure that the machine has not been run in the last 10 minutes.
3b. Set the machine on a level surface and remove the oil plug.
3c. The top surface of the oil must be seen just below the lower rim of the hole for oil plug. Replenish as necessary.
NOTICE: Care should be taken not to overfill the ramming cylinder with oil. Overfilling will cause excessive load on the engine, which may result in poor or irregular vibration.
First 20 Hours of Operation
- Replace the Oil in the Ramming Cylinder
Every 50 Hours or Weekly
- Check for loose Bolts and Nuts. Retighten if necessary.
Every 200 Hours.
- Change the Ramming Cylinder Oil. Do not overfill.
Fuel and Lubricant
| Model | Fuel Engine Crank | case Ramming Cylinder | |||||
| Type of Oil Capacity Type Of | Oil Engine Capacity Type of Oil Capacity | ||||||
| RTX 50 | Unleaded Petrol | 2.5 Litres | 10W-30, API, SF/CC, CD | GX100 / GXR120 | 0.6 Litres | 10W-30, API, SF/CC, CD | 0.7 Litres |
| RTX 60 | |||||||
| RTX 68 | 0.8 LitresRTX 70 | ||||||
| RTX 80D | Diesel L48 | 0.8 Litres | |||||

CAUTION
Please ensure that you have read and fully understand the information below before attempting to transport the RTX Rammer.
On-Site Transport
The RTX Rammer may be moved vertically by 2 people, laid on the Transport Roller (if fitted) and pulled using the Lifting Handle or by using a Sling or Hoist on the Lifting Eye. NOTE:- A sling or hoist must not be used on the Lifting Handle. Alternatively, use the optional Wheel Kit - see below for details.
Road Transport
The RTX Rammer must be transported as far as possible standing up, strapped to the body side board of the truck, or strapped inside a lorry (panel truck). If not possible, it may be laid down only on the Transport Rollers or front bar of the Operating Handle, in stable position and strongly strapped down to guard against rolling or sliding.
Wheel Kit Option
- Place the Wheel Kit under the lip of the plate on the lower Ramming Leg.
- Once the Wheel Kit is engaged, tilt the Rammer backwards slightly until the Wheels take the weight of the Rammer.
- ONLY moving the Rammer backwards, transport to the required location.
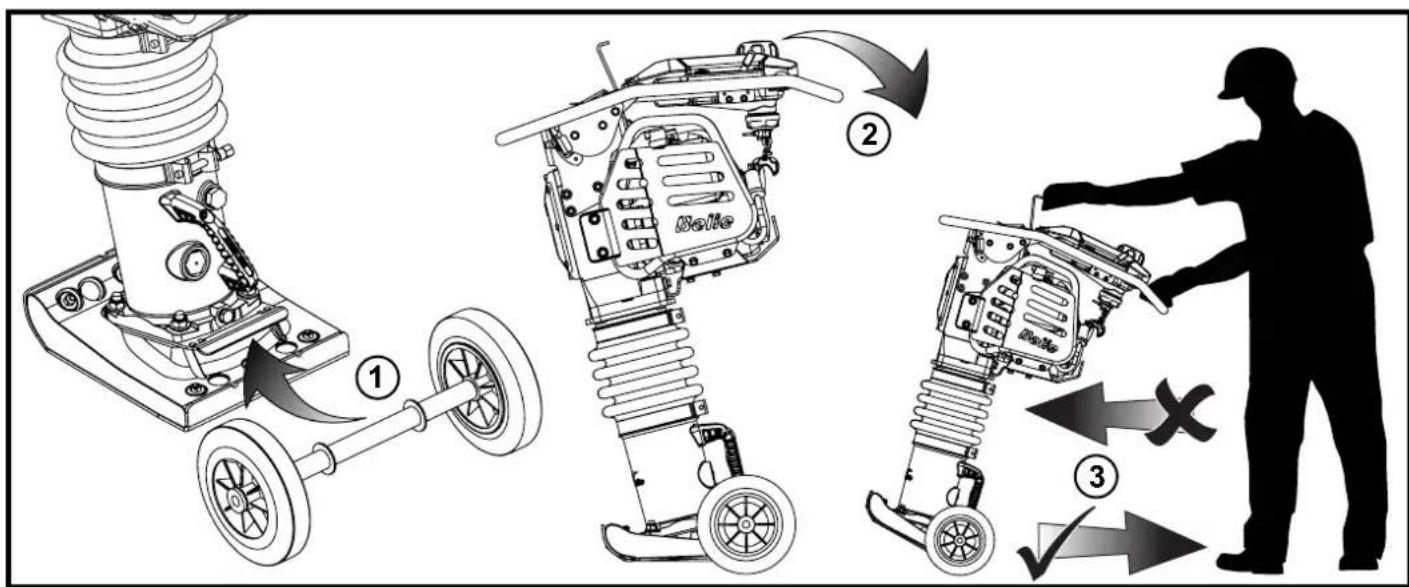

WARNING
DO NOT leave the Wheel Kit engaged whilst unattended or during operation as this will make the Rammer unstable. For transportation purposes only!
KEY

USE LOCTITE

USE OIL

USE SILICONE
When maintaining this product only the manufacturers original, genuine replacement parts may be used.
The user will lose any possible claims if replacement parts used are other than the makers original replacement parts.
Replacement parts for this product can be ordered online 24 hours a day, 7 days a week at www.Altrad-Belle247.com
For more information regarding the availability of replacement parts for this product, please contact Altrad Belle using the following contact details:
Tel:- +44 (0)1298 84606
Fax: +44 (0)1298 84073
Email: sales@altrad-belle.com
Alternatively, please scan the adjacent QR Code (Quick Response Code) using your smartphone to access the Altrad Belle online parts portal.

Warranty

Your new Altrad Belle Rammer Tamper is warranted to the original purchaser for a period of one-year (12 months) from the original date of purchase. The Altrad Belle warranty is against defects in design, materials and workmanship.
The following are not covered under the Altrad Belle warranty:
- Damage caused by abuse, misuse, dropping or other similar damage caused by or as a result of failure to follow assembly, operation or user maintenance instructions.
- Alterations, additions or repairs carried out by persons other than Altrad Belle or their recognised agents.
- Transportation or shipment costs to and from Altrad Belle or their recognised agents, for repair or assessment against a warranty claim, on any machine.
- Materials and/or labour costs to renew, repair or replace components due to fair wear and tear.
The following components are not covered by warranty.
- Engine air filter
- Engine spark plug
Altrad Belle and/or their recognised agents, directors, employees or insurers will not be held liable for consequential or other damages, losses or expenses in connection with or by reason of or the inability to use the machine for any purpose.
Warranty Claims
All warranty claims should firstly be directed to Altrad Belle, either by telephone, by Fax, by Email, or in writing.
For warranty claims:
Tel: +44 (0)1298 84606, Fax: +44 (0)1298 84073, Email: Warranty.dept@altrad-belle.com
or Write to:
Altrad Belle Warranty Department,
Sheen,
Nr. Buxton,
Derbyshire,
SK17 0EU
England
Warranty Registration:
In the bid for ALTRAD Belle to become greener and more eco friendly, we have now introduced online Warranty registration. To access the registration page of our website, please use the following address:
http://www.bellegroup.com/index.php?p=warranty-registration
Alternatively, please scan the adjacent QR Code (Quick Response Code) using your smartphone to access the registration page.

This manual has been written to help you operate and service the RTX Rammer safely. This manual is intended for dealers and operators of the RTX Rammer.
Foreword
The 'Machine Description' section helps you to familiarise yourself with the machine's layout and controls.
The 'Environment' section gives instructions on how to handle the recycling of discarded apparatus in an environmentally friendly way.
The 'General Safety' and 'Health and Safety' sections explain how to use the machine to ensure your safety and the safety of the general public.
The 'Start and Stop Procedure' helps you with starting and stopping the machine.
The 'Trouble Shooting Guide' helps you if you have a problem with your machine.
The 'Service & Maintenance' section is to help you with the general maintenance and servicing of your machine.
The 'Warranty' section details the nature of the warranty cover and the claims procedure.
Directives with regard to the notations.
Text in this manual to which special attention must be paid are shown in the following way:

CAUTION
The product can be at risk. The machine or yourself can be damaged or injured if procedures are not carried out in the correct way.

WARNING
The life of the operator can be at risk.

WARNING

WARNING
Before you operate or carry out any maintenance on this machine YOU MUST READ and STUDY this manual.
KNOW how to safely use the unit's controls and what you must do for safe maintenance. (NB Be sure that you know how to switch the machine off before you switch on, in case you get into difficulty.)
ALWAYS wear or use the proper safety items required for your personal protection. If you have ANY QUESTIONS about the safe use or maintenance of this unit, ASK YOUR SUPERVISOR OR CONTACT: Altrad Belle (UK): +44 (0) 1298 84606

Contents
How to use this manual 36
Warning 36
Machine Description 37
Environment 37
Intended Use 37
Decals 38-40
Technical Data. 41
General Safety 42
Health and Safety. 42
Pre-Start Safety Checks 43
Long Term Storage. 43
Start & Stop Procedure 44-45
Operation 45
Trouble Shooting Guide 46
Service & Maintenance 46-47
Transport 48
Replacement Parts 49
Warranty 49

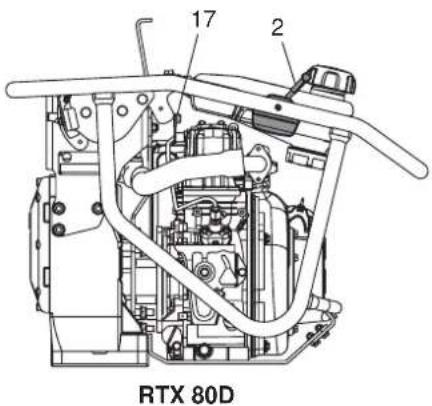
RTX 80D
- Fuel Tank. 7. Bellows 13. Lifting Handle
- Throttle Lever.
- Fuel ON / OFF Lever.
- Engine.
- Stop Button.
-
Crankcase.
-
Lifting Eye.
- Leg Oil Plug.
- Ramming Shoe.
- Operating Handle.
-
Primary Air Cleaner
-
Secondary Air Cleaner (Dual)
- Leg Oil Sight Glass
- Transport Roller (Optional)
- Decompression Lever
Environment

Safe Disposal

Instructions for the protection of the environment. The machine contains valuable materials. Take the discarded apparatus and accessories to the relevant recycling facilities.
| Component Material | |
| Handle Steel | |
| Ramming Shoe | Plywood and Steel or Nylon and Steel |
| Rubber Isolators Rubber and Steel | |
| Bellows Urethane | |
| Crankcase Aluminium | |
| Crankcase Cover Aluminium | |
| Gears Steel | |
| Engine Steel and Aluminium | |
| Transport Roller HDPE | |
| Miscellaneous Plastic Parts | Polypropylene |
| Various Parts Steel and Aluminium | |
Intended Use

This machine is intended for base preparation, driveways, foundations, kerbs, and footings. It can also be used for repair work on streets, highways and/or sidewalks/pavements.


A - Transport Decal (Part No. 800-99631)
On-Site Transport
The RTX Rammer may be moved vertically by 2 people, laid on the Transport Roller (if fitted) and pulled using the Lifting Handle or by using a Sling or Hoist on the Lifting Eye. NOTE:- A sling or hoist must not be used on the Lifting Handle.
Road Transport
The RTX Rammer must be transported as far as possible standing up, strapped to the body side board of the truck, or strapped inside a lorry (panel truck). If not possible, it may be laid down only on the Transport Rollers or front bar of the Operating Handle, in stable position and strongly strapped down to guard against rolling or sliding.
B - Safety Symbols

Wear Ear Protection

Wear Eye Protection

Wear Protective Footwear

Wear Protective Gloves

Please Read Operators Manual

CE Compliant

Please Recycle
C-Lifting Eye Decal (Part No.800-99630)
Lifting Eye for use with a Sling or Mechanical Hoist.
D-Throttle Decal (Part No.800-99628)

Max. RPM Position

Idle Position

Emergency Stop Position

Engine Stop Button (Petrol Only)
E - Branding Decal
Branding Decal to identify the Model of RTX Rammer.
F-Noise Decal
Guaranteed Sound Power Level of the machine in dB(A).
G - Spring Safety Decal (Part No. 800-99619)
DO NOT loosen or remove any of the Screws from the underside of the Rammer Leg. The Rammer Leg contains a highly compressed Spring which may cause serious injury if released by loosening or removing any of the Screws. Contact dealer for more information.
H - Engine Start Decal (Part No. 800-99625)
To Start the Engine, push the Carburettor Primer Bulb 4 times and then pull the Recoil Handle until the Engine fires.
J-Fuel Valve Decal (800-99634-0)
Fuel Valve 'ON' and 'OFF' positions.
- To START the machine, the Fuel Valve must be in the 'ON' position.
- When the machine is not in use or being transported, the Fuel Valve must be in the 'OFF' position.
K - Serial Plate (Part No. 800-99844)
The Serial Plate contains the machine Serial Number and all other information that you may require when contacting Altrad Belle regarding your machine.
- Serial Number.
- RTX Rammer Model.
- Year of Manufacture.
- Machine Weight.
- Machine Power.

L - Safety Decal (Part No. 800-99831)

WARNING! Please

Read Operators Manual

Wear Protective Footwear

Wear Ear Protection

Wear Eye Protection
M - Exhaust Fumes Warning Decal (Part No. 800-99520)
Engines emit carbon monoxide; operate only in well-ventilated areas.
N - Hot Surface Decal (Part No. 800-99520)
CAUTION! Beware of hot surfaces around the Engine and Exhaust area.
P - Diesel Only Decal (Part No. 800-99524)
CAUTION! Only Diesel must be used in this machine (Diesel models only).

| Model | RTX 50 | RTX 50R | RTX 60C | RTX 60 | RTX 60R | RTX 68 | RTX 68R | RTX 70 | RTX 70R | RTX 80D |
| A - Width (in) 13.5 13.5 13.5 13.5 13.5 13.5 13.5 13.5 13.5 13.5 13.5 13.5 13.5 13.5 13.5 13.5 13.5 13.5 13.5 13.5 13. 5 13.5 13.5 13.5 13.5 13.5 13.5 13.5 13.5 13.5 13.5 13.5 13.5 13.5 13.5 13.5 13.5 13.5 13.5 13.5 13 .5 13.5 13.5 13.5 13.5 13.5 13.5 13.5 13.5 13.5 13.5 13.5 13.5 13.5 13.5 13.5 13.5 13.5 13.5 13.5 13 41 41 41 | 13.5 13.5 13.5 13.5 13.5 13.5 13.5 13.5 13.5 13.5 13.5 13.5 13.5 13.5 13.5 13.5 13.5 13.5 13.5 13.5 | 13.5 13.5 13.5 13.5 13.5 13.5 13.5 13.5 13.5 13.5 13.5 13.5 13.5 13.5 13.5 13.5 13.5 13.5 13.5 13. 6 13.5 13.5 13.5 13.5 13.5 13.5 13.5 13.5 13.5 13.5 13.5 13.5 13.5 13.5 13.5 13.5 13.5 13.5 13.5 13. .5 13.5 13.5 13.5 13.5 13.5 13.5 13.5 13.5 13.5 13.5 13.5 13.5 13.5 13.5 13.5 13.5 13.5 13.5 13.5 12.5 12.5 12.5 12.5 12.5 12.5 12.5 12.5 12.5 12.5 12.5 12.5 12.5 12.5 12.5 12.5 12.5 12.5 12.5 12.5 13.5 13.5 13.5 13.5 13.5 13.5 13.5 13.5 13.5 13.5 13.5 13.5 13.5 13.5 13.5 13.5 13.5 13.5 13.5 12 .5 12 .5 12 .5 12 .5 12 .5 12 .5 12 .5 12 .5 12 .5 12 .5 12 .5 12 .5 12 .5 12 .5 12 .5 12 .5 12 .5 12 .5 12 .5 12 .5 12.5 12 .5 12 .5 12 .5 12 .5 12 .5 12 .5 12 .5 12 .5 12 .5 12 .5 12 .5 12 .5 12 .5 12 .5 12 .5 12 .5 12 .5 12 .5 12 .5 13 .5 13 .5 13 .5 13 .5 13 .5 13 .5 13 .5 13 .5 13 .5 13 .5 13 .5 13 .5 13 .5 13 .5 13 .5 13 .5 13 .5 13 .5 13 .5 13 .5 12 .5 12 .5 12 .5 12 .5 12 .5 12 .5 12 .5 12 .5 12 .5 12 .5 12 .5 12 .5 12 .5 12 .5 12 .5 12 .5 12 .5 12 .5 12 .5 13.5 13 .5 13 .5 13 .5 13 .5 13 .5 13 .5 13 .5 13 .5 13 .5 13 .5 13 .5 13 .5 13 .5 13 .5 13 .5 13 .5 13 .5 13 .5 13 .5 13.5 13 .5 13 .5 13 .5 13 .5 13 .5 13 .5 13 .5 13 .5 13 .5 13 .5 13 .5 13 .5 13 .5 13 .5 13 .5 13 .5 13 .5 13 .5 12 .5 12.5 12 .5 12 .5 12 .5 12 .5 12 .5 12 .5 12 .5 12 .5 12 .5 12 .5 12 .5 12 .5 12 .5 12 .5 12 .5 12 .5 12 .5 13 .5 13 .5 13.5 13 .5 13 .5 13 .5 13 .5 13 .5 13 .5 13 .5 13 .5 13 .5 13 .5 13 .5 13 .5 13 .5 13 .5 13 .5 13 .5 12 .5 12 .5 12 .5 12.5 12 .5 12 .5 12 .5 12 .5 12 .5 12 .5 12 .5 12 .5 12 .5 12 .5 12 .5 12 .5 12 .5 12 .5 12 .5 13 .5 13 .5 13 .5 13 .5 13.5 13 .5 13 .5 13 .5 13 .5 13 .5 13 .5 13 .5 13 .5 13 .5 13 .5 13 .5 13 .5 13 .5 13 .5 12 .5 12 .5 12 .5 12 .5 12 .5 12.5 12 .5 12 .5 12 .5 12 .5 12 .5 12 .5 12 .5 12 .5 12 .5 12 .5 12 .5 12 .5 12 .5 13 .5 13 .5 13 .5 13 .5 13 .5 13 .5 13.5 13 .5 13 .5 13 .5 13 .5 13 .5 13 .5 13 .5 13 .5 13 .5 13 .5 13 .5 13 .5 12 .5 12 .5 12 .5 12 .5 12 .5 12 .5 12 .5 12.5 12 .5 12 .5 12 .5 12 .5 12 .5 12 .5 12 .5 12 .5 12 .5 12 .5 12 .5 13 .5 13 .5 13 .5 13 .5 13 .5 13 .5 13 .5 13 .5 13.5 13 .5 13 .5 13 .5 13 .5 13 .5 13 .5 13 .5 13 .5 13 .5 13 .5 12 .5 12 .5 12 .5 12 .5 12 .5 12 .5 12 .5 12 .5 12 .5 12.5 12 .5 12 .5 12 .5 12 .5 12 .5 12 .5 12 .5 12 .5 12 .5 13 .5 13 .5 13 .5 13 .5 13 .5 13 .5 13 .5 13 .5 13 .5 13 .5 13.5 13 .5 13 .5 13 .5 13 .5 13 .5 13 .5 13 .5 13 .5 12 .5 12 .5 12 .5 12 .5 12 .5 12 .5 12 .5 12 .5 12 .5 12 .5 12 .5 12.5 12 .5 12 .5 12 .5 12 .5 12 .5 12 .5 12 .5 13 .5 13 .5 13 .5 13 .5 13 .5 13 .5 13 .5 13 .5 13 .5 13 .5 13 .5 13 .5 13.5 13 .5 13 .5 13 .5 13 .5 13 .5 13 .5 12 .5 12 .5 12 .5 12 .5 12 .5 12 .5 12 .5 12 .5 12 .5 12 .5 12 .5 12 .5 12 .5 12.5 12 .5 12 .5 12 .5 12 .5 12 .5 13 .5 13 .5 13 .5 13 .5 13 .5 13 .5 13 .5 13 .5 13 .5 13 .5 13 .5 13 .5 13 .5 13 .5 13.5 13 .5 13 .5 13 .5 13 .5 12 .5 12 .5 12 .5 12 .5 12 .5 12 .5 12 .5 12 .5 12 .5 12 .5 12 .5 12 .5 12 .5 12 .5 12 .5 12.5 12 .5 12 .5 12 .5 13 .5 13 .5 13 .5 13 .5 13 .5 13 .5 13 .5 13 .5 13 .5 13 .5 13 .5 13 .5 13 .5 13 .5 13 .5 13 .5 13.5 13 .5 13 .5 12 .5 12 .5 12 .5 12 .5 12 .5 12 .5 12 .5 12 .5 12 .5 12 .5 12 .5 12 .5 12 .5 12 .5 12 .5 12 .5 12 .5 12.5 12 .5 13 .5 13 .5 13 .5 13 .5 13 .5 13 .5 13 .5 13 .5 13 .5 13 .5 13 .5 13 .5 13 .5 13 .5 13 .5 13 .5 13 .5 13 .5 13.5 12 .5 12 .5 12 .5 12 .5 12 .5 12 .5 12 .5 12 .5 12 .5 12 .5 12 .5 12 .5 12 .5 12 .5 12 .5 12 .5 12 .5 12 .5 12.5 12.5 12 .5 12 .5 12 .5 12 .5 12 .5 12 .5 12 .5 12 .5 12 .5 12 .5 12 .5 12 .5 12 .5 12 .5 12 .5 12 .5 12 .5 12 .5 12.5 13 .5 13 .5 13 .5 13 .5 13 .5 13 .5 13 .5 13 .5 13 .5 13 .5 13 .5 13 .5 13 .5 13 .5 13 .5 13 .5 13 .5 13 .5 13 .5 12.5 12.5 12.5 12.5 12.5 12.5 12.5 12.5 12.5 12.5 12.5 12.5 12.5 12.5 12.5 12.5 12.5 12.5 12.5 12 .5 12 .5 12 .5 12 .5 12 .5 12 .5 12 .5 12 .5 12 .5 12 .5 12 .5 12 .5 12 .5 12 .5 12 .5 12 .5 12 .5 12.5 12.5 12.5 12.5 12.5 12.5 12.5 12.5 12.5 12.5 12.5 12.5 12.5 12.5 12.5 12.5 12.5 12.5 12.5 13 .5 13 .5 13 .5 13 .5 13 .5 13 .5 13 .5 13 .5 13 .5 13 .5 13 .5 13 .5 13 .5 13 .5 13 .5 13 .5 13 .5 13 .5 13.5 13.5 13 .5 13 .5 13 .5 13 .5 13 .5 13 .5 13 .5 13 .5 13 .5 13 .5 13 .5 13 .5 13 .5 13 .5 13 .5 13 .5 13 .5 13 .5 13.5 12.5 12.5 12.5 12.5 12.5 12.5 12.5 12.5 12.5 12.5 12.5 12.5 12.5 12.5 12.5 12.5 12.5 12.5 12 .5 13 .5 13 .5 13 .5 13 .5 13 .5 13 .5 13 .5 13 .5 13 .5 13 .5 13 .5 13 .5 13 .5 13 .5 13 .5 13 .5 13 .5 13.5 13.5 12.5 12.5 12.5 12.5 12.5 12.5 12.5 12.5 12.5 12.5 12.5 12.5 12.5 12.5 12.5 12.5 12.5 12 .5 12 .5 13 .5 13 .5 13 .5 13 .5 13 .5 13 .5 13 .5 13 .5 13 .5 13 .5 13 .5 13 .5 13 .5 13 .5 13 .5 13 .5 13 .5 13.5 13 .5 12.5 12.5 12.5 12.5 12.5 12.5 12.5 12.5 12.5 12.5 12.5 12.5 12.5 12.5 12.5 12.5 12.5 12.5 12 .5 12.5 12.5 12.5 12.5 12.5 12.5 12.5 12.5 12.5 12.5 12.5 12.5 12.5 12.5 12.5 12.5 12.5 12.5 12 .5 13.5 13 .5 13 .5 13 .5 13 .5 13 .5 13 .5 13 .5 13 .5 13 .5 13 .5 13 .5 13 .5 13 .5 13 .5 13 .5 13 .5 13 .5 13.5 13 .5 13.5 13 .5 13 .5 13 .5 13 .5 13 .5 13 .5 13 .5 13 .5 13 .5 13 .5 13 .5 13 .5 13 .5 13 .5 13 .5 13 .5 13 .5 13.5 12.5 12 .5 12 .5 12 .5 12 .5 12 .5 12 .5 12 .5 12 .5 12 .5 12 .5 12 .5 12 .5 12 .5 12 .5 12 .5 12 .5 12 .5 12 .5 13 .5 13 . ...... |
For your own personal protection and for the safety of those around you, please read and ensure you fully understand the following safety information. It is the responsibility of the operator to ensure that he/she fully understands how to operate this equipment safely. If you are unsure about the safe and correct use of your RTX, consult your supervisor or Altrad Belle of companies.

CAUTION
Improper maintenance or use can be hazardous. Read and Understand this section before you perform any maintenance, service or repairs.
This machine must only be used for its intended purpose. This machine must be operated only by well trained personnel.
- The owner of this machine must observe, and train the user of the machine to observe, the effective Labour Protection Regulation in the country of application.
This equipment is heavy and must not be lifted single-handedly, either GET HELP or use suitable lifting equipment.
- This machine must be operated on ground where stability is guaranteed.
Cordon off the work area and keep members of the public and unauthorised personnel at a safe distance.
Personal Protective Equipment (PPE) must be worn by the operator whenever this equipment is being used (See Health & Safety Section).
Make sure you know how to safely switch this machine OFF before you switch it ON in case you get into difficulty.
Always switch OFF the engine and CLOSE the fuel tap before transporting, moving it around the site or servicing it.
- During use the engine becomes very hot, allow the engine to cool before touching it.
- Never leave the engine running and unattended.
- Never remove or tamper with any guards fitted, they are there for your protection. Always check guards for condition and security, if any are damaged or missing, DO NOT USE THE RTX until the guard has been replaced or repaired.
- Do not operate the RTX when you are ill, feeling tired, or when under the influence of alcohol or drugs.
This machine is designed to eliminate the possible risks arising from its use. However, risks DO reside, and these residual risks are not clearly recognisable and may cause personal injury, property damage and possible death. If such unpredictable and unrecognisable risks become apparent, the machine must be stopped immediately, and the operator or his supervisor must take the appropriate measures to eliminate such risks. It is sometimes necessary for the manufacturer to be informed of such an event for future counter measuring.

WARNING
Fuel is flammable. It may cause injury and property damage. Shut down the engine, extinguish all open flames and do not smoke while filling the fuel tank. Always wipe up any spilled fuel.
- Before refuelling, switch off the engine and allow it to cool.
- When refuelling, DO NOT smoke or allow naked flames in the area.
- When refuelling, use a proper funnel, and avoid spilling fuel over the engine.
- Spilt fuel must be made safe immediately, using sand. If fuel is spilt on your clothes, change them.
- Store fuel in an approved, purpose made container away from heat and ignition sources.

Health & Safety
Vibration
Some vibration from the machines operation is transmitted through the handle to the operator's hands. The Altrad Belle RTX range has been specifically designed to reduce hand/arm vibration levels. Refer to specifications & technical data for vibration levels and usage times (recommended maximum daily exposure time). DO NOT exceed the maximum usage times.
PPE (Personal Protective Equipment)
Personal injury or property damage may be caused by knocks, crushing, slipping, tripping, falling, or by flying chips due mainly to the improper or careless handling of the machine, or working in a confined area.
Suitable PPE must be worn when using this equipment i.e. Safety Goggles, Gloves, Ear Defenders, Dust Mask and Steel Toe capped footwear.
Wear clothing suitable for the work you are doing. Tie back long hair and remove any jewellery which may catch in the equipment's moving parts.
Dust
The compaction process can produce dust, which may be hazardous to your health. Always wear a mask that is suited to the type of dust being produced.
Fuel
Oil and fuel used in this machine may cause the following hazards.
- Poisoning if the fuel or oil vapour is inhaled.
- Allergies if the fuel or oil spills on the skin.
- Fire and explosion if the fuel and oil is handled near smoking or open fires.
- Do not ingest fuel or inhale fuel vapours and avoid contact with your skin. Wash fuel splashes immediately. If you get fuel in your eyes, irritate with copious amounts of water and seek medical attention as soon as possible.
Exhaust Fumes

WARNING
The exhaust fumes produced by this equipment are highly toxic and can kill!
Do not operate your RTX Rammer indoors or in a confined space, make sure the work area is adequately ventilated.
Pre start-up inspection
The following Pre-start-up inspection must be performed before the start of each work session or after every four hours of use, whichever is first. Please refer to the service section for detailed guidance. If any fault is discovered, the RTX must not be used until the fault is rectified.
- Thoroughly inspect the RTX for signs of damage.
- Check Hoses, filler openings, Drain Plugs and any other areas for signs of leakage. Fix any leaks before operating.
- Check the Engine Oil level and top up as necessary.
3.1 To check the Engine Oil level, place the machine on a flat surface ensuring the Engine is level. To achieve this place the Rammer in the position shown below.
3.2 Remove the Oil Gauge, and observe that the Oil is up to the rim of the filler port. Use Engine Oil with the correct viscosity. (SAE 10W-30 Mineral Oil recommended) - Check the Engine Fuel level and top up as necessary. Use clean Fuel. Use of contaminated Fuel may damage the Fuel system.

CAUTION
NOTICE: This machine uses Unleaded Gasoline/Petrol.
NEVER fill the fuel tank with a mixture of Oil and Gasoline/Petrol.
- Check that the Air Filter is clean. Excessive dust/dirt accumulation within the filter element will cause erratic Engine operation. Clean the Air Filter element when it is contaminated (See Maintenance section).
6.1 To check the Rammer Leg Oil level, place the machine on a flat surface ensuring the Foot is flat to the ground, as shown below.
6.2 The minimum level is shown by the Red Dot on the Oil Sight Glass within the Rammer Leg. (SAE 10W-30 Mineral Oil recommended)
Rammer Leg Oil Check Position

Engine Oil Check Position
Long Term Storage

For long term storage, empty the fuel in the carburettor by running the engine with the fuel tap being closed (Petrol Only)
The chemical composition of fuel will deteriorate after prolonged storage. When the machine needs to be stored for a long time, remove all fuel from the fuel tank. Also remove the fuel from the float chamber of the carburettor by draining the fuel out from the drain plug (see diagram) (Petrol Only)
Clean up oil and dust accumulation on rubber parts.
Clean the ramming shoe and apply a light coating of oil to prevent rust formation.
Cover the machine and store in a dry place.

CAUTION
Improper operation can be hazardous. Read and understand this section before you start the machine.

WARNING
To stop the machine in an emergency, move the Throttle Lever to the Emergency Stop position. This will immediately stop the machine from vibrating.
Honda GX100, GX120 & GXR120
- Open the fuel cock/tap.
- Set the speed control lever to the STARTING position (Halfway between HIGH and LOW position).
- Move the choke lever to the CLOSED position.
- Push the Carburettor Primer Bulb 4 times (or at least 10 times when the machine is new or after machine has had the fuel drain).
- Taking a firm hold of the Operating handle with one hand, grasp the recoil starter handle with the other, Pull the recoil starter handle until engine resistance is felt, then allow the starter to return.
- Taking care not to pull the starter rope fully out, pull the starter handle briskly.
- Repeat until the engine fires.
- Once the engine fires gradually set the choke lever to the OPEN position.
- Allow the engine run at idle for a few minutes to warm up.
- After the engine has warmed up, the machine is ready for operation.
- Move the throttle lever to the high speed position quickly to prevent damage from occurring to the clutch. The 'Full Throttle' position of this machine has been preset at the factory to achieve optimum machine performance.
- With the engine running in the full throttle position, the machine will move forward and compact loose 'lifts'
- In preparation for stopping the engine, move the throttle lever to the LOW position.
- Allow the engine to idle for 1-3 minutes.
- Push and hold the RED Engine Stop button.
- Close the fuel cock/tap.
- Pull the recoil starter slowly until you feel resistance. Then release your hand from the starter knob to set it back to its original position. This will prevent any air or humidity from entering into the cylinder.
Yanmar L48
- Slide the Engine Speed Control Lever to the RUN position.
- Taking a firm hold of the Operating handle with one hand, grasp the recoil starter handle with the other, Pull the recoil starter handle until engine resistance is felt, then allow the starter to return.
- Push the decompression lever down and release it. The decompression lever will automatically return to the original position when the engine starts.
- Taking care not to pull the starter rope fully out, pull the starter handle briskly.
- Repeat until the engine fires.

CAUTION
In cold weather if you have trouble starting the engine, remove the Oil Plug and add 2cc of engine oil to the oil port and reinsert the oil plug.
- Allow the engine run at idle for a few minutes to warm up.
- After the engine has warmed up, the machine is ready for operation.
- Move the throttle lever to the high speed position quickly to prevent damage from occurring to the clutch. The 'Full Throttle' position of this machine has been preset at the factory to achieve optimum machine performance.
- With the engine running in the full throttle position, the machine will move forward and compact loose 'lifts'
- In preparation for stopping the engine, move the throttle lever to the LOW position.
- Allow the engine to idle for 1-3 minutes.
- To stop the engine, set the engine speed lever to the slide the Engine Speed Control Lever to the STOP position
Start & Stop Procedure
NOTICE: The optimum maximum engine revolution has been set at the factory as follows:
| Model Engine | Maximum RPM | ||
| Optimum Upper Limit | |||
| RTX 50 Honda G | GX100 3,800 +/- 50 3,850 | ||
| RTX 50R Honda G | GXR120 3,800 +/- 50 3,850 | ||
| RTX 60 Honda G | GX100 3,800 +/- 50 3,850 | ||
| RTX 60R Honda G | GXR120 3,800 +/- 50 3,850 | ||
| RTX 68 Honda G | GX100 3,800 +/- 50 3,850 | ||
| RTX 68R Honda G | GXR120 3,800 +/- 50 3,850 | ||
| RTX 70 | Honda GX100 | 4,050 +/- 50 | 4,100 |
| RTX 70R | Honda GXR120 4,050 +/- 50 4,100 | ||
| RTX 80D | Yanmar L48 3,400 +/- 50 3,450 | ||

CAUTION
DO NOT alter this setting since irregular vibration or damage to the gear transmission mechanism can result, and both engine and machine warranties will be automatically voided.
Operation

Lifting
Where it is necessary to use lifting equipemnt to position the RTX, check and confirm that the rubber mounts on the operation handle are not damaged or cracked. If they are damaged or cracked, replace the rubber mounts before attempting to lift the machine. Also make sure that the lifting equipment has a WLL (Working Load Limit) suitable for the RTX's weight (See specification chart or the machine Serial Plate). Attach suitable chains or slings ONLY to the lifting point on top of the RTX's operating handle.
NEVER leave the engine running whilst transporting or moving the RTX's, even if it is only a short distance.
Once the checks listed in the 'Pre-Start' section have been carried out, you may start the engine.
The Altrad Belle RTX range of tampers are fitted with a centrifugal clutch, this allows the engine to run at idle without driving the crank mechanism. As the engine speed is increased the clutch will engage and the engine will drive the crank mechanism.
- To avoid damage to the centrifugal clutch, move the throttle lever quickly from the L to H position.

CAUTION
For correct operation, the engine speed should be set to maximum.
- Avoid operating the machine on a fully compacted, hard, or non-yielding surface. Otherwise, the gear transmission mechanism will be damaged, and the life of the machine will be greatly reduced.
- When working in a narrow trench, if the ramming shoe should get caught between the walls of the trench, the rammer may miss-strike and can be severely damaged. The ramming shoe may especially be damaged severely.
- Ensure that the rammer is steered only by using the handle grip. It should only be pushed. The rammer must not be pressed into the materials being compacted. Excessive pressure on the operating handle will lead to unsatisfactory compaction due to the fact that the jumping action is reduced.
Transportation.
When transporting or storing the machine, place the machine in an upright position if at all possible. Should the machine be required to be laid down, NEVER attempt to transport the machine in a manner that the air cleaner faces downwards. Otherwise, the oil in the cylinder may get into the combustion chamber or in the air cleaner, which may result in starting difficulties. Laying the machine forwards (The crankcase cover of the rammer facing downwards) may not cause any spill of the engine oil into the cylinder or air cleaner of the engine. However, if the engine is still hot, spilt fuel on the engine may cause fire. Lay the machine after the machine is completely cooled.
The machine fitted with the transporting roller on the operating handle may be easily loaded and unloaded from a vehicle. Tilt the machine forwards until the transporting roller touches the floor of the vehicle. Lift the lower part of the machine using the grab handle provided at the ramming shoe, and push forward to load the machine. During transportation, the machine should be tied firmly, and placed in an upright position if at all possible. To unload the machine, tilt the machine forward, until the roller touches the floor. Slightly lift the lower part of the machine, and pull the machine out.
Operation at High Altitude
For continuous High-Altitude operation above 1,000m (3,000FT), it will be necessary to change the engine main jet to a type that will allow for correct fueling of the engine. Otherwise, the unit will suffer from a lack of engine power and not work correctly (Petrol Only).
| Problem Cause Remedy | ||
| Engine will not start | No fuel Fill Fuel Tank | |
| Fuel Tap has been closed Open fuel tap. | ||
| Engine not primed. (GX100 Only) | Push the Carburettor Primer Bulb 4 times and pull the Recoil Handle until the Engine fires | |
| Engine not primed. (Diesel Only) | See the Service & Maintenance section of this Manual. | |
| Spark Plug contaminated or damaged. (Petrol Only) | Replace spark plug. | |
| Faulty Carburettor. (Petrol Only) Service | the Carburettor | |
| Engine stops suddenly, or stops when the engine rpm is increased. | See Above See Above | |
| Main jet of the Carburettor clogged with dirt. (GX120 Only) | Take out the main jet of the Carburettor and clean with Compressed air. | |
| Air filter element dirty. Clean the element. | ||
| Spark plug cap is loose. (Petrol Only) Tightly fit cap to plug. | ||
| Engine runs, but machine does not produce impact. | Lack of engine power See above. | |
| Clutch is slipping | Dismantle clutch assembly, Clean shoe and drum with proper solvent. Replace clutch shoe if necessary. | |
| Crank mechanism is damaged Contact Dealer. |

Service & Maintenance
Maintenance
The Altrad Belle RTX Range is designed to give many years of trouble free operation. It is, however, important that the simple regular maintenance listed in this section is carried out.
It is recommended that an approved Altrad Belle dealer carries out all major maintenance and repairs. Always use genuine Altrad Belle replacement parts, the use of spurious parts may void your warranty.
Before any maintenance is carried out on the machine, switch off the engine. If working on a petrol engined machine, disconnect the HT lead from the sparkplug.
Always set the RTX on level ground to ensure any fluid levels will be correctly read. Only use recommended oils (see chart).
Servicing the Engine
Service the engine according to the engine manufacturer's specifications. Refer to the engine operation and maintenance manual.
Yanmar L48 Engine Priming
In the event of running out of Diesel or after a change of the Fuel Filter, the Yanmar engine will need to be primed. Please follow the below instructions.

CAUTION
Before starting the Priming procedure, please ensure the Fuel Tank is full and the Fuel Cap is not fitted to the tank.
- Open the fuel cock/tap.
- Slide the Engine Speed Control Lever to the RUN position.
- Using 2 × 17mm Spanners, unlock the Injector Pipe (Item 1) by loosening the Injector Pipe Nut (Item 2).
- Slacken the Injector Pump Nozzle (Item 3) by 2 full revolutions NOTE:DO NOT remove the Injector Pump Nozzle.
- Hold the Injector Pipe away from the Injector Pump Nozzle and wait until Diesel is running freely without any air bubbles.
- Re-tighten the Injector Pump Nozzle to a setting of 12Nm.
- Re-fit the Injector Pipe and tighten to 12Nm.
8 Re-fit the Fuel Cap and start the engine using the Start and Stop Procedure section of this manual.
Service & Maintenance
Every 8 Hours or Daily
- Check for loose bolt and nuts, retighten if necessary.
- Check and clean air filter element, re-lube the element according to the engine manufacturer's recommendations. If operating conditions are unusually dusty and severe, filter element cleaning should be done more frequently.
- Check oil level in crankcase of engine and replenish as necessary. Check oil level in the ramming cylinder as per following procedures.
3a. Make sure that the machine has not been run in the last 10 minutes.
3b. Set the machine on a level surface and remove the oil plug.
3c. The top surface of the oil must be seen just below the lower rim of the hole for oil plug. Replenish as necessary.
NOTICE: Care should be taken not to overfill the ramming cylinder with oil. Overfilling will cause excessive load on the engine, which may result in poor or irregular vibration.
First 20 Hours of Operation
- Replace the Oil in the Ramming Cylinder
Every 50 Hours or Weekly
- Check for loose Bolts and Nuts. Retighten if necessary.
Every 200 Hours.
- Change the Ramming Cylinder Oil. Do not overfill.
Fuel and Lubricant
| Model | Fuel Engine Crankcase Ramming Cylinder | ||||||
| Type of Oil Capacity Type Of | Oil Engine Capacity Type of Oil Capacity | ||||||
| RTX 50 | Unleaded Petrol | 0.66 Gals | 10W-30, API, SF/CC, CD | GX100 / GXR120 | 0.15 Gals | 10W-30, API, SF/CC, CD | 0.18 Gals |
| RTX 60 | |||||||
| RTX 68 | 0.21 GalsRTX 70 | ||||||
| RTX 80D | Diesel L48 | 0.2 Gals | |||||

CAUTION
Please ensure that you have read and fully understand the information below before attempting to transport the RTX Rammer.
On-Site Transport
The RTX Rammer may be moved vertically by 2 people, laid on the Transport Roller (if fitted) and pulled using the Lifting Handle or by using a Sling or Hoist on the Lifting Eye. NOTE:- A sling or hoist must not be used on the Lifting Handle. Alternatively, use the optional Wheel Kit - see below for details.
Road Transport
The RTX Rammer must be transported as far as possible standing up, strapped to the body side board of the truck, or strapped inside a lorry (panel truck). If not possible, it may be laid down only on the Transport Rollers or front bar of the Operating Handle, in stable position and strongly strapped down to guard against rolling or sliding.
Wheel Kit Option
- Place the Wheel Kit under the lip of the plate on the lower Ramming Leg.
- Once the Wheel Kit is engaged, tilt the Rammer backwards slightly until the Wheels take the weight of the Rammer.
- ONLY moving the Rammer backwards, transport to the required location.


WARNING
DO NOT leave the Wheel Kit engaged whilst unattended or during operation as this will make the Rammer unstable. For transportation purposes only!
KEY

USE LOCTITE

USE OIL

USE SILICONE
When maintaining this product only the manufacturers original, genuine replacement parts may be used.
The user will lose any possible claims if replacement parts used are other than the makers original replacement parts.
A PDF of parts listings for this product can be found in the 'product' section of our website www.Altrad-Belle.com Information on sourcing replacement parts from your local dealer can then be found in the 'contact us' section
Warranty

Your new Altrad Belle Rammer Tamper is warranted to the original purchaser for a period of one-year (12 months) from the original date of purchase. The Altrad Belle warranty is against defects in design, materials and workmanship.
The following are not covered under the Altrad Belle warranty:
- Damage caused by abuse, misuse, dropping or other similar damage caused by or as a result of failure to follow assembly, operation or user maintenance instructions.
- Alterations, additions or repairs carried out by persons other than Altrad Belle or their recognised agents.
- Transportation or shipment costs to and from Altrad Belle or their recognised agents, for repair or assessment against a warranty claim, on any machine.
- Materials and/or labour costs to renew, repair or replace components due to fair wear and tear.
The following components are not covered by warranty.
- Engine air filter
- Engine spark plug
Altrad Belle and/or their recognised agents, directors, employees or insurers will not be held liable for consequential or other damages, losses or expenses in connection with or by reason of or the inability to use the machine for any purpose.
Warranty Claims
All warranty claims should firstly be directed to Altrad Belle, either by telephone, by Fax, by Email, or in writing.
For warranty claims:
Tel: +44 (0)1298 84606, Fax: +44 (0)1298 84073, Email: Warranty.dept@altrad-belle.com
or Write to:
Altrad Belle Warranty Department,
Sheen,
Nr. Buxton,
Derbyshire,
SK17 0EU
England
Warranty Registration:
In the bid for ALTRAD Belle to become greener and more eco friendly, we have now introduced online Warranty registration. To access the registration page of our website, please use the following address:
http://www.bellegroup.com/index.php?p=warranty-registration
Alternatively, please scan the adjacent QR Code (Quick Response Code) using your smartphone to access the registration page.

Altrad Belle Warranty Department,
Sheen, Nr. Buxton
Derbyshire
SK17 0EU
England
http://www.bellegroup.com/index.php?p=warranty-registration
Altrad Belle Warranty Department,
Sheen, Nr. Buxton
Derbyshire
SK17 0EU
Inglaterra
Registrar de Garantia :
http://www.bellegroup.com/index.php?p=warrantyregistration
http://www.bellegroup.com/index.php?p=warranty-registration
Engines emit carbon monoxide; operate only in well-ventilated areas.
Altrad Belle Warranty Department,
Sheen, Nr. Buxton
Derbyshire
SK17 0EU
England
http://www.bellegroup.com/index.php?p=warranty-registration
Check for start. 113
Lang Tids Opbevaring 113
Start-og stopprocedure. 114-115
Bettening at RTX 115
Fuel Valve 'ON' and 'OFF' positions.
Start-Og Stopprocedure
ALTRAD Belle Warranty Department,
Sheen, Nr. Buxton
Derbyshire
SK17 0EU
England
Garantiregistrering:
Som led i vores bestaebelser pa at gore ALTRAD Belle gronnere og mere miljovenigt har vi indfort garantiregistering online. For at gä til registeringsssiden pa vores webside bedes du bruge følgende adress:
http://www.bellegroup.com/index.php?p=warranty-registration
Alternativet bedes du skanne QR-koden (Quick Response Code) ved sider af donne tekst med din smartphone for at fa adgang til registraringssiden.

Altrad Belle Warranty Department,
Sheen, Nr. Buxton
Derbyshire
SK17 0EU
England
http://www.bellegroup.com/index.php?p=warranty-registration
ALTRAD Belle Warranty Department,
Sheen, Nr. Buxton
Derbyshire
SK17 0EU
England
http://www.bellegroup.com/index.php?p=warranty-registration
Altrad Belle Warranty Department,
Sheen, Nr. Buxton
Derbyshire
SK17 0EU
England
Garantiregistrering:
http://www.bellegroup.com/index.php?p=warrantyregistration
Altrad Belle Warranty Department,
Sheen, Nr. Buxton
Derbyshire
SK17 0EU
England
http://www.bellegroup.com/index.php?p=warranty-registration
Altrad Belle Warranty Department
Sheen, Nr. Buxton,
Derbyshire.
SK17 0EU
England.
http://www.bellegroup.com/index.php?p=warranty-registration
Na strone rejestracimaybe takweje sckanujac za pomocag smartfona kod QR znajdujacy sie obok.

DahHoe pyKOBOCTBO 6bIIO HanicaHO C cIbIIO NOMOy BAM B 6eOnaCHO pa6oTe n 06cIyKBAHN yTpaM6OBuIKOB cepNI PT. DaaHoe pyKOBOCTBO npEHa3NaHeO dIra NoctabUKNOB n OepaTopoB yTpaM6OBuIKOB cepNI PT.
PpeDnCIOBne
Pa3dien «OnucHue MaunHbI» NOMOKeT Bam OCBOuTb KOHCTpyKUIO MaunHbI eeynpaBneHne.
B pa3dene «Okpykaoua cpea» npedctabneHb i nHctpykun no ytnnnaun cnncahno annapata c yyeTom 3aunTbI Okpykaoue cpebl.
B pa3dienax «O6uaa 6e3onacHocmb» u «3doopo8e u 6e3onacHocmb» o6brcyTeC, KaK pOBb3oBaTbcra daHHoMaunHO C yueToM BaWei co6ctBeHHoN 6e3onacHOCTn, a TAKKe 6e3onacHOCTn OKpyXauHX IIOJe.
Bpa3ene «Ppoedypa no 3anycky u ocmahOke» objchreTcK, KaK 3anyCTnTb N OCTaHOBTb MaunHy.
Pa3dien «Cobembl Ha cnyuau 8o3MOxHbIX HenoJadok» NOMOXET Bam B cnyuae, ecn Bbl CToIKNHeTecb c npO6nEMAMN BAweMaunHe.
B pa3dene "TexHuueckoe 06cnykuaHue" paccMaTpuBaIOrC BONpOcbl NO o6uemy TexHuueckomy 06cnykuaHnIO.
B pa3ene «Fapamur» daetcra taelbhoe onncahne ochoBbix npnHunOB rapaHTn, a taKke npoceDpybl nIpeBBAHnra paaTnHbix npTeH3n.
Yka3aHnO O Beux, Tpe6yUoIx NOBbiueHHoro BHMaHnA.
TeKCT B DaHHOM pyKOBOdCTBe, Ha KOToBb HeoXoDmO o6paTntb O0eHHOe BHIMAHne, BblJeHcNeIyUOnM 6pa3OM:

BHHIMAHNE
Daanna npodykua moxem codepka b cebe 3neMeHb pucka. B cnyuae, ecnu npouedpybblonnHmcm HeepHo, moxem nocmpadamk kak MaunHa, mak u ebI camu.

PpeynpeXeHne
Ku3Nb onepamopomozem nodebepaHymbocnacchocmu.

PpeDynpexdEHNHe!

PpeynpeKdHne
PpeXe Yem npoBodum kakue-nu6 paobmy uuu bInonHmmb mexo6nykueaHue daHHou MaunHb, Bbl DOJKNbI PPOHTATb u N3yUHTb daHHoe pyko8ocm80.
Heo6xOIMO 3HATb, KaK 6e30nacHO nOJIb3OBAtbcra YnpaBHeHem DaHHo MaunHbI uTO HaIO DeNaTb dIg 6e30nacHOrO BblONHeHnpaBOT no TEXHnueckOMy o6cnykUNBaHIO.
NB! YTo6bI He nonactb B 3aTpPyHnTeJIbHOe nIOXKeHne, y6eHNTEcB B TOM, YTO BBI 3Haete KaK 6e3ONaCHO BbIKNIOHTb MaINHy, DO TOTO, KAK Bbl ee BKNIouHte.
BCEHDA HOCHTE INCNOJIb3yIte COOTBECTBYIOUe 3aUNTHbIe Beu, Heo6xOIMMbIe InIg oBeceNeHnBaIe 6eONacHOCTN.
Ecn y Bac Bo3HKnHy KaKne-Jn6o BonpocbI NO NOBOy 6e30NaChOrO INcNoJIb3OBAHnI N TexO6CnyJXnBaHnI DaHHoMaunHbI, o6paTntecb K CBOeMy pyKOBOCTBy nnn C8raJNtEc b CeJIne Ipyn

OrnaBneHne
Kak noJIb3ObaTbcra daHHbIM PyKOBOIDCTBOM 190
PpeDynpexkndnne 190
OncanHe MaunHb1 191
Okpykaioa cpea. 191
3Ta MaHnHa npedHa3HaHeHa InnrpybO noIroTOBKn OCHOBaHH, DOpOr, yHdAmeHTOB, 6apbepOB, n TpoTyapOB. Ee TaKKe MoXHO mCNoJIb3OBaTb InnpeMOHTbIX paobT Ha yInuax, WocCe N/INn TpoTyapax/HaBepekHexbIX.
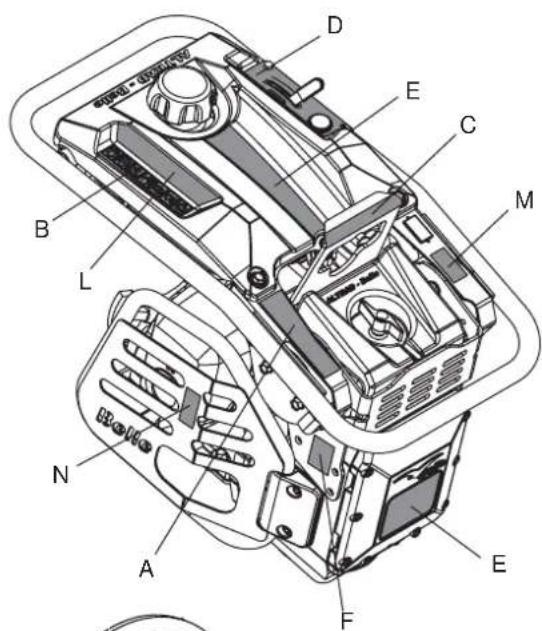

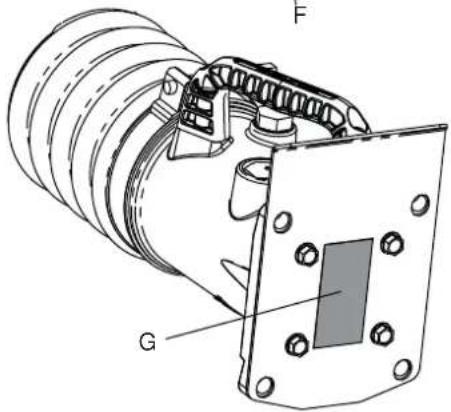
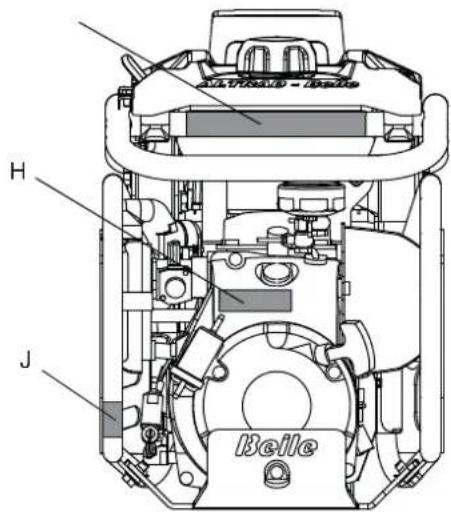
A-3haKn TpaHcnpOpTnpOBKe (apt. Homep 800-99631)
IepemeueHne no TeppHTOpnN oBeKtA
Bn6poTpaMboBky RTX Rammer moKHO noHIMMaTb (2 yeIobeka), CTaBtB Ha TpaHCnopTHbe polIK (ecn ecTB), TAYHy 3a noDbemHyIO pykny nn nepemeaaTb, 3aueeNB cTpon 3a noDbemHyIO neTnIO. PIPMEUAHNE: 3anpeuaetcraenrA b cTpon 3a noDbemHyIO pykny.
Ipebe03ka
Heo6xOIMO (HaCKoJIbKO Bo3MOXHO) NepeBO3NTb TpAM6OBky B BepTKaJIbHOM NIOJOeHN, npKpeIeHHo K 60pTy rpy3OBnKa nII Na pactJxKkax B ky3Oe. Ecnn 3TO HeBO3MOXHO, dONyCKaETcN KNaCTb TpAM6OBky TOJIbKO Ha TpaHCnOpTbIe PoNIKN IIN nepeJHIO CTOPOHy pa6Oey PuyKn IN KpeTIb B yCTOnuHBM NIOJOeHN, YTObl HE DOnyCTNTb CNOJ3AHN INI nepeKaTbIBaHN.
B-ИнфорmaцьnoTexHnke6e3onacHocctu
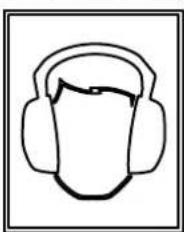
IcnoIb3yIte cpeIcTBA 3aunITbI opraHOB cnyuXa

IIN3aunTbI
opraHOB 3peHn
NCNOLb3ynte
CNEUAnlbHbIe
cpeCTBa
3aUNTbI
OeBaIte cneuaJIbHyIO 3aunTHyIO 06yBb

Pa6oTaB B 3aunThbIX nepuAtkax

PoxkanyuCTa npouHTaHTe PykoBOcTBo nOJIb3ObaTeIa

OTBeyaet Tpe6oBaHnM EC

YTNIN3HPOBAbB COOTBECTCBN C DeIcTByIOUIMN npabNJamn
C-0603NaueHne noBemHno nTn (TeaJIb No 800-99630)
Ponbemha netna KpenieHnCTpOa nnnoDbeMHoro MexaHn3Ma.
D-0603HaueHne Iopccen (Teanb No 800-99628)

IIOJOKeHne MaKc.06/MNH

HeɪtpaɪbHoe nOJIOXeHne

IoioxeHne abapnHoro octaHOba

Khonka «Cron»
E-0603haueHne moDeenn
Hakneika hazBaHnEM moDeI RTx Rammer.
F-0603haueHne yPOBHaUyMa
「papntnpoBaHHbI ypoBeHb IyMaOT MaunHbI B D5(A).
G-npeynpexdeHne 06 onachocn npyKHHb (etaB No 800-99619)
3APPEUAECTC Ocna6nTb HIN CHNMAuB BnHTb Ha HxHKe CTOpOHe HOrn TpaM6oBKn. B Hore TpaM6oBKn HaxoDntc CkaTaA npyKHa. EcIn Ocna6nTb HIN CHaTb BnHTbl, npyKHa OCBO6oDntc N MoKet HaHectn cepbe3HbIe TpaMbbl. Ioppo6HyIO INΦopMaioB Bam coo6uNT duipe.
H-0603haueHne《IyckDnuratena》(TeaNo 800-99625)
YTo6bI BKnHouTb DnuratB, HxH0 4 pa3a HaxaTb «rpyu» Hakaun KAp6iopatopa, a 3aTeM nOraHyb pyky KaTyuK, NOKa He BKnHouTcraKnHaHne DnuratE.
J-3HaK "ToonNHBbI KNaanah" (apT. Homep 800-99873)
TOnJIINBHyI KJIaIIaH B NOJIOKeHHN ON' (BKN) IN OFF'(BbIKJ).
-ДяВКЛIOUCHENMaunHbI,TOJIINBHyI KJIaHaNdoJKeH6bITB NOJIOKeHHN'ON'(BKJI).
- KoiIa MaunHa He IcIIOb3ayetcN BO BpeMraTpaHcIopTpObKN pepeKJIouHTb TOnJIINBbI KpaH B noIOJKeHne 'OFF' (BbIKJI).
K-0603haueHne cepuHoro Homepa (TeaNb No 800-99844)
Ha 3toi HAKNeKe yka3aH 3aObckoH OMeP MaunHbI npBBeHeBIpYrE CBeHeN, KOToPbE MOryT Bam noHaDoBtbc npn o6paueHN B Altrad Belle No BCem Bonpocam, CBraHHbIM c DaHHoM MaunHOH.
- CepinHbI HOMep
- Moenb RTX Rammer
- FODN3rTOBNEHNA
- Macca MaunHbI
- MoUHOCTb MaUNHbI

L-Инфорmaци no TeXHnke 6e3OanachocTn

PpeynpeXeHne

PoxkanyuCTa npouHTaHTe PkyoBOcTBO noJIb3ObaTeJRA

OdeBaIte cneuaJIbHyIO 3aunTHyIO 06yBb

IcnoIb3yIte cpeIcTBA 3aunIbI opraHOB cnyxA

ДяЗauntbI opraHOB 3peHnI nCNoNb3yIte CneuaJIbHbIe cpeCTBa 3auntbI
M- Ipeocteperaioa Hakleka OBbIXonHbIXra3ax (HaCTb No 800-99520)
BnraTeH N BbIeHrOy rApHbI ra3; pa60TaTb TOJbKO B XOpOo npOBetpBaembIX NOMeJeHHx.
N-DekoblropaeynoBepxHocTn(uaCTbNo800-99520)
BHIMAHNE! Beperntecb ropruxn noBepxHocte BOKpyr DBratela N BbIXIOHOI Oblactn.
P-Haannncb(ToNbkoDnAu3en)(yactbNo800-99524)
BHIMAHHE! B 3ToI MaIINHe IcNoJIb3yETcra TOnbKO dI3eNb (TOnbKO dI3eJIbHbIE MoDeHN)


| Мо德尔 | RTX 50 | RTX 50R | RTX 60C | RTX 60 | RTX 60R | RTX 68 | RTX 68R | RTX 70 | RTX 70R | RTX 80D |
| A - Ш偷ина (MM) | 345 | 345 | 345 | 345 | 345 | 345 | 345 | 345 | 345 | 425 |
| В - Длиа (MM) | 670 | 670 | 705 | 705 | 705 | 705 | 705 | 714 71 | 4 700 | |
| С - ВICOTа (MM) | 975 | 975 | 975 | 975 | 975 | 1040 | 1040 | 1040 | 1040 | 1081 |
| D - Ш偷ина onоры Травовки* (MM) | 230 | 230 | 165 | 165 | 165 | 280 | 280 | 280 | 280 | 280 |
| E - Длиа onоры Травовки* (MM) | 335 | 335 | 335 | 335 | 335 | 335 | 335 | 335 | 335 | 335 |
| Мо德尔 мотopa | Honda GX100 | Honda GXR120 | Honda GX100 | Honda GX100 | Honda GXR120 | Honda GX100 | Honda GXR120 | Honda GX100 | Honda GXR120 | Yanmar L48 |
| Тил двигателя | 4-тактоовий, OHC, воздунные охлaxденим | Одinuzлиндр | ||||||||
| М配电. Вьхоная мочност(b KB) | 2.3 | 2.7 | 2.3 | 2.3 | 2.7 | 2.3 | 2.7 | 2.3 | 2.7 | 3.5 |
| Тил толпва | Небтошированный бенин | Diesel | ||||||||
| Емкость толпв Horoобaka (Питра) | 2.5 | 2.5 | 2.5 | 2.5 | 2.5 | 2.5 | 2.5 | 2.5 | 2.5 | 2.5 |
| Тил karбюразORA | Мембранный | Инжесqu-honнь | ||||||||
| Пужковий менизм | Стартер | |||||||||
| Равочий Вesc (кг) | 57.7 | 57.7 | 60 | 60 | 60 | 70 | 70 | 72 | 72 | 86 |
| Частota вибрацни (Hz) | 11 | 11 | 11 | 11 | 11 | 11 | 11 | 11 | 11 | 10 |
| Сида удара (kN | 12.5 | 12.5 | 13.6 | 13.6 | 13.6 | 16 | 16 | 17 | 18 | 20.5 |
| Удaporов в minуту (bpm) | 450 - 660 | 450 - 660 | 450 - 700 | 450 - 600 | ||||||
| Хожд (mm) | 52 | 52 | 52 | 52 | 52 | 52 | 52 | 52 | 52 | 52 |
| Учовеньшума (dB(A)) | 108 | 108 | 108 | 108 | 108 | 108 | 108 | 108 | 108 | 108 |
| Трeshmereя вибрацни (m/cek²) | 9.82 | 9.82 | 7.25 | 7.25 | 7.25 | 7.45 | 7.45 | 7.49 | 7.49 | 11.8 |
Iy6eHCTb TOM, YTO Bbl NOHOCtBHy UCBONN HIXKcElyUOyU INHOpMaunIO No 630NaCHCTn. O6raHHocTbO onepatoparBJIureTc To, YTObbl OH/OHa NIOHOCtBIO IOHMaJ(a), KAK IMEHNO HaIO pa6oTaTb C daHHbIM o6opyDobAHmEB 630NaCHom peXmme.Ecnn yBaCet hEpeHHO nNoOBy 630NaChoro n npabInbHorO nCnOb3ObaHn yTpAm6ObuNka RTX, o6paTntecb K BaWemypykoBOdCTBy nIN CBxNtEc b BeNne rpn.

BHHIMAHNE
Hecoomeemcmayouee mexo6cnykuhaue unu uonno30aue moxem npueecmu K 8o3nukhoehuo onachocmu. Ppoumme u noumme 3mom pa3den neped mem, kaK bInonHmB Kaue-lubopabombl no mexHuueckomy o6cnykuhauo unu peMoHmy.
- DAnHyo MaunHy CneIyET IcNoB3ObA TbOBKO B Tex ueJx, nKOTOpbIX OHa 6bla Co3daHa. ToNko COOTBeTCTByUoum Mcbpa30M oBuYeHHbI NepcoHAn MoKeT ynpabTb DaHHoMaunHoH.
BnaIeueMaunHbI O63aH cAm co6JIIOdaTb, a TaKke 6yUHTb pa6TaIOJero C MaunHOc6JIIOdaTb npaUNa 3aUNTb TpyDa Toi CTpaHb, Ige pImeHReTcMaunHa. - DAnHoe obOpdyoBaHne - TReKeNoe, n erO HeIb3a NOnHMaTb B OOnHOChy; I03OBITE KOrO-HnBvDb HA IOMOuB nnNcNoJIb3yInTe COOTBeTCTByUoUee NoIbEmHoe obOpdyoBaHne.
MaunHa dOnxHa nCnONb3ObaTbcra Ha noBepxHocTn, rIe rapaHTnpoBaHa cTa6nIbHocTb. Ipn pa6ote Ha KpaHO TpaHwe coNIOdaTe oCTOpoxHocTb, YTO6bl He daTb MaUNHe yNaCTb BHIN3.
OrpaTe MeTO npoBeHnra pa6OT n depXnTE ny6nky nOcToPOHHnx Ha 6e3OnaChOM pacCToHn. - Pn IIO6OM NcONb3OBAHm DaHHoro O6OpyIDOBAHn OePaTOp DoJKeH ODeBaTb CpeIcTBa NepcoHaNbHOJ 3auNTbl (CIT3); (CM. «3doPobBe n 6e3oNaChocTb»).
- 4To6bI He nonactB 3aTpHyHHTeJIbHOe nIOJxHHe, y6eHITecB TOM, YTO Bbl 3HaTe, KaK 6e3ONaCHO BblKlHOTb MaunHy DO TORO, KAK Bbl ee BKJIOUHTe.
CneIyET BcERda BbIKIOHATb MOTOp Ipeep Haayanom TpaHCnOPTnPOBKn, IpeHOCOM MaUNHbHa MeCTe BBINOnHeHna pa6oT INN pOBeHnEM Texo6cnyKuBaHn.
BoBpempaobtbiMOTOpHaKaJIaTeTcIpePeTkKerKerToRaTb,JaTeEMOCTbITb. - HNKOrJa He ocTabnIe pa6oTaIOU yO MaunHy 6e3 Ha3Opa.
Hikorda He ChmHaTe H Te TpOaIe KaKHe-Ne6o npEdoXpaHntBhIe 8nTKn: OHcDenaHbI dra BauWe3aunltb. CneDeyET BcerDa npOBepaT coCToRHe npEdoXpaHntBhIbX nTkoB, a TaKke IH KpeNex; ecNk KaKHe-Jn6o I3 HNX NOBpeXeHbI INn OTCytCTBYOT HE POJIb3UYTECb YTPAM5OBUZIKOM RTX do Tex nop, noka npEdoXpaHntBhIbNtOK He b6dertzAmEHn INn ONUHHe.
He pa6oTaIe C yTpAm6BouKOM RTX ecn Bbl 60nbHbI, yCTaII IN IIN ecIn Bbl HaxOHTecB COCTOHN aIKOrOJIbHOrO INI HApKOTUeCKTO ONbAHEN.
-Данная машина 6ылca co3daHa c TAKIM paCteTOM, yTO6bl yCTpaHnTB IIO60I pNCK, BO3HnKaIOUm BO Bpemra pa6Otbl c HeIO.
TeM He MeHee, HaHC Ha 4n octaetcra, noo6bIe Bnblp ncka He Bcerda BO3MOxHO TOH OINCaTb, HOn MOry TnpBecTn K yBeYbO, Nopr HmUeCTBa Hnn DaKe K cmptn. B cnuyae, ecnn HAcTynaet MOMHT, KOJa YCbCTByETc, YTO MOKeT npOn30uTn TaKoe HnepeDyCMOTpeHno E CkpbIToe 4n, cneDeyt HeMeJdEHHO OCTaHOBntb MaunHy, NoCne Yero OepaTOp Hn ero HauAhlNk DoJIHKn Bi PnirHbO CoTBeTCTByUeMHmeBpl dny AycTaPAnEHNo IOo6BOHOr WAnHa Na 4n. IHorDa cneDyET HΦoPmPoBaTb PON3BOHInTeR O NOo6hBix CnyaR, DnT TORO YTO6bl B 6dyUeEM MoXHO 6blIO pInHmMaTb KoHTMpEbl.

PpeynpeKdHne
Tonnue neko bocnnaemrnc. 3mo moxem npueecmu Kmpaamm U K npue umyuece me Bbiknohme momop, ycmpaHume ece omkpblmbie ucmouhuk OeHn u He kypume Bo epema 3anpaBku monnuehozo baka. Cnedyem ceea hacyxo bimupamb npunueeecmonnuo.
- IpepeTEm, KaK npOn3BODnTB 3aPpABky, CneDyeET BcERda BBIKIOUaTb MOTOp n DaTb Emy OCTbITb.
BoBpem3anpaBKnHe Kypnte Hn He pa3BOJTe No6JIn3OCTn OTKpbIToro ORHa.
Pn3aipabKe noJIb3yIeTcB COOTBeTCTByIOUeB BOPOHKo, YTO6bl He daTb 6pbI3rAm TOnNINBa NOnactb Ha MOTOp.
IpoJIInTOe TOnIIINBO CneDyET HeMeIeHHeIO oBe3OanCTb, 3acBInaB ero neckOM. EcIn Bbl npOIIN TOONIBO Ha OdeJdy - CMeHInTe ee.
XpaHnTe TOnnBO B COOTBeTCTBHyOeI N CO3DaHHoN DJIa 3ToIeJN EMKoCTN BdaIIN OT KAKx-JIb6 IO CTOHNKOB TepIIa I BO3rOpaHn.

3dopobbe n 6e30nacnoctb
Bnbaun
Bo BpempaobTo b C MaunHoi KaKa-TO cactb Bn6paunn nepeaetcyepe3 pyKoTky npabneHna hy pkn onepaTopa.
RTX,-npdykunBcIeIpyn6bIinaCneuMaIbHO pa3pa6oTaHa C cIeIbIO NOH3NtBuOBeHb B6paUIN KICTey/pyK. O3HaKOMbTecb C onHcAHm E TexHueckMn DaHHbIMn ypoBHe B6paUIN BpeMeHem NcNoJIb3OBAHnA (peKOMeHdyeEMbl B DeHb MaKCMym BpeMeHN pa6oTbI C MaunHo). HE PPEBblAANTE MaKcMaJIbHOe BpeMraNcNoJIb3OBAHnA.
Cπ3(CpeCTBa nepcoHaJIbHOH 3aunTbI)
B OCHOHOM 33-3a HCOOTBETCTByOuIe IIN HeoctopoxHO pa60Tb C aInpaATom, INn Pp pa6oTe B TeCHOM NOMEseHIM, MOryT BO3HNKHTb nepcoHaNbHe yBeHbI INN POPca IMUeCTBa, Bbl3BaHHbe YdapAM, INPONAMM, COCKAJIb3bBAHMe, INHepCnei, PAHeHEM INN PaJNetaUOUMNc6 OBNMKAM.
PnNCIOB3OBaHmN daHHoMaunHb Heo6xOJIMHO HaeTb COOTBeCTByUOuE BNDI CIN3, TaKne KaK 3aunTHbIe OUY, NepaTKN, 3aunTHbIe HayuHNK, nbJIeByo MACKy u ObyBc CO tAnbHbIMN NOkOBKaMn. CJeDyET HOCNTb ODeKdy, KOtopar NoXoMT dNra Toi paobtbl, KOTOpYIO Bbl BInOnHte. POnDBaRKeTe DInHHbIe BOONcbl n CHIMMe KaKyio-Nb6 bNxyTePNIO, KOtopar MoKet NOnAcTb MeKdy, NOBKnHbIMN qAChTMy annapaTa.
TbInb
Pa6oTa C rIpaBnuecko Ipo6uIKo HOrda npBODNT K nbIneO6pa3OBaHIO, KOtOpoe MoKet NOBpeDntb BaUeMy 3doPobBIO. Bcerda NaDeBaTe MaCKy, KOtOpaa NoxOHT dTn Ta Bo3NkaUeien nIIIN.
TONNBO
IcnoJb3yemblbe B daHHo MaunHe MacNo I ropoye MoYr BblBaTb CneDyUOuNe TpaBMbl:
- OTPaBHeHne npn BdbxHaHm napOB TOnnBa Hm Macna.
AnepnnpnnonadH6pb3rTOnnBa nnMaCnaHaKoxy. - POKAP IN B3PbIB, ECINI pRdOM C TOININBOM INN MACJOM KypT INI pa3BOIDr OROH.
He rnoTaTe TOnnBO n He BbixaTe erO nCnapeHn, n36eaiTe nprrMoTe KOHTaT OToNNBa C Koxe. HEmedneHNO CmBiaTe BCE 6pb3rTOnnBa.EcNI TOONBO nonaTe Bam B rna3a, npomOIte nx 60JIbIIM KOINueCTBOM BObl N KaK MoXHO CKopee oBpaTtEc b 3a nOMoUbIO Bpaua.
BbIXlonHbIe ra3bl

PpeynpeKdene
BbIXNONHbIe 2a3bl, npou38oDumble daHHbIM o6OpyOoHaueM, ouHe bdoumbl u moym y6umbl!
He nonb3yItecb yTpam6oBzukom RTX,BHytpn nOmeueHn IIN B 3aKpbTOM nOmeueHn; BceIg a CneJeYt bC8rTO 30Ha pa60tbI DOCTaTOUHO xopoio npOBeTPNBaeTc. 106
KoHTpoJIb napeI 3aIyckOM
OcmTo npep3anyckom
HnKecneDyUOuOcMOTp DOnJKe H BbINOHNrTbcpeaHaONo KaKOrO pa6Oero UkNa, NIN NOcNe KaKDbIX YeTbIpeX acOB pa6Obl, B 3aBNCIMOCTN OT TORO YTO HAcTyNIT nepBbIM. IJIaTeaNbHO rO ONcaHnro ObaPntEcB, NoKaanyIcTa, Kpa3deny «Texo6CnyKJBAHHe. B cInyae, ecnn 6ydet o6hApYKeH KaKoi-Ni6o C60i, yTrpAm6oBzIKOM PT HeIb3r nOlb3oBaTbcra Do noNHorO yCTpaHEH HEnoJaKn.
- TuaTeJIbHO OCMOTpIe PT Ha npEaMeT NOBpeKdHn.
- Поверпгшланн, Залньные OTверстябakOB, Дрehхнье 3аычк, a taKkeДугь BO3MOxHье MeCTa Ha npdmet yteuek. YctpaHnTe yteuKdoHaayana pa60tbl.
- PpOBeBte ypoBeHb MOTOpHOro MaCnA n npn Heo6xOdMocTn DoJeIte.
3.1 TTo6bI npOBepnTb yOBeHb Macna B DnBraTeJe, HxKHO NOCTaBnTB MaunHy Ha pOBHyIOBepxHOCTb TAK, TTo6bI DnBraTeJIb OKa3JcR B Ropn3OHTaBHom NIOJOKeHN. (Cm. pncyHok.)
3.2 DocTaB MacNoI3MepntbHbIy uyn y6eIITbcra, YTO MacNo DoXoIIT do ypOBHr KOJIbua Ha 3aJIbOuHOr IopIOBnHe. NcNoJb30BaTb MToPbHOe MacNo yKa3aHHO B3KoCTn. (PeKOMeHdyETcNcNoJIb30BaTb MInHepaJIbHOe MacNo SAE 10W-30.) - PpOBepbTe yPOBHeb TOnnBa n npn Heo6xOaMocTn DoJeIte. IcnoNbayIe YnCToe ToNNBO. 3aRpa3HeHoe ToNNBO MoKet npNBecNT K NOBpeXdHHIO TOnnHBHO CnCTembl.
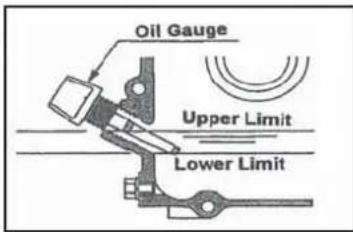

PpeynpeXdHne
INPMEHAHE:daHnMaunuHa uCnoJb3yem He3mUnpoBaHHbu 6eH3uH. HNKOrDA He 3anpaenme monnuehbl 6ak CmecbIO macna u 6eH3uHa!
- PpOBepbTe, YTO6bI BO3dyuHbIe FJIbTpbl 6bln NcTbIMn. CkONNeHne nbINrPrrn BHytpn FInbTp a MoKet npnbecn K npe6oM B pa6ote MOTopa. PpOHCTNTe 3IeMeHT BO3dyuHoro FJIbTppa, ecN OH rpr3hBn (CM. pa3den «TexO6CnyKBAHne»).
- PpOBepntb ypoBeHb Macna B Hore TpaM6oBKn, pni Heo6xoDMOCn DOINrB (BbIKIOHTb MaunHy He MeHee Yem 3a 10 Mmhyd npoBepkn).
6.1 Tc0bI npOBepnB yOBeHb MaCna B Hore TpaMbObKn, HyKHO nOCTaBnTb MaunHy Ha pOBHyIO nobepxHocTb TaK, YTObI ONopa nonHOCTbIO neXana Ha 3eMJIe (CM. PnCyHOK).
6.2 MInHMaJIbHbI dOnyCTmMbI yOBoEh MaCIIa 06o3HaueH KpaCHOI TOKoi HA BODOMepHOM CTKeIe, yCTaHOBJIeHHOM Ha Hore TpAm6OBKn. (PekomeHdyETcR IcNoJIb3ObaTb MInHepaJIbHOe MacIo SAE 10W-30.)
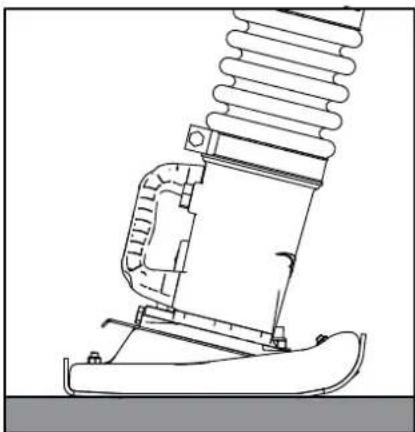
IpoBepka ypOBnMa macna B Hore TpaM6OBKn
PykoBODCTBO NO npIMeHnIO

Iopbem
Pn Heo6xOIMOCTH BocnoB3yTeCb NOBemHbIM OOBpOBAHNEM DnA yCTaHOBKN RTX; y6eNTecb B TOM, YTO pe3INHOBbie 130JIaTOpbl Ha pyKoRTke ynpabIeHn Hne NOBpeKDeHb I He NoTpeCKaIncb. EcIn OH NIOBpeKDeHb INI NOTpeCKaIncb, 3aMeHnTE pe3NHOBBe I30JIaTOpbl nepd TEM, KAK NODHMAtb MaunHy. Y6eNTecb TaKe B TOM, YTO INONJ3yEmOE NOBemHoe OOBpyOBAHHe 6bnadaet DocTaOnHoi dnn BEca ytpamboBzka RTX MoUHocTBIO paOchE Harpy3Kn (cm. rpaFnk CNEuFkauqn Ha cTp. 5 nTN Ta5NIChy C cepiHbIM HomepOM MaunHbI). PNOBOITte Heo6xOIMbIe CEIN INI 3axmMbI TOJbKO K ToQkAm dIgNoBema, pacnoJIOKeHHbIM Ha bepxHe qactn pyKoRTK ynpabIeHn RTX.
- HNKORDA He octabJnTe MOTop BKNIOueHHbIM BO BpeMra TpaHcnpTnpOBKn NIN nepeDbNKeHnRA RTX, daJe dJa KopoTKnx = =nepeHocob.
Iocne toro, kak bbl npobelen Bce npobepkn, KOtOpbIe ONHcAnbI B pa3dJe «Ipeed 3anyckOM», MOxHO 3anyctnB MOTOP. BCE moDen ytpam6boUKNOB BeIe Ipyn CEPIN RTX cH6KeHbI CEHTPnOyKHNbIM CcENIIeHNEM, KOtOpoe n03BOJrE T MaUNHe pa6oTaTb Ha xONOCOM XOdy 6e3 3aDeiCTBOBaHm MexAHm3Ma KapTepa. IIO Mepe yBeJIuHEnHa CKOpocTn pa6oTbI MOTopa, CcENIIeHne HauHET pa6oTaTb N MOTOP 3aDeiCTByeT MEXAHm3M KapTepa.
= = Дя耗 TOrO,уTO6bI n36eKaTb NOBpeKdEHHUcHTpNΦyXHOrO cUeJIeHHa, bICrpo NpePebuHbTe pbyar dpocceIa I3 noIOxehn = = HnAkOe )(=L)ВпОJOKeHne «BbICOKoe(=H).

BHHMAHNE
I npabunbHou pa6ombl cneodyem ucnno30aamb MaKcumalbHyIO ckopocmb Momopa.
- H36eaiTe ynoTpe6nIb MaunHy Ha a6coJIIOHO ytpaM6oBaHHo, TBepOIN He npornaouce nOBepxHocn. TaK KaB E = 10do6Hom cnuae IOBpeNTcR MEXAHN3m TpaHCMIccMM KOp6Kn CKOPoCTe, YTO 3HaunTeJIbHO COKpAITn COK PaOToI MaunHbl.
=Ecnn npn pa6oTe b y3k0n KaHabe TpaM6yUoN 6aMmK 3acTpHET Mekdy CTeHKAM TpaHSe, yTpam6oBcNk ydpnt BxONOCYIO N cepBe3HO NOBpeNTC. Oco6eHHO CINbHO pni 3OM MOKeT NOCTpaDaTb cam TpaM6yUoN 6aIMak.
HanpaBnIe yTpam6oBzIK TOnbKO 3a pykoTky. Ero hao IINb NOtAnKnBaTb. He cJeDyET BxIMMaTb yTpam6oBzIK B ytpam6oBbIaEBM MaepnA. CNIwKOM CNJIbHOe daBHeHne Ha pykoTky ynpaBHeHn IpNBedK HHexeNaTeNbHOMy pe3ynbTaTy yTpam6oBKn, TAK KAK B 3TOM Cnyae CO3daeTcN ppeNrTCTBNE DnN NOIpblBnBAUOero DBNXeHn.
TpaHcnopTnpOBka
Pn TpaHcnpTupOBKe nIx XpAHenn MaunHbI, NO B03MOXHOCTn CTaBte ee BepTKaJIbHO. EcIN BCE-takn npndetcnoIOKHTb MaunHy ropnOHTaJIbHo, HN B KOEM CJIYUAE He yknaDbIbaIe MaunHy NOBepxHOCTbO Bo3dyuHbIX qInbTpOB BHN3. TaK KaK B 3tOM cnyae MacNo I3 ZUNHdp a MoKET nonAcTB B Kamepy crotapn H N B BO3dyxooHCTnteJIb, YTO npNBedeT K npo6nemam BO BpeM CTapTa. PnYkNaJKe MaunHbI nepeDHeN CTopoHOH BHN3 (KpbIka KapTePAy UtpAMBoUHKa HaxODNTC BHN3y) HeJb3a DOnyckaTb NONaDaHnMaTOphoro MocNa B zUNHdp nII B BO3dyxooHCTnteJIb MOTopa. TaK KaK B cNYuae, ecnn MOTOp eEe ropAyn, nonaDaHne rOpOHeRo Ha MOTOp MOKET npVBecTN K NoXApay. YknaDbIbAte MaunHy ToJIbKO NocLe TORO, KaK OHa NOnHOCTbO OCTbIHET.
MaunHy, KOTopar o6OpydoBaHa TpaHcnpTbIMn pOnkAmn Ha pyKoTke ynpaBHeHnna, MoKHO JERKO NOrpy3ntb HIN BByrpy3ntb 13 TpaHCnOpTHoro CpeCTBa. PnnoDHMaIte MaunHy BnepeD Do Tex nop, NOKa TpaHCnOpTHbe PoNkN He KOChyTBcra NoJa TpaHCnOpTHoro CpeCTBa. PnnoDHMnTe HxKHOU qAcTb MaunHb 3a pyKoTky, ImeuSyocn Ha TpaM6yUoem BaUmake, n ToKNHtMeaunHy BnepeD, YTObIe eNorpy3ntb. Bo BpeM TaPacnCnOptnpOBKn MaunHy CNeDuYe npOHO npKAHToBA Tb n TpaHCnOpTnpOBaT b BO3MOXHOCTN B VertNKaJIbHOM NIOKeHm. DnToro, YTObIe BByrpy3ntb MaunHy, npNoDHMaIte ee BnepeD do TORo MOMTa, KOrda polkn KoCHyTCra Na. Cnerka npNoDHMnTe HxKHOU qAcTb MaunHb N ByrpyKaIte ee.
Pa60Ta Ha 60JbWOn BbICote
Дябспесьою pa6obt ha Bcote 6oJIe 1000 M (3000 cyTOB) Heo6xOIMO NOMeHЯТb OCHOBHe cOnIO MoTopa Ha npyToI TnI, KOTOpB INo3BOJNT IpoN3BOJNTb HopMaJIbHyO 3aIpaBky MoTopa. Инawe MaUHHe He 6yTe XBaTaTb MOUHOCTn I OHa He CMOKET pa6oTaTb HopMaJIbHo.
| Описане сбая Причina Действа | HET ropочero. 3anolnite ToPllnbHbI 6ak |
| ToPllnbHbI kpaH 6bln 3aKpbIt OTkpoiTe TOnPllnbHbI KpaH. | |
| He 3abOndTcR MOTOp. | BДВИrataJIe HET TOnPllBa.(GX100 moIbko) |
| BДВИrataJIe HET TOnPllBa.(ДU3eJIb moIbko) | |
| С党支部 ЗаIGN�нaya 3aRpy3Hena Или nobpeJdeHa (БeH3Un moIbko) | |
| Немправноctb Kap6Iopatopa.(БeH3Un moIbko) | |
| ДВИratelь ВHE3aПио OCTaHavBlInBaTeСЯ Или OCTaHavBlInBaTeСя, Когда оборыДВИratelь уВeLynchuraTeCЯ. | Сm. BblSe. Cm. BblSe. |
| Главна Stprya Kap6Iopatop 3a6Ntblgrp3bIy.(GX120 moIbko) | |
| ВОзduПиьфpinьг73Hoi OChIcTite 3IeMeHT. | |
| КoIINaчok Сveu 3aIGNIGANIA Cb6OdHbIe.(БeH3Un moIbko) | |
| ДВИratelь работаet, Н Maшина HeПронЗВODIT Bo3deIcTBVE. | HedocTATOK MoUHOCTN DVBrataJIe Cm. BblSe. |
| MуФТа SkonьжЕнЯ | |
| КрIVBOshINHO-шaTuHbI MexaHn3MПовржden |

TexHnueckoe o6cJyXnBaHne
TexHnueckoe 06cnyKbHaHne
PT-npOdyuknue BEnne Ipyn 6bIy na pa3paobotaHa nI dONIOrcPOHn 6ecpepeoHn pa60tI. Tem He Mehee, Oeyb BaxHO peryJrphno npOBOnTb HecNoXhBie pa60tI NO texHnueCKOMy 0cNcyKuBAHNIO, ONcIBaEMbIe B daHHOM pa3deJe. Ppi 3TOM peKOMeHnyETC npOBOnTb BCE 3NaHTeNbHBe IIO obemy pa60tI NO texHnueCKOMy 0cNcyKuBAHNIO n peMOHTy y oFmuaJIbHorO pEcdTaBNTeJIa BEnne Ipyn. Bcerda nCNoNb3yIte opunnaHbHbe 3anactn Benne Ipyn; nCNoJIb3OBaHHe NODeJIbHbIX 3anacte MoKet anHyInpoBaTb BaIe npABo Ha rapaHTnHoe 0cNcyKuBAHNIE. Peep Te, KAK npOBOnTb KaKe-1n6o pa60tI NO texO6cNpyKuBAHNIO MaunHbI, BbIKNoUHTe MOTOp. Ppi pa60te C MaunHO C 6eH3NHOBBIM MOTOPM OTcoEINHITe KOJnauOK OT CBeHn 3axnraHn. DnI npaBnblHoCTn HabIODeHn 3a yPobHM XnKIOcTn CneDyET BcERda YCTaHabINBaTb YtpAMboBUnk Ha CTporo rpoN3OHtaHBNO nobepxHOCTn. NcNoJIb3yIte TOLbKO peKOMeHDoBaHNbIe TINbI Macna (CM. TabInuHa cNeDuOSe CTpaHnce).
Texo6cnyKbAHne MoTopa
PpOINBODHTB COOTBeTCTBn C yKa3aHnMn PpOIN3BOIDTeN MToPpa.Obpatntecb K PykoBoDCTBy no pa6oTe N obCnyKbaHnMoTopa.
3aBbKa DBratEnYanmar L48
Iocne OOKHuaHn 3n3eJI nn 3aMeHbI TOnNHBHO 0nJbTp a CneDyET BInONHHTb 3aINBky DnRaTeJI Yanmar. Hxke npedctabneH npraok 3aINBKn DnBaTeJI

BHHMAHNE
Ipeod 3aueko cneyem y6edumcbc, ymo monnuehbi 6ak 3anolneu u 3akpbim Kpkiou.
- OTkpbItb TOnJIINBHybI KpaH.
2.ПepeknHouNt bpyar peryIinpoBn qactoTbI BpaueHnB nIOJKeHne RUN (YCK). - C nOMOJIbIO DByX raeUHbIX KJIQUeH Ha 17 MM OCBO6oDITb INHKeKUNHO Tpy6ky (no3.1),OCIa6NBraKy (no3.2).
- Ocnabntb fopcyHky INHexeKcnoHHoro Hacoca (no3. 3) Ha dBa nonhbx o6opota.
PIMMEAHNE: HE CHIMMaTb fOpcyHky INXKeKUMOHHORO HaCoca.
- OTBecn INHKeKUHOHHy TOpy6ky B CTOpOHy OT fOpcyHK INHKeKUHOHHoHACOCa IdoKDaTbCRA, NOKa HE NoIeT Dn3eJIb 6e3 Ny3bIpKOB BO3dyxa.
- 3aTMybΦOpcyHky INHKeKuONHOro HAcOca do 12 HM.
- IOnCOeINHHTb INHXEKUINHOHHyTOpy6ky 3aTAYtB Do 12 Hm.
- YCTaHOBnTb Ha MeCTO TOnPINBHyIO KpbIuKy I 3AnyCTNTb DBrIaTeJIb COrJIaCHO NopRdky Nycka I OCTaHOBA B 3TOM pyKOBODCTBE.
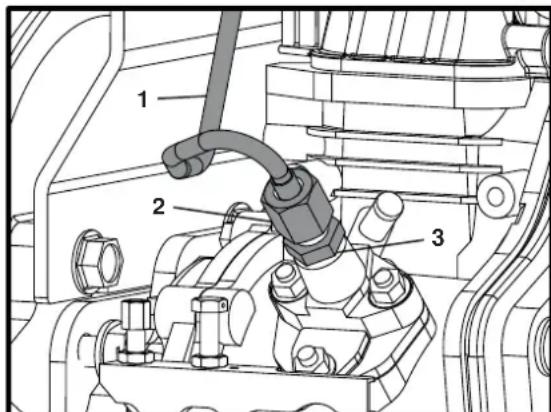
TexHnueckoe o6cnyxmbaHne
06cnykubHHe: KaKdbie 8 YacOB uNn exeDHeBHO.
- PpOBepbTe 3aTgKky 6oITOB nraek, npn Heo6xoIIMOCTN NOITAHNE.
- Поверпги почипге лименты BOДУшOrо Фньтpa, CмжьтЕ лим ent MacnOB MCOBTBCTBnC peKOMeHdauJrMn npOn3BOdnteЯ. EcIn yCNoBn pa6tbyчрЗБун Ho rpy3HbIe n CypOBbie,To uNCTky BO3DyшOrO Фньтpa cneDyET pOn3BOdntb Yaue.
- IpoBepbTe ypOeHb Macna B KapTepe MoToPa NdoJeTBe B Lyuae Heo6xOaMocTn. IpoBepbTe ypOeHb Macna B TpaM6yUoIe MnnHdpe no CneJyoUe npOeIype:
3a.Y6eNTecbBTOM,HTO 3a nocneHHe 10 MNHyMaunHy He B K N IO Y a N
3b. YctahOBNTe MaHHy Ha POBYHIO NOBepXHOCTb N BbITaUNTe UyI.
3c.BepxHn ypOBeH MaCna DoJnxEh 6bITb BnDEH yTb-uyTB HNXHe KpOMKn OTBepCTnB uyne. DoneIe B cnyuae Heo6xoDnMoCTn
PIMMEAHHE: OJINBaIte MacNo B TpAm6yUoNn UINHdp
OCTOPOXHO, CTAPARb He 3aIITb CnIeKOM MHOr. IpeHAnONHeHne MoKet npBecT N NOBIIeHHo Harpy3Ke Ha MOTop, YTO B CBOIO OuepeDb MoKET npBecTu K CInIeKOM Cna6oN nHeperyJpHOr Bn6paun.
Chayana 20 yacob deiCTBn
1.3aMeHHTe HeΦTb B CUNINHIDpe
KaKdbie 50 yacob nJn exKeHeJeBHO.
- PpOBepbTe 3aTgKky BoTbO u rAek, npn Heo6xOAnMoCTn NOITAHHTe.
KaKdIbe 200 yacob.
- 3aMeHInTe MaCNO B Tpam6yIoUeM UINJINHpe. He HAIINBaIte CINJIKOM MHORO.
Kütus ja märdeained
Altrad Belle Warranty Department
Sheen, Nr. Buxton
Derbyshire
SK17 0EU
England
Pernctpaunrapaantn:
IyuyuHnE 3KoONruecknx nokaTeenei ALTRAD Belle Mbl BBeHN OHnaH-perncpaunHO rapaHTMN. Ctpanua pernctpaunn DoctynHa Haawem caTne no aDpecy:
http://www.bellegroup.com/index.php?p=warranty-registration
Bb taKke moKeTe OTKpbIb cTpaHcy perncTaun, npocKaHnpoBa QR-KoD cMapTfoHOM.

Tehnilised andmed. 209
Uldohutusnouded 210
Yanmar L48 mootori tooks ettevalmistamine
Altrad Belle Warranty Department,
Sheen, Nr. Buxton
Derbyshire
SK17 0EU
England
Garantii Registreerimine
http://www.bellegroup.com/index.php?p=warranty-registration
UZMANIBU! Beware of hot surfaces around the Engine and Exhaust area.
P-uzlime tikai dizelim (Detala Nr. 800-99524)
Altrad Belle Warranty Department,
Sheen, Nr. Buxton
Derbyshire
SK17 0EU
England
Garantijas registracija:
Censoties ALTRAD Belle padarit zaaku un ekologiski draudzigaku, mums tagad ir iviesta tiessaistes garantijas registracija. Lai pieklutu registracijalapai musu majas lapa, ludzu, izmantojiet sadu adresi:
http://www.bellegroup.com/index.php?p=warrantyregistration
Alternativi, lai pieklutu registricijas lapai, ludzu, ar Jusu viedtalu npa palidzibu ieskenejiet blakus esoso QR kodu.

NOTICE: This machine uses Unleaded Gasoline/Petrol.
NEVER fill the fuel tank with a mixture of Oil and Gasoline/Petrol.
Please ensure that you have read and fully understand the information below before attempting to transport the RTX Rammer.
Altrad Belle Warranty Department,
Sheen, Nr. Buxton
Derbyshire
SK17 0EU
England.
http://www.bellegroup.com/index.php?p=warranty-registration
TapaHTnpaHO HnBO Ha Cnna Ha UyMa Ha MaunHaTa B nB(A).
G-CTnkep 3a npedna3Ha npyXnHa (apr. Hom. 800-99619)
HE pa3xna6baIte nIN cBAJIaIe BnHToBeTe OT dONHATA CTpaHa HA Kpaka Ha Tpam6ObaUaTa MaunHa. KpaKbT Ha Tpam6ObaUaTa MaHnHa IMA CnIHIO pINTNCHATA npyKuHa, KOrTo MOKe Da npuHn cepno3HO HapaHbAHe, aKO ce OCbo6On upe3 pa3Xna6BaHe nIn CBAJI RHeHabnHToBeTe.CBbPKeTeCEcDnIbpa3anOBueHΦOpMaun.
H-CTnkep 3a cTaptnpahe Ha dBnrateTna (apt. HOM. 800-99625)
3a da cTAPtnapate DnBraTeNa, HATNCHETe NOMnata Ha Kap6bypatopa 4 nTn N3TERlne TpBkKaTa 3a cTAPtnpaHe DOkato DnBraTeJIrT He 3anann.
J-3haun 3a ropnbHaTa KJana (800-99873)
I03uyn BkJ. n N3KJ. Ha roptnbHata knana.
3a da BkIIOHTe MaunHata, rOpBHaTa Kna Ta Tp8Ba Da 6bHe Ha no3nuey BKJI.
Korato MaunHaTa He Ce N3noJ3Ba nnCe TpaHcnpTupa, ropNBnT Knaan Tp6Ba da e Ha 'N3K' n03nua..
K-CepuHa Ta6eIka (apT. Hom. 800-99844)
CepinHata Ta6eKc sbDpXca cepinHnH oHmeP Ha MaunHata n cIaT a HOpMaun, KOTo MoKe da Bn e HxHa, KOrato ce CBe Te c Altrad Belle no OTHoWeHne Ha MaunHata cn.

- CepnEH Homep.
- RTX Tpam6oBa7a MaunHa MoJeI.
- FOnHa Ha npOn3BOcTBO.
- Terno Ha MaunHaTa.
- MoHocT Ha MaHHata.
L-3haun 3a 6e3onacnoct (apt. HOM.800-99831)

PpeynpekdeHne!

MolnypoyeTepebKOBOdCTBOTO3aekcnoTaun

Hocete 3aunTHn 06yBkn

Hocete 3aunita 3a yunnte

Hocete 3aunTa 3a ouHTe
M - Tpaapet/Ta6eJka 3a IIpeDynpexKeHne 3a n3ropeIra3Obe (apT. HOM800-99520)
Дигатяп ATдьЯ BByIepeOEN OKCnД; paBoTe c mO Ha MeCTa Cdo6pa BeHTInaUna.
N-CTnkep 3a ropeu noBbpxHocTn (Part No.800-99520)
BHIMAHHE! Na3eTe ce ot ropeu noBbpxHocTn B 3oHaTa OKOJIO DmraTeN I n3nyckaTeHHaTa.
L-3Haun 3a6e3onacHocT (apt.HOM.800-99831)

PpeynpekdeHne!

MolnypoyeTepebKOBOdCTBOTO3aekcnoatauia

Hocete 3aunTHn 06yBkn

Hocete 3aunita 3a ywnte

Hocete 3aunita 3a ouHTe
M - Tpaapet/Ta6eIka 3a IIpeDynpexKeHne 3a n3ropenra3oBe (apT. Hom800-99520)
BniratenrT OTeJI BByIepoEn OKnD; paOte cMo Ha MeCTa C Do6pa BeHTnnaIaIra.
N - Ctnkep 3a ropeu noBbpxHocTu (apT. HOM800-99520)
BHIMAHHE! Na3eTe ce ot ropeuIN NOBbpxHOCTN B 3OHaTa OKOJIO DnIRATeN I n3NyCKaTeHnHaT.
P-CTnKepe camo du3en (apr. Hom800-99524)
BHIMAHHE! 3a To3n DnBraTeN Tp86Ba Da ce N3NoJ3Ba CaMO DN3eNOBO ROpINBO (cAmO 3a DN3eNOBN MOdEIN)
| Mодeн | RTX 50 | RTX 50R | RTX 60C | RTX 60 | RTX 60R | RTX 68 | RTX 68R | RTX 70 | RTX 70R | RTX 80D |
| A - положka (mm) | 345 345 | 345 345 | 345 345 | 345 345 | 345 425 | |||||
| В - дълхина (mm) | 670 670 | 705 705 | 705 705 | 705 714 | 74 700 | |||||
| С - висуна (mm) | 975 975 | 975 975 | 975 1040 | 1040 104 | 1040 1081 | |||||
| D - Ш经历на на Травовацата положк* (mm) | 230 230 | 165 165 | 165 280 | 280 280 | 280 280 | |||||
| E - Дълхина на Травовацата положк* (mm) | 335 335 | 335 335 | 335 335 | 335 335 | 335 335 | |||||
| Модeн на мотopa | Honda GX100 | Honda GXR120 | Honda GX100 | Honda GX100 | Honda GXR120 | Honda GX100 | Honda GXR120 | Honda GX100 | Honda GXR120 | Yanmar L48 |
| Тир мотор 4-тактор, OHC, Вьзduшно охлaxданe | Единиенцилиндр | |||||||||
| Мakсимална OTаддана мошноct | 2.3 | 2.7 | 2.3 | 2.3 | 2.7 | 2.3 | 2.7 | 2.3 | 2.7 | 3.5 |
| Вид горво | бezолobен бенин | Diesel | ||||||||
| КаразитET на pezerвоара (питра) | 2.5 | 2.5 | 2.5 | 2.5 | 2.5 | 2.5 | 2.5 | 2.5 | 2.5 | 2.5 |
| Тир karбу ratop | диафрагмен | Инжесquioн | ||||||||
| Стартов мөханizьм | рьчen Stapterp | |||||||||
| РавOTNo terno (kg) | 57.7 | 57.7 | 60 | 60 | 60 | 70 | 70 | 72 | 72 | 86 |
| Чеб耗费 на вибрацине (Hz) | 11 | 11 | 11 | 11 | 11 | 11 | 11 | 11 | 11 | 10 |
| Удая сиа (kN) | 12.5 | 12.5 | 13.6 | 13.6 | 13.6 | 16 | 16 | 17 | 18 | 20.5 |
| Удая в минута (bpm) | 450 - 660 | 450 - 660 | 450 - 700 | 450 - 600 | ||||||
| РавOTEN xod (mm) | 52 | 52 | 52 | 52 | 52 | 52 | 52 | 52 | 52 | 52 |
| Шимов Нево (dB(A)) | 108 108 | 108 108 | 108 108 | 108 108 | 108 108 | |||||
| 3-akсанna вибрация (m/s²) | 9.82 | 9.82 | 7.25 | 7.25 | 7.25 | 7.45 | 7.45 | 7.49 | 7.49 | 11.8 |
3a Ba7a co6cTBHeHa 3aunTa n 3a 6e3onacHocTt Ha Te3n OKoNo Bac, MoJ npOye He Ce yBepTe, Ye pa3bnpate HAnbIHO IHOpMaunra Tno-dony. OpeatopbT Ha MaunHaTata Tpr6Ba Da e cnpyeh, Ye moKe da pa60n C MaunHaTata No 6e3onaceH aHIn. Ako He cTe cnpyHn 3a 6e3onachata n npabUnHa ekCnloaTaun Ha RTX, MoJ, ObpHete CE KbM Baunr INKHepe ITO TexNkata Ha 6e3onacHocTn Nm KbM rpynata dpykeCTBa Ha Belle Group.

BHHIMAHNE
HenpaBnHTo To texHnuecko 06cnykBaHe nn ynoTpe6a Moat da 6bDat onacn. Ppoetete n paayte To3n pa3dE npedn da n3BbPwTe texHnuecko 06cnykBaHe, cepBn nnn nonpaBka Ha MaunHaTa.
MaunHaTa ce n3non3Ba cAmo no npedHa3HaueHne. C MaunHaTa moKe da pa60Tu camo HaIeXHo oByeuH nepcoHaJI.
CobCTBHeHKnbT Ha MaunHata Tp6Ba Da Cn3Ba, N obyu onepaToP aHa MaunHata Da Cn3Ba, pa3nped6nte 3a 6e30nachn 3dpabocnoBn yCNOBna Ha Tpyd Ha cbOTBeTHata CTpaHa.
To3n ype d TeKbN He MoKe da 6bNe NOBmHrAT OT EINuOBeK. IOMOJIETE 3A IOMOUI nn Hn n3noJ3BaIte ToBaPONoDMHO o6OpyDbaHe.
Ta3n MaunHa MoKe Da ce 3no3Ba cAmo Ha 3emrTa npn Cta6nHa OCHOB. Pnp pa60a 6n3o da p6bHa n3KOnn, n3no3BaIte MaunHata Taka Ye da He ce npoe6bPhe nn nponaHe.
- 3arpaTepebOHTaIIOuaIka,3aJaHe npemHaBATXopaHneTOpN3npan nepcoHAn.
Hocete NaHa 3aunTHa eKnnpOBKa npu ynoTpe6a Ha Ta3n MaunHa (BnK Be3oNaChn n 3paBOBHy cNoBna Ha Tpyd).
Hayte Ce npbo Da n3KIOyBaTe MaunHaTa, Ppe Da BkIOuHTe, B CnyaYe Bb3HKnHe HkaBnpo6IeM.
BnHaHn n3KnIOuBaIe MOTOpa npedn da MeCTnTe MaunHaTa nn Da n3BbPUnTe cepBn3.
- Ito Bpeme Ha pa6oTa MOTOp ce HargpaBa, He ro nnaIte npeDi da ce oxJaDi.
- HnKora He octabTte MOTopa da pa6oTn 6e3 Na3Op.
He maxaTe NoCTaBeHInTe 3aUTHn eJEMeHTn, Te ca 3a BaUta 6e3OnaCHOCT.
BnHaH npOBepBaIte CbCToHHeTo n CnHyPcHCTTa Ha 3aunTHHe EneMeHTu DaJIN HAKON OT TRe X He JInCBaT UIN He Ca nobpeHn. He non3BaIte RTX doKato He 3aemeHte n NonpaBHe 3auTHHe EneMeHTn.
He pa6oTe c RTX aKO CTe 60JHn, n3MopeHN nn noD BnHne Ha anKoxon nn HapKOTu.
Ta3n MaunHa e KOHCTpyuPapaHa da eIIMMHNpa BCNUK Bb3MOXn pUCKOBe, KOnTO MoT a Da BB3NkHAT npn HeHaTa ynoTppe6a.
BbIpeKn ToBa, pCKOBe MoT a Da Bb3HnKHaT n Te3n OCTaTBuHn pCKOBe He ca rCHO pa3NHyMn MOraT da npEdu3BnKaT HapaHbAHn, nobpeu n Iopn Cmbpt. B cnyauy che noo6Hn He npedcKa3yEmn n TpyHo pa3NHyMn pCKOBe ce npoRBA, MaunHaTa Tpr6Ba He3a6abHO Da Ce n3KnUOu n OepaTopa NIn INHehepa No TexHkata Ha 6e3OnacHocT Tpr6Ba Da npEduPmeT Heo6xOdUmTE MeKn Da eJIMmHnpat PnckA. PohraKora e Heo6xoDIMO npOn3BOUnTeJe Da 6bDe InΦOpMnpaH 3a NDo6Hn clyua, 3a Da MOKe Da B3eMe HyXhnte MePKn.

PpeynpeKdene
Togueomo e lecno 3anaumo. Moke da npeduzka hapaehaunu umyueceenu mu. N3aceme Momopa, omcmpanembe cuyku omkpumn lambucu u he nyweme dokamo nblhume pe3epeoapa. Buha zu 3abpcaeime pa3nmo ce zopueo.
- Ppei Da npe3apeDHTe, n3KIOUeTe MOTOPa I IO OCTaBeTe Da n3CTHHe.
- Ppi npe3apexdahe He nywete Hn He na3eTe 3OHata OT OKpnt NlaMbK.
- Ppi npe3apekdahe n3noJ3BaIte noXoJraaФyHnI He pa3JIbaiTe rOpINBO NO MOTopa.
Pa3IaTOTO rOpBnTO TpRbBA He3a6BaHbNO da ce oBe3OanC npcbk. Ako pa3neTe roPbNO no dpexnte cn, TpRbBA da tn CMeHInTe.
CbxaHraBaIe TropBOTO B NOxOJa 3a ceJI Ta KOHTeHep daney OT OKPnT PnAmBk N 3anaNTenHn N3TOHnU.

Altrad Belle Warranty Department,
Sheen, Nr. Buxton,
Derbyshire,
SK17 0EU
England.
PerncpnpaHa rapaHnraT:
CneBauK noNTnKaTc n da npBbPhem ALTRAD Belle e edHa no-3eHea" n no-eKoNOroc6bpa3Ha KOMNaHn, Hne BBeDOxMe MoEna Ha OHnain PerIcTpipaHe Ha rapaHua. 3a doCTbN do cTpaHuaTa 3a perIcTpipaHe Ha haun yeb caT, MoJn, n3no3BaIte CneHN aDpec:
http://www.bellegroup.com/index.php?p=warranty-registration
Moxete n da cKaHnPate cbc cMaprfoHa cn npIneXaunr QR kO (kO3 3a 6bP3 OTROBOP) 3a doctbn do cTpaHnata 3a pernctpupahe.


BELLE
LIGHT
CONSTRUCTION
EQUIPMENT
ALTRAD BELLE
Sheen, Nr. Buxton, Derbyshire, SK17 DEU, GB
Tel. +44 (0)1298 84606 - Fax +44 (0)1298 84722 - Email: sales@alttrad-belle.com
www.Altrad-Belle.com
EU IMPORTER ADDRESS
ADRESSE DE L'IMPORTATEUR - DIRECCION DEL IMPORTATOR - ENDEREÇÃO DO IMPORTATOR - ADRES IMPORTEUR
IMPORTORENS ADRESSE - IMPORTEUR ADRESSE - INDIRIZZO DELL'IMPORTATORE - IMPORTÖRENS ADRESS - IMPORTÖRADRESSE
MAAHANTUOJAN OSOITE - ADRES IMPORTERA - IMPORTUA AADRESS - IMPORTÉTÄJA ADRESS - IMPORTUOTOJO ADRESAS
ADRESA DOVOZCE - ADRESA IMPORTATORULUI - IMPORTÖR CIME - ADRESA UVOZNIKA - ITHALATCI ADRESI - ADRESA DOVOZCU