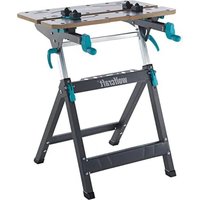
MASTER work 1600 - Table WOLFCRAFT - Free user manual and instructions
Find the device manual for free MASTER work 1600 WOLFCRAFT in PDF.
| Product type | Folding workbench (workbench) |
| Brand | Wolfcraft |
| Model | MASTER work 1600 |
| Dimensions assembled (L x W x H) | 1110 x 765 x 863 mm |
| Dimensions folded (L x W x H) | 1110 x 765 x 200 mm |
| Work surface | 1035 x 695 mm |
| Max. load capacity | 120 kg |
| Net weight | 21 kg |
| Clamping hole diameter | 20 mm |
| Clamping hole spacing (horizontal / vertical) | 128 mm / 128 mm |
| Dimensions of slotted holes | 91 x 23 mm |
| Power supply | None (manual tool, without motor) |
| Main functions | Workstation for sanding, planing, drilling, cutting, assembly |
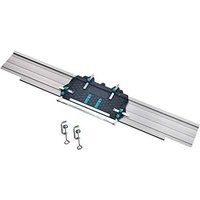
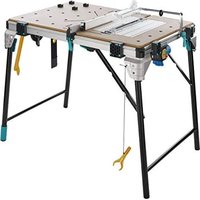
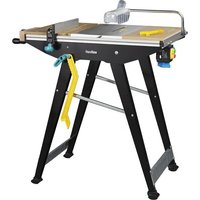
| Compatible accessories | 20 mm clamps, drill support (art. 5027000), oscillating/miter saws |
| Worktop material | Aluminum profile |
| Warranty | 10 years (domestic use) |
| Maintenance and cleaning | Clean with a dry cloth; store indoors, away from moisture |
| Safety | Do not climb on the workbench; load evenly; use PPE (goggles, mask, hearing protection) |
| Spare parts and repairability | Spare parts available from wolfcraft (see page 10 of the manual) |
| General information | 92-page manual available in multiple languages |
Frequently Asked Questions - MASTER work 1600 WOLFCRAFT
User questions about MASTER work 1600 WOLFCRAFT
0 question about this device. Answer the ones you know or ask your own.
Ask a new question about this device
Download the instructions for your Table in PDF format for free! Find your manual MASTER work 1600 - WOLFCRAFT and take your electronic device back in hand. On this page are published all the documents necessary for the use of your device. MASTER work 1600 by WOLFCRAFT.
USER MANUAL MASTER work 1600 WOLFCRAFT
text_image
2.1 A A A 2.2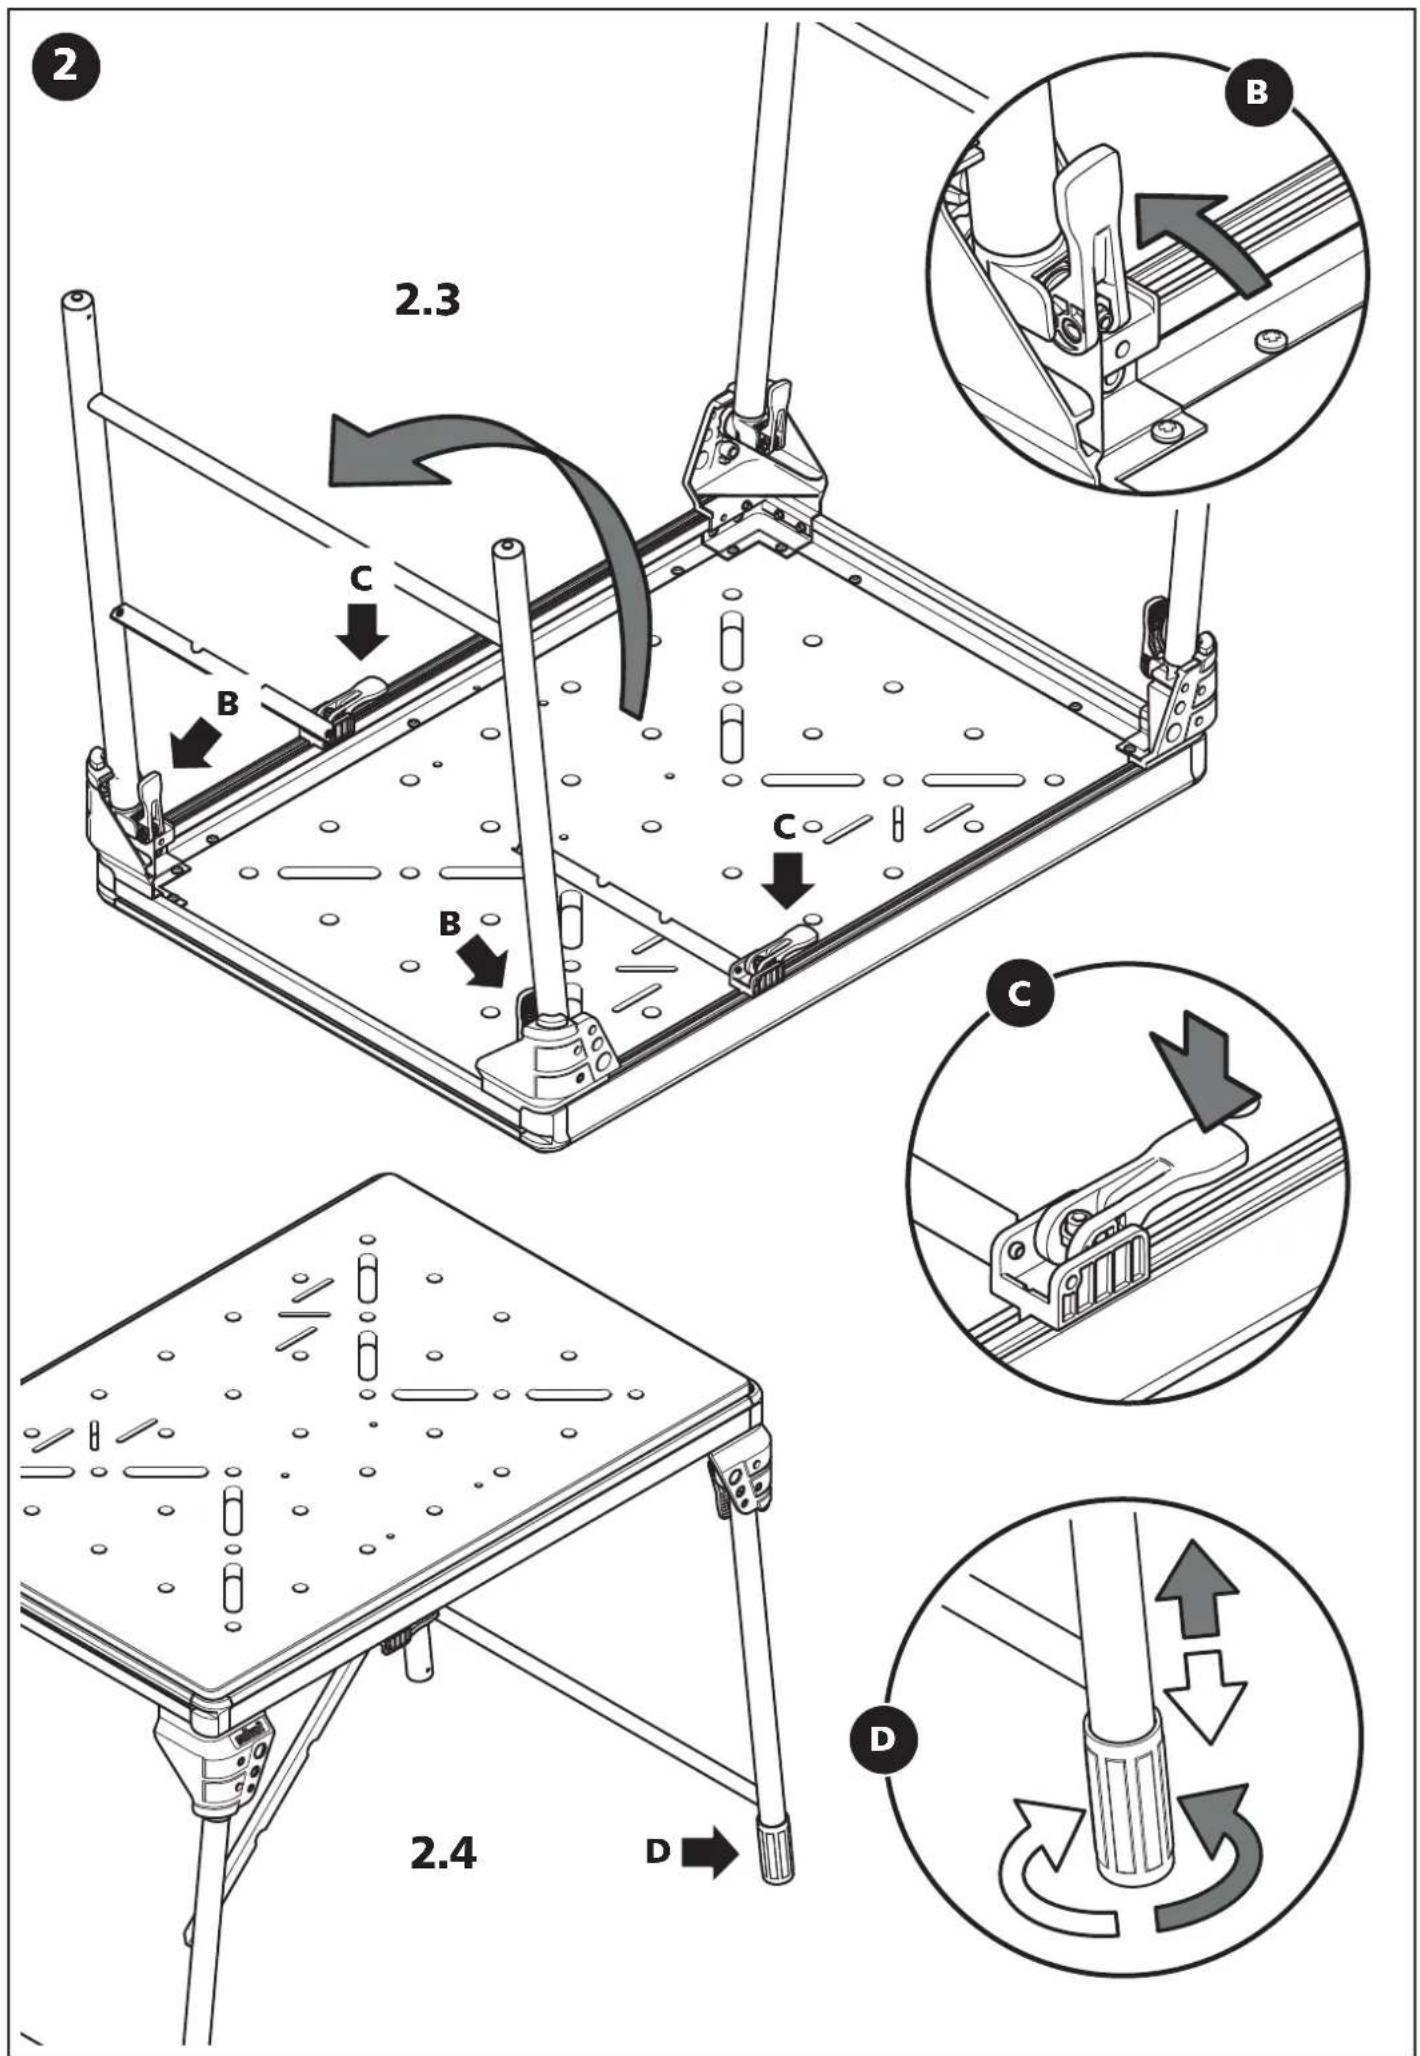
text_image
2 2.3 C B B C D 2.4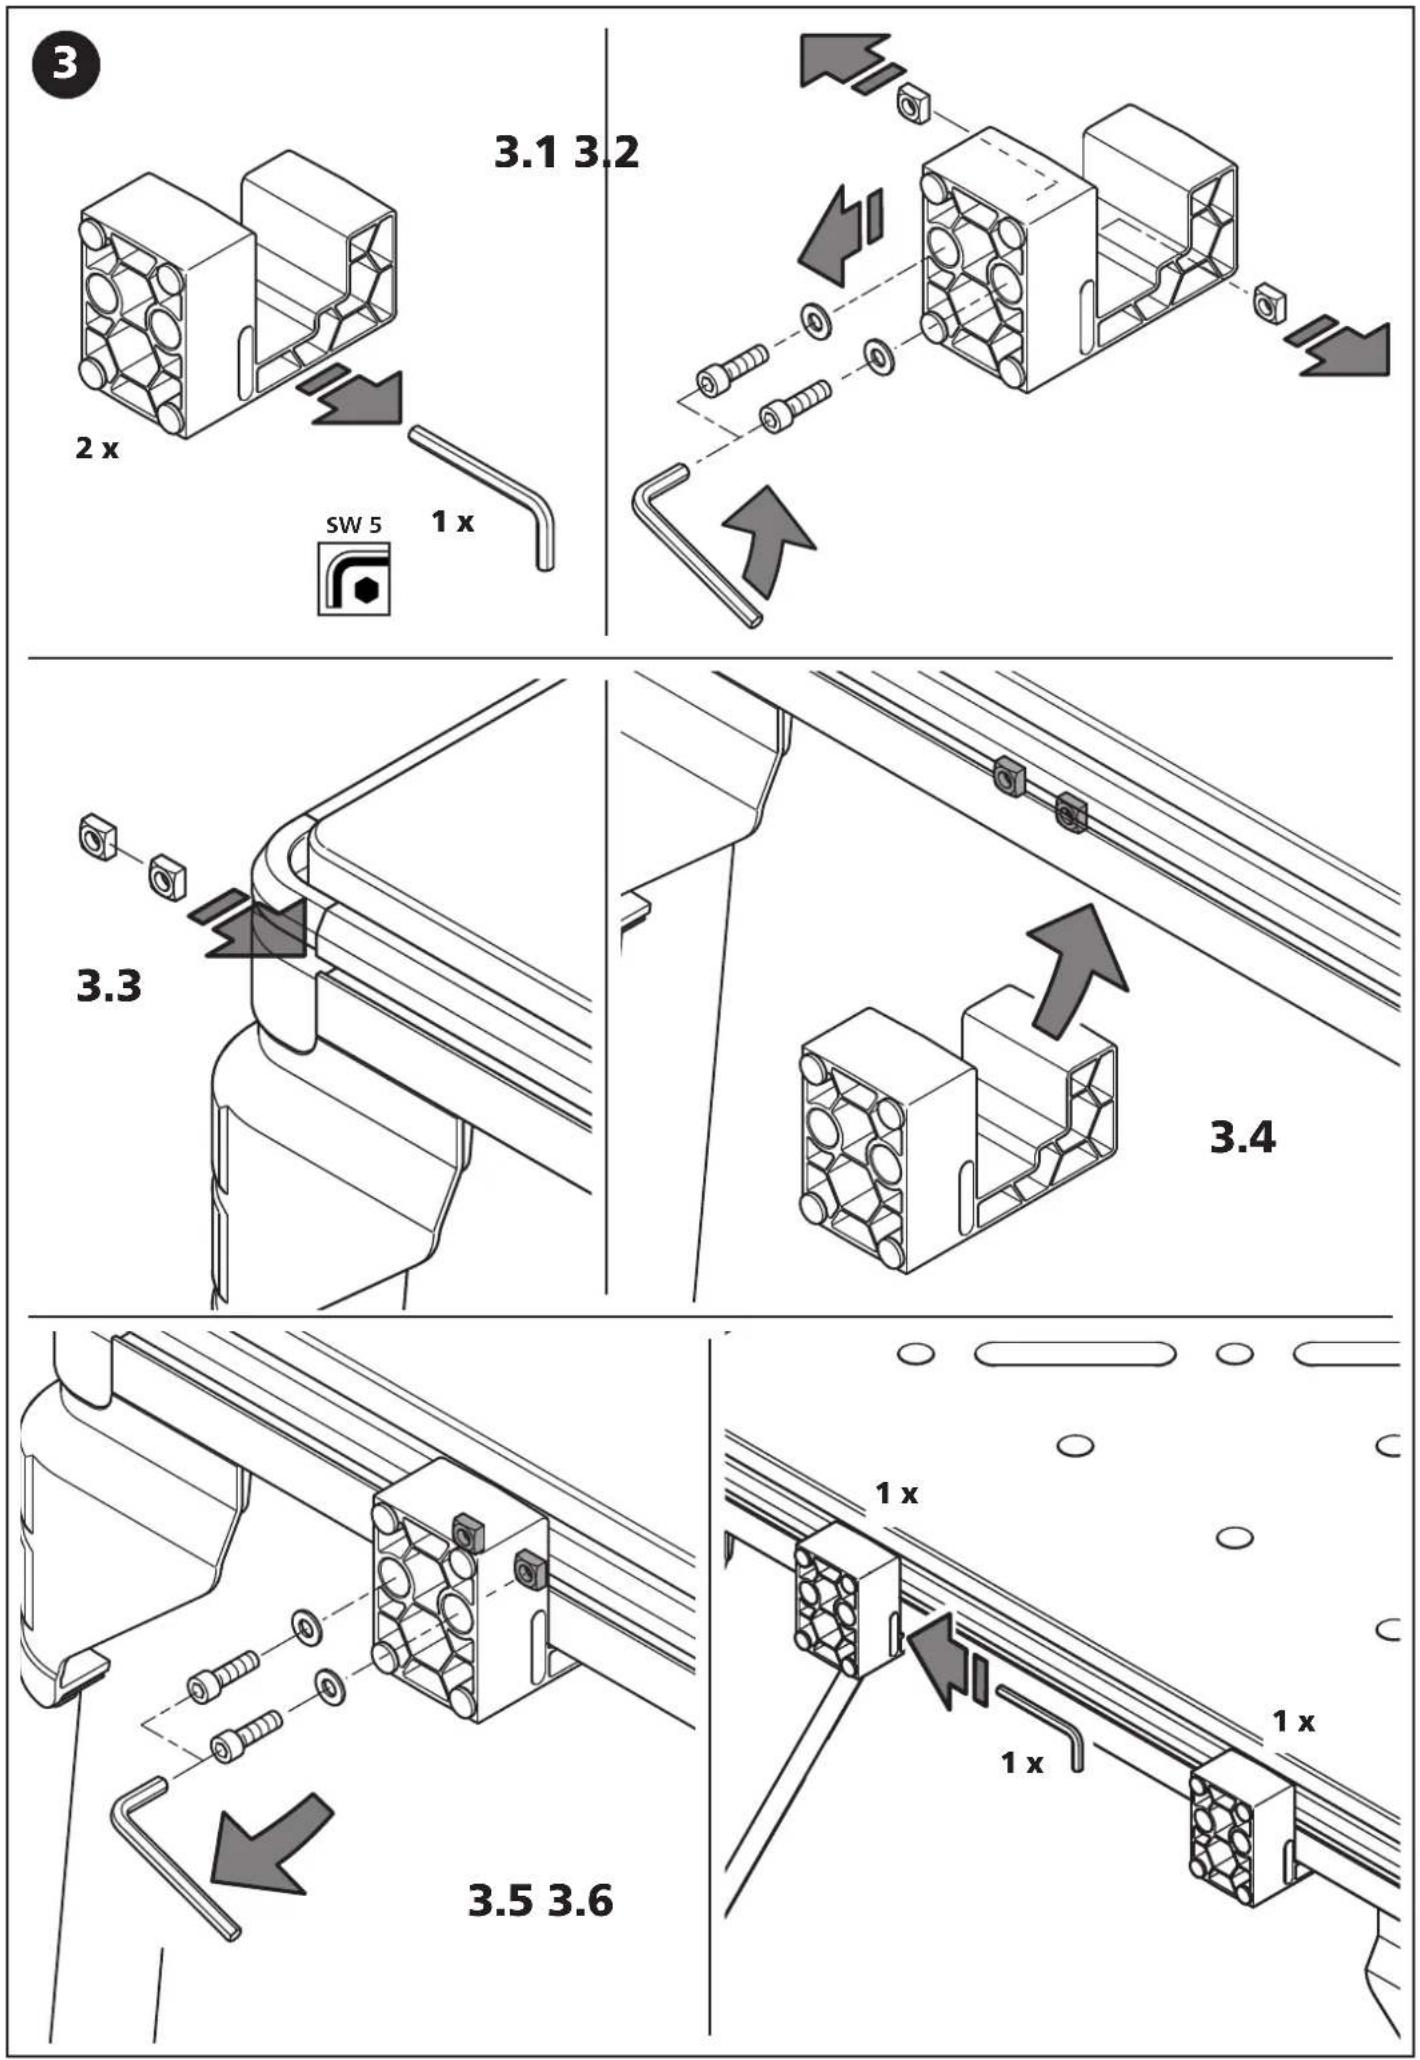

text_image
Technical diagram showing a person using a mobility device with labeled components and directional arrows indicating movement or assembly.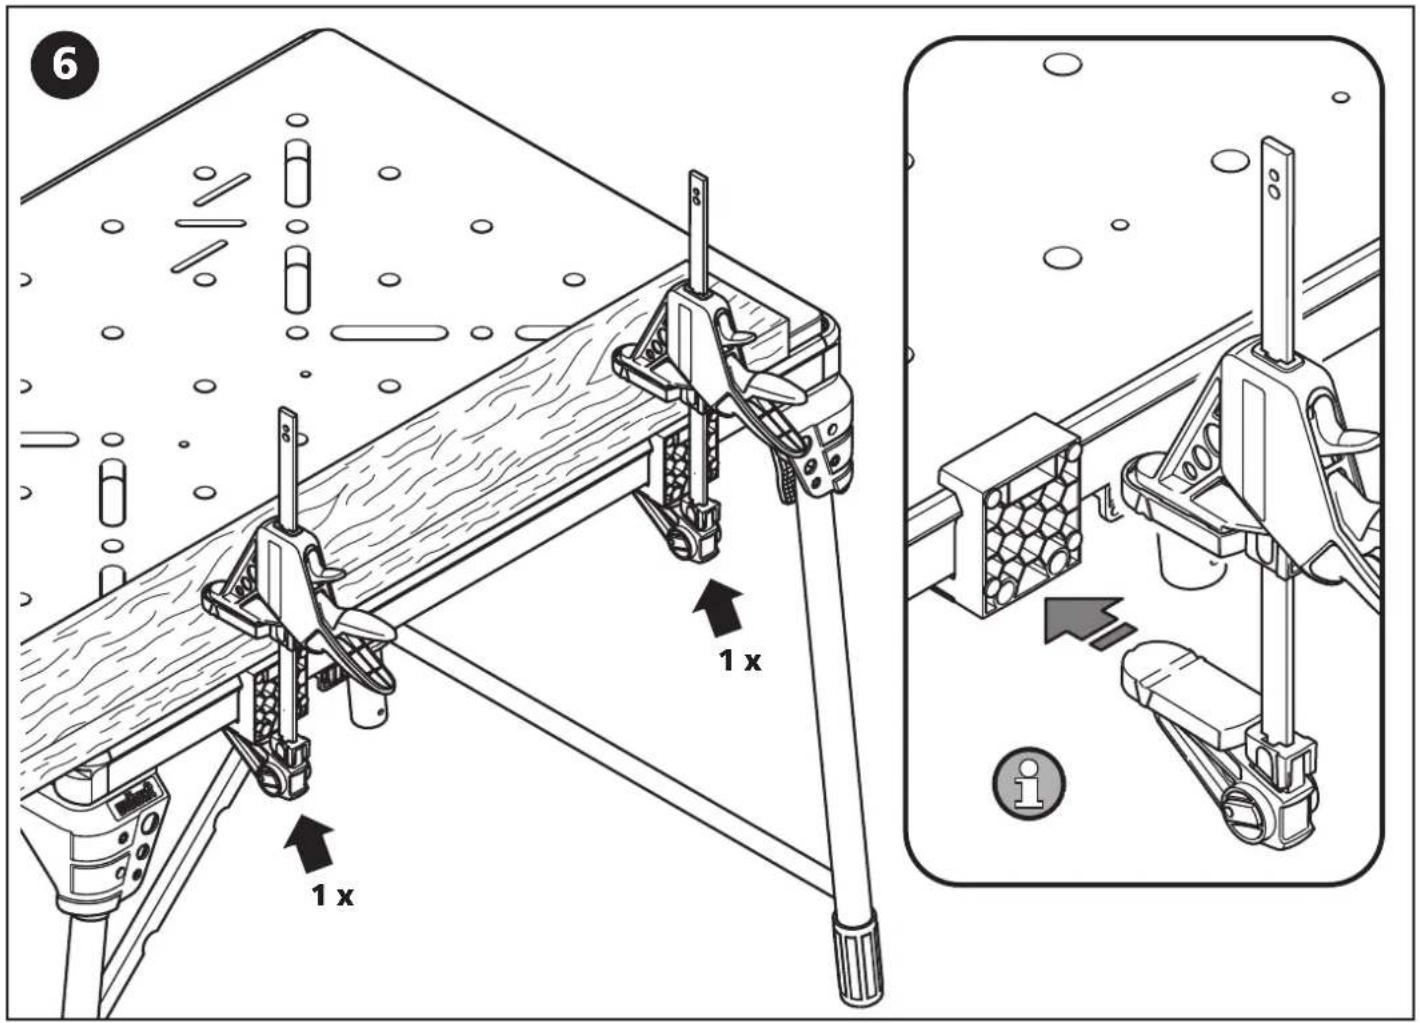
text_image
6 1 x 1 x i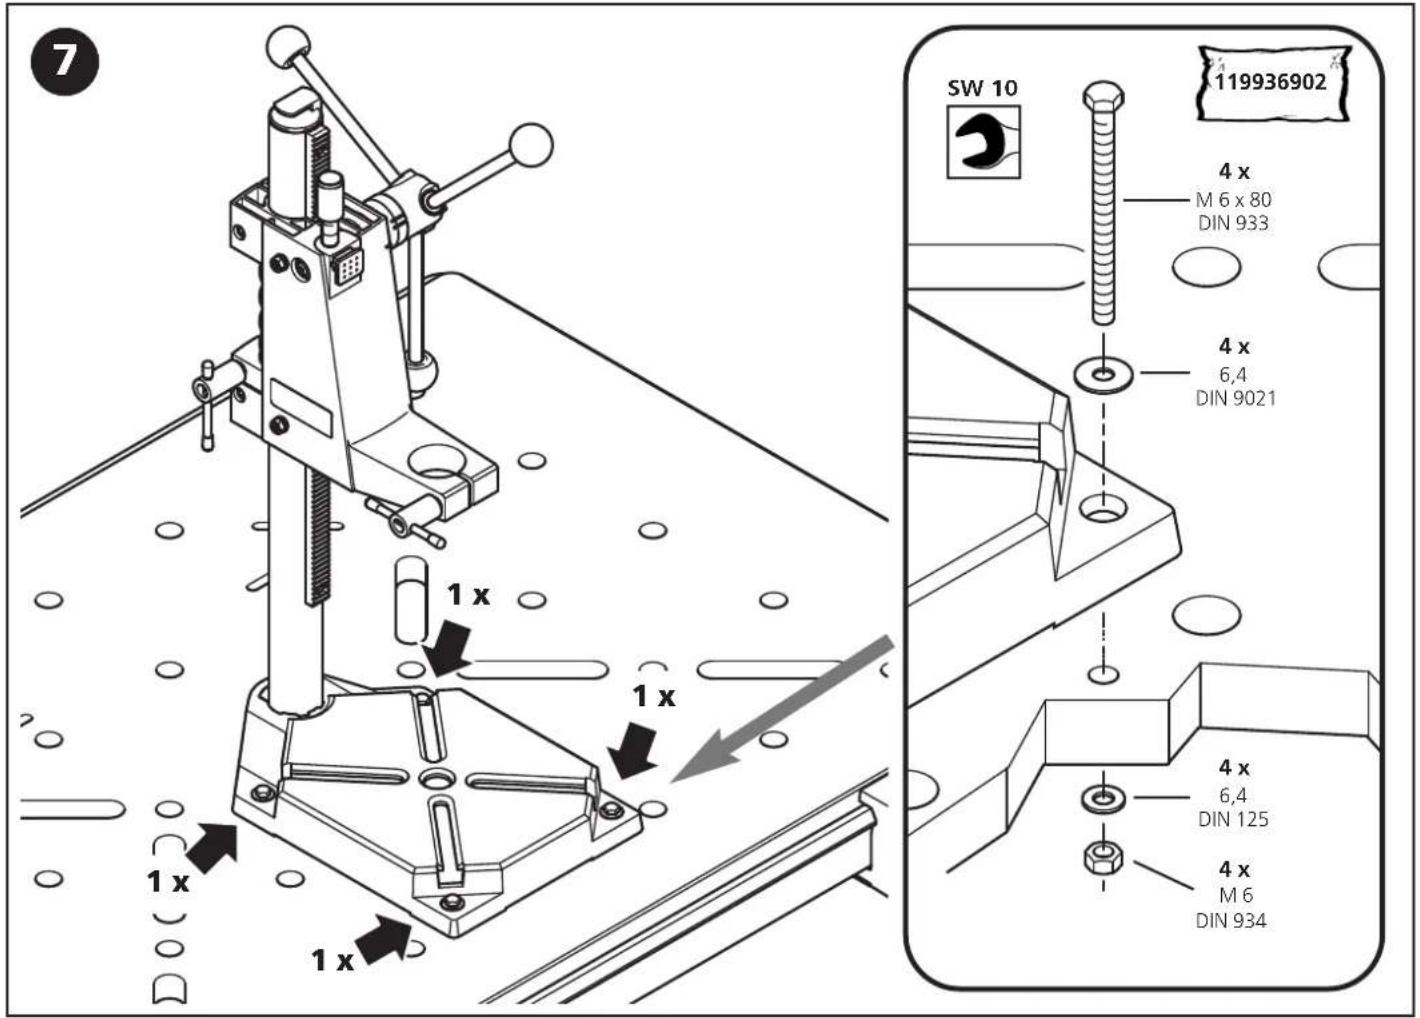
text_image
SW 10 119936902 4 x M 6 x 80 DIN 933 4 x 6,4 DIN 9021 4 x 6,4 DIN 125 4 x M 6 DIN 934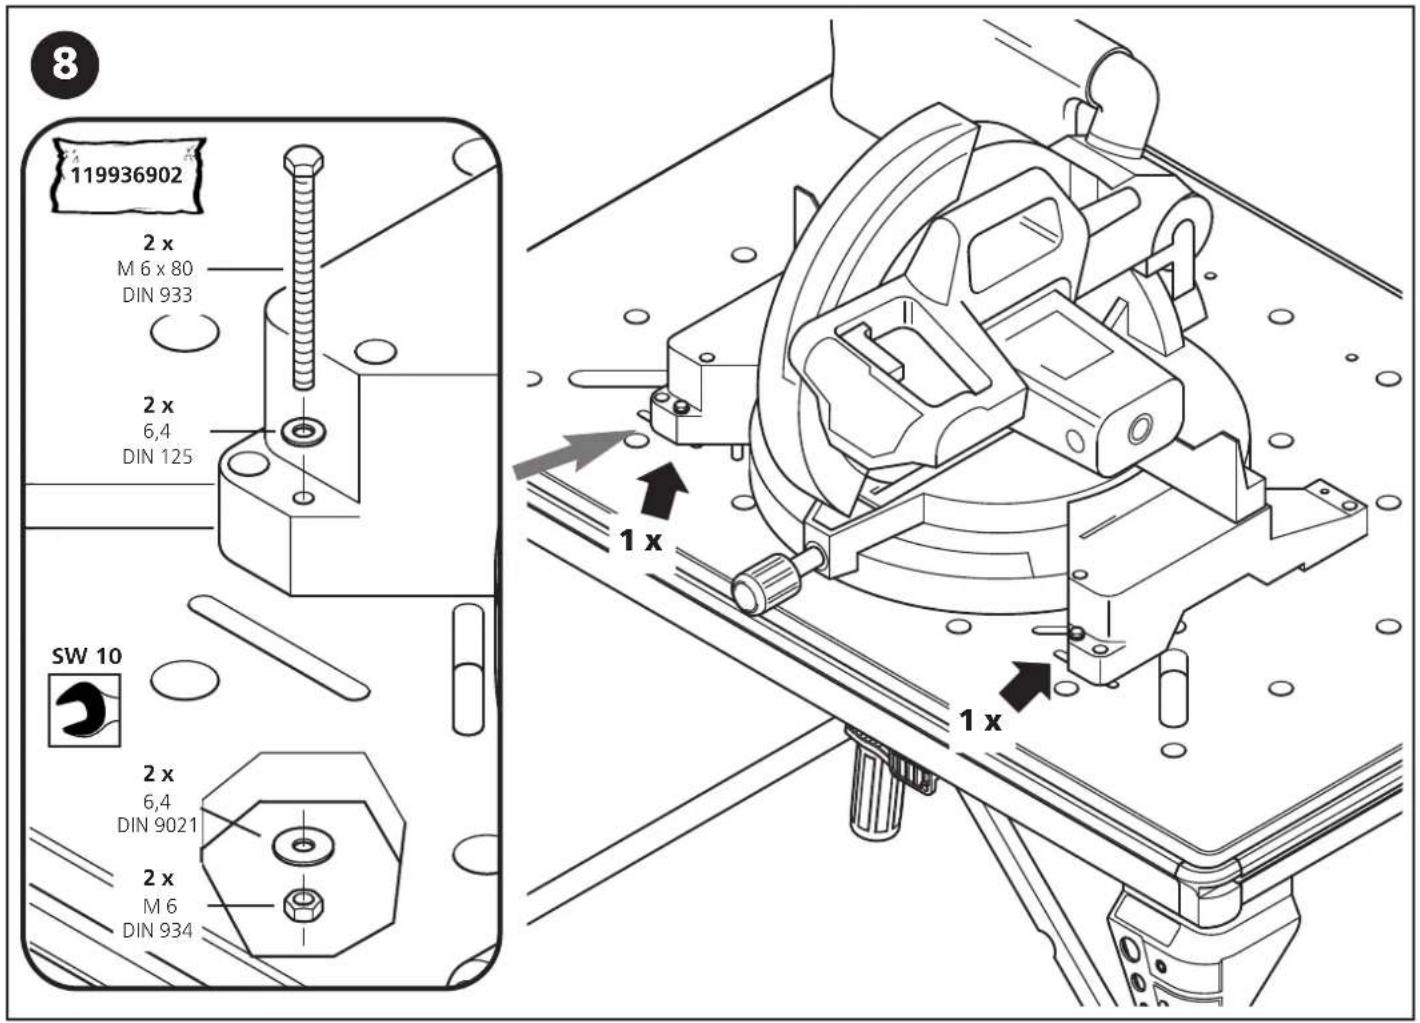
text_image
8 119936902 2 x M 6 x 80 DIN 933 2 x 6,4 DIN 125 SW 10 2 x 6,4 DIN 9021 2 x M 6 DIN 934 1 x 1 x© Zubehör separat erhältlich
GB Accessories not included
F Accessories vendus séparément
E Accesorios no incluidos
NL Accessories separaat verkrijgbaar
① Accessori non compresi
© Accéssoirios vendidos separamente
© DK Tilbehør som fåer separat
s Tillbehör ingår ej
FIN Varusteet eivät sisälly
N Tillbehør følgerikke med
PL Akcesoria opcjonalne do oddzielnego nabycia
⑥ Εξαρτήματα μπορούν
να αγοραστούν ξεχωριστά
TR Aksesuvar ayrıca satın alınabilir
© Příslušenství dodáváno samostatně
H Tartozékok külön kaphatók
® Accesoriiile se pot aciziționa și separat
BG Аксесоарите се поръчват
отделно
HR Pribor dobavljiv odvojeno
® Prинадлежности продаются
отдельно
natural_image
Technical illustration of two mechanical clamps securing a wooden beam, no text or symbols present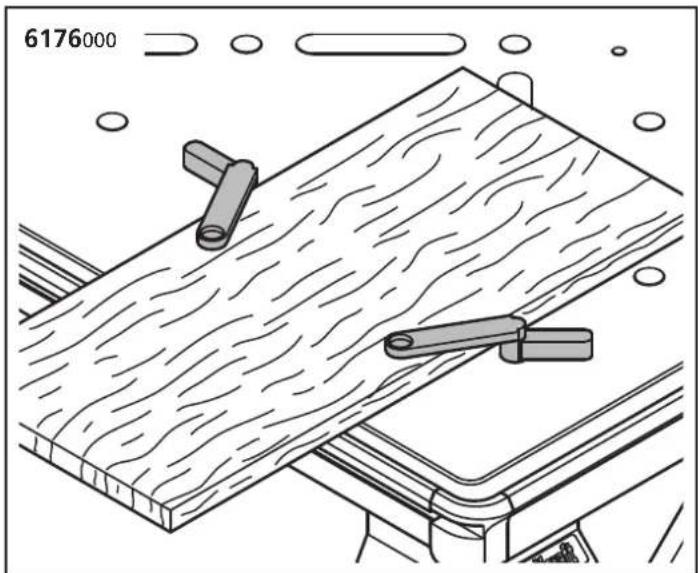
natural_image
Technical illustration of a wooden plank with two clamps and a textured surface, no text or symbols present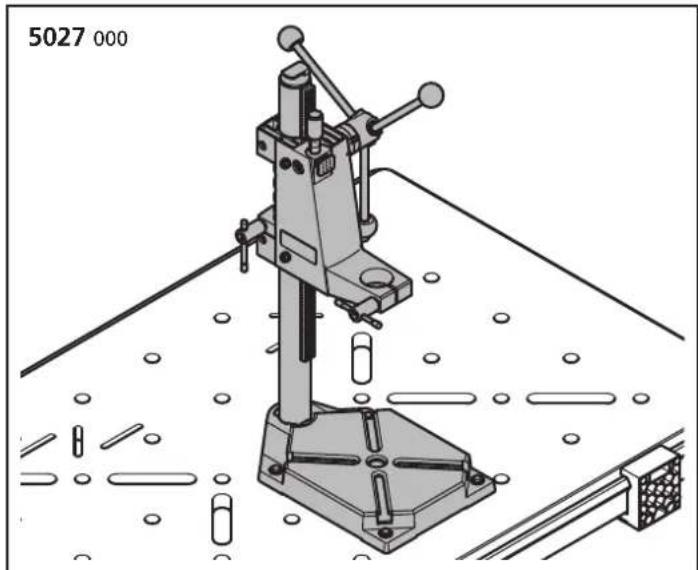
natural_image
Technical line drawing of a mechanical press or drill press device with no visible text or symbols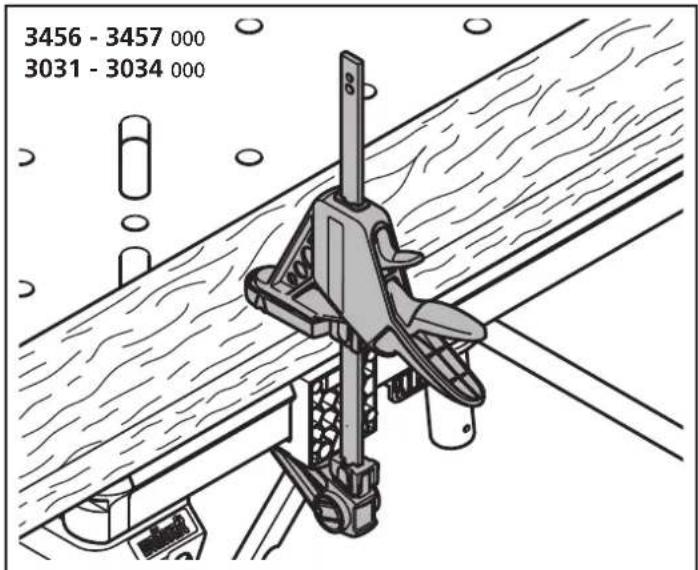
text_image
3456 - 3457 000 3031 - 3034 000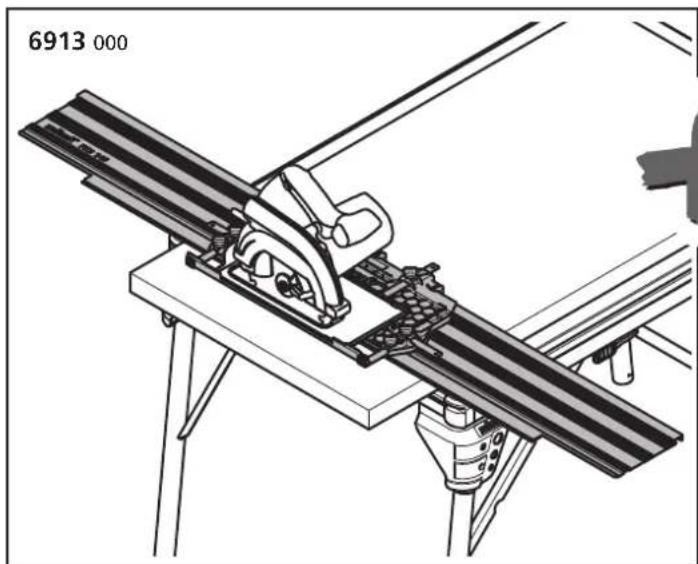
natural_image
Technical line drawing of a mechanical assembly with a diagonal metal beam and mounting base (no text or symbols)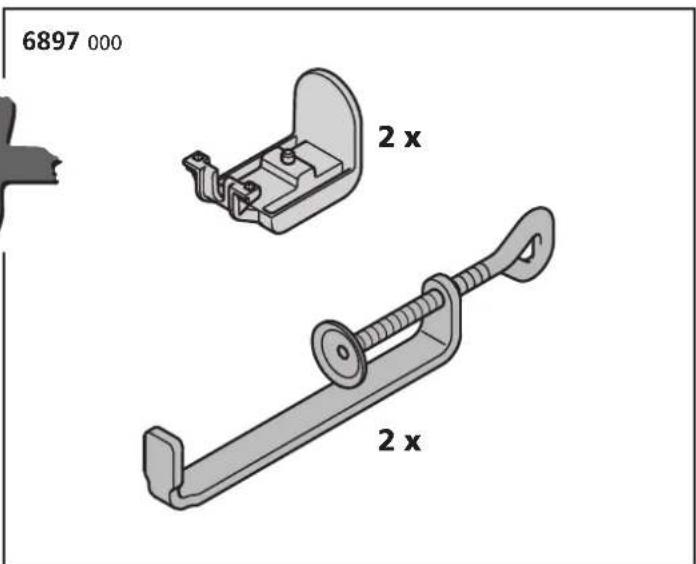
text_image
6897 000 2 x 2 x© Ersatzteilliste
GB Spare parts list
F Liste de pièces de rechange
⑥ Lista de recambios
NL Lijst met reserveonderdelen
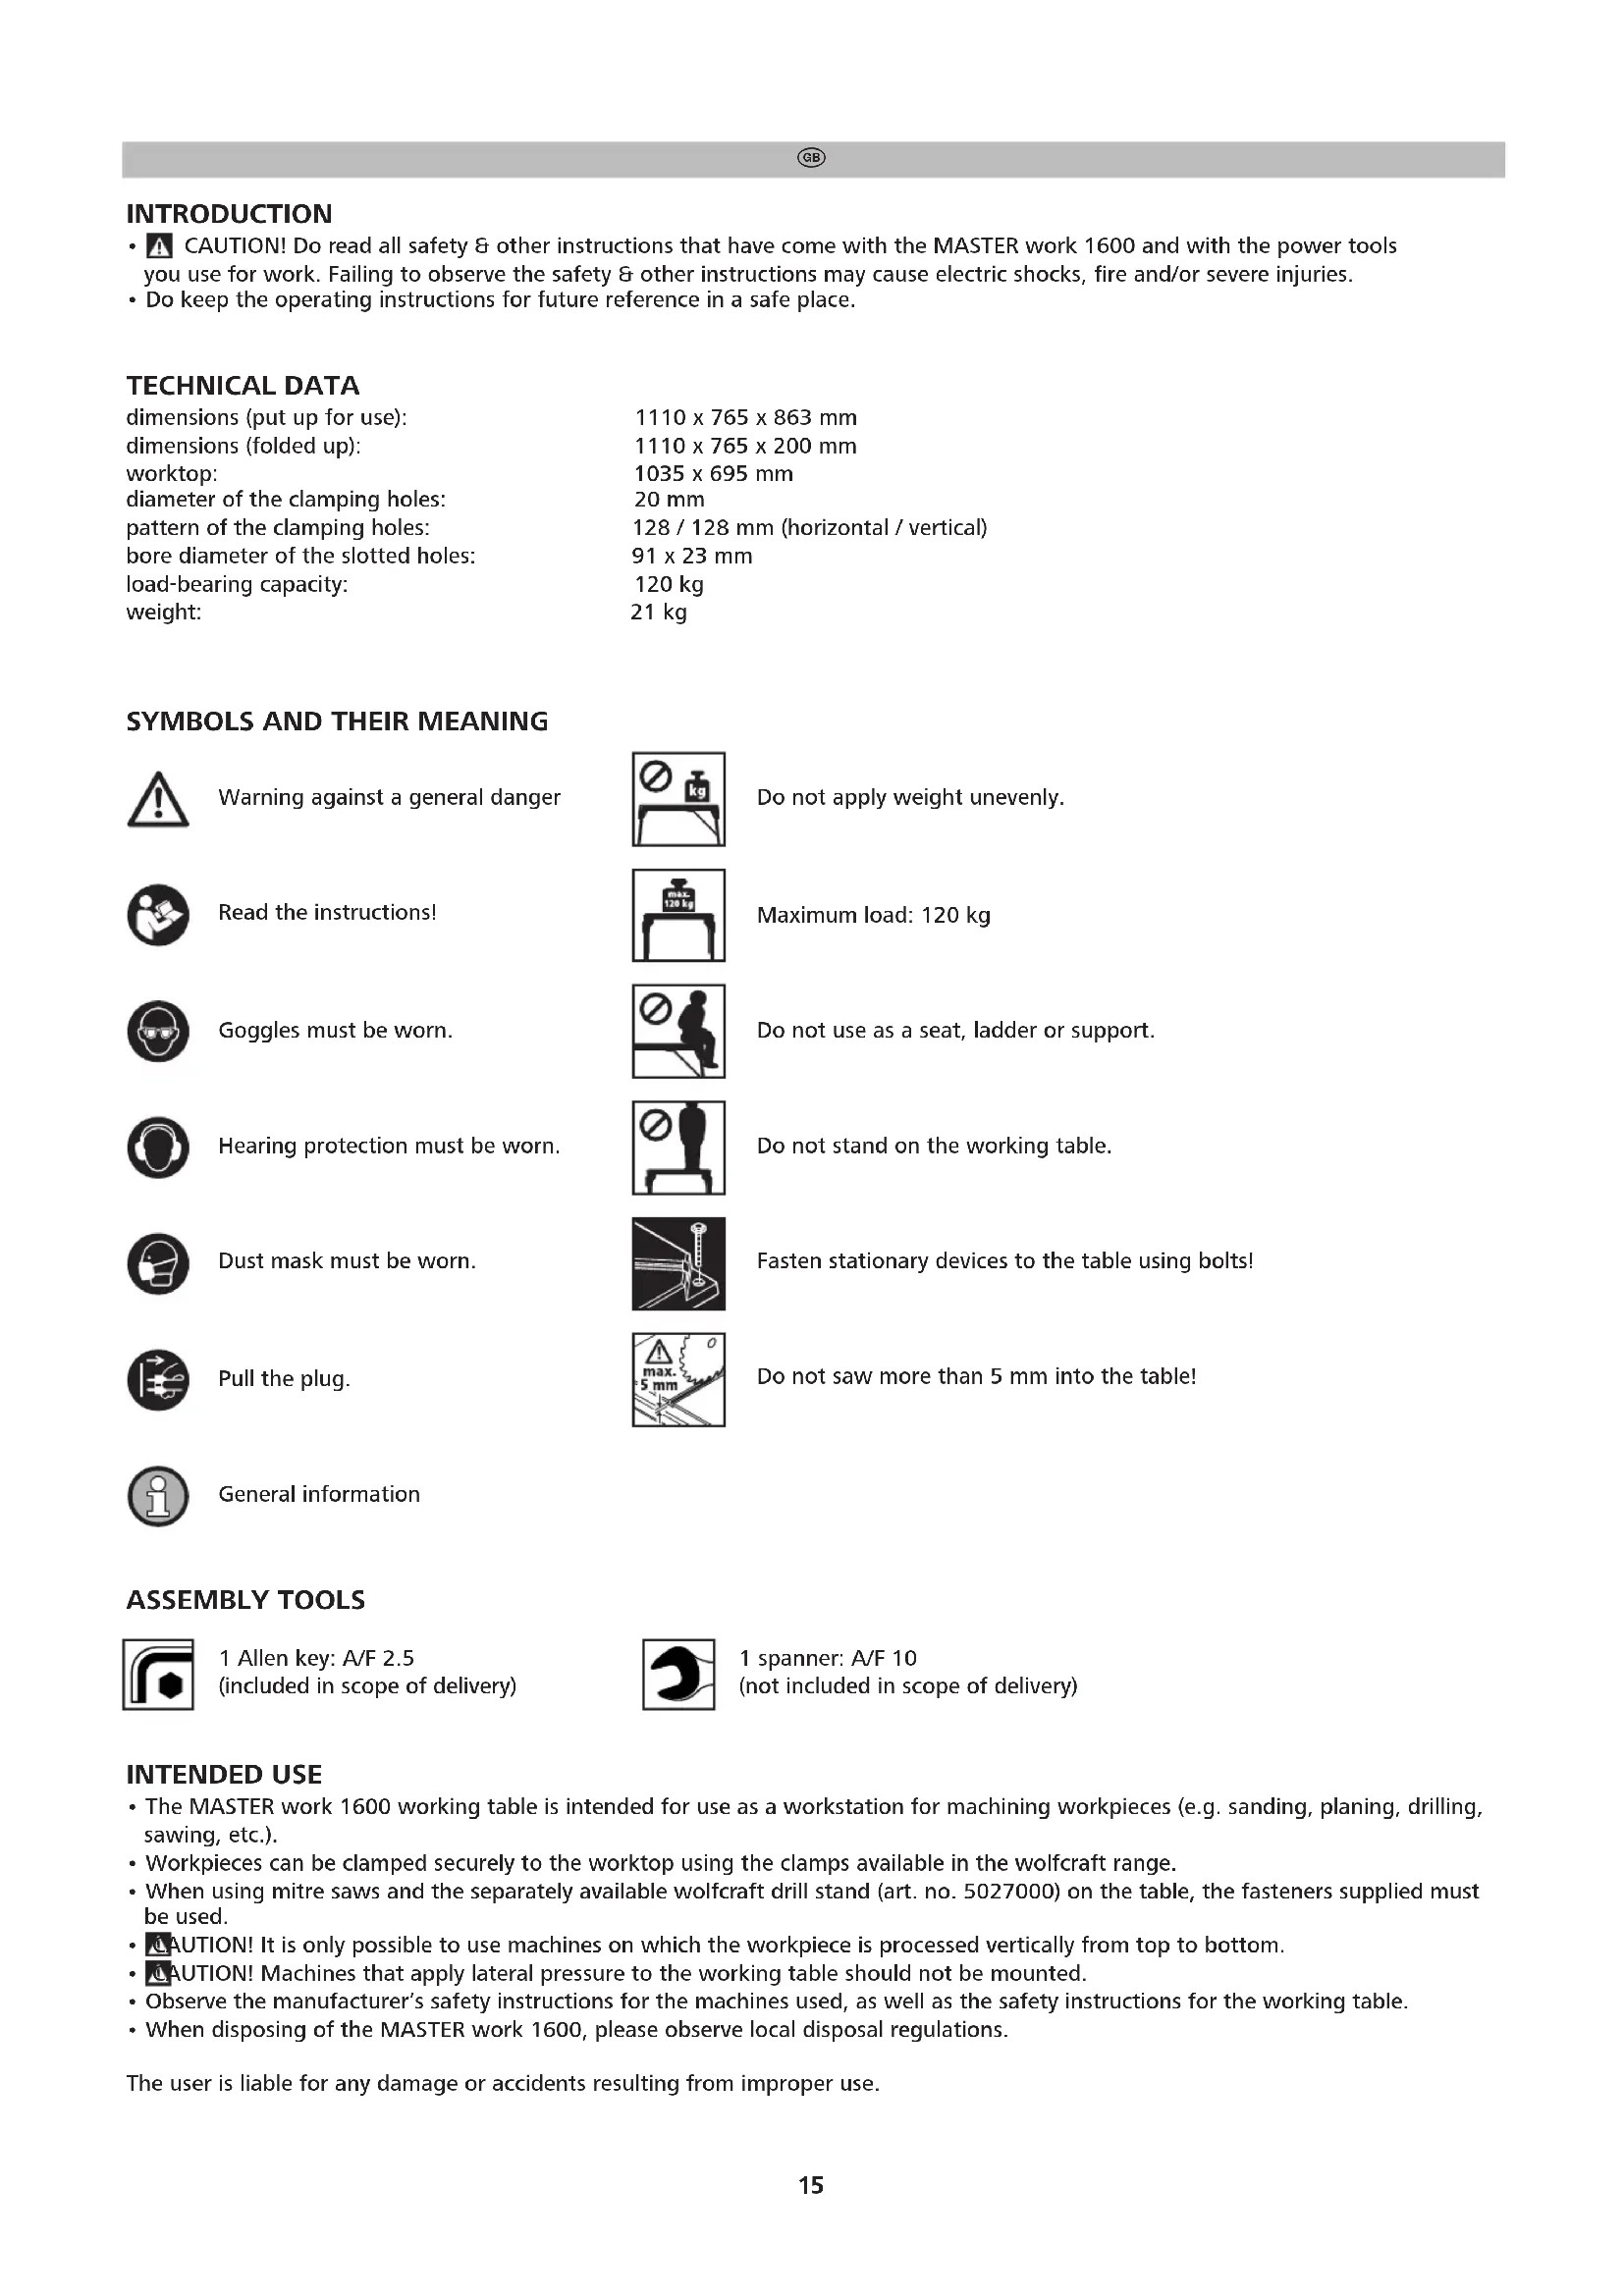
- CAUTION! Do read all safety & other instructions that have come with the MASTER work 1600 and with the power tools you use for work. Failing to observe the safety & other instructions may cause electric shocks, fire and/or severe injuries.
- Do keep the operating instructions for future reference in a safe place.
TECHNICAL DATA
| dimensions (put up for use): | 1110 x 765 x 863 mm |
| dimensions (folded up): | 1110 x 765 x 200 mm |
| worktop: | 1035 x 695 mm |
| diameter of the clamping holes: | 20 mm |
| pattern of the clamping holes: | 128 / 128 mm (horizontal / vertical) |
| bore diameter of the slotted holes: | 91 x 23 mm |
| load-bearing capacity: | 120 kg |
| weight: | 21 kg |
SYMBOLS AND THEIR MEANING
| Warning against a general danger | Do not apply weight unevenly. |
| Read the instructions! | Maximum load: 120 kg |
| Goggles must be worn. | Do not use as a seat, ladder or support. |
| Hearing protection must be worn. | Do not stand on the working table. |
| Dust mask must be worn. | Fasten stationary devices to the table using bolts! |
| Pull the plug. | Do not saw more than 5 mm into the table! |
| General information |
ASSEMBLY TOOLS
| 1 Allen key: A/F 2.5(included in scope of delivery) | 1 spanner: A/F 10(not included in scope of delivery) |
INTENDED USE
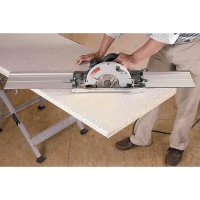
- The MASTER work 1600 working table is intended for use as a workstation for machining workpieces (e.g. sanding, planing, drilling, sawing, etc.).
• Workpieces can be clamped securely to the worktop using the clamps available in the wolfcraft range. - When using mitre saws and the separately available wolfcraft drill stand (art. no. 5027000) on the table, the fasteners supplied must be used.
• CAUTION! It is only possible to use machines on which the workpiece is processed vertically from top to bottom. - CAUTION! Machines that apply lateral pressure to the working table should not be mounted.
- Observe the manufacturer's safety instructions for the machines used, as well as the safety instructions for the working table.
- When disposing of the MASTER work 1600, please observe local disposal regulations.
The user is liable for any damage or accidents resulting from improper use.
SAFETY INFORMATION
- Assemble the working table correctly and check that all the bolts and eccentric levers are tightened before beginning work.
- Never use your working table improperly or for an unintended purpose!
- Remove all items that are surplus to requirements from the working table.
- Never work with a defective working table!
- Clamp the workpiece to be processed firmly!
- Make sure that all bolts and eccentric levers are tightened during transport.
- Place the working table on a firm, level and horizontal surface. If the working table can slip or wobble, the workpiece or power tool cannot be controlled evenly and safely.
- Assemble the working table correctly before mounting the power tool.
- Fasten the power tool securely on the working table before using it. If the power tool slips on the working table, this can lead to loss of control.
- Make sure that the power tool is mounted centrally on the working table. If the power tool is not centred on the working table, this can mean the centre of gravity of the power tool does not align with the centre of gravity of the working table, so that the table can tip over.
• Make sure that long workpieces do not bring the working table out of balance. Long workpieces must be supported at the free end.
- Wear suitable personal protective equipment: ear protection, safety goggles, dust mask (if the work generates dust), protective gloves when working with rough materials and when changing tools.
- Do not store the working table outdoors or in a damp environment. There is a risk of corrosion and the work top may warp.
- Keep your work area clean and well lit. Untidy or dark work areas can lead to accidents.
- Keep children and other persons at a safe distance when using the working table. If you are distracted, you may lose control of the device.
- Remove the adjusting tools or spanners before switching on the power tool. A tool or spanner left behind in a rotating part of the device can cause injury.
- Wear suitable clothing. Never wear loose clothing or jewellery. Keep hair, clothing and gloves away from moving parts. Loose clothing, jewellery or long hair can get caught in moving parts.
- Before starting work, check that the devices and tools are operational. Never work with damaged or blunt tools.
- Disconnect the plug from the electric socket and/or remove the battery pack from the power tool before adjusting the tool or changing the accessories. Accidents may occur if the power tool is started unintentionally.
- Avoid overloading the working table and never use it as a seat, ladder or support. Placing excess weight on the machine table or even standing on it can cause the centre of gravity of the table to shift, so that it tips over.
- Loose fragments, chips or similar materials should not be removed by hand from the area around the moving saw blade.
- Make sure that there are no objects on the worktop each time you start sawing.
- Saw blades must not be stopped by applying lateral pressure after switching off the drive mechanism!
- Only use tools for their actual intended purpose.
- Only use saw blades that are in perfect condition.
- Only use genuine wolfcraft spare parts.
• A CAUTION! There is a risk of tipping in the case of protruding workpieces. Make sure that lateral clamping and machining of laterally clamped workpieces does not result in the table becoming unbalanced.
- Make sure that you do not apply excessive clamping pressure when fastening fragile materials. Risk of splinters!
- Place heavy objects on the table with care and ensure an even load on the tabletop.
- Do not saw more than 5 mm into the table as this will damage the aluminium profile.
• Take care not to pinch your hands when clamping thin workpieces using one-hand clamps.
• Take care not to pinch your hands when folding and unfolding the table.
SAFETY INFORMATION FOR wolfcraft DRILL STAND (Art. No. 5027000)
- The working table is equipped with bores for the separately available wolfcraft drill stand (art. no. 5027000).
- Assemble the separately available drill stand using the fastening materials supplied in accordance with the instructions in this manual.
- The drill stand is designed to hold electric drills with a collar diameter of 43 mm. No other devices may be used.
• In addition to the safety information in the drill stand manual, make sure you observe the safety information for the drill used.
- Support long workpieces on the receiving side to prevent dangerous situations caused by accidental tipping over.
SAFETY INFORMATION FOR MITRE SAWS
- In addition to this tool-specific safety information, make sure you observe the safety information for the mitre saw used. The machines used must comply with DIN EN 62841-5.
- Mount the mitre saw using the fastening materials supplied in accordance with the instructions in this manual.
- If your mitre saw's mounting hole does not fit on the bore grid of the slotted holes provided, the device must not be used on the table.
- Do not work with a damaged mitre saw and do not use blunt or damaged saw blades.
- Support long workpieces on the receiving side to prevent dangerous situations caused by accidental tipping over.
SCOPE OF DELIVERY AND ASSEMBLY
• Take the MASTER work 1600 out of the cardboard box and check that the contents are complete and all illustrated parts are included (Fig. 1).
- Place the table on a flat, clean surface (Fig. 2.1). Release the two eccentric levers and fold out the right pair of legs as far as they will go. Then close the two eccentric levers again (Fig. 2.2). Release the four eccentric levers and fold out the left pair of legs as far as they will go. Then close all four eccentric levers again (Fig. 2.3). Place the table on its legs (Fig. 2.4) and if necessary adjust the table by turning the height adjustment (Fig. 2.4).
- Assemble the two small clamping blocks on the short side of the table (Fig. 3.1 - 3.5) and the two large clamping blocks on the long side of the table (Fig. 4.1 - 4.3). You can use the Allen key supplied for this, and store it within easy reach in one of the small clamping blocks following assembly (Fig. 3.6).
- The four clamping claws supplied can be inserted into the holders on the sides of the large clamping blocks for transport and storage (Fig. 4.4).
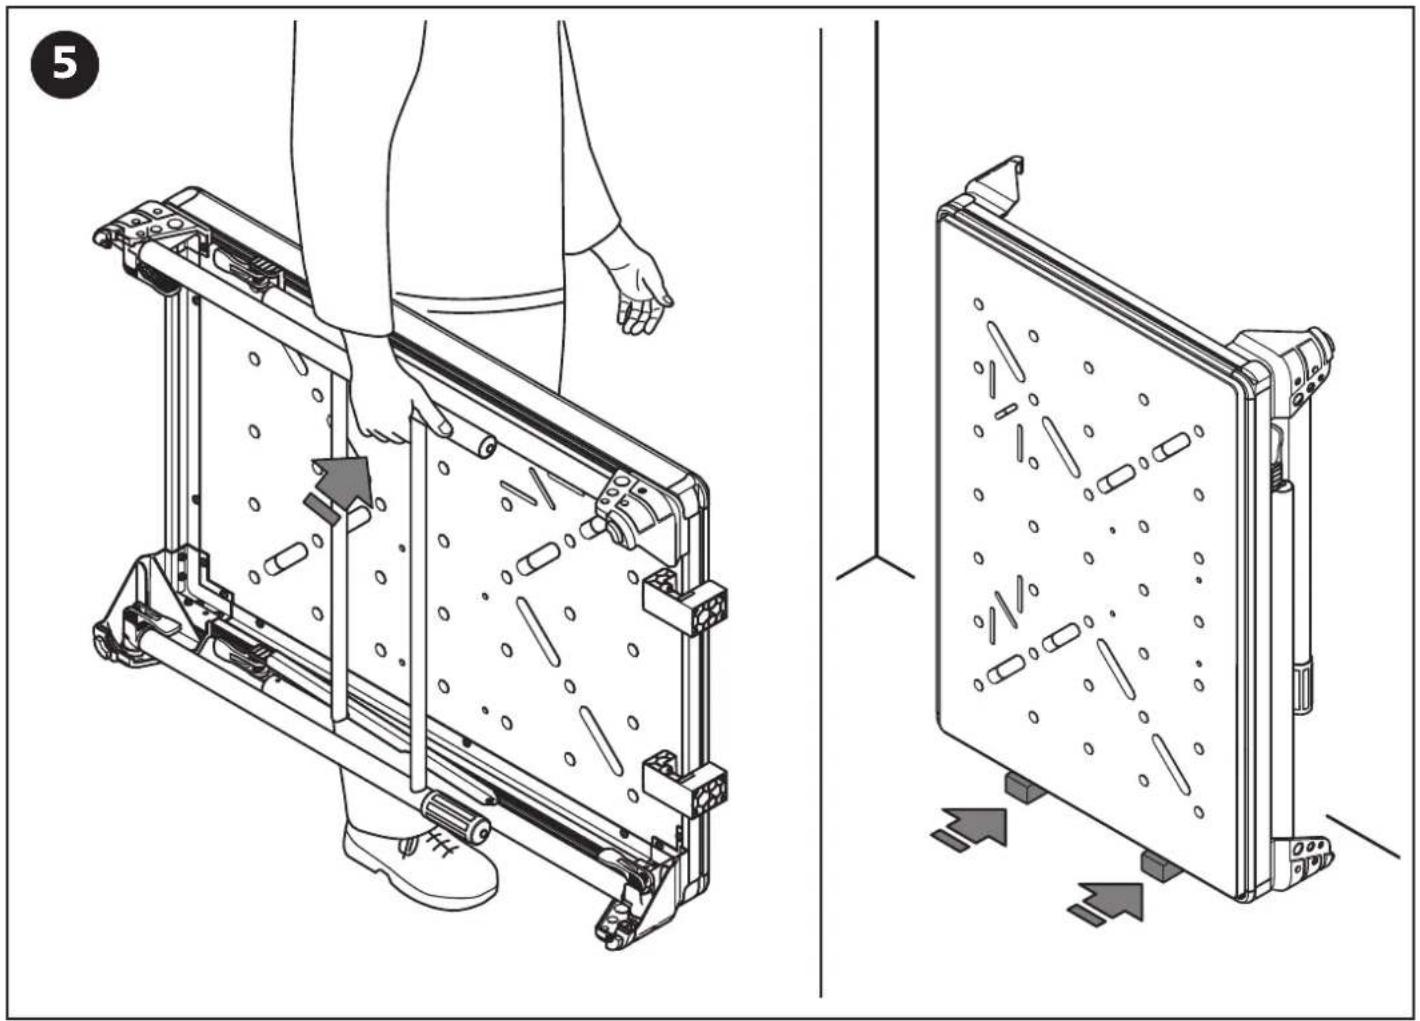
- The working table can be placed on the clamping blocks for transport and storage. This protects the aluminium profile and means that the working table can be self-supporting even when folded (Fig. 5).
CLAMPING WORKPIECES USING THE MASTER work 1600 WORKING TABLE
• The MASTER work 1600 provides various clamping options for machining your workpiece.
- Clamping on the clamping blocks: fasten your workpiece to the outer edge of the working table using clamps (Fig. 6). You can loosen the clamping blocks using the Allen key supplied and move them to the required position for clamping.
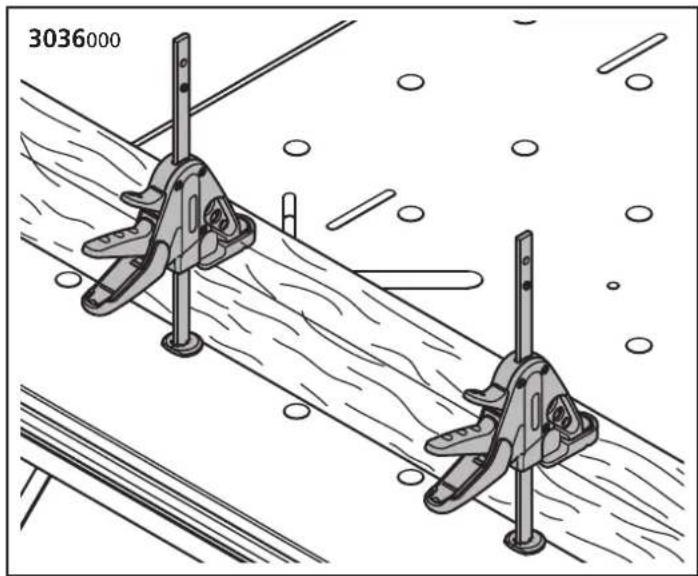
- Clamping using the 20 mm bores: you can clamp objects to the table using almost any clamping element with a 20 mm interface. The separately available wolfcraft work table clamps (art. no. 3036000) are suitable for this (see page 9).
- Clamping using the slotted holes: the 23 mm slotted holes are compatible with all clamps with a width of less than 23 mm. In addition, you can remove the head of the separately available wolfcraft one-hand clamp (various designs, see page 9) and clamp from above or from below.
• See page 9 for an overview of the accessories currently available and page 10 for an overview of the spare parts for the MASTER work 1600.
ASSEMBLY OF THE SEPARATELY AVAILABLE wolfcraft DRILL STAND (Art. No. 5027000)
• AUTION! The drill stand must be bolted to the working table before use.
- DANGER! Disconnect the plug from the electric socket or remove the battery from the power tool before adjusting the tool or changing accessories. Accidents may occur if the power tool is started unintentionally.
- You can mount the wolfcraft drill stand (art. no. 5027000) on the table using the fastening bolts from accessories bag 119936902 supplied in the scope of delivery. Position the drill stand so that the mounting holes are above the four small round holes in the tabletop.
- Mount the drill stand by inserting the bolts and the washers through the mounting holes and the tabletop from above. Fasten it from below using the nuts (Fig. 7).
MOUNTING A MITRE SAW
- AUTION! The mitre saw must be secured to the table using at least two fastening bolts, four washers and two nuts. The mitre saw must not be used if the mounting holes in your saw do not align with the slots in the table plate.
- DANGER! Disconnect the plug from the electric socket or remove the battery from the power tool before adjusting the tool or changing accessories. Accidents may occur if the power tool is started unintentionally.
- You can mount a mitre saw on the table using the fastening bolts from accessories bag 119936902 supplied in the scope of delivery. Position the mitre saw so that the mounting holes are over the narrow slotted holes in the tabletop.
- Next secure the mitre saw. To do this, insert the bolts and the small washers through the mounting holes and table plates from above. Fasten it from below using the large washers and nuts (Fig. 8).
Warranty statement
Dear DIY enthusiast,
You have purchased a high-quality wolfcraft appliance which we know you will enjoy using.
wolfcraft appliances are built to high technical standards and undergo intensive development
and testing before leaving the factory. Constant checks and regular tests during their production ensure a high standard of quality. Sound technical developments and reliable quality assurance give you the certainty that you have made the right purchase decision. For this wolfcraft product we grant you a 10 year guarantee from the date of purchase, provided the appliance is used exclusively for DIY purposes.
This warranty only covers damage to the object of purchase itself and only such damage that is attributable to material or manufacturing defects. This guarantee does not cover defects or damage attributable to improper operation or inadequate maintenance of the appliance. Moreover, the guarantee does not include the effects of normal wear, or defects or damage known to the customer upon conclusion of the purchase contract. Guarantee claims can only be asserted upon submission of the invoice/proof of purchase. The guarantee granted by wolfcraft does not restrict your legal rights as a consumer (supplementary performance, rescission or reduction, compensation for damages or expenses).
Warranty claims should be addressed to:
wolfcraft GmbH
Wolffstraße 1
56746 Kempenich
Germany
INTRODUCTION
SPENNE FAST ARBEIDSSTYKKER PÅ ARBEIDSBORDET MASTER work 1600
(correspondence in English)
E
Mavrofidopoulos S.A.
Salaminos 1 & Mavromihali Str.
GR-185 45 Piraeus
Telefon: 0030 21 0413 6155
Telefax: 0030 21 0413 7692
info@mavrofidopoulos.gr
HR
Manal d.o.o.
Velimira Skorpika 1 a
10090 Zagreb
Telefon: 00385-1-3466400
Telefax: 00385-1-3466412
manal@manal.hr
RO MD
Steinel Distribution S.R.L.
Str. Campului Nr. 1, FSR HALA SCULARIE
RO-505400 Loc. Rasnov, Oras Rasnov
Telefon: 0040 (0) 268530 000
Telefax: 0040 (0) 268531 111
info@steinel.ro
BG
Tashev-Galving Ltd.
68, Kliment Ohridski Blvd.
BG-1756 Sofia
Telefon: 00359 70045454
Telefax: 00359 4392112
info@tashev-galving.com
SRB MN
Mi-lumen d.o.o.
Dositejeva 176
36000 Kraljevo
Telefon: 00381-36-231081
Telefax: 00381-36-312867
milumen@tron-inter.net
MK
FAMOD
Bul. Vidoe Smilevski 5
MK-1000 Skopje
Telefon: 00389 2 2431100
Telefax: 00389 2 2431105
famod@t-home.mk
EST
AS Tooma Tööriist
Männiku tee 107
EE-11215 Tallinn
Telefon: 00372 6 586229
Fax: 00372 6 546725
info@toomatool.ee
BY
UP "18"
Volgogradskaya 13
BY-220049 Minsk
Telefon: 00375 17 2807781
Fax 00375 17 2804854
info@up18.by
RUS
Centro Instrumentalnoj Torgovli
Molodogvardejskaya UI 61
121351 Moskau
Tel.: +7 495 730 80 70
ci@centro-i.ru
wolfcraft GmbH
Wolffstraße 1
56746 Kempenich
Germany
www.wolfcraft.com