Master cut 2600 - Electric saw WOLFCRAFT - Free user manual and instructions
Find the device manual for free Master cut 2600 WOLFCRAFT in PDF.

User questions about Master cut 2600 WOLFCRAFT
0 question about this device. Answer the ones you know or ask your own.
Ask a new question about this device
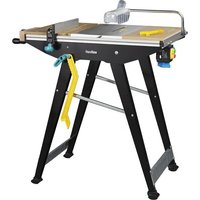
Download the instructions for your Electric saw in PDF format for free! Find your manual Master cut 2600 - WOLFCRAFT and take your electronic device back in hand. On this page are published all the documents necessary for the use of your device. Master cut 2600 by WOLFCRAFT.
USER MANUAL Master cut 2600 WOLFCRAFT
flowchart
graph TD
    A["115980493 / EU"] --> B["12 A / 230 V~"]
    B --> C["Ground"]
    D["117920073"] --> E["Ground"]
    F["117920043"] --> G["Ground"]
    H["Ground"] --> I["13 A / 250 V~"]
    I --> J["Ground"]
    K["Ground"] --> L["Ground"]
    M["Ground"] --> N["Ground"]
    O["Ground"] --> P["Ground"]
    Q["Ground"] --> R["Ground"]
    S["Ground"] --> T["Ground"]
    U["Ground"] --> V["Ground"]
    W["Ground"] --> X["Ground"]


© Zubehör separat erhältlich
GB Accessories not included
⑤ Accessories vendus séparément
E Accesorios no incluidos
NL Accessories separaat verkrijgbaar
① Accessori non compresi
© Accéssoirios vendidos separamente
© DK Tilbehør som fåer separat
⑤ Tillbehör ingår ej
FIN Varusteet eivät sisälly
N Tillbehør følgerikke med
PL Akcesoria opcjonalne do oddzielnego nabycia
© Εξαρτήματα μπορούν
να αγοραστούν ξεχωριστά
TR Aksesuvar ayrıca satın alınabilir
©Příslušenství dodáváno samostatně
H Tartozékok külön kaphatók
® Accesoriiile se pot aciziționa și separat
BG Аксесоарите се поръчват
отделно
HR Pribor dobavljiv odvojeno
® Prинадлежности продаются
отдельно
natural_image
Technical line drawing of a mechanical assembly with mounting brackets and bolts (no text or symbols)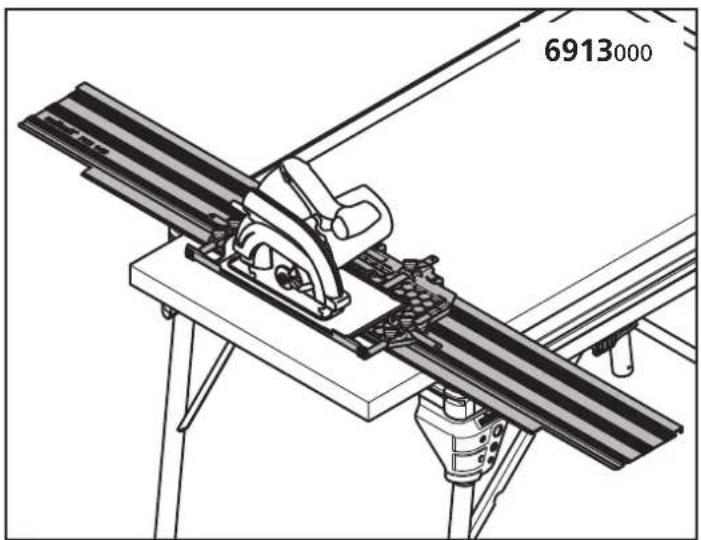
natural_image
Technical line drawing of a mechanical assembly with diagonal metal components and a labeled part (6913000), no readable text or symbols beyond the label.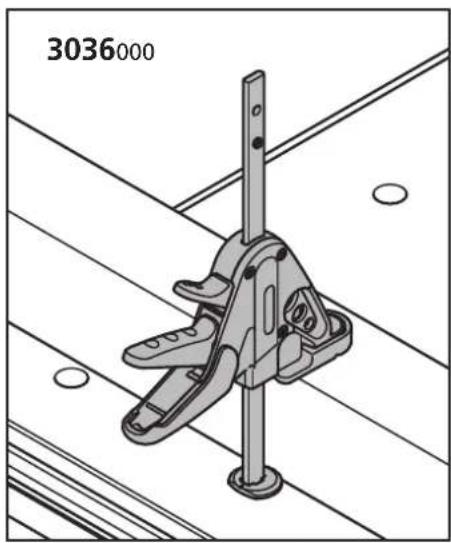
natural_image
Technical line drawing of a mechanical clamp or bracket assembly (no text or symbols)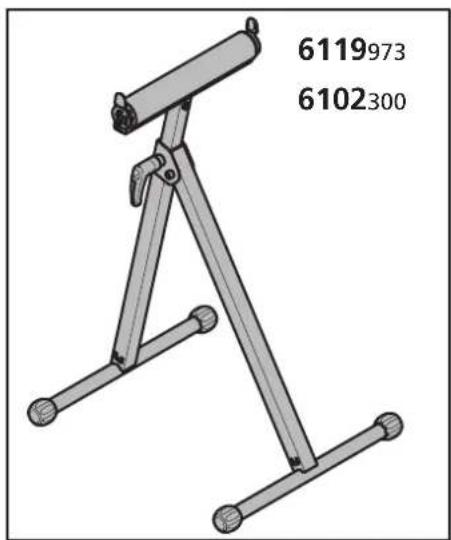
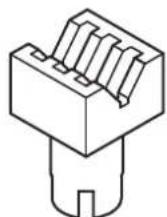
natural_image
3D technical drawing of a rectangular electronic component with internal slots and mounting holes (no text or symbols)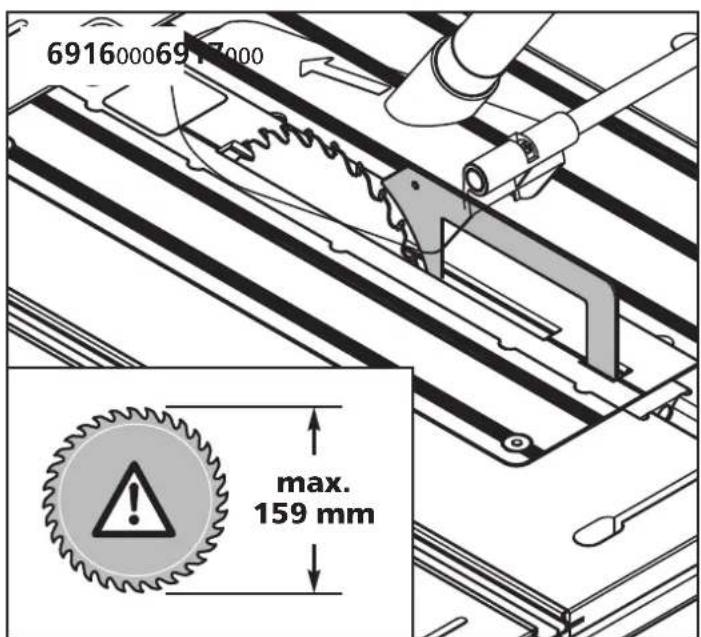
© Ersatzteilliste
⑥ Spare parts list
F Liste de pièces de rechange
E Lista de recambios
NL Lijst met reserveonderdelen
© Zubehörbeutel
GB Accessory bag
F Sachet avec accessoires
© Bolsa de accessorios
NL Zakje met accessoires
① Sacchetto di accessori
P Saco de acessórios
DK Tilbehørspose
⑤ Tillbehörspase
FIN Lisätarvikepussi
natural_image
Simple line drawing of a U-shaped mechanical component (no text or symbols)
119926918
2 x
M 6 x 35
DIN 912
1 x
M 6 x 35
DIN 933
4x
16×20
IN 912
4 x
M 6 x 20
DIN 912
1x 4×8

7 x
6,4
DIN 125

3x
M 6
DIN 985

5 x
M 6
DIN 557

M6

natural_image
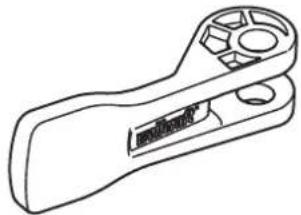
Line drawing of a mechanical tool handle (no text or symbols)1×1×
1 x
1x
1 x
4x
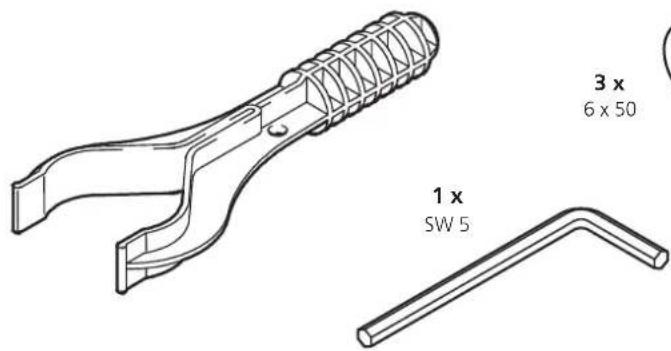
1×1×
natural_image
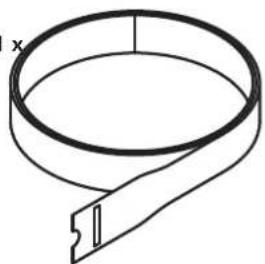
Simple line drawing of a coiled cable or strap with a clip, no text or symbols present119936902
4 x
M 6 x 80
DIN 933

4 x
6,4
DIN 9021

4 x
6,4
DIN 125

4 x
M 6
DIN 934


EINLEITUNG
WARNING: Read all the safety information, instructions, illustrations and technical data that were supplied with the MASTER cut 2600 and the power tools used. Failure to comply with the following instructions can lead to electric shock, fire and/or serious injury.
Keep all safety information and instructions for future reference.
The term "power tool" used in the safety information refers to electric tools operated with mains power (with mains power cable).
TECHNICAL DATA
| Dimensions when set up for use: | 1185 x 757 x 863 mm (width x depth x height) |
| Dimensions when folded up: | 1085 x 757 x 213 mm |
| Worktop dimensions: | 1035 x 695 mm |
| Max. cut capacity at 0°: | circular bench saw 57 mm |
| Max. cut capacity at 45°: | circular bench saw 35 mm |
| Saw blade, tiltable: | 0° to 45° |
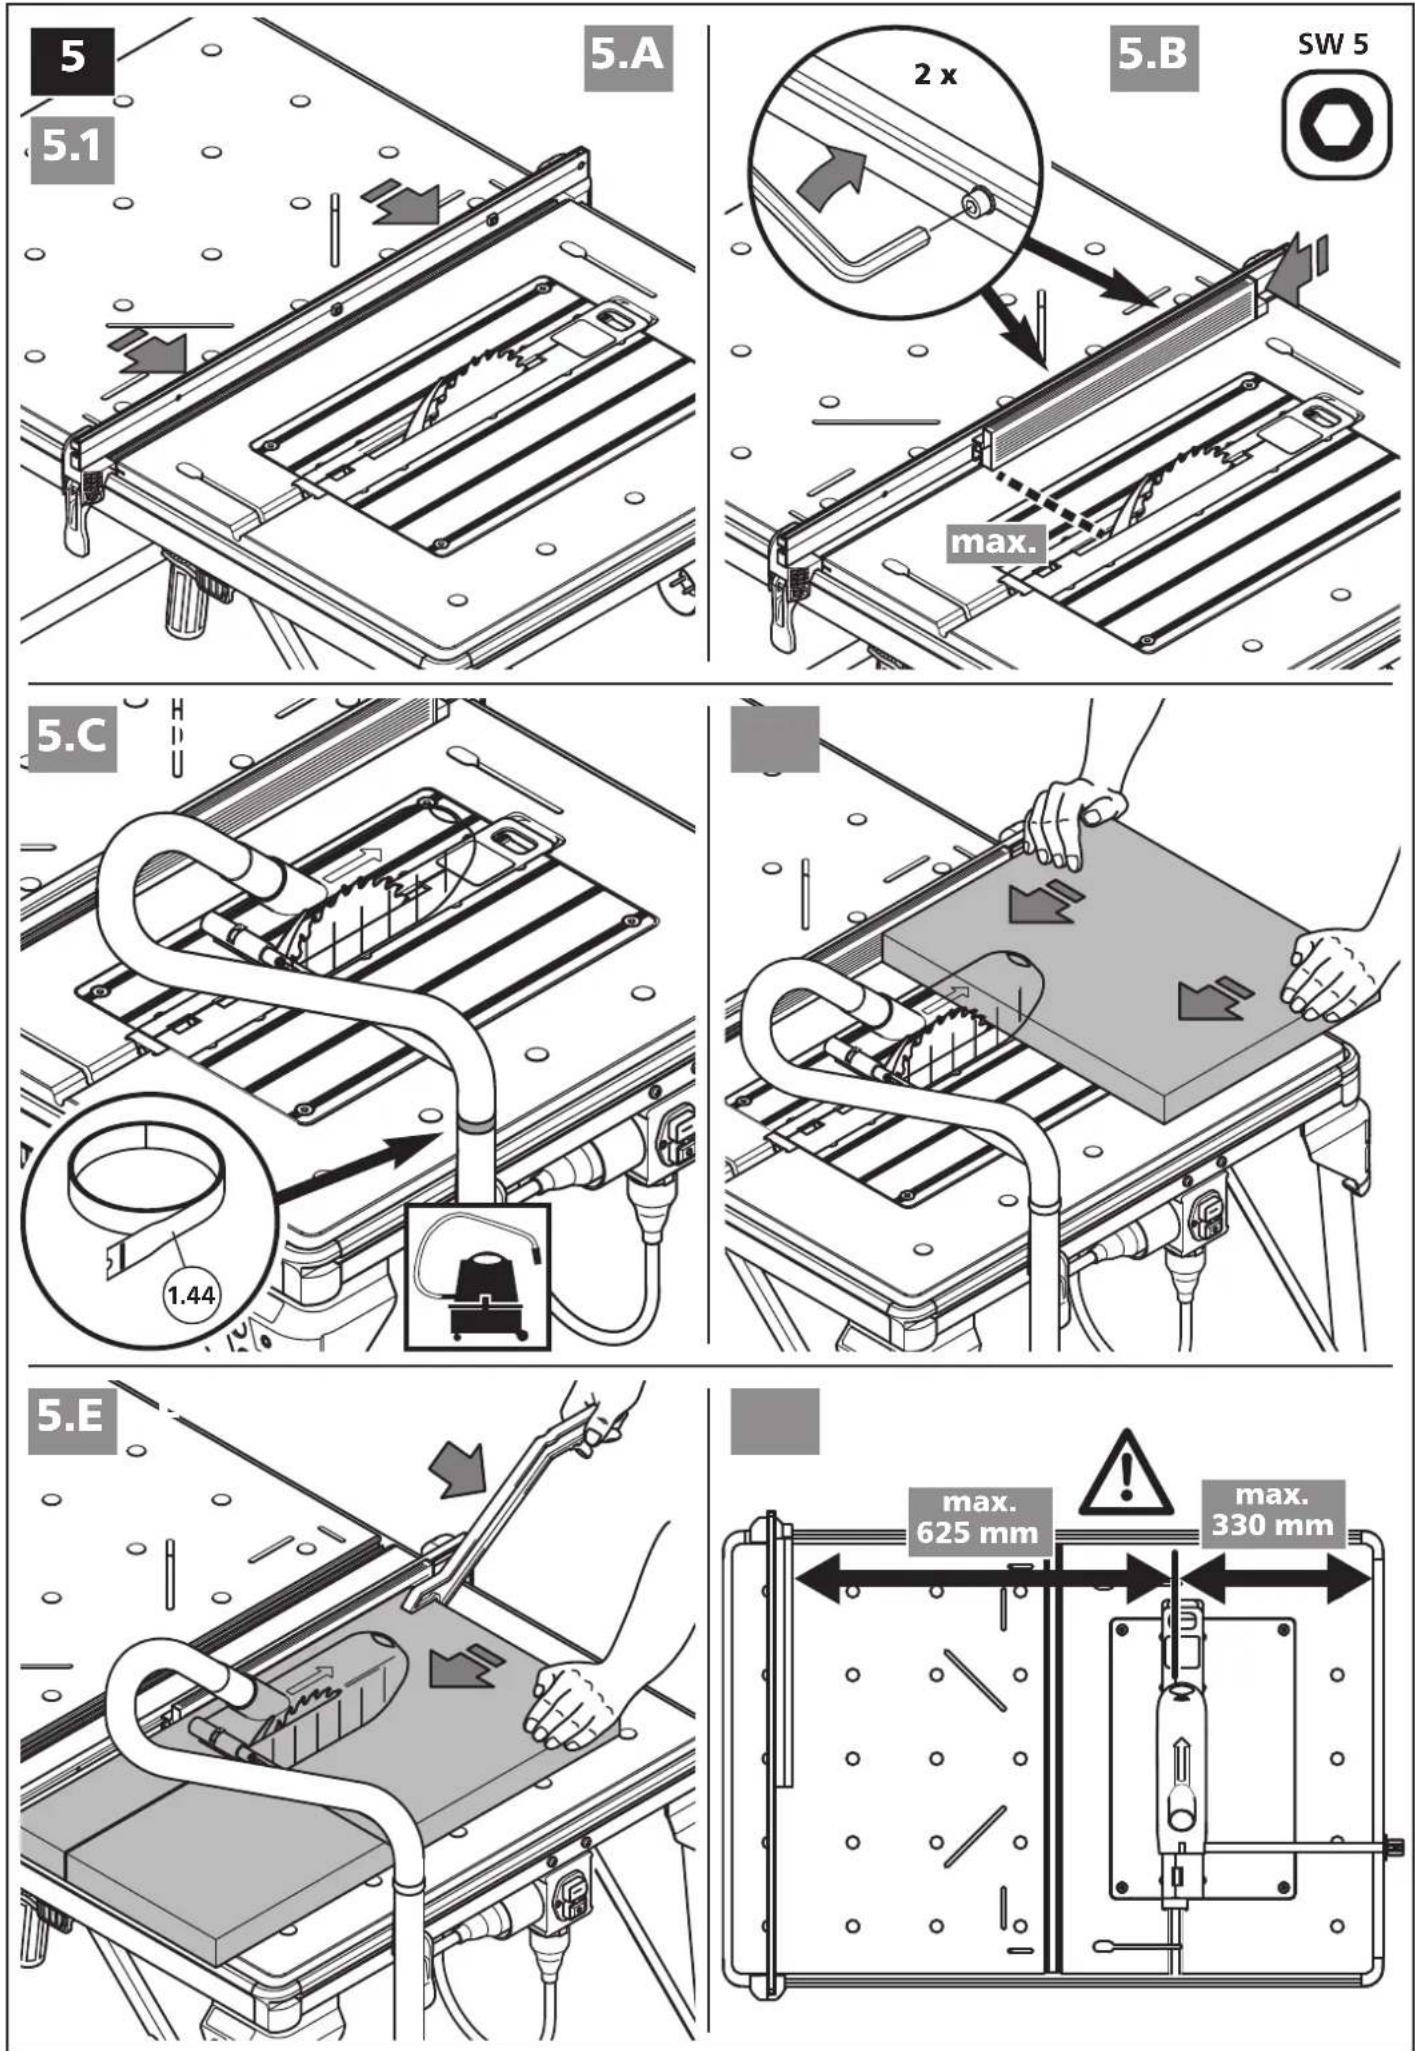
| Max. cutting width with parallel guide: | table saw 625 mm |
| Max. workpiece dimensions: | 600 x 400 x 65 mm (router table) |
| Bore diameter of clamping holes: | 20 mm |
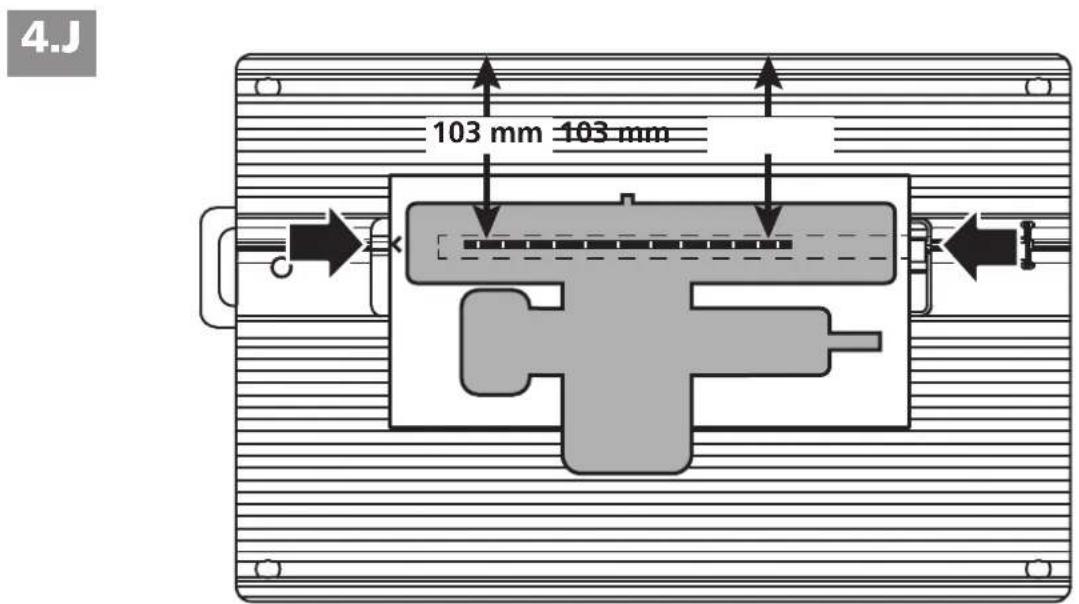
| Pattern of the clamping holes: | 128 / 128 mm (horizontal / vertical) |
| Maximum load: | 120 kg |
| Weight: | 24 kg |
SYMBOLS AND THEIR MEANING

Warning against a general danger
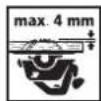
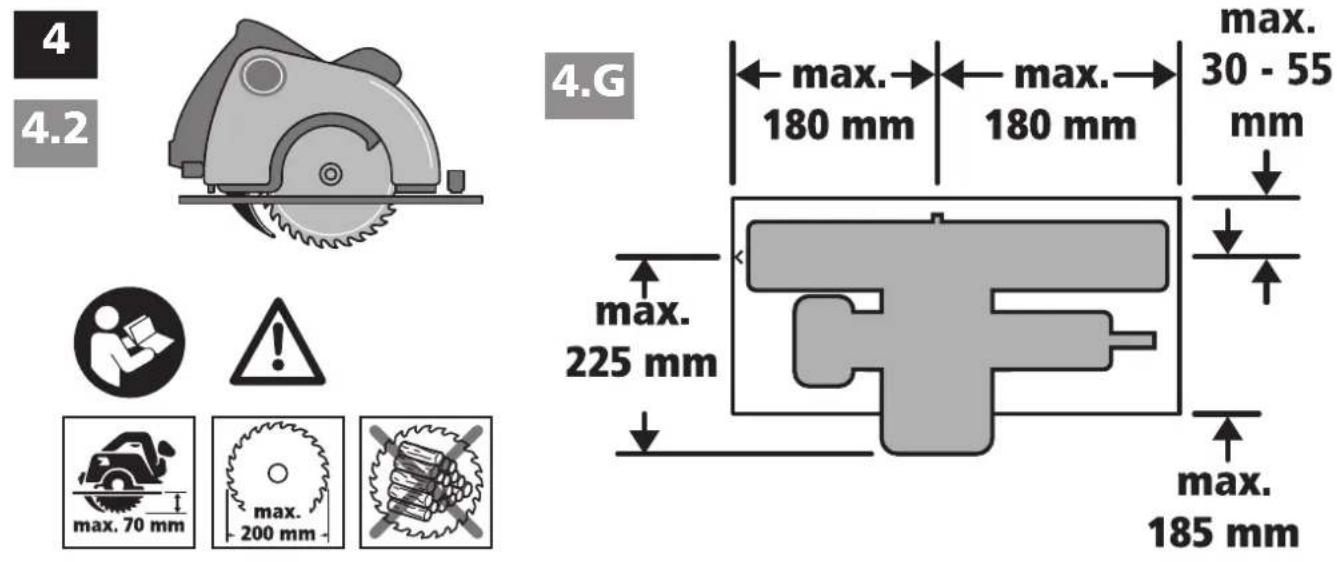
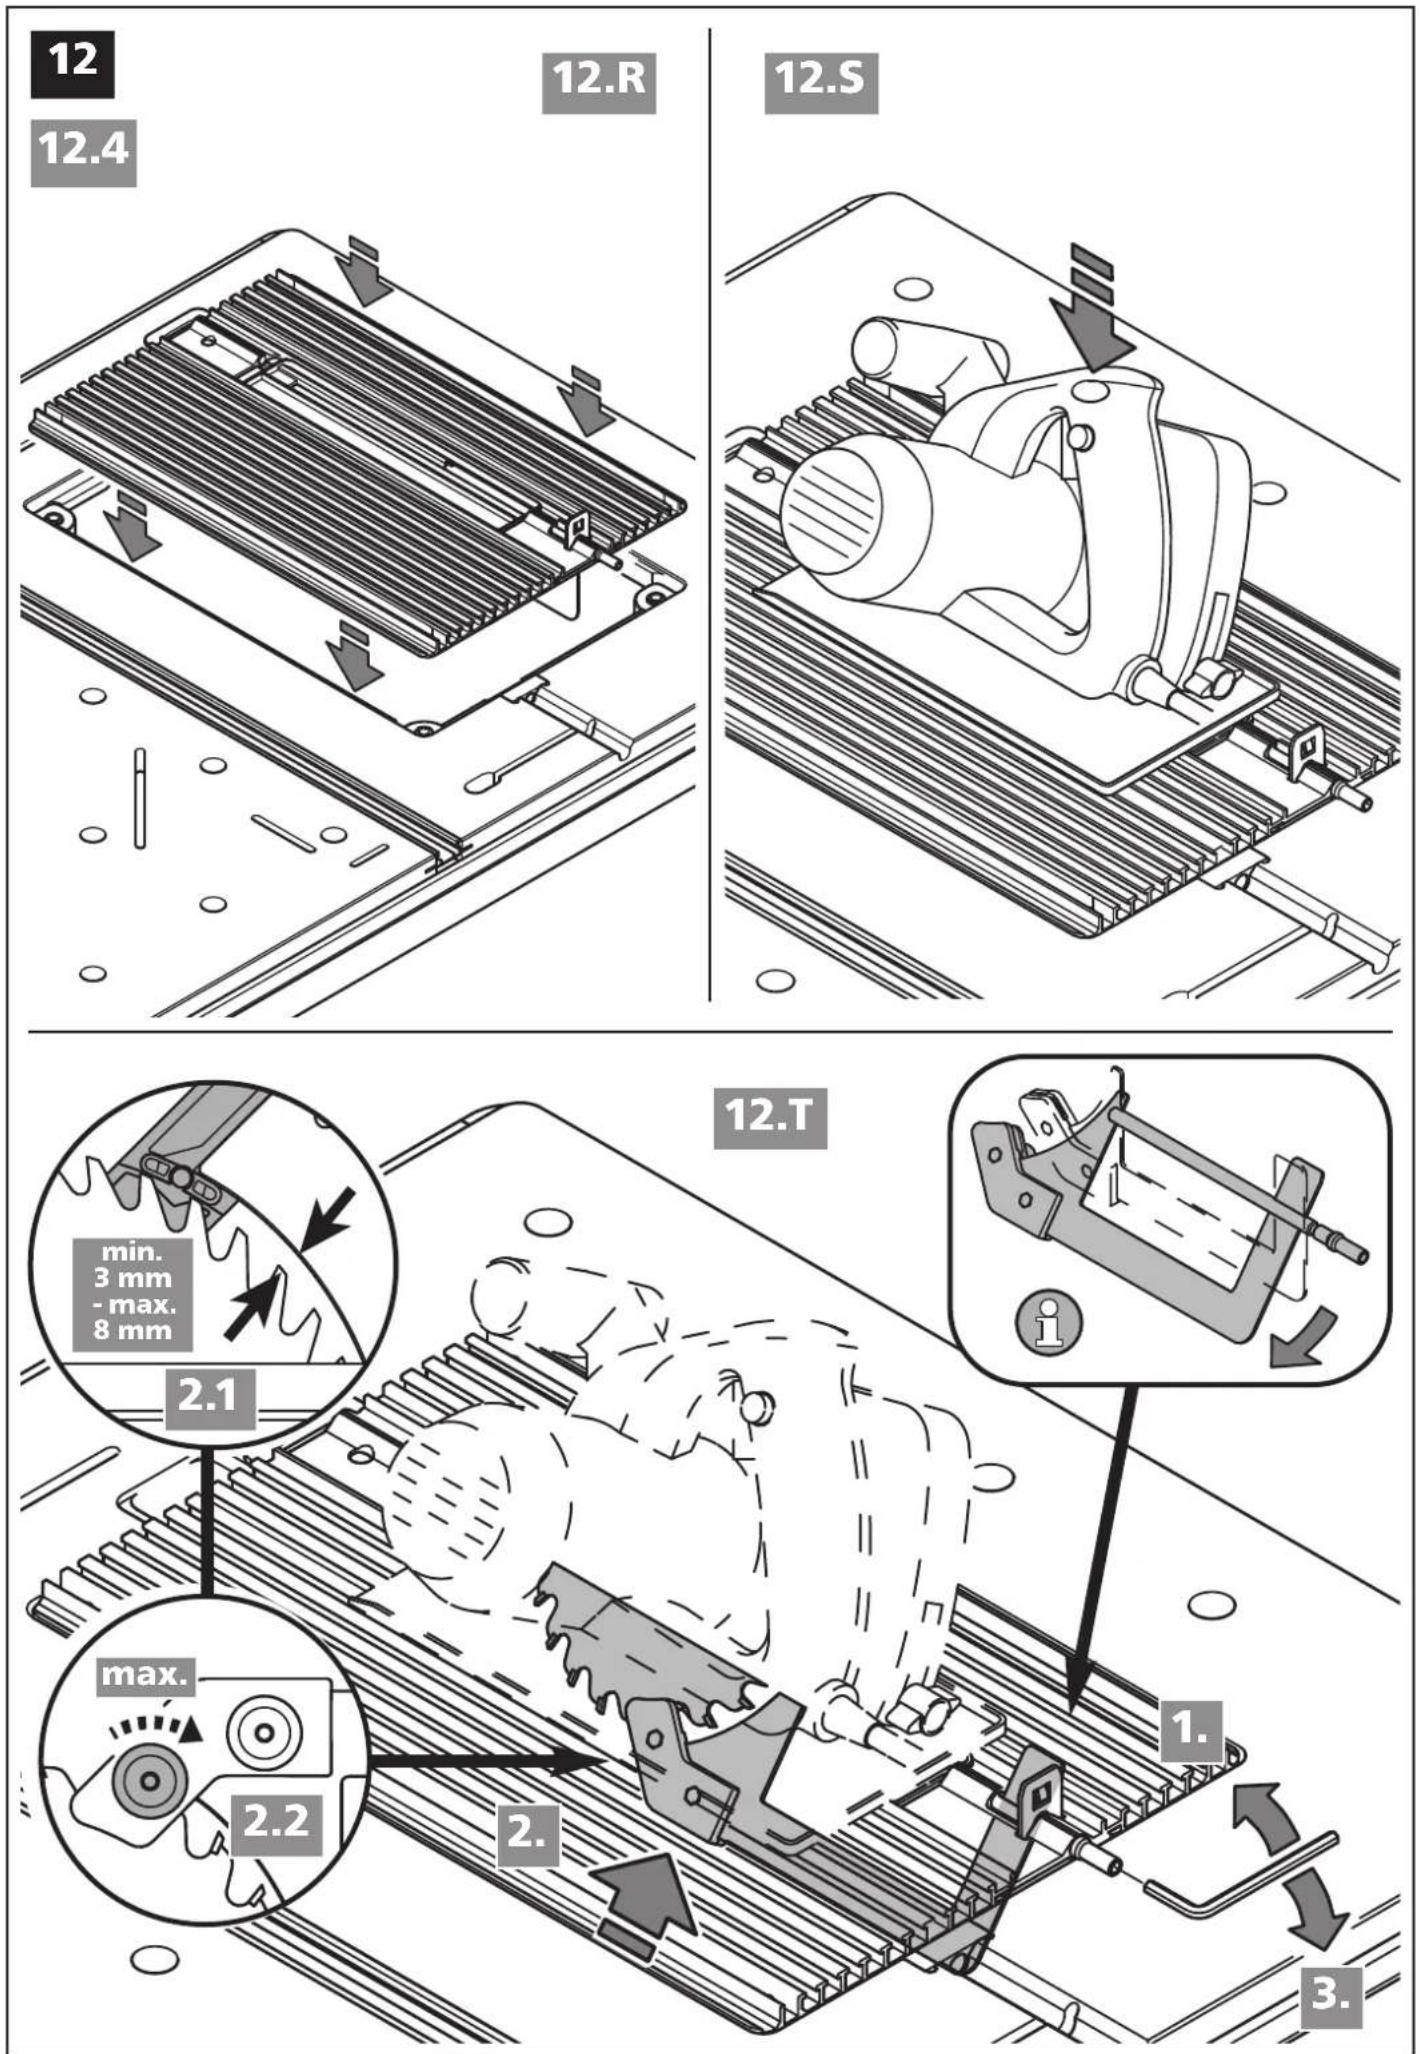
Set the cutting depth of your hand circular saw before every cut in such a way that the saw blade does not protrude more than 4 mm from the work piece.

Read the instructions!
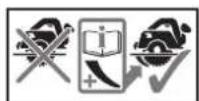
Use only hand circular saws with a riving knife.

Goggles must be worn.
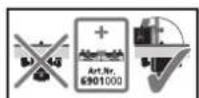
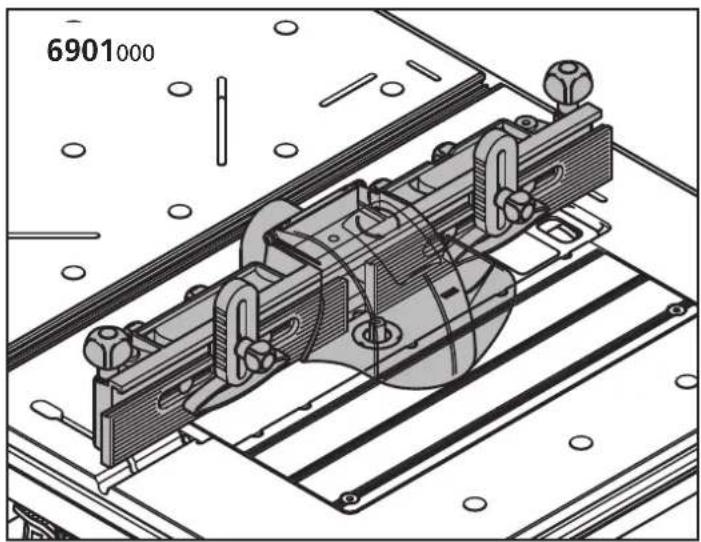
Use as a milling table only in conjunction with the parallel milling guide (art. no. 6901000).

Hearing protection must be worn.
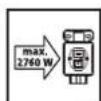
Use only machines with a maximum output of 2760 W.

Dust mask must be worn.
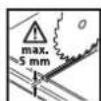
Do not cut more than 5 mm into the worktop.

Pull the plug.
Do not sit on the table.

General information
Do not stand on the table.
Do not use the machine for cutting firewood.
Do not apply weight to the table unevenly.

Use only hand circular saws with a maximum cutting depth of 70 mm.
Do not apply a load of more than 120 kg to the table.
Use only saw blades with a maximum diameter of 200 mm for your hand circular saw.
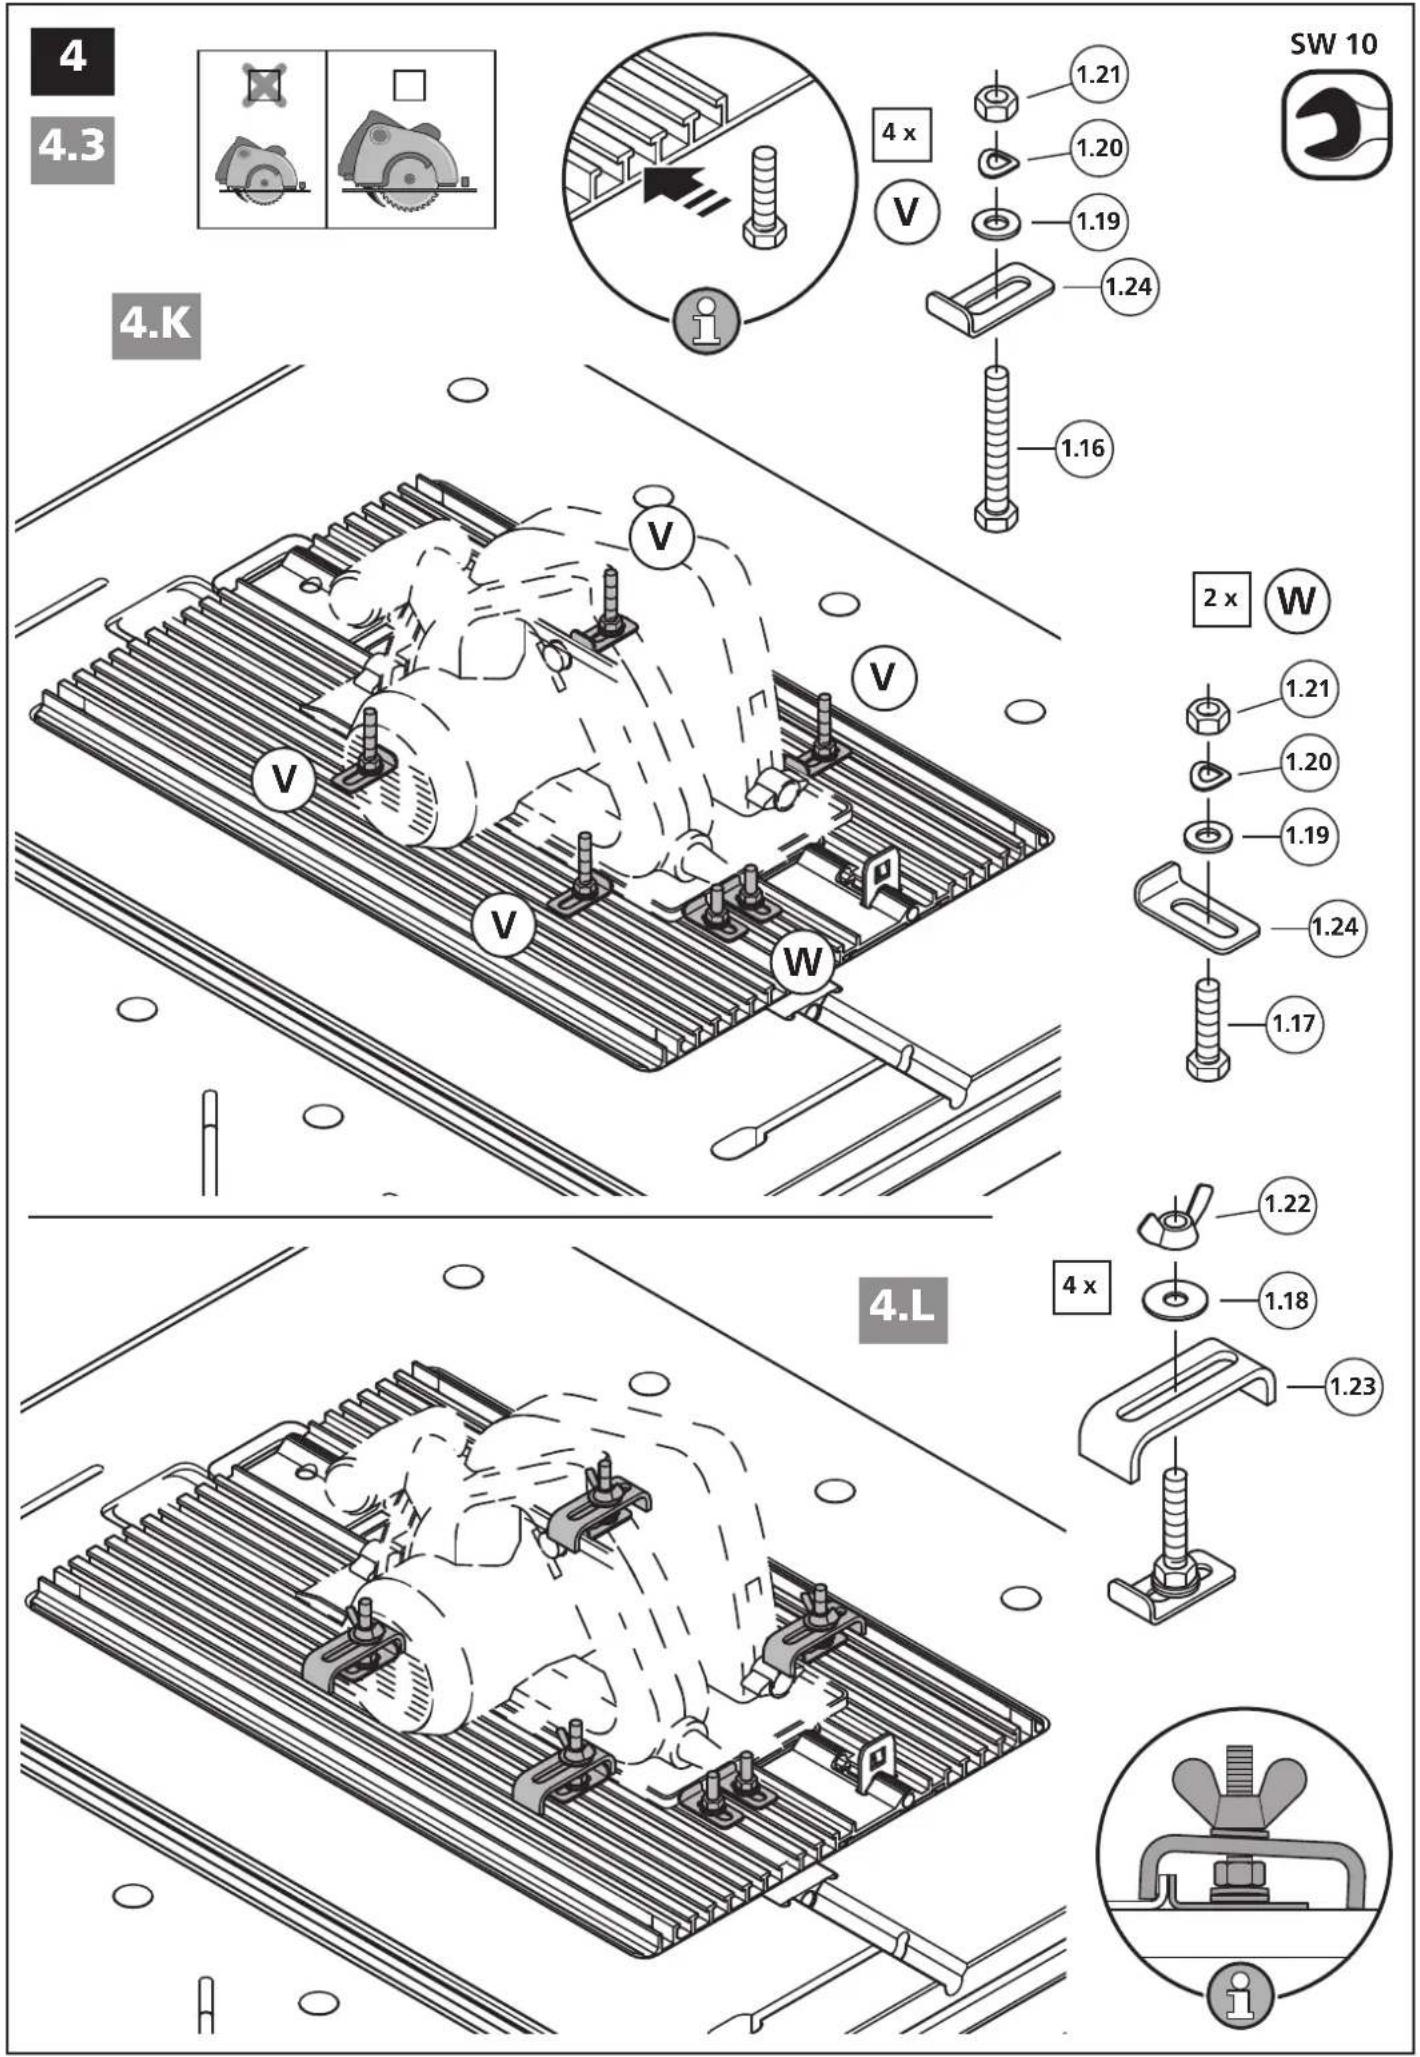
ASSEMBLY TOOLS

1 allen key: A/F 5 (included in scope of delivery)

1 hexagon wrench: SW 10 (not included in scope of delivery)

1 allen key: A/F 8 (not included in scope of delivery)

1 screwdriver: PH 1 (not included in scope of delivery)
INTENDED USE
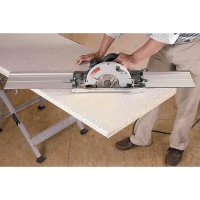
The MASTER cut 2600 is a machine table and work station. It is suitable for:
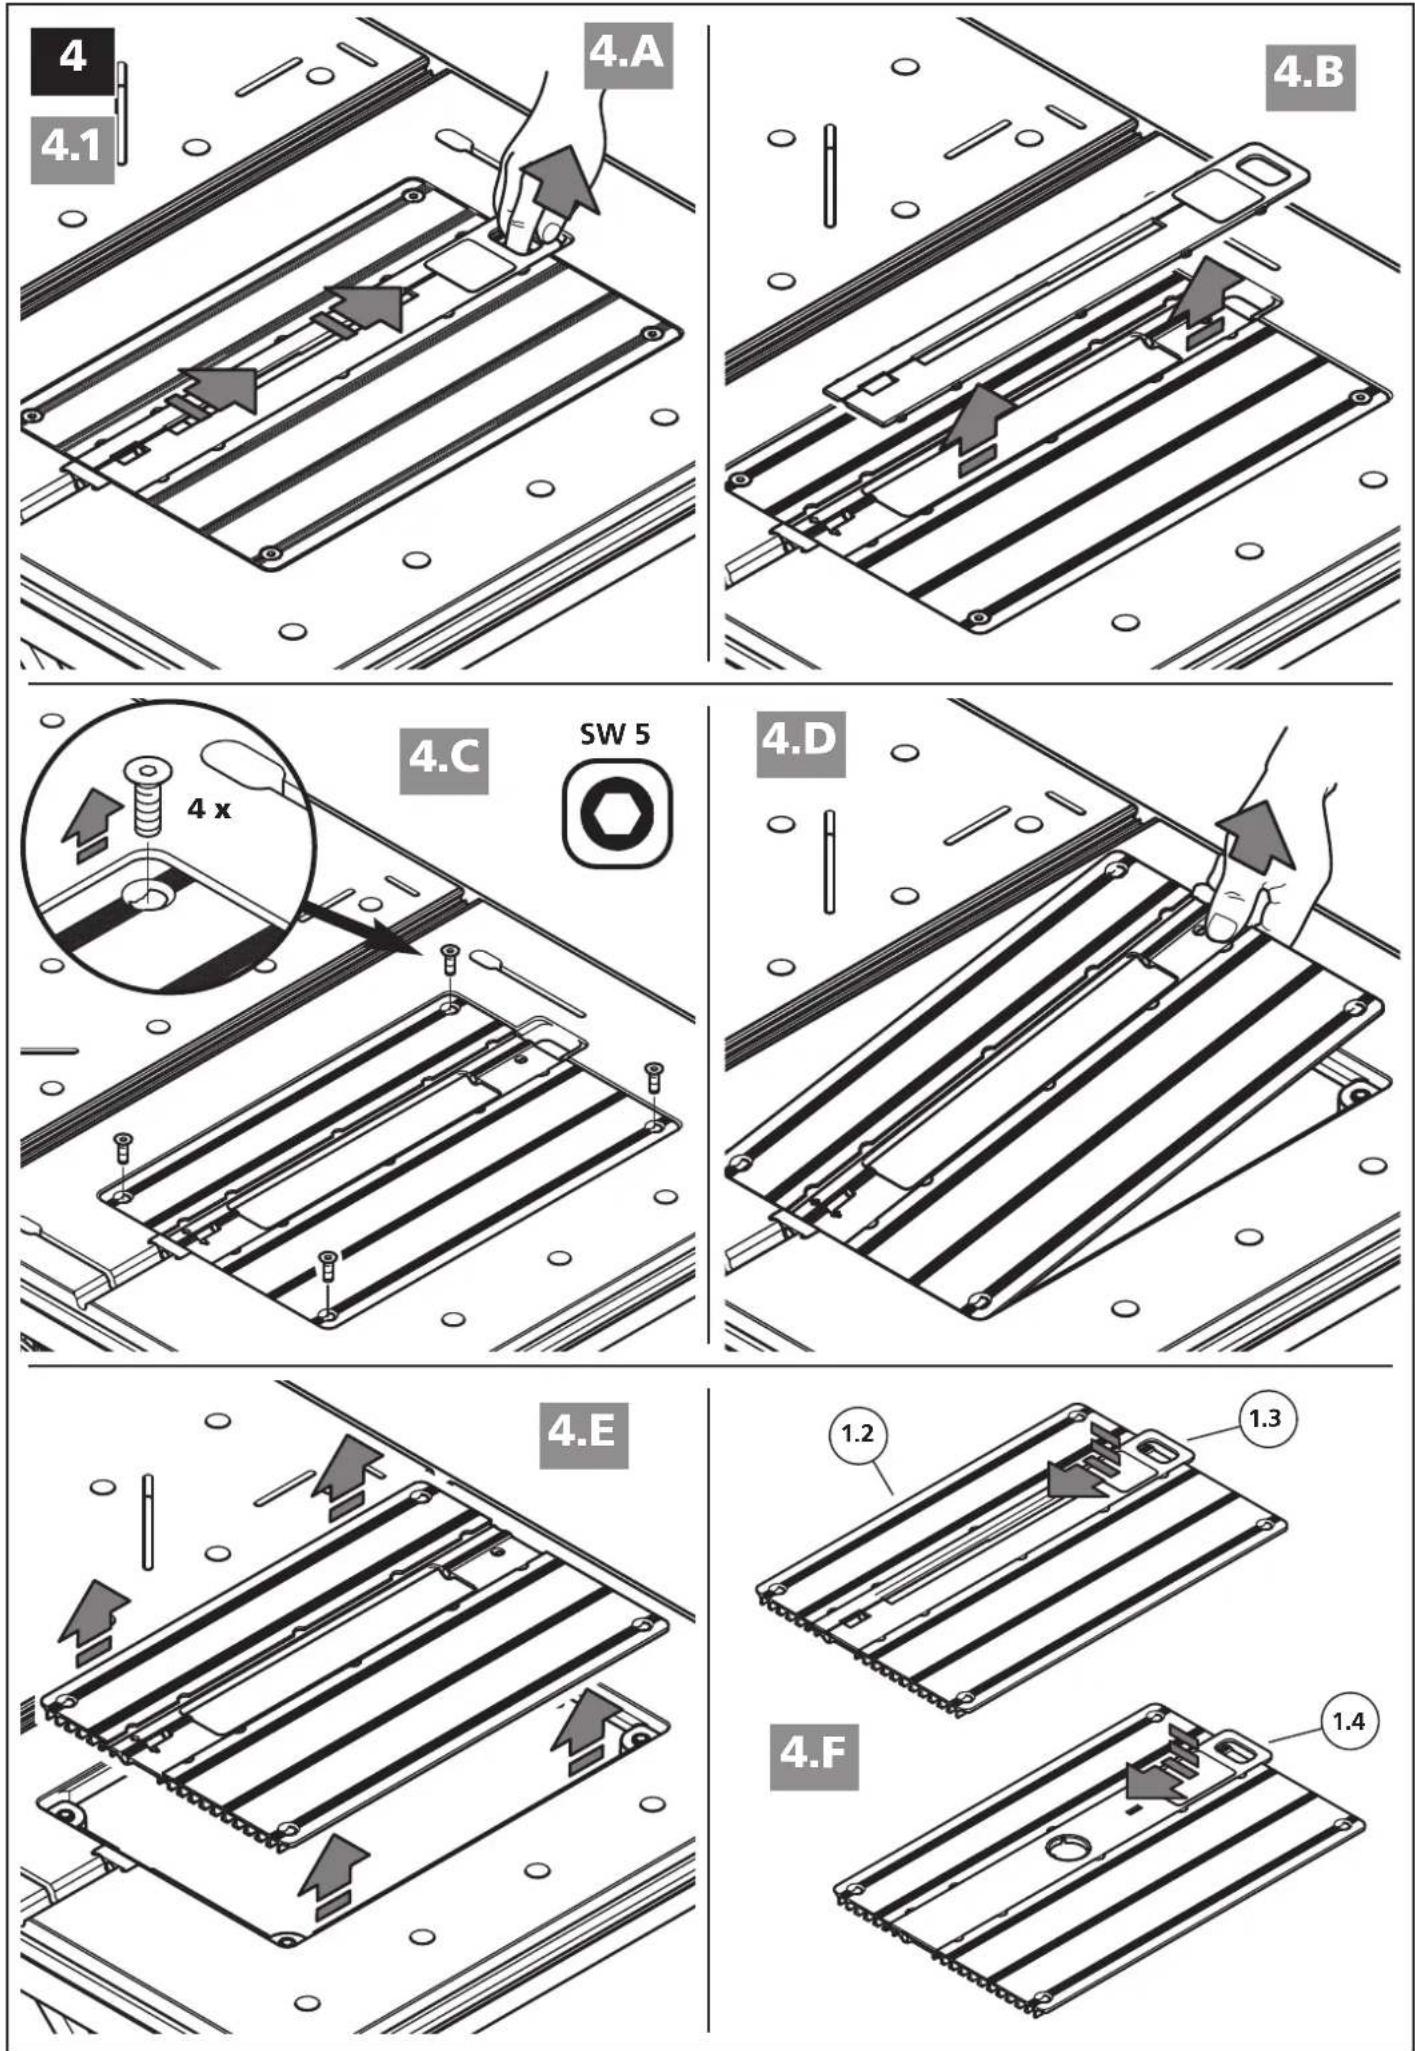
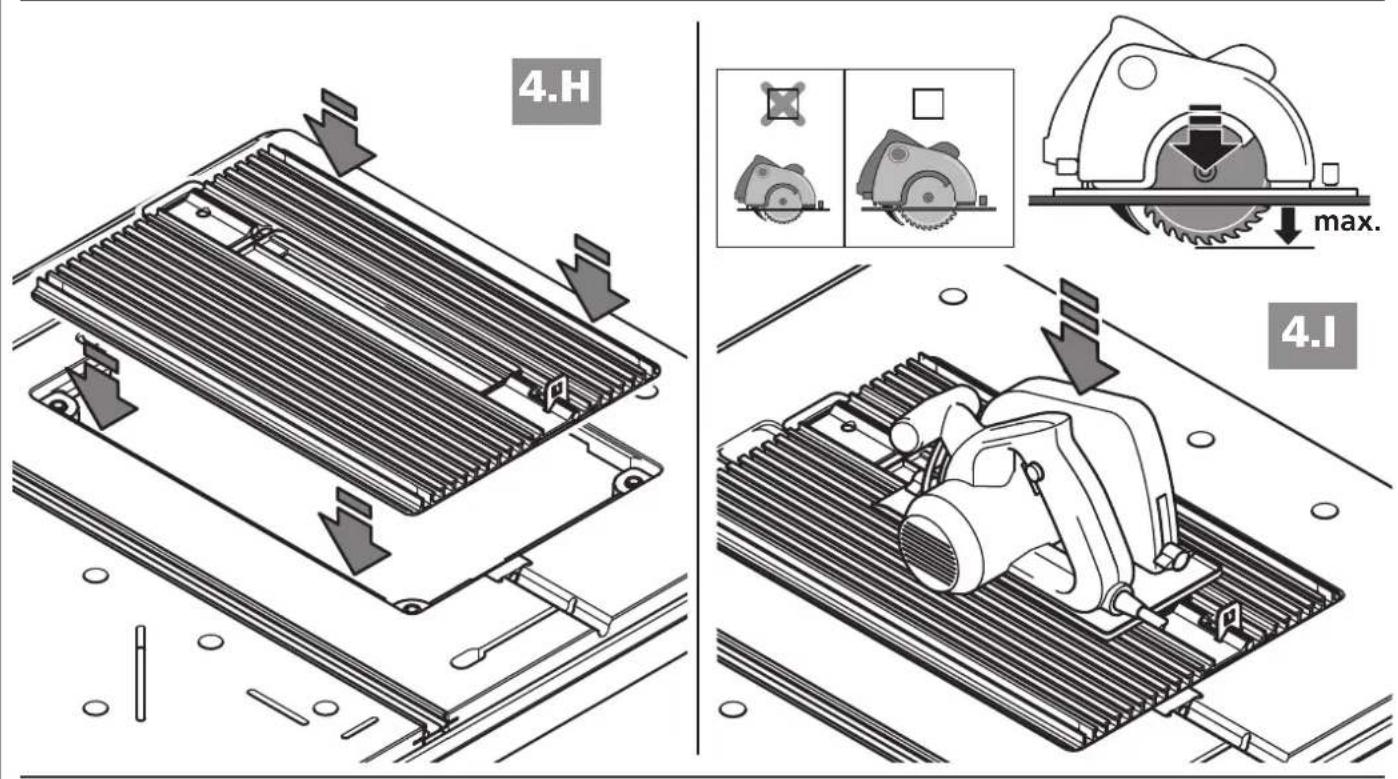
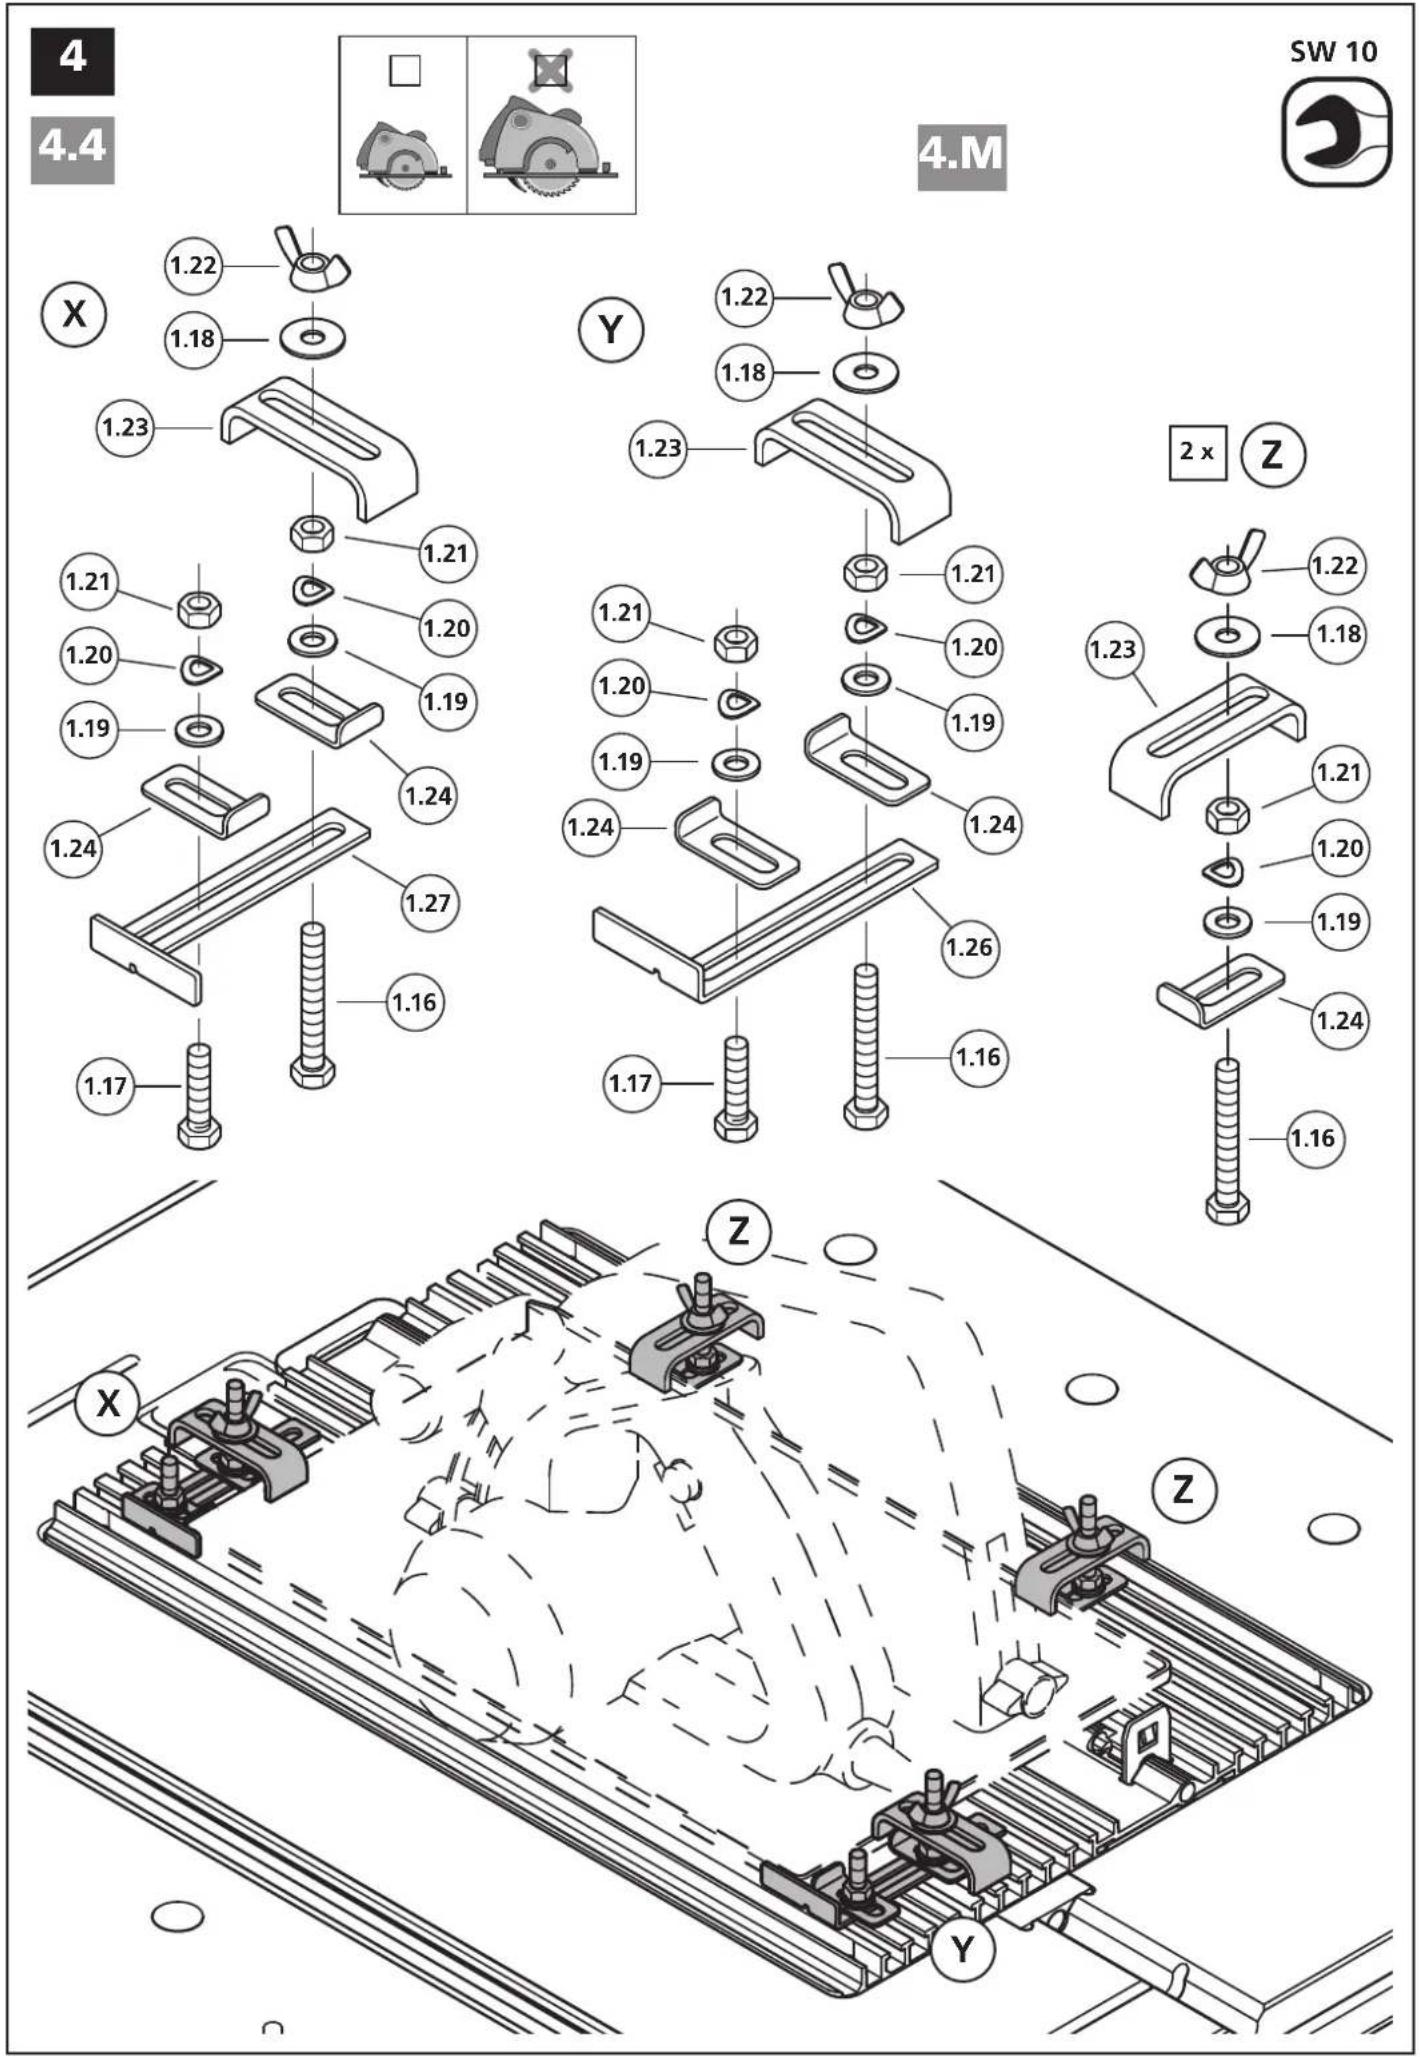
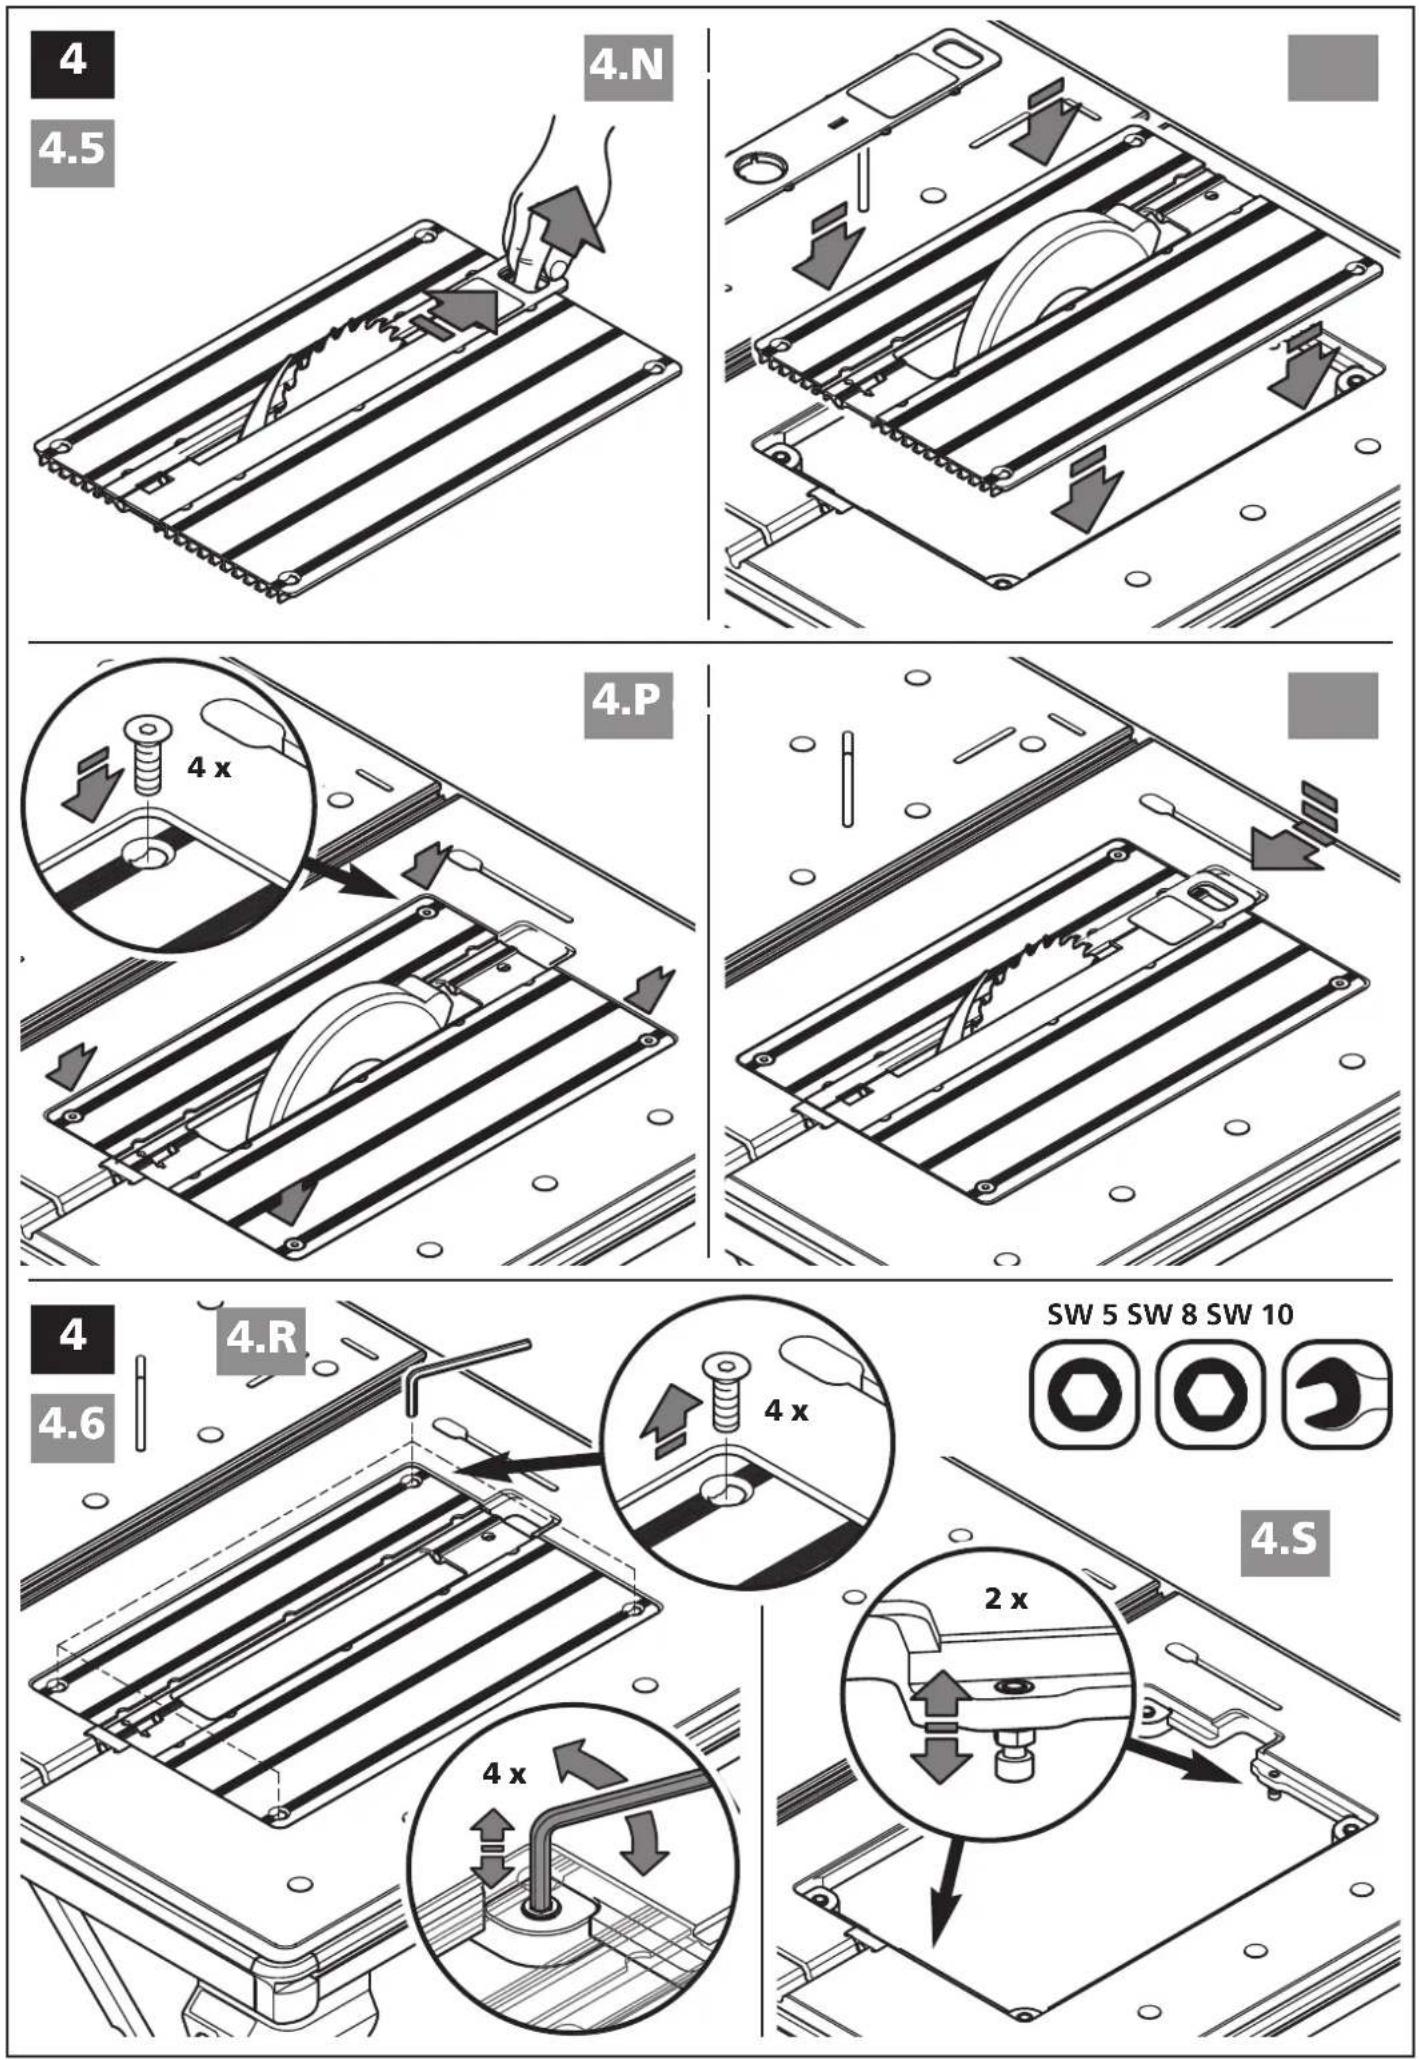
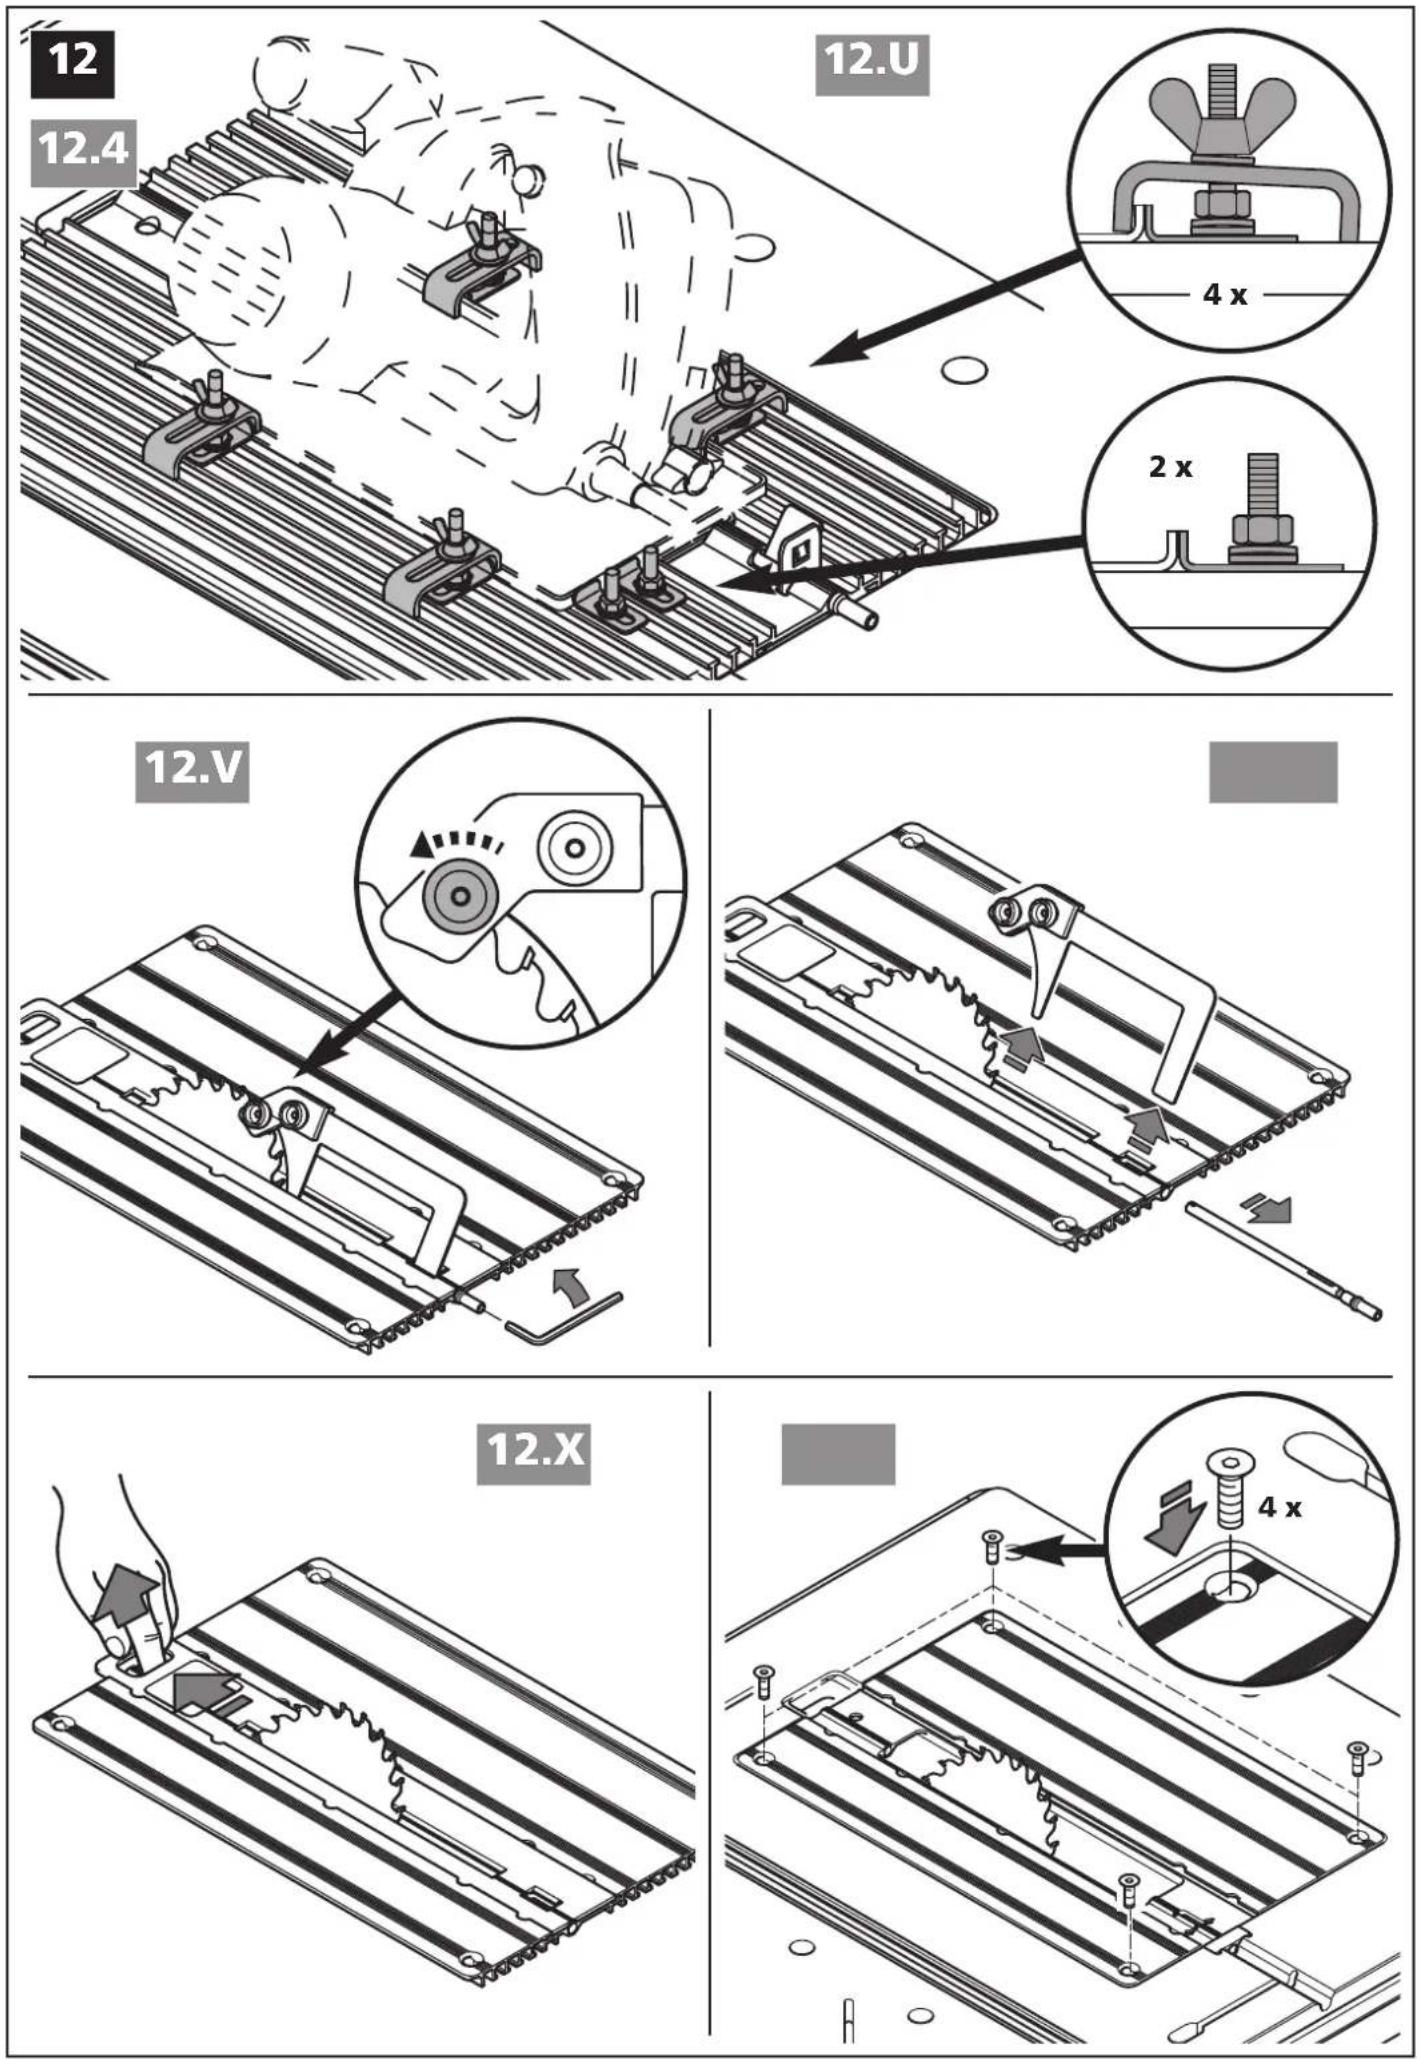
- Mounting a circular hand saw with riving knife on the machine plate with a max. saw blade diameter of 200 mm and max. cutting depth of 70 mm. Do not use saws with base plate dimensions greater than the maximum values indicated (Fig. 4.G). The appropriate gap insert must be used. This makes it a stationary circular bench saw.
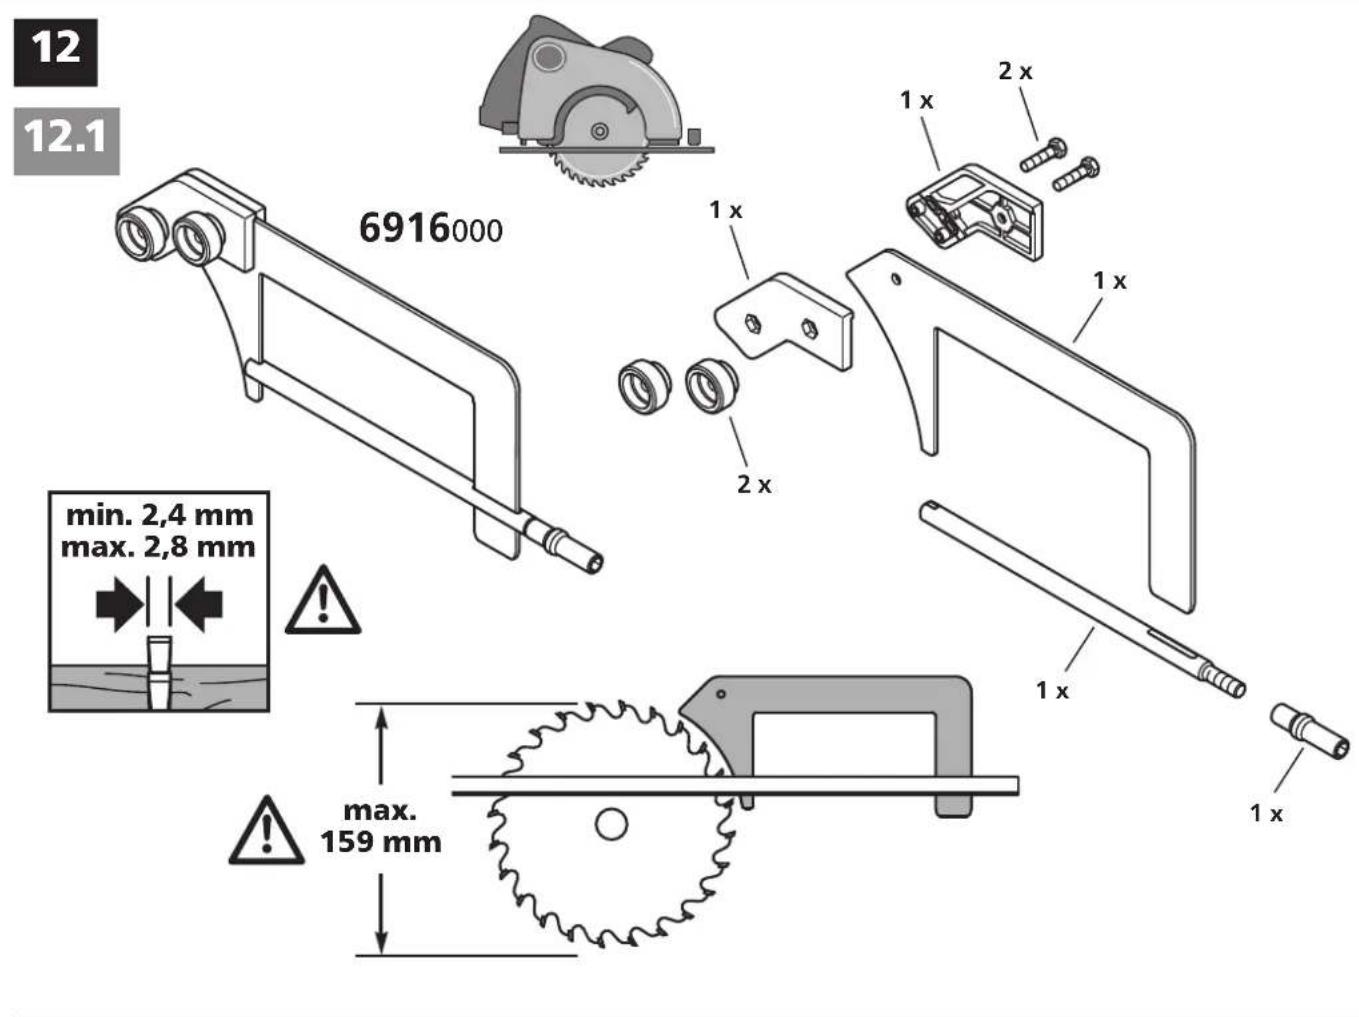
- Use as a circular bench saw for circular hand saws without a riving knife. Only in conjunction with separate riving knife accessory, art. no. 6916000 with a max. saw blade diameter of 159 mm and min. cutting width of 2.4 mm.
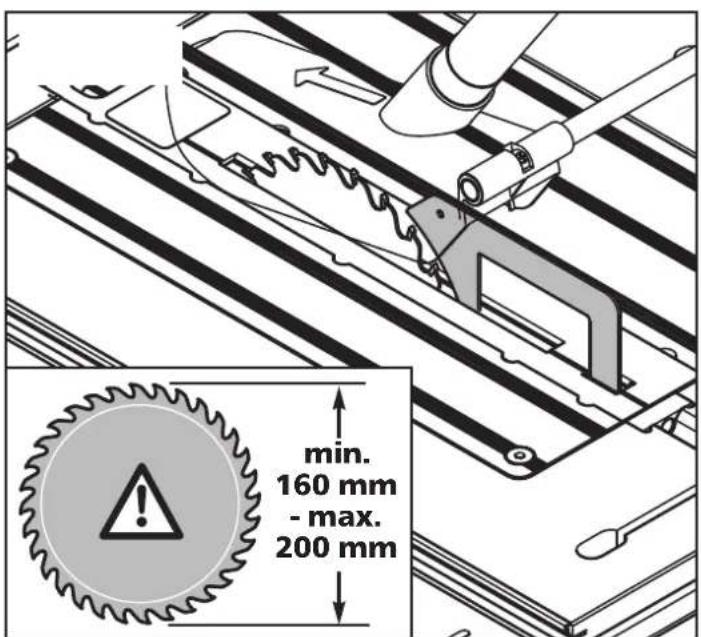
- Use as a circular bench saw for circular hand saws without a riving knife. Only in conjunction with separate riving knife accessory, art. no. 6917000 with a saw blade diameter of min. 160 mm to max. 200 mm, a min. cutting width of min. 2.4 mm and max. cutting depth of 66 mm.
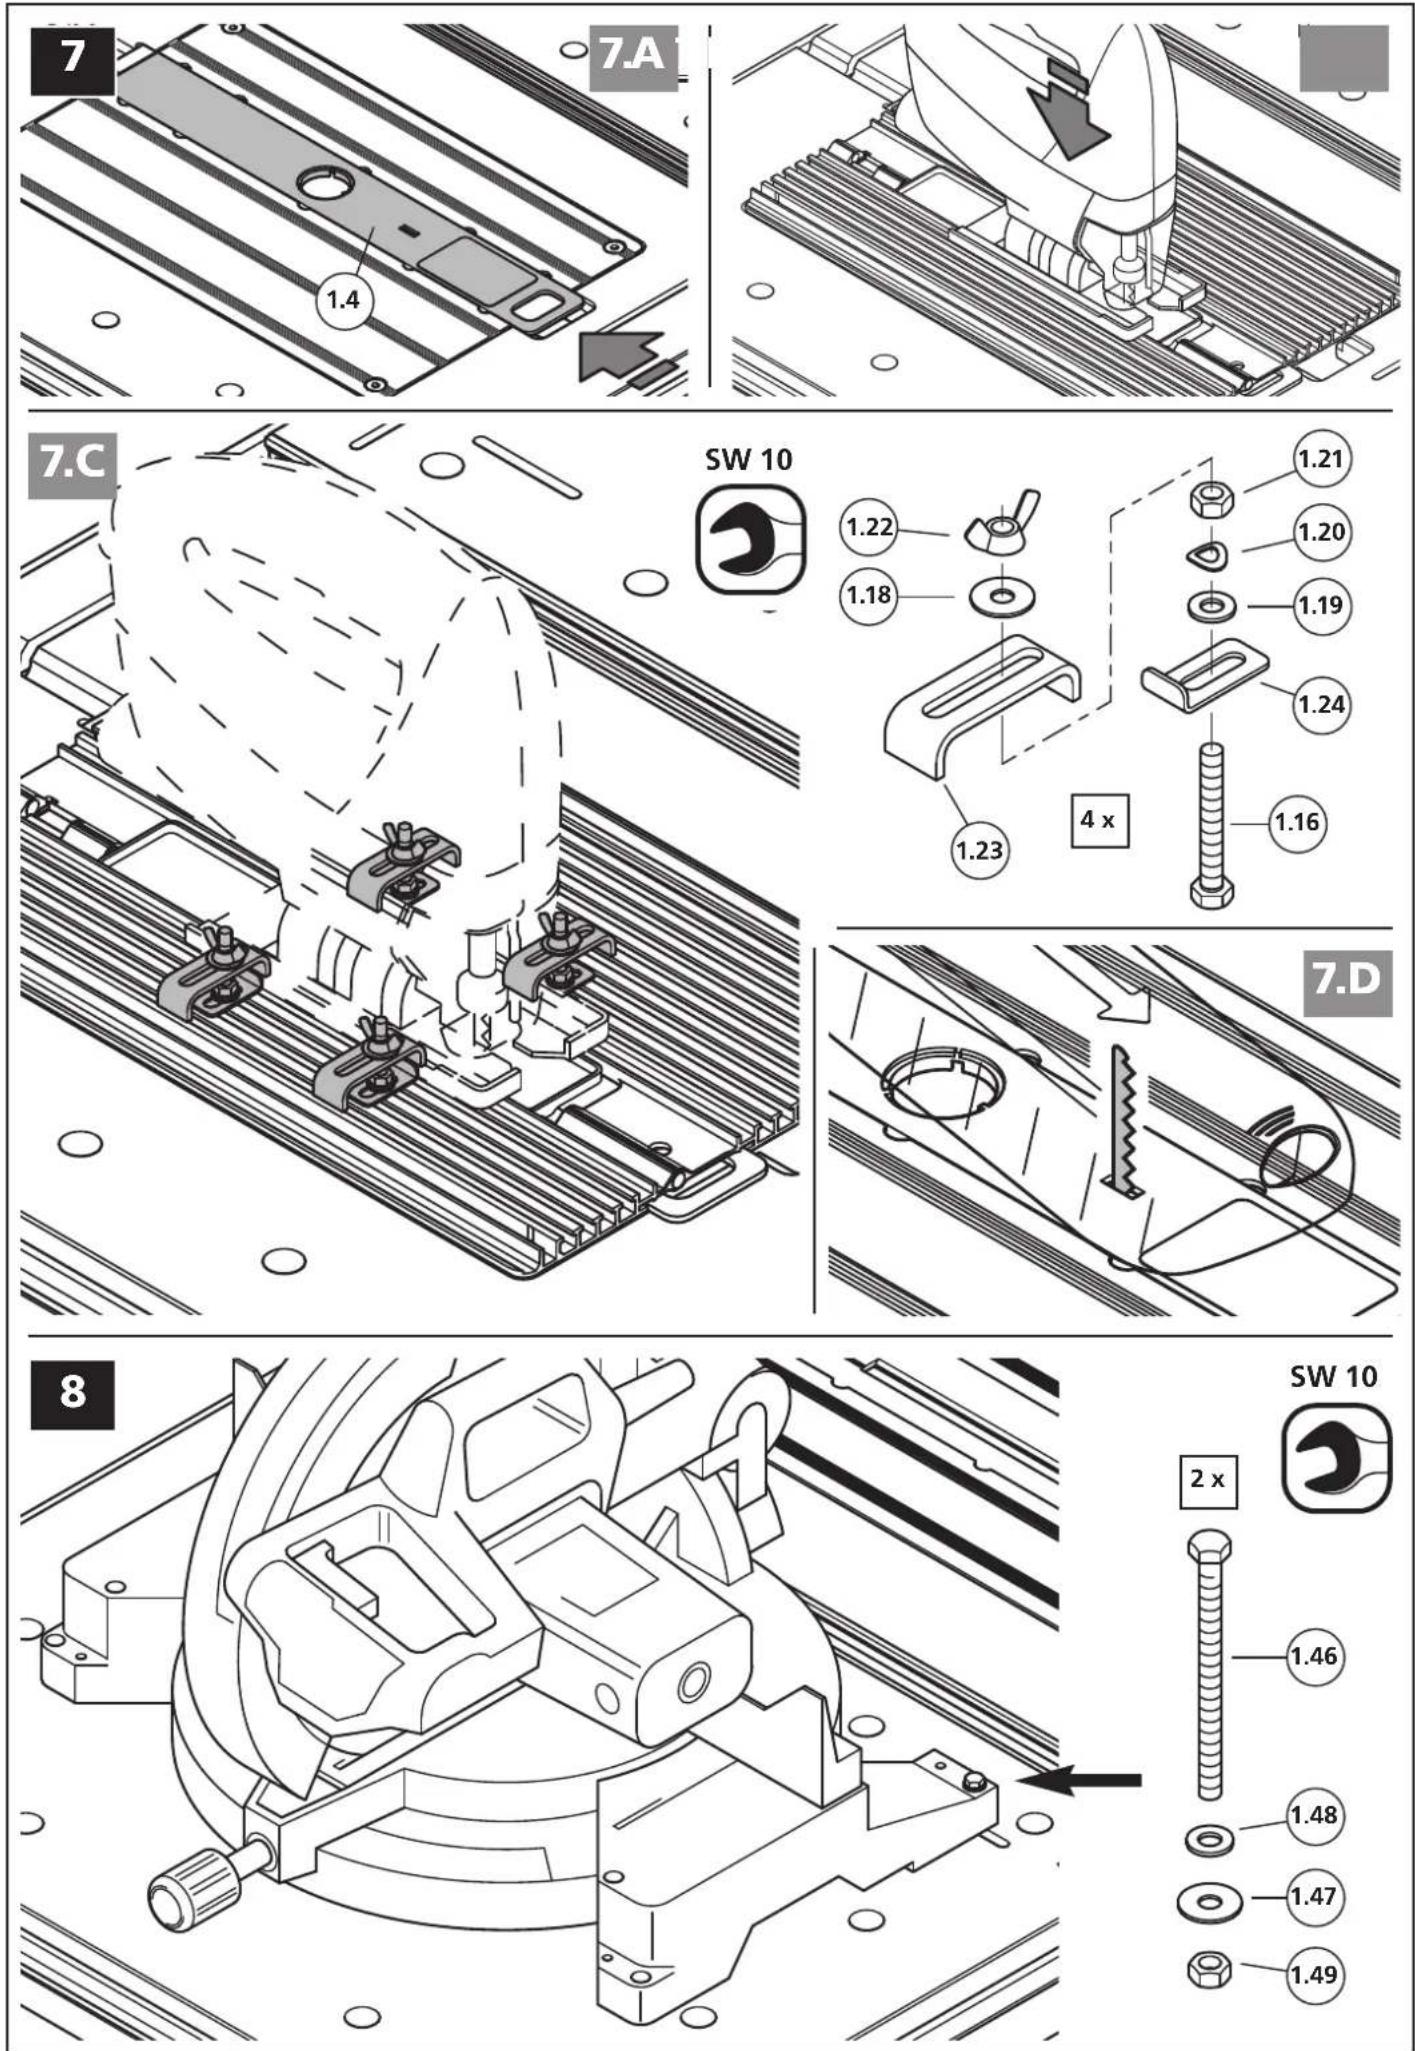
- Use as a jigsaw table. The gap insert for jigsaws and routers must be used. Suitable for jigsaws with max. base plate dimensions of 90 x 200 mm.
- Mounting a mitre saw. The mitre saw must be securely mounted in the designated slots with the fastening materials supplied.
- Use as a router table only in conjunction with the parallel milling guide, art. no. 6901000 and for routers with 230 V and max. 1800 W. Do not use router bits with a diameter exceeding 27 mm. The router and jigsaw gap insert with the spacer rings must be used. Suitable for routers with a base plate diameter of max. 180 mm and a base plate height of max. 40 mm.
- Use as a workbench for machining workpieces (e.g. drilling, sanding, etc.). - Workpieces can be clamped securely to the worktop using the clamping accessories available in the wolfcraft range.
- Observe the manufacturer's safety instructions for the machines used, as well as the safety instructions for the machine table.
- When disposing of the MASTER cut 2600, please observe local disposal regulations.
IMPROPER USE
- Installing electronic devices other than circular hand saws, jigsaws and routers (e.g. no angle grinders, no plunge saws, no reciprocating saws, etc.)
- Do not use battery-operated machines
- Do not saw round workpieces and firewood, as the rotating saw blade can turn them
- Do not make non-through cuts.
- Do not use as machine base for any machines other than mitre saws
- Do not use machines with dimensions that exceed the specified maximum base plate dimensions
The user is liable for any damage or accidents resulting from improper use.
GENERAL SAFETY INFORMATION
Workplace safety
- Keep your work area clean and well lit. Untidy or dark work areas can lead to accidents.
- Do not use power tools in explosive atmospheres that contain flammable liquids, gases or dusts. Power tools generate sparks that can ignite dust or vapours.
- Keep children and other persons at a safe distance when using the power tool. If you are distracted, you may lose control of the power tool.
Electrical safety
- The plug of the power tool must fit into the socket. The plug must not be tampered with in any way. Do not use adapter plugs together with earthed power tools. Unmodified plugs and matching sockets reduce the risk of electric shock.
- Avoid making physical contact with earthed surfaces such as pipes, heaters, cookers and refrigerators. There is increased risk of electric shock when your body is earthed.
- Keep power tools out of the rain and away from wetness. Water penetrating into a power tool increases the risk of electric shock.
- Do not abuse the cord. Never use the cord for carrying, pulling or unplugging the power tool. Keep cord away from heat, oil, sharp edges and moving parts. Damaged or entangled cords increase the risk of electric shock.
- When working with a power tool outside, use only extension cords that are suitable for outdoor use. Using an extension cord that is suitable for outdoor use reduces the risk of electric shock.
- If it is unavoidable to use a power tool in a wet environment, use a residual-current circuit breaker. It will reduce the risk of electric shock.
Personal safety
- Stay alert, watch what you are doing and use common sense when operating a power tool. Do not use a power tool if you are tired or under the influence of drugs, alcohol or medication. A moment of inattention when using the power tool may result result in serious injuries.
- Use personal protective equipment and always wear eye protection. Wearing protective equipment such as a dust mask, non-skid safety shoes, hard hat or hearing protection as appropriate for the type of power tool and its application reduces the risk of personal injuries.
- Prevent unintentional starting. Ensure that the power switch of the power tool is in the OFF position before connecting to the power source and/or battery pack, picking up or carrying the tool. Carrying power tools with your finger on the switch or energising power tools that have the switch on invites accidents.
- Avoid working with an abnormal posture. Ensure that you have secure footing and proper balance at all times. This enables you to better control the power tool in unexpected situations.
- Vermeiden Sie eine abnormale Körperhaltung. Sorgen Sie für einen sicheren Stand und halten Sie jederzeit das Gleichgewicht. Dadurch können Sie das Elektrowerkzeug in unerwarteten Situationen besser kontrollieren.
- Wear appropriate clothing. Never wear loose clothing or jewellery. Keep hair and clothing away from moving parts. Loose clothing, jewellery or long hair can get caught in moving parts.
- If the design of the power tool allows for the connection of dust extraction and collection equipment, these have to be connected and properly used. Using dust extraction equipment can reduce hazards posed by dust.
- Even if you are very familiar with the power tool from frequent use, do not fall into the trap of a false sense of safety and do not disobey the safety rules for using power tools. Careless action can cause severe injury within fractions of a second.
Power tool use and care
- Do not force the power tool. Use the correct power tool for your task. You will be able to do the work better and more safely when using the correct power tool, in compliance with its rating.
- Do not use a power tool with a defective switch. A power tool that cannot be switched on or off is dangerous and has to be repaired.
- Disconnect the plug from the electric socket and/or remove the battery, if detachable, from the power tool before adjusting the tool, changing accessories or storing the power tool. This precautionary measure prevents the power tool from being started accidentally.
- When not in use, store power tools out of reach of children. Do not allow persons who are unfamiliar with the power tool or these instructions to use the power tool. Power tools are dangerous if used by inexperienced persons.
- Maintain power tools and accessories with great care. Check that moving parts are working properly and no binding occurs; check for parts that are broken or damaged such that the function of the power tool is affected. Have damaged parts repaired before using the power tool. Many accidents are the result of poorly maintained power tools.
- Keep cutting tools sharp and clean. Diligently maintained cutting tools with sharp cutting edges are less likely to bind and easier to control.
- Use power tools, accessories, attachments etc. in accordance with these instructions. Take the work conditions and the task to be performed into account. Using power tools for applications other than the intended use can result in hazardous situations.
- Keep handles and grasping surfaces dry, clean and free of oil and grease. When handles and grasping surfaces are slippery, it is not possible to ensure safe operation and control of the power tool in unexpected situations.
Service
- Have your power tool repaired only by qualified specialists, using only original replacement parts. This ensures the power tool remains safe to use.
Product-specific safety information
- Correctly assemble and set up the machine table before installing the power tool. Correct assembly and setup is important to prevent the table from collapsing.
- Fasten the power tool securely to the machine plate before using it. If the power tool slips on the machine plate, loss of control can result.
- Place the machine table on a firm, level and horizontal surface. If the machine table can slip or wobble, the power tool or workpiece cannot be controlled evenly and safely.
- Avoid overloading the machine table and never use it as a ladder or support. Placing excess weight on the machine table or standing on it can cause the centre of gravity of the bench to shift upward, causing it to tip over.
- Do not use the tool on materials other than wood or easily machined plastics. Exception: With the jigsaw only, it is permitted to cut easily machined metal (such as aluminium), provided that a suitable saw blade is used.
- Do not remove loose fragments, chips or similar materials from the area around the moving saw blade by hand.
- The machines used must comply with DIN EN 62841-1. Devices manufactured after 1995 must bear a CE mark.
-
Do not use the saw "freehand" - in other words, do not guide the workpiece by hand only, but also use the parallel guide or angle stop.
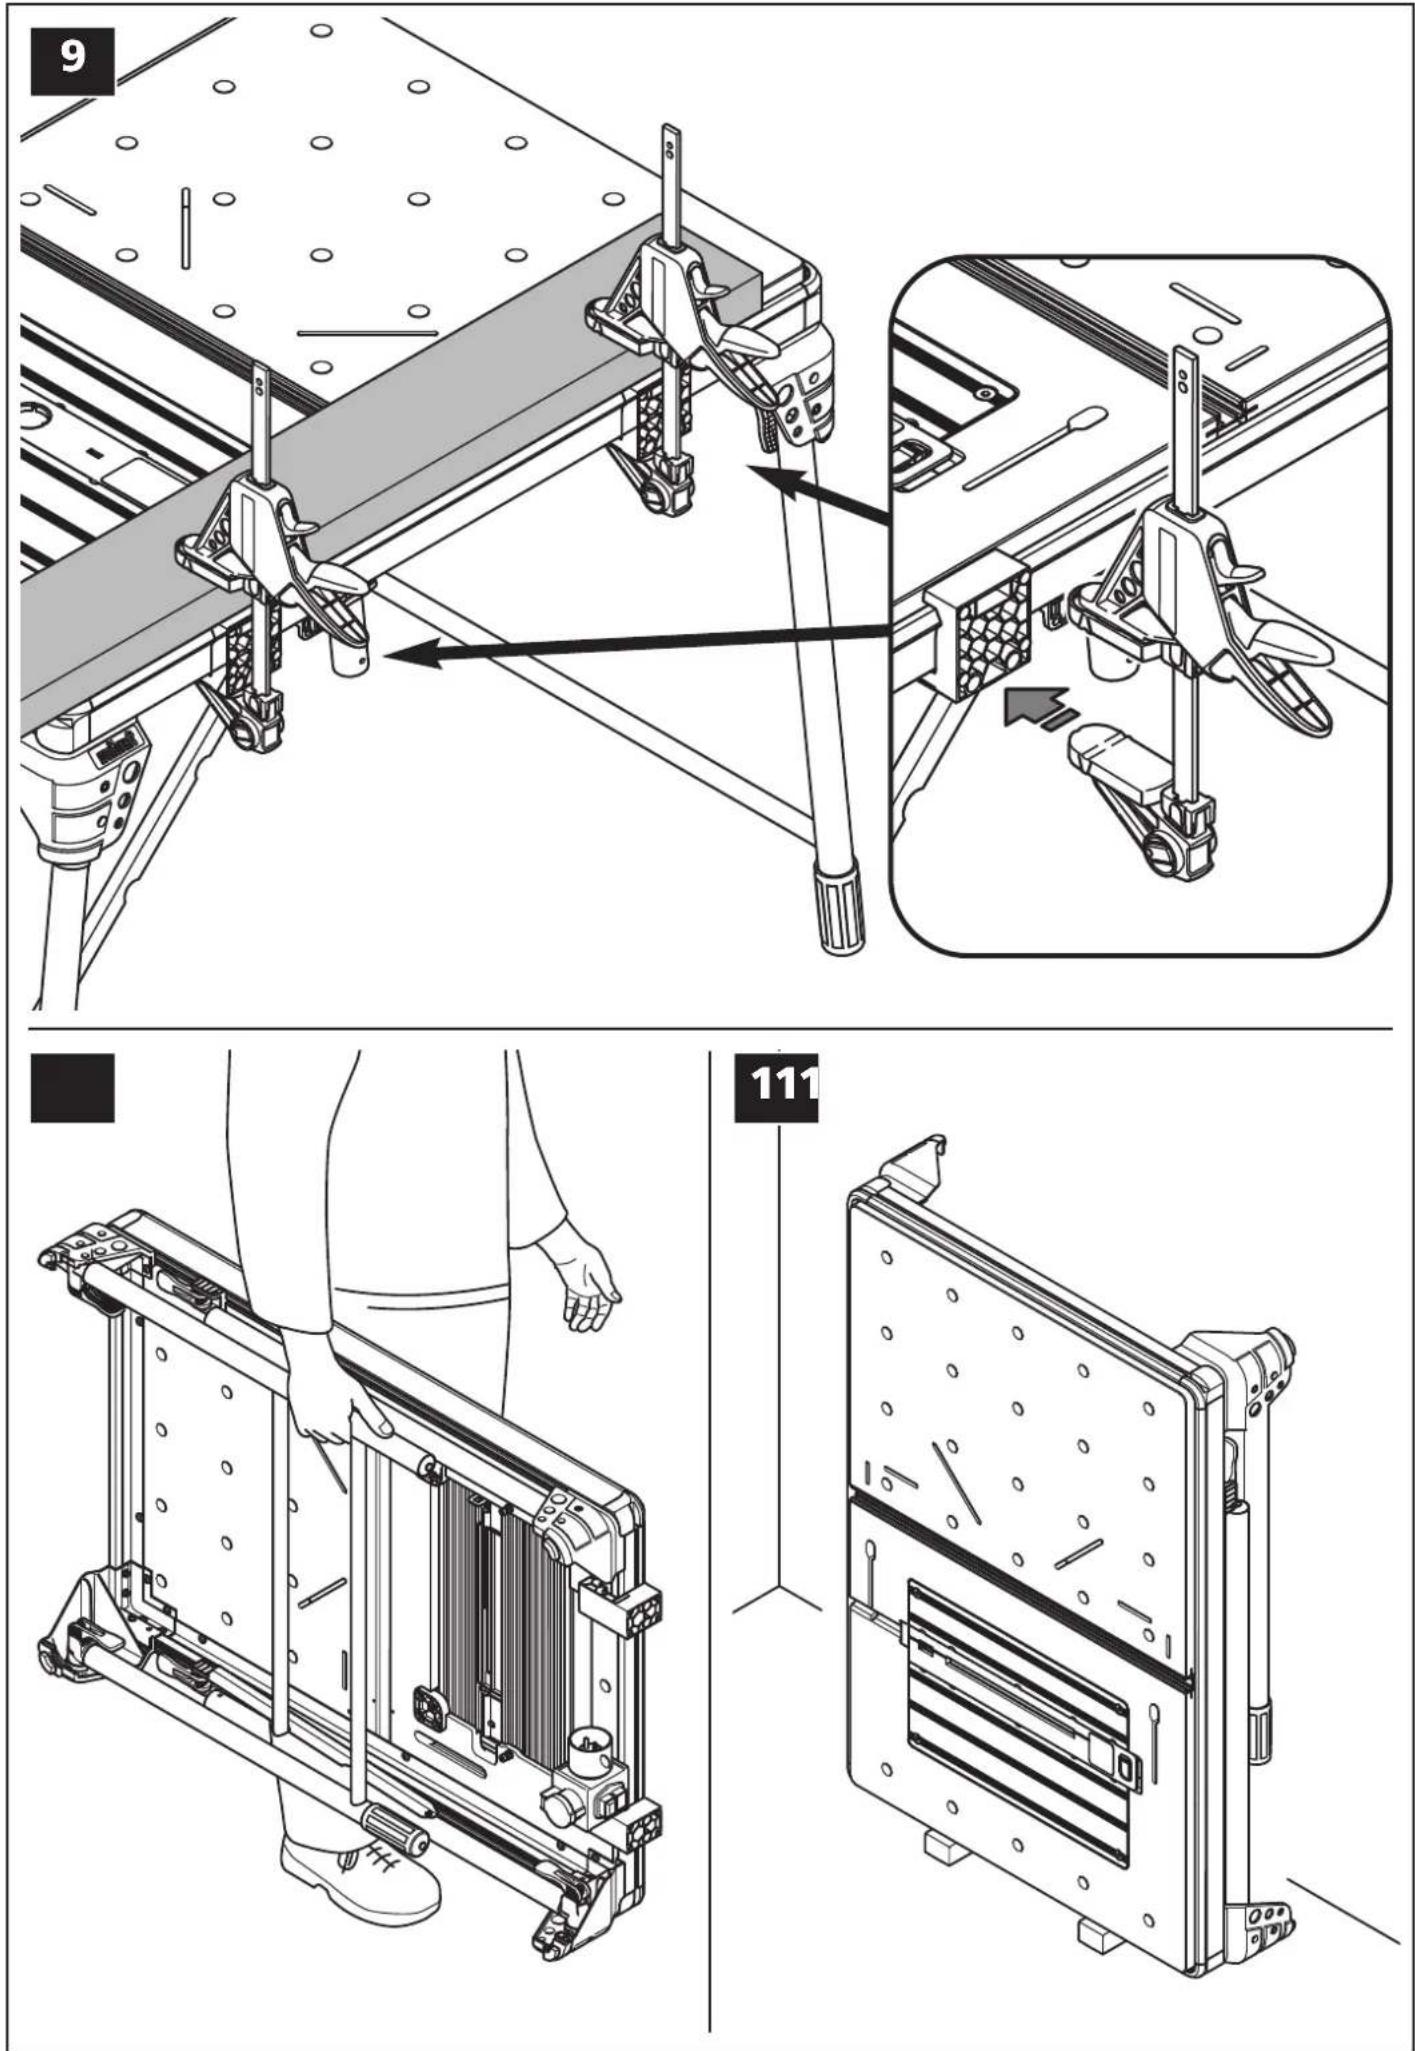
• Take care not to pinch your hands when folding up and unfolding the table or inserting the machine plate. -
Before each sawing or routing operation, make sure that there are no objects on the worktop.
- Saw blades must not be stopped by applying lateral pressure after switching off the drive.
- Only use tools for their actual intended purpose.
- Use only saw blades that are in perfect condition; the body of the saw blade must be thinner and the tooth set must be wider than the thickness of the riving knife.
- Regularly check that all screws are securely fastened.
- Never use your working table improperly or for an unintended purpose.
- Remove all unnecessary items from the working table.
- Do not use the table for cutting firewood.
- Do not use the machine table for cutting round pieces of wood.
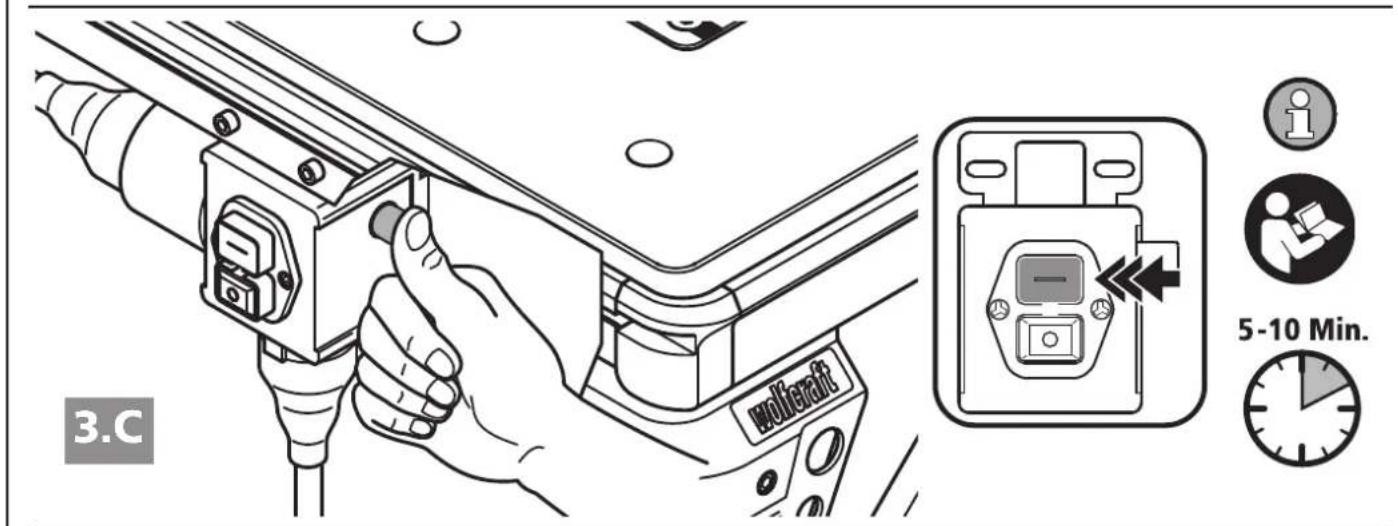
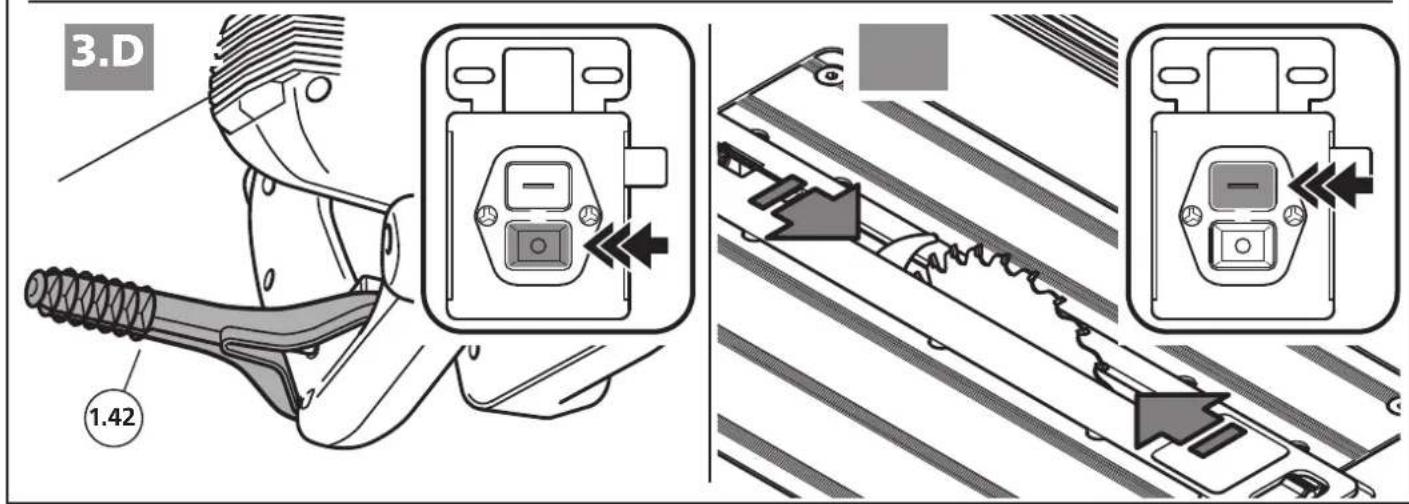
- Use only the safety switch for switching the power tools on and off.
- To permanently fixate the power tool's switch in the ON position, use only the supplied switch clamp.
- Replace damaged gap inserts with new ones.
- When working with narrow workpieces, always use a push stick.
- Make sure the eccentric levers for fixating the table legs are closed and tightened. If necessary, retighten the eccentric levers.
- Before starting to work, make sure that the circular hand saw, the router or the jigsaw is properly attached to the machine plate.
- Observe the maximum permitted workpiece dimensions (see Technical Data).
- Use the various gap inserts exclusively for their respective intended purpose, as graphically depicted on each gap insert.
- When not in use, hang the push stick, the gap inserts or the angle stop on the screw hooks provided for this purpose.
- Do not use the machine table outdoors in the rain or in damp conditions.
- Before starting to work, make sure that the screws with which the machine plate is mounted to the table have been securely tightened.
- Make sure that you use the appropriate gap insert for the respective machine.
- When using the table for sawing, make sure that the saw does not cut into the metal hooks on the side or into the clamping blocks.
- CAUTION: There is a risk of tipping in the case of protruding workpieces. Make sure that lateral clamping and machining of laterally clamped workpieces does not result in the table becoming unbalanced.
• Make sure that you do not apply excessive clamping pressure when fastening fragile materials. Risk of splinters - Place heavy objects on the table with care and ensure an even load on the tabletop.
- Do not saw more than 5 mm into the table as this will damage the aluminium profile.
SAFETY INFORMATION FOR CIRCULAR HAND SAWS
- Apart from these machine-specific safety instructions, also observe the safety instructions for the circular hand saw used.
• Always use circular hand saws with a riving knife, max. saw blade diameter of 200 mm and max. cutting depth of 70 mm. - Do not use saws with base plate dimensions greater than the maximum values indicated (Fig. 4.G).
- Support long workpieces on the receiving side so that they lie flat; e.g. with a wolfcraft roller trestle (art. no. 6102300).
- Avoid overloading the circular hand saw.
- Do not use grinding wheels.
- Use only recommended saw blades and select them depending on the material to be sawn.
SAFETY INFORMATION FOR CIRCULAR BENCH SAWS
Safety information relevant to the protective cover
- Leave protective covers mounted. Protective covers must be in proper working order and correctly mounted. Loose, damaged or poorly functioning protective covers must be repaired or replaced.
• Always use the saw blade protective cover and the riving knife for through cuts. The protective cover and other safety devices reduce the risk of injuries for through-cutting where the blade saws through the entire thickness of the workpiece.
• After completing operations for which it was required to remove the protective cover or the riving knife, immediately reinstall the protective system. The protective cover and riving knife reduce the risk of injuries. - CAUTION The machine table must not be used for cutting joints, making slits or slicing wood during timber handling.
- Before switching on the power tool, make sure that the saw blade is not touching the protective cover, the riving knife or the workpiece. Accidental contact between these components and the saw blade can result in an unsafe situation.
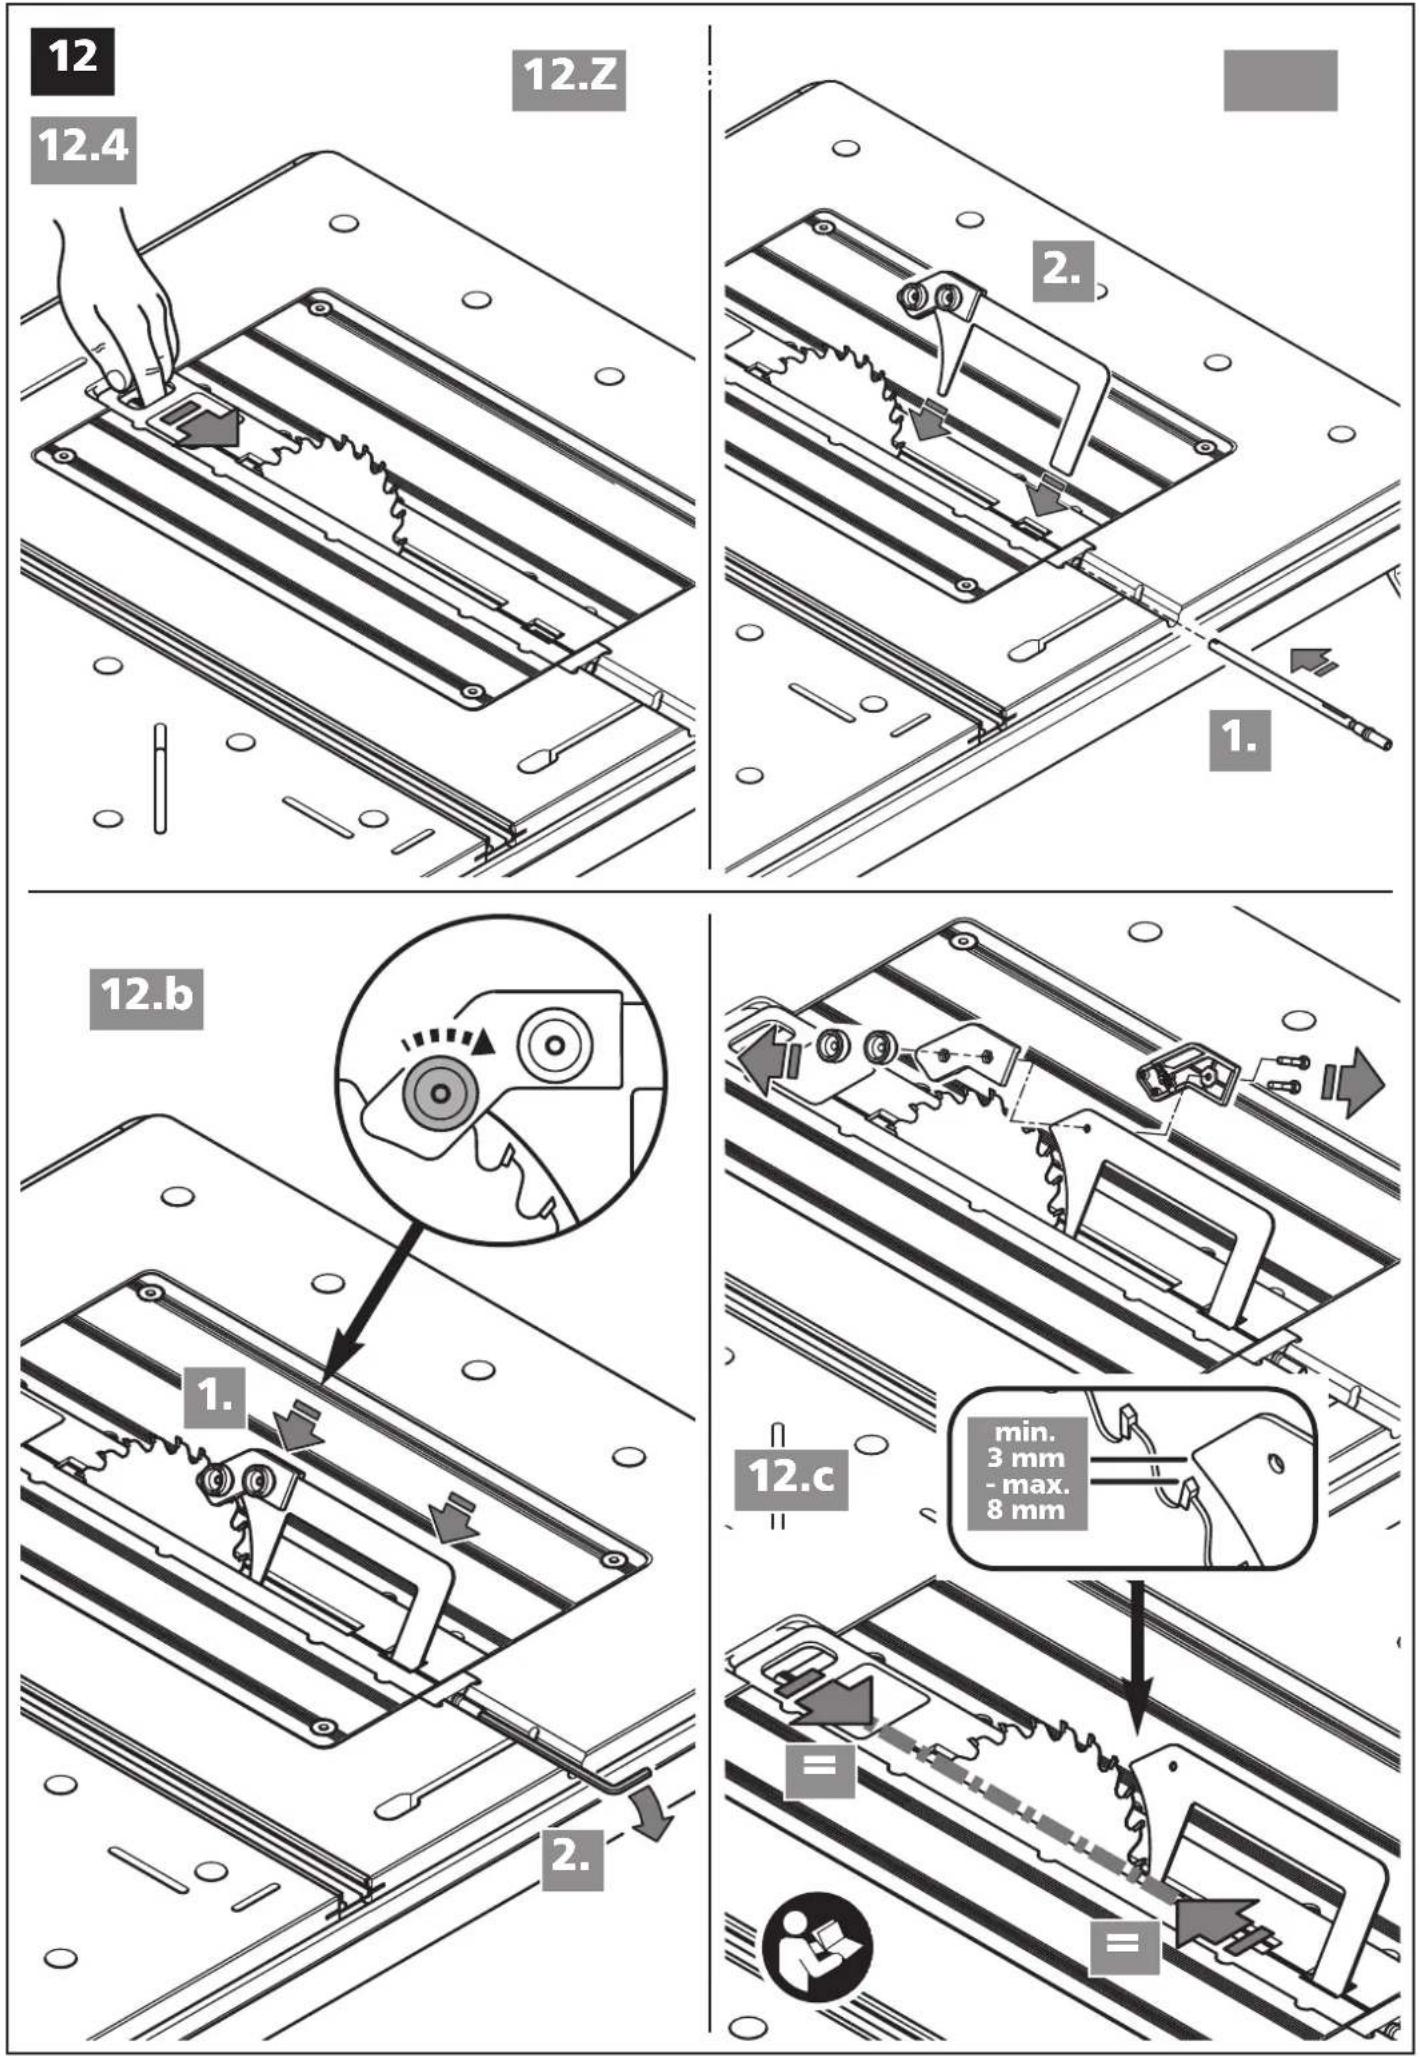
- Adjust the riving knife as described in these operating instructions. Incorrect spacing, position and alignment may result in the riving knife failing to effectively prevent kickback.
- In order for the riving knife to be able to work, it must act on the workpiece. The riving knife will have no effect for cuts in workpieces that are too short to allow the riving knife to engage. Under these conditions, the riving knife is not able to prevent kickback.
- Use the appropriate saw blade for the riving knife. In order for the riving knife to work correctly, the saw blade diameter must match the relevant riving knife, the body of the saw blade must be thinner than the riving knife and the tooth width must be greater than the riving knife thickness.
Safety information for saw operations
- DANGER: Do not place your fingers or hands near the saw blade or in the sawing area. A moment of inattention or a slip could result in your hand being propelled towards the saw blade and result in serious injuries.
- Feed the workpiece to the saw blade against the direction of rotation only. Feeding the workpiece in the same direction as the saw blade's direction of rotation above the table can result in the workpiece and your hand being drawn into the saw blade.
- Never use the mitre stop to feed the workpiece when making rip cuts and never additionally use the parallel guide as a length stop when making cross cuts with the mitre stop. Simultaneously guiding the workpiece using the parallel guide and the mitre stop increases the probability of the saw blade binding and kickback occurring.
- When making rip cuts, always exert the workpiece feeding force between the stop rail (fence) and saw blade. Use a push stick if the distance between the stop rail (fence) and saw blade is less than 150 mm, and a push block if the distance is less than 50 mm. These work aids ensure that your hand remains a safe distance from the saw blade.
- Only use the push stick supplied by the manufacturer or another push stick manufactured according to instructions. The push stick ensures sufficient distance between your hand and the saw blade.
- Never use a damaged or partially sawn-off push stick. A damaged push stick can break and result in your hand coming into contact with the saw blade.
- Do not work "freehand". Always use the parallel guide or the mitre stop to position and guide the workpiece. "Freehand" means supporting or guiding the workpiece using the hands instead of using a parallel guide or mitre stop. Freehand sawing will result in misalignment, binding and kickback.
- Never reach around or over a rotating saw blade. Reaching for a workpiece can result in unintentional contact with a rotating saw blade.
- Support long and/or wide workpieces at the back and/or side of the saw table to keep them horizontal. Long and/or wide workpieces tend to tilt at the edge of the saw table; this results in loss of control, saw blade binding and kickback.
- Feed the workpiece at an even pace. Do not bend or turn the workpiece. If the saw blade jams, switch off the power tool immediately, pull out the mains plug and remove the cause of the jam. Saw blade binding at the workpiece can result in kickback or a blocked motor.
- Do not clear away cut-off material while the saw is running. Cut-off material can settle between the saw blade and stop rail (fence) or in the protective cover and can draw your finger into the saw blade if you attempt to clear it away. Switch off the saw and wait until the saw blade has come to a stop before clearing the material.
- CAUTION! Do not process workpieces less than 2 mm in thickness.
Kickback – Causes and related safety information
Kickback is a sudden reaction of the workpiece due to a pinched, jammed saw blade or misaligned line of cut in the workpiece with respect to the saw blade or when a part of the workpiece binds between the saw blade and the parallel guide (rip fence) or other fixed object.
In most cases of kickback, the workpiece is lifted from the table by the rear section of the saw blade and is propelled towards the operator.
Kickback is the result of misuse of the circular table saw or incorrect operation. It can be prevented through suitable precautions, as described below.
- Never stand in a direct line with the saw blade. Always keep stay on the same side of the saw blade as the stop rail. Kickback can cause the workpiece to be flung at high speed towards people standing in front of and in line with the saw blade.
- Never reach over or behind the saw blade to pull or support the workpiece. This can result in unintentional contact with the saw blade or kickback can result in your fingers being drawn into the saw blade.
- Never hold and push the workpiece being sawn against the rotating saw blade. Pushing the workpiece being sawn against the saw blade will result in binding and kickback.
- Align the stop rail parallel to the saw blade. An unaligned stop rail will push the workpiece against the saw blade and cause kickback.
- CAUTION! The machine table must not be used for cutting joints, making slits or slicing wood during timber handling.
- Exercise particular care when sawing in non-visible areas of assembled workpieces. The protruding saw blade may cut into objects that can cause kickback.
- Support large boards to reduce the risk of kickback due to a jammed saw blade. Large boards can bend under their own weight. Boards must be supported wherever they project past the table surface.
- Exercise particular care when sawing workpieces that are twisted, knotted or warped or that do not have a straight edge for guiding it with a mitre stop or along a stop rail. A twisted, knotted or warped workpiece is unstable and will result in misalignment of the kerf with the saw blade, binding and kickback.
- Never saw several workpieces stacked one on top of each other or one behind the other. The saw blade could pick up one or more parts and cause kickback.
- If you want to restart a saw whose blade is positioned in the workpiece, centre the saw blade in the kerf in such a way that the saw teeth are not engaged in the workpiece. If the saw blade binds, it can lift the workpiece and cause kickback when the saw is restarted.
- Keep the saw blades clean, sharp and ensure the tooth set is adequate. Never use warped saw blades or saw blades with cracked or broken teeth. Sharp saw blades with correct tooth set reduce binding, blocking and kickback.
SAFETY INFORMATION FOR OPERATING CIRCULAR BENCH SAWS
- Switch off the bench saw and disconnect it from the mains before removing the table insert, changing the saw blade, adjusting the riving knife or saw blade protective cover and if the machine is going to be left unattended. Precautions help to avoid accidents.
- Never leave the bench saw running unattended. Switch off the power tool and wait until it has come to a complete stop before leaving it. An unattended saw is an uncontrolled hazard.
• Install the bench saw in a location that is flat and well lit, where you can stand securely and maintain your balance.
The installation location must offer enough space to handle the size of your workpieces. Piled-up sawdust is flammable and can ignite spontaneously. - Remove sawdust and shavings from under the saw table and/or from the dust extractor at regular intervals. Piled-up sawdust is flammable and can ignite spontaneously.
- Secure the circular bench saw. A circular bench saw that has not been secured properly can move or tip over.
- Remove adjusting tools, wood scraps, etc. from the circular bench saw before switching it on. Distractions or possible jams can be dangerous.
- Always use saw blades in the correct size and with the appropriate locating hole (e.g. diamond-shaped or round). Saw blades that are not compatible with the saw's mounting hardware will run off-centre and result in loss of control.
- Never use damaged or the wrong saw blade mounting materials such as flanges, washers, nuts or bolts. This saw blade mounting material has been designed specifically for your saw, for safe operation and optimum performance.
- Never climb onto the circular bench saw and do not use the circular bench saw as a step stool. Serious injuries can occur if the power tool tips over or if you accidentally come into contact with the saw blade.
- Make sure that the saw blade is mounted in the correct direction of rotation. Do not use grinding wheels or wire brushes with the circular bench saw. Improper mounting of the saw blade or using accessories that are not recommended can result in serious injuries.
Product-specific safety information
- Only use the bench saw with the protective cover properly installed.
- CAUTION! Check whether the blade of the circular saw is mounted parallel to the opening in the gap insert. If necessary, re-align the circular hand saw.
- Only circular saw blades are allowed as cutting tools.
- Use the correct saw blade for the material to be cut.
- Use only saw blades with a diameter that matches the specifications on the circular hand saw used.
- Use only saw blades that are rated with an equal or higher speed than the speed of the power tool.
- Use only saw blades recommended by the power tool manufacturer and that comply with EN 847-1 if they are to be used to cut wood or similar materials.
- Keep in mind that it is not permitted to perform complicated concealed cut procedures or to cut bevels/wedges.
- Do not use the tool on materials other than wood or easily machined plastics.
- When cutting wood and plastics, prevent overheating of the saw teeth. Reduce the feed to prevent the plastic from melting.
- When making longitudinal cuts at an angle, do not stand at the side toward which the saw is angled.
- Wear suitable personal protective equipment, hearing protection and goggles.
- Only wear protective gloves when handling saw blades.
SAFETY INFORMATION FOR JIGSAWS
- Apart from these machine-specific safety instructions, also observe the safety instructions for the jigsaw used.
- Never work with a damaged jigsaw.
- Avoid overloading the jigsaw.
• Make sure that you install the gap insert for jigsaws correctly. - When cutting, make sure that the jigsaw blade always protrudes from the material.
SAFETY INFORMATION FOR MITRE SAWS
• In addition to this tool-specific safety information, make sure you observe the safety information for the mitre saw used.
- Do not work with a damaged mitre saw and do not use blunt or damaged saw blades.
- Support long workpieces on the receiving side to prevent dangerous situations caused by accidental tipping over.
- Mount the mitre saw using the fastening materials supplied in accordance with the instructions in this manual.
CAUTION USE AS ROUTER TABLE ONLY PERMITTED IN COMBINATION WITH THE PARALLEL MILLING GUIDE, ART NO. 6901000 SAFETY INFORMATION FOR ROUTERS
- Apart from these machine-specific safety instructions, also observe the safety instructions for the router used.
• Always be aware that the workpiece may unexpectedly get out of control during the routing process and get kicked back.
- Do not use the machine table for curved work.
- Carry out the routing work exclusively with the parallel milling guide available as accessory (art no. 6901000), to prevent kickback and to prevent your hands from touching the router bit.
- Observe the original instruction manual of the parallel milling guide (art. no 6901000) to ensure correct installation.
- Do not use routers with a rating of more than 1800 W and a voltage of more than 230 V.
- Do not use router bits with a diameter exceeding 27 mm.
- Please observe that the feed must be against the direction of rotation of the router bit.
- From the supplied spacer rings, select the spacer ring appropriate for the size of the router tool. Safe work requires selecting the smallest possible spacer ring.
- Use only sharp and properly maintained routing tools that have been set in accordance with the tool manufacturer's instructions.
- Observe the data concerning the minimum/maximum speed and the direction of rotation indicated directly on the equipment and tools used, or on their packaging, or as detailed in the operating instructions.
- Please be aware that the improper use of routing tools, of work pieces and of the guiding devices for the work piece may cause dangerous situations.
- When routing close to the guide, keep your hands away from the routing tool.
- If possible, use table pressure shoes in addition to the parallel milling guide while routing.
- Support long workpieces on the receiving side to prevent dangerous situations caused by accidental tipping over. The support must rest on stable ground and have the same height as the machine table, e.g. the roller trestle (art. no. 6102300).
- Only process work pieces that, considering their weight and size, can be held and advanced safely by one person.
- Choose the correct speed that is appropriate for the tool and workpiece. Refer to the operating manual of your router for the exact speed specifications.
- Observe the maximum permitted workpiece dimensions (see Technical Data).
INTRODUCTION
(correspondence in English)
E
Mavrofidopoulos S.A.
Salaminos 1 & Mavromihali Str.
GR-185 45 Piraeus
Telefon: 0030 21 0413 6155
Telefax: 0030 21 0413 7692
info@mavrofidopoulos.gr
HR
Manal d.o.o.
Velimira Skorpika 1 a
10090 Zagreb
Telefon: 00385-1-3466400
Telefax: 00385-1-3466412
manal@manal.hr
RO MD
PARTENER SRL
Calea Moinesti, nr.34,
Pavilion Administrativ, et. 3
68, Kliment Ohridski Blvd.
BG-1756 Sofia
Telefon: 00359 70045454
Telefax: 00359 4392112
info@tashev-galving.com
SRB MN
Mi-lumen d.o.o.
Dositejeva 176
36000 Kraljevo
Telefon: 00381-36-231081
Telefax: 00381-36-312867
milumen@tron-inter.net
MK
FAMOD
Bul. Vidoe Smilevski 5
MK-1000 Skopje
Telefon: 00389 2 2431100
Telefax: 00389 2 2431105
famod@t-home.mk
EST
AS Tooma Tööriist
Männiku tee 107
EE-11215 Tallinn
Telefon: 00372 6 586229
Fax: 00372 6 546725
info@toomatool.ee
BY
UP "18"
Volgogradskaya 13
BY-220049 Minsk
Telefon: 00375 17 2807781
Fax 00375 17 2804854
info@up18.by
RUS
Centro Instrumentalnoj Torgovli
Molodogvardejskaya UI 61
121351 Moskau
Tel.: +7 495 730 80 70
ci@centro-i.ru