FKS 145 - Cutting guide WOLFCRAFT - Free user manual and instructions
Find the device manual for free FKS 145 WOLFCRAFT in PDF.

| Product type | Cutting guide (rail + carriage) for manual circular saw |
| Brand | Wolfcraft |
| Model | FKS 145 |
| Rail length | 1100 mm |
| Maximum cutting width | 1100 mm (up to 2200 mm with optional extension kit ref. 6911000) |
| Compatible blade diameter | 130 mm - 200 mm |
| Compatible cutting depth | 40 mm - 70 mm |
| Main functions | Precise straight cuts, anti-splinter protection, easy saw adjustment on the carriage |
| Safety | Disconnect the saw before adjustments, wear PPE (goggles, mask, hearing protection), do not use for plunge cuts |
| Maintenance | Regularly check and tighten screws, clean the rail, replace anti-splinter guard if worn |
| Spare parts | Anti-splinter guard (wear part), rail extension kit ref. 6911000 |
| Warranty | 10 years for domestic use |
| Rail material | Aluminum |
| Carriage material | Plastic and metal |
| Required assembly tools | 2.5 mm Allen key (supplied), 10 mm wrench (not supplied), 4 mm Allen key (not supplied) |
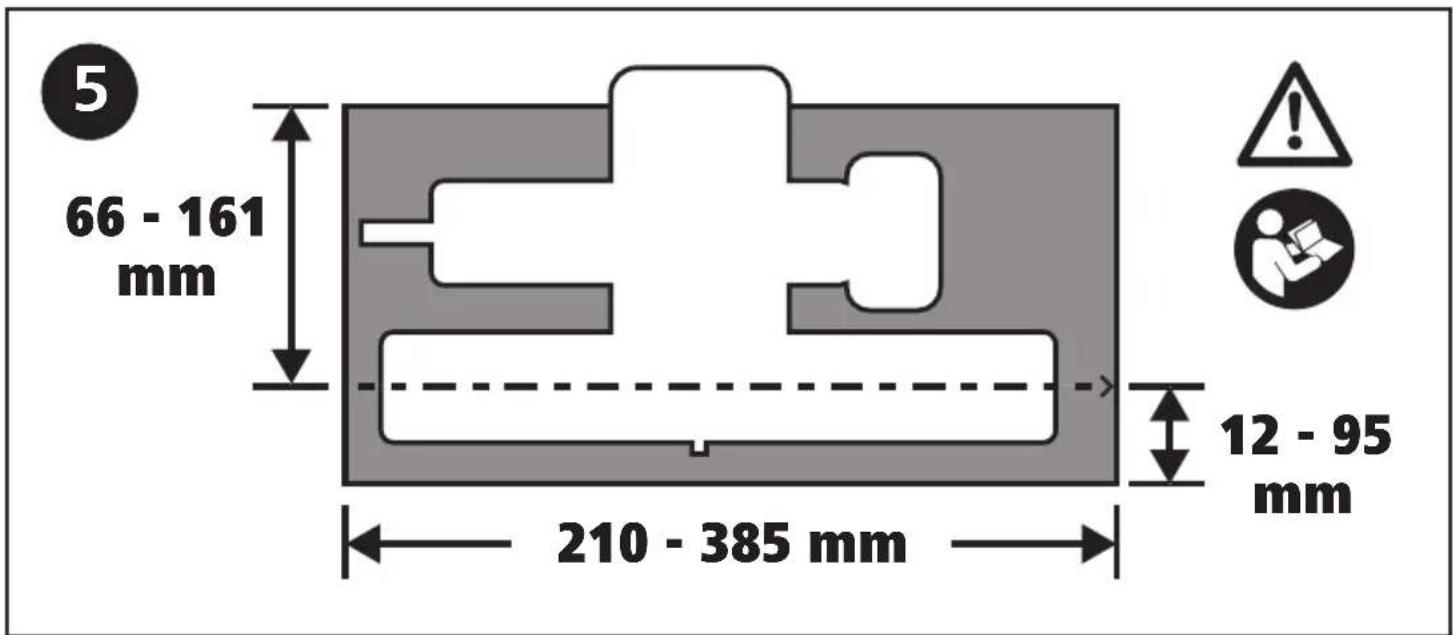
| Intended use | Manual circular saws with vertical blade, base plate dimensions as per figure 5 |
| Non-intended use | Not allowed with angle grinders, plunge saws, jigsaws; carriage without rail; modifications |
| Number of supplied parts | See figure 1 of the manual |
Frequently Asked Questions - FKS 145 WOLFCRAFT
User questions about FKS 145 WOLFCRAFT
0 question about this device. Answer the ones you know or ask your own.
Ask a new question about this device
Download the instructions for your Cutting guide in PDF format for free! Find your manual FKS 145 - WOLFCRAFT and take your electronic device back in hand. On this page are published all the documents necessary for the use of your device. FKS 145 by WOLFCRAFT.
USER MANUAL FKS 145 WOLFCRAFT

other
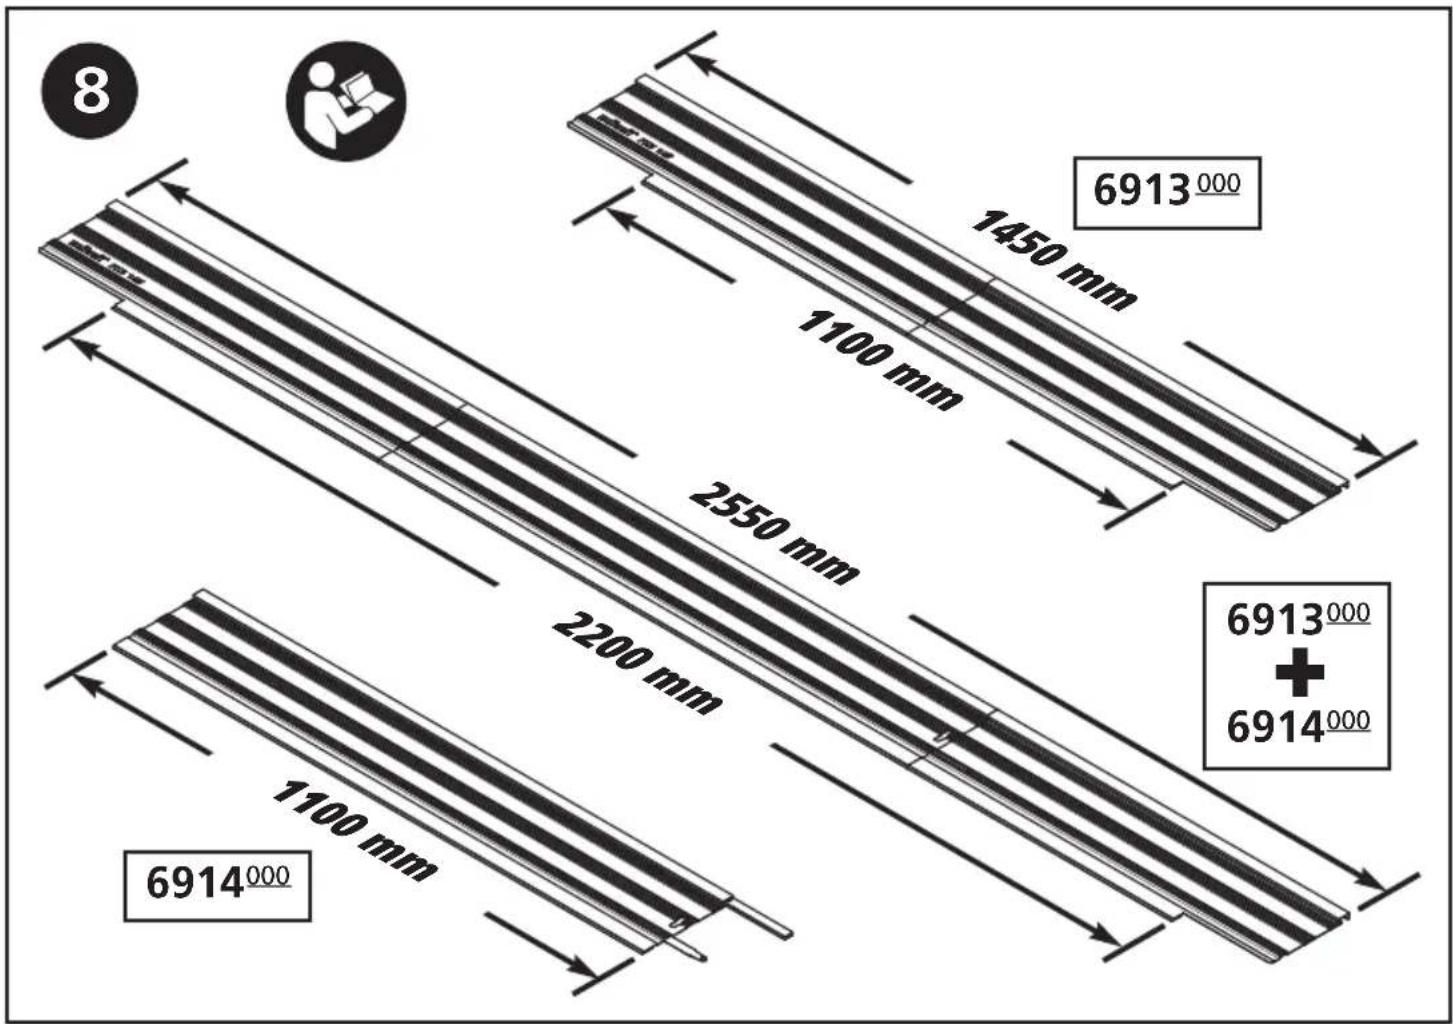
8 6913 000 1450 mm 1100 mm 2550 mm 2200 mm 6914 000 6913 000 + 6914 000 1100 mm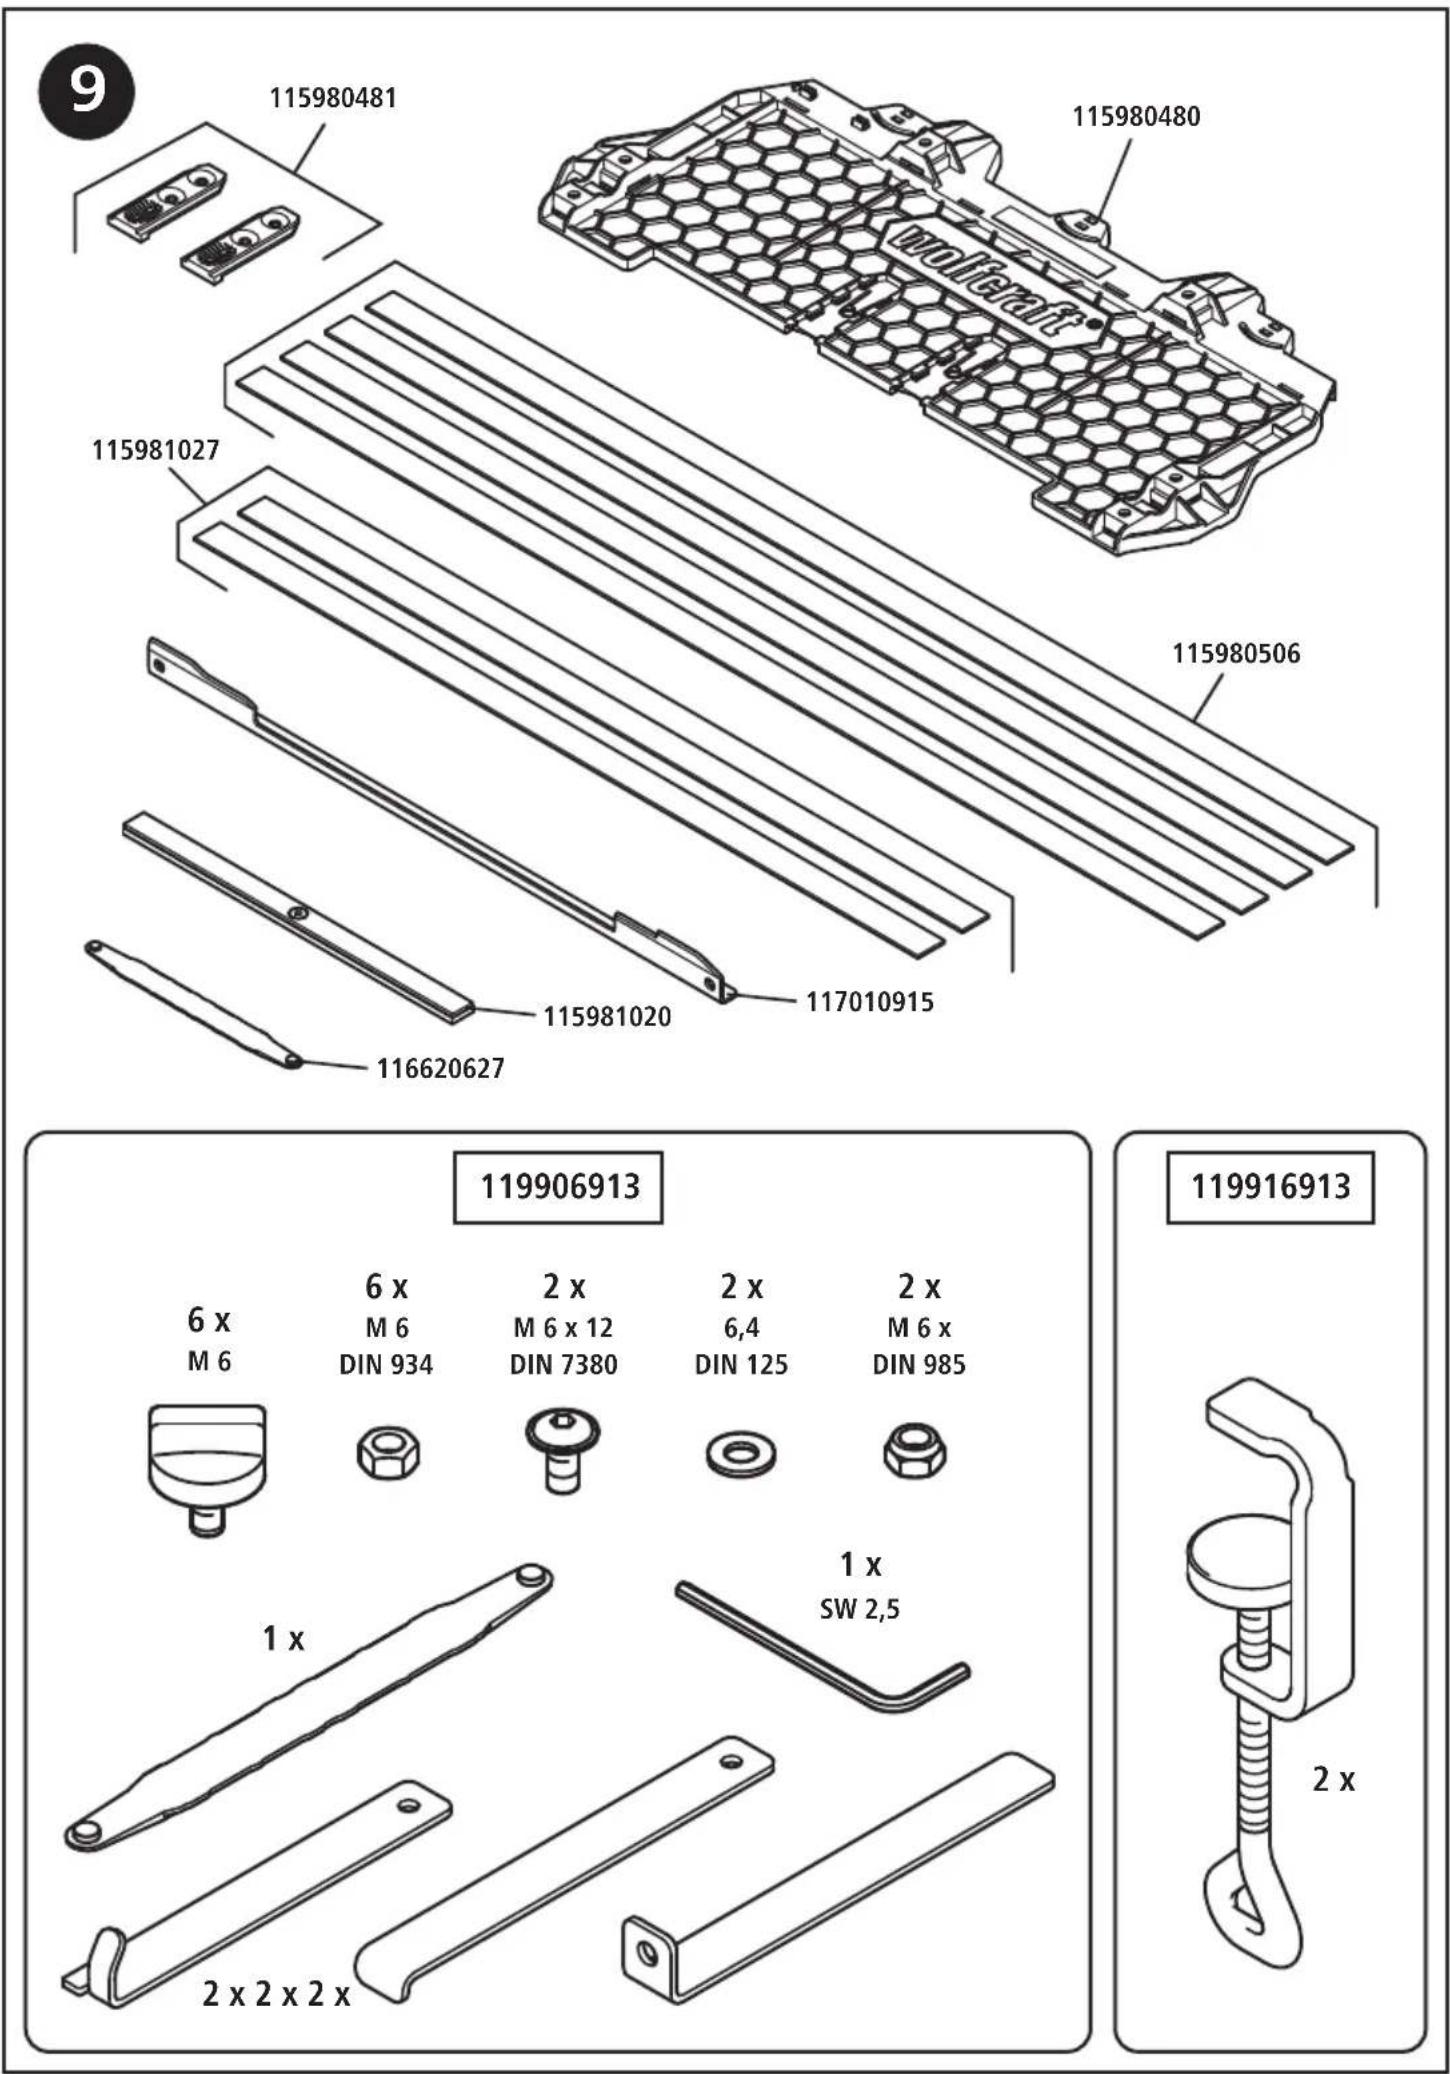
Einleitung
• AUTION! Read all the safety information and instructions that were supplied with the FKS 145 guide rail and the power tools used. Failure to comply with safety information and instructions can lead to electric shock, fire and/or serious injury.
- Keep the manual in a safe place for future reference.
Symbols and meanings

Read manual/instructions.

Wear a dust mask.

Warning of danger. Read the safety information.

Unplug from the mains.

Wear safety goggles.

Remove the battery pack.

Wear ear protection.
Assembly tool

1 Allen key: A/F 2.5 (included in scope of delivery)

1 spanner: A/F 10 (not included in scope of delivery)

1 Allen key: A/F 4 (not included in scope of delivery)
Intended use
- The FKS 145 is an accessory for circular hand saws consisting of a mounting carriage with matching guide rail
- For precise, straight and long cuts
- For cutting edges with few/no tears
- Surface protection
- For cutting or shortening kitchen worktops, doors, etc.
- For commercially available hand saw blades with a saw blade diameter of min. 130 mm to max. 200 mm, with a cutting depth of 40 mm to max. 70 mm and the minimum/maximum base plate dimensions according to Figure 5.
Improper use
- Other electronic devices apart from circular hand saws (e.g. no angle grinders, no pushcut saws, no jigsaws, etc.)
• Using mounting carriage without guide rail - Modifications to mounting carriage
• Using mounting carriage with other rails/ledges - Using circular hand saws outside the minimum and maximum base plate dimensions
The user is liable for any damage or accidents resulting from improper use.
General safety information
- DANGER: Disconnect the plug from the electric socket or remove the battery from the power tool before adjusting the tool or changing accessories. Accidents may occur if the power tool is started unintentionally.
- Keep your work area clean and well lit. Untidy or dark work areas can lead to accidents.
- Before starting work, check that the devices and tools are operational. Never work with damaged or blunt tools.
- Remove the adjusting tools or spanners before switching on the power tool. A tool or spanner left in a rotating part of the device can cause injury.
- Pay close attention. Do not use a power tool if you are tired or under the influence of drugs, alcohol or medication. A moment of inattention when using the power tool can result in serious injuries.
- Wear suitable personal protective equipment: ear protection, safety goggles and dust mask if the work generates dust.
- Wear suitable clothing. Never wear loose clothing or jewellery. Keep long hair, clothing, jewellery and gloves away from moving parts.
- Keep children and other persons at a safe distance when using the power tool. If you are distracted, you may lose control of the device.
- When not in use, store power tools out of reach of children. Do not allow persons to use the tool who are not familiar with it or who have not read these instructions. Power tools are dangerous if used by unexperienced persons.
- Do not use the tool on materials other than wood or easily machined plastics.
- The machines used must comply with DIN EN 62841-5.
- Only use tools for their actual intended purpose.
- Ensure that the guide rail is used on a stable, level surface.
- The guide rail must not be modified to accommodate other machines on the rail.
- Use only the mounting carriage supplied and no older versions/in-house designs.
- Check regularly that all screws on the mounting carriage are securely fastened.
- Remove the circular hand saw from the mounting carriage in the start/end position only (with the safety shield closed) and after the saw blade has come to a complete stop.
Safety information for circular hand saws
- In addition to this tool-specific safety information, make sure to observe the safety information for the circular hand saw used.
- DANGER: Do not place your hands in the sawing area or on the saw blade.
- Use only circular hand saws with a saw blade diameter of min. 130 mm to max. 200 mm, a cutting depth of 40 mm to max. 70 mm and the minimum/maximum base plate dimensions according to Figure 5.
- Support long workpieces on the receiving side so that they lie flat; e.g. with a wolfcraft roller trestle (art. no. 6119973).
- Avoid overloading the circular hand saw.
- Do not use grinding wheels.
- Connect the dust extraction system to the circular hand saw (if available).
- Use only recommend saw blades and select them depending on the material to be sawn.
- When sawing, always be prepared for the saw blade to catch the workpiece and hurl it against the operator.
- Recoil is the result of incorrect and/or inappropriate use of the saw. It can be prevented through suitable precautions, as described below.
- Hold the saw securely with both hands and place your arms in a position where you can absorb the recoil forces. Always position yourself to the side of the saw blade, never bring the saw blade in line with your body. Recoil can cause the circular saw to jump backwards.
- If the saw blade jams or you interrupt your work, switch off the saw and keep it in the material until the saw blade has come to a complete stop. Never attempt to remove the saw from the workpiece or pull it backwards while the saw blade is moving, as this can cause recoil. Identify and fix the cause of the saw blade jamming.
- Do not use blunt or damaged saw blades. Saw blades with blunt or incorrectly aligned teeth cause increased friction, jamming of the saw blade and recoil due to an excessively narrow saw gap.
- Do not use the guide rail for plunge cuts. The plunging saw blade can become blocked in hidden objects when sawing and cause recoil.
- Use the guide rail only with circular hand saws with a saw blade set to vertical (90 degrees).
- Do not clamp the circular hand saw on the mounting carriage.
- Make sure that the saw blade always runs parallel to the mounting carriage or to the guide rail.
Scope of delivery and assembly
- Check that the contents as illustrated are complete (Figure 1).
- Assemble the two parts of the guide rail using the connectors supplied. Start by inserting the plastic connector into the channel until it engages in the intended position. Then push the metal connector half-way into the second channel and tighten the two screws slightly. Connect the two rail parts vertically on a flat surface and tighten all the metal connector screws using the enclosed Allen key (Figures 2.1 - 2.6).
- Note: The plastic connector is difficult to insert into the channel when first used and causes abrasion to ensure an optimum fit. Any chips produced during insertion must be removed before the rail parts are fully pushed together.
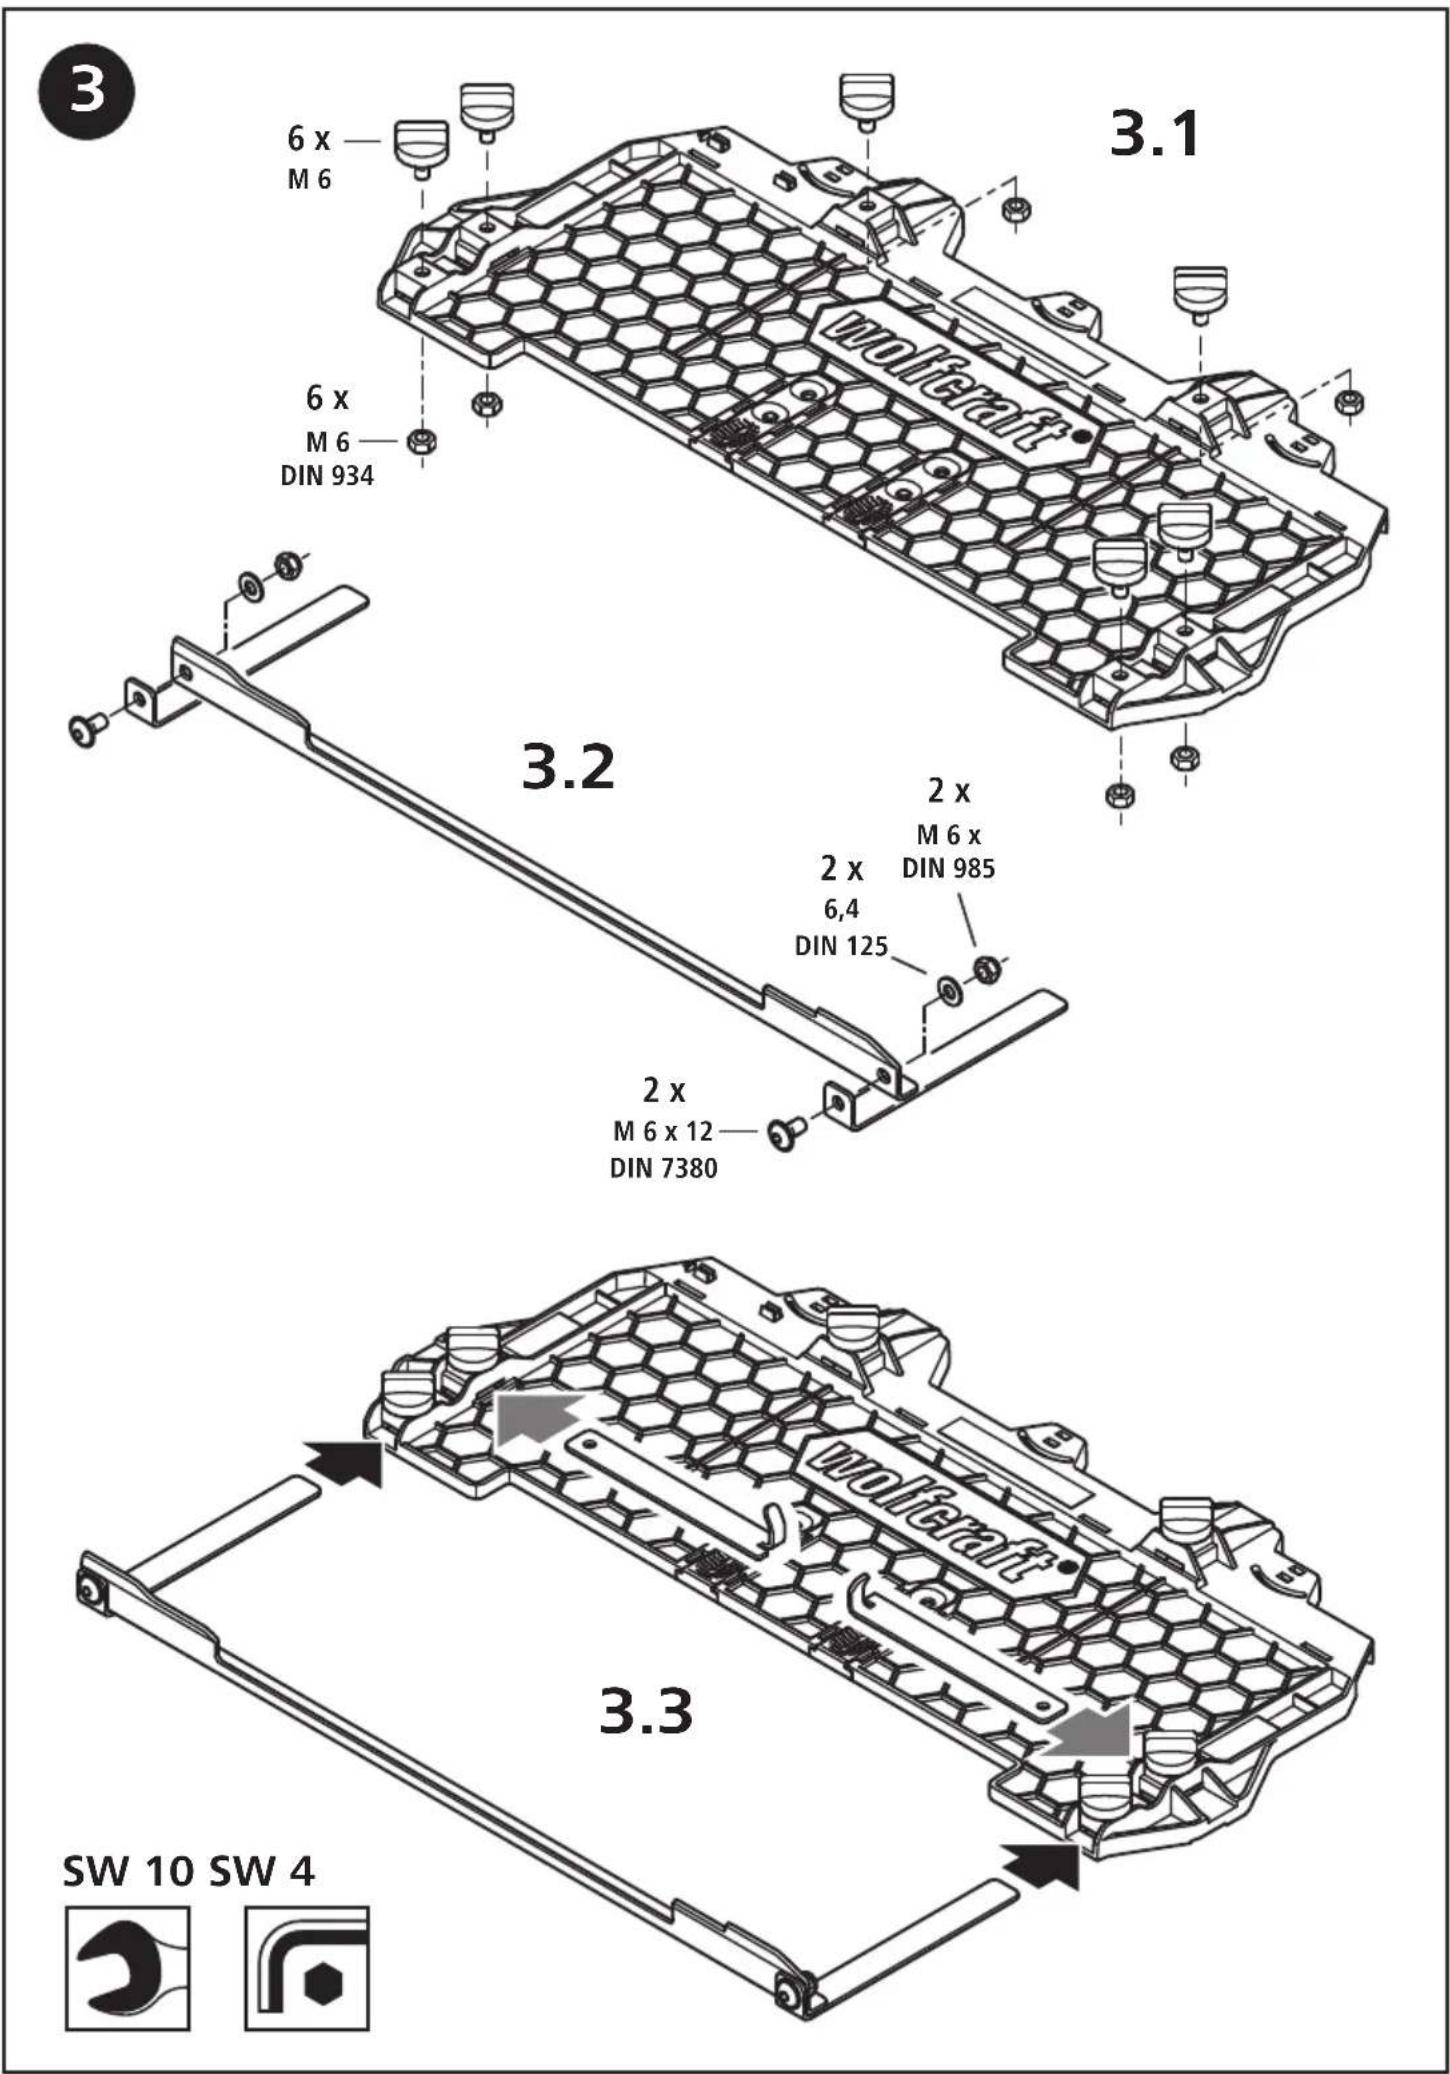
- Start by loosely assembling the handle screws together with the hex nuts on the mounting carriage (Figure 3.1).
- Assemble the side lay as illustrated (Figure 3.2).
- Push the side lay, both limit stops in sowing direction and the two rear limit stops into the mounts as illustrated. Tighten the handle screws (Figures 3.3, 3.4).
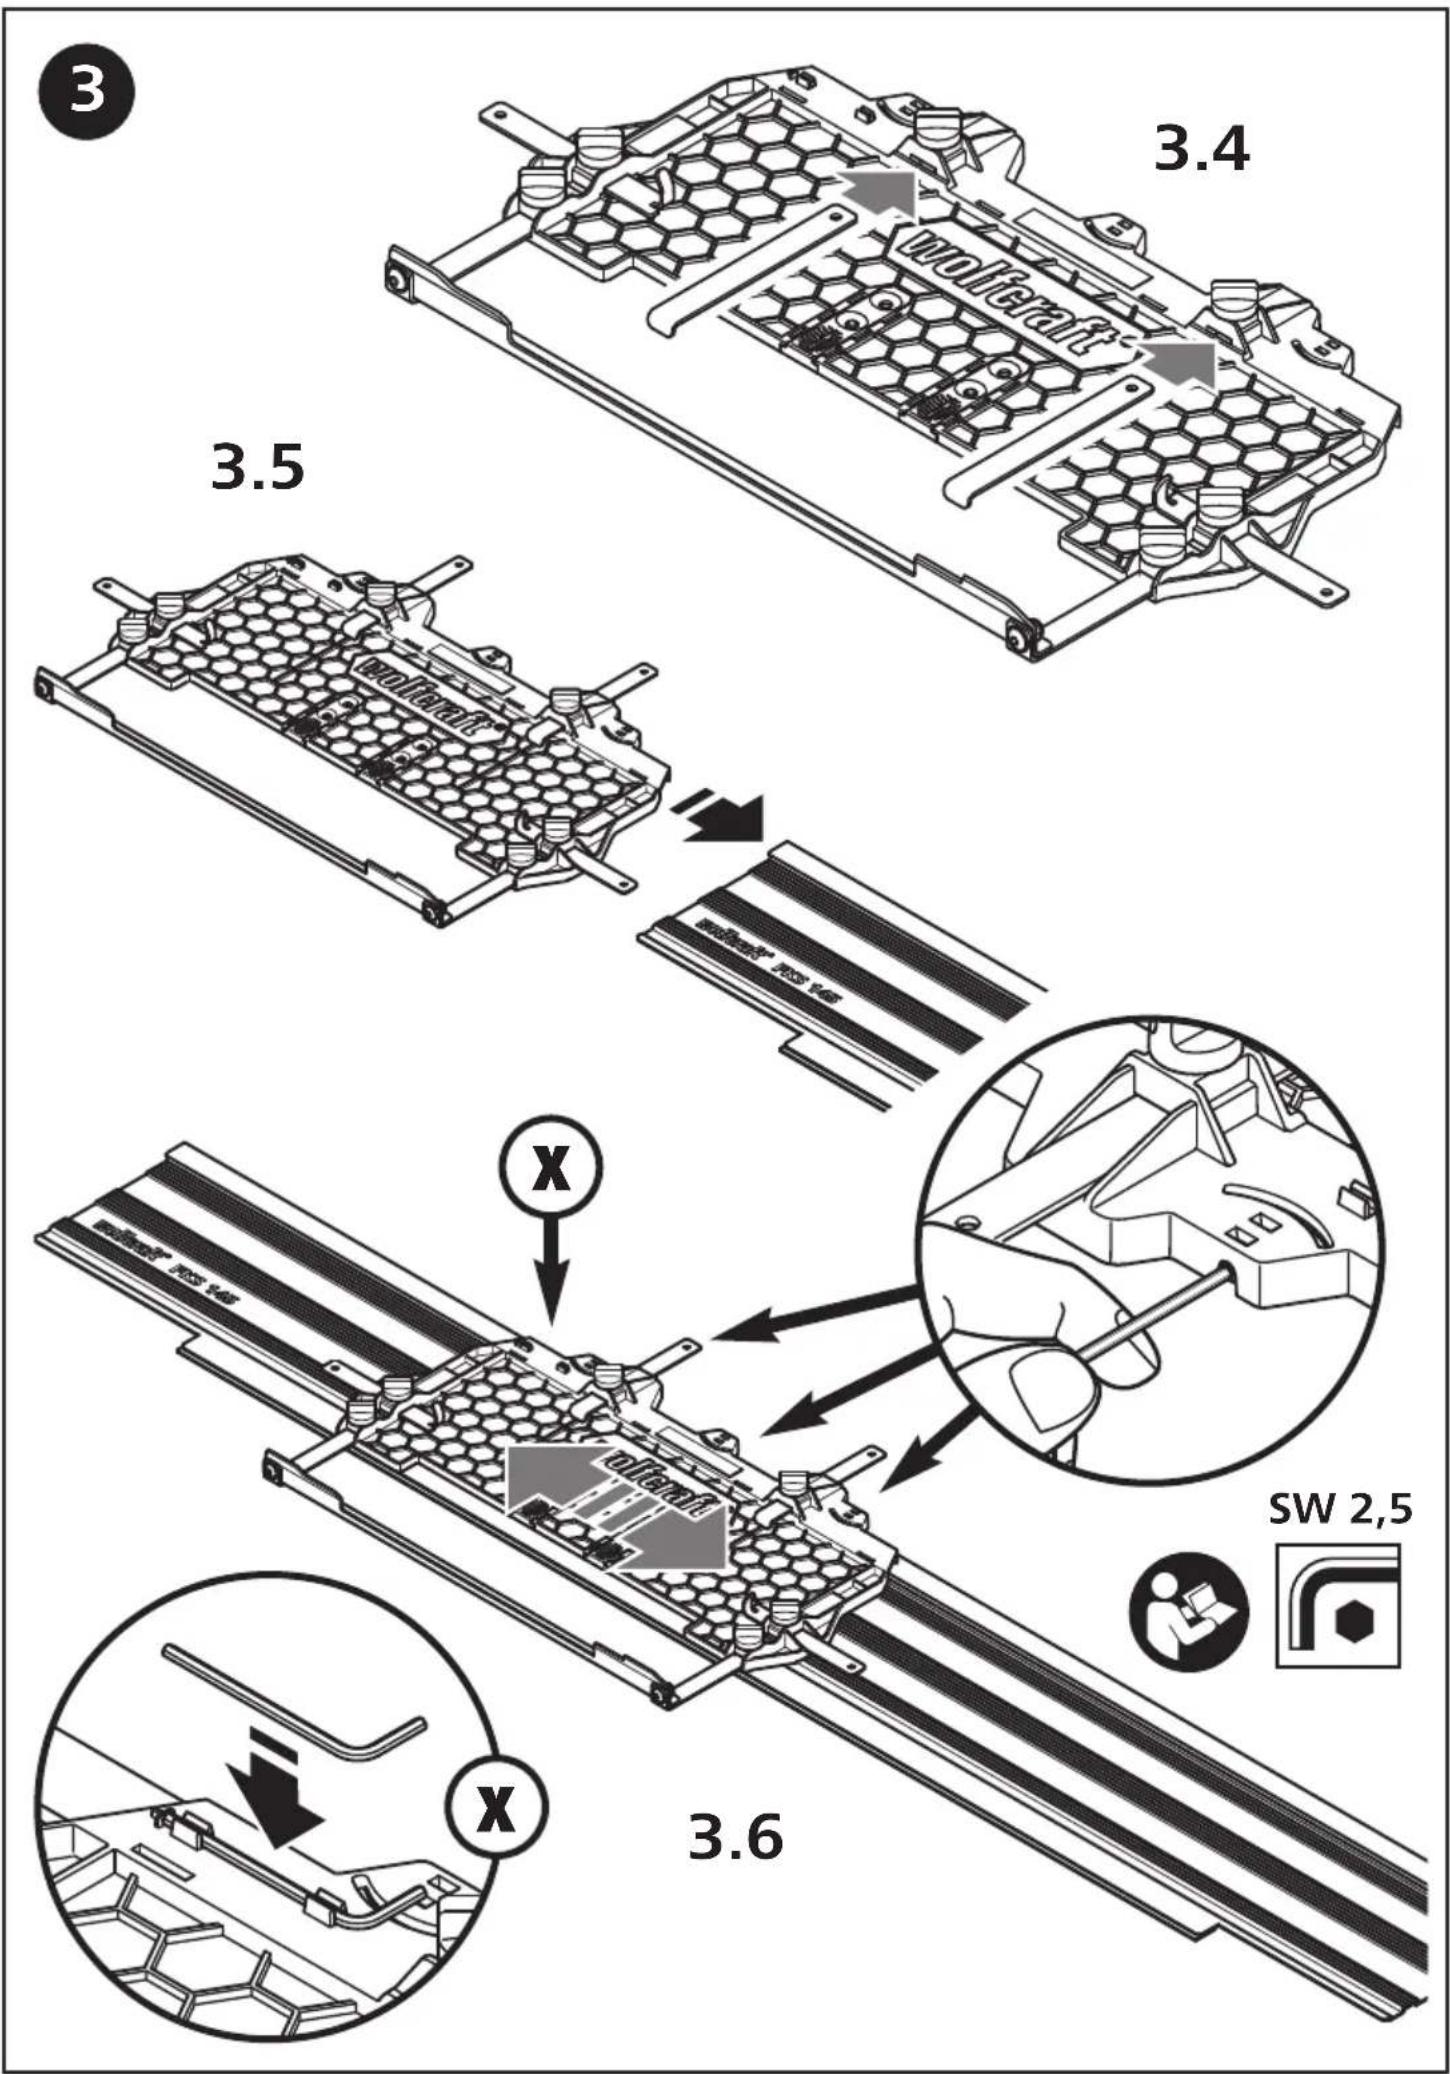
- Push the mounting carriage onto the guide rail as illustrated (Figure 3.5). Adjust the three set screws so that the mounting carriage can be pushed smoothly over the guide rail. The Allen key can be stowed close at hand on the mounting carriage after each adjustment (Figure 3.6).
Sawing with the guide rail
- DANGER: Disconnect the plug from the electric socket or remove the battery from the power tool before adjusting the tool or changing accessories. Accidents may occur if the power tool is started unintentionally.
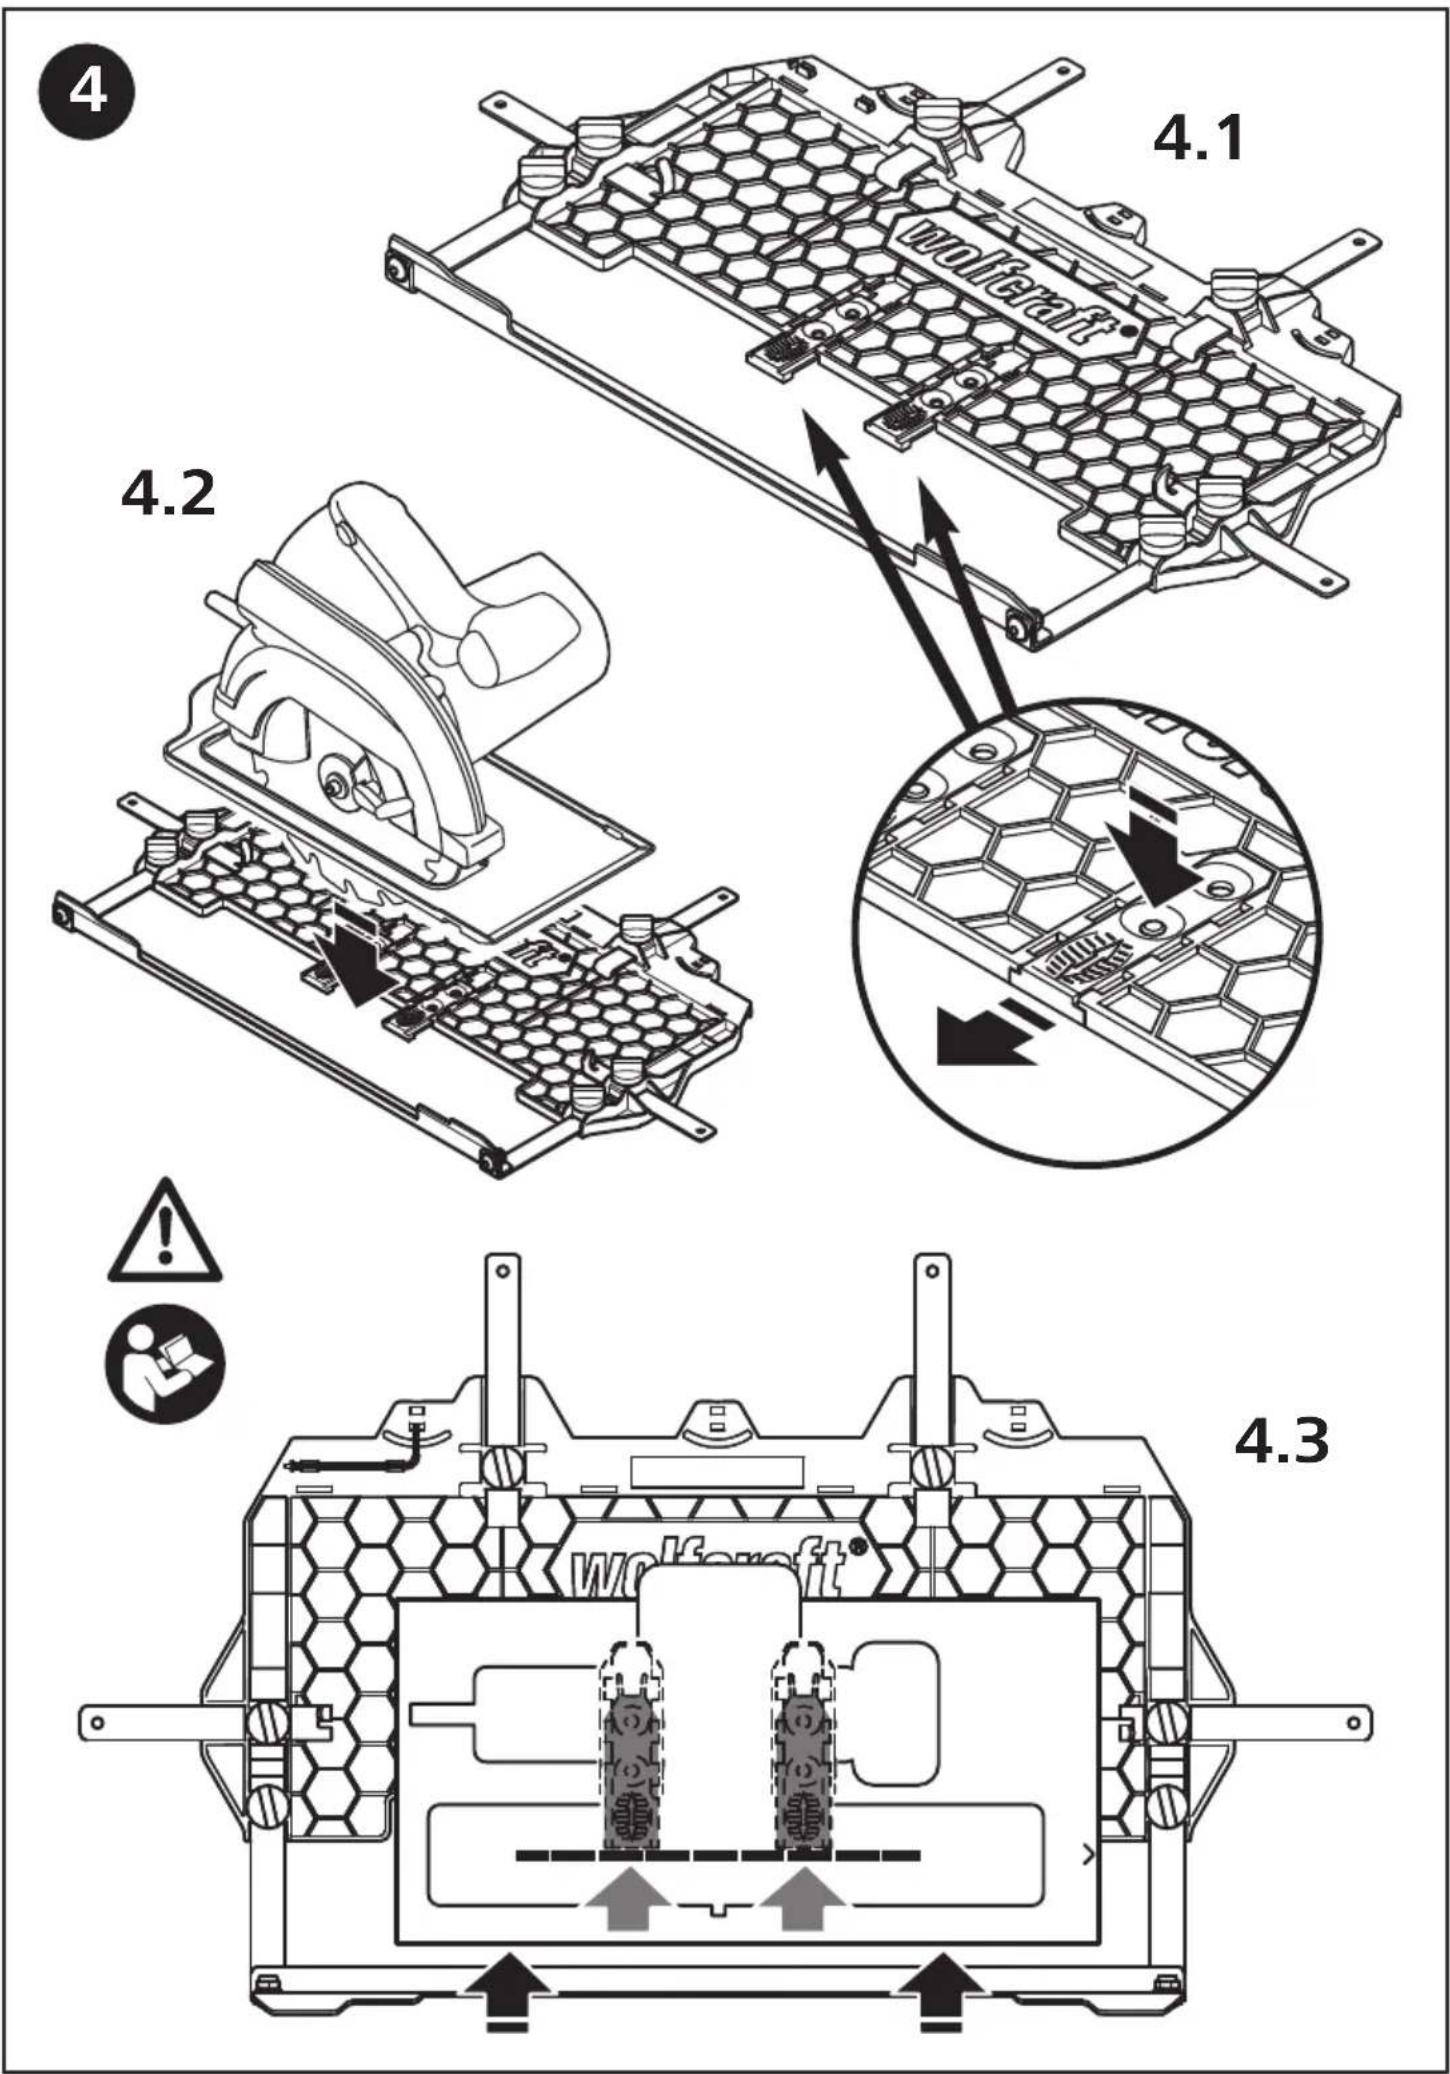
- Setting up the circular hand saw on the mounting carriage: place the mounting carriage on the edge of a table and extend both alignment clips (Figure 4.1). Retract the protective pendulum cover on the circular hand saw and position the machine on the mounting carriage (Figure 4.2).
- Align the saw blade of the circular hand saw parallel to the mounting carriage. To do this, slide the saw blade of the circular hand saw as far as the extended alignment clips and align the saw blade centrally to the clips (Bild 4.3).
- Caution: Do not use circular hand saws with base plate dimensions greater than the values indicated (Figure 5). Always align the circular hand saw with the saw blade and not the base plate when setting up the mounting carriage. The base plate and saw blade may not be parallel to each other.
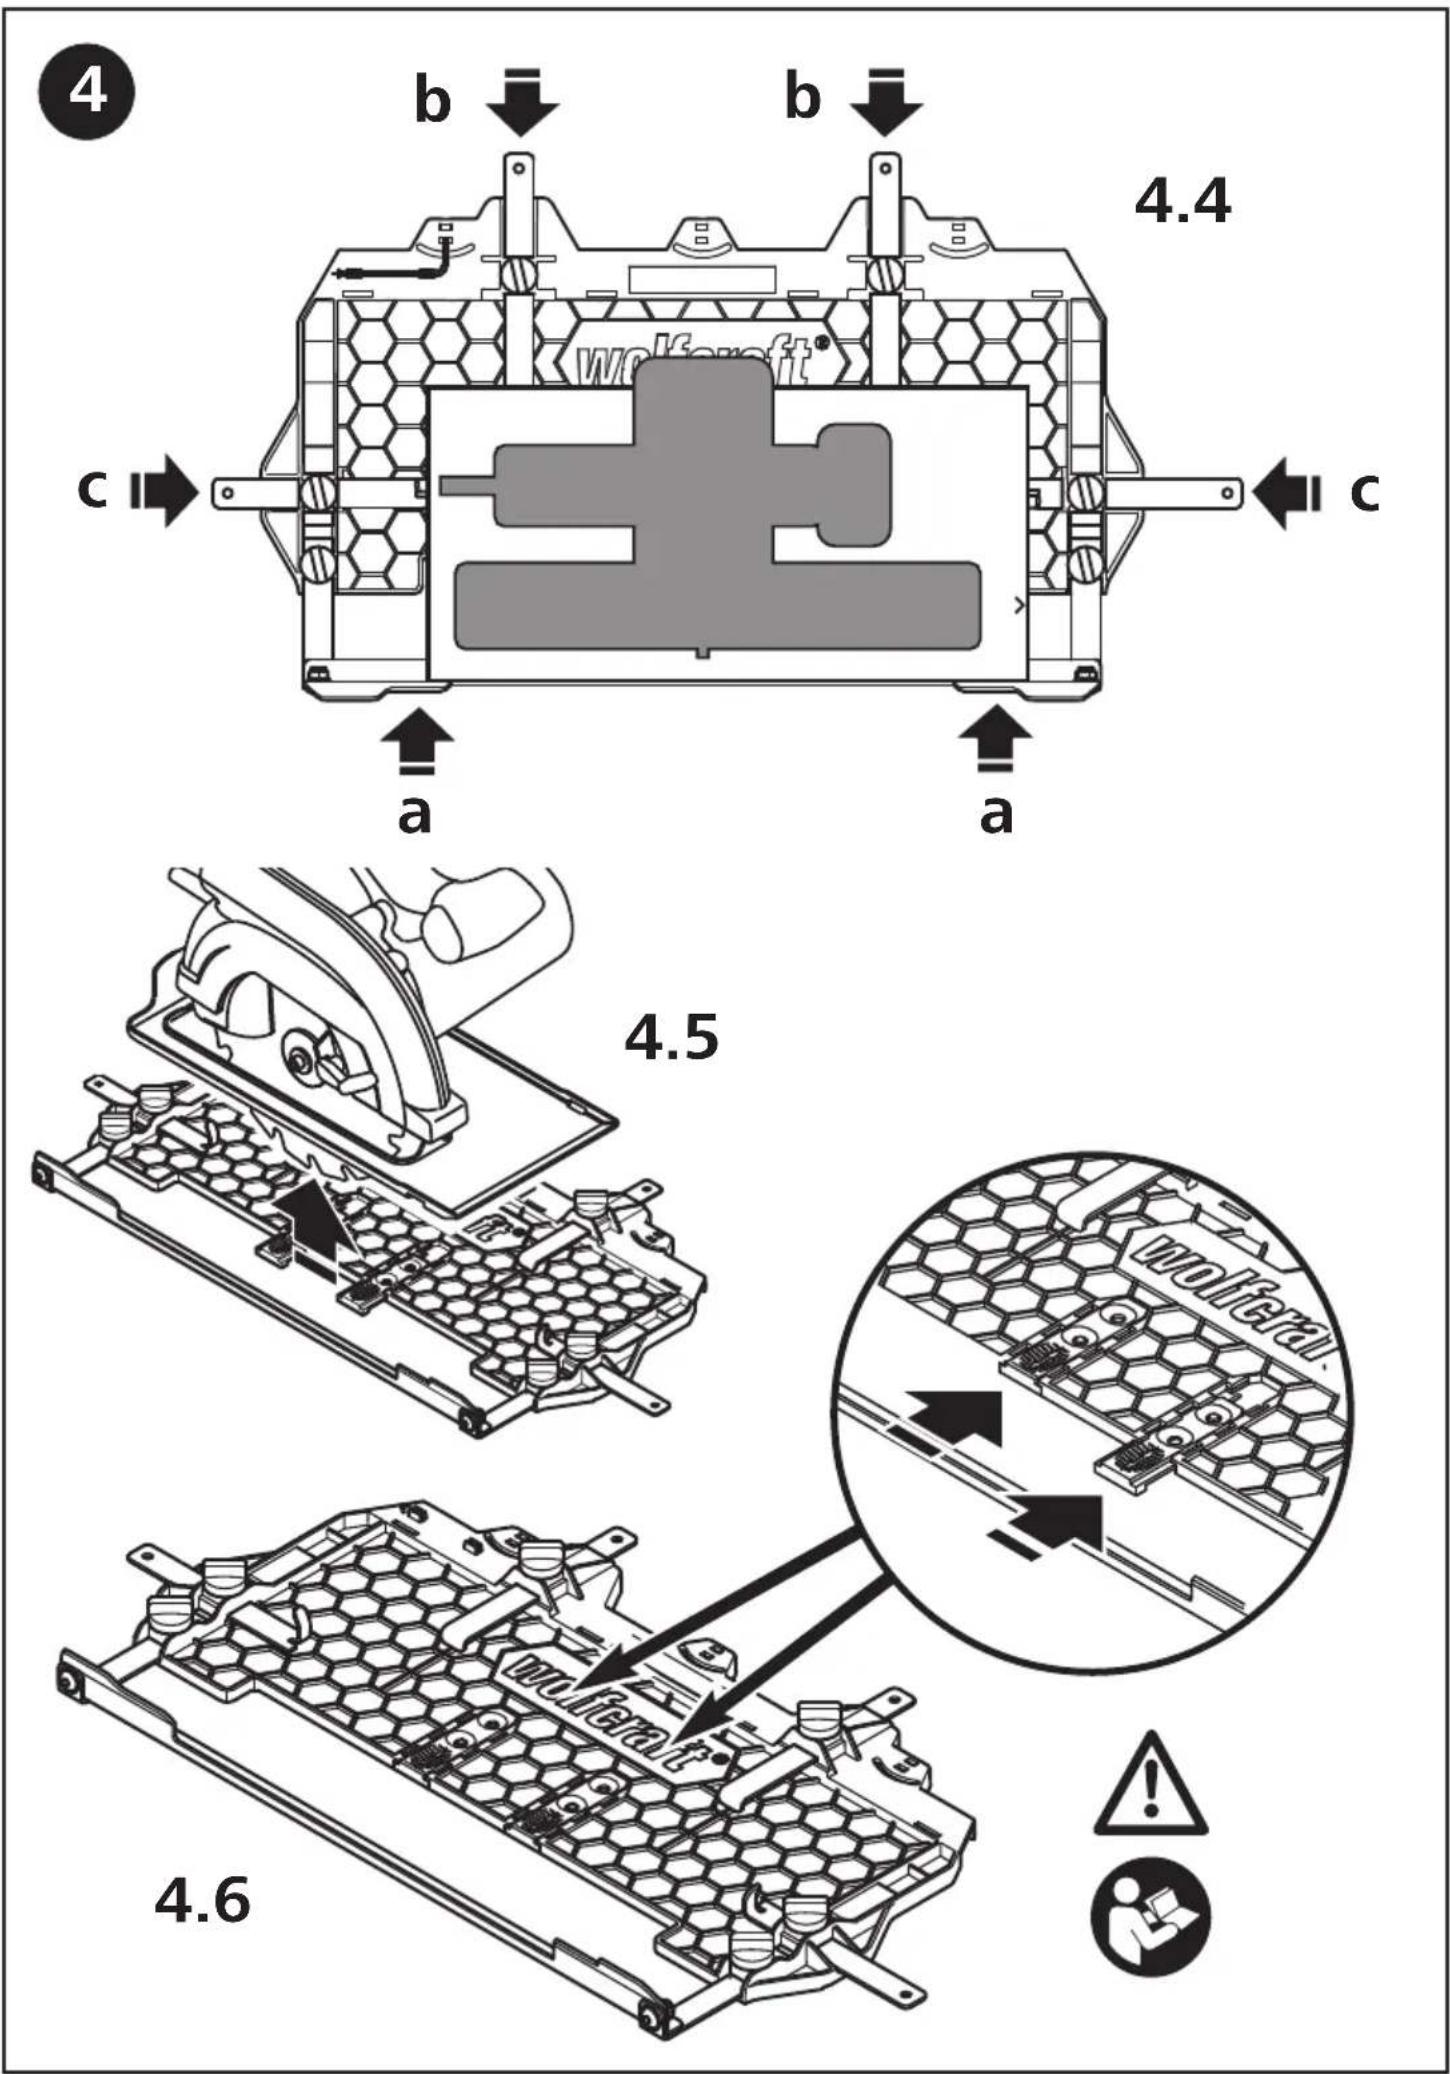
- Now start by pressing the large side lay (a) from the front onto the base plate of the circular hand saw and tighten both handle screws. Then push the four limit stops (b, c) towards the base plate and tighten the four handle screws (Figure 4.4).
- Lift the circular saw out of the mounting carriage and push the alignment clips back into their original position until they engage (Figure 4.5, 4.6).
- Annotation: For safety reasons, the circular hand saw is not clamped to the carriage, but rather only secured laterally. Once the circular hand saw has been set up on the mounting carriage, it can be removed and reinserted at any time without readjustment.
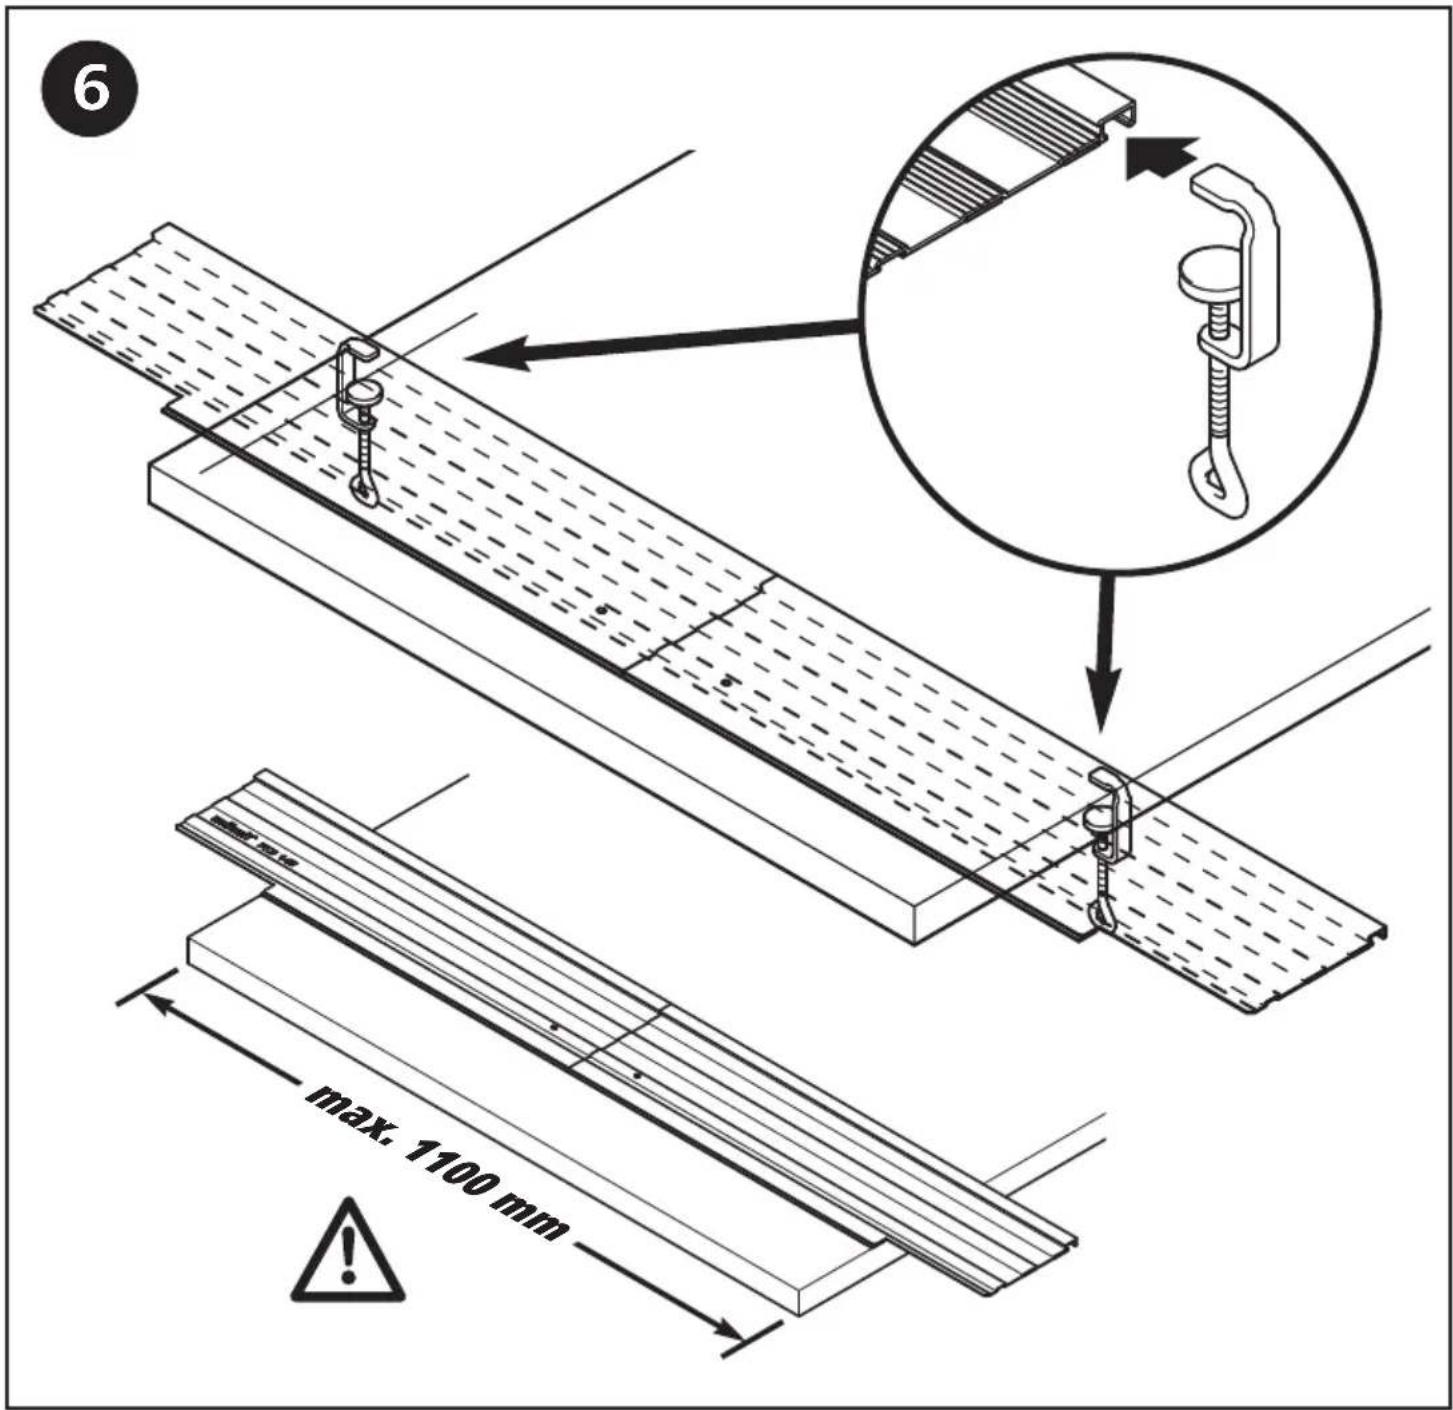
- It is recommended to start by making a test cut with the guide rail corresponding to the cutting length of the rail (1,100 mm).
- Fasten the guide rail to the workpiece you want to use for the test cut using the two clamps (Figure 6). The guide rail can be used to make cuts on workpieces up to a maximum width of 1,100 mm.
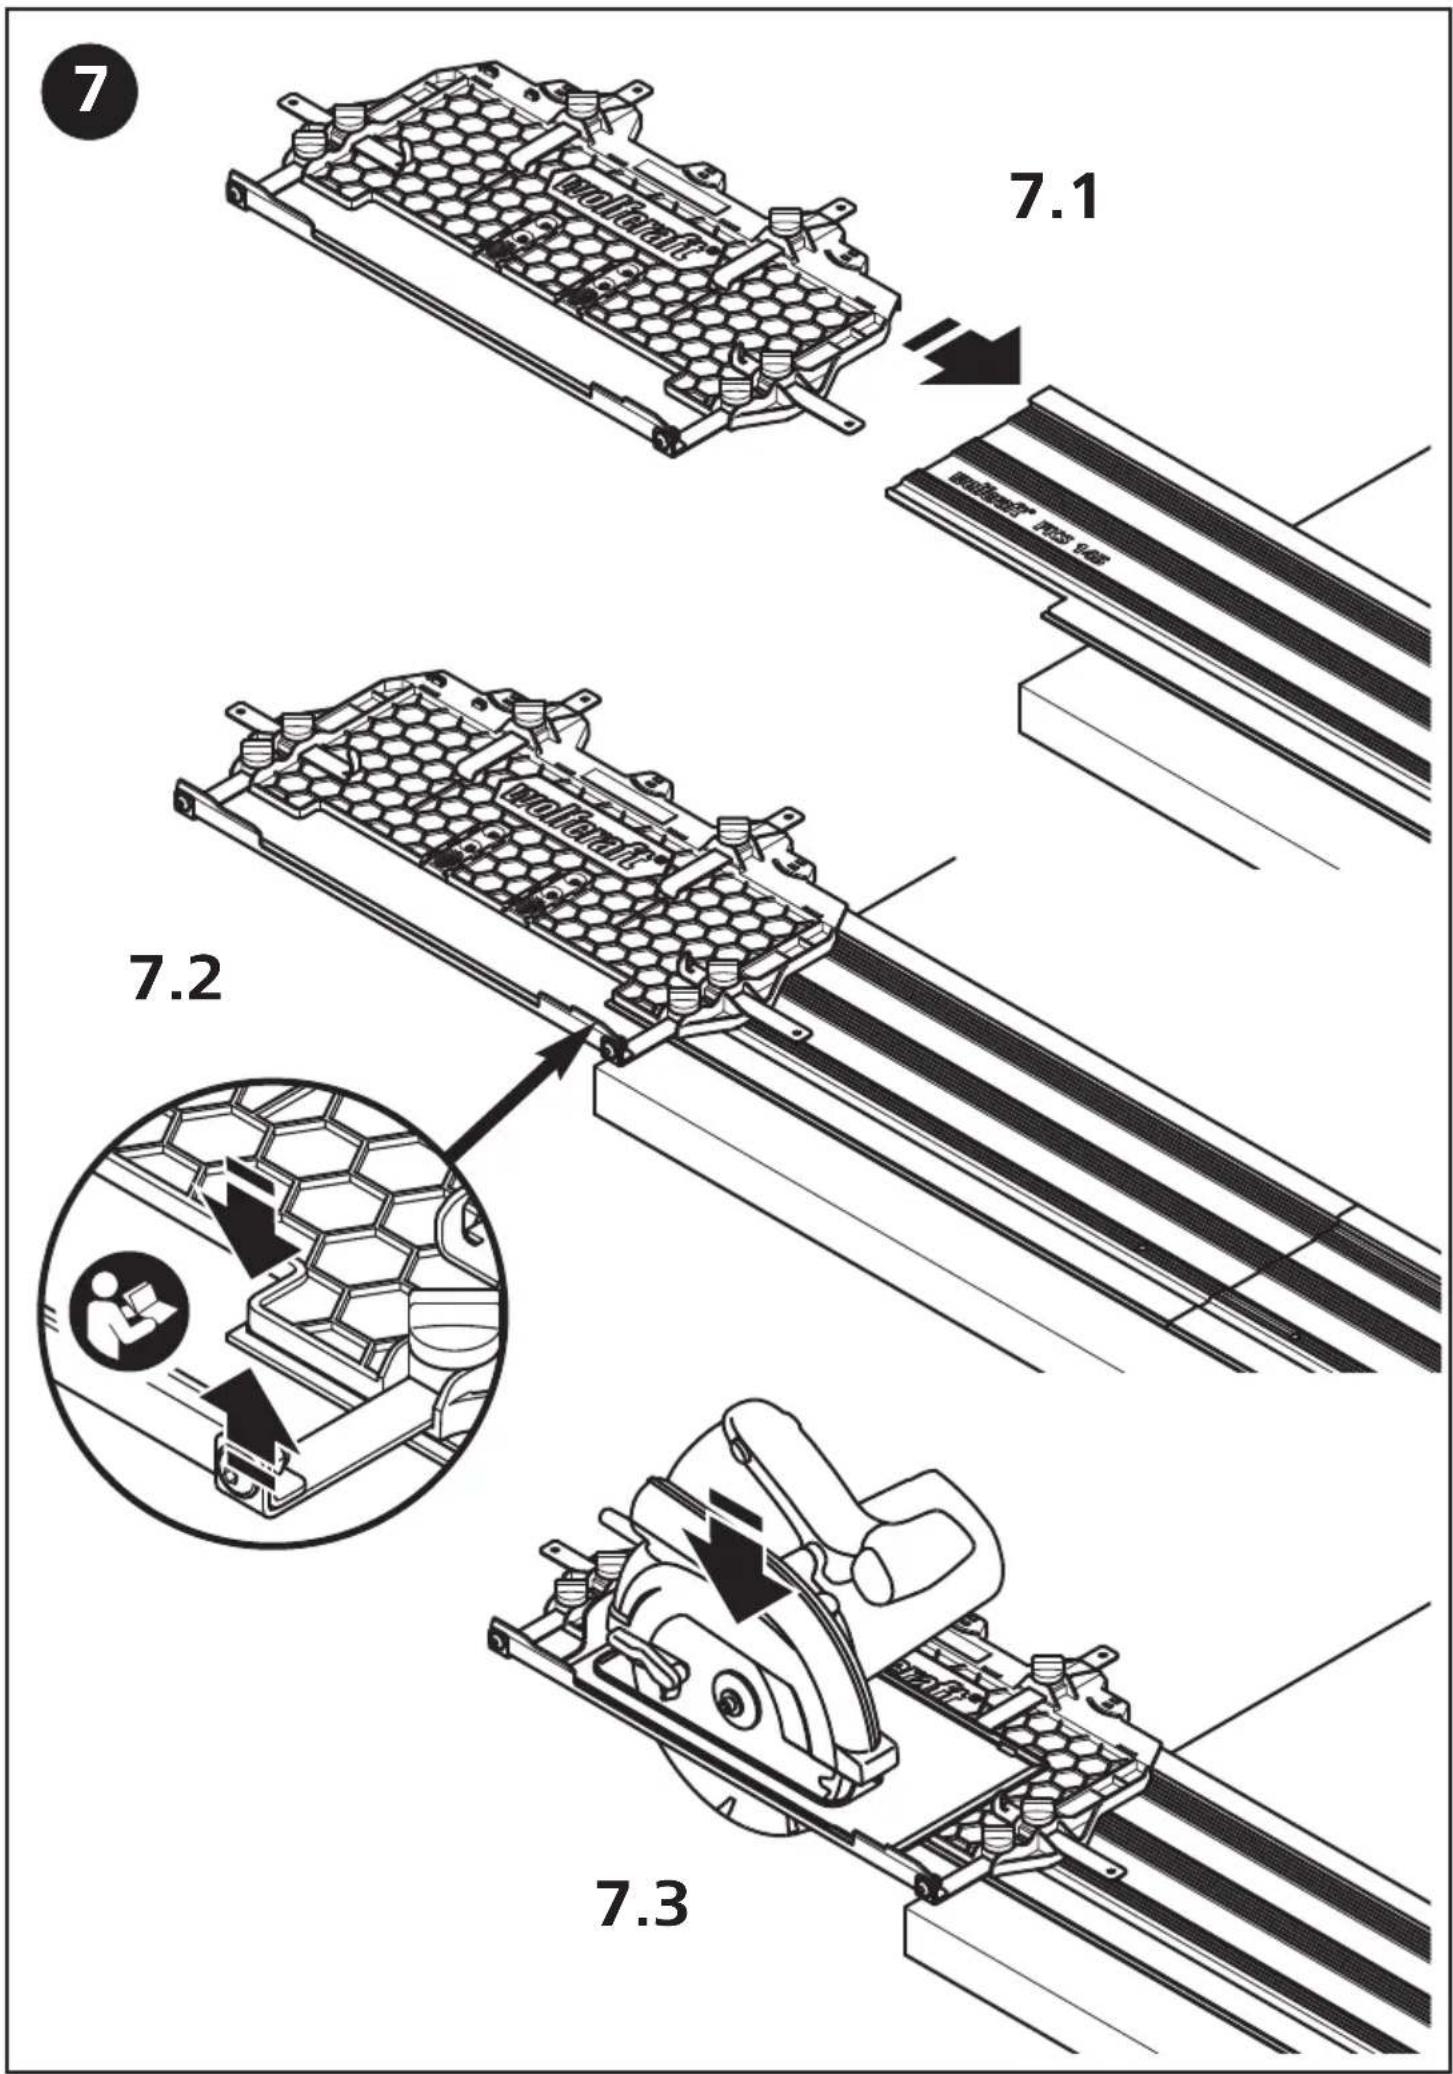
- Push the mounting carriage onto the rail up to the first notch. Then position the circular hand saw (Figures 7.1 - 7.3).
- Caution: Adjust the cutting depth of your circular saw so that the saw blade protrudes max. 3 mm on the underside of the workpiece. Switch on the circular hand saw now. Guide the circular hand saw steadily over the entire workpiece as far as the outfeed area (Figure 7.4). Switch off the circular hand saw. The protective pendulum cover is automatically opened by the leading edge and automatically closed again in the outfeed area of the guide rail (Figure 7.5).
- Cutting into the splinter shield: the splinter shield of the guide rail is cut into during the first cut with the circular hand saw and thus set to the exact dimension for the saw blade used. After cutting in, the leading edge of the splinter shield corresponds exactly to the cutting edge to be made on the workpiece.
- Now measure the actual workpiece (using a universal angle or similar) and make 2 - 3 markings (beginning, middle and end) where you want to saw.
- Secure the workpiece on a flat and secure surface. Place the edge of the splinter shield at your marks and secure the guide rail to the workpiece as described above using the two clamps. Push the mounting carriage onto the guide rail as described above and insert your circular hand saw into the mounting carriage.
- Switch off the circular hand saw after the cut is complete.
- If you want to place the guide rail on a further workpiece after a cut: lift rather than push the rail and place it in the desired position. Pushing the rail can result in the rail parts being pulled crookedly.
- Make a test cut after any changes to the circular saw settings.
- You can cut workpieces up to a maximum width of 2,200 mm with the extension set for guide rail accessory available separately (article 6914000) (Figure 8).
- The splinter shield is a wearing part. It may need to be changed if you use another saw blade or several different circular hand saws with the guide rail. To do this, remove the adhesive strip using a scraper, clean the rail using acetone and attach a new splinter shield (available as a spare part, see Figure 9).
- Annotation: The illustrations show the application for circular hand saws with the saw blade to the right of the grab handle. Figures 7.1 - 7.5 must be viewed mirror-inverted for circular hand saws with the saw blade to the left of the grab handle.
Environment
When disposing of the FKS 145 guide rail, please observe local disposal regulations.
Warranty statement
Dear DIY enthusiast,
You have purchased a high-quality wolfcraft appliance which we know you will enjoy using. wolfcraft appliances are built to high technical standards and undergo intensive development and testing before leaving the factory. Constant checks and regular tests during their production ensure a high standard of quality. Sound technical developments and reliable quality assurance give you the certainty that you have made the right purchase decision. For this wolfcraft product we grant you a 10 year guarantee from the date of purchase, provided the appliance is used exclusively for DIY purposes.
This warranty only covers damage to the object of purchase itself and only such damage that is attributable to material or manufacturing defects. This guarantee does not cover defects or damage attributable to improper operation or inadequate maintenance of the appliance. Moreover, the guarantee does not include the effects of normal wear, or defects or damage known to the customer upon conclusion of the purchase contract. Guarantee claims can only be asserted upon submission of the invoice/proof of purchase. The guarantee granted by wolfcraft does not restrict your legal rights as a consumer (supplementary performance, rescission or reduction, compensation for damages or expenses).
Warranty claims should be addressed to:
wolfcraft GmbH
Wolffstraße 1
56746 Kempenich
Germany
Introduction
(correspondence in English)
E
Mavrofidopoulos S.A.
Salaminos 1 & Mavromihali Str.
GR-185 45 Piraeus
Telefon: 0030 21 0413 6155
Telefax: 0030 21 0413 7692
info@mavrofidopoulos.gr
HR
Manal d.o.o.
Velimira Skorpika 1 a
10090 Zagreb
Telefon: 00385-1-3466400
Telefax: 00385-1-3466412
manal@manal.hr
RO MD
Steinel Distribution S.R.L.
Str. Campului Nr. 1, FSR HALA SCULARIE
RO-505400 Loc. Rasnov, Oras Rasnov
Telefon: 0040 (0) 268530 000
Telefax: 0040 (0) 268531 111
info@steinel.ro
BG
Tashev-Galving Ltd.
68, Kliment Ohridski Blvd.
BG-1756 Sofia
Telefon: 00359 70045454
Telefax: 00359 4392112
info@tashev-galving.com
SHB MN
Mi-lumen d.o.o.
Dositejeva 176
36000 Kraljevo
Telefon: 00381-36-231081
Telefax: 00381-36-312867
milumen@tron-inter.net
MK
FAMOD
Bul. Vidoe Smilevski 5
MK-1000 Skopje
Telefon: 00389 2 2431100
Telefax: 00389 2 2431105
famod@t-home.mk
EST
AS Tooma Tööriist
Männiku tee 107
EE-11215 Tallinn
Telefon: 00372 6 586229
Fax: 00372 6 546725
info@toomatool.ee
BY
UP "18"
Volgogradskaya 13
BY-220049 Minsk
Telefon: 00375 17 2807781
Fax 00375 17 2804854
info@up18.by
RUS
Centro Instrumentalnoj Torgovli
Molodogvardejskaya Ul 61
121351 Moskau
Tel.: +7 495 730 80 70
ci@centro-i.ru
wolfcraft GmbH
Wolffstraße 1
56746 Kempenich
Germany
www.wolfcraft.com