
120iBV - Leaf blower HUSQVARNA - Free user manual and instructions
Find the device manual for free 120iBV HUSQVARNA in PDF.
| Product type | Cordless leaf blower / vacuum |
| Brand | Husqvarna |
| Model | 120iBV |
| Weight (without battery) | 4.6 kg |
| Power supply | 36 V lithium-ion battery (40-B series) |
| Recommended battery | Husqvarna 40-B140 (4 Ah) |
| Charger | Husqvarna 40-C80 (100-240 V, 50-60 Hz) |
| Motor | Brushless (BLDC) 36 V |
| Max. air flow | 6.7 m³/min |
| Max. air speed | 50 m/s (111 mi/h) |
| Guaranteed sound power level | 100 dB(A) |
| Sound pressure level at operator's ear | 84 dB(A) |
| Vibration level (front/rear handle) | 1.4 / 1.7 m/s² |
| Operating modes | Blower, vacuum, ECO |
| Safety functions | Automatic stop after 1 min, safety switches for tubes, thermal protection |
| Maintenance | Regular cleaning of air intakes, checking screws, cleaning collection bag |
| Repairability | Genuine spare parts, authorized workshop recommended |
| Warranty | Refer to the manual or retailer |
Frequently Asked Questions - 120iBV HUSQVARNA
User questions about 120iBV HUSQVARNA
0 question about this device. Answer the ones you know or ask your own.
Ask a new question about this device
Download the instructions for your Leaf blower in PDF format for free! Find your manual 120iBV - HUSQVARNA and take your electronic device back in hand. On this page are published all the documents necessary for the use of your device. 120iBV by HUSQVARNA.
USER MANUAL 120iBV HUSQVARNA
EN Operator's manual 2-19
Transportation, storage and disposal.... 15
Technical data.... 16
Declaration of Conformity.... 18
Introduction
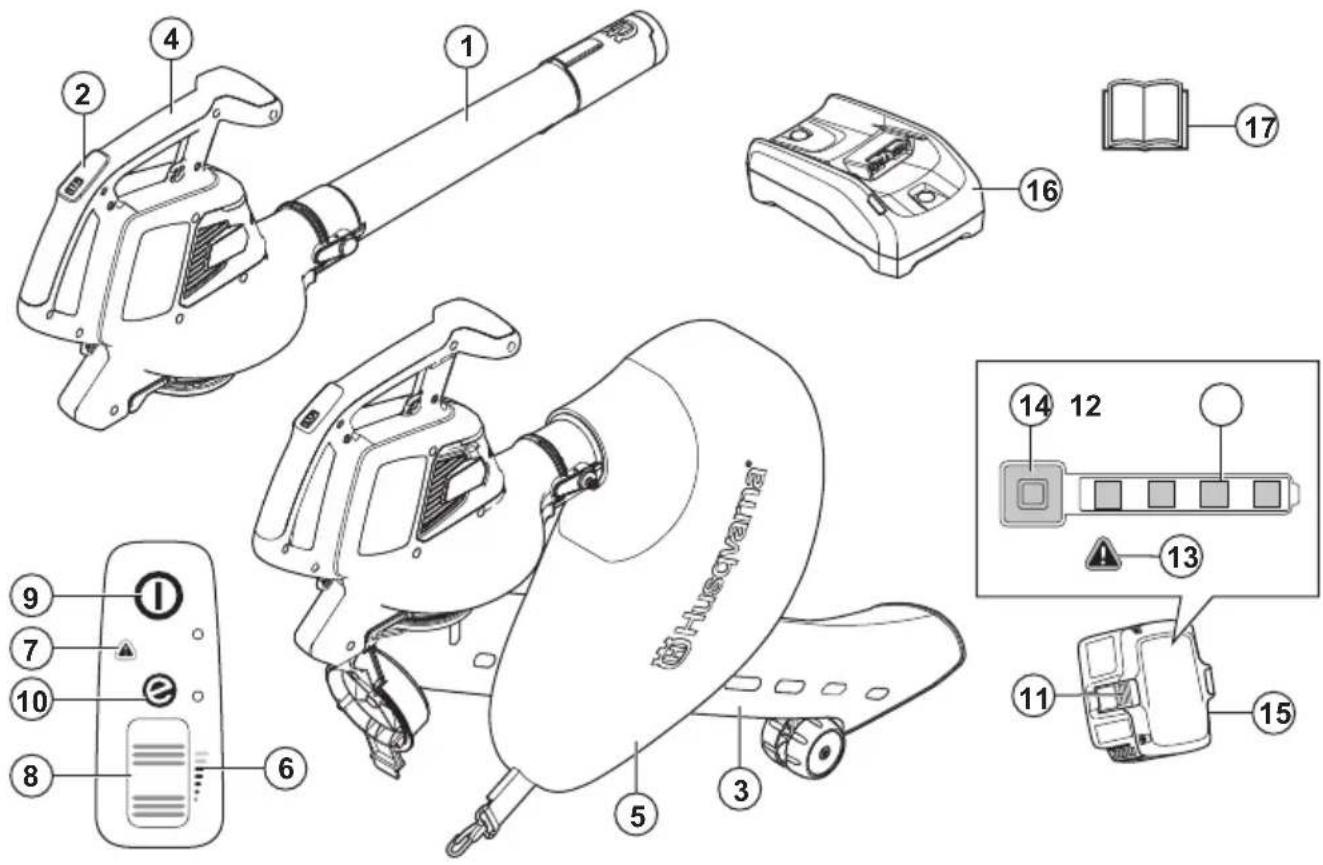
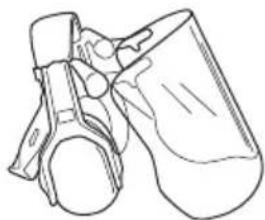
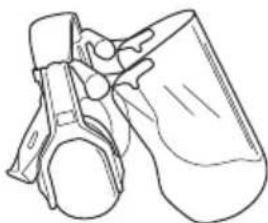
Product overview
-
Blower tube
-
Keypad
-
Vacuum tube
-
Handle
-
Collection bag
-
Airflow indicator
-
Warning indicator (error LED)
-
Power wheel
-
Start/stop button
-
SavE indicator
-
Battery release button
-
Battery status
-
Warning indicator (error LED)
-
Power and warning indicator
- Battery, included in the Husqvarna 120iBV blower kit only
- Battery charger, included in the Husqvarna 120iBV blower kit only
- Operator's manual
Product description
Husqvarna 120iBV is garden blower/vacuum model with an electric motor.
We have a policy of continuous product development and therefore reserve the right to modify the design and the appearance of the products without prior notice.
Intended use
Blower mode: The blower is designed for blowing dirt particles or grass cuttings away from paths, driveways, courtyards and the like. It is also designed for blowing grass cuttings, straw or leaves to create piles, or to remove dirt particles from corners, joints or gaps between tiles or bricks.
Vacuum mode: The vacuum is designed for vacuuming dry material. It includes leaves, grass, small twigs, and bits of paper.
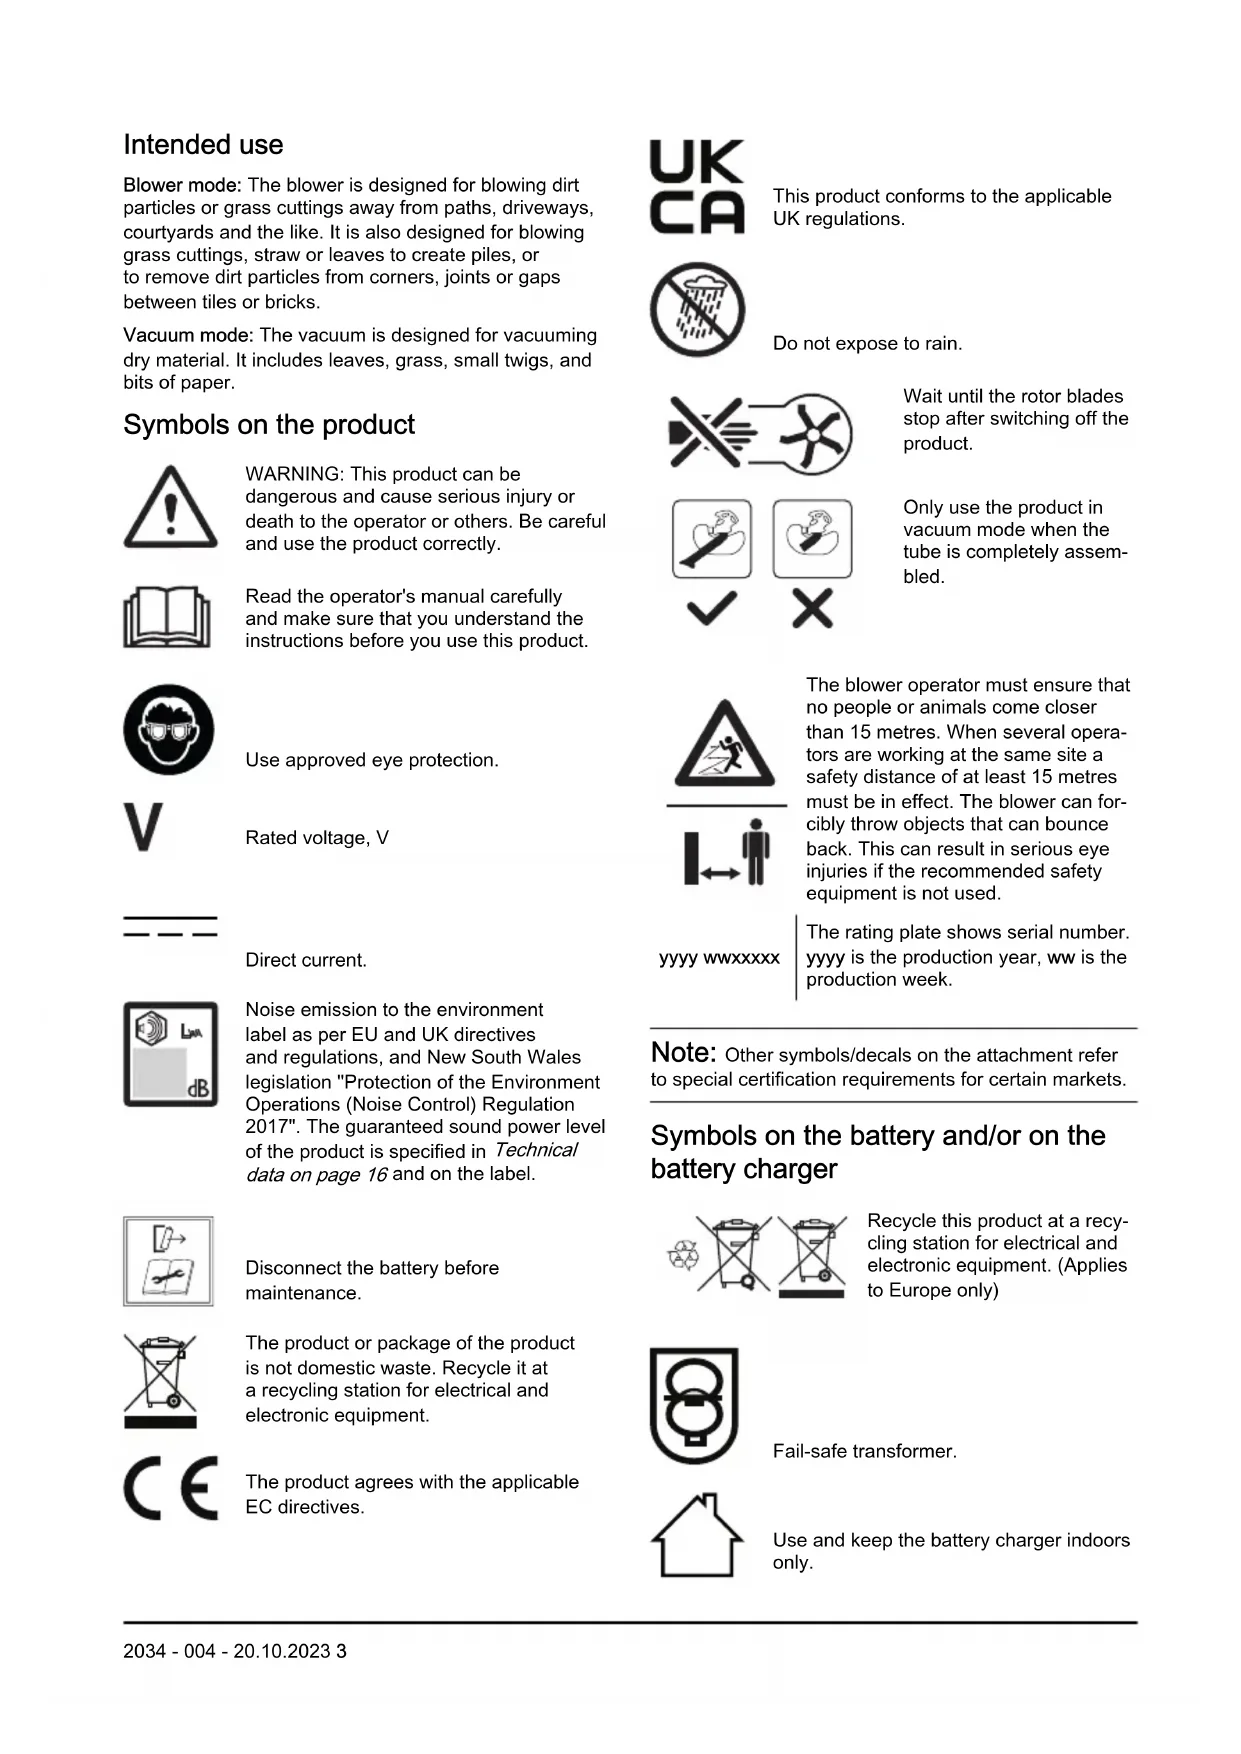
Symbols on the product

WARNING: This product can be dangerous and cause serious injury or death to the operator or others. Be careful and use the product correctly.
Read the operator's manual carefully and make sure that you understand the instructions before you use this product.

Use approved eye protection.

Rated voltage, V

Direct current.

Noise emission to the environment label as per EU and UK directives and regulations, and New South Wales legislation "Protection of the Environment Operations (Noise Control) Regulation 2017". The guaranteed sound power level of the product is specified in Technical data on page 16 and on the label.

Disconnect the battery before maintenance.
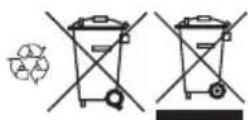
The product or package of the product is not domestic waste. Recycle it at a recycling station for electrical and electronic equipment.

The product agrees with the applicable EC directives.

This product conforms to the applicable UK regulations.

Do not expose to rain.
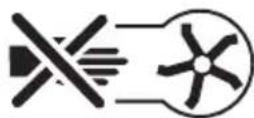
Wait until the rotor blades stop after switching off the product.

Only use the product in vacuum mode when the tube is completely assembled.
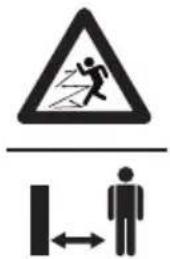
The blower operator must ensure that no people or animals come closer than 15 metres. When several operators are working at the same site a safety distance of at least 15 metres must be in effect. The blower can forcibly throw objects that can bounce back. This can result in serious eye injuries if the recommended safety equipment is not used.
yyyy wxxxxxx
The rating plate shows serial number. yyyy is the production year, ww is the production week.
Note: Other symbols/decals on the attachment refer to special certification requirements for certain markets.
Symbols on the battery and/or on the battery charger
Recycle this product at a recycling station for electrical and electronic equipment. (Applies to Europe only)
Fail-safe transformer.

Use and keep the battery charger indoors only.

Double insulation.
Manufacturer
Husqvarna AB
We are not responsible for damages to our product if:
• the product is incorrectly repaired.
- the product is repaired with parts that are not from the manufacturer or not approved by the manufacturer.
• the product has an accessory that is not from the manufacturer or not approved by the manufacturer.
- the product is not repaired at an approved service center or by an approved authority.
Safety
Safety definitions
Warnings, cautions and notes are used to point out specially important parts of the operator's manual.
WARNING: Used if there is a risk of injury or death for the operator or bystanders if the instructions in the manual are not obeyed.

CAUTION: Used if there is a risk of damage to the product and/or the attachment, other materials or the adjacent area if the instructions in the manual are not obeyed.
Note: Used to give more information that is necessary in a given situation.
General safety instructions

WARNING: Read the warning instructions that follow before you use the product.
- Read the instructions carefully to know the controls and the correct operation of the machine. Incorrect or careless use of the product can turn it into a dangerous tool that can cause serious or even fatal injury to the operator or others.
- Under no circumstances may the design of the product be modified without the permission of the manufacturer. Never use a product that has been modified in any way from its original specification and always use original accessories. Non-authorized modifications and/or accessories can result in serious personal injury or the death of the operator or others. Your warranty may not cover damage or liability caused by the use of non-authorized accessories or replacement parts.
• This product produces an electromagnetic field during operation. This field may under some
circumstances interfere with active or passive medical implants. To reduce the risk of serious or fatal injury, we recommend persons with medical implants to consult their physician and the medical implant manufacturer before operating this product.
- Remove the battery from the product during charging.
General power tool safety warnings
Check before starting
- Inspect the working area. Remove all loose objects, such as stones, broken glass, nails, steel wire, string etc. that could be thrown out.
• Always remove the battery to prevent the machine being started by accident. Always disconnect the battery before any maintenance on the machine. - Before using the machine and after any impact, check for signs of wear or damage and repair as necessary.
- Only use original spare parts.
- The machine operator must ensure that no people or animals come closer than 15 metres while working. When several operators are working in the same area the safety distance should be at least 15 metres.
- Do an overall inspection of the machine before use, see maintenance schedule.
• National or local regulations may regulate the use. Comply to given regulations.
Personal safety
- Stay alert, watch what you are doing and use common sense when operating a power tool. Do not use a power tool while you are tired or under the influence of drugs, alcohol or medication. A moment of inattention while operating power tools may result in serious personal injury.
- Keep bystanders away.
• This appliance is not intended for use by person (including children) with reduced physical, sensory or mental capabilities, or lack of experience and knowledge, unless they have been given supervision
or instruction concerning use of the appliance by a person responsible for their safety. Children should be supervised to ensure that they do not play with the appliance.
- Never allow children or people unfamiliar with these instructions to use the product. Local regulations may restrict the age of the operator.
- Keep unauthorised persons at a distance. Children, animals, onlookers and helpers should be kept outside the safety zone of 15 m (50 ft.). Stop the machine immediately if anyone approaches.
- Store the equipment in a lockable area so that it is out of reach of children and unauthorized persons.
- Do not operate the machine on a paved or gravel surface where ejected material could cause injury.
- While operating the machine always wear substantial footwear and long trousers. Do not operate the machine when barefoot or wearing open sandals. Avoid wearing clothing that is loose fitting or that has hanging cords or ties.
- Do not wear loose clothing or jewellery that can be breathed into the air inlet. Keep long hair away from the air inlets.
- Never use the machine if you are tired, if you have drunk alcohol, or if you are taking medication that could affect your vision, your judgement or your coordination.
- Wear personal protective equipment. See instructions under the heading "Personal protective equipment".
• Always remove the battery when passing the machine to another person. - Keep in mind that it is you, the operator that is responsible for not exposing people or their property to accidents or hazards.
Power tool use and care
- Never use a machine that has been modified in any way from its original specification. Never use the machine near explosive or flammable materials.
- Never use a machine that is faulty. Carry out the safety checks, maintenance and service instructions described in this manual. Some maintenance and service measures must be carried out by trained and qualified specialists. See instructions under the heading Maintenance.
- Only use original spare parts.
- Always ensure that ventilation openings are kept clear of debris.
- All covers, guards and handles must be fitted before starting.
- Only use the machine in daylight or in other well-lit conditions.
-
Never use the machine in bad weather, for instance in fog, in rain, damp or in wet locations, strong winds, intense cold, risk of lightning, etc. Extremely hot weather may cause overheating of the machine. Operation in bad weather is tiring and can lead to dangerous conditions, for instance slippery surfaces.
-
If the machine starts vibrating abnormally, stop the machine and remove the battery.
- Walk, never run.
Safety instructions for operation

WARNING: Read the warning instructions that follow before you use the product.
- If you encounter a situation where you are uncertain how to proceed you should ask an expert. Contact your dealer or your service workshop. Avoid all usage which you consider to be beyond your capability.
- Make sure that you can move and stand safely. Check the area around you for possible obstacles (roots, rocks, branches, ditches, etcetera) in case you have to move suddenly. Take great care when you work on sloping ground.
- Keep a good balance and a firm foothold at all times. Do not overreach.
- Listen out for warning signals or shouts when you wear hearing protection. Always remove your hearing protection as soon as the product stops.
- Do not operate the product near open windows.
- Show consideration to persons in your surroundings by avoiding using the product at unsuitable times, such as late in the evening or early in the morning. Follow local regulations and ordinances.
- Use the product with the lowest possible airflow. It is seldom necessary to use full airflow, and many work procedures can be done at half airflow. A lower airflow means less noise and less dust, and it is also easier to keep control over the rubbish collected together/moved.
- In dusty conditions slightly dampen the surface when using the product.
- Use a rake or a brush to release rubbish stuck to the ground.
- Hold the opening of the blower as close to the ground as possible.
- Observe your surroundings. Direct the product away from persons, animals, play areas, cars etc..
- Minimize the blowing time by lightly wetting dusty areas or using spray equipment.
- Be aware of the wind direction. Work with the wind to make your work easier.
- Stop the product and remove the battery if the product starts to vibrate abnormally.
- Using the blower to move large piles is time consuming and creates unnecessary noise.
- Clean up afterwards. Make sure that you have not blown rubbish into someone's garden.
- Do not run with the product.
• The powerful currents of air can move objects at such a speed that they can bounce back and cause serious eye injuries.
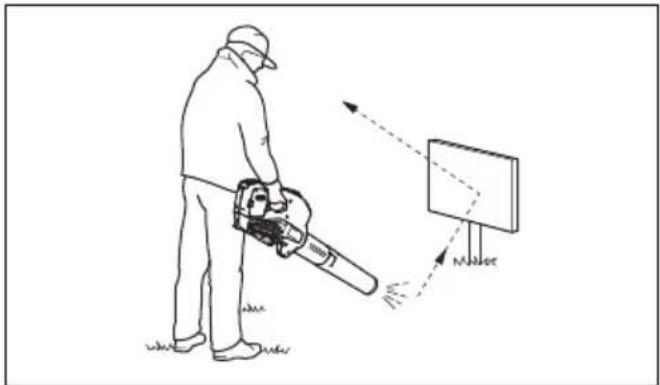
- Do not direct the airflow towards people or animals.
- Stop the motor before you assemble or dismantle accessories or other parts.
- Keep all parts of your body away from hot surfaces.
- Never put the product down when it is activated unless you have it in clear sight.
- Stop the machine, and remove the battery. Make sure that all moving parts have come to a complete stop:
• whenever you leave the machine
• before clearing blockages or unclogging chute
- before checking, cleaning or working on the machine
- Immediately shut off the power source and allow the machine to stop if the cutting mechanism hits any foreign objects or if the machine should start making any unusual noise or vibration. Disconnect the battery from the machine and take the following steps before restarting and operating the machine:
- examine for damage
- replace or repair any damaged parts
- check for and tighten any loose parts
- Shut off the power source and disconnect the machine from battery before cleaning unwanted material if the machine becomes clogged.
- Do not transport this machine while the power source is running.
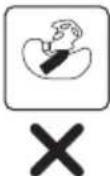
- Do not tilt the machine while the power source is running.
- The blower must not be used while on a ladder or scaffolding.

natural_image
Line drawing of a worker using a power tool on a ladder, crossed by a diagonal line (no text or symbols)- Do not use the product unless you are able to call for help in case of an accident.
- Watch out for thrown objects. Stones, rubbish, etc., can be thrown up into the eyes causing blindness or serious injury.
- Use a residual-current device (RCI) for increased security when you charge the product. A residual-current device is fitted to protect operators in case an electrical fault should occur.
- This product is renowned for its low vibration load. Overexposure to vibration can lead to circulatory damage or nerve damage in people who have impaired circulation. Contact your doctor if you experience symptoms of overexposure to vibration. Such symptoms include numbness, loss of feeling, tingling, pricking, pain, loss of strength, changes in skin colour or condition. These symptoms normally appear in the fingers, hands or wrists.
- Only use the product for the purpose it was intended for.
- It is not possible to cover every conceivable situation you can face. Always exercise care and use your common sense. Avoid all situations which you consider to be beyond your capability. If you still feel uncertain about operating procedures after reading these instructions, you should consult an expert before continuing.
Personal protective equipment
WARNING: Read the warning instructions that follow before you use the product.
• Always use approved personal protective equipment when you use the product. Personal protective equipment cannot fully prevent injury but it decreases the degree of injury if an accident does occur. Let your dealer help you select the right equipment.
- Long term exposure to noise can result in damaged hearing. In general, battery powered products are relatively quiet but damage can result from a combination of noise level and long usage. recommends that operators use hearing protectors when using products for a longer coherent time of a day. Continual and regular users should have their hearing checked regularly. Note that hearing
protectors limit the ability to hear sounds and warning signals.
natural_image
Line drawing of a mechanical component or device (no text or symbols)- Use approved eye protection. If you use a visor, you must also use approved protective goggles. Approved protective goggles must comply with the ANSI Z87.1 standard in the USAs or EN 166 in EU countries.
natural_image
Line drawing of a mechanical component or device with no visible text or symbols- Use clothing made of a strong fabric. Always use heavy, long pants and long sleeves. Do not use loose clothing that can catch on twigs and branches. Do not wear jewelry, short pants, sandals or go with bare feet. Put your hair up safely above shoulder level.
- Keep first aid equipment close at hand.
- A breathing mask should be used when there is a risk of dust.
Safety devices on the product
WARNING: Read the warning instructions that follow before you use the product.
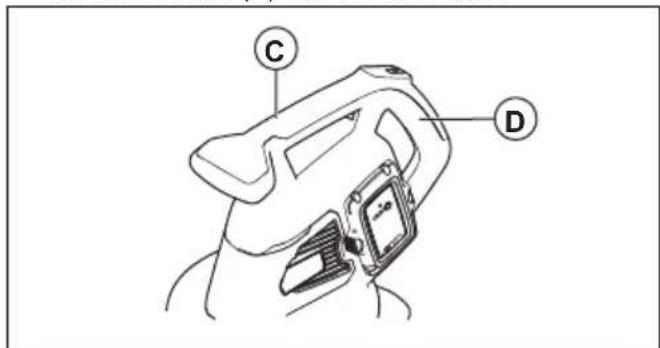
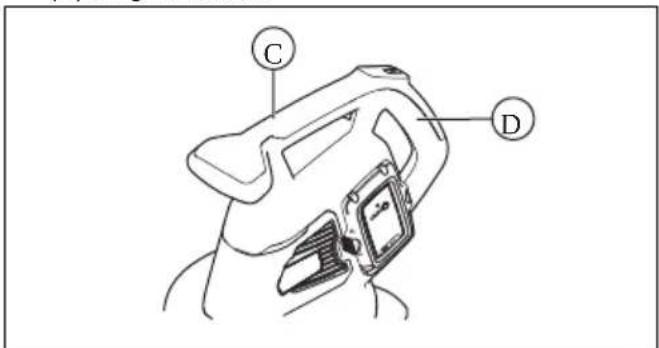
- In this section the product's safety features, its purpose and how checks and maintenance should be carried out to ensure that it operates correctly. See instructions under the heading Product overview on page 2 to find where these parts are located on your product.
• The life span of the product can be reduced and the risk of accidents can increase if product maintenance is not carried out correctly and if service and/or repairs are not carried out professionally. If you need further information please contact your nearest servicing dealer.
- Never use a product with defective safety components. The product's safety equipment must be inspected and maintained as described in this section. If your product fails any of these checks, contact your service agent to get it repaired. - All servicing and repair work on the product requires special training. This is especially true of the product's safety equipment. If your product fails any of the checks described below you must contact your service agent. When you buy any of our products we guarantee the availability of professional repairs and service. If the retailer who sells your product is not a servicing dealer, ask him for the address of your nearest service agent.
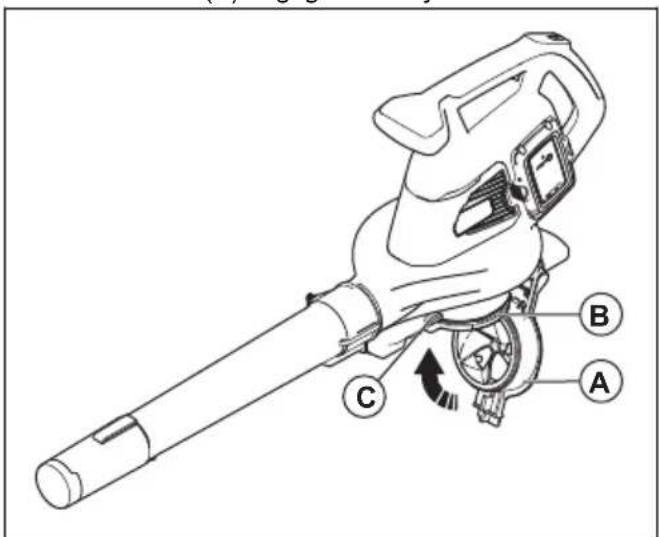
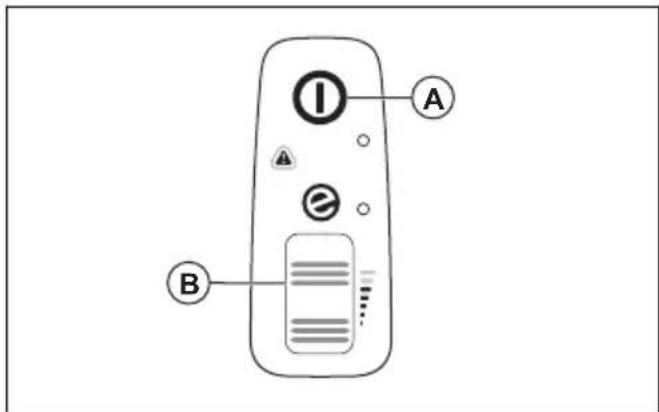
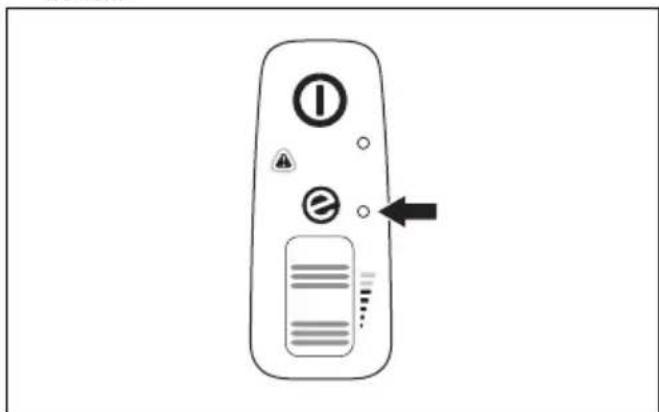
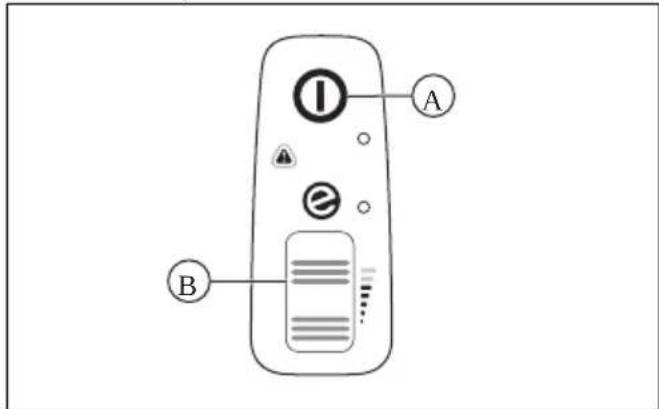
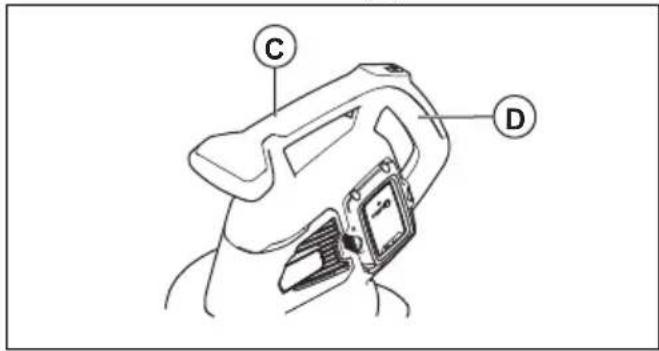
To do a check of the keypad
- Push and hold the start/stop button (A).
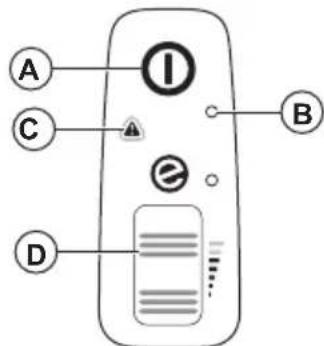
a) The product is on when the LED (B) comes on. b) The product is off when the LED (B) is out.
-
Refer to User interface on page 14 if the warning indicator (C) comes on or flashes.
-
Push and release the power wheel (D) to make sure that it moves freely.
Battery safety

WARNING: Read the warning instructions that follow before you use the product.
- Only use the 40-B series batteries that we recommend for your product. Refer to Approved batteries on page 17. The batteries are software encrypted.
- Use the rechargeable 40-B series batteries as a power supply for the related Husqvarna products only. To prevent injury, do not use the battery as a power supply for other devices.
- Risk of electrical shock. Do not connect the battery terminals to keys, screws or other metal. This can cause a short circuit of the battery.
- Do not use batteries that are non-rechargeable.
- Do not put objects into the air slots of the battery.
-
Keep the battery away from sunlight, heat or open flame. The battery can cause burns and/or chemical burns.
-
Keep the battery away from rain and wet conditions.
- Keep the battery away from microwaves and high pressure.
- Do not try to disassemble or break the battery.
- Use the battery in temperatures between -10^ (14 °F) and 40^ (104 °F).
- Do not clean the battery or the battery charger with water. Refer to To clean the product, the battery and the battery charger on page 14.
- Do not use a defective or damaged battery.
- Keep batteries in storage away from metal objects such as nails, screws or jewelry.
- Keep the battery away from children.
Battery charger safety

WARNING: Read the warning instructions that follow before you use the product.
- Risk of electrical shock or short circuit if the safety instructions are not obeyed.
- Do not use other battery chargers for the one supplied for your product. Only use 40-C80 chargers when you charge Husqvarna 40-B140 replacement batteries. Refer to Approved battery chargers on page 17 and Approved batteries on page 17.
- Do not try to disassemble the battery charger.
- Do not use a defective or damaged battery charger.
- Do not lift the battery charger by the power cord. To disconnect the battery charger from a mains socket, pull out the plug. Do not pull the power cord.
- Keep all cables and extension leads away from water, oil and sharp edges. Make sure that the cable is not caught between objects, for example, doors, fences or equivalent.
- Do not use the battery charger near flammable materials or materials that can cause corrosion. Make sure that the battery charger is not covered. Pull out the plug to the battery charger if there is smoke or fire.
-
Only charge the battery indoors in a location with good airflow and away from sunlight. Do not charge the battery outdoors. Do not charge the battery in wet conditions.
-
Only use the battery charger where the temperature is between 5^ (41 °F) and 40^ (104 °F). Use the charger in an environment which has a good airflow, dry and free from dust.
- Do not put objects into the cooling slots of the battery charger.
- Do not connect the battery charger terminals to metal objects as this can short circuit the battery charger.
- Use approved mains sockets that are not damaged. Make sure that the cord of the battery charger is not damaged. If extension cables are used, make sure that the extension cables are not damaged.
Safety instructions for maintenance
WARNING: Read the warning instructions that follow before you do maintenance on the product.
- When the machine is stopped for servicing, examination, or storage, or to change an accessory, Allow the machine to cool before making any examinations, adjustments, etc. Maintain the machine with care and keep it clean.
- Remove the battery before you do maintenance, other checks or assemble the product.
- The operator must only do the maintenance and servicing shown in this operator's manual. Speak to your servicing dealer for maintenance and servicing of a larger extension.
- Keep all nuts, bolts and screws tight to be sure the product is in safe working condition.
- Replace worn or damaged parts.
- If you do not do maintenance, it decreases the life cycle of the product and increases the risk of accidents.
- Special training is necessary for all servicing and repair work, especially for the safety devices on the product. If not all checks in this operator's manual are approved after maintenance, speak to your servicing dealer. We guarantee that there are professional repairs and servicing available for your product.
- Only use original spare parts.
Assembly
Blower mode

WARNING:
Cut injury can occur when the rotor blades turn or the product starts accidentally. Remove the battery and wait until the rotor blades stop before you assemble the product.

WARNING: Assemble the blower tube and the intake cover fully before you use the product in blower mode.
To assemble the blower tube
Note: When the blower tube is not assembled correctly, a safety switch will prevent the blower from starting.
- Push the blower tube (A) onto the blower outlet (B). The interlock (C) engages when you hear a click.
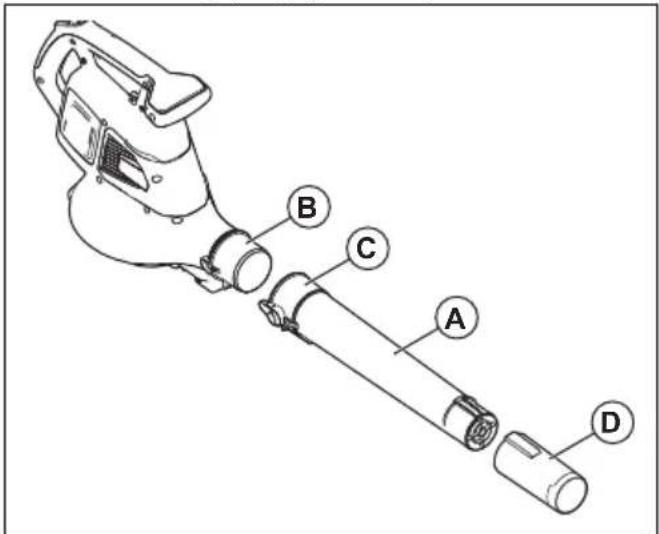
- Install the blower nozzle (D) onto the blower tube. The blower nozzle locks in position when you hear a click.
To assemble the intake cover
Note: When the intake cover is not assembled correctly, a safety switch will prevent the blower from starting.
- Close the intake cover (A) on the blower inlet (B). The interlock (C) engages when you hear a click.
Vacuum mode

WARNING: Assemble the vacuum tube and the collection bag fully before you use the product in vacuum mode.
To assemble the vacuum tube

WARNING: Assemble the upper and lower vacuum tubes before you start the product.
Note: When the vacuum tube is not assembled correctly, a safety switch will prevent the vacuum from starting.
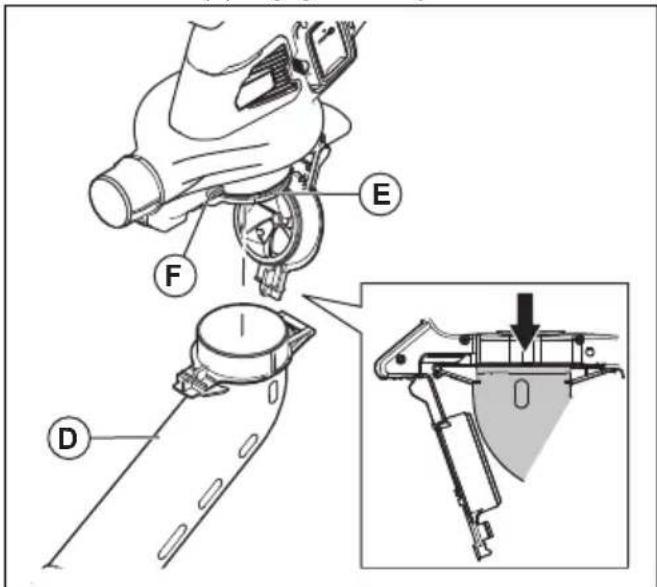
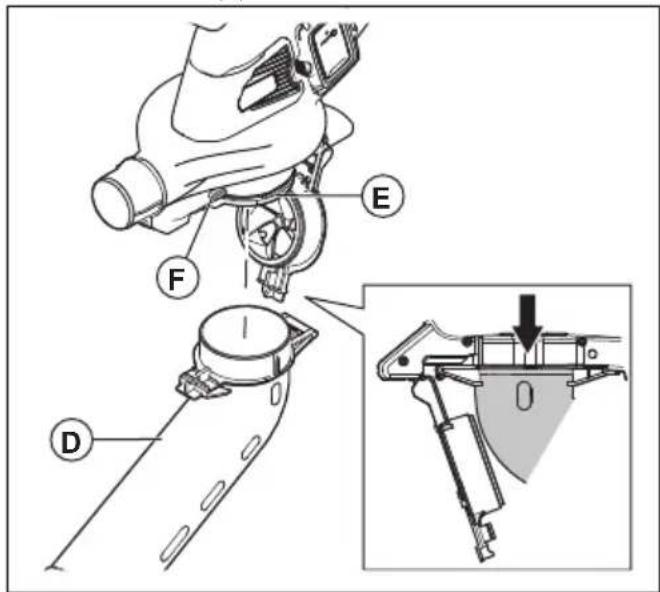
- Align the slots on the upper vacuum tube (A) with the tabs on the lower vacuum tube (B).

- Push the lower vacuum tube onto the upper vacuum tube until you hear a click.
- Tighten the screw (C).
- Install the vacuum tube (D) to the vacuum inlet (E). The interlock (F) engages when you hear a click.
To assemble the collection bag
Note: If the collection bag is not assembled correctly, a safety switch will stop the product start procedure.
WARNING: Stop the machine before attaching or removing the bag.
- Remove the blower tube if it is installed to the product.
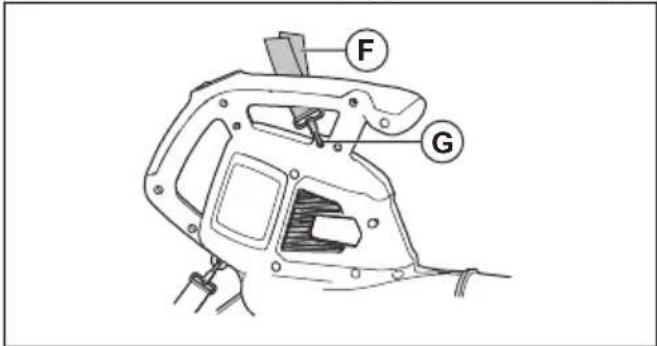
- Push the collection bag (A) onto the vacuum outlet (B). The interlock (C) engages when you hear a click.

- Connect the collection bag strap (D) with the retainer (E).
- Connect the shoulder strap (F) with the retainer (G).
- Make sure that the collection bag is fully closed.
To install the battery charger on the wall

CAUTION: Do not use an electric screwdriver to install the battery charger to the wall. An electric screwdriver can cause damage to the battery charger.
- Install the battery charger on the wall with the 2 screws (A). Use wall plugs (B) if it is necessary.

- Install the 2 screw hole plugs (C).
- Connect the power cord (D) to the battery charger and a mains socket.
Operation
Introduction

WARNING: Read and understand the safety chapter before you use the product.
To do a function check before you use the product
- Do a check of the air inlet for dirt and cracks. Use a brush and clean off grass and leaves from the product.
- Make sure that the product works correctly.
- Do a check of all nuts and screws and make sure that they are tight.
Battery

WARNING: Read and understand the safety chapter before you use the battery. Read and understand the operator's manual for the battery and the battery charger.
Keep the battery and the battery charger in the correct ambient temperatures.
| Ambient temperature | |
| Operation of the battery 5 | °C-40 °C / 41 °F-104 °F |
| Charging of the battery 5 | °C-40 °C / 41 °F-104 °F |
Battery status
The display shows the state of charge and if there are problems with the battery.

natural_image
Diagram showing a device with four ports and a connected device labeled '2000' (no text or symbols on the device itself)| LED indicator Battery state of charge | |
| 4 LED lights are on The battery is 76% - 100% charged. | |
| 3 LED lights are on The battery is 51% - 75% charged. | |
| 2 LED lights are on The battery is 26% - 50% charged. | |
| 1 LED light is on The battery is 6% - 25% charged. | |
| 1 LED light flashes The battery is 0% - 5% charged. |
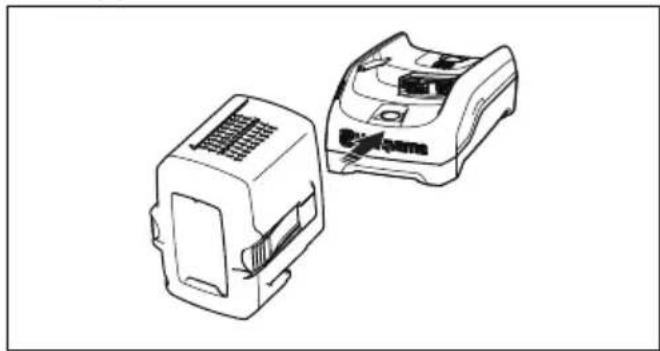
To charge the battery
Charge the battery if it is the first time that you use it. A new battery is only 30% charged.
CAUTION: Connect the battery charger to a power outlet with the voltage and frequency that is specified on the rating plate.
The battery does not charge if the battery temperature is more than 50 °C/122 °F.
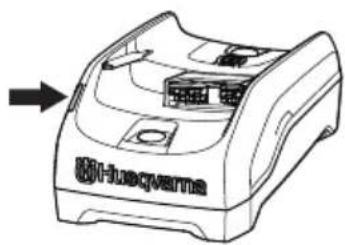
- Connect the power cord to the battery charger.
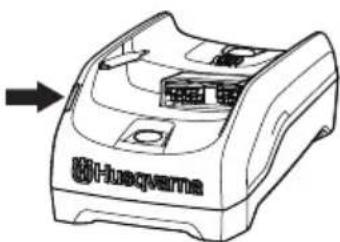
- Connect the battery charger to a grounded power outlet. The charging LED flashes one time.
natural_image
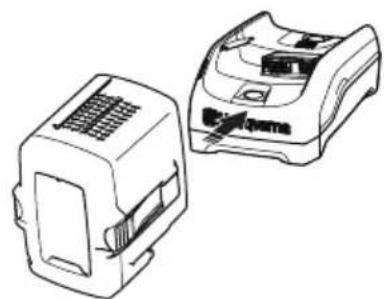
Line drawing of a Huawei-branded printer with an arrow pointing to its front panel (no text or symbols on the device itself)- Connect the battery to the battery charger. The charging LED comes on. Charge the battery for maximum 24 hours.

natural_image
Technical line drawing of two electronic component blocks (no text or symbols)- Push the battery indicator button, if all the LED indicators come on, the battery is fully charged.
- Pull the power plug to disconnect the battery charger from the power outlet. Do not pull the power cord.
- Remove the battery from the battery charger.
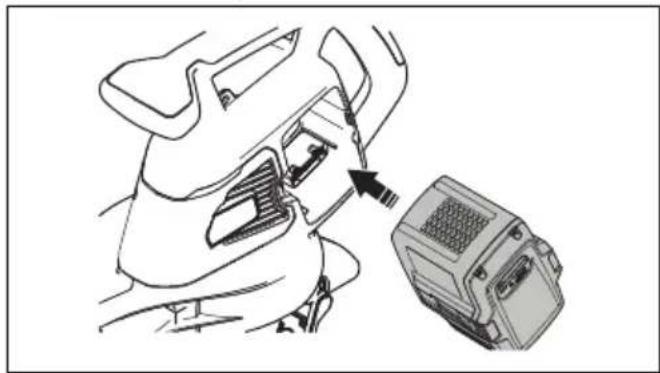
To connect the battery to the product

WARNING: Only use Husqvarna original batteries in the product.
-
Make sure that the battery is fully charged.
-
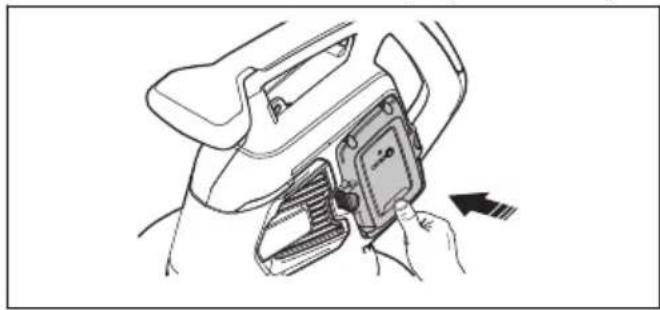
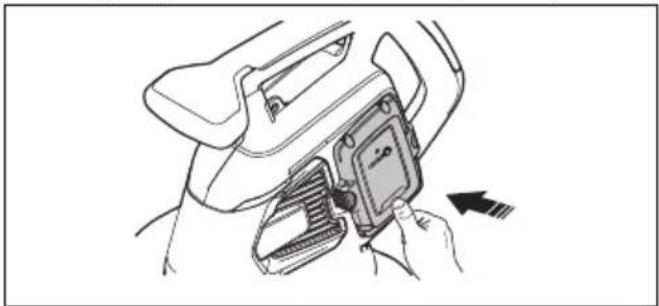
Slide the battery into the battery holder of the product. The battery must slide easily, if not, it is not installed correctly.
natural_image
Line drawing of a person inserting a device into a device housing (no text or symbols)-
Press the lower part of the battery and push it in as far as it will go into the battery compartment. The battery will lock into position when you hear a click.
-
Make sure that the latches snap in place correctly.
natural_image
Line drawing of a car interior showing a hand holding a device with an arrow indicating motion (no text or symbols)To start the product
- Push and hold the start/stop button (A) until the green LED light comes on.

- Hold the auxiliary handle (C) with one hand and hold the main handle (D) with the other hand.
- Scroll the power wheel (B) up to start the blower mode or vacuum mode.

To stop the product
- Scroll the power wheel (B) down to stop the blower model or vacuum mode.
- Push and hold the start/stop button (A) until the green LED light goes off.
ECO mode
ECO mode increases the lifetime of the battery.
- Scroll the power wheel down to start the ECO mode. The LED light comes on when the ECO mode is started.
- Scroll the power wheel up to start the normal mode. The LED light goes off when the normal mode is started.
To empty the collection bag

WARNING:
Sharp objects can cause injury. Do not put your hands in the collection bag when you empty it.
- Stop the product.
- Remove the collection bag.
-
Turn the inner side of the collection bag out and remove the collected objects.
-
Clean the collection bag with a water hose.
- Let the collection bag dry.
- Assemble the collection bag.
Automatic shutdown function
The product has an automatic shutdown function that stops the product if it is not used. The product shuts down after 1 minute.
Maintenance
Introduction

WARNING: Before you do any maintenance work you must read and understand the safety chapter.
Maintenance schedule

WARNING: Remove the battery before you do maintenance.
The following is a list of the maintenance steps that you must do on the product.
| Maintenance Daily Weekly Monthly | |||
| Clean the external surface with a clean and dry cloth. Do not use water. X | |||
| Keep the handles dry, clean and free from oil and grease. X | |||
| Make sure that the start/stop button operates correctly and is not damaged. X | |||
| Make sure the power wheel operates correctly in terms of safety. X | |||
| Examine the nuts and screws for tightness. X | |||
| Examine the battery for damage. X | |||
| X | |||
| Make sure that the release buttons on the battery operate correctly and that the battery locks into the product. | X | ||
| Examine the battery charger for damage and make sure that it operates correctly. | X | ||
| Examine all couplings, connections and cables for damage and make sure that they are free from dirt. | X | ||
| Examine the connections between the battery and the product and also examine the connection between battery and the battery charger. | X | ||
| Clean the airflow slots with a soft brush (do not use a screwdriver). X | |||
| Remove and clean the blower tube or the vacuum tube. X | |||
| Empty and clean the collection bag. Refer to To empty the collection bag on page 13. | X | ||
| Remove grass, leaves, dirt or any unwanted material from the intake opening and intake cover. | X | ||
| Examine the fan impeller for contamination and clean the fan impeller if necessary with a dull, long object. | X |
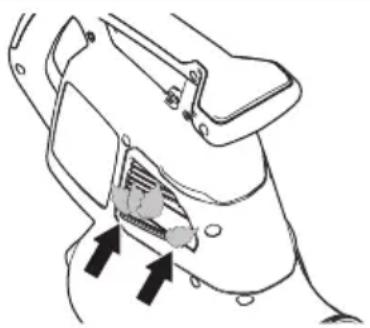
To do a check of the air intake
- Make sure that the air intake is not blocked on the sides on the product.
natural_image
Diagram of a mechanical component with arrows indicating a process or insertion (no text or symbols present)- Stop the product and remove leaves or unwanted material if it is necessary.

CAUTION: A blocked air intake decreases the blow capacity of the product and increases the work temperature of the motor. This can
result in motor failure because the motor becomes too hot.
To examine the battery and the battery charger
- Examine the battery for damages, for example cracks.
- Examine the battery charger for damages, for example cracks.
- Make sure that the connection cord of the battery charger is not damaged and that there are no cracks in it.
To clean the product, the battery and the battery charger
- Clean the product with a dry cloth after use.
- Clean the battery and battery charger with a dry cloth. Keep the battery guide tracks clean.
- Make sure that the terminals on the battery and the battery charger are clean before the battery is put in the battery charger or the product.
Troubleshooting
User interface
| User interface Possible faults Possible solution | ||
| Red error LED flashes. | Temperature deviation. | Let the product become cool. |
| Tube or fan cover is re- moved. | Assemble the tube or fan cover. | |
| Battery error. Replace the battery or charge the battery. | ||
| Servicing is necessary. | Speak to your servicing dealer. | |
| The product does not start. | Dirt in battery connectors. | Clean with compressed air or a soft brush. |
Battery
| LED display Possible faults Possible solution | ||
| Green LED flashes. Low battery voltage. Charge the battery. | ||
| Error LED flashes. Temperature deviation. Use the battery in temperatures | between -10°C (14°F) and 40°C (104°F). | |
| Too much voltage. Make sure that the | mains voltage aligns with the voltage of the product. Refer to the rating plate on the product. | |
| Remove the battery from the battery charger. | ||
| Error LED comes on. Too much cell difference (1V). Speak to your servicing dealer. | ||
Battery charger
| Condition Possible faults Possible procedure | ||
| The charging LED is red. Permanent battery charger error. Speak to your dealer. | ||
| The charging LED flashes green. Temperature deviation, the battery is too cold or too hot to use or charge. | Let the battery cool down or warm it up. When the battery has the correct temperature, it can be used or charged again. Use the battery charger in ambient temperatures between 5 °C (41 °F) and 40 °C (104 °F). | |
| The charging LED flashes red. Faulty battery Speak to your dealer. | ||
Transportation, storage and disposal
Transportation and storage
- The supplied Li-ion batteries obey the Dangerous Goods Legislation requirements.
- Obey the special requirement on package and labels for commercial transportation, including by third parties and forwarding agents.
- Speak to a person with special training in dangerous material before you send the product. Obey all applicable national regulations.
- Use tape on open contacts when you put the battery in a package. Put the battery in the package tightly to prevent movement.
• Always allow the machine to cool before storing. - Remove the battery for storage or transportation.
-
Put the battery and the battery charger in a space that is dry and free from moisture and frost.
-
Do not keep the battery in an area where static electricity can occur. Do not keep the battery in a metal box.
- Put the battery in storage where the temperature is between 5°C/41°F and 25°C/77°F and away from open sunlight.
- Put the battery charger in storage where the temperature is between 5^ / 41^ and 45^ / 113^ and away from open sunlight.
- Use the battery charger only when the surrounding temperature is between 5^ / 41^ and 40^ / 104^ .
- Charge the battery 30% to 50% before you put it in storage for long periods.
- Put the battery charger in storage in a space that is closed and dry.
- Keep the battery away from the battery charger during storage. Do not let children and other not
approved persons to touch the equipment. Keep the equipment in a space that you can lock.
- Clean the product and do a full servicing before you put the product in storage for a long time.
- Use the transportation guard on the product to prevent injuries or damage on the product during transportation and storage.
- Attach the product safely during transportation.
Disposal of the battery, battery charger and product
The symbol below means that the product is not domestic waste. Recycle it at a recycling station
for electrical and electronic equipment. This helps to prevent damage to the environment and to persons.
Speak to local authorities, domestic waste service or your dealer for more information.

Note: The symbol shows on the product or package of the product.
Technical data
Technical data
| 120iBV | |
| Motor | |
| Motor type BLDC (brushless) 36V | |
| Weight | |
| Weight without battery, kg 4.6 | |
| Noise emissions1 | |
| Sound power level, measured dB (A) 97 | |
| Sound power level, guaranteed LWA dB (A) 100 | |
| Sound levels2 | |
| Equivalent sound pressure level at the operator's ear, measured according to EN ISO 11203 and ISO 22868, dB (A): | 84 |
| Vibration levels3 | |
| Vibrations levels at front/rear handle, measured according to ISO 22867, m/s2 | 1.4/1.7 |
| Fan performance | |
| Air flow in normal mode with standard nozzle, m3/min 6.7 | |
| Maximum air velocity in normal mode with standard nozzle, m/s / mph 50/111 | |
Noise and vibration data are determined on the basis of the rated maximum speed.
Approved batteries
Only use Husqvarna original 40-B batteries for this product.
Approved batteries
| Battery 40-B140 | |
| Type Lithium-ion | |
| Battery capacity, Ah 4 | |
| Nominal voltage, V 36 | |
| Weight, kg 1.25 |
Approved battery chargers
| Battery charger 40-C80 | |
| Mains voltage, V 100-240 | |
| Frequency, Hz 50-60 | |
| Power, W 72 | |
| Output Voltage, V d.c./ Amps, A 43/1.6 |
Declaration of Conformity
EU Declaration of conformity
We, Husqvarna AB, SE-561 82 Huskvarna, SWEDEN, tel: +46-36-146500, declare on our sole responsibility that the product:
| Description Handheld | garden blower/vacuum |
| Brand | Husqvarna |
| Type / Model 120iBV | |
| Identification Serial nu | mbers dating from 2022 and onwards |
complies fully with the following EU directives and regulations:
| Regulation Description | |
| 2006/42/EC "relating to machinery" | |
| 2014/30/EU "relating to electromagnetic compatibility" | |
| 2011/65/EU "on the restriction of the use of certain hazardous substances in electrical and electronic equipment" | |
| 2000/14/EC "relating to the noise emissions in the environment" |
and that the following standards and/or technical specifications are applied: EN 60335-1:2012+A11+A13+A1+A14+A2+A15, EN 50636-2-100:2014, EN IEC 63000:2018, EN ISO 12100:2010, EN IEC 55014-1:2021; EN IEC 55014-2:2021
In accordance with directive 2000/14/EC, Annex V, refer to Technical data on page 16 for the declared sound values.
Huskvarna, 2023-01-16
$$ \Delta \cdot 2 m $$
Claes Losdal, R&D Manager, Husqvarna AB
Responsible for technical documentation
CE
UK Declaration of conformity
We, Husqvarna AB, SE-561 82 Huskvarna, SWEDEN, tel: +46-36-146500, declare on our sole responsibility that the product:
| Description Handheld garden blower/vacuum | |
| Brand | Husqvarna |
| Type / Model 120iBV | |
| Identification Serial numbers dating from 2022 and onwards | |
complies fully with the following UK regulations:
| Description |
| The Supply of Machinery (Safety) Regulations 2008 |
| Electromagnetic Compatibility Regulations 2016 |
| The Noise Emission in the Environment by Equipment for use Outdoors Regulations 2001 |
| The Restriction of the Use of Certain Hazardous Substances in Electrical and Electronic Equipment Regulations 2012 |
and that the following standards and/or technical specifications are applied: EN 60335-1:2012+A11+A13+A1+A14+A2+A15, EN 50636-2-100:2014, EN IEC 63000:2018, EN ISO 12100:2010, EN IEC 55014-1:2021; EN IEC 55014-2:2021
In accordance with S.I. 2001/1701, Schedule 8, refer to Technical data on page 16 for the declared sound values.
Huskvarna, 2023-01-16
$$ \Delta \cdot 2 m $$
Claes Losdal, R&D Manager, Husqvarna AB
Responsible for technical documentation

UK Importer: Husqvarna UK Ltd Preston Road, Co. Durham DL5 6UP
Съдържание
natural_image
Illustration of a person using a handheld power shaver to spray or spray near a screen (no text or symbols present)natural_image
Illustration of a worker using a ladder to clean or install equipment, crossed by a black diagonal line (no text or symbols)natural_image
Line drawing of a mechanical device with gears and housing (no text or symbols)natural_image
Line drawing of a mechanical component or device with no visible text or symbolsnatural_image
Technical line drawing of a device with a warning symbol and a labeled component (no text or symbols present)natural_image
Line drawing of a Huawei Huaqvarna washing machine with an arrow pointing to it (no text or symbols on the device itself)natural_image
Technical line drawing of two electronic component enclosures (no text or symbols)natural_image
Line drawing of a person inserting a device into a device housing (no text or symbols)natural_image
Line drawing of a car seatbelt being adjusted for a hand (no text or symbols)natural_image
Technical line drawing of a mechanical component with arrows indicating assembly or insertion (no text or symbols)- Спрете продукта и отстранете листата или нежелания материал, ако е необходимо.

natural_image
Illustration of a person using a power shaver to spray or spray near a display board (no text or symbols present)natural_image
Illustration of a worker climbing stairs with a diagonal line crossing (no text or symbols)natural_image
Line drawing of a mechanical component or tool (no text or symbols)natural_image
Line drawing of a mechanical component or bracket (no text or symbols)natural_image
Line drawing of a Huawei Hubs device with no visible text or symbols on the bodynatural_image
Technical line drawing of two electronic component blocks (no text or symbols)natural_image
Line drawing of a person inserting a device into a container (no text or symbols)natural_image
Line drawing of a car interior showing a hand holding a device with an arrow indicating motion (no text or symbols)natural_image
Technical line drawing of a mechanical component with arrows indicating assembly or insertion (no text or symbols)natural_image
Illustration of a person using a chainsaw to spray or spray near a screen, with no visible text or symbols.natural_image
Illustration of a worker using a ladder to clean or remove equipment, crossed by a black diagonal line (no text or symbols)natural_image
Line drawing of a mechanical device with no visible text or symbolsnatural_image
Line drawing of a mechanical component or device (no text or symbols)natural_image
Diagram showing a device with four ports and a connected device labeled '2000' (no text or symbols on the device itself)natural_image
Line drawing of a Huawei-branded printer with an arrow pointing to its front panel (no text or symbols on the device itself)natural_image
Technical line drawing of two electronic component blocks (no text or symbols)natural_image
Line drawing of a person inserting a device into a car compartment, with no visible text or symbolsnatural_image
Line drawing of a car interior showing a hand adjusting a device with an arrow indicating motion (no text or symbols)natural_image
Technical line drawing of a mechanical component with arrows indicating assembly or movement (no text or symbols)natural_image
Illustration of a person using a power shaver to spray or spray near a display board (no text or symbols present)natural_image
Illustration of a worker using a ladder to lift a ladder, crossed by a black X (no text or symbols)natural_image
Line drawing of a mechanical component or bracket (no text or symbols)natural_image
Line drawing of a mechanical component or bracket (no text or symbols)Saugmodus

natural_image
Diagram showing a device with four ports and an attached device labeled '8000' (no text or symbols on the device itself)natural_image
Line drawing of a Huawei-branded printer with an arrow pointing to its front panel (no text or symbols on the device itself)natural_image
Technical line drawing of two electronic component blocks (no text or symbols)natural_image
Line drawing of a mechanical component with an arrow pointing to a device housing (no text or symbols)natural_image
Line drawing of a car interior showing a hand holding a device with an arrow indicating motion (no text or symbols)natural_image
Diagram of a car interior showing a plug inserted into a housing (no text or symbols present)natural_image
Illustration of a person using a hairdryer to spray or spray near a blank board (no text or symbols)natural_image
Illustration of a worker using a ladder to lift a ladder, crossed by a diagonal line (no text or symbols)natural_image
Line drawing of a mechanical component or device (no text or symbols)natural_image
Line drawing of a mechanical component or device (no text or symbols)Mode aspirateur
natural_image
Diagram showing a device with four buttons and an alert symbol connected to a device with grid lines (no text or labels)natural_image
Line drawing of a Huawei-branded printer casing with an arrow pointing to it (no text or symbols on the device itself)natural_image
Technical line drawing of two electronic component blocks (no text or symbols)natural_image
Line drawing of a car interior with a device attached, showing a mechanical component and a magnified view (no text or symbols)natural_image
Line drawing of a person using a device to adjust or install a device (no text or symbols visible)natural_image
Technical line drawing of a mechanical component with arrows indicating assembly or insertion (no text or symbols)natural_image
Illustration of a worker using a ladder to lift a ladder, crossed by a diagonal line (no text or symbols)natural_image
Line drawing of a mechanical component or bracket (no text or symbols)natural_image
Line drawing of a mechanical component or bracket (no text or symbols)Zuigmodus

natural_image
Diagram showing a device with four buttons and a warning symbol connected to an electronic device (no text or labels present)natural_image
Line drawing of a Huawei-branded printer with internal components and an arrow indicating orientation (no text or symbols on the device itself)natural_image
Technical line drawing of two electronic component blocks (no text or symbols)natural_image
Line drawing of a person inserting a device into a device housing (no text or symbols)natural_image
Line drawing of a car interior showing a hand adjusting a device with an arrow indicating motion (no text or symbols)Product starten
Product stoppen
natural_image
Technical line drawing of a mechanical component with two arrows indicating assembly or insertion (no text or symbols present)natural_image
Illustration of a person using a power shaver to spray or spray near a screen (no text or symbols present)natural_image
Illustration of a worker using a ladder to lift a ladder, crossed by a diagonal line (no text or symbols)natural_image
Line drawing of a mechanical component or bracket (no text or symbols)natural_image
Line drawing of a mechanical component or bracket (no text or symbols)natural_image
Diagram showing a device with a warning symbol connected to an electronic device (no text or labels present)natural_image
Line drawing of a Huawei Huaqvarna washing machine with an arrow pointing to it (no text or symbols on the device itself)natural_image
Technical line drawing of two electronic components (no text or symbols)natural_image
Line drawing of a person inserting a device into a device housing (no text or symbols)natural_image
Line drawing of a car interior showing a hand inserting a device into a seatbelt (no text or symbols)Pornirea produsului
Oprirea produsului
natural_image
Line drawing of a remote control device with warning icons and an arrow pointing to the button (no text or symbols present)natural_image
Technical line drawing of a mechanical component with two arrows indicating assembly or insertion (no text or symbols present)natural_image
Illustration of a person using a chainsaw to spray or spray near a blank board (no text or symbols)natural_image
Illustration of a worker climbing a ladder with a diagonal line crossing (no text or symbols)natural_image
Line drawing of a mechanical component or device with no visible text or symbolsnatural_image
Line drawing of a mechanical component or bracket (no text or symbols)Modo aspirador

ADVERTENCIA: Monte
natural_image
Diagram showing a device with four ports and a warning symbol pointing to a device (no text or labels present)natural_image
Line drawing of a Huawei printer with an arrow pointing to its front panel (no text or symbols on the device itself)natural_image
Technical line drawing of two electronic component blocks (no text or symbols)natural_image
Line drawing of a person inserting a device into a housing (no text or symbols)natural_image
Line drawing of a car interior showing a hand holding a device with an arrow indicating motion (no text or symbols)Parada del producto
natural_image
Technical line drawing of a mechanical component with two arrows indicating assembly or insertion (no text or symbols present)natural_image
Illustration of a person using a chainsaw to spray or spray near a display board (no text or symbols present)natural_image
Illustration of a worker climbing stairs with a diagonal line crossing (no text or symbols)natural_image
Line drawing of a mechanical device with no visible text or symbolsnatural_image
Line drawing of a mechanical component or device with no visible text or symbolsModo de aspiração
natural_image
Diagram showing a device with four ports and a warning symbol pointing to a device (no text or labels present)natural_image
Line drawing of a medical device with an arrow pointing to it, no text or symbols presentnatural_image
Technical line drawing of two electronic component blocks (no text or symbols)natural_image
Line drawing of a person inserting a device into a device housing (no text or symbols)natural_image
Line drawing of a car interior showing a hand holding a device with an arrow indicating left motion (no text or symbols)Arrancar o produto
Parar o produto
natural_image
Technical line drawing of a mechanical component with arrows indicating assembly or insertion (no text or symbols)natural_image
Illustration of a person using a power shaver to spray or spray near a blank board (no text or symbols present)natural_image
Illustration of a worker using a ladder to clean or install equipment, crossed by a black diagonal line (no text or symbols)natural_image
Line drawing of a mechanical component or device (no text or symbols)natural_image
Line drawing of a mechanical component or device with no visible text or symbolsVakum modu

natural_image
Diagram showing a device with four buttons and an alarm symbol connected to a device labeled '2000' (no text or symbols on the device itself)natural_image
Line drawing of a Huawei Huaqvarne device with an arrow pointing to its body (no text or symbols on the device itself)natural_image
Technical line drawing of two electronic component enclosures (no text or symbols)natural_image
Line drawing of a car interior with a device box and directional arrow (no text or symbols)natural_image
Line drawing of a car seatbelt being adjusted for a device, with no visible text or symbolsÜrünü çalıştırma
Ürünü durdurma
natural_image
Technical line drawing of a mechanical component with arrows indicating assembly or movement (no text or symbols)natural_image
Line drawing of a worker using a power tool on a ladder, crossed by a diagonal line (no text or symbols)natural_image
Line drawing of a mechanical component or device with no visible text or symbolsnatural_image
Line drawing of a mechanical component or bracket (no text or symbols)Sugläge
Montera uppsamlaren
natural_image
Diagram showing a device with four ports and a connected device labeled '2000' (no text or symbols on the device itself)natural_image
Line drawing of a Huawei Hubevarne printer with an arrow pointing to it (no text or symbols on the device itself)natural_image
Technical line drawing of two electronic components (no text or symbols visible)natural_image
Line drawing of a person inserting a device into a device housing (no text or symbols)natural_image
Line drawing of a car interior showing a hand holding a device with an arrow indicating motion (no text or symbols)Starta produkten
Stoppa produkten
natural_image
Technical line drawing of a mechanical component with arrows indicating assembly or insertion (no text or symbols)natural_image
Illustration of a person using a chainsaw to spray or spray near a screen, with no visible text or symbols.natural_image
Line drawing of a worker climbing a ladder with a diagonal line crossing through, no text or symbols presentnatural_image
Line drawing of a mechanical component or bracket (no text or symbols)natural_image
Line drawing of a mechanical component or device with no visible text or symbolsSugefunktion
Sådan samles opsamlerposen
natural_image
Diagram showing a device with a warning symbol and an external device labeled '2000' (no text or symbols on the device itself)natural_image
Line drawing of a Huawei-branded printer with an arrow pointing to its front panel (no text or symbols on the device itself)natural_image
Technical line drawing of two electronic components (no text or symbols)natural_image
Line drawing of a car interior with a device box and directional arrow (no text or symbols)natural_image
Line drawing of a hand holding a device with an arrow indicating motion (no text or symbols)- Tryk på start/stop-knappen (A), og hold den nede, indtil den grønne lysdiode slukkes.
ECO-tilstand
- Rul effekthjulet op for at starte normal tilstand. Lysdioden slukkes, när den normale tilstand startes.
natural_image
Technical line drawing of a mechanical component with two arrows indicating fasteners or fasteners (no text or symbols present)- Stands produktet, og fjern blade eller uønsket materiale efter behov.
- Blåserør
- Tastatur
- Vakuumrør
- Håndtak
- Oppsamlingspose
- Luftstrømindikator
- Varsellampe (feilindikator)
- Drivhjul
- Start/stopp-knapp
- SavE-indikator
- Batteriutløserknapp
- Batteristatus
-
Varsellampe (feilindikator)
-
Strøm- og advarselsindikator
- Batteri, bare inkludert i Husqvarna 120iBV-blåsersettet
- Batterilader, bare inkludert i Husqvarna 120iBV-blåsersettet
- Bruksanvisning
Produktbeskrivelse
Husqvarna 120iBV er en hageblåser/-løvsugermodell med elektrisk motor.
Nominell spenning, V

Direktestrøm.

natural_image
Illustration of a worker using a power tool to clean or stop equipment, crossed by a diagonal line (no text or symbols)natural_image
Line drawing of a pair of binoculars (no text or symbols)natural_image
Line drawing of a mechanical component or device with no visible text or symbols- Monter blåsermunnstykket (D) på blåserøret. Blåsermunnstykket låses på plass när du hører et klikk.
Slik monterer du inntaksdekselet
Vakuummodus

ADVARSEL: Monter vakuumrøret og oppsamlingsposen helt før du bruker produktet i vakuummodus.
Slik monterer du vakuumrøret

natural_image
Diagram showing a device with four ports and a connected device labeled '2000' (no text or symbols on the device itself)natural_image
Line drawing of a Huawei Huaqverter device with no visible text or symbols on the bodynatural_image
Technical line drawing of two electronic components (no text or symbols visible)natural_image
Line drawing of a person inserting a device into a device housing (no text or symbols)-
Trykk på den nedre delen av batteriet, og skyv det så langt inn det går i batterirommet. Batteriet låses på plass när du hører et klikk.
-
Kontroller at läsene klikker på plass riktig.

natural_image
Line drawing of a car interior seatbelt being adjusted for a device (no text or symbols)- Rull drivhjulet (B) opp for å starte blåsemodus eller vakuummodus.

- Rull drivhjulet opp for å starte normal modus. LEDlampen slukkes när normal modus startes.
natural_image
Technical line drawing of a mechanical component with two arrows indicating fasteners or fasteners (no text or symbols present)- Slå av produktet, og fjern løv eller uønsket materiale hvis det er nødvendig.

natural_image
Illustration of a worker using a power tool to clean or remove a ladder, crossed by a black diagonal line (no text or symbols)natural_image
Line drawing of a pair of sneakers (no text or symbols)natural_image
Line drawing of a mechanical component or device with no visible text or symbolsImutila
natural_image
Diagram showing a device with four buttons and a warning symbol connected to an electronic device (no text or labels present)natural_image
Line drawing of a Huawei-branded printer with an arrow pointing to its front panel (no text or symbols on the device itself)natural_image
Technical line drawing of two electronic device components (no text or symbols)natural_image
Line drawing of a person inserting a device into a device housing (no text or symbols)natural_image
Line drawing of a hand holding a device with an arrow indicating direction (no text or symbols)natural_image
Technical line drawing of a mechanical component with two arrows indicating assembly or insertion (no text or symbols present)natural_image
Line drawing of a worker using a power tool on a ladder, crossed by a diagonal line (no text or symbols)natural_image
Line drawing of a pair of sneakers (no text or symbols)natural_image
Line drawing of a mechanical component or device (no text or symbols)Imuri režiim
Kogumiskoti kokkupanek
natural_image
Diagram showing a device with four buttons and a warning symbol connected to an electronic device (no text or labels present)| LED-märgutuli Aku laadimisolek | |
| Põleb 4 LED-tuld Aku on 76–100% laetud. | |
| Põleb 3 LED-tuld Aku on 51–75% laetud. | |
| Põleb 2 LED-tuld Aku on 26–50% laetud. | |
| Põleb 1 LED-märgutuli Aku on 6–25% laetud. | |
| 1 LED-märgutuli vilgub Aku on 0–5% laetud. |
Aku laadimine
natural_image
Line drawing of a Huawei printer with an arrow pointing to its front panel (no text or symbols on the device itself)natural_image
Technical line drawing of two electronic component enclosures (no text or symbols)natural_image
Line drawing of a person inserting a device into a device housing (no text or symbols)natural_image
Line drawing of a person using a smartwatch to interact with a device (no text or symbols visible)Toote käivitamine
Toote seiskamine
natural_image
Technical line drawing of a mechanical component with two arrows indicating fasteners or fasteners (no text or symbols present)natural_image
Line drawing of a person using a chainsaw to observe a wall-mounted object (no text or symbols present)natural_image
Illustration of a worker using a ladder to clean or remove equipment, crossed by a black diagonal line (no text or symbols)natural_image
Line drawing of a mechanical component or device (no text or symbols)natural_image
Line drawing of a mechanical component or device with no visible text or symbolsBRĪDINĀJUMS: Pirms ierīces
Sūcēja režīms
natural_image
Diagram showing a device with four ports and a warning symbol pointing to a labeled device (no text or symbols present)natural_image
Line drawing of a Huawei-branded printer with an arrow pointing to its front panel (no text or symbols on the device itself)natural_image
Technical line drawing of two electronic component blocks (no text or symbols)natural_image
Line drawing of a mechanical component with an arrow pointing to a device housing (no text or symbols present)natural_image
Line drawing of a car interior showing a hand holding a device with an arrow indicating motion (no text or symbols)- Ar vienu roku turiet palīgrokturi (C) un ar otru — galveno rokturi (D).
- Ritiniet jaudas regulatoru uz augšu, lai ieslēgtu parasto režīmu. leslēdzot parasto režīmu, LED indikators nodziest.
natural_image
Technical line drawing of a mechanical component with two arrows indicating fasteners or fasteners (no text or symbols present)natural_image
Line drawing of a person using a chainsaw to spray or spray near a blank board (no text or symbols)natural_image
Illustration of a worker using a ladder to clean or remove equipment, crossed by a black diagonal line (no text or symbols)natural_image
Line drawing of a pair of sneakers (no text or symbols)natural_image
Line drawing of a mechanical component or device with no visible text or symbolsSiurblio režimas
Surinkimo maišo surinkimas
natural_image
Diagram showing a device with a warning symbol connected to an electronic device (no text or labels present)natural_image
Line drawing of a Huawei Huxiverter device with an arrow pointing to it (no text or symbols on the device itself)natural_image
Technical line drawing of two electronic components (no text or symbols)natural_image
Line drawing of a person inserting a device into a car interior (no text or symbols)natural_image
Line drawing of a car interior showing a hand adjusting a device with an arrow indicating motion (no text or symbols)Gaminio paleidimas
Gaminio sustabdymas
natural_image
Diagram of a car interior showing a door handle and a tool inserted into the window (no text or symbols)- Cijev puhača
- Tipkovnica
- Cijev usisivača
- Ručica
- Vreća za sakupljanje
- Indikator protoka zraka
- Indikator upozorenja (LED svjetlo pogreške)
- Kotačić napajanja
- Gumb START/STOP
- Indikator SavE
- Gumbi za otpuštanje baterije
- Status baterije
-
Indikator upozorenja (LED svjetlo pogreške)
-
Napajanje i indikator upozorenja
- Baterija je uključena samo u komplet puhača Husqvarna 120iBV
- Punjač baterije uključen je samo u komplet puhača Husqvarna 120iBV
- Korisnički priručnik
Opis proizvoda
Husqvarna 120iBV je model vrtnog puhača/usisivača s električnim motorom.
Naša politika obuhvaća neprekidan razvoj proizvoda i stoga zadržavamo pravo na preinake dizajna i izgleda proizvoda bez prethodne obavijesti.
Namjena
Način rada za puhanje: Puhač je dizajniran za otpuhivanje čestica prljavštine ili odsječene trave sa staza, prilaza, dvorišta i sličnih površina. Također je konstruiran za otpuhivanje odsječene trave, slame ili lišća za izradu stogova ili za uklanjanje čestica prljavštine iz uglova, spojeva ili procijepa između pločica ili opeka.
Način rada za usisavanje: Usisivač je konstruiran za usisavanje suhog materijala. U njega se ubraja lišće, trava, male grane te komadići papira.
Simboli na proizvodu

UPOZORENJE: Ovaj proizvod može biti opasan i izazvati teške ozljede ili smrt rukovatelja ili drugih osoba. Budite oprezni i pravilno upotrebljavajte ovaj proizvod.

Korisnik stroja mora biti siguran da na udaljenosti manjoj od 15 m nema ljudi ili životinja. Kada nekoliko korisnika radi na istoj lokaciji sigurnosna uda- ljenost mora biti barem 15 m. Puhač može snažno odbaciti predmete koji mogu odskočiti natrag. To može re- zultirati teškim ozljedama oka ako se ne upotrebljava preporučena zaštitna oprema.
yyyy wwxxxxx
Na natpisnoj pločici je serijski broj. gggg je godina proizvodnje, a tt je tje-dan proizvodnje.
natural_image
Illustration of a worker climbing stairs with a diagonal line crossing (no text or symbols)• Proizvod nemojte upotrebljavati ako niste u mogućnosti pozvati pomoć u slučaju nezgode.
- Pazite na izbačene predmete. Kamenje, otpaci i sl. mogu biti izbačeni u oči i uzrokovati sljepilo ili ozbiljne ozlijede.
- Za povećanje sigurnosti pri punjenju proizvoda upotrebljavajte zaštitni uređaj diferencijalne struje (RCI). Zaštitni uređaj diferencijalne struje ugrađen je za zaštitu rukovatelja u slučaju električnog kvara.
• Proizvod je poznat po niskoj razini vibracija.
Preveliko izlaganje vibracijama može uzrokovati poremećaj cirkulacije ili oštećenje živčanog sustava kod ljudi sa slabom cirkulacijom. Ako imate simptome uzrokovane prevelikim izlaganjem vibracijama, obratite se liječniku. Simptomi uključuju obamrlost, nedostatak osjećaja, škakljanje, trnce, bol, gubitak snage, promjene boje ili stanja kože.
Simptomi se uglavnom pojavljuju na prstima, šakama ili zglobovima.
• Proizvod upotrebljavajte samo u skladu s namjenom.
- Nije moguće obuhvatiti sve situacije s kojima se možete susresti. Uvijek postupajte oprezno i slijedite zdrav razum. Izbjegavajte sve situacije izvan vaših sposobnosti. Ako i nakon čitanja ovih uputa niste sigurni u radne postupke, prije nastavka obratite se stručnjaku.
Oprema za osobnu zaštitu
UPOZORENJE: Prije upotrebe proizvoda pročitajte upute upozorenja u nastavku.
- Prilikom uporabe proizvoda uvijek upotrebljavajte odobrenu osobnu zaštitnu opremu. Oprema za osobnu zaštitu ne može u potpunosti spriječiti ozljede, no smanjuje stupanj ozljede u slučaju nezgode. Pri odabiru odgovarajuće opreme zatražite pomoć ovlaštenog trgovca.
- Dugotrajno izlaganje buci može uzrokovati oštećenje sluha. Baterijama napajani proizvodi uglavnom su relativno tihi, no do oštećenja može doći zbog razine buke pri dugotrajnoj upotrebi. rukovateljima preporučuje upotrebu zaštite sluha pri dužoj neprekidnoj upotrebi tijekom dana. Stalni i česti korisnici trebaju redovno provjeravati sluh. Imajte
na umu da zaštite sluha ograničavaju sposobnost poimanja zvukova i signala upozorenja.
natural_image
Line drawing of a pair of mechanical components or parts, possibly a valve or connector (no text or symbols present)- Upotrebljavajte odobrenu zaštitu za oči. Ako nosite vizir, morate nositi i odobrene zaštitne naočale. Odobrene zaštitne naočale moraju ispunjavati standard ANSI Z87.1 za SAD ili EN 166 za države EU.

natural_image
Line drawing of a mechanical component or device with no visible text or symbols- Nosite odjeću napravljenu od čvrstog materijala. Uvijek nosite teške duge hlače i duge rukave. Nemojte nositi široku odjeću koja može zapinjati za grane i prutove. Nemojte nositi nakit, kratke hlače, sandale ili biti bosi. Kosu podignite iznad ramena. - Imajte u blizini pribor za prvu pomoć.

- Postavite mlaznicu puhača (D) na cijev puhača. Mlaznica puhača učvršćuje se u položaju uz škljocaj.
Ugradnja poklopca usisa
Napomena: Kada poklopac usisa nije pravilno postavljen, sigurnosna sklopka sprječava pokretanje puhača.
- Zatvorite poklopac usisa (A) na ulazu puhača (B). Blokada (C) zatvara se uz škljocaj.
Način rada za usisavanje
UPOZORENJE: Prije upotrebe proizvoda u načinu rada za usisavanje
potpuno složite cijev usisivača i vreću za sakupljanje.
Postavljanje vreće za sakupljanje
- Postavite čepove provrta za vijke (C).
- Kabel napajanja (D) priključite u punjač baterije i mrežnu utičnicu.
Rad
Uvod

UPOZORENJE: Prije upotrebe proizvoda pročitajte i usvojite poglavlje o sigurnosti.
Prije upotrebe proizvoda provjerite ispravnost rada
natural_image
Diagram showing a device with four buttons and an alarm symbol connected to a device labeled '2000' (no text or symbols on the device itself)| LED indikator Stanje napunjenosti baterije | |
| Uključena su četiri LED indikatora Baterija je napunjena | 76% – 100%. |
| Uključena su tri LED indikatora Baterija je napunjena | 51% – 75%. |
| Uključena su dva LED indikatora Baterija je napunjena | 26% – 50%. |
| Uključen je jedan LED indikator Baterija je napunjena | 6% – 25%. |
| Trepće jedna LED žaruljica Baterija je napunjena | 0% – 5%. |
Zamjena baterije
Napunite bateriju pri prvoj upotrebi. Nova je baterija napunjena samo 30%.
OPREZ: Spojite punjač baterije na strujnu utičnicu s naponom i frekvencijom koji su navedeni na natpisnoj pločici.
Baterija se neće puniti ako je njezina temperatura veća od 50 °C / 122 °F.
- Priključite punjač baterije na strujnu utičnicu.
- Punjač baterije priključite na uzemljenu strujnu utičnicu. LED indikator punjenja zatreptat će jedanput.
natural_image
Line drawing of a Huawei H8 device with an arrow pointing to it (no text or symbols on the device itself)- Priključite bateriju na punjač baterije. Uključuje se LED indikator punjenja. Bateriju punite najdulje 24 sata.
natural_image
Technical line drawing of two electronic component enclosures (no text or symbols)- Pritisnite gumb indikatora baterije kad svijetle svi LED indikatora – baterija je potpuno napunjena.
- Za odvajanje punjača baterije od strujne utičnice izvucite njegov strujni utikač. Nemojte povlačiti kabel za napajanje.
- Izvadite bateriju iz punjača baterije.
natural_image
Line drawing of a person inserting a device into a device housing (no text or symbols)-
Pritisnite donji dio baterije i gurnite ju do kraja hoda u pretinac za bateriju. Baterija se učvršćuje u položaju kad čujete škljocanje.
-
Provjerite jesu li zatvarači pravilno sjeli na mjesto.
natural_image
Line drawing of a car seatbelt being adjusted for a hand (no text or symbols)- Pomoćnu ručku (C) držite jednom, a glavnu ručku (D) drugom rukom.
- Kotačić napajanja (B) okrećite prema gore kako biste pokrenuli način rada za puhanje ili način rada za usisavanje.

Zaustavljanje proizvoda
- Kotačić napajanja (B) okrećite prema dolje kako biste zaustavili način rada za puhanje ili način rada za usisavanje.
- Pritisnite i držite gumb za pokretanje/zaustavljanje (A) sve dok se ne isključi zeleni LED indikator.
Način rada ECO
Način rada ECO produljuje vijek trajanja baterije.
- Kotačić napajanja okrećite prema dolje kako biste pokrenuli način rada ECO. Po pokretanju načina rada ECO uključuje se LED indikator.

- Kotačić napajanja okrećite prema gore kako biste pokrenuli uobičajen način rada. Po pokretanju uobičajenog načina rada LED indikator isključuje se.
Pražnjenje vreće za sakupljanje

UPOZORENJE:
Oštri predmeti mogu uzrokovati ozljede. Vreću za sakupljanje nemojte prazniti rukama.
- Zaustavite proizvod.
- Uklonite vreću za sakupljanje.
-
Unutarnju stranu vreće za sakupljanje okrenite prema van i uklonite sakupljene predmete.
-
Operite vreću za sakupljanje s crijevom za vodu.
- Pričekajte da se vreća za sakupljanje osuši.
- Postavite vreću za sakupljanje.
natural_image
Technical line drawing of a mechanical component with two arrows indicating assembly or insertion (no text or symbols present)- Ako je potrebno, zaustavite proizvod pa uklonite neželjeni materijal ako je to potrebno.

OPREZ: Neprohodan usis zraka smanjuje kapacitet puhanja proizvoda i povećava radnu temperaturu motora.
Pregled baterije i punjača baterije
natural_image
Line drawing of a person using a chainsaw to spray or spray near a display board (no text or symbols)natural_image
Line drawing of a worker using a ladder to clean or stop equipment, crossed by a diagonal line (no text or symbols)natural_image
Line drawing of a mechanical component or device with no visible text or symbolsnatural_image
Line drawing of a mechanical component or device (no text or symbols)Režim vysávání
| Kontrolka LED Stav nabití baterie | |
| Svítí 4 kontrolky LED Baterie je nabitá na 76–100 %. | |
| Svítí 3 kontrolky LED Baterie je nabitá na 51–75 %. | |
| Svítí 2 kontrolky LED Baterie je nabitá na 26–50 %. | |
| Svítí 1 kontrolka LED Baterie je nabitá na 6–25 %. | |
| Bliká 1 kontrolka LED Baterie je nabitá na 0–5 %. |
Nabití baterie
natural_image
Line drawing of a Huawei-branded printer with an arrow pointing to its front panel (no text or symbols on the device itself)natural_image
Technical line drawing of two electronic component blocks (no text or symbols)natural_image
Line drawing of a car interior with a device attached, showing a mechanical component and directional arrow (no text or symbols)natural_image
Line drawing of a car interior with a hand holding a device, showing a right-hand rule (no text or symbols)Spuštění výrobku
Zastavení výrobku
natural_image
Technical line drawing of a mechanical component with two arrows indicating assembly or insertion (no text or symbols present)natural_image
Illustration of a person using a chainsaw to spray or spray near a display board (no text or symbols present)natural_image
Line drawing of a worker using a ladder to clean or stop equipment, crossed by a black diagonal line (no text or symbols)natural_image
Line drawing of a mechanical component or device with no visible text or symbolsnatural_image
Line drawing of a mechanical component or bracket (no text or symbols)- Nainštalujte fúkaciu trysku (D) na fúkaciu trubicu. Fúkacia tryska sa zaistí na mieste, ked' sa ozve cvaknutie.
Režim vysávača
-
Zatlačte spodnú vysávaciu trubicu na hornú vysávaciu trubicu, kým nebudete počut' cvaknutie.
-
Utiahnite skrutku (C).
-
Nainštalujte vysávaciu trubicu (D) do vstupného otvoru vysávača (E). Ked' sa ozve cvaknutie, aktivuje sa blokovanie (F).
natural_image
Diagram showing a device with four ports and a warning symbol pointing to it, connected to an electronic device (no text or labels present)| Indikátor LED Indikátory stavu nabitia akumulátora | |
| Svietia 4 diódy LED Batéria je nabitá na 76 % – 100 %. | |
| Svietia 3 diódy LED Batéria je nabitá na 51% – 75%. | |
| Svietia 2 diódy LED Batéria je nabitá na 26% – 50%. | |
| Svieti 1 dióda LED Batéria je nabitá na 6% – 25%. | |
| Bliká 1 dióda LED Batéria je nabitá na 0 % – 5 %. | |
Nabíjanie batérie
Ak batériu používate prvýkrát, nabite ju. Nová batéria je nabitá iba na 30 %.
VAROVANIE: Nabíjačku akumulátora pripájajte k siet'ovej zásuvke s napätím a frekvenciou uvedenými na výkonovom štítku.
natural_image
Line drawing of a Huawei-branded washing machine with an arrow pointing to it (no text or symbols on the device itself)- Pripojte akumulátor k nabíjačke akumulátorov. Rozsvieti sa indikátor LED nabíjania. Batériu nabíjajte maximálne 24 hodín.
natural_image
Technical line drawing of two electronic component blocks (no text or symbols)natural_image
Line drawing of a car interior with a device and a directional arrow indicating movement (no text or symbols)natural_image
Line drawing of a car interior showing a hand adjusting a device with an arrow indicating motion (no text or symbols)Zapnutie výrobku
- Jednou rukou držte pomocnú rukovát' (C) a druhou rukou držte hlavnú rukovát' (D).
Zastavenie výrobku
natural_image
Technical line drawing of a mechanical component with two arrows indicating assembly or insertion (no text or symbols present)natural_image
Illustration of a person using a hairdryer to spray or spray near a blank board (no text or symbols)natural_image
Line drawing of a worker using a ladder to lift a ladder, crossed by a diagonal line (no text or symbols)natural_image
Line drawing of a mechanical component or device (no text or symbols)natural_image
Line drawing of a mechanical component or bracket (no text or symbols)Tryb odkurzacza

Montaż worka
natural_image
Diagram showing a device with four buttons and an alarm symbol connected to a device labeled '2000' (no text or symbols on the device itself)natural_image
Line drawing of a Huawei-branded printer with an arrow pointing to its side panel (no text or symbols on the device itself)natural_image
Technical line drawing of two electronic components (no text or symbols)natural_image
Line drawing of a car interior with a device box and arrow indicating a component (no text or symbols)natural_image
Line drawing of a car interior showing a hand inserting a device into a seatbelt (no text or symbols)Wyłączanie produktu
natural_image
Technical line drawing of a mechanical component with two arrows indicating fasteners or fasteners (no text or symbols present)natural_image
Illustration of a worker using a ladder to lift a structure, crossed by a diagonal line (no text or symbols)natural_image
Line drawing of a mechanical component or device (no text or symbols)natural_image
Line drawing of a mechanical component or bracket (no text or symbols)Szívó üzemmód

natural_image
Diagram showing a device with four ports and a warning symbol pointing to it, connected to a rectangular device (no text or labels present)natural_image
Line drawing of a Huawei HUA device with an arrow pointing to it (no text or symbols on the device itself)natural_image
Technical line drawing of two electronic component enclosures (no text or symbols)natural_image
Line drawing of a person inserting a device into a container (no text or symbols)natural_image
Line drawing of a car interior showing a hand holding a device with an arrow indicating direction (no text or symbols)A termék elindítása
A termék leállítása
natural_image
Technical line drawing of a mechanical component with arrows indicating assembly or insertion (no text or symbols)natural_image
Illustration of a person using a chainsaw to spray or spray near a display board (no text or symbols present)natural_image
Illustration of a worker using a ladder to clean or remove equipment, crossed by a black diagonal line (no text or symbols)natural_image
Line drawing of a vertebral implant (no text or labels)natural_image
Line drawing of a mechanical component or device with no visible text or symbolsРежим пилососа

Установлення мішка
natural_image
Diagram showing a device with four ports and a warning symbol pointing to a labeled electronic device (no text or labels present)natural_image
Line drawing of a Huawei-branded vacuum cleaner with a black arrow pointing to the component (no text or symbols on the device itself)natural_image
Technical line drawing of two electronic component blocks (no text or symbols)natural_image
Line drawing of a car interior with a device attached, showing no text or symbolsnatural_image
Line drawing of a car seatbelt being adjusted for a hand (no text or symbols)Запуск виробу
Зупинення виробу
natural_image
Technical line drawing of a mechanical component with two arrows indicating assembly or insertion (no text or symbols present)natural_image
Line drawing of a person using a power shaver to spray or spray near a blank board (no text or symbols)natural_image
Line drawing of a worker using a power tool to clean or remove equipment, crossed by a black X (no text or symbols)natural_image
Line drawing of a mechanical component or bracket (no text or symbols)natural_image
Line drawing of a mechanical component or device with no visible text or symbolsバキュームモード

集塵バッグの組み立て
natural_image
Diagram showing a device with four ports and a warning symbol pointing to a device labeled '2000' (no text or symbols on the device itself)natural_image
Line drawing of a Huawei-branded washing machine with an arrow pointing to it (no text or symbols on the device itself)natural_image
Line drawing of two electronic components (no text or symbols)natural_image
Line drawing of a person inserting a device into a device housing (no text or symbols)natural_image
Line drawing of a car seatbelt being adjusted for a hand (no text or symbols)本製品の始動方法
本製品の停止方法
natural_image
Line drawing of a mechanical component with two arrows indicating fasteners or fasteners (no text or symbols present)Original instructions
Оригинални инструкции


- Introduction
- Product overview
- Product description
- Intended use
- Symbols on the product
- Symbols on the battery and/or on the battery charger
- Manufacturer
- Safety
- Safety definitions
- General safety instructions
- General power tool safety warnings
- Check before starting
- Personal safety
- Power tool use and care
- Safety instructions for operation
- Personal protective equipment
- Safety devices on the product
- To do a check of the keypad
- Battery safety
- Battery charger safety
- Safety instructions for maintenance
- Assembly
- Blower mode
- WARNING:
- To assemble the blower tube
- To assemble the intake cover
- Vacuum mode
- To assemble the vacuum tube
- To assemble the collection bag
- To install the battery charger on the wall
- Operation
- To do a function check before you use the product
- Battery
- Battery status
- To charge the battery
- To connect the battery to the product
- To start the product
- To stop the product
- ECO mode
- To empty the collection bag
- Automatic shutdown function
- Maintenance
- Maintenance schedule
- To do a check of the air intake
- To examine the battery and the battery charger
- To clean the product, the battery and the battery charger
- Troubleshooting
- Battery charger
- Transportation, storage and disposal
- Transportation and storage
- Disposal of the battery, battery charger and product
- Technical data
- Approved batteries
- Declaration of Conformity
- EU Declaration of conformity
- UK Declaration of conformity
- Съдържание
- Saugmodus
- Mode aspirateur
- Zuigmodus
- Product starten
- Product stoppen
- Pornirea produsului
- Oprirea produsului
- Modo aspirador
- ADVERTENCIA: Monte
- Parada del producto
- Modo de aspiração
- Arrancar o produto
- Parar o produto
- Vakum modu
- Ürünü çalıştırma
- Ürünü durdurma
- Sugläge
- Montera uppsamlaren
- Starta produkten
- Stoppa produkten
- Sugefunktion
- Sådan samles opsamlerposen
- ECO-tilstand
- Produktbeskrivelse
- Slik monterer du inntaksdekselet
- Vakuummodus
- Slik monterer du vakuumrøret
- Imutila
- Imuri režiim
- Kogumiskoti kokkupanek
- Aku laadimine
- Toote käivitamine
- Toote seiskamine
- BRĪDINĀJUMS: Pirms ierīces
- Sūcēja režīms
- Siurblio režimas
- Surinkimo maišo surinkimas
- Gaminio paleidimas
- Gaminio sustabdymas
- Opis proizvoda
- Namjena
- Simboli na proizvodu
- Oprema za osobnu zaštitu
- UPOZORENJE: Prije upotrebe proizvoda pročitajte upute upozorenja u nastavku.
- Ugradnja poklopca usisa
- Način rada za usisavanje
- Postavljanje vreće za sakupljanje
- Rad
- Uvod
- Prije upotrebe proizvoda provjerite ispravnost rada
- Zamjena baterije
- Zaustavljanje proizvoda
- Način rada ECO
- Pražnjenje vreće za sakupljanje
- UPOZORENJE:
- Pregled baterije i punjača baterije
- Režim vysávání
- Nabití baterie
- Spuštění výrobku
- Zastavení výrobku
- Režim vysávača
- Nabíjanie batérie
- Zapnutie výrobku
- Zastavenie výrobku
- Tryb odkurzacza
- Montaż worka
- Wyłączanie produktu
- Szívó üzemmód
- A termék elindítása
- A termék leállítása
- Режим пилососа
- Запуск виробу
- Зупинення виробу
- バキュームモード
- 集塵バッグの組み立て
- 本製品の始動方法
- 本製品の停止方法
Brand : HUSQVARNA
Model : 120iBV
Category : Leaf blower