
580BFS Mark II - Leaf blower HUSQVARNA - Free user manual and instructions
Find the device manual for free 580BFS Mark II HUSQVARNA in PDF.

User questions about 580BFS Mark II HUSQVARNA
0 question about this device. Answer the ones you know or ask your own.
Ask a new question about this device
Download the instructions for your Leaf blower in PDF format for free! Find your manual 580BFS Mark II - HUSQVARNA and take your electronic device back in hand. On this page are published all the documents necessary for the use of your device. 580BFS Mark II by HUSQVARNA.
USER MANUAL 580BFS Mark II HUSQVARNA
580BTS Mark II, 580BFS Mark II
EN Operator's manual 2-19
Transportation and storage. 16
Assembly. 8
Technical data. 17
Operation 11
Warranty. 18
Introduction
Product description
These products are backpack blowers with a fuel engine.
We have a policy of continuous product development and therefore reserve the right to modify the design and appearance of products without prior notice.
Intended use
Use the product to blow leaves and other unwanted material from areas such as lawns, pathways and asphalt roads.
Product overview

- Frame
- Harness
-
Engine cover
-
Fan housing
-
Air intake screen
6.Fan -
Air filter
- Starter rope handle
- Fuel tank
- Waist belt
- Spark plug
- Vibration damping system
- Choke control
- Handle
- Stop switch with throttle position adjustment
- Throttle trigger/Throttle switch
- Stop switch
- Pipe angle
- Clamp
- Flexible hose
- Control pipe
- Cable clamp
- Intermediate pipe
- Blower nozzle
- Operator's manual
- Combination wrench
Symbols on the product

WARNING! This product is dangerous. Injury or death can occur to the operator or bystanders if the product is not used carefully and correctly. To prevent injury to the operator or bystanders, read and obey all safety instructions in the operator's manual.

Read the operator's manual carefully and make sure that you understand the instructions before use.
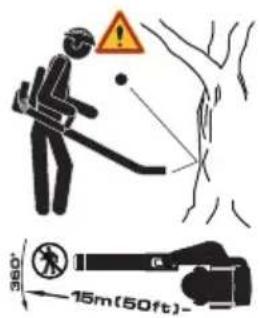
The blower can forcibly throw objects that can bounce back. This can result in serious eye injuries if the recommended safety equipment is not used.
The blower operator must make sure that no bystanders or animals come nearer than 15 meters. Whenever several operators are working in the same work area, they should maintain a safe distance of at least 15 meters from one another.
yyyywwxxxx The rating plate shows the serial number. yyyy is the production
yyyy
year, ww is the production week and xxxx is the sequential number.
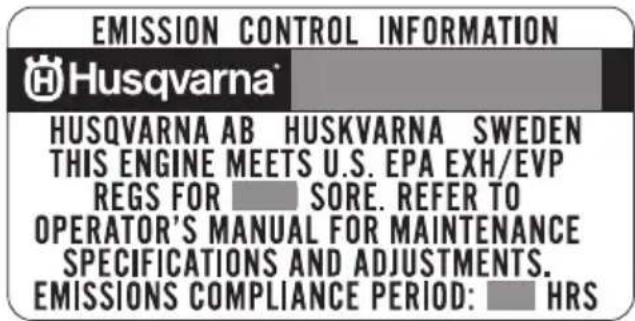
The Emissions Compliance Period referred to on the Emission Compliance label indicates the number of operating hours for which the engine has been shown to meet Federal emissions requirement. Maintenance, replacement or repair of the emission control devices and system may be performed by any nonroad engine repair establishment or individual.
California Proposition 65

WARNING
The engine exhaust from this product contains chemicals known to the State of California to cause cancer, birth defects or other reproductive harm.
Product liability
As referred to in the product liability laws, we are not liable for damages that our product causes if:
- the product is incorrectly repaired.
-
the product is repaired with parts that are not from the manufacturer or not approved by the manufacturer.
-
the product has an accessory that is not from the manufacturer or not approved by the manufacturer.
- the product is not repaired at an approved service center or by an approved authority.
Safety
Safety definitions
Warnings, cautions and notes are used to point out specially important parts of the manual.

WARNING: Used if there is a risk of injury or death for the operator or bystanders if the instructions in the manual are not obeyed.

CAUTION: Used if there is a risk of damage to the product, other materials or the adjacent area if the instructions in the manual are not obeyed.
Note: Used to give more information that is necessary in a given situation.
General safety instructions

WARNING: Read the warning instructions that follow before you use the product.
- Under no circumstances may the design of the product be modified without the permission of the manufacturer. Always use genuine accessories. Non-authorized modifications and/or accessories can result in serious personal injury or the death of the operator or others.
- Never use a product that has been modified in any way from its original specification.
-
Never use a product that is faulty. Carry out the safety checks, maintenance and service instructions described in this manual. Some maintenance and service measures must be carried out by trained and qualified specialists. Refer to Maintenance schedule on page 13 for instructions.
-
All servicing and repair work on the product requires special training. This is especially true of the safety equipment. Never use a product with faulty safety equipment. If your product fails any of the checks described in this operator's manual you must contact your service agent. The safety equipment of the product must be maintained as described in this operator's manual. When you buy any of our products we guarantee the availability of professional repairs and service. If the retailer who sells your product is not a servicing dealer, ask him for the address of your nearest service agent.
Safety instructions for operation

WARNING: Read the warning instructions that follow before you use the product.
- This product is a dangerous tool if used carelessly or incorrectly and can cause serious, even fatal injuries. It is extremely important that you read and understand the contents of this operator's manual.
- Long-term exposure to noise can result in permanent hearing impairment. Always use approved hearing protection.
- Do an overall inspection of the machine before use, Refer to Maintenance schedule on page 13.
- Never use the machine if you are tired, if you have drunk alcohol, or if you are taking medication that could affect your vision, your judgement or your coordination.
- Wear personal protective equipment. Refer to Personal protective equipment on page 6.
- All covers and guards must be fitted before starting. Ensure that the spark plug cap and ignition lead are undamaged to avoid the risk of electric shock.
- The blower operator must make sure that no bystanders or animals come nearer than 15m . Whenever several operators are working in the same work area, they should maintain a safe distance of at least 15m from one another.
- Never allow children to operate the machine. Never allow anyone else to use the machine without first ensuring that they have read and understood the contents of the operator's manual.
- Always check for any objects that may block the air intake screen before beginning work.
- Never remove the air intake screen.
- In case of emergency, release yourself from the machine by opening the waist and chest belt and let the machine fall backwards.
- Always contact local authorities and make sure you are following applicable directives.
- Keep all parts of your body away from hot surfaces.
- Never start the machine indoors. Exhaust fumes can be dangerous if inhaled.
- Observe and be aware of the surroundings. Ensure that no people or animals can come into contact with
the product. If anyone approaches your work area, set the throttle control to the lowest throttle until the person is at a safe distance. Direct the product away from people, animals, play areas, open windows and cars etc. No unauthorised persons or animals may be present in the working area, which is 15 metres.
- Overexposure to vibration can lead to circulatory damage or nerve damage in people who have impaired circulation. Contact your doctor if you experience symptoms of overexposure to vibration. Such symptoms include numbness, loss of feeling, tingling, pricking, pain, loss of strength, changes in skin colour or condition. These symptoms normally appear in the fingers, hands or wrists. The risk increases at low temperatures.
- Engine exhaust fumes contain carbon monoxide, which can cause carbon monoxide poisoning. For this reason you should not start or run the product indoors, or anywhere that is poorly ventilated. The exhaust fumes from the engine are hot and may contain sparks which can start a fire. Never start the product indoors or near combustible material.
- Allow the engine to cool before refueling.
- The powerful currents of air can move objects at such a speed that they can bounce back and cause serious eye injuries.
- Do not direct the air jet towards people or animals.
- Do not use the machine in bad weather, such as dense fog, heavy rain, strong wind, intense cold, etc. Working in bad weather is tiring and can lead to dangerous conditions, e.g. slippery surfaces.
- Minimize the time of operation by lightly wetting dusty areas or using spray equipment.
- Make sure you can move and stand safely. Check the area around you for possible obstacles (roots, rocks, branches, ditches, etc.) in case you have to move suddenly. Take great care when working on sloping ground.
- Never put the product down with the engine running unless you have it in clear sight.
- Never operate the product from ladders or high places (such as roofs), it is prohibited and could result in severe injury.
- Do not use the product unless you are able to call for help in the event of an accident.
- Watch out for thrown objects. Always wear eye protection. Stones, rubbish, etc. can be thrown up into the eyes causing blindness or serious injury. Keep unauthorised persons at a distance. Children, animals, onlookers and helpers should be kept outside the safety zone of 15m . Stop the machine immediately if anyone approaches.
- Do not operate the product if the exhaust gas outlet on the engine cover is covered by a wall and/or some other obstacles. The product could get damaged. Make sure that the distance is 50~cm or more from the obstacles during operation.
-
Always stop the engine before cleaning.
-
Always move the product away from the refueling area and source before starting. Place the product on a flat surface.
- The product may only be started in its complete design. If the product is started without all the guards fitted there is a risk of personal injuries.
Personal protective equipment

WARNING: Read the warning instructions that follow before you use the product.
- Always use approved personal protective equipment when you use the product. Personal protective equipment cannot fully prevent injury but it decreases the degree of injury if an accident does occur. Let your dealer help you select the right equipment.
- Use approved hearing protection.
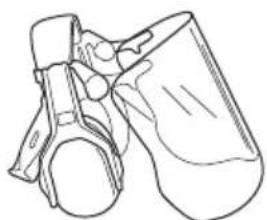
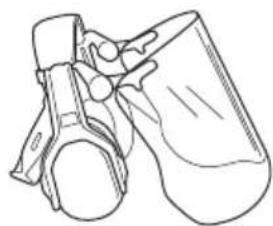
- Use approved eye protection. If you use a visor, you must also use approved protective goggles. Approved protective goggles must agree with the ANSI Z87.1 standard in the USA or EN 166 in EU countries.

- Use gloves when it is necessary, for example, when you examine or clean the product.

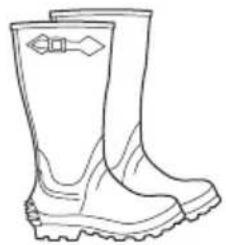
- Use protective boots, or shoes, with non-slip soles.
- Use clothing made of a strong fabric. Always use heavy, long pants and long sleeves. Do not use loose clothing that can catch on twigs and branches. Do not wear jewelry, short pants, open shoes or go with bare feet. Put your hair up safely above your shoulders.
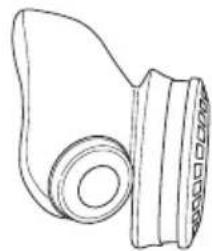
- Use breathing protection when there is a risk of dust.
- Keep first aid equipment close at hand.

Safety devices on the product

WARNING: Read the warning instructions that follow before you use the product.
In this section the product's safety features, its purpose and how checks and maintenance should be carried out to ensure that it operates correctly. See instructions under the heading Product overview on page 2 to find where these parts are located on your product.
The life span of the product can be reduced and the risk of accidents can increase if product maintenance is not carried out correctly and if service and/or repairs are not carried out professionally. If you need further information please contact your nearest servicing dealer.

WARNING: Never use a product with defective safety components. The product's safety equipment must be inspected and
maintained as described in this section. If your product fails any of these checks, contact your service agent to get it repaired.

CAUTION: All servicing and repair work on the machine requires special training. This is especially true of the machine's safety equipment. If your machine fails any of the checks described below you must contact your service agent. When you buy any of our products we guarantee the availability of professional repairs and service. If the retailer who sells your machine is not a servicing dealer, ask him for the address of your nearest service agent.
To do a check of the muffler

WARNING: Do not use a product with a defective muffler.

WARNING: The muffler becomes very hot during and after operation, also at idle speed. Use protective gloves to prevent burn injuries.
The muffler keeps noise levels to a minimum and sends exhaust fumes away from the operator.
- Stop the engine.
- Do a visual check for damage and deformation.
Note: The inner surfaces of the muffler contain chemicals that can cause cancer. Be careful not to touch these elements if the muffler is damaged.
- Make sure that the muffler is correctly attached to the product. Tighten the screws to 8-12 Nm.
- Examine the spark arrester screen, do a visual check.
a) Replace the spark arrester screen if it is damaged.
b) Clean the spark arrester screen if it is blocked. Refer to To do maintenance of the muffler on page 14 for more information.
Vibration damping system
The product has a vibration damping system that decreases vibrations and makes operation easier. Examine the vibration damping system and make sure that it is not damaged. Make sure that the vibration damping system is attached correctly.

Air filter
Do not use the product without an air filter or if the air filter is damaged or has a deformation.
Stop switch
Use the stop switch to stop the engine. Make sure that the engine stops fully.
Harness safety
Always use the harness when you operate the product. If you do not use the harness, you cannot operate the product safely. This can result in injury to you or other persons. Make sure that the waist belt and chest strap
are attached and correctly adjusted. There is a risk that an open belt can go into the fan of the product.
Fuel safety

WARNING: Read the warning instructions that follow before you use the product.
- Do not mix the fuel indoor or near a heat source.
- Do not start the product if there is fuel or engine oil on the product. Remove the unwanted fuel/oil and let the product dry. Remove unwanted fuel from the product.
If you spill fuel on your clothing, change clothing immediately. - Do not get fuel on your body, it can cause injury. If you get fuel on your body, use a soap and water to remove the fuel.
- Do not start the engine if you spill oil or fuel on the product or on your body.
- Do not start the product if the engine has a leak.
Examine the engine for leaks regularly. - Be careful with fuel. Fuel is flammable and the fumes are explosive and can cause injuries or death.
- Do not breathe in the fuel fumes, it can cause injury.
Make sure that there is a sufficient airflow. - Do not smoke near the fuel or the engine.
- Do not put warm objects near the fuel or the engine.
- Do not add the fuel when the engine is on.
-
Make sure that the engine is cool before you refuel.
-
Before you refuel, open the fuel tank cap slowly and release the pressure carefully.
- Do not add fuel to the engine in an indoor area. Not sufficient airflow can cause injury or death because of asphyxiation or carbon monoxide.
- Tighten the fuel tank cap carefully or a fire can occur.
- Move the product at a minimum of 3m (10 ft) from the position where you filled the tank before a start.
- Do not put too much fuel in the fuel tank.
Make sure that a leak cannot occur when you move the product or fuel container. - Do not put the product or a fuel container where there is an open flame, spark or pilot light. Make sure that the storage area does not contain an open flame.
- Only use approved containers when you move the fuel or put the fuel into storage.
- Empty the fuel tank before long-term storage. Obey the local law on where to dispose fuel.
- Clean the product before long-term storage.
- Remove the spark plug cap before you put the product into storage to make sure that the engine does not start accidentally.
Safety instructions for maintenance

WARNING: Read the warning instructions that follow before you use the product.
- Your warranty may not cover damage or liability caused by the use of non-authorized accessories or replacement parts.
- The inside of the muffler contains chemicals that may be carcinogenic. Avoid contact with these elements in the event of a damaged muffler.
- Stop the engine before assembling or dismantling accessories or other parts.
- Check that the thick round pin in the clamp is inserted in the strap. If it is inserted incorrectly it may lead to personal injury.
Assembly
Introduction

WARNING: Read and understand the safety chapter before you assemble the product.
To assemble the tube and handle on the product :580BTS Mark II
- Attach the flexible hose (A) to the pipe angle and the control pipe (B) with the clamps (C), (D).
Note: Lubricate the control pipe and the flexible hose to make them more easy to assemble.
- Attach the handle (E) to the control pipe and put the knob through the handle.
- Tighten the knob.
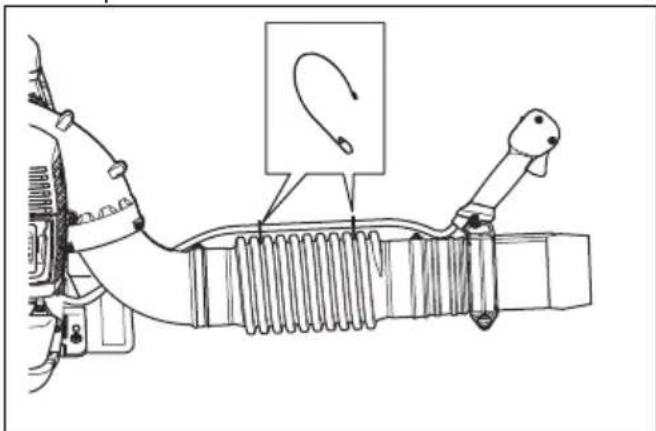
- Attach the cable to the flexible hose with the cable clamp.
- Attach the intermediate pipe to the control pipe.
- Attach the blower nozzle to the intermediate pipe.
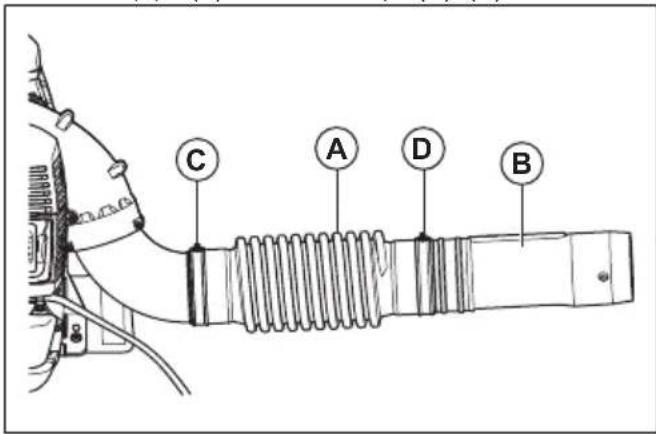
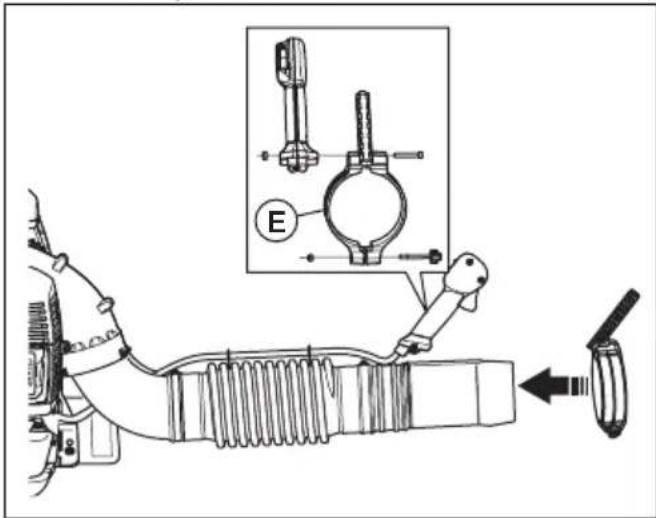
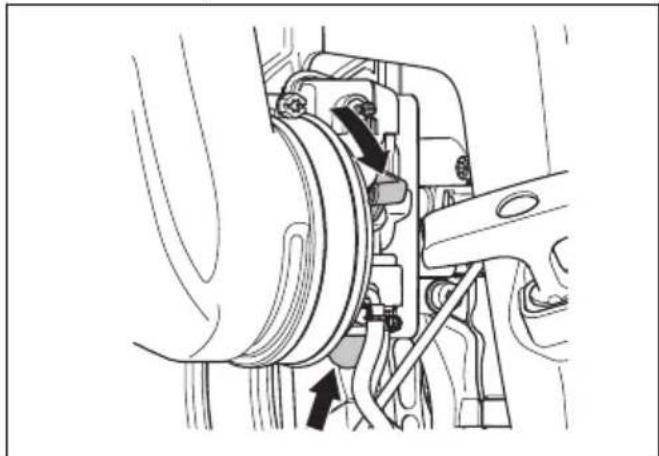
To assemble the tube and handle on the product :580BFS Mark II
- Attach the flexible tube (A) to the pipe angle with the clamp (C).
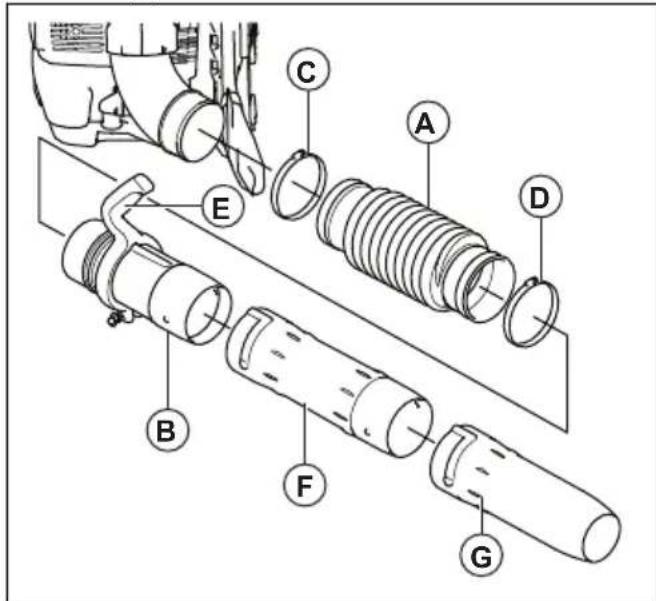
- Push the handle (E) onto the control pipe (B)
- Attach and tighten the bolt, washer and nuts as shown in the illustration.

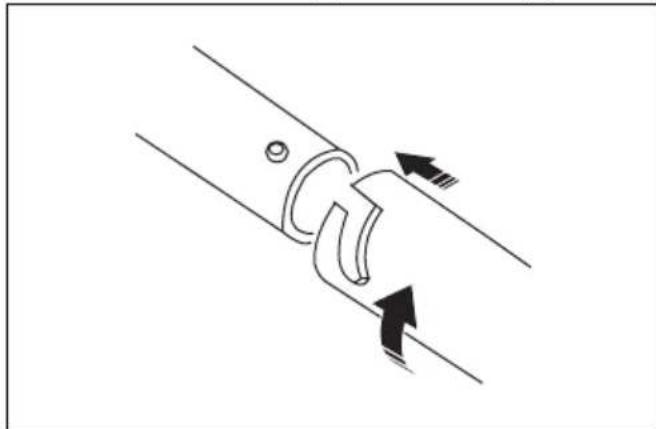
- Attach the control pipe (B) to the flexible tube (A) with the clamp (D). Make sure that the mark on the control pipe is up.
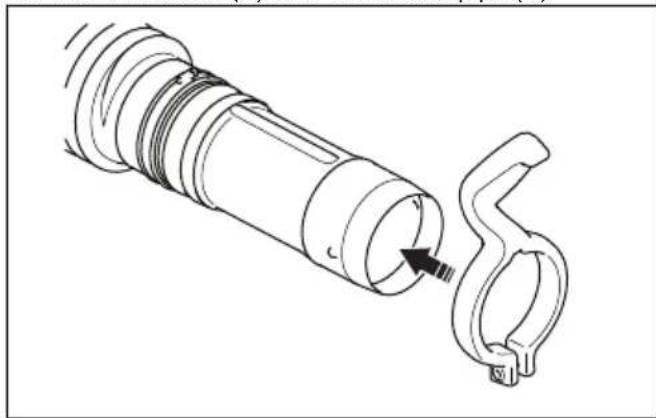
- Attach the intermediate pipe (F) to the control pipe.
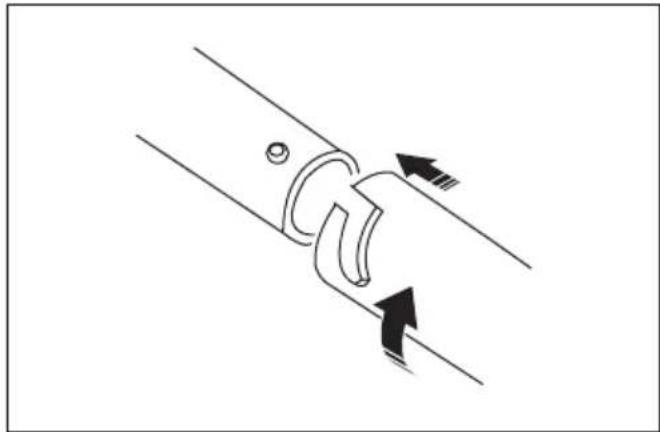
- Attach the blower nozzle (G) to the intermediate pipe.
- Loosen the knob (H) to adjust the position of the handle.
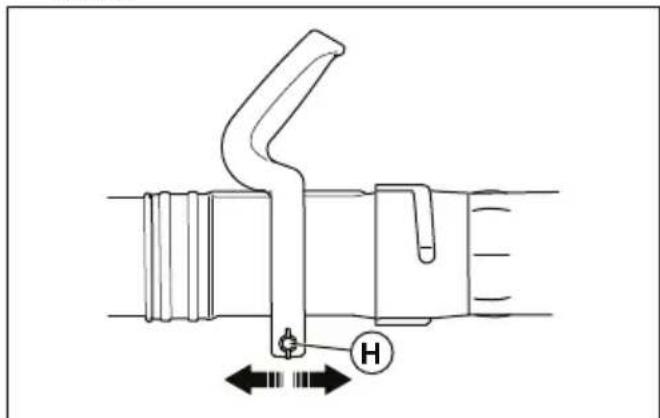
- Tighten the knob again.
To adjust the harness
A correctly adjusted harness and product makes operation easier.
- Put on the harness of the product.
- Tighten the side straps until the product is tight against your body.
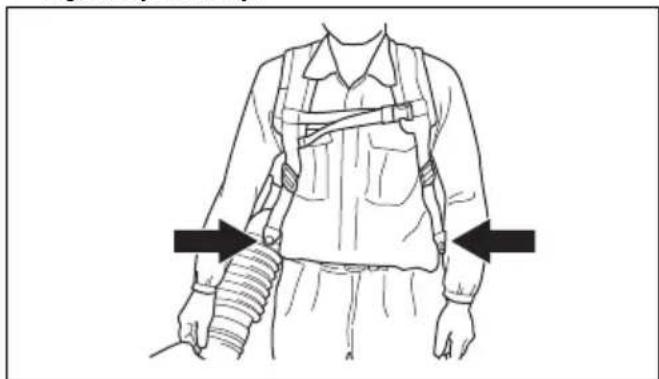
- Connect the chest strap to the clip.
- Tighten the strap.
Operation
Introduction

WARNING: Read and understand the safety chapter before you use the product.
Fuel
To use fuel

CAUTION: This product has a two-stroke engine. Use a mixture of gasoline and two-stroke engine oil. Make sure to use the correct quantity of oil in the mixture. Incorrect ratio of gasoline and oil can cause damage to the engine.
Husqvarna alkylate fuel

CAUTION: Do not use gasoline with an octane number less than 90 RON (87 AKI). This can cause damage to the product.

CAUTION: Do not use gasoline with more than 10% ethanol concentration (E10). This can cause damage to the product.

CAUTION: Do not use leaded gasoline. This can cause damage to the product.
We recommend Husqvarna alkylate fuel for best performance. This fuel gives less dangerous exhaust fumes compared to regular fuel. It keeps the engine clean and increases the engine life. Husqvarna alkylate fuel is not available in all commercial areas.
- Always use new unleaded gasoline with a minimum octane number of 90 RON (87 AKI) and with less than 10% ethanol concentration (E10).
- Use gasoline with a higher octane number if you frequently use the product at continuously high engine speed.
Always use a good quality unleaded gasoline/oil mixture.
Two-stroke oil
- For best results and performance use Husqvarna two-stroke oil, which is specially formulated for our two-stroke engines.
-
If Husqvarna two-stroke oil is not available, use a different two-stroke oil of good quality that is formulated for air-cooled engines. Consult your servicing dealer when you select an oil.
-
Do not use two-stroke oil for water-cooled outboard engines, also referred to as outboard oil.
- Do not use oil intended for four-stroke engines.
| Gasoline, | Two-stroke oil, | I |
| 2% (50:1) | |
| 5 0.10 | |
| 10 0.20 | |
| 15 0.30 | |
| 20 0.40 | |
| US gallon US fl. oz. | |
| 1 2 1/2 | |
| 2 1/2 6 1/2 | |
| 5 12 % |
To make the fuel mixture
Note: Always use a clean fuel container when you mix the fuel.
Note: Do not make more than 30 days quantity of fuel mixture.
- Add half of the gasoline quantity.
- Add the full quantity of oil.
- Shake the fuel mixture to mix the contents.
- Add the remaining gasoline quantity.
- Shake the fuel mixture to mix the contents.
- Fill the fuel tank.
To add fuel
- Always use a fuel container with an antispill valve.
- If there is some fuel on the container, remove the unwanted fuel and let the container dry.
- Make sure that the area near the fuel tank cap is clean.
- Shake the fuel container before you add the fuel mixture to the fuel tank.
To add fuel to the fuel tank
- Stop the product.
- Put the product on a flat surface.
- Loosen the fuel tank cap to release the pressure in the fuel tank.
-
Remove the fuel tank cap.
-
Fill the fuel tank to 80% .
- Tighten the fuel tank cap fully.
- Make sure that there is no leak in the fuel tank.
Before you operate the product

WARNING: Read the safety instructions before you operate the product.
- Use the blower with the lowest possible throttle. A lower throttle means less noise and less dust, and it is also easier to keep control over the rubbish collected together/moved. Use a rake or a brush to release rubbish stuck to the ground.
- Hold the opening of the blower as close to the ground as possible. Utilize the entire length of the blow pipe to keep the air current close to the ground. Clean up afterwards. Make sure that you have not blown rubbish into someone's garden. Operate power equipment only at reasonable hours, not early in the morning or late at night when people might be disturbed. Comply with times listed in local ordinances.
- This blower is a backpack type, and is carried using a shoulder harness while operating. It is operated and controlled with the handle on the tube using the right hand.
- The speed of the air jet is regulated by means of the throttle. Select the speed best suited for respective tasks.
- Check that the air intake is not blocked, for example, by leaves or rubbish. A clogged air intake reduces the machine's blowing capacity and increases the engine's working temperature, which can result in engine failure. Stop the engine and remove the object.
- Be aware of the wind direction. Work with the wind to make your work easier.
- Using the blower to move large piles is time consuming and creates unnecessary noise.
- Keep a good balance and a firm foothold.
- When work is finished the machine should be stored vertically.
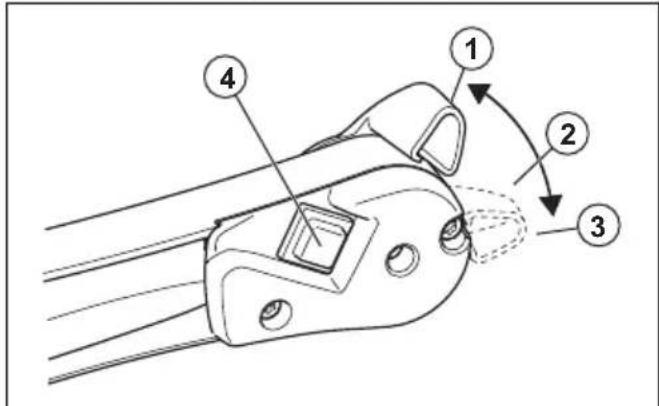
To operate the throttle switch :580BTS Mark II
- Apply full throttle (1).
- Apply 1/3 speed (2).
-
Apply idle speed (3).
-
Stop the product with the stop switch (4).
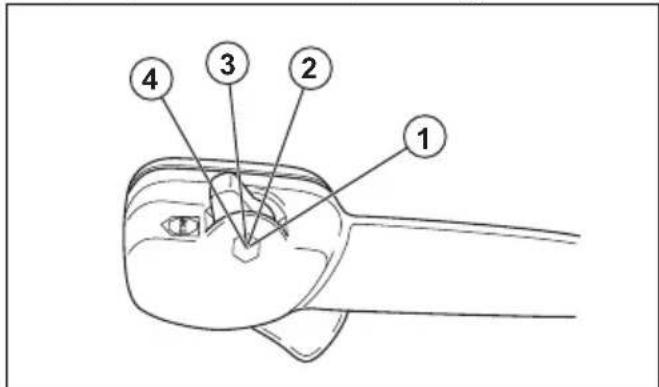
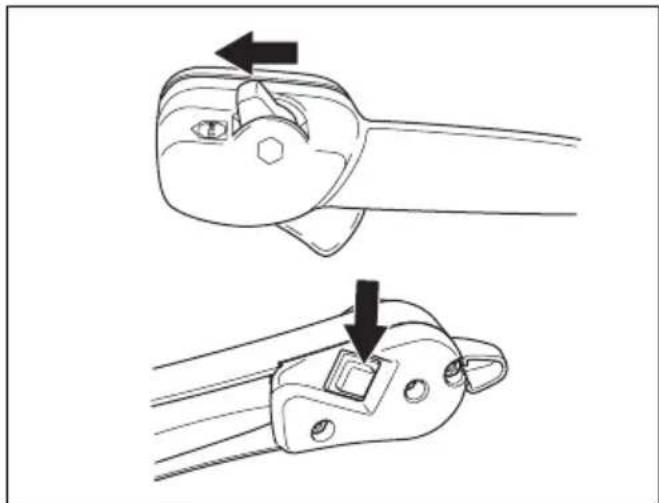
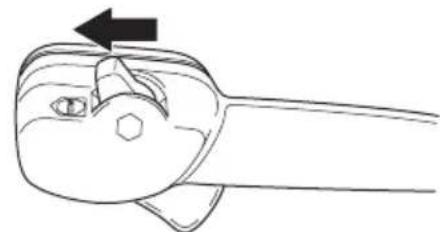
To operate the throttle switch :580BFS Mark II
- Apply full throttle (1).
- Apply 1/3 speed (2).
- Apply Idle speed (3).
- Stop the product with the stop switch (4).
To start the product
- If the engine is cold, push the choke lever to the closed choke position.
- Push the air purge bulb again and again until fuel starts to fill the air purge bulb. It is not necessary to fill the air purge bulb fully.
-
Push the throttle lever to the 1/3 speed position. Refer to To operate the throttle switch :580BTS Mark II on page 12.
-
Put the product on a flat surface on the ground.
- Hold the product with the left hand.
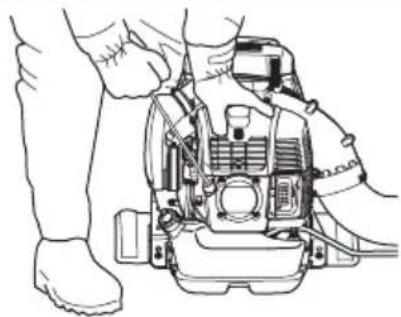
- Put your right foot on the frame.
- Pull the starter rope handle slowly until resistance occurs.
- Pull the starter rope handle quickly with the right hand until the engine starts or attempts to start, maximum 10 times. If the engine starts, move the choke lever gradually to the open position.
Note: Do not pull the starter rope handle to full extension and do not let go of the starter rope handle.
- Move the choke lever to the open choke position until the choke lever stops.
- Pull the starter rope handle repeatedly until the engine starts and continues to run.
- If the engine does not start, do step 1 to step 10 again.
- Let the engine run for 2-3 minutes to become warm before operation.
To stop the product :580BTS Mark II

CAUTION: Do not stop the product at full speed.
- Push the throttle lever to the stop position.
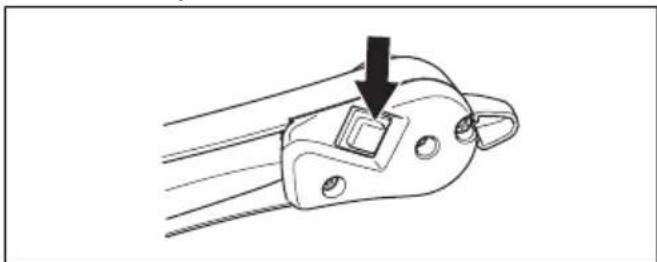
To stop the product :580BFS Mark II

CAUTION: Do not stop the product at full speed.
- Push the stop switch.
Maintenance
Introduction

WARNING: Read and understand the safety chapter before you do maintenance on the product.
Maintenance schedule
| Maintenance Daily Weekly Monthly | |||
| Clean the external surface. X | |||
| Make sure that the throttle control operates correctly. X | |||
| Make sure that the stop switch operates correctly. X | |||
| Do a check of the stop switch, refer to To stop the product :580BTS Mark II on page 13. | X | ||
| Examine the engine, the fuel tank and the fuel lines for leaks. X | |||
| Clean the air filter. Replace if it is necessary. X | |||
| Tighten nuts and screws. X | |||
| Examine the fuel filter for contamination and the fuel hose for cracks and other defects. Replace if it is necessary. | X | ||
| Examine the air intake and make sure that it is not blocked. X | |||
| Examine the starter and the starter rope for damages. X | |||
| Examine the vibration damping units for damages and cracks. X | |||
| Examine the spark plug, refer to To do a check of the spark plug on page 14. | X | ||
| Clean the cooling system. X | |||
| Clean the external surface of the carburetor and the area around it. X | |||
| Clean the fuel tank. X | |||
| Examine all cables and connections. X | |||
| Examine and clean the spark arrester screen on the muffler. X | |||
| Replace the spark plug. Make sure it is attached with a suppressor. X |
To do a check of the spark plug

CAUTION: Use the recommended spark plug. Refer to Technical data on page 17. An incorrect spark plug can cause damage to the product.
- If the product is not easy to start or to operate or if the product operates incorrectly at idle speed, examine the spark plug for unwanted materials. To decrease the risk of unwanted material on the spark plug electrodes, do these steps:
a) make sure that the idle speed is correctly adjusted.
b) make sure that the fuel mixture is correct.
c) make sure that the air filter is clean. - Clean the spark plug if it is dirty.
- Make sure that the electrode gap is correct. Refer to, Technical data on page 17.
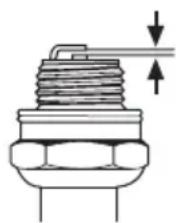
- Replace the spark plug monthly or more frequently if necessary.
To clean the cooling system

CAUTION: A dirty or blocked cooling system can make the product too hot, which can cause damage to the product.
The cooling system includes the cooling fins on the cylinder and the air intake screen.
Make sure that the cooling system is not dirty or blocked.
- Clean the cooling system with a brush weekly or more frequently if it is necessary.
To do maintenance of the muffler

WARNING: Do not use a product with a defective muffler.

WARNING: The mufflers become very hot during and after operation, also at idle speed. Use protective gloves to prevent burn injuries.
- Stop the engine and let the muffler become cool.
-
Replace the spark arrester screen if it is damaged.
-
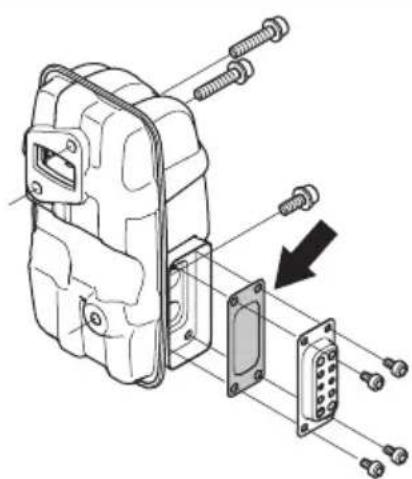
Remove the screws (E) and remove the exhaust duct (D).
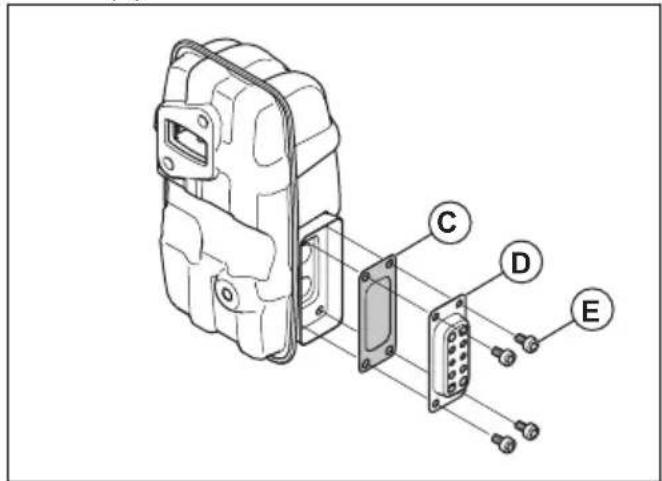
Note: The inner surfaces of the muffler contain chemicals that can cause cancer. Be careful not to touch these elements if the muffler is damaged.
- Remove the spark arrester screen (C) and clean it with a wire brush. Remove dirt from the inlet and outlet of the muffler with the wire brush. Also, remove dirt from the exhaust port of the cylinder with the wire brush.
- Attach the spark arrester screen (C) and the exhaust duct (D) with the screws (E). Tighten the screws to 2-3 Nm.
- Make sure that the muffler is correctly attached to the product. Tighten the screws (A) and (B) to 8-12 Nm.

To examine the air intake screen
A clogged air intake screen decreases the blow force and increases the temperature of the engine. An increased temperature can result in engine failure.
-
Stop the engine.
-
Examine the air intake screen for damages and make sure that it is attached correctly.

- Remove dirt, leaves and unwanted materials from the air intake screen.
To clean the air filter
Clean the air filter regularly from dirt and dust. This prevents carburetor malfunctions, starting problems, loss of engine power, wear to engine parts and more fuel consumption than usual. Clean the air filter at an interval of 40 hours of operation or less if it is heavy operation conditions.
- Loosen the fasteners that holds the air filter cover in position.
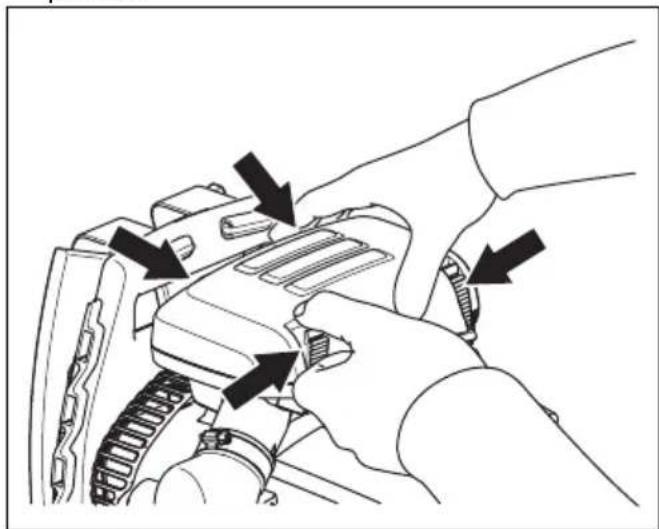
- Remove the air filter cover (A).
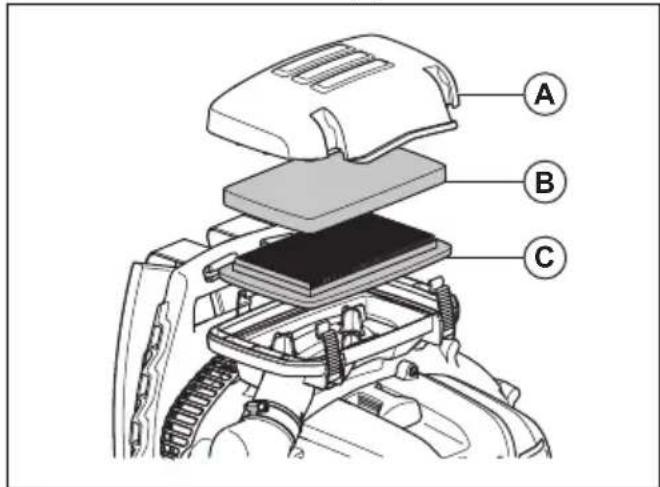
- Remove the foam filter (B) and the paper filter (C) from the filter frame.
- Replace the paper filter (C).
- Clean the foam filter (B) with warm soap water.
Note: An air filter that is used for a long time can not be fully cleaned. Replace the air filter regularly and always replace a defective air filter.
- Make sure that the foam filter (B) is dry.
- Clean the inner surface of the air filter cover with a brush (A).
To replace the harness

WARNING: A damaged harness can make the product fall and cause injuries.
- Stop the engine.
- Remove the clamp from the strap.
- Push the end of the strap through the hanger.
- Pull the new strap through the hanger.
- Attach the clamp to the new strap.
Transportation and storage
Transportation and storage
- For storage and transportation of the product and fuel, make sure that there are no leaks or fumes. Sparks or open flames, for example from electrical devices or boilers, can start a fire.
- Always use approved containers for storage and transportation of fuel.
- Empty the fuel tank before transportation or before long-term storage. Push the air purge bulb to make sure that all fuel is removed. Discard the fuel at an applicable disposal location.
- Make sure that the product is clean and that a complete service is done before long time storage.
- Remove the spark plug and put approximately 15ml of two-stroke oil into the cylinder. Turn the product 3 times and attach the spark plug again.
- Attach the product safely during transportation.
Technical data
Technical data
| 580BTS Mark II 580BFS Mark II | ||
| Engine | ||
| Cylinder displacement, cm3 | 75.6 75.6 | |
| Idle speed, rpm 2000 2000 | ||
| Catalytic converter muffler No No | ||
| Speed-regulated ignition system Yes Yes | ||
| Ignition system1 | ||
| Spark plug NGK CMR7H NGK CMR7H | ||
| Electrode gap, mm/in 0.6-0.7 / 0.024-0.028 0.6-0.7 / 0.024 | 0.028 | |
| Fuel and lubrication system | ||
| Fuel tank capacity, I/US pint 2.6 / 5.5 2.6 / 5.5 | ||
| Weight | ||
| Weight, kg/lb 11.9 / 26.2 12.1/ 26.7 | ||
| Sound levels2 | ||
| Equivalent sound pressure level at the operator's ear, measured according to ISO 22868:2011, dB(A) | 104 | 104 |
| Vibration levels3 | ||
| Equivalent vibration levels (ahveq) at handles, measured according to ISO 22867:2011, m/s2 | 2.2 | 3.1 |
| Fan performance | ||
| Maximum air velocity with standard nozzle, mph / m/s | 206/92 | 206/92 |
| Air flow with standard nozzle, cfm / m3/m | 941/27 | 941/27 |
Warranty
U.S FEDERAL, CALIFORNIA AND CANADA EXHAUST AND EVAPORATIVE EMISSIONS CONTROL WARRANTY STATEMENT
Note: This Annex is intended primarily for the consumer or occasional user.
IMPORTANT: This product is compliant with U.S. EPA Phase 3 regulations for exhaust and evaporative emissions. To ensure EPA Phase 3 compliance, we recommend using only genuine Husqvarna brand replacement parts. Use of non-compliant replacement parts is a violation of federal law.
YOUR WARRANTY RIGHTS AND OBLIGATIONS
The EPA (U.S. Environmental Protection Agency), CARB (California Air Resources Board), Environment Canada and Husqvarna Forest & Garden are pleased to explain the exhaust and evaporative emissions control system's warranty on your 2019-2020* small off-road engine. In California, new equipment that use small off-road engines must be designed, built, and equipped to meet State's stringent anti-smog standards. Husqvarna Forest & Garden must warrant the emissions control system on your small off-road engine for the periods of time listed below provided there has been no abuse, neglect or improper maintenance of your small off-road engine or equipment leading to the failure of the emissions control system. Your emission control system may include parts such as the carburetor or fuel-injection system, the ignition system, catalytic convertor, fuel tanks, fuel lines (for liquid fuel and fuel vapors), fuel caps, valves, canisters, filters, clamps and other associated components. Also included may be hoses, belts, connectors, and other emission-related assemblies. Where a warrantable condition exists, Husqvarna Forest & Garden will repair your small off-road engine at no cost to you including diagnosis, parts and labor.
MANUFACTURER'S WARRANTY COVERAGE
The exhaust and evaporative emissions control system on your small off-road engine is warranted for two years. If any emissions-related part on your small off-road engine is defective, the part will be repaired or replaced by Husqvarna Forest & Garden.
OWNER'S WARRANTY RESPONSIBILITIES
- As the small off-road engine owner, you are responsible for performance of the required maintenance listed in your operator's manual. Husqvarna Forest & Garden recommends that you retain all receipts covering maintenance on your small off-road engine, but Husqvarna Forest & Garden cannot deny warranty solely for the lack of
receipts or your failure to ensure the performance of all scheduled maintenance.
- As the small off-road engine owner, you should however be aware that Husqvarna Forest & Garden may deny you warranty coverage if your small off-road engine or a part has failed due to abuse, neglect, or improper maintenance or unapproved modifications.
- You are responsible for presenting your small off-road engine to a Husqvarna Forest & Garden distribution center or service center as soon as the problem exists. The warranty repairs shall be completed in a reasonable amount of time, not to exceed 30 days. If you have any questions regarding your warranty rights and responsibilities, you should contact Husqvarna Forest & Garden in USA at 1-800-487-5951, in CANADA at 1-800-805-5523 or send e-mail correspondence to emissions@husqvarnagroup.com.
WARRANTY COMMENCEMENT DATE
The warranty period begins on the date the engine or equipment is delivered to an ultimate purchaser.
LENGTH OF COVERAGE
Husqvarna Forest & Garden warrants to the ultimate purchaser and each subsequent owner that the engine or equipment is designed, built, and equipped so as to conform with all applicable regulations adopted by EPA and CARB, and is free from defects in materials and workmanship that causes the failure of a warranted part for a period of two years.
WHAT IS COVERED
REPAIR OR REPLACEMENT OF PARTS: Repair or replacement of any warranted part under the warranty must be performed at no charge to the owner at a warranty station. Warranty services or repairs will be provided at all Husqvarna Forest & Garden distribution centers that are franchised to service the subject engines. Throughout the emissions warranty period of two years, Husqvarna Forest & Garden must maintain a supply of warranted parts sufficient to meet the expected demand for such parts.
WARRANTY PERIOD: Any warranted part that is scheduled for replacement as required in the maintenance schedule, is warranted for the period of time prior to the first scheduled replacement point for that part. If the part fails prior to the first scheduled replacement, the part will be repaired or replaced by Husqvarna Forest & Garden at no cost. Any such part repaired or replaced under warranty is warranted for the remainder of the period prior to the first scheduled replacement point for the part. Any warranted part that is not scheduled for replacement as required in the maintenance schedule, is warranted for two years. If any such part fails during the period of warranty coverage, it will be repaired and replaced by Husqvarna Forest &
Garden at no cost. Any such part repaired or replaced under the warranty is warranted for the remaining warranty period. Any warranted part that is scheduled only for regular inspection in the maintenance schedule will be warranted for a period of two years. A statement in such written instructions to the effect of "repair or replace as necessary" will not reduce the period of warranty coverage. Any such part repaired or replaced under warranty will be warranted for the remaining warranty period.
DIAGNOSIS: The owner must not be charged for diagnostic labor that leads to the determination that a warranted part is in fact defective, provided that such diagnostic work is performed at a warranty station.
CONSEQUENTIAL DAMAGES: Husqvarna Forest & Garden is liable for damages to other engine components proximately caused by a failure under warranty of any warranted part.
EMISSION WARRANTY PARTS LIST
- Carburetor and internal parts.
- Intake pipe, airfilter holder and carburetor bolts.
- Airfilter and fuelfilter covered up to maintenance schedule.
- Spark Plug, covered up to maintenance schedule.
- Ignition Module.
- Fuel tank, fuel line (for liquid fuel and vapor hoses), and fuel cap.
WHAT IS NOT COVERED
All failures caused by abuse, neglect or improper maintenance are not covered.
ADD -ON OR MODIFIED PARTS: Add-on or modified parts that are not exempted by CARB or EPA may not be used. The use of any non-exempted add-on or modified parts will be grounds for disallowing a warranty claim. Husqvarna Forest & Garden will not be liable to warrant failures of warranted parts caused by the use of a non-exempted add-on or modified part.
HOW TO FILE A CLAIM
If you have any questions regarding your warranty rights and responsibilities, you should contact your nearest authorized servicing dealer or call Husqvarna Forest & Garden in USA at 1-800-487-5951, in CANADA at 1-800-805-5523 or send e-mail correspondence to emissions@husqvarnagroup.com.
WHERE TO GET WARRANTY SERVICE
Warranty services or repairs are provided through all Husqvarna Forest & Garden authorized servicing dealers.
MAINTENANCE, REPLACEMENT AND REPAIR OF EMISSION-RELATED PARTS
Any replacement part may be used in the performance of any warranty maintenance or repairs and must be provided without charge to the owner. Such use will not reduce the warranty obligations of the manufacturer.
MAINTENANCE STATEMENT
The owner is responsible for the performance of all required maintenance, as defined in the operator's manual.
*Current and following model year will be updated annually in the warranty statement provided to the consumer. For example, in 2012 model year, 2012-2013 will be specified.
Contedio


- 580BTS Mark II, 580BFS Mark II
- Introduction
- Product description
- Intended use
- Product overview
- Symbols on the product
- California Proposition 65
- WARNING
- Product liability
- Safety
- Safety definitions
- General safety instructions
- Safety instructions for operation
- Personal protective equipment
- Safety devices on the product
- To do a check of the muffler
- Vibration damping system
- Air filter
- Stop switch
- Harness safety
- Fuel safety
- Safety instructions for maintenance
- Assembly
- To assemble the tube and handle on the product :580BTS Mark II
- To assemble the tube and handle on the product :580BFS Mark II
- To adjust the harness
- Operation
- Fuel
- To use fuel
- Husqvarna alkylate fuel
- Two-stroke oil
- To make the fuel mixture
- To add fuel
- To add fuel to the fuel tank
- Before you operate the product
- To operate the throttle switch :580BTS Mark II
- To operate the throttle switch :580BFS Mark II
- To start the product
- To stop the product :580BTS Mark II
- To stop the product :580BFS Mark II
- Maintenance
- Maintenance schedule
- To do a check of the spark plug
- To clean the cooling system
- To do maintenance of the muffler
- To examine the air intake screen
- To clean the air filter
- To replace the harness
- Transportation and storage
- Technical data
- Warranty
- U.S FEDERAL, CALIFORNIA AND CANADA EXHAUST AND EVAPORATIVE EMISSIONS CONTROL WARRANTY STATEMENT
- YOUR WARRANTY RIGHTS AND OBLIGATIONS
- MANUFACTURER'S WARRANTY COVERAGE
- OWNER'S WARRANTY RESPONSIBILITIES
- WARRANTY COMMENCEMENT DATE
- LENGTH OF COVERAGE
- WHAT IS COVERED
- EMISSION WARRANTY PARTS LIST
- WHAT IS NOT COVERED
- HOW TO FILE A CLAIM
- WHERE TO GET WARRANTY SERVICE
- MAINTENANCE, REPLACEMENT AND REPAIR OF EMISSION-RELATED PARTS
- MAINTENANCE STATEMENT
- Contedio
Brand : HUSQVARNA
Model : 580BFS Mark II
Category : Leaf blower